Learn How to Program Bitcoin from Scratch
Copyright © 2019 Jimmy Song. All rights reserved.
Printed in the United States of America.
Published by O’Reilly Media, Inc., 1005 Gravenstein Highway North, Sebastopol, CA 95472.
O’Reilly books may be purchased for educational, business, or sales promotional use. Online editions are also available for most titles (http://oreilly.com/safari). For more information, contact our corporate/institutional sales department: 800-998-9938 or corporate@oreilly.com.
See http://oreilly.com/catalog/errata.csp?isbn=9781492031499 for release details.
The O’Reilly logo is a registered trademark of O’Reilly Media, Inc. Programming Bitcoin, the cover image, and related trade dress are trademarks of O’Reilly Media, Inc.
The views expressed in this work are those of the author, and do not represent the publisher’s views. While the publisher and the author have used good faith efforts to ensure that the information and instructions contained in this work are accurate, the publisher and the author disclaim all responsibility for errors or omissions, including without limitation responsibility for damages resulting from the use of or reliance on this work. Use of the information and instructions contained in this work is at your own risk. If any code samples or other technology this work contains or describes is subject to open source licenses or the intellectual property rights of others, it is your responsibility to ensure that your use thereof complies with such licenses and/or rights.
978-1-492-03149-9
[FILL IN]
This book will teach you the technology of Bitcoin at a fundamental level. This book doesn’t cover monetary, economic or social dynamics of Bitcoin, but knowing how Bitcoin works under the hood should give you greater insight into what’s possible. There’s a tendency to hype Bitcoin and blockchain without really understanding what’s going on and this book is meant to be an antidote to that tendency.
After all, there are lots of books about Bitcoin, everything from the history of Bitcoin, the economic aspects to a technical description of Bitcoin. The aim of this book is to get you to understand Bitcoin by coding all of the components necessary for a Bitcoin library. The library is not meant to be exhaustive or efficient. The aim of the library is to help you learn.
This book is for programmers who want to learn how Bitcoin works by coding it themselves. You will learn Bitcoin by coding the “bare metal” stuff in a Bitcoin library you will create from scratch. This is not a reference book where you can look up the specification for a particular feature.
The material from this book has been largely taken from my two day seminar where I teach developers all about Bitcoin (see programmingblockchain.com).
The material has been refined many times as I’ve taught this material 20+ times and have taught 400+ people as of this writing.
By the time you’re done with the book, you’ll not only be able to create transactions, but be able to get all the data you need from peers and send the transaction over the network. Everything to accomplish this is covered including the math, the parsing, the network connectivity and block validation.
The prerequisites for this book are that you know programming and that you know Python in particular. The library itself is written in Python 3 and a lot of the exercises can be done in a controlled environment like a Jupyter notebook. An intermediate knowledge of Python is preferred, but even a beginner knowledge of Python is probably sufficient to get a lot of the concepts.
Some knowledge of math is required, especially for Chapters 1 and 2. These chapters introduce mathematical concepts probably not familiar to those that didn’t major in mathematics. Math knowledge around algebra-level should suffice to understand the new concepts and to code the exercises covered in those chapters.
General Computer Science knowledge like hash functions will come in handy, but are not strictly necessary to complete the exercises in this book.
This book is split into 14 chapters and built on top of one another. Each chapter is meant to build on the previous one as the Bitcoin library gets built from scratch all the way to the end.
Roughly speaking, Chapters 1-4 establish the mathematical tools that we need, Chapters 5-8 cover Transactions, which are the fundamental unit of Bitcoin and Chapters 9-12 cover Blocks and Networking. The last two chapters cover some advanced topics but don’t actually require you to write code.
Chapters 1 and 2 cover some math that we need. Finite Fields and Elliptic Curves are needed in order for us to understand Elliptic Curve Cryptography in Chapter 3. After we’ve established the Public Key Cryptography at the end of Chapter 3, we move towards implementing how the cryptographic primitives are stored and transmitted through parsing and serializing all the different classes that we established in Chapter 4.
Chapter 5 covers the Transaction structure. Chapter 6 goes into the smart contract language behind Bitcoin called Script. Chapter 7 combines all the previous chapters in validating and creating transactions based on the Elliptic Curve Cryptography from the first 4 chapters. Chapter 8 establishes how p2sh works, which is a way to make more powerful smart contracts.
Chapter 9 covers Blocks, which are groups of ordered Transactions. Chapter 10 covers network communication in Bitcoin. Chapter 11 and Chapter 12 go into how a light client, or software without access to the entire blockchain, might request and broadcast data from and to nodes that do have the entire blockchain.
Chapter 13 covers Segwit and Chapter 14 covers suggestions for further study. Again, these chapters are not strictly necessary, but are included as a way to give you a taste of what more there is to learn.
Chapters 1-12 have exercises that require you to build up the library from scratch. The answers are in the Appendix and in the corresponding chapter directory in the GitHub repository (https://github.com/jimmysong/programmingbitcoin). You will be writing many Python classes and will be building towards being able to not just validate transactions/blocks, but also creating your own transactions and broadcasting them on the network.
The last exercise in Chapter 12 is specifically asking you to connect to another node on the testnet network, calculate what you can spend, construct and sign a transaction of your devising and broadcast that on the network. Essentially, the first 11 chapters are setting up toward being able to do this exercise.
There will be a lot of unit tests that you will have to get to pass. The book has been designed this way so you can do the “fun” part of coding. We will be looking at a lot of code and diagrams throughout.
In order to get the most out of this book, you’ll want to create an environment where you can run the example code and do the exercises. Here are the instructions for setting everything up.
Install Python 3.5 or above on your machine:
Windows:
https://www.python.org/ftp/python/3.6.2/python-3.6.2-amd64.exe
Mac OS X:
https://www.python.org/ftp/python/3.6.2/python-3.6.2-macosx10.6.pkg
Linux: see your distro docs (many Linux distributions like Ubuntu come with Python 3.5+ pre-installed)
Install pip:
Download this script:
https://bootstrap.pypa.io/get-pip.py
Run this script using Python 3:
$ python3 get-pip.pyInstall git:
The instructions for downloading and installing are at https://git-scm.com/downloads.
Download the source code for this book:
$git clone https://github.com/jimmysong/programmingbitcoin$cdprogrammingbitcoin
Install virtualenv:
$ pip install virtualenvInstall the requirements:
Linux/OSX:
$virtualenv -p python3 .venv$. .venv/bin/activate(.venv)$pip install -r requirements.txt
Windows:
C:\programmingbitcoin> virtualenv -p C:\PathToYourPythonInstallation\Python.exe .venv
C:\programmingbitcoin> .venv\Scripts\activate.bat
C:\programmingbitcoin> pip install -r requirements.txt
Run Jupyter notebook:
(.venv)$jupyter notebook[I 11:13:23.061 NotebookApp]Serving notebooks fromlocaldirectory: /home/jimmy/programmingbitcoin[I 11:13:23.061 NotebookApp]The Jupyter Notebook is running at:[I 11:13:23.061 NotebookApp]http://localhost:8888/?token=f849627e4d9d07d2158e3fcde93590eff4a9a7a01f65a8e7[I 11:13:23.061 NotebookApp]Use Control-C to stop this server and shut down all kernels(twice to skip confirmation).[C 11:13:23.065 NotebookApp]Copy/paste this URL into your browser when you connectforthe firsttime, to login with a token: http://localhost:8888/?token=f849627e4d9d07d2158e3fcde93590eff4a9a7a01f65a8e7
You should have a browser open up automatically:
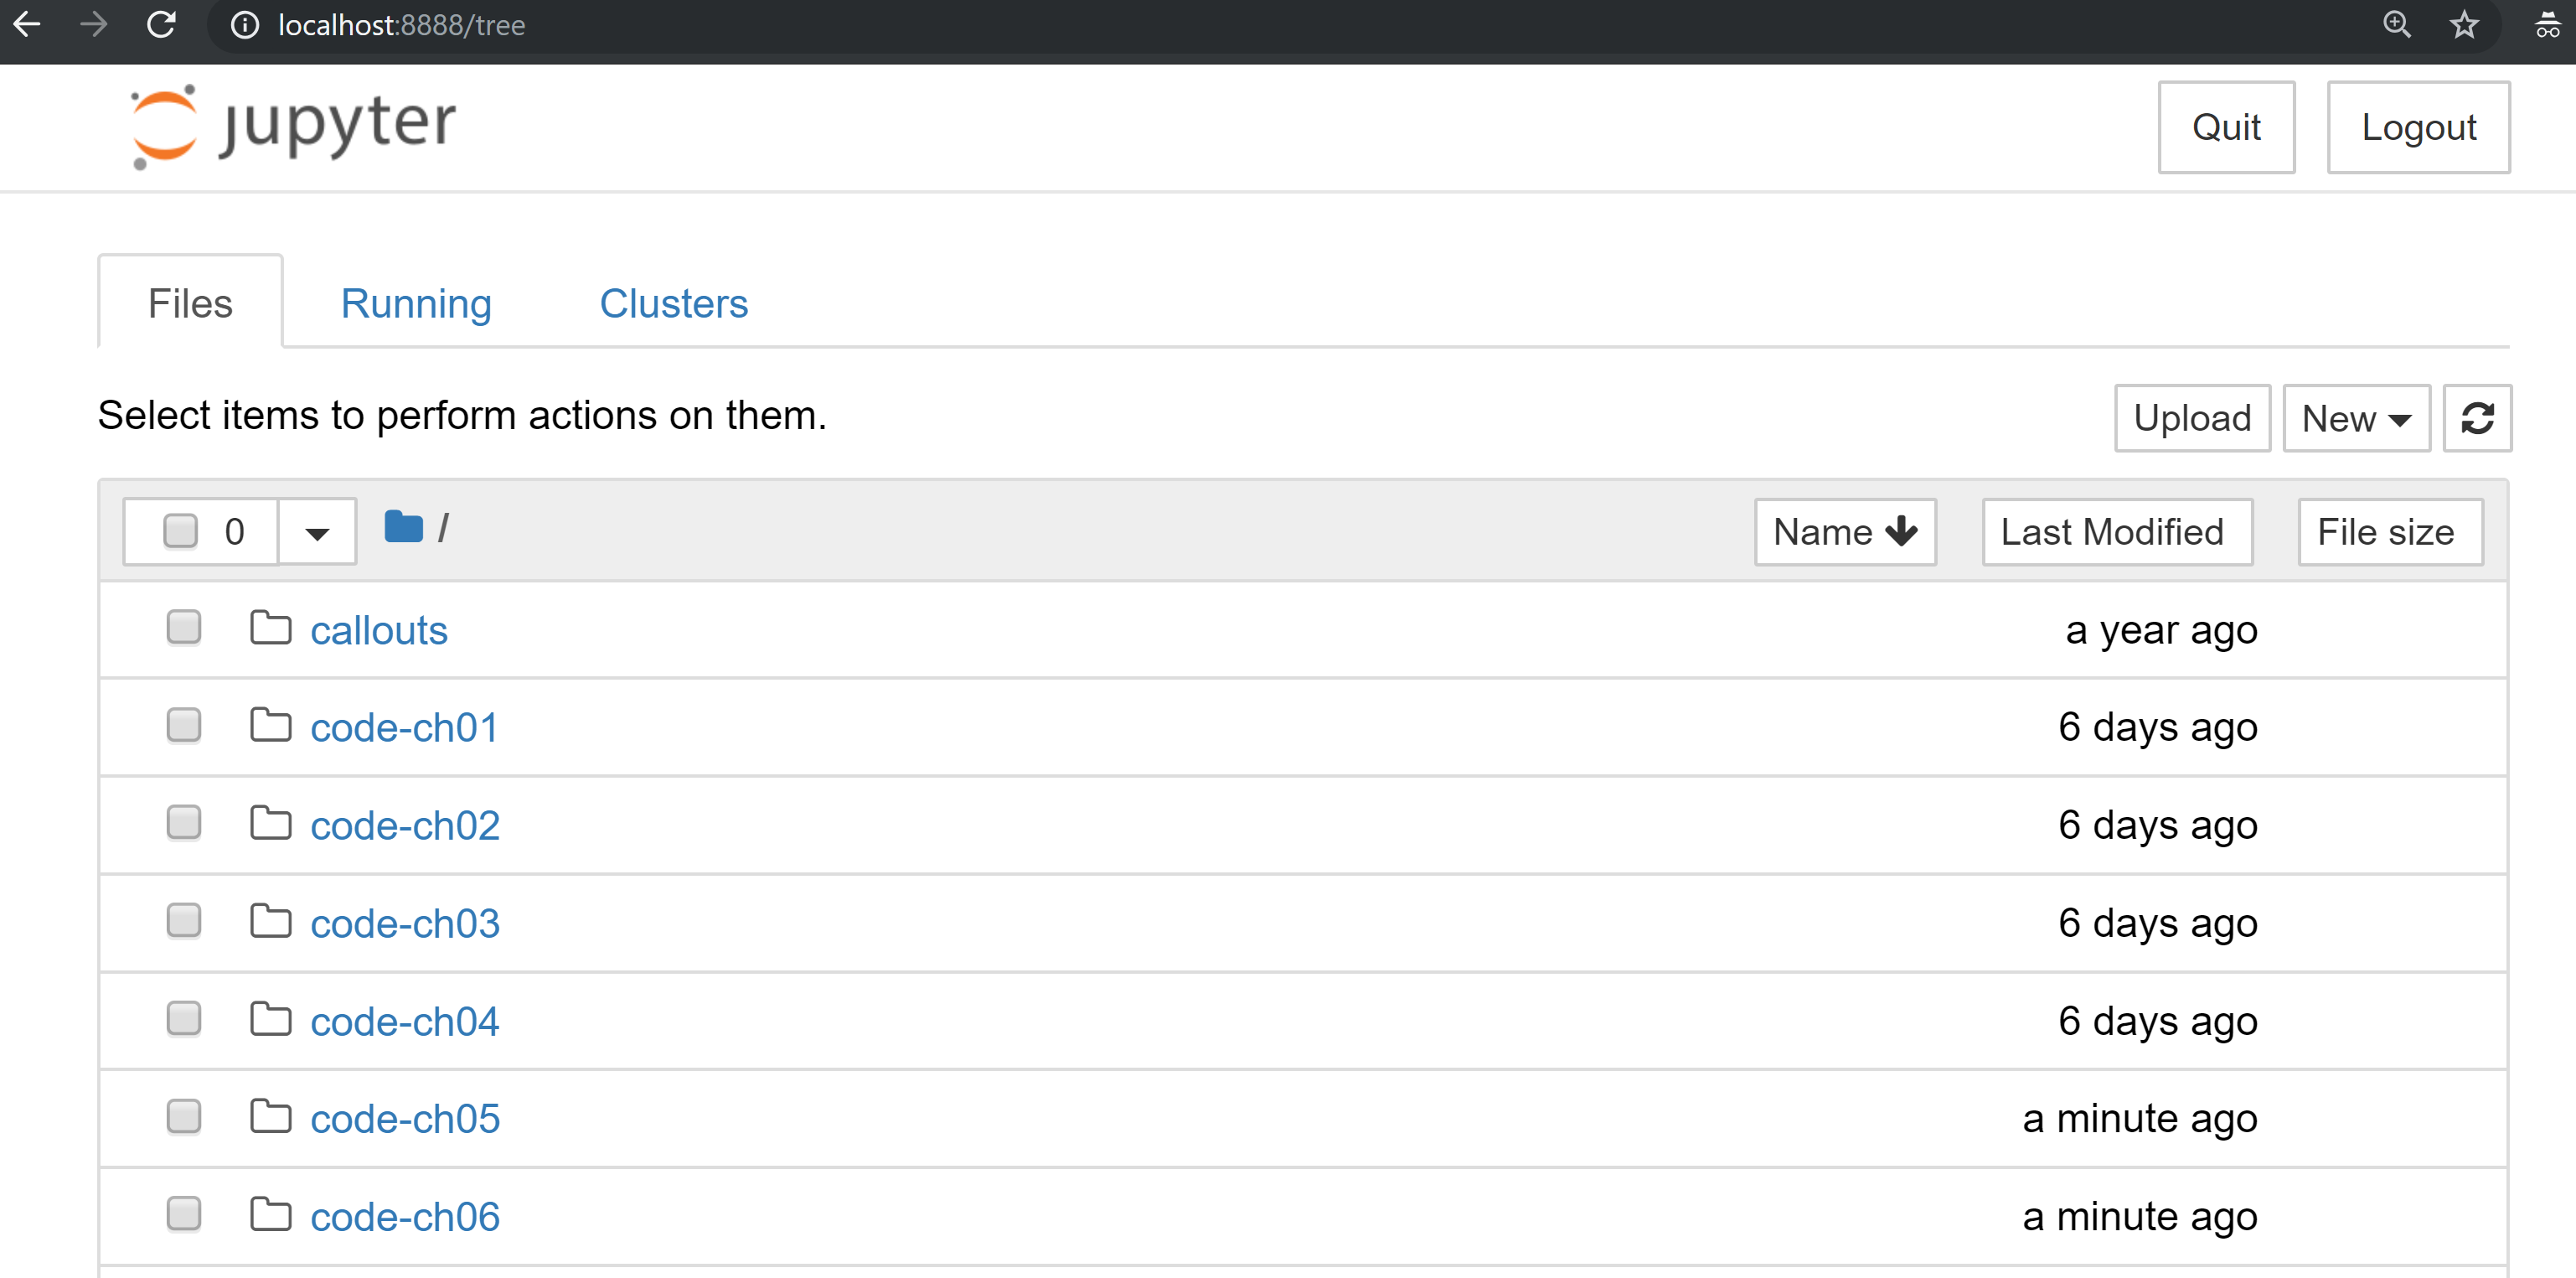
You can navigate to chapter directories. To do the exercises from Chapter 1, you would navigate to code-ch01:
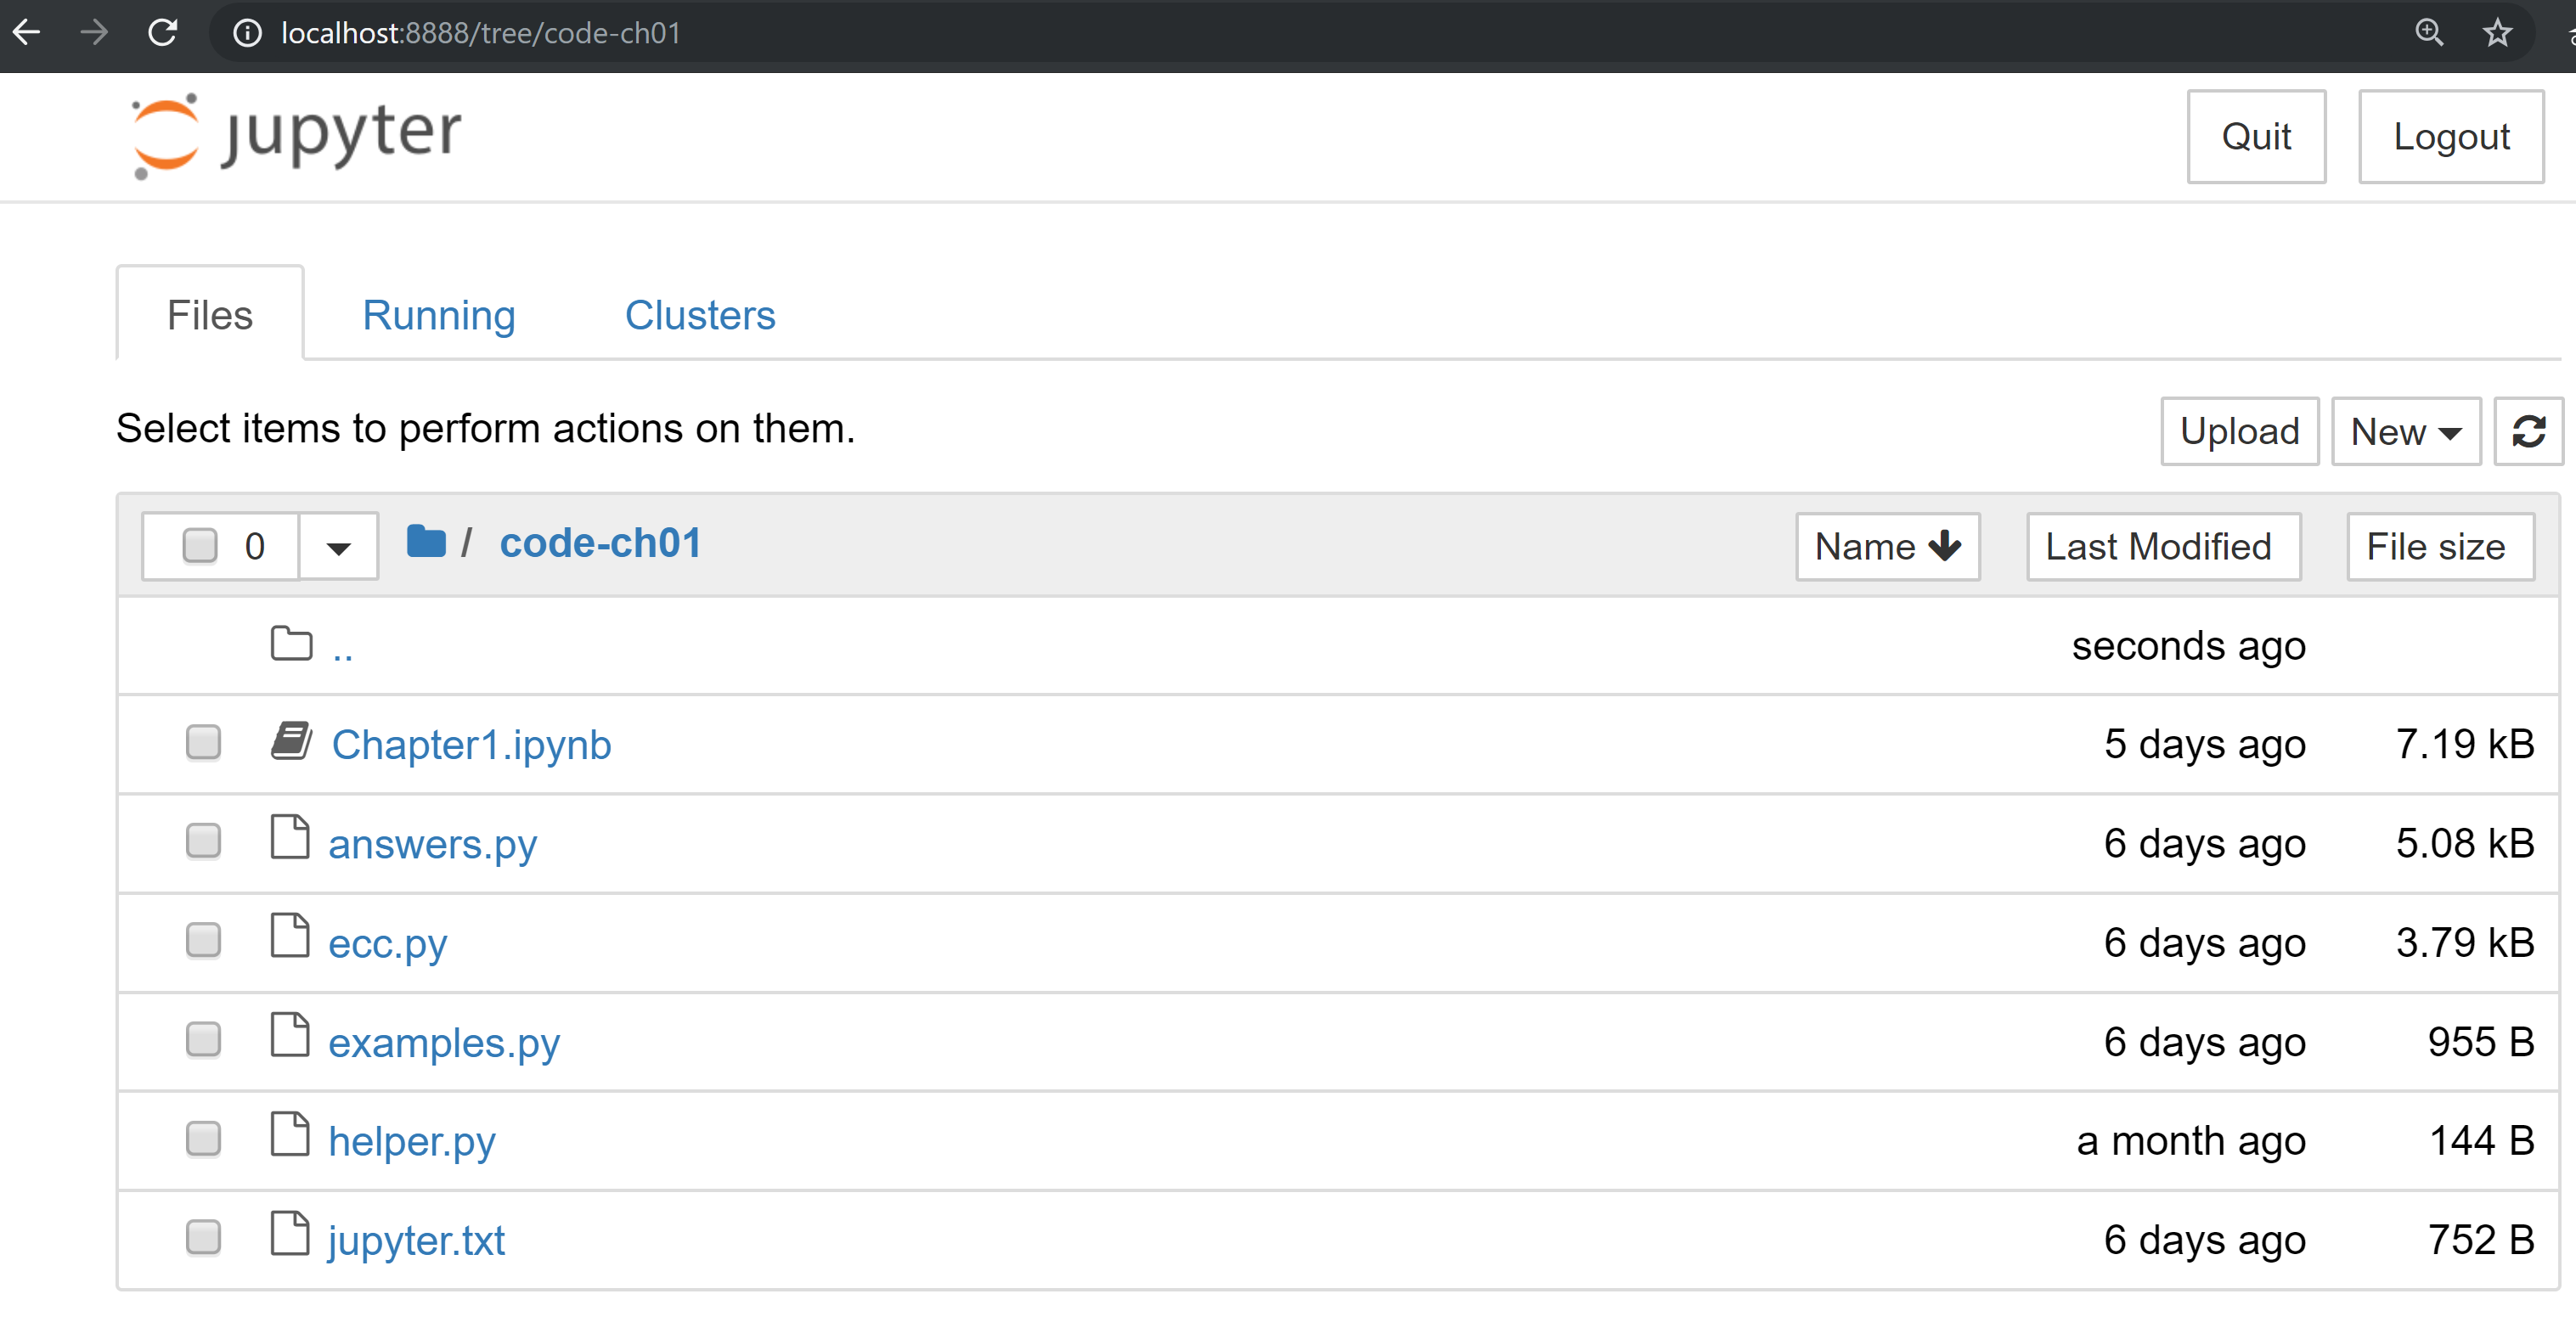
From here you can open Chapter1.ipynb:
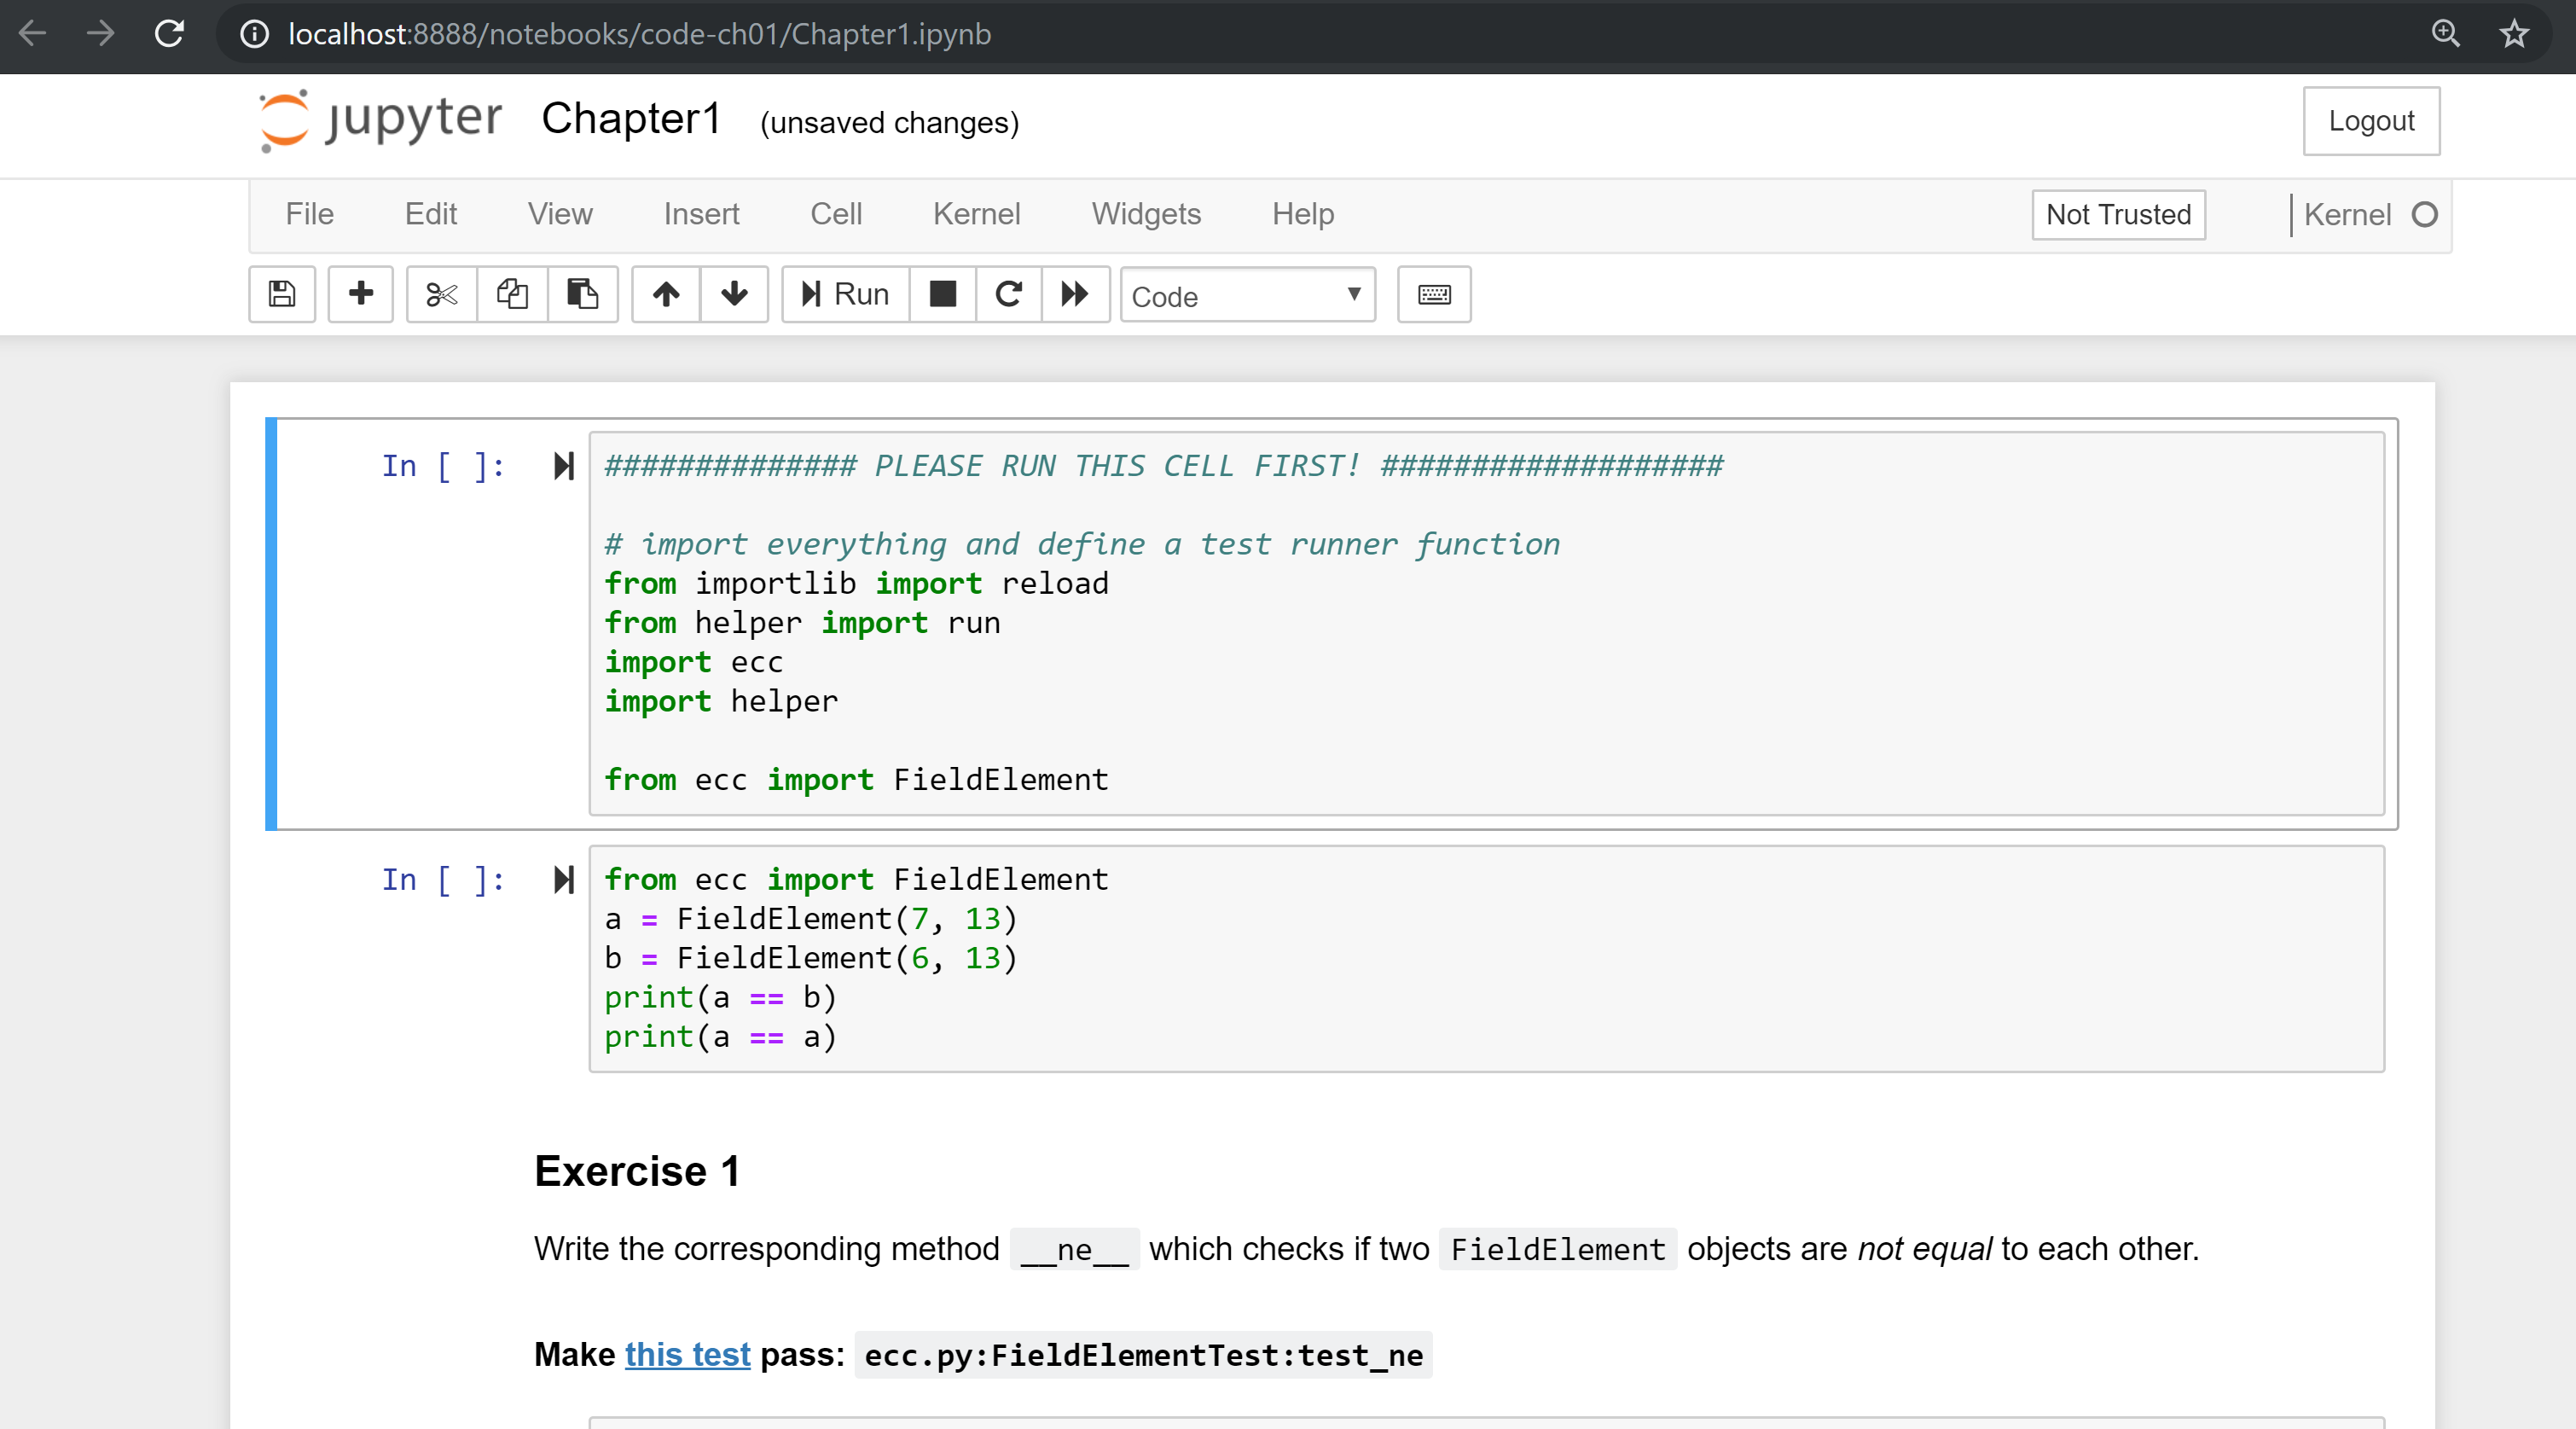
You may want to familiarize yourself with this interface if you haven’t seen it before, but the gist of Jupyter is that it can run Python code from the browser in a way to make experimenting easy. You can run each “cell” and see the results as if this were an interactive Python shell.
A large portion of the exercises will be coding concepts introduced in the book. The unit tests are written for you and you will need to write the Python code to make the tests pass. You can check whether your code is correct directly in Jupyter. You will need to edit the corresponding file by clicking through a link like the “this test” link in Figure P-3 . This will take you to a browser tab like this:
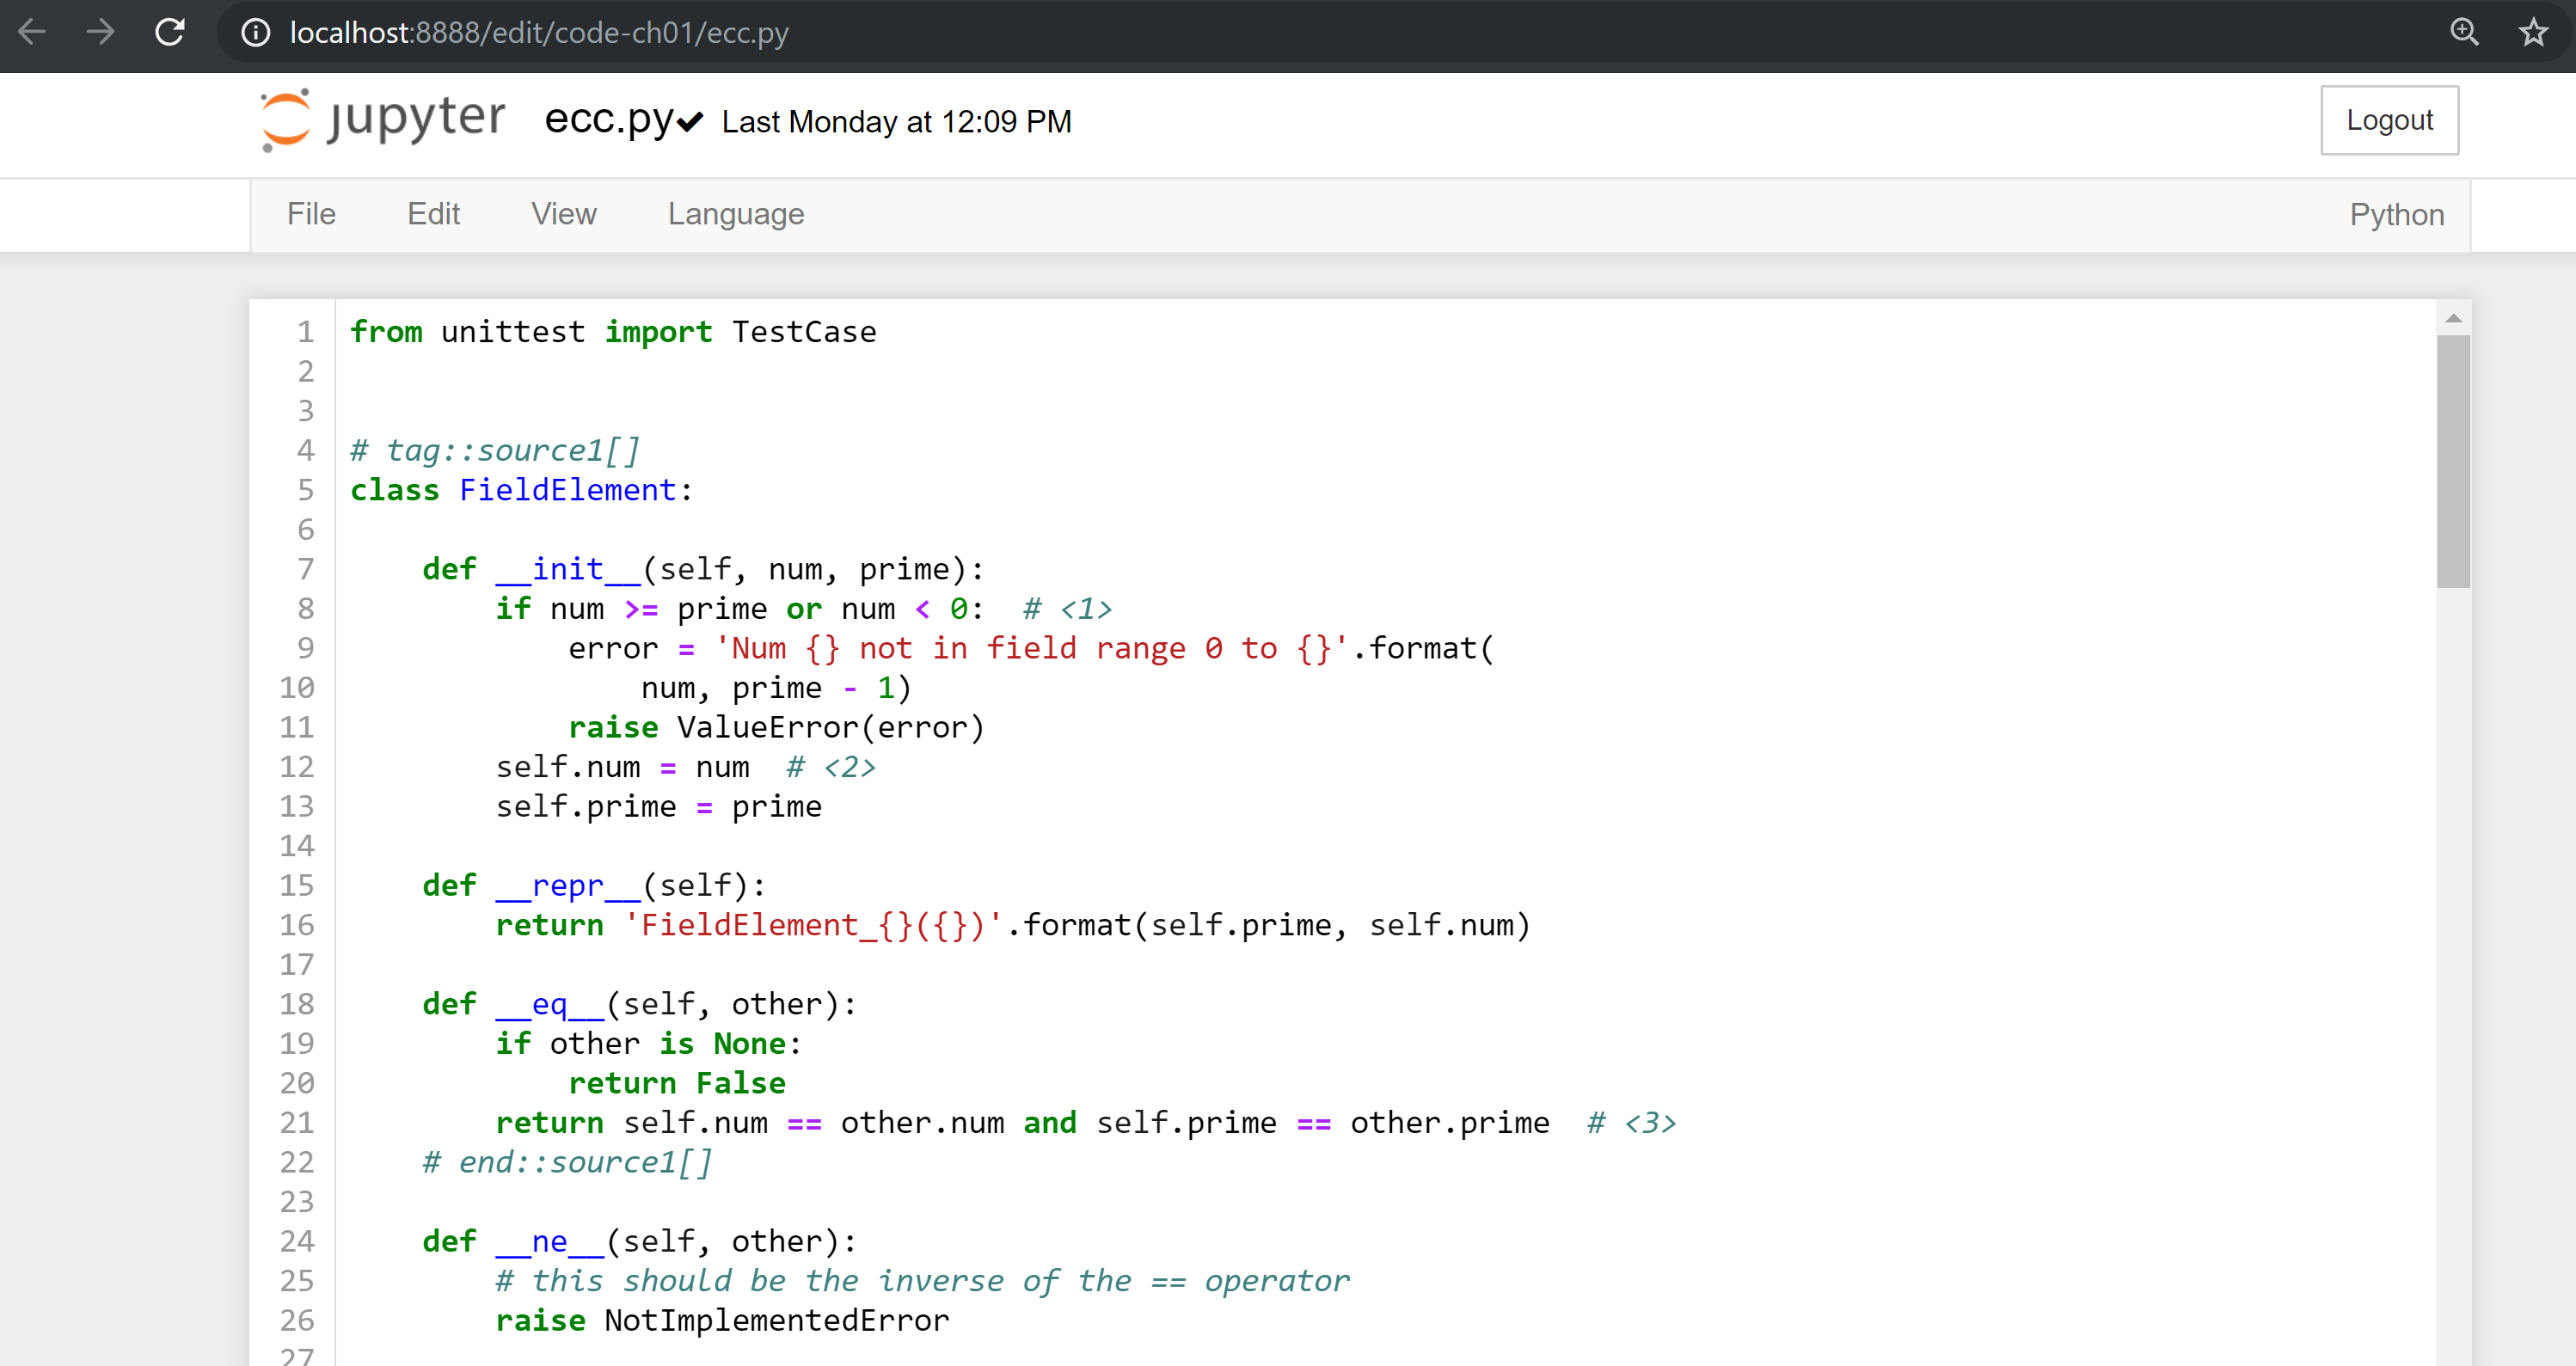
You can edit the file here and save in order to make the test pass.
All the answers to the various exercises in this book are in the Appendix.
They are also available in the code-chxx/answers.py file where xx is the chapter that you’re on.
The following typographical conventions are used in this book:
Indicates new terms, URLs, email addresses, filenames, and file extensions.
Constant widthUsed for program listings, as well as within paragraphs to refer to program elements such as variable or function names, databases, data types, environment variables, statements, and keywords.
Constant width boldShows commands or other text that should be typed literally by the user.
Constant width italicShows text that should be replaced with user-supplied values or by values determined by context.
This element signifies a tip or suggestion.
This element signifies a general note.
This element indicates a waning or caution.
Supplemental material (code examples, exercises, etc.) is available for download at https://github.com/jimmysong/programmingbitcoin.
This book is here to help you get your job done. In general, if example code is offered with this book, you may use it in your programs and documentation. You do not need to contact us for permission unless you’re reproducing a significant portion of the code. For example, writing a program that uses several chunks of code from this book does not require permission. Selling or distributing a CD-ROM of examples from O’Reilly books does require permission. Answering a question by citing this book and quoting example code does not require permission. Incorporating a significant amount of example code from this book into your product’s documentation does require permission.
We appreciate, but do not require, attribution. An attribution usually includes the title, author, publisher, and ISBN. For example: “Programming Bitcoin by Jimmy Song (O’Reilly). Copyright 2019, 978-0-596-xxxx-x.”
If you feel your use of code examples falls outside fair use or the permission given above, feel free to contact us at permissions@oreilly.com.
Safari (formerly Safari Books Online) is a membership-based training and reference platform for enterprise, government, educators, and individuals.
Members have access to thousands of books, training videos, Leaning Paths, interactive tutorials, and curated playlists from over 250 publishers, including O’Reilly Media, Harvard Business Review, Prentice Hall Professional, Addison-Wesley Professional, Microsoft Press, Sams, Que, Peachpit Press, Adobe, Focal Press, Cisco Press, John Wiley & Sons, Syngress, Morgan Kaufmann, IBM Redbooks, Packt, Adobe Press, FT Press, Apress, Manning, New Riders, McGraw-Hill, Jones & Bartlett, and Course Technology, among others.
For more information, please visit http://oreilly.com/safari.
Please address comments and questions concerning this book to the publisher:
We have a web page for this book, where we list errata, examples, and any additional information. You can access this page at http://www.oreilly.com/catalog/<catalog page>.
To comment or ask technical questions about this book, send email to bookquestions@oreilly.com.
For more information about our books, courses, conferences, and news, see our website at http://www.oreilly.com.
Find us on Facebook: http://facebook.com/oreilly
Follow us on Twitter: http://twitter.com/oreillymedia
Watch us on YouTube: http://www.youtube.com/oreillymedia
One of the most difficult things about learning how to program Bitcoin is knowing where to start. There are so many components that depend on each other that learning one thing may lead you to have to learn another which in turn may lead you to learn something else before you can understand the original thing.
This chapter is going to get you off to a start which is more manageable. It may seem strange, but we’ll start with the basic math that you need to understand Elliptic Curve Cryptography. Elliptic Curve Cryptography, in turn, gives us the signing and verification algorithms. These are at the heart of how Transactions work, and Transactions are the atomic unit of value transfer in Bitcoin. By learning Finite Fields and Elliptic Curves first, you’ll get a firm grasp of concepts that you’ll need in order to progress logically.
Be aware that this chapter and the next two chapters may feel a bit like you’re eating vegetables, especially if you haven’t done formal math in a long time. I would encourage you to get through this as the concepts and code here will be used throughout the book.
Learning about new mathematical structures can be a bit intimidating and in this chapter, I hope to dispel the myth that high level math is difficult. Finite Fields, in particular, don’t require all that much in terms of prior mathematical knowledge than, say, Algebra.
Think of Finite Fields as something that you could have learned instead of Trigonometry, just that the education system you’re a part of decided that Trigonometry was more important for you to learn. This is my way of telling you that Finite Fields are not that hard to learn and require no more background than Algebra.
This chapter is required if you want to understand Elliptic Curve Cryptography. Elliptic Curve Cryptography is required for understanding signing and verification, which is at the heart of Bitcoin itself. As I’ve said, this chapter and the next two may feel a bit unrelated, but I encourage you to endure. The fundamentals here will not only make understanding Bitcoin a lot easier, but also make understanding Schnorr Signatures, Confidential Transactions and other leading edge Bitcoin technologies easier.
Mathematically, a Finite Field is defined as follows:
A finite set of numbers and two operations + (addition) and ⋅ (multiplication) that satisfy the following:
If a and b are in the set, a+b and a⋅b are in the set. We call this property closed.
The additive identity, 0 exists and has the property a + 0 = a.
The multiplicative identity, 1 exists and has the property a ⋅ 1 = a.
If a is in the set, -a is in the set, which is defined as the value that makes a + (-a) = 0. This is what we call the additive inverse.
If a is in the set and is not 0, a-1 is in the set, which is defined as the value that makes a ⋅ a-1 = 1. This is what we call the multiplicative inverse.
Let’s unpack each of the following.
We have a set of numbers that’s finite. Because the set is finite, we can designate a number p which is how big the set is. This is what we call the order of the set.
(1) says we are closed under addition and multiplication. This means that we have to define addition and multiplication in a way as to make sure that the results stay in the set. For example, a set containing {0,1,2} is not closed under addition since 1+2=3 and 3 is not in the set, neither is 2+2=4. Of course we can define addition a little differently to make this work, but using “normal” addition, this set is not closed. On the other hand, the set {-1,0,1} is closed under normal multiplication. Any two numbers can be multiplied (there are 9 such combinations) and the result is always in the set.
The other option we have in mathematics is to define multiplication in a particular way to make these sets closed. We’ll get to how exactly we define addition and multiplication later in this chapter, but the key concept here is that we can define addition and subtraction differently than the addition and subtraction you are familiar with.
(2) and (3) mean that we have the additive and multiplicative identities. That means 0 and 1 are in the set.
(4) means that we have the additive inverse. That is, if a is in the set, -a is in the set. Using the additive inverse, we can define subtraction.
(5) means that multiplication has the same property. If a is in the set, a-1 is in the set. That is a⋅a-1=1. Using the multiplicative inverse, we can define division. This will be the trickiest to define in a finite field.
If the order (or size) of the set is p, we can call the elements of the set, 0, 1, 2, …p-1. These numbers are what we call the elements of the set, not necessarily the traditional numbers 0, 1, 2, 3, etc. They behave in many ways like traditional numbers, but have some differences in how we add, subtract, multiply, etc.
In math notation the Finite Field set looks like this:
Fp = {0, 1, 2, … p-1}
What’s in the Finite Field set are called elements. Fp is a specific finite field called “field of p” or “field of 29” or whatever the size of it is (again, the size is what mathematicians call order). The numbers between the {}`s represent what elements are in the field. We name the elements 0, 1, 2, etc because they’re convenient for our purposes.
A Finite Field of order 11 looks like this:
F11 = {0, 1, 2, 3, 4, 5, 6, 7, 8, 9, 10}
A Finite Field of order 17 looks like this:
F17= {0, 1, 2, 3, 4, 5, 6, 7, 8, 9, 10, 11, 12, 13, 14, 15, 16}
A Finite Field of order 981 looks like this:
F981= {0, 1, 2, … 980}
Notice the order of the field is always 1 more than the largest element. You might have noticed that the field has a prime order every time. For a variety of reasons which will become clear later, it turns out that fields must an order that is a power of a prime, but that the Finite Fields whose order is of prime order are the ones we’re interested in.
We want to represent each Finite Field element and in Python, we’ll be creating a class that represents a single Finite Field element.
Naturally, we’ll name the class FieldElement.
The class represents an element in a field Fprime. The bare bones of the class look like this:
classFieldElement:def__init__(self,num,prime):ifnum>=primeornum<0:error='Num {} not in field range 0 to {}'.format(num,prime-1)raiseValueError(error)self.num=numself.prime=primedef__repr__(self):return'FieldElement_{}({})'.format(self.prime,self.num)def__eq__(self,other):ifotherisNone:returnFalsereturnself.num==other.numandself.prime==other.prime

We first check that num is between 0 and prime-1 inclusive.
If not, we have an invalid Field Element and we raise a ValueError which is what we should raise when we get an inappropriate value.

The rest of the __init__ method assigns the initialization values to the object.

The __eq__ method checks if two objects of class FieldElement are equal.
This is only true when the num and prime properties are equal.
What we’ve defined already allows us to do this:
>>>fromeccimportFieldElement>>>a=FieldElement(7,13)>>>b=FieldElement(6,13)>>>(a==b)False>>>(a==a)True
Python allows us to override the == operator on FieldElement with the __eq__ method, which is something we’ll be taking advantage of going forward.
You can see this in action in the code that accompanies this book.
Once you’ve set up Jupyter Notebook (see Preface), you can navigate to code-ch01/Chapter1.ipynb and run the code to see the results.
For the next exercise, you’ll want to open up ecc.py by clicking the link in the Exercise 1 box.
If you get stuck, please remember that the answers to every exercise are in the Appendix.
Write the corresponding method __ne__ which checks if two FieldElement objects are not equal to each other.
One of the tools we can use in order to make a Finite Field closed under addition, subtraction, multiplication and division is something called modulo arithmetic.
We can define addition on the finite set using something called modulo arithmetic. Modulo arithmetic is something you probably learned when you first learned division. Remember problems like Figure 1-1?
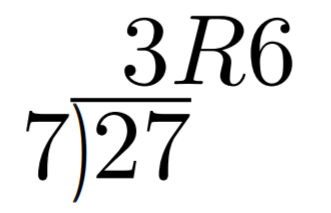
Whenever the division wasn’t even, there was something called the “remainder” which is the leftover from the actual division. We define modulo in the same way. We use the operator % for “modulo”.
7 % 3 = 1
Figure 1-2 shows another example.
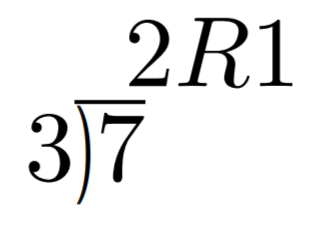
Formally speaking, the modulo operation is the remainder after division of one number by another. Let’s look at another example with larger numbers:
1747 % 241 = 60
If it helps, you can think of modulo arithmetic as “wrap-around” or “clock” math. Imagine a problem like this:
It is currently 3 o’clock. What hour will it be 47 hours from now?
The answer is 2 o’clock because (3 + 47) % 12 = 2 (see Figure 1-3)
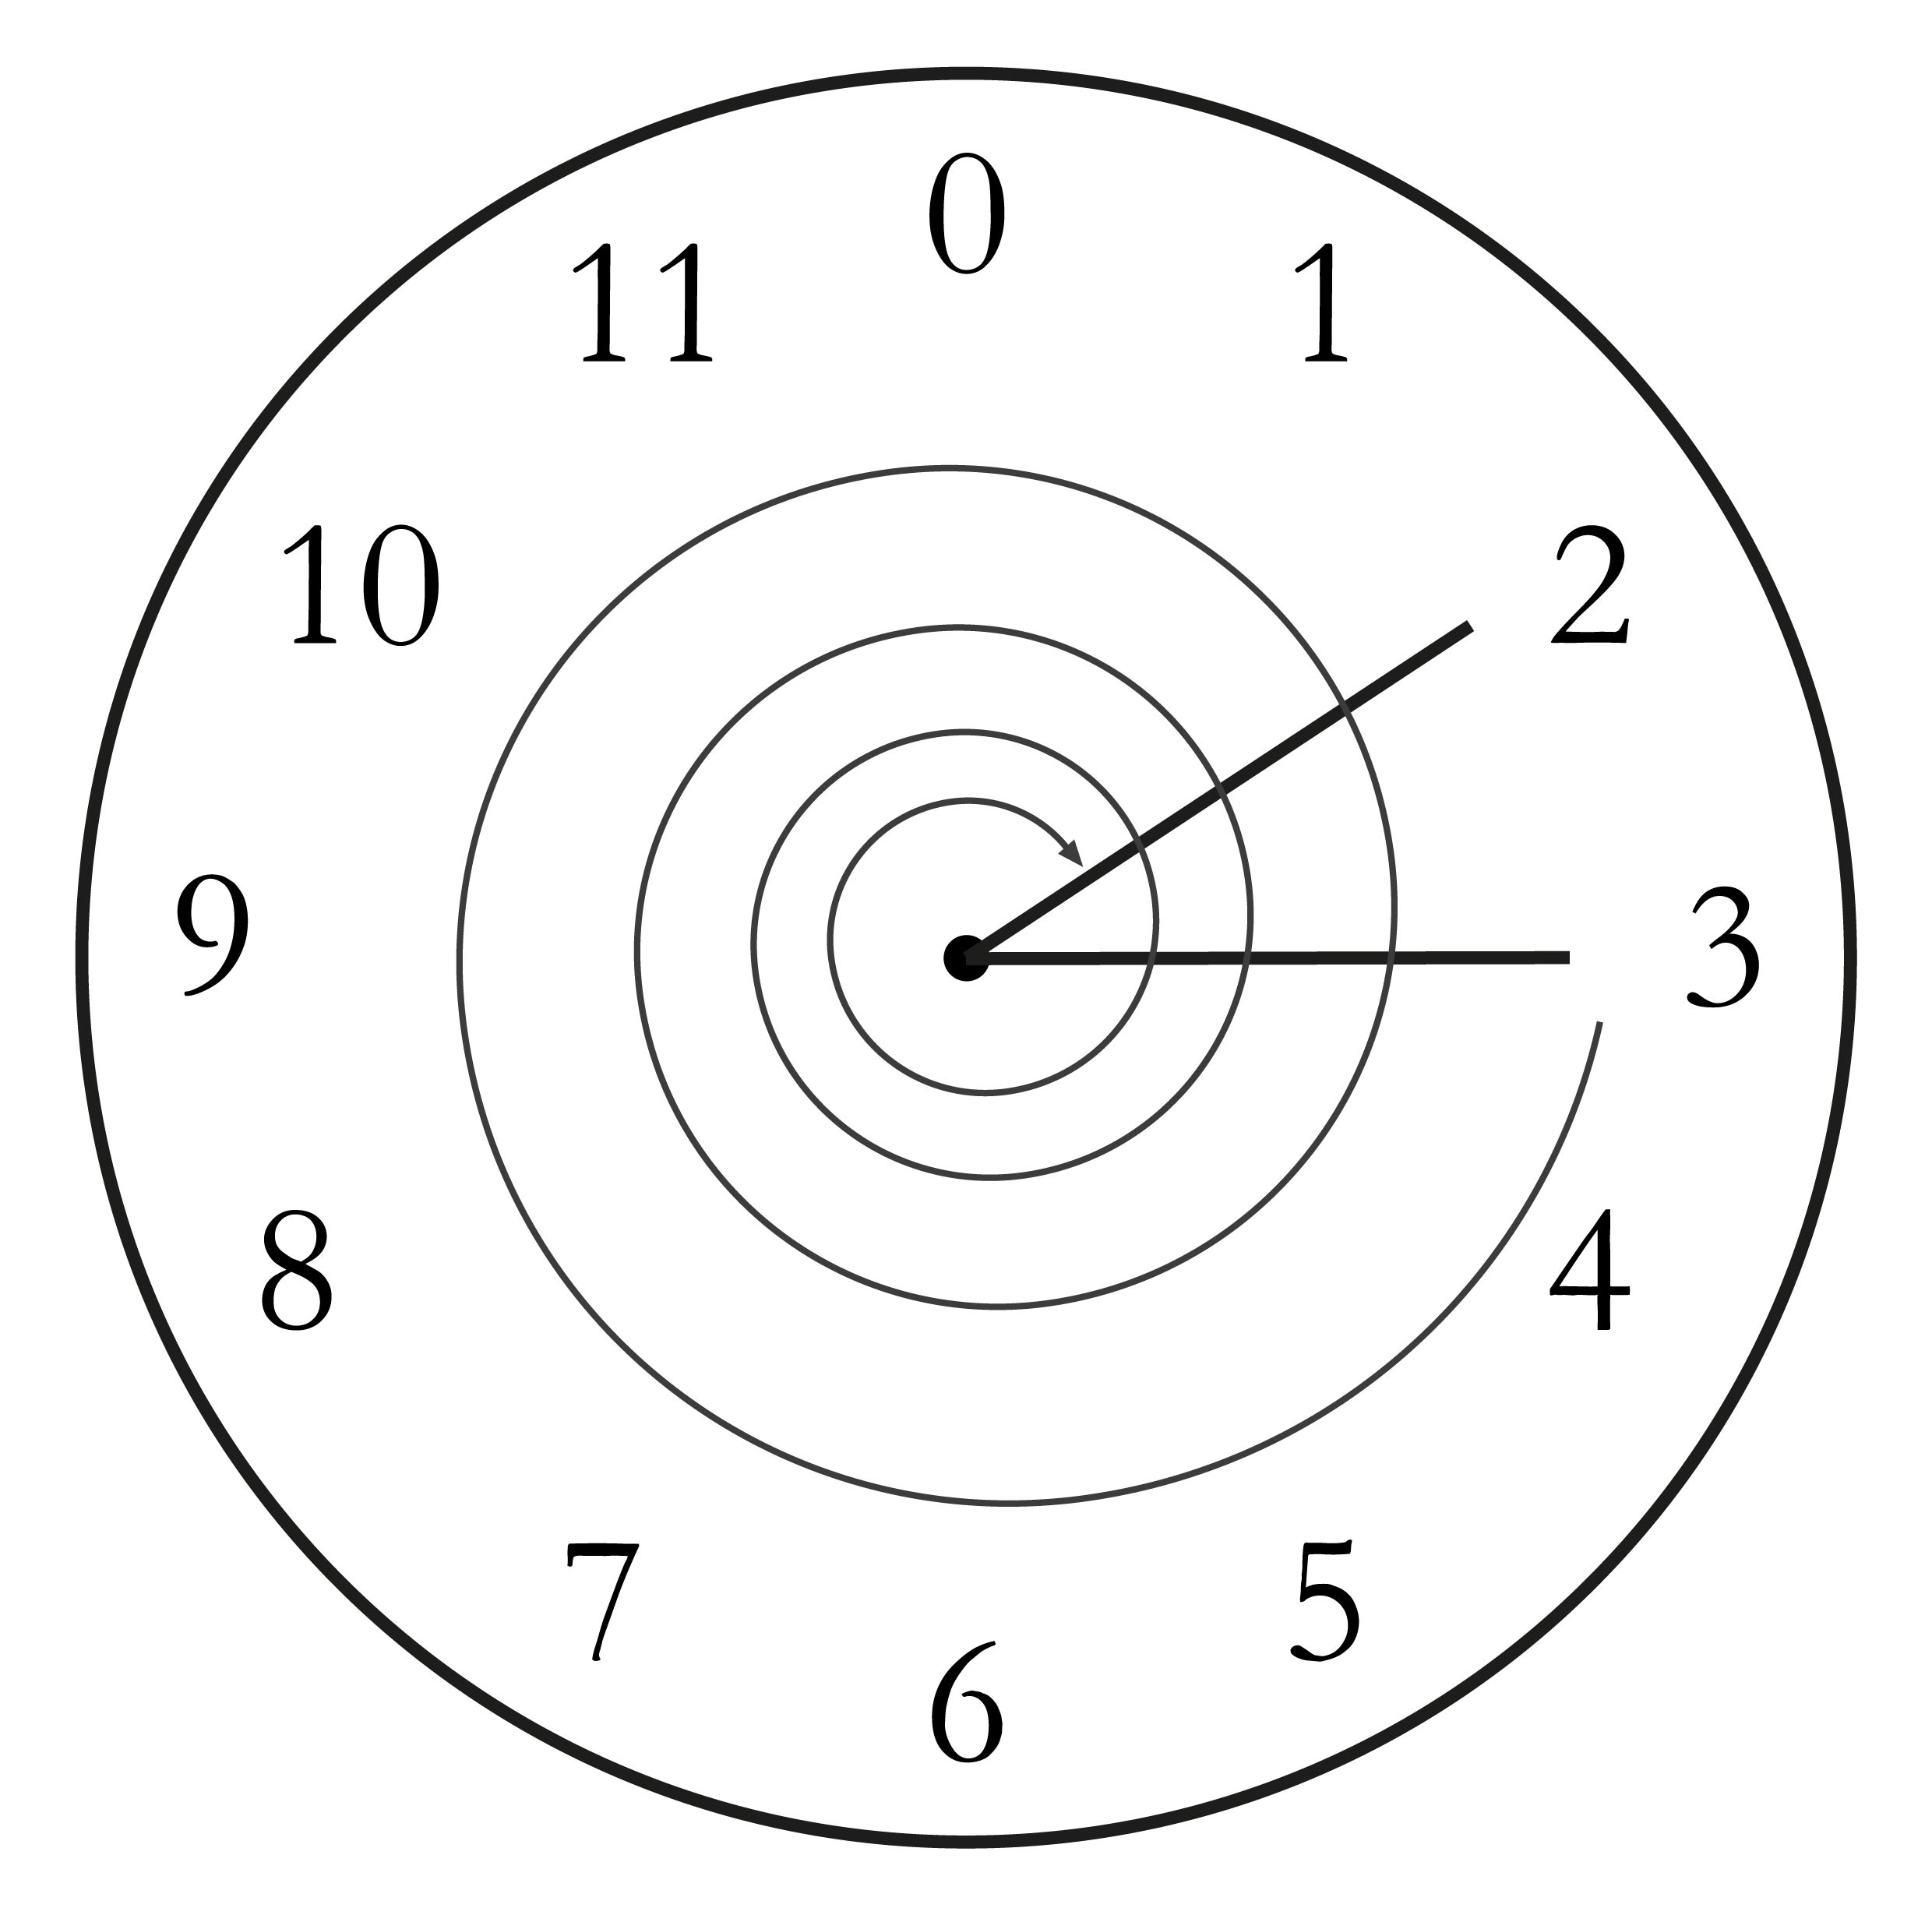
We can also see this as “wrapping around” in the sense that you go past zero every time we move ahead 12 hours.
We can perform modulo on negative numbers. For example, you can ask:
It is currently 3 o’clock. What hour was it 16 hours ago?
The answer is 11 o’clock. Hence we can say:
(3 - 16) % 12 = 11
The minute hand is also a modulo operation. For example, you can ask:
It is currently 12 minutes past the hour. What minute will it be 843 minutes from now?
(12 + 843) % 60 = 15
It will be 15 minutes past the hour. Likewise, we can ask:
It is currently 23 minutes past the hour. What minute will it be 97 minutes from now?
(23 + 97) % 60 = 0
0 is another way of saying there is no remainder.
The result of the modulo (%) operation for minutes is always between 0 and 59, inclusive, in this case. This happens to be a very useful property as even very large numbers can be brought down to a relatively small range with modulo:
14738495684013 % 60 = 33
We’ll be using modulo as we define field arithmetic. Most operations in Finite Fields use the modulo operator in some capacity.
Python uses the % operator for modulo arithmetic.
Here is how the modulo operator is used:
>>>(7%3)1
We can also use the modulo operator on negative numbers like this:
>>>(-27%13)12
Remember that we need to define Finite Field addition in a way as to make sure that the result is still in the set. That is, we want to make sure that addition in a Finite Field is closed.
We can use what we just learned, modulo arithmetic, to make addition closed. Let’s say we have a Finite Field of 19:
F19={0,1,2,…18}, where a, b ∈ F19
Note that the symbol ∈ means “is an element of”.
In our case, a and b are elements of F19.
Addition being closed means:
a+fb ∈ F19
We denote Finite Field addition with +f to avoid confusion with normal integer addition +.
If we utilize modulo arithmetic, we can guarantee this to be the case. We can define a+fb this way:
a+fb = (a+b)%19
For example:
7+f8 = (7+8)%19 = 15
11+f17 = (11+17)%19 = 9
and so on.
We take any two numbers in the set, add and “wrap around” the end to get the sum. We are creating our own addition operator here and the result is a bit unintuitive. After all 11+f17=9 just doesn’t look right for because we’re not used to Finite Field addition.
More generally, we define field addition this way:
a+fb=(a+b)%p where a, b ∈ Fp
We also define the additive inverse this way.
a ∈ Fp implies that -fa ∈ Fp
-fa = (-a) % p
Again, for clarity, we use -f to distinguish field subtraction and negation from integer subtraction and negation.
In F19:
-f9 = (-9) % 19 = 10
Which means that:
9 +f 10 = 0
And that turns out to be true.
Similarly, we can do field subtraction.
a-fb = (a-b)%p where a, b ∈ Fp
In F19:
11-f9=(11-9)%19=2
6-f13=(6-13)%19=12
and so on.
Solve these problems in F57 (assume all +’s here are +f and -`s here -f)
44+33
9-29
17+42+49
52-30-38
In the class FieldElement we can now define __add__ and __sub__ methods.
The idea of these methods is that we want something like this to work:
>>>fromeccimportFieldElement>>>a=FieldElement(7,13)>>>b=FieldElement(12,13)>>>c=FieldElement(6,13)>>>(a+b==c)True
In Python we can define what addition (or + operator) means for our class with the __add__ method.
So how do we do this?
We combine what we learned above with modulo arithmetic and create a new method of the class FieldElement like so:
def__add__(self,other):ifself.prime!=other.prime:raiseTypeError('Cannot add two numbers in different Fields')num=(self.num+other.num)%self.primereturnself.__class__(num,self.prime)
We have to ensure that the elements are from the same Finite Field, otherwise this calculation doesn’t have any meaning.
Addition in a Finite Field is defined with the modulo operator, as explained above.
We have to return an instance of the class, which we can conveniently access with self.__class__.
We pass the two initializing arguments, num and self.prime for the __init__ method above.
Note that we can use FieldElement instead of self.__class__, but this would not make the method easily inheritable.
We will be subclassing FieldElement later, so making the method inheritable is important here.
Write the corresponding __sub__ method which defines the subtraction of two FieldElement objects.
Just as we defined a new addition (+f) for Finite Fields that was closed, we can also define a new multiplication for Finite Fields that’s also closed. By multiplying the same number many times, we can also define exponentiation. In this section, we’ll go through exactly how to define this using modulo arithmetic.
Multiplication is adding multiple times.
5⋅3 = 5+5+5 = 15
8⋅17 = 8+8+8+…(17 total 8’s)…+8 = 136
We can define multiplication on a Finite Field the same way. Operating in F19 once again,
5⋅f3 = 5+f5+f5
8⋅f17 = 8+f8+f8+f…(17 total 8’s)…+f8
We already know how to do the right side, and that yields a number within the F19 set:
5⋅f3 = 5+f5+f5 = 15 % 19 = 15
8⋅f17 = 8+f8+f8+f…(17 total 8’s)…+f8 = (8⋅17) % 19 = 136 % 19 = 3
Note that the second result is pretty unintuitive. We don’t normally think of 8⋅f17=3, but that’s part of what’s necessary in order to define multiplication to be closed. That is, the result of field multiplication is always in the set {0,1,…p-1}.
Exponentiation is simply multiplying a number many times.
73=7⋅f7⋅f7=343
In a Finite Field, we can do exponentiation using modulo arithmetic.
In F19:
73=343 % 19=1
912=7
Exponentiation again gives us counter-intuitive results. We don’t normally think 73=1 or 912=7. Again, Finite Fields have to be defined so that the operations always result in a number within the field.
Solve the following equations in F97 (again, assume ⋅ and exponentiation are field versions):
95⋅45⋅31
17⋅13⋅19⋅44
127⋅7749
For k = 1, 3, 7, 13, 18, what is this set in F19?
{k⋅0, k⋅1, k⋅2, k⋅3, … k⋅18}
Do you notice anything about these sets?
The answer to Exercise 5 is why fields have to have a prime power number of elements. No matter what k you choose, as long as it’s greater than 0, multiplying the entire set by k will result in the same set as you started with.
Intuitively the fact that we have a prime order results in every element of a Finite Field being equivalent. If the order of the set was composite number, multiplying the set by one of the divisors would result in a smaller set.
Now that we understand what multiplication should be in FieldElement, we want to define the __mul__ method which overrides the * operator.
We want this to work:
>>>fromeccimportFieldElement>>>a=FieldElement(3,13)>>>b=FieldElement(12,13)>>>c=FieldElement(10,13)>>>(a*b==c)True
As we did with addition and subtraction above, the next exercise is to make multiplication work for our class by defining the __mul__ method.
Write the corresponding __mul__ method which defines the multiplication of two Finite Field elements.
We need to define the exponentiation for FieldElement, which in Python can be defined with the __pow__ method, overriding the ** operator.
The difference here is that the exponent is not a FieldElement, so has to be treated a bit differently.
We want something like this to work:
>>>fromeccimportFieldElement>>>a=FieldElement(3,13)>>>b=FieldElement(1,13)>>>(a**3==b)True
Note that because the exponent is an integer, instead of another instance of FieldElement, the method receives the variable exponent as an integer.
We can code it this way.
classFieldElement:...def__pow__(self,exponent):num=(self.num**exponent)%self.primereturnself.__class__(num,self.prime)
This is a perfectly fine way to do it, but pow(self.num, exponent, self.prime) is more efficient.
We have to return an instance of the class as before.
Why don’t we force the exponent to be a FieldElement object?
It turns out that the exponent doesn’t have to be a member of the Finite Field in order for the math to work out.
In fact, if it were, the exponents wouldn’t display the intuitive behavior we would expect from exponents, like being able to add the exponents when you multiply with the same base.
Some of what we’re doing now may seem slow for large numbers, but we’ll use some clever tricks to improve the performance of these algorithms.
For p = 7, 11, 17, 31, what is this set in Fp?
{1(p-1), 2(p-1), 3(p-1), 4(p-1), … (p-1)(p-1)}
The intuition that helps us with addition, subtraction, multiplication and perhaps even exponentiation unfortunately doesn’t help us quite as much in division. Because division is the hardest one to make sense of, we’ll start with something that should make sense.
In normal math, division is the inverse of multiplication:
7⋅8 = 56 implies that 56/8 = 7
12⋅2 = 24 implies that 24/12 = 2
And so on. We can use this as the definition of division to help us. Note that like normal math, you cannot divide by 0.
In F19, we know that:
3⋅f7=21%19=2 implies that 2/f7=3
9⋅f5=45%19=7 implies that 7/f5=9
This is very unintuitive as we generally think of 2/f7 or 7/f5 as fractions, not nice Finite Field elements. Yet that is one of the remarkable things about Finite Fields: Finite Fields are closed under division. That is, dividing any two numbers where the denominator is not 0 will result in another Finite Field element.
The question you might be asking yourself is, how do I calculate 2/f7 if I don’t know beforehand that 3⋅f7=2? This is indeed a very good question and in order to answer it, we’ll have to use the result from the Exercise 7.
In case you didn’t get it, the answer is that n(p-1) is always 1 for every p that is prime and every n > 0. This is a beautiful result from number theory called Fermat’s Little Theorem. Essentially, the theorem says:
n(p-1)%p=1 where p is prime
Since we are operating in prime fields, this will always be true.
Because division is the inverse of multiplication, we know:
a/b=a⋅f(1/b)=a⋅fb-1
We can reduce the division problem to a multiplication problem as long as we can figure out what b-1 is. This is where Fermat’s Little Theorem comes into play. We know:
b(p-1)=1
Because p is prime. Thus:
b-1=b-1⋅f1=b-1⋅fb(p-1)=b(p-2)
or
b-1=b(p-2)
In F19, this means practically that:
b18=1 which means that b-1=b17 for all b > 0.
So in other words, we can calculate the inverse using the exponentiation operator. In F19:
2/7=2⋅7(19-2)=2⋅717=465261027974414%19=3
7/5=7⋅5(19-2)=7⋅517=5340576171875%19=9
This is a relatively expensive calculation as exponentiating grows very fast.
Division is the most expensive operation for that reason.
To lessen the expensiveness, we can utilize the pow function in Python.
pow is a function that does exponentiation.
Thus something like pow(7,17) does the same thing as 7**17.
The pow function, however, has an optional third argument which makes our calculation more efficient.
Specifically, pow will modulo by the third argument.
Thus, pow(7,17,19) will give the same result as 7**17%19 but do so faster because the modulo function is done after each round of multiplication.
Solve the following equations in F31:
3 / 24
17-3
4-4⋅11
Write the corresponding __truediv__ method which defines the division of two field elements.
Note that in Python3, division is separated into __truediv__ and __floordiv__. The first does normal division, the second does integer division.
One last thing that we need to take care of before we leave this chapter is the __pow__ method, which will need to take care of negative exponents.
For example a-3 needs to be a Finite Field element, but the current code does not take care of this case.
We want, for example something like this to work:
>>>fromeccimportFieldElement>>>a=FieldElement(7,13)>>>b=FieldElement(8,13)>>>(a**-3==b)True
Unfortunately, the way we’ve defined __pow__ simply doesn’t handle negative exponents as the second parameter of the built-in Python function pow is required to be positive.
Thankfully, we can use some math we already know to solve this. We know from Fermat’s Little Theorem that:
ap-1 = 1
This fact means that we can multiply by ap-1 as many times as we want. So for a-3, for example, we can do:
a-3=a-3⋅ap-1=ap-4
This is a way we can do negative exponents. A naive implementation would do something like this:
classFieldElement:...def__pow__(self,exponent):n=exponentwhilen<0:n+=self.prime-1num=pow(self.num,n,self.prime)returnself.__class__(num,self.prime)
We add until we get a positive exponent
We use the Python built-in pow to make this more efficient
Thankfully, we can do even better.
We already know how to force a number out of being negative, using our familiar friend %!
As a bonus, we can also reduce very large exponents at the same time given that ap-1=1.
This will make the pow function not work as hard.
classFieldElement:...def__pow__(self,exponent):n=exponent%(self.prime-1)num=pow(self.num,n,self.prime)returnself.__class__(num,self.prime)
Make the exponent into something within the 0 to p-1 range
In this chapter we learned about Finite Fields and how to implement it in Python. We’ll be using Finite Fields in Chapter 3 for Elliptic Curve Cryptography. We turn next to the other mathematical component that we need for Elliptic Curve Cryptography and that’s Elliptic Curves.
In this chapter we’re going to learn about Elliptic Curves. In the Chapter 3, we will combine Elliptic Curves with Finite Fields to make Elliptic Curve Cryptography.
As in the Chapter 1, Elliptic Curves can look intimidating if you haven’t seen them before. Also as in Chapter 1, the actual math isn’t very difficult. Most of Elliptic Curves could have been taught to you after Algebra. In this chapter, we’ll get to what these curves are and what we can do with them.
Elliptic Curves are like many equations you’ve been seeing since pre-Algebra.
They have y on one side and x on the other in some form.
Elliptic Curves have a form like this:
y2=x3+ax+b
You’ve worked with other equations that look similar. For example, you probably learned the linear equation back in pre-Algebra:
y = mx + b
You may even remember that m here has the name slope and b, y-intercept. You can also graph linear equations like Figure 2-1:

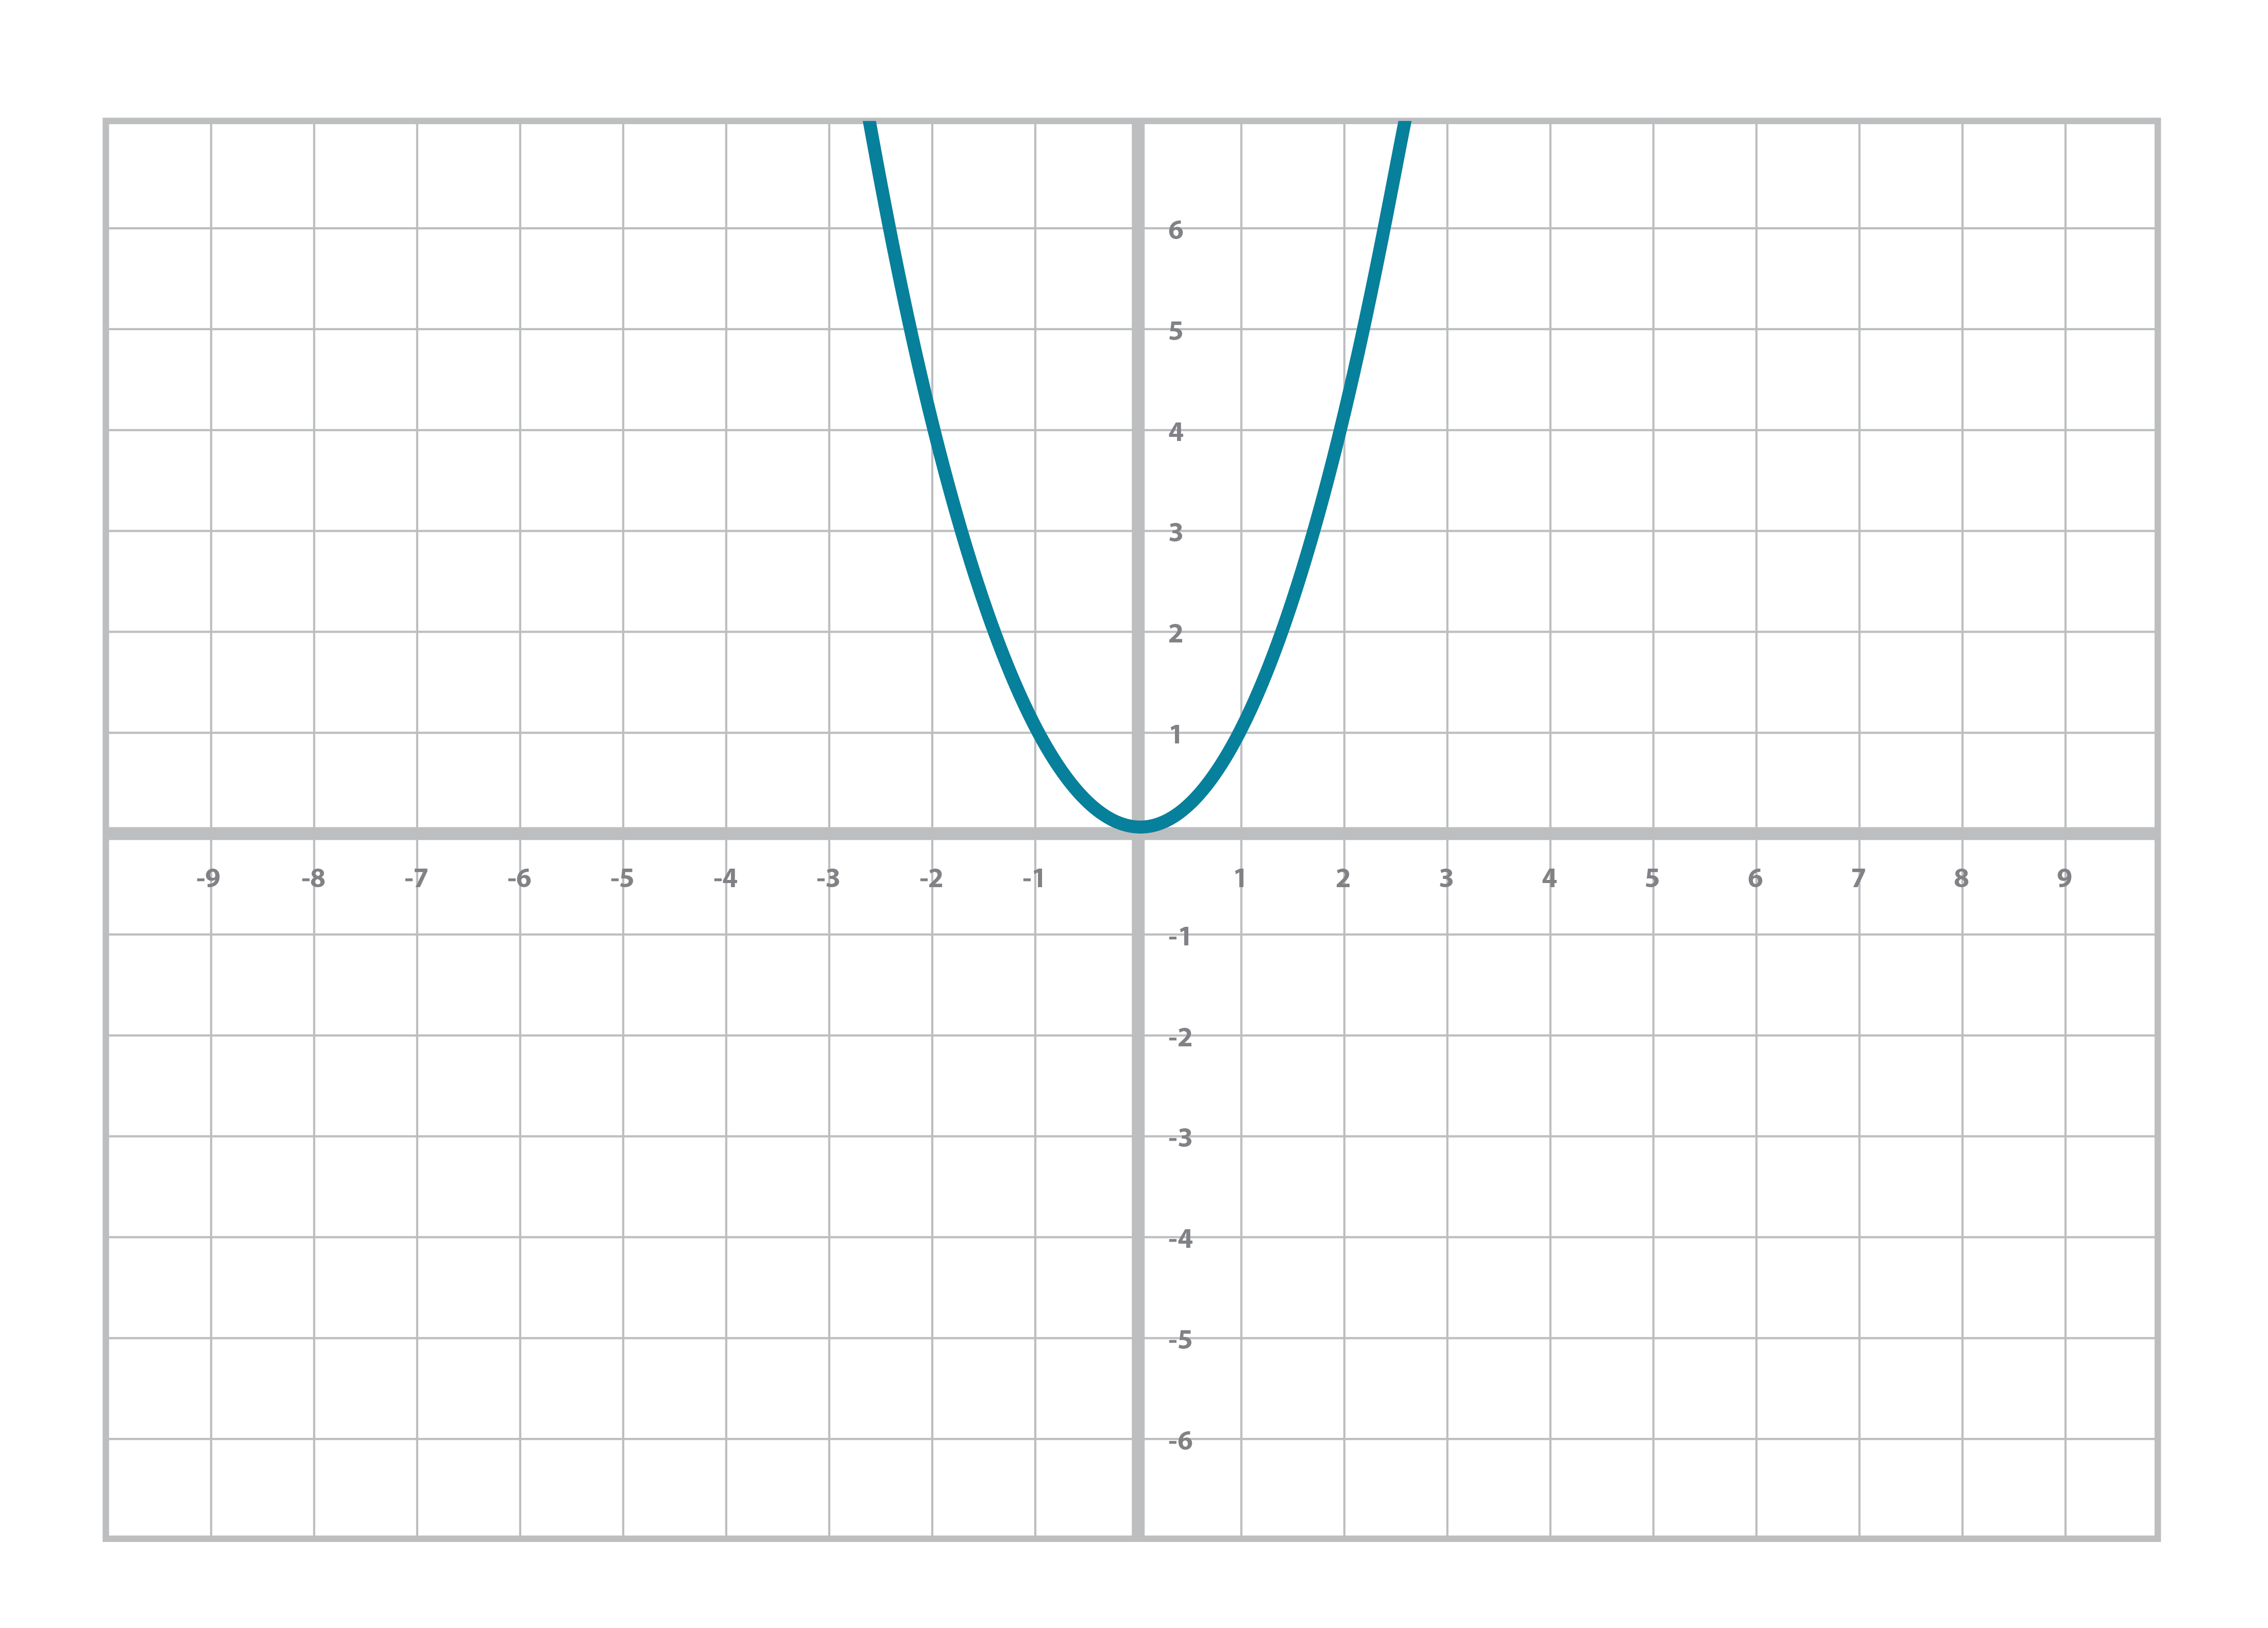
Similarly, you’re probably familiar with the quadratic equation and its graph (Figure 2-2):
y = ax2+bx+c
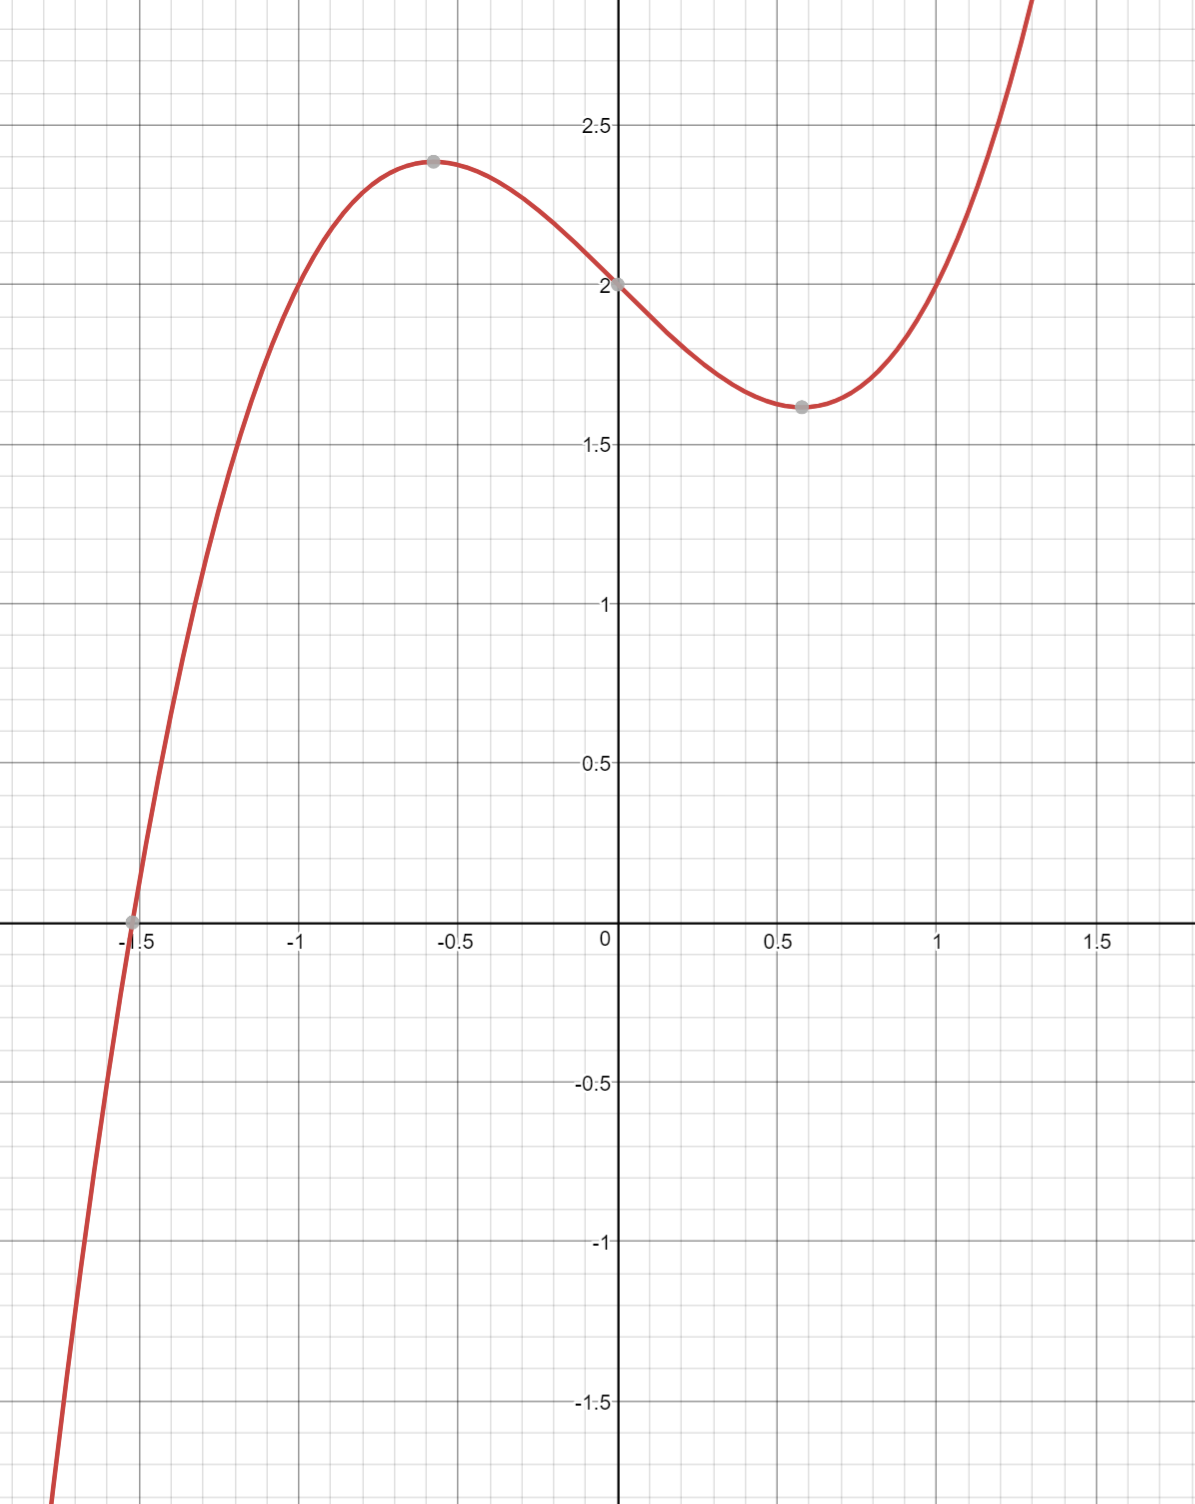
And sometime around Algebra, you did even higher orders of x, something called the cubic equation and its graph (Figure 2-3):
y = ax3+bx2+cx+d

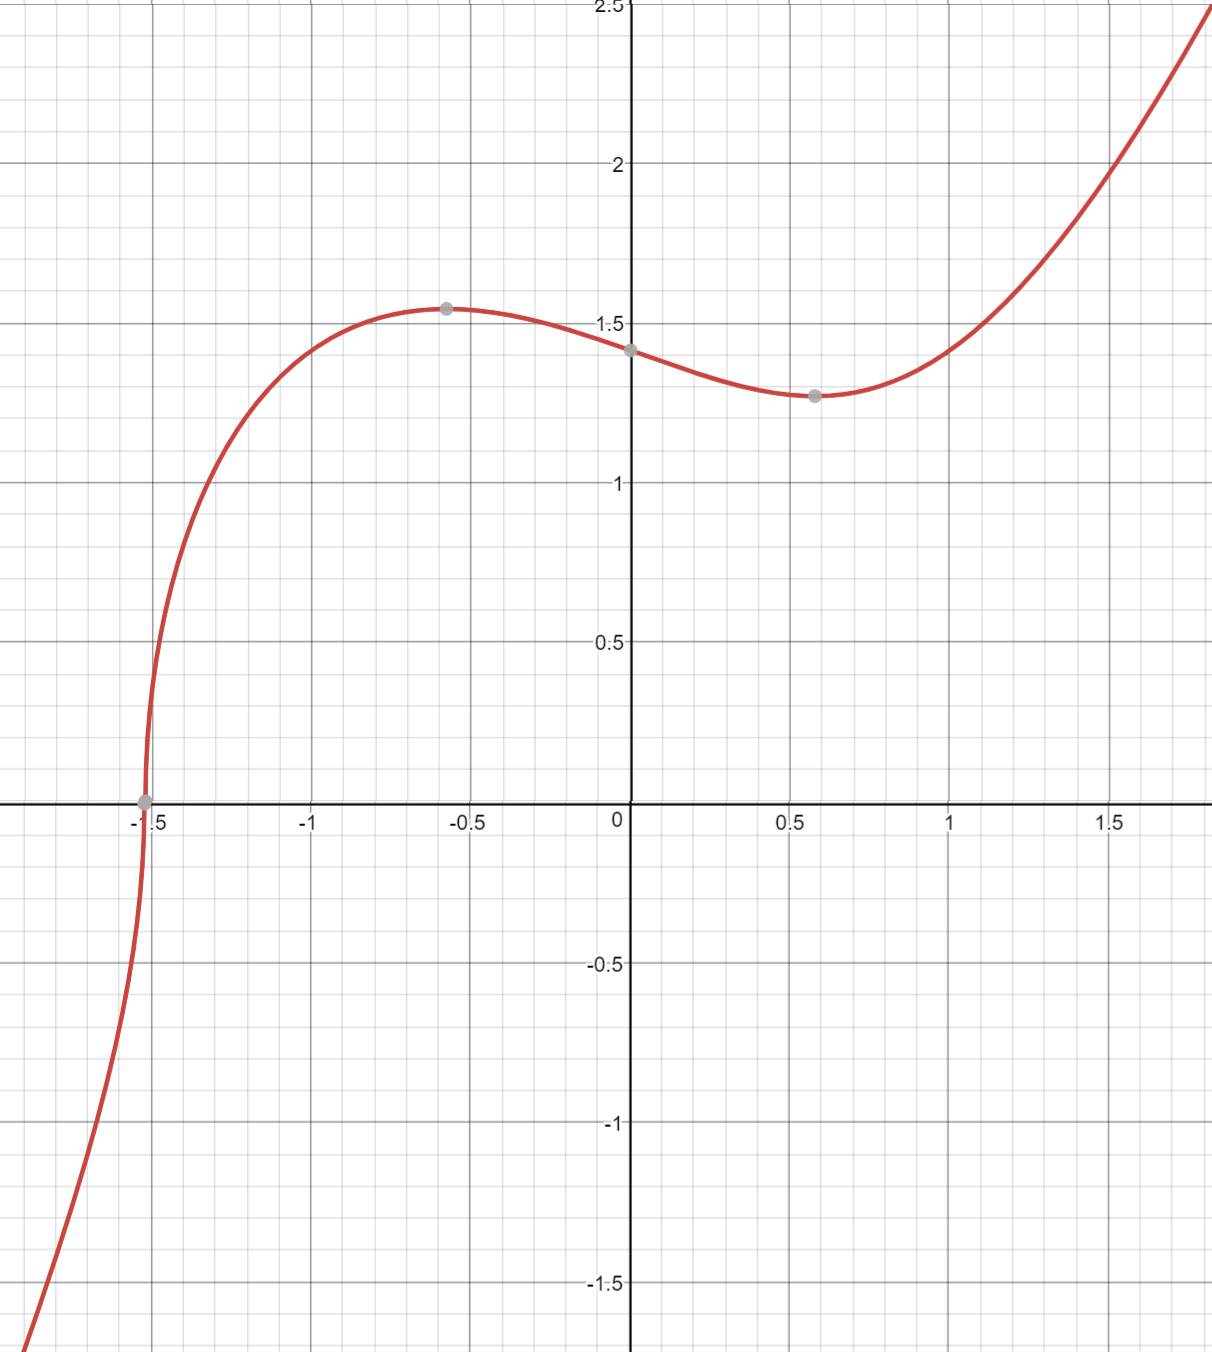
An Elliptic Curve isn’t all that different. The only real difference between the Elliptic Curve and the cubic curve above is the y2 term on the left side. This has the effect of making the graph symmetric over the x-axis, shown in Figure 2-4:

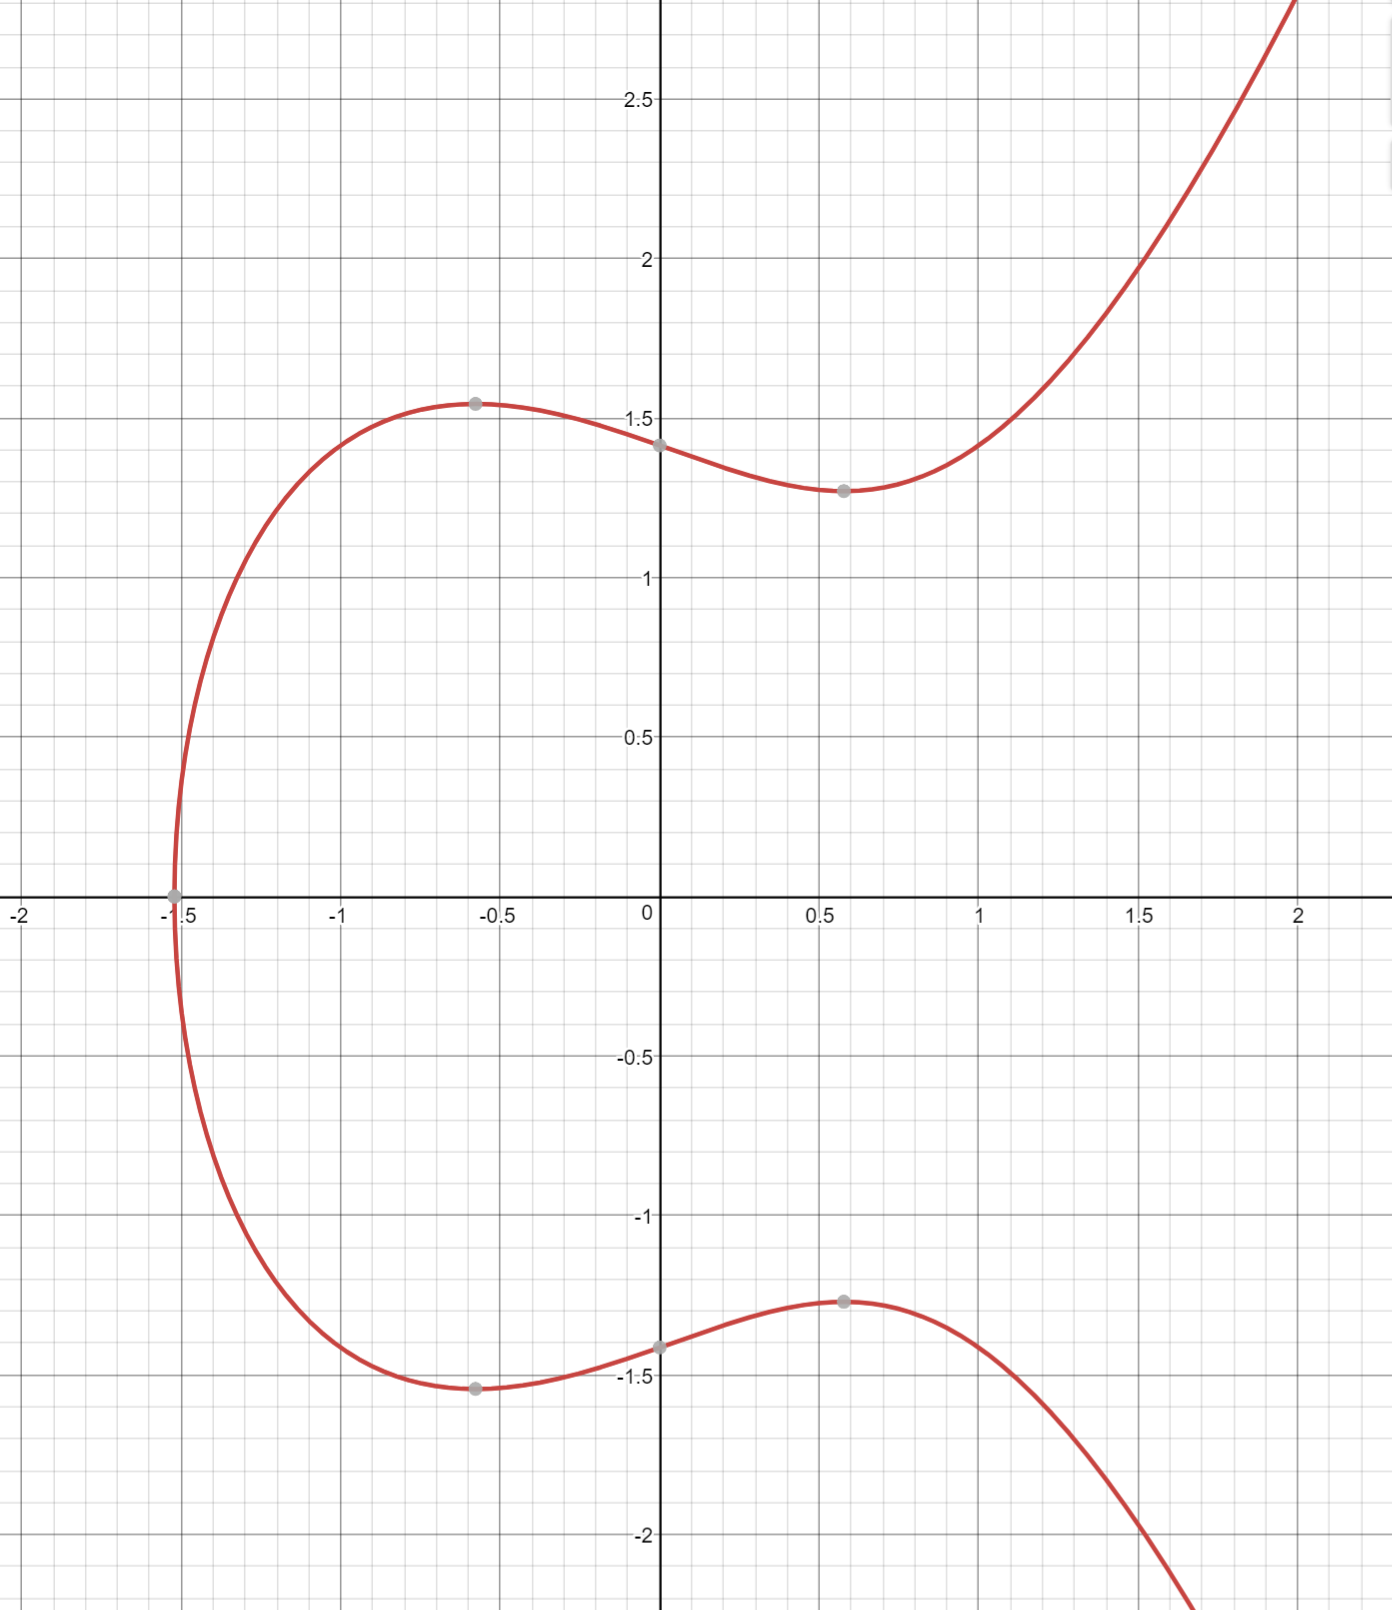
The Elliptic Curve is also less steep than the cubic curve. Again, this is because of the y2 term on the left side. At times, the curve may even be disjoint like Figure 2-5:

If it helps, an Elliptic Curve can be though of as taking a cubic equation graph (Figure 2-6), taking only the part above the x-axis, flattening it out (Figure 2-7) and then mirroring the top half on the bottom half of the x-axis (Figure 2-8).
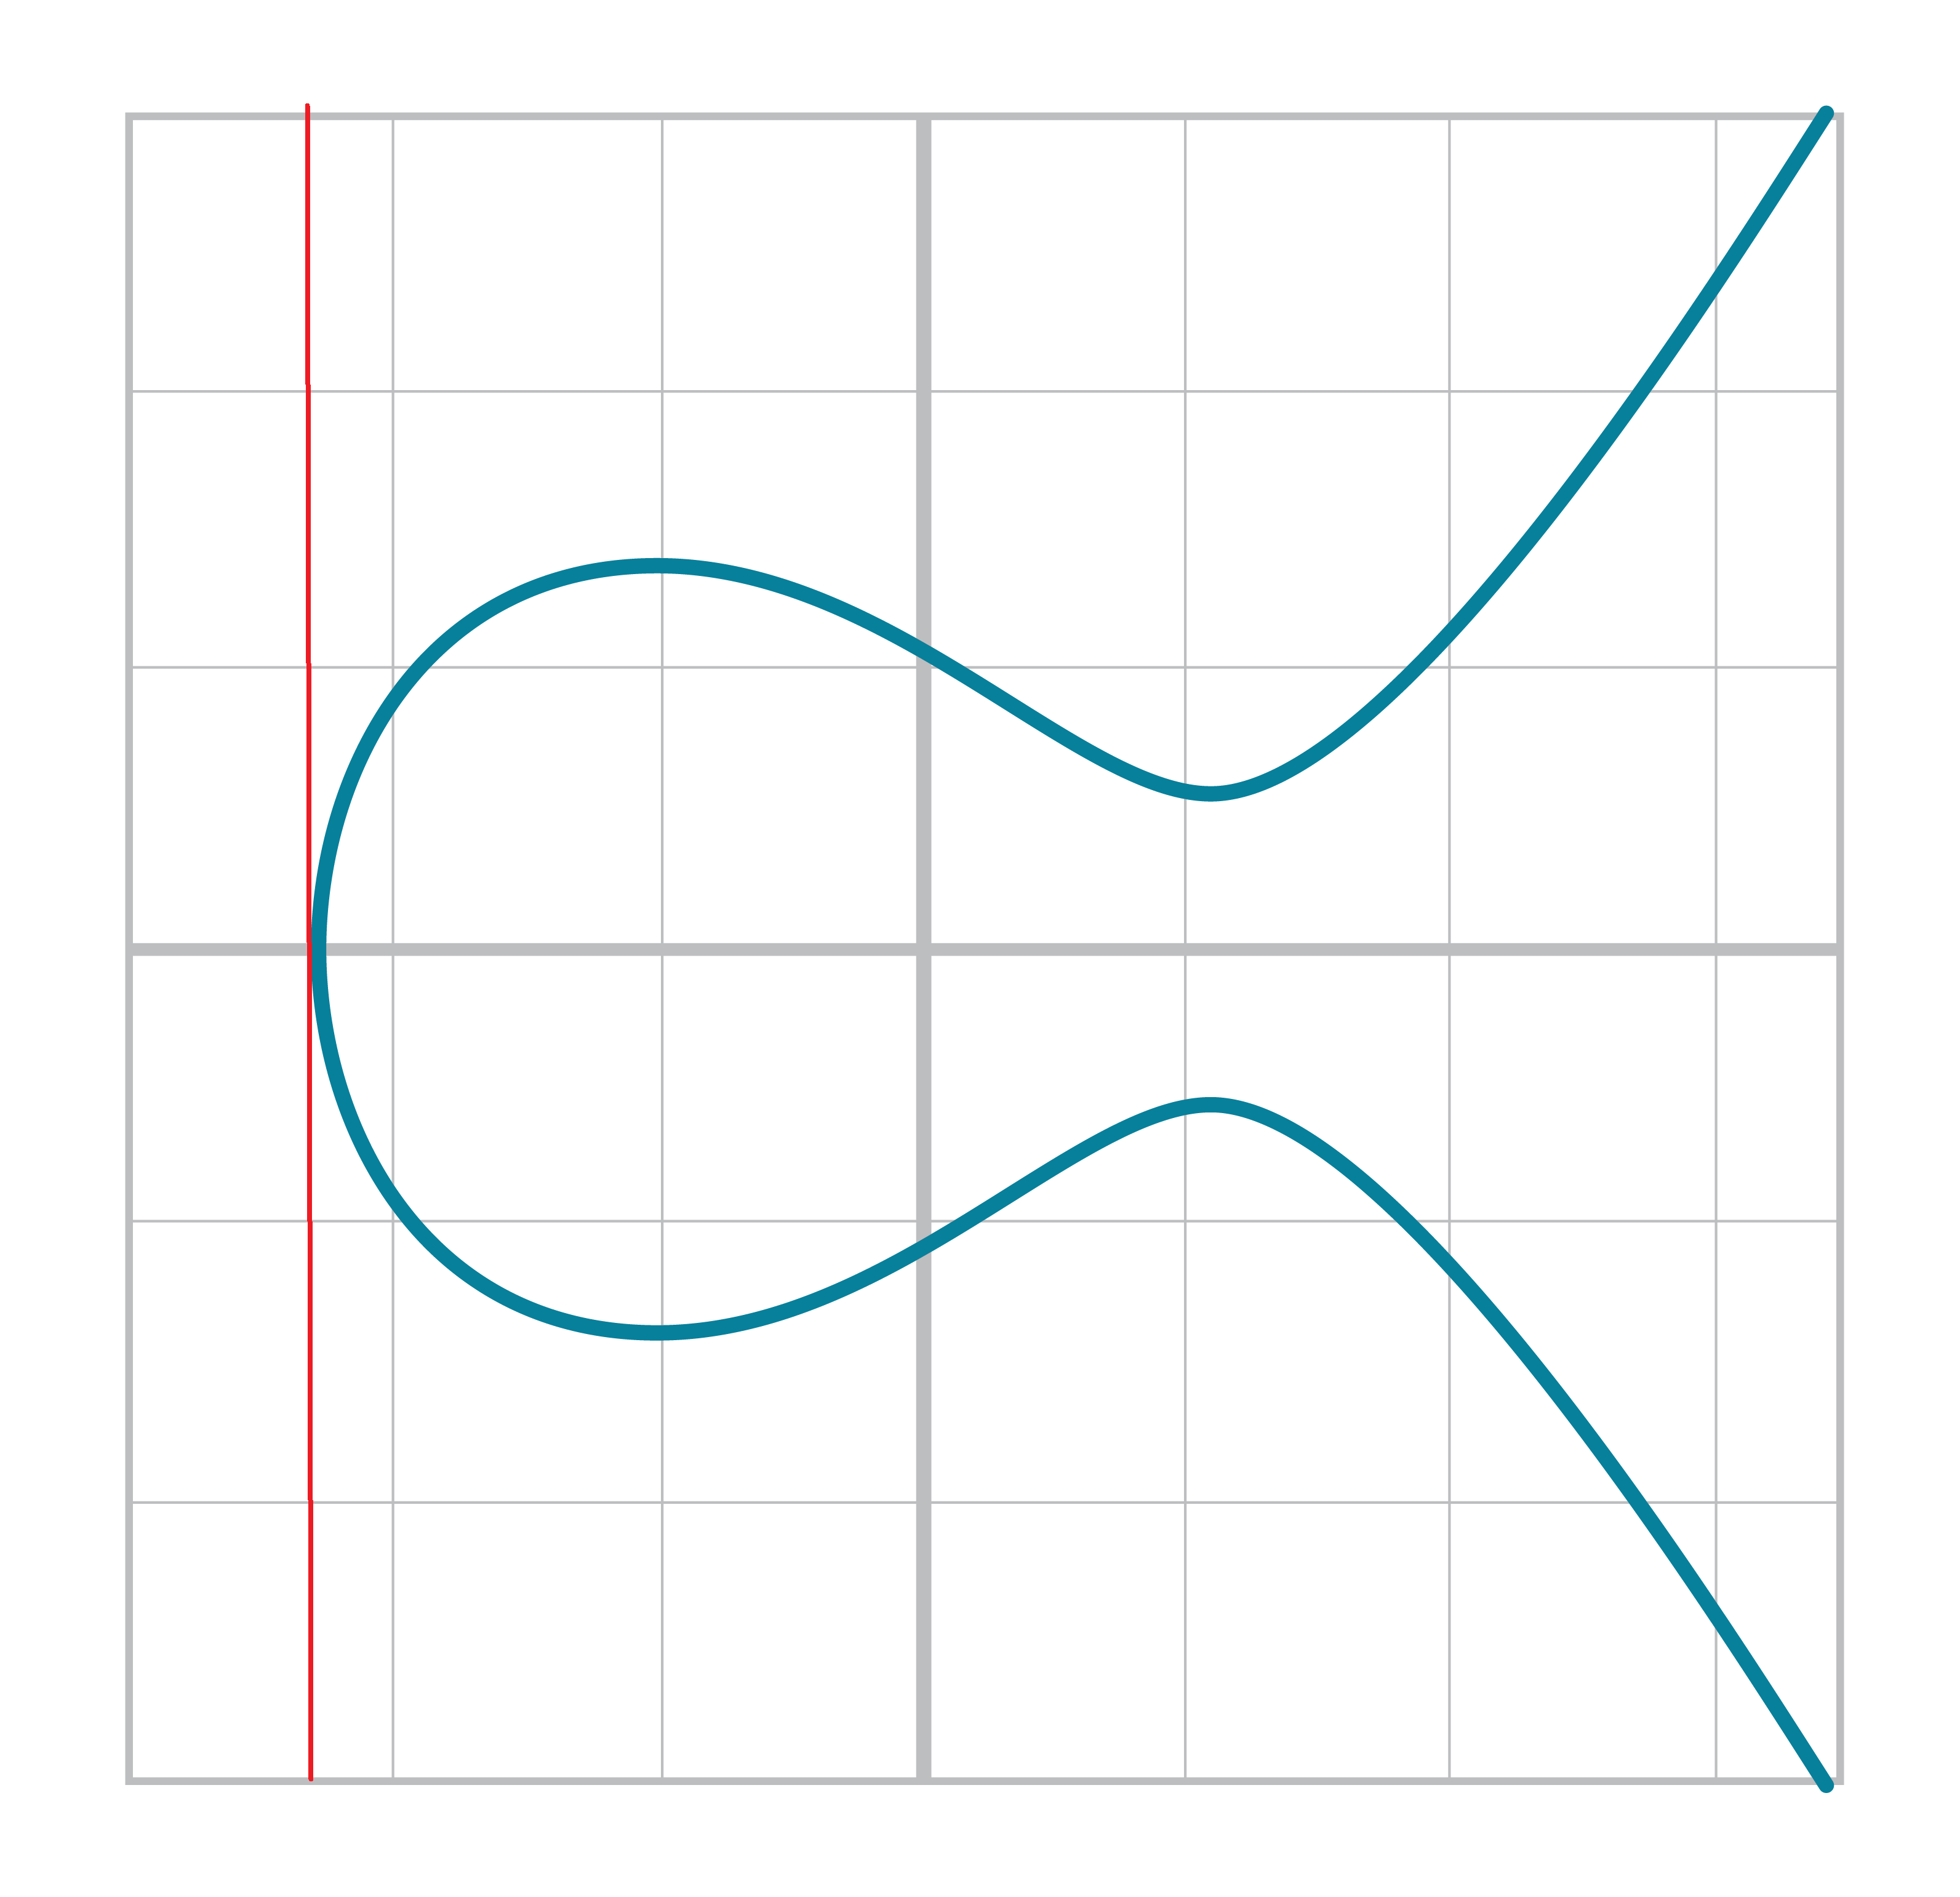
Specifically, the Elliptic Curve used in Bitcoin is called secp256k1 and it uses this particular equation:
y2=x3+7
The canonical form is y2=x3+ax+b so the curve is defined by the constants a=0, b=7.
The curve looks like Figure 2-9:

For a variety of reasons which will be made clear later, we are not interested in the curve itself, but specific points on the curve.
For example, in the curve y2=x3+5x+7, we are interested in the coordinate (-1,1).
We are thus going to define the class Point to be a point on a specific curve.
The curve has the form y2=x3+ax+b, so we can define the curve with just the two numbers a and b.
classPoint:def__init__(self,x,y,a,b):self.a=aself.b=bself.x=xself.y=yifself.y**2!=self.x**3+a*x+b:raiseValueError('({}, {}) is not on the curve'.format(x,y))def__eq__(self,other):returnself.x==other.xandself.y==other.y\andself.a==other.aandself.b==other.b
We check here that the point is actually on the curve.
Points are equal if and only if they are on the same curve and have the same coordinates
We can now create Point objects, and we will get an error if the point is not on the curve:
>>>fromeccimportPoint>>>p1=Point(-1,-1,5,7)>>>p2=Point(-1,-2,5,7)Traceback(mostrecentcalllast):File"<stdin>",line1,in<module>File"ecc.py",line143,in__init__raiseValueError('({}, {}) is not on the curve'.format(self.x,self.y))ValueError:(-1,-2)isnotonthecurve
In other words, __init__ will raise an exception when the point is not on the curve.
Determine which of these points are on the curve y2=x3+5x+7:
(2,4), (-1,-1), (18,77), (5,7)
Write the __ne__ method for Point.
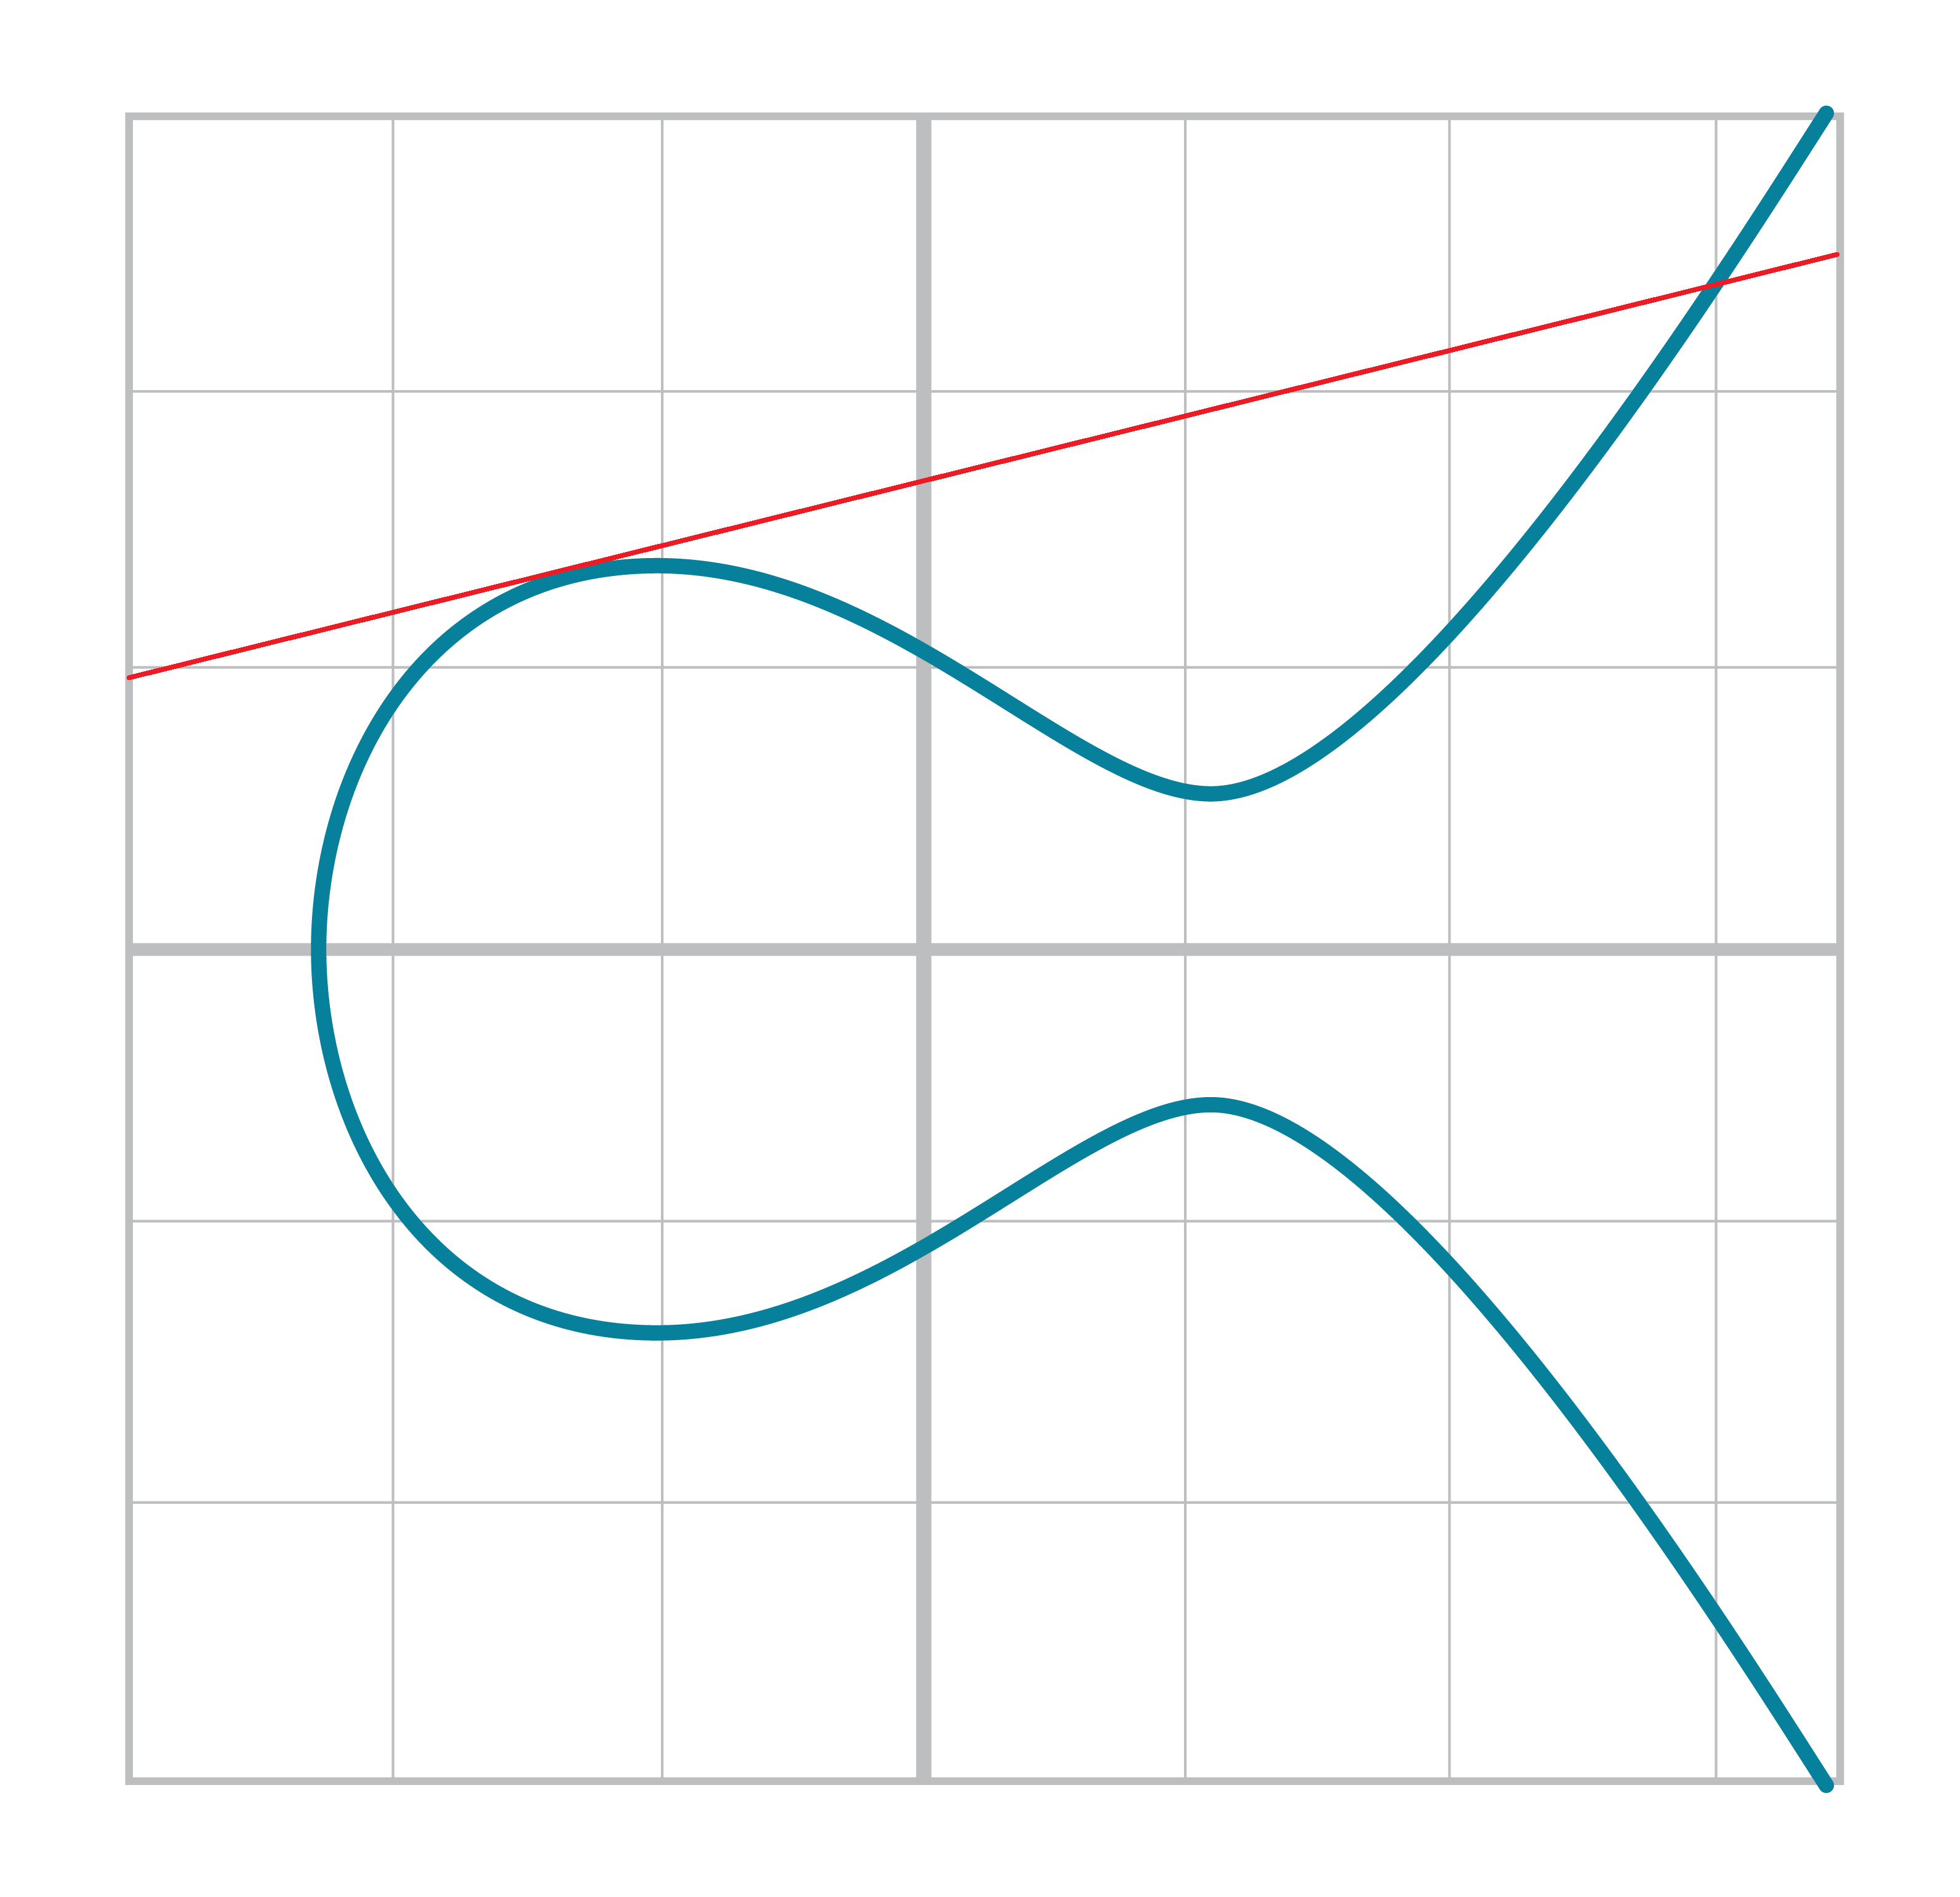
Elliptic Curves are useful because of something called Point Addition. Point Addition is where we can do an operation on two of the points on the curve and get a third point, also on the curve. This is called “addition” because the operation has a lot of the intuitions we associate with what we call “addition”. For example, Point Addition is commutative. That is, adding point A to point B is the same as adding point B to point A.
The way we define Point Addition is as follows. It turns out that for every Elliptic Curve, a line will intersect it at either 1 point (Figure 2-10) or 3 points (Figure 2-11), except for a couple of special cases.
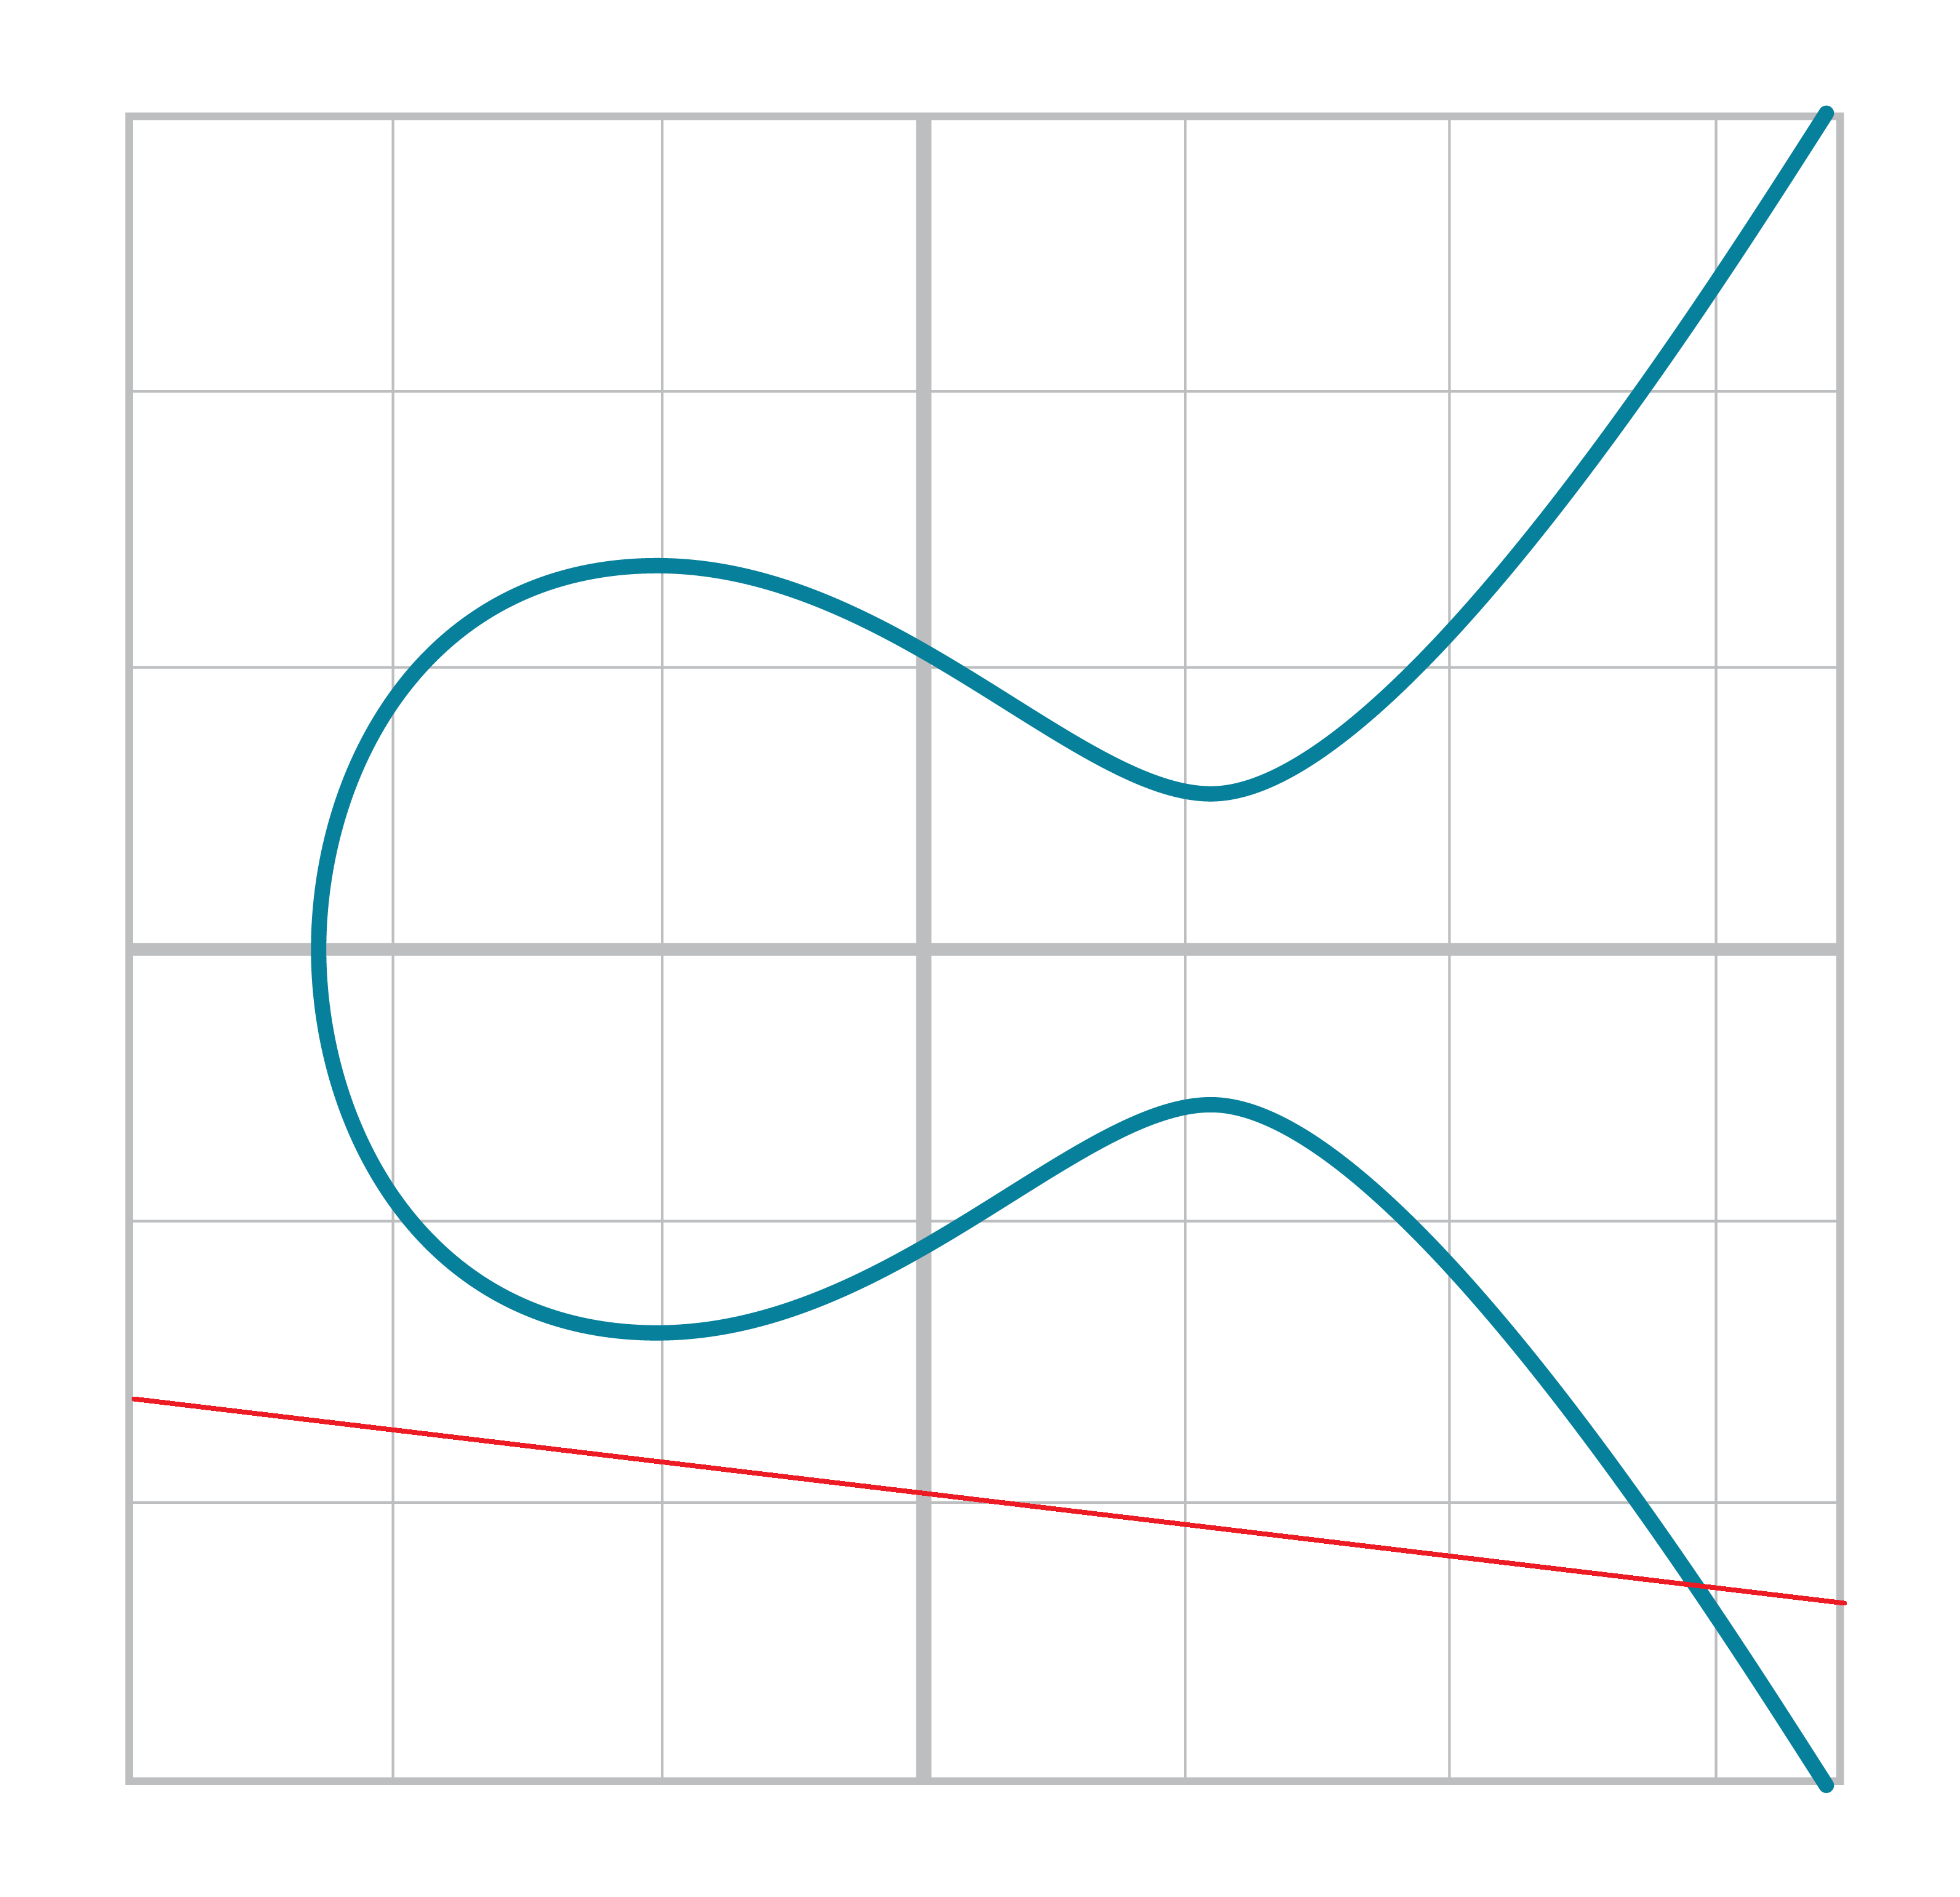

The two exceptions are when a line is tangent to the curve (Figure 2-13) and when a line is exactly vertical (Figure 2-12).

We will come back to these two cases later.
We can define point addition using the fact that lines intersect one or three times with the Elliptic Curve. Two points define a line, so since that line must intersect the curve at some point one more time. That third point reflected over the x-axis is the result of the point addition.
Like Finite Field Addition, we are going to define point addition. In our case, point addition is defined this way:
For any two points P1=(x1,y1) and P2=(x2,y2), we get P1+P2 by:
Find the point intersecting the Elliptic Curve a third time by drawing a line through P1 and P2
Reflect the resulting point over the x-axis
Visually, it looks like Figure 2-14:
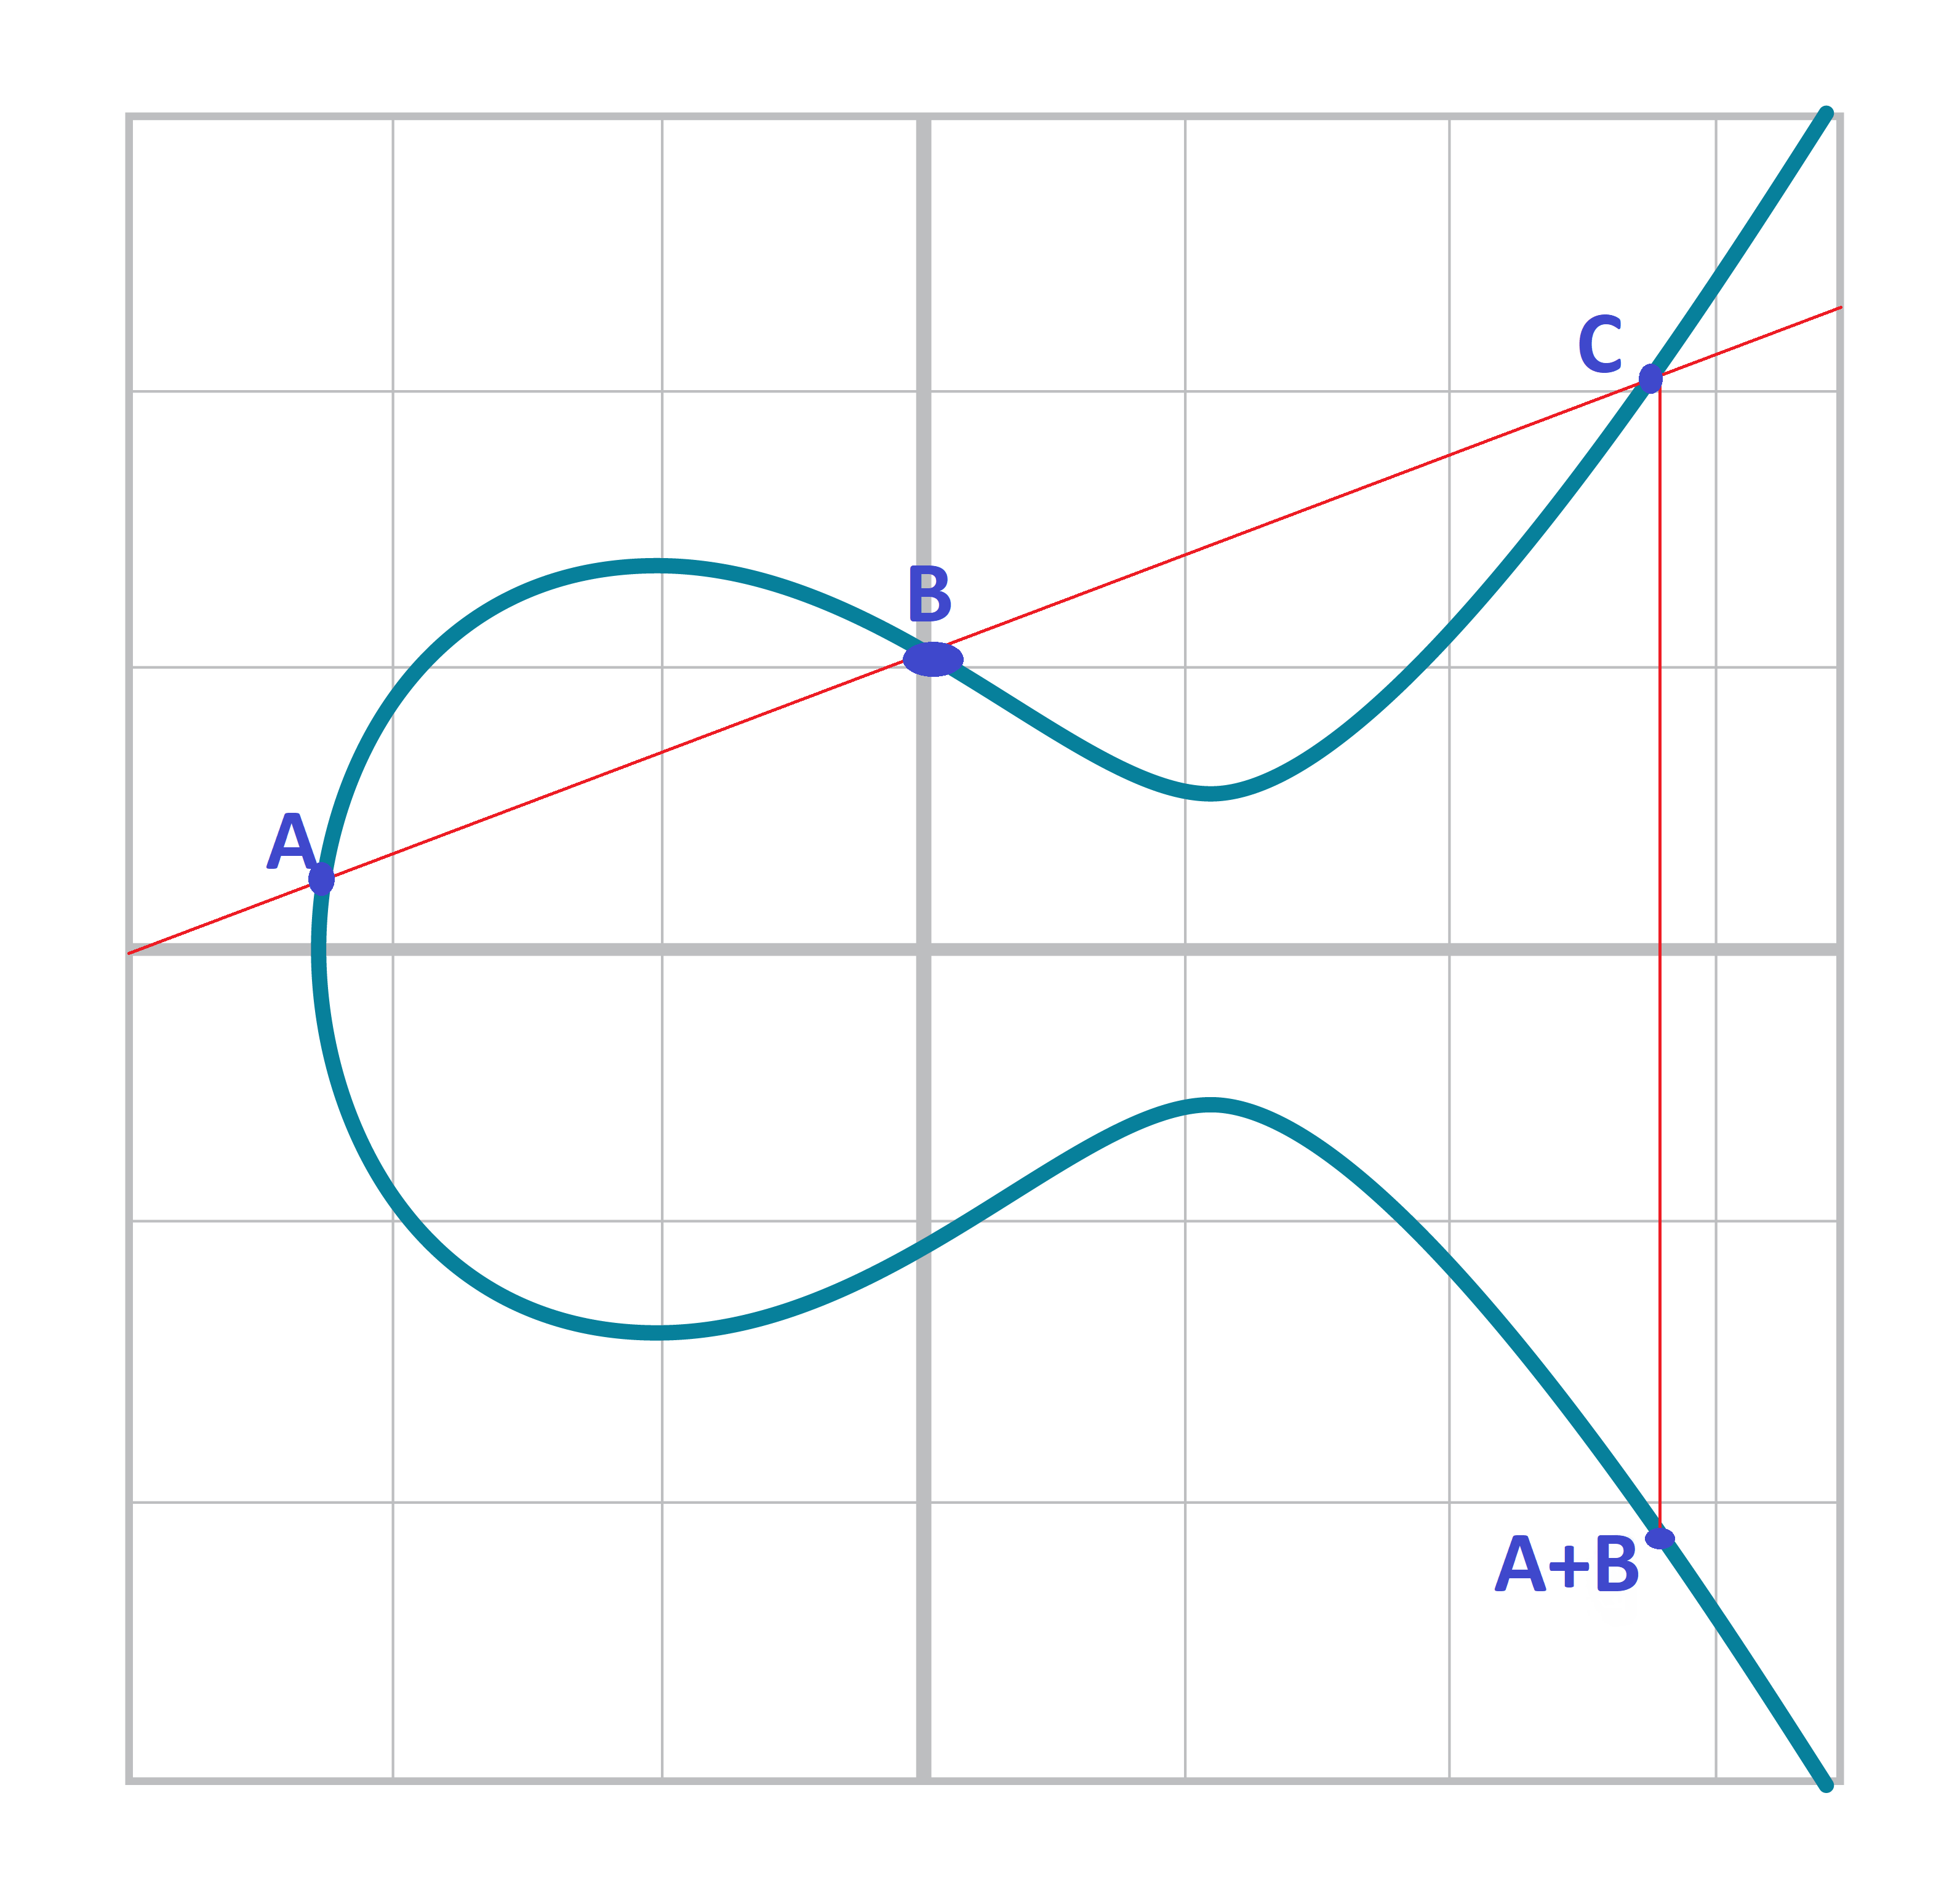
We first draw a line through the two points we’re adding (A and B). The third intersection point is C. We then reflect that point over the x-axis, which puts us at the A+B point in Figure 2-14.
One of the properties that we are going to use is that point addition is not easily predictable. We can calculate point addition easily enough with a formula, but intuitively, the result of point addition can be almost anywhere given two points on the curve. Going back to Figure 2-14, A+B is to the right of both points, A+C would be somewhere between A and C on the x-axis, and B+C would be to the left of both points. In mathematics parlance, point addition is non-linear.
“Addition” in the name Point Addition satisfies certain properties that we think of as addition, such as:
Identity
Commutativity
Associativity
Invertibiltiy
Identity here means that there’s a zero. That is, there exists some point (I) which when added to a point (A) results in A. We’ll call this point the point at infinity (reasons for this will become clear in a bit). That is:
I + A = A
This is also related to invertibility. For some point A, there’s some other point -A which results in the Identity point. That is:
A + (-A) = I
Visually, these are points opposite the x-axis on the curve (see Figure 2-15).
This is why we call this point the point at infinity. We have one extra point in the Elliptic Curve which makes the vertical line intersect the curve a third time.
Commutativity means that A+B=B+A. This is obvious since the line going through A and B will intersect the curve a third time in the same place no matter the order.
Associativity means that (A+B) + C = A + (B+C). This isn’t obvious and is the reason for flipping over the x-axis.
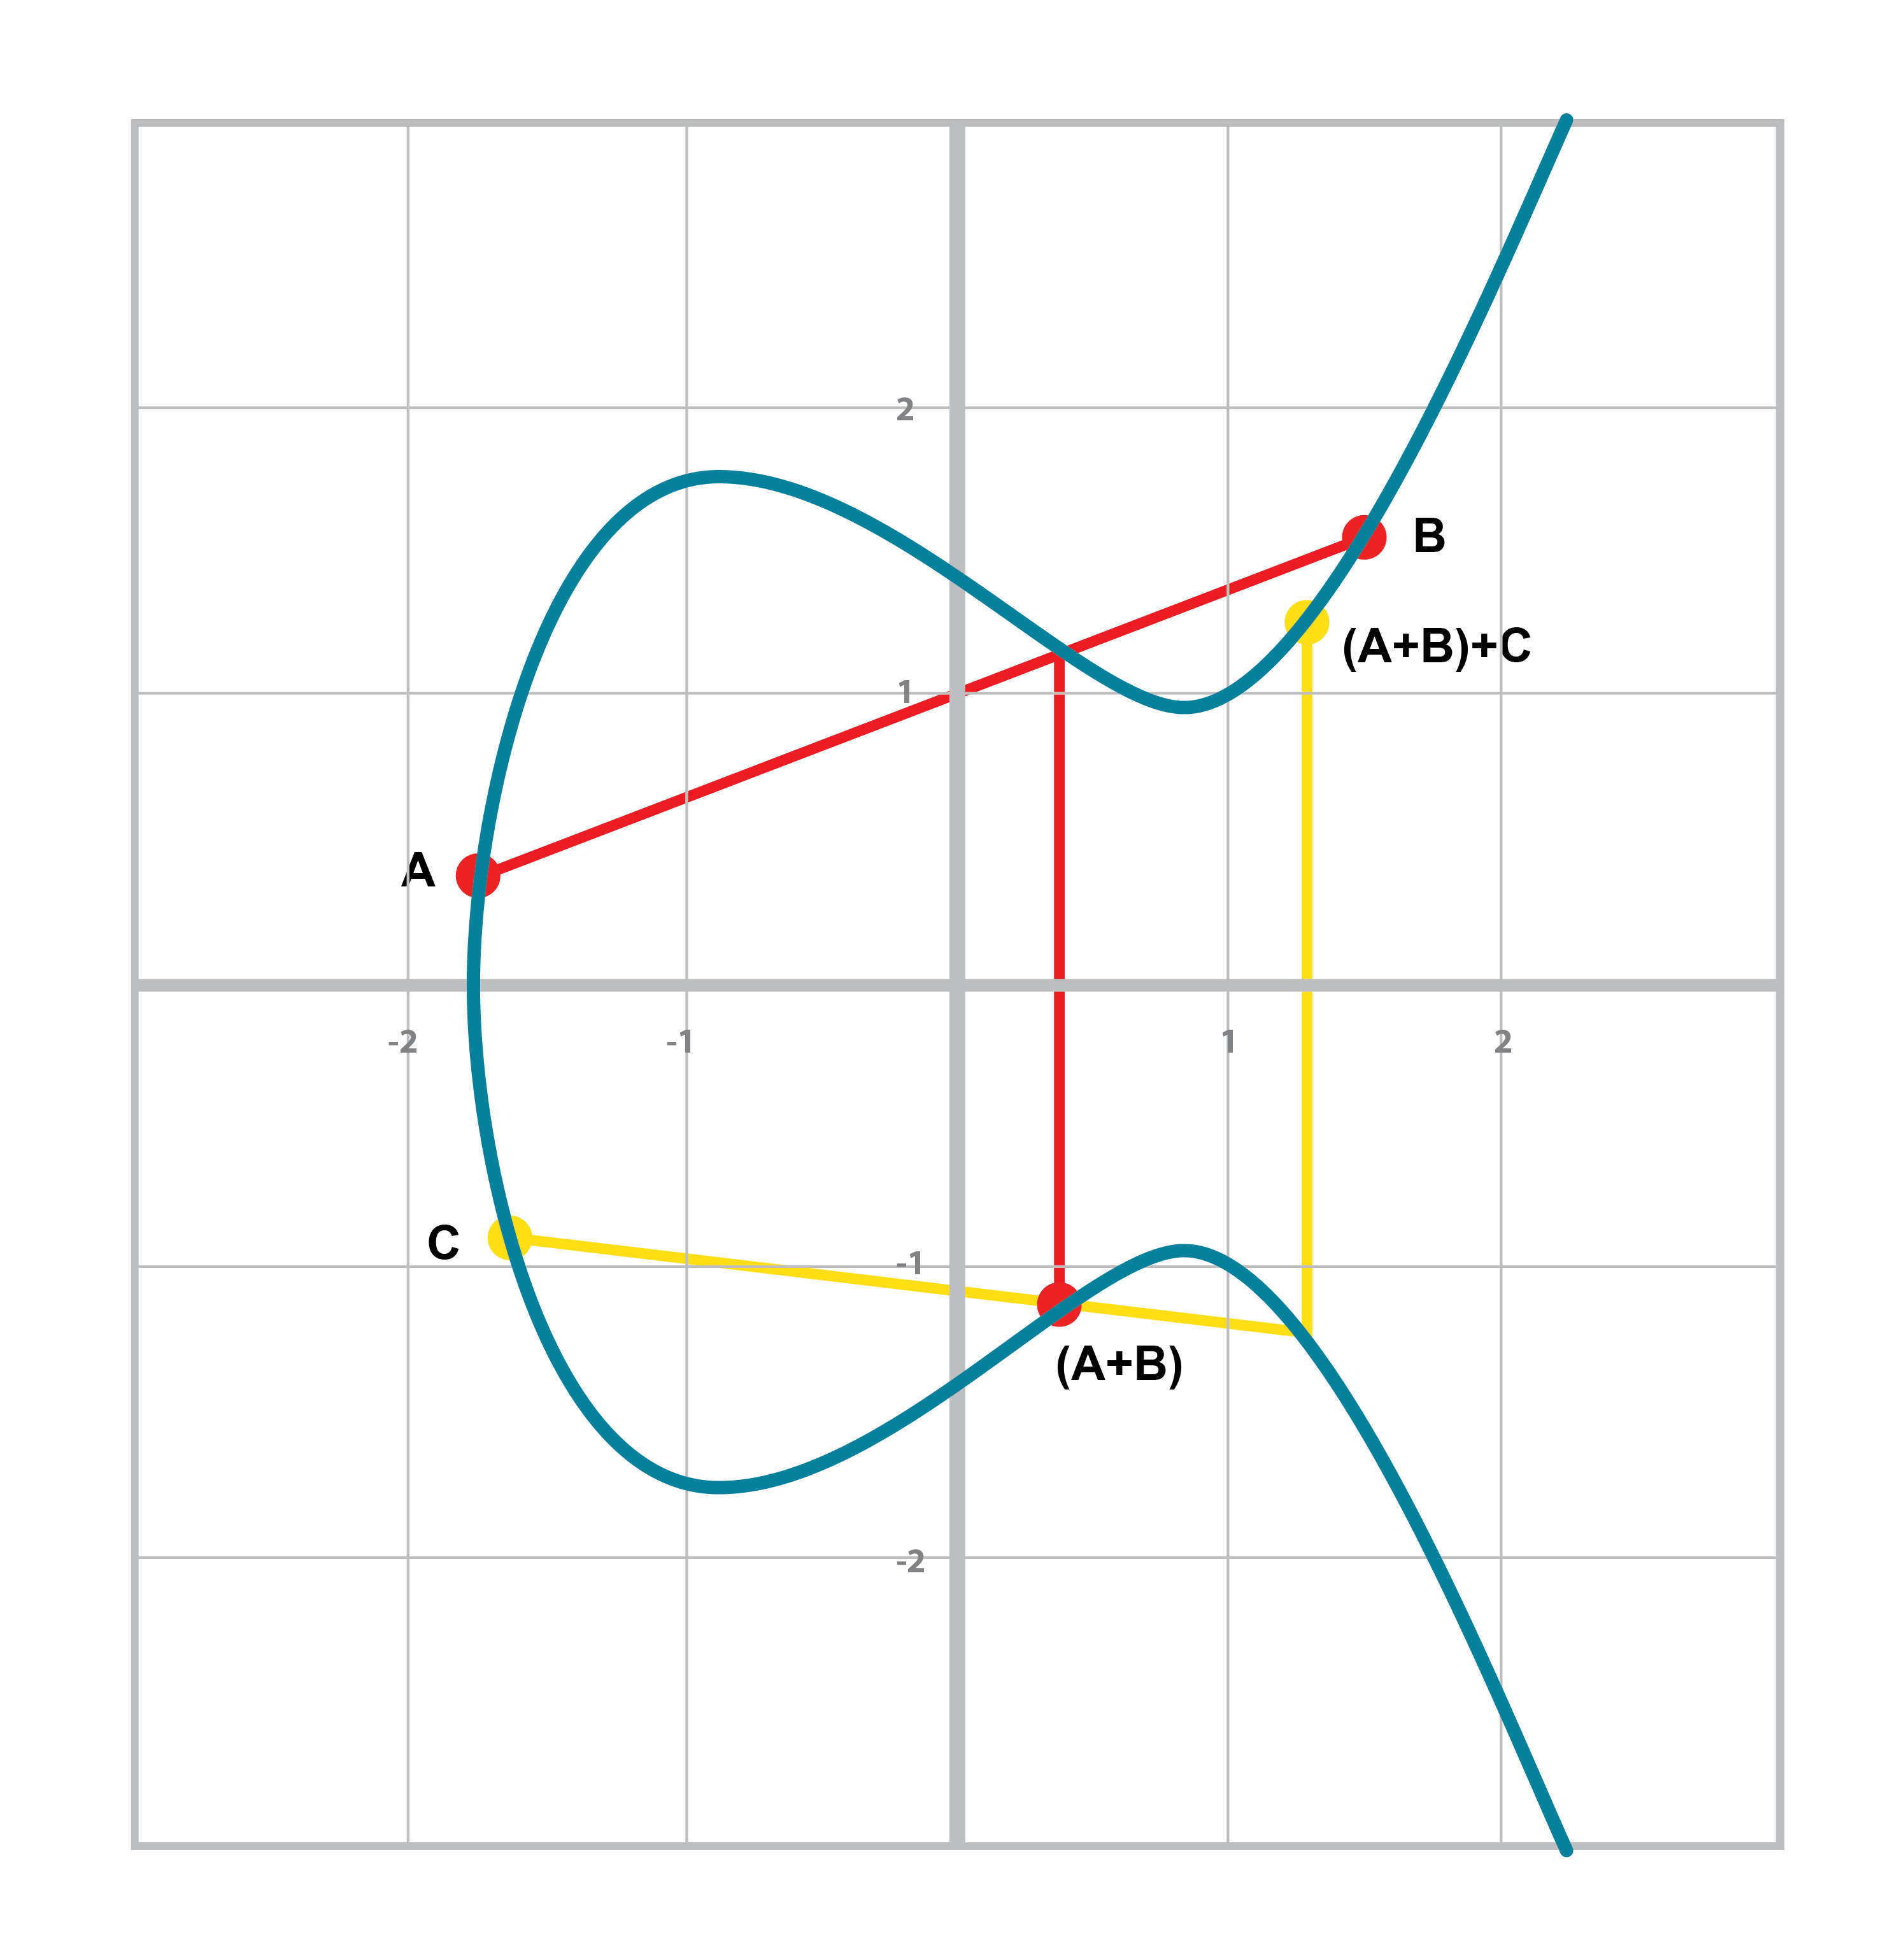
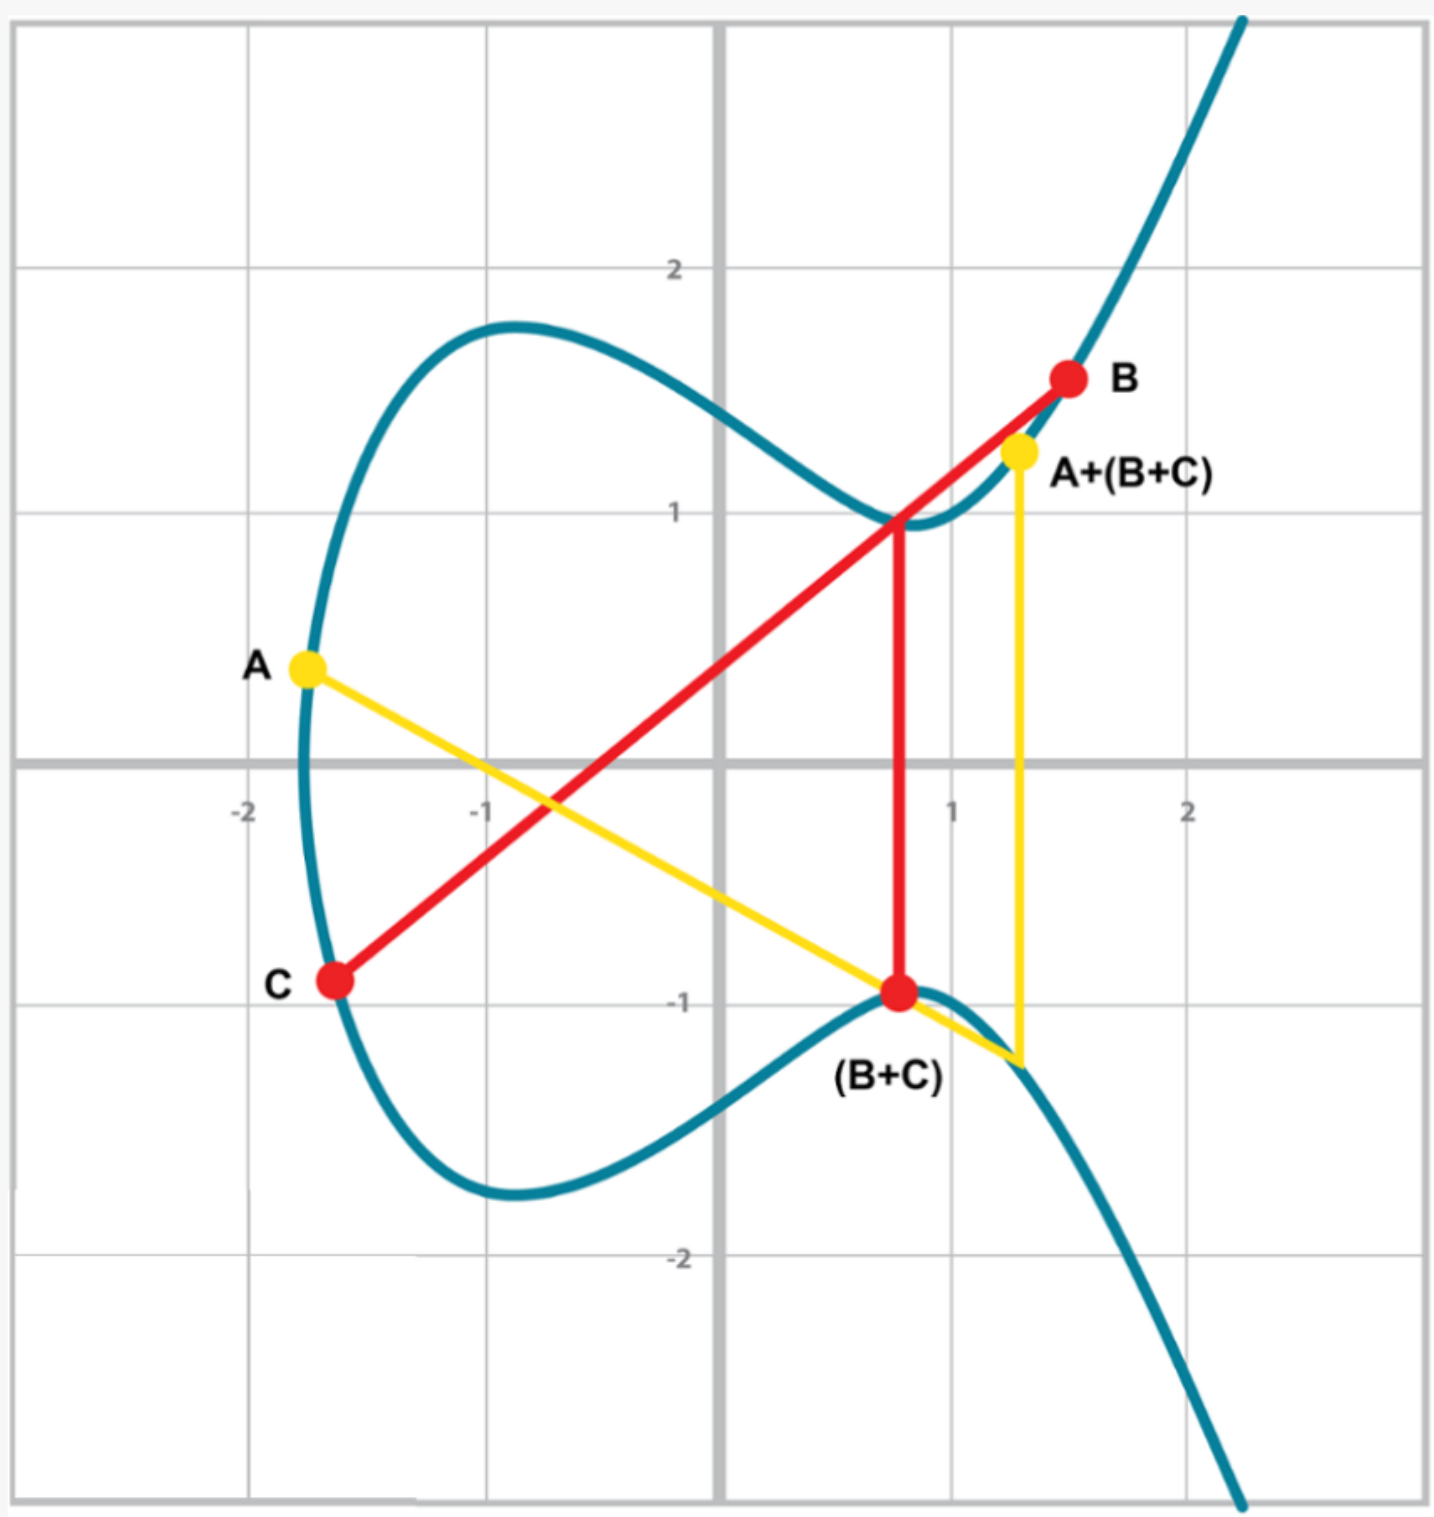
You can see that in both Figure 2-16 and Figure 2-17, the final point is the same. While this doesn’t prove the associativity of point addition, the visual should at least give you the intuition that this is true.
To code point addition, we’re going to split it up into 3 steps:
Where the points are in a vertical line or using the Identity.
Where the points are not in a vertical line, but are different.
Where the two points are the same.
We first handle the identity, or the point at infinity.
Since we can’t easily use infinity in Python, we’ll use the None value instead.
What we want is this to work:
>>>fromeccimportPoint>>>p1=Point(-1,-1,5,7)>>>p2=Point(-1,1,5,7)>>>inf=Point(None,None,5,7)>>>(p1+inf)Point(-1,-1)_5_7>>>(inf+p2)Point(-1,1)_5_7>>>(p1+p2)Point(infinity)
In order to make this work, we have to do two things:
First, we have to adjust the __init__ method slightly so it doesn’t check that the curve equation is satisfied when we have the point at infinity.
Second, we have to overload the addition operator or __add__ as we did with the FieldElement class.
classPoint:def__init__(self,x,y,a,b):self.a=aself.b=bself.x=xself.y=yifself.xisNoneandself.yisNone:returnifself.y**2!=self.x**3+a*x+b:raiseValueError('({}, {}) is not on the curve'.format(x,y))def__add__(self,other):ifself.a!=other.aorself.b!=other.b:raiseTypeError('Points {}, {} are not on the same curve'.format(self,other))ifself.xisNone:returnotherifother.xisNone:returnself
x-coordinate and y-coordinate being None is how we signify the point at infinity.
Note that the next if statement will fail if we don’t return here.
We overload the + operator here
self.x being None means that self is the point at infinity, or the additive identity.
Thus, we return other

self.x being None means that other is the point at infinity, or the additive identity.
Thus, we return self
Handle the case where the two points are additive inverses. That is, they have the same x, but a different y, causing a vertical line. This should return the point at infinity.
Now that we’ve covered the vertical line, we’re now proceeding to when the points are different.
When we have points where the x’s differ, we can add using a fairly simple formula.
To help with intuition, we’ll first find the slope created by the two points.
You can figure this out using a formula from pre-Algebra:
P1=(x1,y1), P2=(x2,y2), P3=(x3,y3)
P1+P2=P3
s=(y2-y1)/(x2-x1)
This is the slope and we can use the slope to calculate x3. Once we know x3, we can calculate y3. P3 can be derived using this formula:
x3=s2-x1-x2
y3=s(x1-x3)-y1
Remember that y3 is the reflection over the x-axis.
For the curve y2=x3+5x+7, what is (2,5) + (-1,-1)?
We now code this into our library.
That means we have to adjust the __add__ method to handle the case where x1≠x2.
We have the formulas:
s=(y2-y1)/(x2-x1)
x3=s2-x1-x2
y3=s(x1-x3)-y1
At the end of the method, we return an instance of the class Point using self.__class__ to make subclassing easier..
Write the __add__ method where x1≠x2
When the x coordinates are the same and the y coordinate is different, we have the situation where the points are opposite each other over the x-axis.
We know that this means:
P1=-P2 or P1+P2=I
We’ve already handled this in Exercise 3.
What happens when P1=P2? Visually, we have to calculate the line that’s tangent to the curve at P1 and find the point at which the line intersects the curve. The situation looks like this as we saw before (see Figure 2-18):
Once again, we’ll find the slope of the tangent point.
P1=(x1,y1), P3=(x3,y3)
P1+P1=P3
s=(3x12+a)/(2y1)
The rest of the formula goes through as before, except x1=x2, so we can combine them:
x3=s2-2x1
y3=s(x1-x3)-y1
We can derive the slope of the tangent line using some slightly more advanced math: calculus. We know that the slope at a given point is
dy/dx
To get this, we need to take the derivative of both sides of the Elliptic Curve equation:
y2=x3+ax+b
Taking the derivative of both sides, we get:
2y dy=(3x2+a) dx
Solving for dy/dx, we get:
dy/dx=(3x2+a)/(2y)
That’s how we arrive at the slope formula. The rest of the results from the point addition formula derivation hold.
For the curve y2=x3+5x+7, what is (2,5) + (-1,-1)?
We adjust the __add__ method to account for this particular case.
We have the formulas, we now implement them.
s=(3x12+a)/(2y1)
x3=s2-2x1
y3=s(x1-x3)-y1
Write the __add__ method when P1=P2.
There is one more exception and this involves the case where the tangent line is vertical (Figure 2-19):
This can only happen if P1=P2 and the y-coordinate is 0, in which case the slope calculation will end up with a 0 in the denominator.
We handle this with a special case:
classPoint:...def__add__(self,other):...ifself==otherandself.y==0*self.x:returnself.__class__(None,None,self.a,self.b)
If the two points are equal and the y coordinate is zero, we return the point at infinity.
The previous two chapters covered some fundamental math. We learned how Finite Fields work and we also learned what an Elliptic Curve is. In this chapter, we’re going to combine the two concepts to learn Elliptic Curve Cryptography. Specifically, we’re going to build the primitives needed to sign and verify messages, which is at the heart of what Bitcoin does.
We discussed in Chapter 2 what an Elliptic Curve looks like visually because we were plotting the curve over real numbers. Specifically, it’s not just integers or even rational numbers, but all real numbers. Pi, sqrt(2), e+7th root of 19, etc are all part of real numbers.
This worked because real numbers are also a field. Note unlike a finite field, there are an infinite number of real numbers, but otherwise the same properties hold:
If a and b are in the set, a+b and a⋅b are in the set.
The additive identity, 0 exists and has the property a + 0 = a.
The multiplicative identity, 1 exists and has the property a ⋅ 1 = a.
If a is in the set, -a is in the set, which is defined as the value that makes a + (-a) = 0.
If a is in the set and is not 0, a-1 is in the set, which is defined as the value that makes a ⋅ a-1 = 1.
Clearly, all of these are true as normal addition and multiplication apply for the first part, additive and multiplicative identities 0 and 1 exist, -x is the additive inverse and 1/x is the multiplicative inverse.
Real numbers are easy to plot and we can see the a graph over reals visually. For example, y2=x3+7 can be plotted like Figure 3-1:
It turns out we can use the point addition equations over any field, including the Finite Fields we learned in Chapter 1. The only difference is that we have to use the addition/subtraction/multiplication/division as defined in Chapter 1, not the “normal” versions that the real numbers use.
So what does an Elliptic Curve over a Finite Field look like? Let’s look at the equation y2=x3+7 over F103. We can verify that the point (17,64) is on the curve by calculating both sides of the equation:
y2=642%103=79
x3+7=(173+7)%103=79
We’ve verified that the point is on the curve using Finite Field math.
Because we’re evaluating the equation over a Finite Field, the plot of the equation looks vastly different (Figure 3-2):
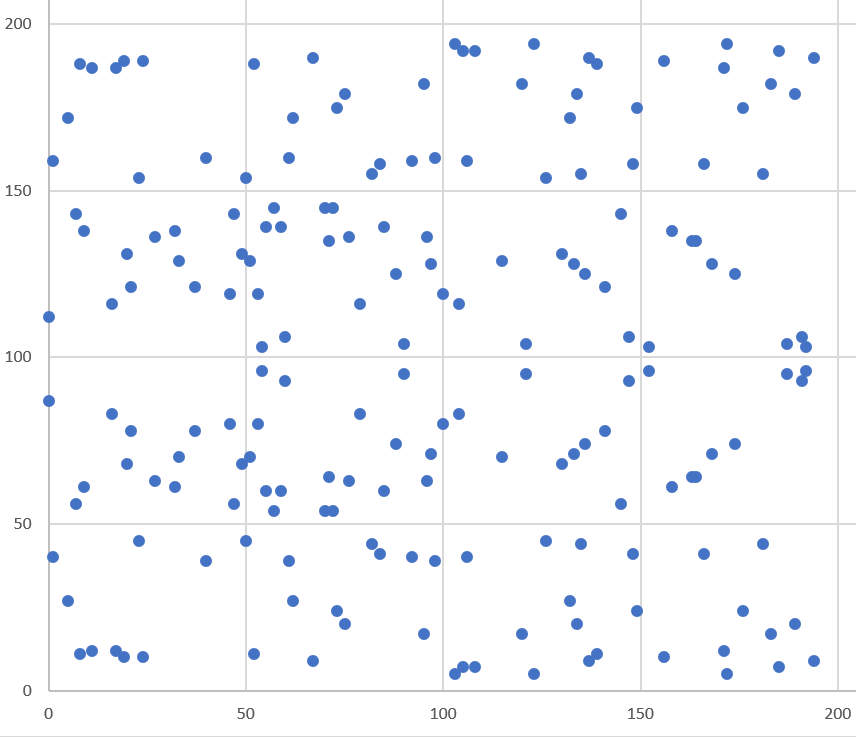
As you can see, it’s very much a scattershot of points and there’s no smooth curve here. This is not surprising since the points are discrete. About the only pattern is that the curve is symmetric right around the middle, which is due to the y2 term. The graph is not symmetric over the x-axis as in the curve over reals, but about half-way up the y-axis due to there not being negative numbers in a Finite Field.
What’s amazing is that we can use the same point addition equations with the addition, subtraction, multiplication, division and exponentiation as we defined them for Finite Fields and everything still works. This may seem surprising, but abstract math has regularities like this despite being different than the traditional modes of calculation you may be familiar with.
Evaluate whether these points are on the curve y2=x3+7 over F223
(192,105), (17,56), (200,119), (1,193), (42,99)
Because we defined an Elliptic Curve point and we defined the +, - ,* and / operators for Finite Fields, we can combine the two classes to create Elliptic Curve points over a Finite Field.
>>>fromeccimportFieldElement,Point>>>a=FieldElement(num=0,prime=223)>>>b=FieldElement(num=7,prime=223)>>>x=FieldElement(num=192,prime=223)>>>y=FieldElement(num=105,prime=223)>>>p1=Point(x,y,a,b)>>>(p1)Point(FieldElement_223(192),FieldElement_223(105))_FieldElement_223(0)_FieldElement_223(7)
When initializing Point, we will run through this part of the code:
classPoint:def__init__(self,x,y,a,b):self.a=aself.b=bself.x=xself.y=yifself.xisNoneandself.yisNone:returnifself.y**2!=self.x**3+a*x+b:raiseValueError('({}, {}) is not on the curve'.format(x,y))
The addition (+), multiplication (*), exponentiation (**) and equality (!=) here use the __add__, __mul__, __pow__ and __ne__ methods from FiniteField respectively and not the integer equivalents.
Being able to do the same equation but with different definitions for the basic arithmetic operators is how we construct an Elliptic Curve Cryptography library.
We’ve already coded the two classes that we need to implement Elliptic Curve points over a Finite Field. However, to check our work, it will be useful to create a test suite. We will do this using the results of Exercise 2.
classECCTest(TestCase):deftest_on_curve(self):prime=223a=FieldElement(0,prime)b=FieldElement(7,prime)valid_points=((192,105),(17,56),(1,193))invalid_points=((200,119),(42,99))forx_raw,y_rawinvalid_points:x=FieldElement(x_raw,prime)y=FieldElement(y_raw,prime)Point(x,y,a,b)forx_raw,y_rawininvalid_points:x=FieldElement(x_raw,prime)y=FieldElement(y_raw,prime)withself.assertRaises(ValueError):Point(x,y,a,b)
We pass in FieldElement objects into the Point class for initialization.
This will, in turn, use all the overloaded math operations in FieldElement
We can now run this test like so:
>>>importecc>>>fromhelperimportrun>>>run(ecc.ECCTest('test_on_curve')).----------------------------------------------------------------------Ran1testin0.001sOK
helper is a module with some very useful utility functions, including the ability to run unit tests individually.
We can use all the same equations over Finite Fields, including the linear equation:
y=mx+b
It turns out that a “line” in a Finite Field is not quite what you’d expect (Figure 3-3):
The equation nevertheless works and we can calculate what y should be for a given x.
Remarkably, point addition works over Finite Fields as well. This is because the Elliptic Curve point addition works over all fields! The same exact formulas we used to calculate point addition over reals work over Finite Fields. Specifically:
when x1≠x2:
P1=(x1,y1), P2=(x2,y2), P3=(x3,y3)
P1+P2=P3
s=(y2-y1)/(x2-x1)
x3=s2-x1-x2
y3=s(x1-x3)-y1
when P1=P2:
P1=(x1,y1), P3=(x3,y3)
P1+P1=P3
s=(3x12+a)/(2y1)
x3=s2-2x1
y3=s(x1-x3)-y1
All of the equations for Elliptic Curves work over Finite Fields and that sets us up to create some cryptographic primitives.
Because we coded FieldElement in such a way as to define __add__, __sub__, __mul__, __truediv__, __pow__, __eq__ and __ne__, we can simply initialize Point with FieldElement objects and point addition will work:
>>>fromeccimportFieldElement,Point>>>prime=223>>>a=FieldElement(num=0,prime=prime)>>>b=FieldElement(num=7,prime=prime)>>>x1=FieldElement(num=192,prime=prime)>>>y1=FieldElement(num=105,prime=prime)>>>x2=FieldElement(num=17,prime=prime)>>>y2=FieldElement(num=56,prime=prime)>>>p1=Point(x1,y1,a,b)>>>p2=Point(x2,y2,a,b)>>>(p1+p2)Point(FieldElement_223(170),FieldElement_223(142))_FieldElement_223(0)_FieldElement_223(7)
For the curve y2=x3+7 over F223, find:
(170,142) + (60,139)
(47,71) + (17,56)
(143,98) + (76,66)
Extend ECCTest to test for the additions from the previous exercise. Call this test_add.
Because we can add a point to itself, we can introduce some new notation:
(170,142) + (170,142) = 2⋅(170,142)
Similarly, because we have associativity, we can actually add the point again:
2⋅(170,142) + (170,142) = 3⋅(170, 142)
We can do this as many times as we want. This is what we call Scalar Multiplication. That is, we have a scalar number in front of the point. We can do this because we have defined point addition and point addition is associative.
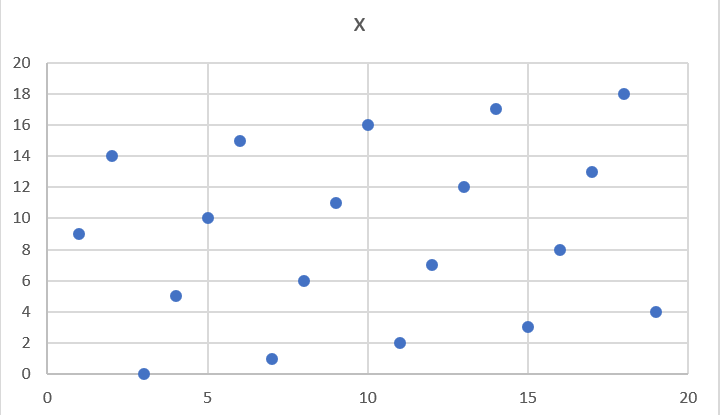
One property of scalar multiplication is that it’s really hard to predict without calculating (see Figure 3-4):
Each point is labeled by how many times we’ve added the point. You can see that this is a complete scattershot. This is because point addition is non-linear and not easy to calculate. Performing scalar multiplication is straightforward, but doing the opposite, Point division, is not.
This is called the Discrete Log problem and is the basis of Elliptic Curve Cryptography.
Another property of scalar multiplication is that at a certain multiple, we get to the point at infinity (remember, point at infinity is the additive identity or 0). If we imagine a point G and scalar multiply until we get the point at infinity, we end up with a set:
{ G, 2G, 3G, 4G, … nG } where nG=0
It turns out that this set is called a Group and because n is finite, we have a Finite Group (or more specifically a Finite Cyclic Group).
Groups are interesting mathematically because they behave a lot like addition:
G+4G=5G or aG+bG=(a+b)G
When we combine the fact that scalar multiplication is easy to go in one direction but hard in the other and the mathematical properties of a Group, we have exactly what we need for Elliptic Curve Cryptography.
For the curve y2=x3+7 over F223, find:
2⋅(192,105)
2⋅(143,98)
2⋅(47,71)
4⋅(47,71)
8⋅(47,71)
21⋅(47,71)
Scalar Multiplication is adding the same point to itself some number of times.
The key making scalar multiplication into Public Key Cryptography is the fact that scalar multiplication on Elliptic Curves is very hard to reverse.
Note the previous exercise.
Most likely, you calculated the point s⋅(47,71) in F223 for s from 1 until 21.
Here are the results:
>>>fromeccimportFieldElement,Point>>>prime=223>>>a=FieldElement(0,prime)>>>b=FieldElement(7,prime)>>>x=FieldElement(47,prime)>>>y=FieldElement(71,prime)>>>p=Point(x,y,a,b)>>>forsinrange(1,21):...result=s*p...('{}*(47,71)=({},{})'.format(s,result.x.num,result.y.num))1*(47,71)=(47,71)2*(47,71)=(36,111)3*(47,71)=(15,137)4*(47,71)=(194,51)5*(47,71)=(126,96)6*(47,71)=(139,137)7*(47,71)=(92,47)8*(47,71)=(116,55)9*(47,71)=(69,86)10*(47,71)=(154,150)11*(47,71)=(154,73)12*(47,71)=(69,137)13*(47,71)=(116,168)14*(47,71)=(92,176)15*(47,71)=(139,86)16*(47,71)=(126,127)17*(47,71)=(194,172)18*(47,71)=(15,86)19*(47,71)=(36,112)20*(47,71)=(47,152)
If we look closely at the numbers, there’s no real discernible pattern to the scalar multiplication. The x-coordinates don’t always increase or decrease and neither do the y-coordinates. About the only pattern is that between 10 and 11, the x-coordinates are equal (10 and 11 have the same x, as do 9 and 12, 8 and 13 and so on). This is due to the fact that 21⋅(47,71)=0.
Scalar multiplication looks really random and that’s what gives this equation asymmetry. An asymmetric problem is one that’s easy to calculate in one direction, but hard to reverse. For example, it’s easy enough to calculate 12⋅(47,71). But if we were presented this:
s⋅(47,71)=(194,172)
Would you be able to solve for s?
We can look up the table above, but that’s because we have a small group.
We’ll see later that when we have numbers that are a lot larger, Discrete Log becomes an intractable problem.
The preceding math (Finite Fields, Elliptic Curves, combining the two), was really to bring us to this point. What we really want to generate for the purposes of Public Key Cryptography are Finite Cyclic Groups and it turns out that if we take a Generator Point from an Elliptic Curve over a Finite Field, we can generate a Finite Cyclic Group.
Unlike fields, groups have only a single operation. In our case, Point Addition is our operation. We also have a few other properties like closure, invertibility, commutativity and associativity. Lastly, we need the identity.
Let’s look at each property.
If you haven’t guessed by now, the identity is defined as the point at infinity, which is guaranteed to be in the group since we generate the group when we get to the point at infinity. So:
0 + A = A
We call 0 the point at infinity because visually, it’s the point that exists to help the math work out (Figure 3-5):
This is perhaps the easiest to prove since we generated the group in the first place by adding G over and over. Thus, two different elements look like this:
aG + bG
We know that the result is going to be:
(a+b)G
How do we know if this element is in the group?
If a+b < n (where n is the order of the group), then we know it’s in the group by definition.
If a+b >= n, then we know a < n and b < n, so a+b<2n so a+b-n<n.
(a+b-n)G=aG+bG-nG=aG+bG-0=aG+bG
More generally (a+b)G=((a+b)%n)G where n is the order of the group.
So we know that this element is in the group, proving closure.
Visually, invertibility is easy to see (Figure 3-6):
Mathematically, we know that if aG is in the group, (n-a)G is also in the group. You can add them together to get aG+(n-a)G=(a+n-a)G=nG=0.
We know from Point Addition that A+B=B+A (Figure 3-7):
This means that aG+bG=bG+aG, which proves commutativity.
For the curve y2=x3+7 over F223, find the order of the group generated by (15,86)
What we’re trying to do with the last exercise is this:
>>>fromeccimportFieldElement,Point>>>prime=223>>>a=FieldElement(0,prime)>>>b=FieldElement(7,prime)>>>x=FieldElement(15,prime)>>>y=FieldElement(86,prime)>>>p=Point(x,y,a,b)>>>(7*p)Point(infinity)
We want to be able to scalar multiply the point with some number.
Thankfully, there’s a method in Python called __rmul__ that can be used to override the front multiplication.
A naive implementation looks something like this:
classPoint:...def__rmul__(self,coefficient):product=self.__class__(None,None,self.a,self.b)for_inrange(coefficient):product+=selfreturnproduct
We start the product at 0, which in the case of Point Addition is the point at infinity.
We loop coefficient times and add the point each time
This is fine for small coefficients, but what if we have a very large coefficient? That is, a number that’s so large that we won’t be able to get out of this loop in a reasonable amount of time? For example, a coefficient of 1 trillion is going to take a really long time.
There’s a really cool technique called binary expansion that allows us to perform multiplication in log2(n) loops, which dramatically reduces the calculation time for large numbers.
For example, 1 trillion is 40 bits in binary, so we only have to loop 40 times for a number that’s generally considered very large.
classPoint:...def__rmul__(self,coefficient):coef=coefficientcurrent=selfresult=self.__class__(None,None,self.a,self.b)whilecoef:ifcoef&1:result+=currentcurrent+=currentcoef>>=1returnresult
current represents the point that’s at the current bit.
First time through the loop it represents 1*self, the second time, it will be 2*self, third time, 4*self, then 8*self and so on.
We double the point each time.
In binary the coefficients are 1, 10, 100, 1000, 10000, etc.
We start the result at 0, or the point at infinity.
We are looking at whether the right-most bit is a 1. If it is, then we add the value of the current bit.
We need to double the point until we’re past how big the coefficient can be.

We bit shift the coefficient to the right.
This is an advanced technique and if you don’t understand bitwise operators, think of representing the coefficient in binary and only adding the point where there are 1’s.
With __add__ and __rmul__, we can start defining some more complicated Elliptic Curves.
While we’ve been using relatively small primes for the sake of examples, we are not restricted to such small numbers. Small primes mean that we can use a computer to search through the entire Group. If the group has a size of 301, the computer can easily do 301 computations to reverse scalar multiplication or break Discrete Log.
But what if we made the prime larger? It turns out that we can choose much larger primes than we’ve been using. The security of Elliptic Curve Cryptography depends on computers not being able to go through the an appreciable fraction of the group.
An Elliptic Curve for Public Key Cryptography is defined with the following parameters:
We specify the a and b of the curve y2=x3+ax+b.
We specify the prime of the Finite Field, p.
We specify the x and y coordinates of the generator point G
We specify the order of the group generated by G, n.
These numbers are known publicly and together form the cryptographic curve. There are many cryptographic curves and they have different security/convenience trade-offs, but the one we’re most interested in is the one Bitcoin uses: secp256k1. The parameters for secp256k1 are these:
a = 0, b = 7, making the equation y2=x3+7
p = 2256-232-977
Gx =
0x79be667ef9dcbbac55a06295ce870b07029bfcdb2dce28d959f2815b16f81798
Gy =
0x483ada7726a3c4655da4fbfc0e1108a8fd17b448a68554199c47d08ffb10d4b8
n =
0xfffffffffffffffffffffffffffffffebaaedce6af48a03bbfd25e8cd0364141
Gx refers to the x-coordinate of the point G and Gy the y-coordinate.
The numbers starting with 0x indicate a hexadecimal number.
There are a few things to notice about this curve.
First, the equation is relatively simple.
Many curves have a and b that are much bigger.
secp256k1 has a really simple equation.
Second, p is really, really close to 2256.
This means that most numbers under 2256 are in the prime field and thus, any point on the curve has x and y-coordinates that are expressible in 256-bits each.
n is also very close to 2256.
This means any scalar multiple can also be expressed in 256 bits.
Third, 2256 is a really big number (See the How Big is 2256). Amazingly, any number below 2256 can be stored in 32 bytes. This means that we can store the private key relatively easily.
Since we know all of the parameters for secp256k1, we can verify in Python whether the generator point, G, is on the curve y2=x3+7:
>>>gx=0x79be667ef9dcbbac55a06295ce870b07029bfcdb2dce28d959f2815b16f81798>>>gy=0x483ada7726a3c4655da4fbfc0e1108a8fd17b448a68554199c47d08ffb10d4b8>>>p=2**256-2**32-977>>>(gy**2%p==(gx**3+7)%p)True
Furthermore, we can verify in Python whether the generator point, G, has the order n.
>>>fromeccimportFieldElement,Point>>>gx=0x79be667ef9dcbbac55a06295ce870b07029bfcdb2dce28d959f2815b16f81798>>>gy=0x483ada7726a3c4655da4fbfc0e1108a8fd17b448a68554199c47d08ffb10d4b8>>>p=2**256-2**32-977>>>n=0xfffffffffffffffffffffffffffffffebaaedce6af48a03bbfd25e8cd0364141>>>x=FieldElement(gx,p)>>>y=FieldElement(gy,p)>>>seven=FieldElement(7,p)>>>zero=FieldElement(0,p)>>>G=Point(x,y,zero,seven)>>>(n*G)Point(infinity)
Since we know the curve we will work in, this is a good time to create a subclass in Python to work exclusively with the parameters for secp256k1.
We’ll define the equivalent FieldElement and Point objects, but specific to the secp256k1 curve.
Let’s start by defining the field we’ll be working in.
P=2**256-2**32-977...classS256Field(FieldElement):def__init__(self,num,prime=None):super().__init__(num=num,prime=P)def__repr__(self):return'{:x}'.format(self.num).zfill(64)
We’re subclassing the FieldElement class so we don’t have to pass in P all the time.
We also want to display a 256-bit number consistently by filling 64 characters so we can see any leading zeroes.
Similarly, we can define a point on the secp256k1 curve and call it S256Point.
A=0B=7...classS256Point(Point):def__init__(self,x,y,a=None,b=None):a,b=S256Field(A),S256Field(B)iftype(x)==int:super().__init__(x=S256Field(x),y=S256Field(y),a=a,b=b)else:super().__init__(x=x,y=y,a=a,b=b)
In case we initialize with the point at infinity, we need to let x and y through directly instead of using the S256Field class.
We now have an easier way to initialize a point on the secp256k1 curve, without having to define the a and b every time like we have to with the Point class.
We can also define __rmul__ a bit more efficiently since we know the order of the group, n.
Since we’re coding Python, we’ll name this with a capital N to make it clear that N is a constant.
N=0xfffffffffffffffffffffffffffffffebaaedce6af48a03bbfd25e8cd0364141...classS256Point(Point):...def__rmul__(self,coefficient):coef=coefficient%Nreturnsuper().__rmul__(coef)
We can mod by n because nG=0.
That is, every n times we cycle back to zero or the point at infinity.
We can now define G directly and keep it around since we’ll be using it a lot going forward.
G=S256Point(0x79be667ef9dcbbac55a06295ce870b07029bfcdb2dce28d959f2815b16f81798,0x483ada7726a3c4655da4fbfc0e1108a8fd17b448a68554199c47d08ffb10d4b8)
Now checking that the order of G is n is trivial:
>>>fromeccimportG,N>>>(N*G)S256Point(infinity)
Finally, we have the tools that we need to do Public Key Cryptography operations.
The key operation that we need is P=eG which is an asymmetric equation.
We can easily compute P when we know e and G, but we cannot easily compute e when we know P and G.
This is the Discrete Log Problem described earlier.
The difficulty of Discrete Log will be essential to understanding signing and verification algorithms.
Generally, we call e the Private Key and P the Public Key.
We’ll note here that the private key is a single 256-bit number and the public key is a coordinate (x,y) where x and y are each 256-bit numbers.
To set up the motivation for why signing and verification exists, imagine this scenario. You want to prove that you are a really good archer, like at the level where you can hit any target you want within 500 yards as opposed to being able to hit any single target.
Now if someone could observe you and interact with you, proving this would be easy. Perhaps they would position your son 400 yards away with an apple on his head and challenge you to hit that apple with an arrow. You, being a very good archer, do this and prove your expertise. The target, if specified by the challenger, makes your archery skill easy to verify.
Unfortunately, this doesn’t scale very well. If, for example you wanted to prove this to 10 people, you would have to shoot 10 different arrows at 10 different targets from 10 different challenges. You could try to do something like have 10 people watch you shoot a single arrow, but since they can’t all choose the target, they can never be sure that you’re not just good at hitting one particular target instead of an arbitrary target. What we want is something that you can do once, requires no interaction but still proves that you are indeed, a good archer that can hit any target.
If, for example, you shot an arrow into a target of your choosing, then the people observing afterwards won’t necessarily be convinced. After all, you may be a sneaky person that paints the target around wherever your arrow happened to land. So what can you do?
Here’s a very clever thing you can do. Inscribe the tip of the arrow with the position of the target that you’re hitting (“apple on top of my son’s head”) and then hit that target with your arrow. Now anyone seeing the target can take an x-ray machine and look at the tip of the embedded arrow and see that the tip indeed says exactly where it was going to hit. The tip clearly had to be inscribed before the arrow was shot, so this can prove you are indeed a good archer (provided the actual target isn’t just one that you’ve practiced over and over).
This is the same technique we’re using with signing and verification, except what we’re proving isn’t that we’re good archers, but that we know a secret number. We want to prove possession of the secret without revealing the secret itself. We do this by putting the target into our calculation and hitting that target.
Ultimately this is going to be used in Transactions which will prove that the rightful owners of the secrets are spending the Bitcoins.
The inscribing of the target depends on the signature algorithm, and in our case, our signature algorithm is called Elliptic Curve Digital Signature Algorithm, or ECDSA for short.
The secret in our case is e satisfying:
eG = P
Where P is the public key and e is the private key.
The target that we’re going to aim at is a random 256-bit number, k.
We then do this:
kG = R
R is our target that we’re aiming for.
In fact, we’re only going to care about the x-coordinate of R, which we’ll call r.
You may have guessed already that r here stands for random.
We claim at this point that the following equation is equivalent to the Discrete Log Problem:
uG+vP=kG where k was chosen randomly and u,v≠0 can be chosen by the signer and G and P are known
This is due to the fact that:
uG+vP=kG implies vP=(k-u)G
Since v≠0, we can divide by the scalar multiple v.
P=((k-u)/v)G
If we know e, we have:
eG=((k-u)/v)G or e = (k-u)/v
This means than any (u,v) combination that satisfies the above equation will suffice.
If we don’t know e, we would have to play with (u,v) until` e = (k-u)/v`.
If we could solve this with any (u,v) combination, that would mean we’ll have solved P=eG while knowing only P and G.
In other words, we’d have broken the Discrete Log problem.
This means to provide a correct u and v, we either have to break the Discrete Log problem or we know the secret e.
Since we assume Discrete Log is hard, we can say e is assumed to be known by the one who came up with u and v.
One subtle thing that we haven’t talked about is that we have to incorporate the purpose of our shooting. This is a contract that gets fulfilled as a result of the shooting at the target. William Tell, for example, was shooting so that he could save his son (shoot the target and you get to save your son). You can imagine there would be other reasons to hit the target and the “reward” that the person hitting the target would receive. This has to be incorporated into our equations.
In signature/verification parlance, this is called the signature hash.
A hash is a deterministic function that takes arbitrary data into a data of fixed size.
This is a fingerprint of the message containing the intent of the shooter that anyone verifying the message already knows.
We denote this with the letter z.
This is incorporated into our uG+vP calculation this way:
u = z/s, v = r/s
Since r is used in the calculation of v, we now have the tip of the arrow inscribed.
We also have the intent of the shooter incorporated into u, so both the reason for shooting and the target that is being aimed at are now a part of the equation.
To make the equation work, we can calculate s:
uG+vP=R=kG
uG+veG=kG
u+ve=k
z/s+re/s=k
(z+re)/s=k
s=(z+re)/k
This is the basis of the signature algorithm and the two numbers in a signature are r and s.
Verification is straightforward:
kAt this point, you might be wondering why we don’t reveal k and instead reveal the x-coordinate of R or r.
If we were to reveal k, then:
uG+vP=R
uG+veG=kG
kG-uG=veG
(k-u)G = veG
(k-u) = ve
(k-u)*1/v = e
Means that our secret would be revealed, which would defeat the whole purpose of the signature. We can, however, reveal R.
It’s worth mentioning again, make sure you’re using truly random numbers for k, as even accidentally revealing k for a known signature is the equivalent of revealing your secret and losing your funds!
Signatures sign some fixed-length value (our “contract”), in our case something that’s 32 bytes.
The fact that 32 bytes is 256 bits is not a coincidence as the thing we’re signing will be a scalar for G.
In order to guarantee that the thing we’re signing is 32 bytes, we hash the document first.
In Bitcoin, the hashing function is hash256, or two rounds of sha256.
This guarantees the thing that we’re signing is exactly 32 bytes.
We will call the result of the hash, the signature hash, or z.
The signature that we are verifying has two components, (r, s).
The r is as above, it’s the x-coordinate of some point R that we’ll come back to.
The formula for s is as above:
s = (z+re)/k
Keep in mind that we know e (P = eG, or what we’re proving we know in the first place), we know k (kG = R, remember?) and we know z.
We will now construct R=uG+vP by defining u and v this way:
u = z/s
v = r/s
Thus:
uG + vP = (z/s)G + (r/s)P = (z/s)G + (re/s)G = ((z+re)/s)G
We know s = (z+re)/k so:
uG + vP = ( (z+re) / ((z+re)/k) )G = kG = R
We’ve successfully chosen u and v in a way as to generate R as we intended.
Furthermore, we used r in the calculation of v proving we knew what R should be.
The only way we could know the details of R beforehand is if we know e.
To whit, here are the steps:
We are given (r, s) as the signature, z as the hash of the thing being signed and P, the public key (or public point) of the signer.
We calculate u = z/s, v = r/s
We calculate uG + vP = R
If R’s x coordinate equals r, the signature is valid.
The calculation of z requires two rounds of sha256, or hash256.
You may be wondering why there are two rounds when only 1 is necessary to get a 256-bit number.
The reason is for security.
There is a well-known hash collision attack on sha1 called a birthday attack which makes finding collisions much easier. Google found a sha1 collision using some modifications of a birthday attack and a lot of other things in 2017 (https://security.googleblog.com/2017/02/announcing-first-sha1-collision.html). Using sha1 twice, or double-sha1 is the way to defeat slow down some forms of this attack.
Two rounds of sha256 don’t necessarily prevent all possible attacks, but doing two rounds is a defense against some potential weaknesses.
We can now verify a signature using some of the primitives that we have.
>>>fromeccimportS256Point,G,N>>>z=0xbc62d4b80d9e36da29c16c5d4d9f11731f36052c72401a76c23c0fb5a9b74423>>>r=0x37206a0610995c58074999cb9767b87af4c4978db68c06e8e6e81d282047a7c6>>>s=0x8ca63759c1157ebeaec0d03cecca119fc9a75bf8e6d0fa65c841c8e2738cdaec>>>px=0x04519fac3d910ca7e7138f7013706f619fa8f033e6ec6e09370ea38cee6a7574>>>py=0x82b51eab8c27c66e26c858a079bcdf4f1ada34cec420cafc7eac1a42216fb6c4>>>point=S256Point(px,py)>>>s_inv=pow(s,N-2,N)>>>u=z*s_inv%N>>>v=r*s_inv%N>>>((u*G+v*point).x.num==r)True
Note that we use Fermat’s Little Theorem for 1/s, since n is prime.
u = z/s
v = r/s
uG+vP = (r,y). We need to check that the x-coordinate is r
Verify whether these signatures are valid:
P = (0x887387e452b8eacc4acfde10d9aaf7f6d9a0f975aabb10d006e4da568744d06c,
     0x61de6d95231cd89026e286df3b6ae4a894a3378e393e93a0f45b666329a0ae34)

# signature 1
z = 0xec208baa0fc1c19f708a9ca96fdeff3ac3f230bb4a7ba4aede4942ad003c0f60
r = 0xac8d1c87e51d0d441be8b3dd5b05c8795b48875dffe00b7ffcfac23010d3a395
s = 0x68342ceff8935ededd102dd876ffd6ba72d6a427a3edb13d26eb0781cb423c4

# signature 2
z = 0x7c076ff316692a3d7eb3c3bb0f8b1488cf72e1afcd929e29307032997a838a3d
r = 0xeff69ef2b1bd93a66ed5219add4fb51e11a840f404876325a1e8ffe0529a2c
s = 0xc7207fee197d27c618aea621406f6bf5ef6fca38681d82b2f06fddbdce6feab6
We already have a class S256Point which is the public point for the private key.
We create a Signature class that houses the r and s values:
classSignature:def__init__(self,r,s):self.r=rself.s=sdef__repr__(self):return'Signature({:x},{:x})'.format(self.r,self.s)
We will be doing more with this class in Chapter 4.
We can write the verify method on S256Point based on the above.
classS256Point(Point):...defverify(self,z,sig):s_inv=pow(sig.s,N-2,N)u=z*s_inv%Nv=sig.r*s_inv%Ntotal=u*G+v*selfreturntotal.x.num==sig.r
s_inv (1/s) is calculated using Fermat’s Little Theorem on the order of the group n which is prime.
u = z/s.
Note that we can mod by n as that’s the order of the group.
v = r/s.
Note that we can mod by n as that’s the order of the group.
uG+vP should be R
We check that the x-coordinate is r
So given a public key, which is a point on the secp256k1 curve and a signature hash, z, we can verify whether a signature is valid or not.
Given that we know how verification should work, signing is straightforward.
The only missing step is figuring out what k, and thus R=kG to use.
We do this by choosing a random k.
Signing Procedure:
We are given z and know e such that eG=P.
Choose a random k
Calculate R=kG and r=x-coordinate of R
Calculate s = (z+re)/k
Signature is (r,s)
Note that the pubkey P has to be transmitted to whoever wants to verify and z must be known by the verifier.
We’ll see later that z is computed and P is sent along with the signature.
We can now create a signature using some of the primitives that we have.
Note that using something like the random library from Python to do cryptography is generally not a good idea.
This library is for teaching purposes only, so please don’t use any of the code explained to you here for production purposes.
>>>fromeccimportS256Point,G,N>>>fromhelperimporthash256>>>e=int.from_bytes(hash256(b'my secret'),'big')>>>z=int.from_bytes(hash256(b'my message'),'big')>>>k=1234567890>>>r=(k*G).x.num>>>k_inv=pow(k,N-2,N)>>>s=(z+r*e)*k_inv%N>>>point=e*G>>>(point)S256Point(028d003eab2e428d11983f3e97c3fa0addf3b42740df0d211795ffb3be2f6c52,\0ae987b9ec6ea159c78cb2a937ed89096fb218d9e7594f02b547526d8cd309e2)>>>(hex(z))0x231c6f3d980a6b0fb7152f85cee7eb52bf92433d9919b9c5218cb08e79cce78>>>(hex(r))0x2b698a0f0a4041b77e63488ad48c23e8e8838dd1fb7520408b121697b782ef22>>>(hex(s))0xbb14e602ef9e3f872e25fad328466b34e6734b7a0fcd58b1eb635447ffae8cb9
This is an example of a “brain wallet” which is a way to keep the private key in your head without having to memorize something too difficult. Please don’t use this for a real secret.
This is the signature hash, or hash of the message that we’re signing.
We’re going to use a fixed k here for demonstration purposes.
kG = (r,y) so we take the x coordinate only
s = (z+re)/k.
We can mod by n because we know this is a cyclical group of order n.

The public point needs to be known by the verifier
Sign the following message with the secret
e = 12345
z = int.from_bytes(hash256('Programming Bitcoin!'), 'big')
In order to program message signing, we now create a PrivateKey class which will house our secret.
classPrivateKey:def__init__(self,secret):self.secret=secretself.point=secret*Gdefhex(self):return'{:x}'.format(self.secret).zfill(64)
We keep around the public key, self.point, for convenience.
We now create the sign method.
fromrandomimportrandint...classPrivateKey:...defsign(self,z):k=randint(0,N)r=(k*G).x.numk_inv=pow(k,N-2,N)s=(z+r*self.secret)*k_inv%Nifs>N/2:s=N-sreturnSignature(r,s)
randint chooses a random integer from [0,n).
Please don’t use this function in production as the random number from this library is not nearly random enough.
r is the x-coordinate of kG
We use Fermat’s Little Theorem again and n, which is prime
s = (z+re)/k
It turns out that using the low-s value will get nodes to relay our transactions easier. This is for malleability reasons
We return a Signature object from above.
We’ve covered Elliptic Curve Cryptography and we can now prove that we know a secret by signing something and we can also verify that the person with the secret actually signed a message. Even if you don’t read another page in this book, you’ve learned to implement what was once considered “weapons grade munitions” (see https://en.wikipedia.org/wiki/Export_of_cryptography_from_the_United_States). This is a major step in your journey and will be essential for the rest of the book!
We now turn to serializing a lot of these structures so that we can store them on disk and send them over the network.
We’ve created a lot of classes thus far, including PrivateKey, S256Point and Signature.
We now need to start thinking about how to transmit these objects to other computers on the network, or even to disk.
This is where serialization comes into play.
We want to communicate or store a S256Point or a Signature or a PrivateKey.
Ideally, we want to do this efficiently for reasons we’ll see in Chapter 10 (Networking).
We’ll start with the S256Point class which is the public key class.
Recall that the public key in Elliptic Curve Cryptography is really a coordinate in the form of (x,y).
How can we serialize this data?
It turns out there’s already a standard for serializing ECDSA public keys called SEC. SEC stands for Standards for Efficient Cryptography and as the word “Efficient” in the name suggests, it’s got minimal overhead. There are two forms of SEC format that we need to be concerned with and the first is the uncompressed SEC format and the second compressed SEC format.
Here is how the uncompressed SEC format for a given point P=(x,y) is generated:
Start with the prefix byte which is 0x04.
Next, append the x-coordinate in 32 bytes as a Big-Endian integer.
Next, append the y-coordinate in 32 bytes as a Big-Endian integer.
The uncompressed SEC format is in Figure 4-1:

The motivation for Big and Little Endian encodings is storing a number on disk. A number under 256 is easy enough to encode as a single byte (28) is enough to hold it. When it’s bigger than 256, how do we serialize the number to bytes?
Arabic numerals are read left-to-right. A number like 123 is 100 + 20 + 3 and not 1 + 20 + 300. This is what we call Big-Endian because the Big End starts first.
Computers can sometimes be more efficient using the opposite order or, Little-Endian. That is, starting with the Little End first.
Since Computers work in bytes, which have 8 bits, we have to think in Base-256.
This means that a number like 500 looks like 01f4 in Big-Endian.
That is, 500 = 1*256 + 244 (f4 in hexadecimal).
The same number looks like f401 in Little-Endian.
Unfortunately, some serializations in Bitcoin (like the SEC format x and y coordinates) are Big-Endian. Other serializations in Bitcoin (like the transaction version number in Chapter 5) are in Little-Endian. This book will let you know which ones are Big vs Little Endian.
Creating the uncompressed SEC format serialization is pretty straightforward. The trickiest part being converting a 256-bit number into 32 bytes, Big-Endian. Here’s how this is done in code:
classS256Point(Point):...defsec(self):'''returns the binary version of the sec format'''returnb'\x04'+self.x.num.to_bytes(32,'big')\+self.y.num.to_bytes(32,'big')
In Python 3, you can convert a number to bytes using the to_bytes method.
The first argument is how many bytes it should take up and the second argument is the endianness (see Big and Little Endian).
Find the uncompressed SEC format for the Public Key where the Private Key secrets are:
5000
20185
0xdeadbeef12345
Recall that for any x-coordinate, there are at most two y-coordinates due to the y2 term in the elliptic curve equation (Figure 4-2):
It turns out that even over a Finite Field, we have the same symmetry.
This is because for any (x,y) that satisfies y2=x3+ax+b, (x,-y) also satisfies the equation.
Furthermore, in a Finite Field, -y (mod p) = p - y.
Or more accurately, if (x,y) satisfies the elliptic curve equation, (x,p-y) also satisfies the equation.
These are the only two solutions for a given x as shown above, so if we know x, we know y-coordinate has to be either y or p-y.
Since p is a prime number greater than 2, we know that p is odd.
Thus, if y is even, p-y (odd minus even) will be odd.
If y is odd, p-y will be even.
In other words, between y and p-y exactly one will be even and one will be odd.
This is something we can use to our advantage to shorten the Uncompressed SEC Format.
We can provide the x-coordinate and the even-ness of the y-coordinate.
We call this the Compressed SEC format because of how the y-coordinate is compressed into a single byte (namely, whether it’s even or odd).
Here is the serialization of the Compressed SEC format for a given point P=(x,y):
Start with the prefix byte.
If y is even, it’s 0x02, otherwise it’s 0x03.
Next, append the x-coordinate in 32 bytes as a Big-Endian integer.
The Compressed SEC format is in Figure 4-3:

Again, the procedure is pretty straightforward.
We can update the sec method to handle compressed SEC keys.
classS256Point(Point):...defsec(self,compressed=True):'''returns the binary version of the SEC format'''ifcompressed:ifself.y.num%2==0:returnb'\x02'+self.x.num.to_bytes(32,'big')else:returnb'\x03'+self.x.num.to_bytes(32,'big')else:returnb'\x04'+self.x.num.to_bytes(32,'big')+\self.y.num.to_bytes(32,'big')
The big advantage of the Compressed SEC format is that it only takes up 33 bytes instead of 65 bytes. This is a big savings when amortized over millions of transactions.
At this point, you may be wondering how you can analytically calculate y given the x-coordinate.
This requires us to calculate a square-root in a Finite Field.
Stated mathematically:
Find w such that w2 = v when we know v.
It turns out that if the Finite Field prime p % 4 = 3, we can do this rather easily. Here’s how.
First, we know:
p % 4 == 3
Which implies
(p + 1) % 4 == 0
That is (p+1)/4 is an integer.
By definition,
w2 = v
We are looking for a formula to calculate w. From Fermat’s Little Theorem:
wp-1 % p = 1
Which means:
w2=w2⋅1=w2⋅wp-1=w(p+1)
Since p is odd (recall p is prime), we know we can divide (p+1) by two and still get an integer implying
w=w(p+1)/2
Now we can use (p+1)/4 being an integer this way:
w=w(p+1)/2=w2(p+1)/4=(w2)(p+1)/4=v(p+1)/4
So our formula for finding the square root becomes:
if w2 = v and p % 4 = 3, w = v(p+1)/4
It turns out that the p used in secp256k1 is such that p % 4 == 3, so we can use this formula:
w2=v
w=v(p+1)/4
That will be one of the two possible w’s the other will be p-w. This is due to taking the square root means that both the positive and negative will work.
We can add this as a general method in the S256Field
classS256Field(FieldElement):...defsqrt(self):returnself**((P+1)//4)
When we get a serialized SEC pubkey, we can write a parse method to figure out which y we need:
classS256Point:...@classmethoddefparse(self,sec_bin):'''returns a Point object from a SEC binary (not hex)'''ifsec_bin[0]==4:x=int.from_bytes(sec_bin[1:33],'big')y=int.from_bytes(sec_bin[33:65],'big')returnS256Point(x=x,y=y)is_even=sec_bin[0]==2x=S256Field(int.from_bytes(sec_bin[1:],'big'))# right side of the equation y^2 = x^3 + 7alpha=x**3+S256Field(B)# solve for left sidebeta=alpha.sqrt()ifbeta.num%2==0:even_beta=betaodd_beta=S256Field(P-beta.num)else:even_beta=S256Field(P-beta.num)odd_beta=betaifis_even:returnS256Point(x,even_beta)else:returnS256Point(x,odd_beta)
The uncompressed is pretty straightforward.
The evenness of the y-coordinate is given in the first byte.
We take the square-root of the right side of the Elliptic Curve equation to get the y.
Determine evenness and return the correct point.
Find the Compressed SEC format for the Public Key where the Private Key secrets are:
5001
20195
0xdeadbeef54321
Another class that we need to learn to serialize is Signature.
Much like the SEC format, it needs to encode two different numbers, r and s.
Unfortunately, unlike S256Point, Signature cannot be compressed as s cannot be derived solely from r.
The standard for serializing signatures (and lots of other things, for that matter) is called DER format. DER stands for Distinguished Encoding Rules and was used by Satoshi to serialize signatures. This was most likely because the standard was already defined in 2008, supported in the OpenSSL library (used in Bitcoin at the time) and was easy enough to adopt, rather than creating a new standard.
DER Signature format is defined like this:
Start with the 0x30 byte
Encode the length of the rest of the signature (usually 0x44 or 0x45) and append
Append the marker byte 0x02
Encode r as a Big-Endian integer, but prepend with 0x00 byte if r’s first byte >= 0x80.
Prepend the resulting length to r.
Add this to the result.
Append the marker byte 0x02
Encode s as a Big-Endian integer, but prepend with 0x00 byte if s’s first byte >= 0x80.
Prepend the resulting length to s.
Add this to the result.
The rules for #4 and #6 with the first byte starting with something greater than or equal to 0x80 is because DER is a general encoding and allows for negative numbers to be encoded.
The first bit being 1 means that the number is negative.
All numbers in an ECDSA signature are positive, so we have to prepend with 0x00 if the first bit is zero which is equivalent to first byte >= 0x80.
The DER format is in Figure 4-4:
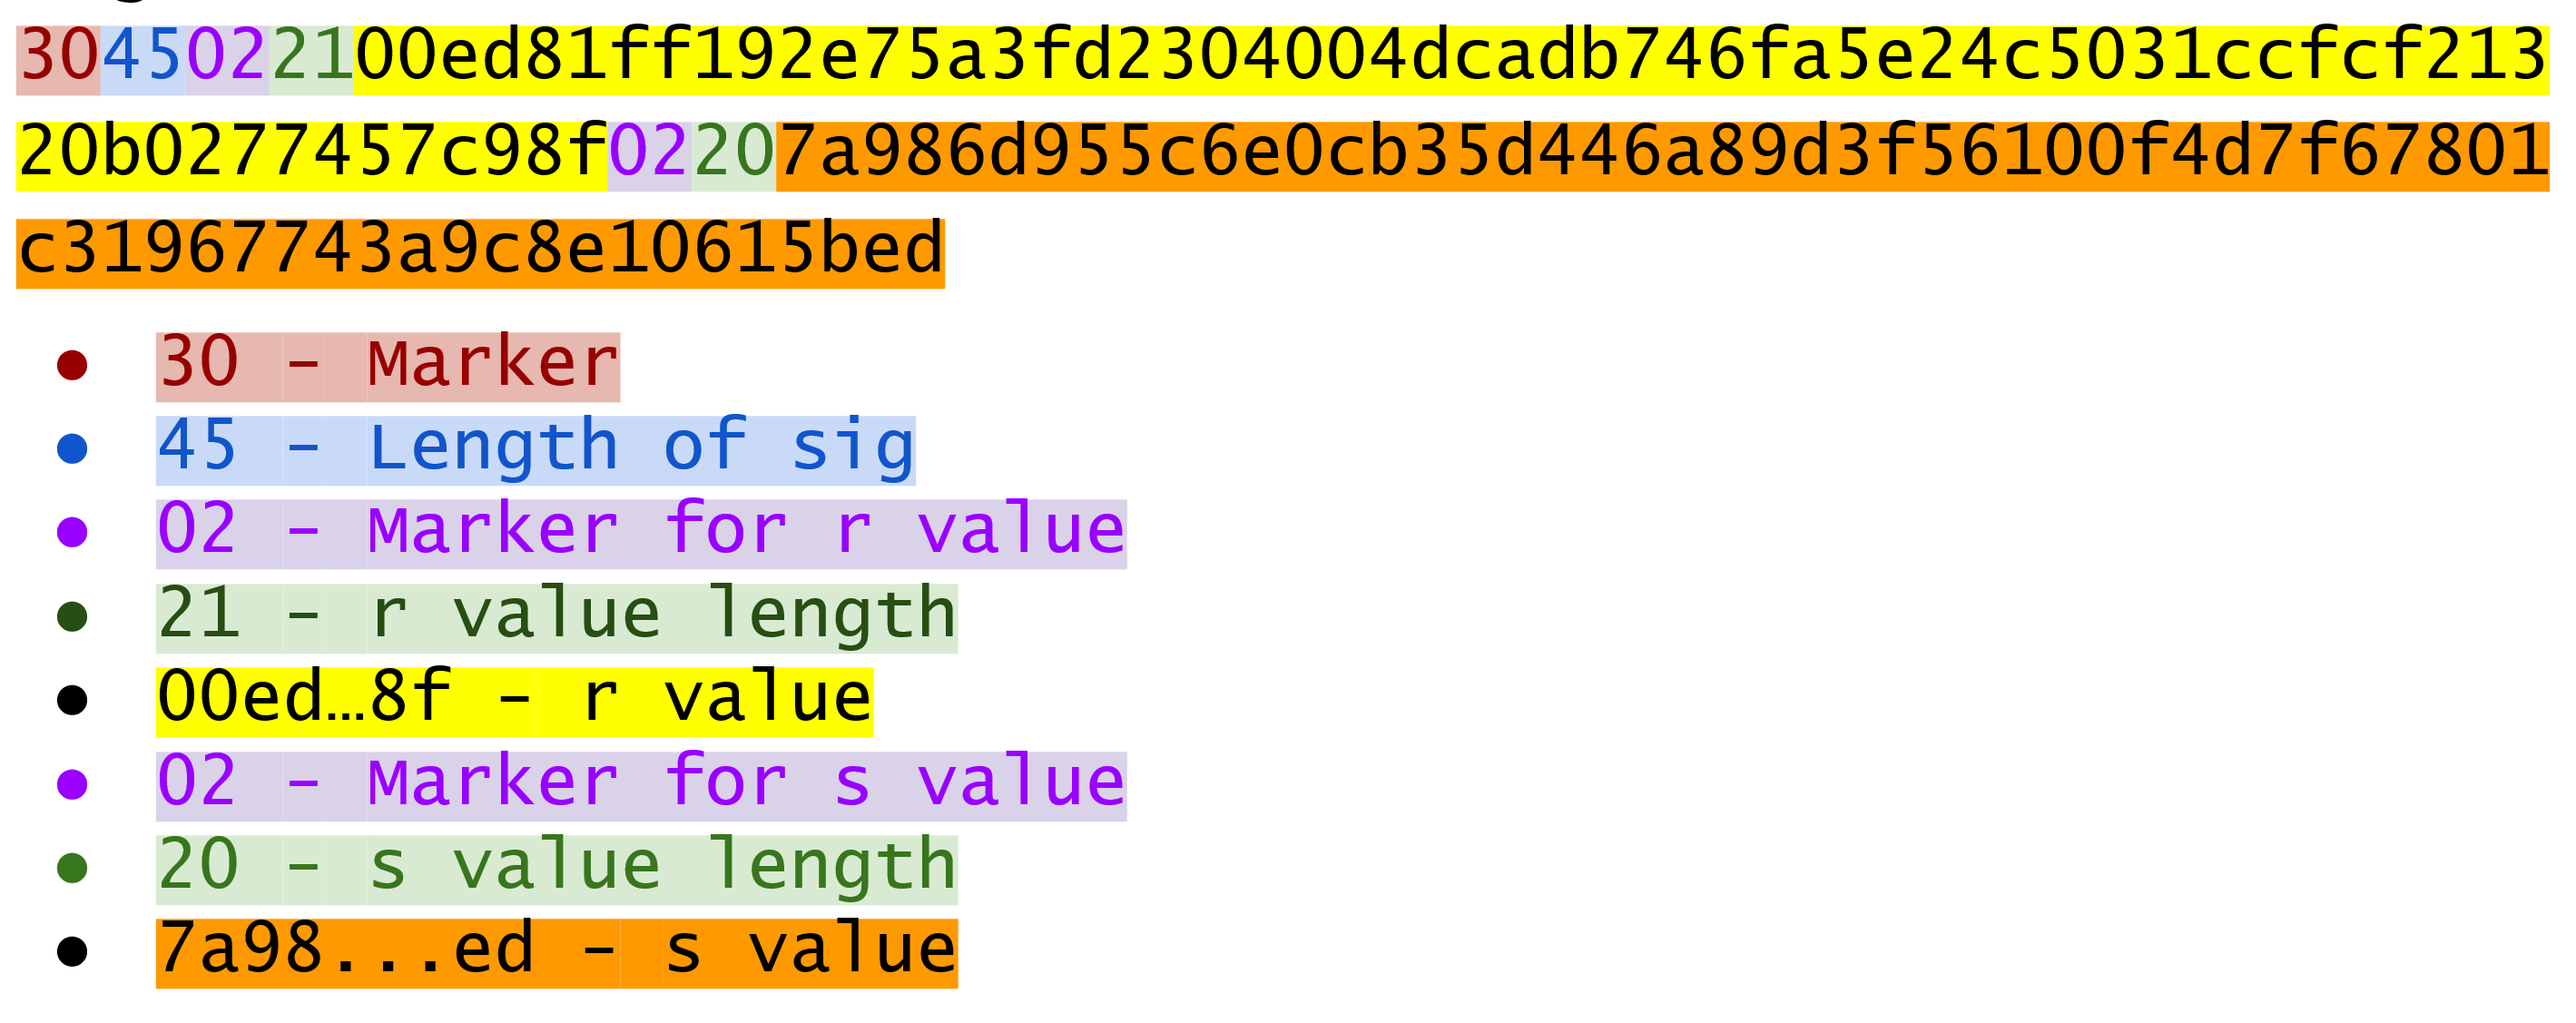
Because we know r is a 256-bit integer, r will be at most 32-bytes expressed as Big-Endian.
It’s also possible the first byte could be >= 0x80, so part 4 can be at most 33-bytes.
However, if r is a relatively small number, it could be less than 32 bytes.
Same goes for s and part 6.
Here’s how this is coded in Python:
classSignature:...defder(self):rbin=self.r.to_bytes(32,byteorder='big')# remove all null bytes at the beginningrbin=rbin.lstrip(b'\x00')# if rbin has a high bit, add a \x00ifrbin[0]&0x80:rbin=b'\x00'+rbinresult=bytes([2,len(rbin)])+rbinsbin=self.s.to_bytes(32,byteorder='big')# remove all null bytes at the beginningsbin=sbin.lstrip(b'\x00')# if sbin has a high bit, add a \x00ifsbin[0]&0x80:sbin=b'\x00'+sbinresult+=bytes([2,len(sbin)])+sbinreturnbytes([0x30,len(result)])+result
In Python 3, you can convert a list of numbers to the byte equivalents using bytes([some_integer1, some_integer2])
Overall, this is an inefficient way to encode r and s as there are at least 4 bytes that aren’t strictly necessary.
Find the DER format for a signature whose r and s values are:
r =
0x37206a0610995c58074999cb9767b87af4c4978db68c06e8e6e81d282047a7c6
s =
0x8ca63759c1157ebeaec0d03cecca119fc9a75bf8e6d0fa65c841c8e2738cdaec
In the early days of Bitcoin, Bitcoins were assigned to Public Keys specified in SEC format (uncompressed) and then were redeemed using DER signatures. For reasons we’ll get to in Chapter 6, using this particular very simple Script turned to be both wasteful for storing UTXOs and a little less secure than the Scripts in more prominent use now. For now, we’ll go through what addresses are and how they are encoded.
In order for Alice to pay Bob, she has to know where to send the money. This is true not just in Bitcoin, but any method of payment. Since Bitcoin is a digital bearer instrument, the address can be something like a public key in a public key cryptography scheme. Unfortunately, SEC format, especially uncompressed is a bit long (65 or 33 bytes). Furthermore, the 65 or 33 bytes are in binary format, not something that’s easy to read, at least raw.
There are three major considerations. The first is that the public key be readable (easy to hand write and not too difficult to mistake say over the phone). The second is that it’s short (not be so long that it’s cumbersome). The third is that it’s secure (harder to make mistakes).
So how do we get readability, compression and security? If we express the SEC format in hexadecimal (4 bits per character), it’s double the length (130 or 66 characters). Can we do better?
We can use something like Base64 which can express 6 bits per character and becomes 87 characters for uncompressed SEC and 44 characters for compressed SEC.
Unfortunately, Base64 is prone to mistakes as a lot of letters and numbers look similar (0 and O, l and I, - and _).
If we remove these characters, we can have something that’s got good readability and decent compression (around 5.86 bits per character).
Lastly, we can add a checksum at the end to ensure that mistakes are easy to detect.
This construction is called Base58. Instead of hexadecimal (base 16) or Base64, we’re encoding numbers in Base58.
The actual mechanics of doing the Base58 encoding are as follows.
All numbers, upper case letters and lower case letters are utilized except for the aforementioned 0/O and l/I.
That leaves us with 10 + 26 + 26 - 4 = 58.
Each of these characters represents a digit in base 58.
We can encode with a function that does exactly this:
BASE58_ALPHABET=b'123456789ABCDEFGHJKLMNPQRSTUVWXYZabcdefghijkmnopqrstuvwxyz'...defencode_base58(s):count=0forcins:ifc==0:count+=1else:breakprefix=b'1'*countnum=int.from_bytes(s,'big')result=bytearray()whilenum>0:num,mod=divmod(num,58)result.insert(0,BASE58_ALPHABET[mod])returnprefix+bytes(result)
The purpose of this loop is to determine how many of the bytes at the front are 0 bytes. We want to add them back at the end.
This is the loop that figures out what Base58 digit to use.
Finally, we prepend all the zeros that we counted at the front because otherwise, they wouldn’t show up as prefixed 1’s. This annoyingly happens with pay-to-pubkey-hash (p2pkh). More on that in Chapter 6.
This function will take any bytes in Python 3 and convert it to Base58.
Base58 has been used for a long time and while it does make it somewhat easier than something like Base64 to communicate, it’s not really that convenient. Most people prefer to copy and paste the addresses and if you’ve ever tried to communicate a Base58 address over voice, you know it can be a nightmare.
What’s much better is the new Bech32 standard which is defined in BIP0173.
Bech32 uses a 32-character alphabet that’s just numbers and lower case letters except 1, b, i and o.
These are thus far only used for Segwit (Chapter 13).
Convert the following hex to binary and then to Base58:
7c076ff316692a3d7eb3c3bb0f8b1488cf72e1afcd929e29307032997a838a3d
eff69ef2b1bd93a66ed5219add4fb51e11a840f404876325a1e8ffe0529a2c
c7207fee197d27c618aea621406f6bf5ef6fca38681d82b2f06fddbdce6feab6
The 264 bits from a compressed SEC format is still a bit too long, not to mention a bit less secure (see Chapter 6). To both shorten and increase security, we can use the ripemd160 hash to reduce the size to a 20-byte hash.
By not using the SEC format directly, we can go from 33 bytes to 20 bytes, shortening the address significantly. Here is how a Bitcoin address is created:
For mainnet addresses, start with the prefix 0x00, for testnet 0x6f.
Take the SEC format (compressed or uncompressed) and do a sha256 operation followed by the ripemd160 hash operation, the combination which is called a hash160 operation.
Combine the prefix from #1 and resulting hash from #2
Do a hash256 of the result from #3 and get the first 4 bytes.
Take the combination of #3 and #4 and encode in Base58.
Step 4 of this process is called the checksum. We can do steps 4 and 5 in one go this way:
defencode_base58_checksum(s):returnencode_base58(s+hash256(s)[:4]).decode('ascii')
Note that the .decode('ascii') part is necessary to convert from Python 3 bytes to a Python 3 string.
Testnet is a parallel bitcoin network that’s meant to be used by developers. The coins on there are not worth anything and the proof-of-work required to find a block relatively easy. The mainnet chain as of this writing has around 550,000 blocks, testnet has around 1,450,000 blocks, which is significantly more.
The process of doing a sha256 operation followed by a ripemd160 operation is called a hash160 operation in Bitcoin.
We can implement this in helper.py.
defhash160(s):'''sha256 followed by ripemd160'''returnhashlib.new('ripemd160',hashlib.sha256(s).digest()).digest()
Note that hashlib.sha256(s).digest() does the sha256 and the wrapper around it does the ripemd160.
We can also update S256Point to with hash160 and address methods.
classS256Point:...defhash160(self,compressed=True):returnhash160(self.sec(compressed))defaddress(self,compressed=True,testnet=False):'''Returns the address string'''h160=self.hash160(compressed)iftestnet:prefix=b'\x6f'else:prefix=b'\x00'returnencode_base58_checksum(prefix+h160)
Find the address corresponding to Public Keys whose Private Key secrets are:
5002 (use uncompressed SEC, on testnet)
20205 (use compressed SEC, on testnet)
0x12345deadbeef (use compressed SEC on mainnet)
The Private Key in our case is a 256-bit number. Generally, we are not going to need to serialize our secret that often as it doesn’t get broadcast (that would be a bad idea!). That said, there are instances where we may want to transfer your private key from one wallet to another, for example, from a paper wallet to a software wallet.
For this purpose, there is a format called WIF, which stands for Wallet Import Format. WIF is a serialization of the private key that’s meant to be human-readable. WIF uses the same Base58 encoding that addresses use.
Here is how the WIF format is created:
For mainnet private keys, start with the prefix 0x80, for testnet 0xef.
Encode the secret in 32-byte Big-Endian.
If the SEC format used for the public key address was compressed add a suffix of 0x01.
Combine the prefix from #1, serialized secret from #2 and suffix from #3
Do a hash256 of the result from #4 and get the first 4 bytes.
Take the combination of #4 and #5 and encode in Base58.
We can now create the wif method on the PrivateKey class.
classPrivateKey...defwif(self,compressed=True,testnet=False):secret_bytes=self.secret.to_bytes(32,'big')iftestnet:prefix=b'\xef'else:prefix=b'\x80'ifcompressed:suffix=b'\x01'else:suffix=b''returnencode_base58_checksum(prefix+secret_bytes+suffix)
Find the WIF for Private Key whose secrets are:
5003 (compressed, testnet)
20215 (uncompressed, testnet)
0x54321deadbeef (compressed, mainnet)
It will be very useful to know how Big and Little Endian are done in Python as the next few chapters will be parsing and serializing numbers to and from Big/Little Endian quite a bit. In particular, Satoshi used a lot of Little-Endian for Bitcoin and unfortunately, there’s no easy-to-learn rule for where Little-Endian is used and where Big-Endian is used. Recall that SEC format uses Big-Endian encoding as do addresses and WIF. From Chapter 5 onward, we will use Little-Endian encoding a lot more. For this reason, we turn to the next two exercises. The last exercise of this section is to create a testnet address for yourself.
Write a function little_endian_to_int which takes Python bytes, interprets those bytes in Little-Endian and returns the number.
Write a function int_to_little_endian which does the reverse of the last exercise.
Create a testnet address for yourself using a long secret that only you know. This is important as there are bots on testnet trying to steal testnet coins. Make sure you write this secret down somewhere! You will be using the secret later to sign Transactions.
Go to a testnet faucet (https://faucet.programmingbitcoin.com) and send some testnet coins to that address (it should start with m or n or else something is wrong).
If you succeeded, congrats!
You’re now the proud owner of some testnet coins!
In this chapter we learned how to serialize a lot of different structures that we created in the previous chapters. We now turn to Transactions which we can parse and understand.
Transactions are at the heart of Bitcoin. Transactions, simply put, are value transfers from one entity to another. We’ll see in Chapter 6 how “entities” in this case are really smart contracts. But we’re getting ahead of ourselves. Let’s first look at what Transactions in Bitcoin are, what they look like and how they are parsed.
At a high level, a Transaction really only has 4 components. They are:
Version
Inputs
Outputs
Locktime
A general overview of these fields might be helpful. Version indicates what additional features the transaction uses, Inputs define what Bitcoins are being spent, Outputs define where the Bitcoins are going and Locktime defines when this Transaction starts being valid. We’ll go through each component in depth.
Figure 5-1 shows a hexadecimal dump of a typical transaction that shows which parts are which.
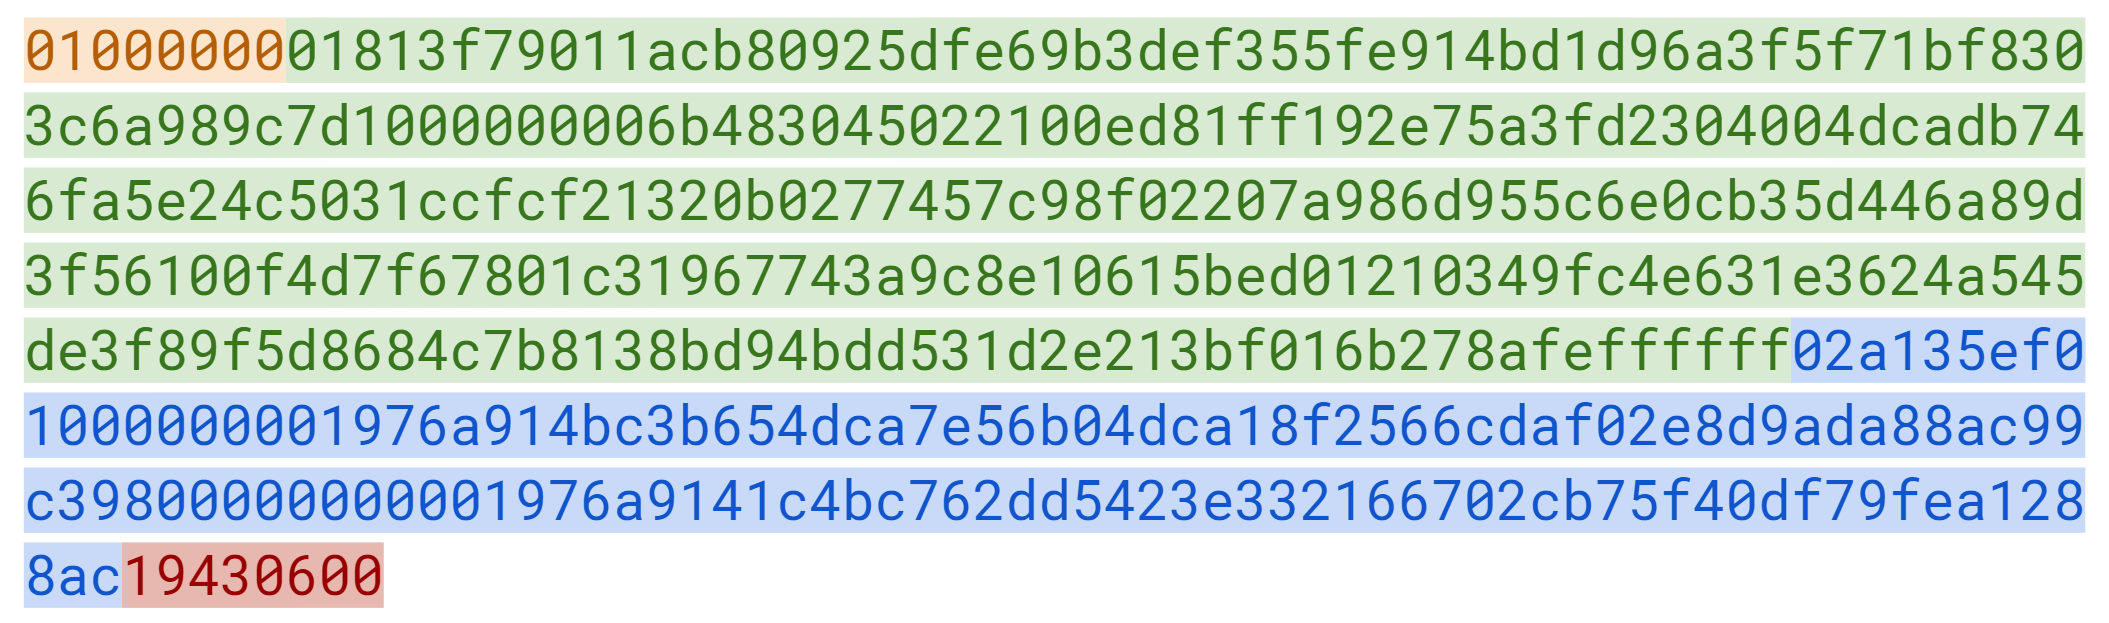
The differently highlighted parts represent Version, Inputs, Outputs and Locktime respectively.
With this in mind, we can start constructing the Transaction class, which we’ll call Tx:
classTx:def__init__(self,version,tx_ins,tx_outs,locktime,testnet=False):self.version=versionself.tx_ins=tx_insself.tx_outs=tx_outsself.locktime=locktimeself.testnet=testnetdef__repr__(self):tx_ins=''fortx_ininself.tx_ins:tx_ins+=tx_in.__repr__()+'\n'tx_outs=''fortx_outinself.tx_outs:tx_outs+=tx_out.__repr__()+'\n'return'tx: {}\nversion: {}\ntx_ins:\n{}tx_outs:\n{}locktime: {}'.format(self.id(),self.version,tx_ins,tx_outs,self.locktime,)defid(self):'''Human-readable hexadecimal of the transaction hash'''returnself.hash().hex()defhash(self):'''Binary hash of the legacy serialization'''returnhash256(self.serialize())[::-1]
Input and Output are very generic terms so we specify what kind of inputs they are. We’ll define the specific object types they are later.
We need to know which network this transaction is on in order to be able to validate it fully.
The id is what block explorers use for looking up transactions.
It’s the hash256 of the transaction in hexadecimal format.
The hash is the hash256 of the serialization in Little-Endian.
Note we don’t have the serialize method yet, so until we do, this won’t work.
The rest of this chapter will be concerned with parsing Transactions. We could, at this point, write code like this:
classTx:...@classmethoddefparse(cls,serialization):version=serialization[0:4]...
This method has to be a class method as the serialization will return a new instance of a Tx object.
We assume here that the variable serialization is a byte array.
This could definitely work, but the transaction may be very large. Ideally, we want to be able to parse from a stream instead. This will allow us to not need the entire serialized transaction before we start parsing and that allows us to fail early and be more efficient. Thus, the code for parsing a transaction will look more like this:
classTx:...@classmethoddefparse(cls,stream):serialized_version=stream.read(4)...
The read method will allow us to parse on the fly as we won’t have to wait on I/O.
This is advantageous from an engineering perspective as the stream can be a socket connection on the network or a file handle.
We can start parsing the stream right away instead of waiting for the whole thing to be transmitted or read first.
Our method will be able to handle any sort of stream and return the Tx object that we need.
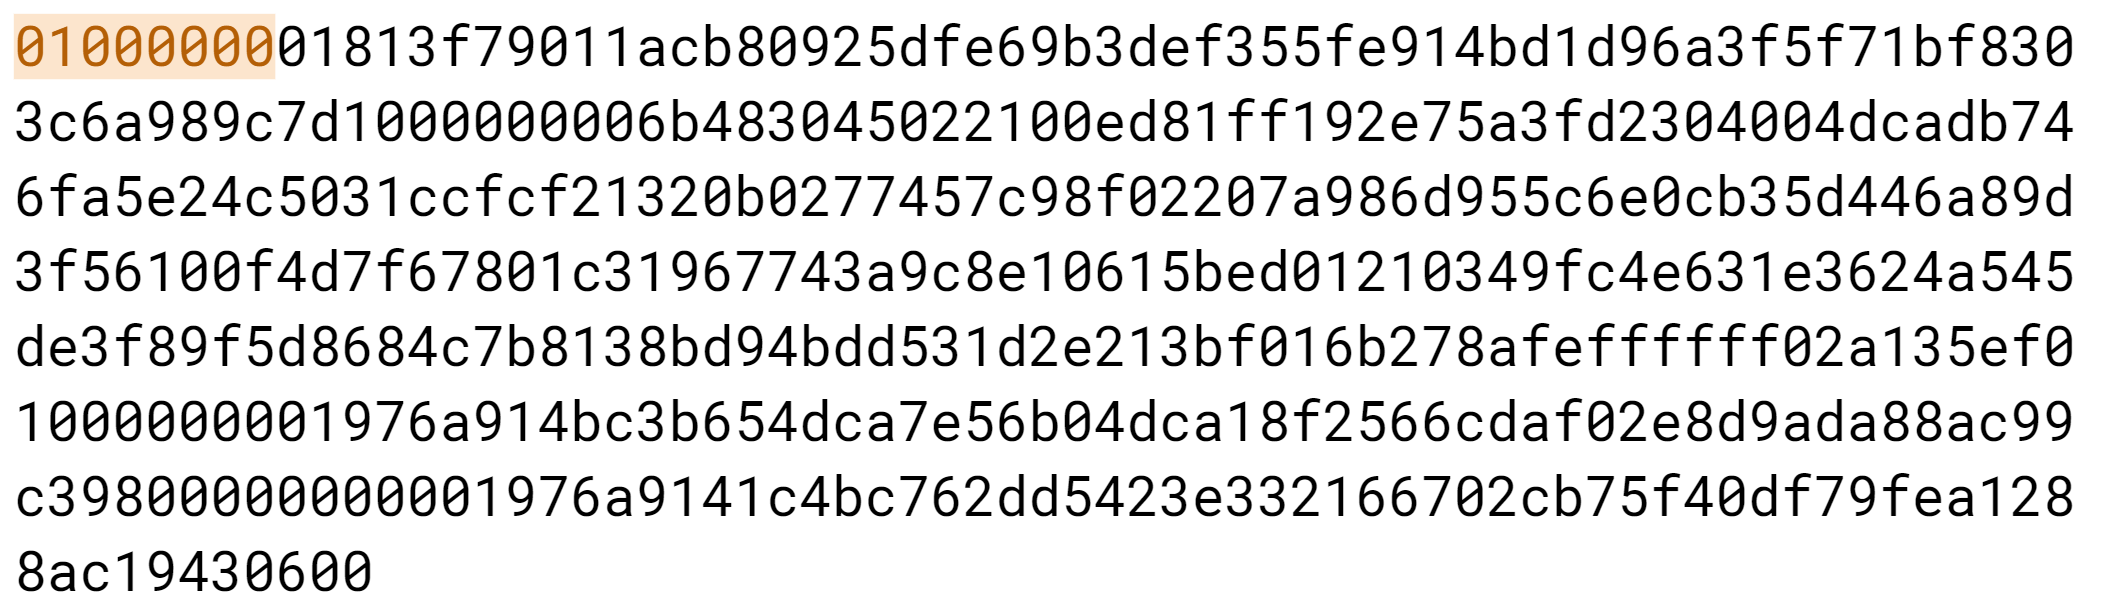
When you see a version number in something (Figure 5-2 shows an example), it’s meant to give the receiver information about what the versioned thing is supposed to represent. If, for example, you are running Windows 3.1, that’s a version number that’s very different than Windows 8 or Windows 10. You could specify just “Windows”, but specifying the version number after the operating system helps you know what features it has and what API’s you can program against.
Similarly, Bitcoin transactions have version numbers.
In Bitcoin’s case, the transaction version is generally 1, but there are cases where it can be 2 (transactions using an opcode called OP_CHECKSEQUENCEVERIFY as defined in BIP112 require use of version > 1).
You may notice here that the actual value in hexadecimal is 01000000, which doesn’t look like 1.
Interpreted as a Little-Endian integer, however, this number is actually 1 (recall the discussion from Chapter 4).
Write the version parsing part of the parse method that we’ve defined. To do this properly, you’ll have to convert 4 bytes into a Little-Endian integer.
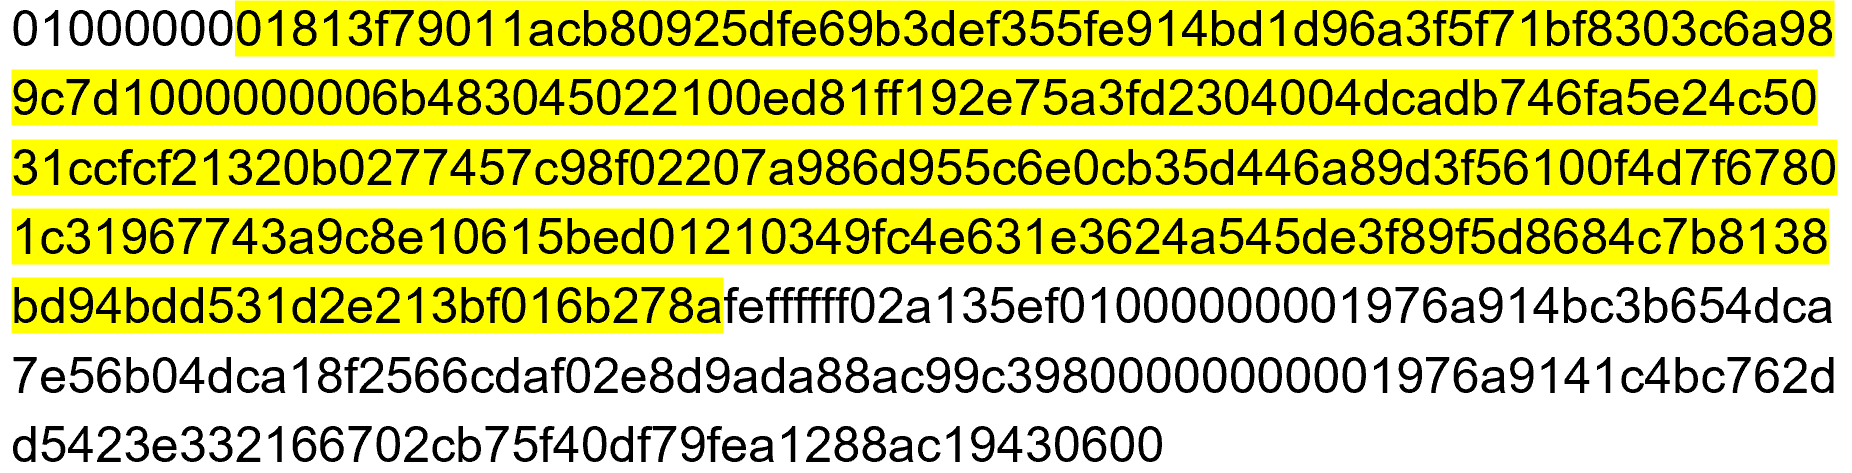
Each input points to an output of a previous transaction (see Figure 5-3). This fact requires more explanation as it’s not intuitively obvious at first.
Bitcoin’s inputs are spending outputs of a previous transaction. That is, you need to have received Bitcoins first to spend something. This makes intuitive sense. You cannot spend money unless you received money first. The inputs refer to Bitcoins that belong to you. There are two things that each input needs to have:
A reference to the previous Bitcoins you received
Proof that these are yours to spend
The second part uses ECDSA (Chapter 3). You don’t want people to be able to forge this, so most inputs contain signatures which only the owner(s) of the private key(s) can produce.
The inputs field can contain more than one input. This is analogous to using a single 100 bill to pay for a 70 dollar meal or a 50 and a 20. The former only requires one input (“bill”) the latter requires 2. There are situations where there could be even more. In our analogy, we can pay for a 70 dollar meal with 14 5-dollar bills or even 7000 pennies. This would be analogous to 14 inputs or 7000 inputs.
The number of inputs is the next part of the transaction shown in Figure 5-4:
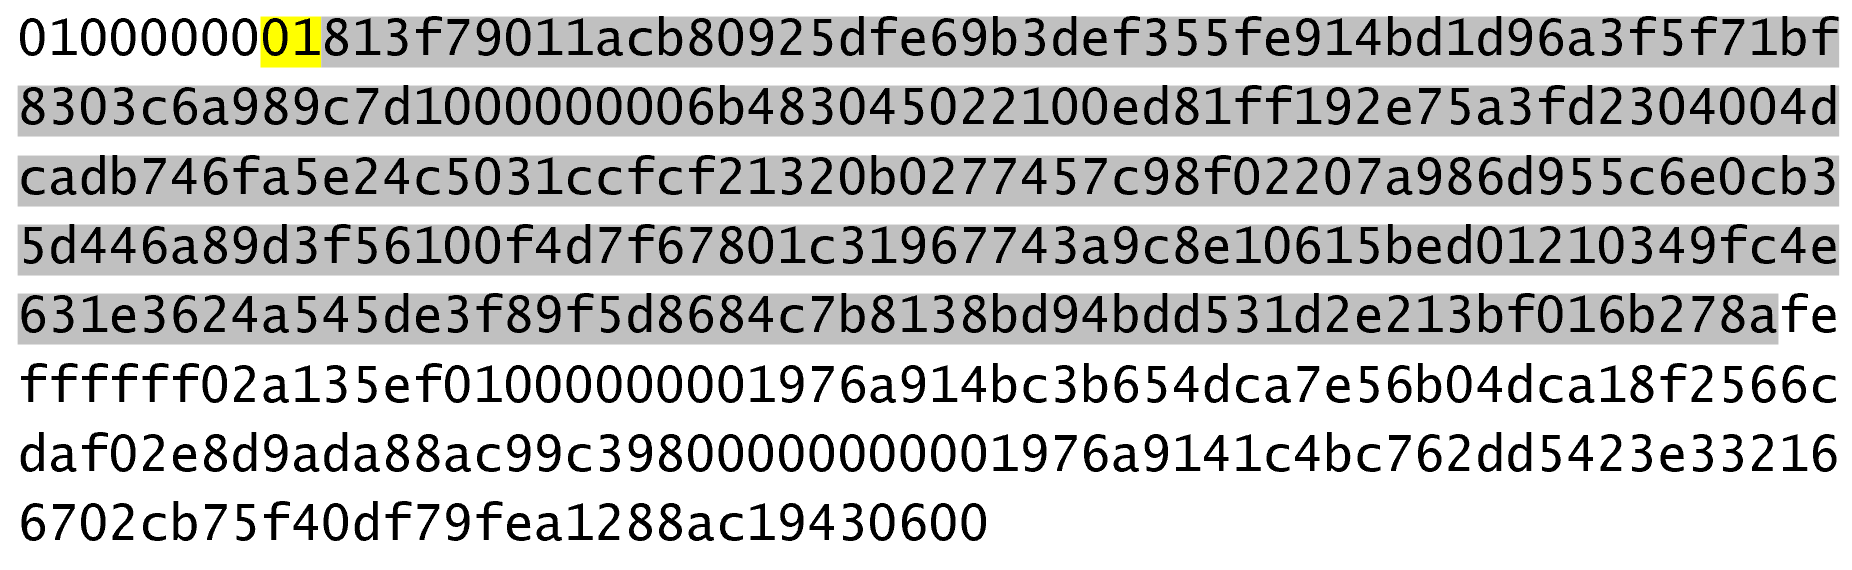
We can see that the byte is actually 01, which means that this transaction has 1 input.
It may be tempting here to assume that it’s always a single byte, but it’s not.
A single byte has 8 bits, so this means that anything over 255 inputs would not be expressible in a single byte.
This is where varint comes in.
Varint is shorthand for variable integer which is a way to encode an integer into bytes that range from 0 to 264-1.
We could, of course, always reserve 8 bytes for the number of inputs, but that would be a lot of wasted space if we expect the number of inputs to be a relatively small number (say under 200).
This is the case with the number of inputs in a normal transaction, so using varint helps to save space.
You can see how they work in the VarInt sidebar.
Each input contains 4 fields. The first two fields point to the previous transaction output and the last two fields define how the previous transaction output can be spent. The fields are as follows:
Previous Transaction ID
Previous Transaction Index
ScriptSig
Sequence
As explained above, each input is has a reference to a previous transaction’s output. The previous transaction ID is the hash256 of the previous transaction’s contents. The previous transaction ID uniquely defines the previous transaction as the probability of a hash collision is impossibly low. As we’ll see below, each transaction has to have at least 1 output, but may have many. Thus, we need to define exactly which output within a transaction that we’re spending which is captured in the previous transaction index.
Note that the previous transaction ID is 32 bytes and that the previous transaction index is 4 bytes. Both are in Little-Endian.
ScriptSig has to do with Bitcoin’s smart contract language Script, and we will be discussing it more thoroughly in Chapter 6. For now, think of ScriptSig as opening a locked box. Opening a locked box is something that can only be done by the owner of the transaction output. The ScriptSig field is a variable-length field, not a fixed-length field like most of what we’ve seen so far. A variable-length field requires us to define exactly how long the field will be which is why the field is preceded by a varint telling us how long the field is.
Sequence was originally intended as a way to do what Satoshi called “high frequency trades” with the Locktime field (see Sequence and Locktime), but is currently used with Replace-By-Fee and OP_CHECKSEQUENCEVERIFY.
Sequence is also in Little-Endian and takes up 4 bytes.
The fields of the input look like Figure 5-5:
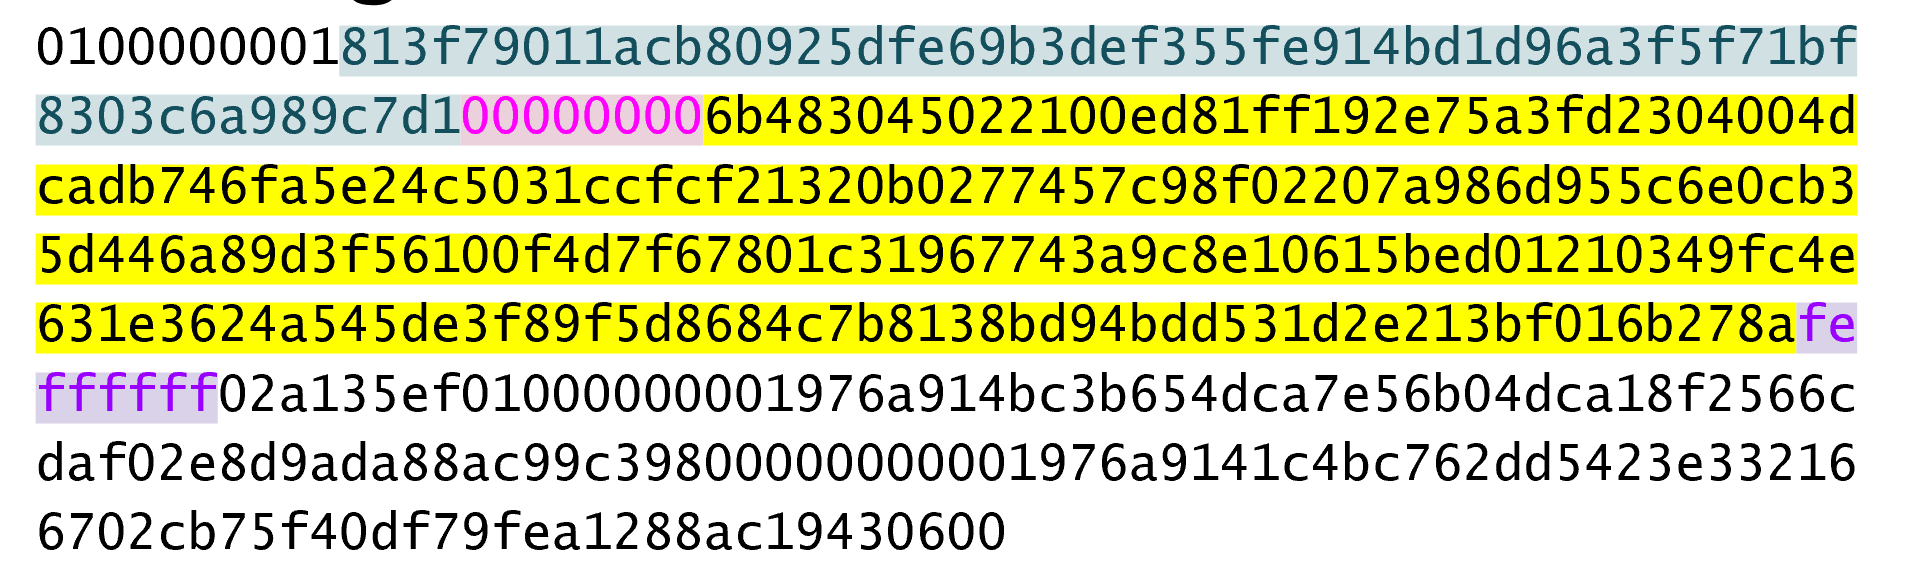
Now that we know what the fields are, we can start creating a TxIn class in Python:
classTxIn:def__init__(self,prev_tx,prev_index,script_sig=None,sequence=0xffffffff):self.prev_tx=prev_txself.prev_index=prev_indexifscript_sigisNone:self.script_sig=Script()else:self.script_sig=script_sigself.sequence=sequencedef__repr__(self):return'{}:{}'.format(self.prev_tx.hex(),self.prev_index,)
We default to an empty ScriptSig.
A couple things to note here. The amount of each input is not specified. We have no idea how much is being spent unless we look up in the blockchain for the transaction(s) that we’re spending. Furthermore, we don’t even know if the transaction is unlocking the right box, so to speak, without knowing about the previous transaction. Every node must verify that this transaction unlocks the right box and that it doesn’t spend non-existent Bitcoins. How we do that is discussed more in Chapter 7.
We’ll delve more deeply into how Script is parsed in Chapter 6, but for now, here’s how you get a Script object from hexadecimal in Python:
>>>fromioimportBytesIO>>>fromscriptimportScript>>>script_hex=('6b483045022100ed81ff192e75a3fd2304004dcadb746fa5e24c5031ccf\cf21320b0277457c98f02207a986d955c6e0cb35d446a89d3f56100f4d7f67801c31967743a9c8\e10615bed01210349fc4e631e3624a545de3f89f5d8684c7b8138bd94bdd531d2e213bf016b278\a')>>>stream=BytesIO(bytes.fromhex(script_hex))>>>script_sig=Script.parse(stream)>>>(script_sig)3045022100ed81ff192e75a3fd2304004dcadb746fa5e24c5031ccfcf21320b0277457c98f0220\7a986d955c6e0cb35d446a89d3f56100f4d7f67801c31967743a9c8e10615bed010349fc4e631\e3624a545de3f89f5d8684c7b8138bd94bdd531d2e213bf016b278a
Note that the Script class will be more thoroughly explored in Chapter 6.
For now, please trust that the Script.parse method will create the object that we need.
Write the inputs parsing part of the parse method in Tx and the parse method for TxIn.
As hinted in the previous section, outputs define where the Bitcoins are going. Each transaction must have one or more outputs. Why would anyone have more than one output? An exchange may batch transactions, for example, and pay out a lot of people at once instead of generating a single transaction for every single person that requests Bitcoins.
Like inputs, the outputs serialization starts with how many outputs there are as a varint as shown in Figure 5-6.
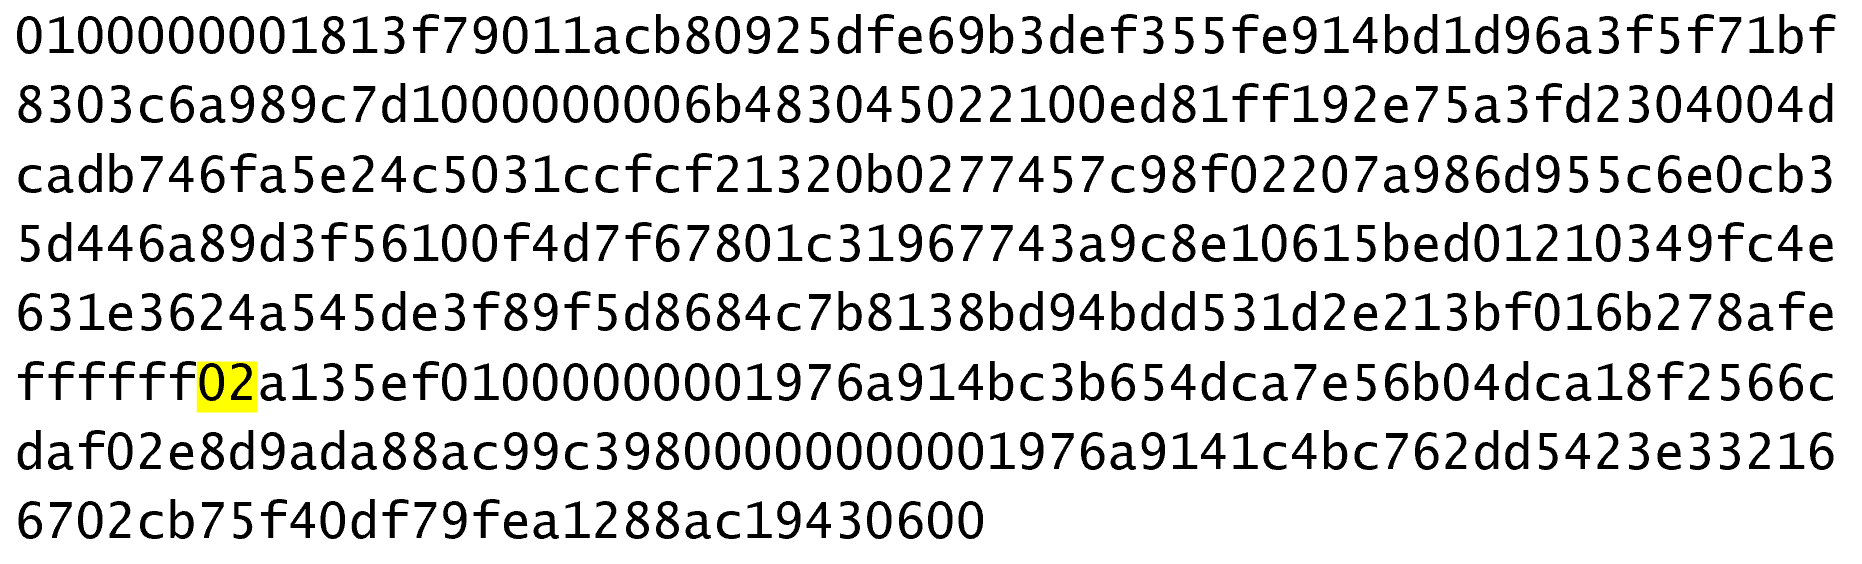
Each output has two fields: Amount and ScriptPubKey. Amount is the amount of Bitcoin being assigned and is specified in satoshis, or 1/100,000,000th of a Bitcoin. This allows us to divide Bitcoin very finely, down to 1/300th of a penny in USD terms as of this writing. The absolute maximum for the amount is the asymptotic limit of Bitcoin (21 million Bitcoins) in satoshis, which is 2,100,000,000,000,000 (2100 trillion) satoshis. This number is greater than 232 (4.3 billion or so) and is thus stored in 64 bits, or 8 bytes. Amount is serialized in Little-Endian.
ScriptPubKey, like ScriptSig, has to do with Bitcoin’s smart contract language Script. Think of ScriptPubKey as the locked box that can only be opened by the holder of the key. ScriptPubKey can be thought of as a one-way safe that can receive deposits from anyone, but can only be opened by the owner of the safe. We’ll explore what this is in more detail in Chapter 6. Like ScriptSig, ScriptPubKey is a variable-length field and is preceded by the length of the field in a varint.
An output field look like Figure 5-7:
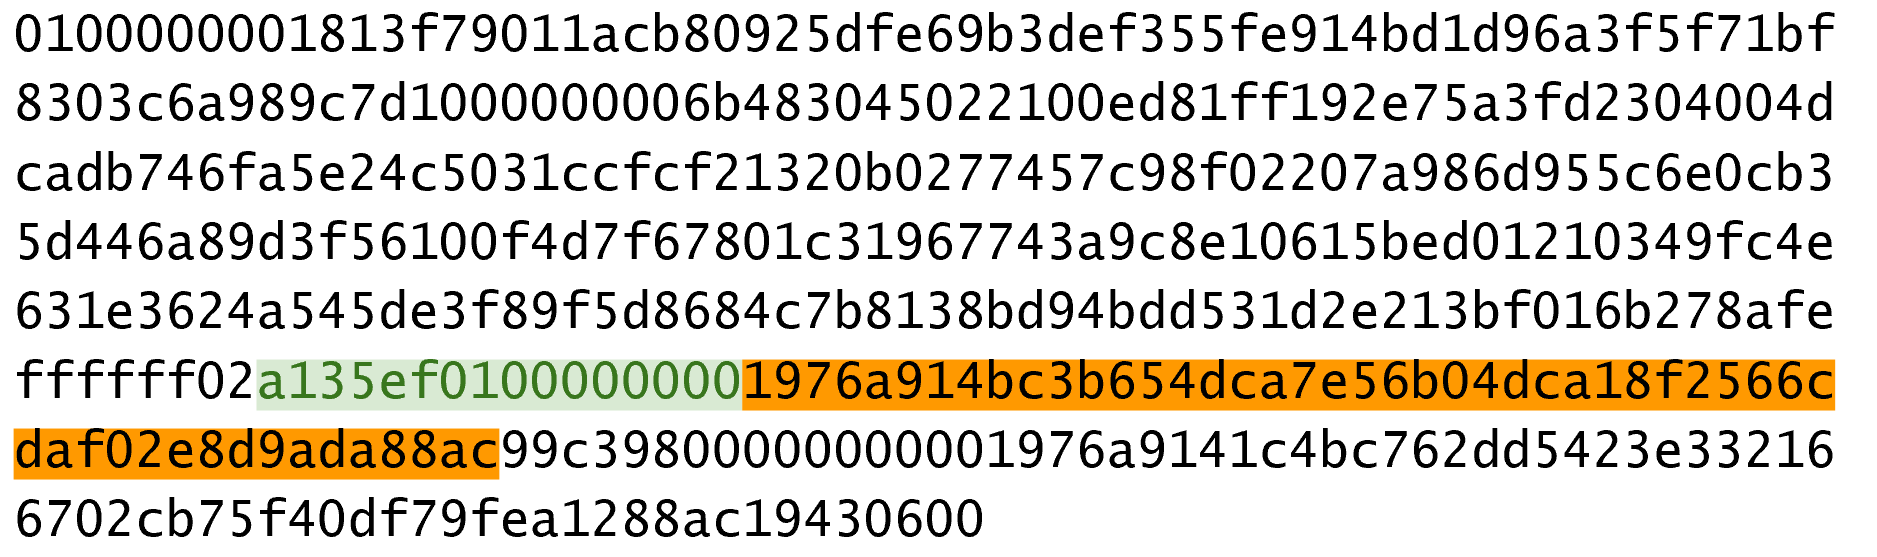
We can now start coding the TxOut class:
classTxOut:def__init__(self,amount,script_pubkey):self.amount=amountself.script_pubkey=script_pubkeydef__repr__(self):return'{}:{}'.format(self.amount,self.script_pubkey)
Write the outputs parsing part of the parse method in Tx and the parse method for TxOut.
Locktime is a way to time-delay a transaction. A transaction with a Locktime of 600,000 cannot go into the blockchain until block 600,000. This was originally construed as a way to do “high frequency trades” (see Sequence and Locktime), which turned out to be insecure. If the Locktime is greater or equal to 500,000,000, Locktime is a UNIX timestamp. If Locktime is less than 500,000,000, it is a block number. This way, transactions can be signed, but unspendable until a certain point in UNIX time or block height.
The serialization is in Little-Endian and 4-bytes (Figure 5-8).
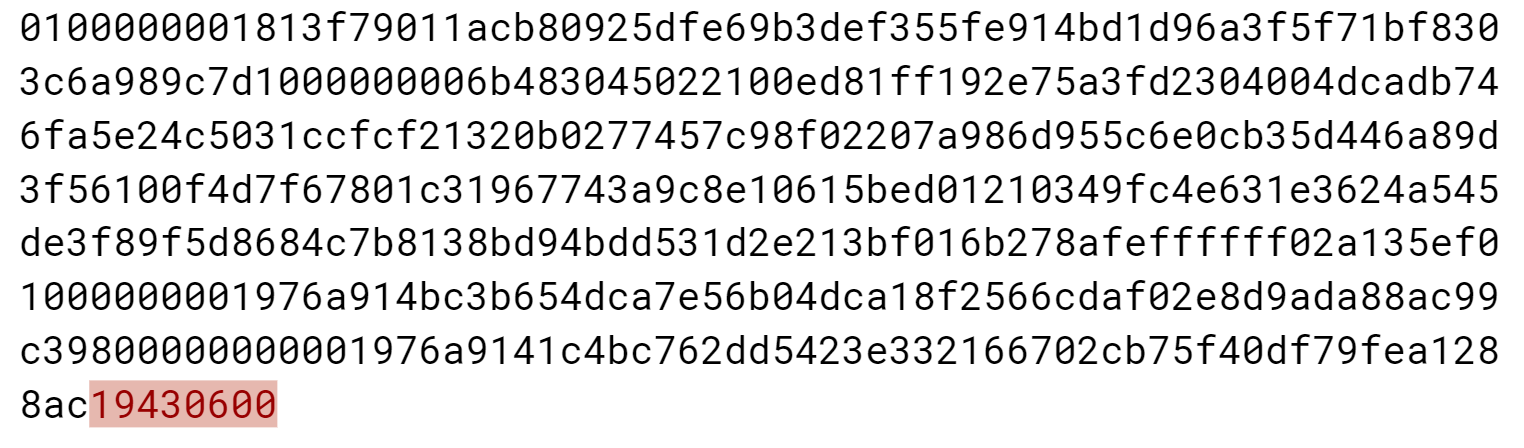
The main problem with using Locktime is that the recipient of the transaction has no certainty that the transaction will be good when the Locktime comes. This is similar to a post-dated bank check, which has the possibility of bouncing. The sender can spend the inputs prior to the Locktime transaction getting into the blockchain invalidating the transaction at Locktime.
The uses before BIP0065 were limited.
BIP0065 introduced OP_CHECKLOCKTIMEVERIFY which makes Locktime more useful by making an output unspendable until a certain Locktime.
Write the Locktime parsing part of the parse method in Tx.
What is the ScriptSig from the second input, ScriptPubKey from the first output and the amount of the second output for this transaction?
010000000456919960ac691763688d3d3bcea9ad6ecaf875df5339e148a1fc61c6ed7a069e0100
00006a47304402204585bcdef85e6b1c6af5c2669d4830ff86e42dd205c0e089bc2a821657e951
c002201024a10366077f87d6bce1f7100ad8cfa8a064b39d4e8fe4ea13a7b71aa8180f012102f0
da57e85eec2934a82a585ea337ce2f4998b50ae699dd79f5880e253dafafb7feffffffeb8f51f4
038dc17e6313cf831d4f02281c2a468bde0fafd37f1bf882729e7fd3000000006a473044022078
99531a52d59a6de200179928ca900254a36b8dff8bb75f5f5d71b1cdc26125022008b422690b84
61cb52c3cc30330b23d574351872b7c361e9aae3649071c1a7160121035d5c93d9ac96881f19ba
1f686f15f009ded7c62efe85a872e6a19b43c15a2937feffffff567bf40595119d1bb8a3037c35
6efd56170b64cbcc160fb028fa10704b45d775000000006a47304402204c7c7818424c7f7911da
6cddc59655a70af1cb5eaf17c69dadbfc74ffa0b662f02207599e08bc8023693ad4e9527dc42c3
4210f7a7d1d1ddfc8492b654a11e7620a0012102158b46fbdff65d0172b7989aec8850aa0dae49
abfb84c81ae6e5b251a58ace5cfeffffffd63a5e6c16e620f86f375925b21cabaf736c779f88fd
04dcad51d26690f7f345010000006a47304402200633ea0d3314bea0d95b3cd8dadb2ef79ea833
1ffe1e61f762c0f6daea0fabde022029f23b3e9c30f080446150b23852028751635dcee2be669c
2a1686a4b5edf304012103ffd6f4a67e94aba353a00882e563ff2722eb4cff0ad6006e86ee20df
e7520d55feffffff0251430f00000000001976a914ab0c0b2e98b1ab6dbf67d4750b0a56244948
a87988ac005a6202000000001976a9143c82d7df364eb6c75be8c80df2b3eda8db57397088ac46
430600
We’ve parsed the transaction, now we want to do the opposite, which is serializing the transaction.
Let’s start with TxOut:
classTxOut:...defserialize(self):'''Returns the byte serialization of the transaction output'''result=int_to_little_endian(self.amount,8)result+=self.script_pubkey.serialize()returnresult
We’re going to serialize the TxOut object to a bunch of bytes.
We can proceed to TxIn:
classTxIn:...defserialize(self):'''Returns the byte serialization of the transaction input'''result=self.prev_tx[::-1]result+=int_to_little_endian(self.prev_index,4)result+=self.script_sig.serialize()result+=int_to_little_endian(self.sequence,4)returnresult
Lastly, we can serialize Tx:
classTx:...defserialize(self):'''Returns the byte serialization of the transaction'''result=int_to_little_endian(self.version,4)result+=encode_varint(len(self.tx_ins))fortx_ininself.tx_ins:result+=tx_in.serialize()result+=encode_varint(len(self.tx_outs))fortx_outinself.tx_outs:result+=tx_out.serialize()result+=int_to_little_endian(self.locktime,4)returnresult
We’ve used the serialize methods of both TxIn and TxOut to serialize Tx.
Note that the transaction fee is not specified anywhere! This is because the fee is an implied amount. Fee is the total of the inputs amounts minus the total of the output amounts.
One of the consensus rules of Bitcoin is that for any non-Coinbase transactions (more on Coinbase transactions in Chapter 8), the sum of the inputs have to be greater than or equal to the sum of the outputs. You may be wondering why the inputs and outputs can’t just be forced to be equal. This is because if every transaction had zero cost, there wouldn’t be any incentive for miners to include transactions in blocks (see Chapter 9). Fees are a way to incentivize miners to include transactions. Transactions not in blocks (so called mempool transactions) are not part of the blockchain and are not final.
The transaction fee is simply the sum of the inputs minus the sum of the outputs. This difference is what the miner gets to keep. As inputs don’t have an amount field, we have to look up the amount. This requires access to the blockchain, specifically the UTXO set. If you are not running a full node, this can be tricky, as you now need to trust some other entity to provide you with this information.
We are creating a new class to handle this, called TxFetcher:
classTxFetcher:cache={}@classmethoddefget_url(cls,testnet=False):iftestnet:return'http://testnet.programmingbitcoin.com'else:return'http://mainnet.programmingbitcoin.com'@classmethoddeffetch(cls,tx_id,testnet=False,fresh=False):iffreshor(tx_idnotincls.cache):url='{}/tx/{}.hex'.format(cls.get_url(testnet),tx_id)response=requests.get(url)try:raw=bytes.fromhex(response.text.strip())exceptValueError:raiseValueError('unexpected response: {}'.format(response.text))ifraw[4]==0:raw=raw[:4]+raw[6:]tx=Tx.parse(BytesIO(raw),testnet=testnet)tx.locktime=little_endian_to_int(raw[-4:])else:tx=Tx.parse(BytesIO(raw),testnet=testnet)iftx.id()!=tx_id:raiseValueError('not the same id: {} vs {}'.format(tx.id(),tx_id))cls.cache[tx_id]=txcls.cache[tx_id].testnet=testnetreturncls.cache[tx_id]
We check that the ID is what we expect it to be
You may be wondering why we don’t get just the specific output for the transaction and instead get the entire transaction. This is because we don’t want to be trusting a third party! By getting the entire transaction, we can verify the transaction ID (hash256 of its contents) and be sure that we are indeed getting the transaction we asked for. This is impossible unless we receive the entire transaction.
As Nick Szabo eloquently wrote in his seminal essay “Trusted Third Parties are Security Holes” (https://nakamotoinstitute.org/trusted-third-parties/), trusting third parties to provide correct data is not a good security practice. The third party may be behaving well now, but you never know when they may get hacked, may have an employee go rogue or start implementing policies that are against your interests. Part of what makes Bitcoin secure is in not trusting, but verifying data that we’re given.
We can now create the appropriate method in TxIn to fetch the previous transaction and methods to get the previous transaction output’s amount and ScriptPubkey (the latter to be used in Chapter 6):
classTxIn:...deffetch_tx(self,testnet=False):returnTxFetcher.fetch(self.prev_tx.hex(),testnet=testnet)defvalue(self,testnet=False):'''Get the outpoint value by looking up the tx hashReturns the amount in satoshi'''tx=self.fetch_tx(testnet=testnet)returntx.tx_outs[self.prev_index].amountdefscript_pubkey(self,testnet=False):'''Get the ScriptPubKey by looking up the tx hashReturns a Script object'''tx=self.fetch_tx(testnet=testnet)returntx.tx_outs[self.prev_index].script_pubkey
Now that we have the amount method in TxIn which lets us access how many Bitcoins are in each transaction input, we can calculate the fee for a transaction.
Write the fee method for the Tx class.
We’ve covered exactly how to parse and serialize transactions along with the fields mean. There are two fields that require more explanation and they are both related to Bitcoin’s smart contract language, Script. To that topic we go in <chapter_script>>.
The ability to lock and unlock coins is the mechanism by which we transfer Bitcoin. Locking is giving some Bitcoins to some entity. Unlocking is spending some Bitcoins that you have received.
In this chapter we examine this locking/unlocking mechanism, which is often called a smart contract. Elliptic Curve Cryptography (Chapter 3) is used to Script to validate that the transaction was properly authorized (Chapter 5). Script essentially allows people to be able to prove that they have the right to spend certain UTXOs. We’re getting a little ahead of ourselves, though, so let’s start with how Script works and go from there.
If you are confused about what a “smart contract” is, don’t worry. “Smart contract” is a fancy way of saying “programmable” and the “smart contract language” is simply a programming language. In Bitcoin, Script is the smart contract language, or the programming language used to express the conditions under which bitcoins are spendable.
Bitcoin has the digital equivalent of a contract in Script. Script is a stack-based language similar to Forth. Script is intentionally limited in the sense that Script avoids certain features. Specifically, Script avoids any mechanism for loops and is therefore not Turing complete.
Turing completeness in a programming language essentially means that the program has the ability to loop. Loops are a useful construct in programming, so you may be wondering at this point why Script doesn’t have the ability to loop.
There are a lot of reasons for this, but let’s start with program execution. Anyone can create a Script program that every full node on the network executes. If Script were Turing Complete, it would be possible for the loop to go on executing forever. This would validating node to enter and never leave that loop. This would be an easy way to attack the network through what would be called a Denial of Service attack (DoS). A single Script that has an infinite loop could take down Bitcoin! This would be a large systematic vulnerability and protecting against this vulnerability is one of the major reasons why Turing-completeness is avoided. Ethereum, which has Turing Completeness in its smart contract language, Solidity, handles this problem by forcing contracts to pay for program execution with something called “gas”. An infinite loop will exhaust whatever gas is in the contract as by definition, it will run an infinite number of times.
There are other reasons to avoid Turing Completeness and that’s because smart contracts with Turing Completeness are very difficult to analyze. A Turing Complete smart contract’s execution conditions are very difficult to enumerate and thus it’s easy to create unintended behavior, causing bugs. Bugs in a smart contract mean that it’s vulnerable to being unintentionally spent, which means the contract participants could lose money. Such bugs are not just theoretical: this was the major problem in the DAO (Decentralized Autonomous Organization), a Turing Complete smart contract which ended with the Ethereum Classic hard fork.
Transactions assign Bitcoins to a locking Script. The locking Script is what’s specified in ScriptPubKey (see Chapter 5). Think of this as the lockbox where some money is deposited which only a particular key can open. The money inside, of course, can only be accessed by the owner who has the key.
The unlocking of the lockbox is done in the ScriptSig field (see Chapter 5) and proves ownership of the locked box which authorizes spending of the funds.
Script is a programming language and like most programming languages, processes one instruction at a time. The instructions operate on a stack of elements. There are two possible types of instructions: elements and operations.
Elements are data. Technically, they’re a push operation onto the stack of that element. They are byte strings of length 1 to 520. A typical element might be a DER signature or a SEC pubkey (Figure 6-1).
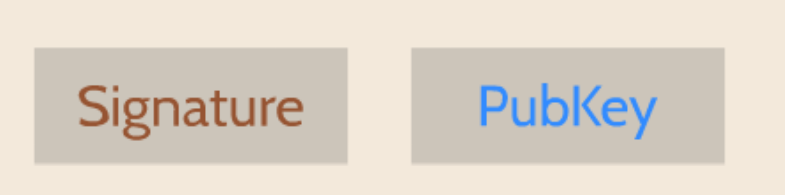
Operations do something to the data (Figure 6-2). They consume zero or more elements from the processing stack and push zero or more elements back on the stack.

A typical operation is OP_DUP (Figure 6-3), which will duplicate the top element (consuming 0) and pushing the new element to the stack (pushing 1).

OP_DUP duplicates the top elementAt the end of evaluating all the instructions, the top element of the stack must be non-zero for the Script to resolve as valid. Having no elements in the stack or the top element being zero would resolve as invalid. Resolving as invalid means that the transaction which includes the unlocking Script is not accepted on the network.
There are many other operations besides OP_DUP.
OP_HASH160 (Figure 6-4) does a sha256 followed by a ripemd160 (aka hash160) to the top element of the stack (consuming 1) and pushing a new element to the stack (pushing 1).
Note in the diagram that y = hash160(x).

OP_HASH160 does a sha256 followed by ripemd160 to the top elementAnother very important operation is OP_CHECKSIG (Figure 6-5).
OP_CHECKSIG consumes 2 elements from the stack, the first being the pubkey, the second being a signature, and examines if the signature is good for the given pubkey.
If so, OP_CHECKSIG pushes a 1 to the stack, otherwise pushes a 0 to the stack.
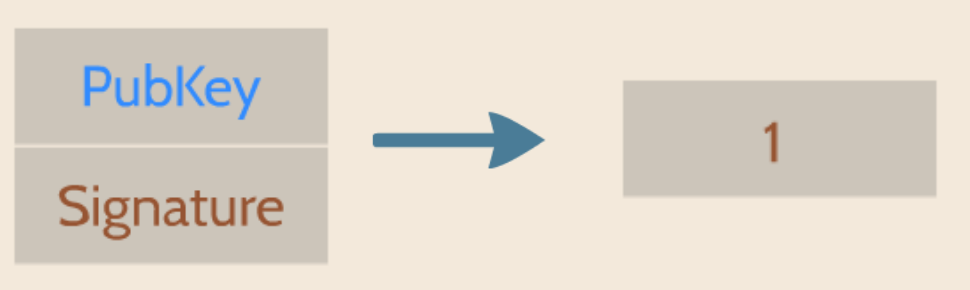
OP_CHECKSIG checks if the signature for the pubkey is valid or notWe can now code OP_DUP, given a stack.
OP_DUP simply duplicates the top element of the stack.
defop_dup(stack):iflen(stack)<1:returnFalsestack.append(stack[-1])returnTrue...OP_CODE_FUNCTIONS={...118:op_dup,...}
We have to have at least one element to duplicate, otherwise, we can’t execute this opcode.
This is how we duplicate the top element of the stack.
118 = 0x76 which is the code for OP_DUP
Note that we return a boolean with this opcode, as a way to tell whether the operation was successful. A failed operation automatically fails Script evaluation.
Here’s another one for OP_HASH256.
This opcode will consume the top element, perform a hash256 operation on it and push the result on the stack.
defop_hash256(stack):iflen(stack)<1:returnFalseelement=stack.pop()stack.append(hash256(element))returnTrue...OP_CODE_FUNCTIONS={...170:op_hash256,...}
Write the op_hash160 function.
Both ScriptPubKey and ScriptSig are parsed the same way.
If the byte is between 0x01 and 0x4b (which we call n), we read the next n bytes as an element.
Otherwise, the byte represents an operation, which we have to look up.
Here are some operations and their byte codes:
0x00 - OP_0
0x51 - OP_1
0x60 - OP_16
0x75 - OP_DUP
0x93 - OP_ADD
0xa9 - OP_HASH160
0xac - OP_CHECKSIG
You might be wondering what would happen if you had an element that’s greater than 0x4b (75 in decimal).
There are 3 specific opcodes for handling elements with length greater than 75, namely, OP_PUSHDATA1, OP_PUSHDATA2 and OP_PUSHDATA4.
OP_PUSHDATA1 means that the next byte contains how many bytes we need to read for the element.
OP_PUSHDATA2 means that the next 2 bytes contain how many bytes we need to read for the element.
OP_PUSHDATA4 means that the next 4 bytes contain how many bytes we need to read for the element.
Practically speaking, this means if we have an element that’s between 76 and 255 bytes inclusive, we use OP_PUSHDATA1 <1-byte length of the element> <element>.
For anything between 256 bytes and 520 bytes inclusive, we use OP_PUSHDATA2 <2-byte length of the element in Little-Endian> <element>.
Anything larger than 520 bytes is not allowed on the network, so OP_PUSHDATA4 is unnecessary, though OP_PUSHDATA4 <4-byte length of the element in Little-Endian, but value less than or equal to 520> <element> is still legal.
It is possible to encode a number below 76 using OP_PUSHDATA1 or a number below 256 using OP_PUSHDATA2 or even any number 520 and below using OP_PUSHDATA4.
These are considered non-standard transactions, meaning most bitcoin nodes (particularly those running Bitcoin Core software) will not relay them.
There are many more opcodes, which are coded in op.py and the full list can be found at http://wiki.bitcoin.it.
Now that we know how Script works, we can write a Script parser.
classScript:def__init__(self,instructions=None):ifinstructionsisNone:self.instructions=[]else:self.instructions=instructions...@classmethoddefparse(cls,s):length=read_varint(s)instructions=[]count=0whilecount<length:current=s.read(1)count+=1current_byte=current[0]ifcurrent_byte>=1andcurrent_byte<=75:n=current_byteinstructions.append(s.read(n))count+=nelifcurrent_byte==76:data_length=little_endian_to_int(s.read(1))instructions.append(s.read(data_length))count+=data_length+1elifcurrent_byte==77:data_length=little_endian_to_int(s.read(2))instructions.append(s.read(data_length))count+=data_length+2else:op_code=current_byteinstructions.append(op_code)ifcount!=length:raiseSyntaxError('parsing script failed')returncls(instructions)
Each instruction is either an opcode to be executed or an element to be pushed onto the stack.
Script serialization always starts with the length of the entire Script.
We parse until the right amount of bytes are consumed.
The byte determines if we have an opcode or element.
This converts the byte into an integer in Python.
For a number between 1 to 75, we know the next n bytes are an element

76 is OP_PUSHDATA1, so the next byte tells us how many bytes to read

77 is OP_PUSHDATA2, so the next two bytes tell us how many bytes to read

We have an opcode that we store.

Script should have consumed exactly the length of bytes we expected, otherwise we raise an error.
We can similarly write a Script serializer.
classScript:...defraw_serialize(self):result=b''forinstructioninself.instructions:iftype(instruction)==int:result+=int_to_little_endian(instruction,1)else:length=len(instruction)iflength<75:result+=int_to_little_endian(length,1)eliflength>75andlength<0x100:result+=int_to_little_endian(76,1)result+=int_to_little_endian(length,1)eliflength>=0x100andlength<=520:result+=int_to_little_endian(77,1)result+=int_to_little_endian(length,2)else:raiseValueError('too long an instruction')result+=instructionreturnresultdefserialize(self):result=self.raw_serialize()total=len(result)returnencode_varint(total)+result
If the instruction is an integer, we know that’s an opcode.
If the byte is between 1 and 75 inclusive, we encode the length as a single byte
For any element with length from 76 to 255, we put OP_PUSHDATA1 first, then encode the length as a single byte and finally, the element.
For anything from 256 to 520, we put OP_PUSHDATA2 first, then encode the length as two bytes in little Endian and finally, the element
Any element longer than 520 bytes cannot be serialized.
Script serialization starts with the length of the entire Script.
Note that both the parser and serializer were used in Chapter 5 parsing/serializing the ScriptSig and ScriptPubKey fields.
The Script object represents the instruction set that requires evaluation. To evaluate Script, we need to combine the ScriptPubKey and ScriptSig fields. The lockbox (ScriptPubKey) and the unlocking (ScriptSig) are in different transactions. Specifically, the lockbox is where the bitcoins are received, the unlocking is where the bitcoins are spent. The input in the spending transaction points to the receiving transaction. Essentially, we have a situation like Figure 6-6:
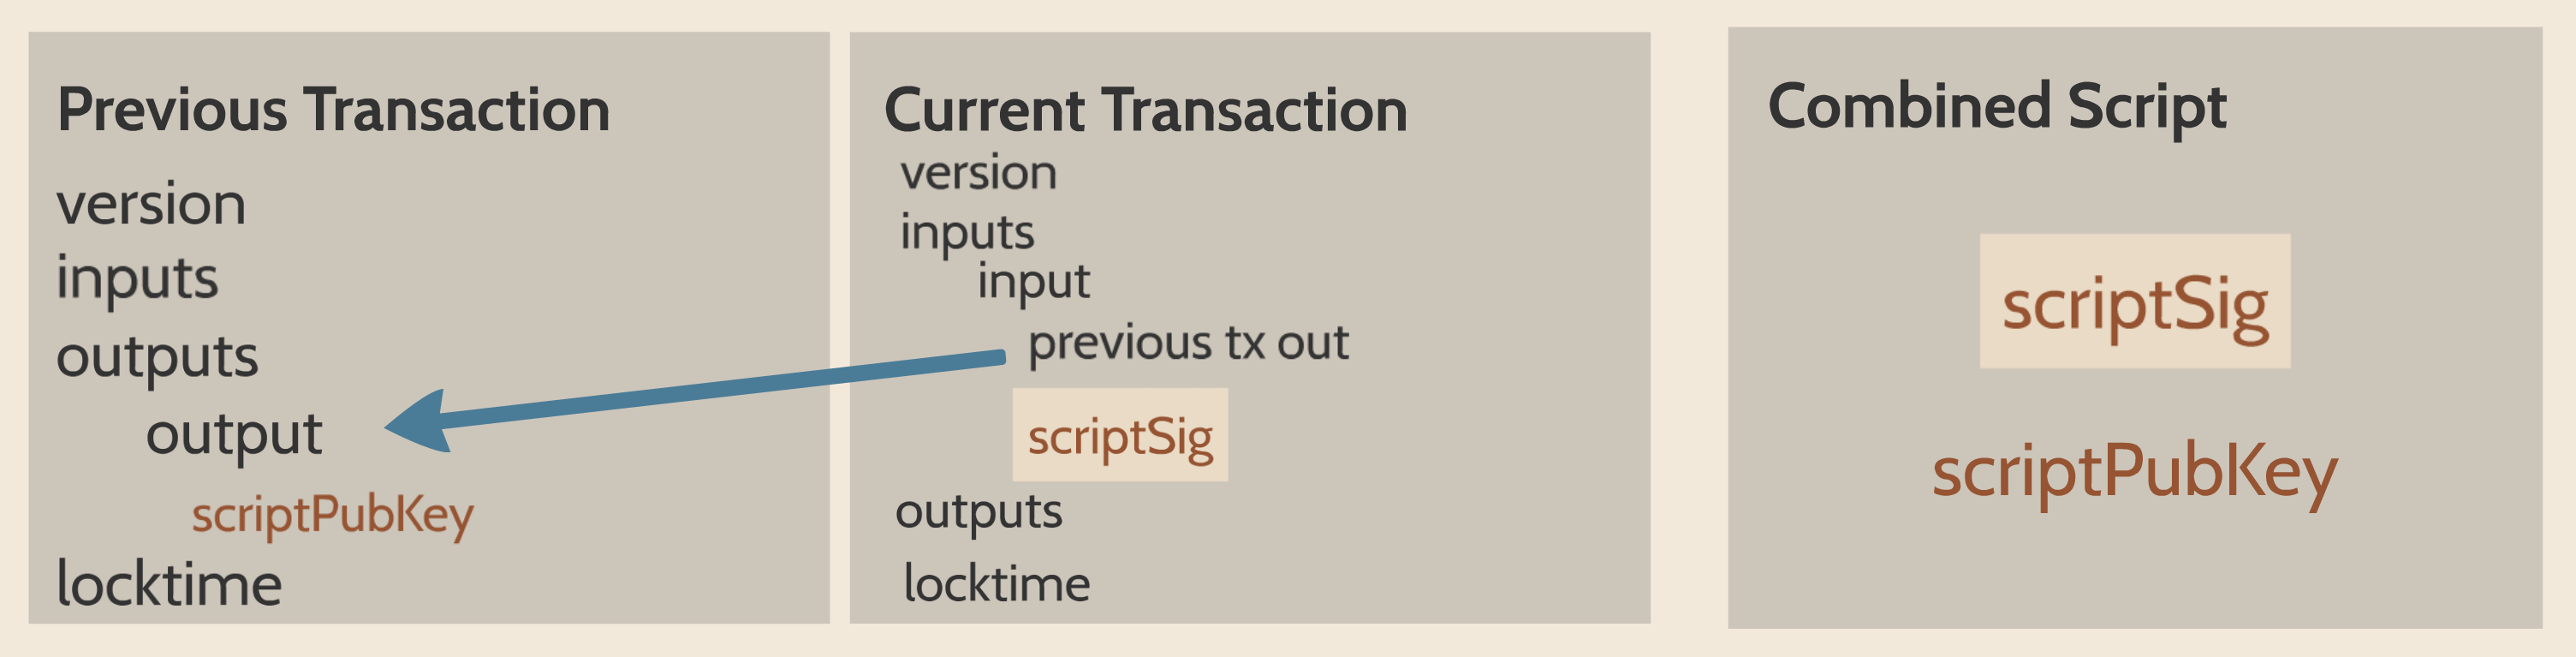
Since ScriptSig unlocks ScriptPubKey, we need a mechanism by which the two Scripts combine. To evaluate the two together, we take the instructions from ScriptSig and ScriptPubKey and combine them as above. The instructions from the ScriptSig go on top of all the instructions from ScriptPubKey. Instructions are processed one at a time until no instructions are left to be processed or if the Script fails early.
The evaluation of Script requires that we take the ScriptSig and ScriptPubKey, combine them into a single instruction set and execute the instructions. In order to do this, we require a way to combine the Scripts.
classScript:...def__add__(self,other):returnScript(self.instructions+other.instructions)
We are combining the instruction set to create a new, combined Script object.
We will use this ability to combine Scripts for evaluation later in this chapter.
There are many types of standard Scripts in Bitcoin including the following:
p2pk - Pay-to-pubkey
p2pkh - Pay-to-pubkey-hash
p2sh - Pay-to-Script-hash
p2wpkh - Pay-to-witness-pubkey-hash
p2wsh - Pay-to-witness-Script-hash
Addresses are data that fit into known Script templates like these. Wallets know how to interpret various address types (p2pkh, p2sh, p2wpkh) and create the appropriate ScriptPubKey. All of the above have a particular type of address format (base58, bech32) so wallets can pay to them.
To show exactly how all this works, we’ll start with one of the original Scripts, pay-to-pubkey.
Pay-to-pubkey (p2pk) was used largely during the early days of bitcoin. Most coins thought to belong to Satoshi are in p2pk UTXOs. That is, transaction outputs whose ScriptPubKeys have the p2pk form. There are some limitations that we’ll discuss later, but first, let’s look at how p2pk works.
Back in Chapter 3, we learned both ECDSA signing and verification.
In order to verify an ECDSA signature, we need the message, z, the public key, P and the signature, r and s.
In p2pk, Bitcoins are sent to a public key and the owner of the private key can unlock, or spend the Bitcoins by creating a signature.
The ScriptPubKey of a Transaction puts the assigned Bitcoins under the control of the private key owner.
Specifying where the Bitcoins go is the job of the ScriptPubKey. ScriptPubKey is the lockbox that receives the bitcoins. The p2pk ScriptPubKey looks like Figure 6-7:

Note the OP_CHECKSIG, as that will be very important.
The ScriptSig is the part that unlocks the received bitcoins.
The pubkey can be compressed or uncompressed, though early on in Bitcoin’s history when p2pk was more prominent, uncompressed was the only one being used (see Chapter 4).
For p2pk, the ScriptSig required to unlock the corresponding ScriptPubKey is just the signature as shown in Figure 6-8:

The ScriptPubKey and ScriptSig combine to make an instruction set that looks like Figure 6-9:
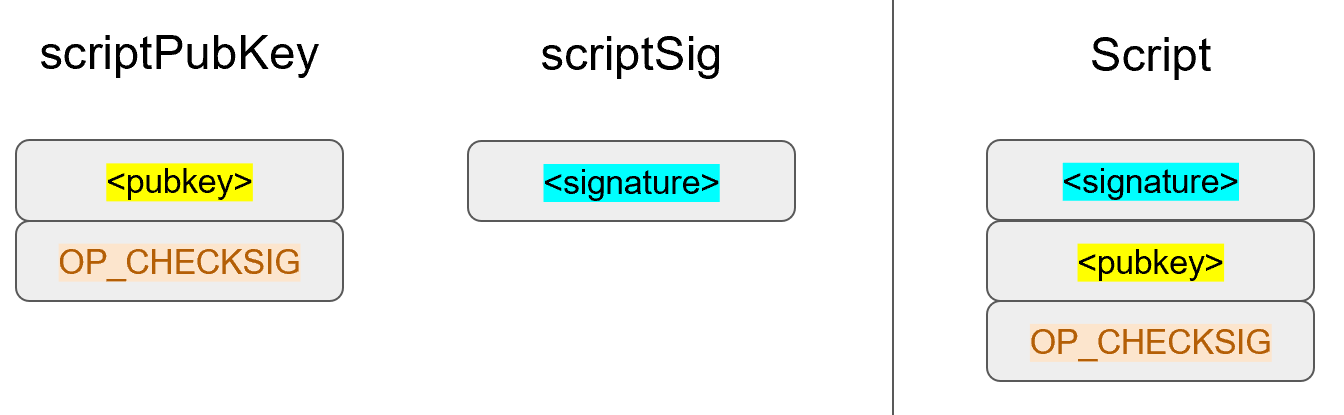
The two columns below are instructions of Script and the elements stack. At the end of this processing, the top element of the stack must be non-zero to be considered a valid ScriptSig. The Script instructions are processed one instruction at a time. We start with the instructions as combined above (Figure 6-10):
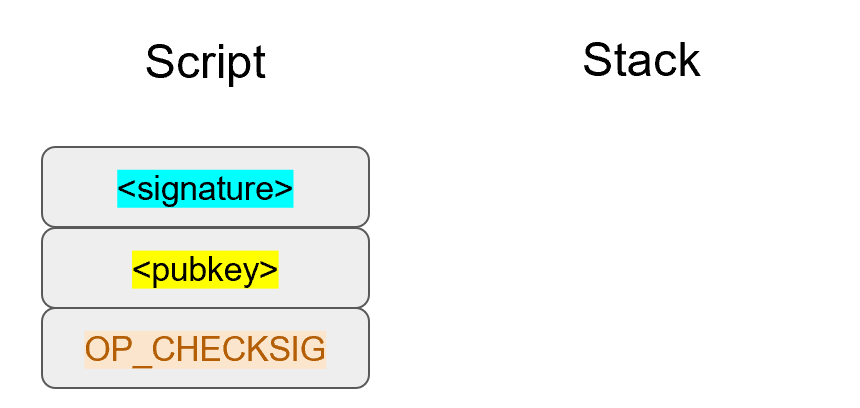
The first instruction is the signature, which is an element. This is data that is pushed to the stack (Figure 6-11).
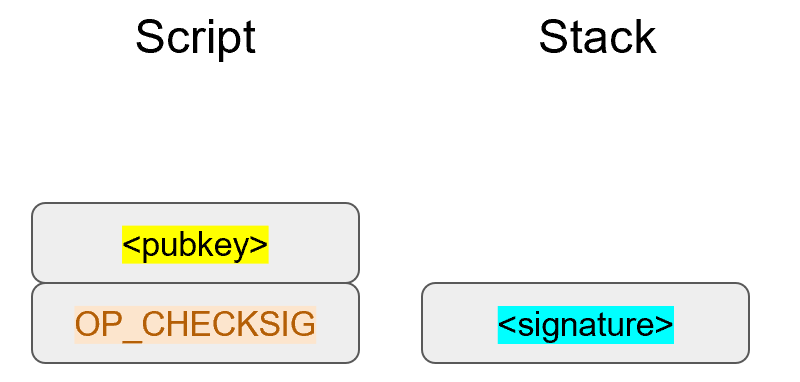
The second instruction is the pubkey, which is also an element. This is again, data is pushed to the stack (Figure 6-12).
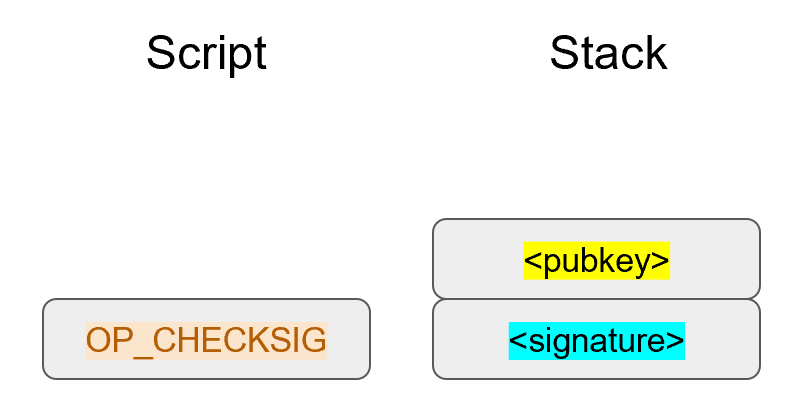
OP_CHECKSIG consumes 2 stack instructions (pubkey and signature) and determines if they are valid for this transaction.
OP_CHECKSIG will push a 1 to the stack if the signature is valid, 0 if not.
Assuming that the signature is valid for this public key, we have this situation (Figure 6-13):
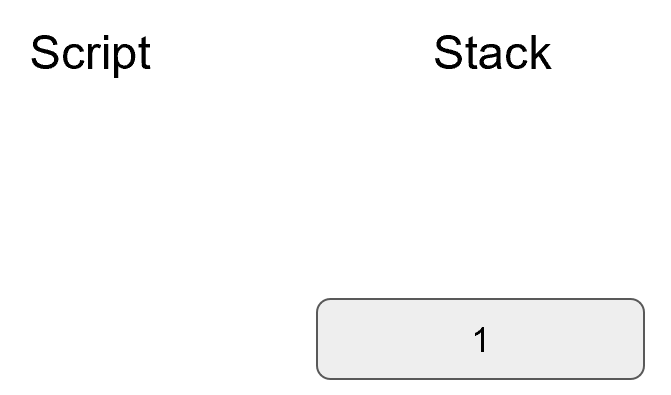
We’re finished processing all the instructions of Script and we’ve ended with a single element on the stack. Since the top element is not zero, (1 is definitely not 0), this Script is valid.
If this transaction instead had an invalid signature, the result from OP_CHECKSIG would be zero, ending our Script processing like Figure 6-14:
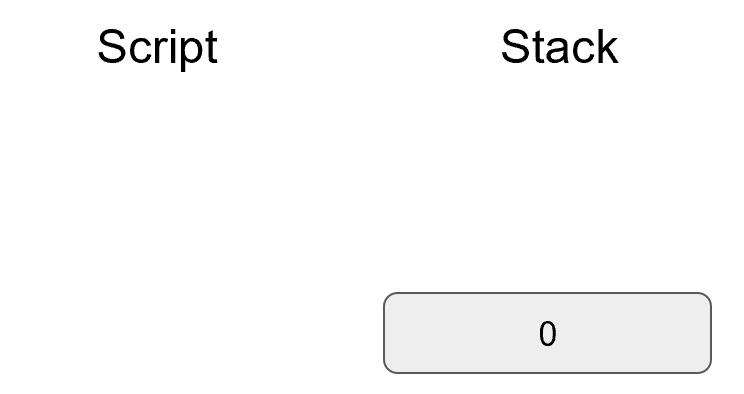
We end with a single element on the stack which is zero. Since the top element is zero, the combined Script is invalid and a transaction with this ScriptSig in the input is invalid.
The combined Script will validate if the signature is valid, but fail if the signature is invalid. The ScriptSig will only unlock the ScriptPubKey if the signature is valid for that public key. In other words, only someone with knowledge of the private key can produce a valid ScriptSig.
Incidentally, we can see where ScriptPubKey got its name.
The public key in uncompressed SEC format is the main instruction in ScriptPubKey for p2pk (the other instruction being OP_CHECKSIG).
Similarly, ScriptSig is named as such because the ScriptSig for p2pk is a single element: the DER signature.
We now code a way to evaluate Script. This requires us to go through each instruction and evaluate whether the Script is valid. What we want to be able to do is this:
>>>fromscriptimportScript>>>z=0x7c076ff316692a3d7eb3c3bb0f8b1488cf72e1afcd929e29307032997a838a3d>>>sec=bytes.fromhex('04887387e452b8eacc4acfde10d9aaf7f6d9a0f975aabb10d006e\4da568744d06c61de6d95231cd89026e286df3b6ae4a894a3378e393e93a0f45b666329a0ae34')>>>sig=bytes.fromhex('3045022000eff69ef2b1bd93a66ed5219add4fb51e11a840f4048\76325a1e8ffe0529a2c022100c7207fee197d27c618aea621406f6bf5ef6fca38681d82b2f06fd\dbdce6feab601')>>>script_pubkey=Script([sec,0xac])>>>script_sig=Script([sig])>>>combined_script=script_sig+script_pubkey>>>(combined_script.evaluate(z))True
p2pk ScriptPubkey is the SEC format pubkey followed by OP_CHECKSIG which is 0xac or 170.
We can do this because of the __add__ method we created above.
We want to evaluate the instructions and see if the Script validates.
Here is the method that we’ll use for the combined instruction set (combination of the ScriptPubKey of the previous transaction and the ScriptSig of the current transaction).
fromopimportOP_CODE_FUNCTIONS,OP_CODE_NAMES...classScript:...defevaluate(self,z):instructions=self.instructions[:]stack=[]altstack=[]whilelen(instructions)>0:instruction=instructions.pop(0)iftype(instruction)==int:operation=OP_CODE_FUNCTIONS[instruction]ifinstructionin(99,100):ifnotoperation(stack,instructions):LOGGER.info('bad op: {}'.format(OP_CODE_NAMES[instruction]))returnFalseelifinstructionin(107,108):ifnotoperation(stack,altstack):LOGGER.info('bad op: {}'.format(OP_CODE_NAMES[instruction]))returnFalseelifinstructionin(172,173,174,175):ifnotoperation(stack,z):LOGGER.info('bad op: {}'.format(OP_CODE_NAMES[instruction]))returnFalseelse:ifnotoperation(stack):LOGGER.info('bad op: {}'.format(OP_CODE_NAMES[instruction]))returnFalseelse:stack.append(instruction)iflen(stack)==0:returnFalseifstack.pop()==b'':returnFalsereturnTrue
As the instructions list will change, we make a copy
We execute until the instructions list is empty
The function that executes the opcode is in the OP_CODE_FUNCTIONS array (e.g.
OP_DUP, OP_CHECKSIG, etc)
99 and 100 are OP_IF and OP_NOTIF respectively.
They require manipulation of the instructions array based on the top element of the stack.
107 and 108 are OP_TOALTSTACK and OP_FROMALTSTACK respectively.
They move stack elements to/from an “alternate” stack, which we call altstack.
172, 173, 174 and 175 are OP_CHECKSIG, OP_CHECKSIGVERIFY, OP_CHECKMULTISIG, and OP_CHECKMULTISIGVERIFY, which all require the signature hash, z, from Chapter 3 for signature validation.
If the instruction is not an opcode, it’s an element, so we push that element to the stack.
If the stack is empty at the end of processing all the instructions, we fail the Script by returning False.
If the stack’s top element is an empty byte string (which is how the stack stores a 0), then we also fail the Script by returning False.
Any other result means that the Script has validated.
The code shown here is a little bit of a cheat as the combined Script is not executed this way exactly. The ScriptSig is evaluated separately from the ScriptPubKey as to not allow operations from ScriptSig to affect the ScriptPubKey instructions.
Specifically, the stack after all the ScriptSig instructions are evaluated are stored and then the ScriptPubkey instructions are evaluated on their own with the stack from the first execution.
It may be confusing that the stack elements are sometimes numbers like 0 or 1 and other times byte-strings like a DER signature or SEC pubkey.
Under the hood, they’re all bytes, but some are interpreted as numbers for certain opcodes.
For example, 1 is stored on the stack as the 01 byte, 2 is stored as the 02 byte, 999 as the e703 and so on.
Any byte-string is interpreted as a Little-Endian number for arithmetic opcodes.
The integer 0 is not stored as the 00 byte, but as the empty byte-string.
The code in op.py can clarify what’s going on:
defencode_num(num):ifnum==0:returnb''abs_num=abs(num)negative=num<0result=bytearray()whileabs_num:result.append(abs_num&0xff)abs_num>>=8ifresult[-1]&0x80:ifnegative:result.append(0x80)else:result.append(0)elifnegative:result[-1]|=0x80returnbytes(result)defdecode_num(element):ifelement==b'':return0big_endian=element[::-1]ifbig_endian[0]&0x80:negative=Trueresult=big_endian[0]&0x7felse:negative=Falseresult=big_endian[0]forcinbig_endian[1:]:result<<=8result+=cifnegative:return-resultelse:returnresultdefop_0(stack):stack.append(encode_num(0))returnTrue
Numbers being pushed to the stack are encoded into bytes and decoded from bytes when the numerical value is needed.
Write the op_checksig function in op.py
Pay-to-pub-key is intuitive in the sense that there is a public key that anyone can send Bitcoins to and a signature that can only be produced by the owner of the private key. This works well, but there are some problems.
First, the public keys are long. We know from Chapter 4 that secp256k1 public points are 33 bytes in compressed SEC and 65 bytes in uncompressed SEC. Unfortunately, humans can’t interpret 33 or 65 raw bytes easily. Most character encodings don’t render certain byte ranges as they are control characters, newlines or similar. The SEC format is typically encoded instead in hexadecimal, doubling the length (hex encodes 4 bits per character instead of 8). This makes the compressed and uncompressed SEC formats 66 and 130 characters respectively, which is bigger than most identifiers (your username on a website, for instance, is usually less than 20). To compound this, early Bitcoin transactions didn’t use the compressed versions so the hexadecimal addresses were 130 characters each! This is not fun or easy for people to transcribe, much less communicate by voice.
That said, the original use-cases for p2pk were for IP-to-IP payments and mining outputs. For IP-to-IP payments, IP addresses were queried for their public keys, so communicating the public keys were done machine-to-machine, which meant that human communication wasn’t necessarily a problem. Use for mining outputs also don’t require human communication. Incidentally, this IP-to-IP payment system was phased out as it’s not secure and prone to man-in-the-middle attacks.
Second, because the public keys are long, this causes a more subtle problem. The UTXO set becomes bigger since this large public key has to be kept around and indexed to see if it’s spendable. This requires more resources on the part of full nodes.
Third, because we’re storing the public key in the ScriptPubKey field, it’s known to everyone. That means should ECDSA someday be broken, these outputs could be stolen. This is not a very big threat since ECDSA is used in a lot of applications besides Bitcoin and would affect all of those things, too. For example, quantum computing has the potential to reduce the calculation times significantly for RSA and ECDSA, so having something else in addition to protect these outputs would be more secure.
Pay-to-pubkey-hash (p2pkh) is an alternative Script that has advantages over p2pk:
The addresses are shorter.
It’s additionally protected by sha256 and ripemd160.
Addresses are shorter due to the use of the sha256 and ripemd160 hashing algorithms. We do both in succession and call that hash160. The result of hash160 is 160-bits or 20 bytes, which are encoded into an address.
The result is what you may have seen on the Bitcoin network and coded in Chapter 4:
1PMycacnJaSqwwJqjawXBErnLsZ7RkXUAs
This address encodes within 20 bytes that look like this in hexadecimal:
f54a5851e9372b87810a8e60cdd2e7cfd80b6e31
These 20 bytes are the result of doing a hash160 operation on this (compressed) SEC public key:
0250863ad64a87ae8a2fe83c1af1a8403cb53f53e486d8511dad8a04887e5b2352
Given p2pkh is shorter and more secure, p2pk use declined significantly after 2010, though it’s still fully supported today.
Pay-to-pubkey-hash was used during the early days of bitcoin, though not as much as p2pk.
The p2pkh ScriptPubKey, or locking Script, looks like Figure 6-15:
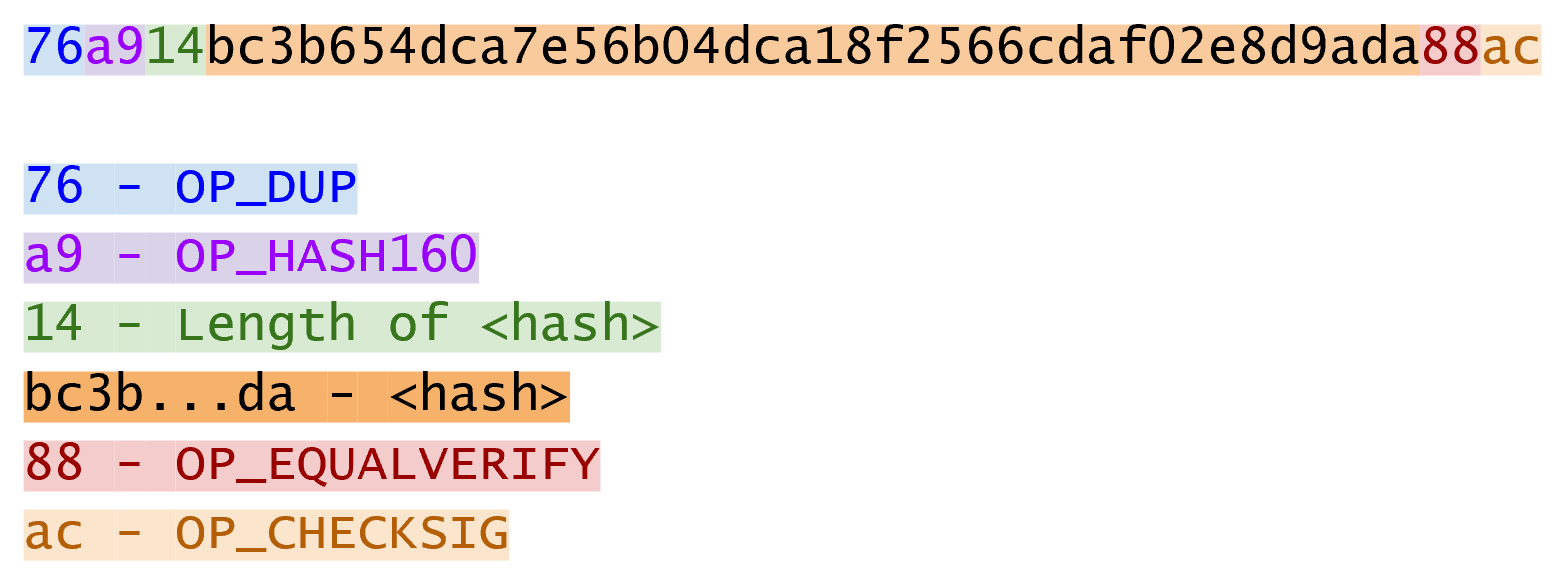
Like p2pk, OP_CHECKSIG is here and OP_HASH160 makes an appearance.
Unlike p2pk, the SEC pubkey is not here but a 20 byte hash is.
There is also a new opcode here: OP_EQUALVERIFY.
The p2pkh ScriptSig, or the unlocking Script, looks like Figure 6-16:
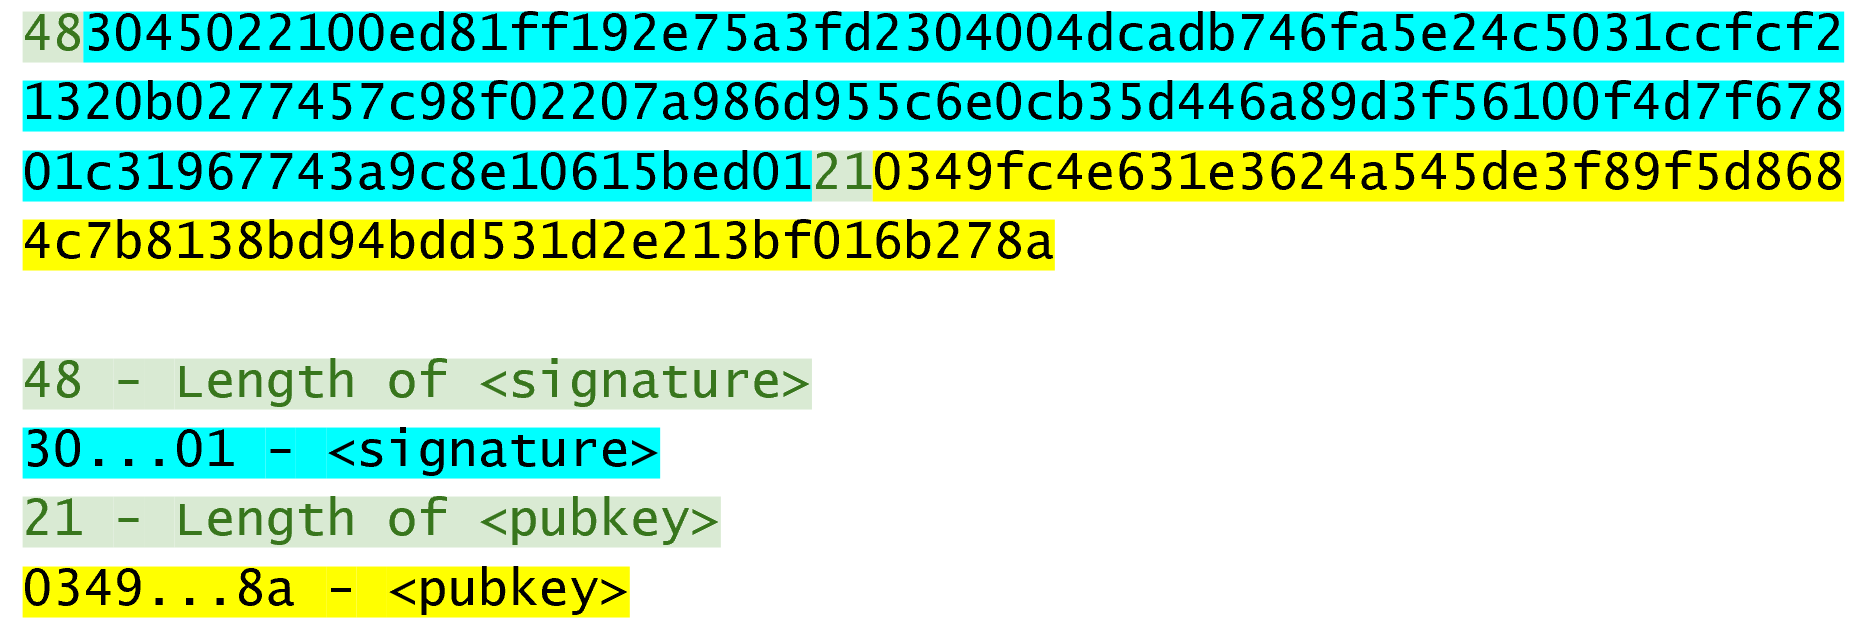
Like p2pk, the ScriptSig has the DER signature. Unlike p2pk, the ScriptSig also has the SEC pubkey. The main difference between p2pk and p2pkh ScriptSigs is that the SEC pubkey has moved from ScriptPubKey to ScriptSig.
The ScriptPubKey and ScriptSig combine to a list of instructions that looks like Figure 6-17:
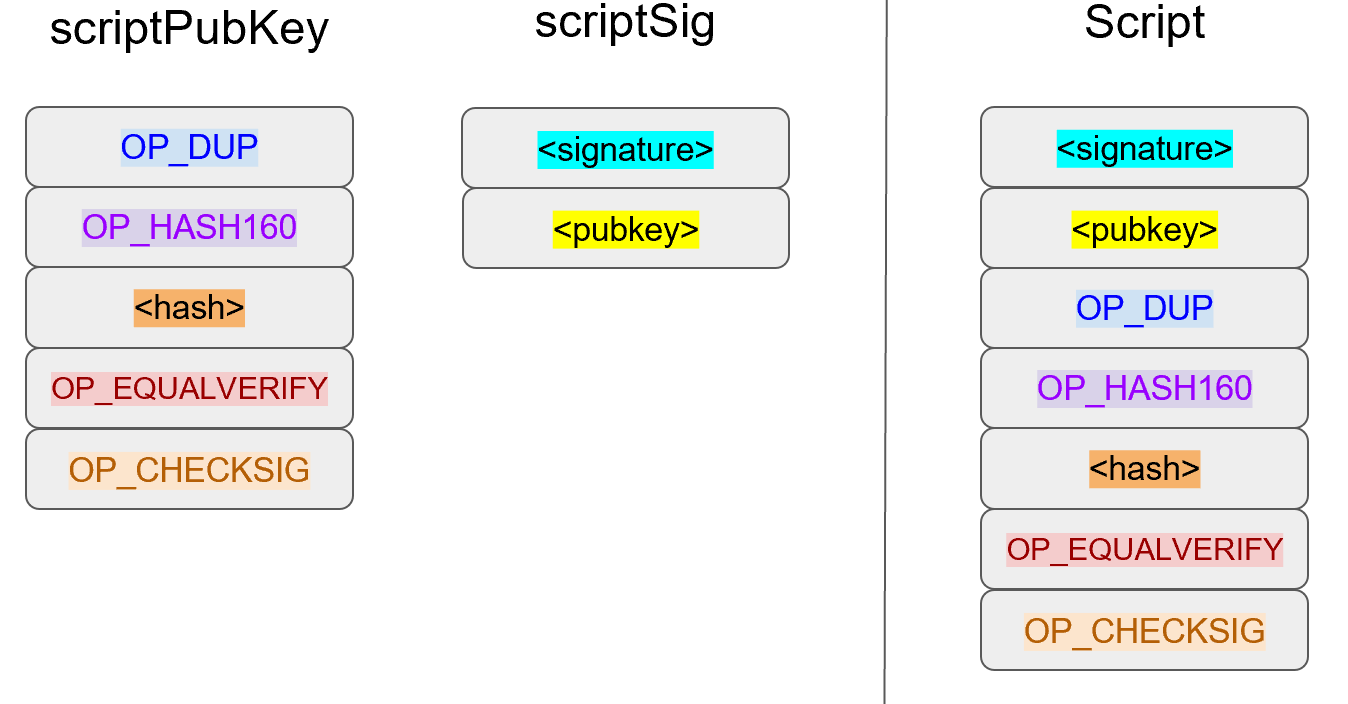
At this point, the Script is processed one instruction at a time. We start with the instructions as above (Figure 6-18).
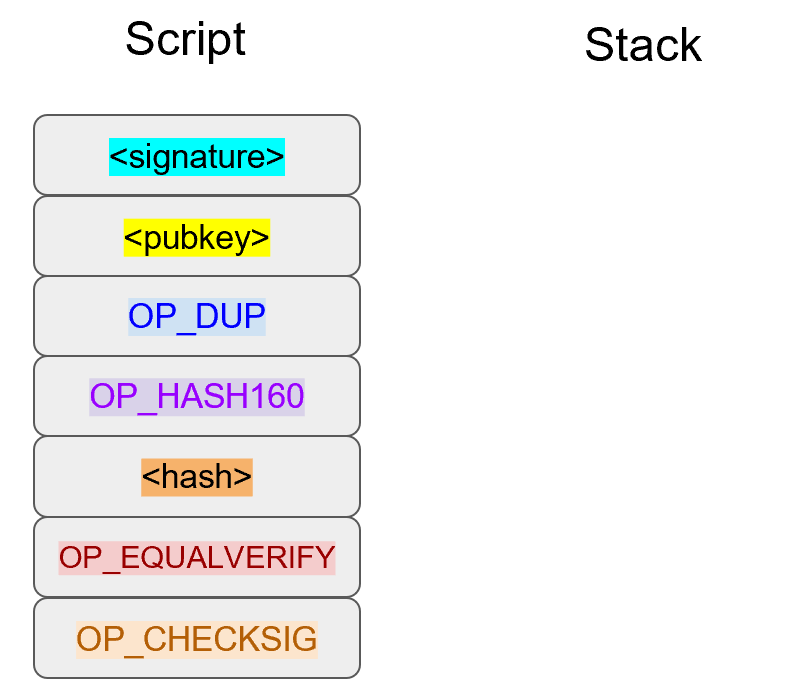
The first two instructions are elements, so they are pushed to the stack (Figure 6-19).
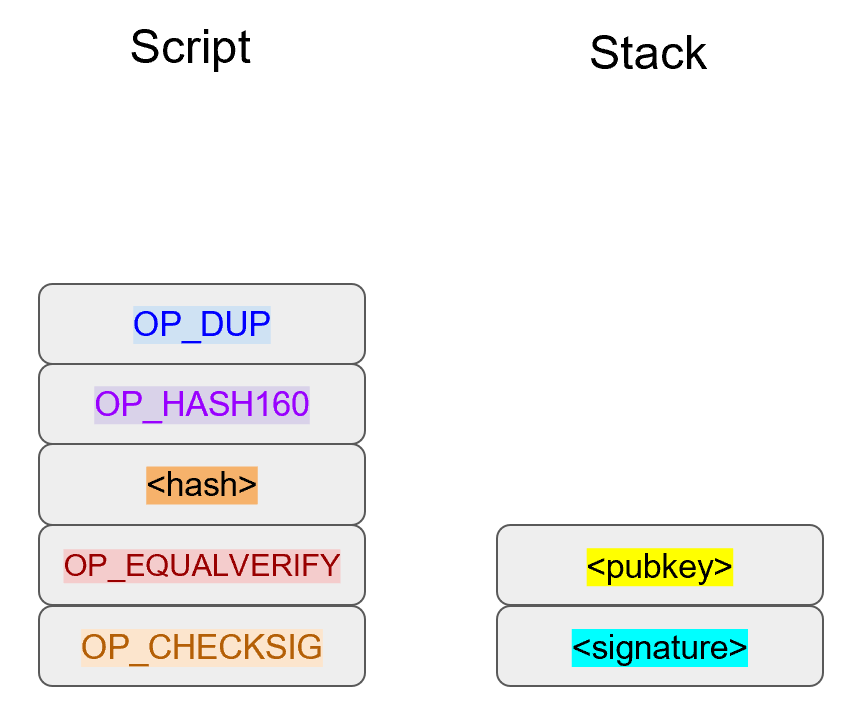
OP_DUP duplicates the top element, so the pubkey gets duplicated (Figure 6-20):

OP_HASH160 takes the top element and performs the hash160 operation on it (sha256 followed by ripemd160), creating a 20-byte hash (Figure 6-21):
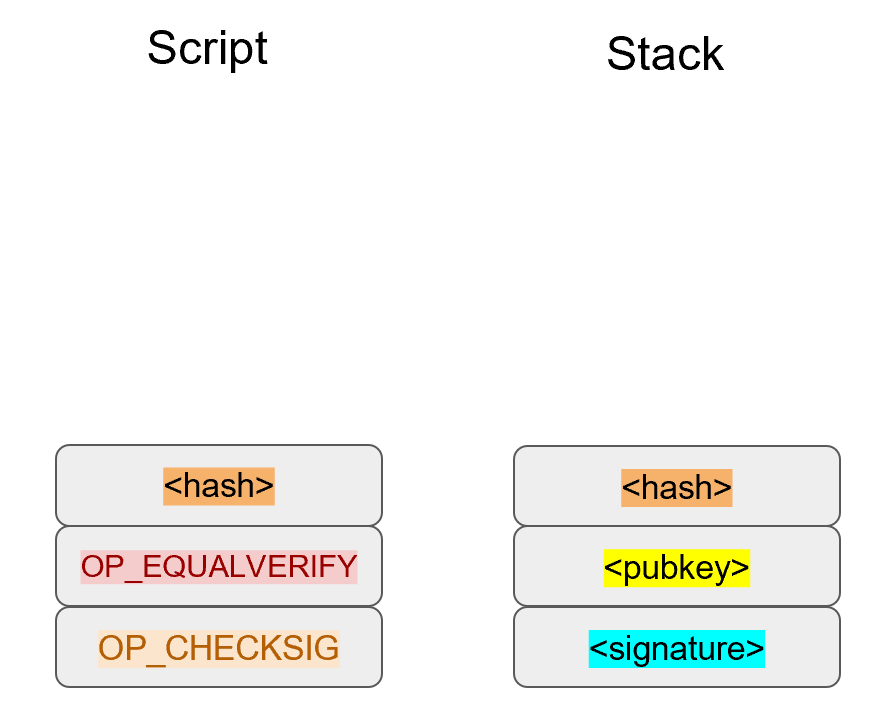
The 20-byte hash is an element and is pushed to the stack (Figure 6-22).
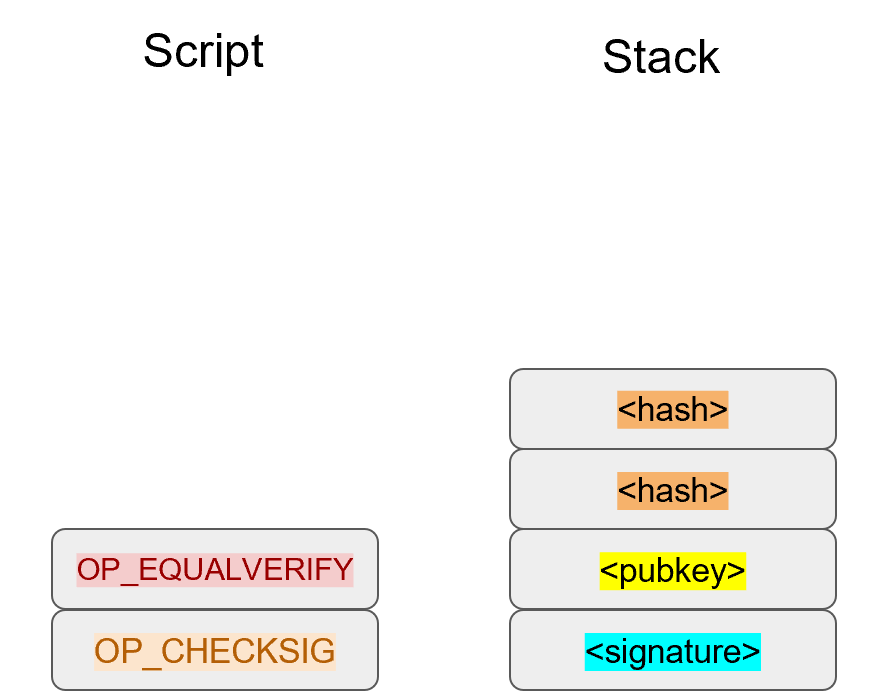
We are now at OP_EQUALVERIFY.
This opcode consumes the top two elements and checks if they’re equal.
If they are equal, the Script continues execution.
If they are not equal, the Script stops immediately and fails.
We assume here that they’re equal, leading to Figure 6-23:

We are now exactly where we were during the OP_CHECKSIG part of processing p2pk.
Once again, we assume that the signature is valid (Figure 6-24):
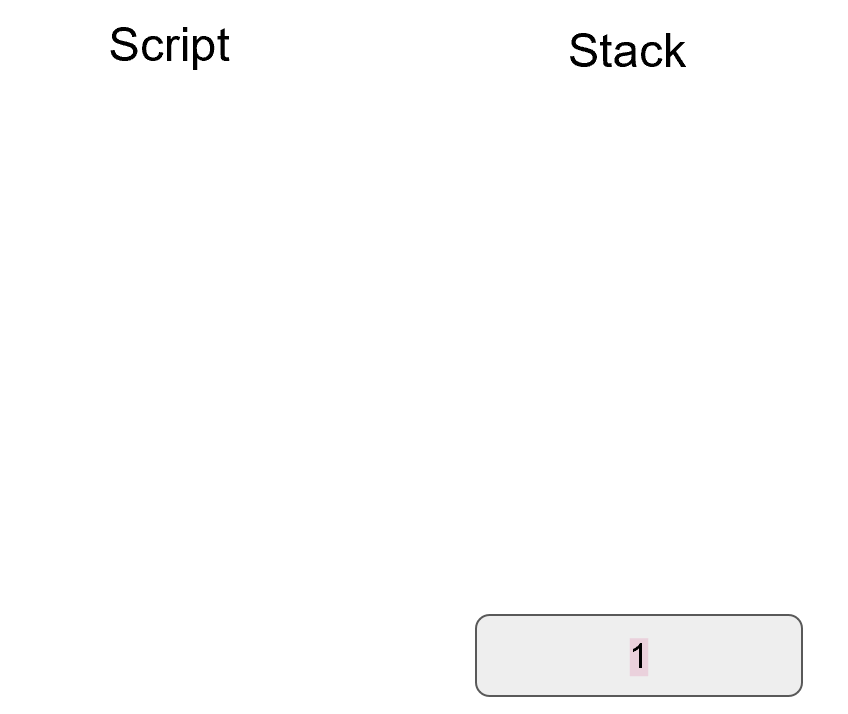
There are two ways this Script can fail.
If the ScriptSig provides a public key that does not hash160 to the 20-byte hash in the ScriptPubKey, the Script will fail at OP_EQUALVERIFY (Figure 6-22).
The other failure condition is if the ScriptSig has a public key that hash160s to the 20-byte hash in the ScriptPubKey, but has an invalid signature.
That would end the combined Script evaluation with a 0, ending in failure.
This is why we call this type of Script pay-to-pubkey-hash. The ScriptPubKey has the 20-byte hash160 of the public key and not the public key itself. We are locking Bitcoins to a hash of the public key and the spender is responsible for revealing the public key as part of constructing the ScriptSig.
The major advantage is that the ScriptPubKey is shorter (just 25 bytes) and a thief would not only have to solve the Discrete Log problem in ECDSA, but also figure out a way to find pre-images of both ripemd160 and sha256.
Note that Scripts can be any arbitrary program. Script is a smart contract language and can lock Bitcoins in many different ways. Figure 6-25 is an example ScriptPubKey:
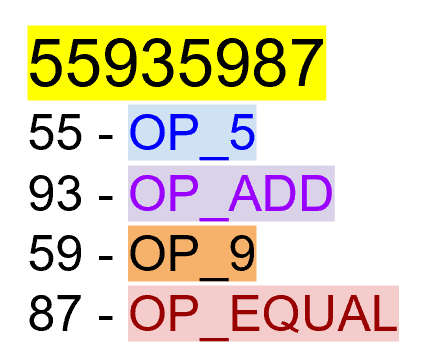
Figure 6-26 is a ScriptSig that will unlock the the ScriptPubKey from Figure 6-25.
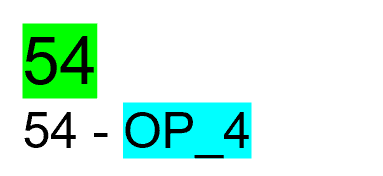
The combined Script is shown in Figure 6-27:
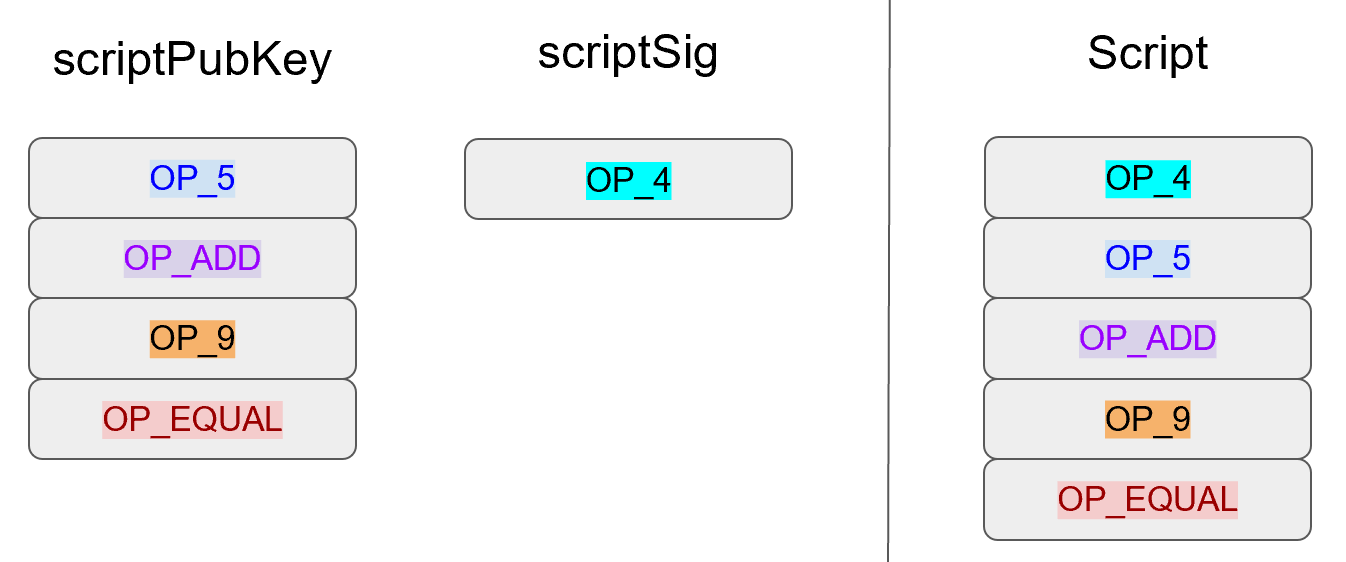
Script evaluation will start like Figure 6-28:
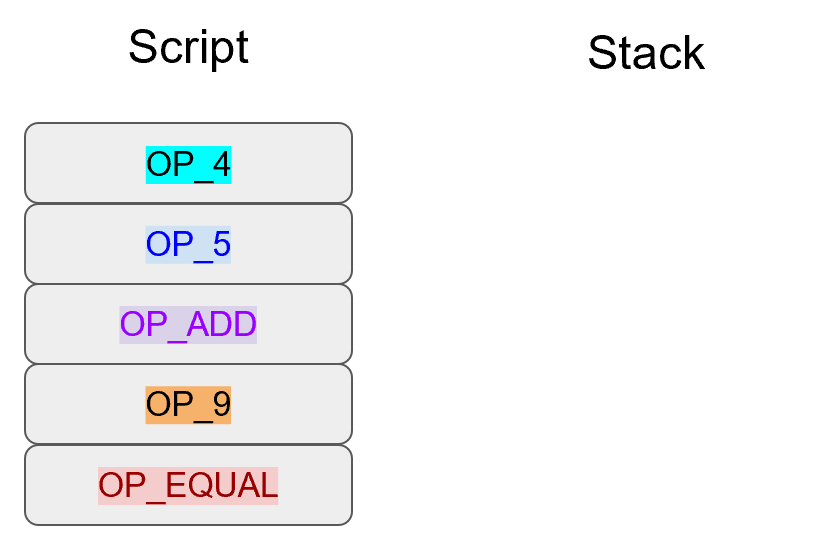
OP_4 will push a 4 to the stack (Figure 6-29).
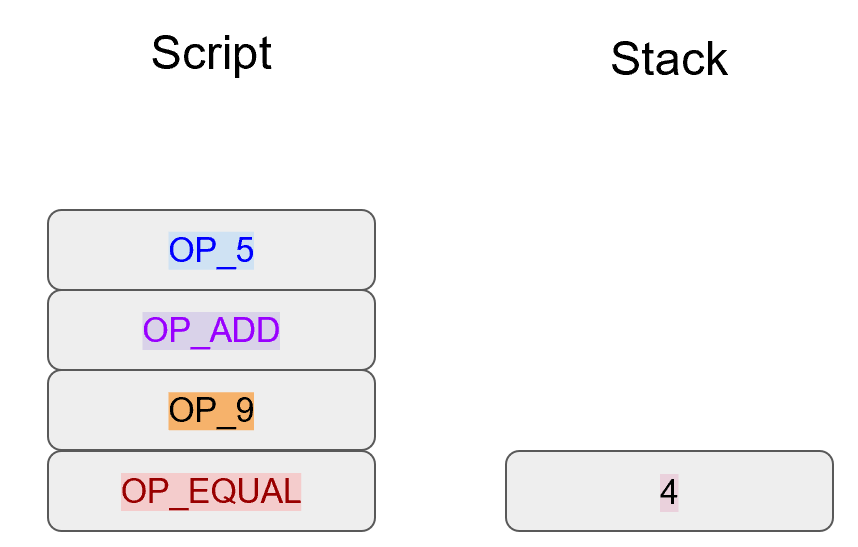
OP_5 will likewise push a 5 to the stack (Figure 6-30).
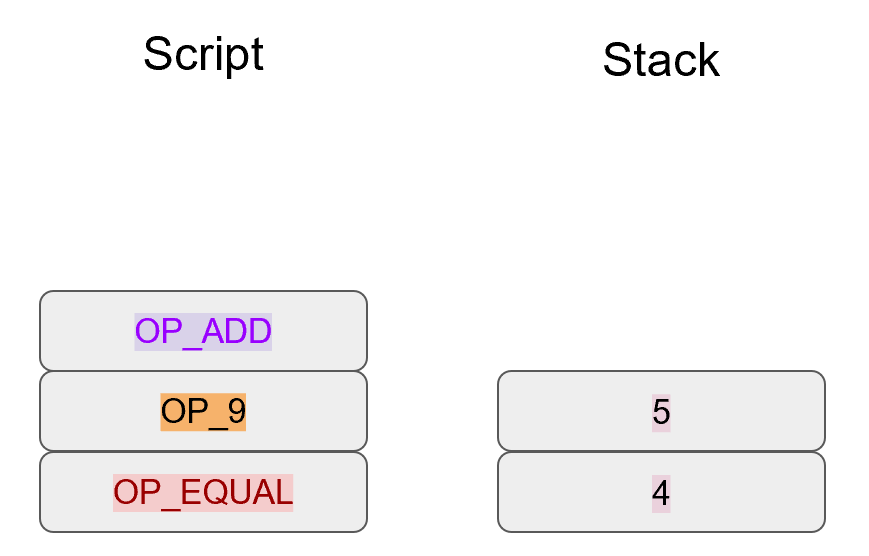
OP_ADD will consume the top two elements of the stack, add them together and push the sum to the stack (Figure 6-31).
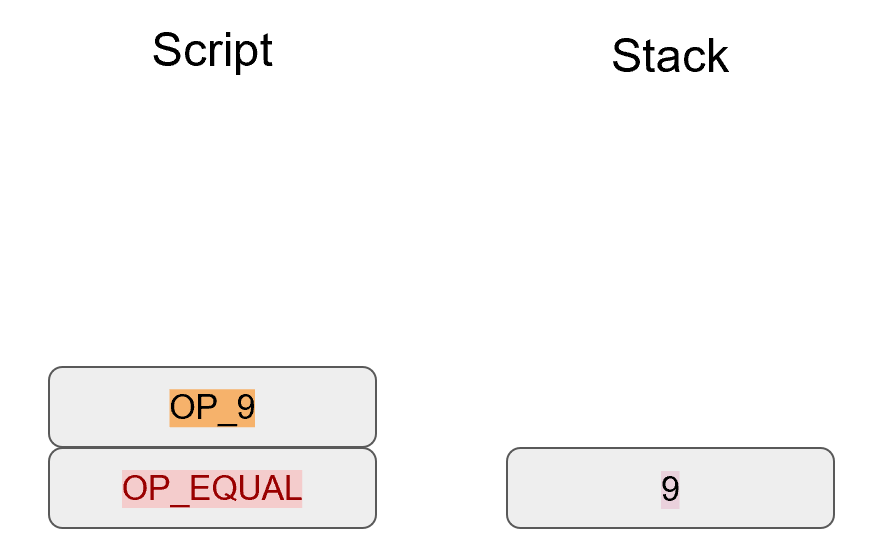
OP_9 will push a 9 to the stack (Figure 6-32).
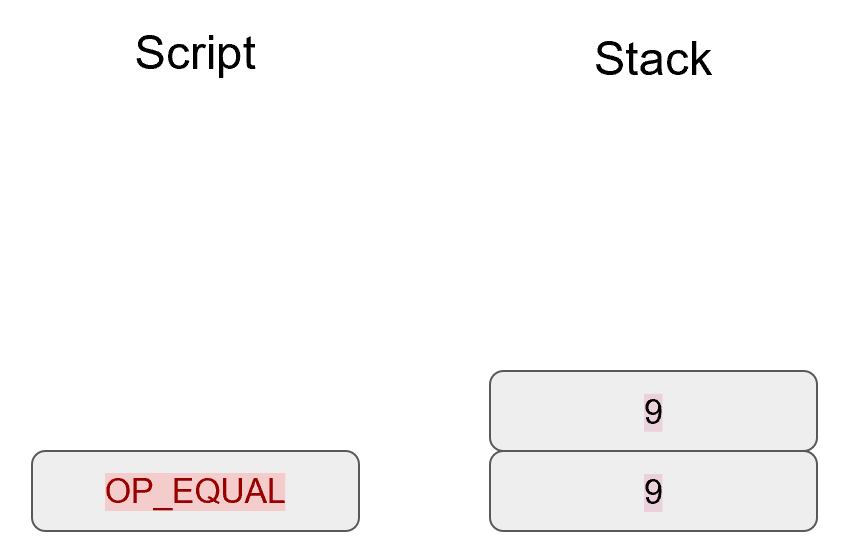
OP_EQUAL will consume 2 elements and push a 1 if equal, 0 if not (Figure 6-33).
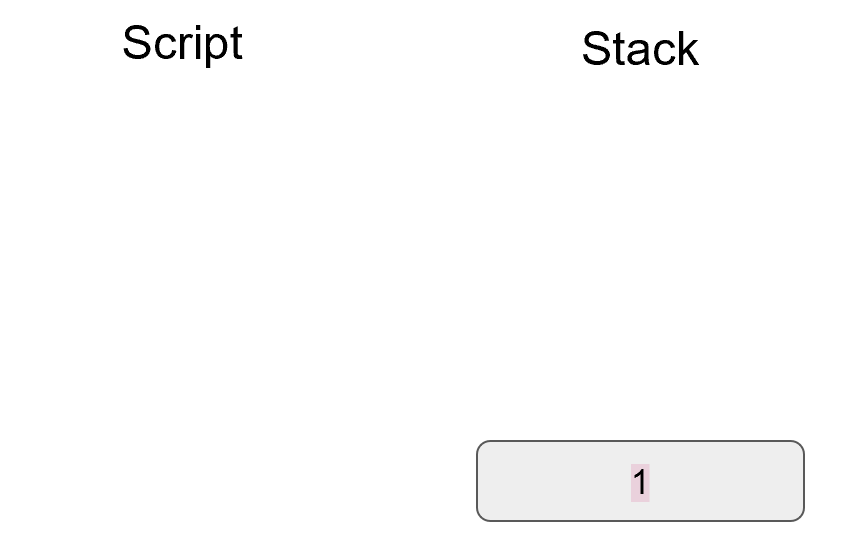
Note that the ScriptSig isn’t particularly hard to figure out and contains no signature. As a result, ScriptPubKey is vulnerable to being taken by anyone who can solve it. Think of this ScriptPubKey as a lockbox with a very flimsy lock that anyone can break into. It is for this reason that most transactions have a signature requirement in the ScriptSig.
Once a UTXO has been spent, included in a block and secured by proof-of-work, the coins are locked to a different ScriptPubKey and no longer as easily spendable. Someone attempting to spend already spent coins would have to provide proof-of-work, which is expensive (see Chapter 9).
Create a ScriptSig that can unlock this ScriptPubKey. Note OP_MUL multiplies the top two elements of the stack.
767695935687
56 = OP_6
76 = OP_DUP
87 = OP_EQUAL
93 = OP_ADD
95 = OP_MUL
The previous exercise was a bit of a cheat as OP_MUL is no longer allowed on the Bitcoin network.
Version 0.3.5 of Bitcoin disabled a lot of different opcodes as anything that had even a little bit of potential to create vulnerabilities on the network were disabled.
This is just as well since most of the functionality in Script is actually not used much. From a software maintenance standpoint, this is not a great situation as the code has to be maintained despite its lack of usage. Simplifying and getting rid of certain capabilities can be seen as a way to make Bitcoin more secure.
This is in stark contrast to other projects which try to expand their smart contract languages, often increasing the attack surface along with new features.
Figure out what this Script is doing:
6e879169a77ca787
69 = OP_VERIFY
6e = OP_2DUP
7c = OP_SWAP
87 = OP_EQUAL
91 = OP_NOT
a7 = OP_SHA1
Use the Script.parse method and look up what various opcodes do at https://en.bitcoin.it/wiki/Script
In 2013, Peter Todd created a Script very similar to the Script in Exercise 4 and put some Bitcoins into it to create an economic incentive for people to find hash collisions. The donations reached 2.49153717 BTC and when Google actually found a hash collision for sha1 in February of 2017 (https://security.googleblog.com/2017/02/announcing-first-sha1-collision.html), this Script was promptly redeemed. The transaction output was 2.48 Bitcoins which was $2848.88 USD at the time.
Peter created more piñatas for sha256, hash256 and hash160, which add economic incentives to find collisions for these hashing functions.
We’ve covered Script and how it works. We can now proceed to the creation and validation of transactions.
One of the trickiest things to code in Bitcoin is validating transactions. Another one is creating transactions. In this chapter, we’ll cover the exact steps to doing both. Towards the end of this chapter, we’ll be creating a testnet transaction and broadcasting it.
Every node, when receiving transactions makes sure that each transaction adheres to the network rules. This process is called transaction validation. Here are the main things that a node checks:
Inputs of the transaction are previously unspent.
Sum of the inputs are greater than or equal to the sum of the outputs.
ScriptSig successfully unlocks the previous ScriptPubKey.
(1) prevents double-spending. Any input that’s been spent (that is, included in the blockchain) cannot be spent again.
(2) makes sure no new Bitcoins are created (except in a special type of transaction called Coinbase transactions. More on that in Chapter 9).
(3) makes sure that the combined Script is valid. In the vast majority of transactions, this means checking that the one or more signatures in the ScriptSig are valid.
Let’s look at how each is checked.
To prevent double-spending, a node checks that each input exists and has not been spent. This can be checked by any full node by looking at the UTXO set (see Chapter 5). We cannot determine from the transaction itself whether it’s double-spending, much like we cannot look at a personal check and determine whether it’s overdrafting. The only way to know is to have access to the UTXO set, which requires calculation from the entire set of transactions.
In Bitcoin, we can determine whether an input is being double spent by keeping track of the UTXOs. If an input is in the UTXO set, that transaction input both exists and is not double-spending. If the transaction passes the rest of the validity tests, then we remove all the inputs of the transaction from the UTXO set. Light clients that do not have access to the blockchain have to trust other nodes for a lot of the information, including whether an input has already been spent.
A full node can check the spentness of an input pretty easily, a light client has to get this information from someone else.
Nodes also make sure that the sum of the inputs is greater than or equal to the sum of the outputs. This ensures that the transaction does not create new coins. The one exception is a Coinbase transaction which we’ll study more in Chapter 9. Since inputs don’t have an amount field, this must be looked up on the blockchain. Once again, full nodes have access to the amounts associated with the unspent output, but light clients have to depend on full nodes to supply this information.
We covered how to calculate fees in Chapter 5.
Checking that the sum of the inputs being greater than or equal to the sum of the outputs is the same as checking that the fee is not negative (that is, creating money).
Recall the last exercise in Chapter 5.
The method fee looks like this:
classTx:...deffee(self):'''Returns the fee of this transaction in satoshi'''input_sum,output_sum=0,0fortx_ininself.tx_ins:input_sum+=tx_in.value(self.testnet)fortx_outinself.tx_outs:output_sum+=tx_out.amountreturninput_sum-output_sum
We can test to see if this transaction is trying to create money by using this method.
>>>fromtximportTx>>>fromioimportBytesIO>>>raw_tx=('0100000001813f79011acb80925dfe69b3def355fe914bd1d96a3f5f71bf830\3c6a989c7d1000000006b483045022100ed81ff192e75a3fd2304004dcadb746fa5e24c5031ccf\cf21320b0277457c98f02207a986d955c6e0cb35d446a89d3f56100f4d7f67801c31967743a9c8\e10615bed01210349fc4e631e3624a545de3f89f5d8684c7b8138bd94bdd531d2e213bf016b278\afeffffff02a135ef01000000001976a914bc3b654dca7e56b04dca18f2566cdaf02e8d9ada88a\c99c39800000000001976a9141c4bc762dd5423e332166702cb75f40df79fea1288ac19430600')>>>stream=BytesIO(bytes.fromhex(raw_tx))>>>transaction=Tx.parse(stream)>>>(transaction.fee()>=0)True
This only works because we’re using Python (see The Value Overflow Incident).
If the fee is negative, we know that the output_sum is greater than the input_sum, which is another way of saying that this transaction is trying to create Bitcoins out of the ether.
Back in 2010, there was a transaction that created 184 billion new Bitcoins. This is due to the fact that in C++, the amount field is a signed integer and not an unsigned integer. That is, the value could be negative!
The clever transaction passed all the checks including the one for not creating new bitcoins, but only because the output amounts overflowed past the maximum number. 264 is ~1.84 * 1019 satoshis, which is 184 billion Bitcoins. The fee was negative by enough that the C++ code was tricked into believing that the fee was actually positive by 0.1 BTC!
The vulnerability is detailed in CVE-2010-5139 and was patched via soft-fork in Bitcoin Core 0.3.11. The transaction and the extra Bitcoins it created was invalidated retroactively by a block reorganization, which is another way of saying that the block including the value overflow transaction and all the blocks built on top of it were replaced.
Perhaps the trickiest part of validating a transaction is the process of checking its signatures.
A transaction typically has at least one signature per input.
If there are multisig outputs being spent, there may be more than one.
As we learned in Chapter 3, the ECDSA signature algorithm requires the public key P, the signature hash z, and the signature (r,s).
Once these are known, the process of verifying the signature is pretty simple as we already coded in Chapter 3:
>>>fromeccimportS256Point,Signature>>>sec=bytes.fromhex('0349fc4e631e3624a545de3f89f5d8684c7b8138bd94bdd531d2e\213bf016b278a')>>>der=bytes.fromhex('3045022100ed81ff192e75a3fd2304004dcadb746fa5e24c5031c\cfcf21320b0277457c98f02207a986d955c6e0cb35d446a89d3f56100f4d7f67801c31967743a9\c8e10615bed')>>>z=0x27e0c5994dec7824e56dec6b2fcb342eb7cdb0d0957c2fce9882f715e85d81a6>>>point=S256Point.parse(sec)>>>signature=Signature.parse(der)>>>(point.verify(z,signature))True
SEC public keys and DER signatures are in the stack when an instruction like OP_CHECKSIG is executed make getting the public key P and signature (r,s) pretty straightforward (see Chapter 6).
The hard part is getting the signature hash, z.
A naive way to get the signature hash would be to hash the transaction serialization as shown in Figure 7-1.
Unfortunately, we can’t do that since the signature is part of the ScriptSig and a signature can’t sign itself.

Instead, we modify the transaction before signing it.
That is, we compute a different signature hash, or z, for each input.
The procedure is as follows.
The first step is to empty all the ScriptSigs when checking the signature (Figure 7-2). The same procedure is used for creating the signature, except the ScriptSigs are usually already empty.

Note that this example has only 1 input, so only that input’s ScriptSig is emptied, but it’s possible to have more than 1 input. Each of those would be emptied.
Each input points to a previous transaction output, which has a ScriptPubKey. Recall the diagram from Chapter 6 shown in Figure 7-3.
We take the ScriptPubKey that the input is pointing to and put that in place of the empty ScriptSig (Figure 7-4). This may require a lookup on the blockchain, but in practice, the signer already knows the ScriptPubKey as the input is one where the signer has the private key.
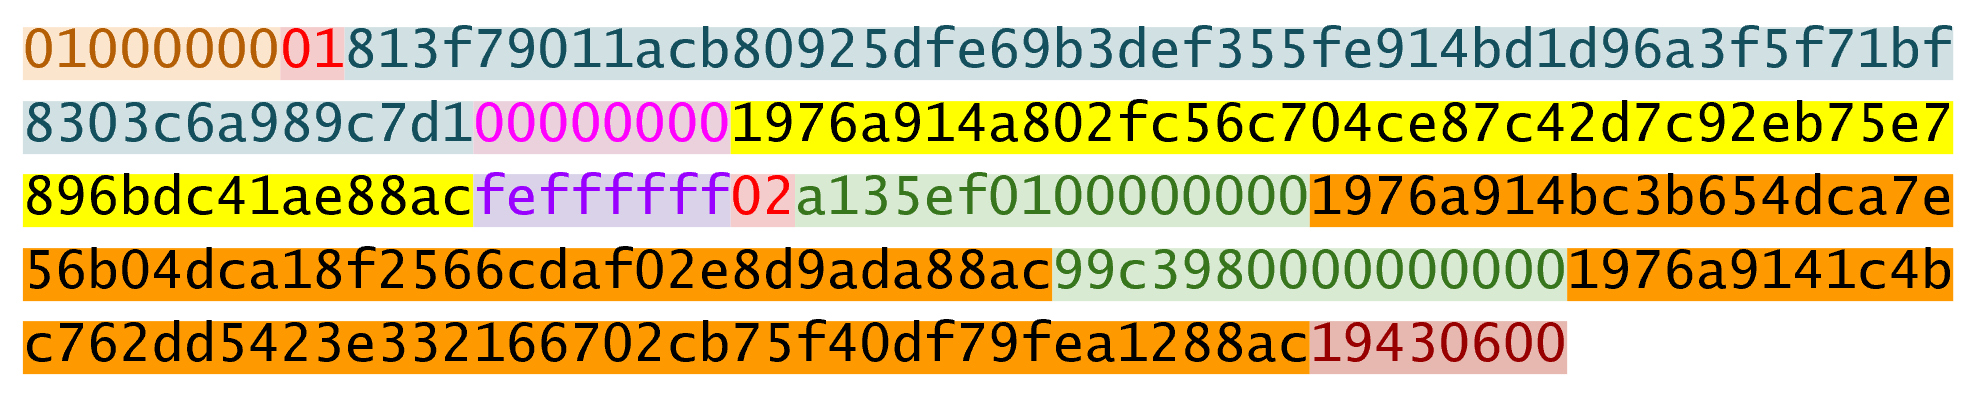
Lastly, we add a 4-byte hash type to the end.
This is to specify what the signature is authorizing.
The signature can authorize that this input has to go with all the other inputs and outputs (SIGHASH_ALL), go with a specific output (SIGHASH_SINGLE) or go with any output whatsoever (SIGHASH_NONE).
The latter two have some theoretical use cases, but in practice, almost every transaction is signed with SIGHASH_ALL.
There’s also rarely used hash type called SIGHASH_ANYONECANPAY which can be combined with any of the previous three, which we won’t get into here.
For SIGHASH_ALL, the final transaction must have the exact outputs that were signed or the input signature is invalid.
The integer corresponding to SIGHASH_ALL is 1 and this has to be encoded in Little-Endian over 4 bytes, which makes the modified transaction look like Figure 7-5:

01000000The hash256 of this modified transaction is interpreted as a Big-Endian integer to produce z.
The code for converting the modified transaction to z looks like this:
>>>fromhelperimporthash256>>>modified_tx=bytes.fromhex('0100000001813f79011acb80925dfe69b3def355fe914\bd1d96a3f5f71bf8303c6a989c7d1000000001976a914a802fc56c704ce87c42d7c92eb75e7896\bdc41ae88acfeffffff02a135ef01000000001976a914bc3b654dca7e56b04dca18f2566cdaf02\e8d9ada88ac99c39800000000001976a9141c4bc762dd5423e332166702cb75f40df79fea1288a\c1943060001000000')>>>h256=hash256(modified_tx)>>>z=int.from_bytes(h256,'big')>>>(hex(z))0x27e0c5994dec7824e56dec6b2fcb342eb7cdb0d0957c2fce9882f715e85d81a6
Now that we have our z, we can take the public key in SEC format and the signature in DER format from the ScriptSig to verify the signature.
>>>fromeccimportS256Point,Signature>>>sec=bytes.fromhex('0349fc4e631e3624a545de3f89f5d8684c7b8138bd94bdd531d2e\213bf016b278a')>>>der=bytes.fromhex('3045022100ed81ff192e75a3fd2304004dcadb746fa5e24c5031c\cfcf21320b0277457c98f02207a986d955c6e0cb35d446a89d3f56100f4d7f67801c31967743a9\c8e10615bed')>>>z=0x27e0c5994dec7824e56dec6b2fcb342eb7cdb0d0957c2fce9882f715e85d81a6>>>point=S256Point.parse(sec)>>>signature=Signature.parse(der)>>>point.verify(z,signature)True
We can code this transaction validation process into a method for Tx.
Thankfully, the Script engine can already handle signature verification (see Chapter 6), so our task here is to glue everything together.
We need the z, or signature hash, to pass into the evaluate method and we need to combine the ScriptSig and ScriptPubKey.
The signature hashing algorithm is inefficient and wasteful and is called the Quadratic Hashing problem.
The Quadratic Hashing problem states that calculating the signature hashes, or z’s increases quadratically with the number of inputs in a transaction.
Specifically, the number of hash256 operations for calculating the z will increase on a per-input basis, but in addition, the length of the transaction will increase, slowing down each hash256 operation as the entire signature hash will need to be calculated anew for each input.
This was particularly obvious with the biggest transaction mined to date:
bb41a757f405890fb0f5856228e23b715702d714d59bf2b1feb70d8b2b4e3e08
This transaction had 5569 inputs and 1 output and took many miners over a minute to validate as the signature hashes for the transaction were expensive to calculate.
Segwit (Chapter 13) fixes this with a different way of calculating the signature hash, which is specified in BIP0143.
Write the sig_hash method for the Tx class.
Write the verify_input method for the Tx class. You will want to use the TxIn.script_pubkey(), Tx.sig_hash() and Script.evaluate() methods.
Now that we can verify an input, the task of verifying the entire transaction is straightforward:
classTx:...defverify(self):'''Verify this transaction'''ifself.fee()<0:returnFalseforiinrange(len(self.tx_ins)):ifnotself.verify_input(i):returnFalsereturnTrue
We make sure that we are not creating money.
We make sure that each input has a correct ScriptSig.
Note that a full node would verify more things like checking for double-spends and checking some other consensus rules not discussed in this chapter (max sigops, size of ScriptSig, etc), but this is good enough for our library.
The code to verify transactions will help quite a bit with creating transactions. We can create transactions that fit the verification process. Transactions we create will require the sum of the inputs to be greater than or equal to the sum of the outputs. Similarly, transactions we create will require a ScriptSig that, when combined with the ScriptPubKey will be valid.
To create a transaction, we need at least one output we’ve received. That is, we need an output from the UTXO set whose ScriptPubKey we can unlock. The vast majority of the time, we need one or more private keys corresponding to the public keys that are hashed in the ScriptPubKey.
The rest of this chapter will be concerned with creating a transaction whose inputs are locked by p2pkh ScriptPubKeys.
The construction of a transaction requires answering some basic questions:
Where do we want the bitcoins to go?
What UTXOs can we spend?
How quickly do we want this transactions to get into the blockchain?
We’ll be using testnet for this example, though this can easily be applied to mainnet.
The first question is about how much we want to pay whom.
We can pay one or more addresses.
In this example, we will pay 0.1 testnet bitcoins (tBTC) to mnrVtF8DWjMu839VW3rBfgYaAfKk8983Xf.
The second question is about what’s in our wallet. What do we have available to spend? In this example, we have an output here denoted by transaction ID and output index:
0d6fe5213c0b3291f208cba8bfb59b7476dffacc4e5cb66f6eb20a080843a299:13
When we view this output on a testnet block explorer (Figure 7-6), we can see that our output is worth 0.33 tBTC.
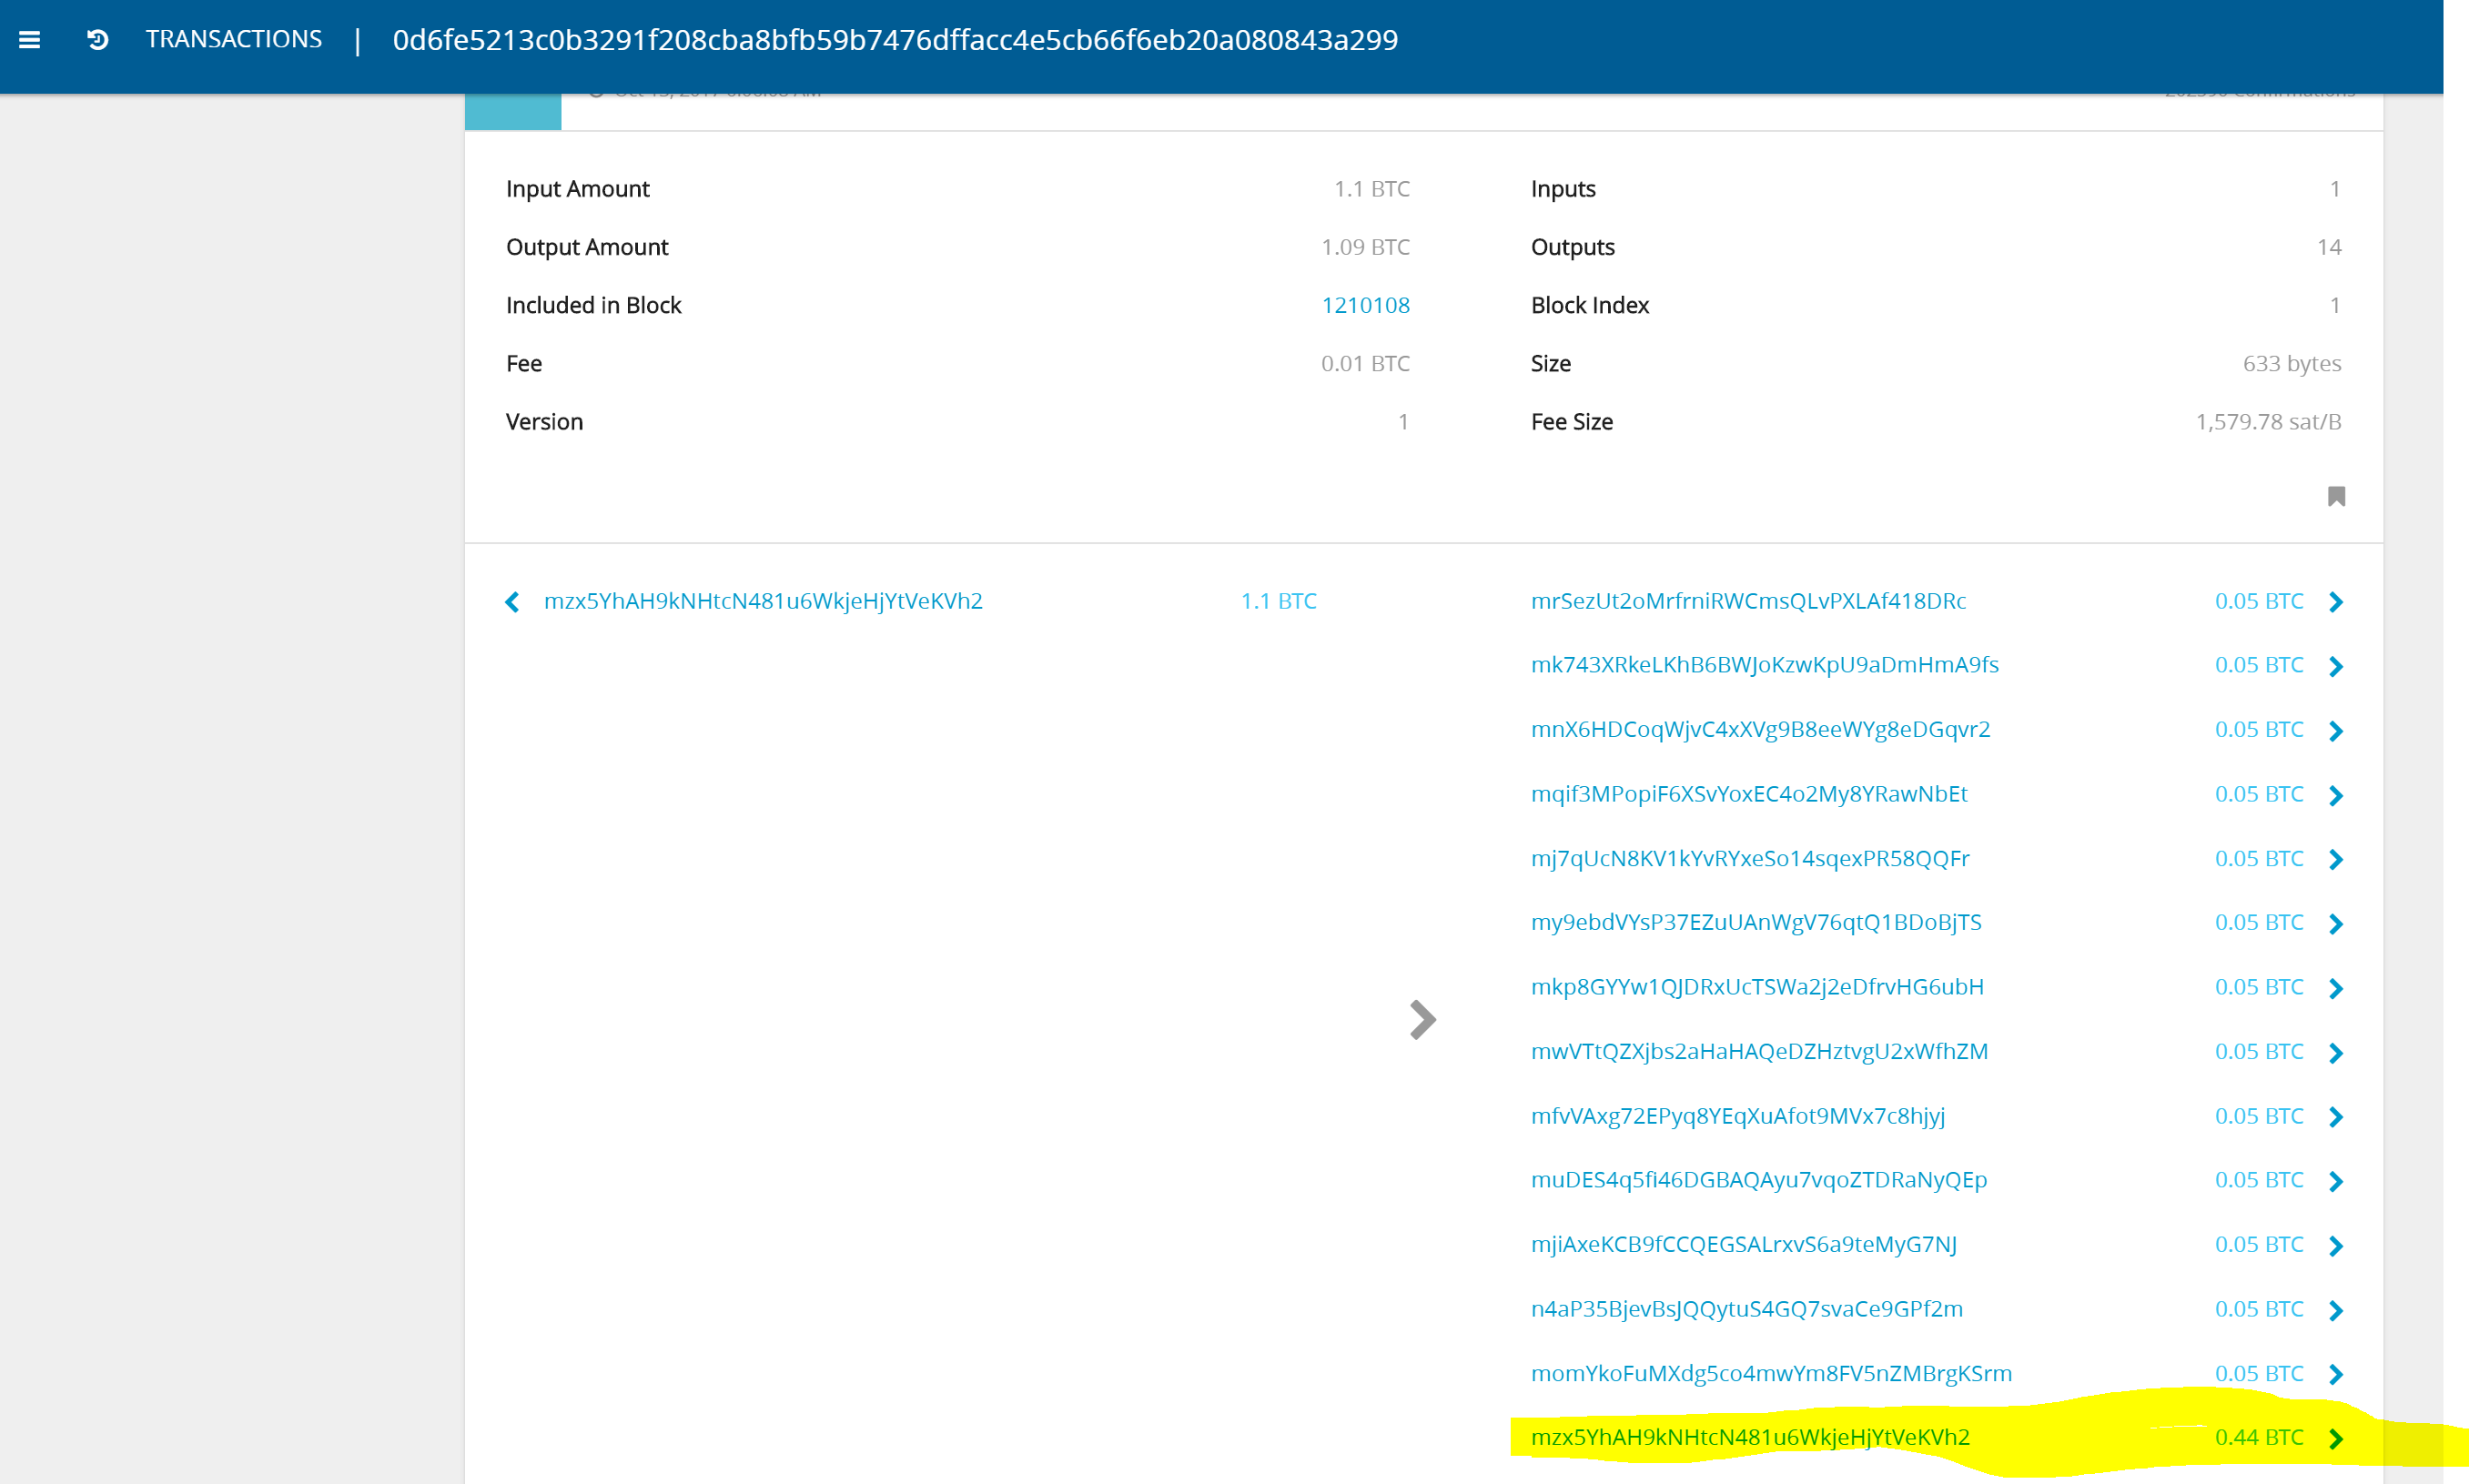
Since this is more than 0.1 tBTC, we’ll want to send the rest back to ourselves.
Though it’s generally bad privacy and security practice to reuse addresses, we’ll send the bitcoins back to mzx5YhAH9kNHtcN481u6WkjeHjYtVeKVh2 to make the transaction construction easier.
Back in Chapter 6, we went through how p2pk was inferior to p2pkh, in part because it was only protected by ECDSA. p2pkh, on the other hand, is also protected by sha256 and ripemd160. However, because the blockchain is public, once we spend from a ScriptPubKey corresponding to our address, we reveal our public key as part of the ScriptSig. Once we’ve revealed that public key, sha256 and ripemd160 no longer protect us as the attacker knows the public key and doesn’t have to guess.
That said, as of this writing, we are still protected by the Discrete Log problem, which is unlikely to be broken any time soon. It’s important from a security perspective, however, to understand what we’re protected by.
The other reason to not reuse addresses is for privacy. Having a single address for all our transactions means that people can link our transactions together. If, for example, we bought something private (medication to treat some disease you don’t want others to know about) and spent another output with the same ScriptPubKey for a donation to some charity, the charity and the medication vendor could identify that we did business with the other.
Privacy leaks tend to become security holes over time.
The third question is really about fees. If we want to get the transaction in the blockchain faster, we’ll want to pay more fees and if we don’t mind waiting, we’ll want to pay less. In our case, we’ll use 0.01 tBTC as our fee.
Fee estimation is done on a per-byte basis. If your transaction is 600 bytes, you’ll want to have double the fees as a transaction that’s 300 bytes. This is because block space is limited and larger transactions take up more space. This calculation has changed a bit since Segregated Witness (See Chapter 13), but the general principle still applies. We want to pay enough on a per-byte basis so that miners are motivated to include our transaction as soon as possible.
When blocks aren’t full, almost any amount above the default relay limit (1 satoshi/byte) is enough to get a transaction included. When blocks are full, this is not an easy thing to estimate. There are multiple ways to estimate fees including:
Looking at various fee levels and estimating the probability of inclusion based on past blocks and the mempools at the time.
Looking at the current mempool and adding a fee that roughly corresponds to enough economic incentivization.
Going with some fixed fee.
Many wallets use different strategies and this is an active area of research.
We have a plan for a new transaction with one input and two outputs. But first, let’s look at some other tools we’ll need.
We need a way to take an address and get the 20-byte hash out of it.
This is the opposite of encoding an address, so we call the function decode_base58
defdecode_base58(s):num=0forcins.encode('ascii'):num*=58num+=BASE58_ALPHABET.index(c)combined=num.to_bytes(25,byteorder='big')checksum=combined[-4:]ifhash256(combined[:-4])[:4]!=checksum:raiseValueError('bad address: {} {}'.format(checksum,hash256(combined[:-4])[:4]))returncombined[1:-4]
We get what number is encoded in this base58 address
Once we have the number, we convert it to Big-Endian bytes
The first byte is the network prefix and the last 4 are the checksum. The middle 20 is the actual 20-byte hash (aka hash160).
We also need a way to convert the 20-byte hash to a ScriptPubKey.
We call this function p2pkh_script since we’re converting the hash160 to a p2pkh.
defp2pkh_script(h160):'''Takes a hash160 and returns the p2pkh ScriptPubKey'''returnScript([0x76,0xa9,h160,0x88,0xac])
Note that 0x76 is OP_DUP, 0xa9 is OP_HASH160, h160 is a 20-byte element, 0x88 is OP_EQUALVERIFY and 0xac is OP_CHECKSIG.
This is the p2pkh ScriptPubKey instruction set from Chapter 6.
Given these tools, we can proceed transaction creation.
>>>fromhelperimportdecode_base58,SIGHASH_ALL>>>fromscriptimportp2pkh_script,Script>>>fromtximportTxIn,TxOut,Tx>>>prev_tx=bytes.fromhex('0d6fe5213c0b3291f208cba8bfb59b7476dffacc4e5cb66f6\eb20a080843a299')>>>prev_index=13>>>tx_in=TxIn(prev_tx,prev_index)>>>tx_outs=[]>>>change_amount=int(0.33*100000000)>>>change_h160=decode_base58('mzx5YhAH9kNHtcN481u6WkjeHjYtVeKVh2')>>>change_script=p2pkh_script(change_h160)>>>change_output=TxOut(amount=change_amount,script_pubkey=change_script)>>>target_amount=int(0.1*100000000)>>>target_h160=decode_base58('mnrVtF8DWjMu839VW3rBfgYaAfKk8983Xf')>>>target_script=p2pkh_script(target_h160)>>>target_output=TxOut(amount=target_amount,script_pubkey=target_script)>>>tx_obj=Tx(1,[tx_in],[change_output,target_output],0,True)>>>(tx_obj)tx:cd30a8da777d28ef0e61efe68a9f7c559c1d3e5bcd7b265c850ccb4068598d11version:1tx_ins:0d6fe5213c0b3291f208cba8bfb59b7476dffacc4e5cb66f6eb20a080843a299:13tx_outs:33000000:OP_DUPOP_HASH160d52ad7ca9b3d096a38e752c2018e6fbc40cdf26fOP_EQUALVE\RIFYOP_CHECKSIG10000000:OP_DUPOP_HASH160507b27411ccf7f16f10297de6cef3f291623eddfOP_EQUALVE\RIFYOP_CHECKSIGlocktime:0
The amount must be in satoshis and given there are 100,000,000 satoshis per BTC, we have to multiply and cast to an integer.
Note we have to designate which network to look up using the testnet=True argument.
We have created the actual transaction. However, every ScriptSig in this transaction is currently empty and filling it is where we turn next.
Signing the transaction would be tricky, but we know how to get the signature hash, or z, from earlier in this chapter.
If we have the private key whose public key hash160’s to the 20-byte hash in the ScriptPubKey, we can sign the z and produce the DER signature.
>>>fromeccimportPrivateKey>>>fromhelperimportSIGHASH_ALL>>>z=transaction.sig_hash(0)>>>private_key=PrivateKey(secret=8675309)>>>der=private_key.sign(z).der()>>>sig=der+SIGHASH_ALL.to_bytes(1,'big')>>>sec=private_key.point.sec()>>>script_sig=Script([sig,sec])>>>transaction.tx_ins[0].script_sig=script_sig>>>(transaction.serialize().hex())0100000001813f79011acb80925dfe69b3def355fe914bd1d96a3f5f71bf8303c6a989c7d10000\00006a47304402207db2402a3311a3b845b038885e3dd889c08126a8570f26a844e3e4049c482a\11022010178cdca4129eacbeab7c44648bf5ac1f9cac217cd609d216ec2ebc8d242c0a01210393\5581e52c354cd2f484fe8ed83af7a3097005b2f9c60bff71d35bd795f54b67feffffff02a135ef\01000000001976a914bc3b654dca7e56b04dca18f2566cdaf02e8d9ada88ac99c3980000000000\1976a9141c4bc762dd5423e332166702cb75f40df79fea1288ac19430600
We only need to sign the first input as there’s only one input. Multiple inputs would require us to sign each input with the right private key.
The signature is actually a combination of the DER signature and the hash type which is SIGHASH_ALL in our case.
The ScriptSig of a p2pkh from Chapter 6 is exactly two elements: signature and SEC format public key.
We only have that one input that we need to sign, but if there were more, this process of creating the ScriptSig would need to be done for each input.
Write the sign_input method for the Tx class.
To creating your own transaction, get some coins for yourself. In order to do that you’ll need an address. If you completed the last exercise in Chapter 4, you should have your own testnet address and private key. If you don’t remember, here’s how:
>>>fromeccimportPrivateKey>>>fromhelperimporthash256,little_endian_to_int>>>secret=little_endian_to_int(hash256(b'Jimmy Song secret'))>>>private_key=PrivateKey(secret)>>>(private_key.point.address(testnet=True))mn81594PzKZa9K3Jyy1ushpuEzrnTnxhVg
Please use a phrase other than Jimmy Song secret
Once you have an address, you can get some coins at a myriad of testnet faucets. Faucets are where you can get testnet coins for free for testing purposes. You can Google “testnet bitcoin faucet” to find them or use one from this list: https://en.bitcoin.it/wiki/Testnet#Faucets. My website, https://faucet.programmingbitcoin.com/ is updated to point to a testnet faucet that works. Enter your address from above into these faucets to get some testnet coins.
After receiving some coins, spend them using this library. This is a big accomplishment for a budding Bitcoin developer, so please take some time to complete this exercise.
Create a testnet transaction that sends 60% of a single UTXO to mwJn1YPMq7y5F8J3LkC5Hxg9PHyZ5K4cFv. The remaining amount minus fees should go back to your own change address. This should be a 1 input, 2 output transaction.
You can broadcast the transaction at https://testnet.blockchain.info/pushtx
Advanced: get some more testnet coins from a testnet faucet and create a 2 input, 1 output transaction. 1 input should be from the faucet, the other should be from the previous exercise, the output can be your own address.
You can broadcast the transaction at https://testnet.blockchain.info/pushtx
We’ve successfully validated existing transactions on the blockchain and we’ve also created our own transactions on testnet! This is a major accomplishment and you should be proud.
The code we have so far will do p2pkh and p2pk. In the next chapter, we turn to a more advanced smart contract, p2sh.
Up to this point in the book, we’ve been doing single-key transactions, or transactions where only a single private key per input. What if we wanted something a little more complicated? A company that has $100 million in Bitcoin might not want funds locked to a single private key as that key can be stolen. Loss of a single key would mean all funds would then be lost. What can we do to reduce the single point of failure?
The solution is multisig, or multiple signatures. This was built into Bitcoin from the beginning, but was clunky at first and so wasn’t used. As we’ll discover later in this chapter, Satoshi probably didn’t test multisig as it has an off-by-one error (see `OP_CHECKMULTISIG` Off-by-one Bug later in the chapter). The bug has had to stay in the protocol as fixing it would require a hard fork.
It is possible to “split” a single private key into multiple private keys and use an interactive method to aggregate signatures without ever reconstructing the private key, but this is not a common practice. Schnorr signatures will make aggregating signatures easier and perhaps more common in the future.
Bare Multisig was the first attempt at creating transaction outputs that require signatures from multiple parties.
The idea is to change from a single point of failure to something a little more resilient to hacks.
To understand Bare Multisig, one must first understand the OP_CHECKMULTISIG opcode.
As discussed in Chapter 6, Script has a lot of different opcodes.
OP_CHECKMULTISIG is one of them at 0xae.
The opcode consumes a lot of elements from the stack and returns whether or not the required number of signatures are valid for a transaction input.
The transaction output is called “bare” multisig because it’s a long ScriptPubKey. Figure 8-1 shows what a ScriptPubKey for a 1-of-2 multisig looks like.
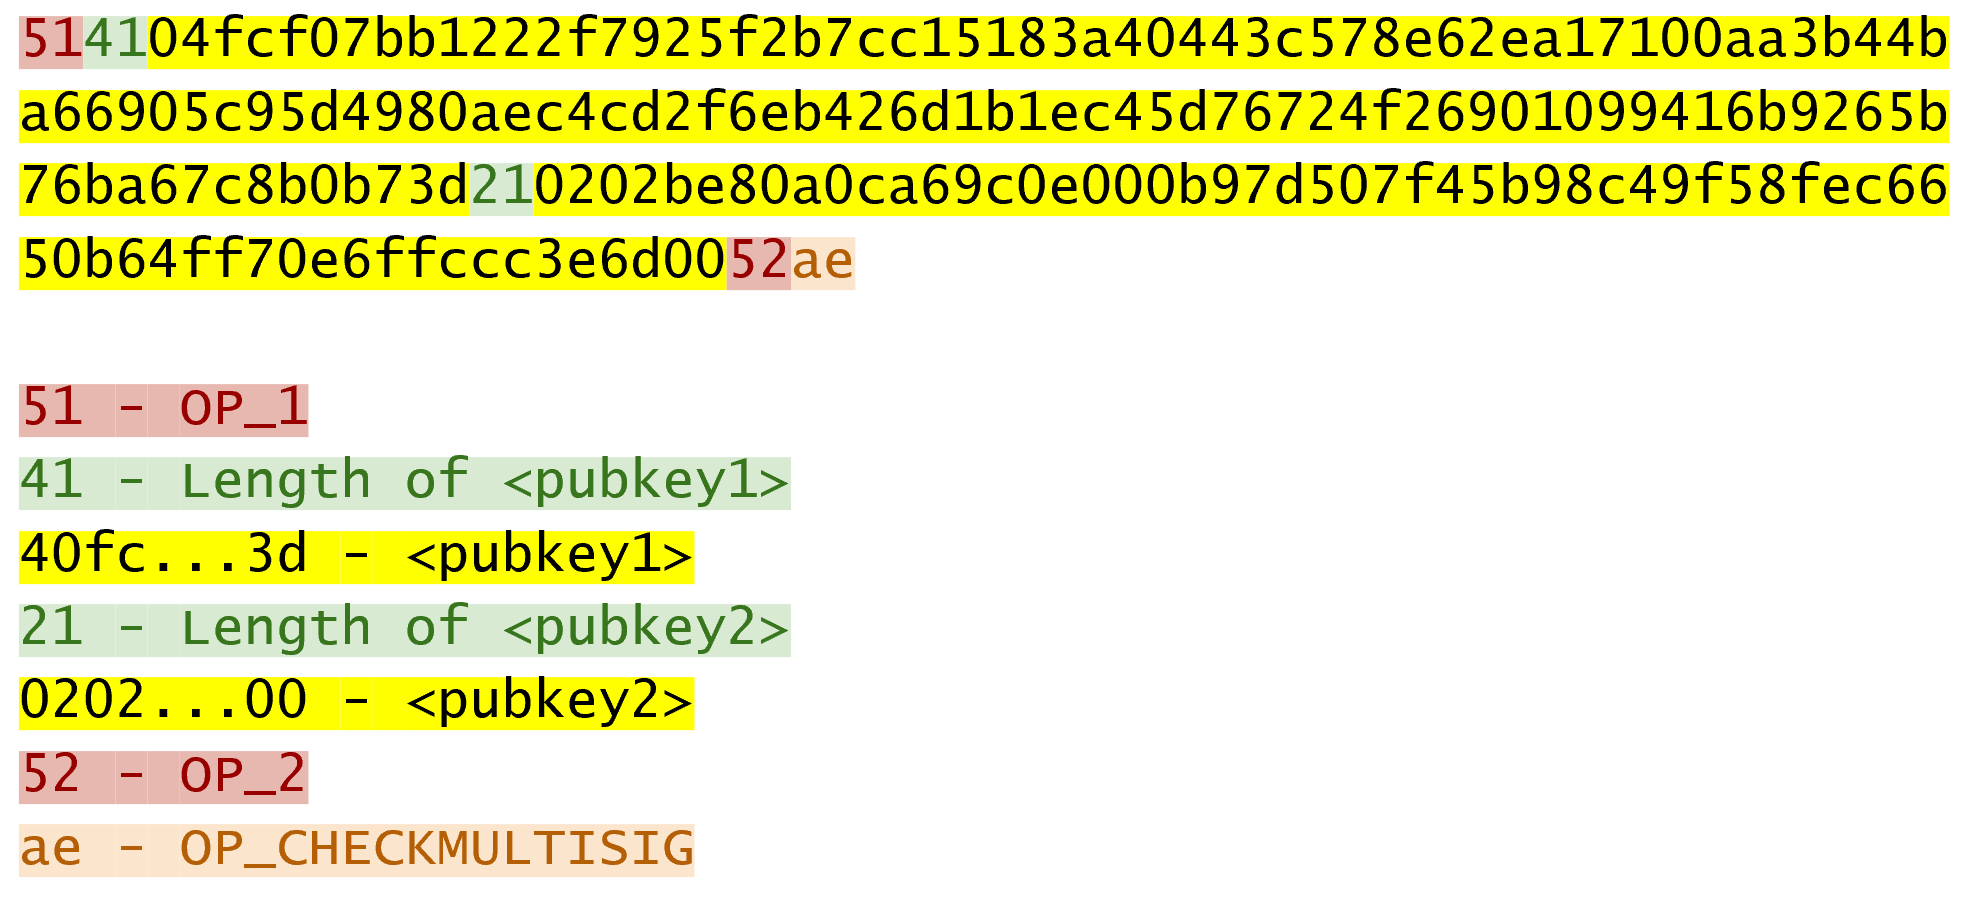
Among Bare Multisig ScriptPubKeys, this one is on the small end, and we can already see that it’s long. The ScriptPubKey for p2pkh is only 25 bytes whereas this Bare Multisig is 101 bytes (though obviously, compressed SEC format would reduce it some), and this is a 1-of-2! Figure 8-2 shows what the ScriptSig looks like:
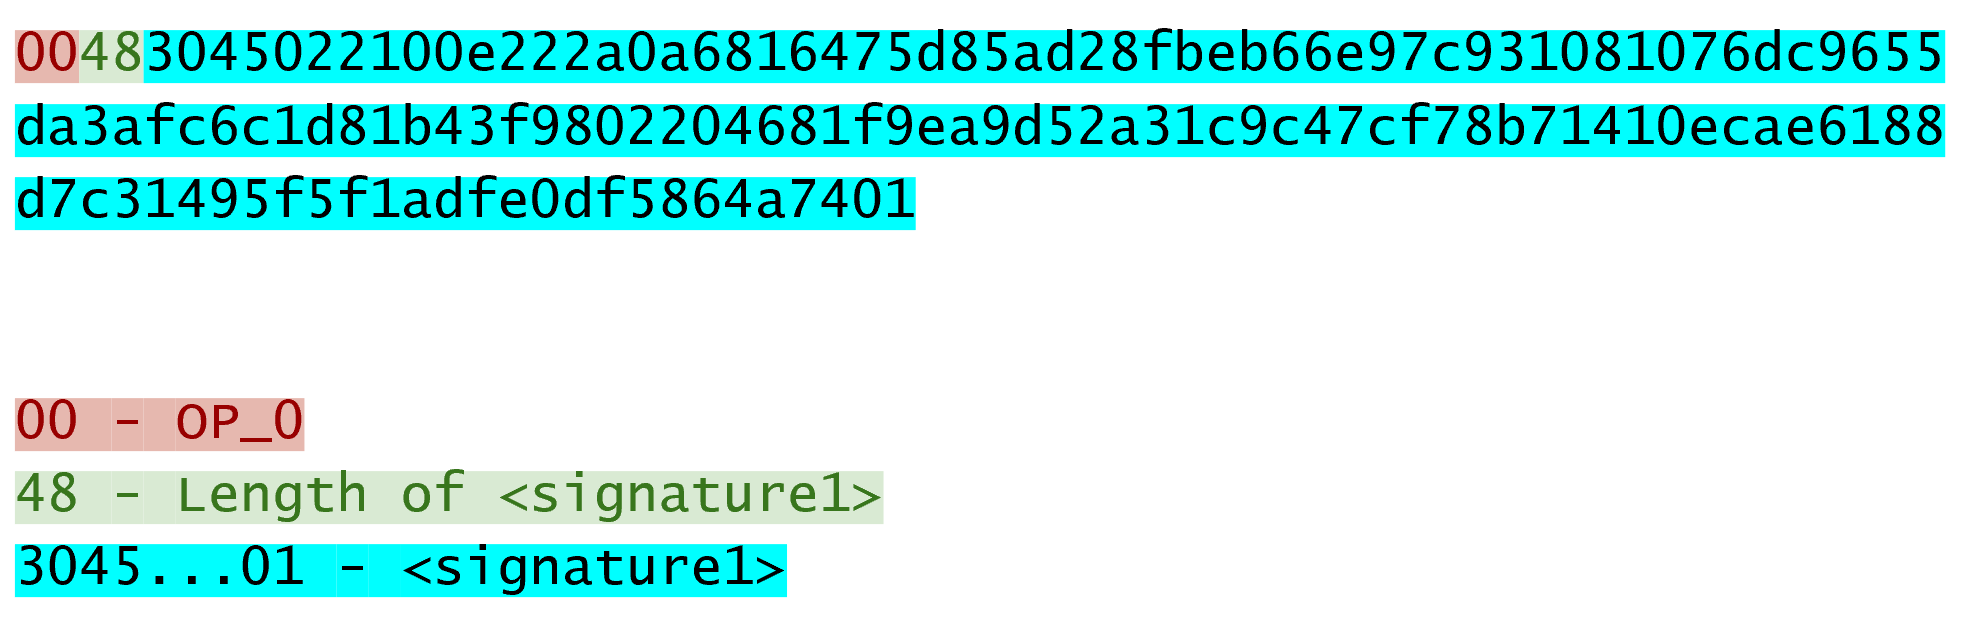
We only need 1 signature for this 1-of-2 multisig, so this is relatively short, though something like a 5-of-7 would require 5 DER signatures and would be a lot longer (360 bytes or so). Figure 8-3 shows how the two combine.
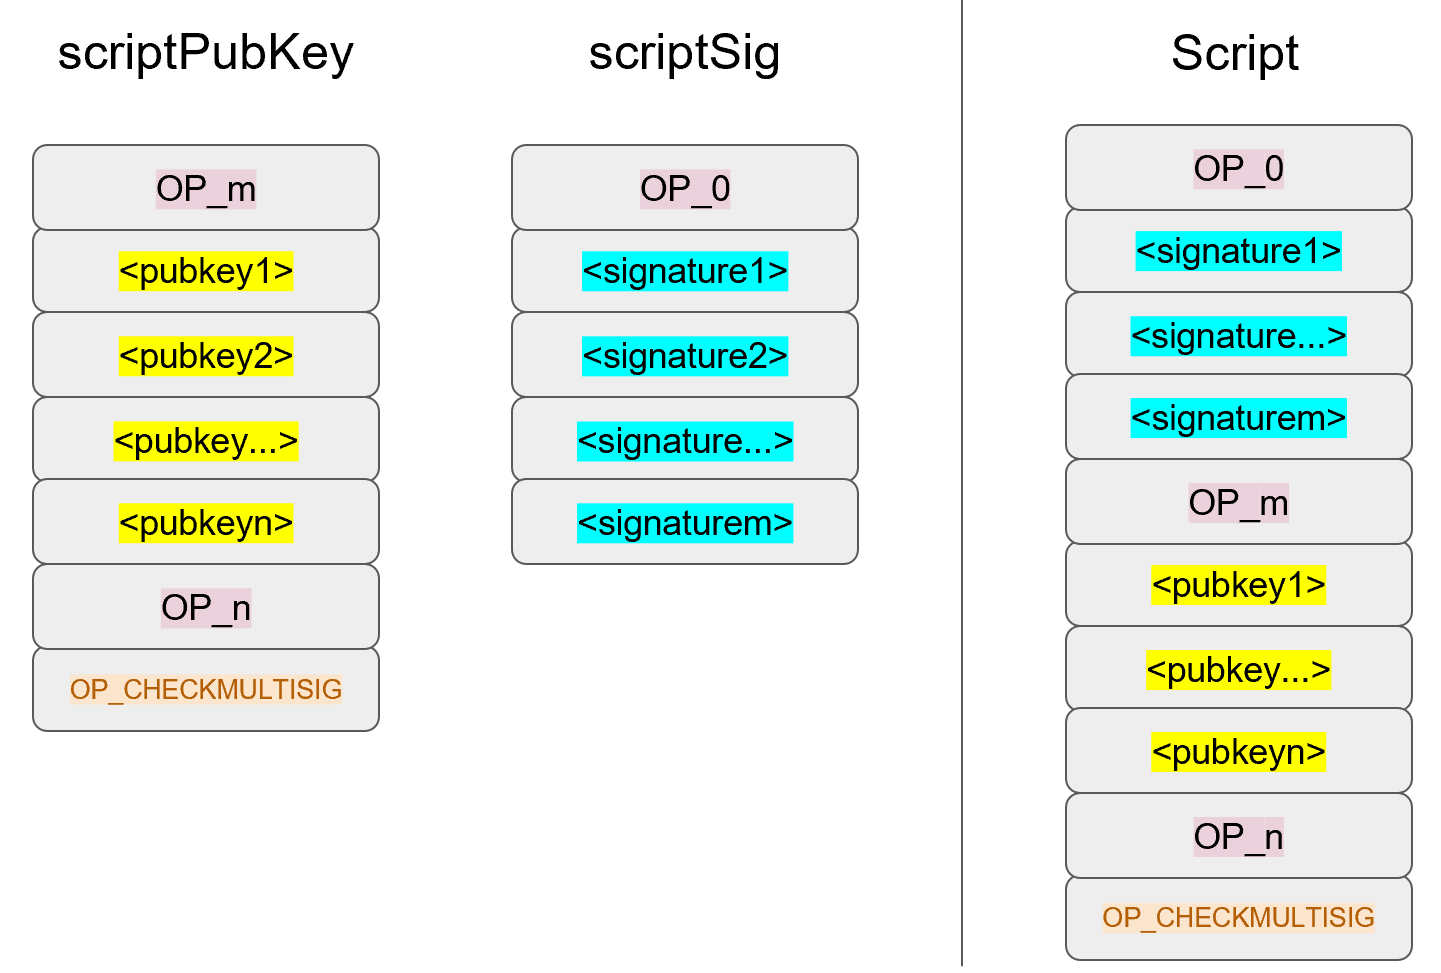
Note m and n are something between 1 and 16 inclusive.
We’ve generalized here so we can see what a Bare m-of-n Multisig would look like (m and n can be anything from 1 to 20, though there’s numerical opcodes only go up to OP_16, 17 to 20 would require 0112 to push a number like 18 to the stack).
The starting state looks like Figure 8-4:
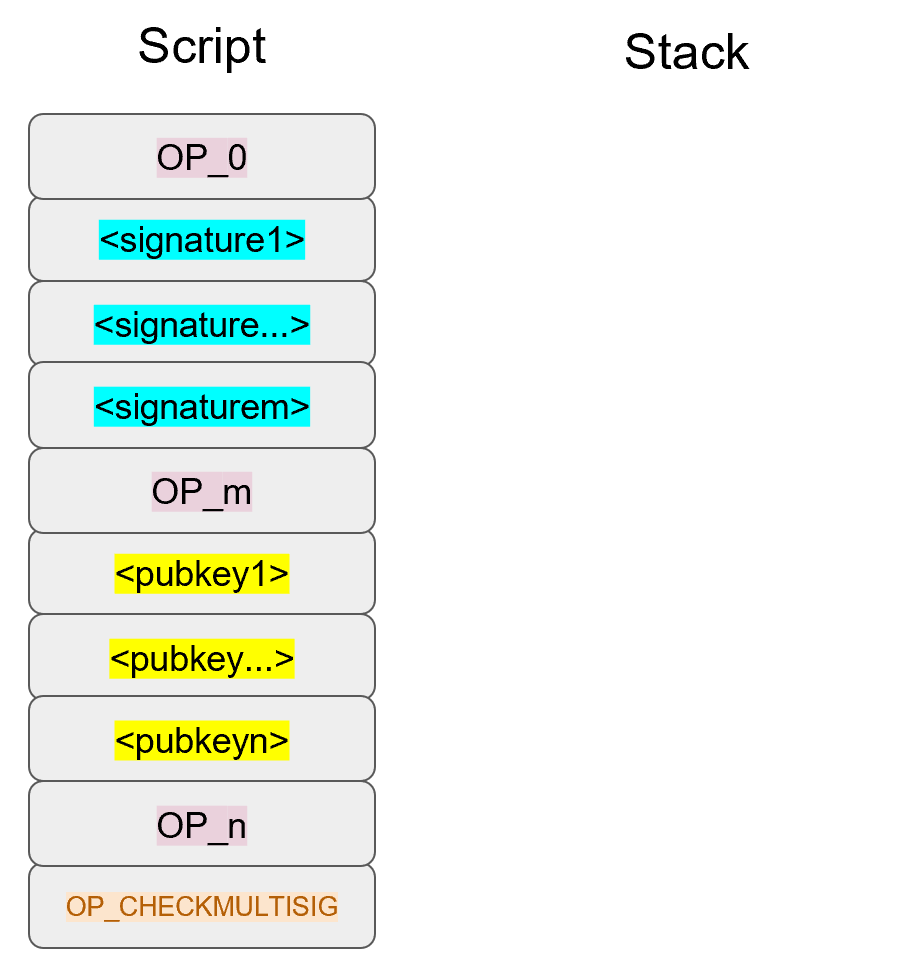
OP_0 will push the number 0 to the stack (Figure 8-5).
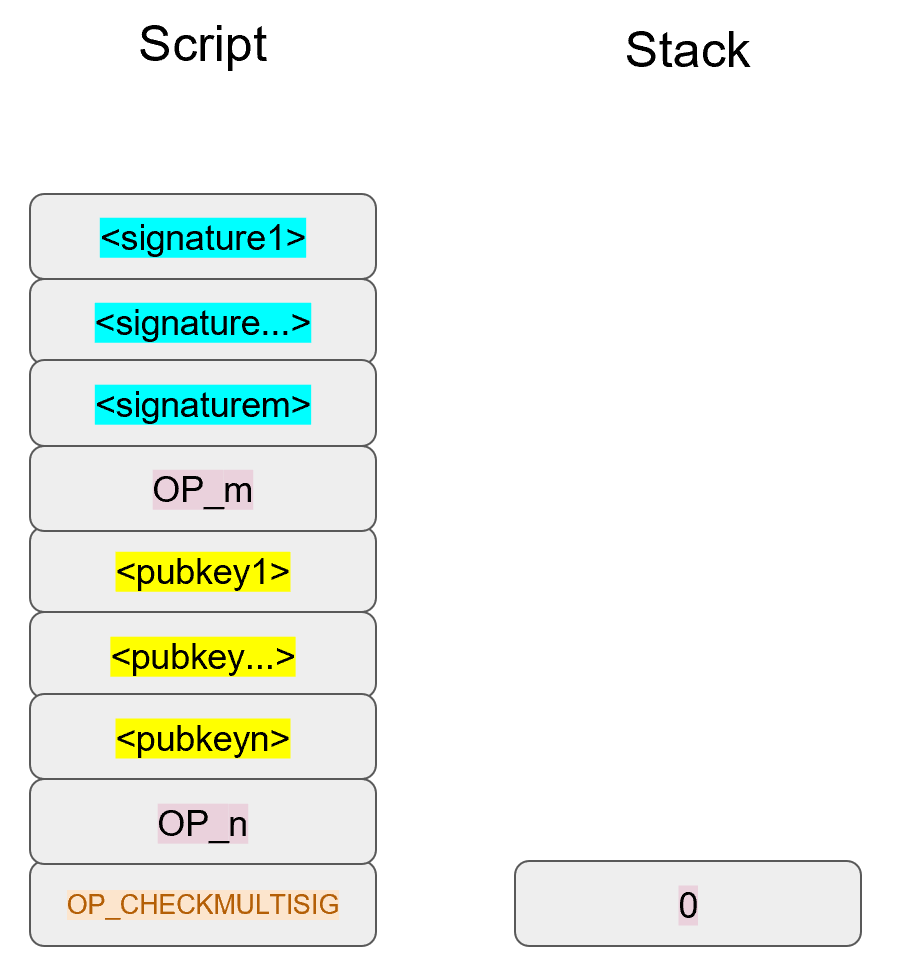
The signatures are elements so they’ll be pushed directly to the stack (Figure 8-6).
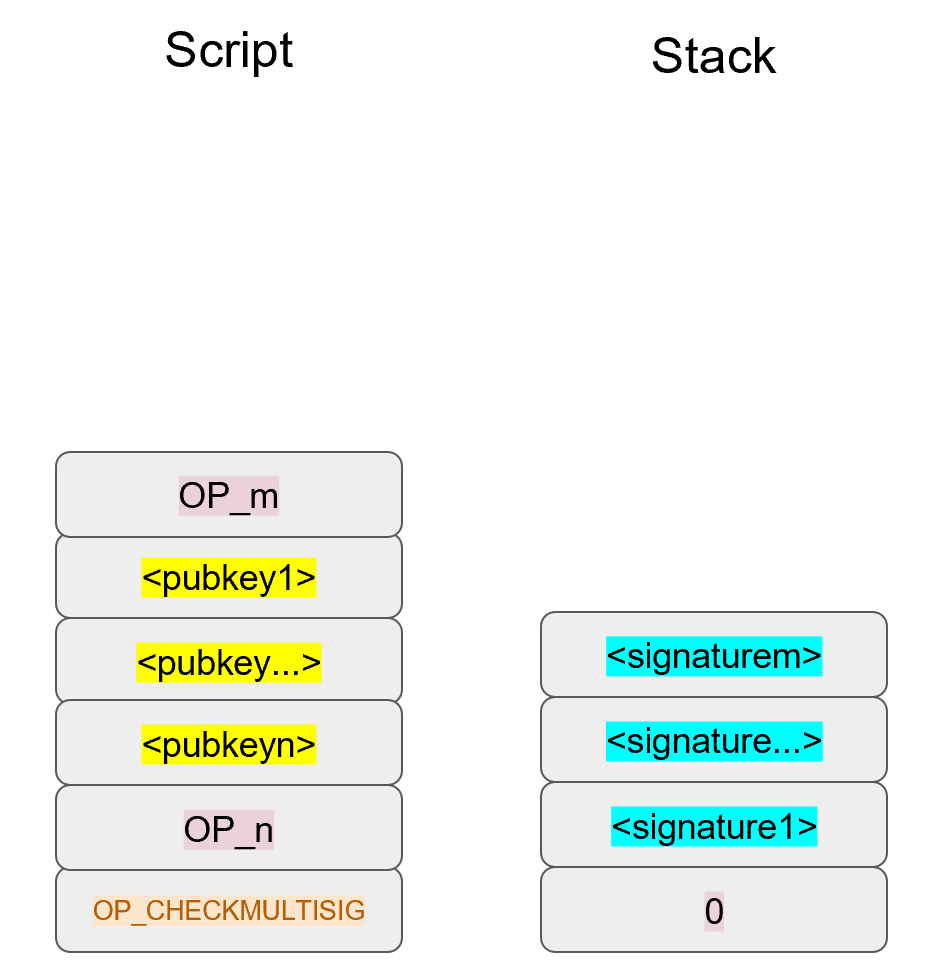
OP_m will push the number m on the stack, the public keys will be pushed to the stack and OP_n will push the number n to the stack (Figure 8-7).
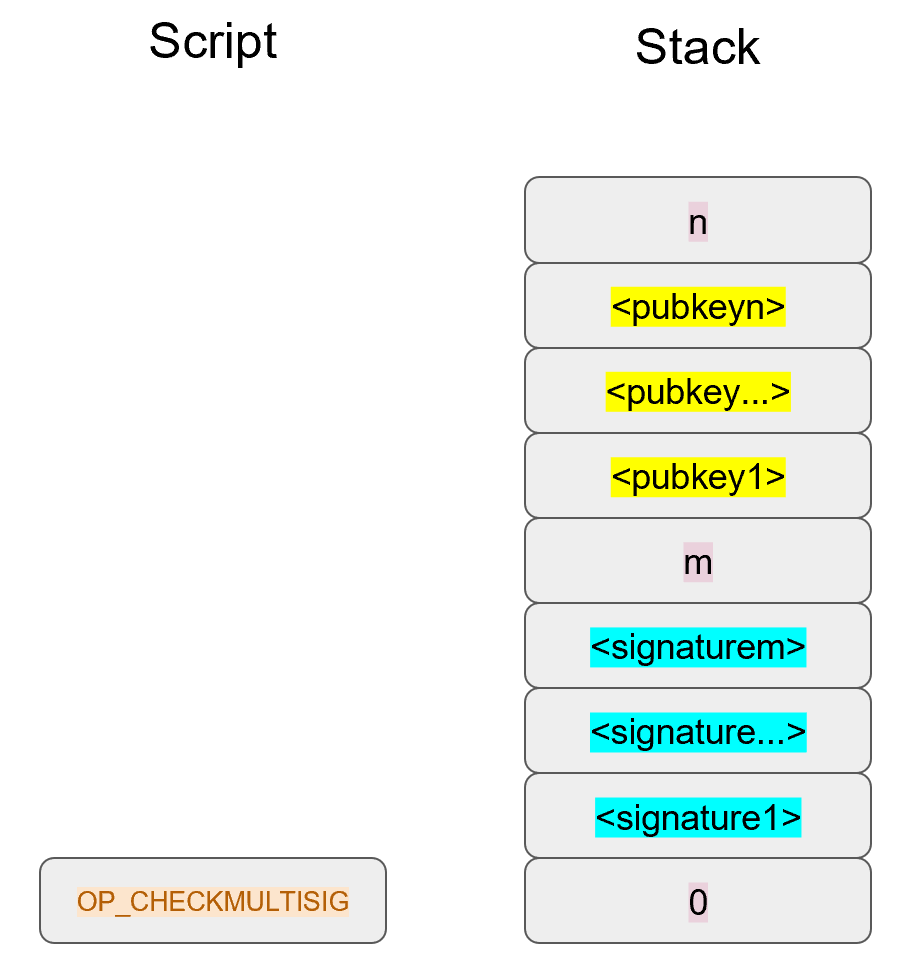
At this point, OP_CHECKMULTISIG will consume m+n+3 elements (see `OP_CHECKMULTISIG` Off-by-one Bug) and push a 1 to the stack if m of the signatures are valid for m distinct public keys from the list of n public keys, a 0 otherwise.
Assuming that the signatures are valid, the stack has a single 1 which validates the combined Script (Figure 8-8):
OP_CHECKMULTISIG Off-by-one BugThe stack elements consumed by OP_CHECKMULTISIG are supposed to be:
m, m different signatures, n, n different pubkeys.
The number of elements consumed should be 2 (m and n themselves) + m (signatures) + n (pubkeys).
Unfortunately, the opcode consumes 1 more element than the m+n+2 elements that it’s supposed to.
OP_CHECKMULTISIG consumes m+n+3, so an extra element is added (OP_0 in our example) in order to not cause a failure.
The opcode does nothing with that extra element and that extra element can be anything.
As a way to combat malleability, however, most nodes on the Bitcoin network will not relay the transaction unless that extra element is OP_0.
Note that if we had m+n+2 elements, that OP_CHECKMULTISIG will just fail as there are not enough elements to be consumed and the combined Script will fail causing the transaction to be invalid.
OP_CHECKMULTISIGIn an m-of-n Bare Multisig, the stack contains n as the top element, then n pubkeys, then m, then m signatures and finally, a filler item due to the off-by-one bug.
The code for OP_CHECKMULTISIG in op.py is mostly written here:
defop_checkmultisig(stack,z):iflen(stack)<1:returnFalsen=decode_num(stack.pop())iflen(stack)<n+1:returnFalsesec_pubkeys=[]for_inrange(n):sec_pubkeys.append(stack.pop())m=decode_num(stack.pop())iflen(stack)<m+1:returnFalseder_signatures=[]for_inrange(m):der_signatures.append(stack.pop()[:-1])stack.pop()try:raiseNotImplementedErrorexcept(ValueError,SyntaxError):returnFalsereturnTrue
Each DER signature is assumed to be signed with SIGHASH_ALL.
We take care of the off-by-one error by consuming the top element of the stack and not doing anything with the element.
This is the part that you will need to code for the next exercise.
Write the op_checkmultisig function of op.py.
Bare multisig is a bit ugly, but it is functional.
This reduces the single point of failure by requiring m of n signatures to unlock a UTXO.
There is plenty of utility in making outputs multisig, especially if you’re a business.
However, Bare Multisig suffers from a few problems:
First problem: the length of the ScriptPubKey. A Bare Multisig ScriptPubKey has many different public keys and that makes the ScriptPubKey long. Unlike p2pkh or even p2pk, these are not easily communicated using voice or even text message.
Second problem: because the output is so long, it requires more resources for node software. Nodes keep track of the UTXO set, so a big ScriptPubKey is more expensive to keep track of. A large output is more expensive to keep in fast-access storage (like RAM), being 5-20x larger than a normal p2pkh output.
Third problem: because the ScriptPubKey can be so much bigger, bare multisig can and has been abused. The entire PDF of the Satoshi’s original whitepaper is encoded in this transaction in block 230009:
54e48e5f5c656b26c3bca14a8c95aa583d07ebe84dde3b7dd4a78f4e4186e713
The creator of this transaction split up the whitepaper PDF into 64 byte chunks which were then made into invalid uncompressed public keys. The whitepaper was encoded into 947 outputs as 1-of-3 Bare Multisig outputs. These outputs are not spendable but have to be indexed in the UTXO sets of full nodes. This is a tax every full node has to pay and is in that sense abusive.
In order to mitigate these problems, pay-to-script-hash (p2sh) was born.
Pay-to-script-hash (p2sh) is a general solution to the long address/ScriptPubKey problem. More complicated ScriptPubKeys than Bare Multisig can easily be made and they have the same problems as Bare Multisig.
The solution that p2sh implements is to take the hash of some Script instructions and then reveal the pre-image Script instructions later. Pay-to-script-hash was introduced in 2011 to a lot of controversy. There were multiple proposals, but as we’ll see, p2sh is kludgy, but works.
In p2sh, a special rule gets executed only when the pattern shown in Figure 8-9 is encountered:
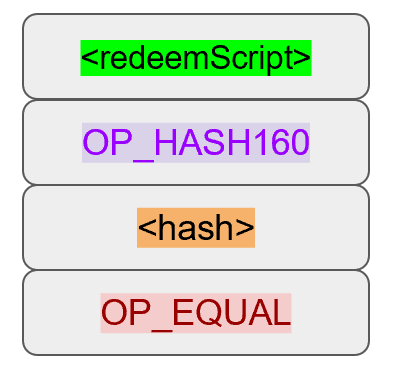
If this exact instruction set ends with a 1 on the stack, then the RedeemScript (top item in Figure 8-9) is parsed and then added to the Script instruction set.
This special pattern was introduced in BIP0016 and Bitcoin software that implements BIP0016 (anything post 2011) checks for the pattern.
The RedeemScript does not add new Script instructions for processing unless this exact sequence is encountered and ends with a 1.
If this sounds hacky, it is. But before we get to that, let’s look a little closer at exactly how this plays out.
Let’s say we have a 2-of-2 multisig ScriptPubKey (Figure 8-10):
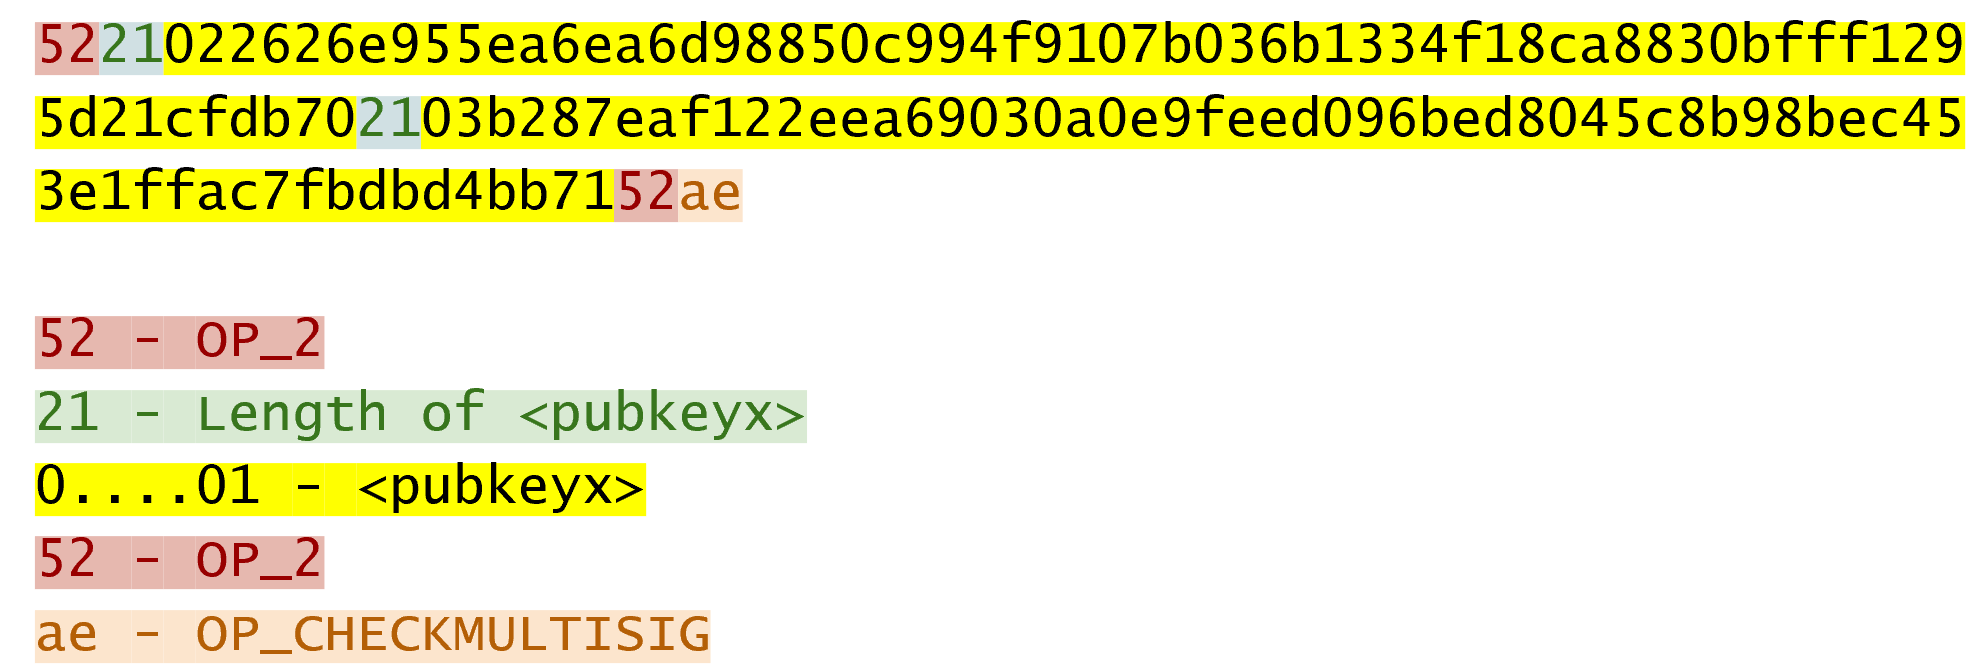
This is a ScriptPubKey for a Bare Multisig. What we need to do to convert this to p2sh is to take a hash of this Script and keep this Script handy for when we want to redeem it. We call this the RedeemScript, because the Script is only revealed during redemption. We put the hash of the RedeemScript as the ScriptPubKey like Figure 8-11:
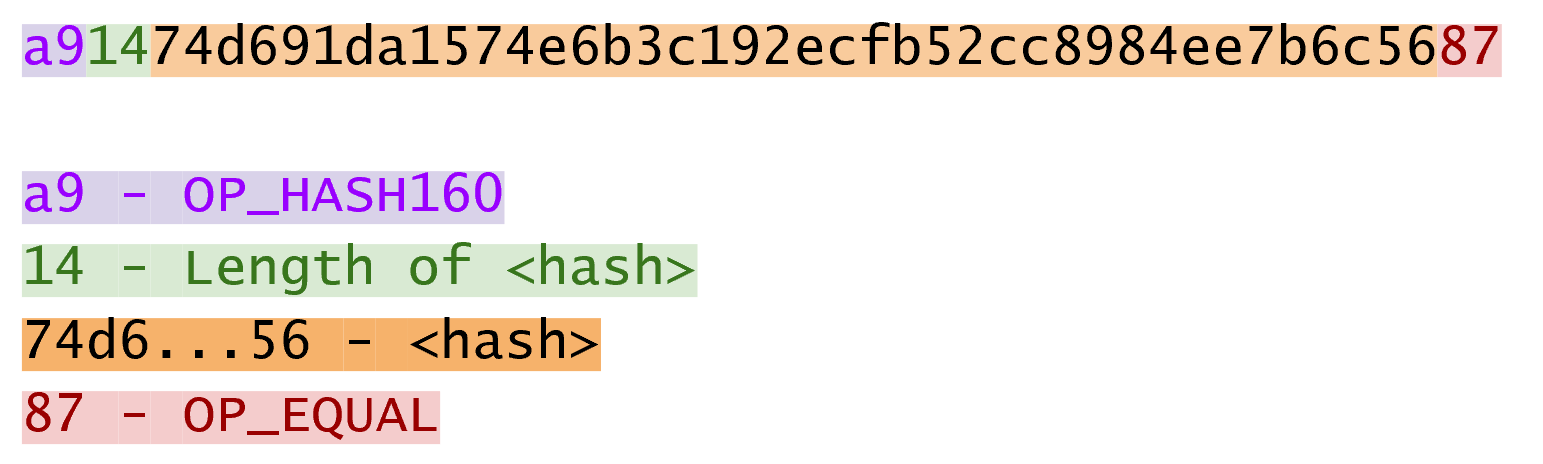
The hash digest here is the hash160 of the RedeemScript, or what was previously the ScriptPubKey. We’re locked the funds to the hash of the RedeemScript which needs to be revealed at unlock time.
Creating the ScriptSig for a p2sh script involves not only revealing the RedeemScript, but also unlocking the RedeemScript. At this point, you might wonder, where is the RedeemScript stored? The RedeemScript is not on the blockchain until actual redemption, so it must be stored by the creator of the p2sh address. If the RedeemScript is lost and cannot be reconstructed, the funds are lost, so it’s very important to keep track of it!
If you are receiving to a p2sh address, be sure to store and backup the RedeemScript! Better yet, make it easy to reconstruct!
The ScriptSig for the 2-of-2 multisig looks like Figure 8-12:
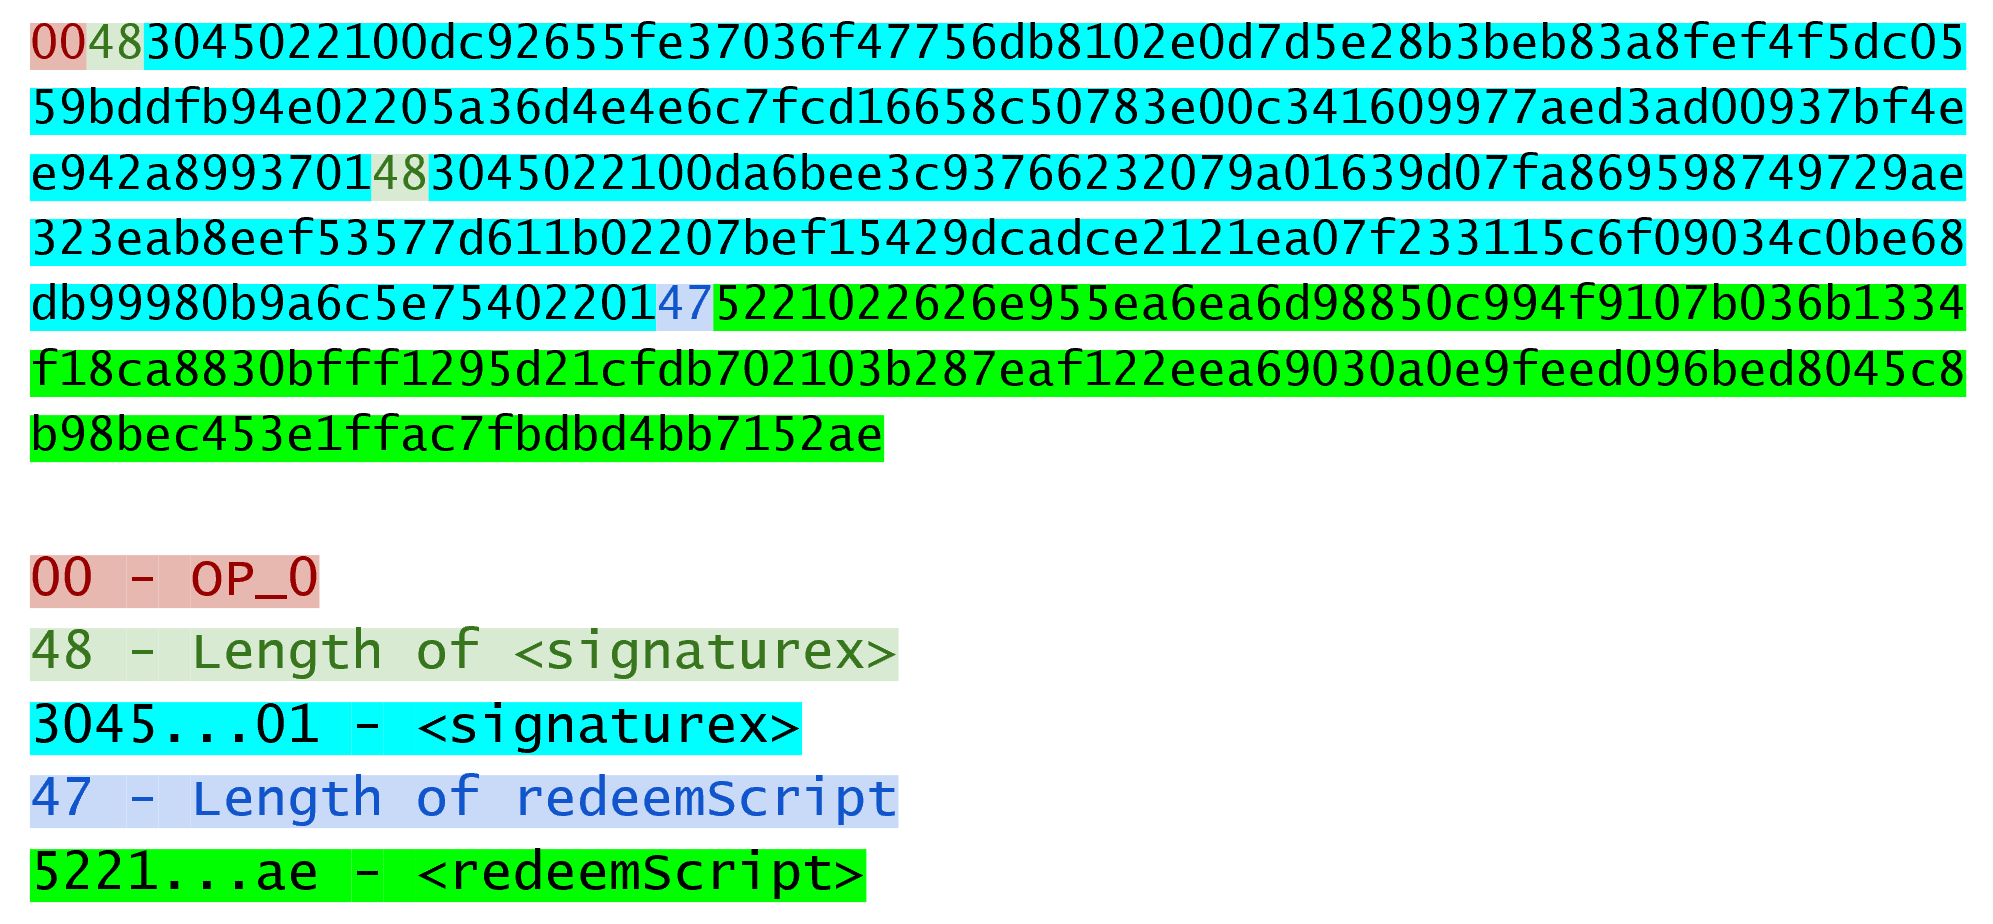
This produces the combined Script (Figure 8-13):
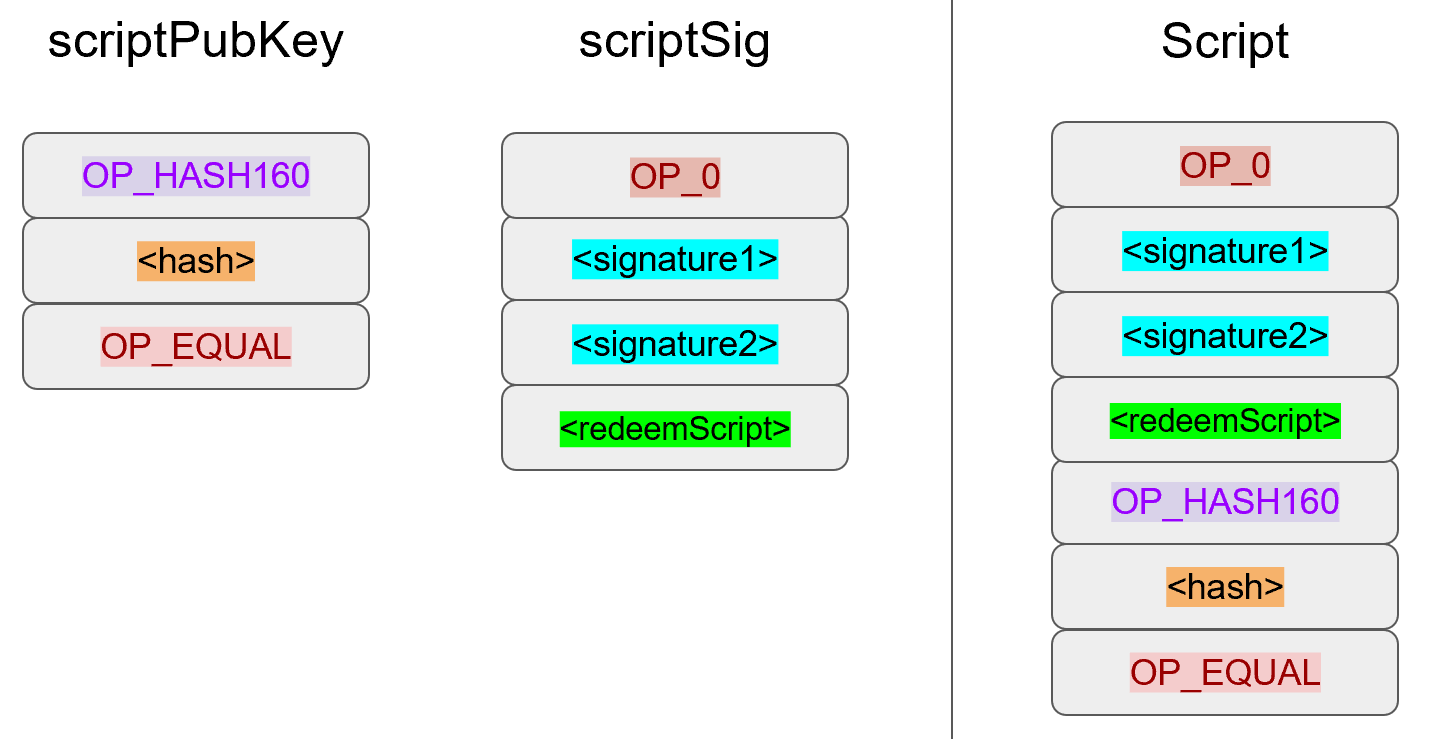
As before, OP_0 is there because of the OP_CHECKMULTISIG bug.
The key to understanding p2sh is the execution of the exact sequence shown in Figure 8-14:
Upon execution of this sequence, if the stack is left with a 1, the RedeemScript is inserted into the Script instruction set.
In other words, if we reveal a RedeemScript whose hash160 is the same hash160 in the ScriptPubKey, that RedeemScript acts like the ScriptPubKey instead.
We hash the Script that locks the funds and put that into the blockchain instead of the Script itself.
This is why we call this ScriptPubKey pay-to-script-hash.
Let’s go through exactly how this works. We start with the Script instructions (Figure 8-15):
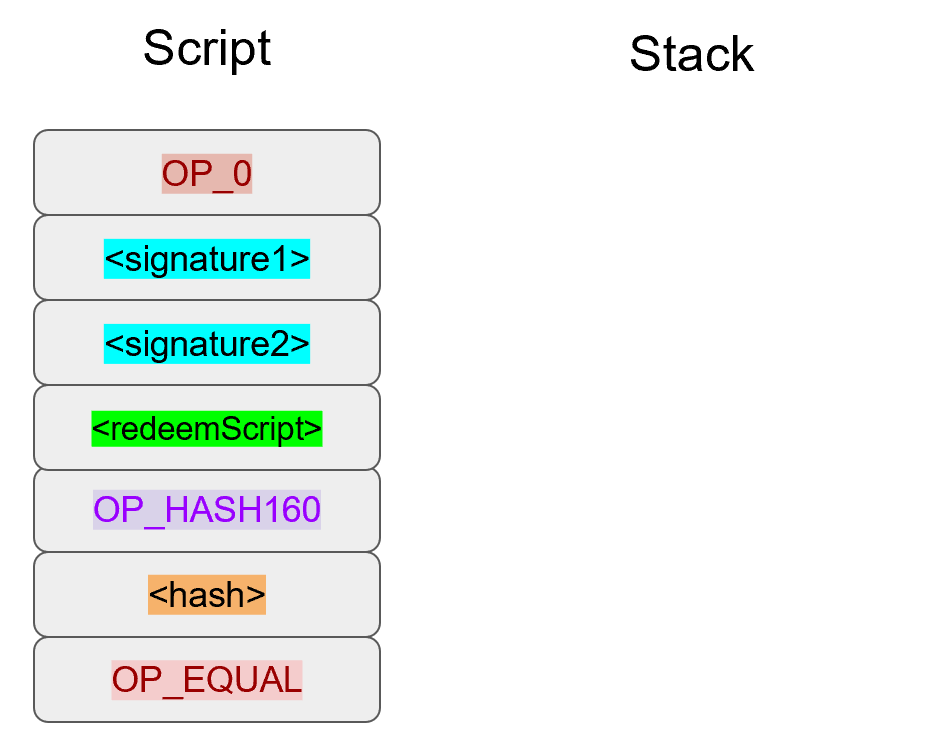
OP_0 will push a 0 to the stack, the two signatures and the RedeemScript will be pushed to the stack directly, leading to Figure 8-16:
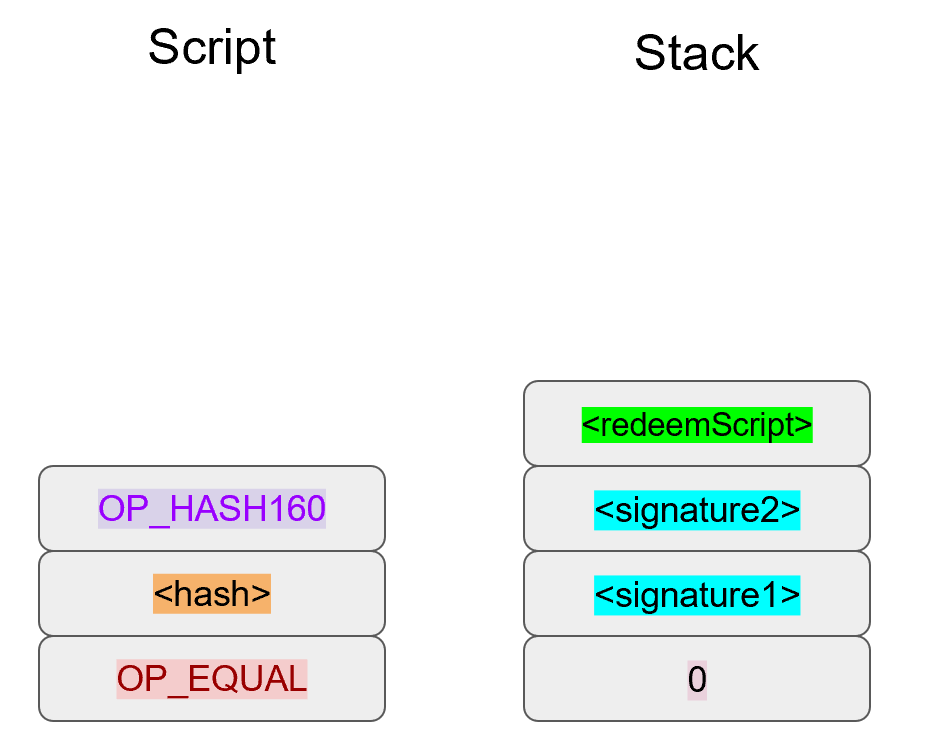
OP_HASH160 will hash the RedeemScript, which will make the stack look like Figure 8-17:
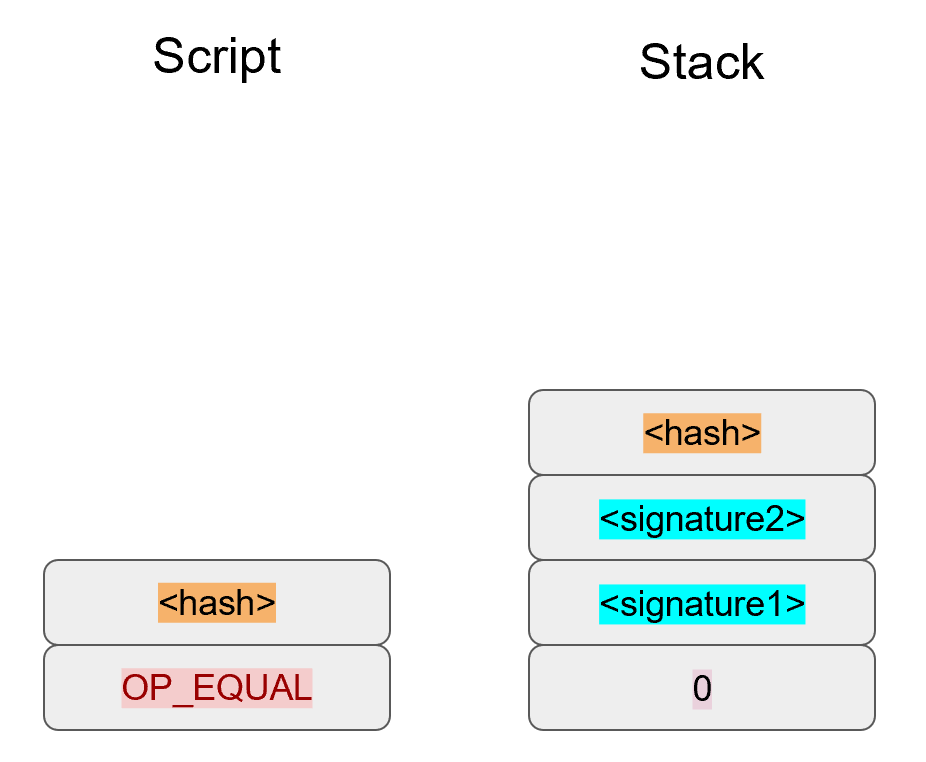
The 20-byte hash will be pushed on the stack (Figure 8-18):
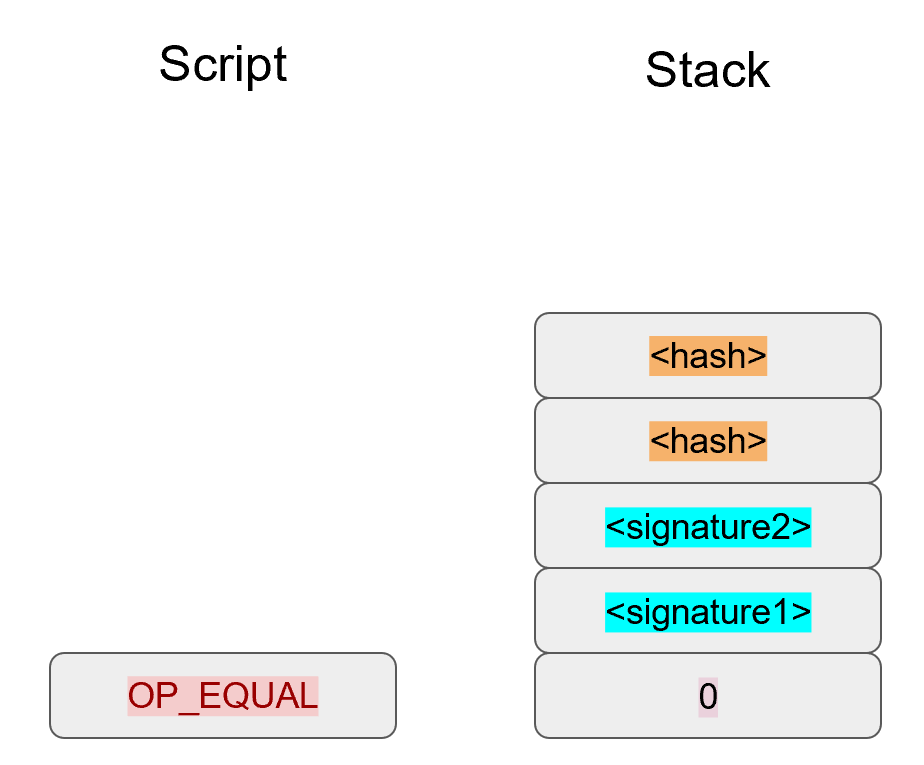
And finally, OP_EQUAL will compare the top two elements.
If the software checking this transaction is pre-BIP0016, we would end up with Figure 8-19:
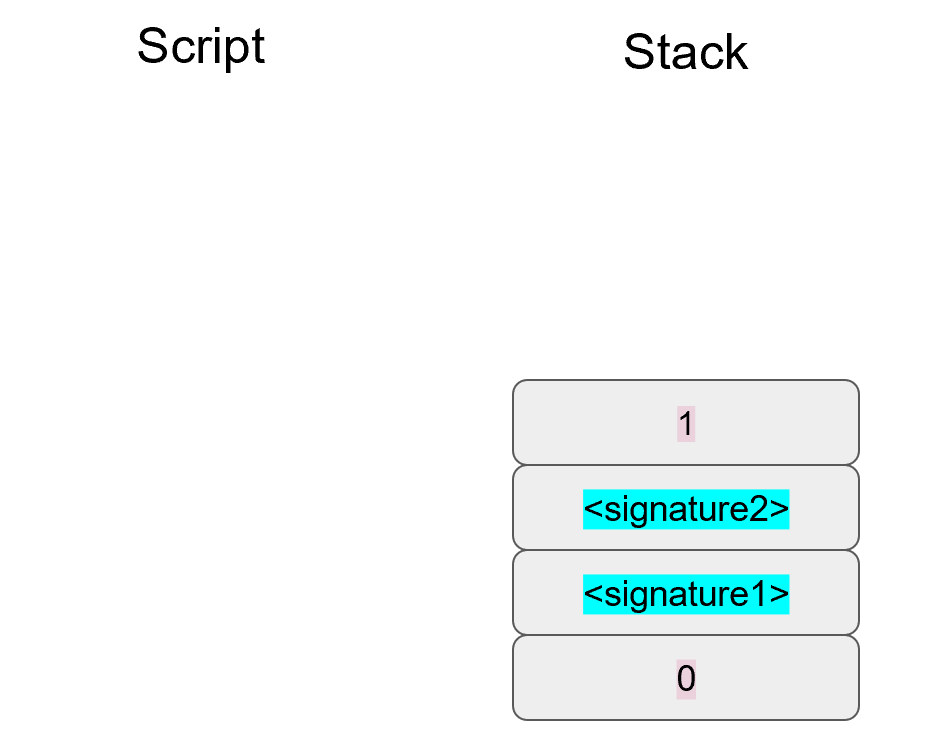
This would end evaluation for pre-BIP0016 nodes and the result would be valid, assuming the hashes are equal.
On the other hand, BIP0016 nodes, which as of this writing are the vast majority, will parse the RedeemScript as Script instructions (Figure 8-20):
These go into the Script column as instructions (Figure 8-21):
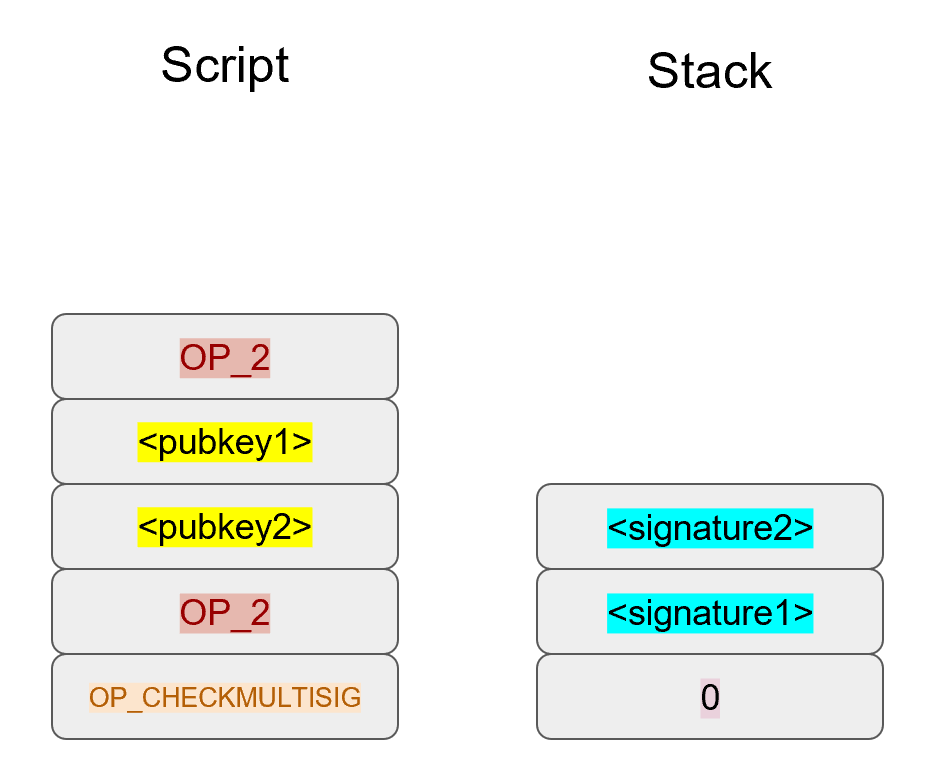
OP_2 pushes a 2 to the stack, the pubkeys are also pushed and a final OP_2 pushes another 2 to the stack (Figure 8-22):
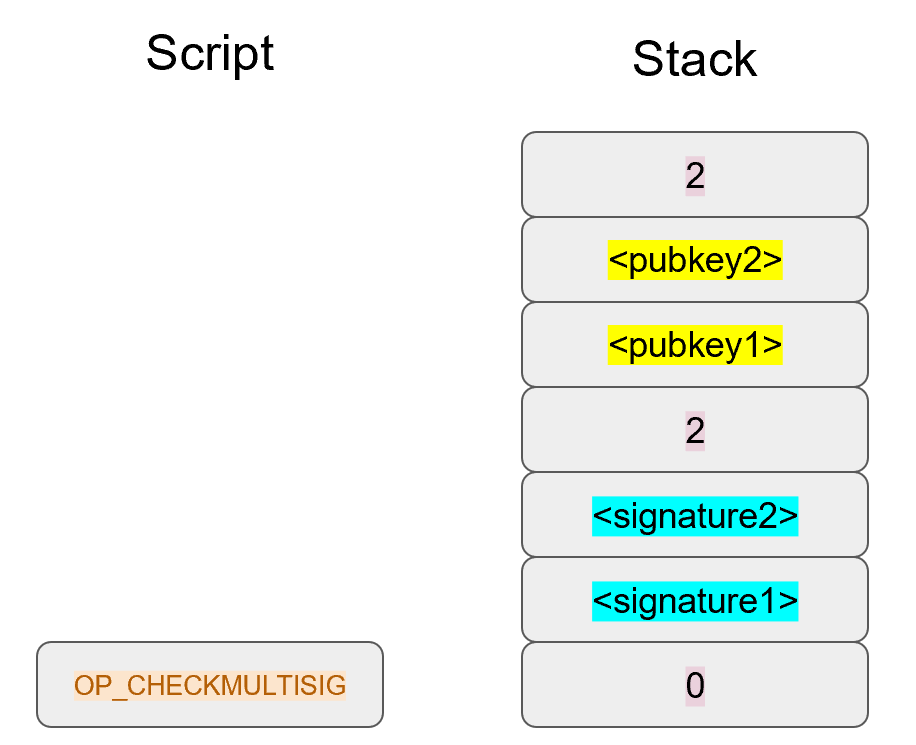
OP_CHECKMULTISIG consumes m+n+3 elements, which is the entire stack, and we end the same way we did Bare Multisig (Figure 8-23).
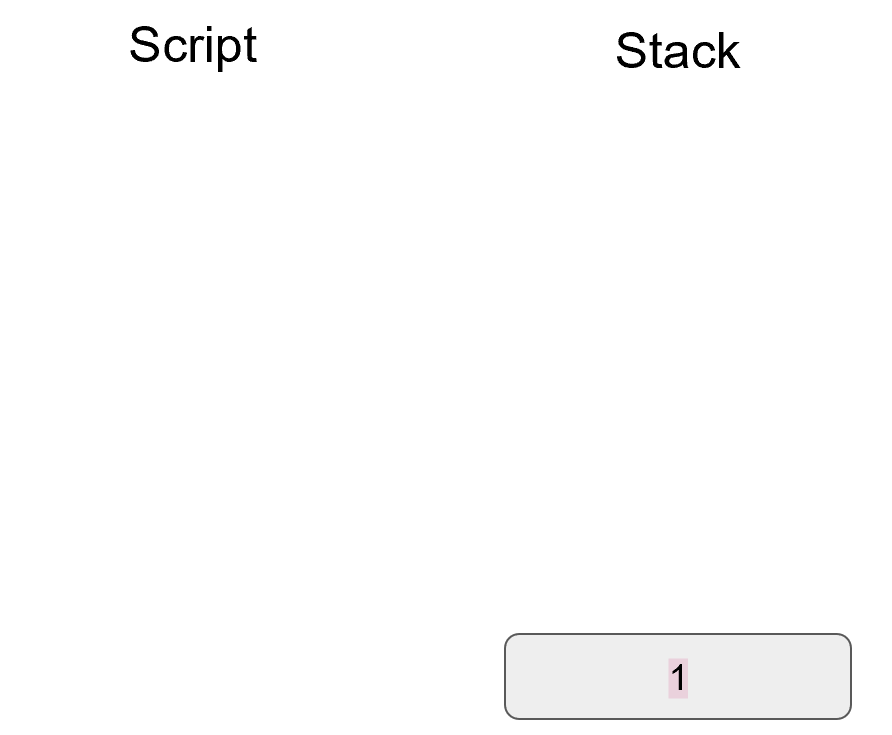
The RedeemScript substitution is a bit hacky and there’s special-cased code in Bitcoin software to handle this.
Why wasn’t something a lot less hacky and more intuitive chosen?
BIP0012 was a competing proposal at the time which used OP_EVAL and was considered more elegant.
A ScriptPubKey like Figure 8-24 would have worked with BIP0012:
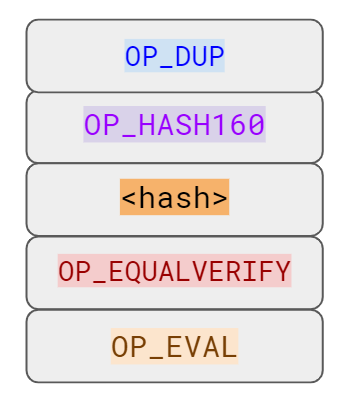
OP_EVAL would have been an instruction which adds additional instructions based on the top element.OP_EVAL would have consumed the top element of the stack and interpreted that as Script instructions to be put into the Script column.
Unfortunately, this more elegant solution comes with an unwanted side-effect, namely Turing-Completeness. Turing-Completeness is undesirable as it makes the security of a smart contract much harder to guarantee (see Chapter 6). Thus, the more hacky, but more secure option of special-casing was chosen in BIP0016. BIP0016 or p2sh was implemented in 2011 and continues to be a part of the network today.
The special pattern of RedeemScript, OP_HASH160, hash160 and OP_EQUAL needs handling.
The evaluate method in script.py is where we handle the special case:
classScript:...defevaluate(self,z):...whilelen(instructions)>0:instruction=instructions.pop(0)iftype(instruction)==int:...else:stack.append(instruction)iflen(instructions)==3andinstructions[0]==0xa9\andtype(instructions[1])==bytesandlen(instructions[1])==20\andinstructions[2]==0x87:instructions.pop()h160=instructions.pop()instructions.pop()ifnotop_hash160(stack):returnFalsestack.append(h160)ifnotop_equal(stack):returnFalseifnotop_verify(stack):LOGGER.info('bad p2sh h160')returnFalseredeem_script=encode_varint(len(instruction))+instructionstream=BytesIO(redeem_script)instructions.extend(Script.parse(stream).instructions)
0xa9 is OP_HASH160, 0x87 is OP_EQUAL.
We’re checking that the next 3 instructions conform to the BIP0016 special pattern.
We know that this is OP_HASH160, so we just pop it off.
Similarly, we know the next instruction is the 20-byte hash value and the third instruction is OP_EQUAL, which is what we tested for in the if statement above it.
We run the OP_HASH160, 20-byte hash push on the stack and OP_EQUAL as normal.
There should be a 1 remaining, which is what op_verify checks for (OP_VERIFY consumes 1 element and does not put anything back).
Because we want to parse the RedeemScript, we need to prepend the length.
We extend the instruction set with the parsed instructions from the RedeemScript.
The nice thing about p2sh is that the RedeemScript can be as long as the largest single element from OP_PUSHDATA2, which is 520 bytes.
Multisig is just one possibility.
You can have Scripts that define more complicated logic like “2 of 3 of these keys or 5 of 7 of these other keys”.
The main feature of p2sh is that it’s flexible and at the same time reduces the UTXO set size by pushing the burden of storing part of the Script back to the user.
In Chapter 13, p2sh is also used to make Segwit backwards compatible.
To compute p2sh addresses, we use a process similar to how we compute p2pkh addresses. The hash160 is prepended with a prefix byte and appended with a checksum.
Mainnet p2sh uses the 0x05 byte which causes addresses to start with a 3 in Base58 while testnet p2sh uses the 0xc4 byte to cause addresses to start with a 2.
We can calculate the address using the encode_base58_checksum function from helper.py.
>>>fromhelperimportencode_base58_checksum>>>h160=bytes.fromhex('74d691da1574e6b3c192ecfb52cc8984ee7b6c56')>>>(encode_base58_checksum(b'\x05'+h160))3CLoMMyuoDQTPRD3XYZtCvgvkadrAdvdXh
Write h160_to_p2pkh_address that converts a 20-byte hash160 into a p2pkh address.
Write h160_to_p2sh_address that converts a 20-byte hash160 into a p2sh address.
As with p2pkh, one of the tricky aspects of p2sh is verifying the signatures. The p2sh signature verification is different than the p2pkh process covered in Chapter 7.
Unlike p2pkh where there’s only 1 signature and 1 public key, we have some number of pubkeys (in SEC format in the RedeemScript) and some equal or smaller number of signatures (in DER format in the ScriptSig). Thankfully, signatures have to be in the same order as the pubkeys or the signatures are not considered valid.
Once we have a particular signature and public key, we only need the signature hash, or z to figure out whether the signature is valid (Figure 8-25).
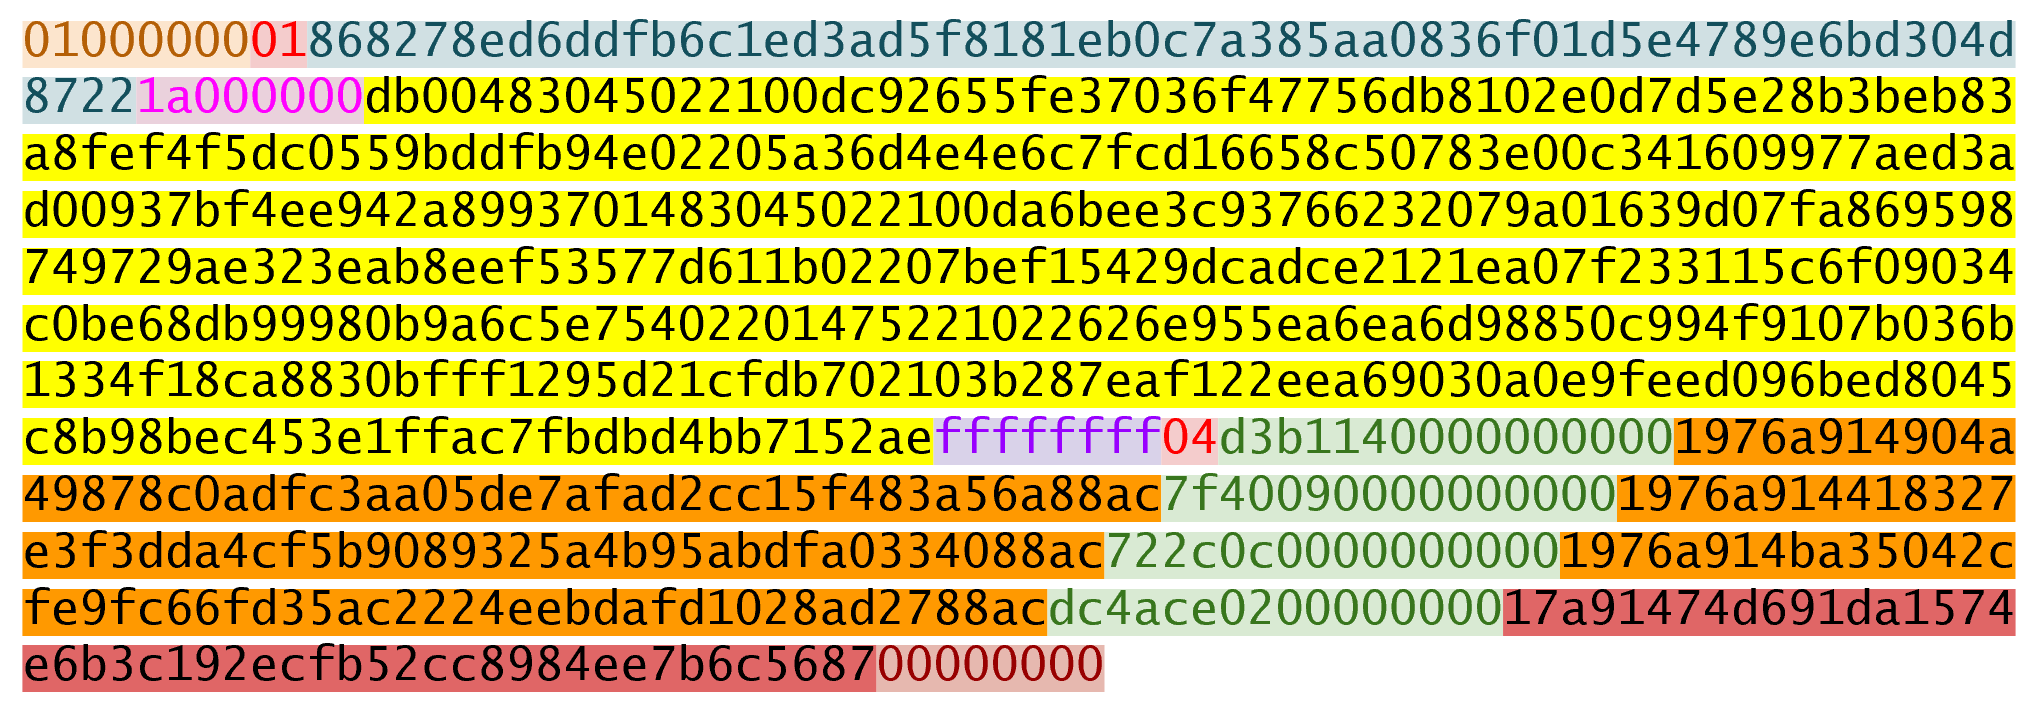
As with p2pkh, finding the signature hash is the most difficult part of the p2sh signature validation process and we’ll now proceed to cover this in detail.
The first step is to empty all the ScriptSigs when checking the signature (Figure 8-26). The same procedure is used for creating the signature.
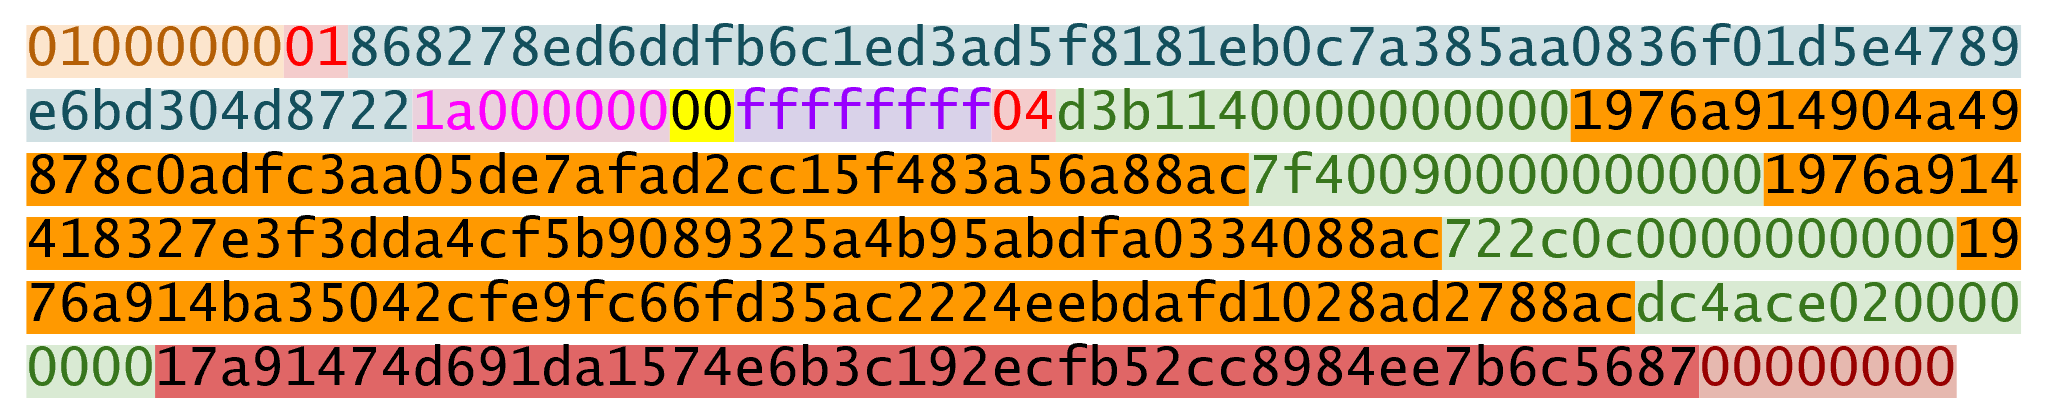
Each p2sh input has a RedeemScript. We take the RedeemScript and put that in place of the empty ScriptSig (Figure 8-27). This is different from p2pkh in that it’s not the ScriptPubKey.
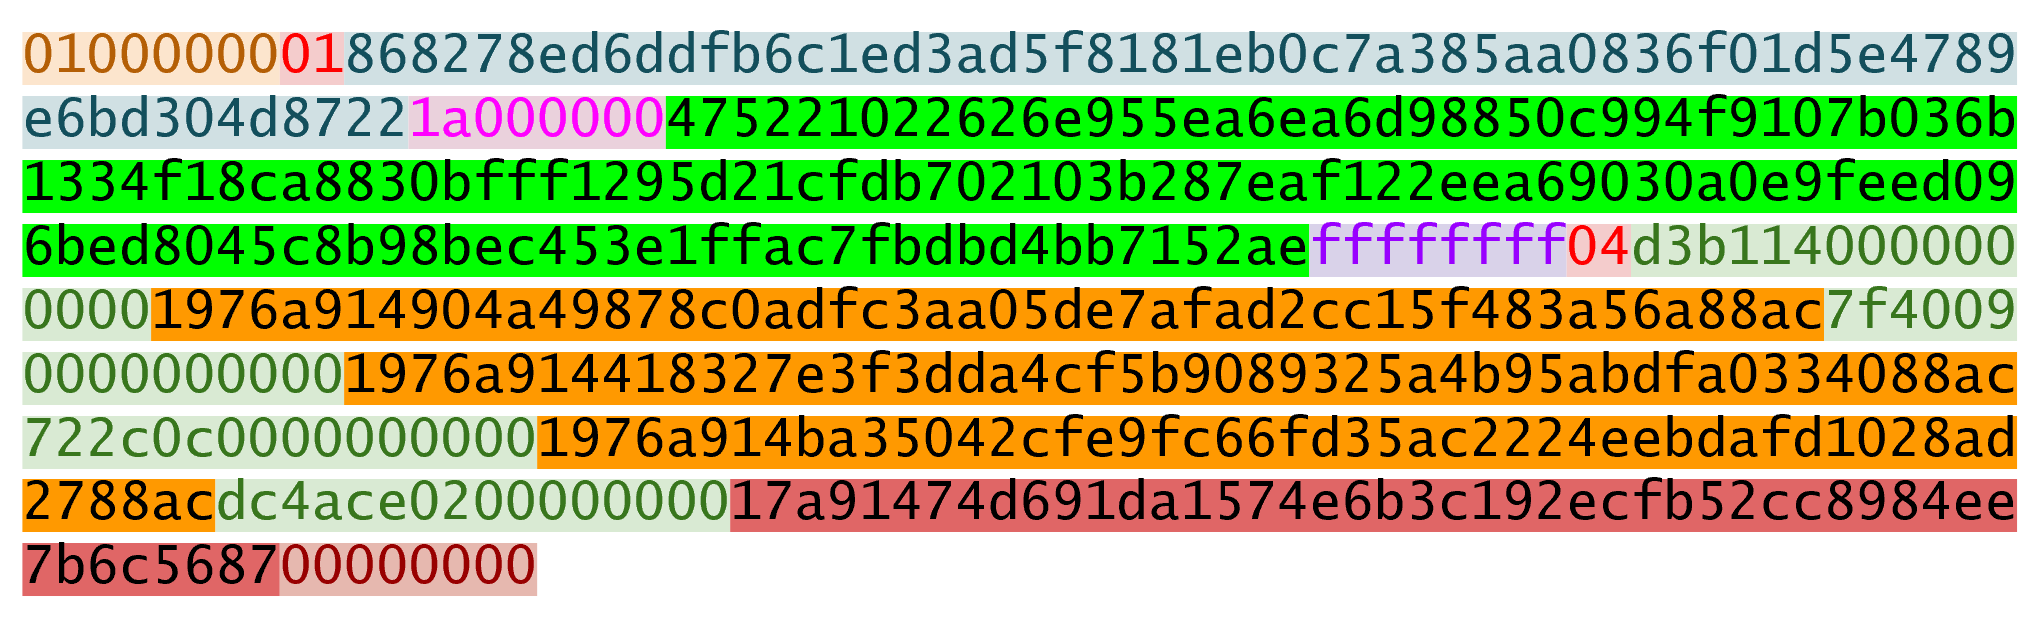
Lastly, we add a 4-byte hash type to the end (Figure 8-28). This is the same as in p2pkh.
The integer corresponding to SIGHASH_ALL is 1 and this has to be encoded in Little-Endian over 4 bytes, which makes the transaction look like this:
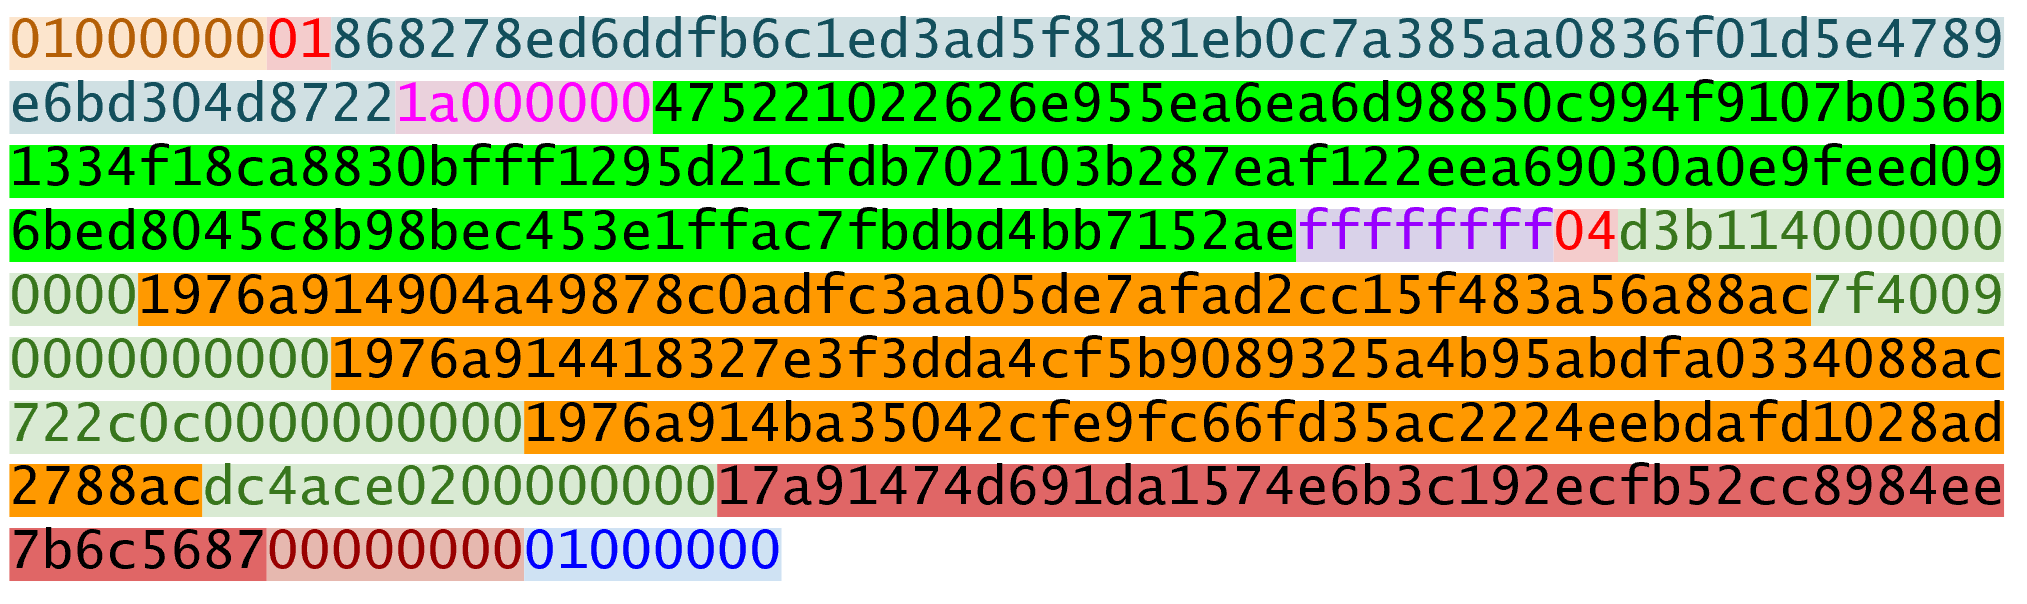
SIGHASH_ALL, or the blue part at the end.The hash256 of this interpreted as a Big-Endian integer is our z.
The code for getting our signature hash, or z, looks like this:
>>>fromhelperimporthash256>>>modified_tx=bytes.fromhex('0100000001868278ed6ddfb6c1ed3ad5f8181eb0c7a38\5aa0836f01d5e4789e6bd304d87221a000000475221022626e955ea6ea6d98850c994f9107b036\b1334f18ca8830bfff1295d21cfdb702103b287eaf122eea69030a0e9feed096bed8045c8b98be\c453e1ffac7fbdbd4bb7152aeffffffff04d3b11400000000001976a914904a49878c0adfc3aa0\5de7afad2cc15f483a56a88ac7f400900000000001976a914418327e3f3dda4cf5b9089325a4b9\5abdfa0334088ac722c0c00000000001976a914ba35042cfe9fc66fd35ac2224eebdafd1028ad2\788acdc4ace020000000017a91474d691da1574e6b3c192ecfb52cc8984ee7b6c5687000000000\1000000')>>>s256=hash256(modified_tx)>>>z=int.from_bytes(s256,'big')>>>(hex(z))0xe71bfa115715d6fd33796948126f40a8cdd39f187e4afb03896795189fe1423c
Now that we have our z, we can grab the SEC public key and DER signature from the ScriptSig and RedeemScript (Figure 8-29):
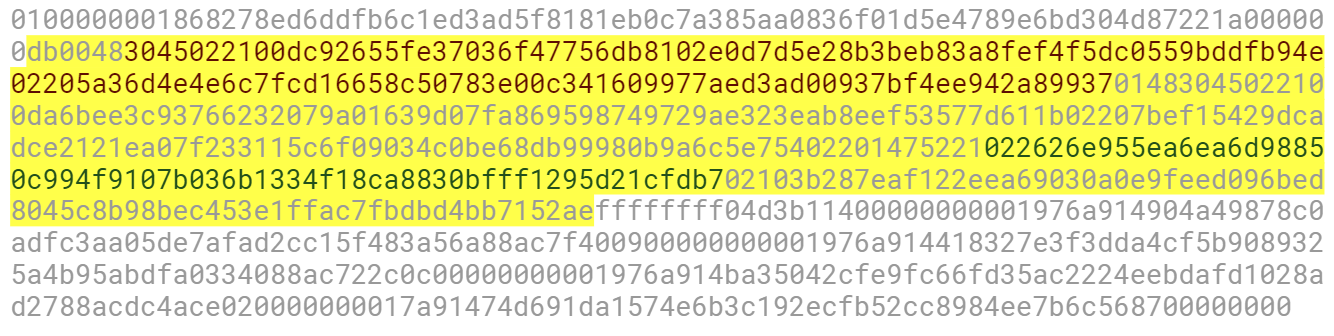
>>>fromeccimportS256Point,Signature>>>fromhelperimporthash256>>>modified_tx=bytes.fromhex('0100000001868278ed6ddfb6c1ed3ad5f8181eb0c7a38\5aa0836f01d5e4789e6bd304d87221a000000475221022626e955ea6ea6d98850c994f9107b036\b1334f18ca8830bfff1295d21cfdb702103b287eaf122eea69030a0e9feed096bed8045c8b98be\c453e1ffac7fbdbd4bb7152aeffffffff04d3b11400000000001976a914904a49878c0adfc3aa0\5de7afad2cc15f483a56a88ac7f400900000000001976a914418327e3f3dda4cf5b9089325a4b9\5abdfa0334088ac722c0c00000000001976a914ba35042cfe9fc66fd35ac2224eebdafd1028ad2\788acdc4ace020000000017a91474d691da1574e6b3c192ecfb52cc8984ee7b6c5687000000000\1000000')>>>h256=hash256(modified_tx)>>>z=int.from_bytes(h256,'big')>>>sec=bytes.fromhex('022626e955ea6ea6d98850c994f9107b036b1334f18ca8830bfff\1295d21cfdb70')>>>der=bytes.fromhex('3045022100dc92655fe37036f47756db8102e0d7d5e28b3beb83a\8fef4f5dc0559bddfb94e02205a36d4e4e6c7fcd16658c50783e00c341609977aed3ad00937bf4\ee942a89937')>>>point=S256Point.parse(sec)>>>sig=Signature.parse(der)>>>(point.verify(z,sig))True
z is from the code above
We’ve verified 1 of the 2 signatures that are required to unlock this p2sh multisig.
Validate the second signature from the transaction above.
Modify the sig_hash and verify_input methods to be able to verify p2sh transactions.
We learned how p2sh ScriptPubKeys are created and how they’re redeemed. We’ve covered Transactions for the last 4 chapters, we now turn to how they are grouped in Blocks.
Transactions transfer Bitcoins from one party to another and are unlocked, or authorized, by signatures. This ensures that the sender authorized the transaction, but what if the sender sends the same coins to multiple people? This is called the double-spending problem and is so called because the owner of a lockbox may try to spend the same output twice. Much like being given a check that has the possibility of bouncing, the receiver needs to be assured that the transaction is valid.
This is where a major innovation of Bitcoin comes in with Blocks. Think of Blocks as a way to order transactions. If we order transactions, a double-spend can be prevented by making any later, conflicting transaction invalid. This is the equivalent to accepting the earlier transaction as the valid one.
Implementing this rule would be easy (earliest transaction is valid, subsequent transactions that conflict are invalid) if we could order transactions one at a time. Unfortunately, that would require nodes on the network to agree on which transaction is supposed to be next and would cause a lot of transmission overhead in coming to consensus. We could also order large batches of transactions, maybe once per day, but that wouldn’t be very practical as transactions would settle only once per day and not have finality before then.
Bitcoin finds a middle ground between these extremes by settling every 10 minutes in batches of transactions. These batches of transactions are what we call Blocks. In this chapter we’ll go through how to parse Blocks and how to check the proof-of-work. We’ll start with a special transaction called the Coinbase transaction which is the first transaction of every block.
Coinbase transactions have nothing to do with the company of the same name based in the US. Coinbase is the required first transaction of every block and is the only transaction allowed to bring Bitcoins into existence. The Coinbase transaction’s outputs are kept by whomever the mining entity designates and usually include all the transaction fees of the other transactions in the block as well as something called the block reward.
The Coinbase transaction is what makes it worthwhile for a miner to mine. Figure 9-1 shows what a Coinbase transaction looks like:
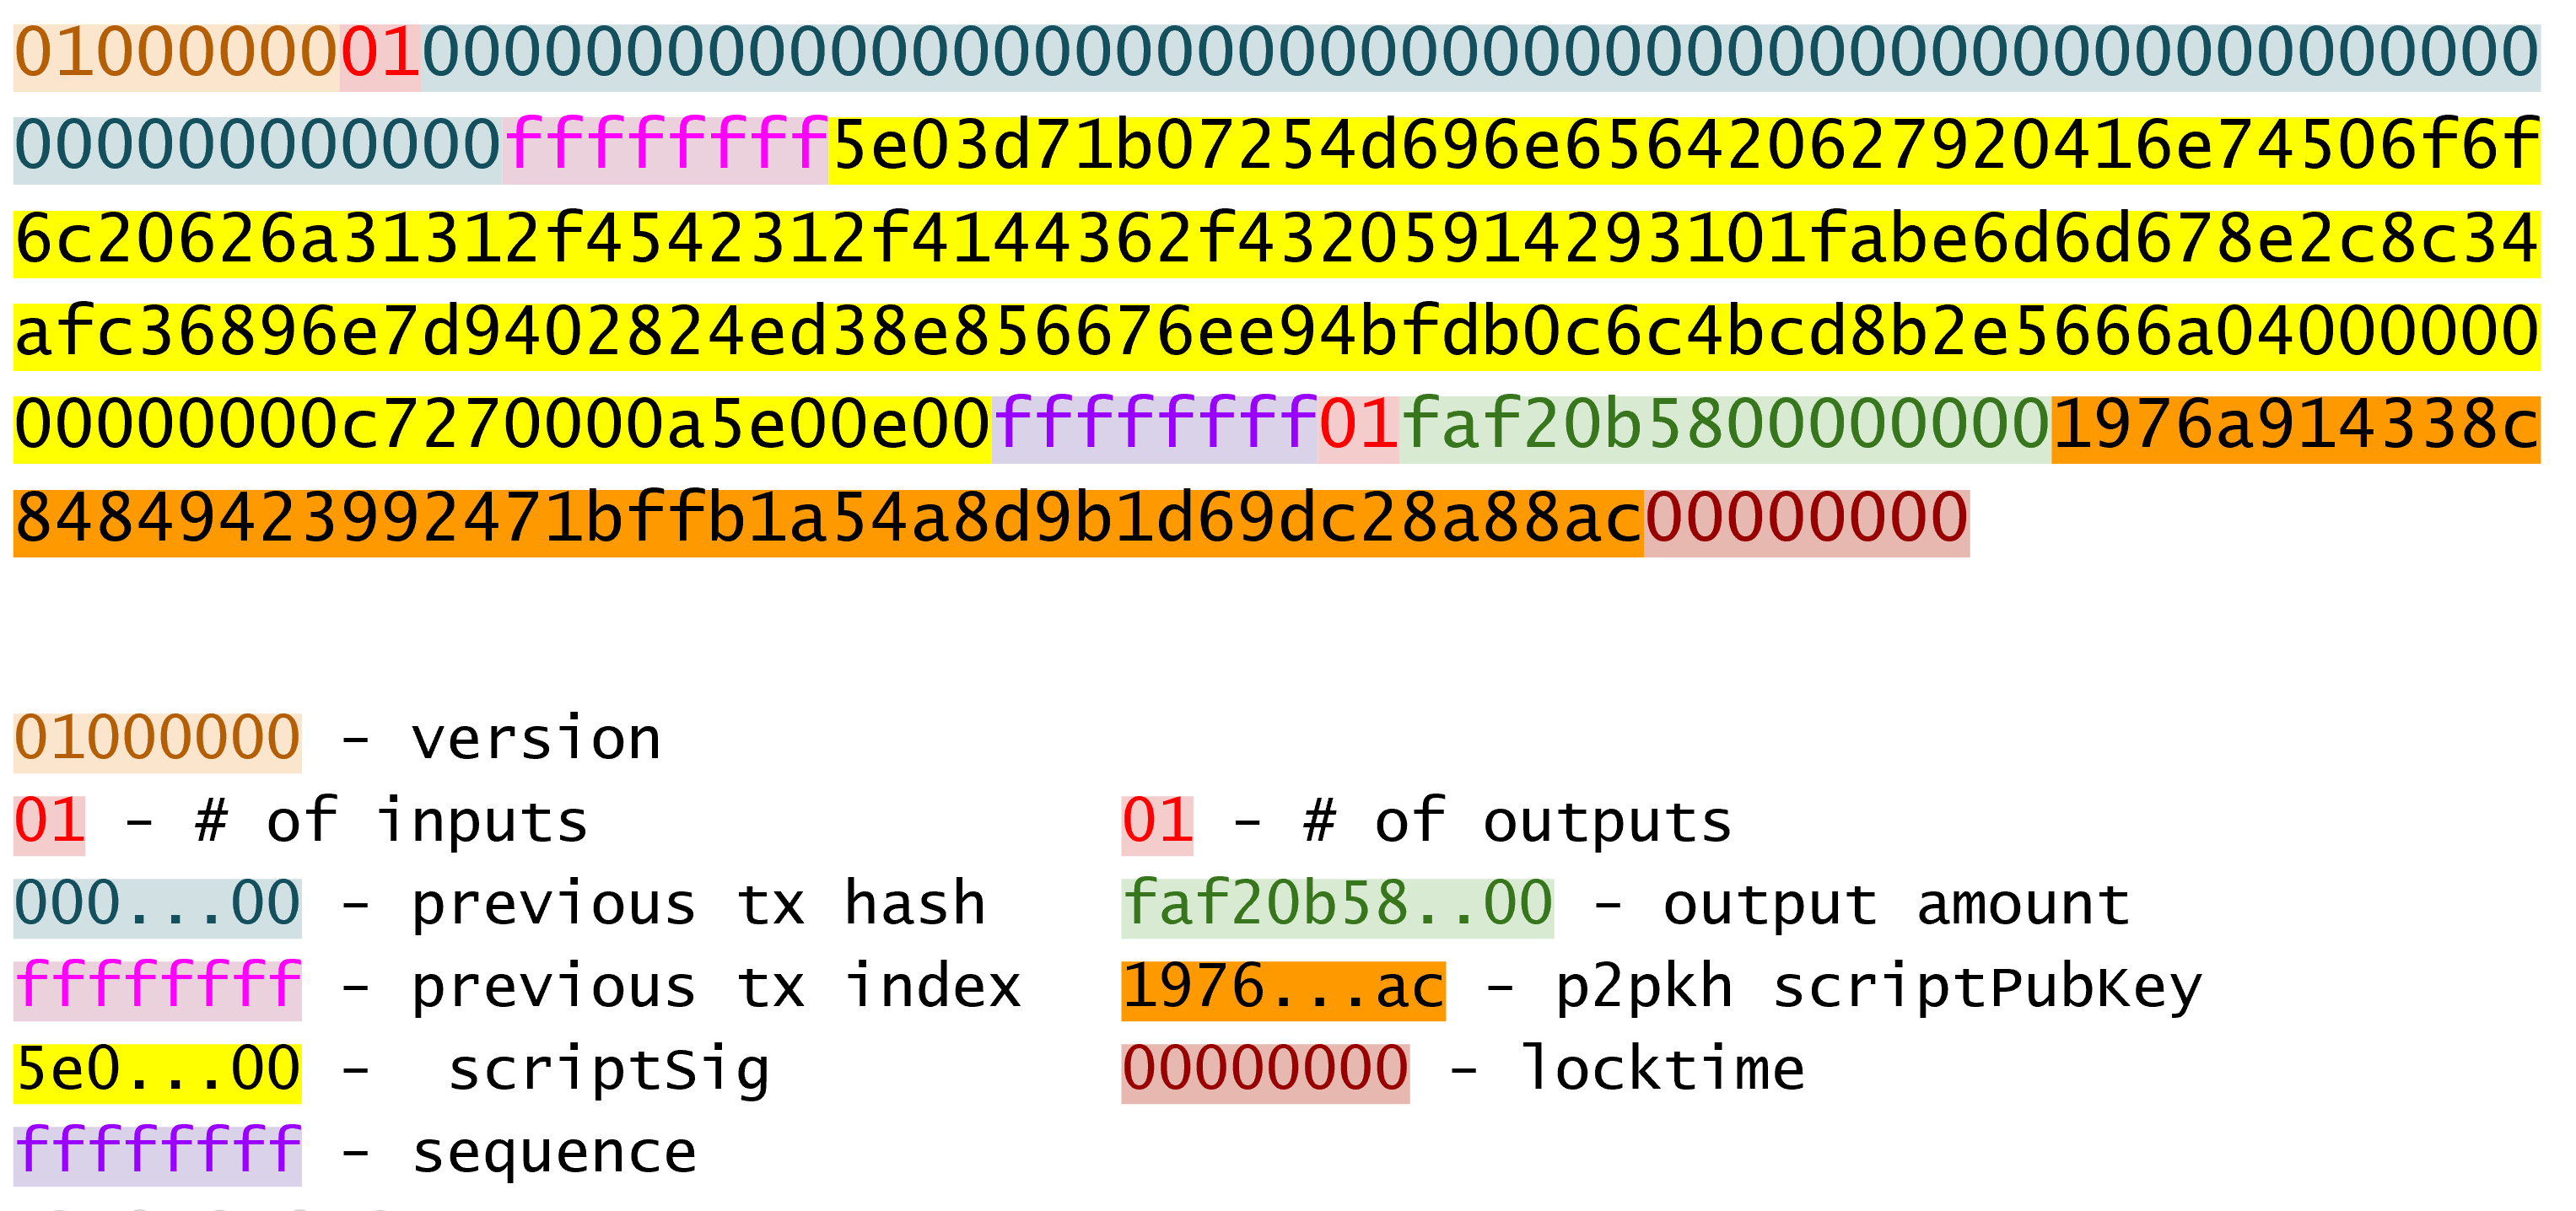
The transaction structure is no different than other transactions on the Bitcoin network with a few exceptions.
Coinbase Transactions must have exactly one input.
The one input must have a previous transaction of 32 bytes of 00.
The one input must have a previous index of ffffffff.
These three determine whether a transaction is a Coinbase transaction or not.
Write the is_coinbase method of the Tx class.
The Coinbase Transaction has no previous output that it’s spending, so the input is not unlocking anything. So what’s in the ScriptSig?
The ScriptSig of the Coinbase transaction is set by whoever mined the transaction. The main restriction is that the ScriptSig has to be at least 2 bytes and no longer than 100 bytes. Other than those restrictions and BIP0034 (see more below) the ScriptSig can be anything the miner wants as long as the evaluation of the ScriptSig by itself, with no corresponding ScriptPubKey, is valid. Here is the ScriptSig for the Genesis Block’s Coinbase Transaction:
4d04ffff001d0104455468652054696d65732030332f4a616e2f32303039204368616e63656c6c
6f72206f6e206272696e6b206f66207365636f6e64206261696c6f757420666f722062616e6b73
This ScriptSig was composed by Satoshi and contains a message that we can read:
>>>fromioimportBytesIO>>>fromscriptimportScript>>>stream=BytesIO(bytes.fromhex('4d04ffff001d0104455468652054696d6573203033\2f4a616e2f32303039204368616e63656c6c6f72206f6e206272696e6b206f66207365636f6e64\206261696c6f757420666f722062616e6b73'))>>>s=Script.parse(stream)>>>(s.instructions[2])b'The Times 03/Jan/2009 Chancellor on brink of second bailout for banks'
This was the headline from The Times newspaper on January 3, 2009. This proves that the Genesis Block was created some time at or after that date, and not before. Other Coinbase Transactions’ ScriptSigs contain similarly arbitrary data.
BIP0034 regulates the first element of the ScriptSig of Coinbase Transactions. This was due to a network problem where miners were using the same Coinbase Transaction for different blocks.
The Coinbase Transaction being the same byte-wise means that the transaction IDs are also the same since the hash256 of the transaction is deterministic. To prevent transaction ID duplication, Gavin Andresen authored BIP0034 which is a soft-fork rule that adds the height of the block being mined into the first element of the Coinbase ScriptSig.
The height is interpreted as a Little-Endian integer and must equal the height of the block (that is, the number of blocks since the Genesis Block). Thus a Coinbase Transaction cannot be byte-wise the same across different blocks since the block height will differ. Here’s how we can parse the height from the Coinbase Transaction in Figure 9-1:
>>>fromioimportBytesIO>>>fromscriptimportScript>>>fromhelperimportlittle_endian_to_int>>>stream=BytesIO(bytes.fromhex('5e03d71b07254d696e656420627920416e74506f6f\6c20626a31312f4542312f4144362f43205914293101fabe6d6d678e2c8c34afc36896e7d94028\24ed38e856676ee94bfdb0c6c4bcd8b2e5666a0400000000000000c7270000a5e00e00'))>>>script_sig=Script.parse(stream)>>>(little_endian_to_int(script_sig.instructions[0]))465879
A Coinbase Transaction reveals the Block it was in! Coinbase Transactions in different Blocks are required to have different ScriptSigs and thus different Transaction IDs. This rule continues to be needed as it otherwise allow the duplicate Coinbase Transaction IDs across multiple blocks.
Write the coinbase_height method for the Tx class.
Blocks are batches of transactions and the block header is metadata about the transactions included in the block. The block header as shown in Figure 9-2 consists of:
Version
Previous Block
Merkle Root
Timestamp
Bits
Nonce
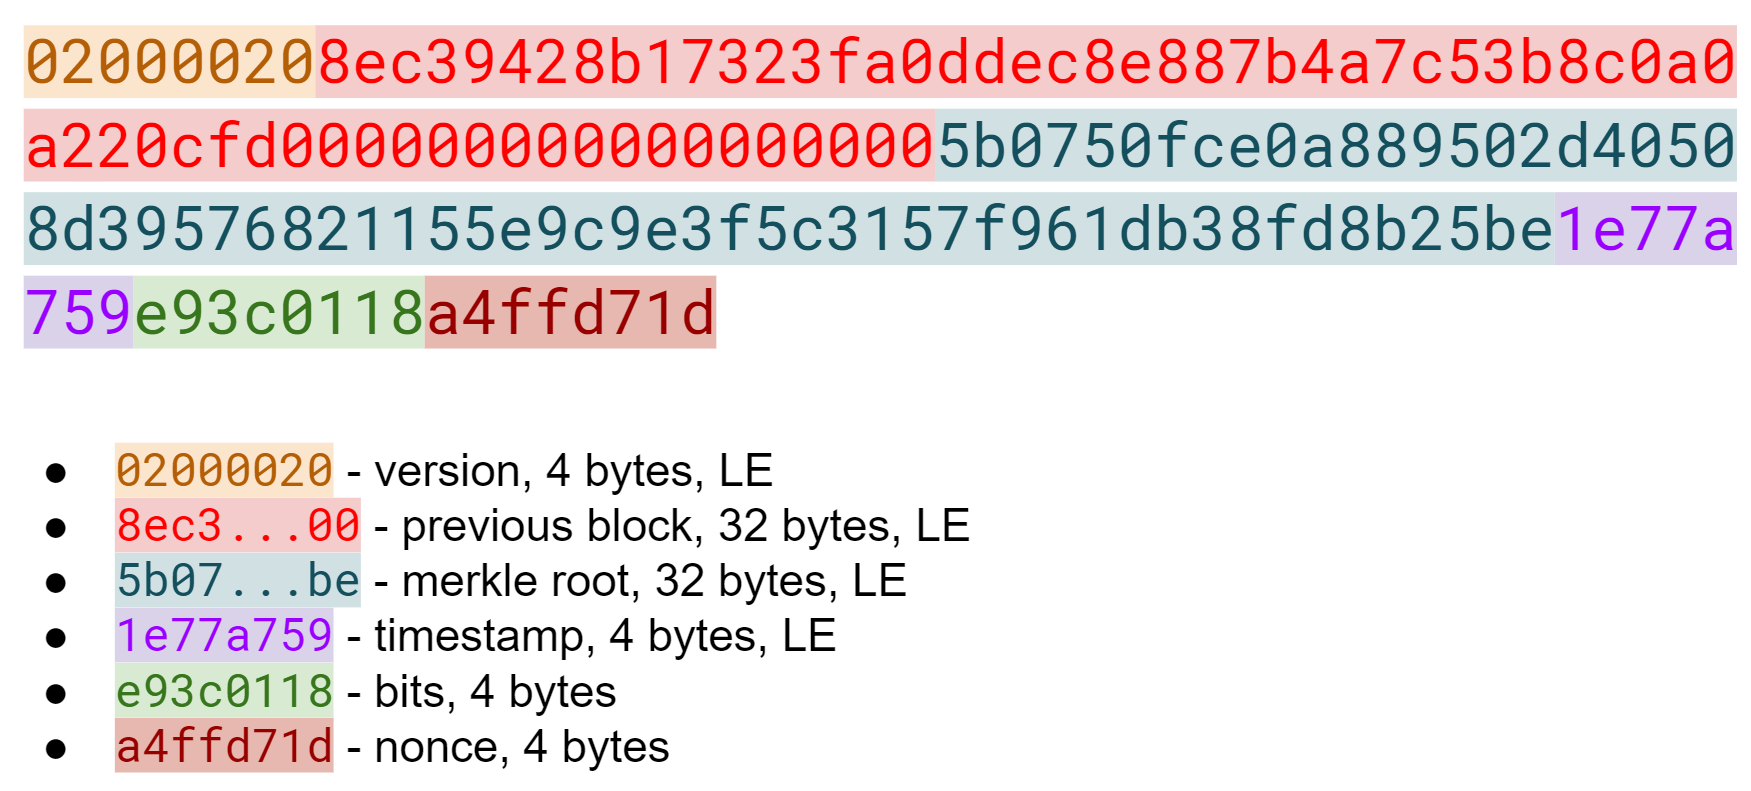
The Block Header is the metadata for the block. Unlike transactions, each field in a block header is of a fixed length. Version is 4 bytes, Previous Block is 32 bytes, Merkle Root is 32 bytes, Timestamp is 4 bytes, Bits is 4 bytes and Nonce is 4 bytes. A Block Header takes up exactly 80 bytes. As of this writing there are roughly 550,000 blocks or ~45 megabytes in Block Headers. The entire blockchain, on the other hand, is roughly 200 GB, so the headers are roughly .023% of the size. The fact that headers are so much smaller is an important feature when we look at Simplified Payment Verification in Chapter 11.
Like the transaction ID, the block ID the hex representation of the hash256 of the header interpreted in Little-Endian. The block ID is interesting:
>>>fromhelperimporthash256>>>block_hash=hash256(bytes.fromhex('020000208ec39428b17323fa0ddec8e887b4a7\c53b8c0a0a220cfd0000000000000000005b0750fce0a889502d40508d39576821155e9c9e3f5c\3157f961db38fd8b25be1e77a759e93c0118a4ffd71d'))[::-1]>>>block_id=block_hash.hex()>>>(block_id)0000000000000000007e9e4c586439b0cdbe13b1370bdd9435d76a644d047523
This ID is what gets put into prev_block for a block building on top of this one. For now, notice that the ID starts with a lot of 0’s. We’ll come back to this in the proof-of-work section later in this chapter.
We can start coding a Block class based on what we already know:
classBlock:def__init__(self,version,prev_block,merkle_root,timestamp,bits,nonce):self.version=versionself.prev_block=prev_blockself.merkle_root=merkle_rootself.timestamp=timestampself.bits=bitsself.nonce=nonce
Write the parse for Block.
Write the serialize for Block.
Write the hash for Block.
Version in normal software refers to a particular set of features.
For a block, this is similar, in the sense that the version field reflects what capabilities the software that produced the block can do.
In the past this was used as a way to indicate a single feature that was ready to be deployed by the miner who mined the block.
Version 2 meant that the software was ready for BIP0034, the Coinbase transaction block height feature from earlier in this chapter.
Version 3 meant that the software was ready for BIP0066, the enforcement of strict DER encoding.
Version 4 meant that the software was ready for BIP0065, which specified OP_CHECKLOCKTIMEVERIFY.
Unfortunately, the incremental increase in version number meant that only one feature was signaled on the network at a time. To alleviate this, the developers came up with BIP9, which allows up to 29 different features to be signaled at the same time.
The way BIP9 works is by fixing the first 3 bits of the 4-byte (32-bit) header to be 001 to indicate that the miner is using BIP9.
The first 3 bits have to be 001 as that forces older clients to interpret the version field as a number greater than or equal to 4, which was the last version number that was used pre-BIP9.
This means that in hexadecimal, the first character will always be 2 or 3. The other 29 bits can be assigned to different soft-fork features which miners can signal readiness for. For example, bit 0 (the rightmost bit) can be flipped to 1 to signal readiness for one soft fork, bit 1 (the second bit from the right) can be flipped to 1 to signal readiness for another, bit 2 (the third bit from the right) can be flipped to 1 to signal readiness for another and so on.
BIP9 requires that 95% of blocks signal readiness in a given 2016 block epoch (the period for a difficulty adjustment, more on that later in this chapter) before the soft fork feature gets activated on the network.
Soft forks which used BIP9 as of this writing have been BIP68/BIP112/BIP113 (OP_CHECKSEQUENCEVERIFY and related changes) and BIP141 (segwit).
These BIPs used bits 0 and 1 for signaling respectively.
BIP91 used something like BIP9, but used an 80% threshold and used a smaller block period, so wasn’t strictly using BIP9.
Bit 4 was used to signal BIP91.
Checking for these features is relatively straightforward:
>>>fromioimportBytesIO>>>fromblockimportBlock>>>b=Block.parse(BytesIO(bytes.fromhex('020000208ec39428b17323fa0ddec8e887b\4a7c53b8c0a0a220cfd0000000000000000005b0750fce0a889502d40508d39576821155e9c9e3\f5c3157f961db38fd8b25be1e77a759e93c0118a4ffd71d')))>>>('BIP9: {}'.format(b.version>>29==0b001))BIP9:True>>>('BIP91: {}'.format(b.version>>4&1==1))BIP91:False>>>('BIP141: {}'.format(b.version>>1&1==1))BIP141:True
The >> operator is the left bit-shift operator, which throws away the rightmost 29 bits, leaving just the top 3 bits.
The 0b001 is a way of writing a number in binary in Python.
The & operator is the “bitwise and” operator.
In our case, we right-shift by 4 bits first and then check that the rightmost bit is 1.
We shift 1 to the right because BIP141 was assigned to bit 1.
Write the bip9 method for the Block class.
Write the bip91 method for the Block class.
Write the bip141 method for the Block class.
All blocks have to point to a previous block.
This is why the data structure is called a blockchain.
Blocks link back all the way to the very first block, or the Genesis Block.
The previous block field ends in a bunch of 00 bytes, which we will discuss more later in this chapter.
The Merkle Root encodes all the ordered transactions in a 32-byte hash. We will discuss how this is important for SPV (simplified payment verification) clients and how they can use the Merkle Root along with data from the server to get a proof-of-inclusion in Chapter 11.
The timestamp is a UNIX-style timestamp taking up 4 bytes. Unix timestamps are the number of seconds since January 1, 1970. This timestamp is used in two places. The first for validating timestamp-based Locktimes on transactions included in the block and in calculating a new bits/target/difficulty every 2016 blocks. The Locktimes were at one point used directly for transactions within a block, but BIP113 changed the behavior to not use the current block’s Locktime directly, but the median-time-past (MTP) of the past 11 blocks.
Bitcoin’s timestamp field in the block header is 4 bytes or 32 bits. This means that once the UNIX timestamp exceeds 232-1, there is no room to go further. 232 seconds is roughly 136 years, which means that this field will have no more room in 2106 (136 years after 1970).
Many people mistakenly believe that we only have until 68 years after 1970, or 2038, but that’s only when the field is a signed integer (231 seconds is 68 years), so we get the benefit of that extra bit, giving us until 2106.
In 2106, the block header will need some sort of fork as the timestamp in the block header will no longer continuously increase.
Bits is a field that encodes the proof-of-work necessary in this block. This will be discussed more in the next section.
Nonce stands for “number used only once” or n-once. This number is what is changed by miners when looking for proof-of-work.
Proof-of-work is what secures Bitcoin and at a deep level, allows the mining of Bitcoin decentralized. Finding a proof-of-work gives a miner the right to put the attached block into the blockchain. As proof-of-work is very rare, this is not an easy task. But because proof-of-work is objective and easy to verify, anyone can be a miner if they so choose.
Proof-of-work is called “mining” for a very good reason. Like physical mining, there is something that miners are searching for. A typical gold mining operation processes 45 tons of dirt and rock before accumulating 1 oz of gold. This is because gold is very rare. However, once gold is found, it’s very easy to verify that the gold is real. There are chemical tests, touchstones and many other ways to tell relatively cheaply whether the thing found is gold.
Similarly, proof-of-work is a number that provides a very rare result. To find a proof-of-work, the miners on the Bitcoin network have to churn through the numerical equivalent of dirt and rock to find that proof-of-work. Like gold, verifying proof-of-work is much cheaper than actually finding it.
So what is proof-of-work? Let’s look at the hash256 of the block we saw before to find out:
020000208ec39428b17323fa0ddec8e887b4a7c53b8c0a0a220cfd000000000000000000
5b0750fce0a889502d40508d39576821155e9c9e3f5c3157f961db38fd8b25be1e77a759
e93c0118a4ffd71d
>>>fromhelperimporthash256>>>block_id=hash256(bytes.fromhex('020000208ec39428b17323fa0ddec8e887b4a7c5\3b8c0a0a220cfd0000000000000000005b0750fce0a889502d40508d39576821155e9c9e3f5c31\57f961db38fd8b25be1e77a759e93c0118a4ffd71d'))[::-1]>>>('{}'.format(block_id.hex()).zfill(64))0000000000000000007e9e4c586439b0cdbe13b1370bdd9435d76a644d047523
We are purposefully printing this number as 64 hexadecimal digits to show how small it is in 256-bit terms.
Sha256 is known to generate uniformly distributed values. Given this, we can treat two rounds of sha256, or hash256 as a random number. The probability of any random 256-bit number being this small is tiny. The probability of the first bit in a 256-bit number being 0 is 0.5. The first two bits being 00, 0.25. The first three bits being 000, 0.125 and so on. Note that each 0 in the hexadecimal above represents 4 0-bits. In this case, we have the first 73 bits being 0, which is 0.573 or about 1 in 1022. This is a really tiny probability. On average 1022 or 10 trillion trillion random 256-bit numbers have to be generated before finding one this small. In other words, we need to calculate 1022 hashes on average to find one this small. Getting back to the analogy, the process of finding proof-of-work requires us to process around 1022 numerical dirt and rock to find our numerical gold nugget.
Where does the miner get new numerical dirt to process to see if it satisfies proof-of-work? This is where the nonce field comes in. The miners can change the nonce field at will.
Unfortunately, the 4 bytes or 32-bits, or 232 possible nonces that a miner can try is insufficient space. This is because the required proof-of-work is much more difficult than can be done in 32-bits. Modern ASIC equipment can calculate way more than 232 different hashes per second. The AntMiner S9, for example, calculates 12 Th/s, or 12,000,000,000,000 hashes per second. That is approximately 243 hashes per second which means that the entire nonce space can be consumed in just 0.0003 seconds.
What miners can do when the nonce field is exhausted is change the Coinbase transaction, which then changes the Merkle Root, giving miners a fresh nonce space each time. The other option is to roll the version field or use overt ASICBOOST. The mechanics of how the Merkle Root changes whenever any transaction in the block changes will be discussed in Chapter 11.
Proof-of-work is the requirement that every block in Bitcoin must be below a certain target. Target is a 256-bit number that is computed directly from the bits field. The target is very small compared to an average 256-bit number.
e93c0118
The bits field is actually two different numbers. The first is the exponent, which is the last byte. The second is the coefficient which is the other three bytes in Little-Endian. The formula for calculating the target from these two numbers is:
target = coefficient * 256exponent-3
This is how we calculate the target given the bits field in Python:
>>>fromhelperimportlittle_endian_to_int>>>bits=bytes.fromhex('e93c0118')>>>exponent=bits[-1]>>>coefficient=little_endian_to_int(bits[:-1])>>>target=coefficient*256**(exponent-3)>>>('{:x}'.format(target).zfill(64))0000000000000000013ce9000000000000000000000000000000000000000000
We are purposefully printing this number as 64 hexadecimal digits to show how small the number is in 256-bit terms.
A valid proof-of-work is a hash of the block which, when interpreted as a Little-Endian integer, is below the target number. Proof-of-work hashes are exceedingly rare and the process of mining is the process of finding one of these hashes. To find a single proof-of-work with the above target, the network as a whole must calculate 3.8 * 1021 hashes, which, when this block was found, was roughly every 10 minutes. To give this number some context, the best GPU miner in the world would need to run for 50,000 years on average to find a single proof-of-work below this target.
We can check that this block’s hash satisfies the proof-of-work:
>>>fromhelperimportlittle_endian_to_int>>>proof=little_endian_to_int(hash256(bytes.fromhex('020000208ec39428b17323\fa0ddec8e887b4a7c53b8c0a0a220cfd0000000000000000005b0750fce0a889502d40508d3957\6821155e9c9e3f5c3157f961db38fd8b25be1e77a759e93c0118a4ffd71d')))>>>(proof<target)True
target is calculated above.
We can see that the proof-of-work is lower by lining up the numbers in 64 hex characters:
TG: 0000000000000000013ce9000000000000000000000000000000000000000000
ID: 0000000000000000007e9e4c586439b0cdbe13b1370bdd9435d76a644d047523
Write the bits_to_target function in helper.py.
Target is hard to comprehend for human beings. Target is the number that the hash must be below, but as humans, it’s hard to easily see the difference between a 180-bit number and a 190-bit number. The first is a thousand times smaller, but from looking at targets, such large numbers are not easy to contextualize.
To make different targets easier to compare, the concept of difficulty was born. The trick is that difficulty is inversely proportional to target to make comparisons easier. The specific formula is:
difficulty = 0xffff * 2560x1d-3 / target
The code looks like this:
>>>fromhelperimportlittle_endian_to_int>>>bits=bytes.fromhex('e93c0118')>>>exponent=bits[-1]>>>coefficient=little_endian_to_int(bits[:-1])>>>target=coefficient*256**(exponent-3)>>>difficulty=0xffff*256**(0x1d-3)/target>>>(difficulty)888171856257.3206
The difficulty of Bitcoin at the Genesis Block was 1. This gives us context for how difficult mainnet currently is. The difficulty can be thought of as how much more difficult mining is now than it was at the start. The mining difficulty in the above code is roughly 888 billion times more difficult than when Bitcoin started.
Difficulty is often shown in block explorers and Bitcoin price charting services as it’s a much more intuitive way to understand the effort required to create a new block.
Write the difficulty method for Block
We already learned that proof-of-work can be calculated by computing the hash256 of the block header and interpreting this as a Little-Endian integer. If this number is lower than the target, we have a valid proof-of-work. If not, the block is not valid as it doesn’t have proof-of-work.
Write the check_pow method for Block.
In Bitcoin, each group of 2016 blocks is called a difficulty adjustment period. At the end of every difficulty adjustment period, the target is adjusted according to this formula:
time_differential = (block timestamp of last block in difficulty adjustment period) -
(block timestamp of first block in difficulty adjustment period)
new_target = previous_target * time_differential / (2 weeks)
The time_differential number is calculated so that if it’s greater than 8 weeks, 8 weeks is used and if it’s less than 3.5 days, 3.5 days is used.
This way, the new target cannot change more than 4x in either direction.
That is, the target will be reduced or increased by 4x at the most.
If each block took on average 10 minutes, 2016 blocks should take 20160 minutes. There are 1440 minutes per day, which means that 2016 blocks take 20160 / 1440 = 14 days. The effect of the difficulty adjustment is that blocks times are regressed toward the mean of 10 minutes per block. This means that long term blocks will always go towards 10 minute blocks even if a lot of hashing power has entered or left the network.
The new bits calculation should be using the timestamp field of the last block of each of the current and previous difficulty adjustment periods. Satoshi unfortunately had another off-by-one error here, as the timestamp differential calculation looks at the first and last blocks of the 2016 block difficulty adjustment period instead. The time differential is the difference of blocks that are 2015 blocks apart instead of 2016 blocks apart.
We can code this formula like so:
>>>fromblockimportBlock>>>fromhelperimportTWO_WEEKS>>>last_block=Block.parse(BytesIO(bytes.fromhex('00000020fdf740b0e49cf75bb3\d5168fb3586f7613dcc5cd89675b0100000000000000002e37b144c0baced07eb7e7b64da916cd\3121f2427005551aeb0ec6a6402ac7d7f0e4235954d801187f5da9f5')))>>>first_block=Block.parse(BytesIO(bytes.fromhex('000000201ecd89664fd205a37\566e694269ed76e425803003628ab010000000000000000bfcade29d080d9aae8fd461254b0418\05ae442749f2a40100440fc0e3d5868e55019345954d80118a1721b2e')))>>>time_differential=last_block.timestamp-first_block.timestamp>>>iftime_differential>TWO_WEEKS*4:...time_differential=TWO_WEEKS*4>>>iftime_differential<TWO_WEEKS//4:...time_differential=TWO_WEEKS//4>>>new_target=last_block.target()*time_differential//TWO_WEEKS>>>('{:x}'.format(new_target).zfill(64))0000000000000000007615000000000000000000000000000000000000000000
Note that TWO_WEEKS = 60*60*24*14 is the number of seconds in 2 weeks.
60 seconds times 60 minutes times 24 hours times 14 days.
This makes sure that if it took more than 8 weeks to find the last 2015 blocks, we don’t decrease the difficulty too much.
This part makes sure that if it took less than 3.5 days to find the last 2015 blocks, we don’t increase the difficulty too much.
Note that you only need the headers to calculate what the next block’s target should be. Once we have the target, we can convert target to bits. The inverse operation looks like this:
deftarget_to_bits(target):'''Turns a target integer back into bits, which is 4 bytes'''raw_bytes=target.to_bytes(32,'big')raw_bytes=raw_bytes.lstrip(b'\x00')ifraw_bytes[0]>0x7f:exponent=len(raw_bytes)+1coefficient=b'\x00'+raw_bytes[:2]else:exponent=len(raw_bytes)coefficient=raw_bytes[:3]new_bits=coefficient[::-1]+bytes([exponent])returnnew_bits
Get rid of all the leading 0’s.
The bits format is a way to express really large numbers succinctly and can be used with both negative and positive numbers. If the first bit in the coefficient is a 1, the bits field is interpreted as a negative number. Since target is always positive for us, we shift everything over by 1 byte if the first bit is 1.
The exponent is how long the number is in base-256.
The coefficient is the first 3 digits of the base-256 number.
The coefficient is in Little-Endian and the exponent goes last in the bits format.
If the block doesn’t have the correct bits calculated using the difficulty adjustment formula, then we can safely reject that block.
Calculate the new bits given the first and last blocks of this 2016 block difficulty adjustment period:
Block 471744:
000000203471101bbda3fe307664b3283a9ef0e97d9a38a7eacd8800000000000000000010c8ab
a8479bbaa5e0848152fd3c2289ca50e1c3e58c9a4faaafbdf5803c5448ddb845597e8b0118e43a
81d3
Block 473759:
02000020f1472d9db4b563c35f97c428ac903f23b7fc055d1cfc26000000000000000000b3f449
fcbe1bc4cfbcb8283a0d2c037f961a3fdf2b8bedc144973735eea707e1264258597e8b0118e5f0
0474
Write the calculate_new_bits function in helper.py
We’ve learned how to calculate proof-of-work, how to calculate the new bits for a block after a difficulty adjustment period and how to parse Coinbase Transactions. We’ll now move onto networking in Chapter 10 on our way to the block header field we haven’t covered, which is the Merkle Root in Chapter 11.
The peer-to-peer network that Bitcoin runs on is what gives it a lot of its robustness. 65000+ nodes are running on the network as of this writing and communicate constantly.
The Bitcoin network is a broadcast network or a gossip network. Every node is announcing different transactions, blocks and peers that it knows about. The protocol is rich and has a lot of features that have been added to it over the years.
One thing to note about the networking protocol is that it is not consensus critical. The same data can be sent from one node to another using some other protocol and the blockchain itself would not be affected.
With that in mind, we’ll work in this chapter toward requesting, receiving and validating block headers using the network protocol.
All network messages looks like Figure 10-1:
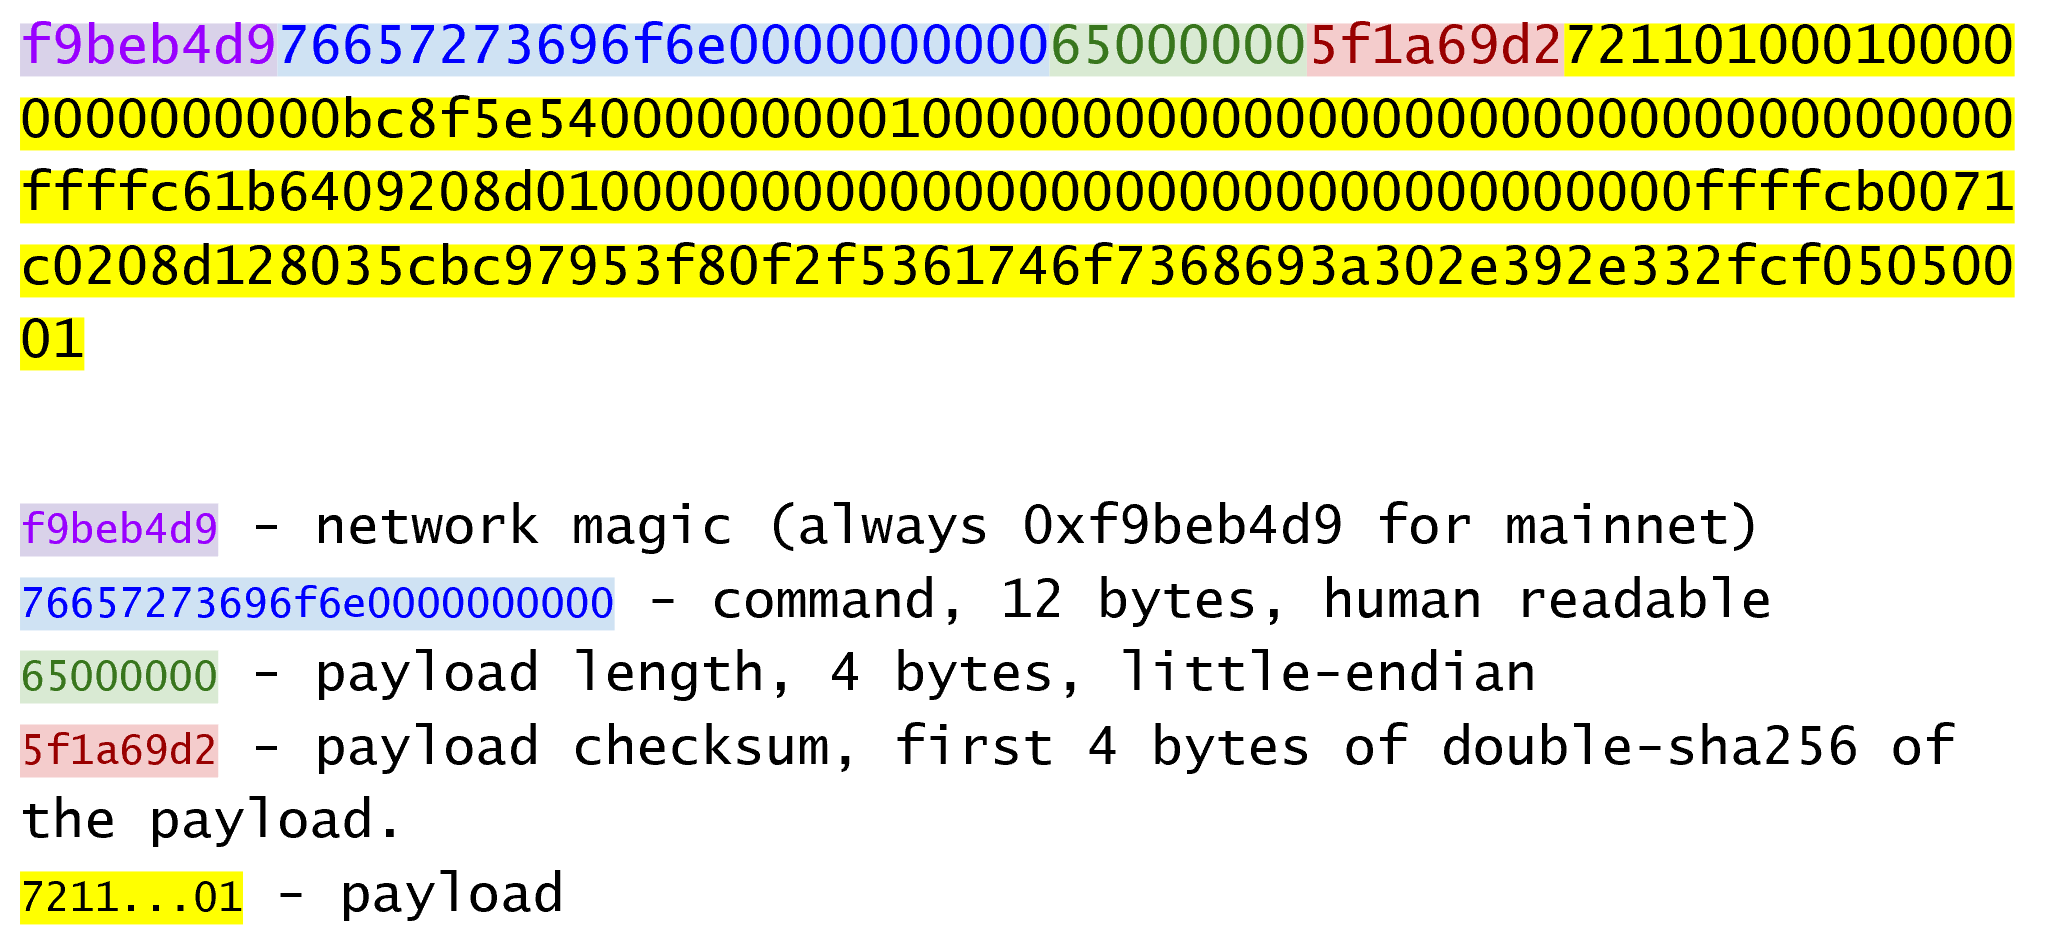
The first four bytes are always the same and are referred to as the network magic.
Magic bytes are common in network programming as the communication is asynchronous and can be intermittent.
Magic bytes give the receiver of the message a place to start should the communication get interrupted (say by your phone dropping signal).
Magic bytes are also useful to identify the network.
You would not want a Bitcoin node to connect to a Litecoin node, for example.
Thus, a Litecoin node has a different magic.
Bitcoin testnet also has a different magic 0b110907 as opposed to the Bitcoin mainnet magic f9beb4d9.
The next 12 bytes is the command field, or a description of what the payload actually carries. There are many different commands, an exhaustive list which can be seen at https://wiki.bitcoin.it. The command field is meant to be human-readable and this particular message is the byte-string “version” in ASCII with 0-byte padding.
The next 4 bytes is the length of the payload in Little-Endian. As we saw in the transaction and block parsing sections, the length of the payload is necessary since the payload is variable. 232 is about 4 billion, so payloads can be as big as 4 GB, though the reference client rejects any payloads over 32MB. In the message above, our payload is 101 bytes.
The next 4 bytes are the checksum field. The checksum algorithm is something of an odd choice as it’s the first 4 bytes of the hash256 of the payload. It’s an odd choice because networking protocol checksums are normally designed to have error-correcting capability and hash256 has none. That said, hash256 is common in the rest of the Bitcoin protocol and is probably the reason it’s used here.
The code to handle network messages requires us to create a new class:
NETWORK_MAGIC=b'\xf9\xbe\xb4\xd9'TESTNET_NETWORK_MAGIC=b'\x0b\x11\x09\x07'classNetworkEnvelope:def__init__(self,command,payload,testnet=False):self.command=commandself.payload=payloadiftestnet:self.magic=TESTNET_NETWORK_MAGICelse:self.magic=NETWORK_MAGICdef__repr__(self):return'{}: {}'.format(self.command.decode('ascii'),self.payload.hex(),)
Determine what this network message is:
f9beb4d976657261636b000000000000000000005df6e0e2
Write the parse method for NetworkEnvelope.
Write the serialize method for NetworkEnvelope.
Each command has a separate payload specification. Figure 10-2 is the parsed payload for Version:
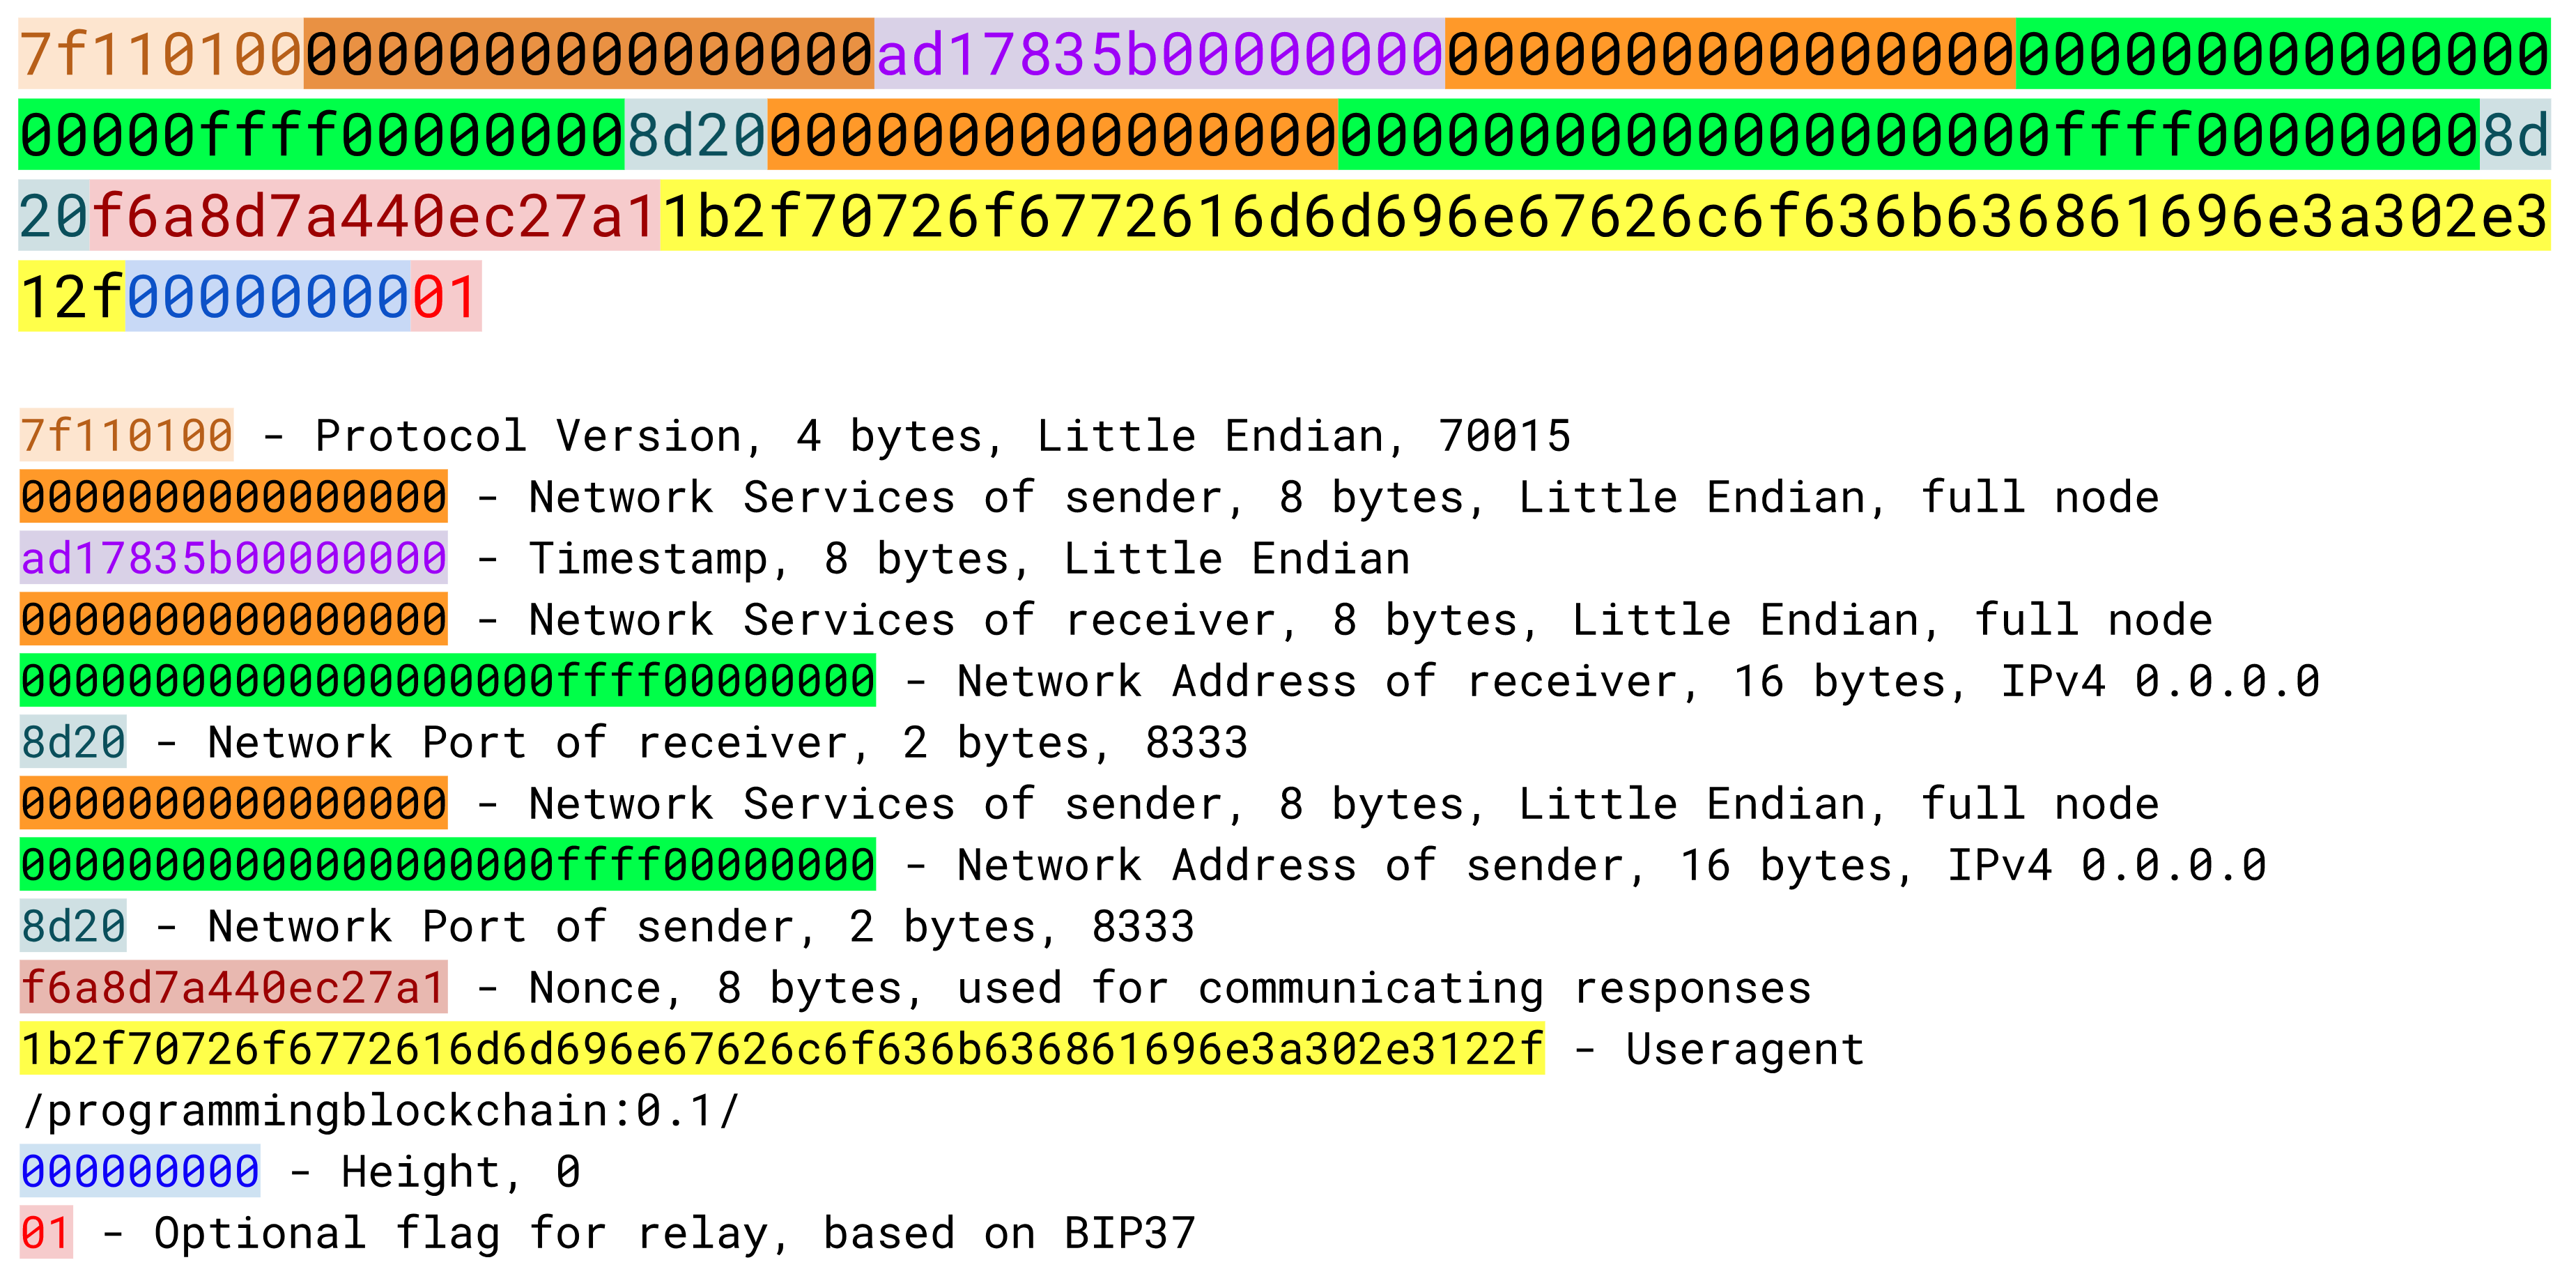
The fields for Version are meant to give enough information for two nodes to be able to communicate.
The first field is the network protocol version, which specifies the what messages may be communicated. The service field give information about what capabilities are available to connecting nodes. The timestamp field is 8 bytes (as opposed to 4 bytes in the block header) and is the UNIX timestamp in Little-Endian.
IP addresses can be IPv6, IPv4 or OnionCat (a mapping of TOR’s .onion addresses to IPv6).
If IPv4, the first 12 bytes are 00000000000000000000ffff and the last 4 bytes are the IP.
The port is 2 bytes Little-Endian. The default on mainnet is 8333, which maps to 208d in Little-Endian hex.
Nonce is a number used by a node to detect a connection to itself. User Agent identifies the software being run. The height or latest block field helps the other node know which block a node is synced up to.
Relay is used for Bloom Filters, which we’ll get to in Chapter 12.
Setting some reasonable defaults, our VersionMessage class looks like this:
classVersionMessage:command=b'version'def__init__(self,version=70015,services=0,timestamp=None,receiver_services=0,receiver_ip=b'\x00\x00\x00\x00',receiver_port=8333,sender_services=0,sender_ip=b'\x00\x00\x00\x00',sender_port=8333,nonce=None,user_agent=b'/programmingbitcoin:0.1/',latest_block=0,relay=True):self.version=versionself.services=servicesiftimestampisNone:self.timestamp=int(time.time())else:self.timestamp=timestampself.receiver_services=receiver_servicesself.receiver_ip=receiver_ipself.receiver_port=receiver_portself.sender_services=sender_servicesself.sender_ip=sender_ipself.sender_port=sender_portifnonceisNone:self.nonce=int_to_little_endian(randint(0,2**64),8)else:self.nonce=nonceself.user_agent=user_agentself.latest_block=latest_blockself.relay=relay
At this point, we need a way to serialize this message.
Write the serialize method for VersionMessage.
The network handshake is how nodes establish communication.
A wants to connect to B and sends a Version message.
B receives the Version message and responds with a Verack message and sends its own Version message.
A receives the Version and Verack messages and sends back a Verack message
B receives the Verack message and continues communication
Once the handshake is finished, A and B can communicate however they want. Note that there is no authentication here and it’s up to the nodes to verify all data that they receive. If a node sends a bad tx or block, it can expect to get banned or disconnected.
Network communication is tricky due to its asynchronous nature. To experiment, we can establish a connection to a node on the network synchronously.
>>>importsocket>>>fromnetworkimportNetworkEnvelope,VersionMessage>>>host='testnet.programmingbitcoin.com'>>>port=18333>>>socket=socket.socket(socket.AF_INET,socket.SOCK_STREAM)>>>socket.connect((host,port))>>>stream=socket.makefile('rb',None)>>>version=VersionMessage()>>>envelope=NetworkEnvelope(version.command,version.serialize())>>>socket.sendall(envelope.serialize())>>>whileTrue:...new_message=NetworkEnvelope.parse(stream)...(new_message)
This is a server I’ve set up for testnet. The testnet port is 18333 by default.
We create a stream to be able to read from the socket. A stream made this way can be passed to all the parse methods.
The first step of the handshake is to send a version message.
We now send the message in the right envelope.
This line will read any messages coming in through our connected socket.
Connecting in this way, we can’t send until we’ve received and can’t respond intelligently to more than 1 message at a time.
A more robust implementation would use an asynchronous library (like asyncio in Python 3) to send and receive without being blocked.
We also need a Verack message class which we’ll create here:
classVerAckMessage:command=b'verack'def__init__(self):pass@classmethoddefparse(cls,s):returncls()defserialize(self):returnb''
VerAckMessage is a minimal network message.
Let’s now automate this by creating a class that will handle the communication for us.
classSimpleNode:def__init__(self,host,port=None,testnet=False,logging=False):ifportisNone:iftestnet:port=18333else:port=8333self.testnet=testnetself.logging=loggingself.socket=socket.socket(socket.AF_INET,socket.SOCK_STREAM)self.socket.connect((host,port))self.stream=self.socket.makefile('rb',None)defsend(self,message):'''Send a message to the connected node'''envelope=NetworkEnvelope(message.command,message.serialize(),testnet=self.testnet)ifself.logging:('sending: {}'.format(envelope))self.socket.sendall(envelope.serialize())defread(self):'''Read a message from the socket'''envelope=NetworkEnvelope.parse(self.stream,testnet=self.testnet)ifself.logging:('receiving: {}'.format(envelope))returnenvelopedefwait_for(self,*message_classes):'''Wait for one of the messages in the list'''command=Nonecommand_to_class={m.command:mforminmessage_classes}whilecommandnotincommand_to_class.keys():envelope=self.read()command=envelope.commandifcommand==VersionMessage.command:self.send(VerAckMessage())elifcommand==PingMessage.command:self.send(PongMessage(envelope.payload))returncommand_to_class[command].parse(envelope.stream())
The send method sends a message over the socket.
The command property and serialize methods are expected to exist in the message object.
The read method reads a new message from the socket.
The wait_for method lets us wait for any one of several commands (specifically, message classes).
Along with the synchronous nature of this class, a method like this makes for a bit easier programming.
A commercial strength node would definitely not use something like this.
Now that we have a node, we can now handshake with another node.
>>>fromnetworkimportSimpleNode,VersionMessage>>>node=SimpleNode('testnet.programmingbitcoin.com',testnet=True)>>>version=VersionMessage()>>>node.send(version)>>>verack_received=False>>>version_received=False>>>whilenotverack_receivedandnotversion_received:...message=node.wait_for(VersionMessage,VerAckMessage)...ifmessage.command==VerAckMessage.command:...verack_received=True...else:...version_received=True...node.send(VerAckMessage())
Most nodes don’t care about the fields in Version like IP address. We can connect with the defaults and everything will be just fine.
We start the handshake by sending the Version message
We only finish when we’ve received both Verack and Version.
We expect to receive a Verack for our Version and the other node’s Version. We don’t know which order, though.
Write the handshake method for SimpleNode
Now that we have code to connect to a node, what can we do? When any node first connects to the network, the data that’s most crucial to get and verify are the block headers. For full nodes, downloading the Block headers allows them to asynchronously ask for full blocks from multiple nodes, parallelizing the download of the blocks. For light clients, downloading headers allows them to verify the proof-of-work in each block. As we’ll see in Chapter 11, light clients will be able to get proofs-of-inclusion through the network, but that requires the light clients have the block headers.
Nodes can give us the block headers without taking up much bandwidth.
The command to get the block headers is called getheaders and it looks like Figure 10-3:
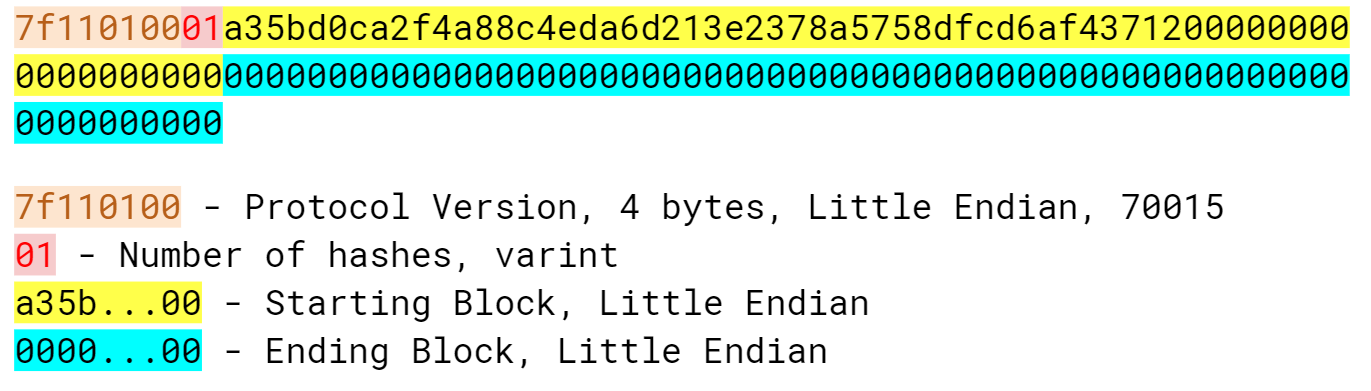
getheadersAs with Version, we start with the protocol version, then the number of block headers in this list (this number can be more than 1 if there’s a chain split), then the starting block headers and lastly, the ending block header.
If we specify the ending block to be 000...000, we’re indicating that we want as many as the other node will give us.
The maximum number of headers that we can get back is 2000, or almost a single difficulty adjustment period (2016 blocks).
Here’s what the class looks like:
classGetHeadersMessage:command=b'getheaders'def__init__(self,version=70015,num_hashes=1,start_block=None,end_block=None):self.version=versionself.num_hashes=num_hashesifstart_blockisNone:raiseRuntimeError('a start block is required')self.start_block=start_blockifend_blockisNone:self.end_block=b'\x00'*32else:self.end_block=end_block
For the purposes of this chapter, we’re going to assume that the number of block header groups is 1. A more robust implementation would handle more than a single block group, but we can download the block headers using a single group.
A starting block is needed, otherwise we can’t create a proper message.
The ending block we assume to be null, or as many as the server will send to us if not defined.
Write the serialize method for GetHeadersMessage.
We can now create a node, handshake, and then ask for some headers.
>>>fromioimportBytesIO>>>fromblockimportBlock,GENESIS_BLOCK>>>fromnetworkimportSimpleNode,GetHeadersMessage>>>node=SimpleNode('mainnet.programmingbitcoin.com',testnet=False)>>>node.handshake()>>>genesis=Block.parse(BytesIO(GENESIS_BLOCK))>>>getheaders=GetHeadersMessage(start_block=genesis.hash())>>>node.send(getheaders)
Now we need a way to receive the headers from the other node.
The other node will send back the headers command.
The headers command is a list of block headers (Figure 10-4) which we already learned how to parse from Chapter 9.
The HeadersMessage class can take advantage when parsing.
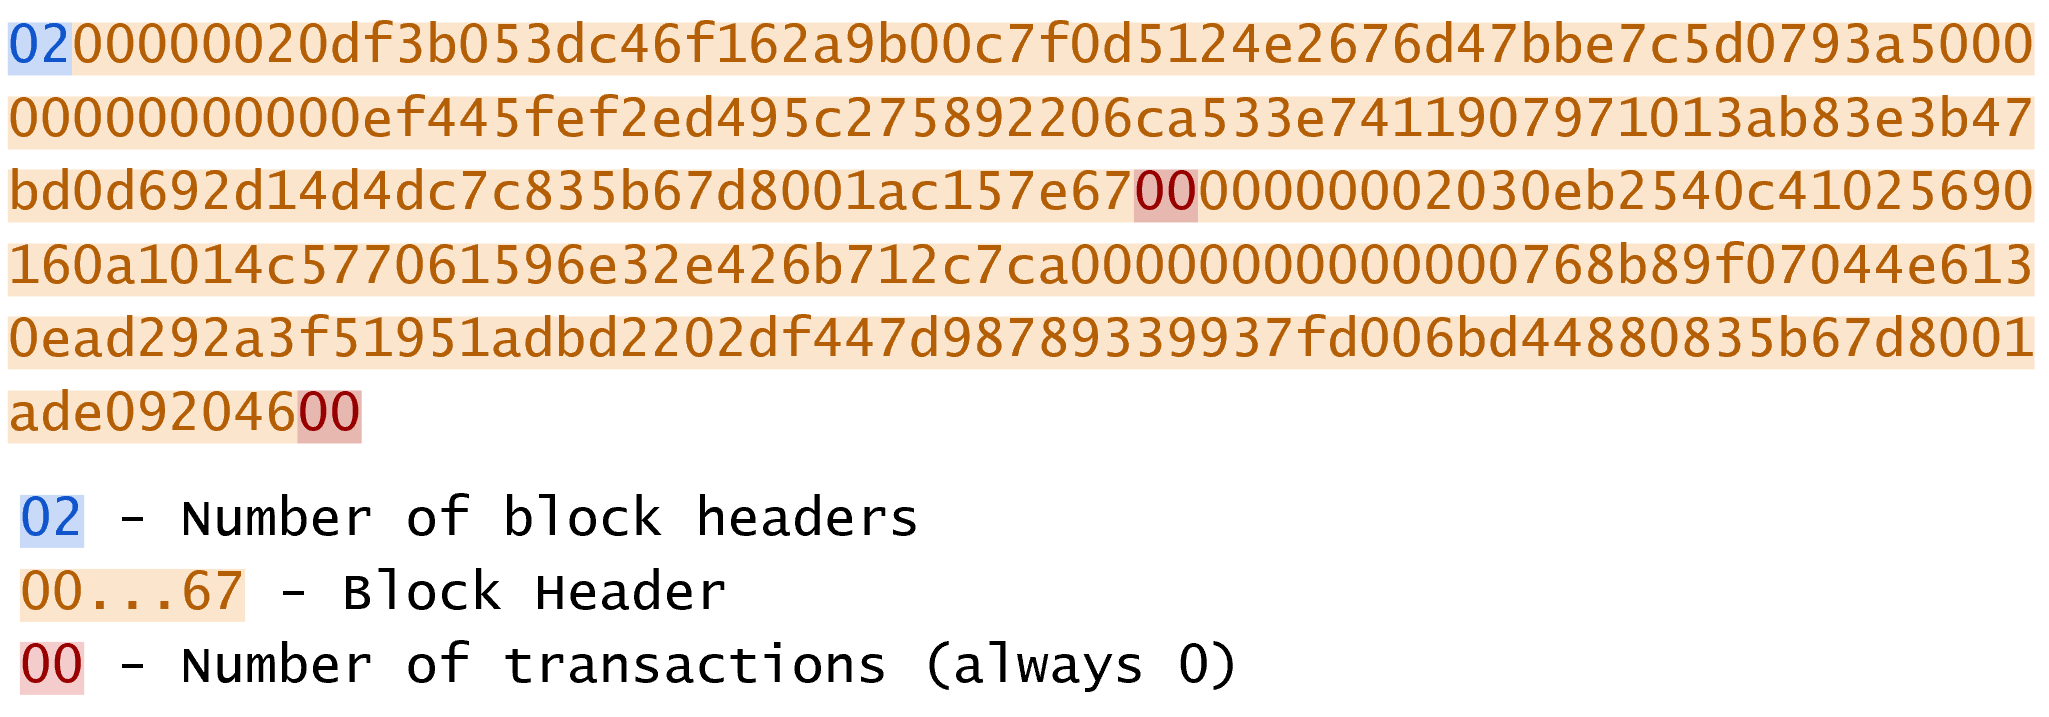
headersThe Headers message starts with the number of headers as a varint, which is a number from 1 to 2000 inclusive. Each block header, we know, is 80 bytes. Then we have the number of transactions, or 0 in this case. The number of transactions in the headers message is always 0. This may be a bit confusing at first since we only asked for the headers and not the transactions. The reason nodes bother sending the number of transactions at all is because the Headers message is meant to be compatible with the format for the Block message, which is the block header, number of transactions and then the transactions themselves. By specifying that the number of transactions is 0, we can use the same parsing engine as when parsing a full block.
classHeadersMessage:command=b'headers'def__init__(self,blocks):self.blocks=blocks@classmethoddefparse(cls,stream):num_headers=read_varint(stream)blocks=[]for_inrange(num_headers):blocks.append(Block.parse(stream))num_txs=read_varint(stream)ifnum_txs!=0:raiseRuntimeError('number of txs not 0')returncls(blocks)
Each block gets parsed using the Block class’s parse method using the same stream that we have.
The number of transactions is always 0 and is a remnant of block parsing.
If we didn’t get 0, something is wrong.
Given the network connection that we’ve set up, we can download the headers, check their proof-of-work and validate the block header difficulty adjustments.
>>>fromioimportBytesIO>>>fromnetworkimportSimpleNode,GetHeadersMessage,HeadersMessage>>>fromblockimportBlock,GENESIS_BLOCK,LOWEST_BITS>>>fromhelperimportcalculate_new_bits>>>previous=Block.parse(BytesIO(GENESIS_BLOCK))>>>first_epoch_timestamp=previous.timestamp>>>expected_bits=LOWEST_BITS>>>count=1>>>node=SimpleNode('mainnet.programmingbitcoin.com',testnet=False)>>>node.handshake()>>>for_inrange(19):...getheaders=GetHeadersMessage(start_block=previous.hash())...node.send(getheaders)...headers=node.wait_for(HeadersMessage)...forheaderinheaders.blocks:...ifnotheader.check_pow():...raiseRuntimeError('bad PoW at block {}'.format(count))...ifheader.prev_block!=previous.hash():...raiseRuntimeError('discontinuous block at {}'.format(count))...ifcount%2016==0:...time_diff=previous.timestamp-first_epoch_timestamp...expected_bits=calculate_new_bits(previous.bits,time_diff)...(expected_bits.hex())...first_epoch_timestamp=header.timestamp...ifheader.bits!=expected_bits:...raiseRuntimeError('bad bits at block {}'.format(count))...previous=header...count+=1ffff001dffff001dffff001dffff001dffff001dffff001dffff001dffff001dffff001dffff001dffff001dffff001dffff001dffff001dffff001d6ad8001d28c4001d71be001d
Check that the proof-of-work is valid.
Check that the current block is after the previous one.
Checking that the bits/target/difficulty is what we expect based on the previous epoch calculation. At the end of the epoch, calculate the next bits/target/difficulty. Store the first block of the epoch to calculate bits at the end of the epoch.
Note that this won’t work on testnet as the difficulty adjustment algorithm is different. To make sure blocks can be found consistently for testing, if a block hasn’t been found on testnet in 20 minutes, the difficulty drops to 1, making it very easy to find a block. This is on purpose as to allow testers to be able to keep building blocks on the network without expensive mining equipment. A $30 USB ASIC can typically find a few blocks per minute at the minimum difficulty.
We’ve managed to connect to a node on the network, handshake, download and verify that the block headers meet the consensus rules. In the next chapter, we focus on getting information about transactions that we’re interested in from another node in a private, yet provable way.
The one block header field that we didn’t investigate much in Chapter 9 is the Merkle Root. In order to understand what makes the Merkle Root useful, we first have to learn about Merkle Trees and what properties they have. In this chapter, we’re going to learn exactly what a Merkle Root is. This will be motivated by something called a Proof of Inclusion.
For a device that doesn’t have much disk space, bandwidth or computing power like your phone, it’s expensive to store, receive and validate the entire blockchain. As of this writing, the entire Bitcoin blockchain is around 200GB, which is more than many phones can store, can be very difficult to download efficiently and will certainly tax the CPU. If the entire blockchain cannot be put on the phone, what else can we do? Is it possible to create a Bitcoin wallet on a phone without having all the data?
For any wallet, there are two scenarios that we’re concerned with:
Paying someone
Getting paid by someone
If you are paying someone with your Bitcoin wallet, it is up to the person receiving your Bitcoins to verify that they’ve been paid. Once they’ve verified that the transaction has been included in a block sufficiently deep, the other side of the trade, or the good or service will be given to you. Once you’ve sent the transaction to the other party, there really isn’t anything for you to do than wait until you receive whatever it is you’re exchanging the Bitcoins for.
When getting paid Bitcoins, however, we have a dilemma. If we are connected and have the full blockchain, we can easily see when the transaction is in a sufficiently deep block at which point we’d give them our goods or services. If we don’t have the full blockchain, as with a phone, what can we do?
The answer lies in the Merkle Root field from the Block header that we saw in Chapter 9. As we saw in the last chapter, we can download the Block headers and verify that they meet the Bitcoin consensus rules. In this chapter we’re going to work towards getting proof that a particular transaction is in a block that we know about. Since the block header is secured by proof-of-work, a transaction with a Proof of Inclusion in that block means at a minimum, there was a good deal of energy spent to produce that block. This means that the cost to deceive you would be at least the cost of the proof-of-work for the block. The rest of this chapter goes into what the Proof of Inclusion is and how to verify it.
A Merkle Tree is a computer science structure designed for efficient proofs of inclusion. The prerequisites are an ordered list of items and a cryptographic hash function. In our case, the ordered list of items are transactions in a block and the hash function, hash256. To construct the Merkle Tree, we follow this algorithm:
Hash all the items of the ordered list with the provided hash function
If there is exactly 1 hash, we are done
If there is an odd number of hashes, we duplicate the last hash in the list and add it to the end so that we have an even number of hashes.
We pair the hashes in order and hash the concatenation to get the parent level which should have half the number of hashes.
Go to 2.
The idea is to come to a single hash that “represents” the entire ordered list. Visually, a Merkle Tree looks like Figure 11-1:

The bottom row is what we call the leaves of the tree. All other nodes besides the leaves are called internal nodes. The leaves get combined to produce its parent level (HAB and HCD) and when we calculate the parent level of that, we get the Merkle Root.
We’ll go through each part of this process below.
There was a vulnerability in Bitcoin 0.4-0.6 which is detailed in CVE-2012-2459. There was a Denial of Service vector due to the duplication of the last item in Merkle Trees, which caused some nodes to invalidate blocks even if they were valid.
Given two hashes, we produce another hash that represents both of them. As they are ordered, we will call the two hashes the left hash and the right hash. The hash of the left and right hashes is what we call the parent hash. To clarify, here’s the formula for the parent hash:
H = Hashing function, P = Parent Hash, L = Left Hash, R = Right Hash
P=H(L||R)
Note the || symbol denotes concatenation.
Here’s how we can code this process in Python:
>>>fromhelperimporthash256>>>hash0=bytes.fromhex('c117ea8ec828342f4dfb0ad6bd140e03a50720ece40169ee38b\dc15d9eb64cf5')>>>hash1=bytes.fromhex('c131474164b412e3406696da1ee20ab0fc9bf41c8f05fa8ceea\7a08d672d7cc5')>>>parent=hash256(hash0+hash1)>>>(parent.hex())8b30c5ba100f6f2e5ad1e2a742e5020491240f8eb514fe97c713c31718ad7ecd
The reason why we hash the concatenation to get the parent is because we can provide a Proof of Inclusion.
Specifically, we can show that L is represented in the parent, P, by revealing R.
That is, if we want proof L is represented in P, the producer of P can show us R and let us know that L is the left child of P.
We can then combine L and R to produce P and have proof that L was used to produce P.
If L is not represented in P, being able to provide R would be the equivalent to providing a hash pre-image, which we know is very difficult.
This is what we mean by a Proof of Inclusion.
Write the merkle_parent function.
Given an ordered list of more than two hashes, we can calculate the parents of each pair, or what we call the Merkle Parent Level. If we have an even number of hashes, this is straightforward, as we can simply pair them up in order. If we have an odd number of hashes, then we need to do something as we have a lone hash at the end. We can solve this by duplicating the last item.
For a list like [A, B, C] what we add C again to get [A, B, C, C].
Now we can calculate the Merkle Parent of A and B and calculate the Merkle Parent of C and C to get:
[H(A||B), H(C||C)]
Since the Merkle Parent always consists of two hashes, the Merkle Parent Level always has exactly half the number of hashes, rounded up.
>>>fromhelperimportmerkle_parent>>>hex_hashes=[...'c117ea8ec828342f4dfb0ad6bd140e03a50720ece40169ee38bdc15d9eb64cf5',...'c131474164b412e3406696da1ee20ab0fc9bf41c8f05fa8ceea7a08d672d7cc5',...'f391da6ecfeed1814efae39e7fcb3838ae0b02c02ae7d0a5848a66947c0727b0',...'3d238a92a94532b946c90e19c49351c763696cff3db400485b813aecb8a13181',...'10092f2633be5f3ce349bf9ddbde36caa3dd10dfa0ec8106bce23acbff637dae',...]>>>hashes=[bytes.fromhex(x)forxinhex_hashes]>>>iflen(hashes)%2==1:...hashes.append(hashes[-1])>>>parent_level=[]>>>foriinrange(0,len(hashes),2):...parent=merkle_parent(hashes[i],hashes[i+1])...parent_level.append(parent)>>>foriteminparent_level:...(item.hex())8b30c5ba100f6f2e5ad1e2a742e5020491240f8eb514fe97c713c31718ad7ecd7f4e6f9e224e20fda0ae4c44114237f97cd35aca38d83081c9bfd41feb9078003ecf6115380c77e8aae56660f5634982ee897351ba906a6837d15ebc3a225df0
We add the last hash on the list, hashes[-1], to the end of hashes to makes the length of hashes even.
This is how we skip by two in Python.
i will be 0 the first time through the loop, 2 the second, 4 the third and so on.
This code results in a new list of hashes that correspond to the Merkle Parent Level
Write the merkle_parent_level function.
The process of getting the Merkle Root is to calculate successive Merkle Parent Levels until we get a single hash. If, for example, we have items A through G (7 items), we calculate the Merkle Parent Level:
[H(A||B), H(C||D), H(E||F), H(G||G)]
Then we calculate the Merkle Parent Level again:
[H(H(A||B)||H(C||D)), H(H(E||F)||H(G||G))]
We are left with just 2 items, where we calculate the Merkle Parent Level one more time:
H(H(H(A||B)||H(C||D))||H(H(E||F)||H(G||G)))
Since we are left with exactly one hash, we are done. The final single hash is called the Merkle Root. Each level will halve the number of hashes, so doing this process over and over will eventually result in a single item or the Merkle Root.
>>>fromhelperimportmerkle_parent_level>>>hex_hashes=[...'c117ea8ec828342f4dfb0ad6bd140e03a50720ece40169ee38bdc15d9eb64cf5',...'c131474164b412e3406696da1ee20ab0fc9bf41c8f05fa8ceea7a08d672d7cc5',...'f391da6ecfeed1814efae39e7fcb3838ae0b02c02ae7d0a5848a66947c0727b0',...'3d238a92a94532b946c90e19c49351c763696cff3db400485b813aecb8a13181',...'10092f2633be5f3ce349bf9ddbde36caa3dd10dfa0ec8106bce23acbff637dae',...'7d37b3d54fa6a64869084bfd2e831309118b9e833610e6228adacdbd1b4ba161',...'8118a77e542892fe15ae3fc771a4abfd2f5d5d5997544c3487ac36b5c85170fc',...'dff6879848c2c9b62fe652720b8df5272093acfaa45a43cdb3696fe2466a3877',...'b825c0745f46ac58f7d3759e6dc535a1fec7820377f24d4c2c6ad2cc55c0cb59',...'95513952a04bd8992721e9b7e2937f1c04ba31e0469fbe615a78197f68f52b7c',...'2e6d722e5e4dbdf2447ddecc9f7dabb8e299bae921c99ad5b0184cd9eb8e5908',...'b13a750047bc0bdceb2473e5fe488c2596d7a7124b4e716fdd29b046ef99bbf0',...]>>>hashes=[bytes.fromhex(x)forxinhex_hashes]>>>current_hashes=hashes>>>whilelen(current_hashes)>1:...current_hashes=merkle_parent_level(current_hashes)>>>(current_hashes[0].hex())acbcab8bcc1af95d8d563b77d24c3d19b18f1486383d75a5085c4e86c86beed6
We loop until there’s 1 hash left.
We’ve exited the loop so there should only be 1 item
Write the merkle_root function.
The Merkle Root in Blocks should be pretty straightforward, but due to Endian-ness issues, this turns out to be tricky. Specifically, we use Little-Endian ordering for the leaves for the Merkle Tree. After we calculate the Merkle Root, we use Little-Endian ordering again.
In practice, this means reversing the leaves before we start and reversing the root at the end.
>>>fromhelperimportmerkle_root>>>tx_hex_hashes=[...'42f6f52f17620653dcc909e58bb352e0bd4bd1381e2955d19c00959a22122b2e',...'94c3af34b9667bf787e1c6a0a009201589755d01d02fe2877cc69b929d2418d4',...'959428d7c48113cb9149d0566bde3d46e98cf028053c522b8fa8f735241aa953',...'a9f27b99d5d108dede755710d4a1ffa2c74af70b4ca71726fa57d68454e609a2',...'62af110031e29de1efcad103b3ad4bec7bdcf6cb9c9f4afdd586981795516577',...'766900590ece194667e9da2984018057512887110bf54fe0aa800157aec796ba',...'e8270fb475763bc8d855cfe45ed98060988c1bdcad2ffc8364f783c98999a208',...]>>>tx_hashes=[bytes.fromhex(x)forxintx_hex_hashes]>>>hashes=[h[::-1]forhintx_hashes]>>>(merkle_root(hashes)[::-1].hex())654d6181e18e4ac4368383fdc5eead11bf138f9b7ac1e15334e4411b3c4797d9
We reverse each hash before we begin using a Python list comprehension
We reverse the root at the end.
We want to calculate Merkle Roots for a Block, so we add a tx_hashes parameter.
classBlock:def__init__(self,version,prev_block,merkle_root,timestamp,bits,nonce,tx_hashes=None):self.version=versionself.prev_block=prev_blockself.merkle_root=merkle_rootself.timestamp=timestampself.bits=bitsself.nonce=nonceself.tx_hashes=tx_hashes
We now allow the transaction hashes to be set as part of the initialization of the block. The transaction hashes have to be ordered.
As a full node, if we are given all of the transactions, we can calculate the Merkle Root and check that the Merkle Root is what we expect.
Write the validate_merkle_root method for Block.
Now that we know how a Merkle Tree is constructed, we can create and verify Proofs of Inclusion. Light nodes can get proofs that transactions of interest were included in a block without having to know all the transactions of a block (Figure 11-2).
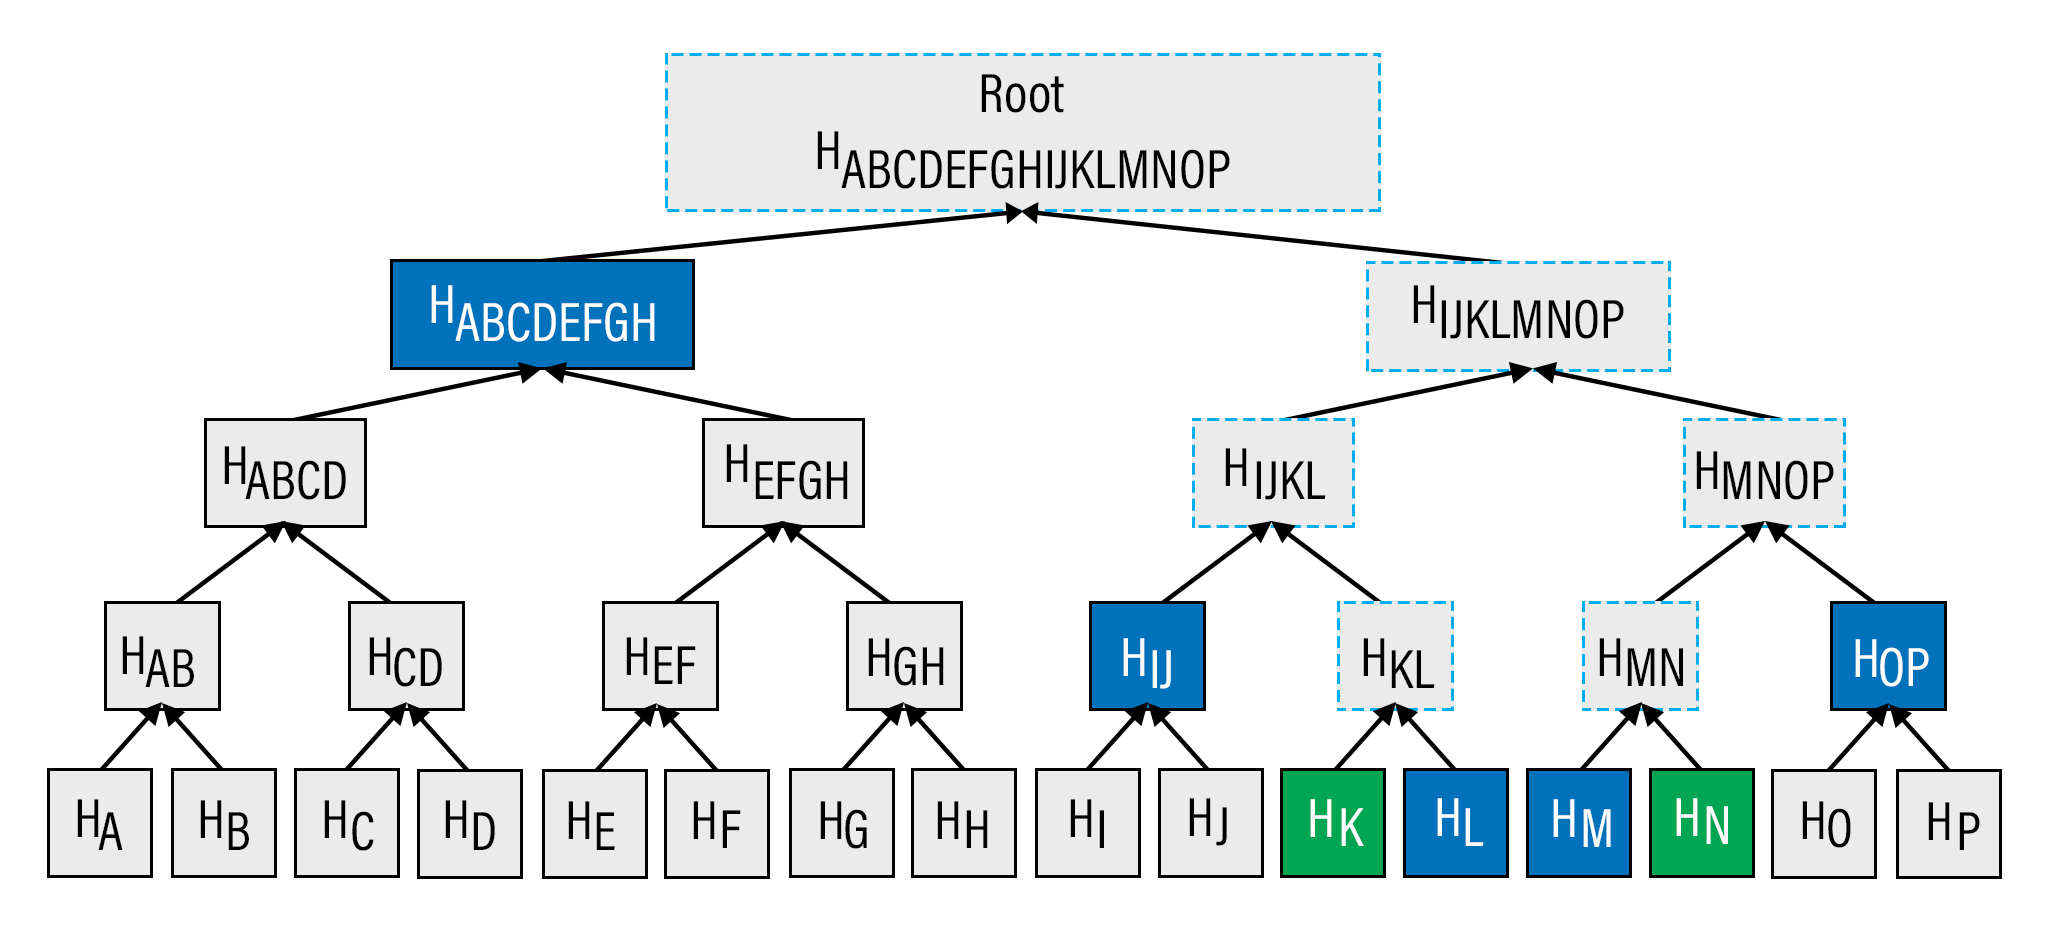
Say that a light client has two transactions that are of interest, which would be the hashes represented by the green boxes, HK and HN above. A full node can construct a Proof of Inclusion by sending us all of the hashes marked by blue boxes, HABCDEFGH, HIJ, HL, HM and HOP. The light client would then perform these calculations:
HKL = merkle_parent(HK, HL)
HMN = merkle_parent(HM, HN)
HIJKL = merkle_parent(HIJ, HKL)
HMNOP = merkle_parent(HMN, HOP)
HIJKLMNOP = merkle_parent(HIJKL, HMNOP)
HABCDEFGHIJKLMNOP = merkle_parent(HABCDEFGH, HIJKLMNOP)
The Merkle Root is HABCDEFGHIJKLMNOP, which we can then be checked against the block header whose proof-of-work has been validated.
The full node can send a limited amount of information about the block and the light client can recalculate the Merkle Root, which can then be verified against the Merkle Root in the block header. This does not guarantee that the transaction is in the longest blockchain, but it does assure the light client that the full node would have had to spend a lot of hashing power or energy creating a valid proof-of-work. As long as the reward for creating such a proof-of-work is greater than the amounts in the transactions, the light client can at least know that the full node has no clear economic incentive to lie.
Since block headers can be requested from multiple nodes, light clients have a way to verify if one node is trying to show them block headers that are not the longest. It only takes a single honest node to invalidate 100 dishonest ones since proof-of-work is objective. Therefore, isolation of a light client (that is, control of who the light client is connected to) is required to deceive in this way. The security of SPV requires that there be lots of honest nodes on the network.
In other words, light client security is based on a robust network of nodes and the economic cost of producing proof-of-work. For small transactions relative to the block subsidy (currently 12.5 BTC), there’s probably little to worry about. For large transactions (say 100 BTC), the full nodes may have economic incentive to deceive you. Transactions that large should generally be validated using a full node.
When a full node sends a Proof of Inclusion, there are two pieces of information that need to be included. First, the light client needs the Merkle Tree structure and second, the light client needs to know which hash is at which position in the Merkle Tree. Once both pieces of information are given, the light client can reconstruct the partial Merkle Tree to reconstruct the Merkle Root and validate the Proof of Inclusion. A full node communicates these two pieces of information to a light client using a Merkle Block.
To understand what’s in a Merkle Block, we need to understand a bit about how a Merkle Tree or more generally, Binary Trees, can be traversed. In a binary tree, nodes can be traversed breadth-first or depth-first. Breadth-first traversal would go level by level like Figure 11-3:
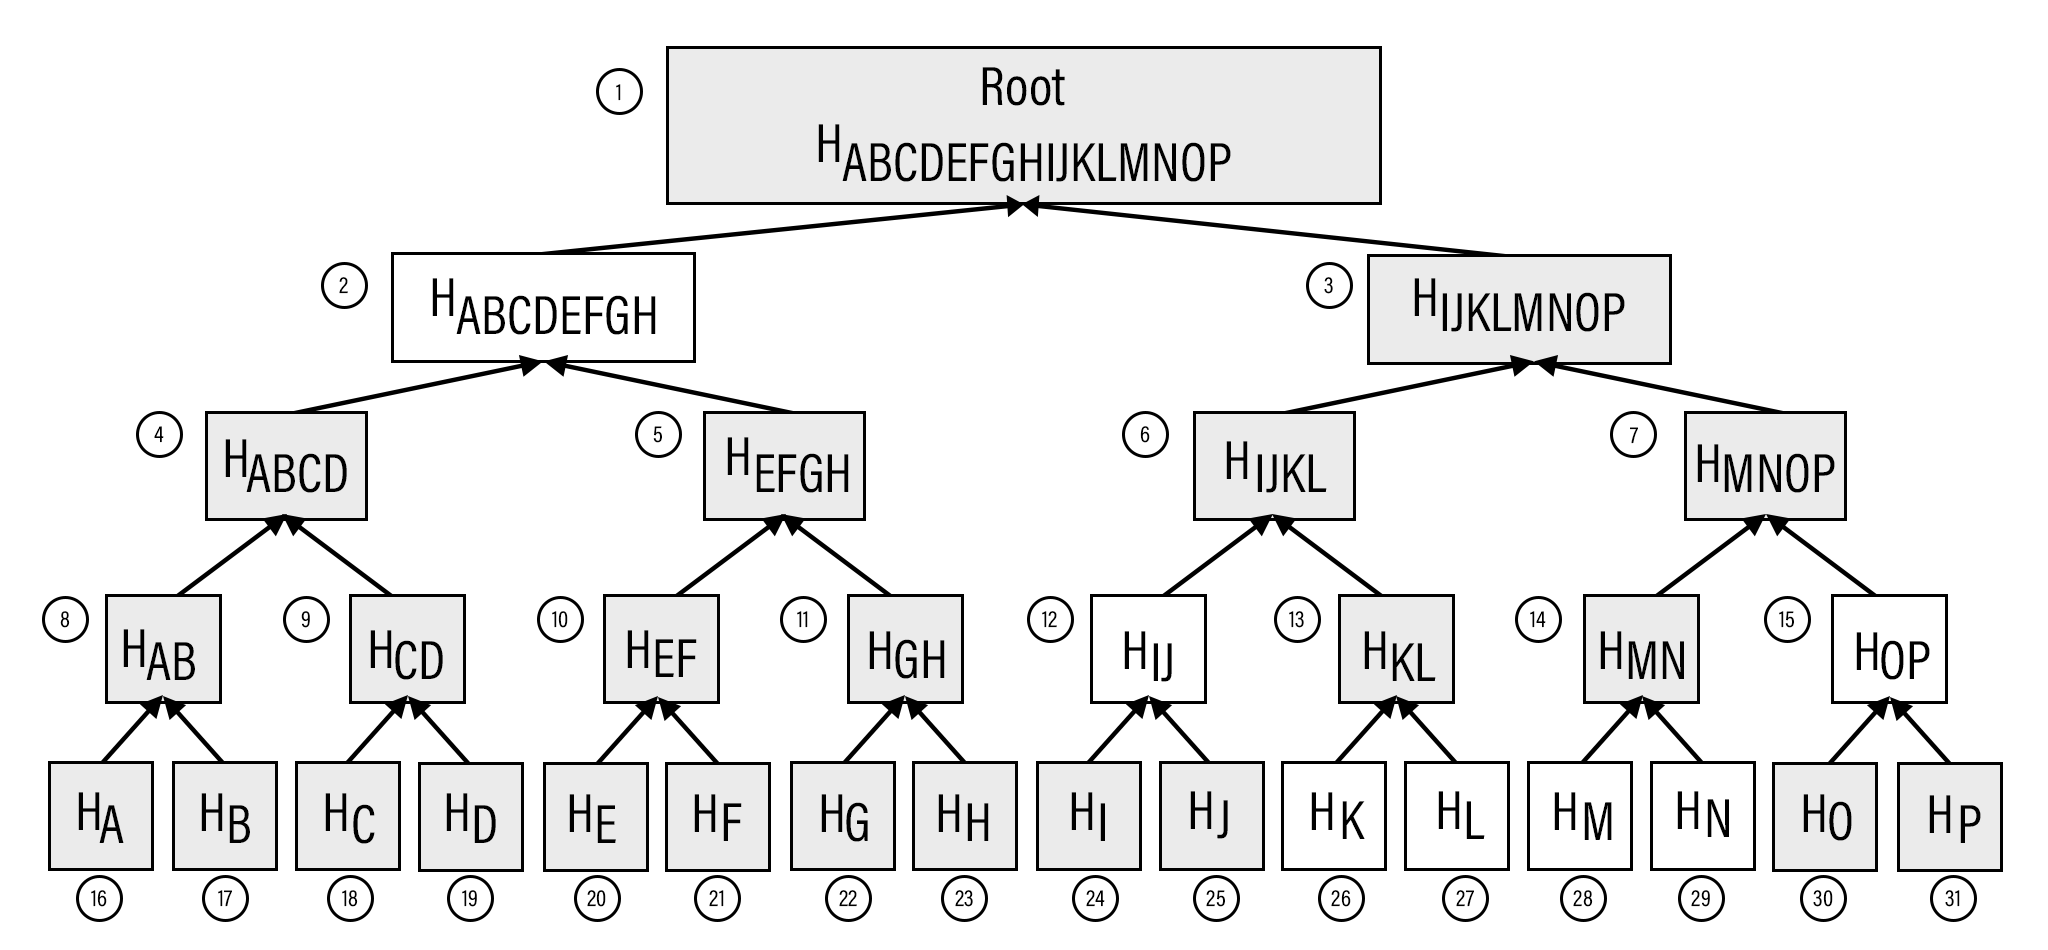
The breadth-first ordering starts at the root and goes from root to leaves, level by level, left to right.
Depth-first ordering is a bit different and looks like Figure 11-4:

The depth-first ordering starts at the root, traverses the left side at each node before the right side.
In a Proof of Inclusion (see Figure 11-5), the full node sends the green boxes, HK and HN along with the blue boxes HABCDEFGH, HIJ, HL, HM and HOP. The location of each hash is reconstructed using depth-first ordering from some flags. The process of reconstructing the tree is what we describe next.
The first thing a light client does is create the general structure of the Merkle Tree. Because Merkle Trees are built from the leaves upward, the only thing a light client needs is the number of leaves that exist to know the structure. The tree from Figure 11-5 has 16 leaves. A light client can create the empty Merkle Tree like so:
>>>importmath>>>total=16>>>max_depth=math.ceil(math.log(total,2))>>>merkle_tree=[]>>>fordepthinrange(max_depth+1):...num_items=math.ceil(total/2**(max_depth-depth))...level_hashes=[None]*num_items...merkle_tree.append(level_hashes)>>>forlevelinmerkle_tree:...(level)[None][None,None][None,None,None,None][None,None,None,None,None,None,None,None][None,None,None,None,None,None,None,None,None,None,None,None,None,\None,None,None]
Since we halve at every level, log2 of the number of leaves is how many levels there are in the Merkle Tree.
Note we round up using math.ceil as we round up for halving at each level.
We could also be clever and use len(bin(total))-2.
The Merkle Tree will hold the root level at index 0, the level below at index 1 and so on. In other words, the index is the “depth” from the top.
There are levels 0 to max_depth in this Merkle Tree.
At any particular level, the number of nodes is the number of total leaves divided by 2 for every level above the leaf level.
We don’t know yet what any of the hashes are, so we set them to None
Note merkle_tree is a list of lists of hashes, or a 2-dimensional array.
Create an empty Merkle Tree with 27 items and print each level.
We create a MerkleTree class:
classMerkleTree:def__init__(self,total):self.total=totalself.max_depth=math.ceil(math.log(self.total,2))self.nodes=[]fordepthinrange(self.max_depth+1):num_items=math.ceil(self.total/2**(self.max_depth-depth))level_hashes=[None]*num_itemsself.nodes.append(level_hashes)self.current_depth=0self.current_index=0def__repr__(self):result=[]fordepth,levelinenumerate(self.nodes):items=[]forindex,hinenumerate(level):ifhisNone:short='None'else:short='{}...'.format(h.hex()[:8])ifdepth==self.current_depthandindex==self.current_index:items.append('*{}*'.format(short[:-2]))else:items.append('{}'.format(short))result.append(','.join(items))return'\n'.join(result)
We keep a pointer to a particular node in the tree, which will come in handy later.
We print a representation of the tree.
Now that we have an empty tree, we can go about fill it to calculate the Merkle Root. If we had every leaf hash, getting the Merkle Root would look like this:
>>>frommerkleblockimportMerkleTree>>>fromhelperimportmerkle_parent_level>>>hex_hashes=[..."9745f7173ef14ee4155722d1cbf13304339fd00d900b759c6f9d58579b5765fb",..."5573c8ede34936c29cdfdfe743f7f5fdfbd4f54ba0705259e62f39917065cb9b",..."82a02ecbb6623b4274dfcab82b336dc017a27136e08521091e443e62582e8f05",..."507ccae5ed9b340363a0e6d765af148be9cb1c8766ccc922f83e4ae681658308",..."a7a4aec28e7162e1e9ef33dfa30f0bc0526e6cf4b11a576f6c5de58593898330",..."bb6267664bd833fd9fc82582853ab144fece26b7a8a5bf328f8a059445b59add",..."ea6d7ac1ee77fbacee58fc717b990c4fcccf1b19af43103c090f601677fd8836",..."457743861de496c429912558a106b810b0507975a49773228aa788df40730d41",..."7688029288efc9e9a0011c960a6ed9e5466581abf3e3a6c26ee317461add619a",..."b1ae7f15836cb2286cdd4e2c37bf9bb7da0a2846d06867a429f654b2e7f383c9",..."9b74f89fa3f93e71ff2c241f32945d877281a6a50a6bf94adac002980aafe5ab",..."b3a92b5b255019bdaf754875633c2de9fec2ab03e6b8ce669d07cb5b18804638",..."b5c0b915312b9bdaedd2b86aa2d0f8feffc73a2d37668fd9010179261e25e263",..."c9d52c5cb1e557b92c84c52e7c4bfbce859408bedffc8a5560fd6e35e10b8800",..."c555bc5fc3bc096df0a0c9532f07640bfb76bfe4fc1ace214b8b228a1297a4c2",..."f9dbfafc3af3400954975da24eb325e326960a25b87fffe23eef3e7ed2fb610e",...]>>>tree=MerkleTree(len(hex_hashes))>>>tree.nodes[4]=[bytes.fromhex(h)forhinhex_hashes]>>>tree.nodes[3]=merkle_parent_level(tree.nodes[4])>>>tree.nodes[2]=merkle_parent_level(tree.nodes[3])>>>tree.nodes[1]=merkle_parent_level(tree.nodes[2])>>>tree.nodes[0]=merkle_parent_level(tree.nodes[1])>>>(tree)*597c4baf.*6382df3f...,87cf8fa3...3ba6c080...,8e894862...,7ab01bb6...,3df760ac...272945ec...,9a38d037...,4a64abd9...,ec7c95e1...,3b67006c...,850683df...,\d40d268b...,8636b7a3...9745f717...,5573c8ed...,82a02ecb...,507ccae5...,a7a4aec2...,bb626766...,\ea6d7ac1...,45774386...,76880292...,b1ae7f15...,9b74f89f...,b3a92b5b...,\b5c0b915...,c9d52c5c...,c555bc5f...,f9dbfafc...
This fills the tree and gets us the Merkle Root. However, the message from the network may not be giving us all of the leaves. The message might contain some internal nodes as well. We need a more clever way to fill the tree.
Tree traversal is going to be the way we do this.
We can do a depth-first traversal and only fill in the nodes that we can calculate.
To traverse, we need to keep track of where in the tree we are.
The properties self.current_depth and self.current_index do this.
We need methods to traverse the Merkle Tree. We’ll also include other useful methods.
classMerkleTree:...defup(self):self.current_depth-=1self.current_index//=2defleft(self):self.current_depth+=1self.current_index*=2defright(self):self.current_depth+=1self.current_index=self.current_index*2+1defroot(self):returnself.nodes[0][0]defset_current_node(self,value):self.nodes[self.current_depth][self.current_index]=valuedefget_current_node(self):returnself.nodes[self.current_depth][self.current_index]defget_left_node(self):returnself.nodes[self.current_depth+1][self.current_index*2]defget_right_node(self):returnself.nodes[self.current_depth+1][self.current_index*2+1]defis_leaf(self):returnself.current_depth==self.max_depthdefright_exists(self):returnlen(self.nodes[self.current_depth+1])>self.current_index*2+1
We want the ability to set the current node in the tree to some value.
We will want to know if we are a leaf node.
In certain situations, we won’t have a right child because we may be at the right-most node of a level whose child level has an odd number of items.
We have Merkle Tree traversal methods left, right and up.
Let’s use these methods to populate the tree via depth-first traversal:
>>>frommerkleblockimportMerkleTree>>>fromhelperimportmerkle_parent>>>hex_hashes=[..."9745f7173ef14ee4155722d1cbf13304339fd00d900b759c6f9d58579b5765fb",..."5573c8ede34936c29cdfdfe743f7f5fdfbd4f54ba0705259e62f39917065cb9b",..."82a02ecbb6623b4274dfcab82b336dc017a27136e08521091e443e62582e8f05",..."507ccae5ed9b340363a0e6d765af148be9cb1c8766ccc922f83e4ae681658308",..."a7a4aec28e7162e1e9ef33dfa30f0bc0526e6cf4b11a576f6c5de58593898330",..."bb6267664bd833fd9fc82582853ab144fece26b7a8a5bf328f8a059445b59add",..."ea6d7ac1ee77fbacee58fc717b990c4fcccf1b19af43103c090f601677fd8836",..."457743861de496c429912558a106b810b0507975a49773228aa788df40730d41",..."7688029288efc9e9a0011c960a6ed9e5466581abf3e3a6c26ee317461add619a",..."b1ae7f15836cb2286cdd4e2c37bf9bb7da0a2846d06867a429f654b2e7f383c9",..."9b74f89fa3f93e71ff2c241f32945d877281a6a50a6bf94adac002980aafe5ab",..."b3a92b5b255019bdaf754875633c2de9fec2ab03e6b8ce669d07cb5b18804638",..."b5c0b915312b9bdaedd2b86aa2d0f8feffc73a2d37668fd9010179261e25e263",..."c9d52c5cb1e557b92c84c52e7c4bfbce859408bedffc8a5560fd6e35e10b8800",..."c555bc5fc3bc096df0a0c9532f07640bfb76bfe4fc1ace214b8b228a1297a4c2",..."f9dbfafc3af3400954975da24eb325e326960a25b87fffe23eef3e7ed2fb610e",...]>>>tree=MerkleTree(len(hex_hashes))>>>tree.nodes[4]=[bytes.fromhex(h)forhinhex_hashes]>>>whiletree.root()isNone:...iftree.is_leaf():...tree.up()...else:...left_hash=tree.get_left_node()...right_hash=tree.get_right_node()...ifleft_hashisNone:...tree.left()...elifright_hashisNone:...tree.right()...else:...tree.set_current_node(merkle_parent(left_hash,right_hash))...tree.up()>>>(tree)597c4baf...6382df3f...,87cf8fa3...3ba6c080...,8e894862...,7ab01bb6...,3df760ac...272945ec...,9a38d037...,4a64abd9...,ec7c95e1...,3b67006c...,850683df...,\d40d268b...,8636b7a3...9745f717...,5573c8ed...,82a02ecb...,507ccae5...,a7a4aec2...,bb626766...,\ea6d7ac1...,45774386...,76880292...,b1ae7f15...,9b74f89f...,b3a92b5b...,\b5c0b915...,c9d52c5c...,c555bc5f...,f9dbfafc...
We traverse until we calculate the Merkle Root. Each time through the loop, we are at a particular node.
If we are at a leaf node, we already have that hash, so we don’t need to do anything but go back up.
If we don’t have the left hash, then we calculate the value first before calculating the current node’s hash.
If we don’t have the right hash, we calculate the value first calculating the current node’s hash. Note we already have the left one due to the depth-first traversal.
We have both the left and the right hash so we calculate the Merkle Parent value and set that to the current node. Once set, we can go back up.
This code will only work when the number of leaves is a power of 2 as edge cases where there’s an odd number of nodes on a level are not handled.
We handle the case where the parent is the parent of the rightmost node on a level with an odd number of nodes:
>>>frommerkleblockimportMerkleTree>>>fromhelperimportmerkle_parent>>>hex_hashes=[..."9745f7173ef14ee4155722d1cbf13304339fd00d900b759c6f9d58579b5765fb",..."5573c8ede34936c29cdfdfe743f7f5fdfbd4f54ba0705259e62f39917065cb9b",..."82a02ecbb6623b4274dfcab82b336dc017a27136e08521091e443e62582e8f05",..."507ccae5ed9b340363a0e6d765af148be9cb1c8766ccc922f83e4ae681658308",..."a7a4aec28e7162e1e9ef33dfa30f0bc0526e6cf4b11a576f6c5de58593898330",..."bb6267664bd833fd9fc82582853ab144fece26b7a8a5bf328f8a059445b59add",..."ea6d7ac1ee77fbacee58fc717b990c4fcccf1b19af43103c090f601677fd8836",..."457743861de496c429912558a106b810b0507975a49773228aa788df40730d41",..."7688029288efc9e9a0011c960a6ed9e5466581abf3e3a6c26ee317461add619a",..."b1ae7f15836cb2286cdd4e2c37bf9bb7da0a2846d06867a429f654b2e7f383c9",..."9b74f89fa3f93e71ff2c241f32945d877281a6a50a6bf94adac002980aafe5ab",..."b3a92b5b255019bdaf754875633c2de9fec2ab03e6b8ce669d07cb5b18804638",..."b5c0b915312b9bdaedd2b86aa2d0f8feffc73a2d37668fd9010179261e25e263",..."c9d52c5cb1e557b92c84c52e7c4bfbce859408bedffc8a5560fd6e35e10b8800",..."c555bc5fc3bc096df0a0c9532f07640bfb76bfe4fc1ace214b8b228a1297a4c2",..."f9dbfafc3af3400954975da24eb325e326960a25b87fffe23eef3e7ed2fb610e",..."38faf8c811988dff0a7e6080b1771c97bcc0801c64d9068cffb85e6e7aacaf51",...]>>>tree=MerkleTree(len(hex_hashes))>>>tree.nodes[5]=[bytes.fromhex(h)forhinhex_hashes]>>>whiletree.root()isNone:...iftree.is_leaf():...tree.up()...else:...left_hash=tree.get_left_node()...ifleft_hashisNone:...tree.left()...eliftree.right_exists():...right_hash=tree.get_right_node()...ifright_hashisNone:...tree.right()...else:...tree.set_current_node(merkle_parent(left_hash,right_hash))...tree.up()...else:...tree.set_current_node(merkle_parent(left_hash,left_hash))...tree.up()>>>(tree)0a313864...597c4baf...,6f8a8190...6382df3f...,87cf8fa3...,5647f416...3ba6c080...,8e894862...,7ab01bb6...,3df760ac...,28e93b98...272945ec...,9a38d037...,4a64abd9...,ec7c95e1...,3b67006c...,850683df...,\d40d268b...,8636b7a3...,ce26d40b...9745f717...,5573c8ed...,82a02ecb...,507ccae5...,a7a4aec2...,bb626766...,\ea6d7ac1...,45774386...,76880292...,b1ae7f15...,9b74f89f...,b3a92b5b...,\b5c0b915...,c9d52c5c...,c555bc5f...,f9dbfafc...,38faf8c8...
If we don’t have left node’s value, we traverse to the left node since all internal nodes are guaranteed a left child.
We check first if this node has a right child. This is true unless this node happens to be the right-most node and the child level has an odd number of nodes.
If we don’t have the right node value, we traverse to that node.
If we have both the left and the right node values, we calculate the current node value using merkle_parent.
We have the left node value, but the right child doesn’t exist. This is the right-most node of this level so we combine the left value twice.
We can now traverse the tree for the number of leaves that aren’t powers of 2.
The full node communicating a Merkle Block sends all the information needed to verify that the interesting transaction is in the Merkle Tree.
The merkleblock network command is what communicates this information and looks like Figure 11-6:
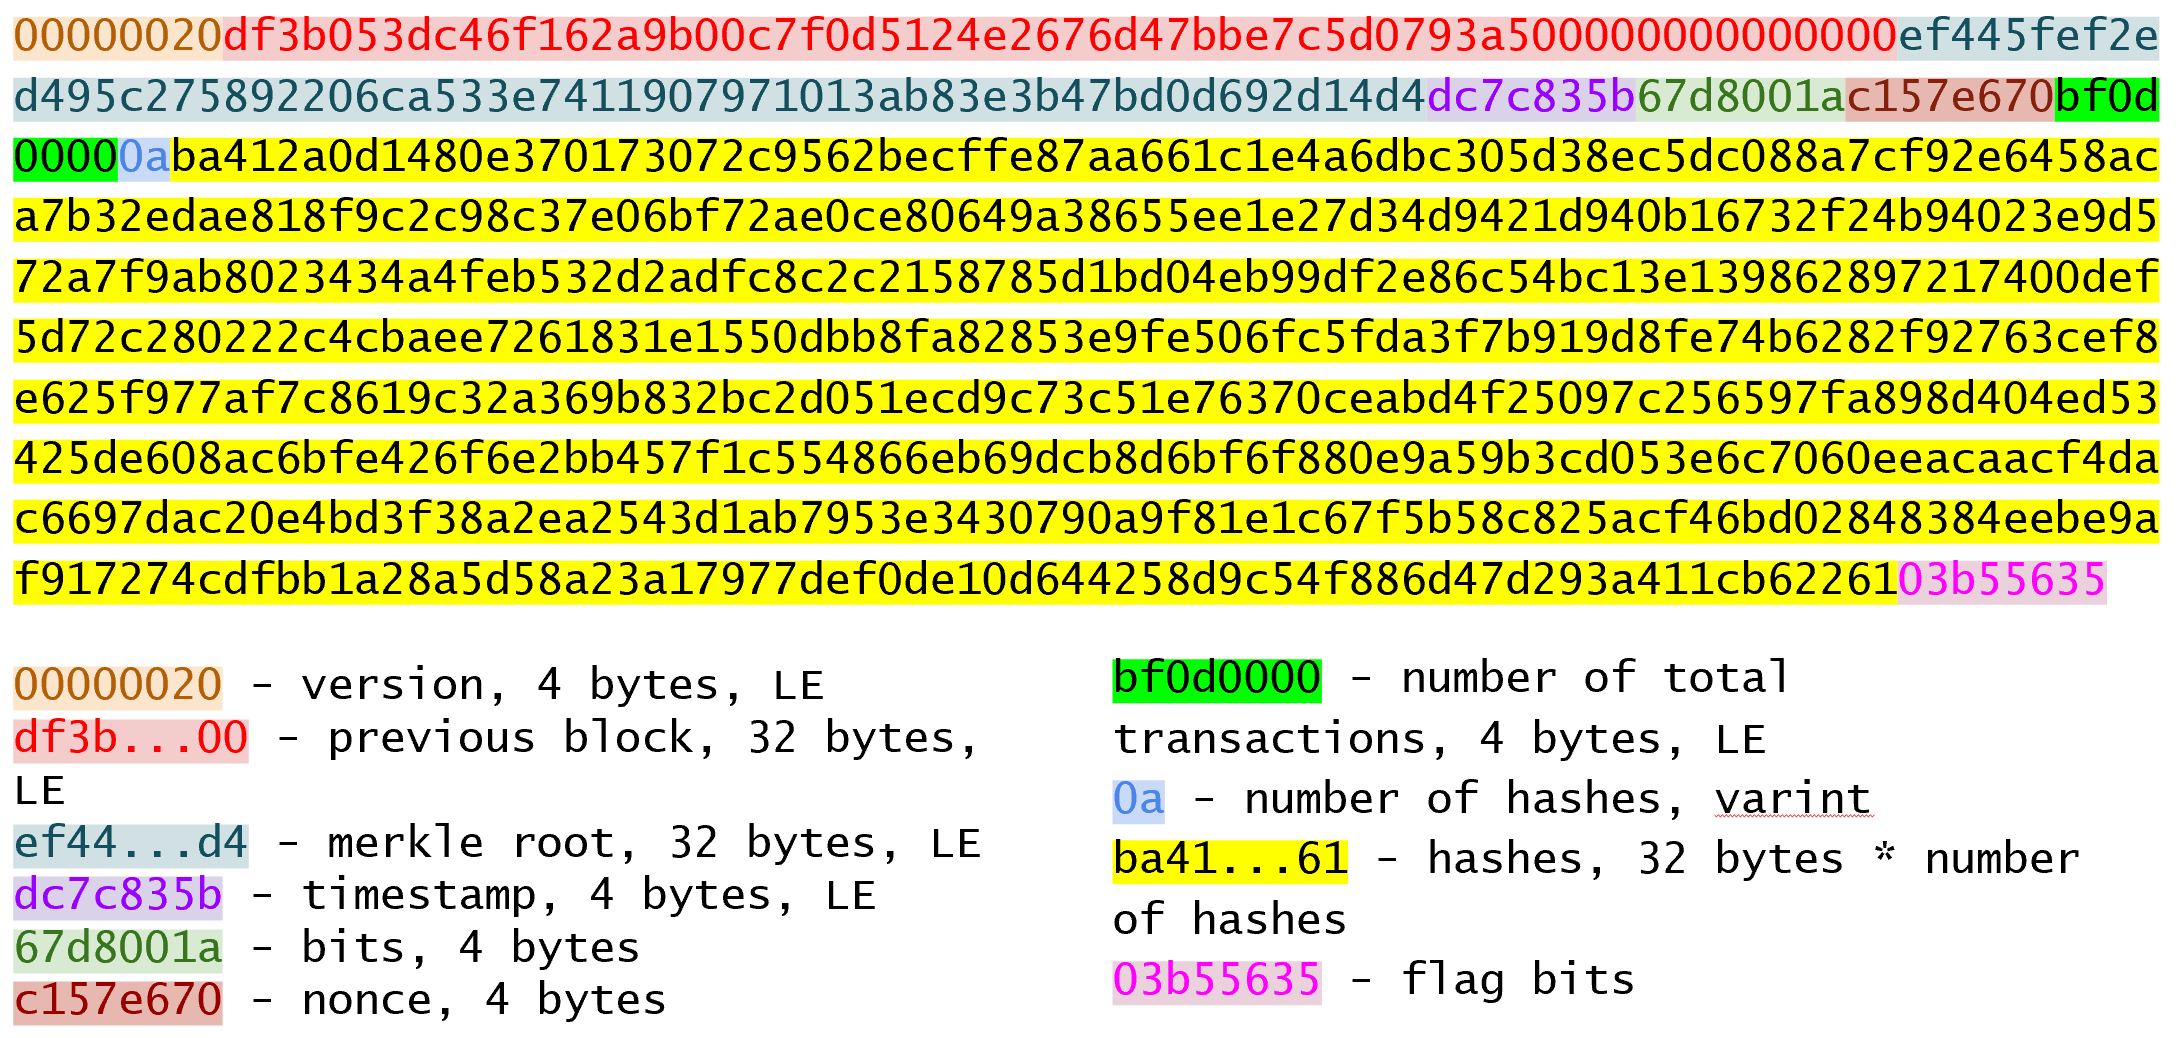
merkleblockThe first 6 fields are exactly the same as the block header from Chapter 9. The last 4 fields are the Proof of Inclusion.
The number of transactions field is how many leaves this particular Merkle Tree will have.
This allows a light client to construct an empty Merkle Tree.
The hashes field are the blue and green boxes from Figure 11-5.
Since the number of hashes in the hashes field is not fixed, it’s prefixed with how many there are.
Lastly, the flags field give information about where the hashes go within the Merkle Tree.
The flags are parsed using bytes_to_bits_field to convert to a list of bits (1’s and 0’s):
defbytes_to_bit_field(some_bytes):flag_bits=[]forbyteinsome_bytes:for_inrange(8):flag_bits.append(byte&1)byte>>=1returnflag_bits
The ordering for the bytes are a bit strange, but meant to be easy to convert into the flag bits needed to reconstruct the Merkle Root.
Write the parse method for MerkleBlock.
The flag bits inform where the hashes go using depth-first ordering.
The rules for the flag bits are:
If the node’s value is given in the hashes field (blue box in the Figure 11-7), the flag bit is 0.
If the node’s value is an internal node and the value is to be calculated by the light client (dotted outline in the Figure 11-7), the flag bit is 1.
If the node is a leaf node and is a transaction of interest (green box in the Figure 11-7), the flag is 1 and also given in the hashes field. These are the items in the Merkle Tree being proven to be included.

Given a tree from Figure 11-7, the flag bit is 1 for the root node (1), since that hash is calculated by the light node. The left child, HABCDEFGH (2), is included in the hashes field, so the flag is 0. From here, we traverse to HIJKLMNOP instead of HABCD or HEFGH since HABCDEFGH represents both those nodes and we don’t need them. We don’t need to traverse any of the descendants of HABCDEFGH and go straight to HIJKLMNOP instead.
The right child, HIJKLMNOP (3) is also calculated so has a flag bit of 1. To calculate HIJKLMNOP, we need the values for HIJKL (4) and HMNOP (9). The next node in depth-first order is the left child, HIJKL (4), which is where we traverse to next. HIJKL is an internal node that’s calculated, so the flag bit is 1. From here, we traverse to its left child HIJ (5). We will be traversing to HKL (6) when we come back to this node. HIJ (5) is next in depth-first ordering and that’s hash is included in the hashes list and the flag is 0. HKL (6) is an internal, calculated node so the flag is 1. HK (7) is a leaf node whose presence in the block is being proved so the flag is 1. HL (8) is a node whose value is included in the hashes field so the flag is 0. We traverse up to HKL whose value can now be calculated since HK and HL are known. We traverse up to HIJKL whose value can now be calculated since HIJ and HKL are known. We traverse up to HIJKLMNOP whose value we can’t calculate yet since we haven’t been to HMNOP. We traverse to HMNOP (9), which is another internal node so the flag is 1. HMN (10) is another internal node that’s calculated, so the flag is 1. HM (11) is a node whose value is included in the hashes field, so the flag is 0. HN (12) is of interest, so the flag is 1 and its value is in the hashes field. We traverse up to HMN whose value can now be calculated. We traverse up again to HMNOP, whose value can not be calculated because we haven’t been to HOP yet. HOP (13) is given, so the flag is 1 and its hash is the final hash in the hashes field. We traverse to HMNOP which can now be calculated. We traverse to HIJKLMNOP which can now be calculated. Finally, we traverse to HABCDEFGHIJKLMNOP which is the Merkle Root and calculate it!
The flag bits for nodes (1) - (13) are:
1, 0, 1, 1, 0, 1, 1, 0, 1, 1, 0, 1, 0
There should be 7 hashes in the hashes field in this order:
HABCDEFGH
HIJ
HK
HL
HM
HN
HOP
Notice that every letter is represented in the hashes above, A-P. This information is sufficient to prove that HK and HN (green boxes in Figure 11-7) are included in the block.
As you can see from Figure 11-7, the flag bits are given in depth-first order. Anytime we’re given a hash, as with HABCDEFGH, we skip its children and continue. In the case of HABCDEFGH, we traverse to HIJKLMNOP instead of HABCD. Flag bits are a clever mechanism to encode which nodes have which hash value.
We can now populate the Merkle Tree and calculate the root, given appropriate flag bits and hashes.
classMerkleTree:...defpopulate_tree(self,flag_bits,hashes):whileself.root()isNone:ifself.is_leaf():flag_bits.pop(0)self.set_current_node(hashes.pop(0))self.up()else:left_hash=self.get_left_node()ifleft_hashisNone:ifflag_bits.pop(0)==0:self.set_current_node(hashes.pop(0))self.up()else:self.left()elifself.right_exists():right_hash=self.get_right_node()ifright_hashisNone:self.right()else:self.set_current_node(merkle_parent(left_hash,right_hash))self.up()else:self.set_current_node(merkle_parent(left_hash,left_hash))self.up()iflen(hashes)!=0:raiseRuntimeError('hashes not all consumed {}'.format(len(hashes)))forflag_bitinflag_bits:ifflag_bit!=0:raiseRuntimeError('flag bits not all consumed')
The point of populating this Merkle Tree is to calculate the root. Each loop iteration processes one node until the root is calculated.
For leaf nodes, we are always given the hash.
flag_bits.pop(0) is a way in Python to dequeue the next flag bit.
We may want to keep track of which hashes are of interest to us by looking at the flag bit, but for now, we don’t.
hashes.pop(0) is how we get the next hash from the hashes field.
We need to set the current node to that hash.
If we don’t have the left child value, there are two possibilities. This node’s value may be in the hashes field or this node’s value might need calculation.
The next flag bit tells us whether we need to calculate this node or not. If the flag bit is 0, the next hash in the hashes field is this node’s value. If the flag bit is 1, we need to calculate the left (and possibly the right)
We are guaranteed that there’s a left child, so traverse to that node and get its value.
We check that the right node exists.
We have the left hash, but not the right. We traverse to the right node to get its value.
We have both the left and the right node values, so we calculate their Merkle Parent to get the current node’s value.

We have the left node’s value, but the right does not exist. In this case, according to Merkle Tree rules, we calculate the Merkle Parent of the left node twice.

All hashes must be consumed or we got bad data.

All flag bits must be consumed or we got bad data.
Write the is_valid method for MerkleBlock
Simplified Payment Verification is useful but not without some significant downsides. The full details are outside the scope of this book, but despite the programming being pretty straightforward, most light wallets do not use SPV and trust data from the wallet vendor servers. The main drawback of SPV is that the nodes you are connecting to know something about the transactions you are interested in. That is, you lose some privacy by using SPV. This will be covered more in detail in the next chapter as we make Bloom Filters to tell nodes what transactions we are interested in.
In the previous chapter we learned how to validate a Merkle Block. A full node can provide a Proof of Inclusion for transactions of interest through the merkleblock command. But how does the full node know which transactions are of interest?
A light client could tell the full node its addresses (or ScriptPubKeys). The full node can check for transactions that are relevant to these addresses, but that would be compromising the light client’s privacy. A light client wouldn’t want to reveal, for example, that it has 1000 BTC to a full node. Privacy leaks are security leaks, and in Bitcoin, it’s generally a good idea to not leak any privacy whenever possible.
One solution is for the light client to tell the full node enough information to create a superset of all transactions of interest. To create this superset, we use what’s called a Bloom Filter.
A Bloom Filter is a filter for all possible transactions.
Full nodes run transactions through a Bloom Filter and send merkleblock commands for transactions that make it through.
Suppose there are 50 total transactions. There is one transaction a light client is interested in. The light client wants to “hide” the transaction among a group of 5 transactions. This requires a function that groups the 50 transactions into 10 different buckets and the full node can then send single bucket of transactions, in a manner of speaking. This grouping would have to be deterministic, that is, be the same each time. How can this be accomplished?
The solution is to use a hash function to get a deterministic number and modulo to organize transactions into buckets.
A Bloom Filter is a computer science structure that can be used on any data in a set, so suppose that we have one item “hello world” that we want to create a Bloom Filter for.
We need a hash function, so we’ll use one we already have hash256.
The process of figuring out what bucket our item goes into looks like this:
>>>fromhelperimporthash256>>>bit_field_size=10>>>bit_field=[0]*bit_field_size>>>h=hash256(b'hello world')>>>bit=int.from_bytes(h,'big')%bit_field_size>>>bit_field[bit]=1>>>(bit_field)[0,0,0,0,0,0,0,0,0,1]
Our bit_field is the list of “buckets” and we want there to be 10.
Hash the item with hash256.
Interpret this as a Big-Endian integer and modulo by 10 to determine the bucket this item belongs to.
We indicate the bucket we want in the Bloom Filter.
Conceptually, what we just did looks like Figure 12-1:
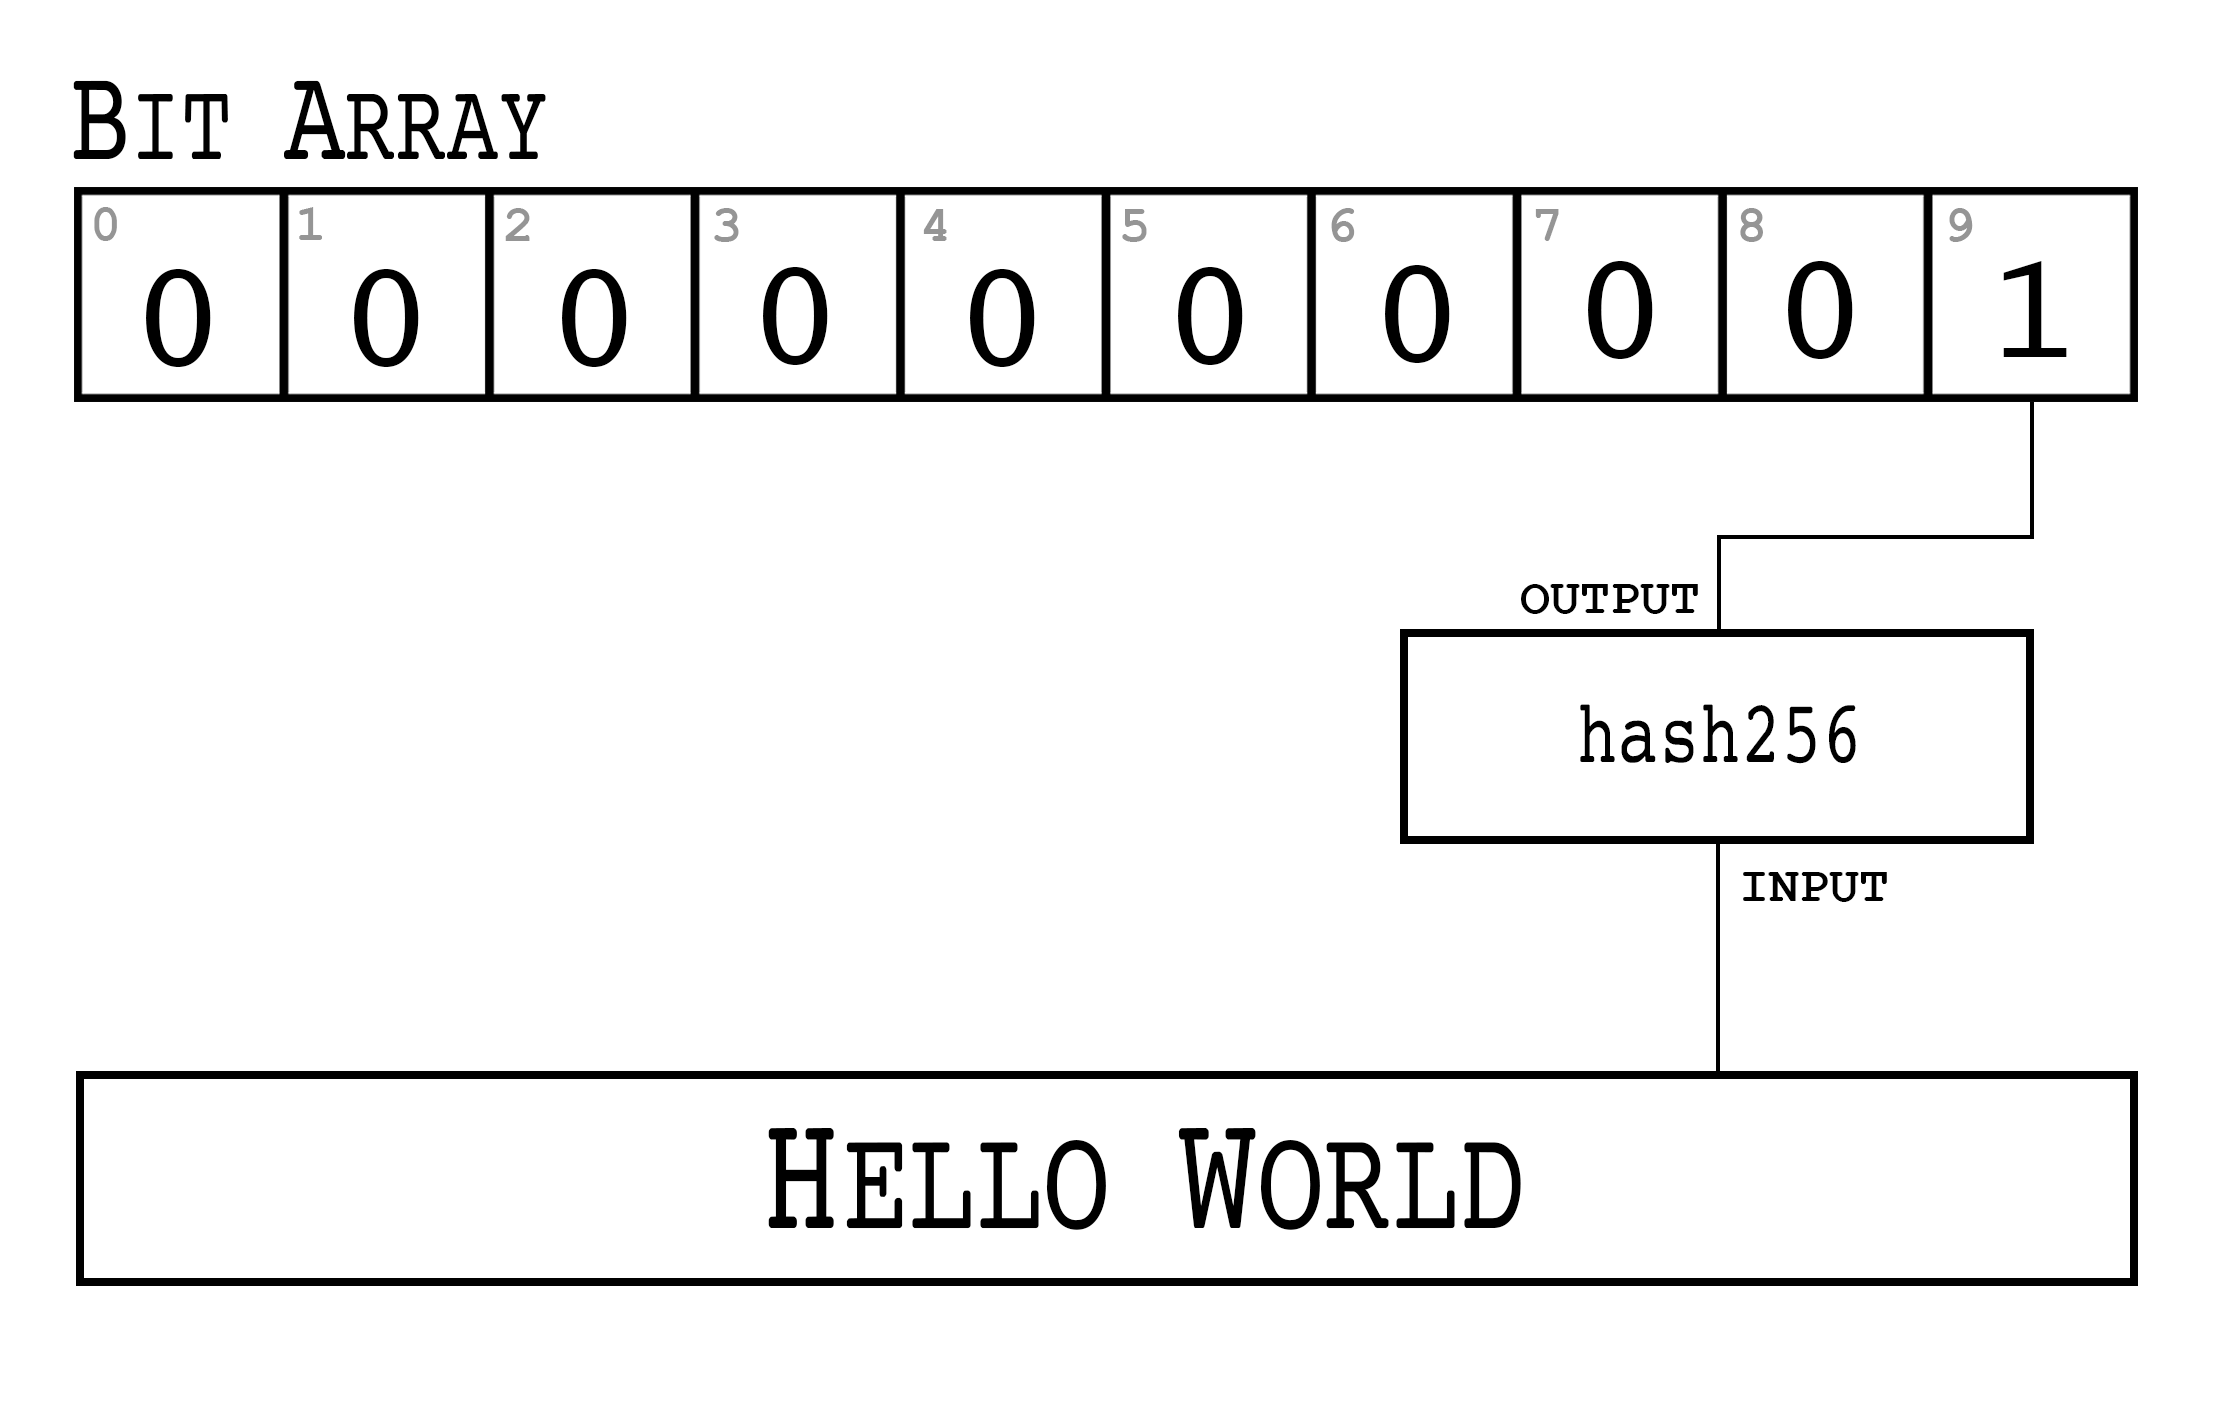
Our Bloom Filter consists of:
The size of the bit field
The hash function used (and how we converted that to a number)
The bit field, which indicates the bucket we’re interested in.
This works great for a single item, so this would work for a single address/ScriptPubKey/Transaction ID of interest. What do we do when we’re interested in more than 1 item?
We can run a second item through the same filter and set that bit to 1 as well. The full node can then send multiple buckets of transactions instead of a single bucket. Let’s create a Bloom Filter with two items, “hello world” and “goodbye” (Figure 12-2)
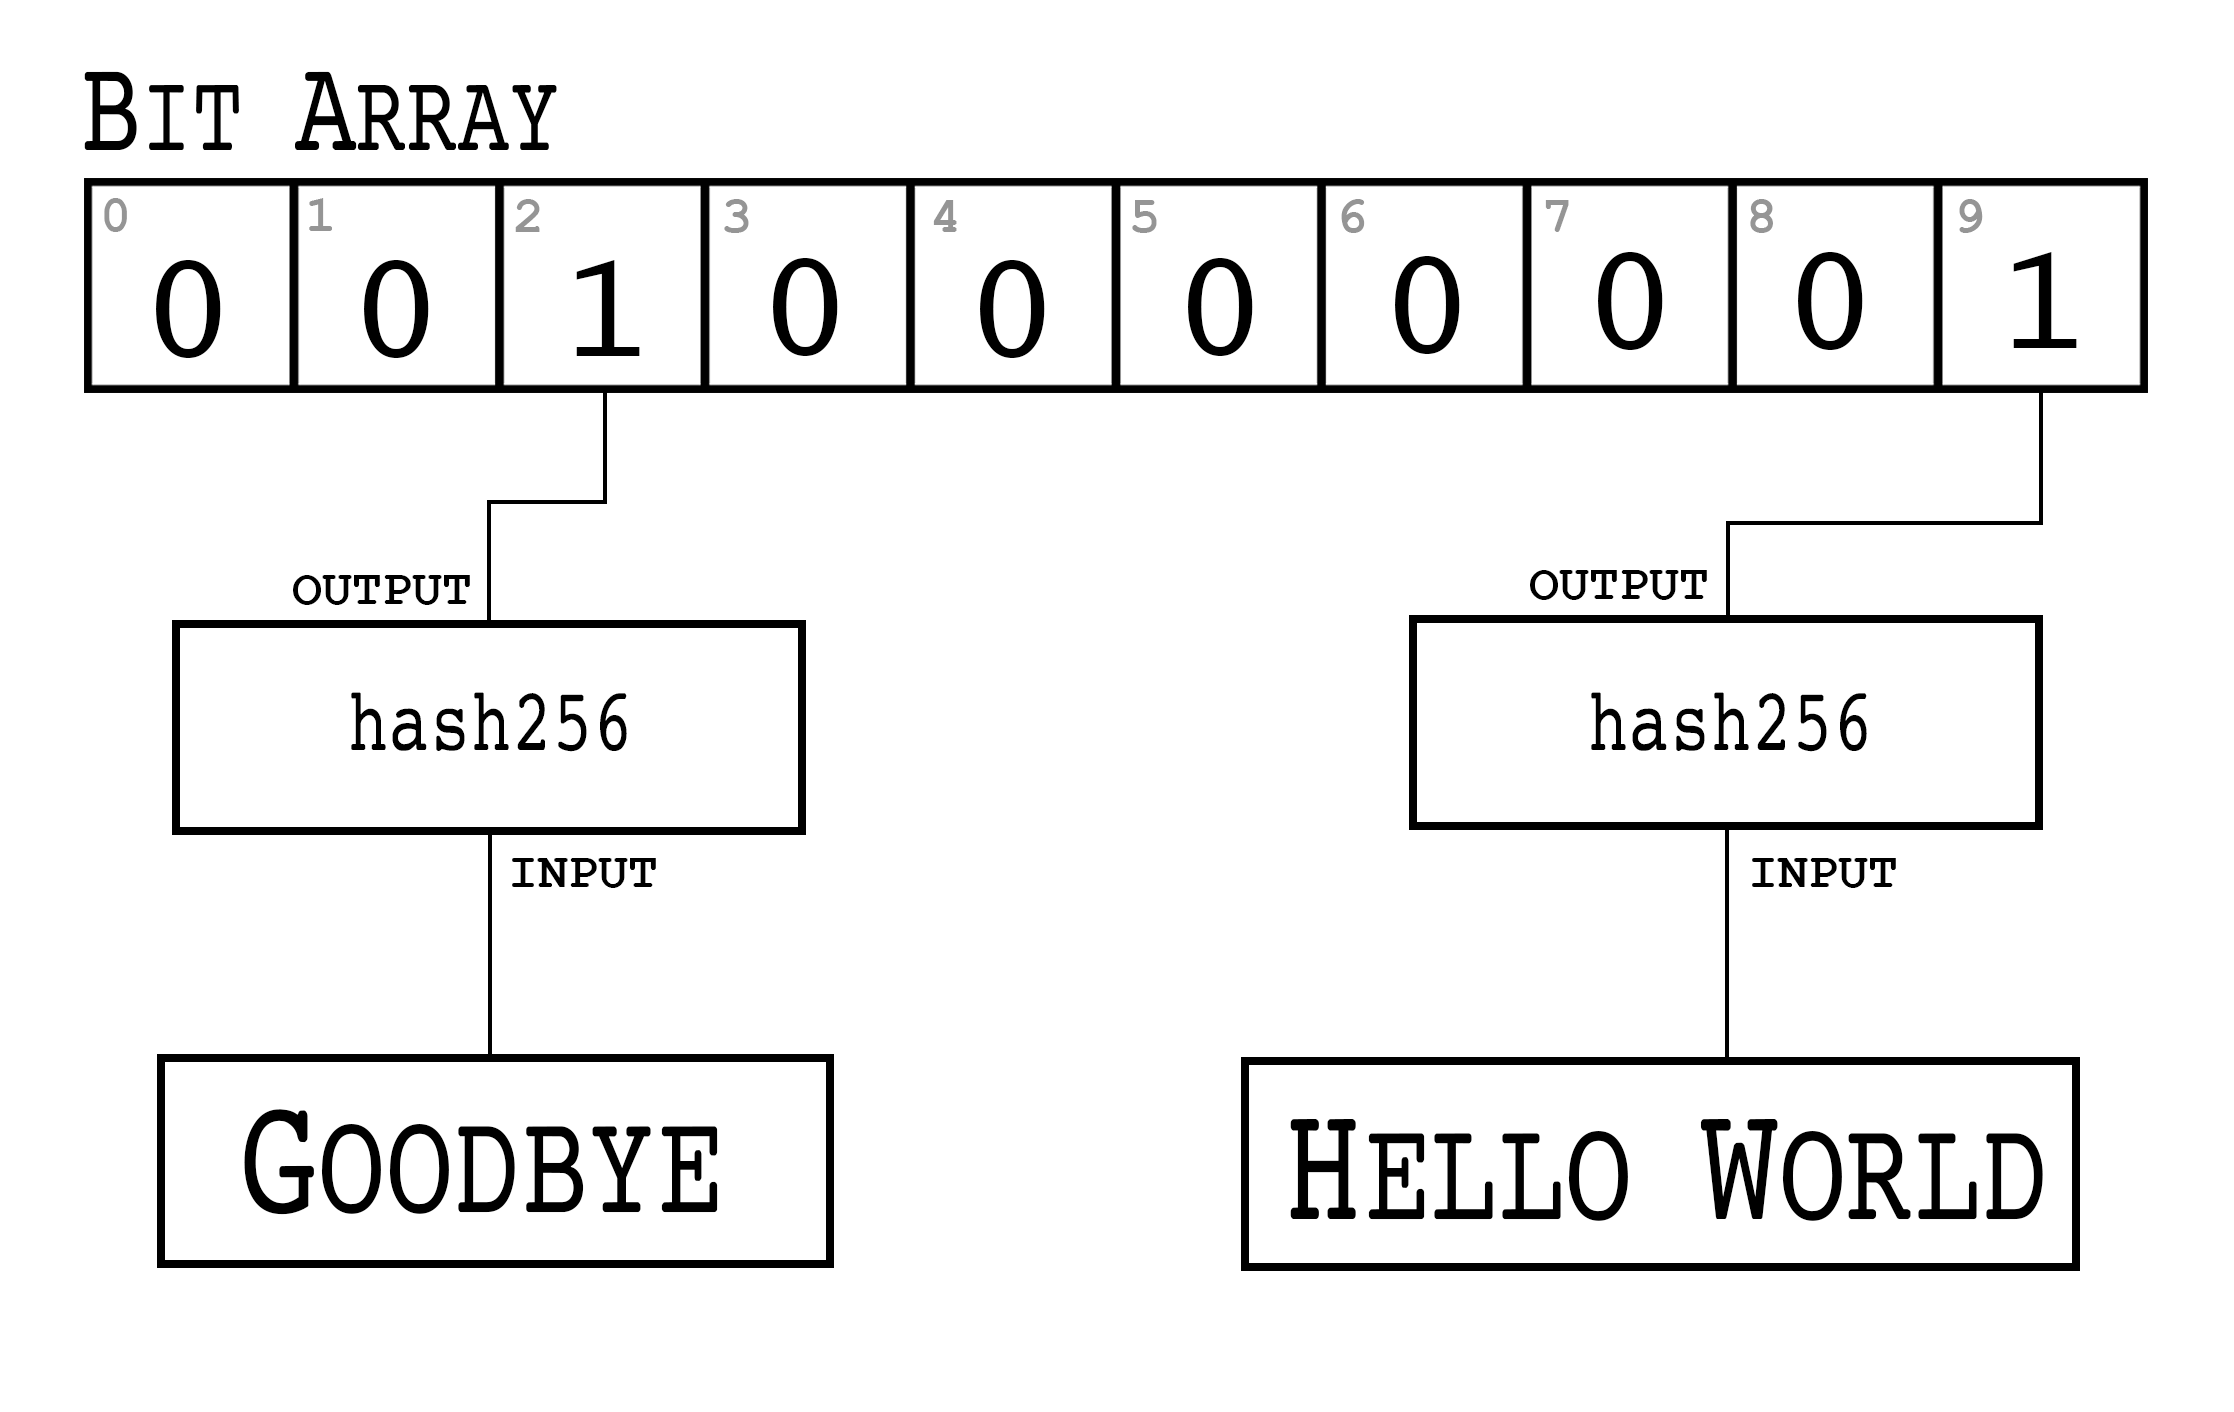
>>>fromhelperimporthash256>>>bit_field_size=10>>>bit_field=[0]*bit_field_size>>>foritemin(b'hello world',b'goodbye'):...h=hash256(item)...bit=int.from_bytes(h,'big')%bit_field_size...bit_field[bit]=1>>>(bit_field)[0,0,1,0,0,0,0,0,0,1]
We are creating a filter for two items here, but this can be extended to many more.
If the space of all possible items is 50, 10 items on average will make it through this filter instead of the 5 when we only had 1 item of interest because 2 buckets are returned, not 1.
Calculate the Bloom Filter for hello world and goodbye using the hash160 hash function over a bit field of 10.
Supposing that the space of all items is 1 million and we want bucket sizes to still be 5, we would need a Bloom Filter that’s 1,000,000 / 5 = 200,000 bits long. Each bucket would have on average 5 items and we would get 5 times the number of items we’re interested in, 20% of which would be items of interest. 200,000 bits is 25,000 bytes and is a lot to transmit. Can we do better?
A Bloom Filter using multiple hash functions can shorten the bit field considerably. If we use 5 hash functions over a bit field of 32, we have 32!/(27!5!) ~ 200,000 possible 5-bit combinations in that 32-bit field. Of 1 million possible items, 5 items on average should have that 5-bit combination. Instead of transmitting 25k bytes, we can transmit just 32 bits or 4 bytes!
Here’s what that would look like. For simplicity, we stick to the same 10-bit field but still have 2 items of interest:
>>>fromhelperimporthash256,hash160>>>bit_field_size=10>>>bit_field=[0]*bit_field_size>>>foritemin(b'hello world',b'goodbye'):...forhash_functionin(hash256,hash160):...h=hash_function(item)...bit=int.from_bytes(h,'big')%bit_field_size...bit_field[bit]=1>>>(bit_field)[1,1,1,0,0,0,0,0,0,1]
We iterate over 2 different hash functions (hash256 and hash160), but we could just as easily have more.
Conceptually, Figure 12-3 shows what the code above does:
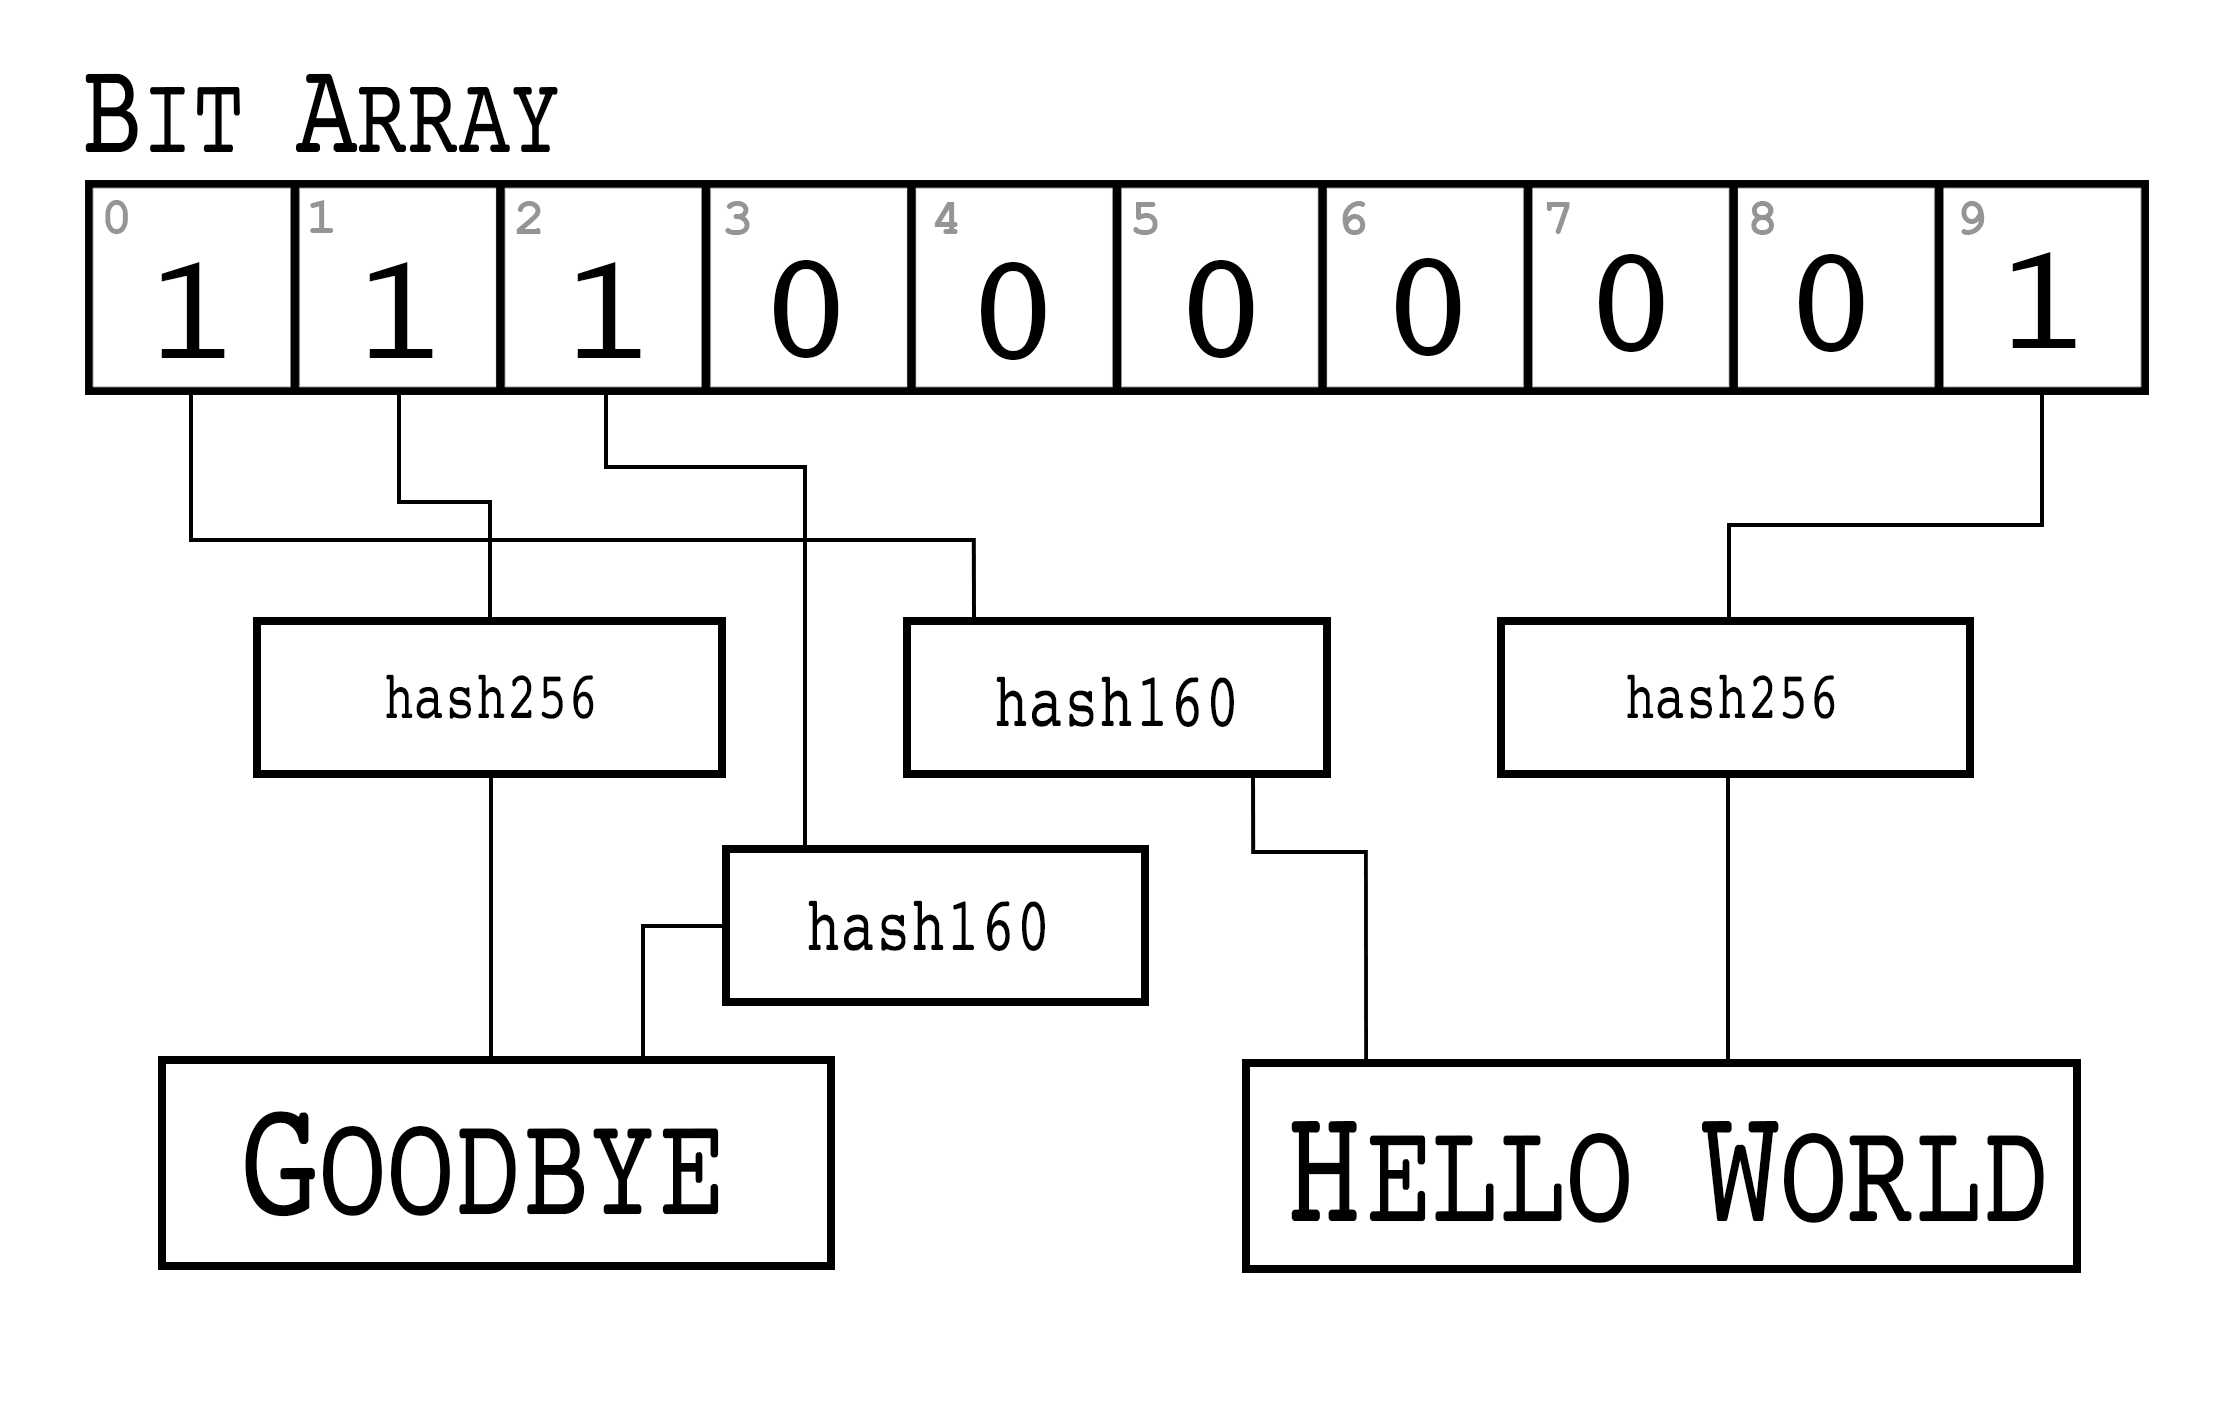
A Bloom Filter can be optimized by changing the number of hash functions and bit field size to get a desirable false-positive rate.
BIP0037 specifies Bloom Filters in network communication. The information contained in a Bloom Filter are:
The size of the bit field, or how many buckets there are. The size is specified in bytes (8 bits per byte) and rounded up if necessary.
The number of hash functions.
A “tweak” to be able to change the Bloom Filter slightly if it hits too many items.
The bit field that results from running the Bloom Filter over the items of interest.
While we could define lots of hash functions (sha512, keccak384, ripemd160, blake256, etc), in practice, we use a single hash function with a different seed. This allows the implementation to be simpler.
The hash function we use is called murmur3.
Unlike sha256, murmur3 is not cryptographically secure, but is much faster.
The task of filtering and getting a deterministic, evenly distributed modulo does not require cryptographic security, but benefits from speed, so murmur3 is the appropriate tool for the job.
The seed formula is defined this way:
i*0xfba4c795 + tweak
The fba4c795 number is a constant for Bitcoin Bloom Filters.
i is 0 for the first hash function, 1 for the second, 2 for the third and so on.
The tweak is a bit of entropy that can be added if the results of of one tweak are not satisfactory.
The hash functions and the size of the bit field are used to calculate the bit field which then get transmitted.
>>>fromhelperimportmurmur3>>>frombloomfilterimportBIP37_CONSTANT>>>field_size=2>>>num_functions=2>>>tweak=42>>>bit_field_size=field_size*8>>>bit_field=[0]*bit_field_size>>>forphrasein(b'hello world',b'goodbye'):...foriinrange(num_functions):...seed=i*BIP37_CONSTANT+tweak...h=murmur3(phrase,seed=seed)...bit=h%bit_field_size...bit_field[bit]=1>>>(bit_field)[0,0,0,0,0,1,1,0,0,1,1,0,0,0,0,0]
murmur3 is implemented in pure Python in helper.py
BIP37_CONSTANT is the fba4c795 number specified in BIP0037
Iterate over some items of interest.
We use 2 hash functions.
Seed formula.
murmur3 returns a number, so we don’t have to do any conversion to an integer.
This 2-byte Bloom Filter has 4 bits set to 1 out of 16, so the probability of any random item passing through this filter is 1/4*1/4=1/16. If space of all items numbers 160, a client will receive 10 items on average, 2 of which will be interesting.
We can start coding a BloomFilter class.
classBloomFilter:def__init__(self,size,function_count,tweak):self.size=sizeself.bit_field=[0]*(size*8)self.function_count=function_countself.tweak=tweak
Given a Bloom Filter with size=10, function count=5, tweak=99, what are the bytes that are set after adding these items? (use bit_field_to_bytes to convert to bytes)
b'Hello World'
b'Goodbye!'
Write the add method for BloomFilter
Once a light client has created a Bloom Filter, it needs to let the full node know the details of the filter so the full node can send Proofs of Inclusion.
The first thing a light client must do is set the optional relay flag in the version message (see Chapter 10) to 1.
This tells the full node not to send transaction messages unless they match a Bloom Filter or has specifically requested the message.
After the relay flag, a light client then communicates to the full node the Bloom Filter itself.
The command to set the Bloom Filter is called filterload.
The payload looks like Figure 12-4:
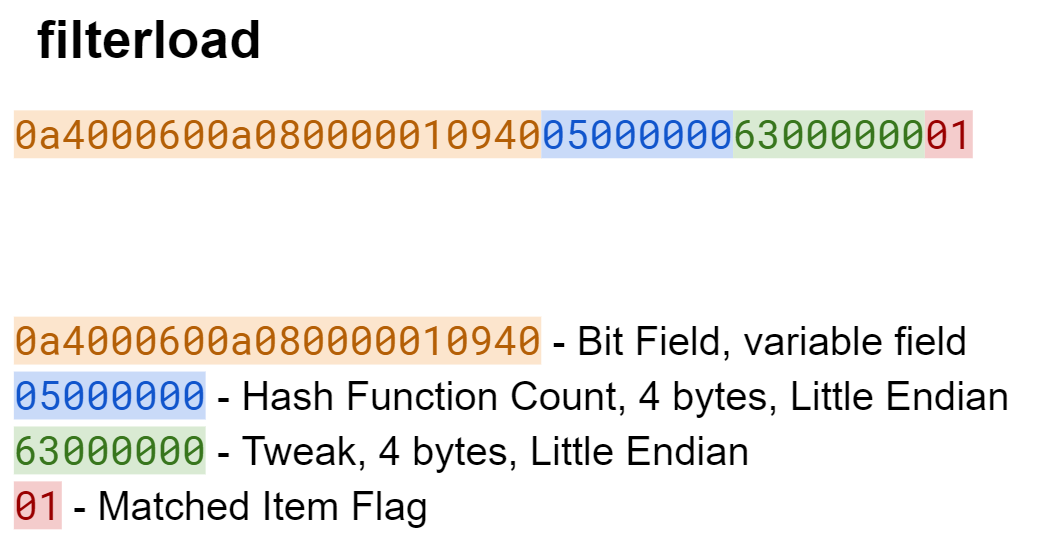
filterloadThe elements of a Bloom Filter are encoded into bytes. The bit field, hash function count and tweak are encoded in this message. The last field, matched item flag, is a way of asking the full node to add any matched transactions to the Bloom Filter.
Write the filterload payload from the BloomFilter class.
There is one more command that a light client needs and that’s Merkle Block information about transactions of interest from the full node.
The getdata command is what communicates blocks and transactions.
The specific type of data that a light client will want from a full node is something called a filtered block.
A filtered block is asking for transactions that pass through the bloom filter in the form of Merkle Blocks.
In other words, the light client can ask for Merkle Blocks whose transactions of interest match the Bloom Filter.
Here is what the payload for getdata looks like Figure 12-5:
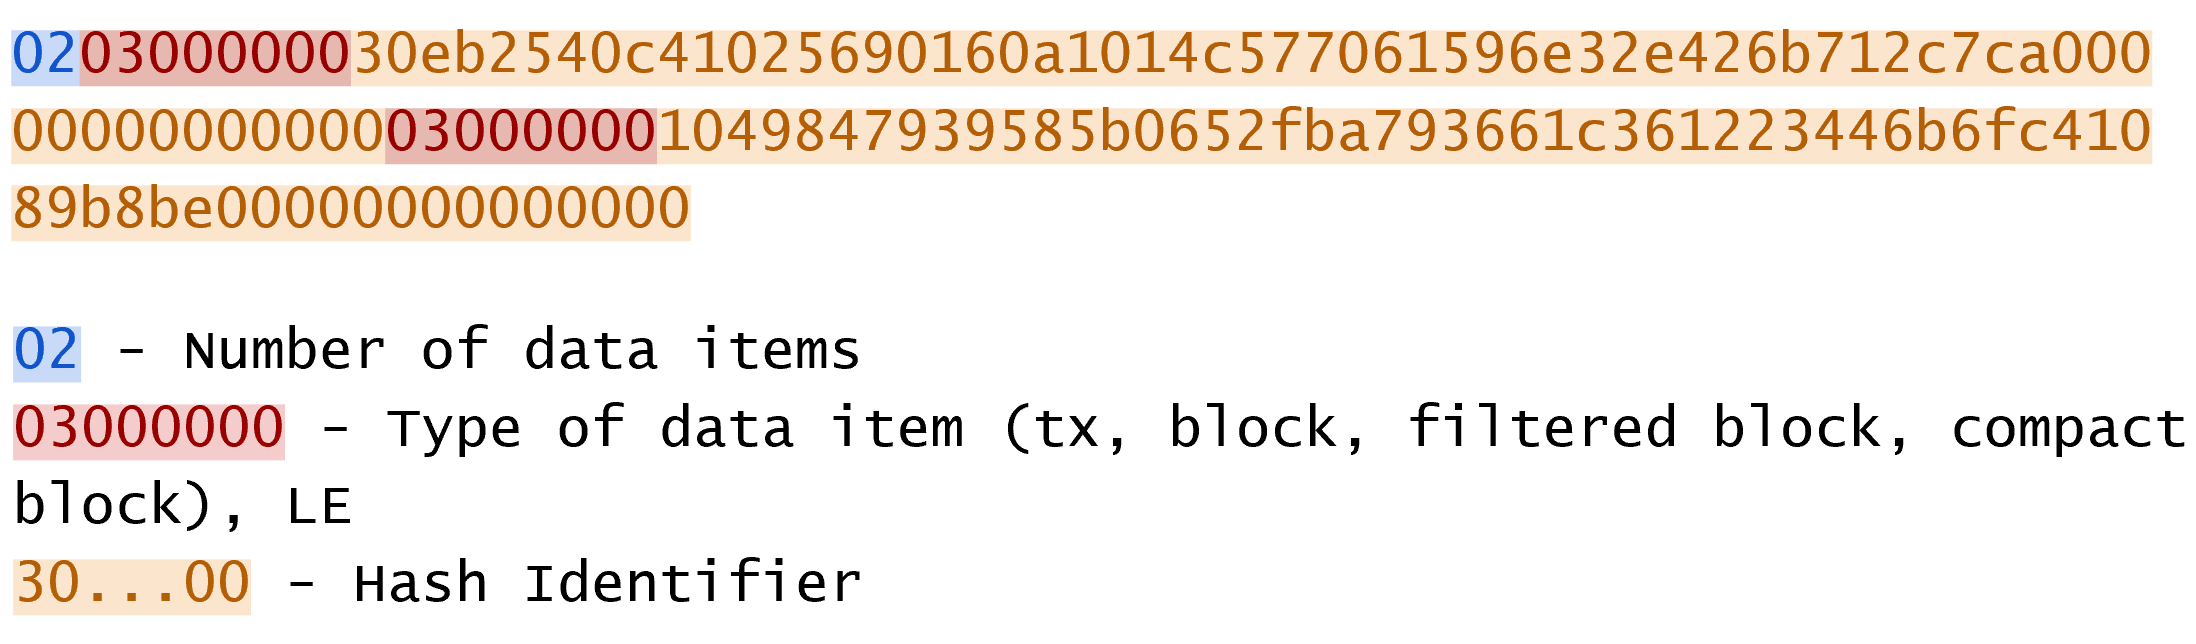
getdataThe number of items as a varint specify how many items we want. The each item has a type. A type value of 1 is a Transaction (Chapter 5), 2, a normal Block (Chapter 9), 3, a Merkle Block (Chapter 11) and 4, a Compact Block (not covered in this book).
We can create this message in network.py.
classGetDataMessage:command=b'getdata'def__init__(self):self.data=[]defadd_data(self,data_type,identifier):self.data.append((data_type,identifier))
Store the items we want.
We add items to the message using the add_data method.
Write the serialize method for the GetDataMessage class.
A light client which loads a Bloom Filter with a full node will get all the information needed to prove that transactions of interest are included in particular blocks.
>>>frombloomfilterimportBloomFilter>>>fromhelperimportdecode_base58>>>frommerkleblockimportMerkleBlock>>>fromnetworkimportFILTERED_BLOCK_DATA_TYPE,GetHeadersMessage,GetDataMe\ssage,HeadersMessage,SimpleNode>>>fromtximportTx>>>last_block_hex='00000000000538d5c2246336644f9a4956551afb44ba47278759ec55\ea912e19'>>>address='mwJn1YPMq7y5F8J3LkC5Hxg9PHyZ5K4cFv'>>>h160=decode_base58(address)>>>node=SimpleNode('testnet.programmingbitcoin.com',testnet=True,logging=\False)>>>bf=BloomFilter(size=30,function_count=5,tweak=90210)>>>bf.add(h160)>>>node.handshake()>>>node.send(bf.filterload())>>>start_block=bytes.fromhex(last_block_hex)>>>getheaders=GetHeadersMessage(start_block=start_block)>>>node.send(getheaders)>>>headers=node.wait_for(HeadersMessage)>>>getdata=GetDataMessage()>>>forbinheaders.blocks:...ifnotb.check_pow():...raiseRuntimeError('proof of work is invalid')...getdata.add_data(FILTERED_BLOCK_DATA_TYPE,b.hash())>>>node.send(getdata)>>>found=False>>>whilenotfound:...message=node.wait_for(MerkleBlock,Tx)...ifmessage.command==b'merkleblock':...ifnotmessage.is_valid():...raiseRuntimeError('invalid merkle proof')...else:...fori,tx_outinenumerate(message.tx_outs):...iftx_out.script_pubkey.address(testnet=True)==address:...('found: {}:{}'.format(message.id(),i))...found=True...breakfound:e3930e1e566ca9b75d53b0eb9acb7607f547e1182d1d22bd4b661cfe18dcddf1:0
We are creating a Bloom Filter that’s 30 bytes, 5 hash functions using a particularly popular 90’s tweak.
We filter for the address above.
We send the filterload command from the Bloom Filter we made.
We get the block headers after last_block_hex.
We create a getdata message for Merkle Blocks that may have transactions of interest.
We request a Merkle Block proving transactions of interest to us are included. Most blocks will probably be complete misses.
The getdata message asks for 2000 Merkle Blocks after the block defined by last_block_hex.
We wait for the merkleblock command, which proves inclusion and the tx command which gives us the transaction of interest.
We check that the Merkle Block proves transaction inclusion.
We’re looking for UTXOs for address, and we print to screen if we find one.
What we’ve done in the above is look at 2000 blocks after a particular block for UTXOs corresponding to a particular address. This is without the use of any block explorer, which preserves, to some degree, our privacy.
Get the current testnet block ID, send yourself some testnet coins, find the UTXO corresponding to the testnet coin without using a block explorer, create a transaction using that UTXO as an input and broadcast the tx message on the testnet network.
In this chapter, we created everything necessary to connecting peer to peer as a light client, ask for and receive the UTXOs necessary to construct a transaction all while preserving some privacy by using a Bloom Filter.
We now turn to Segwit, which is a new type of transaction that was activated in 2017.
Segwit stands for segregated witness and is a backwards-compatible upgrade or “soft fork” that activated on the Bitcoin network in August of 2017. While the activation was controversial, the features of this technology require some explanation. In this chapter, we’ll explore how Segwit works, why it’s backwards compatible and what Segwit enables.
As a brief overview, Segwit did a multitude of things:
Block size increase
Transaction malleability fix
Introduced Segwit versioning for clear upgrade paths
Quadratic hashing fix
Offline wallet fee calculation security
It’s not entirely obvious what Segwit is without looking at how it’s implemented. We’ll start by examining the most basic type of Segwit transaction, pay-to-witness-pubkey-hash.
Pay to witness pubkey hash (p2wpkh) is one of four types of Scripts defined by Segwit in BIP0141 and BIP0143. This is a smart contract that acts a lot like pay-to-pubkey-hash and is named similarly for that reason. The main change from p2pkh is that the data for the ScriptSig is now in the Witness field. The rearrangement is to fix transaction malleability.
Transaction Malleability is the ability to change the transaction’s ID without altering the transaction’s meaning. Mt. Gox CEO Mark Karpeles cited transaction malleability as the reason why his exchange was not allowing withdrawals back in 2013.
Malleability of the ID is an important consideration when creating Payment Channels, which are the atomic unit of the Lightning Network. A malleable transaction ID makes much more difficult the safe creation of Payment Channel transactions.
The reason why transaction malleability is a problem at all is because the transaction ID is calculated from the entire transaction. The ID of the transaction is the hash256 of the transaction. Most of the fields in a transaction cannot be changed without invalidating the transaction’s signature (and thus the transaction itself), so from a malleability standpoint, these fields are not a problem.
The one field that does allow for some manipulation without invalidating the Signature is the ScriptSig field on each input. The ScriptSig is emptied before creating the signature hash (see Chapter 7), so it’s possible to change the ScriptSig without invalidating the signature. Also, as we learned in Chapter 3, signatures contain a random component. This means that two different ScriptSigs can essentially mean the same thing but be different byte-wise.
This makes the ScriptSig field malleable, that is, able to be changed without changing the meaning, and means that the entire transaction, and the Transaction ID is malleable. A malleable transaction ID means that any dependent transactions (that is, a transaction spending one of the malleable transaction’s outputs), cannot be constructed in a way to guarantee validity. The previous transaction hash is uncertain, so the dependent transaction’s transaction input field cannot be guaranteed to be valid.
This is not usually a problem as once a transaction enters the blockchain, the transaction ID is fixed and no longer malleable (at least without finding a proof-of-work!). However, with Payment Channels, there are dependent transactions created before the funding transaction is added to the blockchain.
Transaction malleability is fixed by emptying the ScriptSig field and putting the data in another field that’s not used for ID calculation. For p2wpkh, the signature and pubkey are the items from ScriptSig, so those get moved to the Witness field, which is not used for ID calculation. This way, the transaction ID stays stable as the malleability vector disappears. The Witness field and the whole Segwit serialization of a transaction is only sent to nodes that ask for it. In other words, old nodes that haven’t upgraded to Segwit don’t receive the Witness field and don’t verify the pubkey and signature.
If this sounds familiar, it should. This is similar to how p2sh works (Chapter 8) in that newer nodes do additional validation that older nodes do not and is the basis for why Segwit is a soft fork (backwards-compatible upgrade) and not a hard fork (backwards-incompatible upgrade).
To understand Segwit, it helps to look at what the transaction looks like when sent to an old node (Figure 13-1) versus a new node (Figure 13-2):
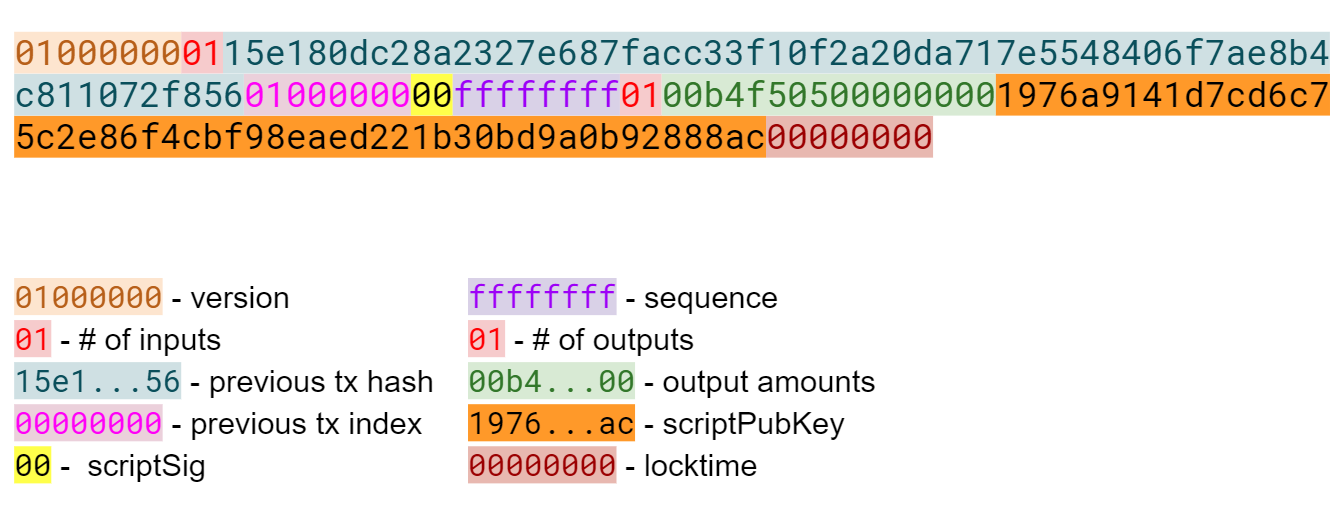
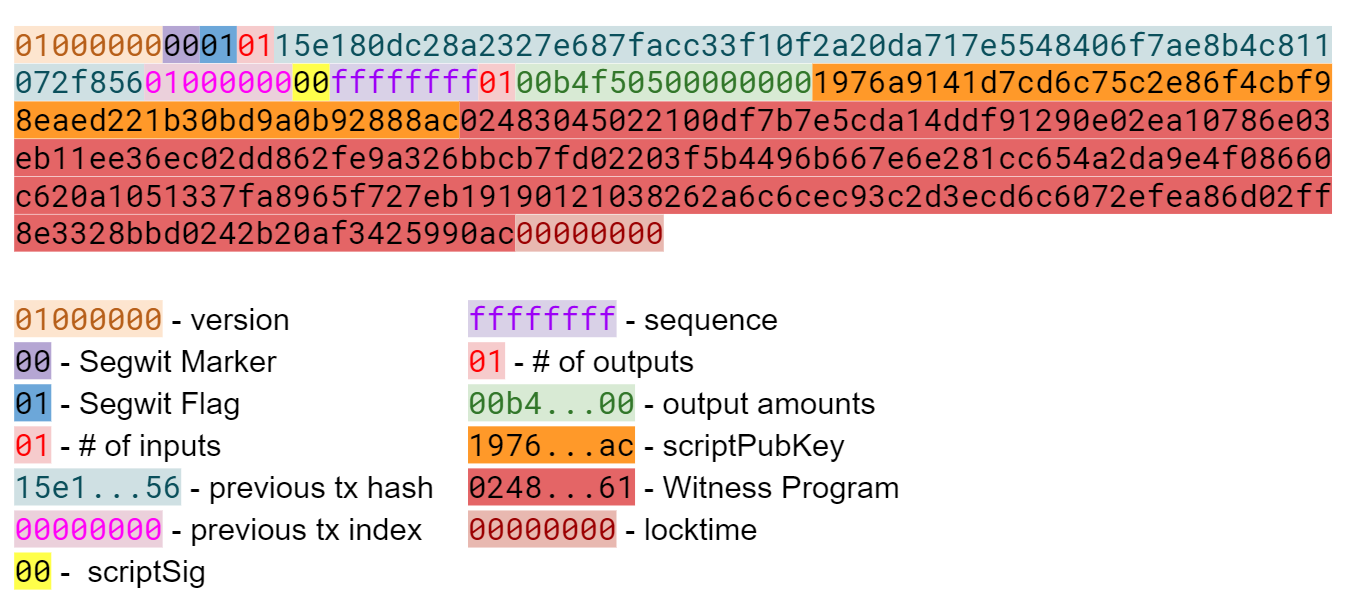
The difference between these two serializations is that the latter transaction (Segwit serialization) has the marker, flag and Witness fields. Otherwise, the two transactions look similar. The reason the transaction ID not malleable is because first serialization is used for calculating the transaction ID.
The Witness in p2wpkh has the Signature and Pubkey as its two elements. These will be used for validation for upgraded nodes only.
The ScriptPubKey for a p2wpkh is OP_0 <20-byte hash>.
The ScriptSig, as seen in both serializations is empty.
The combined Script is Figure 13-3:
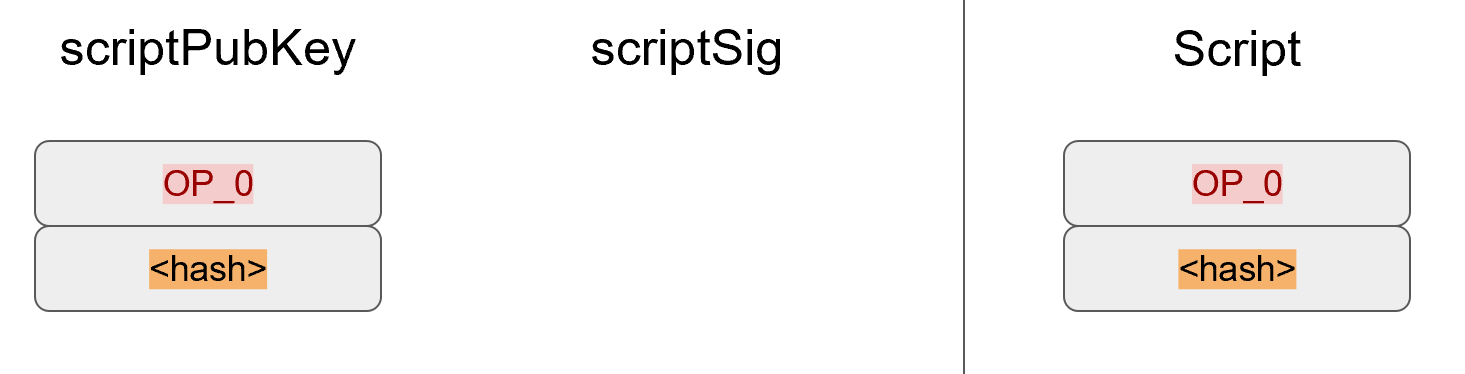
The processing of the combined Script starts like Figure 13-4:
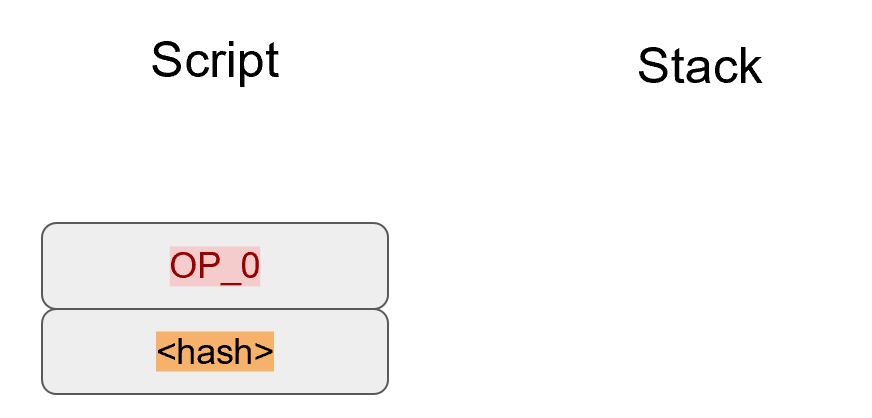
OP_0 pushes a 0 on the stack (Figure 13-5):
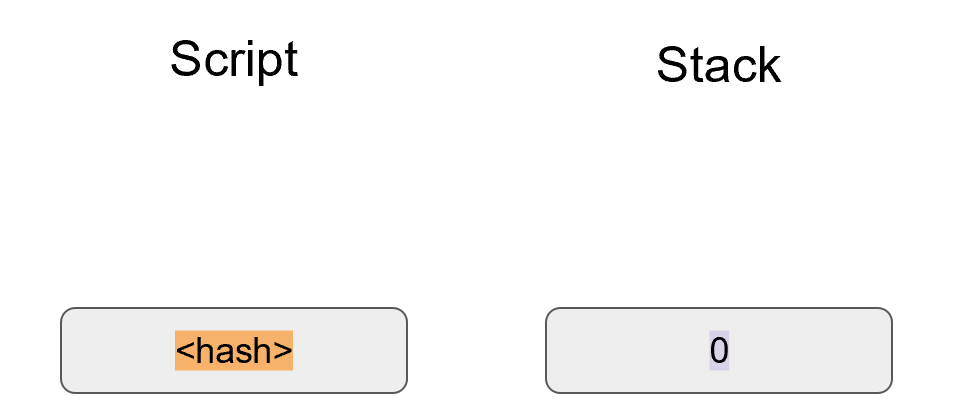
The 20-byte hash is an element, so it’s pushed to the stack (Figure 13-6):
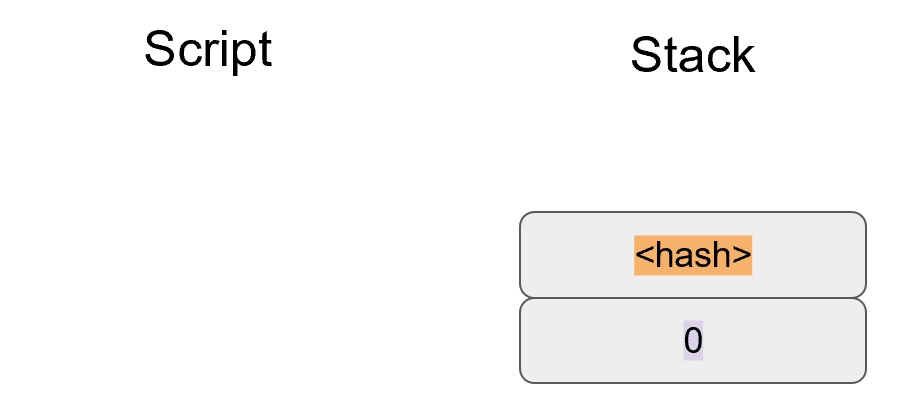
At this point, older nodes will stop as there are no more Script instructions to be processed.
Since the top element is non-zero, this will be counted as a valid Script.
This is very similar to p2sh (Chapter 8) in that older nodes cannot validate further.
Newer nodes, however, have a special Segwit rule much like the special rule for p2sh (see Chapter 8).
Recall that with p2sh, the exact Script sequence of <redeem script> OP_HASH160 <hash> OP_EQUAL trigger a special rule.
In the case of p2wpkh, the Script sequence is OP_0 <20-byte hash>.
When that Script sequence is encountered, the pubkey and signature from the Witness field and the 20-byte hash are added to the instruction set in exactly the same sequence as p2pkh.
Namely: <signature> <pubkey> OP_DUP OP_HASH160 <20-byte hash> OP_EQUALVERIFY OP_CHECKSIG.
Figure 13-7 shows the state that is encountered next:
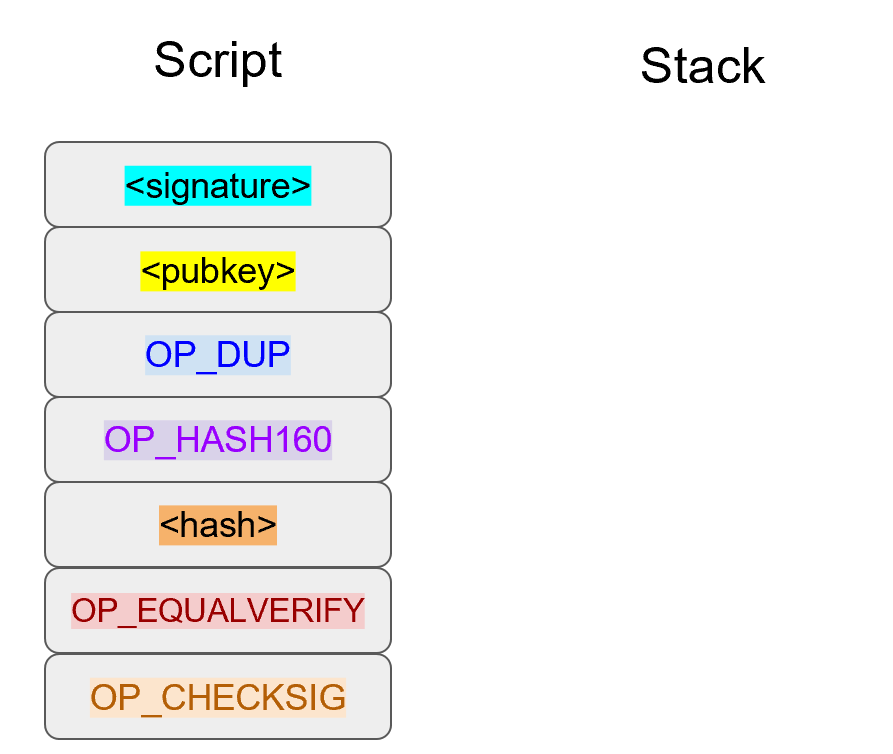
The rest of the processing of p2wpkh is the same as the processing of p2pkh as seen in Chapter 6.
The end state is a single 1 on the stack if and only if the 20-byte hash is the hash160 of the pubkey and the signature is valid (Figure 13-8):
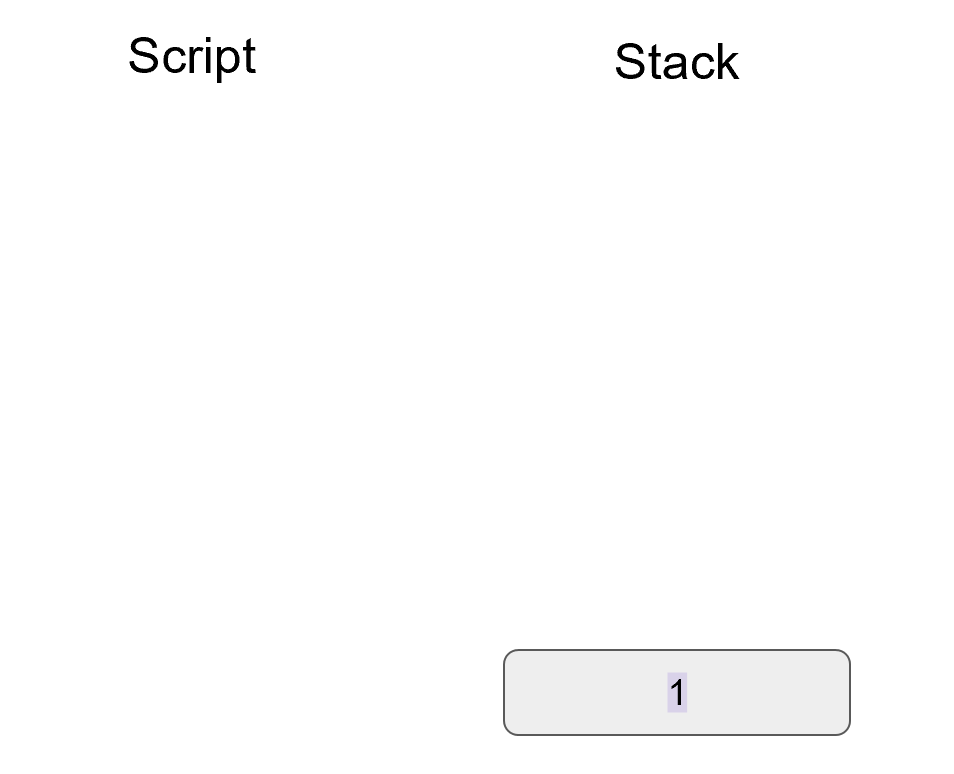
For an older node, processing stops at <20-byte hash> 0, as older nodes don’t know the special Segwit rule.
Only upgraded nodes do the rest of the validation, much like p2sh.
Note that less data is sent over the network to older nodes.
Also, nodes are given the option of not having to download (and hence not verify) transactions that are X blocks old if they don’t want to.
In a sense, the signature has been witnessed by a bunch of people and a node can choose to trust that this is valid instead of validating directly if it so chooses.
Furthermore, this is a special rule for Segwit Version 0.
Segwit Version 1 can have a completely different processing path.
<20-byte hash> 1 could be the special Script sequence that triggers a different rule.
Upgrades of Segwit can introduce Schnorr Signatures, Graftroot or even a different scripting system altogether like Simplicity.
Segwit gives us a clear upgrade path.
Software that understands how to validate Segwit Version X will validate such transactions, but software that isn’t aware of Segwit Version X simply processes only up to the point of the special rule.
P2wpkh is great, but unfortunately, this is a new type of Script and older wallets cannot send Bitcoins to p2wpkh ScriptPubKeys. P2wpkh uses a new address format called bech32, whose ScriptPubKeys older wallets don’t know how to create.
The Segwit authors found an ingenious way to make Segwit backwards compatible by using p2sh. We can “wrap” p2wpkh inside a p2sh. This is called “nested” Segwit as the Segwit Script is nested in a p2sh RedeemScript.
A p2sh-p2wpkh address is a normal p2sh address, but the RedeemScript is OP_0 <20-byte hash>, or the ScriptPubKey of p2wpkh.
As with p2wpkh, different transactions are sent to older nodes (Figure 13-9) versus newer nodes (Figure 13-10):
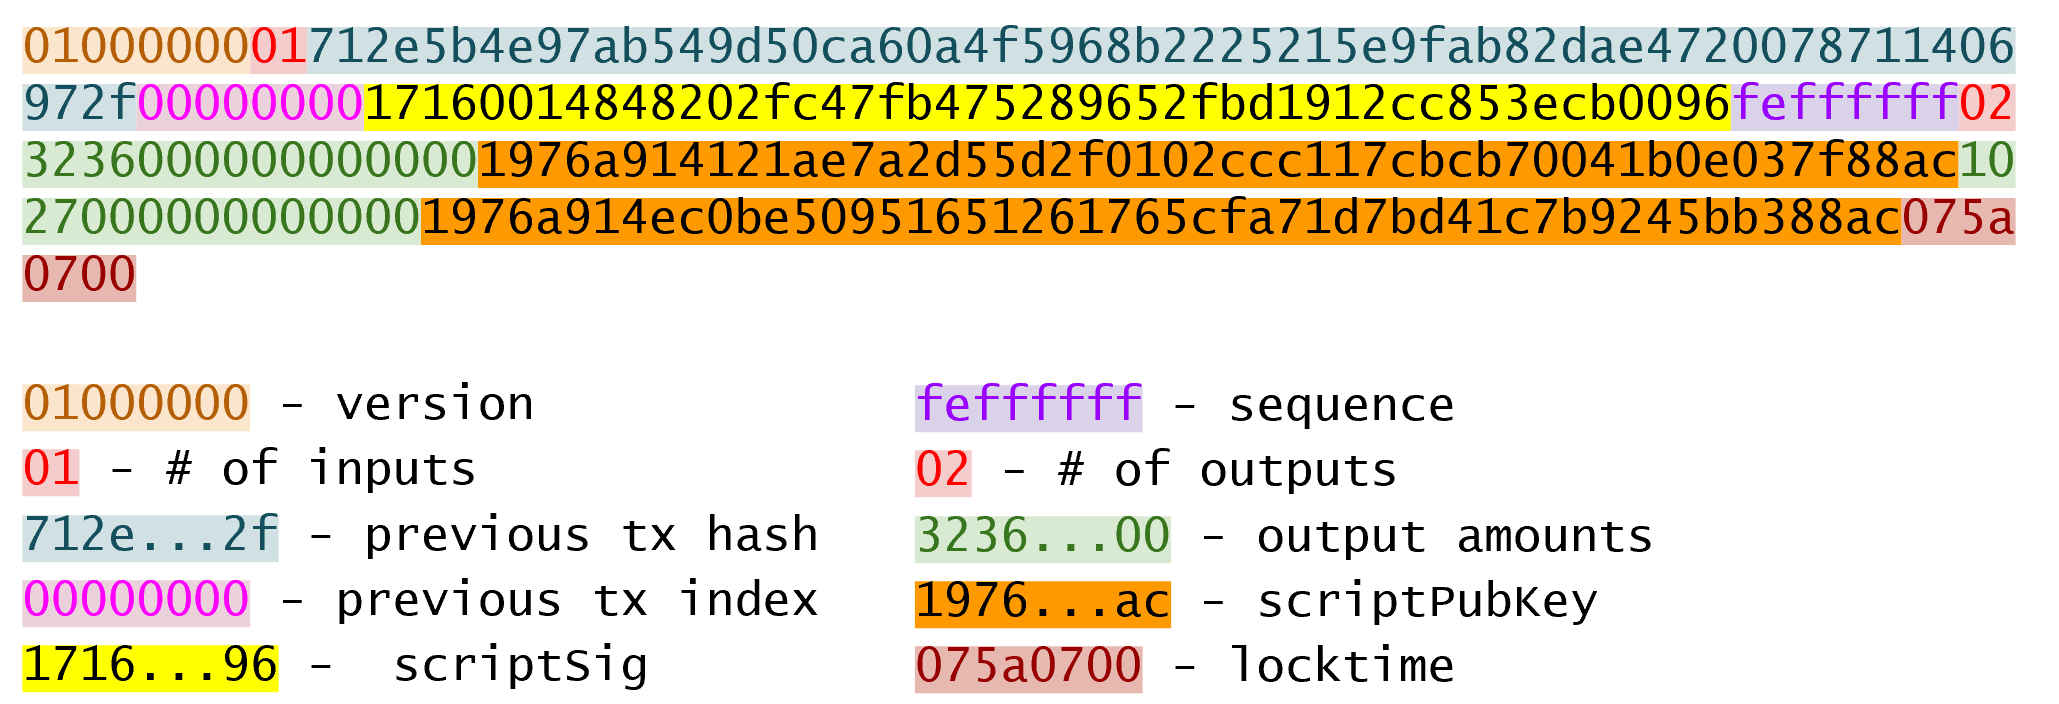
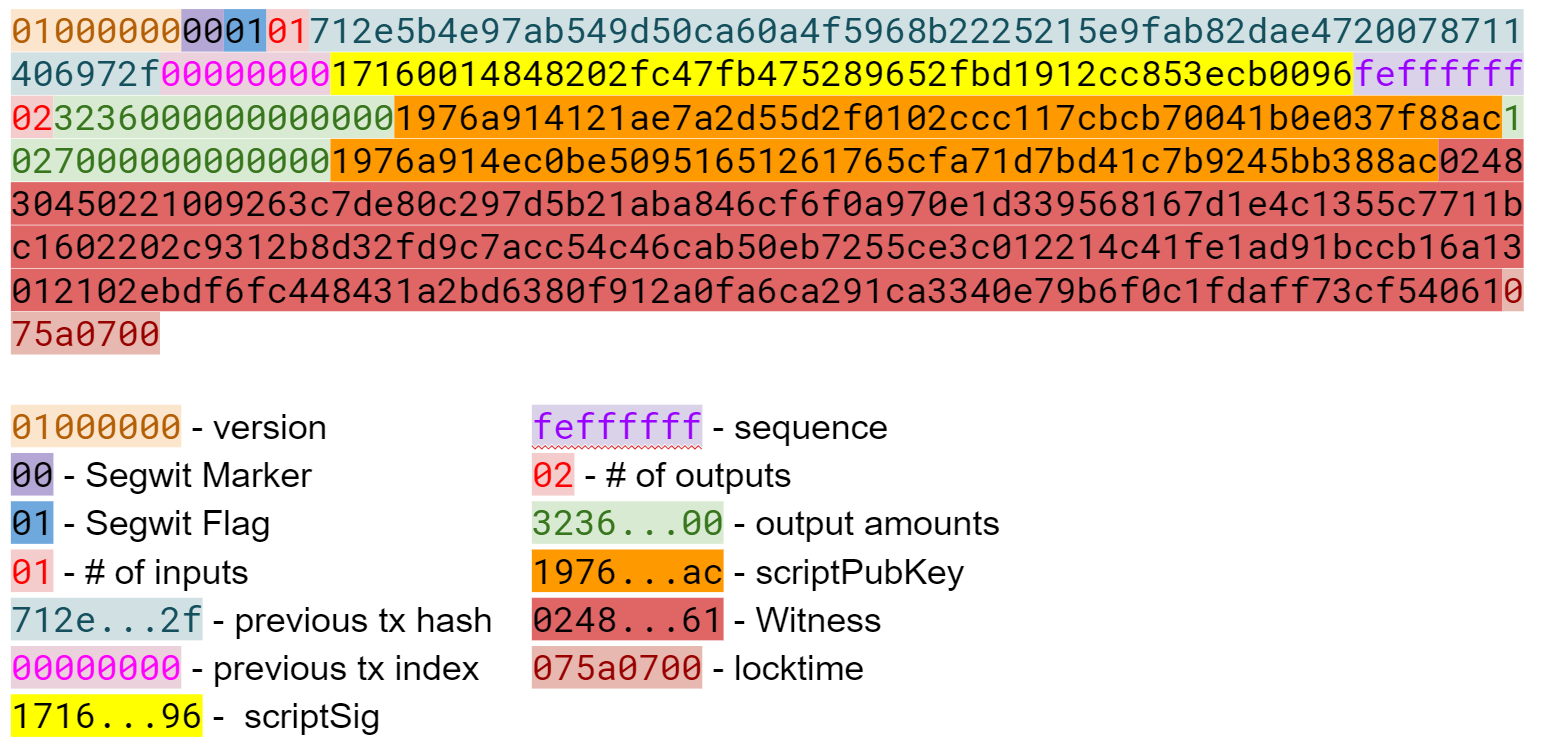
The difference versus p2wpkh is that the ScriptSig is no longer empty. The ScriptSig has a RedeemScript which is equal to the ScriptPubkey in p2wpkh. As this is a p2sh, the ScriptPubKey is the same as any other p2sh. The combined Script looks like Figure 13-11:
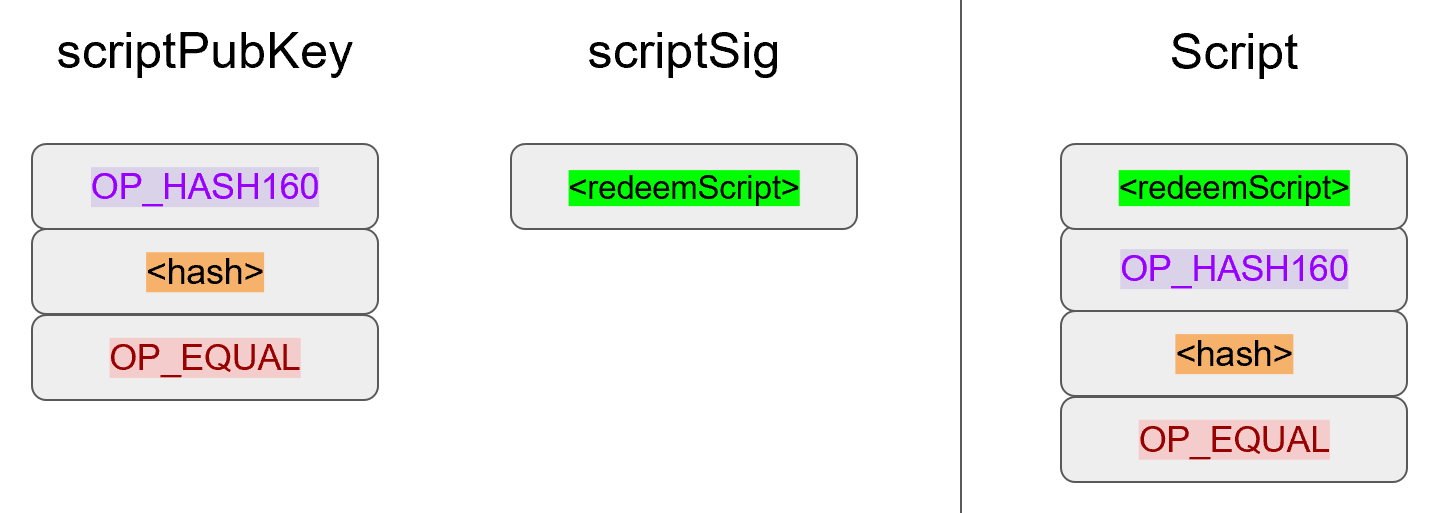
We start the Script evaluation like Figure 13-12:
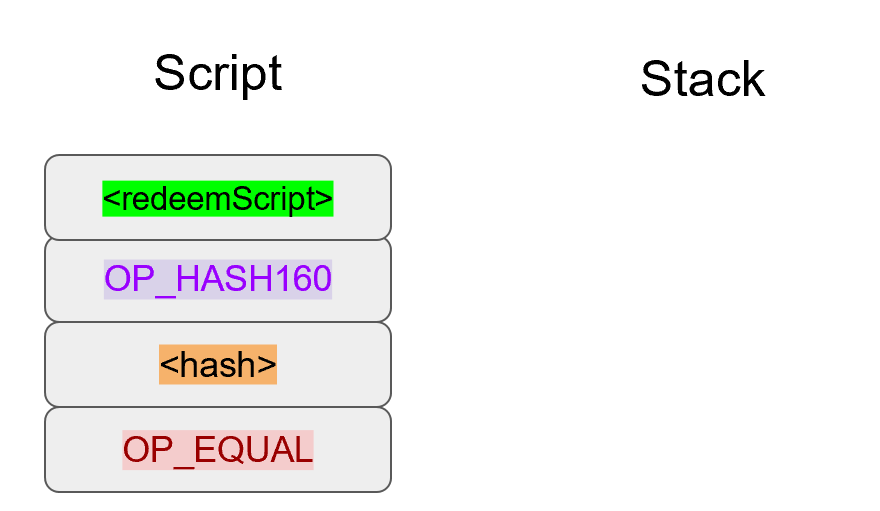
Notice that the instructions to be processed are exactly what triggers the p2sh Special rule. The RedeemScript goes on the stack (Figure 13-13):
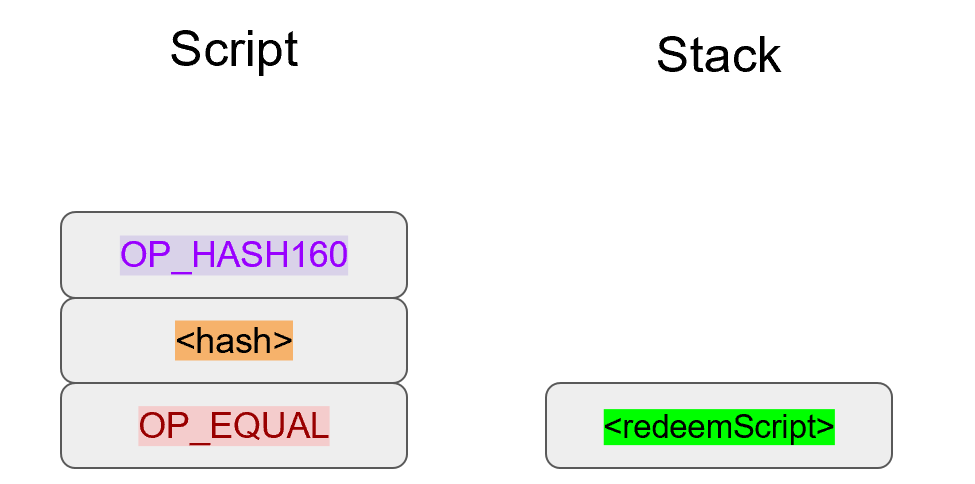
The OP_HASH160 will turn the RedeemScript’s hash (Figure 13-14):
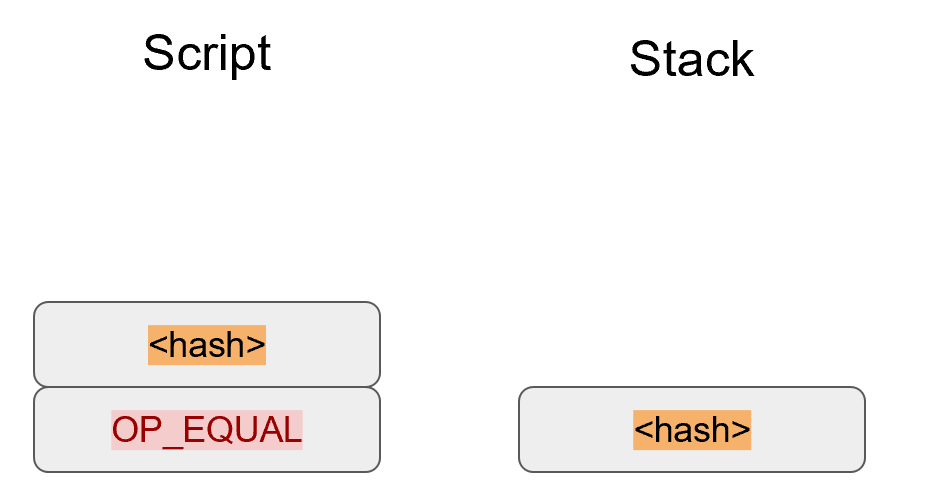
The hash will go on the stack and we then get to OP_EQUAL (Figure 13-15):
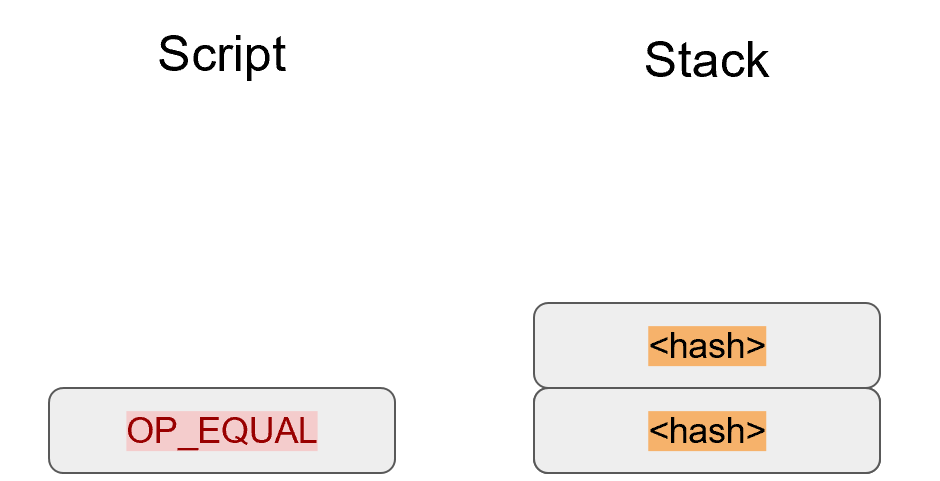
At this point, if the hashes are equal, pre-BIP0016 nodes will simply mark the input as valid as they are unaware of the p2sh validation rules.
However, post-BIP0016 nodes recognize the special Script sequence for p2sh, so the RedeemScript will then be evaluated as Script instructions.
The RedeemScript is OP_0 <20-byte hash>, which is the same as the ScriptPubKey for p2wpkh.
This makes the Script state look like Figure 13-16:
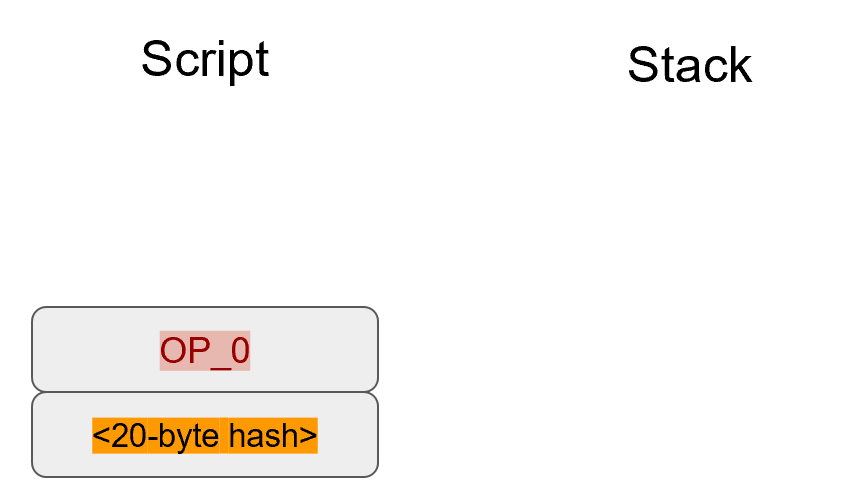
This should look familiar as this is the state that p2wpkh starts with.
After OP_0 and the 20-byte hash we are left with Figure 13-17:
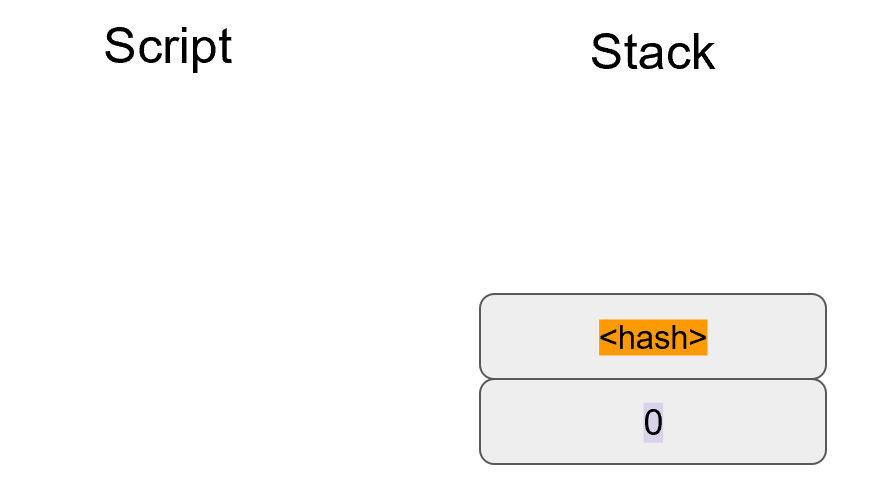
At this point, pre-Segwit nodes will mark this input as valid as they are unaware of the Segwit validation rules. However, post-Segwit nodes will recognize the special Script sequence for p2wpkh. The signature and pubkey from the Witness field along with the 20-byte hash will add the p2pkh instructions (Figure 13-18):
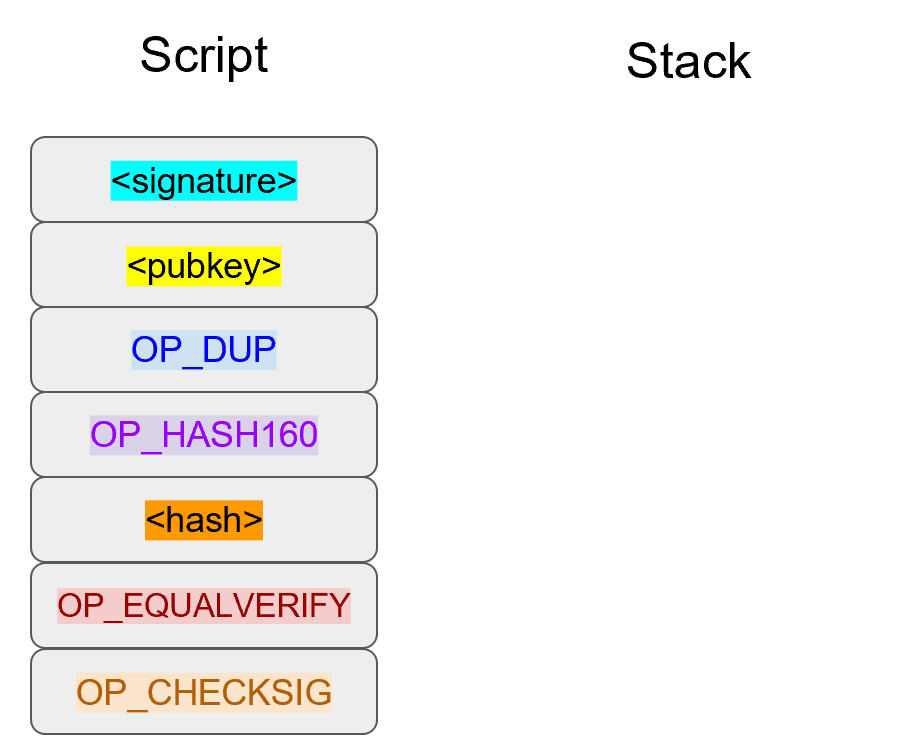
The rest of the processing is the same as p2pkh (Chapter 6). Assuming the signature and pubkey are valid, we are left with Figure 13-19:
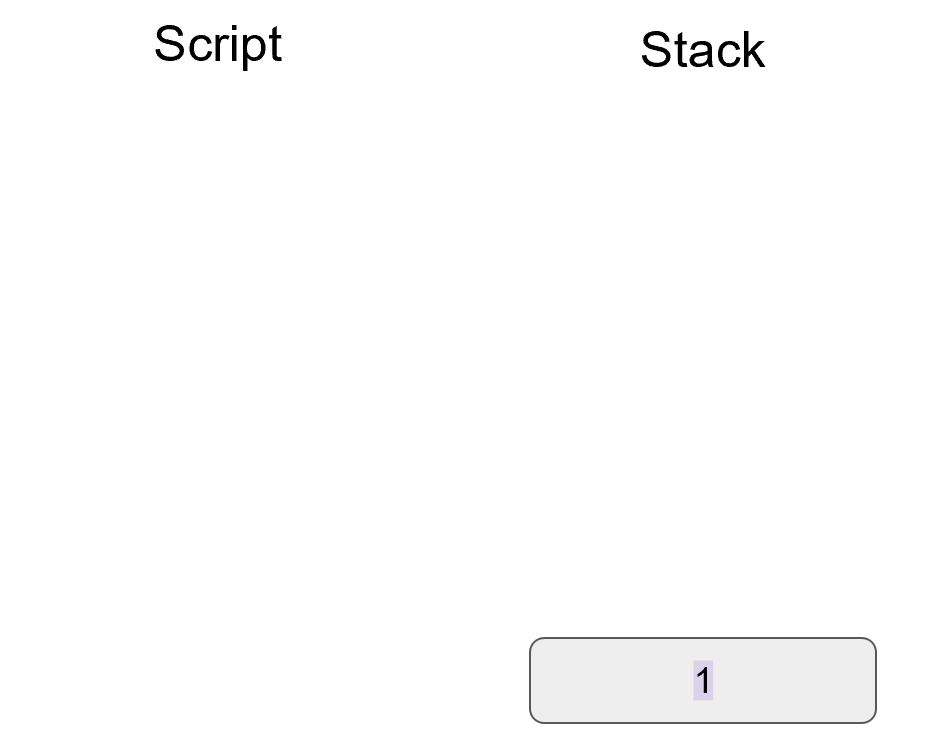
As you can see, a p2sh-p2wpkh transaction is backwards compatible all the way to before BIP0016. A node pre-BIP0016 would consider the Script valid once the RedeemScripts were equal and a post-BIP0016, pre-Segwit node would consider the Script valid at the 20-byte hash. Both would not do the full validation and would accept the transaction. A post-Segwit node would do the complete validation, including checking the signature and pubkey.
Detractors to Segwit have referred to Segwit outputs as “anyone can spend”. This would be true if the Bitcoin community rejected Segwit. In other words, if an economically significant part of the Bitcoin community refused to do the Segwit validation and actively split from the network by accepting a transaction that’s not Segwit valid, the outputs would have been anyone can spend. Due to a variety of economic incentives, Segwit was activated on the network, there was no network split, a lot of Bitcoins are now locked in Segwit outputs and Segwit transactions are validated per the soft-fork rules by the vast economic majority of nodes. We can now say confidently that the detractors were wrong.
The first change we’re going to make is to the Tx class where we need to mark whether the transaction is Segwit or not:
classTx:command=b'tx'def__init__(self,version,tx_ins,tx_outs,locktime,testnet=False,segwit=False):self.version=versionself.tx_ins=tx_insself.tx_outs=tx_outsself.locktime=locktimeself.testnet=testnetself.segwit=segwitself._hash_prevouts=Noneself._hash_sequence=Noneself._hash_outputs=None
Next, we change the parse method depending on the serialization we receive.
classTx:...@classmethoddefparse(cls,s,testnet=False):s.read(4)ifs.read(1)==b'\x00':parse_method=cls.parse_segwitelse:parse_method=cls.parse_legacys.seek(-5,1)returnparse_method(s,testnet=testnet)@classmethoddefparse_legacy(cls,s,testnet=False):version=little_endian_to_int(s.read(4))num_inputs=read_varint(s)inputs=[]for_inrange(num_inputs):inputs.append(TxIn.parse(s))num_outputs=read_varint(s)outputs=[]for_inrange(num_outputs):outputs.append(TxOut.parse(s))locktime=little_endian_to_int(s.read(4))returncls(version,inputs,outputs,locktime,testnet=testnet,segwit=False)
To determine whether we have a Segwit transaction or not, we look at the fifth byte. The first four are version, the fifth is the Segwit marker.
The fifth byte being 0 is how we tell that this transaction is Segwit (this is not fool-proof, but is what we’re going to use). We use different parsers depending on whether it’s Segwit.
Put the stream back to the position before we examined the first 5 bytes.
We’ve moved the old parse method to parse_legacy.
Here’s a parser for the Segwit serialization.
classTx:...@classmethoddefparse_segwit(cls,s,testnet=False):version=little_endian_to_int(s.read(4))marker=s.read(2)ifmarker!=b'\x00\x01':raiseRuntimeError('Not a segwit transaction {}'.format(marker))num_inputs=read_varint(s)inputs=[]for_inrange(num_inputs):inputs.append(TxIn.parse(s))num_outputs=read_varint(s)outputs=[]for_inrange(num_outputs):outputs.append(TxOut.parse(s))fortx_inininputs:num_items=read_varint(s)items=[]for_inrange(num_items):item_len=read_varint(s)ifitem_len==0:items.append(0)else:items.append(s.read(item_len))tx_in.witness=itemslocktime=little_endian_to_int(s.read(4))returncls(version,inputs,outputs,locktime,testnet=testnet,segwit=True)
There are two new fields, one of them is the Segwit marker.
The last new field is Witness, which contains items for each input.
We code the corresponding changes to the serialization methods:
classTx:...defserialize(self):ifself.segwit:returnself.serialize_segwit()else:returnself.serialize_legacy()defserialize_legacy(self):result=int_to_little_endian(self.version,4)result+=encode_varint(len(self.tx_ins))fortx_ininself.tx_ins:result+=tx_in.serialize()result+=encode_varint(len(self.tx_outs))fortx_outinself.tx_outs:result+=tx_out.serialize()result+=int_to_little_endian(self.locktime,4)returnresultdefserialize_segwit(self):result=int_to_little_endian(self.version,4)result+=b'\x00\x01'result+=encode_varint(len(self.tx_ins))fortx_ininself.tx_ins:result+=tx_in.serialize()result+=encode_varint(len(self.tx_outs))fortx_outinself.tx_outs:result+=tx_out.serialize()fortx_ininself.tx_ins:result+=int_to_little_endian(len(tx_in.witness),1)foritemintx_in.witness:iftype(item)==int:result+=int_to_little_endian(item,1)else:result+=encode_varint(len(item))+itemresult+=int_to_little_endian(self.locktime,4)returnresult
What used to be called serialize is now serialize_legacy.
The Segwit serialization adds the markers.
The Witness is serialized at the end.
In addition we have to change the hash method to use the legacy serialization, even for Segwit transactions as that will keep the transaction ID stable.
classTx:...defhash(self):'''Binary hash of the legacy serialization'''returnhash256(self.serialize_legacy())[::-1]
The verify_input method requires a different z for Segwit transactions.
The Segwit transaction signature hash calculation is specified in BIP0143.
In addition, the Witness field is passed through to the Script evaluation engine.
classTx:...defverify_input(self,input_index):tx_in=self.tx_ins[input_index]script_pubkey=tx_in.script_pubkey(testnet=self.testnet)ifscript_pubkey.is_p2sh_script_pubkey():instruction=tx_in.script_sig.instructions[-1]raw_redeem=int_to_little_endian(len(instruction),1)+instructionredeem_script=Script.parse(BytesIO(raw_redeem))ifredeem_script.is_p2wpkh_script_pubkey():z=self.sig_hash_bip143(input_index,redeem_script)witness=tx_in.witnesselse:z=self.sig_hash(input_index,redeem_script)witness=Noneelse:ifscript_pubkey.is_p2wpkh_script_pubkey():z=self.sig_hash_bip143(input_index)witness=tx_in.witnesselse:z=self.sig_hash(input_index)witness=Nonecombined_script=tx_in.script_sig+tx_in.script_pubkey(self.testnet)returncombined_script.evaluate(z,witness)
This handles the p2sh-p2wpkh case.
BIP0143 signature hash generation code is in tx.py of this chapter’s code.
This handles the p2wpkh case.
The Witness passes through to the evaluation engine so that p2wpkh can construct the right instructions.
We also define what a p2wpkh Script looks like in script.py.
defp2wpkh_script(h160):'''Takes a hash160 and returns the p2wpkh ScriptPubKey'''returnScript([0x00,h160])...defis_p2wpkh_script_pubkey(self):returnlen(self.instructions)==2andself.instructions[0]==0x00\andtype(self.instructions[1])==bytesandlen(self.instructions[1])==20
This is OP_0 <20-byte-hash>.
This checks if the current script is a p2wpkh ScriptPubKey.
Lastly, we need to implement the special rule in the evaluate method.
classScript:...defevaluate(self,z,witness):...whilelen(instructions)>0:...else:stack.append(instruction)...iflen(stack)==2andstack[0]==b''andlen(stack[1])==20:h160=stack.pop()stack.pop()instructions.extend(witness)instructions.extend(p2pkh_script(h160).instructions)
This is where we execute Witness Program version 0 for p2wpkh. We make a p2pkh combined Script from the 20-byte hash, signature and pubkey and evaluate.
While p2wpkh takes care of a major use case, we need something more flexible if we want more complicated Scripts like multisig. This is where p2wsh comes in. Pay-to-witness-script-hash is like p2sh, but with all the ScriptSig data in the Witness field instead.
As with p2wpkh, we send different data to pre-BIP0141 software (Figure 13-20) vs post-BIP0141 software (Figure 13-21):
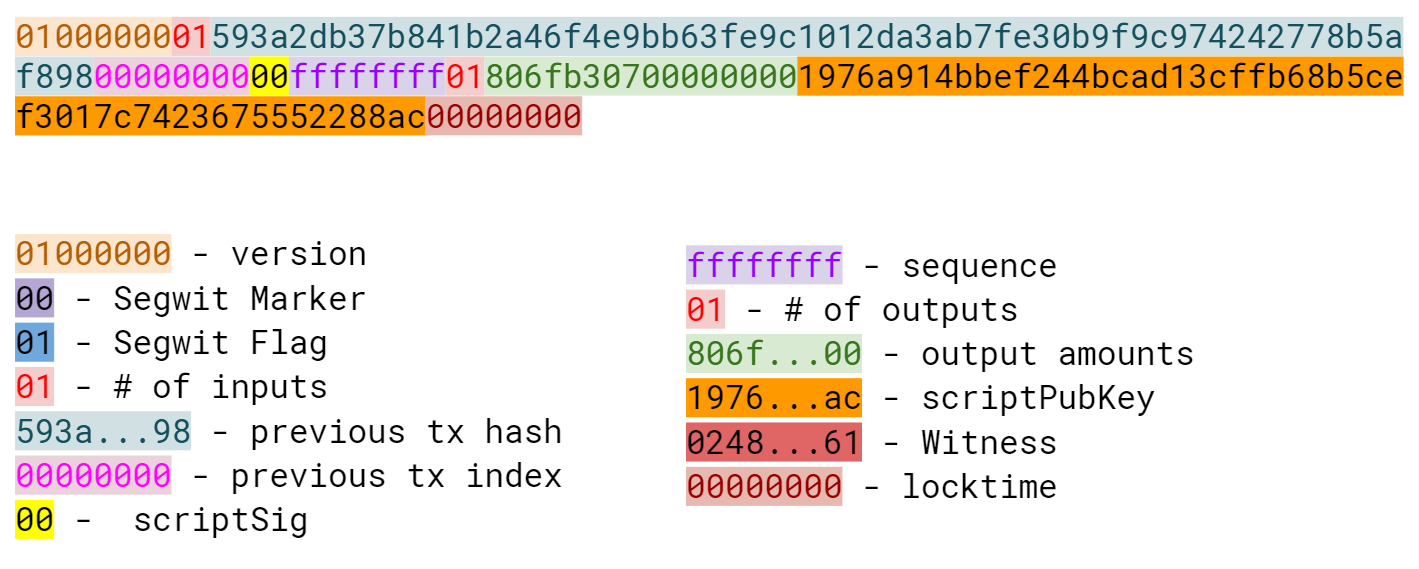
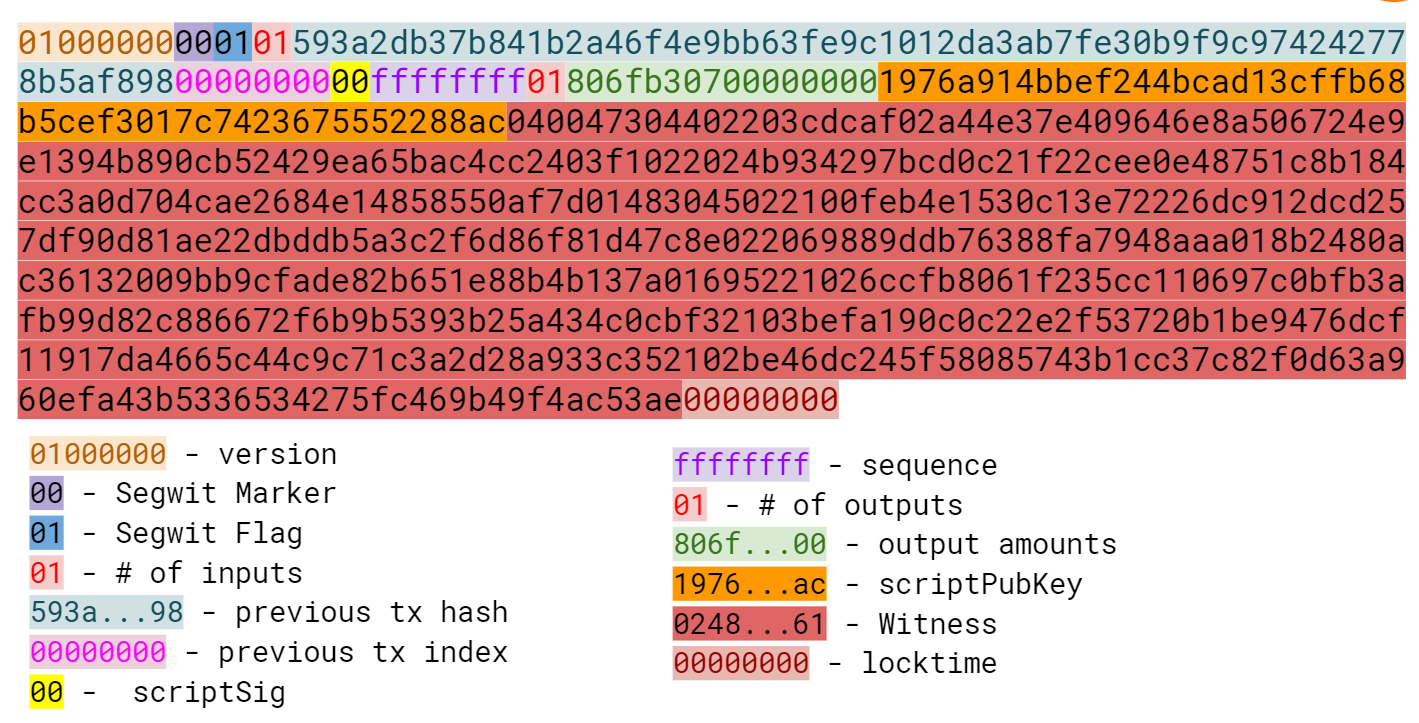
The ScriptPubKey for a p2wsh is OP_0 <32-byte hash>.
This sequence triggers another special rule.
The ScriptSig, as with p2wpkh, is empty.
When p2wsh is being spent, the combined Script looks like Figure 13-22:
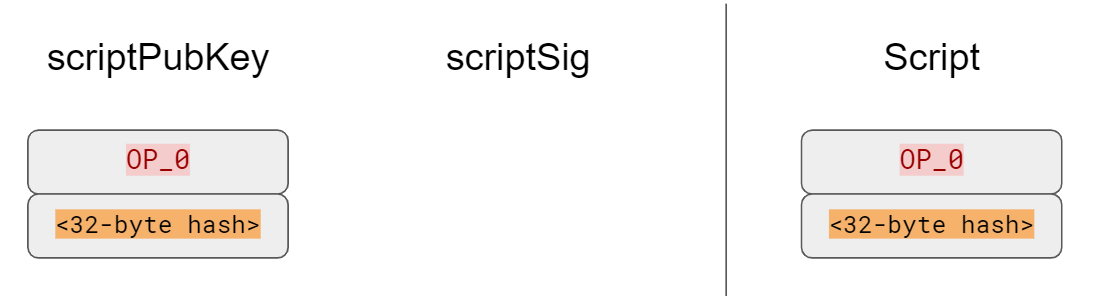
The processing of this Script starts similarly to p2wpkh (Figure 13-23 and 13-24):
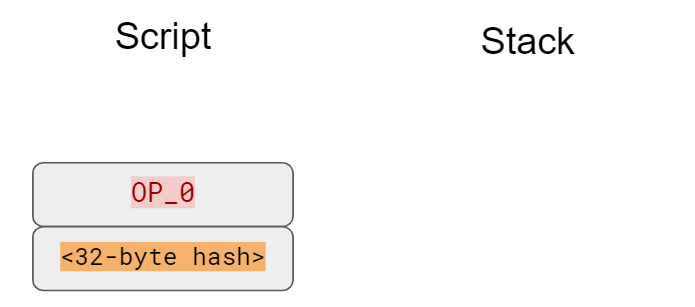
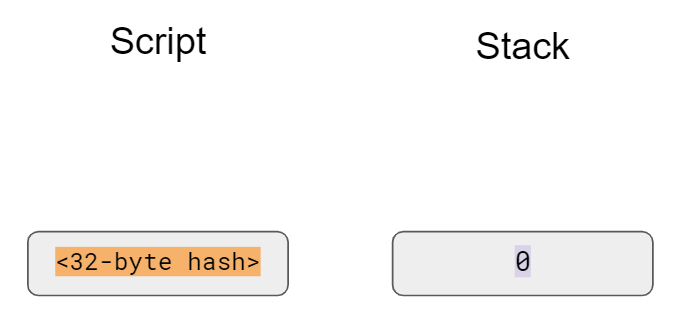
The 32-byte hash is an element, so is pushed to the stack (Figure 13-25):
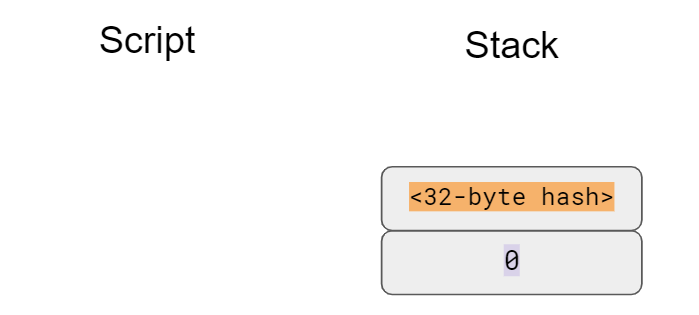
As with p2wpkh, older nodes will stop as there are no more Script instructions to be processed. Newer nodes will recognize the special sequence and do additional validation by looking at the Witness field.
The Witness field for p2wsh in our case is a 2-of-3 multisig (Figure 13-26):
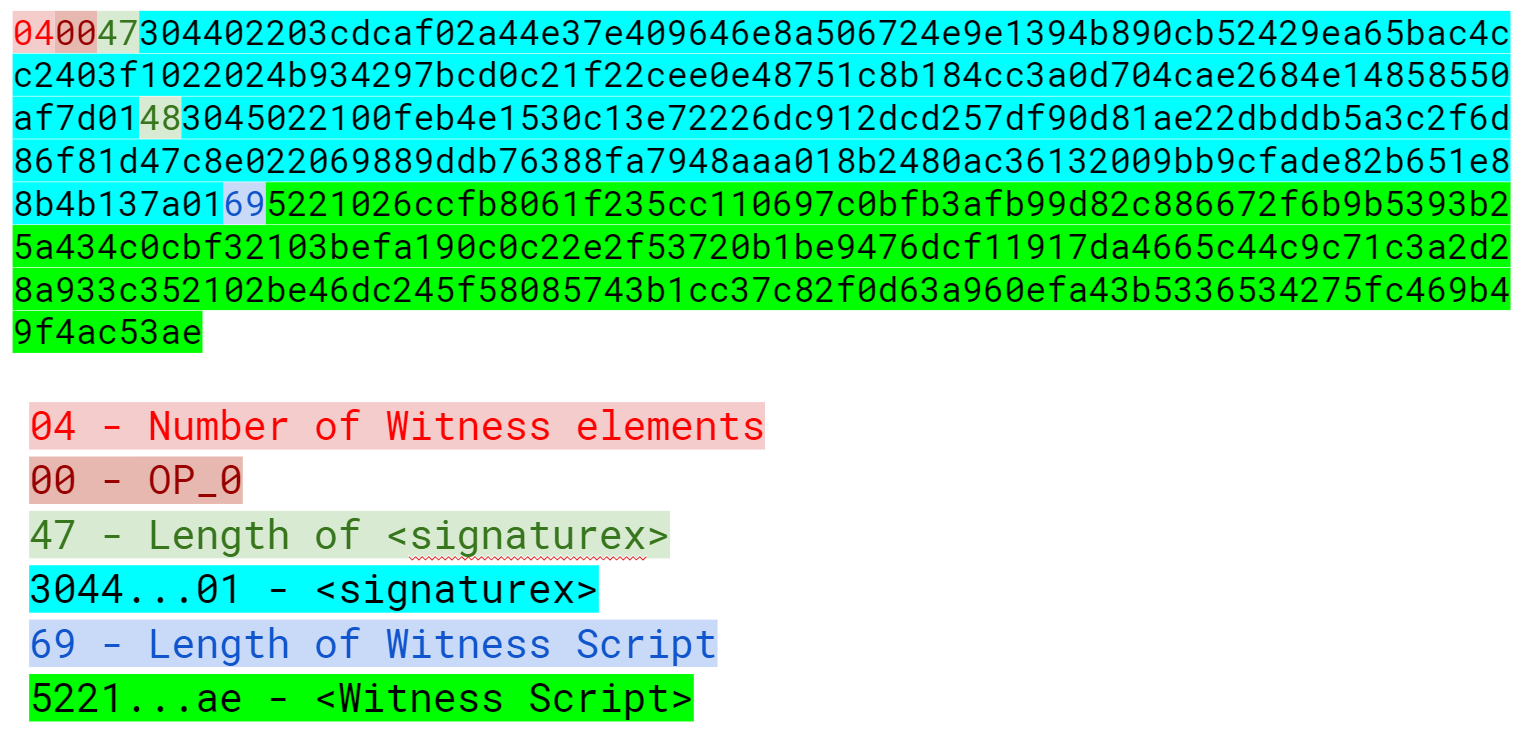
The last item of the Witness is called the WitnessScript and must sha256 to the 32-byte hash from the ScriptPubKey. Note this is sha256, not hash256. Once the WitnessScript is validated by having the same hash value, the WitnessScript is interpreted as Script instructions put into the instruction set. The Witness Script looks like Figure 13-27:

The rest of the Witness field is put on top to produce this instruction set (Figure 13-28):
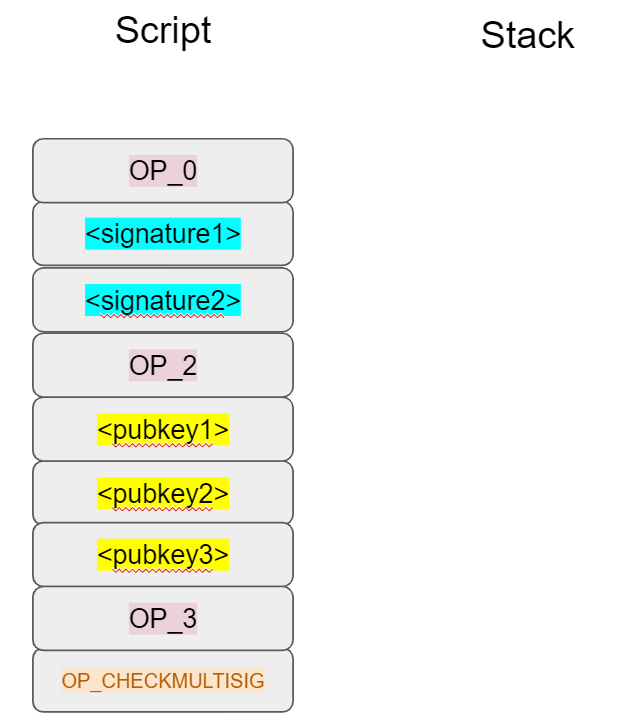
As you can see, this is a 2-of-3 multisig much like what was explored in Chapter 8 (Figure 13-29).
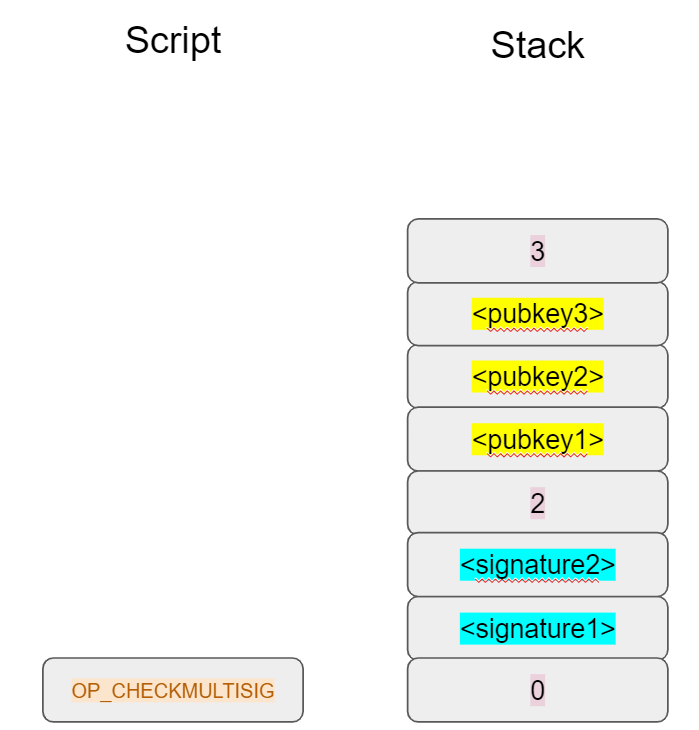
If the signatures are valid, we end like Figure 13-30:
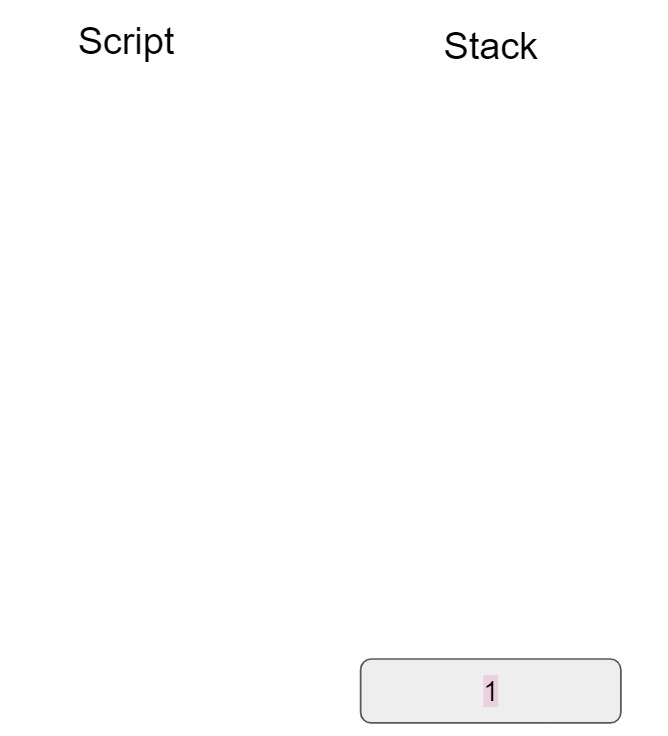
The WitnessScript is very similar to the RedeemScript in that the sha256 of the serialization is addressed in the ScriptPubKey, but only revealed when being spent. Once the sha256 of the WitnessScript is found to be the same as the 32-byte hash, the WitnessScript is interpreted as Script instructions and added to the instruction set. The rest of the Witness is then put on the instruction set as well, producing the final set of instructions to be evaluated. p2wsh is particularly important as unmalleable multisig transactions are required for creating bi-directional Payment Channels for the Lightning Network.
Like p2sh-p2wpkh, p2sh-p2wsh is a way to make p2wsh backward-compatible. These transactions are sent to older nodes (Figure 13-31) vs newer nodes (Figure 13-32):
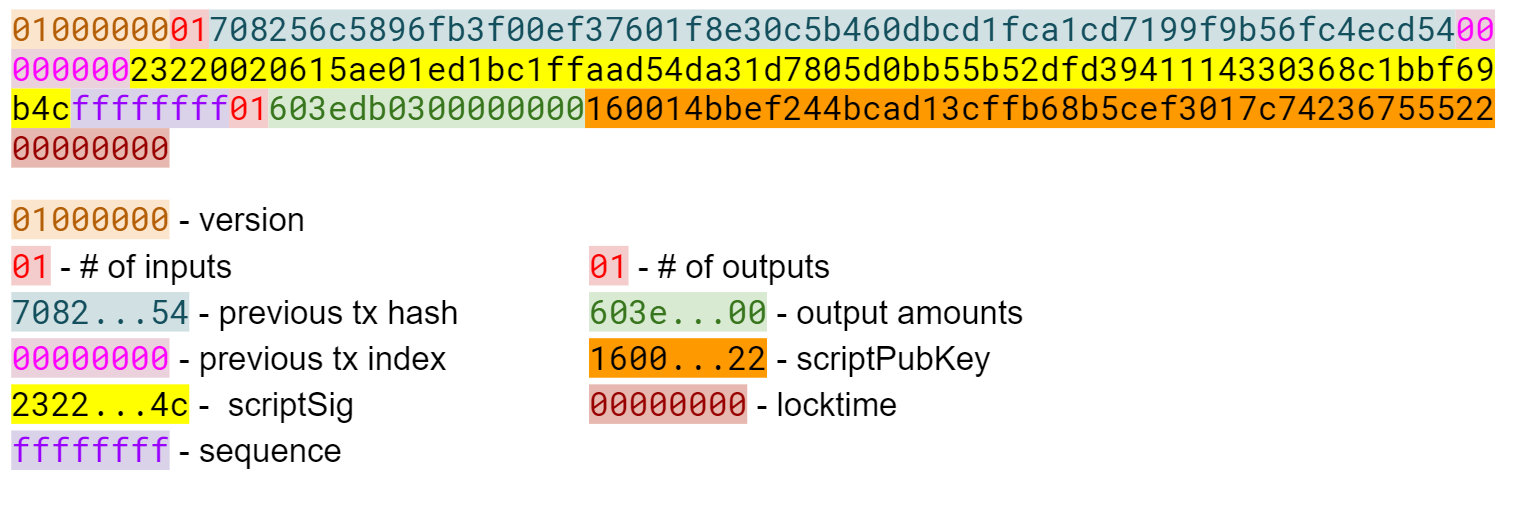
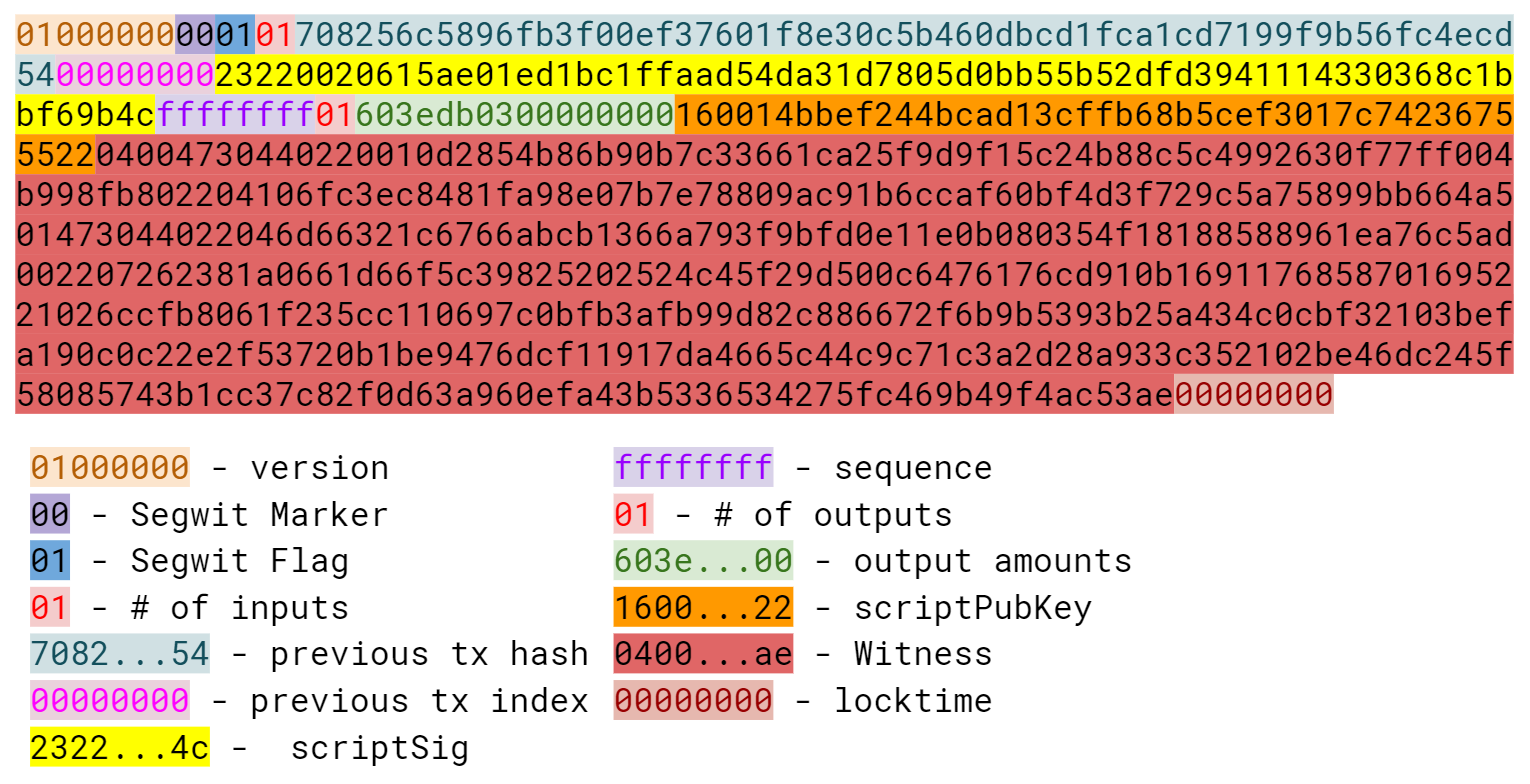
As with p2sh-p2wpkh, the ScriptPubKey is indistinguishable from any other p2sh and the ScriptSig is only the RedeemScript (Figure 13-33):
We start the p2sh-p2wsh in exactly the same way that p2sh-p2wpkh starts (Figure 13-34).
The RedeemScript is pushed to the stack (Figure 13-35):
The OP_HASH160 will return the RedeemScript’s hash (Figure 13-36):
The hash is pushed to the stack and we then get to OP_EQUAL (Figure 13-37):
As with p2sh-p2wpkh, if the hashes are equal, pre-BIP0016 nodes will mark the input as valid as they are unaware of the p2sh validation rules.
However, post-BIP0016 nodes will recognize the special Script sequence for p2sh, so the RedeemScript will be interpreted as new Script instructions.
The RedeemScript is OP_0 <32-byte hash>, which is the same as the ScriptPubKey for p2wsh (Figure 13-38).

This makes the Script state look like Figure 13-39:
Of course, this is the exact same starting state as p2wsh (Figure 13-40).
The 32-byte hash is an element, so is pushed to the stack (Figure 13-41):
At this point, pre-Segwit nodes will mark this input as valid as they are unaware of the Segwit validation rules. However, post-Segwit nodes will recognize the special Script sequence for p2wsh. The Witness field (Figure 13-42) contains the Witness Script (Figure 13-43). The sha256 of the WitnessScript is checked against 32-byte hash and if equal, the WitnessScript is interpreted as Script and put into the instruction set (Figure 13-44):
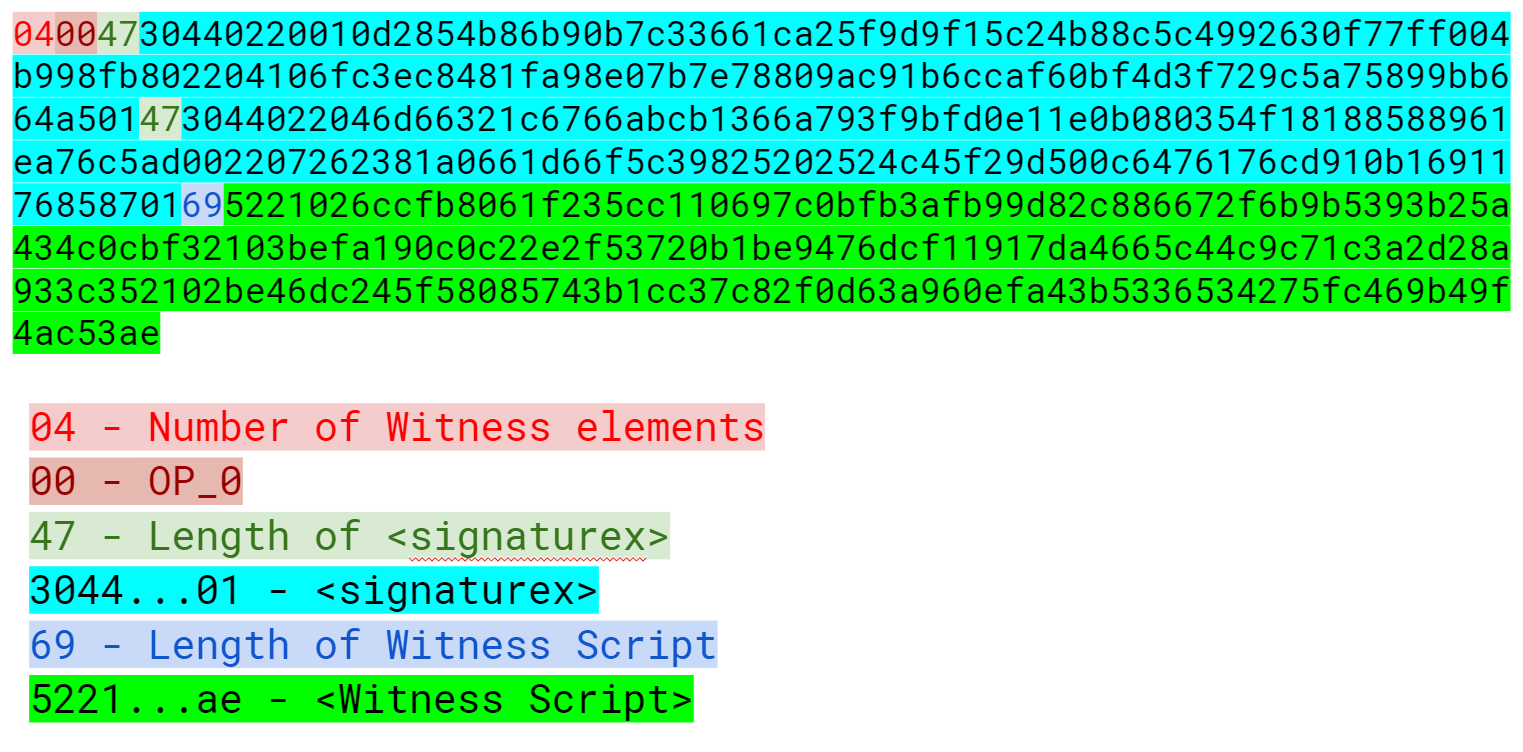
The Witness Script is a 2-of-3 multisig which is put into the instruction set (Figure 13-44):
As you can see, this is a 2-of-3 multisig as in Chapter 8. If the signatures are valid, we end like Figure 13-45:
This makes p2wsh backwards compatible, allowing older wallets to send to p2sh ScriptPubKeys which they can handle.
The parsing and serialization are exactly the same as before.
The main changes have to do with verify_input in tx.py and evaluate in script.py.
classTx:...defverify_input(self,input_index):tx_in=self.tx_ins[input_index]script_pubkey=tx_in.script_pubkey(testnet=self.testnet)ifscript_pubkey.is_p2sh_script_pubkey():instruction=tx_in.script_sig.instructions[-1]raw_redeem=int_to_little_endian(len(instruction),1)+instructionredeem_script=Script.parse(BytesIO(raw_redeem))ifredeem_script.is_p2wpkh_script_pubkey():z=self.sig_hash_bip143(input_index,redeem_script)witness=tx_in.witnesselifredeem_script.is_p2wsh_script_pubkey():instruction=tx_in.witness[-1]raw_witness=encode_varint(len(instruction))+instructionwitness_script=Script.parse(BytesIO(raw_witness))z=self.sig_hash_bip143(input_index,witness_script=witness_script)witness=tx_in.witnesselse:z=self.sig_hash(input_index,redeem_script)witness=Noneelse:ifscript_pubkey.is_p2wpkh_script_pubkey():z=self.sig_hash_bip143(input_index)witness=tx_in.witnesselifscript_pubkey.is_p2wsh_script_pubkey():instruction=tx_in.witness[-1]raw_witness=encode_varint(len(instruction))+instructionwitness_script=Script.parse(BytesIO(raw_witness))z=self.sig_hash_bip143(input_index,witness_script=witness_script)witness=tx_in.witnesselse:z=self.sig_hash(input_index)witness=Nonecombined_script=tx_in.script_sig+tx_in.script_pubkey(self.testnet)returncombined_script.evaluate(z,witness)
This takes care of p2sh-p2wsh
This takes care of p2wsh
We code a way to identify p2wsh in script.py:
defp2wsh_script(h256):'''Takes a hash160 and returns the p2wsh ScriptPubKey'''returnScript([0x00,h256])...classScript:...defis_p2wsh_script_pubkey(self):returnlen(self.instructions)==2andself.instructions[0]==0x00\andtype(self.instructions[1])==bytesandlen(self.instructions[1])==32
OP_0 <32-byte script> is what we expect
Lastly, we handle the special rule for p2wsh:
classScript:...defevaluate(self,z,witness):...whilelen(instructions)>0:...else:stack.append(instruction)...iflen(stack)==2andstack[0]==b''andlen(stack[1])==32:s256=stack.pop()stack.pop()instructions.extend(witness[:-1])witness_script=witness[-1]ifs256!=sha256(witness_script):('bad sha256 {} vs {}'.format(s256.hex(),sha256(witness_script).hex()))returnFalsestream=BytesIO(encode_varint(len(witness_script))+witness_script)witness_script_instructions=Script.parse(stream).instructionsinstructions.extend(witness_script_instructions)
The top element is the sha256 hash of the WitnessScript.
The second element is the Witness version, 0.
Everything but the WitnessScript is added to the instruction set.
The WitnessScript is the last item of the Witness.
The WitnessScript must hash to the sha256 that was in the stack.
Parse the WitnessScript and add to the instruction set.
Other improvements to Segwit include fixing the quadratic hashing problem through a different calculation of the signature hash.
A lot of the calculations for signature hash, or z, can be reused instead of requiring a new hash256 hash for each input.
The signature hash calculation is detailed in BIP0143 and can be seen in code-ch13/tx.py.
Another improvement is that by policy, uncompressed SEC pubkeys are now forbidden and only compressed SEC pubkeys are used for Segwit, saving space.
We’ve now covered the details of Segwit as a taste of what’s now possible. The next chapter will cover next steps that you can take on your Bitcoin developer journey.
If you’ve made it this far, congratulations! You’ve learned a lot about Bitcoin’s inner workings and hopefully, you are inspired to learn a lot more. This book only scratches the surface and there’s quite a bit more to learn. In this chapter, we’ll go through what other things you can learn, how to bootstrap your career as a Bitcoin developer and ways to contribute to the community.
Creating a wallet is a difficult task because securing private keys is very difficult. That said, there are a bunch of standards for creating wallets that can help.
For privacy purposes, reusing addresses is very bad (see Chapter 7). That means we need to create lots of addresses. Unfortunately, storing a different secret for each address generated can become a security and backup problem. How do you back them all up in a secure way? Do you generate a ton of secrets and then back them up? What if you run out of secrets? How do you back them up again? What system can you use to ensure that the backups are current?
To combat this problem, Armory, an early Bitcoin wallet, first implemented deterministic wallets. The idea of a deterministic wallet is that you can generate one seed and create lots and lots of different addresses with that one seed. The Armory style deterministic wallets were great, except people wanted some grouping of addresses so the Hierarchical Deterministic wallet standard or BIP0032 was born. BIP0032 wallets have multiple layers and keys, each with a unique derivation path. The specifications and test vectors are defined in the BIP0032 standard, so implementing your own HD wallet on testnet is a great way to learn.
Additionally, BIP0044 defines what each layer of the BIP0032 hierarchy can mean and the best practices for using a single HD seed to store coins from a lot of different cryptocurrencies. Implementing BIP0044 can also be a way to understand the HD wallet infrastructure a lot better. While many wallets (Trezor, Coinomi, etc) implement both BIP0032 and BIP0044, some wallets ignore BIP0044 altogether and use their own BIP0032 hierarchy (Electrum and Edge being two).
Writing down and transcribing a 256-bit seed is a pain and fraught with errors. To combat this, BIP0039 is a way to encode the seed into a bunch of English words. There are 2048 possible words, or 211, which means that each word encodes 11 bits of the seed. The standard defines exactly how the mnemonic backup gets translated to a BIP0032 seed. BIP0039 along with BIP0032 and BIP0044 is how most wallets implement backup and restoration. Writing a testnet wallet that implements BIP0039 is another good way to get a taste for Bitcoin development.
Payment Channels are the atomic unit of the Lightning Network and learning how they work is a good next step. There are many ways to implement Payment Channels, but the BOLT standard is the specification that lightning nodes use. The specifications are in progress as of this writing and are available at:
A large part of the Bitcoin ethic is in contributing back to the community. The main way you can do that is through open source projects. There are almost too many to list, but here’s a sample:
https://github.com/bitcoin/bitcoin - Bitcoin Core, or the reference client
https://github.com/libbitcoin/libbitcoin - An alternate implementation of Bitcoin in C++,
https://github.com/btcsuite/btcd - A Golang-based implementation of Bitcoin
https://github.com/bcoin-org/bcoin - A Javascript-based implementation of Bitcoin, maintained by purse.io
https://github.com/richardkiss/pycoin - pycoin, a Python library for Bitcoin
https://github.com/bitcoinj/bitcoinj - BitcoinJ, a Java library for Bitcoin
https://github.com/bitcoinjs/bitcoinjs-lib - BitcoinJS, a Javascript library for Bitcoin
https://github.com/btcpayserver/btcpayserver - BTCPay, a bitcoin payment processing engine written in C#
Contributing can be very beneficial for a lot of reasons, including future employment opportunities, learning, getting good business ideas and so on.
If at this point, you’re still wondering what projects would be beneficial for you, what follows are some suggestions.
It’s hard to understate the importance of security in Bitcoin. Writing a wallet even on testnet will help you understand the various considerations that go into creating a wallet. UI, backups, address books and transaction histories are just some of the things that you have to deal with when creating a wallet. As this is the most popular application of Bitcoin, creating a wallet will give you a lot of insight into the needs of users.
A more ambitious project would be to write your own block explorer. The key to making your own block explorer is to store the blockchain data in an easy-to-access fashion. Using a traditional database like Postgres or MySQL may be useful here. As Bitcoin Core does not have address indexes, adding one will make it possible for you to allow lookups of UTXOs and past transactions by address, which is what most users desire.
A Bitcoin-based shop is another project that helps you learn. This is particularly appropriate for web developers as they typically know how to create a web application. A web application with a Bitcoin backend can be a powerful way to not have third party dependencies for payment. Once again, it’s advised that you start on testnet and use the cryptographically secure libraries that are available to hook up the plumbing on payments.
A utility library like the one built in this book is another great way to learn more about Bitcoin. Writing the BIP0143 serialization for the signature hash of Segwit, for example, can be instructive in getting used to protocol programming. Porting the code from this book to another language would also be a great learning tool.
If you are interested in getting more in-depth in this industry, there are lots of great opportunities for developers. The key to proving that you know something is to have a portfolio of projects that you’ve done on your own. Contributing to an existing open source project or making your own project will help you get noticed by companies. In addition, programming against the API of any particular company is a great way to get an interview!
Generally, local work is going to be a lot easier to get as companies don’t like the risk profile of remote workers. Go to local meetups, network with people that you meet there and the local Bitcoin jobs will be a lot easier to come by.
Similarly, remote work requires that you put yourself out there to be noticed. Besides open source contributions, go to conferences, network and create technical content (YouTube videos, blog posts, etc). These will help quite a bit in getting noticed and getting a remote job.
I am excited that you’ve made it to the end. If you are so inclined, please send me notes about your progress as I would love to hear from you! I can be reached at jimmy@programmingblockchain.com.
Write the corresponding method __ne__ which checks if two FieldElement objects are not equal to each other.
classFieldElement:...def__ne__(self,other):# this should be the inverse of the == operatorreturnnot(self==other)
Solve these problems in F57 (assume all +’s here are +f and -`s here -f)
44+33
9-29
17+42+49
52-30-38
>>>prime=57>>>((44+33)%prime)20>>>((9-29)%prime)37>>>((17+42+49)%prime)51>>>((52-30-38)%prime)41
Write the corresponding __sub__ method which defines the subtraction of two FieldElement objects.
classFieldElement:...def__sub__(self,other):ifself.prime!=other.prime:raiseTypeError('Cannot subtract two numbers in different Fields')# self.num and other.num are the actual values# self.prime is what we need to mod againstnum=(self.num-other.num)%self.prime# We return an element of the same classreturnself.__class__(num,self.prime)
Solve the following equations in F97 (again, assume ⋅ and exponentiation are field versions):
95⋅45⋅31
17⋅13⋅19⋅44
127⋅7749
>>>prime=97>>>(95*45*31%prime)23>>>(17*13*19*44%prime)68>>>(12**7*77**49%prime)63
For k = 1, 3, 7, 13, 18, what is this set in F19?
{k⋅0, k⋅1, k⋅2, k⋅3, … k⋅18}
Do you notice anything about these sets?
>>>prime=19>>>forkin(1,3,7,13,18):...([k*i%primeforiinrange(prime)])[0,1,2,3,4,5,6,7,8,9,10,11,12,13,14,15,16,17,18][0,3,6,9,12,15,18,2,5,8,11,14,17,1,4,7,10,13,16][0,7,14,2,9,16,4,11,18,6,13,1,8,15,3,10,17,5,12][0,13,7,1,14,8,2,15,9,3,16,10,4,17,11,5,18,12,6][0,18,17,16,15,14,13,12,11,10,9,8,7,6,5,4,3,2,1]>>>forkin(1,3,7,13,18):...(sorted([k*i%primeforiinrange(prime)]))[0,1,2,3,4,5,6,7,8,9,10,11,12,13,14,15,16,17,18][0,1,2,3,4,5,6,7,8,9,10,11,12,13,14,15,16,17,18][0,1,2,3,4,5,6,7,8,9,10,11,12,13,14,15,16,17,18][0,1,2,3,4,5,6,7,8,9,10,11,12,13,14,15,16,17,18][0,1,2,3,4,5,6,7,8,9,10,11,12,13,14,15,16,17,18]
When sorted, the results are always the same set.
Write the corresponding __mul__ method which defines the multiplication of two Finite Field elements.
classFieldElement:...def__mul__(self,other):ifself.prime!=other.prime:raiseTypeError('Cannot multiply two numbers in different Fields')# self.num and other.num are the actual values# self.prime is what we need to mod againstnum=(self.num*other.num)%self.prime# We return an element of the same classreturnself.__class__(num,self.prime)
For p = 7, 11, 17, 31, what is this set in Fp?
{1(p-1), 2(p-1), 3(p-1), 4(p-1), … (p-1)(p-1)}
>>>forprimein(7,11,17,31):...([pow(i,prime-1,prime)foriinrange(1,prime)])[1,1,1,1,1,1][1,1,1,1,1,1,1,1,1,1][1,1,1,1,1,1,1,1,1,1,1,1,1,1,1,1][1,1,1,1,1,1,1,1,1,1,1,1,1,1,1,1,1,1,1,1,1,1,1,1,\1,1,1,1,1,1]
Solve the following equations in F31:
3 / 24
17-3
4-4⋅11
>>>prime=31>>>(3*pow(24,prime-2,prime)%prime)4>>>(pow(17,prime-4,prime))29>>>(pow(4,prime-5,prime)*11%prime)13
Write the corresponding __truediv__ method which defines the division of two field elements.
Note that in Python3, division is separated into __truediv__ and __floordiv__. The first does normal division, the second does integer division.
classFieldElement:...def__truediv__(self,other):ifself.prime!=other.prime:raiseTypeError('Cannot divide two numbers in different Fields')# use fermat's little theorem:# self.num**(p-1) % p == 1# this means:# 1/n == pow(n, p-2, p)# We return an element of the same classnum=self.num*pow(other.num,self.prime-2,self.prime)%self.primereturnself.__class__(num,self.prime)
Determine which of these points are on the curve y2=x3+5x+7:
(2,4), (-1,-1), (18,77), (5,7)
>>>defon_curve(x,y):...returny**2==x**3+5*x+7>>>(on_curve(2,4))False>>>(on_curve(-1,-1))True>>>(on_curve(18,77))True>>>(on_curve(5,7))False
Write the __ne__ method for Point.
classPoint:...def__ne__(self,other):returnnot(self==other)
Handle the case where the two points are additive inverses. That is, they have the same x, but a different y, causing a vertical line. This should return the point at infinity.
classPoint:...ifself.x==other.xandself.y!=other.y:returnself.__class__(None,None,self.a,self.b)
For the curve y2=x3+5x+7, what is (2,5) + (-1,-1)?
>>>x1,y1=2,5>>>x2,y2=-1,-1>>>s=(y2-y1)/(x2-x1)>>>x3=s**2-x1-x2>>>y3=s*(x1-x3)-y1>>>(x3,y3)3.0-7.0
Write the __add__ method where x1≠x2
classPoint:...def__add__(self,other):...ifself.x!=other.x:s=(other.y-self.y)/(other.x-self.x)x=s**2-self.x-other.xy=s*(self.x-x)-self.yreturnself.__class__(x,y,self.a,self.b)
For the curve y2=x3+5x+7, what is (2,5) + (-1,-1)?
>>>a,x1,y1=5,-1,1>>>s=(3*x1**2+a)/(2*y1)>>>x3=s**2-2*x1>>>y3=s*(x1-x3)-y1>>>(x3,y3)18.0-77.0
Write the __add__ method when P1=P2.
classPoint:...def__add__(self,other):...ifself==other:s=(3*self.x**2+self.a)/(2*self.y)x=s**2-2*self.xy=s*(self.x-x)-self.yreturnself.__class__(x,y,self.a,self.b)
Evaluate whether these points are on the curve y2=x3+7 over F223
(192,105), (17,56), (200,119), (1,193), (42,99)
>>>fromeccimportFieldElement>>>prime=223>>>a=FieldElement(0,prime)>>>b=FieldElement(7,prime)>>>defon_curve(x,y):...returny**2==x**3+a*x+b>>>(on_curve(FieldElement(192,prime),FieldElement(105,prime)))True>>>(on_curve(FieldElement(17,prime),FieldElement(56,prime)))True>>>(on_curve(FieldElement(200,prime),FieldElement(119,prime)))False>>>(on_curve(FieldElement(1,prime),FieldElement(193,prime)))True>>>(on_curve(FieldElement(42,prime),FieldElement(99,prime)))False
For the curve y2=x3+7 over F223, find:
(170,142) + (60,139)
(47,71) + (17,56)
(143,98) + (76,66)
>>>fromeccimportFieldElement,Point>>>prime=223>>>a=FieldElement(0,prime)>>>b=FieldElement(7,prime)>>>p1=Point(FieldElement(170,prime),FieldElement(142,prime),a,b)>>>p2=Point(FieldElement(60,prime),FieldElement(139,prime),a,b)>>>(p1+p2)Point(FieldElement_223(220),FieldElement_223(181))_FieldElement_223(0)_FieldElement_223(7)>>>p1=Point(FieldElement(47,prime),FieldElement(71,prime),a,b)>>>p2=Point(FieldElement(17,prime),FieldElement(56,prime),a,b)>>>(p1+p2)Point(FieldElement_223(215),FieldElement_223(68))_FieldElement_223(0)_FieldElement_223(7)>>>p1=Point(FieldElement(143,prime),FieldElement(98,prime),a,b)>>>p2=Point(FieldElement(76,prime),FieldElement(66,prime),a,b)>>>(p1+p2)Point(FieldElement_223(47),FieldElement_223(71))_FieldElement_223(0)_FieldElement_223(7)
Extend ECCTest to test for the additions from the previous exercise. Call this test_add.
deftest_add(self):prime=223a=FieldElement(0,prime)b=FieldElement(7,prime)additions=((192,105,17,56,170,142),(47,71,117,141,60,139),(143,98,76,66,47,71),)forx1_raw,y1_raw,x2_raw,y2_raw,x3_raw,y3_rawinadditions:x1=FieldElement(x1_raw,prime)y1=FieldElement(y1_raw,prime)p1=Point(x1,y1,a,b)x2=FieldElement(x2_raw,prime)y2=FieldElement(y2_raw,prime)p2=Point(x2,y2,a,b)x3=FieldElement(x3_raw,prime)y3=FieldElement(y3_raw,prime)p3=Point(x3,y3,a,b)self.assertEqual(p1+p2,p3)
For the curve y2=x3+7 over F223, find:
2⋅(192,105)
2⋅(143,98)
2⋅(47,71)
4⋅(47,71)
8⋅(47,71)
21⋅(47,71)
>>>fromeccimportFieldElement,Point>>>prime=223>>>a=FieldElement(0,prime)>>>b=FieldElement(7,prime)>>>x1=FieldElement(num=192,prime=prime)>>>y1=FieldElement(num=105,prime=prime)>>>p=Point(x1,y1,a,b)>>>(p+p)Point(FieldElement_223(49),FieldElement_223(71))_FieldElement_223(0)_FieldElement_223(7)>>>x1=FieldElement(num=143,prime=prime)>>>y1=FieldElement(num=98,prime=prime)>>>p=Point(x1,y1,a,b)>>>(p+p)Point(FieldElement_223(64),FieldElement_223(168))_FieldElement_223(0)_FieldElement_223(7)>>>x1=FieldElement(num=47,prime=prime)>>>y1=FieldElement(num=71,prime=prime)>>>p=Point(x1,y1,a,b)>>>(p+p)Point(FieldElement_223(36),FieldElement_223(111))_FieldElement_223(0)_FieldElement_223(7)>>>(p+p+p+p)Point(FieldElement_223(194),FieldElement_223(51))_FieldElement_223(0)_FieldElement_223(7)>>>(p+p+p+p+p+p+p+p)Point(FieldElement_223(116),FieldElement_223(55))_FieldElement_223(0)_FieldElement_223(7)>>>(p+p+p+p+p+p+p+p+p+p+p+p+p+p+p+p+p+p+p+p+p)Point(infinity)
For the curve y2=x3+7 over F223, find the order of the group generated by (15,86)
>>>prime=223>>>a=FieldElement(0,prime)>>>b=FieldElement(7,prime)>>>x=FieldElement(15,prime)>>>y=FieldElement(86,prime)>>>p=Point(x,y,a,b)>>>inf=Point(None,None,a,b)>>>product=p>>>count=1>>>whileproduct!=inf:...product+=p...count+=1>>>(count)7
Verify whether these signatures are valid:
P = (0x887387e452b8eacc4acfde10d9aaf7f6d9a0f975aabb10d006e4da568744d06c,
     0x61de6d95231cd89026e286df3b6ae4a894a3378e393e93a0f45b666329a0ae34)

# signature 1
z = 0xec208baa0fc1c19f708a9ca96fdeff3ac3f230bb4a7ba4aede4942ad003c0f60
r = 0xac8d1c87e51d0d441be8b3dd5b05c8795b48875dffe00b7ffcfac23010d3a395
s = 0x68342ceff8935ededd102dd876ffd6ba72d6a427a3edb13d26eb0781cb423c4

# signature 2
z = 0x7c076ff316692a3d7eb3c3bb0f8b1488cf72e1afcd929e29307032997a838a3d
r = 0xeff69ef2b1bd93a66ed5219add4fb51e11a840f404876325a1e8ffe0529a2c
s = 0xc7207fee197d27c618aea621406f6bf5ef6fca38681d82b2f06fddbdce6feab6
>>>fromeccimportS256Point,N,G>>>point=S256Point(...0x887387e452b8eacc4acfde10d9aaf7f6d9a0f975aabb10d006e4da568744d06c,...0x61de6d95231cd89026e286df3b6ae4a894a3378e393e93a0f45b666329a0ae34)>>>z=0xec208baa0fc1c19f708a9ca96fdeff3ac3f230bb4a7ba4aede4942ad003c0f60>>>r=0xac8d1c87e51d0d441be8b3dd5b05c8795b48875dffe00b7ffcfac23010d3a395>>>s=0x68342ceff8935ededd102dd876ffd6ba72d6a427a3edb13d26eb0781cb423c4>>>u=z*pow(s,N-2,N)%N>>>v=r*pow(s,N-2,N)%N>>>((u*G+v*point).x.num==r)True>>>z=0x7c076ff316692a3d7eb3c3bb0f8b1488cf72e1afcd929e29307032997a838a3d>>>r=0xeff69ef2b1bd93a66ed5219add4fb51e11a840f404876325a1e8ffe0529a2c>>>s=0xc7207fee197d27c618aea621406f6bf5ef6fca38681d82b2f06fddbdce6feab6>>>u=z*pow(s,N-2,N)%N>>>v=r*pow(s,N-2,N)%N>>>((u*G+v*point).x.num==r)True
Sign the following message with the secret
e = 12345
z = int.from_bytes(hash256('Programming Bitcoin!'), 'big')
>>>fromeccimportS256Point,G,N>>>fromhelperimporthash256>>>e=12345>>>z=int.from_bytes(hash256(b'Programming Bitcoin!'),'big')>>>k=1234567890>>>r=(k*G).x.num>>>k_inv=pow(k,N-2,N)>>>s=(z+r*e)*k_inv%N>>>(e*G)S256Point(f01d6b9018ab421dd410404cb869072065522bf85734008f105cf385a023a80f,\0eba29d0f0c5408ed681984dc525982abefccd9f7ff01dd26da4999cf3f6a295)>>>(hex(z))0x969f6056aa26f7d2795fd013fe88868d09c9f6aed96965016e1936ae47060d48>>>(hex(r))0x2b698a0f0a4041b77e63488ad48c23e8e8838dd1fb7520408b121697b782ef22>>>(hex(s))0x1dbc63bfef4416705e602a7b564161167076d8b20990a0f26f316cff2cb0bc1a
Find the uncompressed SEC format for the Public Key where the Private Key secrets are:
5000
20185
0xdeadbeef12345
>>>fromeccimportPrivateKey>>>priv=PrivateKey(5000)>>>(priv.point.sec(compressed=False).hex())04ffe558e388852f0120e46af2d1b370f85854a8eb0841811ece0e3e03d282d57c315dc72890a4\f10a1481c031b03b351b0dc79901ca18a00cf009dbdb157a1d10>>>priv=PrivateKey(2018**5)>>>(priv.point.sec(compressed=False).hex())04027f3da1918455e03c46f659266a1bb5204e959db7364d2f473bdf8f0a13cc9dff87647fd023\c13b4a4994f17691895806e1b40b57f4fd22581a4f46851f3b06>>>priv=PrivateKey(0xdeadbeef12345)>>>(priv.point.sec(compressed=False).hex())04d90cd625ee87dd38656dd95cf79f65f60f7273b67d3096e68bd81e4f5342691f842efa762fd5\9961d0e99803c61edba8b3e3f7dc3a341836f97733aebf987121
Find the Compressed SEC format for the Public Key where the Private Key secrets are:
5001
20195
0xdeadbeef54321
>>>fromeccimportPrivateKey>>>priv=PrivateKey(5001)>>>(priv.point.sec(compressed=True).hex())0357a4f368868a8a6d572991e484e664810ff14c05c0fa023275251151fe0e53d1>>>priv=PrivateKey(2019**5)>>>(priv.point.sec(compressed=True).hex())02933ec2d2b111b92737ec12f1c5d20f3233a0ad21cd8b36d0bca7a0cfa5cb8701>>>priv=PrivateKey(0xdeadbeef54321)>>>(priv.point.sec(compressed=True).hex())0296be5b1292f6c856b3c5654e886fc13511462059089cdf9c479623bfcbe77690
Find the DER format for a signature whose r and s values are:
r =
0x37206a0610995c58074999cb9767b87af4c4978db68c06e8e6e81d282047a7c6
s =
0x8ca63759c1157ebeaec0d03cecca119fc9a75bf8e6d0fa65c841c8e2738cdaec
>>>fromeccimportSignature>>>r=0x37206a0610995c58074999cb9767b87af4c4978db68c06e8e6e81d282047a7c6>>>s=0x8ca63759c1157ebeaec0d03cecca119fc9a75bf8e6d0fa65c841c8e2738cdaec>>>sig=Signature(r,s)>>>(sig.der().hex())3045022037206a0610995c58074999cb9767b87af4c4978db68c06e8e6e81d282047a7c6022100\8ca63759c1157ebeaec0d03cecca119fc9a75bf8e6d0fa65c841c8e2738cdaec
Convert the following hex to binary and then to Base58:
7c076ff316692a3d7eb3c3bb0f8b1488cf72e1afcd929e29307032997a838a3d
eff69ef2b1bd93a66ed5219add4fb51e11a840f404876325a1e8ffe0529a2c
c7207fee197d27c618aea621406f6bf5ef6fca38681d82b2f06fddbdce6feab6
>>>fromhelperimportencode_base58>>>h='7c076ff316692a3d7eb3c3bb0f8b1488cf72e1afcd929e29307032997a838a3d'>>>(encode_base58(bytes.fromhex(h)).decode('ascii'))9MA8fRQrT4u8Zj8ZRd6MAiiyaxb2Y1CMpvVkHQu5hVM6>>>h='eff69ef2b1bd93a66ed5219add4fb51e11a840f404876325a1e8ffe0529a2c'>>>(encode_base58(bytes.fromhex(h)).decode('ascii'))4fE3H2E6XMp4SsxtwinF7w9a34ooUrwWe4WsW1458Pd>>>h='c7207fee197d27c618aea621406f6bf5ef6fca38681d82b2f06fddbdce6feab6'>>>(encode_base58(bytes.fromhex(h)).decode('ascii'))EQJsjkd6JaGwxrjEhfeqPenqHwrBmPQZjJGNSCHBkcF7
Find the address corresponding to Public Keys whose Private Key secrets are:
5002 (use uncompressed SEC, on testnet)
20205 (use compressed SEC, on testnet)
0x12345deadbeef (use compressed SEC on mainnet)
>>>fromeccimportPrivateKey>>>priv=PrivateKey(5002)>>>(priv.point.address(compressed=False,testnet=True))mmTPbXQFxboEtNRkwfh6K51jvdtHLxGeMA>>>priv=PrivateKey(2020**5)>>>(priv.point.address(compressed=True,testnet=True))mopVkxp8UhXqRYbCYJsbeE1h1fiF64jcoH>>>priv=PrivateKey(0x12345deadbeef)>>>(priv.point.address(compressed=True,testnet=False))1F1Pn2y6pDb68E5nYJJeba4TLg2U7B6KF1
Find the WIF for Private Key whose secrets are:
5003 (compressed, testnet)
20215 (uncompressed, testnet)
0x54321deadbeef (compressed, mainnet)
>>>fromeccimportPrivateKey>>>priv=PrivateKey(5003)>>>(priv.wif(compressed=True,testnet=True))cMahea7zqjxrtgAbB7LSGbcQUr1uX1ojuat9jZodMN8rFTv2sfUK>>>priv=PrivateKey(2021**5)>>>(priv.wif(compressed=False,testnet=True))91avARGdfge8E4tZfYLoxeJ5sGBdNJQH4kvjpWAxgzczjbCwxic>>>priv=PrivateKey(0x54321deadbeef)>>>(priv.wif(compressed=True,testnet=False))KwDiBf89QgGbjEhKnhXJuH7LrciVrZi3qYjgiuQJv1h8Ytr2S53a
Write a function little_endian_to_int which takes Python bytes, interprets those bytes in Little-Endian and returns the number.
deflittle_endian_to_int(b):'''little_endian_to_int takes byte sequence as a little-endian number.Returns an integer'''returnint.from_bytes(b,'little')
Write a function int_to_little_endian which does the reverse of the last exercise.
defint_to_little_endian(n,length):'''endian_to_little_endian takes an integer and returns the little-endianbyte sequence of length'''returnn.to_bytes(length,'little')
Create a testnet address for yourself using a long secret that only you know. This is important as there are bots on testnet trying to steal testnet coins. Make sure you write this secret down somewhere! You will be using the secret later to sign Transactions.
>>>fromeccimportPrivateKey>>>fromhelperimporthash256,little_endian_to_int>>>passphrase=b'jimmy@programmingblockchain.com my secret'>>>secret=little_endian_to_int(hash256(passphrase))>>>priv=PrivateKey(secret)>>>(priv.point.address(testnet=True))mft9LRNtaBNtpkknB8xgm17UvPedZ4ecYL
Write the version parsing part of the parse method that we’ve defined. To do this properly, you’ll have to convert 4 bytes into a Little-Endian integer.
classTx:...@classmethoddefparse(cls,s,testnet=False):version=little_endian_to_int(s.read(4))returncls(version,None,None,None,testnet=testnet)
Write the inputs parsing part of the parse method in Tx and the parse method for TxIn.
classTx:...@classmethoddefparse(cls,s,testnet=False):version=little_endian_to_int(s.read(4))num_inputs=read_varint(s)inputs=[]for_inrange(num_inputs):inputs.append(TxIn.parse(s))returncls(version,inputs,None,None,testnet=testnet)...classTxIn:...@classmethoddefparse(cls,s):'''Takes a byte stream and parses the tx_input at the startreturn a TxIn object'''prev_tx=s.read(32)[::-1]prev_index=little_endian_to_int(s.read(4))script_sig=Script.parse(s)sequence=little_endian_to_int(s.read(4))returncls(prev_tx,prev_index,script_sig,sequence)
Write the outputs parsing part of the parse method in Tx and the parse method for TxOut.
classTx:...classTx:...@classmethoddefparse(cls,s,testnet=False):version=little_endian_to_int(s.read(4))num_inputs=read_varint(s)inputs=[]for_inrange(num_inputs):inputs.append(TxIn.parse(s))num_outputs=read_varint(s)outputs=[]for_inrange(num_outputs):outputs.append(TxOut.parse(s))returncls(version,inputs,outputs,None,testnet=testnet)...classTxOut:...@classmethoddefparse(cls,s):'''Takes a byte stream and parses the tx_output at the startreturn a TxOut object'''amount=little_endian_to_int(s.read(8))script_pubkey=Script.parse(s)returncls(amount,script_pubkey)
Write the Locktime parsing part of the parse method in Tx.
classTx:...@classmethoddefparse(cls,s,testnet=False):version=little_endian_to_int(s.read(4))num_inputs=read_varint(s)inputs=[]for_inrange(num_inputs):inputs.append(TxIn.parse(s))num_outputs=read_varint(s)outputs=[]for_inrange(num_outputs):outputs.append(TxOut.parse(s))locktime=little_endian_to_int(s.read(4))returncls(version,inputs,outputs,locktime,testnet=testnet)
What is the ScriptSig from the second input, ScriptPubKey from the first output and the amount of the second output for this transaction?
010000000456919960ac691763688d3d3bcea9ad6ecaf875df5339e148a1fc61c6ed7a069e0100
00006a47304402204585bcdef85e6b1c6af5c2669d4830ff86e42dd205c0e089bc2a821657e951
c002201024a10366077f87d6bce1f7100ad8cfa8a064b39d4e8fe4ea13a7b71aa8180f012102f0
da57e85eec2934a82a585ea337ce2f4998b50ae699dd79f5880e253dafafb7feffffffeb8f51f4
038dc17e6313cf831d4f02281c2a468bde0fafd37f1bf882729e7fd3000000006a473044022078
99531a52d59a6de200179928ca900254a36b8dff8bb75f5f5d71b1cdc26125022008b422690b84
61cb52c3cc30330b23d574351872b7c361e9aae3649071c1a7160121035d5c93d9ac96881f19ba
1f686f15f009ded7c62efe85a872e6a19b43c15a2937feffffff567bf40595119d1bb8a3037c35
6efd56170b64cbcc160fb028fa10704b45d775000000006a47304402204c7c7818424c7f7911da
6cddc59655a70af1cb5eaf17c69dadbfc74ffa0b662f02207599e08bc8023693ad4e9527dc42c3
4210f7a7d1d1ddfc8492b654a11e7620a0012102158b46fbdff65d0172b7989aec8850aa0dae49
abfb84c81ae6e5b251a58ace5cfeffffffd63a5e6c16e620f86f375925b21cabaf736c779f88fd
04dcad51d26690f7f345010000006a47304402200633ea0d3314bea0d95b3cd8dadb2ef79ea833
1ffe1e61f762c0f6daea0fabde022029f23b3e9c30f080446150b23852028751635dcee2be669c
2a1686a4b5edf304012103ffd6f4a67e94aba353a00882e563ff2722eb4cff0ad6006e86ee20df
e7520d55feffffff0251430f00000000001976a914ab0c0b2e98b1ab6dbf67d4750b0a56244948
a87988ac005a6202000000001976a9143c82d7df364eb6c75be8c80df2b3eda8db57397088ac46
430600
>>>fromioimportBytesIO>>>fromtximportTx>>>hex_transaction='010000000456919960ac691763688d3d3bcea9ad6ecaf875df5339e\148a1fc61c6ed7a069e010000006a47304402204585bcdef85e6b1c6af5c2669d4830ff86e42dd\205c0e089bc2a821657e951c002201024a10366077f87d6bce1f7100ad8cfa8a064b39d4e8fe4e\a13a7b71aa8180f012102f0da57e85eec2934a82a585ea337ce2f4998b50ae699dd79f5880e253\dafafb7feffffffeb8f51f4038dc17e6313cf831d4f02281c2a468bde0fafd37f1bf882729e7fd\3000000006a47304402207899531a52d59a6de200179928ca900254a36b8dff8bb75f5f5d71b1c\dc26125022008b422690b8461cb52c3cc30330b23d574351872b7c361e9aae3649071c1a716012\1035d5c93d9ac96881f19ba1f686f15f009ded7c62efe85a872e6a19b43c15a2937feffffff567\bf40595119d1bb8a3037c356efd56170b64cbcc160fb028fa10704b45d775000000006a4730440\2204c7c7818424c7f7911da6cddc59655a70af1cb5eaf17c69dadbfc74ffa0b662f02207599e08\bc8023693ad4e9527dc42c34210f7a7d1d1ddfc8492b654a11e7620a0012102158b46fbdff65d0\172b7989aec8850aa0dae49abfb84c81ae6e5b251a58ace5cfeffffffd63a5e6c16e620f86f375\925b21cabaf736c779f88fd04dcad51d26690f7f345010000006a47304402200633ea0d3314bea\0d95b3cd8dadb2ef79ea8331ffe1e61f762c0f6daea0fabde022029f23b3e9c30f080446150b23\852028751635dcee2be669c2a1686a4b5edf304012103ffd6f4a67e94aba353a00882e563ff272\2eb4cff0ad6006e86ee20dfe7520d55feffffff0251430f00000000001976a914ab0c0b2e98b1a\b6dbf67d4750b0a56244948a87988ac005a6202000000001976a9143c82d7df364eb6c75be8c80\df2b3eda8db57397088ac46430600'>>>stream=BytesIO(bytes.fromhex(hex_transaction))>>>tx_obj=Tx.parse(stream)>>>(tx_obj.tx_ins[1].script_sig)304402207899531a52d59a6de200179928ca900254a36b8dff8bb75f5f5d71b1cdc26125022008\b422690b8461cb52c3cc30330b23d574351872b7c361e9aae3649071c1a71601035d5c93d9ac9\6881f19ba1f686f15f009ded7c62efe85a872e6a19b43c15a2937>>>(tx_obj.tx_outs[0].script_pubkey)OP_DUPOP_HASH160ab0c0b2e98b1ab6dbf67d4750b0a56244948a879OP_EQUALVERIFYOP_CHECKSIG>>>(tx_obj.tx_outs[1].amount)40000000
Write the fee method for the Tx class.
classTx:...deffee(self,testnet=False):input_sum,output_sum=0,0fortx_ininself.tx_ins:input_sum+=tx_in.value(testnet=testnet)fortx_outinself.tx_outs:output_sum+=tx_out.amountreturninput_sum-output_sum
Write the op_hash160 function.
defop_hash160(stack):iflen(stack)<1:returnFalseelement=stack.pop()h160=hash160(element)stack.append(h160)returnTrue
Write the op_checksig function in op.py
defop_checksig(stack,z):iflen(stack)<2:returnFalsesec_pubkey=stack.pop()der_signature=stack.pop()[:-1]try:point=S256Point.parse(sec_pubkey)sig=Signature.parse(der_signature)except(ValueError,SyntaxError)ase:returnFalseifpoint.verify(z,sig):stack.append(encode_num(1))else:stack.append(encode_num(0))returnTrue
Create a ScriptSig that can unlock this ScriptPubKey. Note OP_MUL multiplies the top two elements of the stack.
767695935687
56 = OP_6
76 = OP_DUP
87 = OP_EQUAL
93 = OP_ADD
95 = OP_MUL
>>>fromscriptimportScript>>>script_pubkey=Script([0x76,0x76,0x95,0x93,0x56,0x87])>>>script_sig=Script([0x52])>>>combined_script=script_sig+script_pubkey>>>(combined_script.evaluate(0))True
OP_2 or 52 will satisfy the equation x2+x-6=0.
Figure out what this Script is doing:
6e879169a77ca787
69 = OP_VERIFY
6e = OP_2DUP
7c = OP_SWAP
87 = OP_EQUAL
91 = OP_NOT
a7 = OP_SHA1
Use the Script.parse method and look up what various opcodes do at https://en.bitcoin.it/wiki/Script
>>>fromscriptimportScript>>>script_pubkey=Script([0x6e,0x87,0x91,0x69,0xa7,0x7c,0xa7,0x87])>>>c1='255044462d312e330a25e2e3cfd30a0a0a312030206f626a0a3c3c2f576964746820\32203020522f4865696768742033203020522f547970652034203020522f537562747970652035\203020522f46696c7465722036203020522f436f6c6f7253706163652037203020522f4c656e67\74682038203020522f42697473506572436f6d706f6e656e7420383e3e0a73747265616d0affd8\fffe00245348412d3120697320646561642121212121852fec092339759c39b1a1c63c4c97e1ff\fe017f46dc93a6b67e013b029aaa1db2560b45ca67d688c7f84b8c4c791fe02b3df614f86db169\0901c56b45c1530afedfb76038e972722fe7ad728f0e4904e046c230570fe9d41398abe12ef5bc\942be33542a4802d98b5d70f2a332ec37fac3514e74ddc0f2cc1a874cd0c78305a215664613097\89606bd0bf3f98cda8044629a1'>>>c2='255044462d312e330a25e2e3cfd30a0a0a312030206f626a0a3c3c2f576964746820\32203020522f4865696768742033203020522f547970652034203020522f537562747970652035\203020522f46696c7465722036203020522f436f6c6f7253706163652037203020522f4c656e67\74682038203020522f42697473506572436f6d706f6e656e7420383e3e0a73747265616d0affd8\fffe00245348412d3120697320646561642121212121852fec092339759c39b1a1c63c4c97e1ff\fe017346dc9166b67e118f029ab621b2560ff9ca67cca8c7f85ba84c79030c2b3de218f86db3a9\0901d5df45c14f26fedfb3dc38e96ac22fe7bd728f0e45bce046d23c570feb141398bb552ef5a0\a82be331fea48037b8b5d71f0e332edf93ac3500eb4ddc0decc1a864790c782c76215660dd3097\91d06bd0af3f98cda4bc4629b1'>>>collision1=bytes.fromhex(c1)>>>collision2=bytes.fromhex(c2)>>>script_sig=Script([collision1,collision2])>>>combined_script=script_sig+script_pubkey>>>(combined_script.evaluate(0))True
collision1 and collision2 are from the sha1 preimages that were found to collide from Google. (https://security.googleblog.com/2017/02/announcing-first-sha1-collision.html)
This is looking for a sha1 Collision. The only way to satisfy this script is to give x and y such that x≠y but sha1(x)=sha1(y).
Write the sig_hash method for the Tx class.
classTx:...defsig_hash(self,input_index):s=int_to_little_endian(self.version,4)s+=encode_varint(len(self.tx_ins))fori,tx_ininenumerate(self.tx_ins):ifi==input_index:s+=TxIn(prev_tx=tx_in.prev_tx,prev_index=tx_in.prev_index,script_sig=tx_in.script_pubkey(self.testnet),sequence=tx_in.sequence,).serialize()else:s+=TxIn(prev_tx=tx_in.prev_tx,prev_index=tx_in.prev_index,sequence=tx_in.sequence,).serialize()s+=encode_varint(len(self.tx_outs))fortx_outinself.tx_outs:s+=tx_out.serialize()s+=int_to_little_endian(self.locktime,4)s+=int_to_little_endian(SIGHASH_ALL,4)h256=hash256(s)returnint.from_bytes(h256,'big')
Write the verify_input method for the Tx class. You will want to use the TxIn.script_pubkey(), Tx.sig_hash() and Script.evaluate() methods.
classTx:...defverify_input(self,input_index):tx_in=self.tx_ins[input_index]script_pubkey=tx_in.script_pubkey(testnet=self.testnet)z=self.sig_hash(input_index)combined=tx_in.script_sig+script_pubkeyreturncombined.evaluate(z)
Write the sign_input method for the Tx class.
classTx:...defsign_input(self,input_index,private_key):z=self.sig_hash(input_index)der=private_key.sign(z).der()sig=der+SIGHASH_ALL.to_bytes(1,'big')sec=private_key.point.sec()self.tx_ins[input_index].script_sig=Script([sig,sec])returnself.verify_input(input_index)
Create a testnet transaction that sends 60% of a single UTXO to mwJn1YPMq7y5F8J3LkC5Hxg9PHyZ5K4cFv. The remaining amount minus fees should go back to your own change address. This should be a 1 input, 2 output transaction.
You can broadcast the transaction at https://testnet.blockchain.info/pushtx
>>>fromeccimportPrivateKey>>>fromhelperimportdecode_base58,SIGHASH_ALL>>>fromscriptimportp2pkh_script,Script>>>fromtximportTxIn,TxOut,Tx>>>prev_tx=bytes.fromhex('75a1c4bc671f55f626dda1074c7725991e6f68b8fcefcfca7\b64405ca3b45f1c')>>>prev_index=1>>>target_address='miKegze5FQNCnGw6PKyqUbYUeBa4x2hFeM'>>>target_amount=0.01>>>change_address='mzx5YhAH9kNHtcN481u6WkjeHjYtVeKVh2'>>>change_amount=0.009>>>secret=8675309>>>priv=PrivateKey(secret=secret)>>>tx_ins=[]>>>tx_ins.append(TxIn(prev_tx,prev_index))>>>tx_outs=[]>>>h160=decode_base58(target_address)>>>script_pubkey=p2pkh_script(h160)>>>target_satoshis=int(target_amount*100000000)>>>tx_outs.append(TxOut(target_satoshis,script_pubkey))>>>h160=decode_base58(change_address)>>>script_pubkey=p2pkh_script(h160)>>>change_satoshis=int(change_amount*100000000)>>>tx_outs.append(TxOut(change_satoshis,script_pubkey))>>>tx_obj=Tx(1,tx_ins,tx_outs,0,testnet=True)>>>(tx_obj.sign_input(0,priv))True>>>(tx_obj.serialize().hex())01000000011c5fb4a35c40647bcacfeffcb8686f1e9925774c07a1dd26f6551f67bcc4a1750100\00006b483045022100a08ebb92422b3599a2d2fcdaa11f8f807a66ccf33e7f4a9ff0a3c51f1b1e\c5dd02205ed21dfede5925362b8d9833e908646c54be7ac6664e31650159e8f69b6ca539012103\935581e52c354cd2f484fe8ed83af7a3097005b2f9c60bff71d35bd795f54b67ffffffff024042\0f00000000001976a9141ec51b3654c1f1d0f4929d11a1f702937eaf50c888ac9fbb0d00000000\001976a914d52ad7ca9b3d096a38e752c2018e6fbc40cdf26f88ac00000000
Advanced: get some more testnet coins from a testnet faucet and create a 2 input, 1 output transaction. 1 input should be from the faucet, the other should be from the previous exercise, the output can be your own address.
You can broadcast the transaction at https://testnet.blockchain.info/pushtx
>>>fromeccimportPrivateKey>>>fromhelperimportdecode_base58,SIGHASH_ALL>>>fromscriptimportp2pkh_script,Script>>>fromtximportTxIn,TxOut,Tx>>>prev_tx_1=bytes.fromhex('11d05ce707c1120248370d1cbf5561d22c4f83aeba04367\92c82e0bd57fe2a2f')>>>prev_index_1=1>>>prev_tx_2=bytes.fromhex('51f61f77bd061b9a0da60d4bedaaf1b1fad0c11e65fdc74\4797ee22d20b03d15')>>>prev_index_2=1>>>target_address='mwJn1YPMq7y5F8J3LkC5Hxg9PHyZ5K4cFv'>>>target_amount=0.0429>>>secret=8675309>>>priv=PrivateKey(secret=secret)>>>tx_ins=[]>>>tx_ins.append(TxIn(prev_tx_1,prev_index_1))>>>tx_ins.append(TxIn(prev_tx_2,prev_index_2))>>>tx_outs=[]>>>h160=decode_base58(target_address)>>>script_pubkey=p2pkh_script(h160)>>>target_satoshis=int(target_amount*100000000)>>>tx_outs.append(TxOut(target_satoshis,script_pubkey))>>>tx_obj=Tx(1,tx_ins,tx_outs,0,testnet=True)>>>(tx_obj.sign_input(0,priv))True>>>(tx_obj.sign_input(1,priv))True>>>(tx_obj.serialize().hex())01000000022f2afe57bde0822c793604baae834f2cd26155bf1c0d37480212c107e75cd0110100\00006a47304402204cc5fe11b2b025f8fc9f6073b5e3942883bbba266b71751068badeb8f11f03\64022070178363f5dea4149581a4b9b9dbad91ec1fd990e3fa14f9de3ccb421fa5b26901210393\5581e52c354cd2f484fe8ed83af7a3097005b2f9c60bff71d35bd795f54b67ffffffff153db020\2de27e7944c7fd651ec1d0fab1f1aaed4b0da60d9a1b06bd771ff651010000006b483045022100\b7a938d4679aa7271f0d32d83b61a85eb0180cf1261d44feaad23dfd9799dafb02205ff2f366dd\d9555f7146861a8298b7636be8b292090a224c5dc84268480d8be1012103935581e52c354cd2f4\84fe8ed83af7a3097005b2f9c60bff71d35bd795f54b67ffffffff01d0754100000000001976a9\14ad346f8eb57dee9a37981716e498120ae80e44f788ac00000000
Write the op_checkmultisig function of op.py.
defop_checkmultisig(stack,z):iflen(stack)<1:returnFalsen=decode_num(stack.pop())iflen(stack)<n+1:returnFalsesec_pubkeys=[]for_inrange(n):sec_pubkeys.append(stack.pop())m=decode_num(stack.pop())iflen(stack)<m+1:returnFalseder_signatures=[]for_inrange(m):der_signatures.append(stack.pop()[:-1])stack.pop()try:points=[S256Point.parse(sec)forsecinsec_pubkeys]sigs=[Signature.parse(der)forderinder_signatures]forsiginsigs:iflen(points)==0:returnFalsewhilepoints:point=points.pop(0)ifpoint.verify(z,sig):breakstack.append(encode_num(1))except(ValueError,SyntaxError):returnFalsereturnTrue
Write h160_to_p2pkh_address that converts a 20-byte hash160 into a p2pkh address.
defh160_to_p2pkh_address(h160,testnet=False):iftestnet:prefix=b'\x6f'else:prefix=b'\x00'returnencode_base58_checksum(prefix+h160)
Write h160_to_p2sh_address that converts a 20-byte hash160 into a p2sh address.
defh160_to_p2sh_address(h160,testnet=False):iftestnet:prefix=b'\xc4'else:prefix=b'\x05'returnencode_base58_checksum(prefix+h160)
Validate the second signature from the transaction above.
>>>fromioimportBytesIO>>>fromeccimportS256Point,Signature>>>fromhelperimporthash256,int_to_little_endian>>>fromscriptimportScript>>>fromtximportTx,SIGHASH_ALL>>>hex_tx='0100000001868278ed6ddfb6c1ed3ad5f8181eb0c7a385aa0836f01d5e4789e6\bd304d87221a000000db00483045022100dc92655fe37036f47756db8102e0d7d5e28b3beb83a8\fef4f5dc0559bddfb94e02205a36d4e4e6c7fcd16658c50783e00c341609977aed3ad00937bf4e\e942a8993701483045022100da6bee3c93766232079a01639d07fa869598749729ae323eab8eef\53577d611b02207bef15429dcadce2121ea07f233115c6f09034c0be68db99980b9a6c5e754022\01475221022626e955ea6ea6d98850c994f9107b036b1334f18ca8830bfff1295d21cfdb702103\b287eaf122eea69030a0e9feed096bed8045c8b98bec453e1ffac7fbdbd4bb7152aeffffffff04\d3b11400000000001976a914904a49878c0adfc3aa05de7afad2cc15f483a56a88ac7f40090000\0000001976a914418327e3f3dda4cf5b9089325a4b95abdfa0334088ac722c0c00000000001976\a914ba35042cfe9fc66fd35ac2224eebdafd1028ad2788acdc4ace020000000017a91474d691da\1574e6b3c192ecfb52cc8984ee7b6c568700000000'>>>hex_sec='03b287eaf122eea69030a0e9feed096bed8045c8b98bec453e1ffac7fbdbd4b\b71'>>>hex_der='3045022100da6bee3c93766232079a01639d07fa869598749729ae323eab8ee\f53577d611b02207bef15429dcadce2121ea07f233115c6f09034c0be68db99980b9a6c5e75402\2'>>>hex_redeem_script='475221022626e955ea6ea6d98850c994f9107b036b1334f18ca88\30bfff1295d21cfdb702103b287eaf122eea69030a0e9feed096bed8045c8b98bec453e1ffac7f\bdbd4bb7152ae'>>>sec=bytes.fromhex(hex_sec)>>>der=bytes.fromhex(hex_der)>>>redeem_script=Script.parse(BytesIO(bytes.fromhex(hex_redeem_script)))>>>stream=BytesIO(bytes.fromhex(hex_tx))>>>tx_obj=Tx.parse(stream)>>>s=int_to_little_endian(tx_obj.version,4)>>>s+=encode_varint(len(tx_obj.tx_ins))>>>i=tx_obj.tx_ins[0]>>>s+=TxIn(i.prev_tx,i.prev_index,redeem_script,i.sequence).serialize()>>>s+=encode_varint(len(tx_obj.tx_outs))>>>fortx_outintx_obj.tx_outs:...s+=tx_out.serialize()>>>s+=int_to_little_endian(tx_obj.locktime,4)>>>s+=int_to_little_endian(SIGHASH_ALL,4)>>>z=int.from_bytes(hash256(s),'big')>>>point=S256Point.parse(sec)>>>sig=Signature.parse(der)>>>(point.verify(z,sig))True
Modify the sig_hash and verify_input methods to be able to verify p2sh transactions.
classTx:...defsig_hash(self,input_index,redeem_script=None):'''Returns the integer representation of the hash that needs to getsigned for index input_index'''s=int_to_little_endian(self.version,4)s+=encode_varint(len(self.tx_ins))fori,tx_ininenumerate(self.tx_ins):ifi==input_index:ifredeem_script:script_sig=redeem_scriptelse:script_sig=tx_in.script_pubkey(self.testnet)else:script_sig=Nones+=TxIn(prev_tx=tx_in.prev_tx,prev_index=tx_in.prev_index,script_sig=script_sig,sequence=tx_in.sequence,).serialize()s+=encode_varint(len(self.tx_outs))fortx_outinself.tx_outs:s+=tx_out.serialize()s+=int_to_little_endian(self.locktime,4)s+=int_to_little_endian(SIGHASH_ALL,4)h256=hash256(s)returnint.from_bytes(h256,'big')defverify_input(self,input_index):tx_in=self.tx_ins[input_index]script_pubkey=tx_in.script_pubkey(testnet=self.testnet)ifscript_pubkey.is_p2sh_script_pubkey():instruction=tx_in.script_sig.instructions[-1]raw_redeem=encode_varint(len(instruction))+instructionredeem_script=Script.parse(BytesIO(raw_redeem))else:redeem_script=Nonez=self.sig_hash(input_index,redeem_script)combined=tx_in.script_sig+script_pubkeyreturncombined.evaluate(z)
Write the is_coinbase method of the Tx class.
classTx:...defis_coinbase(self):iflen(self.tx_ins)!=1:returnFalsefirst_input=self.tx_ins[0]iffirst_input.prev_tx!=b'\x00'*32:returnFalseiffirst_input.prev_index!=0xffffffff:returnFalsereturnTrue
Write the coinbase_height method for the Tx class.
classTx:...defcoinbase_height(self):ifnotself.is_coinbase():returnNoneelement=self.tx_ins[0].script_sig.instructions[0]returnlittle_endian_to_int(element)
Write the parse for Block.
classBlock:...@classmethoddefparse(cls,s):version=little_endian_to_int(s.read(4))prev_block=s.read(32)[::-1]merkle_root=s.read(32)[::-1]timestamp=little_endian_to_int(s.read(4))bits=s.read(4)nonce=s.read(4)returncls(version,prev_block,merkle_root,timestamp,bits,nonce)
Write the serialize for Block.
classBlock:...defserialize(self):result=int_to_little_endian(self.version,4)result+=self.prev_block[::-1]result+=self.merkle_root[::-1]result+=int_to_little_endian(self.timestamp,4)result+=self.bitsresult+=self.noncereturnresult
Write the hash for Block.
classBlock:...defhash(self):s=self.serialize()sha=hash256(s)returnsha[::-1]
Write the bip9 method for the Block class.
classBlock:...defbip9(self):returnself.version>>29==0b001
Write the bip91 method for the Block class.
classBlock:...defbip91(self):returnself.version>>4&1==1
Write the bip141 method for the Block class.
classBlock:...defbip141(self):returnself.version>>1&1==1
Write the bits_to_target function in helper.py.
defbits_to_target(bits):exponent=bits[-1]coefficient=little_endian_to_int(bits[:-1])returncoefficient*256**(exponent-3)
Write the difficulty method for Block
classBlock:...defdifficulty(self):lowest=0xffff*256**(0x1d-3)returnlowest/self.target()
Write the check_pow method for Block.
classBlock:...defcheck_pow(self):sha=hash256(self.serialize())proof=little_endian_to_int(sha)returnproof<self.target()
Calculate the new bits given the first and last blocks of this 2016 block difficulty adjustment period:
Block 471744:
000000203471101bbda3fe307664b3283a9ef0e97d9a38a7eacd8800000000000000000010c8ab a8479bbaa5e0848152fd3c2289ca50e1c3e58c9a4faaafbdf5803c5448ddb845597e8b0118e43a 81d3
Block 473759:
02000020f1472d9db4b563c35f97c428ac903f23b7fc055d1cfc26000000000000000000b3f449 fcbe1bc4cfbcb8283a0d2c037f961a3fdf2b8bedc144973735eea707e1264258597e8b0118e5f0 0474
>>>fromioimportBytesIO>>>fromblockimportBlock>>>fromhelperimportTWO_WEEKS>>>fromhelperimporttarget_to_bits>>>block1_hex='000000203471101bbda3fe307664b3283a9ef0e97d9a38a7eacd88000000\00000000000010c8aba8479bbaa5e0848152fd3c2289ca50e1c3e58c9a4faaafbdf5803c5448dd\b845597e8b0118e43a81d3'>>>block2_hex='02000020f1472d9db4b563c35f97c428ac903f23b7fc055d1cfc26000000\000000000000b3f449fcbe1bc4cfbcb8283a0d2c037f961a3fdf2b8bedc144973735eea707e126\4258597e8b0118e5f00474'>>>last_block=Block.parse(BytesIO(bytes.fromhex(block1_hex)))>>>first_block=Block.parse(BytesIO(bytes.fromhex(block2_hex)))>>>time_differential=last_block.timestamp-first_block.timestamp>>>iftime_differential>TWO_WEEKS*4:...time_differential=TWO_WEEKS*4>>>iftime_differential<TWO_WEEKS//4:...time_differential=TWO_WEEKS//4>>>new_target=last_block.target()*time_differential//TWO_WEEKS>>>new_bits=target_to_bits(new_target)>>>(new_bits.hex())80df6217
Write the calculate_new_bits function in helper.py
defcalculate_new_bits(previous_bits,time_differential):iftime_differential>TWO_WEEKS*4:time_differential=TWO_WEEKS*4iftime_differential<TWO_WEEKS//4:time_differential=TWO_WEEKS//4new_target=bits_to_target(previous_bits)*time_differential//TWO_WEEKSreturntarget_to_bits(new_target)
Determine what this network message is:
f9beb4d976657261636b000000000000000000005df6e0e2
>>>fromnetworkimportNetworkEnvelope>>>fromioimportBytesIO>>>message_hex='f9beb4d976657261636b000000000000000000005df6e0e2'>>>stream=BytesIO(bytes.fromhex(message_hex))>>>envelope=NetworkEnvelope.parse(stream)>>>(envelope.command)b'verack'>>>(envelope.payload)b''
Write the parse method for NetworkEnvelope.
classNetworkEnvelope:...@classmethoddefparse(cls,s,testnet=False):magic=s.read(4)ifmagic==b'':raiseIOError('Connection reset!')iftestnet:expected_magic=TESTNET_NETWORK_MAGICelse:expected_magic=NETWORK_MAGICifmagic!=expected_magic:raiseSyntaxError('magic is not right {} vs {}'.format(magic.hex(),expected_magic.hex()))command=s.read(12)command=command.strip(b'\x00')payload_length=little_endian_to_int(s.read(4))checksum=s.read(4)payload=s.read(payload_length)calculated_checksum=hash256(payload)[:4]ifcalculated_checksum!=checksum:raiseIOError('checksum does not match')returncls(command,payload,testnet=testnet)
Write the serialize method for NetworkEnvelope.
classNetworkEnvelope:...defserialize(self):result=self.magicresult+=self.command+b'\x00'*(12-len(self.command))result+=int_to_little_endian(len(self.payload),4)result+=hash256(self.payload)[:4]result+=self.payloadreturnresult
Write the serialize method for VersionMessage.
classVersionMessage:...defserialize(self):result=int_to_little_endian(self.version,4)result+=int_to_little_endian(self.services,8)result+=int_to_little_endian(self.timestamp,8)result+=int_to_little_endian(self.receiver_services,8)result+=b'\x00'*10+b'\xff\xff'+self.receiver_ipresult+=int_to_little_endian(self.receiver_port,2)result+=int_to_little_endian(self.sender_services,8)result+=b'\x00'*10+b'\xff\xff'+self.sender_ipresult+=int_to_little_endian(self.sender_port,2)result+=self.nonceresult+=encode_varint(len(self.user_agent))result+=self.user_agentresult+=int_to_little_endian(self.latest_block,4)ifself.relay:result+=b'\x01'else:result+=b'\x00'returnresult
Write the handshake method for SimpleNode
classSimpleNode:...defhandshake(self):version=VersionMessage()self.send(version)self.wait_for(VerAckMessage)
Write the serialize method for GetHeadersMessage.
classGetHeadersMessage:...defserialize(self):result=int_to_little_endian(self.version,4)result+=encode_varint(self.num_hashes)result+=self.start_block[::-1]result+=self.end_block[::-1]returnresult
Write the merkle_parent function.
defmerkle_parent(hash1,hash2):'''Takes the binary hashes and calculates the hash256'''returnhash256(hash1+hash2)
Write the merkle_parent_level function.
defmerkle_parent_level(hashes):'''Takes a list of binary hashes and returns a list that's halfthe length'''iflen(hashes)==1:raiseRuntimeError('Cannot take a parent level with only 1 item')iflen(hashes)%2==1:hashes.append(hashes[-1])parent_level=[]foriinrange(0,len(hashes),2):parent=merkle_parent(hashes[i],hashes[i+1])parent_level.append(parent)returnparent_level
Write the merkle_root function.
defmerkle_root(hashes):'''Takes a list of binary hashes and returns the merkle root'''current_level=hasheswhilelen(current_level)>1:current_level=merkle_parent_level(current_level)returncurrent_level[0]
Write the validate_merkle_root method for Block.
classBlock:...defvalidate_merkle_root(self):hashes=[h[::-1]forhinself.tx_hashes]root=merkle_root(hashes)returnroot[::-1]==self.merkle_root
Create an empty Merkle Tree with 27 items and print each level.
>>>importmath>>>total=27>>>max_depth=math.ceil(math.log(total,2))>>>merkle_tree=[]>>>fordepthinrange(max_depth+1):...num_items=math.ceil(total/2**(max_depth-depth))...level_hashes=[None]*num_items...merkle_tree.append(level_hashes)>>>forlevelinmerkle_tree:...(level)[None][None,None][None,None,None,None][None,None,None,None,None,None,None][None,None,None,None,None,None,None,None,None,None,None,None,None,\None][None,None,None,None,None,None,None,None,None,None,None,None,None,\None,None,None,None,None,None,None,None,None,None,None,None,None,\None]
Write the parse method for MerkleBlock.
classMerkleBlock:...@classmethoddefparse(cls,s):version=little_endian_to_int(s.read(4))prev_block=s.read(32)[::-1]merkle_root=s.read(32)[::-1]timestamp=little_endian_to_int(s.read(4))bits=s.read(4)nonce=s.read(4)total=little_endian_to_int(s.read(4))num_txs=read_varint(s)hashes=[]for_inrange(num_txs):hashes.append(s.read(32)[::-1])flags_length=read_varint(s)flags=s.read(flags_length)returncls(version,prev_block,merkle_root,timestamp,bits,nonce,total,hashes,flags)
Write the is_valid method for MerkleBlock
classMerkleBlock:...defis_valid(self):flag_bits=bytes_to_bit_field(self.flags)hashes=[h[::-1]forhinself.hashes]merkle_tree=MerkleTree(self.total)merkle_tree.populate_tree(flag_bits,hashes)returnmerkle_tree.root()[::-1]==self.merkle_root
Calculate the Bloom Filter for hello world and goodbye using the hash160 hash function over a bit field of 10.
>>>fromhelperimporthash160>>>bit_field_size=10>>>bit_field=[0]*bit_field_size>>>foritemin(b'hello world',b'goodbye'):...h=hash160(item)...bit=int.from_bytes(h,'big')%bit_field_size...bit_field[bit]=1>>>(bit_field)[1,1,0,0,0,0,0,0,0,0]
Given a Bloom Filter with size=10, function count=5, tweak=99, what are the bytes that are set after adding these items? (use bit_field_to_bytes to convert to bytes)
b'Hello World'
b'Goodbye!'
>>>frombloomfilterimportBloomFilter,BIP37_CONSTANT>>>fromhelperimportbit_field_to_bytes,murmur3>>>field_size=10>>>function_count=5>>>tweak=99>>>items=(b'Hello World',b'Goodbye!')>>>bit_field_size=field_size*8>>>bit_field=[0]*bit_field_size>>>foriteminitems:...foriinrange(function_count):...seed=i*BIP37_CONSTANT+tweak...h=murmur3(item,seed=seed)...bit=h%bit_field_size...bit_field[bit]=1>>>(bit_field_to_bytes(bit_field).hex())4000600a080000010940
Write the add method for BloomFilter
classBloomFilter:...defadd(self,item):foriinrange(self.function_count):seed=i*BIP37_CONSTANT+self.tweakh=murmur3(item,seed=seed)bit=h%(self.size*8)self.bit_field[bit]=1
Write the filterload payload from the BloomFilter class.
classBloomFilter:...deffilterload(self,flag=1):payload=encode_varint(self.size)payload+=self.filter_bytes()payload+=int_to_little_endian(self.function_count,4)payload+=int_to_little_endian(self.tweak,4)payload+=int_to_little_endian(flag,1)returnGenericMessage(b'filterload',payload)
Write the serialize method for the GetDataMessage class.
classGetDataMessage:...defserialize(self):result=encode_varint(len(self.data))fordata_type,identifierinself.data:result+=int_to_little_endian(data_type,4)result+=identifier[::-1]returnresult
Get the current testnet block ID, send yourself some testnet coins, find the UTXO corresponding to the testnet coin without using a block explorer, create a transaction using that UTXO as an input and broadcast the tx message on the testnet network.
>>>importtime>>>fromblockimportBlock>>>frombloomfilterimportBloomFilter>>>fromeccimportPrivateKey>>>fromhelperimport(...decode_base58,...encode_varint,...hash256,...little_endian_to_int,...read_varint,...)>>>frommerkleblockimportMerkleBlock>>>fromnetworkimport(...GetDataMessage,...GetHeadersMessage,...HeadersMessage,...NetworkEnvelope,...SimpleNode,...TX_DATA_TYPE,...FILTERED_BLOCK_DATA_TYPE,...)>>>fromscriptimportp2pkh_script,Script>>>fromtximportTx,TxIn,TxOut>>>last_block_hex='00000000000000a03f9432ac63813c6710bfe41712ac5ef6faab093f\e2917636'>>>secret=little_endian_to_int(hash256(b'Jimmy Song'))>>>private_key=PrivateKey(secret=secret)>>>addr=private_key.point.address(testnet=True)>>>h160=decode_base58(addr)>>>target_address='mwJn1YPMq7y5F8J3LkC5Hxg9PHyZ5K4cFv'>>>target_h160=decode_base58(target_address)>>>target_script=p2pkh_script(target_h160)>>>fee=5000# fee in satoshis>>># connect to testnet.programmingbitcoin.com in testnet mode>>>node=SimpleNode('testnet.programmingbitcoin.com',testnet=True,logging=\False)>>># create a bloom filter of size 30 and 5 functions. Add a tweak.>>>bf=BloomFilter(30,5,90210)>>># add the h160 to the bloom filter>>>bf.add(h160)>>># complete the handshake>>>node.handshake()>>># load the bloom filter with the filterload command>>>node.send(bf.filterload())>>># set start block to last_block from above>>>start_block=bytes.fromhex(last_block_hex)>>># send a getheaders message with the starting block>>>getheaders=GetHeadersMessage(start_block=start_block)>>>node.send(getheaders)>>># wait for the headers message>>>headers=node.wait_for(HeadersMessage)>>># store the last block as None>>>last_block=None>>># initialize the GetDataMessage>>>getdata=GetDataMessage()>>># loop through the blocks in the headers>>>forbinheaders.blocks:...# check that the proof of work on the block is valid...ifnotb.check_pow():...raiseRuntimeError('proof of work is invalid')...# check that this block's prev_block is the last block...iflast_blockisnotNoneandb.prev_block!=last_block:...raiseRuntimeError('chain broken')...# add a new item to the getdata message...# should be FILTERED_BLOCK_DATA_TYPE and block hash...getdata.add_data(FILTERED_BLOCK_DATA_TYPE,b.hash())...# set the last block to the current hash...last_block=b.hash()>>># send the getdata message>>>node.send(getdata)>>># initialize prev_tx, prev_index and prev_amount to None>>>prev_tx,prev_index,prev_amount=None,None,None>>># loop while prev_tx is None>>>whileprev_txisNone:...# wait for the merkleblock or tx commands...message=node.wait_for(MerkleBlock,Tx)...# if we have the merkleblock command...ifmessage.command==b'merkleblock':...# check that the MerkleBlock is valid...ifnotmessage.is_valid():...raiseRuntimeError('invalid merkle proof')...# else we have the tx command...else:...# set the tx's testnet to be True...message.testnet=True...# loop through the tx outs...fori,tx_outinenumerate(message.tx_outs):...# if our output has the same address as our address we found it...iftx_out.script_pubkey.address(testnet=True)==addr:...# we found our utxo. set prev_tx, prev_index, and tx...prev_tx=message.hash()...prev_index=i...prev_amount=tx_out.amount...('found: {}:{}'.format(prev_tx.hex(),prev_index))found:b2cddd41d18d00910f88c31aa58c6816a190b8fc30fe7c665e1cd2ec60efdf3f:7>>># create the TxIn>>>tx_in=TxIn(prev_tx,prev_index)>>># calculate the output amount (previous amount minus the fee)>>>output_amount=prev_amount-fee>>># create a new TxOut to the target script with the output amount>>>tx_out=TxOut(output_amount,target_script)>>># create a new transaction with the one input and one output>>>tx_obj=Tx(1,[tx_in],[tx_out],0,testnet=True)>>># sign the only input of the transaction>>>(tx_obj.sign_input(0,private_key))True>>># serialize and hex to see what it looks like>>>(tx_obj.serialize().hex())01000000013fdfef60ecd21c5e667cfe30fcb890a116688ca51ac3880f91008dd141ddcdb20700\00006b483045022100ff77d2559261df5490ed00d231099c4b8ea867e6ccfe8e3e6d077313ed4f\1428022033a1db8d69eb0dc376f89684d1ed1be75719888090388a16f1e8eedeb8067768012103\dc585d46cfca73f3a75ba1ef0c5756a21c1924587480700c6eb64e3f75d22083ffffffff019334\e500000000001976a914ad346f8eb57dee9a37981716e498120ae80e44f788ac00000000>>># send this signed transaction on the network>>>node.send(tx_obj)>>># wait a sec so this message goes through with time.sleep(1)>>>time.sleep(1)>>># now ask for this transaction from the other node>>># create a GetDataMessage>>>getdata=GetDataMessage()>>># ask for our transaction by adding it to the message>>>getdata.add_data(TX_DATA_TYPE,tx_obj.hash())>>># send the message>>>node.send(getdata)>>># now wait for a Tx response>>>received_tx=node.wait_for(Tx)>>># if the received tx has the same id as our tx, we are done!>>>ifreceived_tx.id()==tx_obj.id():...('success!')success!
The animal on the cover of FILL IN TITLE is FILL IN DESCRIPTION.
Many of the animals on O’Reilly covers are endangered; all of them are important to the world. To learn more about how you can help, go to animals.oreilly.com.
The cover image is from FILL IN CREDITS. The cover fonts are URW Typewriter and Guardian Sans. The text font is Adobe Minion Pro; the heading font is Adobe Myriad Condensed; and the code font is Dalton Maag’s Ubuntu Mono.
Learn How to Program Bitcoin from Scratch
Copyright © 2019 Jimmy Song. All rights reserved.
Printed in the United States of America.
Published by O’Reilly Media, Inc., 1005 Gravenstein Highway North, Sebastopol, CA 95472.
O’Reilly books may be purchased for educational, business, or sales promotional use. Online editions are also available for most titles (http://oreilly.com/safari). For more information, contact our corporate/institutional sales department: 800-998-9938 or corporate@oreilly.com.
See http://oreilly.com/catalog/errata.csp?isbn=9781492031499 for release details.
The O’Reilly logo is a registered trademark of O’Reilly Media, Inc. Programming Bitcoin, the cover image, and related trade dress are trademarks of O’Reilly Media, Inc.
The views expressed in this work are those of the author, and do not represent the publisher’s views. While the publisher and the author have used good faith efforts to ensure that the information and instructions contained in this work are accurate, the publisher and the author disclaim all responsibility for errors or omissions, including without limitation responsibility for damages resulting from the use of or reliance on this work. Use of the information and instructions contained in this work is at your own risk. If any code samples or other technology this work contains or describes is subject to open source licenses or the intellectual property rights of others, it is your responsibility to ensure that your use thereof complies with such licenses and/or rights.
978-1-492-03149-9
[FILL IN]
This book will teach you the technology of Bitcoin at a fundamental level. This book doesn’t cover monetary, economic or social dynamics of Bitcoin, but knowing how Bitcoin works under the hood should give you greater insight into what’s possible. There’s a tendency to hype Bitcoin and blockchain without really understanding what’s going on and this book is meant to be an antidote to that tendency.
After all, there are lots of books about Bitcoin, everything from the history of Bitcoin, the economic aspects to a technical description of Bitcoin. The aim of this book is to get you to understand Bitcoin by coding all of the components necessary for a Bitcoin library. The library is not meant to be exhaustive or efficient. The aim of the library is to help you learn.
This book is for programmers who want to learn how Bitcoin works by coding it themselves. You will learn Bitcoin by coding the “bare metal” stuff in a Bitcoin library you will create from scratch. This is not a reference book where you can look up the specification for a particular feature.
The material from this book has been largely taken from my two day seminar where I teach developers all about Bitcoin (see programmingblockchain.com).
The material has been refined many times as I’ve taught this material 20+ times and have taught 400+ people as of this writing.
By the time you’re done with the book, you’ll not only be able to create transactions, but be able to get all the data you need from peers and send the transaction over the network. Everything to accomplish this is covered including the math, the parsing, the network connectivity and block validation.
The prerequisites for this book are that you know programming and that you know Python in particular. The library itself is written in Python 3 and a lot of the exercises can be done in a controlled environment like a Jupyter notebook. An intermediate knowledge of Python is preferred, but even a beginner knowledge of Python is probably sufficient to get a lot of the concepts.
Some knowledge of math is required, especially for Chapters 1 and 2. These chapters introduce mathematical concepts probably not familiar to those that didn’t major in mathematics. Math knowledge around algebra-level should suffice to understand the new concepts and to code the exercises covered in those chapters.
General Computer Science knowledge like hash functions will come in handy, but are not strictly necessary to complete the exercises in this book.
This book is split into 14 chapters and built on top of one another. Each chapter is meant to build on the previous one as the Bitcoin library gets built from scratch all the way to the end.
Roughly speaking, Chapters 1-4 establish the mathematical tools that we need, Chapters 5-8 cover Transactions, which are the fundamental unit of Bitcoin and Chapters 9-12 cover Blocks and Networking. The last two chapters cover some advanced topics but don’t actually require you to write code.
Chapters 1 and 2 cover some math that we need. Finite Fields and Elliptic Curves are needed in order for us to understand Elliptic Curve Cryptography in Chapter 3. After we’ve established the Public Key Cryptography at the end of Chapter 3, we move towards implementing how the cryptographic primitives are stored and transmitted through parsing and serializing all the different classes that we established in Chapter 4.
Chapter 5 covers the Transaction structure. Chapter 6 goes into the smart contract language behind Bitcoin called Script. Chapter 7 combines all the previous chapters in validating and creating transactions based on the Elliptic Curve Cryptography from the first 4 chapters. Chapter 8 establishes how p2sh works, which is a way to make more powerful smart contracts.
Chapter 9 covers Blocks, which are groups of ordered Transactions. Chapter 10 covers network communication in Bitcoin. Chapter 11 and Chapter 12 go into how a light client, or software without access to the entire blockchain, might request and broadcast data from and to nodes that do have the entire blockchain.
Chapter 13 covers Segwit and Chapter 14 covers suggestions for further study. Again, these chapters are not strictly necessary, but are included as a way to give you a taste of what more there is to learn.
Chapters 1-12 have exercises that require you to build up the library from scratch. The answers are in the Appendix and in the corresponding chapter directory in the GitHub repository (https://github.com/jimmysong/programmingbitcoin). You will be writing many Python classes and will be building towards being able to not just validate transactions/blocks, but also creating your own transactions and broadcasting them on the network.
The last exercise in Chapter 12 is specifically asking you to connect to another node on the testnet network, calculate what you can spend, construct and sign a transaction of your devising and broadcast that on the network. Essentially, the first 11 chapters are setting up toward being able to do this exercise.
There will be a lot of unit tests that you will have to get to pass. The book has been designed this way so you can do the “fun” part of coding. We will be looking at a lot of code and diagrams throughout.
In order to get the most out of this book, you’ll want to create an environment where you can run the example code and do the exercises. Here are the instructions for setting everything up.
Install Python 3.5 or above on your machine:
Windows:
https://www.python.org/ftp/python/3.6.2/python-3.6.2-amd64.exe
Mac OS X:
https://www.python.org/ftp/python/3.6.2/python-3.6.2-macosx10.6.pkg
Linux: see your distro docs (many Linux distributions like Ubuntu come with Python 3.5+ pre-installed)
Install pip:
Download this script:
https://bootstrap.pypa.io/get-pip.py
Run this script using Python 3:
$ python3 get-pip.pyInstall git:
The instructions for downloading and installing are at https://git-scm.com/downloads.
Download the source code for this book:
$git clone https://github.com/jimmysong/programmingbitcoin$cdprogrammingbitcoin
Install virtualenv:
$ pip install virtualenvInstall the requirements:
Linux/OSX:
$virtualenv -p python3 .venv$. .venv/bin/activate(.venv)$pip install -r requirements.txt
Windows:
C:\programmingbitcoin> virtualenv -p C:\PathToYourPythonInstallation\Python.exe .venv C:\programmingbitcoin> .venv\Scripts\activate.bat C:\programmingbitcoin> pip install -r requirements.txt
Run Jupyter notebook:
(.venv)$jupyter notebook[I 11:13:23.061 NotebookApp]Serving notebooks fromlocaldirectory: /home/jimmy/programmingbitcoin[I 11:13:23.061 NotebookApp]The Jupyter Notebook is running at:[I 11:13:23.061 NotebookApp]http://localhost:8888/?token=f849627e4d9d07d2158e3fcde93590eff4a9a7a01f65a8e7[I 11:13:23.061 NotebookApp]Use Control-C to stop this server and shut down all kernels(twice to skip confirmation).[C 11:13:23.065 NotebookApp]Copy/paste this URL into your browser when you connectforthe firsttime, to login with a token: http://localhost:8888/?token=f849627e4d9d07d2158e3fcde93590eff4a9a7a01f65a8e7
You should have a browser open up automatically:
You can navigate to chapter directories. To do the exercises from Chapter 1, you would navigate to code-ch01:
From here you can open Chapter1.ipynb:
You may want to familiarize yourself with this interface if you haven’t seen it before, but the gist of Jupyter is that it can run Python code from the browser in a way to make experimenting easy. You can run each “cell” and see the results as if this were an interactive Python shell.
A large portion of the exercises will be coding concepts introduced in the book. The unit tests are written for you and you will need to write the Python code to make the tests pass. You can check whether your code is correct directly in Jupyter. You will need to edit the corresponding file by clicking through a link like the “this test” link in Figure P-3 . This will take you to a browser tab like this:
You can edit the file here and save in order to make the test pass.
All the answers to the various exercises in this book are in the Appendix.
They are also available in the code-chxx/answers.py file where xx is the chapter that you’re on.
The following typographical conventions are used in this book:
Indicates new terms, URLs, email addresses, filenames, and file extensions.
Constant widthUsed for program listings, as well as within paragraphs to refer to program elements such as variable or function names, databases, data types, environment variables, statements, and keywords.
Constant width boldShows commands or other text that should be typed literally by the user.
Constant width italicShows text that should be replaced with user-supplied values or by values determined by context.
This element signifies a tip or suggestion.
This element signifies a general note.
This element indicates a waning or caution.
Supplemental material (code examples, exercises, etc.) is available for download at https://github.com/jimmysong/programmingbitcoin.
This book is here to help you get your job done. In general, if example code is offered with this book, you may use it in your programs and documentation. You do not need to contact us for permission unless you’re reproducing a significant portion of the code. For example, writing a program that uses several chunks of code from this book does not require permission. Selling or distributing a CD-ROM of examples from O’Reilly books does require permission. Answering a question by citing this book and quoting example code does not require permission. Incorporating a significant amount of example code from this book into your product’s documentation does require permission.
We appreciate, but do not require, attribution. An attribution usually includes the title, author, publisher, and ISBN. For example: “Programming Bitcoin by Jimmy Song (O’Reilly). Copyright 2019, 978-0-596-xxxx-x.”
If you feel your use of code examples falls outside fair use or the permission given above, feel free to contact us at permissions@oreilly.com.
Safari (formerly Safari Books Online) is a membership-based training and reference platform for enterprise, government, educators, and individuals.
Members have access to thousands of books, training videos, Leaning Paths, interactive tutorials, and curated playlists from over 250 publishers, including O’Reilly Media, Harvard Business Review, Prentice Hall Professional, Addison-Wesley Professional, Microsoft Press, Sams, Que, Peachpit Press, Adobe, Focal Press, Cisco Press, John Wiley & Sons, Syngress, Morgan Kaufmann, IBM Redbooks, Packt, Adobe Press, FT Press, Apress, Manning, New Riders, McGraw-Hill, Jones & Bartlett, and Course Technology, among others.
For more information, please visit http://oreilly.com/safari.
Please address comments and questions concerning this book to the publisher:
We have a web page for this book, where we list errata, examples, and any additional information. You can access this page at http://www.oreilly.com/catalog/<catalog page>.
To comment or ask technical questions about this book, send email to bookquestions@oreilly.com.
For more information about our books, courses, conferences, and news, see our website at http://www.oreilly.com.
Find us on Facebook: http://facebook.com/oreilly
Follow us on Twitter: http://twitter.com/oreillymedia
Watch us on YouTube: http://www.youtube.com/oreillymedia
One of the most difficult things about learning how to program Bitcoin is knowing where to start. There are so many components that depend on each other that learning one thing may lead you to have to learn another which in turn may lead you to learn something else before you can understand the original thing.
This chapter is going to get you off to a start which is more manageable. It may seem strange, but we’ll start with the basic math that you need to understand Elliptic Curve Cryptography. Elliptic Curve Cryptography, in turn, gives us the signing and verification algorithms. These are at the heart of how Transactions work, and Transactions are the atomic unit of value transfer in Bitcoin. By learning Finite Fields and Elliptic Curves first, you’ll get a firm grasp of concepts that you’ll need in order to progress logically.
Be aware that this chapter and the next two chapters may feel a bit like you’re eating vegetables, especially if you haven’t done formal math in a long time. I would encourage you to get through this as the concepts and code here will be used throughout the book.
Learning about new mathematical structures can be a bit intimidating and in this chapter, I hope to dispel the myth that high level math is difficult. Finite Fields, in particular, don’t require all that much in terms of prior mathematical knowledge than, say, Algebra.
Think of Finite Fields as something that you could have learned instead of Trigonometry, just that the education system you’re a part of decided that Trigonometry was more important for you to learn. This is my way of telling you that Finite Fields are not that hard to learn and require no more background than Algebra.
This chapter is required if you want to understand Elliptic Curve Cryptography. Elliptic Curve Cryptography is required for understanding signing and verification, which is at the heart of Bitcoin itself. As I’ve said, this chapter and the next two may feel a bit unrelated, but I encourage you to endure. The fundamentals here will not only make understanding Bitcoin a lot easier, but also make understanding Schnorr Signatures, Confidential Transactions and other leading edge Bitcoin technologies easier.
Mathematically, a Finite Field is defined as follows:
A finite set of numbers and two operations + (addition) and ⋅ (multiplication) that satisfy the following:
If a and b are in the set, a+b and a⋅b are in the set. We call this property closed.
The additive identity, 0 exists and has the property a + 0 = a.
The multiplicative identity, 1 exists and has the property a ⋅ 1 = a.
If a is in the set, -a is in the set, which is defined as the value that makes a + (-a) = 0. This is what we call the additive inverse.
If a is in the set and is not 0, a-1 is in the set, which is defined as the value that makes a ⋅ a-1 = 1. This is what we call the multiplicative inverse.
Let’s unpack each of the following.
We have a set of numbers that’s finite. Because the set is finite, we can designate a number p which is how big the set is. This is what we call the order of the set.
(1) says we are closed under addition and multiplication. This means that we have to define addition and multiplication in a way as to make sure that the results stay in the set. For example, a set containing {0,1,2} is not closed under addition since 1+2=3 and 3 is not in the set, neither is 2+2=4. Of course we can define addition a little differently to make this work, but using “normal” addition, this set is not closed. On the other hand, the set {-1,0,1} is closed under normal multiplication. Any two numbers can be multiplied (there are 9 such combinations) and the result is always in the set.
The other option we have in mathematics is to define multiplication in a particular way to make these sets closed. We’ll get to how exactly we define addition and multiplication later in this chapter, but the key concept here is that we can define addition and subtraction differently than the addition and subtraction you are familiar with.
(2) and (3) mean that we have the additive and multiplicative identities. That means 0 and 1 are in the set.
(4) means that we have the additive inverse. That is, if a is in the set, -a is in the set. Using the additive inverse, we can define subtraction.
(5) means that multiplication has the same property. If a is in the set, a-1 is in the set. That is a⋅a-1=1. Using the multiplicative inverse, we can define division. This will be the trickiest to define in a finite field.
If the order (or size) of the set is p, we can call the elements of the set, 0, 1, 2, …p-1. These numbers are what we call the elements of the set, not necessarily the traditional numbers 0, 1, 2, 3, etc. They behave in many ways like traditional numbers, but have some differences in how we add, subtract, multiply, etc.
In math notation the Finite Field set looks like this:
Fp = {0, 1, 2, … p-1}
What’s in the Finite Field set are called elements. Fp is a specific finite field called “field of p” or “field of 29” or whatever the size of it is (again, the size is what mathematicians call order). The numbers between the {}`s represent what elements are in the field. We name the elements 0, 1, 2, etc because they’re convenient for our purposes.
A Finite Field of order 11 looks like this:
F11 = {0, 1, 2, 3, 4, 5, 6, 7, 8, 9, 10}
A Finite Field of order 17 looks like this:
F17= {0, 1, 2, 3, 4, 5, 6, 7, 8, 9, 10, 11, 12, 13, 14, 15, 16}
A Finite Field of order 981 looks like this:
F981= {0, 1, 2, … 980}
Notice the order of the field is always 1 more than the largest element. You might have noticed that the field has a prime order every time. For a variety of reasons which will become clear later, it turns out that fields must an order that is a power of a prime, but that the Finite Fields whose order is of prime order are the ones we’re interested in.
We want to represent each Finite Field element and in Python, we’ll be creating a class that represents a single Finite Field element.
Naturally, we’ll name the class FieldElement.
The class represents an element in a field Fprime. The bare bones of the class look like this:
classFieldElement:def__init__(self,num,prime):ifnum>=primeornum<0:error='Num {} not in field range 0 to {}'.format(num,prime-1)raiseValueError(error)self.num=numself.prime=primedef__repr__(self):return'FieldElement_{}({})'.format(self.prime,self.num)def__eq__(self,other):ifotherisNone:returnFalsereturnself.num==other.numandself.prime==other.prime
We first check that num is between 0 and prime-1 inclusive.
If not, we have an invalid Field Element and we raise a ValueError which is what we should raise when we get an inappropriate value.
The rest of the __init__ method assigns the initialization values to the object.
The __eq__ method checks if two objects of class FieldElement are equal.
This is only true when the num and prime properties are equal.
What we’ve defined already allows us to do this:
>>>fromeccimportFieldElement>>>a=FieldElement(7,13)>>>b=FieldElement(6,13)>>>(a==b)False>>>(a==a)True
Python allows us to override the == operator on FieldElement with the __eq__ method, which is something we’ll be taking advantage of going forward.
You can see this in action in the code that accompanies this book.
Once you’ve set up Jupyter Notebook (see Preface), you can navigate to code-ch01/Chapter1.ipynb and run the code to see the results.
For the next exercise, you’ll want to open up ecc.py by clicking the link in the Exercise 1 box.
If you get stuck, please remember that the answers to every exercise are in the Appendix.
Write the corresponding method __ne__ which checks if two FieldElement objects are not equal to each other.
One of the tools we can use in order to make a Finite Field closed under addition, subtraction, multiplication and division is something called modulo arithmetic.
We can define addition on the finite set using something called modulo arithmetic. Modulo arithmetic is something you probably learned when you first learned division. Remember problems like Figure 1-1?
Whenever the division wasn’t even, there was something called the “remainder” which is the leftover from the actual division. We define modulo in the same way. We use the operator % for “modulo”.
7 % 3 = 1
Figure 1-2 shows another example.
Formally speaking, the modulo operation is the remainder after division of one number by another. Let’s look at another example with larger numbers:
1747 % 241 = 60
If it helps, you can think of modulo arithmetic as “wrap-around” or “clock” math. Imagine a problem like this:
It is currently 3 o’clock. What hour will it be 47 hours from now?
The answer is 2 o’clock because (3 + 47) % 12 = 2 (see Figure 1-3)
We can also see this as “wrapping around” in the sense that you go past zero every time we move ahead 12 hours.
We can perform modulo on negative numbers. For example, you can ask:
It is currently 3 o’clock. What hour was it 16 hours ago?
The answer is 11 o’clock. Hence we can say:
(3 - 16) % 12 = 11
The minute hand is also a modulo operation. For example, you can ask:
It is currently 12 minutes past the hour. What minute will it be 843 minutes from now?
(12 + 843) % 60 = 15
It will be 15 minutes past the hour. Likewise, we can ask:
It is currently 23 minutes past the hour. What minute will it be 97 minutes from now?
(23 + 97) % 60 = 0
0 is another way of saying there is no remainder.
The result of the modulo (%) operation for minutes is always between 0 and 59, inclusive, in this case. This happens to be a very useful property as even very large numbers can be brought down to a relatively small range with modulo:
14738495684013 % 60 = 33
We’ll be using modulo as we define field arithmetic. Most operations in Finite Fields use the modulo operator in some capacity.
Python uses the % operator for modulo arithmetic.
Here is how the modulo operator is used:
>>>(7%3)1
We can also use the modulo operator on negative numbers like this:
>>>(-27%13)12
Remember that we need to define Finite Field addition in a way as to make sure that the result is still in the set. That is, we want to make sure that addition in a Finite Field is closed.
We can use what we just learned, modulo arithmetic, to make addition closed. Let’s say we have a Finite Field of 19:
F19={0,1,2,…18}, where a, b ∈ F19
Note that the symbol ∈ means “is an element of”.
In our case, a and b are elements of F19.
Addition being closed means:
a+fb ∈ F19
We denote Finite Field addition with +f to avoid confusion with normal integer addition +.
If we utilize modulo arithmetic, we can guarantee this to be the case. We can define a+fb this way:
a+fb = (a+b)%19
For example:
7+f8 = (7+8)%19 = 15
11+f17 = (11+17)%19 = 9
and so on.
We take any two numbers in the set, add and “wrap around” the end to get the sum. We are creating our own addition operator here and the result is a bit unintuitive. After all 11+f17=9 just doesn’t look right for because we’re not used to Finite Field addition.
More generally, we define field addition this way:
a+fb=(a+b)%p where a, b ∈ Fp
We also define the additive inverse this way.
a ∈ Fp implies that -fa ∈ Fp
-fa = (-a) % p
Again, for clarity, we use -f to distinguish field subtraction and negation from integer subtraction and negation.
In F19:
-f9 = (-9) % 19 = 10
Which means that:
9 +f 10 = 0
And that turns out to be true.
Similarly, we can do field subtraction.
a-fb = (a-b)%p where a, b ∈ Fp
In F19:
11-f9=(11-9)%19=2
6-f13=(6-13)%19=12
and so on.
Solve these problems in F57 (assume all +’s here are +f and -`s here -f)
44+33
9-29
17+42+49
52-30-38
In the class FieldElement we can now define __add__ and __sub__ methods.
The idea of these methods is that we want something like this to work:
>>>fromeccimportFieldElement>>>a=FieldElement(7,13)>>>b=FieldElement(12,13)>>>c=FieldElement(6,13)>>>(a+b==c)True
In Python we can define what addition (or + operator) means for our class with the __add__ method.
So how do we do this?
We combine what we learned above with modulo arithmetic and create a new method of the class FieldElement like so:
def__add__(self,other):ifself.prime!=other.prime:raiseTypeError('Cannot add two numbers in different Fields')num=(self.num+other.num)%self.primereturnself.__class__(num,self.prime)
We have to ensure that the elements are from the same Finite Field, otherwise this calculation doesn’t have any meaning.
Addition in a Finite Field is defined with the modulo operator, as explained above.
We have to return an instance of the class, which we can conveniently access with self.__class__.
We pass the two initializing arguments, num and self.prime for the __init__ method above.
Note that we can use FieldElement instead of self.__class__, but this would not make the method easily inheritable.
We will be subclassing FieldElement later, so making the method inheritable is important here.
Write the corresponding __sub__ method which defines the subtraction of two FieldElement objects.
Just as we defined a new addition (+f) for Finite Fields that was closed, we can also define a new multiplication for Finite Fields that’s also closed. By multiplying the same number many times, we can also define exponentiation. In this section, we’ll go through exactly how to define this using modulo arithmetic.
Multiplication is adding multiple times.
5⋅3 = 5+5+5 = 15
8⋅17 = 8+8+8+…(17 total 8’s)…+8 = 136
We can define multiplication on a Finite Field the same way. Operating in F19 once again,
5⋅f3 = 5+f5+f5
8⋅f17 = 8+f8+f8+f…(17 total 8’s)…+f8
We already know how to do the right side, and that yields a number within the F19 set:
5⋅f3 = 5+f5+f5 = 15 % 19 = 15
8⋅f17 = 8+f8+f8+f…(17 total 8’s)…+f8 = (8⋅17) % 19 = 136 % 19 = 3
Note that the second result is pretty unintuitive. We don’t normally think of 8⋅f17=3, but that’s part of what’s necessary in order to define multiplication to be closed. That is, the result of field multiplication is always in the set {0,1,…p-1}.
Exponentiation is simply multiplying a number many times.
73=7⋅f7⋅f7=343
In a Finite Field, we can do exponentiation using modulo arithmetic.
In F19:
73=343 % 19=1
912=7
Exponentiation again gives us counter-intuitive results. We don’t normally think 73=1 or 912=7. Again, Finite Fields have to be defined so that the operations always result in a number within the field.
Solve the following equations in F97 (again, assume ⋅ and exponentiation are field versions):
95⋅45⋅31
17⋅13⋅19⋅44
127⋅7749
For k = 1, 3, 7, 13, 18, what is this set in F19?
{k⋅0, k⋅1, k⋅2, k⋅3, … k⋅18}
Do you notice anything about these sets?
The answer to Exercise 5 is why fields have to have a prime power number of elements. No matter what k you choose, as long as it’s greater than 0, multiplying the entire set by k will result in the same set as you started with.
Intuitively the fact that we have a prime order results in every element of a Finite Field being equivalent. If the order of the set was composite number, multiplying the set by one of the divisors would result in a smaller set.
Now that we understand what multiplication should be in FieldElement, we want to define the __mul__ method which overrides the * operator.
We want this to work:
>>>fromeccimportFieldElement>>>a=FieldElement(3,13)>>>b=FieldElement(12,13)>>>c=FieldElement(10,13)>>>(a*b==c)True
As we did with addition and subtraction above, the next exercise is to make multiplication work for our class by defining the __mul__ method.
Write the corresponding __mul__ method which defines the multiplication of two Finite Field elements.
We need to define the exponentiation for FieldElement, which in Python can be defined with the __pow__ method, overriding the ** operator.
The difference here is that the exponent is not a FieldElement, so has to be treated a bit differently.
We want something like this to work:
>>>fromeccimportFieldElement>>>a=FieldElement(3,13)>>>b=FieldElement(1,13)>>>(a**3==b)True
Note that because the exponent is an integer, instead of another instance of FieldElement, the method receives the variable exponent as an integer.
We can code it this way.
classFieldElement:...def__pow__(self,exponent):num=(self.num**exponent)%self.primereturnself.__class__(num,self.prime)
This is a perfectly fine way to do it, but pow(self.num, exponent, self.prime) is more efficient.
We have to return an instance of the class as before.
Why don’t we force the exponent to be a FieldElement object?
It turns out that the exponent doesn’t have to be a member of the Finite Field in order for the math to work out.
In fact, if it were, the exponents wouldn’t display the intuitive behavior we would expect from exponents, like being able to add the exponents when you multiply with the same base.
Some of what we’re doing now may seem slow for large numbers, but we’ll use some clever tricks to improve the performance of these algorithms.
For p = 7, 11, 17, 31, what is this set in Fp?
{1(p-1), 2(p-1), 3(p-1), 4(p-1), … (p-1)(p-1)}
The intuition that helps us with addition, subtraction, multiplication and perhaps even exponentiation unfortunately doesn’t help us quite as much in division. Because division is the hardest one to make sense of, we’ll start with something that should make sense.
In normal math, division is the inverse of multiplication:
7⋅8 = 56 implies that 56/8 = 7
12⋅2 = 24 implies that 24/12 = 2
And so on. We can use this as the definition of division to help us. Note that like normal math, you cannot divide by 0.
In F19, we know that:
3⋅f7=21%19=2 implies that 2/f7=3
9⋅f5=45%19=7 implies that 7/f5=9
This is very unintuitive as we generally think of 2/f7 or 7/f5 as fractions, not nice Finite Field elements. Yet that is one of the remarkable things about Finite Fields: Finite Fields are closed under division. That is, dividing any two numbers where the denominator is not 0 will result in another Finite Field element.
The question you might be asking yourself is, how do I calculate 2/f7 if I don’t know beforehand that 3⋅f7=2? This is indeed a very good question and in order to answer it, we’ll have to use the result from the Exercise 7.
In case you didn’t get it, the answer is that n(p-1) is always 1 for every p that is prime and every n > 0. This is a beautiful result from number theory called Fermat’s Little Theorem. Essentially, the theorem says:
n(p-1)%p=1 where p is prime
Since we are operating in prime fields, this will always be true.
Because division is the inverse of multiplication, we know:
a/b=a⋅f(1/b)=a⋅fb-1
We can reduce the division problem to a multiplication problem as long as we can figure out what b-1 is. This is where Fermat’s Little Theorem comes into play. We know:
b(p-1)=1
Because p is prime. Thus:
b-1=b-1⋅f1=b-1⋅fb(p-1)=b(p-2)
or
b-1=b(p-2)
In F19, this means practically that:
b18=1 which means that b-1=b17 for all b > 0.
So in other words, we can calculate the inverse using the exponentiation operator. In F19:
2/7=2⋅7(19-2)=2⋅717=465261027974414%19=3
7/5=7⋅5(19-2)=7⋅517=5340576171875%19=9
This is a relatively expensive calculation as exponentiating grows very fast.
Division is the most expensive operation for that reason.
To lessen the expensiveness, we can utilize the pow function in Python.
pow is a function that does exponentiation.
Thus something like pow(7,17) does the same thing as 7**17.
The pow function, however, has an optional third argument which makes our calculation more efficient.
Specifically, pow will modulo by the third argument.
Thus, pow(7,17,19) will give the same result as 7**17%19 but do so faster because the modulo function is done after each round of multiplication.
Solve the following equations in F31:
3 / 24
17-3
4-4⋅11
Write the corresponding __truediv__ method which defines the division of two field elements.
Note that in Python3, division is separated into __truediv__ and __floordiv__. The first does normal division, the second does integer division.
One last thing that we need to take care of before we leave this chapter is the __pow__ method, which will need to take care of negative exponents.
For example a-3 needs to be a Finite Field element, but the current code does not take care of this case.
We want, for example something like this to work:
>>>fromeccimportFieldElement>>>a=FieldElement(7,13)>>>b=FieldElement(8,13)>>>(a**-3==b)True
Unfortunately, the way we’ve defined __pow__ simply doesn’t handle negative exponents as the second parameter of the built-in Python function pow is required to be positive.
Thankfully, we can use some math we already know to solve this. We know from Fermat’s Little Theorem that:
ap-1 = 1
This fact means that we can multiply by ap-1 as many times as we want. So for a-3, for example, we can do:
a-3=a-3⋅ap-1=ap-4
This is a way we can do negative exponents. A naive implementation would do something like this:
classFieldElement:...def__pow__(self,exponent):n=exponentwhilen<0:n+=self.prime-1num=pow(self.num,n,self.prime)returnself.__class__(num,self.prime)
We add until we get a positive exponent
We use the Python built-in pow to make this more efficient
Thankfully, we can do even better.
We already know how to force a number out of being negative, using our familiar friend %!
As a bonus, we can also reduce very large exponents at the same time given that ap-1=1.
This will make the pow function not work as hard.
classFieldElement:...def__pow__(self,exponent):n=exponent%(self.prime-1)num=pow(self.num,n,self.prime)returnself.__class__(num,self.prime)
Make the exponent into something within the 0 to p-1 range
In this chapter we learned about Finite Fields and how to implement it in Python. We’ll be using Finite Fields in Chapter 3 for Elliptic Curve Cryptography. We turn next to the other mathematical component that we need for Elliptic Curve Cryptography and that’s Elliptic Curves.
In this chapter we’re going to learn about Elliptic Curves. In the Chapter 3, we will combine Elliptic Curves with Finite Fields to make Elliptic Curve Cryptography.
As in the Chapter 1, Elliptic Curves can look intimidating if you haven’t seen them before. Also as in Chapter 1, the actual math isn’t very difficult. Most of Elliptic Curves could have been taught to you after Algebra. In this chapter, we’ll get to what these curves are and what we can do with them.
Elliptic Curves are like many equations you’ve been seeing since pre-Algebra.
They have y on one side and x on the other in some form.
Elliptic Curves have a form like this:
y2=x3+ax+b
You’ve worked with other equations that look similar. For example, you probably learned the linear equation back in pre-Algebra:
y = mx + b
You may even remember that m here has the name slope and b, y-intercept. You can also graph linear equations like Figure 2-1:
Similarly, you’re probably familiar with the quadratic equation and its graph (Figure 2-2):
y = ax2+bx+c
And sometime around Algebra, you did even higher orders of x, something called the cubic equation and its graph (Figure 2-3):
y = ax3+bx2+cx+d
An Elliptic Curve isn’t all that different. The only real difference between the Elliptic Curve and the cubic curve above is the y2 term on the left side. This has the effect of making the graph symmetric over the x-axis, shown in Figure 2-4:
The Elliptic Curve is also less steep than the cubic curve. Again, this is because of the y2 term on the left side. At times, the curve may even be disjoint like Figure 2-5:
If it helps, an Elliptic Curve can be though of as taking a cubic equation graph (Figure 2-6), taking only the part above the x-axis, flattening it out (Figure 2-7) and then mirroring the top half on the bottom half of the x-axis (Figure 2-8).
Specifically, the Elliptic Curve used in Bitcoin is called secp256k1 and it uses this particular equation:
y2=x3+7
The canonical form is y2=x3+ax+b so the curve is defined by the constants a=0, b=7.
The curve looks like Figure 2-9:
For a variety of reasons which will be made clear later, we are not interested in the curve itself, but specific points on the curve.
For example, in the curve y2=x3+5x+7, we are interested in the coordinate (-1,1).
We are thus going to define the class Point to be a point on a specific curve.
The curve has the form y2=x3+ax+b, so we can define the curve with just the two numbers a and b.
classPoint:def__init__(self,x,y,a,b):self.a=aself.b=bself.x=xself.y=yifself.y**2!=self.x**3+a*x+b:raiseValueError('({}, {}) is not on the curve'.format(x,y))def__eq__(self,other):returnself.x==other.xandself.y==other.y\andself.a==other.aandself.b==other.b
We check here that the point is actually on the curve.
Points are equal if and only if they are on the same curve and have the same coordinates
We can now create Point objects, and we will get an error if the point is not on the curve:
>>>fromeccimportPoint>>>p1=Point(-1,-1,5,7)>>>p2=Point(-1,-2,5,7)Traceback(mostrecentcalllast):File"<stdin>",line1,in<module>File"ecc.py",line143,in__init__raiseValueError('({}, {}) is not on the curve'.format(self.x,self.y))ValueError:(-1,-2)isnotonthecurve
In other words, __init__ will raise an exception when the point is not on the curve.
Determine which of these points are on the curve y2=x3+5x+7:
(2,4), (-1,-1), (18,77), (5,7)
Write the __ne__ method for Point.
Elliptic Curves are useful because of something called Point Addition. Point Addition is where we can do an operation on two of the points on the curve and get a third point, also on the curve. This is called “addition” because the operation has a lot of the intuitions we associate with what we call “addition”. For example, Point Addition is commutative. That is, adding point A to point B is the same as adding point B to point A.
The way we define Point Addition is as follows. It turns out that for every Elliptic Curve, a line will intersect it at either 1 point (Figure 2-10) or 3 points (Figure 2-11), except for a couple of special cases.
The two exceptions are when a line is tangent to the curve (Figure 2-13) and when a line is exactly vertical (Figure 2-12).
We will come back to these two cases later.
We can define point addition using the fact that lines intersect one or three times with the Elliptic Curve. Two points define a line, so since that line must intersect the curve at some point one more time. That third point reflected over the x-axis is the result of the point addition.
Like Finite Field Addition, we are going to define point addition. In our case, point addition is defined this way:
For any two points P1=(x1,y1) and P2=(x2,y2), we get P1+P2 by:
Find the point intersecting the Elliptic Curve a third time by drawing a line through P1 and P2
Reflect the resulting point over the x-axis
Visually, it looks like Figure 2-14:
We first draw a line through the two points we’re adding (A and B). The third intersection point is C. We then reflect that point over the x-axis, which puts us at the A+B point in Figure 2-14.
One of the properties that we are going to use is that point addition is not easily predictable. We can calculate point addition easily enough with a formula, but intuitively, the result of point addition can be almost anywhere given two points on the curve. Going back to Figure 2-14, A+B is to the right of both points, A+C would be somewhere between A and C on the x-axis, and B+C would be to the left of both points. In mathematics parlance, point addition is non-linear.
“Addition” in the name Point Addition satisfies certain properties that we think of as addition, such as:
Identity
Commutativity
Associativity
Invertibiltiy
Identity here means that there’s a zero. That is, there exists some point (I) which when added to a point (A) results in A. We’ll call this point the point at infinity (reasons for this will become clear in a bit). That is:
I + A = A
This is also related to invertibility. For some point A, there’s some other point -A which results in the Identity point. That is:
A + (-A) = I
Visually, these are points opposite the x-axis on the curve (see Figure 2-15).
This is why we call this point the point at infinity. We have one extra point in the Elliptic Curve which makes the vertical line intersect the curve a third time.
Commutativity means that A+B=B+A. This is obvious since the line going through A and B will intersect the curve a third time in the same place no matter the order.
Associativity means that (A+B) + C = A + (B+C). This isn’t obvious and is the reason for flipping over the x-axis.
You can see that in both Figure 2-16 and Figure 2-17, the final point is the same. While this doesn’t prove the associativity of point addition, the visual should at least give you the intuition that this is true.
To code point addition, we’re going to split it up into 3 steps:
Where the points are in a vertical line or using the Identity.
Where the points are not in a vertical line, but are different.
Where the two points are the same.
We first handle the identity, or the point at infinity.
Since we can’t easily use infinity in Python, we’ll use the None value instead.
What we want is this to work:
>>>fromeccimportPoint>>>p1=Point(-1,-1,5,7)>>>p2=Point(-1,1,5,7)>>>inf=Point(None,None,5,7)>>>(p1+inf)Point(-1,-1)_5_7>>>(inf+p2)Point(-1,1)_5_7>>>(p1+p2)Point(infinity)
In order to make this work, we have to do two things:
First, we have to adjust the __init__ method slightly so it doesn’t check that the curve equation is satisfied when we have the point at infinity.
Second, we have to overload the addition operator or __add__ as we did with the FieldElement class.
classPoint:def__init__(self,x,y,a,b):self.a=aself.b=bself.x=xself.y=yifself.xisNoneandself.yisNone:returnifself.y**2!=self.x**3+a*x+b:raiseValueError('({}, {}) is not on the curve'.format(x,y))def__add__(self,other):ifself.a!=other.aorself.b!=other.b:raiseTypeError('Points {}, {} are not on the same curve'.format(self,other))ifself.xisNone:returnotherifother.xisNone:returnself
x-coordinate and y-coordinate being None is how we signify the point at infinity.
Note that the next if statement will fail if we don’t return here.
We overload the + operator here
self.x being None means that self is the point at infinity, or the additive identity.
Thus, we return other
self.x being None means that other is the point at infinity, or the additive identity.
Thus, we return self
Handle the case where the two points are additive inverses. That is, they have the same x, but a different y, causing a vertical line. This should return the point at infinity.
Now that we’ve covered the vertical line, we’re now proceeding to when the points are different.
When we have points where the x’s differ, we can add using a fairly simple formula.
To help with intuition, we’ll first find the slope created by the two points.
You can figure this out using a formula from pre-Algebra:
P1=(x1,y1), P2=(x2,y2), P3=(x3,y3)
P1+P2=P3
s=(y2-y1)/(x2-x1)
This is the slope and we can use the slope to calculate x3. Once we know x3, we can calculate y3. P3 can be derived using this formula:
x3=s2-x1-x2
y3=s(x1-x3)-y1
Remember that y3 is the reflection over the x-axis.
For the curve y2=x3+5x+7, what is (2,5) + (-1,-1)?
We now code this into our library.
That means we have to adjust the __add__ method to handle the case where x1≠x2.
We have the formulas:
s=(y2-y1)/(x2-x1)
x3=s2-x1-x2
y3=s(x1-x3)-y1
At the end of the method, we return an instance of the class Point using self.__class__ to make subclassing easier..
Write the __add__ method where x1≠x2
When the x coordinates are the same and the y coordinate is different, we have the situation where the points are opposite each other over the x-axis.
We know that this means:
P1=-P2 or P1+P2=I
We’ve already handled this in Exercise 3.
What happens when P1=P2? Visually, we have to calculate the line that’s tangent to the curve at P1 and find the point at which the line intersects the curve. The situation looks like this as we saw before (see Figure 2-18):
Once again, we’ll find the slope of the tangent point.
P1=(x1,y1), P3=(x3,y3)
P1+P1=P3
s=(3x12+a)/(2y1)
The rest of the formula goes through as before, except x1=x2, so we can combine them:
x3=s2-2x1
y3=s(x1-x3)-y1
We can derive the slope of the tangent line using some slightly more advanced math: calculus. We know that the slope at a given point is
dy/dx
To get this, we need to take the derivative of both sides of the Elliptic Curve equation:
y2=x3+ax+b
Taking the derivative of both sides, we get:
2y dy=(3x2+a) dx
Solving for dy/dx, we get:
dy/dx=(3x2+a)/(2y)
That’s how we arrive at the slope formula. The rest of the results from the point addition formula derivation hold.
For the curve y2=x3+5x+7, what is (2,5) + (-1,-1)?
We adjust the __add__ method to account for this particular case.
We have the formulas, we now implement them.
s=(3x12+a)/(2y1)
x3=s2-2x1
y3=s(x1-x3)-y1
Write the __add__ method when P1=P2.
There is one more exception and this involves the case where the tangent line is vertical (Figure 2-19):
This can only happen if P1=P2 and the y-coordinate is 0, in which case the slope calculation will end up with a 0 in the denominator.
We handle this with a special case:
classPoint:...def__add__(self,other):...ifself==otherandself.y==0*self.x:returnself.__class__(None,None,self.a,self.b)
If the two points are equal and the y coordinate is zero, we return the point at infinity.
The previous two chapters covered some fundamental math. We learned how Finite Fields work and we also learned what an Elliptic Curve is. In this chapter, we’re going to combine the two concepts to learn Elliptic Curve Cryptography. Specifically, we’re going to build the primitives needed to sign and verify messages, which is at the heart of what Bitcoin does.
We discussed in Chapter 2 what an Elliptic Curve looks like visually because we were plotting the curve over real numbers. Specifically, it’s not just integers or even rational numbers, but all real numbers. Pi, sqrt(2), e+7th root of 19, etc are all part of real numbers.
This worked because real numbers are also a field. Note unlike a finite field, there are an infinite number of real numbers, but otherwise the same properties hold:
If a and b are in the set, a+b and a⋅b are in the set.
The additive identity, 0 exists and has the property a + 0 = a.
The multiplicative identity, 1 exists and has the property a ⋅ 1 = a.
If a is in the set, -a is in the set, which is defined as the value that makes a + (-a) = 0.
If a is in the set and is not 0, a-1 is in the set, which is defined as the value that makes a ⋅ a-1 = 1.
Clearly, all of these are true as normal addition and multiplication apply for the first part, additive and multiplicative identities 0 and 1 exist, -x is the additive inverse and 1/x is the multiplicative inverse.
Real numbers are easy to plot and we can see the a graph over reals visually. For example, y2=x3+7 can be plotted like Figure 3-1:
It turns out we can use the point addition equations over any field, including the Finite Fields we learned in Chapter 1. The only difference is that we have to use the addition/subtraction/multiplication/division as defined in Chapter 1, not the “normal” versions that the real numbers use.
So what does an Elliptic Curve over a Finite Field look like? Let’s look at the equation y2=x3+7 over F103. We can verify that the point (17,64) is on the curve by calculating both sides of the equation:
y2=642%103=79
x3+7=(173+7)%103=79
We’ve verified that the point is on the curve using Finite Field math.
Because we’re evaluating the equation over a Finite Field, the plot of the equation looks vastly different (Figure 3-2):
As you can see, it’s very much a scattershot of points and there’s no smooth curve here. This is not surprising since the points are discrete. About the only pattern is that the curve is symmetric right around the middle, which is due to the y2 term. The graph is not symmetric over the x-axis as in the curve over reals, but about half-way up the y-axis due to there not being negative numbers in a Finite Field.
What’s amazing is that we can use the same point addition equations with the addition, subtraction, multiplication, division and exponentiation as we defined them for Finite Fields and everything still works. This may seem surprising, but abstract math has regularities like this despite being different than the traditional modes of calculation you may be familiar with.
Evaluate whether these points are on the curve y2=x3+7 over F223
(192,105), (17,56), (200,119), (1,193), (42,99)
Because we defined an Elliptic Curve point and we defined the +, - ,* and / operators for Finite Fields, we can combine the two classes to create Elliptic Curve points over a Finite Field.
>>>fromeccimportFieldElement,Point>>>a=FieldElement(num=0,prime=223)>>>b=FieldElement(num=7,prime=223)>>>x=FieldElement(num=192,prime=223)>>>y=FieldElement(num=105,prime=223)>>>p1=Point(x,y,a,b)>>>(p1)Point(FieldElement_223(192),FieldElement_223(105))_FieldElement_223(0)_FieldElement_223(7)
When initializing Point, we will run through this part of the code:
classPoint:def__init__(self,x,y,a,b):self.a=aself.b=bself.x=xself.y=yifself.xisNoneandself.yisNone:returnifself.y**2!=self.x**3+a*x+b:raiseValueError('({}, {}) is not on the curve'.format(x,y))
The addition (+), multiplication (*), exponentiation (**) and equality (!=) here use the __add__, __mul__, __pow__ and __ne__ methods from FiniteField respectively and not the integer equivalents.
Being able to do the same equation but with different definitions for the basic arithmetic operators is how we construct an Elliptic Curve Cryptography library.
We’ve already coded the two classes that we need to implement Elliptic Curve points over a Finite Field. However, to check our work, it will be useful to create a test suite. We will do this using the results of Exercise 2.
classECCTest(TestCase):deftest_on_curve(self):prime=223a=FieldElement(0,prime)b=FieldElement(7,prime)valid_points=((192,105),(17,56),(1,193))invalid_points=((200,119),(42,99))forx_raw,y_rawinvalid_points:x=FieldElement(x_raw,prime)y=FieldElement(y_raw,prime)Point(x,y,a,b)forx_raw,y_rawininvalid_points:x=FieldElement(x_raw,prime)y=FieldElement(y_raw,prime)withself.assertRaises(ValueError):Point(x,y,a,b)
We pass in FieldElement objects into the Point class for initialization.
This will, in turn, use all the overloaded math operations in FieldElement
We can now run this test like so:
>>>importecc>>>fromhelperimportrun>>>run(ecc.ECCTest('test_on_curve')).----------------------------------------------------------------------Ran1testin0.001sOK
helper is a module with some very useful utility functions, including the ability to run unit tests individually.
We can use all the same equations over Finite Fields, including the linear equation:
y=mx+b
It turns out that a “line” in a Finite Field is not quite what you’d expect (Figure 3-3):
The equation nevertheless works and we can calculate what y should be for a given x.
Remarkably, point addition works over Finite Fields as well. This is because the Elliptic Curve point addition works over all fields! The same exact formulas we used to calculate point addition over reals work over Finite Fields. Specifically:
when x1≠x2:
P1=(x1,y1), P2=(x2,y2), P3=(x3,y3)
P1+P2=P3
s=(y2-y1)/(x2-x1)
x3=s2-x1-x2
y3=s(x1-x3)-y1
when P1=P2:
P1=(x1,y1), P3=(x3,y3)
P1+P1=P3
s=(3x12+a)/(2y1)
x3=s2-2x1
y3=s(x1-x3)-y1
All of the equations for Elliptic Curves work over Finite Fields and that sets us up to create some cryptographic primitives.
Because we coded FieldElement in such a way as to define __add__, __sub__, __mul__, __truediv__, __pow__, __eq__ and __ne__, we can simply initialize Point with FieldElement objects and point addition will work:
>>>fromeccimportFieldElement,Point>>>prime=223>>>a=FieldElement(num=0,prime=prime)>>>b=FieldElement(num=7,prime=prime)>>>x1=FieldElement(num=192,prime=prime)>>>y1=FieldElement(num=105,prime=prime)>>>x2=FieldElement(num=17,prime=prime)>>>y2=FieldElement(num=56,prime=prime)>>>p1=Point(x1,y1,a,b)>>>p2=Point(x2,y2,a,b)>>>(p1+p2)Point(FieldElement_223(170),FieldElement_223(142))_FieldElement_223(0)_FieldElement_223(7)
For the curve y2=x3+7 over F223, find:
(170,142) + (60,139)
(47,71) + (17,56)
(143,98) + (76,66)
Extend ECCTest to test for the additions from the previous exercise. Call this test_add.
Because we can add a point to itself, we can introduce some new notation:
(170,142) + (170,142) = 2⋅(170,142)
Similarly, because we have associativity, we can actually add the point again:
2⋅(170,142) + (170,142) = 3⋅(170, 142)
We can do this as many times as we want. This is what we call Scalar Multiplication. That is, we have a scalar number in front of the point. We can do this because we have defined point addition and point addition is associative.
One property of scalar multiplication is that it’s really hard to predict without calculating (see Figure 3-4):
Each point is labeled by how many times we’ve added the point. You can see that this is a complete scattershot. This is because point addition is non-linear and not easy to calculate. Performing scalar multiplication is straightforward, but doing the opposite, Point division, is not.
This is called the Discrete Log problem and is the basis of Elliptic Curve Cryptography.
Another property of scalar multiplication is that at a certain multiple, we get to the point at infinity (remember, point at infinity is the additive identity or 0). If we imagine a point G and scalar multiply until we get the point at infinity, we end up with a set:
{ G, 2G, 3G, 4G, … nG } where nG=0
It turns out that this set is called a Group and because n is finite, we have a Finite Group (or more specifically a Finite Cyclic Group).
Groups are interesting mathematically because they behave a lot like addition:
G+4G=5G or aG+bG=(a+b)G
When we combine the fact that scalar multiplication is easy to go in one direction but hard in the other and the mathematical properties of a Group, we have exactly what we need for Elliptic Curve Cryptography.
For the curve y2=x3+7 over F223, find:
2⋅(192,105)
2⋅(143,98)
2⋅(47,71)
4⋅(47,71)
8⋅(47,71)
21⋅(47,71)
Scalar Multiplication is adding the same point to itself some number of times.
The key making scalar multiplication into Public Key Cryptography is the fact that scalar multiplication on Elliptic Curves is very hard to reverse.
Note the previous exercise.
Most likely, you calculated the point s⋅(47,71) in F223 for s from 1 until 21.
Here are the results:
>>>fromeccimportFieldElement,Point>>>prime=223>>>a=FieldElement(0,prime)>>>b=FieldElement(7,prime)>>>x=FieldElement(47,prime)>>>y=FieldElement(71,prime)>>>p=Point(x,y,a,b)>>>forsinrange(1,21):...result=s*p...('{}*(47,71)=({},{})'.format(s,result.x.num,result.y.num))1*(47,71)=(47,71)2*(47,71)=(36,111)3*(47,71)=(15,137)4*(47,71)=(194,51)5*(47,71)=(126,96)6*(47,71)=(139,137)7*(47,71)=(92,47)8*(47,71)=(116,55)9*(47,71)=(69,86)10*(47,71)=(154,150)11*(47,71)=(154,73)12*(47,71)=(69,137)13*(47,71)=(116,168)14*(47,71)=(92,176)15*(47,71)=(139,86)16*(47,71)=(126,127)17*(47,71)=(194,172)18*(47,71)=(15,86)19*(47,71)=(36,112)20*(47,71)=(47,152)
If we look closely at the numbers, there’s no real discernible pattern to the scalar multiplication. The x-coordinates don’t always increase or decrease and neither do the y-coordinates. About the only pattern is that between 10 and 11, the x-coordinates are equal (10 and 11 have the same x, as do 9 and 12, 8 and 13 and so on). This is due to the fact that 21⋅(47,71)=0.
Scalar multiplication looks really random and that’s what gives this equation asymmetry. An asymmetric problem is one that’s easy to calculate in one direction, but hard to reverse. For example, it’s easy enough to calculate 12⋅(47,71). But if we were presented this:
s⋅(47,71)=(194,172)
Would you be able to solve for s?
We can look up the table above, but that’s because we have a small group.
We’ll see later that when we have numbers that are a lot larger, Discrete Log becomes an intractable problem.
The preceding math (Finite Fields, Elliptic Curves, combining the two), was really to bring us to this point. What we really want to generate for the purposes of Public Key Cryptography are Finite Cyclic Groups and it turns out that if we take a Generator Point from an Elliptic Curve over a Finite Field, we can generate a Finite Cyclic Group.
Unlike fields, groups have only a single operation. In our case, Point Addition is our operation. We also have a few other properties like closure, invertibility, commutativity and associativity. Lastly, we need the identity.
Let’s look at each property.
If you haven’t guessed by now, the identity is defined as the point at infinity, which is guaranteed to be in the group since we generate the group when we get to the point at infinity. So:
0 + A = A
We call 0 the point at infinity because visually, it’s the point that exists to help the math work out (Figure 3-5):
This is perhaps the easiest to prove since we generated the group in the first place by adding G over and over. Thus, two different elements look like this:
aG + bG
We know that the result is going to be:
(a+b)G
How do we know if this element is in the group?
If a+b < n (where n is the order of the group), then we know it’s in the group by definition.
If a+b >= n, then we know a < n and b < n, so a+b<2n so a+b-n<n.
(a+b-n)G=aG+bG-nG=aG+bG-0=aG+bG
More generally (a+b)G=((a+b)%n)G where n is the order of the group.
So we know that this element is in the group, proving closure.
Visually, invertibility is easy to see (Figure 3-6):
Mathematically, we know that if aG is in the group, (n-a)G is also in the group. You can add them together to get aG+(n-a)G=(a+n-a)G=nG=0.
We know from Point Addition that A+B=B+A (Figure 3-7):
This means that aG+bG=bG+aG, which proves commutativity.
For the curve y2=x3+7 over F223, find the order of the group generated by (15,86)
What we’re trying to do with the last exercise is this:
>>>fromeccimportFieldElement,Point>>>prime=223>>>a=FieldElement(0,prime)>>>b=FieldElement(7,prime)>>>x=FieldElement(15,prime)>>>y=FieldElement(86,prime)>>>p=Point(x,y,a,b)>>>(7*p)Point(infinity)
We want to be able to scalar multiply the point with some number.
Thankfully, there’s a method in Python called __rmul__ that can be used to override the front multiplication.
A naive implementation looks something like this:
classPoint:...def__rmul__(self,coefficient):product=self.__class__(None,None,self.a,self.b)for_inrange(coefficient):product+=selfreturnproduct
We start the product at 0, which in the case of Point Addition is the point at infinity.
We loop coefficient times and add the point each time
This is fine for small coefficients, but what if we have a very large coefficient? That is, a number that’s so large that we won’t be able to get out of this loop in a reasonable amount of time? For example, a coefficient of 1 trillion is going to take a really long time.
There’s a really cool technique called binary expansion that allows us to perform multiplication in log2(n) loops, which dramatically reduces the calculation time for large numbers.
For example, 1 trillion is 40 bits in binary, so we only have to loop 40 times for a number that’s generally considered very large.
classPoint:...def__rmul__(self,coefficient):coef=coefficientcurrent=selfresult=self.__class__(None,None,self.a,self.b)whilecoef:ifcoef&1:result+=currentcurrent+=currentcoef>>=1returnresult
current represents the point that’s at the current bit.
First time through the loop it represents 1*self, the second time, it will be 2*self, third time, 4*self, then 8*self and so on.
We double the point each time.
In binary the coefficients are 1, 10, 100, 1000, 10000, etc.
We start the result at 0, or the point at infinity.
We are looking at whether the right-most bit is a 1. If it is, then we add the value of the current bit.
We need to double the point until we’re past how big the coefficient can be.
We bit shift the coefficient to the right.
This is an advanced technique and if you don’t understand bitwise operators, think of representing the coefficient in binary and only adding the point where there are 1’s.
With __add__ and __rmul__, we can start defining some more complicated Elliptic Curves.
While we’ve been using relatively small primes for the sake of examples, we are not restricted to such small numbers. Small primes mean that we can use a computer to search through the entire Group. If the group has a size of 301, the computer can easily do 301 computations to reverse scalar multiplication or break Discrete Log.
But what if we made the prime larger? It turns out that we can choose much larger primes than we’ve been using. The security of Elliptic Curve Cryptography depends on computers not being able to go through the an appreciable fraction of the group.
An Elliptic Curve for Public Key Cryptography is defined with the following parameters:
We specify the a and b of the curve y2=x3+ax+b.
We specify the prime of the Finite Field, p.
We specify the x and y coordinates of the generator point G
We specify the order of the group generated by G, n.
These numbers are known publicly and together form the cryptographic curve. There are many cryptographic curves and they have different security/convenience trade-offs, but the one we’re most interested in is the one Bitcoin uses: secp256k1. The parameters for secp256k1 are these:
a = 0, b = 7, making the equation y2=x3+7
p = 2256-232-977
Gx =
0x79be667ef9dcbbac55a06295ce870b07029bfcdb2dce28d959f2815b16f81798
Gy =
0x483ada7726a3c4655da4fbfc0e1108a8fd17b448a68554199c47d08ffb10d4b8
n =
0xfffffffffffffffffffffffffffffffebaaedce6af48a03bbfd25e8cd0364141
Gx refers to the x-coordinate of the point G and Gy the y-coordinate.
The numbers starting with 0x indicate a hexadecimal number.
There are a few things to notice about this curve.
First, the equation is relatively simple.
Many curves have a and b that are much bigger.
secp256k1 has a really simple equation.
Second, p is really, really close to 2256.
This means that most numbers under 2256 are in the prime field and thus, any point on the curve has x and y-coordinates that are expressible in 256-bits each.
n is also very close to 2256.
This means any scalar multiple can also be expressed in 256 bits.
Third, 2256 is a really big number (See the How Big is 2256). Amazingly, any number below 2256 can be stored in 32 bytes. This means that we can store the private key relatively easily.
Since we know all of the parameters for secp256k1, we can verify in Python whether the generator point, G, is on the curve y2=x3+7:
>>>gx=0x79be667ef9dcbbac55a06295ce870b07029bfcdb2dce28d959f2815b16f81798>>>gy=0x483ada7726a3c4655da4fbfc0e1108a8fd17b448a68554199c47d08ffb10d4b8>>>p=2**256-2**32-977>>>(gy**2%p==(gx**3+7)%p)True
Furthermore, we can verify in Python whether the generator point, G, has the order n.
>>>fromeccimportFieldElement,Point>>>gx=0x79be667ef9dcbbac55a06295ce870b07029bfcdb2dce28d959f2815b16f81798>>>gy=0x483ada7726a3c4655da4fbfc0e1108a8fd17b448a68554199c47d08ffb10d4b8>>>p=2**256-2**32-977>>>n=0xfffffffffffffffffffffffffffffffebaaedce6af48a03bbfd25e8cd0364141>>>x=FieldElement(gx,p)>>>y=FieldElement(gy,p)>>>seven=FieldElement(7,p)>>>zero=FieldElement(0,p)>>>G=Point(x,y,zero,seven)>>>(n*G)Point(infinity)
Since we know the curve we will work in, this is a good time to create a subclass in Python to work exclusively with the parameters for secp256k1.
We’ll define the equivalent FieldElement and Point objects, but specific to the secp256k1 curve.
Let’s start by defining the field we’ll be working in.
P=2**256-2**32-977...classS256Field(FieldElement):def__init__(self,num,prime=None):super().__init__(num=num,prime=P)def__repr__(self):return'{:x}'.format(self.num).zfill(64)
We’re subclassing the FieldElement class so we don’t have to pass in P all the time.
We also want to display a 256-bit number consistently by filling 64 characters so we can see any leading zeroes.
Similarly, we can define a point on the secp256k1 curve and call it S256Point.
A=0B=7...classS256Point(Point):def__init__(self,x,y,a=None,b=None):a,b=S256Field(A),S256Field(B)iftype(x)==int:super().__init__(x=S256Field(x),y=S256Field(y),a=a,b=b)else:super().__init__(x=x,y=y,a=a,b=b)
In case we initialize with the point at infinity, we need to let x and y through directly instead of using the S256Field class.
We now have an easier way to initialize a point on the secp256k1 curve, without having to define the a and b every time like we have to with the Point class.
We can also define __rmul__ a bit more efficiently since we know the order of the group, n.
Since we’re coding Python, we’ll name this with a capital N to make it clear that N is a constant.
N=0xfffffffffffffffffffffffffffffffebaaedce6af48a03bbfd25e8cd0364141...classS256Point(Point):...def__rmul__(self,coefficient):coef=coefficient%Nreturnsuper().__rmul__(coef)
We can mod by n because nG=0.
That is, every n times we cycle back to zero or the point at infinity.
We can now define G directly and keep it around since we’ll be using it a lot going forward.
G=S256Point(0x79be667ef9dcbbac55a06295ce870b07029bfcdb2dce28d959f2815b16f81798,0x483ada7726a3c4655da4fbfc0e1108a8fd17b448a68554199c47d08ffb10d4b8)
Now checking that the order of G is n is trivial:
>>>fromeccimportG,N>>>(N*G)S256Point(infinity)
Finally, we have the tools that we need to do Public Key Cryptography operations.
The key operation that we need is P=eG which is an asymmetric equation.
We can easily compute P when we know e and G, but we cannot easily compute e when we know P and G.
This is the Discrete Log Problem described earlier.
The difficulty of Discrete Log will be essential to understanding signing and verification algorithms.
Generally, we call e the Private Key and P the Public Key.
We’ll note here that the private key is a single 256-bit number and the public key is a coordinate (x,y) where x and y are each 256-bit numbers.
To set up the motivation for why signing and verification exists, imagine this scenario. You want to prove that you are a really good archer, like at the level where you can hit any target you want within 500 yards as opposed to being able to hit any single target.
Now if someone could observe you and interact with you, proving this would be easy. Perhaps they would position your son 400 yards away with an apple on his head and challenge you to hit that apple with an arrow. You, being a very good archer, do this and prove your expertise. The target, if specified by the challenger, makes your archery skill easy to verify.
Unfortunately, this doesn’t scale very well. If, for example you wanted to prove this to 10 people, you would have to shoot 10 different arrows at 10 different targets from 10 different challenges. You could try to do something like have 10 people watch you shoot a single arrow, but since they can’t all choose the target, they can never be sure that you’re not just good at hitting one particular target instead of an arbitrary target. What we want is something that you can do once, requires no interaction but still proves that you are indeed, a good archer that can hit any target.
If, for example, you shot an arrow into a target of your choosing, then the people observing afterwards won’t necessarily be convinced. After all, you may be a sneaky person that paints the target around wherever your arrow happened to land. So what can you do?
Here’s a very clever thing you can do. Inscribe the tip of the arrow with the position of the target that you’re hitting (“apple on top of my son’s head”) and then hit that target with your arrow. Now anyone seeing the target can take an x-ray machine and look at the tip of the embedded arrow and see that the tip indeed says exactly where it was going to hit. The tip clearly had to be inscribed before the arrow was shot, so this can prove you are indeed a good archer (provided the actual target isn’t just one that you’ve practiced over and over).
This is the same technique we’re using with signing and verification, except what we’re proving isn’t that we’re good archers, but that we know a secret number. We want to prove possession of the secret without revealing the secret itself. We do this by putting the target into our calculation and hitting that target.
Ultimately this is going to be used in Transactions which will prove that the rightful owners of the secrets are spending the Bitcoins.
The inscribing of the target depends on the signature algorithm, and in our case, our signature algorithm is called Elliptic Curve Digital Signature Algorithm, or ECDSA for short.
The secret in our case is e satisfying:
eG = P
Where P is the public key and e is the private key.
The target that we’re going to aim at is a random 256-bit number, k.
We then do this:
kG = R
R is our target that we’re aiming for.
In fact, we’re only going to care about the x-coordinate of R, which we’ll call r.
You may have guessed already that r here stands for random.
We claim at this point that the following equation is equivalent to the Discrete Log Problem:
uG+vP=kG where k was chosen randomly and u,v≠0 can be chosen by the signer and G and P are known
This is due to the fact that:
uG+vP=kG implies vP=(k-u)G
Since v≠0, we can divide by the scalar multiple v.
P=((k-u)/v)G
If we know e, we have:
eG=((k-u)/v)G or e = (k-u)/v
This means than any (u,v) combination that satisfies the above equation will suffice.
If we don’t know e, we would have to play with (u,v) until` e = (k-u)/v`.
If we could solve this with any (u,v) combination, that would mean we’ll have solved P=eG while knowing only P and G.
In other words, we’d have broken the Discrete Log problem.
This means to provide a correct u and v, we either have to break the Discrete Log problem or we know the secret e.
Since we assume Discrete Log is hard, we can say e is assumed to be known by the one who came up with u and v.
One subtle thing that we haven’t talked about is that we have to incorporate the purpose of our shooting. This is a contract that gets fulfilled as a result of the shooting at the target. William Tell, for example, was shooting so that he could save his son (shoot the target and you get to save your son). You can imagine there would be other reasons to hit the target and the “reward” that the person hitting the target would receive. This has to be incorporated into our equations.
In signature/verification parlance, this is called the signature hash.
A hash is a deterministic function that takes arbitrary data into a data of fixed size.
This is a fingerprint of the message containing the intent of the shooter that anyone verifying the message already knows.
We denote this with the letter z.
This is incorporated into our uG+vP calculation this way:
u = z/s, v = r/s
Since r is used in the calculation of v, we now have the tip of the arrow inscribed.
We also have the intent of the shooter incorporated into u, so both the reason for shooting and the target that is being aimed at are now a part of the equation.
To make the equation work, we can calculate s:
uG+vP=R=kG
uG+veG=kG
u+ve=k
z/s+re/s=k
(z+re)/s=k
s=(z+re)/k
This is the basis of the signature algorithm and the two numbers in a signature are r and s.
Verification is straightforward:
kAt this point, you might be wondering why we don’t reveal k and instead reveal the x-coordinate of R or r.
If we were to reveal k, then:
uG+vP=R
uG+veG=kG
kG-uG=veG
(k-u)G = veG
(k-u) = ve
(k-u)*1/v = e
Means that our secret would be revealed, which would defeat the whole purpose of the signature. We can, however, reveal R.
It’s worth mentioning again, make sure you’re using truly random numbers for k, as even accidentally revealing k for a known signature is the equivalent of revealing your secret and losing your funds!
Signatures sign some fixed-length value (our “contract”), in our case something that’s 32 bytes.
The fact that 32 bytes is 256 bits is not a coincidence as the thing we’re signing will be a scalar for G.
In order to guarantee that the thing we’re signing is 32 bytes, we hash the document first.
In Bitcoin, the hashing function is hash256, or two rounds of sha256.
This guarantees the thing that we’re signing is exactly 32 bytes.
We will call the result of the hash, the signature hash, or z.
The signature that we are verifying has two components, (r, s).
The r is as above, it’s the x-coordinate of some point R that we’ll come back to.
The formula for s is as above:
s = (z+re)/k
Keep in mind that we know e (P = eG, or what we’re proving we know in the first place), we know k (kG = R, remember?) and we know z.
We will now construct R=uG+vP by defining u and v this way:
u = z/s
v = r/s
Thus:
uG + vP = (z/s)G + (r/s)P = (z/s)G + (re/s)G = ((z+re)/s)G
We know s = (z+re)/k so:
uG + vP = ( (z+re) / ((z+re)/k) )G = kG = R
We’ve successfully chosen u and v in a way as to generate R as we intended.
Furthermore, we used r in the calculation of v proving we knew what R should be.
The only way we could know the details of R beforehand is if we know e.
To whit, here are the steps:
We are given (r, s) as the signature, z as the hash of the thing being signed and P, the public key (or public point) of the signer.
We calculate u = z/s, v = r/s
We calculate uG + vP = R
If R’s x coordinate equals r, the signature is valid.
The calculation of z requires two rounds of sha256, or hash256.
You may be wondering why there are two rounds when only 1 is necessary to get a 256-bit number.
The reason is for security.
There is a well-known hash collision attack on sha1 called a birthday attack which makes finding collisions much easier. Google found a sha1 collision using some modifications of a birthday attack and a lot of other things in 2017 (https://security.googleblog.com/2017/02/announcing-first-sha1-collision.html). Using sha1 twice, or double-sha1 is the way to defeat slow down some forms of this attack.
Two rounds of sha256 don’t necessarily prevent all possible attacks, but doing two rounds is a defense against some potential weaknesses.
We can now verify a signature using some of the primitives that we have.
>>>fromeccimportS256Point,G,N>>>z=0xbc62d4b80d9e36da29c16c5d4d9f11731f36052c72401a76c23c0fb5a9b74423>>>r=0x37206a0610995c58074999cb9767b87af4c4978db68c06e8e6e81d282047a7c6>>>s=0x8ca63759c1157ebeaec0d03cecca119fc9a75bf8e6d0fa65c841c8e2738cdaec>>>px=0x04519fac3d910ca7e7138f7013706f619fa8f033e6ec6e09370ea38cee6a7574>>>py=0x82b51eab8c27c66e26c858a079bcdf4f1ada34cec420cafc7eac1a42216fb6c4>>>point=S256Point(px,py)>>>s_inv=pow(s,N-2,N)>>>u=z*s_inv%N>>>v=r*s_inv%N>>>((u*G+v*point).x.num==r)True
Note that we use Fermat’s Little Theorem for 1/s, since n is prime.
u = z/s
v = r/s
uG+vP = (r,y). We need to check that the x-coordinate is r
Verify whether these signatures are valid:
P = (0x887387e452b8eacc4acfde10d9aaf7f6d9a0f975aabb10d006e4da568744d06c,
0x61de6d95231cd89026e286df3b6ae4a894a3378e393e93a0f45b666329a0ae34)
# signature 1
z = 0xec208baa0fc1c19f708a9ca96fdeff3ac3f230bb4a7ba4aede4942ad003c0f60
r = 0xac8d1c87e51d0d441be8b3dd5b05c8795b48875dffe00b7ffcfac23010d3a395
s = 0x68342ceff8935ededd102dd876ffd6ba72d6a427a3edb13d26eb0781cb423c4
# signature 2
z = 0x7c076ff316692a3d7eb3c3bb0f8b1488cf72e1afcd929e29307032997a838a3d
r = 0xeff69ef2b1bd93a66ed5219add4fb51e11a840f404876325a1e8ffe0529a2c
s = 0xc7207fee197d27c618aea621406f6bf5ef6fca38681d82b2f06fddbdce6feab6
We already have a class S256Point which is the public point for the private key.
We create a Signature class that houses the r and s values:
classSignature:def__init__(self,r,s):self.r=rself.s=sdef__repr__(self):return'Signature({:x},{:x})'.format(self.r,self.s)
We will be doing more with this class in Chapter 4.
We can write the verify method on S256Point based on the above.
classS256Point(Point):...defverify(self,z,sig):s_inv=pow(sig.s,N-2,N)u=z*s_inv%Nv=sig.r*s_inv%Ntotal=u*G+v*selfreturntotal.x.num==sig.r
s_inv (1/s) is calculated using Fermat’s Little Theorem on the order of the group n which is prime.
u = z/s.
Note that we can mod by n as that’s the order of the group.
v = r/s.
Note that we can mod by n as that’s the order of the group.
uG+vP should be R
We check that the x-coordinate is r
So given a public key, which is a point on the secp256k1 curve and a signature hash, z, we can verify whether a signature is valid or not.
Given that we know how verification should work, signing is straightforward.
The only missing step is figuring out what k, and thus R=kG to use.
We do this by choosing a random k.
Signing Procedure:
We are given z and know e such that eG=P.
Choose a random k
Calculate R=kG and r=x-coordinate of R
Calculate s = (z+re)/k
Signature is (r,s)
Note that the pubkey P has to be transmitted to whoever wants to verify and z must be known by the verifier.
We’ll see later that z is computed and P is sent along with the signature.
We can now create a signature using some of the primitives that we have.
Note that using something like the random library from Python to do cryptography is generally not a good idea.
This library is for teaching purposes only, so please don’t use any of the code explained to you here for production purposes.
>>>fromeccimportS256Point,G,N>>>fromhelperimporthash256>>>e=int.from_bytes(hash256(b'my secret'),'big')>>>z=int.from_bytes(hash256(b'my message'),'big')>>>k=1234567890>>>r=(k*G).x.num>>>k_inv=pow(k,N-2,N)>>>s=(z+r*e)*k_inv%N>>>point=e*G>>>(point)S256Point(028d003eab2e428d11983f3e97c3fa0addf3b42740df0d211795ffb3be2f6c52,\0ae987b9ec6ea159c78cb2a937ed89096fb218d9e7594f02b547526d8cd309e2)>>>(hex(z))0x231c6f3d980a6b0fb7152f85cee7eb52bf92433d9919b9c5218cb08e79cce78>>>(hex(r))0x2b698a0f0a4041b77e63488ad48c23e8e8838dd1fb7520408b121697b782ef22>>>(hex(s))0xbb14e602ef9e3f872e25fad328466b34e6734b7a0fcd58b1eb635447ffae8cb9
This is an example of a “brain wallet” which is a way to keep the private key in your head without having to memorize something too difficult. Please don’t use this for a real secret.
This is the signature hash, or hash of the message that we’re signing.
We’re going to use a fixed k here for demonstration purposes.
kG = (r,y) so we take the x coordinate only
s = (z+re)/k.
We can mod by n because we know this is a cyclical group of order n.
The public point needs to be known by the verifier
Sign the following message with the secret
e = 12345
z = int.from_bytes(hash256('Programming Bitcoin!'), 'big')
In order to program message signing, we now create a PrivateKey class which will house our secret.
classPrivateKey:def__init__(self,secret):self.secret=secretself.point=secret*Gdefhex(self):return'{:x}'.format(self.secret).zfill(64)
We keep around the public key, self.point, for convenience.
We now create the sign method.
fromrandomimportrandint...classPrivateKey:...defsign(self,z):k=randint(0,N)r=(k*G).x.numk_inv=pow(k,N-2,N)s=(z+r*self.secret)*k_inv%Nifs>N/2:s=N-sreturnSignature(r,s)
randint chooses a random integer from [0,n).
Please don’t use this function in production as the random number from this library is not nearly random enough.
r is the x-coordinate of kG
We use Fermat’s Little Theorem again and n, which is prime
s = (z+re)/k
It turns out that using the low-s value will get nodes to relay our transactions easier. This is for malleability reasons
We return a Signature object from above.
We’ve covered Elliptic Curve Cryptography and we can now prove that we know a secret by signing something and we can also verify that the person with the secret actually signed a message. Even if you don’t read another page in this book, you’ve learned to implement what was once considered “weapons grade munitions” (see https://en.wikipedia.org/wiki/Export_of_cryptography_from_the_United_States). This is a major step in your journey and will be essential for the rest of the book!
We now turn to serializing a lot of these structures so that we can store them on disk and send them over the network.
We’ve created a lot of classes thus far, including PrivateKey, S256Point and Signature.
We now need to start thinking about how to transmit these objects to other computers on the network, or even to disk.
This is where serialization comes into play.
We want to communicate or store a S256Point or a Signature or a PrivateKey.
Ideally, we want to do this efficiently for reasons we’ll see in Chapter 10 (Networking).
We’ll start with the S256Point class which is the public key class.
Recall that the public key in Elliptic Curve Cryptography is really a coordinate in the form of (x,y).
How can we serialize this data?
It turns out there’s already a standard for serializing ECDSA public keys called SEC. SEC stands for Standards for Efficient Cryptography and as the word “Efficient” in the name suggests, it’s got minimal overhead. There are two forms of SEC format that we need to be concerned with and the first is the uncompressed SEC format and the second compressed SEC format.
Here is how the uncompressed SEC format for a given point P=(x,y) is generated:
Start with the prefix byte which is 0x04.
Next, append the x-coordinate in 32 bytes as a Big-Endian integer.
Next, append the y-coordinate in 32 bytes as a Big-Endian integer.
The uncompressed SEC format is in Figure 4-1:
The motivation for Big and Little Endian encodings is storing a number on disk. A number under 256 is easy enough to encode as a single byte (28) is enough to hold it. When it’s bigger than 256, how do we serialize the number to bytes?
Arabic numerals are read left-to-right. A number like 123 is 100 + 20 + 3 and not 1 + 20 + 300. This is what we call Big-Endian because the Big End starts first.
Computers can sometimes be more efficient using the opposite order or, Little-Endian. That is, starting with the Little End first.
Since Computers work in bytes, which have 8 bits, we have to think in Base-256.
This means that a number like 500 looks like 01f4 in Big-Endian.
That is, 500 = 1*256 + 244 (f4 in hexadecimal).
The same number looks like f401 in Little-Endian.
Unfortunately, some serializations in Bitcoin (like the SEC format x and y coordinates) are Big-Endian. Other serializations in Bitcoin (like the transaction version number in Chapter 5) are in Little-Endian. This book will let you know which ones are Big vs Little Endian.
Creating the uncompressed SEC format serialization is pretty straightforward. The trickiest part being converting a 256-bit number into 32 bytes, Big-Endian. Here’s how this is done in code:
classS256Point(Point):...defsec(self):'''returns the binary version of the sec format'''returnb'\x04'+self.x.num.to_bytes(32,'big')\+self.y.num.to_bytes(32,'big')
In Python 3, you can convert a number to bytes using the to_bytes method.
The first argument is how many bytes it should take up and the second argument is the endianness (see Big and Little Endian).
Find the uncompressed SEC format for the Public Key where the Private Key secrets are:
5000
20185
0xdeadbeef12345
Recall that for any x-coordinate, there are at most two y-coordinates due to the y2 term in the elliptic curve equation (Figure 4-2):
It turns out that even over a Finite Field, we have the same symmetry.
This is because for any (x,y) that satisfies y2=x3+ax+b, (x,-y) also satisfies the equation.
Furthermore, in a Finite Field, -y (mod p) = p - y.
Or more accurately, if (x,y) satisfies the elliptic curve equation, (x,p-y) also satisfies the equation.
These are the only two solutions for a given x as shown above, so if we know x, we know y-coordinate has to be either y or p-y.
Since p is a prime number greater than 2, we know that p is odd.
Thus, if y is even, p-y (odd minus even) will be odd.
If y is odd, p-y will be even.
In other words, between y and p-y exactly one will be even and one will be odd.
This is something we can use to our advantage to shorten the Uncompressed SEC Format.
We can provide the x-coordinate and the even-ness of the y-coordinate.
We call this the Compressed SEC format because of how the y-coordinate is compressed into a single byte (namely, whether it’s even or odd).
Here is the serialization of the Compressed SEC format for a given point P=(x,y):
Start with the prefix byte.
If y is even, it’s 0x02, otherwise it’s 0x03.
Next, append the x-coordinate in 32 bytes as a Big-Endian integer.
The Compressed SEC format is in Figure 4-3:
Again, the procedure is pretty straightforward.
We can update the sec method to handle compressed SEC keys.
classS256Point(Point):...defsec(self,compressed=True):'''returns the binary version of the SEC format'''ifcompressed:ifself.y.num%2==0:returnb'\x02'+self.x.num.to_bytes(32,'big')else:returnb'\x03'+self.x.num.to_bytes(32,'big')else:returnb'\x04'+self.x.num.to_bytes(32,'big')+\self.y.num.to_bytes(32,'big')
The big advantage of the Compressed SEC format is that it only takes up 33 bytes instead of 65 bytes. This is a big savings when amortized over millions of transactions.
At this point, you may be wondering how you can analytically calculate y given the x-coordinate.
This requires us to calculate a square-root in a Finite Field.
Stated mathematically:
Find w such that w2 = v when we know v.
It turns out that if the Finite Field prime p % 4 = 3, we can do this rather easily. Here’s how.
First, we know:
p % 4 == 3
Which implies
(p + 1) % 4 == 0
That is (p+1)/4 is an integer.
By definition,
w2 = v
We are looking for a formula to calculate w. From Fermat’s Little Theorem:
wp-1 % p = 1
Which means:
w2=w2⋅1=w2⋅wp-1=w(p+1)
Since p is odd (recall p is prime), we know we can divide (p+1) by two and still get an integer implying
w=w(p+1)/2
Now we can use (p+1)/4 being an integer this way:
w=w(p+1)/2=w2(p+1)/4=(w2)(p+1)/4=v(p+1)/4
So our formula for finding the square root becomes:
if w2 = v and p % 4 = 3, w = v(p+1)/4
It turns out that the p used in secp256k1 is such that p % 4 == 3, so we can use this formula:
w2=v
w=v(p+1)/4
That will be one of the two possible w’s the other will be p-w. This is due to taking the square root means that both the positive and negative will work.
We can add this as a general method in the S256Field
classS256Field(FieldElement):...defsqrt(self):returnself**((P+1)//4)
When we get a serialized SEC pubkey, we can write a parse method to figure out which y we need:
classS256Point:...@classmethoddefparse(self,sec_bin):'''returns a Point object from a SEC binary (not hex)'''ifsec_bin[0]==4:x=int.from_bytes(sec_bin[1:33],'big')y=int.from_bytes(sec_bin[33:65],'big')returnS256Point(x=x,y=y)is_even=sec_bin[0]==2x=S256Field(int.from_bytes(sec_bin[1:],'big'))# right side of the equation y^2 = x^3 + 7alpha=x**3+S256Field(B)# solve for left sidebeta=alpha.sqrt()ifbeta.num%2==0:even_beta=betaodd_beta=S256Field(P-beta.num)else:even_beta=S256Field(P-beta.num)odd_beta=betaifis_even:returnS256Point(x,even_beta)else:returnS256Point(x,odd_beta)
The uncompressed is pretty straightforward.
The evenness of the y-coordinate is given in the first byte.
We take the square-root of the right side of the Elliptic Curve equation to get the y.
Determine evenness and return the correct point.
Find the Compressed SEC format for the Public Key where the Private Key secrets are:
5001
20195
0xdeadbeef54321
Another class that we need to learn to serialize is Signature.
Much like the SEC format, it needs to encode two different numbers, r and s.
Unfortunately, unlike S256Point, Signature cannot be compressed as s cannot be derived solely from r.
The standard for serializing signatures (and lots of other things, for that matter) is called DER format. DER stands for Distinguished Encoding Rules and was used by Satoshi to serialize signatures. This was most likely because the standard was already defined in 2008, supported in the OpenSSL library (used in Bitcoin at the time) and was easy enough to adopt, rather than creating a new standard.
DER Signature format is defined like this:
Start with the 0x30 byte
Encode the length of the rest of the signature (usually 0x44 or 0x45) and append
Append the marker byte 0x02
Encode r as a Big-Endian integer, but prepend with 0x00 byte if r’s first byte >= 0x80.
Prepend the resulting length to r.
Add this to the result.
Append the marker byte 0x02
Encode s as a Big-Endian integer, but prepend with 0x00 byte if s’s first byte >= 0x80.
Prepend the resulting length to s.
Add this to the result.
The rules for #4 and #6 with the first byte starting with something greater than or equal to 0x80 is because DER is a general encoding and allows for negative numbers to be encoded.
The first bit being 1 means that the number is negative.
All numbers in an ECDSA signature are positive, so we have to prepend with 0x00 if the first bit is zero which is equivalent to first byte >= 0x80.
The DER format is in Figure 4-4:
Because we know r is a 256-bit integer, r will be at most 32-bytes expressed as Big-Endian.
It’s also possible the first byte could be >= 0x80, so part 4 can be at most 33-bytes.
However, if r is a relatively small number, it could be less than 32 bytes.
Same goes for s and part 6.
Here’s how this is coded in Python:
classSignature:...defder(self):rbin=self.r.to_bytes(32,byteorder='big')# remove all null bytes at the beginningrbin=rbin.lstrip(b'\x00')# if rbin has a high bit, add a \x00ifrbin[0]&0x80:rbin=b'\x00'+rbinresult=bytes([2,len(rbin)])+rbinsbin=self.s.to_bytes(32,byteorder='big')# remove all null bytes at the beginningsbin=sbin.lstrip(b'\x00')# if sbin has a high bit, add a \x00ifsbin[0]&0x80:sbin=b'\x00'+sbinresult+=bytes([2,len(sbin)])+sbinreturnbytes([0x30,len(result)])+result
In Python 3, you can convert a list of numbers to the byte equivalents using bytes([some_integer1, some_integer2])
Overall, this is an inefficient way to encode r and s as there are at least 4 bytes that aren’t strictly necessary.
Find the DER format for a signature whose r and s values are:
r =
0x37206a0610995c58074999cb9767b87af4c4978db68c06e8e6e81d282047a7c6
s =
0x8ca63759c1157ebeaec0d03cecca119fc9a75bf8e6d0fa65c841c8e2738cdaec
In the early days of Bitcoin, Bitcoins were assigned to Public Keys specified in SEC format (uncompressed) and then were redeemed using DER signatures. For reasons we’ll get to in Chapter 6, using this particular very simple Script turned to be both wasteful for storing UTXOs and a little less secure than the Scripts in more prominent use now. For now, we’ll go through what addresses are and how they are encoded.
In order for Alice to pay Bob, she has to know where to send the money. This is true not just in Bitcoin, but any method of payment. Since Bitcoin is a digital bearer instrument, the address can be something like a public key in a public key cryptography scheme. Unfortunately, SEC format, especially uncompressed is a bit long (65 or 33 bytes). Furthermore, the 65 or 33 bytes are in binary format, not something that’s easy to read, at least raw.
There are three major considerations. The first is that the public key be readable (easy to hand write and not too difficult to mistake say over the phone). The second is that it’s short (not be so long that it’s cumbersome). The third is that it’s secure (harder to make mistakes).
So how do we get readability, compression and security? If we express the SEC format in hexadecimal (4 bits per character), it’s double the length (130 or 66 characters). Can we do better?
We can use something like Base64 which can express 6 bits per character and becomes 87 characters for uncompressed SEC and 44 characters for compressed SEC.
Unfortunately, Base64 is prone to mistakes as a lot of letters and numbers look similar (0 and O, l and I, - and _).
If we remove these characters, we can have something that’s got good readability and decent compression (around 5.86 bits per character).
Lastly, we can add a checksum at the end to ensure that mistakes are easy to detect.
This construction is called Base58. Instead of hexadecimal (base 16) or Base64, we’re encoding numbers in Base58.
The actual mechanics of doing the Base58 encoding are as follows.
All numbers, upper case letters and lower case letters are utilized except for the aforementioned 0/O and l/I.
That leaves us with 10 + 26 + 26 - 4 = 58.
Each of these characters represents a digit in base 58.
We can encode with a function that does exactly this:
BASE58_ALPHABET=b'123456789ABCDEFGHJKLMNPQRSTUVWXYZabcdefghijkmnopqrstuvwxyz'...defencode_base58(s):count=0forcins:ifc==0:count+=1else:breakprefix=b'1'*countnum=int.from_bytes(s,'big')result=bytearray()whilenum>0:num,mod=divmod(num,58)result.insert(0,BASE58_ALPHABET[mod])returnprefix+bytes(result)
The purpose of this loop is to determine how many of the bytes at the front are 0 bytes. We want to add them back at the end.
This is the loop that figures out what Base58 digit to use.
Finally, we prepend all the zeros that we counted at the front because otherwise, they wouldn’t show up as prefixed 1’s. This annoyingly happens with pay-to-pubkey-hash (p2pkh). More on that in Chapter 6.
This function will take any bytes in Python 3 and convert it to Base58.
Base58 has been used for a long time and while it does make it somewhat easier than something like Base64 to communicate, it’s not really that convenient. Most people prefer to copy and paste the addresses and if you’ve ever tried to communicate a Base58 address over voice, you know it can be a nightmare.
What’s much better is the new Bech32 standard which is defined in BIP0173.
Bech32 uses a 32-character alphabet that’s just numbers and lower case letters except 1, b, i and o.
These are thus far only used for Segwit (Chapter 13).
Convert the following hex to binary and then to Base58:
7c076ff316692a3d7eb3c3bb0f8b1488cf72e1afcd929e29307032997a838a3d
eff69ef2b1bd93a66ed5219add4fb51e11a840f404876325a1e8ffe0529a2c
c7207fee197d27c618aea621406f6bf5ef6fca38681d82b2f06fddbdce6feab6
The 264 bits from a compressed SEC format is still a bit too long, not to mention a bit less secure (see Chapter 6). To both shorten and increase security, we can use the ripemd160 hash to reduce the size to a 20-byte hash.
By not using the SEC format directly, we can go from 33 bytes to 20 bytes, shortening the address significantly. Here is how a Bitcoin address is created:
For mainnet addresses, start with the prefix 0x00, for testnet 0x6f.
Take the SEC format (compressed or uncompressed) and do a sha256 operation followed by the ripemd160 hash operation, the combination which is called a hash160 operation.
Combine the prefix from #1 and resulting hash from #2
Do a hash256 of the result from #3 and get the first 4 bytes.
Take the combination of #3 and #4 and encode in Base58.
Step 4 of this process is called the checksum. We can do steps 4 and 5 in one go this way:
defencode_base58_checksum(s):returnencode_base58(s+hash256(s)[:4]).decode('ascii')
Note that the .decode('ascii') part is necessary to convert from Python 3 bytes to a Python 3 string.
Testnet is a parallel bitcoin network that’s meant to be used by developers. The coins on there are not worth anything and the proof-of-work required to find a block relatively easy. The mainnet chain as of this writing has around 550,000 blocks, testnet has around 1,450,000 blocks, which is significantly more.
The process of doing a sha256 operation followed by a ripemd160 operation is called a hash160 operation in Bitcoin.
We can implement this in helper.py.
defhash160(s):'''sha256 followed by ripemd160'''returnhashlib.new('ripemd160',hashlib.sha256(s).digest()).digest()
Note that hashlib.sha256(s).digest() does the sha256 and the wrapper around it does the ripemd160.
We can also update S256Point to with hash160 and address methods.
classS256Point:...defhash160(self,compressed=True):returnhash160(self.sec(compressed))defaddress(self,compressed=True,testnet=False):'''Returns the address string'''h160=self.hash160(compressed)iftestnet:prefix=b'\x6f'else:prefix=b'\x00'returnencode_base58_checksum(prefix+h160)
Find the address corresponding to Public Keys whose Private Key secrets are:
5002 (use uncompressed SEC, on testnet)
20205 (use compressed SEC, on testnet)
0x12345deadbeef (use compressed SEC on mainnet)
The Private Key in our case is a 256-bit number. Generally, we are not going to need to serialize our secret that often as it doesn’t get broadcast (that would be a bad idea!). That said, there are instances where we may want to transfer your private key from one wallet to another, for example, from a paper wallet to a software wallet.
For this purpose, there is a format called WIF, which stands for Wallet Import Format. WIF is a serialization of the private key that’s meant to be human-readable. WIF uses the same Base58 encoding that addresses use.
Here is how the WIF format is created:
For mainnet private keys, start with the prefix 0x80, for testnet 0xef.
Encode the secret in 32-byte Big-Endian.
If the SEC format used for the public key address was compressed add a suffix of 0x01.
Combine the prefix from #1, serialized secret from #2 and suffix from #3
Do a hash256 of the result from #4 and get the first 4 bytes.
Take the combination of #4 and #5 and encode in Base58.
We can now create the wif method on the PrivateKey class.
classPrivateKey...defwif(self,compressed=True,testnet=False):secret_bytes=self.secret.to_bytes(32,'big')iftestnet:prefix=b'\xef'else:prefix=b'\x80'ifcompressed:suffix=b'\x01'else:suffix=b''returnencode_base58_checksum(prefix+secret_bytes+suffix)
Find the WIF for Private Key whose secrets are:
5003 (compressed, testnet)
20215 (uncompressed, testnet)
0x54321deadbeef (compressed, mainnet)
It will be very useful to know how Big and Little Endian are done in Python as the next few chapters will be parsing and serializing numbers to and from Big/Little Endian quite a bit. In particular, Satoshi used a lot of Little-Endian for Bitcoin and unfortunately, there’s no easy-to-learn rule for where Little-Endian is used and where Big-Endian is used. Recall that SEC format uses Big-Endian encoding as do addresses and WIF. From Chapter 5 onward, we will use Little-Endian encoding a lot more. For this reason, we turn to the next two exercises. The last exercise of this section is to create a testnet address for yourself.
Write a function little_endian_to_int which takes Python bytes, interprets those bytes in Little-Endian and returns the number.
Write a function int_to_little_endian which does the reverse of the last exercise.
Create a testnet address for yourself using a long secret that only you know. This is important as there are bots on testnet trying to steal testnet coins. Make sure you write this secret down somewhere! You will be using the secret later to sign Transactions.
Go to a testnet faucet (https://faucet.programmingbitcoin.com) and send some testnet coins to that address (it should start with m or n or else something is wrong).
If you succeeded, congrats!
You’re now the proud owner of some testnet coins!
In this chapter we learned how to serialize a lot of different structures that we created in the previous chapters. We now turn to Transactions which we can parse and understand.
Transactions are at the heart of Bitcoin. Transactions, simply put, are value transfers from one entity to another. We’ll see in Chapter 6 how “entities” in this case are really smart contracts. But we’re getting ahead of ourselves. Let’s first look at what Transactions in Bitcoin are, what they look like and how they are parsed.
At a high level, a Transaction really only has 4 components. They are:
Version
Inputs
Outputs
Locktime
A general overview of these fields might be helpful. Version indicates what additional features the transaction uses, Inputs define what Bitcoins are being spent, Outputs define where the Bitcoins are going and Locktime defines when this Transaction starts being valid. We’ll go through each component in depth.
Figure 5-1 shows a hexadecimal dump of a typical transaction that shows which parts are which.
The differently highlighted parts represent Version, Inputs, Outputs and Locktime respectively.
With this in mind, we can start constructing the Transaction class, which we’ll call Tx:
classTx:def__init__(self,version,tx_ins,tx_outs,locktime,testnet=False):self.version=versionself.tx_ins=tx_insself.tx_outs=tx_outsself.locktime=locktimeself.testnet=testnetdef__repr__(self):tx_ins=''fortx_ininself.tx_ins:tx_ins+=tx_in.__repr__()+'\n'tx_outs=''fortx_outinself.tx_outs:tx_outs+=tx_out.__repr__()+'\n'return'tx: {}\nversion: {}\ntx_ins:\n{}tx_outs:\n{}locktime: {}'.format(self.id(),self.version,tx_ins,tx_outs,self.locktime,)defid(self):'''Human-readable hexadecimal of the transaction hash'''returnself.hash().hex()defhash(self):'''Binary hash of the legacy serialization'''returnhash256(self.serialize())[::-1]
Input and Output are very generic terms so we specify what kind of inputs they are. We’ll define the specific object types they are later.
We need to know which network this transaction is on in order to be able to validate it fully.
The id is what block explorers use for looking up transactions.
It’s the hash256 of the transaction in hexadecimal format.
The hash is the hash256 of the serialization in Little-Endian.
Note we don’t have the serialize method yet, so until we do, this won’t work.
The rest of this chapter will be concerned with parsing Transactions. We could, at this point, write code like this:
classTx:...@classmethoddefparse(cls,serialization):version=serialization[0:4]...
This method has to be a class method as the serialization will return a new instance of a Tx object.
We assume here that the variable serialization is a byte array.
This could definitely work, but the transaction may be very large. Ideally, we want to be able to parse from a stream instead. This will allow us to not need the entire serialized transaction before we start parsing and that allows us to fail early and be more efficient. Thus, the code for parsing a transaction will look more like this:
classTx:...@classmethoddefparse(cls,stream):serialized_version=stream.read(4)...
The read method will allow us to parse on the fly as we won’t have to wait on I/O.
This is advantageous from an engineering perspective as the stream can be a socket connection on the network or a file handle.
We can start parsing the stream right away instead of waiting for the whole thing to be transmitted or read first.
Our method will be able to handle any sort of stream and return the Tx object that we need.
When you see a version number in something (Figure 5-2 shows an example), it’s meant to give the receiver information about what the versioned thing is supposed to represent. If, for example, you are running Windows 3.1, that’s a version number that’s very different than Windows 8 or Windows 10. You could specify just “Windows”, but specifying the version number after the operating system helps you know what features it has and what API’s you can program against.
Similarly, Bitcoin transactions have version numbers.
In Bitcoin’s case, the transaction version is generally 1, but there are cases where it can be 2 (transactions using an opcode called OP_CHECKSEQUENCEVERIFY as defined in BIP112 require use of version > 1).
You may notice here that the actual value in hexadecimal is 01000000, which doesn’t look like 1.
Interpreted as a Little-Endian integer, however, this number is actually 1 (recall the discussion from Chapter 4).
Write the version parsing part of the parse method that we’ve defined. To do this properly, you’ll have to convert 4 bytes into a Little-Endian integer.
Each input points to an output of a previous transaction (see Figure 5-3). This fact requires more explanation as it’s not intuitively obvious at first.
Bitcoin’s inputs are spending outputs of a previous transaction. That is, you need to have received Bitcoins first to spend something. This makes intuitive sense. You cannot spend money unless you received money first. The inputs refer to Bitcoins that belong to you. There are two things that each input needs to have:
A reference to the previous Bitcoins you received
Proof that these are yours to spend
The second part uses ECDSA (Chapter 3). You don’t want people to be able to forge this, so most inputs contain signatures which only the owner(s) of the private key(s) can produce.
The inputs field can contain more than one input. This is analogous to using a single 100 bill to pay for a 70 dollar meal or a 50 and a 20. The former only requires one input (“bill”) the latter requires 2. There are situations where there could be even more. In our analogy, we can pay for a 70 dollar meal with 14 5-dollar bills or even 7000 pennies. This would be analogous to 14 inputs or 7000 inputs.
The number of inputs is the next part of the transaction shown in Figure 5-4:
We can see that the byte is actually 01, which means that this transaction has 1 input.
It may be tempting here to assume that it’s always a single byte, but it’s not.
A single byte has 8 bits, so this means that anything over 255 inputs would not be expressible in a single byte.
This is where varint comes in.
Varint is shorthand for variable integer which is a way to encode an integer into bytes that range from 0 to 264-1.
We could, of course, always reserve 8 bytes for the number of inputs, but that would be a lot of wasted space if we expect the number of inputs to be a relatively small number (say under 200).
This is the case with the number of inputs in a normal transaction, so using varint helps to save space.
You can see how they work in the VarInt sidebar.
Each input contains 4 fields. The first two fields point to the previous transaction output and the last two fields define how the previous transaction output can be spent. The fields are as follows:
Previous Transaction ID
Previous Transaction Index
ScriptSig
Sequence
As explained above, each input is has a reference to a previous transaction’s output. The previous transaction ID is the hash256 of the previous transaction’s contents. The previous transaction ID uniquely defines the previous transaction as the probability of a hash collision is impossibly low. As we’ll see below, each transaction has to have at least 1 output, but may have many. Thus, we need to define exactly which output within a transaction that we’re spending which is captured in the previous transaction index.
Note that the previous transaction ID is 32 bytes and that the previous transaction index is 4 bytes. Both are in Little-Endian.
ScriptSig has to do with Bitcoin’s smart contract language Script, and we will be discussing it more thoroughly in Chapter 6. For now, think of ScriptSig as opening a locked box. Opening a locked box is something that can only be done by the owner of the transaction output. The ScriptSig field is a variable-length field, not a fixed-length field like most of what we’ve seen so far. A variable-length field requires us to define exactly how long the field will be which is why the field is preceded by a varint telling us how long the field is.
Sequence was originally intended as a way to do what Satoshi called “high frequency trades” with the Locktime field (see Sequence and Locktime), but is currently used with Replace-By-Fee and OP_CHECKSEQUENCEVERIFY.
Sequence is also in Little-Endian and takes up 4 bytes.
The fields of the input look like Figure 5-5:
Now that we know what the fields are, we can start creating a TxIn class in Python:
classTxIn:def__init__(self,prev_tx,prev_index,script_sig=None,sequence=0xffffffff):self.prev_tx=prev_txself.prev_index=prev_indexifscript_sigisNone:self.script_sig=Script()else:self.script_sig=script_sigself.sequence=sequencedef__repr__(self):return'{}:{}'.format(self.prev_tx.hex(),self.prev_index,)
We default to an empty ScriptSig.
A couple things to note here. The amount of each input is not specified. We have no idea how much is being spent unless we look up in the blockchain for the transaction(s) that we’re spending. Furthermore, we don’t even know if the transaction is unlocking the right box, so to speak, without knowing about the previous transaction. Every node must verify that this transaction unlocks the right box and that it doesn’t spend non-existent Bitcoins. How we do that is discussed more in Chapter 7.
We’ll delve more deeply into how Script is parsed in Chapter 6, but for now, here’s how you get a Script object from hexadecimal in Python:
>>>fromioimportBytesIO>>>fromscriptimportScript>>>script_hex=('6b483045022100ed81ff192e75a3fd2304004dcadb746fa5e24c5031ccf\cf21320b0277457c98f02207a986d955c6e0cb35d446a89d3f56100f4d7f67801c31967743a9c8\e10615bed01210349fc4e631e3624a545de3f89f5d8684c7b8138bd94bdd531d2e213bf016b278\a')>>>stream=BytesIO(bytes.fromhex(script_hex))>>>script_sig=Script.parse(stream)>>>(script_sig)3045022100ed81ff192e75a3fd2304004dcadb746fa5e24c5031ccfcf21320b0277457c98f0220\7a986d955c6e0cb35d446a89d3f56100f4d7f67801c31967743a9c8e10615bed010349fc4e631\e3624a545de3f89f5d8684c7b8138bd94bdd531d2e213bf016b278a
Note that the Script class will be more thoroughly explored in Chapter 6.
For now, please trust that the Script.parse method will create the object that we need.
Write the inputs parsing part of the parse method in Tx and the parse method for TxIn.
As hinted in the previous section, outputs define where the Bitcoins are going. Each transaction must have one or more outputs. Why would anyone have more than one output? An exchange may batch transactions, for example, and pay out a lot of people at once instead of generating a single transaction for every single person that requests Bitcoins.
Like inputs, the outputs serialization starts with how many outputs there are as a varint as shown in Figure 5-6.
Each output has two fields: Amount and ScriptPubKey. Amount is the amount of Bitcoin being assigned and is specified in satoshis, or 1/100,000,000th of a Bitcoin. This allows us to divide Bitcoin very finely, down to 1/300th of a penny in USD terms as of this writing. The absolute maximum for the amount is the asymptotic limit of Bitcoin (21 million Bitcoins) in satoshis, which is 2,100,000,000,000,000 (2100 trillion) satoshis. This number is greater than 232 (4.3 billion or so) and is thus stored in 64 bits, or 8 bytes. Amount is serialized in Little-Endian.
ScriptPubKey, like ScriptSig, has to do with Bitcoin’s smart contract language Script. Think of ScriptPubKey as the locked box that can only be opened by the holder of the key. ScriptPubKey can be thought of as a one-way safe that can receive deposits from anyone, but can only be opened by the owner of the safe. We’ll explore what this is in more detail in Chapter 6. Like ScriptSig, ScriptPubKey is a variable-length field and is preceded by the length of the field in a varint.
An output field look like Figure 5-7:
We can now start coding the TxOut class:
classTxOut:def__init__(self,amount,script_pubkey):self.amount=amountself.script_pubkey=script_pubkeydef__repr__(self):return'{}:{}'.format(self.amount,self.script_pubkey)
Write the outputs parsing part of the parse method in Tx and the parse method for TxOut.
Locktime is a way to time-delay a transaction. A transaction with a Locktime of 600,000 cannot go into the blockchain until block 600,000. This was originally construed as a way to do “high frequency trades” (see Sequence and Locktime), which turned out to be insecure. If the Locktime is greater or equal to 500,000,000, Locktime is a UNIX timestamp. If Locktime is less than 500,000,000, it is a block number. This way, transactions can be signed, but unspendable until a certain point in UNIX time or block height.
The serialization is in Little-Endian and 4-bytes (Figure 5-8).
The main problem with using Locktime is that the recipient of the transaction has no certainty that the transaction will be good when the Locktime comes. This is similar to a post-dated bank check, which has the possibility of bouncing. The sender can spend the inputs prior to the Locktime transaction getting into the blockchain invalidating the transaction at Locktime.
The uses before BIP0065 were limited.
BIP0065 introduced OP_CHECKLOCKTIMEVERIFY which makes Locktime more useful by making an output unspendable until a certain Locktime.
Write the Locktime parsing part of the parse method in Tx.
What is the ScriptSig from the second input, ScriptPubKey from the first output and the amount of the second output for this transaction?
010000000456919960ac691763688d3d3bcea9ad6ecaf875df5339e148a1fc61c6ed7a069e0100 00006a47304402204585bcdef85e6b1c6af5c2669d4830ff86e42dd205c0e089bc2a821657e951 c002201024a10366077f87d6bce1f7100ad8cfa8a064b39d4e8fe4ea13a7b71aa8180f012102f0 da57e85eec2934a82a585ea337ce2f4998b50ae699dd79f5880e253dafafb7feffffffeb8f51f4 038dc17e6313cf831d4f02281c2a468bde0fafd37f1bf882729e7fd3000000006a473044022078 99531a52d59a6de200179928ca900254a36b8dff8bb75f5f5d71b1cdc26125022008b422690b84 61cb52c3cc30330b23d574351872b7c361e9aae3649071c1a7160121035d5c93d9ac96881f19ba 1f686f15f009ded7c62efe85a872e6a19b43c15a2937feffffff567bf40595119d1bb8a3037c35 6efd56170b64cbcc160fb028fa10704b45d775000000006a47304402204c7c7818424c7f7911da 6cddc59655a70af1cb5eaf17c69dadbfc74ffa0b662f02207599e08bc8023693ad4e9527dc42c3 4210f7a7d1d1ddfc8492b654a11e7620a0012102158b46fbdff65d0172b7989aec8850aa0dae49 abfb84c81ae6e5b251a58ace5cfeffffffd63a5e6c16e620f86f375925b21cabaf736c779f88fd 04dcad51d26690f7f345010000006a47304402200633ea0d3314bea0d95b3cd8dadb2ef79ea833 1ffe1e61f762c0f6daea0fabde022029f23b3e9c30f080446150b23852028751635dcee2be669c 2a1686a4b5edf304012103ffd6f4a67e94aba353a00882e563ff2722eb4cff0ad6006e86ee20df e7520d55feffffff0251430f00000000001976a914ab0c0b2e98b1ab6dbf67d4750b0a56244948 a87988ac005a6202000000001976a9143c82d7df364eb6c75be8c80df2b3eda8db57397088ac46 430600
We’ve parsed the transaction, now we want to do the opposite, which is serializing the transaction.
Let’s start with TxOut:
classTxOut:...defserialize(self):'''Returns the byte serialization of the transaction output'''result=int_to_little_endian(self.amount,8)result+=self.script_pubkey.serialize()returnresult
We’re going to serialize the TxOut object to a bunch of bytes.
We can proceed to TxIn:
classTxIn:...defserialize(self):'''Returns the byte serialization of the transaction input'''result=self.prev_tx[::-1]result+=int_to_little_endian(self.prev_index,4)result+=self.script_sig.serialize()result+=int_to_little_endian(self.sequence,4)returnresult
Lastly, we can serialize Tx:
classTx:...defserialize(self):'''Returns the byte serialization of the transaction'''result=int_to_little_endian(self.version,4)result+=encode_varint(len(self.tx_ins))fortx_ininself.tx_ins:result+=tx_in.serialize()result+=encode_varint(len(self.tx_outs))fortx_outinself.tx_outs:result+=tx_out.serialize()result+=int_to_little_endian(self.locktime,4)returnresult
We’ve used the serialize methods of both TxIn and TxOut to serialize Tx.
Note that the transaction fee is not specified anywhere! This is because the fee is an implied amount. Fee is the total of the inputs amounts minus the total of the output amounts.
One of the consensus rules of Bitcoin is that for any non-Coinbase transactions (more on Coinbase transactions in Chapter 8), the sum of the inputs have to be greater than or equal to the sum of the outputs. You may be wondering why the inputs and outputs can’t just be forced to be equal. This is because if every transaction had zero cost, there wouldn’t be any incentive for miners to include transactions in blocks (see Chapter 9). Fees are a way to incentivize miners to include transactions. Transactions not in blocks (so called mempool transactions) are not part of the blockchain and are not final.
The transaction fee is simply the sum of the inputs minus the sum of the outputs. This difference is what the miner gets to keep. As inputs don’t have an amount field, we have to look up the amount. This requires access to the blockchain, specifically the UTXO set. If you are not running a full node, this can be tricky, as you now need to trust some other entity to provide you with this information.
We are creating a new class to handle this, called TxFetcher:
classTxFetcher:cache={}@classmethoddefget_url(cls,testnet=False):iftestnet:return'http://testnet.programmingbitcoin.com'else:return'http://mainnet.programmingbitcoin.com'@classmethoddeffetch(cls,tx_id,testnet=False,fresh=False):iffreshor(tx_idnotincls.cache):url='{}/tx/{}.hex'.format(cls.get_url(testnet),tx_id)response=requests.get(url)try:raw=bytes.fromhex(response.text.strip())exceptValueError:raiseValueError('unexpected response: {}'.format(response.text))ifraw[4]==0:raw=raw[:4]+raw[6:]tx=Tx.parse(BytesIO(raw),testnet=testnet)tx.locktime=little_endian_to_int(raw[-4:])else:tx=Tx.parse(BytesIO(raw),testnet=testnet)iftx.id()!=tx_id:raiseValueError('not the same id: {} vs {}'.format(tx.id(),tx_id))cls.cache[tx_id]=txcls.cache[tx_id].testnet=testnetreturncls.cache[tx_id]
We check that the ID is what we expect it to be
You may be wondering why we don’t get just the specific output for the transaction and instead get the entire transaction. This is because we don’t want to be trusting a third party! By getting the entire transaction, we can verify the transaction ID (hash256 of its contents) and be sure that we are indeed getting the transaction we asked for. This is impossible unless we receive the entire transaction.
As Nick Szabo eloquently wrote in his seminal essay “Trusted Third Parties are Security Holes” (https://nakamotoinstitute.org/trusted-third-parties/), trusting third parties to provide correct data is not a good security practice. The third party may be behaving well now, but you never know when they may get hacked, may have an employee go rogue or start implementing policies that are against your interests. Part of what makes Bitcoin secure is in not trusting, but verifying data that we’re given.
We can now create the appropriate method in TxIn to fetch the previous transaction and methods to get the previous transaction output’s amount and ScriptPubkey (the latter to be used in Chapter 6):
classTxIn:...deffetch_tx(self,testnet=False):returnTxFetcher.fetch(self.prev_tx.hex(),testnet=testnet)defvalue(self,testnet=False):'''Get the outpoint value by looking up the tx hashReturns the amount in satoshi'''tx=self.fetch_tx(testnet=testnet)returntx.tx_outs[self.prev_index].amountdefscript_pubkey(self,testnet=False):'''Get the ScriptPubKey by looking up the tx hashReturns a Script object'''tx=self.fetch_tx(testnet=testnet)returntx.tx_outs[self.prev_index].script_pubkey
Now that we have the amount method in TxIn which lets us access how many Bitcoins are in each transaction input, we can calculate the fee for a transaction.
Write the fee method for the Tx class.
We’ve covered exactly how to parse and serialize transactions along with the fields mean. There are two fields that require more explanation and they are both related to Bitcoin’s smart contract language, Script. To that topic we go in <chapter_script>>.
The ability to lock and unlock coins is the mechanism by which we transfer Bitcoin. Locking is giving some Bitcoins to some entity. Unlocking is spending some Bitcoins that you have received.
In this chapter we examine this locking/unlocking mechanism, which is often called a smart contract. Elliptic Curve Cryptography (Chapter 3) is used to Script to validate that the transaction was properly authorized (Chapter 5). Script essentially allows people to be able to prove that they have the right to spend certain UTXOs. We’re getting a little ahead of ourselves, though, so let’s start with how Script works and go from there.
If you are confused about what a “smart contract” is, don’t worry. “Smart contract” is a fancy way of saying “programmable” and the “smart contract language” is simply a programming language. In Bitcoin, Script is the smart contract language, or the programming language used to express the conditions under which bitcoins are spendable.
Bitcoin has the digital equivalent of a contract in Script. Script is a stack-based language similar to Forth. Script is intentionally limited in the sense that Script avoids certain features. Specifically, Script avoids any mechanism for loops and is therefore not Turing complete.
Turing completeness in a programming language essentially means that the program has the ability to loop. Loops are a useful construct in programming, so you may be wondering at this point why Script doesn’t have the ability to loop.
There are a lot of reasons for this, but let’s start with program execution. Anyone can create a Script program that every full node on the network executes. If Script were Turing Complete, it would be possible for the loop to go on executing forever. This would validating node to enter and never leave that loop. This would be an easy way to attack the network through what would be called a Denial of Service attack (DoS). A single Script that has an infinite loop could take down Bitcoin! This would be a large systematic vulnerability and protecting against this vulnerability is one of the major reasons why Turing-completeness is avoided. Ethereum, which has Turing Completeness in its smart contract language, Solidity, handles this problem by forcing contracts to pay for program execution with something called “gas”. An infinite loop will exhaust whatever gas is in the contract as by definition, it will run an infinite number of times.
There are other reasons to avoid Turing Completeness and that’s because smart contracts with Turing Completeness are very difficult to analyze. A Turing Complete smart contract’s execution conditions are very difficult to enumerate and thus it’s easy to create unintended behavior, causing bugs. Bugs in a smart contract mean that it’s vulnerable to being unintentionally spent, which means the contract participants could lose money. Such bugs are not just theoretical: this was the major problem in the DAO (Decentralized Autonomous Organization), a Turing Complete smart contract which ended with the Ethereum Classic hard fork.
Transactions assign Bitcoins to a locking Script. The locking Script is what’s specified in ScriptPubKey (see Chapter 5). Think of this as the lockbox where some money is deposited which only a particular key can open. The money inside, of course, can only be accessed by the owner who has the key.
The unlocking of the lockbox is done in the ScriptSig field (see Chapter 5) and proves ownership of the locked box which authorizes spending of the funds.
Script is a programming language and like most programming languages, processes one instruction at a time. The instructions operate on a stack of elements. There are two possible types of instructions: elements and operations.
Elements are data. Technically, they’re a push operation onto the stack of that element. They are byte strings of length 1 to 520. A typical element might be a DER signature or a SEC pubkey (Figure 6-1).
Operations do something to the data (Figure 6-2). They consume zero or more elements from the processing stack and push zero or more elements back on the stack.
A typical operation is OP_DUP (Figure 6-3), which will duplicate the top element (consuming 0) and pushing the new element to the stack (pushing 1).
OP_DUP duplicates the top elementAt the end of evaluating all the instructions, the top element of the stack must be non-zero for the Script to resolve as valid. Having no elements in the stack or the top element being zero would resolve as invalid. Resolving as invalid means that the transaction which includes the unlocking Script is not accepted on the network.
There are many other operations besides OP_DUP.
OP_HASH160 (Figure 6-4) does a sha256 followed by a ripemd160 (aka hash160) to the top element of the stack (consuming 1) and pushing a new element to the stack (pushing 1).
Note in the diagram that y = hash160(x).
OP_HASH160 does a sha256 followed by ripemd160 to the top elementAnother very important operation is OP_CHECKSIG (Figure 6-5).
OP_CHECKSIG consumes 2 elements from the stack, the first being the pubkey, the second being a signature, and examines if the signature is good for the given pubkey.
If so, OP_CHECKSIG pushes a 1 to the stack, otherwise pushes a 0 to the stack.
OP_CHECKSIG checks if the signature for the pubkey is valid or notWe can now code OP_DUP, given a stack.
OP_DUP simply duplicates the top element of the stack.
defop_dup(stack):iflen(stack)<1:returnFalsestack.append(stack[-1])returnTrue...OP_CODE_FUNCTIONS={...118:op_dup,...}
We have to have at least one element to duplicate, otherwise, we can’t execute this opcode.
This is how we duplicate the top element of the stack.
118 = 0x76 which is the code for OP_DUP
Note that we return a boolean with this opcode, as a way to tell whether the operation was successful. A failed operation automatically fails Script evaluation.
Here’s another one for OP_HASH256.
This opcode will consume the top element, perform a hash256 operation on it and push the result on the stack.
defop_hash256(stack):iflen(stack)<1:returnFalseelement=stack.pop()stack.append(hash256(element))returnTrue...OP_CODE_FUNCTIONS={...170:op_hash256,...}
Write the op_hash160 function.
Both ScriptPubKey and ScriptSig are parsed the same way.
If the byte is between 0x01 and 0x4b (which we call n), we read the next n bytes as an element.
Otherwise, the byte represents an operation, which we have to look up.
Here are some operations and their byte codes:
0x00 - OP_0
0x51 - OP_1
0x60 - OP_16
0x75 - OP_DUP
0x93 - OP_ADD
0xa9 - OP_HASH160
0xac - OP_CHECKSIG
You might be wondering what would happen if you had an element that’s greater than 0x4b (75 in decimal).
There are 3 specific opcodes for handling elements with length greater than 75, namely, OP_PUSHDATA1, OP_PUSHDATA2 and OP_PUSHDATA4.
OP_PUSHDATA1 means that the next byte contains how many bytes we need to read for the element.
OP_PUSHDATA2 means that the next 2 bytes contain how many bytes we need to read for the element.
OP_PUSHDATA4 means that the next 4 bytes contain how many bytes we need to read for the element.
Practically speaking, this means if we have an element that’s between 76 and 255 bytes inclusive, we use OP_PUSHDATA1 <1-byte length of the element> <element>.
For anything between 256 bytes and 520 bytes inclusive, we use OP_PUSHDATA2 <2-byte length of the element in Little-Endian> <element>.
Anything larger than 520 bytes is not allowed on the network, so OP_PUSHDATA4 is unnecessary, though OP_PUSHDATA4 <4-byte length of the element in Little-Endian, but value less than or equal to 520> <element> is still legal.
It is possible to encode a number below 76 using OP_PUSHDATA1 or a number below 256 using OP_PUSHDATA2 or even any number 520 and below using OP_PUSHDATA4.
These are considered non-standard transactions, meaning most bitcoin nodes (particularly those running Bitcoin Core software) will not relay them.
There are many more opcodes, which are coded in op.py and the full list can be found at http://wiki.bitcoin.it.
Now that we know how Script works, we can write a Script parser.
classScript:def__init__(self,instructions=None):ifinstructionsisNone:self.instructions=[]else:self.instructions=instructions...@classmethoddefparse(cls,s):length=read_varint(s)instructions=[]count=0whilecount<length:current=s.read(1)count+=1current_byte=current[0]ifcurrent_byte>=1andcurrent_byte<=75:n=current_byteinstructions.append(s.read(n))count+=nelifcurrent_byte==76:data_length=little_endian_to_int(s.read(1))instructions.append(s.read(data_length))count+=data_length+1elifcurrent_byte==77:data_length=little_endian_to_int(s.read(2))instructions.append(s.read(data_length))count+=data_length+2else:op_code=current_byteinstructions.append(op_code)ifcount!=length:raiseSyntaxError('parsing script failed')returncls(instructions)
Each instruction is either an opcode to be executed or an element to be pushed onto the stack.
Script serialization always starts with the length of the entire Script.
We parse until the right amount of bytes are consumed.
The byte determines if we have an opcode or element.
This converts the byte into an integer in Python.
For a number between 1 to 75, we know the next n bytes are an element
76 is OP_PUSHDATA1, so the next byte tells us how many bytes to read
77 is OP_PUSHDATA2, so the next two bytes tell us how many bytes to read
We have an opcode that we store.
Script should have consumed exactly the length of bytes we expected, otherwise we raise an error.
We can similarly write a Script serializer.
classScript:...defraw_serialize(self):result=b''forinstructioninself.instructions:iftype(instruction)==int:result+=int_to_little_endian(instruction,1)else:length=len(instruction)iflength<75:result+=int_to_little_endian(length,1)eliflength>75andlength<0x100:result+=int_to_little_endian(76,1)result+=int_to_little_endian(length,1)eliflength>=0x100andlength<=520:result+=int_to_little_endian(77,1)result+=int_to_little_endian(length,2)else:raiseValueError('too long an instruction')result+=instructionreturnresultdefserialize(self):result=self.raw_serialize()total=len(result)returnencode_varint(total)+result
If the instruction is an integer, we know that’s an opcode.
If the byte is between 1 and 75 inclusive, we encode the length as a single byte
For any element with length from 76 to 255, we put OP_PUSHDATA1 first, then encode the length as a single byte and finally, the element.
For anything from 256 to 520, we put OP_PUSHDATA2 first, then encode the length as two bytes in little Endian and finally, the element
Any element longer than 520 bytes cannot be serialized.
Script serialization starts with the length of the entire Script.
Note that both the parser and serializer were used in Chapter 5 parsing/serializing the ScriptSig and ScriptPubKey fields.
The Script object represents the instruction set that requires evaluation. To evaluate Script, we need to combine the ScriptPubKey and ScriptSig fields. The lockbox (ScriptPubKey) and the unlocking (ScriptSig) are in different transactions. Specifically, the lockbox is where the bitcoins are received, the unlocking is where the bitcoins are spent. The input in the spending transaction points to the receiving transaction. Essentially, we have a situation like Figure 6-6:
Since ScriptSig unlocks ScriptPubKey, we need a mechanism by which the two Scripts combine. To evaluate the two together, we take the instructions from ScriptSig and ScriptPubKey and combine them as above. The instructions from the ScriptSig go on top of all the instructions from ScriptPubKey. Instructions are processed one at a time until no instructions are left to be processed or if the Script fails early.
The evaluation of Script requires that we take the ScriptSig and ScriptPubKey, combine them into a single instruction set and execute the instructions. In order to do this, we require a way to combine the Scripts.
classScript:...def__add__(self,other):returnScript(self.instructions+other.instructions)
We are combining the instruction set to create a new, combined Script object.
We will use this ability to combine Scripts for evaluation later in this chapter.
There are many types of standard Scripts in Bitcoin including the following:
p2pk - Pay-to-pubkey
p2pkh - Pay-to-pubkey-hash
p2sh - Pay-to-Script-hash
p2wpkh - Pay-to-witness-pubkey-hash
p2wsh - Pay-to-witness-Script-hash
Addresses are data that fit into known Script templates like these. Wallets know how to interpret various address types (p2pkh, p2sh, p2wpkh) and create the appropriate ScriptPubKey. All of the above have a particular type of address format (base58, bech32) so wallets can pay to them.
To show exactly how all this works, we’ll start with one of the original Scripts, pay-to-pubkey.
Pay-to-pubkey (p2pk) was used largely during the early days of bitcoin. Most coins thought to belong to Satoshi are in p2pk UTXOs. That is, transaction outputs whose ScriptPubKeys have the p2pk form. There are some limitations that we’ll discuss later, but first, let’s look at how p2pk works.
Back in Chapter 3, we learned both ECDSA signing and verification.
In order to verify an ECDSA signature, we need the message, z, the public key, P and the signature, r and s.
In p2pk, Bitcoins are sent to a public key and the owner of the private key can unlock, or spend the Bitcoins by creating a signature.
The ScriptPubKey of a Transaction puts the assigned Bitcoins under the control of the private key owner.
Specifying where the Bitcoins go is the job of the ScriptPubKey. ScriptPubKey is the lockbox that receives the bitcoins. The p2pk ScriptPubKey looks like Figure 6-7:
Note the OP_CHECKSIG, as that will be very important.
The ScriptSig is the part that unlocks the received bitcoins.
The pubkey can be compressed or uncompressed, though early on in Bitcoin’s history when p2pk was more prominent, uncompressed was the only one being used (see Chapter 4).
For p2pk, the ScriptSig required to unlock the corresponding ScriptPubKey is just the signature as shown in Figure 6-8:
The ScriptPubKey and ScriptSig combine to make an instruction set that looks like Figure 6-9:
The two columns below are instructions of Script and the elements stack. At the end of this processing, the top element of the stack must be non-zero to be considered a valid ScriptSig. The Script instructions are processed one instruction at a time. We start with the instructions as combined above (Figure 6-10):
The first instruction is the signature, which is an element. This is data that is pushed to the stack (Figure 6-11).
The second instruction is the pubkey, which is also an element. This is again, data is pushed to the stack (Figure 6-12).
OP_CHECKSIG consumes 2 stack instructions (pubkey and signature) and determines if they are valid for this transaction.
OP_CHECKSIG will push a 1 to the stack if the signature is valid, 0 if not.
Assuming that the signature is valid for this public key, we have this situation (Figure 6-13):
We’re finished processing all the instructions of Script and we’ve ended with a single element on the stack. Since the top element is not zero, (1 is definitely not 0), this Script is valid.
If this transaction instead had an invalid signature, the result from OP_CHECKSIG would be zero, ending our Script processing like Figure 6-14:
We end with a single element on the stack which is zero. Since the top element is zero, the combined Script is invalid and a transaction with this ScriptSig in the input is invalid.
The combined Script will validate if the signature is valid, but fail if the signature is invalid. The ScriptSig will only unlock the ScriptPubKey if the signature is valid for that public key. In other words, only someone with knowledge of the private key can produce a valid ScriptSig.
Incidentally, we can see where ScriptPubKey got its name.
The public key in uncompressed SEC format is the main instruction in ScriptPubKey for p2pk (the other instruction being OP_CHECKSIG).
Similarly, ScriptSig is named as such because the ScriptSig for p2pk is a single element: the DER signature.
We now code a way to evaluate Script. This requires us to go through each instruction and evaluate whether the Script is valid. What we want to be able to do is this:
>>>fromscriptimportScript>>>z=0x7c076ff316692a3d7eb3c3bb0f8b1488cf72e1afcd929e29307032997a838a3d>>>sec=bytes.fromhex('04887387e452b8eacc4acfde10d9aaf7f6d9a0f975aabb10d006e\4da568744d06c61de6d95231cd89026e286df3b6ae4a894a3378e393e93a0f45b666329a0ae34')>>>sig=bytes.fromhex('3045022000eff69ef2b1bd93a66ed5219add4fb51e11a840f4048\76325a1e8ffe0529a2c022100c7207fee197d27c618aea621406f6bf5ef6fca38681d82b2f06fd\dbdce6feab601')>>>script_pubkey=Script([sec,0xac])>>>script_sig=Script([sig])>>>combined_script=script_sig+script_pubkey>>>(combined_script.evaluate(z))True
p2pk ScriptPubkey is the SEC format pubkey followed by OP_CHECKSIG which is 0xac or 170.
We can do this because of the __add__ method we created above.
We want to evaluate the instructions and see if the Script validates.
Here is the method that we’ll use for the combined instruction set (combination of the ScriptPubKey of the previous transaction and the ScriptSig of the current transaction).
fromopimportOP_CODE_FUNCTIONS,OP_CODE_NAMES...classScript:...defevaluate(self,z):instructions=self.instructions[:]stack=[]altstack=[]whilelen(instructions)>0:instruction=instructions.pop(0)iftype(instruction)==int:operation=OP_CODE_FUNCTIONS[instruction]ifinstructionin(99,100):ifnotoperation(stack,instructions):LOGGER.info('bad op: {}'.format(OP_CODE_NAMES[instruction]))returnFalseelifinstructionin(107,108):ifnotoperation(stack,altstack):LOGGER.info('bad op: {}'.format(OP_CODE_NAMES[instruction]))returnFalseelifinstructionin(172,173,174,175):ifnotoperation(stack,z):LOGGER.info('bad op: {}'.format(OP_CODE_NAMES[instruction]))returnFalseelse:ifnotoperation(stack):LOGGER.info('bad op: {}'.format(OP_CODE_NAMES[instruction]))returnFalseelse:stack.append(instruction)iflen(stack)==0:returnFalseifstack.pop()==b'':returnFalsereturnTrue
As the instructions list will change, we make a copy
We execute until the instructions list is empty
The function that executes the opcode is in the OP_CODE_FUNCTIONS array (e.g.
OP_DUP, OP_CHECKSIG, etc)
99 and 100 are OP_IF and OP_NOTIF respectively.
They require manipulation of the instructions array based on the top element of the stack.
107 and 108 are OP_TOALTSTACK and OP_FROMALTSTACK respectively.
They move stack elements to/from an “alternate” stack, which we call altstack.
172, 173, 174 and 175 are OP_CHECKSIG, OP_CHECKSIGVERIFY, OP_CHECKMULTISIG, and OP_CHECKMULTISIGVERIFY, which all require the signature hash, z, from Chapter 3 for signature validation.
If the instruction is not an opcode, it’s an element, so we push that element to the stack.
If the stack is empty at the end of processing all the instructions, we fail the Script by returning False.
If the stack’s top element is an empty byte string (which is how the stack stores a 0), then we also fail the Script by returning False.
Any other result means that the Script has validated.
The code shown here is a little bit of a cheat as the combined Script is not executed this way exactly. The ScriptSig is evaluated separately from the ScriptPubKey as to not allow operations from ScriptSig to affect the ScriptPubKey instructions.
Specifically, the stack after all the ScriptSig instructions are evaluated are stored and then the ScriptPubkey instructions are evaluated on their own with the stack from the first execution.
It may be confusing that the stack elements are sometimes numbers like 0 or 1 and other times byte-strings like a DER signature or SEC pubkey.
Under the hood, they’re all bytes, but some are interpreted as numbers for certain opcodes.
For example, 1 is stored on the stack as the 01 byte, 2 is stored as the 02 byte, 999 as the e703 and so on.
Any byte-string is interpreted as a Little-Endian number for arithmetic opcodes.
The integer 0 is not stored as the 00 byte, but as the empty byte-string.
The code in op.py can clarify what’s going on:
defencode_num(num):ifnum==0:returnb''abs_num=abs(num)negative=num<0result=bytearray()whileabs_num:result.append(abs_num&0xff)abs_num>>=8ifresult[-1]&0x80:ifnegative:result.append(0x80)else:result.append(0)elifnegative:result[-1]|=0x80returnbytes(result)defdecode_num(element):ifelement==b'':return0big_endian=element[::-1]ifbig_endian[0]&0x80:negative=Trueresult=big_endian[0]&0x7felse:negative=Falseresult=big_endian[0]forcinbig_endian[1:]:result<<=8result+=cifnegative:return-resultelse:returnresultdefop_0(stack):stack.append(encode_num(0))returnTrue
Numbers being pushed to the stack are encoded into bytes and decoded from bytes when the numerical value is needed.
Write the op_checksig function in op.py
Pay-to-pub-key is intuitive in the sense that there is a public key that anyone can send Bitcoins to and a signature that can only be produced by the owner of the private key. This works well, but there are some problems.
First, the public keys are long. We know from Chapter 4 that secp256k1 public points are 33 bytes in compressed SEC and 65 bytes in uncompressed SEC. Unfortunately, humans can’t interpret 33 or 65 raw bytes easily. Most character encodings don’t render certain byte ranges as they are control characters, newlines or similar. The SEC format is typically encoded instead in hexadecimal, doubling the length (hex encodes 4 bits per character instead of 8). This makes the compressed and uncompressed SEC formats 66 and 130 characters respectively, which is bigger than most identifiers (your username on a website, for instance, is usually less than 20). To compound this, early Bitcoin transactions didn’t use the compressed versions so the hexadecimal addresses were 130 characters each! This is not fun or easy for people to transcribe, much less communicate by voice.
That said, the original use-cases for p2pk were for IP-to-IP payments and mining outputs. For IP-to-IP payments, IP addresses were queried for their public keys, so communicating the public keys were done machine-to-machine, which meant that human communication wasn’t necessarily a problem. Use for mining outputs also don’t require human communication. Incidentally, this IP-to-IP payment system was phased out as it’s not secure and prone to man-in-the-middle attacks.
Second, because the public keys are long, this causes a more subtle problem. The UTXO set becomes bigger since this large public key has to be kept around and indexed to see if it’s spendable. This requires more resources on the part of full nodes.
Third, because we’re storing the public key in the ScriptPubKey field, it’s known to everyone. That means should ECDSA someday be broken, these outputs could be stolen. This is not a very big threat since ECDSA is used in a lot of applications besides Bitcoin and would affect all of those things, too. For example, quantum computing has the potential to reduce the calculation times significantly for RSA and ECDSA, so having something else in addition to protect these outputs would be more secure.
Pay-to-pubkey-hash (p2pkh) is an alternative Script that has advantages over p2pk:
The addresses are shorter.
It’s additionally protected by sha256 and ripemd160.
Addresses are shorter due to the use of the sha256 and ripemd160 hashing algorithms. We do both in succession and call that hash160. The result of hash160 is 160-bits or 20 bytes, which are encoded into an address.
The result is what you may have seen on the Bitcoin network and coded in Chapter 4:
1PMycacnJaSqwwJqjawXBErnLsZ7RkXUAs
This address encodes within 20 bytes that look like this in hexadecimal:
f54a5851e9372b87810a8e60cdd2e7cfd80b6e31
These 20 bytes are the result of doing a hash160 operation on this (compressed) SEC public key:
0250863ad64a87ae8a2fe83c1af1a8403cb53f53e486d8511dad8a04887e5b2352
Given p2pkh is shorter and more secure, p2pk use declined significantly after 2010, though it’s still fully supported today.
Pay-to-pubkey-hash was used during the early days of bitcoin, though not as much as p2pk.
The p2pkh ScriptPubKey, or locking Script, looks like Figure 6-15:
Like p2pk, OP_CHECKSIG is here and OP_HASH160 makes an appearance.
Unlike p2pk, the SEC pubkey is not here but a 20 byte hash is.
There is also a new opcode here: OP_EQUALVERIFY.
The p2pkh ScriptSig, or the unlocking Script, looks like Figure 6-16:
Like p2pk, the ScriptSig has the DER signature. Unlike p2pk, the ScriptSig also has the SEC pubkey. The main difference between p2pk and p2pkh ScriptSigs is that the SEC pubkey has moved from ScriptPubKey to ScriptSig.
The ScriptPubKey and ScriptSig combine to a list of instructions that looks like Figure 6-17:
At this point, the Script is processed one instruction at a time. We start with the instructions as above (Figure 6-18).
The first two instructions are elements, so they are pushed to the stack (Figure 6-19).
OP_DUP duplicates the top element, so the pubkey gets duplicated (Figure 6-20):
OP_HASH160 takes the top element and performs the hash160 operation on it (sha256 followed by ripemd160), creating a 20-byte hash (Figure 6-21):
The 20-byte hash is an element and is pushed to the stack (Figure 6-22).
We are now at OP_EQUALVERIFY.
This opcode consumes the top two elements and checks if they’re equal.
If they are equal, the Script continues execution.
If they are not equal, the Script stops immediately and fails.
We assume here that they’re equal, leading to Figure 6-23:
We are now exactly where we were during the OP_CHECKSIG part of processing p2pk.
Once again, we assume that the signature is valid (Figure 6-24):
There are two ways this Script can fail.
If the ScriptSig provides a public key that does not hash160 to the 20-byte hash in the ScriptPubKey, the Script will fail at OP_EQUALVERIFY (Figure 6-22).
The other failure condition is if the ScriptSig has a public key that hash160s to the 20-byte hash in the ScriptPubKey, but has an invalid signature.
That would end the combined Script evaluation with a 0, ending in failure.
This is why we call this type of Script pay-to-pubkey-hash. The ScriptPubKey has the 20-byte hash160 of the public key and not the public key itself. We are locking Bitcoins to a hash of the public key and the spender is responsible for revealing the public key as part of constructing the ScriptSig.
The major advantage is that the ScriptPubKey is shorter (just 25 bytes) and a thief would not only have to solve the Discrete Log problem in ECDSA, but also figure out a way to find pre-images of both ripemd160 and sha256.
Note that Scripts can be any arbitrary program. Script is a smart contract language and can lock Bitcoins in many different ways. Figure 6-25 is an example ScriptPubKey:
Figure 6-26 is a ScriptSig that will unlock the the ScriptPubKey from Figure 6-25.
The combined Script is shown in Figure 6-27:
Script evaluation will start like Figure 6-28:
OP_4 will push a 4 to the stack (Figure 6-29).
OP_5 will likewise push a 5 to the stack (Figure 6-30).
OP_ADD will consume the top two elements of the stack, add them together and push the sum to the stack (Figure 6-31).
OP_9 will push a 9 to the stack (Figure 6-32).
OP_EQUAL will consume 2 elements and push a 1 if equal, 0 if not (Figure 6-33).
Note that the ScriptSig isn’t particularly hard to figure out and contains no signature. As a result, ScriptPubKey is vulnerable to being taken by anyone who can solve it. Think of this ScriptPubKey as a lockbox with a very flimsy lock that anyone can break into. It is for this reason that most transactions have a signature requirement in the ScriptSig.
Once a UTXO has been spent, included in a block and secured by proof-of-work, the coins are locked to a different ScriptPubKey and no longer as easily spendable. Someone attempting to spend already spent coins would have to provide proof-of-work, which is expensive (see Chapter 9).
Create a ScriptSig that can unlock this ScriptPubKey. Note OP_MUL multiplies the top two elements of the stack.
767695935687
56 = OP_6
76 = OP_DUP
87 = OP_EQUAL
93 = OP_ADD
95 = OP_MUL
The previous exercise was a bit of a cheat as OP_MUL is no longer allowed on the Bitcoin network.
Version 0.3.5 of Bitcoin disabled a lot of different opcodes as anything that had even a little bit of potential to create vulnerabilities on the network were disabled.
This is just as well since most of the functionality in Script is actually not used much. From a software maintenance standpoint, this is not a great situation as the code has to be maintained despite its lack of usage. Simplifying and getting rid of certain capabilities can be seen as a way to make Bitcoin more secure.
This is in stark contrast to other projects which try to expand their smart contract languages, often increasing the attack surface along with new features.
Figure out what this Script is doing:
6e879169a77ca787
69 = OP_VERIFY
6e = OP_2DUP
7c = OP_SWAP
87 = OP_EQUAL
91 = OP_NOT
a7 = OP_SHA1
Use the Script.parse method and look up what various opcodes do at https://en.bitcoin.it/wiki/Script
In 2013, Peter Todd created a Script very similar to the Script in Exercise 4 and put some Bitcoins into it to create an economic incentive for people to find hash collisions. The donations reached 2.49153717 BTC and when Google actually found a hash collision for sha1 in February of 2017 (https://security.googleblog.com/2017/02/announcing-first-sha1-collision.html), this Script was promptly redeemed. The transaction output was 2.48 Bitcoins which was $2848.88 USD at the time.
Peter created more piñatas for sha256, hash256 and hash160, which add economic incentives to find collisions for these hashing functions.
We’ve covered Script and how it works. We can now proceed to the creation and validation of transactions.
One of the trickiest things to code in Bitcoin is validating transactions. Another one is creating transactions. In this chapter, we’ll cover the exact steps to doing both. Towards the end of this chapter, we’ll be creating a testnet transaction and broadcasting it.
Every node, when receiving transactions makes sure that each transaction adheres to the network rules. This process is called transaction validation. Here are the main things that a node checks:
Inputs of the transaction are previously unspent.
Sum of the inputs are greater than or equal to the sum of the outputs.
ScriptSig successfully unlocks the previous ScriptPubKey.
(1) prevents double-spending. Any input that’s been spent (that is, included in the blockchain) cannot be spent again.
(2) makes sure no new Bitcoins are created (except in a special type of transaction called Coinbase transactions. More on that in Chapter 9).
(3) makes sure that the combined Script is valid. In the vast majority of transactions, this means checking that the one or more signatures in the ScriptSig are valid.
Let’s look at how each is checked.
To prevent double-spending, a node checks that each input exists and has not been spent. This can be checked by any full node by looking at the UTXO set (see Chapter 5). We cannot determine from the transaction itself whether it’s double-spending, much like we cannot look at a personal check and determine whether it’s overdrafting. The only way to know is to have access to the UTXO set, which requires calculation from the entire set of transactions.
In Bitcoin, we can determine whether an input is being double spent by keeping track of the UTXOs. If an input is in the UTXO set, that transaction input both exists and is not double-spending. If the transaction passes the rest of the validity tests, then we remove all the inputs of the transaction from the UTXO set. Light clients that do not have access to the blockchain have to trust other nodes for a lot of the information, including whether an input has already been spent.
A full node can check the spentness of an input pretty easily, a light client has to get this information from someone else.
Nodes also make sure that the sum of the inputs is greater than or equal to the sum of the outputs. This ensures that the transaction does not create new coins. The one exception is a Coinbase transaction which we’ll study more in Chapter 9. Since inputs don’t have an amount field, this must be looked up on the blockchain. Once again, full nodes have access to the amounts associated with the unspent output, but light clients have to depend on full nodes to supply this information.
We covered how to calculate fees in Chapter 5.
Checking that the sum of the inputs being greater than or equal to the sum of the outputs is the same as checking that the fee is not negative (that is, creating money).
Recall the last exercise in Chapter 5.
The method fee looks like this:
classTx:...deffee(self):'''Returns the fee of this transaction in satoshi'''input_sum,output_sum=0,0fortx_ininself.tx_ins:input_sum+=tx_in.value(self.testnet)fortx_outinself.tx_outs:output_sum+=tx_out.amountreturninput_sum-output_sum
We can test to see if this transaction is trying to create money by using this method.
>>>fromtximportTx>>>fromioimportBytesIO>>>raw_tx=('0100000001813f79011acb80925dfe69b3def355fe914bd1d96a3f5f71bf830\3c6a989c7d1000000006b483045022100ed81ff192e75a3fd2304004dcadb746fa5e24c5031ccf\cf21320b0277457c98f02207a986d955c6e0cb35d446a89d3f56100f4d7f67801c31967743a9c8\e10615bed01210349fc4e631e3624a545de3f89f5d8684c7b8138bd94bdd531d2e213bf016b278\afeffffff02a135ef01000000001976a914bc3b654dca7e56b04dca18f2566cdaf02e8d9ada88a\c99c39800000000001976a9141c4bc762dd5423e332166702cb75f40df79fea1288ac19430600')>>>stream=BytesIO(bytes.fromhex(raw_tx))>>>transaction=Tx.parse(stream)>>>(transaction.fee()>=0)True
This only works because we’re using Python (see The Value Overflow Incident).
If the fee is negative, we know that the output_sum is greater than the input_sum, which is another way of saying that this transaction is trying to create Bitcoins out of the ether.
Back in 2010, there was a transaction that created 184 billion new Bitcoins. This is due to the fact that in C++, the amount field is a signed integer and not an unsigned integer. That is, the value could be negative!
The clever transaction passed all the checks including the one for not creating new bitcoins, but only because the output amounts overflowed past the maximum number. 264 is ~1.84 * 1019 satoshis, which is 184 billion Bitcoins. The fee was negative by enough that the C++ code was tricked into believing that the fee was actually positive by 0.1 BTC!
The vulnerability is detailed in CVE-2010-5139 and was patched via soft-fork in Bitcoin Core 0.3.11. The transaction and the extra Bitcoins it created was invalidated retroactively by a block reorganization, which is another way of saying that the block including the value overflow transaction and all the blocks built on top of it were replaced.
Perhaps the trickiest part of validating a transaction is the process of checking its signatures.
A transaction typically has at least one signature per input.
If there are multisig outputs being spent, there may be more than one.
As we learned in Chapter 3, the ECDSA signature algorithm requires the public key P, the signature hash z, and the signature (r,s).
Once these are known, the process of verifying the signature is pretty simple as we already coded in Chapter 3:
>>>fromeccimportS256Point,Signature>>>sec=bytes.fromhex('0349fc4e631e3624a545de3f89f5d8684c7b8138bd94bdd531d2e\213bf016b278a')>>>der=bytes.fromhex('3045022100ed81ff192e75a3fd2304004dcadb746fa5e24c5031c\cfcf21320b0277457c98f02207a986d955c6e0cb35d446a89d3f56100f4d7f67801c31967743a9\c8e10615bed')>>>z=0x27e0c5994dec7824e56dec6b2fcb342eb7cdb0d0957c2fce9882f715e85d81a6>>>point=S256Point.parse(sec)>>>signature=Signature.parse(der)>>>(point.verify(z,signature))True
SEC public keys and DER signatures are in the stack when an instruction like OP_CHECKSIG is executed make getting the public key P and signature (r,s) pretty straightforward (see Chapter 6).
The hard part is getting the signature hash, z.
A naive way to get the signature hash would be to hash the transaction serialization as shown in Figure 7-1.
Unfortunately, we can’t do that since the signature is part of the ScriptSig and a signature can’t sign itself.
Instead, we modify the transaction before signing it.
That is, we compute a different signature hash, or z, for each input.
The procedure is as follows.
The first step is to empty all the ScriptSigs when checking the signature (Figure 7-2). The same procedure is used for creating the signature, except the ScriptSigs are usually already empty.
Note that this example has only 1 input, so only that input’s ScriptSig is emptied, but it’s possible to have more than 1 input. Each of those would be emptied.
Each input points to a previous transaction output, which has a ScriptPubKey. Recall the diagram from Chapter 6 shown in Figure 7-3.
We take the ScriptPubKey that the input is pointing to and put that in place of the empty ScriptSig (Figure 7-4). This may require a lookup on the blockchain, but in practice, the signer already knows the ScriptPubKey as the input is one where the signer has the private key.
Lastly, we add a 4-byte hash type to the end.
This is to specify what the signature is authorizing.
The signature can authorize that this input has to go with all the other inputs and outputs (SIGHASH_ALL), go with a specific output (SIGHASH_SINGLE) or go with any output whatsoever (SIGHASH_NONE).
The latter two have some theoretical use cases, but in practice, almost every transaction is signed with SIGHASH_ALL.
There’s also rarely used hash type called SIGHASH_ANYONECANPAY which can be combined with any of the previous three, which we won’t get into here.
For SIGHASH_ALL, the final transaction must have the exact outputs that were signed or the input signature is invalid.
The integer corresponding to SIGHASH_ALL is 1 and this has to be encoded in Little-Endian over 4 bytes, which makes the modified transaction look like Figure 7-5:
01000000The hash256 of this modified transaction is interpreted as a Big-Endian integer to produce z.
The code for converting the modified transaction to z looks like this:
>>>fromhelperimporthash256>>>modified_tx=bytes.fromhex('0100000001813f79011acb80925dfe69b3def355fe914\bd1d96a3f5f71bf8303c6a989c7d1000000001976a914a802fc56c704ce87c42d7c92eb75e7896\bdc41ae88acfeffffff02a135ef01000000001976a914bc3b654dca7e56b04dca18f2566cdaf02\e8d9ada88ac99c39800000000001976a9141c4bc762dd5423e332166702cb75f40df79fea1288a\c1943060001000000')>>>h256=hash256(modified_tx)>>>z=int.from_bytes(h256,'big')>>>(hex(z))0x27e0c5994dec7824e56dec6b2fcb342eb7cdb0d0957c2fce9882f715e85d81a6
Now that we have our z, we can take the public key in SEC format and the signature in DER format from the ScriptSig to verify the signature.
>>>fromeccimportS256Point,Signature>>>sec=bytes.fromhex('0349fc4e631e3624a545de3f89f5d8684c7b8138bd94bdd531d2e\213bf016b278a')>>>der=bytes.fromhex('3045022100ed81ff192e75a3fd2304004dcadb746fa5e24c5031c\cfcf21320b0277457c98f02207a986d955c6e0cb35d446a89d3f56100f4d7f67801c31967743a9\c8e10615bed')>>>z=0x27e0c5994dec7824e56dec6b2fcb342eb7cdb0d0957c2fce9882f715e85d81a6>>>point=S256Point.parse(sec)>>>signature=Signature.parse(der)>>>point.verify(z,signature)True
We can code this transaction validation process into a method for Tx.
Thankfully, the Script engine can already handle signature verification (see Chapter 6), so our task here is to glue everything together.
We need the z, or signature hash, to pass into the evaluate method and we need to combine the ScriptSig and ScriptPubKey.
The signature hashing algorithm is inefficient and wasteful and is called the Quadratic Hashing problem.
The Quadratic Hashing problem states that calculating the signature hashes, or z’s increases quadratically with the number of inputs in a transaction.
Specifically, the number of hash256 operations for calculating the z will increase on a per-input basis, but in addition, the length of the transaction will increase, slowing down each hash256 operation as the entire signature hash will need to be calculated anew for each input.
This was particularly obvious with the biggest transaction mined to date:
bb41a757f405890fb0f5856228e23b715702d714d59bf2b1feb70d8b2b4e3e08
This transaction had 5569 inputs and 1 output and took many miners over a minute to validate as the signature hashes for the transaction were expensive to calculate.
Segwit (Chapter 13) fixes this with a different way of calculating the signature hash, which is specified in BIP0143.
Write the sig_hash method for the Tx class.
Write the verify_input method for the Tx class. You will want to use the TxIn.script_pubkey(), Tx.sig_hash() and Script.evaluate() methods.
Now that we can verify an input, the task of verifying the entire transaction is straightforward:
classTx:...defverify(self):'''Verify this transaction'''ifself.fee()<0:returnFalseforiinrange(len(self.tx_ins)):ifnotself.verify_input(i):returnFalsereturnTrue
We make sure that we are not creating money.
We make sure that each input has a correct ScriptSig.
Note that a full node would verify more things like checking for double-spends and checking some other consensus rules not discussed in this chapter (max sigops, size of ScriptSig, etc), but this is good enough for our library.
The code to verify transactions will help quite a bit with creating transactions. We can create transactions that fit the verification process. Transactions we create will require the sum of the inputs to be greater than or equal to the sum of the outputs. Similarly, transactions we create will require a ScriptSig that, when combined with the ScriptPubKey will be valid.
To create a transaction, we need at least one output we’ve received. That is, we need an output from the UTXO set whose ScriptPubKey we can unlock. The vast majority of the time, we need one or more private keys corresponding to the public keys that are hashed in the ScriptPubKey.
The rest of this chapter will be concerned with creating a transaction whose inputs are locked by p2pkh ScriptPubKeys.
The construction of a transaction requires answering some basic questions:
Where do we want the bitcoins to go?
What UTXOs can we spend?
How quickly do we want this transactions to get into the blockchain?
We’ll be using testnet for this example, though this can easily be applied to mainnet.
The first question is about how much we want to pay whom.
We can pay one or more addresses.
In this example, we will pay 0.1 testnet bitcoins (tBTC) to mnrVtF8DWjMu839VW3rBfgYaAfKk8983Xf.
The second question is about what’s in our wallet. What do we have available to spend? In this example, we have an output here denoted by transaction ID and output index:
0d6fe5213c0b3291f208cba8bfb59b7476dffacc4e5cb66f6eb20a080843a299:13
When we view this output on a testnet block explorer (Figure 7-6), we can see that our output is worth 0.33 tBTC.
Since this is more than 0.1 tBTC, we’ll want to send the rest back to ourselves.
Though it’s generally bad privacy and security practice to reuse addresses, we’ll send the bitcoins back to mzx5YhAH9kNHtcN481u6WkjeHjYtVeKVh2 to make the transaction construction easier.
Back in Chapter 6, we went through how p2pk was inferior to p2pkh, in part because it was only protected by ECDSA. p2pkh, on the other hand, is also protected by sha256 and ripemd160. However, because the blockchain is public, once we spend from a ScriptPubKey corresponding to our address, we reveal our public key as part of the ScriptSig. Once we’ve revealed that public key, sha256 and ripemd160 no longer protect us as the attacker knows the public key and doesn’t have to guess.
That said, as of this writing, we are still protected by the Discrete Log problem, which is unlikely to be broken any time soon. It’s important from a security perspective, however, to understand what we’re protected by.
The other reason to not reuse addresses is for privacy. Having a single address for all our transactions means that people can link our transactions together. If, for example, we bought something private (medication to treat some disease you don’t want others to know about) and spent another output with the same ScriptPubKey for a donation to some charity, the charity and the medication vendor could identify that we did business with the other.
Privacy leaks tend to become security holes over time.
The third question is really about fees. If we want to get the transaction in the blockchain faster, we’ll want to pay more fees and if we don’t mind waiting, we’ll want to pay less. In our case, we’ll use 0.01 tBTC as our fee.
Fee estimation is done on a per-byte basis. If your transaction is 600 bytes, you’ll want to have double the fees as a transaction that’s 300 bytes. This is because block space is limited and larger transactions take up more space. This calculation has changed a bit since Segregated Witness (See Chapter 13), but the general principle still applies. We want to pay enough on a per-byte basis so that miners are motivated to include our transaction as soon as possible.
When blocks aren’t full, almost any amount above the default relay limit (1 satoshi/byte) is enough to get a transaction included. When blocks are full, this is not an easy thing to estimate. There are multiple ways to estimate fees including:
Looking at various fee levels and estimating the probability of inclusion based on past blocks and the mempools at the time.
Looking at the current mempool and adding a fee that roughly corresponds to enough economic incentivization.
Going with some fixed fee.
Many wallets use different strategies and this is an active area of research.
We have a plan for a new transaction with one input and two outputs. But first, let’s look at some other tools we’ll need.
We need a way to take an address and get the 20-byte hash out of it.
This is the opposite of encoding an address, so we call the function decode_base58
defdecode_base58(s):num=0forcins.encode('ascii'):num*=58num+=BASE58_ALPHABET.index(c)combined=num.to_bytes(25,byteorder='big')checksum=combined[-4:]ifhash256(combined[:-4])[:4]!=checksum:raiseValueError('bad address: {} {}'.format(checksum,hash256(combined[:-4])[:4]))returncombined[1:-4]
We get what number is encoded in this base58 address
Once we have the number, we convert it to Big-Endian bytes
The first byte is the network prefix and the last 4 are the checksum. The middle 20 is the actual 20-byte hash (aka hash160).
We also need a way to convert the 20-byte hash to a ScriptPubKey.
We call this function p2pkh_script since we’re converting the hash160 to a p2pkh.
defp2pkh_script(h160):'''Takes a hash160 and returns the p2pkh ScriptPubKey'''returnScript([0x76,0xa9,h160,0x88,0xac])
Note that 0x76 is OP_DUP, 0xa9 is OP_HASH160, h160 is a 20-byte element, 0x88 is OP_EQUALVERIFY and 0xac is OP_CHECKSIG.
This is the p2pkh ScriptPubKey instruction set from Chapter 6.
Given these tools, we can proceed transaction creation.
>>>fromhelperimportdecode_base58,SIGHASH_ALL>>>fromscriptimportp2pkh_script,Script>>>fromtximportTxIn,TxOut,Tx>>>prev_tx=bytes.fromhex('0d6fe5213c0b3291f208cba8bfb59b7476dffacc4e5cb66f6\eb20a080843a299')>>>prev_index=13>>>tx_in=TxIn(prev_tx,prev_index)>>>tx_outs=[]>>>change_amount=int(0.33*100000000)>>>change_h160=decode_base58('mzx5YhAH9kNHtcN481u6WkjeHjYtVeKVh2')>>>change_script=p2pkh_script(change_h160)>>>change_output=TxOut(amount=change_amount,script_pubkey=change_script)>>>target_amount=int(0.1*100000000)>>>target_h160=decode_base58('mnrVtF8DWjMu839VW3rBfgYaAfKk8983Xf')>>>target_script=p2pkh_script(target_h160)>>>target_output=TxOut(amount=target_amount,script_pubkey=target_script)>>>tx_obj=Tx(1,[tx_in],[change_output,target_output],0,True)>>>(tx_obj)tx:cd30a8da777d28ef0e61efe68a9f7c559c1d3e5bcd7b265c850ccb4068598d11version:1tx_ins:0d6fe5213c0b3291f208cba8bfb59b7476dffacc4e5cb66f6eb20a080843a299:13tx_outs:33000000:OP_DUPOP_HASH160d52ad7ca9b3d096a38e752c2018e6fbc40cdf26fOP_EQUALVE\RIFYOP_CHECKSIG10000000:OP_DUPOP_HASH160507b27411ccf7f16f10297de6cef3f291623eddfOP_EQUALVE\RIFYOP_CHECKSIGlocktime:0
The amount must be in satoshis and given there are 100,000,000 satoshis per BTC, we have to multiply and cast to an integer.
Note we have to designate which network to look up using the testnet=True argument.
We have created the actual transaction. However, every ScriptSig in this transaction is currently empty and filling it is where we turn next.
Signing the transaction would be tricky, but we know how to get the signature hash, or z, from earlier in this chapter.
If we have the private key whose public key hash160’s to the 20-byte hash in the ScriptPubKey, we can sign the z and produce the DER signature.
>>>fromeccimportPrivateKey>>>fromhelperimportSIGHASH_ALL>>>z=transaction.sig_hash(0)>>>private_key=PrivateKey(secret=8675309)>>>der=private_key.sign(z).der()>>>sig=der+SIGHASH_ALL.to_bytes(1,'big')>>>sec=private_key.point.sec()>>>script_sig=Script([sig,sec])>>>transaction.tx_ins[0].script_sig=script_sig>>>(transaction.serialize().hex())0100000001813f79011acb80925dfe69b3def355fe914bd1d96a3f5f71bf8303c6a989c7d10000\00006a47304402207db2402a3311a3b845b038885e3dd889c08126a8570f26a844e3e4049c482a\11022010178cdca4129eacbeab7c44648bf5ac1f9cac217cd609d216ec2ebc8d242c0a01210393\5581e52c354cd2f484fe8ed83af7a3097005b2f9c60bff71d35bd795f54b67feffffff02a135ef\01000000001976a914bc3b654dca7e56b04dca18f2566cdaf02e8d9ada88ac99c3980000000000\1976a9141c4bc762dd5423e332166702cb75f40df79fea1288ac19430600
We only need to sign the first input as there’s only one input. Multiple inputs would require us to sign each input with the right private key.
The signature is actually a combination of the DER signature and the hash type which is SIGHASH_ALL in our case.
The ScriptSig of a p2pkh from Chapter 6 is exactly two elements: signature and SEC format public key.
We only have that one input that we need to sign, but if there were more, this process of creating the ScriptSig would need to be done for each input.
Write the sign_input method for the Tx class.
To creating your own transaction, get some coins for yourself. In order to do that you’ll need an address. If you completed the last exercise in Chapter 4, you should have your own testnet address and private key. If you don’t remember, here’s how:
>>>fromeccimportPrivateKey>>>fromhelperimporthash256,little_endian_to_int>>>secret=little_endian_to_int(hash256(b'Jimmy Song secret'))>>>private_key=PrivateKey(secret)>>>(private_key.point.address(testnet=True))mn81594PzKZa9K3Jyy1ushpuEzrnTnxhVg
Please use a phrase other than Jimmy Song secret
Once you have an address, you can get some coins at a myriad of testnet faucets. Faucets are where you can get testnet coins for free for testing purposes. You can Google “testnet bitcoin faucet” to find them or use one from this list: https://en.bitcoin.it/wiki/Testnet#Faucets. My website, https://faucet.programmingbitcoin.com/ is updated to point to a testnet faucet that works. Enter your address from above into these faucets to get some testnet coins.
After receiving some coins, spend them using this library. This is a big accomplishment for a budding Bitcoin developer, so please take some time to complete this exercise.
Create a testnet transaction that sends 60% of a single UTXO to mwJn1YPMq7y5F8J3LkC5Hxg9PHyZ5K4cFv. The remaining amount minus fees should go back to your own change address. This should be a 1 input, 2 output transaction.
You can broadcast the transaction at https://testnet.blockchain.info/pushtx
Advanced: get some more testnet coins from a testnet faucet and create a 2 input, 1 output transaction. 1 input should be from the faucet, the other should be from the previous exercise, the output can be your own address.
You can broadcast the transaction at https://testnet.blockchain.info/pushtx
We’ve successfully validated existing transactions on the blockchain and we’ve also created our own transactions on testnet! This is a major accomplishment and you should be proud.
The code we have so far will do p2pkh and p2pk. In the next chapter, we turn to a more advanced smart contract, p2sh.
Up to this point in the book, we’ve been doing single-key transactions, or transactions where only a single private key per input. What if we wanted something a little more complicated? A company that has $100 million in Bitcoin might not want funds locked to a single private key as that key can be stolen. Loss of a single key would mean all funds would then be lost. What can we do to reduce the single point of failure?
The solution is multisig, or multiple signatures. This was built into Bitcoin from the beginning, but was clunky at first and so wasn’t used. As we’ll discover later in this chapter, Satoshi probably didn’t test multisig as it has an off-by-one error (see `OP_CHECKMULTISIG` Off-by-one Bug later in the chapter). The bug has had to stay in the protocol as fixing it would require a hard fork.
It is possible to “split” a single private key into multiple private keys and use an interactive method to aggregate signatures without ever reconstructing the private key, but this is not a common practice. Schnorr signatures will make aggregating signatures easier and perhaps more common in the future.
Bare Multisig was the first attempt at creating transaction outputs that require signatures from multiple parties.
The idea is to change from a single point of failure to something a little more resilient to hacks.
To understand Bare Multisig, one must first understand the OP_CHECKMULTISIG opcode.
As discussed in Chapter 6, Script has a lot of different opcodes.
OP_CHECKMULTISIG is one of them at 0xae.
The opcode consumes a lot of elements from the stack and returns whether or not the required number of signatures are valid for a transaction input.
The transaction output is called “bare” multisig because it’s a long ScriptPubKey. Figure 8-1 shows what a ScriptPubKey for a 1-of-2 multisig looks like.
Among Bare Multisig ScriptPubKeys, this one is on the small end, and we can already see that it’s long. The ScriptPubKey for p2pkh is only 25 bytes whereas this Bare Multisig is 101 bytes (though obviously, compressed SEC format would reduce it some), and this is a 1-of-2! Figure 8-2 shows what the ScriptSig looks like:
We only need 1 signature for this 1-of-2 multisig, so this is relatively short, though something like a 5-of-7 would require 5 DER signatures and would be a lot longer (360 bytes or so). Figure 8-3 shows how the two combine.
Note m and n are something between 1 and 16 inclusive.
We’ve generalized here so we can see what a Bare m-of-n Multisig would look like (m and n can be anything from 1 to 20, though there’s numerical opcodes only go up to OP_16, 17 to 20 would require 0112 to push a number like 18 to the stack).
The starting state looks like Figure 8-4:
OP_0 will push the number 0 to the stack (Figure 8-5).
The signatures are elements so they’ll be pushed directly to the stack (Figure 8-6).
OP_m will push the number m on the stack, the public keys will be pushed to the stack and OP_n will push the number n to the stack (Figure 8-7).
At this point, OP_CHECKMULTISIG will consume m+n+3 elements (see `OP_CHECKMULTISIG` Off-by-one Bug) and push a 1 to the stack if m of the signatures are valid for m distinct public keys from the list of n public keys, a 0 otherwise.
Assuming that the signatures are valid, the stack has a single 1 which validates the combined Script (Figure 8-8):
OP_CHECKMULTISIG Off-by-one BugThe stack elements consumed by OP_CHECKMULTISIG are supposed to be:
m, m different signatures, n, n different pubkeys.
The number of elements consumed should be 2 (m and n themselves) + m (signatures) + n (pubkeys).
Unfortunately, the opcode consumes 1 more element than the m+n+2 elements that it’s supposed to.
OP_CHECKMULTISIG consumes m+n+3, so an extra element is added (OP_0 in our example) in order to not cause a failure.
The opcode does nothing with that extra element and that extra element can be anything.
As a way to combat malleability, however, most nodes on the Bitcoin network will not relay the transaction unless that extra element is OP_0.
Note that if we had m+n+2 elements, that OP_CHECKMULTISIG will just fail as there are not enough elements to be consumed and the combined Script will fail causing the transaction to be invalid.
OP_CHECKMULTISIGIn an m-of-n Bare Multisig, the stack contains n as the top element, then n pubkeys, then m, then m signatures and finally, a filler item due to the off-by-one bug.
The code for OP_CHECKMULTISIG in op.py is mostly written here:
defop_checkmultisig(stack,z):iflen(stack)<1:returnFalsen=decode_num(stack.pop())iflen(stack)<n+1:returnFalsesec_pubkeys=[]for_inrange(n):sec_pubkeys.append(stack.pop())m=decode_num(stack.pop())iflen(stack)<m+1:returnFalseder_signatures=[]for_inrange(m):der_signatures.append(stack.pop()[:-1])stack.pop()try:raiseNotImplementedErrorexcept(ValueError,SyntaxError):returnFalsereturnTrue
Each DER signature is assumed to be signed with SIGHASH_ALL.
We take care of the off-by-one error by consuming the top element of the stack and not doing anything with the element.
This is the part that you will need to code for the next exercise.
Write the op_checkmultisig function of op.py.
Bare multisig is a bit ugly, but it is functional.
This reduces the single point of failure by requiring m of n signatures to unlock a UTXO.
There is plenty of utility in making outputs multisig, especially if you’re a business.
However, Bare Multisig suffers from a few problems:
First problem: the length of the ScriptPubKey. A Bare Multisig ScriptPubKey has many different public keys and that makes the ScriptPubKey long. Unlike p2pkh or even p2pk, these are not easily communicated using voice or even text message.
Second problem: because the output is so long, it requires more resources for node software. Nodes keep track of the UTXO set, so a big ScriptPubKey is more expensive to keep track of. A large output is more expensive to keep in fast-access storage (like RAM), being 5-20x larger than a normal p2pkh output.
Third problem: because the ScriptPubKey can be so much bigger, bare multisig can and has been abused. The entire PDF of the Satoshi’s original whitepaper is encoded in this transaction in block 230009:
54e48e5f5c656b26c3bca14a8c95aa583d07ebe84dde3b7dd4a78f4e4186e713
The creator of this transaction split up the whitepaper PDF into 64 byte chunks which were then made into invalid uncompressed public keys. The whitepaper was encoded into 947 outputs as 1-of-3 Bare Multisig outputs. These outputs are not spendable but have to be indexed in the UTXO sets of full nodes. This is a tax every full node has to pay and is in that sense abusive.
In order to mitigate these problems, pay-to-script-hash (p2sh) was born.
Pay-to-script-hash (p2sh) is a general solution to the long address/ScriptPubKey problem. More complicated ScriptPubKeys than Bare Multisig can easily be made and they have the same problems as Bare Multisig.
The solution that p2sh implements is to take the hash of some Script instructions and then reveal the pre-image Script instructions later. Pay-to-script-hash was introduced in 2011 to a lot of controversy. There were multiple proposals, but as we’ll see, p2sh is kludgy, but works.
In p2sh, a special rule gets executed only when the pattern shown in Figure 8-9 is encountered:
If this exact instruction set ends with a 1 on the stack, then the RedeemScript (top item in Figure 8-9) is parsed and then added to the Script instruction set.
This special pattern was introduced in BIP0016 and Bitcoin software that implements BIP0016 (anything post 2011) checks for the pattern.
The RedeemScript does not add new Script instructions for processing unless this exact sequence is encountered and ends with a 1.
If this sounds hacky, it is. But before we get to that, let’s look a little closer at exactly how this plays out.
Let’s say we have a 2-of-2 multisig ScriptPubKey (Figure 8-10):
This is a ScriptPubKey for a Bare Multisig. What we need to do to convert this to p2sh is to take a hash of this Script and keep this Script handy for when we want to redeem it. We call this the RedeemScript, because the Script is only revealed during redemption. We put the hash of the RedeemScript as the ScriptPubKey like Figure 8-11:
The hash digest here is the hash160 of the RedeemScript, or what was previously the ScriptPubKey. We’re locked the funds to the hash of the RedeemScript which needs to be revealed at unlock time.
Creating the ScriptSig for a p2sh script involves not only revealing the RedeemScript, but also unlocking the RedeemScript. At this point, you might wonder, where is the RedeemScript stored? The RedeemScript is not on the blockchain until actual redemption, so it must be stored by the creator of the p2sh address. If the RedeemScript is lost and cannot be reconstructed, the funds are lost, so it’s very important to keep track of it!
If you are receiving to a p2sh address, be sure to store and backup the RedeemScript! Better yet, make it easy to reconstruct!
The ScriptSig for the 2-of-2 multisig looks like Figure 8-12:
This produces the combined Script (Figure 8-13):
As before, OP_0 is there because of the OP_CHECKMULTISIG bug.
The key to understanding p2sh is the execution of the exact sequence shown in Figure 8-14:
Upon execution of this sequence, if the stack is left with a 1, the RedeemScript is inserted into the Script instruction set.
In other words, if we reveal a RedeemScript whose hash160 is the same hash160 in the ScriptPubKey, that RedeemScript acts like the ScriptPubKey instead.
We hash the Script that locks the funds and put that into the blockchain instead of the Script itself.
This is why we call this ScriptPubKey pay-to-script-hash.
Let’s go through exactly how this works. We start with the Script instructions (Figure 8-15):
OP_0 will push a 0 to the stack, the two signatures and the RedeemScript will be pushed to the stack directly, leading to Figure 8-16:
OP_HASH160 will hash the RedeemScript, which will make the stack look like Figure 8-17:
The 20-byte hash will be pushed on the stack (Figure 8-18):
And finally, OP_EQUAL will compare the top two elements.
If the software checking this transaction is pre-BIP0016, we would end up with Figure 8-19:
This would end evaluation for pre-BIP0016 nodes and the result would be valid, assuming the hashes are equal.
On the other hand, BIP0016 nodes, which as of this writing are the vast majority, will parse the RedeemScript as Script instructions (Figure 8-20):
These go into the Script column as instructions (Figure 8-21):
OP_2 pushes a 2 to the stack, the pubkeys are also pushed and a final OP_2 pushes another 2 to the stack (Figure 8-22):
OP_CHECKMULTISIG consumes m+n+3 elements, which is the entire stack, and we end the same way we did Bare Multisig (Figure 8-23).
The RedeemScript substitution is a bit hacky and there’s special-cased code in Bitcoin software to handle this.
Why wasn’t something a lot less hacky and more intuitive chosen?
BIP0012 was a competing proposal at the time which used OP_EVAL and was considered more elegant.
A ScriptPubKey like Figure 8-24 would have worked with BIP0012:
OP_EVAL would have been an instruction which adds additional instructions based on the top element.OP_EVAL would have consumed the top element of the stack and interpreted that as Script instructions to be put into the Script column.
Unfortunately, this more elegant solution comes with an unwanted side-effect, namely Turing-Completeness. Turing-Completeness is undesirable as it makes the security of a smart contract much harder to guarantee (see Chapter 6). Thus, the more hacky, but more secure option of special-casing was chosen in BIP0016. BIP0016 or p2sh was implemented in 2011 and continues to be a part of the network today.
The special pattern of RedeemScript, OP_HASH160, hash160 and OP_EQUAL needs handling.
The evaluate method in script.py is where we handle the special case:
classScript:...defevaluate(self,z):...whilelen(instructions)>0:instruction=instructions.pop(0)iftype(instruction)==int:...else:stack.append(instruction)iflen(instructions)==3andinstructions[0]==0xa9\andtype(instructions[1])==bytesandlen(instructions[1])==20\andinstructions[2]==0x87:instructions.pop()h160=instructions.pop()instructions.pop()ifnotop_hash160(stack):returnFalsestack.append(h160)ifnotop_equal(stack):returnFalseifnotop_verify(stack):LOGGER.info('bad p2sh h160')returnFalseredeem_script=encode_varint(len(instruction))+instructionstream=BytesIO(redeem_script)instructions.extend(Script.parse(stream).instructions)
0xa9 is OP_HASH160, 0x87 is OP_EQUAL.
We’re checking that the next 3 instructions conform to the BIP0016 special pattern.
We know that this is OP_HASH160, so we just pop it off.
Similarly, we know the next instruction is the 20-byte hash value and the third instruction is OP_EQUAL, which is what we tested for in the if statement above it.
We run the OP_HASH160, 20-byte hash push on the stack and OP_EQUAL as normal.
There should be a 1 remaining, which is what op_verify checks for (OP_VERIFY consumes 1 element and does not put anything back).
Because we want to parse the RedeemScript, we need to prepend the length.
We extend the instruction set with the parsed instructions from the RedeemScript.
The nice thing about p2sh is that the RedeemScript can be as long as the largest single element from OP_PUSHDATA2, which is 520 bytes.
Multisig is just one possibility.
You can have Scripts that define more complicated logic like “2 of 3 of these keys or 5 of 7 of these other keys”.
The main feature of p2sh is that it’s flexible and at the same time reduces the UTXO set size by pushing the burden of storing part of the Script back to the user.
In Chapter 13, p2sh is also used to make Segwit backwards compatible.
To compute p2sh addresses, we use a process similar to how we compute p2pkh addresses. The hash160 is prepended with a prefix byte and appended with a checksum.
Mainnet p2sh uses the 0x05 byte which causes addresses to start with a 3 in Base58 while testnet p2sh uses the 0xc4 byte to cause addresses to start with a 2.
We can calculate the address using the encode_base58_checksum function from helper.py.
>>>fromhelperimportencode_base58_checksum>>>h160=bytes.fromhex('74d691da1574e6b3c192ecfb52cc8984ee7b6c56')>>>(encode_base58_checksum(b'\x05'+h160))3CLoMMyuoDQTPRD3XYZtCvgvkadrAdvdXh
Write h160_to_p2pkh_address that converts a 20-byte hash160 into a p2pkh address.
Write h160_to_p2sh_address that converts a 20-byte hash160 into a p2sh address.
As with p2pkh, one of the tricky aspects of p2sh is verifying the signatures. The p2sh signature verification is different than the p2pkh process covered in Chapter 7.
Unlike p2pkh where there’s only 1 signature and 1 public key, we have some number of pubkeys (in SEC format in the RedeemScript) and some equal or smaller number of signatures (in DER format in the ScriptSig). Thankfully, signatures have to be in the same order as the pubkeys or the signatures are not considered valid.
Once we have a particular signature and public key, we only need the signature hash, or z to figure out whether the signature is valid (Figure 8-25).
As with p2pkh, finding the signature hash is the most difficult part of the p2sh signature validation process and we’ll now proceed to cover this in detail.
The first step is to empty all the ScriptSigs when checking the signature (Figure 8-26). The same procedure is used for creating the signature.
Each p2sh input has a RedeemScript. We take the RedeemScript and put that in place of the empty ScriptSig (Figure 8-27). This is different from p2pkh in that it’s not the ScriptPubKey.
Lastly, we add a 4-byte hash type to the end (Figure 8-28). This is the same as in p2pkh.
The integer corresponding to SIGHASH_ALL is 1 and this has to be encoded in Little-Endian over 4 bytes, which makes the transaction look like this:
SIGHASH_ALL, or the blue part at the end.The hash256 of this interpreted as a Big-Endian integer is our z.
The code for getting our signature hash, or z, looks like this:
>>>fromhelperimporthash256>>>modified_tx=bytes.fromhex('0100000001868278ed6ddfb6c1ed3ad5f8181eb0c7a38\5aa0836f01d5e4789e6bd304d87221a000000475221022626e955ea6ea6d98850c994f9107b036\b1334f18ca8830bfff1295d21cfdb702103b287eaf122eea69030a0e9feed096bed8045c8b98be\c453e1ffac7fbdbd4bb7152aeffffffff04d3b11400000000001976a914904a49878c0adfc3aa0\5de7afad2cc15f483a56a88ac7f400900000000001976a914418327e3f3dda4cf5b9089325a4b9\5abdfa0334088ac722c0c00000000001976a914ba35042cfe9fc66fd35ac2224eebdafd1028ad2\788acdc4ace020000000017a91474d691da1574e6b3c192ecfb52cc8984ee7b6c5687000000000\1000000')>>>s256=hash256(modified_tx)>>>z=int.from_bytes(s256,'big')>>>(hex(z))0xe71bfa115715d6fd33796948126f40a8cdd39f187e4afb03896795189fe1423c
Now that we have our z, we can grab the SEC public key and DER signature from the ScriptSig and RedeemScript (Figure 8-29):
>>>fromeccimportS256Point,Signature>>>fromhelperimporthash256>>>modified_tx=bytes.fromhex('0100000001868278ed6ddfb6c1ed3ad5f8181eb0c7a38\5aa0836f01d5e4789e6bd304d87221a000000475221022626e955ea6ea6d98850c994f9107b036\b1334f18ca8830bfff1295d21cfdb702103b287eaf122eea69030a0e9feed096bed8045c8b98be\c453e1ffac7fbdbd4bb7152aeffffffff04d3b11400000000001976a914904a49878c0adfc3aa0\5de7afad2cc15f483a56a88ac7f400900000000001976a914418327e3f3dda4cf5b9089325a4b9\5abdfa0334088ac722c0c00000000001976a914ba35042cfe9fc66fd35ac2224eebdafd1028ad2\788acdc4ace020000000017a91474d691da1574e6b3c192ecfb52cc8984ee7b6c5687000000000\1000000')>>>h256=hash256(modified_tx)>>>z=int.from_bytes(h256,'big')>>>sec=bytes.fromhex('022626e955ea6ea6d98850c994f9107b036b1334f18ca8830bfff\1295d21cfdb70')>>>der=bytes.fromhex('3045022100dc92655fe37036f47756db8102e0d7d5e28b3beb83a\8fef4f5dc0559bddfb94e02205a36d4e4e6c7fcd16658c50783e00c341609977aed3ad00937bf4\ee942a89937')>>>point=S256Point.parse(sec)>>>sig=Signature.parse(der)>>>(point.verify(z,sig))True
z is from the code above
We’ve verified 1 of the 2 signatures that are required to unlock this p2sh multisig.
Validate the second signature from the transaction above.
Modify the sig_hash and verify_input methods to be able to verify p2sh transactions.
We learned how p2sh ScriptPubKeys are created and how they’re redeemed. We’ve covered Transactions for the last 4 chapters, we now turn to how they are grouped in Blocks.
Transactions transfer Bitcoins from one party to another and are unlocked, or authorized, by signatures. This ensures that the sender authorized the transaction, but what if the sender sends the same coins to multiple people? This is called the double-spending problem and is so called because the owner of a lockbox may try to spend the same output twice. Much like being given a check that has the possibility of bouncing, the receiver needs to be assured that the transaction is valid.
This is where a major innovation of Bitcoin comes in with Blocks. Think of Blocks as a way to order transactions. If we order transactions, a double-spend can be prevented by making any later, conflicting transaction invalid. This is the equivalent to accepting the earlier transaction as the valid one.
Implementing this rule would be easy (earliest transaction is valid, subsequent transactions that conflict are invalid) if we could order transactions one at a time. Unfortunately, that would require nodes on the network to agree on which transaction is supposed to be next and would cause a lot of transmission overhead in coming to consensus. We could also order large batches of transactions, maybe once per day, but that wouldn’t be very practical as transactions would settle only once per day and not have finality before then.
Bitcoin finds a middle ground between these extremes by settling every 10 minutes in batches of transactions. These batches of transactions are what we call Blocks. In this chapter we’ll go through how to parse Blocks and how to check the proof-of-work. We’ll start with a special transaction called the Coinbase transaction which is the first transaction of every block.
Coinbase transactions have nothing to do with the company of the same name based in the US. Coinbase is the required first transaction of every block and is the only transaction allowed to bring Bitcoins into existence. The Coinbase transaction’s outputs are kept by whomever the mining entity designates and usually include all the transaction fees of the other transactions in the block as well as something called the block reward.
The Coinbase transaction is what makes it worthwhile for a miner to mine. Figure 9-1 shows what a Coinbase transaction looks like:
The transaction structure is no different than other transactions on the Bitcoin network with a few exceptions.
Coinbase Transactions must have exactly one input.
The one input must have a previous transaction of 32 bytes of 00.
The one input must have a previous index of ffffffff.
These three determine whether a transaction is a Coinbase transaction or not.
Write the is_coinbase method of the Tx class.
The Coinbase Transaction has no previous output that it’s spending, so the input is not unlocking anything. So what’s in the ScriptSig?
The ScriptSig of the Coinbase transaction is set by whoever mined the transaction. The main restriction is that the ScriptSig has to be at least 2 bytes and no longer than 100 bytes. Other than those restrictions and BIP0034 (see more below) the ScriptSig can be anything the miner wants as long as the evaluation of the ScriptSig by itself, with no corresponding ScriptPubKey, is valid. Here is the ScriptSig for the Genesis Block’s Coinbase Transaction:
4d04ffff001d0104455468652054696d65732030332f4a616e2f32303039204368616e63656c6c 6f72206f6e206272696e6b206f66207365636f6e64206261696c6f757420666f722062616e6b73
This ScriptSig was composed by Satoshi and contains a message that we can read:
>>>fromioimportBytesIO>>>fromscriptimportScript>>>stream=BytesIO(bytes.fromhex('4d04ffff001d0104455468652054696d6573203033\2f4a616e2f32303039204368616e63656c6c6f72206f6e206272696e6b206f66207365636f6e64\206261696c6f757420666f722062616e6b73'))>>>s=Script.parse(stream)>>>(s.instructions[2])b'The Times 03/Jan/2009 Chancellor on brink of second bailout for banks'
This was the headline from The Times newspaper on January 3, 2009. This proves that the Genesis Block was created some time at or after that date, and not before. Other Coinbase Transactions’ ScriptSigs contain similarly arbitrary data.
BIP0034 regulates the first element of the ScriptSig of Coinbase Transactions. This was due to a network problem where miners were using the same Coinbase Transaction for different blocks.
The Coinbase Transaction being the same byte-wise means that the transaction IDs are also the same since the hash256 of the transaction is deterministic. To prevent transaction ID duplication, Gavin Andresen authored BIP0034 which is a soft-fork rule that adds the height of the block being mined into the first element of the Coinbase ScriptSig.
The height is interpreted as a Little-Endian integer and must equal the height of the block (that is, the number of blocks since the Genesis Block). Thus a Coinbase Transaction cannot be byte-wise the same across different blocks since the block height will differ. Here’s how we can parse the height from the Coinbase Transaction in Figure 9-1:
>>>fromioimportBytesIO>>>fromscriptimportScript>>>fromhelperimportlittle_endian_to_int>>>stream=BytesIO(bytes.fromhex('5e03d71b07254d696e656420627920416e74506f6f\6c20626a31312f4542312f4144362f43205914293101fabe6d6d678e2c8c34afc36896e7d94028\24ed38e856676ee94bfdb0c6c4bcd8b2e5666a0400000000000000c7270000a5e00e00'))>>>script_sig=Script.parse(stream)>>>(little_endian_to_int(script_sig.instructions[0]))465879
A Coinbase Transaction reveals the Block it was in! Coinbase Transactions in different Blocks are required to have different ScriptSigs and thus different Transaction IDs. This rule continues to be needed as it otherwise allow the duplicate Coinbase Transaction IDs across multiple blocks.
Write the coinbase_height method for the Tx class.
Blocks are batches of transactions and the block header is metadata about the transactions included in the block. The block header as shown in Figure 9-2 consists of:
Version
Previous Block
Merkle Root
Timestamp
Bits
Nonce
The Block Header is the metadata for the block. Unlike transactions, each field in a block header is of a fixed length. Version is 4 bytes, Previous Block is 32 bytes, Merkle Root is 32 bytes, Timestamp is 4 bytes, Bits is 4 bytes and Nonce is 4 bytes. A Block Header takes up exactly 80 bytes. As of this writing there are roughly 550,000 blocks or ~45 megabytes in Block Headers. The entire blockchain, on the other hand, is roughly 200 GB, so the headers are roughly .023% of the size. The fact that headers are so much smaller is an important feature when we look at Simplified Payment Verification in Chapter 11.
Like the transaction ID, the block ID the hex representation of the hash256 of the header interpreted in Little-Endian. The block ID is interesting:
>>>fromhelperimporthash256>>>block_hash=hash256(bytes.fromhex('020000208ec39428b17323fa0ddec8e887b4a7\c53b8c0a0a220cfd0000000000000000005b0750fce0a889502d40508d39576821155e9c9e3f5c\3157f961db38fd8b25be1e77a759e93c0118a4ffd71d'))[::-1]>>>block_id=block_hash.hex()>>>(block_id)0000000000000000007e9e4c586439b0cdbe13b1370bdd9435d76a644d047523
This ID is what gets put into prev_block for a block building on top of this one. For now, notice that the ID starts with a lot of 0’s. We’ll come back to this in the proof-of-work section later in this chapter.
We can start coding a Block class based on what we already know:
classBlock:def__init__(self,version,prev_block,merkle_root,timestamp,bits,nonce):self.version=versionself.prev_block=prev_blockself.merkle_root=merkle_rootself.timestamp=timestampself.bits=bitsself.nonce=nonce
Write the parse for Block.
Write the serialize for Block.
Write the hash for Block.
Version in normal software refers to a particular set of features.
For a block, this is similar, in the sense that the version field reflects what capabilities the software that produced the block can do.
In the past this was used as a way to indicate a single feature that was ready to be deployed by the miner who mined the block.
Version 2 meant that the software was ready for BIP0034, the Coinbase transaction block height feature from earlier in this chapter.
Version 3 meant that the software was ready for BIP0066, the enforcement of strict DER encoding.
Version 4 meant that the software was ready for BIP0065, which specified OP_CHECKLOCKTIMEVERIFY.
Unfortunately, the incremental increase in version number meant that only one feature was signaled on the network at a time. To alleviate this, the developers came up with BIP9, which allows up to 29 different features to be signaled at the same time.
The way BIP9 works is by fixing the first 3 bits of the 4-byte (32-bit) header to be 001 to indicate that the miner is using BIP9.
The first 3 bits have to be 001 as that forces older clients to interpret the version field as a number greater than or equal to 4, which was the last version number that was used pre-BIP9.
This means that in hexadecimal, the first character will always be 2 or 3. The other 29 bits can be assigned to different soft-fork features which miners can signal readiness for. For example, bit 0 (the rightmost bit) can be flipped to 1 to signal readiness for one soft fork, bit 1 (the second bit from the right) can be flipped to 1 to signal readiness for another, bit 2 (the third bit from the right) can be flipped to 1 to signal readiness for another and so on.
BIP9 requires that 95% of blocks signal readiness in a given 2016 block epoch (the period for a difficulty adjustment, more on that later in this chapter) before the soft fork feature gets activated on the network.
Soft forks which used BIP9 as of this writing have been BIP68/BIP112/BIP113 (OP_CHECKSEQUENCEVERIFY and related changes) and BIP141 (segwit).
These BIPs used bits 0 and 1 for signaling respectively.
BIP91 used something like BIP9, but used an 80% threshold and used a smaller block period, so wasn’t strictly using BIP9.
Bit 4 was used to signal BIP91.
Checking for these features is relatively straightforward:
>>>fromioimportBytesIO>>>fromblockimportBlock>>>b=Block.parse(BytesIO(bytes.fromhex('020000208ec39428b17323fa0ddec8e887b\4a7c53b8c0a0a220cfd0000000000000000005b0750fce0a889502d40508d39576821155e9c9e3\f5c3157f961db38fd8b25be1e77a759e93c0118a4ffd71d')))>>>('BIP9: {}'.format(b.version>>29==0b001))BIP9:True>>>('BIP91: {}'.format(b.version>>4&1==1))BIP91:False>>>('BIP141: {}'.format(b.version>>1&1==1))BIP141:True
The >> operator is the left bit-shift operator, which throws away the rightmost 29 bits, leaving just the top 3 bits.
The 0b001 is a way of writing a number in binary in Python.
The & operator is the “bitwise and” operator.
In our case, we right-shift by 4 bits first and then check that the rightmost bit is 1.
We shift 1 to the right because BIP141 was assigned to bit 1.
Write the bip9 method for the Block class.
Write the bip91 method for the Block class.
Write the bip141 method for the Block class.
All blocks have to point to a previous block.
This is why the data structure is called a blockchain.
Blocks link back all the way to the very first block, or the Genesis Block.
The previous block field ends in a bunch of 00 bytes, which we will discuss more later in this chapter.
The Merkle Root encodes all the ordered transactions in a 32-byte hash. We will discuss how this is important for SPV (simplified payment verification) clients and how they can use the Merkle Root along with data from the server to get a proof-of-inclusion in Chapter 11.
The timestamp is a UNIX-style timestamp taking up 4 bytes. Unix timestamps are the number of seconds since January 1, 1970. This timestamp is used in two places. The first for validating timestamp-based Locktimes on transactions included in the block and in calculating a new bits/target/difficulty every 2016 blocks. The Locktimes were at one point used directly for transactions within a block, but BIP113 changed the behavior to not use the current block’s Locktime directly, but the median-time-past (MTP) of the past 11 blocks.
Bitcoin’s timestamp field in the block header is 4 bytes or 32 bits. This means that once the UNIX timestamp exceeds 232-1, there is no room to go further. 232 seconds is roughly 136 years, which means that this field will have no more room in 2106 (136 years after 1970).
Many people mistakenly believe that we only have until 68 years after 1970, or 2038, but that’s only when the field is a signed integer (231 seconds is 68 years), so we get the benefit of that extra bit, giving us until 2106.
In 2106, the block header will need some sort of fork as the timestamp in the block header will no longer continuously increase.
Bits is a field that encodes the proof-of-work necessary in this block. This will be discussed more in the next section.
Nonce stands for “number used only once” or n-once. This number is what is changed by miners when looking for proof-of-work.
Proof-of-work is what secures Bitcoin and at a deep level, allows the mining of Bitcoin decentralized. Finding a proof-of-work gives a miner the right to put the attached block into the blockchain. As proof-of-work is very rare, this is not an easy task. But because proof-of-work is objective and easy to verify, anyone can be a miner if they so choose.
Proof-of-work is called “mining” for a very good reason. Like physical mining, there is something that miners are searching for. A typical gold mining operation processes 45 tons of dirt and rock before accumulating 1 oz of gold. This is because gold is very rare. However, once gold is found, it’s very easy to verify that the gold is real. There are chemical tests, touchstones and many other ways to tell relatively cheaply whether the thing found is gold.
Similarly, proof-of-work is a number that provides a very rare result. To find a proof-of-work, the miners on the Bitcoin network have to churn through the numerical equivalent of dirt and rock to find that proof-of-work. Like gold, verifying proof-of-work is much cheaper than actually finding it.
So what is proof-of-work? Let’s look at the hash256 of the block we saw before to find out:
020000208ec39428b17323fa0ddec8e887b4a7c53b8c0a0a220cfd000000000000000000 5b0750fce0a889502d40508d39576821155e9c9e3f5c3157f961db38fd8b25be1e77a759 e93c0118a4ffd71d
>>>fromhelperimporthash256>>>block_id=hash256(bytes.fromhex('020000208ec39428b17323fa0ddec8e887b4a7c5\3b8c0a0a220cfd0000000000000000005b0750fce0a889502d40508d39576821155e9c9e3f5c31\57f961db38fd8b25be1e77a759e93c0118a4ffd71d'))[::-1]>>>('{}'.format(block_id.hex()).zfill(64))0000000000000000007e9e4c586439b0cdbe13b1370bdd9435d76a644d047523
We are purposefully printing this number as 64 hexadecimal digits to show how small it is in 256-bit terms.
Sha256 is known to generate uniformly distributed values. Given this, we can treat two rounds of sha256, or hash256 as a random number. The probability of any random 256-bit number being this small is tiny. The probability of the first bit in a 256-bit number being 0 is 0.5. The first two bits being 00, 0.25. The first three bits being 000, 0.125 and so on. Note that each 0 in the hexadecimal above represents 4 0-bits. In this case, we have the first 73 bits being 0, which is 0.573 or about 1 in 1022. This is a really tiny probability. On average 1022 or 10 trillion trillion random 256-bit numbers have to be generated before finding one this small. In other words, we need to calculate 1022 hashes on average to find one this small. Getting back to the analogy, the process of finding proof-of-work requires us to process around 1022 numerical dirt and rock to find our numerical gold nugget.
Where does the miner get new numerical dirt to process to see if it satisfies proof-of-work? This is where the nonce field comes in. The miners can change the nonce field at will.
Unfortunately, the 4 bytes or 32-bits, or 232 possible nonces that a miner can try is insufficient space. This is because the required proof-of-work is much more difficult than can be done in 32-bits. Modern ASIC equipment can calculate way more than 232 different hashes per second. The AntMiner S9, for example, calculates 12 Th/s, or 12,000,000,000,000 hashes per second. That is approximately 243 hashes per second which means that the entire nonce space can be consumed in just 0.0003 seconds.
What miners can do when the nonce field is exhausted is change the Coinbase transaction, which then changes the Merkle Root, giving miners a fresh nonce space each time. The other option is to roll the version field or use overt ASICBOOST. The mechanics of how the Merkle Root changes whenever any transaction in the block changes will be discussed in Chapter 11.
Proof-of-work is the requirement that every block in Bitcoin must be below a certain target. Target is a 256-bit number that is computed directly from the bits field. The target is very small compared to an average 256-bit number.
e93c0118
The bits field is actually two different numbers. The first is the exponent, which is the last byte. The second is the coefficient which is the other three bytes in Little-Endian. The formula for calculating the target from these two numbers is:
target = coefficient * 256exponent-3
This is how we calculate the target given the bits field in Python:
>>>fromhelperimportlittle_endian_to_int>>>bits=bytes.fromhex('e93c0118')>>>exponent=bits[-1]>>>coefficient=little_endian_to_int(bits[:-1])>>>target=coefficient*256**(exponent-3)>>>('{:x}'.format(target).zfill(64))0000000000000000013ce9000000000000000000000000000000000000000000
We are purposefully printing this number as 64 hexadecimal digits to show how small the number is in 256-bit terms.
A valid proof-of-work is a hash of the block which, when interpreted as a Little-Endian integer, is below the target number. Proof-of-work hashes are exceedingly rare and the process of mining is the process of finding one of these hashes. To find a single proof-of-work with the above target, the network as a whole must calculate 3.8 * 1021 hashes, which, when this block was found, was roughly every 10 minutes. To give this number some context, the best GPU miner in the world would need to run for 50,000 years on average to find a single proof-of-work below this target.
We can check that this block’s hash satisfies the proof-of-work:
>>>fromhelperimportlittle_endian_to_int>>>proof=little_endian_to_int(hash256(bytes.fromhex('020000208ec39428b17323\fa0ddec8e887b4a7c53b8c0a0a220cfd0000000000000000005b0750fce0a889502d40508d3957\6821155e9c9e3f5c3157f961db38fd8b25be1e77a759e93c0118a4ffd71d')))>>>(proof<target)True
target is calculated above.
We can see that the proof-of-work is lower by lining up the numbers in 64 hex characters:
TG: 0000000000000000013ce9000000000000000000000000000000000000000000
ID: 0000000000000000007e9e4c586439b0cdbe13b1370bdd9435d76a644d047523
Write the bits_to_target function in helper.py.
Target is hard to comprehend for human beings. Target is the number that the hash must be below, but as humans, it’s hard to easily see the difference between a 180-bit number and a 190-bit number. The first is a thousand times smaller, but from looking at targets, such large numbers are not easy to contextualize.
To make different targets easier to compare, the concept of difficulty was born. The trick is that difficulty is inversely proportional to target to make comparisons easier. The specific formula is:
difficulty = 0xffff * 2560x1d-3 / target
The code looks like this:
>>>fromhelperimportlittle_endian_to_int>>>bits=bytes.fromhex('e93c0118')>>>exponent=bits[-1]>>>coefficient=little_endian_to_int(bits[:-1])>>>target=coefficient*256**(exponent-3)>>>difficulty=0xffff*256**(0x1d-3)/target>>>(difficulty)888171856257.3206
The difficulty of Bitcoin at the Genesis Block was 1. This gives us context for how difficult mainnet currently is. The difficulty can be thought of as how much more difficult mining is now than it was at the start. The mining difficulty in the above code is roughly 888 billion times more difficult than when Bitcoin started.
Difficulty is often shown in block explorers and Bitcoin price charting services as it’s a much more intuitive way to understand the effort required to create a new block.
Write the difficulty method for Block
We already learned that proof-of-work can be calculated by computing the hash256 of the block header and interpreting this as a Little-Endian integer. If this number is lower than the target, we have a valid proof-of-work. If not, the block is not valid as it doesn’t have proof-of-work.
Write the check_pow method for Block.
In Bitcoin, each group of 2016 blocks is called a difficulty adjustment period. At the end of every difficulty adjustment period, the target is adjusted according to this formula:
time_differential = (block timestamp of last block in difficulty adjustment period) -
(block timestamp of first block in difficulty adjustment period)
new_target = previous_target * time_differential / (2 weeks)
The time_differential number is calculated so that if it’s greater than 8 weeks, 8 weeks is used and if it’s less than 3.5 days, 3.5 days is used.
This way, the new target cannot change more than 4x in either direction.
That is, the target will be reduced or increased by 4x at the most.
If each block took on average 10 minutes, 2016 blocks should take 20160 minutes. There are 1440 minutes per day, which means that 2016 blocks take 20160 / 1440 = 14 days. The effect of the difficulty adjustment is that blocks times are regressed toward the mean of 10 minutes per block. This means that long term blocks will always go towards 10 minute blocks even if a lot of hashing power has entered or left the network.
The new bits calculation should be using the timestamp field of the last block of each of the current and previous difficulty adjustment periods. Satoshi unfortunately had another off-by-one error here, as the timestamp differential calculation looks at the first and last blocks of the 2016 block difficulty adjustment period instead. The time differential is the difference of blocks that are 2015 blocks apart instead of 2016 blocks apart.
We can code this formula like so:
>>>fromblockimportBlock>>>fromhelperimportTWO_WEEKS>>>last_block=Block.parse(BytesIO(bytes.fromhex('00000020fdf740b0e49cf75bb3\d5168fb3586f7613dcc5cd89675b0100000000000000002e37b144c0baced07eb7e7b64da916cd\3121f2427005551aeb0ec6a6402ac7d7f0e4235954d801187f5da9f5')))>>>first_block=Block.parse(BytesIO(bytes.fromhex('000000201ecd89664fd205a37\566e694269ed76e425803003628ab010000000000000000bfcade29d080d9aae8fd461254b0418\05ae442749f2a40100440fc0e3d5868e55019345954d80118a1721b2e')))>>>time_differential=last_block.timestamp-first_block.timestamp>>>iftime_differential>TWO_WEEKS*4:...time_differential=TWO_WEEKS*4>>>iftime_differential<TWO_WEEKS//4:...time_differential=TWO_WEEKS//4>>>new_target=last_block.target()*time_differential//TWO_WEEKS>>>('{:x}'.format(new_target).zfill(64))0000000000000000007615000000000000000000000000000000000000000000
Note that TWO_WEEKS = 60*60*24*14 is the number of seconds in 2 weeks.
60 seconds times 60 minutes times 24 hours times 14 days.
This makes sure that if it took more than 8 weeks to find the last 2015 blocks, we don’t decrease the difficulty too much.
This part makes sure that if it took less than 3.5 days to find the last 2015 blocks, we don’t increase the difficulty too much.
Note that you only need the headers to calculate what the next block’s target should be. Once we have the target, we can convert target to bits. The inverse operation looks like this:
deftarget_to_bits(target):'''Turns a target integer back into bits, which is 4 bytes'''raw_bytes=target.to_bytes(32,'big')raw_bytes=raw_bytes.lstrip(b'\x00')ifraw_bytes[0]>0x7f:exponent=len(raw_bytes)+1coefficient=b'\x00'+raw_bytes[:2]else:exponent=len(raw_bytes)coefficient=raw_bytes[:3]new_bits=coefficient[::-1]+bytes([exponent])returnnew_bits
Get rid of all the leading 0’s.
The bits format is a way to express really large numbers succinctly and can be used with both negative and positive numbers. If the first bit in the coefficient is a 1, the bits field is interpreted as a negative number. Since target is always positive for us, we shift everything over by 1 byte if the first bit is 1.
The exponent is how long the number is in base-256.
The coefficient is the first 3 digits of the base-256 number.
The coefficient is in Little-Endian and the exponent goes last in the bits format.
If the block doesn’t have the correct bits calculated using the difficulty adjustment formula, then we can safely reject that block.
Calculate the new bits given the first and last blocks of this 2016 block difficulty adjustment period:
Block 471744:
000000203471101bbda3fe307664b3283a9ef0e97d9a38a7eacd8800000000000000000010c8ab a8479bbaa5e0848152fd3c2289ca50e1c3e58c9a4faaafbdf5803c5448ddb845597e8b0118e43a 81d3
Block 473759:
02000020f1472d9db4b563c35f97c428ac903f23b7fc055d1cfc26000000000000000000b3f449 fcbe1bc4cfbcb8283a0d2c037f961a3fdf2b8bedc144973735eea707e1264258597e8b0118e5f0 0474
Write the calculate_new_bits function in helper.py
We’ve learned how to calculate proof-of-work, how to calculate the new bits for a block after a difficulty adjustment period and how to parse Coinbase Transactions. We’ll now move onto networking in Chapter 10 on our way to the block header field we haven’t covered, which is the Merkle Root in Chapter 11.
The peer-to-peer network that Bitcoin runs on is what gives it a lot of its robustness. 65000+ nodes are running on the network as of this writing and communicate constantly.
The Bitcoin network is a broadcast network or a gossip network. Every node is announcing different transactions, blocks and peers that it knows about. The protocol is rich and has a lot of features that have been added to it over the years.
One thing to note about the networking protocol is that it is not consensus critical. The same data can be sent from one node to another using some other protocol and the blockchain itself would not be affected.
With that in mind, we’ll work in this chapter toward requesting, receiving and validating block headers using the network protocol.
All network messages looks like Figure 10-1:
The first four bytes are always the same and are referred to as the network magic.
Magic bytes are common in network programming as the communication is asynchronous and can be intermittent.
Magic bytes give the receiver of the message a place to start should the communication get interrupted (say by your phone dropping signal).
Magic bytes are also useful to identify the network.
You would not want a Bitcoin node to connect to a Litecoin node, for example.
Thus, a Litecoin node has a different magic.
Bitcoin testnet also has a different magic 0b110907 as opposed to the Bitcoin mainnet magic f9beb4d9.
The next 12 bytes is the command field, or a description of what the payload actually carries. There are many different commands, an exhaustive list which can be seen at https://wiki.bitcoin.it. The command field is meant to be human-readable and this particular message is the byte-string “version” in ASCII with 0-byte padding.
The next 4 bytes is the length of the payload in Little-Endian. As we saw in the transaction and block parsing sections, the length of the payload is necessary since the payload is variable. 232 is about 4 billion, so payloads can be as big as 4 GB, though the reference client rejects any payloads over 32MB. In the message above, our payload is 101 bytes.
The next 4 bytes are the checksum field. The checksum algorithm is something of an odd choice as it’s the first 4 bytes of the hash256 of the payload. It’s an odd choice because networking protocol checksums are normally designed to have error-correcting capability and hash256 has none. That said, hash256 is common in the rest of the Bitcoin protocol and is probably the reason it’s used here.
The code to handle network messages requires us to create a new class:
NETWORK_MAGIC=b'\xf9\xbe\xb4\xd9'TESTNET_NETWORK_MAGIC=b'\x0b\x11\x09\x07'classNetworkEnvelope:def__init__(self,command,payload,testnet=False):self.command=commandself.payload=payloadiftestnet:self.magic=TESTNET_NETWORK_MAGICelse:self.magic=NETWORK_MAGICdef__repr__(self):return'{}: {}'.format(self.command.decode('ascii'),self.payload.hex(),)
Determine what this network message is:
f9beb4d976657261636b000000000000000000005df6e0e2
Write the parse method for NetworkEnvelope.
Write the serialize method for NetworkEnvelope.
Each command has a separate payload specification. Figure 10-2 is the parsed payload for Version:
The fields for Version are meant to give enough information for two nodes to be able to communicate.
The first field is the network protocol version, which specifies the what messages may be communicated. The service field give information about what capabilities are available to connecting nodes. The timestamp field is 8 bytes (as opposed to 4 bytes in the block header) and is the UNIX timestamp in Little-Endian.
IP addresses can be IPv6, IPv4 or OnionCat (a mapping of TOR’s .onion addresses to IPv6).
If IPv4, the first 12 bytes are 00000000000000000000ffff and the last 4 bytes are the IP.
The port is 2 bytes Little-Endian. The default on mainnet is 8333, which maps to 208d in Little-Endian hex.
Nonce is a number used by a node to detect a connection to itself. User Agent identifies the software being run. The height or latest block field helps the other node know which block a node is synced up to.
Relay is used for Bloom Filters, which we’ll get to in Chapter 12.
Setting some reasonable defaults, our VersionMessage class looks like this:
classVersionMessage:command=b'version'def__init__(self,version=70015,services=0,timestamp=None,receiver_services=0,receiver_ip=b'\x00\x00\x00\x00',receiver_port=8333,sender_services=0,sender_ip=b'\x00\x00\x00\x00',sender_port=8333,nonce=None,user_agent=b'/programmingbitcoin:0.1/',latest_block=0,relay=True):self.version=versionself.services=servicesiftimestampisNone:self.timestamp=int(time.time())else:self.timestamp=timestampself.receiver_services=receiver_servicesself.receiver_ip=receiver_ipself.receiver_port=receiver_portself.sender_services=sender_servicesself.sender_ip=sender_ipself.sender_port=sender_portifnonceisNone:self.nonce=int_to_little_endian(randint(0,2**64),8)else:self.nonce=nonceself.user_agent=user_agentself.latest_block=latest_blockself.relay=relay
At this point, we need a way to serialize this message.
Write the serialize method for VersionMessage.
The network handshake is how nodes establish communication.
A wants to connect to B and sends a Version message.
B receives the Version message and responds with a Verack message and sends its own Version message.
A receives the Version and Verack messages and sends back a Verack message
B receives the Verack message and continues communication
Once the handshake is finished, A and B can communicate however they want. Note that there is no authentication here and it’s up to the nodes to verify all data that they receive. If a node sends a bad tx or block, it can expect to get banned or disconnected.
Network communication is tricky due to its asynchronous nature. To experiment, we can establish a connection to a node on the network synchronously.
>>>importsocket>>>fromnetworkimportNetworkEnvelope,VersionMessage>>>host='testnet.programmingbitcoin.com'>>>port=18333>>>socket=socket.socket(socket.AF_INET,socket.SOCK_STREAM)>>>socket.connect((host,port))>>>stream=socket.makefile('rb',None)>>>version=VersionMessage()>>>envelope=NetworkEnvelope(version.command,version.serialize())>>>socket.sendall(envelope.serialize())>>>whileTrue:...new_message=NetworkEnvelope.parse(stream)...(new_message)
This is a server I’ve set up for testnet. The testnet port is 18333 by default.
We create a stream to be able to read from the socket. A stream made this way can be passed to all the parse methods.
The first step of the handshake is to send a version message.
We now send the message in the right envelope.
This line will read any messages coming in through our connected socket.
Connecting in this way, we can’t send until we’ve received and can’t respond intelligently to more than 1 message at a time.
A more robust implementation would use an asynchronous library (like asyncio in Python 3) to send and receive without being blocked.
We also need a Verack message class which we’ll create here:
classVerAckMessage:command=b'verack'def__init__(self):pass@classmethoddefparse(cls,s):returncls()defserialize(self):returnb''
VerAckMessage is a minimal network message.
Let’s now automate this by creating a class that will handle the communication for us.
classSimpleNode:def__init__(self,host,port=None,testnet=False,logging=False):ifportisNone:iftestnet:port=18333else:port=8333self.testnet=testnetself.logging=loggingself.socket=socket.socket(socket.AF_INET,socket.SOCK_STREAM)self.socket.connect((host,port))self.stream=self.socket.makefile('rb',None)defsend(self,message):'''Send a message to the connected node'''envelope=NetworkEnvelope(message.command,message.serialize(),testnet=self.testnet)ifself.logging:('sending: {}'.format(envelope))self.socket.sendall(envelope.serialize())defread(self):'''Read a message from the socket'''envelope=NetworkEnvelope.parse(self.stream,testnet=self.testnet)ifself.logging:('receiving: {}'.format(envelope))returnenvelopedefwait_for(self,*message_classes):'''Wait for one of the messages in the list'''command=Nonecommand_to_class={m.command:mforminmessage_classes}whilecommandnotincommand_to_class.keys():envelope=self.read()command=envelope.commandifcommand==VersionMessage.command:self.send(VerAckMessage())elifcommand==PingMessage.command:self.send(PongMessage(envelope.payload))returncommand_to_class[command].parse(envelope.stream())
The send method sends a message over the socket.
The command property and serialize methods are expected to exist in the message object.
The read method reads a new message from the socket.
The wait_for method lets us wait for any one of several commands (specifically, message classes).
Along with the synchronous nature of this class, a method like this makes for a bit easier programming.
A commercial strength node would definitely not use something like this.
Now that we have a node, we can now handshake with another node.
>>>fromnetworkimportSimpleNode,VersionMessage>>>node=SimpleNode('testnet.programmingbitcoin.com',testnet=True)>>>version=VersionMessage()>>>node.send(version)>>>verack_received=False>>>version_received=False>>>whilenotverack_receivedandnotversion_received:...message=node.wait_for(VersionMessage,VerAckMessage)...ifmessage.command==VerAckMessage.command:...verack_received=True...else:...version_received=True...node.send(VerAckMessage())
Most nodes don’t care about the fields in Version like IP address. We can connect with the defaults and everything will be just fine.
We start the handshake by sending the Version message
We only finish when we’ve received both Verack and Version.
We expect to receive a Verack for our Version and the other node’s Version. We don’t know which order, though.
Write the handshake method for SimpleNode
Now that we have code to connect to a node, what can we do? When any node first connects to the network, the data that’s most crucial to get and verify are the block headers. For full nodes, downloading the Block headers allows them to asynchronously ask for full blocks from multiple nodes, parallelizing the download of the blocks. For light clients, downloading headers allows them to verify the proof-of-work in each block. As we’ll see in Chapter 11, light clients will be able to get proofs-of-inclusion through the network, but that requires the light clients have the block headers.
Nodes can give us the block headers without taking up much bandwidth.
The command to get the block headers is called getheaders and it looks like Figure 10-3:
getheadersAs with Version, we start with the protocol version, then the number of block headers in this list (this number can be more than 1 if there’s a chain split), then the starting block headers and lastly, the ending block header.
If we specify the ending block to be 000...000, we’re indicating that we want as many as the other node will give us.
The maximum number of headers that we can get back is 2000, or almost a single difficulty adjustment period (2016 blocks).
Here’s what the class looks like:
classGetHeadersMessage:command=b'getheaders'def__init__(self,version=70015,num_hashes=1,start_block=None,end_block=None):self.version=versionself.num_hashes=num_hashesifstart_blockisNone:raiseRuntimeError('a start block is required')self.start_block=start_blockifend_blockisNone:self.end_block=b'\x00'*32else:self.end_block=end_block
For the purposes of this chapter, we’re going to assume that the number of block header groups is 1. A more robust implementation would handle more than a single block group, but we can download the block headers using a single group.
A starting block is needed, otherwise we can’t create a proper message.
The ending block we assume to be null, or as many as the server will send to us if not defined.
Write the serialize method for GetHeadersMessage.
We can now create a node, handshake, and then ask for some headers.
>>>fromioimportBytesIO>>>fromblockimportBlock,GENESIS_BLOCK>>>fromnetworkimportSimpleNode,GetHeadersMessage>>>node=SimpleNode('mainnet.programmingbitcoin.com',testnet=False)>>>node.handshake()>>>genesis=Block.parse(BytesIO(GENESIS_BLOCK))>>>getheaders=GetHeadersMessage(start_block=genesis.hash())>>>node.send(getheaders)
Now we need a way to receive the headers from the other node.
The other node will send back the headers command.
The headers command is a list of block headers (Figure 10-4) which we already learned how to parse from Chapter 9.
The HeadersMessage class can take advantage when parsing.
headersThe Headers message starts with the number of headers as a varint, which is a number from 1 to 2000 inclusive. Each block header, we know, is 80 bytes. Then we have the number of transactions, or 0 in this case. The number of transactions in the headers message is always 0. This may be a bit confusing at first since we only asked for the headers and not the transactions. The reason nodes bother sending the number of transactions at all is because the Headers message is meant to be compatible with the format for the Block message, which is the block header, number of transactions and then the transactions themselves. By specifying that the number of transactions is 0, we can use the same parsing engine as when parsing a full block.
classHeadersMessage:command=b'headers'def__init__(self,blocks):self.blocks=blocks@classmethoddefparse(cls,stream):num_headers=read_varint(stream)blocks=[]for_inrange(num_headers):blocks.append(Block.parse(stream))num_txs=read_varint(stream)ifnum_txs!=0:raiseRuntimeError('number of txs not 0')returncls(blocks)
Each block gets parsed using the Block class’s parse method using the same stream that we have.
The number of transactions is always 0 and is a remnant of block parsing.
If we didn’t get 0, something is wrong.
Given the network connection that we’ve set up, we can download the headers, check their proof-of-work and validate the block header difficulty adjustments.
>>>fromioimportBytesIO>>>fromnetworkimportSimpleNode,GetHeadersMessage,HeadersMessage>>>fromblockimportBlock,GENESIS_BLOCK,LOWEST_BITS>>>fromhelperimportcalculate_new_bits>>>previous=Block.parse(BytesIO(GENESIS_BLOCK))>>>first_epoch_timestamp=previous.timestamp>>>expected_bits=LOWEST_BITS>>>count=1>>>node=SimpleNode('mainnet.programmingbitcoin.com',testnet=False)>>>node.handshake()>>>for_inrange(19):...getheaders=GetHeadersMessage(start_block=previous.hash())...node.send(getheaders)...headers=node.wait_for(HeadersMessage)...forheaderinheaders.blocks:...ifnotheader.check_pow():...raiseRuntimeError('bad PoW at block {}'.format(count))...ifheader.prev_block!=previous.hash():...raiseRuntimeError('discontinuous block at {}'.format(count))...ifcount%2016==0:...time_diff=previous.timestamp-first_epoch_timestamp...expected_bits=calculate_new_bits(previous.bits,time_diff)...(expected_bits.hex())...first_epoch_timestamp=header.timestamp...ifheader.bits!=expected_bits:...raiseRuntimeError('bad bits at block {}'.format(count))...previous=header...count+=1ffff001dffff001dffff001dffff001dffff001dffff001dffff001dffff001dffff001dffff001dffff001dffff001dffff001dffff001dffff001d6ad8001d28c4001d71be001d
Check that the proof-of-work is valid.
Check that the current block is after the previous one.
Checking that the bits/target/difficulty is what we expect based on the previous epoch calculation. At the end of the epoch, calculate the next bits/target/difficulty. Store the first block of the epoch to calculate bits at the end of the epoch.
Note that this won’t work on testnet as the difficulty adjustment algorithm is different. To make sure blocks can be found consistently for testing, if a block hasn’t been found on testnet in 20 minutes, the difficulty drops to 1, making it very easy to find a block. This is on purpose as to allow testers to be able to keep building blocks on the network without expensive mining equipment. A $30 USB ASIC can typically find a few blocks per minute at the minimum difficulty.
We’ve managed to connect to a node on the network, handshake, download and verify that the block headers meet the consensus rules. In the next chapter, we focus on getting information about transactions that we’re interested in from another node in a private, yet provable way.
The one block header field that we didn’t investigate much in Chapter 9 is the Merkle Root. In order to understand what makes the Merkle Root useful, we first have to learn about Merkle Trees and what properties they have. In this chapter, we’re going to learn exactly what a Merkle Root is. This will be motivated by something called a Proof of Inclusion.
For a device that doesn’t have much disk space, bandwidth or computing power like your phone, it’s expensive to store, receive and validate the entire blockchain. As of this writing, the entire Bitcoin blockchain is around 200GB, which is more than many phones can store, can be very difficult to download efficiently and will certainly tax the CPU. If the entire blockchain cannot be put on the phone, what else can we do? Is it possible to create a Bitcoin wallet on a phone without having all the data?
For any wallet, there are two scenarios that we’re concerned with:
Paying someone
Getting paid by someone
If you are paying someone with your Bitcoin wallet, it is up to the person receiving your Bitcoins to verify that they’ve been paid. Once they’ve verified that the transaction has been included in a block sufficiently deep, the other side of the trade, or the good or service will be given to you. Once you’ve sent the transaction to the other party, there really isn’t anything for you to do than wait until you receive whatever it is you’re exchanging the Bitcoins for.
When getting paid Bitcoins, however, we have a dilemma. If we are connected and have the full blockchain, we can easily see when the transaction is in a sufficiently deep block at which point we’d give them our goods or services. If we don’t have the full blockchain, as with a phone, what can we do?
The answer lies in the Merkle Root field from the Block header that we saw in Chapter 9. As we saw in the last chapter, we can download the Block headers and verify that they meet the Bitcoin consensus rules. In this chapter we’re going to work towards getting proof that a particular transaction is in a block that we know about. Since the block header is secured by proof-of-work, a transaction with a Proof of Inclusion in that block means at a minimum, there was a good deal of energy spent to produce that block. This means that the cost to deceive you would be at least the cost of the proof-of-work for the block. The rest of this chapter goes into what the Proof of Inclusion is and how to verify it.
A Merkle Tree is a computer science structure designed for efficient proofs of inclusion. The prerequisites are an ordered list of items and a cryptographic hash function. In our case, the ordered list of items are transactions in a block and the hash function, hash256. To construct the Merkle Tree, we follow this algorithm:
Hash all the items of the ordered list with the provided hash function
If there is exactly 1 hash, we are done
If there is an odd number of hashes, we duplicate the last hash in the list and add it to the end so that we have an even number of hashes.
We pair the hashes in order and hash the concatenation to get the parent level which should have half the number of hashes.
Go to 2.
The idea is to come to a single hash that “represents” the entire ordered list. Visually, a Merkle Tree looks like Figure 11-1:
The bottom row is what we call the leaves of the tree. All other nodes besides the leaves are called internal nodes. The leaves get combined to produce its parent level (HAB and HCD) and when we calculate the parent level of that, we get the Merkle Root.
We’ll go through each part of this process below.
There was a vulnerability in Bitcoin 0.4-0.6 which is detailed in CVE-2012-2459. There was a Denial of Service vector due to the duplication of the last item in Merkle Trees, which caused some nodes to invalidate blocks even if they were valid.
Given two hashes, we produce another hash that represents both of them. As they are ordered, we will call the two hashes the left hash and the right hash. The hash of the left and right hashes is what we call the parent hash. To clarify, here’s the formula for the parent hash:
H = Hashing function, P = Parent Hash, L = Left Hash, R = Right Hash
P=H(L||R)
Note the || symbol denotes concatenation.
Here’s how we can code this process in Python:
>>>fromhelperimporthash256>>>hash0=bytes.fromhex('c117ea8ec828342f4dfb0ad6bd140e03a50720ece40169ee38b\dc15d9eb64cf5')>>>hash1=bytes.fromhex('c131474164b412e3406696da1ee20ab0fc9bf41c8f05fa8ceea\7a08d672d7cc5')>>>parent=hash256(hash0+hash1)>>>(parent.hex())8b30c5ba100f6f2e5ad1e2a742e5020491240f8eb514fe97c713c31718ad7ecd
The reason why we hash the concatenation to get the parent is because we can provide a Proof of Inclusion.
Specifically, we can show that L is represented in the parent, P, by revealing R.
That is, if we want proof L is represented in P, the producer of P can show us R and let us know that L is the left child of P.
We can then combine L and R to produce P and have proof that L was used to produce P.
If L is not represented in P, being able to provide R would be the equivalent to providing a hash pre-image, which we know is very difficult.
This is what we mean by a Proof of Inclusion.
Write the merkle_parent function.
Given an ordered list of more than two hashes, we can calculate the parents of each pair, or what we call the Merkle Parent Level. If we have an even number of hashes, this is straightforward, as we can simply pair them up in order. If we have an odd number of hashes, then we need to do something as we have a lone hash at the end. We can solve this by duplicating the last item.
For a list like [A, B, C] what we add C again to get [A, B, C, C].
Now we can calculate the Merkle Parent of A and B and calculate the Merkle Parent of C and C to get:
[H(A||B), H(C||C)]
Since the Merkle Parent always consists of two hashes, the Merkle Parent Level always has exactly half the number of hashes, rounded up.
>>>fromhelperimportmerkle_parent>>>hex_hashes=[...'c117ea8ec828342f4dfb0ad6bd140e03a50720ece40169ee38bdc15d9eb64cf5',...'c131474164b412e3406696da1ee20ab0fc9bf41c8f05fa8ceea7a08d672d7cc5',...'f391da6ecfeed1814efae39e7fcb3838ae0b02c02ae7d0a5848a66947c0727b0',...'3d238a92a94532b946c90e19c49351c763696cff3db400485b813aecb8a13181',...'10092f2633be5f3ce349bf9ddbde36caa3dd10dfa0ec8106bce23acbff637dae',...]>>>hashes=[bytes.fromhex(x)forxinhex_hashes]>>>iflen(hashes)%2==1:...hashes.append(hashes[-1])>>>parent_level=[]>>>foriinrange(0,len(hashes),2):...parent=merkle_parent(hashes[i],hashes[i+1])...parent_level.append(parent)>>>foriteminparent_level:...(item.hex())8b30c5ba100f6f2e5ad1e2a742e5020491240f8eb514fe97c713c31718ad7ecd7f4e6f9e224e20fda0ae4c44114237f97cd35aca38d83081c9bfd41feb9078003ecf6115380c77e8aae56660f5634982ee897351ba906a6837d15ebc3a225df0
We add the last hash on the list, hashes[-1], to the end of hashes to makes the length of hashes even.
This is how we skip by two in Python.
i will be 0 the first time through the loop, 2 the second, 4 the third and so on.
This code results in a new list of hashes that correspond to the Merkle Parent Level
Write the merkle_parent_level function.
The process of getting the Merkle Root is to calculate successive Merkle Parent Levels until we get a single hash. If, for example, we have items A through G (7 items), we calculate the Merkle Parent Level:
[H(A||B), H(C||D), H(E||F), H(G||G)]
Then we calculate the Merkle Parent Level again:
[H(H(A||B)||H(C||D)), H(H(E||F)||H(G||G))]
We are left with just 2 items, where we calculate the Merkle Parent Level one more time:
H(H(H(A||B)||H(C||D))||H(H(E||F)||H(G||G)))
Since we are left with exactly one hash, we are done. The final single hash is called the Merkle Root. Each level will halve the number of hashes, so doing this process over and over will eventually result in a single item or the Merkle Root.
>>>fromhelperimportmerkle_parent_level>>>hex_hashes=[...'c117ea8ec828342f4dfb0ad6bd140e03a50720ece40169ee38bdc15d9eb64cf5',...'c131474164b412e3406696da1ee20ab0fc9bf41c8f05fa8ceea7a08d672d7cc5',...'f391da6ecfeed1814efae39e7fcb3838ae0b02c02ae7d0a5848a66947c0727b0',...'3d238a92a94532b946c90e19c49351c763696cff3db400485b813aecb8a13181',...'10092f2633be5f3ce349bf9ddbde36caa3dd10dfa0ec8106bce23acbff637dae',...'7d37b3d54fa6a64869084bfd2e831309118b9e833610e6228adacdbd1b4ba161',...'8118a77e542892fe15ae3fc771a4abfd2f5d5d5997544c3487ac36b5c85170fc',...'dff6879848c2c9b62fe652720b8df5272093acfaa45a43cdb3696fe2466a3877',...'b825c0745f46ac58f7d3759e6dc535a1fec7820377f24d4c2c6ad2cc55c0cb59',...'95513952a04bd8992721e9b7e2937f1c04ba31e0469fbe615a78197f68f52b7c',...'2e6d722e5e4dbdf2447ddecc9f7dabb8e299bae921c99ad5b0184cd9eb8e5908',...'b13a750047bc0bdceb2473e5fe488c2596d7a7124b4e716fdd29b046ef99bbf0',...]>>>hashes=[bytes.fromhex(x)forxinhex_hashes]>>>current_hashes=hashes>>>whilelen(current_hashes)>1:...current_hashes=merkle_parent_level(current_hashes)>>>(current_hashes[0].hex())acbcab8bcc1af95d8d563b77d24c3d19b18f1486383d75a5085c4e86c86beed6
We loop until there’s 1 hash left.
We’ve exited the loop so there should only be 1 item
Write the merkle_root function.
The Merkle Root in Blocks should be pretty straightforward, but due to Endian-ness issues, this turns out to be tricky. Specifically, we use Little-Endian ordering for the leaves for the Merkle Tree. After we calculate the Merkle Root, we use Little-Endian ordering again.
In practice, this means reversing the leaves before we start and reversing the root at the end.
>>>fromhelperimportmerkle_root>>>tx_hex_hashes=[...'42f6f52f17620653dcc909e58bb352e0bd4bd1381e2955d19c00959a22122b2e',...'94c3af34b9667bf787e1c6a0a009201589755d01d02fe2877cc69b929d2418d4',...'959428d7c48113cb9149d0566bde3d46e98cf028053c522b8fa8f735241aa953',...'a9f27b99d5d108dede755710d4a1ffa2c74af70b4ca71726fa57d68454e609a2',...'62af110031e29de1efcad103b3ad4bec7bdcf6cb9c9f4afdd586981795516577',...'766900590ece194667e9da2984018057512887110bf54fe0aa800157aec796ba',...'e8270fb475763bc8d855cfe45ed98060988c1bdcad2ffc8364f783c98999a208',...]>>>tx_hashes=[bytes.fromhex(x)forxintx_hex_hashes]>>>hashes=[h[::-1]forhintx_hashes]>>>(merkle_root(hashes)[::-1].hex())654d6181e18e4ac4368383fdc5eead11bf138f9b7ac1e15334e4411b3c4797d9
We reverse each hash before we begin using a Python list comprehension
We reverse the root at the end.
We want to calculate Merkle Roots for a Block, so we add a tx_hashes parameter.
classBlock:def__init__(self,version,prev_block,merkle_root,timestamp,bits,nonce,tx_hashes=None):self.version=versionself.prev_block=prev_blockself.merkle_root=merkle_rootself.timestamp=timestampself.bits=bitsself.nonce=nonceself.tx_hashes=tx_hashes
We now allow the transaction hashes to be set as part of the initialization of the block. The transaction hashes have to be ordered.
As a full node, if we are given all of the transactions, we can calculate the Merkle Root and check that the Merkle Root is what we expect.
Write the validate_merkle_root method for Block.
Now that we know how a Merkle Tree is constructed, we can create and verify Proofs of Inclusion. Light nodes can get proofs that transactions of interest were included in a block without having to know all the transactions of a block (Figure 11-2).
Say that a light client has two transactions that are of interest, which would be the hashes represented by the green boxes, HK and HN above. A full node can construct a Proof of Inclusion by sending us all of the hashes marked by blue boxes, HABCDEFGH, HIJ, HL, HM and HOP. The light client would then perform these calculations:
HKL = merkle_parent(HK, HL)
HMN = merkle_parent(HM, HN)
HIJKL = merkle_parent(HIJ, HKL)
HMNOP = merkle_parent(HMN, HOP)
HIJKLMNOP = merkle_parent(HIJKL, HMNOP)
HABCDEFGHIJKLMNOP = merkle_parent(HABCDEFGH, HIJKLMNOP)
The Merkle Root is HABCDEFGHIJKLMNOP, which we can then be checked against the block header whose proof-of-work has been validated.
The full node can send a limited amount of information about the block and the light client can recalculate the Merkle Root, which can then be verified against the Merkle Root in the block header. This does not guarantee that the transaction is in the longest blockchain, but it does assure the light client that the full node would have had to spend a lot of hashing power or energy creating a valid proof-of-work. As long as the reward for creating such a proof-of-work is greater than the amounts in the transactions, the light client can at least know that the full node has no clear economic incentive to lie.
Since block headers can be requested from multiple nodes, light clients have a way to verify if one node is trying to show them block headers that are not the longest. It only takes a single honest node to invalidate 100 dishonest ones since proof-of-work is objective. Therefore, isolation of a light client (that is, control of who the light client is connected to) is required to deceive in this way. The security of SPV requires that there be lots of honest nodes on the network.
In other words, light client security is based on a robust network of nodes and the economic cost of producing proof-of-work. For small transactions relative to the block subsidy (currently 12.5 BTC), there’s probably little to worry about. For large transactions (say 100 BTC), the full nodes may have economic incentive to deceive you. Transactions that large should generally be validated using a full node.
When a full node sends a Proof of Inclusion, there are two pieces of information that need to be included. First, the light client needs the Merkle Tree structure and second, the light client needs to know which hash is at which position in the Merkle Tree. Once both pieces of information are given, the light client can reconstruct the partial Merkle Tree to reconstruct the Merkle Root and validate the Proof of Inclusion. A full node communicates these two pieces of information to a light client using a Merkle Block.
To understand what’s in a Merkle Block, we need to understand a bit about how a Merkle Tree or more generally, Binary Trees, can be traversed. In a binary tree, nodes can be traversed breadth-first or depth-first. Breadth-first traversal would go level by level like Figure 11-3:
The breadth-first ordering starts at the root and goes from root to leaves, level by level, left to right.
Depth-first ordering is a bit different and looks like Figure 11-4:
The depth-first ordering starts at the root, traverses the left side at each node before the right side.
In a Proof of Inclusion (see Figure 11-5), the full node sends the green boxes, HK and HN along with the blue boxes HABCDEFGH, HIJ, HL, HM and HOP. The location of each hash is reconstructed using depth-first ordering from some flags. The process of reconstructing the tree is what we describe next.
The first thing a light client does is create the general structure of the Merkle Tree. Because Merkle Trees are built from the leaves upward, the only thing a light client needs is the number of leaves that exist to know the structure. The tree from Figure 11-5 has 16 leaves. A light client can create the empty Merkle Tree like so:
>>>importmath>>>total=16>>>max_depth=math.ceil(math.log(total,2))>>>merkle_tree=[]>>>fordepthinrange(max_depth+1):...num_items=math.ceil(total/2**(max_depth-depth))...level_hashes=[None]*num_items...merkle_tree.append(level_hashes)>>>forlevelinmerkle_tree:...(level)[None][None,None][None,None,None,None][None,None,None,None,None,None,None,None][None,None,None,None,None,None,None,None,None,None,None,None,None,\None,None,None]
Since we halve at every level, log2 of the number of leaves is how many levels there are in the Merkle Tree.
Note we round up using math.ceil as we round up for halving at each level.
We could also be clever and use len(bin(total))-2.
The Merkle Tree will hold the root level at index 0, the level below at index 1 and so on. In other words, the index is the “depth” from the top.
There are levels 0 to max_depth in this Merkle Tree.
At any particular level, the number of nodes is the number of total leaves divided by 2 for every level above the leaf level.
We don’t know yet what any of the hashes are, so we set them to None
Note merkle_tree is a list of lists of hashes, or a 2-dimensional array.
Create an empty Merkle Tree with 27 items and print each level.
We create a MerkleTree class:
classMerkleTree:def__init__(self,total):self.total=totalself.max_depth=math.ceil(math.log(self.total,2))self.nodes=[]fordepthinrange(self.max_depth+1):num_items=math.ceil(self.total/2**(self.max_depth-depth))level_hashes=[None]*num_itemsself.nodes.append(level_hashes)self.current_depth=0self.current_index=0def__repr__(self):result=[]fordepth,levelinenumerate(self.nodes):items=[]forindex,hinenumerate(level):ifhisNone:short='None'else:short='{}...'.format(h.hex()[:8])ifdepth==self.current_depthandindex==self.current_index:items.append('*{}*'.format(short[:-2]))else:items.append('{}'.format(short))result.append(','.join(items))return'\n'.join(result)
We keep a pointer to a particular node in the tree, which will come in handy later.
We print a representation of the tree.
Now that we have an empty tree, we can go about fill it to calculate the Merkle Root. If we had every leaf hash, getting the Merkle Root would look like this:
>>>frommerkleblockimportMerkleTree>>>fromhelperimportmerkle_parent_level>>>hex_hashes=[..."9745f7173ef14ee4155722d1cbf13304339fd00d900b759c6f9d58579b5765fb",..."5573c8ede34936c29cdfdfe743f7f5fdfbd4f54ba0705259e62f39917065cb9b",..."82a02ecbb6623b4274dfcab82b336dc017a27136e08521091e443e62582e8f05",..."507ccae5ed9b340363a0e6d765af148be9cb1c8766ccc922f83e4ae681658308",..."a7a4aec28e7162e1e9ef33dfa30f0bc0526e6cf4b11a576f6c5de58593898330",..."bb6267664bd833fd9fc82582853ab144fece26b7a8a5bf328f8a059445b59add",..."ea6d7ac1ee77fbacee58fc717b990c4fcccf1b19af43103c090f601677fd8836",..."457743861de496c429912558a106b810b0507975a49773228aa788df40730d41",..."7688029288efc9e9a0011c960a6ed9e5466581abf3e3a6c26ee317461add619a",..."b1ae7f15836cb2286cdd4e2c37bf9bb7da0a2846d06867a429f654b2e7f383c9",..."9b74f89fa3f93e71ff2c241f32945d877281a6a50a6bf94adac002980aafe5ab",..."b3a92b5b255019bdaf754875633c2de9fec2ab03e6b8ce669d07cb5b18804638",..."b5c0b915312b9bdaedd2b86aa2d0f8feffc73a2d37668fd9010179261e25e263",..."c9d52c5cb1e557b92c84c52e7c4bfbce859408bedffc8a5560fd6e35e10b8800",..."c555bc5fc3bc096df0a0c9532f07640bfb76bfe4fc1ace214b8b228a1297a4c2",..."f9dbfafc3af3400954975da24eb325e326960a25b87fffe23eef3e7ed2fb610e",...]>>>tree=MerkleTree(len(hex_hashes))>>>tree.nodes[4]=[bytes.fromhex(h)forhinhex_hashes]>>>tree.nodes[3]=merkle_parent_level(tree.nodes[4])>>>tree.nodes[2]=merkle_parent_level(tree.nodes[3])>>>tree.nodes[1]=merkle_parent_level(tree.nodes[2])>>>tree.nodes[0]=merkle_parent_level(tree.nodes[1])>>>(tree)*597c4baf.*6382df3f...,87cf8fa3...3ba6c080...,8e894862...,7ab01bb6...,3df760ac...272945ec...,9a38d037...,4a64abd9...,ec7c95e1...,3b67006c...,850683df...,\d40d268b...,8636b7a3...9745f717...,5573c8ed...,82a02ecb...,507ccae5...,a7a4aec2...,bb626766...,\ea6d7ac1...,45774386...,76880292...,b1ae7f15...,9b74f89f...,b3a92b5b...,\b5c0b915...,c9d52c5c...,c555bc5f...,f9dbfafc...
This fills the tree and gets us the Merkle Root. However, the message from the network may not be giving us all of the leaves. The message might contain some internal nodes as well. We need a more clever way to fill the tree.
Tree traversal is going to be the way we do this.
We can do a depth-first traversal and only fill in the nodes that we can calculate.
To traverse, we need to keep track of where in the tree we are.
The properties self.current_depth and self.current_index do this.
We need methods to traverse the Merkle Tree. We’ll also include other useful methods.
classMerkleTree:...defup(self):self.current_depth-=1self.current_index//=2defleft(self):self.current_depth+=1self.current_index*=2defright(self):self.current_depth+=1self.current_index=self.current_index*2+1defroot(self):returnself.nodes[0][0]defset_current_node(self,value):self.nodes[self.current_depth][self.current_index]=valuedefget_current_node(self):returnself.nodes[self.current_depth][self.current_index]defget_left_node(self):returnself.nodes[self.current_depth+1][self.current_index*2]defget_right_node(self):returnself.nodes[self.current_depth+1][self.current_index*2+1]defis_leaf(self):returnself.current_depth==self.max_depthdefright_exists(self):returnlen(self.nodes[self.current_depth+1])>self.current_index*2+1
We want the ability to set the current node in the tree to some value.
We will want to know if we are a leaf node.
In certain situations, we won’t have a right child because we may be at the right-most node of a level whose child level has an odd number of items.
We have Merkle Tree traversal methods left, right and up.
Let’s use these methods to populate the tree via depth-first traversal:
>>>frommerkleblockimportMerkleTree>>>fromhelperimportmerkle_parent>>>hex_hashes=[..."9745f7173ef14ee4155722d1cbf13304339fd00d900b759c6f9d58579b5765fb",..."5573c8ede34936c29cdfdfe743f7f5fdfbd4f54ba0705259e62f39917065cb9b",..."82a02ecbb6623b4274dfcab82b336dc017a27136e08521091e443e62582e8f05",..."507ccae5ed9b340363a0e6d765af148be9cb1c8766ccc922f83e4ae681658308",..."a7a4aec28e7162e1e9ef33dfa30f0bc0526e6cf4b11a576f6c5de58593898330",..."bb6267664bd833fd9fc82582853ab144fece26b7a8a5bf328f8a059445b59add",..."ea6d7ac1ee77fbacee58fc717b990c4fcccf1b19af43103c090f601677fd8836",..."457743861de496c429912558a106b810b0507975a49773228aa788df40730d41",..."7688029288efc9e9a0011c960a6ed9e5466581abf3e3a6c26ee317461add619a",..."b1ae7f15836cb2286cdd4e2c37bf9bb7da0a2846d06867a429f654b2e7f383c9",..."9b74f89fa3f93e71ff2c241f32945d877281a6a50a6bf94adac002980aafe5ab",..."b3a92b5b255019bdaf754875633c2de9fec2ab03e6b8ce669d07cb5b18804638",..."b5c0b915312b9bdaedd2b86aa2d0f8feffc73a2d37668fd9010179261e25e263",..."c9d52c5cb1e557b92c84c52e7c4bfbce859408bedffc8a5560fd6e35e10b8800",..."c555bc5fc3bc096df0a0c9532f07640bfb76bfe4fc1ace214b8b228a1297a4c2",..."f9dbfafc3af3400954975da24eb325e326960a25b87fffe23eef3e7ed2fb610e",...]>>>tree=MerkleTree(len(hex_hashes))>>>tree.nodes[4]=[bytes.fromhex(h)forhinhex_hashes]>>>whiletree.root()isNone:...iftree.is_leaf():...tree.up()...else:...left_hash=tree.get_left_node()...right_hash=tree.get_right_node()...ifleft_hashisNone:...tree.left()...elifright_hashisNone:...tree.right()...else:...tree.set_current_node(merkle_parent(left_hash,right_hash))...tree.up()>>>(tree)597c4baf...6382df3f...,87cf8fa3...3ba6c080...,8e894862...,7ab01bb6...,3df760ac...272945ec...,9a38d037...,4a64abd9...,ec7c95e1...,3b67006c...,850683df...,\d40d268b...,8636b7a3...9745f717...,5573c8ed...,82a02ecb...,507ccae5...,a7a4aec2...,bb626766...,\ea6d7ac1...,45774386...,76880292...,b1ae7f15...,9b74f89f...,b3a92b5b...,\b5c0b915...,c9d52c5c...,c555bc5f...,f9dbfafc...
We traverse until we calculate the Merkle Root. Each time through the loop, we are at a particular node.
If we are at a leaf node, we already have that hash, so we don’t need to do anything but go back up.
If we don’t have the left hash, then we calculate the value first before calculating the current node’s hash.
If we don’t have the right hash, we calculate the value first calculating the current node’s hash. Note we already have the left one due to the depth-first traversal.
We have both the left and the right hash so we calculate the Merkle Parent value and set that to the current node. Once set, we can go back up.
This code will only work when the number of leaves is a power of 2 as edge cases where there’s an odd number of nodes on a level are not handled.
We handle the case where the parent is the parent of the rightmost node on a level with an odd number of nodes:
>>>frommerkleblockimportMerkleTree>>>fromhelperimportmerkle_parent>>>hex_hashes=[..."9745f7173ef14ee4155722d1cbf13304339fd00d900b759c6f9d58579b5765fb",..."5573c8ede34936c29cdfdfe743f7f5fdfbd4f54ba0705259e62f39917065cb9b",..."82a02ecbb6623b4274dfcab82b336dc017a27136e08521091e443e62582e8f05",..."507ccae5ed9b340363a0e6d765af148be9cb1c8766ccc922f83e4ae681658308",..."a7a4aec28e7162e1e9ef33dfa30f0bc0526e6cf4b11a576f6c5de58593898330",..."bb6267664bd833fd9fc82582853ab144fece26b7a8a5bf328f8a059445b59add",..."ea6d7ac1ee77fbacee58fc717b990c4fcccf1b19af43103c090f601677fd8836",..."457743861de496c429912558a106b810b0507975a49773228aa788df40730d41",..."7688029288efc9e9a0011c960a6ed9e5466581abf3e3a6c26ee317461add619a",..."b1ae7f15836cb2286cdd4e2c37bf9bb7da0a2846d06867a429f654b2e7f383c9",..."9b74f89fa3f93e71ff2c241f32945d877281a6a50a6bf94adac002980aafe5ab",..."b3a92b5b255019bdaf754875633c2de9fec2ab03e6b8ce669d07cb5b18804638",..."b5c0b915312b9bdaedd2b86aa2d0f8feffc73a2d37668fd9010179261e25e263",..."c9d52c5cb1e557b92c84c52e7c4bfbce859408bedffc8a5560fd6e35e10b8800",..."c555bc5fc3bc096df0a0c9532f07640bfb76bfe4fc1ace214b8b228a1297a4c2",..."f9dbfafc3af3400954975da24eb325e326960a25b87fffe23eef3e7ed2fb610e",..."38faf8c811988dff0a7e6080b1771c97bcc0801c64d9068cffb85e6e7aacaf51",...]>>>tree=MerkleTree(len(hex_hashes))>>>tree.nodes[5]=[bytes.fromhex(h)forhinhex_hashes]>>>whiletree.root()isNone:...iftree.is_leaf():...tree.up()...else:...left_hash=tree.get_left_node()...ifleft_hashisNone:...tree.left()...eliftree.right_exists():...right_hash=tree.get_right_node()...ifright_hashisNone:...tree.right()...else:...tree.set_current_node(merkle_parent(left_hash,right_hash))...tree.up()...else:...tree.set_current_node(merkle_parent(left_hash,left_hash))...tree.up()>>>(tree)0a313864...597c4baf...,6f8a8190...6382df3f...,87cf8fa3...,5647f416...3ba6c080...,8e894862...,7ab01bb6...,3df760ac...,28e93b98...272945ec...,9a38d037...,4a64abd9...,ec7c95e1...,3b67006c...,850683df...,\d40d268b...,8636b7a3...,ce26d40b...9745f717...,5573c8ed...,82a02ecb...,507ccae5...,a7a4aec2...,bb626766...,\ea6d7ac1...,45774386...,76880292...,b1ae7f15...,9b74f89f...,b3a92b5b...,\b5c0b915...,c9d52c5c...,c555bc5f...,f9dbfafc...,38faf8c8...
If we don’t have left node’s value, we traverse to the left node since all internal nodes are guaranteed a left child.
We check first if this node has a right child. This is true unless this node happens to be the right-most node and the child level has an odd number of nodes.
If we don’t have the right node value, we traverse to that node.
If we have both the left and the right node values, we calculate the current node value using merkle_parent.
We have the left node value, but the right child doesn’t exist. This is the right-most node of this level so we combine the left value twice.
We can now traverse the tree for the number of leaves that aren’t powers of 2.
The full node communicating a Merkle Block sends all the information needed to verify that the interesting transaction is in the Merkle Tree.
The merkleblock network command is what communicates this information and looks like Figure 11-6:
merkleblockThe first 6 fields are exactly the same as the block header from Chapter 9. The last 4 fields are the Proof of Inclusion.
The number of transactions field is how many leaves this particular Merkle Tree will have.
This allows a light client to construct an empty Merkle Tree.
The hashes field are the blue and green boxes from Figure 11-5.
Since the number of hashes in the hashes field is not fixed, it’s prefixed with how many there are.
Lastly, the flags field give information about where the hashes go within the Merkle Tree.
The flags are parsed using bytes_to_bits_field to convert to a list of bits (1’s and 0’s):
defbytes_to_bit_field(some_bytes):flag_bits=[]forbyteinsome_bytes:for_inrange(8):flag_bits.append(byte&1)byte>>=1returnflag_bits
The ordering for the bytes are a bit strange, but meant to be easy to convert into the flag bits needed to reconstruct the Merkle Root.
Write the parse method for MerkleBlock.
The flag bits inform where the hashes go using depth-first ordering.
The rules for the flag bits are:
If the node’s value is given in the hashes field (blue box in the Figure 11-7), the flag bit is 0.
If the node’s value is an internal node and the value is to be calculated by the light client (dotted outline in the Figure 11-7), the flag bit is 1.
If the node is a leaf node and is a transaction of interest (green box in the Figure 11-7), the flag is 1 and also given in the hashes field. These are the items in the Merkle Tree being proven to be included.
Given a tree from Figure 11-7, the flag bit is 1 for the root node (1), since that hash is calculated by the light node. The left child, HABCDEFGH (2), is included in the hashes field, so the flag is 0. From here, we traverse to HIJKLMNOP instead of HABCD or HEFGH since HABCDEFGH represents both those nodes and we don’t need them. We don’t need to traverse any of the descendants of HABCDEFGH and go straight to HIJKLMNOP instead.
The right child, HIJKLMNOP (3) is also calculated so has a flag bit of 1. To calculate HIJKLMNOP, we need the values for HIJKL (4) and HMNOP (9). The next node in depth-first order is the left child, HIJKL (4), which is where we traverse to next. HIJKL is an internal node that’s calculated, so the flag bit is 1. From here, we traverse to its left child HIJ (5). We will be traversing to HKL (6) when we come back to this node. HIJ (5) is next in depth-first ordering and that’s hash is included in the hashes list and the flag is 0. HKL (6) is an internal, calculated node so the flag is 1. HK (7) is a leaf node whose presence in the block is being proved so the flag is 1. HL (8) is a node whose value is included in the hashes field so the flag is 0. We traverse up to HKL whose value can now be calculated since HK and HL are known. We traverse up to HIJKL whose value can now be calculated since HIJ and HKL are known. We traverse up to HIJKLMNOP whose value we can’t calculate yet since we haven’t been to HMNOP. We traverse to HMNOP (9), which is another internal node so the flag is 1. HMN (10) is another internal node that’s calculated, so the flag is 1. HM (11) is a node whose value is included in the hashes field, so the flag is 0. HN (12) is of interest, so the flag is 1 and its value is in the hashes field. We traverse up to HMN whose value can now be calculated. We traverse up again to HMNOP, whose value can not be calculated because we haven’t been to HOP yet. HOP (13) is given, so the flag is 1 and its hash is the final hash in the hashes field. We traverse to HMNOP which can now be calculated. We traverse to HIJKLMNOP which can now be calculated. Finally, we traverse to HABCDEFGHIJKLMNOP which is the Merkle Root and calculate it!
The flag bits for nodes (1) - (13) are:
1, 0, 1, 1, 0, 1, 1, 0, 1, 1, 0, 1, 0
There should be 7 hashes in the hashes field in this order:
HABCDEFGH
HIJ
HK
HL
HM
HN
HOP
Notice that every letter is represented in the hashes above, A-P. This information is sufficient to prove that HK and HN (green boxes in Figure 11-7) are included in the block.
As you can see from Figure 11-7, the flag bits are given in depth-first order. Anytime we’re given a hash, as with HABCDEFGH, we skip its children and continue. In the case of HABCDEFGH, we traverse to HIJKLMNOP instead of HABCD. Flag bits are a clever mechanism to encode which nodes have which hash value.
We can now populate the Merkle Tree and calculate the root, given appropriate flag bits and hashes.
classMerkleTree:...defpopulate_tree(self,flag_bits,hashes):whileself.root()isNone:ifself.is_leaf():flag_bits.pop(0)self.set_current_node(hashes.pop(0))self.up()else:left_hash=self.get_left_node()ifleft_hashisNone:ifflag_bits.pop(0)==0:self.set_current_node(hashes.pop(0))self.up()else:self.left()elifself.right_exists():right_hash=self.get_right_node()ifright_hashisNone:self.right()else:self.set_current_node(merkle_parent(left_hash,right_hash))self.up()else:self.set_current_node(merkle_parent(left_hash,left_hash))self.up()iflen(hashes)!=0:raiseRuntimeError('hashes not all consumed {}'.format(len(hashes)))forflag_bitinflag_bits:ifflag_bit!=0:raiseRuntimeError('flag bits not all consumed')
The point of populating this Merkle Tree is to calculate the root. Each loop iteration processes one node until the root is calculated.
For leaf nodes, we are always given the hash.
flag_bits.pop(0) is a way in Python to dequeue the next flag bit.
We may want to keep track of which hashes are of interest to us by looking at the flag bit, but for now, we don’t.
hashes.pop(0) is how we get the next hash from the hashes field.
We need to set the current node to that hash.
If we don’t have the left child value, there are two possibilities. This node’s value may be in the hashes field or this node’s value might need calculation.
The next flag bit tells us whether we need to calculate this node or not. If the flag bit is 0, the next hash in the hashes field is this node’s value. If the flag bit is 1, we need to calculate the left (and possibly the right)
We are guaranteed that there’s a left child, so traverse to that node and get its value.
We check that the right node exists.
We have the left hash, but not the right. We traverse to the right node to get its value.
We have both the left and the right node values, so we calculate their Merkle Parent to get the current node’s value.
We have the left node’s value, but the right does not exist. In this case, according to Merkle Tree rules, we calculate the Merkle Parent of the left node twice.
All hashes must be consumed or we got bad data.
All flag bits must be consumed or we got bad data.
Write the is_valid method for MerkleBlock
Simplified Payment Verification is useful but not without some significant downsides. The full details are outside the scope of this book, but despite the programming being pretty straightforward, most light wallets do not use SPV and trust data from the wallet vendor servers. The main drawback of SPV is that the nodes you are connecting to know something about the transactions you are interested in. That is, you lose some privacy by using SPV. This will be covered more in detail in the next chapter as we make Bloom Filters to tell nodes what transactions we are interested in.
In the previous chapter we learned how to validate a Merkle Block. A full node can provide a Proof of Inclusion for transactions of interest through the merkleblock command. But how does the full node know which transactions are of interest?
A light client could tell the full node its addresses (or ScriptPubKeys). The full node can check for transactions that are relevant to these addresses, but that would be compromising the light client’s privacy. A light client wouldn’t want to reveal, for example, that it has 1000 BTC to a full node. Privacy leaks are security leaks, and in Bitcoin, it’s generally a good idea to not leak any privacy whenever possible.
One solution is for the light client to tell the full node enough information to create a superset of all transactions of interest. To create this superset, we use what’s called a Bloom Filter.
A Bloom Filter is a filter for all possible transactions.
Full nodes run transactions through a Bloom Filter and send merkleblock commands for transactions that make it through.
Suppose there are 50 total transactions. There is one transaction a light client is interested in. The light client wants to “hide” the transaction among a group of 5 transactions. This requires a function that groups the 50 transactions into 10 different buckets and the full node can then send single bucket of transactions, in a manner of speaking. This grouping would have to be deterministic, that is, be the same each time. How can this be accomplished?
The solution is to use a hash function to get a deterministic number and modulo to organize transactions into buckets.
A Bloom Filter is a computer science structure that can be used on any data in a set, so suppose that we have one item “hello world” that we want to create a Bloom Filter for.
We need a hash function, so we’ll use one we already have hash256.
The process of figuring out what bucket our item goes into looks like this:
>>>fromhelperimporthash256>>>bit_field_size=10>>>bit_field=[0]*bit_field_size>>>h=hash256(b'hello world')>>>bit=int.from_bytes(h,'big')%bit_field_size>>>bit_field[bit]=1>>>(bit_field)[0,0,0,0,0,0,0,0,0,1]
Our bit_field is the list of “buckets” and we want there to be 10.
Hash the item with hash256.
Interpret this as a Big-Endian integer and modulo by 10 to determine the bucket this item belongs to.
We indicate the bucket we want in the Bloom Filter.
Conceptually, what we just did looks like Figure 12-1:
Our Bloom Filter consists of:
The size of the bit field
The hash function used (and how we converted that to a number)
The bit field, which indicates the bucket we’re interested in.
This works great for a single item, so this would work for a single address/ScriptPubKey/Transaction ID of interest. What do we do when we’re interested in more than 1 item?
We can run a second item through the same filter and set that bit to 1 as well. The full node can then send multiple buckets of transactions instead of a single bucket. Let’s create a Bloom Filter with two items, “hello world” and “goodbye” (Figure 12-2)
>>>fromhelperimporthash256>>>bit_field_size=10>>>bit_field=[0]*bit_field_size>>>foritemin(b'hello world',b'goodbye'):...h=hash256(item)...bit=int.from_bytes(h,'big')%bit_field_size...bit_field[bit]=1>>>(bit_field)[0,0,1,0,0,0,0,0,0,1]
We are creating a filter for two items here, but this can be extended to many more.
If the space of all possible items is 50, 10 items on average will make it through this filter instead of the 5 when we only had 1 item of interest because 2 buckets are returned, not 1.
Calculate the Bloom Filter for hello world and goodbye using the hash160 hash function over a bit field of 10.
Supposing that the space of all items is 1 million and we want bucket sizes to still be 5, we would need a Bloom Filter that’s 1,000,000 / 5 = 200,000 bits long. Each bucket would have on average 5 items and we would get 5 times the number of items we’re interested in, 20% of which would be items of interest. 200,000 bits is 25,000 bytes and is a lot to transmit. Can we do better?
A Bloom Filter using multiple hash functions can shorten the bit field considerably. If we use 5 hash functions over a bit field of 32, we have 32!/(27!5!) ~ 200,000 possible 5-bit combinations in that 32-bit field. Of 1 million possible items, 5 items on average should have that 5-bit combination. Instead of transmitting 25k bytes, we can transmit just 32 bits or 4 bytes!
Here’s what that would look like. For simplicity, we stick to the same 10-bit field but still have 2 items of interest:
>>>fromhelperimporthash256,hash160>>>bit_field_size=10>>>bit_field=[0]*bit_field_size>>>foritemin(b'hello world',b'goodbye'):...forhash_functionin(hash256,hash160):...h=hash_function(item)...bit=int.from_bytes(h,'big')%bit_field_size...bit_field[bit]=1>>>(bit_field)[1,1,1,0,0,0,0,0,0,1]
We iterate over 2 different hash functions (hash256 and hash160), but we could just as easily have more.
Conceptually, Figure 12-3 shows what the code above does:
A Bloom Filter can be optimized by changing the number of hash functions and bit field size to get a desirable false-positive rate.
BIP0037 specifies Bloom Filters in network communication. The information contained in a Bloom Filter are:
The size of the bit field, or how many buckets there are. The size is specified in bytes (8 bits per byte) and rounded up if necessary.
The number of hash functions.
A “tweak” to be able to change the Bloom Filter slightly if it hits too many items.
The bit field that results from running the Bloom Filter over the items of interest.
While we could define lots of hash functions (sha512, keccak384, ripemd160, blake256, etc), in practice, we use a single hash function with a different seed. This allows the implementation to be simpler.
The hash function we use is called murmur3.
Unlike sha256, murmur3 is not cryptographically secure, but is much faster.
The task of filtering and getting a deterministic, evenly distributed modulo does not require cryptographic security, but benefits from speed, so murmur3 is the appropriate tool for the job.
The seed formula is defined this way:
i*0xfba4c795 + tweak
The fba4c795 number is a constant for Bitcoin Bloom Filters.
i is 0 for the first hash function, 1 for the second, 2 for the third and so on.
The tweak is a bit of entropy that can be added if the results of of one tweak are not satisfactory.
The hash functions and the size of the bit field are used to calculate the bit field which then get transmitted.
>>>fromhelperimportmurmur3>>>frombloomfilterimportBIP37_CONSTANT>>>field_size=2>>>num_functions=2>>>tweak=42>>>bit_field_size=field_size*8>>>bit_field=[0]*bit_field_size>>>forphrasein(b'hello world',b'goodbye'):...foriinrange(num_functions):...seed=i*BIP37_CONSTANT+tweak...h=murmur3(phrase,seed=seed)...bit=h%bit_field_size...bit_field[bit]=1>>>(bit_field)[0,0,0,0,0,1,1,0,0,1,1,0,0,0,0,0]
murmur3 is implemented in pure Python in helper.py
BIP37_CONSTANT is the fba4c795 number specified in BIP0037
Iterate over some items of interest.
We use 2 hash functions.
Seed formula.
murmur3 returns a number, so we don’t have to do any conversion to an integer.
This 2-byte Bloom Filter has 4 bits set to 1 out of 16, so the probability of any random item passing through this filter is 1/4*1/4=1/16. If space of all items numbers 160, a client will receive 10 items on average, 2 of which will be interesting.
We can start coding a BloomFilter class.
classBloomFilter:def__init__(self,size,function_count,tweak):self.size=sizeself.bit_field=[0]*(size*8)self.function_count=function_countself.tweak=tweak
Given a Bloom Filter with size=10, function count=5, tweak=99, what are the bytes that are set after adding these items? (use bit_field_to_bytes to convert to bytes)
b'Hello World'
b'Goodbye!'
Write the add method for BloomFilter
Once a light client has created a Bloom Filter, it needs to let the full node know the details of the filter so the full node can send Proofs of Inclusion.
The first thing a light client must do is set the optional relay flag in the version message (see Chapter 10) to 1.
This tells the full node not to send transaction messages unless they match a Bloom Filter or has specifically requested the message.
After the relay flag, a light client then communicates to the full node the Bloom Filter itself.
The command to set the Bloom Filter is called filterload.
The payload looks like Figure 12-4:
filterloadThe elements of a Bloom Filter are encoded into bytes. The bit field, hash function count and tweak are encoded in this message. The last field, matched item flag, is a way of asking the full node to add any matched transactions to the Bloom Filter.
Write the filterload payload from the BloomFilter class.
There is one more command that a light client needs and that’s Merkle Block information about transactions of interest from the full node.
The getdata command is what communicates blocks and transactions.
The specific type of data that a light client will want from a full node is something called a filtered block.
A filtered block is asking for transactions that pass through the bloom filter in the form of Merkle Blocks.
In other words, the light client can ask for Merkle Blocks whose transactions of interest match the Bloom Filter.
Here is what the payload for getdata looks like Figure 12-5:
getdataThe number of items as a varint specify how many items we want. The each item has a type. A type value of 1 is a Transaction (Chapter 5), 2, a normal Block (Chapter 9), 3, a Merkle Block (Chapter 11) and 4, a Compact Block (not covered in this book).
We can create this message in network.py.
classGetDataMessage:command=b'getdata'def__init__(self):self.data=[]defadd_data(self,data_type,identifier):self.data.append((data_type,identifier))
Store the items we want.
We add items to the message using the add_data method.
Write the serialize method for the GetDataMessage class.
A light client which loads a Bloom Filter with a full node will get all the information needed to prove that transactions of interest are included in particular blocks.
>>>frombloomfilterimportBloomFilter>>>fromhelperimportdecode_base58>>>frommerkleblockimportMerkleBlock>>>fromnetworkimportFILTERED_BLOCK_DATA_TYPE,GetHeadersMessage,GetDataMe\ssage,HeadersMessage,SimpleNode>>>fromtximportTx>>>last_block_hex='00000000000538d5c2246336644f9a4956551afb44ba47278759ec55\ea912e19'>>>address='mwJn1YPMq7y5F8J3LkC5Hxg9PHyZ5K4cFv'>>>h160=decode_base58(address)>>>node=SimpleNode('testnet.programmingbitcoin.com',testnet=True,logging=\False)>>>bf=BloomFilter(size=30,function_count=5,tweak=90210)>>>bf.add(h160)>>>node.handshake()>>>node.send(bf.filterload())>>>start_block=bytes.fromhex(last_block_hex)>>>getheaders=GetHeadersMessage(start_block=start_block)>>>node.send(getheaders)>>>headers=node.wait_for(HeadersMessage)>>>getdata=GetDataMessage()>>>forbinheaders.blocks:...ifnotb.check_pow():...raiseRuntimeError('proof of work is invalid')...getdata.add_data(FILTERED_BLOCK_DATA_TYPE,b.hash())>>>node.send(getdata)>>>found=False>>>whilenotfound:...message=node.wait_for(MerkleBlock,Tx)...ifmessage.command==b'merkleblock':...ifnotmessage.is_valid():...raiseRuntimeError('invalid merkle proof')...else:...fori,tx_outinenumerate(message.tx_outs):...iftx_out.script_pubkey.address(testnet=True)==address:...('found: {}:{}'.format(message.id(),i))...found=True...breakfound:e3930e1e566ca9b75d53b0eb9acb7607f547e1182d1d22bd4b661cfe18dcddf1:0
We are creating a Bloom Filter that’s 30 bytes, 5 hash functions using a particularly popular 90’s tweak.
We filter for the address above.
We send the filterload command from the Bloom Filter we made.
We get the block headers after last_block_hex.
We create a getdata message for Merkle Blocks that may have transactions of interest.
We request a Merkle Block proving transactions of interest to us are included. Most blocks will probably be complete misses.
The getdata message asks for 2000 Merkle Blocks after the block defined by last_block_hex.
We wait for the merkleblock command, which proves inclusion and the tx command which gives us the transaction of interest.
We check that the Merkle Block proves transaction inclusion.
We’re looking for UTXOs for address, and we print to screen if we find one.
What we’ve done in the above is look at 2000 blocks after a particular block for UTXOs corresponding to a particular address. This is without the use of any block explorer, which preserves, to some degree, our privacy.
Get the current testnet block ID, send yourself some testnet coins, find the UTXO corresponding to the testnet coin without using a block explorer, create a transaction using that UTXO as an input and broadcast the tx message on the testnet network.
In this chapter, we created everything necessary to connecting peer to peer as a light client, ask for and receive the UTXOs necessary to construct a transaction all while preserving some privacy by using a Bloom Filter.
We now turn to Segwit, which is a new type of transaction that was activated in 2017.
Segwit stands for segregated witness and is a backwards-compatible upgrade or “soft fork” that activated on the Bitcoin network in August of 2017. While the activation was controversial, the features of this technology require some explanation. In this chapter, we’ll explore how Segwit works, why it’s backwards compatible and what Segwit enables.
As a brief overview, Segwit did a multitude of things:
Block size increase
Transaction malleability fix
Introduced Segwit versioning for clear upgrade paths
Quadratic hashing fix
Offline wallet fee calculation security
It’s not entirely obvious what Segwit is without looking at how it’s implemented. We’ll start by examining the most basic type of Segwit transaction, pay-to-witness-pubkey-hash.
Pay to witness pubkey hash (p2wpkh) is one of four types of Scripts defined by Segwit in BIP0141 and BIP0143. This is a smart contract that acts a lot like pay-to-pubkey-hash and is named similarly for that reason. The main change from p2pkh is that the data for the ScriptSig is now in the Witness field. The rearrangement is to fix transaction malleability.
Transaction Malleability is the ability to change the transaction’s ID without altering the transaction’s meaning. Mt. Gox CEO Mark Karpeles cited transaction malleability as the reason why his exchange was not allowing withdrawals back in 2013.
Malleability of the ID is an important consideration when creating Payment Channels, which are the atomic unit of the Lightning Network. A malleable transaction ID makes much more difficult the safe creation of Payment Channel transactions.
The reason why transaction malleability is a problem at all is because the transaction ID is calculated from the entire transaction. The ID of the transaction is the hash256 of the transaction. Most of the fields in a transaction cannot be changed without invalidating the transaction’s signature (and thus the transaction itself), so from a malleability standpoint, these fields are not a problem.
The one field that does allow for some manipulation without invalidating the Signature is the ScriptSig field on each input. The ScriptSig is emptied before creating the signature hash (see Chapter 7), so it’s possible to change the ScriptSig without invalidating the signature. Also, as we learned in Chapter 3, signatures contain a random component. This means that two different ScriptSigs can essentially mean the same thing but be different byte-wise.
This makes the ScriptSig field malleable, that is, able to be changed without changing the meaning, and means that the entire transaction, and the Transaction ID is malleable. A malleable transaction ID means that any dependent transactions (that is, a transaction spending one of the malleable transaction’s outputs), cannot be constructed in a way to guarantee validity. The previous transaction hash is uncertain, so the dependent transaction’s transaction input field cannot be guaranteed to be valid.
This is not usually a problem as once a transaction enters the blockchain, the transaction ID is fixed and no longer malleable (at least without finding a proof-of-work!). However, with Payment Channels, there are dependent transactions created before the funding transaction is added to the blockchain.
Transaction malleability is fixed by emptying the ScriptSig field and putting the data in another field that’s not used for ID calculation. For p2wpkh, the signature and pubkey are the items from ScriptSig, so those get moved to the Witness field, which is not used for ID calculation. This way, the transaction ID stays stable as the malleability vector disappears. The Witness field and the whole Segwit serialization of a transaction is only sent to nodes that ask for it. In other words, old nodes that haven’t upgraded to Segwit don’t receive the Witness field and don’t verify the pubkey and signature.
If this sounds familiar, it should. This is similar to how p2sh works (Chapter 8) in that newer nodes do additional validation that older nodes do not and is the basis for why Segwit is a soft fork (backwards-compatible upgrade) and not a hard fork (backwards-incompatible upgrade).
To understand Segwit, it helps to look at what the transaction looks like when sent to an old node (Figure 13-1) versus a new node (Figure 13-2):
The difference between these two serializations is that the latter transaction (Segwit serialization) has the marker, flag and Witness fields. Otherwise, the two transactions look similar. The reason the transaction ID not malleable is because first serialization is used for calculating the transaction ID.
The Witness in p2wpkh has the Signature and Pubkey as its two elements. These will be used for validation for upgraded nodes only.
The ScriptPubKey for a p2wpkh is OP_0 <20-byte hash>.
The ScriptSig, as seen in both serializations is empty.
The combined Script is Figure 13-3:
The processing of the combined Script starts like Figure 13-4:
OP_0 pushes a 0 on the stack (Figure 13-5):
The 20-byte hash is an element, so it’s pushed to the stack (Figure 13-6):
At this point, older nodes will stop as there are no more Script instructions to be processed.
Since the top element is non-zero, this will be counted as a valid Script.
This is very similar to p2sh (Chapter 8) in that older nodes cannot validate further.
Newer nodes, however, have a special Segwit rule much like the special rule for p2sh (see Chapter 8).
Recall that with p2sh, the exact Script sequence of <redeem script> OP_HASH160 <hash> OP_EQUAL trigger a special rule.
In the case of p2wpkh, the Script sequence is OP_0 <20-byte hash>.
When that Script sequence is encountered, the pubkey and signature from the Witness field and the 20-byte hash are added to the instruction set in exactly the same sequence as p2pkh.
Namely: <signature> <pubkey> OP_DUP OP_HASH160 <20-byte hash> OP_EQUALVERIFY OP_CHECKSIG.
Figure 13-7 shows the state that is encountered next:
The rest of the processing of p2wpkh is the same as the processing of p2pkh as seen in Chapter 6.
The end state is a single 1 on the stack if and only if the 20-byte hash is the hash160 of the pubkey and the signature is valid (Figure 13-8):
For an older node, processing stops at <20-byte hash> 0, as older nodes don’t know the special Segwit rule.
Only upgraded nodes do the rest of the validation, much like p2sh.
Note that less data is sent over the network to older nodes.
Also, nodes are given the option of not having to download (and hence not verify) transactions that are X blocks old if they don’t want to.
In a sense, the signature has been witnessed by a bunch of people and a node can choose to trust that this is valid instead of validating directly if it so chooses.
Furthermore, this is a special rule for Segwit Version 0.
Segwit Version 1 can have a completely different processing path.
<20-byte hash> 1 could be the special Script sequence that triggers a different rule.
Upgrades of Segwit can introduce Schnorr Signatures, Graftroot or even a different scripting system altogether like Simplicity.
Segwit gives us a clear upgrade path.
Software that understands how to validate Segwit Version X will validate such transactions, but software that isn’t aware of Segwit Version X simply processes only up to the point of the special rule.
P2wpkh is great, but unfortunately, this is a new type of Script and older wallets cannot send Bitcoins to p2wpkh ScriptPubKeys. P2wpkh uses a new address format called bech32, whose ScriptPubKeys older wallets don’t know how to create.
The Segwit authors found an ingenious way to make Segwit backwards compatible by using p2sh. We can “wrap” p2wpkh inside a p2sh. This is called “nested” Segwit as the Segwit Script is nested in a p2sh RedeemScript.
A p2sh-p2wpkh address is a normal p2sh address, but the RedeemScript is OP_0 <20-byte hash>, or the ScriptPubKey of p2wpkh.
As with p2wpkh, different transactions are sent to older nodes (Figure 13-9) versus newer nodes (Figure 13-10):
The difference versus p2wpkh is that the ScriptSig is no longer empty. The ScriptSig has a RedeemScript which is equal to the ScriptPubkey in p2wpkh. As this is a p2sh, the ScriptPubKey is the same as any other p2sh. The combined Script looks like Figure 13-11:
We start the Script evaluation like Figure 13-12:
Notice that the instructions to be processed are exactly what triggers the p2sh Special rule. The RedeemScript goes on the stack (Figure 13-13):
The OP_HASH160 will turn the RedeemScript’s hash (Figure 13-14):
The hash will go on the stack and we then get to OP_EQUAL (Figure 13-15):
At this point, if the hashes are equal, pre-BIP0016 nodes will simply mark the input as valid as they are unaware of the p2sh validation rules.
However, post-BIP0016 nodes recognize the special Script sequence for p2sh, so the RedeemScript will then be evaluated as Script instructions.
The RedeemScript is OP_0 <20-byte hash>, which is the same as the ScriptPubKey for p2wpkh.
This makes the Script state look like Figure 13-16:
This should look familiar as this is the state that p2wpkh starts with.
After OP_0 and the 20-byte hash we are left with Figure 13-17:
At this point, pre-Segwit nodes will mark this input as valid as they are unaware of the Segwit validation rules. However, post-Segwit nodes will recognize the special Script sequence for p2wpkh. The signature and pubkey from the Witness field along with the 20-byte hash will add the p2pkh instructions (Figure 13-18):
The rest of the processing is the same as p2pkh (Chapter 6). Assuming the signature and pubkey are valid, we are left with Figure 13-19:
As you can see, a p2sh-p2wpkh transaction is backwards compatible all the way to before BIP0016. A node pre-BIP0016 would consider the Script valid once the RedeemScripts were equal and a post-BIP0016, pre-Segwit node would consider the Script valid at the 20-byte hash. Both would not do the full validation and would accept the transaction. A post-Segwit node would do the complete validation, including checking the signature and pubkey.
Detractors to Segwit have referred to Segwit outputs as “anyone can spend”. This would be true if the Bitcoin community rejected Segwit. In other words, if an economically significant part of the Bitcoin community refused to do the Segwit validation and actively split from the network by accepting a transaction that’s not Segwit valid, the outputs would have been anyone can spend. Due to a variety of economic incentives, Segwit was activated on the network, there was no network split, a lot of Bitcoins are now locked in Segwit outputs and Segwit transactions are validated per the soft-fork rules by the vast economic majority of nodes. We can now say confidently that the detractors were wrong.
The first change we’re going to make is to the Tx class where we need to mark whether the transaction is Segwit or not:
classTx:command=b'tx'def__init__(self,version,tx_ins,tx_outs,locktime,testnet=False,segwit=False):self.version=versionself.tx_ins=tx_insself.tx_outs=tx_outsself.locktime=locktimeself.testnet=testnetself.segwit=segwitself._hash_prevouts=Noneself._hash_sequence=Noneself._hash_outputs=None
Next, we change the parse method depending on the serialization we receive.
classTx:...@classmethoddefparse(cls,s,testnet=False):s.read(4)ifs.read(1)==b'\x00':parse_method=cls.parse_segwitelse:parse_method=cls.parse_legacys.seek(-5,1)returnparse_method(s,testnet=testnet)@classmethoddefparse_legacy(cls,s,testnet=False):version=little_endian_to_int(s.read(4))num_inputs=read_varint(s)inputs=[]for_inrange(num_inputs):inputs.append(TxIn.parse(s))num_outputs=read_varint(s)outputs=[]for_inrange(num_outputs):outputs.append(TxOut.parse(s))locktime=little_endian_to_int(s.read(4))returncls(version,inputs,outputs,locktime,testnet=testnet,segwit=False)
To determine whether we have a Segwit transaction or not, we look at the fifth byte. The first four are version, the fifth is the Segwit marker.
The fifth byte being 0 is how we tell that this transaction is Segwit (this is not fool-proof, but is what we’re going to use). We use different parsers depending on whether it’s Segwit.
Put the stream back to the position before we examined the first 5 bytes.
We’ve moved the old parse method to parse_legacy.
Here’s a parser for the Segwit serialization.
classTx:...@classmethoddefparse_segwit(cls,s,testnet=False):version=little_endian_to_int(s.read(4))marker=s.read(2)ifmarker!=b'\x00\x01':raiseRuntimeError('Not a segwit transaction {}'.format(marker))num_inputs=read_varint(s)inputs=[]for_inrange(num_inputs):inputs.append(TxIn.parse(s))num_outputs=read_varint(s)outputs=[]for_inrange(num_outputs):outputs.append(TxOut.parse(s))fortx_inininputs:num_items=read_varint(s)items=[]for_inrange(num_items):item_len=read_varint(s)ifitem_len==0:items.append(0)else:items.append(s.read(item_len))tx_in.witness=itemslocktime=little_endian_to_int(s.read(4))returncls(version,inputs,outputs,locktime,testnet=testnet,segwit=True)
There are two new fields, one of them is the Segwit marker.
The last new field is Witness, which contains items for each input.
We code the corresponding changes to the serialization methods:
classTx:...defserialize(self):ifself.segwit:returnself.serialize_segwit()else:returnself.serialize_legacy()defserialize_legacy(self):result=int_to_little_endian(self.version,4)result+=encode_varint(len(self.tx_ins))fortx_ininself.tx_ins:result+=tx_in.serialize()result+=encode_varint(len(self.tx_outs))fortx_outinself.tx_outs:result+=tx_out.serialize()result+=int_to_little_endian(self.locktime,4)returnresultdefserialize_segwit(self):result=int_to_little_endian(self.version,4)result+=b'\x00\x01'result+=encode_varint(len(self.tx_ins))fortx_ininself.tx_ins:result+=tx_in.serialize()result+=encode_varint(len(self.tx_outs))fortx_outinself.tx_outs:result+=tx_out.serialize()fortx_ininself.tx_ins:result+=int_to_little_endian(len(tx_in.witness),1)foritemintx_in.witness:iftype(item)==int:result+=int_to_little_endian(item,1)else:result+=encode_varint(len(item))+itemresult+=int_to_little_endian(self.locktime,4)returnresult
What used to be called serialize is now serialize_legacy.
The Segwit serialization adds the markers.
The Witness is serialized at the end.
In addition we have to change the hash method to use the legacy serialization, even for Segwit transactions as that will keep the transaction ID stable.
classTx:...defhash(self):'''Binary hash of the legacy serialization'''returnhash256(self.serialize_legacy())[::-1]
The verify_input method requires a different z for Segwit transactions.
The Segwit transaction signature hash calculation is specified in BIP0143.
In addition, the Witness field is passed through to the Script evaluation engine.
classTx:...defverify_input(self,input_index):tx_in=self.tx_ins[input_index]script_pubkey=tx_in.script_pubkey(testnet=self.testnet)ifscript_pubkey.is_p2sh_script_pubkey():instruction=tx_in.script_sig.instructions[-1]raw_redeem=int_to_little_endian(len(instruction),1)+instructionredeem_script=Script.parse(BytesIO(raw_redeem))ifredeem_script.is_p2wpkh_script_pubkey():z=self.sig_hash_bip143(input_index,redeem_script)witness=tx_in.witnesselse:z=self.sig_hash(input_index,redeem_script)witness=Noneelse:ifscript_pubkey.is_p2wpkh_script_pubkey():z=self.sig_hash_bip143(input_index)witness=tx_in.witnesselse:z=self.sig_hash(input_index)witness=Nonecombined_script=tx_in.script_sig+tx_in.script_pubkey(self.testnet)returncombined_script.evaluate(z,witness)
This handles the p2sh-p2wpkh case.
BIP0143 signature hash generation code is in tx.py of this chapter’s code.
This handles the p2wpkh case.
The Witness passes through to the evaluation engine so that p2wpkh can construct the right instructions.
We also define what a p2wpkh Script looks like in script.py.
defp2wpkh_script(h160):'''Takes a hash160 and returns the p2wpkh ScriptPubKey'''returnScript([0x00,h160])...defis_p2wpkh_script_pubkey(self):returnlen(self.instructions)==2andself.instructions[0]==0x00\andtype(self.instructions[1])==bytesandlen(self.instructions[1])==20
This is OP_0 <20-byte-hash>.
This checks if the current script is a p2wpkh ScriptPubKey.
Lastly, we need to implement the special rule in the evaluate method.
classScript:...defevaluate(self,z,witness):...whilelen(instructions)>0:...else:stack.append(instruction)...iflen(stack)==2andstack[0]==b''andlen(stack[1])==20:h160=stack.pop()stack.pop()instructions.extend(witness)instructions.extend(p2pkh_script(h160).instructions)
This is where we execute Witness Program version 0 for p2wpkh. We make a p2pkh combined Script from the 20-byte hash, signature and pubkey and evaluate.
While p2wpkh takes care of a major use case, we need something more flexible if we want more complicated Scripts like multisig. This is where p2wsh comes in. Pay-to-witness-script-hash is like p2sh, but with all the ScriptSig data in the Witness field instead.
As with p2wpkh, we send different data to pre-BIP0141 software (Figure 13-20) vs post-BIP0141 software (Figure 13-21):
The ScriptPubKey for a p2wsh is OP_0 <32-byte hash>.
This sequence triggers another special rule.
The ScriptSig, as with p2wpkh, is empty.
When p2wsh is being spent, the combined Script looks like Figure 13-22:
The processing of this Script starts similarly to p2wpkh (Figure 13-23 and 13-24):
The 32-byte hash is an element, so is pushed to the stack (Figure 13-25):
As with p2wpkh, older nodes will stop as there are no more Script instructions to be processed. Newer nodes will recognize the special sequence and do additional validation by looking at the Witness field.
The Witness field for p2wsh in our case is a 2-of-3 multisig (Figure 13-26):
The last item of the Witness is called the WitnessScript and must sha256 to the 32-byte hash from the ScriptPubKey. Note this is sha256, not hash256. Once the WitnessScript is validated by having the same hash value, the WitnessScript is interpreted as Script instructions put into the instruction set. The Witness Script looks like Figure 13-27:
The rest of the Witness field is put on top to produce this instruction set (Figure 13-28):
As you can see, this is a 2-of-3 multisig much like what was explored in Chapter 8 (Figure 13-29).
If the signatures are valid, we end like Figure 13-30:
The WitnessScript is very similar to the RedeemScript in that the sha256 of the serialization is addressed in the ScriptPubKey, but only revealed when being spent. Once the sha256 of the WitnessScript is found to be the same as the 32-byte hash, the WitnessScript is interpreted as Script instructions and added to the instruction set. The rest of the Witness is then put on the instruction set as well, producing the final set of instructions to be evaluated. p2wsh is particularly important as unmalleable multisig transactions are required for creating bi-directional Payment Channels for the Lightning Network.
Like p2sh-p2wpkh, p2sh-p2wsh is a way to make p2wsh backward-compatible. These transactions are sent to older nodes (Figure 13-31) vs newer nodes (Figure 13-32):
As with p2sh-p2wpkh, the ScriptPubKey is indistinguishable from any other p2sh and the ScriptSig is only the RedeemScript (Figure 13-33):
We start the p2sh-p2wsh in exactly the same way that p2sh-p2wpkh starts (Figure 13-34).
The RedeemScript is pushed to the stack (Figure 13-35):
The OP_HASH160 will return the RedeemScript’s hash (Figure 13-36):
The hash is pushed to the stack and we then get to OP_EQUAL (Figure 13-37):
As with p2sh-p2wpkh, if the hashes are equal, pre-BIP0016 nodes will mark the input as valid as they are unaware of the p2sh validation rules.
However, post-BIP0016 nodes will recognize the special Script sequence for p2sh, so the RedeemScript will be interpreted as new Script instructions.
The RedeemScript is OP_0 <32-byte hash>, which is the same as the ScriptPubKey for p2wsh (Figure 13-38).
This makes the Script state look like Figure 13-39:
Of course, this is the exact same starting state as p2wsh (Figure 13-40).
The 32-byte hash is an element, so is pushed to the stack (Figure 13-41):
At this point, pre-Segwit nodes will mark this input as valid as they are unaware of the Segwit validation rules. However, post-Segwit nodes will recognize the special Script sequence for p2wsh. The Witness field (Figure 13-42) contains the Witness Script (Figure 13-43). The sha256 of the WitnessScript is checked against 32-byte hash and if equal, the WitnessScript is interpreted as Script and put into the instruction set (Figure 13-44):
The Witness Script is a 2-of-3 multisig which is put into the instruction set (Figure 13-44):
As you can see, this is a 2-of-3 multisig as in Chapter 8. If the signatures are valid, we end like Figure 13-45:
This makes p2wsh backwards compatible, allowing older wallets to send to p2sh ScriptPubKeys which they can handle.
The parsing and serialization are exactly the same as before.
The main changes have to do with verify_input in tx.py and evaluate in script.py.
classTx:...defverify_input(self,input_index):tx_in=self.tx_ins[input_index]script_pubkey=tx_in.script_pubkey(testnet=self.testnet)ifscript_pubkey.is_p2sh_script_pubkey():instruction=tx_in.script_sig.instructions[-1]raw_redeem=int_to_little_endian(len(instruction),1)+instructionredeem_script=Script.parse(BytesIO(raw_redeem))ifredeem_script.is_p2wpkh_script_pubkey():z=self.sig_hash_bip143(input_index,redeem_script)witness=tx_in.witnesselifredeem_script.is_p2wsh_script_pubkey():instruction=tx_in.witness[-1]raw_witness=encode_varint(len(instruction))+instructionwitness_script=Script.parse(BytesIO(raw_witness))z=self.sig_hash_bip143(input_index,witness_script=witness_script)witness=tx_in.witnesselse:z=self.sig_hash(input_index,redeem_script)witness=Noneelse:ifscript_pubkey.is_p2wpkh_script_pubkey():z=self.sig_hash_bip143(input_index)witness=tx_in.witnesselifscript_pubkey.is_p2wsh_script_pubkey():instruction=tx_in.witness[-1]raw_witness=encode_varint(len(instruction))+instructionwitness_script=Script.parse(BytesIO(raw_witness))z=self.sig_hash_bip143(input_index,witness_script=witness_script)witness=tx_in.witnesselse:z=self.sig_hash(input_index)witness=Nonecombined_script=tx_in.script_sig+tx_in.script_pubkey(self.testnet)returncombined_script.evaluate(z,witness)
This takes care of p2sh-p2wsh
This takes care of p2wsh
We code a way to identify p2wsh in script.py:
defp2wsh_script(h256):'''Takes a hash160 and returns the p2wsh ScriptPubKey'''returnScript([0x00,h256])...classScript:...defis_p2wsh_script_pubkey(self):returnlen(self.instructions)==2andself.instructions[0]==0x00\andtype(self.instructions[1])==bytesandlen(self.instructions[1])==32
OP_0 <32-byte script> is what we expect
Lastly, we handle the special rule for p2wsh:
classScript:...defevaluate(self,z,witness):...whilelen(instructions)>0:...else:stack.append(instruction)...iflen(stack)==2andstack[0]==b''andlen(stack[1])==32:s256=stack.pop()stack.pop()instructions.extend(witness[:-1])witness_script=witness[-1]ifs256!=sha256(witness_script):('bad sha256 {} vs {}'.format(s256.hex(),sha256(witness_script).hex()))returnFalsestream=BytesIO(encode_varint(len(witness_script))+witness_script)witness_script_instructions=Script.parse(stream).instructionsinstructions.extend(witness_script_instructions)
The top element is the sha256 hash of the WitnessScript.
The second element is the Witness version, 0.
Everything but the WitnessScript is added to the instruction set.
The WitnessScript is the last item of the Witness.
The WitnessScript must hash to the sha256 that was in the stack.
Parse the WitnessScript and add to the instruction set.
Other improvements to Segwit include fixing the quadratic hashing problem through a different calculation of the signature hash.
A lot of the calculations for signature hash, or z, can be reused instead of requiring a new hash256 hash for each input.
The signature hash calculation is detailed in BIP0143 and can be seen in code-ch13/tx.py.
Another improvement is that by policy, uncompressed SEC pubkeys are now forbidden and only compressed SEC pubkeys are used for Segwit, saving space.
We’ve now covered the details of Segwit as a taste of what’s now possible. The next chapter will cover next steps that you can take on your Bitcoin developer journey.
If you’ve made it this far, congratulations! You’ve learned a lot about Bitcoin’s inner workings and hopefully, you are inspired to learn a lot more. This book only scratches the surface and there’s quite a bit more to learn. In this chapter, we’ll go through what other things you can learn, how to bootstrap your career as a Bitcoin developer and ways to contribute to the community.
Creating a wallet is a difficult task because securing private keys is very difficult. That said, there are a bunch of standards for creating wallets that can help.
For privacy purposes, reusing addresses is very bad (see Chapter 7). That means we need to create lots of addresses. Unfortunately, storing a different secret for each address generated can become a security and backup problem. How do you back them all up in a secure way? Do you generate a ton of secrets and then back them up? What if you run out of secrets? How do you back them up again? What system can you use to ensure that the backups are current?
To combat this problem, Armory, an early Bitcoin wallet, first implemented deterministic wallets. The idea of a deterministic wallet is that you can generate one seed and create lots and lots of different addresses with that one seed. The Armory style deterministic wallets were great, except people wanted some grouping of addresses so the Hierarchical Deterministic wallet standard or BIP0032 was born. BIP0032 wallets have multiple layers and keys, each with a unique derivation path. The specifications and test vectors are defined in the BIP0032 standard, so implementing your own HD wallet on testnet is a great way to learn.
Additionally, BIP0044 defines what each layer of the BIP0032 hierarchy can mean and the best practices for using a single HD seed to store coins from a lot of different cryptocurrencies. Implementing BIP0044 can also be a way to understand the HD wallet infrastructure a lot better. While many wallets (Trezor, Coinomi, etc) implement both BIP0032 and BIP0044, some wallets ignore BIP0044 altogether and use their own BIP0032 hierarchy (Electrum and Edge being two).
Writing down and transcribing a 256-bit seed is a pain and fraught with errors. To combat this, BIP0039 is a way to encode the seed into a bunch of English words. There are 2048 possible words, or 211, which means that each word encodes 11 bits of the seed. The standard defines exactly how the mnemonic backup gets translated to a BIP0032 seed. BIP0039 along with BIP0032 and BIP0044 is how most wallets implement backup and restoration. Writing a testnet wallet that implements BIP0039 is another good way to get a taste for Bitcoin development.
Payment Channels are the atomic unit of the Lightning Network and learning how they work is a good next step. There are many ways to implement Payment Channels, but the BOLT standard is the specification that lightning nodes use. The specifications are in progress as of this writing and are available at:
A large part of the Bitcoin ethic is in contributing back to the community. The main way you can do that is through open source projects. There are almost too many to list, but here’s a sample:
https://github.com/bitcoin/bitcoin - Bitcoin Core, or the reference client
https://github.com/libbitcoin/libbitcoin - An alternate implementation of Bitcoin in C++,
https://github.com/btcsuite/btcd - A Golang-based implementation of Bitcoin
https://github.com/bcoin-org/bcoin - A Javascript-based implementation of Bitcoin, maintained by purse.io
https://github.com/richardkiss/pycoin - pycoin, a Python library for Bitcoin
https://github.com/bitcoinj/bitcoinj - BitcoinJ, a Java library for Bitcoin
https://github.com/bitcoinjs/bitcoinjs-lib - BitcoinJS, a Javascript library for Bitcoin
https://github.com/btcpayserver/btcpayserver - BTCPay, a bitcoin payment processing engine written in C#
Contributing can be very beneficial for a lot of reasons, including future employment opportunities, learning, getting good business ideas and so on.
If at this point, you’re still wondering what projects would be beneficial for you, what follows are some suggestions.
It’s hard to understate the importance of security in Bitcoin. Writing a wallet even on testnet will help you understand the various considerations that go into creating a wallet. UI, backups, address books and transaction histories are just some of the things that you have to deal with when creating a wallet. As this is the most popular application of Bitcoin, creating a wallet will give you a lot of insight into the needs of users.
A more ambitious project would be to write your own block explorer. The key to making your own block explorer is to store the blockchain data in an easy-to-access fashion. Using a traditional database like Postgres or MySQL may be useful here. As Bitcoin Core does not have address indexes, adding one will make it possible for you to allow lookups of UTXOs and past transactions by address, which is what most users desire.
A Bitcoin-based shop is another project that helps you learn. This is particularly appropriate for web developers as they typically know how to create a web application. A web application with a Bitcoin backend can be a powerful way to not have third party dependencies for payment. Once again, it’s advised that you start on testnet and use the cryptographically secure libraries that are available to hook up the plumbing on payments.
A utility library like the one built in this book is another great way to learn more about Bitcoin. Writing the BIP0143 serialization for the signature hash of Segwit, for example, can be instructive in getting used to protocol programming. Porting the code from this book to another language would also be a great learning tool.
If you are interested in getting more in-depth in this industry, there are lots of great opportunities for developers. The key to proving that you know something is to have a portfolio of projects that you’ve done on your own. Contributing to an existing open source project or making your own project will help you get noticed by companies. In addition, programming against the API of any particular company is a great way to get an interview!
Generally, local work is going to be a lot easier to get as companies don’t like the risk profile of remote workers. Go to local meetups, network with people that you meet there and the local Bitcoin jobs will be a lot easier to come by.
Similarly, remote work requires that you put yourself out there to be noticed. Besides open source contributions, go to conferences, network and create technical content (YouTube videos, blog posts, etc). These will help quite a bit in getting noticed and getting a remote job.
I am excited that you’ve made it to the end. If you are so inclined, please send me notes about your progress as I would love to hear from you! I can be reached at jimmy@programmingblockchain.com.
Write the corresponding method __ne__ which checks if two FieldElement objects are not equal to each other.
classFieldElement:...def__ne__(self,other):# this should be the inverse of the == operatorreturnnot(self==other)
Solve these problems in F57 (assume all +’s here are +f and -`s here -f)
44+33
9-29
17+42+49
52-30-38
>>>prime=57>>>((44+33)%prime)20>>>((9-29)%prime)37>>>((17+42+49)%prime)51>>>((52-30-38)%prime)41
Write the corresponding __sub__ method which defines the subtraction of two FieldElement objects.
classFieldElement:...def__sub__(self,other):ifself.prime!=other.prime:raiseTypeError('Cannot subtract two numbers in different Fields')# self.num and other.num are the actual values# self.prime is what we need to mod againstnum=(self.num-other.num)%self.prime# We return an element of the same classreturnself.__class__(num,self.prime)
Solve the following equations in F97 (again, assume ⋅ and exponentiation are field versions):
95⋅45⋅31
17⋅13⋅19⋅44
127⋅7749
>>>prime=97>>>(95*45*31%prime)23>>>(17*13*19*44%prime)68>>>(12**7*77**49%prime)63
For k = 1, 3, 7, 13, 18, what is this set in F19?
{k⋅0, k⋅1, k⋅2, k⋅3, … k⋅18}
Do you notice anything about these sets?
>>>prime=19>>>forkin(1,3,7,13,18):...([k*i%primeforiinrange(prime)])[0,1,2,3,4,5,6,7,8,9,10,11,12,13,14,15,16,17,18][0,3,6,9,12,15,18,2,5,8,11,14,17,1,4,7,10,13,16][0,7,14,2,9,16,4,11,18,6,13,1,8,15,3,10,17,5,12][0,13,7,1,14,8,2,15,9,3,16,10,4,17,11,5,18,12,6][0,18,17,16,15,14,13,12,11,10,9,8,7,6,5,4,3,2,1]>>>forkin(1,3,7,13,18):...(sorted([k*i%primeforiinrange(prime)]))[0,1,2,3,4,5,6,7,8,9,10,11,12,13,14,15,16,17,18][0,1,2,3,4,5,6,7,8,9,10,11,12,13,14,15,16,17,18][0,1,2,3,4,5,6,7,8,9,10,11,12,13,14,15,16,17,18][0,1,2,3,4,5,6,7,8,9,10,11,12,13,14,15,16,17,18][0,1,2,3,4,5,6,7,8,9,10,11,12,13,14,15,16,17,18]
When sorted, the results are always the same set.
Write the corresponding __mul__ method which defines the multiplication of two Finite Field elements.
classFieldElement:...def__mul__(self,other):ifself.prime!=other.prime:raiseTypeError('Cannot multiply two numbers in different Fields')# self.num and other.num are the actual values# self.prime is what we need to mod againstnum=(self.num*other.num)%self.prime# We return an element of the same classreturnself.__class__(num,self.prime)
For p = 7, 11, 17, 31, what is this set in Fp?
{1(p-1), 2(p-1), 3(p-1), 4(p-1), … (p-1)(p-1)}
>>>forprimein(7,11,17,31):...([pow(i,prime-1,prime)foriinrange(1,prime)])[1,1,1,1,1,1][1,1,1,1,1,1,1,1,1,1][1,1,1,1,1,1,1,1,1,1,1,1,1,1,1,1][1,1,1,1,1,1,1,1,1,1,1,1,1,1,1,1,1,1,1,1,1,1,1,1,\1,1,1,1,1,1]
Solve the following equations in F31:
3 / 24
17-3
4-4⋅11
>>>prime=31>>>(3*pow(24,prime-2,prime)%prime)4>>>(pow(17,prime-4,prime))29>>>(pow(4,prime-5,prime)*11%prime)13
Write the corresponding __truediv__ method which defines the division of two field elements.
Note that in Python3, division is separated into __truediv__ and __floordiv__. The first does normal division, the second does integer division.
classFieldElement:...def__truediv__(self,other):ifself.prime!=other.prime:raiseTypeError('Cannot divide two numbers in different Fields')# use fermat's little theorem:# self.num**(p-1) % p == 1# this means:# 1/n == pow(n, p-2, p)# We return an element of the same classnum=self.num*pow(other.num,self.prime-2,self.prime)%self.primereturnself.__class__(num,self.prime)
Determine which of these points are on the curve y2=x3+5x+7:
(2,4), (-1,-1), (18,77), (5,7)
>>>defon_curve(x,y):...returny**2==x**3+5*x+7>>>(on_curve(2,4))False>>>(on_curve(-1,-1))True>>>(on_curve(18,77))True>>>(on_curve(5,7))False
Write the __ne__ method for Point.
classPoint:...def__ne__(self,other):returnnot(self==other)
Handle the case where the two points are additive inverses. That is, they have the same x, but a different y, causing a vertical line. This should return the point at infinity.
classPoint:...ifself.x==other.xandself.y!=other.y:returnself.__class__(None,None,self.a,self.b)
For the curve y2=x3+5x+7, what is (2,5) + (-1,-1)?
>>>x1,y1=2,5>>>x2,y2=-1,-1>>>s=(y2-y1)/(x2-x1)>>>x3=s**2-x1-x2>>>y3=s*(x1-x3)-y1>>>(x3,y3)3.0-7.0
Write the __add__ method where x1≠x2
classPoint:...def__add__(self,other):...ifself.x!=other.x:s=(other.y-self.y)/(other.x-self.x)x=s**2-self.x-other.xy=s*(self.x-x)-self.yreturnself.__class__(x,y,self.a,self.b)
For the curve y2=x3+5x+7, what is (2,5) + (-1,-1)?
>>>a,x1,y1=5,-1,1>>>s=(3*x1**2+a)/(2*y1)>>>x3=s**2-2*x1>>>y3=s*(x1-x3)-y1>>>(x3,y3)18.0-77.0
Write the __add__ method when P1=P2.
classPoint:...def__add__(self,other):...ifself==other:s=(3*self.x**2+self.a)/(2*self.y)x=s**2-2*self.xy=s*(self.x-x)-self.yreturnself.__class__(x,y,self.a,self.b)
Evaluate whether these points are on the curve y2=x3+7 over F223
(192,105), (17,56), (200,119), (1,193), (42,99)
>>>fromeccimportFieldElement>>>prime=223>>>a=FieldElement(0,prime)>>>b=FieldElement(7,prime)>>>defon_curve(x,y):...returny**2==x**3+a*x+b>>>(on_curve(FieldElement(192,prime),FieldElement(105,prime)))True>>>(on_curve(FieldElement(17,prime),FieldElement(56,prime)))True>>>(on_curve(FieldElement(200,prime),FieldElement(119,prime)))False>>>(on_curve(FieldElement(1,prime),FieldElement(193,prime)))True>>>(on_curve(FieldElement(42,prime),FieldElement(99,prime)))False
For the curve y2=x3+7 over F223, find:
(170,142) + (60,139)
(47,71) + (17,56)
(143,98) + (76,66)
>>>fromeccimportFieldElement,Point>>>prime=223>>>a=FieldElement(0,prime)>>>b=FieldElement(7,prime)>>>p1=Point(FieldElement(170,prime),FieldElement(142,prime),a,b)>>>p2=Point(FieldElement(60,prime),FieldElement(139,prime),a,b)>>>(p1+p2)Point(FieldElement_223(220),FieldElement_223(181))_FieldElement_223(0)_FieldElement_223(7)>>>p1=Point(FieldElement(47,prime),FieldElement(71,prime),a,b)>>>p2=Point(FieldElement(17,prime),FieldElement(56,prime),a,b)>>>(p1+p2)Point(FieldElement_223(215),FieldElement_223(68))_FieldElement_223(0)_FieldElement_223(7)>>>p1=Point(FieldElement(143,prime),FieldElement(98,prime),a,b)>>>p2=Point(FieldElement(76,prime),FieldElement(66,prime),a,b)>>>(p1+p2)Point(FieldElement_223(47),FieldElement_223(71))_FieldElement_223(0)_FieldElement_223(7)
Extend ECCTest to test for the additions from the previous exercise. Call this test_add.
deftest_add(self):prime=223a=FieldElement(0,prime)b=FieldElement(7,prime)additions=((192,105,17,56,170,142),(47,71,117,141,60,139),(143,98,76,66,47,71),)forx1_raw,y1_raw,x2_raw,y2_raw,x3_raw,y3_rawinadditions:x1=FieldElement(x1_raw,prime)y1=FieldElement(y1_raw,prime)p1=Point(x1,y1,a,b)x2=FieldElement(x2_raw,prime)y2=FieldElement(y2_raw,prime)p2=Point(x2,y2,a,b)x3=FieldElement(x3_raw,prime)y3=FieldElement(y3_raw,prime)p3=Point(x3,y3,a,b)self.assertEqual(p1+p2,p3)
For the curve y2=x3+7 over F223, find:
2⋅(192,105)
2⋅(143,98)
2⋅(47,71)
4⋅(47,71)
8⋅(47,71)
21⋅(47,71)
>>>fromeccimportFieldElement,Point>>>prime=223>>>a=FieldElement(0,prime)>>>b=FieldElement(7,prime)>>>x1=FieldElement(num=192,prime=prime)>>>y1=FieldElement(num=105,prime=prime)>>>p=Point(x1,y1,a,b)>>>(p+p)Point(FieldElement_223(49),FieldElement_223(71))_FieldElement_223(0)_FieldElement_223(7)>>>x1=FieldElement(num=143,prime=prime)>>>y1=FieldElement(num=98,prime=prime)>>>p=Point(x1,y1,a,b)>>>(p+p)Point(FieldElement_223(64),FieldElement_223(168))_FieldElement_223(0)_FieldElement_223(7)>>>x1=FieldElement(num=47,prime=prime)>>>y1=FieldElement(num=71,prime=prime)>>>p=Point(x1,y1,a,b)>>>(p+p)Point(FieldElement_223(36),FieldElement_223(111))_FieldElement_223(0)_FieldElement_223(7)>>>(p+p+p+p)Point(FieldElement_223(194),FieldElement_223(51))_FieldElement_223(0)_FieldElement_223(7)>>>(p+p+p+p+p+p+p+p)Point(FieldElement_223(116),FieldElement_223(55))_FieldElement_223(0)_FieldElement_223(7)>>>(p+p+p+p+p+p+p+p+p+p+p+p+p+p+p+p+p+p+p+p+p)Point(infinity)
For the curve y2=x3+7 over F223, find the order of the group generated by (15,86)
>>>prime=223>>>a=FieldElement(0,prime)>>>b=FieldElement(7,prime)>>>x=FieldElement(15,prime)>>>y=FieldElement(86,prime)>>>p=Point(x,y,a,b)>>>inf=Point(None,None,a,b)>>>product=p>>>count=1>>>whileproduct!=inf:...product+=p...count+=1>>>(count)7
Verify whether these signatures are valid:
P = (0x887387e452b8eacc4acfde10d9aaf7f6d9a0f975aabb10d006e4da568744d06c,
0x61de6d95231cd89026e286df3b6ae4a894a3378e393e93a0f45b666329a0ae34)
# signature 1
z = 0xec208baa0fc1c19f708a9ca96fdeff3ac3f230bb4a7ba4aede4942ad003c0f60
r = 0xac8d1c87e51d0d441be8b3dd5b05c8795b48875dffe00b7ffcfac23010d3a395
s = 0x68342ceff8935ededd102dd876ffd6ba72d6a427a3edb13d26eb0781cb423c4
# signature 2
z = 0x7c076ff316692a3d7eb3c3bb0f8b1488cf72e1afcd929e29307032997a838a3d
r = 0xeff69ef2b1bd93a66ed5219add4fb51e11a840f404876325a1e8ffe0529a2c
s = 0xc7207fee197d27c618aea621406f6bf5ef6fca38681d82b2f06fddbdce6feab6
>>>fromeccimportS256Point,N,G>>>point=S256Point(...0x887387e452b8eacc4acfde10d9aaf7f6d9a0f975aabb10d006e4da568744d06c,...0x61de6d95231cd89026e286df3b6ae4a894a3378e393e93a0f45b666329a0ae34)>>>z=0xec208baa0fc1c19f708a9ca96fdeff3ac3f230bb4a7ba4aede4942ad003c0f60>>>r=0xac8d1c87e51d0d441be8b3dd5b05c8795b48875dffe00b7ffcfac23010d3a395>>>s=0x68342ceff8935ededd102dd876ffd6ba72d6a427a3edb13d26eb0781cb423c4>>>u=z*pow(s,N-2,N)%N>>>v=r*pow(s,N-2,N)%N>>>((u*G+v*point).x.num==r)True>>>z=0x7c076ff316692a3d7eb3c3bb0f8b1488cf72e1afcd929e29307032997a838a3d>>>r=0xeff69ef2b1bd93a66ed5219add4fb51e11a840f404876325a1e8ffe0529a2c>>>s=0xc7207fee197d27c618aea621406f6bf5ef6fca38681d82b2f06fddbdce6feab6>>>u=z*pow(s,N-2,N)%N>>>v=r*pow(s,N-2,N)%N>>>((u*G+v*point).x.num==r)True
Sign the following message with the secret
e = 12345
z = int.from_bytes(hash256('Programming Bitcoin!'), 'big')
>>>fromeccimportS256Point,G,N>>>fromhelperimporthash256>>>e=12345>>>z=int.from_bytes(hash256(b'Programming Bitcoin!'),'big')>>>k=1234567890>>>r=(k*G).x.num>>>k_inv=pow(k,N-2,N)>>>s=(z+r*e)*k_inv%N>>>(e*G)S256Point(f01d6b9018ab421dd410404cb869072065522bf85734008f105cf385a023a80f,\0eba29d0f0c5408ed681984dc525982abefccd9f7ff01dd26da4999cf3f6a295)>>>(hex(z))0x969f6056aa26f7d2795fd013fe88868d09c9f6aed96965016e1936ae47060d48>>>(hex(r))0x2b698a0f0a4041b77e63488ad48c23e8e8838dd1fb7520408b121697b782ef22>>>(hex(s))0x1dbc63bfef4416705e602a7b564161167076d8b20990a0f26f316cff2cb0bc1a
Find the uncompressed SEC format for the Public Key where the Private Key secrets are:
5000
20185
0xdeadbeef12345
>>>fromeccimportPrivateKey>>>priv=PrivateKey(5000)>>>(priv.point.sec(compressed=False).hex())04ffe558e388852f0120e46af2d1b370f85854a8eb0841811ece0e3e03d282d57c315dc72890a4\f10a1481c031b03b351b0dc79901ca18a00cf009dbdb157a1d10>>>priv=PrivateKey(2018**5)>>>(priv.point.sec(compressed=False).hex())04027f3da1918455e03c46f659266a1bb5204e959db7364d2f473bdf8f0a13cc9dff87647fd023\c13b4a4994f17691895806e1b40b57f4fd22581a4f46851f3b06>>>priv=PrivateKey(0xdeadbeef12345)>>>(priv.point.sec(compressed=False).hex())04d90cd625ee87dd38656dd95cf79f65f60f7273b67d3096e68bd81e4f5342691f842efa762fd5\9961d0e99803c61edba8b3e3f7dc3a341836f97733aebf987121
Find the Compressed SEC format for the Public Key where the Private Key secrets are:
5001
20195
0xdeadbeef54321
>>>fromeccimportPrivateKey>>>priv=PrivateKey(5001)>>>(priv.point.sec(compressed=True).hex())0357a4f368868a8a6d572991e484e664810ff14c05c0fa023275251151fe0e53d1>>>priv=PrivateKey(2019**5)>>>(priv.point.sec(compressed=True).hex())02933ec2d2b111b92737ec12f1c5d20f3233a0ad21cd8b36d0bca7a0cfa5cb8701>>>priv=PrivateKey(0xdeadbeef54321)>>>(priv.point.sec(compressed=True).hex())0296be5b1292f6c856b3c5654e886fc13511462059089cdf9c479623bfcbe77690
Find the DER format for a signature whose r and s values are:
r =
0x37206a0610995c58074999cb9767b87af4c4978db68c06e8e6e81d282047a7c6
s =
0x8ca63759c1157ebeaec0d03cecca119fc9a75bf8e6d0fa65c841c8e2738cdaec
>>>fromeccimportSignature>>>r=0x37206a0610995c58074999cb9767b87af4c4978db68c06e8e6e81d282047a7c6>>>s=0x8ca63759c1157ebeaec0d03cecca119fc9a75bf8e6d0fa65c841c8e2738cdaec>>>sig=Signature(r,s)>>>(sig.der().hex())3045022037206a0610995c58074999cb9767b87af4c4978db68c06e8e6e81d282047a7c6022100\8ca63759c1157ebeaec0d03cecca119fc9a75bf8e6d0fa65c841c8e2738cdaec
Convert the following hex to binary and then to Base58:
7c076ff316692a3d7eb3c3bb0f8b1488cf72e1afcd929e29307032997a838a3d
eff69ef2b1bd93a66ed5219add4fb51e11a840f404876325a1e8ffe0529a2c
c7207fee197d27c618aea621406f6bf5ef6fca38681d82b2f06fddbdce6feab6
>>>fromhelperimportencode_base58>>>h='7c076ff316692a3d7eb3c3bb0f8b1488cf72e1afcd929e29307032997a838a3d'>>>(encode_base58(bytes.fromhex(h)).decode('ascii'))9MA8fRQrT4u8Zj8ZRd6MAiiyaxb2Y1CMpvVkHQu5hVM6>>>h='eff69ef2b1bd93a66ed5219add4fb51e11a840f404876325a1e8ffe0529a2c'>>>(encode_base58(bytes.fromhex(h)).decode('ascii'))4fE3H2E6XMp4SsxtwinF7w9a34ooUrwWe4WsW1458Pd>>>h='c7207fee197d27c618aea621406f6bf5ef6fca38681d82b2f06fddbdce6feab6'>>>(encode_base58(bytes.fromhex(h)).decode('ascii'))EQJsjkd6JaGwxrjEhfeqPenqHwrBmPQZjJGNSCHBkcF7
Find the address corresponding to Public Keys whose Private Key secrets are:
5002 (use uncompressed SEC, on testnet)
20205 (use compressed SEC, on testnet)
0x12345deadbeef (use compressed SEC on mainnet)
>>>fromeccimportPrivateKey>>>priv=PrivateKey(5002)>>>(priv.point.address(compressed=False,testnet=True))mmTPbXQFxboEtNRkwfh6K51jvdtHLxGeMA>>>priv=PrivateKey(2020**5)>>>(priv.point.address(compressed=True,testnet=True))mopVkxp8UhXqRYbCYJsbeE1h1fiF64jcoH>>>priv=PrivateKey(0x12345deadbeef)>>>(priv.point.address(compressed=True,testnet=False))1F1Pn2y6pDb68E5nYJJeba4TLg2U7B6KF1
Find the WIF for Private Key whose secrets are:
5003 (compressed, testnet)
20215 (uncompressed, testnet)
0x54321deadbeef (compressed, mainnet)
>>>fromeccimportPrivateKey>>>priv=PrivateKey(5003)>>>(priv.wif(compressed=True,testnet=True))cMahea7zqjxrtgAbB7LSGbcQUr1uX1ojuat9jZodMN8rFTv2sfUK>>>priv=PrivateKey(2021**5)>>>(priv.wif(compressed=False,testnet=True))91avARGdfge8E4tZfYLoxeJ5sGBdNJQH4kvjpWAxgzczjbCwxic>>>priv=PrivateKey(0x54321deadbeef)>>>(priv.wif(compressed=True,testnet=False))KwDiBf89QgGbjEhKnhXJuH7LrciVrZi3qYjgiuQJv1h8Ytr2S53a
Write a function little_endian_to_int which takes Python bytes, interprets those bytes in Little-Endian and returns the number.
deflittle_endian_to_int(b):'''little_endian_to_int takes byte sequence as a little-endian number.Returns an integer'''returnint.from_bytes(b,'little')
Write a function int_to_little_endian which does the reverse of the last exercise.
defint_to_little_endian(n,length):'''endian_to_little_endian takes an integer and returns the little-endianbyte sequence of length'''returnn.to_bytes(length,'little')
Create a testnet address for yourself using a long secret that only you know. This is important as there are bots on testnet trying to steal testnet coins. Make sure you write this secret down somewhere! You will be using the secret later to sign Transactions.
>>>fromeccimportPrivateKey>>>fromhelperimporthash256,little_endian_to_int>>>passphrase=b'jimmy@programmingblockchain.com my secret'>>>secret=little_endian_to_int(hash256(passphrase))>>>priv=PrivateKey(secret)>>>(priv.point.address(testnet=True))mft9LRNtaBNtpkknB8xgm17UvPedZ4ecYL
Write the version parsing part of the parse method that we’ve defined. To do this properly, you’ll have to convert 4 bytes into a Little-Endian integer.
classTx:...@classmethoddefparse(cls,s,testnet=False):version=little_endian_to_int(s.read(4))returncls(version,None,None,None,testnet=testnet)
Write the inputs parsing part of the parse method in Tx and the parse method for TxIn.
classTx:...@classmethoddefparse(cls,s,testnet=False):version=little_endian_to_int(s.read(4))num_inputs=read_varint(s)inputs=[]for_inrange(num_inputs):inputs.append(TxIn.parse(s))returncls(version,inputs,None,None,testnet=testnet)...classTxIn:...@classmethoddefparse(cls,s):'''Takes a byte stream and parses the tx_input at the startreturn a TxIn object'''prev_tx=s.read(32)[::-1]prev_index=little_endian_to_int(s.read(4))script_sig=Script.parse(s)sequence=little_endian_to_int(s.read(4))returncls(prev_tx,prev_index,script_sig,sequence)
Write the outputs parsing part of the parse method in Tx and the parse method for TxOut.
classTx:...classTx:...@classmethoddefparse(cls,s,testnet=False):version=little_endian_to_int(s.read(4))num_inputs=read_varint(s)inputs=[]for_inrange(num_inputs):inputs.append(TxIn.parse(s))num_outputs=read_varint(s)outputs=[]for_inrange(num_outputs):outputs.append(TxOut.parse(s))returncls(version,inputs,outputs,None,testnet=testnet)...classTxOut:...@classmethoddefparse(cls,s):'''Takes a byte stream and parses the tx_output at the startreturn a TxOut object'''amount=little_endian_to_int(s.read(8))script_pubkey=Script.parse(s)returncls(amount,script_pubkey)
Write the Locktime parsing part of the parse method in Tx.
classTx:...@classmethoddefparse(cls,s,testnet=False):version=little_endian_to_int(s.read(4))num_inputs=read_varint(s)inputs=[]for_inrange(num_inputs):inputs.append(TxIn.parse(s))num_outputs=read_varint(s)outputs=[]for_inrange(num_outputs):outputs.append(TxOut.parse(s))locktime=little_endian_to_int(s.read(4))returncls(version,inputs,outputs,locktime,testnet=testnet)
What is the ScriptSig from the second input, ScriptPubKey from the first output and the amount of the second output for this transaction?
010000000456919960ac691763688d3d3bcea9ad6ecaf875df5339e148a1fc61c6ed7a069e0100 00006a47304402204585bcdef85e6b1c6af5c2669d4830ff86e42dd205c0e089bc2a821657e951 c002201024a10366077f87d6bce1f7100ad8cfa8a064b39d4e8fe4ea13a7b71aa8180f012102f0 da57e85eec2934a82a585ea337ce2f4998b50ae699dd79f5880e253dafafb7feffffffeb8f51f4 038dc17e6313cf831d4f02281c2a468bde0fafd37f1bf882729e7fd3000000006a473044022078 99531a52d59a6de200179928ca900254a36b8dff8bb75f5f5d71b1cdc26125022008b422690b84 61cb52c3cc30330b23d574351872b7c361e9aae3649071c1a7160121035d5c93d9ac96881f19ba 1f686f15f009ded7c62efe85a872e6a19b43c15a2937feffffff567bf40595119d1bb8a3037c35 6efd56170b64cbcc160fb028fa10704b45d775000000006a47304402204c7c7818424c7f7911da 6cddc59655a70af1cb5eaf17c69dadbfc74ffa0b662f02207599e08bc8023693ad4e9527dc42c3 4210f7a7d1d1ddfc8492b654a11e7620a0012102158b46fbdff65d0172b7989aec8850aa0dae49 abfb84c81ae6e5b251a58ace5cfeffffffd63a5e6c16e620f86f375925b21cabaf736c779f88fd 04dcad51d26690f7f345010000006a47304402200633ea0d3314bea0d95b3cd8dadb2ef79ea833 1ffe1e61f762c0f6daea0fabde022029f23b3e9c30f080446150b23852028751635dcee2be669c 2a1686a4b5edf304012103ffd6f4a67e94aba353a00882e563ff2722eb4cff0ad6006e86ee20df e7520d55feffffff0251430f00000000001976a914ab0c0b2e98b1ab6dbf67d4750b0a56244948 a87988ac005a6202000000001976a9143c82d7df364eb6c75be8c80df2b3eda8db57397088ac46 430600
>>>fromioimportBytesIO>>>fromtximportTx>>>hex_transaction='010000000456919960ac691763688d3d3bcea9ad6ecaf875df5339e\148a1fc61c6ed7a069e010000006a47304402204585bcdef85e6b1c6af5c2669d4830ff86e42dd\205c0e089bc2a821657e951c002201024a10366077f87d6bce1f7100ad8cfa8a064b39d4e8fe4e\a13a7b71aa8180f012102f0da57e85eec2934a82a585ea337ce2f4998b50ae699dd79f5880e253\dafafb7feffffffeb8f51f4038dc17e6313cf831d4f02281c2a468bde0fafd37f1bf882729e7fd\3000000006a47304402207899531a52d59a6de200179928ca900254a36b8dff8bb75f5f5d71b1c\dc26125022008b422690b8461cb52c3cc30330b23d574351872b7c361e9aae3649071c1a716012\1035d5c93d9ac96881f19ba1f686f15f009ded7c62efe85a872e6a19b43c15a2937feffffff567\bf40595119d1bb8a3037c356efd56170b64cbcc160fb028fa10704b45d775000000006a4730440\2204c7c7818424c7f7911da6cddc59655a70af1cb5eaf17c69dadbfc74ffa0b662f02207599e08\bc8023693ad4e9527dc42c34210f7a7d1d1ddfc8492b654a11e7620a0012102158b46fbdff65d0\172b7989aec8850aa0dae49abfb84c81ae6e5b251a58ace5cfeffffffd63a5e6c16e620f86f375\925b21cabaf736c779f88fd04dcad51d26690f7f345010000006a47304402200633ea0d3314bea\0d95b3cd8dadb2ef79ea8331ffe1e61f762c0f6daea0fabde022029f23b3e9c30f080446150b23\852028751635dcee2be669c2a1686a4b5edf304012103ffd6f4a67e94aba353a00882e563ff272\2eb4cff0ad6006e86ee20dfe7520d55feffffff0251430f00000000001976a914ab0c0b2e98b1a\b6dbf67d4750b0a56244948a87988ac005a6202000000001976a9143c82d7df364eb6c75be8c80\df2b3eda8db57397088ac46430600'>>>stream=BytesIO(bytes.fromhex(hex_transaction))>>>tx_obj=Tx.parse(stream)>>>(tx_obj.tx_ins[1].script_sig)304402207899531a52d59a6de200179928ca900254a36b8dff8bb75f5f5d71b1cdc26125022008\b422690b8461cb52c3cc30330b23d574351872b7c361e9aae3649071c1a71601035d5c93d9ac9\6881f19ba1f686f15f009ded7c62efe85a872e6a19b43c15a2937>>>(tx_obj.tx_outs[0].script_pubkey)OP_DUPOP_HASH160ab0c0b2e98b1ab6dbf67d4750b0a56244948a879OP_EQUALVERIFYOP_CHECKSIG>>>(tx_obj.tx_outs[1].amount)40000000
Write the fee method for the Tx class.
classTx:...deffee(self,testnet=False):input_sum,output_sum=0,0fortx_ininself.tx_ins:input_sum+=tx_in.value(testnet=testnet)fortx_outinself.tx_outs:output_sum+=tx_out.amountreturninput_sum-output_sum
Write the op_hash160 function.
defop_hash160(stack):iflen(stack)<1:returnFalseelement=stack.pop()h160=hash160(element)stack.append(h160)returnTrue
Write the op_checksig function in op.py
defop_checksig(stack,z):iflen(stack)<2:returnFalsesec_pubkey=stack.pop()der_signature=stack.pop()[:-1]try:point=S256Point.parse(sec_pubkey)sig=Signature.parse(der_signature)except(ValueError,SyntaxError)ase:returnFalseifpoint.verify(z,sig):stack.append(encode_num(1))else:stack.append(encode_num(0))returnTrue
Create a ScriptSig that can unlock this ScriptPubKey. Note OP_MUL multiplies the top two elements of the stack.
767695935687
56 = OP_6
76 = OP_DUP
87 = OP_EQUAL
93 = OP_ADD
95 = OP_MUL
>>>fromscriptimportScript>>>script_pubkey=Script([0x76,0x76,0x95,0x93,0x56,0x87])>>>script_sig=Script([0x52])>>>combined_script=script_sig+script_pubkey>>>(combined_script.evaluate(0))True
OP_2 or 52 will satisfy the equation x2+x-6=0.
Figure out what this Script is doing:
6e879169a77ca787
69 = OP_VERIFY
6e = OP_2DUP
7c = OP_SWAP
87 = OP_EQUAL
91 = OP_NOT
a7 = OP_SHA1
Use the Script.parse method and look up what various opcodes do at https://en.bitcoin.it/wiki/Script
>>>fromscriptimportScript>>>script_pubkey=Script([0x6e,0x87,0x91,0x69,0xa7,0x7c,0xa7,0x87])>>>c1='255044462d312e330a25e2e3cfd30a0a0a312030206f626a0a3c3c2f576964746820\32203020522f4865696768742033203020522f547970652034203020522f537562747970652035\203020522f46696c7465722036203020522f436f6c6f7253706163652037203020522f4c656e67\74682038203020522f42697473506572436f6d706f6e656e7420383e3e0a73747265616d0affd8\fffe00245348412d3120697320646561642121212121852fec092339759c39b1a1c63c4c97e1ff\fe017f46dc93a6b67e013b029aaa1db2560b45ca67d688c7f84b8c4c791fe02b3df614f86db169\0901c56b45c1530afedfb76038e972722fe7ad728f0e4904e046c230570fe9d41398abe12ef5bc\942be33542a4802d98b5d70f2a332ec37fac3514e74ddc0f2cc1a874cd0c78305a215664613097\89606bd0bf3f98cda8044629a1'>>>c2='255044462d312e330a25e2e3cfd30a0a0a312030206f626a0a3c3c2f576964746820\32203020522f4865696768742033203020522f547970652034203020522f537562747970652035\203020522f46696c7465722036203020522f436f6c6f7253706163652037203020522f4c656e67\74682038203020522f42697473506572436f6d706f6e656e7420383e3e0a73747265616d0affd8\fffe00245348412d3120697320646561642121212121852fec092339759c39b1a1c63c4c97e1ff\fe017346dc9166b67e118f029ab621b2560ff9ca67cca8c7f85ba84c79030c2b3de218f86db3a9\0901d5df45c14f26fedfb3dc38e96ac22fe7bd728f0e45bce046d23c570feb141398bb552ef5a0\a82be331fea48037b8b5d71f0e332edf93ac3500eb4ddc0decc1a864790c782c76215660dd3097\91d06bd0af3f98cda4bc4629b1'>>>collision1=bytes.fromhex(c1)>>>collision2=bytes.fromhex(c2)>>>script_sig=Script([collision1,collision2])>>>combined_script=script_sig+script_pubkey>>>(combined_script.evaluate(0))True
collision1 and collision2 are from the sha1 preimages that were found to collide from Google. (https://security.googleblog.com/2017/02/announcing-first-sha1-collision.html)
This is looking for a sha1 Collision. The only way to satisfy this script is to give x and y such that x≠y but sha1(x)=sha1(y).
Write the sig_hash method for the Tx class.
classTx:...defsig_hash(self,input_index):s=int_to_little_endian(self.version,4)s+=encode_varint(len(self.tx_ins))fori,tx_ininenumerate(self.tx_ins):ifi==input_index:s+=TxIn(prev_tx=tx_in.prev_tx,prev_index=tx_in.prev_index,script_sig=tx_in.script_pubkey(self.testnet),sequence=tx_in.sequence,).serialize()else:s+=TxIn(prev_tx=tx_in.prev_tx,prev_index=tx_in.prev_index,sequence=tx_in.sequence,).serialize()s+=encode_varint(len(self.tx_outs))fortx_outinself.tx_outs:s+=tx_out.serialize()s+=int_to_little_endian(self.locktime,4)s+=int_to_little_endian(SIGHASH_ALL,4)h256=hash256(s)returnint.from_bytes(h256,'big')
Write the verify_input method for the Tx class. You will want to use the TxIn.script_pubkey(), Tx.sig_hash() and Script.evaluate() methods.
classTx:...defverify_input(self,input_index):tx_in=self.tx_ins[input_index]script_pubkey=tx_in.script_pubkey(testnet=self.testnet)z=self.sig_hash(input_index)combined=tx_in.script_sig+script_pubkeyreturncombined.evaluate(z)
Write the sign_input method for the Tx class.
classTx:...defsign_input(self,input_index,private_key):z=self.sig_hash(input_index)der=private_key.sign(z).der()sig=der+SIGHASH_ALL.to_bytes(1,'big')sec=private_key.point.sec()self.tx_ins[input_index].script_sig=Script([sig,sec])returnself.verify_input(input_index)
Create a testnet transaction that sends 60% of a single UTXO to mwJn1YPMq7y5F8J3LkC5Hxg9PHyZ5K4cFv. The remaining amount minus fees should go back to your own change address. This should be a 1 input, 2 output transaction.
You can broadcast the transaction at https://testnet.blockchain.info/pushtx
>>>fromeccimportPrivateKey>>>fromhelperimportdecode_base58,SIGHASH_ALL>>>fromscriptimportp2pkh_script,Script>>>fromtximportTxIn,TxOut,Tx>>>prev_tx=bytes.fromhex('75a1c4bc671f55f626dda1074c7725991e6f68b8fcefcfca7\b64405ca3b45f1c')>>>prev_index=1>>>target_address='miKegze5FQNCnGw6PKyqUbYUeBa4x2hFeM'>>>target_amount=0.01>>>change_address='mzx5YhAH9kNHtcN481u6WkjeHjYtVeKVh2'>>>change_amount=0.009>>>secret=8675309>>>priv=PrivateKey(secret=secret)>>>tx_ins=[]>>>tx_ins.append(TxIn(prev_tx,prev_index))>>>tx_outs=[]>>>h160=decode_base58(target_address)>>>script_pubkey=p2pkh_script(h160)>>>target_satoshis=int(target_amount*100000000)>>>tx_outs.append(TxOut(target_satoshis,script_pubkey))>>>h160=decode_base58(change_address)>>>script_pubkey=p2pkh_script(h160)>>>change_satoshis=int(change_amount*100000000)>>>tx_outs.append(TxOut(change_satoshis,script_pubkey))>>>tx_obj=Tx(1,tx_ins,tx_outs,0,testnet=True)>>>(tx_obj.sign_input(0,priv))True>>>(tx_obj.serialize().hex())01000000011c5fb4a35c40647bcacfeffcb8686f1e9925774c07a1dd26f6551f67bcc4a1750100\00006b483045022100a08ebb92422b3599a2d2fcdaa11f8f807a66ccf33e7f4a9ff0a3c51f1b1e\c5dd02205ed21dfede5925362b8d9833e908646c54be7ac6664e31650159e8f69b6ca539012103\935581e52c354cd2f484fe8ed83af7a3097005b2f9c60bff71d35bd795f54b67ffffffff024042\0f00000000001976a9141ec51b3654c1f1d0f4929d11a1f702937eaf50c888ac9fbb0d00000000\001976a914d52ad7ca9b3d096a38e752c2018e6fbc40cdf26f88ac00000000
Advanced: get some more testnet coins from a testnet faucet and create a 2 input, 1 output transaction. 1 input should be from the faucet, the other should be from the previous exercise, the output can be your own address.
You can broadcast the transaction at https://testnet.blockchain.info/pushtx
>>>fromeccimportPrivateKey>>>fromhelperimportdecode_base58,SIGHASH_ALL>>>fromscriptimportp2pkh_script,Script>>>fromtximportTxIn,TxOut,Tx>>>prev_tx_1=bytes.fromhex('11d05ce707c1120248370d1cbf5561d22c4f83aeba04367\92c82e0bd57fe2a2f')>>>prev_index_1=1>>>prev_tx_2=bytes.fromhex('51f61f77bd061b9a0da60d4bedaaf1b1fad0c11e65fdc74\4797ee22d20b03d15')>>>prev_index_2=1>>>target_address='mwJn1YPMq7y5F8J3LkC5Hxg9PHyZ5K4cFv'>>>target_amount=0.0429>>>secret=8675309>>>priv=PrivateKey(secret=secret)>>>tx_ins=[]>>>tx_ins.append(TxIn(prev_tx_1,prev_index_1))>>>tx_ins.append(TxIn(prev_tx_2,prev_index_2))>>>tx_outs=[]>>>h160=decode_base58(target_address)>>>script_pubkey=p2pkh_script(h160)>>>target_satoshis=int(target_amount*100000000)>>>tx_outs.append(TxOut(target_satoshis,script_pubkey))>>>tx_obj=Tx(1,tx_ins,tx_outs,0,testnet=True)>>>(tx_obj.sign_input(0,priv))True>>>(tx_obj.sign_input(1,priv))True>>>(tx_obj.serialize().hex())01000000022f2afe57bde0822c793604baae834f2cd26155bf1c0d37480212c107e75cd0110100\00006a47304402204cc5fe11b2b025f8fc9f6073b5e3942883bbba266b71751068badeb8f11f03\64022070178363f5dea4149581a4b9b9dbad91ec1fd990e3fa14f9de3ccb421fa5b26901210393\5581e52c354cd2f484fe8ed83af7a3097005b2f9c60bff71d35bd795f54b67ffffffff153db020\2de27e7944c7fd651ec1d0fab1f1aaed4b0da60d9a1b06bd771ff651010000006b483045022100\b7a938d4679aa7271f0d32d83b61a85eb0180cf1261d44feaad23dfd9799dafb02205ff2f366dd\d9555f7146861a8298b7636be8b292090a224c5dc84268480d8be1012103935581e52c354cd2f4\84fe8ed83af7a3097005b2f9c60bff71d35bd795f54b67ffffffff01d0754100000000001976a9\14ad346f8eb57dee9a37981716e498120ae80e44f788ac00000000
Write the op_checkmultisig function of op.py.
defop_checkmultisig(stack,z):iflen(stack)<1:returnFalsen=decode_num(stack.pop())iflen(stack)<n+1:returnFalsesec_pubkeys=[]for_inrange(n):sec_pubkeys.append(stack.pop())m=decode_num(stack.pop())iflen(stack)<m+1:returnFalseder_signatures=[]for_inrange(m):der_signatures.append(stack.pop()[:-1])stack.pop()try:points=[S256Point.parse(sec)forsecinsec_pubkeys]sigs=[Signature.parse(der)forderinder_signatures]forsiginsigs:iflen(points)==0:returnFalsewhilepoints:point=points.pop(0)ifpoint.verify(z,sig):breakstack.append(encode_num(1))except(ValueError,SyntaxError):returnFalsereturnTrue
Write h160_to_p2pkh_address that converts a 20-byte hash160 into a p2pkh address.
defh160_to_p2pkh_address(h160,testnet=False):iftestnet:prefix=b'\x6f'else:prefix=b'\x00'returnencode_base58_checksum(prefix+h160)
Write h160_to_p2sh_address that converts a 20-byte hash160 into a p2sh address.
defh160_to_p2sh_address(h160,testnet=False):iftestnet:prefix=b'\xc4'else:prefix=b'\x05'returnencode_base58_checksum(prefix+h160)
Validate the second signature from the transaction above.
>>>fromioimportBytesIO>>>fromeccimportS256Point,Signature>>>fromhelperimporthash256,int_to_little_endian>>>fromscriptimportScript>>>fromtximportTx,SIGHASH_ALL>>>hex_tx='0100000001868278ed6ddfb6c1ed3ad5f8181eb0c7a385aa0836f01d5e4789e6\bd304d87221a000000db00483045022100dc92655fe37036f47756db8102e0d7d5e28b3beb83a8\fef4f5dc0559bddfb94e02205a36d4e4e6c7fcd16658c50783e00c341609977aed3ad00937bf4e\e942a8993701483045022100da6bee3c93766232079a01639d07fa869598749729ae323eab8eef\53577d611b02207bef15429dcadce2121ea07f233115c6f09034c0be68db99980b9a6c5e754022\01475221022626e955ea6ea6d98850c994f9107b036b1334f18ca8830bfff1295d21cfdb702103\b287eaf122eea69030a0e9feed096bed8045c8b98bec453e1ffac7fbdbd4bb7152aeffffffff04\d3b11400000000001976a914904a49878c0adfc3aa05de7afad2cc15f483a56a88ac7f40090000\0000001976a914418327e3f3dda4cf5b9089325a4b95abdfa0334088ac722c0c00000000001976\a914ba35042cfe9fc66fd35ac2224eebdafd1028ad2788acdc4ace020000000017a91474d691da\1574e6b3c192ecfb52cc8984ee7b6c568700000000'>>>hex_sec='03b287eaf122eea69030a0e9feed096bed8045c8b98bec453e1ffac7fbdbd4b\b71'>>>hex_der='3045022100da6bee3c93766232079a01639d07fa869598749729ae323eab8ee\f53577d611b02207bef15429dcadce2121ea07f233115c6f09034c0be68db99980b9a6c5e75402\2'>>>hex_redeem_script='475221022626e955ea6ea6d98850c994f9107b036b1334f18ca88\30bfff1295d21cfdb702103b287eaf122eea69030a0e9feed096bed8045c8b98bec453e1ffac7f\bdbd4bb7152ae'>>>sec=bytes.fromhex(hex_sec)>>>der=bytes.fromhex(hex_der)>>>redeem_script=Script.parse(BytesIO(bytes.fromhex(hex_redeem_script)))>>>stream=BytesIO(bytes.fromhex(hex_tx))>>>tx_obj=Tx.parse(stream)>>>s=int_to_little_endian(tx_obj.version,4)>>>s+=encode_varint(len(tx_obj.tx_ins))>>>i=tx_obj.tx_ins[0]>>>s+=TxIn(i.prev_tx,i.prev_index,redeem_script,i.sequence).serialize()>>>s+=encode_varint(len(tx_obj.tx_outs))>>>fortx_outintx_obj.tx_outs:...s+=tx_out.serialize()>>>s+=int_to_little_endian(tx_obj.locktime,4)>>>s+=int_to_little_endian(SIGHASH_ALL,4)>>>z=int.from_bytes(hash256(s),'big')>>>point=S256Point.parse(sec)>>>sig=Signature.parse(der)>>>(point.verify(z,sig))True
Modify the sig_hash and verify_input methods to be able to verify p2sh transactions.
classTx:...defsig_hash(self,input_index,redeem_script=None):'''Returns the integer representation of the hash that needs to getsigned for index input_index'''s=int_to_little_endian(self.version,4)s+=encode_varint(len(self.tx_ins))fori,tx_ininenumerate(self.tx_ins):ifi==input_index:ifredeem_script:script_sig=redeem_scriptelse:script_sig=tx_in.script_pubkey(self.testnet)else:script_sig=Nones+=TxIn(prev_tx=tx_in.prev_tx,prev_index=tx_in.prev_index,script_sig=script_sig,sequence=tx_in.sequence,).serialize()s+=encode_varint(len(self.tx_outs))fortx_outinself.tx_outs:s+=tx_out.serialize()s+=int_to_little_endian(self.locktime,4)s+=int_to_little_endian(SIGHASH_ALL,4)h256=hash256(s)returnint.from_bytes(h256,'big')defverify_input(self,input_index):tx_in=self.tx_ins[input_index]script_pubkey=tx_in.script_pubkey(testnet=self.testnet)ifscript_pubkey.is_p2sh_script_pubkey():instruction=tx_in.script_sig.instructions[-1]raw_redeem=encode_varint(len(instruction))+instructionredeem_script=Script.parse(BytesIO(raw_redeem))else:redeem_script=Nonez=self.sig_hash(input_index,redeem_script)combined=tx_in.script_sig+script_pubkeyreturncombined.evaluate(z)
Write the is_coinbase method of the Tx class.
classTx:...defis_coinbase(self):iflen(self.tx_ins)!=1:returnFalsefirst_input=self.tx_ins[0]iffirst_input.prev_tx!=b'\x00'*32:returnFalseiffirst_input.prev_index!=0xffffffff:returnFalsereturnTrue
Write the coinbase_height method for the Tx class.
classTx:...defcoinbase_height(self):ifnotself.is_coinbase():returnNoneelement=self.tx_ins[0].script_sig.instructions[0]returnlittle_endian_to_int(element)
Write the parse for Block.
classBlock:...@classmethoddefparse(cls,s):version=little_endian_to_int(s.read(4))prev_block=s.read(32)[::-1]merkle_root=s.read(32)[::-1]timestamp=little_endian_to_int(s.read(4))bits=s.read(4)nonce=s.read(4)returncls(version,prev_block,merkle_root,timestamp,bits,nonce)
Write the serialize for Block.
classBlock:...defserialize(self):result=int_to_little_endian(self.version,4)result+=self.prev_block[::-1]result+=self.merkle_root[::-1]result+=int_to_little_endian(self.timestamp,4)result+=self.bitsresult+=self.noncereturnresult
Write the hash for Block.
classBlock:...defhash(self):s=self.serialize()sha=hash256(s)returnsha[::-1]
Write the bip9 method for the Block class.
classBlock:...defbip9(self):returnself.version>>29==0b001
Write the bip91 method for the Block class.
classBlock:...defbip91(self):returnself.version>>4&1==1
Write the bip141 method for the Block class.
classBlock:...defbip141(self):returnself.version>>1&1==1
Write the bits_to_target function in helper.py.
defbits_to_target(bits):exponent=bits[-1]coefficient=little_endian_to_int(bits[:-1])returncoefficient*256**(exponent-3)
Write the difficulty method for Block
classBlock:...defdifficulty(self):lowest=0xffff*256**(0x1d-3)returnlowest/self.target()
Write the check_pow method for Block.
classBlock:...defcheck_pow(self):sha=hash256(self.serialize())proof=little_endian_to_int(sha)returnproof<self.target()
Calculate the new bits given the first and last blocks of this 2016 block difficulty adjustment period:
Block 471744:
000000203471101bbda3fe307664b3283a9ef0e97d9a38a7eacd8800000000000000000010c8ab a8479bbaa5e0848152fd3c2289ca50e1c3e58c9a4faaafbdf5803c5448ddb845597e8b0118e43a 81d3
Block 473759:
02000020f1472d9db4b563c35f97c428ac903f23b7fc055d1cfc26000000000000000000b3f449 fcbe1bc4cfbcb8283a0d2c037f961a3fdf2b8bedc144973735eea707e1264258597e8b0118e5f0 0474
>>>fromioimportBytesIO>>>fromblockimportBlock>>>fromhelperimportTWO_WEEKS>>>fromhelperimporttarget_to_bits>>>block1_hex='000000203471101bbda3fe307664b3283a9ef0e97d9a38a7eacd88000000\00000000000010c8aba8479bbaa5e0848152fd3c2289ca50e1c3e58c9a4faaafbdf5803c5448dd\b845597e8b0118e43a81d3'>>>block2_hex='02000020f1472d9db4b563c35f97c428ac903f23b7fc055d1cfc26000000\000000000000b3f449fcbe1bc4cfbcb8283a0d2c037f961a3fdf2b8bedc144973735eea707e126\4258597e8b0118e5f00474'>>>last_block=Block.parse(BytesIO(bytes.fromhex(block1_hex)))>>>first_block=Block.parse(BytesIO(bytes.fromhex(block2_hex)))>>>time_differential=last_block.timestamp-first_block.timestamp>>>iftime_differential>TWO_WEEKS*4:...time_differential=TWO_WEEKS*4>>>iftime_differential<TWO_WEEKS//4:...time_differential=TWO_WEEKS//4>>>new_target=last_block.target()*time_differential//TWO_WEEKS>>>new_bits=target_to_bits(new_target)>>>(new_bits.hex())80df6217
Write the calculate_new_bits function in helper.py
defcalculate_new_bits(previous_bits,time_differential):iftime_differential>TWO_WEEKS*4:time_differential=TWO_WEEKS*4iftime_differential<TWO_WEEKS//4:time_differential=TWO_WEEKS//4new_target=bits_to_target(previous_bits)*time_differential//TWO_WEEKSreturntarget_to_bits(new_target)
Determine what this network message is:
f9beb4d976657261636b000000000000000000005df6e0e2
>>>fromnetworkimportNetworkEnvelope>>>fromioimportBytesIO>>>message_hex='f9beb4d976657261636b000000000000000000005df6e0e2'>>>stream=BytesIO(bytes.fromhex(message_hex))>>>envelope=NetworkEnvelope.parse(stream)>>>(envelope.command)b'verack'>>>(envelope.payload)b''
Write the parse method for NetworkEnvelope.
classNetworkEnvelope:...@classmethoddefparse(cls,s,testnet=False):magic=s.read(4)ifmagic==b'':raiseIOError('Connection reset!')iftestnet:expected_magic=TESTNET_NETWORK_MAGICelse:expected_magic=NETWORK_MAGICifmagic!=expected_magic:raiseSyntaxError('magic is not right {} vs {}'.format(magic.hex(),expected_magic.hex()))command=s.read(12)command=command.strip(b'\x00')payload_length=little_endian_to_int(s.read(4))checksum=s.read(4)payload=s.read(payload_length)calculated_checksum=hash256(payload)[:4]ifcalculated_checksum!=checksum:raiseIOError('checksum does not match')returncls(command,payload,testnet=testnet)
Write the serialize method for NetworkEnvelope.
classNetworkEnvelope:...defserialize(self):result=self.magicresult+=self.command+b'\x00'*(12-len(self.command))result+=int_to_little_endian(len(self.payload),4)result+=hash256(self.payload)[:4]result+=self.payloadreturnresult
Write the serialize method for VersionMessage.
classVersionMessage:...defserialize(self):result=int_to_little_endian(self.version,4)result+=int_to_little_endian(self.services,8)result+=int_to_little_endian(self.timestamp,8)result+=int_to_little_endian(self.receiver_services,8)result+=b'\x00'*10+b'\xff\xff'+self.receiver_ipresult+=int_to_little_endian(self.receiver_port,2)result+=int_to_little_endian(self.sender_services,8)result+=b'\x00'*10+b'\xff\xff'+self.sender_ipresult+=int_to_little_endian(self.sender_port,2)result+=self.nonceresult+=encode_varint(len(self.user_agent))result+=self.user_agentresult+=int_to_little_endian(self.latest_block,4)ifself.relay:result+=b'\x01'else:result+=b'\x00'returnresult
Write the handshake method for SimpleNode
classSimpleNode:...defhandshake(self):version=VersionMessage()self.send(version)self.wait_for(VerAckMessage)
Write the serialize method for GetHeadersMessage.
classGetHeadersMessage:...defserialize(self):result=int_to_little_endian(self.version,4)result+=encode_varint(self.num_hashes)result+=self.start_block[::-1]result+=self.end_block[::-1]returnresult
Write the merkle_parent function.
defmerkle_parent(hash1,hash2):'''Takes the binary hashes and calculates the hash256'''returnhash256(hash1+hash2)
Write the merkle_parent_level function.
defmerkle_parent_level(hashes):'''Takes a list of binary hashes and returns a list that's halfthe length'''iflen(hashes)==1:raiseRuntimeError('Cannot take a parent level with only 1 item')iflen(hashes)%2==1:hashes.append(hashes[-1])parent_level=[]foriinrange(0,len(hashes),2):parent=merkle_parent(hashes[i],hashes[i+1])parent_level.append(parent)returnparent_level
Write the merkle_root function.
defmerkle_root(hashes):'''Takes a list of binary hashes and returns the merkle root'''current_level=hasheswhilelen(current_level)>1:current_level=merkle_parent_level(current_level)returncurrent_level[0]
Write the validate_merkle_root method for Block.
classBlock:...defvalidate_merkle_root(self):hashes=[h[::-1]forhinself.tx_hashes]root=merkle_root(hashes)returnroot[::-1]==self.merkle_root
Create an empty Merkle Tree with 27 items and print each level.
>>>importmath>>>total=27>>>max_depth=math.ceil(math.log(total,2))>>>merkle_tree=[]>>>fordepthinrange(max_depth+1):...num_items=math.ceil(total/2**(max_depth-depth))...level_hashes=[None]*num_items...merkle_tree.append(level_hashes)>>>forlevelinmerkle_tree:...(level)[None][None,None][None,None,None,None][None,None,None,None,None,None,None][None,None,None,None,None,None,None,None,None,None,None,None,None,\None][None,None,None,None,None,None,None,None,None,None,None,None,None,\None,None,None,None,None,None,None,None,None,None,None,None,None,\None]
Write the parse method for MerkleBlock.
classMerkleBlock:...@classmethoddefparse(cls,s):version=little_endian_to_int(s.read(4))prev_block=s.read(32)[::-1]merkle_root=s.read(32)[::-1]timestamp=little_endian_to_int(s.read(4))bits=s.read(4)nonce=s.read(4)total=little_endian_to_int(s.read(4))num_txs=read_varint(s)hashes=[]for_inrange(num_txs):hashes.append(s.read(32)[::-1])flags_length=read_varint(s)flags=s.read(flags_length)returncls(version,prev_block,merkle_root,timestamp,bits,nonce,total,hashes,flags)
Write the is_valid method for MerkleBlock
classMerkleBlock:...defis_valid(self):flag_bits=bytes_to_bit_field(self.flags)hashes=[h[::-1]forhinself.hashes]merkle_tree=MerkleTree(self.total)merkle_tree.populate_tree(flag_bits,hashes)returnmerkle_tree.root()[::-1]==self.merkle_root
Calculate the Bloom Filter for hello world and goodbye using the hash160 hash function over a bit field of 10.
>>>fromhelperimporthash160>>>bit_field_size=10>>>bit_field=[0]*bit_field_size>>>foritemin(b'hello world',b'goodbye'):...h=hash160(item)...bit=int.from_bytes(h,'big')%bit_field_size...bit_field[bit]=1>>>(bit_field)[1,1,0,0,0,0,0,0,0,0]
Given a Bloom Filter with size=10, function count=5, tweak=99, what are the bytes that are set after adding these items? (use bit_field_to_bytes to convert to bytes)
b'Hello World'
b'Goodbye!'
>>>frombloomfilterimportBloomFilter,BIP37_CONSTANT>>>fromhelperimportbit_field_to_bytes,murmur3>>>field_size=10>>>function_count=5>>>tweak=99>>>items=(b'Hello World',b'Goodbye!')>>>bit_field_size=field_size*8>>>bit_field=[0]*bit_field_size>>>foriteminitems:...foriinrange(function_count):...seed=i*BIP37_CONSTANT+tweak...h=murmur3(item,seed=seed)...bit=h%bit_field_size...bit_field[bit]=1>>>(bit_field_to_bytes(bit_field).hex())4000600a080000010940
Write the add method for BloomFilter
classBloomFilter:...defadd(self,item):foriinrange(self.function_count):seed=i*BIP37_CONSTANT+self.tweakh=murmur3(item,seed=seed)bit=h%(self.size*8)self.bit_field[bit]=1
Write the filterload payload from the BloomFilter class.
classBloomFilter:...deffilterload(self,flag=1):payload=encode_varint(self.size)payload+=self.filter_bytes()payload+=int_to_little_endian(self.function_count,4)payload+=int_to_little_endian(self.tweak,4)payload+=int_to_little_endian(flag,1)returnGenericMessage(b'filterload',payload)
Write the serialize method for the GetDataMessage class.
classGetDataMessage:...defserialize(self):result=encode_varint(len(self.data))fordata_type,identifierinself.data:result+=int_to_little_endian(data_type,4)result+=identifier[::-1]returnresult
Get the current testnet block ID, send yourself some testnet coins, find the UTXO corresponding to the testnet coin without using a block explorer, create a transaction using that UTXO as an input and broadcast the tx message on the testnet network.
>>>importtime>>>fromblockimportBlock>>>frombloomfilterimportBloomFilter>>>fromeccimportPrivateKey>>>fromhelperimport(...decode_base58,...encode_varint,...hash256,...little_endian_to_int,...read_varint,...)>>>frommerkleblockimportMerkleBlock>>>fromnetworkimport(...GetDataMessage,...GetHeadersMessage,...HeadersMessage,...NetworkEnvelope,...SimpleNode,...TX_DATA_TYPE,...FILTERED_BLOCK_DATA_TYPE,...)>>>fromscriptimportp2pkh_script,Script>>>fromtximportTx,TxIn,TxOut>>>last_block_hex='00000000000000a03f9432ac63813c6710bfe41712ac5ef6faab093f\e2917636'>>>secret=little_endian_to_int(hash256(b'Jimmy Song'))>>>private_key=PrivateKey(secret=secret)>>>addr=private_key.point.address(testnet=True)>>>h160=decode_base58(addr)>>>target_address='mwJn1YPMq7y5F8J3LkC5Hxg9PHyZ5K4cFv'>>>target_h160=decode_base58(target_address)>>>target_script=p2pkh_script(target_h160)>>>fee=5000# fee in satoshis>>># connect to testnet.programmingbitcoin.com in testnet mode>>>node=SimpleNode('testnet.programmingbitcoin.com',testnet=True,logging=\False)>>># create a bloom filter of size 30 and 5 functions. Add a tweak.>>>bf=BloomFilter(30,5,90210)>>># add the h160 to the bloom filter>>>bf.add(h160)>>># complete the handshake>>>node.handshake()>>># load the bloom filter with the filterload command>>>node.send(bf.filterload())>>># set start block to last_block from above>>>start_block=bytes.fromhex(last_block_hex)>>># send a getheaders message with the starting block>>>getheaders=GetHeadersMessage(start_block=start_block)>>>node.send(getheaders)>>># wait for the headers message>>>headers=node.wait_for(HeadersMessage)>>># store the last block as None>>>last_block=None>>># initialize the GetDataMessage>>>getdata=GetDataMessage()>>># loop through the blocks in the headers>>>forbinheaders.blocks:...# check that the proof of work on the block is valid...ifnotb.check_pow():...raiseRuntimeError('proof of work is invalid')...# check that this block's prev_block is the last block...iflast_blockisnotNoneandb.prev_block!=last_block:...raiseRuntimeError('chain broken')...# add a new item to the getdata message...# should be FILTERED_BLOCK_DATA_TYPE and block hash...getdata.add_data(FILTERED_BLOCK_DATA_TYPE,b.hash())...# set the last block to the current hash...last_block=b.hash()>>># send the getdata message>>>node.send(getdata)>>># initialize prev_tx, prev_index and prev_amount to None>>>prev_tx,prev_index,prev_amount=None,None,None>>># loop while prev_tx is None>>>whileprev_txisNone:...# wait for the merkleblock or tx commands...message=node.wait_for(MerkleBlock,Tx)...# if we have the merkleblock command...ifmessage.command==b'merkleblock':...# check that the MerkleBlock is valid...ifnotmessage.is_valid():...raiseRuntimeError('invalid merkle proof')...# else we have the tx command...else:...# set the tx's testnet to be True...message.testnet=True...# loop through the tx outs...fori,tx_outinenumerate(message.tx_outs):...# if our output has the same address as our address we found it...iftx_out.script_pubkey.address(testnet=True)==addr:...# we found our utxo. set prev_tx, prev_index, and tx...prev_tx=message.hash()...prev_index=i...prev_amount=tx_out.amount...('found: {}:{}'.format(prev_tx.hex(),prev_index))found:b2cddd41d18d00910f88c31aa58c6816a190b8fc30fe7c665e1cd2ec60efdf3f:7>>># create the TxIn>>>tx_in=TxIn(prev_tx,prev_index)>>># calculate the output amount (previous amount minus the fee)>>>output_amount=prev_amount-fee>>># create a new TxOut to the target script with the output amount>>>tx_out=TxOut(output_amount,target_script)>>># create a new transaction with the one input and one output>>>tx_obj=Tx(1,[tx_in],[tx_out],0,testnet=True)>>># sign the only input of the transaction>>>(tx_obj.sign_input(0,private_key))True>>># serialize and hex to see what it looks like>>>(tx_obj.serialize().hex())01000000013fdfef60ecd21c5e667cfe30fcb890a116688ca51ac3880f91008dd141ddcdb20700\00006b483045022100ff77d2559261df5490ed00d231099c4b8ea867e6ccfe8e3e6d077313ed4f\1428022033a1db8d69eb0dc376f89684d1ed1be75719888090388a16f1e8eedeb8067768012103\dc585d46cfca73f3a75ba1ef0c5756a21c1924587480700c6eb64e3f75d22083ffffffff019334\e500000000001976a914ad346f8eb57dee9a37981716e498120ae80e44f788ac00000000>>># send this signed transaction on the network>>>node.send(tx_obj)>>># wait a sec so this message goes through with time.sleep(1)>>>time.sleep(1)>>># now ask for this transaction from the other node>>># create a GetDataMessage>>>getdata=GetDataMessage()>>># ask for our transaction by adding it to the message>>>getdata.add_data(TX_DATA_TYPE,tx_obj.hash())>>># send the message>>>node.send(getdata)>>># now wait for a Tx response>>>received_tx=node.wait_for(Tx)>>># if the received tx has the same id as our tx, we are done!>>>ifreceived_tx.id()==tx_obj.id():...('success!')success!
The animal on the cover of FILL IN TITLE is FILL IN DESCRIPTION.
Many of the animals on O’Reilly covers are endangered; all of them are important to the world. To learn more about how you can help, go to animals.oreilly.com.
The cover image is from FILL IN CREDITS. The cover fonts are URW Typewriter and Guardian Sans. The text font is Adobe Minion Pro; the heading font is Adobe Myriad Condensed; and the code font is Dalton Maag’s Ubuntu Mono.