Table of Contents for
Installing, maintaining, and publishing Node modules with npm
 Installing, maintaining, and publishing Node modules with npm
Published by
O'Reilly Media, Inc., 2016
Installing, maintaining, and publishing Node modules with npm
Published by
O'Reilly Media, Inc., 2016
Modularizing and Managing JavaScript
Installing and Maintaining Node Modules with npm
Solution
The glue that holds the Node universe together is npm, the Node package manager. To install a specific module, use the following on the command line:
npminstallpackagename
If you want to install the package globally, so it’s accessible from all locations in the computer, use the following:
npminstall-gpackagename
When to install locally or globally is dependent on whether you’re going to require() the module, or if you need to run it from the command line. Typically you install require() modules locally, and executables are installed globally, though you don’t have to follow this typical usage. If you do install a module globally, you might need administrative privileges:
sudonpminstall-gpackagename
Discussion
The solution demonstrated the most common use of npm: installing a registered npm module locally or globally on your system. However, you can install modules that are located in GitHub, downloaded as a tar file, or located in a folder. If you type:
npminstall--help
you’ll get a list of allowable approaches for installing a module:
npminstallnpminstall<pkg>npminstall<pkg>@<tag>npminstall<pkg>@<version>npminstall<pkg>@<versionrange>npminstall<folder>npminstall<tarballfile>npminstall<tarballurl>npminstall<git:// url>npminstall<githubusername>/<github project>
If your current directory contains a npm-shrinkwrap.json or package.json file, the dependencies in the files are installed by typing npm install.
To remove an installed Node module, use:
npmrmpackagename
The package and any dependencies are removed. To update existing packages, use:
npmupdate[g][packagename[packagename...]]
You can update locally or globally installed modules. When updating, you can list all modules to be updated, or just type the command to update all locally-installed modules relative to your current location.
Searching for a Specific Node Module via npm
Solution
In most cases, you’ll discover modules via recommendations from your friends and co-developers, but sometimes you need something new.
You can search for new modules directly at the npm website. The front page also lists the most popular modules, which are worth an exploratory look.
You can also use npm directly to search for a module. For instance, if you’re interested in modules that do something with PDFs, run the following search at the command line:
npmsearch
Discussion
The npm website provides more than just good documentation for using npm; it also provides a listing of newly updated modules, as well as those modules most depended on. Regardless of what you’re looking for, you definitely should spend time exploring these essential modules. In addition, if you access each module’s page at npm, you can see how popular the module is, what other modules are dependent on it, the license, and other relevant information.
However, you can also search for modules, directly, using npm.
The first time you perform a search with npm, you’ll get the following feedback:
npmWARNBuildingthelocalindexforthefirsttime,pleasebepatient
The process can take a fair amount of time, too. Luckily, the index build only needs to be performed the first time you do a search. And when it finishes, you’re likely to get a huge number of modules in return, especially with a broader topic such as modules that work with PDFs.
You can refine the results by listing multiple terms:
npmsearchgeneration
This query returns a much smaller list of modules, specific to PDF generation. You can also use a regular expression to search:
npmsearch\/Firefox\\sOS
Now I’m getting all modules that reference Firefox OS. However, as the example demonstrates, you have to incorporate escape characters specific to your environment, as I did with the beginning of the regular expression, and the use of \s for white space.
Once you do find a module that sounds interesting, you can get detailed information about it with:
npmviewnode-firefoxos-cli
You’ll get the package.json file for the module, which can tell you what it’s dependent on, who wrote it, and when it was created. I still recommend checking out the module’s GitHub page directly. There you’ll be able to determine if the module is being actively maintained or not. If you access the npm website page for the module, you’ll also get an idea of how popular the module is.
Converting Your Library into a Node Module
Solution
Convert the library into a Node module. For example, if the library is designed as the following IIFE:
(function(){varval='world';console.log('Hello '+val+' from two');}());
You can convert it to work with Node by the simple addition of an exports keyword:
module.exports=(function(){return{hi:function(val){console.log('Hello '+val+' from two');}};}());
You can then use the module in your application:
vartwo=require('./two.js');two.hi('world');
Discussion
Node’s module system is based on CommonJS, the second modular system covered in this chapter. CommonJS uses three constructs: exports to define what’s exported from the library, require() to include the module in the application, and module, which includes information about the module but also can be used to export a function, directly.
Though the solution maintains the IIFE, it’s not really required in the CommonJS environment, because every module operates in its own module space. The following is also acceptable:
module.exports.hi=function(val){console.log('hello '+val+' from two');}
If your library returns an object with several functions and data objects, you can assign each to the comparably named property on module.exports, or you could return an object from a function:
module.exports=function(){return{somedata:'some data',hi:function(val){console.log('Hello '+val+' from two');}};};
And then invoke the object in the application:
vartwoObj=require('./two.js');vartwo=twoObj();two.hi(two.somedata);
Or you can access the object property directly:
varhi=require('./twob.js').hi;hi('world');
Because the module isn’t installed using npm, and just resides in the directory where the application resides, it’s accessed by the location and name, not just the name.
Creating an Installable Node Module
Solution
Once you’ve created your Node module and any supporting functionality (including module tests), you can package the entire directory. The key to packaging and publishing the Node module is creating a package.json file that describes the module, any dependencies, the directory structure, what to ignore, and so on.
The following is a relatively basic package.json file:
{"name":"bbArray","version":"0.1.0","description":"A description of what my module is about","main":"./lib/bbArray","author":{"name":"Shelley Powers"},"keywords":["array","utility"],"repository":{"type":"git","url":"https://github.com/accountname/bbarray.git"},"engines":{"node":">=0.10.3 <0.12"},"bugs":{"url":"https://github.com/accountname/bbarray/issues"},"licenses":[{"type":"MIT","url":"https://github.com/accountname/bbarray/raw/master/LICENSE"}],"dependencies":{"some-module":"~0.1.0"},"directories":{"doc":"./doc","man":"./man","lib":"./lib","bin":"./bin"},"scripts":{"test":"nodeunit test/test-bbarray.js"}}
Once you’ve created package.json, package all the source directories and the package.json file as a gzipped tarball. Then install the package locally, or install it in npm for public access.
Discussion
The package.json file is key to packaging a Node module up for local installation or uploading to npm for management. At a minimum, it requires a name and a version. The other fields given in the solution are:
-
description: A description of what the module is and does -
main: Entry module for application -
author: Author(s) of the module -
keywords: List of keywords appropriate for module -
repository: Place where code lives, typically GitHub -
engines: Node version you know your module works with -
bugs: Where to file bugs -
licenses: License for your module -
dependencies: Any module dependencies -
directories: A hash describing directory structure for your module -
scripts: A hash of object commands that are run during module lifecycle
There are a host of other options, which are described at the npm website. You can also use a tool to help you fill in many of these fields. Typing the following at the command line runs the tool that asks questions and then generates a basic package.json file:
npminit
Once you have your source set up and your package.json file, you can test whether everything works by running the following command in the top-level directory of your module:
npminstall.-g
If you have no errors, then you can package the file as a gzipped tarball. At this point, if you want to publish the module, you’ll first need to add yourself as a user in the npm registry:
npmadd-user
To publish the Node module to the npm registry, use the following in the root directory of the module, specifying a URL to the tarball, a filename for the tarball, or a path:
npmpublish./
If you have development dependencies for your module, such as using a testing framework like Mocha, one excellent shortcut to ensure these are added to your package.json file is to use the following, in the same directory as the package.json file, when you’re installing the dependent module:
npminstall-gmocha--save-dev
Not only does this install Mocha, this command also updates your package.json file with the following:
"devDependencies":{"grunt":"^0.4.5","grunt-contrib-jshint":"^0.10.0","mocha":"^1.21.4"}
You can also use this same type of option to add a module to dependencies in package.json. The following:
npminstalld3--save
adds the following to the package.json file:
"dependencies":{"d3":"^3.4.11"}
If the module is no longer needed and shouldn’t be listed in package.json, remove it from the devDependencies with:
npmremovemocha--save-dev
And remove a module from dependencies with:
npmremoved3--save
If the module is the last in either dependencies or devDependencies, the property isn’t removed. It’s just set to an empty value:
"dependencies":{}
Note
npm provides a decent developer guide for creating and installing a Node module. You should consider the use of an .npmignore file for keeping stuff out of your module. And though this is beyond the scope of the book, you should also become familiar with Git and GitHub, and make use of it for your applications/modules.
Extra: The README File and Markdown Syntax
When you package your module or library for reuse and upload it to a source repository such as GitHub, you’ll need to provide how-to information about installing the module/library and basic information about how to use it. For this, you need a README file.
You’ve seen files named README.md or readme.md with applications and Node modules. They’re text-based with some odd, unobtrusive markup that you’re not sure is useful, until you see it in a site like GitHub, where the README file provides all of the project page installation and usage information. The markup translates into HTML, making for readable Web-based help.
The content for the README is marked up with annotation known as Markdown. The popular website Daring Fireball calls Markdown easy to read and write, but “Readability, however, is emphasized above all else.” Unlike with HTML, the Markdown markup doesn’t get in the way of reading the text.
Note
Daring Fireball also provides an overview of generic Markdown, but if you’re working with GitHub files, you might also want to check out GitHub’s Flavored Markdown.
I created a simple Firefox OS mobile app named “Where Am I?” Part of its installation is a README.md file that provides information about using the app. The following is a brief excerpt from the file:
#WhereAmI?ThisisasimpledemonstrationFirefoxOSappthatusestheGeolocationAPItogettheuser'scurrentlocation,andthenloadsastaticmapintothepage.##ObtainingTheWhereAmI?appishostedontheweb,ina[Burningbirdworkdirectory](http://burningbird.net/work/whereami)##UsageImportitintotheMozillaWebIDEusingthehostedappoption,andthenruntheappinoneormoresimulators.
When I use a CLI tool like Pandoc, I can covert the README.md file into readable HTML:
pandocREADME.md-oreadme.html
Figure 1-1 displays the generated content. It’s not fancy, but it is imminently readable.
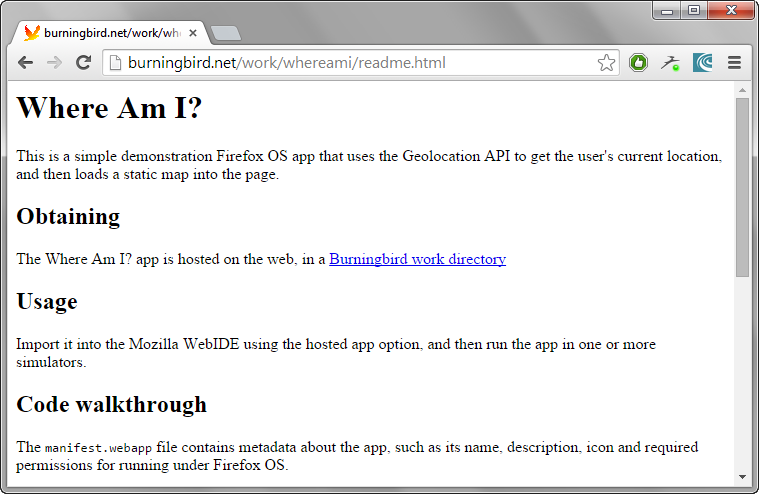
Figure 1-1. Generated HTML from README.md text and Markdown annotation
When you install your source in a site such as GitHub, GitHub uses the README.md file to generate the cover page for the repository.