Table of Contents for
Programming Voice Interfaces
 Programming Voice Interfaces
Published by
O'Reilly Media, Inc., 2017
Programming Voice Interfaces
Published by
O'Reilly Media, Inc., 2017
- Cover
- nav
- Programming Voice Interfaces
- Programming Voice Interfaces
- Preface
- 1. Introduction to Voice Interfaces and the IoT
- 2. Existing APIs and Libraries
- 3. Getting Started with AVS
- 4. Iterate: Evolve the Prototype
- 5. A Different Approach Using IoT Core and API.AI
- 6. What Else Can We Do?
- Index
- About the Authors
- Colophon
Chapter 3. Getting Started with AVS
Now comes the fun part! The preceding chapters presented voice interfaces at a high level. We took a look at some design considerations and covered some of the currently available services and frameworks. Starting with this chapter, during the course of the remainder of the book we will get our hands dirty with hardware tinkering and programming some code as we work on getting our voice interface prototype up and running.
We will begin with creating our very own Alexa-enabled device using a Raspberry Pi 3, a microphone, and a speaker. As we mentioned in Chapter 2, Alexa Voice Service (AVS) enables us to leverage Amazon’s intelligent voice platform on our own custom hardware. Essentially, we will be building our own version of an Echo or Dot, just not quite so fancy. There are some limitations with AVS compared to an off-the-shelf Amazon device, such as not being able to make calls or use the device as an intercom. In addition, when a new feature is released on the Alexa platform, it is not always immediately supported on AVS. Nevertheless, AVS enables makers and companies alike to create uniquely branded voice-enabled devices, using the power of Amazon’s voice AI. When we’re finished, you will be able to ask Alexa for the time or weather, request a song to be played, or even ask her to tell you a joke. A full list of AVS-available features can be found at http://amzn.to/2xlmO6r.
In subsequent chapters, after we have experimented with AVS, we will add in some additional sensors and controls. This will help us to expand further into the IoT world and truly demonstrate how your device can leverage existing voice interfaces to control the world around you.
Tools and Things
To follow along and optimize your learning experience, you will need the components listed in Table 3-1. Additionally, you will want to use your existing workstation, whether it be a Mac, Windows, or Linux machine; this will allow you to simply SSH or remote in from your workstation into your device once it’s connected to the internet and has been configured to allow remote connections.
| Part | Approximate price |
|---|---|
| Raspberry Pi 3 Model B | $40.00 |
| USB Microphonea | $20.00 |
| Mini Audio Speaker w/ 3.5mm Audio Jack | $20.00 |
| Micro SD Card (Minimum 8 GB) | $10.00 |
| USB Keyboard and Mouse bundle | $15.00 |
| Monitor and HDMI cord (you can use your existing PC parts since you will only need a monitor on the Pi during setup) | $90.00 |
| 5V 2.4A Switching Power Supply w/ MicroUSB Cord for the Pi 3 | $10.00 |
a We highly recommend the Kinobo - Mini “AKIRO” USB Microphone for Desktops because of its cross-platform compatability. | |
These components are essential to completing the “Hello, World” prototype in this chapter. You may have some or all of these parts already. In some cases, you can substitute parts. For instance, if you already have a Raspberry Pi 2 Model B, you can use that instead, but you will need an Ethernet connection or a WiFi USB adapter since the Pi 2 doesn’t have built-in WiFi.
Additionally, if you are starting a Raspberry Pi from scratch, you will need a way to write to a micro SD card. If your workstation has an SD card reader, great! Otherwise, you will need to buy a USB SD card reader and adapter. These are currently available on Amazon for as low as $8.
Once you have all of the necessary components you will need to prepare your Pi. The following section will help you do just that.
Preparing Your Pi
First things first: get everything plugged in. During the development process you will want to hook up your Pi 3 to an HDMI monitor as well as a USB keyboard and mouse. Then hook up your Pi with a power adapter, your microphone, and speaker and you are good to go. With your SD card in hand, follow these steps to set up a new instance of a Raspberry Pi (if you already have a working Pi running Raspbian, go ahead and plug that SD card into your Pi, turn it on, and skip ahead to step 3):
-
To create a new Pi from scratch, you will need to download a copy of Raspbian Jessie Lite onto your workstation. Again, this can be your Mac or PC or other primary machine that you use to code on. The great thing about Jessie Lite is that it’s lightweight, as its name suggests. There is no GUI out of the box, so if you prefer using a GUI rather than the command line you can download Raspbian Jessie with Pixel. During our experiments we have found that Jessie Lite required no additional fiddling with audio. If you choose a different version than Jessie Lite, your results may vary based on the type of speaker and microphone you are using.
- Once you have downloaded the Jessie Lite ZIP file onto your workstation, you will need to unzip it in order to get access to the image file (.img). At this point, you can write the Jessie Lite image to your micro SD card. There are various ways you can flash SD cards, depending on your operating system. Here are the steps you’ll need to follow:
- Windows
-
-
Once you have inserted your SD card into your computer, take note of the drive letter it is assigned in Windows Explorer.
-
Download and install the Win32 Disk Imager.
-
When you run Win32 Disk Imager, go ahead and select the Jessie Lite image file you unzipped earlier, select the drive letter of the SD card, and then click the Write button. If you get a permissions error, close the application, then go back and right-click the Win32 Disk Imager icon, and select Run as Administrator.
-
- Mac
-
-
When you insert your SD card, you can locate it by running the following command in Terminal:
diskutil listYou should be able to tell which disk it is by the disk size. Take note of the device name it gives you for your SD card (it should look something like /dev/disk2).
-
Next, you need to unmount the disk. You can do this by running the following command in Terminal:
sudo diskutil unmountDisk /dev/diskXMake sure to replace the device name (i.e.,
/dev/diskX) with your own device name discovered in the first step. -
Lastly, you can start writing the Jessie Lite image to the SD card by running the following command (this process might take a long time and will not display any progress indicator, so be patient, grab a cup of coffee or two, and give it a few minutes to run):
sudo dd if=~/Desktop/image.img of=/dev/diskX bs=5mMake sure to replace the
ifpath to the path of your Jessie Lite image file and change theofdevice name to your own device name that you used to unmount the SD card with.For additional tips and tricks for imaging an SD card on a Mac, consult the Raspberry Pi Foundation’s “Installing Operating System Images on Mac OS”.
-
- Linux
-
-
Similar to Windows and Mac, we need to determine the path of the SD card. We can do this on Linux by running the following command:
df -hIf you are having a hard time deciphering which drive is which, you can run the preceding command before and after you insert the SD card, and simply observe which is the new listing.
-
Next, let’s unmount by running the following command:
umount /dev/sddXMake sure to replace the device name (i.e.,
/dev/sddX) with your own device name discovered in the first step. -
Lastly, write Jessie Lite to the SD card by running the following command (as with Mac, there is no progress indicator, so make sure to give it several minutes to run; time varies based on machine specs and SD card size):
dd bs=4M if=raspbian-jessie-lite.img of=/dev/sddXFor additional tips and tricks for imaging an SD card on a Linux machine, consult the Raspberry Pi Foundation’s “Installing Operating System Images on Linux”.
-
-
Once your SD card is ready, you can eject it from your workstation or laptop and plug it into your Pi. Go ahead and power it on, then once your Pi has booted up, you will need to log in to your Pi. If it’s a fresh install, you can use the username “pi” and the password “raspberry”. Yes, you will need to change this as well as some other house cleaning and configuration items, which are outlined in the following steps:
-
Type the command
sudo raspi-config—you should see a screen similar to the one shown in Figure 3-1.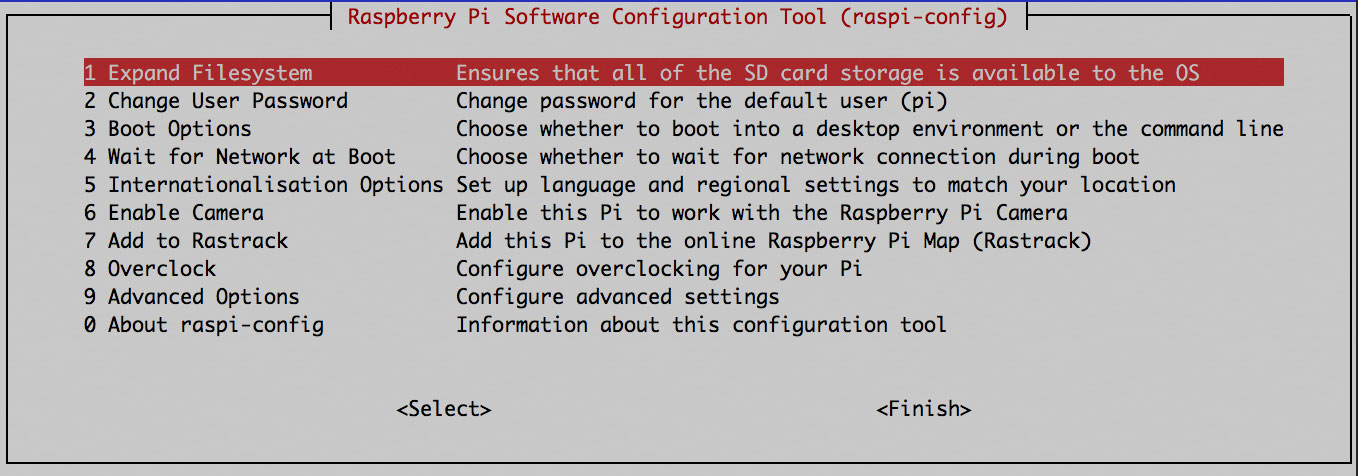
Figure 3-1. Screen capture of raspi-config tool
-
Select Expand Filesystem to take advantage of all the space on your SD card. After this is done, select Finish.
-
Next, select Advanced Options and then select SSH and enable it. This will allow you to remote into your Pi for easier setup and maintenance.
-
If you were not prompted to change your default password when turning on SSH, you should select Change User Password.
-
Optionally, if you find that your keyboard is not quite working the way you expected, select Change Keyboard Layout under the Internationalization Options.
-
At this point we’re done in the raspi-config, so go ahead and click Finish to return to the Pi terminal.
-
-
Next, let’s go ahead and configure the WiFi. We’ll do this by entering the following command in the Pi:
sudo nano /etc/wpa_supplicant/wpa_supplicant.conf
This will open the wpa_supplicant.conf file in the nano file editor as shown in Figure 3-2.
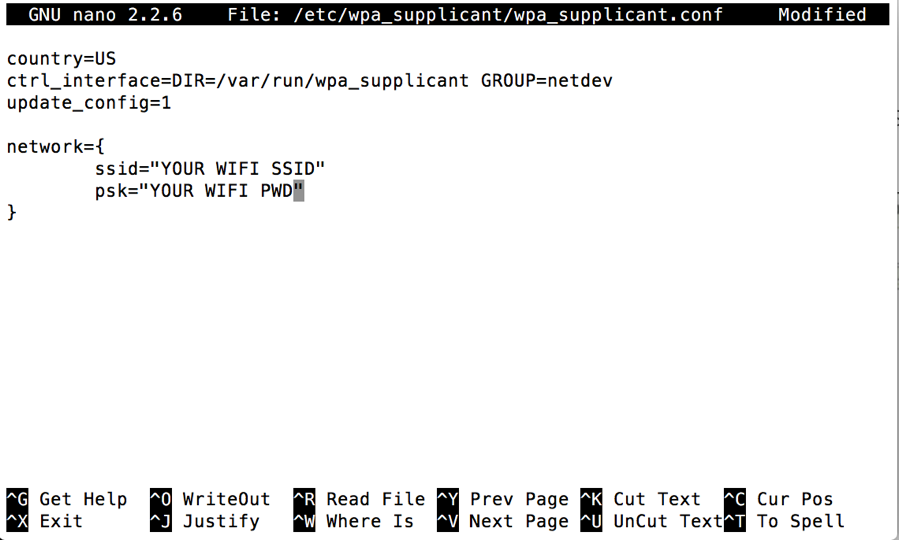
Figure 3-2. The wpa_supplicant.conf file open in the nano file editor
In the nano editor, if you do not see the
networkentry, go ahead and add it in making sure to replaceYOUR WIFI SSIDwith your WiFi’s SSID and replaceYOUR WIFI PWDwith your WiFi password. Once you are done with your changes to the file, hit Ctrl-X on your keyboard then follow the nano prompts to save your changes to the disk. Once nano closes, type the commandsudo rebootto reboot the Pi. -
Once your Pi has rebooted, type the
ifconfigcommand. As shown in Figure 3-3, the output should include your IP address (look for “inet addr”); make note of this, as you will need it later. If the IP address is not present, this means you are not connected to WiFi, in which case you will want to repeat step 4 and ensure that your SSID and password are both correct.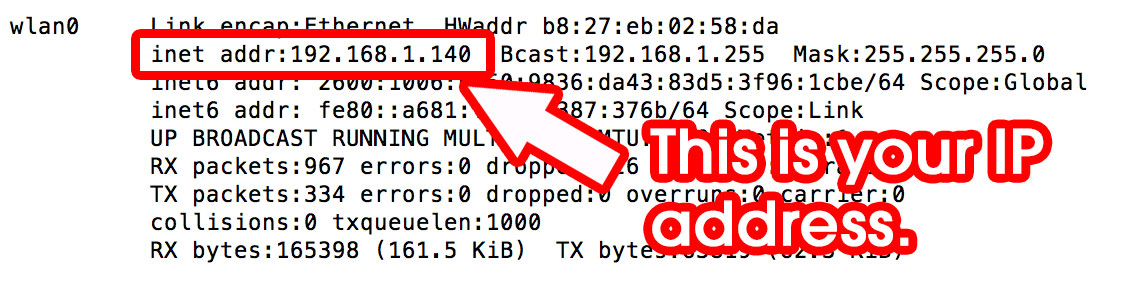
Figure 3-3. Screenshot of ifconfig command in a Raspberry Pi
-
Lastly, let’s make sure your Pi is up-to-date:
-
Type the command
sudo apt-get updateand follow any prompts. -
Type
sudo apt-get install gitto install Git. This will allow us to use Git repositories, which will be especially useful for cloning AlexaPi code (we’ll explain this in further detail in the following section). -
Once you are all set, type in
sudo rebootto make sure everything is all set up as expected.
-
Congratulations! Your Pi is ready to rock and we’re ready for the fun to begin. But before we start, let’s register our device with Amazon.
Amazon AVS Configuration
Once you have a working Raspberry Pi ready to go, you will need to register that device with Amazon at its developer console. If you don’t have an Amazon account, you will need to go ahead and create one. If you’ve never done this before, it could get a bit confusing so before we go too deep into the configuration, let’s take a quick introductory tour of the dev portal itself and all its amazing Amazon features. If you already have an account and are familiar with the Amazon Developer Console, feel free to skip the following section and jump straight to “AVS Setup”.
Navigating the Amazon Developer Console
Getting around the Developer Console can be a bit challenging for first-time users, so before we get into setting up AVS, here’s a quick primer on what you will find there. Keep in mind that the placement of the links and even their labels may have changed by the time you read these pages. Amazon has a tendency to iterate fast and frequently so don’t be surprised if it looks completely different from what you see here. With that in mind, fire up your favorite browser and go to https://developer.amazon.com/. There, look for the Alexa tab or link (Figure 3-4 shows what the tab currently looks like when you hover over it).
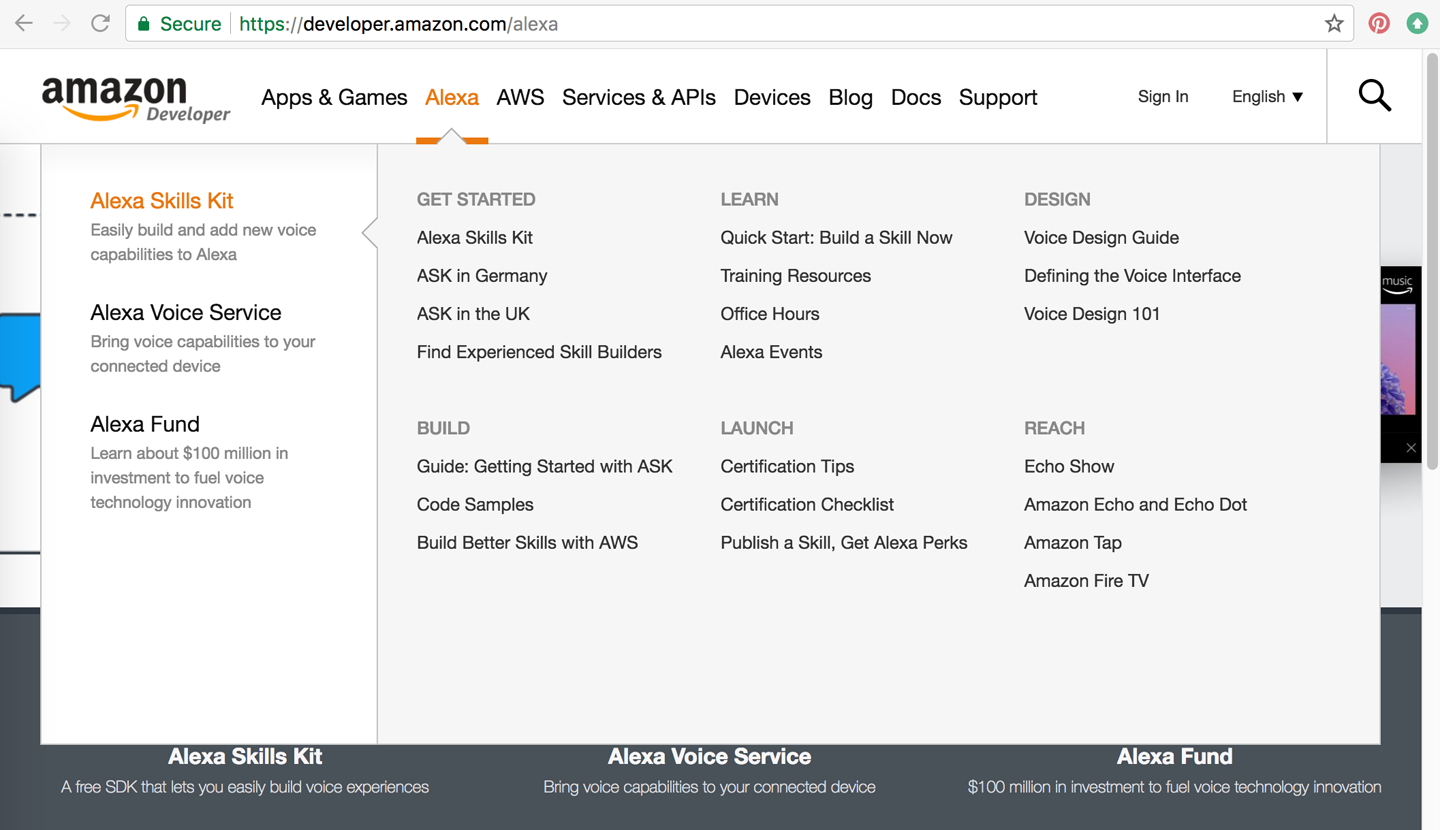
Figure 3-4. Amazon Developer Console, Alexa Menu (June 2017)
Go ahead and click Alexa Voice Service—you’ll see a bunch of links for guides on designing and building with AVS. We have synthesized all the important sections into the following pages but if you want to take a deeper dive, feel free to take a few minutes to explore the site further and get a greater understanding of AVS. Once you are ready to get your hands dirty, continue following the instructions here.
Continuing on, the next thing you will want to do is look for the “Sign in” link (see Figure 3-5). There you will need to provide the email address or mobile number associated with your Amazon account. You can use an existing account if you like (perhaps you already have one that’s tied to your Echo or Dot) or you can also choose to create a new test account. Just keep in mind whatever account you do end up using, must be tied to your device for testing purposes.
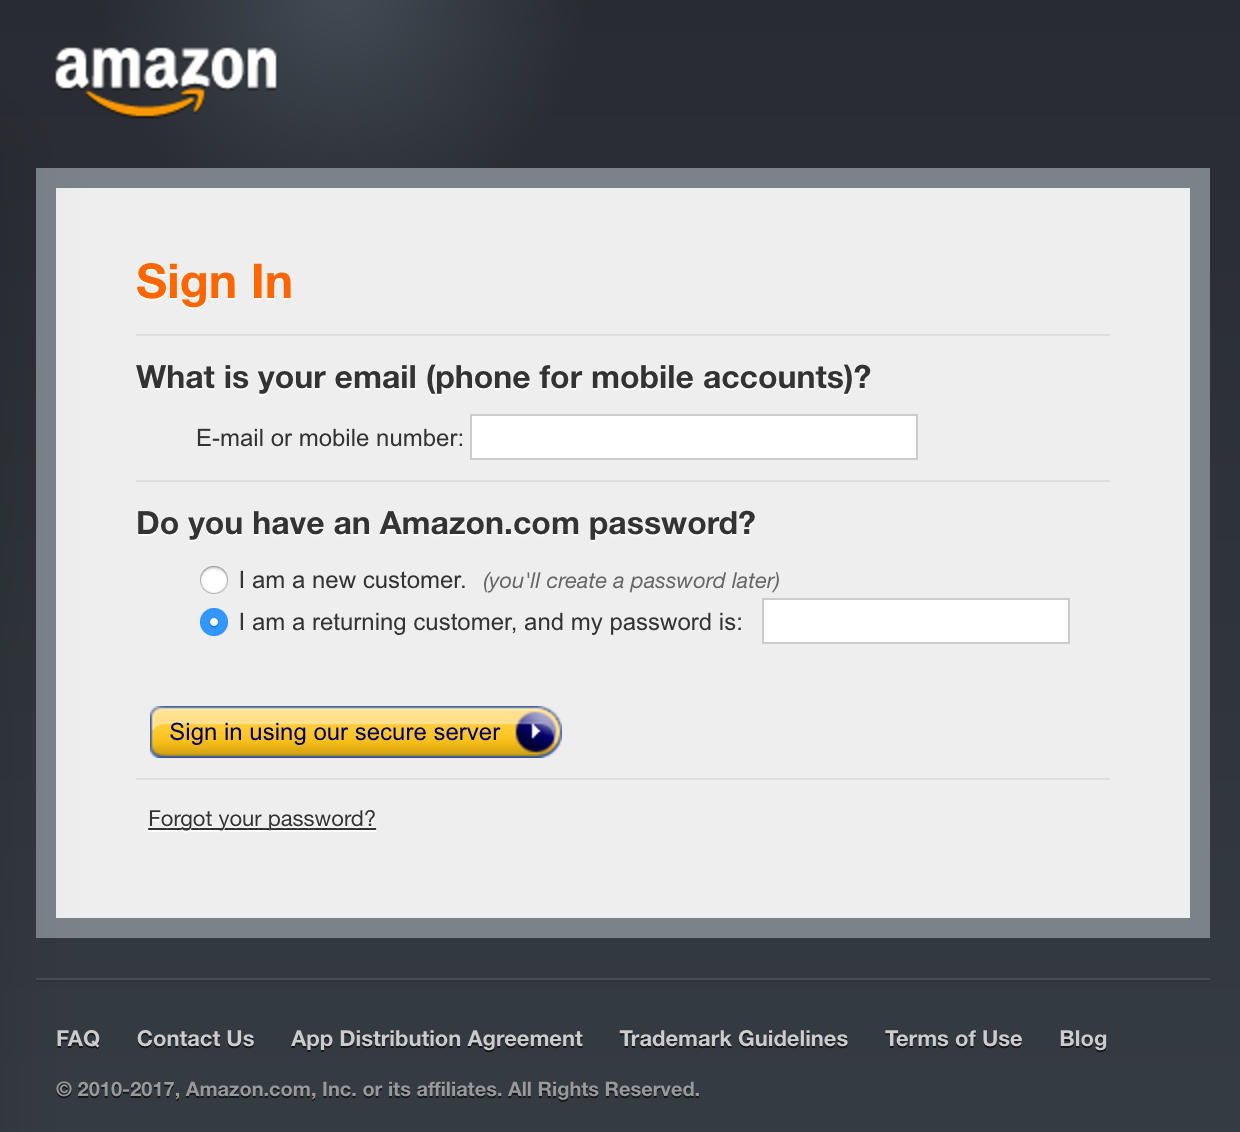
Figure 3-5. Amazon Developer Sign In page
Once you have logged in, you will be at the Developer Console Dashboard (Figure 3-6). Here, you see general announcements, which is a great way to stay apprised of the latest Alexa-related updates. When you’re ready, click the “ALEXA” link in the top menu. This will take you to the ASK and AVS options page.
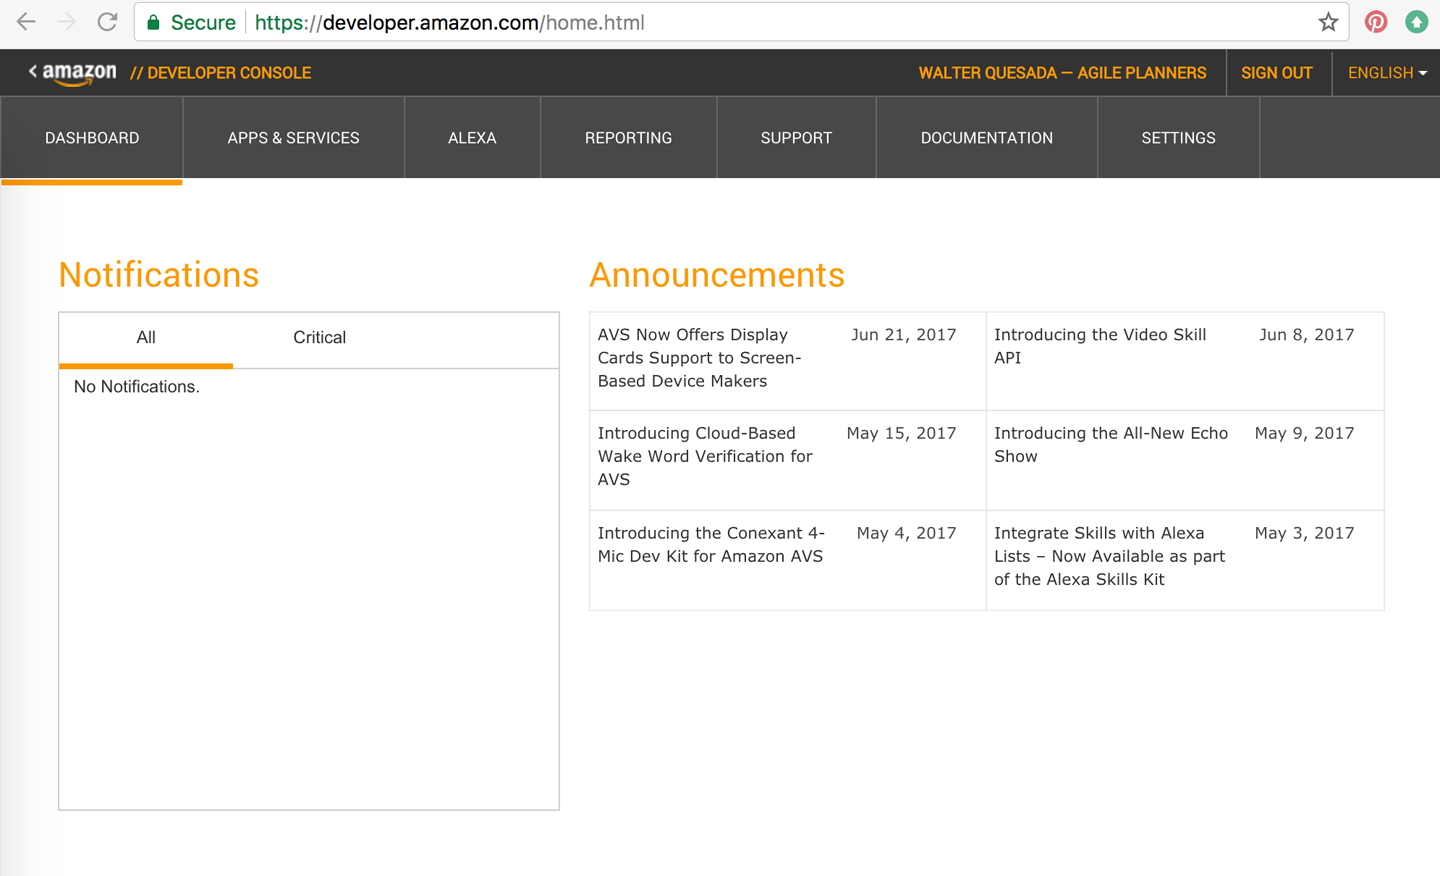
Figure 3-6. Developer Console Dashboard
On the “Get started with Alexa” page you have the option of entering into the ASK or AVS management areas, where you are able to create and edit skills or manage AVS products, respectively (Figure 3-7).
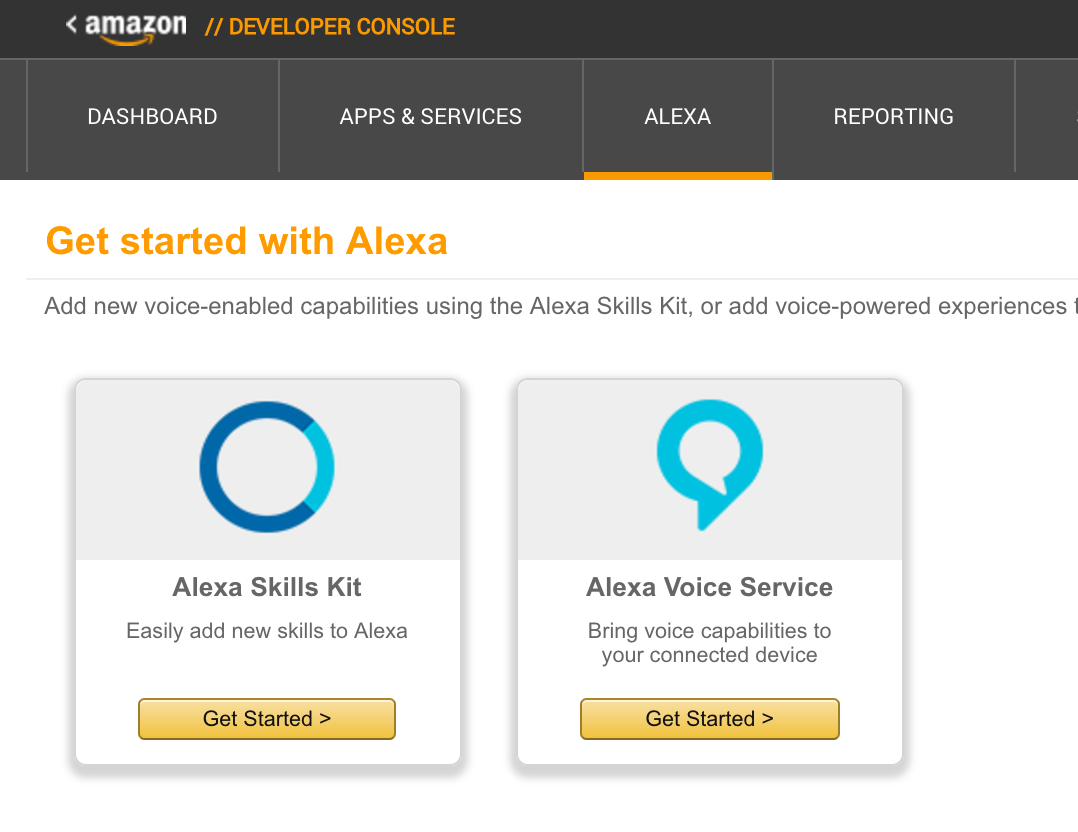
Figure 3-7. Get started with Alexa page—pick your poison!
The following section explains how to register your new product. Once you are done adding the new product to the AVS management area of the Developer Console, make sure to keep it open—you’ll need to come back to this later once you’ve finished adding the code to the Raspberry Pi so that you can copy and paste some of the parameters from the Amazon Developer Console to your Raspberry Pi code.
AVS Setup
Once logged in, go through the following steps:
-
In the Alexa Voice Service section of the Developer Console, click Register a Product Type, then choose Device.
-
You should be on the Device Type Info tab (if not, select it).
-
Enter a value for Device Type ID, (e.g., MyVeryOwnPI).
-
Enter a value for Display Name (this can be the same as Device Type ID or any other text value). Then click Next.
-
-
You should now be on the Security Profile section.
-
From the drop-down menu choose “Create a new profile.”
-
Enter names for your Security Profile Name and Security Profile Description (these can be the same as the Device Type ID or Display Name you entered earlier). Then click Next.
-
Click the Web Settings tab, then click the Edit button.
-
Under Allowed Origins click Add Another.
-
Enter
http://localhost:5050and click Add Another. -
Enter
http://YOUR_RASPI.IP.ADDRESS:5050making sure to replaceYOUR_RASPI.IP.ADDRESSwith your IP address that you noted earlier from the ifconfig command you ran on the Pi.
-
-
Under Allowed Return URLs click Add Another.
-
Enter
http://localhost:5050/codeand click Add Another. -
Enter
http://YOUR_RASPI.IP.ADDRESS:5050/codeagain making sure to replaceYOUR_RASPI.IP.ADDRESSwith your IP address.
-
-
-
Click Next to get to the Device Details section, then fill in the Device Details fields with any valid text or drop-down option. You don’t need to select an image for your AVS device (but you can if you want).
-
Click Next to get to the Amazon Music tab. For the Apply for Amazon Music option select No, then click the Submit button to finish.
At this point we are all set on the Amazon side. Your AVS device portal configuration is now complete and we can go back to our Pi and finish getting the code ready to connect to AVS. Additionally, make sure to leave the Amazon Developer Console open on your browser, as you will need to copy and paste some of the parameters during the code configuration.
Get the Code!
Now for the fun part! We’re going to download some code you can run on your Pi that will connect to AVS. There are multiple options out there, including a Java-based starter kit provided by Amazon, but our favorite is the Python-based AlexaPi project found on GitHub. AlexaPi was originally started by fellow Alexa Champion, Sam Machin out of Bristol, UK. After hundreds of forks, Sam along with Mason Stone and other contributors, created a unified code base that now lives in a GitHub repository.
We will be using the AlexaPi project in this book because Python is the native language of choice for Raspberry Pi. In addition, AlexaPi is simply a smaller code set that will be easier to break down and analyze in this context.
Before we get started, let’s quickly cover the two options for working on a Raspberry Pi. Since we enabled SSH earlier, this will allow you to access your Pi from your workstation. However, if you are more comfortable working directly on the Pi, feel free to do so. We have chosen to work on the Pi via SSH, as it makes it easier to simply copy and paste variables from our workstation browser.
If you are a Windows user, you will need an SSH client for your version of Windows (PuTTY is a great client for this purpose). For Mac and Linux, simply type the following command in Terminal, making sure to replace YOUR.RASPI.IP.ADDRESS:
ssh pi@YOUR.RASPI.IP.ADDRESS
If you’ve forgotten your IP address, simply run the ifconfig command again to retrieve it. Windows users can use ipconfig in the Command Prompt.
When you enter ssh pi@YOUR.RASPI.IP.ADDRESS, the pi@ part of the command is the username you use to log in to the Pi itself. If you changed the username during the initial configuration, then you will need to change pi@ to your username (e.g., ssh yourusername@YOUR.RASPI.IP.ADDRESS).
Once you enter the ssh command from your workstation, you might get a warning confirmation; simply enter “y” or “yes” to continue. Next, you will be prompted to enter your password. Once you hit Enter, you should be logged in and ready to go. Your screen should look something like Figure 3-8.

Figure 3-8. Terminal screen in Raspberry Pi
Now that you are logged in to the Pi again, let’s go ahead and get started with downloading and configuring the AlexaPi code:
-
The first thing we’re going to do is change directory to /opt. To do so, enter the command
cd /opt. It’s important that we download and execute the code from this directory so that AlexaPi runs on boot and you don’t have to start it up manually each time you restart the Pi itself. Down the line you might wish to change the path and update the startup service script, but that’s not necessary at this point. -
Type
sudo git clone https://github.com/alexa-pi/AlexaPi.gitand then hit Enter. This will grab AlexPi from GitHub. -
Type
sudo ./AlexaPi/src/scripts/setup.shand then hit Enter. -
This is where all the magic happens. You will be prompted to answer questions. Select all the defaults. When you are asked for your Device ID you will need to log back in to the Amazon developer console and navigate back to your AVS Device’s Security Profile tab (Figure 3-9). You will need this information to complete the prompts.
Note: When prompted for AirPlay, select “n”; we won’t need it for this example.
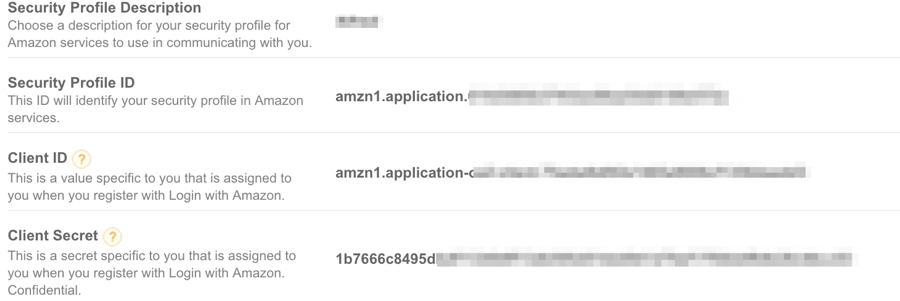
Figure 3-9. AVS Security Profile screen
-
When setup is finished you will be prompted to press Ctrl-C after the authentication has completed; don’t press Ctrl-C just yet—there are still a few more steps we need to complete before we’re done.
-
Open a web browser on your Mac/PC and go to the following URL: http://YOU_PIS_IP_ADDRESS:5050.
-
You should see a page similar to the one shown in Figure 3-10. To complete the authorization, click Continue.
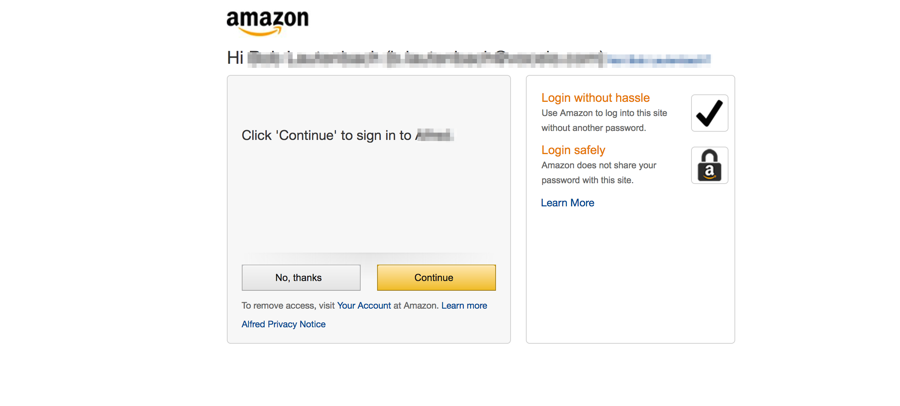
Figure 3-10. AVS OAuth sign in screen
-
The completed authorization screen should look something like Figure 3-11.
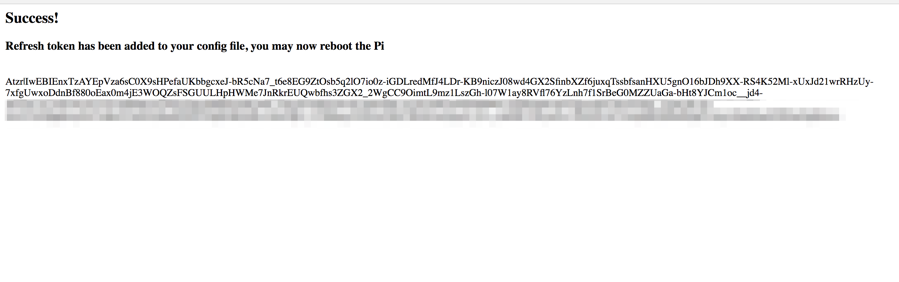
Figure 3-11. AVS OAuth successful authentication screen
-
Reboot your Pi (you can use the Ctrl-C command in your SSH session and then type
sudo reboot(and then hit Enter) or you can simply unplug and replug it in.
Congratulations! You now have your very own Alexa using AVS on a Raspberry Pi device. When you have rebooted, you should be able to ask your Pi, “Alexa, what time is it?” or “Alexa, what’s the weather in Miami?” or any number of the other commands you can ask Alexa out of the box. There are a few caveats, however: at this time, you can’t play music or control your Nest, among other out-of-the box Amazon Echo features that one would expect. This may change in the future but for now, we’ll just focus on how we can make our own Pi work with our own skills, which we will start doing in the next chapter.
But How Does It All Work?
Before we jump into creating custom skills, let’s quickly cover some of the key components. There are a handful of important files that you should really get familiar with if you want to start customizing the embedded code on your device. The files in the root directory are mostly Git, Travis, and documentation-related files as well as a Fritzing diagram that shows you how to wire up and test with some LEDs, resistors, and a button. This setup is optional but if you have some spare parts laying around, you can use the diagram in Figure 3-12 to set that up as well.
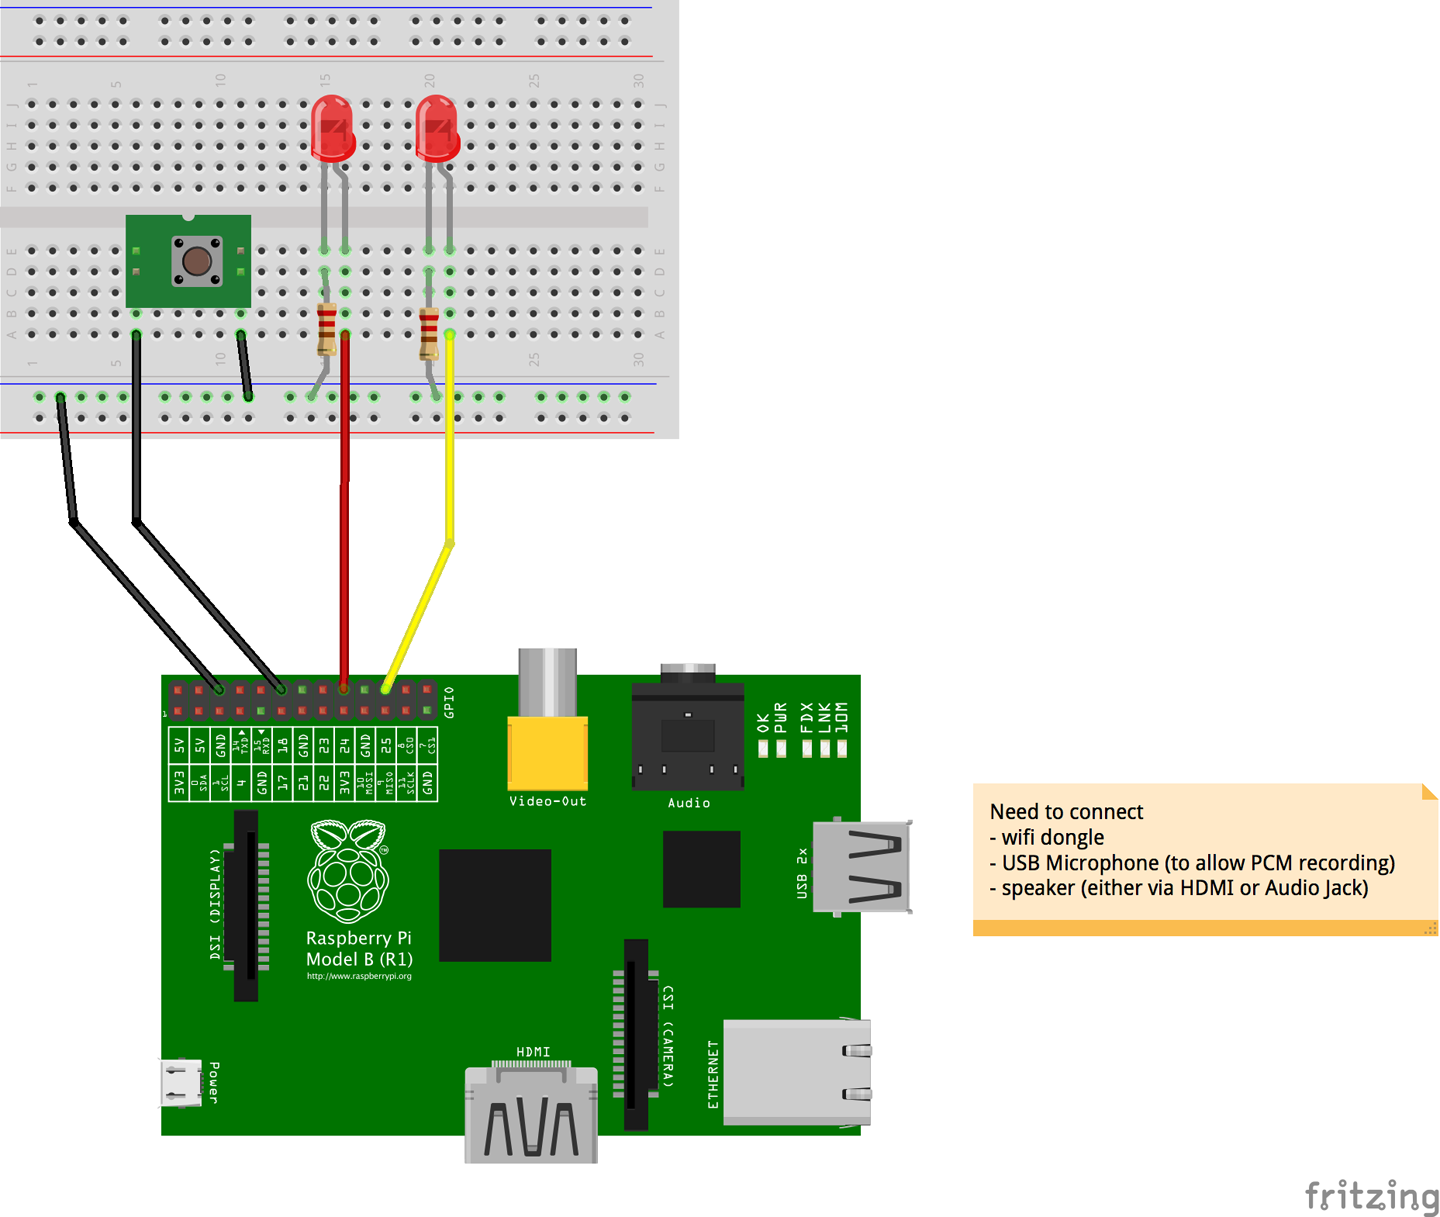
Figure 3-12. AlexaPi Button and LED circuit diagram
The following is breakdown of the current file structure. These files are all located under the /src directory:
- /alexapi
- /resources
- /scripts
- auth_web.py
- config.template.yaml
- dev-requirements.txt
- main.py
- requirements.txt
The important files to remember here are auth_web.py and main.py, as well as the config.template.yaml file (which gets converted to config.yaml during the setup process). Your Amazon AVS credentials are stored in the autogenerated config.yaml file, which is then used by auth_web.py and main.py. Should you need to update your credentials later, simply update the config.yaml file.
The auth_web.py is essentially a web server that helps generate the OAuth refresh tokens for the Amazon user account. The token is also stored in the config.yaml file and is updated automatically when new tokens are generated. The main.py serves as the main Alexa client application that runs on a loop listening for either the trigger word (“Alexa,” for instance) or for the button press if you choose to add a button.
Working with a Button and LEDs
The optional button and LEDs setup is a great way to test and ensure that your device is indeed working as it should. There might be times where you don’t hear a response, in which case the LEDs can provide a hint to help you determine at which point it failed. For example, if the red LED lights up, that means it’s recording audio. When both are lit, the audio is being posted and we are now awaiting a response from AVS. If there’s a delay in the response, only the green LED is lit and if there’s an error, the red LED will flash three times consecutively.
The wake word is recognized by a library called PocketSphinx, which is an open source lightweight continuous speech recognition engine initially developed by Carnegie Mellon University circa 2006. In the config file, you can also modify the wake word by modifying the phrase value under pocketsphinx.
If you are going to add the button and LEDs, you can also change the GPIO pins, if you choose to change them, in the configuration file as well. Under the raspberrypi section, you will see the following key values:
- button: 18
- plb_light: 24
- rec_light: 25
This current configuration means that the button is set to GPIO pin 18, the green playback/activity LED light is set to pin 24, and the red LED light is set to pin 25. Technically you can choose whichever color LEDs you have—just remember to note which color indicates which status. Alternatively, you can also use a single dual color LED or a RGB LED. However, for the RGB LED option, you will need to modify the code in /src/alexapi/device_platforms/rpilikeplatform.py to accommodate the blue lead. For example, you would apply the red lead to pin 25, the green lead to pin 24, and the blue lead to pin 23. Then in the rpilikeplatform.py file, any references made to those pins would need to be updated to support RGB LEDs.
If you want to really get adventurous, you can alternatively use an Adafruit NeoPixel RGB LED Ring, which is an individually addressable ring of LEDs that range from 16 LEDs to 60 LEDs (Figure 3-13).

Figure 3-13. NeoPixel Rings (Creative Commons photo by Phillip Burgess)
What’s in the Resources Directory?
Let’s take another look at the files. The src/sources/ directory contains some audio files you might want to consider changing, such as that lovely “Hello” from Alexa when your device boots up and connects to Alexa. You can change it to your own voice, or Yoda’s voice, or some random sound like a clucking chicken. Totally up to you. Simply keep the same filenames and you won’t need to modify any existing code. It should just work so long as they are encoded correctly.
Customizing the Success Page
Remember that Success page we saw earlier when we authenticated our Amazon Alexa account? Well to edit that template, open up auth_web.py and scroll down to lines 65 through 75 and you will find something that looks like this:
return "<h2>Success!</h2>" \
  "<p>The refresh token has been added to your config file.</p>" \
  "<p>Now:</p>" \
  "<ul>" \
  "<li>close your this browser window,</li>"
  "<li>exit the setup script as indicated,</li>" \
  "<li>and follow the Post-installation steps.</li>" \
  "</ul>"
Deeper Look at the AVS Requests
Now let’s digest some of the meat and potatoes here—in other words, let’s take a deep dive into some of the actual AVS request functions in the AlexaPi. In main.py, we see a function definition called internet_on. This function simply checks to see if the AVS token endpoint is accessible. If it is, a token request will be made via the Token class. Here, we see how the token is requested from the AVS in the renew function. This is what the code should look like there:
def renew(self):

  logger.info("AVS token: Requesting a new one")

  payload = {
    "client_id": self._aconfig['Client_ID'],
    "client_secret": self._aconfig['Client_Secret'],
    "refresh_token": self._aconfig['refresh_token'],
    "grant_type": "refresh_token"
  }

  url = "https://api.amazon.com/auth/o2/token"
  try:
    response = requests.post(url, data=payload)
    resp = json.loads(response.text)

    self._token = resp['access_token']
    self._timestamp = time.time()

    logger.info("AVS token: Obtained successfully")
  except requests.exceptions.RequestException as exp:
    logger.critical("AVS token: Failed to obtain a token: "
      + str(exp))
Here we see some basic logging with the message AVS token: Requesting a new one. Then setting up the payload with the client_id, client_secret, refresh_token, and grant_type all being populated from the values in the configuration file with the exception of grant_type, which is hardcoded to refresh_token. Next, the url variable is set to the AVS OAuth token endpoint currently set to https://api.amazon.com/auth/o2/token. Lastly, the call is made via requests.post, JSON is returned and parsed into the resp variable, where then the self._token field is set to the new access_token available in the resp variable.
So far, all this code is essentially executed at runtime in the Python __main__ routine, which means AlexaPi is running directly and not imported into another Python module. You will find this at the bottom of the main.py file starting with the if __name__ == "__main__": line. Under here, you will find all the setup and configuration processes as well as the connection check and token refresh routines we just talked about. Additionally, you will find trigger callback setup as well as playing the “Hello” MP3 file when AlexaPi loads on reboot. The while True: loop then keeps the code running indefinitely while the trigger callback functions listen on a separate thread for either the push button down event or the wake word.
The trigger_process function handles the trigger events. Let’s take a look at what’s inside there:
def trigger_process(trigger):
  if player.is_playing():
    player.stop()

  # clean up the temp directory
  if not debug:
    for some_file in os.listdir(tmp_path):
      file_path = os.path.join(tmp_path, some_file)
      try:
        if os.path.isfile(file_path):
          os.remove(file_path)
      except Exception as exp:
        logger.warning(exp)

  if event_commands['pre_interaction']:
    subprocess.Popen(event_commands['pre_interaction'],
      shell=True, stdout=subprocess.PIPE)

  force_record = None
  if trigger.event_type in triggers.types_continuous:
    force_record = (trigger.continuous_callback,
      trigger.event_type in triggers.types_vad)

  if trigger.voice_confirm:
    player.play_speech(resources_path + 'alexayes.mp3')

  audio_stream = capture.silence_listener(force_record=force_record)
  alexa_speech_recognizer(audio_stream)

  triggers.enable()

  if event_commands['post_interaction']:
    subprocess.Popen(event_commands['post_interaction'],
      shell=True, stdout=subprocess.PIPE)
The trigger_process function starts off with stopping the audio player then goes into cleaning up the /temp directory, which includes files like previously recorded audio, for example. Interestingly, the subsequent line is a conditional statement to see if there’s a pre_interaction event command specified. Additionally, at the bottom of the function, there’s a condition to check for post_interaction. If there is, it will execute it on a subprocess, which is a cool way to set up your own routine to run before and/or after the callback trigger executes.
The lines in between the pre_interaction and post_interaction conditions execute the trigger events, run a voice_confirm audio clip if the trigger is a voice confirmation, then listen for the audio from the microphone routing that same audio stream to the alexa_speech_recognizer function definition. This function essentially takes in an audio stream and prepares it for departure. Let’s break down the speech recognizer code for a bit:
def alexa_speech_recognizer(audio_stream):
  url = 'https://access-alexa-na.amazon.com/v1/avs/speechrecognizer/recognize'
  boundary = 'this-is-a-boundary'
  headers = {
    'Authorization': 'Bearer %s' % token,
    'Content-Type': 'multipart/form-data; boundary=%s' % boundary,
    'Transfer-Encoding': 'chunked',
  }

  data = alexa_speech_recognizer_generate_data(audio_stream, boundary)
  resp = requests.post(url, headers=headers, data=data)

  platform.indicate_processing(False)
  process_response(resp)
Here we see a request being prepared for the AVS recognize endpoint. The headers suggest it’s a multipart chunked message with the Authorization header set to our refreshed OAuth token. Before the call is made to the endpoint, however, the audio_stream is converted to the chunked data in the alexa_speech_recognizer_generate_data function. Once the data is ready, it’s set to the data parameter, along with URL and headers in the requests.post function. Once that returns and populates resp with the AVS response, the platform.indicate_processing(False) call will turn off the processing LED and then the process_response(resp) call will prepare the response for audio playback on your device.
Conclusion
This chapter explained how to get Alexa to work in a Raspberry Pi. Keep in mind, however, that this is just one of several ways to do so. There are even more ways to accomplish this, particularly once we begin incorporating Cortana, Nuance, or any one of the other voice services out there. No matter which service you use, most likely it will use your own web service where your core business logic will live. While this could be added to your IoT device on the edge, ideally it would be in the cloud, which helps to facilitate smooth updates; otherwise, you would have to continuously push updates to your device.
In the next chapter we will focus on creating a custom web service that you can access from your newly created voice-enabled IoT device. We’ll use a combination of technologies to accomplish this, but will focus primarily on the Alexa Skills Kit, which is how we as developers extend and enhance Alexa’s skills.