For many years, C++ has served as the de facto language for writing fast, powerful, and enterprise-class object-oriented programs. As popular as C++ has become, the language is surprisingly difficult to grasp in full. There are simple, but powerful, techniques that professional C++ programmers use that don’t show up in traditional texts, and there are useful parts of C++ that remain a mystery even to experienced C++ programmers.
Too often, programming books focus on the syntax of the language instead of its real-world use. The typical C++ text introduces a major part of the language in each chapter, explaining the syntax and providing an example. Professional C++ does not follow this pattern. Instead of giving you just the nuts and bolts of the language with little practical context, this book will teach you how to use C++ in the real world. It will show you the little-known features that will make your life easier, and the programming techniques that separate novices from professional programmers.
Even if you have used the language for years, you might still be unfamiliar with the more-advanced features of C++, or you might not be using the full capabilities of the language. Perhaps you write competent C++ code, but would like to learn more about design and good programming style in C++. Or maybe you’re relatively new to C++, but want to learn the “right” way to program from the start. This book will meet those needs and bring your C++ skills to the professional level.
Because this book focuses on advancing from basic or intermediate knowledge of C++ to becoming a professional C++ programmer, it assumes that you have some knowledge of the language. Chapter 1 covers the basics of C++ as a refresher, but it is not a substitute for actual training and use of the language. If you are just starting with C++, but you have significant experience in another programming language such as C, Java, or C#, you should be able to pick up most of what you need from Chapter 1.
In any case, you should have a solid foundation in programming fundamentals. You should know about loops, functions, and variables. You should know how to structure a program, and you should be familiar with fundamental techniques such as recursion. You should have some knowledge of common data structures such as queues, and useful algorithms such as sorting and searching. You don’t need to know about object-oriented programming just yet—that is covered in Chapter 5.
You will also need to be familiar with the compiler you will be using to develop your code. Two compilers, Microsoft Visual C++ and GCC, are introduced later in this introduction. For other compilers, refer to the documentation that came with your compiler.
Professional C++ uses an approach to C++ programming that will both increase the quality of your code and improve your programming efficiency. You will find discussions on new C++17 features throughout this fourth edition. These features are not just isolated to a few chapters or sections; instead, examples have been updated to use new features when appropriate.
Professional C++ teaches you more than just the syntax and language features of C++. It also emphasizes programming methodologies, reusable design patterns, and good programming style. The Professional C++ methodology incorporates the entire software development process, from designing and writing code, to debugging, and working in groups. This approach will enable you to master the C++ language and its idiosyncrasies, as well as take advantage of its powerful capabilities for large-scale software development.
Imagine users who have learned all of the syntax of C++ without seeing a single example of its use. They know just enough to be dangerous! Without examples, they might assume that all code should go in the main() function of the program, or that all variables should be global—practices that are generally not considered hallmarks of good programming.
Professional C++ programmers understand the correct way to use the language, in addition to the syntax. They recognize the importance of good design, the theories of object-oriented programming, and the best ways to use existing libraries. They have also developed an arsenal of useful code and reusable ideas.
By reading and understanding this book, you will become a professional C++ programmer. You will expand your knowledge of C++ to cover lesser-known and often misunderstood language features. You will gain an appreciation for object-oriented design, and acquire top-notch debugging skills. Perhaps most important, you will finish this book armed with a wealth of reusable ideas that you can actually apply to your daily work.
There are many good reasons to make the effort to be a professional C++ programmer, as opposed to a programmer who knows C++. Understanding the true workings of the language will improve the quality of your code. Learning about different programming methodologies and processes will help you to work better with your team. Discovering reusable libraries and common design patterns will improve your daily efficiency and help you stop reinventing the wheel. All of these lessons will make you a better programmer and a more valuable employee. While this book can’t guarantee you a promotion, it certainly won’t hurt.
This book is made up of five parts.
Part I, “Introduction to Professional C++,” begins with a crash course in C++ basics to ensure a foundation of C++ knowledge. Following the crash course, Part I goes deeper into working with strings and string views because strings are used extensively in most examples throughout the book. The last chapter of Part I explores how to write readable C++ code.
Part II, “Professional C++ Software Design,” discusses C++ design methodologies. You will read about the importance of design, the object-oriented methodology, and the importance of code reuse.
Part III, “C++ Coding the Professional Way,” provides a technical tour of C++ from the professional point of view. You will read about the best ways to manage memory in C++, how to create reusable classes, and how to leverage important language features such as inheritance. You will also learn about the unusual and quirky parts of the language, techniques for input and output, error handling, string localization, and how to work with regular expressions. You will read about how to implement operator overloading, and how to write templates. This part also explains the C++ Standard Library, including containers, iterators, and algorithms. You will also read about some additional libraries that are available in the standard, such as the libraries to work with time, random numbers, and the filesystem.
Part IV, “Mastering Advanced Features of C++,” demonstrates how you can get the most out of C++. This part of the book exposes the mysteries of C++ and describes how to use some of its more-advanced features. You will read about how to customize and extend the C++ Standard Library to your needs, advanced details on template programming, including template metaprogramming, and how to use multithreading to take advantage of multiprocessor and multicore systems.
Part V, “C++ Software Engineering,” focuses on writing enterprise-quality software. You’ll read about the engineering practices being used by programming organizations today; how to write efficient C++ code; software testing concepts, such as unit testing and regression testing; techniques used to debug C++ programs; how to incorporate design techniques, frameworks, and conceptual object-oriented design patterns into your own code; and solutions for cross-language and cross-platform code.
The book concludes with a useful chapter-by-chapter guide to succeeding in a C++ technical interview, an annotated bibliography, a summary of the C++ header files available in the standard, and a brief introduction to the Unified Modeling Language (UML).
This book is not a reference of every single class, method, and function available in C++. The book C++ Standard Library Quick Reference by Peter Van Weert and Marc Gregoire1 is a condensed reference to all essential data structures, algorithms, and functions provided by the C++ Standard Library. Appendix B lists a couple more references. Two excellent online references are:
You can use this reference online, or download an offline version for use when you are not connected to the Internet.
When I refer to a “Standard Library Reference” in this book, I am referring to one of these detailed C++ references.
All you need to use this book is a computer with a C++ compiler. This book focuses only on parts of C++ that have been standardized, and not on vendor-specific compiler extensions.
Note that this book includes new features introduced with the C++17 standard. At the time of this writing, some compilers are not yet fully C++17 compliant.
You can use whichever C++ compiler you like. If you don’t have a C++ compiler yet, you can download one for free. There are a lot of choices. For example, for Windows, you can download Microsoft Visual Studio 2017 Community Edition, which is free and includes Visual C++. For Linux, you can use GCC or Clang, which are also free.
The following two sections briefly explain how to use Visual C++ and GCC. Refer to the documentation that came with your compiler for more details.
First, you need to create a project. Start Visual C++ and click File ➪ New ➪ Project. In the project template tree on the left, select Visual C++ ➪ Win32 (or Windows Desktop). Then select the Win32 Console Application (or Windows Console Application) template in the list in the middle of the window. At the bottom, specify a name for the project and a location where to save it, and click OK. A wizard opens2. In this wizard, click Next, select Console Application, Empty Project, and click Finish.
Once your new project is loaded, you can see a list of project files in the Solution Explorer. If this docking window is not visible, go to View ➪ Solution Explorer. You can add new files or existing files to a project by right-clicking the project name in the Solution Explorer and then clicking Add ➪ New Item or Add ➪ Existing Item.
Use Build ➪ Build Solution to compile your code. When it compiles without errors, you can run it with Debug ➪ Start Debugging.
If your program exits before you have a chance to view the output, use Debug ➪ Start without Debugging. This adds a pause to the end of the program so you can view the output.
At the time of this writing, Visual C++ 2017 does not yet automatically enable C++17 features. To enable C++17 features, in the Solution Explorer window, right-click your project and click Properties. In the properties window, go to Configuration Properties ➪ C/C++ ➪ Language, and set the C++ Language Standard option to “ISO C++17 Standard” or “ISO C++ Latest Draft Standard,” whichever is available in your version of Visual C++. These options are only accessible if your project contains at least one .cpp file.
Visual C++ supports so-called precompiled headers, a topic outside the scope of this book. In general, I recommend using precompiled headers if your compiler supports them. However, the source code files in the downloadable source code archive do not use precompiled headers, so you have to disable that feature for them to compile without errors. In the Solution Explorer window, right-click your project and click Properties. In the properties window, go to Configuration Properties ➪ C/C++ ➪ Precompiled Headers, and set the Precompiled Header option to “Not Using Precompiled Headers.”
Create your source code files with any text editor you prefer and save them to a directory. To compile your code, open a terminal and run the following command, specifying all your .cpp files that you want to compile:
gcc -lstdc++ -std=c++17 -o <executable_name> <source1.cpp> [source2.cpp …]The -std=c++17 option is required to tell GCC to enable C++17 support.
For example, you can compile the AirlineTicket example from Chapter 1 by changing to the directory containing the code and running the following command:
gcc –lstdc++ -std=c++17 -o AirlineTicket AirlineTicket.cpp AirlineTicketTest.cppWhen it compiles without errors, you can run it as follows:
./AirlineTicketTo help you get the most from the text and keep track of what’s happening, a number of conventions are used throughout this book.
As for styles in the text:
monkey.cpp.// Comments in code are shown like this.In code examples, new and important code is highlighted like this.Code that's less important in the present context or that has been shown before is formatted like this.
 Paragraphs or sections that are specific to the C++17 standard have a little C++17 icon on the left, just as this paragraph does. C++11 and C++14 features are not marked with any icon.
As you work through the examples in this book, you may choose either to type in all the code manually, or to use the source code files that accompany the book. However, I suggest you type in all the code manually because it greatly benefits the learning process and your memory. All of the source code used in this book is available for download at www.wiley.com/go/proc++4e.
Alternatively, you can go to the main Wrox code download page at www.wrox.com/dynamic/books/download.aspx to see the code that is available for this book and all other Wrox books.
Once you’ve downloaded the code, just decompress it with your favorite decompression tool.
At Wrox, we make every effort to ensure that there are no errors in the text or in the code of our books. However, no one is perfect, and mistakes do occur. If you find an error in one of our books, such as a spelling mistake or faulty piece of code, we would be very grateful for your feedback. By sending in errata, you may save another reader hours of frustration, and at the same time you will be helping us provide even higher-quality information.
To find the errata page for this book, go to www.wrox.com and locate the title by using the Search box or one of the title lists. Then, on the book details page, click the Book Errata link. On this page you can view all errata that has been submitted for this book and posted by Wrox editors. A complete book list, including links to each book’s errata, is also available at www.wrox.com/misc-pages/booklist.shtml.
If you don’t spot “your” error on the Book Errata page, go to www.wrox.com/contact/techsupport.shtml and complete the form there to send us the error you have found. We’ll check the information and, if appropriate, post a message to the book’s errata page and fix the problem in subsequent editions of the book.
The C++ language is often viewed as a “better C” or a “superset of C.” It was mainly designed to be an object-oriented C, commonly called as “C with classes.” Later on, many of the annoyances and rough edges of the C language were addressed as well. Because C++ is based on C, much of the syntax you’ll see in this section will look familiar to you if you are an experienced C programmer. The two languages certainly have their differences, though. As evidence, The C++ Programming Language by C++ creator Bjarne Stroustrup (Fourth Edition; Addison-Wesley Professional, 2013) weighs in at 1,368 pages, while Kernighan and Ritchie’s The C Programming Language (Second Edition; Prentice Hall, 1988) is a scant 274 pages. So, if you’re a C programmer, be on the lookout for new or unfamiliar syntax!
In all its glory, the following code is the simplest C++ program you’re likely to encounter:
// helloworld.cpp#include <iostream>int main(){std::cout << "Hello, World!" << std::endl;return 0;}
This code, as you might expect, prints the message, “Hello, World!” on the screen. It is a simple program and unlikely to win any awards, but it does exhibit the following important concepts about the format of a C++ program:
main() functionThese concepts are briefly explained in the following sections.
The first line of the program is a comment, a message that exists for the programmer only and is ignored by the compiler. In C++, there are two ways to delineate a comment. In the preceding and following examples, two slashes indicate that whatever follows on that line is a comment.
// helloworld.cppThe same behavior (this is to say, none) would be achieved by using a multiline comment. Multiline comments start with /* and end with */. The following code shows a multiline comment in action (or, more appropriately, inaction).
/* This is a multiline comment.The compiler will ignore it.*/
Comments are covered in detail in Chapter 3.
Building a C++ program is a three-step process. First, the code is run through a preprocessor, which recognizes meta-information about the code. Next, the code is compiled, or translated into machine-readable object files. Finally, the individual object files are linked together into a single application.
Directives aimed at the preprocessor start with the # character, as in the line #include <iostream> in the previous example. In this case, an #include directive tells the preprocessor to take everything from the <iostream> header file and make it available to the current file. The most common use of header files is to declare functions that will be defined elsewhere. A function declaration tells the compiler how a function is called, declaring the number and types of parameters, and the function return type. A definition contains the actual code for the function. In C++, declarations usually go into header files, typically with extension .h, while definitions usually go into source files, typically with extension .cpp. A lot of other programming languages, such as C# and Java, do not separate declarations and definitions into separate files.
The <iostream> header declares the input and output mechanisms provided by C++. If the program did not include that header, it would be unable to perform its only task of outputting text.
The following table shows some of the most common preprocessor directives.
| PREPROCESSOR DIRECTIVE | FUNCTIONALITY | COMMON USES |
#include [file] |
The specified file is inserted into the code at the location of the directive. | Almost always used to include header files so that code can make use of functionality defined elsewhere. |
#define [key] [value] |
Every occurrence of the specified key is replaced with the specified value. | Often used in C to define a constant value or a macro. C++ provides better mechanisms for constants and most types of macros. Macros can be dangerous, so use them cautiously. See Chapter 11 for details. |
#ifdef [key]#endif#endif |
Code within the ifdef (“if defined”) or ifndef (“if not defined”) blocks are conditionally included or omitted based on whether the specified key has been defined with #define. |
Used most frequently to protect against circular includes. Each header file starts with an #ifndef checking the absence of a key, followed by a #define directive to define that key. The header file ends with an #endif. This prevents the file from being included multiple times; see the example after this table. |
#pragma [xyz] |
xyz is compiler dependent. It often allows the programmer to display a warning or error if the directive is reached during preprocessing. |
See the example after this table. |
One example of using preprocessor directives is to avoid multiple includes, as shown here:
#ifndef MYHEADER_H#define MYHEADER_H// … the contents of this header file#endif
If your compiler supports the #pragma once directive, and most modern compilers do, then this can be rewritten as follows:
#pragma once// … the contents of this header file
Chapter 11 discusses this in more details.
main() is, of course, where the program starts. The return type of main() is an int, indicating the result status of the program. You can omit any explicit return statements in main(), in which case zero is returned automatically. The main() function either takes no parameters, or takes two parameters as follows:
int main(int argc, char* argv[])argc gives the number of arguments passed to the program, and argv contains those arguments. Note that argv[0] can be the program name, but it might as well be an empty string, so do not rely on it; instead, use platform-specific functionality to retrieve the program name. The important thing to remember is that the actual parameters start at index 1.
I/O streams are covered in depth in Chapter 13, but the basics of output and input are very simple. Think of an output stream as a laundry chute for data. Anything you toss into it will be output appropriately. std::cout is the chute corresponding to the user console, or standard out. There are other chutes, including std::cerr, which outputs to the error console. The << operator tosses data down the chute. In the preceding example, a quoted string of text is sent to standard out. Output streams allow multiple types of data to be sent down the stream sequentially on a single line of code. The following code outputs text, followed by a number, followed by more text:
std::cout << "There are " << 219 << " ways I love you." << std::endl;std::endl represents an end-of-line sequence. When the output stream encounters std::endl, it will output everything that has been sent down the chute so far and move to the next line. An alternate way of representing the end of a line is by using the \n character. The \n character is an escape sequence, which refers to a new-line character. Escape sequences can be used within any quoted string of text. The following table shows the most common ones:
\n |
new line |
\r |
carriage return |
\t |
tab |
\\ |
backslash character |
\" |
quotation mark |
Streams can also be used to accept input from the user. The simplest way to do this is to use the >> operator with an input stream. The std::cin input stream accepts keyboard input from the user. Here is an example:
int value;std::cin >> value;
User input can be tricky because you can never know what kind of data the user will enter. See Chapter 13 for a full explanation of how to use input streams.
If you’re new to C++ and coming from a C background, you’re probably wondering what has been done with the trusty old printf() and scanf() functions. While these functions can still be used in C++, I recommend using the streams library instead, mainly because the printf() and scanf() family of functions do not provide any type safety.
Namespaces address the problem of naming conflicts between different pieces of code. For example, you might be writing some code that has a function called foo(). One day, you decide to start using a third-party library, which also has a foo() function. The compiler has no way of knowing which version of foo() you are referring to within your code. You can’t change the library’s function name, and it would be a big pain to change your own.
Namespaces come to the rescue in such scenarios because you can define the context in which names are defined. To place code in a namespace, enclose it within a namespace block. For example, the following could be the contents of a file called namespaces.h:
namespace mycode {void foo();}
The implementation of a method or function can also be handled in a namespace. The foo() function, for instance, could be implemented in namespaces.cpp as follows:
#include <iostream>#include "namespaces.h"void mycode::foo(){std::cout << "foo() called in the mycode namespace" << std::endl;}
Or alternatively:
#include <iostream>#include "namespaces.h"namespace mycode {void foo(){std::cout << "foo() called in the mycode namespace" << std::endl;}}
By placing your version of foo() in the namespace “mycode,” you are isolating it from the foo() function provided by the third-party library. To call the namespace-enabled version of foo(), prepend the namespace onto the function name by using ::, also called the scope resolution operator, as follows:
mycode::foo(); // Calls the "foo" function in the "mycode" namespaceAny code that falls within a “mycode” namespace block can call other code within the same namespace without explicitly prepending the namespace. This implicit namespace is useful in making the code more readable. You can also avoid prepending of namespaces with the using directive. This directive tells the compiler that the subsequent code is making use of names in the specified namespace. The namespace is thus implied for the code that follows:
#include "namespaces.h"using namespace mycode;int main(){foo(); // Implies mycode::foo();return 0;}
A single source file can contain multiple using directives, but beware of overusing this shortcut. In the extreme case, if you declare that you’re using every namespace known to humanity, you’re effectively eliminating namespaces entirely! Name conflicts will again result if you are using two namespaces that contain the same names. It is also important to know in which namespace your code is operating so that you don’t end up accidentally calling the wrong version of a function.
You’ve seen the namespace syntax before—you used it in the Hello, World program, where cout and endl are actually names defined in the std namespace. You could have written Hello, World with the using directive as shown here:
#include <iostream>using namespace std;int main(){cout <<"Hello, World!"<< endl;return 0;}
A using declaration can be used to refer to a particular item within a namespace. For example, if the only part of the std namespace that you intend to use is cout, you can refer to it as follows:
using std::cout;Subsequent code can refer to cout without prepending the namespace, but other items in the std namespace will still need to be explicit:
using std::cout;cout << "Hello, World!" << std::endl;
C++17 makes it easier to work with nested namespaces. A nested namespace is a namespace inside another one. Before C++17, you had to use nested namespaces as follows:
namespace MyLibraries {namespace Networking {namespace FTP {/* … */}}}
This can be simplified a lot with C++17:
namespace MyLibraries::Networking::FTP {/* … */}
A namespace alias can be used to give a new and possibly shorter name to another namespace. For example: namespace MyFTP = MyLibraries::Networking::FTP;
Literals are used to write numbers or strings in your code. C++ supports a number of standard literals. Numbers can be specified with the following literals (the examples in the list represent the same number, 123):
12301730x7B0b1111011Other examples of literals in C++ include
3.14f)3.14)'a')"character array")It is also possible to define your own type of literals, which is an advanced feature explained in Chapter 11.
Digits separators can be used in numeric literals. A digits separator is a single quote character. For example,
23'456'7890.123'456f C++17 adds support for hexadecimal floating-point literals—for example, 0x3.ABCp-10, 0Xb.cp12l.
In C++, variables can be declared just about anywhere in your code and can be used anywhere in the current block below the line where they are declared. Variables can be declared without being given a value. These uninitialized variables generally end up with a semi-random value based on whatever is in memory at that time, and are therefore the source of countless bugs. Variables in C++ can alternatively be assigned an initial value when they are declared. The code that follows shows both flavors of variable declaration, both using ints, which represent integer values.
int uninitializedInt;int initializedInt = 7;cout << uninitializedInt << " is a random value" << endl;cout << initializedInt << " was assigned an initial value" << endl;
The following table shows the most common types used in C++.
| TYPE | DESCRIPTION | USAGE |
(signed) intsigned |
Positive and negative integers; the range depends on the compiler (usually 4 bytes). | int i = -7;signed int i = -6;signed i = -5; |
(signed) short (int) |
Short integer (usually 2 bytes) | short s = 13;short int s = 14;signed short s = 15;signed short int s = 16; |
(signed) long (int) |
Long integer (usually 4 bytes) | long l = -7L; |
(signed) long long (int) |
Long long integer; the range depends on the compiler, but is at least the same as for long (usually 8 bytes). |
long long ll = 14LL; |
unsigned (int)unsigned short (int)unsigned long (int)unsigned long long (int) |
Limits the preceding types to values >= 0 | unsigned int i = 2U;unsigned j = 5U;unsigned short s = 23U;unsigned long l = 5400UL;unsigned long long ll = 140ULL; |
float |
Floating-point numbers | float f = 7.2f; |
double |
Double precision numbers; precision is at least the same as for float. |
double d = 7.2; |
long double |
Long double precision numbers; precision is at least the same as for double. |
long double d = 16.98L; |
char |
A single character | char ch = 'm'; |
char16_t |
A single 16-bit character | char16_t c16 = u'm'; |
char32_t |
A single 32-bit character | char32_t c32 = U'm'; |
wchar_t |
A single wide character; the size depends on the compiler. | wchar_t w = L'm'; |
bool |
A Boolean type that can have one of two values: true or false |
bool b = true; |
std::byte1 |
A single byte. Before C++17, a char or unsigned char was used to represent a byte, but those types make it look like you are working with characters. std::byte on the other hand clearly states your intention, that is, a single byte of memory. |
std::byte b{42};2 |
1Requires an include directive for the <cstddef> header file.
2Initialization of an std::byte requires direct list initialization with a single-element list. See the “Direct List Initialization versus Copy List Initialization” section later in this chapter for the definition of direct list initialization.
Variables can be converted to other types by casting them. For example, a float can be cast to an int. C++ provides three ways to explicitly change the type of a variable. The first method is a holdover from C; it is not recommended but unfortunately still commonly used. The second method is rarely used. The third method is the most verbose, but is also the cleanest one, and is therefore recommended.
float myFloat = 3.14f;int i1 = (int)myFloat; // method 1int i2 = int(myFloat); // method 2int i3 = static_cast<int>(myFloat); // method 3
The resulting integer will be the value of the floating-point number with the fractional part truncated. Chapter 11 describes the different casting methods in more detail. In some contexts, variables can be automatically cast, or coerced. For example, a short can be automatically converted into a long because a long represents the same type of data with at least the same precision.
long someLong = someShort; // no explicit cast neededWhen automatically casting variables, you need to be aware of the potential loss of data. For example, casting a float to an int throws away information (the fractional part of the number). Most compilers will issue a warning or even an error if you assign a float to an int without an explicit cast. If you are certain that the left-hand side type is fully compatible with the right-hand side type, it’s okay to cast implicitly.
What good is a variable if you don’t have a way to change it? The following table shows the most common operators used in C++ and sample code that makes use of them. Note that operators in C++ can be binary (operate on two expressions), unary (operate on a single expression), or even ternary (operate on three expressions). There is only one ternary operator in C++, and it is explained in the “Conditional Statements” section later in this chapter.
| OPERATOR | DESCRIPTION | USAGE |
= |
Binary operator to assign the value on the right to the expression on the left | int i;i = 3;int j;j = i; |
! |
Unary operator to complement the true/false (non-0/0) status of an expression | bool b = !true;bool b2 = !b; |
+ |
Binary operator for addition | int i = 3 + 2;int j = i + 5;int k = i + j; |
-*/ |
Binary operators for subtraction, multiplication, and division | int i = 5 - 1;int j = 5 * 2;int k = j / i; |
% |
Binary operator for the remainder of a division operation. This is also referred to as the mod or modulo operator. | int remainder = 5 % 2; |
++ |
Unary operator to increment an expression by 1. If the operator occurs after the expression, or post-increment, the result of the expression is the unincremented value. If the operator occurs before the expression, or pre-increment, the result of the expression is the new value. | i++;++i; |
-- |
Unary operator to decrement an expression by 1 | i--;--i; |
+= |
Shorthand syntax for i = i + j |
i += j; |
-=*=/=%= |
Shorthand syntax fori = i - j;i = i * j;i = i / j;i = i % j; |
i -= j;i *= j;i /= j;i %= j; |
&&= |
Takes the raw bits of one expression and performs a bitwise “AND” with the other expression | i = j & k;j &= k; |
||= |
Takes the raw bits of one expression and performs a bitwise “OR” with the other expression | i = j | k;j |= k; |
<<>><<=>>= |
Takes the raw bits of an expression and “shifts” each bit left (<<) or right (>>) the specified number of places |
i = i << 1;i = i >> 4;i <<= 1;i >>= 4; |
^^= |
Performs a bitwise “exclusive or,” also called “XOR” operation, on two expressions | i = i ^ j;i ^= j; |
The following program shows the most common variable types and operators in action. If you are unsure about how variables and operators work, try to figure out what the output of this program will be, and then run it to confirm your answer.
int someInteger = 256;short someShort;long someLong;float someFloat;double someDouble;someInteger++;someInteger *= 2;someShort = static_cast<short>(someInteger);someLong = someShort * 10000;someFloat = someLong + 0.785f;someDouble = static_cast<double>(someFloat) / 100000;cout << someDouble << endl;
The C++ compiler has a recipe for the order in which expressions are evaluated. If you have a complicated line of code with many operators, the order of execution may not be obvious. For that reason, it’s probably better to break up a complicated expression into several smaller expressions, or explicitly group sub-expressions by using parentheses. For example, the following line of code is confusing unless you happen to know the C++ operator precedence table by heart:
int i = 34 + 8 * 2 + 21 / 7 % 2;Adding parentheses makes it clear which operations are happening first:
int i = 34 + (8 * 2) + ( (21 / 7) % 2 );For those of you playing along at home, both approaches are equivalent and end up with i equal to 51. If you assumed that C++ evaluated expressions from left to right, your answer would have been 1. C++ evaluates /, *, and % first (in left-to-right order), followed by addition and subtraction, then bitwise operators. Parentheses let you explicitly tell the compiler that a certain operation should be evaluated separately.
In C++, you can use the basic types (int, bool, and so on) to build more complex types of your own design. Once you are an experienced C++ programmer, you will rarely use the following techniques, which are features brought in from C, because classes are far more powerful. Still, it is important to know about the following ways of building types so that you will recognize the syntax.
An integer really represents a value within a sequence—the sequence of numbers. Enumerated types let you define your own sequences so that you can declare variables with values in that sequence. For example, in a chess program, you could represent each piece as an int, with constants for the piece types, as shown in the following code. The integers representing the types are marked const to indicate that they can never change.
const int PieceTypeKing = 0;const int PieceTypeQueen = 1;const int PieceTypeRook = 2;const int PieceTypePawn = 3;//etc.int myPiece = PieceTypeKing;
This representation is fine, but it can become dangerous. Since a piece is just an int, what would happen if another programmer added code to increment the value of a piece? By adding 1, a king becomes a queen, which really makes no sense. Worse still, someone could come in and give a piece a value of -1, which has no corresponding constant.
Enumerated types solve these problems by tightly defining the range of values for a variable. The following code declares a new type, PieceType, which has four possible values, representing four of the chess pieces:
enum PieceType { PieceTypeKing, PieceTypeQueen, PieceTypeRook, PieceTypePawn };Behind the scenes, an enumerated type is just an integer value. The real value of PieceTypeKing is 0. However, by defining the possible values for variables of type PieceType, your compiler can give you a warning or an error if you attempt to perform arithmetic on PieceType variables or treat them as integers. The following code, which declares a PieceType variable, and then attempts to use it as an integer, results in a warning or an error on most compilers:
PieceType myPiece;myPiece = 0;
It’s also possible to specify the integer values for members of an enumeration. The syntax is as follows:
enum PieceType { PieceTypeKing = 1, PieceTypeQueen, PieceTypeRook = 10, PieceTypePawn };In this example, PieceTypeKing has the integer value 1, PieceTypeQueen has the value 2 assigned by the compiler, PieceTypeRook has the value 10, and PieceTypePawn has the value 11 assigned automatically by the compiler.
If you do not assign a value to an enumeration member, the compiler automatically assigns it a value that is the previous enumeration member incremented by 1. If you do not assign a value to the first enumeration member yourself, the compiler assigns it the value 0.
Enumerations as explained in the previous section are not strongly typed, meaning they are not type safe. They are always interpreted as integers, and thus you can compare enumeration values from completely different enumeration types.
The strongly-typed enum class enumerations solve this problem. For example, the following defines a type-safe version of the earlier-defined PieceType enumeration:
enum class PieceType{King = 1,Queen,Rook = 10,Pawn};
For an enum class, the enumeration value names are not automatically exported to the enclosing scope, which means that you always have to use the scope resolution operator:
PieceType piece = PieceType::King;This also means that you can give shorter names to the enumeration values, for example, King instead of PieceTypeKing.
Additionally, the enumeration values are not automatically converted to integers, which means the following is illegal:
if (PieceType::Queen == 2) {…}By default, the underlying type of an enumeration value is an integer, but this can be changed as follows:
enum class PieceType : unsigned long{King = 1,Queen,Rook = 10,Pawn};
Structs let you encapsulate one or more existing types into a new type. The classic example of a struct is a database record. If you are building a personnel system to keep track of employee information, you might want to store the first initial, last initial, employee number, and salary for each employee. A struct that contains all of this information is shown in the employeestruct.h header file that follows:
struct Employee {char firstInitial;char lastInitial;int employeeNumber;int salary;};
A variable declared with type Employee will have all of these fields built in. The individual fields of a struct can be accessed by using the “.” operator. The example that follows creates and then outputs the record for an employee:
#include <iostream>#include "employeestruct.h"using namespace std;int main(){// Create and populate an employee.Employee anEmployee;anEmployee.firstInitial = 'M';anEmployee.lastInitial = 'G';anEmployee.employeeNumber = 42;anEmployee.salary = 80000;// Output the values of an employee.cout << "Employee: " << anEmployee.firstInitial <<anEmployee.lastInitial << endl;cout << "Number: " << anEmployee.employeeNumber << endl;cout << "Salary: $" << anEmployee.salary << endl;return 0;}
Conditional statements let you execute code based on whether or not something is true. As shown in the following sections, there are three main types of conditional statements in C++: if/else statements, switch statements, and conditional operators.
The most common conditional statement is the if statement, which can be accompanied by an else. If the condition given inside the if statement is true, the line or block of code is executed. If not, execution continues with the else case if present, or with the code following the conditional statement. The following code shows a cascading if statement, a fancy way of saying that the if statement has an else statement that in turn has another if statement, and so on:
if (i > 4) {// Do something.} else if (i > 2) {// Do something else.} else {// Do something else.}
The expression between the parentheses of an if statement must be a Boolean value or evaluate to a Boolean value. A value of 0 evaluates to false, while any non-zero value evaluates to true. For example: if(0) is equivalent to if(false). Logical evaluation operators, described later, provide ways of evaluating expressions to result in a true or false Boolean value.
Initializers for if StatementsC++17 allows you to include an initializer inside an if statement using the following syntax:
if (<initializer> ; <conditional_expression>) { <body> }Any variable introduced in the <initializer> is only available in the <conditional_expression> and in the <body>. Such variables are not available outside the if statement.
It is too early in this book to give a useful example of this feature, but here is what it looks like:
if (Employee employee = GetEmployee() ; employee.salary > 1000) { … }In this example, the initializer gets an employee and the condition checks whether the salary of the retrieved employee exceeds 1000. Only in that case is the body of the if statement executed.
More concrete examples will be given throughout this book.
The switch statement is an alternate syntax for performing actions based on the value of an expression. In C++, the expression of a switch statement must be of an integral type, a type convertible to an integral type, an enumerated type, or a strongly typed enumeration, and must be compared to constants. Each constant value represents a “case.” If the expression matches the case, the subsequent lines of code are executed until a break statement is reached. You can also provide a default case, which is matched if none of the other cases match. The following pseudocode shows a common use of the switch statement:
switch (menuItem) {case OpenMenuItem:// Code to open a filebreak;case SaveMenuItem:// Code to save a filebreak;default:// Code to give an error messagebreak;}
A switch statement can always be converted into if/else statements. The previous switch statement can be converted as follows:
if (menuItem == OpenMenuItem) {// Code to open a file} else if (menuItem == SaveMenuItem) {// Code to save a file} else {// Code to give an error message}
switch statements are generally used when you want to do something based on more than 1 specific value of an expression, as opposed to some test on the expression. In such a case, the switch statement avoids cascading if-else statements. If you only need to inspect 1 value, an if or if-else statement is fine.
Once a case expression matching the switch condition is found, all statements that follow it are executed until a break statement is reached. This execution continues even if another case expression is encountered, which is called fallthrough. The following example has a single set of statements that is executed for several different cases:
switch (backgroundColor) {case Color::DarkBlue:case Color::Black:// Code to execute for both a dark blue or black background colorbreak;case Color::Red:// Code to execute for a red background colorbreak;}
Fallthrough can be a source of bugs, for example if you accidentally forget a break statement. Because of this, compilers might give a warning if a fallthrough is detected in a switch statement, unless the case is empty as in the above example. Starting with C++17, you can tell the compiler that a fallthrough is intentional using the [[fallthrough]] attribute as follows:
switch (backgroundColor) {case Color::DarkBlue:doSomethingForDarkBlue();[[fallthrough]];case Color::Black:// Code is executed for both a dark blue or black background colordoSomethingForBlackOrDarkBlue();break;case Color::Red:case Color::Green:// Code to execute for a red or green background colorbreak;}
Initializers for switch StatementsJust as for if statements, C++17 adds support for initializers to switch statements. The syntax is as follows:
switch (<initializer> ; <expression>) { <body> }Any variables introduced in the <initializer> are only available in the <expression> and in the <body>. They are not available outside the switch statement.
C++ has one operator that takes three arguments, known as a ternary operator. It is used as a shorthand conditional expression of the form “if [something] then [perform action], otherwise [perform some other action].” The conditional operator is represented by a ? and a :. The following code outputs “yes” if the variable i is greater than 2, and “no” otherwise:
std::cout << ((i > 2) ? "yes" : "no");The parentheses around i > 2 are optional, so the following is equivalent:
std::cout << (i > 2 ? "yes" : "no");The advantage of the conditional operator is that it can occur within almost any context. In the preceding example, the conditional operator is used within code that performs output. A convenient way to remember how the syntax is used is to treat the question mark as though the statement that comes before it really is a question. For example, “Is i greater than 2? If so, the result is ‘yes’; if not, the result is ‘no.’”
Unlike an if statement or a switch statement, the conditional operator doesn’t execute code blocks based on the result. Instead, it is used within code, as shown in the preceding example. In this way, it really is an operator (like + and -) as opposed to a true conditional statement, such as if and switch.
You have already seen a logical evaluation operator without a formal definition. The > operator compares two values. The result is “true” if the value on the left is greater than the value on the right. All logical evaluation operators follow this pattern—they all result in a true or false.
The following table shows common logical evaluation operators:
| OP | DESCRIPTION | USAGE |
|
< <= > >= |
Determines if the left-hand side is less than, less than or equal to, greater than, or greater than or equal to the right-hand side |
|
| == | Determines if the left-hand side equals the right-hand side. Don’t confuse this with the = (assignment) operator! |
|
| != | Not equals. The result of the statement is true if the left-hand side does not equal the right-hand side. |
|
| ! |
Logical NOT. This complements the true/false status of a Boolean expression. This is a unary operator. |
|
| && | Logical AND. The result is true if both parts of the expression are true. |
|
| || | Logical OR. The result is true if either part of the expression is true. |
|
C++ uses short-circuit logic when evaluating logical expressions. That means that once the final result is certain, the rest of the expression won’t be evaluated. For example, if you are performing a logical OR operation of several Boolean expressions, as shown in the following code, the result is known to be true as soon as one of them is found to be true. The rest won’t even be checked.
bool result = bool1 || bool2 || (i > 7) || (27 / 13 % i + 1) < 2;In this example, if bool1 is found to be true, the entire expression must be true, so the other parts aren’t evaluated. In this way, the language saves your code from doing unnecessary work. It can, however, be a source of hard-to-find bugs if the later expressions in some way influence the state of the program (for example, by calling a separate function). The following code shows a statement using && that short-circuits after the second term because 0 always evaluates to false:
bool result = bool1 && 0 && (i > 7) && !done;Short-circuiting can be beneficial for performance. You can put cheaper tests first so that more expensive tests are not even executed when the logic short-circuits. It is also useful in the context of pointers to avoid parts of the expression to be executed when a pointer is not valid. Pointers and short-circuiting with pointers are discussed later in this chapter.
For programs of any significant size, placing all the code inside of main() is unmanageable. To make programs easy to understand, you need to break up, or decompose, code into concise functions.
In C++, you first declare a function to make it available for other code to use. If the function is used inside only a particular file, you generally declare and define the function in the source file. If the function is for use by other modules or files, you generally put the declaration in a header file and the definition in a source file.
A function declaration is shown in the following code. This example has a return type of void, indicating that the function does not provide a result to the caller. The caller must provide two arguments for the function to work with—an integer and a character.
void myFunction(int i, char c);Without an actual definition to match this function declaration, the link stage of the compilation process will fail because code that makes use of the function will be calling nonexistent code. The following definition prints the values of the two parameters:
void myFunction(int i, char c){std::cout << "the value of i is " << i << std::endl;std::cout << "the value of c is " << c << std::endl;}
Elsewhere in the program, you can make calls to myFunction() and pass in arguments for the two parameters. Some sample function calls are shown here:
myFunction(8, 'a');myFunction(someInt, 'b');myFunction(5, someChar);
C++ functions can also return a value to the caller. The following function adds two numbers and returns the result:
int addNumbers(int number1, int number2){return number1 + number2;}
This function can be called as follows:
int sum = addNumbers(5, 3);With C++14, you can ask the compiler to figure out the return type of a function automatically. To make use of this functionality, you need to specify auto as the return type:
auto addNumbers(int number1, int number2){return number1 + number2;}
The compiler deduces the return type based on the expressions used for the return statements. There can be multiple return statements in the function, but they should all resolve to the same type. Such a function can even include recursive calls (calls to itself), but the first return statement in the function must be a non-recursive call.
Every function has a local predefined variable __func__ containing the name of the current function. One use of this variable would be for logging purposes:
int addNumbers(int number1, int number2){std::cout << "Entering function " << __func__ << std::endl;return number1 + number2;}
Arrays hold a series of values, all of the same type, each of which can be accessed by its position in the array. In C++, you must provide the size of the array when the array is declared. You cannot give a variable as the size—it must be a constant, or a constant expression (constexpr). Constant expressions are discussed in Chapter 11. The code that follows shows the declaration of an array of three integers followed by three lines to initialize the elements to 0:
int myArray[3];myArray[0] = 0;myArray[1] = 0;myArray[2] = 0;
The next section discusses loops that you can use to initialize each element. However, instead of using loops, or using the previous initialization mechanism, you can also accomplish the zero-initialization with the following one-liner:
int myArray[3] = {0};You can even drop the 0 as follows:
int myArray[3] = {};An array can also be initialized with an initializer list, in which case the compiler can deduce the size of the array automatically. For example,
int myArray[] = {1, 2, 3, 4}; // The compiler creates an array of 4 elements.If you do specify the size of the array, and the initializer list has less elements than the given size, the remaining elements are set to 0. For example, the following code only sets the first element in the array to the value 2, and sets all the other elements to 0:
int myArray[3] = {2};To get the size of a stack-based C-style array, you can use the C++17 std::size() function (requires <array>). For example:
unsigned int arraySize = std::size(myArray);If your compiler is not yet C++17 compliant, the old trick to get the size of a stack-based C-style array is to use the sizeof operator. The sizeof operator returns the size of its argument in bytes. To get the number of elements in a stack-based array, you divide the size in bytes of the array by the size in bytes of the first element. For example:
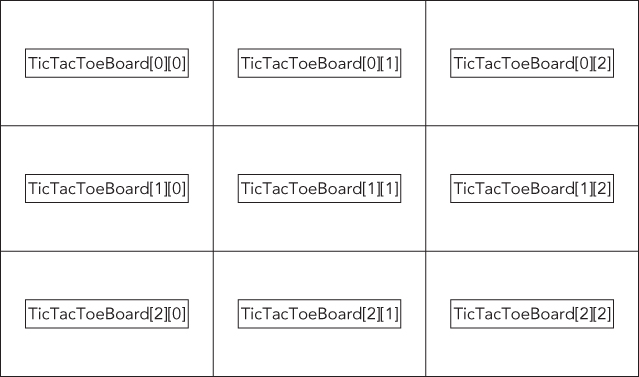
unsigned int arraySize = sizeof(myArray) / sizeof(myArray[0]);The preceding examples show a one-dimensional array, which you can think of as a line of integers, each with its own numbered compartment. C++ allows multi-dimensional arrays. You might think of a two-dimensional array as a checkerboard, where each location has a position along the x-axis and a position along the y-axis. Three-dimensional and higher arrays are harder to picture and are rarely used. The following code shows the syntax for allocating a two-dimensional array of characters for a Tic-Tac-Toe board and then putting an “o” in the center square:
char ticTacToeBoard[3][3];ticTacToeBoard[1][1] = 'o';
Figure 1-1 shows a visual representation of this board with the position of each square.
The arrays discussed in the previous section come from C, and still work in C++. However, C++ has a special type of fixed-size container called std::array, defined in the <array> header file. It’s basically a thin wrapper around C-style arrays.
There are a number of advantages to using std::arrays instead of C-style arrays. They always know their own size, are not automatically cast to a pointer to avoid certain types of bugs, and have iterators to easily loop over the elements. Iterators are discussed in detail in Chapter 17.
The following example demonstrates how to use the array container. The use of angle brackets after array, as in array<int, 3>, will become clear during the discussion of templates in Chapter 12. However, for now, just remember that you have to specify two parameters between the angle brackets. The first parameter represents the type of the elements in the array, and the second one represents the size of the array.
array<int, 3> arr = {9, 8, 7};cout << "Array size = " << arr.size() << endl;cout << "2nd element = " << arr[1] << endl;
If you want an array with a dynamic size, it is recommended to use std::vector, as explained in the next section. A vector automatically increases in size when you add new elements to it.
The C++ Standard Library provides a number of different non-fixed-size containers that can be used to store information. std::vector, declared in <vector>, is an example of such a container. The vector replaces the concept of C-style arrays with a much more flexible and safer mechanism. As a user, you need not worry about memory management, as the vector automatically allocates enough memory to hold its elements. A vector is dynamic, meaning that elements can be added and removed at run time. Chapter 17 goes into more detail regarding containers, but the basic use of a vector is straightforward, which is why it’s introduced in the beginning of this book so that it can be used in examples. The following code demonstrates the basic functionality of vector.
// Create a vector of integersvector<int> myVector = { 11, 22 };// Add some more integers to the vector using push_back()myVector.push_back(33);myVector.push_back(44);// Access elementscout << "1st element: " << myVector[0] << endl;
myVector is declared as vector<int>. The angle brackets are required to specify the template parameters, just as with std::array. A vector is a generic container. It can contain almost any kind of object; that’s why you have to specify the type of object you want in your vector between the angle brackets. Templates are discussed in detail in Chapters 12 and 22.
To add elements to a vector, you can use the push_back() method. Individual elements can be accessed using a similar syntax as for arrays, i.e. operator[].
Structured BindingsC++17 introduces the concept of structured bindings. Structured bindings allow you to declare multiple variables that are initialized with elements from an array, struct, pair, or tuple.
For example, assume you have the following array:
std::array<int, 3> values = { 11, 22, 33 };You can declare three variables, x, y, and z, initialized with the three values from the array as follows. Note that you have to use the auto keyword for structured bindings. You cannot, for example, specify int instead of auto.
auto [x, y, z] = values; The number of variables declared with the structured binding has to match the number of values in the expression on the right.
Structured bindings also work with structures if all non-static members are public. For example,
struct Point { double mX, mY, mZ; };Point point;point.mX = 1.0; point.mY = 2.0; point.mZ = 3.0;auto [x, y, z] = point;
Examples with std::pair and std::tuple are given in chapters 17 and 20 respectively.
Computers are great for doing the same thing over and over. C++ provides four looping mechanisms: the while loop, do/while loop, for loop, and range-based for loop.
The while loop lets you perform a block of code repeatedly as long as an expression evaluates to true. For example, the following completely silly code will output “This is silly.” five times:
int i = 0;while (i < 5) {std::cout << "This is silly." << std::endl;++i;}
The keyword break can be used within a loop to immediately get out of the loop and continue execution of the program. The keyword continue can be used to return to the top of the loop and reevaluate the while expression. However, using continue in loops is often considered poor style because it causes the execution of a program to jump around somewhat haphazardly, so use it sparingly.
C++ also has a variation on the while loop called do/while. It works similarly to the while loop, except that the code to be executed comes first, and the conditional check for whether or not to continue happens at the end. In this way, you can use a loop when you want a block of code to always be executed at least once and possibly additional times based on some condition. The example that follows outputs the statement, “This is silly.” once, even though the condition ends up being false:
int i = 100;do {std::cout << "This is silly." << std::endl;++i;} while (i < 5);
The for loop provides another syntax for looping. Any for loop can be converted to a while loop and vice versa. However, the for loop syntax is often more convenient because it looks at a loop in terms of a starting expression, an ending condition, and a statement to execute at the end of every iteration. In the following code, i is initialized to 0; the loop continues as long as i is less than 5; and at the end of every iteration, i is incremented by 1. This code does the same thing as the while loop example, but is more readable because the starting value, ending condition, and per-iteration statement are all visible on one line.
for (int i = 0; i < 5; ++i) {std::cout << "This is silly." << std::endl;}
The range-based for loop is the fourth looping mechanism. It allows for easy iteration over elements of a container. This type of loop works for C-style arrays, initializer lists (discussed later in this chapter), and any type that has begin() and end() methods returning iterators (see Chapter 17), such as std::array, std::vector, and all other Standard Library containers discussed in Chapter 17.
The following example first defines an array of four integers. The range-based for loop then iterates over a copy of every element in this array and prints each value. To iterate over the elements themselves without making copies, use a reference variable, as I discuss later in this chapter.
std::array<int, 4> arr = {1, 2, 3, 4};for (int i : arr) {std::cout << i << std::endl;}
Initializer lists are defined in the <initializer_list> header file and make it easy to write functions that can accept a variable number of arguments. The initializer_list class is a template and so it requires you to specify the type of elements in the list between angle brackets, similar to how you have to specify the type of object stored in a vector. The following example shows how to use an initializer list:
#include <initializer_list>using namespace std;int makeSum(initializer_list<int> lst){int total = 0;for (int value : lst) {total += value;}return total;}
The function makeSum() accepts an initializer list of integers as argument. The body of the function uses a range-based for loop to accumulate the total sum. This function can be used as follows:
int a = makeSum({1,2,3});int b = makeSum({10,20,30,40,50,60});
Initializer lists are type safe and define which type is allowed to be in the list. For the makeSum() function shown here, all elements of the initializer list must be integers. Trying to call it with a double results in a compiler error or warning, as shown here:
int c = makeSum({1,2,3.0});At this point, you have reviewed the basic essentials of C++ programming. If this section was a breeze, skim the next section to make sure that you are up to speed on the more-advanced material. If you struggled with this section, you may want to obtain one of the fine introductory C++ books mentioned in Appendix B before continuing.
Loops, variables, and conditionals are terrific building blocks, but there is much more to learn. The topics covered next include many features designed to help C++ programmers with their code as well as a few features that are often more confusing than helpful. If you are a C programmer with little C++ experience, you should read this section carefully.
There are three ways to work with strings of text in C++: the C-style, which represents strings as arrays of characters; the C++ style, which wraps that representation in an easier-to-use string type; and the general class of nonstandard approaches. Chapter 2 provides a detailed discussion.
For now, the only thing you need to know is that the C++ string type is defined in the <string> header file, and that you can use a C++ string almost like a basic type. Just like I/O streams, the string type lives in the std namespace. The following example shows that strings can be used just like character arrays:
string myString = "Hello, World";cout << "The value of myString is " << myString << endl;cout << "The second letter is " << myString[1] << endl;
Dynamic memory allows you to build programs with data that is not of fixed size at compile time. Most nontrivial programs make use of dynamic memory in some form.
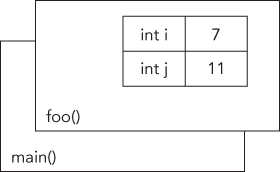
Memory in your C++ application is divided into two parts—the stack and the heap. One way to visualize the stack is as a deck of cards. The current top card represents the current scope of the program, usually the function that is currently being executed. All variables declared inside the current function will take up memory in the top stack frame, the top card of the deck. If the current function, which I’ll call foo(), calls another function bar(), a new card is put on the deck so that bar() has its own stack frame to work with. Any parameters passed from foo() to bar() are copied from the foo() stack frame into the bar() stack frame. Figure 1-2 shows what the stack might look like during the execution of a hypothetical function foo() that has declared two integer values.
Stack frames are nice because they provide an isolated memory workspace for each function. If a variable is declared inside the foo() stack frame, calling the bar() function won’t change it unless you specifically tell it to. Also, when the foo() function is done running, the stack frame goes away, and all of the variables declared within the function no longer take up memory. Variables that are stack-allocated do not need to be deallocated (deleted) by the programmer; it happens automatically.
The heap is an area of memory that is completely independent of the current function or stack frame. You can put variables on the heap if you want them to exist even when the function in which they were created has completed. The heap is less structured than the stack. You can think of it as just a pile of bits. Your program can add new bits to the pile at any time or modify bits that are already in the pile. You have to make sure that you deallocate (delete) any memory that you allocated on the heap. This does not happen automatically, unless you use smart pointers, which are discussed in the section “Smart Pointers.”
You can put anything on the heap by explicitly allocating memory for it. For example, to put an integer on the heap, you need to allocate memory for it, but first you need to declare a pointer:
int* myIntegerPointer;The * after the int type indicates that the variable you are declaring refers or points to some integer memory. Think of the pointer as an arrow that points at the dynamically allocated heap memory. It does not yet point to anything specific because you haven’t assigned it to anything; it is an uninitialized variable. Uninitialized variables should be avoided at all times, and especially uninitialized pointers because they point to some random place in memory. Working with such pointers will most likely make your program crash. That’s why you should always declare and initialize your pointers at the same time. You can initialize them to a null pointer (nullptr—for more information, see the “Null Pointer Constant” section) if you don’t want to allocate memory right away:
int* myIntegerPointer = nullptr;A null pointer is a special default value that no valid pointer will ever have, and converts to false when used in a Boolean expression. For example:
if (!myIntegerPointer) { /* myIntegerPointer is a null pointer */ }You use the new operator to allocate the memory:
myIntegerPointer = new int;In this case, the pointer points to the address of just a single integer value. To access this value, you need to dereference the pointer. Think of dereferencing as following the pointer’s arrow to the actual value on the heap. To set the value of the newly allocated heap integer, you would use code like the following:
*myIntegerPointer = 8;Notice that this is not the same as setting myIntegerPointer to the value 8. You are not changing the pointer; you are changing the memory that it points to. If you were to reassign the pointer value, it would point to the memory address 8, which is probably random garbage that will eventually make your program crash.
After you are finished with your dynamically allocated memory, you need to deallocate the memory using the delete operator. To prevent the pointer from being used after having deallocated the memory it points to, it’s recommended to set your pointer to nullptr:
delete myIntegerPointer;myIntegerPointer = nullptr;
Pointers don’t always point to heap memory. You can declare a pointer that points to a variable on the stack, even another pointer. To get a pointer to a variable, you use the & (“address of”) operator:
int i = 8;int* myIntegerPointer = &i; // Points to the variable with the value 8
C++ has a special syntax for dealing with pointers to structures. Technically, if you have a pointer to a structure, you can access its fields by first dereferencing it with *, then using the normal. syntax, as in the code that follows, which assumes the existence of a function called getEmployee().
Employee* anEmployee = getEmployee();cout << (*anEmployee).salary << endl;
This syntax is a little messy. The -> (arrow) operator lets you perform both the dereference and the field access in one step. The following code is equivalent to the preceding code, but is easier to read:
Employee* anEmployee = getEmployee();cout << anEmployee->salary << endl;
Remember the concept of short-circuiting logic, which was discussed earlier in this chapter? This can be useful in combination with pointers to avoid using an invalid pointer, as in the following example:
bool isValidSalary = (anEmployee && anEmployee->salary > 0);Or, a little bit more verbose:
bool isValidSalary = (anEmployee != nullptr && anEmployee->salary > 0);anEmployee is only dereferenced to get the salary if it is a valid pointer. If it is a null pointer, the logical operation short-circuits, and the anEmployee pointer is not dereferenced.
The heap can also be used to dynamically allocate arrays. You use the new[] operator to allocate memory for an array.
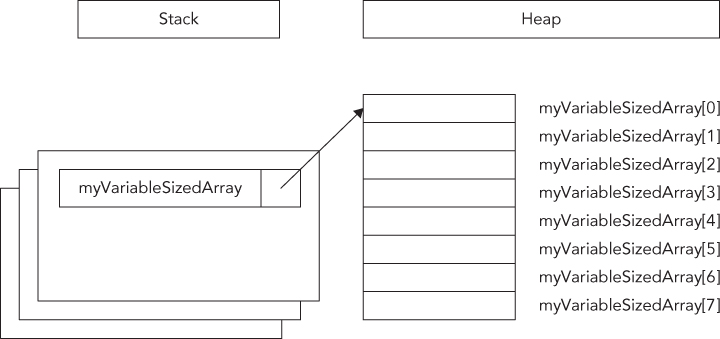
int arraySize = 8;int* myVariableSizedArray = new int[arraySize];
This allocates memory for enough integers to satisfy the arraySize variable. Figure 1-3 shows what the stack and the heap both look like after this code is executed. As you can see, the pointer variable still resides on the stack, but the array that was dynamically created lives on the heap.
Now that the memory has been allocated, you can work with myVariableSizedArray as though it were a regular stack-based array.
myVariableSizedArray[3] = 2;When your code is done with the array, it should remove the array from the heap so that other variables can use the memory. In C++, you use the delete[] operator to do this.
delete[] myVariableSizedArray;myVariableSizedArray = nullptr;
The brackets after delete indicate that you are deleting an array!
Before C++11, the constant NULL was used for null pointers. NULL is simply defined as the constant 0, and this can cause problems. Take the following example:
void func(char* str) {cout << "char* version" << endl;}void func(int i) {cout << "int version" << endl;}int main(){func(NULL);return 0;}
The main() function is calling func() with parameter NULL, which is supposed to be a null pointer constant. In other words, you are expecting the char* version of func() to be called with a null pointer as argument. However, since NULL is not a pointer, but identical to the integer 0, the integer version of func() is called.
This problem is solved with the introduction of a real null pointer constant, nullptr. The following code calls the char* version:
func(nullptr);To avoid common memory problems, you should use smart pointers instead of “raw,” also called “naked,” C-style pointers. Smart pointers automatically deallocate memory when the smart pointer object goes out of scope, for example, when the function has finished executing.
The following are the two most important smart pointer types in C++, both defined in <memory> and in the std namespace:
std::unique_ptrstd::shared_ptrunique_ptr is analogous to an ordinary pointer, except that it automatically frees the memory or resource when the unique_ptr goes out of scope or is deleted. As such, unique_ptr has sole ownership of the object pointed to. One advantage of a unique_ptr is that memory and resources are always freed, even when return statements are executed, or when exceptions (discussed later in this chapter) are thrown. This, for example, simplifies coding when a function has multiple return statements, because you don’t have to remember to free the resources before each return statement.
To create a unique_ptr, you should use std::make_unique<>(). For example, instead of writing the following,
Employee* anEmployee = new Employee;// …delete anEmployee;
you should write this:
auto anEmployee = make_unique<Employee>();Note that you do not call delete anymore; it happens automatically for you. The auto keyword is discussed in more detail in the “Type Inference” section later in this chapter. For now, it suffices to know that the auto keyword tells the compiler to automatically deduce the type of a variable, so that you don’t have to manually specify the full type.
unique_ptr is a generic smart pointer that can point to any kind of memory. That’s why it is a template. Templates require the angle brackets, <
>, to specify the template parameters. Between the brackets, you have to specify the type of memory you want your unique_ptr to point to. Templates are discussed in detail in Chapters 12 and 22, but the smart pointers are introduced in Chapter 1 so that they can be used throughout the book—and as you will see, they are easy to use.
make_unique() has been available since C++14. If your compiler is not yet C++14 compliant, you can make your unique_ptr as follows (note that you now have to specify the type, Employee, twice):
unique_ptr<Employee> anEmployee(new Employee);You can use the anEmployee smart pointer in the same way as a normal pointer, for example:
if (anEmployee) {cout << "Salary: " << anEmployee->salary << endl;}
A unique_ptr can also be used to store a C-style array. The following example creates an array of ten Employee instances, stores it in a unique_ptr, and shows how to access an element from the array:
auto employees = make_unique<Employee[]>(10);cout << "Salary: " << employees[0].salary << endl;
shared_ptr allows for distributed ownership of the data. Each time a shared_ptr is assigned, a reference count is incremented indicating there is one more owner of the data. When a shared_ptr goes out of scope, the reference count is decremented. When the reference count goes to zero, it means there is no longer any owner of the data, and the object referenced by the pointer is freed.
To create a shared_ptr, you should use std::make_shared<>(), which is similar to make_unique<>():
auto anEmployee = make_shared<Employee>();if (anEmployee) {cout << "Salary: " << anEmployee->salary << endl;}
Starting with C++17, you can also store an array in a shared_ptr, whereas older versions of C++ did not allow this. Note however that make_shared<>() of C++17 cannot be used in this case. Here is an example:
shared_ptr<Employee[]> employees(new Employee[10]);cout << "Salary: " << employees[0].salary << endl;
Chapter 7 discusses memory management and smart pointers in more details, but because the basic use of unique_ptr and shared_ptr is straightforward, they are already used in examples throughout this book.
The keyword const can be used in several different ways in C++. All of its uses are related, but there are subtle differences. The subtleties of const make for excellent interview questions! Chapter 11 explains in detail all the ways that const can be used. This section outlines two common use-cases.
If you assumed that the keyword const has something to do with constants, you have correctly uncovered one of its uses. In the C language, programmers often use the preprocessor #define mechanism to declare symbolic names for values that won’t change during the execution of the program, such as the version number. In C++, programmers are encouraged to avoid #define in favor of using const to define constants. Defining a constant with const is just like defining a variable, except that the compiler guarantees that code cannot change the value.
const int versionNumberMajor = 2;const int versionNumberMinor = 1;const std::string productName = "Super Hyper Net Modulator";
In C++, you can cast a non-const variable to a const variable. Why would you want to do this? It offers some degree of protection from other code changing the variable. If you are calling a function that a coworker of yours is writing, and you want to ensure that the function doesn’t change the value of a parameter you pass in, you can tell your coworker to have the function take a const parameter. If the function attempts to change the value of the parameter, it will not compile.
In the following code, a string* is automatically cast to a const string* in the call to mysteryFunction(). If the author of mysteryFunction() attempts to change the value of the passed string, the code will not compile. There are ways around this restriction, but using them requires conscious effort. C++ only protects against accidentally changing const variables.
void mysteryFunction(const std::string* someString){*someString = "Test"; // Will not compile.}int main(){std::string myString = "The string";mysteryFunction(&myString);return 0;}
A reference in C++ allows you to give another name to an existing variable. For example:
int x = 42;int& xReference = x;
Attaching & to a type indicates that the variable is a reference. It is still used as though it was a normal variable, but behind the scenes, it is really a pointer to the original variable. Both the variable x and the reference variable xReference point to exactly the same value. If you change the value through either one of them, the change is visible through the other one as well.
Normally, when you pass a variable into a function, you are passing by value. If a function takes an integer parameter, it is really a copy of the integer that you pass in, so you cannot modify the value of the original variable. Pointers to stack variables are often used in C to allow functions to modify variables in other stack frames. By dereferencing the pointer, the function can change the memory that represents the variable even though that variable isn’t in the current stack frame. The problem with this approach is that it brings the messiness of pointer syntax into what is really a simple task.
Instead of passing pointers to functions, C++ offers a better mechanism, called pass by reference, where parameters are references instead of pointers. Following are two implementations of an addOne() function. The first one has no effect on the variable that is passed in because it is passed by value and thus the function receives a copy of the value passed to it. The second one uses a reference and thus changes the original variable.
void addOne(int i){i++; // Has no real effect because this is a copy of the original}void addOne(int& i){i++; // Actually changes the original variable}
The syntax for the call to the addOne() function with an integer reference is no different than if the function just took an integer:
int myInt = 7;addOne(myInt);
If you have a function that needs to return a big structure or class (discussed later in this chapter) that is expensive to copy, you’ll often see the function taking a non-const reference to such a structure or class which the function then modifies, instead of directly returning it. This was the recommended way a long time ago to prevent the performance penalty of creating a copy when you return the structure or class from the function. Since C++11, this is not necessary anymore. Thanks to move semantics, directly returning structures or classes from functions is efficient without any copying. Move semantics is discussed in detail in Chapter 9.
You will often find code that uses const reference parameters for functions. At first, that seems like a contradiction. Reference parameters allow you to change the value of a variable from within another context. const seems to prevent such changes.
The main value in const reference parameters is efficiency. When you pass a value into a function, an entire copy is made. When you pass a reference, you are really just passing a pointer to the original so the computer doesn’t need to make a copy. By passing a const reference, you get the best of both worlds: no copy is made but the original variable cannot be changed.
const references become more important when you are dealing with objects because they can be large and making copies of them can have unwanted side effects. Subtle issues like this are covered in Chapter 11. The following example shows how to pass an std::string to a function as a const reference:
void printString(const std::string& myString){std::cout << myString << std::endl;}int main(){std::string someString = "Hello World";printString(someString);printString("Hello World"); // Passing literals worksreturn 0;}
C++ is a very flexible language, but not a particularly safe one. The compiler will let you write code that scribbles on random memory addresses or tries to divide by zero (computers don’t deal well with infinity). One language feature that attempts to add a degree of safety back to the language is exceptions.
An exception is an unexpected situation. For example, if you are writing a function that retrieves a web page, several things could go wrong. The Internet host that contains the page might be down, the page might come back blank, or the connection could be lost. One way you could handle this situation is by returning a special value from the function, such as nullptr or an error code. Exceptions provide a much better mechanism for dealing with problems.
Exceptions come with some new terminology. When a piece of code detects an exceptional situation, it throws an exception. Another piece of code catches the exception and takes appropriate action. The following example shows a function, divideNumbers(), that throws an exception if the caller passes in a denominator of zero. The use of std::invalid_argument requires <stdexcept>.
double divideNumbers(double numerator, double denominator){if (denominator == 0) {throw invalid_argument("Denominator cannot be 0.");}return numerator / denominator;}
When the throw line is executed, the function immediately ends without returning a value. If the caller surrounds the function call with a try/catch block, as shown in the following code, it receives the exception and is able to handle it:
try {cout << divideNumbers(2.5, 0.5) << endl;cout << divideNumbers(2.3, 0) << endl;cout << divideNumbers(4.5, 2.5) << endl;} catch (const invalid_argument& exception) {cout << "Exception caught: " << exception.what() << endl;}
The first call to divideNumbers() executes successfully, and the result is output to the user. The second call throws an exception. No value is returned, and the only output is the error message that is printed when the exception is caught. The third call is never executed because the second call throws an exception, causing the program to jump to the catch block. The output for the preceding block of code is as follows:
5An exception was caught: Denominator cannot be 0.
Exceptions can get tricky in C++. To use exceptions properly, you need to understand what happens to the stack variables when an exception is thrown, and you have to be careful to properly catch and handle the necessary exceptions. Also, the preceding example uses the built-in std::invalid_argument type, but it is preferable to write your own exception types that are more specific to the error being thrown. Lastly, the C++ compiler doesn’t force you to catch every exception that might occur. If your code never catches any exceptions but an exception is thrown, it will be caught by the program itself, which will be terminated. These trickier aspects of exceptions are covered in much more detail in Chapter 14.
Type inference allows the compiler to automatically deduce the type of an expression. There are two keywords for type inference: auto and decltype.
The auto keyword has a number of completely different uses:
decltype(auto), see Chapter 12.auto can be used to tell the compiler to automatically deduce the type of a variable at compile time. The following line shows the simplest use of the auto keyword in that context:
auto x = 123; // x will be of type intIn this example, you don’t win much by typing auto instead of int; however, it becomes useful for more complicated types. Suppose you have a function called getFoo() that has a complicated return type. If you want to assign the result of calling getFoo() to a variable, you can spell out the complicated type, or you can simply use auto and let the compiler figure it out:
auto result = getFoo();This has the added benefit that you can easily change the function’s return type without having to update all the places in the code where that function is called.
However, using auto to deduce the type of an expression strips away reference and const qualifiers. Suppose you have the following function:
#include <string>const std::string message = "Test";const std::string& foo(){return message;}
You can call foo() and store the result in a variable with the type specified as auto, as follows:
auto f1 = foo();Because auto strips away reference and const qualifiers, f1 is of type string, and thus a copy is made. If you want a const reference, you can explicitly make it a reference and mark it const, as follows:
const auto& f2 = foo();The decltype keyword takes an expression as argument, and computes the type of that expression, as shown here:
int x = 123;decltype(x) y = 456;
In this example, the compiler deduces the type of y to be int because that is the type of x.
The difference between auto and decltype is that decltype does not strip reference and const qualifiers. Take again the function foo() returning a const reference to a string. Defining f2 using decltype as follows results in f2 being of type const string&, and thus no copy is made.
decltype(foo()) f2 = foo();On first sight, decltype doesn’t seem to add much value. However, it is pretty powerful in the context of templates, discussed in Chapters 12 and 22.
If you are a C programmer, you may have viewed the features covered so far in this chapter as convenient additions to the C language. As the name C++ implies, in many ways the language is just a “better C.” There is one major point that this view overlooks: unlike C, C++ is an object-oriented language.
Object-oriented programming (OOP) is a very different, arguably more natural, way to write code. If you are used to procedural languages such as C or Pascal, don’t worry. Chapter 5 covers all the background information you need to know to shift your mindset to the object-oriented paradigm. If you already know the theory of OOP, the rest of this section will get you up to speed (or refresh your memory) on basic C++ object syntax.
A class defines the characteristics of an object. In C++, classes are usually defined in a header file (.h), while their definitions usually are in a corresponding source file (.cpp).
A basic class definition for an airline ticket class is shown in the following example. The class can calculate the price of the ticket based on the number of miles in the flight and whether or not the customer is a member of the “Elite Super Rewards Program.” The definition begins by declaring the class name. Inside a set of curly braces, the data members (properties) of the class and its methods (behaviors) are declared. Each data member and method is associated with a particular access level: public, protected, or private. These labels can occur in any order and can be repeated. Members that are public can be accessed from outside the class, while members that are private cannot be accessed from outside the class. It’s recommended to make all your data members private, and if needed, to give access to them with public getters and setters. This way, you can easily change the representation of your data while keeping the public interface the same. The use of protected is explained in the context of inheritance in Chapters 5 and 10.
#include <string>class AirlineTicket{public:AirlineTicket();~AirlineTicket();double calculatePriceInDollars() const;const std::string& getPassengerName() const;void setPassengerName(const std::string& name);int getNumberOfMiles() const;void setNumberOfMiles(int miles);bool hasEliteSuperRewardsStatus() const;void setHasEliteSuperRewardsStatus(bool status);private:std::string mPassengerName;int mNumberOfMiles;bool mHasEliteSuperRewardsStatus;};
This book follows the convention to prefix each data member of a class with a lowercase ‘m’, such as mPassengerName.
The method that has the same name as the class with no return type is a constructor. It is automatically called when an object of the class is created. The method with a tilde (~) character followed by the class name is a destructor. It is automatically called when the object is destroyed.
There are two ways of initializing data members with a constructor. The recommended way is to use a constructor initializer, which follows a colon after the constructor name. Here is the AirlineTicket constructor with a constructor initializer:
AirlineTicket::AirlineTicket(): mPassengerName("Unknown Passenger"), mNumberOfMiles(0), mHasEliteSuperRewardsStatus(false){}
A second way is to put the initializations in the body of the constructor, as shown here:
AirlineTicket::AirlineTicket(){// Initialize data membersmPassengerName = "Unknown Passenger";mNumberOfMiles = 0;mHasEliteSuperRewardsStatus = false;}
If the constructor is only initializing data members without doing anything else, then there is no real need for a constructor because data members can be initialized directly inside the class definition. For example, instead of writing an AirlineTicket constructor, you can modify the definition of the data members in the class definition as follows:
private:std::string mPassengerName = "Unknown Passenger";int mNumberOfMiles = 0;bool mHasEliteSuperRewardsStatus = false;
If your class additionally needs to perform some other types of initialization, such as opening a file, allocating memory, and so on, then you still need to write a constructor to handle those.
Here is the destructor for the AirlineTicket class:
AirlineTicket::~AirlineTicket(){// Nothing much to do in terms of cleanup}
This destructor doesn’t do anything, and can simply be removed from this class. It is just shown here so you know the syntax of destructors. Destructors are required if you need to perform some cleanup, such as closing files, freeing memory, and so on. Chapters 8 and 9 discuss destructors in more detail.
The definitions of some of the AirlineTicket class methods are shown here:
double AirlineTicket::calculatePriceInDollars() const{if (hasEliteSuperRewardsStatus()) {// Elite Super Rewards customers fly for free!return 0;}// The cost of the ticket is the number of miles times 0.1.// Real airlines probably have a more complicated formula!return getNumberOfMiles() * 0.1;}const string& AirlineTicket::getPassengerName() const{return mPassengerName;}void AirlineTicket::setPassengerName(const string& name){mPassengerName = name;}// Other get and set methods omitted for brevity.
The following sample program makes use of the AirlineTicket class. This example shows the creation of a stack-based AirlineTicket object as well as a heap-based one:
AirlineTicket myTicket; // Stack-based AirlineTicketmyTicket.setPassengerName("Sherman T. Socketwrench");myTicket.setNumberOfMiles(700);double cost = myTicket.calculatePriceInDollars();cout << "This ticket will cost $" << cost << endl;// Heap-based AirlineTicket with smart pointerauto myTicket2 = make_unique<AirlineTicket>();myTicket2->setPassengerName("Laudimore M. Hallidue");myTicket2->setNumberOfMiles(2000);myTicket2->setHasEliteSuperRewardsStatus(true);double cost2 = myTicket2->calculatePriceInDollars();cout << "This other ticket will cost $" << cost2 << endl;// No need to delete myTicket2, happens automatically// Heap-based AirlineTicket without smart pointer (not recommended)AirlineTicket* myTicket3 = new AirlineTicket();// … Use ticket 3delete myTicket3; // delete the heap object!
The preceding example exposes you to the general syntax for creating and using classes. Of course, there is much more to learn. Chapters 8, 9, and 10 go into more depth about the specific C++ mechanisms for defining classes.
Before C++11, initialization of types was not always uniform. For example, take the following definition of a circle, once as a structure, and once as a class:
struct CircleStruct{int x, y;double radius;};class CircleClass{public:CircleClass(int x, int y, double radius): mX(x), mY(y), mRadius(radius) {}private:int mX, mY;double mRadius;};
In pre-C++11, initialization of a variable of type CircleStruct and a variable of type CircleClass looks different:
CircleStruct myCircle1 = {10, 10, 2.5};CircleClass myCircle2(10, 10, 2.5);
For the structure version, you can use the {…} syntax. However, for the class version, you need to call the constructor using function notation (…).
Since C++11, you can more uniformly use the {…} syntax to initialize types, as follows:
CircleStruct myCircle3 = {10, 10, 2.5};CircleClass myCircle4 = {10, 10, 2.5};
The definition of myCircle4 automatically calls the constructor of CircleClass. Even the use of the equal sign is optional, so the following is identical:
CircleStruct myCircle5{10, 10, 2.5};CircleClass myCircle6{10, 10, 2.5};
Uniform initialization is not limited to structures and classes. You can use it to initialize anything in C++. For example, the following code initializes all four variables with the value 3:
int a = 3;int b(3);int c = {3}; // Uniform initializationint d{3}; // Uniform initialization
Uniform initialization can be used to perform zero-initialization* of variables; you just specify an empty set of curly braces, as shown here:
int e{}; // Uniform initialization, e will be 0Using uniform initialization prevents narrowing. C++ implicitly performs narrowing, as shown here:
void func(int i) { /* … */ }int main(){int x = 3.14;func(3.14);}
In both cases, C++ automatically truncates 3.14 to 3 before assigning it to x or calling func(). Note that some compilers might issue a warning about this narrowing, while others won’t. With uniform initialization, both the assignment to x and the call to func() must generate a compiler error if your compiler fully conforms to the C++11 standard:
void func(int i) { /* … */ }int main(){int x = {3.14}; // Error because narrowingfunc({3.14}); // Error because narrowing}
Uniform initialization can be used to initialize dynamically allocated arrays, as shown here:
int* pArray = new int[4]{0, 1, 2, 3};It can also be used in the constructor initializer to initialize arrays that are members of a class.
class MyClass{public:MyClass() : mArray{0, 1, 2, 3} {}private:int mArray[4];};
Uniform initialization can be used with the Standard Library containers as well—such as the std::vector, as demonstrated later in this chapter.
There are two types of initialization that use braced initializer lists:
T obj = {arg1, arg2, …};T obj {arg1, arg2, …};In combination with auto type deduction, there is an important difference between copy- and direct list initialization introduced with C++17.
Starting with C++17, you have the following results:
// Copy list initializationauto a = {11}; // initializer_list<int>auto b = {11, 22}; // initializer_list<int>// Direct list initializationauto c {11}; // intauto d {11, 22}; // Error, too many elements.
Note that for copy list initialization, all the elements in the braced initializer must be of the same type. For example, the following does not compile:
auto b = {11, 22.33}; // Compilation errorIn earlier versions of the standard (C++11/14), both copy- and direct list initialization deduce an initializer_list<>:
// Copy list initializationauto a = {11}; // initializer_list<int>auto b = {11, 22}; // initializer_list<int>// Direct list initializationauto c {11}; // initializer_list<int>auto d {11, 22}; // initializer_list<int>
C++ comes with a Standard Library, which contains a lot of useful classes that can easily be used in your code. The benefit of using these classes is that you don’t need to reinvent certain classes and you don’t need to waste time on implementing things that have already been implemented for you. Another benefit is that the classes available in the Standard Library are heavily tested and verified for correctness by thousands of users. The Standard Library classes are also tuned for high performance, so using them will most likely result in better performance compared to making your own implementation.
A lot of functionality is available to you in the Standard Library. Chapters 16 to 20 provide more details; however, when you start working with C++ it is a good idea to understand what the Standard Library can do for you from the very beginning. This is especially important if you are a C programmer. As a C programmer, you might try to solve problems in C++ the same way you would solve them in C. However, in C++ there is probably an easier and safer solution to the problem that involves using Standard Library classes.
You already saw some Standard Library classes earlier in this chapter—for example, std::string, std::array, std::vector, std::unique_ptr, and std::shared_ptr. Many more classes are introduced in Chapters 16 to 20.
The following program builds on the employee database example used earlier in the discussion on structs. This time, you will end up with a fully functional C++ program that uses many of the features discussed in this chapter. This real-world example includes the use of classes, exceptions, streams, vectors, namespaces, references, and other language features.
A program to manage a company’s employee records needs to be flexible and have useful features. The feature set for this program includes the following abilities:
The design for this program divides the code into three parts. The Employee class encapsulates the information describing a single employee. The Database class manages all the employees of the company. A separate UserInterface file provides the interactivity of the program.
The Employee class maintains all the information about an employee. Its methods provide a way to query and change that information. Employees also know how to display themselves on the console. Methods also exist to adjust the employee’s salary and employment status.
The Employee.h file defines the Employee class. The sections of this file are described individually in the text that follows.
The first line contains a #pragma once to prevent the file from being included multiple times, followed by the inclusion of the string functionality.
This code also declares that the subsequent code, contained within the curly braces, lives in the Records namespace. Records is the namespace that is used throughout this program for application-specific code.
#pragma once#include <string>namespace Records {
The following constant, representing the default starting salary for new employees, lives in the Records namespace. Other code that lives in Records can access this constant as kDefaultStartingSalary. Elsewhere, it must be referenced as Records::kDefaultStartingSalary.
const int kDefaultStartingSalary = 30000;Note that this book uses the convention to prefix constants with a lowercase ‘k’, from the German “Konstant,” meaning “Constant.”
The Employee class is defined, along with its public methods. The promote() and demote() methods both have integer parameters that are specified with a default value. In this way, other code can omit the integer parameters and the default will automatically be used.
A number of setters and getters provide mechanisms to change the information about an employee or to query the current information about an employee.
The Employee class includes an explicitly defaulted constructor, as discussed in Chapter 8. It also includes a constructor that accepts a first and last name.
class Employee{public:Employee() = default;Employee(const std::string& firstName,const std::string& lastName);void promote(int raiseAmount = 1000);void demote(int demeritAmount = 1000);void hire(); // Hires or rehires the employeevoid fire(); // Dismisses the employeevoid display() const;// Outputs employee info to console// Getters and settersvoid setFirstName(const std::string& firstName);const std::string& getFirstName() const;void setLastName(const std::string& lastName);const std::string& getLastName() const;void setEmployeeNumber(int employeeNumber);int getEmployeeNumber() const;void setSalary(int newSalary);int getSalary() const;bool isHired() const;
Finally, the data members are declared as private so that other parts of the code cannot modify them directly. The setters and getters provide the only public way of modifying or querying those values. The data members are also initialized here instead of in a constructor. By default, new employees have no name, an employee number of -1, the default starting salary, and a status of not hired.
private:std::string mFirstName;std::string mLastName;int mEmployeeNumber = -1;int mSalary = kDefaultStartingSalary;bool mHired = false;};}
The constructor accepting a first and last name just sets the corresponding data members:
#include <iostream>#include "Employee.h"using namespace std;namespace Records {Employee::Employee(const std::string& firstName,const std::string& lastName): mFirstName(firstName), mLastName(lastName){}
The promote() and demote() methods simply call the setSalary() method with a new value. Note that the default values for the integer parameters do not appear in the source file; they are only allowed in a function declaration, not in a definition.
void Employee::promote(int raiseAmount){setSalary(getSalary() + raiseAmount);}void Employee::demote(int demeritAmount){setSalary(getSalary() - demeritAmount);}
The hire() and fire() methods just set the mHired data member appropriately.
void Employee::hire(){mHired = true;}void Employee::fire(){mHired = false;}
The display() method uses the console output stream to display information about the current employee. Because this code is part of the Employee class, it could access data members, such as mSalary, directly instead of using getters, such as getSalary(). However, it is considered good style to make use of getters and setters when they exist, even within the class.
void Employee::display() const{cout << "Employee: " << getLastName() << ", " << getFirstName() << endl;cout << "-------------------------" << endl;cout << (isHired() ? "Current Employee" : "Former Employee") << endl;cout << "Employee Number: " << getEmployeeNumber() << endl;cout << "Salary: $" << getSalary() << endl;cout << endl;}
A number of getters and setters perform the task of getting and setting values. Even though these methods seem trivial, it’s better to have trivial getters and setters than to make your data members public. For example, in the future, you may want to perform bounds checking in the setSalary() method. Getters and setters also make debugging easier because you can insert a breakpoint in them to inspect values when they are retrieved or set. Another reason is that when you decide to change how you are storing the data in your class, you only need to modify these getters and setters.
// Getters and settersvoid Employee::setFirstName(const string& firstName){mFirstName = firstName;}const string& Employee::getFirstName() const{return mFirstName;}// … other getters and setters omitted for brevity}
As you write individual classes, it is often useful to test them in isolation. The following code includes a main() function that performs some simple operations using the Employee class. Once you are confident that the Employee class works, you should remove or comment-out this file so that you don’t attempt to compile your code with multiple main() functions.
#include <iostream>#include "Employee.h"using namespace std;using namespace Records;int main(){cout << "Testing the Employee class." << endl;Employee emp;emp.setFirstName("John");emp.setLastName("Doe");emp.setEmployeeNumber(71);emp.setSalary(50000);emp.promote();emp.promote(50);emp.hire();emp.display();return 0;}
Another way of testing individual classes is with unit testing, which is discussed in Chapter 26.
The Database class uses the std::vector class from the Standard Library to store Employee objects.
Because the database will take care of automatically assigning an employee number to a new employee, a constant defines where the numbering begins.
#pragma once#include <iostream>#include <vector>#include "Employee.h"namespace Records {const int kFirstEmployeeNumber = 1000;
The database provides an easy way to add a new employee by providing a first and last name. For convenience, this method returns a reference to the new employee. External code can also get an employee reference by calling the getEmployee() method. Two versions of this method are declared. One allows retrieval by employee number. The other requires a first and last name.
class Database{public:Employee& addEmployee(const std::string& firstName,const std::string& lastName);Employee& getEmployee(int employeeNumber);Employee& getEmployee(const std::string& firstName,const std::string& lastName);
Because the database is the central repository for all employee records, it has methods that output all employees, the employees who are currently hired, and the employees who are no longer hired.
void displayAll() const;void displayCurrent() const;void displayFormer() const;
mEmployees contains the Employee objects. The mNextEmployeeNumber data member keeps track of what employee number is assigned to a new employee, and is initialized with the kFirstEmployeeNumber constant.
private:std::vector<Employee> mEmployees;int mNextEmployeeNumber = kFirstEmployeeNumber;};}
The addEmployee() method creates a new Employee object, fills in its information, and adds it to the vector. The mNextEmployeeNumber data member is incremented after its use so that the next employee will get a new number.
#include <iostream>#include <stdexcept>#include "Database.h"using namespace std;namespace Records {Employee& Database::addEmployee(const string& firstName,const string& lastName){Employee theEmployee(firstName, lastName);theEmployee.setEmployeeNumber(mNextEmployeeNumber++);theEmployee.hire();mEmployees.push_back(theEmployee);return mEmployees[mEmployees.size() - 1];}
Only one version of getEmployee() is shown. Both versions work in similar ways. The methods loop over all employees in mEmployees using range-based for loops, and check to see if an Employee is a match for the information passed to the method. An exception is thrown if no match is found.
Employee& Database::getEmployee(int employeeNumber){for (auto& employee : mEmployees) {if (employee.getEmployeeNumber() == employeeNumber) {return employee;}}throw logic_error("No employee found.");}
The display methods all use a similar algorithm. They loop through all employees and tell each employee to display itself to the console if the criterion for display matches. displayFormer() is similar to displayCurrent().
void Database::displayAll() const{for (const auto& employee : mEmployees) {employee.display();}}void Database::displayCurrent() const{for (const auto& employee : mEmployees) {if (employee.isHired())employee.display();}}}
A simple test for the basic functionality of the database is shown here:
#include <iostream>#include "Database.h"using namespace std;using namespace Records;int main(){Database myDB;Employee& emp1 = myDB.addEmployee("Greg", "Wallis");emp1.fire();Employee& emp2 = myDB.addEmployee("Marc", "White");emp2.setSalary(100000);Employee& emp3 = myDB.addEmployee("John", "Doe");emp3.setSalary(10000);emp3.promote();cout << "all employees: " << endl << endl;myDB.displayAll();cout << endl << "current employees: " << endl << endl;myDB.displayCurrent();cout << endl << "former employees: " << endl << endl;myDB.displayFormer();}
The final part of the program is a menu-based user interface that makes it easy for users to work with the employee database.
The main() function is a loop that displays the menu, performs the selected action, then does it all again. For most actions, separate functions are defined. For simpler actions, like displaying employees, the actual code is put in the appropriate case.
#include <iostream>#include <stdexcept>#include <exception>#include "Database.h"using namespace std;using namespace Records;int displayMenu();void doHire(Database& db);void doFire(Database& db);void doPromote(Database& db);void doDemote(Database& db);int main(){Database employeeDB;bool done = false;while (!done) {int selection = displayMenu();switch (selection) {case 0:done = true;break;case 1:doHire(employeeDB);break;case 2:doFire(employeeDB);break;case 3:doPromote(employeeDB);break;case 4:employeeDB.displayAll();break;case 5:employeeDB.displayCurrent();break;case 6:employeeDB.displayFormer();break;default:cerr << "Unknown command." << endl;break;}}return 0;}
The displayMenu() function outputs the menu and gets input from the user. One important note is that this code assumes that the user will “play nice” and type a number when a number is requested. When you read about I/O in Chapter 13, you will learn how to protect against bad input.
int displayMenu(){int selection;cout << endl;cout << "Employee Database" << endl;cout << "-----------------" << endl;cout << "1) Hire a new employee" << endl;cout << "2) Fire an employee" << endl;cout << "3) Promote an employee" << endl;cout << "4) List all employees" << endl;cout << "5) List all current employees" << endl;cout << "6) List all former employees" << endl;cout << "0) Quit" << endl;cout << endl;cout << "---> ";cin >> selection;return selection;}
The doHire() function gets the new employee’s name from the user and tells the database to add the employee.
void doHire(Database& db){string firstName;string lastName;cout << "First name? ";cin >> firstName;cout << "Last name? ";cin >> lastName;db.addEmployee(firstName, lastName);}
doFire() and doPromote() both ask the database for an employee by their employee number and then use the public methods of the Employee object to make changes.
void doFire(Database& db){int employeeNumber;cout << "Employee number? ";cin >> employeeNumber;try {Employee& emp = db.getEmployee(employeeNumber);emp.fire();cout << "Employee " << employeeNumber << " terminated." << endl;} catch (const std::logic_error& exception) {cerr << "Unable to terminate employee: " << exception.what() << endl;}}void doPromote(Database& db){int employeeNumber;int raiseAmount;cout << "Employee number? ";cin >> employeeNumber;cout << "How much of a raise? ";cin >> raiseAmount;try {Employee& emp = db.getEmployee(employeeNumber);emp.promote(raiseAmount);} catch (const std::logic_error& exception) {cerr << "Unable to promote employee: " << exception.what() << endl;}}
The preceding program covers a number of topics from the very simple to the relatively complex. There are a number of ways that you could extend this program. For example, the user interface does not expose all of the functionality of the Database or Employee classes. You could modify the UI to include those features. You could also change the Database class to remove fired employees from mEmployees.
If there are parts of this program that don’t make sense, consult the preceding sections to review those topics. If something is still unclear, the best way to learn is to play with the code and try things out. For example, if you’re not sure how to use the conditional operator, write a short main() function that uses it.
Now that you know the fundamentals of C++, you are ready to become a professional C++ programmer. When you start getting deeper into the C++ language later in this book, you can refer to this chapter to brush up on parts of the language you may need to review. Going back to some of the sample code in this chapter may be all you need to bring a forgotten concept back to the forefront of your mind.
The next chapter goes deeper in on how strings are handled in C++, because every program you write will have to work with strings one way or another.
Strings in languages that have supported them as first-class objects tend to have a number of attractive features, such as being able to expand to any size, or to have sub-strings extracted or replaced. In other languages, such as C, strings were almost an afterthought; there was no really good “string” data type, just fixed arrays of bytes. The “string library” was nothing more than a collection of rather primitive functions without even bounds checking. C++ provides a string type as a first-class data type.
In the C language, strings are represented as an array of characters. The last character of a string is a null character (‘\0’) so that code operating on the string can determine where it ends. This null character is officially known as NUL, spelled with one L, not two. NUL is not the same as the NULL pointer. Even though C++ provides a better string abstraction, it is important to understand the C technique for strings because they still arise in C++ programming. One of the most common situations is where a C++ program has to call a C-based interface in some third-party library or as part of interfacing to the operating system.
By far, the most common mistake that programmers make with C strings is that they forget to allocate space for the ‘\0’ character. For example, the string “hello” appears to be five characters long, but six characters worth of space are needed in memory to store the value, as shown in Figure 2-1.

C++ contains several functions from the C language that operate on strings. These functions are defined in the <cstring> header. As a general rule of thumb, these functions do not handle memory allocation. For example, the strcpy() function takes two strings as parameters. It copies the second string onto the first, whether it fits or not. The following code attempts to build a wrapper around strcpy() that allocates the correct amount of memory and returns the result, instead of taking in an already allocated string. It uses the strlen() function to obtain the length of the string. The caller is responsible for freeing the memory allocated by copyString().
char* copyString(const char* str){char* result = new char[strlen(str)]; // BUG! Off by one!strcpy(result, str);return result;}
The copyString() function as written is incorrect. The strlen() function returns the length of the string, not the amount of memory needed to hold it. For the string “hello”, strlen() returns 5, not 6. The proper way to allocate memory for a string is to add 1 to the amount of space needed for the actual characters. It seems a bit unnatural to have +1 all over the place. Unfortunately, that’s how it works, so keep this in mind when you work with C-style strings. The correct implementation is as follows:
char* copyString(const char* str){char* result = new char[strlen(str) + 1];strcpy(result, str);return result;}
One way to remember that strlen()returns only the number of actual characters in the string is to consider what would happen if you were allocating space for a string made up of several other strings. For example, if your function took in three strings and returned a string that was the concatenation of all three, how big would it be? To hold exactly enough space, it would be the length of all three strings, added together, plus one space for the trailing ‘\0’ character. If strlen() included the ‘\0’ in the length of the string, the allocated memory would be too big. The following code uses the strcpy() and strcat() functions to perform this operation. The cat in strcat() stands for concatenate.
char* appendStrings(const char* str1, const char* str2, const char* str3){char* result = new char[strlen(str1) + strlen(str2) + strlen(str3) + 1];strcpy(result, str1);strcat(result, str2);strcat(result, str3);return result;}
The sizeof() operator in C and C++ can be used to get the size of a certain data type or variable. For example, sizeof(char) returns 1 because a char has a size of 1 byte. However, in the context of C-style strings, sizeof() is not the same as strlen(). You should never use sizeof() to try to get the size of a string. It returns different sizes depending on how the C-style string is stored. If it is stored as a char[], then sizeof() returns the actual memory used by the string, including the ‘\0’ character, as in this example:
char text1[] = "abcdef";size_t s1 = sizeof(text1); // is 7size_t s2 = strlen(text1); // is 6
However, if the C-style string is stored as a char*, then sizeof() returns the size of a pointer!
const char* text2 = "abcdef";size_t s3 = sizeof(text2); // is platform-dependentsize_t s4 = strlen(text2); // is 6
Here, s3 will be 4 when compiled in 32-bit mode, and 8 when compiled in 64-bit mode because it is returning the size of a const char*, which is a pointer.
A complete list of C functions to operate on strings can be found in the <cstring> header file.
You’ve probably seen strings written in a C++ program with quotes around them. For example, the following code outputs the string hello by including the string itself, not a variable that contains it:
cout << "hello" << endl;In the preceding line, “hello” is a string literal because it is written as a value, not a variable. String literals are actually stored in a read-only part of memory. This allows the compiler to optimize memory usage by reusing references to equivalent string literals. That is, even if your program uses the string literal “hello” 500 times, the compiler is allowed to create just one instance of hello in memory. This is called literal pooling.
String literals can be assigned to variables, but because string literals are in a read-only part of memory and because of the possibility of literal pooling, assigning them to variables can be risky. The C++ standard officially says that string literals are of type “array of n const char”; however, for backward compatibility with older non-const-aware code, most compilers do not enforce your program to assign a string literal to a variable of type const char*. They let you assign a string literal to a char* without const, and the program will work fine unless you attempt to change the string. Generally, the behavior of modifying string literals is undefined. It could, for example, cause a crash, or it could keep working with seemingly inexplicable side effects, or the modification could silently be ignored, or it could just work; it all depends on your compiler. For example, the following code exhibits undefined behavior:
char* ptr = "hello"; // Assign the string literal to a variable.ptr[1] = 'a'; // Undefined behavior!
A much safer way to code is to use a pointer to const characters when referring to string literals. The following code contains the same bug, but because it assigned the literal to a const char*, the compiler catches the attempt to write to read-only memory:
const char* ptr = "hello"; // Assign the string literal to a variable.ptr[1] = 'a'; // Error! Attempts to write to read-only memory
You can also use a string literal as an initial value for a character array (char[]). In this case, the compiler creates an array that is big enough to hold the string and copies the string to this array. The compiler does not put the literal in read-only memory and does not do any literal pooling.
char arr[] = "hello"; // Compiler takes care of creating appropriate sized// character array arr.arr[1] = 'a'; // The contents can be modified.
Raw string literals are string literals that can span across multiple lines of code, that don’t require escaping of embedded double quotes, and where escape sequences like \t and \n are processed as normal text and not as escape sequences. Escape sequences are discussed in Chapter 1. For example, if you write the following with a normal string literal, you will get a compilation error because the string contains non-escaped double quotes:
const char* str = "Hello "World"!"; // Error!Normally you have to escape the double quotes as follows:
const char* str = "Hello \"World\"!";With a raw string literal, you can avoid the need to escape the quotes. The raw string literal starts with R"( and ends with )".
const char* str = R"(Hello "World"!)";If you need a string consisting of multiple lines, without raw string literals you need to embed \n escape sequences in your string where you want to start a new line. For example:
const char* str = "Line 1\nLine 2";If you output this string to the console, you get the following:
Line 1Line 2
With a raw string literal, instead of using \n escape sequences to start new lines, you can simply press enter to start real physical new lines in your source code as follows. The output is the same as the previous code snippet using the embedded \n.
const char* str = R"(Line 1Line 2)";
Escape sequences are ignored in raw string literals. For example, in the following raw string literal, the \t escape sequence is not replaced with a tab character, but is kept as the sequence of a backslash followed by the letter t:
const char* str = R"(Is the following a tab character? \t)";So, if you output this string to the console, you get:
Is the following a tab character? \tBecause a raw string literal ends with )" you cannot embed a )" in your string using this syntax. For example, the following string is not valid because it contains the )" sequence in the middle of the string:
const char* str = R"(Embedded )" characters)"; // Error!If you need embedded )" characters, you need to use the extended raw string literal syntax, which is as follows:
R"d-char-sequence(r-char-sequence)d-char-sequence"The r-char-sequence is the actual raw string. The d-char-sequence is an optional delimiter sequence, which should be the same at the beginning and at the end of the raw string literal. This delimiter sequence can have at most 16 characters. You should choose this delimiter sequence as a sequence that will not appear in the middle of your raw string literal.
The previous example can be rewritten using a unique delimiter sequence as follows:
const char* str = R"-(Embedded )" characters)-";Raw string literals make it easier to work with database querying strings, regular expressions, file paths, and so on. Regular expressions are discussed in Chapter 19.
C++ provides a much-improved implementation of the concept of a string as part of the Standard Library. In C++, std::string is a class (actually an instantiation of the basic_string class template) that supports many of the same functionalities as the <cstring> functions, but that takes care of memory allocation for you. The string class is defined in the <string> header in the std namespace, and has already been introduced in the previous chapter. Now it’s time to take a deeper look at it.
To understand the necessity of the C++ string class, consider the advantages and disadvantages of C-style strings.
The preceding lists were carefully constructed to make you think that perhaps there is a better way. As you’ll learn, C++ strings solve all the problems of C strings and render most of the arguments about the advantages of C strings over a first-class data type irrelevant.
Even though string is a class, you can almost always treat it as if it were a built-in type. In fact, the more you think of it that way, the better off you are. Through the magic of operator overloading, C++ strings are much easier to use than C-style strings. For example, the + operator is redefined for strings to mean “string concatenation.” The following code produces 1234:
string A("12");string B("34");string C;C = A + B; // C is "1234"
The += operator is also overloaded to allow you to easily append a string:
string A("12");string B("34");A += B; // A is "1234"
Another problem with C strings is that you cannot use == to compare them. Suppose you have the following two strings:
char* a = "12";char b[] = "12";
Writing a comparison as follows always returns false, because it compares the pointer values, not the contents of the strings:
if (a == b)Note that C arrays and pointers are related. You can think of C arrays, like the b array in the example, as pointers to the first element in the array. Chapter 7 goes deeper in on the array-pointer duality.
To compare C strings, you have to write something as follows:
if (strcmp(a, b) == 0)Furthermore, there is no way to use <, <=, >=, or > to compare C strings, so strcmp() returns -1, 0, or 1, depending on the lexicographic relationship of the strings. This results in very clumsy and hard-to-read code, which is also error-prone.
With C++ strings, operator==, operator!=, operator<, and so on are all overloaded to work on the actual string characters. Individual characters can still be accessed with operator[].
As the following code shows, when string operations require extending the string, the memory requirements are automatically handled by the string class, so memory overruns are a thing of the past:
string myString = "hello";myString += ", there";string myOtherString = myString;if (myString == myOtherString) {myOtherString[0] = 'H';}cout << myString << endl;cout << myOtherString << endl;
The output of this code is
hello, thereHello, there
There are several things to note in this example. One point is that there are no memory leaks even though strings are allocated and resized on a few places. All of these string objects are created as stack variables. While the string class certainly has a bunch of allocating and resizing to do, the string destructors clean up this memory when string objects go out of scope.
Another point to note is that the operators work the way you want them to. For example, the = operator copies the strings, which is most likely what you want. If you are used to working with array-based strings, this will either be refreshingly liberating for you or somewhat confusing. Don’t worry—once you learn to trust the string class to do the right thing, life gets so much easier.
For compatibility, you can use the c_str() method on a string to get a const character pointer, representing a C-style string. However, the returned const pointer becomes invalid whenever the string has to perform any memory reallocation, or when the string object is destroyed. You should call the method just before using the result so that it accurately reflects the current contents of the string, and you must never return the result of c_str() called on a stack-based string object from a function.
There is also a data() method which, up until C++14, always returned a const char* just as c_str(). Starting with C++17, however, data() returns a char* when called on a non-const string.
Consult a Standard Library Reference, see Appendix B, for a complete list of all supported operations that you can perform on string objects.
A string literal in source code is usually interpreted as a const char*. You can use the standard user-defined literal “s” to interpret a string literal as an std::string instead.
auto string1 = "Hello World";// string1 is a const char*auto string2 = "Hello World"s;// string2 is an std::string
The standard user-defined literal “s” requires a using namespace std::string_literals; or using namespace std;.
The std namespace includes a number of helper functions that make it easy to convert numerical values into strings or strings into numerical values. The following functions are available to convert numerical values into strings. All these functions take care of memory allocations. A new string object is created and returned from them.
string to_string(int val);string to_string(unsigned val);string to_string(long val);string to_string(unsigned long val);string to_string(long long val);string to_string(unsigned long long val);string to_string(float val);string to_string(double val);string to_string(long double val);These functions are pretty straightforward to use. For example, the following code converts a long double value into a string:
long double d = 3.14L;string s = to_string(d);
Converting in the other direction is done by the following set of functions, also defined in the std namespace. In these prototypes, str is the string that you want to convert, idx is a pointer that receives the index of the first non-converted character, and base is the mathematical base that should be used during conversion. The idx pointer can be a null pointer, in which case it will be ignored. These functions ignore leading whitespace, throw invalid_argument if no conversion could be performed, and throw out_of_range if the converted value is outside the range of the return type.
int stoi(const string& str, size_t *idx=0, int base=10);long stol(const string& str, size_t *idx=0, int base=10);unsigned long stoul(const string& str, size_t *idx=0, int base=10);long long stoll(const string& str, size_t *idx=0, int base=10);unsigned long long stoull(const string& str, size_t *idx=0, int base=10);float stof(const string& str, size_t *idx=0);double stod(const string& str, size_t *idx=0);long double stold(const string& str, size_t *idx=0);Here is an example:
const string toParse = " 123USD";size_t index = 0;int value = stoi(toParse, &index);cout << "Parsed value: " << value << endl;cout << "First non-parsed character: '" << toParse[index] << "'" << endl;
The output is as follows:
Parsed value: 123First non-parsed character: 'U'
Low-Level Numeric ConversionsThe C++17 standard also provides a number of lower-level numerical conversion functions, all defined in the <charconv> header. These functions do not perform any memory allocations, but instead use buffers allocated by the caller. Additionally, they are tuned for high performance and are locale-independent (see Chapter 19 for details on localization). The end result is that these functions can be orders of magnitude faster than other higher-level numerical conversion functions. You should use these functions if you want high performant, locale-independent conversions, for example to serialize/deserialize numerical data to/from human readable formats such as JSON, XML, and so on.
For converting integers to characters, the following set of functions is available:
to_chars_result to_chars(char* first, char* last, IntegerT value, int base = 10);Here, IntegerT can be any signed or unsigned integer type or char. The result is of type to_chars_result, a type defined as follows:
struct to_chars_result {char* ptr;errc ec;};
The ptr member is either equal to the one-past-the-end pointer of the written characters if the conversion was successful, or it is equal to last if the conversion failed (in which case, ec == errc::value_too_large).
Here is an example of its use:
std::string out(10, ' ');auto result = std::to_chars(out.data(), out.data() + out.size(), 12345);if (result.ec == std::errc()) { /* Conversion successful. */ }
Using C++17 structured bindings introduced in Chapter 1, you can write it as follows:
std::string out(10, ' ');auto [ptr, ec] = std::to_chars(out.data(), out.data() + out.size(), 12345);if (ec == std::errc()) { /* Conversion successful. */ }
Similarly, the following set of conversion functions is available for floating point types:
to_chars_result to_chars(char* first, char* last, FloatT value);to_chars_result to_chars(char* first, char* last, FloatT value,chars_format format);to_chars_result to_chars(char* first, char* last, FloatT value,chars_format format, int precision);
Here, FloatT can be float, double, or long double. Formatting can be specified with a combination of chars_format flags:
enum class chars_format {scientific, // Style: (-)d.ddde±ddfixed, // Style: (-)ddd.dddhex, // Style: (-)h.hhhp±d (Note: no 0x!)general = fixed | scientific // See next paragraph};
The default format is chars_format::general, which causes to_chars() to convert the floating point value to a decimal notation in the style of (-)ddd.ddd, or to a decimal exponent notation in the style of (-)d.ddde±dd, whichever results in the shortest representation with at least one digit before the decimal point (if present). If a format is specified but no precision, the precision is automatically determined to result in the shortest possible representation for the given format, with a maximum precision of 6 digits.
For the opposite conversion—that is, converting character sequences into numerical values—the following set of functions is available:
from_chars_result from_chars(const char* first, const char* last,IntegerT& value, int base = 10);from_chars_result from_chars(const char* first, const char* last,FloatT& value,chars_format format = chars_format::general);
Here, from_chars_result is a type defined as follows:
struct from_chars_result {const char* ptr;errc ec;};
The ptr member of the result type is a pointer to the first character that was not converted, or it equals last if all characters were successfully converted. If none of the characters could be converted, ptr equals first, and the value of the error code will be errc::invalid_argument. If the parsed value is too large to be representable by the given type, the value of the error code will be errc::result_out_of_range. Note that from_chars() does not skip any leading whitespace.
The std::string_view ClassBefore C++17, there was always a dilemma of choosing the parameter type for a function that accepted a read-only string. Should it be a const char*? In that case, if a client had an std::string available, they had to call c_str() or data() on it to get a const char*. Even worse, the function would lose the nice object-oriented aspects of the std::string and all its nice helper methods. Maybe the parameter could instead be a const std::string&? In that case, you always needed an std::string. If you passed a string literal, for example, the compiler silently created a temporary string object that contained a copy of your string literal and passed that object to your function, so there was a bit of overhead. Sometimes people would write multiple overloads of the same function—one that accepted a const char*, and another that accepted a const string&—but that was obviously a less-than-elegant solution.
With C++17, all those problems are solved with the introduction of the std::string_view class, which is an instantiation of the std::basic_string_view class template, and is defined in the <string_view> header. A string_view is basically a drop-in replacement for const string&, but without the overhead. It never copies strings! A string_view supports an interface similar to std::string. One exception is the absence of c_str(), but data() is available. On the other hand, string_view does add the methods remove_prefix(size_t) and remove_suffix(size_t), which shrink the string by advancing the starting pointer by a given offset, or by moving the end pointer backward by a given offset.
Note that you cannot concatenate a string and a string_view. The following code does not compile:
string str = "Hello";string_view sv = " world";auto result = str + sv;
To make it compile, you need to replace the last line with:
auto result = str + sv.data();If you know how to use std::string, then using a string_view is very straightforward, as the following example code demonstrates. The extractExtension() function extracts and returns the extension of a given filename. Note that string_views are usually passed by value because they are extremely cheap to copy. They just contain a pointer to, and the length of, a string.
string_view extractExtension(string_view fileName){return fileName.substr(fileName.rfind('.'));}
This function can be used with all kinds of different strings:
string fileName = R"(c:\temp\my file.ext)";cout << "C++ string: " << extractExtension(fileName) << endl;const char* cString = R"(c:\temp\my file.ext)";cout << "C string: " << extractExtension(cString) << endl;cout << "Literal: " << extractExtension(R"(c:\temp\my file.ext)") << endl;
There is not a single copy being made in all these calls to extractExtension(). The fileName parameter of the extractExtension() function is just a pointer and a length, and so is the return type of the function. This is all very efficient.
There is also a string_view constructor that accepts any raw buffer and a length. This can be used to construct a string_view out of a string buffer that is not NUL terminated. It is also useful when you do have a NUL-terminated string buffer, but you already know the length of the string, so the constructor does not need to count the number of characters again.
const char* raw =/* … */;size_t length =/* … */;cout << "Raw: " << extractExtension(string_view(raw, length)) << endl;
You cannot implicitly construct a string from a string_view. Either you use an explicit string constructor, or you use the string_view::data() member. For example, suppose you have the following function that accepts a const string&:
void handleExtension(const string& extension) { /* … */ }Calling this function as follows does not work:
handleExtension(extractExtension("my file.ext"));The following are two possible options you can use:
handleExtension(extractExtension("my file.ext").data()); // data() methodhandleExtension(string(extractExtension("my file.ext"))); // explicit ctor
You can use the standard user-defined literal “sv” to interpret a string literal as an std::string_view. For example:
auto sv = "My string_view"sv;The standard user-defined literal “sv” requires a using namespace std::string_view_ literals; or using namespace std;.
There are several reasons why many C++ programmers don’t use C++-style strings. Some programmers simply aren’t aware of the string type because it was not always part of the C++ specification. Others have discovered over the years that the C++ string doesn’t provide the behavior they need, and so have developed their own string type. Perhaps the most common reason is that development frameworks and operating systems tend to have their own way of representing strings, such as the CString class in the Microsoft MFC. Often, this is for backward compatibility or to address legacy issues. When starting a project in C++, it is very important to decide ahead of time how your group will represent strings. Some things are for sure:
std::string for your strings, then use std::string_view to pass read-only strings as parameters to functions; otherwise, see if your framework has support for something similar like string_views.This chapter discussed the C++ string and string_view classes and what their benefits are compared to plain old C-style character arrays. It also explained how a number of helper functions make it easier to convert numerical values into strings and vice versa, and it introduced the concept of raw string literals.
The next chapter discusses guidelines for good coding style, including code documentation, decomposition, naming, code formatting, and other tips.
If you’re going to spend several hours each day in front of a keyboard writing code, you should take some pride in all that work. Writing code that gets the job done is only part of a programmer’s work. After all, anybody can learn the fundamentals of coding. It takes a true master to code with style.
This chapter explores the question of what makes good code. Along the way, you’ll see several approaches to C++ style. As you will discover, simply changing the style of code can make it appear very different. For example, C++ code written by Windows programmers often has its own style, using Windows conventions. It almost looks like a completely different language than C++ code written by Mac OS programmers. Exposure to several different styles will help you avoid that sinking feeling you get when opening up a C++ source file that barely resembles the C++ you thought you knew.
Writing code that is stylistically “good” takes time. You probably don’t need much time to whip together a quick-and-dirty program to parse an XML file. Writing the same program with functional decomposition, adequate comments, and a clean structure would take you more time. Is it really worth it?
How confident would you be in your code if a new programmer had to work with it a year from now? A friend of mine, faced with a growing mess of web application code, encouraged his team to think about a hypothetical intern who would be starting in a year. How would this poor intern ever get up to speed on the code base when there was no documentation and scary multiple-page functions? When you’re writing code, imagine that somebody new or even you will have to maintain it in the future. Will you even still remember how it works? What if you’re not available to help? Well-written code avoids these problems because it is easy to read and understand.
It is difficult to enumerate the characteristics of code that make it “stylistically good.” Over time, you’ll find styles that you like and notice useful techniques in code that others wrote. Perhaps more important, you’ll encounter horrible code that teaches you what to avoid. However, good code shares several universal tenets that are explored in this chapter:
In the programming context, documentation usually refers to comments contained in the source files. Comments are your opportunity to tell the world what was going through your head when you wrote the accompanying code. They are a place to say anything that isn’t obvious from looking at the code itself.
It may seem obvious that writing comments is a good idea, but have you ever stopped to think about why you need to comment your code? Sometimes programmers acknowledge the importance of commenting without fully understanding why comments are important. There are several reasons, all of which are explored in this chapter.
One reason to use comments is to explain how clients should interact with the code. Normally, a developer should be able to understand what a function does simply based on the name of the function, the type of the return value, and the name and type of its parameters. However, not everything can be expressed in code. Sometimes a function requires certain pre- or postconditions that you have to explain in a comment. Exceptions that can be thrown by a function are also something that should be explained in a comment. In my opinion, you should only add a comment if it really adds any useful information. So, it’s up to the developer to decide whether a function needs a comment or not. Experienced programmers will have no problems deciding this, but less experienced developers might not always make the right decision. That’s why some companies have a rule stating that each publicly accessible function or method in a header file should have a comment explaining what it does. Some organizations go even further and formalize these comments by explicitly listing the purpose of each method, what its arguments are, what values it returns, and possible exceptions it can throw.
A comment gives you the opportunity to state, in English, anything that you can’t state in code. For example, there’s really no way in C++ code to indicate that the saveRecord() method of a database object throws an exception if openDatabase() has not been called yet. A comment, however, can be the perfect place to note this restriction, as follows:
/** This method throws a "DatabaseNotOpenedException"* if the openDatabase() method has not been called yet.*/int saveRecord(Record& record);
The C++ language forces you to specify the return type of a method, but it does not provide a way for you to say what the returned value actually represents. For example, the declaration of the saveRecord() method may indicate that it returns an int (a bad design decision discussed further in this section), but the client reading that declaration wouldn’t know what the int means. A comment explains the meaning of it:
/** Returns: int* An integer representing the ID of the saved record.* Throws:* DatabaseNotOpenedException if the openDatabase() method has not* been called yet.*/int saveRecord(Record& record);
As mentioned earlier, some companies require everything about a function to be documented in a formal way. The following is an example of how such a comment for the saveRecord() method might look like:
/** saveRecord()** Saves the given record to the database.** Parameters:* Record& record: the record to save to the database.* Returns: int* An integer representing the ID of the saved record.* Throws:* DatabaseNotOpenedException if the openDatabase() method has not* been called yet.*/int saveRecord(Record& record);
However, I don’t recommend this style of commenting. The first two lines are completely useless, since the name of the function is self-explanatory. The description of the parameter also does not add any additional information. Documenting what exactly the return type represents for this version of saveRecord() is required since it returns a generic int. However, a much better design would be to return a RecordID instead of a plain int, which removes the need to add any comments for the return type. RecordID could simply be a type alias (see Chapter 11) for int, but it conveys more information. The only comment that should remain is the exception. So, the following is my recommendation for the saveRecord() method:
/** Throws:* DatabaseNotOpenedException if the openDatabase() method has not* been called yet.*/RecordID saveRecord(Record& record);
Sometimes, the parameters to, and the return type from, a function are generic and can be used to pass all kinds of information. In that case you need to clearly document exactly what type is being passed. For example, message handlers in Windows accept two parameters, LPARAM and WPARAM, and can return an LRESULT. All three can be used to pass anything you like, but you cannot change their type. By using type casting, they can, for example, be used to pass a simple integer or to pass a pointer to some object. Your documentation could look like this:
* Parameters:* WPARAM wParam: (WPARAM)(int): An integer representing...* LPARAM lParam: (LPARAM)(string*): A string pointer representing...* Returns: (LRESULT)(Record*)* nullptr in case of an error, otherwise a pointer to a Record object* representing...
Good comments are also important inside the actual source code. In a simple program that processes input from the user and writes a result to the console, it is probably easy to read through and understand all of the code. In the professional world, however, you will often need to write code that is algorithmically complex or too esoteric to understand simply by inspection.
Consider the code that follows. It is well written, but it may not be immediately apparent what it is doing. You might recognize the algorithm if you have seen it before, but a newcomer probably wouldn’t understand the way the code works.
void sort(int inArray[], size_t inSize){for (size_t i = 1; i < inSize; i++) {int element = inArray[i];size_t j = i - 1;while (j >= 0 && inArray[j] > element) {inArray[j+1] = inArray[j];j--;}inArray[j+1] = element;}}
A better approach would be to include comments that describe the algorithm that is being used, and to document (loop) invariants. Invariants are conditions that have to be true during the execution of a piece of code, for example, a loop iteration. In the modified function that follows, a thorough comment at the top explains the algorithm at a high level, and inline comments explain specific lines that may be confusing:
/** Implements the "insertion sort" algorithm. The algorithm separates the* array into two parts--the sorted part and the unsorted part. Each* element, starting at position 1, is examined. Everything earlier in the* array is in the sorted part, so the algorithm shifts each element over* until the correct position is found to insert the current element. When* the algorithm finishes with the last element, the entire array is sorted.*/void sort(int inArray[], size_t inSize){// Start at position 1 and examine each element.for (size_t i = 1; i < inSize; i++) {// Loop invariant:// All elements in the range 0 to i-1 (inclusive) are sorted.int element = inArray[i];// j marks the position in the sorted part after which element// will be inserted.size_t j = i – 1;// As long as the current slot in the sorted array is higher than// element, shift values to the right to make room for inserting// (hence the name, "insertion sort") element in the right position.while (j >= 0 && inArray[j] > element) {inArray[j+1] = inArray[j];j--;}// At this point the current position in the sorted array// is *not* greater than the element, so this is its new position.inArray[j+1] = element;}}
The new code is certainly more verbose, but a reader unfamiliar with sorting algorithms would be much more likely to understand it with the comments included.
Another possible reason to use comments is to provide information at a higher level than the code itself. This meta-information provides details about the creation of the code without addressing the specifics of its behavior. For example, your organization may want to keep track of the original author of each method. You can also use meta-information to cite external documents or refer to other code.
The following example shows several instances of meta-information, including the author, the date it was created, and the specific feature it addresses. It also includes inline comments expressing metadata, such as the bug number that corresponds to a line of code and a reminder to revisit a possible problem in the code later.
/** Author: marcg* Date: 110412* Feature: PRD version 3, Feature 5.10*/RecordID saveRecord(Record& record){if (!mDatabaseOpen) {throw DatabaseNotOpenedException();}RecordID id = getDB()->saveRecord(record);if (id == -1) return -1;// Added to address bug #142 – jsmith 110428record.setId(id);// TODO: What if setId() throws an exception? – akshayr 110501return id;}
A change-log could also be included at the beginning of each file. The following shows a possible example of such a change-log:
/** Date | Change*----------+--------------------------------------------------* 110413 | REQ #005: <marcg> Do not normalize values.* 110417 | REQ #006: <marcg> use nullptr instead of NULL.*/
Another type of meta-information is a copyright notice. Some companies require such a copyright notice at the very beginning of every source file.
It’s easy to go overboard with comments. A good approach is to discuss which types of comments are most useful with your group and to form a policy. For example, if one member of the group uses a “TODO” comment to indicate code that still needs work, but nobody else knows about this convention, the code in need of attention could be overlooked.
Every organization has a different approach to commenting code. In some environments, a particular style is mandated to give the code a common standard for documentation. Other times, the quantity and style of commenting is left up to the programmer. The following examples depict several approaches to commenting code.
One way to avoid lack of documentation is to force yourself to overdocument by including a comment for every line. Commenting every line of code should ensure that there’s a specific reason for everything you write. In reality, such heavy commenting on a large scale is unwieldy, messy, and tedious! For example, consider the following useless comments:
int result; // Declare an integer to hold the result.result = doodad.getResult(); // Get the doodad's result.if (result % 2 == 0) { // If the result modulo 2 is 0 ...logError(); // then log an error,} else { // otherwise ...logSuccess(); // log success.} // End if/elsereturn result; // Return the result
The comments in this code express each line as part of an easily readable English story. This is entirely useless if you assume that the reader has at least basic C++ skills. These comments don’t add any additional information to code. Specifically, look at this line:
if (result % 2 == 0) { // If the result modulo 2 is 0 ...The comment is just an English translation of the code. It doesn’t say why the programmer has used the modulo operator on the result with the value 2. The following would be a better comment:
if (result % 2 == 0) { // If the result is even ...The modified comment, while still fairly obvious to most programmers, gives additional information about the code. The modulo operator with 2 is used because the code needs to check if the result is even.
Despite its tendency to be verbose and superfluous, heavy commenting can be useful in cases where the code would otherwise be difficult to comprehend. The following code also comments every line, but these comments are actually helpful:
// Calculate the doodad. The start, end, and offset values come from the// table on page 96 of the "Doodad API v1.6".result = doodad.calculate(kStart, kEnd, kOffset);// To determine success or failure, we need to bitwise AND the result with// the processor-specific mask (see "Doodad API v1.6", page 201).result &= getProcessorMask();// Set the user field value based on the "Marigold Formula."// (see "Doodad API v1.6", page 136)setUserField((result + kMarigoldOffset) / MarigoldConstant + MarigoldConstant);
This code is taken out of context, but the comments give you a good idea of what each line does. Without them, the calculations involving & and the mysterious “Marigold Formula” would be difficult to decipher.
Your group may decide to begin all source files with a standard comment. This is an excellent opportunity to document important information about the program and specific file. Examples of information that you might want to document at the top of every file include the following:
The items marked with an asterisk are usually automatically handled by your source code control solution.
Your development environment may allow you to create a template that automatically starts new files with your prefix comment. Some source control systems such as Subversion (SVN) can even assist by filling in metadata. For example, if your comment contains the string $Id$, SVN can automatically expand the comment to include the author, filename, revision, and date.
An example of a prefix comment is shown here:
/** $Id: Watermelon.cpp,123 2004/03/10 12:52:33 marcg $** Implements the basic functionality of a watermelon. All units are expressed* in terms of seeds per cubic centimeter. Watermelon theory is based on the* white paper "Algorithms for Watermelon Processing."** The following code is (c) copyright 2017, FruitSoft, Inc. ALL RIGHTS RESERVED*/
Writing comments in a standard format that can be parsed by external document builders is an increasingly popular programming practice. In the Java language, programmers can write comments in a standard format that allows a tool called JavaDoc to automatically create hyperlinked documentation for the project. For C++, a free tool called Doxygen (available at www.doxygen.org) parses comments to automatically build HTML documentation, class diagrams, UNIX man pages, and other useful documents. Doxygen even recognizes and parses JavaDoc-style comments in C++ programs. The code that follows shows JavaDoc-style comments that are recognized by Doxygen:
/*** Implements the basic functionality of a watermelon* TODO: Implement updated algorithms!*/class Watermelon{public:/*** @param initialSeeds The starting number of seeds, must be > 0.*/Watermelon(int initialSeeds);/*** Computes the seed ratio, using the Marigold algorithm.* @param slowCalc Whether or not to use long (slow) calculations* @return The marigold ratio*/double calcSeedRatio(bool slowCalc);};
Doxygen recognizes the C++ syntax and special comment directives such as @param and @return to generate customizable output. An example of a Doxygen-generated HTML class reference is shown in Figure 3-1.
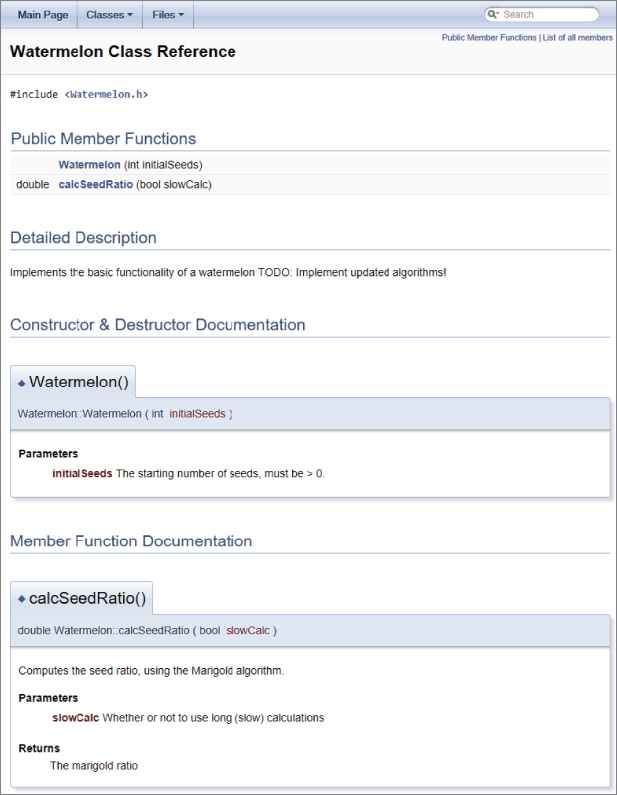
Note that you should still avoid writing useless comments, including when you use a tool to automatically generate documentation. Take a look at the Watermelon constructor in the previous code. Its comment omits a description and only describes the parameter. Adding a description, as in the following example, is redundant:
/*** The Watermelon constructor.* @param initialSeeds The starting number of seeds, must be > 0.*/Watermelon(int initialSeeds);
Automatically generated documentation like the file shown in Figure 3-1 can be helpful during development because it allows developers to browse through a high-level description of classes and their relationships. Your group can easily customize a tool like Doxygen to work with the style of comments that you have adopted. Ideally, your group would set up a machine that builds documentation on a daily basis.
Most of the time, you use comments on an as-needed basis. Here are some guidelines for comments that appear within the body of your code:
Well-written code often doesn’t need abundant commenting. The best code is written to be readable. If you find yourself adding a comment for every line, consider whether the code could be rewritten to better match what you are saying in the comments. For example, use descriptive names for your functions, parameters, variables, classes, and so on. Properly make use of const; that is, if a variable is not supposed to be modified, mark it as const. Reorder the steps in a function to make it clearer what it is doing. Introduce intermediate well-named variables to make an algorithm easier to understand. Remember that C++ is a language. Its main purpose is to tell the computer what to do, but the semantics of the language can also be used to explain its meaning to a reader.
Another way of writing self-documenting code is to break up, or decompose, your code into smaller pieces. Decomposition is covered in detail in the following section.
Decomposition is the practice of breaking up code into smaller pieces. There is nothing more daunting in the world of coding than opening up a file of source code to find 300-line functions and massive, nested blocks of code. Ideally, each function or method should accomplish a single task. Any subtasks of significant complexity should be decomposed into separate functions or methods. For example, if somebody asks you what a method does and you answer, “First it does A, then it does B; then, if C, it does D; otherwise, it does E,” you should probably have separate helper methods for A, B, C, D, and E.
Decomposition is not an exact science. Some programmers will say that no function should be longer than a page of printed code. That may be a good rule of thumb, but you could certainly find a quarter-page of code that is desperately in need of decomposition. Another rule of thumb is that if you squint your eyes and look at the format of the code without reading the actual content, it shouldn’t appear too dense in any one area. For example, Figures 3-2 and 3-3 show code that has been purposely blurred so that you don’t focus on the content. It should be obvious that the code in Figure 3-3 has better decomposition than the code in Figure 3-2.
Sometimes, when you’ve had a few coffees and you’re really in the programming zone, you start coding so fast that you end up with code that does exactly what it’s supposed to do, but is far from pretty. All programmers do this from time to time. Short periods of vigorous coding are sometimes the most productive times in the course of a project. Dense code also arises over the course of time as code is modified. As new requirements and bug fixes emerge, existing code is amended with small modifications. The computing term cruft refers to the gradual accumulation of small amounts of code that eventually turns a once-elegant piece of code into a mess of patches and special cases.
Refactoring is the act of restructuring your code. The following list contains example techniques that you can use to refactor your code. Consult one of the refactoring books in Appendix B to get a more comprehensive list.
Whether your code starts its life as a dense block of unreadable cruft or it just evolves that way, refactoring is necessary to periodically purge the code of accumulated hacks. Through refactoring, you revisit existing code and rewrite it to make it more readable and maintainable. Refactoring is an opportunity to revisit the decomposition of code. If the purpose of the code has changed or if it was never decomposed in the first place, when you refactor the code, squint at it and determine if it needs to be broken down into smaller parts.
When refactoring code, it is very important to be able to rely on a testing framework that catches any defects that you might introduce. Unit tests, discussed in Chapter 26, are particularly well suited for helping you catch mistakes during refactoring.
If you use modular decomposition and approach every module, method, or function by considering what pieces of it you can put off until later, your programs will generally be less dense and more organized than if you implement every feature in its entirety as you code.
Of course, you should still design your program before jumping into the code.
You will see decomposition in many of the examples in this book. In many cases, methods are referred to for which no implementation is shown because they are not relevant to the example and would take up too much space.
The C++ compiler has a few naming rules:
9to5).my__name) are reserved and shall not be used._name or _Name) are reserved and shall not be used.Other than those rules, names exist only to help you and your fellow programmers work with the individual elements of your program. Given this purpose, it is surprising how often programmers use unspecific or inappropriate names.
The best name for a variable, method, function, parameter, class, namespace, and so on accurately describes the purpose of the item. Names can also imply additional information, such as the type or specific usage. Of course, the real test is whether other programmers understand what you are trying to convey with a particular name.
There are no set-in-stone rules for naming other than the rules that work for your organization. However, there are some names that are rarely appropriate. The following table shows some names at both ends of the naming continuum.
| GOOD NAMES | BAD NAMES |
sourceName, destinationNameDistinguishes two objects |
thing1, thing2Too general |
gSettingsConveys global status |
globalUserSpecificSettingsAndPreferencesToo long |
mNameCounterConveys data member status |
mNC Too obscure, too brief |
calculateMarigoldOffset()Simple, accurate |
doAction() Too general, imprecise |
mTypeStringEasy on the eyes |
typeSTR256 A name only a computer could love |
mIHateLarry Unacceptable inside joke |
|
errorMessageDescriptive name |
stringNon-descriptive name |
sourceFile, destinationFileNo abbreviations |
srcFile, dstFileAbbreviations |
Selecting a name doesn’t always require a lot of thought and creativity. In many cases, you’ll want to use standard techniques for naming. Following are some of the types of data for which you can make use of standard names.
Early in your programming career, you probably saw code that used the variable “i” as a counter. It is customary to use i and j as counters and inner-loop counters, respectively. Be careful with nested loops, however. It’s a common mistake to refer to the “ith” element when you really mean the “jth” element. When working with 2-D data, it’s probably easier to use row and column as indices, instead of i and j. Some programmers prefer using counters outerLoopIndex and innerLoopIndex, and some even frown upon using i and j as loop counters.
Many programmers begin their variable names with a letter that provides some information about the variable’s type or usage. On the other hand, there are as many programmers, or even more, who disapprove of using any kind of prefix because this could make evolving code less maintainable in the future. For example, if a member variable is changed from static to non-static, you have to rename all the uses of that name. If you don’t rename them, your names continue to convey semantics, but now they are the wrong semantics.
However, you often don’t have a choice and you need to follow the guidelines of your company. The following table shows some potential prefixes.
| PREFIX | EXAMPLE NAME | LITERAL PREFIX MEANING | USAGE |
mm_ |
mDatam_data |
“member” | Data member within a class |
smsms_ |
sLookupTablemsLookupTablems_lookupTable |
“static” | Static variable or data member |
k |
kMaximumLength |
“konstant” (German for “constant”) | A constant value. Some programmers use all uppercase names without a prefix to indicate constants. |
bis |
bCompletedisCompleted |
“Boolean” | Designates a Boolean value |
nmNum |
nLinesmNumLines |
“number” | A data member that is also a counter. Because an “n” looks similar to an “m,” some programmers instead use mNum as a prefix. |
Hungarian Notation is a variable and data-member–naming convention that is popular with Microsoft Windows programmers. The basic idea is that instead of using single-letter prefixes such as m, you should use more verbose prefixes to indicate additional information. The following line of code shows the use of Hungarian Notation:
char* pszName; // psz means "pointer to a null-terminated string"The term Hungarian Notation arose from the fact that its inventor, Charles Simonyi, is Hungarian. Some also say that it accurately reflects the fact that programs using Hungarian Notation end up looking as if they were written in a foreign language. For this latter reason, some programmers tend to dislike Hungarian Notation. In this book, prefixes are used, but not Hungarian Notation. Adequately named variables don’t need much additional context information besides the prefix. For example, a data member named mName says it all.
If your class contains a data member, such as mStatus, it is customary to provide access to the member via a getter called getStatus() and a setter called setStatus(). To give access to a Boolean data member, you typically use is as a prefix instead of get, for example isRunning(). The C++ language has no prescribed naming for these methods, but your organization will probably want to adopt this or a similar naming scheme.
There are many different ways of capitalizing names in your code. As with most elements of coding style, it is very important that your group adopts a standardized approach and that all members adopt that approach. One way to get messy code is to have some programmers naming classes in all lowercase with underscores representing spaces (priority_queue) and others using capitals with each subsequent word capitalized (PriorityQueue). Variables and data members almost always start with a lowercase letter and use either underscores (my_queue) or capitals (myQueue) to indicate word breaks. Functions and methods are traditionally capitalized in C++, but, as you’ve seen, in this book I have adopted the style of lowercase functions and methods to distinguish them from class names. A similar style of capitalizing letters is used to indicate word boundaries for class and data member names.
Imagine that you are writing a program with a graphical user interface. The program has several menus, including File, Edit, and Help. To represent the ID of each menu, you may decide to use a constant. A perfectly reasonable name for a constant referring to the Help menu ID is kHelp.
The name kHelp will work fine until you add a Help button to the main window. You also need a constant to refer to the ID of the button, but kHelp is already taken.
A possible solution for this is to put your constants in different namespaces, which are discussed in Chapter 1. You create two namespaces: Menu and Button. Each namespace has a kHelp constant and you use them as Menu::kHelp and Button::kHelp. Another, and more recommended solution is to use enumerated types, also introduced in Chapter 1.
The C++ language lets you do all sorts of terribly unreadable things. Take a look at this wacky code:
i++ + ++i;This is unreadable but more importantly, its behavior is undefined by the C++ standard. The problem is that i++ uses the value of i but has a side effect of incrementing it. The standard does not say when this incrementing should be done, only that the side effect (increment) should be visible after the sequence point “;”, but the compiler can do it at any time during the execution of that line. It’s impossible to know which value of i will be used for the ++i part. Running this code with different compilers and platforms can result in different values.
The following is another example of code which you should avoid, because it exhibits undefined behavior if your compiler is not C++17 compliant. With C++17, this has well-defined behavior: first i is incremented, and then used as index in a[i].
a[i] = ++i;With all the power that the C++ language offers, it is important to consider how the language features can be used toward stylistic good instead of evil.
Bad code is often littered with “magic numbers.” In some function, the code might be using 2.71828. Why 2.71828? What does that value mean? People with a mathematical background might find it obvious that this represents an approximation of the transcendental value e, but most people don’t know this. The language offers constants to give a symbolic name to a value that doesn’t change, such as 2.71828.
const double kApproximationForE = 2.71828182845904523536;Traditionally, C++ programmers learned C first. In C, pointers were the only pass-by-reference mechanism, and they certainly worked just fine for many years. Pointers are still required in some cases, but in many situations you can switch to references. If you learned C first, you probably think that references don’t really add any new functionality to the language. You might think that they merely introduce a new syntax for functionality that pointers could already provide.
There are several advantages to using references rather than pointers. First, references are safer than pointers because they don’t deal directly with memory addresses and cannot be nullptr. Second, references are more stylistically pleasing than pointers because they use the same syntax as stack variables, avoiding symbols such as * and &. They’re also easy to use, so you should have no problem adopting references into your style palette. Unfortunately, some programmers think that if they see an & in a function call, they know the called function is going to change the object, and if they don’t see the & it must be pass-by-value. With references, they say they don’t know if the function is going to change the object unless they look at the function prototype. This is a wrong way of thinking. Passing in a pointer does not automatically mean that the object will be modified, because the parameter might be const T*. Passing both a pointer and a reference can modify the object, or it may not, depending on whether the function prototype uses const T*, T*, const T&, or T&. So, you need to look at the prototype anyway to know if the function might change the object.
Another benefit of references is that they clarify ownership of memory. If you are writing a method and another programmer passes you a reference to an object, it is clear that you can read and possibly modify the object, but you have no easy way of freeing its memory. If you are passed a pointer, this is less clear. Do you need to delete the object to clean up memory? Or will the caller do that? Note that the preferred way of handling memory is to use smart pointers, introduced in Chapter 1.
C++ makes it easy to ignore exceptions. Nothing about the language syntax forces you to deal with exceptions and you could easily write error-tolerant programs with traditional mechanisms such as returning nullptr or setting an error flag.
Exceptions provide a much richer mechanism for error handling, and custom exceptions allow you to tailor this mechanism to your needs. For example, a custom exception type for a web browser could include fields that specify the web page that contained the error, the network state when the error occurred, and additional context information.
Chapter 14 contains a wealth of information about exceptions in C++.
Many programming groups have been torn apart and friendships ruined over code-formatting arguments. In college, a friend of mine got into such a heated debate with a peer over the use of spaces in an if statement that people were stopping by to make sure that everything was okay.
If your organization has standards in place for code formatting, consider yourself lucky. You may not like the standards they have in place, but at least you won’t have to argue about them.
If no standards are in place for code formatting, I recommend to introduce them in your organization. Standardized coding guidelines make sure that all programmers on your team follow the same naming conventions, formatting rules, and so on, which makes the code more uniform and easier to understand.
If everybody on your team is just writing code their own way, try to be as tolerant as you can. As you’ll see, some practices are just a matter of taste, while others actually make it difficult to work in teams.
Perhaps the most frequently debated point is where to put the curly braces that demark a block of code. There are several styles of curly brace use. In this book, the curly brace is put on the same line as the leading statement, except in the case of a function, class, or method name. This style is shown in the code that follows (and throughout this book):
void someFunction(){if (condition()) {cout << "condition was true" << endl;} else {cout << "condition was false" << endl;}}
This style conserves vertical space while still showing blocks of code by their indentation. Some programmers would argue that preservation of vertical space isn’t relevant in real-world coding. A more verbose style is shown here:
void someFunction(){if (condition()){cout << "condition was true" << endl;}else{cout << "condition was false" << endl;}}
Some programmers are even liberal with the use of horizontal space, yielding code like this:
void someFunction(){if (condition()){cout << "condition was true" << endl;}else{cout << "condition was false" << endl;}}
Another point of debate is whether or not to put braces around single statements, for example:
void someFunction(){if (condition())cout << "condition was true" << endl;elsecout << "condition was false" << endl;}
Of course, I won’t recommend any particular style because I don’t want hate mail.
The formatting of individual lines of code can also be a source of disagreement. Again, I won’t advocate a particular approach, but you are likely to encounter a few of the styles shown here.
In this book, I use a space after any keyword, a space before and after any operator, a space after every comma in a parameter list or a call, and parentheses to clarify the order of operations, as follows:
if (i == 2) {j = i + (k / m);}
An alternative, shown next, treats if stylistically like a function, with no space between the keyword and the left parenthesis. Also, the parentheses used to clarify the order of operations inside of the if statement are omitted because they have no semantic relevance.
if( i == 2 ) {j = i + k / m;}
The difference is subtle, and the determination of which is better is left to the reader, yet I can’t move on from the issue without pointing out that if is not a function.
The use of spaces and tabs is not merely a stylistic preference. If your group does not agree on a convention for spaces and tabs, there are going to be major problems when programmers work jointly. The most obvious problem occurs when Alice uses four-space tabs to indent code and Bob uses five-space tabs; neither will be able to display code properly when working on the same file. An even worse problem arises when Bob reformats the code to use tabs at the same time that Alice edits the same code; many source code control systems won’t be able to merge in Alice’s changes.
Most, but not all, editors have configurable settings for spaces and tabs. Some environments even adapt to the formatting of the code as it is read in, or always save using spaces even if the Tab key is used for authoring. If you have a flexible environment, you have a better chance of being able to work with other people’s code. Just remember that tabs and spaces are different because a tab can be any length and a space is always a space.
Many programmers begin a new project by pledging that this time, they will do everything right. Any time a variable or parameter shouldn’t be changed, it’ll be marked const. All variables will have clear, concise, readable names. Every developer will put the left curly brace on the subsequent line and will adopt the standard text editor and its conventions for tabs and spaces.
For a number of reasons, it is difficult to sustain this level of stylistic consistency. In the case of const, sometimes programmers just aren’t educated about how to use it. You will eventually come across old code or a library function that isn’t const-savvy. A good programmer will use const_cast() to temporarily suspend the const property of a variable, but an inexperienced programmer will start to unwind the const property back from the calling function, once again ending up with a program that never uses const.
Other times, standardization of style comes up against programmers’ individual tastes and biases. Perhaps the culture of your team makes it impractical to enforce strict style guidelines. In such situations, you may have to decide which elements you really need to standardize (such as variable names and tabs) and which ones are safe to leave up to individuals (perhaps spacing and commenting style). You can even obtain or write scripts that will automatically correct style “bugs” or flag stylistic problems along with code errors. Some development environments, such as Microsoft Visual C++ 2017, support automatic formatting of code according to rules that you specify. This makes it trivial to write code that always follows the guidelines that have been configured.
The C++ language provides a number of stylistic tools without any formal guidelines on how to use them. Ultimately, any style convention is measured by how widely it is adopted and how much it benefits the readability of the code. When coding as part of a team, you should raise issues of style early in the process as part of the discussion of what language and tools to use.
The most important point about style is to appreciate that it is an important aspect of programming. Teach yourself to check over the style of your code before you make it available to others. Recognize good style in the code you interact with and adopt the conventions that you and your organization find useful.
This chapter concludes the first part of this book. The next part discusses software design on a high level.
Before writing a single line of code in your application, you should design your program. What data structures will you use? What classes will you write? This plan is especially important when you program in groups. Imagine sitting down to write a program with no idea what your coworker, who is working on the same program, is planning! In this chapter, you’ll learn how to use the Professional C++ approach to C++ design.
Despite the importance of design, it is probably the most misunderstood and underused aspect of the software-engineering process. Too often, programmers jump into applications without a clear plan: they design as they code. This approach can lead to convoluted and overly complicated designs. It also makes development, debugging, and maintenance tasks more difficult. Although it seems counterintuitive, investing extra time at the beginning of a project to design it properly actually saves time over the life of the project.
The very first step when starting a new program, or a new feature for an existing program, is to analyze the requirements. This involves having discussions with your stakeholders. A vital outcome of this analysis phase is a functional requirements document describing what exactly the new piece of code has to do, but it does not explain how it has to do it. Requirement analysis can also result in a non-functional requirements document describing how the final system should be, compared to what it should do. Examples of non-functional requirements are that the system needs to be secure, extensible, satisfy certain performance criteria, and so on.
Once all requirements have been collected, the design phase of the project can start. Your program design, or software design, is the specification of the architecture that you will implement to fulfill all the requirements (functional and non-functional) of the program. Informally, the design is how you plan to write the program. You should generally write your design in the form of a design document. Although every company or project has its own variation of a desired design document format, most design documents share the same general layout, which includes two main parts:
The design documents usually include diagrams and tables showing subsystem interactions and class hierarchies. The Unified Modeling Language (UML) is the industry standard for such diagrams, and is used for diagrams in this and subsequent chapters. (See Appendix D for a brief introduction to the UML syntax.) With that being said, the exact format of the design document is less important than the process of thinking about your design.
You should generally try to make your design as good as possible before you begin coding. The design should provide a map of the program that any reasonable programmer could follow in order to implement the application. Of course, it is inevitable that the design will need to be modified once you begin coding and you encounter issues that you didn’t think of earlier. Software-engineering processes have been designed to give you the flexibility to make these changes. Scrum, an agile software development methodology, is one example of such an iterative process whereby the application is developed in cycles, known as sprints. With each sprint, designs can be modified, and new requirements can be taken into account. Chapter 24 describes various software-engineering process models in more detail.
It’s tempting to skip the analysis and design steps, or to perform them only cursorily, in order to begin programming as soon as possible. There’s nothing like seeing code compiling and running to give you the impression that you have made progress. It seems like a waste of time to formalize a design, or to write down functional requirements when you already know, more or less, how you want to structure your program. Besides, writing a design document just isn’t as much fun as coding. If you wanted to write papers all day, you wouldn’t be a computer programmer! As a programmer myself, I understand this temptation to begin coding immediately, and have certainly succumbed to it on occasion. However, it will most likely lead to problems on all but the simplest projects. Whether or not you succeed without a design prior to the implementation depends on your experience as a programmer, your proficiency with commonly used design patterns, and how deeply you understand C++, the problem domain, and the requirements.
If you are working in a team where each team member will work on a different part of the project, it is paramount that there is a design document for all team members to follow. Design documents also help newcomers to get up to speed with the designs of a project.
To help you understand the importance of programming design, imagine that you own a plot of land on which you want to build a house. When the builder shows up, you ask to see the blueprints. “What blueprints?” he responds. “I know what I’m doing. I don’t need to plan every little detail ahead of time. Two-story house? No problem. I did a one-story house a few months ago—I’ll just start with that model and work from there.”
Suppose that you suspend your disbelief and allow the builder to proceed. A few months later, you notice that the plumbing appears to run outside the house instead of inside the walls. When you query the builder about this anomaly, he says, “Oh. Well, I forgot to leave space in the walls for the plumbing. I was so excited about this new drywall technology that it just slipped my mind. But it works just as well outside, and functionality is the most important thing.” You’re starting to have your doubts about his approach, but, against your better judgment, you allow him to continue.
When you take your first tour of the completed building, you notice that the kitchen lacks a sink. The builder excuses himself by saying, “We were already two-thirds done with the kitchen by the time we realized there wasn’t space for the sink. Instead of starting over, we just added a separate sink room next door. It works, right?”
Do the builder’s excuses sound familiar if you translate them to the software domain? Have you ever found yourself implementing an “ugly” solution to a problem like putting plumbing outside the house? For example, maybe you forgot to include locking in your queue data structure that is shared between multiple threads. By the time you realize the problem, you decide to just perform the locking manually on all places where the queue is used. Sure, it’s ugly, but it works, you say. That is, until someone new joins the project who assumes that the locking is built into the data structure, fails to ensure mutual exclusion in her access to the shared data, and causes a race condition bug that takes three weeks to track down. Of course, this locking problem is just given as an example of an ugly workaround. Obviously, a professional C++ programmer would never decide to perform the locking manually on each queue access but would instead directly incorporate the locking inside the queue class, or make the queue class thread-safe in a lock-free manner.
Formalizing a design before you code helps you determine how everything fits together. Just as blueprints for a house show how the rooms relate to each other and work together to fulfill the requirements of the house, the design for a program shows how the subsystems of the program relate to each other and work together to fulfill the software requirements. Without a design plan, you are likely to miss connections between subsystems, possibilities for reuse or shared information, and the simplest ways to accomplish tasks. Without the “big picture” that the design gives, you might become so bogged down in individual implementation details that you lose track of the overarching architecture and goals. Furthermore, the design provides written documentation to which all members of the project can refer. If you use an iterative process like the agile Scrum methodology mentioned earlier, you need to make sure to keep the design documentation up-to-date during each cycle of the process.
If the preceding analogy hasn’t convinced you to design before you code, here is an example where jumping directly into coding fails to lead to an optimal design. Suppose that you want to write a chess program. Instead of designing the entire program before you begin coding, you decide to jump in with the easiest parts and move slowly to the more difficult parts. Following the object-oriented perspective introduced in Chapter 1 and covered in more detail in Chapter 5, you decide to model your chess pieces with classes. You figure the pawn is the simplest chess piece, so you opt to start there. After considering the features and behaviors of a pawn, you write a class with the properties and methods shown in the UML class diagram in Figure 4-1.
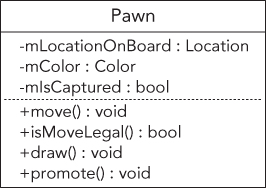
In this design, the mColor attribute denotes whether the pawn is black or white. The promote() method executes upon reaching the opposing side of the board.
Of course, you haven’t actually made this class diagram. You’ve gone straight to the implementation phase. Happy with that class, you move on to the next easiest piece: the bishop. After considering its attributes and functionality, you write a class with the properties and methods shown in the class diagram in Figure 4-2.
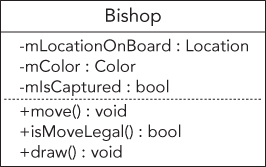
Again, you haven’t generated a class diagram, because you jumped straight to the coding phase. However, at this point you begin to suspect that you might be doing something wrong. The bishop and the pawn look similar. In fact, their properties are identical and they share many methods. Although the implementations of the move method might differ between the pawn and the bishop, both pieces need the ability to move. If you had designed your program before jumping into coding, you would have realized that the various pieces are actually quite similar, and that you should find some way to write the common functionality only once. Chapter 5 explains the object-oriented design techniques for doing that.
Furthermore, several aspects of the chess pieces depend on other subsystems of your program. For example, you cannot accurately represent the location on the board in a chess piece class without knowing how you will model the board. On the other hand, perhaps you will design your program so that the board manages pieces in a way that doesn’t require them to know their own locations. In either case, encoding the location in the piece classes before designing the board leads to problems. To take another example, how can you write a draw method for a piece without first deciding your program’s user interface? Will it be graphical or text-based? What will the board look like? The problem is that subsystems of a program do not exist in isolation—they interrelate with other subsystems. Most of the design work determines and defines these relationships.
There are several aspects of the C++ language that you need to keep in mind when designing for C++:
Tackling a design can be overwhelming. I have spent entire days scribbling design ideas on paper, crossing them out, writing more ideas, crossing those out, and repeating the process. Sometimes this process is helpful, and, at the end of those days (or weeks), it leads to a clean, efficient design. Other times it is frustrating and leads nowhere, but it is not a waste of effort. You will most likely waste more time if you have to re-implement a design that turned out to be broken. It’s important to remain aware of whether or not you are making real progress. If you find that you are stuck, you can take one of the following actions:
There are two fundamental design rules in C++: abstraction and reuse. These guidelines are so important that they can be considered themes of this book. They come up repeatedly throughout the text, and throughout effective C++ program designs in all domains.
The principle of abstraction is easiest to understand through a real-world analogy. A television is a simple piece of technology found in most homes. You are probably familiar with its features: you can turn it on and off, change the channel, adjust the volume, and add external components such as speakers, DVRs, and Blu-ray players. However, can you explain how it works inside the black box? That is, do you know how it receives signals over the air or through a cable, translates them, and displays them on the screen? Most people certainly can’t explain how a television works, yet are quite capable of using it. That is because the television clearly separates its internal implementation from its external interface. We interact with the television through its interface: the power button, channel changer, and volume control. We don’t know, nor do we care, how the television works; we don’t care whether it uses a cathode ray tube or some sort of alien technology to generate the image on our screen. It doesn’t matter because it doesn’t affect the interface.
The abstraction principle is similar in software. You can use code without knowing the underlying implementation. As a trivial example, your program can make a call to the sqrt() function declared in the header file <cmath> without knowing what algorithm the function actually uses to calculate the square root. In fact, the underlying implementation of the square root calculation could change between releases of the library, and as long as the interface stays the same, your function call will still work. The principle of abstraction extends to classes as well. As introduced in Chapter 1, you can use the cout object of class ostream to stream data to standard output like this:
cout << "This call will display this line of text" << endl;In this line, you use the documented interface of the cout insertion operator (<<) with a character array. However, you don’t need to understand how cout manages to display that text on the user’s screen. You only need to know the public interface. The underlying implementation of cout is free to change as long as the exposed behavior and interface remain the same.
You should design functions and classes so that you and other programmers can use them without knowing, or relying on, the underlying implementations. To see the difference between a design that exposes the implementation and one that hides it behind an interface, consider the chess program again. You might want to implement the chessboard with a two-dimensional array of pointers to ChessPiece objects. You could declare and use the board like this:
ChessPiece* chessBoard[8][8];…chessBoard[0][0] = new Rook();
However, that approach fails to use the concept of abstraction. Every programmer who uses the chessboard knows that it is implemented as a two-dimensional array. Changing that implementation to something else, such as a one-dimensional flattened vector of size 64, would be difficult, because you would need to change every use of the board in the entire program. Everyone using the chessboard also has to properly take care of memory management. There is no separation of interface from implementation.
A better approach is to model the chessboard as a class. You could then expose an interface that hides the underlying implementation details. Here is an example of the ChessBoard class:
class ChessBoard{public:// This example omits constructors, destructor, and assignment operator.void setPieceAt(size_t x, size_t y, ChessPiece* piece);ChessPiece* getPieceAt(size_t x, size_t y);bool isEmpty(size_t x, size_t y) const;private:// This example omits data members.};
Note that this interface makes no commitment to any underlying implementation. The ChessBoard could easily be a two-dimensional array, but the interface does not require it. Changing the implementation does not require changing the interface. Furthermore, the implementation can provide additional functionality, such as bounds checking.
Hopefully, this example has convinced you that abstraction is an important technique in C++ programming. Chapter 5 covers abstraction and object-oriented design in more detail, and Chapters 8 and 9 provide all the details about writing your own classes.
The second fundamental rule of design in C++ is reuse. Again, it is helpful to examine a real-world analogy to understand this concept. Suppose that you give up your programming career in favor of working as a baker. On your first day of work, the head baker tells you to bake cookies. In order to fulfill his orders, you find the recipe for chocolate-chip cookies, mix the ingredients, form cookies on the cookie sheet, and place the sheet in the oven. The head baker is pleased with the result.
Now, I’m going to point out something so obvious that it will surprise you: you didn’t build your own oven in which to bake the cookies. Nor did you churn your own butter, mill your own flour, or form your own chocolate chips. I can hear you think, “That goes without saying.” That’s true if you’re a real cook, but what if you’re a programmer writing a baking simulation game? In that case, you would think nothing of writing every component of the program, from the chocolate chips to the oven. Or, you could save yourself time by looking around for code to reuse. Perhaps your office-mate wrote a cooking simulation game and has some nice oven code lying around. Maybe it doesn’t do everything you need, but you might be able to modify it and add the necessary functionality.
Something else you took for granted is that you followed a recipe for the cookies instead of making up your own. Again, that goes without saying. However, in C++ programming, it does not go without saying. Although there are standard ways of approaching problems that arise over and over in C++, many programmers persist in reinventing these strategies in each design.
The idea of using existing code is not new. You’ve been reusing code from the first day you printed something with cout. You didn’t write the code to actually print your data to the screen. You used the existing cout implementation to do the work.
Unfortunately, not all programmers take advantage of available code. Your designs should take into account existing code and reuse it when appropriate.
The design theme of reuse applies to code you write as well as to code that you use. You should design your programs so that you can reuse your classes, algorithms, and data structures. You and your coworkers should be able to use these components in both the current project and future projects. In general, you should avoid designing overly specific code that is applicable only to the case at hand.
One language technique for writing general-purpose code in C++ is the template. The following example shows a templatized data structure. If you’ve never seen this syntax before, don’t worry! Chapter 12 explains the syntax in depth.
Instead of writing a specific ChessBoard class that stores ChessPieces, as shown earlier, consider writing a generic GameBoard template that can be used for any type of two-dimensional board game such as chess or checkers. You would need only to change the class declaration so that it takes the piece to store as a template parameter instead of hard-coding it in the interface. The template could look something like this:
template <typename PieceType>class GameBoard{public:// This example omits constructors, destructor, and assignment operator.void setPieceAt(size_t x, size_t y, PieceType* piece);PieceType* getPieceAt(size_t x, size_t y);bool isEmpty(size_t x, size_t y) const;private:// This example omits data members.};
With this simple change in the interface, you now have a generic game board class that you can use for any two-dimensional board game. Although the code change is simple, it is important to make these decisions in the design phase, so that you are able to implement the code effectively and efficiently.
Chapter 6 goes into more detail on how to design your code with reuse in mind.
Learning the C++ language and becoming a good C++ programmer are two very different things. If you sat down and read the C++ standard, memorizing every fact, you would know C++ as well as anybody else. However, until you gained some experience by looking at code and writing your own programs, you wouldn’t necessarily be a good programmer. The reason is that the C++ syntax defines what the language can do in its raw form, but doesn’t say anything about how each feature should be used.
As the baker example illustrates, it would be ludicrous to reinvent recipes for every dish that you make. However, programmers often make an equivalent mistake in their designs. Instead of using existing “recipes,” or patterns, for designing programs, they reinvent these techniques every time they design a program.
As they become more experienced in using the C++ language, C++ programmers develop their own individual ways of using the features of the language. The C++ community at large has also built some standard ways of leveraging the language, some formal and some informal. Throughout this book, I point out these reusable applications of the language, known as design techniques and design patterns. Additionally, Chapters 28 and 29 focus almost exclusively on design techniques and patterns. Some will seem obvious to you because they are simply a formalization of the obvious solution. Others describe novel solutions to problems you’ve encountered in the past. Some present entirely new ways of thinking about your program organization.
For example, you might want to design your chess program so that you have a single ErrorLogger object that serializes all errors from different components to a log file. When you try to design your ErrorLogger class, you realize that you would like to have only a single instance of the ErrorLogger class in your program. But, you also want several components in your program to be able to use this ErrorLogger instance; that is, these components all want to use the same ErrorLogger service. A standard strategy to implement such a service mechanism is to use dependency injection. With dependency injection, you create an interface for each service and you inject the interfaces a component needs into the component. Thus, a good design at this point would specify that you want to use the dependency injection pattern.
It is important for you to familiarize yourself with these patterns and techniques so that you can recognize when a particular design problem calls for one of these solutions. There are many more techniques and patterns applicable to C++ than those described in this book. Even though a nice selection is covered here, you may want to consult a book on design patterns for more and different patterns. See Appendix B for suggestions.
Experienced C++ programmers never start a project from scratch. They incorporate code from a wide variety of sources, such as the Standard Library, open-source libraries, proprietary code bases in their workplace, and their own code from previous projects. You should reuse code liberally in your designs. In order to make the most of this rule, you need to understand the types of code that you can reuse and the tradeoffs involved in code reuse.
Before analyzing the advantages and disadvantages of code reuse, it is helpful to specify the terminology involved and to categorize the types of reused code. There are three categories of code available for reuse:
There are also several ways that the code you reuse can be structured:
Another term that arises frequently is application programming interface, or API. An API is an interface to a library or body of code for a specific purpose. For example, programmers often refer to the sockets API, meaning the exposed interface to the sockets networking library, instead of the library itself.
For the sake of brevity, the rest of this chapter uses the term library to refer to any reused code, whether it is really a library, framework, or random collection of functions from your office-mate.
The rule to reuse code is easy to understand in the abstract. However, it’s somewhat vague when it comes to the details. How do you know when it’s appropriate to reuse code, and which code to reuse? There is always a tradeoff, and the decision depends on the specific situation. However, there are some general advantages and disadvantages to reusing code.
Reusing code can provide tremendous advantages to you and to your project.
Unfortunately, there are also some disadvantages to reusing code.
Now that you are familiar with the terminology, advantages, and disadvantages of reusing code, you are better prepared to make the decision about whether or not to reuse code. Often, the decision is obvious. For example, if you want to write a graphical user interface (GUI) in C++ for Microsoft Windows, you should use a framework such as Microsoft Foundation Class (MFC) or Qt. You probably don’t know how to write the underlying code to create a GUI in Windows, and more importantly, you don’t want to waste time to learn it. You will save person-years of effort by using a framework in this case.
However, other times the choice is less obvious. For example, if you are unfamiliar with a library or framework, and need only a simple data structure, it might not be worth the time to learn the entire framework to reuse only one component that you could write in a few days.
Ultimately, you need to make a decision based on your own particular needs. It often comes down to a tradeoff between the time it would take to write it yourself and the time required to find and learn how to use a library to solve the problem. Carefully consider how the advantages and disadvantages listed previously apply to your specific case, and decide which factors are most important to you. Finally, remember that you can always change your mind, which might even be relatively easy if you handled the abstraction correctly.
When you use libraries, frameworks, coworkers’ code, or your own code, there are several guidelines you should keep in mind.
Take the time to familiarize yourself with the code. It is important to understand both its capabilities and its limitations. Start with the documentation and the published interfaces or APIs. Ideally, that will be sufficient to understand how to use the code. However, if the library doesn’t provide a clear separation between interface and implementation, you may need to explore the source code itself if it is provided. Also, talk to other programmers who have used the code and who might be able to explain its intricacies. You should begin by learning the basic functionality. If it’s a library, what functions does it provide? If it’s a framework, how does your code fit in? What classes should you derive from? What code do you need to write yourself? You should also consider specific issues depending on the type of code.
Here are some points to keep in mind:
stderr/cerr or stdout/cout, or terminate the program.It is important to know the performance guarantees that the library or other code provides. Even if your particular program is not performance sensitive, you should make sure that the code you use doesn’t have awful performance for your particular use.
Programmers generally discuss and document algorithm and library performance using big-O notation. This section explains the general concepts of algorithm complexity analysis and big-O notation without a lot of unnecessary mathematics. If you are already familiar with these concepts, you can skip this section.
Big-O notation specifies relative, rather than absolute, performance. For example, instead of saying that an algorithm runs in a specific amount of time, such as 300 milliseconds, big-O notation specifies how an algorithm performs as its input size increases. Examples of input sizes include the number of items to be sorted by a sorting algorithm, the number of elements in a hash table during a key lookup, and the size of a file to be copied between disks.
To be more formal: big-O notation specifies an algorithm’s run time as a function of its input size, also known as the complexity of the algorithm. It’s not as complicated as it sounds. For example, an algorithm could take twice as long to process twice as many elements. Thus, if it takes 2 seconds to process 400 elements, it will take 4 seconds to process 800 elements. Figure 4-3 shows this graphically. It is said that the complexity of such an algorithm is a linear function of its input size, because, graphically, it is represented by a straight line.
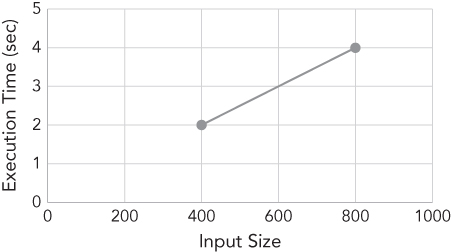
Big-O notation summarizes the algorithm’s linear performance like this: O(n). The O just means that you’re using big-O notation, while the n represents the input size. O(n) specifies that the algorithm speed is a direct linear function of the input size.
Of course, not all algorithms have performance that is linear with respect to their input size. The following table summarizes the common complexities, in order of their performance from best to worst.
| ALGORITHM COMPLEXITY | BIG-O NOTATION | EXPLANATION | EXAMPLE ALGORITHMS |
| Constant | O(1) | The running time is independent of input size. | Accessing a single element in an array |
| Logarithmic | O(log n) | The running time is a function of the logarithm base 2 of the input size. | Finding an element in a sorted list using binary search |
| Linear | O(n) | The running time is directly proportional to the input size. | Finding an element in an unsorted list |
| Linear Logarithmic | O(n log n) | The running time is a function of the linear times the logarithmic function of the input size. | Merge sort |
| Quadratic | O(n2) | The running time is a function of the square of the input size. | A slower sorting algorithm like selection sort |
| Exponential | O(2n) | The running time is an exponential function of the input size. | Optimized traveling salesman problem |
There are two advantages to specifying performance as a function of the input size instead of in absolute numbers:
Now that you are familiar with big-O notation, you are prepared to understand most performance documentation. The C++ Standard Library in particular describes its algorithm and data structure performance using big-O notation. However, big-O notation is sometimes insufficient or even misleading. Consider the following issues whenever you think about big-O performance specifications:
In addition to considering big-O characteristics, you should look at other facets of the algorithm performance. Here are some guidelines to keep in mind:
Before you start using library code, make sure that you understand on which platforms it runs. That might sound obvious, but even libraries that claim to be cross-platform might contain subtle differences on different platforms.
Also, platforms include not only different operating systems but different versions of the same operating system. If you write an application that should run on Solaris 8, Solaris 9, and Solaris 10, ensure that any libraries you use also support all those releases. You cannot assume either forward or backward compatibility across operating system versions. That is, just because a library runs on Solaris 9 doesn’t mean that it will run on Solaris 10 and vice versa.
Using third-party libraries often introduces complicated licensing issues. You must sometimes pay license fees to third-party vendors for the use of their libraries. There may also be other licensing restrictions, including export restrictions. Additionally, open-source libraries are sometimes distributed under licenses that require any code that links with them to be open source as well. A number of licenses commonly used by open-source libraries are discussed later in this chapter.
Using third-party libraries also introduces support issues. Before you use a library, make sure that you understand the process for submitting bugs, and that you realize how long it will take for bugs to be fixed. If possible, determine how long the library will continue to be supported so that you can plan accordingly.
Interestingly, even using libraries from within your own organization can introduce support issues. You may find it just as difficult to convince a coworker in another part of your company to fix a bug in their library as you would to convince a stranger in another company to do the same thing. In fact, you may even find it harder, because you’re not a paying customer. Make sure that you understand the politics and organizational issues within your own organization before using internal libraries.
Using libraries and frameworks can sometimes be daunting at first. Fortunately, there are many avenues of support available. First of all, consult the documentation that accompanies the library. If the library is widely used, such as the Standard Library or the MFC, you should be able to find a good book on the topic. In fact, for help with the Standard Library, you can consult Chapters 16 to 21. If you have specific questions not addressed by books and product documentation, try searching the web. Type your question in your favorite search engine to find web pages that discuss the library. For example, when you search for the phrase, “introduction to C++ Standard Library,” you will find several hundred websites about C++ and the Standard Library. Also, many websites contain their own private newsgroups or forums on specific topics for which you can register.
When you first sit down with a new library or framework, it is often a good idea to write a quick prototype. Trying out the code is the best way to familiarize yourself with the library’s capabilities. You should consider experimenting with the library even before you tackle your program design so that you are intimately familiar with the library’s capabilities and limitations. This empirical testing will allow you to determine the performance characteristics of the library as well.
Even if your prototype application looks nothing like your final application, time spent prototyping is not a waste. Don’t feel compelled to write a prototype of your actual application. Write a dummy program that just tests the library capabilities you want to use. The point is only to familiarize yourself with the library.
Your project might include multiple applications. Perhaps you need a web server front end to support your new e-commerce infrastructure. It is possible to bundle third-party applications, such as a web server, with your software. This approach takes code reuse to the extreme in that you reuse entire applications. However, most of the caveats and guidelines for using libraries apply to bundling third-party applications as well. Specifically, make sure that you understand the legality and licensing ramifications of your decision.
Also, the support issue becomes more complex. If customers encounter a problem with your bundled web server, should they contact you or the web server vendor? Make sure that you resolve this issue before you release the software.
Open-source libraries are an increasingly popular class of reusable code. The general meaning of open-source is that the source code is available for anyone to look at. There are formal definitions and legal rules about including source code with all your distributions, but the important thing to remember about open-source software is that anyone (including you) can look at the source code. Note that open-source applies to more than just libraries. In fact, the most famous open-source product is probably the Android operating system. Linux is another open-source operating system. Google Chrome and Mozilla Firefox are two examples of famous open-source web browsers.
Unfortunately, there is some confusion in terminology in the open-source community. First of all, there are two competing names for the movement (some would say two separate, but similar, movements). Richard Stallman and the GNU project use the term free software. Note that the term free does not imply that the finished product must be available without cost. Developers are welcome to charge as much or as little as they want. Instead, the term free refers to the freedom for people to examine the source code, modify the source code, and redistribute the software. Think of the free in free speech rather than the free in free beer. You can read more about Richard Stallman and the GNU project at www.gnu.org.
The Open Source Initiative uses the term open-source software to describe software in which the source code must be available. As with free software, open-source software does not require the product or library to be available without cost. However, an important difference with free software is that open-source software is not required to give you the freedom to use, modify, and redistribute it. You can read more about the Open Source Initiative at www.opensource.org.
There are several licensing options available for open-source projects. One of them is the GNU Public License (GPL). However, using a library under the GPL requires you to make your own product open-source under the GPL as well. On the other hand, an open-source project can use a licensing option like Boost Software License, Berkeley Software Distribution (BSD) license, Code Project Open License (CPOL), Creative Commons (CC) license, and so on, which allows using the open-source library in a closed-source product.
Because the name “open-source” is less ambiguous than “free software,” this book uses “open-source” to refer to products and libraries with which the source code is available. The choice of name is not intended to imply endorsement of the open-source philosophy over the free software philosophy: it is only for ease of comprehension.
Regardless of the terminology, you can gain amazing benefits from using open-source software. The main benefit is functionality. There is a plethora of open-source C++ libraries available for varied tasks, from XML parsing to cross-platform error logging.
Although open-source libraries are not required to provide free distribution and licensing, many open-source libraries are available without monetary cost. You will generally be able to save money in licensing fees by using open-source libraries.
Finally, you are often but not always free to modify open-source libraries to suit your exact needs.
Most open-source libraries are available on the web. For example, searching for “open-source C++ library XML parsing” results in a list of links to XML libraries in C and C++. There are also a few open-source portals where you can start your search, including the following:
Open-source libraries present several unique issues and require new strategies. First of all, open-source libraries are usually written by people in their “free” time. The source base is generally available for any programmer who wants to pitch in and contribute to development or bug fixing. As a good programming citizen, you should try to contribute to open-source projects if you find yourself reaping the benefits of open-source libraries. If you work for a company, you may find resistance to this idea from your management because it does not lead directly to revenue for your company. However, you might be able to convince management that indirect benefits, such as exposure of your company name, and perceived support from your company for the open-source movement, should allow you to pursue this activity.
Second, because of the distributed nature of their development, and lack of single ownership, open-source libraries often present support issues. If you desperately need a bug fixed in a library, it is often more efficient to make the fix yourself than to wait for someone else to do it. If you do fix bugs, you should make sure to put those fixes back into the public source base for the library. Some licenses even require you to do so. Even if you don’t fix any bugs, make sure to report problems that you find so that other programmers don’t waste time encountering the same issues.
The most important library that you will use as a C++ programmer is the C++ Standard Library. As its name implies, this library is part of the C++ standard, so any standards-conforming compiler should include it. The Standard Library is not monolithic: it includes several disparate components, some of which you have been using already. You may even have assumed they were part of the core language. Chapters 16 to 21 go into more detail about the Standard Library.
Because C++ is mostly a superset of C, the C Standard Library is still available. Its functionality includes mathematical functions such as abs(), sqrt(), and pow(), and error-handling helpers such as assert() and errno. Additionally, the C Standard Library facilities for manipulating character arrays as strings, such as strlen() and strcpy(), and the C-style I/O functions, such as printf() and scanf(), are all available in C++.
Note that the C header files have different names in C++. These names should be used instead of the C library names, because they are less likely to result in name conflicts. For details of the C libraries, consult a Standard Library Reference, see Appendix B.
The Standard Library was designed with functionality, performance, and orthogonality as its priorities. The benefits of using it are substantial. Imagine having to track down pointer errors in linked list or balanced binary tree implementations, or to debug a sorting algorithm that isn’t sorting properly. If you use the Standard Library correctly, you will rarely, if ever, need to perform that kind of coding. Chapters 16 to 21 provide in-depth information on the Standard Library functionality.
This section introduces a systematic approach to designing a C++ program in the context of a simple chess game application. In order to provide a complete example, some of the steps refer to concepts covered in later chapters. You should read this example now, in order to obtain an overview of the design process, but you might also consider rereading it after you have finished later chapters.
Before embarking on the design, it is important to possess clear requirements for the program’s functionality and efficiency. Ideally, these requirements would be documented in the form of a requirements specification. The requirements for the chess program would contain the following types of specifications, although in more detail and greater number:
The requirements ensure that you design your program so that it performs as its users expect.
You should take a systematic approach to designing your program, working from the general to the specific. The following steps do not always apply to all programs, but they provide a general guideline. Your design should include diagrams and tables as appropriate. UML is an industry standard for making diagrams. You can refer to Appendix D for a brief introduction, but in short, UML defines a multitude of standard diagrams you can use for documenting software designs, for example, class diagrams, sequence diagrams, and so on. I recommend using UML or at least UML-like diagrams where applicable. However, I don’t advocate strictly adhering to the UML syntax because having a clear, understandable diagram is more important than having a syntactically correct one.
Your first step is to divide your program into its general functional subsystems and to specify the interfaces and interactions between the subsystems. At this point, you should not worry about specifics of data structures and algorithms, or even classes. You are trying only to obtain a general feel for the various parts of the program and their interactions. You can list the subsystems in a table that expresses the high-level behaviors or functionality of the subsystem, the interfaces exported from the subsystem to other subsystems, and the interfaces consumed, or used, by this subsystem on other subsystems. The recommended design for this chess game is to have a clear separation between storing the data and displaying the data by using the Model-View-Controller (MVC) paradigm. This paradigm models the notion that many applications commonly deal with a set of data, one or more views on that data, and manipulation of the data. In MVC, a set of data is called the model, a view is a particular visualization of the model, and the controller is the piece of code that changes the model in response to some event. The three components of MVC interact in a feedback loop: actions are handled by the controller, which adjusts the model, resulting in a change to the view or views. Using this paradigm, you can easily switch between having a text-based interface and a graphical user interface. A table for the chess game subsystems could look like this.
| SUBSYSTEM NAME | INSTANCES | FUNCTIONALITY | INTERFACES EXPORTED | INTERFACES CONSUMED |
| GamePlay | 1 |
Starts game Controls game flow Controls drawing Declares winner Ends game |
Game Over |
Take Turn (on Player) Draw (on ChessBoardView) |
| ChessBoard | 1 |
Stores chess pieces Checks for ties and checkmates |
Get Piece At Set Piece At |
Game Over (on GamePlay) |
| ChessBoardView | 1 | Draws the associated ChessBoard | Draw | Draw (on ChessPieceView) |
| ChessPiece | 32 |
Moves itself Checks for legal moves |
Move Check Move |
Get Piece At (on ChessBoard) Set Piece At (on ChessBoard) |
| ChessPieceView | 32 | Draws the associated ChessPiece | Draw | None |
| Player | 2 |
Interacts with the user by prompting the user for a move, and obtaining the user’s move Moves pieces |
Take Turn |
Get Piece At (on ChessBoard) Move (on ChessPiece) Check Move (on ChessPiece) |
| ErrorLogger | 1 | Writes error messages to a log file | Log Error | None |
As this table shows, the functional subsystems of this chess game include a GamePlay subsystem, a ChessBoard and ChessBoardView, 32 ChessPieces and ChessPieceViews, two Players, and one ErrorLogger. However, that is not the only reasonable approach. In software design, as in programming itself, there are often many different ways to accomplish the same goal. Not all solutions are equal; some are certainly better than others. However, there are often several equally valid methods.
A good division into subsystems separates the program into its basic functional parts. For example, a Player is a subsystem distinct from the ChessBoard, ChessPieces, or GamePlay. It wouldn’t make sense to lump the players into the GamePlay subsystem because they are logically separate subsystems. Other choices might not be as obvious.
In this MVC design, the ChessBoard and ChessPiece subsystems are part of the Model. The ChessBoardView and ChessPieceView are part of the View, and the Player is part of the Controller.
Because it is often difficult to visualize subsystem relationships from tables, it is usually helpful to show the subsystems of a program in a diagram where lines represent calls from one subsystem to another. Figure 4-4 shows the chess game subsystems visualized as a UML use-case diagram.
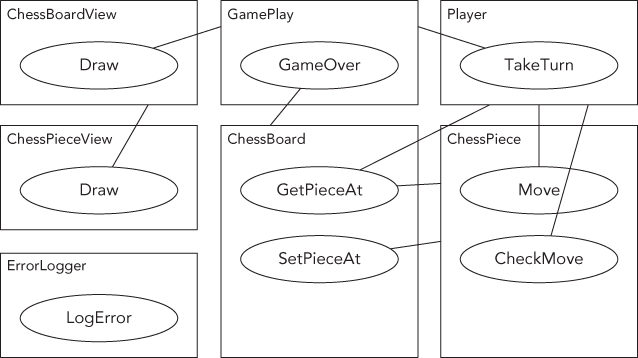
It’s too early in the design phase to think about how to multithread specific loops in algorithms you will write. However, in this step, you choose the number of high-level threads in your program and specify their interactions. Examples of high-level threads are a UI thread, an audio-playing thread, a network communication thread, and so on. In multithreaded designs, you should try to avoid shared data as much as possible because it will make your designs simpler and safer. If you cannot avoid shared data, you should specify locking requirements. If you are unfamiliar with multithreaded programs, or your platform does not support multithreading, then you should make your programs single-threaded. However, if your program has several distinct tasks, each of which could work in parallel, it might be a good candidate for multiple threads. For example, graphical user interface applications often have one thread performing the main application work and another thread waiting for the user to press buttons or select menu items. Multithreaded programming is covered in Chapter 23.
The chess program needs only one thread to control the game flow.
In this step, you determine the class hierarchies that you intend to write in your program. The chess program needs a class hierarchy to represent the chess pieces. This hierarchy could work as shown in Figure 4-5. The generic ChessPiece class serves as the abstract base class. A similar hierarchy is required for the ChessPieceView class.
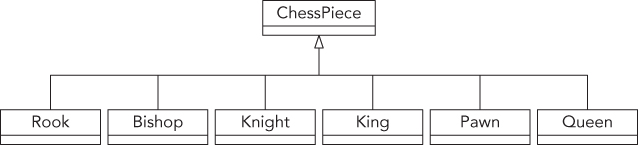
Another class hierarchy can be used for the ChessBoardView class to make it possible to have a text-based interface or a graphical user interface for the game. Figure 4-6 shows an example hierarchy that allows the chessboard to be displayed as text on a console, or with a 2D or 3D graphical user interface. A similar hierarchy is required for the Player controller and for the individual classes of the ChessPieceView hierarchy.
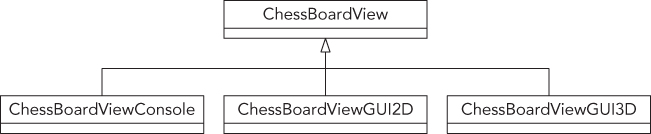
Chapter 5 explains the details of designing classes and class hierarchies.
In this step, you consider a greater level of detail, and specify the particulars of each subsystem, including the specific classes that you write for each subsystem. It may well turn out that you model each subsystem itself as a class. This information can again be summarized in a table.
| SUBSYSTEM | CLASSES | DATA STRUCTURES | ALGORITHMS | PATTERNS |
| GamePlay | GamePlay class |
GamePlay object includes one ChessBoard object and two Player objects. |
Gives each player a turn to play | None |
| ChessBoard | ChessBoard class |
ChessBoard object stores a two-dimensional representation of 32 ChessPieces. |
Checks for a win or tie after each move | None |
| ChessBoardView | ChessBoardView abstract base classConcrete derived classes ChessBoardView Console, ChessBoardView GUI2D, and so on
|
Stores information on how to draw a chessboard | Draws a chessboard | Observer |
| ChessPiece | ChessPiece abstract base classRook, Bishop, Knight, King, Pawn, and Queen derived classes
|
Each piece stores its location on the chessboard. | Piece checks for a legal move by querying the chessboard for pieces at various locations. | None |
| ChessPieceView | ChessPieceView abstract base classDerived classes RookView, BishopView, and so on, and concrete derived classes RookViewConsole, RookViewGUI2D, and so on
|
Stores information on how to draw a chess piece | Draws a chess piece | Observer |
| Player | Player abstract base classConcrete derived classes PlayerConsole, PlayerGUI2D, and so on
|
None | prompts the user for a move, checks if the move is legal, and moves the piece | Mediator |
| ErrorLogger | One ErrorLogger class |
A queue of messages to log | Buffers messages and writes them to a log file | Dependency injection |
This section of the design document would normally present the actual interfaces for each class, but this example will forgo that level of detail.
Designing classes and choosing data structures, algorithms, and patterns can be tricky. You should always keep in mind the rules of abstraction and reuse discussed earlier in this chapter. For abstraction, the key is to consider the interface and the implementation separately. First, specify the interface from the perspective of the user. Decide what you want the component to do. Then decide how the component will do it by choosing data structures and algorithms. For reuse, familiarize yourself with standard data structures, algorithms, and patterns. Also, make sure you are aware of the Standard Library in C++, as well as any proprietary code available in your workplace.
In this design step, you delineate the error handling in each subsystem. The error handling should include both system errors, such as memory allocation failures, and user errors, such as invalid entries. You should specify whether each subsystem uses exceptions. You can again summarize this information in a table.
| SUBSYSTEM | HANDLING SYSTEM ERRORS | HANDLING USER ERRORS |
| GamePlay | Logs an error with the ErrorLogger, shows a message to the user, and gracefully shuts down the program if unable to allocate memory for ChessBoard or Players |
Not applicable (no direct user interface) |
|
ChessBoard ChessPiece |
Logs an error with the ErrorLogger and throws an exception if unable to allocate memory |
Not applicable (no direct user interface) |
|
ChessBoardView ChessPieceView |
Logs an error with the ErrorLogger and throws an exception if something goes wrong during rendering |
Not applicable (no direct user interface) |
| Player | Logs an error with the ErrorLogger and throws an exception if unable to allocate memory |
Sanity-checks a user move entry to ensure that it is not off the board; it then prompts the user for another entry. This subsystem checks each move’s legality before moving the piece; if illegal, it prompts the user for another move. |
| ErrorLogger | Attempts to log an error, informs the user, and gracefully shuts down the program if unable to allocate memory | Not applicable (no direct user interface) |
The general rule for error handling is to handle everything. Think hard about all possible error conditions. If you forget one possibility, it will show up as a bug in your program! Don’t treat anything as an “unexpected” error. Expect all possibilities: memory allocation failures, invalid user entries, disk failures, and network failures, to name a few. However, as the table for the chess game shows, you should handle user errors differently from internal errors. For example, a user entering an invalid move should not cause your chess program to terminate. Chapter 14 discusses error handling in more depth.
In this chapter, you learned about the professional C++ approach to design. I hope that it convinced you that software design is an important first step in any programming project. You also learned about some of the aspects of C++ that make design difficult, including its object-oriented focus, its large feature set and Standard Library, and its facilities for writing generic code. With this information, you are better prepared to tackle C++ design.
This chapter introduced two design themes. The first theme, the concept of abstraction, or separating interface from implementation, permeates this book and should be a guideline for all your design work.
The second theme, the notion of reuse, both of code and designs, also arises frequently in real-world projects, and in this book. You learned that your C++ designs should include both reuse of code, in the form of libraries and frameworks, and reuse of ideas and designs, in the form of techniques and patterns. You should write your code to be as reusable as possible. Also remember about the tradeoffs and about specific guidelines for reusing code, including understanding the capabilities and limitations, the performance, licensing and support models, the platform limitations, prototyping, and where to find help. You also learned about performance analysis and big-O notation. Now that you understand the importance of design and the basic design themes, you are ready for the rest of Part II. Chapter 5 describes strategies for using the object-oriented aspects of C++ in your design.
Now that you have developed an appreciation for good software design from Chapter 4, it’s time to pair the notion of objects with the concept of good design. The difference between programmers who use objects in their code and those who truly grasp object-oriented programming comes down to the way their objects relate to each other and to the overall design of the program.
This chapter begins with a very brief description of procedural programming (C-style), followed by a detailed discussion of object-oriented programming (OOP). Even if you’ve been using objects for years, you will want to read this chapter for some new ideas regarding how to think about objects. I will discuss the different kinds of relationships between objects, including pitfalls programmers often succumb to when building an object-oriented program. I will also describe how the principle of abstraction relates to objects.
When thinking about procedural programming or object-oriented programming, the most important point to remember is that they just represent different ways of reasoning about what’s going on in your program. Too often, programmers get bogged down in the syntax and jargon of OOP before they adequately understand what an object is. This chapter is light on code and heavy on concepts and ideas. For specifics on C++ object syntax, see Chapters 8, 9, and 10.
A procedural language, such as C, divides code into small pieces, each of which (ideally) accomplishes a single task. Without procedures in C, all your code would be lumped together inside main(). Your code would be difficult to read, and your coworkers would be annoyed, to say the least.
The computer doesn’t care if all your code is in main() or if it’s split into bite-sized pieces with descriptive names and comments. Procedures are an abstraction that exists to help you, the programmer, as well as those who read and maintain your code. The concept is built around a fundamental question about your program—What does this program do? By answering that question in English, you are thinking procedurally. For example, you might begin designing a stock selection program by answering as follows: First, the program obtains stock quotes from the Internet. Then, it sorts this data by specific metrics. Next, it performs analysis on the sorted data. Finally, it outputs a list of buy and sell recommendations. When you start coding, you might directly turn this mental model into C functions: retrieveQuotes(), sortQuotes(), analyzeQuotes(), and outputRecommendations().
The procedural approach tends to work well when your program follows a specific list of steps. However, in large, modern applications, there is rarely a linear sequence of events. Often a user is able to perform any command at any time. Procedural thinking also says nothing about data representation. In the previous example, there was no discussion of what a stock quote actually is.
If the procedural mode of thought sounds like the way you approach a program, don’t worry. Once you realize that OOP is simply an alternative, more flexible way of thinking about software, it’ll come naturally.
Unlike the procedural approach—which is based on the question, What does this program do?—the object-oriented approach asks another question: What real-world objects am I modeling? OOP is based on the notion that you should divide your program not into tasks, but into models of physical objects. While this seems abstract at first, it becomes clearer when you consider physical objects in terms of their classes, components, properties, and behaviors.
A class helps distinguish an object from its definition. Consider the orange. There’s a difference between talking about oranges in general as tasty fruit that grows on trees, and talking about a specific orange, such as the one that’s currently dripping juice on my keyboard.
When answering the question “What are oranges?” you are talking about the class of things known as oranges. All oranges are fruit. All oranges grow on trees. All oranges are some shade of orange. All oranges have some particular flavor. A class is simply the encapsulation of what defines a classification of objects.
When describing a specific orange, you are talking about an object. All objects belong to a particular class. Because the object on my desk is an orange, I know that it belongs to the orange class. Thus, I know that it is a fruit that grows on trees. I can further say that it is a medium shade of orange and ranks “mighty tasty” in flavor. An object is an instance of a class—a particular item with characteristics that distinguish it from other instances of the same class.
As a more concrete example, reconsider the stock selection application from earlier. In OOP, “stock quote” is a class because it defines the abstract notion of what makes up a quote. A specific quote, such as “current Microsoft stock quote,” would be an object because it is a particular instance of the class.
From a C background, think of classes and objects as analogous to types and variables. In fact, in Chapter 8, you’ll see that the syntax for classes is similar to the syntax for C structs.
If you consider a complex real-world object, such as an airplane, it should be fairly easy to see that it is made up of smaller components. There’s the fuselage, the controls, the landing gear, the engines, and numerous other parts. The ability to think of objects in terms of their smaller components is essential to OOP, just as the breaking up of complicated tasks into smaller procedures is fundamental to procedural programming.
A component is essentially the same thing as a class, just smaller and more specific. A good object-oriented program might have an Airplane class, but this class would be huge if it fully described an airplane. Instead, the Airplane class deals with many smaller, more manageable, components. Each of these components might have further subcomponents. For example, the landing gear is a component of an airplane, and the wheel is a component of the landing gear.
Properties are what distinguish one object from another. Going back to the Orange class, recall that all oranges are defined as having some shade of orange and a particular flavor. These two characteristics are properties. All oranges have the same properties, just with different values. My orange has a “mighty tasty” flavor, but yours may have a “terribly unpleasant” flavor.
You can also think about properties on the class level. As recognized earlier, all oranges are fruit and grow on trees. These are properties of the fruit class, whereas the specific shade of orange is determined by the particular fruit object. Class properties are shared by all objects of a class, while object properties are present in all objects of the class, but with different values.
In the stock selection example, a stock quote has several object properties, including the name of the company, its ticker symbol, the current price, and other statistics.
Properties are the characteristics that describe an object. They answer the question, “What makes this object different?”
Behaviors answer either of two questions: What does this object do? or What can I do to this object? In the case of an orange, it doesn’t do a whole lot, but we can do things to it. One behavior is that it can be eaten. Like properties, you can think of behaviors on the class level or the object level. All oranges can pretty much be eaten in the same way. However, they might differ in some other behavior, such as being rolled down an incline, where the behavior of a perfectly round orange would differ from that of a more oblate one.
The stock selection example provides some more practical behaviors. If you recall, when thinking procedurally, I determined that my program needed to analyze stock quotes as one of its functions. Thinking in OOP, you might decide that a stock quote object can analyze itself. Analysis becomes a behavior of the stock quote object.
In object-oriented programming, the bulk of functional code is moved out of procedures and into classes. By building classes that have certain behaviors and defining how they interact, OOP offers a much richer mechanism for attaching code to the data on which it operates. Behaviors for classes are implemented in so-called class methods.
With these concepts, you could take another look at the stock selection program and redesign it in an object-oriented manner.
As discussed, “stock quote” would be a fine class to start with. To obtain the list of quotes, the program needs the notion of a group of stock quotes, which is often called a collection. So, a better design might be to have a class that represents a “collection of stock quotes,” which is made up of smaller components that represent a single “stock quote.”
Moving on to properties, the collection class would have at least one property—the actual list of quotes received. It might also have additional properties, such as the exact date and time of the most recent retrieval. As for behaviors, the “collection of stock quotes” would be able to talk to a server to get the quotes and provide a sorted list of quotes. This is the “retrieve quotes” behavior.
The stock quote class would have the properties discussed earlier—name, symbol, current price, and so on. Also, it would have an analyze behavior. You might consider other behaviors, such as buying and selling the stock.
It is often useful to create diagrams showing the relationship between components. Figure 5-1 uses the UML class diagram syntax, see Appendix D, to indicate that a StockQuoteCollection contains zero or more (0..*) StockQuote objects, and that a StockQuote object belongs to a single (1) StockQuoteCollection.
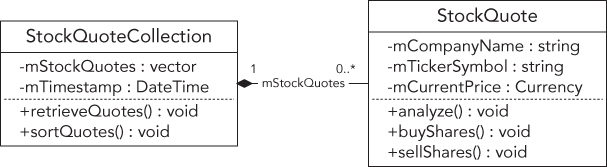
Figure 5-2 shows a possible UML class diagram for the orange class.
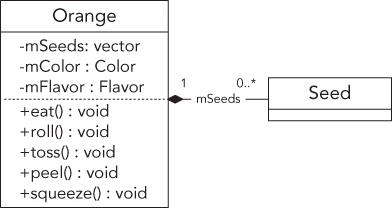
Programmers who transition from a procedural thought process to the object-oriented paradigm often experience an epiphany about the combination of properties and behaviors into objects. Some programmers find themselves revisiting the design of programs they’re working on and rewriting certain pieces as objects. Others might be tempted to throw all the code away and restart the project as a fully object-oriented application.
There are two major approaches to developing software with objects. To some people, objects simply represent a nice encapsulation of data and functionality. These programmers sprinkle objects throughout their programs to make the code more readable and easier to maintain. Programmers taking this approach slice out isolated pieces of code and replace them with objects like a surgeon implanting a pacemaker. There is nothing inherently wrong with this approach. These people see objects as a tool that is beneficial in many situations. Certain parts of a program just “feel like an object,” like the stock quote. These are the parts that can be isolated and described in real-world terms.
Other programmers adopt the OOP paradigm fully and turn everything into an object. In their minds, some objects correspond to real-world things, such as an orange or a stock quote, while others encapsulate more abstract concepts, such as a sorter or an undo object.
The ideal approach is probably somewhere in between these extremes. Your first object-oriented program might really have been a traditional procedural program with a few objects sprinkled in. Or perhaps you went whole hog and made everything an object, from a class representing an int to a class representing the main application. Over time, you will find a happy medium.
There is often a fine line between designing a creative object-oriented system and annoying everybody else on your team by turning every little thing into an object. As Freud used to say, sometimes a variable is just a variable. Okay, that’s a paraphrase of what he said.
Perhaps you’re designing the next bestselling Tic-Tac-Toe game. You’re going all-out OOP on this one, so you sit down with a cup of coffee and a notepad to sketch out your classes and objects. In games like this, there’s often an object that oversees game play and is able to detect the winner. To represent the game board, you might envision a Grid object that will keep track of the markers and their locations. In fact, a component of the grid could be the Piece object that represents an X or an O.
Wait, back up! This design proposes to have a class that represents an X or an O. That is perhaps object overkill. After all, can’t a char represent an X or an O just as well? Better yet, why can’t the Grid just use a two-dimensional array of an enumerated type? Does a Piece object just complicate the code? Take a look at the following table representing the proposed piece class:
| CLASS | ASSOCIATED COMPONENTS | PROPERTIES | BEHAVIORS |
| Piece | None | X or O | None |
The table is a bit sparse, strongly hinting that what we have here may be too granular to be a full-fledged object.
On the other hand, a forward-thinking programmer might argue that while Piece is a pretty meager class as it currently stands, making it into an object allows future expansion without any real penalty. Perhaps down the road, this will be a graphical application and it might be useful to have the Piece class support drawing behavior. Additional properties could be the color of the Piece or whether the Piece was the most recently moved.
Another solution might be to think about the state of a grid square instead of using pieces. The state of a square can be Empty, X, or O. To make the design future-proof to support a graphical application, you could design an abstract base class State with concrete derived classes StateEmpty, StateX, and StateO, which know how to render themselves.
Obviously, there is no right answer. The important point is that these are issues that you should consider when designing your application. Remember that objects exist to help programmers manage their code. If objects are being used for no reason other than to make the code “more object-oriented,” something is wrong.
Perhaps a worse annoyance than objects that shouldn’t be objects is objects that are too general. All OOP students start with examples like “orange”—things that are objects, no question about it. In real-life coding, objects can get pretty abstract. Many OOP programs have an “application object,” despite the fact that an application isn’t really something you can envision in material form. Yet it may be useful to represent the application as an object because the application itself has certain properties and behaviors.
An overly general object is an object that doesn’t represent a particular thing at all. The programmer may be attempting to make an object that is flexible or reusable, but ends up with one that is confusing. For example, imagine a program that organizes and displays media. It can catalog your photos, organize your digital music collection, and serve as a personal journal. The overly general approach is to think of all these things as “media” objects and build a single class that can accommodate all of the formats. It might have a property called “data” that contains the raw bits of the image, song, or journal entry, depending on the type of media. It might have a behavior called “perform” that appropriately draws the image, plays the song, or brings up the journal entry for editing.
The clues that this class is too general are in the names of the properties and behaviors. The word “data” has little meaning by itself—you have to use a general term here because this class has been overextended to three very different uses. Similarly, “perform” will do very different things in the three different cases. Finally, this design is too general because “media” isn’t a particular object, not in the user interface, not in real life, and not even in the programmer’s mind. A major clue that a class is too general is when many ideas in the programmer’s mind all unite as a single object, as shown in Figure 5-3.

As a programmer, you will certainly encounter cases where different classes have characteristics in common, or at least seem somehow related to each other. For example, although creating a “media” object to represent images, music, and text in a digital catalog program is too general, these objects do share characteristics. You may want all of them to keep track of the date and time that they were last modified, or you might want them all to support a delete behavior.
Object-oriented languages provide a number of mechanisms for dealing with such relationships between objects. The tricky part is to understand what the relationship actually is. There are two main types of object relationships—a has-a relationship and an is-a relationship.
Objects engaged in a has-a, or aggregation, relationship follow the pattern A has a B, or A contains a B. In this type of relationship, you can envision one object as part of another. Components, as defined earlier, generally represent a has-a relationship because they describe objects that are made up of other objects.
A real-world example of this might be the relationship between a zoo and a monkey. You could say that a zoo has a monkey or a zoo contains a monkey. A simulation of a zoo in code would have a zoo object, which has a monkey component.
Often, thinking about user interface scenarios is helpful in understanding object relationships. This is so because even though not all UIs are implemented in OOP (though these days, most are), the visual elements on the screen translate well into objects. One UI analogy for a has-a relationship is a window that contains a button. The button and the window are clearly two separate objects but they are obviously related in some way. Because the button is inside the window, you say that the window has a button.
Figure 5-4 shows a real-world and a user interface has-a relationship.
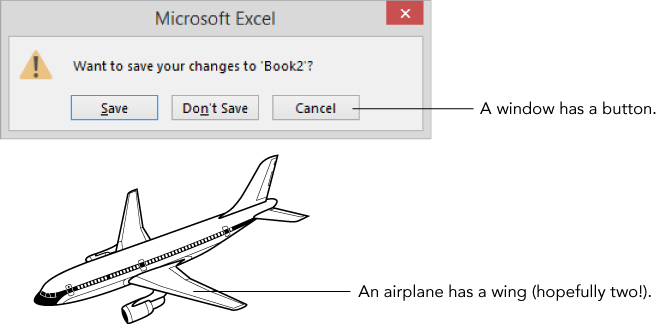
The is-a relationship is such a fundamental concept of object-oriented programming that it has many names, including deriving, subclassing, extending, and inheriting. Classes model the fact that the real world contains objects with properties and behaviors. Inheritance models the fact that these objects tend to be organized in hierarchies. These hierarchies indicate is-a relationships.
Fundamentally, inheritance follows the pattern A is a B or A is really quite a bit like B—it can get tricky. To stick with the simple case, revisit the zoo, but assume that there are other animals besides monkeys. That statement alone has already constructed the relationship—a monkey is an animal. Similarly, a giraffe is an animal, a kangaroo is an animal, and a penguin is an animal. So what? Well, the magic of inheritance comes when you realize that monkeys, giraffes, kangaroos, and penguins have certain things in common. These commonalities are characteristics of animals in general.
What this means for the programmer is that you can define an Animal class that encapsulates all of the properties (size, location, diet, and so on) and behaviors (move, eat, sleep) that pertain to every animal. The specific animals, such as monkeys, become derived classes of Animal because a monkey contains all the characteristics of an animal. Remember, a monkey is an animal plus some additional characteristics that make it distinct. Figure 5-5 shows an inheritance diagram for animals. The arrows indicate the direction of the is-a relationship.

Just as monkeys and giraffes are different types of animals, a user interface often has different types of buttons. A checkbox, for example, is a button. Assuming that a button is simply a UI element that can be clicked to perform an action, a Checkbox extends the Button class by adding state—whether the box is checked or unchecked.
When relating classes in an is-a relationship, one goal is to factor common functionality into the base class, the class that other classes extend. If you find that all of your derived classes have code that is similar or exactly the same, consider how you could move some or all of the code into the base class. That way, any changes that need to be made only happen in one place and future derived classes get the shared functionality “for free.”
The preceding examples cover a few of the techniques used in inheritance without formalizing them. When deriving classes, there are several ways that the programmer can distinguish a class from its parent class, also called base class or superclass. A derived class may use one or more of these techniques, and they are recognized by completing the sentence, “A is a B that …”.
A derived class can augment its parent by adding additional functionality. For example, a monkey is an animal that can swing from trees. In addition to having all of the methods of Animal, the Monkey class also has a swingFromTrees() method, which is specific to only the Monkey class.
A derived class can replace or override a method of its parent entirely. For example, most animals move by walking, so you might give the Animal class a move() method that simulates walking. If that’s the case, a kangaroo is an animal that moves by hopping instead of walking. All the other properties and methods of the Animal base class still apply, but the Kangaroo derived class simply changes the way that the move() method works. Of course, if you find yourself replacing all of the functionality of your base class, it may be an indication that inheriting was not the correct thing to do after all, unless the base class is an abstract base class. An abstract base class forces each of the derived classes to implement all methods that do not have an implementation in the abstract base class. You cannot create instances of an abstract base class. Abstract base classes are discussed in Chapter 10.
A derived class can also add new properties to the ones that were inherited from the base class. For example, a penguin has all the properties of an animal but also has a beak
size property.
C++ provides a way of overriding properties similar to the way you can override methods. However, doing so is rarely appropriate, because it hides the property from the base class; that is, the base class can have a specific value for a property with a certain name, while the derived class can have another value for another property but with the same name. Hiding is explained in more detail in Chapter 10. It’s important not to get the notion of replacing a property confused with the notion of derived classes having different values for properties. For example, all animals have a diet property that indicates what they eat. Monkeys eat bananas and penguins eat fish, but neither of these is replacing the diet property—they simply differ in the value assigned to the property.
Polymorphism is the notion that objects that adhere to a standard set of properties and methods can be used interchangeably. A class definition is like a contract between objects and the code that interacts with them. By definition, any monkey object must support the properties and methods of the monkey class.
This notion extends to base classes as well. Because all monkeys are animals, all Monkey objects support the properties and methods of the Animal class as well.
Polymorphism is a beautiful part of object-oriented programming because it truly takes advantage of what inheritance offers. In a zoo simulation, you could programmatically loop through all of the animals in the zoo and have each animal move once. Because all animals are members of the Animal class, they all know how to move. Some of the animals have overridden the move method, but that’s the best part—your code simply tells each animal to move without knowing or caring what type of animal it is. Each one moves whichever way it knows how.
There is another reason to use inheritance besides polymorphism. Often, it’s just a matter of leveraging existing code. For example, if you need a class that plays music with an echo effect, and your coworker has already written one that plays music without any effects, you might be able to derive a new class from the existing class and add in the new functionality. The is-a relationship still applies (an echo music player is a music player that adds an echo effect), but you didn’t intend for these classes to be used interchangeably. What you end up with are two separate classes, used in completely different parts of the program (or maybe even in different programs entirely) that happen to be related only to avoid reinventing the wheel.
In the real world, it’s pretty easy to classify has-a and is-a relationships between objects. Nobody would claim that an orange has a fruit—an orange is a fruit. In code, things sometimes aren’t so clear.
Consider a hypothetical class that represents a hash table. A hash table is a data structure that efficiently maps a key to a value. For example, an insurance company could use a Hashtable class to map member IDs to names so that given an ID, it’s easy to find the corresponding member name. The member ID is the key and the member name is the value.
In a standard hash table implementation, every key has a single value. If the ID 14534 maps to the member name “Kleper, Scott”, it cannot also map to the member name “Kleper, Marni”. In most implementations, if you tried to add a second value for a key that already has a value, the first value would go away. In other words, if the ID 14534 mapped to “Kleper, Scott” and you then assigned the ID 14534 to “Kleper, Marni”, then Scott would effectively be uninsured. This is demonstrated in the following sequence, which shows two calls to a hypothetical hash table insert() method and the resulting contents of the hash table.
hash.insert(14534, "Kleper, Scott");| KEYS | VALUES |
| 14534 | “Kleper, Scott” [string] |
hash.insert(14534, "Kleper, Marni");| KEYS | VALUES |
| 14534 | “Kleper, Marni” [string] |
It’s not difficult to imagine uses for a data structure that’s like a hash table, but allows multiple values for a given key. In the insurance example, a family might have several names that correspond to the same ID. Because such a data structure is very similar to a hash table, it would be nice to leverage that functionality somehow. A hash table can have only a single value as a key, but that value can be anything. Instead of a string, the value could be a collection (such as an array or a list) containing the multiple values for the key. Every time you add a new member for an existing ID, you add the name to the collection. This would work as shown in the following sequence:
Collection collection; // Make a new collection.collection.insert("Kleper, Scott"); // Add a new element to the collection.hash.insert(14534, collection); // Insert the collection into the table.
| KEYS | VALUES |
| 14534 | {“Kleper, Scott”} [collection] |
Collection collection = hash.get(14534);// Retrieve the existing collection.collection.insert("Kleper, Marni"); // Add a new element to the collection.hash.insert(14534, collection); // Replace the collection with the updated one.
| KEYS | VALUES |
| 14534 | {“Kleper, Scott”, “Kleper, Marni”} [collection] |
Messing around with a collection instead of a string is tedious and requires a lot of repetitive code. It would be preferable to wrap up this multiple-value functionality in a separate class, perhaps called a MultiHash. The MultiHash class would work just like Hashtable except that behind the scenes, it would store each value as a collection of strings instead of a single string. Clearly, MultiHash is somehow related to Hashtable because it is still using a hash table to store the data. What is unclear is whether that constitutes an is-a or a has-a relationship.
To start with the is-a relationship, imagine that MultiHash is a derived class of Hashtable. It would have to override the method that adds an entry into the table so that it would either create a collection and add the new element, or retrieve the existing collection and add the new element. It would also override the method that retrieves a value. It could, for example, append all the values for a given key together into one string. This seems like a perfectly reasonable design. Even though it overrides all the methods of the base class, it will still make use of the base class’s methods by using the original methods within the derived class. This approach is shown in the UML class diagram in Figure 5-6.
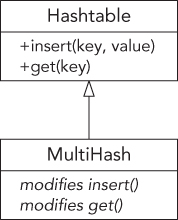
Now consider it as a has-a relationship. MultiHash is its own class, but it contains a Hashtable object. It probably has an interface very similar to Hashtable, but it need not be the same. Behind the scenes, when a user adds something to the MultiHash, it is really wrapped in a collection and put in a Hashtable object. This also seems perfectly reasonable and is shown in Figure 5-7.

So, which solution is right? There’s no clear answer, though a friend of mine who has written a MultiHash class for production use, viewed it as a has-a relationship. The main reason was to allow modifications to the exposed interface without worrying about maintaining hash table functionality. For example, in Figure 5-7, the get() method was changed to getAll(), making it clear that this would get all the values for a particular key in a MultiHash. Additionally, with a has-a relationship, you don’t have to worry about any hash table functionality bleeding through. For example, if the hash table class supported a method that would get the total number of values, it would report the number of collections unless MultiHash knew to override it.
That said, one could make a convincing argument that a MultiHash actually is a Hashtable with some new functionality, and it should have been an is-a relationship. The point is that there is sometimes a fine line between the two relationships, and you will need to consider how the class is going to be used and whether what you are building just leverages some functionality from another class or really is that class with modified or new functionality.
The following table represents the arguments for and against taking either approach for the MultiHash class.
| IS-A | HAS-A | |
| Reasons For |
Fundamentally, it’s the same abstraction with different characteristics. It provides (almost) the same methods as Hashtable.
|
MultiHash can have whatever methods are useful without needing to worry about what methods Hashtable has.The implementation could change to something other than a Hashtable without changing the exposed methods.
|
| Reasons Against |
A hash table by definition has one value per key. To say MultiHash is a hash table is blasphemy!MultiHash overrides both methods of Hashtable, a strong sign that something about the design is wrong.Unknown or inappropriate properties or methods of Hashtable could “bleed through” to MultiHash. |
In a sense, MultiHash reinvents the wheel by coming up with new methods.Some additional properties and methods of Hashtable might have been useful.
|
The reasons against using an is-a relationship in this case are pretty strong. Additionally, the Liskov substitution principle (LSP) can help you decide between an is-a and a has-a relationship. This principle states that you should be able to use a derived class instead of a base class without altering the behavior. Applied to this example, it states that this should be a has-a relationship, because you cannot just start using a MultiHash where before you were using a Hashtable. If you would do so, the behavior would change. For example, the insert() method of Hashtable removes an earlier value with the same key that is already in the map, while MultiHash does not remove such values.
If you do have a choice between the two types of relationships, I recommend, after years of experience, opting for a has-a relationship over an is-a relationship.
Note that the Hashtable and MultiHash are used here to demonstrate the difference between the is-a and has-a relationships. In your own code, it is recommended to use one of the standard hash table classes instead of writing your own. The C++ Standard Library provides an unordered_ map class, which you should use instead of the Hashtable, and an unordered_multimap class, which you should use instead of the MultiHash. Both of these standard classes are discussed in Chapter 17.
As you consider what type of relationship classes have, you should consider whether or not they actually have a relationship at all. Don’t let your zeal for object-oriented design turn into a lot of needless class/derived-class relationships.
One pitfall occurs when things are obviously related in the real world but have no actual relationship in code. Object-oriented hierarchies need to model functional relationships, not artificial ones. Figure 5-8 shows relationships that are meaningful as ontologies or hierarchies, but are unlikely to represent a meaningful relationship in code.

The best way to avoid needless inheritance is to sketch out your design first. For every class and derived class, write down what properties and methods you’re planning on putting into the class. You should rethink your design if you find that a class has no particular properties or methods of its own, or if all of those properties and methods are completely overridden by its derived classes, except when working with abstract base classes as mentioned earlier.
Just as a class A can be a base class of B, B can also be a base class of C. Object-oriented hierarchies can model multilevel relationships like this. A zoo simulation with more animals might be designed with every animal as a derived class of a common Animal class, as shown in Figure 5-9.
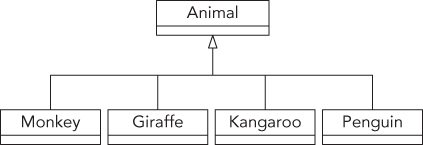
As you code each of these derived classes, you might find that a lot of them are similar. When this occurs, you should consider putting in a common parent. Realizing that Lion and Panther both move the same way and have the same diet might indicate a need for a possible BigCat class. You could further subdivide the Animal class to include WaterAnimal and Marsupial. A more hierarchical design that leverages this commonality is shown in Figure 5-10.
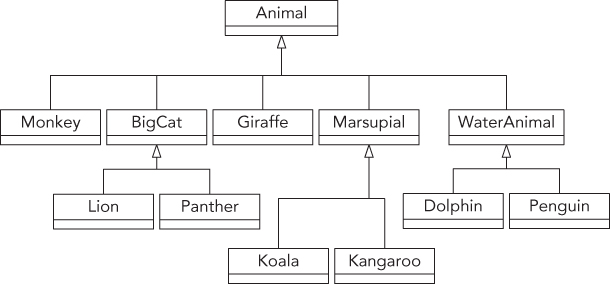
A biologist looking at this hierarchy may be disappointed—a penguin isn’t really in the same family as a dolphin. However, it underlines a good point—in code, you need to balance real-world relationships with shared-functionality relationships. Even though two things might be very closely related in the real world, they might have a not-a relationship in code because they really don’t share functionality. You could just as easily divide animals into mammals and fish, but that wouldn’t factor any commonality to the base class.
Another important point is that there could be other ways of organizing the hierarchy. The preceding design is organized mostly by how the animals move. If it were instead organized by the animals’ diet or height, the hierarchy could be very different. In the end, what matters is how the classes will be used. The needs will dictate the design of the object hierarchy.
A good object-oriented hierarchy accomplishes the following:
Every example so far has had a single inheritance chain. In other words, a given class has, at most, one immediate parent class. This does not have to be the case. Through multiple inheritance, a class can have more than one base class.
Figure 5-11 shows a multiple inheritance design. There is still a base class called Animal, which is further divided by size. A separate hierarchy categorizes by diet, and a third takes care of movement. Each type of animal is then a derived class of all three of these classes, as shown by different lines.
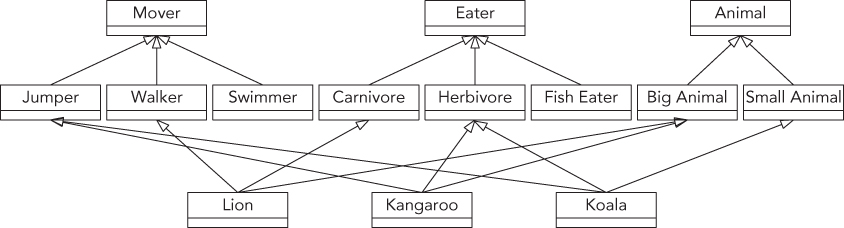
In a user interface context, imagine an image that the user can click on. This object seems to be both a button and an image so the implementation might involve inheriting from both the Image class and the Button class, as shown in Figure 5-12.
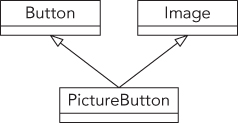
Multiple inheritance can be very useful in certain cases, but it also has a number of disadvantages that you should always keep in mind. Many programmers dislike multiple inheritance. C++ has explicit support for such relationships, though the Java language does away with them altogether, except for inheriting from multiple interfaces (abstract base classes). There are several reasons to which multiple inheritance critics point.
First, visualizing multiple inheritance is complicated. As you can see in Figure 5-11, even a simple class diagram can become very complicated when there are multiple hierarchies and crossing lines. Class hierarchies are supposed to make it easier for the programmer to understand the relationships between code. With multiple inheritance, a class could have several parents that are in no way related to each other. With so many classes contributing code to your object, can you really keep track of what’s going on?
Second, multiple inheritance can destroy otherwise clean hierarchies. In the animal example, switching to a multiple inheritance approach means that the Animal base class is less meaningful because the code that describes animals is now separated into three separate hierarchies. While the design illustrated in Figure 5-11 shows three clean hierarchies, it’s not difficult to imagine how they could get messy. For example, what if you realize that all Jumpers not only move in the same way, but they also eat the same things? Because there are separate hierarchies, there is no way to join the concepts of movement and diet without adding yet another derived class.
Third, implementation of multiple inheritance is complicated. What if two of your base classes implement the same method in different ways? Can you have two base classes that are themselves a derived class of a common base class? These possibilities complicate the implementation because structuring such intricate relationships in code is difficult both for the author and a reader.
The reason that other languages can leave out multiple inheritance is that it is usually avoidable. By rethinking your hierarchy, you can often avoid introducing multiple inheritance when you have control over the design of a project.
Mixin classes represent another type of relationship between classes. In C++, a mixin class is implemented syntactically just like multiple inheritance, but the semantics are refreshingly different. A mixin class answers the question, “What else is this class able to do?” and the answer often ends with “-able.” Mixin classes are a way that you can add functionality to a class without committing to a full is-a relationship. You can think of it as a shares-with relationship.
Going back to the zoo example, you might want to introduce the notion that some animals are “pettable.” That is, there are some animals that visitors to the zoo can pet, presumably without being bitten or mauled. You might want all pettable animals to support the behavior “be pet.” Because pettable animals don’t have anything else in common and you don’t want to break the existing hierarchy you’ve designed, Pettable makes a great mixin class.
Mixin classes are used frequently in user interfaces. Instead of saying that a PictureButton class is both an Image and a Button, you might say that it’s an Image that is Clickable. A folder icon on your desktop could be an Image that is Draggable and Clickable. Software developers tend to make up a lot of fun adjectives.
The difference between a mixin class and a base class has more to do with how you think about the class than any code difference. In general, mixin classes are easier to digest than multiple inheritance because they are very limited in scope. The Pettable mixin class just adds one behavior to any existing class. The Clickable mixin class might just add “mouse down” and “mouse up” behaviors. Also, mixin classes rarely have a large hierarchy so there’s no cross-contamination of functionality. Chapter 28 goes into more detail on mixin classes.
In Chapter 4, you learned about the concept of abstraction—the notion of separating implementation from the means used to access it. Abstraction is a good idea for many reasons that were explored earlier. It’s also a fundamental part of object-oriented design.
The key to abstraction is effectively separating the interface from the implementation. The implementation is the code you’re writing to accomplish the task you set out to accomplish. The interface is the way that other people use your code. In C, the header file that describes the functions in a library you’ve written is an interface. In object-oriented programming, the interface to a class is the collection of publicly accessible properties and methods. A good interface contains only public methods. Properties of a class should never be made public but can be exposed through public methods, also called getters and setters.
The question of how other programmers will interact with your objects comes into play when designing a class. In C++, a class’s properties and methods can each be public, protected, or private. Making a property or method public means that other code can access it; protected means that other code cannot access the property or method but derived classes can access them; private is a stricter control, which means that not only are the properties or methods locked for other code, but even derived classes can’t access them. Note that access specifiers are at the class level, not at the object level. This means that a method of a class can access, for example, private properties or private methods of other objects of the same class.
Designing the exposed interface is all about choosing what to make public. When working on a large project with other programmers, you should view the exposed interface design as a process.
The first step in designing an exposed interface is to consider whom you are designing it for. Is your audience another member of your team? Is this an interface that you will personally be using? Is it something that a programmer external to your company will use? Perhaps a customer or an offshore contractor? In addition to determining who will be coming to you for help with the interface, this should shed some light on some of your design goals.
If the interface is for your own use, you probably have more freedom to iterate on the design. As you’re making use of the interface, you can change it to suit your own needs. However, you should keep in mind that roles on an engineering team change and it is quite likely that, some day, others will be using this interface as well.
Designing an interface for other internal programmers to use is slightly different. In a way, your interface becomes a contract with them. For example, if you are implementing the data store component of a program, others are depending on that interface to support certain operations. You will need to find out all of the things that the rest of the team wants your class to do. Do they need versioning? What types of data can they store? As a contract, you should view the interface as slightly less flexible. If the interface is agreed upon before coding begins, you’ll receive some groans from other programmers if you decide to change it after code has been written.
If the client is an external customer, you will be designing with a very different set of requirements. Ideally, the target customer will be involved in specifying what functionality your interface exposes. You’ll need to consider both the specific features they want as well as what customers might want in the future. The terminology used in the interface will have to correspond to the terms that the customer is familiar with, and the documentation will have to be written with that audience in mind. Inside jokes, codenames, and programmer slang should be left out of your design.
There are many reasons for writing an interface. Before putting any code on paper or even deciding on what functionality you’re going to expose, you need to understand the purpose of the interface.
An application programming interface (API) is an externally visible mechanism to extend a product or use its functionality within another context. If an internal interface is a contract, an API is closer to a set-in-stone law. Once people who don’t even work for your company are using your API, they don’t want it to change unless you’re adding new features that will help them. So, care should be given to planning the API and discussing it with customers before making it available to them.
The main tradeoff in designing an API is usually ease of use versus flexibility. Because the target audience for the interface is not familiar with the internal working of your product, the learning curve to use the API should be gradual. After all, your company is exposing this API to customers because the company wants it to be used. If it’s too difficult to use, the API is a failure. Flexibility often works against this. Your product may have a lot of different uses, and you want the customer to be able to leverage all the functionality you have to offer. However, an API that lets the customer do anything that your product can do may be too complicated.
As a common programming adage goes, “A good API makes the easy case easy and the hard case possible.” That is, APIs should have a simple learning curve. The things that most programmers will want to do should be accessible. However, the API should allow for more advanced usage, and it’s acceptable to trade off complexity of the rare case for simplicity of the common case.
Often, your task is to develop some particular functionality for general use elsewhere in the application. It could be a random number library or a logging class. In these cases, the interface is somewhat easier to decide on because you tend to expose most or all of the functionality, ideally without giving too much away about its implementation. Generality is an important issue to consider. Because the class or library is general purpose, you’ll need to take the possible set of use cases into account in your design.
You may be designing the interface between two major subsystems of the application, such as the mechanism for accessing a database. In these cases, separating the interface from the implementation is paramount because other programmers are likely to start implementing against your interface before your implementation is complete. When working on a subsystem, first think about what its main purpose is. Once you have identified the main task your subsystem is charged with, think about specific uses and how it should be presented to other parts of the code. Try to put yourself in their shoes and not get bogged down in implementation details.
Most of the interfaces you define will probably be smaller than a subsystem interface or an API. These will be classes that you use within other code that you’ve written. In these cases, the main pitfall occurs when your interface evolves gradually and becomes unruly. Even though these interfaces are for your own use, think of them as though they weren’t. As with a subsystem interface, consider the main purpose of each class and be cautious of exposing functionality that doesn’t contribute to that purpose.
As you are designing your interface, keep in mind what the future holds. Is this a design you will be locked into for years? If so, you might need to leave room for expansion by coming up with a plug-in architecture. Do you have evidence that people will try to use your interface for purposes other than what it was designed for? Talk to them and get a better understanding of their use case. The alternative is rewriting it later, or worse, attaching new functionality haphazardly and ending up with a messy interface. Be careful, though! Speculative generality is yet another pitfall. Don’t design the be-all, end-all logging class if the future uses are unclear, because it might unnecessarily complicate the design, the implementation, and its public interface.
Experience and iteration are essential to good abstractions. Truly well-designed interfaces come from years of writing and using other abstractions. You can also leverage someone else’s years of writing and using abstractions by reusing existing, well-designed abstractions in the form of standard design patterns. As you encounter other abstractions, try to remember what worked and what didn’t work. What did you find lacking in the Windows file system API you used last week? What would you have done differently if you had written the network wrapper, instead of your coworker? The best interface is rarely the first one you put on paper, so keep iterating. Bring your design to your peers and ask for feedback. If your company uses code reviews, start the code review by doing a review of the interface specifications before the implementation starts. Don’t be afraid to change the abstraction once coding has begun, even if it means forcing other programmers to adapt. Hopefully, they’ll realize that a good abstraction is beneficial to everyone in the long term.
Sometimes you need to evangelize a bit when communicating your design to other programmers. Perhaps the rest of the team didn’t see a problem with the previous design or feels that your approach requires too much work on their part. In those situations, be prepared both to defend your work and to incorporate their ideas when appropriate.
A good abstraction means that the interface has only public methods. All code should be in the implementation file and not in the class definition file. This means that the interface files containing the class definitions are stable and will not change. A specific technique to accomplish this is called the private implementation idiom, or pimpl idiom, and is discussed in Chapter 9.
Beware of single-class abstractions. If there is significant depth to the code you’re writing, consider what other companion classes might accompany the main interface. For example, if you’re exposing an interface to do some data processing, consider also writing a result object that provides an easy way to view and interpret the results.
Always turn properties into methods. In other words, don’t allow external code to manipulate the data behind your class directly. You don’t want some careless or nefarious programmer to set the height of a bunny object to a negative number. Instead, have a “set height” method that does the necessary bounds checking.
Iteration is worth mentioning again because it is the most important point. Seek and respond to feedback on your design, change it when necessary, and learn from mistakes.
In this chapter, you’ve gained an appreciation for the design of object-oriented programs without a lot of code getting in the way. The concepts you’ve learned are applicable to almost any object-oriented language. Some of it may have been a review to you, or it may be a new way of formalizing a familiar concept. Perhaps you picked up some new approaches to old problems, or new arguments in favor of the concepts you’ve been preaching to your team all along. Even if you’ve never used objects in your code, or have used them only sparingly, you now know more about how to design object-oriented programs than many experienced C++ programmers.
The relationships between objects are important to study, not just because well-linked objects contribute to code reuse and reduce clutter, but also because you will be working in a team. Objects that relate in meaningful ways are easier to read and maintain. You may decide to use the “Object Relationships” section as a reference when you design your programs.
Finally, you learned about creating successful abstractions and the two most important design considerations—audience and purpose.
The next chapter continues the design theme by explaining how to design your code with reuse in mind.
Reusing libraries and other code in your programs is an important design strategy. However, it is only half of the reuse strategy. The other half is designing and writing the code that you can reuse in your programs. As you’ve probably discovered, there is a significant difference between well-designed and poorly designed libraries. Well-designed libraries are a pleasure to use, while poorly designed libraries can prod you to give up in disgust and write the code yourself. Whether you’re writing a library explicitly designed for use by other programmers or merely deciding on a class hierarchy, you should design your code with reuse in mind. You never know when you’ll need a similar piece of functionality in a subsequent project.
Chapter 4 introduces the design theme of reuse and explains how to apply this theme by incorporating libraries and other code in your designs, but it doesn’t explain how to design reusable code. That is the topic of this chapter. It builds on the object-oriented design principles described in Chapter 5.
You should design code that both you and other programmers can reuse. This rule applies not only to libraries and frameworks that you specifically intend for other programmers to use, but also to any class, subsystem, or component that you design for a program. You should always keep in mind the mottos:
There are several reasons for this:
Reusable code fulfills two main goals. First, it is general enough to use for slightly different purposes or in different application domains. Program components with details of a specific application are difficult to reuse in other programs.
Second, reusable code is also easy to use. It doesn’t require significant time to understand its interface or functionality. Programmers must be able to incorporate it readily into their applications.
The means of “delivering” your library to clients is also important. You can deliver it in source form and clients just incorporate your source into their project. Another option is to deliver a static library, which they link into their application, or you can deliver a Dynamic Link Library (DLL) for Windows clients, or a shared object (.so) for Linux clients. Each of these delivery mechanisms can impose additional constraints on how you code your library.
The most important strategy for designing reusable code is abstraction. Chapter 4 presents the real-world analogy of a television, which you can use through its interfaces without understanding how it works inside. Similarly, when you design code, you should clearly separate the interface from the implementation. This separation makes the code easier to use, primarily because clients do not need to understand the internal implementation details in order to use the functionality.
Abstraction separates code into interfaces and implementation, so designing reusable code focuses on these two main areas. First, you must structure the code appropriately. What class hierarchies will you use? Should you use templates? How should you divide the code into subsystems?
Second, you must design the interfaces, which are the “entries” into your library, or code that programmers use, to access the functionality you provide.
You learned about the principle of abstraction in Chapter 4 and read more about its application to object-oriented design in Chapter 5. To follow the principle of abstraction, you should provide interfaces to your code that hide the underlying implementation details. There should be a clear distinction between the interface and the implementation.
Using abstraction benefits both you and the clients who use your code. Clients benefit because they don’t need to worry about the implementation details; they can take advantage of the functionality you offer without understanding how the code really works. You benefit because you can modify the underlying code without changing the interface to the code. Thus, you can provide upgrades and fixes without requiring clients to change their use. With dynamically linked libraries, clients might not even need to rebuild their executables. Finally, you both benefit because you, as the library writer, can specify in the interface exactly what interactions you expect and what functionality you support. Consult Chapter 3 for a discussion on how to write documentation. A clear separation of interfaces and implementations will prevent clients from using the library in ways that you didn’t intend, which can otherwise cause unexpected behaviors and bugs.
Sometimes libraries require client code to keep information returned from one interface in order to pass it to another. This information is sometimes called a handle and is often used to keep track of specific instances that require state to be remembered between calls. If your library design requires a handle, don’t expose its internals. Make that handle into an opaque class, in which the programmer can’t access the internal data members, either directly, or through public getters or setters. Don’t require the client code to tweak variables inside this handle. An example of a bad design would be a library that requires you to set a specific member of a structure in a supposedly opaque handle in order to turn on error logging.
Abstraction is so important that it should guide your entire design. As part of every decision you make, ask yourself whether your choice fulfills the principle of abstraction. Put yourself in your clients’ shoes and determine whether or not you’re requiring knowledge of the internal implementation in the interface. You should rarely, if ever, make exceptions to this rule.
You must consider reuse from the beginning of your design, on all levels, that is, from a single function, over a class, to entire libraries and frameworks. In the text that follows, all these different levels are called components. The following strategies will help you organize your code properly. Note that all of these strategies focus on making your code general purpose. The second aspect of designing reusable code, providing ease of use, is more relevant to your interface design and is discussed later in this chapter.
When you design a component, you should keep it focused on a single task or group of tasks, that is, you should strive for high cohesion. This is also known as the Single Responsibility Principle (SRP). Don’t combine unrelated concepts such as a random number generator and an XML parser.
Even when you are not designing code specifically for reuse, keep this strategy in mind. Entire programs are rarely reused on their own. Instead, pieces or subsystems of the programs are incorporated directly into other applications, or are adapted for slightly different uses. Thus, you should design your programs so that you divide logically separate functionality into distinct components that can be reused in different programs. Each such component should have well-defined responsibilities.
This program strategy models the real-world design principle of discrete, interchangeable parts. For example, you could write a Car class and put all properties and behaviors of the engine into it. However, engines are separable components that are not tied to other aspects of the car. The engine could be removed from one car and put into another car. A proper design would include an Engine class that contains all engine-specific functionality. A Car instance then just contains an instance of Engine.
You should design your subsystems as discrete components that can be reused independently, that is, strive for low coupling. For example, if you are designing a networked game, keep the networking and graphical user interface aspects in separate subsystems. That way, you can reuse either component without dragging in the other one. For example, you might want to write a non-networked game, in which case you could reuse the graphical interface subsystem, but wouldn’t need the networking aspect. Similarly, you could design a peer-to-peer file-sharing program, in which case you could reuse the networking subsystem but not the graphical user interface functionality.
Make sure to follow the principle of abstraction for each subsystem. Think of each subsystem as a miniature library for which you must provide a coherent and easy-to-use interface. Even if you’re the only programmer who ever uses these miniature libraries, you will benefit from well-designed interfaces and implementations that separate logically distinct functionality.
In addition to dividing your program into logical subsystems, you should avoid combining unrelated concepts at the class level. For example, suppose you want to write a class for a self-driving car. You decide to start with a basic class for a car and incorporate all the self-driving logic directly into it. However, what if you just want a non-self-driving car in your program? In that case, all the logic related to self-driving is useless, and might require your program to link with libraries that it could otherwise avoid, such as vision libraries, LIDAR libraries, and so on. A solution is to create a class hierarchy (introduced in Chapter 5) in which a self-driving car is a derived class of a generic car. That way, you can use the car base class in programs that do not need self-driving capabilities without incurring the cost of such algorithms. Figure 6-1 shows this hierarchy.
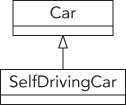
This strategy works well when there are two logical concepts, such as self-driving and cars. It becomes more complicated when there are three or more concepts. For example, suppose you want to provide both a truck and a car, each of which could be self-driving or not. Logically, both the truck and the car are a special case of a vehicle, and so they should be derived classes of a vehicle class. Similarly, self-driving classes could be derived classes of non-self-driving classes. You can’t provide these separations with a linear hierarchy. One possibility is to make the self-driving aspect a mixin class as shown in Figure 6-2. The SelfDriveable mixin class provides all the necessary algorithms for implementing the self-driving functionality.
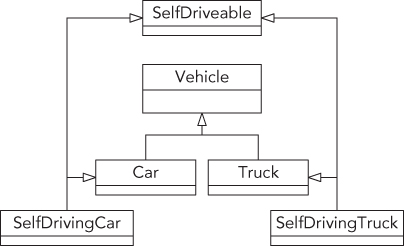
This hierarchy requires you to write six different classes, but the clear separation of functionality is worth the effort.
Similarly, you should avoid combining unrelated concepts, that is, strive for high cohesion, at any level of your design, not only at the class level. For example, at the level of methods, a single method should not perform logically unrelated things, mix mutation (set) and inspection (get), and so on.
Aggregation, discussed in Chapter 5, models the has-a relationship: objects contain other objects to perform some aspects of their functionality. You can use aggregation to separate unrelated or related but separate functionality when inheritance is not appropriate.
For example, suppose you want to write a Family class to store the members of a family. Obviously, a tree data structure would be ideal for storing this information. Instead of integrating the code for the tree structure in your Family class, you should write a separate Tree class. Your Family class can then contain and use a Tree instance. To use the object-oriented terminology, the Family has-a Tree. With this technique, the tree data structure could be reused more easily in another program.
If your library is a data manipulation library, you want to separate data manipulation from the user interface. This means that for those kinds of libraries you should never assume in which type of user interface the library will be used. As such, do not use cout, cerr, cin, stdout, stderr, or stdin, because if the library is used in the context of a graphical user interface, these concepts may make no sense. For example, a Windows GUI-based application usually will not have any form of console I/O. If you think your library will only be used in GUI-based applications, you should still never pop up any kind of message box or other kind of notification to the end user, because that is the responsibility of the client code. It’s the client code that decides how messages are displayed for the user. These kinds of dependencies not only result in poor reusability, but they also prevent client code from properly responding to an error, for example, to handle it silently.
The Model-View-Controller (MVC) paradigm, introduced in Chapter 4, is a well-known design pattern to separate storing data from visualizing that data. With this paradigm, the model can be in the library, while the client code can provide the view and the controller.
C++ has a concept called templates that allows you to create structures that are generic with respect to a type or class. For example, you might have written code for an array of integers. If you subsequently would like an array of doubles, you need to rewrite and replicate all the code to work with doubles. The notion of a template is that the type becomes a parameter to the specification, and you can create a single body of code that can work on any type. Templates allow you to write both data structures and algorithms that work on any types.
The simplest example of this is the std::vector class, which is part of the C++ Standard Library. To create a vector of integers, you write std::vector<int>; to create a vector of doubles, you write std::vector<double>. Template programming is, in general, extremely powerful but can be very complex. Luckily, it is possible to create rather simple usages of templates that parameterize according to a type. Chapters 12 and 22 explain the techniques to write your own templates, while this section discusses some of their important design aspects.
Whenever possible, you should use a generic design for data structures and algorithms instead of encoding specifics of a particular program. Don’t write a balanced binary tree structure that stores only book objects. Make it generic, so that it can store objects of any type. That way, you could use it in a bookstore, a music store, an operating system, or anywhere that you need a balanced binary tree. This strategy underlies the Standard Library, which provides generic data structures and algorithms that work on any types.
Templates are not the only mechanism for writing generic data structures. Another approach to write generic structures in C and C++ is to store void* pointers instead of pointers of a specific type. Clients can use this structure to store anything they want by casting it to a void*. However, the main problem with this approach is that it is not type-safe: the containers are unable to check or enforce the types of the stored elements. You can cast any type to a void* to store in the structure, and when you remove the pointers from the data structure, you must cast them back to what you think they are. Because there are no checks involved, the results can be disastrous. Imagine a scenario where one programmer stores pointers to int in a data structure by first casting them to void*, but another programmer thinks they are pointers to Process objects. The second programmer will blithely cast the void* pointers to Process* pointers and try to use them as Process* objects. Needless to say, the program will not work as expected.
Yet another approach is to write the data structure for a specific class. Through polymorphism, any derived class of that class can be stored in the structure. Java takes this approach to an extreme: it specifies that every class derives directly or indirectly from the Object class. The containers in earlier versions of Java store Objects, so they can store objects of any type. However, this approach is also not type-safe. When you remove an object from the container, you must remember what it really is and down-cast it to the appropriate type. Down casting means casting it to a more specific class in a class hierarchy, that is, casting it downward in the hierarchy.
Templates, on the other hand, are type-safe when used correctly. Each instantiation of a template stores only one type. Your program will not compile if you try to store different types in the same template instantiation. Newer versions of Java do support the concept of generics that are type-safe just like C++ templates.
Templates are not perfect. First of all, their syntax might be confusing, especially for someone who has not used them before. Second, templates require homogeneous data structures, in which you can store only objects of the same type in a single structure. That is, if you write a templatized balanced binary tree, you can create one tree object to store Process objects and another tree object to store ints. You can’t store both ints and Processes in the same tree. This restriction is a direct result of the type-safe nature of templates. Starting with C++17, there is a standardized way around this homogeneity restriction. You can write your data structure to store std::variant or std::any objects. An std::any object can store a value of any type, while an std::variant object can store a value of a selection of types. Both any and variant are discussed in detail in Chapter 20.
Programmers sometimes find it tricky to decide whether to use templates or inheritance. Following are some tips to help you make the decision.
Use templates when you want to provide identical functionality for different types. For example, if you want to write a generic sorting algorithm that works on any type, use templates. If you want to create a container that can store any type, use templates. The key concept is that the templatized structure or algorithm treats all types the same. However, if required, templates can be specialized for specific types to treat those types differently. Template specialization is discussed in Chapter 12.
When you want to provide different behaviors for related types, use inheritance. For example, use inheritance if you want to provide two different, but similar, containers such as a queue and a priority queue.
Note that you can combine inheritance and templates. You could write a templatized class that derives from a templatized base class. Chapter 12 covers the details of the template syntax.
There are two opposite styles for writing safe code. The optimal programming style is probably using a healthy mix of both of them. The first is called design-by-contract, which means that the documentation for a function or a class represents a contract with a detailed description of what the responsibility of the client code is and what the responsibility of your function or class is. There are three important aspects of design-by-contract: preconditions, postconditions, and invariants. Preconditions list the conditions that client code must satisfy before calling a function or method. Postconditions list the conditions that must be satisfied by the function or method when it has finished executing. Finally, invariants list the conditions that must be satisfied during the whole execution of the function or method.
Design-by-contract is often used in the Standard Library. For example, std::vector defines a contract for using the array notation to get a certain element from a vector. The contract states that no bounds checking is performed, but that this is the responsibility of the client code. In other words, a precondition for using array notation to get elements from a vector is that the given index is valid. This is done to increase performance for client code that knows their indices are within bounds. vector also defines an at() method to get a specific element that does perform bounds checking. So, client code can choose whether it uses the array notation without bounds checking, or the at() method with bounds checking.
The second style is that you design your functions and classes to be as safe as possible. The most important aspect of this guideline is to perform error checking in your code. For example, if your random number generator requires a seed to be in a specific range, don’t just trust the user to pass a valid seed. Check the value that is passed in, and reject the call if it is invalid. The at() method of vector as discussed in the previous paragraph is another example of a method that is designed with safety in mind. If the user provides an invalid index, the method throws an exception.
As an analogy, consider an accountant who prepares income tax returns. When you hire an accountant, you provide them with all your financial information for the year. The accountant uses this information to fill out forms from the IRS. However, the accountant does not blindly fill out your information on the form, but instead makes sure the information makes sense. For example, if you own a house, but forget to specify the property tax you paid, the accountant will remind you to supply that information. Similarly, if you say that you paid $12,000 in mortgage interest, but made only $15,000 gross income, the accountant might gently ask you if you provided the correct numbers (or at least recommend more affordable housing).
You can think of the accountant as a “program” where the input is your financial information and the output is an income tax return. However, the value added by an accountant is not just that they fill out the forms. You also choose to employ an accountant because of the checks and safeguards that they provide. Similarly in programming, you could provide as many checks and safeguards as possible in your implementations.
There are several techniques and language features that help you to write safe code and to incorporate checks and safeguards in your programs. To report errors to client code, you can return an error code or a distinct value like false or nullptr. Alternatively, you can throw an exception to notify the client code of any errors. Chapter 14 covers exceptions in detail. To write safe code that works with dynamically allocated resources such as memory, use smart pointers. Conceptually, a smart pointer is a pointer to some resource that automatically frees the resource when it goes out of scope. Smart pointers are introduced in Chapter 1.
You should strive to design your classes in such a way that they can be extended by deriving another class from them, but they should be closed for modification, that is, the behavior should be extendable without you having to modify its implementation. This is called the Open/Closed Principle (OCP).
As an example, suppose you start implementing a drawing application. The first version should only support squares. Your design contains two classes: Square and Renderer. The former contains the definition of a square, such as the length of its sides. The latter is responsible for drawing the squares. You come up with something as follows:
class Square{// Details not important for this example.};class Renderer{public:void render(const vector<Square>& squares);};void Renderer::render(const vector<Square>& squares){for (auto& square : squares){// Render this square object.}}
Next, you add support for circles, so you create a Circle class:
class Circle{// Details not important for this example.};
To be able to render circles, you have to modify the render() method of the Renderer class. You decide to change it as follows:
void Renderer::render(const vector<Square>& squares,const vector<Circle>& circles){for (auto& square : squares){// Render this square object.}for (auto& circle : circles){// Render this circle object.}}
While doing this, you feel there is something wrong, and you are correct! In order to extend the functionality to add support for circles, you have to modify the current implementation of the render() method, so it’s not closed for modifications.
Your design in this case should use inheritance. This example jumps ahead a bit on the syntax for inheritance. Chapter 10 discusses inheritance; however, the syntactical details are not important to understand this example. For now, you only need to know that the following syntax specifies that Square derives from the Shape class:
class Square : public Shape {};Here is a design using inheritance:
class Shape{public:virtual void render() = 0;};class Square : public Shape{public:virtual void render() override { /* Render square */ }// Other members not important for this example.};class Circle : public Shape{public:virtual void render() override { /* Render circle */ }// Other members not important for this example.};class Renderer{public:void render(const vector<shared_ptr<Shape>>& objects);};void Renderer::render(const vector<shared_ptr<Shape>>& objects){for (auto& object : objects){object->render();}}
With this design, if you want to add support for a new type of shape, you just need to write a new class that derives from Shape and that implements the render() method. You don’t need to modify anything in the Renderer class. So, this design can be extended without having to modify the existing code, that is, it’s open for extension, and closed for modification.
In addition to abstracting and structuring your code appropriately, designing for reuse requires you to focus on the interface with which programmers interact. Even if you have the most beautiful and most efficient implementation, your library will not be any good if it has a wretched interface.
Note that every component in your program should have good interfaces, even if you don’t intend them to be used in multiple programs. First of all, you never know when something will be reused. Second, a good interface is important even for the first use, especially if you are programming in a group and other programmers must use the code you design and write.
The main purpose of interfaces is to make the code easy to use, but some interface techniques can help you follow the principle of generality as well.
Your interfaces should be easy to use. That doesn’t mean that they must be trivial, but they should be as simple and intuitive as the functionality allows. You shouldn’t require consumers of your library to wade through pages of source code in order to use a simple data structure, or to go through contortions in their code to obtain the functionality they need. This section provides four specific strategies for designing interfaces that are easy to use.
The best strategy for developing easy-to-use interfaces is to follow standard and familiar ways of doing things. When people encounter an interface similar to something they have used in the past, they will understand it better, adopt it more readily, and be less likely to use it improperly.
For example, suppose that you are designing the steering mechanism of a car. There are a number of possibilities: a joystick, two buttons for moving left or right, a sliding horizontal lever, or a good old steering wheel. Which interface do you think would be easiest to use? Which interface do you think would sell the most cars? Consumers are familiar with steering wheels, so the answer to both questions is, of course, the steering wheel. Even if you developed another mechanism that provided superior performance and safety, you would have a tough time selling your product, let alone teaching people how to use it. When you have a choice between following standard interface models and branching out in a new direction, it’s usually better to stick to the interface to which people are accustomed.
Innovation is important, of course, but you should focus on innovation in the underlying implementation, not in the interface. For example, consumers are excited about the innovative fully electric engine in some car models. These cars are selling well in part because the interface to use them is identical to cars with standard gasoline engines.
Applied to C++, this strategy implies that you should develop interfaces that follow standards to which C++ programmers are accustomed. For example, C++ programmers expect the constructor and destructor of a class to initialize and clean up an object, respectively. When you design your classes, you should follow this standard. If you require programmers to call initialize() and cleanup() methods for initialization and cleanup instead of placing that functionality in the constructor and destructor, you will confuse everyone who tries to use your class. Because your class behaves differently from other C++ classes, programmers will take longer to learn how to use it and will be more likely to use it incorrectly by forgetting to call initialize() or cleanup().
C++ provides a language feature called operator overloading that can help you develop easy-to-use interfaces for your objects. Operator overloading allows you to write classes such that the standard operators work on them just as they work on built-in types like int and double. For example, you can write a Fraction class that allows you to add, subtract, and stream fractions like this:
Fraction f1(3,4);Fraction f2(1,2);Fraction sum = f1 + f2;Fraction diff = f1 – f2;cout << f1 << " " << f2 << endl;
Contrast that with the same behavior using method calls:
Fraction f1(3,4);Fraction f2(1,2);Fraction sum = f1.add(f2);Fraction diff = f1.subtract(f2);f1.print(cout);cout << " ";f2.print(cout);cout << endl;
As you can see, operator overloading allows you to provide an easier-to-use interface for your classes. However, be careful not to abuse operator overloading. It’s possible to overload the + operator so that it implements subtraction and the – operator so that it implements multiplication. Those implementations would be counterintuitive. This does not mean that each operator should always implement exactly the same behavior. For example, the string class implements the + operator to concatenate strings, which is an intuitive interface for string concatenation. See Chapters 9 and 15 for details on operator overloading.
This strategy is twofold. First, include interfaces for all behaviors that clients could need. That might sound obvious at first. Returning to the car analogy, you would never build a car without a speedometer for the driver to view their speed! Similarly, you would never design a Fraction class without a mechanism for client code to access the nominator and denominator values.
However, other possible behaviors might be more obscure. This strategy requires you to anticipate all the uses to which clients might put your code. If you are thinking about the interface in one particular way, you might miss functionality that could be needed when clients use it differently. For example, suppose that you want to design a game board class. You might consider only the typical games, such as chess and checkers, and decide to support a maximum of one game piece per spot on the board. However, what if you later decide to write a backgammon game, which allows multiple pieces in one spot on the board? By precluding that possibility, you have ruled out the use of your game board as a backgammon board.
Obviously, anticipating every possible use for your library is difficult, if not impossible. Don’t feel compelled to agonize over potential future uses in order to design the perfect interface. Just give it some thought and do the best you can.
The second part of this strategy is to include as much functionality in the implementation as possible. Don’t require client code to specify information that you already know in the implementation, or could know if you designed it differently. For example, if your library requires a temporary file, don’t make the clients of your library specify that path. They don’t care what file you use; find some other way to determine an appropriate temporary file path.
Furthermore, don’t require library users to perform unnecessary work to amalgamate results. If your random number library uses a random number algorithm that calculates the low-order and high-order bits of a random number separately, combine the numbers before giving them to the user.
In order to avoid omitting functionality in their interfaces, some programmers go to the opposite extreme: they include every possible piece of functionality imaginable. Programmers who use the interfaces are never left without the means to accomplish a task. Unfortunately, the interface might be so cluttered that they never figure out how to do it!
Don’t provide unnecessary functionality in your interfaces; keep them clean and simple. It might appear at first that this guideline directly contradicts the previous strategy of not omitting necessary functionality. Although one strategy to avoid omitting functionality would be to include every imaginable interface, that is not a sound strategy. You should include necessary functionality and omit useless or counterproductive interfaces.
Consider cars again. You drive a car by interacting with only a few components: the steering wheel, the brake and accelerator pedals, the gearshift, the mirrors, the speedometer, and a few other dials on your dashboard. Now, imagine a car dashboard that looked like an airplane cockpit, with hundreds of dials, levers, monitors, and buttons. It would be unusable! Driving a car is so much easier than flying an airplane that the interface can be much simpler: You don’t need to view your altitude, communicate with control towers, or control the myriad components in an airplane such as the wings, engines, and landing gear.
Additionally, from the library development perspective, smaller libraries are easier to maintain. If you try to make everyone happy, then you have more room to make mistakes, and if your implementation is complicated enough so that everything is intertwined, even one mistake can render the library useless.
Unfortunately, the idea of designing uncluttered interfaces looks good on paper, but is remarkably hard to put into practice. The rule is ultimately subjective: you decide what’s necessary and what’s not. Of course, your clients will be sure to tell you when you get it wrong!
Regardless of how easy you make your interfaces to use, you should supply documentation for their use. You can’t expect programmers to use your library properly unless you tell them how to do it. Think of your library or code as a product for other programmers to consume. Your product should have documentation explaining its proper use.
There are two ways to provide documentation for your interfaces: comments in the interfaces themselves and external documentation. You should strive to provide both. Most public APIs provide only external documentation: comments are a scarce commodity in many of the standard Unix and Windows header files. In Unix, the documentation usually comes in the form of online manuals called man pages. In Windows, the documentation usually accompanies the integrated development environment.
Despite the fact that most APIs and libraries omit comments in the interfaces themselves, I actually consider this form of documentation the most important. You should never give out a “naked” header file that contains only code. Even if your comments repeat exactly what’s in the external documentation, it is less intimidating to look at a header file with friendly comments than one with only code. Even the best programmers still like to see written language every so often!
Some programmers use tools to create documentation automatically from comments. Chapter 3 discusses this technique in more detail.
Whether you provide comments, external documentation, or both, the documentation should describe the behavior of the library, not the implementation. The behavior includes the inputs, outputs, error conditions and handling, intended uses, and performance guarantees. For example, documentation describing a call to generate a single random number should specify that it takes no parameters, returns an integer in a previously specified range, and should list all the exceptions that might be thrown when something goes wrong. This documentation should not explain the details of the linear congruence algorithm for actually generating the number. Providing too much implementation detail in interface comments is probably the single most common mistake in interface development. Many developers have seen perfectly good separations of interface and implementation ruined by comments in the interface that are more appropriate for library maintainers than clients.
Of course, you should also document your internal implementation; just don’t make it publicly available as part of your interface. Chapter 3 provides details on the appropriate use of comments in your code.
The interfaces should be general purpose enough that they can be adapted to a variety of tasks. If you encode specifics of one application in a supposedly general interface, it will be unusable for any other purpose. Here are some guidelines to keep in mind.
In order to satisfy all your “customers,” it is sometimes helpful to provide multiple ways to perform the same functionality. Use this technique judiciously, however, because over-application can easily lead to cluttered interfaces.
Consider cars again. Most new cars these days provide remote keyless entry systems, with which you can unlock your car by pressing a button on a key fob. However, these cars always provide a standard key that you can use to physically unlock the car, for example, when the battery in the key fob is drained. Although these two methods are redundant, most customers appreciate having both options.
Sometimes there are similar situations in program interface design. For example, std::vector provides two methods to get access to a single element at a specific index. You can use either the at() method, which performs bounds checking, or operator[], which does not. If you know your indices are valid, you can use operator[] and forgo the overhead that at() incurs due to bounds checking.
Note that this strategy should be considered an exception to the “uncluttered” rule in interface design. There are a few situations where the exception is appropriate, but you should most often follow the “uncluttered” rule.
In order to increase the flexibility of your interfaces, provide customizability. Customizability can be as simple as allowing a client to turn error logging on or off. The basic premise of customizability is that it allows you to provide the same basic functionality to every client, but gives clients the ability to tweak it slightly.
You can allow greater customizability through function pointers and template parameters. For example, you could allow clients to set their own error-handling routines.
The Standard Library takes this customizability strategy to the extreme and actually allows clients to specify their own memory allocators for containers. If you want to use this feature, you must write a memory allocator object that follows the Standard Library guidelines and adheres to the required interfaces. Each container in the Standard Library takes an allocator as one of its template parameters. Chapter 21 provides more details.
The two goals of ease of use and generality sometimes appear to conflict. Often, introducing generality increases the complexity of the interfaces. For example, suppose that you need a graph structure in a map program to store cities. In the interest of generality, you might use templates to write a generic map structure for any type, not just cities. That way, if you need to write a network simulator in your next program, you can employ the same graph structure to store routers in the network. Unfortunately, by using templates, you make the interface a little clumsier and harder to use, especially if the potential client is not familiar with templates.
However, generality and ease of use are not mutually exclusive. Although in some cases increased generality may decrease ease of use, it is possible to design interfaces that are both general purpose and straightforward to use. Here are two guidelines you can follow.
In order to reduce complexity in your interfaces while still providing enough functionality, you can provide multiple separate interfaces. This is called the Interface Segregation Principle (ISP). For example, you could write a generic networking library with two separate facets: one presents the networking interfaces useful for games, and the other presents the networking interfaces useful for the HyperText Transport Protocol (HTTP) for web browsing.
When you provide a general-purpose interface, some functionality will be used more often than other functionality. You should make the commonly used functionality easy to use, while still providing the option for the more advanced functionality. Returning to the map program, you might want to provide an option for clients of the map to specify names of cities in different languages. English is so predominant that you could make that the default but provide an extra option to change languages. That way, most clients will not need to worry about setting the language, but those who want to will be able to do so.
The basic principles of object-oriented design are often abbreviated with the easy-to-remember acronym: SOLID. The following table summarizes the five SOLID principles. Most of the principles are discussed earlier in this chapter, if not, a reference is given to the chapter where they are discussed.
| S | Single Responsibility Principle (SRP) A single component should have a single, well-defined responsibility and should not combine unrelated functionality. |
| O | Open/Closed Principle (OCP) A class should be open to extension (by deriving from it), but closed for modification. |
| L | Liskov Substitution Principle (LSP) You should be able to replace an instance of an object with an instance of a subtype of that object. Chapter 5 explains this principle in the section “The Fine Line between Has-A and Is-A” with an example to decide whether the relationship between Hashtable and MultiHash is a has-a or an is-a relationship.
|
| I | Interface Segregation Principle (ISP) Keep interfaces clean and simple. It is better to have many smaller, well-defined single-responsibility interfaces than to have broad, general-purpose interfaces. |
| D | Dependency Inversion Principle (DIP) Use interfaces to invert dependency relationships. Chapter 4 briefly mentions an example of an ErrorLogger service. You should define an ErrorLogger interface, and use dependency injection to inject this interface into each component that wants to use the ErrorLogger service. Dependency injection is one way to support the dependency inversion principle.
|
By reading this chapter, you learned why you should design reusable code and how you should do it. You read about the philosophy of reuse, summarized as “write once, use often,” and learned that reusable code should be both general purpose and easy to use. You also discovered that designing reusable code requires you to use abstraction, to structure your code appropriately, and to design good interfaces.
This chapter presented specific tips for structuring your code: to avoid combining unrelated or logically separate concepts, to use templates for generic data structures and algorithms, to provide appropriate checks and safeguards, and to design for extensibility.
This chapter also presented six strategies for designing interfaces: to follow familiar ways of doing things, to not omit required functionality, to present uncluttered interfaces, to provide documentation and comments, to provide multiple ways to perform the same functionality, and to provide customizability. It concluded with two tips for reconciling the often-conflicting demands of generality and ease of use: to supply multiple interfaces and to make common functionality easy to use.
The chapter concluded with SOLID, an easy-to-remember acronym that describes the most important design principles discussed in this and other chapters.
This is the last chapter of the second part of the book, which focuses on discussing design themes on a higher level. The next part delves into the implementation phase of the software engineering process, with details of C++ coding.
Memory is a low-level component of the computer that sometimes unfortunately rears its head even in a high-level programming language like C++. Many programmers understand only enough about dynamic memory to get by. They shy away from data structures that use dynamic memory, or get their programs to work by trial and error. A solid understanding of how dynamic memory really works in C++ is essential to becoming a professional C++ programmer.
Understanding dynamic memory is much easier if you have a mental model for what objects look like in memory. In this book, a unit of memory is shown as a box with a label next to it. The label indicates a variable name that corresponds to the memory. The data inside the box displays the current value of the memory.
For example, Figure 7-1 shows the state of memory after the following line is executed. The line should be in a function, so that i is a local variable:
int i = 7;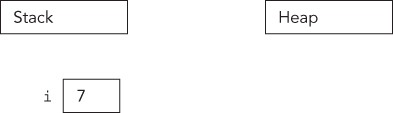
i is a so-called automatic variable allocated on the stack. It is automatically deallocated when the program flow leaves the scope in which the variable is declared.
When you use the new keyword, memory is allocated on the heap. The following code creates a variable ptr on the stack initialized with nullptr, and then allocates memory on the heap to which ptr points:
int* ptr = nullptr;ptr = new int;
This can also be written as a one-liner:
int* ptr = new int;Figure 7-2 shows the state of memory after this code is executed. Notice that the variable ptr is still on the stack even though it points to memory on the heap. A pointer is just a variable and can live on either the stack or the heap, although this fact is easy to forget. Dynamic memory, however, is always allocated on the heap.
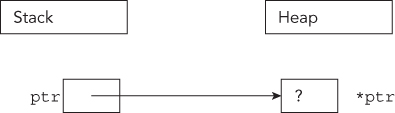
The next example shows that pointers can exist both on the stack and on the heap:
int** handle = nullptr;handle = new int*;*handle = new int;
The preceding code first declares a pointer to a pointer to an integer as the variable handle. It then dynamically allocates enough memory to hold a pointer to an integer, storing the pointer to that new memory in handle. Next, that memory (*handle) is assigned a pointer to another section of dynamic memory that is big enough to hold the integer. Figure 7-3 shows the two levels of pointers with one pointer residing on the stack (handle) and the other residing on the heap (*handle).
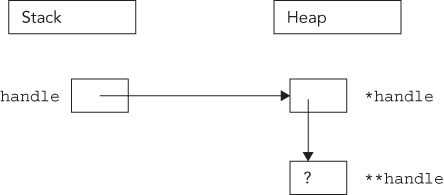
To create space for a variable, you use the new keyword. To release that space for use by other parts of the program, you use the delete keyword. Of course, it wouldn’t be C++ if simple concepts such as new and delete didn’t have several variations and intricacies.
When you want to allocate a block of memory, you call new with the type of variable for which you need space. new returns a pointer to that memory, although it is up to you to store that pointer in a variable. If you ignore the return value of new, or if the pointer variable goes out of scope, the memory becomes orphaned because you no longer have a way to access it. This is also called a memory leak.
For example, the following code orphans enough memory to hold an int. Figure 7-4 shows the state of memory after the code is executed. When there are blocks of data on the heap with no access, direct or indirect, from the stack, the memory is orphaned or leaked.
void leaky(){new int; // BUG! Orphans/leaks memory!cout << "I just leaked an int!" << endl;}
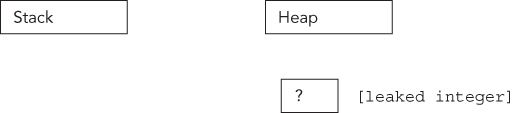
Until they find a way to make computers with an infinite supply of fast memory, you will need to tell the compiler when the memory associated with an object can be released and reused for another purpose. To free memory on the heap, you use the delete keyword with a pointer to the memory, as shown here:
int* ptr = new int;delete ptr;ptr = nullptr;
If you are a C programmer, you may be wondering what is wrong with the malloc() function. In C, malloc() is used to allocate a given number of bytes of memory. For the most part, using malloc() is simple and straightforward. The malloc() function still exists in C++, but you should avoid it. The main advantage of new over malloc() is that new doesn’t just allocate memory, it constructs objects!
For example, consider the following two lines of code, which use a hypothetical class called Foo:
Foo* myFoo = (Foo*)malloc(sizeof(Foo));Foo* myOtherFoo = new Foo();
After executing these lines, both myFoo and myOtherFoo will point to areas of memory on the heap that are big enough for a Foo object. Data members and methods of Foo can be accessed using both pointers. The difference is that the Foo object pointed to by myFoo isn’t a proper object because it was never constructed. The malloc() function only sets aside a piece of memory of a certain size. It doesn’t know about or care about objects. In contrast, the call to new allocates the appropriate size of memory and also calls an appropriate constructor to construct the object.
A similar difference exists between the free() function and the delete operator. With free(), the object’s destructor is not called. With delete, the destructor is called and the object is properly cleaned up.
Many, if not most, programmers write code with the assumption that new will always be successful. The rationale is that if new fails, it means that memory is very low and life is very, very bad. It is often an unfathomable state to be in because it’s unclear what your program could possibly do in this situation.
By default, your program will terminate if new fails. In many programs, this behavior is acceptable. The program exits when new fails because new throws an exception if there is not enough memory available for the request. Chapter 14 explains possible approaches to recover gracefully from an out-of-memory situation.
There is also an alternative version of new, which will not throw an exception. Instead, it will return nullptr, similar to the behavior of malloc() in C. The syntax for using this version is as follows:
int* ptr = new(nothrow) int;Of course, you still have the same problem as the version that throws an exception—what do you do when the result is nullptr? The compiler doesn’t require you to check the result, so the nothrow version of new is more likely to lead to other bugs than the version that throws an exception. For this reason, it’s suggested that you use the standard version of new. If out-of-memory recovery is important to your program, the techniques covered in Chapter 14 give you all the tools you need.
Arrays package multiple variables of the same type into a single variable with indices. Working with arrays quickly becomes natural to a novice programmer because it is easy to think about values in numbered slots. The in-memory representation of an array is not far off from this mental model.
When your program allocates memory for an array, it is allocating contiguous pieces of memory, where each piece is large enough to hold a single element of the array. For example, a local array of five ints can be declared on the stack as follows:
int myArray[5];Figure 7-5 shows the state of memory after the array is created. When creating arrays on the stack, the size must be a constant value known at compile time.
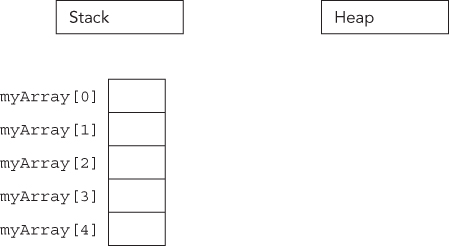
Declaring arrays on the heap is no different, except that you use a pointer to refer to the location of the array. The following code allocates memory for an array of five ints and stores a pointer to the memory in a variable called myArrayPtr:
int* myArrayPtr = new int[5];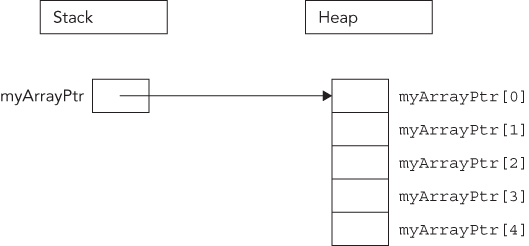
As Figure 7-6 illustrates, the heap-based array is similar to the stack-based array, but in a different location. The myArrayPtr variable points to the 0th element of the array.
Each call to new[] should be paired with a call to delete[] to clean up the memory. For example,
delete [] myArrayPtr;myArrayPtr = nullptr;
The advantage of putting an array on the heap is that you can define its size at run time. For example, the following code snippet receives a desired number of documents from a hypothetical function named askUserForNumberOfDocuments() and uses that result to create an array of Document objects.
Document* createDocArray(){size_t numDocs = askUserForNumberOfDocuments();Document* docArray = new Document[numDocs];return docArray;}
Remember that each call to new[] should be paired with a call to delete[], so in this example, it’s important that the caller of createDocArray() uses delete[] to clean up the returned memory. Another problem is that C-style arrays don’t know their size; thus callers of createDocArray() have no idea how many elements there are in the returned array!
In the preceding function, docArray is a dynamically allocated array. Do not get this confused with a dynamic array. The array itself is not dynamic because its size does not change once it is allocated. Dynamic memory lets you specify the size of an allocated block at run time, but it does not automatically adjust its size to accommodate the data.
There is a function in C++ called realloc(), which is a holdover from the C language. Do not use it! In C, realloc() is used to effectively change the size of an array by allocating a new block of memory of the new size, copying all of the old data to the new location, and deleting the original block. This approach is extremely dangerous in C++ because user-defined objects will not respond well to bitwise copying.
Arrays of objects are no different than arrays of simple types. When you use new[N] to allocate an array of N objects, enough space is allocated for N contiguous blocks where each block is large enough for a single object. Using new[], the zero-argument (= default) constructor for each of the objects is automatically called. In this way, allocating an array of objects using new[] returns a pointer to an array of fully formed and initialized objects.
For example, consider the following class:
class Simple{public:Simple() { cout << "Simple constructor called!" << endl; }~Simple() { cout << "Simple destructor called!" << endl; }};
If you allocate an array of four Simple objects, the Simple constructor is called four times.
Simple* mySimpleArray = new Simple[4];The memory diagram for this array is shown in Figure 7-7. As you can see, it is no different than an array of basic types.

As mentioned earlier, when you allocate memory with the array version of new (new[]), you must release it with the array version of delete (delete[]). This version automatically destructs the objects in the array in addition to releasing the memory associated with them.
Simple* mySimpleArray = new Simple[4];// Use mySimpleArray …delete [] mySimpleArray;mySimpleArray = nullptr;
If you do not use the array version of delete, your program may behave in odd ways. With some compilers, only the destructor for the first element of the array will be called because the compiler only knows that you are deleting a pointer to an object, and all the other elements of the array will become orphaned objects. With other compilers, memory corruption may occur because new and new[] can use completely different memory allocation schemes.
Of course, the destructors are only called if the elements of the array are objects. If you have an array of pointers, you still need to delete each object pointed to individually just as you allocated each object individually, as shown in the following code:
const size_t size = 4;Simple** mySimplePtrArray = new Simple*[size];// Allocate an object for each pointer.for (size_t i = 0; i < size; i++) { mySimplePtrArray[i] = new Simple(); }// Use mySimplePtrArray …// Delete each allocated object.for (size_t i = 0; i < size; i++) { delete mySimplePtrArray[i]; }// Delete the array itself.delete [] mySimplePtrArray;mySimplePtrArray = nullptr;
Multi-dimensional arrays extend the notion of indexed values to multiple indices. For example, a Tic-Tac-Toe game might use a two-dimensional array to represent a three-by-three grid. The following example shows such an array declared on the stack, zero-initialized, and accessed with some test code:
char board[3][3] = {};// Test codeboard[0][0] = 'X'; // X puts marker in position (0,0).board[2][1] = 'O'; // O puts marker in position (2,1).
You may be wondering whether the first subscript in a two-dimensional array is the x-coordinate or the y-coordinate. The truth is that it doesn’t really matter, as long as you are consistent. A four-by-seven grid could be declared as char board[4][7] or char board[7][4]. For most applications, it is easiest to think of the first subscript as the x-axis and the second as the y-axis.
In memory, a stack-based two-dimensional array looks like Figure 7-8. Because memory doesn’t have two axes (addresses are merely sequential), the computer represents a two-dimensional array just like a one-dimensional array. The difference is in the size of the array and the method used to access it.
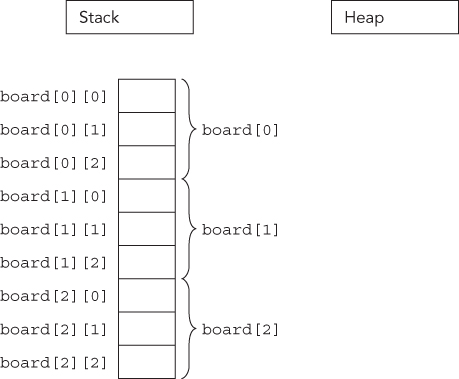
The size of a multi-dimensional array is all of its dimensions multiplied together, then multiplied by the size of a single element in the array. In Figure 7-8, the three-by-three board is 3 × 3 × 1 = 9 bytes, assuming that a character is 1 byte. For a four-by-seven board of characters, the array would be 4 × 7 × 1 = 28 bytes.
To access a value in a multi-dimensional array, the computer treats each subscript as if it were accessing another subarray within the multi-dimensional array. For example, in the three-by-three grid, the expression board[0] actually refers to the subarray highlighted in Figure 7-9. When you add a second subscript, such as board[0][2], the computer is able to access the correct element by looking up the second subscript within the subarray, as shown in Figure 7-10
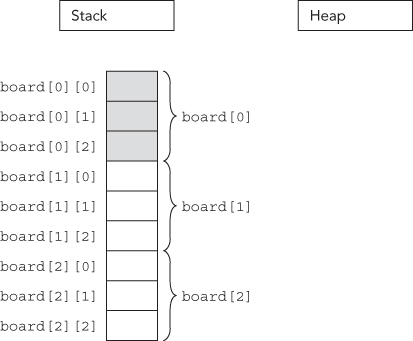
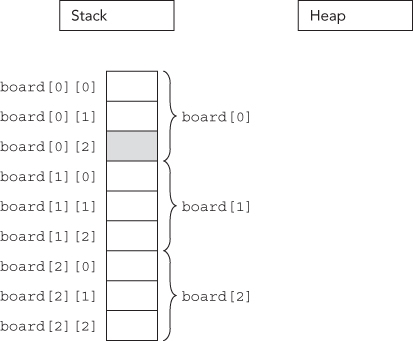
These techniques are extended to N-dimensional arrays, though dimensions higher than three tend to be difficult to conceptualize and are rarely used.
If you need to determine the dimensions of a multi-dimensional array at run time, you can use a heap-based array. Just as a single-dimensional dynamically allocated array is accessed through a pointer, a multi-dimensional dynamically allocated array is also accessed through a pointer. The only difference is that in a two-dimensional array, you need to start with a pointer-to-a-pointer; and in an N-dimensional array, you need N levels of pointers. At first, it might seem as if the correct way to declare and allocate a dynamically allocated multi-dimensional array is as follows:
char** board = new char[i][j]; // BUG! Doesn't compileThis code doesn’t compile because heap-based arrays don’t work like stack-based arrays. Their memory layout isn’t contiguous, so allocating enough memory for a stack-based multi-dimensional array is incorrect. Instead, you can start by allocating a single contiguous array for the first subscript dimension of a heap-based array. Each element of that array is actually a pointer to another array that stores the elements for the second subscript dimension. This layout for a two-by-two dynamically allocated board is shown in Figure 7-11.
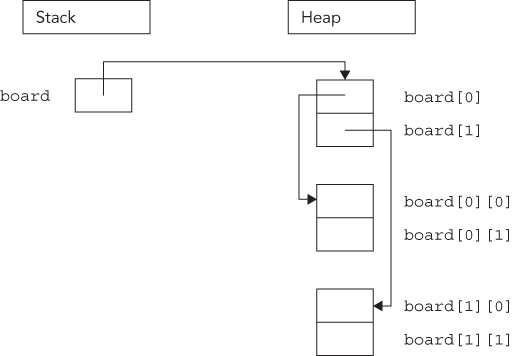
Unfortunately, the compiler doesn’t allocate memory for the subarrays on your behalf. You can allocate the first-dimension array just like a single-dimensional heap-based array, but the individual subarrays must be explicitly allocated. The following function properly allocates memory for a two-dimensional array:
char** allocateCharacterBoard(size_t xDimension, size_t yDimension){char** myArray = new char*[xDimension]; // Allocate first dimensionfor (size_t i = 0; i < xDimension; i++) {myArray[i] = new char[yDimension]; // Allocate ith subarray}return myArray;}
Similarly, when you want to release the memory associated with a multi-dimensional heap-based array, the array delete[] syntax will not clean up the subarrays on your behalf. Your code to release an array should mirror the code to allocate it, as in the following function:
void releaseCharacterBoard(char** myArray, size_t xDimension){for (size_t i = 0; i < xDimension; i++) {delete [] myArray[i]; // Delete ith subarray}delete [] myArray; // Delete first dimension}
Now that you know all the details to work with arrays, it is recommended to avoid these old C-style arrays as much as possible because they do not provide any memory safety. They are explained here because you will encounter them in legacy code. In new code, you should use the C++ Standard Library containers such as std::array, std::vector, and so on (see Chapter 17). For example, use vector<T> for a one-dimensional dynamic array, use vector<vector<T>> for a two-dimensional dynamic array, and so on. Of course, working directly with data structures such as vector<vector<T>> is still tedious, especially for constructing them. If you do need N-dimensional dynamic arrays in your application, it is recommended to write helper classes that provide an easier to use interface. For example, to work with two-dimensional data with equally long rows, you should consider writing (or reusing of course) a Matrix<T> or Table<T> class template which internally might use a vector<vector<T>> data structure. See Chapter 12 for details on writing class templates
Pointers get their bad reputation from the relative ease with which you can abuse them. Because a pointer is just a memory address, you could theoretically change that address manually, even doing something as scary as the following line of code:
char* scaryPointer = (char*)7;This line builds a pointer to the memory address 7, which is likely to be random garbage or memory used elsewhere in the application. If you start to use areas of memory that weren’t set aside on your behalf, for example with new or on the stack, eventually you will corrupt the memory associated with an object, or the memory involved with the management of the heap, and your program will malfunction. Such a malfunction can manifest itself in several ways. For example, it can reveal itself as invalid results because the data has been corrupted, or as hardware exceptions being triggered due to accessing non-existent memory, or attempting to write to protected memory. If you are lucky, you will get one of the serious errors that usually result in program termination by the operating system or the C++ runtime library; if you are unlucky, you will just get wrong results.
There are two ways to think about pointers. More mathematically minded readers might view pointers as addresses. This view makes pointer arithmetic, covered later in this chapter, a bit easier to understand. Pointers aren’t mysterious pathways through memory; they are numbers that happen to correspond to a location in memory. Figure 7-12 illustrates a two-by-two grid in the address-based view of the world.
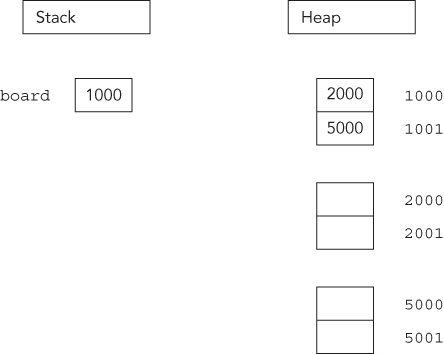
Readers who are more comfortable with spatial representations might derive more benefit from the “arrow” view of pointers. A pointer is a level of indirection that says to the program, “Hey! Look over there.” With this view, multiple levels of pointers become individual steps on the path to the data. Figure 7-11 shows a graphical view of pointers in memory.
When you dereference a pointer, by using the * operator, you are telling the program to look one level deeper in memory. In the address-based view, think of a dereference as a jump in memory to the address indicated by the pointer. With the graphical view, every dereference corresponds to following an arrow from its base to its head.
When you take the address of a location, using the & operator, you are adding a level of indirection in memory. In the address-based view, the program is noting the numerical address of the location, which can be stored as a pointer. In the graphical view, the & operator creates a new arrow whose head ends at the location designated by the expression. The base of the arrow can be stored as a pointer.
Because pointers are just memory addresses (or arrows to somewhere), they are somewhat weakly typed. A pointer to an XML document is the same size as a pointer to an integer. The compiler will let you easily cast any pointer type to any other pointer type using a C-style cast:
Document* documentPtr = getDocument();char* myCharPtr = (char*)documentPtr;
A static cast offers a bit more safety. The compiler refuses to perform a static cast on pointers to unrelated data types:
Document* documentPtr = getDocument();char* myCharPtr = static_cast<char*>(documentPtr);// BUG! Won't compile
If the two pointers you are casting are actually pointing to objects that are related through inheritance, the compiler will permit a static cast. However, a dynamic cast is a safer way to accomplish a cast within an inheritance hierarchy. Chapter 10 discusses inheritance in detail, while the different C++ style casts are discussed in Chapter 11.
You have already seen some of the overlap between pointers and arrays. Heap-allocated arrays are referred to by a pointer to their first element. Stack-based arrays are referred to by using the array syntax ([]) with an otherwise normal variable declaration. As you are about to learn, however, the overlap doesn’t end there. Pointers and arrays have a complicated relationship.
A heap-based array is not the only place where you can use a pointer to refer to an array. You can also use the pointer syntax to access elements of a stack-based array. The address of an array is really the address of the first element (index 0). The compiler knows that when you refer to an array in its entirety by its variable name, you are really referring to the address of the first element. In this way, the pointer works just like a heap-based array. The following code creates a zero-initialized array on the stack, and uses a pointer to access it:
int myIntArray[10] = {};int* myIntPtr = myIntArray;// Access the array through the pointer.myIntPtr[4] = 5;
The ability to refer to a stack-based array through a pointer is useful when passing arrays into functions. The following function accepts an array of integers as a pointer. Note that the caller needs to explicitly pass in the size of the array because the pointer implies nothing about size. In fact, C++ arrays of any form, pointer or not, have no built-in notion of size. That is another reason why you should use modern containers such as those provided by the Standard Library.
void doubleInts(int* theArray, size_t size){for (size_t i = 0; i < size; i++) {theArray[i] *= 2;}}
The caller of this function can pass a stack-based or heap-based array. In the case of a heap-based array, the pointer already exists and is passed by value into the function. In the case of a stack-based array, the caller can pass the array variable, and the compiler automatically treats the array variable as a pointer to the array, or you can explicitly pass the address of the first element. All three forms are shown here:
size_t arrSize = 4;int* heapArray = new int[arrSize]{ 1, 5, 3, 4 };doubleInts(heapArray, arrSize);delete [] heapArray;heapArray = nullptr;int stackArray[] = { 5, 7, 9, 11 };arrSize = std::size(stackArray); // Since C++17, requires <array>//arrSize = sizeof(stackArray) / sizeof(stackArray[0]); // Pre-C++17, see Ch1doubleInts(stackArray, arrSize);doubleInts(&stackArray[0], arrSize);
The parameter-passing semantics of arrays is uncannily similar to that of pointers, because the compiler treats an array as a pointer when it is passed to a function. A function that takes an array as an argument and changes values inside the array is actually changing the original array, not a copy. Just like a pointer, passing an array effectively mimics pass-by-reference functionality because what you really pass to the function is the address of the original array, not a copy. The following implementation of doubleInts() changes the original array even though the parameter is an array, not a pointer:
void doubleInts(int theArray[], size_t size){for (size_t i = 0; i < size; i++) {theArray[i] *= 2;}}
Any number between the square brackets after theArray in the function prototype is simply ignored. The following three versions are identical:
void doubleInts(int* theArray, size_t size);void doubleInts(int theArray[], size_t size);void doubleInts(int theArray[2], size_t size);
You may be wondering why things work this way. Why doesn’t the compiler just copy the array when array syntax is used in the function definition? This is done for efficiency—it takes time to copy the elements of an array, and they potentially take up a lot of memory. By always passing a pointer, the compiler doesn’t need to include the code to copy the array.
There is a way to pass known-length stack-based arrays “by reference” to a function, although the syntax is non-obvious. This does not work for heap-based arrays. For example, the following doubleIntsStack() accepts only stack-based arrays of size 4:
void doubleIntsStack(int (&theArray)[4]);A function template, discussed in detail in Chapter 12, can be used to let the compiler deduce the size of the stack-based array automatically:
template<size_t N>void doubleIntsStack(int (&theArray)[N]){for (size_t i = 0; i < N; i++) {theArray[i] *= 2;}}
To summarize, arrays declared using array syntax can be accessed through a pointer. When an array is passed to a function, it is always passed as a pointer.
Because the compiler lets you pass in an array where a pointer is expected, as in the doubleInts() function in the previous section, you may be led to believe that pointers and arrays are the same. In fact, there are subtle, but important, differences. Pointers and arrays share many properties and can sometimes be used interchangeably (as shown earlier), but they are not the same.
A pointer by itself is meaningless. It may point to random memory, a single object, or an array. You can always use array syntax with a pointer, but doing so is not always appropriate because pointers aren’t always arrays. For example, consider the following code:
int* ptr = new int;The pointer ptr is a valid pointer, but it is not an array. You can access the pointed-to value using array syntax (ptr[0]), but doing so is stylistically questionable and provides no real benefit. In fact, using array syntax with non-array pointers is an invitation for bugs. The memory at ptr[1] could be anything!
One of the great advantages of C++ over C is that you don’t need to worry quite as much about memory. If you code using objects, you just need to make sure that each individual class properly manages its own memory. Through construction and destruction, the compiler helps you manage memory by telling you when to do it. Hiding the management of memory within classes makes a huge difference in usability, as demonstrated by the Standard Library classes. However, with some applications or with legacy code, you may encounter the need to work with memory at a lower level. Whether for legacy, efficiency, debugging, or curiosity, knowing some techniques for working with raw bytes can be helpful.
The C++ compiler uses the declared types of pointers to allow you to perform pointer arithmetic. If you declare a pointer to an int and increase it by 1, the pointer moves ahead in memory by the size of an int, not by a single byte. This type of operation is most useful with arrays, because they contain homogeneous data that is sequential in memory. For example, assume you declare an array of ints on the heap:
int* myArray = new int[8];You are already familiar with the following syntax for setting the value in position 2:
myArray[2] = 33;With pointer arithmetic, you can equivalently use the following syntax, which obtains a pointer to the memory that is “2 ints ahead” of myArray and then dereferences it to set the value:
*(myArray + 2) = 33;As an alternative syntax for accessing individual elements, pointer arithmetic doesn’t seem too appealing. Its real power lies in the fact that an expression like myArray + 2 is still a pointer to an int, and thus can represent a smaller int array. Suppose you have the following wide string. Wide strings are discussed in Chapter 19, but the details are not important at this point. For now, it is enough to know that wide strings support so-called Unicode characters to represent, for example, Japanese strings. The wchar_t type is a character type that can accommodate such Unicode characters, and it is usually bigger than a char (1 byte). To tell the compiler that a string literal is a wide-string literal, you prefix it with an L:
const wchar_t* myString = L"Hello, World";Suppose you also have a function that takes in a wide string and returns a new string that contains a capitalized version of the input:
wchar_t* toCaps(const wchar_t* inString);You can capitalize myString by passing it into this function. However, if you only want to capitalize part of myString, you can use pointer arithmetic to refer to only a latter part of the string. The following code calls toCaps() on the World part of the wide string by just adding 7 to the pointer, even though wchar_t is usually more than 1 byte:
toCaps(myString + 7);Another useful application of pointer arithmetic involves subtraction. Subtracting one pointer from another of the same type gives you the number of elements of the pointed-to type between the two pointers, not the absolute number of bytes between them.
For 99 percent of the cases you will encounter (some might say 100 percent of the cases), the built-in memory allocation facilities in C++ are adequate. Behind the scenes, new and delete do all the work of handing out memory in properly sized chunks, maintaining a list of available areas of memory, and releasing chunks of memory back to that list upon deletion.
When resource constraints are extremely tight, or under very special conditions, such as managing shared memory, implementing custom memory management may be a viable option. Don’t worry—it’s not as scary as it sounds. Basically, managing memory yourself means that classes allocate a large chunk of memory and dole out that memory in pieces as it is needed.
How is this approach any better? Managing your own memory can potentially reduce overhead. When you use new to allocate memory, the program also needs to set aside a small amount of space to record how much memory was allocated. That way, when you call delete, the proper amount of memory can be released. For most objects, the overhead is so much smaller than the memory allocated that it makes little difference. However, for small objects or programs with enormous numbers of objects, the overhead can have an impact.
When you manage memory yourself, you might know the size of each object a priori, so you might be able to avoid the overhead for each object. The difference can be enormous for large numbers of small objects. The syntax for performing custom memory management is described in Chapter 15.
At the other end of the memory hygiene spectrum lies garbage collection. With environments that support garbage collection, the programmer rarely, if ever, explicitly frees memory associated with an object. Instead, objects to which there are no longer any references will be cleaned up automatically at some point by the runtime library.
Garbage collection is not built into the C++ language as it is in C# and Java. In modern C++, you use smart pointers to manage memory, while in legacy code you will see memory management at the object level through new and delete. Smart pointers such as shared_ptr (discussed later in this chapter) provide something very similar to garbage-collected memory, that is, when the last shared_ptr instance for a certain resource is destroyed, at that point in time the resource is destroyed as well. It is possible but not easy to implement true garbage collection in C++, but freeing yourself from the task of releasing memory would probably introduce new headaches.
One approach to garbage collection is called mark and sweep. With this approach, the garbage collector periodically examines every single pointer in your program and annotates the fact that the referenced memory is still in use. At the end of the cycle, any memory that hasn’t been marked is deemed to be not in-use and is freed.
A mark-and-sweep algorithm could be implemented in C++ if you were willing to do the following:
GarbageCollectible, that allows the garbage collector to mark an object as in-use.As you can see, this approach to garbage collection requires quite a bit of diligence on the part of the programmer. It may even be more error-prone than using delete! Attempts at a safe and easy mechanism for garbage collection have been made in C++, but even if a perfect implementation of garbage collection in C++ came along, it wouldn’t necessarily be appropriate to use for all applications. Among the downsides of garbage collection are the following:
Writing a garbage collection mechanism is very hard. You will undoubtedly do it wrong, it will be error prone, and more than likely slow. So, if you do want to use garbage-collected memory in your application, I highly recommend you to research existing specialized garbage-collection libraries that you can reuse. See Chapter 4 for a discussion on code reuse.
Garbage collection is like buying plates for a picnic and leaving any used plates out in the yard where the wind will conveniently blow them into the neighbor’s yard. Surely, there must be a more ecological approach to memory management.
Object pools are the equivalent of recycling. You buy a reasonable number of plates, and after using a plate, you clean it so that it can be reused later. Object pools are ideal for situations where you need to use many objects of the same type over time, and creating each one incurs overhead.
Chapter 25 contains further details on using object pools for performance efficiency.
Memory management in C++ is a perennial source of errors and bugs. Many of these bugs arise from the use of dynamic memory allocation and pointers. When you extensively use dynamic memory allocation in your program and pass many pointers between objects, it’s difficult to remember to call delete on each pointer exactly once and at the right time. The consequences of getting it wrong are severe: when you free dynamically allocated memory more than once, you can cause memory corruption or a fatal run-time error, and when you forget to free dynamically allocated memory, you cause memory leaks.
Smart pointers help you manage your dynamically allocated memory and are the recommended technique for avoiding memory leaks. Conceptually, a smart pointer can hold a dynamically allocated resource, such as memory. When a smart pointer goes out of scope or is reset, it can automatically free the resource it holds. Smart pointers can be used to manage dynamically allocated resources in the scope of a function, or as data members in classes. They can also be used to pass ownership of dynamically allocated resources through function arguments.
C++ provides several language features that make smart pointers attractive. First, you can write a type-safe smart pointer class for any pointer type using templates, see Chapter 12. Second, you can provide an interface to the smart pointer objects using operator overloading, see Chapter 15, that allows code to use the smart pointer objects as if they were dumb pointers. Specifically, you can overload the * and -> operators such that client code can dereference a smart pointer object the same way it dereferences a normal pointer.
There are several kinds of smart pointers. The simplest type of smart pointer takes sole/unique ownership of the resource, and when the smart pointer goes out of scope or is reset, it frees the referenced resource. The Standard Library provides std::unique_ptr which is a smart pointer with unique ownership semantics.
However, managing pointers presents more problems than just remembering to free them when they go out of scope. Sometimes several objects or pieces of code contain copies of the same pointer. This problem is called aliasing. In order to free all resources properly, the last piece of code to use the resource should free the resource pointed to by the pointer. However, it is sometimes difficult to know which piece of code uses the resource last. It may even be impossible to determine the order when you code because it might depend on run-time inputs. Thus, a more sophisticated type of smart pointer implements reference counting to keep track of its owners. Every time such a reference-counted smart pointer is copied, a new instance is created pointing to the same resource, and the reference count is incremented. When such a smart pointer instance goes out of scope or is reset, the reference count is decremented. When the reference count drops to zero, there are no owners of the resource anymore, so the smart pointer frees the resource. The Standard Library provides std::shared_ptr which is a smart pointer with shared ownership semantics using reference counting. The standard shared_ptr is thread-safe, but this does not mean that the pointed-to resource is thread-safe! See Chapter 23 for a discussion on multithreading.
Both standard smart pointers, unique_ptr and shared_ptr, are discussed in detail in the next sections. Both require you to include the <memory> header file.
As a rule of thumb, always store dynamically allocated resources in instances of unique_ptr.
Consider the following function that blatantly leaks memory by allocating a Simple object on the heap and neglecting to release it:
void leaky(){Simple* mySimplePtr = new Simple(); // BUG! Memory is never released!mySimplePtr->go();}
Sometimes you might think that your code is properly deallocating dynamically allocated memory. Unfortunately, it most likely is not correct in all situations. Take the following function:
void couldBeLeaky(){Simple* mySimplePtr = new Simple();mySimplePtr->go();delete mySimplePtr;}
This function dynamically allocates a Simple object, uses the object, and then properly calls delete. However, you can still have memory leaks in this example! If the go() method throws an exception, the call to delete is never executed, causing a memory leak.
In both cases you should use a unique_ptr. The object is not explicitly deleted; but when the unique_ptr instance goes out of scope (at the end of the function, or because an exception is thrown), it automatically deallocates the Simple object in its destructor:
void notLeaky(){auto mySimpleSmartPtr = make_unique<Simple>();mySimpleSmartPtr->go();}
This code uses make_unique() from C++14, in combination with the auto keyword, so that you only have to specify the type of the pointer, Simple in this case, once. If the Simple constructor requires parameters, you put them in between the parentheses of the make_unique() call.
If your compiler does not yet support make_unique(), you can create your unique_ptr as follows. Note that Simple must be mentioned twice:
unique_ptr<Simple> mySimpleSmartPtr(new Simple());Before C++17, you had to use make_unique() not only because you have to specify the type only once, but also because of safety reasons! Consider the following call to a function called foo():
foo(unique_ptr<Simple>(new Simple()), unique_ptr<Bar>(new Bar(data())));If the constructor of Simple or Bar, or the data() function, throws an exception, depending on your compiler optimizations, it was very possible that either a Simple or a Bar object would be leaked. With make_unique(), nothing would leak:
foo(make_unique<Simple>(), make_unique<Bar>(data()))With C++17, both calls to foo() are safe, but I still recommend using make_unique() as it results in code that is easier to read.
One of the greatest characteristics of the standard smart pointers is that they provide enormous benefit without requiring the user to learn a lot of new syntax. Smart pointers can still be dereferenced (using * or ->) just like standard pointers. For example, in the earlier example, the -> operator is used to call the go() method:
mySimpleSmartPtr->go();Just as with standard pointers, you can also write this as follows:
(*mySimpleSmartPtr).go();The get() method can be used to get direct access to the underlying pointer. This can be useful to pass the pointer to a function that requires a dumb pointer. For example, suppose you have the following function:
void processData(Simple* simple) { /* Use the simple pointer… */ }Then you can call it as follows:
auto mySimpleSmartPtr = make_unique<Simple>();processData(mySimpleSmartPtr.get());
You can free the underlying pointer of a unique_ptr and optionally change it to another pointer using reset(). For example:
mySimpleSmartPtr.reset(); // Free resource and set to nullptrmySimpleSmartPtr.reset(new Simple()); // Free resource and set to a new// Simple instance
You can disconnect the underlying pointer from a unique_ptr with release(). The release() method returns the underlying pointer to the resource and then sets the smart pointer to nullptr. Effectively, the smart pointer loses ownership of the resource, and as such, you become responsible for freeing the resource when you are done with it. For example:
Simple* simple = mySimpleSmartPtr.release(); // Release ownership// Use the simple pointer…delete simple;simple = nullptr;
Because a unique_ptr represents unique ownership, it cannot be copied! Using the std::move() utility (discussed in Chapter 9), it is possible to move one unique_ptr to another one using move semantics. This is used to explicitly move ownership, as in this example:
class Foo{public:Foo(unique_ptr<int> data) : mData(move(data)) { }private:unique_ptr<int> mData;};auto myIntSmartPtr = make_unique<int>(42);Foo f(move(myIntSmartPtr));
A unique_ptr is suitable to store a dynamically allocated old C-style array. The following example creates a unique_ptr that holds a dynamically allocated C-style array of ten integers:
auto myVariableSizedArray = make_unique<int[]>(10);Even though it is possible to use a unique_ptr to store a dynamically allocated C-style array, it’s recommended to use a Standard Library container instead, such as std::array or std::vector.
By default,unique_ptruses the standardnewanddeleteoperators to allocate and deallocate memory. You can change this behavior as follows:int* malloc_int(int value){int* p = (int*)malloc(sizeof(int));*p = value;return p;}int main(){unique_ptr<int, decltype(free)*> myIntSmartPtr(malloc_int(42), free);return 0;}
This code allocates memory for an integer with malloc_int(). The unique_ptr deallocates the memory by calling the standard free() function. As said before, in C++ you should never use malloc(), but new instead. However, this feature of unique_ptr is available because it is useful to manage other resources instead of just memory. For example, it can be used to automatically close a file or network socket or anything when the unique_ptr goes out of scope.
Unfortunately, the syntax for a custom deleter with unique_ptr is a bit clumsy. You need to specify the type of your custom deleter as a template type parameter. In this example, decltype(free) is used which returns the type of free(). The template type parameter should be the type of a pointer to a function, so an additional * is appended, as in decltype(free)*. Using a custom deleter with shared_ptr is much easier. The following section on shared_ptr demonstrates how to use a shared_ptr to automatically close a file when it goes out of scope.
You use shared_ptr in a similar way to unique_ptr. To create one, you use make_shared(), which is more efficient than creating a shared_ptr directly. Here’s an example:
auto mySimpleSmartPtr = make_shared<Simple>();Starting with C++17, a shared_ptr can also be used to store a pointer to a dynamically allocated old C-style array, just as you can do with a unique_ptr. This was not possible before C++17. However, even though it is now possible in C++17, it is still recommended to use Standard Library containers instead of C-style arrays.
A shared_ptr also supports the get() and reset() methods, just as a unique_ptr. The only difference is that when calling reset(), due to reference counting, the underlying resource is only freed when the last shared_ptr is destroyed or reset. Note that shared_ptr does not support release(). You can use use_count() to retrieve the number of shared_ptr instances that are sharing the same resource.
Just like unique_ptr, shared_ptr by default uses the standard new and delete operators to allocate and deallocate memory, or new[] and delete[] when storing a C-style array with C++17. You can change this behavior as follows:
// Implementation of malloc_int() as before.shared_ptr<int> myIntSmartPtr(malloc_int(42), free);
As you can see, you don’t have to specify the type of the custom deleter as a template type parameter, so this makes it much easier than a custom deleter with unique_ptr.
The following example uses a shared_ptr to store a file pointer. When the shared_ptr is reset (in this case when it goes out of scope), the file pointer is automatically closed with a call to CloseFile(). Note that C++ has proper object-oriented classes to work with files (see Chapter 13). Those classes already automatically close their files. This example using the old C functions fopen() and fclose() is just to give a demonstration of what shared_ptrs can be used for besides pure memory:
void CloseFile(FILE* filePtr){if (filePtr == nullptr)return;fclose(filePtr);cout << "File closed." << endl;}int main(){FILE* f = fopen("data.txt", "w");shared_ptr<FILE> filePtr(f, CloseFile);if (filePtr == nullptr) {cerr << "Error opening file." << endl;} else {cout << "File opened." << endl;// Use filePtr}return 0;}
The functions that are available to cast shared_ptrs are const_pointer_cast(), dynamic_pointer_cast(), and static_pointer_cast(). C++17 adds reinterpret_pointer_cast() to this list. These behave and work similar to the non-smart pointer casting functions const_cast(), dynamic_cast(), static_cast(), and reinterpret_cast(), which are discussed in detail in Chapter 11.
As a general concept, reference counting is a technique for keeping track of the number of instances of a class or particular object in use. A reference-counting smart pointer is one that keeps track of how many smart pointers have been built to refer to a single real pointer, or single object. This way, smart pointers can avoid double deletion.
The double deletion problem is easy to provoke. Consider again the Simple class introduced earlier in this chapter, which simply prints out messages when an object is created and destroyed. If you were to create two standard shared_ptrs and have them both refer to the same Simple object, as in the following code, both smart pointers would attempt to delete the same object when they are destroyed:
void doubleDelete(){Simple* mySimple = new Simple();shared_ptr<Simple> smartPtr1(mySimple);shared_ptr<Simple> smartPtr2(mySimple);}
Depending on your compiler, this piece of code might crash! If you do get output, it could be as follows:
Simple constructor called!Simple destructor called!Simple destructor called!
Yikes! One call to the constructor and two calls to the destructor? You get the same problem with unique_ptr. You might be surprised that even the reference-counted shared_ptr class behaves this way. However, this is correct behavior according to the C++ standard. You should not use shared_ptr as in the previous doubleDelete() function to create two shared_ptrs pointing to the same object. Instead, you should make a copy as follows:
void noDoubleDelete(){auto smartPtr1 = make_shared<Simple>();shared_ptr<Simple> smartPtr2(smartPtr1);}
Here is the output of this code:
Simple constructor called!Simple destructor called!
Even though there are two shared_ptrs pointing to the same Simple object, the Simple object is destroyed only once. Remember that unique_ptr is not reference counted. In fact, unique_ptr does not allow you to use its copy constructor as in the noDoubleDelete() function.
If you really need to be able to write code as shown in the previous doubleDelete() function example, you will need to implement your own smart pointer to prevent double deletion. But again, it is recommended to use the standard shared_ptr template for sharing a resource. Simply avoid code like that in the doubleDelete() function, and use the copy constructor instead.
A shared_ptr support so-called aliasing. This allows a shared_ptr to share ownership over a pointer (owned pointer) with another shared_ptr, but pointing to a different object (stored pointer). It can, for example, be used to have a shared_ptr pointing to a member of an object while owning the object itself. Here’s an example:
class Foo{public:Foo(int value) : mData(value) { }int mData;};auto foo = make_shared<Foo>(42);auto aliasing = shared_ptr<int>(foo, &foo->mData);
The Foo object is only destroyed when both shared_ptrs (foo and aliasing) are destroyed.
The owned pointer is used for reference counting, while the stored pointer is returned when you dereference the pointer or when you call get() on it. The stored pointer is used with most operations, such as the comparison operators. You can use the owner_before() method, or the std::owner_less class to perform comparisons based on the owned pointer instead. This can be useful in certain situations, such as storing shared_ptrs in an std::set. Chapter 17 discusses the set container in detail.
There is one more class in C++ that is related to shared_ptr, called weak_ptr. A weak_ptr can contain a reference to a resource managed by a shared_ptr. The weak_ptr does not own the resource, so the shared_ptr is not prevented from deallocating the resource. A weak_ptr does not destroy the pointed-to resource when the weak_ptr is destroyed (for example when it goes out of scope); however, it can be used to determine if the resource has been freed by the associated shared_ptr or not. The constructor of a weak_ptr requires a shared_ptr or another weak_ptr as argument. To get access to the pointer stored in a weak_ptr, you need to convert it to a shared_ptr. There are two ways to do this:
lock() method on a weak_ptr instance, which returns a shared_ptr. The returned shared_ptr is nullptr if the shared_ptr associated with the weak_ptr has been deallocated in the meantime.shared_ptr instance and give a weak_ptr as argument to the shared_ptr constructor. This throws an std::bad_weak_ptr exception if the shared_ptr associated with the weak_ptr has been deallocated.The following example demonstrates the use of weak_ptr:
void useResource(weak_ptr<Simple>& weakSimple){auto resource = weakSimple.lock();if (resource) {cout << "Resource still alive." << endl;} else {cout << "Resource has been freed!" << endl;}}int main(){auto sharedSimple = make_shared<Simple>();weak_ptr<Simple> weakSimple(sharedSimple);// Try to use the weak_ptr.useResource(weakSimple);// Reset the shared_ptr.// Since there is only 1 shared_ptr to the Simple resource, this will// free the resource, even though there is still a weak_ptr alive.sharedSimple.reset();// Try to use the weak_ptr a second time.useResource(weakSimple);return 0;}
The output of this code is as follows:
Simple constructor called!Resource still alive.Simple destructor called!Resource has been freed!
Starting with C++17, weak_ptr also supports C-style arrays, just as shared_ptr supports C-style arrays since C++17.
The standard smart pointers, shared_ptr, unique_ptr, and weak_ptr all support move semantics to make them efficient. Move semantics is discussed in detail in Chapter 9; however, the details are not important at this time. What is important is that this means it is very efficient to return such a smart pointer from a function. For example, you can write the following create() function and use it as demonstrated in main():
unique_ptr<Simple> create(){auto ptr = make_unique<Simple>();// Do something with ptr…return ptr;}int main(){unique_ptr<Simple> mySmartPtr1 = create();auto mySmartPtr2 = create();return 0;}
The std::enable_shared_from_this mixin class allows a method on an object to safely return a shared_ptr or weak_ptr to itself. Mixin classes are discussed in Chapter 28. Basically, the enable_shared_from_this mixin class adds the following two methods to a class:
shared_from_this(): returns a shared_ptr that shares ownership of the object.weak_from_this(): returns a weak_ptr that tracks ownership of the object.This is an advanced feature not discussed in detail, but the following code briefly demonstrates its use:
class Foo : public enable_shared_from_this<Foo>{public:shared_ptr<Foo> getPointer() {return shared_from_this();}};int main(){auto ptr1 = make_shared<Foo>();auto ptr2 = ptr1->getPointer();}
Note that you can only use shared_from_this() on an object if its pointer has already been stored in a shared_ptr. In the example, make_shared() is used in main() to create a shared_ptr called ptr1 which contains an instance of Foo. After this shared_ptr creation, it is allowed to call shared_from_this() on that Foo instance.
The following would be a completely wrong implementation of the getPointer() method:
class Foo{public:shared_ptr<Foo> getPointer() {return shared_ptr<Foo>(this);}};
If you use the same code for main() as shown earlier, this implementation of Foo causes a double deletion. You have two completely independent shared_ptrs (ptr1 and ptr2) pointing to the same object, which will both try to delete the object when they go out of scope.
The old, pre-C++11 Standard Library included a basic implementation of a smart pointer, called auto_ptr. Unfortunately, auto_ptr has some serious shortcomings. One of these shortcomings is that it does not work correctly when used inside Standard Library containers such as vectors. C++11 and C++14 officially deprecated auto_ptr, and C++17 finally removed it entirely. It has been replaced with unique_ptr and shared_ptr. auto_ptr is mentioned here to make sure you know about it and to make sure you never use it.
It is difficult to pinpoint the exact situations that can lead to a memory-related bug. Every memory leak or bad pointer has its own nuances. There is no magic bullet for resolving memory issues, but there are several common categories of problems and some tools you can use to detect and resolve them.
The most common problem with C-style strings is underallocation. In most cases, this arises when the programmer fails to allocate an extra character for the trailing '\0' sentinel. Underallocation of strings also occurs when programmers assume a certain fixed maximum size. The basic built-in C-style string functions do not adhere to a fixed size—they will happily write off the end of the string into uncharted memory.
The following code demonstrates underallocation. It reads data off a network connection and puts it in a C-style string. This is done in a loop because the network connection receives only a small amount of data at a time. On each loop, getMoreData() is called, which returns a pointer to dynamically allocated memory. When nullptr is returned from getMoreData(), all of the data has been received. strcat() is a C function that concatenates the C-style string given as a second argument to the end of the C-style string given as a first argument. It expects the destination buffer to be big enough.
char buffer[1024] = {0}; // Allocate a whole bunch of memory.while (true) {char* nextChunk = getMoreData();if (nextChunk == nullptr) {break;} else {strcat(buffer, nextChunk); // BUG! No guarantees against buffer overrun!delete [] nextChunk;}}
There are three ways to resolve the possible underallocation problem. In decreasing order of preference, they are as follows:
getMoreData() that takes a maximum count (including the '\0' character) and returns no more characters than that; then track the amount of space left and the current position in the buffer.Earlier in this chapter, you read that because a pointer is just a memory address, it is possible to have a pointer that points to a random location in memory. Such a condition is quite easy to fall into. For example, consider a C-style string that has somehow lost its '\0' termination character. The following function, which fills the string with all 'm' characters, continues to fill the contents of memory after the string with 'm's:
void fillWithM(char* inStr){int i = 0;while (inStr[i] != '\0') {inStr[i] = 'm';i++;}}
If an improperly terminated string is handed to this function, it is only a matter of time before an essential part of memory is overwritten and the program crashes. Consider what might happen if the memory associated with the objects in your program is suddenly overwritten with 'm's. It’s not pretty!
Bugs that result in writing to memory past the end of an array are often called buffer overflow errors. These bugs have been exploited by several high-profile malware programs such as viruses and worms. A devious hacker can take advantage of the ability to overwrite portions of memory to inject code into a running program.
Many memory-checking tools detect buffer overflows. Also, using higher-level constructs like C++ strings and vectors helps prevent numerous bugs associated with writing to C-style strings and arrays.
Finding and fixing memory leaks can be one of the more frustrating parts of programming in C or C++. Your program finally works and appears to give the correct results. Then, you start to notice that your program gobbles up more and more memory as it runs. Your program has a memory leak. The use of smart pointers to avoid memory leaks is a good first approach to solving the problem.
Memory leaks occur when you allocate memory and neglect to release it. At first, this sounds like the result of careless programming that could easily be avoided. After all, if every new has a corresponding delete in every class you write, there should be no memory leaks, right? Actually, that’s not always true. In the following code, the Simple class is properly written to release any memory that it allocates.
When doSomething() is called, the outSimplePtr pointer is changed to another Simple object without deleting the old one to demonstrate a memory leak. Once you lose a pointer to an object, it’s nearly impossible to delete it.
class Simple{public:Simple() { mIntPtr = new int(); }~Simple() { delete mIntPtr; }void setValue(int value) { *mIntPtr = value; }private:int* mIntPtr;};void doSomething(Simple*& outSimplePtr){outSimplePtr = new Simple(); // BUG! Doesn't delete the original.}int main(){Simple* simplePtr = new Simple(); // Allocate a Simple object.doSomething(simplePtr);delete simplePtr; // Only cleans up the second object.return 0;}
In cases like the preceding example, the memory leak probably arose from poor communication between programmers or poor documentation of code. The caller of doSomething() may not have realized that the variable was passed by reference and thus had no reason to expect that the pointer would be reassigned. If they did notice that the parameter was a non-const reference to a pointer, they may have suspected that something strange was happening, but there is no comment around doSomething() that explains this behavior.
Memory leaks are hard to track down because you can’t easily look at memory and see what objects are not in use and where they were originally allocated. However, there are programs that can do this for you. Memory leak detection tools range from expensive professional software packages to free downloadable tools. If you work with Microsoft Visual C++*, its debug library has built-in support for memory leak detection. This memory leak detection is not enabled by default, unless you create an MFC project. To enable it in other projects, you need to start by including the following three lines at the beginning of your code:
#define _CRTDBG_MAP_ALLOC#include <cstdlib>#include <crtdbg.h>
These lines should be in the exact order as shown. Next, you need to redefine the new operator as follows:
#ifdef _DEBUG#ifndef DBG_NEW#define DBG_NEW new ( _NORMAL_BLOCK , __FILE__ , __LINE__ )#define new DBG_NEW#endif#endif // _DEBUG
Note that this is within an “#ifdef _DEBUG” statement so the redefinition of new is done only when compiling a debug version of your application. This is what you normally want. Release builds usually do not do any memory leak detection.
The last thing you need to do is to add the following line as the first line in your main() function:
_CrtSetDbgFlag(_CRTDBG_ALLOC_MEM_DF | _CRTDBG_LEAK_CHECK_DF);This tells the Visual C++ CRT (C RunTime) library to write all detected memory leaks to the debug output console when the application exits. For the previous leaky program, the debug console will contain lines similar to the following:
Detected memory leaks!Dumping objects ->c:\leaky\leaky.cpp(15) : {147} normal block at 0x014FABF8, 4 bytes long.Data: < > 00 00 00 00c:\leaky\leaky.cpp(33) : {146} normal block at 0x014F5048, 4 bytes long.Data: <Pa > 50 61 20 01Object dump complete.
The output clearly shows in which file and on which line memory was allocated but never deallocated. The line number is between parentheses immediately behind the filename. The number between the curly braces is a counter for the memory allocations. For example, {147} means the 147th allocation in your program since it started. You can use the VC++ _CrtSetBreakAlloc() function to tell the VC++ debug runtime to break into the debugger when a certain allocation is performed. For example, you can add the following line to the beginning of your main() function to instruct the debugger to break on the 147th allocation:
_CrtSetBreakAlloc(147);In this leaky program, there are two leaks: the first Simple object that is never deleted (line 33) and the heap-based integer that it creates (line 15). In the Visual C++ debugger output window, you can simply double-click on one of the memory leaks and it will automatically jump to that line in your code.
Of course, programs like Microsoft Visual C++ (discussed in this section) and Valgrind (discussed in the next section) can’t actually fix the leak for you—what fun would that be? These tools provide information that you can use to find the actual problem. Normally, that involves stepping through the code to find out where the pointer to an object was overwritten without the original object being released. Most debuggers provide “watch point” functionality that can break execution of the program when this occurs.
Valgrind is an example of a free open-source tool for Linux that, among other things, pinpoints the exact line in your code where a leaked object was allocated.
The following output, generated by running Valgrind on the previous leaky program, pinpoints the exact locations where memory was allocated but never released. Valgrind finds the same two memory leaks—the first Simple object never deleted and the heap-based integer that it creates:
==15606== ERROR SUMMARY: 0 errors from 0 contexts (suppressed: 0 from 0)==15606== malloc/free: in use at exit: 8 bytes in 2 blocks.==15606== malloc/free: 4 allocs, 2 frees, 16 bytes allocated.==15606== For counts of detected errors, rerun with: -v==15606== searching for pointers to 2 not-freed blocks.==15606== checked 4455600 bytes.==15606====15606== 4 bytes in 1 blocks are still reachable in loss record 1 of 2==15606== at 0x4002978F: __builtin_new (vg_replace_malloc.c:172)==15606== by 0x400297E6: operator new(unsigned) (vg_replace_malloc.c:185)==15606== by 0x804875B: Simple::Simple() (leaky.cpp:4)==15606== by 0x8048648: main (leaky.cpp:24)==15606====15606====15606== 4 bytes in 1 blocks are definitely lost in loss record 2 of 2==15606== at 0x4002978F: __builtin_new (vg_replace_malloc.c:172)==15606== by 0x400297E6: operator new(unsigned) (vg_replace_malloc.c:185)==15606== by 0x8048633: main (leaky.cpp:20)==15606== by 0x4031FA46: __libc_start_main (in /lib/libc-2.3.2.so)==15606====15606== LEAK SUMMARY:==15606== definitely lost: 4 bytes in 1 blocks.==15606== possibly lost: 0 bytes in 0 blocks.==15606== still reachable: 4 bytes in 1 blocks.==15606== suppressed: 0 bytes in 0 blocks.
Once you release memory associated with a pointer using delete, the memory is available for use by other parts of your program. Nothing stops you, however, from attempting to continue to use the pointer, which is now a dangling pointer. Double deletion is also a problem. If you use delete a second time on a pointer, the program could be releasing memory that has since been assigned to another object.
Double deletion and use of already released memory are both difficult problems to track down because the symptoms may not show up immediately. If two deletions occur within a relatively short amount of time, the program potentially could work indefinitely because the associated memory might not be reused that quickly. Similarly, if a deleted object is used immediately after being deleted, most likely it will still be intact.
Of course, there is no guarantee that such behavior will work or continue to work. The memory allocator is under no obligation to preserve any object once it has been deleted. Even if it does work, it is extremely poor programming style to use objects that have been deleted.
Many memory leak-detection programs, such as Microsoft Visual C++ and Valgrind, are capable of detecting double deletion and use of released objects.
If you disregard the recommendation for using smart pointers and instead still use dumb pointers, at least set your pointers to nullptr after deallocating their memory. This prevents you from accidentally deleting the same pointer twice or using an invalid pointer. It’s worth noting that you are allowed to call delete on a nullptr pointer; it simply will not do anything.
In this chapter, you learned the ins and outs of dynamic memory. Aside from memory-checking tools and careful coding, there are two key takeaways to avoid dynamic memory-related problems. First, you need to understand how pointers work under the hood. After reading about two different mental models for pointers, you should now know how the compiler doles out memory. Second, you can avoid all sorts of dynamic memory issues by using objects which automatically manage such memory, like the C++ string class, the vector container, smart pointers, and so on.
If there is one takeaway from this chapter, it is that you should try to avoid using old C-style constructs and functions as much as possible, and use the safe C++ alternatives.
Both this chapter and the next present a runnable example of a simple spreadsheet application. A spreadsheet is a two-dimensional grid of “cells,” and each cell contains a number or a string. Professional spreadsheets such as Microsoft Excel provide the ability to perform mathematical operations, such as calculating the sum of the values of a set of cells. The spreadsheet example in these chapters does not attempt to challenge Microsoft in the marketplace, but is useful for illustrating the issues of classes and objects.
The spreadsheet application uses two basic classes: Spreadsheet and SpreadsheetCell. Each Spreadsheet object contains SpreadsheetCell objects. In addition, a SpreadsheetApplication class manages a collection of Spreadsheets. This chapter focuses on the SpreadsheetCell. Chapter 9 develops the Spreadsheet and SpreadsheetApplication classes.
When you write a class, you specify the behaviors, or methods, that will apply to objects of that class and the properties, or data members, that each object will contain.
There are two components in the process of writing classes: defining the classes themselves and defining their methods.
Here is a first attempt at a simple SpreadsheetCell class, in which each cell can store only a single number:
class SpreadsheetCell{public:void setValue(double inValue);double getValue() const;private:double mValue;};
As described in Chapter 1, every class definition begins with the keyword class and the name of the class. A class definition is a statement in C++, so it must end with a semicolon. If you fail to terminate your class definition with a semicolon, your compiler will probably give you several errors, most of which will appear to be completely unrelated.
Class definitions usually go in a file named after the class. For example, the SpreadsheetCell class definition can be put in a file called SpreadsheetCell.h. This rule is not enforced and you are free to name your file whatever you like.
A class can have a number of members. A member can be a member function (which in turn is a method, constructor, or destructor), a member variable, also called a data member, member enumerations, type aliases, nested classes, and so on.
The two lines that look like function prototypes declare the methods that this class supports:
void setValue(double inValue);double getValue() const;
Chapter 1 points out that it is always a good idea to declare member functions that do not change the object as const.
The line that looks like a variable declaration declares the data member for this class.
double mValue;A class defines the member functions and data members that apply. They apply only to a specific instance of the class, which is an object. The only exceptions to this rule are static members, which are explained in Chapter 9. Classes define concepts; objects contain real bits. So, each object contains its own value for the mValue variable. The implementation of the member functions is shared across all objects. Classes can contain any number of member functions and data members. You cannot give a data member the same name as a member function.
Every member in a class is subject to one of three access specifiers: public, protected, or private. An access specifier applies to all member declarations that follow it, until the next access specifier. In the SpreadsheetCell class, the setValue() and getValue() methods have public access, while the mValue data member has private access.
The default access specifier for classes is private: all member declarations before the first access specifier have the private access specification. For example, moving the public access specifier below the setValue() method declaration gives the setValue() method private access instead of public:
class SpreadsheetCell{void setValue(double inValue);// now has private accesspublic:double getValue() const;private:double mValue;};
In C++, a struct can have methods just like a class. In fact, the only difference is that the default access specifier for a struct is public while the default for a class is private. For example, the SpreadsheetCell class can be rewritten using a struct as follows:
struct SpreadsheetCell{void setValue(double inValue);double getValue() const;private:double mValue;};
It’s custom to use a struct instead of a class if you only need a collection of publicly accessible data members and no or very few methods. An example of such a simple struct is a structure to store point coordinates:
struct Point{double x;double y;};
The following table summarizes the meanings of the three access specifiers:
| ACCESS SPECIFICATION | MEANING | WHEN TO USE |
public |
Any code can call a public member function or access a public data member of an object. |
Behaviors (methods) that you want clients to use Access methods (getters and setters) for private and protected data members
|
protected |
Any member function of the class can call protected member functions and access protected data members. Member functions of a derived class can access protected members of a base class. |
“Helper” methods that you do not want clients to use |
private |
Only member functions of the class can call private member functions and access private data members. Member functions in derived classes cannot access private members from a base class. |
Everything should be private by default, especially data members. You can provide protected getters and setters if you only want to allow derived classes to access them, and provide public getters and setters if you want clients to access them. |
You can declare your members and access control specifiers in any order: C++ does not impose any restrictions, such as member functions before data members or public before private. Additionally, you can repeat access specifiers. For example, the SpreadsheetCell definition could look like this:
class SpreadsheetCell{public:void setValue(double inValue);private:double mValue;public:double getValue() const;};
However, for clarity it is a good idea to group public, protected, and private declarations, and to group member functions and data members within those declarations.
Member variables can be initialized directly in the class definition. For example, the SpreadsheetCell class can, by default, initialize mValue to 0 directly in the class definition as follows:
class SpreadsheetCell{// Remainder of the class definition omitted for brevityprivate:double mValue = 0;};
The preceding definition for the SpreadsheetCell class is enough for you to create objects of the class. However, if you try to call the setValue() or getValue() methods, your linker will complain that those methods are not defined. That’s because the class definition specifies the prototypes for the methods, but does not define their implementations. Just as you write both a prototype and a definition for a stand-alone function, you must write a prototype and a definition for a method. Note that the class definition must precede the method definitions. Usually the class definition goes in a header file, and the method definitions go in a source file that #includes that header file. Here are the definitions for the two methods of the SpreadsheetCell class:
#include "SpreadsheetCell.h"void SpreadsheetCell::setValue(double inValue){mValue = inValue;}double SpreadsheetCell::getValue() const{return mValue;}
Note that the name of the class followed by two colons precedes each method name:
void SpreadsheetCell::setValue(double inValue)The :: is called the scope resolution operator. In this context, the syntax tells the compiler that the coming definition of the setValue() method is part of the SpreadsheetCell class. Note also that you do not repeat the access specification when you define the method.
Non-static methods of a class, such as setValue() and getValue(), are always executed on behalf of a specific object of that class. Inside a method body, you have access to all data members of the class for that object. In the previous definition for setValue(), the following line changes the mValue variable inside whatever object calls the method:
mValue = inValue;If setValue() is called for two different objects, the same line of code (executed once for each object) changes the variable in two different objects.
You can call methods of a class from inside another method. For example, consider an extension to the SpreadsheetCell class. Real spreadsheet applications allow text data as well as numbers in the cells. When you try to interpret a text cell as a number, the spreadsheet tries to convert the text to a number. If the text does not represent a valid number, the cell value is ignored. In this program, strings that are not numbers will generate a cell value of 0. Here is a first stab at a class definition for a SpreadsheetCell that supports text data:
#include <string>#include <string_view>class SpreadsheetCell{public:void setValue(double inValue);double getValue() const;void setString(std::string_view inString);std::string getString() const;private:std::string doubleToString(double inValue) const;double stringToDouble(std::string_view inString) const;double mValue;};
This version of the class stores the data only as a double. If the client sets the data as a string, it is converted to a double. If the text is not a valid number, the double value is set to 0.0. The class definition shows two new methods to set and retrieve the text representation of the cell, and two new private helper methods to convert a double to a string and vice versa. Here are the implementations of all the methods:
#include "SpreadsheetCell.h"using namespace std;void SpreadsheetCell::setValue(double inValue){mValue = inValue;}double SpreadsheetCell::getValue() const{return mValue;}void SpreadsheetCell::setString(string_view inString){mValue = stringToDouble(inString);}string SpreadsheetCell::getString() const{return doubleToString(mValue);}string SpreadsheetCell::doubleToString(double inValue) const{return to_string(inValue);}double SpreadsheetCell::stringToDouble(string_view inString) const{return strtod(inString.data(), nullptr);}
Note that with this implementation of the doubleToString() method, a value of, for example, 6.1 is converted to “6.100000”. However, because it is a private helper method, you are free to modify the implementation without having to modify any client code.
Every normal method call passes a pointer to the object for which it is called as a “hidden” parameter with the name this. You can use this pointer to access data members or call methods, and you can pass it to other methods or functions. It is sometimes also useful for disambiguating names. For example, you could have defined the SpreadsheetCell class with a value data member instead of mValue and you could have defined the setValue() method to take a parameter named value instead of inValue. In that case, setValue() would look like this:
void SpreadsheetCell::setValue(double value){value = value;// Ambiguous!}
That line is confusing. Which value do you mean: the value that was passed as a parameter, or the value that is a member of the object?
In order to disambiguate the names, you can use the this pointer:
void SpreadsheetCell::setValue(double value){this->value = value;}
However, if you use the naming conventions described in Chapter 3, you will never encounter this type of name collision.
You can also use the this pointer to call a function or method that takes a pointer to an object from within a method of that object. For example, suppose you write a printCell() stand-alone function (not method) like this:
void printCell(const SpreadsheetCell& cell){cout << cell.getString() << endl;}
If you want to call printCell() from the setValue() method, you must pass *this as the argument to give printCell() a reference to the SpreadsheetCell on which setValue() operates:
void SpreadsheetCell::setValue(double value){this->value = value;printCell(*this);}
The previous class definition says that a SpreadsheetCell consists of one data member, four public methods, and two private methods. However, the class definition does not actually create any SpreadsheetCells; it just specifies their shape and behavior. In that sense, a class is similar to architectural blueprints. The blueprints specify what a house should look like, but drawing the blueprints doesn’t build any houses. Houses must be constructed later based on the blueprints.
Similarly, in C++ you can construct a SpreadsheetCell “object” from the SpreadsheetCell class definition by declaring a variable of type SpreadsheetCell. Just as a builder can build more than one house based on a given set of blueprints, a programmer can create more than one SpreadsheetCell object from a SpreadsheetCell class. There are two ways to create and use objects: on the stack and on the heap.
Here is some code that creates and uses SpreadsheetCell objects on the stack:
SpreadsheetCell myCell, anotherCell;myCell.setValue(6);anotherCell.setString("3.2");cout << "cell 1: " << myCell.getValue() << endl;cout << "cell 2: " << anotherCell.getValue() << endl;
You create objects just as you declare simple variables, except that the variable type is the class name. The . in lines like myCell.setValue(6); is called the “dot” operator; it allows you to call methods on the object. If there were any public data members in the object, you could access them with the dot operator as well. Remember that public data members are not recommended.
The output of the program is as follows:
cell 1: 6cell 2: 3.2
You can also dynamically allocate objects by using new:
SpreadsheetCell* myCellp = new SpreadsheetCell();myCellp->setValue(3.7);cout << "cell 1: " << myCellp->getValue() <<" " << myCellp->getString() << endl;delete myCellp;myCellp = nullptr;
When you create an object on the heap, you access its members through the “arrow” operator: ->. The arrow combines dereferencing (*) and member access (.). You could use those two operators instead, but doing so would be stylistically awkward:
SpreadsheetCell* myCellp = new SpreadsheetCell();(*myCellp).setValue(3.7);cout << "cell 1: " << (*myCellp).getValue() <<" " << (*myCellp).getString() << endl;delete myCellp;myCellp = nullptr;
Just as you must free other memory that you allocate on the heap, you must free the memory for objects that you allocate on the heap by calling delete on the objects. To guarantee safety and to avoid memory problems, you should use smart pointers, as in the following example:
auto myCellp = make_unique<SpreadsheetCell>();// Equivalent to:// unique_ptr<SpreadsheetCell> myCellp(new SpreadsheetCell());myCellp->setValue(3.7);cout << "cell 1: " << myCellp->getValue() <<" " << myCellp->getString() << endl;
With smart pointers you don’t need to manually free the memory; it happens automatically.
The object life cycle involves three activities: creation, destruction, and assignment. It is important to understand how and when objects are created, destroyed, and assigned, and how you can customize these behaviors.
Objects are created at the point you declare them (if they’re on the stack) or when you explicitly allocate space for them with new, new[], or a smart pointer. When an object is created, all its embedded objects are also created. Here is an example:
#include <string>class MyClass{private:std::string mName;};int main(){MyClass obj;return 0;}
The embedded string object is created at the point where the MyClass object is created in the main() function and is destructed when its containing object is destructed.
It is often helpful to give variables initial values as you declare them, as in this example:
int x = 0;Similarly, you should give initial values to objects. You can provide this functionality by declaring and writing a special method called a constructor, in which you can perform initialization work for the object. Whenever an object is created, one of its constructors is executed.
Syntactically, a constructor is specified by a method name that is the same as the class name. A constructor never has a return type and may or may not have parameters. A constructor that can be called without any arguments is called a default constructor. This can be a constructor that does not have any parameters, or a constructor for which all parameters have default values. There are certain contexts in which you may have to provide a default constructor and you will get compilation errors if you have not provided one. Default constructors are discussed later in this chapter.
Here is a first attempt at adding a constructor to the SpreadsheetCell class:
class SpreadsheetCell{public:SpreadsheetCell(double initialValue);// Remainder of the class definition omitted for brevity};
Just as you must provide implementations for normal methods, you must provide an implementation for the constructor:
SpreadsheetCell::SpreadsheetCell(double initialValue){setValue(initialValue);}
The SpreadsheetCell constructor is a member of the SpreadsheetCell class, so C++ requires the normal SpreadsheetCell:: scope resolution before the constructor name. The constructor name itself is also SpreadsheetCell, so the code ends up with the funny-looking SpreadsheetCell::SpreadsheetCell. The implementation simply makes a call to setValue().
Using the constructor creates an object and initializes its values. You can use constructors with both stack-based and heap-based allocation.
When you allocate a SpreadsheetCell object on the stack, you use the constructor like this:
SpreadsheetCell myCell(5), anotherCell(4);cout << "cell 1: " << myCell.getValue() << endl;cout << "cell 2: " << anotherCell.getValue() << endl;
Note that you do not call the SpreadsheetCell constructor explicitly. For example, do not use something like the following:
SpreadsheetCell myCell.SpreadsheetCell(5); // WILL NOT COMPILE!Similarly, you cannot call the constructor later. The following is also incorrect:
SpreadsheetCell myCell;myCell.SpreadsheetCell(5); // WILL NOT COMPILE!
When you dynamically allocate a SpreadsheetCell object, you use the constructor like this:
auto smartCellp = make_unique<SpreadsheetCell>(4);// … do something with the cell, no need to delete the smart pointer// Or with raw pointers, without smart pointers (not recommended)SpreadsheetCell* myCellp = new SpreadsheetCell(5);SpreadsheetCell* anotherCellp = nullptr;anotherCellp = new SpreadsheetCell(4);// … do something with the cellsdelete myCellp; myCellp = nullptr;delete anotherCellp; anotherCellp = nullptr;
Note that you can declare a pointer to a SpreadsheetCell object without calling the constructor immediately, which is different from objects on the stack, where the constructor is called at the point of declaration.
If you declare a pointer on the stack in a function, or declare a pointer as a data member in a class, and you don’t immediately initialize the pointer, then it should be initialized to nullptr as in the previous declaration for anotherCellp. If you don’t assign it to nullptr, the pointer is undefined. Accidentally using an undefined pointer will cause unexpected and difficult-to-diagnose memory corruption. If you initialize it to nullptr, using that pointer will cause a memory access error in most operating environments, instead of producing unexpected results.
Remember to call delete on objects that you dynamically allocate with new, or use smart pointers!
You can provide more than one constructor in a class. All constructors have the same name (the name of the class), but different constructors must take a different number of arguments or different argument types. In C++, if you have more than one function with the same name, the compiler selects the one whose parameter types match the types at the call site. This is called overloading and is discussed in detail in Chapter 9.
In the SpreadsheetCell class, it is helpful to have two constructors: one to take an initial double value and one to take an initial string value. Here is the new class definition:
class SpreadsheetCell{public:SpreadsheetCell(double initialValue);SpreadsheetCell(std::string_view initialValue);// Remainder of the class definition omitted for brevity};
Here is the implementation of the second constructor:
SpreadsheetCell::SpreadsheetCell(string_view initialValue){setString(initialValue);}
And here is some code that uses the two different constructors:
SpreadsheetCell aThirdCell("test"); // Uses string-arg ctorSpreadsheetCell aFourthCell(4.4); // Uses double-arg ctorauto aFifthCellp = make_unique<SpreadsheetCell>("5.5"); // string-arg ctorcout << "aThirdCell: " << aThirdCell.getValue() << endl;cout << "aFourthCell: " << aFourthCell.getValue() << endl;cout << "aFifthCellp: " << aFifthCellp->getValue() << endl;
When you have multiple constructors, it is tempting to try to implement one constructor in terms of another. For example, you might want to call the double constructor from the string constructor as follows:
SpreadsheetCell::SpreadsheetCell(string_view initialValue){SpreadsheetCell(stringToDouble(initialValue));}
That seems to make sense. After all, you can call normal class methods from within other methods. The code will compile, link, and run, but will not do what you expect. The explicit call to the SpreadsheetCell constructor actually creates a new temporary unnamed object of type SpreadsheetCell. It does not call the constructor for the object that you are supposed to be initializing.
However, C++ supports delegating constructors that allow you to call other constructors from the same class from inside the ctor-initializer. This is discussed later in this chapter.
A default constructor is a constructor that requires no arguments. It is also called a 0-argument constructor. With a default constructor, you can give initial values to data members even though the client did not specify them.
Consider arrays of objects. The act of creating an array of objects accomplishes two tasks: it allocates contiguous memory space for all the objects and it calls the default constructor on each object. C++ fails to provide any syntax to tell the array creation code directly to call a different constructor. For example, if you do not define a default constructor for the SpreadsheetCell class, the following code does not compile:
SpreadsheetCell cells[3]; // FAILS compilation without default constructorSpreadsheetCell* myCellp = new SpreadsheetCell[10]; // Also FAILS
You can circumvent this restriction for stack-based arrays by using initializers like these:
SpreadsheetCell cells[3] = {SpreadsheetCell(0), SpreadsheetCell(23),SpreadsheetCell(41)};
However, it is usually easier to ensure that your class has a default constructor if you intend to create arrays of objects of that class. If you haven’t defined your own constructors, the compiler automatically creates a default constructor for you. This compiler-generated constructor is discussed in a later section.
A default constructor is also required for classes that you want to store in Standard Library containers, such as std::vector.
Default constructors are also useful when you want to create objects of that class inside other classes, which is shown later in this chapter in the section, “Constructor Initializers.”
Here is part of the SpreadsheetCell class definition with a default constructor:
class SpreadsheetCell{public:SpreadsheetCell();// Remainder of the class definition omitted for brevity};
Here is a first crack at an implementation of the default constructor:
SpreadsheetCell::SpreadsheetCell(){mValue = 0;}
If you use an in-class member initializer for mValue, then the single statement in this default constructor can be left out:
SpreadsheetCell::SpreadsheetCell(){}
You use the default constructor on the stack like this:
SpreadsheetCell myCell;myCell.setValue(6);cout << "cell 1: " << myCell.getValue() << endl;
The preceding code creates a new SpreadsheetCell called myCell, sets its value, and prints out its value. Unlike other constructors for stack-based objects, you do not call the default constructor with function-call syntax. Based on the syntax for other constructors, you might be tempted to call the default constructor like this:
SpreadsheetCell myCell();// WRONG, but will compile.myCell.setValue(6); // However, this line will not compile.cout << "cell 1: " << myCell.getValue() << endl;
Unfortunately, the line attempting to call the default constructor compiles. The line following it does not compile. This problem is commonly known as the most vexing parse, and it means that your compiler thinks the first line is actually a function declaration for a function with the name myCell that takes zero arguments and returns a SpreadsheetCell object. When it gets to the second line, it thinks that you’re trying to use a function name as an object!
For heap-based object allocation, the default constructor can be used as follows:
auto smartCellp = make_unique<SpreadsheetCell>();// Or with a raw pointer (not recommended)SpreadsheetCell* myCellp = new SpreadsheetCell();// Or// SpreadsheetCell* myCellp = new SpreadsheetCell;// … use myCellpdelete myCellp; myCellp = nullptr;
The first SpreadsheetCell class definition in this chapter looked like this:
class SpreadsheetCell{public:void setValue(double inValue);double getValue() const;private:double mValue;};
This definition does not declare a default constructor, but still, the code that follows works fine:
SpreadsheetCell myCell;myCell.setValue(6);
The following definition is the same as the preceding definition except that it adds an explicit constructor, accepting a double. It still does not explicitly declare a default constructor.
class SpreadsheetCell{public:SpreadsheetCell(double initialValue);// No default constructor// Remainder of the class definition omitted for brevity};
With this definition, the following code does not compile anymore:
SpreadsheetCell myCell;myCell.setValue(6);
What’s going on here? The reason it is not compiling is that if you don’t specify any constructors, the compiler writes one for you that doesn’t take any arguments. This compiler-generated default constructor calls the default constructor on all object members of the class, but does not initialize the language primitives such as int and double. Nonetheless, it allows you to create objects of that class. However, if you declare a default constructor, or any other constructor, the compiler no longer generates a default constructor for you.
In C++03 or older, if your class required a number of explicit constructors accepting arguments but also a default constructor that did nothing, you still had to explicitly write your empty default constructor as shown earlier.
To avoid having to write empty default constructors manually, C++ supports the concept of explicitly defaulted constructors. This allows you to write the class definition as follows without the need to implement the default constructor in the implementation file:
class SpreadsheetCell{public:SpreadsheetCell() = default;SpreadsheetCell(double initialValue);SpreadsheetCell(std::string_view initialValue);// Remainder of the class definition omitted for brevity};
SpreadsheetCell defines two custom constructors. However, the compiler still generates a standard compiler-generated default constructor due to the use of the default keyword.
C++ also supports the concept of explicitly deleted constructors. For example, you can define a class with only static methods (see Chapter 9) for which you do not want to write any constructors and you also do not want the compiler to generate the default constructor. In that case, you need to explicitly delete the default constructor:
class MyClass{public:MyClass() = delete;};
Up to now, this chapter initialized data members in the body of a constructor, as in this example:
SpreadsheetCell::SpreadsheetCell(double initialValue){setValue(initialValue);}
C++ provides an alternative method for initializing data members in the constructor, called the constructor initializer, also known as the ctor-initializer or member initializer list. Here is the same SpreadsheetCell constructor, rewritten to use the ctor-initializer syntax:
SpreadsheetCell::SpreadsheetCell(double initialValue): mValue(initialValue){}
As you can see, the ctor-initializer appears syntactically between the constructor argument list and the opening brace for the body of the constructor. The list starts with a colon and is separated by commas. Each element in the list is an initialization of a data member using function notation or the uniform initialization syntax, a call to a base class constructor (see Chapter 10), or a call to a delegated constructor, which is discussed later.
Initializing data members with a ctor-initializer provides different behavior than does initializing data members inside the constructor body itself. When C++ creates an object, it must create all the data members of the object before calling the constructor. As part of creating these data members, it must call a constructor on any of them that are themselves objects. By the time you assign a value to an object inside your constructor body, you are not actually constructing that object. You are only modifying its value. A ctor-initializer allows you to provide initial values for data members as they are created, which is more efficient than assigning values to them later.
If your class has as data member an object of a class that has a default constructor, then you do not have to explicitly initialize the object in the ctor-initializer. For example, if you have an std::string as data member, its default constructor initializes the string to the empty string, so initializing it to "" in the ctor-initializer is superfluous.
On the other hand, if your class has as data member an object of a class without a default constructor, you have to use the ctor-initializer to properly construct that object. For example, take the following SpreadsheetCell class:
class SpreadsheetCell{public:SpreadsheetCell(double d);};
This class only has one explicit constructor accepting a double and does not include a default constructor. You can use this class as a data member of another class as follows:
class SomeClass{public:SomeClass();private:SpreadsheetCell mCell;};
And you can implement the SomeClass constructor as follows:
SomeClass::SomeClass() { }However, with this implementation, the code does not compile. The compiler does not know how to initialize the mCell data member of SomeClass because it does not have a default constructor.
You have to initialize the mCell data member in the ctor-initializer as follows:
SomeClass::SomeClass() : mCell(1.0) { }Some programmers prefer to assign initial values in the body of the constructor, even though this might be less efficient. However, several data types must be initialized in a ctor-initializer or with an in-class initializer. The following table summarizes them:
| DATA TYPE | EXPLANATION |
const data members |
You cannot legally assign a value to a const variable after it is created. Any value must be supplied at the time of creation. |
| Reference data members | References cannot exist without referring to something. |
| Object data members for which there is no default constructor | C++ attempts to initialize member objects using a default constructor. If no default constructor exists, it cannot initialize the object. |
| Base classes without default constructors | These are covered in Chapter 10. |
There is one important caveat with ctor-initializers: they initialize data members in the order that they appear in the class definition, not their order in the ctor-initializer. Take the following definition for a class called Foo. Its constructor simply stores a double value and prints out the value to the console.
class Foo{public:Foo(double value);private:double mValue;};Foo::Foo(double value) : mValue(value){cout << "Foo::mValue = " << mValue << endl;}
Suppose you have another class, MyClass, that contains a Foo object as one of its data members:
class MyClass{public:MyClass(double value);private:double mValue;Foo mFoo;};
Its constructor could be implemented as follows:
MyClass::MyClass(double value) : mValue(value), mFoo(mValue){cout << "MyClass::mValue = " << mValue << endl;}
The ctor-initializer first stores the given value in mValue, and then calls the Foo constructor with mValue as argument. You can create an instance of MyClass as follows:
MyClass instance(1.2);Here is the output of the program:
Foo::mValue = 1.2MyClass::mValue = 1.2
So, everything looks fine. Now make one tiny change to the MyClass definition. You just reverse the order of the mValue and mFoo data members. Nothing else is changed.
class MyClass{public:MyClass(double value);private:Foo mFoo;double mValue;};
The output of the program now depends on your system. It could, for example, be as follows:
Foo::mValue = -9.25596e+61MyClass::mValue = 1.2
This is far from what you would expect. You might assume, based on your ctor-initializer, that mValue is initialized before using mValue in the call to the Foo constructor. But C++ doesn’t work that way. The data members are initialized in the order they appear in the definition of the class, not the order in the ctor-initializer! So, in this case, the Foo constructor is called first with an uninitialized mValue.
Note that some compilers issue a warning when the order in the class definition does not match the order in the ctor-initializer.
There is a special constructor in C++ called a copy constructor that allows you to create an object that is an exact copy of another object. If you don’t write a copy constructor, C++ generates one for you that initializes each data member in the new object from its equivalent data member in the source object. For object data members, this initialization means that their copy constructors are called.
Here is the declaration for a copy constructor in the SpreadsheetCell class:
class SpreadsheetCell{public:SpreadsheetCell(const SpreadsheetCell& src);// Remainder of the class definition omitted for brevity};
The copy constructor takes a const reference to the source object. Like other constructors, it does not return a value. Inside the constructor, you should copy all the data members from the source object. Technically, of course, you can do whatever you want in the copy constructor, but it’s generally a good idea to follow expected behavior and initialize the new object to be a copy of the old one. Here is a sample implementation of the SpreadsheetCell copy constructor. Note the use of the ctor-initializer.
SpreadsheetCell::SpreadsheetCell(const SpreadsheetCell& src): mValue(src.mValue){}
Given a set of data members, called m1, m2, … mn, the compiler-generated copy constructor can be expressed as follows:
classname::classname(const classname& src): m1(src.m1), m2(src.m2), … mn(src.mn) { }
Therefore, in most circumstances, there is no need for you to specify a copy constructor!
The default semantics for passing arguments to functions in C++ is pass-by-value. That means that the function or method receives a copy of the value or object. Thus, whenever you pass an object to a function or method, the compiler calls the copy constructor of the new object to initialize it. For example, suppose you have the following printString() function accepting a string parameter by value:
void printString(string inString){cout << inString << endl;}
Recall that the C++ string is actually a class, not a built-in type. When your code makes a call to printString() passing a string argument, the string parameter inString is initialized with a call to its copy constructor. The argument to the copy constructor is the string you passed to printString(). In the following example, the string copy constructor is executed for the inString object in printString() with name as its parameter.
string name = "heading one";printString(name); // Copies name
When the printString() method finishes, inString is destroyed. Because it was only a copy of name, name remains intact. Of course, you can avoid the overhead of copy constructors by passing parameters as const references.
When returning objects by value from a function, the copy constructor might also get called. This is discussed in the section “Objects as Return Values” later in this chapter.
You can use the copy constructor explicitly as well. It is often useful to be able to construct one object as an exact copy of another. For example, you might want to create a copy of a SpreadsheetCell object like this:
SpreadsheetCell myCell1(4);SpreadsheetCell myCell2(myCell1);// myCell2 has the same values as myCell1
In order to avoid copying objects when you pass them to functions and methods, you should declare that the function or method takes a reference to the object. Passing objects by reference is usually more efficient than passing them by value, because only the address of the object is copied, not the entire contents of the object. Additionally, pass-by-reference avoids problems with dynamic memory allocation in objects, which is discussed in Chapter 9.
When you pass an object by reference, the function or method using the object reference could change the original object. When you are only using pass-by-reference for efficiency, you should preclude this possibility by declaring the object const as well. This is known as passing objects by const reference and has been done in examples throughout this book.
Note that the SpreadsheetCell class has a number of methods accepting an std::string_view as parameter. As discussed in Chapter 2, a string_view is basically just a pointer and a length. So, it is very cheap to copy, and is usually passed by value.
Also primitive types, such as int, double, and so on, should just be passed by value. You don’t gain anything by passing such types by const reference.
The doubleToString() method of the SpreadsheetCell class always returns a string by value because the implementation of the method creates a local string object that at the end of the method is returned to the caller. Returning a reference to this string wouldn’t work because the string to which it references will be destroyed when the function exits.
You can explicitly default or delete a compiler-generated copy constructor as follows:
SpreadsheetCell(const SpreadsheetCell& src) = default;or
SpreadsheetCell(const SpreadsheetCell& src) = delete;By deleting the copy constructor, the object cannot be copied anymore. This can be used to disallow passing the object by value, as discussed in Chapter 9.
An initializer-list constructor is a constructor with an std::initializer_list<T> as first parameter, without any additional parameters or with additional parameters having default values. Before you can use the std::initializer_list<T> template, you need to include the <initializer_list> header. The following class demonstrates its use. The class accepts only an initializer_list<T> with an even number of elements; otherwise, it throws an exception.
class EvenSequence{public:EvenSequence(initializer_list<double> args){if (args.size() % 2 != 0) {throw invalid_argument("initializer_list should ""contain even number of elements.");}mSequence.reserve(args.size());for (const auto& value : args) {mSequence.push_back(value);}}void dump() const{for (const auto& value : mSequence) {cout << value << ", ";}cout << endl;}private:vector<double> mSequence;};
Inside the initializer-list constructor you can access the elements of the initializer-list with a range-based for loop. You can get the number of elements in the initializer-list with the size() method.
The EvenSequence initializer-list constructor uses a range-based for loop to copy elements from the given initializer_list<T>. You can also use the assign() method of vector. The different methods of vector, including assign(), are discussed in detail in Chapter 17. To give you an idea of the power of a vector, here is the initializer-list constructor using assign():
EvenSequence(initializer_list<double> args){if (args.size() % 2 != 0) {throw invalid_argument("initializer_list should ""contain even number of elements.");}mSequence.assign(args);}EvenSequenceobjects can be constructed as follows:EvenSequence p1 = {1.0, 2.0, 3.0, 4.0, 5.0, 6.0};p1.dump();try {EvenSequence p2 = {1.0, 2.0, 3.0};} catch (const invalid_argument& e) {cout << e.what() << endl;}
The construction of p2 throws an exception because it has an odd number of elements in the initializer-list. The preceding equal signs are optional and can be left out, as in this example:
EvenSequence p1{1.0, 2.0, 3.0, 4.0, 5.0, 6.0};The Standard Library has full support for initializer-list constructors. For example, the std::vector container can be initialized with an initializer-list:
std::vector<std::string> myVec = {"String 1", "String 2", "String 3"};Without initializer-list constructors, one way to initialize this vector is by using several push_back() calls:
std::vector<std::string> myVec;myVec.push_back("String 1");myVec.push_back("String 2");myVec.push_back("String 3");
Initializer lists are not limited to constructors and can also be used with normal functions as explained in Chapter 1.
Delegating constructors allow constructors to call another constructor from the same class. However, this call cannot be placed in the constructor body; it must be in the ctor-initializer and it must be the only member-initializer in the list. Following is an example:
SpreadsheetCell::SpreadsheetCell(string_view initialValue): SpreadsheetCell(stringToDouble(initialValue)){}
When this string_view constructor (the delegating constructor) is called, it first delegates the call to the target constructor, which is the double constructor in this example. When the target constructor returns, the body of the delegating constructor is executed.
Make sure you avoid constructor recursion while using delegate constructors. Here is an example:
class MyClass{MyClass(char c) : MyClass(1.2) { }MyClass(double d) : MyClass('m') { }};
The first constructor delegates to the second constructor, which delegates back to the first one. The behavior of such code is undefined by the standard and depends on the compiler.
The compiler can automatically generate a default constructor and a copy constructor for every class. However, the constructors that the compiler automatically generates depend on the constructors that you define yourself according to the rules in the following table.
| IF YOU DEFINE . . . | . . . THEN THE COMPILER GENERATES . . . | . . . AND YOU CAN CREATE AN OBJECT . . . |
| [no constructors] |
A default constructor A copy constructor |
With no arguments:SpreadsheetCell cell;As a copy of another object: SpreadsheetCell myCell(cell); |
| A default constructor only | A copy constructor |
With no arguments:SpreadsheetCell cell;As a copy of another object: SpreadsheetCell myCell(cell); |
| A copy constructor only | No constructors | Theoretically, as a copy of another object. Practically, you can’t create any objects, because there are no non-copy constructors. |
| A single-argument or multi-argument non-copy constructor only | A copy constructor |
With arguments:SpreadsheetCell cell(6);As a copy of another object: SpreadsheetCell myCell(cell); |
| A default constructor as well as a single-argument or multi-argument non-copy constructor | A copy constructor | With no arguments:SpreadsheetCell cell;With arguments: SpreadsheetCell myCell(5);As a copy of another object: SpreadsheetCell anotherCell(cell); |
Note the lack of symmetry between the default constructor and the copy constructor. As long as you don’t define a copy constructor explicitly, the compiler creates one for you. On the other hand, as soon as you define any constructor, the compiler stops generating a default constructor.
As mentioned before in this chapter, the automatic generation of a default constructor and a default copy constructor can be influenced by defining them as explicitly defaulted or explicitly deleted.
When an object is destroyed, two events occur: the object’s destructor method is called, and the memory it was taking up is freed. The destructor is your chance to perform any cleanup work for the object, such as freeing dynamically allocated memory or closing file handles. If you don’t declare a destructor, the compiler writes one for you that does recursive member-wise destruction and allows the object to be deleted. The section on dynamic memory allocation in Chapter 9 shows you how to write a destructor.
Objects on the stack are destroyed when they go out of scope, which means whenever the current function, method, or other execution block ends. In other words, whenever the code encounters an ending curly brace, any objects created on the stack within those curly braces are destroyed. The following program shows this behavior:
int main(){SpreadsheetCell myCell(5);if (myCell.getValue() == 5) {SpreadsheetCell anotherCell(6);} // anotherCell is destroyed as this block ends.cout << "myCell: " << myCell.getValue() << endl;return 0;} // myCell is destroyed as this block ends.
Objects on the stack are destroyed in the reverse order of their declaration (and construction). For example, in the following code fragment, myCell2 is created before anotherCell2, so anotherCell2 is destroyed before myCell2 (note that you can start a new code block at any point in your program with an opening curly brace):
{SpreadsheetCell myCell2(4);SpreadsheetCell anotherCell2(5); // myCell2 constructed before anotherCell2} // anotherCell2 destroyed before myCell2
This ordering also applies to objects that are data members of other objects. Recall that data members are initialized in the order of their declaration in the class. Thus, following the rule that objects are destroyed in the reverse order of their construction, data member objects are destroyed in the reverse order of their declaration in the class.
Objects allocated on the heap without the help of smart pointers are not destroyed automatically. You must call delete on the object pointer to call its destructor and free the memory. The following program shows this behavior:
int main(){SpreadsheetCell* cellPtr1 = new SpreadsheetCell(5);SpreadsheetCell* cellPtr2 = new SpreadsheetCell(6);cout << "cellPtr1: " << cellPtr1->getValue() << endl;delete cellPtr1; // Destroys cellPtr1cellPtr1 = nullptr;return 0;} // cellPtr2 is NOT destroyed because delete was not called on it.
Just as you can assign the value of one int to another in C++, you can assign the value of one object to another. For example, the following code assigns the value of myCell to anotherCell:
SpreadsheetCell myCell(5), anotherCell;anotherCell = myCell;
You might be tempted to say that myCell is “copied” to anotherCell. However, in the world of C++, “copying” only occurs when an object is being initialized. If an object already has a value that is being overwritten, the more accurate term is “assigned to.” Note that the facility that C++ provides for copying is the copy constructor. Because it is a constructor, it can only be used for object creation, not for later assignments to the object.
Therefore, C++ provides another method in every class to perform assignment. This method is called the assignment operator. Its name is operator= because it is actually an overloading of the = operator for that class. In the preceding example, the assignment operator for anotherCell is called, with myCell as the argument.
As usual, if you don’t write your own assignment operator, C++ writes one for you to allow objects to be assigned to one another. The default C++ assignment behavior is almost identical to its default copying behavior: it recursively assigns each data member from the source to the destination object.
Here is the assignment operator for the SpreadsheetCell class:
class SpreadsheetCell{public:SpreadsheetCell& operator=(const SpreadsheetCell& rhs);// Remainder of the class definition omitted for brevity};
The assignment operator often takes a const reference to the source object, like the copy constructor. In this case, the source object is called rhs, which stands for right-hand side of the equals sign, but you are free to call it whatever you want. The object on which the assignment operator is called is the left-hand side of the equals sign.
Unlike a copy constructor, the assignment operator returns a reference to a SpreadsheetCell object. The reason is that assignments can be chained, as in the following example:
myCell = anotherCell = aThirdCell;When that line is executed, the first thing that happens is the assignment operator for anotherCell is called with aThirdCell as its “right-hand side” parameter. Next, the assignment operator for myCell is called. However, its parameter is not anotherCell. Its right-hand side is the result of the assignment of aThirdCell to anotherCell. If that assignment fails to return a result, there is nothing to pass to myCell.
You might be wondering why the assignment operator for myCell can’t just take anotherCell. The reason is that using the equals sign is actually just shorthand for what is really a method call. When you look at the line in its full functional syntax, you can see the problem:
myCell.operator=(anotherCell.operator=(aThirdCell));Now, you can see that the operator= call from anotherCell must return a value, which is passed to the operator= call for myCell. The correct value to return is anotherCell itself, so it can serve as the source for the assignment to myCell. However, returning anotherCell directly would be inefficient, so you can return a reference to anotherCell.
The implementation of the assignment operator is similar to that of a copy constructor, with several important differences. First, a copy constructor is called only for initialization, so the destination object does not yet have valid values. An assignment operator can overwrite the current values in an object. This consideration doesn’t really come into play until you have dynamically allocated memory in your objects. See Chapter 9 for details.
Second, it’s legal in C++ to assign an object to itself. For example, the following code compiles and runs:
SpreadsheetCell cell(4);cell = cell; // Self-assignment
Your assignment operator needs to take the possibility of self-assignment into account. In the SpreadsheetCell class, this is not important, as its only data member is a primitive type, double. However, when your class has dynamically allocated memory or other resources, it’s paramount to take self-assignment into account, as is discussed in detail in Chapter 9. To prevent problems in such cases, assignment operators usually check for self-assignment at the beginning of the method and return immediately.
Here is the start of the definition of the assignment operator for the SpreadsheetCell class:
SpreadsheetCell& SpreadsheetCell::operator=(const SpreadsheetCell& rhs){if (this == &rhs) {
This first line checks for self-assignment, but it might be a bit cryptic. Self-assignment occurs when the left-hand side and the right-hand side of the equals sign are the same. One way to tell if two objects are the same is if they occupy the same memory location—more explicitly, if pointers to them are equal. Recall that this is a pointer to an object accessible from any method called on the object. Thus, this is a pointer to the left-hand side object. Similarly, &rhs is a pointer to the right-hand side object. If these pointers are equal, the assignment must be self-assignment, but because the return type is SpreadsheetCell&, a correct value must still be returned. All assignment operators return *this, and the self-assignment case is no exception:
return *this;}
this is a pointer to the object on which the method executes, so *this is the object itself. The compiler returns a reference to the object to match the declared return value. Now, if it is not self-assignment, you have to do an assignment to every member:
mValue = rhs.mValue;return *this;}
Here the method copies the values, and finally, it returns *this, as explained previously.
You can explicitly default or delete a compiler-generated assignment operator as follows:
SpreadsheetCell& operator=(const SpreadsheetCell& rhs) = default;or
SpreadsheetCell& operator=(const SpreadsheetCell& rhs) = delete;C++11 has deprecated the generation of a copy constructor if the class has a user-declared copy assignment operator or destructor. If you still need a compiler-generated copy constructor in such a case, you can explicitly default one:
MyClass(const MyClass& src) = default;C++11 has also deprecated the generation of a copy assignment operator if the class has a user-declared copy constructor or destructor. If you still need a compiler-generated copy assignment operator in such a case, you can explicitly default one:
MyClass& operator=(const MyClass& rhs) = default;It is sometimes difficult to tell when objects are initialized with a copy constructor rather than assigned to with the assignment operator. Essentially, things that look like a declaration are going to be using copy constructors, and things that look like assignment statements are handled by the assignment operator. Consider the following code:
SpreadsheetCell myCell(5);SpreadsheetCell anotherCell(myCell);
AnotherCell is constructed with the copy constructor.
SpreadsheetCell aThirdCell = myCell;aThirdCell is also constructed with the copy constructor, because this is a declaration. The operator= is not called for this line! This syntax is just another way to write SpreadsheetCell aThirdCell(myCell);. However, consider the following code:
anotherCell = myCell; // Calls operator= for anotherCellHere, anotherCell has already been constructed, so the compiler calls operator=.
When you return objects from functions or methods, it is sometimes difficult to see exactly what copying and assignment is happening. For example, the implementation of SpreadsheetCell:: getString() looks like this:
string SpreadsheetCell::getString() const{return doubleToString(mValue);}
Now consider the following code:
SpreadsheetCell myCell2(5);string s1;s1 = myCell2.getString();
When getString() returns the string, the compiler actually creates an unnamed temporary string object by calling a string copy constructor. When you assign this result to s1, the assignment operator is called for s1 with the temporary string as a parameter. Then, the temporary string object is destroyed. Thus, the single line of code invokes the copy constructor and the assignment operator (for two different objects). However, compilers are free and sometimes required to implement Return Value Optimization (RVO), also known as copy elision, to optimize away costly copy constructions when returning values.
In case you’re not confused enough, consider this code:
SpreadsheetCell myCell3(5);string s2 = myCell3.getString();
In this case, getString() still creates a temporary unnamed string object when it returns. But now, s2 gets its copy constructor called, not its assignment operator.
With move semantics, the compiler can use a move constructor instead of a copy constructor to return the string from getString(). This is more efficient and is discussed in Chapter 9.
If you ever forget the order in which these things happen or which constructor or operator is called, you can easily figure it out by temporarily including helpful output in your code or by stepping through it with a debugger.
You should also note the difference between assignment and copy constructor calls in constructors. If an object contains other objects, the compiler-generated copy constructor calls the copy constructors of each of the contained objects recursively. When you write your own copy constructor, you can provide the same semantics by using a ctor-initializer, as shown previously. If you omit a data member from the ctor-initializer, the compiler performs default initialization on it (a call to the default constructor for objects) before executing your code in the body of the constructor. Thus, by the time the body of the constructor executes, all object data members have already been initialized.
For example, you could write your copy constructor like this:
SpreadsheetCell::SpreadsheetCell(const SpreadsheetCell& src){mValue = src.mValue;}
However, when you assign values to data members in the body of the copy constructor, you are using the assignment operator on them, not the copy constructor, because they have already been initialized, as described previously.
If you write the copy constructor as follows, then mValue is initialized using the copy constructor:
SpreadsheetCell::SpreadsheetCell(const SpreadsheetCell& src): mValue(src.mValue){}
This chapter covered the fundamental aspects of C++’s facilities for object-oriented programming: classes and objects. It first reviewed the basic syntax for writing classes and using objects, including access control. Then, it covered object life cycles: when objects are constructed, destructed, and assigned to, and what methods those actions invoke. The chapter included details of the constructor syntax, including ctor-initializers and initializer-list constructors, and introduced the notion of copy assignment operators. It also specified exactly which constructors the compiler writes for you, and under what circumstances, and explained that default constructors require no arguments.
You may have found this chapter to be mostly review. Or, it may have opened your eyes to the world of object-oriented programming in C++. In any case, now that you are proficient with objects and classes, read Chapter 9 to learn more about their tricks and subtleties.
C++ allows classes to declare that other classes, member functions of other classes, or non-member functions are friends, and can access protected and private data members and methods. For example, suppose you have two classes called Foo and Bar. You can specify that the Bar class is a friend of Foo as follows:
class Foo{friend class Bar;// …};
Now all the methods of Bar can access the private and protected data members and methods of Foo.
If you only want to make a specific method of Bar a friend, you can do that as well. Suppose the Bar class has a method processFoo(const Foo& foo). The following syntax is used to make this method a friend of Foo:
class Foo{friend void Bar::processFoo(const Foo& foo);// …};
Standalone functions can also be friends of classes. You might, for example, want to write a function that dumps all data of a Foo object to the console. You might want this function to be outside the Foo class to model an external audit, but the function should be able to access the internal data members of the object in order to check it properly. Here is the Foo class definition with a friend
dumpFoo() function:
class Foo{friend void dumpFoo(const Foo& foo);// …};
The friend declaration in the class serves as the function’s prototype. There’s no need to write the prototype elsewhere (although it’s harmless to do so).
Here is the function definition:
void dumpFoo(const Foo& foo){// Dump all data of foo to the console, including// private and protected data members.}
You write this function just like any other function, except that you can directly access private and protected data members of Foo. You don’t repeat the friend keyword in the function definition.
Note that a class needs to know which other classes, methods, or functions want to be its friends; a class, method, or function cannot declare itself to be a friend of some other class and access the non-public names of that class.
friend classes and methods are easy to abuse; they allow you to violate the principle of encapsulation by exposing internals of your class to other classes or functions. Thus, you should use them only in limited circumstances. Some use cases are shown throughout this chapter.
Sometimes you don’t know how much memory you will need before your program actually runs. As you read in Chapter 7, the solution is to dynamically allocate as much space as you need during program execution. Classes are no exception. Sometimes you don’t know how much memory an object will need when you write the class. In that case, the object should dynamically allocate memory. Dynamically allocated memory in objects provides several challenges, including freeing the memory, handling object copying, and handling object assignment.
Chapter 8 introduces the SpreadsheetCell class. This chapter moves on to write the Spreadsheet class. As with the SpreadsheetCell class, the Spreadsheet class evolves throughout this chapter. Thus, the various attempts do not always illustrate the best way to do every aspect of class writing. To start, a Spreadsheet is simply a two-dimensional array of SpreadsheetCells, with methods to set and retrieve cells at specific locations in the Spreadsheet. Although most spreadsheet applications use letters in one direction and numbers in the other to refer to cells, this Spreadsheet uses numbers in both directions. Here is a first attempt at a class definition for a simple Spreadsheet class:
#include <cstddef>#include "SpreadsheetCell.h"class Spreadsheet{public:Spreadsheet(size_t width, size_t height);void setCellAt(size_t x, size_t y, const SpreadsheetCell& cell);SpreadsheetCell& getCellAt(size_t x, size_t y);private:bool inRange(size_t value, size_t upper) const;size_t mWidth = 0;size_t mHeight = 0;SpreadsheetCell** mCells = nullptr;};
Note that the Spreadsheet class does not contain a standard two-dimensional array of SpreadsheetCells. Instead, it contains a SpreadsheetCell**. This is because each Spreadsheet object might have different dimensions, so the constructor of the class must dynamically allocate the two-dimensional array based on the client-specified height and width. In order to allocate dynamically a two-dimensional array, you need to write the following code. Note that in C++, unlike in Java, it’s not possible to simply write new
SpreadsheetCell[mWidth][mHeight].
Spreadsheet::Spreadsheet(size_t width, size_t height): mWidth(width), mHeight(height){mCells = new SpreadsheetCell*[mWidth];for (size_t i = 0; i < mWidth; i++) {mCells[i] = new SpreadsheetCell[mHeight];}}
The resulting memory for a Spreadsheet called s1 on the stack with width 4 and height 3 is shown in Figure 9-1.
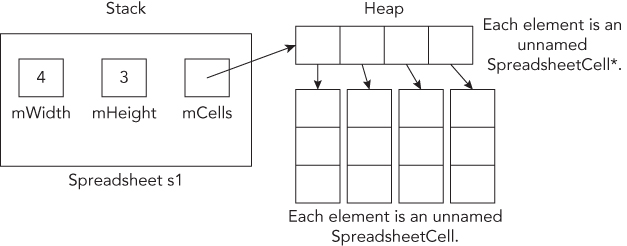
The implementations of the set and retrieval methods are straightforward:
void Spreadsheet::setCellAt(size_t x, size_t y, const SpreadsheetCell& cell){if (!inRange(x, mWidth) || !inRange(y, mHeight)) {throw std::out_of_range("");}mCells[x][y] = cell;}SpreadsheetCell& Spreadsheet::getCellAt(size_t x, size_t y){if (!inRange(x, mWidth) || !inRange(y, mHeight)) {throw std::out_of_range("");}return mCells[x][y];}
Note that these two methods use a helper method inRange() to check that x and y represent valid coordinates in the spreadsheet. Attempting to access an array element at an out-of-range index will cause the program to malfunction. This example uses exceptions, which are mentioned in Chapter 1 and described in detail in Chapter 14.
If you look at the setCellAt() and getCellAt() methods, you see there is some clear code duplication. Chapter 6 explains that code duplication should be avoided at all costs. So, let’s follow that guideline. Instead of a helper method called inRange(), the following verifyCoordinate() method is defined for the class:
void verifyCoordinate(size_t x, size_t y) const;The implementation checks the given coordinate and throws an exception if the coordinate is invalid:
void Spreadsheet::verifyCoordinate(size_t x, size_t y) const{if (x >= mWidth || y >= mHeight) {throw std::out_of_range("");}}
The setCellAt() and getCellAt() methods can now be simplified:
void Spreadsheet::setCellAt(size_t x, size_t y, const SpreadsheetCell& cell){verifyCoordinate(x, y);mCells[x][y] = cell;}SpreadsheetCell& Spreadsheet::getCellAt(size_t x, size_t y){verifyCoordinate(x, y);return mCells[x][y];}
Whenever you are finished with dynamically allocated memory, you should free it. If you dynamically allocate memory in an object, the place to free that memory is in the destructor. The compiler guarantees that the destructor is called when the object is destroyed. Here is the Spreadsheet class definition with a destructor:
class Spreadsheet{public:Spreadsheet(size_t width, size_t height);~Spreadsheet();// Code omitted for brevity};
The destructor has the same name as the name of the class (and of the constructors), preceded by a tilde (~). The destructor takes no arguments, and there can only be one of them. Destructors are implicitly marked as noexcept, since they should not throw any exceptions.
Here is the implementation of the Spreadsheet class destructor:
Spreadsheet::~Spreadsheet(){for (size_t i = 0; i < mWidth; i++) {delete [] mCells[i];}delete [] mCells;mCells = nullptr;}
This destructor frees the memory that was allocated in the constructor. However, no rule requires you to free memory in the destructor. You can write whatever code you want in the destructor, but it is a good idea to use it only for freeing memory or disposing of other resources.
Recall from Chapter 8 that if you don’t write a copy constructor and an assignment operator yourself, C++ writes them for you. These compiler-generated methods recursively call the copy constructor or assignment operator on object data members. However, for primitives, such as int, double, and pointers, they provide shallow or bitwise copying or assignment: they just copy or assign the data members from the source object directly to the destination object. That presents problems when you dynamically allocate memory in your object. For example, the following code copies the spreadsheet s1 to initialize s when s1 is passed to the printSpreadsheet() function:
#include "Spreadsheet.h"void printSpreadsheet(Spreadsheet s){// Code omitted for brevity.}int main(){Spreadsheet s1(4, 3);printSpreadsheet(s1);return 0;}
The Spreadsheet contains one pointer variable: mCells. A shallow copy of a spreadsheet gives the destination object a copy of the mCells pointer, but not a copy of the underlying data. Thus, you end up with a situation where both s and s1 have a pointer to the same data, as shown in Figure 9-2.
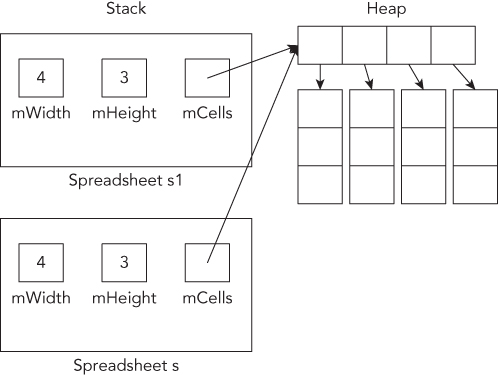
If s changes something to which mCells points, that change shows up in s1 too. Even worse, when the printSpreadsheet() function exits, s’s destructor is called, which frees the memory pointed to by mCells. That leaves the situation shown in Figure 9-3.

Now s1 has a pointer that no longer points to valid memory. This is called a dangling pointer.
Unbelievably, the problem is even worse with assignment. Suppose that you have the following code:
Spreadsheet s1(2, 2), s2(4, 3);s1 = s2;
After the first line, when both objects are constructed, you have the memory layout shown in Figure 9-4.
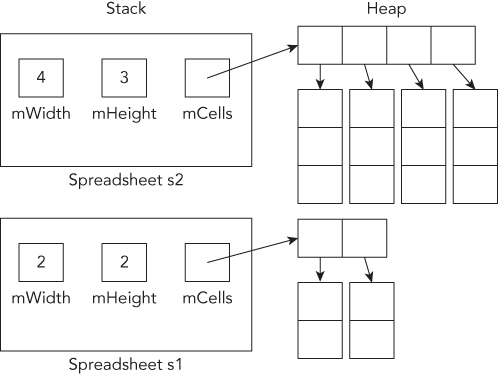
After the assignment statement, you have the layout shown in Figure 9-5.
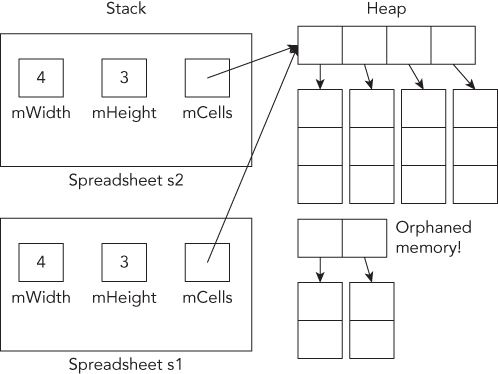
Now, not only do the mCells pointers in s1 and s2 point to the same memory, but you have also orphaned the memory to which mCells in s1 previously pointed. This is called a memory leak. That is why in assignment operators you must do a deep copy.
As you can see, relying on C++’s default copy constructor and default assignment operator is not always a good idea.
Here is a declaration for a copy constructor in the Spreadsheet class:
class Spreadsheet{public:Spreadsheet(const Spreadsheet& src);// Code omitted for brevity};
The definition is as follows:
Spreadsheet::Spreadsheet(const Spreadsheet& src): Spreadsheet(src.mWidth, src.mHeight){for (size_t i = 0; i < mWidth; i++) {for (size_t j = 0; j < mHeight; j++) {mCells[i][j] = src.mCells[i][j];}}}
Note the use of a delegating constructor. The ctor-initializer of this copy constructor delegates first to the non-copy constructor to allocate the proper amount of memory. The body of the copy constructor then copies the actual values. Together, this process implements a deep copy of the mCells dynamically allocated two-dimensional array.
There is no need to delete the existing mCells because this is a copy constructor and therefore there is not an existing mCells yet in this object.
The following shows the Spreadsheet class definition with an assignment operator:
class Spreadsheet{public:Spreadsheet& operator=(const Spreadsheet& rhs);// Code omitted for brevity};
A naïve implementation could be as follows:
Spreadsheet& Spreadsheet::operator=(const Spreadsheet& rhs){// Check for self-assignmentif (this == &rhs) {return *this;}// Free the old memoryfor (size_t i = 0; i < mWidth; i++) {delete[] mCells[i];}delete[] mCells;mCells = nullptr;// Allocate new memorymWidth = rhs.mWidth;mHeight = rhs.mHeight;mCells = new SpreadsheetCell*[mWidth];for (size_t i = 0; i < mWidth; i++) {mCells[i] = new SpreadsheetCell[mHeight];}// Copy the datafor (size_t i = 0; i < mWidth; i++) {for (size_t j = 0; j < mHeight; j++) {mCells[i][j] = rhs.mCells[i][j];}}return *this;}
The code first checks for self-assignment, then frees the current memory of the this object, followed by allocating new memory, and finally copying the individual elements. There is a lot going on in this method, and a lot can go wrong! It is possible that the this object gets into an invalid state. For example, suppose that the memory is successfully freed, that mWidth and mHeight are properly set, but that an exception is thrown in the loop that is allocating the memory. When that happens, execution of the remainder of the method is skipped, and the method is exited. Now the Spreadsheet instance is corrupt; its mWidth and mHeight data members state a certain size, but the mCells data member does not have the right amount of memory. Basically, this code is not exception safe!
What we need is an all-or-nothing mechanism; either everything succeeds, or the this object remains untouched. To implement such an exception-safe assignment operator, the copy-and-swap idiom is recommended. For this, a non-member swap() function is implemented as a friend of the Spreadsheet class. Instead of a non-member swap() function, you could also add a swap() method to the class. However, it’s recommended practice to implement swap() as a non-member function, so that it can also be used by various Standard Library algorithms. Here is the definition of the Spreadsheet class with an assignment operator and the swap() function:
class Spreadsheet{public:Spreadsheet& operator=(const Spreadsheet& rhs);friend void swap(Spreadsheet& first, Spreadsheet& second) noexcept;// Code omitted for brevity};
A requirement for implementing the exception-safe copy-and-swap idiom is that the swap() function never throws any exceptions, so it is marked as noexcept. The implementation of the swap() function swaps each data member using the std::swap() utility function provided by the Standard Library in the <utility> header file:
void swap(Spreadsheet& first, Spreadsheet& second) noexcept{using std::swap;swap(first.mWidth, second.mWidth);swap(first.mHeight, second.mHeight);swap(first.mCells, second.mCells);}
Now that we have this exception-safe swap() function, it can be used to implement the assignment operator:
Spreadsheet& Spreadsheet::operator=(const Spreadsheet& rhs){// Check for self-assignmentif (this == &rhs) {return *this;}Spreadsheet temp(rhs); // Do all the work in a temporary instanceswap(*this, temp); // Commit the work with only non-throwing operationsreturn *this;}
The implementation uses the copy-and-swap idiom. For efficiency, but sometimes also for correctness, the first line of code in an assignment operator usually checks for self-assignment. Next, a copy of the right-hand-side is made, called temp. Then *this is swapped with this copy. This pattern is the recommended way of implementing your assignment operators because it guarantees strong exception safety. This means that if any exception occurs, then the state of the current Spreadsheet object remains unchanged. This is implemented in three phases:
Spreadsheet object, and so there is no problem if an exception is thrown during this phase.swap() function to swap the created temporary copy with the current object. The swap() function shall never throw exceptions.Sometimes when you dynamically allocate memory in your class, it’s easiest just to prevent anyone from copying or assigning to your objects. You can do this by explicitly deleting your operator= and copy constructor. That way, if anyone tries to pass the object by value, return it from a function or method, or assign to it, the compiler will complain. Here is a Spreadsheet class definition that prevents assignment and pass-by-value:
class Spreadsheet{public:Spreadsheet(size_t width, size_t height);Spreadsheet(const Spreadsheet& src) = delete;~Spreadsheet();Spreadsheet& operator=(const Spreadsheet& rhs) = delete;// Code omitted for brevity};
You don’t provide implementations for deleted methods. The linker will never look for them because the compiler won’t allow code to call them. When you write code to copy or assign to a Spreadsheet object, the compiler will complain with a message like this:
'Spreadsheet &Spreadsheet::operator =(const Spreadsheet &)' : attempting to reference a deleted function Move semantics for objects requires a move constructor and a move assignment operator. These can be used by the compiler when the source object is a temporary object that will be destroyed after the operation is finished. Both the move constructor and the move assignment operator move the data members from the source object to the new object, leaving the source object in some valid but otherwise indeterminate state. Often, data members of the source object are reset to null values. This process actually moves ownership of the memory and other resources from one object to another object. They basically do a shallow copy of the member variables, and switch ownership of allocated memory and other resources to prevent dangling pointers or resources, and to prevent memory leaks.
Before you can implement move semantics, you need to learn about rvalues and rvalue references.
In C++, an lvalue is something of which you can take an address; for example, a named variable. The name comes from the fact that lvalues can appear on the left-hand side of an assignment. An rvalue, on the other hand, is anything that is not an lvalue, such as a literal, or a temporary object or value. Typically, an rvalue is on the right-hand side of an assignment operator. For example, take the following statement:
int a = 4 * 2;In this statement, a is an lvalue, it has a name and you can take the address of it with &a. The result of the expression 4 * 2 on the other hand is an rvalue. It is a temporary value that is destroyed when the statement finishes execution. In this example, a copy of this temporary value is stored in the variable with name a.
An rvalue reference is a reference to an rvalue. In particular, it is a concept that is applied when the rvalue is a temporary object. The purpose of an rvalue reference is to make it possible for a particular function to be chosen when a temporary object is involved. The consequence of this is that certain operations that normally involve copying large values can be implemented by copying pointers to those values, knowing the temporary object will be destroyed.
A function can specify an rvalue reference parameter by using && as part of the parameter specification; for example, type&& name. Normally, a temporary object will be seen as a const type&, but when there is a function overload that uses an rvalue reference, a temporary object can be resolved to that overload. The following example demonstrates this. The code first defines two handleMessage() functions, one accepting an lvalue reference and one accepting an rvalue reference:
// lvalue reference parametervoid handleMessage(std::string& message){cout << "handleMessage with lvalue reference: " << message << endl;}// rvalue reference parametervoid handleMessage(std::string&& message){cout << "handleMessage with rvalue reference: " << message << endl;}
You can call handleMessage() with a named variable as argument:
std::string a = "Hello ";std::string b = "World";handleMessage(a); // Calls handleMessage(string& value)
Because a is a named variable, the handleMessage() function accepting an lvalue reference is called. Any changes handleMessage() does through its reference parameter will change the value of a.
You can also call handleMessage() with an expression as argument:
handleMessage(a + b); // Calls handleMessage(string&& value)The handleMessage() function accepting an lvalue reference cannot be used, because the expression a + b results in a temporary, which is not an lvalue. In this case the rvalue reference version is called. Because the argument is a temporary, any changes handleMessage() does through its reference parameter will be lost after the call returns.
A literal can also be used as argument to handleMessage(). This also triggers a call to the rvalue reference version because a literal cannot be an lvalue (though a literal can be passed as argument to a const reference parameter).
handleMessage("Hello World"); // Calls handleMessage(string&& value)If you remove the handleMessage() function accepting an lvalue reference, calling handleMessage() with a named variable like handleMessage(b) will result in a compilation error because an rvalue reference parameter (string&& message) will never be bound to an lvalue (b). You can force the compiler to call the rvalue reference version of handleMessage() by using std::move(), which casts an lvalue into an rvalue as follows:
handleMessage(std::move(b)); // Calls handleMessage(string&& value)As said before, but it’s worth repeating, a named variable is an lvalue. So, inside the handleMessage() function, the rvalue reference message parameter itself is an lvalue because it has a name! If you want to forward this rvalue reference parameter to another function as an rvalue, then you need to use std::move() to cast the lvalue to an rvalue. For example, suppose you add the following function with an rvalue reference parameter:
void helper(std::string&& message){}
Calling it as follows does not compile:
void handleMessage(std::string&& message){helper(message);}
The helper() function needs an rvalue reference, while handleMessage() passes message, which has a name, so it’s an lvalue, causing a compilation error. The correct way is to use std::move():
void handleMessage(std::string&& message){helper(std::move(message));}
Rvalue references are not limited to parameters of functions. You can declare a variable of an rvalue reference type, and assign to it, although this usage is uncommon. Consider the following code, which is illegal in C++:
int& i = 2; // Invalid: reference to a constantint a = 2, b = 3;int& j = a + b; // Invalid: reference to a temporary
Using rvalue references, the following is perfectly legal:
int&& i = 2;int a = 2, b = 3;int&& j = a + b;
Stand-alone rvalue references, as in the preceding example, are rarely used in this way.
Move semantics is implemented by using rvalue references. To add move semantics to a class, you need to implement a move constructor and a move assignment operator. Move constructors and move assignment operators should be marked with the noexcept qualifier to tell the compiler that they don’t throw any exceptions. This is particularly important for compatibility with the Standard Library, as fully compliant implementations of, for example, the Standard Library containers will only move stored objects if, having move semantics implemented, they also guarantee not to throw. Following is the Spreadsheet class definition with a move constructor and move assignment operator. Two helper methods are introduced as well: cleanup(), which is used from the destructor and the move assignment operator, and moveFrom(), which moves the member variables from a source to a destination, and then resets the source object.
class Spreadsheet{public:Spreadsheet(Spreadsheet&& src)noexcept;// Move constructorSpreadsheet& operator=(Spreadsheet&& rhs)noexcept;// Move assign// Remaining code omitted for brevityprivate:void cleanup() noexcept;void moveFrom(Spreadsheet& src) noexcept;// Remaining code omitted for brevity};
The implementations are as follows:
void Spreadsheet::cleanup() noexcept{for (size_t i = 0; i < mWidth; i++) {delete[] mCells[i];}delete[] mCells;mCells = nullptr;mWidth = mHeight = 0;}void Spreadsheet::moveFrom(Spreadsheet& src) noexcept{// Shallow copy of datamWidth = src.mWidth;mHeight = src.mHeight;mCells = src.mCells;// Reset the source object, because ownership has been moved!src.mWidth = 0;src.mHeight = 0;src.mCells = nullptr;}// Move constructorSpreadsheet::Spreadsheet(Spreadsheet&& src) noexcept{moveFrom(src);}// Move assignment operatorSpreadsheet& Spreadsheet::operator=(Spreadsheet&& rhs) noexcept{// check for self-assignmentif (this == &rhs) {return *this;}// free the old memorycleanup();moveFrom(rhs);return *this;}
Both the move constructor and the move assignment operator are moving ownership of the memory for mCells from the source object to the new object. They reset the mCells pointer of the source object to a null pointer to prevent the destructor of the source object from deallocating that memory because now the new object is the owner of that memory.
Obviously, move semantics is useful only when you know that the source object will be destroyed.
Move constructors and move assignment operators can be explicitly deleted or defaulted, just like normal constructors and copy assignment operators, as explained in Chapter 8.
The compiler automatically generates a default move constructor for a class if and only if the class has no user-declared copy constructor, copy assignment operator, move assignment operator, or destructor. A default move assignment operator is generated for a class if and only if the class has no user-declared copy constructor, move constructor, copy assignment operator, or destructor.
The moveFrom() method uses direct assignments of the three data members because they are primitive types. If your object has other objects as data members, then you should move these objects using std::move(). Suppose the Spreadsheet class has an std::string data member called mName. The moveFrom() method is then implemented as follows:
void Spreadsheet::moveFrom(Spreadsheet& src) noexcept{// Move object data membersmName = std::move(src.mName);// Move primitives:// Shallow copy of datamWidth = src.mWidth;mHeight = src.mHeight;mCells = src.mCells;// Reset the source object, because ownership has been moved!src.mWidth = 0;src.mHeight = 0;src.mCells = nullptr;}
The previous implementation of the move constructor and the move assignment operator both use the moveFrom() helper method which moves all data members by performing shallow copies. With this implementation, if you add a new data member to the Spreadsheet class, you have to modify both the swap() function and the moveFrom() method. If you forget to update one of them, you introduce a bug. To avoid such bugs, you can write the move constructor and the move assignment operator in terms of a default constructor and the swap() function.
The first thing to do is to add a default constructor to the Spreadsheet class. It doesn’t make sense for users of the class to use this default constructor, so it’s marked as private:
class Spreadsheet{private:Spreadsheet() = default;// Remaining code omitted for brevity};
Next, we can remove the cleanup() and moveFrom() helper methods. The code from the cleanup() method is moved to the destructor. The move constructor and move assignment operator can then be implemented as follows:
Spreadsheet::Spreadsheet(Spreadsheet&& src) noexcept: Spreadsheet(){swap(*this, src);}Spreadsheet& Spreadsheet::operator=(Spreadsheet&& rhs) noexcept{Spreadsheet temp(std::move(rhs));swap(*this, temp);return *this;}
The move constructor delegates first to the default constructor. Then, the default constructed *this is swapped with the given source object. The move assignment operator first creates a local Spreadsheet instance that is move-constructed with rhs. Then, *this is swapped with this local move-constructed Spreadsheet instance.
Implementing the move constructor and move assignment operator in terms of the default constructor and the swap() function might be a tiny bit less efficient compared to the earlier implementation using moveFrom(). The advantage however is that it requires less code and it is less likely bugs are introduced when data members are added to the class, because you only have to update your swap() implementation to include the new data members.
The Spreadsheet move constructor and move assignment operator can be tested with the following code:
Spreadsheet createObject(){return Spreadsheet(3, 2);}int main(){vector<Spreadsheet> vec;for (int i = 0; i < 2; ++i) {cout << "Iteration " << i << endl;vec.push_back(Spreadsheet(100, 100));cout << endl;}Spreadsheet s(2,3);s = createObject();Spreadsheet s2(5,6);s2 = s;return 0;}
Chapter 1 introduces the vector. A vector grows dynamically in size to accommodate new objects. This is done by allocating a bigger chunk of memory and then copying or moving the objects from the old vector to the new and bigger vector. If the compiler finds a move constructor, the objects are moved instead of copied. Because they are moved, there is no need for any deep copying, making it much more efficient.
When you add output statements to all constructors and assignment operators of the Spreadsheet class implemented with the moveFrom() method, the output of the preceding test program can be as follows. This output and the following discussion are based on the Microsoft Visual C++ 2017 compiler. The C++ standard does not specify the initial capacity of a vector or its growth strategy, so the output can be different on different compilers.
Iteration 0Normal constructor (1)Move constructor (2)Iteration 1Normal constructor (3)Move constructor (4)Move constructor (5)Normal constructor (6)Normal constructor (7)Move assignment operator (8)Normal constructor (9)Copy assignment operator (10)Normal constructor (11)Copy constructor (12)
On the first iteration of the loop, the vector is still empty. Take the following line of code from the loop:
vec.push_back(Spreadsheet(100, 100));With this line, a new Spreadsheet object is created, invoking the normal constructor (1). The vector resizes itself to make space for the new object being pushed in. The created Spreadsheet object is then moved into the vector, invoking the move constructor (2).
On the second iteration of the loop, a second Spreadsheet object is created with the normal constructor (3). At this point, the vector can hold one element, so it’s again resized to make space for a second object. Because the vector is resized, the previously added elements need to be moved from the old vector to the new and bigger vector. This triggers a call to the move constructor for each previously added element. There is one element in the vector, so the move constructor is called one time (4). Finally, the new Spreadsheet object is moved into the vector with its move constructor (5).
Next, a Spreadsheet object s is created using the normal constructor (6). The createObject() function creates a temporary Spreadsheet object with its normal constructor (7), which is then returned from the function, and assigned to the variable s. Because the temporary object returned from createObject() ceases to exist after the assignment, the compiler invokes the move assignment operator (8) instead of the normal copy assignment operator. Another Spreadsheet object is created, s2, using the normal constructor (9). The assignment s2 = s invokes the copy assignment operator (10) because the right-hand side object is not a temporary object, but a named object. This copy assignment operator creates a temporary copy, which triggers a call to the copy constructor, which first delegates to the normal constructor (11 and 12).
If the Spreadsheet class did not implement move semantics, all the calls to the move constructor and move assignment operator would be replaced with calls to the copy constructor and copy assignment operator. In the previous example, the Spreadsheet objects in the loop have 10,000 (100 x 100) elements. The implementation of the Spreadsheet move constructor and move assignment operator doesn’t require any memory allocation, while the copy constructor and copy assignment operator require 101 allocations each. So, using move semantics can increase performance a lot in certain situations.
As another example where move semantics increases performance, take a swap() function that swaps two objects. The following swapCopy() implementation does not use move semantics:
void swapCopy(T& a, T& b){T temp(a);a = b;b = temp;}
First, a is copied to temp, then b is copied to a, and finally temp is copied to b. This implementation will hurt performance if type T is expensive to copy. With move semantics, the implementation can avoid all copying:
void swapMove(T& a, T& b){T temp(std::move(a));a = std::move(b);b = std::move(temp);}
This is exactly how std::swap() from the Standard Library is implemented.
Earlier in this chapter, the rule of five was introduced. All the discussions so far have been to explain how you have to write those five special member functions: destructor, copy and move constructors, and copy and move assignment operators. However, in modern C++, you should adopt the so-called rule of zero.
The rule of zero states that you should design your classes in such a way that they do not require any of those five special member functions. How do you do that? Basically, you should avoid having any old-style dynamically allocated memory. Instead, use modern constructs such as Standard Library containers. For example, use a vector<vector<SpreadsheetCell>> instead of the SpreadsheetCell** data member in the Spreadsheet class. The vector handles memory automatically, so there is no need for any of those five special member functions.
C++ also provides myriad choices for methods. This section explains all the tricky details.
Methods, like data members, sometimes apply to the class as a whole, not to each object. You can write static methods as well as data members. As an example, consider the SpreadsheetCell class from Chapter 8. It has two helper methods: stringToDouble() and doubleToString(). These methods don’t access information about specific objects, so they could be static. Here is the class definition with these methods static:
class SpreadsheetCell{// Omitted for brevityprivate:static std::string doubleToString(double inValue);static double stringToDouble(std::string_view inString);// Omitted for brevity};
The implementations of these two methods are identical to the previous implementations. You don’t repeat the static keyword in front of the method definitions. However, note that static methods are not called on a specific object, so they have no this pointer, and are not executing for a specific object with access to its non-static members. In fact, a static method is just like a regular function. The only difference is that it can access private and protected
static members of the class. It can also access private and protected non-static data members on objects of the same type, if those objects are made visible to the static method, for example, by passing in a reference or pointer to such an object.
You call a static method just like a regular function from within any method of the class. Thus, the implementation of all the methods in SpreadsheetCell can stay the same. Outside of the class, you need to qualify the method name with the class name using the scope resolution operator. Access control applies as usual.
You might want to make stringToDouble() and doubleToString()
public so that other code outside the class can make use of them. If so, you can call them from anywhere like this:
string str = SpreadsheetCell::doubleToString(5.0);A const object is an object whose value cannot be changed. If you have a const, reference to const, or pointer to a const object, the compiler does not let you call any methods on that object unless those methods guarantee that they won’t change any data members. The way you guarantee that a method won’t change data members is to mark the method itself with the const keyword. Here is the SpreadsheetCell class with the methods that don’t change any data members marked as const:
class SpreadsheetCell{public:// Omitted for brevitydouble getValue() const;std::string getString() const;// Omitted for brevity};
The const specification is part of the method prototype and must accompany its definition as well:
double SpreadsheetCell::getValue() const{return mValue;}std::string SpreadsheetCell::getString() const{return doubleToString(mValue);}
Marking a method as const signs a contract with client code guaranteeing that you will not change the internal values of the object within the method. If you try to declare a method const that actually modifies a data member, the compiler will complain. You also cannot declare a static method, such as the doubleToString() and stringToDouble() methods from the previous section, const because it is redundant. Static methods do not have an instance of the class, so it would be impossible for them to change internal values. const works by making it appear inside the method that you have a const reference to each data member. Thus, if you try to change the data member, the compiler will flag an error.
You can call const and non-const methods on a non-const object. However, you can only call const methods on a const object. Here are some examples:
SpreadsheetCell myCell(5);cout << myCell.getValue() << endl; // OKmyCell.setString("6"); // OKconst SpreadsheetCell& myCellConstRef = myCell;cout << myCellConstRef.getValue() << endl; // OKmyCellConstRef.setString("6"); // Compilation Error!
You should get into the habit of declaring const all methods that don’t modify the object so that you can use references to const objects in your program.
Note that const objects can still be destroyed, and their destructor can be called. Nevertheless, destructors are not allowed to be declared const.
Sometimes you write a method that is “logically” const but happens to change a data member of the object. This modification has no effect on any user-visible data, but is technically a change, so the compiler won’t let you declare the method const. For example, suppose that you want to profile your spreadsheet application to obtain information about how often data is being read. A crude way to do this would be to add a counter to the SpreadsheetCell class that counts each call to getValue() or getString(). Unfortunately, that makes those methods non-const in the compiler’s eyes, which is not what you intended. The solution is to make your new counter variable mutable, which tells the compiler that it’s okay to change it in a const method. Here is the new SpreadsheetCell class definition:
class SpreadsheetCell{// Omitted for brevityprivate:double mValue = 0;mutable size_t mNumAccesses = 0;};
Here are the definitions for getValue() and getString():
double SpreadsheetCell::getValue() const{mNumAccesses++;return mValue;}std::string SpreadsheetCell::getString() const{mNumAccesses++;return doubleToString(mValue);}
You’ve already noticed that you can write multiple constructors in a class, all of which have the same name. These constructors differ only in the number and/or types of their parameters. You can do the same thing for any method or function in C++. Specifically, you can overload the function or method name by using it for multiple functions, as long as the number and/or types of the parameters differ. For example, in the SpreadsheetCell class you can rename both setString() and setValue() to set(). The class definition now looks like this:
class SpreadsheetCell{public:// Omitted for brevityvoid set(double inValue);void set(std::string_view inString);// Omitted for brevity};
The implementations of the set() methods stay the same. When you write code to call set(), the compiler determines which instance to call based on the parameter you pass: if you pass a string_view, the compiler calls the string instance; if you pass a double, the compiler calls the double instance. This is called overload resolution.
You might be tempted to do the same thing for getValue() and getString(): rename each of them to get(). However, that does not work. C++ does not allow you to overload a method name based only on the return type of the method because in many cases it would be impossible for the compiler to determine which instance of the method to call. For example, if the return value of the method is not captured anywhere, the compiler has no way to tell which instance of the method you are trying to call.
You can overload a method based on const. That is, you can write two methods with the same name and same parameters, one of which is declared const and one of which is not. The compiler calls the const method if you have a const object, and the non-const method if you have a non-const object.
Often, the implementation of the const version and the non-const version is identical. To prevent code duplication, you can use the Scott Meyer’s const_cast() pattern. For example, the Spreadsheet class has a method called getCellAt() returning a non-const reference to a SpreadsheetCell. You can add a const overload that returns a const reference to a SpreadsheetCell as follows:
class Spreadsheet{public:SpreadsheetCell& getCellAt(size_t x, size_t y);const SpreadsheetCell& getCellAt(size_t x, size_t y) const;// Code omitted for brevity.};
Scott Meyer’s const_cast() pattern says that you should implement the const version as you normally would, and implement the non-const version by forwarding the call to the const version with the appropriate casts. Basically, you cast *this to a const Spreadsheet& using std::as_const() (defined in <utility>), call the const version of getCellAt(), and then remove the const from the result by using a const_cast():
const SpreadsheetCell& Spreadsheet::getCellAt(size_t x, size_t y) const{verifyCoordinate(x, y);return mCells[x][y];}SpreadsheetCell& Spreadsheet::getCellAt(size_t x, size_t y){return const_cast<SpreadsheetCell&>(std::as_const(*this).getCellAt(x, y));}
The std::as_const() function is available since C++17. If your compiler doesn’t support it yet, you can use the following static_cast() instead:
return const_cast<SpreadsheetCell&>(static_cast<const Spreadsheet&>(*this).getCellAt(x, y));
With these two getCellAt() overloads, you can now call getCellAt() on const and non-const Spreadsheet objects:
Spreadsheet sheet1(5, 6);SpreadsheetCell& cell1 = sheet1.getCellAt(1, 1);const Spreadsheet sheet2(5, 6);const SpreadsheetCell& cell2 = sheet2.getCellAt(1, 1);
In this case, the const version of getCellAt() is not doing much, so you don’t win a lot by using the const_cast() pattern. However, imagine that the const version of getCellAt() is doing more work, then forwarding the non-const to the const version avoids duplicating that code.
Overloaded methods can be explicitly deleted, which enables you to disallow calling a method with particular arguments. For example, suppose you have the following class:
class MyClass{public:void foo(int i);};
The foo() method can be called as follows:
MyClass c;c.foo(123);c.foo(1.23);
For the third line, the compiler converts the double value (1.23) to an integer value (1) and then calls foo(int i). The compiler might give you a warning, but it will perform this implicit conversion. You can prevent the compiler from performing this conversion by explicitly deleting a double instance of foo():
class MyClass{public:void foo(int i);void foo(double d) = delete;};
With this change, an attempt to call foo() with a double will be flagged as an error by the compiler, instead of the compiler performing a conversion to an integer.
C++ gives you the ability to recommend that a call to a method (or function) should not actually be implemented in the generated code as a call to a separate block of code. Instead, the compiler should insert the method’s body directly into the code where the method is called. This process is called inlining, and methods that want this behavior are called inline methods. Inlining is safer than using #define macros.
You can specify an inline method by placing the inline keyword in front of its name in the method definition. For example, you might want to make the accessor methods of the SpreadsheetCell class inline, in which case you would define them like this:
inline double SpreadsheetCell::getValue() const{mNumAccesses++;return mValue;}inline std::string SpreadsheetCell::getString() const{mNumAccesses++;return doubleToString(mValue);}
This gives a hint to the compiler to replace calls to getValue() and getString() with the actual method body instead of generating code to make a function call. Note that the inline keyword is just a hint for the compiler. The compiler can ignore it if it thinks it would hurt performance.
There is one caveat: definitions of inline methods (and functions) must be available in every source file in which they are called. That makes sense if you think about it: how can the compiler substitute the method’s body if it can’t see the method definition? Thus, if you write inline methods, you should place the definitions in a header file along with their prototypes.
C++ provides an alternate syntax for declaring inline methods that doesn’t use the inline keyword at all. Instead, you place the method definition directly in the class definition. Here is a SpreadsheetCell class definition with this syntax:
class SpreadsheetCell{public:// Omitted for brevitydouble getValue() const { mNumAccesses++; return mValue; }std::string getString() const{mNumAccesses++;return doubleToString(mValue);}// Omitted for brevity};
Many C++ programmers discover the inline method syntax and employ it without understanding the ramifications of marking a method inline. Marking a method or function as inline only gives a hint to the compiler. Compilers will only inline the simplest methods and functions. If you define an inline method that the compiler doesn’t want to inline, it will silently ignore the hint. Modern compilers will take metrics like code bloat into account before deciding to inline a method or function, and they will not inline anything that is not cost-effective.
A feature similar to method overloading in C++ is default arguments. You can specify defaults for function and method parameters in the prototype. If the user specifies those arguments, the default values are ignored. If the user omits those arguments, the default values are used. There is a limitation, though: you can only provide defaults for a continuous list of parameters starting from the rightmost parameter. Otherwise, the compiler will not be able to match missing arguments to default arguments. Default arguments can be used in functions, methods, and constructors. For example, you can assign default values to the width and height in your Spreadsheet constructor:
class Spreadsheet{public:Spreadsheet(size_t width = 100, size_t height = 100);// Omitted for brevity};
The implementation of the Spreadsheet constructor stays the same. Note that you specify the default arguments only in the method declaration, but not in the definition.
Now you can call the Spreadsheet constructor with zero, one, or two, arguments even though there is only one non-copy constructor:
Spreadsheet s1;Spreadsheet s2(5);Spreadsheet s3(5, 6);
A constructor with defaults for all its parameters can function as a default constructor. That is, you can construct an object of that class without specifying any arguments. If you try to declare both a default constructor and a multi-argument constructor with defaults for all its parameters, the compiler will complain because it won’t know which constructor to call if you don’t specify any arguments.
Note that anything you can do with default arguments you can do with method overloading. You could write three different constructors, each of which takes a different number of parameters. However, default arguments allow you to write just one constructor that can take three different number of arguments. You should use the mechanism with which you are most comfortable.
C++ gives you many choices for data members. In addition to declaring simple data members in your classes, you can create static data members that all objects of the class share, const members, reference members, const reference members, and more. This section explains the intricacies of these different kinds of data members.
Sometimes giving each object of a class a copy of a variable is overkill or won’t work. The data member might be specific to the class, but not appropriate for each object to have its own copy. For example, you might want to give each spreadsheet a unique numerical identifier. You would need a counter that starts at 0 from which each new object could obtain its ID. This spreadsheet counter really belongs to the Spreadsheet class, but it doesn’t make sense for each Spreadsheet object to have a copy of it because you would have to keep all the counters synchronized somehow. C++ provides a solution with static data members. A static data member is a data member associated with a class instead of an object. You can think of static data members as global variables specific to a class. Here is the Spreadsheet class definition, including the new static counter data member:
class Spreadsheet{// Omitted for brevityprivate:static size_t sCounter;};
In addition to listing static class members in the class definition, you will have to allocate space for them in a source file, usually the source file in which you place your class method definitions. You can initialize them at the same time, but note that unlike normal variables and data members, they are initialized to 0 by default. Static pointers are initialized to nullptr. Here is the code to allocate space for, and zero-initialize, the sCounter member:
size_t Spreadsheet::sCounter;Static data members are zero-initialized by default, but if you want, you can explicitly initialize them to 0 as follows:
size_t Spreadsheet::sCounter = 0;This code appears outside of any function or method bodies. It’s almost like declaring a global variable, except that the Spreadsheet:: scope resolution specifies that it’s part of the Spreadsheet class.
Inline VariablesStarting with C++17, you can declare your static data members as inline. The benefit of this is that you do not have to allocate space for them in a source file. Here’s an example:
class Spreadsheet{// Omitted for brevityprivate:static inline size_t sCounter = 0;};
Note the inline keyword. With this class definition, the following line can be removed from the source file:
size_t Spreadsheet::sCounter;You can use static data members as if they were regular data members from within class methods. For example, you might want to create an mId data member for the Spreadsheet class and initialize it from sCounter in the Spreadsheet constructor. Here is the Spreadsheet class definition with an mId member:
class Spreadsheet{public:// Omitted for brevitysize_t getId() const;private:// Omitted for brevitystatic size_t sCounter;size_t mId = 0;};
Here is an implementation of the Spreadsheet constructor that assigns the initial ID:
Spreadsheet::Spreadsheet(size_t width, size_t height): mId(sCounter++), mWidth(width), mHeight(height){mCells = new SpreadsheetCell*[mWidth];for (size_t i = 0; i < mWidth; i++) {mCells[i] = new SpreadsheetCell[mHeight];}}
As you can see, the constructor can access sCounter as if it were a normal member. The copy constructor should also assign a new ID. This is handled automatically because the Spreadsheet copy constructor delegates to the non-copy constructor, which creates the new ID.
You should not copy the ID in the copy assignment operator. Once an ID is assigned to an object, it should never change. Thus, it’s recommended to make mId a const data member. const data members are discussed later in this chapter.
Access control specifiers apply to static data members: sCounter is private, so it cannot be accessed from outside class methods. If sCounter was public, you could access it from outside class methods by specifying that the variable is part of the Spreadsheet class with the :: scope resolution operator:
int c = Spreadsheet::sCounter;However, it’s not recommended to have public data members (const
static members discussed in the next section are an exception). You should grant access through public get/set methods. If you want to grant access to a static data member, you need to implement static get/set methods.
Data members in your class can be declared const, meaning they can’t be changed after they are created and initialized. You should use static
const (or const
static) data members in place of global constants when the constants apply only to the class, also called class constants. static
const data members of integral and enumeration types can be defined and initialized inside the class definition without making them inline variables. For example, you might want to specify a maximum height and width for spreadsheets. If the user tries to construct a spreadsheet with a greater height or width than the maximum, the maximum is used instead. You can make the maximum height and width static
const members of the Spreadsheet class:
class Spreadsheet{public:// Omitted for brevitystatic const size_t kMaxHeight = 100;static const size_t kMaxWidth = 100;};
You can use these new constants in your constructor as follows:
Spreadsheet::Spreadsheet(size_t width, size_t height): mId(sCounter++), mWidth(std::min(width, kMaxWidth))// std::min() requires <algorithm>, mHeight(std::min(height, kMaxHeight)){mCells = new SpreadsheetCell*[mWidth];for (size_t i = 0; i < mWidth; i++) {mCells[i] = new SpreadsheetCell[mHeight];}}
kMaxHeight and kMaxWidth are public, so you can access them from anywhere in your program as if they were global variables, but with slightly different syntax. You must specify that the variable is part of the Spreadsheet class with the :: scope resolution operator:
cout << "Maximum height is: " << Spreadsheet::kMaxHeight << endl;These constants can also be used as default values for the constructor parameters. Remember that you can only give default values for a continuous set of parameters starting with the rightmost parameter:
class Spreadsheet{public:Spreadsheet(size_t width = kMaxWidth, size_t height = kMaxHeight);// Omitted for brevity};
Spreadsheets and SpreadsheetCells are great, but they don’t make a very useful application by themselves. You need code to control the entire spreadsheet program, which you could package into a SpreadsheetApplication class.
The implementation of this class is unimportant at the moment. For now, consider this architecture problem: how can spreadsheets communicate with the application? The application stores a list of spreadsheets, so it can communicate with the spreadsheets. Similarly, each spreadsheet could store a reference to the application object. The Spreadsheet class must then know about the SpreadsheetApplication class, and the SpreadsheetApplication class must know about the Spreadsheet class. This is a circular reference and cannot be solved with normal #includes. The solution is to use a forward declaration in one of the header files. The following is a new Spreadsheet class definition that uses a forward declaration to tell the compiler about the SpreadsheetApplication class. Chapter 11 explains another benefit of forward declarations: they can improve compilation and linking times.
class SpreadsheetApplication;// forward declarationclass Spreadsheet{public:Spreadsheet(size_t width, size_t height,SpreadsheetApplication& theApp);// Code omitted for brevity.private:// Code omitted for brevity.SpreadsheetApplication& mTheApp;};
This definition adds a SpreadsheetApplication reference as a data member. It’s recommended to use a reference in this case instead of a pointer because a Spreadsheet should always refer to a SpreadsheetApplication. This would not be guaranteed with a pointer.
Note that storing a reference to the application is only done to demonstrate the use of references as data members. It’s not recommended to couple the Spreadsheet and SpreadsheetApplication classes together in this way, but instead to use a paradigm such as MVC (Model-View-Controller), introduced in Chapter 4.
The application reference is given to each Spreadsheet in its constructor. A reference cannot exist without referring to something, so mTheApp must be given a value in the ctor-initializer of the constructor:
Spreadsheet::Spreadsheet(size_t width, size_t height,SpreadsheetApplication& theApp): mId(sCounter++), mWidth(std::min(width, kMaxWidth)), mHeight(std::min(height, kMaxHeight)), mTheApp(theApp){// Code omitted for brevity.}
You must also initialize the reference member in the copy constructor. This is handled automatically because the Spreadsheet copy constructor delegates to the non-copy constructor, which initializes the reference member.
Remember that after you have initialized a reference, you cannot change the object to which it refers. It’s not possible to assign to references in the assignment operator. Depending on your use case, this might mean that an assignment operator cannot be provided for your class with reference data members. If that’s the case, the assignment operator is typically marked as deleted.
Your reference members can refer to const objects just as normal references can refer to const objects. For example, you might decide that Spreadsheets should only have a const reference to the application object. You can simply change the class definition to declare mTheApp as a const reference:
class Spreadsheet{public:Spreadsheet(size_t width, size_t height,const SpreadsheetApplication& theApp);// Code omitted for brevity.private:// Code omitted for brevity.const SpreadsheetApplication& mTheApp;};
There is an important difference between using a const reference versus a non-const reference. The const reference SpreadsheetApplication data member can only be used to call const methods on the SpreadsheetApplication object. If you try to call a non-const method through a const reference, you will get a compilation error.
It’s also possible to have a static reference member or a static
const reference member, but you will rarely need something like that.
Class definitions can contain more than just member functions and data members. You can also write nested classes and structs, declare type aliases, or create enumerated types. Anything declared inside a class is in the scope of that class. If it is public, you can access it outside the class by scoping it with the ClassName:: scope resolution syntax.
You can provide a class definition inside another class definition. For example, you might decide that the SpreadsheetCell class is really part of the Spreadsheet class. And since it becomes part of the Spreadsheet class, you might as well rename it to Cell. You could define both of them like this:
class Spreadsheet{public:class Cell{public:Cell() = default;Cell(double initialValue);// Omitted for brevity};Spreadsheet(size_t width, size_t height,const SpreadsheetApplication& theApp);// Remainder of Spreadsheet declarations omitted for brevity};
Now, the Cell class is defined inside the Spreadsheet class, so anywhere you refer to a Cell outside of the Spreadsheet class, you must qualify the name with the Spreadsheet:: scope. This applies even to the method definitions. For example, the double constructor of Cell now looks like this:
Spreadsheet::Cell::Cell(double initialValue): mValue(initialValue){}
You must even use the syntax for return types (but not parameters) of methods in the Spreadsheet class itself:
Spreadsheet::Cell& Spreadsheet::getCellAt(size_t x, size_t y){verifyCoordinate(x, y);return mCells[x][y];}
Fully defining the nested Cell class directly inside the Spreadsheet class makes the definition of the Spreadsheet class a bit bloated. You can alleviate this by only including a forward declaration for Cell in the Spreadsheet class, and then defining the Cell class separately, as follows:
class Spreadsheet{public:class Cell;Spreadsheet(size_t width, size_t height,const SpreadsheetApplication& theApp);// Remainder of Spreadsheet declarations omitted for brevity};class Spreadsheet::Cell{public:Cell() = default;Cell(double initialValue);// Omitted for brevity};
Normal access control applies to nested class definitions. If you declare a private or protected nested class, you can only use it inside the outer class. A nested class has access to all protected and private members of the outer class. The outer class on the other hand can only access public members of the nested class.
If you want to define a number of constants inside a class, you should use an enumerated type instead of a collection of #defines. For example, you can add support for cell coloring to the SpreadsheetCell class as follows:
class SpreadsheetCell{public:// Omitted for brevityenum class Color { Red = 1, Green, Blue, Yellow };void setColor(Color color);Color getColor() const;private:// Omitted for brevityColor mColor = Color::Red;};
The implementation of the setColor() and getColor() methods is straightforward:
void SpreadsheetCell::setColor(Color color) { mColor = color; }SpreadsheetCell::Color SpreadsheetCell::getColor() const { return mColor; }
The new methods can be used as follows:
SpreadsheetCell myCell(5);myCell.setColor(SpreadsheetCell::Color::Blue);auto color = myCell.getColor();
You often want to perform operations on objects, such as adding them, comparing them, or streaming them to or from files. For example, spreadsheets are really only useful when you can perform arithmetic actions on them, such as summing an entire row of cells.
In true object-oriented fashion, SpreadsheetCell objects should be able to add themselves to other SpreadsheetCell objects. Adding a cell to another cell produces a third cell with the result. It doesn’t change either of the original cells. The meaning of addition for SpreadsheetCells is the addition of the values of the cells.
You can declare and define an add() method for your SpreadsheetCell class like this:
class SpreadsheetCell{public:// Omitted for brevitySpreadsheetCell add(const SpreadsheetCell& cell) const;// Omitted for brevity};
This method adds two cells together, returning a new third cell whose value is the sum of the first two. It is declared const and takes a reference to a const
SpreadsheetCell because add() does not change either of the source cells. Here is the implementation:
SpreadsheetCell SpreadsheetCell::add(const SpreadsheetCell& cell) const{return SpreadsheetCell(getValue() + cell.getValue());}
You can use the add() method like this:
SpreadsheetCell myCell(4), anotherCell(5);SpreadsheetCell aThirdCell = myCell.add(anotherCell);
That works, but it’s a bit clumsy. You can do better.
It would be convenient to be able to add two cells with the plus sign the way that you add two ints or two doubles—something like this:
SpreadsheetCell myCell(4), anotherCell(5);SpreadsheetCell aThirdCell = myCell + anotherCell;
C++ allows you to write your own version of the plus sign, called the addition operator, to work correctly with your classes. To do that, you write a method with the name operator+ that looks like this:
class SpreadsheetCell{public:// Omitted for brevitySpreadsheetCell operator+(const SpreadsheetCell& cell) const;// Omitted for brevity};
The definition of the method is identical to the implementation of the add() method:
SpreadsheetCell SpreadsheetCell::operator+(const SpreadsheetCell& cell) const{return SpreadsheetCell(getValue() + cell.getValue());}
Now you can add two cells together using the plus sign as shown previously.
This syntax takes a bit of getting used to. Try not to worry too much about the strange method name operator+—it’s just a name like foo or add. In order to understand the rest of the syntax, it helps to understand what’s really going on. When your C++ compiler parses a program and encounters an operator, such as +, -, =, or <<, it tries to find a function or method with the name operator+, operator-, operator=, or operator<<, respectively, that takes the appropriate parameters. For example, when the compiler sees the following line, it tries to find either a method in the SpreadsheetCell class named operator+ that takes another SpreadsheetCell object, or a global function named operator+ that takes two SpreadsheetCell objects:
SpreadsheetCell aThirdCell = myCell + anotherCell;If the SpreadsheetCell class contains an operator+ method, then the previous line is translated to this:
SpreadsheetCell aThirdCell = myCell.operator+(anotherCell);Note that there’s no requirement that operator+ takes as a parameter an object of the same type as the class for which it’s written. You could write an operator+ for SpreadsheetCells that takes a Spreadsheet to add to the SpreadsheetCell. That wouldn’t make sense to the programmer, but the compiler would allow it.
Note also that you can give operator+ any return value you want. Operator overloading is a form of function overloading, and recall that function overloading does not look at the return type of the function.
Surprisingly, once you’ve written the operator+ shown earlier, not only can you add two cells together, but you can also add a cell to a string_view, a double, or an int!
SpreadsheetCell myCell(4), aThirdCell;string str = "hello";aThirdCell = myCell + string_view(str);aThirdCell = myCell + 5.6;aThirdCell = myCell + 4;
The reason this code works is that the compiler does more to try to find an appropriate operator+ than just look for one with the exact types specified. The compiler also tries to find an appropriate conversion for the types so that an operator+ can be found. Constructors that take the type in question are appropriate converters. In the preceding example, when the compiler sees a SpreadsheetCell trying to add itself to double, it finds the SpreadsheetCell constructor that takes a double and constructs a temporary SpreadsheetCell object to pass to operator+. Similarly, when the compiler sees the line trying to add a SpreadsheetCell to a string_view, it calls the string_view
SpreadsheetCell constructor to create a temporary SpreadsheetCell to pass to operator+.
This implicit conversion behavior is usually convenient. However, in the preceding example, it doesn’t really make sense to add a string_view to a SpreadsheetCell. You can prevent the implicit construction of a SpreadsheetCell from a string_view by marking that constructor with the explicit keyword:
class SpreadsheetCell{public:SpreadsheetCell() = default;SpreadsheetCell(double initialValue);explicit SpreadsheetCell(std::string_view initialValue);// Remainder omitted for brevity};
The explicit keyword goes only in the class definition, and only makes sense when applied to constructors that can be called with one argument, such as one-parameter constructors or multi-parameter constructors with default values for parameters.
The selection of an implicit constructor might be inefficient, because temporary objects must be created. To avoid implicit construction for adding a double, you could write a second operator+ as follows:
SpreadsheetCell SpreadsheetCell::operator+(double rhs) const{return SpreadsheetCell(getValue() + rhs);}
Implicit conversions allow you to use an operator+ method to add your SpreadsheetCell objects to ints and doubles. However, the operator is not commutative, as shown in the following code:
aThirdCell = myCell + 4; // Works fine.aThirdCell = myCell + 5.6; // Works fine.aThirdCell = 4 + myCell; // FAILS TO COMPILE!aThirdCell = 5.6 + myCell; // FAILS TO COMPILE!
The implicit conversion works fine when the SpreadsheetCell object is on the left of the operator, but it doesn’t work when it’s on the right. Addition is supposed to be commutative, so something is wrong here. The problem is that the operator+ method must be called on a SpreadsheetCell object, and that object must be on the left-hand side of the operator+. That’s just the way the C++ language is defined. So, there’s no way you can get this code to work with an operator+ method.
However, you can get it to work if you replace the in-class operator+ method with a global operator+ function that is not tied to any particular object. The function looks like this:
SpreadsheetCell operator+(const SpreadsheetCell& lhs,const SpreadsheetCell& rhs){return SpreadsheetCell(lhs.getValue() + rhs.getValue());}
You need to declare the operator in the header file:
class SpreadsheetCell{//Omitted for brevity};SpreadsheetCell operator+(const SpreadsheetCell& lhs,const SpreadsheetCell& rhs);
Now all four of the addition lines work as you expect:
aThirdCell = myCell + 4; // Works fine.aThirdCell = myCell + 5.6; // Works fine.aThirdCell = 4 + myCell; // Works fine.aThirdCell = 5.6 + myCell; // Works fine.
You might be wondering what happens if you write the following code:
aThirdCell = 4.5 + 5.5;It compiles and runs, but it’s not calling the operator+ you wrote. It does normal double addition of 4.5 and 5.5, which results in the following intermediate statement:
aThirdCell = 10;To make this assignment work, there should be a SpreadsheetCell object on the right-hand side. The compiler will discover a non-explicit user-defined constructor that takes a double, will use this constructor to implicitly convert the double value into a temporary SpreadsheetCell object, and will then call the assignment operator.
Now that you understand how to write operator+, the rest of the basic arithmetic operators are straightforward. Here are the declarations of +, -, *, and /, where you have to replace <op> with +, -, *, and /, resulting in four functions. You can also overload %, but it doesn’t make sense for the double values stored in SpreadsheetCells.
class SpreadsheetCell{// Omitted for brevity};SpreadsheetCell operator<op>(const SpreadsheetCell& lhs,const SpreadsheetCell& rhs);
The implementations of operator- and operator* are very similar to the implementation of operator+, so these are not shown. For operator/, the only tricky aspect is remembering to check for division by zero. This implementation throws an exception if division by zero is detected:
SpreadsheetCell operator/(const SpreadsheetCell& lhs,const SpreadsheetCell& rhs){if (rhs.getValue() == 0) {throw invalid_argument("Divide by zero.");}return SpreadsheetCell(lhs.getValue() / rhs.getValue());}
C++ does not require you to actually implement multiplication in operator*, division in operator/, and so on. You could implement multiplication in operator/, division in operator+, and so forth. However, that would be extremely confusing, and there is no good reason to do so except as a practical joke. Whenever possible, stick to the commonly used operator meanings in your implementations.
In addition to the basic arithmetic operators, C++ provides shorthand operators such as += and -=. You might assume that writing operator+ for your class also provides operator+=. No such luck. You have to overload the shorthand arithmetic operators explicitly. These operators differ from the basic arithmetic operators in that they change the object on the left-hand side of the operator instead of creating a new object. A second, subtler difference is that, like the assignment operator, they generate a result that is a reference to the modified object.
The arithmetic shorthand operators always require an object on the left-hand side, so you should write them as methods, not as global functions. Here are the declarations for the SpreadsheetCell class:
class SpreadsheetCell{public:// Omitted for brevitySpreadsheetCell& operator+=(const SpreadsheetCell& rhs);SpreadsheetCell& operator-=(const SpreadsheetCell& rhs);SpreadsheetCell& operator*=(const SpreadsheetCell& rhs);SpreadsheetCell& operator/=(const SpreadsheetCell& rhs);// Omitted for brevity};
Here is the implementation for operator+=. The others are very similar.
SpreadsheetCell& SpreadsheetCell::operator+=(const SpreadsheetCell& rhs){set(getValue() + rhs.getValue());return *this;}
The shorthand arithmetic operators are combinations of the basic arithmetic and assignment operators. With the previous definitions, you can now write code like this:
SpreadsheetCell myCell(4), aThirdCell(2);aThirdCell -= myCell;aThirdCell += 5.4;
You cannot, however, write code like this (which is a good thing!):
5.4 += aThirdCell;When you have both a normal and a shorthand version of a certain operator, it’s recommended to implement the normal one in terms of the shorthand version to avoid code duplication. For example:
SpreadsheetCell operator+(const SpreadsheetCell& lhs, const SpreadsheetCell& rhs){auto result(lhs);// Local copyresult += rhs;// Forward to op=() versionreturn result;}
The comparison operators, such as >, <, and ==, are another useful set of operators to define for your classes. Like the basic arithmetic operators, they should be global functions so that you can use implicit conversion on both the left-hand side and the right-hand side of the operator. The comparison operators all return a bool. Of course, you can change the return type, but that’s not recommended.
Here are the declarations, where you have to replace <op> with ==, <, >, !=, <=, and >=, resulting in six functions:
class SpreadsheetCell{// Omitted for brevity};bool operator<op>(const SpreadsheetCell& lhs, const SpreadsheetCell& rhs);
Here is the definition of operator==. The others are very similar.
bool operator==(const SpreadsheetCell& lhs, const SpreadsheetCell& rhs){return (lhs.getValue() == rhs.getValue());}
In classes with more data members, it might be painful to compare each data member. However, once you’ve implemented == and <, you can write the rest of the comparison operators in terms of those two. For example, here is a definition of operator>= that uses operator<:
bool operator>=(const SpreadsheetCell& lhs, const SpreadsheetCell& rhs){return !(lhs < rhs);}
You can use these operators to compare SpreadsheetCells to other SpreadsheetCells, and also to doubles and ints:
if (myCell > aThirdCell || myCell < 10) {cout << myCell.getValue() << endl;}
Many people find the syntax of operator overloading tricky and confusing, at least at first. The irony is that it’s supposed to make things simpler. As you’ve discovered, that doesn’t mean simpler for the person writing the class, but simpler for the person using the class. The point is to make your new classes as similar as possible to built-in types such as int and double: it’s easier to add objects using + than to remember whether the method name you should call is add() or sum().
At this point, you might be wondering exactly which operators you can overload. The answer is almost all of them—even some you’ve never heard of. You have actually just scratched the surface: you’ve seen the assignment operator in the section on object life cycles, the basic arithmetic operators, the shorthand arithmetic operators, and the comparison operators. Overloading the stream insertion and extraction operators is also useful. In addition, there are some tricky, but interesting, things you can do with operator overloading that you might not anticipate at first. The Standard Library uses operator overloading extensively. Chapter 15 explains how and when to overload the rest of the operators. Chapters 16 to 20 cover the Standard Library.
Now that you understand all the gory syntax of writing classes in C++, it helps to revisit the design principles from Chapters 5 and 6. Classes are the main unit of abstraction in C++. You should apply the principles of abstraction to your classes to separate the interface from the implementation as much as possible. Specifically, you should make all data members private and provide getter and setter methods for them. This is how the SpreadsheetCell class is implemented. mValue is private; set() sets this value, while getValue() and getString() retrieve the value.
Even with the preceding measures and the best design principles, the C++ language is fundamentally unfriendly to the principle of abstraction. The syntax requires you to combine your public interfaces and private (or protected) data members and methods together in one class definition, thereby exposing some of the internal implementation details of the class to its clients. The downside of this is that if you have to add new non-public methods or data members to your class, all the clients of the class have to be recompiled. This can become a burden in bigger projects.
The good news is that you can make your interfaces a lot cleaner and hide all implementation details, resulting in stable interfaces. The bad news is that it takes a bit of coding. The basic principle is to define two classes for every class you want to write: the interface class and the implementation class. The implementation class is identical to the class you would have written if you were not taking this approach. The interface class presents public methods identical to those of the implementation class, but it only has one data member: a pointer to an implementation class object. This is called the pimpl idiom, private implementation idiom, or bridge pattern. The interface class method implementations simply call the equivalent methods on the implementation class object. The result of this is that no matter how the implementation changes, it has no impact on the public interface class. This reduces the need for recompilation. None of the clients that use the interface class need to be recompiled if the implementation (and only the implementation) changes. Note that this idiom only works if the single data member is a pointer to the implementation class. If it were a by-value data member, the clients would have to be recompiled when the definition of the implementation class changes.
To use this approach with the Spreadsheet class, define a public interface class, Spreadsheet, that looks like this:
#include "SpreadsheetCell.h"#include <memory>// Forward declarationsclass SpreadsheetApplication;class Spreadsheet{public:Spreadsheet(const SpreadsheetApplication& theApp,size_t width = kMaxWidth, size_t height = kMaxHeight);Spreadsheet(const Spreadsheet& src);~Spreadsheet();Spreadsheet& operator=(const Spreadsheet& rhs);void setCellAt(size_t x, size_t y, const SpreadsheetCell& cell);SpreadsheetCell& getCellAt(size_t x, size_t y);size_t getId() const;static const size_t kMaxHeight = 100;static const size_t kMaxWidth = 100;friend void swap(Spreadsheet& first, Spreadsheet& second) noexcept;private:class Impl;std::unique_ptr<Impl> mImpl;};
The implementation class, Impl, is a private nested class, because no one else besides the Spreadsheet class needs to know about the implementation class. The Spreadsheet class now contains only one data member: a pointer to an Impl instance. The public methods are identical to the old Spreadsheet.
The nested Spreadsheet::Impl class has almost the same interface as the original Spreadsheet class. However, because the Impl class is a private nested class of Spreadsheet, you cannot have the following global friend
swap() function that swaps two Spreadsheet::Impl objects:
friend void swap(Spreadsheet::Impl& first, Spreadsheet::Impl& second) noexcept;Instead, a private swap() method is defined for the Spreadsheet::Impl class as follows:
void swap(Impl& other) noexcept;The implementation is straightforward, but you need to remember that this is a nested class, so you need to specify Spreadsheet::Impl::swap() instead of just Impl::swap(). The same holds true for the other members. For details, see the section on nested classes earlier in this chapter. Here is the swap() method:
void Spreadsheet::Impl::swap(Impl& other) noexcept{using std::swap;swap(mWidth, other.mWidth);swap(mHeight, other.mHeight);swap(mCells, other.mCells);}
Now that the Spreadsheet class has a unique_ptr to the implementation class, the Spreadsheet class needs to have a user-declared destructor. Since we don’t need to do anything in this destructor, it can be defaulted in the implementation file as follows:
Spreadsheet::~Spreadsheet() = default;This shows that you can default a special member function not only in the class definition, but also in the implementation file.
The implementations of the Spreadsheet methods, such as setCellAt() and getCellAt(), just pass the request on to the underlying Impl object:
void Spreadsheet::setCellAt(size_t x, size_t y, const SpreadsheetCell& cell){mImpl->setCellAt(x, y, cell);}SpreadsheetCell& Spreadsheet::getCellAt(size_t x, size_t y){return mImpl->getCellAt(x, y);}
The constructors for the Spreadsheet must construct a new Impl to do its work:
Spreadsheet::Spreadsheet(const SpreadsheetApplication& theApp,size_t width, size_t height){mImpl = std::make_unique<Impl>(theApp, width, height);}Spreadsheet::Spreadsheet(const Spreadsheet& src){mImpl = std::make_unique<Impl>(*src.mImpl);}
The copy constructor looks a bit strange because it needs to copy the underlying Impl from the source spreadsheet. The copy constructor takes a reference to an Impl, not a pointer, so you must dereference the mImpl pointer to get to the object itself so the constructor call can take its reference.
The Spreadsheet assignment operator must similarly pass on the assignment to the underlying Impl:
Spreadsheet& Spreadsheet::operator=(const Spreadsheet& rhs){*mImpl = *rhs.mImpl;return *this;}
The first line in the assignment operator looks a little odd. The Spreadsheet assignment operator needs to forward the call to the Impl assignment operator, which only runs when you copy direct objects. By dereferencing the mImpl pointers, you force direct object assignment, which causes the assignment operator of Impl to be called.
The swap() function simply swaps the single data member:
void swap(Spreadsheet& first, Spreadsheet& second) noexcept{using std::swap;swap(first.mImpl, second.mImpl);}
This technique to truly separate interface from implementation is powerful. Although it is a bit clumsy at first, once you get used to it, you will find it natural to work with. However, it’s not common practice in most workplace environments, so you might find some resistance to trying it from your coworkers. The most compelling argument in favor of it is not the aesthetic one of splitting out the interface, but the speedup in build time if the implementation of the class changes. When a class is not using the pimpl idiom, a change to its implementation details might trigger a long build. For example, adding a new data member to a class definition triggers a rebuild of all other source files that include this class definition. With the pimpl idiom, you can modify the implementation class definition as much as you like, as long as the public interface class remains untouched, it won’t trigger a long build.
An alternative to separating the implementation from the interface is to use an abstract interface—that is, an interface with only pure virtual methods—and then have an implementation class that implements that interface. See Chapter 10 for a discussion on abstract interfaces.
This chapter, along with Chapter 8, provided all the tools you need to write solid, well-designed classes, and to use objects effectively.
You discovered that dynamic memory allocation in objects presents new challenges: you need to implement a destructor, copy constructor, copy assignment operator, move constructor, and move assignment operator, which properly copy, move, and free your memory. You learned how to prevent assignment and pass-by-value by explicitly deleting the copy constructor and assignment operator. You discovered the copy-and-swap idiom to implement copy assignment operators, and learned about the rule of zero.
You read more about different kinds of data members, including static, const, const reference, and mutable members. You also learned about static, inline, and const methods, method overloading, and default arguments. This chapter also described nested class definitions, and friend classes, functions, and methods.
You encountered operator overloading, and learned how to overload the arithmetic and comparison operators, both as global friend functions and as class methods.
Finally, you learned how to take abstraction to the extreme by providing separate interface and implementation classes.
Now that you’re fluent in the language of object-oriented programming, it’s time to tackle inheritance, which is covered next in Chapter 10.
In Chapter 5, you learned that an “is-a” relationship recognizes the pattern that real-world objects tend to exist in hierarchies. In programming, that pattern becomes relevant when you need to write a class that builds on, or slightly changes, another class. One way to accomplish this aim is to copy code from one class and paste it into the other. By changing the relevant parts or amending the code, you can achieve the goal of creating a new class that is slightly different from the original. This approach, however, leaves an OOP programmer feeling sullen and highly annoyed for the following reasons:
Not surprisingly, C++ provides built-in support for defining a true is-a relationship. The characteristics of C++ is-a relationships are described in the following section.
When you write a class definition in C++, you can tell the compiler that your class is inheriting from, deriving from, or extending an existing class. By doing so, your class automatically contains the data members and methods of the original class, which is called the parent class or base class or superclass. Extending an existing class gives your class (which is now called a derived class or a subclass) the ability to describe only the ways in which it is different from the parent class.
To extend a class in C++, you specify the class you are extending when you write the class definition. To show the syntax for inheritance, two classes are used, called Base and Derived. Don’t worry—more interesting examples are coming later. To begin, consider the following definition for the Base class:
class Base{public:void someMethod();protected:int mProtectedInt;private:int mPrivateInt;};
If you want to build a new class, called Derived, which inherits from Base, you tell the compiler that Derived derives from Base with the following syntax:
class Derived : public Base{public:void someOtherMethod();};
Derived is a full-fledged class that just happens to share the characteristics of the Base class. Don’t worry about the word public for now—its meaning is explained later in this chapter. Figure 10-1 shows the simple relationship between Derived and Base. You can declare objects of type Derived just like any other object. You could even define a third class that inherits from Derived, forming a chain of classes, as shown in Figure 10-2.
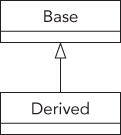
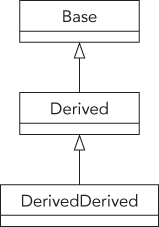
Derived doesn’t have to be the only derived class of Base. Additional classes can also inherit from Base, effectively becoming siblings to Derived, as shown in Figure 10-3.

A Client’s View of Inheritance
To a client, or another part of your code, an object of type Derived is also an object of type Base because Derived inherits from Base. This means that all the public methods and data members of Base and all the public methods and data members of Derived are available.
Code that uses the derived class does not need to know which class in your inheritance chain has defined a method in order to call it. For example, the following code calls two methods of a Derived object even though one of the methods is defined by the Base class:
Derived myDerived;myDerived.someMethod();myDerived.someOtherMethod();
It is important to understand that inheritance works in only one direction. The Derived class has a very clearly defined relationship to the Base class, but the Base class, as written, doesn’t know anything about the Derived class. That means that objects of type Base do not support public methods and data members of Derived because Base is not a Derived.
The following code does not compile because the Base class does not contain a public method called someOtherMethod():
Base myBase;myBase.someOtherMethod(); // Error! Base doesn't have a someOtherMethod().
A pointer or reference to an object can refer to an object of the declared class or any of its derived classes. This tricky subject is explained in detail later in this chapter. The concept to understand now is that a pointer to a Base can actually be pointing to a Derived object. The same is true for a reference. The client can still access only the methods and data members that exist in Base, but through this mechanism, any code that operates on a Base can also operate on a Derived.
For example, the following code compiles and works just fine, even though it initially appears that there is a type mismatch:
Base* base = new Derived(); // Create Derived, store it in Base pointer.However, you cannot call methods from the Derived class through the Base pointer. The following does not work:
base->someOtherMethod();This is flagged as an error by the compiler because, although the object is of type Derived and therefore does have someOtherMethod() defined, the compiler can only think of it as type Base, which does not have someOtherMethod() defined.
To the derived class, nothing much has changed in terms of how it is written or how it behaves. You can still define methods and data members on a derived class just as you would on a regular class. The previous definition of Derived declares a method called someOtherMethod(). Thus, the Derived class augments the Base class by adding an additional method.
A derived class can access public and protected methods and data members declared in its base class as though they were its own, because technically, they are. For example, the implementation of someOtherMethod() on Derived could make use of the data member mProtectedInt, which is declared as part of Base. The following code shows this. Accessing a base class data member or method is no different than if the data member or method were declared as part of the derived class.
void Derived::someOtherMethod(){cout << "I can access base class data member mProtectedInt." << endl;cout << "Its value is " << mProtectedInt << endl;}
When access specifiers (public, private, and protected) were introduced in Chapter 8, the difference between private and protected may have been confusing. Now that you understand derived classes, the difference should be clear. If a class declares methods or data members as protected, derived classes have access to them. If they are declared as private, derived classes do not have access. The following implementation of someOtherMethod() does not compile because the derived class attempts to access a private data member from the base class.
void Derived::someOtherMethod(){cout << "I can access base class data member mProtectedInt." << endl;cout << "Its value is " << mProtectedInt << endl;cout << "The value of mPrivateInt is " << mPrivateInt << endl;// Error!}
The private access specifier gives you control over how a potential derived class could interact with your class. I recommend that you make all your data members private by default. You can provide public getters and setters if you want to allow anyone to access those data members, and you can provide protected getters and setters if you want only derived classes to access them. The reason to make data members private by default is that this provides the highest level of encapsulation. This means that you can change how you represent your data while keeping the public and protected interfaces unchanged. Without giving direct access to data members, you can also easily add checks on the input data in your public and protected setters. Methods should also be private by default. Only make those methods public that are designed to be public, and make methods protected if you want only derived classes to have access to them.
C++ allows you to mark a class as final, which means trying to inherit from it will result in a compilation error. A class can be marked as final with the final keyword right behind the name of the class. For example, the following Base class is marked as final:
class Base final{// Omitted for brevity};
If a class tries to inherit from this Base class, the compiler will complain because Base is marked as final.
class Derived : public Base{// Omitted for brevity};
The main reasons to inherit from a class are to add or replace functionality. The definition of Derived adds functionality to its parent class by providing an additional method, someOtherMethod(). The other method, someMethod(), is inherited from Base and behaves in the derived class exactly as it does in the base class. In many cases, you will want to modify the behavior of a class by replacing, or overriding, a method.
There is one small twist to overriding methods in C++ and it has to do with the keyword virtual. Only methods that are declared as virtual in the base class can be overridden properly by derived classes. The keyword goes at the beginning of a method declaration as shown in the modified version of Base that follows:
class Base{public:virtual void someMethod();protected:int mProtectedInt;private:int mPrivateInt;};
The virtual keyword has a few subtleties. A good rule of thumb is to just make all of your methods virtual. That way, you won’t have to worry about whether or not overriding the method will work. The only drawback is a very tiny performance hit. The subtleties of the virtual keyword are covered in the section “The Truth about virtual.”
The same holds for the Derived class. Its methods should also be marked virtual:
class Derived : public Base{public:virtual void someOtherMethod();};
To override a method, you redeclare it in the derived class definition exactly as it was declared in the base class, and you add the override keyword. In the derived class’s implementation file, you provide the new definition.
For example, the Base class contains a method called someMethod(). The definition of someMethod() is provided in Base.cpp and is shown here:
void Base::someMethod(){cout << "This is Base's version of someMethod()." << endl;}
Note that you do not repeat the virtual keyword in front of the method definition.
If you want to provide a new definition for someMethod() in the Derived class, you must first add it to the class definition for Derived, as follows:
class Derived : public Base{public:virtual void someMethod() override;// Overrides Base's someMethod()virtual void someOtherMethod();};
Adding the override keyword is not mandatory, but it is highly recommended, and discussed in more detail in the section after looking at the client’s view of overridden methods. The new definition of someMethod() is specified along with the rest of Derived’s methods in Derived.cpp.
void Derived::someMethod(){cout << "This is Derived's version of someMethod()." << endl;}
Once a method or destructor is marked as virtual, it is virtual for all derived classes even if the virtual keyword is removed from derived classes. For example, in the following Derived class, someMethod() is still virtual and can still be overridden by classes inheriting from Derived, because it was marked as virtual in the Base class.
class Derived : public Base{public:void someMethod() override;// Overrides Base's someMethod()};
With the preceding changes, other code still calls someMethod() the same way it did before. Just as before, the method could be called on an object of class Base or an object of class Derived. Now, however, the behavior of someMethod() varies based on the class of the object.
For example, the following code works just as it did before, calling Base’s version of someMethod():
Base myBase;myBase.someMethod(); // Calls Base's version of someMethod().
The output of this code is as follows:
This is Base's version of someMethod().If the code declares an object of class Derived, the other version is automatically called:
Derived myDerived;myDerived.someMethod(); // Calls Derived's version of someMethod()
The output this time is as follows:
This is Derived's version of someMethod().Everything else about objects of class Derived remains the same. Other methods that might have been inherited from Base still have the definition provided by Base unless they are explicitly overridden in Derived.
As you learned earlier, a pointer or reference can refer to an object of a class or any of its derived classes. The object itself “knows” the class of which it is actually a member, so the appropriate method is called as long as it was declared virtual. For example, if you have a Base reference that refers to an object that is really a Derived, calling someMethod() actually calls the derived class’s version, as shown next. This aspect of overriding does not work properly if you omit the virtual keyword in the base class.
Derived myDerived;Base& ref = myDerived;ref.someMethod(); // Calls Derived's version of someMethod()
Remember that even though a base class reference or pointer knows that it is actually a derived class, you cannot access derived class methods or members that are not defined in the base class. The following code does not compile because a Base reference does not have a method called someOtherMethod():
Derived myDerived;Base& ref = myDerived;myDerived.someOtherMethod(); // This is fine.ref.someOtherMethod(); // Error
The derived class knowledge characteristic is not true for non-pointer or non-reference objects. You can cast or assign a Derived to a Base because a Derived is a Base. However, the object loses any knowledge of the derived class at that point.
Derived myDerived;Base assignedObject = myDerived; // Assigns a Derived to a Base.assignedObject.someMethod(); // Calls Base's version of someMethod()
One way to remember this seemingly strange behavior is to imagine what the objects look like in memory. Picture a Base object as a box taking up a certain amount of memory. A Derived object is a box that is slightly bigger because it has everything a Base has plus a bit more. When you have a reference or pointer to a Derived, the box doesn’t change—you just have a new way of accessing it. However, when you cast a Derived into a Base, you are throwing out all the “uniqueness” of the Derived class to fit it into a smaller box.
Sometimes, it is possible to accidentally create a new virtual method instead of overriding a method from the base class. Take the following Base and Derived classes where Derived is properly overriding someMethod(), but is not using the override keyword:
class Base{public:virtual void someMethod(double d);};class Derived : public Base{public:virtual void someMethod(double d);};
You can call someMethod() through a reference as follows:
Derived myDerived;Base& ref = myDerived;ref.someMethod(1.1); // Calls Derived's version of someMethod()
This correctly calls the overridden someMethod() from the Derived class. Now, suppose you accidentally use an integer parameter instead of a double while overriding someMethod(), as follows:
class Derived : public Base{public:virtual void someMethod(int i);};
This code does not override someMethod() from Base, but instead creates a new virtual method. If you try to call someMethod() through a reference as in the following code, someMethod() of Base is called instead of the one from Derived!
Derived myDerived;Base& ref = myDerived;ref.someMethod(1.1); // Calls Base's version of someMethod()
This type of problem can happen when you start to modify the Base class but forget to update all derived classes. For example, maybe your first version of the Base class has a method called someMethod() accepting an integer. You then write the Derived class overriding this someMethod() accepting an integer. Later you decide that someMethod() in Base needs a double instead of an integer, so you update someMethod() in the Base class. It might happen that at that time, you forget to update the someMethod() methods in derived classes to also accept a double instead of an integer. By forgetting this, you are now actually creating a new virtual method instead of properly overriding the method.
You can prevent this situation by using the override keyword as follows:
class Derived : public Base{public:virtual void someMethod(int i) override;};
This definition of Derived generates a compilation error, because with the override keyword you are saying that someMethod() is supposed to be overriding a method from a base class, but in the Base class there is no someMethod() accepting an integer, only one accepting a double.
The problem of accidentally creating a new method instead of properly overriding one can also happen when you rename a method in the base class, and forget to rename the overriding methods in derived classes.
If a method is not virtual, you can still attempt to override it, but it will be wrong in subtle ways.
The following code shows a base class and a derived class, each with a single method. The derived class is attempting to override the method in the base class, but it is not declared to be virtual in the base class:
class Base{public:void go() { cout << "go() called on Base" << endl; }};class Derived : public Base{public:void go() { cout << "go() called on Derived" << endl; }};
Attempting to call go() on a Derived object initially appears to work:
Derived myDerived;myDerived.go();
The output of this call is, as expected, “go() called on Derived”. However, because the method is not virtual, it is not actually overridden. Rather, the Derived class creates a new method, also called go(), that is completely unrelated to the Base class’s method called go(). To prove this, simply call the method in the context of a Base pointer or reference:
Derived myDerived;Base& ref = myDerived;ref.go();
You would expect the output to be “go() called on Derived”, but in fact, the output is “go() called on Base”. This is because the ref variable is a Base reference and because the virtual keyword was omitted. When the go() method is called, it simply executes Base’s go() method. Because it is not virtual, there is no need to consider whether a derived class has overridden it.
To understand how method hiding is avoided, you need to know a bit more about what the virtual keyword actually does. When a class is compiled in C++, a binary object is created that contains all methods for the class. In the non-virtual case, the code to transfer control to the appropriate method is hard-coded directly where the method is called based on the compile-time type. This is called static binding, also known as early binding.
If the method is declared virtual, the correct implementation is called through the use of a special area of memory called the vtable, or “virtual table.” Each class that has one or more virtual methods, has a vtable, and every object of such a class contains a pointer to said vtable. This vtable contains pointers to the implementations of the virtual methods. In this way, when a method is called on an object, the pointer is followed into the vtable and the appropriate version of the method is executed based on the actual type of the object at run time. This is called dynamic binding, also known as late binding.
To better understand how vtables make overriding of methods possible, take the following Base and Derived classes as an example:
class Base{public:virtual void func1() {}virtual void func2() {}void nonVirtualFunc() {}};class Derived : public Base{public:virtual void func2() override {}void nonVirtualFunc() {}};
For this example, assume that you have the following two instances:
Base myBase;Derived myDerived;
Figure 10-4 shows a high-level view of how the vtables for both instances look. The myBase object contains a pointer to its vtable. This vtable has two entries, one for func1() and one for func2(). Those entries point to the implementations of Base::func1() and Base::func2().
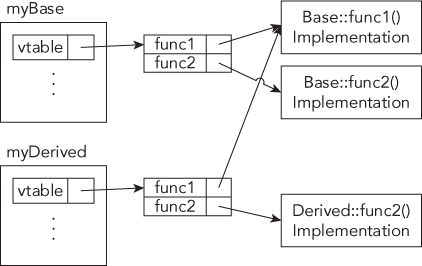
myDerived also contains a pointer to its vtable, which also has two entries, one for func1() and one for func2(). Its func1() entry points to Base::func1() because Derived does not override func1(). On the other hand, its func2() entry points to Derived::func2().
Note that both vtables do not contain any entry for the nonVirtualFunc() method because that method is not virtual.
Because you are advised to make all methods virtual, you might be wondering why the virtual keyword even exists. Can’t the compiler automatically make all methods virtual? The answer is yes, it could. Many people think that the language should just make everything virtual. The Java language effectively does this.
The argument against making everything virtual, and the reason that the keyword was created in the first place, has to do with the overhead of the vtable. To call a virtual method, the program needs to perform an extra operation by dereferencing the pointer to the appropriate code to execute. This is a miniscule performance hit in most cases, but the designers of C++ thought that it was better, at least at the time, to let the programmer decide if the performance hit was necessary. If the method was never going to be overridden, there was no need to make it virtual and take the performance hit. However, with today’s CPUs, the performance hit is measured in fractions of a nanosecond and this will keep getting smaller with future CPUs. In most applications, you will not have a measurable performance difference between using virtual methods and avoiding them, so you should still follow the advice of making all methods, especially destructors, virtual.
Still, in certain cases, the performance overhead might be too costly, and you may need to have an option to avoid the hit. For example, suppose you have a Point class that has a virtual method. If you have another data structure that stores millions or even billions of Points, calling a virtual method on each point creates a significant overhead. In that case, it’s probably wise to avoid any virtual methods in your Point class.
There is also a tiny hit to memory usage for each object. In addition to the implementation of the method, each object also needs a pointer for its vtable, which takes up a tiny amount of space. This is not an issue in the majority of cases. However, sometimes it does matter. Take again the Point class and the container storing billions of Points. In that case, the additional required memory becomes significant.
Even programmers who don’t adopt the guideline of making all methods virtual still adhere to the rule when it comes to destructors. This is because making your destructors non-virtual can easily result in situations in which memory is not freed by object destruction. Only for a class that is marked as final you could make its destructor non-virtual.
For example, if a derived class uses memory that is dynamically allocated in the constructor and deleted in the destructor, it will never be freed if the destructor is never called. Similarly, if your derived class has members that are automatically deleted when an instance of the class is destroyed, such as std::unique_ptrs, then those members will not get deleted either if the destructor is never called.
As the following code shows, it is easy to “trick” the compiler into skipping the call to the destructor if it is non-virtual:
class Base{public:Base() {}~Base() {}};class Derived : public Base{public:Derived(){mString = new char[30];cout << "mString allocated" << endl;}~Derived(){delete[] mString;cout << "mString deallocated" << endl;}private:char* mString;};int main(){Base* ptr = new Derived(); // mString is allocated here.delete ptr; // ~Base is called, but not ~Derived because the destructor// is not virtual!return 0;}
As you can see from the output, the destructor of the Derived object is never called:
mString allocatedActually, the behavior of the delete call in the preceding code is undefined by the standard. A C++ compiler could do whatever it wants in such undefined situations. However, most compilers simply call the destructor of the base class, and not the destructor of the derived class.
Note that since C++11, the generation of a copy constructor and copy assignment operator is deprecated if the class has a user-declared destructor, as mentioned in Chapter 8. If you still need a compiler-generated copy constructor or copy assignment operator in such cases, you can explicitly default them. This is not done in the examples in this chapter in the interest of keeping them concise and to the point.
C++ allows you to mark a method as final, which means that the method cannot be overridden in a derived class. Trying to override a final method results in a compilation error. Take the following Base class:
class Base{public:virtual ~Base() = default;virtual void someMethod() final;};
Trying to override someMethod(), as in the following Derived class, results in a compilation error because someMethod() is marked as final in the Base class:
class Derived : public Base{public:virtual void someMethod() override; // Error};
Now that you are familiar with the basic syntax for inheritance, it’s time to explore one of the main reasons that inheritance is an important feature of the C++ language. Inheritance is a vehicle that allows you to leverage existing code. This section presents an example of inheritance for the purpose of code reuse.
Imagine that you are given the task of writing a program to issue simple weather predictions, working with both Fahrenheit and Celsius. Weather predictions may be a little bit out of your area of expertise as a programmer, so you obtain a third-party class library that was written to make weather predictions based on the current temperature and the current distance between Jupiter and Mars (hey, it’s plausible). This third-party package is distributed as a compiled library to protect the intellectual property of the prediction algorithms, but you do get to see the class definition. The WeatherPrediction class definition is as follows:
// Predicts the weather using proven new-age techniques given the current// temperature and the distance from Jupiter to Mars. If these values are// not provided, a guess is still given but it's only 99% accurate.class WeatherPrediction{public:// Virtual destructorvirtual ~WeatherPrediction();// Sets the current temperature in Fahrenheitvirtual void setCurrentTempFahrenheit(int temp);// Sets the current distance between Jupiter and Marsvirtual void setPositionOfJupiter(int distanceFromMars);// Gets the prediction for tomorrow's temperaturevirtual int getTomorrowTempFahrenheit() const;// Gets the probability of rain tomorrow. 1 means// definite rain. 0 means no chance of rain.virtual double getChanceOfRain() const;// Displays the result to the user in this format:// Result: x.xx chance. Temp. xxvirtual void showResult() const;// Returns a string representation of the temperaturevirtual std::string getTemperature() const;private:int mCurrentTempFahrenheit;int mDistanceFromMars;};
Note that this class marks all methods as virtual, because the class presumes that its methods might be overridden in a derived class.
This class solves most of the problems for your program. However, as is usually the case, it’s not exactly right for your needs. First, all the temperatures are given in Fahrenheit. Your program needs to operate in Celsius as well. Also, the showResult() method might not display the result in a way you require.
When you learned about inheritance in Chapter 5, adding functionality was the first technique described. Fundamentally, your program needs something just like the WeatherPrediction class but with a few extra bells and whistles. Sounds like a good case for inheritance to reuse code. To begin, define a new class, MyWeatherPrediction, that inherits from WeatherPrediction.
#include "WeatherPrediction.h"class MyWeatherPrediction : public WeatherPrediction{};
The preceding class definition compiles just fine. The MyWeatherPrediction class can already be used in place of WeatherPrediction. It provides exactly the same functionality, but nothing new yet. For the first modification, you might want to add knowledge of the Celsius scale to the class. There is a bit of a quandary here because you don’t know what the class is doing internally. If all of the internal calculations are made using Fahrenheit, how do you add support for Celsius? One way is to use the derived class to act as a go-between, interfacing between the user, who can use either scale, and the base class, which only understands Fahrenheit.
The first step in supporting Celsius is to add new methods that allow clients to set the current temperature in Celsius instead of Fahrenheit and to get tomorrow’s prediction in Celsius instead of Fahrenheit. You also need private helper methods that convert between Celsius and Fahrenheit in both directions. These methods can be static because they are the same for all instances of the class.
#include "WeatherPrediction.h"class MyWeatherPrediction : public WeatherPrediction{public:virtual void setCurrentTempCelsius(int temp);virtual int getTomorrowTempCelsius() const;private:static int convertCelsiusToFahrenheit(int celsius);static int convertFahrenheitToCelsius(int fahrenheit);};
The new methods follow the same naming convention as the parent class. Remember that from the point of view of other code, a MyWeatherPrediction object has all of the functionality defined in both MyWeatherPrediction and WeatherPrediction. Adopting the parent class’s naming convention presents a consistent interface.
The implementation of the Celsius/Fahrenheit conversion methods is left as an exercise for the reader—and a fun one at that! The other two methods are more interesting. To set the current temperature in Celsius, you need to convert the temperature first and then present it to the parent class in units that it understands.
void MyWeatherPrediction::setCurrentTempCelsius(int temp){int fahrenheitTemp = convertCelsiusToFahrenheit(temp);setCurrentTempFahrenheit(fahrenheitTemp);}
As you can see, once the temperature is converted, the method calls the existing functionality from the base class. Similarly, the implementation of getTomorrowTempCelsius() uses the parent’s existing functionality to get the temperature in Fahrenheit, but converts the result before returning it.
int MyWeatherPrediction::getTomorrowTempCelsius() const{int fahrenheitTemp = getTomorrowTempFahrenheit();return convertFahrenheitToCelsius(fahrenheitTemp);}
The two new methods effectively reuse the parent class because they “wrap” the existing functionality in a way that provides a new interface for using it.
You can also add new functionality completely unrelated to existing functionality of the parent class. For example, you could add a method that retrieves alternative forecasts from the Internet or a method that suggests an activity based on the predicted weather.
The other major technique for inheritance is replacing existing functionality. The showResult() method in the WeatherPrediction class is in dire need of a facelift. MyWeatherPrediction can override this method to replace the behavior with its own implementation.
The new class definition for MyWeatherPrediction is as follows:
class MyWeatherPrediction : public WeatherPrediction{public:virtual void setCurrentTempCelsius(int temp);virtual int getTomorrowTempCelsius() const;virtual void showResult() const override;private:static int convertCelsiusToFahrenheit(int celsius);static int convertFahrenheitToCelsius(int fahrenheit);};
Here is a possible new user-friendly implementation:
void MyWeatherPrediction::showResult() const{cout << "Tomorrow's temperature will be " <<getTomorrowTempCelsius() << " degrees Celsius (" <<getTomorrowTempFahrenheit() << " degrees Fahrenheit)" << endl;cout << "Chance of rain is " << (getChanceOfRain() * 100) << " percent"<< endl;if (getChanceOfRain() > 0.5) {cout << "Bring an umbrella!" << endl;}}
To clients using this class, it’s as if the old version of showResult() never existed. As long as the object is a MyWeatherPrediction object, the new version is called.
As a result of these changes, MyWeatherPrediction has emerged as a new class with new functionality tailored to a more specific purpose. Yet, it did not require much code because it leveraged its base class’s existing functionality.
When you write a derived class, you need to be aware of the interaction between parent classes and child classes. Issues such as order of creation, constructor chaining, and casting are all potential sources of bugs.
Objects don’t spring to life all at once; they must be constructed along with their parents and any objects that are contained within them. C++ defines the creation order as follows:
static data members of the class are constructed in the order in which they are declared.These rules can apply recursively. If the class has a grandparent, the grandparent is initialized before the parent, and so on. The following code shows this creation order. As a reminder, I generally advise against implementing methods directly in a class definition, as is done in the code that follows. In the interest of readable and concise examples, I have broken my own rule. The proper execution of this code outputs 123.
class Something{public:Something() { cout << "2"; }};class Base{public:Base() { cout << "1"; }};class Derived : public Base{public:Derived() { cout << "3"; }private:Something mDataMember;};int main(){Derived myDerived;return 0;}
When the myDerived object is created, the constructor for Base is called first, outputting the string "1". Next, mDataMember is initialized, calling the Something constructor, which outputs the string "2". Finally, the Derived constructor is called, which outputs "3".
Note that the Base constructor was called automatically. C++ automatically calls the default constructor for the parent class if one exists. If no default constructor exists in the parent class, or if one does exist but you want to use an alternate constructor, you can chain the constructor just as when initializing data members in the constructor initializer. For example, the following code shows a version of Base that lacks a default constructor. The associated version of Derived must explicitly tell the compiler how to call the Base constructor or the code will not compile.
class Base{public:Base(int i);};class Derived : public Base{public:Derived();};Derived::Derived() : Base(7){// Do Derived's other initialization here.}
The Derived constructor passes a fixed value (7) to the Base constructor. Derived could also pass a variable if its constructor required an argument:
Derived::Derived(int i) : Base(i) {}Passing constructor arguments from the derived class to the base class is perfectly fine and quite normal. Passing data members, however, will not work. The code will compile, but remember that data members are not initialized until after the base class is constructed. If you pass a data member as an argument to the parent constructor, it will be uninitialized.
Because destructors cannot take arguments, the language can always automatically call the destructor for parent classes. The order of destruction is conveniently the reverse of the order of construction:
Again, these rules apply recursively. The lowest member of the chain is always destructed first. The following code adds destructors to the previous example. The destructors are all declared virtual! If executed, this code outputs "123321".
class Something{public:Something() { cout << "2"; }virtual ~Something() { cout << "2"; }};class Base{public:Base() { cout << "1"; }virtual ~Base() { cout << "1"; }};class Derived : public Base{public:Derived() { cout << "3"; }virtual ~Derived() { cout << "3"; }private:Something mDataMember;};
If the preceding destructors were not declared virtual, the code would continue to work fine. However, if code ever called delete on a base class pointer that was really pointing to a derived class, the destruction chain would begin in the wrong place. For example, if you remove the virtual keyword from all destructors in the previous code, then a problem arises when a Derived object is accessed as a pointer to a Base and deleted, as shown here:
Base* ptr = new Derived();delete ptr;
The output of this code is a shockingly terse "1231". When the ptr variable is deleted, only the Base destructor is called because the destructor was not declared virtual. As a result, the Derived destructor is not called and the destructors for its data members are not called!
Technically, you could fix the preceding problem by marking only the Base destructor virtual. The “virtualness” is automatically used by any children. However, I advocate explicitly making all destructors virtual so that you never have to worry about it.
When you override a method in a derived class, you are effectively replacing the original as far as other code is concerned. However, that parent version of the method still exists and you may want to make use of it. For example, an overridden method would like to keep doing what the base class implementation does, plus something else. Take a look at the getTemperature() method in the WeatherPrediction class that returns a string representation of the current temperature:
class WeatherPrediction{public:virtual std::string getTemperature() const;// Omitted for brevity};
You can override this method in the MyWeatherPrediction class as follows:
class MyWeatherPrediction : public WeatherPrediction{public:virtual std::string getTemperature() const override;// Omitted for brevity};
Suppose the derived class wants to add °F to the string by first calling the base class getTemperature() method and then adding °F to the string. You might write this as follows:
string MyWeatherPrediction::getTemperature() const{// Note: \u00B0 is the ISO/IEC 10646 representation of the degree symbol.return getTemperature() + "\u00B0F"; // BUG}
However, this does not work because, under the rules of name resolution for C++, it first resolves against the local scope, then the class scope, and as a consequence ends up calling MyWeatherPrediction::getTemperature(). This results in an infinite recursion until you run out of stack space (some compilers detect this error and report it at compile time).
To make this work, you need to use the scope resolution operator as follows:
string MyWeatherPrediction::getTemperature() const{// Note: \u00B0 is the ISO/IEC 10646 representation of the degree symbol.return WeatherPrediction::getTemperature() + "\u00B0F";}
Calling the parent version of the current method is a commonly used pattern in C++. If you have a chain of derived classes, each might want to perform the operation already defined by the base class but add their own additional functionality as well.
As another example, imagine a class hierarchy of book types. A diagram showing such a hierarchy is shown in Figure 10-5.
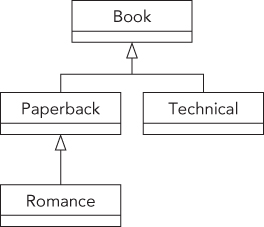
Because each lower class in the hierarchy further specifies the type of book, a method that gets the description of a book really needs to take all levels of the hierarchy into consideration. This can be accomplished by chaining to the parent method. The following code illustrates this pattern:
class Book{public:virtual ~Book() = default;virtual string getDescription() const { return "Book"; }virtual int getHeight() const { return 120; }};class Paperback : public Book{public:virtual string getDescription() const override {return "Paperback " + Book::getDescription();}};class Romance : public Paperback{public:virtual string getDescription() const override {return "Romance " + Paperback::getDescription();}virtual int getHeight() const override {return Paperback::getHeight() / 2; }};class Technical : public Book{public:virtual string getDescription() const override {return "Technical " + Book::getDescription();}};int main(){Romance novel;Book book;cout << novel.getDescription() << endl; // Outputs "Romance Paperback Book"cout << book.getDescription() << endl; // Outputs "Book"cout << novel.getHeight() << endl; // Outputs "60"cout << book.getHeight() << endl; // Outputs "120"return 0;}
The Book base class has two virtual methods: getDescription() and getHeight(). All derived classes override getDescription(), but only the Romance class overrides getHeight() by calling getHeight() on its parent class (Paperback) and dividing the result by two. Paperback does not override getHeight(), but C++ walks up the class hierarchy to find a class that implements getHeight(). In this example, Paperback::getHeight() resolves to Book::getHeight().
As you have already seen, an object can be cast or assigned to its parent class. If the cast or assignment is performed on a plain old object, this results in slicing:
Base myBase = myDerived; // Slicing! Slicing occurs in situations like this because the end result is a Base object, and Base objects lack the additional functionality defined in the Derived class. However, slicing does not occur if a derived class is assigned to a pointer or reference to its base class:
Base& myBase = myDerived; // No slicing!This is generally the correct way to refer to a derived class in terms of its base class, also called upcasting. This is why it’s always a good idea to make your methods and functions take references to classes instead of directly using objects of those classes. By using references, derived classes can be passed in without slicing.
Casting from a base class to one of its derived classes, also called downcasting, is often frowned upon by professional C++ programmers because there is no guarantee that the object really belongs to that derived class, and because downcasting is a sign of bad design. For example, consider the following code:
void presumptuous(Base* base){Derived* myDerived = static_cast<Derived*>(base);// Proceed to access Derived methods on myDerived.}
If the author of presumptuous() also writes code that calls presumptuous(), everything will probably be okay because the author knows that the function expects the argument to be of type Derived*. However, if other programmers call presumptuous(), they might pass in a Base*. There are no compile-time checks that can be done to enforce the type of the argument, and the function blindly assumes that base is actually a pointer to a Derived.
Downcasting is sometimes necessary, and you can use it effectively in controlled circumstances. However, if you are going to downcast, you should use a dynamic_cast(), which uses the object’s built-in knowledge of its type to refuse a cast that doesn’t make sense. This built-in knowledge typically resides in the vtable, which means that dynamic_cast() works only for objects with a vtable, that is, objects with at least one virtual member. If a dynamic_cast() fails on a pointer, the pointer’s value will be nullptr instead of pointing to nonsensical data. If a dynamic_cast() fails on an object reference, an std::bad_cast exception will be thrown. Chapter 11 discusses the different options for casting in more detail.
The previous example could have been written as follows:
void lessPresumptuous(Base* base){Derived* myDerived = dynamic_cast<Derived*>(base);if (myDerived != nullptr) {// Proceed to access Derived methods on myDerived.}}
The use of downcasting is often a sign of a bad design. You should rethink and modify your design so that downcasting can be avoided. For example, the lessPresumptuous() function only really works with Derived objects, so instead of accepting a Base pointer, it should simply accept a Derived pointer. This eliminates the need for any downcasting. If the function should work with different derived classes, all inheriting from Base, then look for a solution that uses polymorphism, which is discussed next.
Now that you understand the relationship between a derived class and its parent, you can use inheritance in its most powerful scenario—polymorphism. Chapter 5 discusses how polymorphism allows you to use objects with a common parent class interchangeably, and to use objects in place of their parents.
Chapters 8 and 9 use a spreadsheet program as an example of an application that lends itself to an object-oriented design. A SpreadsheetCell represents a single element of data. Up to now, that element always stored a single double value. A simplified class definition for SpreadsheetCell follows. Note that a cell can be set either as a double or a string, but it is always stored as a double. The current value of the cell, however, is always returned as a string for this example.
class SpreadsheetCell{public:virtual void set(double inDouble);virtual void set(std::string_view inString);virtual std::string getString() const;private:static std::string doubleToString(double inValue);static double stringToDouble(std::string_view inString);double mValue;};
In a real spreadsheet application, cells can store different things. A cell could store a double, but it might just as well store a piece of text. There could also be a need for additional types of cells, such as a formula cell, or a date cell. How can you support this?
The SpreadsheetCell class is screaming out for a hierarchical makeover. A reasonable approach would be to narrow the scope of the SpreadsheetCell to cover only strings, perhaps renaming it StringSpreadsheetCell in the process. To handle doubles, a second class, DoubleSpreadsheetCell, would inherit from the StringSpreadsheetCell and provide functionality specific to its own format. Figure 10-6 illustrates such a design. This approach models inheritance for reuse because the DoubleSpreadsheetCell would only be deriving from StringSpreadsheetCell to make use of some of its built-in functionality.
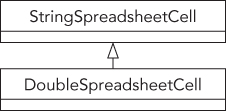
If you were to implement the design shown in Figure 10-6, you might discover that the derived class would override most, if not all, of the functionality of the base class. Because doubles are treated differently from strings in almost all cases, the relationship may not be quite as it was originally understood. Yet, there clearly is a relationship between a cell containing strings and a cell containing doubles. Rather than using the model in Figure 10-6, which implies that somehow a DoubleSpreadsheetCell “is-a” StringSpreadsheetCell, a better design would make these classes peers with a common parent, SpreadsheetCell. Such a design is shown in Figure 10-7.
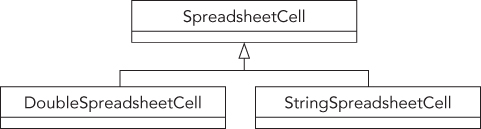
The design in Figure 10-7 shows a polymorphic approach to the SpreadsheetCell hierarchy. Because DoubleSpreadsheetCell and StringSpreadsheetCell both inherit from a common parent, SpreadsheetCell, they are interchangeable in the view of other code. In practical terms, that means the following:
SpreadsheetCell objects can call any method in the interface without even knowing whether the cell is a DoubleSpreadsheetCell or a StringSpreadsheetCell.virtual methods, the appropriate instance of every method in the interface is called depending on the class of the object.Spreadsheet class described in Chapter 9, can contain a collection of multi-typed cells by referring to the parent type.Because all spreadsheet cells are deriving from the SpreadsheetCell base class, it is probably a good idea to write that class first. When designing a base class, you need to consider how the derived classes relate to each other. From this information, you can derive the commonality that will go inside the parent class. For example, string cells and double cells are similar in that they both contain a single piece of data. Because the data is coming from the user and will be displayed back to the user, the value is set as a string and retrieved as a string. These behaviors are the shared functionality that will make up the base class.
The SpreadsheetCell base class is responsible for defining the behaviors that all SpreadsheetCell-derived classes will support. In this example, all cells need to be able to set their value as a string. All cells also need to be able to return their current value as a string. The base class definition declares these methods, as well as an explicitly defaulted virtual destructor, but note that it has no data members:
class SpreadsheetCell{public:virtual ~SpreadsheetCell() = default;virtual void set(std::string_view inString);virtual std::string getString() const;};
When you start writing the .cpp file for this class, you very quickly run into a problem. Considering that the base class of the spreadsheet cell contains neither a double nor a string data member, how can you implement it? More generally, how do you write a parent class that declares the behaviors that are supported by derived classes without actually defining the implementation of those behaviors?
One possible approach is to implement “do nothing” functionality for those behaviors. For example, calling the set() method on the SpreadsheetCell base class will have no effect because the base class has nothing to set. This approach still doesn’t feel right, however. Ideally, there should never be an object that is an instance of the base class. Calling set() should always have an effect because it should always be called on either a DoubleSpreadsheetCell or a StringSpreadsheetCell. A good solution enforces this constraint.
Pure virtual methods are methods that are explicitly undefined in the class definition. By making a method pure virtual, you are telling the compiler that no definition for the method exists in the current class. A class with at least one pure virtual method is said to be an abstract class because no other code will be able to instantiate it. The compiler enforces the fact that if a class contains one or more pure virtual methods, it can never be used to construct an object of that type.
There is a special syntax for designating a pure virtual method. The method declaration is followed by =0. No implementation needs to be written.
class SpreadsheetCell{public:virtual ~SpreadsheetCell() = default;virtual void set(std::string_view inString) = 0;virtual std::string getString() const = 0;};
Now that the base class is an abstract class, it is impossible to create a SpreadsheetCell object. The following code does not compile, and returns an error such as “error C2259: ‘SpreadsheetCell’: cannot instantiate abstract class”:
SpreadsheetCell cell; // Error! Attempts creating abstract class instanceHowever, once the StringSpreadsheetCell class has been implemented, the following code will compile fine because it instantiates a derived class of the abstract base class:
std::unique_ptr<SpreadsheetCell> cell(new StringSpreadsheetCell());Note that you don’t need a SpreadsheetCell.cpp source file, because there is nothing to implement. Most methods are pure virtual, and the destructor is explicitly defaulted in the class definition.
Writing the StringSpreadsheetCell and DoubleSpreadsheetCell classes is just a matter of implementing the functionality that is defined in the parent. Because you want clients to be able to instantiate and work with string cells and double cells, the cells can’t be abstract—they must implement all of the pure virtual methods inherited from their parent. If a derived class does not implement all pure virtual methods from the base class, then the derived class is abstract as well, and clients will not be able to instantiate objects of the derived class.
The first step in writing the class definition of StringSpreadsheetCell is to inherit from SpreadsheetCell.
Next, the inherited pure virtual methods are overridden, this time without being set to zero.
Finally, the string cell adds a private data member, mValue, which stores the actual cell data. This data member is an std::optional, which is defined since C++17 in the <optional> header file. The optional type is a class template, so you have to specify the actual type that you need between angled brackets, as in optional<string>. Class templates are discussed in detail in Chapter 12. By using an optional, it is possible to distinguish whether a value for a cell has been set or not. The optional type is discussed in detail in Chapter 20, but its basic use is rather easy, as the next section shows.
class StringSpreadsheetCell : public SpreadsheetCell{public:virtual void set(std::string_view inString) override;virtual std::string getString() const override;private:std::optional<std::string> mValue;};
The source file for StringSpreadsheetCell contains the implementation of the methods. The set() method is straightforward because the internal representation is already a string. The getString() method has to keep into account that mValue is of type optional, and that it might not have a value. When mValue doesn’t have a value, getString() should return the empty string. This is made easy with the value_or() method of std::optional. By using mValue.value_or(""), the real value is returned if mValue contains an actual value, otherwise the empty string is returned.
void StringSpreadsheetCell::set(string_view inString){mValue = inString;}string StringSpreadsheetCell::getString() const{return mValue.value_or("");}
The double version follows a similar pattern, but with different logic. In addition to the set() method from the base class that takes a string_view, it also provides a new set() method that allows a client to set the value with a double. Two new private
static methods are used to convert between a string and a double, and vice versa. As in StringSpreadsheetCell, it has a data member called mValue, this time of type optional<double>.
class DoubleSpreadsheetCell : public SpreadsheetCell{public:virtual void set(double inDouble);virtual void set(std::string_view inString) override;virtual std::string getString() const override;private:static std::string doubleToString(double inValue);static double stringToDouble(std::string_view inValue);std::optional<double> mValue;};
The set() method that takes a double is straightforward. The string_view version uses the private static method stringToDouble(). The getString() method returns the stored double value as a string, or returns an empty string if no value has been stored. It uses the has_value() method of std::optional to query whether the optional has an actual value or not. If it has a value, the value() method is used to get it.
void DoubleSpreadsheetCell::set(double inDouble){mValue = inDouble;}void DoubleSpreadsheetCell::set(string_view inString){mValue = stringToDouble(inString);}string DoubleSpreadsheetCell::getString() const{return (mValue.has_value() ? doubleToString(mValue.value()) : "");}
You may already see one major advantage of implementing spreadsheet cells in a hierarchy—the code is much simpler. Each object can be self-centered and only deal with its own functionality.
Note that the implementations of doubleToString() and stringToDouble() are omitted because they are the same as in Chapter 8.
Now that the SpreadsheetCell hierarchy is polymorphic, client code can take advantage of the many benefits that polymorphism has to offer. The following test program explores many of these features.
To demonstrate polymorphism, the test program declares a vector of three SpreadsheetCell pointers. Remember that because SpreadsheetCell is an abstract class, you can’t create objects of that type. However, you can still have a pointer or reference to a SpreadsheetCell because it would actually be pointing to one of the derived classes. This vector, because it is a vector of the parent type SpreadsheetCell, allows you to store a heterogeneous mixture of the two derived classes. This means that elements of the vector could be either a StringSpreadsheetCell or a DoubleSpreadsheetCell.
vector<unique_ptr<SpreadsheetCell>> cellArray;The first two elements of the vector are set to point to a new StringSpreadsheetCell, while the third is a new DoubleSpreadsheetCell.
cellArray.push_back(make_unique<StringSpreadsheetCell>());cellArray.push_back(make_unique<StringSpreadsheetCell>());cellArray.push_back(make_unique<DoubleSpreadsheetCell>());
Now that the vector contains multi-typed data, any of the methods declared by the base class can be applied to the objects in the vector. The code just uses SpreadsheetCell pointers—the compiler has no idea at compile time what types the objects actually are. However, because they are inheriting from SpreadsheetCell, they must support the methods of SpreadsheetCell:
cellArray[0]->set("hello");cellArray[1]->set("10");cellArray[2]->set("18");
When the getString() method is called, each object properly returns a string representation of their value. The important, and somewhat amazing, thing to realize is that the different objects do this in different ways. A StringSpreadsheetCell returns its stored value, or an empty string. A DoubleSpreadsheetCell first performs a conversion if it contains a value, otherwise it returns an empty string. As the programmer, you don’t need to know how the object does it—you just need to know that because the object is a SpreadsheetCell, it can perform this behavior.
cout << "Vector values are [" << cellArray[0]->getString() << "," <<cellArray[1]->getString() << "," <<cellArray[2]->getString() << "]" <<endl;
The new implementation of the SpreadsheetCell hierarchy is certainly an improvement from an object-oriented design point of view. Yet, it would probably not suffice as an actual class hierarchy for a real-world spreadsheet program for several reasons.
First, despite the improved design, one feature is still missing: the ability to convert from one cell type to another. By dividing them into two classes, the cell objects become more loosely integrated. To provide the ability to convert from a DoubleSpreadsheetCell to a StringSpreadsheetCell, you could add a converting constructor, also known as a typed constructor. It has a similar appearance as a copy constructor, but instead of a reference to an object of the same class, it takes a reference to an object of a sibling class. Note also that you now have to declare a default constructor, which can be explicitly defaulted, because the compiler stops generating one as soon as you declare any constructor yourself:
class StringSpreadsheetCell : public SpreadsheetCell{public:StringSpreadsheetCell() = default;StringSpreadsheetCell(const DoubleSpreadsheetCell& inDoubleCell);// Omitted for brevity};
This converting constructor can be implemented as follows:
StringSpreadsheetCell::StringSpreadsheetCell(const DoubleSpreadsheetCell& inDoubleCell){mValue = inDoubleCell.getString();}
With a converting constructor, you can easily create a StringSpreadsheetCell given a DoubleSpreadsheetCell. Don’t confuse this with casting pointers or references, however. Casting from one sibling pointer or reference to another does not work, unless you overload the cast operator as described in Chapter 15.
Second, the question of how to implement overloaded operators for cells is an interesting one, and there are several possible solutions. One approach is to implement a version of each operator for every combination of cells. With only two derived classes, this is manageable. There would be an operator+ function to add two double cells, to add two string cells, and to add a double cell to a string cell. Another approach is to decide on a common representation. The preceding implementation already standardizes on a string as a common representation of sorts. A single operator+ function could cover all the cases by taking advantage of this common representation. One possible implementation, which assumes that the result of adding two cells is always a string cell, is as follows:
StringSpreadsheetCell operator+(const StringSpreadsheetCell& lhs,const StringSpreadsheetCell& rhs){StringSpreadsheetCell newCell;newCell.set(lhs.getString() + rhs.getString());return newCell;}
As long as the compiler has a way to turn a particular cell into a StringSpreadsheetCell, the operator will work. Given the previous example of having a StringSpreadsheetCell constructor that takes a DoubleSpreadsheetCell as an argument, the compiler will automatically perform the conversion if it is the only way to get the operator+ to work. That means the following code works, even though operator+ was explicitly written to work on StringSpreadsheetCells:
DoubleSpreadsheetCell myDbl;myDbl.set(8.4);StringSpreadsheetCell result = myDbl + myDbl;
Of course, the result of this addition doesn’t really add the numbers together. It converts the double cells into string cells and concatenates the strings, resulting in a StringSpreadsheetCell with a value of 8.4000008.400000.
If you are still feeling a little unsure about polymorphism, start with the code for this example and try things out. The main() function in the preceding example is a great starting point for experimental code that simply exercises various aspects of the class.
As you read in Chapter 5, multiple inheritance is often perceived as a complicated and unnecessary part of object-oriented programming. I’ll leave the decision of whether or not it is useful up to you and your coworkers. This section explains the mechanics of multiple inheritance in C++.
Defining a class to have multiple parent classes is very simple from a syntactic point of view. All you need to do is list the base classes individually when declaring the class name.
class Baz : public Foo, public Bar{// Etc.};
By listing multiple parents, the Baz object has the following characteristics:
Baz object supports the public methods, and contains the data members of both Foo and Bar.Baz class have access to protected data and methods in both Foo and Bar.Baz object can be upcast to either a Foo or a Bar.Baz object automatically calls the Foo and Bar default constructors, in the order that the classes are listed in the class definition.Baz object automatically calls the destructors for the Foo and Bar classes, in the reverse order that the classes are listed in the class definition.The following example shows a class, DogBird, that has two parent classes—a Dog class and a Bird class, as shown in Figure 10-8. The fact that a dog-bird is a ridiculous example should not be viewed as a statement that multiple inheritance itself is ridiculous. Honestly, I leave that judgment up to you.
class Dog{public:virtual void bark() { cout << "Woof!" << endl; }};class Bird{public:virtual void chirp() { cout << "Chirp!" << endl; }};class DogBird : public Dog, public Bird{};
Using objects of classes with multiple parents is no different from using objects without multiple parents. In fact, the client code doesn’t even have to know that the class has two parents. All that really matters are the properties and behaviors supported by the class. In this case, a DogBird object supports all of the public methods of Dog and Bird.
DogBird myConfusedAnimal;myConfusedAnimal.bark();myConfusedAnimal.chirp();
The output of this program is as follows:
Woof!Chirp!
It’s not difficult to construct a scenario where multiple inheritance would seem to break down. The following examples show some of the edge cases that must be considered.
What if the Dog class and the Bird class both had a method called eat()? Because Dog and Bird are not related in any way, one version of the method does not override the other—they both continue to exist in the DogBird-derived class.
As long as client code never attempts to call the eat() method, that is not a problem. The DogBird class compiles correctly despite having two versions of eat(). However, if client code attempts to call the eat() method on a DogBird, the compiler gives an error indicating that the call to eat() is ambiguous. The compiler does not know which version to call. The following code provokes this ambiguity error:
class Dog{public:virtual void bark() { cout << "Woof!" << endl; }virtual void eat() { cout << "The dog ate." << endl; }};class Bird{public:virtual void chirp() { cout << "Chirp!" << endl; }virtual void eat() { cout << "The bird ate." << endl; }};class DogBird : public Dog, public Bird{};int main(){DogBird myConfusedAnimal;myConfusedAnimal.eat();// Error! Ambiguous call to method eat()return 0;}
The solution to the ambiguity is to either explicitly upcast the object using a dynamic_cast(), essentially hiding the undesired version of the method from the compiler, or to use a disambiguation syntax. For example, the following code shows two ways to invoke the Dog version of eat():
dynamic_cast<Dog&>(myConfusedAnimal).eat(); // Calls Dog::eat()myConfusedAnimal.Dog::eat(); // Calls Dog::eat()
Methods of the derived class itself can also explicitly disambiguate between different methods of the same name by using the same syntax used to access parent methods, that is, the :: scope resolution operator. For example, the DogBird class could prevent ambiguity errors in other code by defining its own eat() method. Inside this method, it would determine which parent version to call:
class DogBird : public Dog, public Bird{public:void eat() override;};void DogBird::eat(){Dog::eat(); // Explicitly call Dog's version of eat()}
Yet another way to prevent the ambiguity error is to use a using statement to explicitly state which version of eat() should be inherited in DogBird. This is done in the following DogBird definition:
class DogBird : public Dog, public Bird{public:using Dog::eat; // Explicitly inherit Dog's version of eat()};
Another way to provoke ambiguity is to inherit from the same class twice. For example, if the Bird class inherits from Dog for some reason, the code for DogBird does not compile because Dog becomes an ambiguous base class:
class Dog {};class Bird : public Dog {};class DogBird : public Bird, public Dog {}; // Error!
Most occurrences of ambiguous base classes are either contrived “what-if” examples, as in the preceding one, or arise from untidy class hierarchies. Figure 10-9 shows a class diagram for the preceding example, indicating the ambiguity.
Ambiguity can also occur with data members. If Dog and Bird both had a data member with the same name, an ambiguity error would occur when client code attempted to access that member.
A more likely scenario is that multiple parents themselves have common parents. For example, perhaps both Bird and Dog are inheriting from an Animal class, as shown in Figure 10-10.

This type of class hierarchy is permitted in C++, though name ambiguity can still occur. For example, if the Animal class has a public method called sleep(), that method cannot be called on a DogBird object because the compiler does not know whether to call the version inherited by Dog or by Bird.
The best way to use these “diamond-shaped” class hierarchies is to make the topmost class an abstract base class with all methods declared as pure virtual. Because the class only declares methods without providing definitions, there are no methods in the base class to call and thus there are no ambiguities at that level.
The following example implements a diamond-shaped class hierarchy in which the Animal abstract base class has a pure virtual eat() method that must be defined by each derived class. The DogBird class still needs to be explicit about which parent’s eat() method it uses, but any ambiguity is caused by Dog and Bird having the same method, not because they inherit from the same class.
class Animal{public:virtual void eat() = 0;};class Dog : public Animal{public:virtual void bark() { cout << "Woof!" << endl; }virtual void eat() override { cout << "The dog ate." << endl; }};class Bird : public Animal{public:virtual void chirp() { cout << "Chirp!" << endl; }virtual void eat() override { cout << "The bird ate." << endl; }};class DogBird : public Dog, public Bird{public:using Dog::eat;};
A more refined mechanism for dealing with the top class in a diamond-shaped hierarchy, virtual base classes, is explained at the end of this chapter.
At this point, you’re probably wondering why programmers would want to tackle multiple inheritance in their code. The most straightforward use case for multiple inheritance is to define a class of objects that is-a something and also is-a something else. As was said in Chapter 5, any real-world objects you find that follow this pattern are unlikely to translate well into code.
One of the most compelling and simple uses of multiple inheritance is for the implementation of mixin classes. Mixin classes are explained in Chapter 5.
Another reason that people sometimes use multiple inheritance is to model a component-based class. Chapter 5 gives the example of an airplane simulator. The Airplane class has an engine, a fuselage, controls, and other components. While the typical implementation of an Airplane class would make each of these components a separate data member, you could use multiple inheritance. The airplane class would inherit from engine, fuselage, and controls, in effect getting the behaviors and properties of all of its components. I recommend you to stay away from this type of code because it confuses a clear has-a relationship with inheritance, which should be used for is-a relationships. The recommended solution is to have an Airplane class that contains data members of type Engine, Fuselage, and Controls.
Extending a class opens up a variety of issues. What characteristics of the class can and cannot be changed? What is non-public inheritance? What are virtual base classes? These questions, and more, are answered in the following sections.
For the most part, the reason you override a method is to change its implementation. Sometimes, however, you may want to change other characteristics of the method.
A good rule of thumb is to override a method with the exact method declaration, or method prototype, that the base class uses. The implementation can change, but the prototype stays the same.
That does not have to be the case, however. In C++, an overriding method can change the return type as long as the original return type is a pointer or reference to a class, and the new return type is a pointer or reference to a descendent class. Such types are called covariant return types. This feature sometimes comes in handy when the base class and derived class work with objects in a parallel hierarchy—that is, another group of classes that is tangential, but related, to the first class hierarchy.
For example, consider a hypothetical cherry orchard simulator. You might have two hierarchies of classes that model different real-world objects but are obviously related. The first is the Cherry chain. The base class, Cherry, has a derived class called BingCherry. Similarly, there is another chain of classes with a base class called CherryTree and a derived class called BingCherryTree. Figure 10-11 shows the two class chains.
Now assume that the CherryTree class has a virtual method called pick() that retrieves a single cherry from the tree:
Cherry* CherryTree::pick(){return new Cherry();}
In the BingCherryTree-derived class, you may want to override this method. Perhaps bing cherries need to be polished when they are picked (bear with me on this one). Because a BingCherry is a Cherry, you could leave the method prototype as is and override the method as in the following example. The BingCherry pointer is automatically cast to a Cherry pointer. Note that this implementation uses a unique_ptr to make sure no memory is leaked when polish() throws an exception.
Cherry* BingCherryTree::pick(){auto theCherry = std::make_unique<BingCherry>();theCherry->polish();return theCherry.release();}
This implementation is perfectly fine and is probably the way that I would write it. However, because you know that the BingCherryTree will always return BingCherry objects, you could indicate this fact to potential users of this class by changing the return type, as shown here:
BingCherry* BingCherryTree::pick(){auto theCherry = std::make_unique<BingCherry>();theCherry->polish();return theCherry.release();}
Here is how you can use the BingCherryTree::pick() method:
BingCherryTree theTree;std::unique_ptr<Cherry> theCherry(theTree.pick());theCherry->printType();
A good way to figure out whether you can change the return type of an overridden method is to consider whether existing code would still work; this is called the Liskov substitution principle (LSP). In the preceding example, changing the return type was fine because any code that assumed that the pick() method would always return a Cherry* would still compile and work correctly. Because a BingCherry is a Cherry, any methods that were called on the result of CherryTree’s version of pick() could still be called on the result of BingCherryTree’s version of pick().
You could not, for example, change the return type to something completely unrelated, such as void*. The following code does not compile:
void* BingCherryTree::pick()// Error!{auto theCherry = std::make_unique<BingCherry>();theCherry->polish();return theCherry.release();}
This generates a compilation error, something like this:
'BingCherryTree::pick': overriding virtual function return type differs and is not covariant from 'CherryTree::pick'.As mentioned before, this example is using raw pointers instead of smart pointers. It does not work for example when using std::unique_ptr as return type. Suppose the CherryTree::pick() method returns a unique_ptr<Cherry> as follows:
std::unique_ptr<Cherry> CherryTree::pick(){return std::make_unique<Cherry>();}
Now, you cannot change the return type for the BingCherryTree::pick() method to unique_ptr<BingCherry>. That is, the following does not compile:
class BingCherryTree : public CherryTree{public:virtual std::unique_ptr<BingCherry> pick() override;};
The reason is that std::unique_ptr is a class template. Class templates are discussed in detail in Chapter 12. Two instantiations of the unique_ptr class template are created, unique_ptr<Cherry> and unique_ptr<BingCherry>. Both these instantiations are completely different types and are in no way related to each other. You cannot change the return type of an overridden method to return a completely different type.
If you use the name of a virtual method from the parent class in the definition of a derived class, but it uses different parameters than the method with that name uses in the parent class, it is not overriding the method of the parent class—it is creating a new method. Returning to the Base and Derived example from earlier in this chapter, you could attempt to override someMethod() in Derived with a new argument list as follows:
class Base{public:virtual void someMethod();};class Derived : public Base{public:virtual void someMethod(int i);// Compiles, but doesn't overridevirtual void someOtherMethod();};
The implementation of this method could be as follows:
void Derived::someMethod(int i){cout << "This is Derived's version of someMethod with argument " << i<< "." << endl;}
The preceding class definition compiles, but you have not overridden someMethod(). Because the arguments are different, you have created a new method that exists only in Derived. If you want a method called someMethod() that takes an int, and you want it to work only on objects of class Derived, the preceding code is correct.
The C++ standard says that the original method is now hidden as far as Derived is concerned. The following sample code does not compile because there is no longer a no-argument version of someMethod().
Derived myDerived;myDerived.someMethod(); // Error! Won't compile because original// method is hidden.
If your intention is to override someMethod() from Base, then you should use the override keyword as recommended before. The compiler then gives an error if you make a mistake in overriding the method.
There is a somewhat obscure technique you can use to have your cake and eat it too. That is, you can use this technique to effectively “override” a method in the derived class with a new prototype but continue to inherit the base class version. This technique uses the using keyword to explicitly include the base class definition of the method within the derived class, as follows:
class Base{public:virtual void someMethod();};class Derived : public Base{public:using Base::someMethod;// Explicitly "inherits" the Base versionvirtual void someMethod(int i);// Adds a new version of someMethodvirtual void someOtherMethod();};
In the previous section, you saw the use of the using keyword to explicitly include the base class definition of a method within a derived class. This works perfectly fine for normal class methods, but it also works for constructors, allowing you to inherit constructors from your base classes. Take a look at the following definition for the Base and Derived classes:
class Base{public:virtual ~Base() = default;Base() = default;Base(std::string_view str);};class Derived : public Base{public:Derived(int i);};
You can construct a Base object only with the provided Base constructors, either the default constructor or the constructor with a string_view parameter. On the other hand, constructing a Derived object can happen only with the provided Derived constructor, which requires a single integer as argument. You cannot construct Derived objects using the constructor accepting a string_view defined in the Base class. Here is an example:
Base base("Hello"); // OK, calls string_view Base ctorDerived derived1(1); // OK, calls integer Derived ctorDerived derived2("Hello"); // Error, Derived does not inherit string_view ctor
If you would like the ability to construct Derived objects using the string_view-based Base constructor, you can explicitly inherit the Base constructors in the Derived class as follows:
class Derived : public Base{public:using Base::Base;Derived(int i);};
The using statement inherits all constructors from the parent class except the default constructor, so now you can construct Derived objects in the following two ways:
Derived derived1(1); // OK, calls integer Derived ctorDerived derived2("Hello"); // OK, calls inherited string_view Base ctor
The Derived class can define a constructor with the same parameter list as one of the inherited constructors in the Base class. In this case, as with any override, the constructor of the Derived class takes precedence over the inherited constructor. In the following example, the Derived class inherits all constructors, except the default constructor, from the Base class with the using statement. However, because the Derived class defines its own constructor with a single parameter of type float, the inherited constructor from the Base class with a single parameter of type float is overridden.
class Base{public:virtual ~Base() = default;Base() = default;Base(std::string_view str);Base(float f);};class Derived : public Base{public:using Base::Base;Derived(float f); // Overrides inherited float Base ctor};
With this definition, objects of Derived can be created as follows:
Derived derived1("Hello"); // OK, calls inherited string_view Base ctorDerived derived2(1.23f); // OK, calls float Derived ctor
A few restrictions apply to inheriting constructors from a base class with the using clause. When you inherit a constructor from a base class, you inherit all of them, except the default constructor. It is not possible to inherit only a subset of the constructors of a base class. A second restriction is related to multiple inheritance. It’s not possible to inherit constructors from one of the base classes if another base class has a constructor with the same parameter list, because this leads to ambiguity. To resolve this, the Derived class needs to explicitly define the conflicting constructors. For example, the following Derived class tries to inherit all constructors from both Base1 and Base2, which results in a compilation error due to ambiguity of the float-based constructors.
class Base1{public:virtual ~Base1() = default;Base1() = default;Base1(float f);};class Base2{public:virtual ~Base2() = default;Base2() = default;Base2(std::string_view str);Base2(float f);};class Derived : public Base1, public Base2{public:using Base1::Base1;using Base2::Base2;Derived(char c);};
The first using clause in Derived inherits all constructors from Base1. This means that Derived gets the following constructor:
Derived(float f); // Inherited from Base1With the second using clause in Derived, you are trying to inherit all constructors from Base2. However, this causes a compilation error because this means that Derived gets a second Derived(float f) constructor. The problem is solved by explicitly declaring conflicting constructors in the Derived class as follows:
class Derived : public Base1, public Base2{public:using Base1::Base1;using Base2::Base2;Derived(char c);Derived(float f);};
The Derived class now explicitly declares a constructor with a single parameter of type float, solving the ambiguity. If you want, this explicitly declared constructor in the Derived class accepting a float parameter can still forward the call to both the Base1 and Base2 constructors in its ctor-initializer as follows:
Derived::Derived(float f) : Base1(f), Base2(f) {}When using inherited constructors, make sure that all member variables are properly initialized. For example, take the following new definitions for Base and Derived. This example does not properly initialize the mInt data member in all cases, which is a serious error.
class Base{public:virtual ~Base() = default;Base(std::string_view str) : mStr(str) {}private:std::string mStr;};class Derived : public Base{public:using Base::Base;Derived(int i) : Base(""), mInt(i) {}private:int mInt;};
You can create a Derived object as follows:
Derived s1(2);This calls the Derived(int i) constructor, which initializes the mInt data member of the Derived class and calls the Base constructor with an empty string to initialize the mStr data member.
Because the Base constructor is inherited in the Derived class, you can also construct a Derived object as follows:
Derived s2("Hello World");This calls the inherited Base constructor in the Derived class. However, this inherited Base constructor only initializes mStr of the Base class, and does not initialize mInt of the Derived class, leaving it in an uninitialized state. This is not recommended!
The solution in this case is to use in-class member initializers, which are discussed in Chapter 8. The following code uses an in-class member initializer to initialize mInt to 0. The Derived(int i) constructor can still change this and initialize mInt to the constructor parameter i.
class Derived : public Base{public:using Base::Base;Derived(int i) : Base(""), mInt(i) {}private:int mInt = 0;};
Several special cases require attention when overriding a method. This section outlines the cases that you are likely to encounter.
In C++, you cannot override a static method. For the most part, that’s all you need to know. There are, however, a few corollaries that you need to understand.
First of all, a method cannot be both static and virtual. This is the first clue that attempting to override a static method will not do what you intend it to do. If you have a static method in your derived class with the same name as a static method in your base class, you actually have two separate methods.
The following code shows two classes that both happen to have static methods called beStatic(). These two methods are in no way related.
class BaseStatic{public:static void beStatic() {cout << "BaseStatic being static." << endl; }};class DerivedStatic : public BaseStatic{public:static void beStatic() {cout << "DerivedStatic keepin' it static." << endl; }};
Because a static method belongs to its class, calling the identically named methods on the two different classes calls their respective methods:
BaseStatic::beStatic();DerivedStatic::beStatic();
This outputs the following:
BaseStatic being static.DerivedStatic keepin' it static.
Everything makes perfect sense as long as the methods are accessed by their class name. The behavior is less clear when objects are involved. In C++, you can call a static method using an object, but because the method is static, it has no this pointer and no access to the object itself, so it is equivalent to calling it by classname::method(). Referring to the previous example classes, you can write code as follows, but the results may be surprising.
DerivedStatic myDerivedStatic;BaseStatic& ref = myDerivedStatic;myDerivedStatic.beStatic();ref.beStatic();
The first call to beStatic() obviously calls the DerivedStatic version because it is explicitly called on an object declared as a DerivedStatic. The second call might not work as you expect. The object is a BaseStatic reference, but it refers to a DerivedStatic object. In this case, BaseStatic’s version of beStatic() is called. The reason is that C++ doesn’t care what the object actually is when calling a static method. It only cares about the compile-time type. In this case, the type is a reference to a BaseStatic.
The output of the previous example is as follows:
DerivedStatic keepin' it static.BaseStatic being static.
When you override a method by specifying a name and a set of parameters, the compiler implicitly hides all other instances of the name in the base class. The idea is that if you have overridden one method of a given name, you might have intended to override all the methods of that name, but simply forgot, and therefore this should be treated as an error. It makes sense if you think about it—why would you want to change some versions of a method and not others? Consider the following Derived class, which overrides a method without overriding its associated overloaded siblings:
class Base{public:virtual ~Base() = default;virtual void overload() { cout << "Base's overload()" << endl; }virtual void overload(int i) {cout << "Base's overload(int i)" << endl; }};class Derived : public Base{public:virtual void overload() override {cout << "Derived's overload()" << endl; }};
If you attempt to call the version of overload() that takes an int parameter on a Derived object, your code will not compile because it was not explicitly overridden.
Derived myDerived;myDerived.overload(2); // Error! No matching method for overload(int).
It is possible, however, to access this version of the method from a Derived object. All you need is a pointer or a reference to a Base object:
Derived myDerived;Base& ref = myDerived;ref.overload(7);
The hiding of unimplemented overloaded methods is only skin deep in C++. Objects that are explicitly declared as instances of the derived class do not make the methods available, but a simple cast to the base class brings them right back.
The using keyword can be employed to save you the trouble of overloading all the versions when you really only want to change one. In the following code, the Derived class definition uses one version of overload() from Base and explicitly overloads the other:
class Base{public:virtual ~Base() = default;virtual void overload() { cout << "Base's overload()" << endl; }virtual void overload(int i) {cout << "Base's overload(int i)" << endl; }};class Derived : public Base{public:using Base::overload;virtual void overload() override {cout << "Derived's overload()" << endl; }};
The using clause has certain risks. Suppose a third overload() method is added to Base, which should have been overridden in Derived. This will now not be detected as an error, because, due to the using clause, the designer of the Derived class has explicitly said, “I am willing to accept all other overloads of this method from the parent class.”
There’s absolutely nothing wrong with overriding a private or protected method. Remember that the access specifier for a method determines who is able to call the method. Just because a derived class can’t call its parent’s private methods doesn’t mean it can’t override them. In fact, overriding a private or protected method is a common pattern in C++. It allows derived classes to define their own “uniqueness” that is referenced in the base class. Note that, for example, Java and C# only allow overriding public and protected methods, not private methods.
For example, the following class is part of a car simulator that estimates the number of miles the car can travel based on its gas mileage and the amount of fuel left:
class MilesEstimator{public:virtual ~MilesEstimator() = default;virtual int getMilesLeft() const;virtual void setGallonsLeft(int gallons);virtual int getGallonsLeft() const;private:int mGallonsLeft;virtual int getMilesPerGallon() const;};
The implementations of the methods are as follows:
int MilesEstimator::getMilesLeft() const{return getMilesPerGallon() * getGallonsLeft();}void MilesEstimator::setGallonsLeft(int gallons){mGallonsLeft = gallons;}int MilesEstimator::getGallonsLeft() const{return mGallonsLeft;}int MilesEstimator::getMilesPerGallon() const{return 20;}
The getMilesLeft() method performs a calculation based on the results of two of its own methods. The following code uses the MilesEstimator to calculate how many miles can be traveled with two gallons of gas:
MilesEstimator myMilesEstimator;myMilesEstimator.setGallonsLeft(2);cout << "Normal estimator can go " << myMilesEstimator.getMilesLeft()<< " more miles." << endl;
The output of this code is as follows:
Normal estimator can go 40 more miles.To make the simulator more interesting, you may want to introduce different types of vehicles, perhaps a more efficient car. The existing MilesEstimator assumes that all cars get 20 miles per gallon, but this value is returned from a separate method specifically so that a derived class can override it. Such a derived class is shown here:
class EfficientCarMilesEstimator : public MilesEstimator{private:virtual int getMilesPerGallon() const override;};
The implementation is as follows:
int EfficientCarMilesEstimator::getMilesPerGallon() const{return 35;}
By overriding this one private method, the new class completely changes the behavior of existing, unmodified, public methods. The getMilesLeft() method in the base class automatically calls the overridden version of the private
getMilesPerGallon() method. An example using the new class is shown here:
EfficientCarMilesEstimator myEstimator;myEstimator.setGallonsLeft(2);cout << "Efficient estimator can go " << myEstimator.getMilesLeft()<< " more miles." << endl;
This time, the output reflects the overridden functionality:
Efficient estimator can go 70 more miles.Derived classes and base classes can each have different default arguments, but the arguments that are used depend on the declared type of the variable, not the underlying object. Following is a simple example of a derived class that provides a different default argument in an overridden method:
class Base{public:virtual ~Base() = default;virtual void go(int i = 2) {cout << "Base's go with i=" << i << endl; }};class Derived : public Base{public:virtual void go(int i = 7) override {cout << "Derived's go with i=" << i << endl; }};
If go() is called on a Derived object, Derived’s version of go() is executed with the default argument of 7. If go() is called on a Base object, Base’s version of go() is called with the default argument of 2. However (and this is the weird part), if go() is called on a Base pointer or Base reference that really points to a Derived object, Derived’s version of go() is called but with Base’s default argument of 2. This behavior is shown in the following example:
Base myBase;Derived myDerived;Base& myBaseReferenceToDerived = myDerived;myBase.go();myDerived.go();myBaseReferenceToDerived.go();
The output of this code is as follows:
Base's go with i=2Derived's go with i=7Derived's go with i=2
The reason for this behavior is that C++ uses the compile-time type of the expression to bind default arguments, not the run-time type. Default arguments are not “inherited” in C++. If the Derived class in this example failed to provide a default argument as its parent did, it would be overloading the go() method with a new non-zero-argument version.
There are two ways you may want to change the access level of a method: you could try to make it more restrictive or less restrictive. Neither case makes much sense in C++, but there are a few legitimate reasons for attempting to do so.
To enforce tighter restrictions on a method (or on a data member for that matter), there are two approaches you can take. One way is to change the access specifier for the entire base class. This approach is described later in this chapter. The other approach is simply to redefine the access in the derived class, as illustrated in the Shy class that follows:
class Gregarious{public:virtual void talk() {cout << "Gregarious says hi!" << endl; }};class Shy : public Gregarious{protected:virtual void talk() override {cout << "Shy reluctantly says hello." << endl; }};
The protected version of talk() in the Shy class properly overrides the Gregarious::talk() method. Any client code that attempts to call talk() on a Shy object gets a compilation error:
Shy myShy;myShy.talk(); // Error! Attempt to access protected method.
However, the method is not fully protected. One only has to obtain a Gregarious reference or pointer to access the method that you thought was protected:
Shy myShy;Gregarious& ref = myShy;ref.talk();
The output of this code is as follows:
Shy reluctantly says hello.This proves that making the method protected in the derived class actually overrode the method (because the derived class version is correctly called), but it also proves that the protected access can’t be fully enforced if the base class makes it public.
It is much easier (and makes more sense) to lessen access restrictions in derived classes. The simplest way is to provide a public method that calls a protected method from the base class, as shown here:
class Secret{protected:virtual void dontTell() { cout << "I'll never tell." << endl; }};class Blabber : public Secret{public:virtual void tell() { dontTell(); }};
A client calling the public tell() method of a Blabber object effectively accesses the protected method of the Secret class. Of course, this doesn’t really change the access level of dontTell(), it just provides a public way of accessing it.
You can also override dontTell() explicitly in Blabber and give it new behavior with public access. This makes a lot more sense than reducing the level of access because it is entirely clear what happens with a reference or pointer to the base class. For example, suppose that Blabber actually makes the dontTell() method public:
class Blabber : public Secret{public:virtual void dontTell() override { cout << "I'll tell all!" << endl; }};
Now you can call dontTell() on a Blabber object:
myBlabber.dontTell(); // Outputs "I'll tell all!"If you don’t want to change the implementation of the overridden method, but only change the access level, then you can use a using clause. For example:
class Blabber : public Secret{public:using Secret::dontTell;};
This also allows you to call dontTell() on a Blabber object, but this time the output will be “I’ll never tell.”:
myBlabber.dontTell(); // Outputs "I'll never tell."In both previous cases, however, the protected method in the base class stays protected because any attempts to call Secret’s dontTell() method through a Secret pointer or reference will not compile.
Blabber myBlabber;Secret& ref = myBlabber;Secret* ptr = &myBlabber;ref.dontTell(); // Error! Attempt to access protected method.ptr->dontTell(); // Error! Attempt to access protected method.
Chapter 9 says that providing a copy constructor and assignment operator is considered a good programming practice when you have dynamically allocated memory in a class. When defining a derived class, you need to be careful about copy constructors and operator=.
If your derived class does not have any special data (pointers, usually) that require a nondefault copy constructor or operator=, you don’t need to have one, regardless of whether or not the base class has one. If your derived class omits the copy constructor or operator=, a default copy constructor or operator= will be provided for the data members specified in the derived class, and the base class copy constructor or operator= will be used for the data members specified in the base class.
On the other hand, if you do specify a copy constructor in the derived class, you need to explicitly chain to the parent copy constructor, as shown in the following code. If you do not do this, the default constructor (not the copy constructor!) will be used for the parent portion of the object.
class Base{public:virtual ~Base() = default;Base() = default;Base(const Base& src);};Base::Base(const Base& src){}class Derived : public Base{public:Derived() = default;Derived(const Derived& src);};Derived::Derived(const Derived& src) : Base(src){}
Similarly, if the derived class overrides operator=, it is almost always necessary to call the parent’s version of operator= as well. The only case where you wouldn’t do this would be if there was some bizarre reason why you only wanted part of the object assigned when an assignment took place. The following code shows how to call the parent’s assignment operator from the derived class:
Derived& Derived::operator=(const Derived& rhs){if (&rhs == this) {return *this;}Base::operator=(rhs); // Calls parent's operator=.// Do necessary assignments for derived class.return *this;}
Relative to other object-oriented languages, C++ is very compile-time oriented. As you learned earlier, overriding methods works because of a level of indirection between a method and its implementation, not because the object has built-in knowledge of its own class.
There are, however, features in C++ that provide a run-time view of an object. These features are commonly grouped together under a feature set called run-time type information, or RTTI. RTTI provides a number of useful features for working with information about an object’s class membership. One such feature is dynamic_cast(), which allows you to safely convert between types within an object-oriented hierarchy; this was discussed earlier in this chapter. Using dynamic_cast() on a class without a vtable, that is, without any virtual methods, causes a compilation error.
A second RTTI feature is the typeid operator, which lets you query an object at run time to find out its type. For the most part, you shouldn’t ever need to use typeid because any code that is conditionally run based on the type of the object would be better handled with virtual methods.
The following code uses typeid to print a message based on the type of the object:
#include <typeinfo>class Animal { public: virtual ~Animal() = default; };class Dog : public Animal {};class Bird : public Animal {};void speak(const Animal& animal){if (typeid(animal) == typeid(Dog)) {cout << "Woof!" << endl;} else if (typeid(animal) == typeid(Bird)) {cout << "Chirp!" << endl;}}
Whenever you see code like this, you should immediately consider reimplementing the functionality as a virtual method. In this case, a better implementation would be to declare a virtual method called speak() in the Animal class. Dog would override the method to print "Woof!" and Bird would override the method to print "Chirp!". This approach better fits object-oriented programming, where functionality related to objects is given to those objects.
One of the primary values of the typeid operator is for logging and debugging purposes. The following code makes use of typeid for logging. The logObject() function takes a “loggable” object as a parameter. The design is such that any object that can be logged inherits from the Loggable class and supports a method called getLogMessage().
class Loggable{public:virtual ~Loggable() = default;virtual std::string getLogMessage() const = 0;};class Foo : public Loggable{public:std::string getLogMessage() const override;};std::string Foo::getLogMessage() const{return "Hello logger.";}void logObject(const Loggable& loggableObject){cout << typeid(loggableObject).name() << ": ";cout << loggableObject.getLogMessage() << endl;}
The logObject() function first writes the name of the object’s class to the output stream, followed by its log message. This way, when you read the log later, you can see which object was responsible for every written line. Here is the output generated by Microsoft Visual C++ 2017 when the logObject() function is called with an instance of Foo:
class Foo: Hello logger.As you can see, the name returned by the typeid operator is “class Foo”. However, this name depends on your compiler. For example, if you compile the same code with GCC, the output is as follows:
3Foo: Hello logger.In all previous examples, parent classes were always listed using the public keyword. You may be wondering if a parent can be private or protected. In fact, it can, though neither is as common as public. If you don’t specify any access specifier for the parent, then it is private inheritance for a class, and public inheritance for a struct.
Declaring the relationship with the parent to be protected means that all public methods and data members from the base class become protected in the context of the derived class. Similarly, specifying private inheritance means that all public and protected methods and data members of the base class become private in the derived class.
There are a handful of reasons why you might want to uniformly degrade the access level of the parent in this way, but most reasons imply flaws in the design of the hierarchy. Some programmers abuse this language feature, often in combination with multiple inheritance, to implement “components” of a class. Instead of making an Airplane class that contains an engine data member and a fuselage data member, they make an Airplane class that is a protected engine and a protected fuselage. In this way, the Airplane doesn’t look like an engine or a fuselage to client code (because everything is protected), but it is able to use all of that functionality internally.
Earlier in this chapter, you learned about ambiguous base classes, a situation that arises when multiple parents each have a parent in common, as shown again in Figure 10-12. The solution that I recommended was to make sure that the shared parent doesn’t have any functionality of its own. That way, its methods can never be called and there is no ambiguity problem.
C++ has another mechanism, called virtual base classes, for addressing this problem if you do want the shared parent to have its own functionality. If the shared parent is a virtual base class, there will not be any ambiguity. The following code adds a sleep() method to the Animal base class and modifies the Dog and Bird classes to inherit from Animal as a virtual base class. Without the virtual keyword, a call to sleep() on a DogBird object would be ambiguous and would generate a compiler error because DogBird would have two subobjects of class Animal, one coming from Dog and one coming from Bird. However, when Animal is inherited virtually, DogBird has only one subobject of class Animal, so there will be no ambiguity with calling sleep().
class Animal{public:virtual void eat() = 0;virtual void sleep() { cout << "zzzzz...." << endl; }};class Dog : public virtual Animal{public:virtual void bark() { cout << "Woof!" << endl; }virtual void eat() override { cout << "The dog ate." << endl; }};class Bird : public virtual Animal{public:virtual void chirp() { cout << "Chirp!" << endl; }virtual void eat() override { cout << "The bird ate." << endl; }};class DogBird : public Dog, public Bird{public:virtual void eat() override { Dog::eat(); }};int main(){DogBird myConfusedAnimal;myConfusedAnimal.sleep(); // Not ambiguous because of virtual base classreturn 0;}
This chapter covered numerous details about inheritance. You learned about its many applications, including code reuse and polymorphism. You also learned about its many abuses, including poorly designed multiple-inheritance schemes. Along the way, you uncovered some cases that require special attention.
Inheritance is a powerful language feature that takes some time to get used to. After you have worked with the examples in this chapter and experimented on your own, I hope that inheritance will become your tool of choice for object-oriented design.
Professional C++ code, including much of the code in this book, uses references extensively. It is helpful to step back and think about what exactly references are, and how they behave.
A reference in C++ is an alias for another variable. All modifications to the reference change the value of the variable to which it refers. You can think of references as implicit pointers that save you the trouble of taking the address of variables and dereferencing the pointer. Alternatively, you can think of references as just another name for the original variable. You can create stand-alone reference variables, use reference data members in classes, accept references as parameters to functions and methods, and return references from functions and methods.
Reference variables must be initialized as soon as they are created, like this:
int x = 3;int& xRef = x;
Subsequent to this assignment, xRef is another name for x. Any use of xRef uses the current value of x. Any assignment to xRef changes the value of x. For example, the following code sets x to 10 through xRef:
xRef = 10;You cannot declare a reference variable outside of a class without initializing it:
int& emptyRef; // DOES NOT COMPILE!You cannot create a reference to an unnamed value, such as an integer literal, unless the reference is to a const value. In the following example, unnamedRef1 does not compile because it is a non-const reference to a constant. That would mean you could change the value of the constant, 5, which doesn’t make sense. unnamedRef2 works because it’s a const reference, so you cannot for example write “unnamedRef2 = 7”.
int& unnamedRef1 = 5; // DOES NOT COMPILEconst int& unnamedRef2 = 5; // Works as expected
The same holds for temporary objects. You cannot have a non-const reference to a temporary object, but a const reference is fine. For example, suppose you have the following function returning an std::string object:
std::string getString() { return "Hello world!"; }You can have a const reference to the result of calling getString(), and that const reference keeps the std::string object alive until the reference goes out of scope:
std::string& string1 = getString(); // DOES NOT COMPILEconst std::string& string2 = getString(); // Works as expected
A reference always refers to the same variable to which it is initialized; references cannot be changed once they are created. This rule leads to some confusing syntax. If you “assign” a variable to a reference when the reference is declared, the reference refers to that variable. However, if you assign a variable to a reference after that, the variable to which the reference refers is changed to the value of the variable being assigned. The reference is not updated to refer to that variable. Here is a code example:
int x = 3, y = 4;int& xRef = x;xRef = y; // Changes value of x to 4. Doesn't make xRef refer to y.
You might try to circumvent this restriction by taking the address of y when you assign it:
xRef = &y; // DOES NOT COMPILE!This code does not compile. The address of y is a pointer, but xRef is declared as a reference to an int, not a reference to a pointer.
Some programmers go even further in their attempts to circumvent the intended semantics of references. What if you assign a reference to a reference? Won’t that make the first reference refer to the variable to which the second reference refers? You might be tempted to try this code:
int x = 3, z = 5;int& xRef = x;int& zRef = z;zRef = xRef; // Assigns values, not references
The final line does not change zRef. Instead, it sets the value of z to 3, because xRef refers to x, which is 3.
You can create references to any type, including pointer types. Here is an example of a reference to a pointer to int:
int* intP;int*& ptrRef = intP;ptrRef = new int;*ptrRef = 5;
The syntax is a little strange: you might not be accustomed to seeing * and & right next to each other. However, the semantics are straightforward: ptrRef is a reference to intP, which is a pointer to int. Modifying ptrRef changes intP. References to pointers are rare, but can occasionally be useful, as discussed in the “Reference Parameters” section later in this chapter.
Note that taking the address of a reference gives the same result as taking the address of the variable to which the reference refers. Here is an example:
int x = 3;int& xRef = x;int* xPtr = &xRef;// Address of a reference is pointer to value*xPtr = 100;
This code sets xPtr to point to x by taking the address of a reference to x. Assigning 100 to *xPtr changes the value of x to 100. Writing a comparison “xPtr == xRef” will not compile because of a type mismatch; xPtr is a pointer to an int while xRef is a reference to an int. The comparisons “xPtr == &xRef” and “xPtr == &x” both compile without errors and are both true.
Finally, note that you cannot declare a reference to a reference, or a pointer to a reference. For example, neither “int& &” nor “int&*” is allowed.
As Chapter 9 explains, data members of classes can be references. A reference cannot exist without referring to some other variable. Thus, you must initialize reference data members in the constructor initializer, not in the body of the constructor. The following is a quick example:
class MyClass{public:MyClass(int& ref) : mRef(ref) {}private:int& mRef;};
Consult Chapter 9 for details.
C++ programmers do not often use stand-alone reference variables or reference data members. The most common use of references is for parameters to functions and methods. Recall that the default parameter-passing semantics are pass-by-value: functions receive copies of their arguments. When those parameters are modified, the original arguments remain unchanged. References allow you to specify pass-by-reference semantics for arguments passed to the function. When you use reference parameters, the function receives references to the function arguments. If those references are modified, the changes are reflected in the original argument variables. For example, here is a simple swap function to swap the values of two ints:
void swap(int& first, int& second){int temp = first;first = second;second = temp;}
You can call it like this:
int x = 5, y = 6;swap(x, y);
When swap() is called with the arguments x and y, the first parameter is initialized to refer to x, and the second parameter is initialized to refer to y. When swap() modifies first and second, x and y are actually changed.
Just as you can’t initialize normal reference variables with constants, you can’t pass constants as arguments to functions that employ pass-by-non-const-reference:
swap(3, 4); // DOES NOT COMPILEA common quandary arises when you have a pointer to something that you need to pass to a function or method that takes a reference. You can “convert” a pointer to a reference in this case by dereferencing the pointer. This action gives you the value to which the pointer points, which the compiler then uses to initialize the reference parameter. For example, you can call swap() like this:
int x = 5, y = 6;int *xp = &x, *yp = &y;swap(*xp, *yp);
Pass-by-reference is required when you want to modify the parameter and see those changes reflected in the variable passed to the function or method. However, you should not limit your use of pass-by-reference to only those cases. Pass-by-reference avoids copying the arguments to the function, providing two additional benefits in some cases:
structs could take a long time to copy. Pass-by-reference passes only a reference to the object or struct into the function.If you want to leverage these benefits, but do not want to allow the original objects to be modified, you should mark the parameters const, giving you pass-by-const-reference. This topic is covered in detail later in this chapter.
These benefits to pass-by-reference imply that you should use pass-by-value only for simple built-in types like int and double for which you don’t need to modify the arguments. Use pass-by-const-reference or pass-by-reference in all other cases.
You can also return a reference from a function or method. The main reason to do so is efficiency. Instead of returning a whole object, return a reference to the object to avoid copying it unnecessarily. Of course, you can only use this technique if the object in question continues to exist following the function termination.
Note that if the type you want to return from your function supports move semantics, discussed in Chapter 9, then returning it by value is almost as efficient as returning a reference.
A second reason to return a reference is if you want to be able to assign to the return value directly as an lvalue (the left-hand side of an assignment statement). Several overloaded operators commonly return references. Chapter 9 shows some examples, and you can read about more applications of this technique in Chapter 15.
An rvalue is anything that is not an lvalue, such as a constant value, or a temporary object or value. Typically, an rvalue is on the right-hand side of an assignment operator. Rvalue references are discussed in detail in Chapter 9, but here is a quick reminder:
// lvalue reference parametervoid handleMessage(std::string& message){cout << "handleMessage with lvalue reference: " << message << endl;}
With only this version of handleMessage(), you cannot call it as follows:
handleMessage("Hello World"); // A literal is not an lvalue.std::string a = "Hello ";std::string b = "World";handleMessage(a + b); // A temporary is not an lvalue.
To allow these kinds of calls, you need a version that accepts an rvalue reference:
// rvalue reference parametervoid handleMessage(std::string&& message){cout << "handleMessage with rvalue reference: " << message << endl;}
See Chapter 9 for more details.
References in C++ could be considered redundant: everything you can do with references, you can accomplish with pointers. For example, you could write the earlier shown swap() function like this:
void swap(int* first, int* second){int temp = *first;*first = *second;*second = temp;}
However, this code is more cluttered than the version with references. References make your programs cleaner and easier to understand. They are also safer than pointers: it’s impossible to have a null reference, and you don’t explicitly dereference references, so you can’t encounter any of the dereferencing errors associated with pointers. These arguments, saying that references are safer, are only valid in the absence of any pointers. For example, take the following function that accepts a reference to an int:
void refcall(int& t) { ++t; }You could declare a pointer and initialize it to point to some random place in memory. Then you could dereference this pointer and pass it as the reference argument to refcall(), as in the following code. This code compiles fine, but it is undefined what will happen when executed. It could for example cause a crash.
int* ptr = (int*)8;refcall(*ptr);
Most of the time, you can use references instead of pointers. References to objects even support polymorphism in the same way as pointers to objects. However, there are some use-cases in which you need to use a pointer. One example is when you need to change the location to which it points. Recall that you cannot change the variable to which references refer. For example, when you dynamically allocate memory, you need to store a pointer to the result in a pointer rather than a reference. A second use-case in which you need to use a pointer is when the pointer is optional, that is, when it can be nullptr. Yet another use-case is if you want to store polymorphic types in a container.
A way to distinguish between appropriate use of pointers and references in parameters and return types is to consider who owns the memory. If the code receiving the variable becomes the owner and thus becomes responsible for releasing the memory associated with an object, it must receive a pointer to the object. Better yet, it should receive a smart pointer, which is the recommended way to transfer ownership. If the code receiving the variable should not free the memory, it should receive a reference.
Consider a function that splits an array of ints into two arrays: one of even numbers and one of odd numbers. The function doesn’t know how many numbers in the source array will be even or odd, so it should dynamically allocate the memory for the destination arrays after examining the source array. It should also return the sizes of the two new arrays. Altogether, there are four items to return: pointers to the two new arrays and the sizes of the two new arrays. Obviously, you must use pass-by-reference. The canonical C way to write the function looks like this:
void separateOddsAndEvens(const int arr[], size_t size, int** odds,size_t* numOdds, int** evens, size_t* numEvens){// Count the number of odds and evens*numOdds = *numEvens = 0;for (size_t i = 0; i < size; ++i) {if (arr[i] % 2 == 1) {++(*numOdds);} else {++(*numEvens);}}// Allocate two new arrays of the appropriate size.*odds = new int[*numOdds];*evens = new int[*numEvens];// Copy the odds and evens to the new arrayssize_t oddsPos = 0, evensPos = 0;for (size_t i = 0; i < size; ++i) {if (arr[i] % 2 == 1) {(*odds)[oddsPos++] = arr[i];} else {(*evens)[evensPos++] = arr[i];}}}
The final four parameters to the function are the “reference” parameters. In order to change the values to which they refer, separateOddsAndEvens() must dereference them, leading to some ugly syntax in the function body. Additionally, when you want to call separateOddsAndEvens(), you must pass the address of two pointers so that the function can change the actual pointers, and the address of two ints so that the function can change the actual ints. Note also that the caller is responsible for deleting the two arrays created by separateOddsAndEvens()!
int unSplit[] = {1, 2, 3, 4, 5, 6, 7, 8, 9, 10};int* oddNums = nullptr;int* evenNums = nullptr;size_t numOdds = 0, numEvens = 0;separateOddsAndEvens(unSplit, std::size(unSplit),&oddNums, &numOdds, &evenNums, &numEvens);// Use the arrays...delete[] oddNums; oddNums = nullptr;delete[] evenNums; evenNums = nullptr;
If this syntax annoys you (which it should), you can write the same function by using references to obtain true pass-by-reference semantics:
void separateOddsAndEvens(const int arr[], size_t size, int*& odds,size_t& numOdds, int*& evens, size_t& numEvens){numOdds = numEvens = 0;for (size_t i = 0; i < size; ++i) {if (arr[i] % 2 == 1) {++numOdds;} else {++numEvens;}}odds = new int[numOdds];evens = new int[numEvens];size_t oddsPos = 0, evensPos = 0;for (size_t i = 0; i < size; ++i) {if (arr[i] % 2 == 1) {odds[oddsPos++] = arr[i];} else {evens[evensPos++] = arr[i];}}}
In this case, the odds and evens parameters are references to int*s. separateOddsAndEvens() can modify the int*s that are used as arguments to the function (through the reference), without any explicit dereferencing. The same logic applies to numOdds and numEvens, which are references to ints. With this version of the function, you no longer need to pass the addresses of the pointers or ints. The reference parameters handle it for you automatically:
separateOddsAndEvens(unSplit, std::size(unSplit),oddNums, numOdds, evenNums, numEvens);
Even though using reference parameters is already much cleaner than using pointers, it is recommended that you avoid dynamically allocated arrays as much as possible. For example, by using the Standard Library vector container, the previous separateOddsAndEvens() function can be rewritten to be much safer, more elegant, and much more readable, because all memory allocation and deallocation happens automatically:
void separateOddsAndEvens(const vector<int>& arr,vector<int>& odds, vector<int>& evens){for (int i : arr) {if (i % 2 == 1) {odds.push_back(i);} else {evens.push_back(i);}}}
This version can be used as follows:
vector<int> vecUnSplit = {1, 2, 3, 4, 5, 6, 7, 8, 9, 10};vector<int> odds, evens;separateOddsAndEvens(vecUnSplit, odds, evens);
Note that you don’t need to deallocate the odds and evens containers; the vector class takes care of this. This version is much easier to use than the versions using pointers or references. The Standard Library vector container is discussed in detail in Chapter 17.
The version using vectors is already much better than the versions using pointers or references, but it’s usually recommended to avoid output parameters as much as possible. If a function needs to return something, you should just return it, instead of using output parameters. Especially since C++11 introduced move semantics, returning something by value from a function is efficient. And now that C++17 has introduced structured bindings, see Chapter 1, it is really convenient to return multiple values from a function.
So, for the separateOddsAndEvens() function, instead of accepting two output vectors, it should simply return a pair of vectors. The std::pair utility class, defined in <utility>, is discussed in detail in Chapter 17, but its use is rather straightforward. Basically, a pair can store two values of two different or equal types. It’s a class template, and it requires two types between the angle brackets to specify the type of both values. A pair can be created using std::make_pair(). Here is the separateOddsAndEvens() function returning a pair of vectors:
pair<vector<int>, vector<int>> separateOddsAndEvens(const vector<int>& arr){vector<int> odds, evens;for (int i : arr) {if (i % 2 == 1) {odds.push_back(i);} else {evens.push_back(i);}}return make_pair(odds, evens);}
By using a structured binding, the code to call separateOddsAndEvens() becomes very compact, yet very easy to read and understand:
vector<int> vecUnSplit = {1, 2, 3, 4, 5, 6, 7, 8, 9, 10};auto[odds, evens] = separateOddsAndEvens(vecUnSplit);
Two keywords in C++ appear to cause more confusion than any others: const and static. Both of these keywords have several different meanings, and each of their uses presents subtleties that are important to understand.
The keyword const is short for “constant” and specifies that something remains unchanged. The compiler enforces this requirement by marking any attempt to change it as an error. Furthermore, when optimizations are enabled, the compiler can take advantage of this knowledge to produce better code. The keyword has two related roles. It can mark variables or parameters, and it can mark methods. This section provides a definitive discussion of these two meanings.
You can use const to “protect” variables by specifying that they cannot be modified. One important use is as a replacement for #define to define constants. This use of const is its most straightforward application. For example, you could declare the constant PI like this:
const double PI = 3.141592653589793238462;You can mark any variable const, including global variables and class data members.
You can also use const to specify that parameters to functions or methods should remain unchanged. For example, the following function accepts a const parameter. In the body of the function, you cannot modify the param integer. If you do try to modify it, the compiler will generate an error.
void func(const int param){// Not allowed to change param...}
The following subsections discuss two special kinds of const variables or parameters in more detail: const pointers and const references.
When a variable contains one or more levels of indirection via a pointer, applying const becomes trickier. Consider the following lines of code:
int* ip;ip = new int[10];ip[4] = 5;
Suppose that you decide to apply const to ip. Set aside your doubts about the usefulness of doing so for a moment, and consider what it means. Do you want to prevent the ip variable itself from being changed, or do you want to prevent the values to which it points from being changed? That is, do you want to prevent the second line or the third line?
In order to prevent the pointed-to values from being modified (as in the third line), you can add the keyword const to the declaration of ip like this:
const int* ip;ip = new int[10];ip[4] = 5;// DOES NOT COMPILE!
Now you cannot change the values to which ip points.
An alternative but semantically equivalent way to write this is as follows:
int const* ip;ip = new int[10];ip[4] = 5;// DOES NOT COMPILE!
Putting the const before or after the int makes no difference in its functionality.
If you instead want to mark ip itself const (not the values to which it points), you need to write this:
int* const ip = nullptr;ip = new int[10];// DOES NOT COMPILE!ip[4] = 5;// Error: dereferencing a null pointer
Now that ip itself cannot be changed, the compiler requires you to initialize it when you declare it, either with nullptr as in the preceding code or with newly allocated memory as follows:
int* const ip = new int[10];ip[4] = 5;
You can also mark both the pointer and the values to which it points const like this:
int const* const ip = nullptr;Here is an alternative but equivalent syntax:
const int* const ip = nullptr;Although this syntax might seem confusing, there is actually a very simple rule: the const keyword applies to whatever is directly to its left. Consider this line again:
int const* const ip = nullptr;From left to right, the first const is directly to the right of the word int. Thus, it applies to the int to which ip points. Therefore, it specifies that you cannot change the values to which ip points. The second const is directly to the right of the *. Thus, it applies to the pointer to the int, which is the ip variable. Therefore, it specifies that you cannot change ip (the pointer) itself.
The reason this rule becomes confusing is an exception. That is, the first const can go before the variable like this:
const int* const ip = nullptr;This “exceptional” syntax is used much more commonly than the other syntax.
You can extend this rule to any number of levels of indirection, as in this example:
const int * const * const * const ip = nullptr;const applied to references is usually simpler than const applied to pointers for two reasons. First, references are const by default, in that you can’t change to what they refer. So, there is no need to mark them const explicitly. Second, you can’t create a reference to a reference, so there is usually only one level of indirection with references. The only way to get multiple levels of indirection is to create a reference to a pointer.
Thus, when C++ programmers refer to a “const reference,” they mean something like this:
int z;const int& zRef = z;zRef = 4; // DOES NOT COMPILE
By applying const to the int&, you prevent assignment to zRef, as shown. Similar to pointers, const int& zRef is equivalent to int const& zRef. Note, however, that marking zRef
const has no effect on z. You can still modify the value of z by changing it directly instead of through the reference.
const references are used most commonly as parameters, where they are quite useful. If you want to pass something by reference for efficiency, but don’t want it to be modifiable, make it a const reference, as in this example:
void doSomething(const BigClass& arg){// Implementation here}
Chapter 9 explains that you can mark a class method const, which prevents the method from modifying any non-mutable data members of the class. Consult Chapter 9 for an example.
C++ always had the notion of constant expressions, and in some circumstances constant expressions are required. For example, when defining an array, the size of the array needs to be a constant expression. Because of this restriction, the following piece of code is not valid in C++:
const int getArraySize() { return 32; }int main(){int myArray[getArraySize()]; // Invalid in C++return 0;}
Using the constexpr keyword, the getArraySize() function can be redefined to make it a constant expression. Constant expressions are evaluated at compile time!
constexpr int getArraySize() { return 32; }int main(){int myArray[getArraySize()]; // OKreturn 0;}
You can even do something like this:
int myArray[getArraySize() + 1]; // OKDeclaring a function as constexpr imposes quite a lot of restrictions on what the function can do because the compiler has to be able to evaluate the function at compile time, and the function is not allowed to have any side effects. Here are a couple of restrictions, although this is not an exhaustive list:
goto statements, try catch blocks, uninitialized variables, or variable definitions that are not literal types,1 and shall not throw any exceptions. It is allowed to call other constexpr functions.constexpr function is a member of a class, the function cannot be virtual.constexpr function cannot be called until it’s defined in the translation unit because the compiler needs to know the complete definition.dynamic_cast() and reinterpret_cast() are not allowed.new and delete expressions are not allowed.By defining a constexpr constructor, you can create constant expression variables of user-defined types. A constexpr constructor also has a lot of restrictions. Here are some of them:
constexpr function.For example, the following Rect class defines a constexpr constructor satisfying the previous requirements. It also defines a constexpr getArea() method that is performing some calculation.
class Rect{public:constexpr Rect(size_t width, size_t height): mWidth(width), mHeight(height) {}constexpr size_t getArea() const { return mWidth * mHeight; }private:size_t mWidth, mHeight;};
Using this class to declare a constexpr object is straightforward:
constexpr Rect r(8, 2);int myArray[r.getArea()]; // OK
There are several uses of the keyword static in C++, all seemingly unrelated. Part of the motivation for “overloading” the keyword was attempting to avoid having to introduce new keywords into the language.
You can declare static data members and methods of classes. static data members, unlike non-static data members, are not part of each object. Instead, there is only one copy of the data member, which exists outside any objects of that class.
static methods are similarly at the class level instead of the object level. A static method does not execute in the context of a specific object.
Chapter 9 provides examples of both static data members and methods.
Before covering the use of the static keyword for linkage, you need to understand the concept of linkage in C++. C++ source files are each compiled independently, and the resulting object files are linked together. Each name in a C++ source file, including functions and global variables, has a linkage that is either external or internal. External linkage means that the name is available from other source files. Internal linkage (also called static linkage) means that it is not. By default, functions and global variables have external linkage. However, you can specify internal (or static) linkage by prefixing the declaration with the keyword static. For example, suppose you have two source files: FirstFile.cpp and AnotherFile.cpp. Here is FirstFile.cpp:
void f();int main(){f();return 0;}
Note that this file provides a prototype for f(), but doesn’t show the definition. Here is AnotherFile.cpp:
#include <iostream>void f();void f(){std::cout << "f\n";}
This file provides both a prototype and a definition for f(). Note that it is legal to write prototypes for the same function in two different files. That’s precisely what the preprocessor does for you if you put the prototype in a header file that you #include in each of the source files. The reason to use header files is that it’s easier to maintain (and keep synchronized) one copy of the prototype. However, for this example, I don’t use a header file.
Each of these source files compiles without error, and the program links fine: because f() has external linkage, main() can call it from a different file.
However, suppose you apply static to the f() prototype in AnotherFile.cpp. Note that you don’t need to repeat the static keyword in front of the definition of f(). As long as it precedes the first instance of the function name, there is no need to repeat it:
#include <iostream>static void f();void f(){std::cout << "f\n";}
Now each of the source files compiles without error, but the linker step fails because f() has internal (static) linkage, making it unavailable from FirstFile.cpp. Some compilers issue a warning when static methods are defined but not used in that source file (implying that they shouldn’t be static, because they’re probably used elsewhere).
An alternative to using static for internal linkage is to employ anonymous namespaces. Instead of marking a variable or function static, wrap it in an unnamed namespace like this:
#include <iostream>namespace {void f();void f(){std::cout << "f\n";}}
Entities in an anonymous namespace can be accessed anywhere following their declaration in the same source file, but cannot be accessed from other source files. These semantics are the same as those obtained with the static keyword.
A related keyword, extern, seems like it should be the opposite of static, specifying external linkage for the names it precedes. It can be used that way in certain cases. For example, consts and typedefs have internal linkage by default. You can use extern to give them external linkage. However, extern has some complications. When you specify a name as extern, the compiler treats it as a declaration, not a definition. For variables, this means the compiler doesn’t allocate space for the variable. You must provide a separate definition line for the variable without the extern keyword. For example, here is the content of AnotherFile.cpp:
extern int x;int x = 3;
Alternatively, you can initialize x in the extern line, which then serves as the declaration and definition:
extern int x = 3;The extern in this case is not very useful, because x has external linkage by default anyway. The real use of extern is when you want to use x from another source file, FirstFile.cpp:
#include <iostream>extern int x;int main(){std::cout << x << std::endl;}
Here, FirstFile.cpp uses an extern declaration so that it can use x. The compiler needs a declaration of x in order to use it in main(). If you declared x without the extern keyword, the compiler would think it’s a definition and would allocate space for x, causing the linkage step to fail (because there are now two x variables in the global scope). With extern, you can make variables globally accessible from multiple source files.
The final use of the static keyword in C++ is to create local variables that retain their values between exits and entrances to their scope. A static variable inside a function is like a global variable that is only accessible from that function. One common use of static variables is to “remember” whether a particular initialization has been performed for a certain function. For example, code that employs this technique might look something like this:
void performTask(){static bool initialized = false;if (!initialized) {cout << "initializing" << endl;// Perform initialization.initialized = true;}// Perform the desired task.}
However, static variables are confusing, and there are usually better ways to structure your code so that you can avoid them. In this case, you might want to write a class in which the constructor performs the required initialization.
Sometimes, however, they are quite useful. One example is for implementing the Meyer’s singleton design pattern, as explained in Chapter 29.
Before leaving the topic of static data members and global variables, consider the order of initialization of these variables. All global variables and static class data members in a program are initialized before main() begins. The variables in a given source file are initialized in the order they appear in the source file. For example, in the following file, Demo::x is guaranteed to be initialized before y:
class Demo{public:static int x;};int Demo::x = 3;int y = 4;
However, C++ provides no specifications or guarantees about the initialization ordering of nonlocal variables in different source files. If you have a global variable x in one source file and a global variable y in another, you have no way of knowing which will be initialized first. Normally, this lack of specification isn’t cause for concern. However, it can be problematic if one global or static variable depends on another. Recall that initialization of objects implies running their constructors. The constructor of one global object might access another global object, assuming that it is already constructed. If these two global objects are declared in two different source files, you cannot count on one being constructed before the other, and you cannot control the order of initialization. This order might not be the same for different compilers or even different versions of the same compiler, and the order might even change when you simply add another file to your project.
Nonlocal variables are destroyed in the reverse order they were initialized. Nonlocal variables in different source files are initialized in an undefined order, which means that the order of destruction is also undefined.
The basic types in C++ are reviewed in Chapter 1, while Chapter 8 shows you how to write your own types with classes. This section explores some of the trickier aspects of types: type aliases, type aliases for function pointers, type aliases for pointers to methods and data members, typedefs, and casts.
A type alias provides a new name for an existing type declaration. You can think of a type alias as syntax for introducing a synonym for an existing type declaration without creating a new type. The following gives a new name, IntPtr, to the int* type declaration:
using IntPtr = int*;You can use the new type name and the definition it aliases interchangeably. For example, the following two lines are valid:
int* p1;IntPtr p2;
Variables created with the new type name are completely compatible with those created with the original type declaration. So, it is perfectly valid, given these definitions, to write the following, because they are not just “compatible” types, they are the same type:
p1 = p2;p2 = p1;
The most common use for type aliases is to provide manageable names when the real type declarations become too unwieldy. This situation commonly arises with templates. For example, Chapter 1 introduces the std::vector from the Standard Library. To declare a vector of strings, you need to declare it as std::vector<std::string>. It’s a templated class, and thus requires you to specify the template parameters any time you want to refer to the type of this vector. Templates are discussed in detail in Chapter 12. For declaring variables, specifying function parameters, and so on, you would have to write std::vector<std::string>:
void processVector(const std::vector<std::string>& vec) { /* omitted */ }int main(){std::vector<std::string> myVector;processVector(myVector);return 0;}
With a type alias, you can create a shorter, more meaningful name:
using StringVector = std::vector<std::string>;void processVector(const StringVector& vec){ /* omitted */ }int main(){StringVector myVector;processVector(myVector);return 0;}
Type aliases can include the scope qualifiers. The preceding example shows this by including the scope std for StringVector.
The Standard Library uses type aliases extensively to provide shorter names for types. For example, std::string is actually a type alias that looks like this:
using string = basic_string<char>;You don’t normally think about the location of functions in memory, but each function actually lives at a particular address. In C++, you can use functions as data. In other words, you can take the address of a function and use it like you use a variable.
Function pointers are typed according to the parameter types and return type of compatible functions. One way to work with function pointers is to use a type alias. A type alias allows you to assign a type name to the family of functions that have the given characteristics. For example, the following line defines a type called MatchFunction that represents a pointer to any function that has two int parameters and returns a bool:
using MatchFunction = bool(*)(int, int);Now that this new type exists, you can write a function that takes a MatchFunction as a parameter. For example, the following function accepts two int arrays and their size, as well as a MatchFunction. It iterates through the arrays in parallel and calls the MatchFunction on corresponding elements of both arrays, printing a message if the call returns true. Notice that even though the MatchFunction is passed in as a variable, it can be called just like a regular function:
void findMatches(int values1[], int values2[], size_t numValues,MatchFunction matcher){for (size_t i = 0; i < numValues; i++) {if (matcher(values1[i], values2[i])) {cout << "Match found at position " << i <<" (" << values1[i] << ", " << values2[i] << ")" << endl;}}}
Note that this implementation requires that both arrays have at least numValues elements. To call the findMatches() function, all you need is any function that adheres to the defined MatchFunction type—that is, any type that takes in two ints and returns a bool. For example, consider the following function, which returns true if the two parameters are equal:
bool intEqual(int item1, int item2){return item1 == item2;}
Because the intEqual() function matches the MatchFunction type, it can be passed as the final argument to findMatches(), as follows:
int arr1[] = { 2, 5, 6, 9, 10, 1, 1 };int arr2[] = { 4, 4, 2, 9, 0, 3, 4 };size_t arrSize = std::size(arr1); // Pre-C++17: sizeof(arr1)/sizeof(arr1[0]);cout << "Calling findMatches() using intEqual():" << endl;findMatches(arr1, arr2, arrSize, &intEqual);
The intEqual() function is passed into the findMatches() function by taking its address. Technically, the & character is optional—if you omit it and only put the function name, the compiler will know that you mean to take its address. The output is as follows:
Calling findMatches() using intEqual():Match found at position 3 (9, 9)
The benefit of function pointers lies in the fact that findMatches() is a generic function that compares parallel values in two arrays. As it is used here, it compares based on equality. However, because it takes a function pointer, it could compare based on other criteria. For example, the following function also adheres to the definition of MatchFunction:
bool bothOdd(int item1, int item2){return item1 % 2 == 1 && item2 % 2 == 1;}
The following code calls findMatches() using bothOdd:
cout << "Calling findMatches() using bothOdd():" << endl;findMatches(arr1, arr2, arrSize, &bothOdd);
The output is as follows:
Calling findMatches() using bothOdd():Match found at position 3 (9, 9)Match found at position 5 (1, 3)
By using function pointers, a single function, findMatches(), is customized to different uses based on a parameter, matcher.
While function pointers in C++ are uncommon, you may need to obtain function pointers in certain cases. Perhaps the most common example of this is when obtaining a pointer to a function in a dynamic link library. The following example obtains a pointer to a function in a Microsoft Windows Dynamic Link Library (DLL). Details of Windows DLLs are outside the scope of this book on platform-independent C++, but it is so important to Windows programmers that it is worth discussing, and it is a good example to explain the details of function pointers in general.
Consider a DLL, hardware.dll, that has a function called Connect(). You would like to load this library only if you need to call Connect(). Loading the library at run-time is done with the Windows LoadLibrary() kernel function:
HMODULE lib = ::LoadLibrary("hardware.dll");The result of this call is what is called a “library handle” and will be NULL if there is an error. Before you can load the function from the library, you need to know the prototype for the function. Suppose the following is the prototype for Connect(), which returns an integer and accepts three parameters: a Boolean, an integer, and a C-style string.
int __stdcall Connect(bool b, int n, const char* p);The __stdcall is a Microsoft-specific directive to specify how parameters are passed to the function and how they are cleaned up.
You can now use a type alias to define a name (ConnectFunction) for a pointer to a function with the preceding prototype:
using ConnectFunction = int(__stdcall*)(bool, int, const char*);Having successfully loaded the library and defined a name for the function pointer, you can get a pointer to the function in the library as follows:
ConnectFunction connect = (ConnectFunction)::GetProcAddress(lib, "Connect");If this fails, connect will be nullptr. If it succeeds, you can call the loaded function:
connect(true, 3, "Hello world");A C programmer might think that you need to dereference the function pointer before calling it as follows:
(*connect)(true, 3, "Hello world");This was true decades ago, but now, every C and C++ compiler is smart enough to know how to automatically dereference a function pointer before calling it.
You can create and use pointers to both variables and functions. Now, consider pointers to class data members and methods. It’s perfectly legitimate in C++ to take the addresses of class data members and methods in order to obtain pointers to them. However, you can’t access a non-static data member or call a non-static method without an object. The whole point of class data members and methods is that they exist on a per-object basis. Thus, when you want to call the method or access the data member via the pointer, you must dereference the pointer in the context of an object. Here is an example using the Employee class introduced in Chapter 1:
Employee employee;int (Employee::*methodPtr) () const = &Employee::getSalary;cout << (employee.*methodPtr)() << endl;
Don’t panic at the syntax. The second line declares a variable called methodPtr of type pointer to a non-static const method of Employee that takes no arguments and returns an int. At the same time, it initializes this variable to point to the getSalary() method of the Employee class. This syntax is quite similar to declaring a simple function pointer, except for the addition of Employee:: before the *methodPtr. Note also that the & is required in this case.
The third line calls the getSalary() method (via the methodPtr pointer) on the employee object. Note the use of parentheses surrounding employee.*methodPtr. They are needed because () has higher precedence than *.
The second line can be made easier to read with a type alias:
Employee employee;using PtrToGet = int (Employee::*) () const;PtrToGet methodPtr = &Employee::getSalary;cout << (employee.*methodPtr)() << endl;
Using auto, it can be simplified even further:
Employee employee;auto methodPtr = &Employee::getSalary;cout << (employee.*methodPtr)() << endl;
Pointers to methods and data members usually won’t come up in your programs. However, it’s important to keep in mind that you can’t dereference a pointer to a non-static method or data member without an object. Every so often, you may want to try something like passing a pointer to a non-static method to a function such as qsort() that requires a function pointer, which simply won’t work.
Type aliases were introduced in C++11. Before C++11, you had to use typedefs to accomplish something similar but in a more convoluted way.
Just as a type alias, a typedef provides a new name for an existing type declaration. For example, take the following type alias:
using IntPtr = int*;Without type aliases, you had to use a typedef which looked as follows:
typedef int* IntPtr;As you can see, it’s much less readable! The order is reversed, which causes a lot of confusion, even for professional C++ developers. Other than being more convoluted, a typedef behaves almost the same as a type alias. For example, the typedef can be used as follows:
IntPtr p;Before type aliases were introduced, you also had to use typedefs for function pointers, which is even more convoluted. For example, take the following type alias:
using FunctionType = int (*)(char, double);Defining the same FunctionType with a typedef looks as follows:
typedef int (*FunctionType)(char, double);This is more convoluted because the name FunctionType is somewhere in the middle of it.
Type aliases and typedefs are not entirely equivalent. Compared to typedefs, type aliases are more powerful when used with templates, but that is covered in Chapter 12 because it requires more details about templates.
C++ provides four specific casts: const_cast(), static_cast(), reinterpret_cast(), and dynamic_cast().
The old C-style casts with () still work in C++, and are still used extensively in existing code bases. C-style casts cover all four C++ casts, so they are more error-prone because it’s not always obvious what you are trying to achieve, and you might end up with unexpected results. I strongly recommend you only use the C++ style casts in new code because they are safer and stand out better syntactically in your code.
This section describes the purposes of each C++ cast and specifies when you would use each of them.
const_cast() is the most straightforward of the different casts available. You can use it to add const-ness to a variable, or cast away const-ness of a variable. It is the only cast of the four that is allowed to cast away const-ness. Theoretically, of course, there should be no need for a const cast. If a variable is const, it should stay const. In practice, however, you sometimes find yourself in a situation where a function is specified to take a const variable, which it must then pass to a function that takes a non-const variable. The “correct” solution would be to make const consistent in the program, but that is not always an option, especially if you are using third-party libraries. Thus, you sometimes need to cast away the const-ness of a variable, but you should only do this when you are sure the function you are calling will not modify the object; otherwise, there is no other option than to restructure your program. Here is an example:
extern void ThirdPartyLibraryMethod(char* str);void f(const char* str){ThirdPartyLibraryMethod(const_cast<char*>(str));}
Starting with C++17, there is a helper method called std::as_const(), defined in <utility>, that returns a const reference version of its reference parameter. Basically, as_const(obj) is equivalent to const_cast<const T&>(obj), where T is the type of obj. As you can see, using as_const() is shorter than using const_cast(). Here is an example:
std::string str = "C++";const std::string& constStr = std::as_const(str);
Watch out when using as_const() in combination with auto. Remember from Chapter 1 that auto strips away reference and const qualifiers! So, the following result variable has type std::string, not const std::string&:
auto result = std::as_const(str);You can use static_cast() to perform explicit conversions that are supported directly by the language. For example, if you write an arithmetic expression in which you need to convert an int to a double in order to avoid integer division, use a static_cast(). In this example, it’s enough to only use static_cast() with i, because that makes one of the two operands a double, making sure C++ performs floating point division.
int i = 3;int j = 4;double result = static_cast<double>(i) / j;
You can also use static_cast() to perform explicit conversions that are allowed because of user-defined constructors or conversion routines. For example, if class A has a constructor that takes an object of class B, you can convert a B object to an A object with static_cast(). In most situations where you want this behavior, however, the compiler performs the conversion automatically.
Another use for static_cast() is to perform downcasts in an inheritance hierarchy, as in this example:
class Base{public:virtual ~Base() = default;};class Derived : public Base{public:virtual ~Derived() = default;};int main(){Base* b;Derived* d = new Derived();b = d; // Don't need a cast to go up the inheritance hierarchyd = static_cast<Derived*>(b); // Need a cast to go down the hierarchyBase base;Derived derived;Base& br = derived;Derived& dr = static_cast<Derived&>(br);return 0;}
These casts work with both pointers and references. They do not work with objects themselves.
Note that these casts using static_cast() do not perform run-time type checking. They allow you to convert any Base pointer to a Derived pointer, or Base reference to a Derived reference, even if the Base really isn’t a Derived at run time. For example, the following code compiles and executes, but using the pointer d can result in potentially catastrophic failure, including memory overwrites outside the bounds of the object.
Base* b = new Base();Derived* d = static_cast<Derived*>(b);
To perform the cast safely with run-time type checking, use dynamic_cast(), which is explained a little later in this chapter.
static_cast() is not all-powerful. You can’t static_cast() pointers of one type to pointers of another unrelated type. You can’t directly static_cast() objects of one type to objects of another type if there is no converting constructor available. You can’t static_cast() a const type to a non-const type. You can’t static_cast() pointers to ints. Basically, you can’t do anything that doesn’t make sense according to the type rules of C++.
reinterpret_cast() is a bit more powerful, and concomitantly less safe, than static_cast(). You can use it to perform some casts that are not technically allowed by the C++ type rules, but which might make sense to the programmer in some circumstances. For example, you can cast a reference to one type to a reference to another type, even if the types are unrelated. Similarly, you can cast a pointer type to any other pointer type, even if they are unrelated by an inheritance hierarchy. This is commonly used to cast a pointer to a void*. This can be done implicitly, so no explicit cast is required. However, casting a void* back to a correctly-typed pointer requires reinterpret_cast(). A void* pointer is just a pointer to some location in memory. No type information is associated with a void* pointer. Here are some examples:
class X {};class Y {};int main(){X x;Y y;X* xp = &x;Y* yp = &y;// Need reinterpret cast for pointer conversion from unrelated classes// static_cast doesn't work.xp = reinterpret_cast<X*>(yp);// No cast required for conversion from pointer to void*void* p = xp;// Need reinterpret cast for pointer conversion from void*xp = reinterpret_cast<X*>(p);// Need reinterpret cast for reference conversion from unrelated classes// static_cast doesn't work.X& xr = x;Y& yr = reinterpret_cast<Y&>(x);return 0;}
One use-case for reinterpret_cast() is with binary I/O of trivially copyable types.2 For example, you can write the individual bytes of such types to a file. When you read the file back into memory, you can use reinterpret_cast() to correctly interpret the bytes read from the file.
However, in general, you should be very careful with reinterpret_cast() because it allows you to do conversions without performing any type checking.
dynamic_cast() provides a run-time check on casts within an inheritance hierarchy. You can use it to cast pointers or references. dynamic_cast() checks the run-time type information of the underlying object at run time. If the cast doesn’t make sense, dynamic_cast() returns a null pointer (for the pointer version), or throws an std::bad_cast exception (for the reference version).
For example, suppose you have the following class hierarchy:
class Base{public:virtual ~Base() = default;};class Derived : public Base{public:virtual ~Derived() = default;};
The following example shows a correct use of dynamic_cast():
Base* b;Derived* d = new Derived();b = d;d = dynamic_cast<Derived*>(b);
The following dynamic_cast() on a reference will cause an exception to be thrown:
Base base;Derived derived;Base& br = base;try {Derived& dr = dynamic_cast<Derived&>(br);} catch (const bad_cast&) {cout << "Bad cast!" << endl;}
Note that you can perform the same casts down the inheritance hierarchy with a static_cast() or reinterpret_cast(). The difference with dynamic_cast() is that it performs run-time (dynamic) type checking, while static_cast() and reinterpret_cast() perform the casting even if they are erroneous.
As Chapter 10 discusses, the run-time type information is stored in the vtable of an object. Therefore, in order to use dynamic_cast(), your classes must have at least one virtual method. If your classes don’t have a vtable, trying to use dynamic_cast() will result in a compilation error. Microsoft VC++, for example, gives the following error:
error C2683: 'dynamic_cast' : 'MyClass' is not a polymorphic type.The following table summarizes the casts you should use for different situations.
| SITUATION | CAST |
Remove const-ness |
const_cast() |
Explicit cast supported by the language (for example, int to double, int to bool) |
static_cast() |
| Explicit cast supported by user-defined constructors or conversions | static_cast() |
| Object of one class to object of another (unrelated) class | Can’t be done |
| Pointer-to-object of one class to pointer-to-object of another class in the same inheritance hierarchy | dynamic_cast() recommended, or static_cast() |
| Reference-to-object of one class to reference-to-object of another class in the same inheritance hierarchy | dynamic_cast() recommended, or static_cast() |
| Pointer-to-type to unrelated pointer-to-type | reinterpret_cast() |
| Reference-to-type to unrelated reference-to-type | reinterpret_cast() |
| Pointer-to-function to pointer-to-function | reinterpret_cast() |
As a C++ programmer, you need to familiarize yourself with the concept of a scope. Every name in your program, including variable, function, and class names, is in a certain scope. You create scopes with namespaces, function definitions, blocks delimited by curly braces, and class definitions. Variables that are initialized in the initialization statement of for loops are scoped to that for loop and are not visible outside that for loop. Similarly, C++17 introduced initializers for if and switch statements; see Chapter 1. Variables initialized in such initializers are scoped to the if or switch statement and are not visible outside that statement. When you try to access a variable, function, or class, the name is first looked up in the nearest enclosing scope, then the next scope, and so forth, up to the global scope. Any name not in a namespace, function, block delimited by curly braces, or class is assumed to be in the global scope. If it is not found in the global scope, at that point the compiler generates an undefined symbol error.
Sometimes names in scopes hide identical names in other scopes. Other times, the scope you want is not part of the default scope resolution from that particular line in the program. If you don’t want the default scope resolution for a name, you can qualify the name with a specific scope using the scope resolution operator ::. For example, to access a static method of a class, one way is to prefix the method name with the name of the class (its scope) and the scope resolution operator. A second way is to access the static method through an object of that class. The following example demonstrates these options. The example defines a class Demo with a static get() method, a get() function that is globally scoped, and a get() function that is in the NS namespace.
class Demo{public:static int get() { return 5; }};int get() { return 10; }namespace NS{int get() { return 20; }}
The global scope is unnamed, but you can access it specifically by using the scope resolution operator by itself (with no name prefix). The different get() functions can be called as follows. In this example, the code itself is in the main() function, which is always in the global scope:
int main(){auto pd = std::make_unique<Demo>();Demo d;std::cout << pd->get() << std::endl; // prints 5std::cout << d.get() << std::endl; // prints 5std::cout << NS::get() << std::endl; // prints 20std::cout << Demo::get() << std::endl; // prints 5std::cout << ::get() << std::endl; // prints 10std::cout << get() << std::endl; // prints 10return 0;}
Note that if the namespace called NS is given as an unnamed namespace, then the following line will give an error about ambiguous name resolution, because you would have a get() defined in the global scope, and another get() defined in the unnamed namespace.
std::cout << get() << std::endl;The same error occurs if you add the following using clause right before the main() function:
using namespace NS;Attributes are a mechanism to add optional and/or vendor-specific information into source code. Before attributes were standardized in C++, vendors decided how to specify such information. Examples are __attribute__, __declspec, and so on. Since C++11, there is standardized support for attributes by using the double square brackets syntax [[attribute]].
The C++ standard defines only six standard attributes. One of them, [[carries_dependency]], is a rather exotic attribute and is not discussed further. The others are discussed in the following sections.
[[noreturn]]means that a function never returns control to the call site. Typically, the function either causes some kind of termination (process termination or thread termination), or throws an exception. With this attribute, the compiler can avoid giving certain warnings or errors because it now knows more about the intent of the function. Here is an example:
[[noreturn]] void forceProgramTermination(){std::exit(1);}bool isDongleAvailable(){bool isAvailable = false;// Check whether a licensing dongle is available...return isAvailable;}bool isFeatureLicensed(int featureId){if (!isDongleAvailable()) {// No licensing dongle found, abort program execution!forceProgramTermination();} else {bool isLicensed = false;// Dongle available, perform license check of the given feature...return isLicensed;}}int main(){bool isLicensed = isFeatureLicensed(42);}
This code snippet compiles fine without any warnings or errors. However, if you remove the [[noreturn]] attribute, the compiler generates the following warning (output from Visual C++):
warning C4715: 'isFeatureLicensed': not all control paths return a value[[deprecated]] can be used to mark something as deprecated, which means you can still use it, but its use is discouraged. This attribute accepts an optional argument that can be used to explain the reason of the deprecation, as in this example:
[[deprecated("Unsafe method, please use xyz")]] void func();If you use this deprecated function, you’ll get a compilation error or warning. For example, GCC gives the following warning:
warning: 'void func()' is deprecated: Unsafe method, please use xyzStarting with C++17, you can tell the compiler that a fallthrough in a switch statement is intentional using the [[fallthrough]] attribute. If you don’t specify this attribute for intentional fallthroughs, the compiler might give you a warning. You don’t need to specify the attribute for empty cases. For example:
switch (backgroundColor) {case Color::DarkBlue:doSomethingForDarkBlue();[[fallthrough]];case Color::Black:// Code is executed for both a dark blue or black background colordoSomethingForBlackOrDarkBlue();break;case Color::Red:case Color::Green:// Code to execute for a red or green background colorbreak;}
[[nodiscard]]The [[nodiscard]] attribute can be used on a function returning a value to let the compiler issue a warning when that function is used without doing something with the returned value. Here is an example:
[[nodiscard]] int func(){return 42;}int main(){func();return 0;}
The compiler issues a warning similar to the following:
warning C4834: discarding return value of function with 'nodiscard' attributeThis feature can, for example, be used for functions that return error codes. By adding the [[nodiscard]] attribute to such functions, the error codes cannot be ignored.
[[maybe_unused]]The [[maybe_unused]] attribute can be used to suppress the compiler from issuing a warning when something is unused, as in this example:
int func(int param1, int param2){return 42;}
If your compiler warning level is set high enough, this function definition might result in two compiler warnings. For example, Microsoft VC++ gives these warnings:
warning C4100: 'param2': unreferenced formal parameterwarning C4100: 'param1': unreferenced formal parameter
By using the [[maybe_unused]] attribute, you can suppress such warnings:
int func(int param1, [[maybe_unused]] int param2){return 42;}
In this case, the second parameter is marked with the attribute suppressing its warning. The compiler now only issues a warning for param1:
warning C4100: 'param1': unreferenced formal parameterMost attributes will be vendor-specific extensions. Vendors are advised not to use attributes to change the meaning of the program, but to use them to help the compiler to optimize code or detect errors in code. Because attributes of different vendors could clash, vendors are recommended to qualify them. Here is an example:
[[clang::noduplicate]]C++ has a number of standard literals that you can use in your code. Here are some examples:
'a': character"character array": zero-terminated array of characters, C-style string3.14f: float floating point value0xabc: hexadecimal valueHowever, C++ also allows you to define your own literals. User-defined literals should start with an underscore. The first character following the underscore must be a lowercase letter. Some examples are: _i, _s, _km, _miles, and so on. User-defined literals are implemented by writing literal operators. A literal operator can work in raw or cooked mode. In raw mode, your literal operator receives a sequence of characters, while in cooked mode your literal operator receives a specific interpreted type. For example, take the C++ literal 123. A raw literal operator receives this as a sequence of characters '1', '2', '3'. A cooked literal operator receives this as the integer 123. As another example, take the C++ literal 0x23. A raw operator receives the characters '0', 'x', '2', '3', while a cooked operator receives the integer 35. One last example, take the C++ literal 3.14. A raw operator receives this as '3', '.', '1', '4', while a cooked operator receives the floating point value 3.14.
A cooked-mode literal operator should have either of the following:
unsigned long long, long double, char, wchar_t, char16_t, or char32_t to process numeric values, orconst char* str, size_t len).As an example, the following implements a cooked literal operator for the user-defined literal _i to define a complex number literal:
std::complex<long double> operator"" _i(long double d){return std::complex<long double>(0, d);}
This _i literal can be used as follows:
std::complex<long double> c1 = 9.634_i;auto c2 = 1.23_i; // c2 has as type std::complex<long double>
A second example implements a cooked literal operator for a user-defined literal _s to define std::string literals:
std::string operator"" _s(const char* str, size_t len){return std::string(str, len);}
This literal can be used as follows:
std::string str1 = "Hello World"_s;auto str2 = "Hello World"_s; // str2 has as type std::string
Without the _s literal, the auto type deduction would be const char*:
auto str3 = "Hello World"; // str3 has as type const char*A raw-mode literal operator requires one parameter of type const char*, a zero-terminated C-style string. The following example defines the literal _i, but using a raw literal operator:
std::complex<long double> operator"" _i(const char* p){// Implementation omitted; it requires parsing the C-style// string and converting it to a complex number.}
Using this raw-mode literal operator is exactly the same as using the cooked version.
C++ defines the following standard user-defined literals. Note that these standard user-defined literals do not start with an underscore.
std::strings
auto myString = "Hello World"s;
using namespace std::string_literals; “sv” for creating std::string_views
auto myStringView = "Hello World"sv;
using namespace std::string_view_literals;std::chrono::duration time intervals, discussed in Chapter 20
auto myDuration = 42min;
using namespace std::chrono_literals;complex<double>, complex<long double>, and complex<float>, respectively
auto myComplexNumber = 1.3i;
using namespace std::complex_literals;A using namespace std; also makes these standard user-defined literals available.
Header files are a mechanism for providing an abstract interface to a subsystem or piece of code. One of the trickier parts of using headers is avoiding multiple includes of the same header file and circular references.
For example, suppose A.h includes Logger.h, defining a Logger class, and B.h also includes Logger.h. If you have a source file called App.cpp, which includes both A.h and B.h, you end up with duplicate definitions of the Logger class because the Logger.h header is included through A.h and B.h.
This problem of duplicate definitions can be avoided with a mechanism known as include guards. The following code snippet shows the Logger.h header with include guards. At the beginning of each header file, the #ifndef directive checks to see if a certain key has not been defined. If the key has been defined, the compiler skips to the matching #endif, which is usually placed at the end of the file. If the key has not been defined, the file proceeds to define the key so that a subsequent include of the same file will be skipped.
#ifndef LOGGER_H#define LOGGER_Hclass Logger{// ...};#endif// LOGGER_H
Nearly all compilers these days support the #pragma once directive which replaces include guards. For example:
#pragma onceclass Logger{// ...};
Another tool for avoiding problems with header files is forward declarations. If you need to refer to a class but you cannot include its header file (for example, because it relies heavily on the class you are writing), you can tell the compiler that such a class exists without providing a formal definition through the #include mechanism. Of course, you cannot actually use the class in the code because the compiler knows nothing about it, except that the named class will exist after everything is linked together. However, you can still make use of pointers or references to forward-declared classes in your code. You can also declare functions that return such forward-declared classes by value, or that have such forward-declared classes as pass-by-value function parameters. Of course, both the code defining the function and any code calling the function will need to include the right header files that properly defines the forward-declared classes.
For example, assume that the Logger class uses another class called Preferences, that keeps track of user settings. The Preferences class may in turn use the Logger class, so you have a circular dependency which cannot be resolved with include guards. You need to make use of forward declarations in such cases. In the following code, the Logger.h header file uses a forward declaration for the Preferences class, and subsequently refers to the Preferences class without including its header file.
#pragma once#include <string_view>class Preferences;// forward declarationclass Logger{public:static void setPreferences(const Preferences& prefs);static void logError(std::string_view error);};
It’s recommended to use forward declarations as much as possible in your header files instead of including other headers. This can reduce your compilation and recompilation times, because it breaks dependencies of your header file on other headers. Of course, your implementation file needs to include the correct headers for types that you’ve forward-declared; otherwise, it won’t compile.
To query whether a certain header file exists, C++17 adds the __has_include("filename") and __has_include(<filename>) preprocessor constants. These constants evaluate to 1 if the header file exists, 0 if it doesn’t exist. For example, before the <optional> header file was fully approved for C++17, a preliminary version existed in <experimental/optional>. You could use __has_include() to check which of the two header files is available on your system:
#if __has_include(<optional>)#include <optional>#elif __has_include(<experimental/optional>)#include <experimental/optional>#endif
There are a few obscure C features that are also available in C++ and which can occasionally be useful. This section examines two of these features: variable-length argument lists and preprocessor macros.
This section explains the old C-style variable-length argument lists. You need to know how these work because you might find them in legacy code. However, in new code you should use variadic templates for type-safe variable-length argument lists, which are described in Chapter 22.
Consider the C function printf() from <cstdio>. You can call it with any number of arguments:
printf("int %d\n", 5);printf("String %s and int %d\n", "hello", 5);printf("Many ints: %d, %d, %d, %d, %d\n", 1, 2, 3, 4, 5);
C/C++ provides the syntax and some utility macros for writing your own functions with a variable number of arguments. These functions usually look a lot like printf(). Although you shouldn’t need this feature very often, occasionally you will run into situations in which it’s quite useful. For example, suppose you want to write a quick-and-dirty debug function that prints strings to stderr if a debug flag is set, but does nothing if the debug flag is not set. Just like printf(), this function should be able to print strings with an arbitrary number of arguments and arbitrary types of arguments. A simple implementation looks like this:
#include <cstdio>#include <cstdarg>bool debug = false;void debugOut(const char* str, ...){va_list ap;if (debug) {va_start(ap, str);vfprintf(stderr, str, ap);va_end(ap);}}
First, note that the prototype for debugOut() contains one typed and named parameter str, followed by ... (ellipses). They stand for any number and type of arguments. In order to access these arguments, you must use macros defined in <cstdarg>. You declare a variable of type va_list, and initialize it with a call to va_start. The second parameter to va_start() must be the rightmost named variable in the parameter list. All functions with variable-length argument lists require at least one named parameter. The debugOut() function simply passes this list to vfprintf() (a standard function in <cstdio>). After the call to vfprintf() returns, debugOut() calls va_end() to terminate the access of the variable argument list. You must always call va_end() after calling va_start() to ensure that the function ends with the stack in a consistent state.
You can use the function in the following way:
debug = true;debugOut("int %d\n", 5);debugOut("String %s and int %d\n", "hello", 5);debugOut("Many ints: %d, %d, %d, %d, %d\n", 1, 2, 3, 4, 5);
If you want to access the actual arguments yourself, you can use va_arg() to do so. It accepts a va_list as first argument, and the type of the argument to interpret. Unfortunately, there is no way to know what the end of the argument list is unless you provide an explicit way of doing so. For example, you can make the first parameter a count of the number of parameters. Or, in the case where you have a set of pointers, you may require the last pointer to be nullptr. There are many ways, but they are all burdensome to the programmer.
The following example demonstrates the technique where the caller specifies in the first named parameter how many arguments are provided. The function accepts any number of ints and prints them out:
void printInts(size_t num, ...){int temp;va_list ap;va_start(ap, num);for (size_t i = 0; i < num; ++i) {temp = va_arg(ap, int);cout << temp << " ";}va_end(ap);cout << endl;}
You can call printInts() as follows. Note that the first parameter specifies how many integers will follow:
printInts(5, 5, 4, 3, 2, 1);Accessing C-style variable-length argument lists is not very safe. There are several risks, as you can see from the printInts() function:
printInts(), you must trust the caller to pass the right number of arguments as the first argument. In the case of debugOut(), you must trust the caller to pass the same number of arguments after the character array as there are formatting codes in the character array.va_arg() takes a type, which it uses to interpret the value in its current spot. However, you can tell va_arg() to interpret the value as any type. There is no way for it to verify the correct type.You can use the C++ preprocessor to write macros, which are like little functions. Here is an example:
#define SQUARE(x) ((x) * (x)) // No semicolon after the macro definition!int main(){cout << SQUARE(5) << endl;return 0;}
Macros are a remnant from C that are quite similar to inline functions, except that they are not type-checked, and the preprocessor dumbly replaces any calls to them with their expansions. The preprocessor does not apply true function-call semantics. This behavior can cause unexpected results. For example, consider what would happen if you called the SQUARE macro with 2
+
3 instead of 5, like this:
cout << SQUARE(2 + 3) << endl;You expect SQUARE to calculate 25, which it does. However, what if you left off some parentheses on the macro definition, so that it looks like this?
#define SQUARE(x) (x * x)Now, the call to SQUARE(2
+
3) generates 11, not 25! Remember that the macro is dumbly expanded without regard to function-call semantics. This means that any x in the macro body is replaced by 2
+
3, leading to this expansion:
cout << (2 + 3 * 2 + 3) << endl;Following proper order of operations, this line performs the multiplication first, followed by the additions, generating 11 instead of 25!
Macros can also have a performance impact. Suppose you call the SQUARE macro as follows:
cout << SQUARE(veryExpensiveFunctionCallToComputeNumber()) << endl;The preprocessor replaces this with the following:
cout << ((veryExpensiveFunctionCallToComputeNumber()) *(veryExpensiveFunctionCallToComputeNumber())) << endl;
Now you are calling the expensive function twice—another reason to avoid macros.
Macros also cause problems for debugging because the code you write is not the code that the compiler sees, or that shows up in your debugger (because of the search-and-replace behavior of the preprocessor). For these reasons, you should avoid macros entirely in favor of inline functions. The details are shown here only because quite a bit of C++ code out there still employs macros. You need to understand them in order to read and maintain that code.
This chapter explained some of the aspects of C++ that generate confusion. By reading this chapter, you learned a plethora of syntax details about C++. Some of the information, such as the details of references, const, scope resolution, the specifics of the C++-style casts, and the techniques for header files, you should use often in your programs. Other information, such as the uses of static and extern, how to write C-style variable-length argument lists, and how to write preprocessor macros, is important to understand, but not information that you should put into use in your programs on a day-to-day basis.
The next chapter starts a discussion on templates allowing you to write generic code.
The main programming unit in the procedural paradigm is the procedure or function. Functions are useful primarily because they allow you to write algorithms that are independent of specific values and can thus be reused for many different values. For example, the sqrt() function in C++ calculates the square root of a value supplied by the caller. A square root function that calculates only the square root of one number, such as four, would not be particularly useful! The sqrt() function is written in terms of a parameter, which is a stand-in for whatever value the caller passes. Computer scientists say that functions parameterize values.
The object-oriented programming paradigm adds the concept of objects, which group related data and behaviors, but it does not change the way functions and methods parameterize values.
Templates take the concept of parameterization a step further to allow you to parameterize on types as well as values. Types in C++ include primitives such as int and double, as well as user-defined classes such as SpreadsheetCell and CherryTree. With templates, you can write code that is independent not only of the values it will be given, but also of the types of those values. For example, instead of writing separate stack classes to store ints, Cars, and SpreadsheetCells, you can write one stack class definition that can be used for any of those types.
Although templates are an amazing language feature, templates in C++ are syntactically confusing, and many programmers avoid writing templates themselves. However, every programmer needs to know at least how to use templates, because they are widely used by libraries. For example, the C++ Standard Library uses templates extensively.
This chapter teaches you about template support in C++ with an emphasis on the aspects that arise in the Standard Library. Along the way, you will learn about some nifty features that you can employ in your programs aside from using the Standard Library.
Class templates define a class where the types of some of the variables, return types of methods, and/or parameters to the methods are specified as parameters. Class templates are useful primarily for containers, or data structures, that store objects. This section uses a running example of a Grid container. In order to keep the examples reasonable in length and simple enough to illustrate specific points, different sections of the chapter add features to the Grid container that are not used in subsequent sections.
Suppose that you want a generic game board class that you can use as a chessboard, checkers board, tic-tac-toe board, or any other two-dimensional game board. In order to make it general-purpose, you should be able to store chess pieces, checkers pieces, tic-tac-toe pieces, or any type of game piece.
Without templates, the best approach to build a generic game board is to employ polymorphism to store generic GamePiece objects. Then, you could let the pieces for each game inherit from the GamePiece class. For example, in a chess game, ChessPiece would be a derived class of GamePiece. Through polymorphism, the GameBoard, written to store GamePieces, could also store ChessPieces. Because it should be possible to copy a GameBoard, the GameBoard needs to be able to copy GamePieces. This implementation employs polymorphism, so one solution is to add a pure virtual clone() method to the GamePiece base class. Here is the basic GamePiece interface:
class GamePiece{public:virtual std::unique_ptr<GamePiece> clone() const = 0;};
GamePiece is an abstract base class. Concrete classes, such as ChessPiece, derive from it and implement the clone() method:
class ChessPiece : public GamePiece{public:virtual std::unique_ptr<GamePiece> clone() const override;};std::unique_ptr<GamePiece> ChessPiece::clone() const{// Call the copy constructor to copy this instancereturn std::make_unique<ChessPiece>(*this);}
The implementation of GameBoard uses a vector of vectors of unique_ptrs to store the GamePieces.
class GameBoard{public:explicit GameBoard(size_t width = kDefaultWidth,size_t height = kDefaultHeight);GameBoard(const GameBoard& src); // copy constructorvirtual ~GameBoard() = default; // virtual defaulted destructorGameBoard& operator=(const GameBoard& rhs); // assignment operator// Explicitly default a move constructor and assignment operator.GameBoard(GameBoard&& src) = default;GameBoard& operator=(GameBoard&& src) = default;std::unique_ptr<GamePiece>& at(size_t x, size_t y);const std::unique_ptr<GamePiece>& at(size_t x, size_t y) const;size_t getHeight() const { return mHeight; }size_t getWidth() const { return mWidth; }static const size_t kDefaultWidth = 10;static const size_t kDefaultHeight = 10;friend void swap(GameBoard& first, GameBoard& second) noexcept;private:void verifyCoordinate(size_t x, size_t y) const;std::vector<std::vector<std::unique_ptr<GamePiece>>> mCells;size_t mWidth, mHeight;};
In this implementation, at() returns a reference to the piece at a specified spot instead of a copy of the piece. The GameBoard serves as an abstraction of a two-dimensional array, so it should provide array access semantics by giving the actual object at an index, not a copy of the object. Client code should not store this reference for future use because it might become invalid. Instead, client code should call at() right before using the returned reference. This follows the design philosophy of the Standard Library std::vector class.
Here are the method definitions. Note that this implementation uses the copy-and-swap idiom for the assignment operator, and Scott Meyer’s const_cast() pattern to avoid code duplication, both of which are discussed in Chapter 9.
GameBoard::GameBoard(size_t width, size_t height): mWidth(width), mHeight(height){mCells.resize(mWidth);for (auto& column : mCells) {column.resize(mHeight);}}GameBoard::GameBoard(const GameBoard& src): GameBoard(src.mWidth, src.mHeight){// The ctor-initializer of this constructor delegates first to the// non-copy constructor to allocate the proper amount of memory.// The next step is to copy the data.for (size_t i = 0; i < mWidth; i++) {for (size_t j = 0; j < mHeight; j++) {if (src.mCells[i][j])mCells[i][j] = src.mCells[i][j]->clone();}}}void GameBoard::verifyCoordinate(size_t x, size_t y) const{if (x >= mWidth || y >= mHeight) {throw std::out_of_range("");}}void swap(GameBoard& first, GameBoard& second) noexcept{using std::swap;swap(first.mWidth, second.mWidth);swap(first.mHeight, second.mHeight);swap(first.mCells, second.mCells);}GameBoard& GameBoard::operator=(const GameBoard& rhs){// Check for self-assignmentif (this == &rhs) {return *this;}// Copy-and-swap idiomGameBoard temp(rhs); // Do all the work in a temporary instanceswap(*this, temp); // Commit the work with only non-throwing operationsreturn *this;}const unique_ptr<GamePiece>& GameBoard::at(size_t x, size_t y) const{verifyCoordinate(x, y);return mCells[x][y];}unique_ptr<GamePiece>& GameBoard::at(size_t x, size_t y){return const_cast<unique_ptr<GamePiece>&>(as_const(*this).at(x, y));}
This GameBoard class works pretty well:
GameBoard chessBoard(8, 8);auto pawn = std::make_unique<ChessPiece>();chessBoard.at(0, 0) = std::move(pawn);chessBoard.at(0, 1) = std::make_unique<ChessPiece>();chessBoard.at(0, 1) = nullptr;
The GameBoard class in the previous section is nice, but insufficient. A first problem is that you cannot use GameBoard to store elements by value; it always stores pointers. Another, more serious issue is related to type safety. Each cell in a GameBoard stores a unique_ptr<GamePiece>. Even if you are storing ChessPieces, when you use at() to request a certain cell, you will get back a unique_ptr<GamePiece>. This means you have to downcast the retrieved GamePiece to a ChessPiece to be able to make use of ChessPiece’s specific functionality. Another shortcoming of GameBoard is that it cannot be used to store primitive types, such as int or double, because the type stored in a cell has to derive from GamePiece.
So, it would be nice if you could write a generic Grid class that you could use for storing ChessPieces, SpreadsheetCells, ints, doubles, and so on. In C++, you can do this by writing a class template, which allows you to write a class without specifying one or more types. Clients then instantiate the template by specifying the types they want to use. This is called generic programming. The biggest advantage of generic programming is type safety. The types used in the class and its methods are concrete types, and not abstract base class types, as is the case with the polymorphic solution from the previous section. For example, suppose there is not only a ChessPiece but also a TicTacToePiece:
class TicTacToePiece : public GamePiece{public:virtual std::unique_ptr<GamePiece> clone() const override;};std::unique_ptr<GamePiece> TicTacToePiece::clone() const{// Call the copy constructor to copy this instancereturn std::make_unique<TicTacToePiece>(*this);}
With the polymorphic solution from the previous section, nothing stops you from storing tic-tac-toe pieces and chess pieces on the same chess board:
GameBoard chessBoard(8, 8);chessBoard.at(0, 0) = std::make_unique<ChessPiece>();chessBoard.at(0, 1) = std::make_unique<TicTacToePiece>();
The big problem with this is that you somehow need to remember what a cell is storing, so that you can perform the correct downcast when you call at().
In order to understand class templates, it is helpful to examine the syntax. The following example shows how you can modify the GameBoard class to make a templatized Grid class. The syntax is explained in detail following the code. Note that the class name has changed from GameBoard to Grid. The Grid should also be usable with primitive types such as int and double. That’s why I opted to implement this solution using value semantics without polymorphism, compared to the polymorphic pointer semantics used in the GameBoard implementation. A downside of using value semantics compared to pointer semantics is that you cannot have a true empty cell, that is, a cell must always contain some value. With pointer semantics, an empty cell stores nullptr. Luckily, C++17’s std::optional, defined in <optional>, comes to the rescue here. It allows you to use value semantics, while still having a way to represent empty cells.
template <typename T>class Grid{public:explicit Grid(size_t width = kDefaultWidth,size_t height = kDefaultHeight);virtual ~Grid() = default;// Explicitly default a copy constructor and assignment operator.Grid(const Grid& src) = default;Grid<T>& operator=(const Grid& rhs) = default;// Explicitly default a move constructor and assignment operator.Grid(Grid&& src) = default;Grid<T>& operator=(Grid&& rhs) = default;std::optional<T>& at(size_t x, size_t y);const std::optional<T>& at(size_t x, size_t y) const;size_t getHeight() const { return mHeight; }size_t getWidth() const { return mWidth; }static const size_t kDefaultWidth = 10;static const size_t kDefaultHeight = 10;private:void verifyCoordinate(size_t x, size_t y) const;std::vector<std::vector<std::optional<T>>> mCells;size_t mWidth, mHeight;};
Now that you’ve seen the full class definition, take another look at it, one line at a time:
template <typename T>This first line says that the following class definition is a template on one type. Both template and typename are keywords in C++. As discussed earlier, templates “parameterize” types in the same way that functions “parameterize” values. Just as you use parameter names in functions to represent the arguments that the caller will pass, you use template parameter names (such as T) in templates to represent the types that the caller will specify. There’s nothing special about the name T—you can use whatever name you want. Traditionally, when a single type is used, it is called T, but that’s just a historical convention, like calling the integer that indexes an array i or j. The template specifier holds for the entire statement, which in this case is the class definition.
In the earlier GameBoard class, the mCells data member is a vector of vectors of pointers, which requires special code for copying—thus the need for a copy constructor and copy assignment operator. In the Grid class, mCells is a vector of vectors of optional values, so the compiler-generated copy constructor and assignment operator are fine. However, as explained in Chapter 8, once you have a user-declared destructor, it’s deprecated for the compiler to implicitly generate a copy constructor or copy assignment operator, so the Grid class template explicitly defaults them. It also explicitly defaults the move constructor and move assignment operator. Here is the explicitly defaulted copy assignment operator:
Grid<T>& operator=(const Grid& rhs) = default;As you can see, the type of the rhs parameter is no longer a const GameBoard&, but a const
Grid&. You can also specify it as a const
Grid<T>&. Within a class definition, the compiler interprets Grid as Grid<T> where needed. However, outside a class definition you need to use Grid<T>. When you write a class template, what you used to think of as the class name (Grid) is actually the template name. When you want to talk about actual Grid classes or types, you discuss them as Grid<T>, instantiations of the Grid class template for a certain type, such as int, SpreadsheetCell, or ChessPiece.
Because mCells is not storing pointers anymore, but optional values, the at() methods now return optional<T>& or const optional<T>& instead of unique_ptrs:
std::optional<T>& at(size_t x, size_t y);const std::optional<T>& at(size_t x, size_t y) const;
The template <typename T> specifier must precede each method definition for the Grid template. The constructor looks like this:
template <typename T>Grid<T>::Grid(size_t width, size_t height): mWidth(width), mHeight(height){mCells.resize(mWidth);for (auto& column : mCells) {// Equivalent to://for (std::vector<std::optional<T>>& column : mCells) {column.resize(mHeight);}}
Note that the class name before the :: is Grid<T>, not Grid. You must specify Grid<T> as the class name in all your methods and static data member definitions. The body of the constructor is identical to the GameBoard constructor.
The rest of the method definitions are also similar to their equivalents in the GameBoard class with the exception of the appropriate template and Grid<T> syntax changes:
template <typename T>void Grid<T>::verifyCoordinate(size_t x, size_t y) const{if (x >= mWidth || y >= mHeight) {throw std::out_of_range("");}}template <typename T>const std::optional<T>& Grid<T>::at(size_t x, size_t y) const{verifyCoordinate(x, y);return mCells[x][y];}template <typename T>std::optional<T>& Grid<T>::at(size_t x, size_t y){return const_cast<std::optional<T>&>(std::as_const(*this).at(x, y));}
When you want to create grid objects, you cannot use Grid alone as a type; you must specify the type that will be stored in that Grid. Creating an object of a class template for a specific type is called instantiating the template. Here is an example:
Grid<int> myIntGrid; // declares a grid that stores ints,// using default arguments for the constructorGrid<double> myDoubleGrid(11, 11); // declares an 11x11 Grid of doublesmyIntGrid.at(0, 0) = 10;int x = myIntGrid.at(0, 0).value_or(0);Grid<int> grid2(myIntGrid); // Copy constructorGrid<int> anotherIntGrid;anotherIntGrid = grid2; // Assignment operator
Note that the type of myIntGrid, grid2, and anotherIntGrid is Grid<int>. You cannot store SpreadsheetCells or ChessPieces in these grids; the compiler will generate an error if you try to do so.
Note also the use of value_or(). The at() method returns an std::optional reference. This optional can contain a value or not. The value_or() method returns the value inside the optional if there is a value; otherwise it returns the argument given to value_or().
The type specification is important; neither of the following two lines compiles:
Grid test; // WILL NOT COMPILEGrid<> test; // WILL NOT COMPILE
The first line causes your compiler to complain with something like, “use of class template requires template argument list.” The second line causes it to say something like, “too few template arguments.”
If you want to declare a function or method that takes a Grid object, you must specify the type stored in that grid as part of the Grid type:
void processIntGrid(Grid<int>& grid){// Body omitted for brevity}
Alternatively, you can use function templates, discussed later in this chapter, to write a function templatized on the type of the elements in the grid.
The Grid template can store more than just ints. For example, you can instantiate a Grid that stores SpreadsheetCells:
Grid<SpreadsheetCell> mySpreadsheet;SpreadsheetCell myCell(1.234);mySpreadsheet.at(3, 4) = myCell;
You can store pointer types as well:
Grid<const char*> myStringGrid;myStringGrid.at(2, 2) = "hello";
The type specified can even be another template type:
Grid<vector<int>> gridOfVectors;vector<int> myVector{ 1, 2, 3, 4 };gridOfVectors.at(5, 6) = myVector;
You can also dynamically allocate Grid template instantiations on the heap:
auto myGridOnHeap = make_unique<Grid<int>>(2, 2); // 2x2 Grid on the heapmyGridOnHeap->at(0, 0) = 10;int x = myGridOnHeap->at(0, 0).value_or(0);
Some of the examples in this book use templates with double angle brackets, as in this example:
std::vector<std::vector<T>> mCells;This works perfectly fine since C++11. However, before C++11, the double angle brackets >> could mean only one thing: the >> operator. Depending on the types involved, this >> operator could be a right bit-shift operation, or a stream extraction operator. This was annoying with template code, because you were forced to put a space between double angle brackets. The previous declaration had to be written as follows:
std::vector<std::vector<T> > mCells;This book uses the modern style without the spaces.
In order to understand the intricacies of templates, you need to learn how the compiler processes template code. When the compiler encounters template method definitions, it performs syntax checking, but doesn’t actually compile the templates. It can’t compile template definitions because it doesn’t know for which types they will be used. It’s impossible for a compiler to generate code for something like x = y without knowing the types of x and y.
When the compiler encounters an instantiation of the template, such as Grid<int> myIntGrid, it writes code for an int version of the Grid template by replacing each T in the class template definition with int. When the compiler encounters a different instantiation of the template, such as Grid<SpreadsheetCell>
mySpreadsheet, it writes another version of the Grid class for SpreadsheetCells. The compiler just writes the code that you would write if you didn’t have template support in the language and had to write separate classes for each element type. There’s no magic here; templates just automate an annoying process. If you don’t instantiate a class template for any types in your program, then the class method definitions are never compiled.
This instantiation process explains why you need to use the Grid<T> syntax in various places in your definition. When the compiler instantiates the template for a particular type, such as int, it replaces T with int, so that Grid<int> is the type.
The compiler always generates code for all virtual methods of a generic class. However, for non-virtual methods, the compiler generates code only for those non-virtual methods that you actually call for a particular type. For example, given the preceding Grid class template, suppose that you write this code (and only this code) in main():
Grid<int> myIntGrid;myIntGrid.at(0, 0) = 10;
The compiler generates only the zero-argument constructor, the destructor, and the non-const
at() method for an int version of the Grid. It does not generate other methods like the copy constructor, the assignment operator, or getHeight().
When you write code that is independent of types, you must assume certain things about those types. For example, in the Grid template, you assume that the element type (represented by T) is destructible. The Grid template implementation doesn’t assume much. However, other templates could assume that their template type parameters support, for example, an assignment operator.
If you attempt to instantiate a template with a type that does not support all the operations used by the template in your particular program, the code will not compile, and the error messages will almost always be quite obscure. However, even if the type you want to use doesn’t support the operations required by all the template code, you can exploit selective instantiation to use some methods but not others.
Normally you put class definitions in a header file and method definitions in a source file. Code that creates or uses objects of the class #includes the header file and obtains access to the method code via the linker. Templates don’t work that way. Because they are “templates” for the compiler to generate the actual methods for the instantiated types, both class template definitions and method definitions must be available to the compiler in any source file that uses them. There are several mechanisms to obtain this inclusion.
You can place the method definitions directly in the same header file where you define the class itself. When you #include this file in a source file where you use the template, the compiler will have access to all the code it needs. This mechanism is used for the previous Grid implementation.
Alternatively, you can place the template method definitions in a separate header file that you #include in the header file with the class definitions. Make sure the #include for the method definitions follows the class definition; otherwise, the code won’t compile. For example:
template <typename T>class Grid{// Class definition omitted for brevity};#include "GridDefinitions.h"
Any client that wants to use the Grid template needs only to include the Grid.h header file. This division helps to keep the distinction between class definitions and method definitions.
Method implementations look strange in header files. If that syntax annoys you, there is a way that you can place the method definitions in a source file. However, you still need to make the definitions available to the code that uses the template, which you can do by #includeing the method implementation source file in the class template definition header file. That sounds odd if you’ve never seen it before, but it’s legal in C++. The header file looks like this:
template <typename T>class Grid{// Class definition omitted for brevity};#include "Grid.cpp"
When using this technique, make sure you don’t add the Grid.cpp file to your project, because it is not supposed to be, and cannot be, compiled separately; it should be #included only in a header file!
You can actually call your file with method implementations anything you want. Some programmers like to give source files that are included an .inl extension, for example, Grid.inl.
If you want your class templates to be used only with certain known types, you can use the following technique.
Suppose you want the Grid class to be instantiated only for int, double, and vector<int>. The header file should look like this:
template <typename T>class Grid{// Class definition omitted for brevity};
Note that there are no method definitions in this header file and that there is no #include at the end!
In this case, you need a real .cpp file added to your project, which contains the method definitions and looks like this:
#include "Grid.h"#include <utility>template <typename T>Grid<T>::Grid(size_t width, size_t height): mWidth(width), mHeight(height){mCells.resize(mWidth);for (auto& column : mCells) {column.resize(mHeight);}}// Other method definitions omitted for brevity...
For this method to work, you need to explicitly instantiate the template for those types that you want to allow clients to use. At the end of the .cpp file you can do this as follows:
// Explicit instantiations for the types you want to allow.template class Grid<int>;template class Grid<double>;template class Grid<std::vector<int>>;
With these explicit instantiations, you disallow client code from using the Grid class template with other types, such as SpreadsheetCell.
In the Grid example, the Grid template has one template parameter: the type that is stored in the grid. When you write the class template, you specify the parameter list inside the angle brackets, like this:
template <typename T>This parameter list is similar to the parameter list in a function or method. As in functions and methods, you can write a class with as many template parameters as you want. Additionally, these parameters don’t have to be types, and they can have default values.
Non-type parameters are “normal” parameters such as ints and pointers: the kind of parameters with which you’re familiar from functions and methods. However, non-type template parameters can only be integral types (char, int, long, and so on), enumeration types, pointers, references, and std::nullptr_t. Starting with C++17, you can also specify auto, auto&, auto*, and so on, as the type of a non-type template parameter. In that case, the compiler deduces the type automatically.
In the Grid class template, you could use non-type template parameters to specify the height and width of the grid instead of specifying them in the constructor. The principle advantage to specifying non-type parameters in the template list instead of in the constructor is that the values are known before the code is compiled. Recall that the compiler generates code for templatized methods by substituting the template parameters before compiling. Thus, you can use a normal two-dimensional array in your implementation instead of a vector of vectors that is dynamically resized. Here is the new class definition:
template <typename T, size_t WIDTH, size_t HEIGHT>class Grid{public:Grid() = default;virtual ~Grid() = default;// Explicitly default a copy constructor and assignment operator.Grid(const Grid& src) = default;Grid<T, WIDTH, HEIGHT>& operator=(const Grid& rhs) = default;std::optional<T>& at(size_t x, size_t y);const std::optional<T>& at(size_t x, size_t y) const;size_t getHeight() const { return HEIGHT; }size_t getWidth() const { return WIDTH; }private:void verifyCoordinate(size_t x, size_t y) const;std::optional<T> mCells[WIDTH][HEIGHT];};
This class does not explicitly default the move constructor and move assignment operator, because C-style arrays do not support move semantics anyways.
Note that the template parameter list requires three parameters: the type of objects stored in the grid, and the width and height of the grid. The width and height are used to create a two-dimensional array to store the objects. Here are the class method definitions:
template <typename T, size_t WIDTH, size_t HEIGHT>void Grid<T, WIDTH, HEIGHT>::verifyCoordinate(size_t x, size_t y) const{if (x >= WIDTH || y >= HEIGHT) {throw std::out_of_range("");}}template <typename T, size_t WIDTH, size_t HEIGHT>const std::optional<T>& Grid<T, WIDTH, HEIGHT>::at(size_t x, size_t y) const{verifyCoordinate(x, y);return mCells[x][y];}template <typename T, size_t WIDTH, size_t HEIGHT>std::optional<T>& Grid<T, WIDTH, HEIGHT>::at(size_t x, size_t y){return const_cast<std::optional<T>&>(std::as_const(*this).at(x, y));}
Note that wherever you previously specified Grid<T> you must now specify Grid<T,
WIDTH,
HEIGHT> to represent the three template parameters.
You can instantiate this template and use it like this:
Grid<int, 10, 10> myGrid;Grid<int, 10, 10> anotherGrid;myGrid.at(2, 3) = 42;anotherGrid = myGrid;cout << anotherGrid.at(2, 3).value_or(0);
This code seems great, but unfortunately, there are more restrictions than you might initially expect. First, you can’t use a non-constant integer to specify the height or width. The following code doesn’t compile:
size_t height = 10;Grid<int, 10, height> testGrid; // DOES NOT COMPILE
However, if you define height as a constant, it compiles:
const size_t height = 10;Grid<int, 10, height> testGrid; // Compiles and works
constexpr functions with the correct return type also work. For example, if you have a constexpr function that returns a size_t, you can use it to initialize the height template parameter:
constexpr size_t getHeight() { return 10; }...Grid<double, 2, getHeight()> myDoubleGrid;
A second restriction might be more significant. Now that the width and height are template parameters, they are part of the type of each grid. That means that Grid<int,
10,
10> and Grid<int,
10,
11> are two different types. You can’t assign an object of one type to an object of the other, and variables of one type can’t be passed to functions or methods that expect variables of another type.
If you continue the approach of making height and width template parameters, you might want to provide defaults for the height and width non-type template parameters just as you did previously in the constructor of the Grid<T> class. C++ allows you to provide defaults for template parameters with a similar syntax. While you are at it, you could also provide a default for the T type parameter. Here is the class definition:
template <typename T = int, size_t WIDTH = 10, size_t HEIGHT = 10>class Grid{// Remainder is identical to the previous version};
You need not specify the default values for T, WIDTH, and HEIGHT in the template specification for the method definitions. For example, here is the implementation of at():
template <typename T, size_t WIDTH, size_t HEIGHT>const std::optional<T>& Grid<T, WIDTH, HEIGHT>::at(size_t x, size_t y) const{verifyCoordinate(x, y);return mCells[x][y];}
Now, you can instantiate a Grid without any template parameters, with only the element type, the element type and the width, or the element type, width, and height:
Grid<> myIntGrid;Grid<int> myGrid;Grid<int, 5> anotherGrid;Grid<int, 5, 5> aFourthGrid;
Note that if you don’t specify any class template parameters, you still need to specify an empty set of angle brackets. For example, the following does not compile!
Grid myIntGrid;The rules for default arguments in class template parameter lists are the same as for functions or methods; that is, you can provide defaults for parameters in order starting from the right.
Template Parameter Deduction for ConstructorsC++17 adds support to automatically deduce the template parameters from the arguments passed to a class template constructor. Before C++17, you always had to specify all the template parameters for a class template explicitly.
For example, the Standard Library has a class template called std::pair, defined in <utility>, and discussed in Chapter 17 in detail. For now, it suffices to know that a pair stores exactly two values of two possibly different types, which you have to specify as the template parameters:
std::pair<int, double> pair1(1, 2.3);To avoid the need of having to write the template parameters, a helper function template called std::make_pair() is available. Details of function templates are discussed later in this chapter. Function templates have always supported the automatic deduction of template parameters based on the arguments passed to the function template. So, make_pair() is capable of automatically deducing the template type parameters based on the values passed to it. For example, the compiler deduces pair<int,
double> for the following call:
auto pair2 = std::make_pair(1, 2.3);With C++17, such helper function templates are not necessary anymore. The compiler now automatically deduces the template type parameters based on the arguments passed to the constructor. For the pair class template, you can simply write the following code:
std::pair pair3(1, 2.3);Of course, this only works when all template parameters of a class template either have a default value, or are used as parameters in the constructor so they can be deduced.
You can also write your own user-defined deduction guides. These allow you to write rules for how the template parameters have to be deduced. This is an advanced topic, so it is not discussed in detail, although one example will demonstrate their power.
Suppose you have the following SpreadsheetCell class template:
template<typename T>class SpreadsheetCell{public:SpreadsheetCell(const T& t) : mContent(t) { }const T& getContent() const { return mContent; }private:T mContent;};
With automatic template parameter deduction, you can create a SpreadsheetCell with an std::string type:
std::string myString = "Hello World!";SpreadsheetCell cell(myString);
However, if you pass a const char* to the SpreadsheetCell constructor, then the type T is deduced as const
char*, which is not what you want. You can create the following user-defined deduction guide to cause it to deduce T as std::string when passing a const
char* as argument to the constructor:
SpreadsheetCell(const char*) -> SpreadsheetCell<std::string>;This guide has to be defined outside the class definition but inside the same namespace as the SpreadsheetCell class.
The general syntax is as follows. The explicit keyword is optional. It behaves the same as explicit for single-parameter constructors, so it only makes sense for deduction rules with one parameter.
explicit TemplateName(Parameters) -> DeducedTemplate;C++ allows you to templatize individual methods of a class. These methods can be inside a class template or in a non-templatized class. When you write a templatized class method, you are actually writing many different versions of that method for many different types. Method templates come in useful for assignment operators and copy constructors in class templates.
Consider the original Grid template with only one template parameter: the element type. You can instantiate grids of many different types, such as ints and doubles:
Grid<int> myIntGrid;Grid<double> myDoubleGrid;
However, Grid<int> and Grid<double> are two different types. If you write a function that takes an object of type Grid<double>, you cannot pass a Grid<int>. Even though you know that the elements of an int grid could be copied to the elements of a double grid, because the ints could be coerced into doubles, you cannot assign an object of type Grid<int> to one of type Grid<double> or construct a Grid<double> from a Grid<int>. Neither of the following two lines compiles:
myDoubleGrid = myIntGrid; // DOES NOT COMPILEGrid<double> newDoubleGrid(myIntGrid); // DOES NOT COMPILE
The problem is that the copy constructor and assignment operator for the Grid template are as follows,
Grid(const Grid& src);Grid<T>& operator=(const Grid& rhs);
which are equivalent to
Grid(const Grid<T>& src);Grid<T>& operator=(const Grid<T>& rhs);
The Grid copy constructor and operator= both take a reference to a const
Grid<T>. When you instantiate a Grid<double> and try to call the copy constructor and operator=, the compiler generates methods with these prototypes:
Grid(const Grid<double>& src);Grid<double>& operator=(const Grid<double>& rhs);
Note that there are no constructors or operator= that take a Grid<int> within the generated Grid<double> class.
Luckily, you can rectify this oversight by adding templatized versions of the copy constructor and assignment operator to the Grid class to generate methods that will convert from one grid type to another. Here is the new Grid class definition:
template <typename T>class Grid{public:// Omitted for brevitytemplate <typename E>Grid(const Grid<E>& src);template <typename E>Grid<T>& operator=(const Grid<E>& rhs);void swap(Grid& other) noexcept;// Omitted for brevity};
Examine the new templatized copy constructor first:
template <typename E>Grid(const Grid<E>& src);
You can see that there is another template declaration with a different typename, E (short for “element”). The class is templatized on one type, T, and the new copy constructor is also templatized on a different type, E. This twofold templatization allows you to copy grids of one type to another. Here is the definition of the new copy constructor:
template <typename T>template <typename E>Grid<T>::Grid(const Grid<E>& src): Grid(src.getWidth(), src.getHeight()){// The ctor-initializer of this constructor delegates first to the// non-copy constructor to allocate the proper amount of memory.// The next step is to copy the data.for (size_t i = 0; i < mWidth; i++) {for (size_t j = 0; j < mHeight; j++) {mCells[i][j] = src.at(i, j);}}}
As you can see, you must declare the class template line (with the T parameter) before the member template line (with the E parameter). You can’t combine them like this:
template <typename T, typename E> // Wrong for nested template constructor!Grid<T>::Grid(const Grid<E>& src)
In addition to the extra template parameter line before the constructor definition, note that you must use the public accessor methods getWidth(), getHeight(), and at() to access the elements of src. That’s because the object you’re copying to is of type Grid<T>, and the object you’re copying from is of type Grid<E>. They are not the same type, so you must use public methods.
The templatized assignment operator takes a const Grid<E>& but returns a Grid<T>&:
template <typename T>template <typename E>Grid<T>& Grid<T>::operator=(const Grid<E>& rhs){// no need to check for self-assignment because this version of// assignment is never called when T and E are the same// Copy-and-swap idiomGrid<T> temp(rhs); // Do all the work in a temporary instanceswap(temp); // Commit the work with only non-throwing operationsreturn *this;}
You need not check for self-assignment in the templatized assignment operator, because assignment of the same types still happens in the old, non-templatized, version of operator=, so there’s no way you can get self-assignment here.
The implementation of this assignment operator uses the copy-and-swap idiom introduced in Chapter 9. However, instead of using a friend swap() function, the Grid template uses a swap() method because function templates are only discussed later in this chapter. Note that this swap() method can only swap Grids of the same type, but that’s okay because the templatized assignment operator first converts the given Grid<E> to a Grid<T> called temp using the templatized copy constructor. Afterward, it uses the swap() method to swap this temporary Grid<T> with this, which is also of type Grid<T>. Here is the definition of the swap() method:
template <typename T>void Grid<T>::swap(Grid<T>& other) noexcept{using std::swap;swap(mWidth, other.mWidth);swap(mHeight, other.mHeight);swap(mCells, other.mCells);}
Looking at the earlier example with integer template parameters for HEIGHT and WIDTH, you see that a major problem is that the height and width become part of the types. This restriction prevents you from assigning a grid with one height and width to a grid with a different height and width. In some cases, however, it’s desirable to assign or copy a grid of one size to a grid of a different size. Instead of making the destination object a perfect clone of the source object, you would copy only those elements from the source array that fit in the destination array, padding the destination array with default values if the source array is smaller in either dimension. With method templates for the assignment operator and copy constructor, you can do exactly that, thus allowing assignment and copying of different-sized grids. Here is the class definition:
template <typename T, size_t WIDTH = 10, size_t HEIGHT = 10>class Grid{public:Grid() = default;virtual ~Grid() = default;// Explicitly default a copy constructor and assignment operator.Grid(const Grid& src) = default;Grid<T, WIDTH, HEIGHT>& operator=(const Grid& rhs) = default;template <typename E, size_t WIDTH2, size_t HEIGHT2>Grid(const Grid<E, WIDTH2, HEIGHT2>& src);template <typename E, size_t WIDTH2, size_t HEIGHT2>Grid<T, WIDTH, HEIGHT>& operator=(const Grid<E, WIDTH2, HEIGHT2>& rhs);void swap(Grid& other) noexcept;std::optional<T>& at(size_t x, size_t y);const std::optional<T>& at(size_t x, size_t y) const;size_t getHeight() const { return HEIGHT; }size_t getWidth() const { return WIDTH; }private:void verifyCoordinate(size_t x, size_t y) const;std::optional<T> mCells[WIDTH][HEIGHT];};
This new definition includes method templates for the copy constructor and assignment operator, plus a helper method swap(). Note that the non-templatized copy constructor and assignment operator are explicitly defaulted (because of the user-declared destructor). They simply copy or assign mCells from the source to the destination, which is exactly the semantics you want for two grids of the same size.
Here is the templatized copy constructor:
template <typename T, size_t WIDTH, size_t HEIGHT>template <typename E, size_t WIDTH2, size_t HEIGHT2>Grid<T, WIDTH, HEIGHT>::Grid(const Grid<E, WIDTH2, HEIGHT2>& src){for (size_t i = 0; i < WIDTH; i++) {for (size_t j = 0; j < HEIGHT; j++) {if (i < WIDTH2 && j < HEIGHT2) {mCells[i][j] = src.at(i, j);} else {mCells[i][j].reset();}}}}
Note that this copy constructor copies only WIDTH and HEIGHT elements in the x and y dimensions, respectively, from src, even if src is bigger than that. If src is smaller in either dimension, the std::optional objects in the extra spots are reset using the reset() method.
Here are the implementations of swap() and operator=:
template <typename T, size_t WIDTH, size_t HEIGHT>void Grid<T, WIDTH, HEIGHT>::swap(Grid<T, WIDTH, HEIGHT>& other) noexcept{using std::swap;swap(mCells, other.mCells);}template <typename T, size_t WIDTH, size_t HEIGHT>template <typename E, size_t WIDTH2, size_t HEIGHT2>Grid<T, WIDTH, HEIGHT>& Grid<T, WIDTH, HEIGHT>::operator=(const Grid<E, WIDTH2, HEIGHT2>& rhs){// no need to check for self-assignment because this version of// assignment is never called when T and E are the same// Copy-and-swap idiomGrid<T, WIDTH, HEIGHT> temp(rhs); // Do all the work in a temp instanceswap(temp); // Commit the work with only non-throwing operationsreturn *this;}
You can provide alternate implementations of class templates for specific types. For example, you might decide that the Grid behavior for const
char*s (C-style strings) doesn’t make sense. A Grid<const
char*> will store its elements in a vector<vector<optional<const
char*>>>. The copy constructor and assignment operator will perform shallow copies of this const
char* pointer type. For const
char*s, it might make sense to do a deep copy of the string. The easiest solution for this is to write an alternative implementation specifically for const
char*s, which stores the strings in a vector<vector<optional<string>>> and converts C-style strings into C++ strings so that their memory is automatically handled.
Alternate implementations of templates are called template specializations. You might find the syntax to be a little weird. When you write a class template specialization, you must specify that it’s a template, and that you are writing the version of the template for that particular type. Here is the syntax for specializing the original version of the Grid for const char*s:
// When the template specialization is used, the original template must be// visible too. Including it here ensures that it will always be visible// when this specialization is visible.#include "Grid.h"template <>class Grid<const char*>{public:explicit Grid(size_t width = kDefaultWidth,size_t height = kDefaultHeight);virtual ~Grid() = default;// Explicitly default a copy constructor and assignment operator.Grid(const Grid& src) = default;Grid<const char*>& operator=(const Grid& rhs) = default;// Explicitly default a move constructor and assignment operator.Grid(Grid&& src) = default;Grid<const char*>& operator=(Grid&& rhs) = default;std::optional<std::string>& at(size_t x, size_t y);const std::optional<std::string>& at(size_t x, size_t y) const;size_t getHeight() const { return mHeight; }size_t getWidth() const { return mWidth; }static const size_t kDefaultWidth = 10;static const size_t kDefaultHeight = 10;private:void verifyCoordinate(size_t x, size_t y) const;std::vector<std::vector<std::optional<std::string>>> mCells;size_t mWidth, mHeight;};
Note that you don’t refer to any type variable, such as T, in the specialization: you work directly with const
char*s. One obvious question at this point is why this class is still a template. That is, what good is the following syntax?
template <>class Grid<const char*>
This syntax tells the compiler that this class is a const
char* specialization of the Grid class. Suppose that you didn’t use that syntax and just tried to write this:
class GridThe compiler wouldn’t let you do that because there is already a class named Grid (the original class template). Only by specializing it can you reuse the name. The main benefit of specializations is that they can be invisible to the user. When a user creates a Grid of ints or SpreadsheetCells, the compiler generates code from the original Grid template. When the user creates a Grid of const
char*s, the compiler uses the const
char* specialization. This can all be “behind the scenes.”
Grid<int> myIntGrid; // Uses original Grid templateGrid<const char*> stringGrid1(2, 2); // Uses const char* specializationconst char* dummy = "dummy";stringGrid1.at(0, 0) = "hello";stringGrid1.at(0, 1) = dummy;stringGrid1.at(1, 0) = dummy;stringGrid1.at(1, 1) = "there";Grid<const char*> stringGrid2(stringGrid1);
When you specialize a template, you don’t “inherit” any code: Specializations are not like derivations. You must rewrite the entire implementation of the class. There is no requirement that you provide methods with the same names or behavior. As an example, the const
char* specialization of Grid implements the at() methods by returning an std::optional<std::string>, not an std::optional<const
char*>. As a matter of fact, you could write a completely different class with no relation to the original. Of course, that would abuse the template specialization ability, and you shouldn’t do it without good reason. Here are the implementations for the methods of the const
char* specialization. Unlike in the template definitions, you do not repeat the template<> syntax before each method definition.
Grid<const char*>::Grid(size_t width, size_t height): mWidth(width), mHeight(height){mCells.resize(mWidth);for (auto& column : mCells) {column.resize(mHeight);}}void Grid<const char*>::verifyCoordinate(size_t x, size_t y) const{if (x >= mWidth || y >= mHeight) {throw std::out_of_range("");}}const std::optional<std::string>& Grid<const char*>::at(size_t x, size_t y) const{verifyCoordinate(x, y);return mCells[x][y];}std::optional<std::string>& Grid<const char*>::at(size_t x, size_t y){return const_cast<std::optional<std::string>&>(std::as_const(*this).at(x, y));}
This section discussed how to use class template specialization. Template specialization allows you to write a special implementation for a template, with the template types replaced by specific types. Chapter 22 continues the discussion of specialization with a more advanced feature called partial specialization.
You can inherit from class templates. If the derived class inherits from the template itself, it must be a template as well. Alternatively, you can derive from a specific instantiation of the class template, in which case your derived class does not need to be a template. As an example of the former, suppose you decide that the generic Grid class doesn’t provide enough functionality to use as a game board. Specifically, you would like to add a move() method to the game board that moves a piece from one location on the board to another. Here is the class definition for the GameBoard template:
#include "Grid.h"template <typename T>class GameBoard : public Grid<T>{public:explicit GameBoard(size_t width = Grid<T>::kDefaultWidth,size_t height = Grid<T>::kDefaultHeight);void move(size_t xSrc, size_t ySrc, size_t xDest, size_t yDest);};
This GameBoard template derives from the Grid template, and thereby inherits all its functionality. You don’t need to rewrite at(), getHeight(), or any of the other methods. You also don’t need to add a copy constructor, operator=, or destructor, because you don’t have any dynamically allocated memory in the GameBoard.
The inheritance syntax looks normal, except that the base class is Grid<T>, not Grid. The reason for this syntax is that the GameBoard template doesn’t really derive from the generic Grid template. Rather, each instantiation of the GameBoard template for a specific type derives from the Grid instantiation for that type. For example, if you instantiate a GameBoard with a ChessPiece type, then the compiler generates code for a Grid<ChessPiece> as well. The “: public Grid<T>” syntax says that this class inherits from whatever Grid instantiation makes sense for the T type parameter. Note that the C++ name lookup rules for template inheritance require you to specify that kDefaultWidth and kDefaultHeight are declared in, and thus dependent on, the Grid<T> base class.
Here are the implementations of the constructor and the move() method. Note the use of Grid<T> in the call to the base class constructor. Additionally, although many compilers don’t enforce it, the name lookup rules require you to use the this pointer or Grid<T>:: to refer to data members and methods in the base class template.
template <typename T>GameBoard<T>::GameBoard(size_t width, size_t height): Grid<T>(width, height){}template <typename T>void GameBoard<T>::move(size_t xSrc, size_t ySrc, size_t xDest, size_t yDest){Grid<T>::at(xDest, yDest) = std::move(Grid<T>::at(xSrc, ySrc));Grid<T>::at(xSrc, ySrc).reset(); // Reset source cell// Or:// this->at(xDest, yDest) = std::move(this->at(xSrc, ySrc));// this->at(xSrc, ySrc).reset();}
You can use the GameBoard template as follows:
GameBoard<ChessPiece> chessboard(8, 8);ChessPiece pawn;chessBoard.at(0, 0) = pawn;chessBoard.move(0, 0, 0, 1);
Some programmers find the distinction between template inheritance and template specialization confusing. The following table summarizes the differences.
| INHERITANCE | SPECIALIZATION | |
| Reuses code? | Yes: Derived classes contain all base class data members and methods. | No: you must rewrite all required code in the specialization. |
| Reuses name? | No: the derived class name must be different from the base class name. | Yes: the specialization must have the same name as the original. |
| Supports polymorphism? | Yes: objects of the derived class can stand in for objects of the base class. | No: each instantiation of a template for a type is a different type. |
Chapter 11 introduces the concept of type aliases and typedefs. They allow you to give other names to specific types. To refresh your memory, you could, for example, write the following type alias to give a second name to type int:
using MyInt = int;Similarly, you can use a type alias to give another name to a templatized class. Suppose you have the following class template:
template<typename T1, typename T2>class MyTemplateClass { /* ... */ };
You can define the following type alias in which you specify both class template type parameters:
using OtherName = MyTemplateClass<int, double>;A typedef can also be used instead of such a type alias.
It’s also possible to only specify some of the types, and keep the other types as template type parameters. This is called an alias template. For example:
template<typename T1>using OtherName = MyTemplateClass<T1, double>;
This is something you cannot do with a typedef.
You can also write templates for stand-alone functions. For example, you could write a generic function to find a value in an array and return its index:
static const size_t NOT_FOUND = static_cast<size_t>(-1);template <typename T>size_t Find(const T& value, const T* arr, size_t size){for (size_t i = 0; i < size; i++) {if (arr[i] == value) {return i; // Found it; return the index}}return NOT_FOUND; // Failed to find it; return NOT_FOUND}
The Find() function template can work on arrays of any type. For example, you could use it to find the index of an int in an array of ints, or a SpreadsheetCell in an array of SpreadsheetCells.
You can call the function in two ways: explicitly specifying the type parameter with angle brackets, or omitting the type and letting the compiler deduce the type parameter from the arguments. Here are some examples:
int myInt = 3, intArray[] = {1, 2, 3, 4};const size_t sizeIntArray = std::size(intArray);size_t res;res = Find(myInt, intArray, sizeIntArray); // calls Find<int> by deductionres = Find<int>(myInt, intArray, sizeIntArray); // calls Find<int> explicitlyif (res != NOT_FOUND)cout << res << endl;elsecout << "Not found" << endl;double myDouble = 5.6, doubleArray[] = {1.2, 3.4, 5.7, 7.5};const size_t sizeDoubleArray = std::size(doubleArray);// calls Find<double> by deductionres = Find(myDouble, doubleArray, sizeDoubleArray);// calls Find<double> explicitlyres = Find<double>(myDouble, doubleArray, sizeDoubleArray);if (res != NOT_FOUND)cout << res << endl;elsecout << "Not found" << endl;//res = Find(myInt, doubleArray, sizeDoubleArray); // DOES NOT COMPILE!// Arguments are different types.// calls Find<double> explicitly, even with myIntres = Find<double>(myInt, doubleArray, sizeDoubleArray);SpreadsheetCell cell1(10), cellArray[] ={SpreadsheetCell(4), SpreadsheetCell(10)};const size_t sizeCellArray = std::size(cellArray);res = Find(cell1, cellArray, sizeCellArray);res = Find<SpreadsheetCell>(cell1, cellArray, sizeCellArray);
The previous implementation of the Find() function requires the size of the array as one of the parameters. Sometimes the compiler knows the exact size of an array, for example, for stack-based arrays. It would be nice to be able to call Find() with such arrays without the need to pass it the size of the array. This can be accomplished by adding the following function template. The implementation just forwards the call to the previous Find() function template. This also demonstrates that function templates can take non-type parameters, just like class templates.
template <typename T, size_t N>size_t Find(const T& value, const T(&arr)[N]){return Find(value, arr, N);}
The syntax of this version of Find() looks a bit strange, but its use is straightforward, as in this example:
int myInt = 3, intArray[] = {1, 2, 3, 4};size_t res = Find(myInt, intArray);
Like class template method definitions, function template definitions (not just the prototypes) must be available to all source files that use them. Thus, you should put the definitions in header files if more than one source file uses them, or use explicit instantiations as discussed earlier in this chapter.
Template parameters of function templates can have defaults, just like class templates.
Just as you can specialize class templates, you can specialize function templates. For example, you might want to write a Find() function for const
char* C-style strings that compares them with strcmp() instead of operator==. Here is a specialization of the Find() function to do this:
template<>size_t Find<const char*>(const char* const& value,const char* const* arr, size_t size){for (size_t i = 0; i < size; i++) {if (strcmp(arr[i], value) == 0) {return i; // Found it; return the index}}return NOT_FOUND; // Failed to find it; return NOT_FOUND}
You can omit the <const
char*> in the function name when the parameter type can be deduced from the arguments, making your prototype look like this:
template<>size_t Find(const char* const& value, const char* const* arr, size_t size)
However, the deduction rules are tricky when you involve overloading as well (see the next section), so, in order to avoid mistakes, it’s better to note the type explicitly.
Although the specialized find() function could take just const
char* instead of const
char* const& as its first parameter, it’s best to keep the arguments parallel to the non-specialized version of the function for the deduction rules to function properly.
You can use this specialization as follows:
const char* word = "two";const char* words[] = {"one", "two", "three", "four"};const size_t sizeWords = std::size(words);size_t res;// Calls const char* specializationres = Find<const char*>(word, words, sizeWords);// Calls const char* specializationres = Find(word, words, sizeWords);
You can also overload function templates with non-template functions. For example, instead of writing a Find() template specialization for const
char*, you could write a non-template Find() function that works on const
char*s:
size_t Find(const char* const& value, const char* const* arr, size_t size){for (size_t i = 0; i < size; i++) {if (strcmp(arr[i], value) == 0) {return i; // Found it; return the index}}return NOT_FOUND; // Failed to find it; return NOT_FOUND}
This function is identical in behavior to the specialized version in the previous section. However, the rules for when it is called are different:
const char* word = "two";const char* words[] = {"one", "two", "three", "four"};const size_t sizeWords = std::size(words);size_t res;// Calls template with T=const char*res = Find<const char*>(word, words, sizeWords);res = Find(word, words, sizeWords); // Calls non-template function!
Thus, if you want your function to work both when const
char* is explicitly specified and via deduction when it is not, you should write a specialized template version instead of a non-template, overloaded version.
It’s possible to write both a specialized Find() template for const
char*s and a stand-alone Find() function for const
char*s. The compiler always prefers the non-template function to a templatized version. However, if you specify the template instantiation explicitly, the compiler will be forced to use the template version:
const char* word = "two";const char* words[] = {"one", "two", "three", "four"};const size_t sizeWords = std::size(words);size_t res;// Calls const char* specialization of the templateres = Find<const char*>(word, words, sizeWords);res = Find(word, words, sizeWords); // Calls the Find non-template function
Function templates are useful when you want to overload operators in a class template. For example, you might want to overload the addition operator (operator+) for the Grid class template to be able to add two grids together. The result will be a Grid with the same size as the smallest Grid of the two operands. Corresponding cells are only added together if both cells contain an actual value. Suppose you want to make your operator+ a stand-alone function template. The definition, which should go directly in Grid.h, looks as follows:
template <typename T>Grid<T> operator+(const Grid<T>& lhs, const Grid<T>& rhs){size_t minWidth = std::min(lhs.getWidth(), rhs.getWidth());size_t minHeight = std::min(lhs.getHeight(), rhs.getHeight());Grid<T> result(minWidth, minHeight);for (size_t y = 0; y < minHeight; ++y) {for (size_t x = 0; x < minWidth; ++x) {const auto& leftElement = lhs.mCells[x][y];const auto& rightElement = rhs.mCells[x][y];if (leftElement.has_value() && rightElement.has_value())result.at(x, y) = leftElement.value() + rightElement.value();}}return result;}
To query whether an std::optional contains an actual value, you use the has_value() method, while value() is used to retrieve this value.
This function template works on any Grid, as long as there is an addition operator for the type of elements stored in the grid. The only problem with this implementation is that it accesses private member mCells of the Grid class. The obvious solution is to use the public at() method, but let’s see how you can make a function template a friend of a class template. For this example, you can make the operator a friend of the Grid class. However, both the Grid class and the operator+ are templates. What you really want is for each instantiation of operator+ for a particular type T to be a friend of the Grid template instantiation for that type. The syntax looks like this:
// Forward declare Grid template.template <typename T> class Grid;// Prototype for templatized operator+.template<typename T>Grid<T> operator+(const Grid<T>& lhs, const Grid<T>& rhs);template <typename T>class Grid{public:// Omitted for brevityfriend Grid<T> operator+ <T>(const Grid<T>& lhs, const Grid<T>& rhs);// Omitted for brevity};
This friend declaration is tricky: you’re saying that, for an instance of the template with type T, the T instantiation of operator+ is a friend. In other words, there is a one-to-one mapping of friends between the class instantiations and the function instantiations. Note particularly the explicit template specification <T> on operator+ (the space after operator+ is optional). This syntax tells the compiler that operator+ is itself a template.
The compiler deduces the type of the template parameters based on the arguments passed to the function template. Template parameters that cannot be deduced have to be specified explicitly.
For example, the following add() function template requires three template parameters: the type of the return value, and the types of the two operands:
template<typename RetType, typename T1, typename T2>RetType add(const T1& t1, const T2& t2) { return t1 + t2; }
You can call this function template specifying all three parameters as follows:
auto result = add<long long, int, int>(1, 2);However, because the template parameters T1 and T2 are parameters to the function, the compiler can deduce those two parameters, so you can call add() by only specifying the type for the return value:
auto result = add<long long>(1, 2);Of course, this only works when the parameters to deduce are last in the list of parameters. Suppose the function template is defined as follows:
template<typename T1, typename RetType, typename T2>RetType add(const T1& t1, const T2& t2) { return t1 + t2; }
You have to specify RetType, because the compiler cannot deduce that type. However, because RetType is the second parameter, you have to explicitly specify T1 as well:
auto result = add<int, long long>(1, 2);You can also provide a default value for the return type template parameter so that you can call add() without specifying any types:
template<typename RetType = long long, typename T1, typename T2>RetType add(const T1& t1, const T2& t2) { return t1 + t2; }...auto result = add(1, 2);
Continuing the example of the add() function template, wouldn’t it be nice to let the compiler deduce the type of the return value? It would; however, the return type depends on the template type parameters, so how can you do this? For example, take the following templatized function:
template<typename T1, typename T2>RetType add(const T1& t1, const T2& t2) { return t1 + t2; }
In this example, RetType should be the type of the expression t1+t2, but you don’t know this because you don’t know what T1 and T2 are.
As discussed in Chapter 1, since C++14 you can ask the compiler to automatically deduce the function return type. So, you can simply write add() as follows:
template<typename T1, typename T2>auto add(const T1& t1, const T2& t2){return t1 + t2;}
However, using auto to deduce the type of an expression strips away reference and const qualifiers; decltype does not strip those. Before continuing with the add() function template, let’s look at the differences between auto and decltype using a non-template example. Suppose you have the following function:
const std::string message = "Test";const std::string& getString(){return message;}
You can call getString() and store the result in a variable with the type specified as auto as follows:
auto s1 = getString();Because auto strips reference and const qualifiers, s1 is of type string, and thus a copy is made. If you want a const reference, you can explicitly make it a reference and mark it const as follows:
const auto& s2 = getString();An alternative solution is to use decltype, which does not strip anything:
decltype(getString()) s3 = getString();In this case, s3 is of type const string&; however, there is code duplication because you need to specify getString() twice, which can be cumbersome when getString() is a more complicated expression.
This is solved with decltype(auto):
decltype(auto) s4 = getString();s4 is also of type const string&.
So, with this knowledge, we can write our add() function template using decltype(auto) to avoid stripping any const and reference qualifiers:
template<typename T1, typename T2>decltype(auto) add(const T1& t1, const T2& t2){return t1 + t2;}
Before C++14—that is, before function return type deduction and decltype(auto) were supported—the problem was solved using decltype(expression), introduced with C++11. For example, you would think you could write the following:
template<typename T1, typename T2>decltype(t1+t2) add(const T1& t1, const T2& t2) { return t1 + t2; }
However, this is wrong. You are using t1 and t2 in the beginning of the prototype line, but these are not yet known. t1 and t2 become known once the semantic analyzer reaches the end of the parameter list.
This problem used to be solved with the alternative function syntax. Note that in this syntax, the return type is specified after the parameter list (trailing return type); thus, the names of the parameters (and their types, and consequently, the type t1+t2) are known:
template<typename T1, typename T2>auto add(const T1& t1, const T2& t2) -> decltype(t1+t2){return t1 + t2;}
However, now that C++ supports auto return type deduction and decltype(auto), it is recommended to use one of these mechanisms, instead of the alternative function syntax.
In addition to class templates, class method templates, and function templates, C++14 adds the ability to write variable templates. The syntax is as follows:
template <typename T>constexpr T pi = T(3.141592653589793238462643383279502884);
This is a variable template for the value of pi. To get pi in a certain type, you use the following syntax:
float piFloat = pi<float>;long double piLongDouble = pi<long double>;
You will always get the closest value of pi representable in the requested type. Just like other types of templates, variable templates can also be specialized.
This chapter started a discussion on using templates for generic programming. You saw the syntax on how to write templates and examples where templates are really useful. It explained how to write class templates, how to organize your code in different files, how to use template parameters, and how to templatize methods of a class. It further discussed how to use class template specialization to write special implementations of a template where the template parameters are replaced with specific arguments. The chapter finished with an explanation of function templates and variable templates.
Chapter 22 continues the discussion on templates with some more advanced features such as variadic templates and metaprogramming.
The stream metaphor takes a bit of getting used to. At first, streams may seem more complex than traditional C-style I/O, such as printf(). In reality, they seem complicated initially only because there is a deeper metaphor behind streams than there is behind printf(). Don’t worry, though; after a few examples, you’ll never look back.
Chapter 1 compares the cout stream to a laundry chute for data. You throw some variables down the stream, and they are written to the user’s screen, or console. More generally, all streams can be viewed as data chutes. Streams vary in their direction and their associated source or destination. For example, the cout stream that you are already familiar with is an output stream, so its direction is “out.” It writes data to the console so its associated destination is “console.” The c in cout does not stand for “console” as you might expect, but stands for “character” as it’s a character-based stream. There is another standard stream called cin that accepts input from the user. Its direction is “in,” and its associated source is “console.” As with cout, the c in cin stands for “character.” Both cout and cin are predefined instances of streams that are defined within the std namespace in C++. The following table gives a brief description of all predefined streams.
The difference between buffered and unbuffered streams is that a buffered stream does not immediately send the data to the destination, but instead, it buffers incoming data and then sends it in blocks. An unbuffered stream, on the other hand, immediately sends the data to the destination. Buffering is usually done to improve performance, as certain destinations, such as files, perform better when writing bigger blocks at once. Note that you can always force a buffered stream to send all its currently buffered data to the destination by flushing its buffer using the flush() method.
| STREAM | DESCRIPTION |
cin |
An input stream, reads data from the “input console.” |
cout |
A buffered output stream, writes data to the “output console.” |
cerr |
An unbuffered output stream, writes data to the “error console,” which is often the same as the “output console.” |
clog |
A buffered version of cerr. |
There are also wide-character versions available of these streams: wcin, wcout, wcerr, and wclog. Wide characters are discussed in Chapter 19.
Note that graphical user interface applications normally do not have a console; that is, if you write something to cout, the user will not see it. If you are writing a library, you should never assume the existence of cout, cin, cerr, or clog because you never know whether your library will be used in a console or in a GUI application.
Another important aspect of streams is that they include data but also have a so-called current position. The current position is the position in the stream where the next read or write operation will take place.
Streams as a concept can be applied to any object that accepts data or emits data. You could write a stream-based network class or stream-based access to a MIDI-based instrument. In C++, there are three common sources and destinations for streams: console, file, and string.
You have already read many examples of user, or console, streams. Console input streams make programs interactive by allowing input from the user at run time. Console output streams provide feedback to the user and output results.
File streams, as the name implies, read data from and write data to a file system. File input streams are useful for reading configuration data and saved files, or for batch processing file-based data. File output streams are useful for saving state and providing output. File streams subsume the functionality of the C functions fprintf(), fwrite(), and fputs() for output, and fscanf(), fread(), and fgets() for input.
String streams are an application of the stream metaphor to the string type. With a string stream, you can treat character data just as you would treat any other stream. For the most part, this is merely a handy syntax for functionality that could be handled through methods on the string class. However, using stream syntax provides opportunities for optimization and can be far more convenient and more efficient than direct use of the string class. String streams subsume the functionality of sprintf(), sprintf_s(), sscanf(), and other forms of C string-formatting functions.
The rest of this section deals with console streams (cin and cout). Examples of file and string streams are provided later in this chapter. Other types of streams, such as printer output or network I/O, are often platform dependent, so they are not covered in this book.
Output using streams is introduced in Chapter 1 and is used in almost every chapter in this book. This section briefly revisits some of the basics and introduces material that is more advanced.
Output streams are defined in the <ostream> header file. Most programmers include <iostream> in their programs, which in turn includes the headers for both input streams and output streams. The <iostream> header also declares all predefined stream instances: cout, cin, cerr, clog, and the wide versions.
The << operator is the simplest way to use output streams. C++ basic types, such as ints, pointers, doubles, and characters, can be output using <<. In addition, the C++ string class is compatible with <<, and C-style strings are properly output as well. Following are some examples of using <<:
int i = 7;cout << i << endl;char ch = 'a';cout << ch << endl;string myString = "Hello World.";cout << myString << endl;
The output is as follows:
7aHello World.
The cout stream is the built-in stream for writing to the console, or standard output. You can “chain” uses of << together to output multiple pieces of data. This is because the << operator returns a reference to the stream as its result so you can immediately use << again on the same stream. Here is an example:
int j = 11;cout << "The value of j is " << j << "!" << endl;
The output is as follows:
The value of j is 11!C++ streams correctly parse C-style escape sequences, such as strings that contain \n. You can also use std::endl to start a new line. The difference between using \n and endl is that \n just starts a new line while endl also flushes the buffer. Watch out with endl because too many flushes might hurt performance. The following example uses endl to output and flush several lines of text with just one line of code:
cout << "Line 1" << endl << "Line 2" << endl << "Line 3" << endl;The output is as follows:
Line 1Line 2Line 3
The << operator is, without a doubt, the most useful part of output streams. However, there is additional functionality to be explored. If you look at the <ostream> header file, you’ll see many lines of overloaded definitions of the << operator to support outputting all kinds of different data types. You’ll also find some useful public methods.
put() and write() are raw output methods. Instead of taking an object or variable that has some defined behavior for output, put() accepts a single character, while write() accepts a character array. The data passed to these methods is output as is, without any special formatting or processing. For example, the following code snippet shows how to output a C-style string to the console without using the << operator:
const char* test = "hello there\n";cout.write(test, strlen(test));
The next snippet shows how to write a single character to the console by using the put() method:
cout.put('a');When you write to an output stream, the stream does not necessarily write the data to its destination right away. Most output streams buffer, or accumulate data instead of writing it out as soon as it comes in. This is usually done to improve performance. Certain stream destinations, such as files, are much more performant if data is written in larger blocks, instead of for example character-by-character. The stream flushes, or writes out the accumulated data, when one of the following conditions occurs:
endl marker, is reached.cin for input, cout will flush). In the section, “File Streams,” you will learn how to establish this type of link.One way to explicitly tell a stream to flush is to call its flush() method, as in the following code:
cout << "abc";cout.flush(); // abc is written to the console.cout << "def";cout << endl; // def is written to the console.
Output errors can arise in a variety of situations. Perhaps you are trying to open a non-existing file. Maybe a disk error has prevented a write operation from succeeding, for example, because the disk is full. None of the streams’ code you have read up until this point has considered these possibilities, mainly for brevity. However, it is vital that you address any error conditions that occur.
When a stream is in its normal usable state, it is said to be “good.” The good() method can be called directly on a stream to determine whether or not the stream is currently good.
if (cout.good()) {cout << "All good" << endl;}
The good() method provides an easy way to obtain basic information about the validity of the stream, but it does not tell you why the stream is unusable. There is a method called bad() that provides a bit more information. If bad() returns true, it means that a fatal error has occurred (as opposed to any nonfatal condition like end-of-file, eof()). Another method, fail(), returns true if the most recent operation has failed; however, it doesn’t say anything about the next operation, which can either succeed or fail as well. For example, after calling flush() on an output stream, you could call fail() to make sure the flush was successful.
cout.flush();if (cout.fail()) {cerr << "Unable to flush to standard out" << endl;}
Streams have a conversion operator to convert to type bool. This conversion operator returns the same as calling !fail(). So, the previous code snippet can be rewritten as follows:
cout.flush();if (!cout) {cerr << "Unable to flush to standard out" << endl;}
Important to know is that both good() and fail() return false if the end-of-file is reached. The relation is as follows: good()
==
(!fail()
&&
!eof()).
You can also tell the streams to throw exceptions when a failure occurs. You then write a catch handler to catch ios_base::failure exceptions, on which you can use the what() method to get a description of the error, and the code() method to get the error code. However, whether or not you get useful information depends on the Standard Library implementation that you use.
cout.exceptions(ios::failbit | ios::badbit | ios::eofbit);try {cout << "Hello World." << endl;} catch (const ios_base::failure& ex) {cerr << "Caught exception: " << ex.what()<< ", error code = " << ex.code() << endl;}
To reset the error state of a stream, use the clear() method:
cout.clear();Error checking is performed less frequently for console output streams than for file output or input streams. The methods discussed here apply for other types of streams as well and are revisited later as each type is discussed.
One of the unusual features of streams is that you can throw more than just data down the chute. C++ streams also recognize manipulators, objects that make a change to the behavior of the stream instead of, or in addition to, providing data for the stream to work with.
You have already seen one manipulator: endl. The endl manipulator encapsulates data and behavior. It tells the stream to output an end-of-line sequence and to flush its buffer. Following are some other useful manipulators, many of which are defined in the <ios> and <iomanip> standard header files. The example after this list shows how to use them.
bool values as true and false (boolalpha) or 1 and 0 (noboolalpha). The default is noboolalpha.All of these manipulators stay in effect for subsequent output to the stream until they are reset, except setw, which is only active for the next single output. The following example uses several of these manipulators to customize its output:
// Boolean valuesbool myBool = true;cout << "This is the default: " << myBool << endl;cout << "This should be true: " << boolalpha << myBool << endl;cout << "This should be 1: " << noboolalpha << myBool << endl;// Simulate "%6d" with streamsint i = 123;printf("This should be ' 123': %6d\n", i);cout << "This should be ' 123': " << setw(6) << i << endl;// Simulate "%06d" with streamsprintf("This should be '000123': %06d\n", i);cout << "This should be '000123': " << setfill('0') << setw(6) << i << endl;// Fill with *cout << "This should be '***123': " << setfill('*') << setw(6) << i << endl;// Reset fill charactercout << setfill(' ');// Floating point valuesdouble dbl = 1.452;double dbl2 = 5;cout << "This should be ' 5': " << setw(2) << noshowpoint << dbl2 << endl;cout << "This should be @@1.452: " << setw(7) << setfill('@') << dbl << endl;// Reset fill charactercout << setfill(' ');// Instructs cout to start formatting numbers according to your location.// Chapter 19 explains the details of the imbue call and the locale object.cout.imbue(locale(""));// Format numbers according to your locationcout << "This is 1234567 formatted according to your location: " << 1234567<< endl;// Monetary value. What exactly a monetary value means depends on your// location. For example, in the USA, a monetary value of 120000 means 120000// dollar cents, which is 1200.00 dollars.cout << "This should be a monetary value of 120000, "<< "formatted according to your location: "<< put_money("120000") << endl;// Date and timetime_t t_t = time(nullptr); // Get current system timetm* t = localtime(&t_t); // Convert to local timecout << "This should be the current date and time "<< "formatted according to your location: "<< put_time(t, "%c") << endl;// Quoted stringcout << "This should be: \"Quoted string with \\\"embedded quotes\\\".\": "<< quoted("Quoted string with \"embedded quotes\".") << endl;
If you don’t care for the concept of manipulators, you can usually get by without them. Streams provide much of the same functionality through equivalent methods like precision(). For example, take the following line:
cout << "This should be '1.2346': " << setprecision(5) << 1.23456789 << endl;This can be converted to use a method call as follows. The advantage of the method calls is that they return the previous value, allowing you to restore it, if needed.
cout.precision(5);cout << "This should be '1.2346': " << 1.23456789 << endl;
For a detailed description of all stream methods and manipulators, consult a Standard Library Reference, for example, the book C++ Standard Library Quick Reference, or online references http://www.cppreference.com/ or http://www.cplusplus.com/reference/.
Input streams provide a simple way to read in structured or unstructured data. In this section, the techniques for input are discussed within the context of cin, the console input stream.
There are two easy ways to read data by using an input stream. The first is an analog of the << operator that outputs data to an output stream. The corresponding operator for reading data is >>. When you use >> to read data from an input stream, the variable you provide is the storage for the received value. For example, the following program reads one word from the user and puts it into a string. Then the string is output back to the console.
string userInput;cin >> userInput;cout << "User input was " << userInput << endl;
By default, the >> operator tokenizes values according to white space. For example, if a user runs the previous program and enters hello there as input, only the characters up to the first white space character (the space character in this instance) are captured into the userInput variable. The output would be as follows:
User input was helloOne solution to include white space in the input is to use get(), which is discussed later in this chapter.
The >> operator works with different variable types, just like the << operator. For example, to read an integer, the code differs only in the type of the variable:
int userInput;cin >> userInput;cout << "User input was " << userInput << endl;
You can use input streams to read in multiple values, mixing and matching types as necessary. For example, the following function, an excerpt from a restaurant reservation system, asks the user for a last name and the number of people in their party:
void getReservationData(){string guestName;int partySize;cout << "Name and number of guests: ";cin >> guestName >> partySize;cout << "Thank you, " << guestName << "." << endl;if (partySize > 10) {cout << "An extra gratuity will apply." << endl;}}
Remember that the >> operator tokenizes values according to white space, so the getReservationData() function does not allow you to enter a name with white space. A solution using unget() is discussed later in this chapter. Note also that even though the use of cout does not explicitly flush the buffer using endl or flush(), the text will still be written to the console because the use of cin immediately flushes the cout buffer; they are linked together in this way.
Input streams have a number of methods to detect unusual circumstances. Most of the error conditions related to input streams occur when there is no data available to read. For example, the end of stream (referred to as end-of-file, even for non-file streams) may have been reached. The most common way of querying the state of an input stream is to access it within a conditional. For example, the following loop keeps looping as long as cin remains in a good state:
while (cin) { ... }You can input data at the same time:
while (cin >> ch) { ... }The good(), bad(), and fail() methods can be called on input streams, just as on output streams. There is also an eof() method that returns true if the stream has reached its end. Similar as for output streams, both good() and fail() return false if the end-of-file is reached. The relation is again as follows: good()
==
(!fail()
&&
!eof()).
You should get into the habit of checking the stream state after reading data so that you can recover from bad input.
The following program shows the common pattern for reading data from a stream and handling errors. The program reads numbers from standard input and displays their sum once end-of-file is reached. Note that in command-line environments, the end-of-file is indicated by the user typing a particular character. In Unix and Linux, it is Control+D; in Windows it is Control+Z. The exact character is operating-system dependent, so you will need to know what your operating system requires:
cout << "Enter numbers on separate lines to add. "<< "Use Control+D to finish (Control+Z in Windows)." << endl;int sum = 0;if (!cin.good()) {cerr << "Standard input is in a bad state!" << endl;return 1;}int number;while (!cin.bad()) {cin >> number;if (cin.good()) {sum += number;} else if (cin.eof()) {break; // Reached end of file} else if (cin.fail()) {// Failure!cin.clear(); // Clear the failure state.string badToken;cin >> badToken; // Consume the bad input.cerr << "WARNING: Bad input encountered: " << badToken << endl;}}cout << "The sum is " << sum << endl;
Here is some example output of this program:
Enter numbers on separate lines to add. Use Control+D to finish (Control+Z in Windows).12testWARNING: Bad input encountered: test3^ZThe sum is 6
Just like output streams, input streams have several methods that allow a lower level of access than the functionality provided by the more common >> operator.
The get() method allows raw input of data from a stream. The simplest version of get() returns the next character in the stream, though other versions exist that read multiple characters at once. get() is most commonly used to avoid the automatic tokenization that occurs with the >> operator. For example, the following function reads a name, which can be made up of several words, from an input stream until the end of the stream is reached:
string readName(istream& stream){string name;while (stream) { // Or: while (!stream.fail()) {int next = stream.get();if (!stream || next == std::char_traits<char>::eof())break;name += static_cast<char>(next);// Append character.}return name;}
There are several interesting observations to make about this readName() function:
const reference to an istream, not a const reference. The methods that read in data from a stream will change the actual stream (most notably, its position), so they are not const methods. Thus, you cannot call them on a const reference.get() is stored in an int, not in a char, because get() can return special non-character values such as std::char_traits<char>::eof() (end-of-file).readName() is a bit strange because there are two ways to get out of the loop: either the stream can get into a failed state, or the end of the stream is reached. A more common pattern for reading from a stream uses a different version of get() that takes a reference to a character and returns a reference to the stream. This pattern takes advantage of the fact that evaluating an input stream within a conditional context results in true only if the stream is not in any error state. Encountering an error causes the stream to evaluate to false. The underlying details of the conversion operations required to implement this feature are explained in Chapter 15. The following version of the same function is a bit more concise:
string readName(istream& stream){string name;char next;while (stream.get(next)) {name += next;}return name;}
For most purposes, the correct way to think of an input stream is as a one-way chute. Data falls down the chute and into variables. The unget() method breaks this model in a way by allowing you to push data back up the chute.
A call to unget() causes the stream to back up by one position, essentially putting the previous character read back on the stream. You can use the fail() method to see if unget() was successful or not. For example, unget() can fail if the current position is at the beginning of the stream.
The getReservationData() function seen earlier in this chapter did not allow you to enter a name with white space. The following code uses unget() to allow white space in the name. The code reads character by character and checks whether the character is a digit or not. If the character is not a digit, it is added to guestName. If it is a digit, the character is put back into the stream using unget(), the loop is stopped, and the >> operator is used to input an integer, partySize. The noskipws input manipulator tells the stream not to skip white space, that is, white space is read like any other characters.
void getReservationData(){string guestName;int partySize = 0;// Read characters until we find a digitchar ch;cin >> noskipws;while (cin >> ch) {if (isdigit(ch)) {cin.unget();if (cin.fail())cout << "unget() failed" << endl;break;}guestName += ch;}// Read partysize, if the stream is not in error stateif (cin)cin >> partySize;if (!cin) {cerr << "Error getting party size." << endl;return;}cout << "Thank you '" << guestName<< "', party of " << partySize << endl;if (partySize > 10) {cout << "An extra gratuity will apply." << endl;}}
The putback() method, like unget(), lets you move backward by one character in an input stream. The difference is that the putback() method takes the character being placed back on the stream as a parameter:
char ch1;cin >> ch1;cin.putback('e');// 'e' will be the next character read off the stream.
The peek() method allows you to preview the next value that would be returned if you were to call get(). To take the chute metaphor perhaps a bit too far, you could think of it as looking up the chute without a value actually falling down it.
peek() is ideal for any situation where you need to look ahead before reading a value. For example, the following code implements the getReservationData() function that allows white space in the name, but uses peek() instead of unget():
void getReservationData(){string guestName;int partySize = 0;// Read characters until we find a digitchar ch;cin >> noskipws;while (true) {// 'peek' at next characterch = static_cast<char>(cin.peek());if (!cin)break;if (isdigit(ch)) {// next character will be a digit, so stop the loopbreak;}// next character will be a non-digit, so read itcin >> ch;if (!cin)break;guestName += ch;}// Read partysize, if the stream is not in error stateif (cin)cin >> partySize;if (!cin) {cerr << "Error getting party size." << endl;return;}cout << "Thank you '" << guestName<< "', party of " << partySize << endl;if (partySize > 10) {cout << "An extra gratuity will apply." << endl;}}
Obtaining a single line of data from an input stream is so common that a method exists to do it for you. The getline() method fills a character buffer with a line of data up to the specified size. The specified size includes the \0 character. Thus, the following code reads a maximum of kBufferSize-1 characters from cin, or until an end-of-line sequence is read:
char buffer[kBufferSize] = { 0 };cin.getline(buffer, kBufferSize);
When getline() is called, it reads a line from the input stream, up to and including the end-of-line sequence. However, the end-of-line character or characters do not appear in the string. Note that the end-of-line sequence is platform dependent. For example, it can be \r\n, or \n, or \n\r.
There is a form of get() that performs the same operation as getline(), except that it leaves the newline sequence in the input stream.
There is also a function called std::getline() that can be used with C++ strings. It is defined in the <string> header file and is in the std namespace. It takes a stream reference, a string reference, and an optional delimiter as parameters. The advantage of using this version of getline() is that it doesn’t require you to specify the size of the buffer.
string myString;std::getline(cin, myString);
The built-in input manipulators, described in the list that follows, can be sent to an input stream to customize the way that data is read.
boolalpha is used, the string false will be interpreted as the Boolean value false; anything else will be treated as the Boolean value true. If noboolalpha is set, zero will be interpreted as false, anything else as true. The default is noboolalpha.skipws.Input is locale aware. For example, the following code enables your system locale for cin. Locales are discussed in Chapter 19:
cin.imbue(locale(""));int i;cin >> i;
If your system locale is U.S. English, you can enter 1,000 and it will be parsed as 1000. If you would enter 1.000, it will be parsed as 1. On the other hand, if your system locale is Dutch Belgium, you can enter 1.000 to get the value of 1000, but entering 1,000 will result in 1. In both cases, you can also just enter 1000 without any digit separators to get the value 1000.
You can use the << operator to output a C++ string even though it is not a basic type. In C++, objects are able to prescribe how they are output and input. This is accomplished by overloading the << and >> operators to understand a new type or class.
Why would you want to overload these operators? If you are familiar with the printf() function in C, you know that it is not flexible in this area. printf() knows about several types of data, but there really isn’t a way to give it additional knowledge. For example, consider the following simple class:
class Muffin{public:virtual ~Muffin() = default;string_view getDescription() const;void setDescription(string_view description);int getSize() const;void setSize(int size);bool hasChocolateChips() const;void setHasChocolateChips(bool hasChips);private:string mDescription;int mSize = 0;bool mHasChocolateChips = false;};string_view Muffin::getDescription() const { return mDescription; }void Muffin::setDescription(string_view description){mDescription = description;}int Muffin::getSize() const { return mSize; }void Muffin::setSize(int size) { mSize = size; }bool Muffin::hasChocolateChips() const { return mHasChocolateChips; }void Muffin::setHasChocolateChips(bool hasChips){mHasChocolateChips = hasChips;}
To output an object of class Muffin by using printf(), it would be nice if you could specify it as an argument, perhaps using %m as a placeholder:
printf("Muffin: %m\n", myMuffin); // BUG! printf doesn't understand Muffin.Unfortunately, the printf() function knows nothing about the Muffin type and is unable to output an object of type Muffin. Worse still, because of the way the printf() function is declared, this will result in a run-time error, not a compile-time error (though a good compiler will give you a warning).
The best you can do with printf() is to add a new output() method to the Muffin class:
class Muffin{public:// Omitted for brevityvoid output() const;// Omitted for brevity};// Other method implementations omitted for brevityvoid Muffin::output() const{printf("%s, Size is %d, %s\n", getDescription().data(), getSize(),(hasChocolateChips() ? "has chips" : "no chips"));}
Using such a mechanism is cumbersome, however. To output a Muffin in the middle of another line of text, you’d need to split the line into two calls with a call to Muffin::output() in between, as shown here:
printf("The muffin is ");myMuffin.output();printf(" -- yummy!\n");
Overloading the << operator lets you output a Muffin just like you output a string—by providing it as an argument to <<. Chapter 15 covers the details of overloading the << and >> operators.
String streams provide a way to use stream semantics with strings. In this way, you can have an in-memory stream that represents textual data. For example, in a GUI application you might want to use streams to build up textual data, but instead of outputting the text to the console or a file, you might want to display the result in a GUI element like a message box or an edit control. Another example could be that you want to pass a string stream around to different functions, while retaining the current read position, so that each function can process the next part of the stream. String streams are also useful for parsing text, because streams have built-in tokenizing functionality.
The std::ostringstream class is used to write data to a string, while the std::istringstream class is used to read data from a string. They are both defined in the <sstream> header file. Because ostringstream and istringstream inherit the same behavior as ostream and istream, working with them is pleasantly similar.
The following program requests words from the user and outputs them to a single ostringstream, separated by the tab character. At the end of the program, the whole stream is turned into a string object using the str() method and is written to the console. Input of tokens can be stopped by entering the token “done” or by closing the input stream with Control+D (Unix) or Control+Z (Windows).
cout << "Enter tokens. Control+D (Unix) or Control+Z (Windows) to end" << endl;ostringstream outStream;while (cin) {string nextToken;cout << "Next token: ";cin >> nextToken;if (!cin || nextToken == "done")break;outStream << nextToken << "\t";}cout << "The end result is: " << outStream.str();
Reading data from a string stream is similarly familiar. The following function creates and populates a Muffin object (see the earlier example) from a string input stream. The stream data is in a fixed format so that the function can easily turn its values into calls to the Muffin setters.
Muffin createMuffin(istringstream& stream){Muffin muffin;// Assume data is properly formatted:// Description size chipsstring description;int size;bool hasChips;// Read all three values. Note that chips is represented// by the strings "true" and "false"stream >> description >> size >> boolalpha >> hasChips;if (stream) { // Reading was successful.muffin.setSize(size);muffin.setDescription(description);muffin.setHasChocolateChips(hasChips);}return muffin;}
An advantage of string streams over standard C++ strings is that, in addition to data, they know where the next read or write operation will take place, also called the current position. Another advantage is that string streams support manipulators and locales to enable more powerful formatting compared to strings.
Files lend themselves very well to the stream abstraction because reading and writing files always involves a position in addition to the data. In C++, the std::ofstream and std::ifstream classes provide output and input functionality for files. They are defined in the <fstream> header file.
When dealing with the file system, it is especially important to detect and handle error cases. The file you are working with could be on a network file store that just went offline, or you may be trying to write to a file that is located on a disk that is full. Maybe you are trying to open a file for which the current user does not have permissions. Error conditions can be detected by using the standard error handling mechanisms described earlier.
The only major difference between output file streams and other output streams is that the file stream constructor can take the name of the file and the mode in which you would like to open it. The default mode is write, ios_base::out, which starts writing to a file at the beginning, overwriting any existing data. You can also open an output file stream in append mode by specifying the constant ios_base::app as second argument to the file stream constructor. The following table lists the different constants that are available.
| CONSTANT | DESCRIPTION |
ios_base::app |
Open, and go to the end before each write operation. |
ios_base::ate |
Open, and go to the end once immediately after opening. |
ios_base::binary |
Perform input and output in binary mode as opposed to text mode. See the next section. |
ios_base::in |
Open for input, start reading at the beginning. |
ios_base::out |
Open for output, start writing at the beginning, overwriting existing data. |
ios_base::trunc |
Open for output, and delete all existing data (truncate). |
Note that modes can be combined. For example, if you want to open a file for output in binary mode, while truncating existing data, you would specify the open mode as follows:
ios_base::out | ios_base::binary | ios_base::truncAn ifstream automatically includes the ios_base::in mode, while an ofstream automatically includes the ios_base::out mode, even if you don’t explicitly specify in or out as the mode.
The following program opens the file test.txt and outputs the arguments to the program. The ifstream and ofstream destructors automatically close the underlying file, so there is no need to explicitly call close().
int main(int argc, char* argv[]){ofstream outFile("test.txt", ios_base::trunc);if (!outFile.good()) {cerr << "Error while opening output file!" << endl;return -1;}outFile << "There were " << argc << " arguments to this program." << endl;outFile << "They are: " << endl;for (int i = 0; i < argc; i++) {outFile << argv[i] << endl;}return 0;}
By default, a file stream is opened in text mode. If you specify the ios_base::binary flag, then the file is opened in binary mode.
In binary mode, the exact bytes you ask the stream to write are written to the file. When reading, the bytes are returned to you exactly as they are in the file.
In text mode, there is some hidden conversion happening: each line you write to, or read from a file ends with a \n. However, it is operating-system dependent how the end of a line is encoded in a file. For example, on Windows, a line ends with \r\n instead of with a single \n character. Therefore, when a file is opened in text mode and you write a line ending with \n to it, the underlying implementation automatically converts the \n to \r\n before writing it to the file. Similarly, when reading a line from the file, the \r\n that is read from the file is automatically converted back to \n before being returned to you.
The seek() and tell() methods are present on all input and output streams.
The seek() methods let you move to an arbitrary position within an input or output stream. There are several forms of seek(). The methods of seek() within an input stream are actually called seekg() (the g is for get), and the versions of seek() in an output stream are called seekp() (the p is for put). You might wonder why there is both a seekg() and a seekp() method, instead of one seek() method. The reason is that you can have streams that are both input and output, for example, file streams. In that case, the stream needs to remember both a read position and a separate write position. This is also called bidirectional I/O and is covered later in this chapter.
There are two overloads of seekg() and two of seekp(). One overload accepts a single argument, an absolute position, and seeks to this absolute position. The second overload accepts an offset and a position, and seeks an offset relative to the given position. Positions are of type std::streampos, while offsets are of type std::streamoff; both are measured in bytes. There are three predefined positions available, as shown here.
| POSITION | DESCRIPTION |
ios_base::beg |
The beginning of the stream |
ios_base::end |
The end of the stream |
ios_base::cur |
The current position in the stream |
For example, to seek to an absolute position in an output stream, you can use the one-parameter version of seekp(), as in the following case, which uses the constant ios_base::beg to move to the beginning of the stream:
outStream.seekp(ios_base::beg);Seeking within an input stream is exactly the same, except that the seekg() method is used:
inStream.seekg(ios_base::beg);The two-argument versions move to a relative position in the stream. The first argument prescribes how many positions to move, and the second argument provides the starting point. To move relative to the beginning of the file, the constant ios_base::beg is used. To move relative to the end of the file, ios_base::end is used. And to move relative to the current position, ios_base::cur is used. For example, the following line moves to the second byte from the beginning of the stream. Note that integers are implicitly converted to type streampos and streamoff.
outStream.seekp(2, ios_base::beg);The next example moves to the third-to-last byte of an input stream:
inStream.seekg(-3, ios_base::end);You can also query a stream’s current location using the tell() method, which returns a streampos that indicates the current position. You can use this result to remember the current marker position before doing a seek() or to query whether you are in a particular location. As with seek(), there are separate versions of tell() for input streams and output streams. Input streams use tellg(), and output streams use tellp().
The following code checks the position of an input stream to determine if it is at the beginning:
std::streampos curPos = inStream.tellg();if (ios_base::beg == curPos) {cout << "We're at the beginning." << endl;}
Following is a sample program that brings it all together. This program writes into a file called test.out and performs the following tests:
12345 to the file.0 in position 2 and closes the output stream.test.out file.12045.ofstream fout("test.out");if (!fout) {cerr << "Error opening test.out for writing" << endl;return 1;}// 1. Output the string "12345".fout << "12345";// 2. Verify that the marker is at position 5.streampos curPos = fout.tellp();if (5 == curPos) {cout << "Test passed: Currently at position 5" << endl;} else {cout << "Test failed: Not at position 5" << endl;}// 3. Move to position 2 in the stream.fout.seekp(2, ios_base::beg);// 4. Output a 0 in position 2 and close the stream.fout << 0;fout.close();// 5. Open an input stream on test.out.ifstream fin("test.out");if (!fin) {cerr << "Error opening test.out for reading" << endl;return 1;}// 6. Read the first token as an integer.int testVal;fin >> testVal;if (!fin) {cerr << "Error reading from file" << endl;return 1;}// 7. Confirm that the value is 12045.const int expected = 12045;if (testVal == expected) {cout << "Test passed: Value is " << expected << endl;} else {cout << "Test failed: Value is not " << expected<< " (it was " << testVal << ")" << endl;}
A link can be established between any input and output streams to give them flush-on-access behavior. In other words, when data is requested from an input stream, its linked output stream is automatically flushed. This behavior is available to all streams, but is particularly useful for file streams that may be dependent upon each other.
Stream linking is accomplished with the tie() method. To tie an output stream to an input stream, call tie() on the input stream, and pass the address of the output stream. To break the link, pass nullptr.
The following program ties the input stream of one file to the output stream of an entirely different file. You could also tie it to an output stream on the same file, but bidirectional I/O (covered in the next section) is perhaps a more elegant way to read and write the same file simultaneously.
ifstream inFile("input.txt"); // Note: input.txt must exist.ofstream outFile("output.txt");// Set up a link between inFile and outFile.inFile.tie(&outFile);// Output some text to outFile. Normally, this would// not flush because std::endl is not sent.outFile << "Hello there!";// outFile has NOT been flushed.// Read some text from inFile. This will trigger flush()// on outFile.string nextToken;inFile >> nextToken;// outFile HAS been flushed.
The flush() method is defined on the ostream base class, so you can also link an output stream to another output stream:
outFile.tie(&anotherOutputFile);Such a relationship means that every time you write to one file, the buffered data that has been sent to the other file is flushed. You can use this mechanism to keep two related files synchronized.
One example of this stream linking is the link between cout and cin. Whenever you try to input data from cin, cout is automatically flushed. There is also a link between cerr and cout, meaning that any output to cerr causes cout to flush. The clog stream on the other hand is not linked to cout. The wide versions of these streams have similar links.
So far, this chapter has discussed input and output streams as two separate but related classes. In fact, there is such a thing as a stream that performs both input and output. A bidirectional stream operates as both an input stream and an output stream.
Bidirectional streams derive from iostream, which in turn derives from both istream and ostream, thus serving as an example of useful multiple inheritance. As you would expect, bidirectional streams support both the >> operator and the << operator, as well as the methods of both input streams and output streams.
The fstream class provides a bidirectional file stream. fstream is ideal for applications that need to replace data within a file because you can read until you find the correct position, then immediately switch to writing. For example, imagine a program that stores a list of mappings between ID numbers and phone numbers. It might use a data file with the following format:
123 408-555-0394124 415-555-3422263 585-555-3490100 650-555-3434
A reasonable approach to such a program would be to read in the entire data file when the program opens and rewrite the file, with any modifications, when the program closes. If the data set is huge, however, you might not be able to keep everything in memory. With iostreams, you don’t have to. You can easily scan through the file to find a record, and you can add new records by opening the file for output in append mode. To modify an existing record, you could use a bidirectional stream, as in the following function that changes the phone number for a given ID:
bool changeNumberForID(string_view filename, int id, string_view newNumber){fstream ioData(filename.data());if (!ioData) {cerr << "Error while opening file " << filename << endl;return false;}// Loop until the end of filewhile (ioData) {int idRead;string number;// Read the next ID.ioData >> idRead;if (!ioData)break;// Check to see if the current record is the one being changed.if (idRead == id) {// Seek the write position to the current read positionioData.seekp(ioData.tellg());// Output a space, then the new number.ioData << " " << newNumber;break;}// Read the current number to advance the stream.ioData >> number;}return true;}
Of course, an approach like this only works properly if the data is of a fixed size. When the preceding program switched from reading to writing, the output data overwrote other data in the file. To preserve the format of the file, and to avoid writing over the next record, the data had to be the exact same size.
String streams can also be accessed in a bidirectional manner through the stringstream class.
Streams provide a flexible and object-oriented way to perform input and output. The most important message in this chapter, even more important than the use of streams, is the concept of a stream. Some operating systems may have their own file access and I/O facilities, but knowledge of how streams and stream-like libraries work is essential to working with any type of modern I/O system.
No program exists in isolation; they all depend on external facilities such as interfaces with the operating system, networks and file systems, external code such as third-party libraries, and user input. Each of these areas can introduce situations that require you to respond to problems you may encounter. These potential problems can be referred to with the general term exceptional situations. Even perfectly written programs encounter errors and exceptional situations. Thus, anyone who writes a computer program must include error-handling capabilities. Some languages, such as C, do not include many specific language facilities for error handling. Programmers using these languages generally rely on return values from functions and other ad hoc approaches. Other languages, such as Java, enforce the use of a language feature called exceptions as an error-handling mechanism. C++ lies between these extremes. It provides language support for exceptions, but does not require their use. However, you can’t ignore exceptions entirely in C++ because a few basic facilities, such as memory allocation routines, use them.
Exceptions are a mechanism for a piece of code to notify another piece of code of an “exceptional” situation or error condition without progressing through the normal code paths. The code that encounters the error throws the exception, and the code that handles the exception catches it. Exceptions do not follow the fundamental rule of step-by-step execution to which you are accustomed. When a piece of code throws an exception, the program control immediately stops executing code step by step and transitions to the exception handler, which could be anywhere from the next line in the same function to several function calls up the stack. If you like sports analogies, you can think of the code that throws an exception as an outfielder throwing a baseball back to the infield, where the nearest infielder (closest exception handler) catches it. Figure 14-1 shows a hypothetical stack of three function calls. Function A() has the exception handler. It calls function B(), which calls function C(), which throws the exception.
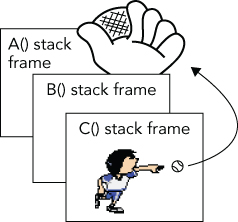
Figure 14-2 shows the handler catching the exception. The stack frames for C() and B() have been removed, leaving only A().
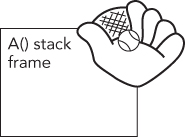
Most modern programming languages, such as C# and Java, have support for exceptions, so it’s no surprise that C++ has full-fledged support for them as well. However, if you are coming from C, then exceptions are something new; but once you get used to them, you probably won’t want to go back.
As mentioned earlier, run-time errors in programs are inevitable. Despite that fact, error handling in most C and C++ programs is messy and ad hoc. The de facto C error-handling standard, which was carried over into many C++ programs, uses integer function return codes, and the errno macro to signify errors. Each thread has its own errno value. errno acts as a thread-local integer variable that functions can use to communicate errors back to calling functions.
Unfortunately, the integer return codes and errno are used inconsistently. Some functions might choose to return 0 for success and -1 for an error. If they return -1, they also set errno to an error code. Other functions return 0 for success and nonzero for an error, with the actual return value specifying the error code. These functions do not use errno. Still others return 0 for failure instead of for success, presumably because 0 always evaluates to false in C and C++.
These inconsistencies can cause problems because programmers encountering a new function often assume that its return codes are the same as other similar functions. That is not always true. For example, on Solaris 9, there are two different libraries of synchronization objects: the POSIX version and the Solaris version. The function to initialize a semaphore in the POSIX version is called sem_init(), and the function to initialize a semaphore in the Solaris version is called sema_init(). As if that weren’t confusing enough, the two functions handle error codes differently! sem_init() returns -1 and sets errno on error, while sema_init() returns the error code directly as a positive integer, and does not set errno.
Another problem is that the return type of functions in C++ can only be of one type, so if you need to return both an error and a value, you must find an alternative mechanism. One solution is to return an std::pair or std::tuple, an object that you can use to store two or more types. These classes are discussed in the upcoming chapters that cover the Standard Library. Another choice is to define your own struct or class that contains several values, and return an instance of that struct or class from your function. Yet another option is to return the value or error through a reference parameter or to make the error code one possible value of the return type, such as a nullptr pointer. In all these solutions, the caller is responsible to explicitly check for any errors returned from the function and if it doesn’t handle the error itself, it should propagate the error to its caller. Unfortunately, this often results in the loss of critical details about the error.
C programmers may be familiar with a mechanism known as setjmp()/longjmp(). This mechanism cannot be used correctly in C++, because it bypasses scoped destructors on the stack. You should avoid it at all costs, even in C programs; therefore, this book does not explain the details of how to use it.
Exceptions provide an easier, more consistent, and safer mechanism for error handling. There are several specific advantages of exceptions over the ad hoc approaches in C and C++.
[[nodiscard]] attribute, introduced in Chapter 11, offers a possible solution to prevent return codes from being ignored, but it’s not foolproof either. Exceptions cannot be forgotten or ignored: if your program fails to catch an exception, it terminates.In some compilers (fewer and fewer these days), exception handling added a tiny amount of overhead to any function that had an exception handler. For most modern compilers there is a trade-off in that there is almost no overhead in the non-throwing case, and only some slight overhead when you actually throw something. This trade-off is not a bad thing because throwing an exception should be exceptional.
Exception handling is not enforced in C++. For example, in Java a function that does not specify a list of possible exceptions that it can throw is not allowed to throw any exceptions. In C++, it is just the opposite: a function can throw any exception it wants, unless it specifies that it will not throw any exceptions (using the noexcept keyword)!
I recommend exceptions as a useful mechanism for error handling. I feel that the structure and error-handling formalization that exceptions provide outweigh the less desirable aspects. Thus, the remainder of this chapter focuses on exceptions. Also, many popular libraries, such as the Standard Library and Boost, use exceptions, so you need to be prepared to handle them.
Exceptional situations arise frequently in file input and output. The following is a function to open a file, read a list of integers from the file, and return the integers in an std::vector data structure. The lack of error handling should jump out at you.
vector<int> readIntegerFile(string_view fileName){ifstream inputStream(fileName.data());// Read the integers one-by-one and add them to a vector.vector<int> integers;int temp;while (inputStream >> temp) {integers.push_back(temp);}return integers;}
The following line keeps reading values from the ifstream until the end of the file is reached or until an error occurs:
while (inputStream >> temp) {If the >> operator encounters an error, it sets the fail bit of the ifstream object. In that case, the bool() conversion operator returns false and the while loop terminates. Streams are discussed in more detail in Chapter 13.
You might use readIntegerFile() like this:
const string fileName = "IntegerFile.txt";vector<int> myInts = readIntegerFile(fileName);for (const auto& element : myInts) {cout << element << " ";}cout << endl;
The rest of this section shows you how to add error handling with exceptions, but first, we need to delve a bit deeper into how you throw and catch exceptions.
Using exceptions consists of providing two parts in your program: a try/catch construct to handle an exception, and a throw statement that throws an exception. Both must be present in some form to make exceptions work. However, in many cases, the throw happens deep inside some library (including the C++ runtime) and the programmer never sees it, but still has to react to it using a try/catch construct.
The try/catch construct looks like this:
try {// ... code which may result in an exception being thrown} catch (exception-type1 exception-name) {// ... code which responds to the exception of type 1} catch (exception-type2 exception-name) {// ... code which responds to the exception of type 2}// ... remaining code
The code that may result in an exception being thrown might contain a throw directly. It might also be calling a function that either directly throws an exception or calls—by some unknown number of layers of calls—a function that throws an exception.
If no exception is thrown, the code in the catch blocks is not executed, and the “remaining code” that follows will follow the last statement executed in the try block.
If an exception is thrown, any code following the throw or following the call that resulted in the throw, is not executed; instead, control immediately goes to the right catch block, depending on the type of the exception that is thrown.
If the catch block does not do a control transfer—for example, by returning a value, throwing a new exception, or rethrowing the exception—then the “remaining code” is executed after the last statement of that catch block.
The simplest example to demonstrate exception handling is avoiding division-by-zero. This example throws an exception of type std::invalid_argument, which requires the <stdexcept> header:
double SafeDivide(double num, double den){if (den == 0)throw invalid_argument("Divide by zero");return num / den;}int main(){try {cout << SafeDivide(5, 2) << endl;cout << SafeDivide(10, 0) << endl;cout << SafeDivide(3, 3) << endl;} catch (const invalid_argument& e) {cout << "Caught exception: " << e.what() << endl;}return 0;}
The output is as follows:
2.5Caught exception: Divide by zero
throw is a keyword in C++, and is the only way to throw an exception. The invalid_argument() part of the throw line means that you are constructing a new object of type invalid_argument to throw. It is one of the standard exceptions provided by the C++ Standard Library. All Standard Library exceptions form a hierarchy, which is discussed later in this chapter. Each class in the hierarchy supports a what() method that returns a const
char* string describing the exception1. This is the string you provide in the constructor of the exception.
Let’s go back to the readIntegerFile() function. The most likely problem to occur is for the file open to fail. That’s a perfect situation for throwing an exception. This code throws an exception of type std::exception, which requires the <exception> header. The syntax looks like this:
vector<int> readIntegerFile(string_view fileName){ifstream inputStream(fileName.data());if (inputStream.fail()) {// We failed to open the file: throw an exceptionthrow exception();}// Read the integers one-by-one and add them to a vectorvector<int> integers;int temp;while (inputStream >> temp) {integers.push_back(temp);}return integers;}
If the function fails to open the file and executes the throw exception(); line, the rest of the function is skipped, and control transitions to the nearest exception handler.
Throwing exceptions in your code is most useful when you also write code that handles them. Exception handling is a way to “try” a block of code, with another block of code designated to react to any problems that might occur. In the following main() function, the catch statement reacts to any exception of type exception that was thrown within the try block by printing an error message. If the try block finishes without throwing an exception, the catch block is skipped. You can think of try/catch blocks as glorified if statements. If an exception is thrown in the try block, execute the catch block. Otherwise, skip it.
int main(){const string fileName = "IntegerFile.txt";vector<int> myInts;try {myInts = readIntegerFile(fileName);} catch (const exception& e) {cerr << "Unable to open file " << fileName << endl;return 1;}for (const auto& element : myInts) {cout << element << " ";}cout << endl;return 0;}
You can throw an exception of any type. The preceding example throws an object of type std::exception, but exceptions do not need to be objects. You could throw a simple int like this:
vector<int> readIntegerFile(string_view fileName){ifstream inputStream(fileName.data());if (inputStream.fail()) {// We failed to open the file: throw an exceptionthrow 5;}// Omitted for brevity}
You would then need to change the catch statement as well:
try {myInts = readIntegerFile(fileName);} catch (int e) {cerr << "Unable to open file " << fileName << " (" << e << ")" << endl;return 1;}
Alternatively, you could throw a const char* C-style string. This technique is sometimes useful because the string can contain information about the exception.
vector<int> readIntegerFile(string_view fileName){ifstream inputStream(fileName.data());if (inputStream.fail()) {// We failed to open the file: throw an exceptionthrow "Unable to open file";}// Omitted for brevity}
When you catch the const char* exception, you can print the result:
try {myInts = readIntegerFile(fileName);} catch (const char* e) {cerr << e << endl;return 1;}
Despite the previous examples, you should generally throw objects as exceptions for two reasons:
The C++ Standard Library defines a number of predefined exception classes, and you can write your own exception classes, as you’ll learn later in this chapter.
In the preceding example in which readIntegerFile() throws an object of type exception, the catch line looks like this:
} catch (const exception& e) {However, there is no requirement to catch objects by const reference. You could catch the object by value like this:
} catch (exception e) {Alternatively, you could catch the object by non-const reference:
} catch (exception& e) { Also, as you saw in the const char* example, you can catch pointers to exceptions, as long as pointers to exceptions are thrown.
Failure to open the file is not the only problem readIntegerFile() could encounter. Reading the data from the file can cause an error if it is formatted incorrectly. Here is an implementation of readIntegerFile() that throws an exception if it cannot either open the file or read the data correctly. This time, it uses a runtime_error, derived from exception, and which allows you to specify a descriptive string in its constructor. The runtime_error exception class is defined in <stdexcept>.
vector<int> readIntegerFile(string_view fileName){ifstream inputStream(fileName.data());if (inputStream.fail()) {// We failed to open the file: throw an exceptionthrow runtime_error("Unable to open the file.");}// Read the integers one-by-one and add them to a vectorvector<int> integers;int temp;while (inputStream >> temp) {integers.push_back(temp);}if (!inputStream.eof()) {// We did not reach the end-of-file.// This means that some error occurred while reading the file.// Throw an exception.throw runtime_error("Error reading the file.");}return integers;}
Your code in main() does not need to change because it already catches an exception of type exception, from which runtime_error derives. However, that exception could now be thrown in two different situations.
try {myInts = readIntegerFile(fileName);} catch (const exception& e) {cerr << e.what() << endl;return 1;}
Alternatively, you could throw two different types of exceptions from readIntegerFile(). Here is an implementation of readIntegerFile() that throws an exception object of class invalid_argument if the file cannot be opened, and an object of class runtime_error if the integers cannot be read. Both invalid_argument and runtime_error are classes defined in the header file <stdexcept> as part of the C++ Standard Library.
vector<int> readIntegerFile(string_view fileName){ifstream inputStream(fileName.data());if (inputStream.fail()) {// We failed to open the file: throw an exceptionthrow invalid_argument("Unable to open the file.");}// Read the integers one-by-one and add them to a vectorvector<int> integers;int temp;while (inputStream >> temp) {integers.push_back(temp);}if (!inputStream.eof()) {// We did not reach the end-of-file.// This means that some error occurred while reading the file.// Throw an exception.throw runtime_error("Error reading the file.");}return integers;}
There are no public default constructors for invalid_argument and runtime_error, only string constructors.
Now main() can catch both invalid_argument and runtime_error with two catch statements:
try {myInts = readIntegerFile(fileName);} catch (const invalid_argument& e) {cerr << e.what() << endl;return 1;} catch (const runtime_error& e) {cerr << e.what() << endl;return 2;}
If an exception is thrown inside the try block, the compiler matches the type of the exception to the proper catch handler. So, if readIntegerFile() is unable to open the file and throws an invalid_argument object, it is caught by the first catch statement. If readIntegerFile() is unable to read the file properly and throws a runtime_error, then the second catch statement catches the exception.
The const-ness specified in the type of the exception you want to catch makes no difference for matching purposes. That is, this line matches any exception of type runtime_error:
} catch (const runtime_error& e) {The following line also matches any exception of type runtime_error:
} catch (runtime_error& e) {You can write a catch line that matches any possible exception with the special syntax shown in the following example:
try {myInts = readIntegerFile(fileName);} catch (...) {cerr << "Error reading or opening file " << fileName << endl;return 1;}
The three dots are not a typo. They are a wildcard that matches any exception type. When you are calling poorly documented code, this technique can be useful to ensure that you catch all possible exceptions. However, in situations where you have complete information about the set of thrown exceptions, this technique is not recommended because it handles every exception type identically. It’s better to match exception types explicitly and take appropriate, targeted actions.
A possible use of a catch block matching any exception is as a default catch handler. When an exception is thrown, a catch handler is looked up in the order that it appears in the code. The following example shows how you can write catch handlers that explicitly handle invalid_argument and runtime_error exceptions, and how to include a default catch handler for all other exceptions:
try {// Code that can throw exceptions} catch (const invalid_argument& e) {// Handle invalid_argument exception} catch (const runtime_error& e) {// Handle runtime_error exception} catch (...) {// Handle all other exceptions}
If your program throws an exception that is not caught anywhere, the program terminates. Basically, there is a try/catch construct around the call to your main() function, which catches all unhandled exceptions, similar to the following:
try {main(argc, argv);} catch (...) {// issue error message and terminate program}
However, this behavior is not usually what you want. The point of exceptions is to give your program a chance to handle and correct undesirable or unexpected situations.
It is also possible to change the behavior of your program if there is an uncaught exception. When the program encounters an uncaught exception, it calls the built-in terminate() function, which calls abort() from <cstdlib> to kill the program. You can set your own terminate_handler by calling set_terminate() with a pointer to a callback function that takes no arguments and returns no value. terminate(), set_terminate(), and terminate_handler are all declared in the <exception> header. The following code shows a high-level overview of how it works:
try {main(argc, argv);} catch (...) {if (terminate_handler != nullptr) {terminate_handler();} else {terminate();}}// normal termination code
Before you get too excited about this feature, you should know that your callback function must still terminate the program. It can’t just ignore the error. However, you can use it to print a helpful error message before exiting. Here is an example of a main() function that doesn’t catch the exceptions thrown by readIntegerFile(). Instead, it sets the terminate_handler to a custom callback. This callback prints an error message and terminates the process by calling exit(). The exit() function accepts an integer which is returned back to the operating system, and which can be used to determine how a process exited.
void myTerminate(){cout << "Uncaught exception!" << endl;exit(1);}int main(){set_terminate(myTerminate);const string fileName = "IntegerFile.txt";vector<int> myInts = readIntegerFile(fileName);for (const auto& element : myInts) {cout << element << " ";}cout << endl;return 0;}
Although not shown in this example, set_terminate() returns the old terminate_handler when it sets the new one. The terminate_handler applies program-wide, so it’s considered good style to reset the old terminate_handler when you have completed the code that needed the new terminate_handler. In this case, the entire program needs the new terminate_handler, so there’s no point in resetting it.
While it’s important to know about set_terminate(), it’s not a very effective exception-handling approach. It’s recommended to try to catch and handle each exception individually in order to provide more precise error handling.
A function is allowed to throw any exception it likes. However, it is possible to mark a function with the noexcept keyword to state that it will not throw any exceptions. For example, here is the readIntegerFile() function from earlier, but this time marked as noexcept, so it is not allowed to throw any exceptions:
vector<int> readIntegerFile(string_view fileName) noexcept;When a function marked as noexcept throws an exception anyway, C++ calls terminate() to terminate the application.
When you override a virtual method in a derived class, you are allowed to mark the overridden method as noexcept, even if the version in the base class is not noexcept. The opposite is not allowed.
Older versions of C++ allowed you to specify the exceptions a function or method intended to throw. This specification was called the throw list or the exception specification.
Because C++17 has officially removed support for exception specifications, this book does not use them, and does not explain them in detail. Even while exception specifications were still supported, they were used rarely. Still, this section briefly mentions them, so you will at least get an idea of what the syntax looked like in the unlikely event you encounter them in legacy code. Here is a simple example of the syntax, the readIntegerFile() function from earlier, with an exception specification:
vector<int> readIntegerFile(string_view fileName)throw(invalid_argument, runtime_error){// Remainder of the function is the same as before}
If a function threw an exception that was not in its exception specification, the C++ runtime called std::unexpected() which by default called std::terminate() to terminate the application.
As described earlier, you can actually throw any type of exception. However, classes are the most useful types of exceptions. In fact, exception classes are usually written in a hierarchy, so that you can employ polymorphism when you catch the exceptions.
You’ve already seen several exceptions from the C++ standard exception hierarchy: exception, runtime_error, and invalid_argument. Figure 14-3 shows the full hierarchy. For completeness, all standard exceptions are shown, including those thrown by parts of the Standard Library, which are discussed in later chapters.
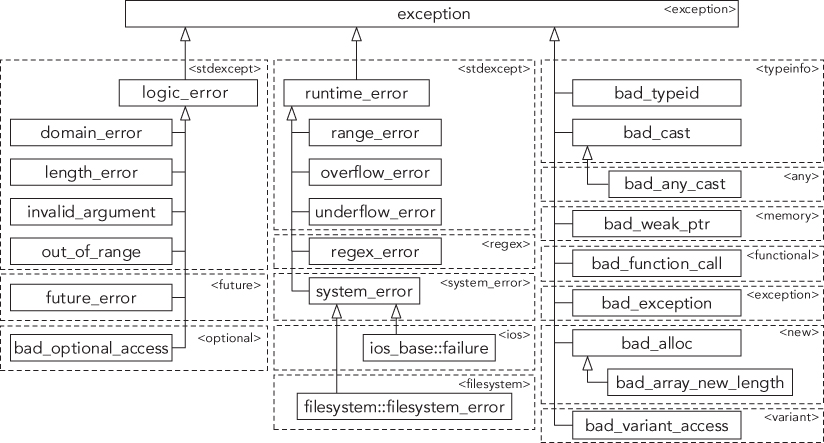
All of the exceptions thrown by the C++ Standard Library are objects of classes in this hierarchy. Each class in the hierarchy supports a what() method that returns a const
char* string describing the exception. You can use this string in an error message.
Most of the exception classes (a notable exception is the base exception class) require you to set in the constructor the string that is returned by what(). That’s why you have to specify a string in the constructors for runtime_error and invalid_argument. This has already been done in examples throughout this chapter. Here is another version of readIntegerFile() that includes the filename in the error message. Note also the use of the standard user-defined literal “s”, introduced in Chapter 2, to interpret a string literal as an std::string.
vector<int> readIntegerFile(string_view fileName){ifstream inputStream(fileName.data());if (inputStream.fail()) {// We failed to open the file: throw an exceptionconst string error = "Unable to open file "s + fileName.data();throw invalid_argument(error);}// Read the integers one-by-one and add them to a vectorvector<int> integers;int temp;while (inputStream >> temp) {integers.push_back(temp);}if (!inputStream.eof()) {// We did not reach the end-of-file.// This means that some error occurred while reading the file.// Throw an exception.const string error = "Unable to read file "s + fileName.data();throw runtime_error(error);}return integers;}int main(){// Code omittedtry {myInts = readIntegerFile(fileName);} catch (const invalid_argument& e) {cerr << e.what() << endl;return 1;} catch (const runtime_error& e) {cerr << e.what() << endl;return 2;}// Code omitted}
A feature of exception hierarchies is that you can catch exceptions polymorphically. For example, if you look at the two catch statements in main() following the call to readIntegerFile(), you can see that they are identical except for the exception class that they handle. Conveniently, invalid_argument and runtime_error are both derived classes of exception, so you can replace the two catch statements with a single catch statement for class exception:
try {myInts = readIntegerFile(fileName);} catch (const exception& e) {cerr << e.what() << endl;return 2;}
The catch statement for an exception reference matches any derived classes of exception, including both invalid_argument and runtime_error. Note that the higher in the exception hierarchy you catch exceptions, the less specific your error handling can be. You should generally catch exceptions at as specific a level as possible.
When more than one catch clause is used, the catch clauses are matched in syntactic order as they appear in your code; the first one that matches, wins. If one catch is more inclusive than a later one, it will match first, and the more restrictive one, which comes later, will not be executed at all. Therefore, you should place your catch clauses from most restrictive to least restrictive in order. For example, suppose that you want to catch invalid_argument from readIntegerFile() explicitly, but you also want to leave the generic exception match for any other exceptions. The correct way to do so is like this:
try {myInts = readIntegerFile(fileName);} catch (const invalid_argument& e) { // List the derived class first.// Take some special action for invalid filenames.} catch (const exception& e) { // Now list exceptioncerr << e.what() << endl;return 1;}
The first catch statement catches invalid_argument exceptions, and the second catches any other exceptions of type exception. However, if you reverse the order of the catch statements, you don’t get the same result:
try {myInts = readIntegerFile(fileName);} catch (const exception& e) { // BUG: catching base class first!cerr << e.what() << endl;return 1;} catch (const invalid_argument& e) {// Take some special action for invalid filenames.}
With this order, any exception of a class that derives from exception is caught by the first catch statement; the second will never be reached. Some compilers issue a warning in this case, but you shouldn’t count on it.
There are two advantages to writing your own exception classes.
runtime_error, you can create classes with names that are more meaningful for the particular errors in your program.It’s recommended that all the exception classes that you write inherit directly or indirectly from the standard exception class. If everyone on your project follows that rule, you know that every exception in the program will be derived from exception (assuming that you aren’t using third-party libraries that break this rule). This guideline makes exception handling via polymorphism significantly easier.
For example, invalid_argument and runtime_error don’t do a very good job of capturing the file opening and reading errors in readIntegerFile(). You can define your own error hierarchy for file errors, starting with a generic FileError class:
class FileError : public exception{public:FileError(string_view fileName) : mFileName(fileName) {}virtual const char* what() const noexcept override {return mMessage.c_str();}string_view getFileName() const noexcept { return mFileName; }protected:void setMessage(string_view message) { mMessage = message; }private:string mFileName;string mMessage;};
As a good programming citizen, you should make FileError a part of the standard exception hierarchy. It seems appropriate to integrate it as a child of exception. When you derive from exception, you can override the what() method, which has the prototype shown and which must return a const
char* string that is valid until the object is destroyed. In the case of FileError, this string comes from the mMessage data member. Derived classes of FileError can set the message using the protected
setMessage() method. The generic FileError class also contains a filename, and a public accessor for that filename.
The first exceptional situation in readIntegerFile() occurs if the file cannot be opened. Thus, you might want to write a FileOpenError exception derived from FileError:
class FileOpenError : public FileError{public:FileOpenError(string_view fileName) : FileError(fileName){setMessage("Unable to open "s + fileName.data());}};
The FileOpenError exception changes the mMessage string to represent the file-opening error.
The second exceptional situation in readIntegerFile() occurs if the file cannot be read properly. It might be useful for this exception to contain the line number of the error in the file, as well as the filename in the error message string returned from what(). Here is a FileReadError exception derived from FileError:
class FileReadError : public FileError{public:FileReadError(string_view fileName, size_t lineNumber): FileError(fileName), mLineNumber(lineNumber){ostringstream ostr;ostr << "Error reading " << fileName << " at line "<< lineNumber;setMessage(ostr.str());}size_t getLineNumber() const noexcept { return mLineNumber; }private:size_t mLineNumber;};
Of course, in order to set the line number properly, you need to modify your readIntegerFile() function to track the number of lines read instead of just reading integers directly. Here is a new readIntegerFile() function that uses the new exceptions:
vector<int> readIntegerFile(string_view fileName){ifstream inputStream(fileName.data());if (inputStream.fail()) {// We failed to open the file: throw an exceptionthrow FileOpenError(fileName);}vector<int> integers;size_t lineNumber = 0;while (!inputStream.eof()) {// Read one line from the filestring line;getline(inputStream, line);++lineNumber;// Create a string stream out of the lineistringstream lineStream(line);// Read the integers one-by-one and add them to a vectorint temp;while (lineStream >> temp) {integers.push_back(temp);}if (!lineStream.eof()) {// We did not reach the end of the string stream.// This means that some error occurred while reading this line.// Throw an exception.throw FileReadError(fileName, lineNumber);}}return integers;}
Now, code that calls readIntegerFile() can use polymorphism to catch exceptions of type FileError like this:
try {myInts = readIntegerFile(fileName);} catch (const FileError& e) {cerr << e.what() << endl;return 1;}
There is one trick to writing classes whose objects will be used as exceptions. When a piece of code throws an exception, the object or value thrown is moved or copied, using either the move constructor or copy constructor. Thus, if you write a class whose objects will be thrown as exceptions, you must make sure those objects are copyable and/or moveable. This means that if you have dynamically allocated memory, your class must have a destructor, but also a copy constructor and copy assignment operator, and/or a move constructor and move assignment operator, see Chapter 9.
It is possible for exceptions to be copied more than once, but only if you catch the exception by value instead of by reference.
It could happen that during handling of a first exception, a second exceptional situation is triggered which requires a second exception to be thrown. Unfortunately, when you throw the second exception, all information about the first exception that you are currently trying to handle will be lost. The solution provided by C++ for this problem is called nested exceptions, which allow you to nest a caught exception in the context of a new exception. This can also be useful if you call a function in a third-party library that throws an exception of a certain type, A, but you only want exceptions of another type, B, in your code. In such a case, you catch all exceptions from the library, and nest them in an exception of type B.
You use std::throw_with_nested() to throw an exception with another exception nested inside it. A catch handler for the second exception can use a dynamic_cast() to get access to the nested_exception representing the first exception. The following example demonstrates the use of nested exceptions. This example defines a MyException class, which derives from exception and accepts a string in its constructor.
class MyException : public std::exception{public:MyException(string_view message) : mMessage(message) {}virtual const char* what() const noexcept override {return mMessage.c_str();}private:string mMessage;};
When you are handling a first exception and you need to throw a second exception with the first one nested inside it, you need to use the std::throw_with_nested() function. The following doSomething() function throws a runtime_error that is immediately caught in the catch handler. The catch handler writes a message and then uses the throw_with_nested() function to throw a second exception that has the first one nested inside it. Note that nesting the exception happens automatically. The predefined __func__ variable is discussed in Chapter 1.
void doSomething(){try {throw runtime_error("Throwing a runtime_error exception");} catch (const runtime_error& e) {cout << __func__ << " caught a runtime_error" << endl;cout << __func__ << " throwing MyException" << endl;throw_with_nested(MyException("MyException with nested runtime_error"));}}
The following main() function demonstrates how to handle the exception with a nested exception. The code calls the doSomething() function and has one catch handler for exceptions of type MyException. When it catches such an exception, it writes a message, and then uses a dynamic_cast() to get access to the nested exception. If there is no nested exception inside, the result will be a null pointer. If there is a nested exception inside, the rethrow_nested() method on the nested_exception is called. This will cause the nested exception to be rethrown, which you can then catch in another try/catch block.
int main(){try {doSomething();} catch (const MyException& e) {cout << __func__ << " caught MyException: " << e.what() << endl;const auto* pNested = dynamic_cast<const nested_exception*>(&e);if (pNested) {try {pNested->rethrow_nested();} catch (const runtime_error& e) {// Handle nested exceptioncout << " Nested exception: " << e.what() << endl;}}}return 0;}
The output should be as follows:
doSomething caught a runtime_errordoSomething throwing MyExceptionmain caught MyException: MyException with nested runtime_errorNested exception: Throwing a runtime_error exception
The preceding main() function uses a dynamic_cast() to check for the nested exception. Because you often have to perform this dynamic_cast() if you want to check for a nested exception, the standard provides a small helper function called std::rethrow_if_nested() that does it for you. This helper function can be used as follows:
int main(){try {doSomething();} catch (const MyException& e) {cout << __func__ << " caught MyException: " << e.what() << endl;try {rethrow_if_nested(e);} catch (const runtime_error& e) {// Handle nested exceptioncout << " Nested exception: " << e.what() << endl;}}return 0;}
The throw keyword can also be used to rethrow the current exception, as in the following example:
void g() { throw invalid_argument("Some exception"); }void f(){try {g();} catch (const invalid_argument& e) {cout << "caught in f: " << e.what() << endl;throw; // rethrow}}int main(){try {f();} catch (const invalid_argument& e) {cout << "caught in main: " << e.what() << endl;}return 0;}
This example produces the following output:
caught in f: Some exceptioncaught in main: Some exception
You might think you could also rethrow an exception using something like a “throw e;” statement; however, that’s wrong, because it can cause slicing of your exception object. For example, suppose f() is modified to catch std::exceptions, and main() is modified to catch both exception and invalid_argument exceptions:
void g() { throw invalid_argument("Some exception"); }void f(){try {g();} catch (const exception& e) {cout << "caught in f: " << e.what() << endl;throw; // rethrow}}int main(){try {f();} catch (const invalid_argument& e) {cout << "invalid_argument caught in main: " << e.what() << endl;} catch (const exception& e) {cout << "exception caught in main: " << e.what() << endl;}return 0;}
Remember that invalid_argument derives from exception. The output of this code is as you would expect:
caught in f: Some exceptioninvalid_argument caught in main: Some exception
However, try replacing the “throw;” line in f() with:
throw e;The output then is as follows:
caught in f: Some exceptionexception caught in main: Some exception
Now main() seems to be catching an exception object, instead of an invalid_argument object. That’s because the “throw e;” statement causes slicing, reducing the invalid_argument to an exception.
When a piece of code throws an exception, it searches for a catch handler on the stack. This catch handler could be zero or more function calls up the stack of execution. When one is found, the stack is stripped back to the stack level that defines the catch handler by unwinding all intermediate stack frames. Stack unwinding means that the destructors for all locally scoped names are called, and all code remaining in each function past the current point of execution is skipped.
However, in stack unwinding, pointer variables are not freed, and other cleanup is not performed. This behavior can present problems, as the following code demonstrates:
void funcOne();void funcTwo();int main(){try {funcOne();} catch (const exception& e) {cerr << "Exception caught!" << endl;return 1;}return 0;}void funcOne(){string str1;string* str2 = new string();funcTwo();delete str2;}void funcTwo(){ifstream fileStream;fileStream.open("filename");throw exception();fileStream.close();}
When funcTwo() throws an exception, the closest exception handler is in main(). Control then jumps immediately from this line in funcTwo(),
throw exception();to this line in main():
cerr << "Exception caught!" << endl;In funcTwo(), control remains at the line that threw the exception, so this subsequent line never gets a chance to run:
fileStream.close();However, luckily for you, the ifstream destructor is called because fileStream is a local variable on the stack. The ifstream destructor closes the file for you, so there is no resource leak here. If you had dynamically allocated fileStream, it would not be destroyed, and the file would not be closed.
In funcOne(), control is at the call to funcTwo(), so this subsequent line never gets a chance to run:
delete str2;In this case, there really is a memory leak. Stack unwinding does not automatically call delete on str2 for you. However, str1 is destroyed properly because it is a local variable on the stack. Stack unwinding destroys all local variables correctly.
This is one reason why you should never mix older C models of allocation (even if you are calling new so it looks like C++) with modern programming methodologies like exceptions. In C++, this situation should be handled by using stack-based allocations, or if that is not possible, by one of the techniques discussed in the following two sections.
If stack-based allocation is not possible, then use smart pointers. They allow you to write code that automatically prevents memory or resource leaks with exception handling. Whenever a smart pointer object is destroyed, it frees the underlying resource. Here is an example of the previous funcOne() function but using the unique_ptr smart pointer, defined in <memory>, and introduced in Chapter 1:
void funcOne(){string str1;auto str2 = make_unique<string>("hello");funcTwo();}
The str2 pointer will automatically be deleted when you return from funcOne() or when an exception is thrown.
Of course, you should only allocate something dynamically if you have a good reason to do so. For example, in the previous funcOne() function, there is no good reason to make str2 a dynamically allocated string. It should just be a stack-based string variable. It’s merely shown here as a compact example of the consequences of throwing exceptions.
Another technique for avoiding memory and resource leaks is for each function to catch any possible exceptions, perform necessary cleanup work, and rethrow the exception for the function higher up the stack to handle. Here is a revised funcOne() with this technique:
void funcOne(){string str1;string* str2 = new string();try {funcTwo();} catch (...) {delete str2;throw; // Rethrow the exception.}delete str2;}
This function wraps the call to funcTwo() with an exception handler that performs the cleanup (calls delete on str2) and then rethrows the exception. The keyword throw by itself rethrows whatever exception was caught most recently. Note that the catch statement uses the ... syntax to catch any exception.
This method works fine, but is messy. In particular, note that there are now two identical lines that call delete on str2: one to handle the exception and one if the function exits normally.
Whether or not you use exceptions in your programs is up to you and your colleagues. However, you are strongly encouraged to formalize an error-handling plan for your programs, regardless of your use of exceptions. If you use exceptions, it is generally easier to come up with a unified error-handling scheme, but it is not impossible without exceptions. The most important aspect of a good plan is uniformity of error handling throughout all the modules of the program. Make sure that every programmer on the project understands and follows the error-handling rules.
This section discusses the most common error-handling issues in the context of exceptions, but the issues are also relevant to programs that do not use exceptions.
Despite the fact that all the examples so far in this book have ignored the possibility, memory allocation can fail. On current 64-bit platforms, this will almost never happen, but on mobile or legacy systems, memory allocation can fail. On such systems, you must account for memory allocation failures. C++ provides several different ways to handle memory errors.
The default behaviors of new and new[] are to throw an exception of type bad_alloc, defined in the <new> header file, if they cannot allocate memory. Your code could catch these exceptions and handle them appropriately.
It’s not realistic to wrap all your calls to new and new[] with a try/catch, but at least you should do so when you are trying to allocate a big block of memory. The following example demonstrates how to catch memory allocation exceptions:
int* ptr = nullptr;size_t integerCount = numeric_limits<size_t>::max();try {ptr = new int[integerCount];} catch (const bad_alloc& e) {cerr << __FILE__ << "(" << __LINE__<< "): Unable to allocate memory: " << e.what() << endl;// Handle memory allocation failure.return;}// Proceed with function that assumes memory has been allocated.
Note that this code uses the predefined preprocessor symbols __FILE__ and __LINE__, which are replaced with the name of the file and the current line number. This makes debugging easier.
You could, of course, bulk handle many possible new failures with a single try/catch block at a higher point in the program, if that works for your program.
Another point to consider is that logging an error might try to allocate memory. If new fails, there might not be enough memory left even to log the error message.
If you don’t like exceptions, you can revert to the old C model in which memory allocation routines return a null pointer if they cannot allocate memory. C++ provides nothrow versions of new and new[], which return nullptr instead of throwing an exception if they fail to allocate memory. This is done by using the syntax new(nothrow) instead of new, as shown in the following example:
int* ptr = new(nothrow) int[integerCount];if (ptr == nullptr) {cerr << __FILE__ << "(" << __LINE__<< "): Unable to allocate memory!" << endl;// Handle memory allocation failure.return;}// Proceed with function that assumes memory has been allocated.
The syntax is a little strange: you really do write “nothrow” as if it’s an argument to new (which it is).
C++ allows you to specify a new handler callback function. By default, there is no new handler, so new and new[] just throw bad_alloc exceptions. However, if there is a new handler, the memory allocation routine calls the new handler upon memory allocation failure instead of throwing an exception. If the new handler returns, the memory allocation routines attempt to allocate memory again, calling the new handler again if they fail. This cycle could become an infinite loop unless your new handler changes the situation with one of three alternatives. Practically speaking, some of the options are better than others. Here is the list with commentary:
bad_alloc exception, or an exception derived from bad_alloc. For example:
document_recovery_alloc exception, inheriting from bad_alloc. This exception can be caught somewhere in your application to trigger the document save operation and restart of the application.please_terminate_me exception, deriving from bad_alloc. In your top-level function—for example, main()—you catch this exception and handle it by returning from the top-level function. It’s recommended to terminate a program by returning from the top-level function, instead of by calling exit().If you don’t do one of these three things in your new handler, any memory allocation failure will cause an infinite loop.
If there are some memory allocations that can fail but you don’t want the new handler to be called, you can simply set the new handler back to its default of nullptr temporarily before calling new in those cases.
You set the new handler with a call to set_new_handler(), declared in the <new> header file. Here is an example of a new handler that logs an error message and throws an exception:
class please_terminate_me : public bad_alloc { };void myNewHandler(){cerr << "Unable to allocate memory." << endl;throw please_terminate_me();}
The new handler must take no arguments and return no value. This new handler throws a please_terminate_me exception, as suggested in the second bullet in the preceding list.
You can set this new handler like this:
int main(){try {// Set the new new_handler and save the old one.new_handler oldHandler = set_new_handler(myNewHandler);// Generate allocation errorsize_t numInts = numeric_limits<size_t>::max();int* ptr = new int[numInts];// Reset the old new_handlerset_new_handler(oldHandler);} catch (const please_terminate_me&) {cerr << __FILE__ << "(" << __LINE__<< "): Terminating program." << endl;return 1;}return 0;}
Note that new_handler is a typedef for the type of function pointer that set_new_handler() takes.
Before C++ programmers discover exceptions, they are often stymied by error handling and constructors. What if a constructor fails to construct the object properly? Constructors don’t have a return value, so the standard pre-exception error-handling mechanism doesn’t work. Without exceptions, the best you can do is to set a flag in the object specifying that it is not constructed properly. You can provide a method, with a name like checkConstructionStatus(), which returns the value of that flag, and hope that clients remember to call this method on the object after constructing it.
Exceptions provide a much better solution. You can throw an exception from a constructor, even though you can’t return a value. With exceptions, you can easily tell clients whether or not construction of an object succeeded. However, there is one major problem: if an exception leaves a constructor, the destructor for that object will never be called! Thus, you must be careful to clean up any resources and free any allocated memory in constructors before allowing exceptions to leave the constructor. This problem is the same as in any other function, but it is subtler in constructors because you’re accustomed to letting the destructors take care of the memory deallocation and resource freeing.
This section describes a Matrix class template as an example in which the constructor correctly handles exceptions. Note that this example is using a raw pointer called mMatrix to demonstrate the problems. In production-quality code, you should avoid using raw pointers, for example, by using a Standard Library container! The definition of the Matrix class template looks like this:
template <typename T>class Matrix{public:Matrix(size_t width, size_t height);virtual ~Matrix();private:void cleanup();size_t mWidth = 0;size_t mHeight = 0;T** mMatrix = nullptr;};
The implementation of the Matrix class is as follows. Note that the first call to new is not protected with a try/catch block. It doesn’t matter if the first new throws an exception because the constructor hasn’t allocated anything else yet that needs freeing. If any of the subsequent new calls throws an exception, though, the constructor must clean up all of the memory already allocated. However, it doesn’t know what exceptions the T constructors themselves might throw, so it catches any exceptions via ... and then nests the caught exception inside a bad_alloc exception. Note that the array allocated with the first call to new is zero-initialized using the {} syntax, that is, each element will be nullptr. This makes the cleanup() method easier, because it is allowed to call delete on a nullptr.
template <typename T>Matrix<T>::Matrix(size_t width, size_t height){mMatrix = new T*[width] {}; // Array is zero-initialized!// Don't initialize the mWidth and mHeight members in the ctor-// initializer. These should only be initialized when the above// mMatrix allocation succeeds!mWidth = width;mHeight = height;try {for (size_t i = 0; i < width; ++i) {mMatrix[i] = new T[height];}} catch (...) {std::cerr << "Exception caught in constructor, cleaning up..."<< std::endl;cleanup();// Nest any caught exception inside a bad_alloc exception.std::throw_with_nested(std::bad_alloc());}}template <typename T>Matrix<T>::~Matrix(){cleanup();}template <typename T>void Matrix<T>::cleanup(){for (size_t i = 0; i < mWidth; ++i)delete[] mMatrix[i];delete[] mMatrix;mMatrix = nullptr;mWidth = mHeight = 0;}
The Matrix class template can be tested as follows:
class Element{// Kept to a bare minimum, but in practice, this Element class// could throw exceptions in its constructor.private:int mValue;};int main(){Matrix<Element> m(10, 10);return 0;}
You might be wondering what happens when you add inheritance into the mix. Base class constructors run before derived class constructors. If a derived class constructor throws an exception, C++ will execute the destructor of the fully constructed base class.
The exception mechanism, as discussed up to now in this chapter, is perfect for handling exceptions within functions. But how should you handle exceptions thrown from inside a ctor-initializer of a constructor? This section explains a feature called function-try-blocks, which are capable of catching those exceptions. Function-try-blocks work for normal functions as well as for constructors. This section focuses on the use with constructors. Most C++ programmers, even experienced C++ programmers, don’t know of the existence of this feature, even though it was introduced a long time ago.
The following piece of pseudo-code shows the basic syntax for a function-try-block for a constructor:
MyClass::MyClass()try: <ctor-initializer>{/* ... constructor body ... */}catch (const exception& e){/* ... */}
As you can see, the try keyword should be right before the start of the ctor-initializer. The catch statements should be after the closing brace for the constructor, actually putting them outside the constructor body. There are a number of restrictions and guidelines that you should keep in mind when using function-try-blocks with constructors:
catch statements catch any exception thrown either directly or indirectly by the ctor-initializer or by the constructor body.catch statements have to rethrow the current exception or throw a new exception. If a catch statement doesn’t do this, the runtime automatically rethrows the current exception.catch statements can access arguments passed to the constructor.catch statement catches an exception in a function-try-block, all fully constructed base classes and members of the object are destroyed before execution of the catch statement starts.catch statements you should not access member variables that are objects because these are destroyed prior to executing the catch statements (see the previous bullet). However, if your object contains non-class data members—for example, raw pointers—you can access them if they have been initialized before the exception was thrown. If you have such naked resources, you have to take care of them by freeing them in the catch statements, as the following example demonstrates.catch statements in a function-try-block cannot use the return keyword to return a value from the function enclosed by it. This is not relevant for constructors because they do not return anything.Based on this list of limitations, function-try-blocks for constructors are useful only in a limited number of situations:
The following example demonstrates how to use function-try-blocks. The code defines a class called SubObject. It has only one constructor, which throws an exception of type runtime_error.
class SubObject{public:SubObject(int i);};SubObject::SubObject(int i){throw std::runtime_error("Exception by SubObject ctor");}
The MyClass class has a member variable of type int* and another one of type SubObject:
class MyClass{public:MyClass();private:int* mData = nullptr;SubObject mSubObject;};
The SubObject class does not have a default constructor. This means that you need to initialize mSubObject in the MyClass ctor-initializer. The constructor of MyClass uses a function-try-block to catch exceptions thrown in its ctor-initializer:
MyClass::MyClass()try: mData(new int[42]{ 1, 2, 3 }), mSubObject(42){/* ... constructor body ... */}catch (const std::exception& e){// Cleanup memory.delete[] mData;mData = nullptr;cout << "function-try-block caught: '" << e.what() << "'" << endl;}
Remember that catch statements in a function-try-block for a constructor have to either rethrow the current exception, or throw a new exception. The preceding catch statement does not throw anything, so the C++ runtime automatically rethrows the current exception. Following is a simple function that uses the preceding class:
int main(){try {MyClass m;} catch (const std::exception& e) {cout << "main() caught: '" << e.what() << "'" << endl;}return 0;}
The output of the preceding example is as follows:
function-try-block caught: 'Exception by SubObject ctor'main() caught: 'Exception by SubObject ctor'
Note that the code in the example can be dangerous. Depending on the order of initialization, it could be that mData contains garbage when entering the catch statement. Deleting such a garbage pointer causes undefined behavior. The solution in this example’s case is to use a smart pointer for the mData member, for example std::unique_ptr, and to remove the function-try-block. Therefore:
Function-try-blocks are not limited to constructors. They can be used with ordinary functions as well. However, for normal functions, there is no useful reason to use function-try-blocks because they can just as easily be converted to a simple try/catch block inside the function body. One notable difference when using a function-try-block on a normal function compared to a constructor is that rethrowing the current exception or throwing a new exception in the catch statements is not required and the C++ runtime will not automatically rethrow the exception.
You should handle all error conditions that arise in destructors in the destructors themselves. You should not let any exceptions be thrown from destructors, for a couple of reasons:
noexcept, unless they are marked with noexcept(false)2 or the class has any subobjects whose destructor is noexcept(false). If you throw an exception from a noexcept destructor, the C++ runtime calls std::terminate() to terminate the application.std::terminate() to terminate the application. For the brave and curious, C++ does provide the ability to determine, in a destructor, whether you are executing as a result of a normal function exit or delete call, or because of stack unwinding. The function uncaught_exceptions(), declared in the <exception> header file, returns the number of uncaught exceptions, that is, exceptions that have been thrown but that have not reached a matching catch yet. If the result of uncaught_exceptions() is greater than zero, then you are in the middle of stack unwinding. However, correct use of this function is complicated, messy, and should be avoided. Note that before C++17, the function was called uncaught_exception() (singular), and returned a bool that was true if you were in the middle of stack unwinding.delete, which calls the destructor. If you throw an exception from the destructor, what is a client supposed to do? It can’t call delete on the object again, and it shouldn’t call the destructor explicitly. There is no reasonable action the client can take, so there is no reason to burden that code with exception handling.Now that you’ve learned about error handling and exceptions, let’s see it all coming together in a bigger example, a GameBoard class. This GameBoard class is based on the GameBoard class from Chapter 12. The implementation in Chapter 12 using a vector of vectors is the recommended implementation because even when an exception is thrown, the code is not leaking any memory due to the use of Standard Library containers. To be able to demonstrate handling memory allocation errors, the following version is adapted to use a raw pointer, GamePiece** mCells. First, here is the definition of the class without any exceptions:
class GamePiece {};class GameBoard{public:// general-purpose GameBoard allows user to specify its dimensionsexplicit GameBoard(size_t width = kDefaultWidth,size_t height = kDefaultHeight);GameBoard(const GameBoard& src); // Copy constructorvirtual ~GameBoard();GameBoard& operator=(const GameBoard& rhs); // Assignment operatorGamePiece& at(size_t x, size_t y);const GamePiece& at(size_t x, size_t y) const;size_t getHeight() const { return mHeight; }size_t getWidth() const { return mWidth; }static const size_t kDefaultWidth = 100;static const size_t kDefaultHeight = 100;friend void swap(GameBoard& first, GameBoard& second) noexcept;private:// Objects dynamically allocate space for the game pieces.GamePiece** mCells = nullptr;size_t mWidth = 0, mHeight = 0;};
Note that you could also add move semantics to this GameBoard class. That would require adding a move constructor and move assignment operator, which both have to be noexcept. See Chapter 9 for details on move semantics.
Here are the implementations without any exceptions:
GameBoard::GameBoard(size_t width, size_t height): mWidth(width), mHeight(height){mCells = new GamePiece*[mWidth];for (size_t i = 0; i < mWidth; i++) {mCells[i] = new GamePiece[mHeight];}}GameBoard::GameBoard(const GameBoard& src): GameBoard(src.mWidth, src.mHeight){// The ctor-initializer of this constructor delegates first to the// non-copy constructor to allocate the proper amount of memory.// The next step is to copy the data.for (size_t i = 0; i < mWidth; i++) {for (size_t j = 0; j < mHeight; j++) {mCells[i][j] = src.mCells[i][j];}}}GameBoard::~GameBoard(){for (size_t i = 0; i < mWidth; i++) {delete[] mCells[i];}delete[] mCells;mCells = nullptr;mWidth = mHeight = 0;}void swap(GameBoard& first, GameBoard& second) noexcept{using std::swap;swap(first.mWidth, second.mWidth);swap(first.mHeight, second.mHeight);swap(first.mCells, second.mCells);}GameBoard& GameBoard::operator=(const GameBoard& rhs){// Check for self-assignmentif (this == &rhs) {return *this;}// Copy-and-swap idiomGameBoard temp(rhs); // Do all the work in a temporary instanceswap(*this, temp); // Commit the work with only non-throwing operationsreturn *this;}const GamePiece& GameBoard::at(size_t x, size_t y) const{return mCells[x][y];}GamePiece& GameBoard::at(size_t x, size_t y){return const_cast<GamePiece&>(std::as_const(*this).at(x, y));}
Now, let’s retrofit the preceding class to include error handling and exceptions. The constructors and operator= can all throw bad_alloc because they perform memory allocation directly or indirectly. The destructor, cleanup(), getHeight(), getWidth(), and swap() throw no exceptions. The verifyCoordinate() and at() methods throw out_of_range if the caller supplies an invalid coordinate. Here is the retrofitted class definition:
class GamePiece {};class GameBoard{public:explicit GameBoard(size_t width = kDefaultWidth,size_t height = kDefaultHeight);GameBoard(const GameBoard& src);virtual ~GameBoard() noexcept;GameBoard& operator=(const GameBoard& rhs); // Assignment operatorGamePiece& at(size_t x, size_t y);const GamePiece& at(size_t x, size_t y) const;size_t getHeight() const noexcept { return mHeight; }size_t getWidth() const noexcept { return mWidth; }static const size_t kDefaultWidth = 100;static const size_t kDefaultHeight = 100;friend void swap(GameBoard& first, GameBoard& second) noexcept;private:void cleanup() noexcept;void verifyCoordinate(size_t x, size_t y) const;GamePiece** mCells = nullptr;size_t mWidth = 0, mHeight = 0;};
Here are the implementations with exception handling:
GameBoard::GameBoard(size_t width, size_t height){mCells = new GamePiece*[width] {}; // Array is zero-initialized!// Don't initialize the mWidth and mHeight members in the ctor-// initializer. These should only be initialized when the above// mCells allocation succeeds!mWidth = width;mHeight = height;try {for (size_t i = 0; i < mWidth; i++) {mCells[i] = new GamePiece[mHeight];}} catch (...) {cleanup();// Nest any caught exception inside a bad_alloc exception.std::throw_with_nested(std::bad_alloc());}}GameBoard::GameBoard(const GameBoard& src): GameBoard(src.mWidth, src.mHeight){// The ctor-initializer of this constructor delegates first to the// non-copy constructor to allocate the proper amount of memory.// The next step is to copy the data.for (size_t i = 0; i < mWidth; i++) {for (size_t j = 0; j < mHeight; j++) {mCells[i][j] = src.mCells[i][j];}}}GameBoard::~GameBoard() noexcept{cleanup();}void GameBoard::cleanup() noexcept{for (size_t i = 0; i < mWidth; i++)delete[] mCells[i];delete[] mCells;mCells = nullptr;mWidth = mHeight = 0;}void GameBoard::verifyCoordinate(size_t x, size_t y) const{if (x >= mWidth)throw out_of_range("x-coordinate beyond width");if (y >= mHeight)throw out_of_range("y-coordinate beyond height");}void swap(GameBoard& first, GameBoard& second) noexcept{using std::swap;swap(first.mWidth, second.mWidth);swap(first.mHeight, second.mHeight);swap(first.mCells, second.mCells);}GameBoard& GameBoard::operator=(const GameBoard& rhs){// Check for self-assignmentif (this == &rhs) {return *this;}// Copy-and-swap idiomGameBoard temp(rhs); // Do all the work in a temporary instanceswap(*this, temp); // Commit the work with only non-throwing operationsreturn *this;}const GamePiece& GameBoard::at(size_t x, size_t y) const{verifyCoordinate(x, y);return mCells[x][y];}GamePiece& GameBoard::at(size_t x, size_t y){return const_cast<GamePiece&>(std::as_const(*this).at(x, y));}
This chapter described the issues related to error handling in C++ programs, and emphasized that you must design and code your programs with an error-handling plan. By reading this chapter, you learned the details of C++ exceptions syntax and behavior. The chapter also covered some of the areas in which error handling plays a large role, including I/O streams, memory allocation, constructors, and destructors. Finally, you saw an example of error handling in a GameBoard class.
As Chapter 1 explains, operators in C++ are symbols such as +, <, *, and <<. They work on built-in types such as int and double to allow you to perform arithmetic, logical, and other operations. There are also operators such as -> and * that allow you to dereference pointers. The concept of operators in C++ is broad, and even includes [] (array index), () (function call), casting, and the memory allocation and deallocation operators. Operator overloading allows you to change the behavior of language operators for your classes. However, this capability comes with rules, limitations, and choices.
Before learning how to overload operators, you probably want to know why you would ever want to do so. The reasons vary for the different operators, but the general guiding principle is to make your classes behave like built-in types. The closer your classes are to built-in types, the easier they will be for clients to use. For example, if you want to write a class to represent fractions, it’s quite helpful to have the ability to define what +, -, *, and / mean when applied to objects of that class.
Another reason to overload operators is to gain greater control over the behavior in your program. For example, you can overload memory allocation and deallocation operators for your classes to specify exactly how memory should be distributed and reclaimed for each new object.
It’s important to emphasize that operator overloading doesn’t necessarily make things easier for you as the class developer; its main purpose is to make things easier for users of the class.
Here is a list of things you cannot do when you overload operators:
. (member access in an object), :: (scope resolution operator), sizeof, ?: (the conditional operator), and a few others. The table lists all the operators that you can overload. The operators that you can’t overload are usually not those you would care to overload anyway, so you shouldn’t find this restriction limiting.++, work on only one operand. Binary operators, such as /, work on two operands. The main situation where this limitation might affect you is when overloading [] (array index), which is discussed later in this chapter.+ for ints to mean subtraction (though you could do so for your classes). The one exception to this rule is the memory allocation and deallocation operators; you can replace the global operators for all memory allocations in your program.Some of the operators already mean two different things. For example, the – operator can be used as a binary operator (as in x
=
y
-
z;) or as a unary operator (as in x
=
-y;). The * operator can be used for multiplication or for dereferencing a pointer. The << operator is the stream insertion operator or the left-shift operator, depending on the context. You can overload both meanings of operators with dual meanings.
When you overload an operator, you write a function or method with the name operatorX, where X is the symbol for some operator, and with optional white space between operator and X. For example, Chapter 9 declares operator+ for SpreadsheetCell objects like this:
SpreadsheetCell operator+(const SpreadsheetCell& lhs,const SpreadsheetCell& rhs);
The following sections describe several choices involved in each overloaded operator function or method you write.
First, you must decide whether your operator should be a method of your class or a global function (sometimes a friend of the class). How do you choose? First, you need to understand the difference between these two choices. When the operator is a method of a class, the left-hand side of the operator expression must always be an object of that class. If you write a global function, the left-hand side can be an object of a different type.
There are three different types of operators:
operator= is tied so closely to the class that it can’t exist anywhere else. The table in the section, “Summary of Overloadable Operators,” lists those operators that must be methods. Most operators do not impose this requirement.operator<< and operator>>, where the left-hand side is an iostream object, not an object of your class. Additionally, commutative operators like binary + and – should allow variables that are not objects of your class on the left-hand side. Chapter 9 discusses this problem.virtual, while global functions obviously cannot. Therefore, when you plan to write overloaded operators in an inheritance tree, you should make them methods if possible.When you write an overloaded operator as a method, you should mark it const if it doesn’t change the object. That way, it can be called on const objects.
You are somewhat limited in your choice of argument types because, as stated earlier, for most operators you cannot change the number of arguments. For example, operator/ must always have two arguments if it is a global function, and one argument if it’s a method. The compiler issues an error if it differs from this standard. In this sense, the operator functions are different from normal functions, which you can overload with any number of parameters. Additionally, although you can write the operator for whichever types you want, the choice is usually constrained by the class for which you are writing the operator. For example, if you want to implement addition for class T, you don’t write an operator+ that takes two strings! The real choice arises when you try to determine whether to take parameters by value or by reference, and whether or not to make them const.
The choice of value versus reference is easy: you should take every non-primitive parameter type by reference. As Chapters 9 and 11 explain, you should never pass objects by value if you can pass-by-reference instead.
The const decision is also trivial: mark every parameter const unless you actually modify it. The table in the section, “Summary of Overloadable Operators,” shows sample prototypes for each operator, with the arguments marked const and reference as appropriate.
C++ doesn’t determine overload resolution based on return type. Thus, you can specify any return type you want when you write overloaded operators. However, just because you can do something doesn’t mean you should do it. This flexibility implies that you could write confusing code in which comparison operators return pointers, and arithmetic operators return bools. However, you shouldn’t do that. Instead, you should write your overloaded operators such that they return the same types as the operators do for the built-in types. If you write a comparison operator, return a bool. If you write an arithmetic operator, return an object representing the result. Sometimes the return type is not obvious at first. For example, as Chapter 8 mentions, operator= should return a reference to the object on which it’s called in order to support nested assignments. Other operators have similarly tricky return types, all of which are summarized in the table in the section, “Summary of Overloadable Operators.”
The same choices of reference and const apply to return types as well. However, for return values, the choices are more difficult. The general rule for value or reference is to return a reference if you can; otherwise, return a value. How do you know when you can return a reference? This choice applies only to operators that return objects: the choice is moot for the comparison operators that return bool, the conversion operators that have no return type, and the function call operator, which may return any type you want. If your operator constructs a new object, then you must return that new object by value. If it does not construct a new object, you can return a reference to the object on which the operator is called, or one of its arguments. The table in the section, “Summary of Overloadable Operators,” shows examples.
A return value that can be modified as an lvalue (the left-hand side of an assignment expression) must be non-const. Otherwise, it should be const. More operators than you might expect require that you return lvalues, including all of the assignment operators (operator=, operator+=, operator-=, and so on).
You can provide whichever implementation you want in an overloaded operator. For example, you could write an operator+ that launches a game of Scrabble. However, as Chapter 6 describes, you should generally constrain your implementations to provide behaviors that clients expect. Write operator+ so that it performs addition, or something like addition, such as string concatenation. This chapter explains how you should implement your overloaded operators. In exceptional circumstances, you might want to differ from these recommendations; but, in general, you should follow the standard patterns.
Some operators should not be overloaded, even though it is permitted. Specifically, the address-of operator (operator&) is not particularly useful to overload, and leads to confusion if you do because you are changing fundamental language behavior (taking addresses of variables) in potentially unexpected ways. The entire Standard Library, which uses operator overloading extensively, never overloads the address-of operator.
Additionally, you should avoid overloading the binary Boolean operators operator&& and operator|| because you lose C++’s short-circuit evaluation rules.
Finally, you should not overload the comma operator (operator,). Yes, you read that correctly: there really is a comma operator in C++. It’s also called the sequencing operator, and is used to separate two expressions in a single statement, while guaranteeing that they are evaluated left to right. There is rarely a good reason to overload this operator.
The following table lists the operators that you can overload, specifies whether they should be methods of the class or global functions, summarizes when you should (or should not) overload them, and provides sample prototypes showing the proper return values.
This table is a useful reference for the future when you want to write an overloaded operator. You’re bound to forget which return type you should use, and whether or not the function should be a method.
In this table, T is the name of the class for which the overloaded operator is written, and E is a different type. Note that the sample prototypes given are not exhaustive; often there are other combinations of T and E possible for a given operator.
| OPERATOR | NAME OR CATEGORY | METHOD OR GLOBAL FUNCTION | WHEN TO OVERLOAD | SAMPLE PROTOTYPE |
operator+operator-operator*operator/operator% |
Binary arithmetic | Global function recommended | Whenever you want to provide these operations for your class | T operator+(const T&, const T&);T operator+(const T&, const E&); |
operator-operator+operator~ |
Unary arithmetic and bitwise operators | Method recommended | Whenever you want to provide these operations for your class | T operator-() const; |
operator++operator-- |
Pre-increment and pre-decrement | Method recommended | Whenever you overload += and -= taking an arithmetic argument (int, long, ...) |
T& operator++(); |
operator++operator-- |
Post-increment and post-decrement | Method recommended | Whenever you overload += and -= taking an arithmetic argument (int, long, ...) |
T operator++(int); |
operator= |
Assignment operator | Method required | Whenever your class has dynamically allocated memory or resources, or members that are references | T& operator=(const T&); |
operator+=operator-=operator*=operator/=operator%= |
Shorthand arithmetic operator assignments | Method recommended | Whenever you overload the binary arithmetic operators and your class is not designed to be immutable | T& operator+=(const T&);T& operator+=(const E&); |
operator<<operator>>operator&operator|operator^ |
Binary bitwise operators | Global function recommended | Whenever you want to provide these operations | T operator<<(const T&, const T&);T operator<<(const T&, const E&); |
operator<<=operator>>=operator&=operator|=operator^= |
Shorthand bitwise operator assignments | Method recommended | Whenever you overload the binary bitwise operators and your class is not designed to be immutable | T& operator<<=(const T&);T& operator<<=(const E&); |
operator<operator>operator<=operator>=operator==operator!= |
Binary comparison operators | Global function recommended | Whenever you want to provide these operations | bool operator<(const T&, const T&);bool operator<(const T&, const E&); |
operator<<operator>> |
I/O stream operators (insertion and extraction) | Global function required | Whenever you want to provide these operations | ostream& operator<<(ostream&, const T&);istream& operator>>(istream&, T&); |
operator! |
Boolean negation operator | Member function recommended | Rarely; use bool or void* conversion instead. |
bool operator!() const; |
operator&&operator|| |
Binary Boolean operators | Global function recommended | Rarely, if ever, because you lose short-circuiting; it’s better to overload & and | instead, as these never short-circuit. |
bool operator&&(const T&, const T&); |
operator[] |
Subscripting (array index) operator | Method required | When you want to support subscripting | E& operator[](size_t);const E& operator[](size_t) const; |
operator() |
Function call operator | Method required | When you want objects to behave like function pointers, or for multi-dimensional array access, since [] can only have one index |
Return type and parameters can vary; see further examples in this chapter. |
operator type() |
Conversion, or cast, operators (separate operator for each type) | Method required | When you want to provide conversions from your class to other types | operator double() const; |
operator newoperator new[] |
Memory allocation routines | Method recommended | When you want to control memory allocation for your classes (rarely) | void* operator new(size_t size);void* operator new[](size_t size); |
operator deleteoperator delete[] |
Memory deallocation routines | Method recommended | Whenever you overload the memory allocation routines (rarely) | void operator delete(void* ptr) noexcept;void operator delete[](void* ptr) noexcept; |
operator*operator-> |
Dereferencing operators |
Method recommended for operator*Method required for operator-> |
Useful for smart pointers | E& operator*() const;E* operator->() const; |
operator& |
Address-of operator | N/A | Never | N/A |
operator->* |
Dereference pointer-to-member | N/A | Never | N/A |
operator, |
Comma operator | N/A | Never | N/A |
Chapter 9 discusses rvalue references, written as && instead of the normal lvalue references, &. They are demonstrated in Chapter 9 by defining move assignment operators, which are used by the compiler in cases where the second object is a temporary object that will be destroyed after the assignment. The normal assignment operator from the preceding table has the following prototype:
T& operator=(const T&);The move assignment operator has almost the same prototype, but uses an rvalue reference. It modifies the argument so it cannot be passed as const. See Chapter 9 for details.
T& operator=(T&&);The preceding table does not include sample prototypes with rvalue reference semantics. However, for most operators it can make sense to write both a version using normal lvalue references and a version using rvalue references. Whether it makes sense depends on implementation details of your class. The operator= is one example from Chapter 9. Another example is operator+ to prevent unnecessary memory allocations. The std::string class from the Standard Library, for example, implements an operator+ using rvalue references as follows (simplified):
string operator+(string&& lhs, string&& rhs);The implementation of this operator reuses memory of one of the arguments because they are being passed as rvalue references, meaning both are temporary objects that will be destroyed when this operator+ is finished. The implementation of the preceding operator+ has the following effect depending on the size and the capacity of both operands:
return std::move(lhs.append(rhs));or
return std::move(rhs.insert(0, lhs));In fact, std::string defines several overloaded operator+ operators with different combinations of lvalue references and rvalue references. The following is a list of all operator+ operators for std::string accepting two strings as arguments (simplified):
string operator+(const string& lhs, const string& rhs);string operator+(string&& lhs, const string& rhs);string operator+(const string& lhs, string&& rhs);string operator+(string&& lhs, string&& rhs);
Reusing memory of one of the rvalue reference arguments is implemented in the same way as it is explained for move assignment operators in Chapter 9.
There is a handy <utility> header file included with the C++ Standard Library. It contains quite a few helper functions and classes. It also contains the following set of function templates for relational operators in the std::rel_ops namespace:
template<class T> bool operator!=(const T& a, const T& b);// Needs operator==template<class T> bool operator>(const T& a, const T& b); // Needs operator<template<class T> bool operator<=(const T& a, const T& b);// Needs operator<template<class T> bool operator>=(const T& a, const T& b);// Needs operator<
These function templates define the operators !=, >, <=, and >= in terms of the == and < operators for any class. If you implement operator== and operator< in your class, you get the other relational operators for free with these templates. You can make these available for your class by simply adding a #include <utility> and adding the following using statement:
using namespace std::rel_ops;However, one problem with this technique is that now those operators might be created for all classes that you use in relational operations, not only for your own class.
A second problem with this technique is that utility templates such as std::greater<T> (discussed in Chapter 18) do not work with those automatically generated relational operators.
Yet another problem with these is that implicit conversions will not work. Therefore:
Chapter 9 shows how to write the binary arithmetic operators and the shorthand arithmetic assignment operators, but it does not cover how to overload the other arithmetic operators.
C++ has several unary arithmetic operators. Two of these are unary minus and unary plus. Here is an example of these operators using ints:
int i, j = 4;i = -j; // Unary minusi = +i; // Unary plusj = +(-i); // Apply unary plus to the result of applying unary minus to i.j = -(-i); // Apply unary minus to the result of applying unary minus to i.
Unary minus negates the operand, while unary plus returns the operand directly. Note that you can apply unary plus or unary minus to the result of unary plus or unary minus. These operators don’t change the object on which they are called so you should make them const.
Here is an example of a unary operator- as a member function for a SpreadsheetCell class. Unary plus is usually an identity operation, so this class doesn’t overload it:
SpreadsheetCell SpreadsheetCell::operator-() const{return SpreadsheetCell(-getValue());}
operator- doesn’t change the operand, so this method must construct a new SpreadsheetCell with the negated value, and return it. Thus, it can’t return a reference. You can use this operator as follows:
SpreadsheetCell c1(4);SpreadsheetCell c3 = -c1;
There are four ways to add 1 to a variable:
i = i + 1;i += 1;++i;i++;
The last two forms are called the increment operators. The first form is prefix increment, which adds 1 to the variable, then returns the newly incremented value for use in the rest of the expression. The second form is postfix increment, which returns the old (non-incremented) value for use in the rest of the expression. The decrement operators work similarly.
The two possible meanings for operator++ and operator-- (prefix and postfix) present a problem when you want to overload them. When you write an overloaded operator++, for example, how do you specify whether you are overloading the prefix or the postfix version? C++ introduced a hack to allow you to make this distinction: the prefix versions of operator++ and operator-- take no arguments, while the postfix versions take one unused argument of type int.
The prototypes of these overloaded operators for the SpreadsheetCell class look like this:
SpreadsheetCell& operator++(); // PrefixSpreadsheetCell operator++(int); // PostfixSpreadsheetCell& operator--(); // PrefixSpreadsheetCell operator--(int); // Postfix
The return value in the prefix forms is the same as the end value of the operand, so prefix increment and decrement can return a reference to the object on which they are called. The postfix versions of increment and decrement, however, return values that are different from the end values of the operands, so they cannot return references.
Here are the implementations for operator++:
SpreadsheetCell& SpreadsheetCell::operator++(){set(getValue() + 1);return *this;}SpreadsheetCell SpreadsheetCell::operator++(int){auto oldCell(*this); // Save current value++(*this); // Increment using prefix ++return oldCell; // Return the old value}
The implementations for operator-- are almost identical. Now you can increment and decrement SpreadsheetCell objects to your heart’s content:
SpreadsheetCell c1(4);SpreadsheetCell c2(4);c1++;++c2;
Increment and decrement also work on pointers. When you write classes that are smart pointers or iterators, you can overload operator++ and operator-- to provide pointer incrementing and decrementing.
The bitwise operators are similar to the arithmetic operators, and the bitwise shorthand assignment operators are similar to the arithmetic shorthand assignment operators. However, they are significantly less common, so no examples are shown here. The table in the section “Summary of Overloadable Operators” shows sample prototypes, so you should be able to implement them easily if the need ever arises.
The logical operators are trickier. It’s not recommended to overload && and ||. These operators don’t really apply to individual types: they aggregate results of Boolean expressions. Additionally, you lose the short-circuit evaluation, because both the left-hand side and the right-hand side have to be evaluated before they can be bound to the parameters of your overloaded operator && and ||. Thus, it rarely, if ever, makes sense to overload them for specific types.
In C++, you use operators not only for arithmetic operations, but also for reading from, and writing to, streams. For example, when you write ints and strings to cout, you use the insertion operator <<:
int number = 10;cout << "The number is " << number << endl;
When you read from streams, you use the extraction operator >>:
int number;string str;cin >> number >> str;
You can write insertion and extraction operators that work on your classes as well, so that you can read and write them like this:
SpreadsheetCell myCell, anotherCell, aThirdCell;cin >> myCell >> anotherCell >> aThirdCell;cout << myCell << " " << anotherCell << " " << aThirdCell << endl;
Before you write the insertion and extraction operators, you need to decide how you want to stream your class out and how you want to read it in. In this example, the SpreadsheetCells simply read and write double values.
The object on the left of an extraction or insertion operator is an istream or ostream (such as cin or cout), not a SpreadsheetCell object. Because you can’t add a method to the istream or ostream classes, you must write the extraction and insertion operators as global functions. The declaration of these functions looks like this:
class SpreadsheetCell{// Omitted for brevity};std::ostream& operator<<(std::ostream& ostr, const SpreadsheetCell& cell);std::istream& operator>>(std::istream& istr, SpreadsheetCell& cell);
By making the insertion operator take a reference to an ostream as its first parameter, you allow it to be used for file output streams, string output streams, cout, cerr, and clog. See Chapter 13 for details on streams. Similarly, by making the extraction operator take a reference to an istream, you make it work on file input streams, string input streams, and cin.
The second parameter to operator<< and operator>> is a reference to the SpreadsheetCell object that you want to write or read. The insertion operator doesn’t change the SpreadsheetCell it writes, so that reference can be const. The extraction operator, however, modifies the SpreadsheetCell object, requiring the argument to be a non-const reference.
Both operators return a reference to the stream they were given as their first argument so that calls to the operator can be nested. Remember that the operator syntax is shorthand for calling the global operator>> or operator<< functions explicitly. Consider this line:
cin >> myCell >> anotherCell >> aThirdCell;It’s actually shorthand for this line:
operator>>(operator>>(operator>>(cin, myCell), anotherCell), aThirdCell);As you can see, the return value of the first call to operator>> is used as input to the next call. Thus, you must return the stream reference so that it can be used in the next nested call. Otherwise, the nesting won’t compile.
Here are the implementations for operator<< and operator>> for the SpreadsheetCell class:
ostream& operator<<(ostream& ostr, const SpreadsheetCell& cell){ostr << cell.getValue();return ostr;}istream& operator>>(istream& istr, SpreadsheetCell& cell){double value;istr >> value;cell.set(value);return istr;}
Pretend for a few minutes that you have never heard of the vector or array class templates in the Standard Library, and so you have decided to write your own dynamically allocated array class. This class would allow you to set and retrieve elements at specified indices, and would take care of all memory allocation “behind the scenes.” A first stab at the class definition for a dynamically allocated array might look like this:
template <typename T>class Array{public:// Creates an array with a default size that will grow as needed.Array();virtual ~Array();// Disallow assignment and pass-by-valueArray<T>& operator=(const Array<T>& rhs) = delete;Array(const Array<T>& src) = delete;// Returns the value at index x. Throws an exception of type// out_of_range if index x does not exist in the array.const T& getElementAt(size_t x) const;// Sets the value at index x. If index x is out of range,// allocates more space to make it in range.void setElementAt(size_t x, const T& value);size_t getSize() const;private:static const size_t kAllocSize = 4;void resize(size_t newSize);T* mElements = nullptr;size_t mSize = 0;};
The interface supports setting and accessing elements. It provides random-access guarantees: a client could create an array and set elements 1, 100, and 1000 without worrying about memory management.
Here are the implementations of the methods:
template <typename T> Array<T>::Array(){mSize = kAllocSize;mElements = new T[mSize] {}; // Elements are zero-initialized!}template <typename T> Array<T>::~Array(){delete [] mElements;mElements = nullptr;}template <typename T> void Array<T>::resize(size_t newSize){// Create new bigger array with zero-initialized elements.auto newArray = std::make_unique<T[]>(newSize);// The new size is always bigger than the old size (mSize)for (size_t i = 0; i < mSize; i++) {// Copy the elements from the old array to the new onenewArray[i] = mElements[i];}// Delete the old array, and set the new arraydelete[] mElements;mSize = newSize;mElements = newArray.release();}template <typename T> const T& Array<T>::getElementAt(size_t x) const{if (x >= mSize) {throw std::out_of_range("");}return mElements[x];}template <typename T> void Array<T>::setElementAt(size_t x, const T& val){if (x >= mSize) {// Allocate kAllocSize past the element the client wantsresize(x + kAllocSize);}mElements[x] = val;}template <typename T> size_t Array<T>::getSize() const{return mSize;}
Pay some attention to the exception-safe implementation of the resize() method. First, it creates a new array of appropriate size, and stores it in a unique_ptr. Then, all elements are copied from the old array to the new array. If anything goes wrong while copying the values, the unique_ptr cleans up the memory automatically. Finally, when both the allocation of the new array and copying all the elements was successful, that is, no exceptions have been thrown, only then we delete the old mElements array and assign the new array to it. The last line has to use release() to release the ownership of the new array from the unique_ptr, otherwise the array will get destroyed when the destructor for the unique_ptr is called.
Here is a small example of how you could use this class:
Array<int> myArray;for (size_t i = 0; i < 10; i++) {myArray.setElementAt(i, 100);}for (size_t i = 0; i < 10; i++) {cout << myArray.getElementAt(i) << " ";}
As you can see, you never have to tell the array how much space you need. It allocates as much space as it requires to store the elements you give it. However, it’s inconvenient to always have to use the setElementAt() and getElementAt() methods. It would be nice to be able to use conventional array index notation like this:
Array<int> myArray;for (size_t i = 0; i < 10; i++) {myArray[i] = 100;}for (size_t i = 0; i < 10; i++) {cout << myArray[i] << " ";}
This is where the overloaded subscripting operator comes in. You can add an operator[] to the class with the following implementation:
template <typename T> T& Array<T>::operator[](size_t x){if (x >= mSize) {// Allocate kAllocSize past the element the client wants.resize(x + kAllocSize);}return mElements[x];}
The example code using array index notation now compiles. The operator[] can be used to both set and get elements because it returns a reference to the element at location x. This reference can be used to assign to that element. When operator[] is used on the left-hand side of an assignment statement, the assignment actually changes the value at location x in the mElements array.
Although it’s sometimes convenient for operator[] to return an element that can serve as an lvalue, you don’t always want that behavior. It would be nice to be able to provide read-only access to the elements of the array as well, by returning a const reference. To provide for this, you need two operator[]s: one returns a reference and one returns a const reference:
T& operator[](size_t x);const T& operator[](size_t x) const;
Remember that you can’t overload a method or operator based only on the return type, so the second overload returns a const reference and is marked as const.
Here is the implementation of the const operator[]. It throws an exception if the index is out of range instead of trying to allocate new space. It doesn’t make sense to allocate new space when you’re only trying to read the element value.
template <typename T> const T& Array<T>::operator[](size_t x) const{if (x >= mSize) {throw std::out_of_range("");}return mElements[x];}
The following code demonstrates these two forms of operator[]:
void printArray(const Array<int>& arr){for (size_t i = 0; i < arr.getSize(); i++) {cout << arr[i] << " "; // Calls the const operator[] because arr is// a const object.}cout << endl;}int main(){Array<int> myArray;for (size_t i = 0; i < 10; i++) {myArray[i] = 100; // Calls the non-const operator[] because// myArray is a non-const object.}printArray(myArray);return 0;}
Note that the const operator[] is called in printArray() only because arr is const. If arr were not const, the non-const operator[] would be called, despite the fact that the result is not modified.
The const operator[] is called for const objects, so it cannot grow the size of the array. The current implementation throws an exception when the given index is out of bounds. An alternative would be to return a zero-initialized element instead of throwing. This can be done as follows:
template <typename T> const T& Array<T>::operator[](size_t x) const{if (x >= mSize) {static T nullValue = T();return nullValue;}return mElements[x];}
The nullValue
static variable is initialized using the zero-initialization1 syntax T(). It’s up to you and your specific use case whether you opt for the throwing version or the version returning a null value.
It is a natural extension of the paradigm of “indexing” into a collection to provide a key of some sort; a vector (or in general, any linear array) is a special case where the “key” is just a position in the array. Think of the argument of operator[] as providing a mapping between two domains: the domain of keys and the domain of values. Thus, you can write an operator[] that uses any type as its index. This type does not need to be an integer type. This is done for the Standard Library associative containers, like std::map, which are discussed in Chapter 17.
For example, you could create an associative array in which you use string keys instead of integers. Here is the definition for such an associative array class:
template <typename T>class AssociativeArray{public:virtual ~AssociativeArray() = default;T& operator[](std::string_view key);const T& operator[](std::string_view key) const;private:// Implementation details omitted};
Implementing this class would be a good exercise for you. You can also find an implementation of this class in the downloadable source code for this book at www.wrox.com/go/proc++4e.
C++ allows you to overload the function call operator, written as operator(). If you write an operator() for your class, you can use objects of that class as if they were function pointers. An object of a class with a function call operator is called a function object, or functor, for short. You can overload this operator only as a non-static method in a class. Here is an example of a simple class with an overloaded operator() and a class method with the same behavior:
class FunctionObject{public:int operator() (int param); // Function call operatorint doSquare(int param); // Normal method};// Implementation of overloaded function call operatorint FunctionObject::operator() (int param){return doSquare(param);}// Implementation of normal methodint FunctionObject::doSquare(int param){return param * param;}
Here is an example of code that uses the function call operator, contrasted with the call to a normal method of the class:
int x = 3, xSquared, xSquaredAgain;FunctionObject square;xSquared = square(x); // Call the function call operatorxSquaredAgain = square.doSquare(x); // Call the normal method
At first, the function call operator probably seems a little strange. Why would you want to write a special method for a class to make objects of the class look like function pointers? Why wouldn’t you just write a function or a standard method of a class? The advantage of function objects over standard methods of objects is simple: these objects can sometimes masquerade as function pointers, that is, you can pass function objects as callback functions to other functions. This is discussed in more detail in Chapter 18.
The advantages of function objects over global functions are more intricate. There are two main benefits:
Of course, you could implement either of the preceding benefits with global or static variables. However, function objects provide a cleaner way to do it, and using global or static variables might cause problems in a multithreaded application. The true benefits of function objects are demonstrated with the Standard Library in Chapter 18.
By following the normal method overloading rules, you can write as many operator()s for your classes as you want. For example, you could add an operator() to the FunctionObject class that takes an std::string_view:
int operator() (int param);void operator() (std::string_view str);
The function call operator can also be used to provide subscripting for multi-dimensional arrays. Simply write an operator() that behaves like operator[] but allows for more than one index. The only minor annoyance with this technique is that you have to use () to index instead of [], as in myArray(3, 4) = 6;.
You can overload three dereferencing operators: *, ->, and ->*. Ignoring ->* for the moment (I’ll come back to it later), consider the built-in meanings of * and ->. The * operator dereferences a pointer to give you direct access to its value, while -> is shorthand for a * dereference followed by a . member selection. The following code shows the equivalences:
SpreadsheetCell* cell = new SpreadsheetCell;(*cell).set(5); // Dereference plus member selectioncell->set(5); // Shorthand arrow dereference and member selection together
You can overload the dereferencing operators for your classes in order to make objects of the classes behave like pointers. The main use of this capability is for implementing smart pointers, introduced in Chapter 1. It is also useful for iterators, which the Standard Library uses extensively. Iterators are discussed in Chapter 17. This chapter teaches you the basic mechanics for overloading the relevant operators in the context of a simple smart pointer class template.
Here is the example smart pointer class template definition, without the dereferencing operators filled in yet:
template <typename T> class Pointer{public:Pointer(T* ptr);virtual ~Pointer();// Prevent assignment and pass by value.Pointer(const Pointer<T>& src) = delete;Pointer<T>& operator=(const Pointer<T>& rhs) = delete;// Dereferencing operators will go here.private:T* mPtr = nullptr;};
This smart pointer is about as simple as you can get. All it does is store a dumb raw pointer, and the storage pointed to by the pointer is deleted when the smart pointer is destroyed. The implementation is equally simple: the constructor takes a raw pointer, which is stored as the only data member in the class. The destructor frees the storage referenced by the pointer.
template <typename T> Pointer<T>::Pointer(T* ptr) : mPtr(ptr){}template <typename T> Pointer<T>::~Pointer(){delete mPtr;mPtr = nullptr;}
You want to be able to use the smart pointer class template like this:
Pointer<int> smartInt(new int);*smartInt = 5; // Dereference the smart pointer.cout << *smartInt << endl;Pointer<SpreadsheetCell> smartCell(new SpreadsheetCell);smartCell->set(5); // Dereference and member select the set method.cout << smartCell->getValue() << endl;
As you can see from this example, you have to provide implementations of operator* and operator-> for this class. These are implemented in the next two sections.
When you dereference a pointer, you expect to be able to access the memory to which the pointer points. If that memory contains a simple type such as an int, you should be able to change its value directly. If the memory contains a more complicated type, such as an object, you should be able to access its data members or methods with the . operator.
To provide these semantics, you should return a reference from operator*. In the Pointer class, the declaration and definition are as follows:
template <typename T> class Pointer{public:// Omitted for brevityT& operator*();const T& operator*() const;// Omitted for brevity};template <typename T> T& Pointer<T>::operator*(){return *mPtr;}template <typename T> const T& Pointer<T>::operator*() const{return *mPtr;}
As you can see, operator* returns a reference to the object or variable to which the underlying raw pointer points. As with overloading the subscripting operators, it’s useful to provide both const and non-const versions of the method, which return a const reference and a non-const reference, respectively.
The arrow operator is a bit trickier. The result of applying the arrow operator should be a member or method of an object. However, in order to implement it like that, you would have to be able to implement the equivalent of operator* followed by operator.; C++ doesn’t allow you to overload operator. for good reason: it’s impossible to write a single prototype that allows you to capture any possible member or method selection. Therefore, C++ treats operator-> as a special case. Consider this line:
smartCell->set(5);C++ translates this to
(smartCell.operator->())->set(5);As you can see, C++ applies another operator-> to whatever you return from your overloaded operator->. Therefore, you must return a pointer, like this:
template <typename T> class Pointer{public:// Omitted for brevityT* operator->();const T* operator->() const;// Omitted for brevity};template <typename T> T* Pointer<T>::operator->(){return mPtr;}template <typename T> const T* Pointer<T>::operator->() const{return mPtr;}
You may find it confusing that operator* and operator-> are asymmetric, but once you see them a few times, you’ll get used to it.
It’s perfectly legitimate in C++ to take the addresses of class data members and methods in order to obtain pointers to them. However, you can’t access a non-static data member or call a non-static method without an object. The whole point of class data members and methods is that they exist on a per-object basis. Thus, when you want to call the method or access the data member via the pointer, you must dereference the pointer in the context of an object. The following example demonstrates this. Chapter 11 discusses the syntactical details in the section “Pointers to Methods and Data Members.”
SpreadsheetCell myCell;double (SpreadsheetCell::*methodPtr) () const = &SpreadsheetCell::getValue;cout << (myCell.*methodPtr)() << endl;
Note the use of the .* operator to dereference the method pointer and call the method. There is also an equivalent operator->* for calling methods via pointers when you have a pointer to an object instead of the object itself. The operator looks like this:
SpreadsheetCell* myCell = new SpreadsheetCell();double (SpreadsheetCell::*methodPtr) () const = &SpreadsheetCell::getValue;cout << (myCell->*methodPtr)() << endl;
C++ does not allow you to overload operator.* (just as you can’t overload operator.), but you could overload operator->*. However, it is very tricky, and, given that most C++ programmers don’t even know that you can access methods and data members through pointers, it’s probably not worth the trouble. The std::shared_ptr template in the Standard Library, for example, does not overload operator->*.
Going back to the SpreadsheetCell example, consider these two lines of code:
SpreadsheetCell cell(1.23);double d1 = cell; // DOES NOT COMPILE!
A SpreadsheetCell contains a double representation, so it seems logical that you could assign it to a double variable. Well, you can’t. The compiler tells you that it doesn’t know how to convert a SpreadsheetCell to a double. You might be tempted to try forcing the compiler to do what you want, like this:
double d1 = (double)cell; // STILL DOES NOT COMPILE!First, the preceding code still doesn’t compile because the compiler still doesn’t know how to convert the SpreadsheetCell to a double. It already knew from the first line what you wanted it to do, and it would do it if it could. Second, it’s a bad idea in general to add gratuitous casts to your program.
If you want to allow this kind of assignment, you must tell the compiler how to perform it. Specifically, you can write a conversion operator to convert SpreadsheetCells to doubles. The prototype looks like this:
operator double() const;The name of the function is operator
double. It has no return type because the return type is specified by the name of the operator: double. It is const because it doesn’t change the object on which it is called. The implementation looks like this:
SpreadsheetCell::operator double() const{return getValue();}
That’s all you need to do to write a conversion operator from SpreadsheetCell to double. Now the compiler accepts the following lines and does the right thing at run time:
SpreadsheetCell cell(1.23);double d1 = cell; // Works as expected
You can write conversion operators for any type with this same syntax. For example, here is an std::string conversion operator for SpreadsheetCell:
SpreadsheetCell::operator std::string() const{return doubleToString(getValue());}
Now you can write code like the following:
SpreadsheetCell cell(1.23);string str = cell;
Note that writing the double conversion operator for the SpreadsheetCell object introduces an ambiguity problem. Consider this line:
SpreadsheetCell cell(1.23);double d2 = cell + 3.3; // DOES NOT COMPILE IF YOU DEFINE operator double()
This line now fails to compile. It worked before you wrote operator
double(), so what’s the problem now? The issue is that the compiler doesn’t know if it should convert cell to a double with operator
double() and perform double addition, or convert 3.3 to a SpreadsheetCell with the double constructor and perform SpreadsheetCell addition. Before you wrote operator
double(), the compiler had only one choice: convert 3.3 to a SpreadsheetCell with the double constructor and perform SpreadsheetCell addition. However, now the compiler could do either. It doesn’t want to make a choice you might not like, so it refuses to make any choice at all.
The usual pre-C++11 solution to this conundrum is to make the constructor in question explicit, so that the automatic conversion using that constructor is prevented (see Chapter 9). However, you don’t want that constructor to be explicit because you generally like the automatic conversion of doubles to SpreadsheetCells. Since C++11, you can solve this problem by making the double conversion operator explicit instead of the constructor:
explicit operator double() const;The following code demonstrates its use:
SpreadsheetCell cell = 6.6; // [1]string str = cell; // [2]double d1 = static_cast<double>(cell); // [3]double d2 = static_cast<double>(cell + 3.3); // [4]
Here is what each line of code means:
double to a SpreadsheetCell. Because this is in the declaration, this is done by calling the constructor that accepts a double.operator
string() conversion operator.operator
double() conversion operator. Note that because this conversion operator is now declared explicit, the cast is required.3.3 to a SpreadsheetCell, followed by operator+ on two SpreadsheetCells, followed by a required explicit cast to invoke operator
double().Sometimes it is useful to be able to use objects in Boolean expressions. For example, programmers often use pointers in conditional statements like this:
if (ptr != nullptr) { /* Perform some dereferencing action. */ }Sometimes they write shorthand conditions such as this:
if (ptr) { /* Perform some dereferencing action. */ }Other times, you see code as follows:
if (!ptr) { /* Do something. */ }Currently, none of the preceding expressions compile with the Pointer smart pointer class template defined earlier. However, you can add a conversion operator to the class to convert it to a pointer type. Then, the comparisons to nullptr, as well as the object alone in an if statement, will trigger the conversion to the pointer type. The usual pointer type for the conversion operator is void* because that’s a pointer type with which you cannot do much except test it in Boolean expressions. Here is the implementation:
template <typename T> Pointer<T>::operator void*() const{return mPtr;}
Now the following code compiles and does what you expect:
void process(Pointer<SpreadsheetCell>& p){if (p != nullptr) { cout << "not nullptr" << endl; }if (p != NULL) { cout << "not NULL" << endl; }if (p) { cout << "not nullptr" << endl; }if (!p) { cout << "nullptr" << endl; }}int main(){Pointer<SpreadsheetCell> smartCell(nullptr);process(smartCell);cout << endl;Pointer<SpreadsheetCell> anotherSmartCell(new SpreadsheetCell(5.0));process(anotherSmartCell);}
The output is as follows:
nullptrnot nullptrnot NULLnot nullptr
Another alternative is to overload operator bool() as follows instead of operator void*(). After all, you’re using the object in a Boolean expression; why not convert it directly to a bool?
template <typename T> Pointer<T>::operator bool() const{return mPtr != nullptr;}
The following comparisons still work:
if (p != NULL) { cout << "not NULL" << endl; }if (p) { cout << "not nullptr" << endl; }if (!p) { cout << "nullptr" << endl; }
However, with operator bool(), the following comparison with nullptr results in a compilation error:
if (p != nullptr) { cout << "not nullptr" << endl; } // ErrorThis is correct behavior because nullptr has its own type called nullptr_t, which is not automatically converted to the integer 0 (false). The compiler cannot find an operator!= that takes a Pointer object and a nullptr_t object. You could implement such an operator!= as a friend of the Pointer class:
template <typename T>class Pointer{public:// Omitted for brevitytemplate <typename T>friend bool operator!=(const Pointer<T>& lhs, std::nullptr_t rhs);// Omitted for brevity};template <typename T>bool operator!=(const Pointer<T>& lhs, std::nullptr_t rhs){return lhs.mPtr != rhs;}
However, after implementing this operator!=, the following comparison stops working, because the compiler no longer knows which operator!= to use.
if (p != NULL) { cout << "not NULL" << endl; }From this example, you might conclude that the operator bool() technique only seems appropriate for objects that don’t represent pointers and for which conversion to a pointer type really doesn’t make sense. Unfortunately, adding a conversion operator to bool presents some other unanticipated consequences. C++ applies “promotion” rules to silently convert bool to int whenever the opportunity arises. Therefore, with the operator bool(), the following code compiles and runs:
Pointer<SpreadsheetCell> anotherSmartCell(new SpreadsheetCell(5.0));int i = anotherSmartCell; // Converts Pointer to bool to int.
That’s usually not behavior that you expect or desire. To prevent such assignments, you could explicitly delete the conversion operators to int, long, long long, and so on. However, this is getting messy. So, many programmers prefer operator void*() instead of operator bool().
As you can see, there is a design element to overloading operators. Your decisions about which operators to overload directly influence the ways in which clients can use your classes.
C++ gives you the ability to redefine the way memory allocation and deallocation work in your programs. You can provide this customization both on the global level and the class level. This capability is most useful when you are worried about memory fragmentation, which can occur if you allocate and deallocate a lot of small objects. For example, instead of going to the default C++ memory allocation each time you need memory, you could write a memory pool allocator that reuses fixed-size chunks of memory. This section explains the subtleties of the memory allocation and deallocation routines and shows you how to customize them. With these tools, you should be able to write your own allocator if the need ever arises.
One of the trickiest aspects of C++ is the details of new and delete. Consider this line of code:
SpreadsheetCell* cell = new SpreadsheetCell();The part “new
SpreadsheetCell()” is called the new-expression. It does two things. First, it allocates space for the SpreadsheetCell object by making a call to operator
new. Second, it calls the constructor for the object. Only after the constructor has completed does it return the pointer to you.
delete works analogously. Consider this line of code:
delete cell;This line is called the delete-expression. It first calls the destructor for cell, and then calls operator
delete to free the memory.
You can overload operator
new and operator
delete to control memory allocation and deallocation, but you cannot overload the new-expression or the delete-expression. Thus, you can customize the actual memory allocation and deallocation, but not the calls to the constructor and destructor.
There are six different forms of the new-expression, each of which has a corresponding operator
new. Earlier chapters in this book already show four new-expressions: new, new[], new(nothrow), and new(nothrow)[]. The following list shows the corresponding four operator
new forms from the <new> header file:
void* operator new(size_t size);void* operator new[](size_t size);void* operator new(size_t size, const std::nothrow_t&) noexcept;void* operator new[](size_t size, const std::nothrow_t&) noexcept;
There are two special new-expressions that do no allocation, but invoke the constructor on an existing piece of storage. These are called placement new operators (including both single and array forms). They allow you to construct an object in preexisting memory like this:
void* ptr = allocateMemorySomehow();SpreadsheetCell* cell = new (ptr) SpreadsheetCell();
This feature is a bit obscure, but it’s important to realize that it exists. It can come in handy if you want to implement memory pools such that you reuse memory without freeing it in between. The corresponding operator
new forms look as follows; however, the C++ standard forbids you from overloading them.
void* operator new(size_t size, void* p) noexcept;void* operator new[](size_t size, void* p) noexcept;
There are only two different forms of the delete-expression that you can call: delete, and delete[]; there are no nothrow or placement forms. However, there are all six forms of operator delete. Why the asymmetry? The two nothrow and two placement forms are used only if an exception is thrown from a constructor. In that case, the operator
delete is called that matches the operator
new that was used to allocate the memory prior to the constructor call. However, if you delete a pointer normally, delete will call either operator
delete or operator
delete[] (never the nothrow or placement forms). Practically, this doesn’t really matter because the C++ standard says that throwing an exception from delete results in undefined behavior. This means delete should never throw an exception anyway, so the nothrow version of operator
delete is superfluous. Also, placement delete should be a no-op, because the memory wasn’t allocated in placement new, so there’s nothing to free. Here are the prototypes for the operator
delete forms:
void operator delete(void* ptr) noexcept;void operator delete[](void* ptr) noexcept;void operator delete(void* ptr, const std::nothrow_t&) noexcept;void operator delete[](void* ptr, const std::nothrow_t&) noexcept;void operator delete(void* p, void*) noexcept;void operator delete[](void* p, void*) noexcept;
You can actually replace the global operator
new and operator
delete routines if you want. These functions are called for every new-expression and delete-expression in the program, unless there are more specific routines in individual classes. However, to quote Bjarne Stroustrup, “... replacing the global operator
new and operator
delete is not for the fainthearted.” (The C++ Programming Language, third edition, Addison-Wesley, 1997). I don’t recommend it either!
A more useful technique is to overload operator
new and operator
delete for specific classes. These overloaded operators will be called only when you allocate and deallocate objects of that particular class. Here is an example of a class that overloads the four non-placement forms of operator
new and operator
delete:
#include <cstddef>#include <new>class MemoryDemo{public:virtual ~MemoryDemo() = default;void* operator new(size_t size);void operator delete(void* ptr) noexcept;void* operator new[](size_t size);void operator delete[](void* ptr) noexcept;void* operator new(size_t size, const std::nothrow_t&) noexcept;void operator delete(void* ptr, const std::nothrow_t&) noexcept;void* operator new[](size_t size, const std::nothrow_t&) noexcept;void operator delete[](void* ptr, const std::nothrow_t&) noexcept;};
Here are implementations of these operators that simply pass the arguments through to calls to the global versions of the operators. Note that nothrow is actually a variable of type nothrow_t:
void* MemoryDemo::operator new(size_t size){cout << "operator new" << endl;return ::operator new(size);}void MemoryDemo::operator delete(void* ptr) noexcept{cout << "operator delete" << endl;::operator delete(ptr);}void* MemoryDemo::operator new[](size_t size){cout << "operator new[]" << endl;return ::operator new[](size);}void MemoryDemo::operator delete[](void* ptr) noexcept{cout << "operator delete[]" << endl;::operator delete[](ptr);}void* MemoryDemo::operator new(size_t size, const nothrow_t&) noexcept{cout << "operator new nothrow" << endl;return ::operator new(size, nothrow);}void MemoryDemo::operator delete(void* ptr, const nothrow_t&) noexcept{cout << "operator delete nothrow" << endl;::operator delete(ptr, nothrow);}void* MemoryDemo::operator new[](size_t size, const nothrow_t&) noexcept{cout << "operator new[] nothrow" << endl;return ::operator new[](size, nothrow);}void MemoryDemo::operator delete[](void* ptr, const nothrow_t&) noexcept{cout << "operator delete[] nothrow" << endl;::operator delete[](ptr, nothrow);}
Here is some code that allocates and frees objects of this class in several ways:
MemoryDemo* mem = new MemoryDemo();delete mem;mem = new MemoryDemo[10];delete [] mem;mem = new (nothrow) MemoryDemo();delete mem;mem = new (nothrow) MemoryDemo[10];delete [] mem;
Here is the output from running the program:
operator newoperator deleteoperator new[]operator delete[]operator new nothrowoperator deleteoperator new[] nothrowoperator delete[]
These implementations of operator
new and operator
delete are obviously trivial and not particularly useful. They are intended only to give you an idea of the syntax in case you ever want to implement nontrivial versions of them.
It might seem overkill to overload all of the various forms of operator
new. However, it’s generally a good idea to do so in order to prevent inconsistencies in the memory allocations. If you don’t want to provide implementations for certain forms, you can explicitly delete these using =delete in order to prevent anyone from using them. See the next section for more information.
Chapter 8 shows how you can explicitly delete or default a constructor or assignment operator. Explicitly deleting or defaulting is not limited to constructors and assignment operators. For example, the following class deletes the operator
new and new[], which means that this class cannot be dynamically created using new or new[]:
class MyClass{public:void* operator new(size_t size) = delete;void* operator new[](size_t size) = delete;};
Using this class in the following ways results in compilation errors:
int main(){MyClass* p1 = new MyClass;MyClass* pArray = new MyClass[2];return 0;}
In addition to overloading the standard forms of operator new, you can write your own versions with extra parameters. These extra parameters can be useful for passing various flags or counters to your memory allocation routines. For instance, some runtime libraries use this in debug mode to provide the filename and line number where an object is allocated, so when there is a memory leak, the offending line that did the allocation can be identified.
As an example, here are the prototypes for an additional operator
new and operator
delete with an extra integer parameter for the MemoryDemo class:
void* operator new(size_t size, int extra);void operator delete(void* ptr, int extra) noexcept;
The implementation is as follows:
void* MemoryDemo::operator new(size_t size, int extra){cout << "operator new with extra int: " << extra << endl;return ::operator new(size);}void MemoryDemo::operator delete(void* ptr, int extra) noexcept{cout << "operator delete with extra int: " << extra << endl;return ::operator delete(ptr);}
When you write an overloaded operator
new with extra parameters, the compiler automatically allows the corresponding new-expression. The extra arguments to new are passed with function call syntax (as with nothrow versions). So, you can now write code like this:
MemoryDemo* memp = new(5) MemoryDemo();delete memp;
The output is as follows:
operator new with extra int: 5operator delete
When you define an operator
new with extra parameters, you should also define the corresponding operator
delete with the same extra parameters. You cannot call this operator
delete with extra parameters yourself, but it will be called only when you use your operator
new with extra parameters and the constructor of your object throws an exception.
An alternate form of operator
delete gives you the size of the memory that should be freed as well as the pointer. Simply declare the prototype for operator
delete with an extra size parameter.
You can replace operator
delete with the version that takes a size for any of the versions of operator
delete independently. Here is the MemoryDemo class definition with the first operator
delete modified to take the size of the memory to be deleted:
class MemoryDemo{public:// Omitted for brevityvoid* operator new(size_t size);void operator delete(void* ptr, size_t size) noexcept;// Omitted for brevity};
The implementation of this operator
delete calls the global operator
delete without the size parameter because there is no global operator
delete that takes the size:
void MemoryDemo::operator delete(void* ptr, size_t size) noexcept{cout << "operator delete with size " << size << endl;::operator delete(ptr);}
This capability is useful only if you are writing a complicated memory allocation and deallocation scheme for your classes.
This chapter summarized the rationale for operator overloading and provided examples and explanations for overloading the various categories of operators. Hopefully, this chapter taught you to appreciate the power that it gives you. Throughout this book, operator overloading is used to provide abstractions and easy-to-use class interfaces.
Now it’s time to start delving into the C++ Standard Library. The next chapter starts with an overview of the functionality provided by the C++ Standard Library, followed by chapters that go deeper into specific features of the library.
The Standard Library makes heavy use of the C++ features called templates and operator overloading.
Templates are used to allow generic programming. They make it possible to write code that can work with all kinds of objects, even objects unknown to the programmer when writing the code. The obligation of the programmer writing the template code is to specify the requirements of the classes that define these objects; for example, that they have an operator for comparison, or a copy constructor, or whatever is deemed appropriate, and then making sure the code that is written uses only those required capabilities. The obligation of the programmer creating the objects is to supply those operators and methods that the template writer requires.
Unfortunately, many programmers consider templates to be the most difficult part of C++ and, for that reason, tend to avoid them. However, even if you never write your own templates, you need to understand their syntax and capabilities in order to use the Standard Library. Templates are described in detail in Chapter 12. If you skipped that chapter and are not familiar with templates, I suggest you first read Chapter 12, and then come back to learn more about the Standard Library.
Operator overloading is another feature used extensively by the C++ Standard Library. Chapter 9 has a whole section devoted to operator overloading. Make sure you read that section and understand it before tackling this and subsequent chapters. In addition, Chapter 15 presents much more detail on the subject of operator overloading, but those details are not required to understand the following chapters.
This section introduces the various components of the Standard Library from a design perspective. You will learn what facilities are available for you to use, but you will not learn the coding details. Those details are covered in other chapters.
C++ provides a built-in string class, defined in the <string> header. Although you may still use C-style strings of character arrays, the C++ string class is superior in almost every way. It handles the memory management; provides some bounds checking, assignment semantics, and comparisons; and supports manipulations such as concatenation, substring extraction, and substring or character replacement.
The Standard Library also provides a string_view class, defined in <string_view>. It is a read-only view of all kind of string representations, and can be used as a drop-in replacement for const string&, but without the overhead. It never copies strings!
C++ provides support for Unicode and localization. These features allow you to write programs that work with different languages, for example, Chinese. Locales, defined in <locale>, allow you to format data such as numbers and dates according to the rules of a certain country or region.
In case you missed it, Chapter 2 provides all the details of the string and string_view classes, while Chapter 19 discusses Unicode and localization.
Regular expressions are available through the <regex> header file. They make it easy to perform so-called pattern-matching, often used in text processing. Pattern-matching allows you to search special patterns in strings and optionally to replace them with a new pattern. Regular expressions are discussed in Chapter 19.
C++ includes a model for input and output called streams. The C++ library provides routines for reading and writing built-in types from and to files, console/keyboard, and strings. C++ also provides the facilities for coding your own routines for reading and writing your own objects. The I/O functionality is defined in several header files: <fstream>, <iomanip>, <ios>, <iosfwd>, <iostream>, <istream>, <ostream>, <sstream>, <streambuf>, and <strstream>. Chapter 1 reviews the basics of I/O streams, and Chapter 13 discusses streams in detail.
One of the problems faced in robust programming is knowing when to delete an object. There are several failures that can happen. A first problem is not deleting the object at all (failing to free the storage). These are known as memory leaks, where objects accumulate and take up space but are not used. Another problem is where a piece of code deletes the storage while another piece of code is still pointing to that storage, resulting in pointers to storage that either is no longer in use or has been reallocated for another purpose. These are known as dangling pointers. One more problem is when one piece of code frees the storage, and another piece of code attempts to free the same storage. This is known as double-freeing. All of these problems tend to result in program failures of some sort. Some failures are readily detected; others cause the program to produce erroneous results. Most of these errors are difficult to discover and repair.
C++ addresses these problems with smart pointers: unique_ptr, shared_ptr, and weak_ptr. shared_ptr and weak_ptr are thread-safe. They are all defined in the <memory> header. These smart pointers are introduced in Chapter 1 and discussed in more detail in Chapter 7.
Before C++11, the functionality of unique_ptr was handled by a type called auto_ptr, which has been removed from C++17 and should not be used anymore. There was no equivalent to shared_ptr in the earlier Standard Library, although many third-party libraries (for example, Boost) did provide this capability.
The C++ language supports exceptions, which allow functions or methods to pass errors of various types up to calling functions or methods. The C++ Standard Library provides a class hierarchy of exceptions that you can use in your code as is, or that you can derive from to create your own exception types. Exception support is defined in a couple of header files: <exception>, <stdexcept>, and <system_error>. Chapter 14 covers the details of exceptions and the standard exception classes.
The C++ Standard Library provides a collection of mathematical utility classes and functions.
A whole range of common mathematical functions is available, such as abs(), remainder(), fma(), exp(), log(), pow(), sqrt(), sin(), atan2(), sinh(), erf(), tgamma(), ceil(), floor(), and more. C++17 adds a number of special mathematical functions to work with Legendre polynomials, beta functions, elliptic integrals, Bessel functions, cylindrical Neumann functions, and so on.
There is a complex number class called complex, defined in <complex>, which provides an abstraction for working with numbers that contain both real and imaginary components.
The compile-time rational arithmetic library provides a ratio class template, defined in the <ratio> header file. This ratio class template can exactly represent any finite rational number defined by a numerator and denominator. This library is discussed in Chapter 20.
The Standard Library also contains a class called valarray, defined in <valarray>, which is similar to the vector class but is more optimized for high-performance numerical applications. The library provides several related classes to represent the concept of vector slices. From these building blocks, it is possible to build classes to perform matrix mathematics. There is no built-in matrix class; however, there are third-party libraries like Boost that include matrix support. The valarray class is not further discussed in this book.
C++ also provides a standard way to obtain information about numeric limits, such as the maximum possible value for an integer on the current platform. In C, you could access #defines, such as INT_MAX. While those are still available in C++, it’s recommended to use the numeric_limits class template defined in the <limits> header file. Its use is straightforward, as shown in the following code:
cout << "int:" << endl;cout << "Max int value: " << numeric_limits<int>::max() << endl;cout << "Min int value: " << numeric_limits<int>::min() << endl;cout << "Lowest int value: " << numeric_limits<int>::lowest() << endl;cout << endl << "double:" << endl;cout << "Max double value: " << numeric_limits<double>::max() << endl;cout << "Min double value: " << numeric_limits<double>::min() << endl;cout << "Lowest double value: " << numeric_limits<double>::lowest() << endl;
The output of this code snippet on my system is as follows:
int:Max int value: 2147483647Min int value: -2147483648Lowest int value: -2147483648double:Max double value: 1.79769e+308Min double value: 2.22507e-308Lowest double value: -1.79769e+308
Note the differences between min() and lowest(). For an integer, the minimum value equals the lowest value. However, for floating-point types, the minimum value is the smallest positive value that can be represented, while the lowest value is the most negative value representable, which equals -max().
C++ includes the chrono library, defined in the <chrono> header file. This library makes it easy to work with time; for example, to time certain durations, or to perform actions based on timing. The chrono library is discussed in detail in Chapter 20. Other time and date utilities are provided in the <ctime> header.
C++ already has support for generating pseudo-random numbers for a long time with the srand() and rand() functions. However, those functions provide only very basic random numbers. For example, you cannot change the distribution of the generated random numbers.
Since C++11, a random number library has been added to the standard, which is much more powerful. The new library is defined in <random>, and comes with random number engines, random number engine adaptors, and random number distributions. All of these can be used to give you random numbers more suited to your problem domain, such as normal distributions, negative exponential distributions, and so on.
Consult Chapter 20 for details on this library.
Initializer lists are defined in the <initializer_list> header file. They make it easy to write functions that can accept a variable number of arguments and are discussed in Chapter 1.
The <utility> header defines the pair template, which can store two elements with two different types. This is known as storing heterogeneous elements. All Standard Library containers discussed further in this chapter store homogeneous elements, meaning that all the elements in the container must have the same type. A pair allows you to store exactly two elements of completely unrelated types in one object. The pair class template is discussed in more detail in Chapter 17.
tuple, defined in <tuple>, is a generalization of pair. It is a sequence with a fixed size that can have heterogeneous elements. The number and type of elements for a tuple instantiation is fixed at compile time. Tuples are discussed in Chapter 20.
optional, variant, and anyC++17 introduces the following new classes:
optional, defined in <optional>, holds a value of a specific type, or nothing. It can be used for parameters or return types of a function if you want to allow for values to be optional.variant, defined in <variant>, can hold a single value of one of a given set of types, or nothing.any, defined in <any>, is a class that can contain a single value of any type.These three types are discussed in Chapter 20.
A class that implements a function call operator is called a function object. Function objects can, for example, be used as predicates for certain Standard Library algorithms. The <functional> header file defines a number of predefined function objects and supports creating new function objects based on existing ones.
Function objects are discussed in detail in Chapter 18 together with the Standard Library algorithms.
FilesystemC++17 introduces a filesystem support library. Everything is defined in the <filesystem> header, and lives in the std::filesystem namespace. It allows you to write portable code to work with a filesystem. You can use it for querying whether something is a directory or a file, iterating over the contents of a directory, manipulating paths, and retrieving information about files such as their size, extension, creation time, and so on. This filesystem support library is discussed in Chapter 20.
All major CPU vendors are selling processors with multiple cores. They are being used for everything from servers to consumer computers and even smartphones. If you want your software to take advantage of all these cores, then you need to write multithreaded code. The Standard Library provides a couple of basic building blocks for writing such code. Individual threads can be created using the thread class from the <thread> header.
In multithreaded code you need to take care that several threads are not reading and writing to the same piece of data at the same time. To prevent this, you can use atomics, defined in <atomic>, which give you thread-safe atomic access to a piece of data. Other thread synchronization mechanisms are provided by <condition_variable> and <mutex>.
If you just need to calculate something, possibly on a different thread, and get the result back with proper exception handling, you can use async and future. These are defined in the <future> header, and are easier to use than directly using the thread class.
Writing multithreaded code is discussed in detail in Chapter 23.
Type traits are defined in the <type_traits> header file and provide information about types at compile time. They are useful when writing advanced templates and are discussed in Chapter 22.
The <cstdint> header file defines a number of standard integer types such as int8_t, int64_t and so on. It also includes macros specifying minimum and maximum values of those types. These integer types are discussed in the context of writing cross-platform code in Chapter 30.
The Standard Library provides implementations of commonly used data structures such as linked lists and queues. When you use C++, you should not need to write such data structures again. The data structures are implemented using a concept called containers, which store information called elements, in a way that implements the data structure (linked list, queue, and so on) appropriately. Different data structures have different insertion, deletion, and access behavior and performance characteristics. It is important to be familiar with the available data structures so that you can choose the most appropriate one for any given task.
All the containers in the Standard Library are class templates, so you can use them to store any type, from built-in types such as int and double to your own classes. Each container instance stores objects of only one type; that is, they are homogeneous collections. If you need non-fixed-sized heterogeneous collections, you can wrap each element in an std::any instance and store those any instances in a container. Alternatively, you can store std::variant instances in a container. A variant can be used if the number of different required types is limited and known at compile time. Both any and variant are introduced with C++17, and are discussed in Chapter 20. If you needed heterogeneous collections before C++17, you could create a class that had multiple derived classes, and each derived class could wrap an object of your required type.
Note that the C++ standard specifies the interface, but not the implementation, of each container and algorithm. Thus, different vendors are free to provide different implementations. However, the standard also specifies performance requirements as part of the interface, which the implementations must meet.
This section provides an overview of the various containers available in the Standard Library.
The <vector> header file defines vector, which stores a sequence of elements and provides random access to these elements. You can think of a vector as an array of elements that grows dynamically as you insert elements, and additionally provides some bounds checking. Like an array, the elements of a vector are stored in contiguous memory.
vectors provide fast element insertion and deletion (amortized constant time) at the end of the vector. Amortized constant time insertion means that most of the time insertions are done in constant time O(1) (Chapter 4 explains big-O notation). However, sometimes the vector needs to grow in size to accommodate new elements, which has a complexity of O(N). On average, this results in O(1) complexity or amortized constant time. Details are explained in Chapter 17. A vector has slower (linear time) insertion and deletion anywhere else, because the operation must move all the elements “up” or “down” by one to make room for the new element or to fill the space left by the deleted element. Like arrays, vectors provide fast (constant time) access to any of their elements.
Even though inserting and removing elements in the middle of a vector requires moving other elements up or down, a vector should be your default container! Often, a vector will be faster than, for example, a linked list, even for inserting and removing elements in the middle. The reason is that a vector is stored contiguously in memory, while a linked list is scattered around in memory. Computers are extremely efficient to work with contiguous data, which makes vector operations fast. You should only use something like a linked list if a performance profiler (discussed in Chapter 25) tells you that it performs better than a vector.
There is a template specialization available for vector<bool> to store Boolean values in a vector. This specialization optimizes space allocation for the Boolean elements; however, the standard does not specify how an implementation of vector<bool> should optimize space. The difference between the vector<bool> specialization and the bitset discussed further in this chapter is that the bitset container is of fixed size.
A Standard Library list is a doubly linked list structure and is defined in <list>. Like an array or vector, it stores a sequence of elements. However, unlike an array or vector, the elements of a list are not necessarily contiguous in memory. Instead, each element in the list specifies where to find the next and previous elements in the list (usually via pointers), hence the name doubly linked list.
The performance characteristics of a list are the exact opposite of a vector. They provide slow (linear time) element lookup and access, but quick (constant time) insertion and deletion of elements once the relevant position has been found. Still, as discussed in the previous section, a vector is usually faster than a list. Use a profiler to be sure.
The forward_list, defined in <forward_list>, is a singly linked list, compared to the list container, which is doubly linked. forward_list supports forward iteration only, and requires less memory than a list. Like lists, forward_lists allow constant time insertion and deletion anywhere once the relevant position has been found, and there is no fast random access to elements.
The name deque is an abbreviation for a double-ended queue. A deque, defined in <deque>, provides quick (constant time) element access. It also provides fast (constant time) insertion and deletion at both ends of the sequence, but it provides slow (linear time) insertion and deletion in the middle of the sequence. The elements of a deque are not stored contiguously in memory, and thus a deque might be slower than a vector.
You could use a deque instead of a vector when you need to insert or remove elements from either end of the sequence but still need fast access to all elements. However, this requirement does not apply to many programming problems; in most cases, a vector is recommended.
The <array> header defines array, which is a replacement for standard C-style arrays. Sometimes you know the exact number of elements in your container up front and you don’t need the flexibility of a vector or a list, which are able to grow dynamically to accommodate new elements. An array is perfect for such fixed-sized collections, and it has a bit less overhead compared to a vector; it’s basically a thin wrapper around standard C-style arrays. There are a number of advantages in using arrays instead of standard C-style arrays: they always know their own size, and do not automatically get cast to a pointer to avoid certain types of bugs. Also, arrays do not provide insertion or deletion; they have a fixed size. The advantage of having a fixed size is that this allows an array to be allocated on the stack, rather than always demanding heap access as vector does. Access to elements is very fast (constant time), just as with vectors.
The name queue comes directly from the definition of the English word queue, which means a line of people or objects. The queue container is defined in <queue> and provides standard first in, first out (or FIFO) semantics. A queue is a container in which you insert elements at one end and take them out at the other end. Both insertion (amortized constant time) and removal (constant time) of elements are quick.
You should use a queue structure when you want to model real-life “first-come, first-served” semantics. For example, consider a bank. As customers arrive at the bank, they get in line. As tellers become available, they serve the next customer in line, thus providing “first-come, first-served” behavior. You could implement a bank simulation by storing customer objects in a queue. As customers arrive at the bank, they are added to the end of the queue. As tellers serve customers, they start with customers at the front of the queue.
A priority_queue, also defined in <queue>, provides queue functionality in which each element has a priority. Elements are removed from the queue in priority order. In the case of priority ties, the order in which elements are removed is undefined. priority_queue insertion and deletion are generally slower than simple queue insertion and deletion, because the elements must be reordered to support the priority ordering.
You can use priority_queues to model “queues with exceptions.” For example, in the preceding bank simulation, suppose that customers with business accounts take priority over regular customers. Many real-life banks implement this behavior with two separate lines: one for business customers and one for everyone else. Any customers in the business queue are taken before customers in the other line. However, banks could also provide this behavior with a single line in which business customers move to the front of the line ahead of any non-business customers. In your program, you could use a priority_queue in which customers have one of two priorities: business or regular. All business customers would be serviced before all regular customers.
The <stack> header defines the stack class, which provides standard first-in, last-out (FILO) semantics, also known as last-in, first-out (LIFO). Like a queue, elements are inserted and removed from the container. However, in a stack, the most recent element inserted is the first one removed. The name stack derives from a visualization of this structure as a stack of objects in which only the top object is visible. When you add an object to the stack, you hide all the objects underneath it.
The stack container provides fast (constant time) insertion and removal of elements. You should use the stack structure when you want FILO semantics. For example, an error-processing tool might want to store errors on a stack so that the most recent error is the first one available for a human administrator to read. Processing errors in a FILO order is often useful because newer errors sometimes obviate older ones.
The set class template is defined in the <set> header file, and, as the name suggests, it is a set of elements, loosely analogous to the notion of a mathematical set: each element is unique, and there is at most one instance of the element in the set. One difference between the mathematical concept of set, and set as implemented in the Standard Library, is that in the Standard Library the elements are kept in an order. The reason for the order is that when the client enumerates the elements, they come out in the ordering imposed by the type’s operator< or a user-defined comparator. The set provides logarithmic insertion, deletion, and lookup. This means that, in theory, insertions and deletions are faster than for a vector but slower than for a list; while lookups are faster than for a list, but slower than for a vector. As always, use a profiler to make sure which container is faster for your use case.
You could use a set when you need the elements to be in an order, to have equal amounts of insertion/deletion and lookups, and you want to optimize performance for both as much as possible. For example, an inventory-tracking program in a busy bookstore might want to use a set to store the books. The list of books in stock must be updated whenever books arrive or are sold, so insertion and deletion should be quick. Customers also need the ability to look for a specific book, so the program should provide fast lookup as well.
Note that a set does not allow duplicate elements. That is, each element in a set must be unique. If you want to store duplicate elements, you must use a multiset, also defined in the <set> header file.
The <map> header defines the map class template, which is an associative array. You can use it as an array in which the index can be any type; for example, a string. A map stores key/value pairs, and keeps its elements in sorted order, based on the keys, not the values. It also provides an operator[], which a set does not provide. In most other respects, it is identical to a set. You could use a map when you want to associate keys and values. For example, in the preceding bookstore example, you might want to store the books in a map where the key is the ISBN number of the book and the value is a Book object containing detailed information for that specific book.
A multimap, also defined in <map>, has the same relation to a map as a multiset does to a set. Specifically, a multimap is a map that allows duplicate keys.
The Standard Library supports hash tables, also called unordered associative containers. There are four unordered associative containers:
unordered_mapunordered_multimapunordered_setunordered_multisetThe first two containers are defined in <unordered_map>, and the other two containers in <unordered_set>. Better names would have been hash_map, hash_set, and so on. Unfortunately, hash tables were not part of the C++ Standard Library before C++11, which means a lot of third-party libraries implemented hash tables themselves by using names with “hash” as a prefix, like hash_map. Because of this, the C++ standard committee decided to use the prefix “unordered” instead of “hash” to avoid name clashes.
These unordered associative containers behave similar to their ordered counterparts. An unordered_map is similar to a standard map except that the standard map sorts its elements while the unordered_map doesn’t sort its elements.
Insertion, deletion, and lookup with these unordered associative containers can be done on average in constant time. In a worst-case scenario, it will be in linear time. Lookup of elements in an unordered container can be much faster than with a normal map or set, especially when there are a lot of elements in the container.
Chapter 17 explains how these unordered associative containers work and why they are also called hash tables.
C and C++ programmers commonly store a set of flags in a single int or long, using one bit for each flag. They set and access these bits with the bitwise operators: &, |, ^, ~, <<, and >>. The C++ Standard Library provides a bitset class that abstracts this bit field manipulation, so you shouldn’t need to use the bit manipulation operators anymore.
The <bitset> header file defines the bitset container, but this is not a container in the normal sense, in that it does not implement a specific data structure in which you insert and remove elements. A bitset has a fixed size and does not support iterators. You can think of them as a sequence of Boolean values that you can read and write. However, unlike the C-style way of handling bits, the bitset is not limited to the size of an int or other elementary data types. Thus, you can have a 40-bit bitset, or a 213-bit bitset. The implementation will use as much storage as it needs to implement N bits when you declare your bitset with bitset<N>.
The following table summarizes the containers provided by the Standard Library. It uses the big-O notation introduced in Chapter 4 to present the performance characteristics on a container of N elements. An N/A entry in the table means that the operation is not part of the container semantics.
| CONTAINER CLASS NAME | CONTAINER TYPE | INSERT PERFORMANCE | DELETE PERFORMANCE | LOOKUP PERFORMANCE |
vector |
Sequential | Amortized O(1) at the end; O(N) otherwise. | O(1) at the end; O(N) otherwise. | O(1) |
When to Use: This should be your default container. Only use another container after using a profiler to confirm it is faster than a vector. |
||||
list |
Sequential | O(1) at the beginning and the end, and once you are at the position where you want to insert the element. | O(1) at the beginning and the end, and once you are at the position where you want to delete the element. | O(1) to access the first or last element; O(N) otherwise. |
When to Use: Rarely. You should use a vector, unless a profiler tells you a list is faster for your use case. |
||||
forward_list |
Sequential | O(1) at the beginning, and once you are at the position where you want to insert the element. | O(1) at the beginning, and once you are at the position where you want to delete the element. | O(1) to access the first element; O(N) otherwise. |
When to Use: Rarely. You should use a vector, unless a profiler tells you a forward_list is faster for your use case. |
||||
deque |
Sequential | O(1) at the beginning or end; O(N) otherwise. | O(1) at the beginning or end; O(N) otherwise. | O(1) |
When to Use: Not usually needed; use a vector instead. |
||||
array |
Sequential | N/A | N/A | O(1) |
| When to Use: When you need a fixed-size array to replace a standard C-style array. | ||||
queue |
Container adaptor | Depends on the underlying container; O(1) for list and deque. |
Depends on the underlying container; O(1) for list and deque. |
N/A |
| When to Use: When you want a FIFO structure. | ||||
priority_queue |
Container adaptor | Depends on the underlying container; amortized O(log(N)) for vector, O(log(N)) for deque. |
Depends on the underlying container; O(log(N)) for vector and deque. |
N/A |
| When to Use: When you want a queue with priority. | ||||
stack |
Container adaptor | Depends on the underlying container; O(1) for list and deque, amortized O(1) for vector. |
Depends on the underlying container; O(1) for list, vector, and deque. |
N/A |
| When to Use: When you want a FILO/LIFO structure. | ||||
setmultiset |
Sorted associative | O(log(N)) | O(log(N)) | O(log(N)) |
When to Use: When you want a sorted collection of elements with equal lookup, insertion, and deletion times. Use a set when you want a collection of elements without duplicates. |
||||
mapmultimap |
Sorted associative | O(log(N)) | O(log(N)) | O(log(N)) |
| When to Use: When you want a sorted collection to associate keys with values, that is, an associative array, with equal lookup, insertion, and deletion times. | ||||
unordered_mapunordered_multimap |
Unordered associative / hash table | Average case O(1); worst case O(N). | Average case O(1); worst case O(N). | Average case O(1); worst case O(N). |
When to Use: When you want to associate keys with values with equal lookup, insertion, and deletion times, and you don’t require the elements to be sorted. Performance can be better than with a normal map, but that depends on the elements. |
||||
unordered_setunordered_multiset |
Unordered associative/hash table | Average case O(1); worst case O(N). | Average case O(1); worst case O(N). | Average case O(1); worst case O(N). |
When to Use: When you want a collection of elements with equal lookup, insertion, and deletion times, and you don’t require the elements to be sorted. Performance can be better than with a normal set, but that depends on the elements. |
||||
bitset |
Special | N/A | N/A | O(1) |
| When to Use: When you want a collection of flags. | ||||
Note that strings are technically containers as well. They can be thought of as vectors of characters. Thus, some of the algorithms described in the material that follows also work on strings.
In addition to containers, the Standard Library provides implementations of many generic algorithms. An algorithm is a strategy for performing a particular task, such as sorting or searching. These algorithms are implemented as function templates, so they work on most of the different container types. Note that the algorithms are not generally part of the containers. The Standard Library takes the approach of separating the data (containers) from the functionality (algorithms). Although this approach seems counter to the spirit of object-oriented programming, it is necessary in order to support generic programming in the Standard Library. The guiding principle of orthogonality maintains that algorithms and containers are independent, with (almost) any algorithm working with (almost) any container.
Note that the generic algorithms do not work directly on the containers. They use an intermediary called an iterator. Each container in the Standard Library provides an iterator that supports traversing the elements in the container in a sequence. The different iterators for the various containers adhere to standard interfaces, so algorithms can perform their work by using iterators without worrying about the underlying container implementation. The <iterator> header defines the following helper functions that return specific iterators for containers.
| FUNCTION NAME | FUNCTION SYNOPSIS |
begin()end() |
Returns a non-const iterator to the first, and one past the last, element in a sequence. |
cbegin()cend() |
Returns a const iterator to the first, and one past the last, element in a sequence. |
rbegin()rend() |
Returns a non-const reverse iterator to the last, and one before the first, element in a sequence. |
crbegin()crend() |
Returns a const reverse iterator to the last, and one before the first, element in a sequence. |
This section gives an overview of what kinds of algorithms are available in the Standard Library without going into detail. Chapter 17 goes deeper into iterators, and Chapter 18 discusses a selection of algorithms with coding examples. For the exact prototypes of all the available algorithms, consult a Standard Library Reference.
There are approximately 100 algorithms in the Standard Library, depending on how you count them. The following sections divide these algorithms into different categories. The algorithms are defined in the <algorithm> header file unless otherwise noted. Note that whenever the following algorithms are specified as working on a “sequence” of elements, that sequence is presented to the algorithm via iterators.
The non-modifying algorithms are those that look at a sequence of elements and return some information about the elements. As “non-modifying” algorithms, they cannot change the values of elements or the order of elements within the sequence. This category contains three types of algorithms. The following tables list and provide brief summaries of the various non-modifying algorithms. With these algorithms, you should rarely need to write a for loop to iterate over a sequence of values.
These algorithms do not require the sequence to be sorted. N is the size of the sequence to search in, and M is the size of the pattern to find.
| ALGORITHM NAME | ALGORITHM SYNOPSIS | COMPLEXITY |
adjacent_find() |
Finds the first instance of two consecutive elements that are equal to each other or are equivalent to each other as specified by a predicate. | O(N) |
find()find_if() |
Finds the first element that matches a value or causes a predicate to return true. |
O(N) |
find_first_of() |
Like find, but searches for one of several elements at the same time. |
O(NM) |
find_if_not() |
Finds the first element that causes a predicate to return false. |
O(N) |
find_end() |
Finds the last subsequence in a sequence that matches another sequence or whose elements are equivalent, as specified by a predicate. | O(M*(N-M)) |
search() |
Finds the first subsequence in a sequence that matches another sequence or whose elements are equivalent, as specified by a predicate.* | O(NM)* |
search_n() |
Finds the first instance of n consecutive elements that are equal to a given value or relate to that value according to a predicate. | O(N) |
*Since C++17, search() accepts an optional extra parameter to specify the searching algorithm to use (default_searcher, boyer_moore_searcher, or boyer_moore_horspool_searcher). With the Boyer-Moore searchers, the worst-case complexity is O(N+M) when the pattern is not found, and O(NM) when the pattern is found.
The following comparison algorithms are provided. None of them require the source sequences to be ordered. All of them have a linear worst-case complexity.
| ALGORITHM NAME | ALGORITHM SYNOPSIS |
equal() |
Determines if two sequences are equal by checking if parallel elements are equal or match a predicate. |
mismatch() |
Returns the first element in each sequence that does not match the element in the same location in the other sequence. |
lexicographical_compare() |
Compares two sequences to determine their “lexicographical” ordering. This algorithm compares each element of the first sequence with its equivalent element in the second. If one element is less than the other, that sequence is lexicographically first. If the elements are equal, it compares the next elements in order. |
| ALGORITHM NAME | ALGORITHM SYNOPSIS |
all_of() |
Returns true if the predicate returns true for all the elements in the sequence or if the sequence is empty; false otherwise. |
any_of() |
Returns true if the predicate returns true for at least one element in the sequence; false otherwise. |
none_of() |
Returns true if the predicate returns false for all the elements in the sequence or if the sequence is empty; false otherwise. |
count()count_if() |
Counts the number of elements matching a value or that cause a predicate to return true. |
The modifying algorithms modify some or all of the elements in a sequence. Some of them modify elements in place, so that the original sequence changes. Others copy the results to a different sequence, so that the original sequence remains unchanged. All of them have a linear worst-case complexity. The following table summarizes the modifying algorithms.
| ALGORITHM NAME | ALGORITHM SYNOPSIS |
copy()copy_backward() |
Copies elements from one sequence to another. |
copy_if() |
Copies elements for which a predicate returns true from one sequence to another. |
copy_n() |
Copies n elements from one sequence to another. |
fill() |
Sets all elements in the sequence to a new value. |
fill_n() |
Sets the first n elements in the sequence to a new value. |
generate() |
Calls a specified function to generate a new value for each element in the sequence. |
generate_n() |
Calls a specified function to generate a new value for the first n elements in the sequence. |
move()move_backward() |
Moves elements from one sequence to another. This uses efficient move semantics (see Chapter 9). |
remove()remove_if()remove_copy()remove_copy_if() |
Removes elements that match a given value or that cause a predicate to return true, either in place or by copying the results to a different sequence. |
replace()replace_if()replace_copy()replace_copy_if() |
Replaces all elements matching a value or that cause a predicate to return true with a new element, either in place or by copying the results to a different sequence. |
reverse()reverse_copy() |
Reverses the order of the elements in the sequence, either in place or by copying the results to a different sequence. |
rotate()rotate_copy() |
Swaps the first and second “halves” of the sequence, either in place or by copying the results to a different sequence. The two subsequences to be swapped need not be equal in size. |
sample() |
Selects n random elements from the sequence. |
shuffle()random_shuffle() |
Shuffles the sequence by randomly reordering the elements. It is possible to specify the properties of the random number generator used for shuffling. random_shuffle() is deprecated since C++14, and is removed from C++17. |
transform() |
Calls a unary function on each element of a sequence or a binary function on parallel elements of two sequences. This is an in-place transformation. |
unique()unique_copy() |
Removes consecutive duplicates from the sequence, either in place or by copying results to a different sequence. |
Operational algorithms execute a function on individual elements of a sequence. There are two operational algorithms provided. Both have a linear complexity and do not require the source sequence to be ordered.
| ALGORITHM NAME | ALGORITHM SYNOPSIS |
for_each() |
Executes a function on each element in the sequence. The sequence is specified with a begin and end iterator. |
for_each_n() |
Similar to for_each() but only processes the first n elements in the sequence. The sequence is specified by a begin iterator and a number of elements (n). |
The C++ Standard Library provides the following swap and exchange algorithms.
| ALGORITHM NAME | ALGORITHM SYNOPSIS |
iter_swap()swap_ranges() |
Swaps two elements or sequences of elements. |
swap() |
Swaps two values, defined in the <utility> header. |
exchange() |
Replaces a given value with a new value and returns the old value. Defined in the <utility> header. |
A sequence is partitioned on a certain predicate, if all elements for which the predicate returns true are before all elements for which it returns false. The first element in the sequence that does not satisfy the predicate is called the partition point. The Standard Library provides the following partition algorithms.
| ALGORITHM NAME | ALGORITHM SYNOPSIS | COMPLEXITY |
is_partitioned() |
Returns true if all elements for which a predicate returns true are before all elements for which it returns false. |
Linear |
partition() |
Sorts the sequence such that all elements for which a predicate returns true are before all elements for which it returns false, without preserving the original order of the elements within each partition. |
Linear |
stable_partition() |
Sorts the sequence such that all elements for which a predicate returns true are before all elements for which it returns false, while preserving the original order of the elements within each partition. |
Linear logarithmic |
partition_copy() |
Copies elements from one sequence to two different sequences. The target sequence is selected based on the result of a predicate, either true or false. |
Linear |
partition_point() |
Returns an iterator such that all elements before this iterator return true for a predicate and all elements after this iterator return false for that predicate. |
Logarithmic |
The Standard Library provides several different sorting algorithms with varying performance guarantees.
| ALGORITHM NAME | ALGORITHM SYNOPSIS | COMPLEXITY |
is_sorted()is_sorted_until() |
Checks if a sequence is sorted or which subsequence is sorted. | Linear |
nth_element() |
Relocates the nth element of the sequence such that the element in the position pointed to by nth is the element that would be in that position if the whole range were sorted, and it rearranges all elements such that all elements preceding the nth element are less than the new nth element, and the ones following it are greater than the new nth element. | Linear |
partial_sort()partial_sort_copy() |
Partially sorts the sequence: the first n elements (specified by iterators) are sorted; the rest are not. They are sorted either in place or by copying them to a new sequence. | Linear logarithmic |
sort()stable_sort() |
Sorts elements in place, either preserving the order of duplicate elements or not. | Linear logarithmic |
The following binary search algorithms are normally used on sorted sequences. Technically, they only require the sequence to be at least partitioned on the element that is searched for. This could, for example, be achieved by applying std::partition(). A sorted sequence also meets this requirement. All these algorithms have logarithmic complexity.
| ALGORITHM NAME | ALGORITHM SYNOPSIS |
lower_bound() |
Finds the first element in a sequence not less than (that is greater or equal to) a given value. |
upper_bound() |
Finds the first element in a sequence greater than a given value. |
equal_range() |
Returns a pair containing the result of both lower_bound() and upper_bound(). |
binary_search() |
Returns true if a given value is found in a sequence; false otherwise. |
Set algorithms are special modifying algorithms that perform set operations on sequences. They are most appropriate on sequences from set containers, but work on sorted sequences from most containers.
| ALGORITHM NAME | ALGORITHM SYNOPSIS | COMPLEXITY |
inplace_merge() |
Merges two sorted sequences in place. | Linear logarithmic |
merge() |
Merges two sorted sequences by copying them to a new sequence. | Linear |
includes() |
Determines if every element from one sorted sequence is in another sorted sequence. | Linear |
set_union()set_intersection()set_difference()set_symmetric_difference() |
Performs the specified set operation on two sorted sequences, copying results to a third sorted sequence. | Linear |
A heap is a standard data structure in which the elements of an array or sequence are ordered in a semi-sorted fashion, so that finding the “top” element is quick. For example, a heap data structure is typically used to implement a priority_queue. Six algorithms allow you to work with heaps.
| ALGORITHM NAME | ALGORITHM SYNOPSIS | COMPLEXITY |
is_heap() |
Checks if a range of elements is a heap. | Linear |
is_heap_until() |
Finds the largest subrange in the given range of elements that is a heap. | Linear |
make_heap() |
Creates a heap from a range of elements. | Linear |
push_heap()pop_heap() |
Adds an element to, or removes an element from a heap. | Logarithmic |
sort_heap() |
Converts a heap into a range of ascending sorted elements. | Linear logarithmic |
| ALGORITHM NAME | ALGORITHM SYNOPSIS |
clamp() |
Makes sure a value (v) is between a given minimum (lo) and maximum (hi). Returns a reference to lo if v < lo; returns a reference to hi if v > hi; otherwise returns a reference to v. |
min()max() |
Returns the minimum or maximum of two or more values. |
minmax() |
Returns the minimum and maximum of two or more values as a pair. |
min_element()max_element() |
Returns the minimum or maximum element in a sequence. |
minmax_element() |
Returns the minimum and maximum element in a sequence as a pair. |
The <numeric> header provides the following numerical processing algorithms. None of them require the source sequences to be ordered. All of them have a linear complexity.
| ALGORITHM NAME | ALGORITHM SYNOPSIS |
iota() |
Fills a sequence with successively incrementing values starting with a given value. |
gcd() |
Returns the greatest common divisor of two integer types. |
lcm() |
Returns the least common multiple of two integer types. |
adjacent_difference() |
Generates a new sequence in which each element is the difference (or other binary operation) of the second and first of each adjacent pair of elements in the source sequence. |
partial_sum() |
Generates a new sequence in which each element is the sum (or other binary operation) of an element and all its preceding elements in the source sequence. |
exclusive_scan()inclusive_scan() |
These are similar to partial_sum(). An inclusive scan is identical to a partial sum if the given summation operation is associative. However, inclusive_scan() sums in a non-deterministic order, while partial_sum() left to right, so for non-associative summation operations the result of the former is non-deterministic. The exclusive_scan() algorithm also sums in a non-deterministic order.For inclusive_scan(), the ith element is included in the ith sum, just as for partial_sum(). For exclusive_scan(), the ith element is not included in the ith sum.
|
transform_exclusive_scan()transform_inclusive_scan() |
Applies a transformation to each element in a sequence, then performs an exclusive/inclusive scan. |
accumulate() |
“Accumulates” the values of all the elements in a sequence. The default behavior is to sum the elements, but the caller can supply a different binary function instead. |
inner_product() |
Similar to accumulate(), but works on two sequences. This algorithm calls a binary function (multiplication by default) on parallel elements in the sequences, accumulating the result using another binary function (addition by default). If the sequences represent mathematical vectors, the algorithm calculates the dot product of the vectors. |
reduce() |
Similar to accumulate(), but supports parallel execution. The order of evaluation for reduce() is non-deterministic, while it’s from left to right for accumulate(). This means that the behavior of the former is non-deterministic if the given binary operation is not associative or not commutative. |
transform_reduce() |
Applies a transformation to each element in a sequence, then performs a reduce(). |
A permutation of a sequence contains the same elements but in a different order. The following algorithms are provided to work with permutations.
| ALGORITHM NAME | ALGORITHM SYNOPSIS | COMPLEXITY |
is_permutation() |
Returns true if the elements in one range are a permutation of the elements in another range. |
Quadratic |
next_permutation()prev_permutation() |
Modifies the sequence by transforming it into its “next” or “previous” lexicographical permutation. Successive calls to one or the other will permute the sequence into all possible permutations of its elements, if you start with a properly sorted sequence. This algorithm returns false if no more permutations exist. |
Linear |
The number and capabilities of the algorithms might overwhelm you at first. It can also be difficult to see how to apply them in the beginning. However, now that you have an idea of the available options, you are better able to tackle your program designs. The following chapters cover the details of how to use these algorithms in your code.
The Standard Library is powerful, but it’s not perfect. Here are two examples of missing functionality:
maps and sets are generally implemented as balanced binary trees, the Standard Library does not expose this implementation in the interface. If you need a tree or graph structure for something like writing a parser, you need to implement your own or find an implementation in another library.It is important to keep in mind that the Standard Library is extensible. You can write your own containers or algorithms that work with existing algorithms or containers. So, if the Standard Library doesn’t provide exactly what you need, consider writing your desired code such that it works with the Standard Library. Chapter 21 covers the topic of customizing and extending the Standard Library.
This chapter provided an overview of the C++ Standard Library, which is the most important library that you will use in your code. It subsumes the C library, and includes additional facilities for strings, I/O, error handling, and other tasks. It also includes generic containers and algorithms. The following chapters describe the Standard Library in more detail.
Containers in the Standard Library are generic data structures that are useful for storing collections of data. You should rarely need to use a standard C-style array, write a linked list, or design a stack when you use the Standard Library. The containers are implemented as class templates, so you can instantiate them for any type that meets certain basic conditions outlined in the next section. Most of the Standard Library containers, except for array and bitset, are flexible in size and automatically grow or shrink to accommodate more or fewer elements. This is a huge benefit compared to the old, standard C-style arrays, which had a fixed size. Because of the fixed-size nature of standard C-style arrays, they are more vulnerable to overruns, which in the simplest cases merely cause the program to crash because data has been corrupted, but in the worst cases allow certain kinds of security attacks. By using Standard Library containers, you ensure that your programs will be less vulnerable to these kinds of problems.
The Standard Library provides 16 containers, divided into four categories.
|
|
Additionally, C++ strings and streams can also be used as Standard Library containers to a certain degree, and bitset can be used to store a fixed number of bits.
Everything in the Standard Library is in the std namespace. The examples in this book usually use the blanket using namespace std; statement in source files (never use this in header files!), but you can be more selective in your own programs about which symbols from std to use.
Standard Library containers use value semantics on elements. That is, they store a copy of elements that they are given, assign to elements with the assignment operator, and destroy elements with the destructor. Thus, when you write classes that you intend to use with the Standard Library, you need to make sure they are copyable. When requesting an element from the container, a reference to the stored copy is returned.
If you prefer reference semantics, you can store pointers to elements instead of the elements themselves. When the containers copy a pointer, the result still refers to the same element. An alternative is to store std::reference_wrappers in the container. A reference_wrapper can be created using std::ref() or std::cref(), and basically exist to make references copyable. The reference_wrapper class template, and the ref() and cref() function templates are defined in the <functional> header. An example of this is given in the section “Storing references in a vector.”
It is possible to store move-only types, that is non-copyable types, in a container, but when doing so, some operations on the container might not compile. An example of a move-only type is std::unique_ptr.
One of the template type parameters for Standard Library containers is a so-called allocator. The container can use this allocator to allocate and deallocate memory for elements. The allocator type parameter has a default value, so you can almost always just ignore it.
Some containers, such as a map, also accept a comparator as one of the template type parameters. This comparator is used to order elements. It has a default value, so you don’t always have to specify it.
The specific requirements on elements in containers using the default allocator and comparator are shown in the following table.
| METHOD | DESCRIPTION | NOTES |
| Copy Constructor | Creates a new element that is “equal” to the old one, but that can safely be destructed without affecting the old one. | Used every time you insert an element, except when using an emplace method (discussed later). |
| Move Constructor | Creates a new element by moving all content from a source element to the new element. | Used when the source element is an rvalue, and will be destroyed after the construction of the new element; also used when a vector grows in size. The move constructor should be noexcept, otherwise it won’t be used! |
| Assignment Operator | Replaces the contents of an element with a copy of the source element. | Used every time you modify an element. |
| Move Assignment Operator | Replaces the contents of an element by moving all content from a source element. | Used when the source element is an rvalue, and will be destroyed after the assignment operation. The move assignment operator should be noexcept, otherwise it won’t be used! |
| Destructor | Cleans up an element. | Used every time you remove an element, or when a vector grows in size and the elements are not noexcept movable. |
| Default Constructor | Constructs an element without any arguments. | Required only for certain operations, such as the vector::resize() method with one argument, and the map::operator[] access. |
operator== |
Compares two elements for equality. | Required for keys in unordered associative containers, and for certain operations, such as operator== on two containers. |
operator< |
Determines if one element is less than another. | Required for keys in ordered associative containers, and for certain operations, such as operator< on two containers. |
Chapter 9 shows you how to write these methods, and discusses move semantics. For move semantics to work properly with Standard Library containers, the move constructor and the move assignment operator must be marked as noexcept!
The Standard Library containers provide limited error checking. Clients are expected to ensure that their uses are valid. However, some container methods and functions throw exceptions in certain conditions, such as out-of-bounds indexing. Of course, it is impossible to list exhaustively the exceptions that can be thrown from these methods because they perform operations on user-specified types with unknown exception characteristics. This chapter mentions exceptions where appropriate. Consult a Standard Library Reference for a list of possible exceptions thrown from each method.
The Standard Library uses the iterator pattern to provide a generic abstraction for accessing the elements of a container. Each container provides a container-specific iterator, which is a glorified smart pointer that knows how to iterate over the elements of that specific container. The iterators for all the different containers adhere to a specific interface defined by the C++ standard. Thus, even though the containers provide different functionality, the iterators present a common interface to code that wishes to work with elements of the containers.
You can think of an iterator as a pointer to a specific element of the container. Like pointers to elements in an array, iterators can move to the next element with operator++. Similarly, you can usually use operator* and operator-> on the iterator to access the actual element or field of the element. Some iterators allow comparison with operator== and operator!=, and support operator-- for moving to previous elements.
All iterators must be copy constructible, copy assignable, and destructible. Lvalues of iterators must be swappable. Different containers provide iterators with slightly different additional capabilities. The standard defines five categories of iterators, as summarized in the following table.
| ITERATOR CATEGORY | OPERATIONS REQUIRED | COMMENTS |
| Input (also known as Read) | operator++operator*operator->copy constructor operator=operator==operator!= |
Provides read-only access, forward only (no operator-- to move backward).Iterators can be assigned, copied, and compared for equality. |
| Output (also known as Write) | operator++operator*copy constructor operator= |
Provides write-only access, forward only. Iterators can be assigned, but cannot be compared for equality. Specific to output iterators is that you can do *iter = value.Note the absence of operator->.Provides both prefix and postfix operator++.
|
| Forward | Capabilities of input iterators, plus default constructor |
Provides read access, forward only. Iterators can be assigned, copied, and compared for equality. |
| Bidirectional |
Capabilities of forward iterators, plusoperator-- |
Provides everything a forward iterator provides. Iterators can also move backward to a previous element. Provides both prefix and postfix operator--.
|
| Random Access |
Bidirectional capability, plus the following:operator+operator-operator+=operator-=operator<operator>operator<=operator>=operator[] |
Equivalent to raw pointers: support pointer arithmetic, array index syntax, and all forms of comparison. |
Additionally, iterators that satisfy the requirements for output iterators are called mutable iterators, otherwise they are called constant iterators.
You can use std::distance() to compute the distance between two iterators of a container.
Iterators are implemented similarly to smart pointer classes in that they overload the specific desired operators. Consult Chapter 15 for details on operator overloading.
The basic iterator operations are similar to those supported by raw pointers, so a raw pointer can be a legitimate iterator for certain containers. In fact, the vector iterator could technically be implemented as a simple raw pointer. However, as a client of the containers, you need not worry about the implementation details; you can simply use the iterator abstraction.
This chapter shows you the basics of using the iterators for each container. Chapter 18 delves into more detail about iterators and the Standard Library algorithms that use them.
Every container class in the Standard Library that supports iterators provides public type aliases for its iterator types, called iterator and const_iterator. For example, a const iterator for a vector of ints has as type std::vector<int>::const_iterator. Containers that allow you to iterate over their elements in reverse order also provide public type aliases called reverse_iterator and const_reverse_iterator. This way, clients can use the container iterators without worrying about the actual types.
The containers also provide a method begin() that returns an iterator referring to the first element in the container. The end() method returns an iterator to the “past-the-end” value of the sequence of elements. That is, end() returns an iterator that is equal to the result of applying operator++ to an iterator referring to the last element in the sequence. Together, begin() and end() provide a half-open range that includes the first element but not the last. The reason for this apparent complication is to support empty ranges (containers without any elements), in which case begin() is equal to end(). The half-open range bounded by iterators begin() and end() is often written mathematically like this: [begin, end).
Similarly, there are
cbegin() and cend() methods that return const iterators.rbegin() and rend() methods that return reverse iterators.crbegin() and crend() methods that return const reverse iterators.Examples of using iterators are given throughout the remainder of this chapter, and in subsequent chapters.
vector, deque, list, forward_list, and array are called sequential containers. The best way to learn about sequential containers is to jump in with an example of the vector container, which should be your default container. The next section describes the vector container in detail, followed by briefer descriptions of deque, list, forward_list, and array. Once you become familiar with the sequential containers, it’s trivial to switch between them.
The Standard Library vector container is similar to a standard C-style array: the elements are stored in contiguous memory, each in its own “slot.” You can index into a vector, as well as add new elements to the back or insert them anywhere else. Inserting and deleting elements into and from a vector generally takes linear time, though these operations actually run in amortized constant time at the end of a vector, as explained in the section “The vector Memory Allocation Scheme,” later in this chapter. Random access of individual elements has a constant complexity.
vector is defined in the <vector> header file as a class template with two type parameters: the element type to store and an allocator type.
template <class T, class Allocator = allocator<T>> class vector;The Allocator parameter specifies the type for a memory allocator object that the client can set in order to use custom memory allocation. This template parameter has a default value.
The simplest way to use a vector is as a fixed-length array. vector provides a constructor that allows you to specify the number of elements, and provides an overloaded operator[] in order to access and modify those elements. The C++ standard states that the result of operator[] is undefined when used to access an element outside the vector bounds. This means that any compiler can decide how to behave in that case. For example, the default behavior of Microsoft Visual C++ is to give a run-time error message when your program is compiled in debug mode, and to disable any bounds checking in release mode for performance reasons. You can change these default behaviors.
In addition to using operator[], you can access vector elements via at(), front(), and back(). The at() method is identical to operator[], except that it performs bounds checking, and throws an out_of_range exception if the index is out of bounds. front() and back() return references to the first and last elements of a vector, respectively. Calling front() or back() on an empty container causes undefined behavior.
Here is a small example program to “normalize” test scores so that the highest score is set to 100, and all other scores are adjusted accordingly. The program creates a vector of ten doubles, reads in ten values from the user, divides each value by the max score (times 100), and prints out the new values. For the sake of brevity, the program forsakes error checking.
vector<double> doubleVector(10); // Create a vector of 10 doubles.// Initialize max to smallest numberdouble max = -numeric_limits<double>::infinity();for (size_t i = 0; i < doubleVector.size(); i++) {cout << "Enter score " << i + 1 << ": ";cin >> doubleVector[i];if (doubleVector[i] > max) {max = doubleVector[i];}}max /= 100.0;for (auto& element : doubleVector) {element /= max;cout << element << " ";}
As you can see from this example, you can use a vector just as you would use a standard C-style array. Note that the first for loop uses the size() method to determine the number of elements in the container. This example also demonstrates the use of a range-based for loop with a vector. Here, the range-based for loop uses auto& and not auto because a reference is required so that the element can be modified in each iteration.
The real power of a vector lies in its ability to grow dynamically. For example, consider the test score normalization program from the previous section with the additional requirement that it should handle any number of test scores. Here is the new version:
vector<double> doubleVector;// Create a vector with zero elements.// Initialize max to smallest numberdouble max = -numeric_limits<double>::infinity();for (size_t i = 1; true; i++) {double temp;cout << "Enter score " << i << " (-1 to stop): ";cin >> temp;if (temp == -1) {break;}doubleVector.push_back(temp);if (temp > max) {max = temp;}}max /= 100.0;for (auto& element : doubleVector) {element /= max;cout << element << " ";}
This version of the program uses the default constructor to create a vector with zero elements. As each score is read, it’s added to the vector with the push_back() method, which takes care of allocating space for the new element. The range-based for loop doesn’t require any changes.
Now that you’ve had a taste of vectors, it’s time to delve into their details.
The default constructor creates a vector with zero elements.
vector<int> intVector; // Creates a vector of ints with zero elementsYou can specify a number of elements and, optionally, a value for those elements, like this:
vector<int> intVector(10, 100); // Creates vector of 10 ints with value 100If you omit the default value, the new objects are zero-initialized. Zero-initialization constructs objects with the default constructor, and initializes primitive integer types (such as char, int, and so on) to zero, primitive floating-point types to 0.0, and pointer types to nullptr.
You can create vectors of built-in classes like this:
vector<string> stringVector(10, "hello");User-defined classes can also be used as vector elements:
class Element{public:Element() {}virtual ~Element() = default;};…vector<Element> elementVector;
A vector can be constructed with an initializer_list containing the initial elements:
vector<int> intVector({ 1, 2, 3, 4, 5, 6 });initializer_lists can also be used for so-called uniform initialization, as discussed in Chapter 1. Uniform initialization works on most Standard Library containers. Here is an example:
vector<int> intVector1 = { 1, 2, 3, 4, 5, 6 };vector<int> intVector2{ 1, 2, 3, 4, 5, 6 };
You can allocate vectors on the heap as well.
auto elementVector = make_unique<vector<Element>>(10);A vector stores copies of the objects, and its destructor calls the destructor for each of the objects. The copy constructor and assignment operator of the vector class perform deep copies of all the elements in the vector. Thus, for efficiency, you should pass vectors by reference or const reference to functions and methods. Consult Chapter 12 for details on writing functions that take template instantiations as parameters.
In addition to normal copying and assignment, vectors provide an assign() method that removes all the current elements and adds any number of new elements. This method is useful if you want to reuse a vector. Here is a trivial example. intVector is created with ten elements having the default value zero. Then assign() is used to remove all ten elements and replace them with five elements with value 100.
vector<int> intVector(10);// Other code …intVector.assign(5, 100);
assign() can also accept an initializer_list as follows. intVector now has four elements with the given values.
intVector.assign({ 1, 2, 3, 4 });vectors also provide a swap() method that allows you to swap the contents of two vectors in constant time. Here is a simple example:
vector<int> vectorOne(10);vector<int> vectorTwo(5, 100);vectorOne.swap(vectorTwo);// vectorOne now has 5 elements with the value 100.// vectorTwo now has 10 elements with the value 0.
The Standard Library provides the usual six overloaded comparison operators for vectors: ==, !=, <, >, <=, >=. Two vectors are equal if they have the same number of elements and all the corresponding elements in the two vectors are equal to each other. Two vectors are compared lexicographically, that is, one vector is “less than” another if all elements 0 through i–1 in the first vector are equal to elements 0 through i-1 in the second vector, but element i in the first is less than element i in the second, where i must be in the range 0…n and n must be less than the size() of the smallest of the two vectors.
Here is an example of a simple program that compares vectors of ints:
vector<int> vectorOne(10);vector<int> vectorTwo(10);if (vectorOne == vectorTwo) {cout << "equal!" << endl;} else {cout << "not equal!" << endl;}vectorOne[3] = 50;if (vectorOne < vectorTwo) {cout << "vectorOne is less than vectorTwo" << endl;} else {cout << "vectorOne is not less than vectorTwo" << endl;}
The output of the program is as follows:
equal!vectorOne is not less than vectorTwo
The section on “Iterators” at the beginning of this chapter explains the concepts of container iterators. The discussion can get a bit abstract, so it’s helpful to jump in and look at a code example. Here is the last for loop of the test score normalization program from earlier using iterators instead of a range-based for loop:
for (vector<double>::iterator iter = begin(doubleVector);iter != end(doubleVector); ++iter) {*iter /= max;cout << *iter << " ";}
First, take a look at the for loop initialization statement:
vector<double>::iterator iter = begin(doubleVector);Recall that every container defines a type named iterator to represent iterators for that type of container. begin() returns an iterator of that type referring to the first element in the container. Thus, the initialization statement obtains in the variable iter an iterator referring to the first element of doubleVector. Next, look at the for loop comparison:
iter != end(doubleVector);This statement simply checks if the iterator is past the end of the sequence of elements in the vector. When it reaches that point, the loop terminates. The increment statement, ++iter, increments the iterator to refer to the next element in the vector.
The for loop body contains these two lines:
*iter /= max;cout << *iter << " ";
As you can see, your code can both access and modify the elements over which it iterates. The first line uses * to dereference iter to obtain the element to which it refers, and assigns to that element. The second line dereferences iter again, but this time only to stream the element to cout.
The preceding for loop using iterators can be simplified by using the auto keyword:
for (auto iter = begin(doubleVector);iter != end(doubleVector); ++iter) {*iter /= max;cout << *iter << " ";}
With auto, the compiler automatically deduces the type of the variable iter based on the right-hand side of the initializer, which in this case is the result of the call to begin().
If the elements of your container are objects, you can use the -> operator on iterators to call methods or access data members of those objects. For example, the following program creates a vector of ten strings, then iterates over all of them appending a new string to each one:
vector<string> stringVector(10, "hello");for (auto it = begin(stringVector); it != end(stringVector); ++it) {it->append(" there");}
Often, using a range-based for loop results in more elegant code, as in this example:
vector<string> stringVector(10, "hello");for (auto& str : stringVector) {str.append(" there");}
The normal iterator is read/write. However, if you call begin() or end() on a const object, or you call cbegin() or cend(), you receive a const_iterator. The const_iterator is read-only; you cannot modify the element it refers to. An iterator can always be converted to a const_iterator, so it’s always safe to write something like this:
vector<type>::const_iterator it = begin(myVector);However, a const_iterator cannot be converted to an iterator. If myVector is const, the following line doesn’t compile:
vector<type>::iterator it = begin(myVector);When using the auto keyword, using const_iterators looks a bit different. Suppose you write the following code:
vector<string> stringVector(10, "hello");for (auto iter = begin(stringVector); iter != end(stringVector); ++iter) {cout << *iter << endl;}
Because of the auto keyword, the compiler deduces the type of the iter variable automatically and makes it a normal iterator because stringVector is not const. If you want a read-only const_iterator in combination with using auto, then you need to use cbegin() and cend() instead of begin() and end() as follows:
vector<string> stringVector(10, "hello");for (auto iter = cbegin(stringVector); iter != cend(stringVector); ++iter) {cout << *iter << endl;}
Now the compiler uses const_iterator as type for the variable iter because that’s what cbegin() returns.
A range-based for loop can also be forced to use const iterators as follows:
vector<string> stringVector(10, "hello");for (const auto& element : stringVector) {cout << element << endl;}
Generally, iterators are about as safe as pointers—that is, extremely unsafe. For example, you can write code like this:
vector<int> intVector;auto iter = end(intVector);*iter = 10; // BUG! iter doesn't refer to a valid element.
Recall that the iterator returned by end() is one element past the end of a vector, not an iterator referring to the last element! Trying to dereference it results in undefined behavior. Iterators are not required to perform any verification.
Another problem can occur if you use mismatched iterators. For example, the following for loop initializes an iterator from vectorTwo, and tries to compare it to the end iterator of vectorOne. Needless to say, this loop will not do what you intended, and may never terminate. Dereferencing the iterator in the loop will likely produce undefined results.
vector<int> vectorOne(10);vector<int> vectorTwo(10);// Fill in the vectors.// BUG! Possible infinite loopfor (auto iter = begin(vectorTwo); iter != end(vectorOne); ++iter) {// Loop body}
The vector iterator is random access, which means that you can move it backward or forward, or jump around. For example, the following code eventually changes the fifth element (index 4) to the value 4:
vector<int> intVector(10);auto it = begin(intVector);it += 5;--it;*it = 4;
Given that you can write a for loop that uses a simple index variable and the size() method to iterate over the elements of the vector, why should you bother using iterators? That’s a valid question, for which there are three main answers:
vectors, but applies to lists, maps, and sets.As mentioned in the beginning of this chapter, it is possible to store references in a container, such as a vector. To do this, you store std::reference_wrappers in the container. The std::ref() and cref() function templates are used to create non-const and const
reference_wrapper instances. You need to include the <functional> header file. Here is an example:
string str1 = "Hello";string str2 = "World";// Create a vector of references to strings.vector<reference_wrapper<string>> vec{ ref(str1) };vec.push_back(ref(str2)); // push_back() works as well.// Modify the string referred to by the second reference in the vector.vec[1].get() += "!";// The end result is that str2 is actually modified.cout << str1 << " " << str2 << endl;
As you have already read, you can append an element to a vector with the push_back() method. The vector provides a parallel remove method called pop_back().
You can also insert elements at any point in the vector with the insert() method, which adds one or more elements to a position specified by an iterator, shifting all subsequent elements down to make room for the new ones. There are five different overloaded forms of insert() that do the following:
vector using move semantics.vector where the list of elements is given as an initializer_list.You can remove elements from any point in a vector with erase(), and you can remove all elements with clear(). There are two forms of erase(): one accepting a single iterator to remove a single element, and one accepting two iterators specifying a range of elements to remove.
If you want to remove a number of elements that satisfy a certain condition, one solution would be to write a loop iterating over all the elements and erasing every element that matches the condition. However, this solution has quadratic complexity, which is very bad for performance. In this case, the quadratic complexity can be avoided by using the remove-erase-idiom, which has a linear complexity. The remove-erase-idiom is discussed in Chapter 18.
Here is a small program that demonstrates the methods for adding and removing elements. It uses a helper function template printVector() to print the contents of a vector to cout as follows. See Chapter 12 for details on writing function templates.
template<typename T>void printVector(const vector<T>& v){for (auto& element : v) { cout << element << " "; }cout << endl;}
The example includes demonstrations of the two-argument version of erase() and the following versions of insert():
insert(const_iterator pos, const T& x): the value x is inserted at position pos.insert(const_iterator pos, size_type n, const T& x): the value x is inserted n times at position pos.insert(const_iterator pos, InputIterator first, InputIterator last): the elements in the range [first, last) are inserted at position pos.The code for the example is as follows:
vector<int> vectorOne = { 1, 2, 3, 5 };vector<int> vectorTwo;// Oops, we forgot to add 4. Insert it in the correct placevectorOne.insert(cbegin(vectorOne) + 3, 4);// Add elements 6 through 10 to vectorTwofor (int i = 6; i <= 10; i++) {vectorTwo.push_back(i);}printVector(vectorOne);printVector(vectorTwo);// Add all the elements from vectorTwo to the end of vectorOnevectorOne.insert(cend(vectorOne), cbegin(vectorTwo), cend(vectorTwo));printVector(vectorOne);// Now erase the numbers 2 through 5 in vectorOnevectorOne.erase(cbegin(vectorOne) + 1, cbegin(vectorOne) + 5);printVector(vectorOne);// Clear vectorTwo entirelyvectorTwo.clear();// And add 10 copies of the value 100vectorTwo.insert(cbegin(vectorTwo), 10, 100);// Decide we only want 9 elementsvectorTwo.pop_back();printVector(vectorTwo);
The output of the program is as follows:
1 2 3 4 56 7 8 9 101 2 3 4 5 6 7 8 9 101 6 7 8 9 10100 100 100 100 100 100 100 100 100
Recall that iterator pairs represent half-open ranges, and insert() adds elements before the element referred to by a given iterator position. Thus, you can insert the entire contents of vectorTwo into the end of vectorOne, like this:
vectorOne.insert(cend(vectorOne), cbegin(vectorTwo), cend(vectorTwo));All Standard Library containers implement move semantics by including a move constructor and move assignment operator. See Chapter 9 for details on move semantics. A big benefit of this is that you can easily return a Standard Library container from a function by value without performance penalty. Take a look at the following function:
vector<int> createVectorOfSize(size_t size){vector<int> vec(size);int contents = 0;for (auto& i : vec) {i = contents++;}return vec;}…vector<int> myVector;myVector = createVectorOfSize(123);
Without move semantics, assigning the result of createVectorOfSize() to myVector calls the copy assignment operator. With the move semantics support in the Standard Library containers, copying of the vector is avoided. Instead, the assignment to myVector triggers a call to the move assignment operator.
Similarly, push operations can also make use of move semantics to improve performance in certain situations. For example, suppose you have a vector of strings:
vector<string> vec;You can add an element to this vector as follows:
string myElement(5, 'a'); // Constructs the string "aaaaa"vec.push_back(myElement);
However, because myElement is not a temporary object, push_back() makes a copy of myElement and puts it in the vector.
The vector class also defines a push_back(T&& val), which is the move equivalent of push_back(const T& val). So, copying can be avoided if you call the push_back() method as follows:
vec.push_back(move(myElement));Now you are explicitly saying that myElement should be moved into the vector. Note that after this call, myElement is in a valid but otherwise indeterminate state. You should not use myElement anymore, unless you first bring it back to a determinate state, for example by calling clear() on it! You can also call push_back() as follows:
vec.push_back(string(5, 'a'));The preceding call to push_back() triggers a call to the move version because the call to the string constructor results in a temporary object. The push_back() method moves this temporary string object into the vector, avoiding any copying.
C++ supports emplace operations on most Standard Library containers, including vector. Emplace means “to put into place.” An example is emplace_back() on a vector object, which does not copy or move anything. Instead, it makes space in the container and constructs the object in place, as in this example:
vec.emplace_back(5, 'a');The emplace methods take a variable number of arguments as a variadic template. Variadic templates are discussed in Chapter 22, but those details are not required to understand how to use emplace_back(). The difference in performance between emplace_back() and push_back() using move semantics depends on how your specific compiler implements these operations. In most situations, you can pick the one based on the syntax that you prefer.
vec.push_back(string(5, 'a'));// Orvec.emplace_back(5, 'a');
Since C++17, the emplace_back() method returns a reference to the inserted element. Before C++17, the return type of emplace_back() was void.
There is also an emplace() method that constructs an object in place at a specific position in the vector, and returns an iterator to the inserted element.
Inserting or erasing elements in a vector causes all subsequent elements to shift up or down to make room for, or fill in the holes left by, the affected elements. Thus, these operations take linear complexity. Furthermore, all iterators referring to the insertion or removal point or subsequent positions are invalid following the action. The iterators are not “magically” moved to keep up with the elements that are shifted up or down in the vector—that’s up to you.
Also keep in mind that an internal vector reallocation can cause invalidation of all iterators referring to elements in the vector, not just those referring to elements past the point of insertion or deletion. See the next section for details.
A vector allocates memory automatically to store the elements that you insert. Recall that the vector requirements dictate that the elements must be in contiguous memory, like in standard C-style arrays. Because it’s impossible to request to add memory to the end of a current chunk of memory, every time a vector allocates more memory, it must allocate a new, larger chunk in a separate memory location and copy/move all the elements to the new chunk. This process is time-consuming, so vector implementations attempt to avoid it by allocating more space than needed when they have to perform a reallocation. That way, they can avoid reallocating memory every time you insert an element.
One obvious question at this point is why you, as a client of vector, care how it manages its memory internally. You might think that the principle of abstraction should allow you to disregard the internals of the vector memory allocation scheme. Unfortunately, there are two reasons why you need to understand how it works:
vector allocation scheme can guarantee that an element insertion runs in amortized constant time: most of the time the operation is constant, but once in a while (if it requires a reallocation), it’s linear. If you are worried about efficiency, you can control when a vector performs reallocations.vector.Thus, the vector interface allows you to query and control the vector reallocations. If you don’t control the reallocations explicitly, you should assume that all insertions cause a reallocation and thus invalidate all iterators.
vector provides two methods for obtaining information about its size: size() and capacity(). The size() method returns the number of elements in a vector, while capacity() returns the number of elements that it can hold without a reallocation. Thus, the number of elements that you can insert without causing a reallocation is capacity()
–
size().
C++17 introduces non-member std::size() and std::empty() global functions. These are similar to the non-member functions that are available to get iterators (std::begin(), std::end(), and so on). The non-member size() and empty() functions can be used with all containers. They can also be used with statically allocated C-style arrays not accessed through pointers, and with initializer_lists. Here is an example of using them with a vector:
vector<int> vec{ 1,2,3 };cout << size(vec) << endl;cout << empty(vec) << endl;
If you don’t care about efficiency or iterator invalidations, there is never a need to control the vector memory allocation explicitly. However, if you want to make your program as efficient as possible, or you want to guarantee that iterators will not be invalidated, you can force a vector to preallocate enough space to hold all of its elements. Of course, you need to know how many elements it will hold, which is sometimes impossible to predict.
One way to preallocate space is to call reserve(), which allocates enough memory to hold the specified number of elements. The next section shows an example of the reserve() method in action.
Another way to preallocate space is to specify, in the constructor, or with the resize() or assign() method, how many elements you want a vector to store. This method actually creates a vector of that size (and probably of that capacity).
A vector stores its data contiguously in memory. You can get a pointer to this block of memory with the data() method.
C++17 introduces a non-member std::data() global function that can be used to get a pointer to the data. It works for the array and vector containers, strings, statically allocated C-style arrays not accessed through pointers, and initializer_lists. Here is an example for a vector:
vector<int> vec{ 1,2,3 };int* data1 = vec.data();int* data2 = data(vec);
A common problem in computer science is distributing requests among a finite list of resources. For example, a simple operating system could keep a list of processes and assign a time slice (such as 100ms) to each process to let the process perform some of its work. After the time slice is finished, the OS suspends the process and the next process in the list is given a time slice to perform some of its work. One of the simplest algorithmic solutions to this problem is round-robin scheduling. When the time slice of the last process is finished, the scheduler starts over again with the first process. For example, in the case of three processes, the first time slice would go to the first process, the second slice to the second process, the third slice to the third process, and the fourth slice back to the first process. The cycle would continue in this way indefinitely.
Suppose that you decide to write a generic round-robin scheduling class that can be used with any type of resource. The class should support adding and removing resources, and should support cycling through the resources in order to obtain the next one. You could use a vector directly, but it’s often helpful to write a wrapper class that provides more directly the functionality you need for your specific application. The following example shows a RoundRobin class template with comments explaining the code. First, here is the class definition:
// Class template RoundRobin// Provides simple round-robin semantics for a list of elements.template <typename T>class RoundRobin{public:// Client can give a hint as to the number of expected elements for// increased efficiency.RoundRobin(size_t numExpected = 0);virtual ~RoundRobin() = default;// Prevent assignment and pass-by-valueRoundRobin(const RoundRobin& src) = delete;RoundRobin& operator=(const RoundRobin& rhs) = delete;// Explicitly default a move constructor and move assignment operatorRoundRobin(RoundRobin&& src) = default;RoundRobin& operator=(RoundRobin&& rhs) = default;// Appends element to the end of the list. May be called// between calls to getNext().void add(const T& element);// Removes the first (and only the first) element// in the list that is equal (with operator==) to element.// May be called between calls to getNext().void remove(const T& element);// Returns the next element in the list, starting with the first,// and cycling back to the first when the end of the list is// reached, taking into account elements that are added or removed.T& getNext();private:std::vector<T> mElements;typename std::vector<T>::iterator mCurrentElement;};
As you can see, the public interface is straightforward: only three methods plus the constructor and destructor. The resources are stored in the vector called mElements. The iterator mCurrentElement always refers to the element that will be returned with the next call to getNext(). If getNext() hasn’t been called yet, mCurrentElement is equal to begin(mElements). Note the use of the typename keyword in front of the line declaring mCurrentElement. So far, you’ve only seen that keyword used to specify template parameters, but there is another use for it. You must specify typename explicitly whenever you access a type based on one or more template parameters. In this case, the template parameter T is used to access the iterator type. Thus, you must specify typename. This is another example of arcane C++ syntax.
The class also prevents assignment and pass-by-value because of the mCurrentElement data member. To make assignment and pass-by-value work, you would have to implement an assignment operator and copy constructor and make sure mCurrentElement is valid in the destination object.
The implementation of the RoundRobin class follows with comments explaining the code. Note the use of reserve() in the constructor, and the extensive use of iterators in add(), remove(), and getNext(). The trickiest aspect is handling mCurrentElement in the add() and remove() methods.
template <typename T> RoundRobin<T>::RoundRobin(size_t numExpected){// If the client gave a guideline, reserve that much space.mElements.reserve(numExpected);// Initialize mCurrentElement even though it isn't used until// there's at least one element.mCurrentElement = begin(mElements);}// Always add the new element at the endtemplate <typename T> void RoundRobin<T>::add(const T& element){// Even though we add the element at the end, the vector could// reallocate and invalidate the mCurrentElement iterator with// the push_back() call. Take advantage of the random-access// iterator features to save our spot.int pos = mCurrentElement - begin(mElements);// Add the element.mElements.push_back(element);// Reset our iterator to make sure it is valid.mCurrentElement = begin(mElements) + pos;}template <typename T> void RoundRobin<T>::remove(const T& element){for (auto it = begin(mElements); it != end(mElements); ++it) {if (*it == element) {// Removing an element invalidates the mCurrentElement iterator// if it refers to an element past the point of the removal.// Take advantage of the random-access features of the iterator// to track the position of the current element after removal.int newPos;if (mCurrentElement == end(mElements) - 1 &&mCurrentElement == it) {// mCurrentElement refers to the last element in the list,// and we are removing that last element, so wrap back to// the beginning.newPos = 0;} else if (mCurrentElement <= it) {// Otherwise, if mCurrentElement is before or at the one// we're removing, the new position is the same as before.newPos = mCurrentElement - begin(mElements);} else {// Otherwise, it's one less than before.newPos = mCurrentElement - begin(mElements) - 1;}// Erase the element (and ignore the return value).mElements.erase(it);// Now reset our iterator to make sure it is valid.mCurrentElement = begin(mElements) + newPos;return;}}}template <typename T> T& RoundRobin<T>::getNext(){// First, make sure there are elements.if (mElements.empty()) {throw std::out_of_range("No elements in the list");}// Store the current element which we need to return.auto& toReturn = *mCurrentElement;// Increment the iterator modulo the number of elements.++mCurrentElement;if (mCurrentElement == end(mElements)) {mCurrentElement = begin(mElements);}// Return a reference to the element.return toReturn;}
Here’s a simple implementation of a scheduler that uses the RoundRobin class template, with comments explaining the code:
// Simple Process class.class Process final{public:// Constructor accepting the name of the process.Process(string_view name) : mName(name) {}// Implementation of doWorkDuringTimeSlice() would let the process// perform its work for the duration of a time slice.// Actual implementation omitted.void doWorkDuringTimeSlice() {cout << "Process " << mName<< " performing work during time slice." << endl;}// Needed for the RoundRobin::remove() method to work.bool operator==(const Process& rhs) {return mName == rhs.mName;}private:string mName;};// Simple round-robin based process scheduler.class Scheduler final{public:// Constructor takes a vector of processes.Scheduler(const vector<Process>& processes);// Selects the next process using a round-robin scheduling// algorithm and allows it to perform some work during// this time slice.void scheduleTimeSlice();// Removes the given process from the list of processes.void removeProcess(const Process& process);private:RoundRobin<Process> mProcesses;};Scheduler::Scheduler(const vector<Process>& processes){// Add the processesfor (auto& process : processes) {mProcesses.add(process);}}void Scheduler::scheduleTimeSlice(){try {mProcesses.getNext().doWorkDuringTimeSlice();} catch (const out_of_range&) {cerr << "No more processes to schedule." << endl;}}void Scheduler::removeProcess(const Process& process){mProcesses.remove(process);}int main(){vector<Process> processes = { Process("1"), Process("2"), Process("3") };Scheduler scheduler(processes);for (int i = 0; i < 4; ++i)scheduler.scheduleTimeSlice();scheduler.removeProcess(processes[1]);cout << "Removed second process" << endl;for (int i = 0; i < 4; ++i)scheduler.scheduleTimeSlice();return 0;}
The output should be as follows:
Process 1 performing work during time slice.Process 2 performing work during time slice.Process 3 performing work during time slice.Process 1 performing work during time slice.Removed second processProcess 3 performing work during time slice.Process 1 performing work during time slice.Process 3 performing work during time slice.Process 1 performing work during time slice.
The C++ standard requires a partial specialization of vector for bools, with the intention that it optimizes space allocation by “packing” the Boolean values. Recall that a bool is either true or false, and thus could be represented by a single bit, which can take on exactly two values. C++ does not have a native type that stores exactly one bit. Some compilers represent a Boolean value with a type the same size as a char, other compilers use an int. The vector<bool> specialization is supposed to store the “array of bools” in single bits, thus saving space.
In a half-hearted attempt to provide some bit-field routines for vector<bool>, there is one additional method: flip(). This method can be called either on the container—in which case it complements all the elements in the container—or on a single reference returned from operator[] or a similar method, in which case it complements that single element.
At this point, you should be wondering how you can call a method on a reference to bool. The answer is that you can’t. The vector<bool> specialization actually defines a class called reference that serves as a proxy for the underlying bool (or bit). When you call operator[], at(), or a similar method, then vector<bool> returns a reference object, which is a proxy for the real bool.
In practice, the little amount of space saved by packing bools hardly seems worth the extra effort. Even worse, accessing and modifying elements in a vector<bool> is much slower than, for example, in a vector<int>. Many C++ experts recommend avoiding vector<bool> in favor of the bitset. If you do need a dynamically sized bit field, then it’s recommended to use something like vector<std::int_fast8_t> or vector<unsigned char>. The std::int_fast8_t type is defined in <cstdint>. It is a signed integer type for which the compiler has to use the fastest integer type it has that is at least 8 bits.
deque (the abbreviation for double-ended queue) is almost identical to vector, but is used far less frequently. It is defined in the <deque> header file. The principle differences are as follows:
deque supports true constant-time insertion and removal of elements at both the front and the back (a vector supports amortized constant time at just the back).deque provides push_front(), pop_front(), and emplace_front(), which the vector omits. Since C++17, emplace_front() returns a reference to the inserted element, instead of void.deque does not invalidate iterators when inserting elements at the front or at the back.deque does not expose its memory management scheme via reserve() or capacity().deques are rarely used, as opposed to vectors, so they are not further discussed. Consult a Standard Library Reference for a detailed list of all supported methods.
The Standard Library list class template, defined in the <list> header file, is a standard doubly linked list. It supports constant-time insertion and deletion of elements at any point in the list, but provides slow (linear) time access to individual elements. In fact, the list does not even provide random-access operations like operator[]. Only through iterators can you access individual elements.
Most of the list operations are identical to those of vector, including the constructors, destructor, copying operations, assignment operations, and comparison operations. This section focuses on those methods that differ from those of vector.
The only methods provided by a list to access elements are front() and back(), both of which run in constant time. These methods return a reference to the first and last elements in a list. All other element access must be performed through iterators.
A list supports begin(), returning an iterator referring to the first element in the list, and end(), returning an iterator referring to one past the last element in the list. It also supports cbegin(), cend(), rbegin(), rend(), crbegin(), and crend(), similar to a vector.
A list iterator is bidirectional, not random access like a vector iterator. That means that you cannot add and subtract list iterators from each other, or perform other pointer arithmetic on them. For example, if p is a list iterator, you can traverse through the elements of the list by doing ++p or --p, but you cannot use the addition or subtraction operator; p+n and p-n do not work.
A list supports the same add element and remove element methods as a vector, including push_back(), pop_back(), emplace(), emplace_back(), the five forms of insert(), the two forms of erase(), and clear(). Like a deque, it also provides push_front(), emplace_front(), and pop_front(). All these methods (except for clear()) run in constant time, once you’ve found the correct position. Thus, a list could be appropriate for applications that perform many insertions and deletions from the data structure, but do not need quick index-based element access. And even then, a vector might still be faster. Use a performance profiler to make sure.
Like deques, and unlike vectors, lists do not expose their underlying memory model. Consequently, they support size(), empty(), and resize(), but not reserve() or capacity(). Note that the size() method on a list has constant complexity, which is not the case for the size() method on a forward_list (discussed later).
A list provides several special operations that exploit its quick element insertion and deletion. This section provides an overview and examples. Consult a Standard Library Reference for a thorough reference of all the methods.
The linked-list characteristics of a list allow it to splice, or insert, an entire list at any position in another list in constant time. The simplest version of this method works as follows:
// Store the a words in the main dictionary.list<string> dictionary{ "aardvark", "ambulance" };// Store the b words.list<string> bWords{ "bathos", "balderdash" };// Add the c words to the main dictionary.dictionary.push_back("canticle");dictionary.push_back("consumerism");// Splice the b words into the main dictionary.if (!bWords.empty()) {// Get an iterator to the last b word.auto iterLastB = --(cend(bWords));// Iterate up to the spot where we want to insert b words.auto it = cbegin(dictionary);for (; it != cend(dictionary); ++it) {if (*it > *iterLastB)break;}// Add in the b words. This action removes the elements from bWords.dictionary.splice(it, bWords);}// Print out the dictionary.for (const auto& word : dictionary) {cout << word << endl;}
The result from running this program looks like this:
aardvarkambulancebathosbalderdashcanticleconsumerism
There are also two other forms of splice(): one that inserts a single element from another list, and one that inserts a range from another list. Additionally, all forms of splice() are available with either a normal reference or an rvalue reference to the source list.
In addition to splice(), a list provides special implementations of several of the generic Standard Library algorithms. The generic forms are covered in Chapter 18. Here, only the specific versions provided by list are discussed.
The following table summarizes the algorithms for which list provides special implementations as methods. See Chapter 18 for more details on the algorithms.
| METHOD | DESCRIPTION |
remove()remove_if() |
Removes certain elements from a list. |
unique() |
Removes duplicate consecutive elements from a list, based on operator== or a user-supplied binary predicate. |
merge() |
Merges two lists. Both lists must be sorted to start, according to operator< or a user-defined comparator. Like splice(), merge() is destructive to the list passed as an argument. |
sort() |
Performs a stable sort on elements in a list. |
reverse() |
Reverses the order of the elements in a list. |
Suppose that you are writing a computer registration system for a university. One feature you might provide is the ability to generate a complete list of enrolled students in the university from lists of the students in each class. For the sake of this example, assume that you must write only a single function that takes a vector of lists of student names (as strings), plus a list of students that have been dropped from their courses because they failed to pay tuition. This method should generate a complete list of all the students in all the courses, without any duplicates, and without those students who have been dropped. Note that students might be in more than one course.
Here is the code for this method, with comments explaining the code. With the power of Standard Library lists, the method is practically shorter than its written description! Note that the Standard Library allows you to “nest” containers: in this case, you can use a vector of lists.
// courseStudents is a vector of lists, one for each course. The lists// contain the students enrolled in those courses. They are not sorted.//// droppedStudents is a list of students who failed to pay their// tuition and so were dropped from their courses.//// The function returns a list of every enrolled (non-dropped) student in// all the courses.list<string> getTotalEnrollment(const vector<list<string>>& courseStudents,const list<string>& droppedStudents){list<string> allStudents;// Concatenate all the course lists onto the master listfor (auto& lst : courseStudents) {allStudents.insert(cend(allStudents), cbegin(lst), cend(lst));}// Sort the master listallStudents.sort();// Remove duplicate student names (those who are in multiple courses).allStudents.unique();// Remove students who are on the dropped list.// Iterate through the dropped list, calling remove on the// master list for each student in the dropped list.for (auto& str : droppedStudents) {allStudents.remove(str);}// done!return allStudents;}
A forward_list, defined in the <forward_list> header file, is similar to a list except that it is a singly linked list, while a list is a doubly linked list. This means that forward_list supports only forward iteration and, because of this, ranges need to be specified differently compared to a list. If you want to modify any list, you need access to the element before the first element of interest. Because a forward_list does not have an iterator that supports going backward, there is no easy way to get to the preceding element. For this reason, ranges that will be modified—for example, ranges supplied to erase() and splice()—must be open at the beginning. The begin() function that was discussed earlier returns an iterator to the first element, and thus can only be used to construct a range that is closed at the beginning. The forward_list class therefore defines a before_begin() method, which returns an iterator that points to an imaginary element before the beginning of the list. You cannot dereference this iterator as it points to invalid data. However, incrementing this iterator by one makes it the same as the iterator returned by begin(); as a result, it can be used to make a range that is open at the beginning. The following table sums up the differences between a list and a forward_list. A filled box ( ) means the container supports that operation, while an empty box (
 ) means the operation is not supported.
| OPERATION | LIST | FORWARD_LIST |
assign() |
|
|
back() |
|
|
before_begin() |
|
|
begin() |
|
|
cbefore_begin() |
|
|
cbegin() |
|
|
cend() |
|
|
clear() |
|
|
crbegin() |
|
|
crend() |
|
|
emplace() |
|
|
emplace_after() |
|
|
emplace_back() |
|
|
emplace_front() |
|
|
empty() |
|
|
end() |
|
|
erase() |
|
|
erase_after() |
|
|
front() |
|
|
insert() |
|
|
insert_after() |
|
|
iterator / const_iterator |
|
|
max_size() |
|
|
merge() |
|
|
pop_back() |
|
|
pop_front() |
|
|
push_back() |
|
|
push_front() |
|
|
rbegin() |
|
|
remove() |
|
|
remove_if() |
|
|
rend() |
|
|
resize() |
|
|
reverse() |
|
|
reverse_iterator / const_reverse_iterator |
|
|
size() |
|
|
sort() |
|
|
splice() |
|
|
splice_after() |
|
|
swap() |
|
|
unique() |
|
|
Constructors and assignment operators are similar between a list and a forward_list. The C++ standard states that forward_lists should try to use minimal space. That’s the reason why there is no size() method, because by not providing it, there is no need to store the size of the list. The following example demonstrates the use of forward_lists:
// Create 3 forward lists using an initializer_list// to initialize their elements (uniform initialization).forward_list<int> list1 = { 5, 6 };forward_list<int> list2 = { 1, 2, 3, 4 };forward_list<int> list3 = { 7, 8, 9 };// Insert list2 at the front of list1 using splice.list1.splice_after(list1.before_begin(), list2);// Add number 0 at the beginning of the list1.list1.push_front(0);// Insert list3 at the end of list1.// For this, we first need an iterator to the last element.auto iter = list1.before_begin();auto iterTemp = iter;while (++iterTemp != end(list1)) {++iter;}list1.insert_after(iter, cbegin(list3), cend(list3));// Output the contents of list1.for (auto& i : list1) {cout << i << ' ';}
To insert list3, you need an iterator to the last element in the list. However, because this is a forward_list, you cannot use --end(list1), so you need to iterate over the list from the beginning and stop at the last element. The output of this example is as follows:
0 1 2 3 4 5 6 7 8 9An array, defined in the <array> header file, is similar to a vector except that it is of a fixed size; it cannot grow or shrink in size. The purpose of a fixed size is to allow an array to be allocated on the stack, rather than always demanding heap access as vector does. Just like vectors, arrays support random-access iterators, and elements are stored in contiguous memory. An array has support for front(), back(), at(), and operator[]. It also supports a fill() method to fill the array with a specific element. Because it is fixed in size, it does not support push_back(), pop_back(), insert(), erase(), clear(), resize(), reserve(), or capacity(). A disadvantage compared to a vector is that the swap() method of an array runs in linear time, while it has constant complexity for a vector. An array can also not be moved in constant time, while a vector can. An array has a size() method, which is a clear advantage over C-style arrays. The following example demonstrates how to use the array class. Note that the array declaration requires two template parameters: the first specifies the type of the elements, and the second specifies the fixed number of elements in the array.
// Create an array of 3 integers and initialize them// with the given initializer_list using uniform initialization.array<int, 3> arr = { 9, 8, 7 };// Output the size of the array.cout << "Array size = " << arr.size() << endl; // or std::size(arr);// Output the contents using a range-based for loop.for (const auto& i : arr) {cout << i << endl;}cout << "Performing arr.fill(3)…" << endl;// Use the fill method to change the contents of the array.arr.fill(3);// Output the contents of the array using iterators.for (auto iter = cbegin(arr); iter != cend(arr); ++iter) {cout << *iter << endl;}
The output of the preceding code is as follows:
Array size = 3987Performing arr.fill(3)…333
You can use the std::get<n>() function template to retrieve an element from an std::array at the given index n. The index has to be a constant expression, so it cannot, for example, be a loop variable. The benefit of using std::get<n>() is that the compiler checks at compile time that the given index is valid; otherwise, it results in a compilation error, as in this example:
array<int, 3> myArray{ 11, 22, 33 };cout << std::get<1>(myArray) << endl;cout << std::get<10>(myArray) << endl; // Compilation error!
In addition to the standard sequential containers, the Standard Library provides three container adaptors: queue, priority_queue, and stack. Each of these adaptors is a wrapper around one of the sequential containers. They allow you to swap the underlying container without having to change the rest of the code. The intent of the adaptors is to simplify the interface and to provide only those features that are appropriate for the stack or queue abstraction. For example, the adaptors don’t provide iterators or the capability to insert or erase multiple elements simultaneously.
The queue container adaptor, defined in the header file <queue>, provides standard “first-in, first-out” (FIFO) semantics. As usual, it’s written as a class template, which looks like this:
template <class T, class Container = deque<T>> class queue;The T template parameter specifies the type that you intend to store in the queue. The second template parameter allows you to stipulate the underlying container that the queue adapts. However, the queue requires the sequential container to support both push_back() and pop_front(), so you have only two built-in choices: deque and list. For most purposes, you can just stick with the default deque.
The queue interface is extremely simple: there are only eight methods plus the constructor and the normal comparison operators. The push()and emplace() methods add a new element to the tail of the queue, while pop() removes the element at the head of the queue. You can retrieve references to, without removing, the first and last elements with front() and back(), respectively. As usual, when called on const objects, front() and back() return const references; and when called on non-const objects, they return non-const (read/write) references.
The queue also supports size(), empty(), and swap().
When two computers communicate over a network, they send information to each other divided up into discrete chunks called packets. The networking layer of the computer’s operating system must pick up the packets and store them as they arrive. However, the computer might not have enough bandwidth to process all of them at once. Thus, the networking layer usually buffers, or stores, the packets until the higher layers have a chance to attend to them. The packets should be processed in the order they arrive, so this problem is perfect for a queue structure. The following is a small PacketBuffer class, with comments explaining the code, which stores incoming packets in a queue until they are processed. It’s a class template so that different layers of the networking layer can use it for different kinds of packets, such as IP packets or TCP packets. It allows the client to specify a maximum size because operating systems usually limit the number of packets that can be stored, so as not to use too much memory. When the buffer is full, subsequently arriving packets are ignored.
template <typename T>class PacketBuffer{public:// If maxSize is 0, the size is unlimited, because creating// a buffer of size 0 makes little sense. Otherwise only// maxSize packets are allowed in the buffer at any one time.PacketBuffer(size_t maxSize = 0);virtual ~PacketBuffer() = default;// Stores a packet in the buffer.// Returns false if the packet has been discarded because// there is no more space in the buffer, true otherwise.bool bufferPacket(const T& packet);// Returns the next packet. Throws out_of_range// if the buffer is empty.T getNextPacket();private:std::queue<T> mPackets;size_t mMaxSize;};template <typename T> PacketBuffer<T>::PacketBuffer(size_t maxSize/*= 0*/): mMaxSize(maxSize){}template <typename T> bool PacketBuffer<T>::bufferPacket(const T& packet){if (mMaxSize > 0 && mPackets.size() == mMaxSize) {// No more space. Drop the packet.return false;}mPackets.push(packet);return true;}template <typename T> T PacketBuffer<T>::getNextPacket(){if (mPackets.empty()) {throw std::out_of_range("Buffer is empty");}// Retrieve the head elementT temp = mPackets.front();// Pop the head elementmPackets.pop();// Return the head elementreturn temp;}
A practical application of this class would require multiple threads. C++ provides synchronization classes to allow thread-safe access to shared objects. Without explicit synchronization, no Standard Library object can be used safely from multiple threads when at least one of the threads modifies the object. Synchronization is discussed in Chapter 23. The focus in this example is on the queue class, so here is a single-threaded example of using the PacketBuffer:
class IPPacket final{public:IPPacket(int id) : mID(id) {}int getID() const { return mID; }private:int mID;};int main(){PacketBuffer<IPPacket> ipPackets(3);// Add 4 packetsfor (int i = 1; i <= 4; ++i) {if (!ipPackets.bufferPacket(IPPacket(i))) {cout << "Packet " << i << " dropped (queue is full)." << endl;}}while (true) {try {IPPacket packet = ipPackets.getNextPacket();cout << "Processing packet " << packet.getID() << endl;} catch (const out_of_range&) {cout << "Queue is empty." << endl;break;}}return 0;}
The output of this program is as follows:
Packet 4 dropped (queue is full).Processing packet 1Processing packet 2Processing packet 3Queue is empty.
A priority queue is a queue that keeps its elements in sorted order. Instead of a strict FIFO ordering, the element at the head of the queue at any given time is the one with the highest priority. This element could be the oldest on the queue or the most recent. If two elements have equal priority, their relative order in the queue is undefined.
The priority_queue container adaptor is also defined in <queue>. Its template definition looks something like this (slightly simplified):
template <class T, class Container = vector<T>,class Compare = less<T>>;
It’s not as complicated as it looks. You’ve seen the first two parameters before: T is the element type stored in the priority_queue and Container is the underlying container on which the priority_queue is adapted. The priority_queue uses vector as the default, but deque works as well. list does not work because the priority_queue requires random access to its elements. The third parameter, Compare, is trickier. As you’ll learn more about in Chapter 18, less is a class template that supports comparison of two objects of type T with operator<. What this means for you is that the priority of elements in a priority_queue is determined according to operator<. You can customize the comparison used, but that’s a topic for Chapter 18. For now, just make sure that you define operator< appropriately for the types stored in a priority_queue.
A priority_queue provides even fewer operations than does a queue. The push() and emplace() methods allow you to insert elements, pop() allows you to remove elements, and top() returns a const reference to the head element.
Like a queue, a priority_queue supports size(), empty(), and swap(). However, it does not provide any comparison operators.
Single failures on a system can often cause multiple errors to be generated from different components. A good error-handling system uses error correlation to process the most important errors first. You can use a priority_queue to write a very simple error correlator. Assume all error events encode their own priority. The error correlator simply sorts error events according to their priority, so that the highest-priority errors are always processed first. Here is the class definition:
// Sample Error class with just a priority and a string error description.class Error final{public:Error(int priority, std::string_view errorString): mPriority(priority), mErrorString(errorString) {}int getPriority() const { return mPriority; }std::string_view getErrorString() const { return mErrorString; }private:int mPriority;std::string mErrorString;};bool operator<(const Error& lhs, const Error& rhs);std::ostream& operator<<(std::ostream& os, const Error& err);// Simple ErrorCorrelator class that returns highest priority errors first.class ErrorCorrelator final{public:// Add an error to be correlated.void addError(const Error& error);// Retrieve the next error to be processed.Error getError();private:std::priority_queue<Error> mErrors;};
Here are the definitions of the functions and methods:
bool operator<(const Error& lhs, const Error& rhs){return (lhs.getPriority() < rhs.getPriority());}ostream& operator<<(ostream& os, const Error& err){os << err.getErrorString() << " (priority " << err.getPriority() << ")";return os;}void ErrorCorrelator::addError(const Error& error){mErrors.push(error);}Error ErrorCorrelator::getError(){// If there are no more errors, throw an exception.if (mErrors.empty()) {throw out_of_range("No more errors.");}// Save the top element.Error top = mErrors.top();// Remove the top element.mErrors.pop();// Return the saved element.return top;}
Here is a simple unit test showing how to use the ErrorCorrelator. Realistic use would require multiple threads so that one thread adds errors, while another processes them. As mentioned earlier with the queue example, this requires explicit synchronization, which is only discussed in Chapter 23.
ErrorCorrelator ec;ec.addError(Error(3, "Unable to read file"));ec.addError(Error(1, "Incorrect entry from user"));ec.addError(Error(10, "Unable to allocate memory!"));while (true) {try {Error e = ec.getError();cout << e << endl;} catch (const out_of_range&) {cout << "Finished processing errors" << endl;break;}}
The output of this program is as follows:
Unable to allocate memory! (priority 10)Unable to read file (priority 3)Incorrect entry from user (priority 1)Finished processing errors
A stack is almost identical to a queue, except that it provides first-in, last-out (FILO) semantics, also known as last-in, first-out (LIFO), instead of FIFO. It is defined in the <stack> header file. The template definition looks like this:
template <class T, class Container = deque<T>> class stack;You can use vector, list, or deque as the underlying container for the stack.
Like the queue, the stack provides push(), emplace(), and pop(). The difference is that push() adds a new element to the top of the stack, “pushing down” all elements inserted earlier, and pop() removes the element from the top of the stack, which is the most recently inserted element. The top() method returns a const reference to the top element if called on a const object, and a non-const reference if called on a non-const object.
The stack supports empty(), size(), swap(), and the standard comparison operators.
You can rewrite the previous ErrorCorrelator class so that it gives out the most recent error instead of the one with the highest priority. The only change required is to change mErrors from a priority_queue to a stack. With this change, the errors are distributed in LIFO order instead of priority order. Nothing in the method definitions needs to change because the push(), pop(), top(), and empty() methods exist on both a priority_queue and a stack.
Unlike the sequential containers, the ordered associative containers do not store elements in a linear configuration. Instead, they provide a mapping of keys to values. They generally offer insertion, deletion, and lookup times that are equivalent to each other.
There are four ordered associative containers provided by the Standard Library: map, multimap, set, and multiset. Each of these containers stores its elements in a sorted, tree-like data structure. There are also four unordered associative containers: unordered_map, unordered_multimap, unordered_set, and unordered_multiset. These are discussed later in this chapter.
Before learning about the ordered associative containers, you must become familiar with the pair class, which is defined in the <utility> header file. pair is a class template that groups together two values of possibly different types. The values are accessible through the first and second public data members. operator== and operator< are defined for pairs to compare both the first and second elements. Here are some examples:
// Two-argument constructor and default constructorpair<string, int> myPair("hello", 5);pair<string, int> myOtherPair;// Can assign directly to first and secondmyOtherPair.first = "hello";myOtherPair.second = 6;// Copy constructorpair<string, int> myThirdPair(myOtherPair);// operator<if (myPair < myOtherPair) {cout << "myPair is less than myOtherPair" << endl;} else {cout << "myPair is greater than or equal to myOtherPair" << endl;}// operator==if (myOtherPair == myThirdPair) {cout << "myOtherPair is equal to myThirdPair" << endl;} else {cout << "myOtherPair is not equal to myThirdPair" << endl;}
The output is as follows:
myPair is less than myOtherPairmyOtherPair is equal to myThirdPair
The library also provides a utility function template, make_pair(), that constructs a pair from two values, as in this example:
pair<int, double> aPair = make_pair(5, 10.10);Of course, in this case you could have just used the two-argument constructor. However, make_pair() is more useful when you want to pass a pair to a function, or assign it to a pre-existing variable. Unlike class templates, function templates can infer types from parameters, so you can use make_pair() to construct a pair without explicitly specifying the types. You can also use make_pair() in combination with the auto keyword as follows:
auto aSecondPair = make_pair(5, 10.10); C++17 introduces template parameter deduction for constructors, as discussed in Chapter 12. This allows you to forget about make_pair(), and simply write the following:
auto aThirdPair = pair(5, 10.10); Structured bindings is another C++17 feature introduced in Chapter 1. It can be used to decompose the elements of a pair into separate variables. Here’s an example:
pair<string, int> myPair("hello", 5);auto[theString, theInt] = myPair; // Decompose using structured bindingscout << "theString: " << theString << endl;cout << "theInt: " << theInt << endl;
A map, defined in the <map> header file, stores key/value pairs instead of just single values. Insertion, lookup, and deletion are all based on the key; the value is just “along for the ride.” The term map comes from the conceptual understanding that the container “maps” keys to values.
A map keeps elements in sorted order, based on the keys, so that insertion, deletion, and lookup all take logarithmic time. Because of the order, when you enumerate the elements, they come out in the ordering imposed by the type’s operator< or a user-defined comparator. It is usually implemented as some form of balanced tree, such as a red-black tree. However, the tree structure is not exposed to the client.
You should use a map whenever you need to store and retrieve elements based on a “key” and you would like to have them in a certain order.
The map class template takes four types: the key type, the value type, the comparison type, and the allocator type. As always, the allocator is ignored in this chapter. The comparison type is similar to the comparison type for a priority_queue described earlier. It allows you to specify a different comparison class than the default. In this chapter, only the default less comparison is used. When using the default, make sure that your keys all respond to operator< appropriately. If you’re interested in further detail, Chapter 18 explains how to write your own comparison classes.
If you ignore the comparison and allocator parameters, constructing a map is just like constructing a vector or a list, except that you specify the key and value types separately in the template instantiation. For example, the following code constructs a map that uses ints as the key and stores objects of the Data class:
class Data final{public:explicit Data(int value = 0) : mValue(value) { }int getValue() const { return mValue; }void setValue(int value) { mValue = value; }private:int mValue;};…map<int, Data> dataMap;
A map also supports uniform initialization:
map<string, int> m = {{ "Marc G.", 123 },{ "Warren B.", 456 },{ "Peter V.W.", 789 }};
Inserting an element into sequential containers such as vector and list always requires you to specify the position at which the element is to be added. A map, along with the other ordered associative containers, is different. The map’s internal implementation determines the position in which to store the new element; you need only to supply the key and the value.
When inserting elements, it is important to keep in mind that maps require unique keys: every element in the map must have a different key. If you want to support multiple elements with the same key, you have two options: you can either use a map and store another container such as a vector or an array as the value for a key, or you can use multimaps, described later.
The insert() method can be used to add elements to a map, and has the advantage of allowing you to detect if a key already exists. You must specify the key/value pair as a pair object or as an initializer_list. The return type of the basic form of insert() is a pair of an iterator and a bool. The reason for the complicated return type is that insert() does not overwrite an element value if one already exists with the specified key. The bool element of the returned pair specifies whether or not the insert() actually inserted the new key/value pair. The iterator refers to the element in the map with the specified key (with a new or old value, depending on whether the insert succeeded or failed). map iterators are discussed in more detail in the next section. Continuing the map example from the previous section, you can use insert() as follows:
map<int, Data> dataMap;auto ret = dataMap.insert({ 1, Data(4) }); // Using an initializer_listif (ret.second) {cout << "Insert succeeded!" << endl;} else {cout << "Insert failed!" << endl;}ret = dataMap.insert(make_pair(1, Data(6))); // Using a pair objectif (ret.second) {cout << "Insert succeeded!" << endl;} else {cout << "Insert failed!" << endl;}
The type of the ret variable is a pair as follows:
pair<map<int, Data>::iterator, bool> ret;The first element of the pair is a map iterator for a map with keys of type int and values of type Data. The second element of the pair is a Boolean value.
The output of the program is as follows:
Insert succeeded!Insert failed!
With initializers for if statements (C++17), inserting the data into the map and checking the result can be done with a single statement as follows:
if (auto result = dataMap.insert({ 1, Data(4) }); result.second) {cout << "Insert succeeded!" << endl;} else {cout << "Insert failed!" << endl;}
This can even be combined with C++17 structured bindings:
if (auto [iter, success] = dataMap.insert({ 1, Data(4) }); success) {cout << "Insert succeeded!" << endl;} else {cout << "Insert failed!" << endl;}
The insert_or_assign() Methodinsert_or_assign() has a similar return type as insert(). However, if an element with the given key already exists, insert_or_assign() overwrites the old value with the new value, while insert() does not overwrite the old value in that case. Another difference with insert() is that insert_or_assign() has two separate parameters: the key and the value. Here is an example:
ret = dataMap.insert_or_assign(1, Data(7));if (ret.second) {cout << "Inserted." << endl;} else {cout << "Overwritten." << endl;}
Another method to insert elements into a map is through the overloaded operator[]. The difference is mainly in the syntax: you specify the key and value separately. Additionally, operator[] always succeeds. If no element value with the given key exists, it creates a new element with that key and value. If an element with the key already exists, operator[] replaces the element value with the newly specified value. Here is part of the previous example using operator[] instead of insert():
map<int, Data> dataMap;dataMap[1] = Data(4);dataMap[1] = Data(6); // Replaces the element with key 1
There is, however, one major caveat to operator[]: it always constructs a new value object, even if it doesn’t need to use it. Thus, it requires a default constructor for your element values, and can be less efficient than insert().
The fact that operator[] creates a new element in a map if the requested element does not already exist means that this operator is not marked as const. This sounds obvious, but might sometimes look counterintuitive. For example, suppose you have the following function:
void func(const map<int, int>& m){cout << m[1] << endl; // Error}
This fails to compile, even though you appear to be just reading the value m[1]. It fails because the variable m is a const reference to a map, and operator[] is not marked as const. Instead, you should use the find() method described in the section “Looking Up Elements.”
A map supports emplace() and emplace_hint() to construct elements in-place, similar to the emplace methods of a vector. C++17 adds a try_emplace() method that inserts an element in-place if the given key does not exist yet, or does nothing if the key already exists in the map.
map iterators work similarly to the iterators on the sequential containers. The major difference is that the iterators refer to key/value pairs instead of just the values. In order to access the value, you must retrieve the second field of the pair object. map iterators are bidirectional, meaning you can traverse them in both directions. Here is how you can iterate through the map from the previous example:
for (auto iter = cbegin(dataMap); iter != cend(dataMap); ++iter) {cout << iter->second.getValue() << endl;}
Take another look at the expression used to access the value:
iter->second.getValue()iter refers to a key/value pair, so you can use the -> operator to access the second field of that pair, which is a Data object. You can then call the getValue() method on that Data object.
Note that the following code is functionally equivalent:
(*iter).second.getValue()Using a range-based for loop, the loop can be written more readable as follows:
for (const auto& p : dataMap) {cout << p.second.getValue() << endl;}
It can be implemented even more elegantly using a combination of a range-based for loop and C++17 structured bindings:
for (const auto& [key, data] : dataMap) {cout << data.getValue() << endl;}
A map provides logarithmic lookup of elements based on a supplied key. If you already know that an element with a given key is in a map, the simplest way to look it up is through operator[] as long as you call it on a non-const
map or a non-const reference to a map. The nice thing about operator[] is that it returns a reference to the element that you can use and modify directly, without worrying about pulling the value out of a pair object. Here is an extension to the preceding example to call the setValue() method on the Data object value at key 1:
map<int, Data> dataMap;dataMap[1] = Data(4);dataMap[1] = Data(6);dataMap[1].setValue(100);
However, if you don’t know whether the element exists, you may not want to use operator[], because it will insert a new element with that key if it doesn’t find one already. As an alternative, map provides a find() method that returns an iterator referring to the element with the specified key, if it exists, or the end() iterator if it’s not in the map. Here is an example using find() to perform the same modification to the Data object with key 1:
auto it = dataMap.find(1);if (it != end(dataMap)) {it->second.setValue(100);}
As you can see, using find() is a bit clumsier, but it’s sometimes necessary.
If you only want to know whether or not an element with a certain key is in a map, you can use the count() method. It returns the number of elements in a map with a given key. For maps, the result will always be 0 or 1 because there can be no elements with duplicate keys.
A map allows you to remove an element at a specific iterator position or to remove all elements in a given iterator range, in amortized constant and logarithmic time, respectively. From the client perspective, these two erase() methods are equivalent to those in the sequential containers. A great feature of a map, however, is that it also provides a version of erase() to remove an element matching a key. Here is an example:
map<int, Data> dataMap;dataMap[1] = Data(4);cout << "There are " << dataMap.count(1) << " elements with key 1" << endl;dataMap.erase(1);cout << "There are " << dataMap.count(1) << " elements with key 1" << endl;
The output is as follows:
There are 1 elements with key 1There are 0 elements with key 1
NodesAll the ordered and unordered associative containers are so-called node-based data structures. Starting with C++17, the Standard Library provides direct access to nodes in the form of node handles. The exact type is unspecified, but each container has a type alias called node_type that specifies the type of a node handle for that container. A node handle can only be moved, and is the owner of the element stored in a node. It provides read/write access to both the key and the value.
Nodes can be extracted from an associative container as a node handle using the extract() method, based either on a given iterator position or on a given key. Extracting a node from a container removes it from the container, because the returned node handle is the sole owner of the extracted element.
New insert() overloads are provided that allow you to insert a node handle into a container.
Using extract() to extract node handles, and insert() to insert node handles, you can effectively transfer data from one associative container to another one without any copying or moving involved. You can even move nodes from a map to a multimap, and from a set to a multiset. Continuing with the example from the previous section, the following code snippet transfers the node with key 1 to a second map:
map<int, Data> dataMap2;auto extractedNode = dataMap.extract(1);dataMap2.insert(std::move(extractedNode));
The last two lines can be combined into one:
dataMap2.insert(dataMap.extract(1));One additional operation is available to move all nodes from one associative container to another one: merge(). Nodes that cannot be moved because they would cause, for example, duplicates in a target container that does not allow duplicates, are left in the source container. Here is an example:
map<int, int> src = { {1, 11}, {2, 22} };map<int, int> dst = { {2, 22}, {3, 33}, {4, 44}, {5, 55} };dst.merge(src);
After the merge operation, src still contains one element, {2, 22}, because the destination already contains such an element, so it cannot be moved. dst contains {1, 11}, {2, 22}, {3, 33}, {4, 44}, and {5, 55} after the operation.
You can implement a simple bank account database using a map. A common pattern is for the key to be one field of a class or struct that is stored in a map. In this case, the key is the account number. Here are simple BankAccount and BankDB classes:
class BankAccount final{public:BankAccount(int acctNum, std::string_view name): mAcctNum(acctNum), mClientName(name) {}void setAcctNum(int acctNum) { mAcctNum = acctNum; }int getAcctNum() const { return mAcctNum; }void setClientName(std::string_view name) { mClientName = name; }std::string_view getClientName() const { return mClientName; }private:int mAcctNum;std::string mClientName;};class BankDB final{public:// Adds account to the bank database. If an account exists already// with that number, the new account is not added. Returns true// if the account is added, false if it's not.bool addAccount(const BankAccount& account);// Removes the account acctNum from the database.void deleteAccount(int acctNum);// Returns a reference to the account represented// by its number or the client name.// Throws out_of_range if the account is not found.BankAccount& findAccount(int acctNum);BankAccount& findAccount(std::string_view name);// Adds all the accounts from db to this database.// Deletes all the accounts from db.void mergeDatabase(BankDB& db);private:std::map<int, BankAccount> mAccounts;};
Here are the implementations of the BankDB methods, with comments explaining the code:
bool BankDB::addAccount(const BankAccount& acct){// Do the actual insert, using the account number as the keyauto res = mAccounts.emplace(acct.getAcctNum(), acct);// or: auto res = mAccounts.insert(make_pair(acct.getAcctNum(), acct));// Return the bool field of the pair specifying success or failurereturn res.second;}void BankDB::deleteAccount(int acctNum){mAccounts.erase(acctNum);}BankAccount& BankDB::findAccount(int acctNum){// Finding an element via its key can be done with find()auto it = mAccounts.find(acctNum);if (it == end(mAccounts)) {throw out_of_range("No account with that number.");}// Remember that iterators into maps refer to pairs of key/valuereturn it->second;}BankAccount& BankDB::findAccount(string_view name){// Finding an element by a non-key attribute requires a linear// search through the elements. Uses C++17 structured bindings.for (auto& [acctNum, account] : mAccounts) {if (account.getClientName() == name) {return account; // found it!}}// If your compiler doesn't support the above C++17 structured// bindings yet, you can use the following implementation//for (auto& p : mAccounts) {// if (p.second.getClientName() == name) { return p.second; }//}throw out_of_range("No account with that name.");}void BankDB::mergeDatabase(BankDB& db){// Use C++17 merge().mAccounts.merge(db.mAccounts);// Or: mAccounts.insert(begin(db.mAccounts), end(db.mAccounts));// Now clear the source database.db.mAccounts.clear();}
You can test the BankDB class with the following code:
BankDB db;db.addAccount(BankAccount(100, "Nicholas Solter"));db.addAccount(BankAccount(200, "Scott Kleper"));try {auto& acct = db.findAccount(100);cout << "Found account 100" << endl;acct.setClientName("Nicholas A Solter");auto& acct2 = db.findAccount("Scott Kleper");cout << "Found account of Scott Kleper" << endl;auto& acct3 = db.findAccount(1000);} catch (const out_of_range& caughtException) {cout << "Unable to find account: " << caughtException.what() << endl;}
The output is as follows:
Found account 100Found account of Scott KleperUnable to find account: No account with that number.
A multimap is a map that allows multiple elements with the same key. Like maps, multimaps support uniform initialization. The interface is almost identical to the map interface, with the following differences:
multimaps do not provide operator[] and at(). The semantics of these do not make sense if there can be multiple elements with a single key.multimaps always succeed. Thus, the multimap::insert() method that adds a single element returns just an iterator instead of a pair.insert_or_assign() and try_emplace() methods supported by map are not supported by a multimap.The trickiest aspect of multimaps is looking up elements. You can’t use operator[], because it is not provided. find() isn’t very useful because it returns an iterator referring to any one of the elements with a given key (not necessarily the first element with that key).
However, multimaps store all elements with the same key together and provide methods to obtain iterators for this subrange of elements with the same key in the container. The lower_bound() and upper_bound() methods each return a single iterator referring to the first and one-past-the-last elements matching a given key. If there are no elements matching that key, the iterators returned by lower_bound() and upper_bound() will be equal to each other.
If you need to obtain both iterators bounding the elements with a given key, it’s more efficient to use equal_range() instead of calling lower_bound() followed by calling upper_bound(). The equal_range() method returns a pair of the two iterators that would be returned by lower_bound() and upper_bound().
Most of the numerous online chat programs allow users to have a “buddy list” or list of friends. The chat program confers special privileges on users in the buddy list, such as allowing them to send unsolicited messages to the user.
One way to implement the buddy lists for an online chat program is to store the information in a multimap. One multimap could store the buddy lists for every user. Each entry in the container stores one buddy for a user. The key is the user and the value is the buddy. For example, if Harry Potter and Ron Weasley had each other on their individual buddy lists, there would be two entries of the form “Harry Potter” maps to “Ron Weasley” and “Ron Weasley” maps to “Harry Potter.” A multimap allows multiple values for the same key, so the same user is allowed multiple buddies. Here is the BuddyList class definition:
class BuddyList final{public:// Adds buddy as a friend of name.void addBuddy(const std::string& name, const std::string& buddy);// Removes buddy as a friend of namevoid removeBuddy(const std::string& name, const std::string& buddy);// Returns true if buddy is a friend of name, false otherwise.bool isBuddy(const std::string& name, const std::string& buddy) const;// Retrieves a list of all the friends of name.std::vector<std::string> getBuddies(const std::string& name) const;private:std::multimap<std::string, std::string> mBuddies;};
Here is the implementation, with comments explaining the code. It demonstrates the use of lower_bound(), upper_bound(), and equal_range():
void BuddyList::addBuddy(const string& name, const string& buddy){// Make sure this buddy isn't already there. We don't want// to insert an identical copy of the key/value pair.if (!isBuddy(name, buddy)) {mBuddies.insert({ name, buddy }); // Using initializer_list}}void BuddyList::removeBuddy(const string& name, const string& buddy){// Obtain the beginning and end of the range of elements with// key 'name'. Use both lower_bound() and upper_bound() to demonstrate// their use. Otherwise, it's more efficient to call equal_range().auto begin = mBuddies.lower_bound(name); // Start of the rangeauto end = mBuddies.upper_bound(name); // End of the range// Iterate through the elements with key 'name' looking// for a value 'buddy'. If there are no elements with key 'name',// begin equals end, so the loop body doesn't execute.for (auto iter = begin; iter != end; ++iter) {if (iter->second == buddy) {// We found a match! Remove it from the map.mBuddies.erase(iter);break;}}}bool BuddyList::isBuddy(const string& name, const string& buddy) const{// Obtain the beginning and end of the range of elements with// key 'name' using equal_range(), and C++17 structured bindings.auto [begin, end] = mBuddies.equal_range(name);// Iterate through the elements with key 'name' looking// for a value 'buddy'.for (auto iter = begin; iter != end; ++iter) {if (iter->second == buddy) {// We found a match!return true;}}// No matchesreturn false;}vector<string> BuddyList::getBuddies(const string& name) const{// Obtain the beginning and end of the range of elements with// key 'name' using equal_range(), and C++17 structured bindings.auto [begin, end] = mBuddies.equal_range(name);// Create a vector with all names in the range (all buddies of name).vector<string> buddies;for (auto iter = begin; iter != end; ++iter) {buddies.push_back(iter->second);}return buddies;}
This implementation uses C++17 structured bindings, as in this example:
auto [begin, end] = mBuddies.equal_range(name);If your compiler doesn’t support structured bindings yet, then you can write the following:
auto range = mBuddies.equal_range(name);auto begin = range.first; // Start of the rangeauto end = range.second; // End of the range
Note that removeBuddy() can’t simply use the version of erase() that erases all elements with a given key, because it should erase only one element with the key, not all of them. Note also that getBuddies() can’t use insert() on the vector to insert the elements in the range returned by equal_range(), because the elements referred to by the multimap iterators are key/value pairs, not strings. The getBuddies() method must iterate explicitly through the range extracting the string from each key/value pair and pushing it onto the new vector to be returned.
Here is a test of the BuddyList:
BuddyList buddies;buddies.addBuddy("Harry Potter", "Ron Weasley");buddies.addBuddy("Harry Potter", "Hermione Granger");buddies.addBuddy("Harry Potter", "Hagrid");buddies.addBuddy("Harry Potter", "Draco Malfoy");// That's not right! Remove Draco.buddies.removeBuddy("Harry Potter", "Draco Malfoy");buddies.addBuddy("Hagrid", "Harry Potter");buddies.addBuddy("Hagrid", "Ron Weasley");buddies.addBuddy("Hagrid", "Hermione Granger");auto harrysFriends = buddies.getBuddies("Harry Potter");cout << "Harry's friends: " << endl;for (const auto& name : harrysFriends) {cout << "\t" << name << endl;}
The output is as follows:
Harry's friends:Ron WeasleyHermione GrangerHagrid
A set, defined in <set>, is very similar to a map. The difference is that instead of storing key/value pairs, in sets the key is the value. sets are useful for storing information in which there is no explicit key, but which you want to have in sorted order without any duplicates, with quick insertion, lookup, and deletion.
The interface supplied by set is almost identical to that of map. The main difference is that set doesn’t provide operator[], insert_or_assign(), and try_emplace().
You cannot change the key/value of elements in a set because modifying elements of a set while they are in the container would destroy the order.
One way to implement basic security on a computer system is through access control lists. Each entity on the system, such as a file or a device, has a list of users with permissions to access that entity. Users can generally be added to and removed from the permissions list for an entity only by users with special privileges. Internally, a set provides a nice way to represent the access control list. You could use one set for each entity, containing all the usernames who are allowed to access the entity. Here is a class definition for a simple access control list:
class AccessList final{public:// Default constructorAccessList() = default;// Constructor to support uniform initialization.AccessList(std::initializer_list<std::string_view> initlist);// Adds the user to the permissions list.void addUser(std::string_view user);// Removes the user from the permissions list.void removeUser(std::string_view user);// Returns true if the user is in the permissions list.bool isAllowed(std::string_view user) const;// Returns a vector of all the users who have permissions.std::vector<std::string> getAllUsers() const;private:std::set<std::string> mAllowed;};
Here are the method definitions:
AccessList::AccessList(initializer_list<string_view> initlist){mAllowed.insert(begin(initlist), end(initlist));}void AccessList::addUser(string_view user){mAllowed.emplace(user);}void AccessList::removeUser(string_view user){mAllowed.erase(string(user));}bool AccessList::isAllowed(string_view user) const{return (mAllowed.count(string(user)) != 0);}vector<string> AccessList::getAllUsers() const{return { begin(mAllowed), end(mAllowed) };}
Take a look at the interesting one-line implementation of getAllUsers(). That one line constructs a vector<string> to return, by passing a begin and end iterator of mAllowed to the vector constructor. If you want, you can split this over two lines:
vector<string> users(begin(mAllowed), end(mAllowed));return users;
Finally, here is a simple test program:
AccessList fileX = { "pvw", "mgregoire", "baduser" };fileX.removeUser("baduser");if (fileX.isAllowed("mgregoire")) {cout << "mgregoire has permissions" << endl;}if (fileX.isAllowed("baduser")) {cout << "baduser has permissions" << endl;}auto users = fileX.getAllUsers();for (const auto& user : users) {cout << user << " ";}
One of the constructors for AccessList uses an initializer_list as a parameter, so that you can use the uniform initialization syntax, as demonstrated in the test program for initializing fileX.
The output of this program is as follows:
mgregoire has permissionsmgregoire pvw
A multiset is to a set what a multimap is to a map. A multiset supports all the operations of a set, but it allows multiple elements that are equal to each other to be stored in the container simultaneously. An example of a multiset is not shown because it’s so similar to set and multimap.
The Standard Library has support for unordered associative containers or hash tables. There are four of them: unordered_map, unordered_multimap, unordered_set, and unordered_multiset. The map, multimap, set, and multiset containers discussed earlier sort their elements, while these unordered variants do not sort their elements.
The unordered associative containers are also called hash tables. That is because the implementation makes use of so-called hash functions. The implementation usually consists of some kind of array where each element in the array is called a bucket. Each bucket has a specific numerical index like 0, 1, 2, up until the last bucket. A hash function transforms a key into a hash value, which is then transformed into a bucket index. The value associated with that key is then stored in that bucket.
The result of a hash function is not always unique. The situation in which two or more keys hash to the same bucket index is called a collision. A collision can occur when different keys result in the same hash value, or when different hash values transform to the same bucket index. There are many approaches to handling collisions, including quadratic re-hashing and linear chaining, among others. If you are interested, you can consult one of the references in the Algorithms and Data Structures section in Appendix B. The Standard Library does not specify which collision-handling algorithm is required, but most current implementations have chosen to resolve collisions by linear chaining. With linear chaining, buckets do not directly contain the data values associated with the keys, but contain a pointer to a linked list. This linked list contains all the data values for that specific bucket. Figure 17-1 shows how this works.
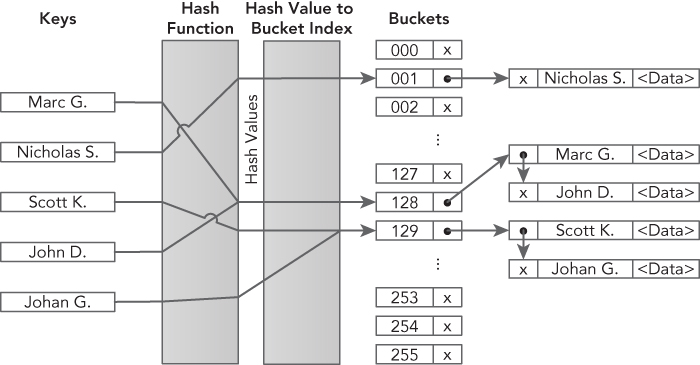
In Figure 17-1, there are two collisions. The first collision is because applying the hash function to the keys “Marc G.” and “John D.” results in the same hash value which maps to bucket index 128. This bucket then points to a linked list containing the keys “Marc G.” and “John D.” together with their associated data values. The second collision is caused by the hash values for “Scott K.” and “Johan G.” mapping to the same bucket index 129.
From Figure 17-1, it is also clear how lookups based on keys work and what the complexity is. A lookup involves a single hash function call to calculate the hash value. This hash value is then transformed to a bucket index. Once the bucket index is known, one or more equality operations are required to find the right key in the linked list. This shows that lookups can be much faster compared to lookups with normal maps, but it all depends on how many collisions there are.
The choice of the hash function is very important. A hash function that creates no collisions is known as a “perfect hash.” A perfect hash has a lookup time that is constant; a regular hash has a lookup time that is, on average, close to 1, independent of the number of elements. As the number of collisions increases, the lookup time increases, reducing performance. Collisions can be reduced by increasing the basic hash table size, but you need to take cache sizes into account.
The C++ standard provides hash functions for pointers and all primitive data types such as bool, char, int, float, double, and so on. Hash functions are also provided for error_code, error_condition, optional, variant, bitset, unique_ptr, shared_ptr, type_index, string, string_view, vector<bool>, and thread::id. If there is no standard hash function available for the type of keys you want to use, then you have to implement your own hash function. Creating a perfect hash is a nontrivial exercise, even when the set of keys is fixed and known. It requires deep mathematical analysis. However, even creating a non-perfect one, but one which is good enough and has decent performance, is still challenging. It’s outside the scope of this book to explain the mathematics behind hash functions in detail. Instead, only an example of a very simple hash function is given.
The following code demonstrates how to write a custom hash function. This implementation simply forwards the request to one of the available standard hash functions. The code defines a class IntWrapper that just wraps a single integer. An operator== is provided because that’s a requirement for keys used in unordered associative containers.
class IntWrapper{public:IntWrapper(int i) : mWrappedInt(i) {}int getValue() const { return mWrappedInt; }private:int mWrappedInt;};bool operator==(const IntWrapper& lhs, const IntWrapper& rhs){return lhs.getValue() == rhs.getValue();}
To write a hash function for IntWrapper, you write a specialization of the std::hash template for IntWrapper. The std::hash template is defined in <functional>. This specialization needs an implementation of the function call operator that calculates and returns the hash of a given IntWrapper instance. For this example, the request is simply forwarded to the standard hash function for integers:
namespace std{template<> struct hash<IntWrapper>{using argument_type = IntWrapper;using result_type = size_t;result_type operator()(const argument_type& f) const {return std::hash<int>()(f.getValue());}};}
Note that you normally are not allowed to put anything in the std namespace; however, std class template specializations are an exception to this rule. The two type definitions are required by the hash class template. The implementation of the function call operator is just one line. It creates an instance of the standard hash function for integers—std::hash<int>()—and then calls the function call operator on it with, as argument, f.getValue(). Note that this forwarding works in this example because IntWrapper contains just one data member, an integer. If the class contained multiple data members, then a hash value would need to be calculated taking all these data members into account; however, those details fall outside the scope of this book.
The unordered_map container is defined in <unordered_map> as a class template:
template <class Key,class T,class Hash = hash<Key>,class Pred = std::equal_to<Key>,class Alloc = std::allocator<std::pair<const Key, T>>>class unordered_map;
There are five template parameters: the key type, the value type, the hash type, the equal comparison type, and the allocator type. With the last three parameters you can specify your own hash function, equal comparison function, and allocator function, respectively. These parameters can usually be ignored because they have default values. I recommend you keep those default values when possible. The most important parameters are the first two. As with maps, uniform initialization can be used to initialize an unordered_map, as shown in the following example:
unordered_map<int, string> m = {{1, "Item 1"},{2, "Item 2"},{3, "Item 3"},{4, "Item 4"}};// Using C++17 structured bindings.for (const auto&[key, value] : m) {cout << key << " = " << value << endl;}// Without structured bindings.for (const auto& p : m) {cout << p.first << " = " << p.second << endl;}
The following table summarizes the differences between a map and an unordered_map. A filled box () means the container supports that operation, while an empty box () means the operation is not supported.
| OPERATION | <char:InlineCodeUserInput>map</char:InlineCodeUserInput> | <char:InlineCodeUserInput>unordered_map</char:InlineCodeUserInput> |
at() |
|
|
begin() |
|
|
begin(n) |
|
|
bucket() |
|
|
bucket_count() |
|
|
bucket_size() |
|
|
cbegin() |
|
|
cbegin(n) |
|
|
cend() |
|
|
cend(n) |
|
|
clear() |
|
|
count() |
|
|
crbegin() |
|
|
crend() |
|
|
emplace() |
|
|
emplace_hint() |
|
|
empty() |
|
|
end() |
|
|
end(n) |
|
|
equal_range() |
|
|
erase() |
|
|
extract() |
|
|
find() |
|
|
insert() |
|
|
insert_or_assign() |
|
|
iterator / const_iterator |
|
|
load_factor() |
|
|
local_iterator / const_local_iterator |
|
|
lower_bound() |
|
|
max_bucket_count() |
|
|
max_load_factor() |
|
|
max_size() |
|
|
merge() |
|
|
operator[] |
|
|
rbegin() |
|
|
rehash() |
|
|
rend() |
|
|
reserve() |
|
|
reverse_iterator / const_reverse_iterator |
|
|
size() |
|
|
swap() |
|
|
try_emplace() |
|
|
upper_bound() |
|
|
As with a normal map, all keys in an unordered_map should be unique. The preceding table includes a number of hash-specific methods. For example, load_factor() returns the average number of elements per bucket to give you an indication of the number of collisions. The bucket_count() method returns the number of buckets in the container. It also provides a local_iterator and const_local_iterator, allowing you to iterate over the elements in a single bucket; however, these may not be used to iterate across buckets. The bucket(key) method returns the index of the bucket that contains the given key; begin(n) returns a local_iterator referring to the first element in the bucket with index n, and end(n) returns a local_iterator referring to one-past-the-last element in the bucket with index n. The example in the next section demonstrates how to use these methods.
The following example uses an unordered_map to represent a phone book. The name of a person is the key, while the phone number is the value associated with that key.
template<class T>void printMap(const T& m){for (auto& [key, value] : m) {cout << key << " (Phone: " << value << ")" << endl;}cout << "-------" << endl;}int main(){// Create a hash table.unordered_map<string, string> phoneBook = {{ "Marc G.", "123-456789" },{ "Scott K.", "654-987321" } };printMap(phoneBook);// Add/remove some phone numbers.phoneBook.insert(make_pair("John D.", "321-987654"));phoneBook["Johan G."] = "963-258147";phoneBook["Freddy K."] = "999-256256";phoneBook.erase("Freddy K.");printMap(phoneBook);// Find the bucket index for a specific key.const size_t bucket = phoneBook.bucket("Marc G.");cout << "Marc G. is in bucket " << bucket<< " which contains the following "<< phoneBook.bucket_size(bucket) << " elements:" << endl;// Get begin and end iterators for the elements in this bucket.// 'auto' is used here. The compiler deduces the type of// both as unordered_map<string, string>::const_local_iteratorauto localBegin = phoneBook.cbegin(bucket);auto localEnd = phoneBook.cend(bucket);for (auto iter = localBegin; iter != localEnd; ++iter) {cout << "\t" << iter->first << " (Phone: "<< iter->second << ")" << endl;}cout << "-------" << endl;// Print some statistics about the hash tablecout << "There are " << phoneBook.bucket_count() << " buckets." << endl;cout << "Average number of elements in a bucket is "<< phoneBook.load_factor() << endl;return 0;}
A possible output is as follows. Note that the output can be different on a different system, because it depends on the implementation of both the hash function and the unordered_map itself being used.
Scott K. (Phone: 654-987321)Marc G. (Phone: 123-456789)-------Scott K. (Phone: 654-987321)Marc G. (Phone: 123-456789)Johan G. (Phone: 963-258147)John D. (Phone: 321-987654)-------Marc G. is in bucket 1 which contains the following 2 elements:Scott K. (Phone: 654-987321)Marc G. (Phone: 123-456789)-------There are 8 buckets.Average number of elements in a bucket is 0.5
An unordered_multimap is an unordered_map that allows multiple elements with the same key. Their interfaces are almost identical, with the following differences:
unordered_multimaps do not provide operator[] and at(). The semantics of these do not make sense if there can be multiple elements with a single key.unordered_multimaps always succeed. Thus, the unordered_multimap::insert() method that adds a single element returns just an iterator instead of a pair.insert_or_assign() and try_emplace() methods supported by unordered_map are not supported by an unordered_multimap.As discussed earlier with multimaps, looking up elements in unordered_multimaps cannot be done using operator[] because it is not provided. You can use find() but it returns an iterator referring to any one of the elements with a given key (not necessarily the first element with that key). Instead, it’s best to use the equal_range() method, which returns a pair of iterators: one referring to the first element matching a given key, and one referring to one-past-the-last element matching that key. The use of equal_range() is exactly the same as discussed for multimaps, so you can look at the example given for multimaps to see how it works.
The <unordered_set> header file defines unordered_set and unordered_multiset, which are very similar to set and multiset, respectively, except that they do not sort their keys but they use a hash function. The differences between unordered_set and unordered_map are similar to the differences between set and map as discussed earlier in this chapter, so they are not discussed in detail here. Consult a Standard Library Reference for a thorough summary of unordered_set and unordered_multiset operations.
There are several other parts of the C++ language that work with the Standard Library to varying degrees, including standard C-style arrays, strings, streams, and bitset.
Recall that “dumb”/raw pointers are bona fide iterators because they support the required operations. This point is more than just a piece of trivia. It means that you can treat standard C-style arrays as Standard Library containers by using pointers to their elements as iterators. Standard C-style arrays, of course, don’t provide methods like size(), empty(), insert(), and erase(), so they aren’t true Standard Library containers. Nevertheless, because they do support iterators through pointers, you can use them in the algorithms described in Chapter 18 and in some of the methods described in this chapter.
For example, you could copy all the elements of a standard C-style array into a vector using the insert() method of a vector that takes an iterator range from any container. This insert() method’s prototype looks like this:
template <class InputIterator> iterator insert(const_iterator position,InputIterator first, InputIterator last);
If you want to use a standard C-style int array as the source, then the templatized type of InputIterator becomes int*. Here is a full example:
const size_t count = 10;int arr[count]; // standard C-style array// Initialize each element of the array to the value of its index.for (int i = 0; i < count; i++) {arr[i] = i;}// Insert the contents of the array at the end of a vector.vector<int> vec;vec.insert(end(vec), arr, arr + count);// Print the contents of the vector.for (const auto& i : vec) {cout << i << " ";}
Note that the iterator referring to the first element of the array is the address of the first element, which is arr in this case. The name of an array alone is interpreted as the address of the first element. The iterator referring to the end must be one-past-the-last element, so it’s the address of the first element plus count, or arr+count.
It’s easier to use std::begin() or std::cbegin() to get an iterator to the first element of a statically allocated C-style array not accessed through pointers, and std::end() or std::cend() to get an iterator to one-past-the-last element of such an array. For example, the call to insert() in the previous example can be written as follows:
vec.insert(end(vec), cbegin(arr), cend(arr));You can think of a string as a sequential container of characters. Thus, it shouldn’t be surprising to learn that a C++ string is a full-fledged sequential container. It contains begin() and end() methods that return iterators into the string, insert(), push_back(), and erase() methods, size(), empty(), and all the rest of the sequential container basics. It resembles a vector quite closely, even providing the methods reserve() and capacity().
You can use string as a Standard Library container just as you would use vector. Here is an example:
string myString;myString.insert(cend(myString), 'h');myString.insert(cend(myString), 'e');myString.push_back('l');myString.push_back('l');myString.push_back('o');for (const auto& letter : myString) {cout << letter;}cout << endl;for (auto it = cbegin(myString); it != cend(myString); ++it) {cout << *it;}cout << endl;
In addition to the Standard Library sequential container methods, strings provide a host of useful methods and friend functions. The string interface is actually quite a good example of a cluttered interface, one of the design pitfalls discussed in Chapter 6. The string class is discussed in detail in Chapter 2.
Input and output streams are not containers in the traditional sense because they do not store elements. However, they can be considered sequences of elements, and as such share some characteristics with Standard Library containers. C++ streams do not provide any Standard Library–related methods directly, but the Standard Library supplies special iterators called istream_iterator and ostream_iterator that allow you to “iterate” through input and output streams. Chapter 21 explains how to use them.
A bitset is a fixed-length abstraction of a sequence of bits. A bit can represent only two values, 1 and 0, which can be referred to as on/off, true/false, and so on. A bitset also uses the terminology set and unset. You can toggle or flip a bit from one value to the other.
A bitset is not a true Standard Library container: it’s of fixed size, it’s not templatized on an element type, and it doesn’t support iteration. However, it’s a useful utility class, which is often lumped with the containers, so a brief introduction is provided here. Consult a Standard Library Reference for a thorough summary of the bitset operations.
A bitset, defined in <bitset>, is templatized on the number of bits it stores. The default constructor initializes all fields of a bitset to 0. An alternative constructor creates a bitset from a string of 0 and 1 characters.
You can adjust the values of individual bits with the set(), reset(), and flip() methods, and you can access and set individual fields with an overloaded operator[]. Note that operator[] on a non-const object returns a proxy object to which you can assign a Boolean value, call flip(), or complement with operator~. You can also access individual fields with the test() method. Additionally, you can stream bitsets with the normal insertion and extraction operators. A bitset is streamed as a string of 0 and 1 characters.
Here is a small example:
bitset<10> myBitset;myBitset.set(3);myBitset.set(6);myBitset[8] = true;myBitset[9] = myBitset[3];if (myBitset.test(3)) {cout << "Bit 3 is set!"<< endl;}cout << myBitset << endl;
The output is as follows:
Bit 3 is set!1101001000
Note that the leftmost character in the output string is the highest numbered bit. This corresponds to our intuitions about binary number representations, where the low-order bit representing 20 = 1 is the rightmost bit in the printed representation.
In addition to the basic bit manipulation routines, a bitset provides implementations of all the bitwise operators: &, |, ^, ~, <<, >>, &=, |=, ^=, <<=, and >>=. They behave just as they would on a “real” sequence of bits. Here is an example:
auto str1 = "0011001100";auto str2 = "0000111100";bitset<10> bitsOne(str1);bitset<10> bitsTwo(str2);auto bitsThree = bitsOne & bitsTwo;cout << bitsThree << endl;bitsThree <<= 4;cout << bitsThree << endl;
The output of the program is as follows:
00000011000011000000
One possible use of bitsets is tracking channels of cable subscribers. Each subscriber could have a bitset of channels associated with their subscription, with set bits representing the channels to which they actually subscribe. This system could also support “packages” of channels, also represented as bitsets, which represent commonly subscribed combinations of channels.
The following CableCompany class is a simple example of this model. It uses two maps, each of string/bitset. One stores the cable packages, while the other stores subscriber information.
const size_t kNumChannels = 10;class CableCompany final{public:// Adds the package with the specified channels to the database.void addPackage(std::string_view packageName,const std::bitset<kNumChannels>& channels);// Removes the specified package from the database.void removePackage(std::string_view packageName);// Retrieves the channels of a given package.// Throws out_of_range if the package name is invalid.const std::bitset<kNumChannels>& getPackage(std::string_view packageName) const;// Adds customer to database with initial channels found in package.// Throws out_of_range if the package name is invalid.// Throws invalid_argument if the customer is already known.void newCustomer(std::string_view name, std::string_view package);// Adds customer to database with given initial channels.// Throws invalid_argument if the customer is already known.void newCustomer(std::string_view name,const std::bitset<kNumChannels>& channels);// Adds the channel to the customers profile.// Throws invalid_argument if the customer is unknown.void addChannel(std::string_view name, int channel);// Removes the channel from the customers profile.// Throws invalid_argument if the customer is unknown.void removeChannel(std::string_view name, int channel);// Adds the specified package to the customers profile.// Throws out_of_range if the package name is invalid.// Throws invalid_argument if the customer is unknown.void addPackageToCustomer(std::string_view name,std::string_view package);// Removes the specified customer from the database.void deleteCustomer(std::string_view name);// Retrieves the channels to which a customer subscribes.// Throws invalid_argument if the customer is unknown.const std::bitset<kNumChannels>& getCustomerChannels(std::string_view name) const;private:// Retrieves the channels for a customer. (non-const)// Throws invalid_argument if the customer is unknown.std::bitset<kNumChannels>& getCustomerChannelsHelper(std::string_view name);using MapType = std::map<std::string, std::bitset<kNumChannels>>;MapType mPackages, mCustomers;};
Here are the implementations of all methods, with comments explaining the code:
void CableCompany::addPackage(string_view packageName,const bitset<kNumChannels>& channels){mPackages.emplace(packageName, channels);}void CableCompany::removePackage(string_view packageName){mPackages.erase(packageName.data());}const bitset<kNumChannels>& CableCompany::getPackage(string_view packageName) const{// Get a reference to the specified package.auto it = mPackages.find(packageName.data());if (it == end(mPackages)) {// That package doesn't exist. Throw an exception.throw out_of_range("Invalid package");}return it->second;}void CableCompany::newCustomer(string_view name, string_view package){// Get the channels for the given package.auto& packageChannels = getPackage(package);// Create the account with the bitset representing that package.newCustomer(name, packageChannels);}void CableCompany::newCustomer(string_view name,const bitset<kNumChannels>& channels){// Add customer to the customers map.auto result = mCustomers.emplace(name, channels);if (!result.second) {// Customer was already in the database. Nothing changed.throw invalid_argument("Duplicate customer");}}void CableCompany::addChannel(string_view name, int channel){// Get the current channels for the customer.auto& customerChannels = getCustomerChannelsHelper(name);// We found the customer; set the channel.customerChannels.set(channel);}void CableCompany::removeChannel(string_view name, int channel){// Get the current channels for the customer.auto& customerChannels = getCustomerChannelsHelper(name);// We found this customer; remove the channel.customerChannels.reset(channel);}void CableCompany::addPackageToCustomer(string_view name, string_view package){// Get the channels for the given package.auto& packageChannels = getPackage(package);// Get the current channels for the customer.auto& customerChannels = getCustomerChannelsHelper(name);// Or-in the package to the customer's existing channels.customerChannels |= packageChannels;}void CableCompany::deleteCustomer(string_view name){mCustomers.erase(name.data());}const bitset<kNumChannels>& CableCompany::getCustomerChannels(string_view name) const{// Use const_cast() to forward to getCustomerChannelsHelper()// to avoid code duplication.return const_cast<CableCompany*>(this)->getCustomerChannelsHelper(name);}bitset<kNumChannels>& CableCompany::getCustomerChannelsHelper(string_view name){// Find a reference to the customer.auto it = mCustomers.find(name.data());if (it == end(mCustomers)) {throw invalid_argument("Unknown customer");}// Found it.// Note that 'it' is a reference to a name/bitset pair.// The bitset is the second field.return it->second;}
Finally, here is a simple program demonstrating how to use the CableCompany class:
CableCompany myCC;auto basic_pkg = "1111000000";auto premium_pkg = "1111111111";auto sports_pkg = "0000100111";myCC.addPackage("basic", bitset<kNumChannels>(basic_pkg));myCC.addPackage("premium", bitset<kNumChannels>(premium_pkg));myCC.addPackage("sports", bitset<kNumChannels>(sports_pkg));myCC.newCustomer("Marc G.", "basic");myCC.addPackageToCustomer("Marc G.", "sports");cout << myCC.getCustomerChannels("Marc G.") << endl;
The output is as follows:
1111100111This chapter introduced the Standard Library containers. It also presented sample code illustrating a variety of uses for these containers. Hopefully, you appreciate the power of vector, deque, list, forward_list, array, stack, queue, priority_queue, map, multimap, set, multiset, unordered_map, unordered_multimap, unordered_set, unordered_multiset, string, and bitset. Even if you don’t incorporate them into your programs immediately, you should keep them in the back of your mind for future projects.
Now that you are familiar with the containers, the next chapter illustrates the true power of the Standard Library with a discussion of generic algorithms.
The “magic” behind the algorithms is that they work on iterator intermediaries instead of on the containers themselves. In that way, they are not tied to specific container implementations. All the Standard Library algorithms are implemented as function templates, where the template type parameters are usually iterator types. The iterators themselves are specified as arguments to the function. Templatized functions can usually deduce the template types from the function arguments, so you can generally call the algorithms as if they were normal functions, not templates.
The iterator arguments are usually iterator ranges. As Chapter 17 explains, iterator ranges are half-open for most containers such that they include the first element in the range, but exclude the last. The end iterator is really a “past-the-end” marker.
Algorithms pose certain requirements on iterators passed to them. For instance, copy_backward() is an example of an algorithm that requires a bidirectional iterator, and stable_sort() is an example of an algorithm requiring random access iterators. This means that such algorithms cannot work on containers that do not provide the necessary iterators. forward_list is an example of a container supporting only forward iterators, no bidirectional or random access iterators; thus, copy_backward() and stable_sort() cannot work on forward_list.
Most algorithms are defined in the <algorithm> header file, while some numerical algorithms are defined in <numeric>. All of them are in the std namespace.
The best way to understand the algorithms is to look at some examples first. After you’ve seen how a few of them work, it’s easy to pick up the others. This section describes the find(), find_if(), and accumulate() algorithms in detail. The following sections present the lambda expressions and function objects, and discuss each of the classes of algorithms with representative samples.
find() looks for a specific element in an iterator range. You can use it on elements in any container type. It returns an iterator referring to the element found, or the end iterator of the range in case the element is not found. Note that the range specified in the call to find() need not be the entire range of elements in a container; it could be a subset.
Here is an example using std::find(). Note that this example assumes that the user plays nice and enters valid numbers; it does not perform any error checking on the user input. Performing error checking on stream input is discussed in Chapter 13.
#include <algorithm>#include <vector>#include <iostream>using namespace std;int main(){int num;vector<int> myVector;while (true) {cout << "Enter a number to add (0 to stop): ";cin >> num;if (num == 0) {break;}myVector.push_back(num);}while (true) {cout << "Enter a number to lookup (0 to stop): ";cin >> num;if (num == 0) {break;}auto endIt = cend(myVector);auto it = find(cbegin(myVector), endIt, num);if (it == endIt) {cout << "Could not find " << num << endl;} else {cout << "Found " << *it << endl;}}return 0;}
The call to find() is made with cbegin(myVector) and endIt as arguments, where endIt is defined as cend(myVector) in order to search all the elements of the vector. If you want to search in a subrange, you can change these two iterators.
Here is a sample run of the program:
Enter a number to add (0 to stop): 3Enter a number to add (0 to stop): 4Enter a number to add (0 to stop): 5Enter a number to add (0 to stop): 6Enter a number to add (0 to stop): 0Enter a number to lookup (0 to stop): 5Found 5Enter a number to lookup (0 to stop): 8Could not find 8Enter a number to lookup (0 to stop): 0
With initializers for if statements (C++17), the call to find() and checking the result can be done with one statement as follows:
if (auto it = find(cbegin(myVector), endIt, num); it == endIt) {cout << "Could not find " << num << endl;} else {cout << "Found " << *it << endl;}
Some containers, such as map and set, provide their own versions of find() as class methods.
find_if() is similar to find(), except that it accepts a predicate function callback instead of a simple element to match. A predicate returns true or false. The find_if() algorithm calls the predicate on each element in the range until the predicate returns true, in which case find_if()returns an iterator referring to that element. The following program reads test scores from the user, then checks if any of the scores are “perfect.” A perfect score is a score of 100 or higher. The program is similar to the previous example. Only the major differences are in bold.
bool perfectScore(int num){return (num >= 100);}int main(){int num;vector<int> myVector;while (true) {cout << "Enter a test score to add (0 to stop): ";cin >> num;if (num == 0) {break;}myVector.push_back(num);}auto endIt = cend(myVector);auto it = find_if(cbegin(myVector), endIt, perfectScore);if (it == endIt) {cout << "No perfect scores" << endl;} else {cout << "Found a \"perfect\" score of " << *it << endl;}return 0;}
This program passes a pointer to the perfectScore() function to find_if(), which the algorithm then calls on each element until it returns true.
The following is the same call to find_if(), but using a lambda expression. It gives you an initial idea about the power of lambda expressions. Don’t worry about their syntax yet; they are explained in detail later in this chapter. Note the absence of the perfectScore() function.
auto it = find_if(cbegin(myVector), endIt, [](int i){ return i >= 100; });It’s often useful to calculate the sum, or some other arithmetic quantity, of elements in a container. The accumulate() function—defined in <numeric>, not in <algorithm>—does just that. In its most basic form, it calculates the sum of the elements in a specified range. For example, the following function calculates the arithmetic mean of a sequence of integers in a vector. The arithmetic mean is simply the sum of all the elements divided by the number of elements.
double arithmeticMean(const vector<int>& nums){double sum = accumulate(cbegin(nums), cend(nums), 0);return sum / nums.size();}
The accumulate() algorithm takes as its third parameter an initial value for the sum, which in this case should be 0 (the identity for addition) to start a fresh sum.
The second form of accumulate() allows the caller to specify an operation to perform instead of the default addition. This operation takes the form of a binary callback. Suppose that you want to calculate the geometric mean, which is the product of all the numbers in the sequence to the power of the inverse of the size. In that case, you would want to use accumulate() to calculate the product instead of the sum. You could write it like this:
int product(int num1, int num2){return num1 * num2;}double geometricMean(const vector<int>& nums){double mult = accumulate(cbegin(nums), cend(nums), 1, product);return pow(mult, 1.0 / nums.size()); // pow() needs <cmath>}
Note that the product() function is passed as a callback to accumulate() and that the initial value for the accumulation is 1 (the identity for multiplication) instead of 0.
To give you a second teaser about the power of lambda expressions, the geometricMean() function could be written as follows, without using the product() function:
double geometricMeanLambda(const vector<int>& nums){double mult = accumulate(cbegin(nums), cend(nums), 1,[](int num1, int num2){ return num1 * num2; });return pow(mult, 1.0 / nums.size());}
However, later in this chapter you will learn how to use accumulate() in the geometricMean() function without writing a function callback or lambda expression.
Just like Standard Library containers, Standard Library algorithms are also optimized to use move semantics at appropriate times. This can greatly speed up certain algorithms, for example, remove(), discussed in detail later in this chapter. For this reason, it is highly recommended that you implement move semantics in your custom element classes that you want to store in containers. Move semantics can be added to any class by implementing a move constructor and a move assignment operator. Both should be marked as noexcept, because they should not throw exceptions. Consult the “Move Semantics” section in Chapter 9 for details on how to add move semantics to your classes.
std::function, defined in the <functional> header file, can be used to create a type that can point to a function, a function object, or a lambda expression—basically anything that is callable. std::function is called a polymorphic function wrapper. It can be used as a function pointer, or as a parameter for a function to implement callbacks. The template parameters for the std::function template look a bit different than most template parameters. Its syntax is as follows:
std::function<R(ArgTypes…)>R is the return type of the function, and ArgTypes is a comma-separated list of parameter types for the function.
The following example demonstrates how to use std::function to implement a function pointer. It creates a function pointer f1 to point to the function func(). Once f1 is defined, you can call func() by using the name func or f1:
void func(int num, const string& str){cout << "func(" << num << ", " << str << ")" << endl;}int main(){function<void(int, const string&)> f1 = func;f1(1, "test");return 0;}
Of course, in the preceding example, it is possible to use the auto keyword, which removes the need to specify the exact type of f1. The following definition for f1 works exactly the same and is much shorter, but the compiler-deduced type of f1 is a function pointer, that is, void (*f1)(int, const string&) instead of an std::function.
auto f1 = func;Because std::function types behave as function pointers, they can be passed to Standard Library algorithms as shown in the following example using the find_if() algorithm:
bool isEven(int num){return num % 2 == 0;}int main(){vector<int> vec{ 1,2,3,4,5,6,7,8,9 };function<bool(int)> fcn = isEven;auto result = find_if(cbegin(vec), cend(vec), fcn);if (result != cend(vec)) {cout << "First even number: " << *result << endl;} else {cout << "No even number found." << endl;}return 0;}
After the preceding examples, you might think that std::function is not really useful; however, std::function really shines when you need to store a callback as a member variable of a class. You can also use std::function when you need to accept a function pointer as parameter to your own function. The following example defines a function called process(), which accepts a reference to a vector and an std::function. The process() function iterates over all the elements in the given vector, and calls the given function f for each element. You can think of the parameter f as a callback.
The print() function prints a given value to the console. The main() function first creates a vector of integers. It then calls the process() function with a function pointer to print(). The result is that each element in the vector is printed.
The last part of the main() function demonstrates that you can also pass a lambda expression (discussed in detail in the next section) for the std::function parameter of the process() function; that’s the power of std::function. You cannot get this same functionality by using a raw function pointer.
void process(const vector<int>& vec, function<void(int)> f){for (auto& i : vec) {f(i);}}void print(int num){cout << num << " ";}int main(){vector<int> vec{ 0,1,2,3,4,5,6,7,8,9 };process(vec, print);cout << endl;int sum = 0;process(vec, [&sum](int num){sum += num;});cout << "sum = " << sum << endl;return 0;}
The output of this example is as follows:
0 1 2 3 4 5 6 7 8 9sum = 45
Instead of using std::function to accept callback parameters, you can also write a function template as follows:
template <typename F>void processTemplate(const vector<int>& vec, F f){for (auto& i : vec) {f(i);}}
This function template can be used in the same way as the non-template process() function, that is, processTemplate() can accept both raw function pointers and lambda expressions.
Lambda expressions allow you to write anonymous functions inline, removing the need to write a separate function or a function object. Lambda expressions can make code easier to read and understand.
Let’s start with a very simple lambda expression. The following example defines a lambda expression that just writes a string to the console. A lambda expression starts with square brackets [], called the lambda introducer, followed by curly braces {}, which contain the body of the lambda expression. The lambda expression is assigned to the basicLambda auto-typed variable. The second line executes the lambda expression using normal function-call syntax.
auto basicLambda = []{ cout << "Hello from Lambda" << endl; };basicLambda();
The output is as follows:
Hello from LambdaA lambda expression can accept parameters. Parameters are specified between parentheses and separated by commas, just as with normal functions. Here is an example using one parameter:
auto parametersLambda =[](int value){ cout << "The value is " << value << endl; };parametersLambda(42);
If a lambda expression does not accept any parameters, you can either specify empty parentheses or simply omit them.
A lambda expression can return a value. The return type is specified following an arrow, called a trailing return type. The following example defines a lambda expression accepting two parameters and returning their sum:
auto returningLambda = [](int a, int b) -> int { return a + b; };int sum = returningLambda(11, 22);
The return type can be omitted, in which case the compiler deduces the return type of the lambda expression according to the same rules as for function return type deduction (see Chapter 1). In the previous example, the return type can be omitted as follows:
auto returningLambda = [](int a, int b){ return a + b; };int sum = returningLambda(11, 22);
A lambda expression can capture variables from its enclosing scope. For example, the following lambda expression captures the variable data so that it can be used in its body:
double data = 1.23;auto capturingLambda = [data]{ cout << "Data = " << data << endl; };
The square brackets part is called the lambda capture block. Capturing a variable means that the variable becomes available inside the body of the lambda expression. Specifying an empty capture block, [], means that no variables from the enclosing scope are captured. When you just write the name of a variable in the capture block as in the preceding example, then you are capturing that variable by value.
The compiler transforms any lambda expression into some kind of unnamed functor (= function object). The captured variables become data members of this functor. Variables captured by value are copied into data members of the functor. These data members have the same constness as the captured variables. In the preceding capturingLambda example, the functor gets a non-const data member called data, because the captured variable, data, is non-const. However, in the following example, the functor gets a const data member called data, because the captured variable is const:
const double data = 1.23;auto capturingLambda = [data]{ cout << "Data = " << data << endl; };
A functor always has an implementation of the function call operator, operator(). For a lambda expression, this function call operator is marked as const by default. That means that even if you capture a non-const variable by value in a lambda expression, the lambda expression is not able to modify this copy. You can mark the function call operator as non-const by specifying the lambda expression as mutable, as follows:
double data = 1.23;auto capturingLambda =[data] () mutable { data *= 2; cout << "Data = " << data << endl; };
In this example, the non-const variable data is captured by value; thus, the functor gets a non-const data member that is a copy of data. Because of the mutable keyword, the function call operator is marked as non-const, and so the body of the lambda expression can modify its copy of data. Note that if you specify mutable, then you have to specify the parentheses for the parameters even if they are empty.
You can prefix the name of a variable with & to capture it by reference. The following example captures the variable data by reference so that the lambda expression can directly change data in the enclosing scope:
double data = 1.23;auto capturingLambda = [&data]{ data *= 2; };
When you capture a variable by reference, you have to make sure that the reference is still valid at the time the lambda expression is executed.
There are two ways to capture all variables from the enclosing scope:
[=] captures all variables by value[&] captures all variables by referenceIt is also possible to selectively decide which variables to capture and how, by specifying a capture list with an optional capture default. Variables prefixed with & are captured by reference. Variables without a prefix are captured by value. If present, the capture default should be the first element in the capture list, and be either & or =. Here are some capture block examples:
[&x] captures only x by reference and nothing else.[x] captures only x by value and nothing else.[=, &x, &y] captures by value by default, except variables x and y, which are captured by reference.[&, x] captures by reference by default, except variable x, which is captured by value.[&x, &x] is illegal because identifiers cannot be repeated.[this] captures the current object. In the body of the lambda expression you can access this object, even without using this->. [*this] captures a copy of the current object. This can be useful in cases where the object will no longer be alive when the lambda expression is executed.The complete syntax of a lambda expression is as follows:
[capture_block](parameters) mutable constexprnoexcept_specifier attributes-> return_type {body}
A lambda expression contains the following parts:
mutable, constexpr, a noexcept specifier, attributes, or a return type. The parameter list is similar to the parameter list for normal functions.mutable (optional). This marks the lambda expression as mutable; see earlier examples. constexpr (optional). This marks the lambda expression as constexpr, so it can be evaluated at compile time. Even if omitted, a lambda expression can be constexpr implicitly if it satisfies certain restrictions, not further discussed in this text.noexcept specifier (optional). This can be used to specify noexcept clauses, similar to noexcept clauses for normal functions.It is possible to use auto type deduction for parameters of lambda expressions instead of explicitly specifying concrete types for them. To specify auto type deduction for a parameter, the type is simply specified as auto. The type deduction rules are the same as for template argument deduction.
The following example defines a generic lambda expression called isGreaterThan100. This single lambda expression is used with the find_if() algorithm, once for a vector of integers and once for a vector of doubles.
// Define a generic lambda to find values > 100.auto isGreaterThan100 = [](auto i){ return i > 100; };// Use the generic lambda with a vector of integers.vector<int> ints{ 11, 55, 101, 200 };auto it1 = find_if(cbegin(ints), cend(ints),isGreaterThan100);if (it1 != cend(ints)) {cout << "Found a value > 100: " << *it1 << endl;}// Use exactly the same generic lambda with a vector of doubles.vector<double> doubles{ 11.1, 55.5, 200.2 };auto it2 = find_if(cbegin(doubles), cend(doubles),isGreaterThan100);if (it2 != cend(doubles)) {cout << "Found a value > 100: " << *it2 << endl;}
Lambda capture expressions allow you to initialize capture variables with any kind of expression. It can be used to introduce variables in the lambda expression that are not captured from the enclosing scope. For example, the following code creates a lambda expression. Inside this lambda expression there are two variables available: one called myCapture, initialized to the string “Pi:” using a lambda capture expression; and one called pi, which is captured by value from the enclosing scope. Note that non-reference capture variables such as myCapture that are initialized with a capture initializer are copy constructed, which means that const qualifiers are stripped.
double pi = 3.1415;auto myLambda = [myCapture = "Pi: ", pi]{ cout << myCapture << pi; };
A lambda capture variable can be initialized with any kind of expression, thus also with std::move(). This is important for objects that cannot be copied, only moved, such as unique_ptr. By default, capturing by value uses copy semantics, so it’s impossible to capture a unique_ptr by value in a lambda expression. Using a lambda capture expression, it is possible to capture it by moving, as in this example:
auto myPtr = std::make_unique<double>(3.1415);auto myLambda = [p = std::move(myPtr)]{ cout << *p; };
It is allowed, though not recommended, to have the same name for the capture variable as the name in the enclosing scope. The previous example can be written as follows:
auto myPtr = std::make_unique<double>(3.1415);auto myLambda = [myPtr = std::move(myPtr)]{ cout << *myPtr; };
By using std::function, discussed earlier in this chapter, lambda expressions can be returned from functions. Take a look at the following definition:
function<int(void)> multiplyBy2Lambda(int x){return [x]{ return 2 * x; };}
The body of this function creates a lambda expression that captures the variable x from the enclosing scope by value, and returns an integer that is two times the value passed to multiplyBy2Lambda(). The return type of the multiplyBy2Lambda() function is function<int(void)>, which is a function accepting no arguments and returning an integer. The lambda expression defined in the body of the function exactly matches this prototype. The variable x is captured by value, and thus a copy of the value of x is bound to the x in the lambda expression before the lambda is returned from the function. The function can be called as follows:
function<int(void)> fn = multiplyBy2Lambda(5);cout << fn() << endl;
You can use the auto keyword to make this easier:
auto fn = multiplyBy2Lambda(5);cout << fn() << endl;
The output will be 10.
Function return type deduction (see Chapter 1) allows you to write the multiplyBy2Lambda() function more elegantly, as follows:
auto multiplyBy2Lambda(int x){return [x]{ return 2 * x; };}
The multiplyBy2Lambda() function captures the variable x by value, [x]. Suppose the function is rewritten to capture the variable by reference, [&x], as follows. This will not work because the lambda expression will be executed later in the program, no longer in the scope of the multiplyBy2Lambda() function, at which point the reference to x is not valid anymore.
auto multiplyBy2Lambda(int x){return [&x]{ return 2 * x; };// BUG!}
The “std::function” section earlier in this chapter discusses that a function parameter of type std::function can accept a lambda expression argument. An example in that section shows a process() function accepting a lambda expression as callback. The section also explains an alternative to std::function, that is, function templates. The processTemplate() function template example is also capable of accepting a lambda expression argument.
This section demonstrates lambda expressions with two Standard Library algorithms: count_if() and generate(). More examples follow later in this chapter.
The following example uses the count_if() algorithm to count the number of elements in a given vector that satisfy a certain condition. The condition is given in the form of a lambda expression, which captures the value variable from its enclosing scope by value.
vector<int> vec{ 1, 2, 3, 4, 5, 6, 7, 8, 9 };int value = 3;int cnt = count_if(cbegin(vec), cend(vec),[value](int i){ return i > value; });cout << "Found " << cnt << " values > " << value << endl;
The output is as follows:
Found 6 values > 3The example can be extended to demonstrate capturing variables by reference. The following lambda expression counts the number of times it is called by incrementing a variable in the enclosing scope that is captured by reference:
vector<int> vec = { 1, 2, 3, 4, 5, 6, 7, 8, 9 };int value = 3;int cntLambdaCalled = 0;int cnt = count_if(cbegin(vec), cend(vec),[value, &cntLambdaCalled](int i){ ++cntLambdaCalled; return i > value; });cout << "The lambda expression was called " << cntLambdaCalled<< " times." << endl;cout << "Found " << cnt << " values > " << value << endl;
The output is as follows:
The lambda expression was called 9 times.Found 6 values > 3
The generate() algorithm requires an iterator range and replaces the values in that range with the values returned from the function given as a third argument. The following example uses the generate() algorithm together with a lambda expression to put the numbers 2, 4, 8, 16, and so on in a vector:
vector<int> vec(10);int value = 1;generate(begin(vec), end(vec), [&value]{ value *= 2; return value; });for (const auto& i : vec) {cout << i << " ";}
The output is as follows:
2 4 8 16 32 64 128 256 512 1024You can overload the function call operator in a class such that objects of the class can be used in place of function pointers. These objects are called function objects, or just functors.
Many of the Standard Library algorithms, such as find_if() and a version of accumulate(), can accept callables, for example function pointers, lambda expressions, and functors, as parameters to modify the algorithm’s behavior. C++ provides several predefined functor classes, defined in the <functional> header file, that perform the most commonly used callback operations.
The clumsiness of having to create a function or functor class, give it a name that does not conflict with other names, and then use this name is considerable overhead for what is fundamentally a simple concept. In these cases, using anonymous (unnamed) functions represented by lambda expressions is a big convenience. Their syntax is easier and can make your code easier to understand. They are discussed in the previous sections. However, this section explains functors and how to use the predefined functor classes because you will likely encounter them at some point.
Your <functional> header might also contain functions like bind1st(), bind2nd(), mem_fun(), mem_fun_ref(), and ptr_fun(). These functions have officially been removed from the C++17 standard, and thus are not further discussed in this book. You should avoid using them.
C++ provides functor class templates for the five binary arithmetic operators: plus, minus, multiplies, divides, and modulus. Additionally, unary negate is supplied. These classes are templatized on the type of the operands and are wrappers for the actual operators. They take one or two parameters of the template type, perform the operation, and return the result. Here is an example using the plus class template:
plus<int> myPlus;int res = myPlus(4, 5);cout << res << endl;
This example is silly, because there’s no reason to use the plus class template when you could just use operator+ directly. The benefit of the arithmetic function objects is that you can pass them as callbacks to algorithms, which you cannot do directly with the arithmetic operators. For example, the implementation of the geometricMean() function earlier in this chapter used the accumulate() function with a function pointer to the product() callback to multiply two integers. You could rewrite it to use the predefined multiplies function object:
double geometricMean(const vector<int>& nums){double mult = accumulate(cbegin(nums), cend(nums), 1, multiplies<int>());return pow(mult, 1.0 / nums.size());}
The expression multiplies<int>() creates a new object of the multiplies functor class template, instantiating it with the int type.
The other arithmetic function objects behave similarly.
C++ has support for transparent operator functors, which allow you to omit the template type argument. For example, you can just specify multiplies<>() instead of multiplies<int>():
double geometricMeanTransparent(const vector<int>& nums){double mult = accumulate(cbegin(nums), cend(nums), 1,multiplies<>());return pow(mult, 1.0 / nums.size());}
A very important feature of these transparent operators is that they are heterogeneous. That is, they are not only more concise than the non-transparent functors, but they also have real functional advantages. For instance, the following code uses a transparent operator functor and uses 1.1, a double, as the initial value, while the vector contains integers. accumulate() calculates the result as a double, and result will be 6.6:
vector<int> nums{ 1, 2, 3 };double result = accumulate(cbegin(nums), cend(nums), 1.1,multiplies<>());
If this code uses a non-transparent operator functor as follows, then accumulate() calculates the result as an integer, and result will be 6. When you compile this code, the compiler will give you warnings about possible loss of data.
vector<int> nums{ 1, 2, 3 };double result = accumulate(cbegin(nums), cend(nums), 1.1,multiplies<int>());
In addition to the arithmetic function object classes, the C++ language provides all the standard comparisons: equal_to, not_equal_to, less, greater, less_equal, and greater_equal. You’ve already seen less in Chapter 17 as the default comparison for elements in the priority_queue and the associative containers. Now you can learn how to change that criterion. Here’s an example of a priority_queue using the default comparison operator: std::less.
priority_queue<int> myQueue;myQueue.push(3);myQueue.push(4);myQueue.push(2);myQueue.push(1);while (!myQueue.empty()) {cout << myQueue.top() << " ";myQueue.pop();}
Here is the output from the program:
4 3 2 1As you can see, the elements of the queue are removed in descending order, according to the less comparison. You can change the comparison to greater by specifying it as the comparison template argument. The priority_queue template definition looks like this:
template <class T, class Container = vector<T>, class Compare = less<T>>;Unfortunately, the Compare type parameter is last, which means that in order to specify it, you must also specify the container type. If you want to use a priority_queue that sorts the elements in ascending order using greater, then you need to change the definition of the priority_queue in the previous example to the following:
priority_queue<int, vector<int>, greater<>> myQueue;The output now is as follows:
1 2 3 4Note that myQueue is defined with a transparent operator, greater<>. In fact, it’s recommended to always use a transparent operator for Standard Library containers that accept a comparator type. Using a transparent comparator can be a bit more performant compared to using a non-transparent operator. For example, if a map<string> uses a non-transparent comparator, performing a query for a key given as a string literal might cause an unwanted copy to be created, because a string instance has to be constructed from the string literal. When using a transparent comparator, this copying is avoided.
Several algorithms that you will learn about later in this chapter require comparison callbacks, for which the predefined comparators come in handy.
C++ provides function object classes for the three logical operations: logical_not (operator!), logical_and (operator&&), and logical_or (operator||). These logical operations deal only with the values true and false. Bitwise function objects are covered in the next section.
Logical functors can, for example, be used to implement an allTrue() function that checks if all the Boolean flags in a container are true:
bool allTrue(const vector<bool>& flags){return accumulate(begin(flags), end(flags), true, logical_and<>());}
Similarly, the logical_or functor can be used to implement an anyTrue() function that returns true if there is at least one Boolean flag in a container true:
bool anyTrue(const vector<bool>& flags){return accumulate(begin(flags), end(flags), false, logical_or<>());}
C++ has function objects for all the bitwise operations: bit_and (operator&), bit_or (operator|), bit_xor (operator^), and bit_not (operator~). These bitwise functors can, for example, be used together with the transform() algorithm (discussed later in this chapter) to perform bitwise operations on all elements in a container.
When you try to use the basic function objects provided by the standard, it often feels as if you’re trying to put a square peg into a round hole. For example, you can’t use the less function object with find_if() to find an element smaller than some value because find_if() passes only one argument to its callback each time, instead of two. The adaptor function objects attempt to rectify this problem and others. They allow you to adapt function objects, lambda expressions, function pointers, basically any callable. The adaptors provide a modicum of support for functional composition, that is, to combine functions together to create the exact behavior you need.
Binders can be used to bind parameters of callables to certain values. For this you use std::bind(), defined in <functional>, which allows you to bind parameters of a callable in a flexible way. You can bind parameters to fixed values, and you can even rearrange parameters in a different order. It is best explained with an example.
Suppose you have a function called func() accepting two arguments:
void func(int num, string_view str){cout << "func(" << num << ", " << str << ")" << endl;}
The following code demonstrates how you can use bind() to bind the second argument of func() to a fixed value, myString. The result is stored in f1(). The auto keyword is used because the return type of bind() is unspecified by the C++ standard, and thus is implementation specific. Arguments that are not bound to specific values should be specified as _1, _2, _3, and so on. These are defined in the std::placeholders namespace. In the definition of f1(), the _1 specifies where the first argument to f1() needs to go when func() is called. After this, f1() can be called with just a single integer argument.
string myString = "abc";auto f1 = bind(func, placeholders::_1, myString);f1(16);
Here is the output:
func(16, abc)bind() can also be used to rearrange the arguments, as shown in the following code. The _2 specifies where the second argument to f2() needs to go when func() is called. In other words, the f2() binding means that the first argument to f2() will become the second argument to func(), and the second argument to f2() will become the first argument to func().
auto f2 = bind(func, placeholders::_2, placeholders::_1);f2("Test", 32);
The output is as follows:
func(32, Test)As discussed in Chapter 17, the <functional> header file defines the std::ref() and cref() helper template functions. These can be used to bind references or const references, respectively. For example, suppose you have the following function:
void increment(int& value) { ++value; }If you call this function as follows, then the value of index becomes 1:
int index = 0;increment(index);
If you use bind() to call it as follows, then the value of index is not incremented because a copy of index is made, and a reference to this copy is bound to the first parameter of the increment() function:
int index = 0;auto incr = bind(increment, index);incr();
Using std::ref() to pass a proper reference correctly increments index:
int index = 0;auto incr = bind(increment, ref(index));incr();
There is a small issue with binding parameters in combination with overloaded functions. Suppose you have the following two overloaded() functions. One accepts an integer and the other accepts a floating-point number:
void overloaded(int num) {}void overloaded(float f) {}
If you want to use bind() with these overloaded functions, you need to explicitly specify which of the two overloads you want to bind. The following will not compile:
auto f3 = bind(overloaded, placeholders::_1); // ERRORIf you want to bind the parameters of the overloaded function accepting a floating-point argument, you need the following syntax:
auto f4 = bind((void(*)(float))overloaded, placeholders::_1); // OKAnother example of bind() is to use the find_if() algorithm to find the first element in a sequence that is greater than or equal to 100. To solve this problem earlier in this chapter, a pointer to a perfectScore() function was passed to find_if(). This can be rewritten using the comparison functor greater_equal and bind(). The following code uses bind() to bind the second parameter of greater_equal to a fixed value of 100:
// Code for inputting scores into the vector omitted, similar as earlier.auto endIter = end(myVector);auto it = find_if(begin(myVector), endIter,bind(greater_equal<>(), placeholders::_1, 100));if (it == endIter) {cout << "No perfect scores" << endl;} else {cout << "Found a \"perfect\" score of " << *it << endl;}
Of course, in this case, I would recommend the solution using a lambda expression:
auto it = find_if(begin(myVector), endIter, [](int i){ return i >= 100; });Negators are similar to binders but they complement the result of a callable. For example, if you want to find the first element in a sequence of test scores less than 100, you can apply the not_fn() negator adaptor to the result of perfectScore() like this:
// Code for inputting scores into the vector omitted, similar as earlier.auto endIter = end(myVector);auto it = find_if(begin(myVector), endIter, not_fn(perfectScore));if (it == endIter) {cout << "All perfect scores" << endl;} else {cout << "Found a \"less-than-perfect\" score of " << *it << endl;}
The not_fn() functor complements the result of every call to the callable it takes as a parameter. Note that in this example you could have used the find_if_not() algorithm.
As you can see, using functors and adaptors can become complicated. My advice is to use lambda expressions instead of functors if possible. For example, the previous find_if() call using the not_fn() negator can be written more elegantly and more readable using a lambda expression:
auto it = find_if(begin(myVector), endIter, [](int i){ return i < 100; });The std::not_fn() adaptor is introduced with C++17. Before C++17 you could use the std::not1() and not2() adaptors. The “1” in not1() refers to the fact that its operand must be a unary function (one that takes a single argument). If its operand is a binary function (which takes two arguments), you must use not2() instead. Here is an example:
// Code for inputting scores into the vector omitted, similar as earlier.auto endIter = end(myVector);function<bool(int)> f = perfectScore;auto it = find_if(begin(myVector), endIter, not1(f));
If you wanted to use not1() with your own functor class, then you had to make sure your functor class definition included two typedefs: argument_type and result_type. If you wanted to use not2(), then your functor class definition had to provide three typedefs: first_argument_type, second_argument_type, and result_type. The easiest way to do that was to derive your function object class from either unary_function or binary_function, depending on whether they take one or two arguments. These two classes, defined in <functional>, are templatized on the parameter and return types of the function they provide. For example:
class PerfectScore : public std::unary_function<int, bool>{public:result_type operator()(const argument_type& score) const{return score >= 100;}};
This functor can be used as follows:
auto it = find_if(begin(myVector), endIter, not1(PerfectScore()));If you have a container of objects, you sometimes want to pass a pointer to a class method as the callback to an algorithm. For example, you might want to find the first empty string in a vector of strings by calling empty() on each string in the sequence. However, if you just pass a pointer to string::empty() to find_if(), the algorithm has no way to know that it received a pointer to a method instead of a normal function pointer or functor. The code to call a method pointer is different from that to call a normal function pointer, because the former must be called in the context of an object.
C++ provides a conversion function called mem_fn() that you can call with a method pointer before passing it to an algorithm. The following example demonstrates this. Note that you have to specify the method pointer as &string::empty. The &string:: part is not optional.
void findEmptyString(const vector<string>& strings){auto endIter = end(strings);auto it = find_if(begin(strings), endIter, mem_fn(&string::empty));if (it == endIter) {cout << "No empty strings!" << endl;} else {cout << "Empty string at position: "<< static_cast<int>(it - begin(strings)) << endl;}}
mem_fn() generates a function object that serves as the callback for find_if(). Each time it is called back, it calls the empty() method on its argument.
mem_fn() works exactly the same when you have a container of pointers to objects instead of objects themselves. Here is an example:
void findEmptyString(const vector<string*>& strings){auto endIter = end(strings);auto it = find_if(begin(strings), endIter, mem_fn(&string::empty));// Remainder of function omitted because it is the same as earlier}
mem_fn() is not the most intuitive way to implement the findEmptyString() function. Using lambda expressions, it can be implemented in a much more readable and elegant way. Here is the implementation using a lambda expression working on a container of objects:
void findEmptyString(const vector<string>& strings){auto endIter = end(strings);auto it = find_if(begin(strings), endIter,[](const string& str){ return str.empty(); });// Remainder of function omitted because it is the same as earlier}
Similarly, the following uses a lambda expression working on a container of pointers to objects:
void findEmptyString(const vector<string*>& strings){auto endIter = end(strings);auto it = find_if(begin(strings), endIter,[](const string* str){ return str->empty(); });// Remainder of function omitted because it is the same as earlier}
InvokersC++17 introduces std::invoke(), defined in <functional>, which you can use to call any callable object with a set of parameters. The following example uses invoke() three times: once to invoke a normal function, once to invoke a lambda expression, and once to invoke a member function on a string instance.
void printMessage(string_view message) { cout << message << endl; }int main(){invoke(printMessage, "Hello invoke.");invoke([](const auto& msg) { cout << msg << endl; }, "Hello invoke.");string msg = "Hello invoke.";cout << invoke(&string::size, msg) << endl;}
By itself, invoke() is not that useful, because you might as well just call the function or the lambda expression directly. However, it is very useful in templated code where you need to invoke some arbitrary callable object.
You can write your own function objects to perform more specific tasks than those provided by the predefined functors, and if you need to do something more complex than is suitable for a lambda expression. Here is a very simple function object example:
class myIsDigit{public:bool operator()(char c) const { return ::isdigit(c) != 0; }};bool isNumber(string_view str){auto endIter = end(str);auto it = find_if(begin(str), endIter, not_fn(myIsDigit()));return (it == endIter);}
Note that the overloaded function call operator of the myIsDigit class must be const in order to pass objects of it to find_if().
Before C++11, a class defined locally in the scope of a function could not be used as a template argument. This limitation has been removed, as shown in the following example:
bool isNumber(string_view str){class myIsDigit{public:bool operator()(char c) const { return ::isdigit(c) != 0; }};auto endIter = end(str);auto it = find_if(begin(str), endIter, not_fn(myIsDigit()));return (it == endIter);}
Chapter 16 lists all available Standard Library algorithms, divided into different categories. Most of the algorithms are defined in the <algorithm> header file, but a few are located in <numeric> and in <utility>. They are all in the std namespace. I cannot discuss all available algorithms in this chapter, and so I have picked a number of categories and provided examples for them. Once you know how to use these algorithms, you should have no problems with the other algorithms. Consult a Standard Library Reference, see Appendix B, for a full reference of all the algorithms.
First, a few more words on iterators. There are five types of iterators: input, output, forward, bidirectional, and random access. These are described in Chapter 17. There is no formal class hierarchy of these iterators, because the implementations for each container are not part of the standard hierarchy. However, one can deduce a hierarchy based on the functionality they are required to provide. Specifically, every random-access iterator is also bidirectional, every bidirectional iterator is also forward, and every forward iterator is also input. Iterators that satisfy the requirements for output iterators are called mutable iterators; otherwise they are called constant iterators. Figure 18-1 shows such hierarchy. Dotted lines are used because the figure is not a real class hierarchy.
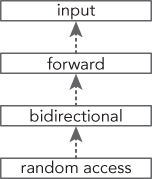
The standard way for the algorithms to specify what kind of iterators they need is to use the following names for the iterator template type arguments: InputIterator, OutputIterator, ForwardIterator, BidirectionalIterator, and RandomAccessIterator. These names are just names: they don’t provide binding type checking. Therefore, you could, for example, try to call an algorithm expecting a RandomAccessIterator by passing a bidirectional iterator. The template cannot do type checking, so it would allow this instantiation. However, the code in the function that uses the random-access iterator capabilities would fail to compile on the bidirectional iterator. Thus, the requirement is enforced, just not where you would expect. The error message can therefore be somewhat confusing. For example, attempting to use the generic sort() algorithm, which requires a random access iterator, on a list, which provides only a bidirectional iterator, gives a cryptic error of more than 30 lines in Visual C++ 2017, of which the first two lines are as follows:
…\vc\tools\msvc\14.11.25301\include\algorithm(3032): error C2784: 'unknown-type std::operator -(const std::move_iterator<_RanIt> &,const std::move_iterator<_RanIt2> &)': could not deduce template argument for 'const std::move_iterator<_RanIt> &' from 'std::_List_unchecked_iterator<std::_List_val<std::_List_simple_types<int>>>'…\vc\tools\msvc\14.11.25301\include\xutility(2191): note: see declaration of 'std::operator -'
The non-modifying sequence algorithms include functions for searching elements in a range and for comparing two ranges to each other; they also include a number of counting algorithms.
You’ve already seen examples of two search algorithms: find() and find_if(). The Standard Library provides several other variations of the basic find() algorithm that work on sequences of elements. The section, “Search Algorithms,” in Chapter 16 describes the different search algorithms that are available, including their complexity.
All the algorithms use default comparisons of operator== or operator<, but also provide overloaded versions that allow you to specify a comparison callback.
Here are examples of some of the search algorithms:
// The list of elements to be searchedvector<int> myVector = { 5, 6, 9, 8, 8, 3 };auto beginIter = cbegin(myVector);auto endIter = cend(myVector);// Find the first element that does not satisfy the given lambda expressionauto it = find_if_not(beginIter, endIter, [](int i){ return i < 8; });if (it != endIter) {cout << "First element not < 8 is " << *it << endl;}// Find the first pair of matching consecutive elementsit = adjacent_find(beginIter, endIter);if (it != endIter) {cout << "Found two consecutive equal elements with value " << *it << endl;}// Find the first of two valuesvector<int> targets = { 8, 9 };it = find_first_of(beginIter, endIter, cbegin(targets), cend(targets));if (it != endIter) {cout << "Found one of 8 or 9: " << *it << endl;}// Find the first subsequencevector<int> sub = { 8, 3 };it = search(beginIter, endIter, cbegin(sub), cend(sub));if (it != endIter) {cout << "Found subsequence {8,3}" << endl;} else {cout << "Unable to find subsequence {8,3}" << endl;}// Find the last subsequence (which is the same as the first in this example)auto it2 = find_end(beginIter, endIter, cbegin(sub), cend(sub));if (it != it2) {cout << "Error: search and find_end found different subsequences "<< "even though there is only one match." << endl;}// Find the first subsequence of two consecutive 8sit = search_n(beginIter, endIter, 2, 8);if (it != endIter) {cout << "Found two consecutive 8s" << endl;} else {cout << "Unable to find two consecutive 8s" << endl;}
Here is the output:
First element not < 8 is 9Found two consecutive equal elements with value 8Found one of 8 or 9: 9Found subsequence {8,3}Found two consecutive 8s
Specialized SearchersC++17 adds an optional extra parameter to the search() algorithm that allows you to specify which search algorithm to use. You have three options: default_searcher, boyer_moore_searcher, or boyer_moore_horspool_searcher, all defined in <functional>. The last two options implement the well-known Boyer-Moore and Boyer-Moore-Horspool search algorithms. These are very efficient, and can be used to find a substring in a larger piece of text. The complexity of the Boyer-Moore searchers is as follows (N is the size of the sequence to search in, the haystack, and M is the size of the pattern to find, the needle):
These are the theoretical worst-case complexities. In practice, these specialized searchers are sublinear, better than O(N), which means they are much faster than the default one! They are sublinear because they are able to skip characters instead of looking at each single character in the haystack. They also have an interesting property that the longer the needle is, the faster they work, as they will be able to skip more characters in the haystack. The difference between the Boyer-Moore and the Boyer-Moore-Horspool algorithm is that the latter has less constant overhead for its initialization and in each loop iteration of its algorithm; however, its worst-case complexity can be significantly higher than for the Boyer-Moore algorithm. So, which one to choose depends on your specific use case.
Here is an example of using a Boyer-Moore searcher:
string text = "This is the haystack to search a needle in.";string toSearchFor = "needle";auto searcher = std::boyer_moore_searcher(cbegin(toSearchFor), cend(toSearchFor));auto result = search(cbegin(text), cend(text), searcher);if (result != cend(text)) {cout << "Found the needle." << endl;} else {cout << "Needle not found." << endl;}
You can compare entire ranges of elements in three different ways: equal(), mismatch(), and lexicographical_compare(). These algorithms have the advantage that you can compare ranges in different containers. For example, you can compare the contents of a vector with the contents of a list. In general, these algorithms work best with sequential containers. They work by comparing the values in corresponding positions of the two collections to each other. The following list describes how each algorithm works.
equal() returns true if all corresponding elements are equal. Originally, equal() accepted three iterators: begin and end iterators for the first range, and a begin iterator for the second range. This version required both ranges to have the same number of elements. Since C++14, there is an overload accepting four iterators: begin and end iterators for the first range, and begin and end iterators for the second range. This version can cope with ranges of different sizes. It’s recommended to always use the four-iterator version because it’s safer!mismatch() returns iterators, one iterator for each range, to indicate where in the range the corresponding elements mismatch. There are three-iterator and four-iterator versions available, just as with equal(). It’s again recommended to use the four-iterator version, because of safety!lexicographical_compare()returns true if the first unequal element in the first range is less than its corresponding element in the second range, or, if the first range has fewer elements than the second and all elements in the first range are equal to their corresponding initial subsequence in the second set. lexicographical_compare() gets its name because it resembles the rules for comparing strings, but extends this set of rules to deal with objects of any type.Here are some examples of these algorithms:
// Function template to populate a container of ints.// The container must support push_back().template<typename Container>void populateContainer(Container& cont){int num;while (true) {cout << "Enter a number (0 to quit): ";cin >> num;if (num == 0) {break;}cont.push_back(num);}}int main(){vector<int> myVector;list<int> myList;cout << "Populate the vector:" << endl;populateContainer(myVector);cout << "Populate the list:" << endl;populateContainer(myList);// Compare the two containersif (equal(cbegin(myVector), cend(myVector),cbegin(myList), cend(myList))) {cout << "The two containers have equal elements" << endl;} else {// If the containers were not equal, find out why notauto miss = mismatch(cbegin(myVector), cend(myVector),cbegin(myList), cend(myList));cout << "The following initial elements are the same in "<< "the vector and the list:" << endl;for (auto i = cbegin(myVector); i != miss.first; ++i) {cout << *i << '\t';}cout << endl;}// Now order them.if (lexicographical_compare(cbegin(myVector), cend(myVector),cbegin(myList), cend(myList))) {cout << "The vector is lexicographically first." << endl;} else {cout << "The list is lexicographically first." << endl;}return 0;}
Here is a sample run of the program:
Populate the vector:Enter a number (0 to quit): 5Enter a number (0 to quit): 6Enter a number (0 to quit): 7Enter a number (0 to quit): 0Populate the list:Enter a number (0 to quit): 5Enter a number (0 to quit): 6Enter a number (0 to quit): 9Enter a number (0 to quit): 8Enter a number (0 to quit): 0The following initial elements are the same in the vector and the list:5 6The vector is lexicographically first.
The non-modifying counting algorithms are all_of(), any_of(), none_of(), count(), and count_if(). Here are some examples of the first three algorithms. (An example of count_if() is given earlier in this chapter.)
// all_of()vector<int> vec2 = { 1, 1, 1, 1 };if (all_of(cbegin(vec2), cend(vec2), [](int i){ return i == 1; })) {cout << "All elements are == 1" << endl;} else {cout << "Not all elements are == 1" << endl;}// any_of()vector<int> vec3 = { 0, 0, 1, 0 };if (any_of(cbegin(vec3), cend(vec3), [](int i){ return i == 1; })) {cout << "At least one element == 1" << endl;} else {cout << "No elements are == 1" << endl;}// none_of()vector<int> vec4 = { 0, 0, 0, 0 };if (none_of(cbegin(vec4), cend(vec4), [](int i){ return i == 1; })) {cout << "All elements are != 1" << endl;} else {cout << "Some elements are == 1" << endl;}
The output is as follows:
All elements are == 1At least one element == 1All elements are != 1
The Standard Library provides a variety of modifying sequence algorithms that perform tasks such as copying elements from one range to another, removing elements, or reversing the order of elements in a range.
Some modifying algorithms use the concept of a source and a destination range. The elements are read from the source range and modified in the destination range. Other algorithms perform their work in-place, that is, they only require one range.
The section “Modifying Sequence Algorithms” in Chapter 16 lists all available modifying algorithms with a description of each one. This section provides code examples for a number of those algorithms. If you understand how to use the algorithms explained in this section, you should not have any problems using the other algorithms for which no examples are given.
A first version of the transform() algorithm applies a callback to each element in a range and expects the callback to generate a new element, which it stores in the specified destination range. The source and destination ranges can be the same if you want transform() to replace each element in a range with the result from the call to the callback. The parameters are a begin and end iterator of the source sequence, a begin iterator of the destination sequence, and the callback. For example, you could add 100 to each element in a vector like this:
vector<int> myVector;populateContainer(myVector);cout << "The vector contains:" << endl;for (const auto& i : myVector) { cout << i << " "; }cout << endl;transform(begin(myVector), end(myVector), begin(myVector),[](int i){ return i + 100;});cout << "The vector contains:" << endl;for (const auto& i : myVector) { cout << i << " "; }
Another version of transform() calls a binary function on pairs of elements in a range. It requires a begin and end iterator of the first range, a begin iterator of the second range, and a begin iterator of the destination range. The following example creates two vectors and uses transform() to calculate the sum of pairs of elements and store the result back in the first vector:
vector<int> vec1, vec2;cout << "Vector1:" << endl; populateContainer(vec1);cout << "Vector2:" << endl; populateContainer(vec2);if (vec2.size() < vec1.size()){cout << "Vector2 should be at least the same size as vector1." << endl;return 1;}// Create a lambda to print the contents of a containerauto printContainer = [](const auto& container) {for (auto& i : container) { cout << i << " "; }cout << endl;};cout << "Vector1: "; printContainer(vec1);cout << "Vector2: "; printContainer(vec2);transform(begin(vec1), end(vec1), begin(vec2), begin(vec1),[](int a, int b){return a + b;});cout << "Vector1: "; printContainer(vec1);cout << "Vector2: "; printContainer(vec2);
The output could look like this:
Vector1:Enter a number (0 to quit): 1Enter a number (0 to quit): 2Enter a number (0 to quit): 0Vector2:Enter a number (0 to quit): 11Enter a number (0 to quit): 22Enter a number (0 to quit): 33Enter a number (0 to quit): 0Vector1: 1 2Vector2: 11 22 33Vector1: 12 24Vector2: 11 22 33
The copy() algorithm allows you to copy elements from one range to another, starting with the first element and proceeding to the last element in the range. The source and destination ranges must be different, but, with restrictions, they can overlap. The restrictions are as follows: for copy(b,e,d), overlapping is fine if d is before b, however, if d is within [b,e), then the behavior is undefined. As with all modifying algorithms, copy() cannot insert elements into the destination. It just overwrites whatever elements are there already. Chapter 21 describes how to use iterator adaptors to insert elements into a container or stream with copy().
Here is a simple example of copy() that uses the resize() method on a vector to ensure that there is enough space in the destination container. It copies all elements from vec1 to vec2:
vector<int> vec1, vec2;populateContainer(vec1);vec2.resize(size(vec1));copy(cbegin(vec1), cend(vec1), begin(vec2));for (const auto& i : vec2) { cout << i << " "; }
There is also a copy_backward() algorithm, which copies the elements from the source backward to the destination. In other words, it starts with the last element of the source, puts it in the last position in the destination range, and then moves backward after each copy. Also for copy_backward(), the source and destination ranges must be different, but, with restrictions, they can again overlap. The restrictions this time are as follows: for copy_backward(b,e,d), overlapping is fine if d is after e, however, if d is within (b,e], then the behavior is undefined. The preceding example can be modified to use copy_backward() instead of copy(), as follows. Note that you need to specify end(vec2) as a third argument instead of begin(vec2).
copy_backward(cbegin(vec1), cend(vec1), end(vec2));This results in exactly the same output.
copy_if() works by having an input range specified by two iterators, an output destination specified by one iterator, and a predicate (for example, a function or lambda expression). The algorithm copies all elements that satisfy the given predicate to the destination. Remember, copy does not create or extend containers; it merely replaces existing elements, so the destination should be big enough to hold all elements to be copied. Of course, after copying the elements, it might be desirable to remove the space “beyond” where the last element was copied to. To facilitate this, copy_if() returns an iterator to the one-past-the-last-copied element in the destination range. This method can be used to determine how many elements should be removed from the destination container. The following example demonstrates this by copying only the even numbers to vec2:
vector<int> vec1, vec2;populateContainer(vec1);vec2.resize(size(vec1));auto endIterator = copy_if(cbegin(vec1), cend(vec1),begin(vec2), [](int i){ return i % 2 == 0; });vec2.erase(endIterator, end(vec2));for (const auto& i : vec2) { cout << i << " "; }
copy_n() copies n elements from the source to the destination. The first parameter of copy_n() is the start iterator. The second parameter is an integer specifying the number of elements to copy, and the third parameter is the destination iterator. The copy_n() algorithm does not perform any bounds checking, so you must make sure that the start iterator, incremented by the number of elements to copy, does not exceed the end() of the collection or your program will have undefined behavior. Here is an example:
vector<int> vec1, vec2;populateContainer(vec1);size_t cnt = 0;cout << "Enter number of elements you want to copy: ";cin >> cnt;cnt = min(cnt, size(vec1));vec2.resize(cnt);copy_n(cbegin(vec1), cnt, begin(vec2));for (const auto& i : vec2) { cout << i << " "; }
There are two move-related algorithms: move() and move_backward(). They both use move semantics, which are discussed in Chapter 9. You have to provide a move assignment operator in your element classes if you want to use these algorithms on containers with elements of your own types, as demonstrated in the following example. The main() function creates a vector with three MyClass objects, and then moves those elements from vecSrc to vecDst. Note that the code includes two different uses of move(). The move() function accepting a single argument converts an lvalue into an rvalue and is defined in <utility>, while move() accepting three arguments is the Standard Library move() algorithm to move elements between containers. Consult Chapter 9 for details on implementing move assignment operators and the use of the single parameter version of std::move().
class MyClass{public:MyClass() = default;MyClass(const MyClass& src) = default;MyClass(string_view str) : mStr(str) {}virtual ~MyClass() = default;// Move assignment operatorMyClass& operator=(MyClass&& rhs) noexcept {if (this == &rhs)return *this;mStr = std::move(rhs.mStr);cout << "Move operator= (mStr=" << mStr << ")" << endl;return *this;}void setString(string_view str) { mStr = str; }string_view getString() const {return mStr;}private:string mStr;};int main(){vector<MyClass> vecSrc {MyClass("a"), MyClass("b"), MyClass("c")};vector<MyClass> vecDst(vecSrc.size());move(begin(vecSrc), end(vecSrc), begin(vecDst));for (const auto& c : vecDst) { cout << c.getString() << " "; }return 0;}
The output is as follows:
Move operator= (mStr=a)Move operator= (mStr=b)Move operator= (mStr=c)a b c
move_backward() uses the same move mechanism as move(), but it moves the elements starting from the last to the first element. For both move() and move_backward(), the source and destination ranges are allowed to overlap with certain restrictions. These restrictions are the same as discussed for copy() and copy_backward().
The replace() and replace_if() algorithms replace elements in a range matching a value or predicate, respectively, with a new value. Take replace_if() as an example. Its first and second parameters specify the range of elements in your container. The third parameter is a function or lambda expression that returns true or false. If it returns true, the value in the container is replaced with the value given as fourth parameter; if it returns false, it leaves the original value.
For example, you might want to replace all odd values in a container with the value zero:
vector<int> vec;populateContainer(vec);replace_if(begin(vec), end(vec), [](int i){ return i % 2 != 0; }, 0);for (const auto& i : vec) { cout << i << " "; }
There are also variants of replace() and replace_if() called replace_copy() and replace_copy_if() that copy the results to a different destination range. They are similar to copy(), in that the destination range must already be large enough to hold the new elements.
Suppose you have a range of elements and you want to remove elements matching a certain condition. The first solution that you might think of is to check the documentation to see if your container has an erase() method, and then iterate over all the elements and call erase() for each element that matches the condition. The vector is an example of a container that has such an erase() method. However, if applied to the vector container, this solution is very inefficient as it will cause a lot of memory operations to keep the vector contiguous in memory, resulting in a quadratic complexity.1 This solution is also error-prone, because you need to be careful that you keep your iterators valid after a call to erase(). For example, here is a function that removes empty strings from a vector of strings without using algorithms. Note how iter is carefully manipulated inside the for loop:
void removeEmptyStringsWithoutAlgorithms(vector<string>& strings){for (auto iter = begin(strings); iter != end(strings); ) {if (iter->empty())iter = strings.erase(iter);else++iter;}}
This solution is inefficient and not recommended. The correct solution for this problem is the so-called remove-erase-idiom, which runs in linear time and is explained next.
Algorithms have access only to the iterator abstraction, not to the container. Thus, the remove algorithms cannot really remove them from the underlying container. Instead, the algorithms work by replacing the elements that match the given value or predicate with the next element that does not match the given value or predicate. It does so using move assignments. The result is that the range becomes partitioned into two sets: the elements to be kept and the elements to be erased. An iterator is returned that points to the first element in the range of elements to be erased. If you want to actually erase these elements from the container, you must first use the remove() algorithm, then call erase() on the container to erase all the elements from the returned iterator up to the end of the range. This is the remove-erase-idiom. Here is an example of a function that removes empty strings from a vector of strings:
void removeEmptyStrings(vector<string>& strings){auto it = remove_if(begin(strings), end(strings),[](const string& str){ return str.empty(); });// Erase the removed elements.strings.erase(it, end(strings));}int main(){vector<string> myVector = {"", "one", "", "two", "three", "four"};for (auto& str : myVector) { cout << "\"" << str << "\" "; }cout << endl;removeEmptyStrings(myVector);for (auto& str : myVector) { cout << "\"" << str << "\" "; }cout << endl;return 0;}
The output is as follows:
"" "one" "" "two" "three" "four""one" "two" "three" "four"
The remove_copy() and remove_copy_if() variations of remove() and remove_if() do not change the source range. Instead, they copy all kept elements to a different destination range. They are similar to copy(), in that the destination range must already be large enough to hold the new elements.
The unique() algorithm is a special case of remove() that removes all duplicate contiguous elements. The list container provides its own unique() method that implements the same semantics. You should generally use unique() on sorted sequences, but nothing prevents you from running it on unsorted sequences.
The basic form of unique() runs in place, but there is also a version of the algorithm called unique_copy() that copies its results to a new destination range.
Chapter 17 shows an example of the list::unique() algorithm in the section “list Example: Determining Enrollment,” so an example of the general form is omitted here.
sampleThe sample() algorithm returns a selection of n randomly chosen elements from a given source range and stores them in a destination range. It requires five parameters:
Here is an example (details on how to use random number generation engines, and how to “seed” them are explained in Chapter 20):
vector<int> vec{ 1,2,3,4,5,6,7,8,9,10 };const size_t numberOfSamples = 5;vector<int> samples(numberOfSamples);random_device seeder;const auto seed = seeder.entropy() ? seeder() : time(nullptr);default_random_engine engine(static_cast<default_random_engine::result_type>(seed));for (int i = 0; i < 6; ++i) {sample(cbegin(vec), cend(vec), begin(samples), numberOfSamples, engine);for (const auto& sample : samples) { cout << sample << " "; }cout << endl;}
Here is some possible output:
1 2 5 8 101 2 4 5 75 6 8 9 102 3 4 6 72 5 7 8 101 2 5 6 7
The reverse() algorithm reverses the order of the elements in a range. The first element in the range is swapped with the last, the second with the second-to-last, and so on.
The basic form of reverse() runs in place and requires two arguments: a start and end iterator for the range. There is also a version of the algorithm called reverse_copy() that copies its results to a new destination range and requires three arguments: a start and end iterator for the source range, and a start iterator for the destination range. The destination range must already be large enough to hold the new elements.
shuffle() rearranges the elements of a range in a random order with a linear complexity. It’s useful for implementing tasks like shuffling a deck of cards. shuffle() requires a start and end iterator for the range that you want to shuffle and a uniform random number generator object that specifies how the random numbers should be generated. Random number generators are discussed in detail in Chapter 20.
There are only two algorithms in this category: for_each() and for_each_n(). The latter is introduced with C++17. They execute a callback on each element of the range, or on the first n elements of a range, respectively. You can use them with simple function callbacks or lambda expressions for things like printing elements from a container. The algorithms are mentioned here so you know they exist; however, it’s often easier and more readable to use a simple range-based for loop instead.
Following is an example using a generic lambda expression, printing the elements from a map:
map<int, int> myMap = { { 4, 40 }, { 5, 50 }, { 6, 60 } };for_each(cbegin(myMap), cend(myMap), [](const auto& p){ cout << p.first << "->" << p.second << endl; });
The type of p is const pair<int, int>&. The output is as follows:
4->405->506->60
The following example shows how to use the for_each() algorithm and a lambda expression to calculate the sum and the product of a range of elements at the same time. Note that the lambda expression explicitly captures only those variables it needs. It captures them by reference; otherwise, changes made to sum and product in the lambda expression would not be visible outside the lambda.
vector<int> myVector;populateContainer(myVector);int sum = 0;int product = 1;for_each(cbegin(myVector), cend(myVector),[&sum, &product](int i){sum += i;product *= i;});cout << "The sum is " << sum << endl;cout << "The product is " << product << endl;
This example can also be written with a functor in which you accumulate information that you can retrieve after for_each() has finished processing each element. For example, you could calculate both the sum and product of the elements in one pass by writing a functor SumAndProduct that tracks both at the same time:
class SumAndProduct{public:void operator()(int value);int getSum() const { return mSum; }int getProduct() const { return mProduct; }private:int mSum = 0;int mProduct = 1;};void SumAndProduct::operator()(int value){mSum += value;mProduct *= value;}int main(){vector<int> myVector;populateContainer(myVector);SumAndProduct func;func = for_each(cbegin(myVector), cend(myVector), func);cout << "The sum is " << func.getSum() << endl;cout << "The product is " << func.getProduct() << endl;return 0;}
You might be tempted to ignore the return value of for_each(), yet still try to read information from func after the call. However, that doesn’t work because the functor is copied into the for_each(), and at the end, this copy is returned from the call. You must capture the return value in order to ensure correct behavior.
A final point about both for_each() and for_each_n(), discussed next, is that your lambda or callback is allowed to take its parameter by reference and modify it. That has the effect of changing values in the actual iterator range. The voter registration example later in this chapter shows a use of this capability.
for_each_nThe for_each_n() algorithm requires a begin iterator of the range, the number of elements to iterate over, and a function callback. It returns an iterator equal to begin + n. As usual, it does not perform any bounds checking. Here is an example that only iterates over the first two elements of a map:
map<int, int> myMap = { { 4, 40 }, { 5, 50 }, { 6, 60 } };for_each_n(cbegin(myMap), 2, [](const auto& p){ cout << p.first << "->" << p.second << endl; });
The C++ Standard Library provides the following swap and exchange algorithms.
std::swap() is used to efficiently swap two values, using move semantics if available. Its use is straightforward:
int a = 11;int b = 22;cout << "Before swap(): a = " << a << ", b = " << b << endl;swap(a, b);cout << "After swap(): a = " << a << ", b = " << b << endl;
The output is as follows:
Before swap(): a = 11, b = 22After swap(): a = 22, b = 11
exchangestd::exchange(), defined in <utility>, replaces a value with a new value and returns the old value, as in this example:
int a = 11;int b = 22;cout << "Before exchange(): a = " << a << ", b = " << b << endl;int returnedValue = exchange(a, b);cout << "After exchange(): a = " << a << ", b = " << b << endl;cout << "exchange() returned: " << returnedValue << endl;
The output is as follows:
Before exchange(): a = 11, b = 22After exchange(): a = 22, b = 22exchange() returned: 11
exchange() is useful in implementing move assignment operators. A move assignment operator needs to move the data from a source object to a destination object. Often, the data in the source object is nullified. Typically, this is done as follows. Suppose Foo has as data member a pointer to some raw memory, called mPtr:
Foo& operator=(Foo&& rhs) noexcept{// Check for self-assignmentif (this == &rhs) { return *this; }// Free the old memorydelete mPtr; mPtr = nullptr;// Move datamPtr = rhs.mPtr; // Move data from source to destinationrhs.mPtr = nullptr; // Nullify data in sourcereturn *this;}
The assignments to mPtr and to rhs.mPtr near the end of the method can be implemented using exchange() as follows:
Foo& operator=(Foo&& rhs) noexcept{// Check for self-assignmentif (this == &rhs) { return *this; }// Free the old memorydelete mPtr; mPtr = nullptr;// Move datamPtr = exchange(rhs.mPtr, nullptr);// Move + nullifyreturn *this;}
partition_copy() copies elements from a source to two different destinations. The specific destination for each element is selected based on the result of a predicate, either true or false. The returned value of partition_copy() is a pair of iterators: one iterator referring to one-past-the-last-copied element in the first destination range, and one iterator referring to one-past-the-last-copied element in the second destination range. These returned iterators can be used in combination with erase() to remove excess elements from the two destination ranges, just as in the earlier copy_if() example. The following example asks the user to enter a number of integers, which are then partitioned into two destination vectors: one for the even numbers and one for the odd numbers.
vector<int> vec1, vecOdd, vecEven;populateContainer(vec1);vecOdd.resize(size(vec1));vecEven.resize(size(vec1));auto pairIters = partition_copy(cbegin(vec1), cend(vec1),begin(vecEven), begin(vecOdd),[](int i){ return i % 2 == 0; });vecEven.erase(pairIters.first, end(vecEven));vecOdd.erase(pairIters.second, end(vecOdd));cout << "Even numbers: ";for (const auto& i : vecEven) { cout << i << " "; }cout << endl << "Odd numbers: ";for (const auto& i : vecOdd) { cout << i << " "; }
The output can be as follows:
Enter a number (0 to quit): 11Enter a number (0 to quit): 22Enter a number (0 to quit): 33Enter a number (0 to quit): 44Enter a number (0 to quit): 0Even numbers: 22 44Odd numbers: 11 33
The partition() algorithm sorts a sequence such that all elements for which a predicate returns true are before all elements for which it returns false, without preserving the original order of the elements within each partition. The following example demonstrates how to partition a vector into all even numbers followed by all odd numbers:
vector<int> vec;populateContainer(vec);partition(begin(vec), end(vec), [](int i){ return i % 2 == 0; });cout << "Partitioned result: ";for (const auto& i : vec) { cout << i << " "; }
The output can be as follows:
Enter a number (0 to quit): 55Enter a number (0 to quit): 44Enter a number (0 to quit): 33Enter a number (0 to quit): 22Enter a number (0 to quit): 11Enter a number (0 to quit): 0Partitioned result: 22 44 33 55 11
A couple of other partition algorithms are available. See Chapter 16 for a list.
The Standard Library provides several variations of sorting algorithms. A “sorting algorithm” reorders the contents of a container such that an ordering is maintained between sequential elements of the collection. Thus, it applies only to sequential collections. Sorting is not relevant for ordered associative containers because they already maintain elements in a sorted order. Sorting is not relevant to the unordered associative containers either, because they have no concept of ordering. Some containers, such as list and forward_list, provide their own sorting methods, because these methods can be implemented more efficiently than a generic sorting mechanism. Consequently, the generic sorting algorithms are most useful for vectors, deques, arrays, and C-style arrays.
The sort() algorithm sorts a range of elements in O(N log N) time in general. Following the application of sort() to a range, the elements in the range are in nondecreasing order (lowest to highest), according to operator<. If you don’t like that order, you can specify a different comparator, such as greater.
A variant of sort(), called stable_sort(), maintains the relative order of equal elements in a range, which means that it is less efficient than the sort() algorithm.
Here is an example of sort():
vector<int> vec;populateContainer(vec);sort(begin(vec), end(vec), greater<>());
There is also is_sorted() and is_sorted_until(). is_sorted() returns true if a given range is sorted, while is_sorted_until() returns an iterator such that everything before this iterator is sorted.
There are several search algorithms that work only on sequences that are sorted, or that are at least partitioned on the element that is searched for. These algorithms are binary_search(), lower_bound(), upper_bound(), and equal_range(). The lower_bound(), upper_bound(), and equal_range() algorithms are similar to their method equivalents on the map and set containers. See Chapter 17 for an example on how to use them on such containers.
The lower_bound() algorithm finds the first element in a sorted range not less than (that is greater or equal to) a given value. It is often used to find at which position in a sorted vector a new value should be inserted, so that the vector remains sorted. Here is an example:
vector<int> vec;populateContainer(vec);// Sort the containersort(begin(vec), end(vec));cout << "Sorted vector: ";for (const auto& i : vec) { cout << i << " "; }cout << endl;while (true) {int num;cout << "Enter a number to insert (0 to quit): ";cin >> num;if (num == 0) {break;}auto iter = lower_bound(begin(vec), end(vec), num);vec.insert(iter, num);cout << "New vector: ";for (const auto& i : vec) { cout << i << " "; }cout << endl;}
The binary_search() algorithm finds a matching element in logarithmic time instead of linear time. It requires a start and end iterator specifying the range to search in, a value to search, and optionally a comparison callback. It returns true if the value is found in the specified range, false otherwise. The following example demonstrates this algorithm:
vector<int> vec;populateContainer(vec);// Sort the containersort(begin(vec), end(vec));while (true) {int num;cout << "Enter a number to find (0 to quit): ";cin >> num;if (num == 0) {break;}if (binary_search(cbegin(vec), cend(vec), num)) {cout << "That number is in the vector." << endl;} else {cout << "That number is not in the vector." << endl;}}
The set algorithms work on any sorted range. The includes() algorithm implements standard subset determination, checking if all the elements of one sorted range are included in another sorted range, in any order.
The set_union(), set_intersection(), set_difference(), and set_symmetric_difference() algorithms implement the standard semantics of those operations. In set theory, the result of union is all the elements in either set. The result of intersection is all the elements which are in both sets. The result of difference is all the elements in the first set but not the second. The result of symmetric difference is the “exclusive or” of sets: all the elements in one, but not both, sets.
Here are examples of how to use these algorithms:
vector<int> vec1, vec2, result;cout << "Enter elements for set 1:" << endl;populateContainer(vec1);cout << "Enter elements for set 2:" << endl;populateContainer(vec2);// set algorithms work on sorted rangessort(begin(vec1), end(vec1));sort(begin(vec2), end(vec2));DumpRange("Set 1: ", cbegin(vec1), cend(vec1));DumpRange("Set 2: ", cbegin(vec2), cend(vec2));if (includes(cbegin(vec1), cend(vec1), cbegin(vec2), cend(vec2))) {cout << "The second set is a subset of the first." << endl;}if (includes(cbegin(vec2), cend(vec2), cbegin(vec1), cend(vec1))) {cout << "The first set is a subset of the second" << endl;}result.resize(size(vec1) + size(vec2));auto newEnd = set_union(cbegin(vec1), cend(vec1), cbegin(vec2),cend(vec2), begin(result));DumpRange("The union is: ", begin(result), newEnd);newEnd = set_intersection(cbegin(vec1), cend(vec1), cbegin(vec2),cend(vec2), begin(result));DumpRange("The intersection is: ", begin(result), newEnd);newEnd = set_difference(cbegin(vec1), cend(vec1), cbegin(vec2),cend(vec2), begin(result));DumpRange("The difference between set 1 and 2 is: ", begin(result), newEnd);newEnd = set_symmetric_difference(cbegin(vec1), cend(vec1),cbegin(vec2), cend(vec2), begin(result));DumpRange("The symmetric difference is: ", begin(result), newEnd);
DumpRange() is a small helper function template to write elements of a given range to the standard output stream; it is implemented as follows:
template<typename Iterator>void DumpRange(string_view message, Iterator begin, Iterator end){cout << message;for_each(begin, end, [](const auto& element) { cout << element << " "; });cout << endl;}
Here is a sample run of the program:
Enter elements for set 1:Enter a number (0 to quit): 5Enter a number (0 to quit): 6Enter a number (0 to quit): 7Enter a number (0 to quit): 8Enter a number (0 to quit): 0Enter elements for set 2:Enter a number (0 to quit): 8Enter a number (0 to quit): 9Enter a number (0 to quit): 10Enter a number (0 to quit): 0Set 1: 5 6 7 8Set 2: 8 9 10The union is: 5 6 7 8 9 10The intersection is: 8The difference between set 1 and set 2 is: 5 6 7The symmetric difference is: 5 6 7 9 10
The merge() algorithm allows you to merge two sorted ranges together, while maintaining the sorted order. The result is a sorted range containing all the elements of the two source ranges. It works in linear time. The following parameters are required:
Without merge(), you could still achieve the same effect by concatenating the two ranges and applying sort() to the result, but that would be less efficient, O(N log N) instead of the linear complexity of merge().
The following example demonstrates merge():
vector<int> vectorOne, vectorTwo, vectorMerged;cout << "Enter values for first vector:" << endl;populateContainer(vectorOne);cout << "Enter values for second vector:" << endl;populateContainer(vectorTwo);// Sort both containerssort(begin(vectorOne), end(vectorOne));sort(begin(vectorTwo), end(vectorTwo));// Make sure the destination vector is large enough to hold the values// from both source vectors.vectorMerged.resize(size(vectorOne) + size(vectorTwo));merge(cbegin(vectorOne), cend(vectorOne),cbegin(vectorTwo), cend(vectorTwo), begin(vectorMerged));DumpRange("Merged vector: ", cbegin(vectorMerged), cend(vectorMerged));
The min() and max() algorithms compare two or more elements of any type using operator< or a user-supplied binary predicate, returning a const reference to the smallest or largest element, respectively. The minmax() algorithm returns a pair containing the minimum and maximum value of two or more elements. These algorithms do not take iterator parameters. There is also min_element(), max_element(), and minmax_element() that work on iterator ranges.
The following program gives some examples:
int x = 4, y = 5;cout << "x is " << x << " and y is " << y << endl;cout << "Max is " << max(x, y) << endl;cout << "Min is " << min(x, y) << endl;// Using max() and min() on more than two valuesint x1 = 2, x2 = 9, x3 = 3, x4 = 12;cout << "Max of 4 elements is " << max({ x1, x2, x3, x4 }) << endl;cout << "Min of 4 elements is " << min({ x1, x2, x3, x4 }) << endl;// Using minmax()auto p2 = minmax({ x1, x2, x3, x4 });cout << "Minmax of 4 elements is <"<< p2.first << "," << p2.second << ">" << endl;// Using minmax() + C++17 structured bindingsauto[min1, max1] = minmax({ x1, x2, x3, x4 });cout << "Minmax of 4 elements is <"<< min1 << "," << max1 << ">" << endl;// Using minmax_element() + C++17 structured bindingsvector<int> vec{ 11, 33, 22 };auto[min2, max2] = minmax_element(cbegin(vec), cend(vec));cout << "minmax_element() result: <"<< *min2 << "," << *max2 << ">" << endl;
Here is the program output:
x is 4 and y is 5Max is 5Min is 4Max of 4 elements is 12Min of 4 elements is 2Minmax of 4 elements is <2,12>Minmax of 4 elements is <2,12>minmax_element() result: <11,33>
std::clamp() is a little helper function, defined in <algorithm>, that you can use to make sure that a value (v) is between a given minimum (lo) and maximum (hi). It returns a reference to lo if v < lo; returns a reference to hi if v > hi; otherwise returns a reference to v. Here is an example:
cout << clamp(-3, 1, 10) << endl;cout << clamp(3, 1, 10) << endl;cout << clamp(22, 1, 10) << endl;
The output is as follows:
1310
Parallel AlgorithmsC++17 adds support to more than 60 Standard Library algorithms for executing them in parallel to improve their performance. Examples include for_each(), all_of(), copy(), count_if(), find(), replace(), search(), sort(), transform(), and many more. Algorithms that support parallel execution have the option to accept a so-called execution policy as their first parameter.
The execution policy allows you to specify whether or not an algorithm is allowed to be executed in parallel or vectorized. There are three standard execution policy types, and three global instances of those types, all defined in the <execution> header file in the std::execution namespace.
| EXECUTION POLICY TYPE | GLOBAL INSTANCE | DESCRIPTION |
sequenced_policy |
seq |
The algorithm is not allowed to parallelize its execution. |
parallel_policy |
par |
The algorithm is allowed to parallelize its execution. |
parallel_unsequenced_policy |
par_unseq |
The algorithm is allowed to parallelize and vectorize its execution. It’s also allowed to migrate its execution across threads. |
A Standard Library implementation is free to add additional execution policies.
Note that for an algorithm executing with parallel_unsequenced_policy, function calls to callbacks are allowed to get interleaved, that is, they are unsequenced. This means that there are a lot of restrictions on what a function callback can do. For example, it cannot allocate/deallocate memory, acquire mutexes, use non-lock free std::atomics (see Chapter 23), and more. For the other standard policies, the function calls are sequenced, but in an indeterminate sequence. Such policies do not impose restrictions on what the function callbacks can do.
Parallel algorithms do not take any measures to prevent data races and deadlocks, so it is your responsibility to avoid them when executing an algorithm in parallel. Data race and deadlock prevention is discussed in detail in Chapter 23.
Here is an example of sorting the contents of a vector using a parallel policy:
sort(std::execution::par, begin(myVector), end(myVector));You’ve already seen an example of one numerical processing algorithm: accumulate(). The following sections give examples of some more numerical algorithms.
inner_product(), defined in <numeric>, calculates the inner product of two sequences. For example, the inner product in the following example is calculated as (1*9)+(2*8)+(3*7)+(4*6):
vector<int> v1{ 1, 2, 3, 4 };vector<int> v2{ 9, 8, 7, 6 };cout << inner_product(cbegin(v1), cend(v1), cbegin(v2), 0) << endl;
The output is 70.
The iota() algorithm, defined in the <numeric> header file, generates a sequence of values in a specified range starting with a specified value and applying operator++ to generate each successive value. The following example shows how to use this algorithm on a vector of integers, but note that it works on any element type that implements operator++:
vector<int> vec(10);iota(begin(vec), end(vec), 5);for (auto& i : vec) { cout << i << " "; }
The output is as follows:
5 6 7 8 9 10 11 12 13 14The gcd() algorithm returns the greatest common divisor, while lcm() returns the least common multiple of two integer types. Both are defined in <numeric>. Here is an example:
auto g = gcd(3, 18); // g = 3auto l = lcm(3, 18); // l = 18
reducestd::accumulate() is one of the few algorithms that does not support parallel execution. Instead, you need to use the newly introduced std::reduce() algorithm to calculate a generalized sum with the option to execute it in parallel. For example, the following two lines calculate the same sum, except that reduce() runs a parallel and vectorized version and thus is much faster, especially on big input ranges:
double result1 = std::accumulate(cbegin(vec), cend(vec), 0.0);double result2 = std::reduce(std::execution::par_unseq, cbegin(vec), cend(vec));
In general, both accumulate() and reduce() calculate the following sum for a range of elements [x0, xn), with a given initial value Init, and a given binary operator Ѳ:
Init Ѳ x0 Ѳ x1 Ѳ … Ѳ xn−1
transform_reducestd::inner_product() is another algorithm that does not support parallel execution. Instead, you need to use the generalized transform_reduce(), which has the option to execute in parallel, and which you can use to calculate the inner product, among others. Its use is similar to reduce(), so no example is given.
transform_reduce() calculates the following sum for a range of elements [x0, xn), with a given initial value Init, a given unary function f, and a given binary operator Ѳ:
Init Ѳ f(x0) Ѳ f(x1) Ѳ … Ѳ f(xn−1)
Scan AlgorithmsC++17 introduces four scan algorithms: exclusive_scan(), inclusive_scan(), transform_exclusive_scan(), and transform_inclusive_scan().
The following table shows which sums [y0, yn) are calculated by exclusive_scan() and by inclusive_scan()/partial_sum() for a range of elements [x0, xn), with a given initial value Init (0 for partial_sum()), and a given operator Ѳ.
exclusive_scan() |
inclusive_scan()/partial_sum() |
| y0 = Init y1 = Init Ѳ x0 y2 = Init Ѳ x0 Ѳ x1 … yn-1 = Init Ѳ x0 Ѳ x1 Ѳ … Ѳ xn−2 |
y0 = Init Ѳ x0 y1 = Init Ѳ x0 Ѳ x1 … yn-1 = Init Ѳ x0 Ѳ x1 Ѳ … Ѳ xn−1 |
transform_exclusive_scan() and transform_inclusive_scan() both first apply a unary function to the elements before calculating the generalized sum, similar to how transform_reduce() applies a unary function to the elements before reducing.
Note that all these scan algorithms can accept an optional execution policy to execute them in parallel. The order of evaluation for these scan algorithms is non-deterministic, while it is from left to right for partial_sum() and accumulate(). That’s also the reason why partial_sum() and accumulate() cannot be parallelized!
Voter fraud can be a problem everywhere. People sometimes attempt to register and vote in two or more different voting districts. Additionally, some people, for example, convicted felons, are ineligible to vote, but occasionally attempt to register and vote anyway. Using your newfound algorithm skills, you could write a simple voter registration auditing function that checks the voter rolls for certain anomalies.
The voter registration audit function should audit the voters’ information. Assume that voter registrations are stored by district in a map that maps district names to a vector of voters. Your audit function should take this map and a vector of convicted felons as parameters, and should remove all convicted felons from the vectors of voters. Additionally, the function should find all voters who are registered in more than one district and should remove those names from all districts. Voters with duplicate registrations must have all their registrations removed, and therefore become ineligible to vote. For simplicity, assume that the vector of voters is simply a vector of string names. A real application would obviously require more data, such as address and party affiliation.
The auditVoterRolls() function works in three steps:
vectors by making a call to getDuplicates().set of duplicates and the vector of convicted felons.vector all the names found in the combined set of duplicates and convicted felons. The approach taken here is to use for_each() to process each vector in the map, applying a lambda expression to remove the offending names from each vector.The following type aliases are used in the code:
using VotersMap = map<string, vector<string>>;using DistrictPair = pair<const string, vector<string>>;
Here’s the implementation of auditVoterRolls():
// Expects a map of string/vector<string> pairs keyed on district names// and containing vectors of all the registered voters in those districts.// Removes from each vector any name on the convictedFelons vector and// any name that is found on any other vector.void auditVoterRolls(VotersMap& votersByDistrict,const vector<string>& convictedFelons){// Get all the duplicate names.set<string> toRemove = getDuplicates(votersByDistrict);// Combine the duplicates and convicted felons -- we want// to remove names on both vectors from all voter rolls.toRemove.insert(cbegin(convictedFelons), cend(convictedFelons));// Now remove all the names we need to remove using// nested lambda expressions and the remove-erase-idiom.for_each(begin(votersByDistrict), end(votersByDistrict),[&toRemove](DistrictPair& district) {auto it = remove_if(begin(district.second),end(district.second), [&toRemove](const string& name) {return (toRemove.count(name) > 0);});district.second.erase(it, end(district.second));});}
This implementation uses the for_each() algorithm to demonstrate its use. Of course, instead of for_each(), you could use a range-based for loop as follows (also uses C++17 structured bindings):
for (auto&[district, voters] : votersByDistrict) {auto it = remove_if(begin(voters), end(voters),[&toRemove](const string& name) {return (toRemove.count(name) > 0);});voters.erase(it, end(voters));}
The getDuplicates() function must find any name that is on more than one voter registration list. There are several different approaches one could use to solve this problem. To demonstrate the adjacent_find() algorithm, this implementation combines the vectors from each district into one big vector and sorts it. At that point, any duplicate names between the different vectors will be next to each other in the big vector. Then the adjacent_find() algorithm can be used on the big, sorted vector to find all consecutive duplicates and store them in a set called duplicates. Here is the implementation:
// Returns a set of all names that appear in more than one vector in// the map.set<string> getDuplicates(const VotersMap& votersByDistrict){// Collect all the names from all the vectors into one big vector.vector<string> allNames;for (auto& district : votersByDistrict) {allNames.insert(end(allNames), begin(district.second),end(district.second));}// Sort the vector.sort(begin(allNames), end(allNames));// Now it's sorted, all duplicate names will be next to each other.// Use adjacent_find() to find instances of two or more identical names// next to each other.// Loop until adjacent_find() returns the end iterator.set<string> duplicates;for (auto lit = cbegin(allNames); lit != cend(allNames); ++lit) {lit = adjacent_find(lit, cend(allNames));if (lit == cend(allNames)) {break;}duplicates.insert(*lit);}return duplicates;}
In this implementation, allNames is of type vector<string>. That way, this example can show you how to use the sort() and adjacent_find() algorithms.
Another solution is to change the type of allNames to set<string>, which results in a more compact implementation, because a set doesn’t allow duplicates. This new solution loops over all vectors and tries to insert each name into allNames. When this insert fails, it means that there is already an element with that name in allNames, so the name is added to duplicates. Note that this code uses C++17 structured bindings.
set<string> getDuplicates(const VotersMap& votersByDistrict){set<string> allNames;set<string> duplicates;for (auto&[district, voters] : votersByDistrict) {for (auto& name : voters) {if (!allNames.insert(name).second) {duplicates.insert(name);}}}return duplicates;}
That’s the complete implementation of the voter roll audit functionality. Here is a small test program:
// Initialize map using uniform initializationVotersMap voters = {{"Orange", {"Amy Aardvark", "Bob Buffalo","Charles Cat", "Dwayne Dog"}},{"Los Angeles", {"Elizabeth Elephant", "Fred Flamingo","Amy Aardvark"}},{"San Diego", {"George Goose", "Heidi Hen", "Fred Flamingo"}}};vector<string> felons = {"Bob Buffalo", "Charles Cat"};// Local lambda expression to print a districtauto printDistrict = [](const DistrictPair& district) {cout << district.first << ":";for (auto& str : district.second) {cout << " {" << str << "}";}cout << endl;};cout << "Before Audit:" << endl;for (const auto& district : voters) { printDistrict(district); }cout << endl;auditVoterRolls(voters, felons);cout << "After Audit:" << endl;for (const auto& district : voters) { printDistrict(district); }cout << endl;
The output of the program is as follows:
Before Audit:Los Angeles: {Elizabeth Elephant} {Fred Flamingo} {Amy Aardvark}Orange: {Amy Aardvark} {Bob Buffalo} {Charles Cat} {Dwayne Dog}San Diego: {George Goose} {Heidi Hen} {Fred Flamingo}After Audit:Los Angeles: {Elizabeth Elephant}Orange: {Dwayne Dog}San Diego: {George Goose} {Heidi Hen}
This chapter concludes the basic Standard Library functionality. It provided an overview of the various algorithms and function objects that are available for your use. It also showed you how to use lambda expressions, which often make it easier to understand what your code is doing. I hope that you have gained an appreciation for the usefulness of the Standard Library containers, algorithms, and function objects. If not, think for a moment about rewriting the voter registration audit example without the Standard Library. You would need to write your own vector- and map-like classes, and your own searching, removing, iterating, and other algorithms. The program would be much longer, more error-prone, harder to debug, and more difficult to maintain.
The following chapters discuss a couple of other aspects of the C++ Standard Library. Chapter 19 discusses regular expressions. Chapter 20 covers a number of additional library utilities that are available for you to use, and Chapter 21 gives a taste of some more advanced features, such as allocators, iterator adaptors, and writing your own algorithms.
When you’re learning how to program in C or C++, it’s useful to think of a character as equivalent to a byte and to treat all characters as members of the ASCII (American Standard Code for Information Interchange) character set. ASCII is a 7-bit set usually stored in an 8-bit char type. In reality, experienced C++ programmers recognize that successful programs are used throughout the world. Even if you don’t initially write your program with international audiences in mind, you shouldn’t prevent yourself from localizing, or making the software locale aware, at a later date.
A critical aspect of localization is that you should never put any native-language string literals in your source code, except maybe for debug strings targeted at the developer. In Microsoft Windows applications, this is accomplished by putting the strings in STRINGTABLE resources. Most other platforms offer similar capabilities. If you need to translate your application to another language, translating those resources should be all you need to do, without requiring any source changes. There are tools available that will help you with this translation process.
To make your source code localizable, you should not compose sentences out of string literals, even if the individual literals can be localized. Here is an example:
cout << "Read " << n << " bytes" << endl;This statement cannot be localized to Dutch because it requires a reordering of the words. The Dutch translation is as follows:
cout << n << " bytes gelezen" << endl;To make sure you can properly localize this string, you could implement something like this:
cout << Format(IDS_TRANSFERRED, n) << endl;IDS_TRANSFERRED is the name of an entry in a string resource table. For the English version, IDS_TRANSFERRED could be defined as “Read $1 bytes”, while the Dutch version of the resource could be defined as “$1 bytes gelezen”. The Format() function loads the string resource, and substitutes $1 with the value of n.
The problem with viewing a character as a byte is that not all languages, or character sets, can be fully represented in 8 bits, or 1 byte. C++ has a built-in type called wchar_t that holds a wide character. Languages with non-ASCII (U.S.) characters, such as Japanese and Arabic, can be represented in C++ with wchar_t. However, the C++ standard does not define a size for wchar_t. Some compilers use 16 bits while others use 32 bits. To write cross-platform code, it is not safe to assume that wchar_t is of a particular size.
If there is any chance that your program will be used in a non-Western character set context (hint: there is!), you should use wide characters from the beginning. When working with wchar_t, string and character literals are prefixed with the letter L to indicate that a wide-character encoding should be used. For example, to initialize a wchar_t character to the letter m, you write it like this:
wchar_t myWideCharacter = L'm';There are wide-character versions of most of your favorite types and classes. The wide string class is wstring. The “prefix letter w” pattern applies to streams as well. Wide-character file output streams are handled with wofstream, and input is handled with wifstream. The joy of pronouncing these class names (woof-stream? whiff-stream?) is reason enough to make your programs locale aware! Streams are discussed in detail in Chapter 13.
There are also wide-versions of cout, cin, cerr, and clog available, called wcout, wcin, wcerr, and wclog. Using them is no different than using the non-wide versions:
wcout << L"I am a wide-character string literal." << endl;Wide characters are a great step forward because they increase the amount of space available to define a single character. The next step is to figure out how that space is used. In wide character sets, just like in ASCII, characters are represented by numbers, now called code points. The only difference is that each number does not fit in 8 bits. The map of characters to code points is quite a bit larger because it handles many different character sets in addition to the characters that English-speaking programmers are familiar with.
The Universal Character Set (UCS)—defined by the International Standard ISO 10646—and Unicode are both standardized sets of characters. They contain around one hundred thousand abstract characters, each identified by an unambiguous name and a code point. The same characters with the same numbers exist in both standards. Both have specific encodings that you can use. For example, UTF-8 is an example of a Unicode encoding where Unicode characters are encoded using one to four 8-bit bytes. UTF-16 encodes Unicode characters as one or two 16-bit values, and UTF-32 encodes Unicode characters as exactly 32 bits.
Different applications can use different encodings. Unfortunately, the C++ standard does not specify a size for wide characters (wchar_t). On Windows it is 16 bits, while on other platforms it could be 32 bits. You need to be aware of this when using wide characters for character encoding in cross-platform code. To help solve this issue, there are two other character types: char16_t and char32_t. The following list gives an overview of all available character types.
char: Stores 8 bits. This type can be used to store ASCII characters, or as a basic building block for storing UTF-8 encoded Unicode characters, where one Unicode character is encoded as one to four chars.char16_t: Stores at least 16 bits. This type can be used as the basic building block for UTF-16 encoded Unicode characters, where one Unicode character is encoded as one or two char16_ts.char32_t: Stores at least 32 bits. This type can be used for storing UTF-32 encoded Unicode characters as one char32_t.wchar_t: Stores a wide character of a compiler-specific size and encoding.The benefit of using char16_t and char32_t instead of wchar_t is that the size of char16_t is guaranteed to be at least 16 bits, and the size of char32_t is guaranteed to be at least 32 bits, independent of the compiler. There is no minimum size guaranteed for wchar_t.
The standard also defines the following macros.
__STDC_UTF_32__: If defined by the compiler, then the type char32_t uses UTF-32 encoding. If it is not defined, char32_t has a compiler-dependent encoding.__STDC_UTF_16__: If defined by the compiler, then the type char16_t uses UTF-16 encoding. If it is not defined, char16_t has a compiler-dependent encoding.String literals can have a string prefix to turn them into a specific type. The complete set of supported string prefixes is as follows.
u8: A char string literal with UTF-8 encoding.u: A char16_t string literal, which can be UTF-16 if __STDC_UTF_16__ is defined by the compiler.U: A char32_t string literal, which can be UTF-32 if __STDC_UTF_32__ is defined by the compiler.L: A wchar_t string literal with a compiler-dependent encoding.All of these string literals can be combined with the raw string literal prefix, R, discussed in Chapter 2. Here are some examples:
const char* s1 = u8R"(Raw UTF-8 encoded string literal)";const wchar_t* s2 = LR"(Raw wide string literal)";const char16_t* s3 = uR"(Raw char16_t string literal)";const char32_t* s4 = UR"(Raw char32_t string literal)";
If you are using Unicode encoding, for example, by using u8 UTF-8 string literals, or if your compiler defines __STDC_UTF_16__ or __STDC_UTF_32__, you can insert a specific Unicode code point in your non-raw string literal by using the \uABCD notation. For example, \u03C0 represents the pi character, and \u00B2 represents the ‘squared’ character. The following formula string represents “π r2”:
const char* formula = u8"\u03C0 r\u00B2";Similarly, character literals can also have a prefix to turn them into specific types. The prefixes u, U, and L are supported, and C++17 adds the u8 prefix for character literals. Here are some examples: u'a', U'a', L'a', and u8'a'.
Besides the std::string class, there is also support for wstring, u16string, and u32string. They are all defined as follows:
using string = basic_string<char>;using wstring = basic_string<wchar_t>;using u16string = basic_string<char16_t>;using u32string = basic_string<char32_t>;Multibyte characters are characters composed of one or more bytes with a compiler-dependent encoding, similar to how Unicode can be represented with one to four bytes using UTF-8, or with one or two 16-bit values using UTF-16. There are conversion functions to convert between char16_t/char32_t and multibyte characters, and vice versa: mbrtoc16, c16rtomb, mbrtoc32, and c32rtomb.
Unfortunately, the support for char16_t and char32_t doesn’t go much further. There are some conversion classes available (see the next section), but, for example, there is nothing like a version of cout or cin that supports char16_t and char32_t; this makes it difficult to print such strings to a console or to read them from user input. If you want to do more with char16_t and char32_t strings, you need to resort to third-party libraries. ICU—International Components for Unicode—is one well-known library that provides Unicode and globalization support for your applications.
The C++ standard provides the codecvt class template to help with converting between different encodings. The <locale> header defines the following four encoding conversion classes.
| CLASS | DESCRIPTION |
codecvt<char,char,mbstate_t> |
Identity conversion, that is, no conversion |
codecvt<char16_t,char,mbstate_t> |
Conversion between UTF-16 and UTF-8 |
codecvt<char32_t,char,mbstate_t> |
Conversion between UTF-32 and UTF-8 |
codecvt<wchar_t,char,mbstate_t> |
Conversion between wide (implementation-specific) and narrow character encodings |
Before C++17, the following three code conversion facets were defined in <codecvt>: codecvt_utf8, codecvt_utf16, and codecvt_utf8_utf16. These could be used with two convenience conversion interfaces: wstring_convert and wbuffer_convert. However, C++17 has deprecated those three conversion facets (the entire <codecvt> header) and the two convenience interfaces, so they are not further discussed in this book. The C++ Standards Committee decided to deprecate this functionality because it does not handle errors well. Ill-formed Unicode strings are a security risk, and in fact can be, and have been, used as an attack vector to compromise the security of systems. Also, the API is too obscure, and too hard to understand. I recommend using third-party libraries, such as ICU, to work correctly with Unicode strings until the Standards Committee comes up with a suitable, safe, and easier-to-use replacement for the deprecated functionality.
Character sets are only one of the differences in data representation between countries. Even countries that use similar character sets, such as Great Britain and the United States, still differ in how they represent certain data, such as dates and money.
The standard C++ mechanism that groups specific data about a particular set of cultural parameters is called a locale. An individual component of a locale, such as date format, time format, number format, and so on, is called a facet. An example of a locale is U.S. English. An example of a facet is the format used to display a date. There are several built-in facets that are common to all locales. C++ also provides a way to customize or add facets.
There are third-party libraries available that make it easier to work with locales. One example is boost.locale, which is able to use ICU as its backend, supporting collations and conversions, converting strings to uppercase (instead of converting character by character to uppercase), and so on.
When using I/O streams, data is formatted according to a particular locale. Locales are objects that can be attached to a stream, and they are defined in the <locale> header file. Locale names are implementation specific. The POSIX standard is to separate a language and an area into two-letter sections with an optional encoding. For example, the locale for the English language as spoken in the U.S. is en_US, while the locale for the English language as spoken in Great Britain is en_GB. The locale for Japanese spoken in Japan with Japanese Industrial Standard encoding is ja_JP.jis.
Locale names on Windows can have two formats. The preferred format is very similar to the POSIX format, but uses a dash instead of an underscore. The second, old format, looks like this:
lang[_country_region[.code_page]]Everything between the square brackets is optional. The following table lists some examples.
| POSIX | WINDOWS | WINDOWS OLD | |
| U.S. English | en_US |
en-US |
English_United States |
| Great Britain English | en_GB |
en-GB |
English_Great Britain |
Most operating systems have a mechanism to determine the locale as defined by the user. In C++, you can pass an empty string to the std::locale object constructor to create a locale from the user’s environment. Once this object is created, you can use it to query the locale, possibly making programmatic decisions based on it. The following code demonstrates how to use the user’s locale for a stream by calling the imbue() method on the stream. The result is that everything that is sent to wcout is formatted according to the formatting rules for your environment:
wcout.imbue(locale(""));wcout << 32767 << endl;
This means that if your system locale is English United States and you output the number 32767, the number is displayed as 32,767; however, if your system locale is Dutch Belgium, the same number is displayed as 32.767.
The default locale is the classic/neutral locale, and not the user’s locale. The classic locale uses ANSI C conventions, and has the name C. The classic C locale is similar to U.S. English, but there are slight differences. For example, numbers are handled without any punctuation:
wcout.imbue(locale("C"));wcout << 32767 << endl;
The output of this code is as follows:
32767The following code manually sets the U.S. English locale, so the number 32767 is formatted with U.S. English punctuation, independent of your system locale:
wcout.imbue(locale("en-US")); // "en_US" for POSIXwcout << 32767 << endl;
The output of this code is as follows:
32,767A locale object allows you to query information about the locale. For example, the following program creates a locale matching the user’s environment. The name() method is used to get a C++ string that describes the locale. Then, the find() method is used on the string object to find a given substring, which returns string::npos when the given substring is not found. The code checks for the Windows name and the POSIX name. One of two messages is output, depending on whether or not the locale appears to be U.S. English:
locale loc("");if (loc.name().find("en_US") == string::npos &&loc.name().find("en-US") == string::npos) {wcout << L"Welcome non-U.S. English speaker!" << endl;} else {wcout << L"Welcome U.S. English speaker!" << endl;}
The <locale> header contains the following character classification functions: std::isspace(), isblank(), iscntrl(), isupper(), islower(), isalpha(), isdigit(), ispunct(), isxdigit(), isalnum(), isprint(), isgraph(). They all accept two parameters: the character to classify, and the locale to use for the classification. Here is an example of isupper() using the user’s environment locale:
bool result = isupper('A', locale(""));The <locale> header also defines two character conversion functions: std::toupper() and tolower(). They accept two parameters: the character to convert, and the locale to use for the conversion.
You can use the std::use_facet() function to obtain a particular facet in a particular locale. The argument to use_facet() is a locale. For example, the following expression retrieves the standard monetary punctuation facet of the British English locale using the POSIX locale name:
use_facet<moneypunct<wchar_t>>(locale("en_GB"));Note that the innermost template type determines the character type to use. This is usually wchar_t or char. The use of nested template classes is unfortunate, but once you get past the syntax, the result is an object that contains all the information you want to know about British money punctuation. The data available in the standard facets is defined in the <locale> header and its associated files. The following table lists the facet categories defined by the standard. Consult a Standard Library reference for details about the individual facets.
| FACET | DESCRIPTION |
ctype |
Character classification facets. |
codecvt |
Conversion facets, see earlier in this chapter. |
collate |
Comparing strings lexicographically. |
time_get |
Parsing dates and times. |
time_put |
Formatting dates and times. |
num_get |
Parsing numeric values. |
num_put |
Formatting numeric values. |
numpunct |
Defines the formatting parameters for numeric values. |
money_get |
Parsing monetary values. |
money_put |
Formatting monetary values. |
moneypunct |
Defines formatting parameters for monetary values. |
The following program brings together locales and facets by printing out the currency symbol in both U.S. English and British English. Note that, depending on your environment, the British currency symbol may appear as a question mark, a box, or not at all. If your environment is set up to handle it, you may actually get the British pound symbol:
locale locUSEng("en-US"); // For Windows//locale locUSEng("en_US"); // For Linuxlocale locBritEng("en-GB"); // For Windows//locale locBritEng("en_GB"); // For Linuxwstring dollars = use_facet<moneypunct<wchar_t>>(locUSEng).curr_symbol();wstring pounds = use_facet<moneypunct<wchar_t>>(locBritEng).curr_symbol();wcout << L"In the US, the currency symbol is " << dollars << endl;wcout << L"In Great Britain, the currency symbol is " << pounds << endl;
Regular expressions, defined in the <regex> header, are a powerful feature of the Standard Library. They are a special mini-language for string processing. They might seem complicated at first, but once you get to know them, they make working with strings easier. Regular expressions can be used for several string-related operations.
Of course, you could write your own code to perform any of the preceding operations on your strings, but using the regular expressions functionality is highly recommended, because writing correct and safe code to process strings can be tricky.
Before I can go into more detail on regular expressions, there is some important terminology you need to know. The following terms are used throughout the discussion.
If you look around on the Internet, you will find several different grammars for regular expressions. For this reason, C++ includes support for several of these grammars:
If you already know any of these regular expression grammars, you can use it straight away in C++ by telling the regular expression library to use that specific syntax (syntax_option_type). The default grammar in C++ is ECMAScript, whose syntax is explained in detail in the following section. It is also the most powerful grammar, so it’s recommended to use ECMAScript instead of one of the other more limited grammars. Explaining the other regular expression grammars falls outside the scope of this book.
A regular expression pattern is a sequence of characters representing what you want to match. Any character in the regular expression matches itself except for the following special characters:
^ $ \ . * + ? ( ) [ ] { } |These special characters are explained throughout the following discussion. If you need to match one of these special characters, you need to escape it using the \ character, as in this example:
\[ or \. or \* or \\The special characters ^ and $ are called anchors. The ^ character matches the position immediately following a line termination character, and $ matches the position of a line termination character. By default, ^ and $ also match the beginning and ending of a string, respectively, but this behavior can be disabled.
For example, ^test$ matches only the string test, and not strings that contain test somewhere in the line, such as 1test, test2, test
abc, and so on.
The wildcard character . can be used to match any character except a newline character. For example, the regular expression a.c will match abc, and a5c, but will not match ab5c, ac, and so on.
The | character can be used to specify the “or” relationship. For example, a|b matches a or b.
Parentheses () are used to mark subexpressions, also called capture groups. Capture groups can be used for several purposes:
(.)(ab|cd)(.). It has three marked subexpressions. Running a regex_search() with this regular expression on 1cd4 results in a match with four entries. The first entry is the entire match, 1cd4, followed by three entries for the three marked subexpressions. These three entries are 1, cd, and 4. The details on how to use the regex_search() algorithm are shown in a later section.Parts of a regular expression can be repeated by using one of four repeats:
* matches the preceding part zero or more times. For example, a*b matches b, ab, aab, aaaab, and so on.+ matches the preceding part one or more times. For example, a+b matches ab, aab, aaaab, and so on, but not b.? matches the preceding part zero or one time. For example, a?b matches b and ab, but nothing else.{…} represents a bounded repeat. a{n} matches a repeated exactly n times; a{n,} matches a repeated n times or more; and a{n,m} matches a repeated between n and m times inclusive. For example, a{3,4} matches aaa and aaaa but not a, aa, aaaaa, and so on.The repeats described in the previous list are called greedy because they find the longest match while still matching the remainder of the regular expression. To make them non-greedy, a ? can be added behind the repeat, as in *?, +?, ??, and {…}?. A non-greedy repetition repeats its pattern as few times as possible while still matching the remainder of the regular expression.
For example, the following table shows a greedy and a non-greedy regular expression, and the resulting submatches when running them on the input sequence aaabbb.
| REGULAR EXPRESSION | SUBMATCHES |
Greedy: (a+)(ab)*(b+) |
"aaa" "" "bbb" |
Non-greedy: (a+?)(ab)*(b+) |
"aa" "ab" "bb" |
Just as with mathematical formulas, it’s important to know the precedence of regular expression elements. Precedence is as follows:
a are the basic building blocks of a regular expression.+, *, ?, and {…} bind tightly to the element on the left; for example, b+.ab+c binds after quantifiers.| binds last.For example, take the regular expression ab+c|d. This matches abc, abbc, abbbc, and so on, and also d. Parentheses can be used to change these precedence rules. For example, ab+(c|d) matches abc, abbc, abbbc, …, abd, abbd, abbbd, and so on. However, by using parentheses you also mark it as a subexpression or capture group. It is possible to change the precedence rules without creating new capture groups by using (?:…). For example, ab+(?:c|d) matches the same as the preceding ab+(c|d) but does not create an additional capture group.
Instead of having to write (a|b|c|…|z), which is clumsy and introduces a capture group, a special syntax for specifying sets of characters or ranges of characters is available. In addition, a “not” form of the match is also available. A character set is specified between square brackets, and allows you to write [c1c2…cn], which matches any of the characters c1, c2 , …, or cn. For example, [abc] matches any character a, b, or c. If the first character is ^, it means “any but”:
ab[cde] matches abc, abd, and abe.ab[^cde] matches abf, abp, and so on but not abc, abd, and abe.If you need to match the ^, [, or ] characters themselves, you need to escape them; for example, [\[\^\]] matches the characters [, ^, or ].
If you want to specify all letters, you could use a character set like [abcdefghijklmnopqrstuvwxyzABCDEFGHIJKLMNOPQRSTUVWXYZ]; however, this is clumsy and doing this several times is awkward, especially if you make a typo and omit one of the letters accidentally. There are two solutions to this.
One solution is to use the range specification in square brackets; this allows you to write [a-zA-Z], which recognizes all the letters in the range a to z and A to Z. If you need to match a hyphen, you need to escape it; for example, [a-zA-Z\-]+ matches any word including a hyphenated word.
Another solution is to use one of the character classes. These are used to denote specific types of characters and are represented as [:name:]. Which character classes are available depends on the locale, but the names listed in the following table are always recognized. The exact meaning of these character classes is also dependent on the locale. This table assumes the standard C locale.
| CHARACTER CLASS NAME | DESCRIPTION |
digit |
Digits |
d |
Same as digit |
xdigit |
Digits (digit) and the following letters used in hexadecimal numbers: ‘a’, ‘b’, ‘c’, ‘d’, ‘e’, ‘f’, ‘A’, ‘B’, ‘C’, ‘D’, ‘E’, ‘F’. |
alpha |
Alphabetic characters. For the C locale, these are all lowercase and uppercase letters. |
alnum |
A combination of the alpha class and the digit class |
w |
Same as alnum |
lower |
Lowercase letters, if applicable to the locale |
upper |
Uppercase letters, if applicable to the locale |
blank |
A blank character is a whitespace character used to separate words within a line of text. For the C locale, these are ‘ ’ and ‘\t’ (tab). |
space |
Whitespace characters. For the C locale, these are ‘ ’, ‘\t’, ‘\n’, ‘\r’, ‘\v’, and ‘\f’. |
s |
Same as space |
print |
Printable characters. These occupy a printing position—for example, on a display—and are the opposite of control characters (cntrl). Examples are lowercase letters, uppercase letters, digits, punctuation characters, and space characters. |
cntrl |
Control characters. These are the opposite of printable characters (print), and don’t occupy a printing position, for example, on a display. Some examples for the C locale are ‘\f’ (form feed), ‘\n’ (new line), and ‘\r’ (carriage return). |
graph |
Characters with a graphical representation. These are all characters that are printable (print), except the space character ‘ ’. |
punct |
Punctuation characters. For the C locale, these are all graphical characters (graph) that are not alphanumeric (alnum). Some examples are ‘!’, ‘#’, ‘@’, ‘}’, and so on. |
Character classes are used within character sets; for example, [[:alpha:]]* in English means the same as [a-zA-Z]*.
Because certain concepts like matching digits are so common, there are shorthand patterns for them. For example, [:digit:] and [:d:] mean the same thing as [0-9]. Some classes have an even shorter pattern using the escape notation \. For example, \d means [:digit:]. Therefore, to recognize a sequence of one or more numbers, you can write any of the following patterns:
[0-9]+[[:digit:]]+[[:d:]]+\d+The following table lists the available escape notations for character classes.
| ESCAPE NOTATION | EQUIVALENT TO |
\d |
[[:d:]] |
\D |
[^[:d:]] |
\s |
[[:s:]] |
\S |
[^[:s:]] |
\w |
[_[:w:]] |
\W |
[^_[:w:]] |
Here are some examples:
Test[5-8] matches Test5, Test6, Test7, and Test8.[[:lower:]] matches a, b, and so on, but not A, B, and so on.[^[:lower:]] matches any character except lowercase letters like a, b, and so on.[[:lower:]5-7] matches any lowercase letter like a, b, and so on, and the numbers 5, 6, and 7.A word boundary can mean the following:
[A-Za-z0-9_]. Matching the beginning of the source string is enabled by default, but you can disable it (regex_constants::match_not_bow).regex_constants::match_not_eow).You can use \b to match a word boundary, and \B to match anything except a word boundary.
Back references allow you to reference a captured group inside the regular expression itself: \n refers to the n-th captured group, with n
>
0. For example, the regular expression (\d+)-.*-\1 matches a string that has the following format:
(\d+)-.*-\1This regular expression matches 123-abc-123, 1234-a-1234, and so on but does not match 123-abc-1234, 123-abc-321, and so on.
Regular expressions support positive lookahead (which uses ?=pattern) and negative lookahead (which uses ?!pattern). The characters following the lookahead must match (positive), or not match (negative) the lookahead pattern, but those characters are not yet consumed.
For example: the pattern a(?!b) contains a negative lookahead to match a letter a not followed by a b. The pattern a(?=b) contains a positive lookahead to match a letter a followed by a b, but b is not consumed so it does not become part of the match.
The following is a more complicated example. The regular expression matches an input sequence that consists of at least one lowercase letter, at least one uppercase letter, at least one punctuation character, and is at least eight characters long. Such a regular expression can, for example, be used to enforce that passwords satisfy certain criteria.
(?=.*[[:lower:]])(?=.*[[:upper:]])(?=.*[[:punct:]]).{8,}As you saw in the preceding sections, regular expressions often use special characters that should be escaped in normal C++ string literals. For example, if you write \d in a regular expression, it matches any digit. However, because \ is a special character in C++, you need to escape it in your regular expression string literal as \\d; otherwise, your C++ compiler tries to interpret the \d. It can get more complicated if you want your regular expression to match a single back-slash character \. Because \ is a special character in the regular expression syntax itself, you need to escape it as \\. The \ character is also a special character in C++ string literals, so you need to escape it in your C++ string literal, resulting in \\\\.
You can use raw string literals to make a complicated regular expression easier to read in your C++ source code. (Raw string literals are discussed in Chapter 2.) For example, take the following regular expression:
"( |\\n|\\r|\\\\)"This regular expression matches spaces, newlines, carriage returns, and back slashes. As you can see, you need a lot of escape characters. Using raw string literals, this can be replaced with the following more readable regular expression:
R"(( |\n|\r|\\))"The raw string literal starts with R"( and ends with )". Everything in between is the regular expression. Of course, you still need a double back slash at the end because the back slash needs to be escaped in the regular expression itself.
This concludes a brief description of the ECMAScript grammar. The following sections explain how to actually use regular expressions in your C++ code.
Everything for the regular expression library is in the <regex> header file and in the std namespace. The basic template types defined by the regular expression library are
basic_regex: An object representing a specific regular expression.match_results: A substring that matched a regular expression, including all the captured groups. It is a collection of sub_matches.sub_match: An object containing a pair of iterators into the input sequence. These iterators represent the matched capture group. The pair is an iterator pointing to the first character of a matched capture group and an iterator pointing to one-past-the-last character of the matched capture group. It has an str() method that returns the matched capture group as a string.The library provides three key algorithms: regex_match(), regex_search(), and regex_replace(). All of these algorithms have different versions that allow you to specify the source string as a string, a character array, or as a begin/end iterator pair. The iterators can be any of the following:
const char*const wchar_t*string::const_iteratorwstring::const_iteratorIn fact, any iterator that behaves as a bidirectional iterator can be used. See Chapters 17 and 18 for details on iterators.
The library also defines the following two types for regular expression iterators, which are very important if you want to find all occurrences of a pattern in a source string.
regex_iterator: iterates over all the occurrences of a pattern in a source string.regex_token_iterator: iterates over all the capture groups of all occurrences of a pattern in a source string.To make the library easier to use, the standard defines a number of type aliases for the preceding templates:
using regex = basic_regex<char>;using wregex = basic_regex<wchar_t>;using csub_match = sub_match<const char*>;using wcsub_match = sub_match<const wchar_t*>;using ssub_match = sub_match<string::const_iterator>;using wssub_match = sub_match<wstring::const_iterator>;using cmatch = match_results<const char*>;using wcmatch = match_results<const wchar_t*>;using smatch = match_results<string::const_iterator>;using wsmatch = match_results<wstring::const_iterator>;using cregex_iterator = regex_iterator<const char*>;using wcregex_iterator = regex_iterator<const wchar_t*>;using sregex_iterator = regex_iterator<string::const_iterator>;using wsregex_iterator = regex_iterator<wstring::const_iterator>;using cregex_token_iterator = regex_token_iterator<const char*>;using wcregex_token_iterator = regex_token_iterator<const wchar_t*>;using sregex_token_iterator = regex_token_iterator<string::const_iterator>;using wsregex_token_iterator = regex_token_iterator<wstring::const_iterator>;
The following sections explain the regex_match(), regex_search(), and regex_replace() algorithms, and the regex_iterator and regex_token_iterator classes.
The regex_match() algorithm can be used to compare a given source string with a regular expression pattern. It returns true if the pattern matches the entire source string, and false otherwise. It is very easy to use. There are six versions of the regex_match() algorithm accepting different kinds of arguments. They all have the following form:
template<…>bool regex_match(InputSequence[, MatchResults], RegEx[, Flags]);
The InputSequence can be represented as follows:
std::stringThe optional MatchResults parameter is a reference to a match_results and receives the match. If regex_match() returns false, you are only allowed to call match_results::empty() or match_results::size(); anything else is undefined. If regex_match() returns true, a match is found and you can inspect the match_results object for what exactly got matched. This is explained with examples in the following subsections.
The RegEx parameter is the regular expression that needs to be matched. The optional Flags parameter specifies options for the matching algorithm. In most cases you can keep the default. For more details, consult a Standard Library Reference, see Appendix B.
Suppose you want to write a program that asks the user to enter a date in the format year/month/day, where year is four digits, month is a number between 1 and 12, and day is a number between 1 and 31. You can use a regular expression together with the regex_match() algorithm to validate the user input as follows. The details of the regular expression are explained after the code.
regex r("\\d{4}/(?:0?[1-9]|1[0-2])/(?:0?[1-9]|[1-2][0-9]|3[0-1])");while (true) {cout << "Enter a date (year/month/day) (q=quit): ";string str;if (!getline(cin, str) || str == "q")break;if (regex_match(str, r))cout << " Valid date." << endl;elsecout << " Invalid date!" << endl;}
The first line creates the regular expression. The expression consists of three parts separated by a forward slash (/) character: one part for year, one for month, and one for day. The following list explains these parts.
\d{4}: This matches any combination of four digits; for example, 1234, 2010, and so on.(?:0?[1-9]|1[0-2]): This subpart of the regular expression is wrapped inside parentheses to make sure the precedence is correct. You don’t need a capture group, so (?:…) is used. The inner expression consists of an alternation of two parts separated by the | character.0?[1-9]: This matches any number from 1 to 9 with an optional 0 in front of it. For example, it matches 1, 2, 9, 03, 04, and so on. It does not match 0, 10, 11, and so on.1[0-2]: This matches 10, 11, or 12, and nothing else.(?:0?[1-9]|[1-2][0-9]|3[0-1]): This subpart is also wrapped inside a non-capture group and consists of an alternation of three parts.0?[1-9]: This matches any number from 1 to 9 with an optional 0 in front of it. For example, it matches 1, 2, 9, 03, 04, and so on. It does not match 0, 10, 11, and so on.[1-2][0-9]: This matches any number between 10 and 29 inclusive and nothing else.3[0-1]: This matches 30 or 31 and nothing else.The example then enters an infinite loop to ask the user to enter a date. Each date entered is given to the regex_match() algorithm. When regex_match() returns true, the user has entered a date that matches the date regular expression pattern.
This example can be extended a bit by asking the regex_match() algorithm to return captured subexpressions in a results object. You first have to understand what a capture group does. By specifying a match_results object like smatch in a call to regex_match(), the elements of the match_results object are filled in when the regular expression matches the input string. To be able to extract these substrings, you must create capture groups using parentheses.
The first element, [0], in a match_results object contains the string that matched the entire pattern. When using regex_match() and a match is found, this is the entire source sequence. When using regex_search(), discussed in the next section, this is a substring in the source sequence that matches the regular expression. Element [1] is the substring matched by the first capture group, [2] by the second capture group, and so on. To get a string representation of a capture group, you can write m[i] as in the following code, or write m[i].str(), where i is the index of the capture group and m is a match_results object.
The following code extracts the year, month, and day digits into three separate integer variables. The regular expression in the revised example has a few small changes. The first part matching the year is wrapped in a capture group, while the month and day parts are now also capture groups instead of non-capture groups. The call to regex_match() includes a smatch parameter, which receives the matched capture groups. Here is the adapted example:
regex r("(\\d{4})/(0?[1-9]|1[0-2])/(0?[1-9]|[1-2][0-9]|3[0-1])");while (true) {cout << "Enter a date (year/month/day) (q=quit): ";string str;if (!getline(cin, str) || str == "q")break;smatch m;if (regex_match(str, m, r)) {int year = stoi(m[1]);int month = stoi(m[2]);int day = stoi(m[3]);cout << " Valid date: Year=" << year<< ", month=" << month<< ", day=" << day << endl;} else {cout << " Invalid date!" << endl;}}
In this example, there are four elements in the smatch results objects:
[0]: the string matching the full regular expression, which is the full date in this example[1]: the year[2]: the month[3]: the dayWhen you execute this example, you can get the following output:
Enter a date (year/month/day) (q=quit): 2011/12/01Valid date: Year=2011, month=12, day=1Enter a date (year/month/day) (q=quit): 11/12/01Invalid date!
The regex_match() algorithm discussed in the previous section returns true if the entire source string matches the regular expression, and false otherwise. It cannot be used to find a matching substring. Instead, you need to use the regex_search() algorithm, which allows you to search for a substring that matches a certain pattern. There are six versions of the regex_search() algorithm, and they all have the following form:
template<…>bool regex_search(InputSequence[, MatchResults], RegEx[, Flags]);
All variations return true when a match is found somewhere in the input sequence, and false otherwise. The parameters are similar to the parameters for regex_match().
Two versions of the regex_search() algorithm accept a begin and end iterator as the input sequence that you want to process. You might be tempted to use this version of regex_search() in a loop to find all occurrences of a pattern in a source string by manipulating these begin and end iterators for each regex_search() call. Never do this! It can cause problems when your regular expression uses anchors (^ or $), word boundaries, and so on. It can also cause an infinite loop due to empty matches. Use the regex_iterator or regex_token_iterator as explained later in this chapter to extract all occurrences of a pattern from a source string.
The regex_search() algorithm can be used to extract matching substrings from an input sequence. The following example extracts code comments from input lines. The regular expression searches for a substring that starts with // followed by some optional whitespace \s* followed by one or more characters captured in a capture group (.+). This capture group captures only the comment substring. The smatch object m receives the search results. If successful, m[1] contains the comment that was found. You can check the m[1].first and m[1].second iterators to see where exactly the comment was found in the source string.
regex r("//\\s*(.+)$");while (true) {cout << "Enter a string with optional code comments (q=quit): ";string str;if (!getline(cin, str) || str == "q")break;smatch m;if (regex_search(str, m, r))cout << " Found comment '" << m[1] << "'" << endl;elsecout << " No comment found!" << endl;}
The output of this program can look as follows:
Enter a string (q=quit): std::string str; // Our source stringFound comment 'Our source string'Enter a string (q=quit): int a; // A comment with // in the middleFound comment 'A comment with // in the middle'Enter a string (q=quit): float f; // A comment with a (tab) characterFound comment 'A comment with a (tab) character'
The match_results object also has a prefix() and suffix() method, which return the string preceding or following the match, respectively.
As explained in the previous section, you should never use regex_search() in a loop to extract all occurrences of a pattern from a source sequence. Instead, you should use a regex_iterator or regex_token_iterator. They work similarly to iterators for Standard Library containers.
The following example asks the user to enter a source string, extracts every word from the string, and prints all words between quotes. The regular expression in this case is [\w]+, which searches for one or more word-letters. This example uses std::string as source, so it uses sregex_iterator for the iterators. A standard iterator loop is used, but in this case, the end iterator is done slightly differently from the end iterators of ordinary Standard Library containers. Normally, you specify an end iterator for a particular container, but for regex_iterator, there is only one “end” iterator. You can get this end iterator by declaring a regex_iterator type using the default constructor.
The for loop creates a start iterator called iter, which accepts a begin and end iterator into the source string together with the regular expression. The loop body is called for every match found, which is every word in this example. The sregex_iterator iterates over all the matches. By dereferencing an sregex_iterator, you get a smatch object. Accessing the first element of this smatch object, [0], gives you the matched substring:
regex reg("[\\w]+");while (true) {cout << "Enter a string to split (q=quit): ";string str;if (!getline(cin, str) || str == "q")break;const sregex_iterator end;for (sregex_iterator iter(cbegin(str), cend(str), reg);iter != end; ++iter) {cout << "\"" << (*iter)[0] << "\"" << endl;}}
The output of this program can look as follows:
Enter a string to split (q=quit): This, is a test."This""is""a""test"
As this example demonstrates, even simple regular expressions can do some powerful string manipulation!
Note that both a regex_iterator and a regex_token_iterator internally contain a pointer to the given regular expression. They both explicitly delete constructors accepting an rvalue regular expression, so you cannot construct them with a temporary regex object. For example, the following does not compile:
for (sregex_iterator iter(cbegin(str), cend(str),regex("[\\w]+"));iter != end; ++iter) { … }
The previous section describes regex_iterator, which iterates through every matched pattern. In each iteration of the loop you get a match_results object, which you can use to extract subexpressions for that match that are captured by capture groups.
A regex_token_iterator can be used to automatically iterate over all or selected capture groups across all matched patterns. There are four constructors with the following format:
regex_token_iterator(BidirectionalIterator a,BidirectionalIterator b,const regex_type& re[, SubMatches[, Flags]]);
All of them require a begin and end iterator as input sequence, and a regular expression. The optional SubMatches parameter is used to specify which capture groups should be iterated over. SubMatches can be specified in four ways:
vector with integers representing the indices of the capture groups that you want to iterate over.initializer_list with capture group indices.When you omit SubMatches or when you specify a 0 for SubMatches, you get an iterator that iterates over all capture groups with index 0, which are the substrings matching the full regular expression. The optional Flags parameter specifies options for the matching algorithm. In most cases you can keep the default. Consult a Standard Library Reference for more details.
The previous regex_iterator example can be rewritten using a regex_token_iterator as follows. Note that *iter is used in the loop body instead of (*iter)[0] as in the regex_iterator example, because the token iterator with 0 as the default submatch index automatically iterates over all capture groups with index 0. The output of this code is exactly the same as the output generated by the regex_iterator example:
regex reg("[\\w]+");while (true) {cout << "Enter a string to split (q=quit): ";string str;if (!getline(cin, str) || str == "q")break;const sregex_token_iterator end;for (sregex_token_iterator iter(cbegin(str), cend(str), reg);iter != end; ++iter) {cout << "\"" << *iter << "\"" << endl;}}
The following example asks the user to enter a date and then uses a regex_token_iterator to iterate over the second and third capture groups (month and day), which are specified as a vector of integers. The regular expression used for dates is explained earlier in this chapter. The only difference is that ^ and $ anchors are added since we want to match the entire source sequence. Earlier, that was not necessary, because regex_match() automatically matches the entire input string.
regex reg("^(\\d{4})/(0?[1-9]|1[0-2])/(0?[1-9]|[1-2][0-9]|3[0-1])$");while (true) {cout << "Enter a date (year/month/day) (q=quit): ";string str;if (!getline(cin, str) || str == "q")break;vector<int> indices{ 2, 3 };const sregex_token_iterator end;for (sregex_token_iterator iter(cbegin(str), cend(str), reg, indices);iter != end; ++iter) {cout << "\"" << *iter << "\"" << endl;}}
This code prints only the month and day of valid dates. Output generated by this example can look like this:
Enter a date (year/month/day) (q=quit): 2011/1/13"1""13"Enter a date (year/month/day) (q=quit): 2011/1/32Enter a date (year/month/day) (q=quit): 2011/12/5"12""5"
The regex_token_iterator can also be used to perform a so-called field splitting or tokenization. It is a much safer and more flexible alternative to using the old strtok() function from C. Tokenization is triggered in the regex_token_iterator constructor by specifying -1 as the capture group index to iterate over. When in tokenization mode, the iterator iterates over all substrings of the input sequence that do not match the regular expression. The following code demonstrates this by tokenizing a string on the delimiters , and ; with zero or more whitespace characters before or after the delimiters:
regex reg(R"(\s*[,;]\s*)");while (true) {cout << "Enter a string to split on ',' and ';' (q=quit): ";string str;if (!getline(cin, str) || str == "q")break;const sregex_token_iterator end;for (sregex_token_iterator iter(cbegin(str), cend(str), reg, -1);iter != end; ++iter) {cout << "\"" << *iter << "\"" << endl;}}
The regular expression in this example is specified as a raw string literal and searches for patterns that match the following:
, or ; characterThe output can be as follows:
Enter a string to split on ',' and ';' (q=quit): This is, a; test string."This is""a""test string."
As you can see from this output, the string is split on , and ;. All whitespace characters around the , and ; are removed, because the tokenization iterator iterates over all substrings that do not match the regular expression, and because the regular expression matches , and ; with whitespace around them.
The regex_replace() algorithm requires a regular expression, and a formatting string that is used to replace matching substrings. This formatting string can reference part of the matched substrings by using the escape sequences in the following table.
| ESCAPE SEQUENCE | REPLACED WITH |
$ n |
The string matching the n-th capture group; for example, $1 for the first capture group, $2 for the second, and so on. n must be greater than 0. |
$& |
The string matching the entire regular expression. |
$` |
The part of the input sequence that appears to the left of the substring matching the regular expression. |
$´ |
The part of the input sequence that appears to the right of the substring matching the regular expression. |
$$ |
A single dollar sign. |
There are six versions of the regex_replace() algorithm. The difference between them is in the type of arguments. Four of them have the following format:
string regex_replace(InputSequence, RegEx, FormatString[, Flags]);These four versions return the resulting string after performing the replacement. Both the InputSequence and the FormatString can be an std::string or a C-style string. The RegEx parameter is the regular expression that needs to be matched. The optional Flags parameter specifies options for the replace algorithm.
Two versions of the regex_replace() algorithm have the following format:
OutputIterator regex_replace(OutputIterator,BidirectionalIterator first,BidirectionalIterator last,RegEx, FormatString[, Flags]);
These two versions write the resulting string to the given output iterator and return this output iterator. The input sequence is given as a begin and end iterator. The other parameters are identical to the other four versions of regex_replace().
As a first example, take the following HTML source string,
<body><h1>Header</h1><p>Some text</p></body>and the regular expression,
<h1>(.*)</h1><p>(.*)</p>The following table shows the different escape sequences and what they will be replaced with.
| ESCAPE SEQUENCE | REPLACED WITH |
$1 |
Header |
$2 |
Some text |
$& |
<h1>Header</h1><p>Some text</p> |
$` |
<body> |
$´ |
</body> |
The following code demonstrates the use of regex_replace():
const string str("<body><h1>Header</h1><p>Some text</p></body>");regex r("<h1>(.*)</h1><p>(.*)</p>");const string format("H1=$1 and P=$2");// See above tablestring result = regex_replace(str, r, format);cout << "Original string: '" << str << "'" << endl;cout << "New string : '" << result << "'" << endl;
The output of this program is as follows:
Original string: '<body><h1>Header</h1><p>Some text</p></body>'New string : '<body>H1=Header and P=Some text</body>'
The regex_replace() algorithm accepts a number of flags that can be used to manipulate how it is working. The most important flags are given in the following table.
| FLAG | DESCRIPTION |
format_default |
The default is to replace all occurrences of the pattern, and to also copy everything to the output that does not match the pattern. |
format_no_copy |
Replaces all occurrences of the pattern, but does not copy anything to the output that does not match the pattern. |
format_first_only |
Replaces only the first occurrence of the pattern. |
The following example modifies the previous code to use the format_no_copy flag:
const string str("<body><h1>Header</h1><p>Some text</p></body>");regex r("<h1>(.*)</h1><p>(.*)</p>");const string format("H1=$1 and P=$2");string result = regex_replace(str, r, format,regex_constants::format_no_copy);cout << "Original string: '" << str << "'" << endl;cout << "New string : '" << result << "'" << endl;
The output is as follows. Compare this with the output of the previous version.
Original string: '<body><h1>Header</h1><p>Some text</p></body>'New string : 'H1=Header and P=Some text'
Another example is to get an input string and replace each word boundary with a newline so that the output contains only one word per line. The following example demonstrates this without using any loops to process a given input string. The code first creates a regular expression that matches individual words. When a match is found, it is replaced with $1\n where $1 is replaced with the matched word. Note also the use of the format_no_copy flag to prevent copying whitespace and other non-word characters from the source string to the output.
regex reg("([\\w]+)");const string format("$1\n");while (true) {cout << "Enter a string to split over multiple lines (q=quit): ";string str;if (!getline(cin, str) || str == "q")break;cout << regex_replace(str, reg, format,regex_constants::format_no_copy) << endl;}
The output of this program can be as follows:
Enter a string to split over multiple lines (q=quit): This is a test.Thisisatest
This chapter gave you an appreciation for coding with localization in mind. As anyone who has been through a localization effort will tell you, adding support for a new language or locale is infinitely easier if you have planned ahead; for example, by using Unicode characters and being mindful of locales.
The second part of this chapter explained the regular expressions library. Once you know the syntax of regular expressions, it becomes much easier to work with strings. Regular expressions allow you to validate strings, search for substrings inside an input sequence, perform find-and-replace operations, and so on. It is highly recommended that you get to know regular expressions and start using them instead of writing your own string manipulation routines. They will make your life easier.
The Ratio library allows you to exactly represent any finite rational number that you can use at compile time. Ratios are used in the std::chrono::duration class discussed in the next section. Everything is defined in the <ratio> header file and is in the std namespace. The numerator and denominator of a rational number are represented as compile-time constants of type std::intmax_t, which is a signed integer type with the maximum width supported by a compiler. Because of the compile-time nature of these rational numbers, using them might look a bit complicated and different than what you are used to. You cannot define a ratio object the same way as you define normal objects, and you cannot call methods on it. Instead, you need to use type aliases. For example, the following line defines a rational compile-time constant representing the fraction 1/60:
using r1 = ratio<1, 60>;The numerator and denominator of the r1 rational number are compile-time constants and can be accessed as follows:
intmax_t num = r1::num;intmax_t den = r1::den;
Remember that a ratio is a compile-time constant, which means that the numerator and denominator need to be known at compile time. The following generates a compilation error:
intmax_t n = 1;intmax_t d = 60;using r1 = ratio<n, d>; // Error
Making n and d constants removes the error:
const intmax_t n = 1;const intmax_t d = 60;using r1 = ratio<n, d>; // Ok
Rational numbers are always normalized. For a rational number ratio<n, d>, the greatest common divisor, gcd, is calculated and the numerator, num, and denominator, den, are then defined as follows:
num = sign(n)*sign(d)*abs(n)/gcdden = abs(d)/gcdThe library supports adding, subtracting, multiplying, and dividing rational numbers. Because all these operations are also happening at compile time, you cannot use the standard arithmetic operators. Instead, you need to use specific templates in combination with type aliases. The following arithmetic ratio templates are available: ratio_add, ratio_subtract, ratio_multiply, and ratio_divide. These templates calculate the result as a new ratio type. This type can be accessed with the embedded type alias called type. For example, the following code first defines two ratios, one representing 1/60 and the other representing 1/30. The ratio_add template adds those two rational numbers together to produce the result rational number, which, after normalization, is 1/20.
using r1 = ratio<1, 60>;using r2 = ratio<1, 30>;using result = ratio_add<r1, r2>::type;
The standard also defines a number of ratio comparison templates: ratio_equal, ratio_not_equal, ratio_less, ratio_less_equal, ratio_greater, and ratio_greater_equal. Just like the arithmetic ratio templates, the ratio comparison templates are all evaluated at compile time. These comparison templates define a new type that is an std::bool_constant, representing the result. bool_constant is an std::integral_constant, a struct template that stores a type and a compile-time constant value. For example, integral_constant<int, 15> stores an integer with value 15. bool_constant is an integral_constant with type bool. For instance, bool_constant<true> is integral_constant<bool, true>, which stores a Boolean with value true. The result of the ratio comparison templates is either bool_constant<true> or bool_constant<false>. The value associated with a bool_constant or an integral_constant can be accessed using the value data member. The following example demonstrates the use of ratio_less. Chapter 13 discusses the use of boolalpha to output true or false for Boolean values.
using r1 = ratio<1, 60>;using r2 = ratio<1, 30>;using res = ratio_less<r2, r1>;cout << boolalpha << res::value << endl;
The following example combines everything I have just covered. Note that because ratios are compile-time constants, you cannot do something like cout << r1; you need to get the numerator and denominator and print them separately.
// Define a compile-time rational numberusing r1 = ratio<1, 60>;cout << "1) " << r1::num << "/" << r1::den << endl;// Get numerator and denominatorintmax_t num = r1::num;intmax_t den = r1::den;cout << "2) " << num << "/" << den << endl;// Add two rational numbersusing r2 = ratio<1, 30>;cout << "3) " << r2::num << "/" << r2::den << endl;using result = ratio_add<r1, r2>::type;cout << "4) " << result::num << "/" << result::den << endl;// Compare two rational numbersusing res = ratio_less<r2, r1>;cout << "5) " << boolalpha << res::value << endl;
The output is as follows:
1) 1/602) 1/603) 1/304) 1/205) false
The library provides a number of SI (Système International) type aliases for your convenience. They are as follows:
using yocto = ratio<1, 1'000'000'000'000'000'000'000'000>; // *using zepto = ratio<1, 1'000'000'000'000'000'000'000>; // *using atto = ratio<1, 1'000'000'000'000'000'000>;using femto = ratio<1, 1'000'000'000'000'000>;using pico = ratio<1, 1'000'000'000'000>;using nano = ratio<1, 1'000'000'000>;using micro = ratio<1, 1'000'000>;using milli = ratio<1, 1'000>;using centi = ratio<1, 100>;using deci = ratio<1, 10>;using deca = ratio<10, 1>;using hecto = ratio<100, 1>;using kilo = ratio<1'000, 1>;using mega = ratio<1'000'000, 1>;using giga = ratio<1'000'000'000, 1>;using tera = ratio<1'000'000'000'000, 1>;using peta = ratio<1'000'000'000'000'000, 1>;using exa = ratio<1'000'000'000'000'000'000, 1>;using zetta = ratio<1'000'000'000'000'000'000'000, 1>; // *using yotta = ratio<1'000'000'000'000'000'000'000'000, 1>; // *
The SI units with an asterisk at the end are defined only if your compiler can represent the constant numerator and denominator values for those type aliases as an intmax_t. An example of how to use these predefined SI units is given in the discussion of durations in the next section.
The chrono library is a collection of classes that work with times. The library consists of the following components:
Everything is defined in the std::chrono namespace and requires you to include the <chrono> header file. The following sections explain each component.
A duration is an interval between two points in time. It is represented by the duration class template, which stores a number of ticks and a tick period. The tick period is the time in seconds between two ticks and is represented as a compile-time ratio constant, which means it could be a fraction of a second. Ratios are discussed in the previous section. The duration template accepts two template parameters and is defined as follows:
template <class Rep, class Period = ratio<1>> class duration {...}The first template parameter, Rep, is the type of variable storing the number of ticks and should be an arithmetic type, for example long, double, and so on. The second template parameter, Period, is the rational constant representing the period of a tick. If you don’t specify the tick period, the default value ratio<1> is used, which represents a tick period of one second.
Three constructors are provided: the default constructor; one that accepts a single value, the number of ticks; and one that accepts another duration. The latter constructor can be used to convert from one duration to another duration, for example, from minutes to seconds. An example is given later in this section.
Durations support arithmetic operations such as +, -, *, /, %, ++, --, +=, -=, *=, /=, and %=, and support the comparison operators. The class also contains the methods shown in the following table.
| METHOD | DESCRIPTION |
Rep count() const |
Returns the duration value as the number of ticks. The return type is the type specified as a parameter to the duration template. |
static duration zero() |
Returns a duration with a duration value equivalent to zero. |
static duration min()static duration max() |
Returns a duration with the minimum/maximum possible duration value representable by the type specified as a parameter to the duration template. |
C++17 adds floor(), ceil(), round(), and abs() operations for durations that behave just as they behave with numerical data.
Let’s see how durations can be used in actual code. A duration where each tick is one second can be defined as follows:
duration<long> d1;Because ratio<1> is the default tick period, this is the same as writing the following:
duration<long, ratio<1>> d1;The following defines a duration in minutes (tick period = 60 seconds):
duration<long, ratio<60>> d2;To define a duration where each tick period is a sixtieth of a second, use the following:
duration<double, ratio<1, 60>> d3;As you saw earlier in this chapter, the <ratio> header file defines a number of SI rational constants. These predefined constants come in handy for defining tick periods. For example, the following line of code defines a duration where each tick period is one millisecond:
duration<long long, milli> d4;The following example demonstrates several aspects of durations. It shows you how to define durations, how to perform arithmetic operations on them, and how to convert one duration into another duration with a different tick period.
// Specify a duration where each tick is 60 secondsduration<long, ratio<60>> d1(123);cout << d1.count() << endl;// Specify a duration represented by a double with each tick// equal to 1 second and assign the largest possible duration to it.duration<double> d2;d2 = d2.max();cout << d2.count() << endl;// Define 2 durations:// For the first duration, each tick is 1 minute// For the second duration, each tick is 1 secondduration<long, ratio<60>> d3(10); // = 10 minutesduration<long, ratio<1>> d4(14); // = 14 seconds// Compare both durationsif (d3 > d4)cout << "d3 > d4" << endl;elsecout << "d3 <= d4" << endl;// Increment d4 with 1 resulting in 15 seconds++d4;// Multiply d4 by 2 resulting in 30 secondsd4 *= 2;// Add both durations and store as minutesduration<double, ratio<60>> d5 = d3 + d4;// Add both durations and store as secondsduration<long, ratio<1>> d6 = d3 + d4;cout << d3.count() << " minutes + " << d4.count() << " seconds = "<< d5.count() << " minutes or "<< d6.count() << " seconds" << endl;// Create a duration of 30 secondsduration<long> d7(30);// Convert the seconds of d7 to minutesduration<double, ratio<60>> d8(d7);cout << d7.count() << " seconds = " << d8.count() << " minutes" << endl;
The output is as follows:
1231.79769e+308d3 > d410 minutes + 30 seconds = 10.5 minutes or 630 seconds30 seconds = 0.5 minutes
Pay special attention to the following two lines:
duration<double, ratio<60>> d5 = d3 + d4;duration<long, ratio<1>> d6 = d3 + d4;
They both calculate d3+d4 but the first line stores it as a floating point value representing minutes, while the second line stores the result as an integral value representing seconds. Conversion from minutes to seconds or vice versa happens automatically.
The following two lines from the preceding example demonstrate how to explicitly convert between different units of time:
duration<long> d7(30); // secondsduration<double, ratio<60>> d8(d7); // minutes
The first line defines a duration representing 30 seconds. The second line converts these 30 seconds into minutes, resulting in 0.5 minutes. Converting in this direction can result in a non-integral value, and thus requires you to use a duration represented by a floating point type; otherwise, you will get some cryptic compilation errors. The following lines, for example, do not compile because d8 is using long instead of a floating point type:
duration<long> d7(30); // secondsduration<long, ratio<60>> d8(d7);// minutes // Error!
You can, however, force this conversion by using duration_cast():
duration<long> d7(30); // secondsauto d8 = duration_cast<duration<long, ratio<60>>>(d7);// minutes
In this case, d8 will be 0 minutes, because integer division is used to convert 30 seconds to minutes.
Converting in the other direction does not require floating point types if the source is an integral type, because the result is always an integral value if you started with an integral value. For example, the following lines convert ten minutes into seconds, both represented by the integral type long:
duration<long, ratio<60>> d9(10); // minutesduration<long> d10(d9); // seconds
The library provides the following standard duration types in the std::chrono namespace:
using nanoseconds = duration<X 64 bits, nano>;using microseconds = duration<X 55 bits, micro>;using milliseconds = duration<X 45 bits, milli>;using seconds = duration<X 35 bits>;using minutes = duration<X 29 bits, ratio<60>>;using hours = duration<X 23 bits, ratio<3600>>;
The exact type of X depends on your compiler, but the C++ standard requires it to be a signed integer type of at least the specified size. The preceding type aliases make use of the predefined SI ratio type aliases that are described earlier in this chapter. With these predefined types, instead of writing this,
duration<long, ratio<60>> d9(10); // minutesyou can simply write this:
minutes d9(10); // minutesThe following code is another example of how to use these predefined durations. The code first defines a variable t, which is the result of 1 hour + 23 minutes + 45 seconds. The auto keyword is used to let the compiler automatically figure out the exact type of t. The second line uses the constructor of the predefined seconds duration to convert the value of t to seconds, and writes the result to the console.
auto t = hours(1) + minutes(23) + seconds(45);cout << seconds(t).count() << " seconds" << endl;
Because the standard requires that the predefined durations use integer types, there can be compilation errors if a conversion could end up with a non-integral value. While integer division normally truncates, in the case of durations, which are implemented with ratio types, the compiler declares any computation that could result in a non-zero remainder as a compile-time error. For example, the following code does not compile because converting 90 seconds to minutes results in 1.5 minutes:
seconds s(90);minutes m(s);
However, the following code does not compile either, even though 60 seconds is exactly 1 minute. It is flagged as a compile-time error because converting from seconds to minutes could result in non-integral values.
seconds s(60);minutes m(s);
Converting in the other direction works perfectly fine because the minutes duration uses an integral type and converting it to seconds always results in an integral value:
minutes m(2);seconds s(m);
You can use the standard user-defined literals “h”, “min”, “s”, “ms”, “us”, and “ns” for creating durations. Technically, these are defined in the std::literals::chrono_literals namespace, but also made accessible with using namespace std::chrono. Here is an example:
using namespace std::chrono;// ...auto myDuration = 42min; // 42 minutes
A clock is a class consisting of a time_point and a duration. The time_point type is discussed in detail in the next section, but those details are not required to understand how clocks work. However, time_points themselves depend on clocks, so it’s important to know the details of clocks first.
Three clocks are defined by the standard. The first one is called system_clock and represents the wall clock time from the system-wide real-time clock. The second one is called steady_clock, and it guarantees its time_point will never decrease, which is not guaranteed for system_clock because the system clock can be adjusted at any time. The third one is the high_resolution_clock, which has the shortest possible tick period. Depending on your compiler, it is possible for the high_resolution_clock to be a synonym for steady_clock or system_clock.
Every clock has a static now() method to get the current time as a time_point. The system_clock also defines two static helper functions for converting time_points to and from the time_t C-style time representation. The first function is called to_time_t(), and it converts a given time_point to a time_t; the second function is called from_time_t(), and it returns a time_point initialized with a given time_t value. The time_t type is defined in the <ctime> header file.
The following example shows a complete program which gets the current time from the system and outputs the time in a human-readable format to the console. The localtime() function converts a time_t to a local time represented by tm and is defined in the <ctime> header file. The put_time() stream manipulator, defined in the <iomanip> header, is introduced in Chapter 13.
// Get current time as a time_pointsystem_clock::time_point tpoint = system_clock::now();// Convert to a time_ttime_t tt = system_clock::to_time_t(tpoint);// Convert to local timetm* t = localtime(&tt);// Write the time to the consolecout << put_time(t, "%H:%M:%S") << endl;
If you want to convert a time to a string, you can use an std::stringstream or the C-style strftime() function, defined in <ctime>, as follows. Using the strftime() function requires you to supply a buffer that is big enough to hold the human-readable representation of the given time:
// Get current time as a time_pointsystem_clock::time_point tpoint = system_clock::now();// Convert to a time_ttime_t tt = system_clock::to_time_t(tpoint);// Convert to local timetm* t = localtime(&tt);// Convert to readable formatchar buffer[80] = {0};strftime(buffer, sizeof(buffer), "%H:%M:%S", t);// Write the time to the consolecout << buffer << endl;
The chrono library can also be used to time how long it takes for a piece of code to execute. The following example shows how you can do this. The actual type of the variables start and end is high_resolution_clock::time_point, and the actual type of diff is a duration.
// Get the start timeauto start = high_resolution_clock::now();// Execute code that you want to timedouble d = 0;for (int i = 0; i < 1000000; ++i) {d += sqrt(sin(i) * cos(i));}// Get the end time and calculate the differenceauto end = high_resolution_clock::now();auto diff = end - start;// Convert the difference into milliseconds and output to the consolecout << duration<double, milli>(diff).count() << "ms" << endl;
The loop in this example is performing some arithmetic operations with sqrt(), sin(), and cos() to make sure the loop doesn’t end too fast. If you get really small values for the difference in milliseconds on your system, those values will not be accurate and you should increase the number of iterations of the loop to make it last longer. Small timings will not be accurate because, while timers often have a resolution in milliseconds, on most operating systems, this timer is updated infrequently, for example, every 10 ms or 15 ms. This induces a phenomenon called gating error, where any event that occurs in less than one timer tick appears to take place in zero units of time; any event between one and two timer ticks appears to take place in one timer unit. For example, on a system with a 15 ms timer update, a loop that takes 44 ms will appear to take only 30 ms. When using such timers to time computations, it is important to make sure that the entire computation takes place across a fairly large number of basic timer tick units so that these errors are minimized.
A point in time is represented by the time_point class and stored as a duration relative to the epoch. A time_point is always associated with a certain clock and the epoch is the origin of this associated clock. For example, the epoch for the classic Unix/Linux time is 1st of January 1970, and durations are measured in seconds. The epoch for Windows is 1st of January 1601 and durations are measured in 100-nanosecond units. Other operating systems have different epoch dates and duration units.
The time_point class contains a function called time_since_epoch(), which returns a duration representing the time between the epoch of the associated clock and the stored point in time.
Arithmetic operations of time_points and durations that make sense are supported. The following table lists those operations. tp is a time_point and d is a duration.
tp + d = tp |
tp – d = tp |
d + tp = tp |
tp – tp = d |
tp += d |
tp -= d |
An example of an operation that is not supported is tp+tp.
Comparison operators are also supported to compare two time points. Two static methods are provided: min(), which returns the smallest possible point in time, and max(), which returns the largest possible point in time.
The time_point class has three constructors.
time_point(): This constructs a time_point initialized with duration::zero(). The resulting time_point represents the epoch of the associated clock.time_point(const duration& d): This constructs a time_point initialized with the given duration. The resulting time_point represents epoch + d.template <class Duration2> time_point(const time_point<clock, Duration2>& t): This constructs a time_point initialized with t.time_since_epoch().Each time_point is associated with a clock. To create a time_point, you specify the clock as the template parameter:
time_point<steady_clock> tp1;Each clock also knows its time_point type, so you can also write it as follows:
steady_clock::time_point tp1;The following example demonstrates the time_point class:
// Create a time_point representing the epoch// of the associated steady clocktime_point<steady_clock> tp1;// Add 10 minutes to the time_pointtp1 += minutes(10);// Store the duration between epoch and time_pointauto d1 = tp1.time_since_epoch();// Convert the duration to seconds and output to the consoleduration<double> d2(d1);cout << d2.count() << " seconds" << endl;
The output should be as follows:
600 secondsConverting time_points can be done implicitly or explicitly, similar to duration conversions. Here is an example of an implicit conversion. The output is 42000 ms.
time_point<steady_clock, seconds> tpSeconds(42s);// Convert seconds to milliseconds implicitly.time_point<steady_clock, milliseconds> tpMilliseconds(tpSeconds);cout << tpMilliseconds.time_since_epoch().count() << " ms" << endl;
If the implicit conversion can result in a loss of data, then you need an explicit conversion using time_point_cast(), just as duration_cast() is needed for explicit duration casts. The following example outputs 42000 ms, even though you start from 42,424ms.
time_point<steady_clock, milliseconds> tpMilliseconds(42'424ms);// Convert milliseconds to seconds explicitly.time_point<steady_clock, seconds> tpSeconds(time_point_cast<seconds>(tpMilliseconds));// Convert seconds back to milliseconds and output the result.milliseconds ms(tpSeconds.time_since_epoch());cout << ms.count() << " ms" << endl;
C++17 adds floor(), ceil(), and round() operations for time_points that behave just as they behave with numerical data.
Generating good random numbers in software is a complex topic. Before C++11, the only way to generate random numbers was to use the C-style srand() and rand() functions. The srand() function needed to be called once in your application and was used to initialize the random number generator, also called seeding. Usually the current system time would be used as a seed.
Once the generator is initialized, random numbers could be generated with rand(). The following example shows how to use srand() and rand(). The time(nullptr) call returns the system time, and is defined in the <ctime> header file.
srand(static_cast<unsigned int>(time(nullptr)));cout << rand() << endl;
A random number within a certain range can be generated with the following function:
int getRandom(int min, int max){return (rand() % static_cast<int>(max + 1 - min)) + min;}
The old C-style rand() function generates random numbers in the range 0 to RAND_MAX, which is defined by the standard to be at least 32,767. Unfortunately, the low-order bits of rand() are often not very random, which means that using the previous getRandom() function to generate a random number in a small range, such as 1 to 6, will not result in very good randomness.
The old srand() and rand() functions don’t offer much in terms of flexibility. You cannot, for example, change the distribution of the generated random numbers. C++11 has added a powerful library to generate random numbers by using different algorithms and distributions. The library is defined in the <random> header file and has three big components: engines, engine adaptors, and distributions. A random number engine is responsible for generating the actual random numbers and storing the state for generating subsequent random numbers. The distribution determines the range of the generated random numbers and how they are mathematically distributed within that range. A random number engine adaptor modifies the results of a random number engine you associate it with.
It’s highly recommended to stop using srand() and rand(), and to start using the classes from <random>.
The following random number engines are available:
random_devicelinear_congruential_enginemersenne_twister_enginesubtract_with_carry_engineThe random_device engine is not a software-based generator; it is a special engine that requires a piece of hardware attached to your computer that generates truly non-deterministic random numbers, for example, by using the laws of physics. A classic mechanism measures the decay of a radioactive isotope by counting alpha-particles-per-time-interval, but there are many other kinds of physics-based random-number generators, including measuring the “noise” of reverse-biased diodes (thus eliminating the concerns about radioactive sources in your computer). The details of these mechanisms fall outside the scope of this book.
According to the specification for random_device, if no such device is attached to the computer, the library is free to use one of the software algorithms. The choice of algorithm is up to the library designer.
The quality of a random number generator is referred to as its entropy measure. The entropy() method of the random_device class returns 0.0 if it is using a software-based pseudo-random number generator, and returns a nonzero value if there is a hardware device attached. The nonzero value is an estimate of the entropy of the attached device.
Using a random_device engine is rather straightforward:
random_device rnd;cout << "Entropy: " << rnd.entropy() << endl;cout << "Min value: " << rnd.min()<< ", Max value: " << rnd.max() << endl;cout << "Random number: " << rnd() << endl;
A possible output of this program could be as follows:
Entropy: 32Min value: 0, Max value: 4294967295Random number: 3590924439
A random_device is usually slower than a pseudo-random number engine. Therefore, if you need to generate a lot of random numbers, I recommend to use a pseudo-random number engine, and to use a random_device to generate a seed for the pseudo-random number engine. This is demonstrated in the section “Generating Random Numbers.”
Next to the random_device engine, there are three pseudo-random number engines:
mt19937 has a period of 219937−1, while the state contains 625 integers or 2.5 kilobytes. It is also one of the fastest engines.The mathematical details of the engines and of the quality of random numbers fall outside the scope of this book. If you want to know more about these topics, you can consult a reference from the “Random Numbers” section in Appendix B.
The random_device engine is easy to use and doesn’t require any parameters. However, creating an instance of one of the three pseudo-random number generators requires you to specify a number of mathematical parameters, which can be complicated. The selection of parameters greatly influences the quality of the generated random numbers. For example, the definition of the mersenne_twister_engine class looks like this:
template<class UIntType, size_t w, size_t n, size_t m, size_t r,UIntType a, size_t u, UIntType d, size_t s,UIntType b, size_t t, UIntType c, size_t l, UIntType f>class mersenne_twister_engine {...}
It requires 14 parameters. The linear_congruential_engine and the subtract_with_carry_engine classes also require a number of such mathematical parameters. For this reason, the standard defines a couple of predefined engines. One example is the mt19937 Mersenne twister, which is defined as follows:
usingmt19937= mersenne_twister_engine<uint_fast32_t, 32, 624, 397, 31,0x9908b0df, 11, 0xffffffff, 7, 0x9d2c5680, 15, 0xefc60000, 18,1812433253>;
These parameters are all magic, unless you understand the details of the Mersenne twister algorithm. In general, you do not want to modify any of these parameters unless you are a specialist in the mathematics of pseudo-random number generators. Instead, it is highly recommended to use one of the predefined type aliases such as mt19937. A complete list of predefined engines is given in a later section.
A random number engine adaptor modifies the result of a random number engine you associate it with, which is called the base engine. This is an example of the adaptor pattern (see Chapter 29). The following three adaptor templates are defined:
template<class Engine, size_t p, size_t r> classdiscard_block_engine{...}template<class Engine, size_t w, class UIntType> classindependent_bits_engine{...}template<class Engine, size_t k> classshuffle_order_engine{...}
The discard_block_engine adaptor generates random numbers by discarding some of the values generated by its base engine. It requires three parameters: the engine to adapt, the block size p, and the used block size r. The base engine is used to generate p random numbers. The adaptor then discards p-r of those numbers and returns the remaining r numbers.
The independent_bits_engine adaptor generates random numbers with a given number of bits w by combining several random numbers generated by the base engine.
The shuffle_order_engine adaptor generates the same random numbers that are generated by the base engine, but delivers them in a different order.
How these adaptors internally work depends on mathematics and falls outside the scope of this book.
A number of predefined engine adaptors are available. The next section gives an overview of the predefined engines and engine adaptors.
As mentioned earlier, it is not recommended to specify your own parameters for pseudo-random number engines and engine adaptors, but instead to use one of the standard ones. C++ defines the following predefined engines and engine adaptors, all in the <random> header file. They all have complicated template arguments, but it is not necessary to understand those arguments to be able to use them.
| NAME | TEMPLATE |
minstd_rand0 |
linear_congruential_engine |
minstd_rand |
linear_congruential_engine |
mt19937 |
mersenne_twister_engine |
mt19937_64 |
mersenne_twister_engine |
ranlux24_base |
subtract_with_carry_engine |
ranlux48_base |
subtract_with_carry_engine |
ranlux24 |
discard_block_engine |
ranlux48 |
discard_block_engine |
knuth_b |
shuffle_order_engine |
default_random_engine |
implementation-defined |
The default_random_engine is compiler dependent.
The following section gives an example of how to use these predefined engines.
Before you can generate any random number, you first need to create an instance of an engine. If you use a software-based engine, you also need to define a distribution. A distribution is a mathematical formula describing how numbers are distributed within a certain range. The recommended way to create an engine is to use one of the predefined engines discussed in the previous section.
The following example uses the predefined engine called mt19937, using a Mersenne twister engine. This is a software-based generator. Just as with the old rand() generator, a software-based engine should be initialized with a seed. The seed used with srand() was often the current time. In modern C++, it’s recommended to use a random_device to generate a seed, and to use a time-based seed as a fallback in case the random_device does not have any entropy.
random_device seeder;const auto seed = seeder.entropy() ? seeder() : time(nullptr);mt19937 eng(static_cast<mt19937::result_type>(seed));
Next, a distribution is defined. This example uses a uniform integer distribution, for the range 1 to 99. Distributions are explained in detail in the next section, but the uniform distribution is easy enough to use for this example:
uniform_int_distribution<int> dist(1, 99);Once the engine and distribution are defined, random numbers can be generated by calling the function call operator of the distribution, and passing the engine as argument. For this example, this is written as dist(eng):
cout << dist(eng) << endl;As you can see, to generate a random number using a software-based engine, you always need to specify the engine and distribution. The std::bind() utility, introduced in Chapter 18 and defined in the <functional> header file, can be used to remove the need to specify both the distribution and the engine when generating a random number. The following example uses the same mt19937 engine and uniform distribution as the previous example. It then defines gen() by using std::bind() to bind eng to the first parameter for dist(). This way, you can call gen() without any argument to generate a new random number. The example then demonstrates the use of gen() in combination with the generate() algorithm to fill a vector of ten elements with random numbers. The generate() algorithm is discussed in Chapter 18 and is defined in <algorithm>.
random_device seeder;const auto seed = seeder.entropy() ? seeder() : time(nullptr);mt19937 eng(static_cast<mt19937::result_type>(seed));uniform_int_distribution<int> dist(1, 99);auto gen = std::bind(dist, eng);vector<int> vec(10);generate(begin(vec), end(vec), gen);for (auto i : vec) { cout << i << " "; }
Even though you don’t know the exact type of gen(), it’s still possible to pass gen() to another function that wants to use that generator. You have two options: use a parameter of type std::function<int()>, or use a function template. The previous example can be adapted to generate random numbers in a function called fillVector(). Here is an implementation using std::function:
void fillVector(vector<int>& vec, const std::function<int()>& generator){generate(begin(vec), end(vec), generator);}
and here is a function template version:
template<typename T>void fillVector(vector<int>& vec, const T& generator){generate(begin(vec), end(vec), generator);}
This function is used as follows:
random_device seeder;const auto seed = seeder.entropy() ? seeder() : time(nullptr);mt19937 eng(static_cast<mt19937::result_type>(seed));uniform_int_distribution<int> dist(1, 99);auto gen = std::bind(dist, eng);vector<int> vec(10);fillVector(vec, gen);for (auto i : vec) { cout << i << " "; }
A distribution is a mathematical formula describing how numbers are distributed within a certain range. The random number generator library comes with the following distributions that can be used with pseudo-random number engines to define the distribution of the generated random numbers. It’s a compacted representation. The first line of each distribution is the class name and class template parameters, if any. The next lines are a constructor for the distribution. Only one constructor for each distribution is shown to give you an idea of the class. Consult a Standard Library Reference, see Appendix B, for a detailed list of all constructors and methods of each distribution.
Available uniform distributions:
template<class IntType = int> class uniform_int_distributionuniform_int_distribution(IntType a = 0,IntType b = numeric_limits<IntType>::max());template<class RealType = double> class uniform_real_distributionuniform_real_distribution(RealType a = 0.0, RealType b = 1.0);
Available Bernoulli distributions:
class bernoulli_distributionbernoulli_distribution(double p = 0.5);template<class IntType = int> class binomial_distributionbinomial_distribution(IntType t = 1, double p = 0.5);template<class IntType = int> class geometric_distributiongeometric_distribution(double p = 0.5);template<class IntType = int> class negative_binomial_distributionnegative_binomial_distribution(IntType k = 1, double p = 0.5);
Available Poisson distributions:
template<class IntType = int> class poisson_distributionpoisson_distribution(double mean = 1.0);template<class RealType = double> class exponential_distributionexponential_distribution(RealType lambda = 1.0);template<class RealType = double> class gamma_distributiongamma_distribution(RealType alpha = 1.0, RealType beta = 1.0);template<class RealType = double> class weibull_distributionweibull_distribution(RealType a = 1.0, RealType b = 1.0);template<class RealType = double> class extreme_value_distributionextreme_value_distribution(RealType a = 0.0, RealType b = 1.0);
Available normal distributions:
template<class RealType = double> class normal_distributionnormal_distribution(RealType mean = 0.0, RealType stddev = 1.0);template<class RealType = double> class lognormal_distributionlognormal_distribution(RealType m = 0.0, RealType s = 1.0);template<class RealType = double> class chi_squared_distributionchi_squared_distribution(RealType n = 1);template<class RealType = double> class cauchy_distributioncauchy_distribution(RealType a = 0.0, RealType b = 1.0);template<class RealType = double> class fisher_f_distributionfisher_f_distribution(RealType m = 1, RealType n = 1);template<class RealType = double> class student_t_distributionstudent_t_distribution(RealType n = 1);
Available sampling distributions:
template<class IntType = int> class discrete_distributiondiscrete_distribution(initializer_list<double> wl);template<class RealType = double> class piecewise_constant_distributiontemplate<class UnaryOperation>piecewise_constant_distribution(initializer_list<RealType> bl,UnaryOperation fw);template<class RealType = double> class piecewise_linear_distributiontemplate<class UnaryOperation>piecewise_linear_distribution(initializer_list<RealType> bl,UnaryOperation fw);
Each distribution requires a set of parameters. Explaining all these mathematical parameters is outside the scope of this book, but the rest of this section includes a couple of examples to explain the impact of a distribution on the generated random numbers.
Distributions are easiest to understand when you look at a graphical representation of them. For example, the following code generates one million random numbers between 1 and 99, and counts how many times a certain number is randomly chosen. The counters are stored in a map where the key is a number between 1 and 99, and the value associated with a key is the number of times that that key has been selected randomly. After the loop, the results are written to a CSV (comma-separated values) file, which can be opened in a spreadsheet application.
const unsigned int kStart = 1;const unsigned int kEnd = 99;const unsigned int kIterations = 1'000'000;// Uniform Mersenne Twisterrandom_device seeder;const auto seed = seeder.entropy() ? seeder() : time(nullptr);mt19937 eng(static_cast<mt19937::result_type>(seed));uniform_int_distribution<int> dist(kStart, kEnd);auto gen = bind(dist, eng);map<int, int> m;for (unsigned int i = 0; i < kIterations; ++i) {int rnd = gen();// Search map for a key = rnd. If found, add 1 to the value associated// with that key. If not found, add the key to the map with value 1.++(m[rnd]);}// Write to a CSV fileofstream of("res.csv");for (unsigned int i = kStart; i <= kEnd; ++i) {of << i << "," << m[i] << endl;}
The resulting data can then be used to generate a graphical representation. The graph of the preceding uniform Mersenne twister is shown in Figure 20-1.
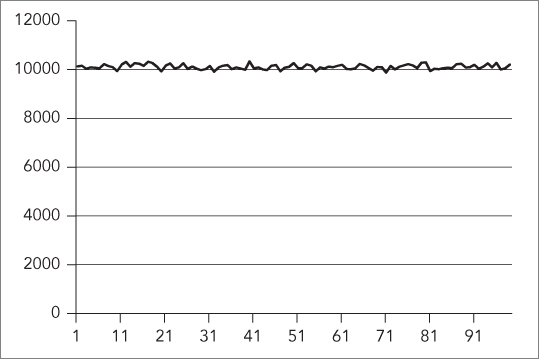
The horizontal axis represents the range in which random numbers are generated. The graph clearly shows that all numbers in the range 1 to 99 are randomly chosen around 10,000 times, and that the distribution of the generated random numbers is uniform across the entire range.
The example can be modified to generate random numbers according to a normal distribution instead of a uniform distribution. Only two small changes are required. First, you need to modify the creation of the distribution as follows:
normal_distribution<double> dist(50, 10);Because normal distributions use doubles instead of integers, you also need to modify the call to gen():
int rnd = static_cast<int>(gen());Figure 20-2 shows a graphical representation of the random numbers generated according to this normal distribution.
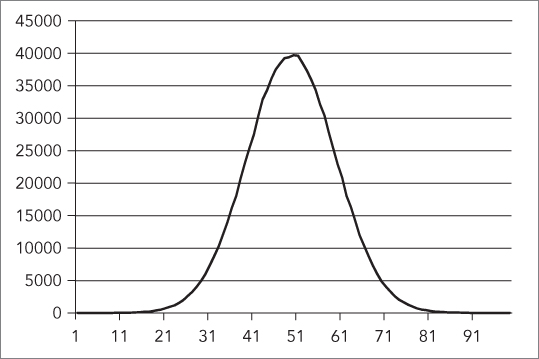
The graph clearly shows that most of the generated random numbers are around the center of the range. In this example, the value 50 is randomly chosen around 40,000 times, while values like 20 and 80 are chosen only around 500 times.
OPTIONALstd::optional, defined in <optional>, holds a value of a specific type, or nothing. It can be used for parameters of a function if you want to allow for values to be optional. It is also often used as a return type from a function if the function can either return something or not. This removes the need to return “special” values from functions such as nullptr, end(), -1, EOF, and so on. It also removes the need to write the function returning a Boolean while storing the actual value in a reference output parameter, such as bool getData(T& dataOut).
Here is an example of a function returning an optional:
optional<int> getData(bool giveIt){if (giveIt) {return 42;}return nullopt; // or simply return {};}
You can call this function as follows:
auto data1 = getData(true);auto data2 = getData(false);
To determine whether or not an optional has a value, use the has_value() method, or simply use the optional in an if statement:
cout << "data1.has_value = " << data1.has_value() << endl;if (data2) {cout << "data2 has a value." << endl;}
If an optional has a value, you can retrieve it with value(), or with the dereferencing operator:
cout << "data1.value = " << data1.value() << endl;cout << "data1.value = " << *data1 << endl;
If you call value() on an empty optional, a bad_optional_access exception is thrown.
value_or() can be used to return either the value of an optional, or another value when the optional is empty:
cout << "data2.value = " << data2.value_or(0) << endl;Note that you cannot store a reference in an optional, so optional<T&> does not work. Instead, you can use optional<T*>, optional<reference_wrapper<T>>, or optional<reference_wrapper<const T>>. Remember from Chapter 17 that you can use std::ref() or cref() to create an std::reference_wrapper<T> or a reference_wrapper<const T> respectively.
VARIANTstd::variant, defined in <variant>, can hold a single value of one of a given set of types. When you define a variant, you have to specify the types it can potentially contain. For example, the following code defines a variant that can contain an integer, a string, or a floating point value, one at a time:
variant<int, string, float> v;This default-constructed variant contains a default-constructed value of its first type, int in this case. If you want to be able to default construct a variant, you have to make sure that the first type of the variant is default constructible. For example, the following does not compile because Foo is not default constructible.
class Foo { public: Foo() = delete; Foo(int) {} };class Bar { public: Bar() = delete; Bar(int) {} };int main(){variant<Foo, Bar> v;}
In fact, neither Foo nor Bar are default constructible. If you still want to be able to default construct such a variant, then you can use std::monostate, an empty alternative, as first type of the variant:
variant<monostate, Foo, Bar> v;You can use the assignment operator to store something in a variant:
variant<int, string, float> v;v = 12;v = 12.5f;v = "An std::string"s;
A variant can only contain one value at any given time. So, with these three lines of code, first the integer 12 is stored in the variant, then the variant is modified to contain a single floating-point value, and lastly, the variant is modified again to contain a single string value.
You can use the index() method to query the index of the value’s type that is currently stored in the variant. The std::holds_alternative() function template can be used to figure out whether or not a variant currently contains a value of a certain type:
cout << "Type index: " << v.index() << endl;cout << "Contains an int: " << holds_alternative<int>(v) << endl;
The output is as follows:
Type index: 1Contains an int: 0
Use std::get<index>() or std::get<T>() to retrieve the value from a variant. These functions throw a bad_variant_access exception if you are using the index of a type, or a type, that does not match the current value in the variant:
cout << std::get<string>(v) << endl;try {cout << std::get<0>(v) << endl;} catch (const bad_variant_access& ex) {cout << "Exception: " << ex.what() << endl;}
This is the output:
An std::stringException: bad variant access
To avoid exceptions, use the std::get_if<index>() or std::get_if<T>() helper functions. These functions accept a pointer to a variant, and return a pointer to the requested value, or nullptr on error:
string* theString = std::get_if<string>(&v);int* theInt = std::get_if<int>(&v);cout << "retrieved string: " << (theString ? *theString : "null") << endl;cout << "retrieved int: " << (theInt ? *theInt : 0) << endl;
Here is the output:
retrieved string: An std::stringretrieved int: 0
There is an std::visit() helper function that you can use to apply the visitor pattern to a variant. Suppose you have the following class that defines a number of overloaded function call operators, one for each possible type in the variant:
class MyVisitor{public:void operator()(int i) { cout << "int " << i << endl; }void operator()(const string& s) { cout << "string " << s << endl; }void operator()(float f) { cout << "float " << f << endl; }};
You can use this with std::visit() as follows.
visit(MyVisitor(), v);The result is that the appropriate overloaded function call operator is called based on the current value stored in the variant. The output for this example is:
string An std::stringAs with optional, you cannot store references in a variant. You can either store pointers, or store instances of reference_wrapper<T> or reference_wrapper<const T>.
ANYstd::any, defined in <any>, is a class that can contain a single value of any type. Once it is constructed, you can ask an any instance whether or not it contains a value, and what the type of the contained value is. To get access to the contained value, you need to use any_cast(), which throws an exception of type bad_any_cast in case of failure. Here is an example:
any empty;any anInt(3);any aString("An std::string."s);cout << "empty.has_value = " << empty.has_value() << endl;cout << "anInt.has_value = " << anInt.has_value() << endl << endl;cout << "anInt wrapped type = " << anInt.type().name() << endl;cout << "aString wrapped type = " << aString.type().name() << endl << endl;int theInt = any_cast<int>(anInt);cout << theInt << endl;try {int test = any_cast<int>(aString);cout << test << endl;} catch (const bad_any_cast& ex) {cout << "Exception: " << ex.what() << endl;}
The output is as follows. Note that the wrapped type of aString is compiler dependent.
empty.has_value = 0anInt.has_value = 1anInt wrapped type = intaString wrapped type = class std::basic_string<char,struct std::char_traits<char>,class std::allocator<char> >3Exception: Bad any_cast
You can assign a new value to an any instance, and even assign a new value of a different type:
any something(3); // Now it contains an integer.something = "An std::string"s; // Now the same instance contains a string.
Instances of any can be stored in Standard Library containers. This allows you to have heterogeneous data in a single container. The only downside is that you have to perform explicit any_casts to retrieve specific values, as in this example:
vector<any> v;v.push_back(any(42));v.push_back(any("An std::string"s));cout << any_cast<string>(v[1]) << endl;
As with optional and variant, you cannot store references in an any instance. You can either store pointers, or store instances of reference_wrapper<T> or reference_wrapper<const T>.
The std::pair class, defined in <utility> and introduced in Chapter 17, can store exactly two values, each with a specific type. The type of each value should be known at compile time. Here is a short example:
pair<int, string> p1(16, "Hello World");pair<bool, float> p2(true, 0.123f);cout << "p1 = (" << p1.first << ", " << p1.second << ")" << endl;cout << "p2 = (" << p2.first << ", " << p2.second << ")" << endl;
The output is as follows:
p1 = (16, Hello World)p2 = (1, 0.123)
An std::tuple, defined in <tuple>, is a generalization of a pair. It allows you to store any number of values, each with its own specific type. Just like a pair, a tuple has a fixed size and fixed value types, which are determined at compile time.
A tuple can be created with a tuple constructor, specifying both the template types and the actual values. For example, the following code creates a tuple where the first element is an integer, the second element a string, and the last element a Boolean:
using MyTuple = tuple<int, string, bool>;MyTuple t1(16, "Test", true);
std::get<i>() is used to get the ith element from a tuple, where i is a 0-based index; that is, <0> is the first element of the tuple, <1> is the second element of the tuple, and so on. The value returned has the correct type for that index in the tuple:
cout << "t1 = (" << get<0>(t1) << ", " << get<1>(t1)<< ", " << get<2>(t1) << ")" << endl;// Outputs: t1 = (16, Test, 1)
You can check that get<
i
>() returns the correct type by using typeid(), from the <typeinfo> header. The output of the following code says that the value returned by get<1>(t1) is indeed an std::string:
cout << "Type of get<1>(t1) = " << typeid(get<1>(t1)).name() << endl;// Outputs: Type of get<1>(t1) = class std::basic_string<char,// struct std::char_traits<char>,class std::allocator<char> >
You can also retrieve an element from a tuple based on its type with std::get<T>(), where T is the type of the element you want to retrieve instead of the index. The compiler generates an error if the tuple has several elements with the requested type. For example, you can retrieve the string element from t1 as follows:
cout << "String = " << get<string>(t1) << endl;// Outputs: String = Test
Iterating over the values of a tuple is unfortunately not straightforward. You cannot write a simple loop and call something like get<i>(mytuple) because the value of i must be known at compile time. A possible solution is to use template metaprogramming, which is discussed in detail in Chapter 22, together with an example on how to print tuple values.
The size of a tuple can be queried with the std::tuple_size template. Note that tuple_size requires you to specify the type of the tuple (MyTuple in this case) and not an actual tuple instance like t1:
cout << "Tuple Size = " << tuple_size<MyTuple>::value << endl;// Outputs: Tuple Size = 3
If you don’t know the exact tuple type, you can always use decltype() as follows:
cout << "Tuple Size = " << tuple_size<decltype(t1)>::value << endl;// Outputs: Tuple Size = 3
With C++17’s template argument deduction for constructors, you can omit the template type parameters when constructing a tuple, and let the compiler deduce them automatically based on the type of arguments passed to the constructor. For example, the following defines the same t1
tuple consisting of an integer, a string, and a Boolean. Note that you now have to specify "Test"s to make sure it’s an std::string.
std::tuple t1(16, "Test"s, true);Because of the automatic deduction of types, you cannot use & to specify a reference. If you want to use template argument deduction for constructors to generate a tuple containing a reference or a constant reference, then you need to use ref() or cref(), respectively, as is demonstrated in the following example. The ref() and cref() utility functions are defined in the <functional> header file. For example, the following construction results in a tuple of type tuple<int, double&, const double&, string&>:
double d = 3.14;string str1 = "Test";std::tuple t2(16, ref(d), cref(d), ref(str1));
To test the double reference in the t2 tuple, the following code first writes the value of the double variable to the console. The call to get<1>(t2) returns a reference to d because ref(d) was used for the second (index 1) tuple element. The second line changes the value of the variable referenced, and the last line shows that the value of d is indeed changed through the reference stored in the tuple. Note that the third line fails to compile because cref(d) was used for the third tuple element, that is, it is a constant reference to d.
cout << "d = " << d << endl;get<1>(t2) *= 2;//get<2>(t2) *= 2; // ERROR because of cref()cout << "d = " << d << endl;// Outputs: d = 3.14// d = 6.28
Without C++17’s template argument deduction for constructors, you can use the std::make_tuple() utility function to create a tuple. This helper function template also allows you to create a tuple by only specifying the actual values. The types are deduced automatically at compile time. For example:
auto t2 = std::make_tuple(16, ref(d), cref(d), ref(str1));There are two ways in which you can decompose a tuple into its individual elements: structured bindings (C++17) and std::tie().
Structured BindingsStructured bindings, introduced in C++17, make it very easy to decompose a tuple into separate variables. For example, the following code defines a tuple consisting of an integer, a string, and a Boolean value, and then uses a structured binding to decompose it into three distinct variables:
tuple t1(16, "Test"s, true);auto[i, str, b] = t1;cout << "Decomposed: i = "<< i << ", str = \"" << str << "\", b = " << b << endl;
With structured bindings, you cannot ignore specific elements while decomposing. If your tuple has three elements, then your structured binding needs three variables. If you want to ignore elements, then you have to use tie(), explained next.
If you want to decompose a tuple without structured bindings, you can use the std::tie() utility function, which generates a tuple of references. The following example first creates a tuple consisting of an integer, a string, and a Boolean value. It then creates three variables—an integer, a string, and a Boolean—and writes the values of those variables to the console. The tie(i, str, b) call creates a tuple containing a reference to i, a reference to str, and a reference to b. The assignment operator is used to assign tuple t1 to the result of tie(). Because the result of tie() is a tuple of references, the assignment actually changes the values in the three separate variables, as is shown by the output of the values after the assignment.
tuple<int, string, bool> t1(16, "Test", true);int i = 0;string str;bool b = false;cout << "Before: i = " << i << ", str = \"" << str << "\", b = " << b << endl;tie(i, str, b) = t1;cout << "After: i = " << i << ", str = \"" << str << "\", b = " << b << endl;
The result is as follows:
Before: i = 0, str = "", b = 0After: i = 16, str = "Test", b = 1
With tie() you can ignore certain elements that you do not want to be decomposed. Instead of a variable name for the decomposed value, you use the special std::ignore value. Here is the previous example, but now the string element of the tuple is ignored in the call to tie():
tuple<int, string, bool> t1(16, "Test", true);int i = 0;bool b = false;cout << "Before: i = " << i << ", b = " << b << endl;tie(i, std::ignore, b) = t1;cout << "After: i = " << i << ", b = " << b << endl;
Here is the new output:
Before: i = 0, b = 0After: i = 16, b = 1
You can use std::tuple_cat() to concatenate two tuples into one tuple. In the following example, the type of t3 is tuple<int, string, bool, double, string>:
tuple<int, string, bool> t1(16, "Test", true);tuple<double, string> t2(3.14, "string 2");auto t3 = tuple_cat(t1, t2);
Tuples also support the following comparison operators: ==, !=, <, >, <=, and >=. For the comparison operators to work, the element types stored in the tuple should support them as well. Here is an example:
tuple<int, string> t1(123, "def");tuple<int, string> t2(123, "abc");if (t1 < t2) {cout << "t1 < t2" << endl;} else {cout << "t1 >= t2" << endl;}
The output is as follows:
t1 >= t2Tuple comparisons can be used to easily implement lexicographical comparison operators for custom types that have several data members. For example, suppose you have a simple structure with three data members:1
struct Foo{int mInt;string mStr;bool mBool;};
Implementing a correct operator< for Foo is not trivial! However, using std::tie() and tuple comparisons, this becomes a simple one-liner:
bool operator<(const Foo& f1, const Foo& f2){return tie(f1.mInt, f1.mStr, f1.mBool) <tie(f2.mInt, f2.mStr, f2.mBool);}
Here is an example of its use:
Foo f1{ 42, "Hello", 0 };Foo f2{ 32, "World", 0 };cout << (f1 < f2) << endl;cout << (f2 < f1) << endl;
make_from_tuplestd::make_from_tuple() constructs an object of a given type T, passing the elements of a given tuple as arguments to the constructor of T. For example, suppose you have the following class:
class Foo{public:Foo(string str, int i) : mStr(str), mInt(i) {}private:string mStr;int mInt;};
You can use make_from_tuple() as follows:
auto myTuple = make_tuple("Hello world.", 42);auto foo = make_from_tuple<Foo>(myTuple);
The argument given to make_from_tuple() does not have to be a tuple, but it has to be something that supports std::get<>() and std::tuple_size. Both std::array and std::pair satisfy these requirements as well.
This function is not that practical for everyday use, but it comes in handy when writing very generic code using templates and template metaprogramming.
applystd::apply() calls a given callable (function, lambda expression, function object, and so on), passing the elements of a given tuple as arguments. Here is an example:
int add(int a, int b) { return a + b; }...cout << apply(add, std::make_tuple(39, 3)) << endl;
As with make_from_tuple(), this function is also meant more for use with generic code using templates and template metaprogramming, than for everyday use.
FILESYSTEM SUPPORT LIBRARYC++17 introduces a filesystem support library. Everything is defined in the <filesystem> header, and lives in the std::filesystem namespace. It allows you to write portable code to work with the filesystem. You can use it for querying whether something is a directory or a file, iterating over the contents of a directory, manipulating paths, and retrieving information about files such as their size, extension, creation time, and so on. The two most important parts of the library—paths and directory entries—are introduced in the next sections.
The basic component of the library is a path. A path can be an absolute or a relative path, and can include a filename or not. For example, the following code defines a couple of paths. Note the use of a raw string literal to avoid having to escape the backslashes.
path p1(LR"(D:\Foo\Bar)");path p2(L"D:/Foo/Bar");path p3(L"D:/Foo/Bar/MyFile.txt");path p4(LR"(..\SomeFolder)");path p5(L"/usr/lib/X11");
When a path is converted to a string (for example by using the c_str() method), or inserted into a stream, it is converted to the native format of the system on which the code is running. For example:
path p1(LR"(D:\Foo\Bar)");path p2(L"D:/Foo/Bar");cout << p1 << endl;cout << p2 << endl;
The output is as follows:
D:\Foo\BarD:\Foo\Bar
You can append a component to a path with the append() method, or with operator/=. A path separator is automatically included. For example:
path p(L"D:\\Foo");p.append("Bar");p /= "Bar";cout << p << endl;
The output is D:\Foo\Bar\Bar.
You can use concat(), or operator+=, to concatenate a string to an existing path. This does not add any path separator! For example:
path p(L"D:\\Foo");p.concat("Bar");p += "Bar";cout << p << endl;
The output now is D:\FooBarBar.
A path supports iterators to iterate over its different components. Here is an example:
path p(LR"(C:\Foo\Bar)");for (const auto& component : p) {cout << component << endl;}
The output is as follows:
C:\FooBar
The path interface supports operations such as remove_filename(), replace_filename(), replace_extension(), root_name(), parent_path(), extension(), has_extension(), is_absolute(), is_relative(), and more. Consult a Standard Library reference, see Appendix B, for a full list of all available functionality.
A path just represents a directory or a file on a filesystem. A path may refer to a non-existing directory or file. If you want to query an actual directory or file on the filesystem, you need to construct a directory_entry from a path. This construction can fail if the given directory or file does not exist. The directory_entry interface supports operations like is_directory(), is_regular_file(), is_socket(), is_symlink(), file_size(), last_write_time(), and others.
The following example constructs a directory_entry from a path to query the size of a file:
path myPath(L"c:/windows/win.ini");directory_entry dirEntry(myPath);if (dirEntry.exists() && dirEntry.is_regular_file()) {cout << "File size: " << dirEntry.file_size() << endl;}
An entire collection of helper functions is available. For example, you can use copy() to copy files or directories, create_directory() to create a new directory on the filesystem, exists() to query whether or not a given directory or file exists, file_size() to get the size of a file, last_write_time() to get the time the file was last modified, remove() to delete a file, temp_directory_path() to get a directory suitable for storing temporary files, space() to query the available space on a filesystem, and more. Consult a Standard Library reference, see Appendix B, for a full list.
The following example prints out the capacity of a filesystem and how much space is still free:
space_info s = space("c:\\");cout << "Capacity: " << s.capacity << endl;cout << "Free: " << s.free << endl;
You can find more examples of these helper functions in the following section on directory iteration.
If you want to recursively iterate over all files and subdirectories in a given directory, you can use the recursive_directory_iterator as follows:
void processPath(const path& p){if (!exists(p)) {return;}auto begin = recursive_directory_iterator(p);auto end = recursive_directory_iterator();for (auto iter = begin; iter != end; ++iter) {const string spacer(iter.depth() * 2, ' ');auto& entry = *iter;if (is_regular_file(entry)) {cout << spacer << "File: " << entry;cout << " (" << file_size(entry) << " bytes)" << endl;} else if (is_directory(entry)) {std::cout << spacer << "Dir: " << entry << endl;}}}
This function can be called as follows:
path p(LR"(D:\Foo\Bar)");processPath(p);
You can also use a directory_iterator to iterate over the contents of a directory and implement the recursion yourself. Here is an example that does the same thing as the previous example but using a directory_iterator instead of a recursive_directory_iterator:
void processPath(const path& p, size_t level = 0){if (!exists(p)) {return;}const string spacer(level * 2, ' ');if (is_regular_file(p)) {cout << spacer << "File: " << p;cout << " (" << file_size(p) << " bytes)" << endl;} else if (is_directory(p)) {std::cout << spacer << "Dir: " << p << endl;for (auto& entry : directory_iterator(p)) {processPath(entry, level + 1);}}}
This chapter gave an overview of additional functionality provided by the C++ standard that did not fit naturally in other chapters. You learned how to use the ratio template to define compile-time rational numbers; the chrono library; the random number generation library; and the optional, variant, and any data types. You also learned about tuples, which are a generalization of pairs. The chapter finished with an introduction to the filesystem support library.
This chapter concludes Part 3 of the book. The next part discusses some more advanced topics and starts with a chapter showing you how to customize and extend the functionality provided by the C++ Standard Library.
Every Standard Library container takes an Allocator type as a template parameter, for which the default usually suffices. For example, the vector template definition looks like this:
template <class T, class Allocator = allocator<T>> class vector;The container constructors then allow you to specify an object of type Allocator. This permits you to customize the way the containers allocate memory. Every memory allocation performed by a container is made with a call to the allocate() method of the Allocator object. Conversely, every deallocation is performed with a call to the deallocate() method of the Allocator object. The Standard Library provides a default Allocator class called allocator, which implements these methods as wrappers for operator new and operator delete.
If you want containers in your program to use a custom memory allocation and deallocation scheme, you can write your own Allocator class. There are several reasons for using custom allocators. For example, if the underlying allocator has unacceptable performance, there are alternatives that can be constructed. Or, if memory fragmentation is a problem (a lot of different allocations and deallocations leaving unusable, small holes in memory), a single “pool” of objects of one type can be created, called a memory pool. When OS-specific capabilities, such as shared memory segments, must be allocated, using custom allocators allows the use of Standard Library containers in those shared memory segments. The use of custom allocators is complex, and there are many potential problems if you are not careful, so this should not be approached lightly.
Any class that provides allocate(), deallocate(), and several other required methods and type aliases can be used in place of the default allocator class.
C++17 introduces the concept of polymorphic memory allocators. Basically, the problem with the allocator for a container being specified as a template type parameter is that two containers that are similar but have different allocator types are completely different. For example, two vector<int> containers with different Allocator template type parameters are different, and so cannot be assigned to one another.
The polymorphic memory allocators, defined in <memory_resource> in the std::pmr namespace, help to solve this problem. The class std::pmr::polymorphic_allocator is a proper Allocator class because it satisfies all the requirements, such as having an allocate() and deallocate() method. The allocation behavior of a polymorphic_allocator depends on the memory_resource it’s given during construction, and not on any template type parameters. As such, different polymorphic_allocators can behave in completely different ways when allocating and deallocating memory, even though they all have the same type, that is, polymorphic_allocator. The standard provides some built-in memory resources that you can use to initialize a polymorphic memory allocator: synchronized_pool_resource, unsynchronized_pool_resource, and monotonic_buffer_resource.
However, in my experience, both custom allocators and polymorphic memory allocators are rather advanced and rarely used features. I’ve never used them myself, so a detailed discussion falls outside the scope of this book. For more information, consult one of the books listed in Appendix B that specifically covers the C++ Standard Library.
The Standard Library provides four stream iterators. These are iterator-like class templates that allow you to treat input and output streams as input and output iterators. Using these stream iterators, you can adapt input and output streams so that they can serve as sources and destinations, respectively, for various Standard Library algorithms. The following stream iterators are available:
ostream_iterator—an output stream iteratoristream_iterator—an input stream iteratorThere is also an ostreambuf_iterator and an istreambuf_iterator, but these are rarely used and are not further discussed here.
The ostream_iterator class is an output stream iterator. It is a class template that takes the element type as a type parameter. Its constructor takes an output stream and a delimiter string to write to the stream following each element. The ostream_iterator class writes elements using operator<<.
For example, you can use the ostream_iterator with the copy() algorithm to print the elements of a container with only one line of code. The first parameter of copy() is the start iterator of the range to copy, the second parameter is the end iterator of the range, and the third parameter is the destination iterator:
vector<int> myVector(10);iota(begin(myVector), end(myVector), 1); // Fill vector with 1,2,3...10// Print the contents of the vector.copy(cbegin(myVector), cend(myVector), ostream_iterator<int>(cout, " "));
The output is as follows:
1 2 3 4 5 6 7 8 9 10You can use the input stream iterator, istream_iterator, to read values from an input stream using the iterator abstraction. It is a class template that takes the element type as a type parameter. Elements are read using operator>>. You can use an istream_iterator as a source for algorithms and container methods.
For example, the following piece of code reads integers from the console until the end of the stream is reached. On Windows, this happens when you press Ctrl+Z followed by Enter, while on Linux you press Enter followed by Ctrl+D. The accumulate() algorithm is used to sum all the integers together. Note that the default constructor of istream_iterator creates an end iterator.
cout << "Enter numbers separated by white space." << endl;cout << "Press Ctrl+Z followed by Enter to stop." << endl;istream_iterator<int> numbersIter(cin);istream_iterator<int> endIter;int sum = accumulate(numbersIter, endIter, 0);cout << "Sum: " << sum << endl;
Take a moment to reflect on this code. If you remove all the output statements and the variable declarations, the only line left is the call to accumulate(). Thanks to algorithms and input stream iterators, this single line of code reads any number of integers from the console and sums them together, without using any explicit loops.
The Standard Library provides three iterator adaptors, which are special iterators built on top of other iterators. All three are defined in the <iterator> header. It’s also possible to write your own iterator adaptors, but this is not covered in this book. Consult one of the books on the Standard Library listed in Appendix B for details.
The Standard Library provides an std::reverse_iterator class template that iterates through a bidirectional or random access iterator in a reverse direction. Every reversible container in the Standard Library, which happens to be every container that’s part of the standard except forward_list and the unordered associative containers, supplies a reverse_iterator type alias and methods called rbegin() and rend(). These reverse_iterator type aliases are of type std::reverse_iterator<T> with T equal to the iterator type alias of the container. The method rbegin() returns a reverse_iterator pointing to the last element of the container, and rend() returns a reverse_iterator pointing to the element before the first element of the container. Applying operator++ to a reverse_iterator calls operator-- on the underlying container iterator, and vice versa. For example, iterating over a collection from the beginning to the end can be done as follows:
for (auto iter = begin(collection); iter != end(collection); ++iter) {}Iterating over the elements in the collection from the end to the beginning can be done using a reverse_iterator by calling rbegin() and rend(). Note that you still call ++iter:
for (auto iter = rbegin(collection); iter != rend(collection); ++iter) {}An std::reverse_iterator is useful mostly with algorithms in the Standard Library that have no equivalents that work in reverse order. For example, the basic find() algorithm searches for the first element in a sequence. If you want to find the last element in the sequence, you can use a reverse_iterator instead. Note that when you call an algorithm such as find() with a reverse_iterator, it returns a reverse_iterator as well. You can always obtain the underlying iterator from a reverse_iterator by calling the base() method on the reverse_iterator. However, due to the implementation details of reverse_iterator, the iterator returned from base() always refers to one element past the element referred to by the reverse_iterator on which it’s called. In order to get to the same element, you must subtract one.
Here is an example of find() with a reverse_iterator:
// The implementation of populateContainer() is identical to that shown in// Chapter 18, so it is omitted here.vector<int> myVector;populateContainer(myVector);int num;cout << "Enter a number to find: ";cin >> num;auto it1 = find(begin(myVector), end(myVector), num);auto it2 = find(rbegin(myVector), rend(myVector), num);if (it1 != end(myVector)) {cout << "Found " << num << " at position " << it1 - begin(myVector)<< " going forward." << endl;cout << "Found " << num << " at position "<< it2.base() - 1 - begin(myVector) << " going backward." << endl;} else {cout << "Failed to find " << num << endl;}
A possible output of this program is as follows:
Enter a number (0 to quit): 11Enter a number (0 to quit): 22Enter a number (0 to quit): 33Enter a number (0 to quit): 22Enter a number (0 to quit): 11Enter a number (0 to quit): 0Enter a number to find: 22Found 22 at position 1 going forward.Found 22 at position 3 going backward.
As Chapter 18 mentions, algorithms like copy() don’t insert elements into a container; they simply replace old elements in a range with new ones. In order to make algorithms like copy() more useful, the Standard Library provides three insert iterator adaptors that actually insert elements into a container: insert_iterator, back_insert_iterator, and front_insert_iterator. They are all templatized on a container type, and take the actual container reference in their constructor. Because they supply the necessary iterator interfaces, these adaptors can be used as the destination iterators of algorithms like copy(). However, instead of replacing elements in the container, they make calls on their container to actually insert new elements.
The basic insert_iterator calls insert(position, element) on the container, the back_insert_iterator calls push_back(element), and the front_insert_iterator calls push_front(element).
The following example uses a back_insert_iterator with the copy_if() algorithm to populate vectorTwo with all elements from vectorOne that are not equal to 100:
vector<int> vectorOne, vectorTwo;populateContainer(vectorOne);back_insert_iterator<vector<int>> inserter(vectorTwo);copy_if(cbegin(vectorOne), cend(vectorOne), inserter,[](int i){ return i != 100; });copy(cbegin(vectorTwo), cend(vectorTwo), ostream_iterator<int>(cout, " "));
As you can see, when you use insert iterators, you don’t need to size the destination containers ahead of time.
You can also use the std::back_inserter() utility function to create a back_insert_iterator. In the previous example, you can remove the line that defines the inserter variable, and rewrite the copy_if() call as follows. The result is exactly the same as the previous implementation:
copy_if(cbegin(vectorOne), cend(vectorOne),back_inserter(vectorTwo), [](int i){ return i != 100; });
With C++17’s template argument deduction for constructors, this can also be written as follows:
copy_if(cbegin(vectorOne), cend(vectorOne),back_insert_iterator(vectorTwo), [](int i) { return i != 100; });
The front_insert_iterator and insert_iterator work similarly, except that the insert_iterator also takes an initial iterator position in its constructor, which it passes to the first call to insert(position, element). Subsequent iterator position hints are generated based on the return value from each insert() call.
One benefit of using an insert_iterator is that it allows you to use associative containers as destinations of the modifying algorithms. Chapter 18 explains that the problem with associative containers is that you are not allowed to modify the elements over which you iterate. By using an insert_iterator, you can instead insert elements. Associative containers actually support a form of insert() that takes an iterator position, and are supposed to use the position as a “hint,” which they can ignore. When you use an insert_iterator on an associative container, you can pass the begin() or end() iterator of the container to use as the hint. The insert_iterator modifies the iterator hint that it passes to insert() after each call to insert(), such that the position is one past the just-inserted element.
Here is the previous example modified so that the destination container is a set instead of a vector:
vector<int> vectorOne;set<int> setOne;populateContainer(vectorOne);insert_iterator<set<int>> inserter(setOne, begin(setOne));copy_if(cbegin(vectorOne), cend(vectorOne), inserter,[](int i){ return i != 100; });copy(cbegin(setOne), cend(setOne), ostream_iterator<int>(cout, " "));
Similar to the back_insert_iterator example, you can use the std::inserter() utility function to create an insert_iterator:
copy_if(cbegin(vectorOne), cend(vectorOne),inserter(setOne, begin(setOne)),[](int i){ return i != 100; });
Or, you can use C++17’s template argument deduction for constructors:
copy_if(cbegin(vectorOne), cend(vectorOne),insert_iterator(setOne, begin(setOne)),[](int i) { return i != 100; });
Chapter 9 discusses move semantics, which can be used to prevent unnecessary copying in cases where you know that the source object will be destroyed after an assignment operation or copy construction. There is an iterator adaptor called std::move_iterator. The dereferencing operator for a move_iterator automatically converts the value to an rvalue reference, which means that the value can be moved to a new destination without the overhead of copying. Before you can use move semantics, you need to make sure your objects are supporting it. The following MoveableClass supports move semantics. For more details, see Chapter 9.
class MoveableClass{public:MoveableClass() {cout << "Default constructor" << endl;}MoveableClass(const MoveableClass& src) {cout << "Copy constructor" << endl;}MoveableClass(MoveableClass&& src) noexcept {cout << "Move constructor" << endl;}MoveableClass& operator=(const MoveableClass& rhs) {cout << "Copy assignment operator" << endl;return *this;}MoveableClass& operator=(MoveableClass&& rhs) noexcept {cout << "Move assignment operator" << endl;return *this;}};
The constructors and assignment operators are not doing anything useful here, except printing a message to make it easy to see which one is being called. Now that you have this class, you can define a vector and store a few MoveableClass instances in it as follows:
vector<MoveableClass> vecSource;MoveableClass mc;vecSource.push_back(mc);vecSource.push_back(mc);
The output could be as follows:
Default constructor // [1]Copy constructor // [2]Copy constructor // [3]Move constructor // [4]
The second line of the code creates a MoveableClass instance by using the default constructor, [1]. The first push_back() call triggers the copy constructor to copy mc into the vector, [2]. After this operation, the vector has space for one element, the first copy of mc. Note that this discussion is based on the growth strategy and the initial size of a vector as implemented by Microsoft Visual C++ 2017. The C++ standard does not specify the initial capacity of a vector or its growth strategy, so the output can be different with different compilers.
The second push_back() call triggers the vector to resize itself, to allocate space for the second element. This resizing causes the move constructor to be called to move every element from the old vector to the new resized vector, [4]. The copy constructor is triggered to copy mc a second time into the vector, [3]. The order of moving and copying is undefined, so [3] and [4] could be reversed.
You can create a new vector called vecOne that contains a copy of the elements from vecSource as follows:
vector<MoveableClass> vecOne(cbegin(vecSource), cend(vecSource));Without using move_iterators, this code triggers the copy constructor two times, once for every element in vecSource:
Copy constructorCopy constructor
By using std::make_move_iterator() to create move_iterators, the move constructor of MoveableClass is called instead of the copy constructor:
vector<MoveableClass> vecTwo(make_move_iterator(begin(vecSource)),make_move_iterator(end(vecSource)));
This generates the following output:
Move constructorMove constructor
You can also use C++17’s template argument deduction for constructors:
vector<MoveableClass> vecTwo(move_iterator(begin(vecSource)),move_iterator(end(vecSource)));
The Standard Library includes many useful containers, algorithms, and iterators that you can use in your applications. It is impossible, however, for any library to include all possible utilities that all potential clients might need. Thus, the best libraries are extensible: they allow clients to adapt and add to the basic capabilities to obtain exactly the functionality they require. The Standard Library is inherently extensible because of its fundamental structure of separating data from the algorithms that operate on them. You can write your own containers that can work with the Standard Library algorithms by providing iterators that conforms to the Standard Library guidelines. Similarly, you can write your own algorithms that work with iterators from the standard containers. Note that you are not allowed to put your own containers and algorithms in the std namespace.
If you sit down to write an algorithm or container in C++, you can either make it adhere to the Standard Library conventions or not. For simple containers and algorithms, it might not be worth the extra effort to follow the Standard Library requirements. However, for substantial code that you plan to reuse, the effort pays off. First, the code will be easier for other C++ programmers to understand, because you follow well-established interface guidelines. Second, you will be able to use your container or algorithm with the other parts of the Standard Library (algorithms or containers) without needing to provide special hacks or adaptors. Finally, it will force you to employ the necessary rigor required to develop solid code.
Chapter 18 describes a useful set of algorithms that are part of the Standard Library, but you will inevitably encounter situations in your programs for which you need new algorithms. When that happens, it is usually not difficult to write your own algorithm that works with Standard Library iterators just like the standard algorithms.
Suppose that you want to find all the elements matching a predicate in a given range. The find() and find_if() algorithms are the most likely candidates, but each returns an iterator referring to only one element. You can use copy_if() to find all elements matching a given predicate, but it fills the output with copies of the found elements. If you want to avoid copies, you can use copy_if() with a back_insert_iterator into a vector<reference_wrapper<T>>, but this does not give you the position of the found elements. In fact, there is no standard algorithm to get iterators to all the elements matching a predicate. However, you can write your own version of this functionality called find_all().
The first task is to define the function prototype. You can follow the model established by copy_if(), that is, a function template with three template type parameters: the input iterator type, the output iterator type, and the predicate type. The arguments of the function are start and end iterators of the input sequence, a start iterator of the output sequence, and a predicate object. As with copy_if(), the algorithm returns an iterator into the output sequence that is one-past-the-last element stored in the output sequence. Here is the prototype:
template <typename InputIterator, typename OutputIterator, typename Predicate>OutputIterator find_all(InputIterator first, InputIterator last,OutputIterator dest, Predicate pred);
Another option would be to omit the output iterator, and to return an iterator into the input sequence that iterates over all the matching elements in the input sequence. This would require you to write your own iterator class, which is discussed later in this chapter.
The next task is to write the implementation. The find_all() algorithm iterates over all elements in the input sequence, calls the predicate on each element, and stores iterators of matching elements in the output sequence. Here is the implementation:
template <typename InputIterator, typename OutputIterator, typename Predicate>OutputIterator find_all(InputIterator first, InputIterator last,OutputIterator dest, Predicate pred){while (first != last) {if (pred(*first)) {*dest = first;++dest;}++first;}return dest;}
Similar to copy_if(), the algorithm only overwrites existing elements in the output sequence, so make sure the output sequence is large enough to hold the result, or use an iterator adaptor such as back_insert_iterator, as demonstrated in the following code. After finding all matching elements, the code counts the number of elements found, which is the number of iterators in matches. Then, it iterates through the result, printing each element.
vector<int> vec{ 3, 4, 5, 4, 5, 6, 5, 8 };vector<vector<int>::iterator> matches;find_all(begin(vec), end(vec), back_inserter(matches),[](int i){ return i == 5; });cout << "Found " << matches.size() << " matching elements: " << endl;for (const auto& it : matches) {cout << *it << " at position " << (it - cbegin(vec)) << endl;;}
The output is as follows:
Found 3 matching elements:5 at position 25 at position 45 at position 6
Some algorithm implementations need additional information about their iterators. For example, they might need to know the type of the elements referred to by the iterator in order to store temporary values, or perhaps they want to know whether the iterator is bidirectional or random access.
C++ provides a class template called iterator_traits that allows you to find this information. You instantiate the iterator_traits class template with the iterator type of interest, and access one of five type aliases: value_type, difference_type, iterator_category, pointer, or reference. For example, the following function template declares a temporary variable of the type that an iterator of type IteratorType refers to. Note the use of the typename keyword in front of the iterator _traits line. You must specify typename explicitly whenever you access a type based on one or more template parameters. In this case, the template parameter IteratorType is used to access the value_type type.
#include <iterator>template <typename IteratorType>void iteratorTraitsTest(IteratorType it){typename std::iterator_traits<IteratorType>::value_type temp;temp = *it;cout << temp << endl;}
This function can be tested with the following code:
vector<int> v{ 5 };iteratorTraitsTest(cbegin(v));
With this code, the variable temp in iteratorTraitsTest() is of type int. The output is 5.
In this example, the auto keyword could be used to simplify the code, but that wouldn’t show you how to use iterator_traits.
The C++ standard contains a list of requirements that any container must fulfill in order to qualify as a Standard Library container.
Additionally, if you want your container to be sequential (like a vector), ordered associative (like a map), or unordered associative (like an unordered_map), it must conform to supplementary requirements.
My suggestion when writing a new container is to write the basic container first, following the general Standard Library rules such as making it a class template, but without worrying too much yet about the specific details of Standard Library conformity. After you’ve developed the basic implementation, you can add the iterator and methods so that it can work with the Standard Library framework. This chapter takes that approach to develop a hash map.
C++11 added support for hash tables, which are discussed in Chapter 17. However, pre-C++11 did not include hash tables. Unlike the Standard Library map and set, which provide logarithmic insertion, lookup, and deletion times, a hash table provides constant time insertion, deletion, and lookup in the average case, linear in the worst case. Instead of storing elements in sorted order, a hash table hashes, or maps, each element to a particular bucket. As long as the number of elements stored isn’t significantly greater than the number of buckets, and the hash function distributes the elements uniformly between the buckets, the insertion, deletion, and lookup operations all run in constant time.
This section implements a simple, but fully functional, hash_map. Like a map, a hash_map stores key/value pairs. In fact, the operations it provides are almost identical to those provided by the map, but with different performance characteristics.
This hash_map implementation uses chained hashing (also called open hashing), and does not attempt to provide advanced features such as rehashing. Chapter 17 explains the concept of chained hashing in the section on unordered associative containers.
The first choice when writing a hash_map is how to handle hash functions. Recalling the adage that a good abstraction makes the easy case easy and the hard case possible, a good hash_map interface allows clients to specify their own hash function and number of buckets in order to customize the hashing behavior for their particular workload. On the other hand, clients that do not have the desire, or ability, to write a good hash function and choose a number of buckets should still be able to use the container without doing so. One solution is to allow clients to provide a hash function and number of buckets in the hash_map constructor, but also to provide default values. In this implementation, the hash function is a simple function object containing just a single function call operator. The function object is templatized on the key type that it hashes in order to support a templatized hash_map container. Template specialization can be used to write custom hash functions for certain types. Here is the basic hash function object:
template <typename T>class hash{public:size_t operator()(const T& key) const;};
Note that everything for the hash_map implementation is inside a ProCpp namespace so that names don’t clash with already existing names. The implementation of the hash function call operator is tricky because it must apply to keys of any type. The following implementation computes an integer-sized hash value by simply treating the key as a sequence of bytes:
// Calculate a hash by treating the key as a sequence// of bytes and summing the ASCII values of the bytes.template <typename T>size_t hash<T>::operator()(const T& key) const{const size_t bytes = sizeof(key);size_t sum = 0;for (size_t i = 0; i < bytes; ++i) {unsigned char b = *(reinterpret_cast<const unsigned char*>(&key) + i);sum += b;}return sum;}
Unfortunately, when using this hashing method on strings, the function calculates the hash of the entire string object, and not just of the actual text. The actual text is probably on the heap, and the string object only contains a length and a pointer to the text on the heap. The pointer will be different, even if the text it refers to is the same. The result is that two string objects with the same text will generate different hash values. Therefore, it’s a good idea to provide a specialization of the hash template for strings, and in general for any class that contains dynamically allocated memory. Template specialization is discussed in detail in Chapter 12.
// A hash specialization for stringstemplate <>class hash<std::string>{public:size_t operator()(const std::string& key) const;};// Calculate a hash by summing the ASCII values of all characters.size_t hash<std::string>::operator()(const std::string& key) const{size_t sum = 0;for (auto c : key) {sum += static_cast<unsigned char>(c);}return sum;}
If you want to use other pointer types or objects as the key, you should write your own hash specialization for those types.
A hash_map supports three basic operations: insertion, deletion, and lookup. It is also swappable. Of course, it provides a constructor and destructor as well. The copy and move constructors are explicitly defaulted, and the copy and move assignment operators are provided. Here is the public portion of the hash_map class template:
template <typename Key, typename T, typename KeyEqual = std::equal_to<>,typename Hash = hash<Key>>class hash_map{public:using key_type = Key;using mapped_type = T;using value_type = std::pair<const Key, T>;virtual ~hash_map() = default; // Virtual destructor// Throws invalid_argument if the number of buckets is illegal.explicit hash_map(const KeyEqual& equal = KeyEqual(),size_t numBuckets = 101, const Hash& hash = Hash());// Copy constructorhash_map(const hash_map<Key, T, KeyEqual, Hash>& src) = default;// Move constructorhash_map(hash_map<Key, T, KeyEqual, Hash>&& src) noexcept = default;// Copy assignment operatorhash_map<Key, T, KeyEqual, Hash>& operator=(const hash_map<Key, T, KeyEqual, Hash>& rhs);// Move assignment operatorhash_map<Key, T, KeyEqual, Hash>& operator=(hash_map<Key, T, KeyEqual, Hash>&& rhs) noexcept;// Inserts the key/value pair x.void insert(const value_type& x);// Removes the element with key k, if it exists.void erase(const key_type& k);// Removes all elements.void clear() noexcept;// Find returns a pointer to the element with key k.// Returns nullptr if no element with that key exists.value_type* find(const key_type& k);const value_type* find(const key_type& k) const;// operator[] finds the element with key k, or inserts an// element with that key if none exists yet. Returns a reference to// the value corresponding to that key.T& operator[] (const key_type& k);// Swaps two hash_maps.void swap(hash_map<Key, T, KeyEqual, Hash>& other) noexcept;private:// Implementation details not shown yet};
As you can see, the key and value types are both template parameters, similar as for the Standard Library map. A hash_map stores pair<const Key, T> as the actual elements in the container. The insert(), erase(), find(), clear(), and operator[] methods are straightforward. However, a few aspects of this interface require further explanation.
Like a map, set, and other standard containers, a hash_map allows the client to specify the comparison type as a template parameter and to pass a specific comparison object of that type in the constructor. Unlike a map and set, a hash_map does not sort elements by key, but must still compare keys for equality. Thus, instead of using less as the default comparator, it uses the transparent equal_to<> comparator. The comparison object is used only to detect attempts to insert duplicate keys into the container.
You should be able to change the hashing function to make it better suit the type of elements you want to store in the hash map. Thus, the hash_map template takes four template parameters: the key type, the value type, the comparator type, and the hash type.
The hash_map class template defines three type aliases:
using key_type = Key;using mapped_type = T;using value_type = std::pair<const Key, T>;
The value_type, in particular, is useful for referring to the more cumbersome pair<const Key, T> type. As you will see, these type aliases are required to satisfy the Standard Library container requirements.
After you finalize the hash_map interface, you need to choose the implementation model. The basic hash table structure generally consists of a fixed number of buckets, each of which can store one or more elements. The buckets should be accessible in constant time based on a bucket-id (the result of hashing a key). Thus, a vector is the most appropriate container for the buckets. Each bucket must store a list of elements, so the Standard Library list can be used as the bucket type. Thus, the final structure is a vector of lists of pair<const Key, T> elements.1 Here are the private members of the hash_map class:
private:using ListType = std::list<value_type>;std::vector<ListType> mBuckets;size_t mSize = 0;KeyEqual mEqual;Hash mHash;
Without the type aliases for value_type and ListType, the line declaring mBuckets would look like this:
std::vector<std::list<std::pair<const Key, T>>> mBuckets;The mEqual and mHash members store the comparison and hashing objects, respectively, and mSize stores the number of elements currently in the container.
The constructor initializes all the fields. It constructs mBuckets with the correct number of buckets. Unfortunately, the template syntax is somewhat dense. If the syntax confuses you, consult Chapter 12 for details on writing class templates.
// Construct mBuckets with the correct number of buckets.template <typename Key, typename T, typename KeyEqual, typename Hash>hash_map<Key, T, KeyEqual, Hash>::hash_map(const KeyEqual& equal, size_t numBuckets, const Hash& hash): mBuckets(numBuckets), mEqual(equal), mHash(hash){if (numBuckets == 0) {throw std::invalid_argument("Number of buckets must be positive");}}
The implementation requires at least one bucket, so the constructor enforces that restriction.
Each of the three major operations (lookup, insertion, and deletion) requires code to find an element with a given key. Thus, it is helpful to have a private helper method that performs that task. findElement() first uses the hash object to calculate the hash of the key and limits the calculated hash value to the number of hash buckets by taking the modulo of the calculated value. Then, it searches all the elements in that bucket for an element with a key matching the given key. The elements stored are key/value pairs, so the actual comparison must be done on the first field of the element. The comparison function object specified in the constructor is used to perform the comparison.
template <typename Key, typename T, typename KeyEqual, typename Hash>std::pair<typename hash_map<Key, T, KeyEqual, Hash>::ListType::iterator, size_t>hash_map<Key, T, KeyEqual, Hash>::findElement(const key_type& k){// Hash the key to get the bucket.size_t bucket = mHash(k) % mBuckets.size();// Search for the key in the bucket.auto iter = find_if(begin(mBuckets[bucket]), end(mBuckets[bucket]),[this, &k](const auto& element) { return mEqual(element.first, k); });// Return a pair of the iterator and the bucket index.return std::make_pair(iter, bucket);}
findElement() returns a pair containing an iterator and a bucket index. The bucket index is the index of the bucket to which the given key maps, independent of whether or not the given key is actually in the container. The returned iterator refers to an element in the bucket list, the list representing the bucket to which the key mapped. If the element is found, the iterator refers to that element; otherwise, it is the end iterator for that list.
The syntax in the function header of this method is somewhat confusing, particularly the use of the typename keyword. You must use the typename keyword whenever you are using a type that is dependent on a template parameter. Specifically, the type ListType::iterator , which is list<pair<const Key, T>>::iterator , is dependent on both the Key and T template parameters.
You can implement the find() method as a simple wrapper for findElement():
template <typename Key, typename T, typename KeyEqual, typename Hash>typename hash_map<Key, T, KeyEqual, Hash>::value_type*hash_map<Key, T, KeyEqual, Hash>::find(const key_type& k){// Use the findElement() helper, and C++17 structured bindings.auto[it, bucket] = findElement(k);if (it == end(mBuckets[bucket])) {// Element not found -- return nullptr.return nullptr;}// Element found -- return a pointer to it.return &(*it);}
The const version of find() uses a const_cast to forward the request to the non-const version to avoid code duplication:
template <typename Key, typename T, typename KeyEqual, typename Hash>const typename hash_map<Key, T, KeyEqual, Hash>::value_type*hash_map<Key, T, KeyEqual, Hash>::find(const key_type& k) const{return const_cast<hash_map<Key, T, KeyEqual, Hash>*>(this)->find(k);}
The operator[] implementation uses findElement() and if it does not find the element, it inserts it as follows:
template <typename Key, typename T, typename KeyEqual, typename Hash>T& hash_map<Key, T, KeyEqual, Hash>::operator[] (const key_type& k){// Try to find the element. If it doesn't exist, add a new element.auto[it, bucket] = findElement(k);if (it == end(mBuckets[bucket])) {mSize++;mBuckets[bucket].push_back(std::make_pair(k, T()));return mBuckets[bucket].back().second;} else {return it->second;}}
insert() must first check if an element with that key is already in the hash_map. If not, it can add the element to the list in the appropriate bucket. Note that findElement() returns the bucket index to which a key hashes, even if an element with that key is not found:
template <typename Key, typename T, typename KeyEqual, typename Hash>void hash_map<Key, T, KeyEqual, Hash>::insert(const value_type& x){// Try to find the element.auto[it, bucket] = findElement(x.first);if (it != end(mBuckets[bucket])) {// The element already exists.return;} else {// We didn't find the element, so insert a new one.mSize++;mBuckets[bucket].push_back(x);}}
Note that this implementation of insert() returns void, so the caller does not know whether the element was inserted or if it was already in the hash_map. This shortcoming is resolved later in this chapter, once iterators have been implemented for hash_map.
erase() follows the same pattern as insert(): It first attempts to find the element by calling findElement(). If the element exists, it erases it from the list in the appropriate bucket. Otherwise, it does nothing.
template <typename Key, typename T, typename KeyEqual, typename Hash>void hash_map<Key, T, KeyEqual, Hash>::erase(const key_type& k){// First, try to find the element.auto[it, bucket] = findElement(k);if (it != end(mBuckets[bucket])) {// The element exists -- erase it.mBuckets[bucket].erase(it);mSize--;}}
clear() simply clears each bucket, and sets the size of the hash_map to zero:
template <typename Key, typename T, typename KeyEqual, typename Hash>void hash_map<Key, T, KeyEqual, Hash>::clear() noexcept{// Call clear on each bucket.for (auto& bucket : mBuckets) {bucket.clear();}mSize = 0;}
The swap() method just swaps all data members using std::swap():
template <typename Key, typename T, typename KeyEqual, typename Hash>void hash_map<Key, T, KeyEqual, Hash>::swap(hash_map<Key, T, KeyEqual, Hash>& other) noexcept{using std::swap;swap(mBuckets, other.mBuckets);swap(mSize, other.mSize);swap(mEqual, other.mEqual);swap(mHash, other.mHash);}
The following standalone swap() function is also provided, which simply forwards to the swap() method:
template <typename Key, typename T, typename KeyEqual, typename Hash>void swap(hash_map<Key, T, KeyEqual, Hash>& first,hash_map<Key, T, KeyEqual, Hash>& second) noexcept{first.swap(second);}
Here are the implementations of the copy and move assignment operators. See Chapter 9 for a discussion of the copy-and-swap idiom.
template <typename Key, typename T, typename KeyEqual, typename Hash>hash_map<Key, T, KeyEqual, Hash>&hash_map<Key, T, KeyEqual, Hash>::operator=(const hash_map<Key, T, KeyEqual, Hash>& rhs){// check for self-assignmentif (this == &rhs) {return *this;}// Copy-and-swap idiomauto copy = rhs; // Do all the work in a temporary instanceswap(copy); // Commit the work with only non-throwing operationsreturn *this;}template <typename Key, typename T, typename KeyEqual, typename Hash>hash_map<Key, T, KeyEqual, Hash>&hash_map<Key, T, KeyEqual, Hash>::operator=(hash_map<Key, T, KeyEqual, Hash>&& rhs) noexcept{swap(rhs);return *this;}
Here is a small test program demonstrating the basic hash_map class template:
hash_map<int, int> myHash;myHash.insert(make_pair(4, 40));myHash.insert(make_pair(6, 60));// x will have type hash_map<int, int>::value_type*auto x = myHash.find(4);if (x != nullptr) {cout << "4 maps to " << x->second << endl;} else {cout << "cannot find 4 in map" << endl;}myHash.erase(4);auto x2 = myHash.find(4);if (x2 != nullptr) {cout << "4 maps to " << x2->second << endl;} else {cout << "cannot find 4 in map" << endl;}myHash[4] = 35;myHash[4] = 60;auto x3 = myHash.find(4);if (x3 != nullptr) {cout << "4 maps to " << x3->second << endl;} else {cout << "cannot find 4 in map" << endl;}// Test std::swap().hash_map<int, int> other(std::equal_to<>(), 11);swap(other, myHash);// Test copy construction and copy assignment.hash_map<int, int> myHash2(other);hash_map<int, int> myHash3;myHash3 = myHash2;// Test move construction and move assignment.hash_map<int, int> myHash4(std::move(myHash3));hash_map<int, int> myHash5;myHash5 = std::move(myHash4);
The output is as follows:
4 maps to 40cannot find 4 in map4 maps to 60
The basic hash_map shown in the previous section follows the spirit, but not the letter, of the Standard Library. For most purposes, the preceding implementation is good enough. However, if you want to use the Standard Library algorithms on your hash_map, you must do a bit more work. The C++ standard specifies methods and type aliases that a data structure must provide in order to qualify as a Standard Library container.
The C++ standard specifies that every Standard Library container must provide the following public type aliases.
| TYPE NAME | DESCRIPTION |
value_type |
The element type stored in the container |
reference |
A reference to the element type stored in the container |
const_reference |
A const reference to the element type stored in the container |
iterator |
The type for iterating over elements of the container |
const_iterator |
A version of iterator for iterating over const elements of the container |
size_type |
A type that can represent the number of elements in the container; this is usually just size_t (from <cstddef>). |
difference_type |
A type that can represent the difference of two iterators for the container; this is usually just ptrdiff_t (from <cstddef>). |
Here are the definitions for the hash_map class template of all these type aliases except iterator and const_iterator. Writing an iterator is covered in detail in a subsequent section. Note that value_type (plus key_type and mapped_type, which are discussed later) was already defined in the previous version of the hash_map. This implementation also adds a type alias hash_map_type to give a shorter name to a specific template instantiation of hash_map:
template <typename Key, typename T, typename KeyEqual = std::equal_to<>,typename Hash = hash<Key>>class hash_map{public:using key_type = Key;using mapped_type = T;using value_type = std::pair<const Key, T>;using reference = value_type&;using const_reference = const value_type&;using size_type = size_t;using difference_type = ptrdiff_t;using hash_map_type = hash_map<Key, T, KeyEqual, Hash>;// Remainder of class definition omitted for brevity};
In addition to the obligatory type aliases, every container must provide the following methods.
| METHOD | DESCRIPTION | WORST-CASE COMPLEXITY |
| Default constructor | Constructs an empty container | Constant |
| Copy constructor | Performs a deep copy of the container | Linear |
| Move constructor | Performs a move constructing operation | Constant |
| Copy assignment operator | Performs a deep copy of the container | Linear |
| Move assignment operator | Performs a move assignment operation | Constant |
| Destructor | Destroys dynamically allocated memory; this method calls destructor on all elements left in the container. | Linear |
iterator begin();const_iterator begin() const; |
Returns an iterator referring to the first element in the container | Constant |
iterator end();const_iterator end() const; |
Returns an iterator referring to one-past-the-last element in the container | Constant |
const_iterator cbegin() const; |
Returns a const iterator referring to the first element in the container |
Constant |
const_iterator cend() const; |
Returns a const iterator referring to one-past-the-last element in the container |
Constant |
operator==operator!= |
Comparison operators that compare two containers, element by element | Linear |
void swap(Container&) noexcept; |
Swaps the contents of the container passed to the method with the object on which the method is called | Constant |
size_type size() const; |
Returns the number of elements in the container | Constant |
size_type max_size() const; |
Returns the maximum number of elements the container can hold | Constant |
bool empty() const; |
Returns whether the container has any elements | Constant |
The following code snippet shows the declarations of the remaining methods except for begin(), end(), cbegin(), and cend(). Those are covered in the next section.
template <typename Key, typename T, typename KeyEqual = std::equal_to<>,typename Hash = hash<Key>>class hash_map{public:// Type aliases omitted for brevity// Size methodsbool empty() const;size_type size() const;size_type max_size() const;// Other methods omitted for brevity};
The implementations of size() and empty() are easy because the hash_map implementation tracks its size in the mSize data member. Note that size_type is one of the type aliases defined in the class. Because it is a member of the class, such a return type in the implementation must be fully qualified with typename hash_map<Key, T, KeyEqual, Hash>:
template <typename Key, typename T, typename KeyEqual, typename Hash>bool hash_map<Key, T, KeyEqual, Hash>::empty() const{return mSize == 0;}template <typename Key, typename T, typename KeyEqual, typename Hash>typename hash_map<Key, T, KeyEqual, Hash>::size_typehash_map<Key, T, KeyEqual, Hash>::size() const{return mSize;}
max_size() is a little trickier. At first, you might think the maximum size of a hash_map container is the sum of the maximum size of all the lists. However, the worst-case scenario is that all the elements hash to the same bucket. Thus, the maximum size it can claim to support is the maximum size of a single list:
template <typename Key, typename T, typename KeyEqual, typename Hash>typename hash_map<Key, T, KeyEqual, Hash>::size_typehash_map<Key, T, KeyEqual, Hash>::max_size() const{return mBuckets[0].max_size();}
The most important container requirement is the iterator. In order to work with the generic algorithms, every container must provide an iterator for accessing the elements in the container. Your iterator should generally provide overloaded operator* and operator->, plus some other operations depending on its specific behavior. As long as your iterator provides the basic iteration operations, everything should be fine.
The first decision to make about your iterator is what kind it will be: forward, bidirectional, or random access. Random-access iterators don’t make much sense for associative containers, so bidirectional seems like the logical choice for a hash_map iterator. That means you must also provide operator++, operator--, operator==, and operator!=. Consult Chapter 17 for more details on the requirements for the different iterators.
The second decision is how to order the elements of your container. The hash_map is unsorted, so iterating in a sorted order is probably too difficult. Instead, your iterator can just step through the buckets, starting with the elements in the first bucket and progressing to those in the last bucket. This order will appear random to the client, but will be consistent and repeatable.
The third decision is how to represent your iterator internally. The implementation is usually quite dependent on the internal implementation of the container. The first purpose of an iterator is to refer to a single element in the container. In the case of a hash_map, each element is in a Standard Library list, so perhaps a hash_map iterator can be a wrapper around a list iterator referring to the element in question. However, the second purpose of a bidirectional iterator is to allow the client to progress to the next or previous element from the current one. In order to progress from one bucket to the next, you need to track the current bucket and the hash_map object to which the iterator refers.
Once you’ve chosen your implementation, you must decide on a consistent representation for the end iterator. Recall that the end iterator should really be the “past-the-end” marker: the iterator that’s reached by applying ++ to an iterator referring to the final element in the container. A hash_map iterator can use as its end iterator the end iterator of the list of the final bucket in the hash_map.
A container needs to provide both a const iterator and a non-const iterator. The non-const iterator must be convertible to a const iterator. This implementation defines a const_hash_map_iterator class with hash_map_iterator deriving from it.
Given the decisions made in the previous section, it’s time to define the const_hash_map_iterator class. The first thing to note is that each const_hash_map_iterator object is an iterator for a specific instantiation of the hash_map class. In order to provide this one-to-one mapping, the const_hash_map_iterator must also be a class template with the hash map type as a template parameter called HashMap.
The main question in the class definition is how to conform to the bidirectional iterator requirements. Recall that anything that behaves like an iterator is an iterator. Your class is not required to derive from another class in order to qualify as a bidirectional iterator. However, if you want your iterator to be usable in the generic algorithms functions, you must specify its traits. The discussion earlier in this chapter explains that iterator_traits is a class template that defines, for each iterator type, five type aliases: value_type, difference_type, iterator_category, pointer, and reference. The iterator_traits class template coud be partially specialized for your new iterator type if you want. Alternatively, the default implementation of the iterator_traits class template just grabs the five type aliases out of the iterator class itself. Thus, you can simply define those type aliases directly in your iterator class. The const_hash_map_iterator is a bidirectional iterator, so you specify bidirectional_iterator_tag as the iterator category. Other legal iterator categories are input_iterator_tag, output_iterator_tag, forward_iterator_tag, and random_access_iterator_tag. For the const_hash_map_iterator, the element type is typename HashMap::value_type.
Here is the basic const_hash_map_iterator class definition:
template <typename HashMap>class const_hash_map_iterator{public:using value_type = typename HashMap::value_type;using difference_type = ptrdiff_t;using iterator_category = std::bidirectional_iterator_tag;using pointer = value_type*;using reference = value_type&;using list_iterator_type = typename HashMap::ListType::const_iterator;// Bidirectional iterators must supply a default constructor.// Using an iterator constructed with the default constructor// is undefined, so it doesn't matter how it's initialized.const_hash_map_iterator() = default;const_hash_map_iterator(size_t bucket, list_iterator_type listIt,const HashMap* hashmap);// Don't need to define a copy constructor or operator= because the// default behavior is what we want.// Don't need destructor because the default behavior// (not deleting mHashmap) is what we want!const value_type& operator*() const;// Return type must be something to which -> can be applied.// Return a pointer to a pair<const Key, T>, to which the compiler// will apply -> again.const value_type* operator->() const;const_hash_map_iterator<HashMap>& operator++();const_hash_map_iterator<HashMap> operator++(int);const_hash_map_iterator<HashMap>& operator--();const_hash_map_iterator<HashMap> operator--(int);// The following are ok as member functions because we don't// support comparisons of different types to this one.bool operator==(const const_hash_map_iterator<HashMap>& rhs) const;bool operator!=(const const_hash_map_iterator<HashMap>& rhs) const;protected:size_t mBucketIndex = 0;list_iterator_type mListIterator;const HashMap* mHashmap = nullptr;// Helper methods for operator++ and operator--void increment();void decrement();};
Consult Chapter 15 for details on operator overloading if the definitions and implementations (shown in the next section) of the overloaded operators confuse you.
The const_hash_map_iterator constructor initializes the three member variables:
template<typename HashMap>const_hash_map_iterator<HashMap>::const_hash_map_iterator(size_t bucket,list_iterator_type listIt, const HashMap* hashmap): mBucketIndex(bucket), mListIterator(listIt), mHashmap(hashmap){}
The default constructor is defaulted so that clients can declare const_hash_map_iterator variables without initializing them. An iterator constructed with the default constructor does not need to refer to any value, and attempting any operations on it is allowed to have undefined results.
The implementations of the dereferencing operators are concise, but can be tricky. Chapter 15 explains that operator* and operator-> are asymmetric; operator* returns a reference to the actual underlying value, which in this case is the element to which the iterator refers, while operator-> must return something to which the arrow operator can be applied again. Thus, it returns a pointer to the element. The compiler then applies -> to the pointer, which results in accessing a field of the element.
// Return a reference to the actual element.template<typename HashMap>const typename const_hash_map_iterator<HashMap>::value_type&const_hash_map_iterator<HashMap>::operator*() const{return *mListIterator;}// Return a pointer to the actual element, so the compiler can// apply -> to it to access the actual desired field.template<typename HashMap>const typename const_hash_map_iterator<HashMap>::value_type*const_hash_map_iterator<HashMap>::operator->() const{return &(*mListIterator);}
The increment and decrement operators are implemented as follows. They defer the actual incrementing and decrementing to the private increment() and decrement() helper methods.
// Defer the details to the increment() helper.template<typename HashMap>const_hash_map_iterator<HashMap>&const_hash_map_iterator<HashMap>::operator++(){increment();return *this;}// Defer the details to the increment() helper.template<typename HashMap>const_hash_map_iterator<HashMap>const_hash_map_iterator<HashMap>::operator++(int){auto oldIt = *this;increment();return oldIt;}// Defer the details to the decrement() helper.template<typename HashMap>const_hash_map_iterator<HashMap>&const_hash_map_iterator<HashMap>::operator--(){decrement();return *this;}// Defer the details to the decrement() helper.template<typename HashMap>const_hash_map_iterator<HashMap>const_hash_map_iterator<HashMap>::operator--(int){auto oldIt = *this;decrement();return oldIt;}
Incrementing a const_hash_map_iterator tells it to refer to the “next” element in the container. This method first increments the list iterator, then checks if it has reached the end of its bucket. If so, it finds the next non-empty bucket in the hash_map and sets the list iterator equal to the start element in that bucket. Note that it can’t simply move to the next bucket, because there might not be any elements in it. If there are no more non-empty buckets, mListIterator is set, by the convention chosen for this example, to the end iterator of the last bucket in the hash_map, which is the special “end” position of the const_hash_map_iterator. Iterators are not required to be any safer than dumb pointers, so error-checking for things like incrementing an iterator already at the end is not required.
// Behavior is undefined if mListIterator already refers to the past-the-end// element, or is otherwise invalid.template<typename HashMap>void const_hash_map_iterator<HashMap>::increment(){// mListIterator is an iterator into a single bucket. Increment it.++mListIterator;// If we're at the end of the current bucket,// find the next bucket with elements.auto& buckets = mHashmap->mBuckets;if (mListIterator == end(buckets[mBucketIndex])) {for (size_t i = mBucketIndex + 1; i < buckets.size(); i++) {if (!buckets[i].empty()) {// We found a non-empty bucket.// Make mListIterator refer to the first element in it.mListIterator = begin(buckets[i]);mBucketIndex = i;return;}}// No more non-empty buckets. Set mListIterator to refer to the// end iterator of the last list.mBucketIndex = buckets.size() - 1;mListIterator = end(buckets[mBucketIndex]);}}
Decrement is the inverse of increment: it makes the iterator refer to the “previous” element in the container. However, there is an asymmetry because of the asymmetry between the way the start and end positions are represented: start is the first element, but end is “one past” the last element. The algorithm for decrement first checks if the underlying list iterator is at the start of its current bucket. If not, it can just be decremented. Otherwise, the code needs to check for the first non-empty bucket before the current one. If one is found, the list iterator must be set to refer to the last element in that bucket, which is the end iterator decremented by one. If no non-empty buckets are found, the decrement is invalid, so the code can do anything it wants (behavior is undefined). Note that the for loop needs to use a signed integer type for its loop variable and not an unsigned type such as size_t because the loop uses --i:
// Behavior is undefined if mListIterator already refers to the first// element, or is otherwise invalid.template<typename HashMap>void const_hash_map_iterator<HashMap>::decrement(){// mListIterator is an iterator into a single bucket.// If it's at the beginning of the current bucket, don't decrement it.// Instead, try to find a non-empty bucket before the current one.auto& buckets = mHashmap->mBuckets;if (mListIterator == begin(buckets[mBucketIndex])) {for (int i = mBucketIndex - 1; i >= 0; --i) {if (!buckets[i].empty()) {mListIterator = --end(buckets[i]);mBucketIndex = i;return;}}// No more non-empty buckets. This is an invalid decrement.// Set mListIterator to refer to the end iterator of the last list.mBucketIndex = buckets.size() - 1;mListIterator = end(buckets[mBucketIndex]);} else {// We're not at the beginning of the bucket, so just move down.--mListIterator;}}
Note that both increment() and decrement() access private members of the hash_map class. Thus, the hash_map class must declare const_hash_map_iterator to be a friend class.
After increment() and decrement(), operator== and operator!= are positively simple. They just compare each of the three data members of the objects:
template<typename HashMap>bool const_hash_map_iterator<HashMap>::operator==(const const_hash_map_iterator<HashMap>& rhs) const{// All fields, including the hash_map to which the iterators refer,// must be equal.return (mHashmap == rhs.mHashmap &&mBucketIndex == rhs.mBucketIndex &&mListIterator == rhs.mListIterator);}template<typename HashMap>bool const_hash_map_iterator<HashMap>::operator!=(const const_hash_map_iterator<HashMap>& rhs) const{return !(*this == rhs);}
The hash_map_iterator class derives from const_hash_map_iterator. It does not need to override operator==, operator!=, increment(), and decrement() because the base class versions are just fine:
template <typename HashMap>class hash_map_iterator : public const_hash_map_iterator<HashMap>{public:using value_type =typename const_hash_map_iterator<HashMap>::value_type;using difference_type = ptrdiff_t;using iterator_category = std::bidirectional_iterator_tag;using pointer = value_type*;using reference = value_type&;using list_iterator_type = typename HashMap::ListType::iterator;hash_map_iterator() = default;hash_map_iterator(size_t bucket, list_iterator_type listIt,HashMap* hashmap);value_type& operator*();value_type* operator->();hash_map_iterator<HashMap>& operator++();hash_map_iterator<HashMap> operator++(int);hash_map_iterator<HashMap>& operator--();hash_map_iterator<HashMap> operator--(int);};
The implementations of the hash_map_iterator methods are rather straightforward. The constructor just calls the base class constructor. The operator* and operator-> use const_cast to return a non-const type. operator++ and operator-- just use the increment() and decrement() from the base class, but return a hash_map_iterator instead of a const_hash_map_iterator. Note that the C++ name lookup rules require you to explicitly use the this pointer to refer to data members and methods in a base class template:
template<typename HashMap>hash_map_iterator<HashMap>::hash_map_iterator(size_t bucket,list_iterator_type listIt, HashMap* hashmap): const_hash_map_iterator<HashMap>(bucket, listIt, hashmap){}// Return a reference to the actual element.template<typename HashMap>typename hash_map_iterator<HashMap>::value_type&hash_map_iterator<HashMap>::operator*(){return const_cast<value_type&>(*this->mListIterator);}// Return a pointer to the actual element, so the compiler can// apply -> to it to access the actual desired field.template<typename HashMap>typename hash_map_iterator<HashMap>::value_type*hash_map_iterator<HashMap>::operator->(){return const_cast<value_type*>(&(*this->mListIterator));}// Defer the details to the increment() helper in the base class.template<typename HashMap>hash_map_iterator<HashMap>& hash_map_iterator<HashMap>::operator++(){this->increment();return *this;}// Defer the details to the increment() helper in the base class.template<typename HashMap>hash_map_iterator<HashMap> hash_map_iterator<HashMap>::operator++(int){auto oldIt = *this;this->increment();return oldIt;}// Defer the details to the decrement() helper in the base class.template<typename HashMap>hash_map_iterator<HashMap>& hash_map_iterator<HashMap>::operator--(){this->decrement();return *this;}// Defer the details to the decrement() helper in the base class.template<typename HashMap>hash_map_iterator<HashMap> hash_map_iterator<HashMap>::operator--(int){auto oldIt = *this;this->decrement();return oldIt;}
The final piece involved in providing iterator support for hash_map is to supply the necessary type aliases in the hash_map class template, and to write the begin(), end(), cbegin(), and cend() methods. The type aliases and method prototypes look like this:
template <typename Key, typename T, typename KeyEqual = std::equal_to<>,typename Hash = hash<Key>>class hash_map{public:// Other type aliases omitted for brevityusing iterator = hash_map_iterator<hash_map_type>;using const_iterator = const_hash_map_iterator<hash_map_type>;// Iterator methodsiterator begin();iterator end();const_iterator begin() const;const_iterator end() const;const_iterator cbegin() const;const_iterator cend() const;// Remainder of class definition omitted for brevity};
The implementation of begin() includes an optimization for the case when there are no elements in the hash_map, in which case the end iterator is returned. Here is the code:
template <typename Key, typename T, typename KeyEqual, typename Hash>typename hash_map<Key, T, KeyEqual, Hash>::iteratorhash_map<Key, T, KeyEqual, Hash>::begin(){if (mSize == 0) {// Special case: there are no elements, so return the end iterator.return end();}// We know there is at least one element. Find the first element.for (size_t i = 0; i < mBuckets.size(); ++i) {if (!mBuckets[i].empty()) {return hash_map_iterator<hash_map_type>(i,std::begin(mBuckets[i]), this);}}// Should never reach here, but if we do, return the end iterator.return end();}
end() creates a hash_map_iterator referring to the end iterator of the last bucket:
template <typename Key, typename T, typename KeyEqual, typename Hash>typename hash_map<Key, T, KeyEqual, Hash>::iteratorhash_map<Key, T, KeyEqual, Hash>::end(){// The end iterator is the end iterator of the list of the last bucket.size_t bucket = mBuckets.size() - 1;return hash_map_iterator<hash_map_type>(bucket,std::end(mBuckets[bucket]), this);}
The implementations of the const versions of begin() and end() use const_cast to call the non-const versions. These non-const versions return a hash_map_iterator, which is convertible to a const_hash_map_iterator:
template <typename Key, typename T, typename KeyEqual, typename Hash>typename hash_map<Key, T, KeyEqual, Hash>::const_iteratorhash_map<Key, T, KeyEqual, Hash>::begin() const{return const_cast<hash_map_type*>(this)->begin();}template <typename Key, typename T, typename KeyEqual, typename Hash>typename hash_map<Key, T, KeyEqual, Hash>::const_iteratorhash_map<Key, T, KeyEqual, Hash>::end() const{return const_cast<hash_map_type*>(this)->end();}
The cbegin() and cend() methods forward the request to the const versions of begin() and end():
template <typename Key, typename T, typename KeyEqual, typename Hash>typename hash_map<Key, T, KeyEqual, Hash>::const_iteratorhash_map<Key, T, KeyEqual, Hash>::cbegin() const{return begin();}template <typename Key, typename T, typename KeyEqual, typename Hash>typename hash_map<Key, T, KeyEqual, Hash>::const_iteratorhash_map<Key, T, KeyEqual, Hash>::cend() const{return end();}
Now that hash_map supports iteration, you can iterate over its elements just as you would on any Standard Library container, and you can pass the iterators to methods and functions. Here are some examples:
hash_map<string, int> myHash;myHash.insert(make_pair("KeyOne", 100));myHash.insert(make_pair("KeyTwo", 200));myHash.insert(make_pair("KeyThree", 300));for (auto it = myHash.cbegin(); it != myHash.cend(); ++it) {// Use both -> and * to test the operations.cout << it->first << " maps to " << (*it).second << endl;}// Print elements using a range-based for loopfor (auto& p : myHash) {cout << p.first << " maps to " << p.second << endl;}// Print elements using a range-based for loop and C++17 structured bindingsfor (auto&[key, value] : myHash) {cout << key << " maps to " << value << endl;}// Create an std::map with all the elements in the hash_map.map<string, int> myMap(cbegin(myHash), cend(myHash));for (auto& p : myMap) {cout << p.first << " maps to " << p.second << endl;}
The last piece of code also shows that the non-member functions such as std::cbegin() and std::cend() are working as expected.
As described earlier in this chapter, all the Standard Library containers allow you to specify a custom memory allocator. A “good citizen” hash_map implementation should do the same. However, those details are omitted because they obscure the main points of this implementation, and because custom allocators are rarely used.
If your container supplies a bidirectional or random access iterator, it is considered reversible. Reversible containers are supposed to supply two additional type aliases.
| TYPE NAME | DESCRIPTION |
reverse_iterator |
The type for iterating over elements of the container in reverse order |
const_reverse_iterator |
A version of reverse_iterator for iterating over const elements of the container in reverse order |
Additionally, the container should provide rbegin() and rend(), which are symmetric with begin() and end(); it should also provide crbegin() and crend(), which are symmetric with cbegin() and cend(). The usual implementations just use the std::reverse_iterator adaptor described earlier in this chapter. These are left as an exercise for you to try.
In addition to the basic container requirements that were shown already, you can also make your container adhere to additional requirements for ordered associative, unordered associative, or sequential containers. This section modifies the hash_map class template to satisfy a few additional unordered associative container requirements.
Unordered associative containers require the following type aliases.
| TYPE NAME | DESCRIPTION |
key_type |
The key type with which the container is instantiated |
mapped_type |
The element type with which the container is instantiated |
value_type |
pair<const Key, T> |
hasher |
The hash type with which the container is instantiated |
key_equal |
The equality predicate with which the container is instantiated |
local_iterator |
An iterator type to iterate through a single bucket. Cannot be used to iterate across buckets. |
const_local_iterator |
A const iterator type to iterate through a single bucket. Cannot be used to iterate across buckets. |
node_type |
A type to represent a node. See Chapter 17 for a discussion on nodes. Not further discussed in this section. |
Here is the hash_map definition with an updated set of type aliases. Note that the definition of ListType has been moved, because the definitions of the local iterators require ListType.
template <typename Key, typename T, typename KeyEqual = std::equal_to<>,typename Hash = hash<Key>>class hash_map{public:using key_type = Key;using mapped_type = T;using value_type = std::pair<const Key, T>;using hasher = Hash;using key_equal = KeyEqual;using reference = value_type&;using const_reference = const value_type&;using size_type = size_t;using difference_type = ptrdiff_t;using hash_map_type = hash_map<Key, T, KeyEqual, Hash>;using iterator = hash_map_iterator<hash_map_type>;using const_iterator = const_hash_map_iterator<hash_map_type>;private:using ListType = std::list<value_type>;public:using local_iterator = typename ListType::iterator;using const_local_iterator = typename ListType::const_iterator;// Remainder of hash_map class definition omitted for brevity};
The standard prescribes quite a few additional method requirements for unordered associative containers, as listed in the following table. In the last column, n is the number of elements in the container.
| METHOD | DESCRIPTION | COMPLEXITY |
| Constructor taking an iterator range |
Constructs the container and inserts the elements from the iterator range. The iterator range need not refer to another container of the same type. Note that all constructors of unordered associative containers must take an equality predicate. The constructors should provide a default constructed object as the default value. |
On average O(n), worst case O(n2) |
Constructor taking an initializer_list<value_type> as parameter |
Constructs the container and inserts the elements from the initializer list into the container. | On average O(n), worst case O(n2) |
Assignment operator with an initializer_list<value_type> as right-hand side |
Replaces all elements from the container with the elements from the initializer list. | On average O(n), worst case O(n2) |
hasher hash_function() const; |
Returns the hash function. | Constant |
key_equal key_eq() const; |
Returns the equality predicate for comparing keys. | Constant |
pair<iterator, bool> insert(value_type&);iterator insert( const_iterator hint, value_type&); |
Two different forms of insert.The hint can be ignored by the implementation.Containers that allow duplicate keys return just iterator for the first form, because insert() always succeeds in that case.
|
On average O(1), worst case O(n) |
void insert( InputIterator start, InputIterator end); |
Inserts a range of elements. The range need not be from a container of the same type. | On average O(m) with m the number of elements to insert. Worst case O(m*n+m) |
void insert( initializer_list< value_type>); |
Inserts the elements from the initializer list into the container. | On average O(m) with m the number of elements to insert. Worst case O(m*n+m) |
pair<iterator, bool> emplace(Args&&…);iterator emplace_hint( const_iterator hint, Args&&...); |
Implements the emplace operations to construct objects in-place. In-place construction is discussed in Chapter 17. | On average O(1), worst case O(n) |
size_type erase(key_type&);iterator erase( iterator position);iterator erase( iterator start, iterator end); |
Three different forms of erase. The first form returns the number of values erased (0 or 1 in containers that do not allow duplicate keys). The second and third forms erase the elements at position, or in the range start to end, and return an iterator to the element following the last erased element.
|
Worst case O(n) |
void clear(); |
Erases all elements. | O(n) |
Iterator find(key_type&);const_iterator find(key_type&) const; |
Finds the element with the specified key. | On average O(1), worst case O(n) |
size_type count(key_type&) const; |
Returns the number of elements with the specified key (0 or 1 in containers that do not allow duplicate keys). | On average O(1), worst case O(n) |
pair<iterator,iterator> equal_range( key_type&);pair<const_iterator, const_iterator> equal_range( key_type&) const; |
Returns iterators referring to the first element with the specified key and one past the last element with the specified key. | Worst case O(n) |
Note that hash_map does not allow duplicate keys, so equal_range() always returns a pair of identical iterators.
C++17 adds extract() and merge() methods to the list of requirements. These have to do with handling nodes as discussed in Chapter 17, but are omitted for this hash_map implementation.
Here is the complete hash_map class definition. The prototypes for insert(), erase(), and find() need to change slightly from the previous versions shown because those initial versions don’t have the right return types required for unordered associative containers.
template <typename Key, typename T, typename KeyEqual = std::equal_to<>,typename Hash = hash<Key>>class hash_map{public:using key_type = Key;using mapped_type = T;using value_type = std::pair<const Key, T>;using hasher = Hash;using key_equal = KeyEqual;using reference = value_type&;using const_reference = const value_type&;using size_type = size_t;using difference_type = ptrdiff_t;using hash_map_type = hash_map<Key, T, KeyEqual, Hash>;using iterator = hash_map_iterator<hash_map_type>;using const_iterator = const_hash_map_iterator<hash_map_type>;private:using ListType = std::list<value_type>;public:using local_iterator = typename ListType::iterator;using const_local_iterator = typename ListType::const_iterator;// The iterator classes need access to all members of the hash_mapfriend class hash_map_iterator<hash_map_type>;friend class const_hash_map_iterator<hash_map_type>;virtual ~hash_map() = default; // Virtual destructor// Throws invalid_argument if the number of buckets is illegal.explicit hash_map(const KeyEqual& equal = KeyEqual(),size_type numBuckets = 101, const Hash& hash = Hash());// Throws invalid_argument if the number of buckets is illegal.template <typename InputIterator>hash_map(InputIterator first, InputIterator last,const KeyEqual& equal = KeyEqual(),size_type numBuckets = 101, const Hash& hash = Hash());// Initializer list constructor// Throws invalid_argument if the number of buckets is illegal.explicit hash_map(std::initializer_list<value_type> il,const KeyEqual& equal = KeyEqual(), size_type numBuckets = 101,const Hash& hash = Hash());// Copy constructorhash_map(const hash_map_type& src) = default;// Move constructorhash_map(hash_map_type&& src) noexcept = default;// Copy assignment operatorhash_map_type& operator=(const hash_map_type& rhs);// Move assignment operatorhash_map_type& operator=(hash_map_type&& rhs) noexcept;// Initializer list assignment operatorhash_map_type& operator=(std::initializer_list<value_type> il);// Iterator methodsiterator begin();iterator end();const_iterator begin() const;const_iterator end() const;const_iterator cbegin() const;const_iterator cend() const;// Size methodsbool empty() const;size_type size() const;size_type max_size() const;// Element insert methodsT& operator[](const key_type& k);std::pair<iterator, bool> insert(const value_type& x);iterator insert(const_iterator hint, const value_type& x);template <typename InputIterator>void insert(InputIterator first, InputIterator last);void insert(std::initializer_list<value_type> il);// Element delete methodssize_type erase(const key_type& k);iterator erase(iterator position);iterator erase(iterator first, iterator last);// Other modifying utilitiesvoid swap(hash_map_type& other) noexcept;void clear() noexcept;// Access methods for Standard Library conformitykey_equal key_eq() const;hasher hash_function() const;// Lookup methodsiterator find(const key_type& k);const_iterator find(const key_type& k) const;std::pair<iterator, iterator> equal_range(const key_type& k);std::pair<const_iterator, const_iterator>equal_range(const key_type& k) const;size_type count(const key_type& k) const;private:// Returns a pair containing an iterator to the found element with// a given key, and the index of that element's bucket.std::pair<typename ListType::iterator, size_t> findElement(const key_type& k);std::vector<ListType> mBuckets;size_type mSize = 0;KeyEqual mEqual;Hash mHash;};
The constructor accepting an iterator range is a method template so that it can take an iterator range from any container, not just other hash_maps. If it were not a method template, it would need to specify the InputIterator type explicitly as hash_map_iterator, limiting it to iterators from hash_maps. Despite the syntax, the implementation is uncomplicated: it delegates the construction to the explicit constructor to initialize all the data members, then calls insert() to actually insert all the elements in the specified range.
// Make a call to insert() to actually insert the elements.template <typename Key, typename T, typename KeyEqual, typename Hash>template <typename InputIterator>hash_map<Key, T, KeyEqual, Hash>::hash_map(InputIterator first, InputIterator last, const KeyEqual& equal,size_type numBuckets, const Hash& hash): hash_map(equal, numBuckets, hash){insert(first, last);}
Initializer lists are discussed in Chapter 1. Following is the implementation of the hash_map constructor that takes an initializer list, which is very similar to the implementation of the constructor accepting an iterator range:
template <typename Key, typename T, typename KeyEqual, typename Hash>hash_map<Key, T, KeyEqual, Hash>::hash_map(std::initializer_list<value_type> il,const KeyEqual& equal, size_type numBuckets, const Hash& hash): hash_map(equal, numBuckets, hash){insert(std::begin(il), std::end(il));}
With this initializer list constructor, a hash_map can be constructed as follows:
hash_map<string, int> myHash {{ "KeyOne", 100 },{ "KeyTwo", 200 },{ "KeyThree", 300 } };
Assignment operators can also accept an initializer list on the right-hand side. Following is an implementation of an initializer list assignment operator for hash_map. It uses a copy-and-swap-like algorithm to guarantee strong exception safety.
template <typename Key, typename T, typename KeyEqual, typename Hash>hash_map<Key, T, KeyEqual, Hash>& hash_map<Key, T, KeyEqual, Hash>::operator=(std::initializer_list<value_type> il){// Do all the work in a temporary instancehash_map_type newHashMap(il, mEqual, mBuckets.size(), mHash);swap(newHashMap); // Commit the work with only non-throwing operationsreturn *this;}
With this assignment operator, you can write code as follows:
myHash = {{ "KeyOne", 100 },{ "KeyTwo", 200 },{ "KeyThree", 300 } };
In the earlier section, “Using the Basic Hash Map,” a simple insert() method is given. In this version, four insert() methods are provided with additional features:
insert() operation returns a pair<iterator, bool>, which indicates both where the item is inserted and whether or not it was newly created.insert() that takes a hint is useless for a hash_map, but it is provided for symmetry with other kinds of collections. The hint is ignored, and it merely calls the first version.insert() is a method template, so ranges of elements from arbitrary containers can be inserted into the hash_map.insert() accepts an initializer_list<value_type>.Note that technically, the following versions of insert() can also be provided. These accept rvalue references.
std::pair<iterator, bool> insert(value_type&& x);iterator insert(const_iterator hint, value_type&& x);
The hash_map does not provide these. Additionally, there are two versions of insert() related to handling nodes. Nodes are discussed in Chapter 17. The hash_map omits these as well.
The first two insert() methods are implemented as follows:
template <typename Key, typename T, typename KeyEqual, typename Hash>std::pair<typename hash_map<Key, T, KeyEqual, Hash>::iterator, bool>hash_map<Key, T, KeyEqual, Hash>::insert(const value_type& x){// Try to find the element.auto[it, bucket] = findElement(x.first);bool inserted = false;if (it == std::end(mBuckets[bucket])) {// We didn't find the element, so insert a new one.it = mBuckets[bucket].insert(it, x);inserted = true;mSize++;}return std::make_pair(hash_map_iterator<hash_map_type>(bucket, it, this), inserted);}template <typename Key, typename T, typename KeyEqual, typename Hash>typename hash_map<Key, T, KeyEqual, Hash>::iteratorhash_map<Key, T, KeyEqual, Hash>::insert(const_iterator /*hint*/, const value_type& x){// Completely ignore position.return insert(x).first;}
The third form of insert() is a method template for the same reason as the constructor shown earlier: it should be able to insert elements by using iterators from containers of any type. The actual implementation uses an insert_iterator, described earlier in this chapter.
template <typename Key, typename T, typename KeyEqual, typename Hash>template <typename InputIterator>void hash_map<Key, T, KeyEqual, Hash>::insert(InputIterator first, InputIterator last){// Copy each element in the range by using an insert_iterator adaptor.// Give begin() as a dummy position -- insert ignores it anyway.std::insert_iterator<hash_map_type> inserter(*this, begin());std::copy(first, last, inserter);}
The last insert operation accepts an initializer list. The implementation for hash_map simply forwards the work to the insert() method accepting an iterator range:
template <typename Key, typename T, typename KeyEqual, typename Hash>void hash_map<Key, T, KeyEqual, Hash>::insert(std::initializer_list<value_type> il){insert(std::begin(il), std::end(il));}
With this insert() method, you can write code as follows:
myHash.insert({{ "KeyFour", 400 },{ "KeyFive", 500 } });
Emplace operations construct objects in-place. They are discussed in Chapter 17. The emplace methods for hash_map look as follows :
template <typename... Args>std::pair<iterator, bool> emplace(Args&&... args);template <typename... Args>iterator emplace_hint(const_iterator hint, Args&&... args);
The ... in these lines are not typos. These are so-called variadic templates, that is, templates with a variable number of template type parameters and a variable number of function parameters. Variadic templates are discussed in Chapter 22. This hash_map implementation omits emplace operations.
The version of erase() in the earlier section, “A Basic Hash Map,” is not compliant with Standard Library requirements. You need to implement the following versions:
key_type and returns a size_type for the number of elements removed from the collection (for hash_map there are only two possible return values, 0 and 1).The first version is implemented as follows:
template <typename Key, typename T, typename KeyEqual, typename Hash>typename hash_map<Key, T, KeyEqual, Hash>::size_typehash_map<Key, T, KeyEqual, Hash>::erase(const key_type& k){// First, try to find the element.auto[it, bucket] = findElement(k);if (it != std::end(mBuckets[bucket])) {// The element exists -- erase it.mBuckets[bucket].erase(it);mSize--;return 1;} else {return 0;}}
The second version of erase() must remove the element at a specific iterator position. The iterator given is, of course, a hash_map_iterator. Thus, hash_map must have some ability to obtain the underlying bucket and list iterator from the hash_map_iterator. The approach taken here is to make the hash_map class a friend of the hash_map_iterator (not shown in the earlier class definition). Here is the implementation of this version of erase():
template <typename Key, typename T, typename KeyEqual, typename Hash>typename hash_map<Key, T, KeyEqual, Hash>::iteratorhash_map<Key, T, KeyEqual, Hash>::erase(iterator position){iterator next = position;++next;// Erase the element from its bucket.mBuckets[position.mBucketIndex].erase(position.mListIterator);mSize--;return next;}
The final version of erase() removes a range of elements. It iterates from first to last, calling erase() on each element, thus letting the previous version of erase() do all the work:
template <typename Key, typename T, typename KeyEqual, typename Hash>typename hash_map<Key, T, KeyEqual, Hash>::iteratorhash_map<Key, T, KeyEqual, Hash>::erase(iterator first, iterator last){// Erase all the elements in the range.for (iterator next = first; next != last;) {next = erase(next);}return last;}
The standard requires methods called key_eq() and hash_function() to retrieve the equality predicate and the hash function respectively:
template <typename Key, typename T, typename KeyEqual, typename Hash>typename hash_map<Key, T, KeyEqual, Hash>::key_equalhash_map<Key, T, KeyEqual, Hash>::key_eq() const{return mEqual;}template <typename Key, typename T, typename KeyEqual, typename Hash>typename hash_map<Key, T, KeyEqual, Hash>::hasherhash_map<Key, T, KeyEqual, Hash>::hash_function() const{return mHash;}
The find() method is identical to the version shown earlier for the basic hash_map, except for the return code. Instead of returning a pointer to the element, it constructs a hash_map_iterator referring to it:
template <typename Key, typename T, typename KeyEqual, typename Hash>typename hash_map<Key, T, KeyEqual, Hash>::iteratorhash_map<Key, T, KeyEqual, Hash>::find(const key_type& k){// Use the findElement() helper, and C++17 structured bindings.auto[it, bucket] = findElement(k);if (it == std::end(mBuckets[bucket])) {// Element not found -- return the end iterator.return end();}// Element found -- convert the bucket/iterator to a hash_map_iterator.return hash_map_iterator<hash_map_type>(bucket, it, this);}
The const version of find() returns a const_hash_map_iterator. It uses const_cast to call the non-const version of find() to avoid code duplication. Note that the non-const
find() returns a hash_map_iterator, which is convertible to a const_hash_map_iterator.
template <typename Key, typename T, typename KeyEqual, typename Hash>typename hash_map<Key, T, KeyEqual, Hash>::const_iteratorhash_map<Key, T, KeyEqual, Hash>::find(const key_type& k) const{return const_cast<hash_map_type*>(this)->find(k);}
The implementations of both versions of equal_range() are identical, except that one returns a pair of hash_map_iterators while the other returns a pair of const_hash_map_iterators. They both simply forward the request to find(). A hash_map cannot have elements with duplicate keys, so the result of equal_range() for hash_map is always a pair of identical iterators.
template <typename Key, typename T, typename KeyEqual, typename Hash>std::pair<typename hash_map<Key, T, KeyEqual, Hash>::iterator,typename hash_map<Key, T, KeyEqual, Hash>::iterator>hash_map<Key, T, KeyEqual, Hash>::equal_range(const key_type& k){auto it = find(k);return std::make_pair(it, it);}
Because hash_map does not allow duplicate keys, count() can only return 1 or 0: 1 if it finds the element, and 0 if it doesn’t. The implementation just wraps a call to find(). The find() method returns the end iterator if it can’t find the element. count() retrieves an end iterator by calling end() in order to compare it.
template <typename Key, typename T, typename KeyEqual, typename Hash>typename hash_map<Key, T, KeyEqual, Hash>::size_typehash_map<Key, T, KeyEqual, Hash>::count(const key_type& k) const{// There are either 1 or 0 elements matching key k.// If we can find a match, return 1, otherwise return 0.if (find(k) == end()) {return 0;} else {return 1;}}
The final method, operator[], is not required by the standard, but is provided for convenience of the programmer, and to be symmetric with std::map. The prototype is identical to the one for std::map. The comments explain the potentially confusing one-line implementation.
template <typename Key, typename T, typename KeyEqual, typename Hash>T& hash_map<Key, T, KeyEqual, Hash>::operator[] (const key_type& k){// It's a bit cryptic, but it basically attempts to insert// a new key/value pair of k and a zero-initialized value. Regardless// of whether the insert succeeds or fails, insert() returns a pair of// an iterator/bool. The iterator refers to a key/value pair, the// second element of which is the value we want to return.return ((insert(std::make_pair(k, T()))).first)->second;}
Unordered associative containers should also provide a number of bucket-related methods:
bucket_count() returns the number of buckets in the container.max_bucket_count() returns the maximum number of buckets that are supported.bucket(key) returns the index of the bucket to which the given key maps.bucket_size(n) returns the number of elements in the bucket with given index.begin(n), end(n), cbegin(n), cend(n) return local begin and end iterators to the bucket with given index.Here are the implementations for the hash_map:
template <typename Key, typename T, typename KeyEqual, typename Hash>typename hash_map<Key, T, KeyEqual, Hash>::size_typehash_map<Key, T, KeyEqual, Hash>::bucket_count() const{return mBuckets.size();}template <typename Key, typename T, typename KeyEqual, typename Hash>typename hash_map<Key, T, KeyEqual, Hash>::size_typehash_map<Key, T, KeyEqual, Hash>::max_bucket_count() const{return mBuckets.max_size();}template <typename Key, typename T, typename KeyEqual, typename Hash>typename hash_map<Key, T, KeyEqual, Hash>::size_typehash_map<Key, T, KeyEqual, Hash>::bucket(const Key& k) const{return const_cast<hash_map_type*>(this)->findElement(k).second;}template <typename Key, typename T, typename KeyEqual, typename Hash>typename hash_map<Key, T, KeyEqual, Hash>::size_typehash_map<Key, T, KeyEqual, Hash>::bucket_size(size_type n) const{return mBuckets[n].size();}template <typename Key, typename T, typename KeyEqual, typename Hash>typename hash_map<Key, T, KeyEqual, Hash>::local_iteratorhash_map<Key, T, KeyEqual, Hash>::begin(size_type n){return mBuckets[n].begin();}
The implementations for the other begin(n), end(n), cbegin(n), and cend(n) methods are similar; they simply forward the call to the correct bucket list based on the given index.
Finally, an unordered associative container should also provide load_factor(), max_load_ factor(), rehash(), and reserve() methods. These are omitted for hash_map.
The hash_map developed in the preceding sections is an unordered associative container. However, you could also write a sequential container, or an ordered associative container, in which case you would need to follow a different set of requirements. Instead of listing them here, it’s easier to point out that the deque container follows the prescribed sequential container requirements almost exactly. The only difference is that it provides an extra resize() method (not required by the standard). An example of an ordered associative container is the map, on which you can model your own ordered associative containers.
The final example in this chapter showed almost the complete development of a hash_map unordered associative container and its iterators. This hash_map implementation is given here only to teach you how to write your own Standard Library-compliant containers and iterators. C++ does include its own set of unordered associative containers. You should use those instead of your own implementation.
In the process of reading this chapter, you hopefully gained an appreciation for the steps involved in developing containers. Even if you never write another Standard Library algorithm or container, you understand better the Standard Library’s mentality and capabilities, and you can put it to better use.
This chapter concludes the tour of the Standard Library. Even with all the details given in this book, some features are still omitted. If this material excited you, and you would like more information, consult some of the resources in Appendix B. Don’t feel compelled to use all the features discussed here. Forcing them into your programs without a true need will just complicate your code. However, I encourage you to consider incorporating aspects of the Standard Library into your programs where they make sense. Start with the containers, maybe throw in an algorithm or two, and before you know it, you’ll be a convert!
There are actually three kinds of template parameters: type, non-type, and template template (no, you’re not seeing double: that really is the name). So far, you’ve seen examples of type and non-type parameters (in Chapter 12), but not template template parameters. There are also some tricky aspects to both type and non-type parameters that are not covered in Chapter 12. This section goes deeper into all three types of template parameters.
Template type parameters are the main purpose of templates. You can declare as many type parameters as you want. For example, you could add to the grid template from Chapter 12 a second type parameter specifying another templatized class container on which to build the grid. The Standard Library defines several templatized container classes, including vector and deque. The original grid class uses a vector of vectors to store the elements of a grid. A user of the Grid class might want to use a vector of deques instead. With another template type parameter, you can allow the user to specify whether they want the underlying container to be a vector or a deque. Here is the class definition with the additional template parameter:
template <typename T, typename Container>class Grid{public:explicit Grid(size_t width = kDefaultWidth,size_t height = kDefaultHeight);virtual ~Grid() = default;// Explicitly default a copy constructor and assignment operator.Grid(const Grid& src) = default;Grid<T, Container>& operator=(const Grid& rhs) = default;// Explicitly default a move constructor and assignment operator.Grid(Grid&& src) = default;Grid<T, Container>& operator=(Grid&& rhs) = default;typename Container::value_type& at(size_t x, size_t y);const typename Container::value_type& at(size_t x, size_t y) const;size_t getHeight() const { return mHeight; }size_t getWidth() const { return mWidth; }static const size_t kDefaultWidth = 10;static const size_t kDefaultHeight = 10;private:void verifyCoordinate(size_t x, size_t y) const;std::vector<Container> mCells;size_t mWidth = 0, mHeight = 0;};
This template now has two parameters: T and Container. Thus, wherever you previously referred to Grid<T>, you must now refer to Grid<T, Container> to specify both template parameters. Another change is that mCells is now a vector of Containers instead of a vector of vectors.
Here is the constructor definition:
template <typename T, typename Container>Grid<T, Container>::Grid(size_t width, size_t height): mWidth(width), mHeight(height){mCells.resize(mWidth);for (auto& column : mCells) {column.resize(mHeight);}}
This constructor assumes that the Container type has a resize() method. If you try to instantiate this template by specifying a type that has no resize() method, the compiler will generate an error.
The return type of the at() methods is the type of the elements that is stored inside the given container type. You can access this type with typename Container::value_type.
Here are the implementations of the remaining methods:
template <typename T, typename Container>void Grid<T, Container>::verifyCoordinate(size_t x, size_t y) const{if (x >= mWidth || y >= mHeight) {throw std::out_of_range("");}}template <typename T, typename Container>const typename Container::value_type&Grid<T, Container>::at(size_t x, size_t y) const{verifyCoordinate(x, y);return mCells[x][y];}template <typename T, typename Container>typename Container::value_type&Grid<T, Container>::at(size_t x, size_t y){return const_cast<typename Container::value_type&>(std::as_const(*this).at(x, y));}
Now you can instantiate and use Grid objects like this:
Grid<int, vector<optional<int>>> myIntVectorGrid;Grid<int, deque<optional<int>>> myIntDequeGrid;myIntVectorGrid.at(3, 4) = 5;cout << myIntVectorGrid.at(3, 4).value_or(0) << endl;myIntDequeGrid.at(1, 2) = 3;cout << myIntDequeGrid.at(1, 2).value_or(0) << endl;Grid<int, vector<optional<int>>> grid2(myIntVectorGrid);grid2 = myIntVectorGrid;
The use of the word Container for the parameter name doesn’t mean that the type really must be a container. You could try to instantiate the Grid class with an int instead:
Grid<int, int> test; // WILL NOT COMPILEThis line does not compile, but it also might not give you the error you expect. It does not complain that the second type argument is an int instead of a container. It tells you something more cryptic. For example, Microsoft Visual C++ tells you that “‘Container’: must be a class or namespace when followed by ‘::’.” That’s because the compiler attempts to generate a Grid class with int as the Container. Everything works fine until it tries to process this line in the class template definition:
typename Container::value_type& at(size_t x, size_t y);At that point, the compiler realizes that Container is an int, which does not have an embedded value_type type alias.
Just as with function parameters, you can give template parameters default values. For example, you might want to say that the default container for your Grid is a vector. The class template definition would look like this:
template <typename T, typename Container = std::vector<std::optional<T>>>class Grid{// Everything else is the same as before.};
You can use the type T from the first template parameter as the argument to the optional template in the default value for the second template parameter. The C++ syntax requires that you do not repeat the default value in the template header line for method definitions. With this default argument, clients can now instantiate a grid with the option of specifying an underlying container:
Grid<int, deque<optional<int>>> myDequeGrid;Grid<int, vector<optional<int>>> myVectorGrid;Grid<int> myVectorGrid2(myVectorGrid);
This approach is used by the Standard Library. The stack, queue, and priority_queue class templates all take a template type parameter, with a default value, specifying the underlying container.
There is one problem with the Container parameter in the previous section. When you instantiate the class template, you write something like this:
Grid<int, vector<optional<int>>> myIntGrid;Note the repetition of the int type. You must specify that it’s the element type both of the Grid and of the optional inside the vector. What if you wrote this instead:
Grid<int, vector<optional<SpreadsheetCell>>> myIntGrid;That wouldn’t work very well. It would be nice to be able to write the following, so that you couldn’t make that mistake:
Grid<int, vector> myIntGrid;The Grid class should be able to figure out that it wants a vector of optionals of ints. The compiler won’t allow you to pass that argument to a normal type parameter, though, because vector by itself is not a type but a template.
If you want to take a template as a template parameter, you must use a special kind of parameter called a template template parameter. Specifying a template template parameter is sort of like specifying a function pointer parameter in a normal function. Function pointer types include the return type and parameter types of a function. Similarly, when you specify a template template parameter, the full specification of the template template parameter includes the parameters to that template.
For example, containers such as vector and deque have a template parameter list that looks something like the following. The E parameter is the element type. The Allocator parameter is covered in Chapter 17.
template <typename E, typename Allocator = std::allocator<E>>class vector{// Vector definition};
To pass such a container as a template template parameter, all you have to do is copy and paste the declaration of the class template (in this example, template <typename E, typename Allocator = std::allocator<E>> class vector), replace the class name (vector) with a parameter name (Container), and use that as the template template parameter of another template declaration—Grid in this example—instead of a simple type name. Given the preceding template specification, here is the class template definition for the Grid class that takes a container template as its second template parameter:
template <typename T,template <typename E, typename Allocator = std::allocator<E>> class Container= std::vector>class Grid{public:// Omitted code that is the same as beforestd::optional<T>& at(size_t x, size_t y);const std::optional<T>& at(size_t x, size_t y) const;// Omitted code that is the same as beforeprivate:void verifyCoordinate(size_t x, size_t y) const;std::vector<Container<std::optional<T>>> mCells;size_t mWidth = 0, mHeight = 0;};
What is going on here? The first template parameter is the same as before: the element type T. The second template parameter is now a template itself for a container such as vector or deque. As you saw earlier, this “template type” must take two parameters: an element type E and an allocator type. Note the repetition of the word class after the nested template parameter list. The name of this parameter in the Grid template is Container (as before). The default value is now vector, instead of vector<T>, because the Container parameter is now a template instead of an actual type.
The syntax rule for a template template parameter, more generically, is this:
template <..., template <TemplateTypeParams> class ParameterName, ...>
Instead of using Container by itself in the code, you must specify Container<std::optional<T>> as the container type. For example, the declaration of mCells is now as follows:
std::vector<Container<std::optional<T>>> mCells;The method definitions don’t need to change, except that you must change the template lines, for example:
template <typename T,template <typename E, typename Allocator = std::allocator<E>> class Container>void Grid<T, Container>::verifyCoordinate(size_t x, size_t y) const{if (x >= mWidth || y >= mHeight) {throw std::out_of_range("");}}
This Grid template can be used as follows:
Grid<int, vector> myGrid;myGrid.at(1, 2) = 3;cout << myGrid.at(1, 2).value_or(0) << endl;Grid<int, vector> myGrid2(myGrid);
This C++ syntax is a bit convoluted because it is trying to allow for maximum flexibility. Try not to get bogged down in the syntax here, and keep the main concept in mind: you can pass templates as parameters to other templates.
You might want to allow the user to specify a default element used to initialize each cell in the grid. Here is a perfectly reasonable approach to implement this goal. It uses T() as the default value for the second template parameter.
template <typename T, const T DEFAULT = T()>class Grid{// Identical as before.};
This definition is legal. You can use the type T from the first parameter as the type for the second parameter, and non-type parameters can be const just like function parameters. You can use this initial value for T to initialize each cell in the grid:
template <typename T, const T DEFAULT>Grid<T, DEFAULT>::Grid(size_t width, size_t height): mWidth(width), mHeight(height){mCells.resize(mWidth);for (auto& column : mCells) {column.resize(mHeight);for (auto& element : column) {element = DEFAULT;}}}
The other method definitions stay the same, except that you must add the second template parameter to the template lines, and all the instances of Grid<T> become Grid<T, DEFAULT>. After making those changes, you can instantiate grids with an initial value for all the elements:
Grid<int> myIntGrid; // Initial value is 0Grid<int, 10> myIntGrid2; // Initial value is 10
The initial value can be any integer you want. However, suppose that you try to create a SpreadsheetCell Grid:
SpreadsheetCell defaultCell;Grid<SpreadsheetCell, defaultCell> mySpreadsheet; // WILL NOT COMPILE
That line leads to a compiler error because you cannot pass objects as arguments to non-type parameters.
This example illustrates one of the vagaries of class templates: they can work correctly on one type but fail to compile for another type.
A more comprehensive way of allowing the user to specify an initial element value for a grid uses a reference to a T as the non-type template parameter. Here is the new class definition:
template <typename T, const T& DEFAULT>class Grid{// Everything else is the same as the previous example.};
Now you can instantiate this class template for any type. The C++17 standard says that the reference you pass as the second template argument must be a converted constant expression of the type of the template parameter. It is not allowed to refer to a subobject, a temporary object, a string literal, the result of a typeid expression, or the predefined __func__ variable. The following example declares int and SpreadsheetCell grids using initial values:
int main(){int defaultInt = 11;Grid<int, defaultInt> myIntGrid;SpreadsheetCell defaultCell(1.2);Grid<SpreadsheetCell, defaultCell> mySpreadsheet;return 0;}
However, those are the rules of C++17, and unfortunately, most compilers do not implement those rules yet. Before C++17, an argument passed to a reference non-type template parameter could not be a temporary, and could not be a named lvalue without linkage (external or internal). So, here is the same example but using the pre-C++17 rules. The initial values are defined with internal linkage:
namespace {int defaultInt = 11;SpreadsheetCell defaultCell(1.2);}int main(){Grid<int, defaultInt> myIntGrid;Grid<SpreadsheetCell, defaultCell> mySpreadsheet;return 0;}
The const char* class specialization of the Grid class template shown in Chapter 12 is called a full class template specialization because it specializes the Grid template for every template parameter. There are no template parameters left in the specialization. That’s not the only way you can specialize a class; you can also write a partial class specialization, in which you specialize some template parameters but not others. For example, recall the basic version of the Grid template with width and height non-type parameters:
template <typename T, size_t WIDTH, size_t HEIGHT>class Grid{public:Grid() = default;virtual ~Grid() = default;// Explicitly default a copy constructor and assignment operator.Grid(const Grid& src) = default;Grid& operator=(const Grid& rhs) = default;std::optional<T>& at(size_t x, size_t y);const std::optional<T>& at(size_t x, size_t y) const;size_t getHeight() const { return HEIGHT; }size_t getWidth() const { return WIDTH; }private:void verifyCoordinate(size_t x, size_t y) const;std::optional<T> mCells[WIDTH][HEIGHT];};
You could specialize this class template for const char* C-style strings like this:
#include "Grid.h"// The file containing the Grid template definitiontemplate <size_t WIDTH, size_t HEIGHT>class Grid<const char*, WIDTH, HEIGHT>{public:Grid() = default;virtual ~Grid() = default;// Explicitly default a copy constructor and assignment operator.Grid(const Grid& src) = default;Grid& operator=(const Grid& rhs) = default;std::optional<std::string>& at(size_t x, size_t y);const std::optional<std::string>& at(size_t x, size_t y) const;size_t getHeight() const { return HEIGHT; }size_t getWidth() const { return WIDTH; }private:void verifyCoordinate(size_t x, size_t y) const;std::optional<std::string> mCells[WIDTH][HEIGHT];};
In this case, you are not specializing all the template parameters. Therefore, your template line looks like this:
template <size_t WIDTH, size_t HEIGHT>class Grid<const char*, WIDTH, HEIGHT>
Note that the template has only two parameters: WIDTH and HEIGHT. However, you’re writing a Grid class for three arguments: T, WIDTH, and HEIGHT. Thus, your template parameter list contains two parameters, and the explicit Grid<const char*, WIDTH, HEIGHT> contains three arguments. When you instantiate the template, you must still specify three parameters. You can’t instantiate the template with only height and width.
Grid<int, 2, 2> myIntGrid; // Uses the original GridGrid<const char*, 2, 2> myStringGrid; // Uses the partial specializationGrid<2, 3> test; // DOES NOT COMPILE! No type specified.
Yes, the syntax is confusing. And it gets worse. In partial specializations, unlike in full specializations, you include the template line in front of every method definition, as in the following example:
template <size_t WIDTH, size_t HEIGHT>const std::optional<std::string>&Grid<const char*, WIDTH, HEIGHT>::at(size_t x, size_t y) const{verifyCoordinate(x, y);return mCells[x][y];}
You need this template line with two parameters to show that this method is parameterized on those two parameters. Note that wherever you refer to the full class name, you must use Grid<const char*, WIDTH, HEIGHT>.
The previous example does not show the true power of partial specialization. You can write specialized implementations for a subset of possible types without specializing individual types. For example, you can write a specialization of the Grid class template for all pointer types. The copy constructor and assignment operator of this specialization could perform deep copies of objects to which pointers point, instead of shallow copies.
Here is the class definition, assuming that you’re specializing the initial version of Grid with only one parameter. In this implementation, Grid becomes the owner of supplied data, so it automatically frees the memory when necessary.
#include "Grid.h"#include <memory>template <typename T>class Grid<T*>{public:explicit Grid(size_t width = kDefaultWidth,size_t height = kDefaultHeight);virtual ~Grid() = default;// Copy constructor and copy assignment operator.Grid(const Grid& src);Grid<T*>& operator=(const Grid& rhs);// Explicitly default a move constructor and assignment operator.Grid(Grid&& src) = default;Grid<T*>& operator=(Grid&& rhs) = default;void swap(Grid& other) noexcept;std::unique_ptr<T>& at(size_t x, size_t y);const std::unique_ptr<T>& at(size_t x, size_t y) const;size_t getHeight() const { return mHeight; }size_t getWidth() const { return mWidth; }static const size_t kDefaultWidth = 10;static const size_t kDefaultHeight = 10;private:void verifyCoordinate(size_t x, size_t y) const;std::vector<std::vector<std::unique_ptr<T>>> mCells;size_t mWidth = 0, mHeight = 0;};
As usual, these two lines are the crux of the matter:
template <typename T>class Grid<T*>
The syntax says that this class is a specialization of the Grid template for all pointer types. You are providing the implementation only in cases where T is a pointer type. Note that if you instantiate a grid like Grid<int*> myIntGrid, then T will actually be int, not int*. That’s a bit unintuitive, but unfortunately, that’s the way it works. Here is an example of using this partial specialization:
Grid<int> myIntGrid; // Uses the non-specialized gridGrid<int*> psGrid(2, 2); // Uses the partial specialization for pointer typespsGrid.at(0, 0) = make_unique<int>(1);psGrid.at(0, 1) = make_unique<int>(2);psGrid.at(1, 0) = make_unique<int>(3);Grid<int*> psGrid2(psGrid);Grid<int*> psGrid3;psGrid3 = psGrid2;auto& element = psGrid2.at(1, 0);if (element) {cout << *element << endl;*element = 6;}cout << *psGrid.at(1, 0) << endl; // psGrid is not modifiedcout << *psGrid2.at(1, 0) << endl; // psGrid2 is modified
Here is the output:
336
The implementations of the methods are rather straightforward, except for the copy constructor, which uses the copy constructor of individual elements to make a deep copy of them:
template <typename T>Grid<T*>::Grid(const Grid& src): Grid(src.mWidth, src.mHeight){// The ctor-initializer of this constructor delegates first to the// non-copy constructor to allocate the proper amount of memory.// The next step is to copy the data.for (size_t i = 0; i < mWidth; i++) {for (size_t j = 0; j < mHeight; j++) {// Make a deep copy of the element by using its copy constructor.if (src.mCells[i][j]) {mCells[i][j].reset(new T(*(src.mCells[i][j])));}}}}
The C++ standard does not permit partial template specialization of functions. Instead, you can overload the function with another template. The difference is subtle. Suppose that you want to write a specialization of the Find() function template, presented in Chapter 12, that dereferences the pointers to use operator== directly on the objects pointed to. Following the syntax for class template partial specialization, you might be tempted to write this:
template <typename T>size_t Find<T*>(T* const& value, T* const* arr, size_t size){for (size_t i = 0; i < size; i++) {if (*arr[i] == *value) {return i; // Found it; return the index}}return NOT_FOUND; // failed to find it; return NOT_FOUND}
However, that syntax declares a partial specialization of the function template, which the C++ standard does not allow. The correct way to implement the behavior you want is to write a new template for Find(). The difference might seem trivial and academic, but it won’t compile otherwise.
template <typename T>size_t Find(T* const& value, T* const* arr, size_t size){for (size_t i = 0; i < size; i++) {if (*arr[i] == *value) {return i; // Found it; return the index}}return NOT_FOUND; // failed to find it; return NOT_FOUND}
Note that the first parameter to this version of Find() is T* const&. This is done to make it symmetric with the original Find() function template, which accepts a const T& as a first parameter. However, in this case, using T* instead of T*
const& for the first parameter of the partial specialization of Find() works as well.
You can define in one program the original Find() template, the overloaded Find() for partial specialization on pointer types, the complete specialization for const char*s, and the overloaded Find() just for const char*s. The compiler selects the appropriate version to call based on its deduction rules.
The following code calls Find() several times. The comments say which version of Find() is called.
size_t res = NOT_FOUND;int myInt = 3, intArray[] = { 1, 2, 3, 4 };size_t sizeArray = std::size(intArray);res = Find(myInt, intArray, sizeArray); // calls Find<int> by deductionres = Find<int>(myInt, intArray, sizeArray); // calls Find<int> explicitlydouble myDouble = 5.6, doubleArray[] = { 1.2, 3.4, 5.7, 7.5 };sizeArray = std::size(doubleArray);// calls Find<double> by deductionres = Find(myDouble, doubleArray, sizeArray);// calls Find<double> explicitlyres = Find<double>(myDouble, doubleArray, sizeArray);const char* word = "two";const char* words[] = { "one", "two", "three", "four" };sizeArray = std::size(words);// calls template specialization for const char*sres = Find<const char*>(word, words, sizeArray);// calls overloaded Find for const char*sres = Find(word, words, sizeArray);int *intPointer = &myInt, *pointerArray[] = { &myInt, &myInt };sizeArray = std::size(pointerArray);// calls the overloaded Find for pointersres = Find(intPointer, pointerArray, sizeArray);SpreadsheetCell cell1(10), cellArray[] = { SpreadsheetCell(4), SpreadsheetCell(10) };sizeArray = std::size(cellArray);// calls Find<SpreadsheetCell> by deductionres = Find(cell1, cellArray, sizeArray);// calls Find<SpreadsheetCell> explicitlyres = Find<SpreadsheetCell>(cell1, cellArray, sizeArray);SpreadsheetCell *cellPointer = &cell1;SpreadsheetCell *cellPointerArray[] = { &cell1, &cell1 };sizeArray = std::size(cellPointerArray);// Calls the overloaded Find for pointersres = Find(cellPointer, cellPointerArray, sizeArray);
Templates in C++ provide capabilities that go far beyond the simple classes and functions you have seen so far in this chapter and Chapter 12. One of these capabilities is template recursion. This section first provides a motivation for template recursion, and then shows how to implement it.
This section uses operator overloading, discussed in Chapter 15. If you skipped that chapter or are unfamiliar with the syntax for overloading operator[], consult Chapter 15 before continuing.
Up to now, the Grid template example supported only two dimensions, which limited its usefulness. What if you wanted to write a 3-D Tic-Tac-Toe game or write a math program with four-dimensional matrices? You could, of course, write a templated or non-templated class for each of those dimensions. However, that would repeat a lot of code. Another approach would be to write only a single-dimensional grid. Then, you could create a Grid of any dimension by instantiating the Grid with another Grid as its element type. This Grid element type could itself be instantiated with a Grid as its element type, and so on. Here is the implementation of the OneDGrid class template. It’s simply a one-dimensional version of the Grid template from earlier examples, with the addition of a resize() method, and the substitution of operator[] for at(). Just as with Standard Library containers such as vector, the operator[] implementation does not perform any bounds checking. Also, for this example, mElements stores instances of T instead of instances of std::optional<T>.
template <typename T>class OneDGrid{public:explicit OneDGrid(size_t size = kDefaultSize);virtual ~OneDGrid() = default;T& operator[](size_t x);const T& operator[](size_t x) const;void resize(size_t newSize);size_t getSize() const { return mElements.size(); }static const size_t kDefaultSize = 10;private:std::vector<T> mElements;};template <typename T>OneDGrid<T>::OneDGrid(size_t size){resize(size);}template <typename T>void OneDGrid<T>::resize(size_t newSize){mElements.resize(newSize);}template <typename T>T& OneDGrid<T>::operator[](size_t x){return mElements[x];}template <typename T>const T& OneDGrid<T>::operator[](size_t x) const{return mElements[x];}
With this implementation of OneDGrid, you can create multidimensional grids like this:
OneDGrid<int> singleDGrid;OneDGrid<OneDGrid<int>> twoDGrid;OneDGrid<OneDGrid<OneDGrid<int>>> threeDGrid;singleDGrid[3] = 5;twoDGrid[3][3] = 5;threeDGrid[3][3][3] = 5;
This code works fine, but the declarations are messy. As you will see in the next section, you can do better.
You can use template recursion to write a “real” N-dimensional grid because dimensionality of grids is essentially recursive. You can see that in this declaration:
OneDGrid<OneDGrid<OneDGrid<int>>> threeDGrid;You can think of each nested OneDGrid as a recursive step, with the OneDGrid of int as the base case. In other words, a three-dimensional grid is a single-dimensional grid of single-dimensional grids of single-dimensional grids of ints. Instead of requiring the user to do this recursion, you can write a class template that does it for you. You can then create N-dimensional grids like this:
NDGrid<int, 1> singleDGrid;NDGrid<int, 2> twoDGrid;NDGrid<int, 3> threeDGrid;
The NDGrid class template takes a type for its element and an integer specifying its “dimensionality.” The key insight here is that the element type of the NDGrid is not the element type specified in the template parameter list, but is in fact another NDGrid of dimensionality one less than the current one. In other words, a three-dimensional grid is a vector of two-dimensional grids; the two-dimensional grids are each vectors of one-dimensional grids.
With recursion, you need a base case. You can write a partial specialization of the NDGrid for dimensionality of 1, in which the element type is not another NDGrid, but is in fact the element type specified by the template parameter.
Here is the general NDGrid template definition, with highlights showing where it differs from the OneDGrid shown in the previous section:
template <typename T, size_t N>class NDGrid{public:explicit NDGrid(size_t size = kDefaultSize);virtual ~NDGrid() = default;NDGrid<T, N-1>& operator[](size_t x);const NDGrid<T, N-1>& operator[](size_t x) const;void resize(size_t newSize);size_t getSize() const { return mElements.size(); }static const size_t kDefaultSize = 10;private:std::vector<NDGrid<T, N-1>> mElements;};
Note that mElements is a vector of NDGrid<T, N-1>; this is the recursive step. Also, operator[] returns a reference to the element type, which is again NDGrid<T, N-1>, not T.
The template definition for the base case is a partial specialization for dimension 1:
template <typename T>class NDGrid<T, 1>{public:explicit NDGrid(size_t size = kDefaultSize);virtual ~NDGrid() = default;T& operator[](size_t x);const T& operator[](size_t x) const;void resize(size_t newSize);size_t getSize() const { return mElements.size(); }static const size_t kDefaultSize = 10;private:std::vector<T> mElements;};
Here the recursion ends: the element type is T, not another template instantiation.
The trickiest aspect of the implementations, other than the template recursion itself, is appropriately sizing each dimension of the grid. This implementation creates the N-dimensional grid with every dimension of equal size. It’s significantly more difficult to specify a separate size for each dimension. However, even with this simplification, there is still a problem: the user should have the ability to create the array with a specified size, such as 20 or 50. Thus, the constructor takes an integer size parameter. However, when you dynamically resize a vector of sub-grids, you cannot pass this size value on to the sub-grid elements because vectors create objects using their default constructor. Thus, you must explicitly call resize() on each grid element of the vector. That code follows. The base case doesn’t need to resize its elements because the elements are Ts, not grids.
Here are the implementations of the general NDGrid template, with highlights showing the differences from the OneDGrid:
template <typename T, size_t N>NDGrid<T, N>::NDGrid(size_t size){resize(size);}template <typename T, size_t N>void NDGrid<T, N>::resize(size_t newSize){mElements.resize(newSize);// Resizing the vector calls the 0-argument constructor for// the NDGrid<T, N-1> elements, which constructs// them with the default size. Thus, we must explicitly call// resize() on each of the elements to recursively resize all// nested Grid elements.for (auto& element : mElements) {element.resize(newSize);}}template <typename T, size_t N>NDGrid<T, N-1>& NDGrid<T, N>::operator[](size_t x){return mElements[x];}template <typename T, size_t N>const NDGrid<T, N-1>& NDGrid<T, N>::operator[](size_t x) const{return mElements[x];}
Now, here are the implementations of the partial specialization (base case). Note that you must rewrite a lot of the code because you don’t inherit any implementations with specializations. Highlights show the differences from the non-specialized NDGrid.
template <typename T>NDGrid<T, 1>::NDGrid(size_t size){resize(size);}template <typename T>void NDGrid<T, 1>::resize(size_t newSize){mElements.resize(newSize);}template <typename T>T& NDGrid<T, 1>::operator[](size_t x){return mElements[x];}template <typename T>const T& NDGrid<T, 1>::operator[](size_t x) const{return mElements[x];}
Now, you can write code like this:
NDGrid<int, 3> my3DGrid;my3DGrid[2][1][2] = 5;my3DGrid[1][1][1] = 5;cout << my3DGrid[2][1][2] << endl;
Normal templates can take only a fixed number of template parameters. Variadic templates can take a variable number of template parameters. For example, the following code defines a template that can accept any number of template parameters, using a parameter pack called Types:
template<typename... Types>class MyVariadicTemplate { };
You can instantiate MyVariadicTemplate with any number of types, as in this example:
MyVariadicTemplate<int> instance1;MyVariadicTemplate<string, double, list<int>> instance2;
It can even be instantiated with zero template arguments:
MyVariadicTemplate<> instance3;To avoid instantiating a variadic template with zero template arguments, you can write your template as follows:
template<typename T1, typename... Types>class MyVariadicTemplate { };
With this definition, trying to instantiate MyVariadicTemplate with zero template arguments results in a compiler error. For example, with Microsoft Visual C++ you get the following error:
error C2976: 'MyVariadicTemplate' : too few template argumentsIt is not possible to directly iterate over the different arguments given to a variadic template. The only way you can do this is with the aid of template recursion. The following sections show two examples of how to use variadic templates.
Variadic templates allow you to create type-safe variable-length argument lists. The following example defines a variadic template called processValues(), allowing it to accept a variable number of arguments with different types in a type-safe manner. The processValues() function processes each value in the variable-length argument list and executes a function called handleValue() for each single argument. This means that you have to write a handleValue() function for each type that you want to handle—int, double, and string in this example:
void handleValue(int value) { cout << "Integer: " << value << endl; }void handleValue(double value) { cout << "Double: " << value << endl; }void handleValue(string_view value) { cout << "String: " << value << endl; }void processValues() { /* Nothing to do in this base case.*/ }template<typename T1, typename... Tn>void processValues(T1 arg1, Tn... args){handleValue(arg1);processValues(args...);}
What this example also demonstrates is the double use of the triple dots ... operator. This operator appears in three places and has two different meanings. First, it is used after typename in the template parameter list and after type Tn in the function parameter list. In both cases it denotes a parameter pack. A parameter pack can accept a variable number of arguments.
The second use of the ... operator is following the parameter name args in the function body. In this case, it means a parameter pack expansion; the operator unpacks/expands the parameter pack into separate arguments. It basically takes what is on the left side of the operator, and repeats it for every template parameter in the pack, separated by commas. Take the following line:
processValues(args...);This line unpacks/expands the args parameter pack into its separate arguments, separated by commas, and then calls the processValues() function with the list of expanded arguments. The template always requires at least one template parameter, T1. The act of recursively calling processValues() with args... is that on each call there is one template parameter less.
Because the implementation of the processValues() function is recursive, you need to have a way to stop the recursion. This is done by implementing a processValues() function that accepts no arguments.
You can test the processValues() variadic template as follows:
processValues(1, 2, 3.56, "test", 1.1f);The recursive calls generated by this example are as follows:
processValues(1, 2, 3.56, "test", 1.1f);handleValue(1);processValues(2, 3.56, "test", 1.1f);handleValue(2);processValues(3.56, "test", 1.1f);handleValue(3.56);processValues("test", 1.1f);handleValue("test");processValues(1.1f);handleValue(1.1f);processValues();
It is important to remember that this method of variable-length argument lists is fully type-safe. The processValues() function automatically calls the correct handleValue() overload based on the actual type. Automatic casting can happen as usual in C++. For example, the 1.1f in the preceding example is of type float. The processValues() function calls handleValue(double value) because conversion from float to double is without any loss. However, the compiler will issue an error when you call processValues() with an argument of a certain type for which there is no handleValue() defined.
There is a problem, though, with the preceding implementation. Because it’s a recursive implementation, the parameters are copied for each recursive call to processValues(). This can become costly depending on the type of the arguments. You might think that you can avoid this copying by passing references to processValues() instead of using pass-by-value. Unfortunately, that also means that you cannot call processValues() with literals anymore, because a reference to a literal value is not allowed, unless you use const references.
To use non-const references and still allow literal values, you can use forwarding references. The following implementation uses forwarding references, T&&, and uses std::forward() for perfect forwarding of all parameters. Perfect forwarding means that if an rvalue is passed to processValues(), it is forwarded as an rvalue reference. If an lvalue or lvalue reference is passed, it is forwarded as an lvalue reference.
void processValues() { /* Nothing to do in this base case.*/ }template<typename T1, typename... Tn>void processValues(T1&& arg1, Tn&&... args){handleValue(std::forward<T1>(arg1));processValues(std::forward<Tn>(args)...);}
There is one line that needs further explanation:
processValues(std::forward<Tn>(args)...);The ... operator is used to unpack the parameter pack. It uses std::forward() on each individual argument in the pack and separates them with commas. For example, suppose args is a parameter pack with three arguments, a1, a2, and a3, of three types, A1, A2, and A3. The expanded call then looks as follows:
processValues(std::forward<A1>(a1),std::forward<A2>(a2),std::forward<A3>(a3));
Inside the body of a function using a parameter pack, you can retrieve the number of arguments in the pack as follows:
int numOfArgs = sizeof...(args);A practical example of using variadic templates is to write a secure and type-safe printf()-like function template. This would be a good practice exercise for you to try.
Parameter packs can be used almost everywhere. For example, the following code uses a parameter pack to define a variable number of mixin classes for MyClass. Chapter 5 discusses the concept of mixin classes.
class Mixin1{public:Mixin1(int i) : mValue(i) {}virtual void Mixin1Func() { cout << "Mixin1: " << mValue << endl; }private:int mValue;};class Mixin2{public:Mixin2(int i) : mValue(i) {}virtual void Mixin2Func() { cout << "Mixin2: " << mValue << endl; }private:int mValue;};template<typename... Mixins>class MyClass : public Mixins...{public:MyClass(const Mixins&... mixins) : Mixins(mixins)... {}virtual ~MyClass() = default;};
This code first defines two mixin classes: Mixin1 and Mixin2. They are kept pretty simple for this example. Their constructor accepts an integer, which is stored, and they have a function to print information about that specific instance of the class. The MyClass variadic template uses a parameter pack typename... Mixins to accept a variable number of mixin classes. The class then inherits from all those mixin classes and the constructor accepts the same number of arguments to initialize each inherited mixin class. Remember that the ... expansion operator basically takes what is on the left of the operator and repeats it for every template parameter in the pack, separated by commas. The class can be used as follows:
MyClass<Mixin1, Mixin2> a(Mixin1(11), Mixin2(22));a.Mixin1Func();a.Mixin2Func();MyClass<Mixin1> b(Mixin1(33));b.Mixin1Func();//b.Mixin2Func(); // Error: does not compile.MyClass<> c;//c.Mixin1Func(); // Error: does not compile.//c.Mixin2Func(); // Error: does not compile.
When you try to call Mixin2Func() on b, you will get a compilation error because b is not inheriting from the Mixin2 class. The output of this program is as follows:
Mixin1: 11Mixin2: 22Mixin1: 33
Folding ExpressionsC++17 adds supports for so-called folding expressions. This makes working with parameter packs in variadic templates much easier. The following table lists the four types of folds that are supported. In this table, Ѳ can be any of the following operators: + - * / % ^ & | << >> += -= *= /= %= ^= &= |= <<= >>= = == != < > <= >= && || , .* ->*.
| NAME | EXPRESSION | IS EXPANDED TO |
| Unary right fold | (pack Ѳ ...) | pack0 Ѳ (... Ѳ (packn-1 Ѳ packn)) |
| Unary left fold | (... Ѳ pack) | ((pack0 Ѳ pack1) Ѳ ... ) Ѳ packn |
| Binary right fold | (pack Ѳ ... Ѳ Init) | pack0 Ѳ (... Ѳ (packn-1 Ѳ (packn Ѳ Init))) |
| Binary left fold | (Init Ѳ … Ѳ pack) | (((Init Ѳ pack0) Ѳ pack1) Ѳ … ) Ѳ packn |
Let’s look at some examples. Earlier, the processValue() function template was defined recursively as follows:
void processValues() { /* Nothing to do in this base case.*/ }template<typename T1, typename... Tn>void processValues(T1 arg1, Tn... args){handleValue(arg1);processValues(args...);}
Because it was defined recursively, it needs a base case to stop the recursion. With folding expressions, this can be implemented with a single function template using a unary right fold, where no base case is needed:
template<typename... Tn>void processValues(const Tn&... args){(handleValue(args), ...);}
Basically, the three dots in the function body trigger folding. That line is expanded to call handleValue() for each argument in the parameter pack, and each call to handleValue() is separated by a comma. For example, suppose args is a parameter pack with three arguments, a1, a2, and a3. The expansion of the unary right fold then becomes as follows:
(handleValue(a1), (handleValue(a2), handleValue(a3)));Here is another example. The printValues() function template writes all its arguments to the console, separated by newlines.
template<typename... Values>void printValues(const Values&... values){((cout << values << endl), ...);}
Suppose that values is a parameter pack with three arguments, v1, v2, and v3. The expansion of the unary right fold then becomes as follows:
((cout << v1 << endl), ((cout << v2 << endl), (cout << v3 << endl)));You can call printValues() with as many arguments as you want, as shown here:
printValues(1, "test", 2.34);In these examples, the folding is used with the comma operator, but it can be used with almost any kind of operator. For example, the following code defines a variadic function template using a binary left fold to calculate the sum of all the values given to it. A binary left fold always requires an Init value (see the overview table earlier). So, sumValues() has two template type parameters: a normal one to specify the type of Init, and a parameter pack which can accept 0 or more arguments.
template<typename T, typename... Values>double sumValues(const T& init, const Values&... values){return (init + ... + values);}
Suppose that values is a parameter pack with three arguments, v1, v2, and v3. Here is the expansion of the binary left fold in that case:
return (((init + v1) + v2) + v3);The sumValues() function template can be used as follows:
cout << sumValues(1, 2, 3.3) << endl;cout << sumValues(1) << endl;
The template requires at least one argument, so the following does not compile:
cout << sumValues() << endl;This section touches on template metaprogramming. It is a very complicated subject and there are books written about it explaining all the little details. This book doesn’t have the space to go into all of these details. Instead, this section explains the most important concepts, with the aid of a couple of examples.
The goal of template metaprogramming is to perform some computation at compile time instead of at run time. It is basically a programming language on top of C++. The following section starts the discussion with a simple example that calculates the factorial of a number at compile time and makes the result available as a simple constant at run time.
Template metaprogramming allows you to perform calculations at compile time instead of at run time. The following code is a small example that calculates the factorial of a number at compile time. The code uses template recursion, explained earlier in this chapter, which requires a recursive template and a base template to stop the recursion. By mathematical definition, the factorial of 0 is 1, so that is used as the base case.
template<unsigned char f>class Factorial{public:static const unsigned long long val = (f * Factorial<f - 1>::val);};template<>class Factorial<0>{public:static const unsigned long long val = 1;};int main(){cout << Factorial<6>::val << endl;return 0;}
This calculates the factorial of 6, mathematically written as 6!, which is 1×2×3×4×5×6 or 720.
For this specific example of calculating the factorial of a number at compile time, you don’t necessarily need to use template metaprogramming. Since the introduction of constexpr, it can be written as follows without any templates, though the template implementation still serves as a good example on how to implement recursive templates.
constexpr unsigned long long factorial(unsigned char f){if (f == 0) {return 1;} else {return f * factorial(f - 1);}}
If you call this version as follows, the value is calculated at compile time:
constexpr auto f1 = factorial(6);However, you have to be careful not to forget the constexpr in this statement. If, instead, you write the following, then the calculation happens at run time!
auto f1 = factorial(6);You cannot make such a mistake with the template metaprogramming version; that one always happens at compile time.
A second example of template metaprogramming is to unroll loops at compile time instead of executing the loop at run time. Note that loop unrolling should only be done when you really need it, because the compiler is usually smart enough to unroll loops that can be unrolled for you.
This example again uses template recursion because it needs to do something in a loop at compile time. On each recursion, the Loop template instantiates itself with i-1. When it hits 0, the recursion stops.
template<int i>class Loop{public:template <typename FuncType>static inline void Do(FuncType func) {Loop<i - 1>::Do(func);func(i);}};template<>class Loop<0>{public:template <typename FuncType>static inline void Do(FuncType /* func */) { }};
The Loop template can be used as follows:
void DoWork(int i) { cout << "DoWork(" << i << ")" << endl; }int main(){Loop<3>::Do(DoWork);}
This code causes the compiler to unroll the loop and to call the function DoWork() three times in a row. The output of the program is as follows:
DoWork(1)DoWork(2)DoWork(3)
With a lambda expression you can use a version of DoWork() that accepts more than one parameter:
void DoWork2(string str, int i){cout << "DoWork2(" << str << ", " << i << ")" << endl;}int main(){Loop<2>::Do([](int i) { DoWork2("TestStr", i); });}
The code first implements a function that accepts a string and an int. The main() function uses a lambda expression to call DoWork2() on each iteration with a fixed string, "TestStr", as first argument. If you compile and run this code, the output is as follows:
DoWork2(TestStr, 1)DoWork2(TestStr, 2)
This example uses template metaprogramming to print the individual elements of an std::tuple. Tuples are explained in Chapter 20. They allow you to store any number of values, each with its own specific type. A tuple has a fixed size and fixed value types, determined at compile time. However, tuples don’t have any built-in mechanism to iterate over their elements. The following example shows how you could use template metaprogramming to iterate over the elements of a tuple at compile time.
As is often the case with template metaprogramming, this example is again using template recursion. The tuple_print class template has two template parameters: the tuple type, and an integer, initialized with the size of the tuple. It then recursively instantiates itself in the constructor and decrements the integer on every call. A partial specialization of tuple_print stops the recursion when this integer hits 0. The main() function shows how this tuple_print class template can be used.
template<typename TupleType, int n>class tuple_print{public:tuple_print(const TupleType& t) {tuple_print<TupleType, n - 1> tp(t);cout << get<n - 1>(t) << endl;}};template<typename TupleType>class tuple_print<TupleType, 0>{public:tuple_print(const TupleType&) { }};int main(){using MyTuple = tuple<int, string, bool>;MyTuple t1(16, "Test", true);tuple_print<MyTuple, tuple_size<MyTuple>::value> tp(t1);}
If you look at the main() function, you can see that the line to use the tuple_print template looks a bit complicated because it requires the exact type of the tuple and the size of the tuple as template arguments. This can be simplified a lot by introducing a helper function template that automatically deduces the template parameters. The simplified implementation is as follows:
template<typename TupleType, int n>class tuple_print_helper{public:tuple_print_helper(const TupleType& t) {tuple_print_helper<TupleType, n - 1> tp(t);cout << get<n - 1>(t) << endl;}};template<typename TupleType>class tuple_print_helper<TupleType, 0>{public:tuple_print_helper(const TupleType&) { }};template<typename T>void tuple_print(const T& t){tuple_print_helper<T, tuple_size<T>::value> tph(t);}int main(){auto t1 = make_tuple(167, "Testing", false, 2.3);tuple_print(t1);}
The first change made here is renaming the original tuple_print class template to tuple_print_helper. The code then implements a small function template called tuple_print(). It accepts the tuple’s type as a template type parameter, and accepts a reference to the tuple itself as a function parameter. The body of that function instantiates the tuple_print_helper class template. The main() function shows how to use this simplified version. Because you no longer need to know the exact type of the tuple, you can use make_tuple() together with auto. The call to the tuple_print() function template is very simple:
tuple_print(t1);You don’t need to specify the function template parameter because the compiler can deduce this automatically from the supplied argument.
constexpr ifC++17 introduced constexpr
if. These are if statements executed at compile time, not at run time. If a branch of a constexpr
if statement is never taken, it is never compiled. This can be used to simplify a lot of template metaprogramming techniques, and also comes in handy for SFINAE (discussed later in this chapter).
For example, you can simplify the previous code for printing elements of a tuple using constexpr
if, as follows. Note that the template recursion base case is not needed anymore, because the recursion is stopped with the constexpr
if statement.
template<typename TupleType, int n>class tuple_print_helper{public:tuple_print_helper(const TupleType& t) {if constexpr(n > 1) {tuple_print_helper<TupleType, n - 1> tp(t);}cout << get<n - 1>(t) << endl;}};template<typename T>void tuple_print(const T& t){tuple_print_helper<T, tuple_size<T>::value> tph(t);}
Now you can even get rid of the class template itself, and replace it with a simple function template called tuple_print_helper:
template<typename TupleType, int n>void tuple_print_helper(const TupleType& t) {if constexpr(n > 1) {tuple_print_helper<TupleType, n - 1>(t);}cout << get<n - 1>(t) << endl;}template<typename T>void tuple_print(const T& t){tuple_print_helper<T, tuple_size<T>::value>(t);}
This can be simplified even more. Both methods can be combined into one, as follows:
template<typename TupleType, int n = tuple_size<TupleType>::value>void tuple_print(const TupleType& t) {if constexpr(n > 1) {tuple_print<TupleType, n - 1>(t);}cout << get<n - 1>(t) << endl;}
It can still be called the same as before:
auto t1 = make_tuple(167, "Testing", false, 2.3);tuple_print(t1);
C++ supports compile-time integer sequences using std::integer_sequence, which is defined in <utility>. A common use case with template metaprogramming is to generate a compile-time sequence of indices, that is, an integer sequence of type size_t. For this, a helper std::index_sequence is available. You can use std::index_sequence_for to generate an index sequence of the same length as the length of a given parameter pack.
The tuple printer could be implemented using variadic templates, compile-time index sequences, and C++17 folding expressions as follows:
template<typename Tuple, size_t... Indices>void tuple_print_helper(const Tuple& t, index_sequence<Indices...>){((cout << get<Indices>(t) << endl), ...);}template<typename... Args>void tuple_print(const tuple<Args...>& t){tuple_print_helper(t, index_sequence_for<Args...>());}
It can be called in the same way as before:
auto t1 = make_tuple(167, "Testing", false, 2.3);tuple_print(t1);
With this call, the unary right fold expression in the tuple_print_helper() function template expands to the following:
(((cout << get<0>(t) << endl),((cout << get<1>(t) << endl),((cout << get<2>(t) << endl),(cout << get<3>(t) << endl)))));
Type traits allow you to make decisions based on types at compile time. For example, you can write a template that requires a type that is derived from a certain type, or a type that is convertible to a certain type, or a type that is integral, and so on. The C++ standard defines several helper classes for this. All type traits-related functionality is defined in the <type_traits> header file. Type traits are divided into separate categories. The following list gives a few examples of the available type traits in each category. Consult a Standard Library Reference, see Appendix B, for a complete list.
|
|
The type traits marked with an asterisk (*) are only available since C++17.
Type traits is a pretty advanced C++ feature. By just looking at the preceding list, which is already a shortened version of the list from the C++ standard, it is clear that this book cannot explain all details about all type traits. This section explains just a couple of use cases to show you how type traits can be used.
Before an example can be given for a template using type traits, you first need to know a bit more on how classes like is_integral work. The C++ standard defines an integral_constant class that looks like this:
template <class T, T v>struct integral_constant {static constexpr T value = v;using value_type = T;using type = integral_constant<T, v>;constexpr operator value_type() const noexcept { return value; }constexpr value_type operator()() const noexcept { return value; }};
It also defines bool_constant, true_type, and false_type type aliases:
template <bool B>using bool_constant = integral_constant<bool, B>;using true_type = bool_constant<true>;using false_type = bool_constant<false>;
What this code defines is two types: true_type and false_type. When you access true_type::value, you get the value true, and when you access false_type::value, you get the value false. You can also access true_type::type, which results in the type of true_type. The same holds for false_type. Classes like is_integral and is_class inherit from either true_type or false_type. For example, is_integral can be specialized for type bool as follows:
template<> struct is_integral<bool> : public true_type { };This allows you to write is_integral<bool>::value, which results in the value true. Note that you don’t need to write these specializations yourself; they are part of the Standard Library.
The following code shows the simplest example of how type categories can be used:
if (is_integral<int>::value) {cout << "int is integral" << endl;} else {cout << "int is not integral" << endl;}if (is_class<string>::value) {cout << "string is a class" << endl;} else {cout << "string is not a class" << endl;}
This example uses is_integral to check whether or not int is an integral type, and it uses is_class to check whether or not string is a class. The output is as follows:
int is integralstring is a class
For each trait that has a value member, C++17 adds a variable template that has the same name as the trait followed by _v. Instead of writing some_trait<T>::value, you can write some_trait_v<T>—for example, is_integral_v<T>, is_const_v<T>, and so on. Here is the previous example written using these helpers:
if (is_integral_v<int>) {cout << "int is integral" << endl;} else {cout << "int is not integral" << endl;}if (is_class_v<string>) {cout << "string is a class" << endl;} else {cout << "string is not a class" << endl;}
Of course, you will likely never use type traits in this way. They become more useful in combination with templates to generate code based on some properties of a type. The following template functions demonstrate this. The code defines two overloaded process_helper() function templates that accept a type as template parameter. The first parameter to these functions is a value, and the second is an instance of either true_type or false_type. The process() function template accepts a single parameter and calls process_helper().
template<typename T>void process_helper(const T& t, true_type){cout << t << " is an integral type." << endl;}template<typename T>void process_helper(const T& t, false_type){cout << t << " is a non-integral type." << endl;}template<typename T>void process(const T& t){process_helper(t, typename is_integral<T>::type());}
The second argument in the call to process_helper() is as follows:
typename is_integral<T>::type()This argument uses is_integral to figure out if T is an integral type. You use ::type to access the resulting integral_constant type, which can be true_type or false_type. The process_helper() function needs an instance of true_type or false_type as a second parameter, so that is the reason for the two empty parentheses behind ::type. Note that the two overloaded process_helper() functions use nameless parameters of type true_type and false_type. They are nameless because they don’t use those parameters inside their function body. These parameters are only used for function overload resolution.
The code can be tested as follows:
process(123);process(2.2);process("Test"s);
Here is the output:
123 is an integral type.2.2 is a non-integral type.Test is a non-integral type.
The previous example could be written as a single function template as follows. However, that doesn’t demonstrate how to use type traits to select different overloads based on a type.
template<typename T>void process(const T& t){if constexpr (is_integral_v<T>) {cout << t << " is an integral type." << endl;} else {cout << t << " is a non-integral type." << endl;}}
Some examples of type relations are is_same, is_base_of, and is_convertible. This section gives an example of how to use is_same; the other type relations work similarly.
The following same() function template uses the is_same type trait to figure out whether or not the two given arguments are of the same type, and outputs an appropriate message:
template<typename T1, typename T2>void same(const T1& t1, const T2& t2){bool areTypesTheSame = is_same_v<T1, T2>;cout << "'" << t1 << "' and '" << t2 << "' are ";cout << (areTypesTheSame ? "the same types." : "different types.") << endl;}int main(){same(1, 32);same(1, 3.01);same(3.01, "Test"s);}
The output is as follows:
'1' and '32' are the same types.'1' and '3.01' are different types'3.01' and 'Test' are different types
The use of enable_if is based on a feature called Substitution Failure Is Not An Error (SFINAE), a complicated feature of C++. This section only explains the basics of SFINAE.
If you have a set of overloaded functions, you can use enable_if to selectively disable certain overloads based on some type traits. The enable_if trait is usually used on the return types for your set of overloads. enable_if accepts two template type parameters. The first is a Boolean, and the second is a type that is void by default. If the Boolean is true, then the enable_if class has a nested type that you can access using ::type. The type of this nested type is the type given as a second template type parameter. If the Boolean is false, then there is no nested type.
The C++ standard defines alias templates for traits that have a type member, such as enable_if. These have the same name as the trait, but are appended with _t. For example, instead of writing the following,
typename enable_if<..., bool>::typeyou can write a much shorter version,
enable_if_t<..., bool>The same() function template from the previous section can be rewritten into an overloaded check_type() function template by using enable_if as follows. In this version, the check_type() functions return true or false depending on whether or not the types of the given values are the same. If you don’t want to return anything from check_type(), you can remove the return statements, and remove the second template type parameter for enable_if or replace it with void.
template<typename T1, typename T2>enable_if_t<is_same_v<T1, T2>, bool>check_type(const T1& t1, const T2& t2){cout << "'" << t1 << "' and '" << t2 << "' ";cout << "are the same types." << endl;return true;}template<typename T1, typename T2>enable_if_t<!is_same_v<T1, T2>, bool>check_type(const T1& t1, const T2& t2){cout << "'" << t1 << "' and '" << t2 << "' ";cout << "are different types." << endl;return false;}int main(){check_type(1, 32);check_type(1, 3.01);check_type(3.01, "Test"s);}
The output is the same as before:
'1' and '32' are the same types.'1' and '3.01' are different types.'3.01' and 'Test' are different types.
The code defines two versions of check_type(). The return type of both versions is the nested type of enable_if, which is bool. First, is_same_v is used to check whether or not the two types are the same. The result is given to enable_if_t. When the first argument to enable_if_t is true, enable_if_t has type bool; otherwise, there is no type. This is where SFINAE comes into play.
When the compiler starts to compile the first line of main(), it tries to find a function check_type() that accepts two integer values. It finds the first check_type() function template overload in the source code and deduces that it can use an instance of this function template by making T1 and T2 both integers. It then tries to figure out the return type. Because both arguments are integers and thus the same types, is_same_v<T1, T2> is true, which causes enable_if_t<true, bool> to be type bool. With this instantiation, everything is fine and the compiler can use that version of check_type().
However, when the compiler tries to compile the second line in main(), it again tries to find a suitable check_type() function. It starts with the first check_type() and decides it can use that overload by setting T1 to type int and T2 to type double. It then tries to figure out the return type. This time, T1 and T2 are different types, which means that is_same_v<T1, T2> is false. Because of this, enable_if_t<false, bool> does not represent a type, leaving the function check_type() without a return type. The compiler notices this error but does not yet generate a real compilation error because of SFINAE (Substitution Failure Is Not An Error). Instead, the compiler gracefully backtracks and tries to find another check_type() function. In this case, the second check_type() works out perfectly fine because !is_same_v<T1, T2> is true, and thus enable_if_t<true, bool> is type bool.
If you want to use enable_if on a set of constructors, you can’t use it with the return type because constructors don’t have a return type. In that case, you can use enable_if on an extra constructor parameter with a default value.
It is recommended to use enable_if judiciously. Use it only when you need to resolve overload ambiguities that you cannot possibly resolve using any other technique, such as specialization, partial specialization, and so on. For example, if you just want compilation to fail when you use a template with the wrong types, use static_assert(), explained in Chapter 27, and not SFINAE. Of course, there are legitimate use cases for enable_if. One such example is specializing a copy function for a custom vector-like class to perform bit-wise copying of trivially copyable types using enable_if and the is_trivially_copyable type trait. Such a specialized copy function could for example use memcpy().
Using constexpr if to Simplify enable_if ConstructsAs you can see from the earlier examples, using enable_if can become quite complicated. The constexpr
if feature, introduced in C++17, helps to dramatically simplify certain use cases of enable_if.
For example, suppose you have the following two classes:
class IsDoable{public:void doit() const { cout << "IsDoable::doit()" << endl; }};class Derived : public IsDoable { };
You can create a function template, call_doit(), that calls the doit() method if the method is available; otherwise, it prints an error message to the console. You can do this with enable_if by checking whether the given type is derived from IsDoable:
template<typename T>enable_if_t<is_base_of_v<IsDoable, T>, void>call_doit(const T& t){t.doit();}template<typename T>enable_if_t<!is_base_of_v<IsDoable, T>, void>call_doit(const T&){cout << "Cannot call doit()!" << endl;}
The following code tests this implementation:
Derived d;call_doit(d);call_doit(123);
Here is the output:
IsDoable::doit()Cannot call doit()!
You can simplify this enable_if implementation a lot by using C++17 constexpr
if:
template<typename T>void call_doit(const T& [[maybe_unused]] t){if constexpr(is_base_of_v<IsDoable, T>) {t.doit();} else {cout << "Cannot call doit()!" << endl;}}
You cannot accomplish this using a normal if statement! With a normal if statement, both branches need to be compiled, and this will fail if you supply a type T that is not derived from IsDoable. In that case, the line t.doit() will fail to compile. However, with the constexpr
if statement, if a type is supplied that is not derived from IsDoable, then the line t.doit() won’t even be compiled!
Note also the use of the [[maybe_unused]] attribute, introduced in C++17. Because the line t.doit() is not compiled if the given type T is not derived from IsDoable, the parameter t won’t be used in that instantiation of call_doit(). Most compilers give a warning or even an error if you have unused parameters. The attribute prevents such warnings or errors for the parameter t.
Instead of using the is_base_of type trait, you can also use the new C++17 is_invocable trait, which determines whether or not a given function can be called with a given set of arguments. Here is an implementation of call_doit() using the is_invocable trait:
template<typename T>void call_doit(const T& [[maybe_unused]] t){if constexpr(is_invocable_v<decltype(&IsDoable::doit), T>) {t.doit();} else {cout << "Cannot call doit()!" << endl;}}
Logical Operator TraitsThere are three logical operator traits: conjunction, disjunction, and negation. Variable templates, ending with _v, are available as well. These traits accept a variable number of template type parameters, and can be used to perform logical operations on type traits, as in this example:
cout << conjunction_v<is_integral<int>, is_integral<short>> << " ";cout << conjunction_v<is_integral<int>, is_integral<double>> << " ";cout << disjunction_v<is_integral<int>, is_integral<double>,is_integral<short>> << " ";cout << negation_v<is_integral<int>> << " ";
The output is as follows:
1 0 1 0As you have seen in this section, template metaprogramming can be a very powerful tool, but it can also get quite complicated. One problem with template metaprogramming, not mentioned before, is that everything happens at compile time so you cannot use a debugger to pinpoint a problem. If you decide to use template metaprogramming in your code, make sure you write good comments to explain exactly what is going on and why you are doing something a certain way. If you don’t properly document your template metaprogramming code, it might be very difficult for someone else to understand your code, and it might even make it difficult for you to understand your own code in the future.
This chapter is a continuation of the template discussion from Chapter 12. These chapters show you how to use templates for generic programming, and template metaprogramming for compile-time computations. Hopefully you gained an appreciation for the power and capabilities of these features, and an idea of how you could apply these concepts to your own code. Don’t worry if you didn’t understand all the syntax, or didn’t follow all the examples, on your first reading. The concepts can be difficult to grasp when you are first exposed to them, and the syntax is tricky whenever you want to write more complicated templates. When you actually sit down to write a class or function template, you can consult this chapter and Chapter 12 for a reference on the proper syntax.
Multithreaded programming allows you to perform multiple calculations in parallel. As a result, you can take advantage of the multiple processor units inside virtually all systems today. Two decades ago, the processor market was racing for the highest frequency, which is perfect for single-threaded applications. Around 2005, this race stopped due to a combination of power and heat management problems. Since then, the processor market is racing toward the most cores on a single processor chip. Dual- and quad-core processors are common, and even 12-, 16-, 18-, and more core processors are available.
Similarly, if you look at the processors on graphics cards, called GPUs, you’ll see that they are massively-parallel processors. Today, high-end graphics cards have more than 4,000 cores, a number that will increase rapidly! These graphics cards are used not only for gaming, but also to perform computationally intensive tasks. Examples are image and video manipulation, protein folding (useful for discovering new drugs), processing signals as part of the SETI (Search for Extraterrestrial Intelligence) project, and so on.
C++98/03 did not have support for multithreaded programming, and you had to resort to third-party libraries or to the multithreading APIs of your target operating system. Because C++11 included a standard multithreading library, it became easier to write cross-platform multithreaded applications. The current C++ standard targets only CPUs and not GPUs. This might change in the future.
There are two reasons to start writing multithreaded code. First, if you have a computational problem and you manage to separate it into small pieces that can be run in parallel independently from each other, you can expect a huge performance boost when running it on multiple processor units. Second, you can modularize computations along orthogonal axes. For example, you can do long computations in a thread instead of blocking the UI thread, so the user interface remains responsive while a long computation occurs in the background.
Figure 23-1 shows a situation that is perfectly suited for running in parallel. An example could be the processing of pixels of an image by an algorithm that does not require information about neighboring pixels. The algorithm could split the image into four parts. On a single-core processor, each part would be processed sequentially; on a dual-core processor, two parts would be processed in parallel; and on a quad-core processor, four parts would be processed in parallel, resulting in an almost linear scaling of the performance with the number of cores.
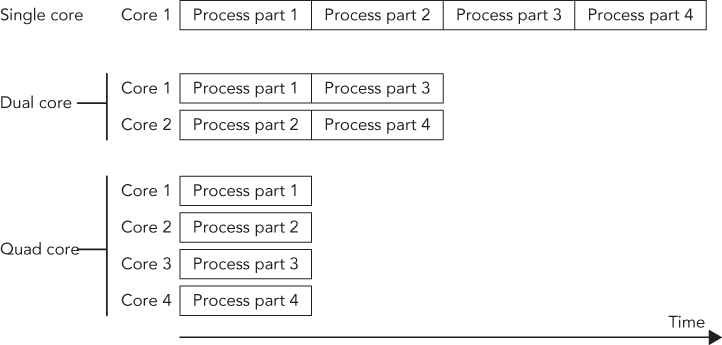
Of course, it’s not always possible to split the problem into parts that can be executed independently of each other in parallel. However, it can often be made parallel, at least partially, resulting in a performance increase. A difficult part of multithreaded programming is making your algorithm parallel, which is highly dependent on the type of the algorithm. Other difficulties are preventing race conditions, deadlocks, tearing, and false-sharing. These are discussed in the following sections. They are usually solved using atomics or explicit synchronization mechanisms, as discussed later in this chapter.
Race conditions can occur when multiple threads want to access any kind of shared resources. Race conditions in the context of shared memory are called data races. A data race can occur when multiple threads access shared memory, and at least one thread writes to the shared memory. For example, suppose you have a shared variable and one thread increments this value while another thread decrements it. Incrementing and decrementing the value means that the current value needs to be retrieved from memory, incremented or decremented, and stored back in memory. On old architectures, such as PDP-11 and VAX, this used to be implemented with an INC processor instruction, which was atomic. On modern x86 processors, the INC instruction is not atomic anymore, meaning that other instructions can be executed in the middle of this operation, which might cause the code to retrieve a wrong value.
The following table shows the result when the increment is finished before the decrement starts, and assumes that the initial value is 1.
| THREAD 1 (INCREMENT) | THREAD 2 (DECREMENT) |
| load value (value = 1) | |
| increment value (value = 2) | |
| store value (value = 2) | |
| load value (value = 2) | |
| decrement value (value = 1) | |
| store value (value = 1) |
The final value stored in memory is 1. When the decrement thread is finished before the increment thread starts, the final value is also 1, as shown in the following table.
| THREAD 1 (INCREMENT) | THREAD 2 (DECREMENT) |
| load value (value = 1) | |
| decrement value (value = 0) | |
| store value (value = 0) | |
| load value (value = 0) | |
| increment value (value = 1) | |
| store value (value = 1) |
However, when the instructions are interleaved, the result is different, as shown in the following table.
| THREAD 1 (INCREMENT) | THREAD 2 (DECREMENT) |
| load value (value = 1) | |
| increment value (value = 2) | |
| load value (value = 1) | |
| decrement value (value = 0) | |
| store value (value = 2) | |
| store value (value = 0) |
The final result in this case is 0. In other words, the effect of the increment operation is lost. This is a data race.
Tearing is a specific case or consequence of a data race. There are two kinds of tearing: torn read and torn write. If a thread has written part of your data to memory, while another part hasn’t been written yet by the same thread, any other thread reading that data at that exact moment sees inconsistent data, a torn read. If two threads are writing to the data at the same time, one thread might have written part of the data, while another thread might have written another part of the data. The final result will be inconsistent, a torn write.
If you opt to solve a race condition by using a synchronization method, such as mutual exclusion, you might run into another common problem with multithreaded programming: deadlocks. Two threads are deadlocked if they are both waiting for the other thread to do something. This can be extended to more than two threads. For example, if two threads want to acquire access to a shared resource, they need to ask for permission to access this resource. If one of the threads currently holds the permission to access the resource, but is blocked indefinitely for some other reason, then the other thread will block indefinitely as well when trying to acquire permission for the same resource. One mechanism to acquire permission for a shared resource is called a mutual exclusion object, discussed in detail later in this chapter. For example, suppose you have two threads and two resources protected with two mutual exclusion objects, A and B. Both threads acquire permission for both resources, but they acquire the permission in different order. The following table shows this situation in pseudo-code.
| THREAD 1 | THREAD 2 |
|
Acquire A Acquire B // … computeRelease B Release A |
Acquire B Acquire A // … computeRelease A Release B |
Now, imagine that the code in the two threads is executed in the following order.
Both threads are now waiting indefinitely in a deadlock situation. Figure 23-2 shows a graphical representation of the deadlock. Thread 1 has acquired permission for resource A and is waiting to acquire permission for resource B. Thread 2 has acquired permission for resource B and is waiting to acquire permission for resource A. In this graphical representation, you see a cycle that depicts the deadlock. Both threads will wait indefinitely.
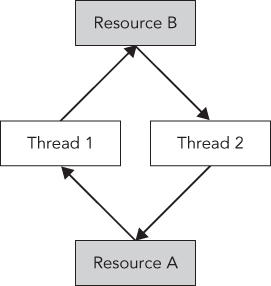
It’s best to always acquire permissions in the same order to avoid these kinds of deadlocks. You can also include mechanisms in your program to break these deadlocks. One possible solution is to try for a certain time to acquire permission for a resource. If the permission could not be obtained within a certain time interval, the thread could stop waiting and possibly releases other permissions it is currently holding. The thread might then sleep for a little bit and try again later to acquire all the resources it needs. This method might give other threads the opportunity to acquire necessary permissions and continue their execution. Whether this method works or not depends heavily on your specific deadlock case.
Instead of using a workaround as described in the previous paragraph, you should try to avoid any possible deadlock situation altogether. If you need to acquire permission to multiple resources protected with several mutual exclusion objects, instead of acquiring permission for each resource individually, the recommended way is to use the standard std::lock() or std::try_lock() functions described later in the section “Mutual Exclusion.” These functions obtain or try to obtain permission for several resources with one call.
Most caches work with so-called cache lines. For modern CPUs, cache lines are usually 64 bytes. If something needs to be written to a cache line, the entire line needs to be locked. This can bring a serious performance penalty for multithreaded code if your data structure is not properly designed. For example, if two threads are using two different pieces of data, but that data shares a cache line, then when one thread writes something, the other thread is blocked because the entire cache line is locked. You can optimize your data structures by using explicit memory alignments to make sure data that is worked on by multiple threads does not share any cache lines. To do this in a portable manner, C++17 introduces a constant called hardware_destructive_interference_size, defined in <new>, which returns you the minimum recommended offset between two concurrently accessed objects to avoid cache line sharing. You can use that value in combination with the alignas keyword to properly align your data.
The C++ threading library, defined in the <thread> header file, makes it very easy to launch new threads. You can specify what needs to be executed in the new thread in several ways. You can let the new thread execute a global function, the operator() of a function object, a lambda expression, or even a member function of an instance of some class. The following sections give small examples of all these methods.
Functions such as CreateThread(), _beginthread(), and so on, on Windows, and pthread_create() with the pthreads library, require that the thread function has only one parameter. On the other hand, a function that you want to use with the standard C++ std::thread class can have as many parameters as you want.
Suppose you have a counter() function accepting two integers: the first representing an ID and the second representing the number of iterations that the function should loop. The body of the function is a single loop that loops the given number of iterations. On each iteration, a message is printed to standard output:
void counter(int id, int numIterations){for (int i = 0; i < numIterations; ++i) {cout << "Counter " << id << " has value " << i << endl;}}
You can launch multiple threads executing this function using std::thread. You can create a thread t1, executing counter() with arguments 1 and 6 as follows:
thread t1(counter, 1, 6);The constructor of the thread class is a variadic template, which means that it accepts any number of arguments. Variadic templates are discussed in detail in Chapter 22. The first argument is the name of the function to execute in the new thread. The subsequent variable number of arguments are passed to this function when execution of the thread starts.
A thread object is said to be joinable if it represents or represented an active thread in the system. Even when the thread has finished executing, a thread object remains in the joinable state. A default constructed thread object is unjoinable. Before a joinable thread object is destroyed, you need to make sure to call either join() or detach() on it. A call to join() is a blocking call, it waits until the thread has finished its work. A call to detach() detaches a thread object from its underlying OS thread, in which case the OS thread keeps running independently. Both methods cause the thread to become unjoinable. If a thread object that is still joinable is destroyed, the destructor will call std::terminate(), which abruptly terminates all threads and the application itself.
The following code launches two threads executing the counter() function. After launching the threads, main() calls join() on both threads.
thread t1(counter, 1, 6);thread t2(counter, 2, 4);t1.join();t2.join();
A possible output of this example looks as follows:
Counter 2 has value 0Counter 1 has value 0Counter 1 has value 1Counter 1 has value 2Counter 1 has value 3Counter 1 has value 4Counter 1 has value 5Counter 2 has value 1Counter 2 has value 2Counter 2 has value 3
The output on your system will be different and it will most likely be different every time you run it. This is because two threads are executing the counter() function at the same time, so the output depends on the number of processing cores in your machine and on the thread scheduling of the operating system.
By default, accessing cout from different threads is thread-safe and doesn’t cause any data races, unless you have called cout.sync_with_stdio(false) before the first output or input operation. However, even though there are no data races, output from different threads can still be interleaved! This means that the output of the previous example can be mixed together as follows:
Counter Counter 2 has value 01 has value 0Counter 1 has value 1Counter 1 has value 2…
This can be fixed using synchronization methods, which are discussed later in this chapter.
Instead of using function pointers, you can also use a function object to execute in a thread. With the function pointer technique of the previous section, the only way to pass information to the thread is by passing arguments to the function. With function objects, you can add member variables to your function object class, which you can initialize and use however you want. The following example first defines a class called Counter, which has two member variables: an ID and the number of iterations for the loop. Both variables are initialized with the constructor. To make the Counter class a function object, you need to implement operator(), as discussed in Chapter 18. The implementation of operator() is the same as the counter() function from the previous section. Here is the code:
class Counter{public:Counter(int id, int numIterations): mId(id), mNumIterations(numIterations){}void operator()() const{for (int i = 0; i < mNumIterations; ++i) {cout << "Counter " << mId << " has value " << i << endl;}}private:int mId;int mNumIterations;};
Three methods for initializing threads with a function object are demonstrated in the following code snippet. The first method uses the uniform initialization syntax. You create an instance of Counter with its constructor arguments and give it to the thread constructor between curly braces.
The second method defines a named instance of Counter and gives this named instance to the constructor of the thread class.
The third method looks similar to the first one; it creates an instance of Counter and gives it to the constructor of the thread class, but uses parentheses instead of curly braces. The ramifications of this are discussed after the code.
// Using uniform initialization syntaxthread t1{ Counter{ 1, 20 }};// Using named variableCounter c(2, 12);thread t2(c);// Using temporarythread t3(Counter(3, 10));// Wait for threads to finisht1.join();t2.join();t3.join();
If you compare the creation of t1 with the creation of t3, the only difference seems to be that the first method uses curly braces while the third method uses parentheses. However, when your function object constructor doesn’t require any parameters, the third method as written earlier does not work. Here is an example:
class Counter{public:Counter() {}void operator()() const { /* Omitted for brevity */ }};int main(){thread t1(Counter());// Error!t1.join();}
This results in a compilation error because C++ interprets the first line in main() as a declaration of a function called t1, which returns a thread object and accepts a pointer to a function without parameters returning a Counter object. For this reason, it’s recommended to use the uniform initialization syntax:
thread t1{ Counter{} }; // OKLambda expressions fit nicely with the standard C++ threading library. Here is an example that launches a thread to execute a given lambda expression:
int main(){int id = 1;int numIterations = 5;thread t1([id, numIterations] {for (int i = 0; i < numIterations; ++i) {cout << "Counter " << id << " has value " << i << endl;}});t1.join();}
You can specify a member function of a class to be executed in a thread. The following example defines a basic Request class with a process() method. The main() function creates an instance of the Request class, and launches a new thread, which executes the process() method of the Request instance req.
class Request{public:Request(int id) : mId(id) { }void process(){cout << "Processing request " << mId << endl;}private:int mId;};int main(){Request req(100);thread t{ &Request::process, &req };t.join();}
With this technique, you are executing a method on a specific object in a separate thread. If other threads are accessing the same object, you need to make sure this happens in a thread-safe way to avoid data races. Mutual exclusion, discussed later in this chapter, can be used as a synchronization mechanism to make it thread-safe.
The C++ standard supports the concept of thread local storage. With a keyword called thread_local, you can mark any variable as thread local, which means that each thread will have its own unique copy of the variable and it will last for the entire duration of the thread. For each thread, the variable is initialized exactly once. For example, the following code defines two global variables. Every thread shares one—and only one—copy of k, while each thread has its own unique copy of n:
int k;thread_local int n;
Note that if the thread_local variable is declared in the scope of a function, its behavior is as if it were declared static, except that every thread has its own unique copy and is initialized exactly once per thread, no matter how many times that function is called in that thread.
The C++ standard does not include any mechanism for cancelling a running thread from another thread. The best way to achieve this is to provide some communication mechanism that the two threads agree upon. The simplest mechanism is to have a shared variable, which the target thread checks periodically to determine if it should terminate. Other threads can set this shared variable to indirectly instruct the thread to shut down. You have to be careful here, because this shared variable is being accessed by multiple threads, of which at least one is writing to the shared variable. It’s recommended to use atomic variables or condition variables, both discussed later in this chapter.
As you saw in the previous examples, launching a new thread is pretty easy. However, in most cases you are probably interested in results produced by the thread. For example, if your thread performs some mathematical calculations, you really would like to get the results out of the thread once the thread is finished. One way is to pass a pointer or reference to a result variable to the thread in which the thread stores the results. Another method is to store the results inside class member variables of a function object, which you can retrieve later once the thread has finished executing. This only works if you use std::ref() to pass your function object by reference to the thread constructor.
However, there is another easier method to obtain a result from threads: futures. Futures also make it easier to handle errors that occur inside your threads. They are discussed later in this chapter.
The whole exception mechanism in C++ works perfectly fine, as long as it stays within one single thread. Every thread can throw its own exceptions, but they need to be caught within their own thread. If a thread throws an exception and it is not caught inside the thread, the C++ runtime calls std::terminate(), which terminates the whole application. Exceptions thrown in one thread cannot be caught in another thread. This introduces quite a few problems when you would like to use exception handling in combination with multithreaded programming.
Without the standard threading library, it’s very difficult if not impossible to gracefully handle exceptions across threads. The standard threading library solves this issue with the following exception-related functions. These functions work not only with std::exceptions, but also with other kinds of exceptions, ints, strings, custom exceptions, and so on:
exception_ptr current_exception() noexcept;
This is intended to be called from inside a catch block. It returns an exception_ptr object that refers to the exception currently being handled, or a copy of the currently handled exception. A null exception_ptr object is returned if no exception is being handled. This referenced exception object remains valid for as long as there is an object of type exception_ptr that is referencing it. exception_ptr is of type NullablePointer, which means it can easily be tested with a simple if statement, as the example later in this section will demonstrate.
[[noreturn]] void rethrow_exception(exception_ptr p);
This function rethrows the exception referenced by the exception_ptr parameter. Rethrowing the referenced exception does not have to be done in the same thread that generated the referenced exception in the first place, which makes this feature perfectly suited for handling exceptions across different threads. The [[noreturn]] attribute makes it clear that this function never returns normally. Attributes are introduced in Chapter 11.
template<class E> exception_ptr make_exception_ptr(E e) noexcept;
This function creates an exception_ptr object that refers to a copy of the given exception object. This is basically a shorthand notation for the following code:
try {throw e;} catch(…) {return current_exception();}
Let’s see how handling exceptions across different threads can be implemented using these functions. The following code defines a function that does some work and throws an exception. This function will ultimately be running in a separate thread:
void doSomeWork(){for (int i = 0; i < 5; ++i) {cout << i << endl;}cout << "Thread throwing a runtime_error exception…" << endl;throw runtime_error("Exception from thread");}
The following threadFunc() function wraps the call to the preceding function in a try/catch block, catching all exceptions that doSomeWork() might throw. A single argument is supplied to threadFunc(), which is of type exception_ptr&. Once an exception is caught, the function current_exception() is used to get a reference to the exception being handled, which is then assigned to the exception_ptr parameter. After that, the thread exits normally:
void threadFunc(exception_ptr& err){try {doSomeWork();} catch (…) {cout << "Thread caught exception, returning exception…" << endl;err = current_exception();}}
The following doWorkInThread() function is called from within the main thread. Its responsibility is to create a new thread and start executing threadFunc() in it. A reference to an object of type exception_ptr is given as argument to threadFunc(). Once the thread is created, the doWorkInThread() function waits for the thread to finish by using the join() method, after which the error object is examined. Because exception_ptr is of type NullablePointer, you can easily check it using an if statement. If it’s a non-null value, the exception is rethrown in the current thread, which is the main thread in this example. Because you are rethrowing the exception in the main thread, the exception has been transferred from one thread to another thread.
void doWorkInThread(){exception_ptr error;// Launch threadthread t{ threadFunc, ref(error) };// Wait for thread to finisht.join();// See if thread has thrown any exceptionif (error) {cout << "Main thread received exception, rethrowing it…" << endl;rethrow_exception(error);} else {cout << "Main thread did not receive any exception." << endl;}}
The main() function is pretty straightforward. It calls doWorkInThread() and wraps the call in a try/catch block to catch exceptions thrown by the thread spawned by doWorkInThread():
int main(){try {doWorkInThread();} catch (const exception& e) {cout << "Main function caught: '" << e.what() << "'" << endl;}}
The output is as follows:
01234Thread throwing a runtime_error exception…Thread caught exception, returning exception…Main thread received exception, rethrowing it…Main function caught: 'Exception from thread'
To keep the examples in this chapter compact and to the point, their main() functions usually use join() to block the main thread, and to wait until threads have finished. Of course, in real-world applications you do not want to block your main thread. For example, in a GUI application, blocking your main thread means that the UI becomes unresponsive. In that case, you can use a messaging paradigm to communicate between threads. For example, the earlier threadFunc() function could send a message to the UI thread with as argument a copy of the result of current_exception(). But even then, you need to make sure to call either join() or detach() on any spawned threads, as discussed earlier in this chapter.
Atomic types allow atomic access, which means that concurrent reading and writing without additional synchronization is allowed. Without atomic operations, incrementing a variable is not thread-safe because the compiler first loads the value from memory into a register, increments it, and then stores the result back in memory. Another thread might touch the same memory during this increment operation, which is a data race. For example, the following code is not thread-safe and contains a data race. This type of data races is discussed in the beginning of this chapter.
int counter = 0; // Global variable++counter; // Executed in multiple threads
You can use an std::atomic type to make this thread-safe without explicitly using any synchronization mechanism, such as mutual exclusion objects, which are discussed later in this chapter. Here is the same code using an atomic integer:
atomic<int> counter(0) ; // Global variable++counter; // Executed in multiple threads
You need to include the <atomic> header to use these atomic types. The C++ standard defines named integral atomic types for all primitive types. The following table lists a few.
| NAMED ATOMIC TYPE | EQUIVALENT STD::ATOMIC TYPE |
atomic_bool |
atomic<bool> |
atomic_char |
atomic<char> |
atomic_uchar |
atomic<unsigned char> |
atomic_int |
atomic<int> |
atomic_uint |
atomic<unsigned int> |
atomic_long |
atomic<long> |
atomic_ulong |
atomic<unsigned long> |
atomic_llong |
atomic<long long> |
atomic_ullong |
atomic<unsigned long long> |
atomic_wchar_t |
atomic<wchar_t> |
You can use atomic types without explicitly using any synchronization mechanism. However, underneath, operations on atomics of a certain type might use a synchronization mechanism such as mutual exclusion objects. This might happen, for example, when the hardware you are targeting lacks the instructions to perform an operation atomically. You can use the is_lock_free() method on an atomic type to query whether it supports lock-free operations, that is, its operations run without any explicit synchronization mechanism underneath.
The std::atomic class template can be used with all kinds of types, not only integral types. For example, you can create an atomic<double>, or an atomic<MyType>, but only if MyType is trivially copyable. Depending on the size of the specified type, underneath these might require explicit synchronization mechanisms. In the following example, both Foo and Bar are trivially copyable, that is, std::is_trivially_copyable_v is true for both. However, atomic<Foo> is not lock free, while atomic<Bar> is.
class Foo { private: int mArray[123]; };class Bar { private: int mInt; };int main(){atomic<Foo> f;// Outputs: 1 0cout << is_trivially_copyable_v<Foo> << " " << f.is_lock_free() << endl;atomic<Bar> b;// Outputs: 1 1cout << is_trivially_copyable_v<Bar> << " " << b.is_lock_free() << endl;}
When accessing a piece of data from multiple threads, atomics also solve problems such as memory ordering, compiler optimizations, and so on. Basically, it’s virtually never safe to read and write to the same piece of data from multiple threads without using atomics or explicit synchronization mechanisms!
This section explains in more detail why you should use atomic types. Suppose you have a function called increment() that increments an integer reference parameter in a loop. This code uses std::this_thread::sleep_for() to introduce a small delay in each loop. The argument to sleep_for() is an std::chrono::duration, which is explained in Chapter 20.
void increment(int& counter){for (int i = 0; i < 100; ++i) {++counter;this_thread::sleep_for(1ms);}}
Now, you would like to run several threads in parallel, all executing this increment() function on a shared counter variable. By implementing this naively without atomic types or without any kind of thread synchronization, you introduce data races. The following code launches ten threads, after which it waits for all threads to finish by calling join() on each thread:
int main(){int counter = 0;vector<thread> threads;for (int i = 0; i < 10; ++i) {threads.push_back(thread{ increment, ref(counter) });}for (auto& t : threads) {t.join();}cout << "Result = " << counter <<endl;}
Because increment() increments its given integer 100 times, and ten threads are launched, each of which executes increment() on the same shared counter, the expected result is 1,000. If you execute this program several times, you might get the following output but with different values:
Result = 982Result = 977Result = 984
This code is clearly showing a data race. In this example, you can use an atomic type to fix the code. The following code highlights the required changes:
#include <atomic>void increment(atomic<int>& counter){for (int i = 0; i < 100; ++i) {++counter;this_thread::sleep_for(1ms);}}int main(){atomic<int> counter(0);vector<thread> threads;for (int i = 0; i < 10; ++i) {threads.push_back(thread{ increment, ref(counter) });}for (auto& t : threads) {t.join();}cout << "Result = " << counter << endl;}
The changes add the <atomic> header file, and change the type of the shared counter to std::atomic<int> instead of int. When you run this modified version, you always get 1,000 as the result:
Result = 1000Result = 1000Result = 1000
Without explicitly adding any synchronization mechanism to the code, it is now thread-safe and data-race-free because the ++counter operation on an atomic type loads, increments, and stores the value in one atomic transaction, which cannot be interrupted.
However, there is a new problem with this modified code: a performance problem. You should try to minimize the amount of synchronization, either atomic or explicit synchronization, because it lowers performance. For this simple example, the best and recommended solution is to let increment() calculate its result in a local variable, and only after the loop, add it to the counter reference. Note that it is still required to use an atomic type, because you are still writing to counter from multiple threads.
void increment(atomic<int>& counter){int result = 0;for (int i = 0; i < 100; ++i) {++result;this_thread::sleep_for(1ms);}counter += result;}
The C++ standard defines a number of atomic operations. This section describes a few of those operations. For a full list, consult a Standard Library Reference, see Appendix B.
A first example of an atomic operation is the following:
bool atomic<T>::compare_exchange_strong(T& expected, T desired);The logic implemented atomically by this operation is as follows, in pseudo-code:
if (*this == expected) {*this = desired;return true;} else {expected = *this;return false;}
Although this logic might seem fairly strange on first sight, this operation is a key building block for writing lock-free concurrent data structures. Lock-free concurrent data structures allow operations on their data without requiring any synchronization mechanisms. However, implementing such data structures is an advanced topic, outside the scope of this book.
A second example is atomic<T>::fetch_add(), which works for integral atomic types. It fetches the current value of the atomic type, adds the given increment to the atomic value, and returns the original non-incremented value. Here is an example:
atomic<int> value(10);cout << "Value = " << value << endl;int fetched = value.fetch_add(4);cout << "Fetched = " << fetched << endl;cout << "Value = " << value << endl;
If no other threads are touching the contents of the fetched and value variables, the output is as follows:
Value = 10Fetched = 10Value = 14
Atomic integral types support the following atomic operations: fetch_add(), fetch_sub(), fetch_and(), fetch_or(), fetch_xor(), ++, --, +=, -=, &=, ^=, and |=. Atomic pointer types support fetch_add(), fetch_sub(), ++, --, +=, and -=.
Most of the atomic operations can accept an extra parameter specifying the memory ordering that you would like. Here is an example:
T atomic<T>::fetch_add(T value, memory_order = memory_order_seq_cst);You can change the default memory_order. The C++ standard provides memory_order_relaxed, memory_order_consume, memory_order_acquire, memory_order_release, memory_order_acq_rel, and memory_order_seq_cst, all of which are defined in the std namespace. However, you will rarely want to use them instead of the default. While another memory order may perform better than the default, according to some metrics, if you use them in a slightly incorrect way, you will again introduce data races or other difficult-to-track threading-related problems. If you do want to know more about memory ordering, consult one of the multithreading references in Appendix B.
If you are writing multithreaded applications, you have to be sensitive to sequencing of operations. If your threads read and write shared data, this can be a problem. There are many ways to avoid this problem, such as never actually sharing data between threads. However, if you can’t avoid sharing data, you must provide for synchronization so that only one thread at a time can change the data.
Scalars such as Booleans and integers can often be synchronized properly with atomic operations, as described earlier; however, when your data is more complex, and you need to use that data from multiple threads, you must provide explicit synchronization.
The Standard Library has support for mutual exclusion in the form of mutex and lock classes. These can be used to implement synchronization between threads and are discussed in the following sections.
Mutex stands for mutual exclusion. The basic mechanism of using a mutex is as follows:
The C++ standard provides non-timed mutex and timed mutex classes.
The Standard Library has three non-timed mutex classes: std::mutex, recursive_mutex, and shared_mutex (since C++17). The first two classes are defined in <mutex>, and the last one in <shared_mutex>. Each mutex supports the following methods.
lock(): The calling thread tries to obtain the lock and blocks until the lock has been acquired. It blocks indefinitely. If there is a desire to limit the amount of time the thread blocks, you should use a timed mutex, discussed in the next section.try_lock(): The calling thread tries to obtain the lock. If the lock is currently held by another thread, the call returns immediately. If the lock has been obtained, try_lock() returns true; otherwise, it returns false.unlock(): The calling thread releases the lock it currently holds, making it available for another thread.std::mutex is a standard mutual exclusion class with exclusive ownership semantics. There can be only one thread owning the mutex. If another thread wants to obtain ownership of this mutex, it either blocks when using lock(), or fails when using try_lock(). A thread already having ownership of a mutex is not allowed to call lock() or try_lock() again on that mutex. This might lead to a deadlock!
std::recursive_mutex behaves almost identically to mutex, except that a thread already having ownership of a recursive mutex is allowed to call lock() or try_lock() again on the same recursive mutex. The calling thread should call the unlock() method as many times as it obtained a lock on the recursive mutex.
The shared_mutex class supports the concept of shared lock ownership, also known as readers-writers lock. A thread can get either exclusive ownership or shared ownership of the lock. Exclusive ownership, also known as a write lock, can be acquired only when there are no other threads having exclusive or shared ownership. Shared ownership, also known as a read lock, can be acquired if there is no other thread having exclusive ownership, but other threads are allowed to have acquired shared ownership. The shared_mutex class supports lock(), try_lock(), and unlock(). These methods acquire and release exclusive locks. Additionally, they have the following shared ownership-related methods: lock_shared(), try_lock_shared(), and unlock_shared(). These work similarly to the other set of methods, but try to acquire or release shared ownership.
A thread already having a lock on a shared_mutex is not allowed to try to acquire a second lock on that mutex. This might lead to a deadlock!
The Standard Library provides three timed mutex classes: std::timed_mutex, recursive_timed_mutex, and shared_timed_mutex. The first two classes are defined in <mutex>, and the last one in <shared_mutex>. They all support the lock(), try_lock(), and unlock() methods; and shared_timed_mutex also supports lock_shared(), try_lock_shared(), and unlock_shared(). All these methods behave the same as described in the previous section. Additionally, they support the following methods.
try_lock_for(rel_time): The calling thread tries to obtain the lock for a certain relative time. If the lock could not be obtained after the given timeout, the call fails and returns false. If the lock could be obtained within the timeout, the call succeeds and returns true. The timeout is specified as an std::chrono::duration, see Chapter 20.try_lock_until(abs_time): The calling thread tries to obtain the lock until the system time equals or exceeds the specified absolute time. If the lock could be obtained before this time, the call returns true. If the system time passes the given absolute time, the function stops trying to obtain the lock and returns false. The absolute time is specified as an std::chrono::time_point, see Chapter 20.A shared_timed_mutex also supports try_lock_shared_for() and try_lock_shared_until().
A thread already having ownership of a timed_mutex or a shared_timed_mutex is not allowed to acquire the lock a second time on that mutex. This might lead to a deadlock!
A recursive_timed_mutex allows a thread to acquire a lock multiple times, just as with recursive_mutex.
A lock class is an RAII class that makes it easier to correctly obtain and release a lock on a mutex; the destructor of the lock class automatically releases the associated mutex. The C++ standard defines four types of locks: std::lock_guard, unique_lock, shared_lock, and scoped_lock. The latter has been introduced with C++17.
lock_guard, defined in <mutex>, is a simple lock with two constructors:
explicit lock_guard(mutex_type& m);
This is a constructor accepting a reference to a mutex. This constructor tries to obtain a lock on the mutex and blocks until the lock is obtained. The explicit keyword for constructors is discussed in Chapter 9.
lock_guard(mutex_type& m, adopt_lock_t);
This is a constructor accepting a reference to a mutex and an instance of std::adopt_lock_t. There is a predefined adopt_lock_t instance provided, called std::adopt_lock. The lock assumes that the calling thread has already obtained a lock on the referenced mutex. The lock “adopts” the mutex, and automatically releases the mutex when the lock is destroyed.
std::unique_lock, defined in <mutex>, is a more sophisticated lock that allows you to defer lock acquisition until later in the execution, long after the declaration. You can use the owns_lock() method, or the unique_lock’s bool conversion operator, to see if the lock has been acquired. An example of using this conversion operator is given later in this chapter in the section “Using Timed Locks.” unique_lock has several constructors:
explicit unique_lock(mutex_type& m);
This constructor accepts a reference to a mutex. It tries to obtain a lock on the mutex and blocks until the lock is obtained.
unique_lock(mutex_type& m, defer_lock_t) noexcept;
This constructor accepts a reference to a mutex and an instance of std::defer_lock_t. There is a predefined defer_lock_t instance provided, called std::defer_lock. The unique_lock stores the reference to the mutex, but does not immediately try to obtain a lock. A lock can be obtained later.
unique_lock(mutex_type& m, try_to_lock_t);
This constructor accepts a reference to a mutex and an instance of std::try_to_lock_t. There is a predefined try_to_lock_t instance provided, called std::try_to_lock. The lock tries to obtain a lock to the referenced mutex, but if it fails, it does not block, in which case, a lock can be obtained later.
unique_lock(mutex_type& m, adopt_lock_t);
This constructor accepts a reference to a mutex and an instance of std::adopt_lock_t, for example std::adopt_lock. The lock assumes that the calling thread has already obtained a lock on the referenced mutex. The lock “adopts” the mutex, and automatically releases the mutex when the lock is destroyed.
unique_lock(mutex_type& m, const chrono::time_point<Clock, Duration>& abs_time);
This constructor accepts a reference to a mutex and an absolute time. The constructor tries to obtain a lock until the system time passes the given absolute time. The chrono library is discussed in Chapter 20.
unique_lock(mutex_type& m, const chrono::duration<Rep, Period>& rel_time);
This constructor accepts a reference to a mutex and a relative time. The constructor tries to get a lock on the mutex with the given relative timeout.
The unique_lock class also has the methods lock(), try_lock(), try_lock_for(), try_lock_until(), and unlock(), which behave as explained in the section “Timed Mutex Classes,” earlier in this chapter.
The shared_lock class, defined in <shared_mutex>, has the same type of constructors and the same methods as unique_lock. The difference is that the shared_lock class calls the shared ownership-related methods on the underlying shared mutex. Thus, the methods of shared_lock are called lock(), try_lock(), and so on, but on the underlying shared mutex they call lock_shared(), try_lock_shared(), and so on. This is done to give shared_lock the same interface as unique_lock, so it can be used as a stand-in replacement for unique_lock, but acquires a shared lock instead of an exclusive lock.
C++ has two generic lock functions that you can use to obtain locks on multiple mutex objects at once without the risk of creating deadlocks. Both functions are defined in the std namespace, and both are variadic template functions, as discussed in Chapter 22.
The first function, lock(), locks all the given mutex objects in an unspecified order without the risk of deadlocks. If one of the mutex lock calls throws an exception, unlock() is called on all locks that have already been obtained. Its prototype is as follows:
template <class L1, class L2, class… L3> void lock(L1&, L2&, L3&…);try_lock() has a similar prototype, but it tries to obtain a lock on all the given mutex objects by calling try_lock() on each of them in sequence. It returns -1 if all calls to try_lock() succeed. If any try_lock() fails, unlock() is called on all locks that have already been obtained, and the return value is the zero-based index of the parameter position of the mutex on which try_lock() failed.
The following example demonstrates how to use the generic lock() function. The process() function first creates two locks, one for each mutex, and gives an instance of std::defer_lock_t as a second argument to tell unique_lock not to acquire the lock during construction. The call to std::lock() then acquires both locks without the risk of deadlocks.
mutex mut1;mutex mut2;void process(){unique_lock lock1(mut1, defer_lock); // C++17unique_lock lock2(mut2, defer_lock); // C++17//unique_lock<mutex> lock1(mut1, defer_lock);//unique_lock<mutex> lock2(mut2, defer_lock);lock(lock1, lock2);// Locks acquired} // Locks automatically released
std::scoped_lock, defined in <mutex>, is similar to lock_guard, except that it accepts a variable number of mutexes. This greatly simplifies acquiring multiple locks. For instance, the example with the process() function in the previous section can be written using a scoped_lock as follows:
mutex mut1;mutex mut2;void process(){scoped_lock locks(mut1, mut2);// Locks acquired} // Locks automatically released
This uses C++17’s template argument deduction for constructors. If your compiler does not support this feature yet, you have to write the following:
scoped_lock<mutex, mutex> locks(mut1, mut2);You can use std::call_once() in combination with std::once_flag to make sure a certain function or method is called exactly one time, no matter how many threads try to call call_once() with the same once_flag. Only one call_once() invocation actually calls the given function or method. If the given function does not throw any exceptions, then this invocation is called the effective call_once() invocation. If the given function does throw an exception, the exception is propagated back to the caller, and another caller is selected to execute the function. The effective invocation on a specific once_flag instance finishes before all other call_once() invocations on the same once_flag. Other threads calling call_once() on the same once_flag block until the effective call is finished. Figure 23-3 illustrates this with three threads. Thread 1 performs the effective call_once() invocation, thread 2 blocks until the effective invocation is finished, and thread 3 doesn’t block because the effective invocation from thread 1 has already finished.
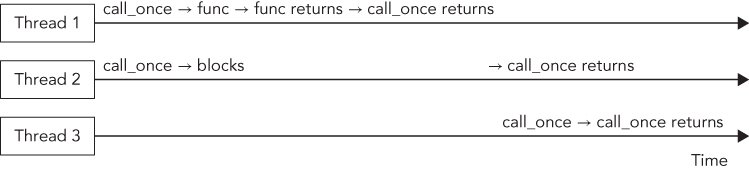
The following example demonstrates the use of call_once(). The example launches three threads running processingFunction() that use some shared resources. These shared resources should be initialized only once by calling initializeSharedResources() once. To accomplish this, each thread calls call_once() with a global once_flag. The result is that only one thread effectively executes initializeSharedResources(), and exactly one time. While this call_once() call is in progress, other threads block until initializeSharedResources() returns.
once_flag gOnceFlag;void initializeSharedResources(){// … Initialize shared resources to be used by multiple threads.cout << "Shared resources initialized." << endl;}void processingFunction(){// Make sure the shared resources are initialized.call_once(gOnceFlag, initializeSharedResources);// … Do some work, including using the shared resourcescout << "Processing" << endl;}int main(){// Launch 3 threads.vector<thread> threads(3);for (auto& t : threads) {t = thread{ processingFunction };}// Join on all threadsfor (auto& t : threads) {t.join();}}
The output of this code is as follows:
Shared resources initialized.ProcessingProcessingProcessing
Of course, in this example, you could call initializeSharedResources() once in the beginning of the main() function before the threads are launched; however, that wouldn’t demonstrate the use of call_once().
The following sections give a couple of examples on how to use mutual exclusion objects to synchronize multiple threads.
Earlier in this chapter, in the “Threads” section, there is an example with a class called Counter. That example mentions that C++ streams are data-race free by default, but that the output from multiple threads can be interleaved. To solve this interleaving issue, you can use a mutual exclusion object to make sure that only one thread at a time is reading/writing to the stream object.
The following example synchronizes all accesses to cout in the Counter class. For this, a static
mutex object is added. It should be static, because all instances of the class should use the same mutex instance. lock_guard is used to obtain a lock on the mutex before writing to cout. Changes compared to the earlier version are shown in bold.
class Counter{public:Counter(int id, int numIterations): mId(id), mNumIterations(numIterations){}void operator()() const{for (int i = 0; i < mNumIterations; ++i) {lock_guard lock(sMutex);cout << "Counter " << mId << " has value " << i << endl;}}private:int mId;int mNumIterations;static mutex sMutex;};mutex Counter::sMutex;
This code creates a lock_guard instance on each iteration of the for loop. It is recommended to limit the time a lock is held as much as possible; otherwise, you are blocking other threads for too long. For example, if the lock_guard instance was created once right before the for loop, then you would basically lose all multithreading in this code because one thread would hold a lock for the entire duration of its for loop, and all other threads would wait for this lock to be released.
The following example demonstrates how to use a timed mutex. It is the same Counter class as before, but this time it uses a timed_mutex in combination with a unique_lock. A relative time of 200 milliseconds is given to the unique_lock constructor, causing it to try to obtain a lock for 200 milliseconds. If the lock cannot be obtained within this timeout interval, the constructor returns. Afterward, you can check whether or not the lock has been acquired. You can do this with an if statement on the lock variable, because unique_lock defines a bool conversion operator. The timeout is specified using the chrono library, discussed in Chapter 20.
class Counter{public:Counter(int id, int numIterations): mId(id), mNumIterations(numIterations){}void operator()() const{for (int i = 0; i < mNumIterations; ++i) {unique_lock lock(sTimedMutex, 200ms);if (lock) {cout << "Counter " << mId << " has value " << i << endl;} else {// Lock not acquired in 200ms, skip output.}}}private:int mId;int mNumIterations;static timed_mutex sTimedMutex;};timed_mutex Counter::sTimedMutex;
The double-checked locking pattern is actually an anti-pattern, which you should avoid! It is shown here because you might come across it in existing code bases. The idea of the double-checked locking pattern is to try to avoid the use of mutual exclusion objects. It’s a half-baked attempt at trying to write more efficient code than using a mutual exclusion object. It can really go wrong when you try to make it faster than demonstrated in the upcoming example, for instance, by using relaxed atomics (not further discussed), using a regular Boolean instead of an atomic<bool>, and so on. The pattern becomes sensitive to data races, and it is hard to get right. The irony is that using call_once() will actually be faster, and using a magic static1 (if applicable) will be even faster than that.
Double-checked locking could, for example, be used to make sure that resources are initialized exactly once. The following example shows how you can implement this. It is called the double-checked locking pattern because it is checking the value of the gInitialized variable twice, once before acquiring the lock and once right after acquiring the lock. The first gInitialized check is used to prevent acquiring a lock when it is not needed. The second check is required to make sure that no other thread performed the initialization between the first gInitialized check and acquiring the lock.
void initializeSharedResources(){// … Initialize shared resources to be used by multiple threads.cout << "Shared resources initialized." << endl;}atomic<bool> gInitialized(false);mutex gMutex;void processingFunction(){if (!gInitialized) {unique_lock lock(gMutex);if (!gInitialized) {initializeSharedResources();gInitialized = true;}}cout << "OK" << endl;}int main(){vector<thread> threads;for (int i = 0; i < 5; ++i) {threads.push_back(thread{ processingFunction });}for (auto& t : threads) {t.join();}}
The output clearly shows that only one thread initializes the shared resources:
Shared resources initialized.OKOKOKOKOK
Condition variables allow a thread to block until a certain condition is set by another thread, or until the system time reaches a specified time. These variables allow for explicit inter-thread communication. If you are familiar with multithreaded programming using the Win32 API, you can compare condition variables with event objects in Windows.
Two kinds of condition variables are available, both of which are defined in the <condition_variable> header file.
std::condition_variable: A condition variable that can wait only on a unique_lock<mutex>, which, according to the C++ standard, allows for maximum efficiency on certain platforms.std::condition_variable_any: A condition variable that can wait on any kind of object, including custom lock types.A condition_variable supports the following methods:
notify_one();
This method wakes up one of the threads waiting on this condition variable. This is similar to an auto-reset event in Windows.
notify_all();
This method wakes up all threads waiting on this condition variable.
wait(unique_lock<mutex>& lk);
The thread calling wait() should already have acquired a lock on lk. The effect of calling wait() is that it atomically calls lk.unlock() and then blocks the thread, waiting for a notification. When the thread is unblocked by a notify_one() or notify_all() call in another thread, the function calls lk.lock() again, possibly blocking until the lock has been acquired, and then returns.
wait_for(unique_lock<mutex>& lk, const chrono::duration<Rep, Period>& rel_time);
This method is similar to wait(), except that the thread is unblocked by a notify_one() call, a notify_all() call, or when the given timeout has expired.
wait_until(unique_lock<mutex>& lk, const chrono::time_point<Clock, Duration>& abs_time);
This method is similar to wait(), except that the thread is unblocked by a notify_one() call, a notify_all() call, or when the system time passes the given absolute time.
There are also versions of wait(), wait_for(), and wait_until() that accept an extra predicate parameter. For instance, the version of wait() accepting an extra predicate is equivalent to the following:
while (!predicate())wait(lk);
The condition_variable_any class supports the same methods as condition_variable, except that it accepts any kind of lock class instead of only a unique_lock<mutex>. The lock class used should have a lock() and unlock() method.
Threads waiting on a condition variable can wake up when another thread calls notify_one() or notify_all(), with a relative timeout, or when the system time reaches a certain time. However, they can also wake up spuriously. This means that a thread can wake up, even if no other thread has called any notify method, and no timeouts have been reached yet. Thus, when a thread waits on a condition variable and wakes up, it needs to check why it woke up. One way to check for this is by using one of the versions of wait() accepting a predicate, as shown in the following example.
As an example, condition variables can be used for background threads processing items from a queue. You can define a queue in which you insert items to be processed. A background thread waits until there are items in the queue. When an item is inserted into the queue, the thread wakes up, processes the item, and goes back to sleep, waiting for the next item. Suppose you have the following queue:
queue<string> mQueue;You need to make sure that only one thread is modifying this queue at any given time. You can do this with a mutex:
mutex mMutex;To be able to notify a background thread when an item is added, you need a condition variable:
condition_variable mCondVar;A thread that wants to add an item to the queue first acquires a lock on the mutex, then adds the item to the queue, and notifies the background thread. You can call notify_one() or notify_all() whether or not you currently have the lock; both work.
// Lock mutex and add entry to the queue.unique_lock lock(mMutex);mQueue.push(entry);// Notify condition variable to wake up thread.mCondVar.notify_all();
The background thread waits for notifications in an infinite loop, as follows. Note the use of wait() accepting a predicate to correctly handle spurious wake-ups. The predicate checks if there really is something in the queue. When the call to wait() returns, you are sure there is something in the queue.
unique_lock lock(mMutex);while (true) {// Wait for a notification.mCondVar.wait(lock, [this]{ return !mQueue.empty(); });// Condition variable is notified, so something is in the queue.// Process queue item…}
The section “Example: Multithreaded Logger Class,” toward the end of this chapter, provides a complete example on how to use condition variables to send notifications to other threads.
The C++ standard also defines a helper function called std::notify_all_at_thread_exit(cond, lk) where cond is a condition variable and lk is a unique_lock<mutex> instance. A thread calling this function should already have acquired the lock lk. When the thread exits, it automatically executes the following:
lk.unlock();cond.notify_all();
As discussed earlier in this chapter, using std::thread to launch a thread that calculates a single result does not make it easy to get the computed result back once the thread has finished executing. Another problem with std::thread is in how it handles errors like exceptions. If a thread throws an exception and this exception is not caught by the thread itself, the C++ runtime calls std::terminate(), which usually terminates the entire application.
A future can be used to more easily get the result out of a thread, and to transport exceptions from one thread to another thread, which can then handle the exception however it wants. Of course, it’s still good practice to always try to handle exceptions in the actual threads as much as possible, in order to prevent them from leaving the thread.
A promise is something where a thread stores its result. A future is used to get access to the result stored in a promise. That is, a promise is the input side for a result, a future is the output side. Once a function, running in the same thread or in another thread, has calculated the value that it wants to return, it can put this value in a promise. This value can then be retrieved through a future. You can think of this mechanism as an inter-thread communication channel for a result.
C++ provides a standard future, called std::future. You can retrieve the result from an std::future as follows. T is the type of the calculated result.
future<T> myFuture = …; // Is discussed laterT result = myFuture.get();
The call to get() retrieves the result and stores it in the variable result. If calculating the result is not finished yet, the call to get() blocks until the value becomes available. You can only call get() once on a future. The behavior of calling it a second time is undefined by the standard.
If you want to avoid blocking, you can first ask the future if there is a result available:
if (myFuture.wait_for(0)) { // Value is availableT result = myFuture.get();} else { // Value is not yet available…}
C++ provides the std::promise class as one way to implement the concept of a promise. You can call set_value() on a promise to store a result, or you can call set_exception() on it to store an exception in the promise. Note that you can only call set_value() or set_exception() once on a specific promise. If you call it multiple times, an std::future_error exception will be thrown.
A thread A that launches another thread B to calculate something can create an std::promise and pass this to the launched thread. Note that a promise cannot be copied, but it can be moved into a thread! Thread B uses that promise to store the result. Before moving the promise into thread B, thread A calls get_future() on the created promise to be able to get access to the result once B has finished. Here is a simple example:
void DoWork(promise<int> thePromise){// … Do some work …// And ultimately store the result in the promise.thePromise.set_value(42);}int main(){// Create a promise to pass to the thread.promise<int> myPromise;// Get the future of the promise.auto theFuture = myPromise.get_future();// Create a thread and move the promise into it.thread theThread{ DoWork, std::move(myPromise) };// Do some more work…// Get the result.int result = theFuture.get();cout << "Result: " << result << endl;// Make sure to join the thread.theThread.join();}
An std::packaged_task makes it easier to work with promises than explicitly using std::promise, as in the previous section. The following code demonstrates this. It creates a packaged_task to execute CalculateSum(). The future is retrieved from the packaged_task by calling get_future(). A thread is launched, and the packaged_task is moved into it. A packaged_task cannot be copied! After the thread is launched, get() is called on the retrieved future to get the result. This blocks until the result is available.
Note that CalculateSum() does not need to store anything explicitly in any kind of promise. A packaged_task automatically creates a promise, automatically stores the result of the called function, CalculateSum() in this case, in the promise, and automatically stores any exceptions thrown from the function in the promise.
int CalculateSum(int a, int b) { return a + b; }int main(){// Create a packaged task to run CalculateSum.packaged_task<int(int, int)> task(CalculateSum);// Get the future for the result of the packaged task.auto theFuture = task.get_future();// Create a thread, move the packaged task into it, and// execute the packaged task with the given arguments.thread theThread{ std::move(task), 39, 3 };// Do some more work…// Get the result.int result = theFuture.get();cout << result << endl;// Make sure to join the thread.theThread.join();}
If you want to give the C++ runtime more control over whether or not a thread is created to calculate something, you can use std::async(). It accepts a function to be executed, and returns a future that you can use to retrieve the result. There are two ways in which async() can run your function:
get() on the returned futureIf you call async() without additional arguments, the runtime automatically chooses one of the two methods depending on factors such as the number of CPU cores in your system and the amount of concurrency already taking place. You can influence the runtime’s behavior by specifying a policy argument.
launch::async: forces the runtime to execute the function asynchronously on a different thread.launch::deferred: forces the runtime to execute the function synchronously on the calling thread when get() is called.launch::async | launch::deferred: lets the runtime choose (= default behavior).The following example demonstrates the use of async():
int calculate(){return 123;}int main(){auto myFuture = async(calculate);//auto myFuture = async(launch::async, calculate);//auto myFuture = async(launch::deferred, calculate);// Do some more work…// Get the result.int result = myFuture.get();cout << result << endl;}
As you can see in this example, std::async() is one of the easiest methods to perform some calculations either asynchronously (on a different thread), or synchronously (on the same thread), and retrieve the result afterward.
A big advantage of using futures is that they can transport exceptions between threads. Calling get() on a future either returns the calculated result, or rethrows any exception that has been stored in the promise linked to the future. When you use packaged_task or async(), any exception thrown from the launched function is automatically stored in the promise. If you use std::promise as your promise, you can call set_exception() to store an exception in it. Here is an example using async():
int calculate(){throw runtime_error("Exception thrown from calculate().");}int main(){// Use the launch::async policy to force asynchronous execution.auto myFuture = async(launch::async, calculate);// Do some more work…// Get the result.try {int result = myFuture.get();cout << result << endl;} catch (const exception& ex) {cout << "Caught exception: " << ex.what() << endl;}}
std::future<T> only requires T to be move-constructible. When you call get() on a future<T>, the result is moved out of the future and returned to you. This means you can call get() only once on a future<T>.
If you want to be able to call get() multiple times, even from multiple threads, then you need to use an std::shared_future<T>, in which case T needs to be copy-constructible. A shared_future can be created by using std::future::share(), or by passing a future to the shared_future constructor. Note that a future is not copyable, so you have to move it into the shared_future constructor.
shared_future can be used to wake up multiple threads at once. For example, the following piece of code defines two lambda expressions to be executed asynchronously on different threads. The first thing each lambda expression does is set a value to their respective promise to signal that they have started. Then they both call get() on signalFuture which blocks until a parameter is made available through the future, after which they continue their execution. Each lambda expression captures their respective promise by reference, and captures signalFuture by value, so both lambda expressions have a copy of signalFuture. The main thread uses async() to execute both lambda expressions asynchronously on different threads, waits until both threads have started, and then sets the parameter in the signalPromise which wakes up both threads.
promise<void> thread1Started, thread2Started;promise<int> signalPromise;auto signalFuture = signalPromise.get_future().share();//shared_future<int> signalFuture(signalPromise.get_future());auto function1 = [&thread1Started, signalFuture] {thread1Started.set_value();// Wait until parameter is set.int parameter = signalFuture.get();// …};auto function2 = [&thread2Started, signalFuture] {thread2Started.set_value();// Wait until parameter is set.int parameter = signalFuture.get();// …};// Run both lambda expressions asynchronously.// Remember to capture the future returned by async()!auto result1 = async(launch::async, function1);auto result2 = async(launch::async, function2);// Wait until both threads have started.thread1Started.get_future().wait();thread2Started.get_future().wait();// Both threads are now waiting for the parameter.// Set the parameter to wake up both of them.signalPromise.set_value(42);
This section demonstrates how to use threads, mutual exclusion objects, locks, and condition variables to write a multithreaded Logger class. The class allows log messages to be added to a queue from different threads. The Logger class itself processes this queue in a background thread that serially writes the log messages to a file. The class will be designed in two iterations to show you some examples of problems you will encounter when writing multithreaded code.
The C++ standard does not have a thread-safe queue, so it is obvious that you have to protect access to the queue with some synchronization mechanism to prevent multiple threads from reading/writing to the queue at the same time. This example uses a mutual exclusion object and a condition variable to provide the synchronization. Based on that, you might define the Logger class as follows:
class Logger{public:// Starts a background thread writing log entries to a file.Logger();// Prevent copy construction and assignment.Logger(const Logger& src) = delete;Logger& operator=(const Logger& rhs) = delete;// Add log entry to the queue.void log(std::string_view entry);private:// The function running in the background thread.void processEntries();// Mutex and condition variable to protect access to the queue.std::mutex mMutex;std::condition_variable mCondVar;std::queue<std::string> mQueue;// The background thread.std::thread mThread;};
The implementation is as follows. Note that this initial design has a couple of problems and when you try to run it, it might behave strangely or even crash. This is discussed and solved in the next iteration of the Logger class. The inner while loop in the processEntries() method is worth looking at. It processes all messages in the queue one at a time, and acquires and releases the lock on each iteration. This is done to make sure the loop doesn’t keep the lock for too long, blocking other threads.
Logger::Logger(){// Start background thread.mThread = thread{ &Logger::processEntries, this };}void Logger::log(string_view entry){// Lock mutex and add entry to the queue.unique_lock lock(mMutex);mQueue.push(string(entry));// Notify condition variable to wake up thread.mCondVar.notify_all();}void Logger::processEntries(){// Open log file.ofstream logFile("log.txt");if (logFile.fail()) {cerr << "Failed to open logfile." << endl;return;}// Start processing loop.unique_lock lock(mMutex);while (true) {// Wait for a notification.mCondVar.wait(lock);// Condition variable notified, something might be in the queue.lock.unlock();while (true) {lock.lock();if (mQueue.empty()) {break;} else {logFile << mQueue.front() << endl;mQueue.pop();}lock.unlock();}}}
This Logger class can be tested with the following test code. It launches a number of threads, all logging a few messages to the same Logger instance.
void logSomeMessages(int id, Logger& logger){for (int i = 0; i < 10; ++i) {stringstream ss;ss << "Log entry " << i << " from thread " << id;logger.log(ss.str());}}int main(){Logger logger;vector<thread> threads;// Create a few threads all working with the same Logger instance.for (int i = 0; i < 10; ++i) {threads.emplace_back(logSomeMessages, i, ref(logger));}// Wait for all threads to finish.for (auto& t : threads) {t.join();}}
If you build and run this naive initial version, you will notice that the application is terminated abruptly. That is caused because the application never calls join() or detach() on the background thread. Remember from earlier in this chapter that the destructor of a thread object which is still joinable, that is, neither join() nor detach() has been called yet, will call std::terminate() to terminate all running threads and the application itself. This means that messages still in the queue are not written to the file on disk. Some runtime libraries even issue an error or generate a crash
dump when the application is terminated like this. You need to add a mechanism to gracefully shut down the background thread and wait until the background thread is completely shut down before terminating the application. You can do this by adding a destructor and a Boolean member variable to the class. The new definition of the class is as follows:
class Logger{public:// Gracefully shut down background thread.virtual ~Logger();// Other public members omitted for brevityprivate:// Boolean telling the background thread to terminate.bool mExit = false;// Other members omitted for brevity};
The destructor sets mExit to true, wakes up the background thread, and then waits until the thread is shut down. The destructor acquires a lock on mMutex before setting mExit to true and before calling notify_all(). This is to prevent a race condition and deadlock with processEntries(). processEntries() could be at the beginning of its while loop right after having checked mExit and right before the call to wait(). If the main thread calls the Logger destructor at that very moment, and the destructor wouldn’t acquire a lock on mMutex, then the destructor sets mExit to true and calls notify_all() after processEntries() has checked mExit and before processEntries() is waiting on the condition variable; thus, processEntries() will not see the new value of mExit and it will miss the notification. In that case, the application is in a deadlock situation, because the destructor is waiting on the join() call and the background thread is waiting on the condition variable. Note that the destructor must release the lock on mMutex before calling join(), which explains the extra code block using curly brackets.
Logger::~Logger(){{unique_lock lock(mMutex);// Gracefully shut down the thread by setting mExit// to true and notifying the thread.mExit = true;// Notify condition variable to wake up thread.mCondVar.notify_all();}// Wait until thread is shut down. This should be outside the above code// block because the lock must be released before calling join()!mThread.join();}
The processEntries() method needs to check this Boolean variable and terminate the processing loop when it’s true:
void Logger::processEntries(){// Open log file.ofstream logFile("log.txt");if (logFile.fail()) {cerr << "Failed to open logfile." << endl;return;}// Start processing loop.unique_lock lock(mMutex);while (true) {if (!mExit) {// Only wait for notifications if we don't have to exit.// Wait for a notification.mCondVar.wait(lock);}// Condition variable is notified, so something might be in the queue// and/or we need to shut down this thread.lock.unlock();while (true) {lock.lock();if (mQueue.empty()) {break;} else {logFile << mQueue.front() << endl;mQueue.pop();}lock.unlock();}if (mExit) {break;}}}
Note that you cannot just check for mExit in the condition for the outer while loop because even when mExit is true, there might still be log entries in the queue that need to be written.
You can add artificial delays in specific places in your multithreaded code to trigger certain behavior. Note that such delays should only be added for testing, and should be removed from your final code! For example, to test that the race condition with the destructor is solved, you can remove any calls to log() from the main program, causing it to almost immediately call the destructor of the Logger class, and add the following delay:
void Logger::processEntries(){// Omitted for brevity// Start processing loop.unique_lock lock(mMutex);while (true) {this_thread::sleep_for(1000ms);// Needs #include <chrono>if (!mExit) { // Only wait for notifications if we don't have to exit.// Wait for a notification.mCondVar.wait(lock);}// Omitted for brevity}}
Instead of creating and deleting threads dynamically throughout your program’s lifetime, you can create a pool of threads that can be used as needed. This technique is often used in programs that want to handle some kind of event in a thread. In most environments, the ideal number of threads is equal to the number of processing cores. If there are more threads than cores, threads will have to be suspended to allow other threads to run, and this will ultimately add overhead. Note that while the ideal number of threads is equal to the number of cores, this applies only in the case where the threads are compute bound and cannot block for any other reason, including I/O. When threads can block, it is often appropriate to run more threads than there are cores. Determining the optimal number of threads in such cases is hard, and may involve throughput measurements.
Because not all processing is identical, it is not uncommon to have threads from a thread pool receive, as part of their input, a function object or lambda expression that represents the computation to be done.
Because threads from a thread pool are pre-existing, it is much more efficient for the operating system to schedule a thread from the pool to run than it is to create one in response to an input. Furthermore, the use of a thread pool allows you to manage the number of threads that are created, so, depending on the platform, you may have just one thread or thousands of threads.
Several libraries are available that implement thread pools, including Intel Threading Building Blocks (TBB), Microsoft Parallel Patterns Library (PPL), and so on. It’s recommended to use such a library for your thread pools instead of writing your own implementation. If you do want to implement a thread pool yourself, it can be done in a similar way to an object pool. Chapter 25 gives an example implementation of an object pool.
This section briefly lists a few best practices related to multithreaded programming.
thread objects are unjoinable: Make sure that either join() or detach() has been called on all thread objects. Destructors of threads that are still joinable will call std::terminate() which abruptly terminates all threads and the application.std::lock() or std::try_lock():If multiple threads need to acquire multiple locks, they must be acquired in the same order in all threads to prevent deadlocks. You should use the generic std::lock() or std::try_lock() functions to acquire multiple locks.lock_guard, unique_lock, shared_lock, or scoped_lock RAII classes to automatically release locks at the right time.This chapter gave a brief overview of multithreaded programming using the standard C++ threading support library. It explained how you can use atomic types and atomic operations to operate on shared data without having to use an explicit synchronization mechanism. In case you cannot use these atomic types and operations, you learned how to use mutual exclusion mechanisms to ensure proper synchronization between different threads that need read/write access to shared data. You also saw how promises and futures represent a simple inter-thread communication channel; you can use futures to more easily get a result back from a thread. The chapter finished with a number of best practices for multithreaded application design.
As mentioned in the introduction, this chapter tried to touch on all the basic multithreading building blocks provided by the Standard Library, but due to space constraints, it cannot go into all the details of multithreaded programming. There are books available that discuss nothing but multithreading. See Appendix B for a few references.
Chapter 24 starts the last part of this book, which is about software engineering. This part describes software engineering methods, code efficiency, testing, debugging, design techniques, design patterns, and how to target multiple platforms.
When you first learned how to program, you were probably on your own schedule. You were free to do everything at the last minute if you wanted to, and you could radically change your design during implementation. When coding in the professional world, however, programmers rarely have such flexibility. Even the most liberal engineering managers admit that some amount of process is necessary. These days, knowing the software engineering process is as important as knowing how to code.
In this chapter, I will survey various approaches to software engineering. I will not go into great depth on any one approach—there are plenty of excellent books on software engineering processes. My intention is to cover some different types of processes in broad strokes so you can compare and contrast them. I will try not to advocate or discourage any particular methodology. Rather, I hope that by learning about the tradeoffs of several different approaches, you’ll be able to construct a process that works for you and the rest of your team. Whether you’re a contractor working alone on projects, or your team consists of hundreds of engineers on several continents, understanding different approaches to software development will help you with your job on a daily basis.
The last part of this chapter discusses Source Code Control solutions that make it easier to manage source code and keep track of its history. A Source Code Control solution is mandatory in every company in order to avoid a source code maintenance nightmare, and it is even highly recommended for one-person projects.
The history of software development is filled with tales of failed projects. From over-budget and poorly marketed consumer applications to grandiose mega-hyped operating systems, it seems that no area of software development is free from this trend.
Even when software successfully reaches users, bugs have become so commonplace that end users are often forced to endure constant updates and patches. Sometimes the software does not accomplish the tasks it is supposed to do or doesn’t work the way the user would expect. These issues all point to a common truism of software: writing software is hard.
You may wonder why software engineering seems to differ from other forms of engineering in its frequency of failures. For example, while cars have their share of bugs, you rarely see them stop suddenly and demand a reboot due to a buffer overflow (though as more and more car components become software-driven, you just may). Your TV may not be perfect, but you don’t have to upgrade to version 2.3 to get Channel 6 to work.
Is it the case that other engineering disciplines are just more advanced than software development? Is a civil engineer able to construct a working bridge by drawing upon the long history of bridge building? Are chemical engineers able to build a compound successfully because most of the bugs were worked out in earlier generations? Is software engineering too new, or is it really a different type of discipline with inherent qualities contributing to the occurrence of bugs, unusable results, and doomed projects?
It certainly seems as if there’s something different about software engineering. For one thing, computer technology changes rapidly, creating uncertainty in the software development process. Even if an earth-shattering breakthrough does not occur during your project, the pace at which the IT industry moves can lead to problems. Software also often needs to be developed quickly because competition is fierce.
Software development schedules can also be unpredictable. Accurate scheduling is nearly impossible when a single gnarly bug can take days or even weeks to fix. Even when things seem to be going according to schedule, the widespread tendency of product definition changes (feature creep) can throw a wrench in the process.
Software is often complex. There is no easy and accurate way to prove that a program is bug-free. Buggy or messy code can have an impact on software for years if it is maintained through several versions. Software systems are often so complex that when staff turnover occurs, nobody wants to get anywhere near some legacy messy code. This leads to a cycle of endless patching, hacks, and workarounds.
Of course, standard business risks apply to software as well. Marketing pressures and miscommunication get in the way. Many programmers try to steer clear of corporate politics, but it’s not uncommon to have adversity between the development and product marketing groups.
All of these factors working against software engineering products indicate the need for some sort of process. Software projects are big, complicated, and fast-paced. To avoid failure, engineering groups need to adopt a system to control this unwieldy process.
Elegantly designed software with clean and maintainable code can be developed. I’m convinced it is possible, but it takes continuous efforts of each individual team member, and requires following proper software development processes and practices.
Complexity in software isn’t new. The need for a formalized process was recognized decades ago. Several approaches to modeling the software life cycle have attempted to bring some order to the chaos of software development by defining the software process in terms of steps from the initial idea to the final product. These models, refined over the years, guide much of software development today.
A classic life cycle model for software is the Waterfall Model. This model is based on the idea that software can be built almost like following a recipe. There is a set of steps that, if followed correctly, will yield a mighty fine chocolate cake, or program as the case may be. Each stage must be completed before the next stage can begin, as shown in Figure 24-1. You can compare this process to a waterfall, as you can only go downward to the next phase.
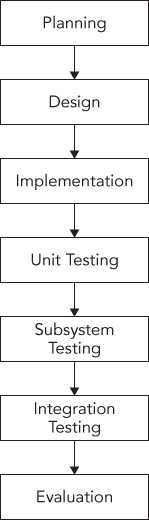
The process starts with formal planning, which includes gathering an exhaustive list of requirements. This list defines feature completeness for the product. The more specific the requirements are, the more likely that the project will succeed. Next, the software is designed and fully specified. The design step, like the requirements step, needs to be as specific as possible to maximize the chance of success. All design decisions are made at this time, often including pseudo-code and the definition of specific subsystems that will need to be written. Subsystem owners work out how their code will interact, and the team agrees on the specifics of the architecture. Implementation of the design occurs next. Because the design has been fully specified, the code needs to adhere strongly to the design or else the pieces won’t fit together. The final four stages are reserved for unit testing, subsystem testing, integration testing, and evaluation.
The main problem with the Waterfall Model is that, in practice, it is nearly impossible to complete one stage without at least exploring the next stage. A design cannot be set in stone without at least writing some code. Furthermore, what is the point of testing if the model doesn’t provide a way to go back to the coding phase?
Various incarnations have refined the process in different ways. For example, some plans include a “feasibility” step where experiments are performed before formal requirements are even gathered.
The value of the Waterfall Model lies in its simplicity. You, or your manager, may have followed this approach in past projects without formalizing it or recognizing it by name. The underlying assumption behind the Waterfall Model is that as long as each step is accomplished as completely and accurately as possible, subsequent steps will go smoothly. As long as all of the requirements are carefully specified in the first step, and all the design decisions and problems are hashed out in the second step, implementation in the third step should be a simple matter of translating the designs into code.
The simplicity of the Waterfall Model makes project plans based on this system organized and easy to manage. Every project is started the same way: by exhaustively listing all the features that are necessary. For example, managers using this approach can require that by the end of the design phase, all engineers in charge of a subsystem must submit their design as a formal design document or a functional subsystem specification. The benefit for the manager is that by having engineers specify requirements and designs upfront, risks are, hopefully, minimized.
From the engineer’s point of view, the Waterfall Model forces resolution of major issues upfront. All engineers will need to understand their project and design their subsystem before writing a significant amount of code. Ideally, this means that code can be written once instead of being hacked together or rewritten when the pieces don’t fit.
For small projects with very specific requirements, the Waterfall Model can work quite well. Particularly for consulting arrangements, it has the advantage of specifying clearly defined metrics for success at the start of the project. Formalizing requirements helps the consultant to produce exactly what the client wants, and forces the client to be specific about the goals for the project.
In many organizations, and almost all modern software engineering texts, the Waterfall Model has fallen out of favor. Critics disparage its fundamental premise that software development tasks happen in discrete, linear steps. The Waterfall Model generally does not allow backward movement. Unfortunately, in many projects today, new requirements are introduced throughout the development of the product. Often, a potential customer will request a feature that is necessary for the sale, or a competitor’s product will have a new feature that requires parity.
Another drawback is that in an effort to minimize risk by making decisions as formally and early as possible, the Waterfall Model may actually be hiding risk. For example, a major design issue might be undiscovered, glossed over, forgotten, or purposely avoided during the design phase. By the time integration testing reveals the mismatch, it may be too late to save the project. A major design flaw has arisen but, according to the Waterfall Model, the product is one step away from shipping! A mistake anywhere in the waterfall process will likely lead to failure at the end of the process. Early detection is difficult and occurs rarely.
If you do use the Waterfall Model, it is often necessary to make it more flexible by taking cues from other approaches.
A number of refinements to the Waterfall Model have been formalized. One such refinement is called the Sashimi Model. The main advancement that the Sashimi Model brought was the concept of overlap between stages. The name, Sashimi Model, comes from a Japanese fish dish, called sashimi, in which different pieces of fish are overlapping each other. While the model still stresses a rigorous process of planning, designing, coding, and testing, successive stages can partially overlap. Figure 24-2 shows an example of the Sashimi Model, illustrating the overlapping of stages. Overlap permits activities in two phases to occur simultaneously. This recognizes the fact that one stage can often not be finished completely without at least partially looking at the next stage.
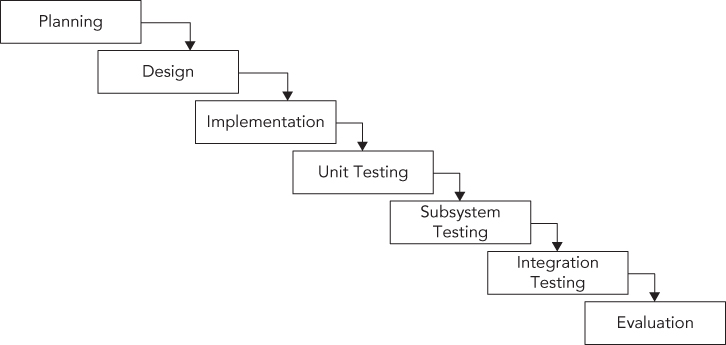
The Spiral Model was proposed by Barry W. Boehm in 1986 as a risk-driven software development process. Several derivatives have been formulated, which are called spiral-like models. The model discussed in this section is part of a family of techniques known as iterative processes. The fundamental idea is that it’s okay if something goes wrong because you’ll fix it the next time around. A single spin through this spiral-like model is shown in Figure 24-3.

The phases of this model are similar to the steps of the Waterfall Model. The discovery phase involves discovering requirements, determining objectives, determining alternatives (design alternatives, reuse, buying third-party libraries, and so on), and determining any constraints. During the evaluation phase, implementation alternatives are evaluated, risks are analyzed, and prototype options are considered. In a spiral-like model, particular attention is paid to evaluating and resolving risks in the evaluation phase. The tasks deemed most risky are the ones that are implemented in the current cycle of the spiral. The tasks in the development phase are determined by the risks identified in the evaluation phase. For example, if evaluation reveals a risky algorithm that may be impossible to implement, the main task for development in the current cycle will be modeling, building, and testing that algorithm. The fourth phase is reserved for analysis and planning. Based on the results of the current cycle, a plan for the subsequent cycle is formed.
Figure 24-4 shows an example of three cycles through the spiral in the development of an operating system. The first cycle yields a plan containing the major requirements for the product. The second cycle results in a prototype showing the user experience. The third cycle builds a component that is determined to be a high risk.
A spiral-like model can be viewed as the application of an iterative approach to the best that the Waterfall Model has to offer. Figure 24-5 shows a spiral-like model as a waterfall process that has been modified to allow iteration. Hidden risks and a linear development path, the main drawbacks of the Waterfall Model, are resolved through iterative cycles.
Performing the riskiest tasks first is another benefit. By bringing risk to the forefront and acknowledging that new conditions can arise at any time, a spiral-like model avoids the hidden time bombs that can occur with the Waterfall Model. When unexpected problems arise, they can be dealt with by using the same four-stage approach that works for the rest of the process.
This iterative approach also allows for incorporating feedback from testers. For example, an early version of the product can be released for internal or even external evaluation. Testers could, for instance, say that a certain feature is missing, or an existing feature is not working as expected. A spiral-like model has a built-in mechanism to react to such input.
Finally, by repeatedly analyzing after each cycle and building new designs, the practical difficulties with the design-then-implement approach are virtually eliminated. With each cycle, there is more knowledge of the system that can influence the design.
The main drawback of a spiral-like model is that it can be difficult to scope each iteration small enough to gain real benefit. In a worst-case scenario, a spiral-like model can degenerate into a Waterfall Model because the iterations are too long. Unfortunately, a spiral-like model only models the software life cycle; it cannot prescribe a specific way to break down a project into single-cycle iterations because that division varies from project to project.
Other possible drawbacks are the overhead of repeating all four phases for each cycle and the difficulty of coordinating cycles. Logistically, it may be difficult to assemble all the group members for design discussions at the right time. If different teams are working on different parts of the product simultaneously, they are probably operating in parallel cycles, which can get out of synch. For example, during the development of an operating system, the user interface group could be ready to start the discovery phase of the Window Manager cycle, but the core OS group could still be in the development phase of the memory subsystem.
To address the shortcomings of the Waterfall Model, the Agile Model was introduced in 2001 in the form of an Agile Manifesto.
As can be understood from this manifesto, the term Agile is only a high-level description. Basically, it tells you to make the process flexible so that customers’ changes can easily be incorporated into the project during development. Scrum is one of the most used Agile software development methodologies, and is discussed in the next section.
Software life cycle models provide a formal way of answering the question, “What do we do next?” but are rarely able to contribute an answer to the logical follow-up question, “How do we do it?” To provide some answers to the “how” question, a number of methodologies have been developed that provide practical rules of thumb for professional software development. Books and articles on software methodologies abound, but a few of these methodologies deserve particular attention: UP, RUP, Scrum, Extreme Programming, and Software Triage.
The Unified Process (UP) is an iterative and incremental software development process. The UP is not set in stone; it’s a framework that you should customize to the specific needs of your project. According to the Unified Process, a project can be split into four phases.
The elaboration, construction, and transition phases are split into time-boxed iterations, each having a tangible result. In each iteration, the teams are working on several disciplines of the project at the same time: business modeling, requirements, analysis and design, implementation, testing, and deployment. The amount of work done in each discipline changes with each iteration. This iterative and overlapping development is shown in Figure 24-6. In this example, the inception phase is done in one iteration, the elaboration phase in two, the construction phase in four, and the transition phase in two iterations.
The Rational Unified Process (RUP) is one of the best-known refinements of the Unified Process. It is a disciplined and formal approach to managing the software development process. The most important characteristic of the RUP is that, unlike the Spiral Model or the Waterfall Model, RUP is more than just a theoretical process model. RUP is actually a software product that is sold by Rational Software, a division of IBM. Treating the process itself as software brings about some interesting advantages:
As a product, the RUP takes the form of a suite of software applications that guides developers through the software development process. The product also offers specific guidance for other Rational products, such as the Rational Rose visual modeling tool and the Rational ClearCase configuration management tool. Extensive groupware communication tools are included as part of the “marketplace of ideas” that allows developers to share knowledge.
One of the basic principles behind RUP is that each iteration on a development cycle should have a tangible result. During the Rational Unified Process, users will create numerous designs, requirement documents, reports, and plans. The RUP software provides visualization and development tools for the creation of these artifacts.
Defining an accurate model is the central principle of RUP. Models, according to RUP, help explain the complicated structures and relationships in the software development process. In RUP, models are often expressed in Unified Modeling Language (UML) format, see Appendix D.
RUP defines each part of the process as an individual workflow (called discipline in the earlier discussion of the Unified Process). Workflows represent each step of a process in terms of who is responsible for the step, what tasks are being performed, the artifacts or results of these tasks, and the sequence of events that drives the tasks. Almost everything about RUP is customizable, but several core process workflows are defined “out of the box” by RUP.
The core process workflows bear some resemblance to the stages of the Waterfall Model, but each one is iterative and more specific in definition. The business modeling workflow models business processes, usually with the goal of driving software requirements forward. The requirements workflow creates the requirements definition by analyzing the problems in the system and iterating on its assumptions. The analysis and design workflow deals with system architecture and subsystem design. The implementation workflow covers the modeling, coding, and integration of software subsystems. The testing workflow models the planning, implementation, and evaluation of software quality tests. The deployment workflow is a high-level view of overall planning, releasing, supporting, and testing workflows. The configuration management workflow goes from new project conception to iteration and end-of-product scenarios. Finally, the environment workflow supports the engineering organization through the creation and maintenance of development tools.
RUP is aimed mainly at larger organizations and offers several advantages over the adoption of traditional life cycle models. Once the team has gotten over the learning curve of using the software, all members will be using a common platform for designing, communicating, and implementing their ideas. The process can be customized to the needs of the team, and each stage reveals a wealth of valuable artifacts that document each phase of the development.
A product like RUP can be too heavyweight for some organizations. Teams with diverse development environments or tight engineering budgets might not want to, or be able to, standardize on a software-based development system. The learning curve can also be a factor; new engineers who aren’t familiar with the process software will have to learn how to use it, while at the same time getting up to speed on the product and the existing code base.
The Agile model is just a high-level foundation; it does not specify exactly how the model should be implemented in real life. That’s where Scrum comes into play; it’s an Agile methodology with precise descriptions of how to use it on a daily basis.
Scrum is an iterative process. It is very popular as a means to manage software development projects. In Scrum, each iteration is called a sprint cycle. The sprint cycle is the central part of the Scrum process. The length of sprints, which should be decided at the beginning of the project, is typically between two and four weeks. At the end of each sprint, the goal is to have a version of the software available that is fully working and tested, and which represents a subset of the customers’ requirements. Scrum recognizes that customers will often change their minds during development, so it allows the result of each sprint to be shipped to the customer. This gives customers the opportunity to see iterative versions of the software, and allows them to give feedback to the development team about potential issues.
There are three roles in Scrum. The first role, Product Owner (PO), is the connection to the customer and to other people. The PO writes high-level user stories based on input from the customer, gives each user story a priority, and puts the stories in the Scrum product backlog. Actually, everyone on the team is allowed to write high-level user stories for the product backlog, but the Product Owner decides which user stories are kept and which are removed.
The second role, Scrum Master (SM), is responsible for keeping the process running and can be part of the team, although not the team leader, because with Scrum the team leads itself. The SM is the contact person for the team so that the rest of the team members can concentrate on their tasks. The SM ensures that the Scrum process is followed correctly by the team, for example, by organizing the Daily Scrum meetings, which are discussed later. The Scrum Master and Product Owner should be two different people.
The third and final role in the Scrum process is the team itself. Teams develop the software, and should be kept small, with preferably fewer than ten members.
The Scrum process enforces a daily meeting called the Daily Scrum or Standup. In this meeting, all team members stand together with the Scrum Master. According to the Scrum process, this meeting should start every day at exactly the same time and location, and should be no longer than 15 minutes. During this meeting, all team members get to answer three questions:
Problems faced by team members should be noted by the Scrum Master, who will try to solve them after the Daily Scrum meeting.
Before the start of each sprint cycle, there is a Sprint Planning meeting in which team members must decide which product features they will implement in the new sprint. This is formalized in a sprint backlog. The features are selected from a product backlog containing prioritized user stories, which are high-level requirements of new features. User stories from the product backlog are broken down into smaller tasks with an effort estimation and are put on the sprint backlog. Once a sprint is in progress, the sprint backlog is frozen and cannot be changed during that sprint. The duration of the Sprint Planning meeting depends on the length of the sprints, typically, four hours Sprint Planning meeting for each two weeks of a sprint. The Sprint Planning meeting is usually split into two parts: meeting with the Product Owner and the team to discuss the priority of product backlog items, and meeting with only the team to complete the sprint backlog.
In a Scrum team you will sometimes find a physical board with three columns: To Do, In Progress, and Done. Every task for the sprint is written on a small piece of paper and stuck on the board in the correct column. Tasks are not assigned to people during a meeting; instead, every team member can go to the board, pick one of the To Do tasks, and move that paper to the In Progress column. When the team member is finished with that task, the paper is moved to the Done column. This method makes it easy for team members to quickly get an overview of the work that still needs to be done and what tasks are in progress or finished. Instead of a physical Scrum board, you can also use a software solution to work with a virtual Scrum board.
Sometimes, a burn-down chart is also created every day that displays the days of the sprint on the horizontal axis and the remaining development hours on the vertical axis. This gives a quick overview of the progress made and can be used to determine whether all planned tasks can be completed during the sprint.
Once a sprint cycle is finished, there are two meetings: the Sprint Review and the Sprint Retrospective. The duration of the Sprint Review meeting again depends on the length of the sprints, typically, two hours per two weeks of a sprint. During the Sprint Review meeting, the results of the sprint cycle are discussed, including what tasks were completed and what tasks were not completed, and why. The Sprint Retrospective typically takes around one-and-a-half hours for each two weeks of a sprint, and allows the team to think about how the last sprint cycle was executed. For example, the team can identify shortcomings in the process and adapt the process for the next sprint. Questions like “What went well?”, “What could be improved?”, “What do we want to start, continue, or stop doing?”, and so on, are answered. This is called continuous improvement, that is, after every sprint, the process is examined and improved.
A final step in the Scrum process is a demo. At the end of each sprint cycle, a demo should be given to show the sprint results to all interested stakeholders.
Scrum is resilient to unforeseen problems that come up during the development stage. When a problem pops up, it can be handled in one of the following sprints. The team is involved in every step of the project. They discuss user stories from the product backlog with the Product Owner and convert these user stories into smaller tasks for inclusion in a sprint backlog. The team autonomously assigns work to their members with the aid of the Scrum task board. This board makes it easy to quickly see which team member is working on which task. And finally, the Daily Scrum meeting ensures that everyone knows what is happening.
A huge benefit to the paying customer is the demo that follows each sprint, which demonstrates the new iterative version of the project. The customer quickly gets a sense of how the project is progressing, and can make changes to the requirements, which usually can be incorporated into a future sprint.
Some companies might find it difficult to accept that the team itself decides who is doing what. Tasks are not assigned to team members by a manager or a team leader. All members pick their own tasks from the Scrum task board.
The Scrum Master is a key person to make sure the team stays on track. It is very important that the SM trusts the team. Having too tight a control over the team members will cause the Scrum process to fail.
A possible problem with Scrum is called feature creep. Scrum allows new user stories to be added to the product backlog during development. There is a danger that project managers will keep adding new features to the product backlog. This problem is best solved by deciding on a final release date, or the end date of the last sprint.
When a friend of mine arrived home from work years ago and told his wife that his company had adopted some of the principles of Extreme Programming, she joked, “I hope you wear a safety harness for that.” Despite the somewhat hokey name, Extreme Programming (or XP) effectively bundles up the best of other software development guidelines, and adds some new material.
XP, popularized by Kent Beck in eXtreme Programming eXplained (Addison-Wesley, 1999), claims to take the best practices of good software development and turn them up a notch. For example, most programmers would agree that testing is a good thing. In XP, testing is deemed so good that you’re supposed to write the tests before you write the code.
The Extreme Programming methodology is made up of 12 main guiding principles, grouped into four categories. These principles are manifested throughout all phases of the software development process, and have a direct impact on the daily tasks of engineers.
XP provides four fine-grained guidelines related to coding, planning, and testing.
XP suggests that all production code should be written by two people working side-by-side, a technique called pair programming. Obviously, only one person can actually be in control of the keyboard. The other person reviews the code his peer is writing, and takes a high-level approach, thinking about issues such as testing, necessary refactoring, and the overall model of the project.
As an example, if you are in charge of writing the user interface for a particular feature of your application, you might want to ask the original author of the feature to sit down with you. He can advise you about the correct use of the feature, warn you about any “gotchas” you should watch out for, and help oversee your efforts at a high level. Even if you can’t acquire the help of the original author, just grabbing another member of the team can help. The theory is that working in pairs builds shared knowledge, ensures proper design, and puts an informal system of checks and balances in place.
In the Waterfall Model, planning happens once, at the beginning of the process. Under the Spiral Model, planning is the first phase of each iteration. Under XP, planning is more than just a step—it’s a never-ending task. XP teams start with a rough plan that captures the major points of the product being developed. During each iteration of the process, there is a so-called planning game meeting. Throughout the development process, the plan is refined and modified as necessary. The theory is that conditions are constantly changing and new information is obtained all the time. There are two major parts in the planning process:
Under XP, estimates for a given feature are always made by the person who will be implementing that particular feature. This helps to avoid situations where the implementer is forced to adhere to an unrealistic and artificial schedule. Initially, estimates are very rough, perhaps on the order of weeks for a feature. As the time horizon shortens, the estimates become more granular. Features are broken down into tasks taking no more than five days.
According to eXtreme Programming eXplained, “Any program feature without an automated test simply doesn’t exist.” Extreme Programming is zealous about testing. Part of your responsibility as an XP engineer is to write the unit tests that accompany your code. A unit test is generally a small piece of code that makes sure that an individual piece of functionality works. For example, individual unit tests for a file-based object store may include testSaveObject, testLoadObject, and testDeleteObject.
XP takes unit testing one step further by suggesting that unit tests should be written before the actual code is written. Of course, the tests won’t pass because the code hasn’t been written yet. In theory, if your tests are thorough, you should know when your code is done because all the tests will complete successfully. This is called test-driven development, TDD. I told you it was “extreme.”
Because an XP-savvy engineering group constantly refines its product plan and builds only what is currently necessary, having a customer contribute to the process is very valuable. Although it is not always possible to convince a customer to be physically present during development, the idea that there should be communication between engineering and the end user is clearly a valuable notion. In addition to assisting with the design of individual features, customers can help prioritize tasks by conveying their individual needs.
XP advocates that you should continuously integrate subsystems so that mismatches between subsystems can be detected early. You should also refactor code whenever necessary, and aim to build and deploy small incremental releases.
All programmers are familiar with the dreaded chore of integrating code. This task becomes necessary when you discover that your view of the object store is a complete mismatch with the way it was actually written. When subsystems come together, problems are exposed. XP recognizes this phenomenon and advocates integrating code into the project frequently as it is being developed.
XP suggests a specific method for integration. Two programmers (the pair that developed the code) sit down at a designated “integration station” and merge the code in together. The code is not checked in until it passes 100 percent of the tests. By having a single station, conflicts are avoided and integration is clearly defined as a step that must occur before a check-in.
A similar approach can still work on an individual level. Engineers run tests individually or in pairs before checking code into the repository. A designated machine continually runs automated tests. When the automated tests fail, the team receives an e-mail indicating the problem and listing the most recent check-ins.
Most programmers refactor their code from time to time. Refactoring is the process of redesigning existing working code to take into account new knowledge or alternate uses that have been discovered since the code was written. Refactoring is difficult to build into a traditional software engineering schedule because its results are not as tangible as implementing a new feature. Good managers, however, recognize its importance for long-term code maintainability.
The extreme way of refactoring is to recognize situations during development when refactoring is useful and to do the refactoring at that time. Instead of deciding at the start of a release which existing parts of the product need design work, XP programmers learn to recognize the signs of code that is ready to be refactored. While this practice will almost certainly result in unexpected and unscheduled tasks, restructuring the code when appropriate should make future development easier.
One of the theories of XP is that software projects grow risky and unwieldy when they try to accomplish too much at one time. Instead of massive software releases that involve core changes and several pages of release notes, XP advocates smaller releases with a timeframe closer to two months than 18 months. With such a short release cycle, only the most important features can make it into the product. This forces engineering and marketing to agree on what features are truly important.
Software is developed by a team. Any code written is not owned by individuals, but by the team as a whole. XP gives a couple of guidelines to make sure sharing the code and ideas is possible.
Due to the collective ownership guideline and the practice of pair programming, coding in an extreme environment can be difficult if each engineer has their own naming and indenting conventions. XP doesn’t advocate any particular style, but recommends that if you can look at a piece of code and immediately identify the author, your group probably needs a better definition of its coding standards.
For additional information on various approaches to coding style, see Chapter 3.
In many traditional development environments, code ownership is strongly defined and often enforced. A friend of mine once worked in an environment where the manager explicitly forbade checking in changes to code written by any other member of the team. XP takes the extreme opposite approach by declaring that the code is collectively owned by everybody.
Collective ownership is practical for a number of reasons. From a management point of view, it is less detrimental when a single engineer leaves suddenly because there are others who understand that part of the code. From an engineer’s point of view, collective ownership builds a common view of how the system works. This helps with design tasks and frees the individual programmer to make any changes that will add value to the overall project.
One important note about collective ownership is that it is not necessary for every programmer to be familiar with every single line of code. It is more of a mindset that the project is a team effort, and there is no reason for any one person to hoard knowledge.
A mantra frequently sung by XP-savvy engineers is “avoid speculative generality.” This goes against the natural inclinations of many programmers. If you are given the task of designing a file-based object store, you may start down the path of creating the be-all, end-all solution to all file-based storage problems. Your design might quickly evolve to cover multiple languages and any type of object. XP says you should lean toward the other end of the generality continuum. Instead of making the ideal object store that will win awards and be celebrated by your peers, design the simplest possible object store that gets the job done. You should understand the current requirements and write your code to those specifications to avoid overly complex code.
It may be hard to get used to simplicity in design. Depending on the type of work you do, your code may need to exist for years and be used by other parts of the code that you haven’t even dreamed of. As discussed in Chapter 6, the problem with building in functionality that may be useful in the future is that you don’t know what those hypothetical use cases are, and there is no way to craft a good design that is purely speculative. Instead, XP says you should build something that is useful today and leave open the opportunity to modify it later.
XP uses the term metaphor for the idea that all members of the team (including customers and managers) should share a common high-level view of the system. This does not refer to the specifics of how objects will communicate, or the exact APIs that will be written. Rather, the metaphor is the mental model and naming model for the components of the system. Each component should be given a descriptive name, so that each member of the team can guess its functionality simply based on its name. Team members should use the metaphor to drive shared terminology when discussing the project.
Obviously, the welfare of the developers is important. So, the final guideline of XP is a guidance on working sane hours.
XP has a thing or two to say about the hours you’ve been putting in. The claim is that a well-rested programmer is a happy and productive programmer. XP advocates a workweek of approximately 40 hours and warns against putting in overtime for more than two consecutive weeks.
Of course, different people need different amounts of rest. The main idea, though, is that if you sit down to write code without a clear head, you’re going to write poor code and abandon many of the XP principles.
XP purists claim that the 12 tenets of Extreme Programming are so intertwined that adopting some of them without others would largely ruin the methodology. For example, pair programming is vital to testing because if you can’t determine how to test a particular piece of code, your partner can help. Also, if you’re tired one day and decide to skip the testing, your partner will be there to evoke feelings of guilt.
Some of the XP guidelines, however, can prove difficult to implement. To some engineers, the idea of writing tests before code is too abstract. For those engineers, it may be sufficient to design the tests without actually writing them until there is code to test. Many of the XP principles are rigidly defined, but if you understand the theory behind them, you may be able to find ways to adapt the guidelines to the needs of your project.
The collaborative aspects of XP can be challenging as well. Pair programming has measurable benefits, but it may be difficult for a manager to rationalize having half as many people actually writing code each day. Some members of the team may even feel uncomfortable with such close collaboration, perhaps finding it difficult to type while others are watching. Pair programming also has obvious challenges if the team is geographically spread out, or if members tend to telecommute regularly.
For some organizations, Extreme Programming may be too radical. Large, established companies with formal policies in place for engineering may be slow to adopt approaches like XP. However, even if your company is resistant to the implementation of XP, you can still improve your own productivity by understanding the theory behind it.
In the fatalistically named book Death March (Prentice Hall, 1997), Edward Yourdon describes the frequent and scary condition of software that is behind schedule, short on staff, over budget, or poorly designed. Yourdon’s theory is that when software projects get into this state, even the best modern software development methodologies will no longer apply. As you have learned in this chapter, many approaches to software development are built around formalized documents or taking a user-centered approach to design. In a project that’s already in “death march” mode, there simply isn’t time for these approaches.
The idea behind software triage is that when a project is already in a bad state, resources are scarce. Time is scarce, engineers are scarce, and money may be scarce. The main mental obstacle that managers and developers need to overcome when a project is way behind schedule is that it will be impossible to satisfy the original requirements in the allotted time. The task then becomes organizing remaining functionality into “must-have,” “should-have,” and “nice-to-have” lists.
Software triage is a daunting and delicate process. It often requires the leadership of an outside seasoned veteran of “death march” projects to make the tough decisions. For the engineer, the most important point is that in certain conditions, it may be necessary to throw familiar processes out the window (along with some existing code, unfortunately) to finish a project on time.
It’s unlikely that any book or engineering theory will perfectly match the needs of your project or organization. I recommend that you learn from as many approaches as you can and design your own process. Combining concepts from different approaches may be easier than you think. For example, RUP optionally supports an XP-like approach. Here are some tips for building the software engineering process of your dreams.
Some engineering techniques seem crazy at first or unlikely to work. Look at new innovations in software engineering methodologies as a way to refine your existing process. Try things out when you can. If XP sounds intriguing, but you’re not sure if it will work in your organization, see if you can work it in slowly, taking a few of the principles at a time or trying it out with a smaller pilot project.
Most likely, your engineering team is made up of people from varying backgrounds. You may have people who are veterans of startups, long-time consultants, recent graduates, and PhDs on your team. You all have a different set of experiences and your own ideas of how a software project should be run. Sometimes the best processes turn out to be a combination of the way things are typically done in these very different environments.
At the end of a project (or better yet, during the project, as with the Sprint Retrospective of the Scrum methodology), get the team together to evaluate the process. Sometimes there’s a major problem that nobody notices until the entire team stops to think about it. Perhaps there’s a problem that everybody knows about but nobody has discussed.
Consider what isn’t working and see how those parts can be fixed. Some organizations require formal code reviews prior to any source code check-in. If code reviews are so long and boring that nobody does a good job, discuss code-reviewing techniques as a group.
Also consider what is going well and see how those parts can be extended. For example, if maintaining the feature tasks as a group-editable website is working, then maybe devote some time to making the website even better.
Whether a process is mandated by your manager or custom-built by the team, it’s there for a reason. If your process involves writing formal design documents, make sure you write them. If you think that the process is broken or too complex, talk to your manager about it. Don’t just avoid the process—it will come back to haunt you.
Managing all source code is very important for any company, big or small, even for one-person projects. In a company, for example, it would be very impractical to store all the source code on the machines of individual developers that are not managed by any Source Code Control software. This would result in a maintenance nightmare because not everyone would always have the latest code. All source code must be managed by Source Code Control software. There are three kinds of Source Code Control software solutions.
The client/server solution consists of two parts. The first part is the server software, which is software running on the central server and which is responsible for keeping track of all source code files and their history. The second part is the client software. This client software should be installed on every developer’s machine; this software is responsible for communicating with the server software to get the latest version of a source file, get a previous version of a source file, commit local changes back to the server, roll back changes to a previous version, and so on.
A distributed solution doesn’t use a central server. The client software uses peer-to-peer protocols to synchronize with other peers by exchanging patches. Common operations such as committing changes, rolling back changes, and so on, are fast because no network access to a central server is involved. The disadvantage is that it requires more space on the client machine because it needs to store all the files, including the entire history.
Most Source Code Control systems have a special terminology, but unfortunately, not all systems use exactly the same terms. The following list explains a number of terms that are commonly used.
Several Source Code Control software solutions are available. Some of them are free, and some are commercial. The following table lists a few available solutions.
| FREE/OPEN-SOURCE | COMMERCIAL | |
| Local Only | SCCS, RCS | PVCS |
| Client/Server | CVS, Subversion | IBM Rational ClearCase, Microsoft Team Foundation Server, Perforce |
| Distributed | Git, Mercurial, Bazaar | TeamWare, BitKeeper, Plastic SCM |
This book does not recommend a particular software solution. Most software companies these days have a Source Code Control solution already in place, which every developer needs to adopt. If this is not the case, the company should definitely invest some time into researching the available solutions, and pick one that suits them. The bottom line is that it will be a maintenance nightmare without any Source Code Control solution in place. Even for your personal projects, you might want to investigate the available solutions. If you find one that you like, it will make your life easier. It will automatically keep track of different versions and a history of your changes. This makes it easy for you to roll back to an older version if a change didn’t work out the way it was supposed to.
This chapter introduced you to several models and methodologies for the software development process. There are certainly many other ways of building software, both formalized and informal. There probably isn’t a single correct method for developing software except the method that works for your team. The best way to find this method is to do your own research, learn what you can from various methods, talk to your peers about their experiences, and iterate on your process. Remember, the only metric that matters when examining a process methodology is how much it helps your team to write code.
The last part of this chapter briefly touched on the concept of Source Code Control. This should be an integral part of any software company, big or small, and is even beneficial for personal projects at home. There are several Source Code Control software solutions available, so it is recommended that you try out a few, and see which one of them works for you.
Before delving further into the details, it’s helpful to define the terms performance and efficiency, as used in this book. The performance of a program can refer to several areas, such as speed, memory usage, disk access, and network use. This chapter focuses on speed performance. The term efficiency, when applied to programs, means running without wasted effort. An efficient program completes its tasks as quickly as possible within the given circumstances. A program can be efficient without being fast, if the application domain is inherently prohibitive to quick execution.
Note that the title of this chapter, “Writing Efficient C++,” means writing programs that run efficiently, not efficiently writing programs. That is, the time you learn to save by reading this chapter will be your users’, not your own!
Language-level efficiency involves using the language as efficiently as possible, for example, passing objects by reference instead of by value. However, this will only get you so far. Much more important is design-level efficiency, which includes choosing efficient algorithms, avoiding unnecessary steps and computations, and selecting appropriate design optimizations. More often than not, optimizing existing code involves replacing a bad algorithm or data structure with a better, more efficient one.
As I’ve noted, efficiency is important for all application domains. Additionally, there is a small subset of programs, such as system-level software, embedded systems, intensive computational applications, and real-time games, that require extremely high levels of efficiency. Most programs don’t. Unless you write those types of high-performance applications, you probably don’t need to worry about squeezing every ounce of speed out of your C++ code. Think of it as the difference between building normal family cars and building sports cars. Every car must be reasonably efficient, but sports cars require extremely high performance. You wouldn’t want to waste your time optimizing family cars for speed when they’ll never go faster than 70 miles per hour.
C programmers often resist using C++ for high-performance applications. They claim that the language is inherently less efficient than C or a similar procedural language because C++ includes high-level concepts, such as exceptions and virtual methods. However, there are problems with this argument.
When discussing the efficiency of a language, you must separate the performance capabilities of the language itself from the effectiveness of its compilers at optimizing it, that is, you cannot ignore the effect of compilers. Recall that the C or C++ code you write is not the code that the computer executes. A compiler first translates that code into machine language, applying optimizations in the process. This means that you can’t simply run benchmarks of C and C++ programs and compare the results. You’re really comparing the compiler optimizations of the languages, not the languages themselves. C++ compilers can optimize away many of the high-level constructs in the language to generate machine code similar to, or even better than, the machine code generated from a comparable C program. These days, much more research and development is poured into C++ compilers than into C compilers, so C++ code might actually get better optimized and might run faster than C code.
Critics, however, still maintain that some features of C++ cannot be optimized away. For example, as Chapter 10 explains, virtual methods require the existence of a vtable and an additional level of indirection at run time, possibly making them slower than regular non-virtual function calls. However, when you really think about it, this argument is unconvincing. Virtual method calls provide more than just a function call: they also give you a run-time choice of which function to call. A comparable non-virtual function call would need a conditional statement to decide which function to call. If you don’t need those extra semantics, you can use a non-virtual function. A general design rule in the C++ language is that “if you don’t use a feature, you don’t need to pay for it.” If you don’t use virtual methods, you pay no performance penalty for the fact that you could use them. Thus, non-virtual function calls in C++ are identical to function calls in C in terms of performance. However, because virtual function calls have such a tiny overhead, I recommend making all your class methods, including destructors but not constructors, virtual for all your non-final classes.
Far more important, the high-level constructs of C++ enable you to write cleaner programs that are more efficient at the design level, are more readable, more easily maintained, and avoid accumulating unnecessary and dead code.
I believe that you will be better served in your development, performance, and maintenance by choosing C++ instead of a procedural language such as C.
There are also other higher-level object-oriented languages such as C# and Java, both of which run on top of a virtual machine. C++ code is executed directly by a CPU; there is no such thing as a virtual machine to run your code. C++ is closer to the hardware, which means that in most cases it runs faster than languages such as C# and Java.
Many books, articles, and programmers spend a lot of time trying to convince you to apply language-level optimizations to your code. These tips and tricks are important, and can speed up your programs in some cases. However, they are far less important than the overall design and algorithm choices in your program. You can pass-by-reference all you want, but it won’t make your program fast if you perform twice as many disk writes as you need to. It’s easy to get bogged down in references and pointers and forget about the big picture.
Furthermore, some of these language-level tricks can be performed automatically by good optimizing compilers. You should never spend time optimizing a particular area, unless a profiler, discussed later in this chapter, tells you that that particular area is a bottleneck.
That being said, using certain language-level optimizations, such as pass-by-reference, is just considered good coding style.
In this book, I’ve tried to present a balance of strategies. So, I’ve included here what I feel are the most useful language-level optimizations. This list is not comprehensive, but is a good start to write optimized code. However, make sure to read, and practice, the design-level efficiency advice that I offer later in this chapter as well.
C++ does a lot of work for you behind the scenes, particularly with regard to objects. You should always be aware of the performance impact of the code you write. If you follow a few simple guidelines, your code will become more efficient. Note that these guidelines are only relevant for objects, and not for primitive types such as bool, int, float, and so on.
The pass-by-reference rule is discussed elsewhere in this book, but it’s worth repeating here.
When you pass an object of a derived class by value as argument for a function parameter with as type one of the base classes, then the derived object is sliced to fit into the base class type. This causes information to be lost, see Chapter 10 for details.
Pass-by-value also incurs copying costs that are avoided with pass-by-reference. One reason why this rule can be difficult to remember is that on the surface there doesn’t appear to be any problem when you pass-by-value. Consider a class to represent a person that looks like this:
class Person{public:Person() = default;Person(std::string_view firstName, std::string_view lastName, int age);virtual ~Person() = default;std::string_view getFirstName() const { return mFirstName; }std::string_view getLastName() const { return mLastName; }int getAge() const { return mAge; }private:std::string mFirstName, mLastName;int mAge = 0;};
You could write a function that takes a Person object as follows:
void processPerson(Person p){// Process the person.}
You can call this function like this:
Person me("Marc", "Gregoire", 38);processPerson(me);
This doesn’t look like there’s any more code than if you write the function like this instead:
void processPerson(const Person& p){// Process the person.}
The call to the function remains the same. However, consider what happens when you pass-by-value in the first version of the function. In order to initialize the p parameter of processPerson(), me must be copied with a call to its copy constructor. Even though you didn’t write a copy constructor for the Person class, the compiler generates one that copies each of the data members. That still doesn’t look so bad: there are only three data members. However, two of them are strings, which are themselves objects with copy constructors. So, each of their copy constructors will be called as well. The version of processPerson() that takes p by reference incurs no such copying costs. Thus, pass-by-reference in this example avoids three copy constructor calls when the code enters the function.
And you’re still not done. Remember that p in the first version of processPerson() is a local variable to the processPerson() function, and so must be destroyed when the function exits. This destruction requires a call to the Person destructor, which will call the destructor of all of the data members. strings have destructors, so exiting this function (if you passed by value) incurs calls to three destructors. None of those calls are needed if the Person object is passed by reference.
Just as you should pass objects by reference to functions, you should also return them by reference from functions in order to avoid copying the objects unnecessarily. Unfortunately, it is sometimes impossible to return objects by reference, such as when you write overloaded operator+ and other similar operators. And, you should never return a reference or a pointer to a local object that will be destroyed when the function exits!
Since C++11, the language has support for move semantics, which allows you to efficiently return objects by value, instead of using reference semantics.
As noted in Chapter 14, you should catch exceptions by reference in order to avoid slicing and unnecessary copying. Throwing exceptions is heavy in terms of performance, so any little thing you can do to improve their efficiency will help.
You should make sure your classes have a move constructor and move assignment operator to allow the C++ compiler to use move semantics with objects of those classes. According to the rule of zero (see Chapter 9), you should try to design your classes such that the compiler generated copy and move constructors and copy and move assignment operators are sufficient. If the compiler cannot implicitly define these for a class, try to explicitly default them if that works for your class. If that is also not an option, you should implement them yourself. With move semantics for your objects, returning them by value from a function will be efficient without incurring large copying costs. Consult Chapter 9 for details on move semantics.
The compiler creates temporary, unnamed objects in several circumstances. Chapter 9 explains that after writing a global operator+ for a class, you can add objects of that class to other types, as long as those types can be converted to objects of that class. For example, the SpreadsheetCell class definition looks in part like this:
class SpreadsheetCell{public:// Other constructors omitted for brevitySpreadsheetCell(double initialValue);// Remainder omitted for brevity};SpreadsheetCell operator+(const SpreadsheetCell& lhs,const SpreadsheetCell& rhs);
The constructor that takes a double allows you to write code like this:
SpreadsheetCell myCell(4), aThirdCell;aThirdCell = myCell + 5.6;aThirdCell = myCell + 4;
The second line constructs a temporary SpreadsheetCell object from the 5.6 argument; it then calls the operator+ with myCell and this temporary object as arguments. The result is stored in aThirdCell. The third line does the same thing, except that 4 must be coerced to a double in order to call the double constructor of the SpreadsheetCell.
The important point in this example is that the compiler generates code to create an extra, unnamed SpreadsheetCell object for both addition operations in this example. That object must be constructed and destructed with calls to its constructor and destructor. If you’re still skeptical, try inserting cout statements in your constructor and destructor, and watch the printout.
In general, the compiler constructs a temporary object whenever your code converts a variable of one type to another type for use in a larger expression. This rule applies mostly to function calls. For example, suppose that you write a function with the following prototype:
void doSomething(const SpreadsheetCell& s);You can call this function like this:
doSomething(5.56);The compiler constructs a temporary SpreadsheetCell object from 5.56 using the double constructor. This temporary object is then passed to doSomething(). Note that if you remove the const from the s parameter, you can no longer call doSomething() with a constant; you must pass a variable.
You should generally attempt to avoid cases in which the compiler is forced to construct temporary objects. Although it is impossible to avoid in some situations, you should at least be aware of the existence of this “feature” so you aren’t surprised by performance and profiling results.
Move semantics is used by the compiler to make working with temporary objects more efficient. That’s another reason to make sure your classes support move semantics. See Chapter 9 for details.
A function that returns an object by value can cause the creation of a temporary object. Continuing with the Person example from earlier, consider this function:
Person createPerson(){Person newP("Marc", "Gregoire", 38);return newP;}
Suppose that you call it like this (assuming that operator<< is implemented for the Person class):
cout << createPerson();Even though this call does not store the result of createPerson() anywhere, the result must be stored somewhere in order to pass it to operator<<. In order to generate code for this behavior, the compiler is allowed to create a temporary variable in which to store the Person object returned from createPerson().
Even if the result of the function is not used anywhere, the compiler might still generate code to create the temporary object. For example, suppose that you have this code:
createPerson();The compiler might generate code to create a temporary object for the return value, even though it is not used.
However, you usually don’t need to worry about this issue because in most cases, the compiler optimizes away the temporary variable to avoid all copying and moving. For the createPerson() example, this optimization is called named return value optimization (NRVO) because the return statement returns a named variable. In the case the return statement has as argument a nameless temporary value, then this optimization is called return value optimization (RVO). These kinds of optimizations are usually only enabled for release builds. For NRVO to work, the argument to the return statement must be a single local variable. For example, in the following case, the compiler cannot do NRVO:
Person createPerson(){Person person1;Person person2;return getRandomBool() ? person1 : person2;}
If NRVO and RVO are not applicable, then copying or moving will happen. If the object you want to return from a function supports move semantics, then it is moved out of the function instead of copied.
One of the main advantages of using containers such as those from the C++ Standard Library is that they handle all memory management for you. The containers grow automatically when you add more elements to them. However, sometimes this causes a performance penalty. For example, an std::vector container stores its elements contiguously in memory. If it needs to grow in size, it needs to allocate a new block of memory, and then move (or copy) all elements to this new memory. This has serious performance implications, for example, if you use push_back() in a loop to add millions of elements to a vector.
If you know in advance how many elements you are going to add to a vector, or if you have a rough estimate, you should pre-allocate enough memory before starting to add your elements. A vector has a capacity, that is, the number of elements that can be added without reallocation, and a size, that is, the actual number of elements in the container. You can pre-allocate memory by changing the capacity using the reserve() method, or by resizing the vector using resize(). See Chapter 17 for details.
As described in Chapter 9, the code for an inline method or function is inserted directly into the code where it is called, avoiding the overhead of a function call. You should mark as inline all functions and methods that you think can qualify for this optimization. However, do not overuse this feature, because it basically throws away a fundamental design principle, which states that the interface and the implementation should be separated, such that the implementation can evolve without any changes to the interface. Consider using this feature only for often-used, fundamental classes. Also, remember that inlining requests by the programmer are only a recommendation to the compiler, which is allowed to refuse them.
On the other hand, some compilers inline appropriate functions and methods during their optimization steps, even if those functions aren’t marked with the inline keyword, and even if those functions are implemented in a source file instead of a header file. Thus, you should read your compiler documentation before wasting a lot of effort deciding which functions to inline.
The design choices in your program affect its performance far more than do language details such as pass-by-reference. For example, if you choose an algorithm for a fundamental task in your application that runs in O(n2) time instead of a simpler one that runs in O(n) time, you could potentially perform the square of the number of operations that you really need. To put numbers on that, a task that uses an O(n2) algorithm and performs one million operations would perform only one thousand with an O(n) algorithm. Even if that operation is optimized beyond recognition at the language level, the simple fact that you perform one million operations when a better algorithm would use only one thousand will make your program very inefficient. Always choose your algorithms carefully. Refer to Part II, specifically Chapter 4, of this book for a detailed discussion of algorithm design choices and big-O notation.
In addition to your choice of algorithms, design-level efficiency includes specific tips and tricks. Instead of writing your own data structures and algorithms, you should use existing ones, such as those from the C++ Standard Library, the Boost libraries, or other libraries, as much as possible because they are written by experts. These libraries have been, and are being, used a lot, so you can expect most bugs to have been discovered and fixed. You should also think about incorporating multithreading in your design to take full advantage of all processing power available on the machine. See Chapter 23 for more details. The remainder of this section presents two more design techniques for optimizing your program: caching and using object pools.
Caching means storing items for future use in order to avoid retrieving or recalculating them. You might be familiar with the principle from its use in computer hardware. Modern computer processors are built with memory caches that store recently and frequently accessed memory values in a location that is quicker to access than main memory. Most memory locations that are accessed at all are accessed more than once in a short time period, so caching at the hardware level can significantly speed up computations.
Caching in software follows the same approach. If a task or computation is particularly slow, you should make sure that you are not performing it more than necessary. Store the results in memory the first time you perform the task so that they are available for future needs. Here is a list of tasks that are usually slow.
One common problem with caching is that the data you store often comprises only copies of the underlying information. The original data might change during the lifetime of the cache. For example, you might want to cache the values in a configuration file so that you don’t need to read it repeatedly. However, the user might be allowed to change the configuration file while your program is running, which would make your cached version of the information obsolete. In cases like this, you need a mechanism for cache invalidation: when the underlying data changes, you must either stop using your cached information or repopulate your cache.
One technique for cache invalidation is to request that the entity managing the underlying data notifies your program of the data change. It could do this through a callback that your program registers with the manager. Alternatively, your program could poll for certain events that would trigger it to repopulate the cache automatically. Regardless of your specific cache invalidation technique, make sure that you think about these issues before relying on a cache in your program.
There are different kinds of object pools. One kind of object pool is where it allocates a large chunk of memory at once, in which the object pool creates smaller objects in-place. These objects can be handed out to clients, and reused when the clients are done with them, without incurring any additional calls to the memory manager to allocate or deallocate memory for individual objects.
This section describes another kind of object pool. If your program needs a large number of short-lived objects of the same type that have an expensive constructor (for example, a constructor creating a large, pre-sized vector for storing data), and a profiler confirms that allocating and deallocating these objects is a bottleneck, then you can create a pool, or cache, of those objects. Whenever you need an object in your code, you ask the pool for one. When you are done with the object, you return it to the pool. The object pool creates the objects only once, so their constructor is called only once, not each time they are used. Thus, object pools are appropriate when the constructor performs some setup actions that apply to many uses of the object, and when you can set instance-specific parameters on the object through non-constructor method calls.
This section provides an implementation of an object pool class template that you can use in your programs. The pool hands out objects via the acquireObject() method. If acquireObject() is called but there are no free objects, then the pool allocates another instance of the object. acquireObject() returns an Object that is an std::shared_ptr with a custom deleter. The custom deleter doesn’t actually delete the memory; it simply puts the object back on the list of free objects.
The most difficult aspect of an object pool implementation is keeping track of which objects are free and which are in use. This implementation takes the approach of storing free objects in a queue. Each time a client requests an object, the pool gives that client the top object from the queue. The code uses the std::queue class from the Standard Library, as discussed in Chapter 17. Because this standard data structure is used, this implementation is not thread safe. One way to make it thread safe is to use a lock-free concurrent queue. However, the Standard Library does not provide any concurrent data structures, so you’ll have to use third-party libraries.
Here is the class definition, with comments that explain the details. The class template is parameterized on the class type from which the objects in the pool are to be constructed.
#include <queue>#include <memory>// Provides an object pool that can be used with any class that provides a// default constructor.//// acquireObject() returns an object from the list of free objects. If// there are no more free objects, acquireObject() creates a new instance.// The pool only grows: objects are never removed from the pool (freed),// until the pool is destroyed.// acquireObject() returns an Object which is an std::shared_ptr with a// custom deleter that automatically puts the object back into the object// pool when the shared_ptr is destroyed and its reference reaches 0.//// The constructor and destructor on each object in the pool will be called// only once each for the lifetime of the object pool, not once per// acquisition and release.//// The primary use of an object pool is to avoid creating and deleting// objects repeatedly. This object pool is most suited to applications that// use large numbers of objects with expensive constructors for short// periods of time, and if a profiler tells you that allocating and// deallocating these objects is a bottleneck.template <typename T>class ObjectPool{public:ObjectPool() = default;virtual ~ObjectPool() = default;// Prevent assignment and pass-by-valueObjectPool(const ObjectPool<T>& src) = delete;ObjectPool<T>& operator=(const ObjectPool<T>& rhs) = delete;// The type of smart pointer returned by acquireObject().using Object = std::shared_ptr<T>;// Reserves and returns an object for use.Object acquireObject();private:// Stores the objects that are not currently in use by clients.std::queue<std::unique_ptr<T>> mFreeList;};
When using this object pool, you have to make sure that the object pool itself outlives all the objects handed out by the pool. A user of the object pool specifies through the template parameter the name of the class from which objects can be created.
acquireObject() returns the top object from the free list, first allocating a new object if there are no free objects:
template <typename T>typename ObjectPool<T>::Object ObjectPool<T>::acquireObject(){if (mFreeList.empty()) {mFreeList.emplace(std::make_unique<T>());}// Move next free object from the queue to a local unique_ptr.std::unique_ptr<T> obj(std::move(mFreeList.front()));mFreeList.pop();// Convert the object pointer to an Object (a shared_ptr with// a custom deleter).Object smartObject(obj.release(), [this](T* t){// The custom deleter doesn't actually deallocate the// memory, but simply puts the object back on the free list.mFreeList.emplace(t);});// Return the Object.return smartObject;}
Consider an application that uses a lot of short-lived objects with an expensive constructor. Let’s assume the ExpensiveObject class definition looks as follows:
class ExpensiveObject{public:ExpensiveObject() { /* Expensive construction … */ }virtual ~ExpensiveObject() = default;// Methods to populate the object with specific information.// Methods to retrieve the object data.// (not shown)private:// Data members (not shown)};
Instead of creating and deleting large numbers of such objects throughout the lifetime of your program, you can use the object pool developed in the previous section. Your program structure could be something like this:
ObjectPool<ExpensiveObject>::ObjectgetExpensiveObject(ObjectPool<ExpensiveObject>& pool){// Obtain an ExpensiveObject object from the pool.auto object = pool.acquireObject();// Populate the object. (not shown)return object;}void processExpensiveObject(ObjectPool<ExpensiveObject>::Object& object){// Process the object. (not shown)}int main(){ObjectPool<ExpensiveObject> requestPool;{vector<ObjectPool<ExpensiveObject>::Object> objects;for (size_t i = 0; i < 10; ++i) {objects.push_back(getExpensiveObject(requestPool));}}for (size_t i = 0; i < 100; ++i) {auto req = getExpensiveObject(requestPool);processExpensiveObject(req);}return 0;}
The first part of this main() function contains an inner code block which creates ten expensive objects and stores them in the objects container. Because all created Objects are stored in a vector and thus kept alive, the object pool is forced to create ten ExpensiveObject instances. At the closing brace of the inner code block, the vector goes out of scope, and all Objects contained in it are automatically released back to the object pool.
In the second for loop, the Objects (= shared_ptrs) returned by getExpensiveObject() go out of scope at the end of each iteration of the for loop, and so are automatically released back to the pool. If you add an output statement to the constructor of the ExpensiveObject class, you’ll see that the constructor is only called ten times during the entire program, even though the second for loop in main() loops a hundred times.
It is good to think about efficiency as you design and code. There is no point in writing obviously inefficient programs if this can be avoided with some common sense, or experience-based intuition. However, I urge you not to get too obsessed with performance during the design and coding phases. It’s best to first make a clean, well-structured design and implementation, then use a profiler, and only optimize parts that are flagged by the profiler as being performance bottlenecks. Remember the “90/10” rule, introduced in Chapter 4, which states that 90 percent of the running time of most programs is spent in only 10 percent of the code (Hennessy and Patterson, Computer Architecture, A Quantitative Approach, Fourth Edition, [Morgan Kaufmann, 2006]). This means that you could optimize 90 percent of your code, but still only improve the running time of the program by 10 percent. Obviously, you want to optimize the parts of the code that are exercised the most for the specific workload that you expect the program to run.
Consequently, it is often helpful to profile your program to determine which parts of the code require optimization. There are many profiling tools available that analyze programs as they run in order to generate data about their performance. Most profiling tools provide analysis at the function level by specifying the amount of time (or percent of total execution time) spent in each function in the program. After running a profiler on your program, you can usually tell immediately which parts of the program need optimization. Profiling before and after optimizing is essential to prove that your optimizations had an effect.
If you are using Microsoft Visual C++ 2017, you already have a great built-in profiler, which is discussed later in this chapter. If you are not using Visual C++, Microsoft has a Community edition available which is free of charge for students, open-source developers, and individual developers to create both free and paid applications. It’s also free of charge for up to five users in small organizations. Another great profiling tool is Rational PurifyPlus from IBM. There are also a number of smaller free profiling tools available: Very Sleepy and Luke Stackwalker are popular profilers for Windows, Valgrind and gprof (GNU profiler) are well-known profilers for Unix/Linux systems, and there are plenty of other choices.
The power of profiling can best be seen with a real coding example. As a disclaimer, the performance bugs in the first implementation shown are not subtle! Real efficiency issues would probably be more complex, but a program long enough to demonstrate them would be too lengthy for this book.
Suppose that you work for the United States Social Security Administration. Every year the administration puts up a website that allows users to look up the popularity of new baby names from the previous year. Your job is to write the back-end program that looks up names for users. Your input is a file containing the name of every new baby. This file will obviously contain redundant names. For example, in the file for boys for 2003, the name Jacob was the most popular, showing up 29,195 times. Your program must read the file to construct an in-memory database. A user may then request the absolute number of babies with a given name, or the rank of that name among all the babies.
A logical design for this program consists of a NameDB class with the following public methods:
#include <string_view>class NameDB{public:// Reads list of baby names in nameFile to populate the database.// Throws invalid_argument if nameFile cannot be opened or read.NameDB(std::string_view nameFile);// Returns the rank of the name (1st, 2nd, etc).// Returns –1 if the name is not found.int getNameRank(std::string_view name) const;// Returns the number of babies with this name.// Returns –1 if the name is not found.int getAbsoluteNumber(std::string_view name) const;// Protected and private members and methods not shown};
The hard part is choosing a good data structure for the in-memory database. My first attempt is a vector of name/count pairs. Each entry in the vector stores one of the names, along with a count of the number of times that name shows up in the raw data file. Here is the complete class definition with this design:
#include <string_view>#include <string>#include <vector>#include <utility>class NameDB{public:NameDB(std::string_view nameFile);int getNameRank(std::string_view name) const;int getAbsoluteNumber(std::string_view name) const;private:std::vector<std::pair<std::string, int>> mNames;// Helper methodsbool nameExists(std::string_view name) const;void incrementNameCount(std::string_view name);void addNewName(std::string_view name);};
Note the use of the Standard Library vector and pair classes, both of which are discussed in Chapter 17. A pair is a utility class that combines two values of possibly different types.
Here are the implementations of the constructor and the helper methods nameExists(), incrementNameCount(), and addNewName(). The loops in nameExists() and incrementNameCount() iterate over all the elements of the vector.
// Reads the names from the file and populates the database.// The database is a vector of name/count pairs, storing the// number of times each name shows up in the raw data.NameDB::NameDB(string_view nameFile){// Open the file and check for errors.ifstream inputFile(nameFile.data());if (!inputFile) {throw invalid_argument("Unable to open file");}// Read the names one at a time.string name;while (inputFile >> name) {// Look up the name in the database so far.if (nameExists(name)) {// If the name exists in the database, just increment the count.incrementNameCount(name);} else {// If the name doesn't yet exist, add it with a count of 1.addNewName(name);}}}// Returns true if the name exists in the database, false otherwise.bool NameDB::nameExists(string_view name) const{// Iterate through the vector of names looking for the name.for (auto& entry : mNames) {if (entry.first == name) {return true;}}return false;}// Precondition: name exists in the vector of names.// Postcondition: the count associated with name is incremented.void NameDB::incrementNameCount(string_view name){for (auto& entry : mNames) {if (entry.first == name) {entry.second++;return;}}}// Adds a new name to the database.void NameDB::addNewName(string_view name){mNames.push_back(make_pair(name.data(), 1));}
Note that in the preceding example, you could use an algorithm like find_if() to accomplish the same thing as the loops in nameExists() and incrementNameCount(). The loops are shown explicitly in order to emphasize the performance problems.
You might have noticed some performance problems already. What if there are hundreds of thousands of names? The many linear searches involved in populating the database will become slow.
In order to complete the example, here are the implementations of the two public methods:
// Returns the rank of the name.// First looks up the name to obtain the number of babies with that name.// Then iterates through all the names, counting all the names with a higher// count than the specified name. Returns that count as the rank.int NameDB::getNameRank(string_view name) const{// Make use of the getAbsoluteNumber() method.int num = getAbsoluteNumber(name);// Check if we found the name.if (num == -1) {return -1;}// Now count all the names in the vector that have a// count higher than this one. If no name has a higher count,// this name is rank number 1. Every name with a higher count// decreases the rank of this name by 1.int rank = 1;for (auto& entry : mNames) {if (entry.second > num) {rank++;}}return rank;}// Returns the count associated with this name.int NameDB::getAbsoluteNumber(string_view name) const{for (auto& entry : mNames) {if (entry.first == name) {return entry.second;}}return -1;}
In order to test the program, you need a main() function:
#include "NameDB.h"#include <iostream>using namespace std;int main(){NameDB boys("boys_long.txt");cout << boys.getNameRank("Daniel") << endl;cout << boys.getNameRank("Jacob") << endl;cout << boys.getNameRank("William") << endl;return 0;}
This main() function creates one NameDB database called boys, telling it to populate itself with the file boys_long.txt, which contains 500,500 names.
There are three steps to using gprof:
–pg, as in this example:
> gcc -lstdc++ -std=c++17 -pg -o namedb NameDB.cpp NameDBTest.cppgmon.out in the working directory. Be patient when you run the program because this first version is slow.gmon.out profiling information and produce a (somewhat) readable report. gprof outputs to standard out, so you should redirect the output to a file:> gprof namedb gmon.out > gprof_analysis.outNow you can analyze the data. Unfortunately, the output file is somewhat cryptic and intimidating, so it takes a little while to learn how to interpret it. gprof provides two separate sets of information. The first set summarizes the amount of time spent executing each function in the program. The second and more useful set summarizes the amount of time spent executing each function and its descendants; this set is also called a call graph. Here is some of the output from the gprof_analysis.out file, edited to make it more readable. Note that the numbers will be different on your machine.
index %time self children called name[1] 100.0 0.00 14.06 main [1]0.00 14.00 1/1 NameDB::NameDB [2]0.00 0.04 3/3 NameDB::getNameRank [25]0.00 0.01 1/1 NameDB::~NameDB [28]
The following list explains the different columns.
index: an index to be able to refer to this entry in the call graph.%time: the percentage of the total execution time of the program required by this function and its descendants.self: how many seconds the function itself was executing.children: how many seconds the descendants of this function were executing.called: how often this function was called.name: the name of the function. If the name of the function is followed by a number between square brackets, that number refers to another index in the call graph.The preceding extract tells you that main() and its descendants took 100 percent of the total execution time of the program, for a total of 14.06 seconds. The second line shows that the NameDB constructor took 14.00 seconds of the total 14.06 seconds. So, it’s immediately clear where the performance issue is situated. To track down which part of the constructor is taking so long, you need to jump to the call graph entry with index 2, because that’s the index in square brackets behind the name in the last column. The call graph entry with index 2 is as follows on my test system:
[2] 99.6 0.00 14.00 1 NameDB::NameDB [2]1.20 6.14 500500/500500 NameDB::nameExists [3]1.24 5.24 499500/499500 NameDB::incrementNameCount [4]0.00 0.18 1000/1000 NameDB::addNewName [19]0.00 0.00 1/1 vector::vector [69]
The nested entries below NameDB::NameDB show which of its descendants took the most time. Here you can see that nameExists() took 6.14 seconds, and incrementNameCount()took 5.24 seconds. These times are the sums of all the calls to the functions. The fourth column in those lines shows the number of calls to the function (500,500 to nameExists() and 499,500 to incrementNameCount()). No other function took a significant amount of time.
Without going any further in this analysis, two things should jump out at you:
nameExists() and incrementNameCount() take an almost identical amount of time, and are called almost the same number of times. If you think about the application domain, that makes sense: most names in the input text file are duplicates, so the vast majority of the calls to nameExists() are followed by a call to incrementNameCount(). If you look back at the code, you can see that these functions are almost identical; they could probably be combined. In addition, most of what they are doing is searching the vector. It would probably be better to use a sorted data structure to reduce the searching time.With these two observations from the gprof output, it’s time to redesign the program. The new design uses a map instead of a vector. Chapter 17 explains that the Standard Library map keeps the entries sorted, and provides O(log n) lookup instead of the O(n) searches in a vector. A good exercise for you to try would be to use an std::unordered_map, which has an expected O(1) for lookups, and to use a profiler to see if that is faster than std::map for this application.
The new version of the program also combines nameExists() and incrementNameCount() into one nameExistsAndIncrement() method.
Here is the new class definition:
#include <string_view>#include <string>#include <map>class NameDB{public:NameDB(std::string_view nameFile);int getNameRank(std::string_view name) const;int getAbsoluteNumber(std::string_view name) const;private:std::map<std::string, int> mNames;bool nameExistsAndIncrement(std::string_view name);void addNewName(std::string_view name);};
Here are the new method implementations:
// Reads the names from the file and populates the database.// The database is a map associating names with their frequency.NameDB::NameDB(string_view nameFile){// Open the file and check for errors.ifstream inputFile(nameFile.data());if (!inputFile) {throw invalid_argument("Unable to open file");}// Read the names one at a time.string name;while (inputFile >> name) {// Look up the name in the database so far.if (!nameExistsAndIncrement(name)) {// If the name exists in the database, the// method incremented it, so we just continue.// We get here if it didn't exist, in which case// we add it with a count of 1.addNewName(name);}}}// Returns true if the name exists in the database, false// otherwise. If it finds it, it increments it.bool NameDB::nameExistsAndIncrement(string_view name){// Find the name in the map.auto res = mNames.find(name.data());if (res != end(mNames)) {res->second++;return true;}return false;}// Adds a new name to the database.void NameDB::addNewName(string_view name){mNames[name.data()] = 1;}int NameDB::getNameRank(string_view name) const{// Implementation omitted, same as before.}// Returns the count associated with this name.int NameDB::getAbsoluteNumber(string_view name) const{auto res = mNames.find(name.data());if (res != end(mNames)) {return res->second;}return -1;}
By following the same steps shown earlier, you can obtain the gprof performance data on the new version of the program. The data is quite encouraging:
index %time self children called name[1] 100.0 0.00 0.21 main [1]0.02 0.18 1/1 NameDB::NameDB [2]0.00 0.01 1/1 NameDB::~NameDB [13]0.00 0.00 3/3 NameDB::getNameRank [28][2] 95.2 0.02 0.18 1 NameDB::NameDB [2]0.02 0.16 500500/500500 NameDB::nameExistsAndIncrement[3] 0.00 0.00 1000/1000 NameDB::addNewName [24]0.00 0.00 1/1 map::map [87]
If you run this on your machine, the output will be different. It’s even possible that you will not see the data for NameDB methods in your output. Because of the efficiency of this second attempt, the timings are getting so small that you might see more map methods in the output than NameDB methods.
On my test system, main() now takes only 0.21 seconds—a 67-fold improvement! There are certainly further improvements that you could make on this program. For example, the current constructor performs a lookup to see if the name is already in the map, and if not, adds it to the map. You could combine these two operations simply with the following single line:
++mNames[name];If the name is already in the map, this statement just increments its counter. If the name is not yet in the map, this statement first adds an entry to the map with the given name as key and a zero-initialized value, and then increments the value, resulting in a counter of 1.
With this improvement, you can remove the nameExistsAndIncrement() and addNewName() methods, and change the constructor as follows:
NameDB::NameDB(string_view nameFile){// Open the file and check for errorsifstream inputFile(nameFile.data());if (!inputFile) {throw invalid_argument("Unable to open file");}// Read the names one at a time.string name;while (inputFile >> name) {++mNames[name];}}
getNameRank() still uses a loop that iterates over all elements in the map. A good exercise for you to try is to come up with another data structure so that the linear iteration in getNameRank() can be avoided.
Most editions of Microsoft Visual C++ 2017 come with a great built-in profiler, which is briefly discussed in this section. The VC++ profiler has a complete graphical user interface. This book does not recommend one profiler over another, but it is always good to have an idea of what a command line–based profiler like gprof can provide in comparison with a GUI-based profiler like the one included with VC++.
To start profiling an application in Visual C++ 2017, you first need to open the project in Visual Studio. This example uses the same NameDB code as in the first inefficient design attempt from earlier in the chapter. That code is not repeated here. Once your project is opened in Visual Studio, click on the Analyze menu, and then choose Performance Profiler. A new window appears, as shown in Figure 25-1.
In this new window, enable the “Performance Wizard” option and click the Start button. This starts a wizard, as shown in Figure 25-2.
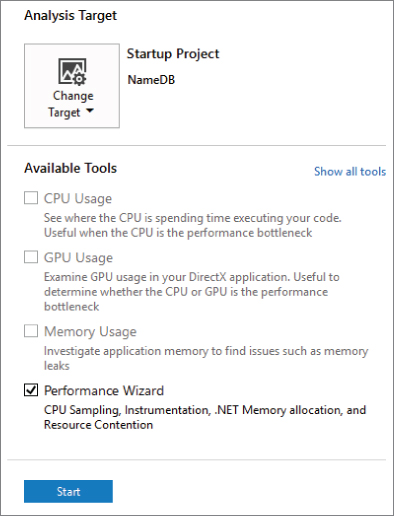
Depending on your version of VC++ 2017, there are a number of different profiling methods available. The following non-exhaustive list explains three of them.
For this profiling example, leave the default CPU sampling method selected and click the Next button. The next page of the wizard asks you to select the application that you want to profile. Here you should select your NameDB project and click the Next button. On the last page of the wizard, you can enable the “Launch profiling after the wizard finishes” option and then click the Finish button. You may get a message saying that you don’t have the right credentials for profiling, and asking whether you would like to upgrade your credentials. If you get this message, you should allow VC++ to upgrade your credentials; otherwise, the profiler will not work.
When the program execution is finished, Visual Studio automatically opens the profiling report. Figure 25-3 shows how this report might look like when profiling the first attempt of the NameDB application.
From this report, you can immediately see the hot path. Just like with gprof, it shows that the NameDB constructor takes up most of the running time of the program, and that incrementNameCount() and nameExists() both take almost the same time. The Visual Studio profiling report is interactive. For example, you can drill down the NameDB constructor by clicking on it. This results in a drill-down report for that function, as show in Figure 25-4.
This drill-down view shows a graphical breakdown at the top, and the actual code of the method at the bottom. The code view shows the percentage of the running time that a line needed. The lines using up most of the time are shown in red. When you are interactively browsing the profiling report, you can always go back by using the back arrow in the top-left corner of the report.

At the top of the report there is also a drop-down menu, which you can use to quickly jump to certain summary or details pages.
If you go back to the “Summary” page of the profiling report, you can see that there is a “Show Trimmed Call Tree” link on the right. Clicking that link displays a trimmed call tree showing you an alternative view of the hot path in your code, as shown in Figure 25-5.
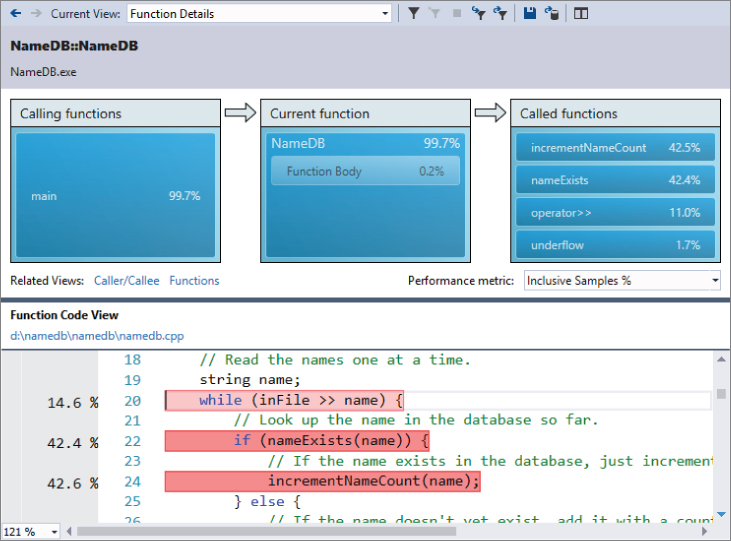
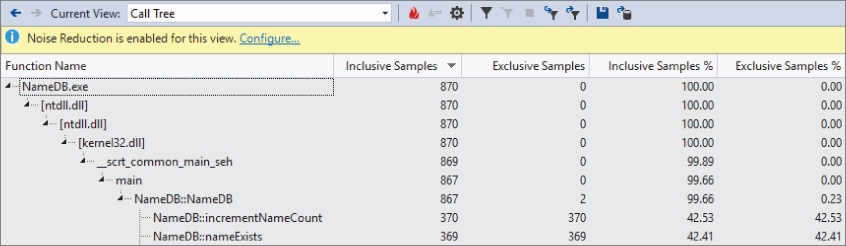
Also in this view, you immediately see that main() is calling the NameDB constructor, which is using up most of the running time.
This chapter discussed the key aspects of efficiency and performance in C++ programs, and provided several specific tips and techniques for designing and writing more efficient applications. Hopefully you gained an appreciation for the importance of performance and for the power of profiling tools.
There are two important things to remember from this chapter. The first thing is that you should not get too obsessed with performance while designing and coding. It’s recommended to first make a correct, well-structured design and implementation, then use a profiler, and only optimize those parts that are flagged by a profiler as being a performance bottleneck.
The second thing to remember is that design-level efficiency is far more important than language-level efficiency. For example, you shouldn’t use algorithms or data structures with bad complexity if there are better ones available.
Large programming projects are rarely finished when a feature-complete goal is reached. There are always bugs to find and fix, both during and after the main development phase. It is essential to understand the shared responsibility of quality control and the life cycle of a bug in order to perform well in a group.
Software development organizations have different approaches to testing. In a small startup, there may not be a group of people whose full-time job is testing the product. Testing may be the responsibility of the individual developers, or all the employees of the company may be asked to lend a hand and try to break the product before its release. In larger organizations, a full-time quality assurance staff probably qualifies a release by testing it according to a set of criteria. Nonetheless, some aspects of testing may still be the responsibility of the developers. Even in organizations where the developers have no role in formal testing, you still need to be aware of what your responsibilities are in the larger process of quality assurance.
All good engineering groups recognize that bugs will occur in software both before and after its release. There are many different ways to deal with these problems. Figure 26-1 shows a formal bug process, expressed as a flow chart. In this particular process, a bug is always filed by a member of the QA team. The bug reporting software sends a notification to the development manager, who sets the priority of the bug and assigns the bug to the appropriate module owner. The module owner can accept the bug, or explain why the bug actually belongs to a different module or is invalid, giving the development manager the opportunity to assign it to someone else.
Once the bug has found its rightful owner, a fix is made and the developer marks the bug as “fixed.” At this point, the QA engineer verifies that the bug no longer exists and marks the bug as “closed” or reopens the bug if it is still present.
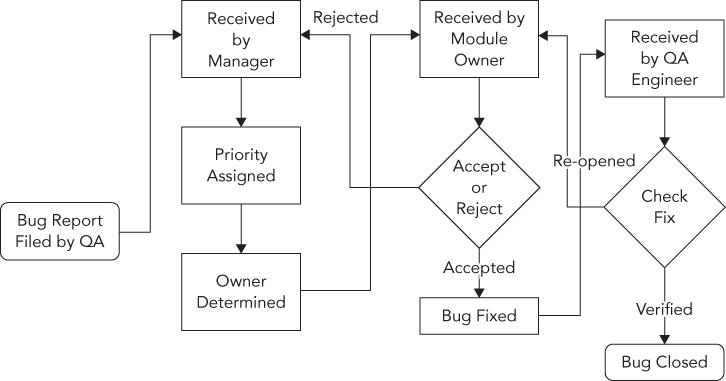
A less formal approach is shown in Figure 26-2. In this workflow, anybody can file a bug, and assign an initial priority and a module. The module owner receives the bug report and can either accept it or reassign it to another engineer or module. When a correction is made, the bug is marked as “fixed.” Toward the end of the testing phase, all the developers and QA engineers divide up the fixed bugs and verify that each bug is no longer present in the current build. The release is ready when all bugs are marked as “closed.”
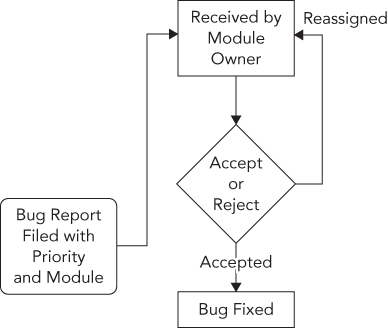
There are many ways to keep track of software bugs, from informal spreadsheet- or e-mail-based schemes to expensive third-party bug-tracking software. The appropriate solution for your organization depends on the group’s size, the nature of the software, and the level of formality you want to build around bug fixing.
There are also a number of free open-source bug-tracking solutions available. One of the more popular free tools for bug tracking is Bugzilla, written by the authors of the Mozilla web browser. As an open-source project, Bugzilla has gradually accumulated a number of useful features to the point where it now rivals expensive bug-tracking software packages. Here are just a few of its many features:
Figure 26-3 shows a bug being entered into a Bugzilla project that was set up for the second edition of this book. For my purposes, each chapter was input as a Bugzilla component. The filer of the bug can specify the severity of the bug (how big of a deal it is). A summary and description are included to make it possible to search for the bug or list it in a report format.
Bug-tracking tools like Bugzilla are essential components of a professional software development environment. In addition to supplying a central list of currently open bugs, bug-tracking tools provide an important archive of previous bugs and their fixes. A support engineer, for instance, might use the tool to search for a problem similar to one reported by a customer. If a fix was made, the support person will be able to tell the customer which version they need to update to, or how to work around the problem.
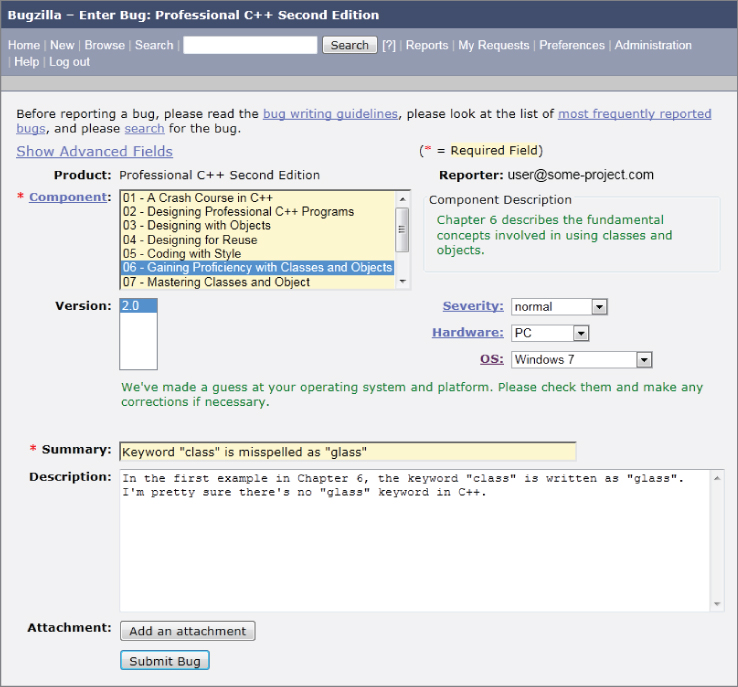
The only way to find bugs is through testing. One of the most important types of tests from a developer’s point of view is the unit test. Unit tests are pieces of code that exercise specific functionality of a class or subsystem. These are the finest-grained tests that you could possibly write. Ideally, one or more unit tests should exist for every low-level task that your code can perform. For example, imagine that you are writing a math library that can perform addition and multiplication. Your suite of unit tests might contain the following tests:
Well-written unit tests protect you in many ways:
It’s hard to go wrong with unit tests, unless you don’t write them or you write them poorly. In general, the more tests you have, the more coverage you have. The more coverage you have, the less likely it is for bugs to fall through the cracks and for you to have to tell your boss, or worse, your customer, “Oh, we never tested that.”
There are several methodologies for writing unit tests most effectively. The Extreme Programming methodology, explained in Chapter 24, instructs its followers to write unit tests before writing code.
Writing tests first helps you to solidify the requirements for the component and to provide a metric that can be used to determine when it is done. However, writing tests first can be tricky and requires diligence on the part of the programmer. For some programmers, it simply doesn’t mesh well with their coding style. A less rigid approach is to design the tests before coding, but implement them later in the process. This way, the programmer is still forced to understand the requirements of the module but doesn’t have to write code that makes use of nonexistent classes.
In some groups, the author of a particular subsystem doesn’t write the unit tests for that subsystem. The idea is that if you write the tests for your own code, you might subconsciously work around problems that you know about, or only cover certain cases that you know your code handles well. In addition, it’s sometimes difficult to get excited about finding bugs in code you just wrote, so you might only put in a half-hearted effort. Having one developer write unit tests for another developer’s code requires a lot of extra overhead and coordination. When such coordination is accomplished, however, this approach helps guarantee more-effective tests.
Another way to ensure that unit tests are actually testing the right parts of the code is to write them so that they maximize code coverage. You can use a code coverage tool, such as gcov, that tells you what percentage of the code is called by unit tests. The idea is that a properly tested piece of code has unit tests to test all possible code paths that can be taken through that piece of code.
The process of providing unit tests for your code starts from the very beginning, long before any code is written. Keeping unit-testability in mind during the design phase can influence the design decisions you make for your software. Even if you do not subscribe to the methodology of writing unit tests before you write code, you should at least take the time to consider what sorts of tests you will provide, even while still in the design phase. This way, you can break the task up into well-defined chunks, each of which has its own test-validated criteria. For example, if your task is to write a database access class, you might first write the functionality that inserts data into the database. Once that is fully tested with a suite of unit tests, you can continue to write the code to support updates, deletes, and selects, testing each piece as you go.
The following list of steps is a suggested approach for designing and implementing unit tests. As with any programming methodology, the best process is the one that yields the best results. I suggest that you experiment with different ways of using unit tests to discover what works best for you.
Writing unit tests takes time, there is no way around this. Software developers are often crunched for time. To reach deadlines, developers tend to skip writing unit tests, because they think they will finish faster that way. Unfortunately, this thinking does not take the whole picture into account. Omitting unit tests will back-fire in the long run. The earlier a bug is detected in the software development process, the less it costs. If a developer finds a bug during unit testing, it can be fixed immediately, before anyone else encounters it. However, if the bug is discovered by QA, then it becomes a much costlier bug. The bug can cause an extra development cycle, requires bug management, has to go back to the development team for a fix, and then back to QA to verify the fix. If a bug slips through the QA process and finds its way to the customer, then it becomes even more expensive.
The granularity of tests refers to their scope. As the following table illustrates, you can initially unit test a database class with just a few test functions, and then gradually add more tests to ensure that everything works as it should.
| LARGE-GRAINED TESTS | MEDIUM-GRAINED TESTS | FINE-GRAINED TESTS |
testConnection()testInsert()testUpdate()testDelete()testSelect() |
testConnectionDropped()testInsertBadData()testInsertStrings()testInsertIntegers()testUpdateStrings()testUpdateIntegers()testDeleteNonexistentRow()testSelectComplicated()testSelectMalformed() |
testConnectionThroughHTTP()testConnectionLocal()testConnectionErrorBadHost()testConnectionErrorServerBusy()testInsertWideCharacters()testInsertLargeData()testInsertMalformed()testUpdateWideCharacters()testUpdateLargeData()testUpdateMalformed()testDeleteWithoutPermissions()testDeleteThenUpdate()testSelectNested()testSelectWideCharacters()testSelectLargeData() |
As you can see, each successive column brings in more-specific tests. As you move from large-grained tests to more finely grained tests, you start to consider error conditions, different input data sets, and different modes of operation.
Of course, the decisions you make initially when choosing the granularity of your tests are not set in stone. Perhaps the database class is just being written as a proof-of-concept and might not even be used. A few simple tests may be adequate now, and you can always add more later. Or perhaps the use cases will change at a later date. For example, the database class might not initially have been written with international characters in mind. Once such features are added, they should be tested with specific targeted unit tests.
Consider the unit tests to be part of the actual implementation of a feature. When you make a modification, don’t just modify the tests so that they continue to work. Write new tests and re-evaluate the existing ones. When bugs are uncovered and fixed, add new unit tests that specifically test those fixes.
Over time, you will gain an intuition for which aspects of a piece of code should turn into a unit test. Certain methods or inputs will just feel like they should be tested. This intuition is gained through trial and error, and by looking at unit tests that other people in your group have written. It should be pretty easy to pick out which programmers are the best unit testers. Their tests tend to be organized and frequently modified.
Until unit test creation becomes second nature, approach the task of figuring out which tests to write by brainstorming. To get some ideas flowing, consider the following questions:
You don’t need to write formal answers to those questions (unless your manager is a particularly fervent devotee of this book or of certain testing methodologies), but they should help you generate some ideas for unit tests. The table of tests for the database class contained test functions, each of which arose from one of these questions.
Once you have generated ideas for some of the tests you would like to use, consider how you might organize them into categories; the breakdown of tests will fall into place. In the database class example, the tests could be split into the following categories:
Splitting your tests into categories makes them easier to identify and augment. It might also make it easier to realize which aspects of the code are well tested and which could use a few more unit tests.
The most common trap to fall into when writing unit tests is to match the test to the behavior of the code, instead of using the test to validate the code. If you write a unit test that performs a database select for a piece of data that is definitely in the database, and the test fails, is it a problem with the code or a problem with the test? It’s often easier to assume that the code is right and to modify the test to match. This approach is usually wrong.
To avoid this pitfall, you should understand the inputs to the test and the expected output before you try it out. This is sometimes easier said than done. For example, say you wrote some code to encrypt an arbitrary block of text using a particular key. A reasonable unit test would take a fixed string of text and pass it in to the encryption module. Then, it would examine the result to see if it was correctly encrypted.
When you go to write such a test, it is tempting to try out the behavior with the encryption module first and see the result. If it looks reasonable, you might write a test to look for that value. Doing so really doesn’t prove anything, however! You haven’t actually tested the code; you’ve just written a test that guarantees it will continue to return that same value. Often times, writing the test requires some real work; you would need to encrypt the text independently of your encryption module to get an accurate result.
The exact code behind a test varies, depending on what type of test framework you have in place. One framework, the Microsoft Visual C++ Testing Framework, is discussed later in this chapter. Independent of the actual implementation, however, the following guidelines will help ensure effective tests:
As you will see later in this chapter, unit tests are usually very small and simple pieces of code. In most cases, writing a single unit test will take only a few minutes, making them one of the most productive uses of your time.
When you’re done writing a test, you should run it right away before the anticipation of the results becomes too much to bear. The joy of a screen full of passing unit tests shouldn’t be minimized. For most programmers, this is the easiest way to see quantitative data that declares your code useful and correct.
Even if you adopt the methodology of writing tests before writing code, you should still run the tests immediately after they are written. This way, you can prove to yourself that the tests fail initially. Once the code is in place, you have tangible data that shows that it accomplished what it was supposed to accomplish.
It’s unlikely that every test you write will have the expected result the first time. In theory, if you are writing tests before writing code, all of your tests should fail. If one passes, either the code magically appeared or there is a problem with the test. If the code is done and tests still fail (some would say that if tests fail, the code is actually not done), there are two possibilities: the code could be wrong, or the tests could be wrong.
Running unit tests must be automated. This can be done in several ways. One option is to have a dedicated system that automatically runs all unit tests after every continuous integration build, or at least once a night. Such a system must send out e-mails to notify developers when unit tests are failing. Another option is to set up your local development environment so that unit tests are executed every time you compile your code. For this, unit tests should be kept small and very efficient. If you do have longer-running unit tests, put these separate, and let these be tested by a dedicated test system.
Now that you’ve read about unit testing in theory, it’s time to actually write some tests. The following example draws on the object pool implementation from Chapter 25. As a brief recap, the object pool is a class that can be used to avoid excessive object creation. By keeping track of already-created objects, the pool acts as a broker between code that needs a certain type of object and such objects that already exist.
The interface for the ObjectPool class is as follows; consult Chapter 25 for all the details.
template <typename T>class ObjectPool{public:ObjectPool() = default;virtual ~ObjectPool() = default;// Prevent assignment and pass-by-valueObjectPool(const ObjectPool<T>& src) = delete;ObjectPool<T>& operator=(const ObjectPool<T>& rhs) = delete;// The type of smart pointer returned by acquireObject().using Object = std::shared_ptr<T>;// Reserves and returns an object for use.Object acquireObject();private:// Stores the objects that are not currently in use by clients.std::queue<std::unique_ptr<T>> mFreeList;};
Microsoft Visual C++ comes with a built-in testing framework. The advantage of using a unit testing framework is that it allows the developer to focus on writing tests instead of dealing with setting up tests, building logic around tests, and gathering results. The following discussion is written for Visual C++ 2017.
To get started with the Visual C++ Testing Framework, you have to create a test project. The following steps explain how to test the ObjectPool class:
unittest1.cpp. Select this file in the Solution Explorer and delete it, because you will add your own files.ObjectPoolTest.h and ObjectPoolTest.cpp to the newly created test project.#include "stdafx.h" as the first line in ObjectPoolTest.cpp. (This line is required for the precompiled header feature of Visual C++.)Now you are ready to start adding unit tests to the code.
The most common way is to divide your unit tests into logical groups of tests, called test classes. You will now create a test class called ObjectPoolTest. The basic code in ObjectPoolTest.h for getting started is as follows:
#pragma once#include <CppUnitTest.h>TEST_CLASS(ObjectPoolTest){public:};
This code defines a test class called ObjectPoolTest, but the syntax is a bit different compared to standard C++. This is so that the framework can automatically discover all the tests.
If you need to perform any tasks that need to happen prior to running the tests defined in a test class, or to perform any cleanup after the tests have been executed, then you can implement an initialize method and a cleanup method. Here is an example:
TEST_CLASS(ObjectPoolTest){public:TEST_CLASS_INITIALIZE(setUp);TEST_CLASS_CLEANUP(tearDown);};
Because the tests for ObjectPool are relatively simple and isolated, empty definitions will suffice for setUp() and tearDown(), or you can simply remove them altogether. If you do need them, the beginning stage of the ObjectPoolTest.cpp source file is as follows:
#include "stdafx.h"#include "ObjectPoolTest.h"void ObjectPoolTest::setUp() { }void ObjectPoolTest::tearDown() { }
That’s all the initial code you need to start developing unit tests.
Because this may be your first exposure to the Visual C++ Testing Framework, or to unit tests at large, the first test will be a very simple one. It tests whether 0 < 1.
An individual unit test is just a method of a test class. To create a simple test, add its declaration to the ObjectPoolTest.h file:
TEST_CLASS(ObjectPoolTest){public:TEST_CLASS_INITIALIZE(setUp);TEST_CLASS_CLEANUP(tearDown);TEST_METHOD(testSimple); // Your first test!};
The implementation of this test uses Assert::IsTrue(), defined in the Microsoft::VisualStudio::CppUnitTestFramework namespace, to perform the actual test. In this case, the test claims that 0 is less than 1. Here is the updated ObjectPoolTest.cpp file:
#include "stdafx.h"#include "ObjectPoolTest.h"using namespace Microsoft::VisualStudio::CppUnitTestFramework;void ObjectPoolTest::setUp() { }void ObjectPoolTest::tearDown() { }void ObjectPoolTest::testSimple(){Assert::IsTrue(0 < 1);}
That’s it. Of course, most of your unit tests will do something a bit more interesting than a simple assert. As you will see, the common pattern is to perform some sort of calculation, and then assert that the result is the value you expect. With the Visual C++ Testing Framework, you don’t even need to worry about exceptions; the framework catches and reports them as necessary.
Build your solution by clicking Build ➪ Build Solution, and open the Test Explorer (Test ➪ Windows ➪ Test Explorer), shown in Figure 26-4.
After having built the solution, the Test Explorer automatically displays all discovered unit tests. In this case, it displays the testSimple unit test. You can run the tests by clicking the “Run All” link in the upper-left corner of the window. When you do that, the Test Explorer shows whether the unit tests succeed or fail. In this case, the single unit test succeeds, as shown in Figure 26-5.
If you modify the code to assert that 1 < 0, the test fails, and the Test Explorer reports the failure, as shown in Figure 26-6.
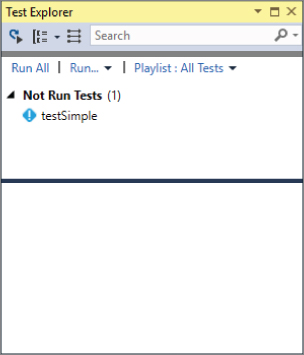
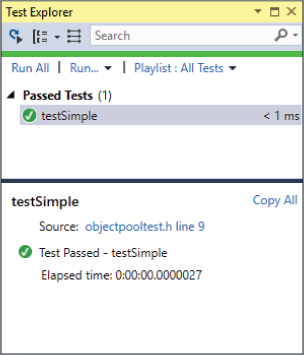
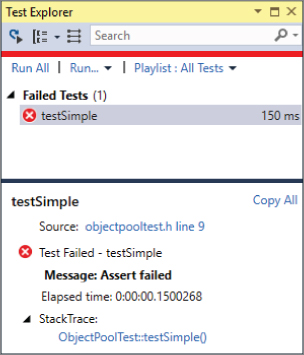
The lower part of the Test Explorer window displays useful information related to the selected unit test. In case of a failed unit test, it tells you exactly what failed. In this case, it says that an assertion failed. There is also a stack trace that was captured at the time the failure occurred. You can click the hyperlinks in that stack trace to jump directly to the offending line—very useful for debugging.
You can write negative tests, tests that do something that should fail. For example, you can write a negative test to test that a certain method throws an expected exception. The Visual C++ Testing Framework provides the Assert::ExpectException() function to handle expected exceptions. For example, the following unit test uses ExpectException() to execute a lambda expression that throws an std::invalid_argument exception. The template type parameter for ExpectException() specifies the type of exception to expect.
void ObjectPoolTest::testException(){Assert::ExpectException<std::invalid_argument>([]{throw std::invalid_argument("Error"); },L"Unknown exception caught.");}
Now that the framework is all set up and a simple test is working, it’s time to turn your attention to the ObjectPool class and write some code that actually tests it. All of the following tests will be added to ObjectPoolTest.h and ObjectPoolTest.cpp, just like the earlier initial test.
First, copy the ObjectPool.h header file next to the ObjectPoolTest.h file you created, and then add it to the project.
Before you can write the tests, you’ll need a helper class to use with the ObjectPool class. The ObjectPool creates objects of a certain type and hands them out to the caller as requested. Some of the tests will need to check if a retrieved object is the same as a previously retrieved object. One way to do this is to create a pool of serial objects—objects that have a monotonically increasing serial number. The following code shows the Serial.h header file defining such a class:
#include <cstddef> // For size_tclass Serial{public:Serial();size_t getSerialNumber() const;private:static size_t sNextSerial;size_t mSerialNumber;};
And here are the implementations in Serial.cpp:
#include "stdafx.h"#include "Serial.h"size_t Serial::sNextSerial = 0; // The first serial number is 0.Serial::Serial(): mSerialNumber(sNextSerial++) // A new object gets the next serial number.{}size_t Serial::getSerialNumber() const{return mSerialNumber;}
Now, on to the tests! As an initial sanity check, you might want a test that creates an object pool. If any exceptions are thrown during creation, the Visual C++ Testing Framework will report an error:
void ObjectPoolTest::testCreation(){ObjectPool<Serial> myPool;}
Don’t forget to add a TEST_METHOD(testCreation); statement to the header file. This holds for all subsequent tests as well. You also need to add an include for "ObjectPool.h" and for "Serial.h" to the ObjectPoolTest.cpp source file.
A second test, testAcquire(), tests a specific piece of public functionality: the ability of the ObjectPool to give out an object. In this case, there is not much to assert. To prove validity of the resulting Serial reference, the test asserts that its serial number is greater than or equal to zero:
void ObjectPoolTest::testAcquire(){ObjectPool<Serial> myPool;auto serial = myPool.acquireObject();Assert::IsTrue(serial->getSerialNumber() >= 0);}
The next test is a bit more interesting. The ObjectPool should not give out the same Serial object twice (unless it is released back to the pool). This test checks the exclusivity property of the ObjectPool by retrieving a number of objects from the pool. The retrieved objects are stored in a vector to make sure they aren’t automatically released back to the pool at the end of each for loop iteration. If the pool is properly dishing out unique objects, none of their serial numbers should match. This implementation uses the vector and set containers from the Standard Library. Consult Chapter 17 for details if you are unfamiliar with these containers. The code is written according to the AAA principle: Arrange, Act, Assert; the test first sets up everything for the test to run, then does some work (retrieving a number of objects from the pool), and finally asserts the expected result (all serial numbers are different).
void ObjectPoolTest::testExclusivity(){ObjectPool<Serial> myPool;const size_t numberOfObjectsToRetrieve = 10;std::vector<ObjectPool<Serial>::Object> retrievedSerials;std::set<size_t> seenSerialNumbers;for (size_t i = 0; i < numberOfObjectsToRetrieve; i++) {auto nextSerial = myPool.acquireObject();// Add the retrieved Serial to the vector to keep it 'alive',// and add the serial number to the set.retrievedSerials.push_back(nextSerial);seenSerialNumbers.insert(nextSerial->getSerialNumber());}// Assert that all retrieved serial numbers are different.Assert::AreEqual(numberOfObjectsToRetrieve, seenSerialNumbers.size());}
The final test (for now) checks the release functionality. Once an object is released, the ObjectPool can give it out again. The pool shouldn’t create additional objects until it has recycled all released objects.
The test first retrieves ten Serial objects from the pool, stores them in a vector to keep them alive, records the serial number of the last retrieved Serial, and finally clears the vector to return all retrieved objects back to the pool.
The second phase of the test again retrieves ten objects from the pool and stores them in a vector to keep them alive. All these retrieved objects must have a serial number less than or equal to the last serial number retrieved during the first phase of the test. After retrieving ten objects, one additional object is retrieved. This object should have a new serial number.
Finally, two assertions assert that all ten objects were recycled, and that the eleventh object had a new serial number.
void ObjectPoolTest::testRelease(){ObjectPool<Serial> myPool;const size_t numberOfObjectsToRetrieve = 10;std::vector<ObjectPool<Serial>::Object> retrievedSerials;for (size_t i = 0; i < numberOfObjectsToRetrieve; i++) {// Add the retrieved Serial to the vector to keep it 'alive'.retrievedSerials.push_back(myPool.acquireObject());}size_t lastSerialNumber = retrievedSerials.back()->getSerialNumber();// Release all objects back to the pool.retrievedSerials.clear();// The above loop has created ten Serial objects, with serial// numbers 0-9, and released all ten Serial objects back to the pool.// The next loop first again retrieves ten Serial objects. The serial// numbers of these should all be <= lastSerialNumber.// The Serial object acquired after that should have a new serial number.bool wronglyNewObjectCreated = false;for (size_t i = 0; i < numberOfObjectsToRetrieve; i++) {auto nextSerial = myPool.acquireObject();if (nextSerial->getSerialNumber() > lastSerialNumber) {wronglyNewObjectCreated = true;break;}retrievedSerials.push_back(nextSerial);}// Acquire one more Serial object, which should have a serial// number > lastSerialNumber.auto anotherSerial = myPool.acquireObject();bool newObjectCreated =(anotherSerial->getSerialNumber() > lastSerialNumber);Assert::IsFalse(wronglyNewObjectCreated);Assert::IsTrue(newObjectCreated);}
If you add all these tests and run them, the Test Explorer should look like Figure 26-7. Of course, if one or more tests fail, you are presented with the quintessential issue in unit testing: is it the test or the code that is broken?
The Visual C++ Testing Framework makes it easy to debug unit tests that are failing. The Test Explorer shows a stack trace captured at the time a unit test failed, containing hyperlinks pointing directly to offending lines.

However, sometimes it is useful to run a unit test directly in the debugger so that you can inspect variables at run time, step through the code line by line, and so on. To do this, you put a breakpoint on some line of code in your unit test. Then, you right-click the unit test in the Test Explorer and click Debug Selected Tests. The testing framework starts running the selected tests in the debugger and breaks at your breakpoint. From then on, you can step through the code however you want.
The tests in the previous section should have given you a good idea of how to start writing professional-quality tests for real code. It’s just the tip of the iceberg, though. The previous examples should help you think of additional tests that you could write for the ObjectPool class. For example, you should include a test that acquires and releases objects multiple times, and tests whether such objects are properly recycled.
There is no end to the number of unit tests you could write for a given piece of code, and that’s the best thing about unit tests. If you find yourself wondering how your code might react to a certain situation, that’s a unit test. If a particular aspect of your subsystem seems to be presenting problems, increase unit test coverage of that particular area. Even if you simply want to put yourself in the client’s shoes to see what it’s like to work with your class, writing unit tests is a great way to get a different perspective.
While unit tests are the best first line of defense against bugs, they are only part of the larger testing process. Higher-level tests focus on how pieces of the product work together, as opposed to the relatively narrow focus of unit tests. In a way, higher-level tests are more challenging to write because it’s less clear what tests need to be written. Still, you cannot really claim that the program works until you have tested how its pieces work together.
An integration test covers areas where components meet. Unlike a unit test, which generally acts on the level of a single class, an integration test usually involves two or more classes. Integration tests excel at testing interactions between two components, often written by two different programmers. In fact, the process of writing an integration test often reveals important incompatibilities in designs.
Because there are no hard-and-fast rules to determine what integration tests you should write, some examples might help you get a sense of when integration tests are useful. The following scenarios depict cases where an integration test is appropriate, but they do not cover every possible case. Just as with unit tests, over time you will refine your intuition for useful integration tests.
Suppose that your project includes a persistence layer that is used to save certain types of objects to disk and to read them back in. The hip way to serialize data is to use the JSON format, so a logical breakdown of components might include a JSON conversion layer sitting on top of a custom file API. Both of these components can be thoroughly unit tested. The JSON layer can have unit tests that ensure that different types of objects are correctly converted to JSON and populated from JSON. The file API can have tests that read, write, update, and delete files on disk.
When these modules start to work together, integration tests are appropriate. At the very least, you should have an integration test that saves an object to disk through the JSON layer, then reads it back in and does a comparison to the original. Because the test covers both modules, it is a basic integration test.
Imagine a program that contains a data structure shared by different components. For example, a stock-trading program can have a queue of buy-and-sell requests. Components related to receiving stock transaction requests can add orders to the queue, and components related to performing stock trades can take data off the queue. You can unit test the heck out of the queue class, but until it is tested with the actual components that will be using it, you really don’t know if any of your assumptions are wrong.
A good integration test uses the stock request components and the stock trade components as clients of the queue class. You can write some sample orders and make sure that they successfully enter and exit the queue through the client components.
Integration tests do not always need to occur at integration points in your own code. Many times, integration tests are written to test the interaction between your code and a third-party library.
For example, you may be using a database connection library to talk to a relational database system. Perhaps you built an object-oriented wrapper around the library that adds support for connection caching or provides a friendlier interface. This is a very important integration point to test because, even though the wrapper probably provides a more useful interface to the database, it introduces possible misuse of the original library.
In other words, writing a wrapper is a good thing, but writing a wrapper that introduces bugs is going to be a disaster.
When it comes to actually writing integration tests, there is often a fine line between integration and unit tests. If a unit test is modified so that it touches another component, is it suddenly an integration test? In a way, the answer is moot because a good test is a good test, regardless of the type of test. I recommend that you use the concepts of integration and unit testing as two approaches to testing, but avoid getting caught up in labeling the category of every single test.
In terms of implementation, integration tests are often written by using a unit testing framework, further blurring their distinction. As it turns out, unit testing frameworks provide an easy way to write a yes/no test and produce useful results. Whether the test is looking at a single unit of functionality or the intersection of two components hardly makes a difference from the framework’s point of view.
However, for performance and organizational reasons, you may want to attempt to separate unit tests from integration tests. For example, your group may decide that everybody must run integration tests before checking in new code, but be a bit laxer on running unrelated unit tests. Separating the two types of tests also increases the value of results. If a test failure occurs within the JSON class tests, it will be clear that it’s a bug in that class, not in the interaction between that class and the file API.
System tests operate at an even higher level than integration tests. These tests examine the program as a whole. System tests often make use of a virtual user that simulates a human being working with the program. Of course, the virtual user must be programmed with a script of actions to perform. Other system tests rely on scripts or a fixed set of inputs and expected outputs.
Much like unit and integration tests, an individual system test performs a specific test and expects a specific result. It is not uncommon to use system tests to make sure that different features work in combination with one another.
In theory, a fully system-tested program would contain a test for every permutation of every feature. This approach quickly grows unwieldy, but you should still make an effort to test many features in combination. For example, a graphics program could have a system test that imports an image, rotates it, performs a blur filter, converts it to black and white, and then saves it. The test would compare the saved image to a file that contains the expected result.
Unfortunately, few specific rules can be stated about system tests because they are highly dependent on the actual application. For applications that process files with no user interaction, system tests can be written much like unit and integration tests. For graphical programs, a virtual user approach may be best. For server applications, you might need to build stub clients that simulate network traffic. The important part is that you are actually testing real use of the program, not just a piece of it.
Regression testing is more of a testing concept than a specific type of test. The idea is that once a feature works, developers tend to put it aside and assume that it will continue to work. Unfortunately, new features and other code changes often conspire to break previously working functionality.
Regression tests are often put in place as a sanity check for features that are, more or less, complete and working. If the regression test is well written, it will cease to pass when a change is introduced that breaks the feature.
If your company has an army of quality-assurance testers, regression testing may take the form of manual testing. The tester acts as a user would and goes through a series of steps, gradually testing every feature that worked in the previous release. This approach is thorough and accurate if carefully performed, but is not particularly scalable.
At the other extreme, you could build a completely automated system that performs each function as a virtual user. This would be a scripting challenge, though several commercial and noncommercial packages exist to ease the scripting of various types of applications.
A middle ground is known as smoke testing. Some tests will only test a subset of the most important features that should work. The idea is that if something is broken, it should show up right away. If smoke tests pass, they could be followed by more rigorous manual or automated testing. The term smoke testing was introduced a long time ago, in electronics. After a circuit was built, with different components like vacuum tubes, resistors, and so on, the question was, “Is it assembled correctly?” A solution was to “plug it in, turn it on, and see if smoke comes out.” If smoke came out, the design might be wrong, or the assembly might be wrong. By seeing what part went up in smoke, the error could be determined.
Some bugs are like nightmares: they are both terrifying and recurring. Recurring bugs are frustrating and a poor use of engineering resources. Even if, for some reason, you decide not to write a suite of regression tests, you should still write regression tests for bugs that you fix.
By writing a test for a bug fix, you both prove that the bug is fixed and set up an alert that is triggered if the bug ever comes back (for example, if your change is rolled back or otherwise undone, or if two branches are not merged correctly into the main development branch). When a regression test of a previously fixed bug fails, it should be easy to fix because the regression test can refer to the original bug number and describe how it was fixed the first time.
As a software engineer, your role in testing may range anywhere from basic unit testing responsibility to complete management of an automated test system. Because testing roles and styles vary so much, here are several tips from my experience that may help you in different testing situations:
The most important tip I can give you is to remember that testing is a part of software development. If you agree with that and accept it before you start coding, it won’t be quite as unexpected when the feature is finished, but there is still more work to do to prove that it works.
This chapter covered the basic information that all professional programmers should know about testing. Unit testing in particular is the easiest and most effective way to increase the quality of your own code. Higher-level tests provide coverage of use cases, synchronicity between modules, and protection against regressions. No matter what your role is with regard to testing, you should now be able to confidently design, create, and review tests at various levels.
Now that you know how to find bugs, it’s time to learn how to fix them. To that end, Chapter 27 covers techniques and strategies for effective debugging.
The first rule of debugging is to be honest with yourself and admit that your code will contain bugs! This realistic assessment enables you to put your best effort into preventing bugs from crawling into your code in the first place, while you simultaneously include the necessary features to make debugging as easy as possible.
A bug in a computer program is incorrect run-time behavior. This undesirable behavior includes both catastrophic and noncatastrophic bugs. Examples of catastrophic bugs are program death, data corruption, operating system failures, or some other horrific outcome. A catastrophic bug can also manifest itself external to the software or computer system running the software; for example, medical software might contain a catastrophic bug causing a massive radiation overdose to a patient. Noncatastrophic bugs are bugs that cause the program to behave incorrectly in more subtle ways; for example, a web browser might return the wrong web page, or a spreadsheet application might calculate the standard deviation of a column incorrectly.
There are also so-called cosmetic bugs, where something is visually not correct, but otherwise works correctly. For example, a button in a user interface is kept enabled when it shouldn’t be, but clicking it does nothing. All computations are perfectly correct, the program does not crash, but it doesn’t look as “nice” as it should.
The underlying cause, or root cause, of the bug is the mistake in the program that causes this incorrect behavior. The process of debugging a program includes both determining the root cause of the bug, and fixing the code so that the bug will not occur again.
It’s impossible to write completely bug-free code, so debugging skills are important. However, a few tips can help you to minimize the number of bugs.
override keyword, and so on. This makes it easier for other people to understand your code.Your programs should contain features that enable easier debugging when the inevitable bugs arise. This section describes these features and presents sample implementations, where appropriate, that you can incorporate into your own programs.
Imagine this scenario: You have just released a new version of your flagship product, and one of the first users reports that the program “stopped working.” You attempt to pry more information from the user, and eventually discover that the program died in the middle of an operation. The user can’t quite remember what he was doing, or if there were any error messages. How will you debug this problem?
Now imagine the same scenario, but in addition to the limited information from the user, you are also able to examine the error log on the user’s computer. In the log you see a message from your program that says, “Error: unable to open config.xml file.” Looking at the code near the spot where that error message was generated, you find a line in which you read from the file without checking whether the file was opened successfully. You’ve found the root cause of your bug!
Error logging is the process of writing error messages to persistent storage so that they will be available following an application, or even machine, death. Despite the example scenario, you might still have doubts about this strategy. Won’t it be obvious by your program’s behavior if it encounters errors? Won’t the user notice if something goes wrong? As the preceding example shows, user reports are not always accurate or complete. In addition, many programs, such as the operating system kernel and long-running daemons like inetd or syslogd on Unix, are not interactive and run unattended on a machine. The only way these programs can communicate with users is through error logging. In many cases, a program might also want to automatically recover from certain errors, and hide those errors from the user. Still, having logs of those errors available can be invaluable to improve the overall stability of the program.
Thus, your program should log errors as it encounters them. That way, if a user reports a bug, you will be able to examine the log files on the machine to see if your program reported any errors prior to encountering the bug. Unfortunately, error logging is platform dependent: C++ does not contain a standard logging mechanism. Examples of platform-specific logging mechanisms include the syslog facility in Unix, and the event reporting API in Windows. You should consult the documentation for your development platform. There are also some open-source implementations of cross-platform logging frameworks. Here are two examples:
http://log4cpp.sourceforge.net/http://www.boost.org/Now that you’re convinced that logging is a great feature to add to your programs, you might be tempted to log messages every few lines in your code so that, in the event of any bug, you’ll be able to trace the code path that was executing. These types of log messages are appropriately called traces.
However, you should not write these traces to log files for two reasons. First, writing to persistent storage is slow. Even on systems that write the logs asynchronously, logging that much information will slow down your program. Second, and most important, most of the information that you would put in your traces is not appropriate for the end user to see. It will just confuse the user, leading to unwarranted service calls. That said, tracing is an important debugging technique under the correct circumstances, as described in the next section.
Here are some specific guidelines for the types of errors your programs should log:
It is also useful to log warnings, or recoverable errors, which allows you to investigate if you can possibly avoid them.
Most logging APIs allow you to specify a log level or error level, typically error, warning, and info. You can log non-error conditions under a log level that is less severe than “error.” For example, you might want to log significant state changes in your application, or startup and shutdown of the program. You also might consider giving your users a way to adjust the log level of your program at run time so that they can customize the amount of logging that occurs.
When debugging complicated problems, public error messages generally do not contain enough information. You often need a complete trace of the code path taken, or values of variables before the bug showed up. In addition to basic messages, it’s sometimes helpful to include the following information in debug traces:
You can add this tracing to your program through a special debug mode, or via a ring buffer. Both of these methods are explained in detail in the following sections. Note that in multithreaded programs you have to make your trace logging thread-safe. See Chapter 23 for details on multithreaded programming.
The first technique to add debug traces is to provide a debug mode for your program. In debug mode, the program writes trace output to standard error or to a file, and perhaps does extra checking during execution. There are several ways to add a debug mode to your program. Note that all these examples are writing traces in text format.
Start-time debug mode allows your application to run with or without debug mode depending on a command-line argument. This strategy includes the debug code in the “release” binary, and allows debug mode to be enabled at a customer site. However, it does require users to restart the program in order to run it in debug mode, which may prevent you from obtaining useful information about certain bugs.
The following example is a simple program implementing a start-time debug mode. This program doesn’t do anything useful; it is only for demonstrating the technique.
All logging functionality is wrapped in a Logger class. This class has two static data members: the name of the log file, and a Boolean saying whether logging is enabled or disabled. The class has a static public log() variadic template method. Variadic templates are discussed in Chapter 22. Note that the log file is opened, flushed, and closed on each call to log(). This might lower performance a bit; however, it does guarantee correct logging, which is more important.
class Logger{public:static void enableLogging(bool enable) { msLoggingEnabled = enable; }static bool isLoggingEnabled() { return msLoggingEnabled; }template<typename… Args>static void log(const Args&… args){if (!msLoggingEnabled)return;ofstream logfile(msDebugFileName, ios_base::app);if (logfile.fail()) {cerr << "Unable to open debug file!" << endl;return;}// Use a C++17 unary right fold, see Chapter 22.((logfile << args),…);logfile << endl;}private:static const string msDebugFileName;static bool msLoggingEnabled;};const string Logger::msDebugFileName = "debugfile.out";bool Logger::msLoggingEnabled = false;
The following helper macro is defined to make it easy to log something. It uses __func__, a predefined variable defined by the C++ standard that contains the name of the current function.
#define log(…) Logger::log(__func__, "(): ", __VA_ARGS__)This macro replaces every call to log() in your code with a call to Logger::log(). The macro automatically includes the function name as first argument to Logger::log(). For example, suppose you call the macro as follows:
log("The value is: ", value);The log() macro replaces this with the following:
Logger::log(__func__, "(): ", "The value is: ", value);Start-time debug mode needs to parse the command-line arguments to find out whether or not it should enable debug mode. Unfortunately, there is no standard functionality in C++ for parsing command-line arguments. This program uses a simple isDebugSet() function to check for the debug flag among all the command-line arguments, but a function to parse all command-line arguments would need to be more sophisticated.
bool isDebugSet(int argc, char* argv[]){for (int i = 1; i < argc; i++) {if (strcmp(argv[i], "-d") == 0) {return true;}}return false;}
Some arbitrary test code is used to exercise the debug mode in this example. Two classes are defined, ComplicatedClass and UserCommand. Both classes define an operator<< to write instances of them to a stream. The Logger class uses this operator to dump objects to the log file.
class ComplicatedClass { /* … */ };ostream& operator<<(ostream& ostr, const ComplicatedClass& src){ostr << "ComplicatedClass";return ostr;}class UserCommand { /* … */ };ostream& operator<<(ostream& ostr, const UserCommand& src){ostr << "UserCommand";return ostr;}
Here is some test code with a number of log calls:
UserCommand getNextCommand(ComplicatedClass* obj){UserCommand cmd;return cmd;}void processUserCommand(UserCommand& cmd){// details omitted for brevity}void trickyFunction(ComplicatedClass* obj){log("given argument: ", *obj);for (size_t i = 0; i < 100; ++i) {UserCommand cmd = getNextCommand(obj);log("retrieved cmd ", i, ": ", cmd);try {processUserCommand(cmd);} catch (const exception& e) {log("exception from processUserCommand(): ", e.what());}}}int main(int argc, char* argv[]){Logger::enableLogging(isDebugSet(argc, argv));if (Logger::isLoggingEnabled()) {// Print the command-line arguments to the tracefor (int i = 0; i < argc; i++) {log(argv[i]);}}ComplicatedClass obj;trickyFunction(&obj);// Rest of the function not shownreturn 0;}
There are two ways to run this application:
> STDebug> STDebug -d
Debug mode is activated only when the -d argument is specified on the command line.
Instead of enabling or disabling debug mode through a command-line argument, you could also use a preprocessor symbol such as DEBUG_MODE and #ifdefs to selectively compile the debug code into your program. In order to generate a debug version of this program, you would have to compile it with the symbol DEBUG_MODE defined. Your compiler should allow you to define symbols during compilation; consult your compiler’s documentation for details. For example, GCC allows you to specify –Dsymbol through the command-line. Microsoft VC++ allows you to specify the symbols through the Visual Studio IDE, or by specifying /D symbol if you use the VC++ command-line tools. Visual C++ automatically defines the _DEBUG symbol for debug builds. However, that symbol is Visual C++ specific, so the example in this section uses a custom symbol called DEBUG_MODE.
The advantage of this method is that your debug code is not compiled into the “release” binary, and so does not increase its size. The disadvantage is that there is no way to enable debugging at a customer site for testing or following the discovery of a bug.
An example implementation is given in CTDebug.cpp in the downloadable source code archive. One important remark on this implementation is that it contains the following definition for the log() macro:
#ifdef DEBUG_MODE#define log(…) Logger::log(__func__, "(): ", __VA_ARGS__)#else#define log(…)#endif
That is, if DEBUG_MODE is not defined, then all calls to log() are replaced with nothing, called no-ops.
The most flexible way to provide a debug mode is to allow it to be enabled or disabled at run time. One way to provide this feature is to supply an asynchronous interface that controls debug mode on the fly. This interface could be an asynchronous command that makes an interprocess call into the application (for example, using sockets, signals, or remote procedure calls). This interface could also take the form of a menu command in the user interface. C++ provides no standard way to perform interprocess communication, so an example of this technique is not shown.
Debug mode is useful for debugging reproducible problems and for running tests. However, bugs often appear when the program is running in non-debug mode, and by the time you or the customer enables debug mode, it is too late to gain any information about the bug. One solution to this problem is to enable tracing in your program at all times. You usually need only the most recent traces to debug a program, so you should store only the most recent traces at any point in a program’s execution. One way to provide for this is through careful use of log file rotations.
However, for performance reasons, it is better that your program doesn’t log these traces continuously to disk. Instead, it should store them in memory and provide a mechanism to dump all the trace messages to standard error or to a log file if the need arises.
A common technique is to use a ring buffer, also known as a circular buffer, to store a fixed number of messages, or messages in a fixed amount of memory. When the buffer fills up, it starts writing messages at the beginning of the buffer again, overwriting the older messages. This cycle can repeat indefinitely. The following sections provide an implementation of a ring buffer and show you how you can use it in your programs.
The following RingBuffer class provides a simple debug ring buffer. The client specifies the number of entries in the constructor, and adds messages with the addEntry() method. Once the number of entries exceeds the number allowed, new entries overwrite the oldest entries in the buffer. The buffer also provides the option to output entries to a stream as they are added to the buffer. The client can specify an output stream in the constructor, and can reset it with the setOutput() method. Finally, the operator<< streams the entire buffer to an output stream. This implementation uses a variadic template method. Variadic templates are discussed in Chapter 22.
class RingBuffer{public:// Constructs a ring buffer with space for numEntries.// Entries are written to *ostr as they are queued (optional).explicit RingBuffer(size_t numEntries = kDefaultNumEntries,std::ostream* ostr = nullptr);virtual ~RingBuffer() = default;// Adds an entry to the ring buffer, possibly overwriting the// oldest entry in the buffer (if the buffer is full).template<typename… Args>void addEntry(const Args&… args){std::ostringstream os;// Use a C++17 unary right fold, see Chapter 22.((os << args), …);addStringEntry(os.str());}// Streams the buffer entries, separated by newlines, to ostr.friend std::ostream& operator<<(std::ostream& ostr, RingBuffer& rb);// Streams entries as they are added to the given stream.// Specify nullptr to disable this feature.// Returns the old output stream.std::ostream* setOutput(std::ostream* newOstr);private:std::vector<std::string> mEntries;std::vector<std::string>::iterator mNext;std::ostream* mOstr;bool mWrapped;static const size_t kDefaultNumEntries = 500;void addStringEntry(std::string&& entry);};
This implementation of the ring buffer stores a fixed number of string objects. This approach certainly is not the most efficient solution. Other possibilities would be to provide a fixed number of bytes of memory for the buffer. However, this implementation should be sufficient unless you’re writing a high-performance application.
For multithreaded programs, it’s useful to add the ID of the thread and a timestamp to each trace entry. Of course, the ring buffer has to be made thread-safe before using it in a multithreaded application. See Chapter 23 for multithreaded programming.
Here are the implementations:
// Initialize the vector to hold exactly numEntries. The vector size// does not need to change during the lifetime of the object.// Initialize the other members.RingBuffer::RingBuffer(size_t numEntries, ostream* ostr): mEntries(numEntries), mOstr(ostr), mWrapped(false){if (numEntries == 0)throw invalid_argument("Number of entries must be > 0.");mNext = begin(mEntries);}// The addStringEntry algorithm is pretty simple: add the entry to the next// free spot, then reset mNext to indicate the free spot after// that. If mNext reaches the end of the vector, it starts over at 0.//// The buffer needs to know if the buffer has wrapped or not so// that it knows whether to print the entries past mNext in operator<<.void RingBuffer::addStringEntry(string&& entry){// If there is a valid ostream, write this entry to it.if (mOstr) {*mOstr << entry << endl;}// Move the entry to the next free spot and increment// mNext to point to the free spot after that.*mNext = std::move(entry);++mNext;// Check if we've reached the end of the buffer. If so, we need to wrap.if (mNext == end(mEntries)) {mNext = begin(mEntries);mWrapped = true;}}// Set the output stream.ostream* RingBuffer::setOutput(ostream* newOstr){return std::exchange(mOstr, newOstr);}// operator<< uses an ostream_iterator to "copy" entries directly// from the vector to the output stream.//// operator<< must print the entries in order. If the buffer has wrapped,// the earliest entry is one past the most recent entry, which is the entry// indicated by mNext. So, first print from entry mNext to the end.//// Then (even if the buffer hasn't wrapped) print from beginning to mNext-1.ostream& operator<<(ostream& ostr, RingBuffer& rb){if (rb.mWrapped) {// If the buffer has wrapped, print the elements from// the earliest entry to the end.copy(rb.mNext, end(rb.mEntries), ostream_iterator<string>(ostr, "\n"));}// Now, print up to the most recent entry.// Go up to mNext because the range is not inclusive on the right side.copy(begin(rb.mEntries), rb.mNext, ostream_iterator<string>(ostr, "\n"));return ostr;}
In order to use the ring buffer, you can create an instance of it and start adding messages to it. When you want to print the buffer, just use operator<< to print it to the appropriate ostream. Here is the earlier start-time debug mode program modified to use a ring buffer instead. Changes are highlighted. The definitions of the ComplicatedClass and UserCommand classes, and the functions getNextCommand(), processUserCommand(), and trickyFunction() are not shown. They are exactly the same as before.
RingBuffer debugBuf;#define log(…) debugBuf.addEntry(__func__, "(): ", __VA_ARGS__)int main(int argc, char* argv[]){// Log the command-line argumentsfor (int i = 0; i < argc; i++) {log(argv[i]);}ComplicatedClass obj;trickyFunction(&obj);// Print the current contents of the debug buffer to coutcout << debugBuf;return 0;}
Storing trace debug messages in memory is a great start, but in order for them to be useful, you need a way to access these traces for debugging.
Your program should provide a “hook” to tell it to export the messages. This hook could be similar to the interface you would use to enable debugging at run time. Additionally, if your program encounters a fatal error that causes it to exit, it could export the ring buffer automatically to a log file before exiting.
Another way to retrieve these messages is to obtain a memory dump of the program. Each platform handles memory dumps differently, so you should consult a reference or expert for your platform.
The <cassert> header defines an assert macro. It takes a Boolean expression and, if the expression evaluates to false, prints an error message and terminates the program. If the expression evaluates to true, it does nothing.
Assertions allow you to “force” your program to exhibit a bug at the exact point where that bug originates. If you didn’t assert at that point, your program might proceed with those incorrect values, and the bug might not show up until much later. Thus, assertions allow you to detect bugs earlier than you otherwise would.
You could use assertions in your code whenever you are “assuming” something about the state of your variables. For example, if you call a library function that is supposed to return a pointer and claims never to return nullptr, throw in an assert after the function call to make sure that the pointer isn’t nullptr.
Note that you should assume as little as possible. For example, if you are writing a library function, don’t assert that the parameters are valid. Instead, check the parameters, and return an error code or throw an exception if they are invalid.
As a rule, assertions should only be used for cases that are truly problematic, and should therefore never be ignored when they occur during development. If you hit an assertion during development, fix it, don’t just disable the assertion.
Make sure your programs create crash dumps, also called memory dumps, core dumps, and so on. A crash dump is a dump file that is created when your application crashes. It contains information about which threads were running at the time of the crash, a call stack of all the threads, and so on. How you create such dumps is platform dependent, so you should consult the documentation of your platform, or use a third-party library that takes care of it for you. Breakpad1 is an example of such an open-source cross-platform library that can write and process crash dumps.
Also make sure you set up a symbol server and a source code server. The symbol server is used to store debugging symbols of released binaries of your software. These symbols are used later on to interpret crash dumps received from customers. The source code server, discussed in Chapter 24, stores all revisions of your source code. When debugging crash dumps, this source code server is used to download the correct source code for the revision of your software that created the crash dump.
The exact procedure of analyzing crash dumps depends on your platform and compiler, so consult their documentation.
From my personal experience, I have found that a crash dump is often worth more than a thousand bug reports.
The assertions discussed earlier in this chapter are evaluated at run time. static_assert() allows assertions evaluated at compile time. A call to static_assert() accepts two parameters: an expression to evaluate at compile time and a string. When the expression evaluates to false, the compiler issues an error that contains the given string. A simple example could be to check that you are compiling with a 64-bit compiler:
static_assert(sizeof(void*) == 8, "Requires 64-bit compilation.");If you compile this with a 32-bit compiler where a pointer is four bytes, the compiler issues an error that can look like this:
test.cpp(3): error C2338: Requires 64-bit compilation. Since C++17, the string parameter is optional, as in this example:
static_assert(sizeof(void*) == 8);In this case, if the expression evaluates to false, you get a compiler-dependent error message. For example, Microsoft Visual C++ 2017 gives the following error:
test.cpp(3): error C2607: static assertion failedAnother example where static_asserts are pretty powerful is in combination with type traits, which are discussed in Chapter 22. For example, if you write a function template or class template, you could use static_asserts together with type traits to issue compiler errors when template types don’t satisfy certain conditions. The following example requires that the template type for the process() function template has Base1 as a base class:
class Base1 {};class Base1Child : public Base1 {};class Base2 {};class Base2Child : public Base2 {};template<typename T>void process(const T& t){static_assert(is_base_of_v<Base1, T>, "Base1 should be a base for T.");}int main(){process(Base1());process(Base1Child());//process(Base2()); // Error//process(Base2Child()); // Error}
If you try to call process() with an instance of Base2 or Base2Child, the compiler issues an error that could look like this:
test.cpp(13): error C2338: Base1 should be a base for T.test.cpp(21) : see reference to function templateinstantiation 'void process<Base2>(const T &)' being compiledwith[T=Base2]
Debugging a program can be incredibly frustrating. However, with a systematic approach it becomes significantly easier. Your first step in trying to debug a program should always be to reproduce the bug. Depending on whether or not you can reproduce the bug, your subsequent approach will differ. The next four sections explain how to reproduce bugs, how to debug reproducible bugs, how to debug nonreproducible bugs, and how to debug regressions. Additional sections explain details about debugging memory errors and debugging multithreaded programs.
If you can reproduce the bug consistently, it will be much easier to determine the root cause. Finding the root cause of bugs that are not reproducible is difficult, if not impossible.
As a first step to reproduce the bug, run the program with exactly the same inputs as the run when the bug first appeared. Be sure to include all inputs, from the program’s startup to the time of the bug’s appearance. A common mistake is to attempt to reproduce the bug by performing only the triggering action. This technique may not reproduce the bug because the bug might be caused by an entire sequence of actions.
For example, if your web browser program dies when you request a certain web page, it may be due to memory corruption triggered by that particular request’s network address. On the other hand, it may be because your program records all requests in a queue, with space for one million entries, and this entry was number one million and one. Starting the program over and sending one request certainly wouldn’t trigger the bug in that case.
Sometimes it is impossible to emulate the entire sequence of events that leads to the bug. Perhaps the bug was reported by someone who can’t remember everything that she did. Alternatively, maybe the program was running for too long to emulate every input. In that case, do your best to reproduce the bug. It takes some guesswork, and can be time-consuming, but effort at this point will save time later in the debugging process. Here are some techniques you can try:
After you are able to reproduce the bug consistently, you should attempt to find the smallest sequence that triggers the bug. You can start with the minimum sequence, containing only the triggering action, and slowly expand the sequence to cover the entire sequence from startup until the bug is triggered. This will result in the simplest and most efficient test case to reproduce it, which makes it simpler to find the root cause of the problem, and easier to verify the fix.
When you can reproduce a bug consistently and efficiently, it’s time to figure out the problem in the code that causes the bug. Your goal at this point is to find the exact lines of code that trigger the problem. You can use two different strategies.
The debugging example at the end of this chapter demonstrates both these approaches.
Fixing bugs that are not reproducible is significantly more difficult than fixing reproducible bugs. You often have very little information and must employ a lot of guesswork. Nevertheless, a few strategies can aid you.
Once you have found the root cause of a nonreproducible bug, you should create a reproducible test case and move it to the “reproducible bugs” category. It is important to be able to reproduce a bug before you actually fix it. Otherwise, how will you test the fix? A common mistake when debugging nonreproducible bugs is to fix the wrong problem in the code. Because you can’t reproduce the bug, you don’t know if you’ve really fixed it, so you shouldn’t be surprised when it shows up again a month later.
If a feature contains a regression bug, it means that the feature used to work correctly, but stopped working due to the introduction of a bug.
A useful debugging technique for investigating regressions is to look at the change log of relevant files. If you know at what time the feature was still working, look at all the change logs since that time. You might notice something suspicious that could lead you to the root cause.
Another approach that can save you a lot of time when debugging regressions is to use a binary search approach with older versions of the software to try and figure out when it started to go wrong. You can use binaries of older versions if you keep them, or revert the source code to an older revision. Once you know when it started to go wrong, inspect the change logs to see what changed at that time. This mechanism is only possible when you can reproduce the bug.
Most catastrophic bugs, such as application death, are caused by memory errors. Many noncatastrophic bugs are triggered by memory errors as well. Some memory bugs are obvious. If your program attempts to dereference a nullptr pointer, the default action is to terminate the program. However, nearly every platform enables you to respond to catastrophic errors and take remedial action. The amount of effort you devote to the response depends on the importance of this kind of recovery to your end users. For example, a text editor really needs to make a best attempt to save the modified buffers (possibly under a “recovered” name), while for other programs, users may find the default behavior acceptable, even if it is unpleasant.
Some memory bugs are more insidious. If you write past the end of an array in C++, your program will probably not crash at that point. However, if that array was on the stack, you may have written into a different variable or array, changing values that won’t show up until later in the program. Alternatively, if the array was on the heap, you could cause memory corruption in the heap, which will cause errors later when you attempt to allocate or free more memory dynamically.
Chapter 7 introduces some of the common memory errors from the perspective of what to avoid when you’re coding. This section discusses memory errors from the perspective of identifying problems in code that exhibits bugs. You should be familiar with the discussion in Chapter 7 before continuing with this section.
In order to debug memory problems, you should be familiar with the types of errors that can occur. This section describes the major categories of memory errors. Each category lists different types of memory errors, including a small code example demonstrating each error, and a list of possible symptoms that you might observe. Note that a symptom is not the same thing as a bug: a symptom is an observable behavior caused by a bug.
The following table summarizes five major errors that involve freeing memory.
| ERROR TYPE | SYMPTOMS | EXAMPLE |
| Memory leak |
Process memory usage grows over time. Process runs more slowly over time. Eventually, depending on the OS, operations and system calls fail because of lack of memory. |
void memoryLeak(){ int* p = new int[1000]; return; // Bug! Not freeing p.} |
| Using mismatched allocation and free operations |
Does not usually cause a crash immediately. This type of error can cause memory corruption on some platforms, which might show up as a crash later in the program. Certain mismatches can also cause memory leaks. |
void mismatchedFree(){ int* p1 = (int*)malloc(sizeof(int)); int* p2 = new int; int* p3 = new int[1000]; delete p1; // BUG! Should use free() delete[] p2; // BUG! Should use delete free(p3); // BUG! Should use delete[]} |
| Freeing memory more than once | Can cause a crash if the memory at that location has been handed out in another allocation between the two calls to delete. | void doubleFree(){ int* p1 = new int[1000]; delete[] p1; int* p2 = new int[1000]; delete[] p1; // BUG! freeing p1 twice} // BUG! Leaking memory of p2 |
| Freeing unallocated memory | Will usually cause a crash. | void freeUnallocated(){ int* p = reinterpret_cast<int*>(10000); delete p; // BUG! p not a valid pointer.} |
| Freeing stack memory | Technically a special case of freeing unallocated memory. This will usually cause a crash. | void freeStack(){ int x; int* p = &x; delete p; // BUG! Freeing stack memory} |
The crashes mentioned in this table can have different manifestations depending on your platform, such as segmentation faults, bus errors, access violations, and so on.
As you can see, some of the errors do not cause immediate program termination. These bugs are more subtle, leading to problems later in the program’s execution.
Another category of memory errors involves the actual reading and writing of memory.
| ERROR TYPE | SYMPTOMS | EXAMPLE |
| Accessing invalid memory | Almost always causes the program to crash immediately. | void accessInvalid(){ int* p = reinterpret_cast<int*>(10000); *p = 5; // BUG! p is not a valid pointer.} |
| Accessing freed memory |
Does not usually cause a program crash. If the memory has been handed out in another allocation, this error type can cause “strange” values to appear unexpectedly. |
void accessFreed(){ int* p1 = new int; delete p1; int* p2 = new int; *p1 = 5; // BUG! The memory pointed to // by p1 has been freed.} |
| Accessing memory in a different allocation |
Does not cause a crash. This error type can cause “strange” and potentially dangerous values to appear unexpectedly. |
void accessElsewhere(){ int x, y[10], z; x = 0; z = 0; for (int i = 0; i <= 10; i++) { y[i] = 5; // BUG for i==10! element 10 // is past end of array. }} |
| Reading uninitialized memory | Does not cause a crash, unless you use the uninitialized value as a pointer and dereference it (as in the example). Even then, it will not always cause a crash. | void readUninitialized(){ int* p; cout << *p; // BUG! p is uninitialized} |
Memory-access errors don’t always cause a crash. They can instead lead to subtle errors, in which the program does not terminate but instead produces erroneous results. Erroneous results can lead to serious consequences, for example, when external devices (such as robotic arms, X-ray machines, radiation treatments, life support systems, and so on) are being controlled by the computer.
Note that the symptoms discussed here for both memory-freeing errors and memory-access errors are the default symptoms for release builds of your program. Debug builds will most likely behave differently, and when you run the program inside a debugger, the debugger might break into the code when an error occurs.
Memory-related bugs often show up in slightly different places in the code each time you run the program. This is usually the case with heap memory corruption. Heap memory corruption is like a time bomb, ready to explode at some attempt to allocate, free, or use memory on the heap. So, when you see a bug that is reproducible, but that shows up in slightly different places, you should suspect memory corruption.
If you suspect a memory bug, your best option is to use a memory-checking tool for C++. Debuggers often provide options to run the program while checking for memory errors. For example, if you run a debug build of your application in the Microsoft Visual C++ debugger, it will catch almost all types of errors discussed in the previous sections. Additionally, there are some excellent third-party tools such as Purify from Rational Software (now owned by IBM) and Valgrind for Linux (discussed in Chapter 7). Microsoft also provides a free download called Application Verifier, which can be used with release builds of your applications in a Windows environment. It is a run-time verification tool to help you find subtle programming errors like the previously discussed memory errors. These debuggers and tools work by interposing their own memory-allocation and -freeing routines in order to check for any misuse of dynamic memory, such as freeing unallocated memory, dereferencing unallocated memory, or writing off the end of an array.
If you don’t have a memory-checking tool at your disposal, and the normal strategies for debugging are not helping, you may need to resort to code inspection. First, narrow down the part of the code containing the bug. Then, as a general rule, look at all raw pointers. Provided that you work on moderate- to good-quality code, most pointers should already be wrapped in smart pointers. If you do encounter raw pointers, take a closer look at how they are used, because they might be the cause of the error. Here are some more items to look for in your code.
nullptr so that their destructors don’t try to free that memory.dynamic_casts.new is matched with exactly one call to delete. Similarly, every call to malloc, alloc, or calloc should be matched with one call to free, and every call to new[] should be matched with one call to delete[]. To avoid freeing memory multiple times or using freed memory, it’s recommended to set your pointer to nullptr after freeing its memory. Of course, the best solution is to avoid using raw pointers to handle ownership of resources, and instead use smart pointers.T* p = nullptr; or T* p = new T; but never T* p;. Better yet, use smart pointers!nullptr. Also here, the best solution is to use smart pointers.C++ includes a threading support library that provides mechanisms for threading and synchronization between threads. This threading support library is discussed in Chapter 23. Multithreaded C++ programs are common, so it is important to think about the special issues involved in debugging a multithreaded program. Bugs in multithreaded programs are often caused by variations in timings in the operating system scheduling, and can be difficult to reproduce. Thus, debugging multithreaded programs requires a special set of techniques.
<thread> header defines sleep_until() and sleep_for() in the std::this_thread namespace, which you can use to sleep. The time to sleep is specified as an std::time_point or an std::duration respectively, both part of the chrono library discussed in Chapter 20. Sleeping for several seconds right before releasing a lock, immediately before signaling a condition variable, or directly before accessing shared data can reveal race conditions that would otherwise go undetected. If this debugging technique reveals the root cause, it must be fixed, so that it works correctly after removing these forced sleeps and context switches. Never leave these forced sleeps and context switches in your code! That would be the wrong “fix” for the problem.This section presents a buggy program and shows you the steps to take in order to debug it and fix the problem.
Suppose that you’re part of a team writing a web page that allows users to search for the research articles that cite a particular paper. This type of service is useful for authors who are trying to find work similar to their own. Once they find one paper representing a related work, they can look for every paper that cites that one to find other related work.
In this project, you are responsible for the code that reads the raw citation data from text files. For simplicity, assume that the citation information for each paper is found in its own file. Furthermore, assume that the first line of each file contains the author, title, and publication information for the paper; that the second line is always empty; and that all subsequent lines contain the citations from the article (one on each line). Here is an example file for one of the most important papers in computer science:
Alan Turing, "On Computable Numbers, with an Application to the Entscheidungsproblem", Proceedings of the London Mathematical Society, Series 2, Vol.42 (1936-37), 230-265.Gödel, "Über formal unentscheidbare Sätze der Principia Mathematica und verwandter Systeme, I", Monatshefte Math. Phys., 38 (1931), 173-198.Alonzo Church. "An unsolvable problem of elementary number theory", American J. of Math., 58 (1936), 345-363.Alonzo Church. "A note on the Entscheidungsproblem", J. of Symbolic Logic, 1 (1936), 40-41.E.W. Hobson, "Theory of functions of a real variable (2nd ed., 1921)", 87-88.
You may decide to structure your program by writing an ArticleCitations class that reads the file and stores the information. This class stores the article information from the first line in one string, and the citations in a C-style array of strings.
The ArticleCitations class definition looks like this:
class ArticleCitations{public:ArticleCitations(std::string_view fileName);virtual ~ArticleCitations();ArticleCitations(const ArticleCitations& src);ArticleCitations& operator=(const ArticleCitations& rhs);std::string_view getArticle() const { return mArticle; }int getNumCitations() const { return mNumCitations; }std::string_view getCitation(int i) const { return mCitations[i]; }private:void readFile(std::string_view fileName);void copy(const ArticleCitations& src);std::string mArticle;std::string* mCitations;int mNumCitations;};
The implementation is as follows. Keep in mind that this program is buggy! Don’t use it verbatim or as a model.
ArticleCitations::ArticleCitations(string_view fileName): mCitations(nullptr), mNumCitations(0){// All we have to do is read the file.readFile(fileName);}ArticleCitations::ArticleCitations(const ArticleCitations& src){copy(src);}ArticleCitations& ArticleCitations::operator=(const ArticleCitations& rhs){// Check for self-assignment.if (this == &rhs) {return *this;}// Free the old memory.delete [] mCitations;// Copy the datacopy(rhs);return *this;}void ArticleCitations::copy(const ArticleCitations& src){// Copy the article name, author, etc.mArticle = src.mArticle;// Copy the number of citationsmNumCitations = src.mNumCitations;// Allocate an array of the correct sizemCitations = new string[mNumCitations];// Copy each element of the arrayfor (int i = 0; i < mNumCitations; i++) {mCitations[i] = src.mCitations[i];}}ArticleCitations::~ArticleCitations(){delete [] mCitations;}void ArticleCitations::readFile(string_view fileName){// Open the file and check for failure.ifstream inputFile(fileName.data());if (inputFile.fail()) {throw invalid_argument("Unable to open file");}// Read the article author, title, etc. line.getline(inputFile, mArticle);// Skip the white space before the citations start.inputFile >> ws;int count = 0;// Save the current position so we can return to it.streampos citationsStart = inputFile.tellg();// First count the number of citations.while (!inputFile.eof()) {// Skip white space before the next entry.inputFile >> ws;string temp;getline(inputFile, temp);if (!temp.empty()) {count++;}}if (count != 0) {// Allocate an array of strings to store the citations.mCitations = new string[count];mNumCitations = count;// Seek back to the start of the citations.inputFile.seekg(citationsStart);// Read each citation and store it in the new array.for (count = 0; count < mNumCitations; count++) {string temp;getline(inputFile, temp);if (!temp.empty()) {mCitations[count] = temp;}}} else {mNumCitations = -1;}}
The following program asks the user for a filename, constructs an ArticleCitations instance for that file, and passes this instance by value to the processCitations() function, which prints out all the information:
void processCitations(ArticleCitations cit){cout << cit.getArticle() << endl;int num = cit.getNumCitations();for (int i = 0; i < num; i++) {cout << cit.getCitation(i) << endl;}}int main(){while (true) {cout << "Enter a file name (\"STOP\" to stop): ";string fileName;cin >> fileName;if (fileName == "STOP") {break;}ArticleCitations cit(fileName);processCitations(cit);}return 0;}
You decide to test the program on the Alan Turing example (stored in a file called paper1.txt). Here is the output:
Enter a file name ("STOP" to stop): paper1.txtAlan Turing, "On Computable Numbers, with an Application to the Entscheidungsproblem", Proceedings of the London Mathematical Society, Series 2, Vol.42 (1936-37), 230-265.[ 4 empty lines omitted for brevity ]Enter a file name ("STOP" to stop): STOP
That doesn’t look right. There are supposed to be four citations printed instead of four blank lines.
For this bug, you decide to try log-based debugging, and because this is a console application, you decide to just print messages to cout. In this case, it makes sense to start by looking at the function that reads the citations from the file. If that doesn’t work right, then obviously the object won’t have the citations. You can modify readFile() as follows:
void ArticleCitations::readFile(string_view fileName){// Code omitted for brevity// First count the number of citations.cout << "readFile(): counting number of citations" << endl;while (!inputFile.eof()) {// Skip white space before the next entry.inputFile >> ws;string temp;getline(inputFile, temp);if (!temp.empty()) {cout << "Citation " << count << ": " << temp << endl;count++;}}cout << "Found " << count << " citations" << endl;cout << "readFile(): reading citations" << endl;if (count != 0) {// Allocate an array of strings to store the citations.mCitations = new string[count];mNumCitations = count;// Seek back to the start of the citations.inputFile.seekg(citationsStart);// Read each citation and store it in the new array.for (count = 0; count < mNumCitations; count++) {string temp;getline(inputFile, temp);if (!temp.empty()) {cout << temp << endl;mCitations[count] = temp;}}} else {mNumCitations = -1;}cout << "readFile(): finished" << endl;}
Running the same test with this program gives the following output:
Enter a file name ("STOP" to stop): paper1.txtreadFile(): counting number of citationsCitation 0: Gödel, "Über formal unentscheidbare Sätze der Principia Mathematica und verwandter Systeme, I", Monatshefte Math. Phys., 38 (1931), 173-198.Citation 1: Alonzo Church. "An unsolvable problem of elementary number theory", American J. of Math., 58 (1936), 345-363.Citation 2: Alonzo Church. "A note on the Entscheidungsproblem", J. of Symbolic Logic, 1 (1936), 40-41.Citation 3: E.W. Hobson, "Theory of functions of a real variable (2nd ed., 1921)", 87-88.Found 4 citationsreadFile(): reading citationsreadFile(): finishedAlan Turing, "On Computable Numbers, with an Application to the Entscheidungsproblem", Proceedings of the London Mathematical Society, Series 2, Vol.42 (1936-37), 230-265.[ 4 empty lines omitted for brevity ]Enter a file name ("STOP" to stop): STOP
As you can see from the output, the first time the program reads the citations from the file, in order to count them, it reads them correctly. However, the second time, they are not read correctly; nothing is printed between “readFile(): reading citations” and “readFile(): finished”. Why not? One way to delve deeper into this issue is to add some debugging code to check the state of the file stream after each attempt to read a citation:
void printStreamState(const istream& inputStream){if (inputStream.good()) {cout << "stream state is good" << endl;}if (inputStream.bad()) {cout << "stream state is bad" << endl;}if (inputStream.fail()) {cout << "stream state is fail" << endl;}if (inputStream.eof()) {cout << "stream state is eof" << endl;}}void ArticleCitations::readFile(string_view fileName){// Code omitted for brevity// First count the number of citations.cout << "readFile(): counting number of citations" << endl;while (!inputFile.eof()) {// Skip white space before the next entry.inputFile >> ws;printStreamState(inputFile);string temp;getline(inputFile, temp);printStreamState(inputFile);if (!temp.empty()) {cout << "Citation " << count << ": " << temp << endl;count++;}}cout << "Found " << count << " citations" << endl;cout << "readFile(): reading citations" << endl;if (count != 0) {// Allocate an array of strings to store the citations.mCitations = new string[count];mNumCitations = count;// Seek back to the start of the citations.inputFile.seekg(citationsStart);// Read each citation and store it in the new array.for (count = 0; count < mNumCitations; count++) {string temp;getline(inputFile, temp);printStreamState(inputFile);if (!temp.empty()) {cout << temp << endl;mCitations[count] = temp;}}} else {mNumCitations = -1;}cout << "readFile(): finished" << endl;}
When you run your program this time, you find some interesting information:
Enter a file name ("STOP" to stop): paper1.txtreadFile(): counting number of citationsstream state is goodstream state is goodCitation 0: Gödel, "Über formal unentscheidbare Sätze der Principia Mathematica und verwandter Systeme, I", Monatshefte Math. Phys., 38 (1931), 173-198.stream state is goodstream state is goodCitation 1: Alonzo Church. "An unsolvable problem of elementary number theory", American J. of Math., 58 (1936), 345-363.stream state is goodstream state is goodCitation 2: Alonzo Church. "A note on the Entscheidungsproblem", J. of Symbolic Logic, 1 (1936), 40-41.stream state is goodstream state is goodCitation 3: E.W. Hobson, "Theory of functions of a real variable (2nd ed., 1921)", 87-88.stream state is eofstream state is failstream state is eofFound 4 citationsreadFile(): reading citationsstream state is failstream state is failstream state is failstream state is failreadFile(): finishedAlan Turing, "On Computable Numbers, with an Application to the Entscheidungsproblem", Proceedings of the London Mathematical Society, Series 2, Vol.42 (1936-37), 230-265.[ 4 empty lines omitted for brevity ]Enter a file name ("STOP" to stop): STOP
It looks like the stream state is good until after the final citation is read for the first time. Because the paper1.txt file contains an empty last line, the while loop is executed one more time after having read the last citation. In this last loop, inputFile >> ws reads the white-space of the last line, which causes the stream state to become eof. Then, the code still tries to read a line using getline() which causes the stream state to become fail and eof. That is expected. What is not expected is that the stream state remains as fail after all attempts to read the citations a second time. That doesn’t appear to make sense at first: the code uses seekg() to seek back to the beginning of the citations before reading them a second time.
However, Chapter 13 explains that streams maintain their error states until you clear them explicitly; seekg() doesn’t clear the fail state automatically. When in an error state, streams fail to read data correctly, which explains why the stream state is also fail after trying to read the citations a second time. A closer look at the code reveals that it fails to call clear() on the istream after reaching the end of the file. If you modify the code by adding a call to clear(), it will read the citations properly.
Here is the corrected readFile() method without the debugging cout statements:
void ArticleCitations::readFile(string_view fileName){// Code omitted for brevityif (count != 0) {// Allocate an array of strings to store the citations.mCitations = new string[count];mNumCitations = count;// Clear the stream state.inputFile.clear();// Seek back to the start of the citations.inputFile.seekg(citationsStart);// Read each citation and store it in the new array.for (count = 0; count < mNumCitations; count++) {string temp;getline(inputFile, temp);if (!temp.empty()) {mCitations[count] = temp;}}} else {mNumCitations = -1;}}
Running the same test again on paper1.txt now shows you the correct four citations.
Now that your ArticleCitations class seems to work well on one citations file, you decide to blaze ahead and test some special cases, starting with a file with no citations. The file looks like this, and is stored in a file named paper2.txt:
Author with no citationsWhen you try to run your program on this file, depending on your version of Linux and your compiler, you might get a crash that looks something like the following:
Enter a file name ("STOP" to stop): paper2.txtterminate called after throwing an instance of 'std::bad_alloc'what(): std::bad_allocAborted (core dumped)
The message “core dumped” means that the program crashed. This time you decide to give the debugger a shot. The Gnu Debugger (GDB) is widely available on Unix and Linux platforms. First, you must compile your program with debugging information (-g with g++). Then you can launch the program under GDB. Here’s an example session using the debugger to find the root cause of this problem. This example assumes your compiled executable is called buggyprogram. Text that you have to type is shown in bold.
>gdb buggyprogram[ Start-up messages omitted for brevity ]Reading symbols from /home/marc/c++/gdb/buggyprogram…done.(gdb)runStarting program: buggyprogramEnter a file name ("STOP" to stop):paper2.txtterminate called after throwing an instance of 'std::bad_alloc'what(): std::bad_allocProgram received signal SIGABRT, Aborted.0x00007ffff7535c39 in raise () from /lib64/libc.so.6(gdb)
When the program crashes, the debugger breaks the execution, and allows you to poke around in the state of the program at that time. The backtrace or bt command shows the current stack trace. The last operation is at the top, with frame number zero (#0):
(gdb)bt#0 0x00007ffff7535c39 in raise () from /lib64/libc.so.6#1 0x00007ffff7537348 in abort () from /lib64/libc.so.6#2 0x00007ffff7b35f85 in __gnu_cxx::__verbose_terminate_handler() () from /lib64/libstdc++.so.6#3 0x00007ffff7b33ee6 in ?? () from /lib64/libstdc++.so.6#4 0x00007ffff7b33f13 in std::terminate() () from /lib64/libstdc++.so.6#5 0x00007ffff7b3413f in __cxa_throw () from /lib64/libstdc++.so.6#6 0x00007ffff7b346cd in operator new(unsigned long) () from /lib64/libstdc++.so.6#7 0x00007ffff7b34769 in operator new[](unsigned long) () from /lib64/libstdc++.so.6#8 0x00000000004016ea in ArticleCitations::copy (this=0x7fffffffe090, src=…) at ArticleCitations.cpp:40#9 0x00000000004015b5 in ArticleCitations::ArticleCitations (this=0x7fffffffe090, src=…)at ArticleCitations.cpp:16#10 0x0000000000401d0c in main () at ArticleCitationsTest.cpp:20
When you get a stack trace like this, you should try to find the first stack frame from the top that is in your own code. In this example, this is stack frame #8. From this frame, you can see that there seems to be a problem in the copy() method of ArticleCitations. This method is invoked because main() calls processCitations() and passes the argument by value, which triggers a call to the copy constructor, which calls copy(). Of course, in production code you should pass a const reference, but pass-by-value is used in this example of a buggy program. You can tell the debugger to switch to stack frame #8 with the frame command, which requires the index of the frame to jump to:
(gdb)frame 8#8 0x00000000004016ea in ArticleCitations::copy (this=0x7fffffffe090, src=…) at ArticleCitations.cpp:4040 mCitations = new string[mNumCitations];
This output shows that the following line caused a problem:
mCitations = new string[mNumCitations];Now, you can use the list command to show the code in the current stack frame around the offending line:
(gdb)list35 // Copy the article name, author, etc.36 mArticle = src.mArticle;37 // Copy the number of citations38 mNumCitations = src.mNumCitations;39 // Allocate an array of the correct size40 mCitations = new string[mNumCitations];41 // Copy each element of the array42 for (int i = 0; i < mNumCitations; i++) {43 mCitations[i] = src.mCitations[i];44 }
In GDB, you can print values available in the current scope with the print command. In order to find the root cause of the problem, you can try printing some of the variables. The error happens inside the copy() method, so checking the value of the src parameter is a good start:
(gdb)print src$1 = (const ArticleCitations &) @0x7fffffffe060: {_vptr.ArticleCitations = 0x401fb0 <vtable for ArticleCitations+16>,mArticle = "Author with no citations", mCitations = 0x7fffffffe080, mNumCitations = -1}
Ah-ha! Here’s the problem. This article isn’t supposed to have any citations. Why is mNumCitations set to the strange value -1? Take another look at the code in readFile() for the case where there are no citations. In that case, it looks like mNumCitations is erroneously set to -1. The fix is easy: you always need to initialize mNumCitations to 0, instead of setting it to -1 when there are no citations. Another problem is that readFile() can be called multiple times on the same ArticleCitations object, so you also need to free a previously allocated mCitations array. Here is the fixed code:
void ArticleCitations::readFile(string_view fileName){// Code omitted for brevitydelete [] mCitations;// Free previously allocated citations.mCitations = nullptr;mNumCitations = 0;if (count != 0) {// Allocate an array of strings to store the citations.mCitations = new string[count];mNumCitations = count;// Clear the stream state.inputFile.clear();// Seek back to the start of the citations.inputFile.seekg(citationsStart);// Code omitted for brevity}}
As this example shows, bugs don’t always show up right away. It often takes a debugger and some persistence to find them.
This section explains the same debugging procedure as described in the previous section, but uses the Microsoft Visual C++ 2017 debugger instead of GDB.
First, you need to create a project. Start VC++ and click File ➪ New ➪ Project. In the project template tree on the left, select Visual C++ ➪ Win32 (or Windows Desktop). Then select the Win32 Console Application (or Windows Console Application) template in the list in the middle of the window. At the bottom, you can specify a name for the project and a location where to save it. Specify ArticleCitations as the name, choose a folder in which to save the project, and click OK. A wizard opens.2 In this wizard, click Next, select Console application, select Empty Project, and click Finish.
Once your new project is created, you can see a list of project files in the Solution Explorer. If this docking window is not visible, go to View ➪ Solution Explorer. There should be no files in the solution right now. Right-click the ArticleCitations project in the Solution Explorer and click Add ➪ Existing Item. Add all the files from the 06_ArticleCitations\06_VisualStudio folder in the downloadable source code archive to the project. After this, your Solution Explorer should look similar to Figure 27-1.

VC++ 2017 does not yet automatically enable C++17 features yet. Because this example uses std::string_view from C++17, you have to tell VC++ to enable C++17 features. In the Solution Explorer window, right-click the ArticleCitations project and click Properties. In the properties window, go to Configuration Properties ➪ C/C++ ➪ Language, and set the C++ Language Standard option to “ISO C++17 Standard” or “ISO C++ Latest Draft Standard”, whichever is available in your version of Visual C++.
Visual C++ supports so-called precompiled headers, a topic outside the scope of this book. In general, I recommend to use precompiled headers if your compiler supports them. However, the ArticleCitations implementation does not use precompiled headers, so you have to disable that feature for this particular project. In the Solution Explorer window, right-click the ArticleCitations project and click Properties. In the properties window, go to Configuration Properties ➪ C/C++ ➪ Precompiled Headers, and set the Precompiled Header option to “Not Using Precompiled Headers.”
Now you can compile the program. Click Build ➪ Build Solution. Then copy the paper1.txt and paper2.txt test files to your ArticleCitations project folder, which is the folder containing the ArticleCitations.vcxproj file.
Run the application with Debug ➪ Start Debugging, and test the program by first specifying the paper1.txt file. It should properly read the file and output the result to the console. Then, test paper2.txt. The debugger breaks the execution with a message similar to Figure 27-2.
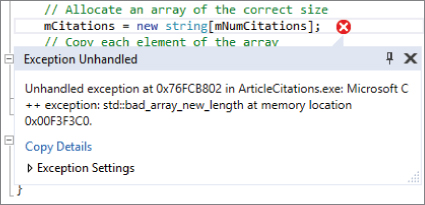
This immediately shows you the line where the crash happened. If you only see disassembly code, right-click anywhere on the disassembly and select Go To Source Code. You can now inspect variables by simply hovering your mouse over the name of a variable. If you hover over src, you’ll notice that mNumCitations is -1. The reason and the fix are exactly the same as in the earlier example.
You can come to the same conclusion by inspecting the call stack (Debug ➪ Windows ➪ Call Stack). In this call stack, you need to find the first line that contains code that you wrote. This is shown in Figure 27-3.
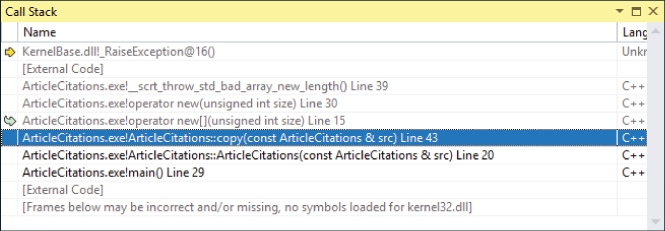
Just as with GDB, you see that the problem is in copy(). You can double-click that line in the call stack window to jump to the right place in the code.
Instead of hovering over variables to inspect their values, you can also use the Debug ➪ Windows ➪ Autos window, which shows a list of variables. Figure 27-4 shows this list with the src variable expanded to show its data members. From this window, you can also see that mNumCitations is -1.
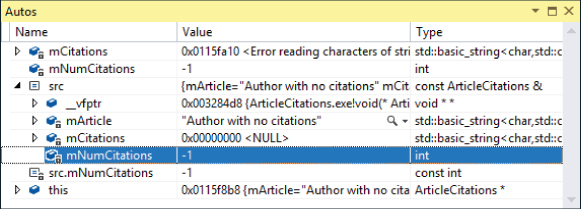
You might be inclined to disregard this example as too small to be representative of real debugging. Although the buggy code is not lengthy, many classes that you write will not be much bigger, even in large projects. Imagine if you had failed to test this example thoroughly before integrating it with the rest of the project. If these bugs showed up later, you and other engineers would have to spend more time narrowing down the problem before you could debug it as shown here. Additionally, the techniques shown in this example apply to all debugging, whether on a large or small scale.
The most important concept in this chapter is the fundamental law of debugging: avoid bugs when you’re coding, but plan for bugs in your code. The reality of programming is that bugs will appear. If you’ve prepared your program properly, with error logging, debug traces, and assertions, then the actual debugging will be significantly easier.
In addition to these techniques, this chapter also presented specific approaches for debugging bugs. The most important rule when actually debugging is to reproduce the problem. Then, you can use a symbolic debugger, or log-based debugging, to track down the root cause. Memory errors present particular difficulties, and account for the majority of bugs in legacy C++ code. This chapter described the various categories of memory bugs and their symptoms, and showed examples of debugging errors in a program.
Debugging is a hard skill to learn. To take your C++ skills to a professional level, you will have to practice debugging a lot.
Chapter 1 compares the size of the C standard to the size of the C++ standard. It is possible, and somewhat common, for a C programmer to memorize the entire C language. The keywords are few, the language features are minimal, and the behaviors are well defined. This is not the case with C++. Even C++ experts need to look things up sometimes. With that in mind, this section presents examples of coding techniques that are used in almost all C++ programs. When you remember the concept but forgot the syntax, turn to the following sections for a refresher.
Don’t remember how to get started? No problem—here is the definition of a simple class:
#pragma once// A simple class that illustrates class definition syntax.class Simple{public:Simple(); // Constructorvirtual ~Simple() = default; // Defaulted virtual destructor// Disallow assignment and pass-by-value.Simple(const Simple& src) = delete;Simple& operator=(const Simple& rhs) = delete;// Explicitly default move constructor and move assignment operator.Simple(Simple&& src) = default;Simple& operator=(Simple&& rhs) = default;virtual void publicMethod(); // Public methodint mPublicInteger; // Public data memberprotected:virtual void protectedMethod(); // Protected methodint mProtectedInteger = 41; // Protected data memberprivate:virtual void privateMethod(); // Private methodint mPrivateInteger = 42; // Private data memberstatic const int kConstant = 2; // Private constantstatic int sStaticInt; // Private static data member};
As Chapter 10 explains, it’s a good idea to always make at least your destructor virtual in case someone wants to derive from your class. It’s allowed to leave the destructor non-virtual, but only if you mark your class as final so that no other classes can derive from it. If you only want to make your destructor virtual but you don’t need any code inside the destructor, then you can explicitly default it, as in the Simple class example.
This example also demonstrates that you can explicitly delete or default special member functions. The copy constructor and copy assignment operator are deleted to prevent assignment and pass-by-value, while the move constructor and move assignment operator are explicitly defaulted.
Next, here is the implementation, including the initialization of the static data member:
#include "Simple.h"int Simple::sStaticInt = 0; // Initialize static data member.Simple::Simple() : mPublicInteger(40){// Implementation of constructor}void Simple::publicMethod() { /* Implementation of public method */ }void Simple::protectedMethod() { /* Implementation of protected method */ }void Simple::privateMethod() { /* Implementation of private method */ }
With C++17, you can remove the initialization of sStaticInt from the source file if you make it an inline variable instead, initialized in the class definition as follows:
static inline int sStaticInt = 0; // Private static data memberChapters 8 and 9 provide all the details for writing your own classes.
To derive from an existing class, you declare a new class that is an extension of another class. Here is the definition for a class called DerivedSimple, which derives from Simple:
#pragma once#include "Simple.h"// A derived class of the Simple class.class DerivedSimple : public Simple{public:DerivedSimple(); // Constructorvirtual void publicMethod() override; // Overridden methodvirtual void anotherMethod(); // Added method};
The implementation is as follows:
#include "DerivedSimple.h"DerivedSimple::DerivedSimple() : Simple(){// Implementation of constructor}void DerivedSimple::publicMethod(){// Implementation of overridden methodSimple::publicMethod(); // You can access base class implementations.}void DerivedSimple::anotherMethod(){// Implementation of added method}
Consult Chapter 10 for details on inheritance techniques.
The copy-and-swap idiom is discussed in detail in Chapter 9. It’s an idiom to implement a possibly throwing operation on an object with a strong exception-safety guarantee, that is, all-or-nothing. You simply create a copy of the object, modify that copy (can be a complex algorithm, possibly throwing exceptions), and finally, when no exceptions have been thrown, swap the copy with the original object. An assignment operator is an example of an operation for which you can use the copy-and-swap idiom. Your assignment operator first makes a local copy of the source object, then swaps this copy with the current object using only a non-throwing swap() implementation.
Here is a concise example of the copy-and-swap idiom used for a copy assignment operator. The class defines a copy constructor, a copy assignment operator, and a friend swap() function, which is marked as noexcept.
class CopyAndSwap{public:CopyAndSwap() = default;virtual ~CopyAndSwap(); // Virtual destructorCopyAndSwap(const CopyAndSwap& src); // Copy constructorCopyAndSwap& operator=(const CopyAndSwap& rhs); // Assignment operatorfriend void swap(CopyAndSwap& first, CopyAndSwap& second) noexcept;private:// Private data members…};
The implementation is as follows:
CopyAndSwap::~CopyAndSwap(){// Implementation of destructor}CopyAndSwap::CopyAndSwap(const CopyAndSwap& src){// This copy constructor can first delegate to a non-copy constructor// if any resource allocations have to be done. See the Spreadsheet// implementation in Chapter 9 for an example.// Make a copy of all data members}void swap(CopyAndSwap& first, CopyAndSwap& second) noexcept{using std::swap; // Requires <utility>// Swap each data member, for example:// swap(first.mData, second.mData);}CopyAndSwap& CopyAndSwap::operator=(const CopyAndSwap& rhs){// Check for self-assignmentif (this == &rhs) {return *this;}auto copy(rhs); // Do all the work in a temporary instanceswap(*this, copy); // Commit the work with only non-throwing operationsreturn *this;}
Consult Chapter 9 for a more detailed discussion.
If you’ve been working on a team that doesn’t use exceptions (for shame!) or if you’ve gotten used to Java-style exceptions, the C++ syntax may escape you. Here’s a refresher that uses the built-in exception class std::runtime_error. In most large programs, you will write your own exception classes.
#include <stdexcept>#include <iostream>void throwIf(bool throwIt){if (throwIt) {throw std::runtime_error("Here's my exception");}}int main(){try {throwIf(false); // doesn't throwthrowIf(true); // throws} catch (const std::runtime_error& e) {std::cerr << "Caught exception: " << e.what() << std::endl;return 1;}return 0;}
Chapter 14 discusses exceptions in more detail.
Complete details for file input are included in Chapter 13. Here is a quick sample program for file reading basics. This program reads its own source code and outputs it one token at a time:
#include <iostream>#include <fstream>#include <string>using namespace std;int main(){ifstream inputFile("FileRead.cpp");if (inputFile.fail()) {cerr << "Unable to open file for reading." << endl;return 1;}string nextToken;while (inputFile >> nextToken) {cout << "Token: " << nextToken << endl;}return 0;}
The following program outputs a message to a file, then reopens the file and appends another message. Additional details can be found in Chapter 13.
#include <iostream>#include <fstream>using namespace std;int main(){ofstream outputFile("FileWrite.out");if (outputFile.fail()) {cerr << "Unable to open file for writing." << endl;return 1;}outputFile << "Hello!" << endl;outputFile.close();ofstream appendFile("FileWrite.out", ios_base::app);if (appendFile.fail()) {cerr << "Unable to open file for appending." << endl;return 2;}appendFile << "Append!" << endl;return 0;}
Template syntax is one of the messiest parts of the C++ language. The most-forgotten piece of the template puzzle is that code that uses a class template needs to be able to see the method implementations as well as the class template definition. The same holds for function templates. For class templates, the usual technique to accomplish this is to simply put the implementations directly in the header file following the class template definition, as in the following example. Another technique is to put the implementations in a separate file, often with an .inl extension, and then #include that file as the last line in the class template header file. The following program shows a class template that wraps a reference to an object and adds get and set semantics to it. Here is the SimpleTemplate.h header file:
template <typename T>class SimpleTemplate{public:SimpleTemplate(T& object);const T& get() const;void set(const T& object);private:T& mObject;};template<typename T>SimpleTemplate<T>::SimpleTemplate(T& object) : mObject(object){}template<typename T>const T& SimpleTemplate<T>::get() const{return mObject;}template<typename T>void SimpleTemplate<T>::set(const T& object){mObject = object;}
The code can be tested as follows:
#include <iostream>#include <string>#include "SimpleTemplate.h"using namespace std;int main(){// Try wrapping an integer.int i = 7;SimpleTemplate<int> intWrapper(i);i = 2;cout << "wrapped value is " << intWrapper.get() << endl;// Try wrapping a string.string str = "test";SimpleTemplate<string> stringWrapper(str);str += "!";cout << "wrapped value is " << stringWrapper.get() << endl;return 0;}
Details about templates can be found in Chapters 12 and 22.
As you read this paragraph, thousands of C++ programmers throughout the world are solving problems that have already been solved. Someone in a cubicle in San Jose is writing a smart pointer implementation from scratch that uses reference counting. A young programmer on a Mediterranean island is designing a class hierarchy that could benefit immensely from the use of mixin classes.
As a Professional C++ programmer, you need to spend less of your time reinventing the wheel, and more of your time adapting reusable concepts in new ways. This section gives some examples of general-purpose approaches that you can apply directly to your own programs or customize for your needs.
RAII, or Resource Acquisition Is Initialization, is a simple yet very powerful concept. It is used to automatically free acquired resources when an RAII instance goes out of scope. This happens at a deterministic point in time. Basically, the constructor of a new RAII instance acquires ownership of a certain resource and initializes the instance with that resource, hence the name Resource Acquisition Is Initialization. The destructor automatically frees the acquired resource when the RAII instance is destroyed.
Here is an example of a File RAII class that safely wraps a C-style file handle (std::FILE) and automatically closes the file when the RAII instance goes out of scope. The RAII class also provides get(), release(), and reset() methods that behave similar to the same methods on certain Standard Library classes, such as std::unique_ptr.
#include <cstdio>class File final{public:File(std::FILE* file);~File();// Prevent copy construction and copy assignment.File(const File& src) = delete;File& operator=(const File& rhs) = delete;// Allow move construction and move assignment.File(File&& src) noexcept = default;File& operator=(File&& rhs) noexcept = default;// get(), release(), and reset()std::FILE* get() const noexcept;std::FILE* release() noexcept;void reset(std::FILE* file = nullptr) noexcept;private:std::FILE* mFile;};File::File(std::FILE* file) : mFile(file){}File::~File(){reset();}std::FILE* File::get() const noexcept{return mFile;}std::FILE* File::release() noexcept{std::FILE* file = mFile;mFile = nullptr;return file;}void File::reset(std::FILE* file /*= nullptr*/) noexcept{if (mFile) {fclose(mFile);}mFile = file;}
It can be used as follows:
File myFile(fopen("input.txt", "r"));As soon as the myFile instance goes out of scope, its destructor is called, and the file is automatically closed.
I recommend to never include a default constructor or to explicitly delete the default constructor for RAII classes. The reason can best be explained using a Standard Library RAII class that has a default constructor, std::unique_lock (see Chapter 23). Proper use of unique_lock is as follows:
class Foo{public:void setData();private:mutex mMutex;};void Foo::setData(){unique_lock<mutex> lock(mMutex);// …}
The setData() method uses the unique_lock RAII object to construct a local lock object that locks the mMutex data member and automatically unlocks that mutex at the end of the method.
However, because you do not directly use the lock variable after it has been defined, it is easy to make the following mistake:
void Foo::setData(){unique_lock<mutex>(mMutex);// …}
In this code, you accidentally forgot to give the unique_lock a name. This will compile, but it does not what you intended it to do! It will actually declare a local variable called mMutex (hiding the mMutex data member), and initialize it with a call to the unique_lock’s default constructor. The result is that the mMutex data member is not locked!
Double dispatch is a technique that adds an extra dimension to the concept of polymorphism. As described in Chapter 5, polymorphism lets the program determine behavior based on types at run time. For example, you could have an Animal class with a move() method. All Animals move, but they differ in terms of how they move. The move() method is defined for every derived class of Animal so that the appropriate method can be called, or dispatched, for the appropriate animal at run time without knowing the type of the animal at compile time. Chapter 10 explains how to use virtual methods to implement this run-time polymorphism.
Sometimes, however, you need a method to behave according to the run-time type of two objects, instead of just one. For example, suppose that you want to add a method to the Animal class that returns true if the animal eats another animal, and false otherwise. The decision is based on two factors: the type of animal doing the eating, and the type of animal being eaten. Unfortunately, C++ provides no language mechanism to choose a behavior based on the run-time type of more than one object. Virtual methods alone are insufficient for modeling this scenario because they determine a method, or behavior, depending on the run-time type of only the receiving object.
Some object-oriented languages provide the ability to choose a method at run time based on the run-time types of two or more objects. They call this feature multi-methods. In C++, however, there is no core language feature to support multi-methods, but you can use the double dispatch technique, which provides a way to make functions virtual for more than one object.
The most straightforward way to implement a method whose behavior depends on the run-time types of two different objects is to take the perspective of one of the objects and use a series of if/else constructs to check the type of the other. For example, you could implement a method called eats() in each class derived from Animal that takes the other animal as a parameter. The method is declared pure virtual in the base class as follows:
class Animal{public:virtual bool eats(const Animal& prey) const = 0;};
Each derived class implements the eats() method, and returns the appropriate value based on the type of the parameter. The implementation of eats() for several derived classes follows. Note that the Dinosaur avoids the series of if/else constructs because—according to the author—dinosaurs eat anything:
bool Bear::eats(const Animal& prey) const{if (typeid(prey) == typeid(Bear)) {return false;} else if (typeid(prey) == typeid(Fish)) {return true;} else if (typeid(prey) == typeid(Dinosaur)) {return false;}return false;}bool Fish::eats(const Animal& prey) const{if (typeid(prey) == typeid(Bear)) {return false;} else if (typeid(prey) == typeid(Fish)) {return true;} else if (typeid(prey) == typeid(Dinosaur)) {return false;}return false;}bool Dinosaur::eats(const Animal& prey) const{return true;}
This brute force approach works, and it’s probably the most straightforward technique for a small number of classes. However, there are several reasons why you might want to avoid this approach:
Donkey, the Bear class would continue to compile, but would return false when told to eat a Donkey, even though everybody knows that bears eat donkeys.You could attempt to use polymorphism with overloading to circumvent all of the cascading if/else constructs. Instead of giving each class a single eats() method that takes an Animal reference, why not overload the method for each derived class of Animal? The base class definition would look like this:
class Animal{public:virtual bool eats(const Bear&) const = 0;virtual bool eats(const Fish&) const = 0;virtual bool eats(const Dinosaur&) const = 0;};
Because the methods are pure virtual in the base class, each derived class is forced to implement the behavior for every other type of Animal. For example, the Bear class contains the following methods:
class Bear : public Animal{public:virtual bool eats(const Bear&) const override { return false; }virtual bool eats(const Fish&) const override { return true; }virtual bool eats(const Dinosaur&) const override { return false; }};
This approach initially appears to work, but it really solves only half of the problem. In order to call the proper eats() method on an Animal, the compiler needs to know the compile-time type of the animal being eaten. A call such as the following will be successful because the compile-time types of both the animal that eats and the animal that is eaten are known:
Bear myBear;Fish myFish;cout << myBear.eats(myFish) << endl;
The missing piece is that the solution is only polymorphic in one direction. You can access myBear through an Animal reference and the correct method will be called:
Bear myBear;Fish myFish;Animal& animalRef = myBear;cout << animalRef.eats(myFish) << endl;
However, the reverse is not true. If you pass an Animal reference to the eats() method, you will get a compilation error because there is no eats() method that takes an Animal. The compiler cannot determine, at compile time, which version to call. The following example does not compile:
Bear myBear;Fish myFish;Animal& animalRef = myFish;cout << myBear.eats(animalRef) << endl; // BUG! No method Bear::eats(Animal&)
Because the compiler needs to know which overloaded version of the eats() method is going to be called at compile time, this solution is not truly polymorphic. It would not work, for example, if you were iterating over an array of Animal references and passing each one to a call to eats().
The double dispatch technique is a truly polymorphic solution to the multiple-type problem. In C++, polymorphism is achieved by overriding methods in derived classes. At run time, methods are called based on the actual type of the object. The preceding single polymorphic attempt didn’t work because it attempted to use polymorphism to determine which overloaded version of a method to call instead of using it to determine on which class to call the method.
To begin, focus on a single derived class, perhaps the Bear class. The class needs a method with the following declaration:
virtual bool eats(const Animal& prey) const override;The key to double dispatch is to determine the result based on a method call on the argument. Suppose that the Animal class has a method called eatenBy(), which takes an Animal reference as a parameter. This method returns true if the current Animal gets eaten by the one passed in. With such a method, the definition of eats() becomes very simple:
bool Bear::eats(const Animal& prey) const{return prey.eatenBy(*this);}
At first, it looks like this solution adds another layer of method calls to the single polymorphic method. After all, each derived class still has to implement a version of eatenBy() for every derived class of Animal. However, there is a key difference. Polymorphism is occurring twice! When you call the eats() method on an Animal, polymorphism determines whether you are calling Bear::eats(), Fish::eats(), or one of the others. When you call eatenBy(), polymorphism again determines which class’s version of the method to call. It calls eatenBy() on the run-time type of the prey object. Note that the run-time type of *this is always the same as the compile-time type so that the compiler can call the correct overloaded version of eatenBy() for the argument (in this case Bear).
Following are the class definitions for the Animal hierarchy using double dispatch. Note that forward class declarations are necessary because the base class uses references to the derived classes:
// forward declarationsclass Fish;class Bear;class Dinosaur;class Animal{public:virtual bool eats(const Animal& prey) const = 0;virtual bool eatenBy(const Bear&) const = 0;virtual bool eatenBy(const Fish&) const = 0;virtual bool eatenBy(const Dinosaur&) const = 0;};class Bear : public Animal{public:virtual bool eats(const Animal& prey) const override;virtual bool eatenBy(const Bear&) const override;virtual bool eatenBy(const Fish&) const override;virtual bool eatenBy(const Dinosaur&) const override;};// The definitions for the Fish and Dinosaur classes are identical to the// Bear class, so they are not shown here.
The implementations follow. Note that each Animal-derived class implements the eats() method in the same way, but it cannot be factored up into the base class. The reason is that if you attempt to do so, the compiler won’t know which overloaded version of the eatenBy() method to call because *this would be an Animal, not a particular derived class. Method overload resolution is determined according to the compile-time type of the object, not its run-time type.
bool Bear::eats(const Animal& prey) const { return prey.eatenBy(*this); }bool Bear::eatenBy(const Bear&) const { return false; }bool Bear::eatenBy(const Fish&) const { return false; }bool Bear::eatenBy(const Dinosaur&) const { return true; }bool Fish::eats(const Animal& prey) const { return prey.eatenBy(*this); }bool Fish::eatenBy(const Bear&) const { return true; }bool Fish::eatenBy(const Fish&) const { return true; }bool Fish::eatenBy(const Dinosaur&) const { return true; }bool Dinosaur::eats(const Animal& prey) const { return prey.eatenBy(*this); }bool Dinosaur::eatenBy(const Bear&) const { return false; }bool Dinosaur::eatenBy(const Fish&) const { return false; }bool Dinosaur::eatenBy(const Dinosaur&) const { return true; }
Double dispatch is a concept that takes a bit of getting used to. I suggest playing with this code to adapt to the concept and its implementation.
Chapters 5 and 10 introduce the technique of using multiple inheritance to build mixin classes. Mixin classes add a small piece of extra behavior to a class in an existing hierarchy. You can usually spot a mixin class by its name, which ends in “-able”, for example, Clickable, Drawable, Printable, or Lovable.
Mixin classes contain actual code that can be reused by other classes. A single mixin class implements a well-defined piece of functionality. For example, you might have a mixin class called Playable that is mixed into certain types of media objects. The mixin class could, for example, contain most of the code to communicate with the computer’s sound drivers. By mixing in the class, the media object would get that functionality for free.
When designing a mixin class, you need to consider what behavior you are adding and whether it belongs in the object hierarchy or in a separate class. Using the previous example, if all media classes are playable, the base class should derive from Playable instead of mixing the Playable class into all of the derived classes. If only certain media classes are playable and they are scattered throughout the hierarchy, a mixin class makes sense.
One of the cases where mixin classes are particularly useful is when you have classes organized into a hierarchy on one axis, but they also contain similarities on another axis. For example, consider a war simulation game played on a grid. Each grid location can contain an Item with attack and defense capabilities and other characteristics. Some items, such as a Castle, are stationary. Others, such as a Knight or FloatingCastle, can move throughout the grid. When initially designing the object hierarchy, you might end up with something like Figure 28-1, which organizes the classes according to their attack and defense capabilities.
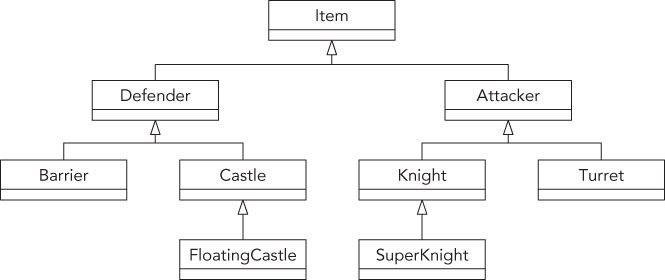
The hierarchy in Figure 28-1 ignores the movement functionality that certain classes contain. Building your hierarchy around movement would result in a structure similar to Figure 28-2.
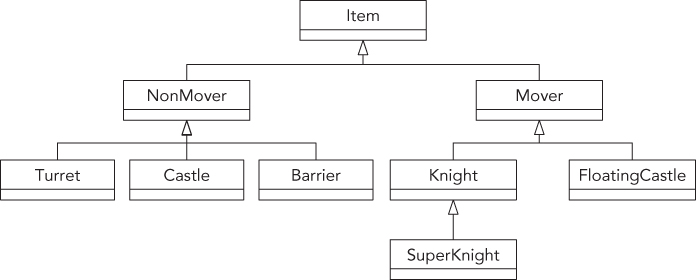
Of course, the design of Figure 28-2 throws away all the organization of Figure 28-1. What’s a good object-oriented programmer to do?
There are two common solutions for this problem. Assuming that you go with the first hierarchy, organized around attackers and defenders, you need some way to work movement into the equation. One possibility is that, even though only a portion of the derived classes support movement, you could add a move() method to the Item base class. The default implementation would do nothing. Certain derived classes would override move() to actually change their location on the grid.
The other approach is to write a Movable mixin class. The elegant hierarchy from Figure 28-1 could be preserved, but certain classes in the hierarchy would derive from Movable in addition to their parent. Figure 28-3 shows this design.

Writing a mixin class is no different from writing a normal class. In fact, it’s usually much simpler. Using the earlier war simulation, the Movable mixin class might look as follows:
class Movable{public:virtual void move() { /* Implementation to move an item… */ }};
This Movable mixin class implements the actual code to move an item on the grid. It also provides a type for Items that can be moved. This allows you to create, for example, an array of all movable items without knowing or caring what actual derived class of Item they belong to.
The code for using a mixin class is syntactically equivalent to multiple inheritance. In addition to deriving from your parent class in the main hierarchy, you also derive from the mixin class:
class FloatingCastle : public Castle, public Movable{// …};
This mixes in the functionality provided by the Movable mixin class into the FloatingCastle class. Now you have a class that exists in the most logical place in the hierarchy, but still shares commonality with objects elsewhere in the hierarchy.
When graphical operating systems first came on the scene in the 1980s, procedural programming was the norm. At the time, writing a GUI application usually involved manipulating complex data structures and passing them to OS-provided functions. For example, to draw a rectangle in a window, you might have had to populate a Window struct with the appropriate information and pass it to a drawRect() function.
As object-oriented programming (OOP) grew in popularity, programmers looked for a way to apply the OOP paradigm to GUI development. The result is known as an object-oriented framework. In general, a framework is a set of classes that are used collectively to provide an object-oriented interface to some underlying functionality. When talking about frameworks, programmers are usually referring to large class libraries that are used for general application development. However, a framework can really represent functionality of any size. If you write a suite of classes that provides database functionality for your application, those classes could be considered a framework.
The defining characteristic of a framework is that it provides its own set of techniques and patterns. Frameworks usually require a bit of learning to get started with because they have their own mental model. Before you can work with a large application framework, such as the Microsoft Foundation Classes (MFC), you need to understand its view of the world.
Frameworks vary greatly in their abstract ideas and in their actual implementation. Many frameworks are built on top of legacy procedural APIs, which may affect various aspects of their design. Other frameworks are written from the ground up with object-oriented design in mind. Some frameworks might ideologically oppose certain aspects of the C++ language. For example, a framework could consciously shun the notion of multiple inheritance.
When you start working with a new framework, your first task is to find out what makes it tick. To what design principles does it subscribe? What mental model are its developers trying to convey? What aspects of the language does it use extensively? These are all vital questions, even though they may sound like things that you’ll pick up along the way. If you fail to understand the design, model, or language features of the framework, you will quickly get into situations where you overstep the bounds of the framework.
An understanding of the framework’s design will also make it possible for you to extend it. For example, if the framework omits a feature, such as support for printing, you could write your own printing classes using the same model as the framework. By doing so, you retain a consistent model for your application, and you have code that can be reused by other applications.
A framework might use certain specific data types. For example, the MFC framework uses the CString data type to represent strings, instead of using the Standard Library std::string class. This does not mean that you have to switch to the data types provided by the framework for your entire code base. Instead, you should convert the data types on the boundaries between the framework code and the rest of your code.
As I mentioned earlier, frameworks vary in their approaches to object-oriented design. One common paradigm is known as model-view-controller, or MVC. This paradigm models the notion that many applications commonly deal with a set of data, one or more views on that data, and manipulation of the data.
In MVC, a set of data is called the model. In a race car simulator, the model would keep track of various statistics, such as the current speed of the car and the amount of damage it has sustained. In practice, the model often takes the form of a class with many getters and setters. The class definition for the model of the race car might look as follows:
class RaceCar{public:RaceCar();virtual ~RaceCar() = default;virtual double getSpeed() const;virtual void setSpeed(double speed);virtual double getDamageLevel() const;virtual void setDamageLevel(double damage);private:double mSpeed;double mDamageLevel;};
A view is a particular visualization of the model. For example, there could be two views on a RaceCar. The first view could be a graphical view of the car, and the second could be a graph that shows the level of damage over time. The important point is that both views are operating on the same data—they are different ways of looking at the same information. This is one of the main advantages of the MVC paradigm: by keeping data separated from its display, you can keep your code more organized, and easily create additional views.
The final piece to the MVC paradigm is the controller. The controller is the piece of code that changes the model in response to some event. For example, when the driver of the race car simulator runs into a concrete barrier, the controller instructs the model to bump up the car’s damage level and reduce its speed. The controller can also manipulate the view. For example, when the user scrolls a scrollbar in the user interface, the controller instructs the view to scroll its content.
The three components of MVC interact in a feedback loop. Actions are handled by the controller, which adjusts the model and/or views. If the model changes, it notifies the views to update them. This interaction is shown in Figure 28-4.
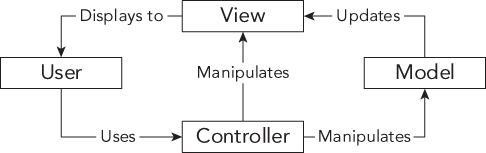
The model-view-controller paradigm has gained widespread support within many popular frameworks. Even nontraditional applications, such as web applications, are moving in the direction of MVC because it enforces a clear separation between data, the manipulation of data, and the displaying of data.
The MVC pattern has evolved into several different variants, such as model-view-presenter (MVP), model-view-adapter (MVA), model-view-viewmodel (MVVM), and so on.
In this chapter, you read about some of the common techniques that Professional C++ programmers use consistently in their projects. As you advance as a software developer, you will undoubtedly form your own collection of reusable classes and libraries. Discovering design techniques opens the door to developing and using patterns, which are higher-level reusable constructs. You will experience the many applications of patterns next in Chapter 29.
A design pattern is a standard approach to program organization that solves a general problem. C++ is an object-oriented language, so the design patterns of interest to C++ programmers are generally object-oriented patterns, which describe strategies for organizing objects and object relationships in your programs. These patterns are usually applicable to any object-oriented language, such as C++, C#, Java, or Smalltalk. In fact, if you are familiar with C# or Java programming, you will recognize many of these patterns.
Design patterns are less language-specific than are techniques. The difference between a pattern and a technique is admittedly fuzzy, and different books employ different definitions. This book defines a technique as a strategy particular to the C++ language, while a pattern is a more general strategy for object-oriented design applicable to any object-oriented language.
Note that many patterns have several different names. The distinctions between the patterns themselves can be somewhat vague, with different sources describing and categorizing them slightly differently. In fact, depending on the books or other sources you use, you may find the same name applied to different patterns. There is even disagreement as to which design approaches qualify as patterns. With a few exceptions, this book follows the terminology used in the seminal book Design Patterns: Elements of Reusable Object-Oriented Software, by Erich Gamma et al. (Addison-wesley Professional, 1994). However, other pattern names and variations are noted when appropriate.
The design pattern concept is a simple but powerful idea. Once you are able to recognize the recurring object-oriented interactions that occur in a program, finding an elegant solution becomes a matter of merely selecting the appropriate pattern to apply. This chapter describes several design patterns in detail and presents sample implementations.
Certain patterns go by different names or are subject to different interpretations. Any aspect of design is likely to provoke debate among programmers, and I believe that is a good thing. Don’t simply accept these patterns as the only way to accomplish a task—draw on their approaches and ideas to refine them and form new patterns.
The iterator pattern provides a mechanism for separating algorithms or operations from the data on which they operate. At first glance, this pattern seems to contradict the fundamental principle in object-oriented programming of grouping together in objects data and the behaviors that operate on that data. While that argument is true on a certain level, the iterator pattern does not advocate removing fundamental behaviors from objects. Instead, it solves two problems that commonly arise with tight coupling of data and behaviors.
The first problem with tightly coupling data and behaviors is that it precludes generic algorithms that work on a variety of objects, not all of which are in the same class hierarchy. In order to write generic algorithms, you need some standard mechanism to access the contents of the objects.
The second problem with tightly coupled data and behaviors is that it’s sometimes difficult to add new behaviors. At the very least, you need access to the source code for the data objects. However, what if the object hierarchy of interest is part of a third-party framework or library that you cannot change? It would be nice to be able to add an algorithm or operation that works on the data without modifying the original object hierarchy of classes that hold the data.
You’ve already seen an example of the iterator pattern in the Standard Library. Conceptually, iterators provide a mechanism for an operation or algorithm to access a container of elements in a sequence. The name comes from the English word iterate, which means “repeat.” It applies to iterators because they repeat the action of moving forward in the sequence to reach each new element. In the Standard Library, the generic algorithms use iterators to access the elements of the containers on which they operate. By defining a standard iterator interface, the Standard Library allows you to write algorithms that can work on any container that supplies an iterator with the appropriate interface. Thus, iterators allow you to write generic algorithms without modifying the classes that hold the data. Figure 29-1 shows an iterator as the central coordinator; operations depend on iterators, and data objects provide iterators.

Chapter 21 illustrates a detailed example of how to implement an iterator for a class that conforms to the Standard Library requirements, which means that its iterator can be used by the generic Standard Library algorithms.
The singleton is one of the simplest design patterns. In English, the word singleton means “one of a kind” or “individual.” It has a similar meaning in programming. The singleton pattern is a strategy for enforcing the existence of exactly one instance of a class in a program. Applying the singleton pattern to a class guarantees that only one object of that class will ever be created. The singleton pattern also specifies that that one object is globally accessible from anywhere in the program. Programmers usually refer to a class following the singleton pattern as a singleton class.
If your program relies on the assumption that there will be exactly one instance of a class, you could enforce that assumption with the singleton pattern.
However, the singleton pattern has a number of disadvantages that you need to be aware of. If you have multiple singletons, it’s not always easy to guarantee that they are initialized in the right order at program startup. It’s also not easy to ensure a singleton is still there when callers need it during program shutdown. On top of that, singleton classes introduce hidden dependencies, cause tight coupling, and complicate unit testing. In a unit test, for example, you might want to write a stub version (see Chapter 26) of a singleton, but given the nature of a typical singleton implementation, that’s hard to do. A more appropriate design pattern could be dependency injection. With dependency injection, you create an interface for each service you provide, and inject the interfaces a component needs into the component. Dependency injection allows mocking (stub versions), makes it easier to introduce multiple instances later on, allows for more complicated ways of constructing the single object than a typical singleton, for example using factories, and so on. Still, the singleton pattern is discussed here because you will encounter it.
Singletons can be useful for utility classes. Many applications have a notion of a logger—a class that is responsible for writing status information, debugging data, and errors to a central location. The ideal logging class has the following characteristics:
The singleton pattern is a good match for a logger because, even though the logger could be used in many different contexts and for many different purposes, it is conceptually a single instance. Implementing the logger class as a singleton also makes it easier to use because you never have to worry about which logger is the current one or how to get a hold of the current logger; there’s only one, so it’s a moot point!
There are two basic ways to implement singleton behavior in C++. The first approach uses a class with only static methods. Such a class needs no instantiation and is accessible from anywhere. The problem with this method is that it lacks a built-in mechanism for construction and destruction. However, technically, a class that uses all static methods isn’t really a singleton: it’s a nothington or a static class, to coin new terms. The term singleton implies that there is exactly one instance of the class. If all of the methods are static and the class is never instantiated at all, you cannot really call it a singleton anymore. So, this is not further discussed in this section.
The second approach uses access control levels to regulate the creation and access of one single instance of a class. This is a true singleton and discussed further with an example of a simple Logger class, which provides the following features:
To build a true singleton in C++, you can use the access control mechanisms as well as the static keyword. An actual Logger object exists at run time, and the class enforces that only one object is ever instantiated. Clients can always get a hold of that object through a static method called instance(). The class definition looks like this:
// Definition of a singleton logger class.class Logger final{public:enum class LogLevel {Error,Info,Debug};// Returns a reference to the singleton Logger object.static Logger& instance();// Prevent copy/move construction.Logger(const Logger&) = delete;Logger(Logger&&) = delete;// Prevent copy/move assignment operations.Logger& operator=(const Logger&) = delete;Logger& operator=(Logger&&) = delete;// Sets the log level.void setLogLevel(LogLevel level);// Logs a single message at the given log level.void log(std::string_view message, LogLevel logLevel);// Logs a vector of messages at the given log level.void log(const std::vector<std::string>& messages,LogLevel logLevel);private:// Private constructor and destructor.Logger();~Logger();// Converts a log level to a human readable string.std::string_view getLogLevelString(LogLevel level) const;static const char* const kLogFileName;std::ofstream mOutputStream;LogLevel mLogLevel = LogLevel::Error;};
This implementation is based on Scott Meyer’s singleton pattern. This means that the instance() method contains a local static instance of the Logger class. C++ guarantees that this local static instance is initialized in a thread-safe fashion, so you don’t need any manual thread synchronization in this version of the singleton pattern. These are so-called magic statics. Note that only the initialization is thread safe! If multiple threads are going to call methods on the Logger class, then you should make the Logger methods themselves thread safe as well. See Chapter 23 for a detailed discussion on synchronization mechanisms to make a class thread safe.
The implementation of the Logger class is fairly straightforward. Once the log file has been opened, each log message is written to it with the log level prepended. The constructor and destructor are called automatically when the static instance of the Logger class in the instance() method is created and destroyed. Because the constructor and destructor are private, no external code can create or delete a Logger. Here is the implementation:
#include "Logger.h"#include <stdexcept>using namespace std;const char* const Logger::kLogFileName = "log.out"; //*Logger& Logger::instance(){static Logger instance;return instance;}Logger::Logger(){mOutputStream.open(kLogFileName, ios_base::app);if (!mOutputStream.good()) {throw runtime_error("Unable to initialize the Logger!");}}Logger::~Logger(){mOutputStream << "Logger shutting down." << endl;mOutputStream.close();}void Logger::setLogLevel(LogLevel level){mLogLevel = level;}string_view Logger::getLogLevelString(LogLevel level) const{switch (level) {case LogLevel::Error:return "ERROR";case LogLevel::Info:return "INFO";case LogLevel::Debug:return "DEBUG";}throw runtime_error("Invalid log level.");}void Logger::log(string_view message, LogLevel logLevel){if (mLogLevel < logLevel) {return;}mOutputStream << getLogLevelString(logLevel).data()<< ": " << message << endl;}void Logger::log(const vector<string>& messages, LogLevel logLevel){if (mLogLevel < logLevel) {return;}for (const auto& message : messages) {log(message, logLevel);}}
If your compiler supports C++17 inline variables, introduced in Chapter 9, then you can remove the line marked with //* from the source file, and instead define it as an inline variable directly in the class definition, as follows:
class Logger final{// Omitted for brevitystatic inline const char* const kLogFileName = "log.out";};
The singleton Logger class can be tested as follows:
// Set log level to Debug.Logger::instance().setLogLevel(Logger::LogLevel::Debug);// Log some messages.Logger::instance().log("test message", Logger::LogLevel::Debug);vector<string> items = {"item1", "item2"};Logger::instance().log(items, Logger::LogLevel::Error);// Set log level to Error.Logger::instance().setLogLevel(Logger::LogLevel::Error);// Now that the log level is set to Error, logging a Debug// message will be ignored.Logger::instance().log("A debug message", Logger::LogLevel::Debug);
After executing, the file log.out contains the following lines:
DEBUG: test messageERROR: item1ERROR: item2Logger shutting down.
A factory in real life constructs tangible objects, such as tables or cars. Similarly, a factory in object-oriented programming constructs objects. When you use factories in your program, portions of code that want to create a particular object ask the factory for an instance of the object instead of calling the object constructor themselves. For example, an interior decorating program might have a FurnitureFactory object. When part of the code needs a piece of furniture such as a table, it would call the createTable() method of the FurnitureFactory object, which would return a new table.
At first glance, factories seem to lead to complicated designs without clear benefits. It appears that you’re only adding another layer of complexity to the program. Instead of calling createTable() on a FurnitureFactory, you could simply create a new Table object directly. However, factories can actually be quite useful. Instead of creating various objects all over the program, you centralize the object creation for a particular domain.
Another benefit of factories is that you can use them alongside class hierarchies to construct objects without knowing their exact class. As you’ll see in the following example, factories can run parallel to class hierarchies. This is not to say they must run parallel to class hierarchies. Factories may as well just create any number of concrete types.
Another reason to use a factory is that maybe the creation of your objects requires certain information, state, resources, and so on, owned by the factory. A factory can also be used if creating your objects requires a complex series of steps to be executed in the right order, or if all created objects need to be linked to other objects in a correct manner, and so on.
One of the main benefits is that factories abstract the object creation process; using dependency injection, you can easily substitute a different factory in your program. Just as you can use polymorphism with the created objects, you can use polymorphism with factories. The following example demonstrates this.
In the real world, when you talk about driving a car, you can do so without referring to the specific type of car. You could be discussing a Toyota or a Ford. It doesn’t matter, because both Toyotas and Fords are drivable. Now, suppose that you want a new car. You would then need to specify whether you wanted a Toyota or a Ford, right? Not always. You could just say, “I want a car,” and depending on where you were, you would get a specific car. If you said, “I want a car,” in a Toyota factory, chances are you’d get a Toyota. (Or you’d get arrested, depending on how you asked.) If you said, “I want a car,” in a Ford factory, you’d get a Ford.
The same concepts apply to C++ programming. The first concept, a generic car that’s drivable, is nothing new; it’s standard polymorphism, described in Chapter 5. You could write an abstract Car class that defines a virtual drive() method. Both Toyota and Ford could be derived classes of the Car class, as shown in Figure 29-2.
Your program could drive Cars without knowing whether they were really Toyotas or Fords. However, with standard object-oriented programming, the one place that you’d need to specify Toyota or Ford would be when you created the car. Here, you would need to call the constructor for one or the other. You couldn’t just say, “I want a car.” However, suppose that you also had a parallel class hierarchy of car factories. The CarFactory base class could define a virtual requestCar() method. The ToyotaFactory and FordFactory derived classes would override the requestCar() method to build a Toyota or a Ford. Figure 29-3 shows the CarFactory hierarchy.
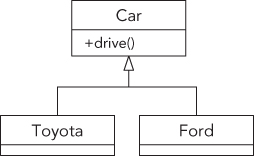
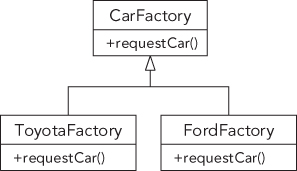
Now, suppose that there is one CarFactory object in a program. When code in the program, such as a car dealer, wants a new car, it calls requestCar() on the CarFactory object. Depending on whether that car factory is really a ToyotaFactory or a FordFactory, the code gets either a Toyota or a Ford. Figure 29-4 shows the objects in a car dealer program using a ToyotaFactory.

Figure 29-5 shows the same program, but with a FordFactory instead of a ToyotaFactory. Note that the CarDealer object and its relationship with the factory stay the same.

This example demonstrates using polymorphism with factories. When you ask the car factory for a car, you might not know whether it’s a Toyota factory or a Ford factory, but either way it will give you a Car that you can drive. This approach leads to easily extensible programs; simply changing the factory instance can allow the program to work on a completely different set of objects and classes.
One reason for using factories is that the type of the object you want to create may depend on some condition. For example, if you want a car, you might want to put your order into the factory that has received the fewest requests so far, regardless of whether the car you eventually get is a Toyota or a Ford. The following implementation shows how to write such factories in C++.
The first thing you’ll need is the hierarchy of cars. To keep this example concise, the Car class simply has an abstract method that returns a description of the car:
class Car{public:virtual ~Car() = default; // Always a virtual destructor!virtual std::string_view info() const = 0;};class Ford : public Car{public:virtual std::string_view info() const override { return "Ford"; }};class Toyota : public Car{public:virtual std::string_view info() const override { return "Toyota"; }};
The CarFactory base class is a bit more interesting. Each factory keeps track of the number of cars produced. When the public requestCar() method is called, the number of cars produced at the factory is increased by one, and the pure virtual createCar() method is called, which creates and returns a new car. The idea is that individual factories override createCar() to return the appropriate type of car. The CarFactory itself implements requestCar(), which takes care of updating the number of cars produced. The CarFactory also provides a public method to query the number of cars produced at each factory.
The class definitions for the CarFactory class and derived classes are as follows:
#include "Car.h"#include <cstddef>#include <memory>class CarFactory{public:virtual ~CarFactory() = default; // Always a virtual destructor!std::unique_ptr<Car> requestCar();size_t getNumberOfCarsProduced() const;protected:virtual std::unique_ptr<Car> createCar() = 0;private:size_t mNumberOfCarsProduced = 0;};class FordFactory : public CarFactory{protected:virtual std::unique_ptr<Car> createCar() override;};class ToyotaFactory : public CarFactory{protected:virtual std::unique_ptr<Car> createCar() override;};
As you can see, the derived classes simply override createCar() to return the specific type of car that they produce. The implementation of the CarFactory hierarchy is as follows:
// Increment the number of cars produced and return the new car.std::unique_ptr<Car> CarFactory::requestCar(){++mNumberOfCarsProduced;return createCar();}size_t CarFactory::getNumberOfCarsProduced() const{return mNumberOfCarsProduced;}std::unique_ptr<Car> FordFactory::createCar(){return std::make_unique<Ford>();}std::unique_ptr<Car> ToyotaFactory::createCar(){return std::make_unique<Toyota>();}
The implementation approach used in this example is called an abstract factory because the type of object created depends on which concrete derived class of the factory class is being used. A similar pattern can be implemented in a single class instead of a class hierarchy. In that case, a single create() method takes a type or string parameter from which it decides which object to create. For example, a CarFactory class could provide a requestCar() method that takes a string representing the type of car to build, and constructs the appropriate car.
The simplest way to use a factory is to instantiate it and to call the appropriate method, as in the following piece of code:
ToyotaFactory myFactory;auto myCar = myFactory.requestCar();cout << myCar->info() << endl; // Outputs Toyota
A more interesting example makes use of the virtual constructor idea to build a car in the factory that has the fewest cars produced. To do this, you can create a new factory, called LeastBusyFactory, that derives from CarFactory and that accepts a number of other CarFactory objects in its constructor. As all CarFactory classes have to do, LeastBusyFactory overrides the createCar() method. Its implementation finds the least busy factory in the list of factories passed to the constructor, and asks that factory to create a car. Here is the implementation of such a factory:
class LeastBusyFactory : public CarFactory{public:// Constructs a LeastBusyFactory instance, taking ownership of// the given factories.explicit LeastBusyFactory(vector<unique_ptr<CarFactory>>&& factories);protected:virtual unique_ptr<Car> createCar() override;private:vector<unique_ptr<CarFactory>> mFactories;};LeastBusyFactory::LeastBusyFactory(vector<unique_ptr<CarFactory>>&& factories): mFactories(std::move(factories)){if (mFactories.empty())throw runtime_error("No factories provided.");}unique_ptr<Car> LeastBusyFactory::createCar(){CarFactory* bestSoFar = mFactories[0].get();for (auto& factory : mFactories) {if (factory->getNumberOfCarsProduced() <bestSoFar->getNumberOfCarsProduced()) {bestSoFar = factory.get();}}return bestSoFar->requestCar();}
The following code makes use of this factory to build ten cars, whatever brand they might be, from the factory that has produced the least number of cars.
vector<unique_ptr<CarFactory>> factories;// Create 3 Ford factories and 1 Toyota factory.factories.push_back(make_unique<FordFactory>());factories.push_back(make_unique<FordFactory>());factories.push_back(make_unique<FordFactory>());factories.push_back(make_unique<ToyotaFactory>());// To get more interesting results, preorder some cars.factories[0]->requestCar();factories[0]->requestCar();factories[1]->requestCar();factories[3]->requestCar();// Create a factory that automatically selects the least busy// factory from a list of given factories.LeastBusyFactory leastBusyFactory(std::move(factories));// Build 10 cars from the least busy factory.for (size_t i = 0; i < 10; i++) {auto theCar = leastBusyFactory.requestCar();cout << theCar->info() << endl;}
When executed, the program prints out the make of each car produced:
FordFordFordToyotaFordFordFordToyotaFordFord
The results are rather predictable because the loop effectively iterates through the factories in a round-robin fashion. However, one could imagine a scenario where multiple dealers are requesting cars, and the current status of each factory isn’t quite so predictable.
You can also use the factory pattern for more than just modeling real-world factories. For example, consider a word processor in which you want to support documents in different languages, where each document uses a single language. There are many aspects of the word processor in which the choice of document language requires different support: the character set used in the document (whether or not accented characters are needed), the spell checker, the thesaurus, and the way the document is displayed, to name just a few. You could use factories to design a clean word processor by writing an abstract LanguageFactory base class and concrete factories for each language of interest, such as EnglishLanguageFactory and FrenchLanguageFactory. When the user specifies a language for a document, the program instantiates the appropriate language factory and attaches it to the document. From then on, the program doesn’t need to know which language is supported in the document. When it needs a language-specific piece of functionality, it can just ask the LanguageFactory. For example, when it needs a spell checker, it can call the createSpellchecker() method on the factory, which will return a spell checker in the appropriate language.
The proxy pattern is one of several patterns that divorce the abstraction of a class from its underlying representation. A proxy object serves as a stand-in for a real object. Such objects are generally used when using the real object would be time-consuming or impossible. For example, take a document editor. A document could contain several big objects, such as images. Instead of loading all those images when opening the document, the document editor could substitute all images with image proxies. These proxies don’t immediately load the images. Only when the user scrolls down in the document and reaches an image, does the document editor ask the image proxy to draw itself. At that time, the proxy delegates the work to the real image class, which loads the image.
Consider a networked game with a Player class that represents a person on the Internet who has joined the game. The Player class includes functionality that requires network connectivity, such as an instant messaging feature. If a player’s connection becomes slow or unresponsive, the Player object representing that person can no longer receive instant messages.
Because you don’t want to expose network problems to the user, it may be desirable to have a separate class that hides the networked parts of a Player. This PlayerProxy object would substitute for the actual Player object. Either clients of the class would use the PlayerProxy class at all times as a gatekeeper to the real Player class, or the system would substitute a PlayerProxy when a Player became unavailable. During a network failure, the PlayerProxy object could still display the player’s name and last-known state, and could continue to function when the original Player object could not. Thus, the proxy class hides some undesirable semantics of the underlying Player class.
The first step is defining an IPlayer interface containing the public interface for a Player.
class IPlayer{public:virtual std::string getName() const = 0;// Sends an instant message to the player over the network and// returns the reply as a string.virtual std::string sendInstantMessage(std::string_view message) const = 0;};
The Player class definition then becomes as follows. The sendInstantMessage() method of a Player requires network connectivity to properly function.
class Player : public IPlayer{public:virtual std::string getName() const override;// Network connectivity is required.virtual std::string sendInstantMessage(std::string_view message) const override;};
The PlayerProxy class also derives from IPlayer, and contains another IPlayer instance (the ‘real’ Player):
class PlayerProxy : public IPlayer{public:// Create a PlayerProxy, taking ownership of the given player.PlayerProxy(std::unique_ptr<IPlayer> player);virtual std::string getName() const override;// Network connectivity is optional.virtual std::string sendInstantMessage(std::string_view message) const override;private:std::unique_ptr<IPlayer> mPlayer;};
The constructor takes ownership of the given IPlayer:
PlayerProxy::PlayerProxy(std::unique_ptr<IPlayer> player): mPlayer(std::move(player)){}
The implementation of the PlayerProxy’s sendInstantMessage() method checks the network connectivity, and either returns a default string or forwards the request.
std::string PlayerProxy::sendInstantMessage(std::string_view message) const{if (hasNetworkConnectivity())return mPlayer->sendInstantMessage(message);elsereturn "The player has gone offline.";}
If a proxy is well written, using it should be no different from using any other object. For the PlayerProxy example, the code that uses the proxy could be completely unaware of its existence. The following function, designed to be called when the Player has won, could be dealing with an actual Player or a PlayerProxy. The code is able to handle both cases in the same way because the proxy ensures a valid result.
bool informWinner(const IPlayer& player){auto result = player.sendInstantMessage("You have won! Play again?");if (result == "yes") {cout << player.getName() << " wants to play again." << endl;return true;} else {// The player said no, or is offline.cout << player.getName() << " does not want to play again." << endl;return false;}}
The motivation for changing the abstraction given by a class is not always driven by a desire to hide functionality. Sometimes, the underlying abstraction cannot be changed but it doesn’t suit the current design. In this case, you can build an adaptor or wrapper class. The adaptor provides the abstraction that the rest of the code uses and serves as the bridge between the desired abstraction and the actual underlying code. Chapter 17 discusses how the Standard Library uses the adaptor pattern to implement containers like stack and queue in terms of other containers, such as deque and list.
For this adaptor pattern example, let’s assume a very basic Logger class. Here is the class definition:
class Logger{public:enum class LogLevel {Error,Info,Debug};Logger();virtual ~Logger() = default; // Always a virtual destructor!void log(LogLevel level, std::string message);private:// Converts a log level to a human readable string.std::string_view getLogLevelString(LogLevel level) const;};
And here are the implementations:
Logger::Logger(){cout << "Logger constructor" << endl;}void Logger::log(LogLevel level, std::string message){cout << getLogLevelString(level).data() << ": " << message << endl;}string_view Logger::getLogLevelString(LogLevel level) const{// Same implementation as the Singleton logger earlier in this chapter.}
The Logger class has a constructor, which outputs a line of text to the standard console, and a method called log() that writes the given message to the console prefixed with a log level.
One reason why you might want to write a wrapper class around this basic Logger class is to change its interface. Maybe you are not interested in the log level and you would like to call the log() method with only one parameter, the actual message. You might also want to change the interface to accept an std::string_view instead of an std::string as parameter for the log() method.
The first step in implementing the adaptor pattern is to define the new interface for the underlying functionality. This new interface is called NewLoggerInterface and looks like this:
class NewLoggerInterface{public:virtual ~NewLoggerInterface() = default; // Always virtual destructor!virtual void log(std::string_view message) = 0;};
This class is an abstract class, which declares the desired interface that you want for your new logger. The interface only defines one abstract method, that is, a log() method accepting only a single argument of type string_view, which needs to be implemented by any class implementing this interface.
The next step is to write the actual new logger class, NewLoggerAdaptor, which implements NewLoggerInterface so that it has the interface that you designed. The implementation wraps a Logger instance; it uses composition.
class NewLoggerAdaptor : public NewLoggerInterface{public:NewLoggerAdaptor();virtual void log(std::string_view message) override;private:Logger mLogger;};
The constructor of the new class writes a line to standard output to keep track of which constructors are being called. The code then implements the log() method from NewLoggerInterface by forwarding the call to the log() method of the Logger instance that is wrapped. In that call, the given string_view is converted to a string, and the log level is hard-coded as Info:
NewLoggerAdaptor::NewLoggerAdaptor(){cout << "NewLoggerAdaptor constructor" << endl;}void NewLoggerAdaptor::log(string_view message){mLogger.log(Logger::LogLevel::Info, message.data());}
Because adaptors exist to provide a more appropriate interface for the underlying functionality, their use should be straightforward and specific to the particular case. Given the previous implementation, the following code snippet uses the new simplified interface for the Logger class:
NewLoggerAdaptor logger;logger.log("Testing the logger.");
It produces the following output:
Logger constructorNewLoggerAdaptor constructorINFO: Testing the logger.
The decorator pattern is exactly what it sounds like: a “decoration” on an object. It is also often called a wrapper. The pattern is used to add or change the behavior of an object at run time. Decorators are a lot like derived classes, but their effects can be temporary. For example, if you have a stream of data that you are parsing and you reach data that represents an image, you could temporarily decorate the stream object with an ImageStream object. The ImageStream constructor would take the stream object as a parameter and would have built-in knowledge of image parsing. Once the image is parsed, you could continue using the original object to parse the remainder of the stream. The ImageStream acts as a decorator because it adds new functionality (image parsing) to an existing object (a stream).
As you may already know, web pages are written in a simple text-based structure called HyperText Markup Language (HTML). In HTML, you can apply styles to a text by using style tags, such as <B> and </B> for bold and <I> and </I> for italic. The following line of HTML displays the message in bold:
<B>A party? For me? Thanks!</B>The following line displays the message in bold and italic:
<I><B>A party? For me? Thanks!</B></I>Suppose you are writing an HTML editing application. Your users will be able to type in paragraphs of text and apply one or more styles to them. You could make each type of paragraph a new derived class, as shown in Figure 29-6, but that design could be cumbersome and would grow exponentially as new styles were added.
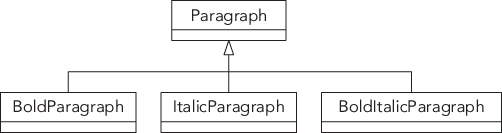
The alternative is to consider styled paragraphs not as types of paragraphs, but as decorated paragraphs. This leads to situations like the one shown in Figure 29-7, where an ItalicParagraph operates on a BoldParagraph, which in turn operates on a Paragraph. The recursive decoration of objects nests the styles in code just as they are nested in HTML.
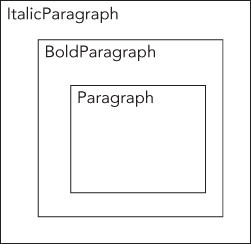
To start, you need an IParagraph interface:
class IParagraph{public:virtual ~IParagraph() = default; // Always a virtual destructor!virtual std::string getHTML() const = 0;};
The Paragraph class implements this IParagraph interface:
class Paragraph : public IParagraph{public:Paragraph(std::string_view text) : mText(text) {}virtual std::string getHTML() const override { return mText; }private:std::string mText;};
To decorate a Paragraph with zero or more styles, you need styled IParagraph classes, each one constructible from an existing IParagraph. This way, they can all decorate a Paragraph or a styled IParagraph. The BoldParagraph class derives from IParagraph and implements getHTML(). However, because you only intend to use it as a decorator, its single public non-copy constructor takes a const reference to an IParagraph.
class BoldParagraph : public IParagraph{public:BoldParagraph(const IParagraph& paragraph) : mWrapped(paragraph) {}virtual std::string getHTML() const override {return "<B>" + mWrapped.getHTML() + "</B>";}private:const IParagraph& mWrapped;};
The ItalicParagraph class is almost identical:
class ItalicParagraph : public IParagraph{public:ItalicParagraph(const IParagraph& paragraph) : mWrapped(paragraph) {}virtual std::string getHTML() const override {return "<I>" + mWrapped.getHTML() + "</I>";}private:const IParagraph& mWrapped;};
From the user’s point of view, the decorator pattern is appealing because it is very easy to apply, and is transparent once applied. The user doesn’t need to know that a decorator has been employed at all. A BoldParagraph behaves just like a Paragraph.
Here is a quick example that creates and outputs a paragraph, first in bold, then in bold and italic:
Paragraph p("A party? For me? Thanks!");// Boldstd::cout << BoldParagraph(p).getHTML() << std::endl;// Bold and Italicstd::cout << ItalicParagraph(BoldParagraph(p)).getHTML() << std::endl;
The output is as follows:
<B>A party? For me? Thanks!</B><I><B>A party? For me? Thanks!</B></I>
A chain of responsibility is used when you want a number of objects to get a crack at performing a particular action. The technique can employ polymorphism so that the most specific class gets called first and can either handle the call or pass it up to its parent. The parent then makes the same decision—it can handle the call or pass it up to its parent. A chain of responsibility does not necessarily have to follow a class hierarchy, but it typically does.
Chains of responsibility are perhaps most commonly used for event handling. Many modern applications, particularly those with graphical user interfaces, are designed as a series of events and responses. For example, when a user clicks on the File menu and selects Open, an open event has occurred. When the user moves the mouse over the drawable area of a paint program, mouse move events are generated continuously. If the user presses down a button on the mouse, a mouse down event for that button-press is generated. The program can then start paying attention to the mouse move events, allowing the user to “draw” some object, and continue doing this until the mouse up event occurs. Each operating system has its own way of naming and using these events, but the overall idea is the same: when an event occurs, it is somehow communicated to the program, which takes appropriate action.
As you know, C++ does not have any built-in facilities for graphical programming. It also has no notion of events, event transmission, or event handling. A chain of responsibility is a reasonable approach to event handling to give different objects a chance to handle certain events.
Consider a drawing program, which has a hierarchy of Shape classes, as in Figure 29-8.

The leaf nodes can handle certain events. For example, Circle can receive mouse move events to change the radius of the circle. The parent class handles events that have the same effect, regardless of the particular shape. For example, a delete event is handled the same way, regardless of the type of shape being deleted. With a chain of responsibility, the leaf nodes get the first crack at handling a particular event. If that leaf node cannot handle the event, it explicitly forwards the event to the next handler in the chain, and so on. For example, if a mouse down event occurs on a Square object, first the Square gets a chance to handle the event. If it doesn’t handle the event, it forwards the event to the next handler in the chain, which is the Shape class for this example. Now the Shape class gets a crack at handling the event. If Shape can’t handle the event either, it could forward it to its parent if it had one, and so on. This continues all the way up the chain. It’s a chain of responsibility because each handler may either handle the event, or pass the event up to the next handler in the chain.
The code for a chained messaging approach varies based on how your operating system handles events, but it tends to resemble the following code, which uses integers to represent types of events:
void Square::handleMessage(int message){switch (message) {case kMessageMouseDown:handleMouseDown();break;case kMessageInvert:handleInvert();break;default:// Message not recognized--chain to base class.Shape::handleMessage(message);}}void Shape::handleMessage(int message){switch (message) {case kMessageDelete:handleDelete();break;default:{stringstream ss;ss << __func__ << ": Unrecognized message received: " << message;throw invalid_argument(ss.str());}}}
When the event-handling portion of the program or framework receives a message, it finds the corresponding shape and calls handleMessage(). Through polymorphism, the derived class’s version of handleMessage() is called. This gives the leaf node the first chance at handling the message. If it doesn’t know how to handle the message, it passes it up to its base class, which gets the next chance. In this example, the final recipient of the message throws an exception if it is unable to handle the event. You could also have your handleMessage() method return a Boolean indicating success or failure.
This chain of responsibility example can be tested as follows. For the chain to respond to events, there must be another class that dispatches the events to the correct object. Because this task varies greatly by framework or platform, the following example shows pseudo-code for handling a mouse down event, in lieu of platform-specific C++ code:
MouseLocation loc = getClickLocation();Shape* clickedShape = findShapeAtLocation(loc);if (clickedShape)clickedShape->handleMessage(kMessageMouseDown);
The chained approach is flexible and has a very appealing structure for object-oriented hierarchies. The downside is that it requires diligence on the part of the programmer. If you forget to chain up to the base class from a derived class, events will effectively get lost. Worse, if you chain to the wrong class, you could end up in an infinite loop! Note that while event chains usually correlate with a class hierarchy, they do not have to. In the preceding example, the Square class could have just as easily passed the message to an entirely different object. An example of such a chain of responsibility is given in the next section.
If the different handlers in a chain of responsibility are not related by a class hierarchy, you need to keep track of the chain yourself. Here is an example. First, a Handler mixin class is defined:
class Handler{public:virtual ~Handler() = default;Handler(Handler* nextHandler) : mNextHandler(nextHandler) { }virtual void handleMessage(int message){if (mNextHandler)mNextHandler->handleMessage(message);}private:Handler* mNextHandler;};
Next, two concrete handlers are defined, both deriving from the Handler mixin. The first handles only messages with ID 1, and the second handles only messages with ID 2. If any of the handlers receives a message it doesn’t know about, it calls the next handler in the chain.
class ConcreteHandler1 : public Handler{public:ConcreteHandler1(Handler* nextHandler) : Handler(nextHandler) {}void handleMessage(int message) override{cout << "ConcreteHandler1::handleMessage()" << endl;if (message == 1)cout << "Handling message " << message << endl;else {cout << "Not handling message " << message << endl;Handler::handleMessage(message);}}};class ConcreteHandler2 : public Handler{public:ConcreteHandler2(Handler* nextHandler) : Handler(nextHandler) {}void handleMessage(int message) override{cout << "ConcreteHandler2::handleMessage()" << endl;if (message == 2)cout << "Handling message " << message << endl;else {cout << "Not handling message " << message << endl;Handler::handleMessage(message);}}};
This implementation can be tested as follows:
ConcreteHandler2 handler2(nullptr);ConcreteHandler1 handler1(&handler2);handler1.handleMessage(1);cout << endl;handler1.handleMessage(2);cout << endl;handler1.handleMessage(3);
The output is as follows:
ConcreteHandler1::handleMessage()Handling message 1ConcreteHandler1::handleMessage()Not handling message 2ConcreteHandler2::handleMessage()Handling message 2ConcreteHandler1::handleMessage()Not handling message 3ConcreteHandler2::handleMessage()Not handling message 3
The observer pattern is used to have objects/observers get notified by observable objects. With the observer pattern, individual objects register themselves with the observable object they are interested in. When the observable object’s state changes, it notifies all registered observers of this change.
The main benefit of using the observer pattern is that it decreases coupling. The observable class does not need to know the concrete observer types that are observing it. The observable class only needs to know about a basic interface, for example IObserver.
First, an IObserver interface is defined. Any object that wants to observe an observable should implement this interface:
class IObserver{public:virtual ~IObserver() = default; // Always a virtual destructor!virtual void notify() = 0;};
Here are two concrete observers that simply print out a message in response to a notification:
class ConcreteObserver1 : public IObserver{public:void notify() override{std::cout << "ConcreteObserver1::notify()" << std::endl;}};class ConcreteObserver2 : public IObserver{public:void notify() override{std::cout << "ConcreteObserver2::notify()" << std::endl;}};
An observable just keeps a list of IObservers that have registered themselves to get notified. It needs to support adding and removing observers, and should be able to notify all registered observers. All this functionality can be provided by an Observable mixin class. Here is the implementation:
class Observable{public:virtual ~Observable() = default; // Always a virtual destructor!// Add an observer. Ownership is not transferred.void addObserver(IObserver* observer){mObservers.push_back(observer);}// Remove the given observer.void removeObserver(IObserver* observer){mObservers.erase(std::remove(begin(mObservers), end(mObservers), observer),end(mObservers));}protected:void notifyAllObservers(){for (auto* observer : mObservers)observer->notify();}private:std::vector<IObserver*> mObservers;};
A concrete class, ObservableSubject, that wants to be observable simply derives from the Observable mixin class to get all its functionality. Whenever the state of an ObservableSubject changes, it simply calls notifyAllObservers() to notify all registered observers.
class ObservableSubject : public Observable{public:void modifyData(){// …notifyAllObservers();}};
Following is a very simple test that demonstrates how to use the observer pattern.
ObservableSubject subject;ConcreteObserver1 observer1;subject.addObserver(&observer1);subject.modifyData();std::cout << std::endl;ConcreteObserver2 observer2;subject.addObserver(&observer2);subject.modifyData();
The output is as follows:
ConcreteObserver1::notify()ConcreteObserver1::notify()ConcreteObserver2::notify()
This chapter has given you just a taste of how patterns can help you organize object-oriented concepts into high-level designs. A lot of design patterns are cataloged and discussed on Wikipedia1. It’s easy to get carried away and spend all your time trying to find the specific pattern that applies to your task. Instead, I recommend that you concentrate on a few patterns that interest you and focus your learning on how patterns are developed, not just the small differences between similar ones. After all, to paraphrase the old saying, “Teach me a design pattern, and I’ll code for a day. Teach me how to create design patterns, and I’ll code for a lifetime.”
C++ programs can be compiled to run on a variety of computing platforms, and the language has been rigorously defined to ensure that programming in C++ for one platform is very similar to programming in C++ for another. Yet, despite the standardization of the language, platform differences eventually come into play when writing professional-quality programs in C++. Even when development is limited to a particular platform, small differences in compilers can elicit major programming headaches. This chapter examines the necessary complication of programming in a world with multiple platforms and multiple programming languages.
The first part of this chapter surveys the platform-related issues that C++ programmers encounter. A platform is the collection of all of the details that make up your development and/or run-time system. For example, your platform may be the Microsoft Visual C++ 2017 compiler running on Windows 10 on an Intel Core i7 processor. Alternatively, your platform might be the GCC 7.2 compiler running on Linux on a PowerPC processor. Both of these platforms are able to compile and run C++ programs, but there are significant differences between them.
The second part of this chapter looks at how C++ can interact with other programming languages. While C++ is a general-purpose language, it may not always be the right tool for the job. Through a variety of mechanisms, you can integrate C++ with other languages that may better serve your needs.
There are several reasons why the C++ language encounters platform issues. C++ is a high-level language, and the standard does not specify certain low-level details. For example, the layout of an object in memory is undefined by the standard and left to the compiler. Different compilers can use different memory layouts for objects. C++ also faces the challenge of providing a standard language and a Standard Library without a standard implementation. Varying interpretations of the specification among C++ compiler and library vendors can lead to trouble when moving from one system to another. Finally, C++ is selective in what the language provides as standard. Despite the presence of a Standard Library, programs often need functionality that is not provided by the language or the Standard Library. This functionality generally comes from third-party libraries or the platform, and can vary greatly.
The term architecture generally refers to the processor, or family of processors, on which a program runs. A standard PC running Windows or Linux generally runs on the x86 or x64 architecture, and older versions of Mac OS were usually found on the PowerPC architecture. As a high-level language, C++ shields you from the differences between these architectures. For example, a Core i7 processor may have a single instruction that performs the same functionality as six PowerPC instructions. As a C++ programmer, you don’t need to know what this difference is or even that it exists. One advantage to using a high-level language is that the compiler takes care of converting your code into the processor’s native assembly code format.
However, processor differences do sometimes rise up to the level of C++ code. The first one discussed, the size of integers, is very important if you are writing cross-platform code. The others you won’t face often, unless you are doing particularly low-level work, but still, you should be aware that they exist.
The C++ standard does not define the exact size of integer types. The standard just says the following:
There are five standard signed integer types:
signed char,short int,int,long int, andlong long int. In this list, each type provides at least as much storage as those preceding it in the list.
The standard does give a few additional hints for the size of these types, but never an exact size. The actual size is compiler-dependent. Thus, if you want to write cross-platform code, you cannot really rely on these types.
Besides these standard integer types, the C++ standard does define a number of types that have clearly specified sizes, all defined in the <cstdint> header file, although some of the types are optional. Here is an overview:
| TYPE | DESCRIPTION |
int8_tint16_tint32_tint64_t |
Signed integers of which the size is exactly 8, 16, 32, or 64 bits. This type is defined by the standard as being optional, although most compilers support it. |
int_fast8_tint_fast16_tint_fast32_tint_fast64_t |
Signed integers with sizes of at least 8, 16, 32, or 64 bits. For these, the compiler should use the fastest integer type it has that satisfies the requirements. |
int_least8_tint_least16_tint_least32_tint_least64_t |
Signed integers with sizes of at least 8, 16, 32, or 64 bits. For these, the compiler should use the smallest integer type it has that satisfies the requirements. |
intmax_t |
An integer type with the maximum size supported by the compiler. |
intptr_t |
An integer type big enough to store a pointer. This type is also optional, but most compilers support it. |
There are also unsigned versions available, such as uint8_t, uint_fast8_t, and so on.
If you want to write cross-platform code, I recommend you to use these <cstdint> types instead of the basic integer types.
As you probably already know, you cannot take a program written and compiled for a Core i7 computer and run it on a PowerPC-based Mac. These two platforms are not binary compatible because their processors do not support the same set of instructions. When you compile a C++ program, your source code is turned into binary instructions that the computer executes. That binary format is defined by the platform, not by the C++ language.
One solution to support platforms that are not binary compatible is to build each version separately with a compiler on each target platform.
Another solution is cross-compiling. When you are using platform X for your development, but you want your program to run on platforms Y and Z, you can use a cross-compiler on your platform X that generates binary code for platforms Y and Z.
You can also make your program open source. When you make your source available to the end user, she can compile it natively on her system and build a version of the program that is in the correct binary format for her machine. As discussed in Chapter 4, open-source software has become increasingly popular. One of the major reasons is that it allows programmers to collaboratively develop software and increase the number of platforms on which it can run.
When someone describes an architecture as 32-bit, they most likely mean that the address size is 32 bits, or 4 bytes. In general, a system with a larger address size can handle more memory and might operate more quickly on complex programs.
Because pointers are memory addresses, they are inherently tied to address sizes. Many programmers are taught that pointers are always 4 bytes, but this is wrong. For example, consider the following code snippet, which outputs the size of a pointer:
int *ptr = nullptr;cout << "ptr size is " << sizeof(ptr) << " bytes" << endl;
If this program is compiled and run on a 32-bit x86 system, the output will be as follows:
ptr size is 4 bytesIf you compile it with a 64-bit compiler and run it on an x64 system, the output will be as follows:
ptr size is 8 bytesFrom a programmer’s point of view, the upshot of varying pointer sizes is that you cannot equate a pointer with 4 bytes. More generally, you need to be aware that most sizes are not prescribed by the C++ standard. The standard only says that a short integer has as much, or less, space than an integer, which has as much, or less, space than a long integer.
The size of a pointer is also not necessarily the same as the size of an integer. For example, on a 64-bit platform, pointers are 64 bit, but integers could be 32 bit. Casting a 64-bit pointer to a 32-bit integer will result in losing 32 critical bits! The standard does define an std::intptr_t integer type in <cstdint> which is an integer type at least big enough to hold a pointer. The definition of this type is optional according to the standard, but virtually all compilers support it.
All modern computers store numbers in a binary representation, but the representation of the same number on two platforms may not be identical. This sounds contradictory, but as you’ll see, there are two approaches to reading numbers that both make sense.
A single slot in your computer’s memory is usually a byte because most computers are byte addressable. Number types in C++ are usually multiple bytes. For example, a short may be 2 bytes. Imagine that your program contains the following line:
short myShort = 513;In binary, the number 513 is 0000 0010 0000 0001. This number contains 16 ones and zeros, or 16 bits. Because there are 8 bits in a byte, the computer needs 2 bytes to store the number. Because each individual memory address contains 1 byte, the computer needs to split the number up into multiple bytes. Assuming that a short is 2 bytes, the number is split into two even parts. The higher part of the number is put into the high-order byte and the lower part of the number is put into the low-order byte. In this case, the high-order byte is 0000 0010 and the low-order byte is 0000 0001.
Now that the number has been split up into memory-sized parts, the only question that remains is how to store them in memory. Two bytes are needed, but the order of the bytes is unclear and, in fact, depends on the architecture of the system in question.
One way to represent the number is to put the high-order byte first in memory and the low-order byte next. This strategy is called big-endian ordering because the bigger part of the number comes first. PowerPC and SPARC processors use a big-endian approach. Some other processors, such as x86, arrange the bytes in the opposite order, putting the low-order byte first in memory. This approach is called little-endian ordering because the smaller part of the number comes first. An architecture may choose one approach or the other, usually based on backward compatibility. For the curious, the terms “big-endian” and “little-endian” predate modern computers by several hundred years. Jonathan Swift coined the terms in his eighteenth-century novel Gulliver’s Travels to describe the opposing camps of a debate about the proper end on which to break an egg.
Regardless of the ordering a particular architecture uses, your programs can continue to use numerical values without paying any attention to whether the machine uses big-endian ordering or little-endian ordering. The ordering only comes into play when data moves between architectures. For example, if you are sending binary data across a network, you may need to consider the ordering of the other system. One solution is to use the standard network byte ordering, which is always big-endian. So, before sending data across a network, you convert it to big-endian, and whenever you receive data from a network, you convert it from big-endian to the byte ordering of your system.
Similarly, if you are writing binary data to a file, you may need to consider what will happen when that file is opened on a system with opposite byte ordering.
When a C++ compiler is written, it is designed by a human being who attempts to adhere to the C++ standard. Unfortunately, the C++ standard is more than a thousand pages long and written in a combination of prose, language grammars, and examples. Two human beings implementing a compiler according to such a standard are unlikely to interpret every piece of prescribed information in the exact same way or to catch every single edge case. As a result, compilers will have bugs.
There is no simple rule for finding or avoiding compiler bugs. The best you can do is to stay up to speed on compiler updates and perhaps subscribe to a mailing list or newsgroup for your compiler. If you suspect that you have encountered a compiler bug, a simple web search for the error message or condition you have witnessed could uncover a workaround or patch.
One area that compilers are notorious for having trouble with is language additions that are added by recent updates to the standard. Although in recent years, vendors of major compilers are pretty quick in adding support for the latest features.
Another issue to be aware of is that compilers often include their own language extensions without making it obvious to the programmer. For example, variable-length stack-based arrays (VLAs) are not part of the C++ language; however, they are part of the C language. Some compilers support both the C and the C++ standard, and can allow the use of VLAs in C++ code. One such compiler is g++. The following compiles and runs as expected with the g++ compiler:
int i = 4;char myStackArray[i]; // Not a standard language feature!
Some compiler extensions may be useful, but if there is a chance that you will switch compilers at some point, you should see if your compiler has a strict mode where it avoids using such extensions. For example, compiling the previous code with the -pedantic flag passed to g++ yields the following warning:
warning: ISO C++ forbids variable length array 'myStackArray' [-Wvla]The C++ specification allows for a certain type of compiler-defined language extension through the #pragma mechanism. #pragma is a precompiler directive whose behavior is defined by the implementation. If the implementation does not understand the directive, it ignores it. For example, some compilers allow the programmer to turn compiler warnings off temporarily with #pragma.
Most likely, your compiler includes an implementation of the C++ Standard Library. Because the Standard Library is written in C++, however, you aren’t required to use the implementation that came bundled with your compiler. You could use a third-party Standard Library that, for example, has been optimized for speed, or you could even write your own.
Of course, Standard Library implementers face the same problems that compiler writers face: the standard is subject to interpretation. In addition, certain implementations may make tradeoffs that are incompatible with your needs. For example, one implementation may optimize for speed, while another implementation may focus on using as little memory as possible for containers.
When working with a Standard Library implementation, or indeed any third-party library, it is important to consider the tradeoffs that the designers made during the development. Chapter 4 contains a more detailed discussion of the issues involved in using libraries.
C++ is a great general-purpose language. With the addition of the Standard Library, the language is packed full of so many features that a casual programmer could happily code in C++ for years without going beyond what is built in. However, professional programs require facilities that C++ does not provide. This section lists several important features that are provided by the platform or third-party libraries, not by the C++ language or the C++ Standard Library.
For certain types of programs, C++ may not be the best tool for the job. For example, if your Unix program needs to interact closely with the shell environment, you may be better off writing a shell script than a C++ program. If your program performs heavy text processing, you may decide that the Perl language is the way to go. If you need a lot of database interaction, then C# or Java might be a better choice. C# and the WPF framework might be better suited to write modern GUI applications, and so on. Still, if you do decide to use another language, you sometimes might want to be able to call into C++ code, for example, to perform some computational-expensive operations. Fortunately, there are some techniques you can use to get the best of both worlds—the unique specialty of another language combined with the power and flexibility of C++.
As you already know, the C++ language is almost a superset of the C language. That means that almost all C programs will compile and run in C++. There are a few exceptions. Some exceptions have to do with the fact that a handful of C features are not supported by C++, for example, C supports variable-length arrays (VLAs), while C++ does not. Other exceptions usually have to do with reserved words. In C, for example, the term class has no particular meaning. Thus, it could be used as a variable name, as in the following C code:
int class = 1; // Compiles in C, not C++printf("class is %d\n", class);
This program compiles and runs in C, but yields an error when compiled as C++ code. When you translate, or port, a program from C to C++, these are the types of errors you will face. Fortunately, the fixes are usually quite simple. In this case, rename the class variable to classID and the code will compile. The other types of errors you’ll face are the handful of C features that are not supported by C++, but these are usually rare.
The ease of incorporating C code in a C++ program comes in handy when you encounter a useful library or legacy code that was written in C. Functions and classes, as you’ve seen many times in this book, work just fine together. A class method can call a function, and a function can make use of objects.
One of the dangers of mixing C and C++ is that your program may start to lose its object-oriented properties. For example, if your object-oriented web browser is implemented with a procedural networking library, the program will be mixing these two paradigms. Given the importance and quantity of networking tasks in such an application, you might consider writing an object-oriented wrapper around the procedural library. A typical design pattern that can be used for this is called the façade.
For example, imagine that you are writing a web browser in C++, but you are using a C networking library that contains the functions declared in the following code. Note that the HostHandle and ConnectionHandle data structures have been omitted for brevity.
// netwrklib.h#include "HostHandle.h"#include "ConnectionHandle.h"// Gets the host record for a particular Internet host given// its hostname (i.e. www.host.com)HostHandle* lookupHostByName(char* hostName);// Frees the given HostHandlevoid freeHostHandle(HostHandle* host);// Connects to the given hostConnectionHandle* connectToHost(HostHandle* host);// Closes the given connectionvoid closeConnection(ConnectionHandle* connection);// Retrieves a web page from an already-opened connectionchar* retrieveWebPage(ConnectionHandle* connection, char* page);// Frees the memory pointed to by pagevoid freeWebPage(char* page);
The netwrklib.h interface is fairly simple and straightforward. However, it is not object-oriented, and a C++ programmer who uses such a library is bound to feel icky, to use a technical term. This library isn’t organized into a cohesive class and it isn’t even const-correct. Of course, a talented C programmer could have written a better interface, but as the user of a library, you have to accept what you are given. Writing a wrapper is your opportunity to customize the interface.
Before you build an object-oriented wrapper for this library, take a look at how it might be used as-is to gain an understanding of its actual usage. In the following program, the netwrklib library is used to retrieve the web page at www.wrox.com/index.html:
HostHandle* myHost = lookupHostByName("www.wrox.com");ConnectionHandle* myConnection = connectToHost(myHost);char* result = retrieveWebPage(myConnection, "/index.html");cout << "The result is " << result << endl;freeWebPage(result);closeConnection(myConnection);freeHostHandle(myHost);
A possible way to make the library more object-oriented is to provide a single abstraction that recognizes the links between looking up a host, connecting to the host, and retrieving a web page. A good object-oriented wrapper hides the needless complexity of the HostHandle and ConnectionHandle types.
This example follows the design principles described in Chapters 5 and 6: the new class should capture the common use case for the library. The previous example shows the most frequently used pattern: first a host is looked up, then a connection is established, and finally a page is retrieved. It is also likely that subsequent pages will be retrieved from the same host, so a good design will accommodate that mode of use as well.
To start, the HostRecord class wraps the functionality of looking up a host. It’s an RAII class. Its constructor uses lookupHostByName() to perform the lookup, and its destructor automatically frees the retrieved HostHandle. Here is the code:
class HostRecord{public:// Looks up the host record for the given hostexplicit HostRecord(std::string_view host);// Frees the host recordvirtual ~HostRecord();// Returns the underlying handle.HostHandle* get() const noexcept;private:HostHandle* mHostHandle = nullptr;};HostRecord::HostRecord(std::string_view host){mHostHandle = lookupHostByName(const_cast<char*>(host.data()));}HostRecord::~HostRecord(){if (mHostHandle)freeHostHandle(mHostHandle);}HostHandle* HostRecord::get() const noexcept{return mHostHandle;}
Because the HostRecord class deals with C++ string_views instead of C-style strings, it uses the data() method on host to obtain a const char*, then performs a const_cast() to make up for netwrklib’s const-incorrectness.
Next, a WebHost class can be implemented that uses the HostRecord class. The WebHost class creates a connection to a given host and supports retrieving webpages. It’s also an RAII class. When the WebHost object is destroyed, it automatically closes the connection to the host. Here is the code:
class WebHost{public:// Connects to the given hostexplicit WebHost(std::string_view host);// Closes the connection to the hostvirtual ~WebHost();// Obtains the given page from this hoststd::string getPage(std::string_view page);private:ConnectionHandle* mConnection = nullptr;};WebHost::WebHost(std::string_view host){HostRecord hostRecord(host);if (hostRecord.get()) {mConnection = connectToHost(hostRecord.get());}}WebHost::~WebHost(){if (mConnection)closeConnection(mConnection);}std::string WebHost::getPage(std::string_view page){std::string resultAsString;if (mConnection) {char* result = retrieveWebPage(mConnection,const_cast<char*>(page.data()));resultAsString = result;freeWebPage(result);}return resultAsString;}
The WebHost class effectively encapsulates the behavior of a host and provides useful functionality without unnecessary calls and data structures. The implementation of the WebHost class makes extensive use of the netwrklib library without exposing any of its workings to the user. The constructor of WebHost uses a HostRecord RAII object for the specified host. The resulting HostRecord is used to set up a connection to the host, which is stored in the mConnection data member for later use. The HostRecord RAII object is automatically destroyed at the end of the constructor. The WebHost destructor closes the connection. The getPage() method uses retrieveWebPage() to retrieve a web page, converts it to an std::string, uses freeWebPage() to free memory, and returns the std::string.
The WebHost class makes the common case easy for the client programmer:
WebHost myHost("www.wrox.com");string result = myHost.getPage("/index.html");cout << "The result is " << result << endl;
As you can see, the WebHost class provides an object-oriented wrapper around the C library. By providing an abstraction, you can change the underlying implementation without affecting client code, and you can provide additional features. These features can include connection reference counting, automatically closing connections after a specific time to adhere to the HTTP specification and automatically reopening the connection on the next getPage() call, and so on.
The previous example assumed that you had the raw C code to work with. The example took advantage of the fact that most C code will successfully compile with a C++ compiler. If you only have compiled C code, perhaps in the form of a library, you can still use it in your C++ program, but you need to take a few extra steps.
Before you can start using compiled C code in your C++ programs, you first need to know about a concept called name mangling. In order to implement function overloading, the complex C++ namespace is “flattened.” For example, if you have a C++ program, it is legitimate to write the following:
void MyFunc(double);void MyFunc(int);void MyFunc(int, int);
However, this would mean that the linker would see several different names, all called MyFunc, and would not know which one you want to call. Therefore, all C++ compilers perform an operation that is referred to as name mangling and is the logical equivalent of generating names, as follows:
MyFunc_doubleMyFunc_intMyFunc_int_int
To avoid conflicts with other names you might have defined, the generated names usually have some characters that are legal to the linker but not legal in C++ source code. For example, Microsoft VC++ generates names as follows:
?MyFunc@@YAXN@Z?MyFunc@@YAXH@Z?MyFunc@@YAXHH@Z
This encoding is complex and often vendor-specific. The C++ standard does not specify how function overloading should be implemented on a given platform, so there is no standard for name mangling algorithms.
In C, function overloading is not supported (the compiler will complain about duplicate definitions). So, names generated by the C compiler are quite simple, for example, _MyFunc.
Now, if you compile a simple program with the C++ compiler, even if it has only one instance of the MyFunc name, it still generates a request to link to a mangled name. However, when you link with the C library, it cannot find the desired mangled name, and the linker complains. Therefore, it is necessary to tell the C++ compiler to not mangle that name. This is done by using the extern "language" qualification both in the header file (to instruct the client code to create a name compatible with the specified language) and, if your library source is in C++, at the definition site (to instruct the library code to generate a name compatible with the specified language).
Here is the syntax of extern
"language":
extern "language" declaration1();extern "language" declaration2();
or it can also be like this:
extern "language" {declaration1();declaration2();}
The C++ standard says that any language specification can be used, so in principle, the following could be supported by a compiler:
extern "C" MyFunc(int i);extern "Fortran" MatrixInvert(Matrix* M);extern "Pascal" SomeLegacySubroutine(int n);extern "Ada" AimMissileDefense(double angle);
In practice, many compilers only support "C". Each compiler vendor will inform you which language designators they support.
For example, in the following code, the function prototype for doCFunction() is specified as an external C function:
extern "C" {void doCFunction(int i);}int main(){doCFunction(8); // Calls the C function.return 0;}
The actual definition for doCFunction() is provided in a compiled binary file attached in the link phase. The extern keyword informs the compiler that the linked-in code was compiled in C.
A more common pattern for using extern is at the header level. For example, if you are using a graphics library written in C, it probably came with an .h file for you to use. You can write another header file that wraps the original one in an extern block to specify that the entire header defines functions written in C. The wrapper .h file is often named with .hpp to distinguish it from the C version of the header:
// graphicslib.hppextern "C" {#include "graphicslib.h"}
Another common model is to write a single header file, which is conditioned on whether it is being compiled for C or C++. A C++ compiler predefines the symbol __cplusplus if you are compiling for C++. The symbol is not defined for C compilations. So, you will often see header files in the following form:
#ifdef __cplusplusextern "C" {#endifdeclaration1();declaration2();#ifdef __cplusplus} // matches extern "C"#endif
This means that declaration1() and declaration2() are functions that are in a library compiled by the C compiler. Using this technique, the same header file can be used in both C and C++ clients.
Whether you are including C code in your C++ program or linking against a compiled C library, remember that even though C++ is almost a superset of C, they are different languages with different design goals. Adapting C code to work in C++ is quite common, but providing an object-oriented C++ wrapper around procedural C code is often much better.
Even though this is a C++ book, I won’t pretend that there aren’t snazzier languages out there. One example is C#. By using the Interop services from C#, it’s pretty easy to call C++ code from within your C# applications. An example scenario could be that you develop parts of your application, like the graphical user interface, in C#, but use C++ to implement certain performance-critical or computational-expensive components. To make Interop work, you need to write a library in C++, which can be called from C#. On Windows, the library will be in a .DLL file. The following C++ example defines a FunctionInDLL() function that will be compiled into a library. The function accepts a Unicode string and returns an integer. The implementation writes the received string to the console and returns the value 42 to the caller:
#include <iostream>using namespace std;extern "C"{__declspec(dllexport) int FunctionInDLL(const wchar_t* p){wcout << L"The following string was received by C++:\n '";wcout << p << L"'" << endl;return 42; // Return some value…}}
Keep in mind that you are implementing a function in a library, not writing a program, so you do not need a main() function. How you compile this code depends on your environment. If you are using Microsoft Visual C++, you need to go to the properties of your project and select “Dynamic Library (.dll)” as the configuration type. Note that the example uses __declspec(dllexport) to tell the linker that this function should be made available to clients of the library. This is the way you do it with Microsoft Visual C++. Other linkers might use a different mechanism to export functions.
Once you have the library, you can call it from C# by using the Interop services. First, you need to include the Interop namespace:
using System.Runtime.InteropServices;Next, you define the function prototype, and tell C# where it can find the implementation of the function. This is done with the following line, assuming you have compiled the library as HelloCpp.dll:
[DllImport("HelloCpp.dll", CharSet = CharSet.Unicode)]public static extern int FunctionInDLL(String s);
The first part of this line is saying that C# should import this function from a library called HelloCpp.dll, and that it should use Unicode strings. The second part specifies the actual prototype of the function, which is a function accepting a string as parameter and returning an integer. The following code shows a complete example of how to use the C++ library from C#:
using System;using System.Runtime.InteropServices;namespace HelloCSharp{class Program{[DllImport("HelloCpp.dll", CharSet = CharSet.Unicode)]public static extern int FunctionInDLL(String s);static void Main(string[] args){Console.WriteLine("Written by C#.");int result = FunctionInDLL("Some string from C#.");Console.WriteLine("C++ returned the value " + result);}}}
The output is as follows:
Written by C#.The following string was received by C++:'Some string from C#.'C++ returned the value 42
The details of the C# code are outside the scope of this C++ book, but the general idea should be clear with this example.
The Java Native Interface, or JNI, is a part of the Java language that allows programmers to access functionality that was not written in Java. Because Java is a cross-platform language, the original intent was to make it possible for Java programs to interact with the operating system. JNI also allows programmers to make use of libraries written in other languages, such as C++. Access to C++ libraries may be useful to a Java programmer who has a performance-critical or computational-expensive piece of code, or who needs to use legacy code.
JNI can also be used to execute Java code within a C++ program, but such a use is far less common. Because this is a C++ book, I do not include an introduction to the Java language. This section is recommended if you already know Java and want to incorporate C++ code into your Java code.
To begin your Java cross-language adventure, start with the Java program. For this example, the simplest of Java programs will suffice:
public class HelloCpp {public static void main(String[] args){System.out.println("Hello from Java!");}}
Next, you need to declare a Java method that will be written in another language. To do this, you use the native keyword and leave out the implementation:
public class HelloCpp {// This will be implemented in C++.public static native void callCpp();// Remainder omitted for brevity}
The C++ code will eventually be compiled into a shared library that gets dynamically loaded into the Java program. You can load this library inside a Java static block so that it is loaded when the Java program begins executing. The name of the library can be whatever you want, for example, hellocpp.so on Linux systems, or hellocpp.dll on Windows systems.
public class HelloCpp {static {System.loadLibrary("hellocpp");}// Remainder omitted for brevity}
Finally, you need to actually call the C++ code from within the Java program. The callCpp() Java method serves as a placeholder for the not-yet-written C++ code. Here is the complete Java program:
public class HelloCpp {static {System.loadLibrary("hellocpp");}// This will be implemented in C++.public static native void callCpp();public static void main(String[] args){System.out.println("Hello from Java!");callCpp();}}
That’s all for the Java side. Now, just compile the Java program as you normally would:
javac HelloCpp.javaThen use the javah program (I like to pronounce it as jav-AHH!) to create a header file for the native method:
javah HelloCppAfter running javah, you will find a file named HelloCpp.h, which is a fully working (if somewhat ugly) C/C++ header file. Inside of that header file is a C function definition for a function called Java_HelloCpp_callCpp(). Your C++ program will need to implement this function. The full prototype is as follows:
JNIEXPORT void JNICALL Java_HelloCpp_callCpp(JNIEnv*, jclass);Your C++ implementation of this function can make full use of the C++ language. This example outputs some text from C++. First, you need to include the jni.h header file and the HelloCpp.h file that was created by javah. You also need to include any C++ headers that you intend to use:
#include <jni.h>#include "HelloCpp.h"#include <iostream>
The C++ function is written as normal. The parameters to the function allow interaction with the Java environment and the object that called the native code. They are beyond the scope of this example.
JNIEXPORT void JNICALL Java_HelloCpp_callCpp(JNIEnv*, jclass){std::cout << "Hello from C++!" << std::endl;}
How to compile this code into a library depends on your environment, but you will most likely need to tweak your compiler’s settings to include the JNI headers. Using the GCC compiler on Linux, your compile command might look like this:
g++ -shared -I/usr/java/jdk/include/ -I/usr/java/jdk/include/linux \HelloCpp.cpp -o hellocpp.so
The output from the compiler is the library used by the Java program. As long as the shared library is somewhere in the Java class path, you can execute the Java program normally:
java HelloCppYou should see the following result:
Hello from Java!Hello from C++!
Of course, this example just scratches the surface of what is possible through JNI. You could use JNI to interface with OS-specific features or hardware drivers. For complete coverage of JNI, you should consult a Java text.
The original Unix OS included a rather limited C library, which did not support certain common operations. Unix programmers therefore developed the habit of launching shell scripts from applications to accomplish tasks that should have had API or library support.
Today, many of these Unix programmers still insist on using scripts as a form of subroutine call. Usually, they execute the system() C library call with a string that is the script to execute. There are significant risks to this approach. For example, if there is an error in the script, the caller may or may not get a detailed error indication. The system() call is also exceptionally heavy-duty, because it has to create an entire new process to execute the script. This may ultimately be a serious performance bottleneck in your application.
Using system() to launch scripts is not further discussed in this text. In general, you should explore the features of C++ libraries to see if there are better ways to do something. There are some platform-independent wrappers around a lot of platform-specific libraries, for example, the Boost Asio library, which provides portable networking and other low-level I/O, including sockets, timers, serial ports, and so on. If you need to work with the filesystem, C++17 now includes a platform-independent <filesystem> API, as discussed in Chapter 20. Concepts like launching a Perl script with system() to process some textual data may not be the best choice. Using techniques like the regular expressions library of C++, see Chapter 19, might be a better choice for your string processing needs.
C++ contains a built-in general-purpose mechanism to interface with other languages and environments. You’ve already used it many times, probably without paying much attention to it—it’s the arguments to and return value from the main() function.
C and C++ were designed with command-line interfaces in mind. The main() function receives the arguments from the command line, and returns a status code that can be interpreted by the caller. In a scripting environment, arguments to and status codes from your program can be a powerful mechanism that allows you to interface with the environment.
Assume that you have a system that writes everything a user sees and types to a file for auditing purposes. The file can be read only by the system administrator so that she can figure out who to blame if something goes wrong. An excerpt of such a file might look like this:
Login: bucky-boPassword: feldsparbucky-bo> mailbucky-bo has no mailbucky-bo> exit
While the system administrator may want to keep a log of all user activity, she may also want to obscure everybody’s passwords in case the file is somehow obtained by a hacker. She decides to write a script to parse the log files, and to use C++ to perform the actual encryption. The script then calls out to a C++ program to perform the encryption.
The following script uses the Perl language, though almost any scripting language could accomplish this task. Note also that these days, there are libraries available for Perl that perform encryption, but, for the sake of this example, let’s assume the encryption is done in C++. If you don’t know Perl, you will still be able to follow along. The most important element of the Perl syntax for this example is the ` character. The ` character instructs the Perl script to shell out to an external command. In this case, the script will shell out to a C++ program called encryptString.
The strategy for the script is to loop over every line of a file, userlog.txt, looking for lines that contain a password prompt. The script writes a new file, userlog.out, which contains the same text as the source file, except that all passwords are encrypted. The first step is to open the input file for reading and the output file for writing. Then, the script needs to loop over all the lines in the file. Each line in turn is placed in a variable called $line.
open (INPUT, "userlog.txt") or die "Couldn't open input file!";open (OUTPUT, ">userlog.out") or die "Couldn't open output file!";while ($line = <INPUT>) {
Next, the current line is checked against a regular expression to see if this particular line contains the Password: prompt. If it does, Perl stores the password in the variable $1.
if ($line =~ m/^Password: (.*)/) {If a match is found, the script calls the encryptString program with the detected password to obtain an encrypted version of it. The output of the program is stored in the $result variable, and the result status code from the program is stored in the variable $?. The script checks $? and quits immediately if there is a problem. If everything is okay, the password line is written to the output file with the encrypted password instead of the original one.
$result = `./encryptString $1`;if ($? != 0) { exit(-1); }print OUTPUT "Password: $result\n";} else {
If the current line is not a password prompt, the script writes the line as-is to the output file. At the end of the loop, it closes both files and exits.
print OUTPUT "$line";}}close (INPUT);close (OUTPUT);
That’s it. The only other required piece is the actual C++ program. Implementation of a cryptographic algorithm is beyond the scope of this book. The important piece is the main() function because it accepts the string that should be encrypted as an argument.
Arguments are contained in the argv array of C-style strings. You should always check the argc parameter before accessing an element of argv. If argc is 1, there is one element in the argument list and it is accessible as argv[0]. The 0th element of the argv array is generally the name of the program, so actual parameters begin at argv[1].
Following is the main() function for a C++ program that encrypts the input string. Notice that the program returns 0 for success and non-0 for failure, as is standard in Linux.
int main(int argc, char* argv[]){if (argc < 2) {cerr << "Usage: " << argv[0] << " string-to-be-encrypted" << endl;return -1;}cout << encrypt(argv[1]);return 0;}
Now that you’ve seen how easily C++ programs can be incorporated into scripting languages, you can combine the strengths of the two languages for your own projects. You can use a scripting language to interact with the operating system and control the flow of the script, and a traditional programming language like C++ for the heavy lifting.
C++ is considered a fast language, especially relative to other languages. Yet, in some rare cases, you might want to use raw assembly code when speed is absolutely critical. The compiler generates assembly code from your source files, and this generated assembly code is fast enough for virtually all purposes. Both the compiler and the linker (when it supports link time code generation) use optimization algorithms to make the generated assembly code as fast as possible. These optimizers are getting more and more powerful by using special processor instruction sets such as MMX, SSE, and AVX. These days, it’s very hard to write your own assembly code that outperforms the code generated by the compiler, unless you know all the little details of these enhanced instruction sets.
However, in case you do need it, the keyword asm can be used by a C++ compiler to allow the programmer to insert raw assembly code. The keyword is part of the C++ standard, but its implementation is compiler-defined. In some compilers, you can use asm to drop from C++ down to the level of assembly right in the middle of your program. Sometimes, the support for the asm keyword depends on your target architecture. For example, Microsoft VC++ 2017 supports the asm keyword when compiling in 32-bit mode, but asm is not supported when compiling in 64-bit mode.
Assembly code can be useful in some applications, but I don’t recommend it for most programs. There are several reasons to avoid assembly code:
Practically, if you have a computationally expensive block of code, you should move it to its own C++ function. If you determine, using performance profiling (see Chapter 25), that this function is a performance bottleneck, and there is no way to write the code smaller and faster, you might use raw assembly code to try to increase its performance.
In such a case, one of the first things you want to do is declare the function extern
"C" so the C++ name mangling is suppressed. Then, you can write a separate module in assembly code that performs the function more efficiently. The advantage of a separate module is that there is both a “reference implementation” in C++ that is platform-independent, and also a platform-specific high-performance implementation in raw assembly code. The use of extern
"C" means that the assembly code can use a simple naming convention (otherwise, you have to reverse-engineer your compiler’s name mangling algorithm). Then, you can link with either the C++ version or the assembly code version.
You would write this module in assembly code and run it through an assembler, rather than using inline asm directives in C++. This is particularly true in many of the popular x86-compatible 64-bit compilers, where the inline asm keyword is not supported.
However, you should only use raw assembly code if there are significant performance improvements. Increasing the performance by a factor of 2 might possibly justify the effort. A factor of 10 is compelling. An improvement of 10 percent is not worth the effort.
If you take away one point from this chapter, it should be that C++ is a flexible language. It exists in the sweet spot between languages that are too tied to a particular platform, and languages that are too high-level and generic. Rest assured that when you develop code in C++, you aren’t locking yourself into the language forever. C++ can be mixed with other technologies, and has a solid history and code base that will help guarantee its relevance in the future.
In Part V of this book, I discussed software engineering methods, writing efficient C++, testing and debugging techniques, design techniques and patterns, and cross-platform and cross-language application development. This is a terrific way to end your journey through Professional C++ programming because these topics help good C++ programmers become great C++ programmers. By thinking through your designs, experimenting with different approaches in object-oriented programming, selectively adding new techniques to your coding repertoire, and practicing testing and debugging techniques, you’ll be able to take your C++ skills to the professional level.
Reading this book will surely give your C++ career a kick-start, but employers will want you to prove yourself before they offer the big bucks. Interview methodologies vary from company to company, but many aspects of technical interviews are predictable. A thorough interviewer will want to test your basic coding skills, your debugging skills, your design and style skills, and your problem-solving skills. The set of questions you might be asked is quite large. In this appendix, you’ll read about some of the different types of questions you may encounter and the best tactics for landing that high-paying C++ programming job you’re after.
This appendix iterates through the chapters of the book, discussing the aspects of each chapter that are likely to come up in an interview situation. Each section also includes a discussion of the types of questions that could be designed to test those skills, and the best ways to deal with those questions.
A technical interview will often include some basic C++ questions to weed out the candidates who put C++ on their resume simply because they’ve heard of the language. These questions might be asked during a phone screen, when a developer or recruiter calls you before bringing you in for an in-person interview. They could also be asked via e-mail or in person. When answering these questions, remember that the interviewer is just trying to establish that you’ve actually learned and used C++. You generally don’t need to get every detail right to earn high marks.
for loop, conditional statements, the conditional operator, and variablesconstauto keywordstd::vectorBasic C++ questions will often come in the form of a vocabulary test. The interviewer may ask you to define C++ terms, such as const or static. She may be looking for the textbook answer, but you can often score extra points by giving sample usage or extra detail. For example, in addition to saying that one of the uses of const is to specify that a reference parameter cannot be changed, you can also say that a const reference is more efficient than a copy when passing an object into a function or method.
The other form that basic C++ competence questions can take is a short program that you write in front of the interviewer. An interviewer may give you a warm-up question, such as, “Write Hello, World in C++.” When you get a seemingly simple question like this, make sure that you score all the extra points you can by showing that you are namespace-savvy, you use streams instead of printf(), and you know which standard headers to include.
Strings are very important, and are used in almost every kind of application. An interviewer will most likely ask at least one question related to string handling in C++.
std::string and std::string_view classesstd::string class and C-style strings, including why C-style strings should be avoidedAn interviewer could ask you to explain how you can append two strings together. With this question, he wants to find out whether you are thinking as a professional C++ programmer or as a C programmer. If you get such a question, you should explain the std::string class, and show how to use it to append two strings. It’s also worth mentioning that the string class will handle all memory management for you automatically, and contrasting this to C-style strings.
Your interviewer may not ask specifically about localization, but you can show your worldwide interest by using wchar_t instead of char during the interview. If you do receive a question about your experience with localization, be sure to mention the importance of considering worldwide use from the beginning of the project.
You may also be asked about the general idea behind locales and facets. You probably will not have to explain the exact syntax, but you should explain that they allow you to format text and numbers according to the rules of a certain language or country.
You might get a question about Unicode, but most likely it will be a question to explain the ideas and the basic concepts behind Unicode instead of implementation details. So, make sure you understand the high-level concepts of Unicode and that you can explain their use in the context of localization. You should also know about the different options for encoding Unicode characters, such as UTF-8 and UTF-16, without specific details.
As discussed in Chapter 19, regular expressions can have a daunting syntax. It is unlikely that an interviewer will ask you about little details of regular expressions. However, you should be able to explain the concept of regular expressions and what kind of string manipulations you can do with them.
Anybody who’s coded in the professional world has had a co-worker who codes as if they learned C++ from the back of a cereal box. Nobody wants to work with someone who writes messy code, so interviewers sometimes attempt to determine a candidate’s style skills.
Style questions can come in a few different forms. A friend of mine was once asked to write the code for a relatively complex algorithm on a whiteboard. As soon as he wrote the first variable name, the interviewer stopped him and told him he passed. The question wasn’t about the algorithm; it was just a red herring to see how well he named his variables. More commonly, you may be asked to submit code that you’ve written, or to give your opinions on style.
You need to be careful when a potential employer asks you to submit code. You probably cannot legally submit code that you wrote for a previous employer. You also have to find a piece of code that shows off your skills without requiring too much background knowledge. For example, you wouldn’t want to submit your master’s thesis on high-speed image rendering to a company that is interviewing you for a database administration position.
If the company gives you a specific program to write, that’s a perfect opportunity to show off what you’ve learned in this book. Even if the potential employer doesn’t specify the program, you should consider writing a small program specifically to submit to the company. Instead of selecting some code you’ve already written, start from scratch to produce code that is relevant to the job and highlights good style.
If you have documentation that you have written and that can be released, meaning it is not confidential, use it to show your skills to communicate; it will give you extra points. Websites you have built or maintained, and articles you have submitted to places like CodeGuru, CodeProject, and so on, are very useful. This tells the interviewer that you can not only write code, but also communicate to others how to use that code effectively. Of course, having a book title attached to your name is also a big plus.
If you are contributing to active open-source projects, for example on GitHub, you’ll score extra points. Even better would be if you have your own open-source project that you actively maintain. That’s the perfect opportunity to show off your coding style and your communication skills. Profile pages on websites such as GitHub are taken as part of your resume by certain employers.
Your interviewer will want to make sure that in addition to knowing the C++ language, you are skilled at applying it. You may not be asked a design question explicitly, but good interviewers have a variety of techniques to sneak design into other questions, as you’ll see.
A potential employer will also want to know that you’re able to work with code that you didn’t write yourself. If you’ve listed specific libraries on your resume, then you should be prepared to answer questions about them. If you didn’t list specific libraries, a general understanding of the importance of libraries will probably suffice.
Design questions are hard for an interviewer to come up with; any program that you could design in an interview setting is probably too simple to demonstrate real-world design skills. Design questions may come in a fuzzier form, such as, “Tell me the steps in designing a good program,” or “Explain the principle of abstraction.” They can also be less explicit. When discussing your previous job, the interviewer may ask, “Can you explain the design of that project to me?” Be careful not to expose intellectual property from your previous jobs though.
If the interviewer is asking you about a specific library, he will probably focus on the high-level aspects of the library as opposed to technical specifics. For example, you may be asked to explain what the strengths and weaknesses of the Standard Library are from a library design point of view. The best candidates talk about the Standard Library’s breadth and standardization as strengths, and its sometimes complex usage as a drawback.
You may also be asked a design question that initially doesn’t sound as if it’s related to libraries. For example, the interviewer could ask how you would go about creating an application that downloads MP3 music from the web and plays it on a local computer. This question isn’t explicitly related to libraries, but that’s what it’s getting at; the question is really asking about process.
You should begin by talking about how you would gather requirements and do initial prototypes. Because the question mentions two specific technologies, the interviewer would like to know how you would deal with them. This is where libraries come into play. If you tell the interviewer that you would write your own web classes and MP3 playing code, you won’t fail the test, but you will be challenged to justify the time and expense of reinventing these tools.
A better answer is to say that you would survey existing libraries that perform web and MP3 functionality to see if one exists that suits the project. You might want to name some technologies that you would start with, such as libcurl for web retrieval in Linux, or the Windows Media library for music playback in Windows.
Mentioning some websites with free libraries, and some ideas of what those websites provide, might also get you extra points. Some examples are www.codeguru.com and www.codeproject.com for Windows libraries; www.boost.org and www.github.com for platform-independent C++ libraries, and so on. Giving examples of some of the licenses that are available for open-source software, such as the GNU General Public License, Boost Software License, Creative Commons license, CodeGuru license, OpenBSD license, and so on, might score you extra credit.
Object-oriented design questions are used to weed out C programmers who merely know what a reference is, from C++ programmers who actually use the object-oriented features of the language. Interviewers don’t take anything for granted; even if you’ve been using object-oriented languages for years, they may still want to see evidence that you understand the methodology.
There are typically two ways to ask object-oriented design questions: you can be asked to define an object-oriented concept, or you can be asked to sketch out an object-oriented hierarchy. The former is pretty straightforward. Remember that examples might earn you extra credit.
If you’re asked to sketch out an object-oriented hierarchy, the interviewer will usually provide a simple application, such as a card game, for which you should design a class hierarchy. Interviewers often ask design questions about games because those are applications with which most people are already familiar. They also help lighten the mood a bit when compared to questions about things like database implementations. The hierarchy you generate will, of course, vary based on the game or application they are asking you to design. Here are some points to consider:
Interviewers rarely ask questions about designing reusable code. This omission is unfortunate because having programmers on staff who can write only single-purpose code can be detrimental to a programming organization. Occasionally, you’ll find a company that is savvy on code reuse and asks about it in their interviews. Such a question is an indication that it might be a good company to work for.
public methods and no implementation detailsQuestions about reuse will almost certainly be about previous projects on which you have worked. For example, if you worked at a company that produced both consumer and professional video-editing applications, the interviewer may ask how code was shared between the two applications. Even if you aren’t explicitly asked about code reuse, you might be able to sneak it in. When you’re describing some of your past work, tell the interviewer if the modules you wrote were used in other projects. Even when answering apparently straight coding questions, make sure to consider and mention the interfaces involved. As always, be careful not to expose intellectual property from your previous jobs though.
You can be sure that an interviewer will ask you some questions related to memory management, including your knowledge of smart pointers. Besides smart pointers, you will also get more low-level questions. The goal is to determine whether the object-oriented aspects of C++ have distanced you too much from the underlying implementation details. Memory management questions will give you a chance to prove that you know what’s really going on.
new, delete, new[], delete[], malloc(), free(), and so on. Instead, use smart pointers.std::unique_ptr by default, shared_ptr for shared ownership.std::make_unique() to create an std::unique_ptr.std::make_shared() to create an std::shared_ptr.std::auto_ptr; it has even been removed from C++17.new, delete, new[], and delete[] instead of malloc() and free().Find-the-bug questions often contain memory issues, such as double deletion, new/delete/new[]/delete[] mix-up, and memory leaks. When you are tracing through code that makes heavy use of pointers and arrays, you should draw and update the state of the memory as you process each line of code.
Another good way to find out if a candidate understands memory is to ask how pointers and arrays differ. At this point, the differences may be so tacit in your mind that the question catches you off-guard for a moment. If that’s the case, skim Chapter 7 again for the discussion on pointers and arrays.
When answering questions about memory allocation, it’s always a good idea to mention the concept of smart pointers and their benefits for automatically cleaning up memory and other resources. You definitely should also mention that it’s much better to use Standard Library containers, such as std::vector, instead of C-style arrays, because the Standard Library containers handle memory management for you automatically.
There are no bounds to the types of questions you can be asked about classes and objects. Some interviewers are syntax-fixated and might throw some complicated code at you. Others are less concerned with the implementation and more interested in your design skills.
this pointermutable keywordconst membersstatic methods and data membersinline keyword is just a hint for the compiler, which can ignore the hintpublic methods, should be as stable as possible, and should not contain any data members or private/protected methods. Thus, interfaces can remain stable while implementations are free to change under them.Questions such as, “What does the keyword mutable mean?” are great for phone screening. A recruiter may have a list of C++ terms and will move candidates to the next stage of the process based on the number of terms that they get right. You may not know all of the terms thrown at you, but keep in mind that other candidates are facing the same questions and it’s one of the few metrics available to a recruiter.
The find-the-bug style of questions is popular among interviewers and course instructors alike. You will be presented with some nonsense code and asked to point out its flaws. Interviewers struggle to find quantitative ways to analyze candidates, and this is one of the few ways to do it. In general, your approach should be to read each line of code and voice your concerns, brainstorming aloud. The types of bugs can fall into these categories.
std::string instead.Here’s a find-the-bug problem that demonstrates each of these areas:
class Buggy{Buggy(int param);~Buggy();double fjord(double val);int fjord(double val);protected:void turtle(int i = 7, int j);int param;double* mGraphicDimension;};Buggy::Buggy(int param){param = param;mGraphicDimension = new double;}Buggy::~Buggy(){}double Buggy::fjord(double val){return val * param;}int Buggy::fjord(double val){return (int)fjord(val);}void Buggy::turtle(int i, int j){cout << "i is " << i << ", j is " << j << endl;}
Take a careful look at the code, and then consult the following corrected version for the answers:
#include <iostream> // Streams are used in the implementation.#include <memory> // For std::unique_ptr.class Buggy{public: // These should most likely be public.Buggy(int param);// Recommended to make destructors virtual. Also, explicitly// default it, because this class doesn't need to do anything// in it.virtual ~Buggy() = default;// Disallow copy construction and copy assignment operator.Buggy(const Buggy& src) = delete;Buggy& operator=(const Buggy& rhs) = delete;// Explicitly default move constructor and move assignment op.Buggy(Buggy&& src) noexcept = default;Buggy& operator=(Buggy&& rhs) noexcept = default;// int version won't compile. Overloaded// methods cannot differ only in return type.double fjord(double val);private: // Use private by default.void turtle(int i, int j); // Only last parameters can have defaults.int mParam; // Data member naming.std::unique_ptr<double> mGraphicDimension; // Use smart pointers!};Buggy::Buggy(int param) // Prefer using ctor initializer: mParam(param), mGraphicDimension(new double){}double Buggy::fjord(double val){return val * mParam; // Changed data member name.}void Buggy::turtle(int i, int j){std::cout << "i is " << i << ", j is " << j << std::endl; // Namespaces.}
You should explain why you should never use raw pointers that represent ownership, but smart pointers instead. You should also explain why you are explicitly defaulting the move constructor and move assignment operator, and why you opt to delete the copy constructor and copy assignment operator. Explain what impact it would have on the class if you do need to implement a copy constructor and a copy assignment operator.
Questions about inheritance usually come in the same forms as questions about classes. The interviewer might also ask you to implement a class hierarchy to show that you have worked with C++ enough to write derived classes without looking it up in a book.
private and protected from a derived class point of viewvirtualvirtualvirtual methods and abstract base classesfinal keyword on classesoverride and final keywords on methodsMany of the pitfalls in inheritance questions are related to getting the details right. When you are writing a base class, don’t forget to make the methods virtual. If you mark all methods virtual, be prepared to justify that decision. You should be able to explain what virtual means and how it works. Also, don’t forget the public keyword before the name of the parent class in the derived class definition (for example, class Derived : public Base). It’s unlikely that you’ll be asked to perform nonpublic inheritance during an interview.
More challenging inheritance questions have to do with the relationship between a base class and a derived class. Be sure you know how the different access levels work, and the difference between private and protected. Remind yourself of the phenomenon known as slicing, when certain types of casts cause a class to lose its derived class information.
Many interviewers tend to focus on the more obscure cases because that way, experienced C++ programmers can demonstrate that they have conquered the unusual parts of C++. Sometimes interviewers have difficulty coming up with interesting questions and end up asking the most obscure question they can think of.
conststatictypedefs workAsking a candidate to define const and static is a classic C++ interview question. Both keywords provide a sliding scale with which an interviewer can assess an answer. For example, a fair candidate will talk about static methods and static data members. A good candidate will give good examples of static methods and static data members. A great candidate will also know about static linkage and static variables in functions.
The edge cases described in this chapter also come in find-the-bug type problems. Be on the lookout for misuse of references. For example, imagine a class that contains a reference as a data member:
class Gwenyth{private:int& mCaversham;};
Because mCaversham is a reference, it needs to be bound to a variable when the class is constructed. To do that, you’d need to use a constructor initializer. The class could take the variable to be referenced as a parameter to the constructor:
class Gwenyth{public:Gwenyth(int& i);private:int& mCaversham;};Gwenyth::Gwenyth(int& i) : mCaversham(i){}
As one of the most arcane parts of C++, templates are a good way for interviewers to separate the C++ novices from the pros. While most interviewers will forgive you for not remembering some of the advanced template syntax, you should go into the interview knowing the basics.
typedefsMany interview questions start out with a simple problem and gradually add complexity. Often, interviewers have an endless amount of complexity that they are prepared to add, and they simply want to see how far you get. For example, an interviewer might begin a problem by asking you to create a class that provides sequential access to a fixed number of ints. Next, the class will need to grow to accommodate an arbitrary-sized array. Then, it will need arbitrary data types, which is where templates come in. From there, the interviewer could take the problem in a number of directions, asking you to use operator overloading to provide array-like syntax, or continuing down the template path by asking you to provide a default type.
Templates are more likely to be employed in the solution of another coding problem than to be asked about explicitly. You should brush up on the basics in case the subject comes up. However, most interviewers understand that the template syntax is difficult, and asking someone to write complex template code in an interview is rather cruel.
The interviewer might ask you high-level questions related to metaprogramming to find out whether or not you have heard about it. While explaining, you could give a small example such as calculating the factorial of a number at compile time. Don’t worry if the syntax is not entirely correct. As long as you explain what it is supposed to do, you should be fine.
If you’re interviewing for a job writing GUI applications, you probably won’t get too many questions about I/O streams because GUI applications tend to use other mechanisms for I/O. However, streams can come up in other problems and, as a standard part of C++, they are fair game as far as the interviewer is concerned.
I/O may come up in the context of any question. For example, the interviewer could ask you to read in a file containing test scores and put them in a vector. This question tests basic C++ skills, basic Standard Library, and basic I/O. Even if I/O is only a small part of the problem you’re working on, be sure to check for errors. If you don’t, you’re giving the interviewer an opportunity to say something negative about your otherwise perfect program.
Managers sometimes shy away from hiring recent graduates or novice programmers for vital (and high-paying) jobs because it is assumed that they don’t write production-quality code. You can prove to an interviewer that your code won’t keel over randomly by demonstrating your error-handling skills during an interview.
const referencessetjmp() and longjmp() in C++Interviewers will be on the lookout to see how you report and handle errors. When you are asked to write a piece of code, make sure you implement proper error handling.
You might be asked to give a high-level overview of how stack unwinding works when an exception is thrown, without implementation details.
Of course, not all programmers understand or appreciate exceptions. Some may even have a completely unfounded bias against them for performance reasons. If the interviewer asks you to do something without exceptions, you’ll have to revert to traditional nullptr checks and error codes. That would be a good time to demonstrate your knowledge of nothrow new.
An interviewer can also ask questions in the form of “Would you use this?” One example question could be, “Would you use setjmp()/longjmp() in C++, as they are more efficient than exceptions?” Your answer should be a big no, because setjmp()/longjmp() do not work in C++ as they might bypass scoped destructors. The belief that exceptions have a big performance penalty is a misconception. On modern compilers, just having code that can handle potential exceptions has close to zero performance penalty.
It’s possible, though somewhat unlikely, that you will have to perform something more difficult than a simple operator overload during an interview. Some interviewers like to have an advanced question on hand that they don’t really expect anybody to answer correctly. The intricacies of operator overloading make great, nearly impossible questions because few programmers get the syntax right without looking it up. That means it’s a great area to review before an interview.
operator<= can be written by complementing the result of operator>)Let’s face it: operator overloading questions (other than the simple ones) can be cruel. Anybody who is asking such questions knows this and is going to be impressed when you get it right. It’s impossible to predict the exact question that you’ll get, but the number of operators is finite. As long as you’ve seen an example of overloading each operator that makes sense to overload, you’ll do fine!
Besides asking you to implement an overloaded operator, you could be asked high-level questions about operator overloading. A find-the-bug question could contain an operator that is overloaded to do something that is conceptually wrong for that particular operator. In addition to syntax, keep the use cases and theory of operator overloading in mind.
As you’ve seen, certain aspects of the Standard Library can be difficult to work with. Few interviewers would expect you to recite the details of Standard Library classes unless you claim to be a Standard Library expert. If you know that the job you’re interviewing for makes heavy use of the Standard Library, you might want to write some Standard Library code the day before to refresh your memory. Otherwise, recalling the high-level design of the Standard Library and its basic usage should suffice.
vector, which is the most frequently used Standard Library classmapunordered_mapIf interviewers are dead set on asking detailed Standard Library questions, there really are no bounds to the types of questions they could ask. If you’re feeling uncertain about syntax though, you should state the obvious during the interview: “In real life, of course, I’d look that up in Professional C++, but I’m pretty sure it works like this…” At least that way, the interviewer is reminded that he should forgive the details as long as you get the basic idea right.
High-level questions about the Standard Library are often used to gauge how much you’ve used the Standard Library without making you recall all the details. For example, casual users of the Standard Library may be familiar with associative and non-associative containers. A slightly more advanced user would be able to define an iterator, describe how iterators work with containers, and describe the remove-erase idiom. Other high-level questions could ask you about your experience with Standard Library algorithms, or whether you’ve customized the Standard Library. An interviewer might also gauge your knowledge about lambda expressions, and their use with Standard Library algorithms.
This chapter describes a number of features and additional libraries from the C++ standard that don’t fit in other chapters, including some new C++17 features. An interviewer might touch on a few of those topics to see whether you are keeping up to date with the latest developments in the C++ world.
<random> library as the preferred method of generating random numbersstd::optional valuesstd::variant and std::any data typesstd::tuple as a generalization of std::pairYou shouldn’t expect detailed questions about these topics. However, knowledge of the C++17 std::optional, variant, and any classes will definitely score you extra points. You might also be asked to explain the basic ideas and concepts of the chrono and random number generation libraries, but without going into syntax details. If the interviewer starts focusing on random numbers, it is important to explain the differences between true random numbers and pseudo-random numbers. You should also explain how the random number generation library uses the concepts of generators and distributions.
Multithreaded programming is becoming more and more important with the release of multicore processors for everything from servers to consumer computers. Even smartphones have multicore processors. An interviewer might ask you a couple of multithreading questions. C++ includes a standard threading support library, so it’s a good idea to know how it works.
std::thread to spawn threadsMultithreaded programming is a complicated subject, so you don’t need to expect detailed questions, unless you are interviewing for a specific multithreading programming position.
Instead, an interviewer might ask you to explain the different kinds of problems you can encounter with multithreaded code: problems such as race conditions, deadlocks, and tearing. You may also be asked to explain the general concepts behind multithreaded programming. This is a very broad question, but it allows the interviewer to get an idea of your multithreading knowledge. You can also mention that with C++17, a lot of the Standard Library algorithms have an option to run in parallel.
You should be suspicious if you go through the complete interview process with a company, and the interviewers do not ask any process questions—it may mean that they don’t have any process or that they don’t care about it. Alternatively, they might not want to scare you away with their process behemoth. Another important aspect of any development process is Source Code Control.
Most of the time, you’ll get a chance to ask questions regarding the company. I suggest you consider asking about engineering processes and Source Code Control solutions as one of your standard questions.
The most common question you’ll be asked is to describe the process that your previous employer used. Be careful, though, not to disclose any confidential information. When answering, you should mention what worked well and what failed, but try not to denounce any particular methodology. The methodology you criticize could be the one that your interviewer uses.
Almost every candidate is listing Scum/Agile as a skill these days. If the interviewer asks you about Scrum, he probably doesn’t want you to simply recite the textbook definition—the interviewer knows that you can read the table of contents of a Scrum book. Instead, pick a few ideas from Scrum that you find appealing. Explain each one to the interviewer along with your thoughts on it. Try to engage the interviewer in a conversation, proceeding in a direction in which he is interested based on the cues that he gives.
If you get a question regarding Source Code Control, it will most likely be a high-level question. You should explain the general principles behind Source Code Control solutions, mention the fact that there are commercial and free open-source solutions available, and possibly explain how Source Code Control was implemented by your previous employer.
Efficiency questions are quite common in interviews because many organizations are facing scalability issues with their code and need programmers who are savvy about performance.
Often, the interviewer will use her own product as an example to drive efficiency questions. Sometimes the interviewer will describe an older design and some performance-related symptoms she experienced. The candidate is supposed to come up with a new design that alleviates the problem. Unfortunately, there is a major problem with a question like this: what are the odds that you’re going to come up with the same solution that the company did when the problem was actually solved? Because the odds are slim, you need to be extra careful to justify your designs. You may not come up with the actual solution, but you could still have an answer that is correct or even better than the company’s newer design.
Other types of efficiency questions may ask you to tweak some C++ code for performance or iterate on an algorithm. For example, the interviewer could show you code that contains extraneous copies or inefficient loops.
The interviewer might also ask you for a high-level description of profiling tools and what their benefits are.
Potential employers value strong testing abilities. Because your resume probably doesn’t indicate your testing skills, unless you have explicit quality assurance (QA) experience, you might face interview questions about testing.
An interviewer could ask you to write some tests during the interview, but it’s unlikely that a program presented during an interview would contain the depth necessary for interesting tests. It’s more likely that you will be asked high-level testing questions. Be prepared to describe how testing was done at your last job, and what you liked and didn’t like about it. Again, be careful not to disclose any confidential information. After you’ve answered the interviewer’s questions about testing, a good question for you to ask the interviewer is to ask how testing is done at their company. It might start a conversation about testing and give you a better idea of the environment at your potential job.
Engineering organizations look for candidates who are able to debug their own code as well as code that they’ve never seen before. Technical interviews often attempt to size up your debugging muscles.
During an interview, you might be challenged with an obscure debugging problem. Remember that the process is the most important thing, and the interviewer probably knows that. Even if you don’t find the bug during the interview, make sure that the interviewer knows what steps you would go through to track it down. If the interviewer hands you a function and tells you that it crashes during execution, he should award you just as many points if you properly discuss the sequence of steps to find the bug, as if you find the bug right away.
Each of the techniques presented in Chapter 28 makes a fine interview question. Rather than repeat what you already read in the chapter, I suggest that you skim over Chapter 28 prior to an interview to make sure that you are able to understand each of the techniques.
If you are being interviewed for a GUI-based job, you should know about the existence of frameworks such as MFC, Qt, and possibly others.
Because design patterns are very popular in the professional world (many candidates even list them as skills), it’s likely that you’ll encounter an interviewer who wants you to explain a pattern, give a use case for a pattern, or implement a pattern.
Answering questions about design patterns is usually a walk in the park, unless the interviewer expects you to know the details of every single pattern known to humankind. Luckily, most interviewers who appreciate design patterns will just want to chat with you about them and get your opinions. After all, looking up concepts in a book or online instead of memorizing them is a good pattern in itself.
Few programmers submit resumes that list only a single language or technology, and few large applications rely on only a single language or technology. Even if you’re only interviewing for a C++ position, the interviewer may still ask questions about other languages, especially as they relate to C++.
The most popular cross-language question is to compare and contrast two different languages. You should avoid saying only positive or negative things about a particular language, even if you really love or hate that language. The interviewer wants to know that you are able to see tradeoffs and make decisions based on them.
Cross-platform questions are more likely to be asked while discussing previous work. If your resume indicates that you once wrote C++ applications that ran on a custom hardware platform, you should be prepared to talk about the compiler you used and the challenges of that platform.
This appendix contains a list of books and online resources on various C++-related topics that were either consulted while writing this book, or are recommended for further or background reading.
A quick (about 190 pages) tutorial-based overview of the entire C++ language and Standard Library at a moderately high level for people who already know C++ or are at least experienced programmers. This book includes C++11 features.
A very thorough introduction to C++ that covers just about everything in the language in a very accessible format and in great detail.
Covers the same material as C++ Primer, but in much less space, because it assumes that the reader has programmed in another language before.
An excellent introduction to C++ programming that expects the reader to know C already. This text is available at no cost online at www.bruceeckel.com.
The home of Standard C++ on the web, containing news, status, and discussions about the C++ standard on all compilers and platforms.
A huge collection of frequently asked questions about C++.
Three books that provide excellent tips and tricks on commonly misused and misunderstood features of C++.
The “bible” of C++ books, written by the designer of C++. Every C++ programmer should own a copy of this book, although it can be a bit obscure in places for the C++ novice.
Presented as a set of puzzles, with one of the best, most thorough discussions of proper resource management and exception safety in C++ through Resource Acquisition is Initialization (RAII). This book also includes in-depth coverage of a variety of topics, such as the pimpl idiom, name lookup, good class design, and the C++ memory model.
Covers additional exception safety topics not covered in Exceptional C++: 47 Engineering Puzzles, Programming Problems, and Solutions. This book also discusses effective object-oriented programming and correct use of certain aspects of the Standard Library.
Discusses generic programming, optimization, and resource management. This book also has an excellent exposition of how to write modular code in C++ by using nonmember functions and the single responsibility principle.
Provides 99 specific tips for C++ programming.
The second volume of Eckel’s book, which covers more advanced C++ topics. The text is also available at no cost online at www.bruceeckel.com.
A C++ reference covering everything from the basics to more-advanced material.
One of the most comprehensive C++ books available.
An excellent reference of C++98, C++03, C++11, C++14, and C++17.
A website containing a lot of information related to C++, with a complete reference of the language, including C++17.
A well-written article that takes the mystery out of defining custom stream manipulators in C++.
A unique blend of software development advice and C++ specifics, as well as a very good explanation of locale and Unicode support in C++.
A treatise by Joel Spolsky on the importance of localization. After reading this, you’ll want to check out the other entries on his Joel on Software website.
The definitive book on Unicode, which all developers using Unicode must have.
The best resource for finding Unicode characters, charts, and tables.
An explanation of what the Universal Character Set (UCS) is, including the Unicode standard.
This quick reference is a condensed guide to all essential data structures, algorithms, and functions provided by the C++ Standard Library
Covers the entire Standard Library, including I/O streams and strings as well as the containers and algorithms. This book is an excellent reference.
Written in the same spirit as the author’s Effective C++ books. This book provides targeted tips for using the Standard Library, but is not a reference or tutorial.
An interesting video lecture series on the C++ Standard Library.
Similar to the Josuttis text, but covering only parts of the Standard Library, such as containers and algorithms.
An excellent explanation of making function templates friends of classes.
Everything you ever wanted to know (or didn’t want to know) about C++ templates. This book assumes significant background in general C++.
Delivers practical metaprogramming tools and techniques into the hands of the everyday programmer.
A wealth of papers written by the C++ standards committee.
A document containing the presentation materials from a Scott Meyers’ training course. This is an excellent reference to get a list of all C++11 and select C++14 features.
Three Wikipedia articles with a description of new features added to C++11, C++14, and C++17.
One of the syntaxes of the regular expressions in C++ is the same as the regular expressions in the ECMAScript language, as described in this specification document.
A very readable book on UML 2.0. The authors use Java in examples, but they are convertible to C++ without too much trouble.
One of the most popular introductory algorithms books, covering all the common data structures and algorithms.
Knuth’s four-volume tome on algorithms and data structures. If you enjoy mathematical rigor, there is no better text on this topic. However, it is probably inaccessible without undergraduate knowledge of mathematics or theoretical computer science.
An approachable reference to data structures and algorithms.
A mathematical explanation of the Mersenne Twister, used to generate pseudo-random numbers.
Websites where the two main open-source movements explain their philosophies and provide information about obtaining open-source software and contributing to its development.
A huge number of free, peer-reviewed portable C++ source libraries. This website is definitely worth checking out.
Two websites that host many open-source projects. These are great resources for finding useful open-source software.
Excellent resources to find free libraries and code for reuse in your own projects.
Written for software engineers “in the trenches,” this text focuses on the technology—the principles, patterns, and process—that help software engineers effectively manage increasingly complex operating systems and applications.
An excellent guide to start with the Scrum methodology.
A classic book, and a must read for every software engineer. Almost twenty years later, its advice is still spot on. It examines the core process—what do you do, as an individual and as a team, if you want to create software that’s easy to work with and good for your users.
A landmark paper that described the state of software development at the time and proposed the Spiral Model.
One of several books in a series that promote Extreme Programming as a new approach to software development.
A guidebook for anybody who is responsible for the management of software development processes.
Discusses various aspects of the software development process and exposes hidden truisms along the way.
Provides an overview of RUP, including its mission and processes.
A wonderfully enlightening book about the politics and realities of software development.
A detailed discussion of the Scrum methodology.
Explains the concepts behind revision control systems, and what kinds of solutions are available.
This document is a set of guidelines for using C++ well. The aim of this document is to help people to use modern C++ effectively.
A classic book that espouses the practice of recognizing and improving bad code.
A must-have book on C++ design and coding style. “Coding standards” here doesn’t mean “how many spaces I should indent my code.” This book contains 101 best practices, idioms, and common pitfalls that can help you to write correct, understandable, and efficient C++ code.
A unique book that turns the issue of programming style upside down by challenging the reader to learn to read code properly in order to become a better programmer.
A highly configurable program that generates documentation from source code and comments.
A nice little book with advice about how to perform the most common operations on code: reading, modifying, testing, debugging, and writing.
A discussion of what code refactoring means, including a number of techniques for refactoring.
A discussion of the C++ style guidelines used at Google.
Two books that provide all the information most software engineers will ever need to know about computer architecture.
One of the few books to focus exclusively on efficient C++ programming. This book covers both language-level and design-level efficiency.
Information about the gprof profiling tool.
A book aimed at quality assurance professionals, although any software engineer will benefit from this book’s discussion of the software-testing process.
http://microsoft.com/vs.
The Community Edition of Microsoft Visual Studio is a version of Visual Studio free of charge for students, open-source developers, and individual developers to create both free and paid applications. It’s also free of charge for up to five users in small organizations. It comes with an excellent graphical symbolic debugger.
www.gnu.org/software/gdb/gdb.html.
An excellent command-line symbolic debugger.
http://valgrind.org/.
An open-source memory-debugging tool for Linux.
https://docs.microsoft.com/en-us/windows-hardware/drivers/debugger/application-verifier.
A run-time verification tool for C++ code that assists in finding subtle programming errors and security issues that can be difficult to identify with normal application testing techniques.
Called the “Gang of Four” (GoF) book (because of its four authors), the seminal work on design patterns.
Offers an approach to C++ programming that employs highly reusable code and patterns.
A companion to the GoF book, explaining how patterns can actually be applied.
A book that goes further than just listing design patterns. The authors show good and bad examples of using patterns, and give solid reasoning behind each pattern.
Contains descriptions of a large number of design patterns used in computer programming.
A great discussion on operating systems, including multithreading issues such as deadlocks and race conditions.
An excellent book on practical multithreaded programming, including the C++ threading library.
A book for developers of various skill levels who are making the move into multicore programming.
A great book on writing code for multiprocessor and multicore systems.
The interface to the C++ Standard Library consists of 87 header files, 26 of which present the C Standard Library. It’s often difficult to remember which header files you need to include in your source code, so this appendix provides a brief description of the contents of each header, organized into eight categories:
The C++ Standard Library includes almost the entire C Standard Library. The header files are generally the same, except for two points:
<cname> instead of <name.h>.<cname> header files are in the std namespace.The following table provides a summary of the most useful functionality. Note that it’s recommended to avoid using C functionality, and instead use equivalent C++ features whenever possible.
| HEADER FILENAME | CONTENTS |
<cassert> |
assert() macro |
<ccomplex> |
Only includes <complex>. This header is deprecated since C++17. |
<cctype> |
Character predicates and manipulation functions, such as isspace() and tolower() |
<cerrno> |
Defines errno expression, a macro to get the last error number for certain C functions. |
<cfenv> |
Supports the floating-point environment, such as floating-point exceptions, rounding, and so on. |
<cfloat> |
C-style defines related to floating-point arithmetic, such as FLT_MAX |
<cinttypes> |
Defines a number of macros to use with the printf(), scanf(), and similar functions. This header also includes a few functions to work with intmax_t. |
<ciso646> |
In C, the <iso646.h> file defines macros and, or, and so on. In C++, those are keywords, so this header is empty. |
<climits> |
C-style limit defines, such as INT_MAX. It is recommended to use the C++ equivalents from <limits> instead. |
<clocale> |
A few localization macros and functions like LC_ALL and setlocale(). See also the C++ equivalents in <locale>. |
<cmath> |
Math utilities, including trigonometric functions sqrt(), fabs(), and others |
<csetjmp> |
setjmp() and longjmp(). Never use these in C++! |
<csignal> |
signal() and raise(). Avoid these in C++. |
<cstdalign> |
Alignment-related macro __alignas_is_defined. This is deprecated since C++17. |
<cstdarg> |
Macros and types for processing variable-length argument lists |
<cstdbool> |
Boolean type-related macro __bool_true_false_are_defined. This is deprecated since C++17. |
<cstddef> |
Important constants such as NULL, and important types such as size_t |
<cstdint> |
Defines a number of standard integer types such as int8_t, int64_t and so on. It also includes macros specifying minimum and maximum values of those types. |
<cstdio> |
File operations, including fopen() and fclose(). Formatted I/O: printf(), scanf(), and family. Character I/O: getc(), putc(), and family. File positioning: fseek() and ftell(). It is recommended to use C++ streams instead. (See the section “I/O Streams,” later in this appendix.) |
<cstdlib> |
Random numbers with rand() and srand() (deprecated since C++14; use the C++ <random> instead). This header includes the abort() and exit() functions, which you should avoid; C-style memory allocation functions calloc(), malloc(), realloc(), and free(); C-style searching and sorting with qsort() and bsearch(); string to number conversions: atof(), atoi(); a set of functions related to multibyte/wide string manipulation. |
<cstring> |
Low-level memory management functions, including memcpy() and memset(). This header includes C-style string functions, such as strcpy() and strcmp(). |
<ctgmath> |
Only includes <complex> and <cmath>. This header is deprecated since C++17. |
<ctime> |
Time-related functions, including time() and localtime() |
<cuchar> |
Defines a number of Unicode-related macros, and functions like mbrtoc16(). |
<cwchar> |
Versions of string, memory, and I/O functions for wide characters |
<cwctype> |
Versions of functions in <cctype> for wide characters: iswspace(), towlower(), and so on. |
The definitions for the Standard Library containers can be found in 12 header files.
| HEADER FILENAME | CONTENTS |
<array> |
The array class template |
<bitset> |
The bitset class template |
<deque> |
The deque class template |
<forward_list> |
The forward_list class template |
<list> |
The list class template |
<map> |
The map and multimap class templates |
<queue> |
The queue and priority_queue class templates |
<set> |
The set and multiset class templates |
<stack> |
The stack class template |
<unordered_map> |
The unordered_map and unordered_multimap class templates |
<unordered_set> |
The unordered_set and unordered_multiset class templates |
<vector> |
The vector class template and the vector<bool> specialization |
Each of these header files contains all the definitions you need to use the specified container, including iterators. Chapter 17 describes these containers in detail.
The following header files define the available Standard Library algorithms, iterators, and allocators.
| HEADER FILENAME | CONTENTS |
<algorithm> |
Prototypes for most of the algorithms in the Standard Library. See Chapter 18. |
<execution> |
Defines the execution policy types for use with the Standard Library algorithms. See Chapter 18. |
<functional> |
Defines the built-in function objects, negators, binders, and adaptors. See Chapter 18. |
<iterator> |
Definitions of iterator_traits, iterator tags, iterator, reverse_iterator, insert iterators (such as back_insert_iterator), and stream iterators. See Chapter 21. |
<memory> |
Defines the default allocator, functions for dealing with uninitialized memory inside containers, unique_ptr, shared_ptr, make_unique(), and make_shared(), introduced in Chapter 1. |
<memory_resource> |
Defines polymorphic allocators and memory resources. See Chapter 21. |
<numeric> |
Prototypes for some numerical algorithms: accumulate(), inner_product(), partial_sum(), adjacent_difference(), and a few others. See Chapter 18. |
<scoped_allocator> |
An allocator that can be used with nested containers such as a vector of strings, or a vector of maps. |
The Standard Library contains some general-purpose utilities in several different header files.
| HEADER FILENAME | CONTENTS |
<any> |
Defines the any class. See Chapter 20. |
<charconv> |
Defines the chars_format enumeration class, the from_chars() and to_chars() functions, and related structs. |
<chrono> |
Defines the chrono library. See Chapter 20. |
<codecvt> |
Provides code conversion facets for various character encodings. This header is deprecated since C++17. |
<filesystem> |
Defines all available classes and functions to work with the filesystem. See Chapter 20. |
<initializer_list> |
Defines the initializer_list class. See Chapter 1. |
<limits> |
Defines the numeric_limits class template, and specializations for most built-in types. See Chapter 16. |
<locale> |
Defines the locale class, the use_facet() and has_facet() function templates, and the various facet families. See Chapter 19. |
<new> |
Defines the bad_alloc exception and set_new_handler() function. This header also defines the prototypes for all six forms of operator new and operator delete. See Chapter 15. |
<optional> |
Defines the optional class. See Chapter 20. |
<random> |
Defines the random number generation library. See Chapter 20. |
<ratio> |
Defines the Ratio library to work with compile-time rational numbers. See Chapter 20. |
<regex> |
Defines the regular expressions library. See Chapter 19. |
<string> |
Defines the basic_string class template and the type aliases string and wstring. See Chapter 2. |
<string_view> |
Defines the basic_string_view class template and the type aliases string_view and wstring_view. See Chapter 2. |
<system_error> |
Defines error categories and error codes. |
<tuple> |
Defines the tuple class template as a generalization of the pair class template. See Chapter 20. |
<type_traits> |
Defines type traits for use with template metaprogramming. See Chapter 22. |
<typeindex> |
Defines a simple wrapper for type_info, which can be used as an index type in associative containers and in unordered associative containers. |
<typeinfo> |
Defines the bad_cast and bad_typeid exceptions. Defines the type_info class, objects of which are returned by the typeid operator. See Chapter 10 for details on typeid. |
<utility> |
Defines the pair class template and make_pair() (see Chapter 17). This header also defines utility functions such as swap(), exchange(), move(), and more. |
<variant> |
Defines the variant class. See Chapter 20. |
C++ provides some facilities for numeric processing. These capabilities are not described in detail in this book; for details, consult one of the Standard Library references listed in the Annotated Bibliography in Appendix B.
| HEADER FILENAME | CONTENTS |
<complex> |
Defines the complex class template for working with complex numbers. |
<valarray> |
Defines valarray and related classes and class templates for working with mathematical vectors and matrices. |
Exceptions and exception support are covered in Chapter 14. Two header files provide most of the requisite definitions, but some exceptions for other domains are defined in the header file for that domain.
| HEADER FILENAME | CONTENTS |
<exception> |
Defines the exception and bad_exception classes, and the set_unexpected(), set_terminate(), and uncaught_exception() functions. |
<stdexcept> |
Non-domain-specific exceptions not defined in <exception>. |
The following table lists all the header files related to I/O streams in C++. However, normally your applications only need to include <fstream>, <iomanip>, <iostream>, <istream>, <ostream>, and <sstream>. Consult Chapter 13 for details.
| HEADER FILENAME | CONTENTS |
<fstream> |
Defines the basic_filebuf, basic_ifstream, basic_ofstream, and basic_fstream classes. This header declares the filebuf, wfilebuf, ifstream, wifstream, ofstream, wofstream, fstream, and wfstream type aliases. |
<iomanip> |
Declares the I/O manipulators not declared elsewhere (mostly in <ios>). |
<ios> |
Defines the ios_base and basic_ios classes. This header declares most of the stream manipulators. You rarely have to include this header directly. |
<iosfwd> |
Forward declarations of the templates and type aliases found in the other I/O stream header files. You rarely need to include this header directly. |
<iostream> |
Declares cin, cout, cerr, clog, and the wide-character counterparts. Note that it’s not just a combination of <istream> and <ostream>. |
<istream> |
Defines the basic_istream and basic_iostream classes. This header declares the istream, wistream, iostream, and wiostream type aliases. |
<ostream> |
Defines the basic_ostream class. This header declares the ostream and wostream type aliases. |
<sstream> |
Defines the basic_stringbuf, basic_istringstream, basic_ostringstream, and basic_stringstream classes. This header declares the stringbuf, wstringbuf, istringstream, wistringstream, ostringstream, wostringstream, stringstream, and wstringstream type aliases. |
<streambuf> |
Defines the basic_streambuf class. This header declares the type aliases streambuf and wstreambuf. You rarely have to include this header directly. |
<strstream> |
Deprecated. |
C++ includes a threading support library, which allows you to write platform-independent multithreaded applications. See Chapter 23 for details. The threading support library consists of the following header files.
| HEADER FILENAME | CONTENTS |
<atomic> |
Defines the atomic types, atomic<T>, and atomic operations. |
<condition_variable> |
Defines the condition_variable and condition_variable_any classes. |
<future> |
Defines future, promise, packaged_task, and async(). |
<mutex> |
Defines call_once() and the different non-shared mutex and lock classes. |
<shared_mutex> |
Defines the shared_mutex, shared_timed_mutex, and shared_lock classes. |
<thread> |
Defines the thread class. |
Unified Modeling Language, or UML, is the industry standard for diagrams visualizing class hierarchies, subsystem interactions, sequence diagrams, and so on. This book uses UML for its class diagrams. Explaining the entire UML standard warrants a book in itself, so this appendix is just a brief introduction to only those aspects of UML that are used throughout this book, which are class diagrams. There are different versions of the UML standard. This book uses UML 2.
UML defines the following collection of types of diagrams:
Because this book only uses class diagrams, that is the only type of diagram that is discussed further in this appendix.
Class diagrams are used to visualize individual classes and the relationships between different classes, both are discussed in the next sections.
A class is represented in UML as a box with a maximum of three compartments, containing the following:
Figure D-1 shows an example.
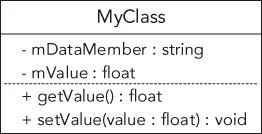
MyClass has two data members—one of type string, the other of type float—and it has two methods. The plus and minus signs in front of each member specify its visibility. The following table lists the most commonly used visibilities.
| VISIBILITY | MEANING |
+ |
public member |
- |
private member |
# |
protected member |
Depending on the goal of your class diagram, sometimes details of members are left out, in which case a class is represented with a box, as shown in Figure D-2. This can, for example, be used if you are only interested in visualizing the relationships between different classes without details of members of individual classes.
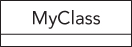
UML 2 supports six different kinds of relationships between classes. I discuss these relationships in the following sections.
Inheritance is visualized using a line starting from the derived class and going to the base class. The line ends in a hollow triangle on the side of the base class, depicting the is-a relationship. Figure D-3 shows an example.
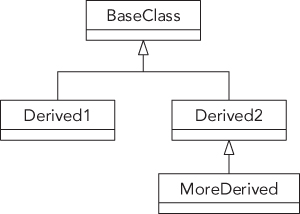
A class implementing a certain interface is basically inheriting from that interface (is-a relationship). However, to make a distinction between generic inheritance and interface realization, the latter is visualized similar to inheritance but using a dashed line instead of a solid line, as shown in Figure D-4. The ListBox class is derived from UIElement, and implements/realizes the Clickable and Scrollable interfaces.
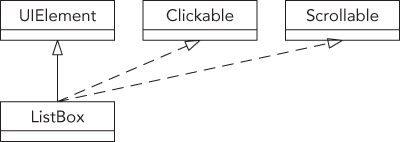
Aggregation represents a has-a relationship. It is shown with a line with a hollow diamond shape on the side of the class that contains the instance or instances of the other class. In an aggregation relationship, you can also optionally specify the multiplicity of each participant in the relationship. The location of the multiplicity, that is, on which side of the line you need to write it, can be confusing at first (see Figure D-5). In this example, a Class can contain/aggregate one or more Students, and each Student can follow zero or more Classes. An aggregation relationship means that the aggregated object or objects can continue to live when the aggregator is destroyed. For example, if a Class is destroyed, its Students are not destroyed. Figure D-5

The following table lists a few examples of possible multiplicities.
| MULTIPLICITY | MEANING |
N |
Exactly N instances |
0..1 |
Zero or one instance |
0..* |
Zero or more instances |
N..* |
N or more instances |
Composition is very similar to aggregation, and is visually represented almost the same, except that a full diamond is used instead of a hollow diamond. With composition, in contrast to aggregation, if the class that contains instances of the other class is destroyed, those contained instances are destroyed as well. Figure D-6 shows an example. A Window can contain zero or more Buttons, and each Button has to be contained by exactly one Window. If the Window is destroyed, all Buttons it contains are destroyed as well.

A dependency visualizes that a class depends on another class. It is depicted as a dashed line with an arrow pointing toward the dependent class. Usually, some text on the dashed line describes the dependency. To come back to the car factory example of Chapter 29, a CarFactory is dependent on a Car because the factory creates the cars. This is visualized in Figure D-7.

An association is a generalization of an aggregation. It represents a binary link between classes, while an aggregation is a unidirectional link. A binary link can be traversed in both directions. Figure D-8 shows an example. Every Book knows who its authors are, and every Author knows which books she wrote.

Professional C++, Fourth Edition
Published by
John Wiley & Sons, Inc.
10475 Crosspoint Boulevard
Indianapolis, IN 46256www.wiley.com
Copyright © 2018 by John Wiley & Sons, Inc., Indianapolis, Indiana
Published simultaneously in Canada
ISBN: 978-1-119-42130-6
ISBN: 978-1-119-42126-9 (ebk)
ISBN: 978-1-119-42122-1 (ebk)
No part of this publication may be reproduced, stored in a retrieval system or transmitted in any form or by any means, electronic, mechanical, photocopying, recording, scanning or otherwise, except as permitted under Sections 107 or 108 of the 1976 United States Copyright Act, without either the prior written permission of the Publisher, or authorization through payment of the appropriate per-copy fee to the Copyright Clearance Center, 222 Rosewood Drive, Danvers, MA 01923, (978) 750-8400, fax (978) 646-8600. Requests to the Publisher for permission should be addressed to the Permissions Department, John Wiley & Sons, Inc., 111 River Street, Hoboken, NJ 07030, (201) 748-6011, fax (201) 748-6008, or online at http://www.wiley.com/go/permissions.
Limit of Liability/Disclaimer of Warranty: The publisher and the author make no representations or warranties with respect to the accuracy or completeness of the contents of this work and specifically disclaim all warranties, including without limitation warranties of fitness for a particular purpose. No warranty may be created or extended by sales or promotional materials. The advice and strategies contained herein may not be suitable for every situation. This work is sold with the understanding that the publisher is not engaged in rendering legal, accounting, or other professional services. If professional assistance is required, the services of a competent professional person should be sought. Neither the publisher nor the author shall be liable for damages arising herefrom. The fact that an organization or Web site is referred to in this work as a citation and/or a potential source of further information does not mean that the author or the publisher endorses the information the organization or Web site may provide or recommendations it may make. Further, readers should be aware that Internet Web sites listed in this work may have changed or disappeared between when this work was written and when it is read.
For general information on our other products and services please contact our Customer Care Department within the United States at (877) 762-2974, outside the United States at (317) 572-3993 or fax (317) 572-4002.
Wiley publishes in a variety of print and electronic formats and by print-on-demand. Some material included with standard print versions of this book may not be included in e-books or in print-on-demand. If this book refers to media such as a CD or DVD that is not included in the version you purchased, you may download this material at http://booksupport.wiley.com. For more information about Wiley products, visit www.wiley.com.
Library of Congress Control Number: 2017963243
Trademarks: Wiley, the Wiley logo, Wrox, the Wrox logo, Programmer to Programmer, and related trade dress are trademarks or registered trademarks of John Wiley & Sons, Inc. and/or its affiliates, in the United States and other countries, and may not be used without written permission. All other trademarks are the property of their respective owners. John Wiley & Sons, Inc., is not associated with any product or vendor mentioned in this book.
Dedicated to my parents and my brother, who are always there for me. Their support and patience helped me in finishing this book.
MARC GREGOIRE is a software architect from Belgium. He graduated from the University of Leuven, Belgium, with a degree in “Burgerlijk ingenieur in de computer wetenschappen” (equivalent to master of science in engineering: computer science). The year after, he received an advanced master’s degree in artificial intelligence, cum laude, at the same university. After his studies, Marc started working for a software consultancy company called Ordina Belgium. As a consultant, he worked for Siemens and Nokia Siemens Networks on critical 2G and 3G software running on Solaris for telecom operators. This required working with international teams stretching from South America and the United States to Europe, the Middle East, Africa, and Asia. Now, Marc is a software architect at Nikon Metrology (www.nikonmetrology.com), a division of Nikon and a leading provider of precision optical instruments and metrology solutions for 3D geometric inspection.
His main expertise is in C/C++, and specifically Microsoft VC++ and the MFC framework. He has experience in developing C++ programs running 24/7 on Windows and Linux platforms: for example, KNX/EIB home automation software. In addition to C/C++, Marc also likes C# and uses PHP for creating web pages.
Since April 2007, he has received the annual Microsoft MVP (Most Valuable Professional) award for his Visual C++ expertise.
Marc is the founder of the Belgian C++ Users Group (www.becpp.org), co-author of C++ Standard Library Quick Reference (Apress), technical editor for numerous books for several publishers, and a member on the CodeGuru forum (as Marc G). He maintains a blog at www.nuonsoft.com/blog/, and is passionate about traveling and gastronomic restaurants.
PETER VAN WEERT is a Belgian software engineer, whose main interests and expertise are in C++, programming languages, algorithms, and data structures.
He received his master of science in computer science from the University of Leuven, Belgium, summa cum laude, with congratulations of the Board of Examiners. In 2010, the same university awarded him a PhD for his research on the efficient compilation of rule-based programming languages (mainly Java). During his doctoral studies, he was a teaching assistant for courses on object-oriented analysis and design, Java programming, and declarative programming languages.
After his studies, Peter worked for Nikon Metrology on large-scale, industrial-application software in the area of 3D laser scanning and point cloud inspection. In 2017, he joined the software R&D unit of Nobel Biocare, which specializes in digital dentistry software. Throughout his professional career, Peter has mastered C++ software development, as well as the management, refactoring, and debugging of very large code bases. He also gained further proficiency in all aspects of the software development process, including the analysis of functional and technical requirements, and Agile- and Scrum-based project and team management.
Peter is a regular speaker at, and board member of, the Belgian C++ Users Group. He also co-authored two books: C++ Standard Library Quick Reference and Beginning C++ (5th edition), both published by Apress.
I THANK THE JOHN WILEY & SONS AND WROX Press editorial and production teams for their support. Especially, thank you to Jim Minatel, executive editor at Wiley, for giving me a chance to write this new edition, Adaobi Obi Tulton, project editor, for managing this project, and Marylouise Wiack, copy editor, for improving readability and consistency and making sure the text is grammatically correct.
A very special thank you to my technical editor, Peter Van Weert, for his outstanding technical review. His many constructive comments and ideas have certainly made this book better.
Of course, the support and patience of my parents and my brother were very important in finishing this book. I would also like to express my sincere gratitude toward my employer, Nikon Metrology, for supporting me during this project.
Finally, I thank you, the reader, for trying this approach to professional C++ software development.
Go to www.wiley.com/go/eula to access Wiley’s ebook EULA.
For many years, C++ has served as the de facto language for writing fast, powerful, and enterprise-class object-oriented programs. As popular as C++ has become, the language is surprisingly difficult to grasp in full. There are simple, but powerful, techniques that professional C++ programmers use that don’t show up in traditional texts, and there are useful parts of C++ that remain a mystery even to experienced C++ programmers.
Too often, programming books focus on the syntax of the language instead of its real-world use. The typical C++ text introduces a major part of the language in each chapter, explaining the syntax and providing an example. Professional C++ does not follow this pattern. Instead of giving you just the nuts and bolts of the language with little practical context, this book will teach you how to use C++ in the real world. It will show you the little-known features that will make your life easier, and the programming techniques that separate novices from professional programmers.
Even if you have used the language for years, you might still be unfamiliar with the more-advanced features of C++, or you might not be using the full capabilities of the language. Perhaps you write competent C++ code, but would like to learn more about design and good programming style in C++. Or maybe you’re relatively new to C++, but want to learn the “right” way to program from the start. This book will meet those needs and bring your C++ skills to the professional level.
Because this book focuses on advancing from basic or intermediate knowledge of C++ to becoming a professional C++ programmer, it assumes that you have some knowledge of the language. Chapter 1 covers the basics of C++ as a refresher, but it is not a substitute for actual training and use of the language. If you are just starting with C++, but you have significant experience in another programming language such as C, Java, or C#, you should be able to pick up most of what you need from Chapter 1.
In any case, you should have a solid foundation in programming fundamentals. You should know about loops, functions, and variables. You should know how to structure a program, and you should be familiar with fundamental techniques such as recursion. You should have some knowledge of common data structures such as queues, and useful algorithms such as sorting and searching. You don’t need to know about object-oriented programming just yet—that is covered in Chapter 5.
You will also need to be familiar with the compiler you will be using to develop your code. Two compilers, Microsoft Visual C++ and GCC, are introduced later in this introduction. For other compilers, refer to the documentation that came with your compiler.
Professional C++ uses an approach to C++ programming that will both increase the quality of your code and improve your programming efficiency. You will find discussions on new C++17 features throughout this fourth edition. These features are not just isolated to a few chapters or sections; instead, examples have been updated to use new features when appropriate.
Professional C++ teaches you more than just the syntax and language features of C++. It also emphasizes programming methodologies, reusable design patterns, and good programming style. The Professional C++ methodology incorporates the entire software development process, from designing and writing code, to debugging, and working in groups. This approach will enable you to master the C++ language and its idiosyncrasies, as well as take advantage of its powerful capabilities for large-scale software development.
Imagine users who have learned all of the syntax of C++ without seeing a single example of its use. They know just enough to be dangerous! Without examples, they might assume that all code should go in the main() function of the program, or that all variables should be global—practices that are generally not considered hallmarks of good programming.
Professional C++ programmers understand the correct way to use the language, in addition to the syntax. They recognize the importance of good design, the theories of object-oriented programming, and the best ways to use existing libraries. They have also developed an arsenal of useful code and reusable ideas.
By reading and understanding this book, you will become a professional C++ programmer. You will expand your knowledge of C++ to cover lesser-known and often misunderstood language features. You will gain an appreciation for object-oriented design, and acquire top-notch debugging skills. Perhaps most important, you will finish this book armed with a wealth of reusable ideas that you can actually apply to your daily work.
There are many good reasons to make the effort to be a professional C++ programmer, as opposed to a programmer who knows C++. Understanding the true workings of the language will improve the quality of your code. Learning about different programming methodologies and processes will help you to work better with your team. Discovering reusable libraries and common design patterns will improve your daily efficiency and help you stop reinventing the wheel. All of these lessons will make you a better programmer and a more valuable employee. While this book can’t guarantee you a promotion, it certainly won’t hurt.
This book is made up of five parts.
Part I, “Introduction to Professional C++,” begins with a crash course in C++ basics to ensure a foundation of C++ knowledge. Following the crash course, Part I goes deeper into working with strings and string views because strings are used extensively in most examples throughout the book. The last chapter of Part I explores how to write readable C++ code.
Part II, “Professional C++ Software Design,” discusses C++ design methodologies. You will read about the importance of design, the object-oriented methodology, and the importance of code reuse.
Part III, “C++ Coding the Professional Way,” provides a technical tour of C++ from the professional point of view. You will read about the best ways to manage memory in C++, how to create reusable classes, and how to leverage important language features such as inheritance. You will also learn about the unusual and quirky parts of the language, techniques for input and output, error handling, string localization, and how to work with regular expressions. You will read about how to implement operator overloading, and how to write templates. This part also explains the C++ Standard Library, including containers, iterators, and algorithms. You will also read about some additional libraries that are available in the standard, such as the libraries to work with time, random numbers, and the filesystem.
Part IV, “Mastering Advanced Features of C++,” demonstrates how you can get the most out of C++. This part of the book exposes the mysteries of C++ and describes how to use some of its more-advanced features. You will read about how to customize and extend the C++ Standard Library to your needs, advanced details on template programming, including template metaprogramming, and how to use multithreading to take advantage of multiprocessor and multicore systems.
Part V, “C++ Software Engineering,” focuses on writing enterprise-quality software. You’ll read about the engineering practices being used by programming organizations today; how to write efficient C++ code; software testing concepts, such as unit testing and regression testing; techniques used to debug C++ programs; how to incorporate design techniques, frameworks, and conceptual object-oriented design patterns into your own code; and solutions for cross-language and cross-platform code.
The book concludes with a useful chapter-by-chapter guide to succeeding in a C++ technical interview, an annotated bibliography, a summary of the C++ header files available in the standard, and a brief introduction to the Unified Modeling Language (UML).
This book is not a reference of every single class, method, and function available in C++. The book C++ Standard Library Quick Reference by Peter Van Weert and Marc Gregoire1 is a condensed reference to all essential data structures, algorithms, and functions provided by the C++ Standard Library. Appendix B lists a couple more references. Two excellent online references are:
You can use this reference online, or download an offline version for use when you are not connected to the Internet.
When I refer to a “Standard Library Reference” in this book, I am referring to one of these detailed C++ references.
All you need to use this book is a computer with a C++ compiler. This book focuses only on parts of C++ that have been standardized, and not on vendor-specific compiler extensions.
Note that this book includes new features introduced with the C++17 standard. At the time of this writing, some compilers are not yet fully C++17 compliant.
You can use whichever C++ compiler you like. If you don’t have a C++ compiler yet, you can download one for free. There are a lot of choices. For example, for Windows, you can download Microsoft Visual Studio 2017 Community Edition, which is free and includes Visual C++. For Linux, you can use GCC or Clang, which are also free.
The following two sections briefly explain how to use Visual C++ and GCC. Refer to the documentation that came with your compiler for more details.
First, you need to create a project. Start Visual C++ and click File ➪ New ➪ Project. In the project template tree on the left, select Visual C++ ➪ Win32 (or Windows Desktop). Then select the Win32 Console Application (or Windows Console Application) template in the list in the middle of the window. At the bottom, specify a name for the project and a location where to save it, and click OK. A wizard opens2. In this wizard, click Next, select Console Application, Empty Project, and click Finish.
Once your new project is loaded, you can see a list of project files in the Solution Explorer. If this docking window is not visible, go to View ➪ Solution Explorer. You can add new files or existing files to a project by right-clicking the project name in the Solution Explorer and then clicking Add ➪ New Item or Add ➪ Existing Item.
Use Build ➪ Build Solution to compile your code. When it compiles without errors, you can run it with Debug ➪ Start Debugging.
If your program exits before you have a chance to view the output, use Debug ➪ Start without Debugging. This adds a pause to the end of the program so you can view the output.
At the time of this writing, Visual C++ 2017 does not yet automatically enable C++17 features. To enable C++17 features, in the Solution Explorer window, right-click your project and click Properties. In the properties window, go to Configuration Properties ➪ C/C++ ➪ Language, and set the C++ Language Standard option to “ISO C++17 Standard” or “ISO C++ Latest Draft Standard,” whichever is available in your version of Visual C++. These options are only accessible if your project contains at least one .cpp file.
Visual C++ supports so-called precompiled headers, a topic outside the scope of this book. In general, I recommend using precompiled headers if your compiler supports them. However, the source code files in the downloadable source code archive do not use precompiled headers, so you have to disable that feature for them to compile without errors. In the Solution Explorer window, right-click your project and click Properties. In the properties window, go to Configuration Properties ➪ C/C++ ➪ Precompiled Headers, and set the Precompiled Header option to “Not Using Precompiled Headers.”
Create your source code files with any text editor you prefer and save them to a directory. To compile your code, open a terminal and run the following command, specifying all your .cpp files that you want to compile:
gcc -lstdc++ -std=c++17 -o <executable_name> <source1.cpp> [source2.cpp …]The -std=c++17 option is required to tell GCC to enable C++17 support.
For example, you can compile the AirlineTicket example from Chapter 1 by changing to the directory containing the code and running the following command:
gcc –lstdc++ -std=c++17 -o AirlineTicket AirlineTicket.cpp AirlineTicketTest.cppWhen it compiles without errors, you can run it as follows:
./AirlineTicketTo help you get the most from the text and keep track of what’s happening, a number of conventions are used throughout this book.
As for styles in the text:
monkey.cpp.// Comments in code are shown like this.In code examples, new and important code is highlighted like this.Code that's less important in the present context or that has been shown before is formatted like this.
Paragraphs or sections that are specific to the C++17 standard have a little C++17 icon on the left, just as this paragraph does. C++11 and C++14 features are not marked with any icon.
As you work through the examples in this book, you may choose either to type in all the code manually, or to use the source code files that accompany the book. However, I suggest you type in all the code manually because it greatly benefits the learning process and your memory. All of the source code used in this book is available for download at www.wiley.com/go/proc++4e.
Alternatively, you can go to the main Wrox code download page at www.wrox.com/dynamic/books/download.aspx to see the code that is available for this book and all other Wrox books.
Once you’ve downloaded the code, just decompress it with your favorite decompression tool.
At Wrox, we make every effort to ensure that there are no errors in the text or in the code of our books. However, no one is perfect, and mistakes do occur. If you find an error in one of our books, such as a spelling mistake or faulty piece of code, we would be very grateful for your feedback. By sending in errata, you may save another reader hours of frustration, and at the same time you will be helping us provide even higher-quality information.
To find the errata page for this book, go to www.wrox.com and locate the title by using the Search box or one of the title lists. Then, on the book details page, click the Book Errata link. On this page you can view all errata that has been submitted for this book and posted by Wrox editors. A complete book list, including links to each book’s errata, is also available at www.wrox.com/misc-pages/booklist.shtml.
If you don’t spot “your” error on the Book Errata page, go to www.wrox.com/contact/techsupport.shtml and complete the form there to send us the error you have found. We’ll check the information and, if appropriate, post a message to the book’s errata page and fix the problem in subsequent editions of the book.
The C++ language is often viewed as a “better C” or a “superset of C.” It was mainly designed to be an object-oriented C, commonly called as “C with classes.” Later on, many of the annoyances and rough edges of the C language were addressed as well. Because C++ is based on C, much of the syntax you’ll see in this section will look familiar to you if you are an experienced C programmer. The two languages certainly have their differences, though. As evidence, The C++ Programming Language by C++ creator Bjarne Stroustrup (Fourth Edition; Addison-Wesley Professional, 2013) weighs in at 1,368 pages, while Kernighan and Ritchie’s The C Programming Language (Second Edition; Prentice Hall, 1988) is a scant 274 pages. So, if you’re a C programmer, be on the lookout for new or unfamiliar syntax!
In all its glory, the following code is the simplest C++ program you’re likely to encounter:
// helloworld.cpp#include <iostream>int main(){std::cout << "Hello, World!" << std::endl;return 0;}
This code, as you might expect, prints the message, “Hello, World!” on the screen. It is a simple program and unlikely to win any awards, but it does exhibit the following important concepts about the format of a C++ program:
main() functionThese concepts are briefly explained in the following sections.
The first line of the program is a comment, a message that exists for the programmer only and is ignored by the compiler. In C++, there are two ways to delineate a comment. In the preceding and following examples, two slashes indicate that whatever follows on that line is a comment.
// helloworld.cppThe same behavior (this is to say, none) would be achieved by using a multiline comment. Multiline comments start with /* and end with */. The following code shows a multiline comment in action (or, more appropriately, inaction).
/* This is a multiline comment.The compiler will ignore it.*/
Comments are covered in detail in Chapter 3.
Building a C++ program is a three-step process. First, the code is run through a preprocessor, which recognizes meta-information about the code. Next, the code is compiled, or translated into machine-readable object files. Finally, the individual object files are linked together into a single application.
Directives aimed at the preprocessor start with the # character, as in the line #include <iostream> in the previous example. In this case, an #include directive tells the preprocessor to take everything from the <iostream> header file and make it available to the current file. The most common use of header files is to declare functions that will be defined elsewhere. A function declaration tells the compiler how a function is called, declaring the number and types of parameters, and the function return type. A definition contains the actual code for the function. In C++, declarations usually go into header files, typically with extension .h, while definitions usually go into source files, typically with extension .cpp. A lot of other programming languages, such as C# and Java, do not separate declarations and definitions into separate files.
The <iostream> header declares the input and output mechanisms provided by C++. If the program did not include that header, it would be unable to perform its only task of outputting text.
The following table shows some of the most common preprocessor directives.
| PREPROCESSOR DIRECTIVE | FUNCTIONALITY | COMMON USES |
#include [file] |
The specified file is inserted into the code at the location of the directive. | Almost always used to include header files so that code can make use of functionality defined elsewhere. |
#define [key] [value] |
Every occurrence of the specified key is replaced with the specified value. | Often used in C to define a constant value or a macro. C++ provides better mechanisms for constants and most types of macros. Macros can be dangerous, so use them cautiously. See Chapter 11 for details. |
#ifdef [key]#endif#endif |
Code within the ifdef (“if defined”) or ifndef (“if not defined”) blocks are conditionally included or omitted based on whether the specified key has been defined with #define. |
Used most frequently to protect against circular includes. Each header file starts with an #ifndef checking the absence of a key, followed by a #define directive to define that key. The header file ends with an #endif. This prevents the file from being included multiple times; see the example after this table. |
#pragma [xyz] |
xyz is compiler dependent. It often allows the programmer to display a warning or error if the directive is reached during preprocessing. |
See the example after this table. |
One example of using preprocessor directives is to avoid multiple includes, as shown here:
#ifndef MYHEADER_H#define MYHEADER_H// … the contents of this header file#endif
If your compiler supports the #pragma once directive, and most modern compilers do, then this can be rewritten as follows:
#pragma once// … the contents of this header file
Chapter 11 discusses this in more details.
main() is, of course, where the program starts. The return type of main() is an int, indicating the result status of the program. You can omit any explicit return statements in main(), in which case zero is returned automatically. The main() function either takes no parameters, or takes two parameters as follows:
int main(int argc, char* argv[])argc gives the number of arguments passed to the program, and argv contains those arguments. Note that argv[0] can be the program name, but it might as well be an empty string, so do not rely on it; instead, use platform-specific functionality to retrieve the program name. The important thing to remember is that the actual parameters start at index 1.
I/O streams are covered in depth in Chapter 13, but the basics of output and input are very simple. Think of an output stream as a laundry chute for data. Anything you toss into it will be output appropriately. std::cout is the chute corresponding to the user console, or standard out. There are other chutes, including std::cerr, which outputs to the error console. The << operator tosses data down the chute. In the preceding example, a quoted string of text is sent to standard out. Output streams allow multiple types of data to be sent down the stream sequentially on a single line of code. The following code outputs text, followed by a number, followed by more text:
std::cout << "There are " << 219 << " ways I love you." << std::endl;std::endl represents an end-of-line sequence. When the output stream encounters std::endl, it will output everything that has been sent down the chute so far and move to the next line. An alternate way of representing the end of a line is by using the \n character. The \n character is an escape sequence, which refers to a new-line character. Escape sequences can be used within any quoted string of text. The following table shows the most common ones:
\n |
new line |
\r |
carriage return |
\t |
tab |
\\ |
backslash character |
\" |
quotation mark |
Streams can also be used to accept input from the user. The simplest way to do this is to use the >> operator with an input stream. The std::cin input stream accepts keyboard input from the user. Here is an example:
int value;std::cin >> value;
User input can be tricky because you can never know what kind of data the user will enter. See Chapter 13 for a full explanation of how to use input streams.
If you’re new to C++ and coming from a C background, you’re probably wondering what has been done with the trusty old printf() and scanf() functions. While these functions can still be used in C++, I recommend using the streams library instead, mainly because the printf() and scanf() family of functions do not provide any type safety.
Namespaces address the problem of naming conflicts between different pieces of code. For example, you might be writing some code that has a function called foo(). One day, you decide to start using a third-party library, which also has a foo() function. The compiler has no way of knowing which version of foo() you are referring to within your code. You can’t change the library’s function name, and it would be a big pain to change your own.
Namespaces come to the rescue in such scenarios because you can define the context in which names are defined. To place code in a namespace, enclose it within a namespace block. For example, the following could be the contents of a file called namespaces.h:
namespace mycode {void foo();}
The implementation of a method or function can also be handled in a namespace. The foo() function, for instance, could be implemented in namespaces.cpp as follows:
#include <iostream>#include "namespaces.h"void mycode::foo(){std::cout << "foo() called in the mycode namespace" << std::endl;}
Or alternatively:
#include <iostream>#include "namespaces.h"namespace mycode {void foo(){std::cout << "foo() called in the mycode namespace" << std::endl;}}
By placing your version of foo() in the namespace “mycode,” you are isolating it from the foo() function provided by the third-party library. To call the namespace-enabled version of foo(), prepend the namespace onto the function name by using ::, also called the scope resolution operator, as follows:
mycode::foo(); // Calls the "foo" function in the "mycode" namespaceAny code that falls within a “mycode” namespace block can call other code within the same namespace without explicitly prepending the namespace. This implicit namespace is useful in making the code more readable. You can also avoid prepending of namespaces with the using directive. This directive tells the compiler that the subsequent code is making use of names in the specified namespace. The namespace is thus implied for the code that follows:
#include "namespaces.h"using namespace mycode;int main(){foo(); // Implies mycode::foo();return 0;}
A single source file can contain multiple using directives, but beware of overusing this shortcut. In the extreme case, if you declare that you’re using every namespace known to humanity, you’re effectively eliminating namespaces entirely! Name conflicts will again result if you are using two namespaces that contain the same names. It is also important to know in which namespace your code is operating so that you don’t end up accidentally calling the wrong version of a function.
You’ve seen the namespace syntax before—you used it in the Hello, World program, where cout and endl are actually names defined in the std namespace. You could have written Hello, World with the using directive as shown here:
#include <iostream>using namespace std;int main(){cout <<"Hello, World!"<< endl;return 0;}
A using declaration can be used to refer to a particular item within a namespace. For example, if the only part of the std namespace that you intend to use is cout, you can refer to it as follows:
using std::cout;Subsequent code can refer to cout without prepending the namespace, but other items in the std namespace will still need to be explicit:
using std::cout;cout << "Hello, World!" << std::endl;
C++17 makes it easier to work with nested namespaces. A nested namespace is a namespace inside another one. Before C++17, you had to use nested namespaces as follows:
namespace MyLibraries {namespace Networking {namespace FTP {/* … */}}}
This can be simplified a lot with C++17:
namespace MyLibraries::Networking::FTP {/* … */}
A namespace alias can be used to give a new and possibly shorter name to another namespace. For example: namespace MyFTP = MyLibraries::Networking::FTP;
Literals are used to write numbers or strings in your code. C++ supports a number of standard literals. Numbers can be specified with the following literals (the examples in the list represent the same number, 123):
12301730x7B0b1111011Other examples of literals in C++ include
3.14f)3.14)'a')"character array")It is also possible to define your own type of literals, which is an advanced feature explained in Chapter 11.
Digits separators can be used in numeric literals. A digits separator is a single quote character. For example,
23'456'7890.123'456f C++17 adds support for hexadecimal floating-point literals—for example, 0x3.ABCp-10, 0Xb.cp12l.
In C++, variables can be declared just about anywhere in your code and can be used anywhere in the current block below the line where they are declared. Variables can be declared without being given a value. These uninitialized variables generally end up with a semi-random value based on whatever is in memory at that time, and are therefore the source of countless bugs. Variables in C++ can alternatively be assigned an initial value when they are declared. The code that follows shows both flavors of variable declaration, both using ints, which represent integer values.
int uninitializedInt;int initializedInt = 7;cout << uninitializedInt << " is a random value" << endl;cout << initializedInt << " was assigned an initial value" << endl;
The following table shows the most common types used in C++.
| TYPE | DESCRIPTION | USAGE |
(signed) intsigned |
Positive and negative integers; the range depends on the compiler (usually 4 bytes). | int i = -7;signed int i = -6;signed i = -5; |
(signed) short (int) |
Short integer (usually 2 bytes) | short s = 13;short int s = 14;signed short s = 15;signed short int s = 16; |
(signed) long (int) |
Long integer (usually 4 bytes) | long l = -7L; |
(signed) long long (int) |
Long long integer; the range depends on the compiler, but is at least the same as for long (usually 8 bytes). |
long long ll = 14LL; |
unsigned (int)unsigned short (int)unsigned long (int)unsigned long long (int) |
Limits the preceding types to values >= 0 | unsigned int i = 2U;unsigned j = 5U;unsigned short s = 23U;unsigned long l = 5400UL;unsigned long long ll = 140ULL; |
float |
Floating-point numbers | float f = 7.2f; |
double |
Double precision numbers; precision is at least the same as for float. |
double d = 7.2; |
long double |
Long double precision numbers; precision is at least the same as for double. |
long double d = 16.98L; |
char |
A single character | char ch = 'm'; |
char16_t |
A single 16-bit character | char16_t c16 = u'm'; |
char32_t |
A single 32-bit character | char32_t c32 = U'm'; |
wchar_t |
A single wide character; the size depends on the compiler. | wchar_t w = L'm'; |
bool |
A Boolean type that can have one of two values: true or false |
bool b = true; |
std::byte1 |
A single byte. Before C++17, a char or unsigned char was used to represent a byte, but those types make it look like you are working with characters. std::byte on the other hand clearly states your intention, that is, a single byte of memory. |
std::byte b{42};2 |
1Requires an include directive for the <cstddef> header file.
2Initialization of an std::byte requires direct list initialization with a single-element list. See the “Direct List Initialization versus Copy List Initialization” section later in this chapter for the definition of direct list initialization.
Variables can be converted to other types by casting them. For example, a float can be cast to an int. C++ provides three ways to explicitly change the type of a variable. The first method is a holdover from C; it is not recommended but unfortunately still commonly used. The second method is rarely used. The third method is the most verbose, but is also the cleanest one, and is therefore recommended.
float myFloat = 3.14f;int i1 = (int)myFloat; // method 1int i2 = int(myFloat); // method 2int i3 = static_cast<int>(myFloat); // method 3
The resulting integer will be the value of the floating-point number with the fractional part truncated. Chapter 11 describes the different casting methods in more detail. In some contexts, variables can be automatically cast, or coerced. For example, a short can be automatically converted into a long because a long represents the same type of data with at least the same precision.
long someLong = someShort; // no explicit cast neededWhen automatically casting variables, you need to be aware of the potential loss of data. For example, casting a float to an int throws away information (the fractional part of the number). Most compilers will issue a warning or even an error if you assign a float to an int without an explicit cast. If you are certain that the left-hand side type is fully compatible with the right-hand side type, it’s okay to cast implicitly.
What good is a variable if you don’t have a way to change it? The following table shows the most common operators used in C++ and sample code that makes use of them. Note that operators in C++ can be binary (operate on two expressions), unary (operate on a single expression), or even ternary (operate on three expressions). There is only one ternary operator in C++, and it is explained in the “Conditional Statements” section later in this chapter.
| OPERATOR | DESCRIPTION | USAGE |
= |
Binary operator to assign the value on the right to the expression on the left | int i;i = 3;int j;j = i; |
! |
Unary operator to complement the true/false (non-0/0) status of an expression | bool b = !true;bool b2 = !b; |
+ |
Binary operator for addition | int i = 3 + 2;int j = i + 5;int k = i + j; |
-*/ |
Binary operators for subtraction, multiplication, and division | int i = 5 - 1;int j = 5 * 2;int k = j / i; |
% |
Binary operator for the remainder of a division operation. This is also referred to as the mod or modulo operator. | int remainder = 5 % 2; |
++ |
Unary operator to increment an expression by 1. If the operator occurs after the expression, or post-increment, the result of the expression is the unincremented value. If the operator occurs before the expression, or pre-increment, the result of the expression is the new value. | i++;++i; |
-- |
Unary operator to decrement an expression by 1 | i--;--i; |
+= |
Shorthand syntax for i = i + j |
i += j; |
-=*=/=%= |
Shorthand syntax fori = i - j;i = i * j;i = i / j;i = i % j; |
i -= j;i *= j;i /= j;i %= j; |
&&= |
Takes the raw bits of one expression and performs a bitwise “AND” with the other expression | i = j & k;j &= k; |
||= |
Takes the raw bits of one expression and performs a bitwise “OR” with the other expression | i = j | k;j |= k; |
<<>><<=>>= |
Takes the raw bits of an expression and “shifts” each bit left (<<) or right (>>) the specified number of places |
i = i << 1;i = i >> 4;i <<= 1;i >>= 4; |
^^= |
Performs a bitwise “exclusive or,” also called “XOR” operation, on two expressions | i = i ^ j;i ^= j; |
The following program shows the most common variable types and operators in action. If you are unsure about how variables and operators work, try to figure out what the output of this program will be, and then run it to confirm your answer.
int someInteger = 256;short someShort;long someLong;float someFloat;double someDouble;someInteger++;someInteger *= 2;someShort = static_cast<short>(someInteger);someLong = someShort * 10000;someFloat = someLong + 0.785f;someDouble = static_cast<double>(someFloat) / 100000;cout << someDouble << endl;
The C++ compiler has a recipe for the order in which expressions are evaluated. If you have a complicated line of code with many operators, the order of execution may not be obvious. For that reason, it’s probably better to break up a complicated expression into several smaller expressions, or explicitly group sub-expressions by using parentheses. For example, the following line of code is confusing unless you happen to know the C++ operator precedence table by heart:
int i = 34 + 8 * 2 + 21 / 7 % 2;Adding parentheses makes it clear which operations are happening first:
int i = 34 + (8 * 2) + ( (21 / 7) % 2 );For those of you playing along at home, both approaches are equivalent and end up with i equal to 51. If you assumed that C++ evaluated expressions from left to right, your answer would have been 1. C++ evaluates /, *, and % first (in left-to-right order), followed by addition and subtraction, then bitwise operators. Parentheses let you explicitly tell the compiler that a certain operation should be evaluated separately.
In C++, you can use the basic types (int, bool, and so on) to build more complex types of your own design. Once you are an experienced C++ programmer, you will rarely use the following techniques, which are features brought in from C, because classes are far more powerful. Still, it is important to know about the following ways of building types so that you will recognize the syntax.
An integer really represents a value within a sequence—the sequence of numbers. Enumerated types let you define your own sequences so that you can declare variables with values in that sequence. For example, in a chess program, you could represent each piece as an int, with constants for the piece types, as shown in the following code. The integers representing the types are marked const to indicate that they can never change.
const int PieceTypeKing = 0;const int PieceTypeQueen = 1;const int PieceTypeRook = 2;const int PieceTypePawn = 3;//etc.int myPiece = PieceTypeKing;
This representation is fine, but it can become dangerous. Since a piece is just an int, what would happen if another programmer added code to increment the value of a piece? By adding 1, a king becomes a queen, which really makes no sense. Worse still, someone could come in and give a piece a value of -1, which has no corresponding constant.
Enumerated types solve these problems by tightly defining the range of values for a variable. The following code declares a new type, PieceType, which has four possible values, representing four of the chess pieces:
enum PieceType { PieceTypeKing, PieceTypeQueen, PieceTypeRook, PieceTypePawn };Behind the scenes, an enumerated type is just an integer value. The real value of PieceTypeKing is 0. However, by defining the possible values for variables of type PieceType, your compiler can give you a warning or an error if you attempt to perform arithmetic on PieceType variables or treat them as integers. The following code, which declares a PieceType variable, and then attempts to use it as an integer, results in a warning or an error on most compilers:
PieceType myPiece;myPiece = 0;
It’s also possible to specify the integer values for members of an enumeration. The syntax is as follows:
enum PieceType { PieceTypeKing = 1, PieceTypeQueen, PieceTypeRook = 10, PieceTypePawn };In this example, PieceTypeKing has the integer value 1, PieceTypeQueen has the value 2 assigned by the compiler, PieceTypeRook has the value 10, and PieceTypePawn has the value 11 assigned automatically by the compiler.
If you do not assign a value to an enumeration member, the compiler automatically assigns it a value that is the previous enumeration member incremented by 1. If you do not assign a value to the first enumeration member yourself, the compiler assigns it the value 0.
Enumerations as explained in the previous section are not strongly typed, meaning they are not type safe. They are always interpreted as integers, and thus you can compare enumeration values from completely different enumeration types.
The strongly-typed enum class enumerations solve this problem. For example, the following defines a type-safe version of the earlier-defined PieceType enumeration:
enum class PieceType{King = 1,Queen,Rook = 10,Pawn};
For an enum class, the enumeration value names are not automatically exported to the enclosing scope, which means that you always have to use the scope resolution operator:
PieceType piece = PieceType::King;This also means that you can give shorter names to the enumeration values, for example, King instead of PieceTypeKing.
Additionally, the enumeration values are not automatically converted to integers, which means the following is illegal:
if (PieceType::Queen == 2) {…}By default, the underlying type of an enumeration value is an integer, but this can be changed as follows:
enum class PieceType : unsigned long{King = 1,Queen,Rook = 10,Pawn};
Structs let you encapsulate one or more existing types into a new type. The classic example of a struct is a database record. If you are building a personnel system to keep track of employee information, you might want to store the first initial, last initial, employee number, and salary for each employee. A struct that contains all of this information is shown in the employeestruct.h header file that follows:
struct Employee {char firstInitial;char lastInitial;int employeeNumber;int salary;};
A variable declared with type Employee will have all of these fields built in. The individual fields of a struct can be accessed by using the “.” operator. The example that follows creates and then outputs the record for an employee:
#include <iostream>#include "employeestruct.h"using namespace std;int main(){// Create and populate an employee.Employee anEmployee;anEmployee.firstInitial = 'M';anEmployee.lastInitial = 'G';anEmployee.employeeNumber = 42;anEmployee.salary = 80000;// Output the values of an employee.cout << "Employee: " << anEmployee.firstInitial <<anEmployee.lastInitial << endl;cout << "Number: " << anEmployee.employeeNumber << endl;cout << "Salary: $" << anEmployee.salary << endl;return 0;}
Conditional statements let you execute code based on whether or not something is true. As shown in the following sections, there are three main types of conditional statements in C++: if/else statements, switch statements, and conditional operators.
The most common conditional statement is the if statement, which can be accompanied by an else. If the condition given inside the if statement is true, the line or block of code is executed. If not, execution continues with the else case if present, or with the code following the conditional statement. The following code shows a cascading if statement, a fancy way of saying that the if statement has an else statement that in turn has another if statement, and so on:
if (i > 4) {// Do something.} else if (i > 2) {// Do something else.} else {// Do something else.}
The expression between the parentheses of an if statement must be a Boolean value or evaluate to a Boolean value. A value of 0 evaluates to false, while any non-zero value evaluates to true. For example: if(0) is equivalent to if(false). Logical evaluation operators, described later, provide ways of evaluating expressions to result in a true or false Boolean value.
Initializers for if StatementsC++17 allows you to include an initializer inside an if statement using the following syntax:
if (<initializer> ; <conditional_expression>) { <body> }Any variable introduced in the <initializer> is only available in the <conditional_expression> and in the <body>. Such variables are not available outside the if statement.
It is too early in this book to give a useful example of this feature, but here is what it looks like:
if (Employee employee = GetEmployee() ; employee.salary > 1000) { … }In this example, the initializer gets an employee and the condition checks whether the salary of the retrieved employee exceeds 1000. Only in that case is the body of the if statement executed.
More concrete examples will be given throughout this book.
The switch statement is an alternate syntax for performing actions based on the value of an expression. In C++, the expression of a switch statement must be of an integral type, a type convertible to an integral type, an enumerated type, or a strongly typed enumeration, and must be compared to constants. Each constant value represents a “case.” If the expression matches the case, the subsequent lines of code are executed until a break statement is reached. You can also provide a default case, which is matched if none of the other cases match. The following pseudocode shows a common use of the switch statement:
switch (menuItem) {case OpenMenuItem:// Code to open a filebreak;case SaveMenuItem:// Code to save a filebreak;default:// Code to give an error messagebreak;}
A switch statement can always be converted into if/else statements. The previous switch statement can be converted as follows:
if (menuItem == OpenMenuItem) {// Code to open a file} else if (menuItem == SaveMenuItem) {// Code to save a file} else {// Code to give an error message}
switch statements are generally used when you want to do something based on more than 1 specific value of an expression, as opposed to some test on the expression. In such a case, the switch statement avoids cascading if-else statements. If you only need to inspect 1 value, an if or if-else statement is fine.
Once a case expression matching the switch condition is found, all statements that follow it are executed until a break statement is reached. This execution continues even if another case expression is encountered, which is called fallthrough. The following example has a single set of statements that is executed for several different cases:
switch (backgroundColor) {case Color::DarkBlue:case Color::Black:// Code to execute for both a dark blue or black background colorbreak;case Color::Red:// Code to execute for a red background colorbreak;}
Fallthrough can be a source of bugs, for example if you accidentally forget a break statement. Because of this, compilers might give a warning if a fallthrough is detected in a switch statement, unless the case is empty as in the above example. Starting with C++17, you can tell the compiler that a fallthrough is intentional using the [[fallthrough]] attribute as follows:
switch (backgroundColor) {case Color::DarkBlue:doSomethingForDarkBlue();[[fallthrough]];case Color::Black:// Code is executed for both a dark blue or black background colordoSomethingForBlackOrDarkBlue();break;case Color::Red:case Color::Green:// Code to execute for a red or green background colorbreak;}
Initializers for switch StatementsJust as for if statements, C++17 adds support for initializers to switch statements. The syntax is as follows:
switch (<initializer> ; <expression>) { <body> }Any variables introduced in the <initializer> are only available in the <expression> and in the <body>. They are not available outside the switch statement.
C++ has one operator that takes three arguments, known as a ternary operator. It is used as a shorthand conditional expression of the form “if [something] then [perform action], otherwise [perform some other action].” The conditional operator is represented by a ? and a :. The following code outputs “yes” if the variable i is greater than 2, and “no” otherwise:
std::cout << ((i > 2) ? "yes" : "no");The parentheses around i > 2 are optional, so the following is equivalent:
std::cout << (i > 2 ? "yes" : "no");The advantage of the conditional operator is that it can occur within almost any context. In the preceding example, the conditional operator is used within code that performs output. A convenient way to remember how the syntax is used is to treat the question mark as though the statement that comes before it really is a question. For example, “Is i greater than 2? If so, the result is ‘yes’; if not, the result is ‘no.’”
Unlike an if statement or a switch statement, the conditional operator doesn’t execute code blocks based on the result. Instead, it is used within code, as shown in the preceding example. In this way, it really is an operator (like + and -) as opposed to a true conditional statement, such as if and switch.
You have already seen a logical evaluation operator without a formal definition. The > operator compares two values. The result is “true” if the value on the left is greater than the value on the right. All logical evaluation operators follow this pattern—they all result in a true or false.
The following table shows common logical evaluation operators:
| OP | DESCRIPTION | USAGE |
|
< <= > >= |
Determines if the left-hand side is less than, less than or equal to, greater than, or greater than or equal to the right-hand side |
|
| == | Determines if the left-hand side equals the right-hand side. Don’t confuse this with the = (assignment) operator! |
|
| != | Not equals. The result of the statement is true if the left-hand side does not equal the right-hand side. |
|
| ! |
Logical NOT. This complements the true/false status of a Boolean expression. This is a unary operator. |
|
| && | Logical AND. The result is true if both parts of the expression are true. |
|
| || | Logical OR. The result is true if either part of the expression is true. |
|
C++ uses short-circuit logic when evaluating logical expressions. That means that once the final result is certain, the rest of the expression won’t be evaluated. For example, if you are performing a logical OR operation of several Boolean expressions, as shown in the following code, the result is known to be true as soon as one of them is found to be true. The rest won’t even be checked.
bool result = bool1 || bool2 || (i > 7) || (27 / 13 % i + 1) < 2;In this example, if bool1 is found to be true, the entire expression must be true, so the other parts aren’t evaluated. In this way, the language saves your code from doing unnecessary work. It can, however, be a source of hard-to-find bugs if the later expressions in some way influence the state of the program (for example, by calling a separate function). The following code shows a statement using && that short-circuits after the second term because 0 always evaluates to false:
bool result = bool1 && 0 && (i > 7) && !done;Short-circuiting can be beneficial for performance. You can put cheaper tests first so that more expensive tests are not even executed when the logic short-circuits. It is also useful in the context of pointers to avoid parts of the expression to be executed when a pointer is not valid. Pointers and short-circuiting with pointers are discussed later in this chapter.
For programs of any significant size, placing all the code inside of main() is unmanageable. To make programs easy to understand, you need to break up, or decompose, code into concise functions.
In C++, you first declare a function to make it available for other code to use. If the function is used inside only a particular file, you generally declare and define the function in the source file. If the function is for use by other modules or files, you generally put the declaration in a header file and the definition in a source file.
A function declaration is shown in the following code. This example has a return type of void, indicating that the function does not provide a result to the caller. The caller must provide two arguments for the function to work with—an integer and a character.
void myFunction(int i, char c);Without an actual definition to match this function declaration, the link stage of the compilation process will fail because code that makes use of the function will be calling nonexistent code. The following definition prints the values of the two parameters:
void myFunction(int i, char c){std::cout << "the value of i is " << i << std::endl;std::cout << "the value of c is " << c << std::endl;}
Elsewhere in the program, you can make calls to myFunction() and pass in arguments for the two parameters. Some sample function calls are shown here:
myFunction(8, 'a');myFunction(someInt, 'b');myFunction(5, someChar);
C++ functions can also return a value to the caller. The following function adds two numbers and returns the result:
int addNumbers(int number1, int number2){return number1 + number2;}
This function can be called as follows:
int sum = addNumbers(5, 3);With C++14, you can ask the compiler to figure out the return type of a function automatically. To make use of this functionality, you need to specify auto as the return type:
auto addNumbers(int number1, int number2){return number1 + number2;}
The compiler deduces the return type based on the expressions used for the return statements. There can be multiple return statements in the function, but they should all resolve to the same type. Such a function can even include recursive calls (calls to itself), but the first return statement in the function must be a non-recursive call.
Every function has a local predefined variable __func__ containing the name of the current function. One use of this variable would be for logging purposes:
int addNumbers(int number1, int number2){std::cout << "Entering function " << __func__ << std::endl;return number1 + number2;}
Arrays hold a series of values, all of the same type, each of which can be accessed by its position in the array. In C++, you must provide the size of the array when the array is declared. You cannot give a variable as the size—it must be a constant, or a constant expression (constexpr). Constant expressions are discussed in Chapter 11. The code that follows shows the declaration of an array of three integers followed by three lines to initialize the elements to 0:
int myArray[3];myArray[0] = 0;myArray[1] = 0;myArray[2] = 0;
The next section discusses loops that you can use to initialize each element. However, instead of using loops, or using the previous initialization mechanism, you can also accomplish the zero-initialization with the following one-liner:
int myArray[3] = {0};You can even drop the 0 as follows:
int myArray[3] = {};An array can also be initialized with an initializer list, in which case the compiler can deduce the size of the array automatically. For example,
int myArray[] = {1, 2, 3, 4}; // The compiler creates an array of 4 elements.If you do specify the size of the array, and the initializer list has less elements than the given size, the remaining elements are set to 0. For example, the following code only sets the first element in the array to the value 2, and sets all the other elements to 0:
int myArray[3] = {2};To get the size of a stack-based C-style array, you can use the C++17 std::size() function (requires <array>). For example:
unsigned int arraySize = std::size(myArray);If your compiler is not yet C++17 compliant, the old trick to get the size of a stack-based C-style array is to use the sizeof operator. The sizeof operator returns the size of its argument in bytes. To get the number of elements in a stack-based array, you divide the size in bytes of the array by the size in bytes of the first element. For example:
unsigned int arraySize = sizeof(myArray) / sizeof(myArray[0]);The preceding examples show a one-dimensional array, which you can think of as a line of integers, each with its own numbered compartment. C++ allows multi-dimensional arrays. You might think of a two-dimensional array as a checkerboard, where each location has a position along the x-axis and a position along the y-axis. Three-dimensional and higher arrays are harder to picture and are rarely used. The following code shows the syntax for allocating a two-dimensional array of characters for a Tic-Tac-Toe board and then putting an “o” in the center square:
char ticTacToeBoard[3][3];ticTacToeBoard[1][1] = 'o';
Figure 1-1 shows a visual representation of this board with the position of each square.
The arrays discussed in the previous section come from C, and still work in C++. However, C++ has a special type of fixed-size container called std::array, defined in the <array> header file. It’s basically a thin wrapper around C-style arrays.
There are a number of advantages to using std::arrays instead of C-style arrays. They always know their own size, are not automatically cast to a pointer to avoid certain types of bugs, and have iterators to easily loop over the elements. Iterators are discussed in detail in Chapter 17.
The following example demonstrates how to use the array container. The use of angle brackets after array, as in array<int, 3>, will become clear during the discussion of templates in Chapter 12. However, for now, just remember that you have to specify two parameters between the angle brackets. The first parameter represents the type of the elements in the array, and the second one represents the size of the array.
array<int, 3> arr = {9, 8, 7};cout << "Array size = " << arr.size() << endl;cout << "2nd element = " << arr[1] << endl;
If you want an array with a dynamic size, it is recommended to use std::vector, as explained in the next section. A vector automatically increases in size when you add new elements to it.
The C++ Standard Library provides a number of different non-fixed-size containers that can be used to store information. std::vector, declared in <vector>, is an example of such a container. The vector replaces the concept of C-style arrays with a much more flexible and safer mechanism. As a user, you need not worry about memory management, as the vector automatically allocates enough memory to hold its elements. A vector is dynamic, meaning that elements can be added and removed at run time. Chapter 17 goes into more detail regarding containers, but the basic use of a vector is straightforward, which is why it’s introduced in the beginning of this book so that it can be used in examples. The following code demonstrates the basic functionality of vector.
// Create a vector of integersvector<int> myVector = { 11, 22 };// Add some more integers to the vector using push_back()myVector.push_back(33);myVector.push_back(44);// Access elementscout << "1st element: " << myVector[0] << endl;
myVector is declared as vector<int>. The angle brackets are required to specify the template parameters, just as with std::array. A vector is a generic container. It can contain almost any kind of object; that’s why you have to specify the type of object you want in your vector between the angle brackets. Templates are discussed in detail in Chapters 12 and 22.
To add elements to a vector, you can use the push_back() method. Individual elements can be accessed using a similar syntax as for arrays, i.e. operator[].
Structured BindingsC++17 introduces the concept of structured bindings. Structured bindings allow you to declare multiple variables that are initialized with elements from an array, struct, pair, or tuple.
For example, assume you have the following array:
std::array<int, 3> values = { 11, 22, 33 };You can declare three variables, x, y, and z, initialized with the three values from the array as follows. Note that you have to use the auto keyword for structured bindings. You cannot, for example, specify int instead of auto.
auto [x, y, z] = values; The number of variables declared with the structured binding has to match the number of values in the expression on the right.
Structured bindings also work with structures if all non-static members are public. For example,
struct Point { double mX, mY, mZ; };Point point;point.mX = 1.0; point.mY = 2.0; point.mZ = 3.0;auto [x, y, z] = point;
Examples with std::pair and std::tuple are given in chapters 17 and 20 respectively.
Computers are great for doing the same thing over and over. C++ provides four looping mechanisms: the while loop, do/while loop, for loop, and range-based for loop.
The while loop lets you perform a block of code repeatedly as long as an expression evaluates to true. For example, the following completely silly code will output “This is silly.” five times:
int i = 0;while (i < 5) {std::cout << "This is silly." << std::endl;++i;}
The keyword break can be used within a loop to immediately get out of the loop and continue execution of the program. The keyword continue can be used to return to the top of the loop and reevaluate the while expression. However, using continue in loops is often considered poor style because it causes the execution of a program to jump around somewhat haphazardly, so use it sparingly.
C++ also has a variation on the while loop called do/while. It works similarly to the while loop, except that the code to be executed comes first, and the conditional check for whether or not to continue happens at the end. In this way, you can use a loop when you want a block of code to always be executed at least once and possibly additional times based on some condition. The example that follows outputs the statement, “This is silly.” once, even though the condition ends up being false:
int i = 100;do {std::cout << "This is silly." << std::endl;++i;} while (i < 5);
The for loop provides another syntax for looping. Any for loop can be converted to a while loop and vice versa. However, the for loop syntax is often more convenient because it looks at a loop in terms of a starting expression, an ending condition, and a statement to execute at the end of every iteration. In the following code, i is initialized to 0; the loop continues as long as i is less than 5; and at the end of every iteration, i is incremented by 1. This code does the same thing as the while loop example, but is more readable because the starting value, ending condition, and per-iteration statement are all visible on one line.
for (int i = 0; i < 5; ++i) {std::cout << "This is silly." << std::endl;}
The range-based for loop is the fourth looping mechanism. It allows for easy iteration over elements of a container. This type of loop works for C-style arrays, initializer lists (discussed later in this chapter), and any type that has begin() and end() methods returning iterators (see Chapter 17), such as std::array, std::vector, and all other Standard Library containers discussed in Chapter 17.
The following example first defines an array of four integers. The range-based for loop then iterates over a copy of every element in this array and prints each value. To iterate over the elements themselves without making copies, use a reference variable, as I discuss later in this chapter.
std::array<int, 4> arr = {1, 2, 3, 4};for (int i : arr) {std::cout << i << std::endl;}
Initializer lists are defined in the <initializer_list> header file and make it easy to write functions that can accept a variable number of arguments. The initializer_list class is a template and so it requires you to specify the type of elements in the list between angle brackets, similar to how you have to specify the type of object stored in a vector. The following example shows how to use an initializer list:
#include <initializer_list>using namespace std;int makeSum(initializer_list<int> lst){int total = 0;for (int value : lst) {total += value;}return total;}
The function makeSum() accepts an initializer list of integers as argument. The body of the function uses a range-based for loop to accumulate the total sum. This function can be used as follows:
int a = makeSum({1,2,3});int b = makeSum({10,20,30,40,50,60});
Initializer lists are type safe and define which type is allowed to be in the list. For the makeSum() function shown here, all elements of the initializer list must be integers. Trying to call it with a double results in a compiler error or warning, as shown here:
int c = makeSum({1,2,3.0});At this point, you have reviewed the basic essentials of C++ programming. If this section was a breeze, skim the next section to make sure that you are up to speed on the more-advanced material. If you struggled with this section, you may want to obtain one of the fine introductory C++ books mentioned in Appendix B before continuing.
Loops, variables, and conditionals are terrific building blocks, but there is much more to learn. The topics covered next include many features designed to help C++ programmers with their code as well as a few features that are often more confusing than helpful. If you are a C programmer with little C++ experience, you should read this section carefully.
There are three ways to work with strings of text in C++: the C-style, which represents strings as arrays of characters; the C++ style, which wraps that representation in an easier-to-use string type; and the general class of nonstandard approaches. Chapter 2 provides a detailed discussion.
For now, the only thing you need to know is that the C++ string type is defined in the <string> header file, and that you can use a C++ string almost like a basic type. Just like I/O streams, the string type lives in the std namespace. The following example shows that strings can be used just like character arrays:
string myString = "Hello, World";cout << "The value of myString is " << myString << endl;cout << "The second letter is " << myString[1] << endl;
Dynamic memory allows you to build programs with data that is not of fixed size at compile time. Most nontrivial programs make use of dynamic memory in some form.
Memory in your C++ application is divided into two parts—the stack and the heap. One way to visualize the stack is as a deck of cards. The current top card represents the current scope of the program, usually the function that is currently being executed. All variables declared inside the current function will take up memory in the top stack frame, the top card of the deck. If the current function, which I’ll call foo(), calls another function bar(), a new card is put on the deck so that bar() has its own stack frame to work with. Any parameters passed from foo() to bar() are copied from the foo() stack frame into the bar() stack frame. Figure 1-2 shows what the stack might look like during the execution of a hypothetical function foo() that has declared two integer values.
Stack frames are nice because they provide an isolated memory workspace for each function. If a variable is declared inside the foo() stack frame, calling the bar() function won’t change it unless you specifically tell it to. Also, when the foo() function is done running, the stack frame goes away, and all of the variables declared within the function no longer take up memory. Variables that are stack-allocated do not need to be deallocated (deleted) by the programmer; it happens automatically.
The heap is an area of memory that is completely independent of the current function or stack frame. You can put variables on the heap if you want them to exist even when the function in which they were created has completed. The heap is less structured than the stack. You can think of it as just a pile of bits. Your program can add new bits to the pile at any time or modify bits that are already in the pile. You have to make sure that you deallocate (delete) any memory that you allocated on the heap. This does not happen automatically, unless you use smart pointers, which are discussed in the section “Smart Pointers.”
You can put anything on the heap by explicitly allocating memory for it. For example, to put an integer on the heap, you need to allocate memory for it, but first you need to declare a pointer:
int* myIntegerPointer;The * after the int type indicates that the variable you are declaring refers or points to some integer memory. Think of the pointer as an arrow that points at the dynamically allocated heap memory. It does not yet point to anything specific because you haven’t assigned it to anything; it is an uninitialized variable. Uninitialized variables should be avoided at all times, and especially uninitialized pointers because they point to some random place in memory. Working with such pointers will most likely make your program crash. That’s why you should always declare and initialize your pointers at the same time. You can initialize them to a null pointer (nullptr—for more information, see the “Null Pointer Constant” section) if you don’t want to allocate memory right away:
int* myIntegerPointer = nullptr;A null pointer is a special default value that no valid pointer will ever have, and converts to false when used in a Boolean expression. For example:
if (!myIntegerPointer) { /* myIntegerPointer is a null pointer */ }You use the new operator to allocate the memory:
myIntegerPointer = new int;In this case, the pointer points to the address of just a single integer value. To access this value, you need to dereference the pointer. Think of dereferencing as following the pointer’s arrow to the actual value on the heap. To set the value of the newly allocated heap integer, you would use code like the following:
*myIntegerPointer = 8;Notice that this is not the same as setting myIntegerPointer to the value 8. You are not changing the pointer; you are changing the memory that it points to. If you were to reassign the pointer value, it would point to the memory address 8, which is probably random garbage that will eventually make your program crash.
After you are finished with your dynamically allocated memory, you need to deallocate the memory using the delete operator. To prevent the pointer from being used after having deallocated the memory it points to, it’s recommended to set your pointer to nullptr:
delete myIntegerPointer;myIntegerPointer = nullptr;
Pointers don’t always point to heap memory. You can declare a pointer that points to a variable on the stack, even another pointer. To get a pointer to a variable, you use the & (“address of”) operator:
int i = 8;int* myIntegerPointer = &i; // Points to the variable with the value 8
C++ has a special syntax for dealing with pointers to structures. Technically, if you have a pointer to a structure, you can access its fields by first dereferencing it with *, then using the normal. syntax, as in the code that follows, which assumes the existence of a function called getEmployee().
Employee* anEmployee = getEmployee();cout << (*anEmployee).salary << endl;
This syntax is a little messy. The -> (arrow) operator lets you perform both the dereference and the field access in one step. The following code is equivalent to the preceding code, but is easier to read:
Employee* anEmployee = getEmployee();cout << anEmployee->salary << endl;
Remember the concept of short-circuiting logic, which was discussed earlier in this chapter? This can be useful in combination with pointers to avoid using an invalid pointer, as in the following example:
bool isValidSalary = (anEmployee && anEmployee->salary > 0);Or, a little bit more verbose:
bool isValidSalary = (anEmployee != nullptr && anEmployee->salary > 0);anEmployee is only dereferenced to get the salary if it is a valid pointer. If it is a null pointer, the logical operation short-circuits, and the anEmployee pointer is not dereferenced.
The heap can also be used to dynamically allocate arrays. You use the new[] operator to allocate memory for an array.
int arraySize = 8;int* myVariableSizedArray = new int[arraySize];
This allocates memory for enough integers to satisfy the arraySize variable. Figure 1-3 shows what the stack and the heap both look like after this code is executed. As you can see, the pointer variable still resides on the stack, but the array that was dynamically created lives on the heap.
Now that the memory has been allocated, you can work with myVariableSizedArray as though it were a regular stack-based array.
myVariableSizedArray[3] = 2;When your code is done with the array, it should remove the array from the heap so that other variables can use the memory. In C++, you use the delete[] operator to do this.
delete[] myVariableSizedArray;myVariableSizedArray = nullptr;
The brackets after delete indicate that you are deleting an array!
Before C++11, the constant NULL was used for null pointers. NULL is simply defined as the constant 0, and this can cause problems. Take the following example:
void func(char* str) {cout << "char* version" << endl;}void func(int i) {cout << "int version" << endl;}int main(){func(NULL);return 0;}
The main() function is calling func() with parameter NULL, which is supposed to be a null pointer constant. In other words, you are expecting the char* version of func() to be called with a null pointer as argument. However, since NULL is not a pointer, but identical to the integer 0, the integer version of func() is called.
This problem is solved with the introduction of a real null pointer constant, nullptr. The following code calls the char* version:
func(nullptr);To avoid common memory problems, you should use smart pointers instead of “raw,” also called “naked,” C-style pointers. Smart pointers automatically deallocate memory when the smart pointer object goes out of scope, for example, when the function has finished executing.
The following are the two most important smart pointer types in C++, both defined in <memory> and in the std namespace:
std::unique_ptrstd::shared_ptrunique_ptr is analogous to an ordinary pointer, except that it automatically frees the memory or resource when the unique_ptr goes out of scope or is deleted. As such, unique_ptr has sole ownership of the object pointed to. One advantage of a unique_ptr is that memory and resources are always freed, even when return statements are executed, or when exceptions (discussed later in this chapter) are thrown. This, for example, simplifies coding when a function has multiple return statements, because you don’t have to remember to free the resources before each return statement.
To create a unique_ptr, you should use std::make_unique<>(). For example, instead of writing the following,
Employee* anEmployee = new Employee;// …delete anEmployee;
you should write this:
auto anEmployee = make_unique<Employee>();Note that you do not call delete anymore; it happens automatically for you. The auto keyword is discussed in more detail in the “Type Inference” section later in this chapter. For now, it suffices to know that the auto keyword tells the compiler to automatically deduce the type of a variable, so that you don’t have to manually specify the full type.
unique_ptr is a generic smart pointer that can point to any kind of memory. That’s why it is a template. Templates require the angle brackets, <
>, to specify the template parameters. Between the brackets, you have to specify the type of memory you want your unique_ptr to point to. Templates are discussed in detail in Chapters 12 and 22, but the smart pointers are introduced in Chapter 1 so that they can be used throughout the book—and as you will see, they are easy to use.
make_unique() has been available since C++14. If your compiler is not yet C++14 compliant, you can make your unique_ptr as follows (note that you now have to specify the type, Employee, twice):
unique_ptr<Employee> anEmployee(new Employee);You can use the anEmployee smart pointer in the same way as a normal pointer, for example:
if (anEmployee) {cout << "Salary: " << anEmployee->salary << endl;}
A unique_ptr can also be used to store a C-style array. The following example creates an array of ten Employee instances, stores it in a unique_ptr, and shows how to access an element from the array:
auto employees = make_unique<Employee[]>(10);cout << "Salary: " << employees[0].salary << endl;
shared_ptr allows for distributed ownership of the data. Each time a shared_ptr is assigned, a reference count is incremented indicating there is one more owner of the data. When a shared_ptr goes out of scope, the reference count is decremented. When the reference count goes to zero, it means there is no longer any owner of the data, and the object referenced by the pointer is freed.
To create a shared_ptr, you should use std::make_shared<>(), which is similar to make_unique<>():
auto anEmployee = make_shared<Employee>();if (anEmployee) {cout << "Salary: " << anEmployee->salary << endl;}
Starting with C++17, you can also store an array in a shared_ptr, whereas older versions of C++ did not allow this. Note however that make_shared<>() of C++17 cannot be used in this case. Here is an example:
shared_ptr<Employee[]> employees(new Employee[10]);cout << "Salary: " << employees[0].salary << endl;
Chapter 7 discusses memory management and smart pointers in more details, but because the basic use of unique_ptr and shared_ptr is straightforward, they are already used in examples throughout this book.
The keyword const can be used in several different ways in C++. All of its uses are related, but there are subtle differences. The subtleties of const make for excellent interview questions! Chapter 11 explains in detail all the ways that const can be used. This section outlines two common use-cases.
If you assumed that the keyword const has something to do with constants, you have correctly uncovered one of its uses. In the C language, programmers often use the preprocessor #define mechanism to declare symbolic names for values that won’t change during the execution of the program, such as the version number. In C++, programmers are encouraged to avoid #define in favor of using const to define constants. Defining a constant with const is just like defining a variable, except that the compiler guarantees that code cannot change the value.
const int versionNumberMajor = 2;const int versionNumberMinor = 1;const std::string productName = "Super Hyper Net Modulator";
In C++, you can cast a non-const variable to a const variable. Why would you want to do this? It offers some degree of protection from other code changing the variable. If you are calling a function that a coworker of yours is writing, and you want to ensure that the function doesn’t change the value of a parameter you pass in, you can tell your coworker to have the function take a const parameter. If the function attempts to change the value of the parameter, it will not compile.
In the following code, a string* is automatically cast to a const string* in the call to mysteryFunction(). If the author of mysteryFunction() attempts to change the value of the passed string, the code will not compile. There are ways around this restriction, but using them requires conscious effort. C++ only protects against accidentally changing const variables.
void mysteryFunction(const std::string* someString){*someString = "Test"; // Will not compile.}int main(){std::string myString = "The string";mysteryFunction(&myString);return 0;}
A reference in C++ allows you to give another name to an existing variable. For example:
int x = 42;int& xReference = x;
Attaching & to a type indicates that the variable is a reference. It is still used as though it was a normal variable, but behind the scenes, it is really a pointer to the original variable. Both the variable x and the reference variable xReference point to exactly the same value. If you change the value through either one of them, the change is visible through the other one as well.
Normally, when you pass a variable into a function, you are passing by value. If a function takes an integer parameter, it is really a copy of the integer that you pass in, so you cannot modify the value of the original variable. Pointers to stack variables are often used in C to allow functions to modify variables in other stack frames. By dereferencing the pointer, the function can change the memory that represents the variable even though that variable isn’t in the current stack frame. The problem with this approach is that it brings the messiness of pointer syntax into what is really a simple task.
Instead of passing pointers to functions, C++ offers a better mechanism, called pass by reference, where parameters are references instead of pointers. Following are two implementations of an addOne() function. The first one has no effect on the variable that is passed in because it is passed by value and thus the function receives a copy of the value passed to it. The second one uses a reference and thus changes the original variable.
void addOne(int i){i++; // Has no real effect because this is a copy of the original}void addOne(int& i){i++; // Actually changes the original variable}
The syntax for the call to the addOne() function with an integer reference is no different than if the function just took an integer:
int myInt = 7;addOne(myInt);
If you have a function that needs to return a big structure or class (discussed later in this chapter) that is expensive to copy, you’ll often see the function taking a non-const reference to such a structure or class which the function then modifies, instead of directly returning it. This was the recommended way a long time ago to prevent the performance penalty of creating a copy when you return the structure or class from the function. Since C++11, this is not necessary anymore. Thanks to move semantics, directly returning structures or classes from functions is efficient without any copying. Move semantics is discussed in detail in Chapter 9.
You will often find code that uses const reference parameters for functions. At first, that seems like a contradiction. Reference parameters allow you to change the value of a variable from within another context. const seems to prevent such changes.
The main value in const reference parameters is efficiency. When you pass a value into a function, an entire copy is made. When you pass a reference, you are really just passing a pointer to the original so the computer doesn’t need to make a copy. By passing a const reference, you get the best of both worlds: no copy is made but the original variable cannot be changed.
const references become more important when you are dealing with objects because they can be large and making copies of them can have unwanted side effects. Subtle issues like this are covered in Chapter 11. The following example shows how to pass an std::string to a function as a const reference:
void printString(const std::string& myString){std::cout << myString << std::endl;}int main(){std::string someString = "Hello World";printString(someString);printString("Hello World"); // Passing literals worksreturn 0;}
C++ is a very flexible language, but not a particularly safe one. The compiler will let you write code that scribbles on random memory addresses or tries to divide by zero (computers don’t deal well with infinity). One language feature that attempts to add a degree of safety back to the language is exceptions.
An exception is an unexpected situation. For example, if you are writing a function that retrieves a web page, several things could go wrong. The Internet host that contains the page might be down, the page might come back blank, or the connection could be lost. One way you could handle this situation is by returning a special value from the function, such as nullptr or an error code. Exceptions provide a much better mechanism for dealing with problems.
Exceptions come with some new terminology. When a piece of code detects an exceptional situation, it throws an exception. Another piece of code catches the exception and takes appropriate action. The following example shows a function, divideNumbers(), that throws an exception if the caller passes in a denominator of zero. The use of std::invalid_argument requires <stdexcept>.
double divideNumbers(double numerator, double denominator){if (denominator == 0) {throw invalid_argument("Denominator cannot be 0.");}return numerator / denominator;}
When the throw line is executed, the function immediately ends without returning a value. If the caller surrounds the function call with a try/catch block, as shown in the following code, it receives the exception and is able to handle it:
try {cout << divideNumbers(2.5, 0.5) << endl;cout << divideNumbers(2.3, 0) << endl;cout << divideNumbers(4.5, 2.5) << endl;} catch (const invalid_argument& exception) {cout << "Exception caught: " << exception.what() << endl;}
The first call to divideNumbers() executes successfully, and the result is output to the user. The second call throws an exception. No value is returned, and the only output is the error message that is printed when the exception is caught. The third call is never executed because the second call throws an exception, causing the program to jump to the catch block. The output for the preceding block of code is as follows:
5An exception was caught: Denominator cannot be 0.
Exceptions can get tricky in C++. To use exceptions properly, you need to understand what happens to the stack variables when an exception is thrown, and you have to be careful to properly catch and handle the necessary exceptions. Also, the preceding example uses the built-in std::invalid_argument type, but it is preferable to write your own exception types that are more specific to the error being thrown. Lastly, the C++ compiler doesn’t force you to catch every exception that might occur. If your code never catches any exceptions but an exception is thrown, it will be caught by the program itself, which will be terminated. These trickier aspects of exceptions are covered in much more detail in Chapter 14.
Type inference allows the compiler to automatically deduce the type of an expression. There are two keywords for type inference: auto and decltype.
The auto keyword has a number of completely different uses:
decltype(auto), see Chapter 12.auto can be used to tell the compiler to automatically deduce the type of a variable at compile time. The following line shows the simplest use of the auto keyword in that context:
auto x = 123; // x will be of type intIn this example, you don’t win much by typing auto instead of int; however, it becomes useful for more complicated types. Suppose you have a function called getFoo() that has a complicated return type. If you want to assign the result of calling getFoo() to a variable, you can spell out the complicated type, or you can simply use auto and let the compiler figure it out:
auto result = getFoo();This has the added benefit that you can easily change the function’s return type without having to update all the places in the code where that function is called.
However, using auto to deduce the type of an expression strips away reference and const qualifiers. Suppose you have the following function:
#include <string>const std::string message = "Test";const std::string& foo(){return message;}
You can call foo() and store the result in a variable with the type specified as auto, as follows:
auto f1 = foo();Because auto strips away reference and const qualifiers, f1 is of type string, and thus a copy is made. If you want a const reference, you can explicitly make it a reference and mark it const, as follows:
const auto& f2 = foo();The decltype keyword takes an expression as argument, and computes the type of that expression, as shown here:
int x = 123;decltype(x) y = 456;
In this example, the compiler deduces the type of y to be int because that is the type of x.
The difference between auto and decltype is that decltype does not strip reference and const qualifiers. Take again the function foo() returning a const reference to a string. Defining f2 using decltype as follows results in f2 being of type const string&, and thus no copy is made.
decltype(foo()) f2 = foo();On first sight, decltype doesn’t seem to add much value. However, it is pretty powerful in the context of templates, discussed in Chapters 12 and 22.
If you are a C programmer, you may have viewed the features covered so far in this chapter as convenient additions to the C language. As the name C++ implies, in many ways the language is just a “better C.” There is one major point that this view overlooks: unlike C, C++ is an object-oriented language.
Object-oriented programming (OOP) is a very different, arguably more natural, way to write code. If you are used to procedural languages such as C or Pascal, don’t worry. Chapter 5 covers all the background information you need to know to shift your mindset to the object-oriented paradigm. If you already know the theory of OOP, the rest of this section will get you up to speed (or refresh your memory) on basic C++ object syntax.
A class defines the characteristics of an object. In C++, classes are usually defined in a header file (.h), while their definitions usually are in a corresponding source file (.cpp).
A basic class definition for an airline ticket class is shown in the following example. The class can calculate the price of the ticket based on the number of miles in the flight and whether or not the customer is a member of the “Elite Super Rewards Program.” The definition begins by declaring the class name. Inside a set of curly braces, the data members (properties) of the class and its methods (behaviors) are declared. Each data member and method is associated with a particular access level: public, protected, or private. These labels can occur in any order and can be repeated. Members that are public can be accessed from outside the class, while members that are private cannot be accessed from outside the class. It’s recommended to make all your data members private, and if needed, to give access to them with public getters and setters. This way, you can easily change the representation of your data while keeping the public interface the same. The use of protected is explained in the context of inheritance in Chapters 5 and 10.
#include <string>class AirlineTicket{public:AirlineTicket();~AirlineTicket();double calculatePriceInDollars() const;const std::string& getPassengerName() const;void setPassengerName(const std::string& name);int getNumberOfMiles() const;void setNumberOfMiles(int miles);bool hasEliteSuperRewardsStatus() const;void setHasEliteSuperRewardsStatus(bool status);private:std::string mPassengerName;int mNumberOfMiles;bool mHasEliteSuperRewardsStatus;};
This book follows the convention to prefix each data member of a class with a lowercase ‘m’, such as mPassengerName.
The method that has the same name as the class with no return type is a constructor. It is automatically called when an object of the class is created. The method with a tilde (~) character followed by the class name is a destructor. It is automatically called when the object is destroyed.
There are two ways of initializing data members with a constructor. The recommended way is to use a constructor initializer, which follows a colon after the constructor name. Here is the AirlineTicket constructor with a constructor initializer:
AirlineTicket::AirlineTicket(): mPassengerName("Unknown Passenger"), mNumberOfMiles(0), mHasEliteSuperRewardsStatus(false){}
A second way is to put the initializations in the body of the constructor, as shown here:
AirlineTicket::AirlineTicket(){// Initialize data membersmPassengerName = "Unknown Passenger";mNumberOfMiles = 0;mHasEliteSuperRewardsStatus = false;}
If the constructor is only initializing data members without doing anything else, then there is no real need for a constructor because data members can be initialized directly inside the class definition. For example, instead of writing an AirlineTicket constructor, you can modify the definition of the data members in the class definition as follows:
private:std::string mPassengerName = "Unknown Passenger";int mNumberOfMiles = 0;bool mHasEliteSuperRewardsStatus = false;
If your class additionally needs to perform some other types of initialization, such as opening a file, allocating memory, and so on, then you still need to write a constructor to handle those.
Here is the destructor for the AirlineTicket class:
AirlineTicket::~AirlineTicket(){// Nothing much to do in terms of cleanup}
This destructor doesn’t do anything, and can simply be removed from this class. It is just shown here so you know the syntax of destructors. Destructors are required if you need to perform some cleanup, such as closing files, freeing memory, and so on. Chapters 8 and 9 discuss destructors in more detail.
The definitions of some of the AirlineTicket class methods are shown here:
double AirlineTicket::calculatePriceInDollars() const{if (hasEliteSuperRewardsStatus()) {// Elite Super Rewards customers fly for free!return 0;}// The cost of the ticket is the number of miles times 0.1.// Real airlines probably have a more complicated formula!return getNumberOfMiles() * 0.1;}const string& AirlineTicket::getPassengerName() const{return mPassengerName;}void AirlineTicket::setPassengerName(const string& name){mPassengerName = name;}// Other get and set methods omitted for brevity.
The following sample program makes use of the AirlineTicket class. This example shows the creation of a stack-based AirlineTicket object as well as a heap-based one:
AirlineTicket myTicket; // Stack-based AirlineTicketmyTicket.setPassengerName("Sherman T. Socketwrench");myTicket.setNumberOfMiles(700);double cost = myTicket.calculatePriceInDollars();cout << "This ticket will cost $" << cost << endl;// Heap-based AirlineTicket with smart pointerauto myTicket2 = make_unique<AirlineTicket>();myTicket2->setPassengerName("Laudimore M. Hallidue");myTicket2->setNumberOfMiles(2000);myTicket2->setHasEliteSuperRewardsStatus(true);double cost2 = myTicket2->calculatePriceInDollars();cout << "This other ticket will cost $" << cost2 << endl;// No need to delete myTicket2, happens automatically// Heap-based AirlineTicket without smart pointer (not recommended)AirlineTicket* myTicket3 = new AirlineTicket();// … Use ticket 3delete myTicket3; // delete the heap object!
The preceding example exposes you to the general syntax for creating and using classes. Of course, there is much more to learn. Chapters 8, 9, and 10 go into more depth about the specific C++ mechanisms for defining classes.
Before C++11, initialization of types was not always uniform. For example, take the following definition of a circle, once as a structure, and once as a class:
struct CircleStruct{int x, y;double radius;};class CircleClass{public:CircleClass(int x, int y, double radius): mX(x), mY(y), mRadius(radius) {}private:int mX, mY;double mRadius;};
In pre-C++11, initialization of a variable of type CircleStruct and a variable of type CircleClass looks different:
CircleStruct myCircle1 = {10, 10, 2.5};CircleClass myCircle2(10, 10, 2.5);
For the structure version, you can use the {…} syntax. However, for the class version, you need to call the constructor using function notation (…).
Since C++11, you can more uniformly use the {…} syntax to initialize types, as follows:
CircleStruct myCircle3 = {10, 10, 2.5};CircleClass myCircle4 = {10, 10, 2.5};
The definition of myCircle4 automatically calls the constructor of CircleClass. Even the use of the equal sign is optional, so the following is identical:
CircleStruct myCircle5{10, 10, 2.5};CircleClass myCircle6{10, 10, 2.5};
Uniform initialization is not limited to structures and classes. You can use it to initialize anything in C++. For example, the following code initializes all four variables with the value 3:
int a = 3;int b(3);int c = {3}; // Uniform initializationint d{3}; // Uniform initialization
Uniform initialization can be used to perform zero-initialization* of variables; you just specify an empty set of curly braces, as shown here:
int e{}; // Uniform initialization, e will be 0Using uniform initialization prevents narrowing. C++ implicitly performs narrowing, as shown here:
void func(int i) { /* … */ }int main(){int x = 3.14;func(3.14);}
In both cases, C++ automatically truncates 3.14 to 3 before assigning it to x or calling func(). Note that some compilers might issue a warning about this narrowing, while others won’t. With uniform initialization, both the assignment to x and the call to func() must generate a compiler error if your compiler fully conforms to the C++11 standard:
void func(int i) { /* … */ }int main(){int x = {3.14}; // Error because narrowingfunc({3.14}); // Error because narrowing}
Uniform initialization can be used to initialize dynamically allocated arrays, as shown here:
int* pArray = new int[4]{0, 1, 2, 3};It can also be used in the constructor initializer to initialize arrays that are members of a class.
class MyClass{public:MyClass() : mArray{0, 1, 2, 3} {}private:int mArray[4];};
Uniform initialization can be used with the Standard Library containers as well—such as the std::vector, as demonstrated later in this chapter.
There are two types of initialization that use braced initializer lists:
T obj = {arg1, arg2, …};T obj {arg1, arg2, …};In combination with auto type deduction, there is an important difference between copy- and direct list initialization introduced with C++17.
Starting with C++17, you have the following results:
// Copy list initializationauto a = {11}; // initializer_list<int>auto b = {11, 22}; // initializer_list<int>// Direct list initializationauto c {11}; // intauto d {11, 22}; // Error, too many elements.
Note that for copy list initialization, all the elements in the braced initializer must be of the same type. For example, the following does not compile:
auto b = {11, 22.33}; // Compilation errorIn earlier versions of the standard (C++11/14), both copy- and direct list initialization deduce an initializer_list<>:
// Copy list initializationauto a = {11}; // initializer_list<int>auto b = {11, 22}; // initializer_list<int>// Direct list initializationauto c {11}; // initializer_list<int>auto d {11, 22}; // initializer_list<int>
C++ comes with a Standard Library, which contains a lot of useful classes that can easily be used in your code. The benefit of using these classes is that you don’t need to reinvent certain classes and you don’t need to waste time on implementing things that have already been implemented for you. Another benefit is that the classes available in the Standard Library are heavily tested and verified for correctness by thousands of users. The Standard Library classes are also tuned for high performance, so using them will most likely result in better performance compared to making your own implementation.
A lot of functionality is available to you in the Standard Library. Chapters 16 to 20 provide more details; however, when you start working with C++ it is a good idea to understand what the Standard Library can do for you from the very beginning. This is especially important if you are a C programmer. As a C programmer, you might try to solve problems in C++ the same way you would solve them in C. However, in C++ there is probably an easier and safer solution to the problem that involves using Standard Library classes.
You already saw some Standard Library classes earlier in this chapter—for example, std::string, std::array, std::vector, std::unique_ptr, and std::shared_ptr. Many more classes are introduced in Chapters 16 to 20.
The following program builds on the employee database example used earlier in the discussion on structs. This time, you will end up with a fully functional C++ program that uses many of the features discussed in this chapter. This real-world example includes the use of classes, exceptions, streams, vectors, namespaces, references, and other language features.
A program to manage a company’s employee records needs to be flexible and have useful features. The feature set for this program includes the following abilities:
The design for this program divides the code into three parts. The Employee class encapsulates the information describing a single employee. The Database class manages all the employees of the company. A separate UserInterface file provides the interactivity of the program.
The Employee class maintains all the information about an employee. Its methods provide a way to query and change that information. Employees also know how to display themselves on the console. Methods also exist to adjust the employee’s salary and employment status.
The Employee.h file defines the Employee class. The sections of this file are described individually in the text that follows.
The first line contains a #pragma once to prevent the file from being included multiple times, followed by the inclusion of the string functionality.
This code also declares that the subsequent code, contained within the curly braces, lives in the Records namespace. Records is the namespace that is used throughout this program for application-specific code.
#pragma once#include <string>namespace Records {
The following constant, representing the default starting salary for new employees, lives in the Records namespace. Other code that lives in Records can access this constant as kDefaultStartingSalary. Elsewhere, it must be referenced as Records::kDefaultStartingSalary.
const int kDefaultStartingSalary = 30000;Note that this book uses the convention to prefix constants with a lowercase ‘k’, from the German “Konstant,” meaning “Constant.”
The Employee class is defined, along with its public methods. The promote() and demote() methods both have integer parameters that are specified with a default value. In this way, other code can omit the integer parameters and the default will automatically be used.
A number of setters and getters provide mechanisms to change the information about an employee or to query the current information about an employee.
The Employee class includes an explicitly defaulted constructor, as discussed in Chapter 8. It also includes a constructor that accepts a first and last name.
class Employee{public:Employee() = default;Employee(const std::string& firstName,const std::string& lastName);void promote(int raiseAmount = 1000);void demote(int demeritAmount = 1000);void hire(); // Hires or rehires the employeevoid fire(); // Dismisses the employeevoid display() const;// Outputs employee info to console// Getters and settersvoid setFirstName(const std::string& firstName);const std::string& getFirstName() const;void setLastName(const std::string& lastName);const std::string& getLastName() const;void setEmployeeNumber(int employeeNumber);int getEmployeeNumber() const;void setSalary(int newSalary);int getSalary() const;bool isHired() const;
Finally, the data members are declared as private so that other parts of the code cannot modify them directly. The setters and getters provide the only public way of modifying or querying those values. The data members are also initialized here instead of in a constructor. By default, new employees have no name, an employee number of -1, the default starting salary, and a status of not hired.
private:std::string mFirstName;std::string mLastName;int mEmployeeNumber = -1;int mSalary = kDefaultStartingSalary;bool mHired = false;};}
The constructor accepting a first and last name just sets the corresponding data members:
#include <iostream>#include "Employee.h"using namespace std;namespace Records {Employee::Employee(const std::string& firstName,const std::string& lastName): mFirstName(firstName), mLastName(lastName){}
The promote() and demote() methods simply call the setSalary() method with a new value. Note that the default values for the integer parameters do not appear in the source file; they are only allowed in a function declaration, not in a definition.
void Employee::promote(int raiseAmount){setSalary(getSalary() + raiseAmount);}void Employee::demote(int demeritAmount){setSalary(getSalary() - demeritAmount);}
The hire() and fire() methods just set the mHired data member appropriately.
void Employee::hire(){mHired = true;}void Employee::fire(){mHired = false;}
The display() method uses the console output stream to display information about the current employee. Because this code is part of the Employee class, it could access data members, such as mSalary, directly instead of using getters, such as getSalary(). However, it is considered good style to make use of getters and setters when they exist, even within the class.
void Employee::display() const{cout << "Employee: " << getLastName() << ", " << getFirstName() << endl;cout << "-------------------------" << endl;cout << (isHired() ? "Current Employee" : "Former Employee") << endl;cout << "Employee Number: " << getEmployeeNumber() << endl;cout << "Salary: $" << getSalary() << endl;cout << endl;}
A number of getters and setters perform the task of getting and setting values. Even though these methods seem trivial, it’s better to have trivial getters and setters than to make your data members public. For example, in the future, you may want to perform bounds checking in the setSalary() method. Getters and setters also make debugging easier because you can insert a breakpoint in them to inspect values when they are retrieved or set. Another reason is that when you decide to change how you are storing the data in your class, you only need to modify these getters and setters.
// Getters and settersvoid Employee::setFirstName(const string& firstName){mFirstName = firstName;}const string& Employee::getFirstName() const{return mFirstName;}// … other getters and setters omitted for brevity}
As you write individual classes, it is often useful to test them in isolation. The following code includes a main() function that performs some simple operations using the Employee class. Once you are confident that the Employee class works, you should remove or comment-out this file so that you don’t attempt to compile your code with multiple main() functions.
#include <iostream>#include "Employee.h"using namespace std;using namespace Records;int main(){cout << "Testing the Employee class." << endl;Employee emp;emp.setFirstName("John");emp.setLastName("Doe");emp.setEmployeeNumber(71);emp.setSalary(50000);emp.promote();emp.promote(50);emp.hire();emp.display();return 0;}
Another way of testing individual classes is with unit testing, which is discussed in Chapter 26.
The Database class uses the std::vector class from the Standard Library to store Employee objects.
Because the database will take care of automatically assigning an employee number to a new employee, a constant defines where the numbering begins.
#pragma once#include <iostream>#include <vector>#include "Employee.h"namespace Records {const int kFirstEmployeeNumber = 1000;
The database provides an easy way to add a new employee by providing a first and last name. For convenience, this method returns a reference to the new employee. External code can also get an employee reference by calling the getEmployee() method. Two versions of this method are declared. One allows retrieval by employee number. The other requires a first and last name.
class Database{public:Employee& addEmployee(const std::string& firstName,const std::string& lastName);Employee& getEmployee(int employeeNumber);Employee& getEmployee(const std::string& firstName,const std::string& lastName);
Because the database is the central repository for all employee records, it has methods that output all employees, the employees who are currently hired, and the employees who are no longer hired.
void displayAll() const;void displayCurrent() const;void displayFormer() const;
mEmployees contains the Employee objects. The mNextEmployeeNumber data member keeps track of what employee number is assigned to a new employee, and is initialized with the kFirstEmployeeNumber constant.
private:std::vector<Employee> mEmployees;int mNextEmployeeNumber = kFirstEmployeeNumber;};}
The addEmployee() method creates a new Employee object, fills in its information, and adds it to the vector. The mNextEmployeeNumber data member is incremented after its use so that the next employee will get a new number.
#include <iostream>#include <stdexcept>#include "Database.h"using namespace std;namespace Records {Employee& Database::addEmployee(const string& firstName,const string& lastName){Employee theEmployee(firstName, lastName);theEmployee.setEmployeeNumber(mNextEmployeeNumber++);theEmployee.hire();mEmployees.push_back(theEmployee);return mEmployees[mEmployees.size() - 1];}
Only one version of getEmployee() is shown. Both versions work in similar ways. The methods loop over all employees in mEmployees using range-based for loops, and check to see if an Employee is a match for the information passed to the method. An exception is thrown if no match is found.
Employee& Database::getEmployee(int employeeNumber){for (auto& employee : mEmployees) {if (employee.getEmployeeNumber() == employeeNumber) {return employee;}}throw logic_error("No employee found.");}
The display methods all use a similar algorithm. They loop through all employees and tell each employee to display itself to the console if the criterion for display matches. displayFormer() is similar to displayCurrent().
void Database::displayAll() const{for (const auto& employee : mEmployees) {employee.display();}}void Database::displayCurrent() const{for (const auto& employee : mEmployees) {if (employee.isHired())employee.display();}}}
A simple test for the basic functionality of the database is shown here:
#include <iostream>#include "Database.h"using namespace std;using namespace Records;int main(){Database myDB;Employee& emp1 = myDB.addEmployee("Greg", "Wallis");emp1.fire();Employee& emp2 = myDB.addEmployee("Marc", "White");emp2.setSalary(100000);Employee& emp3 = myDB.addEmployee("John", "Doe");emp3.setSalary(10000);emp3.promote();cout << "all employees: " << endl << endl;myDB.displayAll();cout << endl << "current employees: " << endl << endl;myDB.displayCurrent();cout << endl << "former employees: " << endl << endl;myDB.displayFormer();}
The final part of the program is a menu-based user interface that makes it easy for users to work with the employee database.
The main() function is a loop that displays the menu, performs the selected action, then does it all again. For most actions, separate functions are defined. For simpler actions, like displaying employees, the actual code is put in the appropriate case.
#include <iostream>#include <stdexcept>#include <exception>#include "Database.h"using namespace std;using namespace Records;int displayMenu();void doHire(Database& db);void doFire(Database& db);void doPromote(Database& db);void doDemote(Database& db);int main(){Database employeeDB;bool done = false;while (!done) {int selection = displayMenu();switch (selection) {case 0:done = true;break;case 1:doHire(employeeDB);break;case 2:doFire(employeeDB);break;case 3:doPromote(employeeDB);break;case 4:employeeDB.displayAll();break;case 5:employeeDB.displayCurrent();break;case 6:employeeDB.displayFormer();break;default:cerr << "Unknown command." << endl;break;}}return 0;}
The displayMenu() function outputs the menu and gets input from the user. One important note is that this code assumes that the user will “play nice” and type a number when a number is requested. When you read about I/O in Chapter 13, you will learn how to protect against bad input.
int displayMenu(){int selection;cout << endl;cout << "Employee Database" << endl;cout << "-----------------" << endl;cout << "1) Hire a new employee" << endl;cout << "2) Fire an employee" << endl;cout << "3) Promote an employee" << endl;cout << "4) List all employees" << endl;cout << "5) List all current employees" << endl;cout << "6) List all former employees" << endl;cout << "0) Quit" << endl;cout << endl;cout << "---> ";cin >> selection;return selection;}
The doHire() function gets the new employee’s name from the user and tells the database to add the employee.
void doHire(Database& db){string firstName;string lastName;cout << "First name? ";cin >> firstName;cout << "Last name? ";cin >> lastName;db.addEmployee(firstName, lastName);}
doFire() and doPromote() both ask the database for an employee by their employee number and then use the public methods of the Employee object to make changes.
void doFire(Database& db){int employeeNumber;cout << "Employee number? ";cin >> employeeNumber;try {Employee& emp = db.getEmployee(employeeNumber);emp.fire();cout << "Employee " << employeeNumber << " terminated." << endl;} catch (const std::logic_error& exception) {cerr << "Unable to terminate employee: " << exception.what() << endl;}}void doPromote(Database& db){int employeeNumber;int raiseAmount;cout << "Employee number? ";cin >> employeeNumber;cout << "How much of a raise? ";cin >> raiseAmount;try {Employee& emp = db.getEmployee(employeeNumber);emp.promote(raiseAmount);} catch (const std::logic_error& exception) {cerr << "Unable to promote employee: " << exception.what() << endl;}}
The preceding program covers a number of topics from the very simple to the relatively complex. There are a number of ways that you could extend this program. For example, the user interface does not expose all of the functionality of the Database or Employee classes. You could modify the UI to include those features. You could also change the Database class to remove fired employees from mEmployees.
If there are parts of this program that don’t make sense, consult the preceding sections to review those topics. If something is still unclear, the best way to learn is to play with the code and try things out. For example, if you’re not sure how to use the conditional operator, write a short main() function that uses it.
Now that you know the fundamentals of C++, you are ready to become a professional C++ programmer. When you start getting deeper into the C++ language later in this book, you can refer to this chapter to brush up on parts of the language you may need to review. Going back to some of the sample code in this chapter may be all you need to bring a forgotten concept back to the forefront of your mind.
The next chapter goes deeper in on how strings are handled in C++, because every program you write will have to work with strings one way or another.
Strings in languages that have supported them as first-class objects tend to have a number of attractive features, such as being able to expand to any size, or to have sub-strings extracted or replaced. In other languages, such as C, strings were almost an afterthought; there was no really good “string” data type, just fixed arrays of bytes. The “string library” was nothing more than a collection of rather primitive functions without even bounds checking. C++ provides a string type as a first-class data type.
In the C language, strings are represented as an array of characters. The last character of a string is a null character (‘\0’) so that code operating on the string can determine where it ends. This null character is officially known as NUL, spelled with one L, not two. NUL is not the same as the NULL pointer. Even though C++ provides a better string abstraction, it is important to understand the C technique for strings because they still arise in C++ programming. One of the most common situations is where a C++ program has to call a C-based interface in some third-party library or as part of interfacing to the operating system.
By far, the most common mistake that programmers make with C strings is that they forget to allocate space for the ‘\0’ character. For example, the string “hello” appears to be five characters long, but six characters worth of space are needed in memory to store the value, as shown in Figure 2-1.
C++ contains several functions from the C language that operate on strings. These functions are defined in the <cstring> header. As a general rule of thumb, these functions do not handle memory allocation. For example, the strcpy() function takes two strings as parameters. It copies the second string onto the first, whether it fits or not. The following code attempts to build a wrapper around strcpy() that allocates the correct amount of memory and returns the result, instead of taking in an already allocated string. It uses the strlen() function to obtain the length of the string. The caller is responsible for freeing the memory allocated by copyString().
char* copyString(const char* str){char* result = new char[strlen(str)]; // BUG! Off by one!strcpy(result, str);return result;}
The copyString() function as written is incorrect. The strlen() function returns the length of the string, not the amount of memory needed to hold it. For the string “hello”, strlen() returns 5, not 6. The proper way to allocate memory for a string is to add 1 to the amount of space needed for the actual characters. It seems a bit unnatural to have +1 all over the place. Unfortunately, that’s how it works, so keep this in mind when you work with C-style strings. The correct implementation is as follows:
char* copyString(const char* str){char* result = new char[strlen(str) + 1];strcpy(result, str);return result;}
One way to remember that strlen()returns only the number of actual characters in the string is to consider what would happen if you were allocating space for a string made up of several other strings. For example, if your function took in three strings and returned a string that was the concatenation of all three, how big would it be? To hold exactly enough space, it would be the length of all three strings, added together, plus one space for the trailing ‘\0’ character. If strlen() included the ‘\0’ in the length of the string, the allocated memory would be too big. The following code uses the strcpy() and strcat() functions to perform this operation. The cat in strcat() stands for concatenate.
char* appendStrings(const char* str1, const char* str2, const char* str3){char* result = new char[strlen(str1) + strlen(str2) + strlen(str3) + 1];strcpy(result, str1);strcat(result, str2);strcat(result, str3);return result;}
The sizeof() operator in C and C++ can be used to get the size of a certain data type or variable. For example, sizeof(char) returns 1 because a char has a size of 1 byte. However, in the context of C-style strings, sizeof() is not the same as strlen(). You should never use sizeof() to try to get the size of a string. It returns different sizes depending on how the C-style string is stored. If it is stored as a char[], then sizeof() returns the actual memory used by the string, including the ‘\0’ character, as in this example:
char text1[] = "abcdef";size_t s1 = sizeof(text1); // is 7size_t s2 = strlen(text1); // is 6
However, if the C-style string is stored as a char*, then sizeof() returns the size of a pointer!
const char* text2 = "abcdef";size_t s3 = sizeof(text2); // is platform-dependentsize_t s4 = strlen(text2); // is 6
Here, s3 will be 4 when compiled in 32-bit mode, and 8 when compiled in 64-bit mode because it is returning the size of a const char*, which is a pointer.
A complete list of C functions to operate on strings can be found in the <cstring> header file.
You’ve probably seen strings written in a C++ program with quotes around them. For example, the following code outputs the string hello by including the string itself, not a variable that contains it:
cout << "hello" << endl;In the preceding line, “hello” is a string literal because it is written as a value, not a variable. String literals are actually stored in a read-only part of memory. This allows the compiler to optimize memory usage by reusing references to equivalent string literals. That is, even if your program uses the string literal “hello” 500 times, the compiler is allowed to create just one instance of hello in memory. This is called literal pooling.
String literals can be assigned to variables, but because string literals are in a read-only part of memory and because of the possibility of literal pooling, assigning them to variables can be risky. The C++ standard officially says that string literals are of type “array of n const char”; however, for backward compatibility with older non-const-aware code, most compilers do not enforce your program to assign a string literal to a variable of type const char*. They let you assign a string literal to a char* without const, and the program will work fine unless you attempt to change the string. Generally, the behavior of modifying string literals is undefined. It could, for example, cause a crash, or it could keep working with seemingly inexplicable side effects, or the modification could silently be ignored, or it could just work; it all depends on your compiler. For example, the following code exhibits undefined behavior:
char* ptr = "hello"; // Assign the string literal to a variable.ptr[1] = 'a'; // Undefined behavior!
A much safer way to code is to use a pointer to const characters when referring to string literals. The following code contains the same bug, but because it assigned the literal to a const char*, the compiler catches the attempt to write to read-only memory:
const char* ptr = "hello"; // Assign the string literal to a variable.ptr[1] = 'a'; // Error! Attempts to write to read-only memory
You can also use a string literal as an initial value for a character array (char[]). In this case, the compiler creates an array that is big enough to hold the string and copies the string to this array. The compiler does not put the literal in read-only memory and does not do any literal pooling.
char arr[] = "hello"; // Compiler takes care of creating appropriate sized// character array arr.arr[1] = 'a'; // The contents can be modified.
Raw string literals are string literals that can span across multiple lines of code, that don’t require escaping of embedded double quotes, and where escape sequences like \t and \n are processed as normal text and not as escape sequences. Escape sequences are discussed in Chapter 1. For example, if you write the following with a normal string literal, you will get a compilation error because the string contains non-escaped double quotes:
const char* str = "Hello "World"!"; // Error!Normally you have to escape the double quotes as follows:
const char* str = "Hello \"World\"!";With a raw string literal, you can avoid the need to escape the quotes. The raw string literal starts with R"( and ends with )".
const char* str = R"(Hello "World"!)";If you need a string consisting of multiple lines, without raw string literals you need to embed \n escape sequences in your string where you want to start a new line. For example:
const char* str = "Line 1\nLine 2";If you output this string to the console, you get the following:
Line 1Line 2
With a raw string literal, instead of using \n escape sequences to start new lines, you can simply press enter to start real physical new lines in your source code as follows. The output is the same as the previous code snippet using the embedded \n.
const char* str = R"(Line 1Line 2)";
Escape sequences are ignored in raw string literals. For example, in the following raw string literal, the \t escape sequence is not replaced with a tab character, but is kept as the sequence of a backslash followed by the letter t:
const char* str = R"(Is the following a tab character? \t)";So, if you output this string to the console, you get:
Is the following a tab character? \tBecause a raw string literal ends with )" you cannot embed a )" in your string using this syntax. For example, the following string is not valid because it contains the )" sequence in the middle of the string:
const char* str = R"(Embedded )" characters)"; // Error!If you need embedded )" characters, you need to use the extended raw string literal syntax, which is as follows:
R"d-char-sequence(r-char-sequence)d-char-sequence"The r-char-sequence is the actual raw string. The d-char-sequence is an optional delimiter sequence, which should be the same at the beginning and at the end of the raw string literal. This delimiter sequence can have at most 16 characters. You should choose this delimiter sequence as a sequence that will not appear in the middle of your raw string literal.
The previous example can be rewritten using a unique delimiter sequence as follows:
const char* str = R"-(Embedded )" characters)-";Raw string literals make it easier to work with database querying strings, regular expressions, file paths, and so on. Regular expressions are discussed in Chapter 19.
C++ provides a much-improved implementation of the concept of a string as part of the Standard Library. In C++, std::string is a class (actually an instantiation of the basic_string class template) that supports many of the same functionalities as the <cstring> functions, but that takes care of memory allocation for you. The string class is defined in the <string> header in the std namespace, and has already been introduced in the previous chapter. Now it’s time to take a deeper look at it.
To understand the necessity of the C++ string class, consider the advantages and disadvantages of C-style strings.
The preceding lists were carefully constructed to make you think that perhaps there is a better way. As you’ll learn, C++ strings solve all the problems of C strings and render most of the arguments about the advantages of C strings over a first-class data type irrelevant.
Even though string is a class, you can almost always treat it as if it were a built-in type. In fact, the more you think of it that way, the better off you are. Through the magic of operator overloading, C++ strings are much easier to use than C-style strings. For example, the + operator is redefined for strings to mean “string concatenation.” The following code produces 1234:
string A("12");string B("34");string C;C = A + B; // C is "1234"
The += operator is also overloaded to allow you to easily append a string:
string A("12");string B("34");A += B; // A is "1234"
Another problem with C strings is that you cannot use == to compare them. Suppose you have the following two strings:
char* a = "12";char b[] = "12";
Writing a comparison as follows always returns false, because it compares the pointer values, not the contents of the strings:
if (a == b)Note that C arrays and pointers are related. You can think of C arrays, like the b array in the example, as pointers to the first element in the array. Chapter 7 goes deeper in on the array-pointer duality.
To compare C strings, you have to write something as follows:
if (strcmp(a, b) == 0)Furthermore, there is no way to use <, <=, >=, or > to compare C strings, so strcmp() returns -1, 0, or 1, depending on the lexicographic relationship of the strings. This results in very clumsy and hard-to-read code, which is also error-prone.
With C++ strings, operator==, operator!=, operator<, and so on are all overloaded to work on the actual string characters. Individual characters can still be accessed with operator[].
As the following code shows, when string operations require extending the string, the memory requirements are automatically handled by the string class, so memory overruns are a thing of the past:
string myString = "hello";myString += ", there";string myOtherString = myString;if (myString == myOtherString) {myOtherString[0] = 'H';}cout << myString << endl;cout << myOtherString << endl;
The output of this code is
hello, thereHello, there
There are several things to note in this example. One point is that there are no memory leaks even though strings are allocated and resized on a few places. All of these string objects are created as stack variables. While the string class certainly has a bunch of allocating and resizing to do, the string destructors clean up this memory when string objects go out of scope.
Another point to note is that the operators work the way you want them to. For example, the = operator copies the strings, which is most likely what you want. If you are used to working with array-based strings, this will either be refreshingly liberating for you or somewhat confusing. Don’t worry—once you learn to trust the string class to do the right thing, life gets so much easier.
For compatibility, you can use the c_str() method on a string to get a const character pointer, representing a C-style string. However, the returned const pointer becomes invalid whenever the string has to perform any memory reallocation, or when the string object is destroyed. You should call the method just before using the result so that it accurately reflects the current contents of the string, and you must never return the result of c_str() called on a stack-based string object from a function.
There is also a data() method which, up until C++14, always returned a const char* just as c_str(). Starting with C++17, however, data() returns a char* when called on a non-const string.
Consult a Standard Library Reference, see Appendix B, for a complete list of all supported operations that you can perform on string objects.
A string literal in source code is usually interpreted as a const char*. You can use the standard user-defined literal “s” to interpret a string literal as an std::string instead.
auto string1 = "Hello World";// string1 is a const char*auto string2 = "Hello World"s;// string2 is an std::string
The standard user-defined literal “s” requires a using namespace std::string_literals; or using namespace std;.
The std namespace includes a number of helper functions that make it easy to convert numerical values into strings or strings into numerical values. The following functions are available to convert numerical values into strings. All these functions take care of memory allocations. A new string object is created and returned from them.
string to_string(int val);string to_string(unsigned val);string to_string(long val);string to_string(unsigned long val);string to_string(long long val);string to_string(unsigned long long val);string to_string(float val);string to_string(double val);string to_string(long double val);These functions are pretty straightforward to use. For example, the following code converts a long double value into a string:
long double d = 3.14L;string s = to_string(d);
Converting in the other direction is done by the following set of functions, also defined in the std namespace. In these prototypes, str is the string that you want to convert, idx is a pointer that receives the index of the first non-converted character, and base is the mathematical base that should be used during conversion. The idx pointer can be a null pointer, in which case it will be ignored. These functions ignore leading whitespace, throw invalid_argument if no conversion could be performed, and throw out_of_range if the converted value is outside the range of the return type.
int stoi(const string& str, size_t *idx=0, int base=10);long stol(const string& str, size_t *idx=0, int base=10);unsigned long stoul(const string& str, size_t *idx=0, int base=10);long long stoll(const string& str, size_t *idx=0, int base=10);unsigned long long stoull(const string& str, size_t *idx=0, int base=10);float stof(const string& str, size_t *idx=0);double stod(const string& str, size_t *idx=0);long double stold(const string& str, size_t *idx=0);Here is an example:
const string toParse = " 123USD";size_t index = 0;int value = stoi(toParse, &index);cout << "Parsed value: " << value << endl;cout << "First non-parsed character: '" << toParse[index] << "'" << endl;
The output is as follows:
Parsed value: 123First non-parsed character: 'U'
Low-Level Numeric ConversionsThe C++17 standard also provides a number of lower-level numerical conversion functions, all defined in the <charconv> header. These functions do not perform any memory allocations, but instead use buffers allocated by the caller. Additionally, they are tuned for high performance and are locale-independent (see Chapter 19 for details on localization). The end result is that these functions can be orders of magnitude faster than other higher-level numerical conversion functions. You should use these functions if you want high performant, locale-independent conversions, for example to serialize/deserialize numerical data to/from human readable formats such as JSON, XML, and so on.
For converting integers to characters, the following set of functions is available:
to_chars_result to_chars(char* first, char* last, IntegerT value, int base = 10);Here, IntegerT can be any signed or unsigned integer type or char. The result is of type to_chars_result, a type defined as follows:
struct to_chars_result {char* ptr;errc ec;};
The ptr member is either equal to the one-past-the-end pointer of the written characters if the conversion was successful, or it is equal to last if the conversion failed (in which case, ec == errc::value_too_large).
Here is an example of its use:
std::string out(10, ' ');auto result = std::to_chars(out.data(), out.data() + out.size(), 12345);if (result.ec == std::errc()) { /* Conversion successful. */ }
Using C++17 structured bindings introduced in Chapter 1, you can write it as follows:
std::string out(10, ' ');auto [ptr, ec] = std::to_chars(out.data(), out.data() + out.size(), 12345);if (ec == std::errc()) { /* Conversion successful. */ }
Similarly, the following set of conversion functions is available for floating point types:
to_chars_result to_chars(char* first, char* last, FloatT value);to_chars_result to_chars(char* first, char* last, FloatT value,chars_format format);to_chars_result to_chars(char* first, char* last, FloatT value,chars_format format, int precision);
Here, FloatT can be float, double, or long double. Formatting can be specified with a combination of chars_format flags:
enum class chars_format {scientific, // Style: (-)d.ddde±ddfixed, // Style: (-)ddd.dddhex, // Style: (-)h.hhhp±d (Note: no 0x!)general = fixed | scientific // See next paragraph};
The default format is chars_format::general, which causes to_chars() to convert the floating point value to a decimal notation in the style of (-)ddd.ddd, or to a decimal exponent notation in the style of (-)d.ddde±dd, whichever results in the shortest representation with at least one digit before the decimal point (if present). If a format is specified but no precision, the precision is automatically determined to result in the shortest possible representation for the given format, with a maximum precision of 6 digits.
For the opposite conversion—that is, converting character sequences into numerical values—the following set of functions is available:
from_chars_result from_chars(const char* first, const char* last,IntegerT& value, int base = 10);from_chars_result from_chars(const char* first, const char* last,FloatT& value,chars_format format = chars_format::general);
Here, from_chars_result is a type defined as follows:
struct from_chars_result {const char* ptr;errc ec;};
The ptr member of the result type is a pointer to the first character that was not converted, or it equals last if all characters were successfully converted. If none of the characters could be converted, ptr equals first, and the value of the error code will be errc::invalid_argument. If the parsed value is too large to be representable by the given type, the value of the error code will be errc::result_out_of_range. Note that from_chars() does not skip any leading whitespace.
The std::string_view ClassBefore C++17, there was always a dilemma of choosing the parameter type for a function that accepted a read-only string. Should it be a const char*? In that case, if a client had an std::string available, they had to call c_str() or data() on it to get a const char*. Even worse, the function would lose the nice object-oriented aspects of the std::string and all its nice helper methods. Maybe the parameter could instead be a const std::string&? In that case, you always needed an std::string. If you passed a string literal, for example, the compiler silently created a temporary string object that contained a copy of your string literal and passed that object to your function, so there was a bit of overhead. Sometimes people would write multiple overloads of the same function—one that accepted a const char*, and another that accepted a const string&—but that was obviously a less-than-elegant solution.
With C++17, all those problems are solved with the introduction of the std::string_view class, which is an instantiation of the std::basic_string_view class template, and is defined in the <string_view> header. A string_view is basically a drop-in replacement for const string&, but without the overhead. It never copies strings! A string_view supports an interface similar to std::string. One exception is the absence of c_str(), but data() is available. On the other hand, string_view does add the methods remove_prefix(size_t) and remove_suffix(size_t), which shrink the string by advancing the starting pointer by a given offset, or by moving the end pointer backward by a given offset.
Note that you cannot concatenate a string and a string_view. The following code does not compile:
string str = "Hello";string_view sv = " world";auto result = str + sv;
To make it compile, you need to replace the last line with:
auto result = str + sv.data();If you know how to use std::string, then using a string_view is very straightforward, as the following example code demonstrates. The extractExtension() function extracts and returns the extension of a given filename. Note that string_views are usually passed by value because they are extremely cheap to copy. They just contain a pointer to, and the length of, a string.
string_view extractExtension(string_view fileName){return fileName.substr(fileName.rfind('.'));}
This function can be used with all kinds of different strings:
string fileName = R"(c:\temp\my file.ext)";cout << "C++ string: " << extractExtension(fileName) << endl;const char* cString = R"(c:\temp\my file.ext)";cout << "C string: " << extractExtension(cString) << endl;cout << "Literal: " << extractExtension(R"(c:\temp\my file.ext)") << endl;
There is not a single copy being made in all these calls to extractExtension(). The fileName parameter of the extractExtension() function is just a pointer and a length, and so is the return type of the function. This is all very efficient.
There is also a string_view constructor that accepts any raw buffer and a length. This can be used to construct a string_view out of a string buffer that is not NUL terminated. It is also useful when you do have a NUL-terminated string buffer, but you already know the length of the string, so the constructor does not need to count the number of characters again.
const char* raw =/* … */;size_t length =/* … */;cout << "Raw: " << extractExtension(string_view(raw, length)) << endl;
You cannot implicitly construct a string from a string_view. Either you use an explicit string constructor, or you use the string_view::data() member. For example, suppose you have the following function that accepts a const string&:
void handleExtension(const string& extension) { /* … */ }Calling this function as follows does not work:
handleExtension(extractExtension("my file.ext"));The following are two possible options you can use:
handleExtension(extractExtension("my file.ext").data()); // data() methodhandleExtension(string(extractExtension("my file.ext"))); // explicit ctor
You can use the standard user-defined literal “sv” to interpret a string literal as an std::string_view. For example:
auto sv = "My string_view"sv;The standard user-defined literal “sv” requires a using namespace std::string_view_ literals; or using namespace std;.
There are several reasons why many C++ programmers don’t use C++-style strings. Some programmers simply aren’t aware of the string type because it was not always part of the C++ specification. Others have discovered over the years that the C++ string doesn’t provide the behavior they need, and so have developed their own string type. Perhaps the most common reason is that development frameworks and operating systems tend to have their own way of representing strings, such as the CString class in the Microsoft MFC. Often, this is for backward compatibility or to address legacy issues. When starting a project in C++, it is very important to decide ahead of time how your group will represent strings. Some things are for sure:
std::string for your strings, then use std::string_view to pass read-only strings as parameters to functions; otherwise, see if your framework has support for something similar like string_views.This chapter discussed the C++ string and string_view classes and what their benefits are compared to plain old C-style character arrays. It also explained how a number of helper functions make it easier to convert numerical values into strings and vice versa, and it introduced the concept of raw string literals.
The next chapter discusses guidelines for good coding style, including code documentation, decomposition, naming, code formatting, and other tips.
If you’re going to spend several hours each day in front of a keyboard writing code, you should take some pride in all that work. Writing code that gets the job done is only part of a programmer’s work. After all, anybody can learn the fundamentals of coding. It takes a true master to code with style.
This chapter explores the question of what makes good code. Along the way, you’ll see several approaches to C++ style. As you will discover, simply changing the style of code can make it appear very different. For example, C++ code written by Windows programmers often has its own style, using Windows conventions. It almost looks like a completely different language than C++ code written by Mac OS programmers. Exposure to several different styles will help you avoid that sinking feeling you get when opening up a C++ source file that barely resembles the C++ you thought you knew.
Writing code that is stylistically “good” takes time. You probably don’t need much time to whip together a quick-and-dirty program to parse an XML file. Writing the same program with functional decomposition, adequate comments, and a clean structure would take you more time. Is it really worth it?
How confident would you be in your code if a new programmer had to work with it a year from now? A friend of mine, faced with a growing mess of web application code, encouraged his team to think about a hypothetical intern who would be starting in a year. How would this poor intern ever get up to speed on the code base when there was no documentation and scary multiple-page functions? When you’re writing code, imagine that somebody new or even you will have to maintain it in the future. Will you even still remember how it works? What if you’re not available to help? Well-written code avoids these problems because it is easy to read and understand.
It is difficult to enumerate the characteristics of code that make it “stylistically good.” Over time, you’ll find styles that you like and notice useful techniques in code that others wrote. Perhaps more important, you’ll encounter horrible code that teaches you what to avoid. However, good code shares several universal tenets that are explored in this chapter:
In the programming context, documentation usually refers to comments contained in the source files. Comments are your opportunity to tell the world what was going through your head when you wrote the accompanying code. They are a place to say anything that isn’t obvious from looking at the code itself.
It may seem obvious that writing comments is a good idea, but have you ever stopped to think about why you need to comment your code? Sometimes programmers acknowledge the importance of commenting without fully understanding why comments are important. There are several reasons, all of which are explored in this chapter.
One reason to use comments is to explain how clients should interact with the code. Normally, a developer should be able to understand what a function does simply based on the name of the function, the type of the return value, and the name and type of its parameters. However, not everything can be expressed in code. Sometimes a function requires certain pre- or postconditions that you have to explain in a comment. Exceptions that can be thrown by a function are also something that should be explained in a comment. In my opinion, you should only add a comment if it really adds any useful information. So, it’s up to the developer to decide whether a function needs a comment or not. Experienced programmers will have no problems deciding this, but less experienced developers might not always make the right decision. That’s why some companies have a rule stating that each publicly accessible function or method in a header file should have a comment explaining what it does. Some organizations go even further and formalize these comments by explicitly listing the purpose of each method, what its arguments are, what values it returns, and possible exceptions it can throw.
A comment gives you the opportunity to state, in English, anything that you can’t state in code. For example, there’s really no way in C++ code to indicate that the saveRecord() method of a database object throws an exception if openDatabase() has not been called yet. A comment, however, can be the perfect place to note this restriction, as follows:
/** This method throws a "DatabaseNotOpenedException"* if the openDatabase() method has not been called yet.*/int saveRecord(Record& record);
The C++ language forces you to specify the return type of a method, but it does not provide a way for you to say what the returned value actually represents. For example, the declaration of the saveRecord() method may indicate that it returns an int (a bad design decision discussed further in this section), but the client reading that declaration wouldn’t know what the int means. A comment explains the meaning of it:
/** Returns: int* An integer representing the ID of the saved record.* Throws:* DatabaseNotOpenedException if the openDatabase() method has not* been called yet.*/int saveRecord(Record& record);
As mentioned earlier, some companies require everything about a function to be documented in a formal way. The following is an example of how such a comment for the saveRecord() method might look like:
/** saveRecord()** Saves the given record to the database.** Parameters:* Record& record: the record to save to the database.* Returns: int* An integer representing the ID of the saved record.* Throws:* DatabaseNotOpenedException if the openDatabase() method has not* been called yet.*/int saveRecord(Record& record);
However, I don’t recommend this style of commenting. The first two lines are completely useless, since the name of the function is self-explanatory. The description of the parameter also does not add any additional information. Documenting what exactly the return type represents for this version of saveRecord() is required since it returns a generic int. However, a much better design would be to return a RecordID instead of a plain int, which removes the need to add any comments for the return type. RecordID could simply be a type alias (see Chapter 11) for int, but it conveys more information. The only comment that should remain is the exception. So, the following is my recommendation for the saveRecord() method:
/** Throws:* DatabaseNotOpenedException if the openDatabase() method has not* been called yet.*/RecordID saveRecord(Record& record);
Sometimes, the parameters to, and the return type from, a function are generic and can be used to pass all kinds of information. In that case you need to clearly document exactly what type is being passed. For example, message handlers in Windows accept two parameters, LPARAM and WPARAM, and can return an LRESULT. All three can be used to pass anything you like, but you cannot change their type. By using type casting, they can, for example, be used to pass a simple integer or to pass a pointer to some object. Your documentation could look like this:
* Parameters:* WPARAM wParam: (WPARAM)(int): An integer representing...* LPARAM lParam: (LPARAM)(string*): A string pointer representing...* Returns: (LRESULT)(Record*)* nullptr in case of an error, otherwise a pointer to a Record object* representing...
Good comments are also important inside the actual source code. In a simple program that processes input from the user and writes a result to the console, it is probably easy to read through and understand all of the code. In the professional world, however, you will often need to write code that is algorithmically complex or too esoteric to understand simply by inspection.
Consider the code that follows. It is well written, but it may not be immediately apparent what it is doing. You might recognize the algorithm if you have seen it before, but a newcomer probably wouldn’t understand the way the code works.
void sort(int inArray[], size_t inSize){for (size_t i = 1; i < inSize; i++) {int element = inArray[i];size_t j = i - 1;while (j >= 0 && inArray[j] > element) {inArray[j+1] = inArray[j];j--;}inArray[j+1] = element;}}
A better approach would be to include comments that describe the algorithm that is being used, and to document (loop) invariants. Invariants are conditions that have to be true during the execution of a piece of code, for example, a loop iteration. In the modified function that follows, a thorough comment at the top explains the algorithm at a high level, and inline comments explain specific lines that may be confusing:
/** Implements the "insertion sort" algorithm. The algorithm separates the* array into two parts--the sorted part and the unsorted part. Each* element, starting at position 1, is examined. Everything earlier in the* array is in the sorted part, so the algorithm shifts each element over* until the correct position is found to insert the current element. When* the algorithm finishes with the last element, the entire array is sorted.*/void sort(int inArray[], size_t inSize){// Start at position 1 and examine each element.for (size_t i = 1; i < inSize; i++) {// Loop invariant:// All elements in the range 0 to i-1 (inclusive) are sorted.int element = inArray[i];// j marks the position in the sorted part after which element// will be inserted.size_t j = i – 1;// As long as the current slot in the sorted array is higher than// element, shift values to the right to make room for inserting// (hence the name, "insertion sort") element in the right position.while (j >= 0 && inArray[j] > element) {inArray[j+1] = inArray[j];j--;}// At this point the current position in the sorted array// is *not* greater than the element, so this is its new position.inArray[j+1] = element;}}
The new code is certainly more verbose, but a reader unfamiliar with sorting algorithms would be much more likely to understand it with the comments included.
Another possible reason to use comments is to provide information at a higher level than the code itself. This meta-information provides details about the creation of the code without addressing the specifics of its behavior. For example, your organization may want to keep track of the original author of each method. You can also use meta-information to cite external documents or refer to other code.
The following example shows several instances of meta-information, including the author, the date it was created, and the specific feature it addresses. It also includes inline comments expressing metadata, such as the bug number that corresponds to a line of code and a reminder to revisit a possible problem in the code later.
/** Author: marcg* Date: 110412* Feature: PRD version 3, Feature 5.10*/RecordID saveRecord(Record& record){if (!mDatabaseOpen) {throw DatabaseNotOpenedException();}RecordID id = getDB()->saveRecord(record);if (id == -1) return -1;// Added to address bug #142 – jsmith 110428record.setId(id);// TODO: What if setId() throws an exception? – akshayr 110501return id;}
A change-log could also be included at the beginning of each file. The following shows a possible example of such a change-log:
/** Date | Change*----------+--------------------------------------------------* 110413 | REQ #005: <marcg> Do not normalize values.* 110417 | REQ #006: <marcg> use nullptr instead of NULL.*/
Another type of meta-information is a copyright notice. Some companies require such a copyright notice at the very beginning of every source file.
It’s easy to go overboard with comments. A good approach is to discuss which types of comments are most useful with your group and to form a policy. For example, if one member of the group uses a “TODO” comment to indicate code that still needs work, but nobody else knows about this convention, the code in need of attention could be overlooked.
Every organization has a different approach to commenting code. In some environments, a particular style is mandated to give the code a common standard for documentation. Other times, the quantity and style of commenting is left up to the programmer. The following examples depict several approaches to commenting code.
One way to avoid lack of documentation is to force yourself to overdocument by including a comment for every line. Commenting every line of code should ensure that there’s a specific reason for everything you write. In reality, such heavy commenting on a large scale is unwieldy, messy, and tedious! For example, consider the following useless comments:
int result; // Declare an integer to hold the result.result = doodad.getResult(); // Get the doodad's result.if (result % 2 == 0) { // If the result modulo 2 is 0 ...logError(); // then log an error,} else { // otherwise ...logSuccess(); // log success.} // End if/elsereturn result; // Return the result
The comments in this code express each line as part of an easily readable English story. This is entirely useless if you assume that the reader has at least basic C++ skills. These comments don’t add any additional information to code. Specifically, look at this line:
if (result % 2 == 0) { // If the result modulo 2 is 0 ...The comment is just an English translation of the code. It doesn’t say why the programmer has used the modulo operator on the result with the value 2. The following would be a better comment:
if (result % 2 == 0) { // If the result is even ...The modified comment, while still fairly obvious to most programmers, gives additional information about the code. The modulo operator with 2 is used because the code needs to check if the result is even.
Despite its tendency to be verbose and superfluous, heavy commenting can be useful in cases where the code would otherwise be difficult to comprehend. The following code also comments every line, but these comments are actually helpful:
// Calculate the doodad. The start, end, and offset values come from the// table on page 96 of the "Doodad API v1.6".result = doodad.calculate(kStart, kEnd, kOffset);// To determine success or failure, we need to bitwise AND the result with// the processor-specific mask (see "Doodad API v1.6", page 201).result &= getProcessorMask();// Set the user field value based on the "Marigold Formula."// (see "Doodad API v1.6", page 136)setUserField((result + kMarigoldOffset) / MarigoldConstant + MarigoldConstant);
This code is taken out of context, but the comments give you a good idea of what each line does. Without them, the calculations involving & and the mysterious “Marigold Formula” would be difficult to decipher.
Your group may decide to begin all source files with a standard comment. This is an excellent opportunity to document important information about the program and specific file. Examples of information that you might want to document at the top of every file include the following:
The items marked with an asterisk are usually automatically handled by your source code control solution.
Your development environment may allow you to create a template that automatically starts new files with your prefix comment. Some source control systems such as Subversion (SVN) can even assist by filling in metadata. For example, if your comment contains the string $Id$, SVN can automatically expand the comment to include the author, filename, revision, and date.
An example of a prefix comment is shown here:
/** $Id: Watermelon.cpp,123 2004/03/10 12:52:33 marcg $** Implements the basic functionality of a watermelon. All units are expressed* in terms of seeds per cubic centimeter. Watermelon theory is based on the* white paper "Algorithms for Watermelon Processing."** The following code is (c) copyright 2017, FruitSoft, Inc. ALL RIGHTS RESERVED*/
Writing comments in a standard format that can be parsed by external document builders is an increasingly popular programming practice. In the Java language, programmers can write comments in a standard format that allows a tool called JavaDoc to automatically create hyperlinked documentation for the project. For C++, a free tool called Doxygen (available at www.doxygen.org) parses comments to automatically build HTML documentation, class diagrams, UNIX man pages, and other useful documents. Doxygen even recognizes and parses JavaDoc-style comments in C++ programs. The code that follows shows JavaDoc-style comments that are recognized by Doxygen:
/*** Implements the basic functionality of a watermelon* TODO: Implement updated algorithms!*/class Watermelon{public:/*** @param initialSeeds The starting number of seeds, must be > 0.*/Watermelon(int initialSeeds);/*** Computes the seed ratio, using the Marigold algorithm.* @param slowCalc Whether or not to use long (slow) calculations* @return The marigold ratio*/double calcSeedRatio(bool slowCalc);};
Doxygen recognizes the C++ syntax and special comment directives such as @param and @return to generate customizable output. An example of a Doxygen-generated HTML class reference is shown in Figure 3-1.
Note that you should still avoid writing useless comments, including when you use a tool to automatically generate documentation. Take a look at the Watermelon constructor in the previous code. Its comment omits a description and only describes the parameter. Adding a description, as in the following example, is redundant:
/*** The Watermelon constructor.* @param initialSeeds The starting number of seeds, must be > 0.*/Watermelon(int initialSeeds);
Automatically generated documentation like the file shown in Figure 3-1 can be helpful during development because it allows developers to browse through a high-level description of classes and their relationships. Your group can easily customize a tool like Doxygen to work with the style of comments that you have adopted. Ideally, your group would set up a machine that builds documentation on a daily basis.
Most of the time, you use comments on an as-needed basis. Here are some guidelines for comments that appear within the body of your code:
Well-written code often doesn’t need abundant commenting. The best code is written to be readable. If you find yourself adding a comment for every line, consider whether the code could be rewritten to better match what you are saying in the comments. For example, use descriptive names for your functions, parameters, variables, classes, and so on. Properly make use of const; that is, if a variable is not supposed to be modified, mark it as const. Reorder the steps in a function to make it clearer what it is doing. Introduce intermediate well-named variables to make an algorithm easier to understand. Remember that C++ is a language. Its main purpose is to tell the computer what to do, but the semantics of the language can also be used to explain its meaning to a reader.
Another way of writing self-documenting code is to break up, or decompose, your code into smaller pieces. Decomposition is covered in detail in the following section.
Decomposition is the practice of breaking up code into smaller pieces. There is nothing more daunting in the world of coding than opening up a file of source code to find 300-line functions and massive, nested blocks of code. Ideally, each function or method should accomplish a single task. Any subtasks of significant complexity should be decomposed into separate functions or methods. For example, if somebody asks you what a method does and you answer, “First it does A, then it does B; then, if C, it does D; otherwise, it does E,” you should probably have separate helper methods for A, B, C, D, and E.
Decomposition is not an exact science. Some programmers will say that no function should be longer than a page of printed code. That may be a good rule of thumb, but you could certainly find a quarter-page of code that is desperately in need of decomposition. Another rule of thumb is that if you squint your eyes and look at the format of the code without reading the actual content, it shouldn’t appear too dense in any one area. For example, Figures 3-2 and 3-3 show code that has been purposely blurred so that you don’t focus on the content. It should be obvious that the code in Figure 3-3 has better decomposition than the code in Figure 3-2.
Sometimes, when you’ve had a few coffees and you’re really in the programming zone, you start coding so fast that you end up with code that does exactly what it’s supposed to do, but is far from pretty. All programmers do this from time to time. Short periods of vigorous coding are sometimes the most productive times in the course of a project. Dense code also arises over the course of time as code is modified. As new requirements and bug fixes emerge, existing code is amended with small modifications. The computing term cruft refers to the gradual accumulation of small amounts of code that eventually turns a once-elegant piece of code into a mess of patches and special cases.
Refactoring is the act of restructuring your code. The following list contains example techniques that you can use to refactor your code. Consult one of the refactoring books in Appendix B to get a more comprehensive list.
Whether your code starts its life as a dense block of unreadable cruft or it just evolves that way, refactoring is necessary to periodically purge the code of accumulated hacks. Through refactoring, you revisit existing code and rewrite it to make it more readable and maintainable. Refactoring is an opportunity to revisit the decomposition of code. If the purpose of the code has changed or if it was never decomposed in the first place, when you refactor the code, squint at it and determine if it needs to be broken down into smaller parts.
When refactoring code, it is very important to be able to rely on a testing framework that catches any defects that you might introduce. Unit tests, discussed in Chapter 26, are particularly well suited for helping you catch mistakes during refactoring.
If you use modular decomposition and approach every module, method, or function by considering what pieces of it you can put off until later, your programs will generally be less dense and more organized than if you implement every feature in its entirety as you code.
Of course, you should still design your program before jumping into the code.
You will see decomposition in many of the examples in this book. In many cases, methods are referred to for which no implementation is shown because they are not relevant to the example and would take up too much space.
The C++ compiler has a few naming rules:
9to5).my__name) are reserved and shall not be used._name or _Name) are reserved and shall not be used.Other than those rules, names exist only to help you and your fellow programmers work with the individual elements of your program. Given this purpose, it is surprising how often programmers use unspecific or inappropriate names.
The best name for a variable, method, function, parameter, class, namespace, and so on accurately describes the purpose of the item. Names can also imply additional information, such as the type or specific usage. Of course, the real test is whether other programmers understand what you are trying to convey with a particular name.
There are no set-in-stone rules for naming other than the rules that work for your organization. However, there are some names that are rarely appropriate. The following table shows some names at both ends of the naming continuum.
| GOOD NAMES | BAD NAMES |
sourceName, destinationNameDistinguishes two objects |
thing1, thing2Too general |
gSettingsConveys global status |
globalUserSpecificSettingsAndPreferencesToo long |
mNameCounterConveys data member status |
mNC Too obscure, too brief |
calculateMarigoldOffset()Simple, accurate |
doAction() Too general, imprecise |
mTypeStringEasy on the eyes |
typeSTR256 A name only a computer could love |
mIHateLarry Unacceptable inside joke |
|
errorMessageDescriptive name |
stringNon-descriptive name |
sourceFile, destinationFileNo abbreviations |
srcFile, dstFileAbbreviations |
Selecting a name doesn’t always require a lot of thought and creativity. In many cases, you’ll want to use standard techniques for naming. Following are some of the types of data for which you can make use of standard names.
Early in your programming career, you probably saw code that used the variable “i” as a counter. It is customary to use i and j as counters and inner-loop counters, respectively. Be careful with nested loops, however. It’s a common mistake to refer to the “ith” element when you really mean the “jth” element. When working with 2-D data, it’s probably easier to use row and column as indices, instead of i and j. Some programmers prefer using counters outerLoopIndex and innerLoopIndex, and some even frown upon using i and j as loop counters.
Many programmers begin their variable names with a letter that provides some information about the variable’s type or usage. On the other hand, there are as many programmers, or even more, who disapprove of using any kind of prefix because this could make evolving code less maintainable in the future. For example, if a member variable is changed from static to non-static, you have to rename all the uses of that name. If you don’t rename them, your names continue to convey semantics, but now they are the wrong semantics.
However, you often don’t have a choice and you need to follow the guidelines of your company. The following table shows some potential prefixes.
| PREFIX | EXAMPLE NAME | LITERAL PREFIX MEANING | USAGE |
mm_ |
mDatam_data |
“member” | Data member within a class |
smsms_ |
sLookupTablemsLookupTablems_lookupTable |
“static” | Static variable or data member |
k |
kMaximumLength |
“konstant” (German for “constant”) | A constant value. Some programmers use all uppercase names without a prefix to indicate constants. |
bis |
bCompletedisCompleted |
“Boolean” | Designates a Boolean value |
nmNum |
nLinesmNumLines |
“number” | A data member that is also a counter. Because an “n” looks similar to an “m,” some programmers instead use mNum as a prefix. |
Hungarian Notation is a variable and data-member–naming convention that is popular with Microsoft Windows programmers. The basic idea is that instead of using single-letter prefixes such as m, you should use more verbose prefixes to indicate additional information. The following line of code shows the use of Hungarian Notation:
char* pszName; // psz means "pointer to a null-terminated string"The term Hungarian Notation arose from the fact that its inventor, Charles Simonyi, is Hungarian. Some also say that it accurately reflects the fact that programs using Hungarian Notation end up looking as if they were written in a foreign language. For this latter reason, some programmers tend to dislike Hungarian Notation. In this book, prefixes are used, but not Hungarian Notation. Adequately named variables don’t need much additional context information besides the prefix. For example, a data member named mName says it all.
If your class contains a data member, such as mStatus, it is customary to provide access to the member via a getter called getStatus() and a setter called setStatus(). To give access to a Boolean data member, you typically use is as a prefix instead of get, for example isRunning(). The C++ language has no prescribed naming for these methods, but your organization will probably want to adopt this or a similar naming scheme.
There are many different ways of capitalizing names in your code. As with most elements of coding style, it is very important that your group adopts a standardized approach and that all members adopt that approach. One way to get messy code is to have some programmers naming classes in all lowercase with underscores representing spaces (priority_queue) and others using capitals with each subsequent word capitalized (PriorityQueue). Variables and data members almost always start with a lowercase letter and use either underscores (my_queue) or capitals (myQueue) to indicate word breaks. Functions and methods are traditionally capitalized in C++, but, as you’ve seen, in this book I have adopted the style of lowercase functions and methods to distinguish them from class names. A similar style of capitalizing letters is used to indicate word boundaries for class and data member names.
Imagine that you are writing a program with a graphical user interface. The program has several menus, including File, Edit, and Help. To represent the ID of each menu, you may decide to use a constant. A perfectly reasonable name for a constant referring to the Help menu ID is kHelp.
The name kHelp will work fine until you add a Help button to the main window. You also need a constant to refer to the ID of the button, but kHelp is already taken.
A possible solution for this is to put your constants in different namespaces, which are discussed in Chapter 1. You create two namespaces: Menu and Button. Each namespace has a kHelp constant and you use them as Menu::kHelp and Button::kHelp. Another, and more recommended solution is to use enumerated types, also introduced in Chapter 1.
The C++ language lets you do all sorts of terribly unreadable things. Take a look at this wacky code:
i++ + ++i;This is unreadable but more importantly, its behavior is undefined by the C++ standard. The problem is that i++ uses the value of i but has a side effect of incrementing it. The standard does not say when this incrementing should be done, only that the side effect (increment) should be visible after the sequence point “;”, but the compiler can do it at any time during the execution of that line. It’s impossible to know which value of i will be used for the ++i part. Running this code with different compilers and platforms can result in different values.
The following is another example of code which you should avoid, because it exhibits undefined behavior if your compiler is not C++17 compliant. With C++17, this has well-defined behavior: first i is incremented, and then used as index in a[i].
a[i] = ++i;With all the power that the C++ language offers, it is important to consider how the language features can be used toward stylistic good instead of evil.
Bad code is often littered with “magic numbers.” In some function, the code might be using 2.71828. Why 2.71828? What does that value mean? People with a mathematical background might find it obvious that this represents an approximation of the transcendental value e, but most people don’t know this. The language offers constants to give a symbolic name to a value that doesn’t change, such as 2.71828.
const double kApproximationForE = 2.71828182845904523536;Traditionally, C++ programmers learned C first. In C, pointers were the only pass-by-reference mechanism, and they certainly worked just fine for many years. Pointers are still required in some cases, but in many situations you can switch to references. If you learned C first, you probably think that references don’t really add any new functionality to the language. You might think that they merely introduce a new syntax for functionality that pointers could already provide.
There are several advantages to using references rather than pointers. First, references are safer than pointers because they don’t deal directly with memory addresses and cannot be nullptr. Second, references are more stylistically pleasing than pointers because they use the same syntax as stack variables, avoiding symbols such as * and &. They’re also easy to use, so you should have no problem adopting references into your style palette. Unfortunately, some programmers think that if they see an & in a function call, they know the called function is going to change the object, and if they don’t see the & it must be pass-by-value. With references, they say they don’t know if the function is going to change the object unless they look at the function prototype. This is a wrong way of thinking. Passing in a pointer does not automatically mean that the object will be modified, because the parameter might be const T*. Passing both a pointer and a reference can modify the object, or it may not, depending on whether the function prototype uses const T*, T*, const T&, or T&. So, you need to look at the prototype anyway to know if the function might change the object.
Another benefit of references is that they clarify ownership of memory. If you are writing a method and another programmer passes you a reference to an object, it is clear that you can read and possibly modify the object, but you have no easy way of freeing its memory. If you are passed a pointer, this is less clear. Do you need to delete the object to clean up memory? Or will the caller do that? Note that the preferred way of handling memory is to use smart pointers, introduced in Chapter 1.
C++ makes it easy to ignore exceptions. Nothing about the language syntax forces you to deal with exceptions and you could easily write error-tolerant programs with traditional mechanisms such as returning nullptr or setting an error flag.
Exceptions provide a much richer mechanism for error handling, and custom exceptions allow you to tailor this mechanism to your needs. For example, a custom exception type for a web browser could include fields that specify the web page that contained the error, the network state when the error occurred, and additional context information.
Chapter 14 contains a wealth of information about exceptions in C++.
Many programming groups have been torn apart and friendships ruined over code-formatting arguments. In college, a friend of mine got into such a heated debate with a peer over the use of spaces in an if statement that people were stopping by to make sure that everything was okay.
If your organization has standards in place for code formatting, consider yourself lucky. You may not like the standards they have in place, but at least you won’t have to argue about them.
If no standards are in place for code formatting, I recommend to introduce them in your organization. Standardized coding guidelines make sure that all programmers on your team follow the same naming conventions, formatting rules, and so on, which makes the code more uniform and easier to understand.
If everybody on your team is just writing code their own way, try to be as tolerant as you can. As you’ll see, some practices are just a matter of taste, while others actually make it difficult to work in teams.
Perhaps the most frequently debated point is where to put the curly braces that demark a block of code. There are several styles of curly brace use. In this book, the curly brace is put on the same line as the leading statement, except in the case of a function, class, or method name. This style is shown in the code that follows (and throughout this book):
void someFunction(){if (condition()) {cout << "condition was true" << endl;} else {cout << "condition was false" << endl;}}
This style conserves vertical space while still showing blocks of code by their indentation. Some programmers would argue that preservation of vertical space isn’t relevant in real-world coding. A more verbose style is shown here:
void someFunction(){if (condition()){cout << "condition was true" << endl;}else{cout << "condition was false" << endl;}}
Some programmers are even liberal with the use of horizontal space, yielding code like this:
void someFunction(){if (condition()){cout << "condition was true" << endl;}else{cout << "condition was false" << endl;}}
Another point of debate is whether or not to put braces around single statements, for example:
void someFunction(){if (condition())cout << "condition was true" << endl;elsecout << "condition was false" << endl;}
Of course, I won’t recommend any particular style because I don’t want hate mail.
The formatting of individual lines of code can also be a source of disagreement. Again, I won’t advocate a particular approach, but you are likely to encounter a few of the styles shown here.
In this book, I use a space after any keyword, a space before and after any operator, a space after every comma in a parameter list or a call, and parentheses to clarify the order of operations, as follows:
if (i == 2) {j = i + (k / m);}
An alternative, shown next, treats if stylistically like a function, with no space between the keyword and the left parenthesis. Also, the parentheses used to clarify the order of operations inside of the if statement are omitted because they have no semantic relevance.
if( i == 2 ) {j = i + k / m;}
The difference is subtle, and the determination of which is better is left to the reader, yet I can’t move on from the issue without pointing out that if is not a function.
The use of spaces and tabs is not merely a stylistic preference. If your group does not agree on a convention for spaces and tabs, there are going to be major problems when programmers work jointly. The most obvious problem occurs when Alice uses four-space tabs to indent code and Bob uses five-space tabs; neither will be able to display code properly when working on the same file. An even worse problem arises when Bob reformats the code to use tabs at the same time that Alice edits the same code; many source code control systems won’t be able to merge in Alice’s changes.
Most, but not all, editors have configurable settings for spaces and tabs. Some environments even adapt to the formatting of the code as it is read in, or always save using spaces even if the Tab key is used for authoring. If you have a flexible environment, you have a better chance of being able to work with other people’s code. Just remember that tabs and spaces are different because a tab can be any length and a space is always a space.
Many programmers begin a new project by pledging that this time, they will do everything right. Any time a variable or parameter shouldn’t be changed, it’ll be marked const. All variables will have clear, concise, readable names. Every developer will put the left curly brace on the subsequent line and will adopt the standard text editor and its conventions for tabs and spaces.
For a number of reasons, it is difficult to sustain this level of stylistic consistency. In the case of const, sometimes programmers just aren’t educated about how to use it. You will eventually come across old code or a library function that isn’t const-savvy. A good programmer will use const_cast() to temporarily suspend the const property of a variable, but an inexperienced programmer will start to unwind the const property back from the calling function, once again ending up with a program that never uses const.
Other times, standardization of style comes up against programmers’ individual tastes and biases. Perhaps the culture of your team makes it impractical to enforce strict style guidelines. In such situations, you may have to decide which elements you really need to standardize (such as variable names and tabs) and which ones are safe to leave up to individuals (perhaps spacing and commenting style). You can even obtain or write scripts that will automatically correct style “bugs” or flag stylistic problems along with code errors. Some development environments, such as Microsoft Visual C++ 2017, support automatic formatting of code according to rules that you specify. This makes it trivial to write code that always follows the guidelines that have been configured.
The C++ language provides a number of stylistic tools without any formal guidelines on how to use them. Ultimately, any style convention is measured by how widely it is adopted and how much it benefits the readability of the code. When coding as part of a team, you should raise issues of style early in the process as part of the discussion of what language and tools to use.
The most important point about style is to appreciate that it is an important aspect of programming. Teach yourself to check over the style of your code before you make it available to others. Recognize good style in the code you interact with and adopt the conventions that you and your organization find useful.
This chapter concludes the first part of this book. The next part discusses software design on a high level.
Before writing a single line of code in your application, you should design your program. What data structures will you use? What classes will you write? This plan is especially important when you program in groups. Imagine sitting down to write a program with no idea what your coworker, who is working on the same program, is planning! In this chapter, you’ll learn how to use the Professional C++ approach to C++ design.
Despite the importance of design, it is probably the most misunderstood and underused aspect of the software-engineering process. Too often, programmers jump into applications without a clear plan: they design as they code. This approach can lead to convoluted and overly complicated designs. It also makes development, debugging, and maintenance tasks more difficult. Although it seems counterintuitive, investing extra time at the beginning of a project to design it properly actually saves time over the life of the project.
The very first step when starting a new program, or a new feature for an existing program, is to analyze the requirements. This involves having discussions with your stakeholders. A vital outcome of this analysis phase is a functional requirements document describing what exactly the new piece of code has to do, but it does not explain how it has to do it. Requirement analysis can also result in a non-functional requirements document describing how the final system should be, compared to what it should do. Examples of non-functional requirements are that the system needs to be secure, extensible, satisfy certain performance criteria, and so on.
Once all requirements have been collected, the design phase of the project can start. Your program design, or software design, is the specification of the architecture that you will implement to fulfill all the requirements (functional and non-functional) of the program. Informally, the design is how you plan to write the program. You should generally write your design in the form of a design document. Although every company or project has its own variation of a desired design document format, most design documents share the same general layout, which includes two main parts:
The design documents usually include diagrams and tables showing subsystem interactions and class hierarchies. The Unified Modeling Language (UML) is the industry standard for such diagrams, and is used for diagrams in this and subsequent chapters. (See Appendix D for a brief introduction to the UML syntax.) With that being said, the exact format of the design document is less important than the process of thinking about your design.
You should generally try to make your design as good as possible before you begin coding. The design should provide a map of the program that any reasonable programmer could follow in order to implement the application. Of course, it is inevitable that the design will need to be modified once you begin coding and you encounter issues that you didn’t think of earlier. Software-engineering processes have been designed to give you the flexibility to make these changes. Scrum, an agile software development methodology, is one example of such an iterative process whereby the application is developed in cycles, known as sprints. With each sprint, designs can be modified, and new requirements can be taken into account. Chapter 24 describes various software-engineering process models in more detail.
It’s tempting to skip the analysis and design steps, or to perform them only cursorily, in order to begin programming as soon as possible. There’s nothing like seeing code compiling and running to give you the impression that you have made progress. It seems like a waste of time to formalize a design, or to write down functional requirements when you already know, more or less, how you want to structure your program. Besides, writing a design document just isn’t as much fun as coding. If you wanted to write papers all day, you wouldn’t be a computer programmer! As a programmer myself, I understand this temptation to begin coding immediately, and have certainly succumbed to it on occasion. However, it will most likely lead to problems on all but the simplest projects. Whether or not you succeed without a design prior to the implementation depends on your experience as a programmer, your proficiency with commonly used design patterns, and how deeply you understand C++, the problem domain, and the requirements.
If you are working in a team where each team member will work on a different part of the project, it is paramount that there is a design document for all team members to follow. Design documents also help newcomers to get up to speed with the designs of a project.
To help you understand the importance of programming design, imagine that you own a plot of land on which you want to build a house. When the builder shows up, you ask to see the blueprints. “What blueprints?” he responds. “I know what I’m doing. I don’t need to plan every little detail ahead of time. Two-story house? No problem. I did a one-story house a few months ago—I’ll just start with that model and work from there.”
Suppose that you suspend your disbelief and allow the builder to proceed. A few months later, you notice that the plumbing appears to run outside the house instead of inside the walls. When you query the builder about this anomaly, he says, “Oh. Well, I forgot to leave space in the walls for the plumbing. I was so excited about this new drywall technology that it just slipped my mind. But it works just as well outside, and functionality is the most important thing.” You’re starting to have your doubts about his approach, but, against your better judgment, you allow him to continue.
When you take your first tour of the completed building, you notice that the kitchen lacks a sink. The builder excuses himself by saying, “We were already two-thirds done with the kitchen by the time we realized there wasn’t space for the sink. Instead of starting over, we just added a separate sink room next door. It works, right?”
Do the builder’s excuses sound familiar if you translate them to the software domain? Have you ever found yourself implementing an “ugly” solution to a problem like putting plumbing outside the house? For example, maybe you forgot to include locking in your queue data structure that is shared between multiple threads. By the time you realize the problem, you decide to just perform the locking manually on all places where the queue is used. Sure, it’s ugly, but it works, you say. That is, until someone new joins the project who assumes that the locking is built into the data structure, fails to ensure mutual exclusion in her access to the shared data, and causes a race condition bug that takes three weeks to track down. Of course, this locking problem is just given as an example of an ugly workaround. Obviously, a professional C++ programmer would never decide to perform the locking manually on each queue access but would instead directly incorporate the locking inside the queue class, or make the queue class thread-safe in a lock-free manner.
Formalizing a design before you code helps you determine how everything fits together. Just as blueprints for a house show how the rooms relate to each other and work together to fulfill the requirements of the house, the design for a program shows how the subsystems of the program relate to each other and work together to fulfill the software requirements. Without a design plan, you are likely to miss connections between subsystems, possibilities for reuse or shared information, and the simplest ways to accomplish tasks. Without the “big picture” that the design gives, you might become so bogged down in individual implementation details that you lose track of the overarching architecture and goals. Furthermore, the design provides written documentation to which all members of the project can refer. If you use an iterative process like the agile Scrum methodology mentioned earlier, you need to make sure to keep the design documentation up-to-date during each cycle of the process.
If the preceding analogy hasn’t convinced you to design before you code, here is an example where jumping directly into coding fails to lead to an optimal design. Suppose that you want to write a chess program. Instead of designing the entire program before you begin coding, you decide to jump in with the easiest parts and move slowly to the more difficult parts. Following the object-oriented perspective introduced in Chapter 1 and covered in more detail in Chapter 5, you decide to model your chess pieces with classes. You figure the pawn is the simplest chess piece, so you opt to start there. After considering the features and behaviors of a pawn, you write a class with the properties and methods shown in the UML class diagram in Figure 4-1.
In this design, the mColor attribute denotes whether the pawn is black or white. The promote() method executes upon reaching the opposing side of the board.
Of course, you haven’t actually made this class diagram. You’ve gone straight to the implementation phase. Happy with that class, you move on to the next easiest piece: the bishop. After considering its attributes and functionality, you write a class with the properties and methods shown in the class diagram in Figure 4-2.
Again, you haven’t generated a class diagram, because you jumped straight to the coding phase. However, at this point you begin to suspect that you might be doing something wrong. The bishop and the pawn look similar. In fact, their properties are identical and they share many methods. Although the implementations of the move method might differ between the pawn and the bishop, both pieces need the ability to move. If you had designed your program before jumping into coding, you would have realized that the various pieces are actually quite similar, and that you should find some way to write the common functionality only once. Chapter 5 explains the object-oriented design techniques for doing that.
Furthermore, several aspects of the chess pieces depend on other subsystems of your program. For example, you cannot accurately represent the location on the board in a chess piece class without knowing how you will model the board. On the other hand, perhaps you will design your program so that the board manages pieces in a way that doesn’t require them to know their own locations. In either case, encoding the location in the piece classes before designing the board leads to problems. To take another example, how can you write a draw method for a piece without first deciding your program’s user interface? Will it be graphical or text-based? What will the board look like? The problem is that subsystems of a program do not exist in isolation—they interrelate with other subsystems. Most of the design work determines and defines these relationships.
There are several aspects of the C++ language that you need to keep in mind when designing for C++:
Tackling a design can be overwhelming. I have spent entire days scribbling design ideas on paper, crossing them out, writing more ideas, crossing those out, and repeating the process. Sometimes this process is helpful, and, at the end of those days (or weeks), it leads to a clean, efficient design. Other times it is frustrating and leads nowhere, but it is not a waste of effort. You will most likely waste more time if you have to re-implement a design that turned out to be broken. It’s important to remain aware of whether or not you are making real progress. If you find that you are stuck, you can take one of the following actions:
There are two fundamental design rules in C++: abstraction and reuse. These guidelines are so important that they can be considered themes of this book. They come up repeatedly throughout the text, and throughout effective C++ program designs in all domains.
The principle of abstraction is easiest to understand through a real-world analogy. A television is a simple piece of technology found in most homes. You are probably familiar with its features: you can turn it on and off, change the channel, adjust the volume, and add external components such as speakers, DVRs, and Blu-ray players. However, can you explain how it works inside the black box? That is, do you know how it receives signals over the air or through a cable, translates them, and displays them on the screen? Most people certainly can’t explain how a television works, yet are quite capable of using it. That is because the television clearly separates its internal implementation from its external interface. We interact with the television through its interface: the power button, channel changer, and volume control. We don’t know, nor do we care, how the television works; we don’t care whether it uses a cathode ray tube or some sort of alien technology to generate the image on our screen. It doesn’t matter because it doesn’t affect the interface.
The abstraction principle is similar in software. You can use code without knowing the underlying implementation. As a trivial example, your program can make a call to the sqrt() function declared in the header file <cmath> without knowing what algorithm the function actually uses to calculate the square root. In fact, the underlying implementation of the square root calculation could change between releases of the library, and as long as the interface stays the same, your function call will still work. The principle of abstraction extends to classes as well. As introduced in Chapter 1, you can use the cout object of class ostream to stream data to standard output like this:
cout << "This call will display this line of text" << endl;In this line, you use the documented interface of the cout insertion operator (<<) with a character array. However, you don’t need to understand how cout manages to display that text on the user’s screen. You only need to know the public interface. The underlying implementation of cout is free to change as long as the exposed behavior and interface remain the same.
You should design functions and classes so that you and other programmers can use them without knowing, or relying on, the underlying implementations. To see the difference between a design that exposes the implementation and one that hides it behind an interface, consider the chess program again. You might want to implement the chessboard with a two-dimensional array of pointers to ChessPiece objects. You could declare and use the board like this:
ChessPiece* chessBoard[8][8];…chessBoard[0][0] = new Rook();
However, that approach fails to use the concept of abstraction. Every programmer who uses the chessboard knows that it is implemented as a two-dimensional array. Changing that implementation to something else, such as a one-dimensional flattened vector of size 64, would be difficult, because you would need to change every use of the board in the entire program. Everyone using the chessboard also has to properly take care of memory management. There is no separation of interface from implementation.
A better approach is to model the chessboard as a class. You could then expose an interface that hides the underlying implementation details. Here is an example of the ChessBoard class:
class ChessBoard{public:// This example omits constructors, destructor, and assignment operator.void setPieceAt(size_t x, size_t y, ChessPiece* piece);ChessPiece* getPieceAt(size_t x, size_t y);bool isEmpty(size_t x, size_t y) const;private:// This example omits data members.};
Note that this interface makes no commitment to any underlying implementation. The ChessBoard could easily be a two-dimensional array, but the interface does not require it. Changing the implementation does not require changing the interface. Furthermore, the implementation can provide additional functionality, such as bounds checking.
Hopefully, this example has convinced you that abstraction is an important technique in C++ programming. Chapter 5 covers abstraction and object-oriented design in more detail, and Chapters 8 and 9 provide all the details about writing your own classes.
The second fundamental rule of design in C++ is reuse. Again, it is helpful to examine a real-world analogy to understand this concept. Suppose that you give up your programming career in favor of working as a baker. On your first day of work, the head baker tells you to bake cookies. In order to fulfill his orders, you find the recipe for chocolate-chip cookies, mix the ingredients, form cookies on the cookie sheet, and place the sheet in the oven. The head baker is pleased with the result.
Now, I’m going to point out something so obvious that it will surprise you: you didn’t build your own oven in which to bake the cookies. Nor did you churn your own butter, mill your own flour, or form your own chocolate chips. I can hear you think, “That goes without saying.” That’s true if you’re a real cook, but what if you’re a programmer writing a baking simulation game? In that case, you would think nothing of writing every component of the program, from the chocolate chips to the oven. Or, you could save yourself time by looking around for code to reuse. Perhaps your office-mate wrote a cooking simulation game and has some nice oven code lying around. Maybe it doesn’t do everything you need, but you might be able to modify it and add the necessary functionality.
Something else you took for granted is that you followed a recipe for the cookies instead of making up your own. Again, that goes without saying. However, in C++ programming, it does not go without saying. Although there are standard ways of approaching problems that arise over and over in C++, many programmers persist in reinventing these strategies in each design.
The idea of using existing code is not new. You’ve been reusing code from the first day you printed something with cout. You didn’t write the code to actually print your data to the screen. You used the existing cout implementation to do the work.
Unfortunately, not all programmers take advantage of available code. Your designs should take into account existing code and reuse it when appropriate.
The design theme of reuse applies to code you write as well as to code that you use. You should design your programs so that you can reuse your classes, algorithms, and data structures. You and your coworkers should be able to use these components in both the current project and future projects. In general, you should avoid designing overly specific code that is applicable only to the case at hand.
One language technique for writing general-purpose code in C++ is the template. The following example shows a templatized data structure. If you’ve never seen this syntax before, don’t worry! Chapter 12 explains the syntax in depth.
Instead of writing a specific ChessBoard class that stores ChessPieces, as shown earlier, consider writing a generic GameBoard template that can be used for any type of two-dimensional board game such as chess or checkers. You would need only to change the class declaration so that it takes the piece to store as a template parameter instead of hard-coding it in the interface. The template could look something like this:
template <typename PieceType>class GameBoard{public:// This example omits constructors, destructor, and assignment operator.void setPieceAt(size_t x, size_t y, PieceType* piece);PieceType* getPieceAt(size_t x, size_t y);bool isEmpty(size_t x, size_t y) const;private:// This example omits data members.};
With this simple change in the interface, you now have a generic game board class that you can use for any two-dimensional board game. Although the code change is simple, it is important to make these decisions in the design phase, so that you are able to implement the code effectively and efficiently.
Chapter 6 goes into more detail on how to design your code with reuse in mind.
Learning the C++ language and becoming a good C++ programmer are two very different things. If you sat down and read the C++ standard, memorizing every fact, you would know C++ as well as anybody else. However, until you gained some experience by looking at code and writing your own programs, you wouldn’t necessarily be a good programmer. The reason is that the C++ syntax defines what the language can do in its raw form, but doesn’t say anything about how each feature should be used.
As the baker example illustrates, it would be ludicrous to reinvent recipes for every dish that you make. However, programmers often make an equivalent mistake in their designs. Instead of using existing “recipes,” or patterns, for designing programs, they reinvent these techniques every time they design a program.
As they become more experienced in using the C++ language, C++ programmers develop their own individual ways of using the features of the language. The C++ community at large has also built some standard ways of leveraging the language, some formal and some informal. Throughout this book, I point out these reusable applications of the language, known as design techniques and design patterns. Additionally, Chapters 28 and 29 focus almost exclusively on design techniques and patterns. Some will seem obvious to you because they are simply a formalization of the obvious solution. Others describe novel solutions to problems you’ve encountered in the past. Some present entirely new ways of thinking about your program organization.
For example, you might want to design your chess program so that you have a single ErrorLogger object that serializes all errors from different components to a log file. When you try to design your ErrorLogger class, you realize that you would like to have only a single instance of the ErrorLogger class in your program. But, you also want several components in your program to be able to use this ErrorLogger instance; that is, these components all want to use the same ErrorLogger service. A standard strategy to implement such a service mechanism is to use dependency injection. With dependency injection, you create an interface for each service and you inject the interfaces a component needs into the component. Thus, a good design at this point would specify that you want to use the dependency injection pattern.
It is important for you to familiarize yourself with these patterns and techniques so that you can recognize when a particular design problem calls for one of these solutions. There are many more techniques and patterns applicable to C++ than those described in this book. Even though a nice selection is covered here, you may want to consult a book on design patterns for more and different patterns. See Appendix B for suggestions.
Experienced C++ programmers never start a project from scratch. They incorporate code from a wide variety of sources, such as the Standard Library, open-source libraries, proprietary code bases in their workplace, and their own code from previous projects. You should reuse code liberally in your designs. In order to make the most of this rule, you need to understand the types of code that you can reuse and the tradeoffs involved in code reuse.
Before analyzing the advantages and disadvantages of code reuse, it is helpful to specify the terminology involved and to categorize the types of reused code. There are three categories of code available for reuse:
There are also several ways that the code you reuse can be structured:
Another term that arises frequently is application programming interface, or API. An API is an interface to a library or body of code for a specific purpose. For example, programmers often refer to the sockets API, meaning the exposed interface to the sockets networking library, instead of the library itself.
For the sake of brevity, the rest of this chapter uses the term library to refer to any reused code, whether it is really a library, framework, or random collection of functions from your office-mate.
The rule to reuse code is easy to understand in the abstract. However, it’s somewhat vague when it comes to the details. How do you know when it’s appropriate to reuse code, and which code to reuse? There is always a tradeoff, and the decision depends on the specific situation. However, there are some general advantages and disadvantages to reusing code.
Reusing code can provide tremendous advantages to you and to your project.
Unfortunately, there are also some disadvantages to reusing code.
Now that you are familiar with the terminology, advantages, and disadvantages of reusing code, you are better prepared to make the decision about whether or not to reuse code. Often, the decision is obvious. For example, if you want to write a graphical user interface (GUI) in C++ for Microsoft Windows, you should use a framework such as Microsoft Foundation Class (MFC) or Qt. You probably don’t know how to write the underlying code to create a GUI in Windows, and more importantly, you don’t want to waste time to learn it. You will save person-years of effort by using a framework in this case.
However, other times the choice is less obvious. For example, if you are unfamiliar with a library or framework, and need only a simple data structure, it might not be worth the time to learn the entire framework to reuse only one component that you could write in a few days.
Ultimately, you need to make a decision based on your own particular needs. It often comes down to a tradeoff between the time it would take to write it yourself and the time required to find and learn how to use a library to solve the problem. Carefully consider how the advantages and disadvantages listed previously apply to your specific case, and decide which factors are most important to you. Finally, remember that you can always change your mind, which might even be relatively easy if you handled the abstraction correctly.
When you use libraries, frameworks, coworkers’ code, or your own code, there are several guidelines you should keep in mind.
Take the time to familiarize yourself with the code. It is important to understand both its capabilities and its limitations. Start with the documentation and the published interfaces or APIs. Ideally, that will be sufficient to understand how to use the code. However, if the library doesn’t provide a clear separation between interface and implementation, you may need to explore the source code itself if it is provided. Also, talk to other programmers who have used the code and who might be able to explain its intricacies. You should begin by learning the basic functionality. If it’s a library, what functions does it provide? If it’s a framework, how does your code fit in? What classes should you derive from? What code do you need to write yourself? You should also consider specific issues depending on the type of code.
Here are some points to keep in mind:
stderr/cerr or stdout/cout, or terminate the program.It is important to know the performance guarantees that the library or other code provides. Even if your particular program is not performance sensitive, you should make sure that the code you use doesn’t have awful performance for your particular use.
Programmers generally discuss and document algorithm and library performance using big-O notation. This section explains the general concepts of algorithm complexity analysis and big-O notation without a lot of unnecessary mathematics. If you are already familiar with these concepts, you can skip this section.
Big-O notation specifies relative, rather than absolute, performance. For example, instead of saying that an algorithm runs in a specific amount of time, such as 300 milliseconds, big-O notation specifies how an algorithm performs as its input size increases. Examples of input sizes include the number of items to be sorted by a sorting algorithm, the number of elements in a hash table during a key lookup, and the size of a file to be copied between disks.
To be more formal: big-O notation specifies an algorithm’s run time as a function of its input size, also known as the complexity of the algorithm. It’s not as complicated as it sounds. For example, an algorithm could take twice as long to process twice as many elements. Thus, if it takes 2 seconds to process 400 elements, it will take 4 seconds to process 800 elements. Figure 4-3 shows this graphically. It is said that the complexity of such an algorithm is a linear function of its input size, because, graphically, it is represented by a straight line.
Big-O notation summarizes the algorithm’s linear performance like this: O(n). The O just means that you’re using big-O notation, while the n represents the input size. O(n) specifies that the algorithm speed is a direct linear function of the input size.
Of course, not all algorithms have performance that is linear with respect to their input size. The following table summarizes the common complexities, in order of their performance from best to worst.
| ALGORITHM COMPLEXITY | BIG-O NOTATION | EXPLANATION | EXAMPLE ALGORITHMS |
| Constant | O(1) | The running time is independent of input size. | Accessing a single element in an array |
| Logarithmic | O(log n) | The running time is a function of the logarithm base 2 of the input size. | Finding an element in a sorted list using binary search |
| Linear | O(n) | The running time is directly proportional to the input size. | Finding an element in an unsorted list |
| Linear Logarithmic | O(n log n) | The running time is a function of the linear times the logarithmic function of the input size. | Merge sort |
| Quadratic | O(n2) | The running time is a function of the square of the input size. | A slower sorting algorithm like selection sort |
| Exponential | O(2n) | The running time is an exponential function of the input size. | Optimized traveling salesman problem |
There are two advantages to specifying performance as a function of the input size instead of in absolute numbers:
Now that you are familiar with big-O notation, you are prepared to understand most performance documentation. The C++ Standard Library in particular describes its algorithm and data structure performance using big-O notation. However, big-O notation is sometimes insufficient or even misleading. Consider the following issues whenever you think about big-O performance specifications:
In addition to considering big-O characteristics, you should look at other facets of the algorithm performance. Here are some guidelines to keep in mind:
Before you start using library code, make sure that you understand on which platforms it runs. That might sound obvious, but even libraries that claim to be cross-platform might contain subtle differences on different platforms.
Also, platforms include not only different operating systems but different versions of the same operating system. If you write an application that should run on Solaris 8, Solaris 9, and Solaris 10, ensure that any libraries you use also support all those releases. You cannot assume either forward or backward compatibility across operating system versions. That is, just because a library runs on Solaris 9 doesn’t mean that it will run on Solaris 10 and vice versa.
Using third-party libraries often introduces complicated licensing issues. You must sometimes pay license fees to third-party vendors for the use of their libraries. There may also be other licensing restrictions, including export restrictions. Additionally, open-source libraries are sometimes distributed under licenses that require any code that links with them to be open source as well. A number of licenses commonly used by open-source libraries are discussed later in this chapter.
Using third-party libraries also introduces support issues. Before you use a library, make sure that you understand the process for submitting bugs, and that you realize how long it will take for bugs to be fixed. If possible, determine how long the library will continue to be supported so that you can plan accordingly.
Interestingly, even using libraries from within your own organization can introduce support issues. You may find it just as difficult to convince a coworker in another part of your company to fix a bug in their library as you would to convince a stranger in another company to do the same thing. In fact, you may even find it harder, because you’re not a paying customer. Make sure that you understand the politics and organizational issues within your own organization before using internal libraries.
Using libraries and frameworks can sometimes be daunting at first. Fortunately, there are many avenues of support available. First of all, consult the documentation that accompanies the library. If the library is widely used, such as the Standard Library or the MFC, you should be able to find a good book on the topic. In fact, for help with the Standard Library, you can consult Chapters 16 to 21. If you have specific questions not addressed by books and product documentation, try searching the web. Type your question in your favorite search engine to find web pages that discuss the library. For example, when you search for the phrase, “introduction to C++ Standard Library,” you will find several hundred websites about C++ and the Standard Library. Also, many websites contain their own private newsgroups or forums on specific topics for which you can register.
When you first sit down with a new library or framework, it is often a good idea to write a quick prototype. Trying out the code is the best way to familiarize yourself with the library’s capabilities. You should consider experimenting with the library even before you tackle your program design so that you are intimately familiar with the library’s capabilities and limitations. This empirical testing will allow you to determine the performance characteristics of the library as well.
Even if your prototype application looks nothing like your final application, time spent prototyping is not a waste. Don’t feel compelled to write a prototype of your actual application. Write a dummy program that just tests the library capabilities you want to use. The point is only to familiarize yourself with the library.
Your project might include multiple applications. Perhaps you need a web server front end to support your new e-commerce infrastructure. It is possible to bundle third-party applications, such as a web server, with your software. This approach takes code reuse to the extreme in that you reuse entire applications. However, most of the caveats and guidelines for using libraries apply to bundling third-party applications as well. Specifically, make sure that you understand the legality and licensing ramifications of your decision.
Also, the support issue becomes more complex. If customers encounter a problem with your bundled web server, should they contact you or the web server vendor? Make sure that you resolve this issue before you release the software.
Open-source libraries are an increasingly popular class of reusable code. The general meaning of open-source is that the source code is available for anyone to look at. There are formal definitions and legal rules about including source code with all your distributions, but the important thing to remember about open-source software is that anyone (including you) can look at the source code. Note that open-source applies to more than just libraries. In fact, the most famous open-source product is probably the Android operating system. Linux is another open-source operating system. Google Chrome and Mozilla Firefox are two examples of famous open-source web browsers.
Unfortunately, there is some confusion in terminology in the open-source community. First of all, there are two competing names for the movement (some would say two separate, but similar, movements). Richard Stallman and the GNU project use the term free software. Note that the term free does not imply that the finished product must be available without cost. Developers are welcome to charge as much or as little as they want. Instead, the term free refers to the freedom for people to examine the source code, modify the source code, and redistribute the software. Think of the free in free speech rather than the free in free beer. You can read more about Richard Stallman and the GNU project at www.gnu.org.
The Open Source Initiative uses the term open-source software to describe software in which the source code must be available. As with free software, open-source software does not require the product or library to be available without cost. However, an important difference with free software is that open-source software is not required to give you the freedom to use, modify, and redistribute it. You can read more about the Open Source Initiative at www.opensource.org.
There are several licensing options available for open-source projects. One of them is the GNU Public License (GPL). However, using a library under the GPL requires you to make your own product open-source under the GPL as well. On the other hand, an open-source project can use a licensing option like Boost Software License, Berkeley Software Distribution (BSD) license, Code Project Open License (CPOL), Creative Commons (CC) license, and so on, which allows using the open-source library in a closed-source product.
Because the name “open-source” is less ambiguous than “free software,” this book uses “open-source” to refer to products and libraries with which the source code is available. The choice of name is not intended to imply endorsement of the open-source philosophy over the free software philosophy: it is only for ease of comprehension.
Regardless of the terminology, you can gain amazing benefits from using open-source software. The main benefit is functionality. There is a plethora of open-source C++ libraries available for varied tasks, from XML parsing to cross-platform error logging.
Although open-source libraries are not required to provide free distribution and licensing, many open-source libraries are available without monetary cost. You will generally be able to save money in licensing fees by using open-source libraries.
Finally, you are often but not always free to modify open-source libraries to suit your exact needs.
Most open-source libraries are available on the web. For example, searching for “open-source C++ library XML parsing” results in a list of links to XML libraries in C and C++. There are also a few open-source portals where you can start your search, including the following:
Open-source libraries present several unique issues and require new strategies. First of all, open-source libraries are usually written by people in their “free” time. The source base is generally available for any programmer who wants to pitch in and contribute to development or bug fixing. As a good programming citizen, you should try to contribute to open-source projects if you find yourself reaping the benefits of open-source libraries. If you work for a company, you may find resistance to this idea from your management because it does not lead directly to revenue for your company. However, you might be able to convince management that indirect benefits, such as exposure of your company name, and perceived support from your company for the open-source movement, should allow you to pursue this activity.
Second, because of the distributed nature of their development, and lack of single ownership, open-source libraries often present support issues. If you desperately need a bug fixed in a library, it is often more efficient to make the fix yourself than to wait for someone else to do it. If you do fix bugs, you should make sure to put those fixes back into the public source base for the library. Some licenses even require you to do so. Even if you don’t fix any bugs, make sure to report problems that you find so that other programmers don’t waste time encountering the same issues.
The most important library that you will use as a C++ programmer is the C++ Standard Library. As its name implies, this library is part of the C++ standard, so any standards-conforming compiler should include it. The Standard Library is not monolithic: it includes several disparate components, some of which you have been using already. You may even have assumed they were part of the core language. Chapters 16 to 21 go into more detail about the Standard Library.
Because C++ is mostly a superset of C, the C Standard Library is still available. Its functionality includes mathematical functions such as abs(), sqrt(), and pow(), and error-handling helpers such as assert() and errno. Additionally, the C Standard Library facilities for manipulating character arrays as strings, such as strlen() and strcpy(), and the C-style I/O functions, such as printf() and scanf(), are all available in C++.
Note that the C header files have different names in C++. These names should be used instead of the C library names, because they are less likely to result in name conflicts. For details of the C libraries, consult a Standard Library Reference, see Appendix B.
The Standard Library was designed with functionality, performance, and orthogonality as its priorities. The benefits of using it are substantial. Imagine having to track down pointer errors in linked list or balanced binary tree implementations, or to debug a sorting algorithm that isn’t sorting properly. If you use the Standard Library correctly, you will rarely, if ever, need to perform that kind of coding. Chapters 16 to 21 provide in-depth information on the Standard Library functionality.
This section introduces a systematic approach to designing a C++ program in the context of a simple chess game application. In order to provide a complete example, some of the steps refer to concepts covered in later chapters. You should read this example now, in order to obtain an overview of the design process, but you might also consider rereading it after you have finished later chapters.
Before embarking on the design, it is important to possess clear requirements for the program’s functionality and efficiency. Ideally, these requirements would be documented in the form of a requirements specification. The requirements for the chess program would contain the following types of specifications, although in more detail and greater number:
The requirements ensure that you design your program so that it performs as its users expect.
You should take a systematic approach to designing your program, working from the general to the specific. The following steps do not always apply to all programs, but they provide a general guideline. Your design should include diagrams and tables as appropriate. UML is an industry standard for making diagrams. You can refer to Appendix D for a brief introduction, but in short, UML defines a multitude of standard diagrams you can use for documenting software designs, for example, class diagrams, sequence diagrams, and so on. I recommend using UML or at least UML-like diagrams where applicable. However, I don’t advocate strictly adhering to the UML syntax because having a clear, understandable diagram is more important than having a syntactically correct one.
Your first step is to divide your program into its general functional subsystems and to specify the interfaces and interactions between the subsystems. At this point, you should not worry about specifics of data structures and algorithms, or even classes. You are trying only to obtain a general feel for the various parts of the program and their interactions. You can list the subsystems in a table that expresses the high-level behaviors or functionality of the subsystem, the interfaces exported from the subsystem to other subsystems, and the interfaces consumed, or used, by this subsystem on other subsystems. The recommended design for this chess game is to have a clear separation between storing the data and displaying the data by using the Model-View-Controller (MVC) paradigm. This paradigm models the notion that many applications commonly deal with a set of data, one or more views on that data, and manipulation of the data. In MVC, a set of data is called the model, a view is a particular visualization of the model, and the controller is the piece of code that changes the model in response to some event. The three components of MVC interact in a feedback loop: actions are handled by the controller, which adjusts the model, resulting in a change to the view or views. Using this paradigm, you can easily switch between having a text-based interface and a graphical user interface. A table for the chess game subsystems could look like this.
| SUBSYSTEM NAME | INSTANCES | FUNCTIONALITY | INTERFACES EXPORTED | INTERFACES CONSUMED |
| GamePlay | 1 |
Starts game Controls game flow Controls drawing Declares winner Ends game |
Game Over |
Take Turn (on Player) Draw (on ChessBoardView) |
| ChessBoard | 1 |
Stores chess pieces Checks for ties and checkmates |
Get Piece At Set Piece At |
Game Over (on GamePlay) |
| ChessBoardView | 1 | Draws the associated ChessBoard | Draw | Draw (on ChessPieceView) |
| ChessPiece | 32 |
Moves itself Checks for legal moves |
Move Check Move |
Get Piece At (on ChessBoard) Set Piece At (on ChessBoard) |
| ChessPieceView | 32 | Draws the associated ChessPiece | Draw | None |
| Player | 2 |
Interacts with the user by prompting the user for a move, and obtaining the user’s move Moves pieces |
Take Turn |
Get Piece At (on ChessBoard) Move (on ChessPiece) Check Move (on ChessPiece) |
| ErrorLogger | 1 | Writes error messages to a log file | Log Error | None |
As this table shows, the functional subsystems of this chess game include a GamePlay subsystem, a ChessBoard and ChessBoardView, 32 ChessPieces and ChessPieceViews, two Players, and one ErrorLogger. However, that is not the only reasonable approach. In software design, as in programming itself, there are often many different ways to accomplish the same goal. Not all solutions are equal; some are certainly better than others. However, there are often several equally valid methods.
A good division into subsystems separates the program into its basic functional parts. For example, a Player is a subsystem distinct from the ChessBoard, ChessPieces, or GamePlay. It wouldn’t make sense to lump the players into the GamePlay subsystem because they are logically separate subsystems. Other choices might not be as obvious.
In this MVC design, the ChessBoard and ChessPiece subsystems are part of the Model. The ChessBoardView and ChessPieceView are part of the View, and the Player is part of the Controller.
Because it is often difficult to visualize subsystem relationships from tables, it is usually helpful to show the subsystems of a program in a diagram where lines represent calls from one subsystem to another. Figure 4-4 shows the chess game subsystems visualized as a UML use-case diagram.
It’s too early in the design phase to think about how to multithread specific loops in algorithms you will write. However, in this step, you choose the number of high-level threads in your program and specify their interactions. Examples of high-level threads are a UI thread, an audio-playing thread, a network communication thread, and so on. In multithreaded designs, you should try to avoid shared data as much as possible because it will make your designs simpler and safer. If you cannot avoid shared data, you should specify locking requirements. If you are unfamiliar with multithreaded programs, or your platform does not support multithreading, then you should make your programs single-threaded. However, if your program has several distinct tasks, each of which could work in parallel, it might be a good candidate for multiple threads. For example, graphical user interface applications often have one thread performing the main application work and another thread waiting for the user to press buttons or select menu items. Multithreaded programming is covered in Chapter 23.
The chess program needs only one thread to control the game flow.
In this step, you determine the class hierarchies that you intend to write in your program. The chess program needs a class hierarchy to represent the chess pieces. This hierarchy could work as shown in Figure 4-5. The generic ChessPiece class serves as the abstract base class. A similar hierarchy is required for the ChessPieceView class.
Another class hierarchy can be used for the ChessBoardView class to make it possible to have a text-based interface or a graphical user interface for the game. Figure 4-6 shows an example hierarchy that allows the chessboard to be displayed as text on a console, or with a 2D or 3D graphical user interface. A similar hierarchy is required for the Player controller and for the individual classes of the ChessPieceView hierarchy.
Chapter 5 explains the details of designing classes and class hierarchies.
In this step, you consider a greater level of detail, and specify the particulars of each subsystem, including the specific classes that you write for each subsystem. It may well turn out that you model each subsystem itself as a class. This information can again be summarized in a table.
| SUBSYSTEM | CLASSES | DATA STRUCTURES | ALGORITHMS | PATTERNS |
| GamePlay | GamePlay class |
GamePlay object includes one ChessBoard object and two Player objects. |
Gives each player a turn to play | None |
| ChessBoard | ChessBoard class |
ChessBoard object stores a two-dimensional representation of 32 ChessPieces. |
Checks for a win or tie after each move | None |
| ChessBoardView | ChessBoardView abstract base classConcrete derived classes ChessBoardView Console, ChessBoardView GUI2D, and so on
|
Stores information on how to draw a chessboard | Draws a chessboard | Observer |
| ChessPiece | ChessPiece abstract base classRook, Bishop, Knight, King, Pawn, and Queen derived classes
|
Each piece stores its location on the chessboard. | Piece checks for a legal move by querying the chessboard for pieces at various locations. | None |
| ChessPieceView | ChessPieceView abstract base classDerived classes RookView, BishopView, and so on, and concrete derived classes RookViewConsole, RookViewGUI2D, and so on
|
Stores information on how to draw a chess piece | Draws a chess piece | Observer |
| Player | Player abstract base classConcrete derived classes PlayerConsole, PlayerGUI2D, and so on
|
None | prompts the user for a move, checks if the move is legal, and moves the piece | Mediator |
| ErrorLogger | One ErrorLogger class |
A queue of messages to log | Buffers messages and writes them to a log file | Dependency injection |
This section of the design document would normally present the actual interfaces for each class, but this example will forgo that level of detail.
Designing classes and choosing data structures, algorithms, and patterns can be tricky. You should always keep in mind the rules of abstraction and reuse discussed earlier in this chapter. For abstraction, the key is to consider the interface and the implementation separately. First, specify the interface from the perspective of the user. Decide what you want the component to do. Then decide how the component will do it by choosing data structures and algorithms. For reuse, familiarize yourself with standard data structures, algorithms, and patterns. Also, make sure you are aware of the Standard Library in C++, as well as any proprietary code available in your workplace.
In this design step, you delineate the error handling in each subsystem. The error handling should include both system errors, such as memory allocation failures, and user errors, such as invalid entries. You should specify whether each subsystem uses exceptions. You can again summarize this information in a table.
| SUBSYSTEM | HANDLING SYSTEM ERRORS | HANDLING USER ERRORS |
| GamePlay | Logs an error with the ErrorLogger, shows a message to the user, and gracefully shuts down the program if unable to allocate memory for ChessBoard or Players |
Not applicable (no direct user interface) |
|
ChessBoard ChessPiece |
Logs an error with the ErrorLogger and throws an exception if unable to allocate memory |
Not applicable (no direct user interface) |
|
ChessBoardView ChessPieceView |
Logs an error with the ErrorLogger and throws an exception if something goes wrong during rendering |
Not applicable (no direct user interface) |
| Player | Logs an error with the ErrorLogger and throws an exception if unable to allocate memory |
Sanity-checks a user move entry to ensure that it is not off the board; it then prompts the user for another entry. This subsystem checks each move’s legality before moving the piece; if illegal, it prompts the user for another move. |
| ErrorLogger | Attempts to log an error, informs the user, and gracefully shuts down the program if unable to allocate memory | Not applicable (no direct user interface) |
The general rule for error handling is to handle everything. Think hard about all possible error conditions. If you forget one possibility, it will show up as a bug in your program! Don’t treat anything as an “unexpected” error. Expect all possibilities: memory allocation failures, invalid user entries, disk failures, and network failures, to name a few. However, as the table for the chess game shows, you should handle user errors differently from internal errors. For example, a user entering an invalid move should not cause your chess program to terminate. Chapter 14 discusses error handling in more depth.
In this chapter, you learned about the professional C++ approach to design. I hope that it convinced you that software design is an important first step in any programming project. You also learned about some of the aspects of C++ that make design difficult, including its object-oriented focus, its large feature set and Standard Library, and its facilities for writing generic code. With this information, you are better prepared to tackle C++ design.
This chapter introduced two design themes. The first theme, the concept of abstraction, or separating interface from implementation, permeates this book and should be a guideline for all your design work.
The second theme, the notion of reuse, both of code and designs, also arises frequently in real-world projects, and in this book. You learned that your C++ designs should include both reuse of code, in the form of libraries and frameworks, and reuse of ideas and designs, in the form of techniques and patterns. You should write your code to be as reusable as possible. Also remember about the tradeoffs and about specific guidelines for reusing code, including understanding the capabilities and limitations, the performance, licensing and support models, the platform limitations, prototyping, and where to find help. You also learned about performance analysis and big-O notation. Now that you understand the importance of design and the basic design themes, you are ready for the rest of Part II. Chapter 5 describes strategies for using the object-oriented aspects of C++ in your design.
Now that you have developed an appreciation for good software design from Chapter 4, it’s time to pair the notion of objects with the concept of good design. The difference between programmers who use objects in their code and those who truly grasp object-oriented programming comes down to the way their objects relate to each other and to the overall design of the program.
This chapter begins with a very brief description of procedural programming (C-style), followed by a detailed discussion of object-oriented programming (OOP). Even if you’ve been using objects for years, you will want to read this chapter for some new ideas regarding how to think about objects. I will discuss the different kinds of relationships between objects, including pitfalls programmers often succumb to when building an object-oriented program. I will also describe how the principle of abstraction relates to objects.
When thinking about procedural programming or object-oriented programming, the most important point to remember is that they just represent different ways of reasoning about what’s going on in your program. Too often, programmers get bogged down in the syntax and jargon of OOP before they adequately understand what an object is. This chapter is light on code and heavy on concepts and ideas. For specifics on C++ object syntax, see Chapters 8, 9, and 10.
A procedural language, such as C, divides code into small pieces, each of which (ideally) accomplishes a single task. Without procedures in C, all your code would be lumped together inside main(). Your code would be difficult to read, and your coworkers would be annoyed, to say the least.
The computer doesn’t care if all your code is in main() or if it’s split into bite-sized pieces with descriptive names and comments. Procedures are an abstraction that exists to help you, the programmer, as well as those who read and maintain your code. The concept is built around a fundamental question about your program—What does this program do? By answering that question in English, you are thinking procedurally. For example, you might begin designing a stock selection program by answering as follows: First, the program obtains stock quotes from the Internet. Then, it sorts this data by specific metrics. Next, it performs analysis on the sorted data. Finally, it outputs a list of buy and sell recommendations. When you start coding, you might directly turn this mental model into C functions: retrieveQuotes(), sortQuotes(), analyzeQuotes(), and outputRecommendations().
The procedural approach tends to work well when your program follows a specific list of steps. However, in large, modern applications, there is rarely a linear sequence of events. Often a user is able to perform any command at any time. Procedural thinking also says nothing about data representation. In the previous example, there was no discussion of what a stock quote actually is.
If the procedural mode of thought sounds like the way you approach a program, don’t worry. Once you realize that OOP is simply an alternative, more flexible way of thinking about software, it’ll come naturally.
Unlike the procedural approach—which is based on the question, What does this program do?—the object-oriented approach asks another question: What real-world objects am I modeling? OOP is based on the notion that you should divide your program not into tasks, but into models of physical objects. While this seems abstract at first, it becomes clearer when you consider physical objects in terms of their classes, components, properties, and behaviors.
A class helps distinguish an object from its definition. Consider the orange. There’s a difference between talking about oranges in general as tasty fruit that grows on trees, and talking about a specific orange, such as the one that’s currently dripping juice on my keyboard.
When answering the question “What are oranges?” you are talking about the class of things known as oranges. All oranges are fruit. All oranges grow on trees. All oranges are some shade of orange. All oranges have some particular flavor. A class is simply the encapsulation of what defines a classification of objects.
When describing a specific orange, you are talking about an object. All objects belong to a particular class. Because the object on my desk is an orange, I know that it belongs to the orange class. Thus, I know that it is a fruit that grows on trees. I can further say that it is a medium shade of orange and ranks “mighty tasty” in flavor. An object is an instance of a class—a particular item with characteristics that distinguish it from other instances of the same class.
As a more concrete example, reconsider the stock selection application from earlier. In OOP, “stock quote” is a class because it defines the abstract notion of what makes up a quote. A specific quote, such as “current Microsoft stock quote,” would be an object because it is a particular instance of the class.
From a C background, think of classes and objects as analogous to types and variables. In fact, in Chapter 8, you’ll see that the syntax for classes is similar to the syntax for C structs.
If you consider a complex real-world object, such as an airplane, it should be fairly easy to see that it is made up of smaller components. There’s the fuselage, the controls, the landing gear, the engines, and numerous other parts. The ability to think of objects in terms of their smaller components is essential to OOP, just as the breaking up of complicated tasks into smaller procedures is fundamental to procedural programming.
A component is essentially the same thing as a class, just smaller and more specific. A good object-oriented program might have an Airplane class, but this class would be huge if it fully described an airplane. Instead, the Airplane class deals with many smaller, more manageable, components. Each of these components might have further subcomponents. For example, the landing gear is a component of an airplane, and the wheel is a component of the landing gear.
Properties are what distinguish one object from another. Going back to the Orange class, recall that all oranges are defined as having some shade of orange and a particular flavor. These two characteristics are properties. All oranges have the same properties, just with different values. My orange has a “mighty tasty” flavor, but yours may have a “terribly unpleasant” flavor.
You can also think about properties on the class level. As recognized earlier, all oranges are fruit and grow on trees. These are properties of the fruit class, whereas the specific shade of orange is determined by the particular fruit object. Class properties are shared by all objects of a class, while object properties are present in all objects of the class, but with different values.
In the stock selection example, a stock quote has several object properties, including the name of the company, its ticker symbol, the current price, and other statistics.
Properties are the characteristics that describe an object. They answer the question, “What makes this object different?”
Behaviors answer either of two questions: What does this object do? or What can I do to this object? In the case of an orange, it doesn’t do a whole lot, but we can do things to it. One behavior is that it can be eaten. Like properties, you can think of behaviors on the class level or the object level. All oranges can pretty much be eaten in the same way. However, they might differ in some other behavior, such as being rolled down an incline, where the behavior of a perfectly round orange would differ from that of a more oblate one.
The stock selection example provides some more practical behaviors. If you recall, when thinking procedurally, I determined that my program needed to analyze stock quotes as one of its functions. Thinking in OOP, you might decide that a stock quote object can analyze itself. Analysis becomes a behavior of the stock quote object.
In object-oriented programming, the bulk of functional code is moved out of procedures and into classes. By building classes that have certain behaviors and defining how they interact, OOP offers a much richer mechanism for attaching code to the data on which it operates. Behaviors for classes are implemented in so-called class methods.
With these concepts, you could take another look at the stock selection program and redesign it in an object-oriented manner.
As discussed, “stock quote” would be a fine class to start with. To obtain the list of quotes, the program needs the notion of a group of stock quotes, which is often called a collection. So, a better design might be to have a class that represents a “collection of stock quotes,” which is made up of smaller components that represent a single “stock quote.”
Moving on to properties, the collection class would have at least one property—the actual list of quotes received. It might also have additional properties, such as the exact date and time of the most recent retrieval. As for behaviors, the “collection of stock quotes” would be able to talk to a server to get the quotes and provide a sorted list of quotes. This is the “retrieve quotes” behavior.
The stock quote class would have the properties discussed earlier—name, symbol, current price, and so on. Also, it would have an analyze behavior. You might consider other behaviors, such as buying and selling the stock.
It is often useful to create diagrams showing the relationship between components. Figure 5-1 uses the UML class diagram syntax, see Appendix D, to indicate that a StockQuoteCollection contains zero or more (0..*) StockQuote objects, and that a StockQuote object belongs to a single (1) StockQuoteCollection.
Figure 5-2 shows a possible UML class diagram for the orange class.
Programmers who transition from a procedural thought process to the object-oriented paradigm often experience an epiphany about the combination of properties and behaviors into objects. Some programmers find themselves revisiting the design of programs they’re working on and rewriting certain pieces as objects. Others might be tempted to throw all the code away and restart the project as a fully object-oriented application.
There are two major approaches to developing software with objects. To some people, objects simply represent a nice encapsulation of data and functionality. These programmers sprinkle objects throughout their programs to make the code more readable and easier to maintain. Programmers taking this approach slice out isolated pieces of code and replace them with objects like a surgeon implanting a pacemaker. There is nothing inherently wrong with this approach. These people see objects as a tool that is beneficial in many situations. Certain parts of a program just “feel like an object,” like the stock quote. These are the parts that can be isolated and described in real-world terms.
Other programmers adopt the OOP paradigm fully and turn everything into an object. In their minds, some objects correspond to real-world things, such as an orange or a stock quote, while others encapsulate more abstract concepts, such as a sorter or an undo object.
The ideal approach is probably somewhere in between these extremes. Your first object-oriented program might really have been a traditional procedural program with a few objects sprinkled in. Or perhaps you went whole hog and made everything an object, from a class representing an int to a class representing the main application. Over time, you will find a happy medium.
There is often a fine line between designing a creative object-oriented system and annoying everybody else on your team by turning every little thing into an object. As Freud used to say, sometimes a variable is just a variable. Okay, that’s a paraphrase of what he said.
Perhaps you’re designing the next bestselling Tic-Tac-Toe game. You’re going all-out OOP on this one, so you sit down with a cup of coffee and a notepad to sketch out your classes and objects. In games like this, there’s often an object that oversees game play and is able to detect the winner. To represent the game board, you might envision a Grid object that will keep track of the markers and their locations. In fact, a component of the grid could be the Piece object that represents an X or an O.
Wait, back up! This design proposes to have a class that represents an X or an O. That is perhaps object overkill. After all, can’t a char represent an X or an O just as well? Better yet, why can’t the Grid just use a two-dimensional array of an enumerated type? Does a Piece object just complicate the code? Take a look at the following table representing the proposed piece class:
| CLASS | ASSOCIATED COMPONENTS | PROPERTIES | BEHAVIORS |
| Piece | None | X or O | None |
The table is a bit sparse, strongly hinting that what we have here may be too granular to be a full-fledged object.
On the other hand, a forward-thinking programmer might argue that while Piece is a pretty meager class as it currently stands, making it into an object allows future expansion without any real penalty. Perhaps down the road, this will be a graphical application and it might be useful to have the Piece class support drawing behavior. Additional properties could be the color of the Piece or whether the Piece was the most recently moved.
Another solution might be to think about the state of a grid square instead of using pieces. The state of a square can be Empty, X, or O. To make the design future-proof to support a graphical application, you could design an abstract base class State with concrete derived classes StateEmpty, StateX, and StateO, which know how to render themselves.
Obviously, there is no right answer. The important point is that these are issues that you should consider when designing your application. Remember that objects exist to help programmers manage their code. If objects are being used for no reason other than to make the code “more object-oriented,” something is wrong.
Perhaps a worse annoyance than objects that shouldn’t be objects is objects that are too general. All OOP students start with examples like “orange”—things that are objects, no question about it. In real-life coding, objects can get pretty abstract. Many OOP programs have an “application object,” despite the fact that an application isn’t really something you can envision in material form. Yet it may be useful to represent the application as an object because the application itself has certain properties and behaviors.
An overly general object is an object that doesn’t represent a particular thing at all. The programmer may be attempting to make an object that is flexible or reusable, but ends up with one that is confusing. For example, imagine a program that organizes and displays media. It can catalog your photos, organize your digital music collection, and serve as a personal journal. The overly general approach is to think of all these things as “media” objects and build a single class that can accommodate all of the formats. It might have a property called “data” that contains the raw bits of the image, song, or journal entry, depending on the type of media. It might have a behavior called “perform” that appropriately draws the image, plays the song, or brings up the journal entry for editing.
The clues that this class is too general are in the names of the properties and behaviors. The word “data” has little meaning by itself—you have to use a general term here because this class has been overextended to three very different uses. Similarly, “perform” will do very different things in the three different cases. Finally, this design is too general because “media” isn’t a particular object, not in the user interface, not in real life, and not even in the programmer’s mind. A major clue that a class is too general is when many ideas in the programmer’s mind all unite as a single object, as shown in Figure 5-3.
As a programmer, you will certainly encounter cases where different classes have characteristics in common, or at least seem somehow related to each other. For example, although creating a “media” object to represent images, music, and text in a digital catalog program is too general, these objects do share characteristics. You may want all of them to keep track of the date and time that they were last modified, or you might want them all to support a delete behavior.
Object-oriented languages provide a number of mechanisms for dealing with such relationships between objects. The tricky part is to understand what the relationship actually is. There are two main types of object relationships—a has-a relationship and an is-a relationship.
Objects engaged in a has-a, or aggregation, relationship follow the pattern A has a B, or A contains a B. In this type of relationship, you can envision one object as part of another. Components, as defined earlier, generally represent a has-a relationship because they describe objects that are made up of other objects.
A real-world example of this might be the relationship between a zoo and a monkey. You could say that a zoo has a monkey or a zoo contains a monkey. A simulation of a zoo in code would have a zoo object, which has a monkey component.
Often, thinking about user interface scenarios is helpful in understanding object relationships. This is so because even though not all UIs are implemented in OOP (though these days, most are), the visual elements on the screen translate well into objects. One UI analogy for a has-a relationship is a window that contains a button. The button and the window are clearly two separate objects but they are obviously related in some way. Because the button is inside the window, you say that the window has a button.
Figure 5-4 shows a real-world and a user interface has-a relationship.
The is-a relationship is such a fundamental concept of object-oriented programming that it has many names, including deriving, subclassing, extending, and inheriting. Classes model the fact that the real world contains objects with properties and behaviors. Inheritance models the fact that these objects tend to be organized in hierarchies. These hierarchies indicate is-a relationships.
Fundamentally, inheritance follows the pattern A is a B or A is really quite a bit like B—it can get tricky. To stick with the simple case, revisit the zoo, but assume that there are other animals besides monkeys. That statement alone has already constructed the relationship—a monkey is an animal. Similarly, a giraffe is an animal, a kangaroo is an animal, and a penguin is an animal. So what? Well, the magic of inheritance comes when you realize that monkeys, giraffes, kangaroos, and penguins have certain things in common. These commonalities are characteristics of animals in general.
What this means for the programmer is that you can define an Animal class that encapsulates all of the properties (size, location, diet, and so on) and behaviors (move, eat, sleep) that pertain to every animal. The specific animals, such as monkeys, become derived classes of Animal because a monkey contains all the characteristics of an animal. Remember, a monkey is an animal plus some additional characteristics that make it distinct. Figure 5-5 shows an inheritance diagram for animals. The arrows indicate the direction of the is-a relationship.
Just as monkeys and giraffes are different types of animals, a user interface often has different types of buttons. A checkbox, for example, is a button. Assuming that a button is simply a UI element that can be clicked to perform an action, a Checkbox extends the Button class by adding state—whether the box is checked or unchecked.
When relating classes in an is-a relationship, one goal is to factor common functionality into the base class, the class that other classes extend. If you find that all of your derived classes have code that is similar or exactly the same, consider how you could move some or all of the code into the base class. That way, any changes that need to be made only happen in one place and future derived classes get the shared functionality “for free.”
The preceding examples cover a few of the techniques used in inheritance without formalizing them. When deriving classes, there are several ways that the programmer can distinguish a class from its parent class, also called base class or superclass. A derived class may use one or more of these techniques, and they are recognized by completing the sentence, “A is a B that …”.
A derived class can augment its parent by adding additional functionality. For example, a monkey is an animal that can swing from trees. In addition to having all of the methods of Animal, the Monkey class also has a swingFromTrees() method, which is specific to only the Monkey class.
A derived class can replace or override a method of its parent entirely. For example, most animals move by walking, so you might give the Animal class a move() method that simulates walking. If that’s the case, a kangaroo is an animal that moves by hopping instead of walking. All the other properties and methods of the Animal base class still apply, but the Kangaroo derived class simply changes the way that the move() method works. Of course, if you find yourself replacing all of the functionality of your base class, it may be an indication that inheriting was not the correct thing to do after all, unless the base class is an abstract base class. An abstract base class forces each of the derived classes to implement all methods that do not have an implementation in the abstract base class. You cannot create instances of an abstract base class. Abstract base classes are discussed in Chapter 10.
A derived class can also add new properties to the ones that were inherited from the base class. For example, a penguin has all the properties of an animal but also has a beak
size property.
C++ provides a way of overriding properties similar to the way you can override methods. However, doing so is rarely appropriate, because it hides the property from the base class; that is, the base class can have a specific value for a property with a certain name, while the derived class can have another value for another property but with the same name. Hiding is explained in more detail in Chapter 10. It’s important not to get the notion of replacing a property confused with the notion of derived classes having different values for properties. For example, all animals have a diet property that indicates what they eat. Monkeys eat bananas and penguins eat fish, but neither of these is replacing the diet property—they simply differ in the value assigned to the property.
Polymorphism is the notion that objects that adhere to a standard set of properties and methods can be used interchangeably. A class definition is like a contract between objects and the code that interacts with them. By definition, any monkey object must support the properties and methods of the monkey class.
This notion extends to base classes as well. Because all monkeys are animals, all Monkey objects support the properties and methods of the Animal class as well.
Polymorphism is a beautiful part of object-oriented programming because it truly takes advantage of what inheritance offers. In a zoo simulation, you could programmatically loop through all of the animals in the zoo and have each animal move once. Because all animals are members of the Animal class, they all know how to move. Some of the animals have overridden the move method, but that’s the best part—your code simply tells each animal to move without knowing or caring what type of animal it is. Each one moves whichever way it knows how.
There is another reason to use inheritance besides polymorphism. Often, it’s just a matter of leveraging existing code. For example, if you need a class that plays music with an echo effect, and your coworker has already written one that plays music without any effects, you might be able to derive a new class from the existing class and add in the new functionality. The is-a relationship still applies (an echo music player is a music player that adds an echo effect), but you didn’t intend for these classes to be used interchangeably. What you end up with are two separate classes, used in completely different parts of the program (or maybe even in different programs entirely) that happen to be related only to avoid reinventing the wheel.
In the real world, it’s pretty easy to classify has-a and is-a relationships between objects. Nobody would claim that an orange has a fruit—an orange is a fruit. In code, things sometimes aren’t so clear.
Consider a hypothetical class that represents a hash table. A hash table is a data structure that efficiently maps a key to a value. For example, an insurance company could use a Hashtable class to map member IDs to names so that given an ID, it’s easy to find the corresponding member name. The member ID is the key and the member name is the value.
In a standard hash table implementation, every key has a single value. If the ID 14534 maps to the member name “Kleper, Scott”, it cannot also map to the member name “Kleper, Marni”. In most implementations, if you tried to add a second value for a key that already has a value, the first value would go away. In other words, if the ID 14534 mapped to “Kleper, Scott” and you then assigned the ID 14534 to “Kleper, Marni”, then Scott would effectively be uninsured. This is demonstrated in the following sequence, which shows two calls to a hypothetical hash table insert() method and the resulting contents of the hash table.
hash.insert(14534, "Kleper, Scott");| KEYS | VALUES |
| 14534 | “Kleper, Scott” [string] |
hash.insert(14534, "Kleper, Marni");| KEYS | VALUES |
| 14534 | “Kleper, Marni” [string] |
It’s not difficult to imagine uses for a data structure that’s like a hash table, but allows multiple values for a given key. In the insurance example, a family might have several names that correspond to the same ID. Because such a data structure is very similar to a hash table, it would be nice to leverage that functionality somehow. A hash table can have only a single value as a key, but that value can be anything. Instead of a string, the value could be a collection (such as an array or a list) containing the multiple values for the key. Every time you add a new member for an existing ID, you add the name to the collection. This would work as shown in the following sequence:
Collection collection; // Make a new collection.collection.insert("Kleper, Scott"); // Add a new element to the collection.hash.insert(14534, collection); // Insert the collection into the table.
| KEYS | VALUES |
| 14534 | {“Kleper, Scott”} [collection] |
Collection collection = hash.get(14534);// Retrieve the existing collection.collection.insert("Kleper, Marni"); // Add a new element to the collection.hash.insert(14534, collection); // Replace the collection with the updated one.
| KEYS | VALUES |
| 14534 | {“Kleper, Scott”, “Kleper, Marni”} [collection] |
Messing around with a collection instead of a string is tedious and requires a lot of repetitive code. It would be preferable to wrap up this multiple-value functionality in a separate class, perhaps called a MultiHash. The MultiHash class would work just like Hashtable except that behind the scenes, it would store each value as a collection of strings instead of a single string. Clearly, MultiHash is somehow related to Hashtable because it is still using a hash table to store the data. What is unclear is whether that constitutes an is-a or a has-a relationship.
To start with the is-a relationship, imagine that MultiHash is a derived class of Hashtable. It would have to override the method that adds an entry into the table so that it would either create a collection and add the new element, or retrieve the existing collection and add the new element. It would also override the method that retrieves a value. It could, for example, append all the values for a given key together into one string. This seems like a perfectly reasonable design. Even though it overrides all the methods of the base class, it will still make use of the base class’s methods by using the original methods within the derived class. This approach is shown in the UML class diagram in Figure 5-6.
Now consider it as a has-a relationship. MultiHash is its own class, but it contains a Hashtable object. It probably has an interface very similar to Hashtable, but it need not be the same. Behind the scenes, when a user adds something to the MultiHash, it is really wrapped in a collection and put in a Hashtable object. This also seems perfectly reasonable and is shown in Figure 5-7.
So, which solution is right? There’s no clear answer, though a friend of mine who has written a MultiHash class for production use, viewed it as a has-a relationship. The main reason was to allow modifications to the exposed interface without worrying about maintaining hash table functionality. For example, in Figure 5-7, the get() method was changed to getAll(), making it clear that this would get all the values for a particular key in a MultiHash. Additionally, with a has-a relationship, you don’t have to worry about any hash table functionality bleeding through. For example, if the hash table class supported a method that would get the total number of values, it would report the number of collections unless MultiHash knew to override it.
That said, one could make a convincing argument that a MultiHash actually is a Hashtable with some new functionality, and it should have been an is-a relationship. The point is that there is sometimes a fine line between the two relationships, and you will need to consider how the class is going to be used and whether what you are building just leverages some functionality from another class or really is that class with modified or new functionality.
The following table represents the arguments for and against taking either approach for the MultiHash class.
| IS-A | HAS-A | |
| Reasons For |
Fundamentally, it’s the same abstraction with different characteristics. It provides (almost) the same methods as Hashtable.
|
MultiHash can have whatever methods are useful without needing to worry about what methods Hashtable has.The implementation could change to something other than a Hashtable without changing the exposed methods.
|
| Reasons Against |
A hash table by definition has one value per key. To say MultiHash is a hash table is blasphemy!MultiHash overrides both methods of Hashtable, a strong sign that something about the design is wrong.Unknown or inappropriate properties or methods of Hashtable could “bleed through” to MultiHash. |
In a sense, MultiHash reinvents the wheel by coming up with new methods.Some additional properties and methods of Hashtable might have been useful.
|
The reasons against using an is-a relationship in this case are pretty strong. Additionally, the Liskov substitution principle (LSP) can help you decide between an is-a and a has-a relationship. This principle states that you should be able to use a derived class instead of a base class without altering the behavior. Applied to this example, it states that this should be a has-a relationship, because you cannot just start using a MultiHash where before you were using a Hashtable. If you would do so, the behavior would change. For example, the insert() method of Hashtable removes an earlier value with the same key that is already in the map, while MultiHash does not remove such values.
If you do have a choice between the two types of relationships, I recommend, after years of experience, opting for a has-a relationship over an is-a relationship.
Note that the Hashtable and MultiHash are used here to demonstrate the difference between the is-a and has-a relationships. In your own code, it is recommended to use one of the standard hash table classes instead of writing your own. The C++ Standard Library provides an unordered_ map class, which you should use instead of the Hashtable, and an unordered_multimap class, which you should use instead of the MultiHash. Both of these standard classes are discussed in Chapter 17.
As you consider what type of relationship classes have, you should consider whether or not they actually have a relationship at all. Don’t let your zeal for object-oriented design turn into a lot of needless class/derived-class relationships.
One pitfall occurs when things are obviously related in the real world but have no actual relationship in code. Object-oriented hierarchies need to model functional relationships, not artificial ones. Figure 5-8 shows relationships that are meaningful as ontologies or hierarchies, but are unlikely to represent a meaningful relationship in code.
The best way to avoid needless inheritance is to sketch out your design first. For every class and derived class, write down what properties and methods you’re planning on putting into the class. You should rethink your design if you find that a class has no particular properties or methods of its own, or if all of those properties and methods are completely overridden by its derived classes, except when working with abstract base classes as mentioned earlier.
Just as a class A can be a base class of B, B can also be a base class of C. Object-oriented hierarchies can model multilevel relationships like this. A zoo simulation with more animals might be designed with every animal as a derived class of a common Animal class, as shown in Figure 5-9.
As you code each of these derived classes, you might find that a lot of them are similar. When this occurs, you should consider putting in a common parent. Realizing that Lion and Panther both move the same way and have the same diet might indicate a need for a possible BigCat class. You could further subdivide the Animal class to include WaterAnimal and Marsupial. A more hierarchical design that leverages this commonality is shown in Figure 5-10.
A biologist looking at this hierarchy may be disappointed—a penguin isn’t really in the same family as a dolphin. However, it underlines a good point—in code, you need to balance real-world relationships with shared-functionality relationships. Even though two things might be very closely related in the real world, they might have a not-a relationship in code because they really don’t share functionality. You could just as easily divide animals into mammals and fish, but that wouldn’t factor any commonality to the base class.
Another important point is that there could be other ways of organizing the hierarchy. The preceding design is organized mostly by how the animals move. If it were instead organized by the animals’ diet or height, the hierarchy could be very different. In the end, what matters is how the classes will be used. The needs will dictate the design of the object hierarchy.
A good object-oriented hierarchy accomplishes the following:
Every example so far has had a single inheritance chain. In other words, a given class has, at most, one immediate parent class. This does not have to be the case. Through multiple inheritance, a class can have more than one base class.
Figure 5-11 shows a multiple inheritance design. There is still a base class called Animal, which is further divided by size. A separate hierarchy categorizes by diet, and a third takes care of movement. Each type of animal is then a derived class of all three of these classes, as shown by different lines.
In a user interface context, imagine an image that the user can click on. This object seems to be both a button and an image so the implementation might involve inheriting from both the Image class and the Button class, as shown in Figure 5-12.
Multiple inheritance can be very useful in certain cases, but it also has a number of disadvantages that you should always keep in mind. Many programmers dislike multiple inheritance. C++ has explicit support for such relationships, though the Java language does away with them altogether, except for inheriting from multiple interfaces (abstract base classes). There are several reasons to which multiple inheritance critics point.
First, visualizing multiple inheritance is complicated. As you can see in Figure 5-11, even a simple class diagram can become very complicated when there are multiple hierarchies and crossing lines. Class hierarchies are supposed to make it easier for the programmer to understand the relationships between code. With multiple inheritance, a class could have several parents that are in no way related to each other. With so many classes contributing code to your object, can you really keep track of what’s going on?
Second, multiple inheritance can destroy otherwise clean hierarchies. In the animal example, switching to a multiple inheritance approach means that the Animal base class is less meaningful because the code that describes animals is now separated into three separate hierarchies. While the design illustrated in Figure 5-11 shows three clean hierarchies, it’s not difficult to imagine how they could get messy. For example, what if you realize that all Jumpers not only move in the same way, but they also eat the same things? Because there are separate hierarchies, there is no way to join the concepts of movement and diet without adding yet another derived class.
Third, implementation of multiple inheritance is complicated. What if two of your base classes implement the same method in different ways? Can you have two base classes that are themselves a derived class of a common base class? These possibilities complicate the implementation because structuring such intricate relationships in code is difficult both for the author and a reader.
The reason that other languages can leave out multiple inheritance is that it is usually avoidable. By rethinking your hierarchy, you can often avoid introducing multiple inheritance when you have control over the design of a project.
Mixin classes represent another type of relationship between classes. In C++, a mixin class is implemented syntactically just like multiple inheritance, but the semantics are refreshingly different. A mixin class answers the question, “What else is this class able to do?” and the answer often ends with “-able.” Mixin classes are a way that you can add functionality to a class without committing to a full is-a relationship. You can think of it as a shares-with relationship.
Going back to the zoo example, you might want to introduce the notion that some animals are “pettable.” That is, there are some animals that visitors to the zoo can pet, presumably without being bitten or mauled. You might want all pettable animals to support the behavior “be pet.” Because pettable animals don’t have anything else in common and you don’t want to break the existing hierarchy you’ve designed, Pettable makes a great mixin class.
Mixin classes are used frequently in user interfaces. Instead of saying that a PictureButton class is both an Image and a Button, you might say that it’s an Image that is Clickable. A folder icon on your desktop could be an Image that is Draggable and Clickable. Software developers tend to make up a lot of fun adjectives.
The difference between a mixin class and a base class has more to do with how you think about the class than any code difference. In general, mixin classes are easier to digest than multiple inheritance because they are very limited in scope. The Pettable mixin class just adds one behavior to any existing class. The Clickable mixin class might just add “mouse down” and “mouse up” behaviors. Also, mixin classes rarely have a large hierarchy so there’s no cross-contamination of functionality. Chapter 28 goes into more detail on mixin classes.
In Chapter 4, you learned about the concept of abstraction—the notion of separating implementation from the means used to access it. Abstraction is a good idea for many reasons that were explored earlier. It’s also a fundamental part of object-oriented design.
The key to abstraction is effectively separating the interface from the implementation. The implementation is the code you’re writing to accomplish the task you set out to accomplish. The interface is the way that other people use your code. In C, the header file that describes the functions in a library you’ve written is an interface. In object-oriented programming, the interface to a class is the collection of publicly accessible properties and methods. A good interface contains only public methods. Properties of a class should never be made public but can be exposed through public methods, also called getters and setters.
The question of how other programmers will interact with your objects comes into play when designing a class. In C++, a class’s properties and methods can each be public, protected, or private. Making a property or method public means that other code can access it; protected means that other code cannot access the property or method but derived classes can access them; private is a stricter control, which means that not only are the properties or methods locked for other code, but even derived classes can’t access them. Note that access specifiers are at the class level, not at the object level. This means that a method of a class can access, for example, private properties or private methods of other objects of the same class.
Designing the exposed interface is all about choosing what to make public. When working on a large project with other programmers, you should view the exposed interface design as a process.
The first step in designing an exposed interface is to consider whom you are designing it for. Is your audience another member of your team? Is this an interface that you will personally be using? Is it something that a programmer external to your company will use? Perhaps a customer or an offshore contractor? In addition to determining who will be coming to you for help with the interface, this should shed some light on some of your design goals.
If the interface is for your own use, you probably have more freedom to iterate on the design. As you’re making use of the interface, you can change it to suit your own needs. However, you should keep in mind that roles on an engineering team change and it is quite likely that, some day, others will be using this interface as well.
Designing an interface for other internal programmers to use is slightly different. In a way, your interface becomes a contract with them. For example, if you are implementing the data store component of a program, others are depending on that interface to support certain operations. You will need to find out all of the things that the rest of the team wants your class to do. Do they need versioning? What types of data can they store? As a contract, you should view the interface as slightly less flexible. If the interface is agreed upon before coding begins, you’ll receive some groans from other programmers if you decide to change it after code has been written.
If the client is an external customer, you will be designing with a very different set of requirements. Ideally, the target customer will be involved in specifying what functionality your interface exposes. You’ll need to consider both the specific features they want as well as what customers might want in the future. The terminology used in the interface will have to correspond to the terms that the customer is familiar with, and the documentation will have to be written with that audience in mind. Inside jokes, codenames, and programmer slang should be left out of your design.
There are many reasons for writing an interface. Before putting any code on paper or even deciding on what functionality you’re going to expose, you need to understand the purpose of the interface.
An application programming interface (API) is an externally visible mechanism to extend a product or use its functionality within another context. If an internal interface is a contract, an API is closer to a set-in-stone law. Once people who don’t even work for your company are using your API, they don’t want it to change unless you’re adding new features that will help them. So, care should be given to planning the API and discussing it with customers before making it available to them.
The main tradeoff in designing an API is usually ease of use versus flexibility. Because the target audience for the interface is not familiar with the internal working of your product, the learning curve to use the API should be gradual. After all, your company is exposing this API to customers because the company wants it to be used. If it’s too difficult to use, the API is a failure. Flexibility often works against this. Your product may have a lot of different uses, and you want the customer to be able to leverage all the functionality you have to offer. However, an API that lets the customer do anything that your product can do may be too complicated.
As a common programming adage goes, “A good API makes the easy case easy and the hard case possible.” That is, APIs should have a simple learning curve. The things that most programmers will want to do should be accessible. However, the API should allow for more advanced usage, and it’s acceptable to trade off complexity of the rare case for simplicity of the common case.
Often, your task is to develop some particular functionality for general use elsewhere in the application. It could be a random number library or a logging class. In these cases, the interface is somewhat easier to decide on because you tend to expose most or all of the functionality, ideally without giving too much away about its implementation. Generality is an important issue to consider. Because the class or library is general purpose, you’ll need to take the possible set of use cases into account in your design.
You may be designing the interface between two major subsystems of the application, such as the mechanism for accessing a database. In these cases, separating the interface from the implementation is paramount because other programmers are likely to start implementing against your interface before your implementation is complete. When working on a subsystem, first think about what its main purpose is. Once you have identified the main task your subsystem is charged with, think about specific uses and how it should be presented to other parts of the code. Try to put yourself in their shoes and not get bogged down in implementation details.
Most of the interfaces you define will probably be smaller than a subsystem interface or an API. These will be classes that you use within other code that you’ve written. In these cases, the main pitfall occurs when your interface evolves gradually and becomes unruly. Even though these interfaces are for your own use, think of them as though they weren’t. As with a subsystem interface, consider the main purpose of each class and be cautious of exposing functionality that doesn’t contribute to that purpose.
As you are designing your interface, keep in mind what the future holds. Is this a design you will be locked into for years? If so, you might need to leave room for expansion by coming up with a plug-in architecture. Do you have evidence that people will try to use your interface for purposes other than what it was designed for? Talk to them and get a better understanding of their use case. The alternative is rewriting it later, or worse, attaching new functionality haphazardly and ending up with a messy interface. Be careful, though! Speculative generality is yet another pitfall. Don’t design the be-all, end-all logging class if the future uses are unclear, because it might unnecessarily complicate the design, the implementation, and its public interface.
Experience and iteration are essential to good abstractions. Truly well-designed interfaces come from years of writing and using other abstractions. You can also leverage someone else’s years of writing and using abstractions by reusing existing, well-designed abstractions in the form of standard design patterns. As you encounter other abstractions, try to remember what worked and what didn’t work. What did you find lacking in the Windows file system API you used last week? What would you have done differently if you had written the network wrapper, instead of your coworker? The best interface is rarely the first one you put on paper, so keep iterating. Bring your design to your peers and ask for feedback. If your company uses code reviews, start the code review by doing a review of the interface specifications before the implementation starts. Don’t be afraid to change the abstraction once coding has begun, even if it means forcing other programmers to adapt. Hopefully, they’ll realize that a good abstraction is beneficial to everyone in the long term.
Sometimes you need to evangelize a bit when communicating your design to other programmers. Perhaps the rest of the team didn’t see a problem with the previous design or feels that your approach requires too much work on their part. In those situations, be prepared both to defend your work and to incorporate their ideas when appropriate.
A good abstraction means that the interface has only public methods. All code should be in the implementation file and not in the class definition file. This means that the interface files containing the class definitions are stable and will not change. A specific technique to accomplish this is called the private implementation idiom, or pimpl idiom, and is discussed in Chapter 9.
Beware of single-class abstractions. If there is significant depth to the code you’re writing, consider what other companion classes might accompany the main interface. For example, if you’re exposing an interface to do some data processing, consider also writing a result object that provides an easy way to view and interpret the results.
Always turn properties into methods. In other words, don’t allow external code to manipulate the data behind your class directly. You don’t want some careless or nefarious programmer to set the height of a bunny object to a negative number. Instead, have a “set height” method that does the necessary bounds checking.
Iteration is worth mentioning again because it is the most important point. Seek and respond to feedback on your design, change it when necessary, and learn from mistakes.
In this chapter, you’ve gained an appreciation for the design of object-oriented programs without a lot of code getting in the way. The concepts you’ve learned are applicable to almost any object-oriented language. Some of it may have been a review to you, or it may be a new way of formalizing a familiar concept. Perhaps you picked up some new approaches to old problems, or new arguments in favor of the concepts you’ve been preaching to your team all along. Even if you’ve never used objects in your code, or have used them only sparingly, you now know more about how to design object-oriented programs than many experienced C++ programmers.
The relationships between objects are important to study, not just because well-linked objects contribute to code reuse and reduce clutter, but also because you will be working in a team. Objects that relate in meaningful ways are easier to read and maintain. You may decide to use the “Object Relationships” section as a reference when you design your programs.
Finally, you learned about creating successful abstractions and the two most important design considerations—audience and purpose.
The next chapter continues the design theme by explaining how to design your code with reuse in mind.
Reusing libraries and other code in your programs is an important design strategy. However, it is only half of the reuse strategy. The other half is designing and writing the code that you can reuse in your programs. As you’ve probably discovered, there is a significant difference between well-designed and poorly designed libraries. Well-designed libraries are a pleasure to use, while poorly designed libraries can prod you to give up in disgust and write the code yourself. Whether you’re writing a library explicitly designed for use by other programmers or merely deciding on a class hierarchy, you should design your code with reuse in mind. You never know when you’ll need a similar piece of functionality in a subsequent project.
Chapter 4 introduces the design theme of reuse and explains how to apply this theme by incorporating libraries and other code in your designs, but it doesn’t explain how to design reusable code. That is the topic of this chapter. It builds on the object-oriented design principles described in Chapter 5.
You should design code that both you and other programmers can reuse. This rule applies not only to libraries and frameworks that you specifically intend for other programmers to use, but also to any class, subsystem, or component that you design for a program. You should always keep in mind the mottos:
There are several reasons for this:
Reusable code fulfills two main goals. First, it is general enough to use for slightly different purposes or in different application domains. Program components with details of a specific application are difficult to reuse in other programs.
Second, reusable code is also easy to use. It doesn’t require significant time to understand its interface or functionality. Programmers must be able to incorporate it readily into their applications.
The means of “delivering” your library to clients is also important. You can deliver it in source form and clients just incorporate your source into their project. Another option is to deliver a static library, which they link into their application, or you can deliver a Dynamic Link Library (DLL) for Windows clients, or a shared object (.so) for Linux clients. Each of these delivery mechanisms can impose additional constraints on how you code your library.
The most important strategy for designing reusable code is abstraction. Chapter 4 presents the real-world analogy of a television, which you can use through its interfaces without understanding how it works inside. Similarly, when you design code, you should clearly separate the interface from the implementation. This separation makes the code easier to use, primarily because clients do not need to understand the internal implementation details in order to use the functionality.
Abstraction separates code into interfaces and implementation, so designing reusable code focuses on these two main areas. First, you must structure the code appropriately. What class hierarchies will you use? Should you use templates? How should you divide the code into subsystems?
Second, you must design the interfaces, which are the “entries” into your library, or code that programmers use, to access the functionality you provide.
You learned about the principle of abstraction in Chapter 4 and read more about its application to object-oriented design in Chapter 5. To follow the principle of abstraction, you should provide interfaces to your code that hide the underlying implementation details. There should be a clear distinction between the interface and the implementation.
Using abstraction benefits both you and the clients who use your code. Clients benefit because they don’t need to worry about the implementation details; they can take advantage of the functionality you offer without understanding how the code really works. You benefit because you can modify the underlying code without changing the interface to the code. Thus, you can provide upgrades and fixes without requiring clients to change their use. With dynamically linked libraries, clients might not even need to rebuild their executables. Finally, you both benefit because you, as the library writer, can specify in the interface exactly what interactions you expect and what functionality you support. Consult Chapter 3 for a discussion on how to write documentation. A clear separation of interfaces and implementations will prevent clients from using the library in ways that you didn’t intend, which can otherwise cause unexpected behaviors and bugs.
Sometimes libraries require client code to keep information returned from one interface in order to pass it to another. This information is sometimes called a handle and is often used to keep track of specific instances that require state to be remembered between calls. If your library design requires a handle, don’t expose its internals. Make that handle into an opaque class, in which the programmer can’t access the internal data members, either directly, or through public getters or setters. Don’t require the client code to tweak variables inside this handle. An example of a bad design would be a library that requires you to set a specific member of a structure in a supposedly opaque handle in order to turn on error logging.
Abstraction is so important that it should guide your entire design. As part of every decision you make, ask yourself whether your choice fulfills the principle of abstraction. Put yourself in your clients’ shoes and determine whether or not you’re requiring knowledge of the internal implementation in the interface. You should rarely, if ever, make exceptions to this rule.
You must consider reuse from the beginning of your design, on all levels, that is, from a single function, over a class, to entire libraries and frameworks. In the text that follows, all these different levels are called components. The following strategies will help you organize your code properly. Note that all of these strategies focus on making your code general purpose. The second aspect of designing reusable code, providing ease of use, is more relevant to your interface design and is discussed later in this chapter.
When you design a component, you should keep it focused on a single task or group of tasks, that is, you should strive for high cohesion. This is also known as the Single Responsibility Principle (SRP). Don’t combine unrelated concepts such as a random number generator and an XML parser.
Even when you are not designing code specifically for reuse, keep this strategy in mind. Entire programs are rarely reused on their own. Instead, pieces or subsystems of the programs are incorporated directly into other applications, or are adapted for slightly different uses. Thus, you should design your programs so that you divide logically separate functionality into distinct components that can be reused in different programs. Each such component should have well-defined responsibilities.
This program strategy models the real-world design principle of discrete, interchangeable parts. For example, you could write a Car class and put all properties and behaviors of the engine into it. However, engines are separable components that are not tied to other aspects of the car. The engine could be removed from one car and put into another car. A proper design would include an Engine class that contains all engine-specific functionality. A Car instance then just contains an instance of Engine.
You should design your subsystems as discrete components that can be reused independently, that is, strive for low coupling. For example, if you are designing a networked game, keep the networking and graphical user interface aspects in separate subsystems. That way, you can reuse either component without dragging in the other one. For example, you might want to write a non-networked game, in which case you could reuse the graphical interface subsystem, but wouldn’t need the networking aspect. Similarly, you could design a peer-to-peer file-sharing program, in which case you could reuse the networking subsystem but not the graphical user interface functionality.
Make sure to follow the principle of abstraction for each subsystem. Think of each subsystem as a miniature library for which you must provide a coherent and easy-to-use interface. Even if you’re the only programmer who ever uses these miniature libraries, you will benefit from well-designed interfaces and implementations that separate logically distinct functionality.
In addition to dividing your program into logical subsystems, you should avoid combining unrelated concepts at the class level. For example, suppose you want to write a class for a self-driving car. You decide to start with a basic class for a car and incorporate all the self-driving logic directly into it. However, what if you just want a non-self-driving car in your program? In that case, all the logic related to self-driving is useless, and might require your program to link with libraries that it could otherwise avoid, such as vision libraries, LIDAR libraries, and so on. A solution is to create a class hierarchy (introduced in Chapter 5) in which a self-driving car is a derived class of a generic car. That way, you can use the car base class in programs that do not need self-driving capabilities without incurring the cost of such algorithms. Figure 6-1 shows this hierarchy.
This strategy works well when there are two logical concepts, such as self-driving and cars. It becomes more complicated when there are three or more concepts. For example, suppose you want to provide both a truck and a car, each of which could be self-driving or not. Logically, both the truck and the car are a special case of a vehicle, and so they should be derived classes of a vehicle class. Similarly, self-driving classes could be derived classes of non-self-driving classes. You can’t provide these separations with a linear hierarchy. One possibility is to make the self-driving aspect a mixin class as shown in Figure 6-2. The SelfDriveable mixin class provides all the necessary algorithms for implementing the self-driving functionality.
This hierarchy requires you to write six different classes, but the clear separation of functionality is worth the effort.
Similarly, you should avoid combining unrelated concepts, that is, strive for high cohesion, at any level of your design, not only at the class level. For example, at the level of methods, a single method should not perform logically unrelated things, mix mutation (set) and inspection (get), and so on.
Aggregation, discussed in Chapter 5, models the has-a relationship: objects contain other objects to perform some aspects of their functionality. You can use aggregation to separate unrelated or related but separate functionality when inheritance is not appropriate.
For example, suppose you want to write a Family class to store the members of a family. Obviously, a tree data structure would be ideal for storing this information. Instead of integrating the code for the tree structure in your Family class, you should write a separate Tree class. Your Family class can then contain and use a Tree instance. To use the object-oriented terminology, the Family has-a Tree. With this technique, the tree data structure could be reused more easily in another program.
If your library is a data manipulation library, you want to separate data manipulation from the user interface. This means that for those kinds of libraries you should never assume in which type of user interface the library will be used. As such, do not use cout, cerr, cin, stdout, stderr, or stdin, because if the library is used in the context of a graphical user interface, these concepts may make no sense. For example, a Windows GUI-based application usually will not have any form of console I/O. If you think your library will only be used in GUI-based applications, you should still never pop up any kind of message box or other kind of notification to the end user, because that is the responsibility of the client code. It’s the client code that decides how messages are displayed for the user. These kinds of dependencies not only result in poor reusability, but they also prevent client code from properly responding to an error, for example, to handle it silently.
The Model-View-Controller (MVC) paradigm, introduced in Chapter 4, is a well-known design pattern to separate storing data from visualizing that data. With this paradigm, the model can be in the library, while the client code can provide the view and the controller.
C++ has a concept called templates that allows you to create structures that are generic with respect to a type or class. For example, you might have written code for an array of integers. If you subsequently would like an array of doubles, you need to rewrite and replicate all the code to work with doubles. The notion of a template is that the type becomes a parameter to the specification, and you can create a single body of code that can work on any type. Templates allow you to write both data structures and algorithms that work on any types.
The simplest example of this is the std::vector class, which is part of the C++ Standard Library. To create a vector of integers, you write std::vector<int>; to create a vector of doubles, you write std::vector<double>. Template programming is, in general, extremely powerful but can be very complex. Luckily, it is possible to create rather simple usages of templates that parameterize according to a type. Chapters 12 and 22 explain the techniques to write your own templates, while this section discusses some of their important design aspects.
Whenever possible, you should use a generic design for data structures and algorithms instead of encoding specifics of a particular program. Don’t write a balanced binary tree structure that stores only book objects. Make it generic, so that it can store objects of any type. That way, you could use it in a bookstore, a music store, an operating system, or anywhere that you need a balanced binary tree. This strategy underlies the Standard Library, which provides generic data structures and algorithms that work on any types.
Templates are not the only mechanism for writing generic data structures. Another approach to write generic structures in C and C++ is to store void* pointers instead of pointers of a specific type. Clients can use this structure to store anything they want by casting it to a void*. However, the main problem with this approach is that it is not type-safe: the containers are unable to check or enforce the types of the stored elements. You can cast any type to a void* to store in the structure, and when you remove the pointers from the data structure, you must cast them back to what you think they are. Because there are no checks involved, the results can be disastrous. Imagine a scenario where one programmer stores pointers to int in a data structure by first casting them to void*, but another programmer thinks they are pointers to Process objects. The second programmer will blithely cast the void* pointers to Process* pointers and try to use them as Process* objects. Needless to say, the program will not work as expected.
Yet another approach is to write the data structure for a specific class. Through polymorphism, any derived class of that class can be stored in the structure. Java takes this approach to an extreme: it specifies that every class derives directly or indirectly from the Object class. The containers in earlier versions of Java store Objects, so they can store objects of any type. However, this approach is also not type-safe. When you remove an object from the container, you must remember what it really is and down-cast it to the appropriate type. Down casting means casting it to a more specific class in a class hierarchy, that is, casting it downward in the hierarchy.
Templates, on the other hand, are type-safe when used correctly. Each instantiation of a template stores only one type. Your program will not compile if you try to store different types in the same template instantiation. Newer versions of Java do support the concept of generics that are type-safe just like C++ templates.
Templates are not perfect. First of all, their syntax might be confusing, especially for someone who has not used them before. Second, templates require homogeneous data structures, in which you can store only objects of the same type in a single structure. That is, if you write a templatized balanced binary tree, you can create one tree object to store Process objects and another tree object to store ints. You can’t store both ints and Processes in the same tree. This restriction is a direct result of the type-safe nature of templates. Starting with C++17, there is a standardized way around this homogeneity restriction. You can write your data structure to store std::variant or std::any objects. An std::any object can store a value of any type, while an std::variant object can store a value of a selection of types. Both any and variant are discussed in detail in Chapter 20.
Programmers sometimes find it tricky to decide whether to use templates or inheritance. Following are some tips to help you make the decision.
Use templates when you want to provide identical functionality for different types. For example, if you want to write a generic sorting algorithm that works on any type, use templates. If you want to create a container that can store any type, use templates. The key concept is that the templatized structure or algorithm treats all types the same. However, if required, templates can be specialized for specific types to treat those types differently. Template specialization is discussed in Chapter 12.
When you want to provide different behaviors for related types, use inheritance. For example, use inheritance if you want to provide two different, but similar, containers such as a queue and a priority queue.
Note that you can combine inheritance and templates. You could write a templatized class that derives from a templatized base class. Chapter 12 covers the details of the template syntax.
There are two opposite styles for writing safe code. The optimal programming style is probably using a healthy mix of both of them. The first is called design-by-contract, which means that the documentation for a function or a class represents a contract with a detailed description of what the responsibility of the client code is and what the responsibility of your function or class is. There are three important aspects of design-by-contract: preconditions, postconditions, and invariants. Preconditions list the conditions that client code must satisfy before calling a function or method. Postconditions list the conditions that must be satisfied by the function or method when it has finished executing. Finally, invariants list the conditions that must be satisfied during the whole execution of the function or method.
Design-by-contract is often used in the Standard Library. For example, std::vector defines a contract for using the array notation to get a certain element from a vector. The contract states that no bounds checking is performed, but that this is the responsibility of the client code. In other words, a precondition for using array notation to get elements from a vector is that the given index is valid. This is done to increase performance for client code that knows their indices are within bounds. vector also defines an at() method to get a specific element that does perform bounds checking. So, client code can choose whether it uses the array notation without bounds checking, or the at() method with bounds checking.
The second style is that you design your functions and classes to be as safe as possible. The most important aspect of this guideline is to perform error checking in your code. For example, if your random number generator requires a seed to be in a specific range, don’t just trust the user to pass a valid seed. Check the value that is passed in, and reject the call if it is invalid. The at() method of vector as discussed in the previous paragraph is another example of a method that is designed with safety in mind. If the user provides an invalid index, the method throws an exception.
As an analogy, consider an accountant who prepares income tax returns. When you hire an accountant, you provide them with all your financial information for the year. The accountant uses this information to fill out forms from the IRS. However, the accountant does not blindly fill out your information on the form, but instead makes sure the information makes sense. For example, if you own a house, but forget to specify the property tax you paid, the accountant will remind you to supply that information. Similarly, if you say that you paid $12,000 in mortgage interest, but made only $15,000 gross income, the accountant might gently ask you if you provided the correct numbers (or at least recommend more affordable housing).
You can think of the accountant as a “program” where the input is your financial information and the output is an income tax return. However, the value added by an accountant is not just that they fill out the forms. You also choose to employ an accountant because of the checks and safeguards that they provide. Similarly in programming, you could provide as many checks and safeguards as possible in your implementations.
There are several techniques and language features that help you to write safe code and to incorporate checks and safeguards in your programs. To report errors to client code, you can return an error code or a distinct value like false or nullptr. Alternatively, you can throw an exception to notify the client code of any errors. Chapter 14 covers exceptions in detail. To write safe code that works with dynamically allocated resources such as memory, use smart pointers. Conceptually, a smart pointer is a pointer to some resource that automatically frees the resource when it goes out of scope. Smart pointers are introduced in Chapter 1.
You should strive to design your classes in such a way that they can be extended by deriving another class from them, but they should be closed for modification, that is, the behavior should be extendable without you having to modify its implementation. This is called the Open/Closed Principle (OCP).
As an example, suppose you start implementing a drawing application. The first version should only support squares. Your design contains two classes: Square and Renderer. The former contains the definition of a square, such as the length of its sides. The latter is responsible for drawing the squares. You come up with something as follows:
class Square{// Details not important for this example.};class Renderer{public:void render(const vector<Square>& squares);};void Renderer::render(const vector<Square>& squares){for (auto& square : squares){// Render this square object.}}
Next, you add support for circles, so you create a Circle class:
class Circle{// Details not important for this example.};
To be able to render circles, you have to modify the render() method of the Renderer class. You decide to change it as follows:
void Renderer::render(const vector<Square>& squares,const vector<Circle>& circles){for (auto& square : squares){// Render this square object.}for (auto& circle : circles){// Render this circle object.}}
While doing this, you feel there is something wrong, and you are correct! In order to extend the functionality to add support for circles, you have to modify the current implementation of the render() method, so it’s not closed for modifications.
Your design in this case should use inheritance. This example jumps ahead a bit on the syntax for inheritance. Chapter 10 discusses inheritance; however, the syntactical details are not important to understand this example. For now, you only need to know that the following syntax specifies that Square derives from the Shape class:
class Square : public Shape {};Here is a design using inheritance:
class Shape{public:virtual void render() = 0;};class Square : public Shape{public:virtual void render() override { /* Render square */ }// Other members not important for this example.};class Circle : public Shape{public:virtual void render() override { /* Render circle */ }// Other members not important for this example.};class Renderer{public:void render(const vector<shared_ptr<Shape>>& objects);};void Renderer::render(const vector<shared_ptr<Shape>>& objects){for (auto& object : objects){object->render();}}
With this design, if you want to add support for a new type of shape, you just need to write a new class that derives from Shape and that implements the render() method. You don’t need to modify anything in the Renderer class. So, this design can be extended without having to modify the existing code, that is, it’s open for extension, and closed for modification.
In addition to abstracting and structuring your code appropriately, designing for reuse requires you to focus on the interface with which programmers interact. Even if you have the most beautiful and most efficient implementation, your library will not be any good if it has a wretched interface.
Note that every component in your program should have good interfaces, even if you don’t intend them to be used in multiple programs. First of all, you never know when something will be reused. Second, a good interface is important even for the first use, especially if you are programming in a group and other programmers must use the code you design and write.
The main purpose of interfaces is to make the code easy to use, but some interface techniques can help you follow the principle of generality as well.
Your interfaces should be easy to use. That doesn’t mean that they must be trivial, but they should be as simple and intuitive as the functionality allows. You shouldn’t require consumers of your library to wade through pages of source code in order to use a simple data structure, or to go through contortions in their code to obtain the functionality they need. This section provides four specific strategies for designing interfaces that are easy to use.
The best strategy for developing easy-to-use interfaces is to follow standard and familiar ways of doing things. When people encounter an interface similar to something they have used in the past, they will understand it better, adopt it more readily, and be less likely to use it improperly.
For example, suppose that you are designing the steering mechanism of a car. There are a number of possibilities: a joystick, two buttons for moving left or right, a sliding horizontal lever, or a good old steering wheel. Which interface do you think would be easiest to use? Which interface do you think would sell the most cars? Consumers are familiar with steering wheels, so the answer to both questions is, of course, the steering wheel. Even if you developed another mechanism that provided superior performance and safety, you would have a tough time selling your product, let alone teaching people how to use it. When you have a choice between following standard interface models and branching out in a new direction, it’s usually better to stick to the interface to which people are accustomed.
Innovation is important, of course, but you should focus on innovation in the underlying implementation, not in the interface. For example, consumers are excited about the innovative fully electric engine in some car models. These cars are selling well in part because the interface to use them is identical to cars with standard gasoline engines.
Applied to C++, this strategy implies that you should develop interfaces that follow standards to which C++ programmers are accustomed. For example, C++ programmers expect the constructor and destructor of a class to initialize and clean up an object, respectively. When you design your classes, you should follow this standard. If you require programmers to call initialize() and cleanup() methods for initialization and cleanup instead of placing that functionality in the constructor and destructor, you will confuse everyone who tries to use your class. Because your class behaves differently from other C++ classes, programmers will take longer to learn how to use it and will be more likely to use it incorrectly by forgetting to call initialize() or cleanup().
C++ provides a language feature called operator overloading that can help you develop easy-to-use interfaces for your objects. Operator overloading allows you to write classes such that the standard operators work on them just as they work on built-in types like int and double. For example, you can write a Fraction class that allows you to add, subtract, and stream fractions like this:
Fraction f1(3,4);Fraction f2(1,2);Fraction sum = f1 + f2;Fraction diff = f1 – f2;cout << f1 << " " << f2 << endl;
Contrast that with the same behavior using method calls:
Fraction f1(3,4);Fraction f2(1,2);Fraction sum = f1.add(f2);Fraction diff = f1.subtract(f2);f1.print(cout);cout << " ";f2.print(cout);cout << endl;
As you can see, operator overloading allows you to provide an easier-to-use interface for your classes. However, be careful not to abuse operator overloading. It’s possible to overload the + operator so that it implements subtraction and the – operator so that it implements multiplication. Those implementations would be counterintuitive. This does not mean that each operator should always implement exactly the same behavior. For example, the string class implements the + operator to concatenate strings, which is an intuitive interface for string concatenation. See Chapters 9 and 15 for details on operator overloading.
This strategy is twofold. First, include interfaces for all behaviors that clients could need. That might sound obvious at first. Returning to the car analogy, you would never build a car without a speedometer for the driver to view their speed! Similarly, you would never design a Fraction class without a mechanism for client code to access the nominator and denominator values.
However, other possible behaviors might be more obscure. This strategy requires you to anticipate all the uses to which clients might put your code. If you are thinking about the interface in one particular way, you might miss functionality that could be needed when clients use it differently. For example, suppose that you want to design a game board class. You might consider only the typical games, such as chess and checkers, and decide to support a maximum of one game piece per spot on the board. However, what if you later decide to write a backgammon game, which allows multiple pieces in one spot on the board? By precluding that possibility, you have ruled out the use of your game board as a backgammon board.
Obviously, anticipating every possible use for your library is difficult, if not impossible. Don’t feel compelled to agonize over potential future uses in order to design the perfect interface. Just give it some thought and do the best you can.
The second part of this strategy is to include as much functionality in the implementation as possible. Don’t require client code to specify information that you already know in the implementation, or could know if you designed it differently. For example, if your library requires a temporary file, don’t make the clients of your library specify that path. They don’t care what file you use; find some other way to determine an appropriate temporary file path.
Furthermore, don’t require library users to perform unnecessary work to amalgamate results. If your random number library uses a random number algorithm that calculates the low-order and high-order bits of a random number separately, combine the numbers before giving them to the user.
In order to avoid omitting functionality in their interfaces, some programmers go to the opposite extreme: they include every possible piece of functionality imaginable. Programmers who use the interfaces are never left without the means to accomplish a task. Unfortunately, the interface might be so cluttered that they never figure out how to do it!
Don’t provide unnecessary functionality in your interfaces; keep them clean and simple. It might appear at first that this guideline directly contradicts the previous strategy of not omitting necessary functionality. Although one strategy to avoid omitting functionality would be to include every imaginable interface, that is not a sound strategy. You should include necessary functionality and omit useless or counterproductive interfaces.
Consider cars again. You drive a car by interacting with only a few components: the steering wheel, the brake and accelerator pedals, the gearshift, the mirrors, the speedometer, and a few other dials on your dashboard. Now, imagine a car dashboard that looked like an airplane cockpit, with hundreds of dials, levers, monitors, and buttons. It would be unusable! Driving a car is so much easier than flying an airplane that the interface can be much simpler: You don’t need to view your altitude, communicate with control towers, or control the myriad components in an airplane such as the wings, engines, and landing gear.
Additionally, from the library development perspective, smaller libraries are easier to maintain. If you try to make everyone happy, then you have more room to make mistakes, and if your implementation is complicated enough so that everything is intertwined, even one mistake can render the library useless.
Unfortunately, the idea of designing uncluttered interfaces looks good on paper, but is remarkably hard to put into practice. The rule is ultimately subjective: you decide what’s necessary and what’s not. Of course, your clients will be sure to tell you when you get it wrong!
Regardless of how easy you make your interfaces to use, you should supply documentation for their use. You can’t expect programmers to use your library properly unless you tell them how to do it. Think of your library or code as a product for other programmers to consume. Your product should have documentation explaining its proper use.
There are two ways to provide documentation for your interfaces: comments in the interfaces themselves and external documentation. You should strive to provide both. Most public APIs provide only external documentation: comments are a scarce commodity in many of the standard Unix and Windows header files. In Unix, the documentation usually comes in the form of online manuals called man pages. In Windows, the documentation usually accompanies the integrated development environment.
Despite the fact that most APIs and libraries omit comments in the interfaces themselves, I actually consider this form of documentation the most important. You should never give out a “naked” header file that contains only code. Even if your comments repeat exactly what’s in the external documentation, it is less intimidating to look at a header file with friendly comments than one with only code. Even the best programmers still like to see written language every so often!
Some programmers use tools to create documentation automatically from comments. Chapter 3 discusses this technique in more detail.
Whether you provide comments, external documentation, or both, the documentation should describe the behavior of the library, not the implementation. The behavior includes the inputs, outputs, error conditions and handling, intended uses, and performance guarantees. For example, documentation describing a call to generate a single random number should specify that it takes no parameters, returns an integer in a previously specified range, and should list all the exceptions that might be thrown when something goes wrong. This documentation should not explain the details of the linear congruence algorithm for actually generating the number. Providing too much implementation detail in interface comments is probably the single most common mistake in interface development. Many developers have seen perfectly good separations of interface and implementation ruined by comments in the interface that are more appropriate for library maintainers than clients.
Of course, you should also document your internal implementation; just don’t make it publicly available as part of your interface. Chapter 3 provides details on the appropriate use of comments in your code.
The interfaces should be general purpose enough that they can be adapted to a variety of tasks. If you encode specifics of one application in a supposedly general interface, it will be unusable for any other purpose. Here are some guidelines to keep in mind.
In order to satisfy all your “customers,” it is sometimes helpful to provide multiple ways to perform the same functionality. Use this technique judiciously, however, because over-application can easily lead to cluttered interfaces.
Consider cars again. Most new cars these days provide remote keyless entry systems, with which you can unlock your car by pressing a button on a key fob. However, these cars always provide a standard key that you can use to physically unlock the car, for example, when the battery in the key fob is drained. Although these two methods are redundant, most customers appreciate having both options.
Sometimes there are similar situations in program interface design. For example, std::vector provides two methods to get access to a single element at a specific index. You can use either the at() method, which performs bounds checking, or operator[], which does not. If you know your indices are valid, you can use operator[] and forgo the overhead that at() incurs due to bounds checking.
Note that this strategy should be considered an exception to the “uncluttered” rule in interface design. There are a few situations where the exception is appropriate, but you should most often follow the “uncluttered” rule.
In order to increase the flexibility of your interfaces, provide customizability. Customizability can be as simple as allowing a client to turn error logging on or off. The basic premise of customizability is that it allows you to provide the same basic functionality to every client, but gives clients the ability to tweak it slightly.
You can allow greater customizability through function pointers and template parameters. For example, you could allow clients to set their own error-handling routines.
The Standard Library takes this customizability strategy to the extreme and actually allows clients to specify their own memory allocators for containers. If you want to use this feature, you must write a memory allocator object that follows the Standard Library guidelines and adheres to the required interfaces. Each container in the Standard Library takes an allocator as one of its template parameters. Chapter 21 provides more details.
The two goals of ease of use and generality sometimes appear to conflict. Often, introducing generality increases the complexity of the interfaces. For example, suppose that you need a graph structure in a map program to store cities. In the interest of generality, you might use templates to write a generic map structure for any type, not just cities. That way, if you need to write a network simulator in your next program, you can employ the same graph structure to store routers in the network. Unfortunately, by using templates, you make the interface a little clumsier and harder to use, especially if the potential client is not familiar with templates.
However, generality and ease of use are not mutually exclusive. Although in some cases increased generality may decrease ease of use, it is possible to design interfaces that are both general purpose and straightforward to use. Here are two guidelines you can follow.
In order to reduce complexity in your interfaces while still providing enough functionality, you can provide multiple separate interfaces. This is called the Interface Segregation Principle (ISP). For example, you could write a generic networking library with two separate facets: one presents the networking interfaces useful for games, and the other presents the networking interfaces useful for the HyperText Transport Protocol (HTTP) for web browsing.
When you provide a general-purpose interface, some functionality will be used more often than other functionality. You should make the commonly used functionality easy to use, while still providing the option for the more advanced functionality. Returning to the map program, you might want to provide an option for clients of the map to specify names of cities in different languages. English is so predominant that you could make that the default but provide an extra option to change languages. That way, most clients will not need to worry about setting the language, but those who want to will be able to do so.
The basic principles of object-oriented design are often abbreviated with the easy-to-remember acronym: SOLID. The following table summarizes the five SOLID principles. Most of the principles are discussed earlier in this chapter, if not, a reference is given to the chapter where they are discussed.
| S | Single Responsibility Principle (SRP) A single component should have a single, well-defined responsibility and should not combine unrelated functionality. |
| O | Open/Closed Principle (OCP) A class should be open to extension (by deriving from it), but closed for modification. |
| L | Liskov Substitution Principle (LSP) You should be able to replace an instance of an object with an instance of a subtype of that object. Chapter 5 explains this principle in the section “The Fine Line between Has-A and Is-A” with an example to decide whether the relationship between Hashtable and MultiHash is a has-a or an is-a relationship.
|
| I | Interface Segregation Principle (ISP) Keep interfaces clean and simple. It is better to have many smaller, well-defined single-responsibility interfaces than to have broad, general-purpose interfaces. |
| D | Dependency Inversion Principle (DIP) Use interfaces to invert dependency relationships. Chapter 4 briefly mentions an example of an ErrorLogger service. You should define an ErrorLogger interface, and use dependency injection to inject this interface into each component that wants to use the ErrorLogger service. Dependency injection is one way to support the dependency inversion principle.
|
By reading this chapter, you learned why you should design reusable code and how you should do it. You read about the philosophy of reuse, summarized as “write once, use often,” and learned that reusable code should be both general purpose and easy to use. You also discovered that designing reusable code requires you to use abstraction, to structure your code appropriately, and to design good interfaces.
This chapter presented specific tips for structuring your code: to avoid combining unrelated or logically separate concepts, to use templates for generic data structures and algorithms, to provide appropriate checks and safeguards, and to design for extensibility.
This chapter also presented six strategies for designing interfaces: to follow familiar ways of doing things, to not omit required functionality, to present uncluttered interfaces, to provide documentation and comments, to provide multiple ways to perform the same functionality, and to provide customizability. It concluded with two tips for reconciling the often-conflicting demands of generality and ease of use: to supply multiple interfaces and to make common functionality easy to use.
The chapter concluded with SOLID, an easy-to-remember acronym that describes the most important design principles discussed in this and other chapters.
This is the last chapter of the second part of the book, which focuses on discussing design themes on a higher level. The next part delves into the implementation phase of the software engineering process, with details of C++ coding.
Memory is a low-level component of the computer that sometimes unfortunately rears its head even in a high-level programming language like C++. Many programmers understand only enough about dynamic memory to get by. They shy away from data structures that use dynamic memory, or get their programs to work by trial and error. A solid understanding of how dynamic memory really works in C++ is essential to becoming a professional C++ programmer.
Understanding dynamic memory is much easier if you have a mental model for what objects look like in memory. In this book, a unit of memory is shown as a box with a label next to it. The label indicates a variable name that corresponds to the memory. The data inside the box displays the current value of the memory.
For example, Figure 7-1 shows the state of memory after the following line is executed. The line should be in a function, so that i is a local variable:
int i = 7;i is a so-called automatic variable allocated on the stack. It is automatically deallocated when the program flow leaves the scope in which the variable is declared.
When you use the new keyword, memory is allocated on the heap. The following code creates a variable ptr on the stack initialized with nullptr, and then allocates memory on the heap to which ptr points:
int* ptr = nullptr;ptr = new int;
This can also be written as a one-liner:
int* ptr = new int;Figure 7-2 shows the state of memory after this code is executed. Notice that the variable ptr is still on the stack even though it points to memory on the heap. A pointer is just a variable and can live on either the stack or the heap, although this fact is easy to forget. Dynamic memory, however, is always allocated on the heap.
The next example shows that pointers can exist both on the stack and on the heap:
int** handle = nullptr;handle = new int*;*handle = new int;
The preceding code first declares a pointer to a pointer to an integer as the variable handle. It then dynamically allocates enough memory to hold a pointer to an integer, storing the pointer to that new memory in handle. Next, that memory (*handle) is assigned a pointer to another section of dynamic memory that is big enough to hold the integer. Figure 7-3 shows the two levels of pointers with one pointer residing on the stack (handle) and the other residing on the heap (*handle).
To create space for a variable, you use the new keyword. To release that space for use by other parts of the program, you use the delete keyword. Of course, it wouldn’t be C++ if simple concepts such as new and delete didn’t have several variations and intricacies.
When you want to allocate a block of memory, you call new with the type of variable for which you need space. new returns a pointer to that memory, although it is up to you to store that pointer in a variable. If you ignore the return value of new, or if the pointer variable goes out of scope, the memory becomes orphaned because you no longer have a way to access it. This is also called a memory leak.
For example, the following code orphans enough memory to hold an int. Figure 7-4 shows the state of memory after the code is executed. When there are blocks of data on the heap with no access, direct or indirect, from the stack, the memory is orphaned or leaked.
void leaky(){new int; // BUG! Orphans/leaks memory!cout << "I just leaked an int!" << endl;}
Until they find a way to make computers with an infinite supply of fast memory, you will need to tell the compiler when the memory associated with an object can be released and reused for another purpose. To free memory on the heap, you use the delete keyword with a pointer to the memory, as shown here:
int* ptr = new int;delete ptr;ptr = nullptr;
If you are a C programmer, you may be wondering what is wrong with the malloc() function. In C, malloc() is used to allocate a given number of bytes of memory. For the most part, using malloc() is simple and straightforward. The malloc() function still exists in C++, but you should avoid it. The main advantage of new over malloc() is that new doesn’t just allocate memory, it constructs objects!
For example, consider the following two lines of code, which use a hypothetical class called Foo:
Foo* myFoo = (Foo*)malloc(sizeof(Foo));Foo* myOtherFoo = new Foo();
After executing these lines, both myFoo and myOtherFoo will point to areas of memory on the heap that are big enough for a Foo object. Data members and methods of Foo can be accessed using both pointers. The difference is that the Foo object pointed to by myFoo isn’t a proper object because it was never constructed. The malloc() function only sets aside a piece of memory of a certain size. It doesn’t know about or care about objects. In contrast, the call to new allocates the appropriate size of memory and also calls an appropriate constructor to construct the object.
A similar difference exists between the free() function and the delete operator. With free(), the object’s destructor is not called. With delete, the destructor is called and the object is properly cleaned up.
Many, if not most, programmers write code with the assumption that new will always be successful. The rationale is that if new fails, it means that memory is very low and life is very, very bad. It is often an unfathomable state to be in because it’s unclear what your program could possibly do in this situation.
By default, your program will terminate if new fails. In many programs, this behavior is acceptable. The program exits when new fails because new throws an exception if there is not enough memory available for the request. Chapter 14 explains possible approaches to recover gracefully from an out-of-memory situation.
There is also an alternative version of new, which will not throw an exception. Instead, it will return nullptr, similar to the behavior of malloc() in C. The syntax for using this version is as follows:
int* ptr = new(nothrow) int;Of course, you still have the same problem as the version that throws an exception—what do you do when the result is nullptr? The compiler doesn’t require you to check the result, so the nothrow version of new is more likely to lead to other bugs than the version that throws an exception. For this reason, it’s suggested that you use the standard version of new. If out-of-memory recovery is important to your program, the techniques covered in Chapter 14 give you all the tools you need.
Arrays package multiple variables of the same type into a single variable with indices. Working with arrays quickly becomes natural to a novice programmer because it is easy to think about values in numbered slots. The in-memory representation of an array is not far off from this mental model.
When your program allocates memory for an array, it is allocating contiguous pieces of memory, where each piece is large enough to hold a single element of the array. For example, a local array of five ints can be declared on the stack as follows:
int myArray[5];Figure 7-5 shows the state of memory after the array is created. When creating arrays on the stack, the size must be a constant value known at compile time.
Declaring arrays on the heap is no different, except that you use a pointer to refer to the location of the array. The following code allocates memory for an array of five ints and stores a pointer to the memory in a variable called myArrayPtr:
int* myArrayPtr = new int[5];As Figure 7-6 illustrates, the heap-based array is similar to the stack-based array, but in a different location. The myArrayPtr variable points to the 0th element of the array.
Each call to new[] should be paired with a call to delete[] to clean up the memory. For example,
delete [] myArrayPtr;myArrayPtr = nullptr;
The advantage of putting an array on the heap is that you can define its size at run time. For example, the following code snippet receives a desired number of documents from a hypothetical function named askUserForNumberOfDocuments() and uses that result to create an array of Document objects.
Document* createDocArray(){size_t numDocs = askUserForNumberOfDocuments();Document* docArray = new Document[numDocs];return docArray;}
Remember that each call to new[] should be paired with a call to delete[], so in this example, it’s important that the caller of createDocArray() uses delete[] to clean up the returned memory. Another problem is that C-style arrays don’t know their size; thus callers of createDocArray() have no idea how many elements there are in the returned array!
In the preceding function, docArray is a dynamically allocated array. Do not get this confused with a dynamic array. The array itself is not dynamic because its size does not change once it is allocated. Dynamic memory lets you specify the size of an allocated block at run time, but it does not automatically adjust its size to accommodate the data.
There is a function in C++ called realloc(), which is a holdover from the C language. Do not use it! In C, realloc() is used to effectively change the size of an array by allocating a new block of memory of the new size, copying all of the old data to the new location, and deleting the original block. This approach is extremely dangerous in C++ because user-defined objects will not respond well to bitwise copying.
Arrays of objects are no different than arrays of simple types. When you use new[N] to allocate an array of N objects, enough space is allocated for N contiguous blocks where each block is large enough for a single object. Using new[], the zero-argument (= default) constructor for each of the objects is automatically called. In this way, allocating an array of objects using new[] returns a pointer to an array of fully formed and initialized objects.
For example, consider the following class:
class Simple{public:Simple() { cout << "Simple constructor called!" << endl; }~Simple() { cout << "Simple destructor called!" << endl; }};
If you allocate an array of four Simple objects, the Simple constructor is called four times.
Simple* mySimpleArray = new Simple[4];The memory diagram for this array is shown in Figure 7-7. As you can see, it is no different than an array of basic types.
As mentioned earlier, when you allocate memory with the array version of new (new[]), you must release it with the array version of delete (delete[]). This version automatically destructs the objects in the array in addition to releasing the memory associated with them.
Simple* mySimpleArray = new Simple[4];// Use mySimpleArray …delete [] mySimpleArray;mySimpleArray = nullptr;
If you do not use the array version of delete, your program may behave in odd ways. With some compilers, only the destructor for the first element of the array will be called because the compiler only knows that you are deleting a pointer to an object, and all the other elements of the array will become orphaned objects. With other compilers, memory corruption may occur because new and new[] can use completely different memory allocation schemes.
Of course, the destructors are only called if the elements of the array are objects. If you have an array of pointers, you still need to delete each object pointed to individually just as you allocated each object individually, as shown in the following code:
const size_t size = 4;Simple** mySimplePtrArray = new Simple*[size];// Allocate an object for each pointer.for (size_t i = 0; i < size; i++) { mySimplePtrArray[i] = new Simple(); }// Use mySimplePtrArray …// Delete each allocated object.for (size_t i = 0; i < size; i++) { delete mySimplePtrArray[i]; }// Delete the array itself.delete [] mySimplePtrArray;mySimplePtrArray = nullptr;
Multi-dimensional arrays extend the notion of indexed values to multiple indices. For example, a Tic-Tac-Toe game might use a two-dimensional array to represent a three-by-three grid. The following example shows such an array declared on the stack, zero-initialized, and accessed with some test code:
char board[3][3] = {};// Test codeboard[0][0] = 'X'; // X puts marker in position (0,0).board[2][1] = 'O'; // O puts marker in position (2,1).
You may be wondering whether the first subscript in a two-dimensional array is the x-coordinate or the y-coordinate. The truth is that it doesn’t really matter, as long as you are consistent. A four-by-seven grid could be declared as char board[4][7] or char board[7][4]. For most applications, it is easiest to think of the first subscript as the x-axis and the second as the y-axis.
In memory, a stack-based two-dimensional array looks like Figure 7-8. Because memory doesn’t have two axes (addresses are merely sequential), the computer represents a two-dimensional array just like a one-dimensional array. The difference is in the size of the array and the method used to access it.
The size of a multi-dimensional array is all of its dimensions multiplied together, then multiplied by the size of a single element in the array. In Figure 7-8, the three-by-three board is 3 × 3 × 1 = 9 bytes, assuming that a character is 1 byte. For a four-by-seven board of characters, the array would be 4 × 7 × 1 = 28 bytes.
To access a value in a multi-dimensional array, the computer treats each subscript as if it were accessing another subarray within the multi-dimensional array. For example, in the three-by-three grid, the expression board[0] actually refers to the subarray highlighted in Figure 7-9. When you add a second subscript, such as board[0][2], the computer is able to access the correct element by looking up the second subscript within the subarray, as shown in Figure 7-10
These techniques are extended to N-dimensional arrays, though dimensions higher than three tend to be difficult to conceptualize and are rarely used.
If you need to determine the dimensions of a multi-dimensional array at run time, you can use a heap-based array. Just as a single-dimensional dynamically allocated array is accessed through a pointer, a multi-dimensional dynamically allocated array is also accessed through a pointer. The only difference is that in a two-dimensional array, you need to start with a pointer-to-a-pointer; and in an N-dimensional array, you need N levels of pointers. At first, it might seem as if the correct way to declare and allocate a dynamically allocated multi-dimensional array is as follows:
char** board = new char[i][j]; // BUG! Doesn't compileThis code doesn’t compile because heap-based arrays don’t work like stack-based arrays. Their memory layout isn’t contiguous, so allocating enough memory for a stack-based multi-dimensional array is incorrect. Instead, you can start by allocating a single contiguous array for the first subscript dimension of a heap-based array. Each element of that array is actually a pointer to another array that stores the elements for the second subscript dimension. This layout for a two-by-two dynamically allocated board is shown in Figure 7-11.
Unfortunately, the compiler doesn’t allocate memory for the subarrays on your behalf. You can allocate the first-dimension array just like a single-dimensional heap-based array, but the individual subarrays must be explicitly allocated. The following function properly allocates memory for a two-dimensional array:
char** allocateCharacterBoard(size_t xDimension, size_t yDimension){char** myArray = new char*[xDimension]; // Allocate first dimensionfor (size_t i = 0; i < xDimension; i++) {myArray[i] = new char[yDimension]; // Allocate ith subarray}return myArray;}
Similarly, when you want to release the memory associated with a multi-dimensional heap-based array, the array delete[] syntax will not clean up the subarrays on your behalf. Your code to release an array should mirror the code to allocate it, as in the following function:
void releaseCharacterBoard(char** myArray, size_t xDimension){for (size_t i = 0; i < xDimension; i++) {delete [] myArray[i]; // Delete ith subarray}delete [] myArray; // Delete first dimension}
Now that you know all the details to work with arrays, it is recommended to avoid these old C-style arrays as much as possible because they do not provide any memory safety. They are explained here because you will encounter them in legacy code. In new code, you should use the C++ Standard Library containers such as std::array, std::vector, and so on (see Chapter 17). For example, use vector<T> for a one-dimensional dynamic array, use vector<vector<T>> for a two-dimensional dynamic array, and so on. Of course, working directly with data structures such as vector<vector<T>> is still tedious, especially for constructing them. If you do need N-dimensional dynamic arrays in your application, it is recommended to write helper classes that provide an easier to use interface. For example, to work with two-dimensional data with equally long rows, you should consider writing (or reusing of course) a Matrix<T> or Table<T> class template which internally might use a vector<vector<T>> data structure. See Chapter 12 for details on writing class templates
Pointers get their bad reputation from the relative ease with which you can abuse them. Because a pointer is just a memory address, you could theoretically change that address manually, even doing something as scary as the following line of code:
char* scaryPointer = (char*)7;This line builds a pointer to the memory address 7, which is likely to be random garbage or memory used elsewhere in the application. If you start to use areas of memory that weren’t set aside on your behalf, for example with new or on the stack, eventually you will corrupt the memory associated with an object, or the memory involved with the management of the heap, and your program will malfunction. Such a malfunction can manifest itself in several ways. For example, it can reveal itself as invalid results because the data has been corrupted, or as hardware exceptions being triggered due to accessing non-existent memory, or attempting to write to protected memory. If you are lucky, you will get one of the serious errors that usually result in program termination by the operating system or the C++ runtime library; if you are unlucky, you will just get wrong results.
There are two ways to think about pointers. More mathematically minded readers might view pointers as addresses. This view makes pointer arithmetic, covered later in this chapter, a bit easier to understand. Pointers aren’t mysterious pathways through memory; they are numbers that happen to correspond to a location in memory. Figure 7-12 illustrates a two-by-two grid in the address-based view of the world.
Readers who are more comfortable with spatial representations might derive more benefit from the “arrow” view of pointers. A pointer is a level of indirection that says to the program, “Hey! Look over there.” With this view, multiple levels of pointers become individual steps on the path to the data. Figure 7-11 shows a graphical view of pointers in memory.
When you dereference a pointer, by using the * operator, you are telling the program to look one level deeper in memory. In the address-based view, think of a dereference as a jump in memory to the address indicated by the pointer. With the graphical view, every dereference corresponds to following an arrow from its base to its head.
When you take the address of a location, using the & operator, you are adding a level of indirection in memory. In the address-based view, the program is noting the numerical address of the location, which can be stored as a pointer. In the graphical view, the & operator creates a new arrow whose head ends at the location designated by the expression. The base of the arrow can be stored as a pointer.
Because pointers are just memory addresses (or arrows to somewhere), they are somewhat weakly typed. A pointer to an XML document is the same size as a pointer to an integer. The compiler will let you easily cast any pointer type to any other pointer type using a C-style cast:
Document* documentPtr = getDocument();char* myCharPtr = (char*)documentPtr;
A static cast offers a bit more safety. The compiler refuses to perform a static cast on pointers to unrelated data types:
Document* documentPtr = getDocument();char* myCharPtr = static_cast<char*>(documentPtr);// BUG! Won't compile
If the two pointers you are casting are actually pointing to objects that are related through inheritance, the compiler will permit a static cast. However, a dynamic cast is a safer way to accomplish a cast within an inheritance hierarchy. Chapter 10 discusses inheritance in detail, while the different C++ style casts are discussed in Chapter 11.
You have already seen some of the overlap between pointers and arrays. Heap-allocated arrays are referred to by a pointer to their first element. Stack-based arrays are referred to by using the array syntax ([]) with an otherwise normal variable declaration. As you are about to learn, however, the overlap doesn’t end there. Pointers and arrays have a complicated relationship.
A heap-based array is not the only place where you can use a pointer to refer to an array. You can also use the pointer syntax to access elements of a stack-based array. The address of an array is really the address of the first element (index 0). The compiler knows that when you refer to an array in its entirety by its variable name, you are really referring to the address of the first element. In this way, the pointer works just like a heap-based array. The following code creates a zero-initialized array on the stack, and uses a pointer to access it:
int myIntArray[10] = {};int* myIntPtr = myIntArray;// Access the array through the pointer.myIntPtr[4] = 5;
The ability to refer to a stack-based array through a pointer is useful when passing arrays into functions. The following function accepts an array of integers as a pointer. Note that the caller needs to explicitly pass in the size of the array because the pointer implies nothing about size. In fact, C++ arrays of any form, pointer or not, have no built-in notion of size. That is another reason why you should use modern containers such as those provided by the Standard Library.
void doubleInts(int* theArray, size_t size){for (size_t i = 0; i < size; i++) {theArray[i] *= 2;}}
The caller of this function can pass a stack-based or heap-based array. In the case of a heap-based array, the pointer already exists and is passed by value into the function. In the case of a stack-based array, the caller can pass the array variable, and the compiler automatically treats the array variable as a pointer to the array, or you can explicitly pass the address of the first element. All three forms are shown here:
size_t arrSize = 4;int* heapArray = new int[arrSize]{ 1, 5, 3, 4 };doubleInts(heapArray, arrSize);delete [] heapArray;heapArray = nullptr;int stackArray[] = { 5, 7, 9, 11 };arrSize = std::size(stackArray); // Since C++17, requires <array>//arrSize = sizeof(stackArray) / sizeof(stackArray[0]); // Pre-C++17, see Ch1doubleInts(stackArray, arrSize);doubleInts(&stackArray[0], arrSize);
The parameter-passing semantics of arrays is uncannily similar to that of pointers, because the compiler treats an array as a pointer when it is passed to a function. A function that takes an array as an argument and changes values inside the array is actually changing the original array, not a copy. Just like a pointer, passing an array effectively mimics pass-by-reference functionality because what you really pass to the function is the address of the original array, not a copy. The following implementation of doubleInts() changes the original array even though the parameter is an array, not a pointer:
void doubleInts(int theArray[], size_t size){for (size_t i = 0; i < size; i++) {theArray[i] *= 2;}}
Any number between the square brackets after theArray in the function prototype is simply ignored. The following three versions are identical:
void doubleInts(int* theArray, size_t size);void doubleInts(int theArray[], size_t size);void doubleInts(int theArray[2], size_t size);
You may be wondering why things work this way. Why doesn’t the compiler just copy the array when array syntax is used in the function definition? This is done for efficiency—it takes time to copy the elements of an array, and they potentially take up a lot of memory. By always passing a pointer, the compiler doesn’t need to include the code to copy the array.
There is a way to pass known-length stack-based arrays “by reference” to a function, although the syntax is non-obvious. This does not work for heap-based arrays. For example, the following doubleIntsStack() accepts only stack-based arrays of size 4:
void doubleIntsStack(int (&theArray)[4]);A function template, discussed in detail in Chapter 12, can be used to let the compiler deduce the size of the stack-based array automatically:
template<size_t N>void doubleIntsStack(int (&theArray)[N]){for (size_t i = 0; i < N; i++) {theArray[i] *= 2;}}
To summarize, arrays declared using array syntax can be accessed through a pointer. When an array is passed to a function, it is always passed as a pointer.
Because the compiler lets you pass in an array where a pointer is expected, as in the doubleInts() function in the previous section, you may be led to believe that pointers and arrays are the same. In fact, there are subtle, but important, differences. Pointers and arrays share many properties and can sometimes be used interchangeably (as shown earlier), but they are not the same.
A pointer by itself is meaningless. It may point to random memory, a single object, or an array. You can always use array syntax with a pointer, but doing so is not always appropriate because pointers aren’t always arrays. For example, consider the following code:
int* ptr = new int;The pointer ptr is a valid pointer, but it is not an array. You can access the pointed-to value using array syntax (ptr[0]), but doing so is stylistically questionable and provides no real benefit. In fact, using array syntax with non-array pointers is an invitation for bugs. The memory at ptr[1] could be anything!
One of the great advantages of C++ over C is that you don’t need to worry quite as much about memory. If you code using objects, you just need to make sure that each individual class properly manages its own memory. Through construction and destruction, the compiler helps you manage memory by telling you when to do it. Hiding the management of memory within classes makes a huge difference in usability, as demonstrated by the Standard Library classes. However, with some applications or with legacy code, you may encounter the need to work with memory at a lower level. Whether for legacy, efficiency, debugging, or curiosity, knowing some techniques for working with raw bytes can be helpful.
The C++ compiler uses the declared types of pointers to allow you to perform pointer arithmetic. If you declare a pointer to an int and increase it by 1, the pointer moves ahead in memory by the size of an int, not by a single byte. This type of operation is most useful with arrays, because they contain homogeneous data that is sequential in memory. For example, assume you declare an array of ints on the heap:
int* myArray = new int[8];You are already familiar with the following syntax for setting the value in position 2:
myArray[2] = 33;With pointer arithmetic, you can equivalently use the following syntax, which obtains a pointer to the memory that is “2 ints ahead” of myArray and then dereferences it to set the value:
*(myArray + 2) = 33;As an alternative syntax for accessing individual elements, pointer arithmetic doesn’t seem too appealing. Its real power lies in the fact that an expression like myArray + 2 is still a pointer to an int, and thus can represent a smaller int array. Suppose you have the following wide string. Wide strings are discussed in Chapter 19, but the details are not important at this point. For now, it is enough to know that wide strings support so-called Unicode characters to represent, for example, Japanese strings. The wchar_t type is a character type that can accommodate such Unicode characters, and it is usually bigger than a char (1 byte). To tell the compiler that a string literal is a wide-string literal, you prefix it with an L:
const wchar_t* myString = L"Hello, World";Suppose you also have a function that takes in a wide string and returns a new string that contains a capitalized version of the input:
wchar_t* toCaps(const wchar_t* inString);You can capitalize myString by passing it into this function. However, if you only want to capitalize part of myString, you can use pointer arithmetic to refer to only a latter part of the string. The following code calls toCaps() on the World part of the wide string by just adding 7 to the pointer, even though wchar_t is usually more than 1 byte:
toCaps(myString + 7);Another useful application of pointer arithmetic involves subtraction. Subtracting one pointer from another of the same type gives you the number of elements of the pointed-to type between the two pointers, not the absolute number of bytes between them.
For 99 percent of the cases you will encounter (some might say 100 percent of the cases), the built-in memory allocation facilities in C++ are adequate. Behind the scenes, new and delete do all the work of handing out memory in properly sized chunks, maintaining a list of available areas of memory, and releasing chunks of memory back to that list upon deletion.
When resource constraints are extremely tight, or under very special conditions, such as managing shared memory, implementing custom memory management may be a viable option. Don’t worry—it’s not as scary as it sounds. Basically, managing memory yourself means that classes allocate a large chunk of memory and dole out that memory in pieces as it is needed.
How is this approach any better? Managing your own memory can potentially reduce overhead. When you use new to allocate memory, the program also needs to set aside a small amount of space to record how much memory was allocated. That way, when you call delete, the proper amount of memory can be released. For most objects, the overhead is so much smaller than the memory allocated that it makes little difference. However, for small objects or programs with enormous numbers of objects, the overhead can have an impact.
When you manage memory yourself, you might know the size of each object a priori, so you might be able to avoid the overhead for each object. The difference can be enormous for large numbers of small objects. The syntax for performing custom memory management is described in Chapter 15.
At the other end of the memory hygiene spectrum lies garbage collection. With environments that support garbage collection, the programmer rarely, if ever, explicitly frees memory associated with an object. Instead, objects to which there are no longer any references will be cleaned up automatically at some point by the runtime library.
Garbage collection is not built into the C++ language as it is in C# and Java. In modern C++, you use smart pointers to manage memory, while in legacy code you will see memory management at the object level through new and delete. Smart pointers such as shared_ptr (discussed later in this chapter) provide something very similar to garbage-collected memory, that is, when the last shared_ptr instance for a certain resource is destroyed, at that point in time the resource is destroyed as well. It is possible but not easy to implement true garbage collection in C++, but freeing yourself from the task of releasing memory would probably introduce new headaches.
One approach to garbage collection is called mark and sweep. With this approach, the garbage collector periodically examines every single pointer in your program and annotates the fact that the referenced memory is still in use. At the end of the cycle, any memory that hasn’t been marked is deemed to be not in-use and is freed.
A mark-and-sweep algorithm could be implemented in C++ if you were willing to do the following:
GarbageCollectible, that allows the garbage collector to mark an object as in-use.As you can see, this approach to garbage collection requires quite a bit of diligence on the part of the programmer. It may even be more error-prone than using delete! Attempts at a safe and easy mechanism for garbage collection have been made in C++, but even if a perfect implementation of garbage collection in C++ came along, it wouldn’t necessarily be appropriate to use for all applications. Among the downsides of garbage collection are the following:
Writing a garbage collection mechanism is very hard. You will undoubtedly do it wrong, it will be error prone, and more than likely slow. So, if you do want to use garbage-collected memory in your application, I highly recommend you to research existing specialized garbage-collection libraries that you can reuse. See Chapter 4 for a discussion on code reuse.
Garbage collection is like buying plates for a picnic and leaving any used plates out in the yard where the wind will conveniently blow them into the neighbor’s yard. Surely, there must be a more ecological approach to memory management.
Object pools are the equivalent of recycling. You buy a reasonable number of plates, and after using a plate, you clean it so that it can be reused later. Object pools are ideal for situations where you need to use many objects of the same type over time, and creating each one incurs overhead.
Chapter 25 contains further details on using object pools for performance efficiency.
Memory management in C++ is a perennial source of errors and bugs. Many of these bugs arise from the use of dynamic memory allocation and pointers. When you extensively use dynamic memory allocation in your program and pass many pointers between objects, it’s difficult to remember to call delete on each pointer exactly once and at the right time. The consequences of getting it wrong are severe: when you free dynamically allocated memory more than once, you can cause memory corruption or a fatal run-time error, and when you forget to free dynamically allocated memory, you cause memory leaks.
Smart pointers help you manage your dynamically allocated memory and are the recommended technique for avoiding memory leaks. Conceptually, a smart pointer can hold a dynamically allocated resource, such as memory. When a smart pointer goes out of scope or is reset, it can automatically free the resource it holds. Smart pointers can be used to manage dynamically allocated resources in the scope of a function, or as data members in classes. They can also be used to pass ownership of dynamically allocated resources through function arguments.
C++ provides several language features that make smart pointers attractive. First, you can write a type-safe smart pointer class for any pointer type using templates, see Chapter 12. Second, you can provide an interface to the smart pointer objects using operator overloading, see Chapter 15, that allows code to use the smart pointer objects as if they were dumb pointers. Specifically, you can overload the * and -> operators such that client code can dereference a smart pointer object the same way it dereferences a normal pointer.
There are several kinds of smart pointers. The simplest type of smart pointer takes sole/unique ownership of the resource, and when the smart pointer goes out of scope or is reset, it frees the referenced resource. The Standard Library provides std::unique_ptr which is a smart pointer with unique ownership semantics.
However, managing pointers presents more problems than just remembering to free them when they go out of scope. Sometimes several objects or pieces of code contain copies of the same pointer. This problem is called aliasing. In order to free all resources properly, the last piece of code to use the resource should free the resource pointed to by the pointer. However, it is sometimes difficult to know which piece of code uses the resource last. It may even be impossible to determine the order when you code because it might depend on run-time inputs. Thus, a more sophisticated type of smart pointer implements reference counting to keep track of its owners. Every time such a reference-counted smart pointer is copied, a new instance is created pointing to the same resource, and the reference count is incremented. When such a smart pointer instance goes out of scope or is reset, the reference count is decremented. When the reference count drops to zero, there are no owners of the resource anymore, so the smart pointer frees the resource. The Standard Library provides std::shared_ptr which is a smart pointer with shared ownership semantics using reference counting. The standard shared_ptr is thread-safe, but this does not mean that the pointed-to resource is thread-safe! See Chapter 23 for a discussion on multithreading.
Both standard smart pointers, unique_ptr and shared_ptr, are discussed in detail in the next sections. Both require you to include the <memory> header file.
As a rule of thumb, always store dynamically allocated resources in instances of unique_ptr.
Consider the following function that blatantly leaks memory by allocating a Simple object on the heap and neglecting to release it:
void leaky(){Simple* mySimplePtr = new Simple(); // BUG! Memory is never released!mySimplePtr->go();}
Sometimes you might think that your code is properly deallocating dynamically allocated memory. Unfortunately, it most likely is not correct in all situations. Take the following function:
void couldBeLeaky(){Simple* mySimplePtr = new Simple();mySimplePtr->go();delete mySimplePtr;}
This function dynamically allocates a Simple object, uses the object, and then properly calls delete. However, you can still have memory leaks in this example! If the go() method throws an exception, the call to delete is never executed, causing a memory leak.
In both cases you should use a unique_ptr. The object is not explicitly deleted; but when the unique_ptr instance goes out of scope (at the end of the function, or because an exception is thrown), it automatically deallocates the Simple object in its destructor:
void notLeaky(){auto mySimpleSmartPtr = make_unique<Simple>();mySimpleSmartPtr->go();}
This code uses make_unique() from C++14, in combination with the auto keyword, so that you only have to specify the type of the pointer, Simple in this case, once. If the Simple constructor requires parameters, you put them in between the parentheses of the make_unique() call.
If your compiler does not yet support make_unique(), you can create your unique_ptr as follows. Note that Simple must be mentioned twice:
unique_ptr<Simple> mySimpleSmartPtr(new Simple());Before C++17, you had to use make_unique() not only because you have to specify the type only once, but also because of safety reasons! Consider the following call to a function called foo():
foo(unique_ptr<Simple>(new Simple()), unique_ptr<Bar>(new Bar(data())));If the constructor of Simple or Bar, or the data() function, throws an exception, depending on your compiler optimizations, it was very possible that either a Simple or a Bar object would be leaked. With make_unique(), nothing would leak:
foo(make_unique<Simple>(), make_unique<Bar>(data()))With C++17, both calls to foo() are safe, but I still recommend using make_unique() as it results in code that is easier to read.
One of the greatest characteristics of the standard smart pointers is that they provide enormous benefit without requiring the user to learn a lot of new syntax. Smart pointers can still be dereferenced (using * or ->) just like standard pointers. For example, in the earlier example, the -> operator is used to call the go() method:
mySimpleSmartPtr->go();Just as with standard pointers, you can also write this as follows:
(*mySimpleSmartPtr).go();The get() method can be used to get direct access to the underlying pointer. This can be useful to pass the pointer to a function that requires a dumb pointer. For example, suppose you have the following function:
void processData(Simple* simple) { /* Use the simple pointer… */ }Then you can call it as follows:
auto mySimpleSmartPtr = make_unique<Simple>();processData(mySimpleSmartPtr.get());
You can free the underlying pointer of a unique_ptr and optionally change it to another pointer using reset(). For example:
mySimpleSmartPtr.reset(); // Free resource and set to nullptrmySimpleSmartPtr.reset(new Simple()); // Free resource and set to a new// Simple instance
You can disconnect the underlying pointer from a unique_ptr with release(). The release() method returns the underlying pointer to the resource and then sets the smart pointer to nullptr. Effectively, the smart pointer loses ownership of the resource, and as such, you become responsible for freeing the resource when you are done with it. For example:
Simple* simple = mySimpleSmartPtr.release(); // Release ownership// Use the simple pointer…delete simple;simple = nullptr;
Because a unique_ptr represents unique ownership, it cannot be copied! Using the std::move() utility (discussed in Chapter 9), it is possible to move one unique_ptr to another one using move semantics. This is used to explicitly move ownership, as in this example:
class Foo{public:Foo(unique_ptr<int> data) : mData(move(data)) { }private:unique_ptr<int> mData;};auto myIntSmartPtr = make_unique<int>(42);Foo f(move(myIntSmartPtr));
A unique_ptr is suitable to store a dynamically allocated old C-style array. The following example creates a unique_ptr that holds a dynamically allocated C-style array of ten integers:
auto myVariableSizedArray = make_unique<int[]>(10);Even though it is possible to use a unique_ptr to store a dynamically allocated C-style array, it’s recommended to use a Standard Library container instead, such as std::array or std::vector.
By default,unique_ptruses the standardnewanddeleteoperators to allocate and deallocate memory. You can change this behavior as follows:int* malloc_int(int value){int* p = (int*)malloc(sizeof(int));*p = value;return p;}int main(){unique_ptr<int, decltype(free)*> myIntSmartPtr(malloc_int(42), free);return 0;}
This code allocates memory for an integer with malloc_int(). The unique_ptr deallocates the memory by calling the standard free() function. As said before, in C++ you should never use malloc(), but new instead. However, this feature of unique_ptr is available because it is useful to manage other resources instead of just memory. For example, it can be used to automatically close a file or network socket or anything when the unique_ptr goes out of scope.
Unfortunately, the syntax for a custom deleter with unique_ptr is a bit clumsy. You need to specify the type of your custom deleter as a template type parameter. In this example, decltype(free) is used which returns the type of free(). The template type parameter should be the type of a pointer to a function, so an additional * is appended, as in decltype(free)*. Using a custom deleter with shared_ptr is much easier. The following section on shared_ptr demonstrates how to use a shared_ptr to automatically close a file when it goes out of scope.
You use shared_ptr in a similar way to unique_ptr. To create one, you use make_shared(), which is more efficient than creating a shared_ptr directly. Here’s an example:
auto mySimpleSmartPtr = make_shared<Simple>();Starting with C++17, a shared_ptr can also be used to store a pointer to a dynamically allocated old C-style array, just as you can do with a unique_ptr. This was not possible before C++17. However, even though it is now possible in C++17, it is still recommended to use Standard Library containers instead of C-style arrays.
A shared_ptr also supports the get() and reset() methods, just as a unique_ptr. The only difference is that when calling reset(), due to reference counting, the underlying resource is only freed when the last shared_ptr is destroyed or reset. Note that shared_ptr does not support release(). You can use use_count() to retrieve the number of shared_ptr instances that are sharing the same resource.
Just like unique_ptr, shared_ptr by default uses the standard new and delete operators to allocate and deallocate memory, or new[] and delete[] when storing a C-style array with C++17. You can change this behavior as follows:
// Implementation of malloc_int() as before.shared_ptr<int> myIntSmartPtr(malloc_int(42), free);
As you can see, you don’t have to specify the type of the custom deleter as a template type parameter, so this makes it much easier than a custom deleter with unique_ptr.
The following example uses a shared_ptr to store a file pointer. When the shared_ptr is reset (in this case when it goes out of scope), the file pointer is automatically closed with a call to CloseFile(). Note that C++ has proper object-oriented classes to work with files (see Chapter 13). Those classes already automatically close their files. This example using the old C functions fopen() and fclose() is just to give a demonstration of what shared_ptrs can be used for besides pure memory:
void CloseFile(FILE* filePtr){if (filePtr == nullptr)return;fclose(filePtr);cout << "File closed." << endl;}int main(){FILE* f = fopen("data.txt", "w");shared_ptr<FILE> filePtr(f, CloseFile);if (filePtr == nullptr) {cerr << "Error opening file." << endl;} else {cout << "File opened." << endl;// Use filePtr}return 0;}
The functions that are available to cast shared_ptrs are const_pointer_cast(), dynamic_pointer_cast(), and static_pointer_cast(). C++17 adds reinterpret_pointer_cast() to this list. These behave and work similar to the non-smart pointer casting functions const_cast(), dynamic_cast(), static_cast(), and reinterpret_cast(), which are discussed in detail in Chapter 11.
As a general concept, reference counting is a technique for keeping track of the number of instances of a class or particular object in use. A reference-counting smart pointer is one that keeps track of how many smart pointers have been built to refer to a single real pointer, or single object. This way, smart pointers can avoid double deletion.
The double deletion problem is easy to provoke. Consider again the Simple class introduced earlier in this chapter, which simply prints out messages when an object is created and destroyed. If you were to create two standard shared_ptrs and have them both refer to the same Simple object, as in the following code, both smart pointers would attempt to delete the same object when they are destroyed:
void doubleDelete(){Simple* mySimple = new Simple();shared_ptr<Simple> smartPtr1(mySimple);shared_ptr<Simple> smartPtr2(mySimple);}
Depending on your compiler, this piece of code might crash! If you do get output, it could be as follows:
Simple constructor called!Simple destructor called!Simple destructor called!
Yikes! One call to the constructor and two calls to the destructor? You get the same problem with unique_ptr. You might be surprised that even the reference-counted shared_ptr class behaves this way. However, this is correct behavior according to the C++ standard. You should not use shared_ptr as in the previous doubleDelete() function to create two shared_ptrs pointing to the same object. Instead, you should make a copy as follows:
void noDoubleDelete(){auto smartPtr1 = make_shared<Simple>();shared_ptr<Simple> smartPtr2(smartPtr1);}
Here is the output of this code:
Simple constructor called!Simple destructor called!
Even though there are two shared_ptrs pointing to the same Simple object, the Simple object is destroyed only once. Remember that unique_ptr is not reference counted. In fact, unique_ptr does not allow you to use its copy constructor as in the noDoubleDelete() function.
If you really need to be able to write code as shown in the previous doubleDelete() function example, you will need to implement your own smart pointer to prevent double deletion. But again, it is recommended to use the standard shared_ptr template for sharing a resource. Simply avoid code like that in the doubleDelete() function, and use the copy constructor instead.
A shared_ptr support so-called aliasing. This allows a shared_ptr to share ownership over a pointer (owned pointer) with another shared_ptr, but pointing to a different object (stored pointer). It can, for example, be used to have a shared_ptr pointing to a member of an object while owning the object itself. Here’s an example:
class Foo{public:Foo(int value) : mData(value) { }int mData;};auto foo = make_shared<Foo>(42);auto aliasing = shared_ptr<int>(foo, &foo->mData);
The Foo object is only destroyed when both shared_ptrs (foo and aliasing) are destroyed.
The owned pointer is used for reference counting, while the stored pointer is returned when you dereference the pointer or when you call get() on it. The stored pointer is used with most operations, such as the comparison operators. You can use the owner_before() method, or the std::owner_less class to perform comparisons based on the owned pointer instead. This can be useful in certain situations, such as storing shared_ptrs in an std::set. Chapter 17 discusses the set container in detail.
There is one more class in C++ that is related to shared_ptr, called weak_ptr. A weak_ptr can contain a reference to a resource managed by a shared_ptr. The weak_ptr does not own the resource, so the shared_ptr is not prevented from deallocating the resource. A weak_ptr does not destroy the pointed-to resource when the weak_ptr is destroyed (for example when it goes out of scope); however, it can be used to determine if the resource has been freed by the associated shared_ptr or not. The constructor of a weak_ptr requires a shared_ptr or another weak_ptr as argument. To get access to the pointer stored in a weak_ptr, you need to convert it to a shared_ptr. There are two ways to do this:
lock() method on a weak_ptr instance, which returns a shared_ptr. The returned shared_ptr is nullptr if the shared_ptr associated with the weak_ptr has been deallocated in the meantime.shared_ptr instance and give a weak_ptr as argument to the shared_ptr constructor. This throws an std::bad_weak_ptr exception if the shared_ptr associated with the weak_ptr has been deallocated.The following example demonstrates the use of weak_ptr:
void useResource(weak_ptr<Simple>& weakSimple){auto resource = weakSimple.lock();if (resource) {cout << "Resource still alive." << endl;} else {cout << "Resource has been freed!" << endl;}}int main(){auto sharedSimple = make_shared<Simple>();weak_ptr<Simple> weakSimple(sharedSimple);// Try to use the weak_ptr.useResource(weakSimple);// Reset the shared_ptr.// Since there is only 1 shared_ptr to the Simple resource, this will// free the resource, even though there is still a weak_ptr alive.sharedSimple.reset();// Try to use the weak_ptr a second time.useResource(weakSimple);return 0;}
The output of this code is as follows:
Simple constructor called!Resource still alive.Simple destructor called!Resource has been freed!
Starting with C++17, weak_ptr also supports C-style arrays, just as shared_ptr supports C-style arrays since C++17.
The standard smart pointers, shared_ptr, unique_ptr, and weak_ptr all support move semantics to make them efficient. Move semantics is discussed in detail in Chapter 9; however, the details are not important at this time. What is important is that this means it is very efficient to return such a smart pointer from a function. For example, you can write the following create() function and use it as demonstrated in main():
unique_ptr<Simple> create(){auto ptr = make_unique<Simple>();// Do something with ptr…return ptr;}int main(){unique_ptr<Simple> mySmartPtr1 = create();auto mySmartPtr2 = create();return 0;}
The std::enable_shared_from_this mixin class allows a method on an object to safely return a shared_ptr or weak_ptr to itself. Mixin classes are discussed in Chapter 28. Basically, the enable_shared_from_this mixin class adds the following two methods to a class:
shared_from_this(): returns a shared_ptr that shares ownership of the object.weak_from_this(): returns a weak_ptr that tracks ownership of the object.This is an advanced feature not discussed in detail, but the following code briefly demonstrates its use:
class Foo : public enable_shared_from_this<Foo>{public:shared_ptr<Foo> getPointer() {return shared_from_this();}};int main(){auto ptr1 = make_shared<Foo>();auto ptr2 = ptr1->getPointer();}
Note that you can only use shared_from_this() on an object if its pointer has already been stored in a shared_ptr. In the example, make_shared() is used in main() to create a shared_ptr called ptr1 which contains an instance of Foo. After this shared_ptr creation, it is allowed to call shared_from_this() on that Foo instance.
The following would be a completely wrong implementation of the getPointer() method:
class Foo{public:shared_ptr<Foo> getPointer() {return shared_ptr<Foo>(this);}};
If you use the same code for main() as shown earlier, this implementation of Foo causes a double deletion. You have two completely independent shared_ptrs (ptr1 and ptr2) pointing to the same object, which will both try to delete the object when they go out of scope.
The old, pre-C++11 Standard Library included a basic implementation of a smart pointer, called auto_ptr. Unfortunately, auto_ptr has some serious shortcomings. One of these shortcomings is that it does not work correctly when used inside Standard Library containers such as vectors. C++11 and C++14 officially deprecated auto_ptr, and C++17 finally removed it entirely. It has been replaced with unique_ptr and shared_ptr. auto_ptr is mentioned here to make sure you know about it and to make sure you never use it.
It is difficult to pinpoint the exact situations that can lead to a memory-related bug. Every memory leak or bad pointer has its own nuances. There is no magic bullet for resolving memory issues, but there are several common categories of problems and some tools you can use to detect and resolve them.
The most common problem with C-style strings is underallocation. In most cases, this arises when the programmer fails to allocate an extra character for the trailing '\0' sentinel. Underallocation of strings also occurs when programmers assume a certain fixed maximum size. The basic built-in C-style string functions do not adhere to a fixed size—they will happily write off the end of the string into uncharted memory.
The following code demonstrates underallocation. It reads data off a network connection and puts it in a C-style string. This is done in a loop because the network connection receives only a small amount of data at a time. On each loop, getMoreData() is called, which returns a pointer to dynamically allocated memory. When nullptr is returned from getMoreData(), all of the data has been received. strcat() is a C function that concatenates the C-style string given as a second argument to the end of the C-style string given as a first argument. It expects the destination buffer to be big enough.
char buffer[1024] = {0}; // Allocate a whole bunch of memory.while (true) {char* nextChunk = getMoreData();if (nextChunk == nullptr) {break;} else {strcat(buffer, nextChunk); // BUG! No guarantees against buffer overrun!delete [] nextChunk;}}
There are three ways to resolve the possible underallocation problem. In decreasing order of preference, they are as follows:
getMoreData() that takes a maximum count (including the '\0' character) and returns no more characters than that; then track the amount of space left and the current position in the buffer.Earlier in this chapter, you read that because a pointer is just a memory address, it is possible to have a pointer that points to a random location in memory. Such a condition is quite easy to fall into. For example, consider a C-style string that has somehow lost its '\0' termination character. The following function, which fills the string with all 'm' characters, continues to fill the contents of memory after the string with 'm's:
void fillWithM(char* inStr){int i = 0;while (inStr[i] != '\0') {inStr[i] = 'm';i++;}}
If an improperly terminated string is handed to this function, it is only a matter of time before an essential part of memory is overwritten and the program crashes. Consider what might happen if the memory associated with the objects in your program is suddenly overwritten with 'm's. It’s not pretty!
Bugs that result in writing to memory past the end of an array are often called buffer overflow errors. These bugs have been exploited by several high-profile malware programs such as viruses and worms. A devious hacker can take advantage of the ability to overwrite portions of memory to inject code into a running program.
Many memory-checking tools detect buffer overflows. Also, using higher-level constructs like C++ strings and vectors helps prevent numerous bugs associated with writing to C-style strings and arrays.
Finding and fixing memory leaks can be one of the more frustrating parts of programming in C or C++. Your program finally works and appears to give the correct results. Then, you start to notice that your program gobbles up more and more memory as it runs. Your program has a memory leak. The use of smart pointers to avoid memory leaks is a good first approach to solving the problem.
Memory leaks occur when you allocate memory and neglect to release it. At first, this sounds like the result of careless programming that could easily be avoided. After all, if every new has a corresponding delete in every class you write, there should be no memory leaks, right? Actually, that’s not always true. In the following code, the Simple class is properly written to release any memory that it allocates.
When doSomething() is called, the outSimplePtr pointer is changed to another Simple object without deleting the old one to demonstrate a memory leak. Once you lose a pointer to an object, it’s nearly impossible to delete it.
class Simple{public:Simple() { mIntPtr = new int(); }~Simple() { delete mIntPtr; }void setValue(int value) { *mIntPtr = value; }private:int* mIntPtr;};void doSomething(Simple*& outSimplePtr){outSimplePtr = new Simple(); // BUG! Doesn't delete the original.}int main(){Simple* simplePtr = new Simple(); // Allocate a Simple object.doSomething(simplePtr);delete simplePtr; // Only cleans up the second object.return 0;}
In cases like the preceding example, the memory leak probably arose from poor communication between programmers or poor documentation of code. The caller of doSomething() may not have realized that the variable was passed by reference and thus had no reason to expect that the pointer would be reassigned. If they did notice that the parameter was a non-const reference to a pointer, they may have suspected that something strange was happening, but there is no comment around doSomething() that explains this behavior.
Memory leaks are hard to track down because you can’t easily look at memory and see what objects are not in use and where they were originally allocated. However, there are programs that can do this for you. Memory leak detection tools range from expensive professional software packages to free downloadable tools. If you work with Microsoft Visual C++*, its debug library has built-in support for memory leak detection. This memory leak detection is not enabled by default, unless you create an MFC project. To enable it in other projects, you need to start by including the following three lines at the beginning of your code:
#define _CRTDBG_MAP_ALLOC#include <cstdlib>#include <crtdbg.h>
These lines should be in the exact order as shown. Next, you need to redefine the new operator as follows:
#ifdef _DEBUG#ifndef DBG_NEW#define DBG_NEW new ( _NORMAL_BLOCK , __FILE__ , __LINE__ )#define new DBG_NEW#endif#endif // _DEBUG
Note that this is within an “#ifdef _DEBUG” statement so the redefinition of new is done only when compiling a debug version of your application. This is what you normally want. Release builds usually do not do any memory leak detection.
The last thing you need to do is to add the following line as the first line in your main() function:
_CrtSetDbgFlag(_CRTDBG_ALLOC_MEM_DF | _CRTDBG_LEAK_CHECK_DF);This tells the Visual C++ CRT (C RunTime) library to write all detected memory leaks to the debug output console when the application exits. For the previous leaky program, the debug console will contain lines similar to the following:
Detected memory leaks!Dumping objects ->c:\leaky\leaky.cpp(15) : {147} normal block at 0x014FABF8, 4 bytes long.Data: < > 00 00 00 00c:\leaky\leaky.cpp(33) : {146} normal block at 0x014F5048, 4 bytes long.Data: <Pa > 50 61 20 01Object dump complete.
The output clearly shows in which file and on which line memory was allocated but never deallocated. The line number is between parentheses immediately behind the filename. The number between the curly braces is a counter for the memory allocations. For example, {147} means the 147th allocation in your program since it started. You can use the VC++ _CrtSetBreakAlloc() function to tell the VC++ debug runtime to break into the debugger when a certain allocation is performed. For example, you can add the following line to the beginning of your main() function to instruct the debugger to break on the 147th allocation:
_CrtSetBreakAlloc(147);In this leaky program, there are two leaks: the first Simple object that is never deleted (line 33) and the heap-based integer that it creates (line 15). In the Visual C++ debugger output window, you can simply double-click on one of the memory leaks and it will automatically jump to that line in your code.
Of course, programs like Microsoft Visual C++ (discussed in this section) and Valgrind (discussed in the next section) can’t actually fix the leak for you—what fun would that be? These tools provide information that you can use to find the actual problem. Normally, that involves stepping through the code to find out where the pointer to an object was overwritten without the original object being released. Most debuggers provide “watch point” functionality that can break execution of the program when this occurs.
Valgrind is an example of a free open-source tool for Linux that, among other things, pinpoints the exact line in your code where a leaked object was allocated.
The following output, generated by running Valgrind on the previous leaky program, pinpoints the exact locations where memory was allocated but never released. Valgrind finds the same two memory leaks—the first Simple object never deleted and the heap-based integer that it creates:
==15606== ERROR SUMMARY: 0 errors from 0 contexts (suppressed: 0 from 0)==15606== malloc/free: in use at exit: 8 bytes in 2 blocks.==15606== malloc/free: 4 allocs, 2 frees, 16 bytes allocated.==15606== For counts of detected errors, rerun with: -v==15606== searching for pointers to 2 not-freed blocks.==15606== checked 4455600 bytes.==15606====15606== 4 bytes in 1 blocks are still reachable in loss record 1 of 2==15606== at 0x4002978F: __builtin_new (vg_replace_malloc.c:172)==15606== by 0x400297E6: operator new(unsigned) (vg_replace_malloc.c:185)==15606== by 0x804875B: Simple::Simple() (leaky.cpp:4)==15606== by 0x8048648: main (leaky.cpp:24)==15606====15606====15606== 4 bytes in 1 blocks are definitely lost in loss record 2 of 2==15606== at 0x4002978F: __builtin_new (vg_replace_malloc.c:172)==15606== by 0x400297E6: operator new(unsigned) (vg_replace_malloc.c:185)==15606== by 0x8048633: main (leaky.cpp:20)==15606== by 0x4031FA46: __libc_start_main (in /lib/libc-2.3.2.so)==15606====15606== LEAK SUMMARY:==15606== definitely lost: 4 bytes in 1 blocks.==15606== possibly lost: 0 bytes in 0 blocks.==15606== still reachable: 4 bytes in 1 blocks.==15606== suppressed: 0 bytes in 0 blocks.
Once you release memory associated with a pointer using delete, the memory is available for use by other parts of your program. Nothing stops you, however, from attempting to continue to use the pointer, which is now a dangling pointer. Double deletion is also a problem. If you use delete a second time on a pointer, the program could be releasing memory that has since been assigned to another object.
Double deletion and use of already released memory are both difficult problems to track down because the symptoms may not show up immediately. If two deletions occur within a relatively short amount of time, the program potentially could work indefinitely because the associated memory might not be reused that quickly. Similarly, if a deleted object is used immediately after being deleted, most likely it will still be intact.
Of course, there is no guarantee that such behavior will work or continue to work. The memory allocator is under no obligation to preserve any object once it has been deleted. Even if it does work, it is extremely poor programming style to use objects that have been deleted.
Many memory leak-detection programs, such as Microsoft Visual C++ and Valgrind, are capable of detecting double deletion and use of released objects.
If you disregard the recommendation for using smart pointers and instead still use dumb pointers, at least set your pointers to nullptr after deallocating their memory. This prevents you from accidentally deleting the same pointer twice or using an invalid pointer. It’s worth noting that you are allowed to call delete on a nullptr pointer; it simply will not do anything.
In this chapter, you learned the ins and outs of dynamic memory. Aside from memory-checking tools and careful coding, there are two key takeaways to avoid dynamic memory-related problems. First, you need to understand how pointers work under the hood. After reading about two different mental models for pointers, you should now know how the compiler doles out memory. Second, you can avoid all sorts of dynamic memory issues by using objects which automatically manage such memory, like the C++ string class, the vector container, smart pointers, and so on.
If there is one takeaway from this chapter, it is that you should try to avoid using old C-style constructs and functions as much as possible, and use the safe C++ alternatives.
Both this chapter and the next present a runnable example of a simple spreadsheet application. A spreadsheet is a two-dimensional grid of “cells,” and each cell contains a number or a string. Professional spreadsheets such as Microsoft Excel provide the ability to perform mathematical operations, such as calculating the sum of the values of a set of cells. The spreadsheet example in these chapters does not attempt to challenge Microsoft in the marketplace, but is useful for illustrating the issues of classes and objects.
The spreadsheet application uses two basic classes: Spreadsheet and SpreadsheetCell. Each Spreadsheet object contains SpreadsheetCell objects. In addition, a SpreadsheetApplication class manages a collection of Spreadsheets. This chapter focuses on the SpreadsheetCell. Chapter 9 develops the Spreadsheet and SpreadsheetApplication classes.
When you write a class, you specify the behaviors, or methods, that will apply to objects of that class and the properties, or data members, that each object will contain.
There are two components in the process of writing classes: defining the classes themselves and defining their methods.
Here is a first attempt at a simple SpreadsheetCell class, in which each cell can store only a single number:
class SpreadsheetCell{public:void setValue(double inValue);double getValue() const;private:double mValue;};
As described in Chapter 1, every class definition begins with the keyword class and the name of the class. A class definition is a statement in C++, so it must end with a semicolon. If you fail to terminate your class definition with a semicolon, your compiler will probably give you several errors, most of which will appear to be completely unrelated.
Class definitions usually go in a file named after the class. For example, the SpreadsheetCell class definition can be put in a file called SpreadsheetCell.h. This rule is not enforced and you are free to name your file whatever you like.
A class can have a number of members. A member can be a member function (which in turn is a method, constructor, or destructor), a member variable, also called a data member, member enumerations, type aliases, nested classes, and so on.
The two lines that look like function prototypes declare the methods that this class supports:
void setValue(double inValue);double getValue() const;
Chapter 1 points out that it is always a good idea to declare member functions that do not change the object as const.
The line that looks like a variable declaration declares the data member for this class.
double mValue;A class defines the member functions and data members that apply. They apply only to a specific instance of the class, which is an object. The only exceptions to this rule are static members, which are explained in Chapter 9. Classes define concepts; objects contain real bits. So, each object contains its own value for the mValue variable. The implementation of the member functions is shared across all objects. Classes can contain any number of member functions and data members. You cannot give a data member the same name as a member function.
Every member in a class is subject to one of three access specifiers: public, protected, or private. An access specifier applies to all member declarations that follow it, until the next access specifier. In the SpreadsheetCell class, the setValue() and getValue() methods have public access, while the mValue data member has private access.
The default access specifier for classes is private: all member declarations before the first access specifier have the private access specification. For example, moving the public access specifier below the setValue() method declaration gives the setValue() method private access instead of public:
class SpreadsheetCell{void setValue(double inValue);// now has private accesspublic:double getValue() const;private:double mValue;};
In C++, a struct can have methods just like a class. In fact, the only difference is that the default access specifier for a struct is public while the default for a class is private. For example, the SpreadsheetCell class can be rewritten using a struct as follows:
struct SpreadsheetCell{void setValue(double inValue);double getValue() const;private:double mValue;};
It’s custom to use a struct instead of a class if you only need a collection of publicly accessible data members and no or very few methods. An example of such a simple struct is a structure to store point coordinates:
struct Point{double x;double y;};
The following table summarizes the meanings of the three access specifiers:
| ACCESS SPECIFICATION | MEANING | WHEN TO USE |
public |
Any code can call a public member function or access a public data member of an object. |
Behaviors (methods) that you want clients to use Access methods (getters and setters) for private and protected data members
|
protected |
Any member function of the class can call protected member functions and access protected data members. Member functions of a derived class can access protected members of a base class. |
“Helper” methods that you do not want clients to use |
private |
Only member functions of the class can call private member functions and access private data members. Member functions in derived classes cannot access private members from a base class. |
Everything should be private by default, especially data members. You can provide protected getters and setters if you only want to allow derived classes to access them, and provide public getters and setters if you want clients to access them. |
You can declare your members and access control specifiers in any order: C++ does not impose any restrictions, such as member functions before data members or public before private. Additionally, you can repeat access specifiers. For example, the SpreadsheetCell definition could look like this:
class SpreadsheetCell{public:void setValue(double inValue);private:double mValue;public:double getValue() const;};
However, for clarity it is a good idea to group public, protected, and private declarations, and to group member functions and data members within those declarations.
Member variables can be initialized directly in the class definition. For example, the SpreadsheetCell class can, by default, initialize mValue to 0 directly in the class definition as follows:
class SpreadsheetCell{// Remainder of the class definition omitted for brevityprivate:double mValue = 0;};
The preceding definition for the SpreadsheetCell class is enough for you to create objects of the class. However, if you try to call the setValue() or getValue() methods, your linker will complain that those methods are not defined. That’s because the class definition specifies the prototypes for the methods, but does not define their implementations. Just as you write both a prototype and a definition for a stand-alone function, you must write a prototype and a definition for a method. Note that the class definition must precede the method definitions. Usually the class definition goes in a header file, and the method definitions go in a source file that #includes that header file. Here are the definitions for the two methods of the SpreadsheetCell class:
#include "SpreadsheetCell.h"void SpreadsheetCell::setValue(double inValue){mValue = inValue;}double SpreadsheetCell::getValue() const{return mValue;}
Note that the name of the class followed by two colons precedes each method name:
void SpreadsheetCell::setValue(double inValue)The :: is called the scope resolution operator. In this context, the syntax tells the compiler that the coming definition of the setValue() method is part of the SpreadsheetCell class. Note also that you do not repeat the access specification when you define the method.
Non-static methods of a class, such as setValue() and getValue(), are always executed on behalf of a specific object of that class. Inside a method body, you have access to all data members of the class for that object. In the previous definition for setValue(), the following line changes the mValue variable inside whatever object calls the method:
mValue = inValue;If setValue() is called for two different objects, the same line of code (executed once for each object) changes the variable in two different objects.
You can call methods of a class from inside another method. For example, consider an extension to the SpreadsheetCell class. Real spreadsheet applications allow text data as well as numbers in the cells. When you try to interpret a text cell as a number, the spreadsheet tries to convert the text to a number. If the text does not represent a valid number, the cell value is ignored. In this program, strings that are not numbers will generate a cell value of 0. Here is a first stab at a class definition for a SpreadsheetCell that supports text data:
#include <string>#include <string_view>class SpreadsheetCell{public:void setValue(double inValue);double getValue() const;void setString(std::string_view inString);std::string getString() const;private:std::string doubleToString(double inValue) const;double stringToDouble(std::string_view inString) const;double mValue;};
This version of the class stores the data only as a double. If the client sets the data as a string, it is converted to a double. If the text is not a valid number, the double value is set to 0.0. The class definition shows two new methods to set and retrieve the text representation of the cell, and two new private helper methods to convert a double to a string and vice versa. Here are the implementations of all the methods:
#include "SpreadsheetCell.h"using namespace std;void SpreadsheetCell::setValue(double inValue){mValue = inValue;}double SpreadsheetCell::getValue() const{return mValue;}void SpreadsheetCell::setString(string_view inString){mValue = stringToDouble(inString);}string SpreadsheetCell::getString() const{return doubleToString(mValue);}string SpreadsheetCell::doubleToString(double inValue) const{return to_string(inValue);}double SpreadsheetCell::stringToDouble(string_view inString) const{return strtod(inString.data(), nullptr);}
Note that with this implementation of the doubleToString() method, a value of, for example, 6.1 is converted to “6.100000”. However, because it is a private helper method, you are free to modify the implementation without having to modify any client code.
Every normal method call passes a pointer to the object for which it is called as a “hidden” parameter with the name this. You can use this pointer to access data members or call methods, and you can pass it to other methods or functions. It is sometimes also useful for disambiguating names. For example, you could have defined the SpreadsheetCell class with a value data member instead of mValue and you could have defined the setValue() method to take a parameter named value instead of inValue. In that case, setValue() would look like this:
void SpreadsheetCell::setValue(double value){value = value;// Ambiguous!}
That line is confusing. Which value do you mean: the value that was passed as a parameter, or the value that is a member of the object?
In order to disambiguate the names, you can use the this pointer:
void SpreadsheetCell::setValue(double value){this->value = value;}
However, if you use the naming conventions described in Chapter 3, you will never encounter this type of name collision.
You can also use the this pointer to call a function or method that takes a pointer to an object from within a method of that object. For example, suppose you write a printCell() stand-alone function (not method) like this:
void printCell(const SpreadsheetCell& cell){cout << cell.getString() << endl;}
If you want to call printCell() from the setValue() method, you must pass *this as the argument to give printCell() a reference to the SpreadsheetCell on which setValue() operates:
void SpreadsheetCell::setValue(double value){this->value = value;printCell(*this);}
The previous class definition says that a SpreadsheetCell consists of one data member, four public methods, and two private methods. However, the class definition does not actually create any SpreadsheetCells; it just specifies their shape and behavior. In that sense, a class is similar to architectural blueprints. The blueprints specify what a house should look like, but drawing the blueprints doesn’t build any houses. Houses must be constructed later based on the blueprints.
Similarly, in C++ you can construct a SpreadsheetCell “object” from the SpreadsheetCell class definition by declaring a variable of type SpreadsheetCell. Just as a builder can build more than one house based on a given set of blueprints, a programmer can create more than one SpreadsheetCell object from a SpreadsheetCell class. There are two ways to create and use objects: on the stack and on the heap.
Here is some code that creates and uses SpreadsheetCell objects on the stack:
SpreadsheetCell myCell, anotherCell;myCell.setValue(6);anotherCell.setString("3.2");cout << "cell 1: " << myCell.getValue() << endl;cout << "cell 2: " << anotherCell.getValue() << endl;
You create objects just as you declare simple variables, except that the variable type is the class name. The . in lines like myCell.setValue(6); is called the “dot” operator; it allows you to call methods on the object. If there were any public data members in the object, you could access them with the dot operator as well. Remember that public data members are not recommended.
The output of the program is as follows:
cell 1: 6cell 2: 3.2
You can also dynamically allocate objects by using new:
SpreadsheetCell* myCellp = new SpreadsheetCell();myCellp->setValue(3.7);cout << "cell 1: " << myCellp->getValue() <<" " << myCellp->getString() << endl;delete myCellp;myCellp = nullptr;
When you create an object on the heap, you access its members through the “arrow” operator: ->. The arrow combines dereferencing (*) and member access (.). You could use those two operators instead, but doing so would be stylistically awkward:
SpreadsheetCell* myCellp = new SpreadsheetCell();(*myCellp).setValue(3.7);cout << "cell 1: " << (*myCellp).getValue() <<" " << (*myCellp).getString() << endl;delete myCellp;myCellp = nullptr;
Just as you must free other memory that you allocate on the heap, you must free the memory for objects that you allocate on the heap by calling delete on the objects. To guarantee safety and to avoid memory problems, you should use smart pointers, as in the following example:
auto myCellp = make_unique<SpreadsheetCell>();// Equivalent to:// unique_ptr<SpreadsheetCell> myCellp(new SpreadsheetCell());myCellp->setValue(3.7);cout << "cell 1: " << myCellp->getValue() <<" " << myCellp->getString() << endl;
With smart pointers you don’t need to manually free the memory; it happens automatically.
The object life cycle involves three activities: creation, destruction, and assignment. It is important to understand how and when objects are created, destroyed, and assigned, and how you can customize these behaviors.
Objects are created at the point you declare them (if they’re on the stack) or when you explicitly allocate space for them with new, new[], or a smart pointer. When an object is created, all its embedded objects are also created. Here is an example:
#include <string>class MyClass{private:std::string mName;};int main(){MyClass obj;return 0;}
The embedded string object is created at the point where the MyClass object is created in the main() function and is destructed when its containing object is destructed.
It is often helpful to give variables initial values as you declare them, as in this example:
int x = 0;Similarly, you should give initial values to objects. You can provide this functionality by declaring and writing a special method called a constructor, in which you can perform initialization work for the object. Whenever an object is created, one of its constructors is executed.
Syntactically, a constructor is specified by a method name that is the same as the class name. A constructor never has a return type and may or may not have parameters. A constructor that can be called without any arguments is called a default constructor. This can be a constructor that does not have any parameters, or a constructor for which all parameters have default values. There are certain contexts in which you may have to provide a default constructor and you will get compilation errors if you have not provided one. Default constructors are discussed later in this chapter.
Here is a first attempt at adding a constructor to the SpreadsheetCell class:
class SpreadsheetCell{public:SpreadsheetCell(double initialValue);// Remainder of the class definition omitted for brevity};
Just as you must provide implementations for normal methods, you must provide an implementation for the constructor:
SpreadsheetCell::SpreadsheetCell(double initialValue){setValue(initialValue);}
The SpreadsheetCell constructor is a member of the SpreadsheetCell class, so C++ requires the normal SpreadsheetCell:: scope resolution before the constructor name. The constructor name itself is also SpreadsheetCell, so the code ends up with the funny-looking SpreadsheetCell::SpreadsheetCell. The implementation simply makes a call to setValue().
Using the constructor creates an object and initializes its values. You can use constructors with both stack-based and heap-based allocation.
When you allocate a SpreadsheetCell object on the stack, you use the constructor like this:
SpreadsheetCell myCell(5), anotherCell(4);cout << "cell 1: " << myCell.getValue() << endl;cout << "cell 2: " << anotherCell.getValue() << endl;
Note that you do not call the SpreadsheetCell constructor explicitly. For example, do not use something like the following:
SpreadsheetCell myCell.SpreadsheetCell(5); // WILL NOT COMPILE!Similarly, you cannot call the constructor later. The following is also incorrect:
SpreadsheetCell myCell;myCell.SpreadsheetCell(5); // WILL NOT COMPILE!
When you dynamically allocate a SpreadsheetCell object, you use the constructor like this:
auto smartCellp = make_unique<SpreadsheetCell>(4);// … do something with the cell, no need to delete the smart pointer// Or with raw pointers, without smart pointers (not recommended)SpreadsheetCell* myCellp = new SpreadsheetCell(5);SpreadsheetCell* anotherCellp = nullptr;anotherCellp = new SpreadsheetCell(4);// … do something with the cellsdelete myCellp; myCellp = nullptr;delete anotherCellp; anotherCellp = nullptr;
Note that you can declare a pointer to a SpreadsheetCell object without calling the constructor immediately, which is different from objects on the stack, where the constructor is called at the point of declaration.
If you declare a pointer on the stack in a function, or declare a pointer as a data member in a class, and you don’t immediately initialize the pointer, then it should be initialized to nullptr as in the previous declaration for anotherCellp. If you don’t assign it to nullptr, the pointer is undefined. Accidentally using an undefined pointer will cause unexpected and difficult-to-diagnose memory corruption. If you initialize it to nullptr, using that pointer will cause a memory access error in most operating environments, instead of producing unexpected results.
Remember to call delete on objects that you dynamically allocate with new, or use smart pointers!
You can provide more than one constructor in a class. All constructors have the same name (the name of the class), but different constructors must take a different number of arguments or different argument types. In C++, if you have more than one function with the same name, the compiler selects the one whose parameter types match the types at the call site. This is called overloading and is discussed in detail in Chapter 9.
In the SpreadsheetCell class, it is helpful to have two constructors: one to take an initial double value and one to take an initial string value. Here is the new class definition:
class SpreadsheetCell{public:SpreadsheetCell(double initialValue);SpreadsheetCell(std::string_view initialValue);// Remainder of the class definition omitted for brevity};
Here is the implementation of the second constructor:
SpreadsheetCell::SpreadsheetCell(string_view initialValue){setString(initialValue);}
And here is some code that uses the two different constructors:
SpreadsheetCell aThirdCell("test"); // Uses string-arg ctorSpreadsheetCell aFourthCell(4.4); // Uses double-arg ctorauto aFifthCellp = make_unique<SpreadsheetCell>("5.5"); // string-arg ctorcout << "aThirdCell: " << aThirdCell.getValue() << endl;cout << "aFourthCell: " << aFourthCell.getValue() << endl;cout << "aFifthCellp: " << aFifthCellp->getValue() << endl;
When you have multiple constructors, it is tempting to try to implement one constructor in terms of another. For example, you might want to call the double constructor from the string constructor as follows:
SpreadsheetCell::SpreadsheetCell(string_view initialValue){SpreadsheetCell(stringToDouble(initialValue));}
That seems to make sense. After all, you can call normal class methods from within other methods. The code will compile, link, and run, but will not do what you expect. The explicit call to the SpreadsheetCell constructor actually creates a new temporary unnamed object of type SpreadsheetCell. It does not call the constructor for the object that you are supposed to be initializing.
However, C++ supports delegating constructors that allow you to call other constructors from the same class from inside the ctor-initializer. This is discussed later in this chapter.
A default constructor is a constructor that requires no arguments. It is also called a 0-argument constructor. With a default constructor, you can give initial values to data members even though the client did not specify them.
Consider arrays of objects. The act of creating an array of objects accomplishes two tasks: it allocates contiguous memory space for all the objects and it calls the default constructor on each object. C++ fails to provide any syntax to tell the array creation code directly to call a different constructor. For example, if you do not define a default constructor for the SpreadsheetCell class, the following code does not compile:
SpreadsheetCell cells[3]; // FAILS compilation without default constructorSpreadsheetCell* myCellp = new SpreadsheetCell[10]; // Also FAILS
You can circumvent this restriction for stack-based arrays by using initializers like these:
SpreadsheetCell cells[3] = {SpreadsheetCell(0), SpreadsheetCell(23),SpreadsheetCell(41)};
However, it is usually easier to ensure that your class has a default constructor if you intend to create arrays of objects of that class. If you haven’t defined your own constructors, the compiler automatically creates a default constructor for you. This compiler-generated constructor is discussed in a later section.
A default constructor is also required for classes that you want to store in Standard Library containers, such as std::vector.
Default constructors are also useful when you want to create objects of that class inside other classes, which is shown later in this chapter in the section, “Constructor Initializers.”
Here is part of the SpreadsheetCell class definition with a default constructor:
class SpreadsheetCell{public:SpreadsheetCell();// Remainder of the class definition omitted for brevity};
Here is a first crack at an implementation of the default constructor:
SpreadsheetCell::SpreadsheetCell(){mValue = 0;}
If you use an in-class member initializer for mValue, then the single statement in this default constructor can be left out:
SpreadsheetCell::SpreadsheetCell(){}
You use the default constructor on the stack like this:
SpreadsheetCell myCell;myCell.setValue(6);cout << "cell 1: " << myCell.getValue() << endl;
The preceding code creates a new SpreadsheetCell called myCell, sets its value, and prints out its value. Unlike other constructors for stack-based objects, you do not call the default constructor with function-call syntax. Based on the syntax for other constructors, you might be tempted to call the default constructor like this:
SpreadsheetCell myCell();// WRONG, but will compile.myCell.setValue(6); // However, this line will not compile.cout << "cell 1: " << myCell.getValue() << endl;
Unfortunately, the line attempting to call the default constructor compiles. The line following it does not compile. This problem is commonly known as the most vexing parse, and it means that your compiler thinks the first line is actually a function declaration for a function with the name myCell that takes zero arguments and returns a SpreadsheetCell object. When it gets to the second line, it thinks that you’re trying to use a function name as an object!
For heap-based object allocation, the default constructor can be used as follows:
auto smartCellp = make_unique<SpreadsheetCell>();// Or with a raw pointer (not recommended)SpreadsheetCell* myCellp = new SpreadsheetCell();// Or// SpreadsheetCell* myCellp = new SpreadsheetCell;// … use myCellpdelete myCellp; myCellp = nullptr;
The first SpreadsheetCell class definition in this chapter looked like this:
class SpreadsheetCell{public:void setValue(double inValue);double getValue() const;private:double mValue;};
This definition does not declare a default constructor, but still, the code that follows works fine:
SpreadsheetCell myCell;myCell.setValue(6);
The following definition is the same as the preceding definition except that it adds an explicit constructor, accepting a double. It still does not explicitly declare a default constructor.
class SpreadsheetCell{public:SpreadsheetCell(double initialValue);// No default constructor// Remainder of the class definition omitted for brevity};
With this definition, the following code does not compile anymore:
SpreadsheetCell myCell;myCell.setValue(6);
What’s going on here? The reason it is not compiling is that if you don’t specify any constructors, the compiler writes one for you that doesn’t take any arguments. This compiler-generated default constructor calls the default constructor on all object members of the class, but does not initialize the language primitives such as int and double. Nonetheless, it allows you to create objects of that class. However, if you declare a default constructor, or any other constructor, the compiler no longer generates a default constructor for you.
In C++03 or older, if your class required a number of explicit constructors accepting arguments but also a default constructor that did nothing, you still had to explicitly write your empty default constructor as shown earlier.
To avoid having to write empty default constructors manually, C++ supports the concept of explicitly defaulted constructors. This allows you to write the class definition as follows without the need to implement the default constructor in the implementation file:
class SpreadsheetCell{public:SpreadsheetCell() = default;SpreadsheetCell(double initialValue);SpreadsheetCell(std::string_view initialValue);// Remainder of the class definition omitted for brevity};
SpreadsheetCell defines two custom constructors. However, the compiler still generates a standard compiler-generated default constructor due to the use of the default keyword.
C++ also supports the concept of explicitly deleted constructors. For example, you can define a class with only static methods (see Chapter 9) for which you do not want to write any constructors and you also do not want the compiler to generate the default constructor. In that case, you need to explicitly delete the default constructor:
class MyClass{public:MyClass() = delete;};
Up to now, this chapter initialized data members in the body of a constructor, as in this example:
SpreadsheetCell::SpreadsheetCell(double initialValue){setValue(initialValue);}
C++ provides an alternative method for initializing data members in the constructor, called the constructor initializer, also known as the ctor-initializer or member initializer list. Here is the same SpreadsheetCell constructor, rewritten to use the ctor-initializer syntax:
SpreadsheetCell::SpreadsheetCell(double initialValue): mValue(initialValue){}
As you can see, the ctor-initializer appears syntactically between the constructor argument list and the opening brace for the body of the constructor. The list starts with a colon and is separated by commas. Each element in the list is an initialization of a data member using function notation or the uniform initialization syntax, a call to a base class constructor (see Chapter 10), or a call to a delegated constructor, which is discussed later.
Initializing data members with a ctor-initializer provides different behavior than does initializing data members inside the constructor body itself. When C++ creates an object, it must create all the data members of the object before calling the constructor. As part of creating these data members, it must call a constructor on any of them that are themselves objects. By the time you assign a value to an object inside your constructor body, you are not actually constructing that object. You are only modifying its value. A ctor-initializer allows you to provide initial values for data members as they are created, which is more efficient than assigning values to them later.
If your class has as data member an object of a class that has a default constructor, then you do not have to explicitly initialize the object in the ctor-initializer. For example, if you have an std::string as data member, its default constructor initializes the string to the empty string, so initializing it to "" in the ctor-initializer is superfluous.
On the other hand, if your class has as data member an object of a class without a default constructor, you have to use the ctor-initializer to properly construct that object. For example, take the following SpreadsheetCell class:
class SpreadsheetCell{public:SpreadsheetCell(double d);};
This class only has one explicit constructor accepting a double and does not include a default constructor. You can use this class as a data member of another class as follows:
class SomeClass{public:SomeClass();private:SpreadsheetCell mCell;};
And you can implement the SomeClass constructor as follows:
SomeClass::SomeClass() { }However, with this implementation, the code does not compile. The compiler does not know how to initialize the mCell data member of SomeClass because it does not have a default constructor.
You have to initialize the mCell data member in the ctor-initializer as follows:
SomeClass::SomeClass() : mCell(1.0) { }Some programmers prefer to assign initial values in the body of the constructor, even though this might be less efficient. However, several data types must be initialized in a ctor-initializer or with an in-class initializer. The following table summarizes them:
| DATA TYPE | EXPLANATION |
const data members |
You cannot legally assign a value to a const variable after it is created. Any value must be supplied at the time of creation. |
| Reference data members | References cannot exist without referring to something. |
| Object data members for which there is no default constructor | C++ attempts to initialize member objects using a default constructor. If no default constructor exists, it cannot initialize the object. |
| Base classes without default constructors | These are covered in Chapter 10. |
There is one important caveat with ctor-initializers: they initialize data members in the order that they appear in the class definition, not their order in the ctor-initializer. Take the following definition for a class called Foo. Its constructor simply stores a double value and prints out the value to the console.
class Foo{public:Foo(double value);private:double mValue;};Foo::Foo(double value) : mValue(value){cout << "Foo::mValue = " << mValue << endl;}
Suppose you have another class, MyClass, that contains a Foo object as one of its data members:
class MyClass{public:MyClass(double value);private:double mValue;Foo mFoo;};
Its constructor could be implemented as follows:
MyClass::MyClass(double value) : mValue(value), mFoo(mValue){cout << "MyClass::mValue = " << mValue << endl;}
The ctor-initializer first stores the given value in mValue, and then calls the Foo constructor with mValue as argument. You can create an instance of MyClass as follows:
MyClass instance(1.2);Here is the output of the program:
Foo::mValue = 1.2MyClass::mValue = 1.2
So, everything looks fine. Now make one tiny change to the MyClass definition. You just reverse the order of the mValue and mFoo data members. Nothing else is changed.
class MyClass{public:MyClass(double value);private:Foo mFoo;double mValue;};
The output of the program now depends on your system. It could, for example, be as follows:
Foo::mValue = -9.25596e+61MyClass::mValue = 1.2
This is far from what you would expect. You might assume, based on your ctor-initializer, that mValue is initialized before using mValue in the call to the Foo constructor. But C++ doesn’t work that way. The data members are initialized in the order they appear in the definition of the class, not the order in the ctor-initializer! So, in this case, the Foo constructor is called first with an uninitialized mValue.
Note that some compilers issue a warning when the order in the class definition does not match the order in the ctor-initializer.
There is a special constructor in C++ called a copy constructor that allows you to create an object that is an exact copy of another object. If you don’t write a copy constructor, C++ generates one for you that initializes each data member in the new object from its equivalent data member in the source object. For object data members, this initialization means that their copy constructors are called.
Here is the declaration for a copy constructor in the SpreadsheetCell class:
class SpreadsheetCell{public:SpreadsheetCell(const SpreadsheetCell& src);// Remainder of the class definition omitted for brevity};
The copy constructor takes a const reference to the source object. Like other constructors, it does not return a value. Inside the constructor, you should copy all the data members from the source object. Technically, of course, you can do whatever you want in the copy constructor, but it’s generally a good idea to follow expected behavior and initialize the new object to be a copy of the old one. Here is a sample implementation of the SpreadsheetCell copy constructor. Note the use of the ctor-initializer.
SpreadsheetCell::SpreadsheetCell(const SpreadsheetCell& src): mValue(src.mValue){}
Given a set of data members, called m1, m2, … mn, the compiler-generated copy constructor can be expressed as follows:
classname::classname(const classname& src): m1(src.m1), m2(src.m2), … mn(src.mn) { }
Therefore, in most circumstances, there is no need for you to specify a copy constructor!
The default semantics for passing arguments to functions in C++ is pass-by-value. That means that the function or method receives a copy of the value or object. Thus, whenever you pass an object to a function or method, the compiler calls the copy constructor of the new object to initialize it. For example, suppose you have the following printString() function accepting a string parameter by value:
void printString(string inString){cout << inString << endl;}
Recall that the C++ string is actually a class, not a built-in type. When your code makes a call to printString() passing a string argument, the string parameter inString is initialized with a call to its copy constructor. The argument to the copy constructor is the string you passed to printString(). In the following example, the string copy constructor is executed for the inString object in printString() with name as its parameter.
string name = "heading one";printString(name); // Copies name
When the printString() method finishes, inString is destroyed. Because it was only a copy of name, name remains intact. Of course, you can avoid the overhead of copy constructors by passing parameters as const references.
When returning objects by value from a function, the copy constructor might also get called. This is discussed in the section “Objects as Return Values” later in this chapter.
You can use the copy constructor explicitly as well. It is often useful to be able to construct one object as an exact copy of another. For example, you might want to create a copy of a SpreadsheetCell object like this:
SpreadsheetCell myCell1(4);SpreadsheetCell myCell2(myCell1);// myCell2 has the same values as myCell1
In order to avoid copying objects when you pass them to functions and methods, you should declare that the function or method takes a reference to the object. Passing objects by reference is usually more efficient than passing them by value, because only the address of the object is copied, not the entire contents of the object. Additionally, pass-by-reference avoids problems with dynamic memory allocation in objects, which is discussed in Chapter 9.
When you pass an object by reference, the function or method using the object reference could change the original object. When you are only using pass-by-reference for efficiency, you should preclude this possibility by declaring the object const as well. This is known as passing objects by const reference and has been done in examples throughout this book.
Note that the SpreadsheetCell class has a number of methods accepting an std::string_view as parameter. As discussed in Chapter 2, a string_view is basically just a pointer and a length. So, it is very cheap to copy, and is usually passed by value.
Also primitive types, such as int, double, and so on, should just be passed by value. You don’t gain anything by passing such types by const reference.
The doubleToString() method of the SpreadsheetCell class always returns a string by value because the implementation of the method creates a local string object that at the end of the method is returned to the caller. Returning a reference to this string wouldn’t work because the string to which it references will be destroyed when the function exits.
You can explicitly default or delete a compiler-generated copy constructor as follows:
SpreadsheetCell(const SpreadsheetCell& src) = default;or
SpreadsheetCell(const SpreadsheetCell& src) = delete;By deleting the copy constructor, the object cannot be copied anymore. This can be used to disallow passing the object by value, as discussed in Chapter 9.
An initializer-list constructor is a constructor with an std::initializer_list<T> as first parameter, without any additional parameters or with additional parameters having default values. Before you can use the std::initializer_list<T> template, you need to include the <initializer_list> header. The following class demonstrates its use. The class accepts only an initializer_list<T> with an even number of elements; otherwise, it throws an exception.
class EvenSequence{public:EvenSequence(initializer_list<double> args){if (args.size() % 2 != 0) {throw invalid_argument("initializer_list should ""contain even number of elements.");}mSequence.reserve(args.size());for (const auto& value : args) {mSequence.push_back(value);}}void dump() const{for (const auto& value : mSequence) {cout << value << ", ";}cout << endl;}private:vector<double> mSequence;};
Inside the initializer-list constructor you can access the elements of the initializer-list with a range-based for loop. You can get the number of elements in the initializer-list with the size() method.
The EvenSequence initializer-list constructor uses a range-based for loop to copy elements from the given initializer_list<T>. You can also use the assign() method of vector. The different methods of vector, including assign(), are discussed in detail in Chapter 17. To give you an idea of the power of a vector, here is the initializer-list constructor using assign():
EvenSequence(initializer_list<double> args){if (args.size() % 2 != 0) {throw invalid_argument("initializer_list should ""contain even number of elements.");}mSequence.assign(args);}EvenSequenceobjects can be constructed as follows:EvenSequence p1 = {1.0, 2.0, 3.0, 4.0, 5.0, 6.0};p1.dump();try {EvenSequence p2 = {1.0, 2.0, 3.0};} catch (const invalid_argument& e) {cout << e.what() << endl;}
The construction of p2 throws an exception because it has an odd number of elements in the initializer-list. The preceding equal signs are optional and can be left out, as in this example:
EvenSequence p1{1.0, 2.0, 3.0, 4.0, 5.0, 6.0};The Standard Library has full support for initializer-list constructors. For example, the std::vector container can be initialized with an initializer-list:
std::vector<std::string> myVec = {"String 1", "String 2", "String 3"};Without initializer-list constructors, one way to initialize this vector is by using several push_back() calls:
std::vector<std::string> myVec;myVec.push_back("String 1");myVec.push_back("String 2");myVec.push_back("String 3");
Initializer lists are not limited to constructors and can also be used with normal functions as explained in Chapter 1.
Delegating constructors allow constructors to call another constructor from the same class. However, this call cannot be placed in the constructor body; it must be in the ctor-initializer and it must be the only member-initializer in the list. Following is an example:
SpreadsheetCell::SpreadsheetCell(string_view initialValue): SpreadsheetCell(stringToDouble(initialValue)){}
When this string_view constructor (the delegating constructor) is called, it first delegates the call to the target constructor, which is the double constructor in this example. When the target constructor returns, the body of the delegating constructor is executed.
Make sure you avoid constructor recursion while using delegate constructors. Here is an example:
class MyClass{MyClass(char c) : MyClass(1.2) { }MyClass(double d) : MyClass('m') { }};
The first constructor delegates to the second constructor, which delegates back to the first one. The behavior of such code is undefined by the standard and depends on the compiler.
The compiler can automatically generate a default constructor and a copy constructor for every class. However, the constructors that the compiler automatically generates depend on the constructors that you define yourself according to the rules in the following table.
| IF YOU DEFINE . . . | . . . THEN THE COMPILER GENERATES . . . | . . . AND YOU CAN CREATE AN OBJECT . . . |
| [no constructors] |
A default constructor A copy constructor |
With no arguments:SpreadsheetCell cell;As a copy of another object: SpreadsheetCell myCell(cell); |
| A default constructor only | A copy constructor |
With no arguments:SpreadsheetCell cell;As a copy of another object: SpreadsheetCell myCell(cell); |
| A copy constructor only | No constructors | Theoretically, as a copy of another object. Practically, you can’t create any objects, because there are no non-copy constructors. |
| A single-argument or multi-argument non-copy constructor only | A copy constructor |
With arguments:SpreadsheetCell cell(6);As a copy of another object: SpreadsheetCell myCell(cell); |
| A default constructor as well as a single-argument or multi-argument non-copy constructor | A copy constructor | With no arguments:SpreadsheetCell cell;With arguments: SpreadsheetCell myCell(5);As a copy of another object: SpreadsheetCell anotherCell(cell); |
Note the lack of symmetry between the default constructor and the copy constructor. As long as you don’t define a copy constructor explicitly, the compiler creates one for you. On the other hand, as soon as you define any constructor, the compiler stops generating a default constructor.
As mentioned before in this chapter, the automatic generation of a default constructor and a default copy constructor can be influenced by defining them as explicitly defaulted or explicitly deleted.
When an object is destroyed, two events occur: the object’s destructor method is called, and the memory it was taking up is freed. The destructor is your chance to perform any cleanup work for the object, such as freeing dynamically allocated memory or closing file handles. If you don’t declare a destructor, the compiler writes one for you that does recursive member-wise destruction and allows the object to be deleted. The section on dynamic memory allocation in Chapter 9 shows you how to write a destructor.
Objects on the stack are destroyed when they go out of scope, which means whenever the current function, method, or other execution block ends. In other words, whenever the code encounters an ending curly brace, any objects created on the stack within those curly braces are destroyed. The following program shows this behavior:
int main(){SpreadsheetCell myCell(5);if (myCell.getValue() == 5) {SpreadsheetCell anotherCell(6);} // anotherCell is destroyed as this block ends.cout << "myCell: " << myCell.getValue() << endl;return 0;} // myCell is destroyed as this block ends.
Objects on the stack are destroyed in the reverse order of their declaration (and construction). For example, in the following code fragment, myCell2 is created before anotherCell2, so anotherCell2 is destroyed before myCell2 (note that you can start a new code block at any point in your program with an opening curly brace):
{SpreadsheetCell myCell2(4);SpreadsheetCell anotherCell2(5); // myCell2 constructed before anotherCell2} // anotherCell2 destroyed before myCell2
This ordering also applies to objects that are data members of other objects. Recall that data members are initialized in the order of their declaration in the class. Thus, following the rule that objects are destroyed in the reverse order of their construction, data member objects are destroyed in the reverse order of their declaration in the class.
Objects allocated on the heap without the help of smart pointers are not destroyed automatically. You must call delete on the object pointer to call its destructor and free the memory. The following program shows this behavior:
int main(){SpreadsheetCell* cellPtr1 = new SpreadsheetCell(5);SpreadsheetCell* cellPtr2 = new SpreadsheetCell(6);cout << "cellPtr1: " << cellPtr1->getValue() << endl;delete cellPtr1; // Destroys cellPtr1cellPtr1 = nullptr;return 0;} // cellPtr2 is NOT destroyed because delete was not called on it.
Just as you can assign the value of one int to another in C++, you can assign the value of one object to another. For example, the following code assigns the value of myCell to anotherCell:
SpreadsheetCell myCell(5), anotherCell;anotherCell = myCell;
You might be tempted to say that myCell is “copied” to anotherCell. However, in the world of C++, “copying” only occurs when an object is being initialized. If an object already has a value that is being overwritten, the more accurate term is “assigned to.” Note that the facility that C++ provides for copying is the copy constructor. Because it is a constructor, it can only be used for object creation, not for later assignments to the object.
Therefore, C++ provides another method in every class to perform assignment. This method is called the assignment operator. Its name is operator= because it is actually an overloading of the = operator for that class. In the preceding example, the assignment operator for anotherCell is called, with myCell as the argument.
As usual, if you don’t write your own assignment operator, C++ writes one for you to allow objects to be assigned to one another. The default C++ assignment behavior is almost identical to its default copying behavior: it recursively assigns each data member from the source to the destination object.
Here is the assignment operator for the SpreadsheetCell class:
class SpreadsheetCell{public:SpreadsheetCell& operator=(const SpreadsheetCell& rhs);// Remainder of the class definition omitted for brevity};
The assignment operator often takes a const reference to the source object, like the copy constructor. In this case, the source object is called rhs, which stands for right-hand side of the equals sign, but you are free to call it whatever you want. The object on which the assignment operator is called is the left-hand side of the equals sign.
Unlike a copy constructor, the assignment operator returns a reference to a SpreadsheetCell object. The reason is that assignments can be chained, as in the following example:
myCell = anotherCell = aThirdCell;When that line is executed, the first thing that happens is the assignment operator for anotherCell is called with aThirdCell as its “right-hand side” parameter. Next, the assignment operator for myCell is called. However, its parameter is not anotherCell. Its right-hand side is the result of the assignment of aThirdCell to anotherCell. If that assignment fails to return a result, there is nothing to pass to myCell.
You might be wondering why the assignment operator for myCell can’t just take anotherCell. The reason is that using the equals sign is actually just shorthand for what is really a method call. When you look at the line in its full functional syntax, you can see the problem:
myCell.operator=(anotherCell.operator=(aThirdCell));Now, you can see that the operator= call from anotherCell must return a value, which is passed to the operator= call for myCell. The correct value to return is anotherCell itself, so it can serve as the source for the assignment to myCell. However, returning anotherCell directly would be inefficient, so you can return a reference to anotherCell.
The implementation of the assignment operator is similar to that of a copy constructor, with several important differences. First, a copy constructor is called only for initialization, so the destination object does not yet have valid values. An assignment operator can overwrite the current values in an object. This consideration doesn’t really come into play until you have dynamically allocated memory in your objects. See Chapter 9 for details.
Second, it’s legal in C++ to assign an object to itself. For example, the following code compiles and runs:
SpreadsheetCell cell(4);cell = cell; // Self-assignment
Your assignment operator needs to take the possibility of self-assignment into account. In the SpreadsheetCell class, this is not important, as its only data member is a primitive type, double. However, when your class has dynamically allocated memory or other resources, it’s paramount to take self-assignment into account, as is discussed in detail in Chapter 9. To prevent problems in such cases, assignment operators usually check for self-assignment at the beginning of the method and return immediately.
Here is the start of the definition of the assignment operator for the SpreadsheetCell class:
SpreadsheetCell& SpreadsheetCell::operator=(const SpreadsheetCell& rhs){if (this == &rhs) {
This first line checks for self-assignment, but it might be a bit cryptic. Self-assignment occurs when the left-hand side and the right-hand side of the equals sign are the same. One way to tell if two objects are the same is if they occupy the same memory location—more explicitly, if pointers to them are equal. Recall that this is a pointer to an object accessible from any method called on the object. Thus, this is a pointer to the left-hand side object. Similarly, &rhs is a pointer to the right-hand side object. If these pointers are equal, the assignment must be self-assignment, but because the return type is SpreadsheetCell&, a correct value must still be returned. All assignment operators return *this, and the self-assignment case is no exception:
return *this;}
this is a pointer to the object on which the method executes, so *this is the object itself. The compiler returns a reference to the object to match the declared return value. Now, if it is not self-assignment, you have to do an assignment to every member:
mValue = rhs.mValue;return *this;}
Here the method copies the values, and finally, it returns *this, as explained previously.
You can explicitly default or delete a compiler-generated assignment operator as follows:
SpreadsheetCell& operator=(const SpreadsheetCell& rhs) = default;or
SpreadsheetCell& operator=(const SpreadsheetCell& rhs) = delete;C++11 has deprecated the generation of a copy constructor if the class has a user-declared copy assignment operator or destructor. If you still need a compiler-generated copy constructor in such a case, you can explicitly default one:
MyClass(const MyClass& src) = default;C++11 has also deprecated the generation of a copy assignment operator if the class has a user-declared copy constructor or destructor. If you still need a compiler-generated copy assignment operator in such a case, you can explicitly default one:
MyClass& operator=(const MyClass& rhs) = default;It is sometimes difficult to tell when objects are initialized with a copy constructor rather than assigned to with the assignment operator. Essentially, things that look like a declaration are going to be using copy constructors, and things that look like assignment statements are handled by the assignment operator. Consider the following code:
SpreadsheetCell myCell(5);SpreadsheetCell anotherCell(myCell);
AnotherCell is constructed with the copy constructor.
SpreadsheetCell aThirdCell = myCell;aThirdCell is also constructed with the copy constructor, because this is a declaration. The operator= is not called for this line! This syntax is just another way to write SpreadsheetCell aThirdCell(myCell);. However, consider the following code:
anotherCell = myCell; // Calls operator= for anotherCellHere, anotherCell has already been constructed, so the compiler calls operator=.
When you return objects from functions or methods, it is sometimes difficult to see exactly what copying and assignment is happening. For example, the implementation of SpreadsheetCell:: getString() looks like this:
string SpreadsheetCell::getString() const{return doubleToString(mValue);}
Now consider the following code:
SpreadsheetCell myCell2(5);string s1;s1 = myCell2.getString();
When getString() returns the string, the compiler actually creates an unnamed temporary string object by calling a string copy constructor. When you assign this result to s1, the assignment operator is called for s1 with the temporary string as a parameter. Then, the temporary string object is destroyed. Thus, the single line of code invokes the copy constructor and the assignment operator (for two different objects). However, compilers are free and sometimes required to implement Return Value Optimization (RVO), also known as copy elision, to optimize away costly copy constructions when returning values.
In case you’re not confused enough, consider this code:
SpreadsheetCell myCell3(5);string s2 = myCell3.getString();
In this case, getString() still creates a temporary unnamed string object when it returns. But now, s2 gets its copy constructor called, not its assignment operator.
With move semantics, the compiler can use a move constructor instead of a copy constructor to return the string from getString(). This is more efficient and is discussed in Chapter 9.
If you ever forget the order in which these things happen or which constructor or operator is called, you can easily figure it out by temporarily including helpful output in your code or by stepping through it with a debugger.
You should also note the difference between assignment and copy constructor calls in constructors. If an object contains other objects, the compiler-generated copy constructor calls the copy constructors of each of the contained objects recursively. When you write your own copy constructor, you can provide the same semantics by using a ctor-initializer, as shown previously. If you omit a data member from the ctor-initializer, the compiler performs default initialization on it (a call to the default constructor for objects) before executing your code in the body of the constructor. Thus, by the time the body of the constructor executes, all object data members have already been initialized.
For example, you could write your copy constructor like this:
SpreadsheetCell::SpreadsheetCell(const SpreadsheetCell& src){mValue = src.mValue;}
However, when you assign values to data members in the body of the copy constructor, you are using the assignment operator on them, not the copy constructor, because they have already been initialized, as described previously.
If you write the copy constructor as follows, then mValue is initialized using the copy constructor:
SpreadsheetCell::SpreadsheetCell(const SpreadsheetCell& src): mValue(src.mValue){}
This chapter covered the fundamental aspects of C++’s facilities for object-oriented programming: classes and objects. It first reviewed the basic syntax for writing classes and using objects, including access control. Then, it covered object life cycles: when objects are constructed, destructed, and assigned to, and what methods those actions invoke. The chapter included details of the constructor syntax, including ctor-initializers and initializer-list constructors, and introduced the notion of copy assignment operators. It also specified exactly which constructors the compiler writes for you, and under what circumstances, and explained that default constructors require no arguments.
You may have found this chapter to be mostly review. Or, it may have opened your eyes to the world of object-oriented programming in C++. In any case, now that you are proficient with objects and classes, read Chapter 9 to learn more about their tricks and subtleties.
C++ allows classes to declare that other classes, member functions of other classes, or non-member functions are friends, and can access protected and private data members and methods. For example, suppose you have two classes called Foo and Bar. You can specify that the Bar class is a friend of Foo as follows:
class Foo{friend class Bar;// …};
Now all the methods of Bar can access the private and protected data members and methods of Foo.
If you only want to make a specific method of Bar a friend, you can do that as well. Suppose the Bar class has a method processFoo(const Foo& foo). The following syntax is used to make this method a friend of Foo:
class Foo{friend void Bar::processFoo(const Foo& foo);// …};
Standalone functions can also be friends of classes. You might, for example, want to write a function that dumps all data of a Foo object to the console. You might want this function to be outside the Foo class to model an external audit, but the function should be able to access the internal data members of the object in order to check it properly. Here is the Foo class definition with a friend
dumpFoo() function:
class Foo{friend void dumpFoo(const Foo& foo);// …};
The friend declaration in the class serves as the function’s prototype. There’s no need to write the prototype elsewhere (although it’s harmless to do so).
Here is the function definition:
void dumpFoo(const Foo& foo){// Dump all data of foo to the console, including// private and protected data members.}
You write this function just like any other function, except that you can directly access private and protected data members of Foo. You don’t repeat the friend keyword in the function definition.
Note that a class needs to know which other classes, methods, or functions want to be its friends; a class, method, or function cannot declare itself to be a friend of some other class and access the non-public names of that class.
friend classes and methods are easy to abuse; they allow you to violate the principle of encapsulation by exposing internals of your class to other classes or functions. Thus, you should use them only in limited circumstances. Some use cases are shown throughout this chapter.
Sometimes you don’t know how much memory you will need before your program actually runs. As you read in Chapter 7, the solution is to dynamically allocate as much space as you need during program execution. Classes are no exception. Sometimes you don’t know how much memory an object will need when you write the class. In that case, the object should dynamically allocate memory. Dynamically allocated memory in objects provides several challenges, including freeing the memory, handling object copying, and handling object assignment.
Chapter 8 introduces the SpreadsheetCell class. This chapter moves on to write the Spreadsheet class. As with the SpreadsheetCell class, the Spreadsheet class evolves throughout this chapter. Thus, the various attempts do not always illustrate the best way to do every aspect of class writing. To start, a Spreadsheet is simply a two-dimensional array of SpreadsheetCells, with methods to set and retrieve cells at specific locations in the Spreadsheet. Although most spreadsheet applications use letters in one direction and numbers in the other to refer to cells, this Spreadsheet uses numbers in both directions. Here is a first attempt at a class definition for a simple Spreadsheet class:
#include <cstddef>#include "SpreadsheetCell.h"class Spreadsheet{public:Spreadsheet(size_t width, size_t height);void setCellAt(size_t x, size_t y, const SpreadsheetCell& cell);SpreadsheetCell& getCellAt(size_t x, size_t y);private:bool inRange(size_t value, size_t upper) const;size_t mWidth = 0;size_t mHeight = 0;SpreadsheetCell** mCells = nullptr;};
Note that the Spreadsheet class does not contain a standard two-dimensional array of SpreadsheetCells. Instead, it contains a SpreadsheetCell**. This is because each Spreadsheet object might have different dimensions, so the constructor of the class must dynamically allocate the two-dimensional array based on the client-specified height and width. In order to allocate dynamically a two-dimensional array, you need to write the following code. Note that in C++, unlike in Java, it’s not possible to simply write new
SpreadsheetCell[mWidth][mHeight].
Spreadsheet::Spreadsheet(size_t width, size_t height): mWidth(width), mHeight(height){mCells = new SpreadsheetCell*[mWidth];for (size_t i = 0; i < mWidth; i++) {mCells[i] = new SpreadsheetCell[mHeight];}}
The resulting memory for a Spreadsheet called s1 on the stack with width 4 and height 3 is shown in Figure 9-1.
The implementations of the set and retrieval methods are straightforward:
void Spreadsheet::setCellAt(size_t x, size_t y, const SpreadsheetCell& cell){if (!inRange(x, mWidth) || !inRange(y, mHeight)) {throw std::out_of_range("");}mCells[x][y] = cell;}SpreadsheetCell& Spreadsheet::getCellAt(size_t x, size_t y){if (!inRange(x, mWidth) || !inRange(y, mHeight)) {throw std::out_of_range("");}return mCells[x][y];}
Note that these two methods use a helper method inRange() to check that x and y represent valid coordinates in the spreadsheet. Attempting to access an array element at an out-of-range index will cause the program to malfunction. This example uses exceptions, which are mentioned in Chapter 1 and described in detail in Chapter 14.
If you look at the setCellAt() and getCellAt() methods, you see there is some clear code duplication. Chapter 6 explains that code duplication should be avoided at all costs. So, let’s follow that guideline. Instead of a helper method called inRange(), the following verifyCoordinate() method is defined for the class:
void verifyCoordinate(size_t x, size_t y) const;The implementation checks the given coordinate and throws an exception if the coordinate is invalid:
void Spreadsheet::verifyCoordinate(size_t x, size_t y) const{if (x >= mWidth || y >= mHeight) {throw std::out_of_range("");}}
The setCellAt() and getCellAt() methods can now be simplified:
void Spreadsheet::setCellAt(size_t x, size_t y, const SpreadsheetCell& cell){verifyCoordinate(x, y);mCells[x][y] = cell;}SpreadsheetCell& Spreadsheet::getCellAt(size_t x, size_t y){verifyCoordinate(x, y);return mCells[x][y];}
Whenever you are finished with dynamically allocated memory, you should free it. If you dynamically allocate memory in an object, the place to free that memory is in the destructor. The compiler guarantees that the destructor is called when the object is destroyed. Here is the Spreadsheet class definition with a destructor:
class Spreadsheet{public:Spreadsheet(size_t width, size_t height);~Spreadsheet();// Code omitted for brevity};
The destructor has the same name as the name of the class (and of the constructors), preceded by a tilde (~). The destructor takes no arguments, and there can only be one of them. Destructors are implicitly marked as noexcept, since they should not throw any exceptions.
Here is the implementation of the Spreadsheet class destructor:
Spreadsheet::~Spreadsheet(){for (size_t i = 0; i < mWidth; i++) {delete [] mCells[i];}delete [] mCells;mCells = nullptr;}
This destructor frees the memory that was allocated in the constructor. However, no rule requires you to free memory in the destructor. You can write whatever code you want in the destructor, but it is a good idea to use it only for freeing memory or disposing of other resources.
Recall from Chapter 8 that if you don’t write a copy constructor and an assignment operator yourself, C++ writes them for you. These compiler-generated methods recursively call the copy constructor or assignment operator on object data members. However, for primitives, such as int, double, and pointers, they provide shallow or bitwise copying or assignment: they just copy or assign the data members from the source object directly to the destination object. That presents problems when you dynamically allocate memory in your object. For example, the following code copies the spreadsheet s1 to initialize s when s1 is passed to the printSpreadsheet() function:
#include "Spreadsheet.h"void printSpreadsheet(Spreadsheet s){// Code omitted for brevity.}int main(){Spreadsheet s1(4, 3);printSpreadsheet(s1);return 0;}
The Spreadsheet contains one pointer variable: mCells. A shallow copy of a spreadsheet gives the destination object a copy of the mCells pointer, but not a copy of the underlying data. Thus, you end up with a situation where both s and s1 have a pointer to the same data, as shown in Figure 9-2.
If s changes something to which mCells points, that change shows up in s1 too. Even worse, when the printSpreadsheet() function exits, s’s destructor is called, which frees the memory pointed to by mCells. That leaves the situation shown in Figure 9-3.
Now s1 has a pointer that no longer points to valid memory. This is called a dangling pointer.
Unbelievably, the problem is even worse with assignment. Suppose that you have the following code:
Spreadsheet s1(2, 2), s2(4, 3);s1 = s2;
After the first line, when both objects are constructed, you have the memory layout shown in Figure 9-4.
After the assignment statement, you have the layout shown in Figure 9-5.
Now, not only do the mCells pointers in s1 and s2 point to the same memory, but you have also orphaned the memory to which mCells in s1 previously pointed. This is called a memory leak. That is why in assignment operators you must do a deep copy.
As you can see, relying on C++’s default copy constructor and default assignment operator is not always a good idea.
Here is a declaration for a copy constructor in the Spreadsheet class:
class Spreadsheet{public:Spreadsheet(const Spreadsheet& src);// Code omitted for brevity};
The definition is as follows:
Spreadsheet::Spreadsheet(const Spreadsheet& src): Spreadsheet(src.mWidth, src.mHeight){for (size_t i = 0; i < mWidth; i++) {for (size_t j = 0; j < mHeight; j++) {mCells[i][j] = src.mCells[i][j];}}}
Note the use of a delegating constructor. The ctor-initializer of this copy constructor delegates first to the non-copy constructor to allocate the proper amount of memory. The body of the copy constructor then copies the actual values. Together, this process implements a deep copy of the mCells dynamically allocated two-dimensional array.
There is no need to delete the existing mCells because this is a copy constructor and therefore there is not an existing mCells yet in this object.
The following shows the Spreadsheet class definition with an assignment operator:
class Spreadsheet{public:Spreadsheet& operator=(const Spreadsheet& rhs);// Code omitted for brevity};
A naïve implementation could be as follows:
Spreadsheet& Spreadsheet::operator=(const Spreadsheet& rhs){// Check for self-assignmentif (this == &rhs) {return *this;}// Free the old memoryfor (size_t i = 0; i < mWidth; i++) {delete[] mCells[i];}delete[] mCells;mCells = nullptr;// Allocate new memorymWidth = rhs.mWidth;mHeight = rhs.mHeight;mCells = new SpreadsheetCell*[mWidth];for (size_t i = 0; i < mWidth; i++) {mCells[i] = new SpreadsheetCell[mHeight];}// Copy the datafor (size_t i = 0; i < mWidth; i++) {for (size_t j = 0; j < mHeight; j++) {mCells[i][j] = rhs.mCells[i][j];}}return *this;}
The code first checks for self-assignment, then frees the current memory of the this object, followed by allocating new memory, and finally copying the individual elements. There is a lot going on in this method, and a lot can go wrong! It is possible that the this object gets into an invalid state. For example, suppose that the memory is successfully freed, that mWidth and mHeight are properly set, but that an exception is thrown in the loop that is allocating the memory. When that happens, execution of the remainder of the method is skipped, and the method is exited. Now the Spreadsheet instance is corrupt; its mWidth and mHeight data members state a certain size, but the mCells data member does not have the right amount of memory. Basically, this code is not exception safe!
What we need is an all-or-nothing mechanism; either everything succeeds, or the this object remains untouched. To implement such an exception-safe assignment operator, the copy-and-swap idiom is recommended. For this, a non-member swap() function is implemented as a friend of the Spreadsheet class. Instead of a non-member swap() function, you could also add a swap() method to the class. However, it’s recommended practice to implement swap() as a non-member function, so that it can also be used by various Standard Library algorithms. Here is the definition of the Spreadsheet class with an assignment operator and the swap() function:
class Spreadsheet{public:Spreadsheet& operator=(const Spreadsheet& rhs);friend void swap(Spreadsheet& first, Spreadsheet& second) noexcept;// Code omitted for brevity};
A requirement for implementing the exception-safe copy-and-swap idiom is that the swap() function never throws any exceptions, so it is marked as noexcept. The implementation of the swap() function swaps each data member using the std::swap() utility function provided by the Standard Library in the <utility> header file:
void swap(Spreadsheet& first, Spreadsheet& second) noexcept{using std::swap;swap(first.mWidth, second.mWidth);swap(first.mHeight, second.mHeight);swap(first.mCells, second.mCells);}
Now that we have this exception-safe swap() function, it can be used to implement the assignment operator:
Spreadsheet& Spreadsheet::operator=(const Spreadsheet& rhs){// Check for self-assignmentif (this == &rhs) {return *this;}Spreadsheet temp(rhs); // Do all the work in a temporary instanceswap(*this, temp); // Commit the work with only non-throwing operationsreturn *this;}
The implementation uses the copy-and-swap idiom. For efficiency, but sometimes also for correctness, the first line of code in an assignment operator usually checks for self-assignment. Next, a copy of the right-hand-side is made, called temp. Then *this is swapped with this copy. This pattern is the recommended way of implementing your assignment operators because it guarantees strong exception safety. This means that if any exception occurs, then the state of the current Spreadsheet object remains unchanged. This is implemented in three phases:
Spreadsheet object, and so there is no problem if an exception is thrown during this phase.swap() function to swap the created temporary copy with the current object. The swap() function shall never throw exceptions.Sometimes when you dynamically allocate memory in your class, it’s easiest just to prevent anyone from copying or assigning to your objects. You can do this by explicitly deleting your operator= and copy constructor. That way, if anyone tries to pass the object by value, return it from a function or method, or assign to it, the compiler will complain. Here is a Spreadsheet class definition that prevents assignment and pass-by-value:
class Spreadsheet{public:Spreadsheet(size_t width, size_t height);Spreadsheet(const Spreadsheet& src) = delete;~Spreadsheet();Spreadsheet& operator=(const Spreadsheet& rhs) = delete;// Code omitted for brevity};
You don’t provide implementations for deleted methods. The linker will never look for them because the compiler won’t allow code to call them. When you write code to copy or assign to a Spreadsheet object, the compiler will complain with a message like this:
'Spreadsheet &Spreadsheet::operator =(const Spreadsheet &)' : attempting to reference a deleted function Move semantics for objects requires a move constructor and a move assignment operator. These can be used by the compiler when the source object is a temporary object that will be destroyed after the operation is finished. Both the move constructor and the move assignment operator move the data members from the source object to the new object, leaving the source object in some valid but otherwise indeterminate state. Often, data members of the source object are reset to null values. This process actually moves ownership of the memory and other resources from one object to another object. They basically do a shallow copy of the member variables, and switch ownership of allocated memory and other resources to prevent dangling pointers or resources, and to prevent memory leaks.
Before you can implement move semantics, you need to learn about rvalues and rvalue references.
In C++, an lvalue is something of which you can take an address; for example, a named variable. The name comes from the fact that lvalues can appear on the left-hand side of an assignment. An rvalue, on the other hand, is anything that is not an lvalue, such as a literal, or a temporary object or value. Typically, an rvalue is on the right-hand side of an assignment operator. For example, take the following statement:
int a = 4 * 2;In this statement, a is an lvalue, it has a name and you can take the address of it with &a. The result of the expression 4 * 2 on the other hand is an rvalue. It is a temporary value that is destroyed when the statement finishes execution. In this example, a copy of this temporary value is stored in the variable with name a.
An rvalue reference is a reference to an rvalue. In particular, it is a concept that is applied when the rvalue is a temporary object. The purpose of an rvalue reference is to make it possible for a particular function to be chosen when a temporary object is involved. The consequence of this is that certain operations that normally involve copying large values can be implemented by copying pointers to those values, knowing the temporary object will be destroyed.
A function can specify an rvalue reference parameter by using && as part of the parameter specification; for example, type&& name. Normally, a temporary object will be seen as a const type&, but when there is a function overload that uses an rvalue reference, a temporary object can be resolved to that overload. The following example demonstrates this. The code first defines two handleMessage() functions, one accepting an lvalue reference and one accepting an rvalue reference:
// lvalue reference parametervoid handleMessage(std::string& message){cout << "handleMessage with lvalue reference: " << message << endl;}// rvalue reference parametervoid handleMessage(std::string&& message){cout << "handleMessage with rvalue reference: " << message << endl;}
You can call handleMessage() with a named variable as argument:
std::string a = "Hello ";std::string b = "World";handleMessage(a); // Calls handleMessage(string& value)
Because a is a named variable, the handleMessage() function accepting an lvalue reference is called. Any changes handleMessage() does through its reference parameter will change the value of a.
You can also call handleMessage() with an expression as argument:
handleMessage(a + b); // Calls handleMessage(string&& value)The handleMessage() function accepting an lvalue reference cannot be used, because the expression a + b results in a temporary, which is not an lvalue. In this case the rvalue reference version is called. Because the argument is a temporary, any changes handleMessage() does through its reference parameter will be lost after the call returns.
A literal can also be used as argument to handleMessage(). This also triggers a call to the rvalue reference version because a literal cannot be an lvalue (though a literal can be passed as argument to a const reference parameter).
handleMessage("Hello World"); // Calls handleMessage(string&& value)If you remove the handleMessage() function accepting an lvalue reference, calling handleMessage() with a named variable like handleMessage(b) will result in a compilation error because an rvalue reference parameter (string&& message) will never be bound to an lvalue (b). You can force the compiler to call the rvalue reference version of handleMessage() by using std::move(), which casts an lvalue into an rvalue as follows:
handleMessage(std::move(b)); // Calls handleMessage(string&& value)As said before, but it’s worth repeating, a named variable is an lvalue. So, inside the handleMessage() function, the rvalue reference message parameter itself is an lvalue because it has a name! If you want to forward this rvalue reference parameter to another function as an rvalue, then you need to use std::move() to cast the lvalue to an rvalue. For example, suppose you add the following function with an rvalue reference parameter:
void helper(std::string&& message){}
Calling it as follows does not compile:
void handleMessage(std::string&& message){helper(message);}
The helper() function needs an rvalue reference, while handleMessage() passes message, which has a name, so it’s an lvalue, causing a compilation error. The correct way is to use std::move():
void handleMessage(std::string&& message){helper(std::move(message));}
Rvalue references are not limited to parameters of functions. You can declare a variable of an rvalue reference type, and assign to it, although this usage is uncommon. Consider the following code, which is illegal in C++:
int& i = 2; // Invalid: reference to a constantint a = 2, b = 3;int& j = a + b; // Invalid: reference to a temporary
Using rvalue references, the following is perfectly legal:
int&& i = 2;int a = 2, b = 3;int&& j = a + b;
Stand-alone rvalue references, as in the preceding example, are rarely used in this way.
Move semantics is implemented by using rvalue references. To add move semantics to a class, you need to implement a move constructor and a move assignment operator. Move constructors and move assignment operators should be marked with the noexcept qualifier to tell the compiler that they don’t throw any exceptions. This is particularly important for compatibility with the Standard Library, as fully compliant implementations of, for example, the Standard Library containers will only move stored objects if, having move semantics implemented, they also guarantee not to throw. Following is the Spreadsheet class definition with a move constructor and move assignment operator. Two helper methods are introduced as well: cleanup(), which is used from the destructor and the move assignment operator, and moveFrom(), which moves the member variables from a source to a destination, and then resets the source object.
class Spreadsheet{public:Spreadsheet(Spreadsheet&& src)noexcept;// Move constructorSpreadsheet& operator=(Spreadsheet&& rhs)noexcept;// Move assign// Remaining code omitted for brevityprivate:void cleanup() noexcept;void moveFrom(Spreadsheet& src) noexcept;// Remaining code omitted for brevity};
The implementations are as follows:
void Spreadsheet::cleanup() noexcept{for (size_t i = 0; i < mWidth; i++) {delete[] mCells[i];}delete[] mCells;mCells = nullptr;mWidth = mHeight = 0;}void Spreadsheet::moveFrom(Spreadsheet& src) noexcept{// Shallow copy of datamWidth = src.mWidth;mHeight = src.mHeight;mCells = src.mCells;// Reset the source object, because ownership has been moved!src.mWidth = 0;src.mHeight = 0;src.mCells = nullptr;}// Move constructorSpreadsheet::Spreadsheet(Spreadsheet&& src) noexcept{moveFrom(src);}// Move assignment operatorSpreadsheet& Spreadsheet::operator=(Spreadsheet&& rhs) noexcept{// check for self-assignmentif (this == &rhs) {return *this;}// free the old memorycleanup();moveFrom(rhs);return *this;}
Both the move constructor and the move assignment operator are moving ownership of the memory for mCells from the source object to the new object. They reset the mCells pointer of the source object to a null pointer to prevent the destructor of the source object from deallocating that memory because now the new object is the owner of that memory.
Obviously, move semantics is useful only when you know that the source object will be destroyed.
Move constructors and move assignment operators can be explicitly deleted or defaulted, just like normal constructors and copy assignment operators, as explained in Chapter 8.
The compiler automatically generates a default move constructor for a class if and only if the class has no user-declared copy constructor, copy assignment operator, move assignment operator, or destructor. A default move assignment operator is generated for a class if and only if the class has no user-declared copy constructor, move constructor, copy assignment operator, or destructor.
The moveFrom() method uses direct assignments of the three data members because they are primitive types. If your object has other objects as data members, then you should move these objects using std::move(). Suppose the Spreadsheet class has an std::string data member called mName. The moveFrom() method is then implemented as follows:
void Spreadsheet::moveFrom(Spreadsheet& src) noexcept{// Move object data membersmName = std::move(src.mName);// Move primitives:// Shallow copy of datamWidth = src.mWidth;mHeight = src.mHeight;mCells = src.mCells;// Reset the source object, because ownership has been moved!src.mWidth = 0;src.mHeight = 0;src.mCells = nullptr;}
The previous implementation of the move constructor and the move assignment operator both use the moveFrom() helper method which moves all data members by performing shallow copies. With this implementation, if you add a new data member to the Spreadsheet class, you have to modify both the swap() function and the moveFrom() method. If you forget to update one of them, you introduce a bug. To avoid such bugs, you can write the move constructor and the move assignment operator in terms of a default constructor and the swap() function.
The first thing to do is to add a default constructor to the Spreadsheet class. It doesn’t make sense for users of the class to use this default constructor, so it’s marked as private:
class Spreadsheet{private:Spreadsheet() = default;// Remaining code omitted for brevity};
Next, we can remove the cleanup() and moveFrom() helper methods. The code from the cleanup() method is moved to the destructor. The move constructor and move assignment operator can then be implemented as follows:
Spreadsheet::Spreadsheet(Spreadsheet&& src) noexcept: Spreadsheet(){swap(*this, src);}Spreadsheet& Spreadsheet::operator=(Spreadsheet&& rhs) noexcept{Spreadsheet temp(std::move(rhs));swap(*this, temp);return *this;}
The move constructor delegates first to the default constructor. Then, the default constructed *this is swapped with the given source object. The move assignment operator first creates a local Spreadsheet instance that is move-constructed with rhs. Then, *this is swapped with this local move-constructed Spreadsheet instance.
Implementing the move constructor and move assignment operator in terms of the default constructor and the swap() function might be a tiny bit less efficient compared to the earlier implementation using moveFrom(). The advantage however is that it requires less code and it is less likely bugs are introduced when data members are added to the class, because you only have to update your swap() implementation to include the new data members.
The Spreadsheet move constructor and move assignment operator can be tested with the following code:
Spreadsheet createObject(){return Spreadsheet(3, 2);}int main(){vector<Spreadsheet> vec;for (int i = 0; i < 2; ++i) {cout << "Iteration " << i << endl;vec.push_back(Spreadsheet(100, 100));cout << endl;}Spreadsheet s(2,3);s = createObject();Spreadsheet s2(5,6);s2 = s;return 0;}
Chapter 1 introduces the vector. A vector grows dynamically in size to accommodate new objects. This is done by allocating a bigger chunk of memory and then copying or moving the objects from the old vector to the new and bigger vector. If the compiler finds a move constructor, the objects are moved instead of copied. Because they are moved, there is no need for any deep copying, making it much more efficient.
When you add output statements to all constructors and assignment operators of the Spreadsheet class implemented with the moveFrom() method, the output of the preceding test program can be as follows. This output and the following discussion are based on the Microsoft Visual C++ 2017 compiler. The C++ standard does not specify the initial capacity of a vector or its growth strategy, so the output can be different on different compilers.
Iteration 0Normal constructor (1)Move constructor (2)Iteration 1Normal constructor (3)Move constructor (4)Move constructor (5)Normal constructor (6)Normal constructor (7)Move assignment operator (8)Normal constructor (9)Copy assignment operator (10)Normal constructor (11)Copy constructor (12)
On the first iteration of the loop, the vector is still empty. Take the following line of code from the loop:
vec.push_back(Spreadsheet(100, 100));With this line, a new Spreadsheet object is created, invoking the normal constructor (1). The vector resizes itself to make space for the new object being pushed in. The created Spreadsheet object is then moved into the vector, invoking the move constructor (2).
On the second iteration of the loop, a second Spreadsheet object is created with the normal constructor (3). At this point, the vector can hold one element, so it’s again resized to make space for a second object. Because the vector is resized, the previously added elements need to be moved from the old vector to the new and bigger vector. This triggers a call to the move constructor for each previously added element. There is one element in the vector, so the move constructor is called one time (4). Finally, the new Spreadsheet object is moved into the vector with its move constructor (5).
Next, a Spreadsheet object s is created using the normal constructor (6). The createObject() function creates a temporary Spreadsheet object with its normal constructor (7), which is then returned from the function, and assigned to the variable s. Because the temporary object returned from createObject() ceases to exist after the assignment, the compiler invokes the move assignment operator (8) instead of the normal copy assignment operator. Another Spreadsheet object is created, s2, using the normal constructor (9). The assignment s2 = s invokes the copy assignment operator (10) because the right-hand side object is not a temporary object, but a named object. This copy assignment operator creates a temporary copy, which triggers a call to the copy constructor, which first delegates to the normal constructor (11 and 12).
If the Spreadsheet class did not implement move semantics, all the calls to the move constructor and move assignment operator would be replaced with calls to the copy constructor and copy assignment operator. In the previous example, the Spreadsheet objects in the loop have 10,000 (100 x 100) elements. The implementation of the Spreadsheet move constructor and move assignment operator doesn’t require any memory allocation, while the copy constructor and copy assignment operator require 101 allocations each. So, using move semantics can increase performance a lot in certain situations.
As another example where move semantics increases performance, take a swap() function that swaps two objects. The following swapCopy() implementation does not use move semantics:
void swapCopy(T& a, T& b){T temp(a);a = b;b = temp;}
First, a is copied to temp, then b is copied to a, and finally temp is copied to b. This implementation will hurt performance if type T is expensive to copy. With move semantics, the implementation can avoid all copying:
void swapMove(T& a, T& b){T temp(std::move(a));a = std::move(b);b = std::move(temp);}
This is exactly how std::swap() from the Standard Library is implemented.
Earlier in this chapter, the rule of five was introduced. All the discussions so far have been to explain how you have to write those five special member functions: destructor, copy and move constructors, and copy and move assignment operators. However, in modern C++, you should adopt the so-called rule of zero.
The rule of zero states that you should design your classes in such a way that they do not require any of those five special member functions. How do you do that? Basically, you should avoid having any old-style dynamically allocated memory. Instead, use modern constructs such as Standard Library containers. For example, use a vector<vector<SpreadsheetCell>> instead of the SpreadsheetCell** data member in the Spreadsheet class. The vector handles memory automatically, so there is no need for any of those five special member functions.
C++ also provides myriad choices for methods. This section explains all the tricky details.
Methods, like data members, sometimes apply to the class as a whole, not to each object. You can write static methods as well as data members. As an example, consider the SpreadsheetCell class from Chapter 8. It has two helper methods: stringToDouble() and doubleToString(). These methods don’t access information about specific objects, so they could be static. Here is the class definition with these methods static:
class SpreadsheetCell{// Omitted for brevityprivate:static std::string doubleToString(double inValue);static double stringToDouble(std::string_view inString);// Omitted for brevity};
The implementations of these two methods are identical to the previous implementations. You don’t repeat the static keyword in front of the method definitions. However, note that static methods are not called on a specific object, so they have no this pointer, and are not executing for a specific object with access to its non-static members. In fact, a static method is just like a regular function. The only difference is that it can access private and protected
static members of the class. It can also access private and protected non-static data members on objects of the same type, if those objects are made visible to the static method, for example, by passing in a reference or pointer to such an object.
You call a static method just like a regular function from within any method of the class. Thus, the implementation of all the methods in SpreadsheetCell can stay the same. Outside of the class, you need to qualify the method name with the class name using the scope resolution operator. Access control applies as usual.
You might want to make stringToDouble() and doubleToString()
public so that other code outside the class can make use of them. If so, you can call them from anywhere like this:
string str = SpreadsheetCell::doubleToString(5.0);A const object is an object whose value cannot be changed. If you have a const, reference to const, or pointer to a const object, the compiler does not let you call any methods on that object unless those methods guarantee that they won’t change any data members. The way you guarantee that a method won’t change data members is to mark the method itself with the const keyword. Here is the SpreadsheetCell class with the methods that don’t change any data members marked as const:
class SpreadsheetCell{public:// Omitted for brevitydouble getValue() const;std::string getString() const;// Omitted for brevity};
The const specification is part of the method prototype and must accompany its definition as well:
double SpreadsheetCell::getValue() const{return mValue;}std::string SpreadsheetCell::getString() const{return doubleToString(mValue);}
Marking a method as const signs a contract with client code guaranteeing that you will not change the internal values of the object within the method. If you try to declare a method const that actually modifies a data member, the compiler will complain. You also cannot declare a static method, such as the doubleToString() and stringToDouble() methods from the previous section, const because it is redundant. Static methods do not have an instance of the class, so it would be impossible for them to change internal values. const works by making it appear inside the method that you have a const reference to each data member. Thus, if you try to change the data member, the compiler will flag an error.
You can call const and non-const methods on a non-const object. However, you can only call const methods on a const object. Here are some examples:
SpreadsheetCell myCell(5);cout << myCell.getValue() << endl; // OKmyCell.setString("6"); // OKconst SpreadsheetCell& myCellConstRef = myCell;cout << myCellConstRef.getValue() << endl; // OKmyCellConstRef.setString("6"); // Compilation Error!
You should get into the habit of declaring const all methods that don’t modify the object so that you can use references to const objects in your program.
Note that const objects can still be destroyed, and their destructor can be called. Nevertheless, destructors are not allowed to be declared const.
Sometimes you write a method that is “logically” const but happens to change a data member of the object. This modification has no effect on any user-visible data, but is technically a change, so the compiler won’t let you declare the method const. For example, suppose that you want to profile your spreadsheet application to obtain information about how often data is being read. A crude way to do this would be to add a counter to the SpreadsheetCell class that counts each call to getValue() or getString(). Unfortunately, that makes those methods non-const in the compiler’s eyes, which is not what you intended. The solution is to make your new counter variable mutable, which tells the compiler that it’s okay to change it in a const method. Here is the new SpreadsheetCell class definition:
class SpreadsheetCell{// Omitted for brevityprivate:double mValue = 0;mutable size_t mNumAccesses = 0;};
Here are the definitions for getValue() and getString():
double SpreadsheetCell::getValue() const{mNumAccesses++;return mValue;}std::string SpreadsheetCell::getString() const{mNumAccesses++;return doubleToString(mValue);}
You’ve already noticed that you can write multiple constructors in a class, all of which have the same name. These constructors differ only in the number and/or types of their parameters. You can do the same thing for any method or function in C++. Specifically, you can overload the function or method name by using it for multiple functions, as long as the number and/or types of the parameters differ. For example, in the SpreadsheetCell class you can rename both setString() and setValue() to set(). The class definition now looks like this:
class SpreadsheetCell{public:// Omitted for brevityvoid set(double inValue);void set(std::string_view inString);// Omitted for brevity};
The implementations of the set() methods stay the same. When you write code to call set(), the compiler determines which instance to call based on the parameter you pass: if you pass a string_view, the compiler calls the string instance; if you pass a double, the compiler calls the double instance. This is called overload resolution.
You might be tempted to do the same thing for getValue() and getString(): rename each of them to get(). However, that does not work. C++ does not allow you to overload a method name based only on the return type of the method because in many cases it would be impossible for the compiler to determine which instance of the method to call. For example, if the return value of the method is not captured anywhere, the compiler has no way to tell which instance of the method you are trying to call.
You can overload a method based on const. That is, you can write two methods with the same name and same parameters, one of which is declared const and one of which is not. The compiler calls the const method if you have a const object, and the non-const method if you have a non-const object.
Often, the implementation of the const version and the non-const version is identical. To prevent code duplication, you can use the Scott Meyer’s const_cast() pattern. For example, the Spreadsheet class has a method called getCellAt() returning a non-const reference to a SpreadsheetCell. You can add a const overload that returns a const reference to a SpreadsheetCell as follows:
class Spreadsheet{public:SpreadsheetCell& getCellAt(size_t x, size_t y);const SpreadsheetCell& getCellAt(size_t x, size_t y) const;// Code omitted for brevity.};
Scott Meyer’s const_cast() pattern says that you should implement the const version as you normally would, and implement the non-const version by forwarding the call to the const version with the appropriate casts. Basically, you cast *this to a const Spreadsheet& using std::as_const() (defined in <utility>), call the const version of getCellAt(), and then remove the const from the result by using a const_cast():
const SpreadsheetCell& Spreadsheet::getCellAt(size_t x, size_t y) const{verifyCoordinate(x, y);return mCells[x][y];}SpreadsheetCell& Spreadsheet::getCellAt(size_t x, size_t y){return const_cast<SpreadsheetCell&>(std::as_const(*this).getCellAt(x, y));}
The std::as_const() function is available since C++17. If your compiler doesn’t support it yet, you can use the following static_cast() instead:
return const_cast<SpreadsheetCell&>(static_cast<const Spreadsheet&>(*this).getCellAt(x, y));
With these two getCellAt() overloads, you can now call getCellAt() on const and non-const Spreadsheet objects:
Spreadsheet sheet1(5, 6);SpreadsheetCell& cell1 = sheet1.getCellAt(1, 1);const Spreadsheet sheet2(5, 6);const SpreadsheetCell& cell2 = sheet2.getCellAt(1, 1);
In this case, the const version of getCellAt() is not doing much, so you don’t win a lot by using the const_cast() pattern. However, imagine that the const version of getCellAt() is doing more work, then forwarding the non-const to the const version avoids duplicating that code.
Overloaded methods can be explicitly deleted, which enables you to disallow calling a method with particular arguments. For example, suppose you have the following class:
class MyClass{public:void foo(int i);};
The foo() method can be called as follows:
MyClass c;c.foo(123);c.foo(1.23);
For the third line, the compiler converts the double value (1.23) to an integer value (1) and then calls foo(int i). The compiler might give you a warning, but it will perform this implicit conversion. You can prevent the compiler from performing this conversion by explicitly deleting a double instance of foo():
class MyClass{public:void foo(int i);void foo(double d) = delete;};
With this change, an attempt to call foo() with a double will be flagged as an error by the compiler, instead of the compiler performing a conversion to an integer.
C++ gives you the ability to recommend that a call to a method (or function) should not actually be implemented in the generated code as a call to a separate block of code. Instead, the compiler should insert the method’s body directly into the code where the method is called. This process is called inlining, and methods that want this behavior are called inline methods. Inlining is safer than using #define macros.
You can specify an inline method by placing the inline keyword in front of its name in the method definition. For example, you might want to make the accessor methods of the SpreadsheetCell class inline, in which case you would define them like this:
inline double SpreadsheetCell::getValue() const{mNumAccesses++;return mValue;}inline std::string SpreadsheetCell::getString() const{mNumAccesses++;return doubleToString(mValue);}
This gives a hint to the compiler to replace calls to getValue() and getString() with the actual method body instead of generating code to make a function call. Note that the inline keyword is just a hint for the compiler. The compiler can ignore it if it thinks it would hurt performance.
There is one caveat: definitions of inline methods (and functions) must be available in every source file in which they are called. That makes sense if you think about it: how can the compiler substitute the method’s body if it can’t see the method definition? Thus, if you write inline methods, you should place the definitions in a header file along with their prototypes.
C++ provides an alternate syntax for declaring inline methods that doesn’t use the inline keyword at all. Instead, you place the method definition directly in the class definition. Here is a SpreadsheetCell class definition with this syntax:
class SpreadsheetCell{public:// Omitted for brevitydouble getValue() const { mNumAccesses++; return mValue; }std::string getString() const{mNumAccesses++;return doubleToString(mValue);}// Omitted for brevity};
Many C++ programmers discover the inline method syntax and employ it without understanding the ramifications of marking a method inline. Marking a method or function as inline only gives a hint to the compiler. Compilers will only inline the simplest methods and functions. If you define an inline method that the compiler doesn’t want to inline, it will silently ignore the hint. Modern compilers will take metrics like code bloat into account before deciding to inline a method or function, and they will not inline anything that is not cost-effective.
A feature similar to method overloading in C++ is default arguments. You can specify defaults for function and method parameters in the prototype. If the user specifies those arguments, the default values are ignored. If the user omits those arguments, the default values are used. There is a limitation, though: you can only provide defaults for a continuous list of parameters starting from the rightmost parameter. Otherwise, the compiler will not be able to match missing arguments to default arguments. Default arguments can be used in functions, methods, and constructors. For example, you can assign default values to the width and height in your Spreadsheet constructor:
class Spreadsheet{public:Spreadsheet(size_t width = 100, size_t height = 100);// Omitted for brevity};
The implementation of the Spreadsheet constructor stays the same. Note that you specify the default arguments only in the method declaration, but not in the definition.
Now you can call the Spreadsheet constructor with zero, one, or two, arguments even though there is only one non-copy constructor:
Spreadsheet s1;Spreadsheet s2(5);Spreadsheet s3(5, 6);
A constructor with defaults for all its parameters can function as a default constructor. That is, you can construct an object of that class without specifying any arguments. If you try to declare both a default constructor and a multi-argument constructor with defaults for all its parameters, the compiler will complain because it won’t know which constructor to call if you don’t specify any arguments.
Note that anything you can do with default arguments you can do with method overloading. You could write three different constructors, each of which takes a different number of parameters. However, default arguments allow you to write just one constructor that can take three different number of arguments. You should use the mechanism with which you are most comfortable.
C++ gives you many choices for data members. In addition to declaring simple data members in your classes, you can create static data members that all objects of the class share, const members, reference members, const reference members, and more. This section explains the intricacies of these different kinds of data members.
Sometimes giving each object of a class a copy of a variable is overkill or won’t work. The data member might be specific to the class, but not appropriate for each object to have its own copy. For example, you might want to give each spreadsheet a unique numerical identifier. You would need a counter that starts at 0 from which each new object could obtain its ID. This spreadsheet counter really belongs to the Spreadsheet class, but it doesn’t make sense for each Spreadsheet object to have a copy of it because you would have to keep all the counters synchronized somehow. C++ provides a solution with static data members. A static data member is a data member associated with a class instead of an object. You can think of static data members as global variables specific to a class. Here is the Spreadsheet class definition, including the new static counter data member:
class Spreadsheet{// Omitted for brevityprivate:static size_t sCounter;};
In addition to listing static class members in the class definition, you will have to allocate space for them in a source file, usually the source file in which you place your class method definitions. You can initialize them at the same time, but note that unlike normal variables and data members, they are initialized to 0 by default. Static pointers are initialized to nullptr. Here is the code to allocate space for, and zero-initialize, the sCounter member:
size_t Spreadsheet::sCounter;Static data members are zero-initialized by default, but if you want, you can explicitly initialize them to 0 as follows:
size_t Spreadsheet::sCounter = 0;This code appears outside of any function or method bodies. It’s almost like declaring a global variable, except that the Spreadsheet:: scope resolution specifies that it’s part of the Spreadsheet class.
Inline VariablesStarting with C++17, you can declare your static data members as inline. The benefit of this is that you do not have to allocate space for them in a source file. Here’s an example:
class Spreadsheet{// Omitted for brevityprivate:static inline size_t sCounter = 0;};
Note the inline keyword. With this class definition, the following line can be removed from the source file:
size_t Spreadsheet::sCounter;You can use static data members as if they were regular data members from within class methods. For example, you might want to create an mId data member for the Spreadsheet class and initialize it from sCounter in the Spreadsheet constructor. Here is the Spreadsheet class definition with an mId member:
class Spreadsheet{public:// Omitted for brevitysize_t getId() const;private:// Omitted for brevitystatic size_t sCounter;size_t mId = 0;};
Here is an implementation of the Spreadsheet constructor that assigns the initial ID:
Spreadsheet::Spreadsheet(size_t width, size_t height): mId(sCounter++), mWidth(width), mHeight(height){mCells = new SpreadsheetCell*[mWidth];for (size_t i = 0; i < mWidth; i++) {mCells[i] = new SpreadsheetCell[mHeight];}}
As you can see, the constructor can access sCounter as if it were a normal member. The copy constructor should also assign a new ID. This is handled automatically because the Spreadsheet copy constructor delegates to the non-copy constructor, which creates the new ID.
You should not copy the ID in the copy assignment operator. Once an ID is assigned to an object, it should never change. Thus, it’s recommended to make mId a const data member. const data members are discussed later in this chapter.
Access control specifiers apply to static data members: sCounter is private, so it cannot be accessed from outside class methods. If sCounter was public, you could access it from outside class methods by specifying that the variable is part of the Spreadsheet class with the :: scope resolution operator:
int c = Spreadsheet::sCounter;However, it’s not recommended to have public data members (const
static members discussed in the next section are an exception). You should grant access through public get/set methods. If you want to grant access to a static data member, you need to implement static get/set methods.
Data members in your class can be declared const, meaning they can’t be changed after they are created and initialized. You should use static
const (or const
static) data members in place of global constants when the constants apply only to the class, also called class constants. static
const data members of integral and enumeration types can be defined and initialized inside the class definition without making them inline variables. For example, you might want to specify a maximum height and width for spreadsheets. If the user tries to construct a spreadsheet with a greater height or width than the maximum, the maximum is used instead. You can make the maximum height and width static
const members of the Spreadsheet class:
class Spreadsheet{public:// Omitted for brevitystatic const size_t kMaxHeight = 100;static const size_t kMaxWidth = 100;};
You can use these new constants in your constructor as follows:
Spreadsheet::Spreadsheet(size_t width, size_t height): mId(sCounter++), mWidth(std::min(width, kMaxWidth))// std::min() requires <algorithm>, mHeight(std::min(height, kMaxHeight)){mCells = new SpreadsheetCell*[mWidth];for (size_t i = 0; i < mWidth; i++) {mCells[i] = new SpreadsheetCell[mHeight];}}
kMaxHeight and kMaxWidth are public, so you can access them from anywhere in your program as if they were global variables, but with slightly different syntax. You must specify that the variable is part of the Spreadsheet class with the :: scope resolution operator:
cout << "Maximum height is: " << Spreadsheet::kMaxHeight << endl;These constants can also be used as default values for the constructor parameters. Remember that you can only give default values for a continuous set of parameters starting with the rightmost parameter:
class Spreadsheet{public:Spreadsheet(size_t width = kMaxWidth, size_t height = kMaxHeight);// Omitted for brevity};
Spreadsheets and SpreadsheetCells are great, but they don’t make a very useful application by themselves. You need code to control the entire spreadsheet program, which you could package into a SpreadsheetApplication class.
The implementation of this class is unimportant at the moment. For now, consider this architecture problem: how can spreadsheets communicate with the application? The application stores a list of spreadsheets, so it can communicate with the spreadsheets. Similarly, each spreadsheet could store a reference to the application object. The Spreadsheet class must then know about the SpreadsheetApplication class, and the SpreadsheetApplication class must know about the Spreadsheet class. This is a circular reference and cannot be solved with normal #includes. The solution is to use a forward declaration in one of the header files. The following is a new Spreadsheet class definition that uses a forward declaration to tell the compiler about the SpreadsheetApplication class. Chapter 11 explains another benefit of forward declarations: they can improve compilation and linking times.
class SpreadsheetApplication;// forward declarationclass Spreadsheet{public:Spreadsheet(size_t width, size_t height,SpreadsheetApplication& theApp);// Code omitted for brevity.private:// Code omitted for brevity.SpreadsheetApplication& mTheApp;};
This definition adds a SpreadsheetApplication reference as a data member. It’s recommended to use a reference in this case instead of a pointer because a Spreadsheet should always refer to a SpreadsheetApplication. This would not be guaranteed with a pointer.
Note that storing a reference to the application is only done to demonstrate the use of references as data members. It’s not recommended to couple the Spreadsheet and SpreadsheetApplication classes together in this way, but instead to use a paradigm such as MVC (Model-View-Controller), introduced in Chapter 4.
The application reference is given to each Spreadsheet in its constructor. A reference cannot exist without referring to something, so mTheApp must be given a value in the ctor-initializer of the constructor:
Spreadsheet::Spreadsheet(size_t width, size_t height,SpreadsheetApplication& theApp): mId(sCounter++), mWidth(std::min(width, kMaxWidth)), mHeight(std::min(height, kMaxHeight)), mTheApp(theApp){// Code omitted for brevity.}
You must also initialize the reference member in the copy constructor. This is handled automatically because the Spreadsheet copy constructor delegates to the non-copy constructor, which initializes the reference member.
Remember that after you have initialized a reference, you cannot change the object to which it refers. It’s not possible to assign to references in the assignment operator. Depending on your use case, this might mean that an assignment operator cannot be provided for your class with reference data members. If that’s the case, the assignment operator is typically marked as deleted.
Your reference members can refer to const objects just as normal references can refer to const objects. For example, you might decide that Spreadsheets should only have a const reference to the application object. You can simply change the class definition to declare mTheApp as a const reference:
class Spreadsheet{public:Spreadsheet(size_t width, size_t height,const SpreadsheetApplication& theApp);// Code omitted for brevity.private:// Code omitted for brevity.const SpreadsheetApplication& mTheApp;};
There is an important difference between using a const reference versus a non-const reference. The const reference SpreadsheetApplication data member can only be used to call const methods on the SpreadsheetApplication object. If you try to call a non-const method through a const reference, you will get a compilation error.
It’s also possible to have a static reference member or a static
const reference member, but you will rarely need something like that.
Class definitions can contain more than just member functions and data members. You can also write nested classes and structs, declare type aliases, or create enumerated types. Anything declared inside a class is in the scope of that class. If it is public, you can access it outside the class by scoping it with the ClassName:: scope resolution syntax.
You can provide a class definition inside another class definition. For example, you might decide that the SpreadsheetCell class is really part of the Spreadsheet class. And since it becomes part of the Spreadsheet class, you might as well rename it to Cell. You could define both of them like this:
class Spreadsheet{public:class Cell{public:Cell() = default;Cell(double initialValue);// Omitted for brevity};Spreadsheet(size_t width, size_t height,const SpreadsheetApplication& theApp);// Remainder of Spreadsheet declarations omitted for brevity};
Now, the Cell class is defined inside the Spreadsheet class, so anywhere you refer to a Cell outside of the Spreadsheet class, you must qualify the name with the Spreadsheet:: scope. This applies even to the method definitions. For example, the double constructor of Cell now looks like this:
Spreadsheet::Cell::Cell(double initialValue): mValue(initialValue){}
You must even use the syntax for return types (but not parameters) of methods in the Spreadsheet class itself:
Spreadsheet::Cell& Spreadsheet::getCellAt(size_t x, size_t y){verifyCoordinate(x, y);return mCells[x][y];}
Fully defining the nested Cell class directly inside the Spreadsheet class makes the definition of the Spreadsheet class a bit bloated. You can alleviate this by only including a forward declaration for Cell in the Spreadsheet class, and then defining the Cell class separately, as follows:
class Spreadsheet{public:class Cell;Spreadsheet(size_t width, size_t height,const SpreadsheetApplication& theApp);// Remainder of Spreadsheet declarations omitted for brevity};class Spreadsheet::Cell{public:Cell() = default;Cell(double initialValue);// Omitted for brevity};
Normal access control applies to nested class definitions. If you declare a private or protected nested class, you can only use it inside the outer class. A nested class has access to all protected and private members of the outer class. The outer class on the other hand can only access public members of the nested class.
If you want to define a number of constants inside a class, you should use an enumerated type instead of a collection of #defines. For example, you can add support for cell coloring to the SpreadsheetCell class as follows:
class SpreadsheetCell{public:// Omitted for brevityenum class Color { Red = 1, Green, Blue, Yellow };void setColor(Color color);Color getColor() const;private:// Omitted for brevityColor mColor = Color::Red;};
The implementation of the setColor() and getColor() methods is straightforward:
void SpreadsheetCell::setColor(Color color) { mColor = color; }SpreadsheetCell::Color SpreadsheetCell::getColor() const { return mColor; }
The new methods can be used as follows:
SpreadsheetCell myCell(5);myCell.setColor(SpreadsheetCell::Color::Blue);auto color = myCell.getColor();
You often want to perform operations on objects, such as adding them, comparing them, or streaming them to or from files. For example, spreadsheets are really only useful when you can perform arithmetic actions on them, such as summing an entire row of cells.
In true object-oriented fashion, SpreadsheetCell objects should be able to add themselves to other SpreadsheetCell objects. Adding a cell to another cell produces a third cell with the result. It doesn’t change either of the original cells. The meaning of addition for SpreadsheetCells is the addition of the values of the cells.
You can declare and define an add() method for your SpreadsheetCell class like this:
class SpreadsheetCell{public:// Omitted for brevitySpreadsheetCell add(const SpreadsheetCell& cell) const;// Omitted for brevity};
This method adds two cells together, returning a new third cell whose value is the sum of the first two. It is declared const and takes a reference to a const
SpreadsheetCell because add() does not change either of the source cells. Here is the implementation:
SpreadsheetCell SpreadsheetCell::add(const SpreadsheetCell& cell) const{return SpreadsheetCell(getValue() + cell.getValue());}
You can use the add() method like this:
SpreadsheetCell myCell(4), anotherCell(5);SpreadsheetCell aThirdCell = myCell.add(anotherCell);
That works, but it’s a bit clumsy. You can do better.
It would be convenient to be able to add two cells with the plus sign the way that you add two ints or two doubles—something like this:
SpreadsheetCell myCell(4), anotherCell(5);SpreadsheetCell aThirdCell = myCell + anotherCell;
C++ allows you to write your own version of the plus sign, called the addition operator, to work correctly with your classes. To do that, you write a method with the name operator+ that looks like this:
class SpreadsheetCell{public:// Omitted for brevitySpreadsheetCell operator+(const SpreadsheetCell& cell) const;// Omitted for brevity};
The definition of the method is identical to the implementation of the add() method:
SpreadsheetCell SpreadsheetCell::operator+(const SpreadsheetCell& cell) const{return SpreadsheetCell(getValue() + cell.getValue());}
Now you can add two cells together using the plus sign as shown previously.
This syntax takes a bit of getting used to. Try not to worry too much about the strange method name operator+—it’s just a name like foo or add. In order to understand the rest of the syntax, it helps to understand what’s really going on. When your C++ compiler parses a program and encounters an operator, such as +, -, =, or <<, it tries to find a function or method with the name operator+, operator-, operator=, or operator<<, respectively, that takes the appropriate parameters. For example, when the compiler sees the following line, it tries to find either a method in the SpreadsheetCell class named operator+ that takes another SpreadsheetCell object, or a global function named operator+ that takes two SpreadsheetCell objects:
SpreadsheetCell aThirdCell = myCell + anotherCell;If the SpreadsheetCell class contains an operator+ method, then the previous line is translated to this:
SpreadsheetCell aThirdCell = myCell.operator+(anotherCell);Note that there’s no requirement that operator+ takes as a parameter an object of the same type as the class for which it’s written. You could write an operator+ for SpreadsheetCells that takes a Spreadsheet to add to the SpreadsheetCell. That wouldn’t make sense to the programmer, but the compiler would allow it.
Note also that you can give operator+ any return value you want. Operator overloading is a form of function overloading, and recall that function overloading does not look at the return type of the function.
Surprisingly, once you’ve written the operator+ shown earlier, not only can you add two cells together, but you can also add a cell to a string_view, a double, or an int!
SpreadsheetCell myCell(4), aThirdCell;string str = "hello";aThirdCell = myCell + string_view(str);aThirdCell = myCell + 5.6;aThirdCell = myCell + 4;
The reason this code works is that the compiler does more to try to find an appropriate operator+ than just look for one with the exact types specified. The compiler also tries to find an appropriate conversion for the types so that an operator+ can be found. Constructors that take the type in question are appropriate converters. In the preceding example, when the compiler sees a SpreadsheetCell trying to add itself to double, it finds the SpreadsheetCell constructor that takes a double and constructs a temporary SpreadsheetCell object to pass to operator+. Similarly, when the compiler sees the line trying to add a SpreadsheetCell to a string_view, it calls the string_view
SpreadsheetCell constructor to create a temporary SpreadsheetCell to pass to operator+.
This implicit conversion behavior is usually convenient. However, in the preceding example, it doesn’t really make sense to add a string_view to a SpreadsheetCell. You can prevent the implicit construction of a SpreadsheetCell from a string_view by marking that constructor with the explicit keyword:
class SpreadsheetCell{public:SpreadsheetCell() = default;SpreadsheetCell(double initialValue);explicit SpreadsheetCell(std::string_view initialValue);// Remainder omitted for brevity};
The explicit keyword goes only in the class definition, and only makes sense when applied to constructors that can be called with one argument, such as one-parameter constructors or multi-parameter constructors with default values for parameters.
The selection of an implicit constructor might be inefficient, because temporary objects must be created. To avoid implicit construction for adding a double, you could write a second operator+ as follows:
SpreadsheetCell SpreadsheetCell::operator+(double rhs) const{return SpreadsheetCell(getValue() + rhs);}
Implicit conversions allow you to use an operator+ method to add your SpreadsheetCell objects to ints and doubles. However, the operator is not commutative, as shown in the following code:
aThirdCell = myCell + 4; // Works fine.aThirdCell = myCell + 5.6; // Works fine.aThirdCell = 4 + myCell; // FAILS TO COMPILE!aThirdCell = 5.6 + myCell; // FAILS TO COMPILE!
The implicit conversion works fine when the SpreadsheetCell object is on the left of the operator, but it doesn’t work when it’s on the right. Addition is supposed to be commutative, so something is wrong here. The problem is that the operator+ method must be called on a SpreadsheetCell object, and that object must be on the left-hand side of the operator+. That’s just the way the C++ language is defined. So, there’s no way you can get this code to work with an operator+ method.
However, you can get it to work if you replace the in-class operator+ method with a global operator+ function that is not tied to any particular object. The function looks like this:
SpreadsheetCell operator+(const SpreadsheetCell& lhs,const SpreadsheetCell& rhs){return SpreadsheetCell(lhs.getValue() + rhs.getValue());}
You need to declare the operator in the header file:
class SpreadsheetCell{//Omitted for brevity};SpreadsheetCell operator+(const SpreadsheetCell& lhs,const SpreadsheetCell& rhs);
Now all four of the addition lines work as you expect:
aThirdCell = myCell + 4; // Works fine.aThirdCell = myCell + 5.6; // Works fine.aThirdCell = 4 + myCell; // Works fine.aThirdCell = 5.6 + myCell; // Works fine.
You might be wondering what happens if you write the following code:
aThirdCell = 4.5 + 5.5;It compiles and runs, but it’s not calling the operator+ you wrote. It does normal double addition of 4.5 and 5.5, which results in the following intermediate statement:
aThirdCell = 10;To make this assignment work, there should be a SpreadsheetCell object on the right-hand side. The compiler will discover a non-explicit user-defined constructor that takes a double, will use this constructor to implicitly convert the double value into a temporary SpreadsheetCell object, and will then call the assignment operator.
Now that you understand how to write operator+, the rest of the basic arithmetic operators are straightforward. Here are the declarations of +, -, *, and /, where you have to replace <op> with +, -, *, and /, resulting in four functions. You can also overload %, but it doesn’t make sense for the double values stored in SpreadsheetCells.
class SpreadsheetCell{// Omitted for brevity};SpreadsheetCell operator<op>(const SpreadsheetCell& lhs,const SpreadsheetCell& rhs);
The implementations of operator- and operator* are very similar to the implementation of operator+, so these are not shown. For operator/, the only tricky aspect is remembering to check for division by zero. This implementation throws an exception if division by zero is detected:
SpreadsheetCell operator/(const SpreadsheetCell& lhs,const SpreadsheetCell& rhs){if (rhs.getValue() == 0) {throw invalid_argument("Divide by zero.");}return SpreadsheetCell(lhs.getValue() / rhs.getValue());}
C++ does not require you to actually implement multiplication in operator*, division in operator/, and so on. You could implement multiplication in operator/, division in operator+, and so forth. However, that would be extremely confusing, and there is no good reason to do so except as a practical joke. Whenever possible, stick to the commonly used operator meanings in your implementations.
In addition to the basic arithmetic operators, C++ provides shorthand operators such as += and -=. You might assume that writing operator+ for your class also provides operator+=. No such luck. You have to overload the shorthand arithmetic operators explicitly. These operators differ from the basic arithmetic operators in that they change the object on the left-hand side of the operator instead of creating a new object. A second, subtler difference is that, like the assignment operator, they generate a result that is a reference to the modified object.
The arithmetic shorthand operators always require an object on the left-hand side, so you should write them as methods, not as global functions. Here are the declarations for the SpreadsheetCell class:
class SpreadsheetCell{public:// Omitted for brevitySpreadsheetCell& operator+=(const SpreadsheetCell& rhs);SpreadsheetCell& operator-=(const SpreadsheetCell& rhs);SpreadsheetCell& operator*=(const SpreadsheetCell& rhs);SpreadsheetCell& operator/=(const SpreadsheetCell& rhs);// Omitted for brevity};
Here is the implementation for operator+=. The others are very similar.
SpreadsheetCell& SpreadsheetCell::operator+=(const SpreadsheetCell& rhs){set(getValue() + rhs.getValue());return *this;}
The shorthand arithmetic operators are combinations of the basic arithmetic and assignment operators. With the previous definitions, you can now write code like this:
SpreadsheetCell myCell(4), aThirdCell(2);aThirdCell -= myCell;aThirdCell += 5.4;
You cannot, however, write code like this (which is a good thing!):
5.4 += aThirdCell;When you have both a normal and a shorthand version of a certain operator, it’s recommended to implement the normal one in terms of the shorthand version to avoid code duplication. For example:
SpreadsheetCell operator+(const SpreadsheetCell& lhs, const SpreadsheetCell& rhs){auto result(lhs);// Local copyresult += rhs;// Forward to op=() versionreturn result;}
The comparison operators, such as >, <, and ==, are another useful set of operators to define for your classes. Like the basic arithmetic operators, they should be global functions so that you can use implicit conversion on both the left-hand side and the right-hand side of the operator. The comparison operators all return a bool. Of course, you can change the return type, but that’s not recommended.
Here are the declarations, where you have to replace <op> with ==, <, >, !=, <=, and >=, resulting in six functions:
class SpreadsheetCell{// Omitted for brevity};bool operator<op>(const SpreadsheetCell& lhs, const SpreadsheetCell& rhs);
Here is the definition of operator==. The others are very similar.
bool operator==(const SpreadsheetCell& lhs, const SpreadsheetCell& rhs){return (lhs.getValue() == rhs.getValue());}
In classes with more data members, it might be painful to compare each data member. However, once you’ve implemented == and <, you can write the rest of the comparison operators in terms of those two. For example, here is a definition of operator>= that uses operator<:
bool operator>=(const SpreadsheetCell& lhs, const SpreadsheetCell& rhs){return !(lhs < rhs);}
You can use these operators to compare SpreadsheetCells to other SpreadsheetCells, and also to doubles and ints:
if (myCell > aThirdCell || myCell < 10) {cout << myCell.getValue() << endl;}
Many people find the syntax of operator overloading tricky and confusing, at least at first. The irony is that it’s supposed to make things simpler. As you’ve discovered, that doesn’t mean simpler for the person writing the class, but simpler for the person using the class. The point is to make your new classes as similar as possible to built-in types such as int and double: it’s easier to add objects using + than to remember whether the method name you should call is add() or sum().
At this point, you might be wondering exactly which operators you can overload. The answer is almost all of them—even some you’ve never heard of. You have actually just scratched the surface: you’ve seen the assignment operator in the section on object life cycles, the basic arithmetic operators, the shorthand arithmetic operators, and the comparison operators. Overloading the stream insertion and extraction operators is also useful. In addition, there are some tricky, but interesting, things you can do with operator overloading that you might not anticipate at first. The Standard Library uses operator overloading extensively. Chapter 15 explains how and when to overload the rest of the operators. Chapters 16 to 20 cover the Standard Library.
Now that you understand all the gory syntax of writing classes in C++, it helps to revisit the design principles from Chapters 5 and 6. Classes are the main unit of abstraction in C++. You should apply the principles of abstraction to your classes to separate the interface from the implementation as much as possible. Specifically, you should make all data members private and provide getter and setter methods for them. This is how the SpreadsheetCell class is implemented. mValue is private; set() sets this value, while getValue() and getString() retrieve the value.
Even with the preceding measures and the best design principles, the C++ language is fundamentally unfriendly to the principle of abstraction. The syntax requires you to combine your public interfaces and private (or protected) data members and methods together in one class definition, thereby exposing some of the internal implementation details of the class to its clients. The downside of this is that if you have to add new non-public methods or data members to your class, all the clients of the class have to be recompiled. This can become a burden in bigger projects.
The good news is that you can make your interfaces a lot cleaner and hide all implementation details, resulting in stable interfaces. The bad news is that it takes a bit of coding. The basic principle is to define two classes for every class you want to write: the interface class and the implementation class. The implementation class is identical to the class you would have written if you were not taking this approach. The interface class presents public methods identical to those of the implementation class, but it only has one data member: a pointer to an implementation class object. This is called the pimpl idiom, private implementation idiom, or bridge pattern. The interface class method implementations simply call the equivalent methods on the implementation class object. The result of this is that no matter how the implementation changes, it has no impact on the public interface class. This reduces the need for recompilation. None of the clients that use the interface class need to be recompiled if the implementation (and only the implementation) changes. Note that this idiom only works if the single data member is a pointer to the implementation class. If it were a by-value data member, the clients would have to be recompiled when the definition of the implementation class changes.
To use this approach with the Spreadsheet class, define a public interface class, Spreadsheet, that looks like this:
#include "SpreadsheetCell.h"#include <memory>// Forward declarationsclass SpreadsheetApplication;class Spreadsheet{public:Spreadsheet(const SpreadsheetApplication& theApp,size_t width = kMaxWidth, size_t height = kMaxHeight);Spreadsheet(const Spreadsheet& src);~Spreadsheet();Spreadsheet& operator=(const Spreadsheet& rhs);void setCellAt(size_t x, size_t y, const SpreadsheetCell& cell);SpreadsheetCell& getCellAt(size_t x, size_t y);size_t getId() const;static const size_t kMaxHeight = 100;static const size_t kMaxWidth = 100;friend void swap(Spreadsheet& first, Spreadsheet& second) noexcept;private:class Impl;std::unique_ptr<Impl> mImpl;};
The implementation class, Impl, is a private nested class, because no one else besides the Spreadsheet class needs to know about the implementation class. The Spreadsheet class now contains only one data member: a pointer to an Impl instance. The public methods are identical to the old Spreadsheet.
The nested Spreadsheet::Impl class has almost the same interface as the original Spreadsheet class. However, because the Impl class is a private nested class of Spreadsheet, you cannot have the following global friend
swap() function that swaps two Spreadsheet::Impl objects:
friend void swap(Spreadsheet::Impl& first, Spreadsheet::Impl& second) noexcept;Instead, a private swap() method is defined for the Spreadsheet::Impl class as follows:
void swap(Impl& other) noexcept;The implementation is straightforward, but you need to remember that this is a nested class, so you need to specify Spreadsheet::Impl::swap() instead of just Impl::swap(). The same holds true for the other members. For details, see the section on nested classes earlier in this chapter. Here is the swap() method:
void Spreadsheet::Impl::swap(Impl& other) noexcept{using std::swap;swap(mWidth, other.mWidth);swap(mHeight, other.mHeight);swap(mCells, other.mCells);}
Now that the Spreadsheet class has a unique_ptr to the implementation class, the Spreadsheet class needs to have a user-declared destructor. Since we don’t need to do anything in this destructor, it can be defaulted in the implementation file as follows:
Spreadsheet::~Spreadsheet() = default;This shows that you can default a special member function not only in the class definition, but also in the implementation file.
The implementations of the Spreadsheet methods, such as setCellAt() and getCellAt(), just pass the request on to the underlying Impl object:
void Spreadsheet::setCellAt(size_t x, size_t y, const SpreadsheetCell& cell){mImpl->setCellAt(x, y, cell);}SpreadsheetCell& Spreadsheet::getCellAt(size_t x, size_t y){return mImpl->getCellAt(x, y);}
The constructors for the Spreadsheet must construct a new Impl to do its work:
Spreadsheet::Spreadsheet(const SpreadsheetApplication& theApp,size_t width, size_t height){mImpl = std::make_unique<Impl>(theApp, width, height);}Spreadsheet::Spreadsheet(const Spreadsheet& src){mImpl = std::make_unique<Impl>(*src.mImpl);}
The copy constructor looks a bit strange because it needs to copy the underlying Impl from the source spreadsheet. The copy constructor takes a reference to an Impl, not a pointer, so you must dereference the mImpl pointer to get to the object itself so the constructor call can take its reference.
The Spreadsheet assignment operator must similarly pass on the assignment to the underlying Impl:
Spreadsheet& Spreadsheet::operator=(const Spreadsheet& rhs){*mImpl = *rhs.mImpl;return *this;}
The first line in the assignment operator looks a little odd. The Spreadsheet assignment operator needs to forward the call to the Impl assignment operator, which only runs when you copy direct objects. By dereferencing the mImpl pointers, you force direct object assignment, which causes the assignment operator of Impl to be called.
The swap() function simply swaps the single data member:
void swap(Spreadsheet& first, Spreadsheet& second) noexcept{using std::swap;swap(first.mImpl, second.mImpl);}
This technique to truly separate interface from implementation is powerful. Although it is a bit clumsy at first, once you get used to it, you will find it natural to work with. However, it’s not common practice in most workplace environments, so you might find some resistance to trying it from your coworkers. The most compelling argument in favor of it is not the aesthetic one of splitting out the interface, but the speedup in build time if the implementation of the class changes. When a class is not using the pimpl idiom, a change to its implementation details might trigger a long build. For example, adding a new data member to a class definition triggers a rebuild of all other source files that include this class definition. With the pimpl idiom, you can modify the implementation class definition as much as you like, as long as the public interface class remains untouched, it won’t trigger a long build.
An alternative to separating the implementation from the interface is to use an abstract interface—that is, an interface with only pure virtual methods—and then have an implementation class that implements that interface. See Chapter 10 for a discussion on abstract interfaces.
This chapter, along with Chapter 8, provided all the tools you need to write solid, well-designed classes, and to use objects effectively.
You discovered that dynamic memory allocation in objects presents new challenges: you need to implement a destructor, copy constructor, copy assignment operator, move constructor, and move assignment operator, which properly copy, move, and free your memory. You learned how to prevent assignment and pass-by-value by explicitly deleting the copy constructor and assignment operator. You discovered the copy-and-swap idiom to implement copy assignment operators, and learned about the rule of zero.
You read more about different kinds of data members, including static, const, const reference, and mutable members. You also learned about static, inline, and const methods, method overloading, and default arguments. This chapter also described nested class definitions, and friend classes, functions, and methods.
You encountered operator overloading, and learned how to overload the arithmetic and comparison operators, both as global friend functions and as class methods.
Finally, you learned how to take abstraction to the extreme by providing separate interface and implementation classes.
Now that you’re fluent in the language of object-oriented programming, it’s time to tackle inheritance, which is covered next in Chapter 10.
In Chapter 5, you learned that an “is-a” relationship recognizes the pattern that real-world objects tend to exist in hierarchies. In programming, that pattern becomes relevant when you need to write a class that builds on, or slightly changes, another class. One way to accomplish this aim is to copy code from one class and paste it into the other. By changing the relevant parts or amending the code, you can achieve the goal of creating a new class that is slightly different from the original. This approach, however, leaves an OOP programmer feeling sullen and highly annoyed for the following reasons:
Not surprisingly, C++ provides built-in support for defining a true is-a relationship. The characteristics of C++ is-a relationships are described in the following section.
When you write a class definition in C++, you can tell the compiler that your class is inheriting from, deriving from, or extending an existing class. By doing so, your class automatically contains the data members and methods of the original class, which is called the parent class or base class or superclass. Extending an existing class gives your class (which is now called a derived class or a subclass) the ability to describe only the ways in which it is different from the parent class.
To extend a class in C++, you specify the class you are extending when you write the class definition. To show the syntax for inheritance, two classes are used, called Base and Derived. Don’t worry—more interesting examples are coming later. To begin, consider the following definition for the Base class:
class Base{public:void someMethod();protected:int mProtectedInt;private:int mPrivateInt;};
If you want to build a new class, called Derived, which inherits from Base, you tell the compiler that Derived derives from Base with the following syntax:
class Derived : public Base{public:void someOtherMethod();};
Derived is a full-fledged class that just happens to share the characteristics of the Base class. Don’t worry about the word public for now—its meaning is explained later in this chapter. Figure 10-1 shows the simple relationship between Derived and Base. You can declare objects of type Derived just like any other object. You could even define a third class that inherits from Derived, forming a chain of classes, as shown in Figure 10-2.
Derived doesn’t have to be the only derived class of Base. Additional classes can also inherit from Base, effectively becoming siblings to Derived, as shown in Figure 10-3.
A Client’s View of Inheritance
To a client, or another part of your code, an object of type Derived is also an object of type Base because Derived inherits from Base. This means that all the public methods and data members of Base and all the public methods and data members of Derived are available.
Code that uses the derived class does not need to know which class in your inheritance chain has defined a method in order to call it. For example, the following code calls two methods of a Derived object even though one of the methods is defined by the Base class:
Derived myDerived;myDerived.someMethod();myDerived.someOtherMethod();
It is important to understand that inheritance works in only one direction. The Derived class has a very clearly defined relationship to the Base class, but the Base class, as written, doesn’t know anything about the Derived class. That means that objects of type Base do not support public methods and data members of Derived because Base is not a Derived.
The following code does not compile because the Base class does not contain a public method called someOtherMethod():
Base myBase;myBase.someOtherMethod(); // Error! Base doesn't have a someOtherMethod().
A pointer or reference to an object can refer to an object of the declared class or any of its derived classes. This tricky subject is explained in detail later in this chapter. The concept to understand now is that a pointer to a Base can actually be pointing to a Derived object. The same is true for a reference. The client can still access only the methods and data members that exist in Base, but through this mechanism, any code that operates on a Base can also operate on a Derived.
For example, the following code compiles and works just fine, even though it initially appears that there is a type mismatch:
Base* base = new Derived(); // Create Derived, store it in Base pointer.However, you cannot call methods from the Derived class through the Base pointer. The following does not work:
base->someOtherMethod();This is flagged as an error by the compiler because, although the object is of type Derived and therefore does have someOtherMethod() defined, the compiler can only think of it as type Base, which does not have someOtherMethod() defined.
To the derived class, nothing much has changed in terms of how it is written or how it behaves. You can still define methods and data members on a derived class just as you would on a regular class. The previous definition of Derived declares a method called someOtherMethod(). Thus, the Derived class augments the Base class by adding an additional method.
A derived class can access public and protected methods and data members declared in its base class as though they were its own, because technically, they are. For example, the implementation of someOtherMethod() on Derived could make use of the data member mProtectedInt, which is declared as part of Base. The following code shows this. Accessing a base class data member or method is no different than if the data member or method were declared as part of the derived class.
void Derived::someOtherMethod(){cout << "I can access base class data member mProtectedInt." << endl;cout << "Its value is " << mProtectedInt << endl;}
When access specifiers (public, private, and protected) were introduced in Chapter 8, the difference between private and protected may have been confusing. Now that you understand derived classes, the difference should be clear. If a class declares methods or data members as protected, derived classes have access to them. If they are declared as private, derived classes do not have access. The following implementation of someOtherMethod() does not compile because the derived class attempts to access a private data member from the base class.
void Derived::someOtherMethod(){cout << "I can access base class data member mProtectedInt." << endl;cout << "Its value is " << mProtectedInt << endl;cout << "The value of mPrivateInt is " << mPrivateInt << endl;// Error!}
The private access specifier gives you control over how a potential derived class could interact with your class. I recommend that you make all your data members private by default. You can provide public getters and setters if you want to allow anyone to access those data members, and you can provide protected getters and setters if you want only derived classes to access them. The reason to make data members private by default is that this provides the highest level of encapsulation. This means that you can change how you represent your data while keeping the public and protected interfaces unchanged. Without giving direct access to data members, you can also easily add checks on the input data in your public and protected setters. Methods should also be private by default. Only make those methods public that are designed to be public, and make methods protected if you want only derived classes to have access to them.
C++ allows you to mark a class as final, which means trying to inherit from it will result in a compilation error. A class can be marked as final with the final keyword right behind the name of the class. For example, the following Base class is marked as final:
class Base final{// Omitted for brevity};
If a class tries to inherit from this Base class, the compiler will complain because Base is marked as final.
class Derived : public Base{// Omitted for brevity};
The main reasons to inherit from a class are to add or replace functionality. The definition of Derived adds functionality to its parent class by providing an additional method, someOtherMethod(). The other method, someMethod(), is inherited from Base and behaves in the derived class exactly as it does in the base class. In many cases, you will want to modify the behavior of a class by replacing, or overriding, a method.
There is one small twist to overriding methods in C++ and it has to do with the keyword virtual. Only methods that are declared as virtual in the base class can be overridden properly by derived classes. The keyword goes at the beginning of a method declaration as shown in the modified version of Base that follows:
class Base{public:virtual void someMethod();protected:int mProtectedInt;private:int mPrivateInt;};
The virtual keyword has a few subtleties. A good rule of thumb is to just make all of your methods virtual. That way, you won’t have to worry about whether or not overriding the method will work. The only drawback is a very tiny performance hit. The subtleties of the virtual keyword are covered in the section “The Truth about virtual.”
The same holds for the Derived class. Its methods should also be marked virtual:
class Derived : public Base{public:virtual void someOtherMethod();};
To override a method, you redeclare it in the derived class definition exactly as it was declared in the base class, and you add the override keyword. In the derived class’s implementation file, you provide the new definition.
For example, the Base class contains a method called someMethod(). The definition of someMethod() is provided in Base.cpp and is shown here:
void Base::someMethod(){cout << "This is Base's version of someMethod()." << endl;}
Note that you do not repeat the virtual keyword in front of the method definition.
If you want to provide a new definition for someMethod() in the Derived class, you must first add it to the class definition for Derived, as follows:
class Derived : public Base{public:virtual void someMethod() override;// Overrides Base's someMethod()virtual void someOtherMethod();};
Adding the override keyword is not mandatory, but it is highly recommended, and discussed in more detail in the section after looking at the client’s view of overridden methods. The new definition of someMethod() is specified along with the rest of Derived’s methods in Derived.cpp.
void Derived::someMethod(){cout << "This is Derived's version of someMethod()." << endl;}
Once a method or destructor is marked as virtual, it is virtual for all derived classes even if the virtual keyword is removed from derived classes. For example, in the following Derived class, someMethod() is still virtual and can still be overridden by classes inheriting from Derived, because it was marked as virtual in the Base class.
class Derived : public Base{public:void someMethod() override;// Overrides Base's someMethod()};
With the preceding changes, other code still calls someMethod() the same way it did before. Just as before, the method could be called on an object of class Base or an object of class Derived. Now, however, the behavior of someMethod() varies based on the class of the object.
For example, the following code works just as it did before, calling Base’s version of someMethod():
Base myBase;myBase.someMethod(); // Calls Base's version of someMethod().
The output of this code is as follows:
This is Base's version of someMethod().If the code declares an object of class Derived, the other version is automatically called:
Derived myDerived;myDerived.someMethod(); // Calls Derived's version of someMethod()
The output this time is as follows:
This is Derived's version of someMethod().Everything else about objects of class Derived remains the same. Other methods that might have been inherited from Base still have the definition provided by Base unless they are explicitly overridden in Derived.
As you learned earlier, a pointer or reference can refer to an object of a class or any of its derived classes. The object itself “knows” the class of which it is actually a member, so the appropriate method is called as long as it was declared virtual. For example, if you have a Base reference that refers to an object that is really a Derived, calling someMethod() actually calls the derived class’s version, as shown next. This aspect of overriding does not work properly if you omit the virtual keyword in the base class.
Derived myDerived;Base& ref = myDerived;ref.someMethod(); // Calls Derived's version of someMethod()
Remember that even though a base class reference or pointer knows that it is actually a derived class, you cannot access derived class methods or members that are not defined in the base class. The following code does not compile because a Base reference does not have a method called someOtherMethod():
Derived myDerived;Base& ref = myDerived;myDerived.someOtherMethod(); // This is fine.ref.someOtherMethod(); // Error
The derived class knowledge characteristic is not true for non-pointer or non-reference objects. You can cast or assign a Derived to a Base because a Derived is a Base. However, the object loses any knowledge of the derived class at that point.
Derived myDerived;Base assignedObject = myDerived; // Assigns a Derived to a Base.assignedObject.someMethod(); // Calls Base's version of someMethod()
One way to remember this seemingly strange behavior is to imagine what the objects look like in memory. Picture a Base object as a box taking up a certain amount of memory. A Derived object is a box that is slightly bigger because it has everything a Base has plus a bit more. When you have a reference or pointer to a Derived, the box doesn’t change—you just have a new way of accessing it. However, when you cast a Derived into a Base, you are throwing out all the “uniqueness” of the Derived class to fit it into a smaller box.
Sometimes, it is possible to accidentally create a new virtual method instead of overriding a method from the base class. Take the following Base and Derived classes where Derived is properly overriding someMethod(), but is not using the override keyword:
class Base{public:virtual void someMethod(double d);};class Derived : public Base{public:virtual void someMethod(double d);};
You can call someMethod() through a reference as follows:
Derived myDerived;Base& ref = myDerived;ref.someMethod(1.1); // Calls Derived's version of someMethod()
This correctly calls the overridden someMethod() from the Derived class. Now, suppose you accidentally use an integer parameter instead of a double while overriding someMethod(), as follows:
class Derived : public Base{public:virtual void someMethod(int i);};
This code does not override someMethod() from Base, but instead creates a new virtual method. If you try to call someMethod() through a reference as in the following code, someMethod() of Base is called instead of the one from Derived!
Derived myDerived;Base& ref = myDerived;ref.someMethod(1.1); // Calls Base's version of someMethod()
This type of problem can happen when you start to modify the Base class but forget to update all derived classes. For example, maybe your first version of the Base class has a method called someMethod() accepting an integer. You then write the Derived class overriding this someMethod() accepting an integer. Later you decide that someMethod() in Base needs a double instead of an integer, so you update someMethod() in the Base class. It might happen that at that time, you forget to update the someMethod() methods in derived classes to also accept a double instead of an integer. By forgetting this, you are now actually creating a new virtual method instead of properly overriding the method.
You can prevent this situation by using the override keyword as follows:
class Derived : public Base{public:virtual void someMethod(int i) override;};
This definition of Derived generates a compilation error, because with the override keyword you are saying that someMethod() is supposed to be overriding a method from a base class, but in the Base class there is no someMethod() accepting an integer, only one accepting a double.
The problem of accidentally creating a new method instead of properly overriding one can also happen when you rename a method in the base class, and forget to rename the overriding methods in derived classes.
If a method is not virtual, you can still attempt to override it, but it will be wrong in subtle ways.
The following code shows a base class and a derived class, each with a single method. The derived class is attempting to override the method in the base class, but it is not declared to be virtual in the base class:
class Base{public:void go() { cout << "go() called on Base" << endl; }};class Derived : public Base{public:void go() { cout << "go() called on Derived" << endl; }};
Attempting to call go() on a Derived object initially appears to work:
Derived myDerived;myDerived.go();
The output of this call is, as expected, “go() called on Derived”. However, because the method is not virtual, it is not actually overridden. Rather, the Derived class creates a new method, also called go(), that is completely unrelated to the Base class’s method called go(). To prove this, simply call the method in the context of a Base pointer or reference:
Derived myDerived;Base& ref = myDerived;ref.go();
You would expect the output to be “go() called on Derived”, but in fact, the output is “go() called on Base”. This is because the ref variable is a Base reference and because the virtual keyword was omitted. When the go() method is called, it simply executes Base’s go() method. Because it is not virtual, there is no need to consider whether a derived class has overridden it.
To understand how method hiding is avoided, you need to know a bit more about what the virtual keyword actually does. When a class is compiled in C++, a binary object is created that contains all methods for the class. In the non-virtual case, the code to transfer control to the appropriate method is hard-coded directly where the method is called based on the compile-time type. This is called static binding, also known as early binding.
If the method is declared virtual, the correct implementation is called through the use of a special area of memory called the vtable, or “virtual table.” Each class that has one or more virtual methods, has a vtable, and every object of such a class contains a pointer to said vtable. This vtable contains pointers to the implementations of the virtual methods. In this way, when a method is called on an object, the pointer is followed into the vtable and the appropriate version of the method is executed based on the actual type of the object at run time. This is called dynamic binding, also known as late binding.
To better understand how vtables make overriding of methods possible, take the following Base and Derived classes as an example:
class Base{public:virtual void func1() {}virtual void func2() {}void nonVirtualFunc() {}};class Derived : public Base{public:virtual void func2() override {}void nonVirtualFunc() {}};
For this example, assume that you have the following two instances:
Base myBase;Derived myDerived;
Figure 10-4 shows a high-level view of how the vtables for both instances look. The myBase object contains a pointer to its vtable. This vtable has two entries, one for func1() and one for func2(). Those entries point to the implementations of Base::func1() and Base::func2().
myDerived also contains a pointer to its vtable, which also has two entries, one for func1() and one for func2(). Its func1() entry points to Base::func1() because Derived does not override func1(). On the other hand, its func2() entry points to Derived::func2().
Note that both vtables do not contain any entry for the nonVirtualFunc() method because that method is not virtual.
Because you are advised to make all methods virtual, you might be wondering why the virtual keyword even exists. Can’t the compiler automatically make all methods virtual? The answer is yes, it could. Many people think that the language should just make everything virtual. The Java language effectively does this.
The argument against making everything virtual, and the reason that the keyword was created in the first place, has to do with the overhead of the vtable. To call a virtual method, the program needs to perform an extra operation by dereferencing the pointer to the appropriate code to execute. This is a miniscule performance hit in most cases, but the designers of C++ thought that it was better, at least at the time, to let the programmer decide if the performance hit was necessary. If the method was never going to be overridden, there was no need to make it virtual and take the performance hit. However, with today’s CPUs, the performance hit is measured in fractions of a nanosecond and this will keep getting smaller with future CPUs. In most applications, you will not have a measurable performance difference between using virtual methods and avoiding them, so you should still follow the advice of making all methods, especially destructors, virtual.
Still, in certain cases, the performance overhead might be too costly, and you may need to have an option to avoid the hit. For example, suppose you have a Point class that has a virtual method. If you have another data structure that stores millions or even billions of Points, calling a virtual method on each point creates a significant overhead. In that case, it’s probably wise to avoid any virtual methods in your Point class.
There is also a tiny hit to memory usage for each object. In addition to the implementation of the method, each object also needs a pointer for its vtable, which takes up a tiny amount of space. This is not an issue in the majority of cases. However, sometimes it does matter. Take again the Point class and the container storing billions of Points. In that case, the additional required memory becomes significant.
Even programmers who don’t adopt the guideline of making all methods virtual still adhere to the rule when it comes to destructors. This is because making your destructors non-virtual can easily result in situations in which memory is not freed by object destruction. Only for a class that is marked as final you could make its destructor non-virtual.
For example, if a derived class uses memory that is dynamically allocated in the constructor and deleted in the destructor, it will never be freed if the destructor is never called. Similarly, if your derived class has members that are automatically deleted when an instance of the class is destroyed, such as std::unique_ptrs, then those members will not get deleted either if the destructor is never called.
As the following code shows, it is easy to “trick” the compiler into skipping the call to the destructor if it is non-virtual:
class Base{public:Base() {}~Base() {}};class Derived : public Base{public:Derived(){mString = new char[30];cout << "mString allocated" << endl;}~Derived(){delete[] mString;cout << "mString deallocated" << endl;}private:char* mString;};int main(){Base* ptr = new Derived(); // mString is allocated here.delete ptr; // ~Base is called, but not ~Derived because the destructor// is not virtual!return 0;}
As you can see from the output, the destructor of the Derived object is never called:
mString allocatedActually, the behavior of the delete call in the preceding code is undefined by the standard. A C++ compiler could do whatever it wants in such undefined situations. However, most compilers simply call the destructor of the base class, and not the destructor of the derived class.
Note that since C++11, the generation of a copy constructor and copy assignment operator is deprecated if the class has a user-declared destructor, as mentioned in Chapter 8. If you still need a compiler-generated copy constructor or copy assignment operator in such cases, you can explicitly default them. This is not done in the examples in this chapter in the interest of keeping them concise and to the point.
C++ allows you to mark a method as final, which means that the method cannot be overridden in a derived class. Trying to override a final method results in a compilation error. Take the following Base class:
class Base{public:virtual ~Base() = default;virtual void someMethod() final;};
Trying to override someMethod(), as in the following Derived class, results in a compilation error because someMethod() is marked as final in the Base class:
class Derived : public Base{public:virtual void someMethod() override; // Error};
Now that you are familiar with the basic syntax for inheritance, it’s time to explore one of the main reasons that inheritance is an important feature of the C++ language. Inheritance is a vehicle that allows you to leverage existing code. This section presents an example of inheritance for the purpose of code reuse.
Imagine that you are given the task of writing a program to issue simple weather predictions, working with both Fahrenheit and Celsius. Weather predictions may be a little bit out of your area of expertise as a programmer, so you obtain a third-party class library that was written to make weather predictions based on the current temperature and the current distance between Jupiter and Mars (hey, it’s plausible). This third-party package is distributed as a compiled library to protect the intellectual property of the prediction algorithms, but you do get to see the class definition. The WeatherPrediction class definition is as follows:
// Predicts the weather using proven new-age techniques given the current// temperature and the distance from Jupiter to Mars. If these values are// not provided, a guess is still given but it's only 99% accurate.class WeatherPrediction{public:// Virtual destructorvirtual ~WeatherPrediction();// Sets the current temperature in Fahrenheitvirtual void setCurrentTempFahrenheit(int temp);// Sets the current distance between Jupiter and Marsvirtual void setPositionOfJupiter(int distanceFromMars);// Gets the prediction for tomorrow's temperaturevirtual int getTomorrowTempFahrenheit() const;// Gets the probability of rain tomorrow. 1 means// definite rain. 0 means no chance of rain.virtual double getChanceOfRain() const;// Displays the result to the user in this format:// Result: x.xx chance. Temp. xxvirtual void showResult() const;// Returns a string representation of the temperaturevirtual std::string getTemperature() const;private:int mCurrentTempFahrenheit;int mDistanceFromMars;};
Note that this class marks all methods as virtual, because the class presumes that its methods might be overridden in a derived class.
This class solves most of the problems for your program. However, as is usually the case, it’s not exactly right for your needs. First, all the temperatures are given in Fahrenheit. Your program needs to operate in Celsius as well. Also, the showResult() method might not display the result in a way you require.
When you learned about inheritance in Chapter 5, adding functionality was the first technique described. Fundamentally, your program needs something just like the WeatherPrediction class but with a few extra bells and whistles. Sounds like a good case for inheritance to reuse code. To begin, define a new class, MyWeatherPrediction, that inherits from WeatherPrediction.
#include "WeatherPrediction.h"class MyWeatherPrediction : public WeatherPrediction{};
The preceding class definition compiles just fine. The MyWeatherPrediction class can already be used in place of WeatherPrediction. It provides exactly the same functionality, but nothing new yet. For the first modification, you might want to add knowledge of the Celsius scale to the class. There is a bit of a quandary here because you don’t know what the class is doing internally. If all of the internal calculations are made using Fahrenheit, how do you add support for Celsius? One way is to use the derived class to act as a go-between, interfacing between the user, who can use either scale, and the base class, which only understands Fahrenheit.
The first step in supporting Celsius is to add new methods that allow clients to set the current temperature in Celsius instead of Fahrenheit and to get tomorrow’s prediction in Celsius instead of Fahrenheit. You also need private helper methods that convert between Celsius and Fahrenheit in both directions. These methods can be static because they are the same for all instances of the class.
#include "WeatherPrediction.h"class MyWeatherPrediction : public WeatherPrediction{public:virtual void setCurrentTempCelsius(int temp);virtual int getTomorrowTempCelsius() const;private:static int convertCelsiusToFahrenheit(int celsius);static int convertFahrenheitToCelsius(int fahrenheit);};
The new methods follow the same naming convention as the parent class. Remember that from the point of view of other code, a MyWeatherPrediction object has all of the functionality defined in both MyWeatherPrediction and WeatherPrediction. Adopting the parent class’s naming convention presents a consistent interface.
The implementation of the Celsius/Fahrenheit conversion methods is left as an exercise for the reader—and a fun one at that! The other two methods are more interesting. To set the current temperature in Celsius, you need to convert the temperature first and then present it to the parent class in units that it understands.
void MyWeatherPrediction::setCurrentTempCelsius(int temp){int fahrenheitTemp = convertCelsiusToFahrenheit(temp);setCurrentTempFahrenheit(fahrenheitTemp);}
As you can see, once the temperature is converted, the method calls the existing functionality from the base class. Similarly, the implementation of getTomorrowTempCelsius() uses the parent’s existing functionality to get the temperature in Fahrenheit, but converts the result before returning it.
int MyWeatherPrediction::getTomorrowTempCelsius() const{int fahrenheitTemp = getTomorrowTempFahrenheit();return convertFahrenheitToCelsius(fahrenheitTemp);}
The two new methods effectively reuse the parent class because they “wrap” the existing functionality in a way that provides a new interface for using it.
You can also add new functionality completely unrelated to existing functionality of the parent class. For example, you could add a method that retrieves alternative forecasts from the Internet or a method that suggests an activity based on the predicted weather.
The other major technique for inheritance is replacing existing functionality. The showResult() method in the WeatherPrediction class is in dire need of a facelift. MyWeatherPrediction can override this method to replace the behavior with its own implementation.
The new class definition for MyWeatherPrediction is as follows:
class MyWeatherPrediction : public WeatherPrediction{public:virtual void setCurrentTempCelsius(int temp);virtual int getTomorrowTempCelsius() const;virtual void showResult() const override;private:static int convertCelsiusToFahrenheit(int celsius);static int convertFahrenheitToCelsius(int fahrenheit);};
Here is a possible new user-friendly implementation:
void MyWeatherPrediction::showResult() const{cout << "Tomorrow's temperature will be " <<getTomorrowTempCelsius() << " degrees Celsius (" <<getTomorrowTempFahrenheit() << " degrees Fahrenheit)" << endl;cout << "Chance of rain is " << (getChanceOfRain() * 100) << " percent"<< endl;if (getChanceOfRain() > 0.5) {cout << "Bring an umbrella!" << endl;}}
To clients using this class, it’s as if the old version of showResult() never existed. As long as the object is a MyWeatherPrediction object, the new version is called.
As a result of these changes, MyWeatherPrediction has emerged as a new class with new functionality tailored to a more specific purpose. Yet, it did not require much code because it leveraged its base class’s existing functionality.
When you write a derived class, you need to be aware of the interaction between parent classes and child classes. Issues such as order of creation, constructor chaining, and casting are all potential sources of bugs.
Objects don’t spring to life all at once; they must be constructed along with their parents and any objects that are contained within them. C++ defines the creation order as follows:
static data members of the class are constructed in the order in which they are declared.These rules can apply recursively. If the class has a grandparent, the grandparent is initialized before the parent, and so on. The following code shows this creation order. As a reminder, I generally advise against implementing methods directly in a class definition, as is done in the code that follows. In the interest of readable and concise examples, I have broken my own rule. The proper execution of this code outputs 123.
class Something{public:Something() { cout << "2"; }};class Base{public:Base() { cout << "1"; }};class Derived : public Base{public:Derived() { cout << "3"; }private:Something mDataMember;};int main(){Derived myDerived;return 0;}
When the myDerived object is created, the constructor for Base is called first, outputting the string "1". Next, mDataMember is initialized, calling the Something constructor, which outputs the string "2". Finally, the Derived constructor is called, which outputs "3".
Note that the Base constructor was called automatically. C++ automatically calls the default constructor for the parent class if one exists. If no default constructor exists in the parent class, or if one does exist but you want to use an alternate constructor, you can chain the constructor just as when initializing data members in the constructor initializer. For example, the following code shows a version of Base that lacks a default constructor. The associated version of Derived must explicitly tell the compiler how to call the Base constructor or the code will not compile.
class Base{public:Base(int i);};class Derived : public Base{public:Derived();};Derived::Derived() : Base(7){// Do Derived's other initialization here.}
The Derived constructor passes a fixed value (7) to the Base constructor. Derived could also pass a variable if its constructor required an argument:
Derived::Derived(int i) : Base(i) {}Passing constructor arguments from the derived class to the base class is perfectly fine and quite normal. Passing data members, however, will not work. The code will compile, but remember that data members are not initialized until after the base class is constructed. If you pass a data member as an argument to the parent constructor, it will be uninitialized.
Because destructors cannot take arguments, the language can always automatically call the destructor for parent classes. The order of destruction is conveniently the reverse of the order of construction:
Again, these rules apply recursively. The lowest member of the chain is always destructed first. The following code adds destructors to the previous example. The destructors are all declared virtual! If executed, this code outputs "123321".
class Something{public:Something() { cout << "2"; }virtual ~Something() { cout << "2"; }};class Base{public:Base() { cout << "1"; }virtual ~Base() { cout << "1"; }};class Derived : public Base{public:Derived() { cout << "3"; }virtual ~Derived() { cout << "3"; }private:Something mDataMember;};
If the preceding destructors were not declared virtual, the code would continue to work fine. However, if code ever called delete on a base class pointer that was really pointing to a derived class, the destruction chain would begin in the wrong place. For example, if you remove the virtual keyword from all destructors in the previous code, then a problem arises when a Derived object is accessed as a pointer to a Base and deleted, as shown here:
Base* ptr = new Derived();delete ptr;
The output of this code is a shockingly terse "1231". When the ptr variable is deleted, only the Base destructor is called because the destructor was not declared virtual. As a result, the Derived destructor is not called and the destructors for its data members are not called!
Technically, you could fix the preceding problem by marking only the Base destructor virtual. The “virtualness” is automatically used by any children. However, I advocate explicitly making all destructors virtual so that you never have to worry about it.
When you override a method in a derived class, you are effectively replacing the original as far as other code is concerned. However, that parent version of the method still exists and you may want to make use of it. For example, an overridden method would like to keep doing what the base class implementation does, plus something else. Take a look at the getTemperature() method in the WeatherPrediction class that returns a string representation of the current temperature:
class WeatherPrediction{public:virtual std::string getTemperature() const;// Omitted for brevity};
You can override this method in the MyWeatherPrediction class as follows:
class MyWeatherPrediction : public WeatherPrediction{public:virtual std::string getTemperature() const override;// Omitted for brevity};
Suppose the derived class wants to add °F to the string by first calling the base class getTemperature() method and then adding °F to the string. You might write this as follows:
string MyWeatherPrediction::getTemperature() const{// Note: \u00B0 is the ISO/IEC 10646 representation of the degree symbol.return getTemperature() + "\u00B0F"; // BUG}
However, this does not work because, under the rules of name resolution for C++, it first resolves against the local scope, then the class scope, and as a consequence ends up calling MyWeatherPrediction::getTemperature(). This results in an infinite recursion until you run out of stack space (some compilers detect this error and report it at compile time).
To make this work, you need to use the scope resolution operator as follows:
string MyWeatherPrediction::getTemperature() const{// Note: \u00B0 is the ISO/IEC 10646 representation of the degree symbol.return WeatherPrediction::getTemperature() + "\u00B0F";}
Calling the parent version of the current method is a commonly used pattern in C++. If you have a chain of derived classes, each might want to perform the operation already defined by the base class but add their own additional functionality as well.
As another example, imagine a class hierarchy of book types. A diagram showing such a hierarchy is shown in Figure 10-5.
Because each lower class in the hierarchy further specifies the type of book, a method that gets the description of a book really needs to take all levels of the hierarchy into consideration. This can be accomplished by chaining to the parent method. The following code illustrates this pattern:
class Book{public:virtual ~Book() = default;virtual string getDescription() const { return "Book"; }virtual int getHeight() const { return 120; }};class Paperback : public Book{public:virtual string getDescription() const override {return "Paperback " + Book::getDescription();}};class Romance : public Paperback{public:virtual string getDescription() const override {return "Romance " + Paperback::getDescription();}virtual int getHeight() const override {return Paperback::getHeight() / 2; }};class Technical : public Book{public:virtual string getDescription() const override {return "Technical " + Book::getDescription();}};int main(){Romance novel;Book book;cout << novel.getDescription() << endl; // Outputs "Romance Paperback Book"cout << book.getDescription() << endl; // Outputs "Book"cout << novel.getHeight() << endl; // Outputs "60"cout << book.getHeight() << endl; // Outputs "120"return 0;}
The Book base class has two virtual methods: getDescription() and getHeight(). All derived classes override getDescription(), but only the Romance class overrides getHeight() by calling getHeight() on its parent class (Paperback) and dividing the result by two. Paperback does not override getHeight(), but C++ walks up the class hierarchy to find a class that implements getHeight(). In this example, Paperback::getHeight() resolves to Book::getHeight().
As you have already seen, an object can be cast or assigned to its parent class. If the cast or assignment is performed on a plain old object, this results in slicing:
Base myBase = myDerived; // Slicing! Slicing occurs in situations like this because the end result is a Base object, and Base objects lack the additional functionality defined in the Derived class. However, slicing does not occur if a derived class is assigned to a pointer or reference to its base class:
Base& myBase = myDerived; // No slicing!This is generally the correct way to refer to a derived class in terms of its base class, also called upcasting. This is why it’s always a good idea to make your methods and functions take references to classes instead of directly using objects of those classes. By using references, derived classes can be passed in without slicing.
Casting from a base class to one of its derived classes, also called downcasting, is often frowned upon by professional C++ programmers because there is no guarantee that the object really belongs to that derived class, and because downcasting is a sign of bad design. For example, consider the following code:
void presumptuous(Base* base){Derived* myDerived = static_cast<Derived*>(base);// Proceed to access Derived methods on myDerived.}
If the author of presumptuous() also writes code that calls presumptuous(), everything will probably be okay because the author knows that the function expects the argument to be of type Derived*. However, if other programmers call presumptuous(), they might pass in a Base*. There are no compile-time checks that can be done to enforce the type of the argument, and the function blindly assumes that base is actually a pointer to a Derived.
Downcasting is sometimes necessary, and you can use it effectively in controlled circumstances. However, if you are going to downcast, you should use a dynamic_cast(), which uses the object’s built-in knowledge of its type to refuse a cast that doesn’t make sense. This built-in knowledge typically resides in the vtable, which means that dynamic_cast() works only for objects with a vtable, that is, objects with at least one virtual member. If a dynamic_cast() fails on a pointer, the pointer’s value will be nullptr instead of pointing to nonsensical data. If a dynamic_cast() fails on an object reference, an std::bad_cast exception will be thrown. Chapter 11 discusses the different options for casting in more detail.
The previous example could have been written as follows:
void lessPresumptuous(Base* base){Derived* myDerived = dynamic_cast<Derived*>(base);if (myDerived != nullptr) {// Proceed to access Derived methods on myDerived.}}
The use of downcasting is often a sign of a bad design. You should rethink and modify your design so that downcasting can be avoided. For example, the lessPresumptuous() function only really works with Derived objects, so instead of accepting a Base pointer, it should simply accept a Derived pointer. This eliminates the need for any downcasting. If the function should work with different derived classes, all inheriting from Base, then look for a solution that uses polymorphism, which is discussed next.
Now that you understand the relationship between a derived class and its parent, you can use inheritance in its most powerful scenario—polymorphism. Chapter 5 discusses how polymorphism allows you to use objects with a common parent class interchangeably, and to use objects in place of their parents.
Chapters 8 and 9 use a spreadsheet program as an example of an application that lends itself to an object-oriented design. A SpreadsheetCell represents a single element of data. Up to now, that element always stored a single double value. A simplified class definition for SpreadsheetCell follows. Note that a cell can be set either as a double or a string, but it is always stored as a double. The current value of the cell, however, is always returned as a string for this example.
class SpreadsheetCell{public:virtual void set(double inDouble);virtual void set(std::string_view inString);virtual std::string getString() const;private:static std::string doubleToString(double inValue);static double stringToDouble(std::string_view inString);double mValue;};
In a real spreadsheet application, cells can store different things. A cell could store a double, but it might just as well store a piece of text. There could also be a need for additional types of cells, such as a formula cell, or a date cell. How can you support this?
The SpreadsheetCell class is screaming out for a hierarchical makeover. A reasonable approach would be to narrow the scope of the SpreadsheetCell to cover only strings, perhaps renaming it StringSpreadsheetCell in the process. To handle doubles, a second class, DoubleSpreadsheetCell, would inherit from the StringSpreadsheetCell and provide functionality specific to its own format. Figure 10-6 illustrates such a design. This approach models inheritance for reuse because the DoubleSpreadsheetCell would only be deriving from StringSpreadsheetCell to make use of some of its built-in functionality.
If you were to implement the design shown in Figure 10-6, you might discover that the derived class would override most, if not all, of the functionality of the base class. Because doubles are treated differently from strings in almost all cases, the relationship may not be quite as it was originally understood. Yet, there clearly is a relationship between a cell containing strings and a cell containing doubles. Rather than using the model in Figure 10-6, which implies that somehow a DoubleSpreadsheetCell “is-a” StringSpreadsheetCell, a better design would make these classes peers with a common parent, SpreadsheetCell. Such a design is shown in Figure 10-7.
The design in Figure 10-7 shows a polymorphic approach to the SpreadsheetCell hierarchy. Because DoubleSpreadsheetCell and StringSpreadsheetCell both inherit from a common parent, SpreadsheetCell, they are interchangeable in the view of other code. In practical terms, that means the following:
SpreadsheetCell objects can call any method in the interface without even knowing whether the cell is a DoubleSpreadsheetCell or a StringSpreadsheetCell.virtual methods, the appropriate instance of every method in the interface is called depending on the class of the object.Spreadsheet class described in Chapter 9, can contain a collection of multi-typed cells by referring to the parent type.Because all spreadsheet cells are deriving from the SpreadsheetCell base class, it is probably a good idea to write that class first. When designing a base class, you need to consider how the derived classes relate to each other. From this information, you can derive the commonality that will go inside the parent class. For example, string cells and double cells are similar in that they both contain a single piece of data. Because the data is coming from the user and will be displayed back to the user, the value is set as a string and retrieved as a string. These behaviors are the shared functionality that will make up the base class.
The SpreadsheetCell base class is responsible for defining the behaviors that all SpreadsheetCell-derived classes will support. In this example, all cells need to be able to set their value as a string. All cells also need to be able to return their current value as a string. The base class definition declares these methods, as well as an explicitly defaulted virtual destructor, but note that it has no data members:
class SpreadsheetCell{public:virtual ~SpreadsheetCell() = default;virtual void set(std::string_view inString);virtual std::string getString() const;};
When you start writing the .cpp file for this class, you very quickly run into a problem. Considering that the base class of the spreadsheet cell contains neither a double nor a string data member, how can you implement it? More generally, how do you write a parent class that declares the behaviors that are supported by derived classes without actually defining the implementation of those behaviors?
One possible approach is to implement “do nothing” functionality for those behaviors. For example, calling the set() method on the SpreadsheetCell base class will have no effect because the base class has nothing to set. This approach still doesn’t feel right, however. Ideally, there should never be an object that is an instance of the base class. Calling set() should always have an effect because it should always be called on either a DoubleSpreadsheetCell or a StringSpreadsheetCell. A good solution enforces this constraint.
Pure virtual methods are methods that are explicitly undefined in the class definition. By making a method pure virtual, you are telling the compiler that no definition for the method exists in the current class. A class with at least one pure virtual method is said to be an abstract class because no other code will be able to instantiate it. The compiler enforces the fact that if a class contains one or more pure virtual methods, it can never be used to construct an object of that type.
There is a special syntax for designating a pure virtual method. The method declaration is followed by =0. No implementation needs to be written.
class SpreadsheetCell{public:virtual ~SpreadsheetCell() = default;virtual void set(std::string_view inString) = 0;virtual std::string getString() const = 0;};
Now that the base class is an abstract class, it is impossible to create a SpreadsheetCell object. The following code does not compile, and returns an error such as “error C2259: ‘SpreadsheetCell’: cannot instantiate abstract class”:
SpreadsheetCell cell; // Error! Attempts creating abstract class instanceHowever, once the StringSpreadsheetCell class has been implemented, the following code will compile fine because it instantiates a derived class of the abstract base class:
std::unique_ptr<SpreadsheetCell> cell(new StringSpreadsheetCell());Note that you don’t need a SpreadsheetCell.cpp source file, because there is nothing to implement. Most methods are pure virtual, and the destructor is explicitly defaulted in the class definition.
Writing the StringSpreadsheetCell and DoubleSpreadsheetCell classes is just a matter of implementing the functionality that is defined in the parent. Because you want clients to be able to instantiate and work with string cells and double cells, the cells can’t be abstract—they must implement all of the pure virtual methods inherited from their parent. If a derived class does not implement all pure virtual methods from the base class, then the derived class is abstract as well, and clients will not be able to instantiate objects of the derived class.
The first step in writing the class definition of StringSpreadsheetCell is to inherit from SpreadsheetCell.
Next, the inherited pure virtual methods are overridden, this time without being set to zero.
Finally, the string cell adds a private data member, mValue, which stores the actual cell data. This data member is an std::optional, which is defined since C++17 in the <optional> header file. The optional type is a class template, so you have to specify the actual type that you need between angled brackets, as in optional<string>. Class templates are discussed in detail in Chapter 12. By using an optional, it is possible to distinguish whether a value for a cell has been set or not. The optional type is discussed in detail in Chapter 20, but its basic use is rather easy, as the next section shows.
class StringSpreadsheetCell : public SpreadsheetCell{public:virtual void set(std::string_view inString) override;virtual std::string getString() const override;private:std::optional<std::string> mValue;};
The source file for StringSpreadsheetCell contains the implementation of the methods. The set() method is straightforward because the internal representation is already a string. The getString() method has to keep into account that mValue is of type optional, and that it might not have a value. When mValue doesn’t have a value, getString() should return the empty string. This is made easy with the value_or() method of std::optional. By using mValue.value_or(""), the real value is returned if mValue contains an actual value, otherwise the empty string is returned.
void StringSpreadsheetCell::set(string_view inString){mValue = inString;}string StringSpreadsheetCell::getString() const{return mValue.value_or("");}
The double version follows a similar pattern, but with different logic. In addition to the set() method from the base class that takes a string_view, it also provides a new set() method that allows a client to set the value with a double. Two new private
static methods are used to convert between a string and a double, and vice versa. As in StringSpreadsheetCell, it has a data member called mValue, this time of type optional<double>.
class DoubleSpreadsheetCell : public SpreadsheetCell{public:virtual void set(double inDouble);virtual void set(std::string_view inString) override;virtual std::string getString() const override;private:static std::string doubleToString(double inValue);static double stringToDouble(std::string_view inValue);std::optional<double> mValue;};
The set() method that takes a double is straightforward. The string_view version uses the private static method stringToDouble(). The getString() method returns the stored double value as a string, or returns an empty string if no value has been stored. It uses the has_value() method of std::optional to query whether the optional has an actual value or not. If it has a value, the value() method is used to get it.
void DoubleSpreadsheetCell::set(double inDouble){mValue = inDouble;}void DoubleSpreadsheetCell::set(string_view inString){mValue = stringToDouble(inString);}string DoubleSpreadsheetCell::getString() const{return (mValue.has_value() ? doubleToString(mValue.value()) : "");}
You may already see one major advantage of implementing spreadsheet cells in a hierarchy—the code is much simpler. Each object can be self-centered and only deal with its own functionality.
Note that the implementations of doubleToString() and stringToDouble() are omitted because they are the same as in Chapter 8.
Now that the SpreadsheetCell hierarchy is polymorphic, client code can take advantage of the many benefits that polymorphism has to offer. The following test program explores many of these features.
To demonstrate polymorphism, the test program declares a vector of three SpreadsheetCell pointers. Remember that because SpreadsheetCell is an abstract class, you can’t create objects of that type. However, you can still have a pointer or reference to a SpreadsheetCell because it would actually be pointing to one of the derived classes. This vector, because it is a vector of the parent type SpreadsheetCell, allows you to store a heterogeneous mixture of the two derived classes. This means that elements of the vector could be either a StringSpreadsheetCell or a DoubleSpreadsheetCell.
vector<unique_ptr<SpreadsheetCell>> cellArray;The first two elements of the vector are set to point to a new StringSpreadsheetCell, while the third is a new DoubleSpreadsheetCell.
cellArray.push_back(make_unique<StringSpreadsheetCell>());cellArray.push_back(make_unique<StringSpreadsheetCell>());cellArray.push_back(make_unique<DoubleSpreadsheetCell>());
Now that the vector contains multi-typed data, any of the methods declared by the base class can be applied to the objects in the vector. The code just uses SpreadsheetCell pointers—the compiler has no idea at compile time what types the objects actually are. However, because they are inheriting from SpreadsheetCell, they must support the methods of SpreadsheetCell:
cellArray[0]->set("hello");cellArray[1]->set("10");cellArray[2]->set("18");
When the getString() method is called, each object properly returns a string representation of their value. The important, and somewhat amazing, thing to realize is that the different objects do this in different ways. A StringSpreadsheetCell returns its stored value, or an empty string. A DoubleSpreadsheetCell first performs a conversion if it contains a value, otherwise it returns an empty string. As the programmer, you don’t need to know how the object does it—you just need to know that because the object is a SpreadsheetCell, it can perform this behavior.
cout << "Vector values are [" << cellArray[0]->getString() << "," <<cellArray[1]->getString() << "," <<cellArray[2]->getString() << "]" <<endl;
The new implementation of the SpreadsheetCell hierarchy is certainly an improvement from an object-oriented design point of view. Yet, it would probably not suffice as an actual class hierarchy for a real-world spreadsheet program for several reasons.
First, despite the improved design, one feature is still missing: the ability to convert from one cell type to another. By dividing them into two classes, the cell objects become more loosely integrated. To provide the ability to convert from a DoubleSpreadsheetCell to a StringSpreadsheetCell, you could add a converting constructor, also known as a typed constructor. It has a similar appearance as a copy constructor, but instead of a reference to an object of the same class, it takes a reference to an object of a sibling class. Note also that you now have to declare a default constructor, which can be explicitly defaulted, because the compiler stops generating one as soon as you declare any constructor yourself:
class StringSpreadsheetCell : public SpreadsheetCell{public:StringSpreadsheetCell() = default;StringSpreadsheetCell(const DoubleSpreadsheetCell& inDoubleCell);// Omitted for brevity};
This converting constructor can be implemented as follows:
StringSpreadsheetCell::StringSpreadsheetCell(const DoubleSpreadsheetCell& inDoubleCell){mValue = inDoubleCell.getString();}
With a converting constructor, you can easily create a StringSpreadsheetCell given a DoubleSpreadsheetCell. Don’t confuse this with casting pointers or references, however. Casting from one sibling pointer or reference to another does not work, unless you overload the cast operator as described in Chapter 15.
Second, the question of how to implement overloaded operators for cells is an interesting one, and there are several possible solutions. One approach is to implement a version of each operator for every combination of cells. With only two derived classes, this is manageable. There would be an operator+ function to add two double cells, to add two string cells, and to add a double cell to a string cell. Another approach is to decide on a common representation. The preceding implementation already standardizes on a string as a common representation of sorts. A single operator+ function could cover all the cases by taking advantage of this common representation. One possible implementation, which assumes that the result of adding two cells is always a string cell, is as follows:
StringSpreadsheetCell operator+(const StringSpreadsheetCell& lhs,const StringSpreadsheetCell& rhs){StringSpreadsheetCell newCell;newCell.set(lhs.getString() + rhs.getString());return newCell;}
As long as the compiler has a way to turn a particular cell into a StringSpreadsheetCell, the operator will work. Given the previous example of having a StringSpreadsheetCell constructor that takes a DoubleSpreadsheetCell as an argument, the compiler will automatically perform the conversion if it is the only way to get the operator+ to work. That means the following code works, even though operator+ was explicitly written to work on StringSpreadsheetCells:
DoubleSpreadsheetCell myDbl;myDbl.set(8.4);StringSpreadsheetCell result = myDbl + myDbl;
Of course, the result of this addition doesn’t really add the numbers together. It converts the double cells into string cells and concatenates the strings, resulting in a StringSpreadsheetCell with a value of 8.4000008.400000.
If you are still feeling a little unsure about polymorphism, start with the code for this example and try things out. The main() function in the preceding example is a great starting point for experimental code that simply exercises various aspects of the class.
As you read in Chapter 5, multiple inheritance is often perceived as a complicated and unnecessary part of object-oriented programming. I’ll leave the decision of whether or not it is useful up to you and your coworkers. This section explains the mechanics of multiple inheritance in C++.
Defining a class to have multiple parent classes is very simple from a syntactic point of view. All you need to do is list the base classes individually when declaring the class name.
class Baz : public Foo, public Bar{// Etc.};
By listing multiple parents, the Baz object has the following characteristics:
Baz object supports the public methods, and contains the data members of both Foo and Bar.Baz class have access to protected data and methods in both Foo and Bar.Baz object can be upcast to either a Foo or a Bar.Baz object automatically calls the Foo and Bar default constructors, in the order that the classes are listed in the class definition.Baz object automatically calls the destructors for the Foo and Bar classes, in the reverse order that the classes are listed in the class definition.The following example shows a class, DogBird, that has two parent classes—a Dog class and a Bird class, as shown in Figure 10-8. The fact that a dog-bird is a ridiculous example should not be viewed as a statement that multiple inheritance itself is ridiculous. Honestly, I leave that judgment up to you.
class Dog{public:virtual void bark() { cout << "Woof!" << endl; }};class Bird{public:virtual void chirp() { cout << "Chirp!" << endl; }};class DogBird : public Dog, public Bird{};
Using objects of classes with multiple parents is no different from using objects without multiple parents. In fact, the client code doesn’t even have to know that the class has two parents. All that really matters are the properties and behaviors supported by the class. In this case, a DogBird object supports all of the public methods of Dog and Bird.
DogBird myConfusedAnimal;myConfusedAnimal.bark();myConfusedAnimal.chirp();
The output of this program is as follows:
Woof!Chirp!
It’s not difficult to construct a scenario where multiple inheritance would seem to break down. The following examples show some of the edge cases that must be considered.
What if the Dog class and the Bird class both had a method called eat()? Because Dog and Bird are not related in any way, one version of the method does not override the other—they both continue to exist in the DogBird-derived class.
As long as client code never attempts to call the eat() method, that is not a problem. The DogBird class compiles correctly despite having two versions of eat(). However, if client code attempts to call the eat() method on a DogBird, the compiler gives an error indicating that the call to eat() is ambiguous. The compiler does not know which version to call. The following code provokes this ambiguity error:
class Dog{public:virtual void bark() { cout << "Woof!" << endl; }virtual void eat() { cout << "The dog ate." << endl; }};class Bird{public:virtual void chirp() { cout << "Chirp!" << endl; }virtual void eat() { cout << "The bird ate." << endl; }};class DogBird : public Dog, public Bird{};int main(){DogBird myConfusedAnimal;myConfusedAnimal.eat();// Error! Ambiguous call to method eat()return 0;}
The solution to the ambiguity is to either explicitly upcast the object using a dynamic_cast(), essentially hiding the undesired version of the method from the compiler, or to use a disambiguation syntax. For example, the following code shows two ways to invoke the Dog version of eat():
dynamic_cast<Dog&>(myConfusedAnimal).eat(); // Calls Dog::eat()myConfusedAnimal.Dog::eat(); // Calls Dog::eat()
Methods of the derived class itself can also explicitly disambiguate between different methods of the same name by using the same syntax used to access parent methods, that is, the :: scope resolution operator. For example, the DogBird class could prevent ambiguity errors in other code by defining its own eat() method. Inside this method, it would determine which parent version to call:
class DogBird : public Dog, public Bird{public:void eat() override;};void DogBird::eat(){Dog::eat(); // Explicitly call Dog's version of eat()}
Yet another way to prevent the ambiguity error is to use a using statement to explicitly state which version of eat() should be inherited in DogBird. This is done in the following DogBird definition:
class DogBird : public Dog, public Bird{public:using Dog::eat; // Explicitly inherit Dog's version of eat()};
Another way to provoke ambiguity is to inherit from the same class twice. For example, if the Bird class inherits from Dog for some reason, the code for DogBird does not compile because Dog becomes an ambiguous base class:
class Dog {};class Bird : public Dog {};class DogBird : public Bird, public Dog {}; // Error!
Most occurrences of ambiguous base classes are either contrived “what-if” examples, as in the preceding one, or arise from untidy class hierarchies. Figure 10-9 shows a class diagram for the preceding example, indicating the ambiguity.
Ambiguity can also occur with data members. If Dog and Bird both had a data member with the same name, an ambiguity error would occur when client code attempted to access that member.
A more likely scenario is that multiple parents themselves have common parents. For example, perhaps both Bird and Dog are inheriting from an Animal class, as shown in Figure 10-10.
This type of class hierarchy is permitted in C++, though name ambiguity can still occur. For example, if the Animal class has a public method called sleep(), that method cannot be called on a DogBird object because the compiler does not know whether to call the version inherited by Dog or by Bird.
The best way to use these “diamond-shaped” class hierarchies is to make the topmost class an abstract base class with all methods declared as pure virtual. Because the class only declares methods without providing definitions, there are no methods in the base class to call and thus there are no ambiguities at that level.
The following example implements a diamond-shaped class hierarchy in which the Animal abstract base class has a pure virtual eat() method that must be defined by each derived class. The DogBird class still needs to be explicit about which parent’s eat() method it uses, but any ambiguity is caused by Dog and Bird having the same method, not because they inherit from the same class.
class Animal{public:virtual void eat() = 0;};class Dog : public Animal{public:virtual void bark() { cout << "Woof!" << endl; }virtual void eat() override { cout << "The dog ate." << endl; }};class Bird : public Animal{public:virtual void chirp() { cout << "Chirp!" << endl; }virtual void eat() override { cout << "The bird ate." << endl; }};class DogBird : public Dog, public Bird{public:using Dog::eat;};
A more refined mechanism for dealing with the top class in a diamond-shaped hierarchy, virtual base classes, is explained at the end of this chapter.
At this point, you’re probably wondering why programmers would want to tackle multiple inheritance in their code. The most straightforward use case for multiple inheritance is to define a class of objects that is-a something and also is-a something else. As was said in Chapter 5, any real-world objects you find that follow this pattern are unlikely to translate well into code.
One of the most compelling and simple uses of multiple inheritance is for the implementation of mixin classes. Mixin classes are explained in Chapter 5.
Another reason that people sometimes use multiple inheritance is to model a component-based class. Chapter 5 gives the example of an airplane simulator. The Airplane class has an engine, a fuselage, controls, and other components. While the typical implementation of an Airplane class would make each of these components a separate data member, you could use multiple inheritance. The airplane class would inherit from engine, fuselage, and controls, in effect getting the behaviors and properties of all of its components. I recommend you to stay away from this type of code because it confuses a clear has-a relationship with inheritance, which should be used for is-a relationships. The recommended solution is to have an Airplane class that contains data members of type Engine, Fuselage, and Controls.
Extending a class opens up a variety of issues. What characteristics of the class can and cannot be changed? What is non-public inheritance? What are virtual base classes? These questions, and more, are answered in the following sections.
For the most part, the reason you override a method is to change its implementation. Sometimes, however, you may want to change other characteristics of the method.
A good rule of thumb is to override a method with the exact method declaration, or method prototype, that the base class uses. The implementation can change, but the prototype stays the same.
That does not have to be the case, however. In C++, an overriding method can change the return type as long as the original return type is a pointer or reference to a class, and the new return type is a pointer or reference to a descendent class. Such types are called covariant return types. This feature sometimes comes in handy when the base class and derived class work with objects in a parallel hierarchy—that is, another group of classes that is tangential, but related, to the first class hierarchy.
For example, consider a hypothetical cherry orchard simulator. You might have two hierarchies of classes that model different real-world objects but are obviously related. The first is the Cherry chain. The base class, Cherry, has a derived class called BingCherry. Similarly, there is another chain of classes with a base class called CherryTree and a derived class called BingCherryTree. Figure 10-11 shows the two class chains.
Now assume that the CherryTree class has a virtual method called pick() that retrieves a single cherry from the tree:
Cherry* CherryTree::pick(){return new Cherry();}
In the BingCherryTree-derived class, you may want to override this method. Perhaps bing cherries need to be polished when they are picked (bear with me on this one). Because a BingCherry is a Cherry, you could leave the method prototype as is and override the method as in the following example. The BingCherry pointer is automatically cast to a Cherry pointer. Note that this implementation uses a unique_ptr to make sure no memory is leaked when polish() throws an exception.
Cherry* BingCherryTree::pick(){auto theCherry = std::make_unique<BingCherry>();theCherry->polish();return theCherry.release();}
This implementation is perfectly fine and is probably the way that I would write it. However, because you know that the BingCherryTree will always return BingCherry objects, you could indicate this fact to potential users of this class by changing the return type, as shown here:
BingCherry* BingCherryTree::pick(){auto theCherry = std::make_unique<BingCherry>();theCherry->polish();return theCherry.release();}
Here is how you can use the BingCherryTree::pick() method:
BingCherryTree theTree;std::unique_ptr<Cherry> theCherry(theTree.pick());theCherry->printType();
A good way to figure out whether you can change the return type of an overridden method is to consider whether existing code would still work; this is called the Liskov substitution principle (LSP). In the preceding example, changing the return type was fine because any code that assumed that the pick() method would always return a Cherry* would still compile and work correctly. Because a BingCherry is a Cherry, any methods that were called on the result of CherryTree’s version of pick() could still be called on the result of BingCherryTree’s version of pick().
You could not, for example, change the return type to something completely unrelated, such as void*. The following code does not compile:
void* BingCherryTree::pick()// Error!{auto theCherry = std::make_unique<BingCherry>();theCherry->polish();return theCherry.release();}
This generates a compilation error, something like this:
'BingCherryTree::pick': overriding virtual function return type differs and is not covariant from 'CherryTree::pick'.As mentioned before, this example is using raw pointers instead of smart pointers. It does not work for example when using std::unique_ptr as return type. Suppose the CherryTree::pick() method returns a unique_ptr<Cherry> as follows:
std::unique_ptr<Cherry> CherryTree::pick(){return std::make_unique<Cherry>();}
Now, you cannot change the return type for the BingCherryTree::pick() method to unique_ptr<BingCherry>. That is, the following does not compile:
class BingCherryTree : public CherryTree{public:virtual std::unique_ptr<BingCherry> pick() override;};
The reason is that std::unique_ptr is a class template. Class templates are discussed in detail in Chapter 12. Two instantiations of the unique_ptr class template are created, unique_ptr<Cherry> and unique_ptr<BingCherry>. Both these instantiations are completely different types and are in no way related to each other. You cannot change the return type of an overridden method to return a completely different type.
If you use the name of a virtual method from the parent class in the definition of a derived class, but it uses different parameters than the method with that name uses in the parent class, it is not overriding the method of the parent class—it is creating a new method. Returning to the Base and Derived example from earlier in this chapter, you could attempt to override someMethod() in Derived with a new argument list as follows:
class Base{public:virtual void someMethod();};class Derived : public Base{public:virtual void someMethod(int i);// Compiles, but doesn't overridevirtual void someOtherMethod();};
The implementation of this method could be as follows:
void Derived::someMethod(int i){cout << "This is Derived's version of someMethod with argument " << i<< "." << endl;}
The preceding class definition compiles, but you have not overridden someMethod(). Because the arguments are different, you have created a new method that exists only in Derived. If you want a method called someMethod() that takes an int, and you want it to work only on objects of class Derived, the preceding code is correct.
The C++ standard says that the original method is now hidden as far as Derived is concerned. The following sample code does not compile because there is no longer a no-argument version of someMethod().
Derived myDerived;myDerived.someMethod(); // Error! Won't compile because original// method is hidden.
If your intention is to override someMethod() from Base, then you should use the override keyword as recommended before. The compiler then gives an error if you make a mistake in overriding the method.
There is a somewhat obscure technique you can use to have your cake and eat it too. That is, you can use this technique to effectively “override” a method in the derived class with a new prototype but continue to inherit the base class version. This technique uses the using keyword to explicitly include the base class definition of the method within the derived class, as follows:
class Base{public:virtual void someMethod();};class Derived : public Base{public:using Base::someMethod;// Explicitly "inherits" the Base versionvirtual void someMethod(int i);// Adds a new version of someMethodvirtual void someOtherMethod();};
In the previous section, you saw the use of the using keyword to explicitly include the base class definition of a method within a derived class. This works perfectly fine for normal class methods, but it also works for constructors, allowing you to inherit constructors from your base classes. Take a look at the following definition for the Base and Derived classes:
class Base{public:virtual ~Base() = default;Base() = default;Base(std::string_view str);};class Derived : public Base{public:Derived(int i);};
You can construct a Base object only with the provided Base constructors, either the default constructor or the constructor with a string_view parameter. On the other hand, constructing a Derived object can happen only with the provided Derived constructor, which requires a single integer as argument. You cannot construct Derived objects using the constructor accepting a string_view defined in the Base class. Here is an example:
Base base("Hello"); // OK, calls string_view Base ctorDerived derived1(1); // OK, calls integer Derived ctorDerived derived2("Hello"); // Error, Derived does not inherit string_view ctor
If you would like the ability to construct Derived objects using the string_view-based Base constructor, you can explicitly inherit the Base constructors in the Derived class as follows:
class Derived : public Base{public:using Base::Base;Derived(int i);};
The using statement inherits all constructors from the parent class except the default constructor, so now you can construct Derived objects in the following two ways:
Derived derived1(1); // OK, calls integer Derived ctorDerived derived2("Hello"); // OK, calls inherited string_view Base ctor
The Derived class can define a constructor with the same parameter list as one of the inherited constructors in the Base class. In this case, as with any override, the constructor of the Derived class takes precedence over the inherited constructor. In the following example, the Derived class inherits all constructors, except the default constructor, from the Base class with the using statement. However, because the Derived class defines its own constructor with a single parameter of type float, the inherited constructor from the Base class with a single parameter of type float is overridden.
class Base{public:virtual ~Base() = default;Base() = default;Base(std::string_view str);Base(float f);};class Derived : public Base{public:using Base::Base;Derived(float f); // Overrides inherited float Base ctor};
With this definition, objects of Derived can be created as follows:
Derived derived1("Hello"); // OK, calls inherited string_view Base ctorDerived derived2(1.23f); // OK, calls float Derived ctor
A few restrictions apply to inheriting constructors from a base class with the using clause. When you inherit a constructor from a base class, you inherit all of them, except the default constructor. It is not possible to inherit only a subset of the constructors of a base class. A second restriction is related to multiple inheritance. It’s not possible to inherit constructors from one of the base classes if another base class has a constructor with the same parameter list, because this leads to ambiguity. To resolve this, the Derived class needs to explicitly define the conflicting constructors. For example, the following Derived class tries to inherit all constructors from both Base1 and Base2, which results in a compilation error due to ambiguity of the float-based constructors.
class Base1{public:virtual ~Base1() = default;Base1() = default;Base1(float f);};class Base2{public:virtual ~Base2() = default;Base2() = default;Base2(std::string_view str);Base2(float f);};class Derived : public Base1, public Base2{public:using Base1::Base1;using Base2::Base2;Derived(char c);};
The first using clause in Derived inherits all constructors from Base1. This means that Derived gets the following constructor:
Derived(float f); // Inherited from Base1With the second using clause in Derived, you are trying to inherit all constructors from Base2. However, this causes a compilation error because this means that Derived gets a second Derived(float f) constructor. The problem is solved by explicitly declaring conflicting constructors in the Derived class as follows:
class Derived : public Base1, public Base2{public:using Base1::Base1;using Base2::Base2;Derived(char c);Derived(float f);};
The Derived class now explicitly declares a constructor with a single parameter of type float, solving the ambiguity. If you want, this explicitly declared constructor in the Derived class accepting a float parameter can still forward the call to both the Base1 and Base2 constructors in its ctor-initializer as follows:
Derived::Derived(float f) : Base1(f), Base2(f) {}When using inherited constructors, make sure that all member variables are properly initialized. For example, take the following new definitions for Base and Derived. This example does not properly initialize the mInt data member in all cases, which is a serious error.
class Base{public:virtual ~Base() = default;Base(std::string_view str) : mStr(str) {}private:std::string mStr;};class Derived : public Base{public:using Base::Base;Derived(int i) : Base(""), mInt(i) {}private:int mInt;};
You can create a Derived object as follows:
Derived s1(2);This calls the Derived(int i) constructor, which initializes the mInt data member of the Derived class and calls the Base constructor with an empty string to initialize the mStr data member.
Because the Base constructor is inherited in the Derived class, you can also construct a Derived object as follows:
Derived s2("Hello World");This calls the inherited Base constructor in the Derived class. However, this inherited Base constructor only initializes mStr of the Base class, and does not initialize mInt of the Derived class, leaving it in an uninitialized state. This is not recommended!
The solution in this case is to use in-class member initializers, which are discussed in Chapter 8. The following code uses an in-class member initializer to initialize mInt to 0. The Derived(int i) constructor can still change this and initialize mInt to the constructor parameter i.
class Derived : public Base{public:using Base::Base;Derived(int i) : Base(""), mInt(i) {}private:int mInt = 0;};
Several special cases require attention when overriding a method. This section outlines the cases that you are likely to encounter.
In C++, you cannot override a static method. For the most part, that’s all you need to know. There are, however, a few corollaries that you need to understand.
First of all, a method cannot be both static and virtual. This is the first clue that attempting to override a static method will not do what you intend it to do. If you have a static method in your derived class with the same name as a static method in your base class, you actually have two separate methods.
The following code shows two classes that both happen to have static methods called beStatic(). These two methods are in no way related.
class BaseStatic{public:static void beStatic() {cout << "BaseStatic being static." << endl; }};class DerivedStatic : public BaseStatic{public:static void beStatic() {cout << "DerivedStatic keepin' it static." << endl; }};
Because a static method belongs to its class, calling the identically named methods on the two different classes calls their respective methods:
BaseStatic::beStatic();DerivedStatic::beStatic();
This outputs the following:
BaseStatic being static.DerivedStatic keepin' it static.
Everything makes perfect sense as long as the methods are accessed by their class name. The behavior is less clear when objects are involved. In C++, you can call a static method using an object, but because the method is static, it has no this pointer and no access to the object itself, so it is equivalent to calling it by classname::method(). Referring to the previous example classes, you can write code as follows, but the results may be surprising.
DerivedStatic myDerivedStatic;BaseStatic& ref = myDerivedStatic;myDerivedStatic.beStatic();ref.beStatic();
The first call to beStatic() obviously calls the DerivedStatic version because it is explicitly called on an object declared as a DerivedStatic. The second call might not work as you expect. The object is a BaseStatic reference, but it refers to a DerivedStatic object. In this case, BaseStatic’s version of beStatic() is called. The reason is that C++ doesn’t care what the object actually is when calling a static method. It only cares about the compile-time type. In this case, the type is a reference to a BaseStatic.
The output of the previous example is as follows:
DerivedStatic keepin' it static.BaseStatic being static.
When you override a method by specifying a name and a set of parameters, the compiler implicitly hides all other instances of the name in the base class. The idea is that if you have overridden one method of a given name, you might have intended to override all the methods of that name, but simply forgot, and therefore this should be treated as an error. It makes sense if you think about it—why would you want to change some versions of a method and not others? Consider the following Derived class, which overrides a method without overriding its associated overloaded siblings:
class Base{public:virtual ~Base() = default;virtual void overload() { cout << "Base's overload()" << endl; }virtual void overload(int i) {cout << "Base's overload(int i)" << endl; }};class Derived : public Base{public:virtual void overload() override {cout << "Derived's overload()" << endl; }};
If you attempt to call the version of overload() that takes an int parameter on a Derived object, your code will not compile because it was not explicitly overridden.
Derived myDerived;myDerived.overload(2); // Error! No matching method for overload(int).
It is possible, however, to access this version of the method from a Derived object. All you need is a pointer or a reference to a Base object:
Derived myDerived;Base& ref = myDerived;ref.overload(7);
The hiding of unimplemented overloaded methods is only skin deep in C++. Objects that are explicitly declared as instances of the derived class do not make the methods available, but a simple cast to the base class brings them right back.
The using keyword can be employed to save you the trouble of overloading all the versions when you really only want to change one. In the following code, the Derived class definition uses one version of overload() from Base and explicitly overloads the other:
class Base{public:virtual ~Base() = default;virtual void overload() { cout << "Base's overload()" << endl; }virtual void overload(int i) {cout << "Base's overload(int i)" << endl; }};class Derived : public Base{public:using Base::overload;virtual void overload() override {cout << "Derived's overload()" << endl; }};
The using clause has certain risks. Suppose a third overload() method is added to Base, which should have been overridden in Derived. This will now not be detected as an error, because, due to the using clause, the designer of the Derived class has explicitly said, “I am willing to accept all other overloads of this method from the parent class.”
There’s absolutely nothing wrong with overriding a private or protected method. Remember that the access specifier for a method determines who is able to call the method. Just because a derived class can’t call its parent’s private methods doesn’t mean it can’t override them. In fact, overriding a private or protected method is a common pattern in C++. It allows derived classes to define their own “uniqueness” that is referenced in the base class. Note that, for example, Java and C# only allow overriding public and protected methods, not private methods.
For example, the following class is part of a car simulator that estimates the number of miles the car can travel based on its gas mileage and the amount of fuel left:
class MilesEstimator{public:virtual ~MilesEstimator() = default;virtual int getMilesLeft() const;virtual void setGallonsLeft(int gallons);virtual int getGallonsLeft() const;private:int mGallonsLeft;virtual int getMilesPerGallon() const;};
The implementations of the methods are as follows:
int MilesEstimator::getMilesLeft() const{return getMilesPerGallon() * getGallonsLeft();}void MilesEstimator::setGallonsLeft(int gallons){mGallonsLeft = gallons;}int MilesEstimator::getGallonsLeft() const{return mGallonsLeft;}int MilesEstimator::getMilesPerGallon() const{return 20;}
The getMilesLeft() method performs a calculation based on the results of two of its own methods. The following code uses the MilesEstimator to calculate how many miles can be traveled with two gallons of gas:
MilesEstimator myMilesEstimator;myMilesEstimator.setGallonsLeft(2);cout << "Normal estimator can go " << myMilesEstimator.getMilesLeft()<< " more miles." << endl;
The output of this code is as follows:
Normal estimator can go 40 more miles.To make the simulator more interesting, you may want to introduce different types of vehicles, perhaps a more efficient car. The existing MilesEstimator assumes that all cars get 20 miles per gallon, but this value is returned from a separate method specifically so that a derived class can override it. Such a derived class is shown here:
class EfficientCarMilesEstimator : public MilesEstimator{private:virtual int getMilesPerGallon() const override;};
The implementation is as follows:
int EfficientCarMilesEstimator::getMilesPerGallon() const{return 35;}
By overriding this one private method, the new class completely changes the behavior of existing, unmodified, public methods. The getMilesLeft() method in the base class automatically calls the overridden version of the private
getMilesPerGallon() method. An example using the new class is shown here:
EfficientCarMilesEstimator myEstimator;myEstimator.setGallonsLeft(2);cout << "Efficient estimator can go " << myEstimator.getMilesLeft()<< " more miles." << endl;
This time, the output reflects the overridden functionality:
Efficient estimator can go 70 more miles.Derived classes and base classes can each have different default arguments, but the arguments that are used depend on the declared type of the variable, not the underlying object. Following is a simple example of a derived class that provides a different default argument in an overridden method:
class Base{public:virtual ~Base() = default;virtual void go(int i = 2) {cout << "Base's go with i=" << i << endl; }};class Derived : public Base{public:virtual void go(int i = 7) override {cout << "Derived's go with i=" << i << endl; }};
If go() is called on a Derived object, Derived’s version of go() is executed with the default argument of 7. If go() is called on a Base object, Base’s version of go() is called with the default argument of 2. However (and this is the weird part), if go() is called on a Base pointer or Base reference that really points to a Derived object, Derived’s version of go() is called but with Base’s default argument of 2. This behavior is shown in the following example:
Base myBase;Derived myDerived;Base& myBaseReferenceToDerived = myDerived;myBase.go();myDerived.go();myBaseReferenceToDerived.go();
The output of this code is as follows:
Base's go with i=2Derived's go with i=7Derived's go with i=2
The reason for this behavior is that C++ uses the compile-time type of the expression to bind default arguments, not the run-time type. Default arguments are not “inherited” in C++. If the Derived class in this example failed to provide a default argument as its parent did, it would be overloading the go() method with a new non-zero-argument version.
There are two ways you may want to change the access level of a method: you could try to make it more restrictive or less restrictive. Neither case makes much sense in C++, but there are a few legitimate reasons for attempting to do so.
To enforce tighter restrictions on a method (or on a data member for that matter), there are two approaches you can take. One way is to change the access specifier for the entire base class. This approach is described later in this chapter. The other approach is simply to redefine the access in the derived class, as illustrated in the Shy class that follows:
class Gregarious{public:virtual void talk() {cout << "Gregarious says hi!" << endl; }};class Shy : public Gregarious{protected:virtual void talk() override {cout << "Shy reluctantly says hello." << endl; }};
The protected version of talk() in the Shy class properly overrides the Gregarious::talk() method. Any client code that attempts to call talk() on a Shy object gets a compilation error:
Shy myShy;myShy.talk(); // Error! Attempt to access protected method.
However, the method is not fully protected. One only has to obtain a Gregarious reference or pointer to access the method that you thought was protected:
Shy myShy;Gregarious& ref = myShy;ref.talk();
The output of this code is as follows:
Shy reluctantly says hello.This proves that making the method protected in the derived class actually overrode the method (because the derived class version is correctly called), but it also proves that the protected access can’t be fully enforced if the base class makes it public.
It is much easier (and makes more sense) to lessen access restrictions in derived classes. The simplest way is to provide a public method that calls a protected method from the base class, as shown here:
class Secret{protected:virtual void dontTell() { cout << "I'll never tell." << endl; }};class Blabber : public Secret{public:virtual void tell() { dontTell(); }};
A client calling the public tell() method of a Blabber object effectively accesses the protected method of the Secret class. Of course, this doesn’t really change the access level of dontTell(), it just provides a public way of accessing it.
You can also override dontTell() explicitly in Blabber and give it new behavior with public access. This makes a lot more sense than reducing the level of access because it is entirely clear what happens with a reference or pointer to the base class. For example, suppose that Blabber actually makes the dontTell() method public:
class Blabber : public Secret{public:virtual void dontTell() override { cout << "I'll tell all!" << endl; }};
Now you can call dontTell() on a Blabber object:
myBlabber.dontTell(); // Outputs "I'll tell all!"If you don’t want to change the implementation of the overridden method, but only change the access level, then you can use a using clause. For example:
class Blabber : public Secret{public:using Secret::dontTell;};
This also allows you to call dontTell() on a Blabber object, but this time the output will be “I’ll never tell.”:
myBlabber.dontTell(); // Outputs "I'll never tell."In both previous cases, however, the protected method in the base class stays protected because any attempts to call Secret’s dontTell() method through a Secret pointer or reference will not compile.
Blabber myBlabber;Secret& ref = myBlabber;Secret* ptr = &myBlabber;ref.dontTell(); // Error! Attempt to access protected method.ptr->dontTell(); // Error! Attempt to access protected method.
Chapter 9 says that providing a copy constructor and assignment operator is considered a good programming practice when you have dynamically allocated memory in a class. When defining a derived class, you need to be careful about copy constructors and operator=.
If your derived class does not have any special data (pointers, usually) that require a nondefault copy constructor or operator=, you don’t need to have one, regardless of whether or not the base class has one. If your derived class omits the copy constructor or operator=, a default copy constructor or operator= will be provided for the data members specified in the derived class, and the base class copy constructor or operator= will be used for the data members specified in the base class.
On the other hand, if you do specify a copy constructor in the derived class, you need to explicitly chain to the parent copy constructor, as shown in the following code. If you do not do this, the default constructor (not the copy constructor!) will be used for the parent portion of the object.
class Base{public:virtual ~Base() = default;Base() = default;Base(const Base& src);};Base::Base(const Base& src){}class Derived : public Base{public:Derived() = default;Derived(const Derived& src);};Derived::Derived(const Derived& src) : Base(src){}
Similarly, if the derived class overrides operator=, it is almost always necessary to call the parent’s version of operator= as well. The only case where you wouldn’t do this would be if there was some bizarre reason why you only wanted part of the object assigned when an assignment took place. The following code shows how to call the parent’s assignment operator from the derived class:
Derived& Derived::operator=(const Derived& rhs){if (&rhs == this) {return *this;}Base::operator=(rhs); // Calls parent's operator=.// Do necessary assignments for derived class.return *this;}
Relative to other object-oriented languages, C++ is very compile-time oriented. As you learned earlier, overriding methods works because of a level of indirection between a method and its implementation, not because the object has built-in knowledge of its own class.
There are, however, features in C++ that provide a run-time view of an object. These features are commonly grouped together under a feature set called run-time type information, or RTTI. RTTI provides a number of useful features for working with information about an object’s class membership. One such feature is dynamic_cast(), which allows you to safely convert between types within an object-oriented hierarchy; this was discussed earlier in this chapter. Using dynamic_cast() on a class without a vtable, that is, without any virtual methods, causes a compilation error.
A second RTTI feature is the typeid operator, which lets you query an object at run time to find out its type. For the most part, you shouldn’t ever need to use typeid because any code that is conditionally run based on the type of the object would be better handled with virtual methods.
The following code uses typeid to print a message based on the type of the object:
#include <typeinfo>class Animal { public: virtual ~Animal() = default; };class Dog : public Animal {};class Bird : public Animal {};void speak(const Animal& animal){if (typeid(animal) == typeid(Dog)) {cout << "Woof!" << endl;} else if (typeid(animal) == typeid(Bird)) {cout << "Chirp!" << endl;}}
Whenever you see code like this, you should immediately consider reimplementing the functionality as a virtual method. In this case, a better implementation would be to declare a virtual method called speak() in the Animal class. Dog would override the method to print "Woof!" and Bird would override the method to print "Chirp!". This approach better fits object-oriented programming, where functionality related to objects is given to those objects.
One of the primary values of the typeid operator is for logging and debugging purposes. The following code makes use of typeid for logging. The logObject() function takes a “loggable” object as a parameter. The design is such that any object that can be logged inherits from the Loggable class and supports a method called getLogMessage().
class Loggable{public:virtual ~Loggable() = default;virtual std::string getLogMessage() const = 0;};class Foo : public Loggable{public:std::string getLogMessage() const override;};std::string Foo::getLogMessage() const{return "Hello logger.";}void logObject(const Loggable& loggableObject){cout << typeid(loggableObject).name() << ": ";cout << loggableObject.getLogMessage() << endl;}
The logObject() function first writes the name of the object’s class to the output stream, followed by its log message. This way, when you read the log later, you can see which object was responsible for every written line. Here is the output generated by Microsoft Visual C++ 2017 when the logObject() function is called with an instance of Foo:
class Foo: Hello logger.As you can see, the name returned by the typeid operator is “class Foo”. However, this name depends on your compiler. For example, if you compile the same code with GCC, the output is as follows:
3Foo: Hello logger.In all previous examples, parent classes were always listed using the public keyword. You may be wondering if a parent can be private or protected. In fact, it can, though neither is as common as public. If you don’t specify any access specifier for the parent, then it is private inheritance for a class, and public inheritance for a struct.
Declaring the relationship with the parent to be protected means that all public methods and data members from the base class become protected in the context of the derived class. Similarly, specifying private inheritance means that all public and protected methods and data members of the base class become private in the derived class.
There are a handful of reasons why you might want to uniformly degrade the access level of the parent in this way, but most reasons imply flaws in the design of the hierarchy. Some programmers abuse this language feature, often in combination with multiple inheritance, to implement “components” of a class. Instead of making an Airplane class that contains an engine data member and a fuselage data member, they make an Airplane class that is a protected engine and a protected fuselage. In this way, the Airplane doesn’t look like an engine or a fuselage to client code (because everything is protected), but it is able to use all of that functionality internally.
Earlier in this chapter, you learned about ambiguous base classes, a situation that arises when multiple parents each have a parent in common, as shown again in Figure 10-12. The solution that I recommended was to make sure that the shared parent doesn’t have any functionality of its own. That way, its methods can never be called and there is no ambiguity problem.
C++ has another mechanism, called virtual base classes, for addressing this problem if you do want the shared parent to have its own functionality. If the shared parent is a virtual base class, there will not be any ambiguity. The following code adds a sleep() method to the Animal base class and modifies the Dog and Bird classes to inherit from Animal as a virtual base class. Without the virtual keyword, a call to sleep() on a DogBird object would be ambiguous and would generate a compiler error because DogBird would have two subobjects of class Animal, one coming from Dog and one coming from Bird. However, when Animal is inherited virtually, DogBird has only one subobject of class Animal, so there will be no ambiguity with calling sleep().
class Animal{public:virtual void eat() = 0;virtual void sleep() { cout << "zzzzz...." << endl; }};class Dog : public virtual Animal{public:virtual void bark() { cout << "Woof!" << endl; }virtual void eat() override { cout << "The dog ate." << endl; }};class Bird : public virtual Animal{public:virtual void chirp() { cout << "Chirp!" << endl; }virtual void eat() override { cout << "The bird ate." << endl; }};class DogBird : public Dog, public Bird{public:virtual void eat() override { Dog::eat(); }};int main(){DogBird myConfusedAnimal;myConfusedAnimal.sleep(); // Not ambiguous because of virtual base classreturn 0;}
This chapter covered numerous details about inheritance. You learned about its many applications, including code reuse and polymorphism. You also learned about its many abuses, including poorly designed multiple-inheritance schemes. Along the way, you uncovered some cases that require special attention.
Inheritance is a powerful language feature that takes some time to get used to. After you have worked with the examples in this chapter and experimented on your own, I hope that inheritance will become your tool of choice for object-oriented design.
Professional C++ code, including much of the code in this book, uses references extensively. It is helpful to step back and think about what exactly references are, and how they behave.
A reference in C++ is an alias for another variable. All modifications to the reference change the value of the variable to which it refers. You can think of references as implicit pointers that save you the trouble of taking the address of variables and dereferencing the pointer. Alternatively, you can think of references as just another name for the original variable. You can create stand-alone reference variables, use reference data members in classes, accept references as parameters to functions and methods, and return references from functions and methods.
Reference variables must be initialized as soon as they are created, like this:
int x = 3;int& xRef = x;
Subsequent to this assignment, xRef is another name for x. Any use of xRef uses the current value of x. Any assignment to xRef changes the value of x. For example, the following code sets x to 10 through xRef:
xRef = 10;You cannot declare a reference variable outside of a class without initializing it:
int& emptyRef; // DOES NOT COMPILE!You cannot create a reference to an unnamed value, such as an integer literal, unless the reference is to a const value. In the following example, unnamedRef1 does not compile because it is a non-const reference to a constant. That would mean you could change the value of the constant, 5, which doesn’t make sense. unnamedRef2 works because it’s a const reference, so you cannot for example write “unnamedRef2 = 7”.
int& unnamedRef1 = 5; // DOES NOT COMPILEconst int& unnamedRef2 = 5; // Works as expected
The same holds for temporary objects. You cannot have a non-const reference to a temporary object, but a const reference is fine. For example, suppose you have the following function returning an std::string object:
std::string getString() { return "Hello world!"; }You can have a const reference to the result of calling getString(), and that const reference keeps the std::string object alive until the reference goes out of scope:
std::string& string1 = getString(); // DOES NOT COMPILEconst std::string& string2 = getString(); // Works as expected
A reference always refers to the same variable to which it is initialized; references cannot be changed once they are created. This rule leads to some confusing syntax. If you “assign” a variable to a reference when the reference is declared, the reference refers to that variable. However, if you assign a variable to a reference after that, the variable to which the reference refers is changed to the value of the variable being assigned. The reference is not updated to refer to that variable. Here is a code example:
int x = 3, y = 4;int& xRef = x;xRef = y; // Changes value of x to 4. Doesn't make xRef refer to y.
You might try to circumvent this restriction by taking the address of y when you assign it:
xRef = &y; // DOES NOT COMPILE!This code does not compile. The address of y is a pointer, but xRef is declared as a reference to an int, not a reference to a pointer.
Some programmers go even further in their attempts to circumvent the intended semantics of references. What if you assign a reference to a reference? Won’t that make the first reference refer to the variable to which the second reference refers? You might be tempted to try this code:
int x = 3, z = 5;int& xRef = x;int& zRef = z;zRef = xRef; // Assigns values, not references
The final line does not change zRef. Instead, it sets the value of z to 3, because xRef refers to x, which is 3.
You can create references to any type, including pointer types. Here is an example of a reference to a pointer to int:
int* intP;int*& ptrRef = intP;ptrRef = new int;*ptrRef = 5;
The syntax is a little strange: you might not be accustomed to seeing * and & right next to each other. However, the semantics are straightforward: ptrRef is a reference to intP, which is a pointer to int. Modifying ptrRef changes intP. References to pointers are rare, but can occasionally be useful, as discussed in the “Reference Parameters” section later in this chapter.
Note that taking the address of a reference gives the same result as taking the address of the variable to which the reference refers. Here is an example:
int x = 3;int& xRef = x;int* xPtr = &xRef;// Address of a reference is pointer to value*xPtr = 100;
This code sets xPtr to point to x by taking the address of a reference to x. Assigning 100 to *xPtr changes the value of x to 100. Writing a comparison “xPtr == xRef” will not compile because of a type mismatch; xPtr is a pointer to an int while xRef is a reference to an int. The comparisons “xPtr == &xRef” and “xPtr == &x” both compile without errors and are both true.
Finally, note that you cannot declare a reference to a reference, or a pointer to a reference. For example, neither “int& &” nor “int&*” is allowed.
As Chapter 9 explains, data members of classes can be references. A reference cannot exist without referring to some other variable. Thus, you must initialize reference data members in the constructor initializer, not in the body of the constructor. The following is a quick example:
class MyClass{public:MyClass(int& ref) : mRef(ref) {}private:int& mRef;};
Consult Chapter 9 for details.
C++ programmers do not often use stand-alone reference variables or reference data members. The most common use of references is for parameters to functions and methods. Recall that the default parameter-passing semantics are pass-by-value: functions receive copies of their arguments. When those parameters are modified, the original arguments remain unchanged. References allow you to specify pass-by-reference semantics for arguments passed to the function. When you use reference parameters, the function receives references to the function arguments. If those references are modified, the changes are reflected in the original argument variables. For example, here is a simple swap function to swap the values of two ints:
void swap(int& first, int& second){int temp = first;first = second;second = temp;}
You can call it like this:
int x = 5, y = 6;swap(x, y);
When swap() is called with the arguments x and y, the first parameter is initialized to refer to x, and the second parameter is initialized to refer to y. When swap() modifies first and second, x and y are actually changed.
Just as you can’t initialize normal reference variables with constants, you can’t pass constants as arguments to functions that employ pass-by-non-const-reference:
swap(3, 4); // DOES NOT COMPILEA common quandary arises when you have a pointer to something that you need to pass to a function or method that takes a reference. You can “convert” a pointer to a reference in this case by dereferencing the pointer. This action gives you the value to which the pointer points, which the compiler then uses to initialize the reference parameter. For example, you can call swap() like this:
int x = 5, y = 6;int *xp = &x, *yp = &y;swap(*xp, *yp);
Pass-by-reference is required when you want to modify the parameter and see those changes reflected in the variable passed to the function or method. However, you should not limit your use of pass-by-reference to only those cases. Pass-by-reference avoids copying the arguments to the function, providing two additional benefits in some cases:
structs could take a long time to copy. Pass-by-reference passes only a reference to the object or struct into the function.If you want to leverage these benefits, but do not want to allow the original objects to be modified, you should mark the parameters const, giving you pass-by-const-reference. This topic is covered in detail later in this chapter.
These benefits to pass-by-reference imply that you should use pass-by-value only for simple built-in types like int and double for which you don’t need to modify the arguments. Use pass-by-const-reference or pass-by-reference in all other cases.
You can also return a reference from a function or method. The main reason to do so is efficiency. Instead of returning a whole object, return a reference to the object to avoid copying it unnecessarily. Of course, you can only use this technique if the object in question continues to exist following the function termination.
Note that if the type you want to return from your function supports move semantics, discussed in Chapter 9, then returning it by value is almost as efficient as returning a reference.
A second reason to return a reference is if you want to be able to assign to the return value directly as an lvalue (the left-hand side of an assignment statement). Several overloaded operators commonly return references. Chapter 9 shows some examples, and you can read about more applications of this technique in Chapter 15.
An rvalue is anything that is not an lvalue, such as a constant value, or a temporary object or value. Typically, an rvalue is on the right-hand side of an assignment operator. Rvalue references are discussed in detail in Chapter 9, but here is a quick reminder:
// lvalue reference parametervoid handleMessage(std::string& message){cout << "handleMessage with lvalue reference: " << message << endl;}
With only this version of handleMessage(), you cannot call it as follows:
handleMessage("Hello World"); // A literal is not an lvalue.std::string a = "Hello ";std::string b = "World";handleMessage(a + b); // A temporary is not an lvalue.
To allow these kinds of calls, you need a version that accepts an rvalue reference:
// rvalue reference parametervoid handleMessage(std::string&& message){cout << "handleMessage with rvalue reference: " << message << endl;}
See Chapter 9 for more details.
References in C++ could be considered redundant: everything you can do with references, you can accomplish with pointers. For example, you could write the earlier shown swap() function like this:
void swap(int* first, int* second){int temp = *first;*first = *second;*second = temp;}
However, this code is more cluttered than the version with references. References make your programs cleaner and easier to understand. They are also safer than pointers: it’s impossible to have a null reference, and you don’t explicitly dereference references, so you can’t encounter any of the dereferencing errors associated with pointers. These arguments, saying that references are safer, are only valid in the absence of any pointers. For example, take the following function that accepts a reference to an int:
void refcall(int& t) { ++t; }You could declare a pointer and initialize it to point to some random place in memory. Then you could dereference this pointer and pass it as the reference argument to refcall(), as in the following code. This code compiles fine, but it is undefined what will happen when executed. It could for example cause a crash.
int* ptr = (int*)8;refcall(*ptr);
Most of the time, you can use references instead of pointers. References to objects even support polymorphism in the same way as pointers to objects. However, there are some use-cases in which you need to use a pointer. One example is when you need to change the location to which it points. Recall that you cannot change the variable to which references refer. For example, when you dynamically allocate memory, you need to store a pointer to the result in a pointer rather than a reference. A second use-case in which you need to use a pointer is when the pointer is optional, that is, when it can be nullptr. Yet another use-case is if you want to store polymorphic types in a container.
A way to distinguish between appropriate use of pointers and references in parameters and return types is to consider who owns the memory. If the code receiving the variable becomes the owner and thus becomes responsible for releasing the memory associated with an object, it must receive a pointer to the object. Better yet, it should receive a smart pointer, which is the recommended way to transfer ownership. If the code receiving the variable should not free the memory, it should receive a reference.
Consider a function that splits an array of ints into two arrays: one of even numbers and one of odd numbers. The function doesn’t know how many numbers in the source array will be even or odd, so it should dynamically allocate the memory for the destination arrays after examining the source array. It should also return the sizes of the two new arrays. Altogether, there are four items to return: pointers to the two new arrays and the sizes of the two new arrays. Obviously, you must use pass-by-reference. The canonical C way to write the function looks like this:
void separateOddsAndEvens(const int arr[], size_t size, int** odds,size_t* numOdds, int** evens, size_t* numEvens){// Count the number of odds and evens*numOdds = *numEvens = 0;for (size_t i = 0; i < size; ++i) {if (arr[i] % 2 == 1) {++(*numOdds);} else {++(*numEvens);}}// Allocate two new arrays of the appropriate size.*odds = new int[*numOdds];*evens = new int[*numEvens];// Copy the odds and evens to the new arrayssize_t oddsPos = 0, evensPos = 0;for (size_t i = 0; i < size; ++i) {if (arr[i] % 2 == 1) {(*odds)[oddsPos++] = arr[i];} else {(*evens)[evensPos++] = arr[i];}}}
The final four parameters to the function are the “reference” parameters. In order to change the values to which they refer, separateOddsAndEvens() must dereference them, leading to some ugly syntax in the function body. Additionally, when you want to call separateOddsAndEvens(), you must pass the address of two pointers so that the function can change the actual pointers, and the address of two ints so that the function can change the actual ints. Note also that the caller is responsible for deleting the two arrays created by separateOddsAndEvens()!
int unSplit[] = {1, 2, 3, 4, 5, 6, 7, 8, 9, 10};int* oddNums = nullptr;int* evenNums = nullptr;size_t numOdds = 0, numEvens = 0;separateOddsAndEvens(unSplit, std::size(unSplit),&oddNums, &numOdds, &evenNums, &numEvens);// Use the arrays...delete[] oddNums; oddNums = nullptr;delete[] evenNums; evenNums = nullptr;
If this syntax annoys you (which it should), you can write the same function by using references to obtain true pass-by-reference semantics:
void separateOddsAndEvens(const int arr[], size_t size, int*& odds,size_t& numOdds, int*& evens, size_t& numEvens){numOdds = numEvens = 0;for (size_t i = 0; i < size; ++i) {if (arr[i] % 2 == 1) {++numOdds;} else {++numEvens;}}odds = new int[numOdds];evens = new int[numEvens];size_t oddsPos = 0, evensPos = 0;for (size_t i = 0; i < size; ++i) {if (arr[i] % 2 == 1) {odds[oddsPos++] = arr[i];} else {evens[evensPos++] = arr[i];}}}
In this case, the odds and evens parameters are references to int*s. separateOddsAndEvens() can modify the int*s that are used as arguments to the function (through the reference), without any explicit dereferencing. The same logic applies to numOdds and numEvens, which are references to ints. With this version of the function, you no longer need to pass the addresses of the pointers or ints. The reference parameters handle it for you automatically:
separateOddsAndEvens(unSplit, std::size(unSplit),oddNums, numOdds, evenNums, numEvens);
Even though using reference parameters is already much cleaner than using pointers, it is recommended that you avoid dynamically allocated arrays as much as possible. For example, by using the Standard Library vector container, the previous separateOddsAndEvens() function can be rewritten to be much safer, more elegant, and much more readable, because all memory allocation and deallocation happens automatically:
void separateOddsAndEvens(const vector<int>& arr,vector<int>& odds, vector<int>& evens){for (int i : arr) {if (i % 2 == 1) {odds.push_back(i);} else {evens.push_back(i);}}}
This version can be used as follows:
vector<int> vecUnSplit = {1, 2, 3, 4, 5, 6, 7, 8, 9, 10};vector<int> odds, evens;separateOddsAndEvens(vecUnSplit, odds, evens);
Note that you don’t need to deallocate the odds and evens containers; the vector class takes care of this. This version is much easier to use than the versions using pointers or references. The Standard Library vector container is discussed in detail in Chapter 17.
The version using vectors is already much better than the versions using pointers or references, but it’s usually recommended to avoid output parameters as much as possible. If a function needs to return something, you should just return it, instead of using output parameters. Especially since C++11 introduced move semantics, returning something by value from a function is efficient. And now that C++17 has introduced structured bindings, see Chapter 1, it is really convenient to return multiple values from a function.
So, for the separateOddsAndEvens() function, instead of accepting two output vectors, it should simply return a pair of vectors. The std::pair utility class, defined in <utility>, is discussed in detail in Chapter 17, but its use is rather straightforward. Basically, a pair can store two values of two different or equal types. It’s a class template, and it requires two types between the angle brackets to specify the type of both values. A pair can be created using std::make_pair(). Here is the separateOddsAndEvens() function returning a pair of vectors:
pair<vector<int>, vector<int>> separateOddsAndEvens(const vector<int>& arr){vector<int> odds, evens;for (int i : arr) {if (i % 2 == 1) {odds.push_back(i);} else {evens.push_back(i);}}return make_pair(odds, evens);}
By using a structured binding, the code to call separateOddsAndEvens() becomes very compact, yet very easy to read and understand:
vector<int> vecUnSplit = {1, 2, 3, 4, 5, 6, 7, 8, 9, 10};auto[odds, evens] = separateOddsAndEvens(vecUnSplit);
Two keywords in C++ appear to cause more confusion than any others: const and static. Both of these keywords have several different meanings, and each of their uses presents subtleties that are important to understand.
The keyword const is short for “constant” and specifies that something remains unchanged. The compiler enforces this requirement by marking any attempt to change it as an error. Furthermore, when optimizations are enabled, the compiler can take advantage of this knowledge to produce better code. The keyword has two related roles. It can mark variables or parameters, and it can mark methods. This section provides a definitive discussion of these two meanings.
You can use const to “protect” variables by specifying that they cannot be modified. One important use is as a replacement for #define to define constants. This use of const is its most straightforward application. For example, you could declare the constant PI like this:
const double PI = 3.141592653589793238462;You can mark any variable const, including global variables and class data members.
You can also use const to specify that parameters to functions or methods should remain unchanged. For example, the following function accepts a const parameter. In the body of the function, you cannot modify the param integer. If you do try to modify it, the compiler will generate an error.
void func(const int param){// Not allowed to change param...}
The following subsections discuss two special kinds of const variables or parameters in more detail: const pointers and const references.
When a variable contains one or more levels of indirection via a pointer, applying const becomes trickier. Consider the following lines of code:
int* ip;ip = new int[10];ip[4] = 5;
Suppose that you decide to apply const to ip. Set aside your doubts about the usefulness of doing so for a moment, and consider what it means. Do you want to prevent the ip variable itself from being changed, or do you want to prevent the values to which it points from being changed? That is, do you want to prevent the second line or the third line?
In order to prevent the pointed-to values from being modified (as in the third line), you can add the keyword const to the declaration of ip like this:
const int* ip;ip = new int[10];ip[4] = 5;// DOES NOT COMPILE!
Now you cannot change the values to which ip points.
An alternative but semantically equivalent way to write this is as follows:
int const* ip;ip = new int[10];ip[4] = 5;// DOES NOT COMPILE!
Putting the const before or after the int makes no difference in its functionality.
If you instead want to mark ip itself const (not the values to which it points), you need to write this:
int* const ip = nullptr;ip = new int[10];// DOES NOT COMPILE!ip[4] = 5;// Error: dereferencing a null pointer
Now that ip itself cannot be changed, the compiler requires you to initialize it when you declare it, either with nullptr as in the preceding code or with newly allocated memory as follows:
int* const ip = new int[10];ip[4] = 5;
You can also mark both the pointer and the values to which it points const like this:
int const* const ip = nullptr;Here is an alternative but equivalent syntax:
const int* const ip = nullptr;Although this syntax might seem confusing, there is actually a very simple rule: the const keyword applies to whatever is directly to its left. Consider this line again:
int const* const ip = nullptr;From left to right, the first const is directly to the right of the word int. Thus, it applies to the int to which ip points. Therefore, it specifies that you cannot change the values to which ip points. The second const is directly to the right of the *. Thus, it applies to the pointer to the int, which is the ip variable. Therefore, it specifies that you cannot change ip (the pointer) itself.
The reason this rule becomes confusing is an exception. That is, the first const can go before the variable like this:
const int* const ip = nullptr;This “exceptional” syntax is used much more commonly than the other syntax.
You can extend this rule to any number of levels of indirection, as in this example:
const int * const * const * const ip = nullptr;const applied to references is usually simpler than const applied to pointers for two reasons. First, references are const by default, in that you can’t change to what they refer. So, there is no need to mark them const explicitly. Second, you can’t create a reference to a reference, so there is usually only one level of indirection with references. The only way to get multiple levels of indirection is to create a reference to a pointer.
Thus, when C++ programmers refer to a “const reference,” they mean something like this:
int z;const int& zRef = z;zRef = 4; // DOES NOT COMPILE
By applying const to the int&, you prevent assignment to zRef, as shown. Similar to pointers, const int& zRef is equivalent to int const& zRef. Note, however, that marking zRef
const has no effect on z. You can still modify the value of z by changing it directly instead of through the reference.
const references are used most commonly as parameters, where they are quite useful. If you want to pass something by reference for efficiency, but don’t want it to be modifiable, make it a const reference, as in this example:
void doSomething(const BigClass& arg){// Implementation here}
Chapter 9 explains that you can mark a class method const, which prevents the method from modifying any non-mutable data members of the class. Consult Chapter 9 for an example.
C++ always had the notion of constant expressions, and in some circumstances constant expressions are required. For example, when defining an array, the size of the array needs to be a constant expression. Because of this restriction, the following piece of code is not valid in C++:
const int getArraySize() { return 32; }int main(){int myArray[getArraySize()]; // Invalid in C++return 0;}
Using the constexpr keyword, the getArraySize() function can be redefined to make it a constant expression. Constant expressions are evaluated at compile time!
constexpr int getArraySize() { return 32; }int main(){int myArray[getArraySize()]; // OKreturn 0;}
You can even do something like this:
int myArray[getArraySize() + 1]; // OKDeclaring a function as constexpr imposes quite a lot of restrictions on what the function can do because the compiler has to be able to evaluate the function at compile time, and the function is not allowed to have any side effects. Here are a couple of restrictions, although this is not an exhaustive list:
goto statements, try catch blocks, uninitialized variables, or variable definitions that are not literal types,1 and shall not throw any exceptions. It is allowed to call other constexpr functions.constexpr function is a member of a class, the function cannot be virtual.constexpr function cannot be called until it’s defined in the translation unit because the compiler needs to know the complete definition.dynamic_cast() and reinterpret_cast() are not allowed.new and delete expressions are not allowed.By defining a constexpr constructor, you can create constant expression variables of user-defined types. A constexpr constructor also has a lot of restrictions. Here are some of them:
constexpr function.For example, the following Rect class defines a constexpr constructor satisfying the previous requirements. It also defines a constexpr getArea() method that is performing some calculation.
class Rect{public:constexpr Rect(size_t width, size_t height): mWidth(width), mHeight(height) {}constexpr size_t getArea() const { return mWidth * mHeight; }private:size_t mWidth, mHeight;};
Using this class to declare a constexpr object is straightforward:
constexpr Rect r(8, 2);int myArray[r.getArea()]; // OK
There are several uses of the keyword static in C++, all seemingly unrelated. Part of the motivation for “overloading” the keyword was attempting to avoid having to introduce new keywords into the language.
You can declare static data members and methods of classes. static data members, unlike non-static data members, are not part of each object. Instead, there is only one copy of the data member, which exists outside any objects of that class.
static methods are similarly at the class level instead of the object level. A static method does not execute in the context of a specific object.
Chapter 9 provides examples of both static data members and methods.
Before covering the use of the static keyword for linkage, you need to understand the concept of linkage in C++. C++ source files are each compiled independently, and the resulting object files are linked together. Each name in a C++ source file, including functions and global variables, has a linkage that is either external or internal. External linkage means that the name is available from other source files. Internal linkage (also called static linkage) means that it is not. By default, functions and global variables have external linkage. However, you can specify internal (or static) linkage by prefixing the declaration with the keyword static. For example, suppose you have two source files: FirstFile.cpp and AnotherFile.cpp. Here is FirstFile.cpp:
void f();int main(){f();return 0;}
Note that this file provides a prototype for f(), but doesn’t show the definition. Here is AnotherFile.cpp:
#include <iostream>void f();void f(){std::cout << "f\n";}
This file provides both a prototype and a definition for f(). Note that it is legal to write prototypes for the same function in two different files. That’s precisely what the preprocessor does for you if you put the prototype in a header file that you #include in each of the source files. The reason to use header files is that it’s easier to maintain (and keep synchronized) one copy of the prototype. However, for this example, I don’t use a header file.
Each of these source files compiles without error, and the program links fine: because f() has external linkage, main() can call it from a different file.
However, suppose you apply static to the f() prototype in AnotherFile.cpp. Note that you don’t need to repeat the static keyword in front of the definition of f(). As long as it precedes the first instance of the function name, there is no need to repeat it:
#include <iostream>static void f();void f(){std::cout << "f\n";}
Now each of the source files compiles without error, but the linker step fails because f() has internal (static) linkage, making it unavailable from FirstFile.cpp. Some compilers issue a warning when static methods are defined but not used in that source file (implying that they shouldn’t be static, because they’re probably used elsewhere).
An alternative to using static for internal linkage is to employ anonymous namespaces. Instead of marking a variable or function static, wrap it in an unnamed namespace like this:
#include <iostream>namespace {void f();void f(){std::cout << "f\n";}}
Entities in an anonymous namespace can be accessed anywhere following their declaration in the same source file, but cannot be accessed from other source files. These semantics are the same as those obtained with the static keyword.
A related keyword, extern, seems like it should be the opposite of static, specifying external linkage for the names it precedes. It can be used that way in certain cases. For example, consts and typedefs have internal linkage by default. You can use extern to give them external linkage. However, extern has some complications. When you specify a name as extern, the compiler treats it as a declaration, not a definition. For variables, this means the compiler doesn’t allocate space for the variable. You must provide a separate definition line for the variable without the extern keyword. For example, here is the content of AnotherFile.cpp:
extern int x;int x = 3;
Alternatively, you can initialize x in the extern line, which then serves as the declaration and definition:
extern int x = 3;The extern in this case is not very useful, because x has external linkage by default anyway. The real use of extern is when you want to use x from another source file, FirstFile.cpp:
#include <iostream>extern int x;int main(){std::cout << x << std::endl;}
Here, FirstFile.cpp uses an extern declaration so that it can use x. The compiler needs a declaration of x in order to use it in main(). If you declared x without the extern keyword, the compiler would think it’s a definition and would allocate space for x, causing the linkage step to fail (because there are now two x variables in the global scope). With extern, you can make variables globally accessible from multiple source files.
The final use of the static keyword in C++ is to create local variables that retain their values between exits and entrances to their scope. A static variable inside a function is like a global variable that is only accessible from that function. One common use of static variables is to “remember” whether a particular initialization has been performed for a certain function. For example, code that employs this technique might look something like this:
void performTask(){static bool initialized = false;if (!initialized) {cout << "initializing" << endl;// Perform initialization.initialized = true;}// Perform the desired task.}
However, static variables are confusing, and there are usually better ways to structure your code so that you can avoid them. In this case, you might want to write a class in which the constructor performs the required initialization.
Sometimes, however, they are quite useful. One example is for implementing the Meyer’s singleton design pattern, as explained in Chapter 29.
Before leaving the topic of static data members and global variables, consider the order of initialization of these variables. All global variables and static class data members in a program are initialized before main() begins. The variables in a given source file are initialized in the order they appear in the source file. For example, in the following file, Demo::x is guaranteed to be initialized before y:
class Demo{public:static int x;};int Demo::x = 3;int y = 4;
However, C++ provides no specifications or guarantees about the initialization ordering of nonlocal variables in different source files. If you have a global variable x in one source file and a global variable y in another, you have no way of knowing which will be initialized first. Normally, this lack of specification isn’t cause for concern. However, it can be problematic if one global or static variable depends on another. Recall that initialization of objects implies running their constructors. The constructor of one global object might access another global object, assuming that it is already constructed. If these two global objects are declared in two different source files, you cannot count on one being constructed before the other, and you cannot control the order of initialization. This order might not be the same for different compilers or even different versions of the same compiler, and the order might even change when you simply add another file to your project.
Nonlocal variables are destroyed in the reverse order they were initialized. Nonlocal variables in different source files are initialized in an undefined order, which means that the order of destruction is also undefined.
The basic types in C++ are reviewed in Chapter 1, while Chapter 8 shows you how to write your own types with classes. This section explores some of the trickier aspects of types: type aliases, type aliases for function pointers, type aliases for pointers to methods and data members, typedefs, and casts.
A type alias provides a new name for an existing type declaration. You can think of a type alias as syntax for introducing a synonym for an existing type declaration without creating a new type. The following gives a new name, IntPtr, to the int* type declaration:
using IntPtr = int*;You can use the new type name and the definition it aliases interchangeably. For example, the following two lines are valid:
int* p1;IntPtr p2;
Variables created with the new type name are completely compatible with those created with the original type declaration. So, it is perfectly valid, given these definitions, to write the following, because they are not just “compatible” types, they are the same type:
p1 = p2;p2 = p1;
The most common use for type aliases is to provide manageable names when the real type declarations become too unwieldy. This situation commonly arises with templates. For example, Chapter 1 introduces the std::vector from the Standard Library. To declare a vector of strings, you need to declare it as std::vector<std::string>. It’s a templated class, and thus requires you to specify the template parameters any time you want to refer to the type of this vector. Templates are discussed in detail in Chapter 12. For declaring variables, specifying function parameters, and so on, you would have to write std::vector<std::string>:
void processVector(const std::vector<std::string>& vec) { /* omitted */ }int main(){std::vector<std::string> myVector;processVector(myVector);return 0;}
With a type alias, you can create a shorter, more meaningful name:
using StringVector = std::vector<std::string>;void processVector(const StringVector& vec){ /* omitted */ }int main(){StringVector myVector;processVector(myVector);return 0;}
Type aliases can include the scope qualifiers. The preceding example shows this by including the scope std for StringVector.
The Standard Library uses type aliases extensively to provide shorter names for types. For example, std::string is actually a type alias that looks like this:
using string = basic_string<char>;You don’t normally think about the location of functions in memory, but each function actually lives at a particular address. In C++, you can use functions as data. In other words, you can take the address of a function and use it like you use a variable.
Function pointers are typed according to the parameter types and return type of compatible functions. One way to work with function pointers is to use a type alias. A type alias allows you to assign a type name to the family of functions that have the given characteristics. For example, the following line defines a type called MatchFunction that represents a pointer to any function that has two int parameters and returns a bool:
using MatchFunction = bool(*)(int, int);Now that this new type exists, you can write a function that takes a MatchFunction as a parameter. For example, the following function accepts two int arrays and their size, as well as a MatchFunction. It iterates through the arrays in parallel and calls the MatchFunction on corresponding elements of both arrays, printing a message if the call returns true. Notice that even though the MatchFunction is passed in as a variable, it can be called just like a regular function:
void findMatches(int values1[], int values2[], size_t numValues,MatchFunction matcher){for (size_t i = 0; i < numValues; i++) {if (matcher(values1[i], values2[i])) {cout << "Match found at position " << i <<" (" << values1[i] << ", " << values2[i] << ")" << endl;}}}
Note that this implementation requires that both arrays have at least numValues elements. To call the findMatches() function, all you need is any function that adheres to the defined MatchFunction type—that is, any type that takes in two ints and returns a bool. For example, consider the following function, which returns true if the two parameters are equal:
bool intEqual(int item1, int item2){return item1 == item2;}
Because the intEqual() function matches the MatchFunction type, it can be passed as the final argument to findMatches(), as follows:
int arr1[] = { 2, 5, 6, 9, 10, 1, 1 };int arr2[] = { 4, 4, 2, 9, 0, 3, 4 };size_t arrSize = std::size(arr1); // Pre-C++17: sizeof(arr1)/sizeof(arr1[0]);cout << "Calling findMatches() using intEqual():" << endl;findMatches(arr1, arr2, arrSize, &intEqual);
The intEqual() function is passed into the findMatches() function by taking its address. Technically, the & character is optional—if you omit it and only put the function name, the compiler will know that you mean to take its address. The output is as follows:
Calling findMatches() using intEqual():Match found at position 3 (9, 9)
The benefit of function pointers lies in the fact that findMatches() is a generic function that compares parallel values in two arrays. As it is used here, it compares based on equality. However, because it takes a function pointer, it could compare based on other criteria. For example, the following function also adheres to the definition of MatchFunction:
bool bothOdd(int item1, int item2){return item1 % 2 == 1 && item2 % 2 == 1;}
The following code calls findMatches() using bothOdd:
cout << "Calling findMatches() using bothOdd():" << endl;findMatches(arr1, arr2, arrSize, &bothOdd);
The output is as follows:
Calling findMatches() using bothOdd():Match found at position 3 (9, 9)Match found at position 5 (1, 3)
By using function pointers, a single function, findMatches(), is customized to different uses based on a parameter, matcher.
While function pointers in C++ are uncommon, you may need to obtain function pointers in certain cases. Perhaps the most common example of this is when obtaining a pointer to a function in a dynamic link library. The following example obtains a pointer to a function in a Microsoft Windows Dynamic Link Library (DLL). Details of Windows DLLs are outside the scope of this book on platform-independent C++, but it is so important to Windows programmers that it is worth discussing, and it is a good example to explain the details of function pointers in general.
Consider a DLL, hardware.dll, that has a function called Connect(). You would like to load this library only if you need to call Connect(). Loading the library at run-time is done with the Windows LoadLibrary() kernel function:
HMODULE lib = ::LoadLibrary("hardware.dll");The result of this call is what is called a “library handle” and will be NULL if there is an error. Before you can load the function from the library, you need to know the prototype for the function. Suppose the following is the prototype for Connect(), which returns an integer and accepts three parameters: a Boolean, an integer, and a C-style string.
int __stdcall Connect(bool b, int n, const char* p);The __stdcall is a Microsoft-specific directive to specify how parameters are passed to the function and how they are cleaned up.
You can now use a type alias to define a name (ConnectFunction) for a pointer to a function with the preceding prototype:
using ConnectFunction = int(__stdcall*)(bool, int, const char*);Having successfully loaded the library and defined a name for the function pointer, you can get a pointer to the function in the library as follows:
ConnectFunction connect = (ConnectFunction)::GetProcAddress(lib, "Connect");If this fails, connect will be nullptr. If it succeeds, you can call the loaded function:
connect(true, 3, "Hello world");A C programmer might think that you need to dereference the function pointer before calling it as follows:
(*connect)(true, 3, "Hello world");This was true decades ago, but now, every C and C++ compiler is smart enough to know how to automatically dereference a function pointer before calling it.
You can create and use pointers to both variables and functions. Now, consider pointers to class data members and methods. It’s perfectly legitimate in C++ to take the addresses of class data members and methods in order to obtain pointers to them. However, you can’t access a non-static data member or call a non-static method without an object. The whole point of class data members and methods is that they exist on a per-object basis. Thus, when you want to call the method or access the data member via the pointer, you must dereference the pointer in the context of an object. Here is an example using the Employee class introduced in Chapter 1:
Employee employee;int (Employee::*methodPtr) () const = &Employee::getSalary;cout << (employee.*methodPtr)() << endl;
Don’t panic at the syntax. The second line declares a variable called methodPtr of type pointer to a non-static const method of Employee that takes no arguments and returns an int. At the same time, it initializes this variable to point to the getSalary() method of the Employee class. This syntax is quite similar to declaring a simple function pointer, except for the addition of Employee:: before the *methodPtr. Note also that the & is required in this case.
The third line calls the getSalary() method (via the methodPtr pointer) on the employee object. Note the use of parentheses surrounding employee.*methodPtr. They are needed because () has higher precedence than *.
The second line can be made easier to read with a type alias:
Employee employee;using PtrToGet = int (Employee::*) () const;PtrToGet methodPtr = &Employee::getSalary;cout << (employee.*methodPtr)() << endl;
Using auto, it can be simplified even further:
Employee employee;auto methodPtr = &Employee::getSalary;cout << (employee.*methodPtr)() << endl;
Pointers to methods and data members usually won’t come up in your programs. However, it’s important to keep in mind that you can’t dereference a pointer to a non-static method or data member without an object. Every so often, you may want to try something like passing a pointer to a non-static method to a function such as qsort() that requires a function pointer, which simply won’t work.
Type aliases were introduced in C++11. Before C++11, you had to use typedefs to accomplish something similar but in a more convoluted way.
Just as a type alias, a typedef provides a new name for an existing type declaration. For example, take the following type alias:
using IntPtr = int*;Without type aliases, you had to use a typedef which looked as follows:
typedef int* IntPtr;As you can see, it’s much less readable! The order is reversed, which causes a lot of confusion, even for professional C++ developers. Other than being more convoluted, a typedef behaves almost the same as a type alias. For example, the typedef can be used as follows:
IntPtr p;Before type aliases were introduced, you also had to use typedefs for function pointers, which is even more convoluted. For example, take the following type alias:
using FunctionType = int (*)(char, double);Defining the same FunctionType with a typedef looks as follows:
typedef int (*FunctionType)(char, double);This is more convoluted because the name FunctionType is somewhere in the middle of it.
Type aliases and typedefs are not entirely equivalent. Compared to typedefs, type aliases are more powerful when used with templates, but that is covered in Chapter 12 because it requires more details about templates.
C++ provides four specific casts: const_cast(), static_cast(), reinterpret_cast(), and dynamic_cast().
The old C-style casts with () still work in C++, and are still used extensively in existing code bases. C-style casts cover all four C++ casts, so they are more error-prone because it’s not always obvious what you are trying to achieve, and you might end up with unexpected results. I strongly recommend you only use the C++ style casts in new code because they are safer and stand out better syntactically in your code.
This section describes the purposes of each C++ cast and specifies when you would use each of them.
const_cast() is the most straightforward of the different casts available. You can use it to add const-ness to a variable, or cast away const-ness of a variable. It is the only cast of the four that is allowed to cast away const-ness. Theoretically, of course, there should be no need for a const cast. If a variable is const, it should stay const. In practice, however, you sometimes find yourself in a situation where a function is specified to take a const variable, which it must then pass to a function that takes a non-const variable. The “correct” solution would be to make const consistent in the program, but that is not always an option, especially if you are using third-party libraries. Thus, you sometimes need to cast away the const-ness of a variable, but you should only do this when you are sure the function you are calling will not modify the object; otherwise, there is no other option than to restructure your program. Here is an example:
extern void ThirdPartyLibraryMethod(char* str);void f(const char* str){ThirdPartyLibraryMethod(const_cast<char*>(str));}
Starting with C++17, there is a helper method called std::as_const(), defined in <utility>, that returns a const reference version of its reference parameter. Basically, as_const(obj) is equivalent to const_cast<const T&>(obj), where T is the type of obj. As you can see, using as_const() is shorter than using const_cast(). Here is an example:
std::string str = "C++";const std::string& constStr = std::as_const(str);
Watch out when using as_const() in combination with auto. Remember from Chapter 1 that auto strips away reference and const qualifiers! So, the following result variable has type std::string, not const std::string&:
auto result = std::as_const(str);You can use static_cast() to perform explicit conversions that are supported directly by the language. For example, if you write an arithmetic expression in which you need to convert an int to a double in order to avoid integer division, use a static_cast(). In this example, it’s enough to only use static_cast() with i, because that makes one of the two operands a double, making sure C++ performs floating point division.
int i = 3;int j = 4;double result = static_cast<double>(i) / j;
You can also use static_cast() to perform explicit conversions that are allowed because of user-defined constructors or conversion routines. For example, if class A has a constructor that takes an object of class B, you can convert a B object to an A object with static_cast(). In most situations where you want this behavior, however, the compiler performs the conversion automatically.
Another use for static_cast() is to perform downcasts in an inheritance hierarchy, as in this example:
class Base{public:virtual ~Base() = default;};class Derived : public Base{public:virtual ~Derived() = default;};int main(){Base* b;Derived* d = new Derived();b = d; // Don't need a cast to go up the inheritance hierarchyd = static_cast<Derived*>(b); // Need a cast to go down the hierarchyBase base;Derived derived;Base& br = derived;Derived& dr = static_cast<Derived&>(br);return 0;}
These casts work with both pointers and references. They do not work with objects themselves.
Note that these casts using static_cast() do not perform run-time type checking. They allow you to convert any Base pointer to a Derived pointer, or Base reference to a Derived reference, even if the Base really isn’t a Derived at run time. For example, the following code compiles and executes, but using the pointer d can result in potentially catastrophic failure, including memory overwrites outside the bounds of the object.
Base* b = new Base();Derived* d = static_cast<Derived*>(b);
To perform the cast safely with run-time type checking, use dynamic_cast(), which is explained a little later in this chapter.
static_cast() is not all-powerful. You can’t static_cast() pointers of one type to pointers of another unrelated type. You can’t directly static_cast() objects of one type to objects of another type if there is no converting constructor available. You can’t static_cast() a const type to a non-const type. You can’t static_cast() pointers to ints. Basically, you can’t do anything that doesn’t make sense according to the type rules of C++.
reinterpret_cast() is a bit more powerful, and concomitantly less safe, than static_cast(). You can use it to perform some casts that are not technically allowed by the C++ type rules, but which might make sense to the programmer in some circumstances. For example, you can cast a reference to one type to a reference to another type, even if the types are unrelated. Similarly, you can cast a pointer type to any other pointer type, even if they are unrelated by an inheritance hierarchy. This is commonly used to cast a pointer to a void*. This can be done implicitly, so no explicit cast is required. However, casting a void* back to a correctly-typed pointer requires reinterpret_cast(). A void* pointer is just a pointer to some location in memory. No type information is associated with a void* pointer. Here are some examples:
class X {};class Y {};int main(){X x;Y y;X* xp = &x;Y* yp = &y;// Need reinterpret cast for pointer conversion from unrelated classes// static_cast doesn't work.xp = reinterpret_cast<X*>(yp);// No cast required for conversion from pointer to void*void* p = xp;// Need reinterpret cast for pointer conversion from void*xp = reinterpret_cast<X*>(p);// Need reinterpret cast for reference conversion from unrelated classes// static_cast doesn't work.X& xr = x;Y& yr = reinterpret_cast<Y&>(x);return 0;}
One use-case for reinterpret_cast() is with binary I/O of trivially copyable types.2 For example, you can write the individual bytes of such types to a file. When you read the file back into memory, you can use reinterpret_cast() to correctly interpret the bytes read from the file.
However, in general, you should be very careful with reinterpret_cast() because it allows you to do conversions without performing any type checking.
dynamic_cast() provides a run-time check on casts within an inheritance hierarchy. You can use it to cast pointers or references. dynamic_cast() checks the run-time type information of the underlying object at run time. If the cast doesn’t make sense, dynamic_cast() returns a null pointer (for the pointer version), or throws an std::bad_cast exception (for the reference version).
For example, suppose you have the following class hierarchy:
class Base{public:virtual ~Base() = default;};class Derived : public Base{public:virtual ~Derived() = default;};
The following example shows a correct use of dynamic_cast():
Base* b;Derived* d = new Derived();b = d;d = dynamic_cast<Derived*>(b);
The following dynamic_cast() on a reference will cause an exception to be thrown:
Base base;Derived derived;Base& br = base;try {Derived& dr = dynamic_cast<Derived&>(br);} catch (const bad_cast&) {cout << "Bad cast!" << endl;}
Note that you can perform the same casts down the inheritance hierarchy with a static_cast() or reinterpret_cast(). The difference with dynamic_cast() is that it performs run-time (dynamic) type checking, while static_cast() and reinterpret_cast() perform the casting even if they are erroneous.
As Chapter 10 discusses, the run-time type information is stored in the vtable of an object. Therefore, in order to use dynamic_cast(), your classes must have at least one virtual method. If your classes don’t have a vtable, trying to use dynamic_cast() will result in a compilation error. Microsoft VC++, for example, gives the following error:
error C2683: 'dynamic_cast' : 'MyClass' is not a polymorphic type.The following table summarizes the casts you should use for different situations.
| SITUATION | CAST |
Remove const-ness |
const_cast() |
Explicit cast supported by the language (for example, int to double, int to bool) |
static_cast() |
| Explicit cast supported by user-defined constructors or conversions | static_cast() |
| Object of one class to object of another (unrelated) class | Can’t be done |
| Pointer-to-object of one class to pointer-to-object of another class in the same inheritance hierarchy | dynamic_cast() recommended, or static_cast() |
| Reference-to-object of one class to reference-to-object of another class in the same inheritance hierarchy | dynamic_cast() recommended, or static_cast() |
| Pointer-to-type to unrelated pointer-to-type | reinterpret_cast() |
| Reference-to-type to unrelated reference-to-type | reinterpret_cast() |
| Pointer-to-function to pointer-to-function | reinterpret_cast() |
As a C++ programmer, you need to familiarize yourself with the concept of a scope. Every name in your program, including variable, function, and class names, is in a certain scope. You create scopes with namespaces, function definitions, blocks delimited by curly braces, and class definitions. Variables that are initialized in the initialization statement of for loops are scoped to that for loop and are not visible outside that for loop. Similarly, C++17 introduced initializers for if and switch statements; see Chapter 1. Variables initialized in such initializers are scoped to the if or switch statement and are not visible outside that statement. When you try to access a variable, function, or class, the name is first looked up in the nearest enclosing scope, then the next scope, and so forth, up to the global scope. Any name not in a namespace, function, block delimited by curly braces, or class is assumed to be in the global scope. If it is not found in the global scope, at that point the compiler generates an undefined symbol error.
Sometimes names in scopes hide identical names in other scopes. Other times, the scope you want is not part of the default scope resolution from that particular line in the program. If you don’t want the default scope resolution for a name, you can qualify the name with a specific scope using the scope resolution operator ::. For example, to access a static method of a class, one way is to prefix the method name with the name of the class (its scope) and the scope resolution operator. A second way is to access the static method through an object of that class. The following example demonstrates these options. The example defines a class Demo with a static get() method, a get() function that is globally scoped, and a get() function that is in the NS namespace.
class Demo{public:static int get() { return 5; }};int get() { return 10; }namespace NS{int get() { return 20; }}
The global scope is unnamed, but you can access it specifically by using the scope resolution operator by itself (with no name prefix). The different get() functions can be called as follows. In this example, the code itself is in the main() function, which is always in the global scope:
int main(){auto pd = std::make_unique<Demo>();Demo d;std::cout << pd->get() << std::endl; // prints 5std::cout << d.get() << std::endl; // prints 5std::cout << NS::get() << std::endl; // prints 20std::cout << Demo::get() << std::endl; // prints 5std::cout << ::get() << std::endl; // prints 10std::cout << get() << std::endl; // prints 10return 0;}
Note that if the namespace called NS is given as an unnamed namespace, then the following line will give an error about ambiguous name resolution, because you would have a get() defined in the global scope, and another get() defined in the unnamed namespace.
std::cout << get() << std::endl;The same error occurs if you add the following using clause right before the main() function:
using namespace NS;Attributes are a mechanism to add optional and/or vendor-specific information into source code. Before attributes were standardized in C++, vendors decided how to specify such information. Examples are __attribute__, __declspec, and so on. Since C++11, there is standardized support for attributes by using the double square brackets syntax [[attribute]].
The C++ standard defines only six standard attributes. One of them, [[carries_dependency]], is a rather exotic attribute and is not discussed further. The others are discussed in the following sections.
[[noreturn]]means that a function never returns control to the call site. Typically, the function either causes some kind of termination (process termination or thread termination), or throws an exception. With this attribute, the compiler can avoid giving certain warnings or errors because it now knows more about the intent of the function. Here is an example:
[[noreturn]] void forceProgramTermination(){std::exit(1);}bool isDongleAvailable(){bool isAvailable = false;// Check whether a licensing dongle is available...return isAvailable;}bool isFeatureLicensed(int featureId){if (!isDongleAvailable()) {// No licensing dongle found, abort program execution!forceProgramTermination();} else {bool isLicensed = false;// Dongle available, perform license check of the given feature...return isLicensed;}}int main(){bool isLicensed = isFeatureLicensed(42);}
This code snippet compiles fine without any warnings or errors. However, if you remove the [[noreturn]] attribute, the compiler generates the following warning (output from Visual C++):
warning C4715: 'isFeatureLicensed': not all control paths return a value[[deprecated]] can be used to mark something as deprecated, which means you can still use it, but its use is discouraged. This attribute accepts an optional argument that can be used to explain the reason of the deprecation, as in this example:
[[deprecated("Unsafe method, please use xyz")]] void func();If you use this deprecated function, you’ll get a compilation error or warning. For example, GCC gives the following warning:
warning: 'void func()' is deprecated: Unsafe method, please use xyzStarting with C++17, you can tell the compiler that a fallthrough in a switch statement is intentional using the [[fallthrough]] attribute. If you don’t specify this attribute for intentional fallthroughs, the compiler might give you a warning. You don’t need to specify the attribute for empty cases. For example:
switch (backgroundColor) {case Color::DarkBlue:doSomethingForDarkBlue();[[fallthrough]];case Color::Black:// Code is executed for both a dark blue or black background colordoSomethingForBlackOrDarkBlue();break;case Color::Red:case Color::Green:// Code to execute for a red or green background colorbreak;}
[[nodiscard]]The [[nodiscard]] attribute can be used on a function returning a value to let the compiler issue a warning when that function is used without doing something with the returned value. Here is an example:
[[nodiscard]] int func(){return 42;}int main(){func();return 0;}
The compiler issues a warning similar to the following:
warning C4834: discarding return value of function with 'nodiscard' attributeThis feature can, for example, be used for functions that return error codes. By adding the [[nodiscard]] attribute to such functions, the error codes cannot be ignored.
[[maybe_unused]]The [[maybe_unused]] attribute can be used to suppress the compiler from issuing a warning when something is unused, as in this example:
int func(int param1, int param2){return 42;}
If your compiler warning level is set high enough, this function definition might result in two compiler warnings. For example, Microsoft VC++ gives these warnings:
warning C4100: 'param2': unreferenced formal parameterwarning C4100: 'param1': unreferenced formal parameter
By using the [[maybe_unused]] attribute, you can suppress such warnings:
int func(int param1, [[maybe_unused]] int param2){return 42;}
In this case, the second parameter is marked with the attribute suppressing its warning. The compiler now only issues a warning for param1:
warning C4100: 'param1': unreferenced formal parameterMost attributes will be vendor-specific extensions. Vendors are advised not to use attributes to change the meaning of the program, but to use them to help the compiler to optimize code or detect errors in code. Because attributes of different vendors could clash, vendors are recommended to qualify them. Here is an example:
[[clang::noduplicate]]C++ has a number of standard literals that you can use in your code. Here are some examples:
'a': character"character array": zero-terminated array of characters, C-style string3.14f: float floating point value0xabc: hexadecimal valueHowever, C++ also allows you to define your own literals. User-defined literals should start with an underscore. The first character following the underscore must be a lowercase letter. Some examples are: _i, _s, _km, _miles, and so on. User-defined literals are implemented by writing literal operators. A literal operator can work in raw or cooked mode. In raw mode, your literal operator receives a sequence of characters, while in cooked mode your literal operator receives a specific interpreted type. For example, take the C++ literal 123. A raw literal operator receives this as a sequence of characters '1', '2', '3'. A cooked literal operator receives this as the integer 123. As another example, take the C++ literal 0x23. A raw operator receives the characters '0', 'x', '2', '3', while a cooked operator receives the integer 35. One last example, take the C++ literal 3.14. A raw operator receives this as '3', '.', '1', '4', while a cooked operator receives the floating point value 3.14.
A cooked-mode literal operator should have either of the following:
unsigned long long, long double, char, wchar_t, char16_t, or char32_t to process numeric values, orconst char* str, size_t len).As an example, the following implements a cooked literal operator for the user-defined literal _i to define a complex number literal:
std::complex<long double> operator"" _i(long double d){return std::complex<long double>(0, d);}
This _i literal can be used as follows:
std::complex<long double> c1 = 9.634_i;auto c2 = 1.23_i; // c2 has as type std::complex<long double>
A second example implements a cooked literal operator for a user-defined literal _s to define std::string literals:
std::string operator"" _s(const char* str, size_t len){return std::string(str, len);}
This literal can be used as follows:
std::string str1 = "Hello World"_s;auto str2 = "Hello World"_s; // str2 has as type std::string
Without the _s literal, the auto type deduction would be const char*:
auto str3 = "Hello World"; // str3 has as type const char*A raw-mode literal operator requires one parameter of type const char*, a zero-terminated C-style string. The following example defines the literal _i, but using a raw literal operator:
std::complex<long double> operator"" _i(const char* p){// Implementation omitted; it requires parsing the C-style// string and converting it to a complex number.}
Using this raw-mode literal operator is exactly the same as using the cooked version.
C++ defines the following standard user-defined literals. Note that these standard user-defined literals do not start with an underscore.
std::strings
auto myString = "Hello World"s;
using namespace std::string_literals; “sv” for creating std::string_views
auto myStringView = "Hello World"sv;
using namespace std::string_view_literals;std::chrono::duration time intervals, discussed in Chapter 20
auto myDuration = 42min;
using namespace std::chrono_literals;complex<double>, complex<long double>, and complex<float>, respectively
auto myComplexNumber = 1.3i;
using namespace std::complex_literals;A using namespace std; also makes these standard user-defined literals available.
Header files are a mechanism for providing an abstract interface to a subsystem or piece of code. One of the trickier parts of using headers is avoiding multiple includes of the same header file and circular references.
For example, suppose A.h includes Logger.h, defining a Logger class, and B.h also includes Logger.h. If you have a source file called App.cpp, which includes both A.h and B.h, you end up with duplicate definitions of the Logger class because the Logger.h header is included through A.h and B.h.
This problem of duplicate definitions can be avoided with a mechanism known as include guards. The following code snippet shows the Logger.h header with include guards. At the beginning of each header file, the #ifndef directive checks to see if a certain key has not been defined. If the key has been defined, the compiler skips to the matching #endif, which is usually placed at the end of the file. If the key has not been defined, the file proceeds to define the key so that a subsequent include of the same file will be skipped.
#ifndef LOGGER_H#define LOGGER_Hclass Logger{// ...};#endif// LOGGER_H
Nearly all compilers these days support the #pragma once directive which replaces include guards. For example:
#pragma onceclass Logger{// ...};
Another tool for avoiding problems with header files is forward declarations. If you need to refer to a class but you cannot include its header file (for example, because it relies heavily on the class you are writing), you can tell the compiler that such a class exists without providing a formal definition through the #include mechanism. Of course, you cannot actually use the class in the code because the compiler knows nothing about it, except that the named class will exist after everything is linked together. However, you can still make use of pointers or references to forward-declared classes in your code. You can also declare functions that return such forward-declared classes by value, or that have such forward-declared classes as pass-by-value function parameters. Of course, both the code defining the function and any code calling the function will need to include the right header files that properly defines the forward-declared classes.
For example, assume that the Logger class uses another class called Preferences, that keeps track of user settings. The Preferences class may in turn use the Logger class, so you have a circular dependency which cannot be resolved with include guards. You need to make use of forward declarations in such cases. In the following code, the Logger.h header file uses a forward declaration for the Preferences class, and subsequently refers to the Preferences class without including its header file.
#pragma once#include <string_view>class Preferences;// forward declarationclass Logger{public:static void setPreferences(const Preferences& prefs);static void logError(std::string_view error);};
It’s recommended to use forward declarations as much as possible in your header files instead of including other headers. This can reduce your compilation and recompilation times, because it breaks dependencies of your header file on other headers. Of course, your implementation file needs to include the correct headers for types that you’ve forward-declared; otherwise, it won’t compile.
To query whether a certain header file exists, C++17 adds the __has_include("filename") and __has_include(<filename>) preprocessor constants. These constants evaluate to 1 if the header file exists, 0 if it doesn’t exist. For example, before the <optional> header file was fully approved for C++17, a preliminary version existed in <experimental/optional>. You could use __has_include() to check which of the two header files is available on your system:
#if __has_include(<optional>)#include <optional>#elif __has_include(<experimental/optional>)#include <experimental/optional>#endif
There are a few obscure C features that are also available in C++ and which can occasionally be useful. This section examines two of these features: variable-length argument lists and preprocessor macros.
This section explains the old C-style variable-length argument lists. You need to know how these work because you might find them in legacy code. However, in new code you should use variadic templates for type-safe variable-length argument lists, which are described in Chapter 22.
Consider the C function printf() from <cstdio>. You can call it with any number of arguments:
printf("int %d\n", 5);printf("String %s and int %d\n", "hello", 5);printf("Many ints: %d, %d, %d, %d, %d\n", 1, 2, 3, 4, 5);
C/C++ provides the syntax and some utility macros for writing your own functions with a variable number of arguments. These functions usually look a lot like printf(). Although you shouldn’t need this feature very often, occasionally you will run into situations in which it’s quite useful. For example, suppose you want to write a quick-and-dirty debug function that prints strings to stderr if a debug flag is set, but does nothing if the debug flag is not set. Just like printf(), this function should be able to print strings with an arbitrary number of arguments and arbitrary types of arguments. A simple implementation looks like this:
#include <cstdio>#include <cstdarg>bool debug = false;void debugOut(const char* str, ...){va_list ap;if (debug) {va_start(ap, str);vfprintf(stderr, str, ap);va_end(ap);}}
First, note that the prototype for debugOut() contains one typed and named parameter str, followed by ... (ellipses). They stand for any number and type of arguments. In order to access these arguments, you must use macros defined in <cstdarg>. You declare a variable of type va_list, and initialize it with a call to va_start. The second parameter to va_start() must be the rightmost named variable in the parameter list. All functions with variable-length argument lists require at least one named parameter. The debugOut() function simply passes this list to vfprintf() (a standard function in <cstdio>). After the call to vfprintf() returns, debugOut() calls va_end() to terminate the access of the variable argument list. You must always call va_end() after calling va_start() to ensure that the function ends with the stack in a consistent state.
You can use the function in the following way:
debug = true;debugOut("int %d\n", 5);debugOut("String %s and int %d\n", "hello", 5);debugOut("Many ints: %d, %d, %d, %d, %d\n", 1, 2, 3, 4, 5);
If you want to access the actual arguments yourself, you can use va_arg() to do so. It accepts a va_list as first argument, and the type of the argument to interpret. Unfortunately, there is no way to know what the end of the argument list is unless you provide an explicit way of doing so. For example, you can make the first parameter a count of the number of parameters. Or, in the case where you have a set of pointers, you may require the last pointer to be nullptr. There are many ways, but they are all burdensome to the programmer.
The following example demonstrates the technique where the caller specifies in the first named parameter how many arguments are provided. The function accepts any number of ints and prints them out:
void printInts(size_t num, ...){int temp;va_list ap;va_start(ap, num);for (size_t i = 0; i < num; ++i) {temp = va_arg(ap, int);cout << temp << " ";}va_end(ap);cout << endl;}
You can call printInts() as follows. Note that the first parameter specifies how many integers will follow:
printInts(5, 5, 4, 3, 2, 1);Accessing C-style variable-length argument lists is not very safe. There are several risks, as you can see from the printInts() function:
printInts(), you must trust the caller to pass the right number of arguments as the first argument. In the case of debugOut(), you must trust the caller to pass the same number of arguments after the character array as there are formatting codes in the character array.va_arg() takes a type, which it uses to interpret the value in its current spot. However, you can tell va_arg() to interpret the value as any type. There is no way for it to verify the correct type.You can use the C++ preprocessor to write macros, which are like little functions. Here is an example:
#define SQUARE(x) ((x) * (x)) // No semicolon after the macro definition!int main(){cout << SQUARE(5) << endl;return 0;}
Macros are a remnant from C that are quite similar to inline functions, except that they are not type-checked, and the preprocessor dumbly replaces any calls to them with their expansions. The preprocessor does not apply true function-call semantics. This behavior can cause unexpected results. For example, consider what would happen if you called the SQUARE macro with 2
+
3 instead of 5, like this:
cout << SQUARE(2 + 3) << endl;You expect SQUARE to calculate 25, which it does. However, what if you left off some parentheses on the macro definition, so that it looks like this?
#define SQUARE(x) (x * x)Now, the call to SQUARE(2
+
3) generates 11, not 25! Remember that the macro is dumbly expanded without regard to function-call semantics. This means that any x in the macro body is replaced by 2
+
3, leading to this expansion:
cout << (2 + 3 * 2 + 3) << endl;Following proper order of operations, this line performs the multiplication first, followed by the additions, generating 11 instead of 25!
Macros can also have a performance impact. Suppose you call the SQUARE macro as follows:
cout << SQUARE(veryExpensiveFunctionCallToComputeNumber()) << endl;The preprocessor replaces this with the following:
cout << ((veryExpensiveFunctionCallToComputeNumber()) *(veryExpensiveFunctionCallToComputeNumber())) << endl;
Now you are calling the expensive function twice—another reason to avoid macros.
Macros also cause problems for debugging because the code you write is not the code that the compiler sees, or that shows up in your debugger (because of the search-and-replace behavior of the preprocessor). For these reasons, you should avoid macros entirely in favor of inline functions. The details are shown here only because quite a bit of C++ code out there still employs macros. You need to understand them in order to read and maintain that code.
This chapter explained some of the aspects of C++ that generate confusion. By reading this chapter, you learned a plethora of syntax details about C++. Some of the information, such as the details of references, const, scope resolution, the specifics of the C++-style casts, and the techniques for header files, you should use often in your programs. Other information, such as the uses of static and extern, how to write C-style variable-length argument lists, and how to write preprocessor macros, is important to understand, but not information that you should put into use in your programs on a day-to-day basis.
The next chapter starts a discussion on templates allowing you to write generic code.
The main programming unit in the procedural paradigm is the procedure or function. Functions are useful primarily because they allow you to write algorithms that are independent of specific values and can thus be reused for many different values. For example, the sqrt() function in C++ calculates the square root of a value supplied by the caller. A square root function that calculates only the square root of one number, such as four, would not be particularly useful! The sqrt() function is written in terms of a parameter, which is a stand-in for whatever value the caller passes. Computer scientists say that functions parameterize values.
The object-oriented programming paradigm adds the concept of objects, which group related data and behaviors, but it does not change the way functions and methods parameterize values.
Templates take the concept of parameterization a step further to allow you to parameterize on types as well as values. Types in C++ include primitives such as int and double, as well as user-defined classes such as SpreadsheetCell and CherryTree. With templates, you can write code that is independent not only of the values it will be given, but also of the types of those values. For example, instead of writing separate stack classes to store ints, Cars, and SpreadsheetCells, you can write one stack class definition that can be used for any of those types.
Although templates are an amazing language feature, templates in C++ are syntactically confusing, and many programmers avoid writing templates themselves. However, every programmer needs to know at least how to use templates, because they are widely used by libraries. For example, the C++ Standard Library uses templates extensively.
This chapter teaches you about template support in C++ with an emphasis on the aspects that arise in the Standard Library. Along the way, you will learn about some nifty features that you can employ in your programs aside from using the Standard Library.
Class templates define a class where the types of some of the variables, return types of methods, and/or parameters to the methods are specified as parameters. Class templates are useful primarily for containers, or data structures, that store objects. This section uses a running example of a Grid container. In order to keep the examples reasonable in length and simple enough to illustrate specific points, different sections of the chapter add features to the Grid container that are not used in subsequent sections.
Suppose that you want a generic game board class that you can use as a chessboard, checkers board, tic-tac-toe board, or any other two-dimensional game board. In order to make it general-purpose, you should be able to store chess pieces, checkers pieces, tic-tac-toe pieces, or any type of game piece.
Without templates, the best approach to build a generic game board is to employ polymorphism to store generic GamePiece objects. Then, you could let the pieces for each game inherit from the GamePiece class. For example, in a chess game, ChessPiece would be a derived class of GamePiece. Through polymorphism, the GameBoard, written to store GamePieces, could also store ChessPieces. Because it should be possible to copy a GameBoard, the GameBoard needs to be able to copy GamePieces. This implementation employs polymorphism, so one solution is to add a pure virtual clone() method to the GamePiece base class. Here is the basic GamePiece interface:
class GamePiece{public:virtual std::unique_ptr<GamePiece> clone() const = 0;};
GamePiece is an abstract base class. Concrete classes, such as ChessPiece, derive from it and implement the clone() method:
class ChessPiece : public GamePiece{public:virtual std::unique_ptr<GamePiece> clone() const override;};std::unique_ptr<GamePiece> ChessPiece::clone() const{// Call the copy constructor to copy this instancereturn std::make_unique<ChessPiece>(*this);}
The implementation of GameBoard uses a vector of vectors of unique_ptrs to store the GamePieces.
class GameBoard{public:explicit GameBoard(size_t width = kDefaultWidth,size_t height = kDefaultHeight);GameBoard(const GameBoard& src); // copy constructorvirtual ~GameBoard() = default; // virtual defaulted destructorGameBoard& operator=(const GameBoard& rhs); // assignment operator// Explicitly default a move constructor and assignment operator.GameBoard(GameBoard&& src) = default;GameBoard& operator=(GameBoard&& src) = default;std::unique_ptr<GamePiece>& at(size_t x, size_t y);const std::unique_ptr<GamePiece>& at(size_t x, size_t y) const;size_t getHeight() const { return mHeight; }size_t getWidth() const { return mWidth; }static const size_t kDefaultWidth = 10;static const size_t kDefaultHeight = 10;friend void swap(GameBoard& first, GameBoard& second) noexcept;private:void verifyCoordinate(size_t x, size_t y) const;std::vector<std::vector<std::unique_ptr<GamePiece>>> mCells;size_t mWidth, mHeight;};
In this implementation, at() returns a reference to the piece at a specified spot instead of a copy of the piece. The GameBoard serves as an abstraction of a two-dimensional array, so it should provide array access semantics by giving the actual object at an index, not a copy of the object. Client code should not store this reference for future use because it might become invalid. Instead, client code should call at() right before using the returned reference. This follows the design philosophy of the Standard Library std::vector class.
Here are the method definitions. Note that this implementation uses the copy-and-swap idiom for the assignment operator, and Scott Meyer’s const_cast() pattern to avoid code duplication, both of which are discussed in Chapter 9.
GameBoard::GameBoard(size_t width, size_t height): mWidth(width), mHeight(height){mCells.resize(mWidth);for (auto& column : mCells) {column.resize(mHeight);}}GameBoard::GameBoard(const GameBoard& src): GameBoard(src.mWidth, src.mHeight){// The ctor-initializer of this constructor delegates first to the// non-copy constructor to allocate the proper amount of memory.// The next step is to copy the data.for (size_t i = 0; i < mWidth; i++) {for (size_t j = 0; j < mHeight; j++) {if (src.mCells[i][j])mCells[i][j] = src.mCells[i][j]->clone();}}}void GameBoard::verifyCoordinate(size_t x, size_t y) const{if (x >= mWidth || y >= mHeight) {throw std::out_of_range("");}}void swap(GameBoard& first, GameBoard& second) noexcept{using std::swap;swap(first.mWidth, second.mWidth);swap(first.mHeight, second.mHeight);swap(first.mCells, second.mCells);}GameBoard& GameBoard::operator=(const GameBoard& rhs){// Check for self-assignmentif (this == &rhs) {return *this;}// Copy-and-swap idiomGameBoard temp(rhs); // Do all the work in a temporary instanceswap(*this, temp); // Commit the work with only non-throwing operationsreturn *this;}const unique_ptr<GamePiece>& GameBoard::at(size_t x, size_t y) const{verifyCoordinate(x, y);return mCells[x][y];}unique_ptr<GamePiece>& GameBoard::at(size_t x, size_t y){return const_cast<unique_ptr<GamePiece>&>(as_const(*this).at(x, y));}
This GameBoard class works pretty well:
GameBoard chessBoard(8, 8);auto pawn = std::make_unique<ChessPiece>();chessBoard.at(0, 0) = std::move(pawn);chessBoard.at(0, 1) = std::make_unique<ChessPiece>();chessBoard.at(0, 1) = nullptr;
The GameBoard class in the previous section is nice, but insufficient. A first problem is that you cannot use GameBoard to store elements by value; it always stores pointers. Another, more serious issue is related to type safety. Each cell in a GameBoard stores a unique_ptr<GamePiece>. Even if you are storing ChessPieces, when you use at() to request a certain cell, you will get back a unique_ptr<GamePiece>. This means you have to downcast the retrieved GamePiece to a ChessPiece to be able to make use of ChessPiece’s specific functionality. Another shortcoming of GameBoard is that it cannot be used to store primitive types, such as int or double, because the type stored in a cell has to derive from GamePiece.
So, it would be nice if you could write a generic Grid class that you could use for storing ChessPieces, SpreadsheetCells, ints, doubles, and so on. In C++, you can do this by writing a class template, which allows you to write a class without specifying one or more types. Clients then instantiate the template by specifying the types they want to use. This is called generic programming. The biggest advantage of generic programming is type safety. The types used in the class and its methods are concrete types, and not abstract base class types, as is the case with the polymorphic solution from the previous section. For example, suppose there is not only a ChessPiece but also a TicTacToePiece:
class TicTacToePiece : public GamePiece{public:virtual std::unique_ptr<GamePiece> clone() const override;};std::unique_ptr<GamePiece> TicTacToePiece::clone() const{// Call the copy constructor to copy this instancereturn std::make_unique<TicTacToePiece>(*this);}
With the polymorphic solution from the previous section, nothing stops you from storing tic-tac-toe pieces and chess pieces on the same chess board:
GameBoard chessBoard(8, 8);chessBoard.at(0, 0) = std::make_unique<ChessPiece>();chessBoard.at(0, 1) = std::make_unique<TicTacToePiece>();
The big problem with this is that you somehow need to remember what a cell is storing, so that you can perform the correct downcast when you call at().
In order to understand class templates, it is helpful to examine the syntax. The following example shows how you can modify the GameBoard class to make a templatized Grid class. The syntax is explained in detail following the code. Note that the class name has changed from GameBoard to Grid. The Grid should also be usable with primitive types such as int and double. That’s why I opted to implement this solution using value semantics without polymorphism, compared to the polymorphic pointer semantics used in the GameBoard implementation. A downside of using value semantics compared to pointer semantics is that you cannot have a true empty cell, that is, a cell must always contain some value. With pointer semantics, an empty cell stores nullptr. Luckily, C++17’s std::optional, defined in <optional>, comes to the rescue here. It allows you to use value semantics, while still having a way to represent empty cells.
template <typename T>class Grid{public:explicit Grid(size_t width = kDefaultWidth,size_t height = kDefaultHeight);virtual ~Grid() = default;// Explicitly default a copy constructor and assignment operator.Grid(const Grid& src) = default;Grid<T>& operator=(const Grid& rhs) = default;// Explicitly default a move constructor and assignment operator.Grid(Grid&& src) = default;Grid<T>& operator=(Grid&& rhs) = default;std::optional<T>& at(size_t x, size_t y);const std::optional<T>& at(size_t x, size_t y) const;size_t getHeight() const { return mHeight; }size_t getWidth() const { return mWidth; }static const size_t kDefaultWidth = 10;static const size_t kDefaultHeight = 10;private:void verifyCoordinate(size_t x, size_t y) const;std::vector<std::vector<std::optional<T>>> mCells;size_t mWidth, mHeight;};
Now that you’ve seen the full class definition, take another look at it, one line at a time:
template <typename T>This first line says that the following class definition is a template on one type. Both template and typename are keywords in C++. As discussed earlier, templates “parameterize” types in the same way that functions “parameterize” values. Just as you use parameter names in functions to represent the arguments that the caller will pass, you use template parameter names (such as T) in templates to represent the types that the caller will specify. There’s nothing special about the name T—you can use whatever name you want. Traditionally, when a single type is used, it is called T, but that’s just a historical convention, like calling the integer that indexes an array i or j. The template specifier holds for the entire statement, which in this case is the class definition.
In the earlier GameBoard class, the mCells data member is a vector of vectors of pointers, which requires special code for copying—thus the need for a copy constructor and copy assignment operator. In the Grid class, mCells is a vector of vectors of optional values, so the compiler-generated copy constructor and assignment operator are fine. However, as explained in Chapter 8, once you have a user-declared destructor, it’s deprecated for the compiler to implicitly generate a copy constructor or copy assignment operator, so the Grid class template explicitly defaults them. It also explicitly defaults the move constructor and move assignment operator. Here is the explicitly defaulted copy assignment operator:
Grid<T>& operator=(const Grid& rhs) = default;As you can see, the type of the rhs parameter is no longer a const GameBoard&, but a const
Grid&. You can also specify it as a const
Grid<T>&. Within a class definition, the compiler interprets Grid as Grid<T> where needed. However, outside a class definition you need to use Grid<T>. When you write a class template, what you used to think of as the class name (Grid) is actually the template name. When you want to talk about actual Grid classes or types, you discuss them as Grid<T>, instantiations of the Grid class template for a certain type, such as int, SpreadsheetCell, or ChessPiece.
Because mCells is not storing pointers anymore, but optional values, the at() methods now return optional<T>& or const optional<T>& instead of unique_ptrs:
std::optional<T>& at(size_t x, size_t y);const std::optional<T>& at(size_t x, size_t y) const;
The template <typename T> specifier must precede each method definition for the Grid template. The constructor looks like this:
template <typename T>Grid<T>::Grid(size_t width, size_t height): mWidth(width), mHeight(height){mCells.resize(mWidth);for (auto& column : mCells) {// Equivalent to://for (std::vector<std::optional<T>>& column : mCells) {column.resize(mHeight);}}
Note that the class name before the :: is Grid<T>, not Grid. You must specify Grid<T> as the class name in all your methods and static data member definitions. The body of the constructor is identical to the GameBoard constructor.
The rest of the method definitions are also similar to their equivalents in the GameBoard class with the exception of the appropriate template and Grid<T> syntax changes:
template <typename T>void Grid<T>::verifyCoordinate(size_t x, size_t y) const{if (x >= mWidth || y >= mHeight) {throw std::out_of_range("");}}template <typename T>const std::optional<T>& Grid<T>::at(size_t x, size_t y) const{verifyCoordinate(x, y);return mCells[x][y];}template <typename T>std::optional<T>& Grid<T>::at(size_t x, size_t y){return const_cast<std::optional<T>&>(std::as_const(*this).at(x, y));}
When you want to create grid objects, you cannot use Grid alone as a type; you must specify the type that will be stored in that Grid. Creating an object of a class template for a specific type is called instantiating the template. Here is an example:
Grid<int> myIntGrid; // declares a grid that stores ints,// using default arguments for the constructorGrid<double> myDoubleGrid(11, 11); // declares an 11x11 Grid of doublesmyIntGrid.at(0, 0) = 10;int x = myIntGrid.at(0, 0).value_or(0);Grid<int> grid2(myIntGrid); // Copy constructorGrid<int> anotherIntGrid;anotherIntGrid = grid2; // Assignment operator
Note that the type of myIntGrid, grid2, and anotherIntGrid is Grid<int>. You cannot store SpreadsheetCells or ChessPieces in these grids; the compiler will generate an error if you try to do so.
Note also the use of value_or(). The at() method returns an std::optional reference. This optional can contain a value or not. The value_or() method returns the value inside the optional if there is a value; otherwise it returns the argument given to value_or().
The type specification is important; neither of the following two lines compiles:
Grid test; // WILL NOT COMPILEGrid<> test; // WILL NOT COMPILE
The first line causes your compiler to complain with something like, “use of class template requires template argument list.” The second line causes it to say something like, “too few template arguments.”
If you want to declare a function or method that takes a Grid object, you must specify the type stored in that grid as part of the Grid type:
void processIntGrid(Grid<int>& grid){// Body omitted for brevity}
Alternatively, you can use function templates, discussed later in this chapter, to write a function templatized on the type of the elements in the grid.
The Grid template can store more than just ints. For example, you can instantiate a Grid that stores SpreadsheetCells:
Grid<SpreadsheetCell> mySpreadsheet;SpreadsheetCell myCell(1.234);mySpreadsheet.at(3, 4) = myCell;
You can store pointer types as well:
Grid<const char*> myStringGrid;myStringGrid.at(2, 2) = "hello";
The type specified can even be another template type:
Grid<vector<int>> gridOfVectors;vector<int> myVector{ 1, 2, 3, 4 };gridOfVectors.at(5, 6) = myVector;
You can also dynamically allocate Grid template instantiations on the heap:
auto myGridOnHeap = make_unique<Grid<int>>(2, 2); // 2x2 Grid on the heapmyGridOnHeap->at(0, 0) = 10;int x = myGridOnHeap->at(0, 0).value_or(0);
Some of the examples in this book use templates with double angle brackets, as in this example:
std::vector<std::vector<T>> mCells;This works perfectly fine since C++11. However, before C++11, the double angle brackets >> could mean only one thing: the >> operator. Depending on the types involved, this >> operator could be a right bit-shift operation, or a stream extraction operator. This was annoying with template code, because you were forced to put a space between double angle brackets. The previous declaration had to be written as follows:
std::vector<std::vector<T> > mCells;This book uses the modern style without the spaces.
In order to understand the intricacies of templates, you need to learn how the compiler processes template code. When the compiler encounters template method definitions, it performs syntax checking, but doesn’t actually compile the templates. It can’t compile template definitions because it doesn’t know for which types they will be used. It’s impossible for a compiler to generate code for something like x = y without knowing the types of x and y.
When the compiler encounters an instantiation of the template, such as Grid<int> myIntGrid, it writes code for an int version of the Grid template by replacing each T in the class template definition with int. When the compiler encounters a different instantiation of the template, such as Grid<SpreadsheetCell>
mySpreadsheet, it writes another version of the Grid class for SpreadsheetCells. The compiler just writes the code that you would write if you didn’t have template support in the language and had to write separate classes for each element type. There’s no magic here; templates just automate an annoying process. If you don’t instantiate a class template for any types in your program, then the class method definitions are never compiled.
This instantiation process explains why you need to use the Grid<T> syntax in various places in your definition. When the compiler instantiates the template for a particular type, such as int, it replaces T with int, so that Grid<int> is the type.
The compiler always generates code for all virtual methods of a generic class. However, for non-virtual methods, the compiler generates code only for those non-virtual methods that you actually call for a particular type. For example, given the preceding Grid class template, suppose that you write this code (and only this code) in main():
Grid<int> myIntGrid;myIntGrid.at(0, 0) = 10;
The compiler generates only the zero-argument constructor, the destructor, and the non-const
at() method for an int version of the Grid. It does not generate other methods like the copy constructor, the assignment operator, or getHeight().
When you write code that is independent of types, you must assume certain things about those types. For example, in the Grid template, you assume that the element type (represented by T) is destructible. The Grid template implementation doesn’t assume much. However, other templates could assume that their template type parameters support, for example, an assignment operator.
If you attempt to instantiate a template with a type that does not support all the operations used by the template in your particular program, the code will not compile, and the error messages will almost always be quite obscure. However, even if the type you want to use doesn’t support the operations required by all the template code, you can exploit selective instantiation to use some methods but not others.
Normally you put class definitions in a header file and method definitions in a source file. Code that creates or uses objects of the class #includes the header file and obtains access to the method code via the linker. Templates don’t work that way. Because they are “templates” for the compiler to generate the actual methods for the instantiated types, both class template definitions and method definitions must be available to the compiler in any source file that uses them. There are several mechanisms to obtain this inclusion.
You can place the method definitions directly in the same header file where you define the class itself. When you #include this file in a source file where you use the template, the compiler will have access to all the code it needs. This mechanism is used for the previous Grid implementation.
Alternatively, you can place the template method definitions in a separate header file that you #include in the header file with the class definitions. Make sure the #include for the method definitions follows the class definition; otherwise, the code won’t compile. For example:
template <typename T>class Grid{// Class definition omitted for brevity};#include "GridDefinitions.h"
Any client that wants to use the Grid template needs only to include the Grid.h header file. This division helps to keep the distinction between class definitions and method definitions.
Method implementations look strange in header files. If that syntax annoys you, there is a way that you can place the method definitions in a source file. However, you still need to make the definitions available to the code that uses the template, which you can do by #includeing the method implementation source file in the class template definition header file. That sounds odd if you’ve never seen it before, but it’s legal in C++. The header file looks like this:
template <typename T>class Grid{// Class definition omitted for brevity};#include "Grid.cpp"
When using this technique, make sure you don’t add the Grid.cpp file to your project, because it is not supposed to be, and cannot be, compiled separately; it should be #included only in a header file!
You can actually call your file with method implementations anything you want. Some programmers like to give source files that are included an .inl extension, for example, Grid.inl.
If you want your class templates to be used only with certain known types, you can use the following technique.
Suppose you want the Grid class to be instantiated only for int, double, and vector<int>. The header file should look like this:
template <typename T>class Grid{// Class definition omitted for brevity};
Note that there are no method definitions in this header file and that there is no #include at the end!
In this case, you need a real .cpp file added to your project, which contains the method definitions and looks like this:
#include "Grid.h"#include <utility>template <typename T>Grid<T>::Grid(size_t width, size_t height): mWidth(width), mHeight(height){mCells.resize(mWidth);for (auto& column : mCells) {column.resize(mHeight);}}// Other method definitions omitted for brevity...
For this method to work, you need to explicitly instantiate the template for those types that you want to allow clients to use. At the end of the .cpp file you can do this as follows:
// Explicit instantiations for the types you want to allow.template class Grid<int>;template class Grid<double>;template class Grid<std::vector<int>>;
With these explicit instantiations, you disallow client code from using the Grid class template with other types, such as SpreadsheetCell.
In the Grid example, the Grid template has one template parameter: the type that is stored in the grid. When you write the class template, you specify the parameter list inside the angle brackets, like this:
template <typename T>This parameter list is similar to the parameter list in a function or method. As in functions and methods, you can write a class with as many template parameters as you want. Additionally, these parameters don’t have to be types, and they can have default values.
Non-type parameters are “normal” parameters such as ints and pointers: the kind of parameters with which you’re familiar from functions and methods. However, non-type template parameters can only be integral types (char, int, long, and so on), enumeration types, pointers, references, and std::nullptr_t. Starting with C++17, you can also specify auto, auto&, auto*, and so on, as the type of a non-type template parameter. In that case, the compiler deduces the type automatically.
In the Grid class template, you could use non-type template parameters to specify the height and width of the grid instead of specifying them in the constructor. The principle advantage to specifying non-type parameters in the template list instead of in the constructor is that the values are known before the code is compiled. Recall that the compiler generates code for templatized methods by substituting the template parameters before compiling. Thus, you can use a normal two-dimensional array in your implementation instead of a vector of vectors that is dynamically resized. Here is the new class definition:
template <typename T, size_t WIDTH, size_t HEIGHT>class Grid{public:Grid() = default;virtual ~Grid() = default;// Explicitly default a copy constructor and assignment operator.Grid(const Grid& src) = default;Grid<T, WIDTH, HEIGHT>& operator=(const Grid& rhs) = default;std::optional<T>& at(size_t x, size_t y);const std::optional<T>& at(size_t x, size_t y) const;size_t getHeight() const { return HEIGHT; }size_t getWidth() const { return WIDTH; }private:void verifyCoordinate(size_t x, size_t y) const;std::optional<T> mCells[WIDTH][HEIGHT];};
This class does not explicitly default the move constructor and move assignment operator, because C-style arrays do not support move semantics anyways.
Note that the template parameter list requires three parameters: the type of objects stored in the grid, and the width and height of the grid. The width and height are used to create a two-dimensional array to store the objects. Here are the class method definitions:
template <typename T, size_t WIDTH, size_t HEIGHT>void Grid<T, WIDTH, HEIGHT>::verifyCoordinate(size_t x, size_t y) const{if (x >= WIDTH || y >= HEIGHT) {throw std::out_of_range("");}}template <typename T, size_t WIDTH, size_t HEIGHT>const std::optional<T>& Grid<T, WIDTH, HEIGHT>::at(size_t x, size_t y) const{verifyCoordinate(x, y);return mCells[x][y];}template <typename T, size_t WIDTH, size_t HEIGHT>std::optional<T>& Grid<T, WIDTH, HEIGHT>::at(size_t x, size_t y){return const_cast<std::optional<T>&>(std::as_const(*this).at(x, y));}
Note that wherever you previously specified Grid<T> you must now specify Grid<T,
WIDTH,
HEIGHT> to represent the three template parameters.
You can instantiate this template and use it like this:
Grid<int, 10, 10> myGrid;Grid<int, 10, 10> anotherGrid;myGrid.at(2, 3) = 42;anotherGrid = myGrid;cout << anotherGrid.at(2, 3).value_or(0);
This code seems great, but unfortunately, there are more restrictions than you might initially expect. First, you can’t use a non-constant integer to specify the height or width. The following code doesn’t compile:
size_t height = 10;Grid<int, 10, height> testGrid; // DOES NOT COMPILE
However, if you define height as a constant, it compiles:
const size_t height = 10;Grid<int, 10, height> testGrid; // Compiles and works
constexpr functions with the correct return type also work. For example, if you have a constexpr function that returns a size_t, you can use it to initialize the height template parameter:
constexpr size_t getHeight() { return 10; }...Grid<double, 2, getHeight()> myDoubleGrid;
A second restriction might be more significant. Now that the width and height are template parameters, they are part of the type of each grid. That means that Grid<int,
10,
10> and Grid<int,
10,
11> are two different types. You can’t assign an object of one type to an object of the other, and variables of one type can’t be passed to functions or methods that expect variables of another type.
If you continue the approach of making height and width template parameters, you might want to provide defaults for the height and width non-type template parameters just as you did previously in the constructor of the Grid<T> class. C++ allows you to provide defaults for template parameters with a similar syntax. While you are at it, you could also provide a default for the T type parameter. Here is the class definition:
template <typename T = int, size_t WIDTH = 10, size_t HEIGHT = 10>class Grid{// Remainder is identical to the previous version};
You need not specify the default values for T, WIDTH, and HEIGHT in the template specification for the method definitions. For example, here is the implementation of at():
template <typename T, size_t WIDTH, size_t HEIGHT>const std::optional<T>& Grid<T, WIDTH, HEIGHT>::at(size_t x, size_t y) const{verifyCoordinate(x, y);return mCells[x][y];}
Now, you can instantiate a Grid without any template parameters, with only the element type, the element type and the width, or the element type, width, and height:
Grid<> myIntGrid;Grid<int> myGrid;Grid<int, 5> anotherGrid;Grid<int, 5, 5> aFourthGrid;
Note that if you don’t specify any class template parameters, you still need to specify an empty set of angle brackets. For example, the following does not compile!
Grid myIntGrid;The rules for default arguments in class template parameter lists are the same as for functions or methods; that is, you can provide defaults for parameters in order starting from the right.
Template Parameter Deduction for ConstructorsC++17 adds support to automatically deduce the template parameters from the arguments passed to a class template constructor. Before C++17, you always had to specify all the template parameters for a class template explicitly.
For example, the Standard Library has a class template called std::pair, defined in <utility>, and discussed in Chapter 17 in detail. For now, it suffices to know that a pair stores exactly two values of two possibly different types, which you have to specify as the template parameters:
std::pair<int, double> pair1(1, 2.3);To avoid the need of having to write the template parameters, a helper function template called std::make_pair() is available. Details of function templates are discussed later in this chapter. Function templates have always supported the automatic deduction of template parameters based on the arguments passed to the function template. So, make_pair() is capable of automatically deducing the template type parameters based on the values passed to it. For example, the compiler deduces pair<int,
double> for the following call:
auto pair2 = std::make_pair(1, 2.3);With C++17, such helper function templates are not necessary anymore. The compiler now automatically deduces the template type parameters based on the arguments passed to the constructor. For the pair class template, you can simply write the following code:
std::pair pair3(1, 2.3);Of course, this only works when all template parameters of a class template either have a default value, or are used as parameters in the constructor so they can be deduced.
You can also write your own user-defined deduction guides. These allow you to write rules for how the template parameters have to be deduced. This is an advanced topic, so it is not discussed in detail, although one example will demonstrate their power.
Suppose you have the following SpreadsheetCell class template:
template<typename T>class SpreadsheetCell{public:SpreadsheetCell(const T& t) : mContent(t) { }const T& getContent() const { return mContent; }private:T mContent;};
With automatic template parameter deduction, you can create a SpreadsheetCell with an std::string type:
std::string myString = "Hello World!";SpreadsheetCell cell(myString);
However, if you pass a const char* to the SpreadsheetCell constructor, then the type T is deduced as const
char*, which is not what you want. You can create the following user-defined deduction guide to cause it to deduce T as std::string when passing a const
char* as argument to the constructor:
SpreadsheetCell(const char*) -> SpreadsheetCell<std::string>;This guide has to be defined outside the class definition but inside the same namespace as the SpreadsheetCell class.
The general syntax is as follows. The explicit keyword is optional. It behaves the same as explicit for single-parameter constructors, so it only makes sense for deduction rules with one parameter.
explicit TemplateName(Parameters) -> DeducedTemplate;C++ allows you to templatize individual methods of a class. These methods can be inside a class template or in a non-templatized class. When you write a templatized class method, you are actually writing many different versions of that method for many different types. Method templates come in useful for assignment operators and copy constructors in class templates.
Consider the original Grid template with only one template parameter: the element type. You can instantiate grids of many different types, such as ints and doubles:
Grid<int> myIntGrid;Grid<double> myDoubleGrid;
However, Grid<int> and Grid<double> are two different types. If you write a function that takes an object of type Grid<double>, you cannot pass a Grid<int>. Even though you know that the elements of an int grid could be copied to the elements of a double grid, because the ints could be coerced into doubles, you cannot assign an object of type Grid<int> to one of type Grid<double> or construct a Grid<double> from a Grid<int>. Neither of the following two lines compiles:
myDoubleGrid = myIntGrid; // DOES NOT COMPILEGrid<double> newDoubleGrid(myIntGrid); // DOES NOT COMPILE
The problem is that the copy constructor and assignment operator for the Grid template are as follows,
Grid(const Grid& src);Grid<T>& operator=(const Grid& rhs);
which are equivalent to
Grid(const Grid<T>& src);Grid<T>& operator=(const Grid<T>& rhs);
The Grid copy constructor and operator= both take a reference to a const
Grid<T>. When you instantiate a Grid<double> and try to call the copy constructor and operator=, the compiler generates methods with these prototypes:
Grid(const Grid<double>& src);Grid<double>& operator=(const Grid<double>& rhs);
Note that there are no constructors or operator= that take a Grid<int> within the generated Grid<double> class.
Luckily, you can rectify this oversight by adding templatized versions of the copy constructor and assignment operator to the Grid class to generate methods that will convert from one grid type to another. Here is the new Grid class definition:
template <typename T>class Grid{public:// Omitted for brevitytemplate <typename E>Grid(const Grid<E>& src);template <typename E>Grid<T>& operator=(const Grid<E>& rhs);void swap(Grid& other) noexcept;// Omitted for brevity};
Examine the new templatized copy constructor first:
template <typename E>Grid(const Grid<E>& src);
You can see that there is another template declaration with a different typename, E (short for “element”). The class is templatized on one type, T, and the new copy constructor is also templatized on a different type, E. This twofold templatization allows you to copy grids of one type to another. Here is the definition of the new copy constructor:
template <typename T>template <typename E>Grid<T>::Grid(const Grid<E>& src): Grid(src.getWidth(), src.getHeight()){// The ctor-initializer of this constructor delegates first to the// non-copy constructor to allocate the proper amount of memory.// The next step is to copy the data.for (size_t i = 0; i < mWidth; i++) {for (size_t j = 0; j < mHeight; j++) {mCells[i][j] = src.at(i, j);}}}
As you can see, you must declare the class template line (with the T parameter) before the member template line (with the E parameter). You can’t combine them like this:
template <typename T, typename E> // Wrong for nested template constructor!Grid<T>::Grid(const Grid<E>& src)
In addition to the extra template parameter line before the constructor definition, note that you must use the public accessor methods getWidth(), getHeight(), and at() to access the elements of src. That’s because the object you’re copying to is of type Grid<T>, and the object you’re copying from is of type Grid<E>. They are not the same type, so you must use public methods.
The templatized assignment operator takes a const Grid<E>& but returns a Grid<T>&:
template <typename T>template <typename E>Grid<T>& Grid<T>::operator=(const Grid<E>& rhs){// no need to check for self-assignment because this version of// assignment is never called when T and E are the same// Copy-and-swap idiomGrid<T> temp(rhs); // Do all the work in a temporary instanceswap(temp); // Commit the work with only non-throwing operationsreturn *this;}
You need not check for self-assignment in the templatized assignment operator, because assignment of the same types still happens in the old, non-templatized, version of operator=, so there’s no way you can get self-assignment here.
The implementation of this assignment operator uses the copy-and-swap idiom introduced in Chapter 9. However, instead of using a friend swap() function, the Grid template uses a swap() method because function templates are only discussed later in this chapter. Note that this swap() method can only swap Grids of the same type, but that’s okay because the templatized assignment operator first converts the given Grid<E> to a Grid<T> called temp using the templatized copy constructor. Afterward, it uses the swap() method to swap this temporary Grid<T> with this, which is also of type Grid<T>. Here is the definition of the swap() method:
template <typename T>void Grid<T>::swap(Grid<T>& other) noexcept{using std::swap;swap(mWidth, other.mWidth);swap(mHeight, other.mHeight);swap(mCells, other.mCells);}
Looking at the earlier example with integer template parameters for HEIGHT and WIDTH, you see that a major problem is that the height and width become part of the types. This restriction prevents you from assigning a grid with one height and width to a grid with a different height and width. In some cases, however, it’s desirable to assign or copy a grid of one size to a grid of a different size. Instead of making the destination object a perfect clone of the source object, you would copy only those elements from the source array that fit in the destination array, padding the destination array with default values if the source array is smaller in either dimension. With method templates for the assignment operator and copy constructor, you can do exactly that, thus allowing assignment and copying of different-sized grids. Here is the class definition:
template <typename T, size_t WIDTH = 10, size_t HEIGHT = 10>class Grid{public:Grid() = default;virtual ~Grid() = default;// Explicitly default a copy constructor and assignment operator.Grid(const Grid& src) = default;Grid<T, WIDTH, HEIGHT>& operator=(const Grid& rhs) = default;template <typename E, size_t WIDTH2, size_t HEIGHT2>Grid(const Grid<E, WIDTH2, HEIGHT2>& src);template <typename E, size_t WIDTH2, size_t HEIGHT2>Grid<T, WIDTH, HEIGHT>& operator=(const Grid<E, WIDTH2, HEIGHT2>& rhs);void swap(Grid& other) noexcept;std::optional<T>& at(size_t x, size_t y);const std::optional<T>& at(size_t x, size_t y) const;size_t getHeight() const { return HEIGHT; }size_t getWidth() const { return WIDTH; }private:void verifyCoordinate(size_t x, size_t y) const;std::optional<T> mCells[WIDTH][HEIGHT];};
This new definition includes method templates for the copy constructor and assignment operator, plus a helper method swap(). Note that the non-templatized copy constructor and assignment operator are explicitly defaulted (because of the user-declared destructor). They simply copy or assign mCells from the source to the destination, which is exactly the semantics you want for two grids of the same size.
Here is the templatized copy constructor:
template <typename T, size_t WIDTH, size_t HEIGHT>template <typename E, size_t WIDTH2, size_t HEIGHT2>Grid<T, WIDTH, HEIGHT>::Grid(const Grid<E, WIDTH2, HEIGHT2>& src){for (size_t i = 0; i < WIDTH; i++) {for (size_t j = 0; j < HEIGHT; j++) {if (i < WIDTH2 && j < HEIGHT2) {mCells[i][j] = src.at(i, j);} else {mCells[i][j].reset();}}}}
Note that this copy constructor copies only WIDTH and HEIGHT elements in the x and y dimensions, respectively, from src, even if src is bigger than that. If src is smaller in either dimension, the std::optional objects in the extra spots are reset using the reset() method.
Here are the implementations of swap() and operator=:
template <typename T, size_t WIDTH, size_t HEIGHT>void Grid<T, WIDTH, HEIGHT>::swap(Grid<T, WIDTH, HEIGHT>& other) noexcept{using std::swap;swap(mCells, other.mCells);}template <typename T, size_t WIDTH, size_t HEIGHT>template <typename E, size_t WIDTH2, size_t HEIGHT2>Grid<T, WIDTH, HEIGHT>& Grid<T, WIDTH, HEIGHT>::operator=(const Grid<E, WIDTH2, HEIGHT2>& rhs){// no need to check for self-assignment because this version of// assignment is never called when T and E are the same// Copy-and-swap idiomGrid<T, WIDTH, HEIGHT> temp(rhs); // Do all the work in a temp instanceswap(temp); // Commit the work with only non-throwing operationsreturn *this;}
You can provide alternate implementations of class templates for specific types. For example, you might decide that the Grid behavior for const
char*s (C-style strings) doesn’t make sense. A Grid<const
char*> will store its elements in a vector<vector<optional<const
char*>>>. The copy constructor and assignment operator will perform shallow copies of this const
char* pointer type. For const
char*s, it might make sense to do a deep copy of the string. The easiest solution for this is to write an alternative implementation specifically for const
char*s, which stores the strings in a vector<vector<optional<string>>> and converts C-style strings into C++ strings so that their memory is automatically handled.
Alternate implementations of templates are called template specializations. You might find the syntax to be a little weird. When you write a class template specialization, you must specify that it’s a template, and that you are writing the version of the template for that particular type. Here is the syntax for specializing the original version of the Grid for const char*s:
// When the template specialization is used, the original template must be// visible too. Including it here ensures that it will always be visible// when this specialization is visible.#include "Grid.h"template <>class Grid<const char*>{public:explicit Grid(size_t width = kDefaultWidth,size_t height = kDefaultHeight);virtual ~Grid() = default;// Explicitly default a copy constructor and assignment operator.Grid(const Grid& src) = default;Grid<const char*>& operator=(const Grid& rhs) = default;// Explicitly default a move constructor and assignment operator.Grid(Grid&& src) = default;Grid<const char*>& operator=(Grid&& rhs) = default;std::optional<std::string>& at(size_t x, size_t y);const std::optional<std::string>& at(size_t x, size_t y) const;size_t getHeight() const { return mHeight; }size_t getWidth() const { return mWidth; }static const size_t kDefaultWidth = 10;static const size_t kDefaultHeight = 10;private:void verifyCoordinate(size_t x, size_t y) const;std::vector<std::vector<std::optional<std::string>>> mCells;size_t mWidth, mHeight;};
Note that you don’t refer to any type variable, such as T, in the specialization: you work directly with const
char*s. One obvious question at this point is why this class is still a template. That is, what good is the following syntax?
template <>class Grid<const char*>
This syntax tells the compiler that this class is a const
char* specialization of the Grid class. Suppose that you didn’t use that syntax and just tried to write this:
class GridThe compiler wouldn’t let you do that because there is already a class named Grid (the original class template). Only by specializing it can you reuse the name. The main benefit of specializations is that they can be invisible to the user. When a user creates a Grid of ints or SpreadsheetCells, the compiler generates code from the original Grid template. When the user creates a Grid of const
char*s, the compiler uses the const
char* specialization. This can all be “behind the scenes.”
Grid<int> myIntGrid; // Uses original Grid templateGrid<const char*> stringGrid1(2, 2); // Uses const char* specializationconst char* dummy = "dummy";stringGrid1.at(0, 0) = "hello";stringGrid1.at(0, 1) = dummy;stringGrid1.at(1, 0) = dummy;stringGrid1.at(1, 1) = "there";Grid<const char*> stringGrid2(stringGrid1);
When you specialize a template, you don’t “inherit” any code: Specializations are not like derivations. You must rewrite the entire implementation of the class. There is no requirement that you provide methods with the same names or behavior. As an example, the const
char* specialization of Grid implements the at() methods by returning an std::optional<std::string>, not an std::optional<const
char*>. As a matter of fact, you could write a completely different class with no relation to the original. Of course, that would abuse the template specialization ability, and you shouldn’t do it without good reason. Here are the implementations for the methods of the const
char* specialization. Unlike in the template definitions, you do not repeat the template<> syntax before each method definition.
Grid<const char*>::Grid(size_t width, size_t height): mWidth(width), mHeight(height){mCells.resize(mWidth);for (auto& column : mCells) {column.resize(mHeight);}}void Grid<const char*>::verifyCoordinate(size_t x, size_t y) const{if (x >= mWidth || y >= mHeight) {throw std::out_of_range("");}}const std::optional<std::string>& Grid<const char*>::at(size_t x, size_t y) const{verifyCoordinate(x, y);return mCells[x][y];}std::optional<std::string>& Grid<const char*>::at(size_t x, size_t y){return const_cast<std::optional<std::string>&>(std::as_const(*this).at(x, y));}
This section discussed how to use class template specialization. Template specialization allows you to write a special implementation for a template, with the template types replaced by specific types. Chapter 22 continues the discussion of specialization with a more advanced feature called partial specialization.
You can inherit from class templates. If the derived class inherits from the template itself, it must be a template as well. Alternatively, you can derive from a specific instantiation of the class template, in which case your derived class does not need to be a template. As an example of the former, suppose you decide that the generic Grid class doesn’t provide enough functionality to use as a game board. Specifically, you would like to add a move() method to the game board that moves a piece from one location on the board to another. Here is the class definition for the GameBoard template:
#include "Grid.h"template <typename T>class GameBoard : public Grid<T>{public:explicit GameBoard(size_t width = Grid<T>::kDefaultWidth,size_t height = Grid<T>::kDefaultHeight);void move(size_t xSrc, size_t ySrc, size_t xDest, size_t yDest);};
This GameBoard template derives from the Grid template, and thereby inherits all its functionality. You don’t need to rewrite at(), getHeight(), or any of the other methods. You also don’t need to add a copy constructor, operator=, or destructor, because you don’t have any dynamically allocated memory in the GameBoard.
The inheritance syntax looks normal, except that the base class is Grid<T>, not Grid. The reason for this syntax is that the GameBoard template doesn’t really derive from the generic Grid template. Rather, each instantiation of the GameBoard template for a specific type derives from the Grid instantiation for that type. For example, if you instantiate a GameBoard with a ChessPiece type, then the compiler generates code for a Grid<ChessPiece> as well. The “: public Grid<T>” syntax says that this class inherits from whatever Grid instantiation makes sense for the T type parameter. Note that the C++ name lookup rules for template inheritance require you to specify that kDefaultWidth and kDefaultHeight are declared in, and thus dependent on, the Grid<T> base class.
Here are the implementations of the constructor and the move() method. Note the use of Grid<T> in the call to the base class constructor. Additionally, although many compilers don’t enforce it, the name lookup rules require you to use the this pointer or Grid<T>:: to refer to data members and methods in the base class template.
template <typename T>GameBoard<T>::GameBoard(size_t width, size_t height): Grid<T>(width, height){}template <typename T>void GameBoard<T>::move(size_t xSrc, size_t ySrc, size_t xDest, size_t yDest){Grid<T>::at(xDest, yDest) = std::move(Grid<T>::at(xSrc, ySrc));Grid<T>::at(xSrc, ySrc).reset(); // Reset source cell// Or:// this->at(xDest, yDest) = std::move(this->at(xSrc, ySrc));// this->at(xSrc, ySrc).reset();}
You can use the GameBoard template as follows:
GameBoard<ChessPiece> chessboard(8, 8);ChessPiece pawn;chessBoard.at(0, 0) = pawn;chessBoard.move(0, 0, 0, 1);
Some programmers find the distinction between template inheritance and template specialization confusing. The following table summarizes the differences.
| INHERITANCE | SPECIALIZATION | |
| Reuses code? | Yes: Derived classes contain all base class data members and methods. | No: you must rewrite all required code in the specialization. |
| Reuses name? | No: the derived class name must be different from the base class name. | Yes: the specialization must have the same name as the original. |
| Supports polymorphism? | Yes: objects of the derived class can stand in for objects of the base class. | No: each instantiation of a template for a type is a different type. |
Chapter 11 introduces the concept of type aliases and typedefs. They allow you to give other names to specific types. To refresh your memory, you could, for example, write the following type alias to give a second name to type int:
using MyInt = int;Similarly, you can use a type alias to give another name to a templatized class. Suppose you have the following class template:
template<typename T1, typename T2>class MyTemplateClass { /* ... */ };
You can define the following type alias in which you specify both class template type parameters:
using OtherName = MyTemplateClass<int, double>;A typedef can also be used instead of such a type alias.
It’s also possible to only specify some of the types, and keep the other types as template type parameters. This is called an alias template. For example:
template<typename T1>using OtherName = MyTemplateClass<T1, double>;
This is something you cannot do with a typedef.
You can also write templates for stand-alone functions. For example, you could write a generic function to find a value in an array and return its index:
static const size_t NOT_FOUND = static_cast<size_t>(-1);template <typename T>size_t Find(const T& value, const T* arr, size_t size){for (size_t i = 0; i < size; i++) {if (arr[i] == value) {return i; // Found it; return the index}}return NOT_FOUND; // Failed to find it; return NOT_FOUND}
The Find() function template can work on arrays of any type. For example, you could use it to find the index of an int in an array of ints, or a SpreadsheetCell in an array of SpreadsheetCells.
You can call the function in two ways: explicitly specifying the type parameter with angle brackets, or omitting the type and letting the compiler deduce the type parameter from the arguments. Here are some examples:
int myInt = 3, intArray[] = {1, 2, 3, 4};const size_t sizeIntArray = std::size(intArray);size_t res;res = Find(myInt, intArray, sizeIntArray); // calls Find<int> by deductionres = Find<int>(myInt, intArray, sizeIntArray); // calls Find<int> explicitlyif (res != NOT_FOUND)cout << res << endl;elsecout << "Not found" << endl;double myDouble = 5.6, doubleArray[] = {1.2, 3.4, 5.7, 7.5};const size_t sizeDoubleArray = std::size(doubleArray);// calls Find<double> by deductionres = Find(myDouble, doubleArray, sizeDoubleArray);// calls Find<double> explicitlyres = Find<double>(myDouble, doubleArray, sizeDoubleArray);if (res != NOT_FOUND)cout << res << endl;elsecout << "Not found" << endl;//res = Find(myInt, doubleArray, sizeDoubleArray); // DOES NOT COMPILE!// Arguments are different types.// calls Find<double> explicitly, even with myIntres = Find<double>(myInt, doubleArray, sizeDoubleArray);SpreadsheetCell cell1(10), cellArray[] ={SpreadsheetCell(4), SpreadsheetCell(10)};const size_t sizeCellArray = std::size(cellArray);res = Find(cell1, cellArray, sizeCellArray);res = Find<SpreadsheetCell>(cell1, cellArray, sizeCellArray);
The previous implementation of the Find() function requires the size of the array as one of the parameters. Sometimes the compiler knows the exact size of an array, for example, for stack-based arrays. It would be nice to be able to call Find() with such arrays without the need to pass it the size of the array. This can be accomplished by adding the following function template. The implementation just forwards the call to the previous Find() function template. This also demonstrates that function templates can take non-type parameters, just like class templates.
template <typename T, size_t N>size_t Find(const T& value, const T(&arr)[N]){return Find(value, arr, N);}
The syntax of this version of Find() looks a bit strange, but its use is straightforward, as in this example:
int myInt = 3, intArray[] = {1, 2, 3, 4};size_t res = Find(myInt, intArray);
Like class template method definitions, function template definitions (not just the prototypes) must be available to all source files that use them. Thus, you should put the definitions in header files if more than one source file uses them, or use explicit instantiations as discussed earlier in this chapter.
Template parameters of function templates can have defaults, just like class templates.
Just as you can specialize class templates, you can specialize function templates. For example, you might want to write a Find() function for const
char* C-style strings that compares them with strcmp() instead of operator==. Here is a specialization of the Find() function to do this:
template<>size_t Find<const char*>(const char* const& value,const char* const* arr, size_t size){for (size_t i = 0; i < size; i++) {if (strcmp(arr[i], value) == 0) {return i; // Found it; return the index}}return NOT_FOUND; // Failed to find it; return NOT_FOUND}
You can omit the <const
char*> in the function name when the parameter type can be deduced from the arguments, making your prototype look like this:
template<>size_t Find(const char* const& value, const char* const* arr, size_t size)
However, the deduction rules are tricky when you involve overloading as well (see the next section), so, in order to avoid mistakes, it’s better to note the type explicitly.
Although the specialized find() function could take just const
char* instead of const
char* const& as its first parameter, it’s best to keep the arguments parallel to the non-specialized version of the function for the deduction rules to function properly.
You can use this specialization as follows:
const char* word = "two";const char* words[] = {"one", "two", "three", "four"};const size_t sizeWords = std::size(words);size_t res;// Calls const char* specializationres = Find<const char*>(word, words, sizeWords);// Calls const char* specializationres = Find(word, words, sizeWords);
You can also overload function templates with non-template functions. For example, instead of writing a Find() template specialization for const
char*, you could write a non-template Find() function that works on const
char*s:
size_t Find(const char* const& value, const char* const* arr, size_t size){for (size_t i = 0; i < size; i++) {if (strcmp(arr[i], value) == 0) {return i; // Found it; return the index}}return NOT_FOUND; // Failed to find it; return NOT_FOUND}
This function is identical in behavior to the specialized version in the previous section. However, the rules for when it is called are different:
const char* word = "two";const char* words[] = {"one", "two", "three", "four"};const size_t sizeWords = std::size(words);size_t res;// Calls template with T=const char*res = Find<const char*>(word, words, sizeWords);res = Find(word, words, sizeWords); // Calls non-template function!
Thus, if you want your function to work both when const
char* is explicitly specified and via deduction when it is not, you should write a specialized template version instead of a non-template, overloaded version.
It’s possible to write both a specialized Find() template for const
char*s and a stand-alone Find() function for const
char*s. The compiler always prefers the non-template function to a templatized version. However, if you specify the template instantiation explicitly, the compiler will be forced to use the template version:
const char* word = "two";const char* words[] = {"one", "two", "three", "four"};const size_t sizeWords = std::size(words);size_t res;// Calls const char* specialization of the templateres = Find<const char*>(word, words, sizeWords);res = Find(word, words, sizeWords); // Calls the Find non-template function
Function templates are useful when you want to overload operators in a class template. For example, you might want to overload the addition operator (operator+) for the Grid class template to be able to add two grids together. The result will be a Grid with the same size as the smallest Grid of the two operands. Corresponding cells are only added together if both cells contain an actual value. Suppose you want to make your operator+ a stand-alone function template. The definition, which should go directly in Grid.h, looks as follows:
template <typename T>Grid<T> operator+(const Grid<T>& lhs, const Grid<T>& rhs){size_t minWidth = std::min(lhs.getWidth(), rhs.getWidth());size_t minHeight = std::min(lhs.getHeight(), rhs.getHeight());Grid<T> result(minWidth, minHeight);for (size_t y = 0; y < minHeight; ++y) {for (size_t x = 0; x < minWidth; ++x) {const auto& leftElement = lhs.mCells[x][y];const auto& rightElement = rhs.mCells[x][y];if (leftElement.has_value() && rightElement.has_value())result.at(x, y) = leftElement.value() + rightElement.value();}}return result;}
To query whether an std::optional contains an actual value, you use the has_value() method, while value() is used to retrieve this value.
This function template works on any Grid, as long as there is an addition operator for the type of elements stored in the grid. The only problem with this implementation is that it accesses private member mCells of the Grid class. The obvious solution is to use the public at() method, but let’s see how you can make a function template a friend of a class template. For this example, you can make the operator a friend of the Grid class. However, both the Grid class and the operator+ are templates. What you really want is for each instantiation of operator+ for a particular type T to be a friend of the Grid template instantiation for that type. The syntax looks like this:
// Forward declare Grid template.template <typename T> class Grid;// Prototype for templatized operator+.template<typename T>Grid<T> operator+(const Grid<T>& lhs, const Grid<T>& rhs);template <typename T>class Grid{public:// Omitted for brevityfriend Grid<T> operator+ <T>(const Grid<T>& lhs, const Grid<T>& rhs);// Omitted for brevity};
This friend declaration is tricky: you’re saying that, for an instance of the template with type T, the T instantiation of operator+ is a friend. In other words, there is a one-to-one mapping of friends between the class instantiations and the function instantiations. Note particularly the explicit template specification <T> on operator+ (the space after operator+ is optional). This syntax tells the compiler that operator+ is itself a template.
The compiler deduces the type of the template parameters based on the arguments passed to the function template. Template parameters that cannot be deduced have to be specified explicitly.
For example, the following add() function template requires three template parameters: the type of the return value, and the types of the two operands:
template<typename RetType, typename T1, typename T2>RetType add(const T1& t1, const T2& t2) { return t1 + t2; }
You can call this function template specifying all three parameters as follows:
auto result = add<long long, int, int>(1, 2);However, because the template parameters T1 and T2 are parameters to the function, the compiler can deduce those two parameters, so you can call add() by only specifying the type for the return value:
auto result = add<long long>(1, 2);Of course, this only works when the parameters to deduce are last in the list of parameters. Suppose the function template is defined as follows:
template<typename T1, typename RetType, typename T2>RetType add(const T1& t1, const T2& t2) { return t1 + t2; }
You have to specify RetType, because the compiler cannot deduce that type. However, because RetType is the second parameter, you have to explicitly specify T1 as well:
auto result = add<int, long long>(1, 2);You can also provide a default value for the return type template parameter so that you can call add() without specifying any types:
template<typename RetType = long long, typename T1, typename T2>RetType add(const T1& t1, const T2& t2) { return t1 + t2; }...auto result = add(1, 2);
Continuing the example of the add() function template, wouldn’t it be nice to let the compiler deduce the type of the return value? It would; however, the return type depends on the template type parameters, so how can you do this? For example, take the following templatized function:
template<typename T1, typename T2>RetType add(const T1& t1, const T2& t2) { return t1 + t2; }
In this example, RetType should be the type of the expression t1+t2, but you don’t know this because you don’t know what T1 and T2 are.
As discussed in Chapter 1, since C++14 you can ask the compiler to automatically deduce the function return type. So, you can simply write add() as follows:
template<typename T1, typename T2>auto add(const T1& t1, const T2& t2){return t1 + t2;}
However, using auto to deduce the type of an expression strips away reference and const qualifiers; decltype does not strip those. Before continuing with the add() function template, let’s look at the differences between auto and decltype using a non-template example. Suppose you have the following function:
const std::string message = "Test";const std::string& getString(){return message;}
You can call getString() and store the result in a variable with the type specified as auto as follows:
auto s1 = getString();Because auto strips reference and const qualifiers, s1 is of type string, and thus a copy is made. If you want a const reference, you can explicitly make it a reference and mark it const as follows:
const auto& s2 = getString();An alternative solution is to use decltype, which does not strip anything:
decltype(getString()) s3 = getString();In this case, s3 is of type const string&; however, there is code duplication because you need to specify getString() twice, which can be cumbersome when getString() is a more complicated expression.
This is solved with decltype(auto):
decltype(auto) s4 = getString();s4 is also of type const string&.
So, with this knowledge, we can write our add() function template using decltype(auto) to avoid stripping any const and reference qualifiers:
template<typename T1, typename T2>decltype(auto) add(const T1& t1, const T2& t2){return t1 + t2;}
Before C++14—that is, before function return type deduction and decltype(auto) were supported—the problem was solved using decltype(expression), introduced with C++11. For example, you would think you could write the following:
template<typename T1, typename T2>decltype(t1+t2) add(const T1& t1, const T2& t2) { return t1 + t2; }
However, this is wrong. You are using t1 and t2 in the beginning of the prototype line, but these are not yet known. t1 and t2 become known once the semantic analyzer reaches the end of the parameter list.
This problem used to be solved with the alternative function syntax. Note that in this syntax, the return type is specified after the parameter list (trailing return type); thus, the names of the parameters (and their types, and consequently, the type t1+t2) are known:
template<typename T1, typename T2>auto add(const T1& t1, const T2& t2) -> decltype(t1+t2){return t1 + t2;}
However, now that C++ supports auto return type deduction and decltype(auto), it is recommended to use one of these mechanisms, instead of the alternative function syntax.
In addition to class templates, class method templates, and function templates, C++14 adds the ability to write variable templates. The syntax is as follows:
template <typename T>constexpr T pi = T(3.141592653589793238462643383279502884);
This is a variable template for the value of pi. To get pi in a certain type, you use the following syntax:
float piFloat = pi<float>;long double piLongDouble = pi<long double>;
You will always get the closest value of pi representable in the requested type. Just like other types of templates, variable templates can also be specialized.
This chapter started a discussion on using templates for generic programming. You saw the syntax on how to write templates and examples where templates are really useful. It explained how to write class templates, how to organize your code in different files, how to use template parameters, and how to templatize methods of a class. It further discussed how to use class template specialization to write special implementations of a template where the template parameters are replaced with specific arguments. The chapter finished with an explanation of function templates and variable templates.
Chapter 22 continues the discussion on templates with some more advanced features such as variadic templates and metaprogramming.
The stream metaphor takes a bit of getting used to. At first, streams may seem more complex than traditional C-style I/O, such as printf(). In reality, they seem complicated initially only because there is a deeper metaphor behind streams than there is behind printf(). Don’t worry, though; after a few examples, you’ll never look back.
Chapter 1 compares the cout stream to a laundry chute for data. You throw some variables down the stream, and they are written to the user’s screen, or console. More generally, all streams can be viewed as data chutes. Streams vary in their direction and their associated source or destination. For example, the cout stream that you are already familiar with is an output stream, so its direction is “out.” It writes data to the console so its associated destination is “console.” The c in cout does not stand for “console” as you might expect, but stands for “character” as it’s a character-based stream. There is another standard stream called cin that accepts input from the user. Its direction is “in,” and its associated source is “console.” As with cout, the c in cin stands for “character.” Both cout and cin are predefined instances of streams that are defined within the std namespace in C++. The following table gives a brief description of all predefined streams.
The difference between buffered and unbuffered streams is that a buffered stream does not immediately send the data to the destination, but instead, it buffers incoming data and then sends it in blocks. An unbuffered stream, on the other hand, immediately sends the data to the destination. Buffering is usually done to improve performance, as certain destinations, such as files, perform better when writing bigger blocks at once. Note that you can always force a buffered stream to send all its currently buffered data to the destination by flushing its buffer using the flush() method.
| STREAM | DESCRIPTION |
cin |
An input stream, reads data from the “input console.” |
cout |
A buffered output stream, writes data to the “output console.” |
cerr |
An unbuffered output stream, writes data to the “error console,” which is often the same as the “output console.” |
clog |
A buffered version of cerr. |
There are also wide-character versions available of these streams: wcin, wcout, wcerr, and wclog. Wide characters are discussed in Chapter 19.
Note that graphical user interface applications normally do not have a console; that is, if you write something to cout, the user will not see it. If you are writing a library, you should never assume the existence of cout, cin, cerr, or clog because you never know whether your library will be used in a console or in a GUI application.
Another important aspect of streams is that they include data but also have a so-called current position. The current position is the position in the stream where the next read or write operation will take place.
Streams as a concept can be applied to any object that accepts data or emits data. You could write a stream-based network class or stream-based access to a MIDI-based instrument. In C++, there are three common sources and destinations for streams: console, file, and string.
You have already read many examples of user, or console, streams. Console input streams make programs interactive by allowing input from the user at run time. Console output streams provide feedback to the user and output results.
File streams, as the name implies, read data from and write data to a file system. File input streams are useful for reading configuration data and saved files, or for batch processing file-based data. File output streams are useful for saving state and providing output. File streams subsume the functionality of the C functions fprintf(), fwrite(), and fputs() for output, and fscanf(), fread(), and fgets() for input.
String streams are an application of the stream metaphor to the string type. With a string stream, you can treat character data just as you would treat any other stream. For the most part, this is merely a handy syntax for functionality that could be handled through methods on the string class. However, using stream syntax provides opportunities for optimization and can be far more convenient and more efficient than direct use of the string class. String streams subsume the functionality of sprintf(), sprintf_s(), sscanf(), and other forms of C string-formatting functions.
The rest of this section deals with console streams (cin and cout). Examples of file and string streams are provided later in this chapter. Other types of streams, such as printer output or network I/O, are often platform dependent, so they are not covered in this book.
Output using streams is introduced in Chapter 1 and is used in almost every chapter in this book. This section briefly revisits some of the basics and introduces material that is more advanced.
Output streams are defined in the <ostream> header file. Most programmers include <iostream> in their programs, which in turn includes the headers for both input streams and output streams. The <iostream> header also declares all predefined stream instances: cout, cin, cerr, clog, and the wide versions.
The << operator is the simplest way to use output streams. C++ basic types, such as ints, pointers, doubles, and characters, can be output using <<. In addition, the C++ string class is compatible with <<, and C-style strings are properly output as well. Following are some examples of using <<:
int i = 7;cout << i << endl;char ch = 'a';cout << ch << endl;string myString = "Hello World.";cout << myString << endl;
The output is as follows:
7aHello World.
The cout stream is the built-in stream for writing to the console, or standard output. You can “chain” uses of << together to output multiple pieces of data. This is because the << operator returns a reference to the stream as its result so you can immediately use << again on the same stream. Here is an example:
int j = 11;cout << "The value of j is " << j << "!" << endl;
The output is as follows:
The value of j is 11!C++ streams correctly parse C-style escape sequences, such as strings that contain \n. You can also use std::endl to start a new line. The difference between using \n and endl is that \n just starts a new line while endl also flushes the buffer. Watch out with endl because too many flushes might hurt performance. The following example uses endl to output and flush several lines of text with just one line of code:
cout << "Line 1" << endl << "Line 2" << endl << "Line 3" << endl;The output is as follows:
Line 1Line 2Line 3
The << operator is, without a doubt, the most useful part of output streams. However, there is additional functionality to be explored. If you look at the <ostream> header file, you’ll see many lines of overloaded definitions of the << operator to support outputting all kinds of different data types. You’ll also find some useful public methods.
put() and write() are raw output methods. Instead of taking an object or variable that has some defined behavior for output, put() accepts a single character, while write() accepts a character array. The data passed to these methods is output as is, without any special formatting or processing. For example, the following code snippet shows how to output a C-style string to the console without using the << operator:
const char* test = "hello there\n";cout.write(test, strlen(test));
The next snippet shows how to write a single character to the console by using the put() method:
cout.put('a');When you write to an output stream, the stream does not necessarily write the data to its destination right away. Most output streams buffer, or accumulate data instead of writing it out as soon as it comes in. This is usually done to improve performance. Certain stream destinations, such as files, are much more performant if data is written in larger blocks, instead of for example character-by-character. The stream flushes, or writes out the accumulated data, when one of the following conditions occurs:
endl marker, is reached.cin for input, cout will flush). In the section, “File Streams,” you will learn how to establish this type of link.One way to explicitly tell a stream to flush is to call its flush() method, as in the following code:
cout << "abc";cout.flush(); // abc is written to the console.cout << "def";cout << endl; // def is written to the console.
Output errors can arise in a variety of situations. Perhaps you are trying to open a non-existing file. Maybe a disk error has prevented a write operation from succeeding, for example, because the disk is full. None of the streams’ code you have read up until this point has considered these possibilities, mainly for brevity. However, it is vital that you address any error conditions that occur.
When a stream is in its normal usable state, it is said to be “good.” The good() method can be called directly on a stream to determine whether or not the stream is currently good.
if (cout.good()) {cout << "All good" << endl;}
The good() method provides an easy way to obtain basic information about the validity of the stream, but it does not tell you why the stream is unusable. There is a method called bad() that provides a bit more information. If bad() returns true, it means that a fatal error has occurred (as opposed to any nonfatal condition like end-of-file, eof()). Another method, fail(), returns true if the most recent operation has failed; however, it doesn’t say anything about the next operation, which can either succeed or fail as well. For example, after calling flush() on an output stream, you could call fail() to make sure the flush was successful.
cout.flush();if (cout.fail()) {cerr << "Unable to flush to standard out" << endl;}
Streams have a conversion operator to convert to type bool. This conversion operator returns the same as calling !fail(). So, the previous code snippet can be rewritten as follows:
cout.flush();if (!cout) {cerr << "Unable to flush to standard out" << endl;}
Important to know is that both good() and fail() return false if the end-of-file is reached. The relation is as follows: good()
==
(!fail()
&&
!eof()).
You can also tell the streams to throw exceptions when a failure occurs. You then write a catch handler to catch ios_base::failure exceptions, on which you can use the what() method to get a description of the error, and the code() method to get the error code. However, whether or not you get useful information depends on the Standard Library implementation that you use.
cout.exceptions(ios::failbit | ios::badbit | ios::eofbit);try {cout << "Hello World." << endl;} catch (const ios_base::failure& ex) {cerr << "Caught exception: " << ex.what()<< ", error code = " << ex.code() << endl;}
To reset the error state of a stream, use the clear() method:
cout.clear();Error checking is performed less frequently for console output streams than for file output or input streams. The methods discussed here apply for other types of streams as well and are revisited later as each type is discussed.
One of the unusual features of streams is that you can throw more than just data down the chute. C++ streams also recognize manipulators, objects that make a change to the behavior of the stream instead of, or in addition to, providing data for the stream to work with.
You have already seen one manipulator: endl. The endl manipulator encapsulates data and behavior. It tells the stream to output an end-of-line sequence and to flush its buffer. Following are some other useful manipulators, many of which are defined in the <ios> and <iomanip> standard header files. The example after this list shows how to use them.
bool values as true and false (boolalpha) or 1 and 0 (noboolalpha). The default is noboolalpha.All of these manipulators stay in effect for subsequent output to the stream until they are reset, except setw, which is only active for the next single output. The following example uses several of these manipulators to customize its output:
// Boolean valuesbool myBool = true;cout << "This is the default: " << myBool << endl;cout << "This should be true: " << boolalpha << myBool << endl;cout << "This should be 1: " << noboolalpha << myBool << endl;// Simulate "%6d" with streamsint i = 123;printf("This should be ' 123': %6d\n", i);cout << "This should be ' 123': " << setw(6) << i << endl;// Simulate "%06d" with streamsprintf("This should be '000123': %06d\n", i);cout << "This should be '000123': " << setfill('0') << setw(6) << i << endl;// Fill with *cout << "This should be '***123': " << setfill('*') << setw(6) << i << endl;// Reset fill charactercout << setfill(' ');// Floating point valuesdouble dbl = 1.452;double dbl2 = 5;cout << "This should be ' 5': " << setw(2) << noshowpoint << dbl2 << endl;cout << "This should be @@1.452: " << setw(7) << setfill('@') << dbl << endl;// Reset fill charactercout << setfill(' ');// Instructs cout to start formatting numbers according to your location.// Chapter 19 explains the details of the imbue call and the locale object.cout.imbue(locale(""));// Format numbers according to your locationcout << "This is 1234567 formatted according to your location: " << 1234567<< endl;// Monetary value. What exactly a monetary value means depends on your// location. For example, in the USA, a monetary value of 120000 means 120000// dollar cents, which is 1200.00 dollars.cout << "This should be a monetary value of 120000, "<< "formatted according to your location: "<< put_money("120000") << endl;// Date and timetime_t t_t = time(nullptr); // Get current system timetm* t = localtime(&t_t); // Convert to local timecout << "This should be the current date and time "<< "formatted according to your location: "<< put_time(t, "%c") << endl;// Quoted stringcout << "This should be: \"Quoted string with \\\"embedded quotes\\\".\": "<< quoted("Quoted string with \"embedded quotes\".") << endl;
If you don’t care for the concept of manipulators, you can usually get by without them. Streams provide much of the same functionality through equivalent methods like precision(). For example, take the following line:
cout << "This should be '1.2346': " << setprecision(5) << 1.23456789 << endl;This can be converted to use a method call as follows. The advantage of the method calls is that they return the previous value, allowing you to restore it, if needed.
cout.precision(5);cout << "This should be '1.2346': " << 1.23456789 << endl;
For a detailed description of all stream methods and manipulators, consult a Standard Library Reference, for example, the book C++ Standard Library Quick Reference, or online references http://www.cppreference.com/ or http://www.cplusplus.com/reference/.
Input streams provide a simple way to read in structured or unstructured data. In this section, the techniques for input are discussed within the context of cin, the console input stream.
There are two easy ways to read data by using an input stream. The first is an analog of the << operator that outputs data to an output stream. The corresponding operator for reading data is >>. When you use >> to read data from an input stream, the variable you provide is the storage for the received value. For example, the following program reads one word from the user and puts it into a string. Then the string is output back to the console.
string userInput;cin >> userInput;cout << "User input was " << userInput << endl;
By default, the >> operator tokenizes values according to white space. For example, if a user runs the previous program and enters hello there as input, only the characters up to the first white space character (the space character in this instance) are captured into the userInput variable. The output would be as follows:
User input was helloOne solution to include white space in the input is to use get(), which is discussed later in this chapter.
The >> operator works with different variable types, just like the << operator. For example, to read an integer, the code differs only in the type of the variable:
int userInput;cin >> userInput;cout << "User input was " << userInput << endl;
You can use input streams to read in multiple values, mixing and matching types as necessary. For example, the following function, an excerpt from a restaurant reservation system, asks the user for a last name and the number of people in their party:
void getReservationData(){string guestName;int partySize;cout << "Name and number of guests: ";cin >> guestName >> partySize;cout << "Thank you, " << guestName << "." << endl;if (partySize > 10) {cout << "An extra gratuity will apply." << endl;}}
Remember that the >> operator tokenizes values according to white space, so the getReservationData() function does not allow you to enter a name with white space. A solution using unget() is discussed later in this chapter. Note also that even though the use of cout does not explicitly flush the buffer using endl or flush(), the text will still be written to the console because the use of cin immediately flushes the cout buffer; they are linked together in this way.
Input streams have a number of methods to detect unusual circumstances. Most of the error conditions related to input streams occur when there is no data available to read. For example, the end of stream (referred to as end-of-file, even for non-file streams) may have been reached. The most common way of querying the state of an input stream is to access it within a conditional. For example, the following loop keeps looping as long as cin remains in a good state:
while (cin) { ... }You can input data at the same time:
while (cin >> ch) { ... }The good(), bad(), and fail() methods can be called on input streams, just as on output streams. There is also an eof() method that returns true if the stream has reached its end. Similar as for output streams, both good() and fail() return false if the end-of-file is reached. The relation is again as follows: good()
==
(!fail()
&&
!eof()).
You should get into the habit of checking the stream state after reading data so that you can recover from bad input.
The following program shows the common pattern for reading data from a stream and handling errors. The program reads numbers from standard input and displays their sum once end-of-file is reached. Note that in command-line environments, the end-of-file is indicated by the user typing a particular character. In Unix and Linux, it is Control+D; in Windows it is Control+Z. The exact character is operating-system dependent, so you will need to know what your operating system requires:
cout << "Enter numbers on separate lines to add. "<< "Use Control+D to finish (Control+Z in Windows)." << endl;int sum = 0;if (!cin.good()) {cerr << "Standard input is in a bad state!" << endl;return 1;}int number;while (!cin.bad()) {cin >> number;if (cin.good()) {sum += number;} else if (cin.eof()) {break; // Reached end of file} else if (cin.fail()) {// Failure!cin.clear(); // Clear the failure state.string badToken;cin >> badToken; // Consume the bad input.cerr << "WARNING: Bad input encountered: " << badToken << endl;}}cout << "The sum is " << sum << endl;
Here is some example output of this program:
Enter numbers on separate lines to add. Use Control+D to finish (Control+Z in Windows).12testWARNING: Bad input encountered: test3^ZThe sum is 6
Just like output streams, input streams have several methods that allow a lower level of access than the functionality provided by the more common >> operator.
The get() method allows raw input of data from a stream. The simplest version of get() returns the next character in the stream, though other versions exist that read multiple characters at once. get() is most commonly used to avoid the automatic tokenization that occurs with the >> operator. For example, the following function reads a name, which can be made up of several words, from an input stream until the end of the stream is reached:
string readName(istream& stream){string name;while (stream) { // Or: while (!stream.fail()) {int next = stream.get();if (!stream || next == std::char_traits<char>::eof())break;name += static_cast<char>(next);// Append character.}return name;}
There are several interesting observations to make about this readName() function:
const reference to an istream, not a const reference. The methods that read in data from a stream will change the actual stream (most notably, its position), so they are not const methods. Thus, you cannot call them on a const reference.get() is stored in an int, not in a char, because get() can return special non-character values such as std::char_traits<char>::eof() (end-of-file).readName() is a bit strange because there are two ways to get out of the loop: either the stream can get into a failed state, or the end of the stream is reached. A more common pattern for reading from a stream uses a different version of get() that takes a reference to a character and returns a reference to the stream. This pattern takes advantage of the fact that evaluating an input stream within a conditional context results in true only if the stream is not in any error state. Encountering an error causes the stream to evaluate to false. The underlying details of the conversion operations required to implement this feature are explained in Chapter 15. The following version of the same function is a bit more concise:
string readName(istream& stream){string name;char next;while (stream.get(next)) {name += next;}return name;}
For most purposes, the correct way to think of an input stream is as a one-way chute. Data falls down the chute and into variables. The unget() method breaks this model in a way by allowing you to push data back up the chute.
A call to unget() causes the stream to back up by one position, essentially putting the previous character read back on the stream. You can use the fail() method to see if unget() was successful or not. For example, unget() can fail if the current position is at the beginning of the stream.
The getReservationData() function seen earlier in this chapter did not allow you to enter a name with white space. The following code uses unget() to allow white space in the name. The code reads character by character and checks whether the character is a digit or not. If the character is not a digit, it is added to guestName. If it is a digit, the character is put back into the stream using unget(), the loop is stopped, and the >> operator is used to input an integer, partySize. The noskipws input manipulator tells the stream not to skip white space, that is, white space is read like any other characters.
void getReservationData(){string guestName;int partySize = 0;// Read characters until we find a digitchar ch;cin >> noskipws;while (cin >> ch) {if (isdigit(ch)) {cin.unget();if (cin.fail())cout << "unget() failed" << endl;break;}guestName += ch;}// Read partysize, if the stream is not in error stateif (cin)cin >> partySize;if (!cin) {cerr << "Error getting party size." << endl;return;}cout << "Thank you '" << guestName<< "', party of " << partySize << endl;if (partySize > 10) {cout << "An extra gratuity will apply." << endl;}}
The putback() method, like unget(), lets you move backward by one character in an input stream. The difference is that the putback() method takes the character being placed back on the stream as a parameter:
char ch1;cin >> ch1;cin.putback('e');// 'e' will be the next character read off the stream.
The peek() method allows you to preview the next value that would be returned if you were to call get(). To take the chute metaphor perhaps a bit too far, you could think of it as looking up the chute without a value actually falling down it.
peek() is ideal for any situation where you need to look ahead before reading a value. For example, the following code implements the getReservationData() function that allows white space in the name, but uses peek() instead of unget():
void getReservationData(){string guestName;int partySize = 0;// Read characters until we find a digitchar ch;cin >> noskipws;while (true) {// 'peek' at next characterch = static_cast<char>(cin.peek());if (!cin)break;if (isdigit(ch)) {// next character will be a digit, so stop the loopbreak;}// next character will be a non-digit, so read itcin >> ch;if (!cin)break;guestName += ch;}// Read partysize, if the stream is not in error stateif (cin)cin >> partySize;if (!cin) {cerr << "Error getting party size." << endl;return;}cout << "Thank you '" << guestName<< "', party of " << partySize << endl;if (partySize > 10) {cout << "An extra gratuity will apply." << endl;}}
Obtaining a single line of data from an input stream is so common that a method exists to do it for you. The getline() method fills a character buffer with a line of data up to the specified size. The specified size includes the \0 character. Thus, the following code reads a maximum of kBufferSize-1 characters from cin, or until an end-of-line sequence is read:
char buffer[kBufferSize] = { 0 };cin.getline(buffer, kBufferSize);
When getline() is called, it reads a line from the input stream, up to and including the end-of-line sequence. However, the end-of-line character or characters do not appear in the string. Note that the end-of-line sequence is platform dependent. For example, it can be \r\n, or \n, or \n\r.
There is a form of get() that performs the same operation as getline(), except that it leaves the newline sequence in the input stream.
There is also a function called std::getline() that can be used with C++ strings. It is defined in the <string> header file and is in the std namespace. It takes a stream reference, a string reference, and an optional delimiter as parameters. The advantage of using this version of getline() is that it doesn’t require you to specify the size of the buffer.
string myString;std::getline(cin, myString);
The built-in input manipulators, described in the list that follows, can be sent to an input stream to customize the way that data is read.
boolalpha is used, the string false will be interpreted as the Boolean value false; anything else will be treated as the Boolean value true. If noboolalpha is set, zero will be interpreted as false, anything else as true. The default is noboolalpha.skipws.Input is locale aware. For example, the following code enables your system locale for cin. Locales are discussed in Chapter 19:
cin.imbue(locale(""));int i;cin >> i;
If your system locale is U.S. English, you can enter 1,000 and it will be parsed as 1000. If you would enter 1.000, it will be parsed as 1. On the other hand, if your system locale is Dutch Belgium, you can enter 1.000 to get the value of 1000, but entering 1,000 will result in 1. In both cases, you can also just enter 1000 without any digit separators to get the value 1000.
You can use the << operator to output a C++ string even though it is not a basic type. In C++, objects are able to prescribe how they are output and input. This is accomplished by overloading the << and >> operators to understand a new type or class.
Why would you want to overload these operators? If you are familiar with the printf() function in C, you know that it is not flexible in this area. printf() knows about several types of data, but there really isn’t a way to give it additional knowledge. For example, consider the following simple class:
class Muffin{public:virtual ~Muffin() = default;string_view getDescription() const;void setDescription(string_view description);int getSize() const;void setSize(int size);bool hasChocolateChips() const;void setHasChocolateChips(bool hasChips);private:string mDescription;int mSize = 0;bool mHasChocolateChips = false;};string_view Muffin::getDescription() const { return mDescription; }void Muffin::setDescription(string_view description){mDescription = description;}int Muffin::getSize() const { return mSize; }void Muffin::setSize(int size) { mSize = size; }bool Muffin::hasChocolateChips() const { return mHasChocolateChips; }void Muffin::setHasChocolateChips(bool hasChips){mHasChocolateChips = hasChips;}
To output an object of class Muffin by using printf(), it would be nice if you could specify it as an argument, perhaps using %m as a placeholder:
printf("Muffin: %m\n", myMuffin); // BUG! printf doesn't understand Muffin.Unfortunately, the printf() function knows nothing about the Muffin type and is unable to output an object of type Muffin. Worse still, because of the way the printf() function is declared, this will result in a run-time error, not a compile-time error (though a good compiler will give you a warning).
The best you can do with printf() is to add a new output() method to the Muffin class:
class Muffin{public:// Omitted for brevityvoid output() const;// Omitted for brevity};// Other method implementations omitted for brevityvoid Muffin::output() const{printf("%s, Size is %d, %s\n", getDescription().data(), getSize(),(hasChocolateChips() ? "has chips" : "no chips"));}
Using such a mechanism is cumbersome, however. To output a Muffin in the middle of another line of text, you’d need to split the line into two calls with a call to Muffin::output() in between, as shown here:
printf("The muffin is ");myMuffin.output();printf(" -- yummy!\n");
Overloading the << operator lets you output a Muffin just like you output a string—by providing it as an argument to <<. Chapter 15 covers the details of overloading the << and >> operators.
String streams provide a way to use stream semantics with strings. In this way, you can have an in-memory stream that represents textual data. For example, in a GUI application you might want to use streams to build up textual data, but instead of outputting the text to the console or a file, you might want to display the result in a GUI element like a message box or an edit control. Another example could be that you want to pass a string stream around to different functions, while retaining the current read position, so that each function can process the next part of the stream. String streams are also useful for parsing text, because streams have built-in tokenizing functionality.
The std::ostringstream class is used to write data to a string, while the std::istringstream class is used to read data from a string. They are both defined in the <sstream> header file. Because ostringstream and istringstream inherit the same behavior as ostream and istream, working with them is pleasantly similar.
The following program requests words from the user and outputs them to a single ostringstream, separated by the tab character. At the end of the program, the whole stream is turned into a string object using the str() method and is written to the console. Input of tokens can be stopped by entering the token “done” or by closing the input stream with Control+D (Unix) or Control+Z (Windows).
cout << "Enter tokens. Control+D (Unix) or Control+Z (Windows) to end" << endl;ostringstream outStream;while (cin) {string nextToken;cout << "Next token: ";cin >> nextToken;if (!cin || nextToken == "done")break;outStream << nextToken << "\t";}cout << "The end result is: " << outStream.str();
Reading data from a string stream is similarly familiar. The following function creates and populates a Muffin object (see the earlier example) from a string input stream. The stream data is in a fixed format so that the function can easily turn its values into calls to the Muffin setters.
Muffin createMuffin(istringstream& stream){Muffin muffin;// Assume data is properly formatted:// Description size chipsstring description;int size;bool hasChips;// Read all three values. Note that chips is represented// by the strings "true" and "false"stream >> description >> size >> boolalpha >> hasChips;if (stream) { // Reading was successful.muffin.setSize(size);muffin.setDescription(description);muffin.setHasChocolateChips(hasChips);}return muffin;}
An advantage of string streams over standard C++ strings is that, in addition to data, they know where the next read or write operation will take place, also called the current position. Another advantage is that string streams support manipulators and locales to enable more powerful formatting compared to strings.
Files lend themselves very well to the stream abstraction because reading and writing files always involves a position in addition to the data. In C++, the std::ofstream and std::ifstream classes provide output and input functionality for files. They are defined in the <fstream> header file.
When dealing with the file system, it is especially important to detect and handle error cases. The file you are working with could be on a network file store that just went offline, or you may be trying to write to a file that is located on a disk that is full. Maybe you are trying to open a file for which the current user does not have permissions. Error conditions can be detected by using the standard error handling mechanisms described earlier.
The only major difference between output file streams and other output streams is that the file stream constructor can take the name of the file and the mode in which you would like to open it. The default mode is write, ios_base::out, which starts writing to a file at the beginning, overwriting any existing data. You can also open an output file stream in append mode by specifying the constant ios_base::app as second argument to the file stream constructor. The following table lists the different constants that are available.
| CONSTANT | DESCRIPTION |
ios_base::app |
Open, and go to the end before each write operation. |
ios_base::ate |
Open, and go to the end once immediately after opening. |
ios_base::binary |
Perform input and output in binary mode as opposed to text mode. See the next section. |
ios_base::in |
Open for input, start reading at the beginning. |
ios_base::out |
Open for output, start writing at the beginning, overwriting existing data. |
ios_base::trunc |
Open for output, and delete all existing data (truncate). |
Note that modes can be combined. For example, if you want to open a file for output in binary mode, while truncating existing data, you would specify the open mode as follows:
ios_base::out | ios_base::binary | ios_base::truncAn ifstream automatically includes the ios_base::in mode, while an ofstream automatically includes the ios_base::out mode, even if you don’t explicitly specify in or out as the mode.
The following program opens the file test.txt and outputs the arguments to the program. The ifstream and ofstream destructors automatically close the underlying file, so there is no need to explicitly call close().
int main(int argc, char* argv[]){ofstream outFile("test.txt", ios_base::trunc);if (!outFile.good()) {cerr << "Error while opening output file!" << endl;return -1;}outFile << "There were " << argc << " arguments to this program." << endl;outFile << "They are: " << endl;for (int i = 0; i < argc; i++) {outFile << argv[i] << endl;}return 0;}
By default, a file stream is opened in text mode. If you specify the ios_base::binary flag, then the file is opened in binary mode.
In binary mode, the exact bytes you ask the stream to write are written to the file. When reading, the bytes are returned to you exactly as they are in the file.
In text mode, there is some hidden conversion happening: each line you write to, or read from a file ends with a \n. However, it is operating-system dependent how the end of a line is encoded in a file. For example, on Windows, a line ends with \r\n instead of with a single \n character. Therefore, when a file is opened in text mode and you write a line ending with \n to it, the underlying implementation automatically converts the \n to \r\n before writing it to the file. Similarly, when reading a line from the file, the \r\n that is read from the file is automatically converted back to \n before being returned to you.
The seek() and tell() methods are present on all input and output streams.
The seek() methods let you move to an arbitrary position within an input or output stream. There are several forms of seek(). The methods of seek() within an input stream are actually called seekg() (the g is for get), and the versions of seek() in an output stream are called seekp() (the p is for put). You might wonder why there is both a seekg() and a seekp() method, instead of one seek() method. The reason is that you can have streams that are both input and output, for example, file streams. In that case, the stream needs to remember both a read position and a separate write position. This is also called bidirectional I/O and is covered later in this chapter.
There are two overloads of seekg() and two of seekp(). One overload accepts a single argument, an absolute position, and seeks to this absolute position. The second overload accepts an offset and a position, and seeks an offset relative to the given position. Positions are of type std::streampos, while offsets are of type std::streamoff; both are measured in bytes. There are three predefined positions available, as shown here.
| POSITION | DESCRIPTION |
ios_base::beg |
The beginning of the stream |
ios_base::end |
The end of the stream |
ios_base::cur |
The current position in the stream |
For example, to seek to an absolute position in an output stream, you can use the one-parameter version of seekp(), as in the following case, which uses the constant ios_base::beg to move to the beginning of the stream:
outStream.seekp(ios_base::beg);Seeking within an input stream is exactly the same, except that the seekg() method is used:
inStream.seekg(ios_base::beg);The two-argument versions move to a relative position in the stream. The first argument prescribes how many positions to move, and the second argument provides the starting point. To move relative to the beginning of the file, the constant ios_base::beg is used. To move relative to the end of the file, ios_base::end is used. And to move relative to the current position, ios_base::cur is used. For example, the following line moves to the second byte from the beginning of the stream. Note that integers are implicitly converted to type streampos and streamoff.
outStream.seekp(2, ios_base::beg);The next example moves to the third-to-last byte of an input stream:
inStream.seekg(-3, ios_base::end);You can also query a stream’s current location using the tell() method, which returns a streampos that indicates the current position. You can use this result to remember the current marker position before doing a seek() or to query whether you are in a particular location. As with seek(), there are separate versions of tell() for input streams and output streams. Input streams use tellg(), and output streams use tellp().
The following code checks the position of an input stream to determine if it is at the beginning:
std::streampos curPos = inStream.tellg();if (ios_base::beg == curPos) {cout << "We're at the beginning." << endl;}
Following is a sample program that brings it all together. This program writes into a file called test.out and performs the following tests:
12345 to the file.0 in position 2 and closes the output stream.test.out file.12045.ofstream fout("test.out");if (!fout) {cerr << "Error opening test.out for writing" << endl;return 1;}// 1. Output the string "12345".fout << "12345";// 2. Verify that the marker is at position 5.streampos curPos = fout.tellp();if (5 == curPos) {cout << "Test passed: Currently at position 5" << endl;} else {cout << "Test failed: Not at position 5" << endl;}// 3. Move to position 2 in the stream.fout.seekp(2, ios_base::beg);// 4. Output a 0 in position 2 and close the stream.fout << 0;fout.close();// 5. Open an input stream on test.out.ifstream fin("test.out");if (!fin) {cerr << "Error opening test.out for reading" << endl;return 1;}// 6. Read the first token as an integer.int testVal;fin >> testVal;if (!fin) {cerr << "Error reading from file" << endl;return 1;}// 7. Confirm that the value is 12045.const int expected = 12045;if (testVal == expected) {cout << "Test passed: Value is " << expected << endl;} else {cout << "Test failed: Value is not " << expected<< " (it was " << testVal << ")" << endl;}
A link can be established between any input and output streams to give them flush-on-access behavior. In other words, when data is requested from an input stream, its linked output stream is automatically flushed. This behavior is available to all streams, but is particularly useful for file streams that may be dependent upon each other.
Stream linking is accomplished with the tie() method. To tie an output stream to an input stream, call tie() on the input stream, and pass the address of the output stream. To break the link, pass nullptr.
The following program ties the input stream of one file to the output stream of an entirely different file. You could also tie it to an output stream on the same file, but bidirectional I/O (covered in the next section) is perhaps a more elegant way to read and write the same file simultaneously.
ifstream inFile("input.txt"); // Note: input.txt must exist.ofstream outFile("output.txt");// Set up a link between inFile and outFile.inFile.tie(&outFile);// Output some text to outFile. Normally, this would// not flush because std::endl is not sent.outFile << "Hello there!";// outFile has NOT been flushed.// Read some text from inFile. This will trigger flush()// on outFile.string nextToken;inFile >> nextToken;// outFile HAS been flushed.
The flush() method is defined on the ostream base class, so you can also link an output stream to another output stream:
outFile.tie(&anotherOutputFile);Such a relationship means that every time you write to one file, the buffered data that has been sent to the other file is flushed. You can use this mechanism to keep two related files synchronized.
One example of this stream linking is the link between cout and cin. Whenever you try to input data from cin, cout is automatically flushed. There is also a link between cerr and cout, meaning that any output to cerr causes cout to flush. The clog stream on the other hand is not linked to cout. The wide versions of these streams have similar links.
So far, this chapter has discussed input and output streams as two separate but related classes. In fact, there is such a thing as a stream that performs both input and output. A bidirectional stream operates as both an input stream and an output stream.
Bidirectional streams derive from iostream, which in turn derives from both istream and ostream, thus serving as an example of useful multiple inheritance. As you would expect, bidirectional streams support both the >> operator and the << operator, as well as the methods of both input streams and output streams.
The fstream class provides a bidirectional file stream. fstream is ideal for applications that need to replace data within a file because you can read until you find the correct position, then immediately switch to writing. For example, imagine a program that stores a list of mappings between ID numbers and phone numbers. It might use a data file with the following format:
123 408-555-0394124 415-555-3422263 585-555-3490100 650-555-3434
A reasonable approach to such a program would be to read in the entire data file when the program opens and rewrite the file, with any modifications, when the program closes. If the data set is huge, however, you might not be able to keep everything in memory. With iostreams, you don’t have to. You can easily scan through the file to find a record, and you can add new records by opening the file for output in append mode. To modify an existing record, you could use a bidirectional stream, as in the following function that changes the phone number for a given ID:
bool changeNumberForID(string_view filename, int id, string_view newNumber){fstream ioData(filename.data());if (!ioData) {cerr << "Error while opening file " << filename << endl;return false;}// Loop until the end of filewhile (ioData) {int idRead;string number;// Read the next ID.ioData >> idRead;if (!ioData)break;// Check to see if the current record is the one being changed.if (idRead == id) {// Seek the write position to the current read positionioData.seekp(ioData.tellg());// Output a space, then the new number.ioData << " " << newNumber;break;}// Read the current number to advance the stream.ioData >> number;}return true;}
Of course, an approach like this only works properly if the data is of a fixed size. When the preceding program switched from reading to writing, the output data overwrote other data in the file. To preserve the format of the file, and to avoid writing over the next record, the data had to be the exact same size.
String streams can also be accessed in a bidirectional manner through the stringstream class.
Streams provide a flexible and object-oriented way to perform input and output. The most important message in this chapter, even more important than the use of streams, is the concept of a stream. Some operating systems may have their own file access and I/O facilities, but knowledge of how streams and stream-like libraries work is essential to working with any type of modern I/O system.
No program exists in isolation; they all depend on external facilities such as interfaces with the operating system, networks and file systems, external code such as third-party libraries, and user input. Each of these areas can introduce situations that require you to respond to problems you may encounter. These potential problems can be referred to with the general term exceptional situations. Even perfectly written programs encounter errors and exceptional situations. Thus, anyone who writes a computer program must include error-handling capabilities. Some languages, such as C, do not include many specific language facilities for error handling. Programmers using these languages generally rely on return values from functions and other ad hoc approaches. Other languages, such as Java, enforce the use of a language feature called exceptions as an error-handling mechanism. C++ lies between these extremes. It provides language support for exceptions, but does not require their use. However, you can’t ignore exceptions entirely in C++ because a few basic facilities, such as memory allocation routines, use them.
Exceptions are a mechanism for a piece of code to notify another piece of code of an “exceptional” situation or error condition without progressing through the normal code paths. The code that encounters the error throws the exception, and the code that handles the exception catches it. Exceptions do not follow the fundamental rule of step-by-step execution to which you are accustomed. When a piece of code throws an exception, the program control immediately stops executing code step by step and transitions to the exception handler, which could be anywhere from the next line in the same function to several function calls up the stack. If you like sports analogies, you can think of the code that throws an exception as an outfielder throwing a baseball back to the infield, where the nearest infielder (closest exception handler) catches it. Figure 14-1 shows a hypothetical stack of three function calls. Function A() has the exception handler. It calls function B(), which calls function C(), which throws the exception.
Figure 14-2 shows the handler catching the exception. The stack frames for C() and B() have been removed, leaving only A().
Most modern programming languages, such as C# and Java, have support for exceptions, so it’s no surprise that C++ has full-fledged support for them as well. However, if you are coming from C, then exceptions are something new; but once you get used to them, you probably won’t want to go back.
As mentioned earlier, run-time errors in programs are inevitable. Despite that fact, error handling in most C and C++ programs is messy and ad hoc. The de facto C error-handling standard, which was carried over into many C++ programs, uses integer function return codes, and the errno macro to signify errors. Each thread has its own errno value. errno acts as a thread-local integer variable that functions can use to communicate errors back to calling functions.
Unfortunately, the integer return codes and errno are used inconsistently. Some functions might choose to return 0 for success and -1 for an error. If they return -1, they also set errno to an error code. Other functions return 0 for success and nonzero for an error, with the actual return value specifying the error code. These functions do not use errno. Still others return 0 for failure instead of for success, presumably because 0 always evaluates to false in C and C++.
These inconsistencies can cause problems because programmers encountering a new function often assume that its return codes are the same as other similar functions. That is not always true. For example, on Solaris 9, there are two different libraries of synchronization objects: the POSIX version and the Solaris version. The function to initialize a semaphore in the POSIX version is called sem_init(), and the function to initialize a semaphore in the Solaris version is called sema_init(). As if that weren’t confusing enough, the two functions handle error codes differently! sem_init() returns -1 and sets errno on error, while sema_init() returns the error code directly as a positive integer, and does not set errno.
Another problem is that the return type of functions in C++ can only be of one type, so if you need to return both an error and a value, you must find an alternative mechanism. One solution is to return an std::pair or std::tuple, an object that you can use to store two or more types. These classes are discussed in the upcoming chapters that cover the Standard Library. Another choice is to define your own struct or class that contains several values, and return an instance of that struct or class from your function. Yet another option is to return the value or error through a reference parameter or to make the error code one possible value of the return type, such as a nullptr pointer. In all these solutions, the caller is responsible to explicitly check for any errors returned from the function and if it doesn’t handle the error itself, it should propagate the error to its caller. Unfortunately, this often results in the loss of critical details about the error.
C programmers may be familiar with a mechanism known as setjmp()/longjmp(). This mechanism cannot be used correctly in C++, because it bypasses scoped destructors on the stack. You should avoid it at all costs, even in C programs; therefore, this book does not explain the details of how to use it.
Exceptions provide an easier, more consistent, and safer mechanism for error handling. There are several specific advantages of exceptions over the ad hoc approaches in C and C++.
[[nodiscard]] attribute, introduced in Chapter 11, offers a possible solution to prevent return codes from being ignored, but it’s not foolproof either. Exceptions cannot be forgotten or ignored: if your program fails to catch an exception, it terminates.In some compilers (fewer and fewer these days), exception handling added a tiny amount of overhead to any function that had an exception handler. For most modern compilers there is a trade-off in that there is almost no overhead in the non-throwing case, and only some slight overhead when you actually throw something. This trade-off is not a bad thing because throwing an exception should be exceptional.
Exception handling is not enforced in C++. For example, in Java a function that does not specify a list of possible exceptions that it can throw is not allowed to throw any exceptions. In C++, it is just the opposite: a function can throw any exception it wants, unless it specifies that it will not throw any exceptions (using the noexcept keyword)!
I recommend exceptions as a useful mechanism for error handling. I feel that the structure and error-handling formalization that exceptions provide outweigh the less desirable aspects. Thus, the remainder of this chapter focuses on exceptions. Also, many popular libraries, such as the Standard Library and Boost, use exceptions, so you need to be prepared to handle them.
Exceptional situations arise frequently in file input and output. The following is a function to open a file, read a list of integers from the file, and return the integers in an std::vector data structure. The lack of error handling should jump out at you.
vector<int> readIntegerFile(string_view fileName){ifstream inputStream(fileName.data());// Read the integers one-by-one and add them to a vector.vector<int> integers;int temp;while (inputStream >> temp) {integers.push_back(temp);}return integers;}
The following line keeps reading values from the ifstream until the end of the file is reached or until an error occurs:
while (inputStream >> temp) {If the >> operator encounters an error, it sets the fail bit of the ifstream object. In that case, the bool() conversion operator returns false and the while loop terminates. Streams are discussed in more detail in Chapter 13.
You might use readIntegerFile() like this:
const string fileName = "IntegerFile.txt";vector<int> myInts = readIntegerFile(fileName);for (const auto& element : myInts) {cout << element << " ";}cout << endl;
The rest of this section shows you how to add error handling with exceptions, but first, we need to delve a bit deeper into how you throw and catch exceptions.
Using exceptions consists of providing two parts in your program: a try/catch construct to handle an exception, and a throw statement that throws an exception. Both must be present in some form to make exceptions work. However, in many cases, the throw happens deep inside some library (including the C++ runtime) and the programmer never sees it, but still has to react to it using a try/catch construct.
The try/catch construct looks like this:
try {// ... code which may result in an exception being thrown} catch (exception-type1 exception-name) {// ... code which responds to the exception of type 1} catch (exception-type2 exception-name) {// ... code which responds to the exception of type 2}// ... remaining code
The code that may result in an exception being thrown might contain a throw directly. It might also be calling a function that either directly throws an exception or calls—by some unknown number of layers of calls—a function that throws an exception.
If no exception is thrown, the code in the catch blocks is not executed, and the “remaining code” that follows will follow the last statement executed in the try block.
If an exception is thrown, any code following the throw or following the call that resulted in the throw, is not executed; instead, control immediately goes to the right catch block, depending on the type of the exception that is thrown.
If the catch block does not do a control transfer—for example, by returning a value, throwing a new exception, or rethrowing the exception—then the “remaining code” is executed after the last statement of that catch block.
The simplest example to demonstrate exception handling is avoiding division-by-zero. This example throws an exception of type std::invalid_argument, which requires the <stdexcept> header:
double SafeDivide(double num, double den){if (den == 0)throw invalid_argument("Divide by zero");return num / den;}int main(){try {cout << SafeDivide(5, 2) << endl;cout << SafeDivide(10, 0) << endl;cout << SafeDivide(3, 3) << endl;} catch (const invalid_argument& e) {cout << "Caught exception: " << e.what() << endl;}return 0;}
The output is as follows:
2.5Caught exception: Divide by zero
throw is a keyword in C++, and is the only way to throw an exception. The invalid_argument() part of the throw line means that you are constructing a new object of type invalid_argument to throw. It is one of the standard exceptions provided by the C++ Standard Library. All Standard Library exceptions form a hierarchy, which is discussed later in this chapter. Each class in the hierarchy supports a what() method that returns a const
char* string describing the exception1. This is the string you provide in the constructor of the exception.
Let’s go back to the readIntegerFile() function. The most likely problem to occur is for the file open to fail. That’s a perfect situation for throwing an exception. This code throws an exception of type std::exception, which requires the <exception> header. The syntax looks like this:
vector<int> readIntegerFile(string_view fileName){ifstream inputStream(fileName.data());if (inputStream.fail()) {// We failed to open the file: throw an exceptionthrow exception();}// Read the integers one-by-one and add them to a vectorvector<int> integers;int temp;while (inputStream >> temp) {integers.push_back(temp);}return integers;}
If the function fails to open the file and executes the throw exception(); line, the rest of the function is skipped, and control transitions to the nearest exception handler.
Throwing exceptions in your code is most useful when you also write code that handles them. Exception handling is a way to “try” a block of code, with another block of code designated to react to any problems that might occur. In the following main() function, the catch statement reacts to any exception of type exception that was thrown within the try block by printing an error message. If the try block finishes without throwing an exception, the catch block is skipped. You can think of try/catch blocks as glorified if statements. If an exception is thrown in the try block, execute the catch block. Otherwise, skip it.
int main(){const string fileName = "IntegerFile.txt";vector<int> myInts;try {myInts = readIntegerFile(fileName);} catch (const exception& e) {cerr << "Unable to open file " << fileName << endl;return 1;}for (const auto& element : myInts) {cout << element << " ";}cout << endl;return 0;}
You can throw an exception of any type. The preceding example throws an object of type std::exception, but exceptions do not need to be objects. You could throw a simple int like this:
vector<int> readIntegerFile(string_view fileName){ifstream inputStream(fileName.data());if (inputStream.fail()) {// We failed to open the file: throw an exceptionthrow 5;}// Omitted for brevity}
You would then need to change the catch statement as well:
try {myInts = readIntegerFile(fileName);} catch (int e) {cerr << "Unable to open file " << fileName << " (" << e << ")" << endl;return 1;}
Alternatively, you could throw a const char* C-style string. This technique is sometimes useful because the string can contain information about the exception.
vector<int> readIntegerFile(string_view fileName){ifstream inputStream(fileName.data());if (inputStream.fail()) {// We failed to open the file: throw an exceptionthrow "Unable to open file";}// Omitted for brevity}
When you catch the const char* exception, you can print the result:
try {myInts = readIntegerFile(fileName);} catch (const char* e) {cerr << e << endl;return 1;}
Despite the previous examples, you should generally throw objects as exceptions for two reasons:
The C++ Standard Library defines a number of predefined exception classes, and you can write your own exception classes, as you’ll learn later in this chapter.
In the preceding example in which readIntegerFile() throws an object of type exception, the catch line looks like this:
} catch (const exception& e) {However, there is no requirement to catch objects by const reference. You could catch the object by value like this:
} catch (exception e) {Alternatively, you could catch the object by non-const reference:
} catch (exception& e) { Also, as you saw in the const char* example, you can catch pointers to exceptions, as long as pointers to exceptions are thrown.
Failure to open the file is not the only problem readIntegerFile() could encounter. Reading the data from the file can cause an error if it is formatted incorrectly. Here is an implementation of readIntegerFile() that throws an exception if it cannot either open the file or read the data correctly. This time, it uses a runtime_error, derived from exception, and which allows you to specify a descriptive string in its constructor. The runtime_error exception class is defined in <stdexcept>.
vector<int> readIntegerFile(string_view fileName){ifstream inputStream(fileName.data());if (inputStream.fail()) {// We failed to open the file: throw an exceptionthrow runtime_error("Unable to open the file.");}// Read the integers one-by-one and add them to a vectorvector<int> integers;int temp;while (inputStream >> temp) {integers.push_back(temp);}if (!inputStream.eof()) {// We did not reach the end-of-file.// This means that some error occurred while reading the file.// Throw an exception.throw runtime_error("Error reading the file.");}return integers;}
Your code in main() does not need to change because it already catches an exception of type exception, from which runtime_error derives. However, that exception could now be thrown in two different situations.
try {myInts = readIntegerFile(fileName);} catch (const exception& e) {cerr << e.what() << endl;return 1;}
Alternatively, you could throw two different types of exceptions from readIntegerFile(). Here is an implementation of readIntegerFile() that throws an exception object of class invalid_argument if the file cannot be opened, and an object of class runtime_error if the integers cannot be read. Both invalid_argument and runtime_error are classes defined in the header file <stdexcept> as part of the C++ Standard Library.
vector<int> readIntegerFile(string_view fileName){ifstream inputStream(fileName.data());if (inputStream.fail()) {// We failed to open the file: throw an exceptionthrow invalid_argument("Unable to open the file.");}// Read the integers one-by-one and add them to a vectorvector<int> integers;int temp;while (inputStream >> temp) {integers.push_back(temp);}if (!inputStream.eof()) {// We did not reach the end-of-file.// This means that some error occurred while reading the file.// Throw an exception.throw runtime_error("Error reading the file.");}return integers;}
There are no public default constructors for invalid_argument and runtime_error, only string constructors.
Now main() can catch both invalid_argument and runtime_error with two catch statements:
try {myInts = readIntegerFile(fileName);} catch (const invalid_argument& e) {cerr << e.what() << endl;return 1;} catch (const runtime_error& e) {cerr << e.what() << endl;return 2;}
If an exception is thrown inside the try block, the compiler matches the type of the exception to the proper catch handler. So, if readIntegerFile() is unable to open the file and throws an invalid_argument object, it is caught by the first catch statement. If readIntegerFile() is unable to read the file properly and throws a runtime_error, then the second catch statement catches the exception.
The const-ness specified in the type of the exception you want to catch makes no difference for matching purposes. That is, this line matches any exception of type runtime_error:
} catch (const runtime_error& e) {The following line also matches any exception of type runtime_error:
} catch (runtime_error& e) {You can write a catch line that matches any possible exception with the special syntax shown in the following example:
try {myInts = readIntegerFile(fileName);} catch (...) {cerr << "Error reading or opening file " << fileName << endl;return 1;}
The three dots are not a typo. They are a wildcard that matches any exception type. When you are calling poorly documented code, this technique can be useful to ensure that you catch all possible exceptions. However, in situations where you have complete information about the set of thrown exceptions, this technique is not recommended because it handles every exception type identically. It’s better to match exception types explicitly and take appropriate, targeted actions.
A possible use of a catch block matching any exception is as a default catch handler. When an exception is thrown, a catch handler is looked up in the order that it appears in the code. The following example shows how you can write catch handlers that explicitly handle invalid_argument and runtime_error exceptions, and how to include a default catch handler for all other exceptions:
try {// Code that can throw exceptions} catch (const invalid_argument& e) {// Handle invalid_argument exception} catch (const runtime_error& e) {// Handle runtime_error exception} catch (...) {// Handle all other exceptions}
If your program throws an exception that is not caught anywhere, the program terminates. Basically, there is a try/catch construct around the call to your main() function, which catches all unhandled exceptions, similar to the following:
try {main(argc, argv);} catch (...) {// issue error message and terminate program}
However, this behavior is not usually what you want. The point of exceptions is to give your program a chance to handle and correct undesirable or unexpected situations.
It is also possible to change the behavior of your program if there is an uncaught exception. When the program encounters an uncaught exception, it calls the built-in terminate() function, which calls abort() from <cstdlib> to kill the program. You can set your own terminate_handler by calling set_terminate() with a pointer to a callback function that takes no arguments and returns no value. terminate(), set_terminate(), and terminate_handler are all declared in the <exception> header. The following code shows a high-level overview of how it works:
try {main(argc, argv);} catch (...) {if (terminate_handler != nullptr) {terminate_handler();} else {terminate();}}// normal termination code
Before you get too excited about this feature, you should know that your callback function must still terminate the program. It can’t just ignore the error. However, you can use it to print a helpful error message before exiting. Here is an example of a main() function that doesn’t catch the exceptions thrown by readIntegerFile(). Instead, it sets the terminate_handler to a custom callback. This callback prints an error message and terminates the process by calling exit(). The exit() function accepts an integer which is returned back to the operating system, and which can be used to determine how a process exited.
void myTerminate(){cout << "Uncaught exception!" << endl;exit(1);}int main(){set_terminate(myTerminate);const string fileName = "IntegerFile.txt";vector<int> myInts = readIntegerFile(fileName);for (const auto& element : myInts) {cout << element << " ";}cout << endl;return 0;}
Although not shown in this example, set_terminate() returns the old terminate_handler when it sets the new one. The terminate_handler applies program-wide, so it’s considered good style to reset the old terminate_handler when you have completed the code that needed the new terminate_handler. In this case, the entire program needs the new terminate_handler, so there’s no point in resetting it.
While it’s important to know about set_terminate(), it’s not a very effective exception-handling approach. It’s recommended to try to catch and handle each exception individually in order to provide more precise error handling.
A function is allowed to throw any exception it likes. However, it is possible to mark a function with the noexcept keyword to state that it will not throw any exceptions. For example, here is the readIntegerFile() function from earlier, but this time marked as noexcept, so it is not allowed to throw any exceptions:
vector<int> readIntegerFile(string_view fileName) noexcept;When a function marked as noexcept throws an exception anyway, C++ calls terminate() to terminate the application.
When you override a virtual method in a derived class, you are allowed to mark the overridden method as noexcept, even if the version in the base class is not noexcept. The opposite is not allowed.
Older versions of C++ allowed you to specify the exceptions a function or method intended to throw. This specification was called the throw list or the exception specification.
Because C++17 has officially removed support for exception specifications, this book does not use them, and does not explain them in detail. Even while exception specifications were still supported, they were used rarely. Still, this section briefly mentions them, so you will at least get an idea of what the syntax looked like in the unlikely event you encounter them in legacy code. Here is a simple example of the syntax, the readIntegerFile() function from earlier, with an exception specification:
vector<int> readIntegerFile(string_view fileName)throw(invalid_argument, runtime_error){// Remainder of the function is the same as before}
If a function threw an exception that was not in its exception specification, the C++ runtime called std::unexpected() which by default called std::terminate() to terminate the application.
As described earlier, you can actually throw any type of exception. However, classes are the most useful types of exceptions. In fact, exception classes are usually written in a hierarchy, so that you can employ polymorphism when you catch the exceptions.
You’ve already seen several exceptions from the C++ standard exception hierarchy: exception, runtime_error, and invalid_argument. Figure 14-3 shows the full hierarchy. For completeness, all standard exceptions are shown, including those thrown by parts of the Standard Library, which are discussed in later chapters.
All of the exceptions thrown by the C++ Standard Library are objects of classes in this hierarchy. Each class in the hierarchy supports a what() method that returns a const
char* string describing the exception. You can use this string in an error message.
Most of the exception classes (a notable exception is the base exception class) require you to set in the constructor the string that is returned by what(). That’s why you have to specify a string in the constructors for runtime_error and invalid_argument. This has already been done in examples throughout this chapter. Here is another version of readIntegerFile() that includes the filename in the error message. Note also the use of the standard user-defined literal “s”, introduced in Chapter 2, to interpret a string literal as an std::string.
vector<int> readIntegerFile(string_view fileName){ifstream inputStream(fileName.data());if (inputStream.fail()) {// We failed to open the file: throw an exceptionconst string error = "Unable to open file "s + fileName.data();throw invalid_argument(error);}// Read the integers one-by-one and add them to a vectorvector<int> integers;int temp;while (inputStream >> temp) {integers.push_back(temp);}if (!inputStream.eof()) {// We did not reach the end-of-file.// This means that some error occurred while reading the file.// Throw an exception.const string error = "Unable to read file "s + fileName.data();throw runtime_error(error);}return integers;}int main(){// Code omittedtry {myInts = readIntegerFile(fileName);} catch (const invalid_argument& e) {cerr << e.what() << endl;return 1;} catch (const runtime_error& e) {cerr << e.what() << endl;return 2;}// Code omitted}
A feature of exception hierarchies is that you can catch exceptions polymorphically. For example, if you look at the two catch statements in main() following the call to readIntegerFile(), you can see that they are identical except for the exception class that they handle. Conveniently, invalid_argument and runtime_error are both derived classes of exception, so you can replace the two catch statements with a single catch statement for class exception:
try {myInts = readIntegerFile(fileName);} catch (const exception& e) {cerr << e.what() << endl;return 2;}
The catch statement for an exception reference matches any derived classes of exception, including both invalid_argument and runtime_error. Note that the higher in the exception hierarchy you catch exceptions, the less specific your error handling can be. You should generally catch exceptions at as specific a level as possible.
When more than one catch clause is used, the catch clauses are matched in syntactic order as they appear in your code; the first one that matches, wins. If one catch is more inclusive than a later one, it will match first, and the more restrictive one, which comes later, will not be executed at all. Therefore, you should place your catch clauses from most restrictive to least restrictive in order. For example, suppose that you want to catch invalid_argument from readIntegerFile() explicitly, but you also want to leave the generic exception match for any other exceptions. The correct way to do so is like this:
try {myInts = readIntegerFile(fileName);} catch (const invalid_argument& e) { // List the derived class first.// Take some special action for invalid filenames.} catch (const exception& e) { // Now list exceptioncerr << e.what() << endl;return 1;}
The first catch statement catches invalid_argument exceptions, and the second catches any other exceptions of type exception. However, if you reverse the order of the catch statements, you don’t get the same result:
try {myInts = readIntegerFile(fileName);} catch (const exception& e) { // BUG: catching base class first!cerr << e.what() << endl;return 1;} catch (const invalid_argument& e) {// Take some special action for invalid filenames.}
With this order, any exception of a class that derives from exception is caught by the first catch statement; the second will never be reached. Some compilers issue a warning in this case, but you shouldn’t count on it.
There are two advantages to writing your own exception classes.
runtime_error, you can create classes with names that are more meaningful for the particular errors in your program.It’s recommended that all the exception classes that you write inherit directly or indirectly from the standard exception class. If everyone on your project follows that rule, you know that every exception in the program will be derived from exception (assuming that you aren’t using third-party libraries that break this rule). This guideline makes exception handling via polymorphism significantly easier.
For example, invalid_argument and runtime_error don’t do a very good job of capturing the file opening and reading errors in readIntegerFile(). You can define your own error hierarchy for file errors, starting with a generic FileError class:
class FileError : public exception{public:FileError(string_view fileName) : mFileName(fileName) {}virtual const char* what() const noexcept override {return mMessage.c_str();}string_view getFileName() const noexcept { return mFileName; }protected:void setMessage(string_view message) { mMessage = message; }private:string mFileName;string mMessage;};
As a good programming citizen, you should make FileError a part of the standard exception hierarchy. It seems appropriate to integrate it as a child of exception. When you derive from exception, you can override the what() method, which has the prototype shown and which must return a const
char* string that is valid until the object is destroyed. In the case of FileError, this string comes from the mMessage data member. Derived classes of FileError can set the message using the protected
setMessage() method. The generic FileError class also contains a filename, and a public accessor for that filename.
The first exceptional situation in readIntegerFile() occurs if the file cannot be opened. Thus, you might want to write a FileOpenError exception derived from FileError:
class FileOpenError : public FileError{public:FileOpenError(string_view fileName) : FileError(fileName){setMessage("Unable to open "s + fileName.data());}};
The FileOpenError exception changes the mMessage string to represent the file-opening error.
The second exceptional situation in readIntegerFile() occurs if the file cannot be read properly. It might be useful for this exception to contain the line number of the error in the file, as well as the filename in the error message string returned from what(). Here is a FileReadError exception derived from FileError:
class FileReadError : public FileError{public:FileReadError(string_view fileName, size_t lineNumber): FileError(fileName), mLineNumber(lineNumber){ostringstream ostr;ostr << "Error reading " << fileName << " at line "<< lineNumber;setMessage(ostr.str());}size_t getLineNumber() const noexcept { return mLineNumber; }private:size_t mLineNumber;};
Of course, in order to set the line number properly, you need to modify your readIntegerFile() function to track the number of lines read instead of just reading integers directly. Here is a new readIntegerFile() function that uses the new exceptions:
vector<int> readIntegerFile(string_view fileName){ifstream inputStream(fileName.data());if (inputStream.fail()) {// We failed to open the file: throw an exceptionthrow FileOpenError(fileName);}vector<int> integers;size_t lineNumber = 0;while (!inputStream.eof()) {// Read one line from the filestring line;getline(inputStream, line);++lineNumber;// Create a string stream out of the lineistringstream lineStream(line);// Read the integers one-by-one and add them to a vectorint temp;while (lineStream >> temp) {integers.push_back(temp);}if (!lineStream.eof()) {// We did not reach the end of the string stream.// This means that some error occurred while reading this line.// Throw an exception.throw FileReadError(fileName, lineNumber);}}return integers;}
Now, code that calls readIntegerFile() can use polymorphism to catch exceptions of type FileError like this:
try {myInts = readIntegerFile(fileName);} catch (const FileError& e) {cerr << e.what() << endl;return 1;}
There is one trick to writing classes whose objects will be used as exceptions. When a piece of code throws an exception, the object or value thrown is moved or copied, using either the move constructor or copy constructor. Thus, if you write a class whose objects will be thrown as exceptions, you must make sure those objects are copyable and/or moveable. This means that if you have dynamically allocated memory, your class must have a destructor, but also a copy constructor and copy assignment operator, and/or a move constructor and move assignment operator, see Chapter 9.
It is possible for exceptions to be copied more than once, but only if you catch the exception by value instead of by reference.
It could happen that during handling of a first exception, a second exceptional situation is triggered which requires a second exception to be thrown. Unfortunately, when you throw the second exception, all information about the first exception that you are currently trying to handle will be lost. The solution provided by C++ for this problem is called nested exceptions, which allow you to nest a caught exception in the context of a new exception. This can also be useful if you call a function in a third-party library that throws an exception of a certain type, A, but you only want exceptions of another type, B, in your code. In such a case, you catch all exceptions from the library, and nest them in an exception of type B.
You use std::throw_with_nested() to throw an exception with another exception nested inside it. A catch handler for the second exception can use a dynamic_cast() to get access to the nested_exception representing the first exception. The following example demonstrates the use of nested exceptions. This example defines a MyException class, which derives from exception and accepts a string in its constructor.
class MyException : public std::exception{public:MyException(string_view message) : mMessage(message) {}virtual const char* what() const noexcept override {return mMessage.c_str();}private:string mMessage;};
When you are handling a first exception and you need to throw a second exception with the first one nested inside it, you need to use the std::throw_with_nested() function. The following doSomething() function throws a runtime_error that is immediately caught in the catch handler. The catch handler writes a message and then uses the throw_with_nested() function to throw a second exception that has the first one nested inside it. Note that nesting the exception happens automatically. The predefined __func__ variable is discussed in Chapter 1.
void doSomething(){try {throw runtime_error("Throwing a runtime_error exception");} catch (const runtime_error& e) {cout << __func__ << " caught a runtime_error" << endl;cout << __func__ << " throwing MyException" << endl;throw_with_nested(MyException("MyException with nested runtime_error"));}}
The following main() function demonstrates how to handle the exception with a nested exception. The code calls the doSomething() function and has one catch handler for exceptions of type MyException. When it catches such an exception, it writes a message, and then uses a dynamic_cast() to get access to the nested exception. If there is no nested exception inside, the result will be a null pointer. If there is a nested exception inside, the rethrow_nested() method on the nested_exception is called. This will cause the nested exception to be rethrown, which you can then catch in another try/catch block.
int main(){try {doSomething();} catch (const MyException& e) {cout << __func__ << " caught MyException: " << e.what() << endl;const auto* pNested = dynamic_cast<const nested_exception*>(&e);if (pNested) {try {pNested->rethrow_nested();} catch (const runtime_error& e) {// Handle nested exceptioncout << " Nested exception: " << e.what() << endl;}}}return 0;}
The output should be as follows:
doSomething caught a runtime_errordoSomething throwing MyExceptionmain caught MyException: MyException with nested runtime_errorNested exception: Throwing a runtime_error exception
The preceding main() function uses a dynamic_cast() to check for the nested exception. Because you often have to perform this dynamic_cast() if you want to check for a nested exception, the standard provides a small helper function called std::rethrow_if_nested() that does it for you. This helper function can be used as follows:
int main(){try {doSomething();} catch (const MyException& e) {cout << __func__ << " caught MyException: " << e.what() << endl;try {rethrow_if_nested(e);} catch (const runtime_error& e) {// Handle nested exceptioncout << " Nested exception: " << e.what() << endl;}}return 0;}
The throw keyword can also be used to rethrow the current exception, as in the following example:
void g() { throw invalid_argument("Some exception"); }void f(){try {g();} catch (const invalid_argument& e) {cout << "caught in f: " << e.what() << endl;throw; // rethrow}}int main(){try {f();} catch (const invalid_argument& e) {cout << "caught in main: " << e.what() << endl;}return 0;}
This example produces the following output:
caught in f: Some exceptioncaught in main: Some exception
You might think you could also rethrow an exception using something like a “throw e;” statement; however, that’s wrong, because it can cause slicing of your exception object. For example, suppose f() is modified to catch std::exceptions, and main() is modified to catch both exception and invalid_argument exceptions:
void g() { throw invalid_argument("Some exception"); }void f(){try {g();} catch (const exception& e) {cout << "caught in f: " << e.what() << endl;throw; // rethrow}}int main(){try {f();} catch (const invalid_argument& e) {cout << "invalid_argument caught in main: " << e.what() << endl;} catch (const exception& e) {cout << "exception caught in main: " << e.what() << endl;}return 0;}
Remember that invalid_argument derives from exception. The output of this code is as you would expect:
caught in f: Some exceptioninvalid_argument caught in main: Some exception
However, try replacing the “throw;” line in f() with:
throw e;The output then is as follows:
caught in f: Some exceptionexception caught in main: Some exception
Now main() seems to be catching an exception object, instead of an invalid_argument object. That’s because the “throw e;” statement causes slicing, reducing the invalid_argument to an exception.
When a piece of code throws an exception, it searches for a catch handler on the stack. This catch handler could be zero or more function calls up the stack of execution. When one is found, the stack is stripped back to the stack level that defines the catch handler by unwinding all intermediate stack frames. Stack unwinding means that the destructors for all locally scoped names are called, and all code remaining in each function past the current point of execution is skipped.
However, in stack unwinding, pointer variables are not freed, and other cleanup is not performed. This behavior can present problems, as the following code demonstrates:
void funcOne();void funcTwo();int main(){try {funcOne();} catch (const exception& e) {cerr << "Exception caught!" << endl;return 1;}return 0;}void funcOne(){string str1;string* str2 = new string();funcTwo();delete str2;}void funcTwo(){ifstream fileStream;fileStream.open("filename");throw exception();fileStream.close();}
When funcTwo() throws an exception, the closest exception handler is in main(). Control then jumps immediately from this line in funcTwo(),
throw exception();to this line in main():
cerr << "Exception caught!" << endl;In funcTwo(), control remains at the line that threw the exception, so this subsequent line never gets a chance to run:
fileStream.close();However, luckily for you, the ifstream destructor is called because fileStream is a local variable on the stack. The ifstream destructor closes the file for you, so there is no resource leak here. If you had dynamically allocated fileStream, it would not be destroyed, and the file would not be closed.
In funcOne(), control is at the call to funcTwo(), so this subsequent line never gets a chance to run:
delete str2;In this case, there really is a memory leak. Stack unwinding does not automatically call delete on str2 for you. However, str1 is destroyed properly because it is a local variable on the stack. Stack unwinding destroys all local variables correctly.
This is one reason why you should never mix older C models of allocation (even if you are calling new so it looks like C++) with modern programming methodologies like exceptions. In C++, this situation should be handled by using stack-based allocations, or if that is not possible, by one of the techniques discussed in the following two sections.
If stack-based allocation is not possible, then use smart pointers. They allow you to write code that automatically prevents memory or resource leaks with exception handling. Whenever a smart pointer object is destroyed, it frees the underlying resource. Here is an example of the previous funcOne() function but using the unique_ptr smart pointer, defined in <memory>, and introduced in Chapter 1:
void funcOne(){string str1;auto str2 = make_unique<string>("hello");funcTwo();}
The str2 pointer will automatically be deleted when you return from funcOne() or when an exception is thrown.
Of course, you should only allocate something dynamically if you have a good reason to do so. For example, in the previous funcOne() function, there is no good reason to make str2 a dynamically allocated string. It should just be a stack-based string variable. It’s merely shown here as a compact example of the consequences of throwing exceptions.
Another technique for avoiding memory and resource leaks is for each function to catch any possible exceptions, perform necessary cleanup work, and rethrow the exception for the function higher up the stack to handle. Here is a revised funcOne() with this technique:
void funcOne(){string str1;string* str2 = new string();try {funcTwo();} catch (...) {delete str2;throw; // Rethrow the exception.}delete str2;}
This function wraps the call to funcTwo() with an exception handler that performs the cleanup (calls delete on str2) and then rethrows the exception. The keyword throw by itself rethrows whatever exception was caught most recently. Note that the catch statement uses the ... syntax to catch any exception.
This method works fine, but is messy. In particular, note that there are now two identical lines that call delete on str2: one to handle the exception and one if the function exits normally.
Whether or not you use exceptions in your programs is up to you and your colleagues. However, you are strongly encouraged to formalize an error-handling plan for your programs, regardless of your use of exceptions. If you use exceptions, it is generally easier to come up with a unified error-handling scheme, but it is not impossible without exceptions. The most important aspect of a good plan is uniformity of error handling throughout all the modules of the program. Make sure that every programmer on the project understands and follows the error-handling rules.
This section discusses the most common error-handling issues in the context of exceptions, but the issues are also relevant to programs that do not use exceptions.
Despite the fact that all the examples so far in this book have ignored the possibility, memory allocation can fail. On current 64-bit platforms, this will almost never happen, but on mobile or legacy systems, memory allocation can fail. On such systems, you must account for memory allocation failures. C++ provides several different ways to handle memory errors.
The default behaviors of new and new[] are to throw an exception of type bad_alloc, defined in the <new> header file, if they cannot allocate memory. Your code could catch these exceptions and handle them appropriately.
It’s not realistic to wrap all your calls to new and new[] with a try/catch, but at least you should do so when you are trying to allocate a big block of memory. The following example demonstrates how to catch memory allocation exceptions:
int* ptr = nullptr;size_t integerCount = numeric_limits<size_t>::max();try {ptr = new int[integerCount];} catch (const bad_alloc& e) {cerr << __FILE__ << "(" << __LINE__<< "): Unable to allocate memory: " << e.what() << endl;// Handle memory allocation failure.return;}// Proceed with function that assumes memory has been allocated.
Note that this code uses the predefined preprocessor symbols __FILE__ and __LINE__, which are replaced with the name of the file and the current line number. This makes debugging easier.
You could, of course, bulk handle many possible new failures with a single try/catch block at a higher point in the program, if that works for your program.
Another point to consider is that logging an error might try to allocate memory. If new fails, there might not be enough memory left even to log the error message.
If you don’t like exceptions, you can revert to the old C model in which memory allocation routines return a null pointer if they cannot allocate memory. C++ provides nothrow versions of new and new[], which return nullptr instead of throwing an exception if they fail to allocate memory. This is done by using the syntax new(nothrow) instead of new, as shown in the following example:
int* ptr = new(nothrow) int[integerCount];if (ptr == nullptr) {cerr << __FILE__ << "(" << __LINE__<< "): Unable to allocate memory!" << endl;// Handle memory allocation failure.return;}// Proceed with function that assumes memory has been allocated.
The syntax is a little strange: you really do write “nothrow” as if it’s an argument to new (which it is).
C++ allows you to specify a new handler callback function. By default, there is no new handler, so new and new[] just throw bad_alloc exceptions. However, if there is a new handler, the memory allocation routine calls the new handler upon memory allocation failure instead of throwing an exception. If the new handler returns, the memory allocation routines attempt to allocate memory again, calling the new handler again if they fail. This cycle could become an infinite loop unless your new handler changes the situation with one of three alternatives. Practically speaking, some of the options are better than others. Here is the list with commentary:
bad_alloc exception, or an exception derived from bad_alloc. For example:
document_recovery_alloc exception, inheriting from bad_alloc. This exception can be caught somewhere in your application to trigger the document save operation and restart of the application.please_terminate_me exception, deriving from bad_alloc. In your top-level function—for example, main()—you catch this exception and handle it by returning from the top-level function. It’s recommended to terminate a program by returning from the top-level function, instead of by calling exit().If you don’t do one of these three things in your new handler, any memory allocation failure will cause an infinite loop.
If there are some memory allocations that can fail but you don’t want the new handler to be called, you can simply set the new handler back to its default of nullptr temporarily before calling new in those cases.
You set the new handler with a call to set_new_handler(), declared in the <new> header file. Here is an example of a new handler that logs an error message and throws an exception:
class please_terminate_me : public bad_alloc { };void myNewHandler(){cerr << "Unable to allocate memory." << endl;throw please_terminate_me();}
The new handler must take no arguments and return no value. This new handler throws a please_terminate_me exception, as suggested in the second bullet in the preceding list.
You can set this new handler like this:
int main(){try {// Set the new new_handler and save the old one.new_handler oldHandler = set_new_handler(myNewHandler);// Generate allocation errorsize_t numInts = numeric_limits<size_t>::max();int* ptr = new int[numInts];// Reset the old new_handlerset_new_handler(oldHandler);} catch (const please_terminate_me&) {cerr << __FILE__ << "(" << __LINE__<< "): Terminating program." << endl;return 1;}return 0;}
Note that new_handler is a typedef for the type of function pointer that set_new_handler() takes.
Before C++ programmers discover exceptions, they are often stymied by error handling and constructors. What if a constructor fails to construct the object properly? Constructors don’t have a return value, so the standard pre-exception error-handling mechanism doesn’t work. Without exceptions, the best you can do is to set a flag in the object specifying that it is not constructed properly. You can provide a method, with a name like checkConstructionStatus(), which returns the value of that flag, and hope that clients remember to call this method on the object after constructing it.
Exceptions provide a much better solution. You can throw an exception from a constructor, even though you can’t return a value. With exceptions, you can easily tell clients whether or not construction of an object succeeded. However, there is one major problem: if an exception leaves a constructor, the destructor for that object will never be called! Thus, you must be careful to clean up any resources and free any allocated memory in constructors before allowing exceptions to leave the constructor. This problem is the same as in any other function, but it is subtler in constructors because you’re accustomed to letting the destructors take care of the memory deallocation and resource freeing.
This section describes a Matrix class template as an example in which the constructor correctly handles exceptions. Note that this example is using a raw pointer called mMatrix to demonstrate the problems. In production-quality code, you should avoid using raw pointers, for example, by using a Standard Library container! The definition of the Matrix class template looks like this:
template <typename T>class Matrix{public:Matrix(size_t width, size_t height);virtual ~Matrix();private:void cleanup();size_t mWidth = 0;size_t mHeight = 0;T** mMatrix = nullptr;};
The implementation of the Matrix class is as follows. Note that the first call to new is not protected with a try/catch block. It doesn’t matter if the first new throws an exception because the constructor hasn’t allocated anything else yet that needs freeing. If any of the subsequent new calls throws an exception, though, the constructor must clean up all of the memory already allocated. However, it doesn’t know what exceptions the T constructors themselves might throw, so it catches any exceptions via ... and then nests the caught exception inside a bad_alloc exception. Note that the array allocated with the first call to new is zero-initialized using the {} syntax, that is, each element will be nullptr. This makes the cleanup() method easier, because it is allowed to call delete on a nullptr.
template <typename T>Matrix<T>::Matrix(size_t width, size_t height){mMatrix = new T*[width] {}; // Array is zero-initialized!// Don't initialize the mWidth and mHeight members in the ctor-// initializer. These should only be initialized when the above// mMatrix allocation succeeds!mWidth = width;mHeight = height;try {for (size_t i = 0; i < width; ++i) {mMatrix[i] = new T[height];}} catch (...) {std::cerr << "Exception caught in constructor, cleaning up..."<< std::endl;cleanup();// Nest any caught exception inside a bad_alloc exception.std::throw_with_nested(std::bad_alloc());}}template <typename T>Matrix<T>::~Matrix(){cleanup();}template <typename T>void Matrix<T>::cleanup(){for (size_t i = 0; i < mWidth; ++i)delete[] mMatrix[i];delete[] mMatrix;mMatrix = nullptr;mWidth = mHeight = 0;}
The Matrix class template can be tested as follows:
class Element{// Kept to a bare minimum, but in practice, this Element class// could throw exceptions in its constructor.private:int mValue;};int main(){Matrix<Element> m(10, 10);return 0;}
You might be wondering what happens when you add inheritance into the mix. Base class constructors run before derived class constructors. If a derived class constructor throws an exception, C++ will execute the destructor of the fully constructed base class.
The exception mechanism, as discussed up to now in this chapter, is perfect for handling exceptions within functions. But how should you handle exceptions thrown from inside a ctor-initializer of a constructor? This section explains a feature called function-try-blocks, which are capable of catching those exceptions. Function-try-blocks work for normal functions as well as for constructors. This section focuses on the use with constructors. Most C++ programmers, even experienced C++ programmers, don’t know of the existence of this feature, even though it was introduced a long time ago.
The following piece of pseudo-code shows the basic syntax for a function-try-block for a constructor:
MyClass::MyClass()try: <ctor-initializer>{/* ... constructor body ... */}catch (const exception& e){/* ... */}
As you can see, the try keyword should be right before the start of the ctor-initializer. The catch statements should be after the closing brace for the constructor, actually putting them outside the constructor body. There are a number of restrictions and guidelines that you should keep in mind when using function-try-blocks with constructors:
catch statements catch any exception thrown either directly or indirectly by the ctor-initializer or by the constructor body.catch statements have to rethrow the current exception or throw a new exception. If a catch statement doesn’t do this, the runtime automatically rethrows the current exception.catch statements can access arguments passed to the constructor.catch statement catches an exception in a function-try-block, all fully constructed base classes and members of the object are destroyed before execution of the catch statement starts.catch statements you should not access member variables that are objects because these are destroyed prior to executing the catch statements (see the previous bullet). However, if your object contains non-class data members—for example, raw pointers—you can access them if they have been initialized before the exception was thrown. If you have such naked resources, you have to take care of them by freeing them in the catch statements, as the following example demonstrates.catch statements in a function-try-block cannot use the return keyword to return a value from the function enclosed by it. This is not relevant for constructors because they do not return anything.Based on this list of limitations, function-try-blocks for constructors are useful only in a limited number of situations:
The following example demonstrates how to use function-try-blocks. The code defines a class called SubObject. It has only one constructor, which throws an exception of type runtime_error.
class SubObject{public:SubObject(int i);};SubObject::SubObject(int i){throw std::runtime_error("Exception by SubObject ctor");}
The MyClass class has a member variable of type int* and another one of type SubObject:
class MyClass{public:MyClass();private:int* mData = nullptr;SubObject mSubObject;};
The SubObject class does not have a default constructor. This means that you need to initialize mSubObject in the MyClass ctor-initializer. The constructor of MyClass uses a function-try-block to catch exceptions thrown in its ctor-initializer:
MyClass::MyClass()try: mData(new int[42]{ 1, 2, 3 }), mSubObject(42){/* ... constructor body ... */}catch (const std::exception& e){// Cleanup memory.delete[] mData;mData = nullptr;cout << "function-try-block caught: '" << e.what() << "'" << endl;}
Remember that catch statements in a function-try-block for a constructor have to either rethrow the current exception, or throw a new exception. The preceding catch statement does not throw anything, so the C++ runtime automatically rethrows the current exception. Following is a simple function that uses the preceding class:
int main(){try {MyClass m;} catch (const std::exception& e) {cout << "main() caught: '" << e.what() << "'" << endl;}return 0;}
The output of the preceding example is as follows:
function-try-block caught: 'Exception by SubObject ctor'main() caught: 'Exception by SubObject ctor'
Note that the code in the example can be dangerous. Depending on the order of initialization, it could be that mData contains garbage when entering the catch statement. Deleting such a garbage pointer causes undefined behavior. The solution in this example’s case is to use a smart pointer for the mData member, for example std::unique_ptr, and to remove the function-try-block. Therefore:
Function-try-blocks are not limited to constructors. They can be used with ordinary functions as well. However, for normal functions, there is no useful reason to use function-try-blocks because they can just as easily be converted to a simple try/catch block inside the function body. One notable difference when using a function-try-block on a normal function compared to a constructor is that rethrowing the current exception or throwing a new exception in the catch statements is not required and the C++ runtime will not automatically rethrow the exception.
You should handle all error conditions that arise in destructors in the destructors themselves. You should not let any exceptions be thrown from destructors, for a couple of reasons:
noexcept, unless they are marked with noexcept(false)2 or the class has any subobjects whose destructor is noexcept(false). If you throw an exception from a noexcept destructor, the C++ runtime calls std::terminate() to terminate the application.std::terminate() to terminate the application. For the brave and curious, C++ does provide the ability to determine, in a destructor, whether you are executing as a result of a normal function exit or delete call, or because of stack unwinding. The function uncaught_exceptions(), declared in the <exception> header file, returns the number of uncaught exceptions, that is, exceptions that have been thrown but that have not reached a matching catch yet. If the result of uncaught_exceptions() is greater than zero, then you are in the middle of stack unwinding. However, correct use of this function is complicated, messy, and should be avoided. Note that before C++17, the function was called uncaught_exception() (singular), and returned a bool that was true if you were in the middle of stack unwinding.delete, which calls the destructor. If you throw an exception from the destructor, what is a client supposed to do? It can’t call delete on the object again, and it shouldn’t call the destructor explicitly. There is no reasonable action the client can take, so there is no reason to burden that code with exception handling.Now that you’ve learned about error handling and exceptions, let’s see it all coming together in a bigger example, a GameBoard class. This GameBoard class is based on the GameBoard class from Chapter 12. The implementation in Chapter 12 using a vector of vectors is the recommended implementation because even when an exception is thrown, the code is not leaking any memory due to the use of Standard Library containers. To be able to demonstrate handling memory allocation errors, the following version is adapted to use a raw pointer, GamePiece** mCells. First, here is the definition of the class without any exceptions:
class GamePiece {};class GameBoard{public:// general-purpose GameBoard allows user to specify its dimensionsexplicit GameBoard(size_t width = kDefaultWidth,size_t height = kDefaultHeight);GameBoard(const GameBoard& src); // Copy constructorvirtual ~GameBoard();GameBoard& operator=(const GameBoard& rhs); // Assignment operatorGamePiece& at(size_t x, size_t y);const GamePiece& at(size_t x, size_t y) const;size_t getHeight() const { return mHeight; }size_t getWidth() const { return mWidth; }static const size_t kDefaultWidth = 100;static const size_t kDefaultHeight = 100;friend void swap(GameBoard& first, GameBoard& second) noexcept;private:// Objects dynamically allocate space for the game pieces.GamePiece** mCells = nullptr;size_t mWidth = 0, mHeight = 0;};
Note that you could also add move semantics to this GameBoard class. That would require adding a move constructor and move assignment operator, which both have to be noexcept. See Chapter 9 for details on move semantics.
Here are the implementations without any exceptions:
GameBoard::GameBoard(size_t width, size_t height): mWidth(width), mHeight(height){mCells = new GamePiece*[mWidth];for (size_t i = 0; i < mWidth; i++) {mCells[i] = new GamePiece[mHeight];}}GameBoard::GameBoard(const GameBoard& src): GameBoard(src.mWidth, src.mHeight){// The ctor-initializer of this constructor delegates first to the// non-copy constructor to allocate the proper amount of memory.// The next step is to copy the data.for (size_t i = 0; i < mWidth; i++) {for (size_t j = 0; j < mHeight; j++) {mCells[i][j] = src.mCells[i][j];}}}GameBoard::~GameBoard(){for (size_t i = 0; i < mWidth; i++) {delete[] mCells[i];}delete[] mCells;mCells = nullptr;mWidth = mHeight = 0;}void swap(GameBoard& first, GameBoard& second) noexcept{using std::swap;swap(first.mWidth, second.mWidth);swap(first.mHeight, second.mHeight);swap(first.mCells, second.mCells);}GameBoard& GameBoard::operator=(const GameBoard& rhs){// Check for self-assignmentif (this == &rhs) {return *this;}// Copy-and-swap idiomGameBoard temp(rhs); // Do all the work in a temporary instanceswap(*this, temp); // Commit the work with only non-throwing operationsreturn *this;}const GamePiece& GameBoard::at(size_t x, size_t y) const{return mCells[x][y];}GamePiece& GameBoard::at(size_t x, size_t y){return const_cast<GamePiece&>(std::as_const(*this).at(x, y));}
Now, let’s retrofit the preceding class to include error handling and exceptions. The constructors and operator= can all throw bad_alloc because they perform memory allocation directly or indirectly. The destructor, cleanup(), getHeight(), getWidth(), and swap() throw no exceptions. The verifyCoordinate() and at() methods throw out_of_range if the caller supplies an invalid coordinate. Here is the retrofitted class definition:
class GamePiece {};class GameBoard{public:explicit GameBoard(size_t width = kDefaultWidth,size_t height = kDefaultHeight);GameBoard(const GameBoard& src);virtual ~GameBoard() noexcept;GameBoard& operator=(const GameBoard& rhs); // Assignment operatorGamePiece& at(size_t x, size_t y);const GamePiece& at(size_t x, size_t y) const;size_t getHeight() const noexcept { return mHeight; }size_t getWidth() const noexcept { return mWidth; }static const size_t kDefaultWidth = 100;static const size_t kDefaultHeight = 100;friend void swap(GameBoard& first, GameBoard& second) noexcept;private:void cleanup() noexcept;void verifyCoordinate(size_t x, size_t y) const;GamePiece** mCells = nullptr;size_t mWidth = 0, mHeight = 0;};
Here are the implementations with exception handling:
GameBoard::GameBoard(size_t width, size_t height){mCells = new GamePiece*[width] {}; // Array is zero-initialized!// Don't initialize the mWidth and mHeight members in the ctor-// initializer. These should only be initialized when the above// mCells allocation succeeds!mWidth = width;mHeight = height;try {for (size_t i = 0; i < mWidth; i++) {mCells[i] = new GamePiece[mHeight];}} catch (...) {cleanup();// Nest any caught exception inside a bad_alloc exception.std::throw_with_nested(std::bad_alloc());}}GameBoard::GameBoard(const GameBoard& src): GameBoard(src.mWidth, src.mHeight){// The ctor-initializer of this constructor delegates first to the// non-copy constructor to allocate the proper amount of memory.// The next step is to copy the data.for (size_t i = 0; i < mWidth; i++) {for (size_t j = 0; j < mHeight; j++) {mCells[i][j] = src.mCells[i][j];}}}GameBoard::~GameBoard() noexcept{cleanup();}void GameBoard::cleanup() noexcept{for (size_t i = 0; i < mWidth; i++)delete[] mCells[i];delete[] mCells;mCells = nullptr;mWidth = mHeight = 0;}void GameBoard::verifyCoordinate(size_t x, size_t y) const{if (x >= mWidth)throw out_of_range("x-coordinate beyond width");if (y >= mHeight)throw out_of_range("y-coordinate beyond height");}void swap(GameBoard& first, GameBoard& second) noexcept{using std::swap;swap(first.mWidth, second.mWidth);swap(first.mHeight, second.mHeight);swap(first.mCells, second.mCells);}GameBoard& GameBoard::operator=(const GameBoard& rhs){// Check for self-assignmentif (this == &rhs) {return *this;}// Copy-and-swap idiomGameBoard temp(rhs); // Do all the work in a temporary instanceswap(*this, temp); // Commit the work with only non-throwing operationsreturn *this;}const GamePiece& GameBoard::at(size_t x, size_t y) const{verifyCoordinate(x, y);return mCells[x][y];}GamePiece& GameBoard::at(size_t x, size_t y){return const_cast<GamePiece&>(std::as_const(*this).at(x, y));}
This chapter described the issues related to error handling in C++ programs, and emphasized that you must design and code your programs with an error-handling plan. By reading this chapter, you learned the details of C++ exceptions syntax and behavior. The chapter also covered some of the areas in which error handling plays a large role, including I/O streams, memory allocation, constructors, and destructors. Finally, you saw an example of error handling in a GameBoard class.
As Chapter 1 explains, operators in C++ are symbols such as +, <, *, and <<. They work on built-in types such as int and double to allow you to perform arithmetic, logical, and other operations. There are also operators such as -> and * that allow you to dereference pointers. The concept of operators in C++ is broad, and even includes [] (array index), () (function call), casting, and the memory allocation and deallocation operators. Operator overloading allows you to change the behavior of language operators for your classes. However, this capability comes with rules, limitations, and choices.
Before learning how to overload operators, you probably want to know why you would ever want to do so. The reasons vary for the different operators, but the general guiding principle is to make your classes behave like built-in types. The closer your classes are to built-in types, the easier they will be for clients to use. For example, if you want to write a class to represent fractions, it’s quite helpful to have the ability to define what +, -, *, and / mean when applied to objects of that class.
Another reason to overload operators is to gain greater control over the behavior in your program. For example, you can overload memory allocation and deallocation operators for your classes to specify exactly how memory should be distributed and reclaimed for each new object.
It’s important to emphasize that operator overloading doesn’t necessarily make things easier for you as the class developer; its main purpose is to make things easier for users of the class.
Here is a list of things you cannot do when you overload operators:
. (member access in an object), :: (scope resolution operator), sizeof, ?: (the conditional operator), and a few others. The table lists all the operators that you can overload. The operators that you can’t overload are usually not those you would care to overload anyway, so you shouldn’t find this restriction limiting.++, work on only one operand. Binary operators, such as /, work on two operands. The main situation where this limitation might affect you is when overloading [] (array index), which is discussed later in this chapter.+ for ints to mean subtraction (though you could do so for your classes). The one exception to this rule is the memory allocation and deallocation operators; you can replace the global operators for all memory allocations in your program.Some of the operators already mean two different things. For example, the – operator can be used as a binary operator (as in x
=
y
-
z;) or as a unary operator (as in x
=
-y;). The * operator can be used for multiplication or for dereferencing a pointer. The << operator is the stream insertion operator or the left-shift operator, depending on the context. You can overload both meanings of operators with dual meanings.
When you overload an operator, you write a function or method with the name operatorX, where X is the symbol for some operator, and with optional white space between operator and X. For example, Chapter 9 declares operator+ for SpreadsheetCell objects like this:
SpreadsheetCell operator+(const SpreadsheetCell& lhs,const SpreadsheetCell& rhs);
The following sections describe several choices involved in each overloaded operator function or method you write.
First, you must decide whether your operator should be a method of your class or a global function (sometimes a friend of the class). How do you choose? First, you need to understand the difference between these two choices. When the operator is a method of a class, the left-hand side of the operator expression must always be an object of that class. If you write a global function, the left-hand side can be an object of a different type.
There are three different types of operators:
operator= is tied so closely to the class that it can’t exist anywhere else. The table in the section, “Summary of Overloadable Operators,” lists those operators that must be methods. Most operators do not impose this requirement.operator<< and operator>>, where the left-hand side is an iostream object, not an object of your class. Additionally, commutative operators like binary + and – should allow variables that are not objects of your class on the left-hand side. Chapter 9 discusses this problem.virtual, while global functions obviously cannot. Therefore, when you plan to write overloaded operators in an inheritance tree, you should make them methods if possible.When you write an overloaded operator as a method, you should mark it const if it doesn’t change the object. That way, it can be called on const objects.
You are somewhat limited in your choice of argument types because, as stated earlier, for most operators you cannot change the number of arguments. For example, operator/ must always have two arguments if it is a global function, and one argument if it’s a method. The compiler issues an error if it differs from this standard. In this sense, the operator functions are different from normal functions, which you can overload with any number of parameters. Additionally, although you can write the operator for whichever types you want, the choice is usually constrained by the class for which you are writing the operator. For example, if you want to implement addition for class T, you don’t write an operator+ that takes two strings! The real choice arises when you try to determine whether to take parameters by value or by reference, and whether or not to make them const.
The choice of value versus reference is easy: you should take every non-primitive parameter type by reference. As Chapters 9 and 11 explain, you should never pass objects by value if you can pass-by-reference instead.
The const decision is also trivial: mark every parameter const unless you actually modify it. The table in the section, “Summary of Overloadable Operators,” shows sample prototypes for each operator, with the arguments marked const and reference as appropriate.
C++ doesn’t determine overload resolution based on return type. Thus, you can specify any return type you want when you write overloaded operators. However, just because you can do something doesn’t mean you should do it. This flexibility implies that you could write confusing code in which comparison operators return pointers, and arithmetic operators return bools. However, you shouldn’t do that. Instead, you should write your overloaded operators such that they return the same types as the operators do for the built-in types. If you write a comparison operator, return a bool. If you write an arithmetic operator, return an object representing the result. Sometimes the return type is not obvious at first. For example, as Chapter 8 mentions, operator= should return a reference to the object on which it’s called in order to support nested assignments. Other operators have similarly tricky return types, all of which are summarized in the table in the section, “Summary of Overloadable Operators.”
The same choices of reference and const apply to return types as well. However, for return values, the choices are more difficult. The general rule for value or reference is to return a reference if you can; otherwise, return a value. How do you know when you can return a reference? This choice applies only to operators that return objects: the choice is moot for the comparison operators that return bool, the conversion operators that have no return type, and the function call operator, which may return any type you want. If your operator constructs a new object, then you must return that new object by value. If it does not construct a new object, you can return a reference to the object on which the operator is called, or one of its arguments. The table in the section, “Summary of Overloadable Operators,” shows examples.
A return value that can be modified as an lvalue (the left-hand side of an assignment expression) must be non-const. Otherwise, it should be const. More operators than you might expect require that you return lvalues, including all of the assignment operators (operator=, operator+=, operator-=, and so on).
You can provide whichever implementation you want in an overloaded operator. For example, you could write an operator+ that launches a game of Scrabble. However, as Chapter 6 describes, you should generally constrain your implementations to provide behaviors that clients expect. Write operator+ so that it performs addition, or something like addition, such as string concatenation. This chapter explains how you should implement your overloaded operators. In exceptional circumstances, you might want to differ from these recommendations; but, in general, you should follow the standard patterns.
Some operators should not be overloaded, even though it is permitted. Specifically, the address-of operator (operator&) is not particularly useful to overload, and leads to confusion if you do because you are changing fundamental language behavior (taking addresses of variables) in potentially unexpected ways. The entire Standard Library, which uses operator overloading extensively, never overloads the address-of operator.
Additionally, you should avoid overloading the binary Boolean operators operator&& and operator|| because you lose C++’s short-circuit evaluation rules.
Finally, you should not overload the comma operator (operator,). Yes, you read that correctly: there really is a comma operator in C++. It’s also called the sequencing operator, and is used to separate two expressions in a single statement, while guaranteeing that they are evaluated left to right. There is rarely a good reason to overload this operator.
The following table lists the operators that you can overload, specifies whether they should be methods of the class or global functions, summarizes when you should (or should not) overload them, and provides sample prototypes showing the proper return values.
This table is a useful reference for the future when you want to write an overloaded operator. You’re bound to forget which return type you should use, and whether or not the function should be a method.
In this table, T is the name of the class for which the overloaded operator is written, and E is a different type. Note that the sample prototypes given are not exhaustive; often there are other combinations of T and E possible for a given operator.
| OPERATOR | NAME OR CATEGORY | METHOD OR GLOBAL FUNCTION | WHEN TO OVERLOAD | SAMPLE PROTOTYPE |
operator+operator-operator*operator/operator% |
Binary arithmetic | Global function recommended | Whenever you want to provide these operations for your class | T operator+(const T&, const T&);T operator+(const T&, const E&); |
operator-operator+operator~ |
Unary arithmetic and bitwise operators | Method recommended | Whenever you want to provide these operations for your class | T operator-() const; |
operator++operator-- |
Pre-increment and pre-decrement | Method recommended | Whenever you overload += and -= taking an arithmetic argument (int, long, ...) |
T& operator++(); |
operator++operator-- |
Post-increment and post-decrement | Method recommended | Whenever you overload += and -= taking an arithmetic argument (int, long, ...) |
T operator++(int); |
operator= |
Assignment operator | Method required | Whenever your class has dynamically allocated memory or resources, or members that are references | T& operator=(const T&); |
operator+=operator-=operator*=operator/=operator%= |
Shorthand arithmetic operator assignments | Method recommended | Whenever you overload the binary arithmetic operators and your class is not designed to be immutable | T& operator+=(const T&);T& operator+=(const E&); |
operator<<operator>>operator&operator|operator^ |
Binary bitwise operators | Global function recommended | Whenever you want to provide these operations | T operator<<(const T&, const T&);T operator<<(const T&, const E&); |
operator<<=operator>>=operator&=operator|=operator^= |
Shorthand bitwise operator assignments | Method recommended | Whenever you overload the binary bitwise operators and your class is not designed to be immutable | T& operator<<=(const T&);T& operator<<=(const E&); |
operator<operator>operator<=operator>=operator==operator!= |
Binary comparison operators | Global function recommended | Whenever you want to provide these operations | bool operator<(const T&, const T&);bool operator<(const T&, const E&); |
operator<<operator>> |
I/O stream operators (insertion and extraction) | Global function required | Whenever you want to provide these operations | ostream& operator<<(ostream&, const T&);istream& operator>>(istream&, T&); |
operator! |
Boolean negation operator | Member function recommended | Rarely; use bool or void* conversion instead. |
bool operator!() const; |
operator&&operator|| |
Binary Boolean operators | Global function recommended | Rarely, if ever, because you lose short-circuiting; it’s better to overload & and | instead, as these never short-circuit. |
bool operator&&(const T&, const T&); |
operator[] |
Subscripting (array index) operator | Method required | When you want to support subscripting | E& operator[](size_t);const E& operator[](size_t) const; |
operator() |
Function call operator | Method required | When you want objects to behave like function pointers, or for multi-dimensional array access, since [] can only have one index |
Return type and parameters can vary; see further examples in this chapter. |
operator type() |
Conversion, or cast, operators (separate operator for each type) | Method required | When you want to provide conversions from your class to other types | operator double() const; |
operator newoperator new[] |
Memory allocation routines | Method recommended | When you want to control memory allocation for your classes (rarely) | void* operator new(size_t size);void* operator new[](size_t size); |
operator deleteoperator delete[] |
Memory deallocation routines | Method recommended | Whenever you overload the memory allocation routines (rarely) | void operator delete(void* ptr) noexcept;void operator delete[](void* ptr) noexcept; |
operator*operator-> |
Dereferencing operators |
Method recommended for operator*Method required for operator-> |
Useful for smart pointers | E& operator*() const;E* operator->() const; |
operator& |
Address-of operator | N/A | Never | N/A |
operator->* |
Dereference pointer-to-member | N/A | Never | N/A |
operator, |
Comma operator | N/A | Never | N/A |
Chapter 9 discusses rvalue references, written as && instead of the normal lvalue references, &. They are demonstrated in Chapter 9 by defining move assignment operators, which are used by the compiler in cases where the second object is a temporary object that will be destroyed after the assignment. The normal assignment operator from the preceding table has the following prototype:
T& operator=(const T&);The move assignment operator has almost the same prototype, but uses an rvalue reference. It modifies the argument so it cannot be passed as const. See Chapter 9 for details.
T& operator=(T&&);The preceding table does not include sample prototypes with rvalue reference semantics. However, for most operators it can make sense to write both a version using normal lvalue references and a version using rvalue references. Whether it makes sense depends on implementation details of your class. The operator= is one example from Chapter 9. Another example is operator+ to prevent unnecessary memory allocations. The std::string class from the Standard Library, for example, implements an operator+ using rvalue references as follows (simplified):
string operator+(string&& lhs, string&& rhs);The implementation of this operator reuses memory of one of the arguments because they are being passed as rvalue references, meaning both are temporary objects that will be destroyed when this operator+ is finished. The implementation of the preceding operator+ has the following effect depending on the size and the capacity of both operands:
return std::move(lhs.append(rhs));or
return std::move(rhs.insert(0, lhs));In fact, std::string defines several overloaded operator+ operators with different combinations of lvalue references and rvalue references. The following is a list of all operator+ operators for std::string accepting two strings as arguments (simplified):
string operator+(const string& lhs, const string& rhs);string operator+(string&& lhs, const string& rhs);string operator+(const string& lhs, string&& rhs);string operator+(string&& lhs, string&& rhs);
Reusing memory of one of the rvalue reference arguments is implemented in the same way as it is explained for move assignment operators in Chapter 9.
There is a handy <utility> header file included with the C++ Standard Library. It contains quite a few helper functions and classes. It also contains the following set of function templates for relational operators in the std::rel_ops namespace:
template<class T> bool operator!=(const T& a, const T& b);// Needs operator==template<class T> bool operator>(const T& a, const T& b); // Needs operator<template<class T> bool operator<=(const T& a, const T& b);// Needs operator<template<class T> bool operator>=(const T& a, const T& b);// Needs operator<
These function templates define the operators !=, >, <=, and >= in terms of the == and < operators for any class. If you implement operator== and operator< in your class, you get the other relational operators for free with these templates. You can make these available for your class by simply adding a #include <utility> and adding the following using statement:
using namespace std::rel_ops;However, one problem with this technique is that now those operators might be created for all classes that you use in relational operations, not only for your own class.
A second problem with this technique is that utility templates such as std::greater<T> (discussed in Chapter 18) do not work with those automatically generated relational operators.
Yet another problem with these is that implicit conversions will not work. Therefore:
Chapter 9 shows how to write the binary arithmetic operators and the shorthand arithmetic assignment operators, but it does not cover how to overload the other arithmetic operators.
C++ has several unary arithmetic operators. Two of these are unary minus and unary plus. Here is an example of these operators using ints:
int i, j = 4;i = -j; // Unary minusi = +i; // Unary plusj = +(-i); // Apply unary plus to the result of applying unary minus to i.j = -(-i); // Apply unary minus to the result of applying unary minus to i.
Unary minus negates the operand, while unary plus returns the operand directly. Note that you can apply unary plus or unary minus to the result of unary plus or unary minus. These operators don’t change the object on which they are called so you should make them const.
Here is an example of a unary operator- as a member function for a SpreadsheetCell class. Unary plus is usually an identity operation, so this class doesn’t overload it:
SpreadsheetCell SpreadsheetCell::operator-() const{return SpreadsheetCell(-getValue());}
operator- doesn’t change the operand, so this method must construct a new SpreadsheetCell with the negated value, and return it. Thus, it can’t return a reference. You can use this operator as follows:
SpreadsheetCell c1(4);SpreadsheetCell c3 = -c1;
There are four ways to add 1 to a variable:
i = i + 1;i += 1;++i;i++;
The last two forms are called the increment operators. The first form is prefix increment, which adds 1 to the variable, then returns the newly incremented value for use in the rest of the expression. The second form is postfix increment, which returns the old (non-incremented) value for use in the rest of the expression. The decrement operators work similarly.
The two possible meanings for operator++ and operator-- (prefix and postfix) present a problem when you want to overload them. When you write an overloaded operator++, for example, how do you specify whether you are overloading the prefix or the postfix version? C++ introduced a hack to allow you to make this distinction: the prefix versions of operator++ and operator-- take no arguments, while the postfix versions take one unused argument of type int.
The prototypes of these overloaded operators for the SpreadsheetCell class look like this:
SpreadsheetCell& operator++(); // PrefixSpreadsheetCell operator++(int); // PostfixSpreadsheetCell& operator--(); // PrefixSpreadsheetCell operator--(int); // Postfix
The return value in the prefix forms is the same as the end value of the operand, so prefix increment and decrement can return a reference to the object on which they are called. The postfix versions of increment and decrement, however, return values that are different from the end values of the operands, so they cannot return references.
Here are the implementations for operator++:
SpreadsheetCell& SpreadsheetCell::operator++(){set(getValue() + 1);return *this;}SpreadsheetCell SpreadsheetCell::operator++(int){auto oldCell(*this); // Save current value++(*this); // Increment using prefix ++return oldCell; // Return the old value}
The implementations for operator-- are almost identical. Now you can increment and decrement SpreadsheetCell objects to your heart’s content:
SpreadsheetCell c1(4);SpreadsheetCell c2(4);c1++;++c2;
Increment and decrement also work on pointers. When you write classes that are smart pointers or iterators, you can overload operator++ and operator-- to provide pointer incrementing and decrementing.
The bitwise operators are similar to the arithmetic operators, and the bitwise shorthand assignment operators are similar to the arithmetic shorthand assignment operators. However, they are significantly less common, so no examples are shown here. The table in the section “Summary of Overloadable Operators” shows sample prototypes, so you should be able to implement them easily if the need ever arises.
The logical operators are trickier. It’s not recommended to overload && and ||. These operators don’t really apply to individual types: they aggregate results of Boolean expressions. Additionally, you lose the short-circuit evaluation, because both the left-hand side and the right-hand side have to be evaluated before they can be bound to the parameters of your overloaded operator && and ||. Thus, it rarely, if ever, makes sense to overload them for specific types.
In C++, you use operators not only for arithmetic operations, but also for reading from, and writing to, streams. For example, when you write ints and strings to cout, you use the insertion operator <<:
int number = 10;cout << "The number is " << number << endl;
When you read from streams, you use the extraction operator >>:
int number;string str;cin >> number >> str;
You can write insertion and extraction operators that work on your classes as well, so that you can read and write them like this:
SpreadsheetCell myCell, anotherCell, aThirdCell;cin >> myCell >> anotherCell >> aThirdCell;cout << myCell << " " << anotherCell << " " << aThirdCell << endl;
Before you write the insertion and extraction operators, you need to decide how you want to stream your class out and how you want to read it in. In this example, the SpreadsheetCells simply read and write double values.
The object on the left of an extraction or insertion operator is an istream or ostream (such as cin or cout), not a SpreadsheetCell object. Because you can’t add a method to the istream or ostream classes, you must write the extraction and insertion operators as global functions. The declaration of these functions looks like this:
class SpreadsheetCell{// Omitted for brevity};std::ostream& operator<<(std::ostream& ostr, const SpreadsheetCell& cell);std::istream& operator>>(std::istream& istr, SpreadsheetCell& cell);
By making the insertion operator take a reference to an ostream as its first parameter, you allow it to be used for file output streams, string output streams, cout, cerr, and clog. See Chapter 13 for details on streams. Similarly, by making the extraction operator take a reference to an istream, you make it work on file input streams, string input streams, and cin.
The second parameter to operator<< and operator>> is a reference to the SpreadsheetCell object that you want to write or read. The insertion operator doesn’t change the SpreadsheetCell it writes, so that reference can be const. The extraction operator, however, modifies the SpreadsheetCell object, requiring the argument to be a non-const reference.
Both operators return a reference to the stream they were given as their first argument so that calls to the operator can be nested. Remember that the operator syntax is shorthand for calling the global operator>> or operator<< functions explicitly. Consider this line:
cin >> myCell >> anotherCell >> aThirdCell;It’s actually shorthand for this line:
operator>>(operator>>(operator>>(cin, myCell), anotherCell), aThirdCell);As you can see, the return value of the first call to operator>> is used as input to the next call. Thus, you must return the stream reference so that it can be used in the next nested call. Otherwise, the nesting won’t compile.
Here are the implementations for operator<< and operator>> for the SpreadsheetCell class:
ostream& operator<<(ostream& ostr, const SpreadsheetCell& cell){ostr << cell.getValue();return ostr;}istream& operator>>(istream& istr, SpreadsheetCell& cell){double value;istr >> value;cell.set(value);return istr;}
Pretend for a few minutes that you have never heard of the vector or array class templates in the Standard Library, and so you have decided to write your own dynamically allocated array class. This class would allow you to set and retrieve elements at specified indices, and would take care of all memory allocation “behind the scenes.” A first stab at the class definition for a dynamically allocated array might look like this:
template <typename T>class Array{public:// Creates an array with a default size that will grow as needed.Array();virtual ~Array();// Disallow assignment and pass-by-valueArray<T>& operator=(const Array<T>& rhs) = delete;Array(const Array<T>& src) = delete;// Returns the value at index x. Throws an exception of type// out_of_range if index x does not exist in the array.const T& getElementAt(size_t x) const;// Sets the value at index x. If index x is out of range,// allocates more space to make it in range.void setElementAt(size_t x, const T& value);size_t getSize() const;private:static const size_t kAllocSize = 4;void resize(size_t newSize);T* mElements = nullptr;size_t mSize = 0;};
The interface supports setting and accessing elements. It provides random-access guarantees: a client could create an array and set elements 1, 100, and 1000 without worrying about memory management.
Here are the implementations of the methods:
template <typename T> Array<T>::Array(){mSize = kAllocSize;mElements = new T[mSize] {}; // Elements are zero-initialized!}template <typename T> Array<T>::~Array(){delete [] mElements;mElements = nullptr;}template <typename T> void Array<T>::resize(size_t newSize){// Create new bigger array with zero-initialized elements.auto newArray = std::make_unique<T[]>(newSize);// The new size is always bigger than the old size (mSize)for (size_t i = 0; i < mSize; i++) {// Copy the elements from the old array to the new onenewArray[i] = mElements[i];}// Delete the old array, and set the new arraydelete[] mElements;mSize = newSize;mElements = newArray.release();}template <typename T> const T& Array<T>::getElementAt(size_t x) const{if (x >= mSize) {throw std::out_of_range("");}return mElements[x];}template <typename T> void Array<T>::setElementAt(size_t x, const T& val){if (x >= mSize) {// Allocate kAllocSize past the element the client wantsresize(x + kAllocSize);}mElements[x] = val;}template <typename T> size_t Array<T>::getSize() const{return mSize;}
Pay some attention to the exception-safe implementation of the resize() method. First, it creates a new array of appropriate size, and stores it in a unique_ptr. Then, all elements are copied from the old array to the new array. If anything goes wrong while copying the values, the unique_ptr cleans up the memory automatically. Finally, when both the allocation of the new array and copying all the elements was successful, that is, no exceptions have been thrown, only then we delete the old mElements array and assign the new array to it. The last line has to use release() to release the ownership of the new array from the unique_ptr, otherwise the array will get destroyed when the destructor for the unique_ptr is called.
Here is a small example of how you could use this class:
Array<int> myArray;for (size_t i = 0; i < 10; i++) {myArray.setElementAt(i, 100);}for (size_t i = 0; i < 10; i++) {cout << myArray.getElementAt(i) << " ";}
As you can see, you never have to tell the array how much space you need. It allocates as much space as it requires to store the elements you give it. However, it’s inconvenient to always have to use the setElementAt() and getElementAt() methods. It would be nice to be able to use conventional array index notation like this:
Array<int> myArray;for (size_t i = 0; i < 10; i++) {myArray[i] = 100;}for (size_t i = 0; i < 10; i++) {cout << myArray[i] << " ";}
This is where the overloaded subscripting operator comes in. You can add an operator[] to the class with the following implementation:
template <typename T> T& Array<T>::operator[](size_t x){if (x >= mSize) {// Allocate kAllocSize past the element the client wants.resize(x + kAllocSize);}return mElements[x];}
The example code using array index notation now compiles. The operator[] can be used to both set and get elements because it returns a reference to the element at location x. This reference can be used to assign to that element. When operator[] is used on the left-hand side of an assignment statement, the assignment actually changes the value at location x in the mElements array.
Although it’s sometimes convenient for operator[] to return an element that can serve as an lvalue, you don’t always want that behavior. It would be nice to be able to provide read-only access to the elements of the array as well, by returning a const reference. To provide for this, you need two operator[]s: one returns a reference and one returns a const reference:
T& operator[](size_t x);const T& operator[](size_t x) const;
Remember that you can’t overload a method or operator based only on the return type, so the second overload returns a const reference and is marked as const.
Here is the implementation of the const operator[]. It throws an exception if the index is out of range instead of trying to allocate new space. It doesn’t make sense to allocate new space when you’re only trying to read the element value.
template <typename T> const T& Array<T>::operator[](size_t x) const{if (x >= mSize) {throw std::out_of_range("");}return mElements[x];}
The following code demonstrates these two forms of operator[]:
void printArray(const Array<int>& arr){for (size_t i = 0; i < arr.getSize(); i++) {cout << arr[i] << " "; // Calls the const operator[] because arr is// a const object.}cout << endl;}int main(){Array<int> myArray;for (size_t i = 0; i < 10; i++) {myArray[i] = 100; // Calls the non-const operator[] because// myArray is a non-const object.}printArray(myArray);return 0;}
Note that the const operator[] is called in printArray() only because arr is const. If arr were not const, the non-const operator[] would be called, despite the fact that the result is not modified.
The const operator[] is called for const objects, so it cannot grow the size of the array. The current implementation throws an exception when the given index is out of bounds. An alternative would be to return a zero-initialized element instead of throwing. This can be done as follows:
template <typename T> const T& Array<T>::operator[](size_t x) const{if (x >= mSize) {static T nullValue = T();return nullValue;}return mElements[x];}
The nullValue
static variable is initialized using the zero-initialization1 syntax T(). It’s up to you and your specific use case whether you opt for the throwing version or the version returning a null value.
It is a natural extension of the paradigm of “indexing” into a collection to provide a key of some sort; a vector (or in general, any linear array) is a special case where the “key” is just a position in the array. Think of the argument of operator[] as providing a mapping between two domains: the domain of keys and the domain of values. Thus, you can write an operator[] that uses any type as its index. This type does not need to be an integer type. This is done for the Standard Library associative containers, like std::map, which are discussed in Chapter 17.
For example, you could create an associative array in which you use string keys instead of integers. Here is the definition for such an associative array class:
template <typename T>class AssociativeArray{public:virtual ~AssociativeArray() = default;T& operator[](std::string_view key);const T& operator[](std::string_view key) const;private:// Implementation details omitted};
Implementing this class would be a good exercise for you. You can also find an implementation of this class in the downloadable source code for this book at www.wrox.com/go/proc++4e.
C++ allows you to overload the function call operator, written as operator(). If you write an operator() for your class, you can use objects of that class as if they were function pointers. An object of a class with a function call operator is called a function object, or functor, for short. You can overload this operator only as a non-static method in a class. Here is an example of a simple class with an overloaded operator() and a class method with the same behavior:
class FunctionObject{public:int operator() (int param); // Function call operatorint doSquare(int param); // Normal method};// Implementation of overloaded function call operatorint FunctionObject::operator() (int param){return doSquare(param);}// Implementation of normal methodint FunctionObject::doSquare(int param){return param * param;}
Here is an example of code that uses the function call operator, contrasted with the call to a normal method of the class:
int x = 3, xSquared, xSquaredAgain;FunctionObject square;xSquared = square(x); // Call the function call operatorxSquaredAgain = square.doSquare(x); // Call the normal method
At first, the function call operator probably seems a little strange. Why would you want to write a special method for a class to make objects of the class look like function pointers? Why wouldn’t you just write a function or a standard method of a class? The advantage of function objects over standard methods of objects is simple: these objects can sometimes masquerade as function pointers, that is, you can pass function objects as callback functions to other functions. This is discussed in more detail in Chapter 18.
The advantages of function objects over global functions are more intricate. There are two main benefits:
Of course, you could implement either of the preceding benefits with global or static variables. However, function objects provide a cleaner way to do it, and using global or static variables might cause problems in a multithreaded application. The true benefits of function objects are demonstrated with the Standard Library in Chapter 18.
By following the normal method overloading rules, you can write as many operator()s for your classes as you want. For example, you could add an operator() to the FunctionObject class that takes an std::string_view:
int operator() (int param);void operator() (std::string_view str);
The function call operator can also be used to provide subscripting for multi-dimensional arrays. Simply write an operator() that behaves like operator[] but allows for more than one index. The only minor annoyance with this technique is that you have to use () to index instead of [], as in myArray(3, 4) = 6;.
You can overload three dereferencing operators: *, ->, and ->*. Ignoring ->* for the moment (I’ll come back to it later), consider the built-in meanings of * and ->. The * operator dereferences a pointer to give you direct access to its value, while -> is shorthand for a * dereference followed by a . member selection. The following code shows the equivalences:
SpreadsheetCell* cell = new SpreadsheetCell;(*cell).set(5); // Dereference plus member selectioncell->set(5); // Shorthand arrow dereference and member selection together
You can overload the dereferencing operators for your classes in order to make objects of the classes behave like pointers. The main use of this capability is for implementing smart pointers, introduced in Chapter 1. It is also useful for iterators, which the Standard Library uses extensively. Iterators are discussed in Chapter 17. This chapter teaches you the basic mechanics for overloading the relevant operators in the context of a simple smart pointer class template.
Here is the example smart pointer class template definition, without the dereferencing operators filled in yet:
template <typename T> class Pointer{public:Pointer(T* ptr);virtual ~Pointer();// Prevent assignment and pass by value.Pointer(const Pointer<T>& src) = delete;Pointer<T>& operator=(const Pointer<T>& rhs) = delete;// Dereferencing operators will go here.private:T* mPtr = nullptr;};
This smart pointer is about as simple as you can get. All it does is store a dumb raw pointer, and the storage pointed to by the pointer is deleted when the smart pointer is destroyed. The implementation is equally simple: the constructor takes a raw pointer, which is stored as the only data member in the class. The destructor frees the storage referenced by the pointer.
template <typename T> Pointer<T>::Pointer(T* ptr) : mPtr(ptr){}template <typename T> Pointer<T>::~Pointer(){delete mPtr;mPtr = nullptr;}
You want to be able to use the smart pointer class template like this:
Pointer<int> smartInt(new int);*smartInt = 5; // Dereference the smart pointer.cout << *smartInt << endl;Pointer<SpreadsheetCell> smartCell(new SpreadsheetCell);smartCell->set(5); // Dereference and member select the set method.cout << smartCell->getValue() << endl;
As you can see from this example, you have to provide implementations of operator* and operator-> for this class. These are implemented in the next two sections.
When you dereference a pointer, you expect to be able to access the memory to which the pointer points. If that memory contains a simple type such as an int, you should be able to change its value directly. If the memory contains a more complicated type, such as an object, you should be able to access its data members or methods with the . operator.
To provide these semantics, you should return a reference from operator*. In the Pointer class, the declaration and definition are as follows:
template <typename T> class Pointer{public:// Omitted for brevityT& operator*();const T& operator*() const;// Omitted for brevity};template <typename T> T& Pointer<T>::operator*(){return *mPtr;}template <typename T> const T& Pointer<T>::operator*() const{return *mPtr;}
As you can see, operator* returns a reference to the object or variable to which the underlying raw pointer points. As with overloading the subscripting operators, it’s useful to provide both const and non-const versions of the method, which return a const reference and a non-const reference, respectively.
The arrow operator is a bit trickier. The result of applying the arrow operator should be a member or method of an object. However, in order to implement it like that, you would have to be able to implement the equivalent of operator* followed by operator.; C++ doesn’t allow you to overload operator. for good reason: it’s impossible to write a single prototype that allows you to capture any possible member or method selection. Therefore, C++ treats operator-> as a special case. Consider this line:
smartCell->set(5);C++ translates this to
(smartCell.operator->())->set(5);As you can see, C++ applies another operator-> to whatever you return from your overloaded operator->. Therefore, you must return a pointer, like this:
template <typename T> class Pointer{public:// Omitted for brevityT* operator->();const T* operator->() const;// Omitted for brevity};template <typename T> T* Pointer<T>::operator->(){return mPtr;}template <typename T> const T* Pointer<T>::operator->() const{return mPtr;}
You may find it confusing that operator* and operator-> are asymmetric, but once you see them a few times, you’ll get used to it.
It’s perfectly legitimate in C++ to take the addresses of class data members and methods in order to obtain pointers to them. However, you can’t access a non-static data member or call a non-static method without an object. The whole point of class data members and methods is that they exist on a per-object basis. Thus, when you want to call the method or access the data member via the pointer, you must dereference the pointer in the context of an object. The following example demonstrates this. Chapter 11 discusses the syntactical details in the section “Pointers to Methods and Data Members.”
SpreadsheetCell myCell;double (SpreadsheetCell::*methodPtr) () const = &SpreadsheetCell::getValue;cout << (myCell.*methodPtr)() << endl;
Note the use of the .* operator to dereference the method pointer and call the method. There is also an equivalent operator->* for calling methods via pointers when you have a pointer to an object instead of the object itself. The operator looks like this:
SpreadsheetCell* myCell = new SpreadsheetCell();double (SpreadsheetCell::*methodPtr) () const = &SpreadsheetCell::getValue;cout << (myCell->*methodPtr)() << endl;
C++ does not allow you to overload operator.* (just as you can’t overload operator.), but you could overload operator->*. However, it is very tricky, and, given that most C++ programmers don’t even know that you can access methods and data members through pointers, it’s probably not worth the trouble. The std::shared_ptr template in the Standard Library, for example, does not overload operator->*.
Going back to the SpreadsheetCell example, consider these two lines of code:
SpreadsheetCell cell(1.23);double d1 = cell; // DOES NOT COMPILE!
A SpreadsheetCell contains a double representation, so it seems logical that you could assign it to a double variable. Well, you can’t. The compiler tells you that it doesn’t know how to convert a SpreadsheetCell to a double. You might be tempted to try forcing the compiler to do what you want, like this:
double d1 = (double)cell; // STILL DOES NOT COMPILE!First, the preceding code still doesn’t compile because the compiler still doesn’t know how to convert the SpreadsheetCell to a double. It already knew from the first line what you wanted it to do, and it would do it if it could. Second, it’s a bad idea in general to add gratuitous casts to your program.
If you want to allow this kind of assignment, you must tell the compiler how to perform it. Specifically, you can write a conversion operator to convert SpreadsheetCells to doubles. The prototype looks like this:
operator double() const;The name of the function is operator
double. It has no return type because the return type is specified by the name of the operator: double. It is const because it doesn’t change the object on which it is called. The implementation looks like this:
SpreadsheetCell::operator double() const{return getValue();}
That’s all you need to do to write a conversion operator from SpreadsheetCell to double. Now the compiler accepts the following lines and does the right thing at run time:
SpreadsheetCell cell(1.23);double d1 = cell; // Works as expected
You can write conversion operators for any type with this same syntax. For example, here is an std::string conversion operator for SpreadsheetCell:
SpreadsheetCell::operator std::string() const{return doubleToString(getValue());}
Now you can write code like the following:
SpreadsheetCell cell(1.23);string str = cell;
Note that writing the double conversion operator for the SpreadsheetCell object introduces an ambiguity problem. Consider this line:
SpreadsheetCell cell(1.23);double d2 = cell + 3.3; // DOES NOT COMPILE IF YOU DEFINE operator double()
This line now fails to compile. It worked before you wrote operator
double(), so what’s the problem now? The issue is that the compiler doesn’t know if it should convert cell to a double with operator
double() and perform double addition, or convert 3.3 to a SpreadsheetCell with the double constructor and perform SpreadsheetCell addition. Before you wrote operator
double(), the compiler had only one choice: convert 3.3 to a SpreadsheetCell with the double constructor and perform SpreadsheetCell addition. However, now the compiler could do either. It doesn’t want to make a choice you might not like, so it refuses to make any choice at all.
The usual pre-C++11 solution to this conundrum is to make the constructor in question explicit, so that the automatic conversion using that constructor is prevented (see Chapter 9). However, you don’t want that constructor to be explicit because you generally like the automatic conversion of doubles to SpreadsheetCells. Since C++11, you can solve this problem by making the double conversion operator explicit instead of the constructor:
explicit operator double() const;The following code demonstrates its use:
SpreadsheetCell cell = 6.6; // [1]string str = cell; // [2]double d1 = static_cast<double>(cell); // [3]double d2 = static_cast<double>(cell + 3.3); // [4]
Here is what each line of code means:
double to a SpreadsheetCell. Because this is in the declaration, this is done by calling the constructor that accepts a double.operator
string() conversion operator.operator
double() conversion operator. Note that because this conversion operator is now declared explicit, the cast is required.3.3 to a SpreadsheetCell, followed by operator+ on two SpreadsheetCells, followed by a required explicit cast to invoke operator
double().Sometimes it is useful to be able to use objects in Boolean expressions. For example, programmers often use pointers in conditional statements like this:
if (ptr != nullptr) { /* Perform some dereferencing action. */ }Sometimes they write shorthand conditions such as this:
if (ptr) { /* Perform some dereferencing action. */ }Other times, you see code as follows:
if (!ptr) { /* Do something. */ }Currently, none of the preceding expressions compile with the Pointer smart pointer class template defined earlier. However, you can add a conversion operator to the class to convert it to a pointer type. Then, the comparisons to nullptr, as well as the object alone in an if statement, will trigger the conversion to the pointer type. The usual pointer type for the conversion operator is void* because that’s a pointer type with which you cannot do much except test it in Boolean expressions. Here is the implementation:
template <typename T> Pointer<T>::operator void*() const{return mPtr;}
Now the following code compiles and does what you expect:
void process(Pointer<SpreadsheetCell>& p){if (p != nullptr) { cout << "not nullptr" << endl; }if (p != NULL) { cout << "not NULL" << endl; }if (p) { cout << "not nullptr" << endl; }if (!p) { cout << "nullptr" << endl; }}int main(){Pointer<SpreadsheetCell> smartCell(nullptr);process(smartCell);cout << endl;Pointer<SpreadsheetCell> anotherSmartCell(new SpreadsheetCell(5.0));process(anotherSmartCell);}
The output is as follows:
nullptrnot nullptrnot NULLnot nullptr
Another alternative is to overload operator bool() as follows instead of operator void*(). After all, you’re using the object in a Boolean expression; why not convert it directly to a bool?
template <typename T> Pointer<T>::operator bool() const{return mPtr != nullptr;}
The following comparisons still work:
if (p != NULL) { cout << "not NULL" << endl; }if (p) { cout << "not nullptr" << endl; }if (!p) { cout << "nullptr" << endl; }
However, with operator bool(), the following comparison with nullptr results in a compilation error:
if (p != nullptr) { cout << "not nullptr" << endl; } // ErrorThis is correct behavior because nullptr has its own type called nullptr_t, which is not automatically converted to the integer 0 (false). The compiler cannot find an operator!= that takes a Pointer object and a nullptr_t object. You could implement such an operator!= as a friend of the Pointer class:
template <typename T>class Pointer{public:// Omitted for brevitytemplate <typename T>friend bool operator!=(const Pointer<T>& lhs, std::nullptr_t rhs);// Omitted for brevity};template <typename T>bool operator!=(const Pointer<T>& lhs, std::nullptr_t rhs){return lhs.mPtr != rhs;}
However, after implementing this operator!=, the following comparison stops working, because the compiler no longer knows which operator!= to use.
if (p != NULL) { cout << "not NULL" << endl; }From this example, you might conclude that the operator bool() technique only seems appropriate for objects that don’t represent pointers and for which conversion to a pointer type really doesn’t make sense. Unfortunately, adding a conversion operator to bool presents some other unanticipated consequences. C++ applies “promotion” rules to silently convert bool to int whenever the opportunity arises. Therefore, with the operator bool(), the following code compiles and runs:
Pointer<SpreadsheetCell> anotherSmartCell(new SpreadsheetCell(5.0));int i = anotherSmartCell; // Converts Pointer to bool to int.
That’s usually not behavior that you expect or desire. To prevent such assignments, you could explicitly delete the conversion operators to int, long, long long, and so on. However, this is getting messy. So, many programmers prefer operator void*() instead of operator bool().
As you can see, there is a design element to overloading operators. Your decisions about which operators to overload directly influence the ways in which clients can use your classes.
C++ gives you the ability to redefine the way memory allocation and deallocation work in your programs. You can provide this customization both on the global level and the class level. This capability is most useful when you are worried about memory fragmentation, which can occur if you allocate and deallocate a lot of small objects. For example, instead of going to the default C++ memory allocation each time you need memory, you could write a memory pool allocator that reuses fixed-size chunks of memory. This section explains the subtleties of the memory allocation and deallocation routines and shows you how to customize them. With these tools, you should be able to write your own allocator if the need ever arises.
One of the trickiest aspects of C++ is the details of new and delete. Consider this line of code:
SpreadsheetCell* cell = new SpreadsheetCell();The part “new
SpreadsheetCell()” is called the new-expression. It does two things. First, it allocates space for the SpreadsheetCell object by making a call to operator
new. Second, it calls the constructor for the object. Only after the constructor has completed does it return the pointer to you.
delete works analogously. Consider this line of code:
delete cell;This line is called the delete-expression. It first calls the destructor for cell, and then calls operator
delete to free the memory.
You can overload operator
new and operator
delete to control memory allocation and deallocation, but you cannot overload the new-expression or the delete-expression. Thus, you can customize the actual memory allocation and deallocation, but not the calls to the constructor and destructor.
There are six different forms of the new-expression, each of which has a corresponding operator
new. Earlier chapters in this book already show four new-expressions: new, new[], new(nothrow), and new(nothrow)[]. The following list shows the corresponding four operator
new forms from the <new> header file:
void* operator new(size_t size);void* operator new[](size_t size);void* operator new(size_t size, const std::nothrow_t&) noexcept;void* operator new[](size_t size, const std::nothrow_t&) noexcept;
There are two special new-expressions that do no allocation, but invoke the constructor on an existing piece of storage. These are called placement new operators (including both single and array forms). They allow you to construct an object in preexisting memory like this:
void* ptr = allocateMemorySomehow();SpreadsheetCell* cell = new (ptr) SpreadsheetCell();
This feature is a bit obscure, but it’s important to realize that it exists. It can come in handy if you want to implement memory pools such that you reuse memory without freeing it in between. The corresponding operator
new forms look as follows; however, the C++ standard forbids you from overloading them.
void* operator new(size_t size, void* p) noexcept;void* operator new[](size_t size, void* p) noexcept;
There are only two different forms of the delete-expression that you can call: delete, and delete[]; there are no nothrow or placement forms. However, there are all six forms of operator delete. Why the asymmetry? The two nothrow and two placement forms are used only if an exception is thrown from a constructor. In that case, the operator
delete is called that matches the operator
new that was used to allocate the memory prior to the constructor call. However, if you delete a pointer normally, delete will call either operator
delete or operator
delete[] (never the nothrow or placement forms). Practically, this doesn’t really matter because the C++ standard says that throwing an exception from delete results in undefined behavior. This means delete should never throw an exception anyway, so the nothrow version of operator
delete is superfluous. Also, placement delete should be a no-op, because the memory wasn’t allocated in placement new, so there’s nothing to free. Here are the prototypes for the operator
delete forms:
void operator delete(void* ptr) noexcept;void operator delete[](void* ptr) noexcept;void operator delete(void* ptr, const std::nothrow_t&) noexcept;void operator delete[](void* ptr, const std::nothrow_t&) noexcept;void operator delete(void* p, void*) noexcept;void operator delete[](void* p, void*) noexcept;
You can actually replace the global operator
new and operator
delete routines if you want. These functions are called for every new-expression and delete-expression in the program, unless there are more specific routines in individual classes. However, to quote Bjarne Stroustrup, “... replacing the global operator
new and operator
delete is not for the fainthearted.” (The C++ Programming Language, third edition, Addison-Wesley, 1997). I don’t recommend it either!
A more useful technique is to overload operator
new and operator
delete for specific classes. These overloaded operators will be called only when you allocate and deallocate objects of that particular class. Here is an example of a class that overloads the four non-placement forms of operator
new and operator
delete:
#include <cstddef>#include <new>class MemoryDemo{public:virtual ~MemoryDemo() = default;void* operator new(size_t size);void operator delete(void* ptr) noexcept;void* operator new[](size_t size);void operator delete[](void* ptr) noexcept;void* operator new(size_t size, const std::nothrow_t&) noexcept;void operator delete(void* ptr, const std::nothrow_t&) noexcept;void* operator new[](size_t size, const std::nothrow_t&) noexcept;void operator delete[](void* ptr, const std::nothrow_t&) noexcept;};
Here are implementations of these operators that simply pass the arguments through to calls to the global versions of the operators. Note that nothrow is actually a variable of type nothrow_t:
void* MemoryDemo::operator new(size_t size){cout << "operator new" << endl;return ::operator new(size);}void MemoryDemo::operator delete(void* ptr) noexcept{cout << "operator delete" << endl;::operator delete(ptr);}void* MemoryDemo::operator new[](size_t size){cout << "operator new[]" << endl;return ::operator new[](size);}void MemoryDemo::operator delete[](void* ptr) noexcept{cout << "operator delete[]" << endl;::operator delete[](ptr);}void* MemoryDemo::operator new(size_t size, const nothrow_t&) noexcept{cout << "operator new nothrow" << endl;return ::operator new(size, nothrow);}void MemoryDemo::operator delete(void* ptr, const nothrow_t&) noexcept{cout << "operator delete nothrow" << endl;::operator delete(ptr, nothrow);}void* MemoryDemo::operator new[](size_t size, const nothrow_t&) noexcept{cout << "operator new[] nothrow" << endl;return ::operator new[](size, nothrow);}void MemoryDemo::operator delete[](void* ptr, const nothrow_t&) noexcept{cout << "operator delete[] nothrow" << endl;::operator delete[](ptr, nothrow);}
Here is some code that allocates and frees objects of this class in several ways:
MemoryDemo* mem = new MemoryDemo();delete mem;mem = new MemoryDemo[10];delete [] mem;mem = new (nothrow) MemoryDemo();delete mem;mem = new (nothrow) MemoryDemo[10];delete [] mem;
Here is the output from running the program:
operator newoperator deleteoperator new[]operator delete[]operator new nothrowoperator deleteoperator new[] nothrowoperator delete[]
These implementations of operator
new and operator
delete are obviously trivial and not particularly useful. They are intended only to give you an idea of the syntax in case you ever want to implement nontrivial versions of them.
It might seem overkill to overload all of the various forms of operator
new. However, it’s generally a good idea to do so in order to prevent inconsistencies in the memory allocations. If you don’t want to provide implementations for certain forms, you can explicitly delete these using =delete in order to prevent anyone from using them. See the next section for more information.
Chapter 8 shows how you can explicitly delete or default a constructor or assignment operator. Explicitly deleting or defaulting is not limited to constructors and assignment operators. For example, the following class deletes the operator
new and new[], which means that this class cannot be dynamically created using new or new[]:
class MyClass{public:void* operator new(size_t size) = delete;void* operator new[](size_t size) = delete;};
Using this class in the following ways results in compilation errors:
int main(){MyClass* p1 = new MyClass;MyClass* pArray = new MyClass[2];return 0;}
In addition to overloading the standard forms of operator new, you can write your own versions with extra parameters. These extra parameters can be useful for passing various flags or counters to your memory allocation routines. For instance, some runtime libraries use this in debug mode to provide the filename and line number where an object is allocated, so when there is a memory leak, the offending line that did the allocation can be identified.
As an example, here are the prototypes for an additional operator
new and operator
delete with an extra integer parameter for the MemoryDemo class:
void* operator new(size_t size, int extra);void operator delete(void* ptr, int extra) noexcept;
The implementation is as follows:
void* MemoryDemo::operator new(size_t size, int extra){cout << "operator new with extra int: " << extra << endl;return ::operator new(size);}void MemoryDemo::operator delete(void* ptr, int extra) noexcept{cout << "operator delete with extra int: " << extra << endl;return ::operator delete(ptr);}
When you write an overloaded operator
new with extra parameters, the compiler automatically allows the corresponding new-expression. The extra arguments to new are passed with function call syntax (as with nothrow versions). So, you can now write code like this:
MemoryDemo* memp = new(5) MemoryDemo();delete memp;
The output is as follows:
operator new with extra int: 5operator delete
When you define an operator
new with extra parameters, you should also define the corresponding operator
delete with the same extra parameters. You cannot call this operator
delete with extra parameters yourself, but it will be called only when you use your operator
new with extra parameters and the constructor of your object throws an exception.
An alternate form of operator
delete gives you the size of the memory that should be freed as well as the pointer. Simply declare the prototype for operator
delete with an extra size parameter.
You can replace operator
delete with the version that takes a size for any of the versions of operator
delete independently. Here is the MemoryDemo class definition with the first operator
delete modified to take the size of the memory to be deleted:
class MemoryDemo{public:// Omitted for brevityvoid* operator new(size_t size);void operator delete(void* ptr, size_t size) noexcept;// Omitted for brevity};
The implementation of this operator
delete calls the global operator
delete without the size parameter because there is no global operator
delete that takes the size:
void MemoryDemo::operator delete(void* ptr, size_t size) noexcept{cout << "operator delete with size " << size << endl;::operator delete(ptr);}
This capability is useful only if you are writing a complicated memory allocation and deallocation scheme for your classes.
This chapter summarized the rationale for operator overloading and provided examples and explanations for overloading the various categories of operators. Hopefully, this chapter taught you to appreciate the power that it gives you. Throughout this book, operator overloading is used to provide abstractions and easy-to-use class interfaces.
Now it’s time to start delving into the C++ Standard Library. The next chapter starts with an overview of the functionality provided by the C++ Standard Library, followed by chapters that go deeper into specific features of the library.
The Standard Library makes heavy use of the C++ features called templates and operator overloading.
Templates are used to allow generic programming. They make it possible to write code that can work with all kinds of objects, even objects unknown to the programmer when writing the code. The obligation of the programmer writing the template code is to specify the requirements of the classes that define these objects; for example, that they have an operator for comparison, or a copy constructor, or whatever is deemed appropriate, and then making sure the code that is written uses only those required capabilities. The obligation of the programmer creating the objects is to supply those operators and methods that the template writer requires.
Unfortunately, many programmers consider templates to be the most difficult part of C++ and, for that reason, tend to avoid them. However, even if you never write your own templates, you need to understand their syntax and capabilities in order to use the Standard Library. Templates are described in detail in Chapter 12. If you skipped that chapter and are not familiar with templates, I suggest you first read Chapter 12, and then come back to learn more about the Standard Library.
Operator overloading is another feature used extensively by the C++ Standard Library. Chapter 9 has a whole section devoted to operator overloading. Make sure you read that section and understand it before tackling this and subsequent chapters. In addition, Chapter 15 presents much more detail on the subject of operator overloading, but those details are not required to understand the following chapters.
This section introduces the various components of the Standard Library from a design perspective. You will learn what facilities are available for you to use, but you will not learn the coding details. Those details are covered in other chapters.
C++ provides a built-in string class, defined in the <string> header. Although you may still use C-style strings of character arrays, the C++ string class is superior in almost every way. It handles the memory management; provides some bounds checking, assignment semantics, and comparisons; and supports manipulations such as concatenation, substring extraction, and substring or character replacement.
The Standard Library also provides a string_view class, defined in <string_view>. It is a read-only view of all kind of string representations, and can be used as a drop-in replacement for const string&, but without the overhead. It never copies strings!
C++ provides support for Unicode and localization. These features allow you to write programs that work with different languages, for example, Chinese. Locales, defined in <locale>, allow you to format data such as numbers and dates according to the rules of a certain country or region.
In case you missed it, Chapter 2 provides all the details of the string and string_view classes, while Chapter 19 discusses Unicode and localization.
Regular expressions are available through the <regex> header file. They make it easy to perform so-called pattern-matching, often used in text processing. Pattern-matching allows you to search special patterns in strings and optionally to replace them with a new pattern. Regular expressions are discussed in Chapter 19.
C++ includes a model for input and output called streams. The C++ library provides routines for reading and writing built-in types from and to files, console/keyboard, and strings. C++ also provides the facilities for coding your own routines for reading and writing your own objects. The I/O functionality is defined in several header files: <fstream>, <iomanip>, <ios>, <iosfwd>, <iostream>, <istream>, <ostream>, <sstream>, <streambuf>, and <strstream>. Chapter 1 reviews the basics of I/O streams, and Chapter 13 discusses streams in detail.
One of the problems faced in robust programming is knowing when to delete an object. There are several failures that can happen. A first problem is not deleting the object at all (failing to free the storage). These are known as memory leaks, where objects accumulate and take up space but are not used. Another problem is where a piece of code deletes the storage while another piece of code is still pointing to that storage, resulting in pointers to storage that either is no longer in use or has been reallocated for another purpose. These are known as dangling pointers. One more problem is when one piece of code frees the storage, and another piece of code attempts to free the same storage. This is known as double-freeing. All of these problems tend to result in program failures of some sort. Some failures are readily detected; others cause the program to produce erroneous results. Most of these errors are difficult to discover and repair.
C++ addresses these problems with smart pointers: unique_ptr, shared_ptr, and weak_ptr. shared_ptr and weak_ptr are thread-safe. They are all defined in the <memory> header. These smart pointers are introduced in Chapter 1 and discussed in more detail in Chapter 7.
Before C++11, the functionality of unique_ptr was handled by a type called auto_ptr, which has been removed from C++17 and should not be used anymore. There was no equivalent to shared_ptr in the earlier Standard Library, although many third-party libraries (for example, Boost) did provide this capability.
The C++ language supports exceptions, which allow functions or methods to pass errors of various types up to calling functions or methods. The C++ Standard Library provides a class hierarchy of exceptions that you can use in your code as is, or that you can derive from to create your own exception types. Exception support is defined in a couple of header files: <exception>, <stdexcept>, and <system_error>. Chapter 14 covers the details of exceptions and the standard exception classes.
The C++ Standard Library provides a collection of mathematical utility classes and functions.
A whole range of common mathematical functions is available, such as abs(), remainder(), fma(), exp(), log(), pow(), sqrt(), sin(), atan2(), sinh(), erf(), tgamma(), ceil(), floor(), and more. C++17 adds a number of special mathematical functions to work with Legendre polynomials, beta functions, elliptic integrals, Bessel functions, cylindrical Neumann functions, and so on.
There is a complex number class called complex, defined in <complex>, which provides an abstraction for working with numbers that contain both real and imaginary components.
The compile-time rational arithmetic library provides a ratio class template, defined in the <ratio> header file. This ratio class template can exactly represent any finite rational number defined by a numerator and denominator. This library is discussed in Chapter 20.
The Standard Library also contains a class called valarray, defined in <valarray>, which is similar to the vector class but is more optimized for high-performance numerical applications. The library provides several related classes to represent the concept of vector slices. From these building blocks, it is possible to build classes to perform matrix mathematics. There is no built-in matrix class; however, there are third-party libraries like Boost that include matrix support. The valarray class is not further discussed in this book.
C++ also provides a standard way to obtain information about numeric limits, such as the maximum possible value for an integer on the current platform. In C, you could access #defines, such as INT_MAX. While those are still available in C++, it’s recommended to use the numeric_limits class template defined in the <limits> header file. Its use is straightforward, as shown in the following code:
cout << "int:" << endl;cout << "Max int value: " << numeric_limits<int>::max() << endl;cout << "Min int value: " << numeric_limits<int>::min() << endl;cout << "Lowest int value: " << numeric_limits<int>::lowest() << endl;cout << endl << "double:" << endl;cout << "Max double value: " << numeric_limits<double>::max() << endl;cout << "Min double value: " << numeric_limits<double>::min() << endl;cout << "Lowest double value: " << numeric_limits<double>::lowest() << endl;
The output of this code snippet on my system is as follows:
int:Max int value: 2147483647Min int value: -2147483648Lowest int value: -2147483648double:Max double value: 1.79769e+308Min double value: 2.22507e-308Lowest double value: -1.79769e+308
Note the differences between min() and lowest(). For an integer, the minimum value equals the lowest value. However, for floating-point types, the minimum value is the smallest positive value that can be represented, while the lowest value is the most negative value representable, which equals -max().
C++ includes the chrono library, defined in the <chrono> header file. This library makes it easy to work with time; for example, to time certain durations, or to perform actions based on timing. The chrono library is discussed in detail in Chapter 20. Other time and date utilities are provided in the <ctime> header.
C++ already has support for generating pseudo-random numbers for a long time with the srand() and rand() functions. However, those functions provide only very basic random numbers. For example, you cannot change the distribution of the generated random numbers.
Since C++11, a random number library has been added to the standard, which is much more powerful. The new library is defined in <random>, and comes with random number engines, random number engine adaptors, and random number distributions. All of these can be used to give you random numbers more suited to your problem domain, such as normal distributions, negative exponential distributions, and so on.
Consult Chapter 20 for details on this library.
Initializer lists are defined in the <initializer_list> header file. They make it easy to write functions that can accept a variable number of arguments and are discussed in Chapter 1.
The <utility> header defines the pair template, which can store two elements with two different types. This is known as storing heterogeneous elements. All Standard Library containers discussed further in this chapter store homogeneous elements, meaning that all the elements in the container must have the same type. A pair allows you to store exactly two elements of completely unrelated types in one object. The pair class template is discussed in more detail in Chapter 17.
tuple, defined in <tuple>, is a generalization of pair. It is a sequence with a fixed size that can have heterogeneous elements. The number and type of elements for a tuple instantiation is fixed at compile time. Tuples are discussed in Chapter 20.
optional, variant, and anyC++17 introduces the following new classes:
optional, defined in <optional>, holds a value of a specific type, or nothing. It can be used for parameters or return types of a function if you want to allow for values to be optional.variant, defined in <variant>, can hold a single value of one of a given set of types, or nothing.any, defined in <any>, is a class that can contain a single value of any type.These three types are discussed in Chapter 20.
A class that implements a function call operator is called a function object. Function objects can, for example, be used as predicates for certain Standard Library algorithms. The <functional> header file defines a number of predefined function objects and supports creating new function objects based on existing ones.
Function objects are discussed in detail in Chapter 18 together with the Standard Library algorithms.
FilesystemC++17 introduces a filesystem support library. Everything is defined in the <filesystem> header, and lives in the std::filesystem namespace. It allows you to write portable code to work with a filesystem. You can use it for querying whether something is a directory or a file, iterating over the contents of a directory, manipulating paths, and retrieving information about files such as their size, extension, creation time, and so on. This filesystem support library is discussed in Chapter 20.
All major CPU vendors are selling processors with multiple cores. They are being used for everything from servers to consumer computers and even smartphones. If you want your software to take advantage of all these cores, then you need to write multithreaded code. The Standard Library provides a couple of basic building blocks for writing such code. Individual threads can be created using the thread class from the <thread> header.
In multithreaded code you need to take care that several threads are not reading and writing to the same piece of data at the same time. To prevent this, you can use atomics, defined in <atomic>, which give you thread-safe atomic access to a piece of data. Other thread synchronization mechanisms are provided by <condition_variable> and <mutex>.
If you just need to calculate something, possibly on a different thread, and get the result back with proper exception handling, you can use async and future. These are defined in the <future> header, and are easier to use than directly using the thread class.
Writing multithreaded code is discussed in detail in Chapter 23.
Type traits are defined in the <type_traits> header file and provide information about types at compile time. They are useful when writing advanced templates and are discussed in Chapter 22.
The <cstdint> header file defines a number of standard integer types such as int8_t, int64_t and so on. It also includes macros specifying minimum and maximum values of those types. These integer types are discussed in the context of writing cross-platform code in Chapter 30.
The Standard Library provides implementations of commonly used data structures such as linked lists and queues. When you use C++, you should not need to write such data structures again. The data structures are implemented using a concept called containers, which store information called elements, in a way that implements the data structure (linked list, queue, and so on) appropriately. Different data structures have different insertion, deletion, and access behavior and performance characteristics. It is important to be familiar with the available data structures so that you can choose the most appropriate one for any given task.
All the containers in the Standard Library are class templates, so you can use them to store any type, from built-in types such as int and double to your own classes. Each container instance stores objects of only one type; that is, they are homogeneous collections. If you need non-fixed-sized heterogeneous collections, you can wrap each element in an std::any instance and store those any instances in a container. Alternatively, you can store std::variant instances in a container. A variant can be used if the number of different required types is limited and known at compile time. Both any and variant are introduced with C++17, and are discussed in Chapter 20. If you needed heterogeneous collections before C++17, you could create a class that had multiple derived classes, and each derived class could wrap an object of your required type.
Note that the C++ standard specifies the interface, but not the implementation, of each container and algorithm. Thus, different vendors are free to provide different implementations. However, the standard also specifies performance requirements as part of the interface, which the implementations must meet.
This section provides an overview of the various containers available in the Standard Library.
The <vector> header file defines vector, which stores a sequence of elements and provides random access to these elements. You can think of a vector as an array of elements that grows dynamically as you insert elements, and additionally provides some bounds checking. Like an array, the elements of a vector are stored in contiguous memory.
vectors provide fast element insertion and deletion (amortized constant time) at the end of the vector. Amortized constant time insertion means that most of the time insertions are done in constant time O(1) (Chapter 4 explains big-O notation). However, sometimes the vector needs to grow in size to accommodate new elements, which has a complexity of O(N). On average, this results in O(1) complexity or amortized constant time. Details are explained in Chapter 17. A vector has slower (linear time) insertion and deletion anywhere else, because the operation must move all the elements “up” or “down” by one to make room for the new element or to fill the space left by the deleted element. Like arrays, vectors provide fast (constant time) access to any of their elements.
Even though inserting and removing elements in the middle of a vector requires moving other elements up or down, a vector should be your default container! Often, a vector will be faster than, for example, a linked list, even for inserting and removing elements in the middle. The reason is that a vector is stored contiguously in memory, while a linked list is scattered around in memory. Computers are extremely efficient to work with contiguous data, which makes vector operations fast. You should only use something like a linked list if a performance profiler (discussed in Chapter 25) tells you that it performs better than a vector.
There is a template specialization available for vector<bool> to store Boolean values in a vector. This specialization optimizes space allocation for the Boolean elements; however, the standard does not specify how an implementation of vector<bool> should optimize space. The difference between the vector<bool> specialization and the bitset discussed further in this chapter is that the bitset container is of fixed size.
A Standard Library list is a doubly linked list structure and is defined in <list>. Like an array or vector, it stores a sequence of elements. However, unlike an array or vector, the elements of a list are not necessarily contiguous in memory. Instead, each element in the list specifies where to find the next and previous elements in the list (usually via pointers), hence the name doubly linked list.
The performance characteristics of a list are the exact opposite of a vector. They provide slow (linear time) element lookup and access, but quick (constant time) insertion and deletion of elements once the relevant position has been found. Still, as discussed in the previous section, a vector is usually faster than a list. Use a profiler to be sure.
The forward_list, defined in <forward_list>, is a singly linked list, compared to the list container, which is doubly linked. forward_list supports forward iteration only, and requires less memory than a list. Like lists, forward_lists allow constant time insertion and deletion anywhere once the relevant position has been found, and there is no fast random access to elements.
The name deque is an abbreviation for a double-ended queue. A deque, defined in <deque>, provides quick (constant time) element access. It also provides fast (constant time) insertion and deletion at both ends of the sequence, but it provides slow (linear time) insertion and deletion in the middle of the sequence. The elements of a deque are not stored contiguously in memory, and thus a deque might be slower than a vector.
You could use a deque instead of a vector when you need to insert or remove elements from either end of the sequence but still need fast access to all elements. However, this requirement does not apply to many programming problems; in most cases, a vector is recommended.
The <array> header defines array, which is a replacement for standard C-style arrays. Sometimes you know the exact number of elements in your container up front and you don’t need the flexibility of a vector or a list, which are able to grow dynamically to accommodate new elements. An array is perfect for such fixed-sized collections, and it has a bit less overhead compared to a vector; it’s basically a thin wrapper around standard C-style arrays. There are a number of advantages in using arrays instead of standard C-style arrays: they always know their own size, and do not automatically get cast to a pointer to avoid certain types of bugs. Also, arrays do not provide insertion or deletion; they have a fixed size. The advantage of having a fixed size is that this allows an array to be allocated on the stack, rather than always demanding heap access as vector does. Access to elements is very fast (constant time), just as with vectors.
The name queue comes directly from the definition of the English word queue, which means a line of people or objects. The queue container is defined in <queue> and provides standard first in, first out (or FIFO) semantics. A queue is a container in which you insert elements at one end and take them out at the other end. Both insertion (amortized constant time) and removal (constant time) of elements are quick.
You should use a queue structure when you want to model real-life “first-come, first-served” semantics. For example, consider a bank. As customers arrive at the bank, they get in line. As tellers become available, they serve the next customer in line, thus providing “first-come, first-served” behavior. You could implement a bank simulation by storing customer objects in a queue. As customers arrive at the bank, they are added to the end of the queue. As tellers serve customers, they start with customers at the front of the queue.
A priority_queue, also defined in <queue>, provides queue functionality in which each element has a priority. Elements are removed from the queue in priority order. In the case of priority ties, the order in which elements are removed is undefined. priority_queue insertion and deletion are generally slower than simple queue insertion and deletion, because the elements must be reordered to support the priority ordering.
You can use priority_queues to model “queues with exceptions.” For example, in the preceding bank simulation, suppose that customers with business accounts take priority over regular customers. Many real-life banks implement this behavior with two separate lines: one for business customers and one for everyone else. Any customers in the business queue are taken before customers in the other line. However, banks could also provide this behavior with a single line in which business customers move to the front of the line ahead of any non-business customers. In your program, you could use a priority_queue in which customers have one of two priorities: business or regular. All business customers would be serviced before all regular customers.
The <stack> header defines the stack class, which provides standard first-in, last-out (FILO) semantics, also known as last-in, first-out (LIFO). Like a queue, elements are inserted and removed from the container. However, in a stack, the most recent element inserted is the first one removed. The name stack derives from a visualization of this structure as a stack of objects in which only the top object is visible. When you add an object to the stack, you hide all the objects underneath it.
The stack container provides fast (constant time) insertion and removal of elements. You should use the stack structure when you want FILO semantics. For example, an error-processing tool might want to store errors on a stack so that the most recent error is the first one available for a human administrator to read. Processing errors in a FILO order is often useful because newer errors sometimes obviate older ones.
The set class template is defined in the <set> header file, and, as the name suggests, it is a set of elements, loosely analogous to the notion of a mathematical set: each element is unique, and there is at most one instance of the element in the set. One difference between the mathematical concept of set, and set as implemented in the Standard Library, is that in the Standard Library the elements are kept in an order. The reason for the order is that when the client enumerates the elements, they come out in the ordering imposed by the type’s operator< or a user-defined comparator. The set provides logarithmic insertion, deletion, and lookup. This means that, in theory, insertions and deletions are faster than for a vector but slower than for a list; while lookups are faster than for a list, but slower than for a vector. As always, use a profiler to make sure which container is faster for your use case.
You could use a set when you need the elements to be in an order, to have equal amounts of insertion/deletion and lookups, and you want to optimize performance for both as much as possible. For example, an inventory-tracking program in a busy bookstore might want to use a set to store the books. The list of books in stock must be updated whenever books arrive or are sold, so insertion and deletion should be quick. Customers also need the ability to look for a specific book, so the program should provide fast lookup as well.
Note that a set does not allow duplicate elements. That is, each element in a set must be unique. If you want to store duplicate elements, you must use a multiset, also defined in the <set> header file.
The <map> header defines the map class template, which is an associative array. You can use it as an array in which the index can be any type; for example, a string. A map stores key/value pairs, and keeps its elements in sorted order, based on the keys, not the values. It also provides an operator[], which a set does not provide. In most other respects, it is identical to a set. You could use a map when you want to associate keys and values. For example, in the preceding bookstore example, you might want to store the books in a map where the key is the ISBN number of the book and the value is a Book object containing detailed information for that specific book.
A multimap, also defined in <map>, has the same relation to a map as a multiset does to a set. Specifically, a multimap is a map that allows duplicate keys.
The Standard Library supports hash tables, also called unordered associative containers. There are four unordered associative containers:
unordered_mapunordered_multimapunordered_setunordered_multisetThe first two containers are defined in <unordered_map>, and the other two containers in <unordered_set>. Better names would have been hash_map, hash_set, and so on. Unfortunately, hash tables were not part of the C++ Standard Library before C++11, which means a lot of third-party libraries implemented hash tables themselves by using names with “hash” as a prefix, like hash_map. Because of this, the C++ standard committee decided to use the prefix “unordered” instead of “hash” to avoid name clashes.
These unordered associative containers behave similar to their ordered counterparts. An unordered_map is similar to a standard map except that the standard map sorts its elements while the unordered_map doesn’t sort its elements.
Insertion, deletion, and lookup with these unordered associative containers can be done on average in constant time. In a worst-case scenario, it will be in linear time. Lookup of elements in an unordered container can be much faster than with a normal map or set, especially when there are a lot of elements in the container.
Chapter 17 explains how these unordered associative containers work and why they are also called hash tables.
C and C++ programmers commonly store a set of flags in a single int or long, using one bit for each flag. They set and access these bits with the bitwise operators: &, |, ^, ~, <<, and >>. The C++ Standard Library provides a bitset class that abstracts this bit field manipulation, so you shouldn’t need to use the bit manipulation operators anymore.
The <bitset> header file defines the bitset container, but this is not a container in the normal sense, in that it does not implement a specific data structure in which you insert and remove elements. A bitset has a fixed size and does not support iterators. You can think of them as a sequence of Boolean values that you can read and write. However, unlike the C-style way of handling bits, the bitset is not limited to the size of an int or other elementary data types. Thus, you can have a 40-bit bitset, or a 213-bit bitset. The implementation will use as much storage as it needs to implement N bits when you declare your bitset with bitset<N>.
The following table summarizes the containers provided by the Standard Library. It uses the big-O notation introduced in Chapter 4 to present the performance characteristics on a container of N elements. An N/A entry in the table means that the operation is not part of the container semantics.
| CONTAINER CLASS NAME | CONTAINER TYPE | INSERT PERFORMANCE | DELETE PERFORMANCE | LOOKUP PERFORMANCE |
vector |
Sequential | Amortized O(1) at the end; O(N) otherwise. | O(1) at the end; O(N) otherwise. | O(1) |
When to Use: This should be your default container. Only use another container after using a profiler to confirm it is faster than a vector. |
||||
list |
Sequential | O(1) at the beginning and the end, and once you are at the position where you want to insert the element. | O(1) at the beginning and the end, and once you are at the position where you want to delete the element. | O(1) to access the first or last element; O(N) otherwise. |
When to Use: Rarely. You should use a vector, unless a profiler tells you a list is faster for your use case. |
||||
forward_list |
Sequential | O(1) at the beginning, and once you are at the position where you want to insert the element. | O(1) at the beginning, and once you are at the position where you want to delete the element. | O(1) to access the first element; O(N) otherwise. |
When to Use: Rarely. You should use a vector, unless a profiler tells you a forward_list is faster for your use case. |
||||
deque |
Sequential | O(1) at the beginning or end; O(N) otherwise. | O(1) at the beginning or end; O(N) otherwise. | O(1) |
When to Use: Not usually needed; use a vector instead. |
||||
array |
Sequential | N/A | N/A | O(1) |
| When to Use: When you need a fixed-size array to replace a standard C-style array. | ||||
queue |
Container adaptor | Depends on the underlying container; O(1) for list and deque. |
Depends on the underlying container; O(1) for list and deque. |
N/A |
| When to Use: When you want a FIFO structure. | ||||
priority_queue |
Container adaptor | Depends on the underlying container; amortized O(log(N)) for vector, O(log(N)) for deque. |
Depends on the underlying container; O(log(N)) for vector and deque. |
N/A |
| When to Use: When you want a queue with priority. | ||||
stack |
Container adaptor | Depends on the underlying container; O(1) for list and deque, amortized O(1) for vector. |
Depends on the underlying container; O(1) for list, vector, and deque. |
N/A |
| When to Use: When you want a FILO/LIFO structure. | ||||
setmultiset |
Sorted associative | O(log(N)) | O(log(N)) | O(log(N)) |
When to Use: When you want a sorted collection of elements with equal lookup, insertion, and deletion times. Use a set when you want a collection of elements without duplicates. |
||||
mapmultimap |
Sorted associative | O(log(N)) | O(log(N)) | O(log(N)) |
| When to Use: When you want a sorted collection to associate keys with values, that is, an associative array, with equal lookup, insertion, and deletion times. | ||||
unordered_mapunordered_multimap |
Unordered associative / hash table | Average case O(1); worst case O(N). | Average case O(1); worst case O(N). | Average case O(1); worst case O(N). |
When to Use: When you want to associate keys with values with equal lookup, insertion, and deletion times, and you don’t require the elements to be sorted. Performance can be better than with a normal map, but that depends on the elements. |
||||
unordered_setunordered_multiset |
Unordered associative/hash table | Average case O(1); worst case O(N). | Average case O(1); worst case O(N). | Average case O(1); worst case O(N). |
When to Use: When you want a collection of elements with equal lookup, insertion, and deletion times, and you don’t require the elements to be sorted. Performance can be better than with a normal set, but that depends on the elements. |
||||
bitset |
Special | N/A | N/A | O(1) |
| When to Use: When you want a collection of flags. | ||||
Note that strings are technically containers as well. They can be thought of as vectors of characters. Thus, some of the algorithms described in the material that follows also work on strings.
In addition to containers, the Standard Library provides implementations of many generic algorithms. An algorithm is a strategy for performing a particular task, such as sorting or searching. These algorithms are implemented as function templates, so they work on most of the different container types. Note that the algorithms are not generally part of the containers. The Standard Library takes the approach of separating the data (containers) from the functionality (algorithms). Although this approach seems counter to the spirit of object-oriented programming, it is necessary in order to support generic programming in the Standard Library. The guiding principle of orthogonality maintains that algorithms and containers are independent, with (almost) any algorithm working with (almost) any container.
Note that the generic algorithms do not work directly on the containers. They use an intermediary called an iterator. Each container in the Standard Library provides an iterator that supports traversing the elements in the container in a sequence. The different iterators for the various containers adhere to standard interfaces, so algorithms can perform their work by using iterators without worrying about the underlying container implementation. The <iterator> header defines the following helper functions that return specific iterators for containers.
| FUNCTION NAME | FUNCTION SYNOPSIS |
begin()end() |
Returns a non-const iterator to the first, and one past the last, element in a sequence. |
cbegin()cend() |
Returns a const iterator to the first, and one past the last, element in a sequence. |
rbegin()rend() |
Returns a non-const reverse iterator to the last, and one before the first, element in a sequence. |
crbegin()crend() |
Returns a const reverse iterator to the last, and one before the first, element in a sequence. |
This section gives an overview of what kinds of algorithms are available in the Standard Library without going into detail. Chapter 17 goes deeper into iterators, and Chapter 18 discusses a selection of algorithms with coding examples. For the exact prototypes of all the available algorithms, consult a Standard Library Reference.
There are approximately 100 algorithms in the Standard Library, depending on how you count them. The following sections divide these algorithms into different categories. The algorithms are defined in the <algorithm> header file unless otherwise noted. Note that whenever the following algorithms are specified as working on a “sequence” of elements, that sequence is presented to the algorithm via iterators.
The non-modifying algorithms are those that look at a sequence of elements and return some information about the elements. As “non-modifying” algorithms, they cannot change the values of elements or the order of elements within the sequence. This category contains three types of algorithms. The following tables list and provide brief summaries of the various non-modifying algorithms. With these algorithms, you should rarely need to write a for loop to iterate over a sequence of values.
These algorithms do not require the sequence to be sorted. N is the size of the sequence to search in, and M is the size of the pattern to find.
| ALGORITHM NAME | ALGORITHM SYNOPSIS | COMPLEXITY |
adjacent_find() |
Finds the first instance of two consecutive elements that are equal to each other or are equivalent to each other as specified by a predicate. | O(N) |
find()find_if() |
Finds the first element that matches a value or causes a predicate to return true. |
O(N) |
find_first_of() |
Like find, but searches for one of several elements at the same time. |
O(NM) |
find_if_not() |
Finds the first element that causes a predicate to return false. |
O(N) |
find_end() |
Finds the last subsequence in a sequence that matches another sequence or whose elements are equivalent, as specified by a predicate. | O(M*(N-M)) |
search() |
Finds the first subsequence in a sequence that matches another sequence or whose elements are equivalent, as specified by a predicate.* | O(NM)* |
search_n() |
Finds the first instance of n consecutive elements that are equal to a given value or relate to that value according to a predicate. | O(N) |
*Since C++17, search() accepts an optional extra parameter to specify the searching algorithm to use (default_searcher, boyer_moore_searcher, or boyer_moore_horspool_searcher). With the Boyer-Moore searchers, the worst-case complexity is O(N+M) when the pattern is not found, and O(NM) when the pattern is found.
The following comparison algorithms are provided. None of them require the source sequences to be ordered. All of them have a linear worst-case complexity.
| ALGORITHM NAME | ALGORITHM SYNOPSIS |
equal() |
Determines if two sequences are equal by checking if parallel elements are equal or match a predicate. |
mismatch() |
Returns the first element in each sequence that does not match the element in the same location in the other sequence. |
lexicographical_compare() |
Compares two sequences to determine their “lexicographical” ordering. This algorithm compares each element of the first sequence with its equivalent element in the second. If one element is less than the other, that sequence is lexicographically first. If the elements are equal, it compares the next elements in order. |
| ALGORITHM NAME | ALGORITHM SYNOPSIS |
all_of() |
Returns true if the predicate returns true for all the elements in the sequence or if the sequence is empty; false otherwise. |
any_of() |
Returns true if the predicate returns true for at least one element in the sequence; false otherwise. |
none_of() |
Returns true if the predicate returns false for all the elements in the sequence or if the sequence is empty; false otherwise. |
count()count_if() |
Counts the number of elements matching a value or that cause a predicate to return true. |
The modifying algorithms modify some or all of the elements in a sequence. Some of them modify elements in place, so that the original sequence changes. Others copy the results to a different sequence, so that the original sequence remains unchanged. All of them have a linear worst-case complexity. The following table summarizes the modifying algorithms.
| ALGORITHM NAME | ALGORITHM SYNOPSIS |
copy()copy_backward() |
Copies elements from one sequence to another. |
copy_if() |
Copies elements for which a predicate returns true from one sequence to another. |
copy_n() |
Copies n elements from one sequence to another. |
fill() |
Sets all elements in the sequence to a new value. |
fill_n() |
Sets the first n elements in the sequence to a new value. |
generate() |
Calls a specified function to generate a new value for each element in the sequence. |
generate_n() |
Calls a specified function to generate a new value for the first n elements in the sequence. |
move()move_backward() |
Moves elements from one sequence to another. This uses efficient move semantics (see Chapter 9). |
remove()remove_if()remove_copy()remove_copy_if() |
Removes elements that match a given value or that cause a predicate to return true, either in place or by copying the results to a different sequence. |
replace()replace_if()replace_copy()replace_copy_if() |
Replaces all elements matching a value or that cause a predicate to return true with a new element, either in place or by copying the results to a different sequence. |
reverse()reverse_copy() |
Reverses the order of the elements in the sequence, either in place or by copying the results to a different sequence. |
rotate()rotate_copy() |
Swaps the first and second “halves” of the sequence, either in place or by copying the results to a different sequence. The two subsequences to be swapped need not be equal in size. |
sample() |
Selects n random elements from the sequence. |
shuffle()random_shuffle() |
Shuffles the sequence by randomly reordering the elements. It is possible to specify the properties of the random number generator used for shuffling. random_shuffle() is deprecated since C++14, and is removed from C++17. |
transform() |
Calls a unary function on each element of a sequence or a binary function on parallel elements of two sequences. This is an in-place transformation. |
unique()unique_copy() |
Removes consecutive duplicates from the sequence, either in place or by copying results to a different sequence. |
Operational algorithms execute a function on individual elements of a sequence. There are two operational algorithms provided. Both have a linear complexity and do not require the source sequence to be ordered.
| ALGORITHM NAME | ALGORITHM SYNOPSIS |
for_each() |
Executes a function on each element in the sequence. The sequence is specified with a begin and end iterator. |
for_each_n() |
Similar to for_each() but only processes the first n elements in the sequence. The sequence is specified by a begin iterator and a number of elements (n). |
The C++ Standard Library provides the following swap and exchange algorithms.
| ALGORITHM NAME | ALGORITHM SYNOPSIS |
iter_swap()swap_ranges() |
Swaps two elements or sequences of elements. |
swap() |
Swaps two values, defined in the <utility> header. |
exchange() |
Replaces a given value with a new value and returns the old value. Defined in the <utility> header. |
A sequence is partitioned on a certain predicate, if all elements for which the predicate returns true are before all elements for which it returns false. The first element in the sequence that does not satisfy the predicate is called the partition point. The Standard Library provides the following partition algorithms.
| ALGORITHM NAME | ALGORITHM SYNOPSIS | COMPLEXITY |
is_partitioned() |
Returns true if all elements for which a predicate returns true are before all elements for which it returns false. |
Linear |
partition() |
Sorts the sequence such that all elements for which a predicate returns true are before all elements for which it returns false, without preserving the original order of the elements within each partition. |
Linear |
stable_partition() |
Sorts the sequence such that all elements for which a predicate returns true are before all elements for which it returns false, while preserving the original order of the elements within each partition. |
Linear logarithmic |
partition_copy() |
Copies elements from one sequence to two different sequences. The target sequence is selected based on the result of a predicate, either true or false. |
Linear |
partition_point() |
Returns an iterator such that all elements before this iterator return true for a predicate and all elements after this iterator return false for that predicate. |
Logarithmic |
The Standard Library provides several different sorting algorithms with varying performance guarantees.
| ALGORITHM NAME | ALGORITHM SYNOPSIS | COMPLEXITY |
is_sorted()is_sorted_until() |
Checks if a sequence is sorted or which subsequence is sorted. | Linear |
nth_element() |
Relocates the nth element of the sequence such that the element in the position pointed to by nth is the element that would be in that position if the whole range were sorted, and it rearranges all elements such that all elements preceding the nth element are less than the new nth element, and the ones following it are greater than the new nth element. | Linear |
partial_sort()partial_sort_copy() |
Partially sorts the sequence: the first n elements (specified by iterators) are sorted; the rest are not. They are sorted either in place or by copying them to a new sequence. | Linear logarithmic |
sort()stable_sort() |
Sorts elements in place, either preserving the order of duplicate elements or not. | Linear logarithmic |
The following binary search algorithms are normally used on sorted sequences. Technically, they only require the sequence to be at least partitioned on the element that is searched for. This could, for example, be achieved by applying std::partition(). A sorted sequence also meets this requirement. All these algorithms have logarithmic complexity.
| ALGORITHM NAME | ALGORITHM SYNOPSIS |
lower_bound() |
Finds the first element in a sequence not less than (that is greater or equal to) a given value. |
upper_bound() |
Finds the first element in a sequence greater than a given value. |
equal_range() |
Returns a pair containing the result of both lower_bound() and upper_bound(). |
binary_search() |
Returns true if a given value is found in a sequence; false otherwise. |
Set algorithms are special modifying algorithms that perform set operations on sequences. They are most appropriate on sequences from set containers, but work on sorted sequences from most containers.
| ALGORITHM NAME | ALGORITHM SYNOPSIS | COMPLEXITY |
inplace_merge() |
Merges two sorted sequences in place. | Linear logarithmic |
merge() |
Merges two sorted sequences by copying them to a new sequence. | Linear |
includes() |
Determines if every element from one sorted sequence is in another sorted sequence. | Linear |
set_union()set_intersection()set_difference()set_symmetric_difference() |
Performs the specified set operation on two sorted sequences, copying results to a third sorted sequence. | Linear |
A heap is a standard data structure in which the elements of an array or sequence are ordered in a semi-sorted fashion, so that finding the “top” element is quick. For example, a heap data structure is typically used to implement a priority_queue. Six algorithms allow you to work with heaps.
| ALGORITHM NAME | ALGORITHM SYNOPSIS | COMPLEXITY |
is_heap() |
Checks if a range of elements is a heap. | Linear |
is_heap_until() |
Finds the largest subrange in the given range of elements that is a heap. | Linear |
make_heap() |
Creates a heap from a range of elements. | Linear |
push_heap()pop_heap() |
Adds an element to, or removes an element from a heap. | Logarithmic |
sort_heap() |
Converts a heap into a range of ascending sorted elements. | Linear logarithmic |
| ALGORITHM NAME | ALGORITHM SYNOPSIS |
clamp() |
Makes sure a value (v) is between a given minimum (lo) and maximum (hi). Returns a reference to lo if v < lo; returns a reference to hi if v > hi; otherwise returns a reference to v. |
min()max() |
Returns the minimum or maximum of two or more values. |
minmax() |
Returns the minimum and maximum of two or more values as a pair. |
min_element()max_element() |
Returns the minimum or maximum element in a sequence. |
minmax_element() |
Returns the minimum and maximum element in a sequence as a pair. |
The <numeric> header provides the following numerical processing algorithms. None of them require the source sequences to be ordered. All of them have a linear complexity.
| ALGORITHM NAME | ALGORITHM SYNOPSIS |
iota() |
Fills a sequence with successively incrementing values starting with a given value. |
gcd() |
Returns the greatest common divisor of two integer types. |
lcm() |
Returns the least common multiple of two integer types. |
adjacent_difference() |
Generates a new sequence in which each element is the difference (or other binary operation) of the second and first of each adjacent pair of elements in the source sequence. |
partial_sum() |
Generates a new sequence in which each element is the sum (or other binary operation) of an element and all its preceding elements in the source sequence. |
exclusive_scan()inclusive_scan() |
These are similar to partial_sum(). An inclusive scan is identical to a partial sum if the given summation operation is associative. However, inclusive_scan() sums in a non-deterministic order, while partial_sum() left to right, so for non-associative summation operations the result of the former is non-deterministic. The exclusive_scan() algorithm also sums in a non-deterministic order.For inclusive_scan(), the ith element is included in the ith sum, just as for partial_sum(). For exclusive_scan(), the ith element is not included in the ith sum.
|
transform_exclusive_scan()transform_inclusive_scan() |
Applies a transformation to each element in a sequence, then performs an exclusive/inclusive scan. |
accumulate() |
“Accumulates” the values of all the elements in a sequence. The default behavior is to sum the elements, but the caller can supply a different binary function instead. |
inner_product() |
Similar to accumulate(), but works on two sequences. This algorithm calls a binary function (multiplication by default) on parallel elements in the sequences, accumulating the result using another binary function (addition by default). If the sequences represent mathematical vectors, the algorithm calculates the dot product of the vectors. |
reduce() |
Similar to accumulate(), but supports parallel execution. The order of evaluation for reduce() is non-deterministic, while it’s from left to right for accumulate(). This means that the behavior of the former is non-deterministic if the given binary operation is not associative or not commutative. |
transform_reduce() |
Applies a transformation to each element in a sequence, then performs a reduce(). |
A permutation of a sequence contains the same elements but in a different order. The following algorithms are provided to work with permutations.
| ALGORITHM NAME | ALGORITHM SYNOPSIS | COMPLEXITY |
is_permutation() |
Returns true if the elements in one range are a permutation of the elements in another range. |
Quadratic |
next_permutation()prev_permutation() |
Modifies the sequence by transforming it into its “next” or “previous” lexicographical permutation. Successive calls to one or the other will permute the sequence into all possible permutations of its elements, if you start with a properly sorted sequence. This algorithm returns false if no more permutations exist. |
Linear |
The number and capabilities of the algorithms might overwhelm you at first. It can also be difficult to see how to apply them in the beginning. However, now that you have an idea of the available options, you are better able to tackle your program designs. The following chapters cover the details of how to use these algorithms in your code.
The Standard Library is powerful, but it’s not perfect. Here are two examples of missing functionality:
maps and sets are generally implemented as balanced binary trees, the Standard Library does not expose this implementation in the interface. If you need a tree or graph structure for something like writing a parser, you need to implement your own or find an implementation in another library.It is important to keep in mind that the Standard Library is extensible. You can write your own containers or algorithms that work with existing algorithms or containers. So, if the Standard Library doesn’t provide exactly what you need, consider writing your desired code such that it works with the Standard Library. Chapter 21 covers the topic of customizing and extending the Standard Library.
This chapter provided an overview of the C++ Standard Library, which is the most important library that you will use in your code. It subsumes the C library, and includes additional facilities for strings, I/O, error handling, and other tasks. It also includes generic containers and algorithms. The following chapters describe the Standard Library in more detail.
Containers in the Standard Library are generic data structures that are useful for storing collections of data. You should rarely need to use a standard C-style array, write a linked list, or design a stack when you use the Standard Library. The containers are implemented as class templates, so you can instantiate them for any type that meets certain basic conditions outlined in the next section. Most of the Standard Library containers, except for array and bitset, are flexible in size and automatically grow or shrink to accommodate more or fewer elements. This is a huge benefit compared to the old, standard C-style arrays, which had a fixed size. Because of the fixed-size nature of standard C-style arrays, they are more vulnerable to overruns, which in the simplest cases merely cause the program to crash because data has been corrupted, but in the worst cases allow certain kinds of security attacks. By using Standard Library containers, you ensure that your programs will be less vulnerable to these kinds of problems.
The Standard Library provides 16 containers, divided into four categories.
|
|
Additionally, C++ strings and streams can also be used as Standard Library containers to a certain degree, and bitset can be used to store a fixed number of bits.
Everything in the Standard Library is in the std namespace. The examples in this book usually use the blanket using namespace std; statement in source files (never use this in header files!), but you can be more selective in your own programs about which symbols from std to use.
Standard Library containers use value semantics on elements. That is, they store a copy of elements that they are given, assign to elements with the assignment operator, and destroy elements with the destructor. Thus, when you write classes that you intend to use with the Standard Library, you need to make sure they are copyable. When requesting an element from the container, a reference to the stored copy is returned.
If you prefer reference semantics, you can store pointers to elements instead of the elements themselves. When the containers copy a pointer, the result still refers to the same element. An alternative is to store std::reference_wrappers in the container. A reference_wrapper can be created using std::ref() or std::cref(), and basically exist to make references copyable. The reference_wrapper class template, and the ref() and cref() function templates are defined in the <functional> header. An example of this is given in the section “Storing references in a vector.”
It is possible to store move-only types, that is non-copyable types, in a container, but when doing so, some operations on the container might not compile. An example of a move-only type is std::unique_ptr.
One of the template type parameters for Standard Library containers is a so-called allocator. The container can use this allocator to allocate and deallocate memory for elements. The allocator type parameter has a default value, so you can almost always just ignore it.
Some containers, such as a map, also accept a comparator as one of the template type parameters. This comparator is used to order elements. It has a default value, so you don’t always have to specify it.
The specific requirements on elements in containers using the default allocator and comparator are shown in the following table.
| METHOD | DESCRIPTION | NOTES |
| Copy Constructor | Creates a new element that is “equal” to the old one, but that can safely be destructed without affecting the old one. | Used every time you insert an element, except when using an emplace method (discussed later). |
| Move Constructor | Creates a new element by moving all content from a source element to the new element. | Used when the source element is an rvalue, and will be destroyed after the construction of the new element; also used when a vector grows in size. The move constructor should be noexcept, otherwise it won’t be used! |
| Assignment Operator | Replaces the contents of an element with a copy of the source element. | Used every time you modify an element. |
| Move Assignment Operator | Replaces the contents of an element by moving all content from a source element. | Used when the source element is an rvalue, and will be destroyed after the assignment operation. The move assignment operator should be noexcept, otherwise it won’t be used! |
| Destructor | Cleans up an element. | Used every time you remove an element, or when a vector grows in size and the elements are not noexcept movable. |
| Default Constructor | Constructs an element without any arguments. | Required only for certain operations, such as the vector::resize() method with one argument, and the map::operator[] access. |
operator== |
Compares two elements for equality. | Required for keys in unordered associative containers, and for certain operations, such as operator== on two containers. |
operator< |
Determines if one element is less than another. | Required for keys in ordered associative containers, and for certain operations, such as operator< on two containers. |
Chapter 9 shows you how to write these methods, and discusses move semantics. For move semantics to work properly with Standard Library containers, the move constructor and the move assignment operator must be marked as noexcept!
The Standard Library containers provide limited error checking. Clients are expected to ensure that their uses are valid. However, some container methods and functions throw exceptions in certain conditions, such as out-of-bounds indexing. Of course, it is impossible to list exhaustively the exceptions that can be thrown from these methods because they perform operations on user-specified types with unknown exception characteristics. This chapter mentions exceptions where appropriate. Consult a Standard Library Reference for a list of possible exceptions thrown from each method.
The Standard Library uses the iterator pattern to provide a generic abstraction for accessing the elements of a container. Each container provides a container-specific iterator, which is a glorified smart pointer that knows how to iterate over the elements of that specific container. The iterators for all the different containers adhere to a specific interface defined by the C++ standard. Thus, even though the containers provide different functionality, the iterators present a common interface to code that wishes to work with elements of the containers.
You can think of an iterator as a pointer to a specific element of the container. Like pointers to elements in an array, iterators can move to the next element with operator++. Similarly, you can usually use operator* and operator-> on the iterator to access the actual element or field of the element. Some iterators allow comparison with operator== and operator!=, and support operator-- for moving to previous elements.
All iterators must be copy constructible, copy assignable, and destructible. Lvalues of iterators must be swappable. Different containers provide iterators with slightly different additional capabilities. The standard defines five categories of iterators, as summarized in the following table.
| ITERATOR CATEGORY | OPERATIONS REQUIRED | COMMENTS |
| Input (also known as Read) | operator++operator*operator->copy constructor operator=operator==operator!= |
Provides read-only access, forward only (no operator-- to move backward).Iterators can be assigned, copied, and compared for equality. |
| Output (also known as Write) | operator++operator*copy constructor operator= |
Provides write-only access, forward only. Iterators can be assigned, but cannot be compared for equality. Specific to output iterators is that you can do *iter = value.Note the absence of operator->.Provides both prefix and postfix operator++.
|
| Forward | Capabilities of input iterators, plus default constructor |
Provides read access, forward only. Iterators can be assigned, copied, and compared for equality. |
| Bidirectional |
Capabilities of forward iterators, plusoperator-- |
Provides everything a forward iterator provides. Iterators can also move backward to a previous element. Provides both prefix and postfix operator--.
|
| Random Access |
Bidirectional capability, plus the following:operator+operator-operator+=operator-=operator<operator>operator<=operator>=operator[] |
Equivalent to raw pointers: support pointer arithmetic, array index syntax, and all forms of comparison. |
Additionally, iterators that satisfy the requirements for output iterators are called mutable iterators, otherwise they are called constant iterators.
You can use std::distance() to compute the distance between two iterators of a container.
Iterators are implemented similarly to smart pointer classes in that they overload the specific desired operators. Consult Chapter 15 for details on operator overloading.
The basic iterator operations are similar to those supported by raw pointers, so a raw pointer can be a legitimate iterator for certain containers. In fact, the vector iterator could technically be implemented as a simple raw pointer. However, as a client of the containers, you need not worry about the implementation details; you can simply use the iterator abstraction.
This chapter shows you the basics of using the iterators for each container. Chapter 18 delves into more detail about iterators and the Standard Library algorithms that use them.
Every container class in the Standard Library that supports iterators provides public type aliases for its iterator types, called iterator and const_iterator. For example, a const iterator for a vector of ints has as type std::vector<int>::const_iterator. Containers that allow you to iterate over their elements in reverse order also provide public type aliases called reverse_iterator and const_reverse_iterator. This way, clients can use the container iterators without worrying about the actual types.
The containers also provide a method begin() that returns an iterator referring to the first element in the container. The end() method returns an iterator to the “past-the-end” value of the sequence of elements. That is, end() returns an iterator that is equal to the result of applying operator++ to an iterator referring to the last element in the sequence. Together, begin() and end() provide a half-open range that includes the first element but not the last. The reason for this apparent complication is to support empty ranges (containers without any elements), in which case begin() is equal to end(). The half-open range bounded by iterators begin() and end() is often written mathematically like this: [begin, end).
Similarly, there are
cbegin() and cend() methods that return const iterators.rbegin() and rend() methods that return reverse iterators.crbegin() and crend() methods that return const reverse iterators.Examples of using iterators are given throughout the remainder of this chapter, and in subsequent chapters.
vector, deque, list, forward_list, and array are called sequential containers. The best way to learn about sequential containers is to jump in with an example of the vector container, which should be your default container. The next section describes the vector container in detail, followed by briefer descriptions of deque, list, forward_list, and array. Once you become familiar with the sequential containers, it’s trivial to switch between them.
The Standard Library vector container is similar to a standard C-style array: the elements are stored in contiguous memory, each in its own “slot.” You can index into a vector, as well as add new elements to the back or insert them anywhere else. Inserting and deleting elements into and from a vector generally takes linear time, though these operations actually run in amortized constant time at the end of a vector, as explained in the section “The vector Memory Allocation Scheme,” later in this chapter. Random access of individual elements has a constant complexity.
vector is defined in the <vector> header file as a class template with two type parameters: the element type to store and an allocator type.
template <class T, class Allocator = allocator<T>> class vector;The Allocator parameter specifies the type for a memory allocator object that the client can set in order to use custom memory allocation. This template parameter has a default value.
The simplest way to use a vector is as a fixed-length array. vector provides a constructor that allows you to specify the number of elements, and provides an overloaded operator[] in order to access and modify those elements. The C++ standard states that the result of operator[] is undefined when used to access an element outside the vector bounds. This means that any compiler can decide how to behave in that case. For example, the default behavior of Microsoft Visual C++ is to give a run-time error message when your program is compiled in debug mode, and to disable any bounds checking in release mode for performance reasons. You can change these default behaviors.
In addition to using operator[], you can access vector elements via at(), front(), and back(). The at() method is identical to operator[], except that it performs bounds checking, and throws an out_of_range exception if the index is out of bounds. front() and back() return references to the first and last elements of a vector, respectively. Calling front() or back() on an empty container causes undefined behavior.
Here is a small example program to “normalize” test scores so that the highest score is set to 100, and all other scores are adjusted accordingly. The program creates a vector of ten doubles, reads in ten values from the user, divides each value by the max score (times 100), and prints out the new values. For the sake of brevity, the program forsakes error checking.
vector<double> doubleVector(10); // Create a vector of 10 doubles.// Initialize max to smallest numberdouble max = -numeric_limits<double>::infinity();for (size_t i = 0; i < doubleVector.size(); i++) {cout << "Enter score " << i + 1 << ": ";cin >> doubleVector[i];if (doubleVector[i] > max) {max = doubleVector[i];}}max /= 100.0;for (auto& element : doubleVector) {element /= max;cout << element << " ";}
As you can see from this example, you can use a vector just as you would use a standard C-style array. Note that the first for loop uses the size() method to determine the number of elements in the container. This example also demonstrates the use of a range-based for loop with a vector. Here, the range-based for loop uses auto& and not auto because a reference is required so that the element can be modified in each iteration.
The real power of a vector lies in its ability to grow dynamically. For example, consider the test score normalization program from the previous section with the additional requirement that it should handle any number of test scores. Here is the new version:
vector<double> doubleVector;// Create a vector with zero elements.// Initialize max to smallest numberdouble max = -numeric_limits<double>::infinity();for (size_t i = 1; true; i++) {double temp;cout << "Enter score " << i << " (-1 to stop): ";cin >> temp;if (temp == -1) {break;}doubleVector.push_back(temp);if (temp > max) {max = temp;}}max /= 100.0;for (auto& element : doubleVector) {element /= max;cout << element << " ";}
This version of the program uses the default constructor to create a vector with zero elements. As each score is read, it’s added to the vector with the push_back() method, which takes care of allocating space for the new element. The range-based for loop doesn’t require any changes.
Now that you’ve had a taste of vectors, it’s time to delve into their details.
The default constructor creates a vector with zero elements.
vector<int> intVector; // Creates a vector of ints with zero elementsYou can specify a number of elements and, optionally, a value for those elements, like this:
vector<int> intVector(10, 100); // Creates vector of 10 ints with value 100If you omit the default value, the new objects are zero-initialized. Zero-initialization constructs objects with the default constructor, and initializes primitive integer types (such as char, int, and so on) to zero, primitive floating-point types to 0.0, and pointer types to nullptr.
You can create vectors of built-in classes like this:
vector<string> stringVector(10, "hello");User-defined classes can also be used as vector elements:
class Element{public:Element() {}virtual ~Element() = default;};…vector<Element> elementVector;
A vector can be constructed with an initializer_list containing the initial elements:
vector<int> intVector({ 1, 2, 3, 4, 5, 6 });initializer_lists can also be used for so-called uniform initialization, as discussed in Chapter 1. Uniform initialization works on most Standard Library containers. Here is an example:
vector<int> intVector1 = { 1, 2, 3, 4, 5, 6 };vector<int> intVector2{ 1, 2, 3, 4, 5, 6 };
You can allocate vectors on the heap as well.
auto elementVector = make_unique<vector<Element>>(10);A vector stores copies of the objects, and its destructor calls the destructor for each of the objects. The copy constructor and assignment operator of the vector class perform deep copies of all the elements in the vector. Thus, for efficiency, you should pass vectors by reference or const reference to functions and methods. Consult Chapter 12 for details on writing functions that take template instantiations as parameters.
In addition to normal copying and assignment, vectors provide an assign() method that removes all the current elements and adds any number of new elements. This method is useful if you want to reuse a vector. Here is a trivial example. intVector is created with ten elements having the default value zero. Then assign() is used to remove all ten elements and replace them with five elements with value 100.
vector<int> intVector(10);// Other code …intVector.assign(5, 100);
assign() can also accept an initializer_list as follows. intVector now has four elements with the given values.
intVector.assign({ 1, 2, 3, 4 });vectors also provide a swap() method that allows you to swap the contents of two vectors in constant time. Here is a simple example:
vector<int> vectorOne(10);vector<int> vectorTwo(5, 100);vectorOne.swap(vectorTwo);// vectorOne now has 5 elements with the value 100.// vectorTwo now has 10 elements with the value 0.
The Standard Library provides the usual six overloaded comparison operators for vectors: ==, !=, <, >, <=, >=. Two vectors are equal if they have the same number of elements and all the corresponding elements in the two vectors are equal to each other. Two vectors are compared lexicographically, that is, one vector is “less than” another if all elements 0 through i–1 in the first vector are equal to elements 0 through i-1 in the second vector, but element i in the first is less than element i in the second, where i must be in the range 0…n and n must be less than the size() of the smallest of the two vectors.
Here is an example of a simple program that compares vectors of ints:
vector<int> vectorOne(10);vector<int> vectorTwo(10);if (vectorOne == vectorTwo) {cout << "equal!" << endl;} else {cout << "not equal!" << endl;}vectorOne[3] = 50;if (vectorOne < vectorTwo) {cout << "vectorOne is less than vectorTwo" << endl;} else {cout << "vectorOne is not less than vectorTwo" << endl;}
The output of the program is as follows:
equal!vectorOne is not less than vectorTwo
The section on “Iterators” at the beginning of this chapter explains the concepts of container iterators. The discussion can get a bit abstract, so it’s helpful to jump in and look at a code example. Here is the last for loop of the test score normalization program from earlier using iterators instead of a range-based for loop:
for (vector<double>::iterator iter = begin(doubleVector);iter != end(doubleVector); ++iter) {*iter /= max;cout << *iter << " ";}
First, take a look at the for loop initialization statement:
vector<double>::iterator iter = begin(doubleVector);Recall that every container defines a type named iterator to represent iterators for that type of container. begin() returns an iterator of that type referring to the first element in the container. Thus, the initialization statement obtains in the variable iter an iterator referring to the first element of doubleVector. Next, look at the for loop comparison:
iter != end(doubleVector);This statement simply checks if the iterator is past the end of the sequence of elements in the vector. When it reaches that point, the loop terminates. The increment statement, ++iter, increments the iterator to refer to the next element in the vector.
The for loop body contains these two lines:
*iter /= max;cout << *iter << " ";
As you can see, your code can both access and modify the elements over which it iterates. The first line uses * to dereference iter to obtain the element to which it refers, and assigns to that element. The second line dereferences iter again, but this time only to stream the element to cout.
The preceding for loop using iterators can be simplified by using the auto keyword:
for (auto iter = begin(doubleVector);iter != end(doubleVector); ++iter) {*iter /= max;cout << *iter << " ";}
With auto, the compiler automatically deduces the type of the variable iter based on the right-hand side of the initializer, which in this case is the result of the call to begin().
If the elements of your container are objects, you can use the -> operator on iterators to call methods or access data members of those objects. For example, the following program creates a vector of ten strings, then iterates over all of them appending a new string to each one:
vector<string> stringVector(10, "hello");for (auto it = begin(stringVector); it != end(stringVector); ++it) {it->append(" there");}
Often, using a range-based for loop results in more elegant code, as in this example:
vector<string> stringVector(10, "hello");for (auto& str : stringVector) {str.append(" there");}
The normal iterator is read/write. However, if you call begin() or end() on a const object, or you call cbegin() or cend(), you receive a const_iterator. The const_iterator is read-only; you cannot modify the element it refers to. An iterator can always be converted to a const_iterator, so it’s always safe to write something like this:
vector<type>::const_iterator it = begin(myVector);However, a const_iterator cannot be converted to an iterator. If myVector is const, the following line doesn’t compile:
vector<type>::iterator it = begin(myVector);When using the auto keyword, using const_iterators looks a bit different. Suppose you write the following code:
vector<string> stringVector(10, "hello");for (auto iter = begin(stringVector); iter != end(stringVector); ++iter) {cout << *iter << endl;}
Because of the auto keyword, the compiler deduces the type of the iter variable automatically and makes it a normal iterator because stringVector is not const. If you want a read-only const_iterator in combination with using auto, then you need to use cbegin() and cend() instead of begin() and end() as follows:
vector<string> stringVector(10, "hello");for (auto iter = cbegin(stringVector); iter != cend(stringVector); ++iter) {cout << *iter << endl;}
Now the compiler uses const_iterator as type for the variable iter because that’s what cbegin() returns.
A range-based for loop can also be forced to use const iterators as follows:
vector<string> stringVector(10, "hello");for (const auto& element : stringVector) {cout << element << endl;}
Generally, iterators are about as safe as pointers—that is, extremely unsafe. For example, you can write code like this:
vector<int> intVector;auto iter = end(intVector);*iter = 10; // BUG! iter doesn't refer to a valid element.
Recall that the iterator returned by end() is one element past the end of a vector, not an iterator referring to the last element! Trying to dereference it results in undefined behavior. Iterators are not required to perform any verification.
Another problem can occur if you use mismatched iterators. For example, the following for loop initializes an iterator from vectorTwo, and tries to compare it to the end iterator of vectorOne. Needless to say, this loop will not do what you intended, and may never terminate. Dereferencing the iterator in the loop will likely produce undefined results.
vector<int> vectorOne(10);vector<int> vectorTwo(10);// Fill in the vectors.// BUG! Possible infinite loopfor (auto iter = begin(vectorTwo); iter != end(vectorOne); ++iter) {// Loop body}
The vector iterator is random access, which means that you can move it backward or forward, or jump around. For example, the following code eventually changes the fifth element (index 4) to the value 4:
vector<int> intVector(10);auto it = begin(intVector);it += 5;--it;*it = 4;
Given that you can write a for loop that uses a simple index variable and the size() method to iterate over the elements of the vector, why should you bother using iterators? That’s a valid question, for which there are three main answers:
vectors, but applies to lists, maps, and sets.As mentioned in the beginning of this chapter, it is possible to store references in a container, such as a vector. To do this, you store std::reference_wrappers in the container. The std::ref() and cref() function templates are used to create non-const and const
reference_wrapper instances. You need to include the <functional> header file. Here is an example:
string str1 = "Hello";string str2 = "World";// Create a vector of references to strings.vector<reference_wrapper<string>> vec{ ref(str1) };vec.push_back(ref(str2)); // push_back() works as well.// Modify the string referred to by the second reference in the vector.vec[1].get() += "!";// The end result is that str2 is actually modified.cout << str1 << " " << str2 << endl;
As you have already read, you can append an element to a vector with the push_back() method. The vector provides a parallel remove method called pop_back().
You can also insert elements at any point in the vector with the insert() method, which adds one or more elements to a position specified by an iterator, shifting all subsequent elements down to make room for the new ones. There are five different overloaded forms of insert() that do the following:
vector using move semantics.vector where the list of elements is given as an initializer_list.You can remove elements from any point in a vector with erase(), and you can remove all elements with clear(). There are two forms of erase(): one accepting a single iterator to remove a single element, and one accepting two iterators specifying a range of elements to remove.
If you want to remove a number of elements that satisfy a certain condition, one solution would be to write a loop iterating over all the elements and erasing every element that matches the condition. However, this solution has quadratic complexity, which is very bad for performance. In this case, the quadratic complexity can be avoided by using the remove-erase-idiom, which has a linear complexity. The remove-erase-idiom is discussed in Chapter 18.
Here is a small program that demonstrates the methods for adding and removing elements. It uses a helper function template printVector() to print the contents of a vector to cout as follows. See Chapter 12 for details on writing function templates.
template<typename T>void printVector(const vector<T>& v){for (auto& element : v) { cout << element << " "; }cout << endl;}
The example includes demonstrations of the two-argument version of erase() and the following versions of insert():
insert(const_iterator pos, const T& x): the value x is inserted at position pos.insert(const_iterator pos, size_type n, const T& x): the value x is inserted n times at position pos.insert(const_iterator pos, InputIterator first, InputIterator last): the elements in the range [first, last) are inserted at position pos.The code for the example is as follows:
vector<int> vectorOne = { 1, 2, 3, 5 };vector<int> vectorTwo;// Oops, we forgot to add 4. Insert it in the correct placevectorOne.insert(cbegin(vectorOne) + 3, 4);// Add elements 6 through 10 to vectorTwofor (int i = 6; i <= 10; i++) {vectorTwo.push_back(i);}printVector(vectorOne);printVector(vectorTwo);// Add all the elements from vectorTwo to the end of vectorOnevectorOne.insert(cend(vectorOne), cbegin(vectorTwo), cend(vectorTwo));printVector(vectorOne);// Now erase the numbers 2 through 5 in vectorOnevectorOne.erase(cbegin(vectorOne) + 1, cbegin(vectorOne) + 5);printVector(vectorOne);// Clear vectorTwo entirelyvectorTwo.clear();// And add 10 copies of the value 100vectorTwo.insert(cbegin(vectorTwo), 10, 100);// Decide we only want 9 elementsvectorTwo.pop_back();printVector(vectorTwo);
The output of the program is as follows:
1 2 3 4 56 7 8 9 101 2 3 4 5 6 7 8 9 101 6 7 8 9 10100 100 100 100 100 100 100 100 100
Recall that iterator pairs represent half-open ranges, and insert() adds elements before the element referred to by a given iterator position. Thus, you can insert the entire contents of vectorTwo into the end of vectorOne, like this:
vectorOne.insert(cend(vectorOne), cbegin(vectorTwo), cend(vectorTwo));All Standard Library containers implement move semantics by including a move constructor and move assignment operator. See Chapter 9 for details on move semantics. A big benefit of this is that you can easily return a Standard Library container from a function by value without performance penalty. Take a look at the following function:
vector<int> createVectorOfSize(size_t size){vector<int> vec(size);int contents = 0;for (auto& i : vec) {i = contents++;}return vec;}…vector<int> myVector;myVector = createVectorOfSize(123);
Without move semantics, assigning the result of createVectorOfSize() to myVector calls the copy assignment operator. With the move semantics support in the Standard Library containers, copying of the vector is avoided. Instead, the assignment to myVector triggers a call to the move assignment operator.
Similarly, push operations can also make use of move semantics to improve performance in certain situations. For example, suppose you have a vector of strings:
vector<string> vec;You can add an element to this vector as follows:
string myElement(5, 'a'); // Constructs the string "aaaaa"vec.push_back(myElement);
However, because myElement is not a temporary object, push_back() makes a copy of myElement and puts it in the vector.
The vector class also defines a push_back(T&& val), which is the move equivalent of push_back(const T& val). So, copying can be avoided if you call the push_back() method as follows:
vec.push_back(move(myElement));Now you are explicitly saying that myElement should be moved into the vector. Note that after this call, myElement is in a valid but otherwise indeterminate state. You should not use myElement anymore, unless you first bring it back to a determinate state, for example by calling clear() on it! You can also call push_back() as follows:
vec.push_back(string(5, 'a'));The preceding call to push_back() triggers a call to the move version because the call to the string constructor results in a temporary object. The push_back() method moves this temporary string object into the vector, avoiding any copying.
C++ supports emplace operations on most Standard Library containers, including vector. Emplace means “to put into place.” An example is emplace_back() on a vector object, which does not copy or move anything. Instead, it makes space in the container and constructs the object in place, as in this example:
vec.emplace_back(5, 'a');The emplace methods take a variable number of arguments as a variadic template. Variadic templates are discussed in Chapter 22, but those details are not required to understand how to use emplace_back(). The difference in performance between emplace_back() and push_back() using move semantics depends on how your specific compiler implements these operations. In most situations, you can pick the one based on the syntax that you prefer.
vec.push_back(string(5, 'a'));// Orvec.emplace_back(5, 'a');
Since C++17, the emplace_back() method returns a reference to the inserted element. Before C++17, the return type of emplace_back() was void.
There is also an emplace() method that constructs an object in place at a specific position in the vector, and returns an iterator to the inserted element.
Inserting or erasing elements in a vector causes all subsequent elements to shift up or down to make room for, or fill in the holes left by, the affected elements. Thus, these operations take linear complexity. Furthermore, all iterators referring to the insertion or removal point or subsequent positions are invalid following the action. The iterators are not “magically” moved to keep up with the elements that are shifted up or down in the vector—that’s up to you.
Also keep in mind that an internal vector reallocation can cause invalidation of all iterators referring to elements in the vector, not just those referring to elements past the point of insertion or deletion. See the next section for details.
A vector allocates memory automatically to store the elements that you insert. Recall that the vector requirements dictate that the elements must be in contiguous memory, like in standard C-style arrays. Because it’s impossible to request to add memory to the end of a current chunk of memory, every time a vector allocates more memory, it must allocate a new, larger chunk in a separate memory location and copy/move all the elements to the new chunk. This process is time-consuming, so vector implementations attempt to avoid it by allocating more space than needed when they have to perform a reallocation. That way, they can avoid reallocating memory every time you insert an element.
One obvious question at this point is why you, as a client of vector, care how it manages its memory internally. You might think that the principle of abstraction should allow you to disregard the internals of the vector memory allocation scheme. Unfortunately, there are two reasons why you need to understand how it works:
vector allocation scheme can guarantee that an element insertion runs in amortized constant time: most of the time the operation is constant, but once in a while (if it requires a reallocation), it’s linear. If you are worried about efficiency, you can control when a vector performs reallocations.vector.Thus, the vector interface allows you to query and control the vector reallocations. If you don’t control the reallocations explicitly, you should assume that all insertions cause a reallocation and thus invalidate all iterators.
vector provides two methods for obtaining information about its size: size() and capacity(). The size() method returns the number of elements in a vector, while capacity() returns the number of elements that it can hold without a reallocation. Thus, the number of elements that you can insert without causing a reallocation is capacity()
–
size().
C++17 introduces non-member std::size() and std::empty() global functions. These are similar to the non-member functions that are available to get iterators (std::begin(), std::end(), and so on). The non-member size() and empty() functions can be used with all containers. They can also be used with statically allocated C-style arrays not accessed through pointers, and with initializer_lists. Here is an example of using them with a vector:
vector<int> vec{ 1,2,3 };cout << size(vec) << endl;cout << empty(vec) << endl;
If you don’t care about efficiency or iterator invalidations, there is never a need to control the vector memory allocation explicitly. However, if you want to make your program as efficient as possible, or you want to guarantee that iterators will not be invalidated, you can force a vector to preallocate enough space to hold all of its elements. Of course, you need to know how many elements it will hold, which is sometimes impossible to predict.
One way to preallocate space is to call reserve(), which allocates enough memory to hold the specified number of elements. The next section shows an example of the reserve() method in action.
Another way to preallocate space is to specify, in the constructor, or with the resize() or assign() method, how many elements you want a vector to store. This method actually creates a vector of that size (and probably of that capacity).
A vector stores its data contiguously in memory. You can get a pointer to this block of memory with the data() method.
C++17 introduces a non-member std::data() global function that can be used to get a pointer to the data. It works for the array and vector containers, strings, statically allocated C-style arrays not accessed through pointers, and initializer_lists. Here is an example for a vector:
vector<int> vec{ 1,2,3 };int* data1 = vec.data();int* data2 = data(vec);
A common problem in computer science is distributing requests among a finite list of resources. For example, a simple operating system could keep a list of processes and assign a time slice (such as 100ms) to each process to let the process perform some of its work. After the time slice is finished, the OS suspends the process and the next process in the list is given a time slice to perform some of its work. One of the simplest algorithmic solutions to this problem is round-robin scheduling. When the time slice of the last process is finished, the scheduler starts over again with the first process. For example, in the case of three processes, the first time slice would go to the first process, the second slice to the second process, the third slice to the third process, and the fourth slice back to the first process. The cycle would continue in this way indefinitely.
Suppose that you decide to write a generic round-robin scheduling class that can be used with any type of resource. The class should support adding and removing resources, and should support cycling through the resources in order to obtain the next one. You could use a vector directly, but it’s often helpful to write a wrapper class that provides more directly the functionality you need for your specific application. The following example shows a RoundRobin class template with comments explaining the code. First, here is the class definition:
// Class template RoundRobin// Provides simple round-robin semantics for a list of elements.template <typename T>class RoundRobin{public:// Client can give a hint as to the number of expected elements for// increased efficiency.RoundRobin(size_t numExpected = 0);virtual ~RoundRobin() = default;// Prevent assignment and pass-by-valueRoundRobin(const RoundRobin& src) = delete;RoundRobin& operator=(const RoundRobin& rhs) = delete;// Explicitly default a move constructor and move assignment operatorRoundRobin(RoundRobin&& src) = default;RoundRobin& operator=(RoundRobin&& rhs) = default;// Appends element to the end of the list. May be called// between calls to getNext().void add(const T& element);// Removes the first (and only the first) element// in the list that is equal (with operator==) to element.// May be called between calls to getNext().void remove(const T& element);// Returns the next element in the list, starting with the first,// and cycling back to the first when the end of the list is// reached, taking into account elements that are added or removed.T& getNext();private:std::vector<T> mElements;typename std::vector<T>::iterator mCurrentElement;};
As you can see, the public interface is straightforward: only three methods plus the constructor and destructor. The resources are stored in the vector called mElements. The iterator mCurrentElement always refers to the element that will be returned with the next call to getNext(). If getNext() hasn’t been called yet, mCurrentElement is equal to begin(mElements). Note the use of the typename keyword in front of the line declaring mCurrentElement. So far, you’ve only seen that keyword used to specify template parameters, but there is another use for it. You must specify typename explicitly whenever you access a type based on one or more template parameters. In this case, the template parameter T is used to access the iterator type. Thus, you must specify typename. This is another example of arcane C++ syntax.
The class also prevents assignment and pass-by-value because of the mCurrentElement data member. To make assignment and pass-by-value work, you would have to implement an assignment operator and copy constructor and make sure mCurrentElement is valid in the destination object.
The implementation of the RoundRobin class follows with comments explaining the code. Note the use of reserve() in the constructor, and the extensive use of iterators in add(), remove(), and getNext(). The trickiest aspect is handling mCurrentElement in the add() and remove() methods.
template <typename T> RoundRobin<T>::RoundRobin(size_t numExpected){// If the client gave a guideline, reserve that much space.mElements.reserve(numExpected);// Initialize mCurrentElement even though it isn't used until// there's at least one element.mCurrentElement = begin(mElements);}// Always add the new element at the endtemplate <typename T> void RoundRobin<T>::add(const T& element){// Even though we add the element at the end, the vector could// reallocate and invalidate the mCurrentElement iterator with// the push_back() call. Take advantage of the random-access// iterator features to save our spot.int pos = mCurrentElement - begin(mElements);// Add the element.mElements.push_back(element);// Reset our iterator to make sure it is valid.mCurrentElement = begin(mElements) + pos;}template <typename T> void RoundRobin<T>::remove(const T& element){for (auto it = begin(mElements); it != end(mElements); ++it) {if (*it == element) {// Removing an element invalidates the mCurrentElement iterator// if it refers to an element past the point of the removal.// Take advantage of the random-access features of the iterator// to track the position of the current element after removal.int newPos;if (mCurrentElement == end(mElements) - 1 &&mCurrentElement == it) {// mCurrentElement refers to the last element in the list,// and we are removing that last element, so wrap back to// the beginning.newPos = 0;} else if (mCurrentElement <= it) {// Otherwise, if mCurrentElement is before or at the one// we're removing, the new position is the same as before.newPos = mCurrentElement - begin(mElements);} else {// Otherwise, it's one less than before.newPos = mCurrentElement - begin(mElements) - 1;}// Erase the element (and ignore the return value).mElements.erase(it);// Now reset our iterator to make sure it is valid.mCurrentElement = begin(mElements) + newPos;return;}}}template <typename T> T& RoundRobin<T>::getNext(){// First, make sure there are elements.if (mElements.empty()) {throw std::out_of_range("No elements in the list");}// Store the current element which we need to return.auto& toReturn = *mCurrentElement;// Increment the iterator modulo the number of elements.++mCurrentElement;if (mCurrentElement == end(mElements)) {mCurrentElement = begin(mElements);}// Return a reference to the element.return toReturn;}
Here’s a simple implementation of a scheduler that uses the RoundRobin class template, with comments explaining the code:
// Simple Process class.class Process final{public:// Constructor accepting the name of the process.Process(string_view name) : mName(name) {}// Implementation of doWorkDuringTimeSlice() would let the process// perform its work for the duration of a time slice.// Actual implementation omitted.void doWorkDuringTimeSlice() {cout << "Process " << mName<< " performing work during time slice." << endl;}// Needed for the RoundRobin::remove() method to work.bool operator==(const Process& rhs) {return mName == rhs.mName;}private:string mName;};// Simple round-robin based process scheduler.class Scheduler final{public:// Constructor takes a vector of processes.Scheduler(const vector<Process>& processes);// Selects the next process using a round-robin scheduling// algorithm and allows it to perform some work during// this time slice.void scheduleTimeSlice();// Removes the given process from the list of processes.void removeProcess(const Process& process);private:RoundRobin<Process> mProcesses;};Scheduler::Scheduler(const vector<Process>& processes){// Add the processesfor (auto& process : processes) {mProcesses.add(process);}}void Scheduler::scheduleTimeSlice(){try {mProcesses.getNext().doWorkDuringTimeSlice();} catch (const out_of_range&) {cerr << "No more processes to schedule." << endl;}}void Scheduler::removeProcess(const Process& process){mProcesses.remove(process);}int main(){vector<Process> processes = { Process("1"), Process("2"), Process("3") };Scheduler scheduler(processes);for (int i = 0; i < 4; ++i)scheduler.scheduleTimeSlice();scheduler.removeProcess(processes[1]);cout << "Removed second process" << endl;for (int i = 0; i < 4; ++i)scheduler.scheduleTimeSlice();return 0;}
The output should be as follows:
Process 1 performing work during time slice.Process 2 performing work during time slice.Process 3 performing work during time slice.Process 1 performing work during time slice.Removed second processProcess 3 performing work during time slice.Process 1 performing work during time slice.Process 3 performing work during time slice.Process 1 performing work during time slice.
The C++ standard requires a partial specialization of vector for bools, with the intention that it optimizes space allocation by “packing” the Boolean values. Recall that a bool is either true or false, and thus could be represented by a single bit, which can take on exactly two values. C++ does not have a native type that stores exactly one bit. Some compilers represent a Boolean value with a type the same size as a char, other compilers use an int. The vector<bool> specialization is supposed to store the “array of bools” in single bits, thus saving space.
In a half-hearted attempt to provide some bit-field routines for vector<bool>, there is one additional method: flip(). This method can be called either on the container—in which case it complements all the elements in the container—or on a single reference returned from operator[] or a similar method, in which case it complements that single element.
At this point, you should be wondering how you can call a method on a reference to bool. The answer is that you can’t. The vector<bool> specialization actually defines a class called reference that serves as a proxy for the underlying bool (or bit). When you call operator[], at(), or a similar method, then vector<bool> returns a reference object, which is a proxy for the real bool.
In practice, the little amount of space saved by packing bools hardly seems worth the extra effort. Even worse, accessing and modifying elements in a vector<bool> is much slower than, for example, in a vector<int>. Many C++ experts recommend avoiding vector<bool> in favor of the bitset. If you do need a dynamically sized bit field, then it’s recommended to use something like vector<std::int_fast8_t> or vector<unsigned char>. The std::int_fast8_t type is defined in <cstdint>. It is a signed integer type for which the compiler has to use the fastest integer type it has that is at least 8 bits.
deque (the abbreviation for double-ended queue) is almost identical to vector, but is used far less frequently. It is defined in the <deque> header file. The principle differences are as follows:
deque supports true constant-time insertion and removal of elements at both the front and the back (a vector supports amortized constant time at just the back).deque provides push_front(), pop_front(), and emplace_front(), which the vector omits. Since C++17, emplace_front() returns a reference to the inserted element, instead of void.deque does not invalidate iterators when inserting elements at the front or at the back.deque does not expose its memory management scheme via reserve() or capacity().deques are rarely used, as opposed to vectors, so they are not further discussed. Consult a Standard Library Reference for a detailed list of all supported methods.
The Standard Library list class template, defined in the <list> header file, is a standard doubly linked list. It supports constant-time insertion and deletion of elements at any point in the list, but provides slow (linear) time access to individual elements. In fact, the list does not even provide random-access operations like operator[]. Only through iterators can you access individual elements.
Most of the list operations are identical to those of vector, including the constructors, destructor, copying operations, assignment operations, and comparison operations. This section focuses on those methods that differ from those of vector.
The only methods provided by a list to access elements are front() and back(), both of which run in constant time. These methods return a reference to the first and last elements in a list. All other element access must be performed through iterators.
A list supports begin(), returning an iterator referring to the first element in the list, and end(), returning an iterator referring to one past the last element in the list. It also supports cbegin(), cend(), rbegin(), rend(), crbegin(), and crend(), similar to a vector.
A list iterator is bidirectional, not random access like a vector iterator. That means that you cannot add and subtract list iterators from each other, or perform other pointer arithmetic on them. For example, if p is a list iterator, you can traverse through the elements of the list by doing ++p or --p, but you cannot use the addition or subtraction operator; p+n and p-n do not work.
A list supports the same add element and remove element methods as a vector, including push_back(), pop_back(), emplace(), emplace_back(), the five forms of insert(), the two forms of erase(), and clear(). Like a deque, it also provides push_front(), emplace_front(), and pop_front(). All these methods (except for clear()) run in constant time, once you’ve found the correct position. Thus, a list could be appropriate for applications that perform many insertions and deletions from the data structure, but do not need quick index-based element access. And even then, a vector might still be faster. Use a performance profiler to make sure.
Like deques, and unlike vectors, lists do not expose their underlying memory model. Consequently, they support size(), empty(), and resize(), but not reserve() or capacity(). Note that the size() method on a list has constant complexity, which is not the case for the size() method on a forward_list (discussed later).
A list provides several special operations that exploit its quick element insertion and deletion. This section provides an overview and examples. Consult a Standard Library Reference for a thorough reference of all the methods.
The linked-list characteristics of a list allow it to splice, or insert, an entire list at any position in another list in constant time. The simplest version of this method works as follows:
// Store the a words in the main dictionary.list<string> dictionary{ "aardvark", "ambulance" };// Store the b words.list<string> bWords{ "bathos", "balderdash" };// Add the c words to the main dictionary.dictionary.push_back("canticle");dictionary.push_back("consumerism");// Splice the b words into the main dictionary.if (!bWords.empty()) {// Get an iterator to the last b word.auto iterLastB = --(cend(bWords));// Iterate up to the spot where we want to insert b words.auto it = cbegin(dictionary);for (; it != cend(dictionary); ++it) {if (*it > *iterLastB)break;}// Add in the b words. This action removes the elements from bWords.dictionary.splice(it, bWords);}// Print out the dictionary.for (const auto& word : dictionary) {cout << word << endl;}
The result from running this program looks like this:
aardvarkambulancebathosbalderdashcanticleconsumerism
There are also two other forms of splice(): one that inserts a single element from another list, and one that inserts a range from another list. Additionally, all forms of splice() are available with either a normal reference or an rvalue reference to the source list.
In addition to splice(), a list provides special implementations of several of the generic Standard Library algorithms. The generic forms are covered in Chapter 18. Here, only the specific versions provided by list are discussed.
The following table summarizes the algorithms for which list provides special implementations as methods. See Chapter 18 for more details on the algorithms.
| METHOD | DESCRIPTION |
remove()remove_if() |
Removes certain elements from a list. |
unique() |
Removes duplicate consecutive elements from a list, based on operator== or a user-supplied binary predicate. |
merge() |
Merges two lists. Both lists must be sorted to start, according to operator< or a user-defined comparator. Like splice(), merge() is destructive to the list passed as an argument. |
sort() |
Performs a stable sort on elements in a list. |
reverse() |
Reverses the order of the elements in a list. |
Suppose that you are writing a computer registration system for a university. One feature you might provide is the ability to generate a complete list of enrolled students in the university from lists of the students in each class. For the sake of this example, assume that you must write only a single function that takes a vector of lists of student names (as strings), plus a list of students that have been dropped from their courses because they failed to pay tuition. This method should generate a complete list of all the students in all the courses, without any duplicates, and without those students who have been dropped. Note that students might be in more than one course.
Here is the code for this method, with comments explaining the code. With the power of Standard Library lists, the method is practically shorter than its written description! Note that the Standard Library allows you to “nest” containers: in this case, you can use a vector of lists.
// courseStudents is a vector of lists, one for each course. The lists// contain the students enrolled in those courses. They are not sorted.//// droppedStudents is a list of students who failed to pay their// tuition and so were dropped from their courses.//// The function returns a list of every enrolled (non-dropped) student in// all the courses.list<string> getTotalEnrollment(const vector<list<string>>& courseStudents,const list<string>& droppedStudents){list<string> allStudents;// Concatenate all the course lists onto the master listfor (auto& lst : courseStudents) {allStudents.insert(cend(allStudents), cbegin(lst), cend(lst));}// Sort the master listallStudents.sort();// Remove duplicate student names (those who are in multiple courses).allStudents.unique();// Remove students who are on the dropped list.// Iterate through the dropped list, calling remove on the// master list for each student in the dropped list.for (auto& str : droppedStudents) {allStudents.remove(str);}// done!return allStudents;}
A forward_list, defined in the <forward_list> header file, is similar to a list except that it is a singly linked list, while a list is a doubly linked list. This means that forward_list supports only forward iteration and, because of this, ranges need to be specified differently compared to a list. If you want to modify any list, you need access to the element before the first element of interest. Because a forward_list does not have an iterator that supports going backward, there is no easy way to get to the preceding element. For this reason, ranges that will be modified—for example, ranges supplied to erase() and splice()—must be open at the beginning. The begin() function that was discussed earlier returns an iterator to the first element, and thus can only be used to construct a range that is closed at the beginning. The forward_list class therefore defines a before_begin() method, which returns an iterator that points to an imaginary element before the beginning of the list. You cannot dereference this iterator as it points to invalid data. However, incrementing this iterator by one makes it the same as the iterator returned by begin(); as a result, it can be used to make a range that is open at the beginning. The following table sums up the differences between a list and a forward_list. A filled box () means the container supports that operation, while an empty box () means the operation is not supported.
| OPERATION | LIST | FORWARD_LIST |
assign() |
|
|
back() |
|
|
before_begin() |
|
|
begin() |
|
|
cbefore_begin() |
|
|
cbegin() |
|
|
cend() |
|
|
clear() |
|
|
crbegin() |
|
|
crend() |
|
|
emplace() |
|
|
emplace_after() |
|
|
emplace_back() |
|
|
emplace_front() |
|
|
empty() |
|
|
end() |
|
|
erase() |
|
|
erase_after() |
|
|
front() |
|
|
insert() |
|
|
insert_after() |
|
|
iterator / const_iterator |
|
|
max_size() |
|
|
merge() |
|
|
pop_back() |
|
|
pop_front() |
|
|
push_back() |
|
|
push_front() |
|
|
rbegin() |
|
|
remove() |
|
|
remove_if() |
|
|
rend() |
|
|
resize() |
|
|
reverse() |
|
|
reverse_iterator / const_reverse_iterator |
|
|
size() |
|
|
sort() |
|
|
splice() |
|
|
splice_after() |
|
|
swap() |
|
|
unique() |
|
|
Constructors and assignment operators are similar between a list and a forward_list. The C++ standard states that forward_lists should try to use minimal space. That’s the reason why there is no size() method, because by not providing it, there is no need to store the size of the list. The following example demonstrates the use of forward_lists:
// Create 3 forward lists using an initializer_list// to initialize their elements (uniform initialization).forward_list<int> list1 = { 5, 6 };forward_list<int> list2 = { 1, 2, 3, 4 };forward_list<int> list3 = { 7, 8, 9 };// Insert list2 at the front of list1 using splice.list1.splice_after(list1.before_begin(), list2);// Add number 0 at the beginning of the list1.list1.push_front(0);// Insert list3 at the end of list1.// For this, we first need an iterator to the last element.auto iter = list1.before_begin();auto iterTemp = iter;while (++iterTemp != end(list1)) {++iter;}list1.insert_after(iter, cbegin(list3), cend(list3));// Output the contents of list1.for (auto& i : list1) {cout << i << ' ';}
To insert list3, you need an iterator to the last element in the list. However, because this is a forward_list, you cannot use --end(list1), so you need to iterate over the list from the beginning and stop at the last element. The output of this example is as follows:
0 1 2 3 4 5 6 7 8 9An array, defined in the <array> header file, is similar to a vector except that it is of a fixed size; it cannot grow or shrink in size. The purpose of a fixed size is to allow an array to be allocated on the stack, rather than always demanding heap access as vector does. Just like vectors, arrays support random-access iterators, and elements are stored in contiguous memory. An array has support for front(), back(), at(), and operator[]. It also supports a fill() method to fill the array with a specific element. Because it is fixed in size, it does not support push_back(), pop_back(), insert(), erase(), clear(), resize(), reserve(), or capacity(). A disadvantage compared to a vector is that the swap() method of an array runs in linear time, while it has constant complexity for a vector. An array can also not be moved in constant time, while a vector can. An array has a size() method, which is a clear advantage over C-style arrays. The following example demonstrates how to use the array class. Note that the array declaration requires two template parameters: the first specifies the type of the elements, and the second specifies the fixed number of elements in the array.
// Create an array of 3 integers and initialize them// with the given initializer_list using uniform initialization.array<int, 3> arr = { 9, 8, 7 };// Output the size of the array.cout << "Array size = " << arr.size() << endl; // or std::size(arr);// Output the contents using a range-based for loop.for (const auto& i : arr) {cout << i << endl;}cout << "Performing arr.fill(3)…" << endl;// Use the fill method to change the contents of the array.arr.fill(3);// Output the contents of the array using iterators.for (auto iter = cbegin(arr); iter != cend(arr); ++iter) {cout << *iter << endl;}
The output of the preceding code is as follows:
Array size = 3987Performing arr.fill(3)…333
You can use the std::get<n>() function template to retrieve an element from an std::array at the given index n. The index has to be a constant expression, so it cannot, for example, be a loop variable. The benefit of using std::get<n>() is that the compiler checks at compile time that the given index is valid; otherwise, it results in a compilation error, as in this example:
array<int, 3> myArray{ 11, 22, 33 };cout << std::get<1>(myArray) << endl;cout << std::get<10>(myArray) << endl; // Compilation error!
In addition to the standard sequential containers, the Standard Library provides three container adaptors: queue, priority_queue, and stack. Each of these adaptors is a wrapper around one of the sequential containers. They allow you to swap the underlying container without having to change the rest of the code. The intent of the adaptors is to simplify the interface and to provide only those features that are appropriate for the stack or queue abstraction. For example, the adaptors don’t provide iterators or the capability to insert or erase multiple elements simultaneously.
The queue container adaptor, defined in the header file <queue>, provides standard “first-in, first-out” (FIFO) semantics. As usual, it’s written as a class template, which looks like this:
template <class T, class Container = deque<T>> class queue;The T template parameter specifies the type that you intend to store in the queue. The second template parameter allows you to stipulate the underlying container that the queue adapts. However, the queue requires the sequential container to support both push_back() and pop_front(), so you have only two built-in choices: deque and list. For most purposes, you can just stick with the default deque.
The queue interface is extremely simple: there are only eight methods plus the constructor and the normal comparison operators. The push()and emplace() methods add a new element to the tail of the queue, while pop() removes the element at the head of the queue. You can retrieve references to, without removing, the first and last elements with front() and back(), respectively. As usual, when called on const objects, front() and back() return const references; and when called on non-const objects, they return non-const (read/write) references.
The queue also supports size(), empty(), and swap().
When two computers communicate over a network, they send information to each other divided up into discrete chunks called packets. The networking layer of the computer’s operating system must pick up the packets and store them as they arrive. However, the computer might not have enough bandwidth to process all of them at once. Thus, the networking layer usually buffers, or stores, the packets until the higher layers have a chance to attend to them. The packets should be processed in the order they arrive, so this problem is perfect for a queue structure. The following is a small PacketBuffer class, with comments explaining the code, which stores incoming packets in a queue until they are processed. It’s a class template so that different layers of the networking layer can use it for different kinds of packets, such as IP packets or TCP packets. It allows the client to specify a maximum size because operating systems usually limit the number of packets that can be stored, so as not to use too much memory. When the buffer is full, subsequently arriving packets are ignored.
template <typename T>class PacketBuffer{public:// If maxSize is 0, the size is unlimited, because creating// a buffer of size 0 makes little sense. Otherwise only// maxSize packets are allowed in the buffer at any one time.PacketBuffer(size_t maxSize = 0);virtual ~PacketBuffer() = default;// Stores a packet in the buffer.// Returns false if the packet has been discarded because// there is no more space in the buffer, true otherwise.bool bufferPacket(const T& packet);// Returns the next packet. Throws out_of_range// if the buffer is empty.T getNextPacket();private:std::queue<T> mPackets;size_t mMaxSize;};template <typename T> PacketBuffer<T>::PacketBuffer(size_t maxSize/*= 0*/): mMaxSize(maxSize){}template <typename T> bool PacketBuffer<T>::bufferPacket(const T& packet){if (mMaxSize > 0 && mPackets.size() == mMaxSize) {// No more space. Drop the packet.return false;}mPackets.push(packet);return true;}template <typename T> T PacketBuffer<T>::getNextPacket(){if (mPackets.empty()) {throw std::out_of_range("Buffer is empty");}// Retrieve the head elementT temp = mPackets.front();// Pop the head elementmPackets.pop();// Return the head elementreturn temp;}
A practical application of this class would require multiple threads. C++ provides synchronization classes to allow thread-safe access to shared objects. Without explicit synchronization, no Standard Library object can be used safely from multiple threads when at least one of the threads modifies the object. Synchronization is discussed in Chapter 23. The focus in this example is on the queue class, so here is a single-threaded example of using the PacketBuffer:
class IPPacket final{public:IPPacket(int id) : mID(id) {}int getID() const { return mID; }private:int mID;};int main(){PacketBuffer<IPPacket> ipPackets(3);// Add 4 packetsfor (int i = 1; i <= 4; ++i) {if (!ipPackets.bufferPacket(IPPacket(i))) {cout << "Packet " << i << " dropped (queue is full)." << endl;}}while (true) {try {IPPacket packet = ipPackets.getNextPacket();cout << "Processing packet " << packet.getID() << endl;} catch (const out_of_range&) {cout << "Queue is empty." << endl;break;}}return 0;}
The output of this program is as follows:
Packet 4 dropped (queue is full).Processing packet 1Processing packet 2Processing packet 3Queue is empty.
A priority queue is a queue that keeps its elements in sorted order. Instead of a strict FIFO ordering, the element at the head of the queue at any given time is the one with the highest priority. This element could be the oldest on the queue or the most recent. If two elements have equal priority, their relative order in the queue is undefined.
The priority_queue container adaptor is also defined in <queue>. Its template definition looks something like this (slightly simplified):
template <class T, class Container = vector<T>,class Compare = less<T>>;
It’s not as complicated as it looks. You’ve seen the first two parameters before: T is the element type stored in the priority_queue and Container is the underlying container on which the priority_queue is adapted. The priority_queue uses vector as the default, but deque works as well. list does not work because the priority_queue requires random access to its elements. The third parameter, Compare, is trickier. As you’ll learn more about in Chapter 18, less is a class template that supports comparison of two objects of type T with operator<. What this means for you is that the priority of elements in a priority_queue is determined according to operator<. You can customize the comparison used, but that’s a topic for Chapter 18. For now, just make sure that you define operator< appropriately for the types stored in a priority_queue.
A priority_queue provides even fewer operations than does a queue. The push() and emplace() methods allow you to insert elements, pop() allows you to remove elements, and top() returns a const reference to the head element.
Like a queue, a priority_queue supports size(), empty(), and swap(). However, it does not provide any comparison operators.
Single failures on a system can often cause multiple errors to be generated from different components. A good error-handling system uses error correlation to process the most important errors first. You can use a priority_queue to write a very simple error correlator. Assume all error events encode their own priority. The error correlator simply sorts error events according to their priority, so that the highest-priority errors are always processed first. Here is the class definition:
// Sample Error class with just a priority and a string error description.class Error final{public:Error(int priority, std::string_view errorString): mPriority(priority), mErrorString(errorString) {}int getPriority() const { return mPriority; }std::string_view getErrorString() const { return mErrorString; }private:int mPriority;std::string mErrorString;};bool operator<(const Error& lhs, const Error& rhs);std::ostream& operator<<(std::ostream& os, const Error& err);// Simple ErrorCorrelator class that returns highest priority errors first.class ErrorCorrelator final{public:// Add an error to be correlated.void addError(const Error& error);// Retrieve the next error to be processed.Error getError();private:std::priority_queue<Error> mErrors;};
Here are the definitions of the functions and methods:
bool operator<(const Error& lhs, const Error& rhs){return (lhs.getPriority() < rhs.getPriority());}ostream& operator<<(ostream& os, const Error& err){os << err.getErrorString() << " (priority " << err.getPriority() << ")";return os;}void ErrorCorrelator::addError(const Error& error){mErrors.push(error);}Error ErrorCorrelator::getError(){// If there are no more errors, throw an exception.if (mErrors.empty()) {throw out_of_range("No more errors.");}// Save the top element.Error top = mErrors.top();// Remove the top element.mErrors.pop();// Return the saved element.return top;}
Here is a simple unit test showing how to use the ErrorCorrelator. Realistic use would require multiple threads so that one thread adds errors, while another processes them. As mentioned earlier with the queue example, this requires explicit synchronization, which is only discussed in Chapter 23.
ErrorCorrelator ec;ec.addError(Error(3, "Unable to read file"));ec.addError(Error(1, "Incorrect entry from user"));ec.addError(Error(10, "Unable to allocate memory!"));while (true) {try {Error e = ec.getError();cout << e << endl;} catch (const out_of_range&) {cout << "Finished processing errors" << endl;break;}}
The output of this program is as follows:
Unable to allocate memory! (priority 10)Unable to read file (priority 3)Incorrect entry from user (priority 1)Finished processing errors
A stack is almost identical to a queue, except that it provides first-in, last-out (FILO) semantics, also known as last-in, first-out (LIFO), instead of FIFO. It is defined in the <stack> header file. The template definition looks like this:
template <class T, class Container = deque<T>> class stack;You can use vector, list, or deque as the underlying container for the stack.
Like the queue, the stack provides push(), emplace(), and pop(). The difference is that push() adds a new element to the top of the stack, “pushing down” all elements inserted earlier, and pop() removes the element from the top of the stack, which is the most recently inserted element. The top() method returns a const reference to the top element if called on a const object, and a non-const reference if called on a non-const object.
The stack supports empty(), size(), swap(), and the standard comparison operators.
You can rewrite the previous ErrorCorrelator class so that it gives out the most recent error instead of the one with the highest priority. The only change required is to change mErrors from a priority_queue to a stack. With this change, the errors are distributed in LIFO order instead of priority order. Nothing in the method definitions needs to change because the push(), pop(), top(), and empty() methods exist on both a priority_queue and a stack.
Unlike the sequential containers, the ordered associative containers do not store elements in a linear configuration. Instead, they provide a mapping of keys to values. They generally offer insertion, deletion, and lookup times that are equivalent to each other.
There are four ordered associative containers provided by the Standard Library: map, multimap, set, and multiset. Each of these containers stores its elements in a sorted, tree-like data structure. There are also four unordered associative containers: unordered_map, unordered_multimap, unordered_set, and unordered_multiset. These are discussed later in this chapter.
Before learning about the ordered associative containers, you must become familiar with the pair class, which is defined in the <utility> header file. pair is a class template that groups together two values of possibly different types. The values are accessible through the first and second public data members. operator== and operator< are defined for pairs to compare both the first and second elements. Here are some examples:
// Two-argument constructor and default constructorpair<string, int> myPair("hello", 5);pair<string, int> myOtherPair;// Can assign directly to first and secondmyOtherPair.first = "hello";myOtherPair.second = 6;// Copy constructorpair<string, int> myThirdPair(myOtherPair);// operator<if (myPair < myOtherPair) {cout << "myPair is less than myOtherPair" << endl;} else {cout << "myPair is greater than or equal to myOtherPair" << endl;}// operator==if (myOtherPair == myThirdPair) {cout << "myOtherPair is equal to myThirdPair" << endl;} else {cout << "myOtherPair is not equal to myThirdPair" << endl;}
The output is as follows:
myPair is less than myOtherPairmyOtherPair is equal to myThirdPair
The library also provides a utility function template, make_pair(), that constructs a pair from two values, as in this example:
pair<int, double> aPair = make_pair(5, 10.10);Of course, in this case you could have just used the two-argument constructor. However, make_pair() is more useful when you want to pass a pair to a function, or assign it to a pre-existing variable. Unlike class templates, function templates can infer types from parameters, so you can use make_pair() to construct a pair without explicitly specifying the types. You can also use make_pair() in combination with the auto keyword as follows:
auto aSecondPair = make_pair(5, 10.10); C++17 introduces template parameter deduction for constructors, as discussed in Chapter 12. This allows you to forget about make_pair(), and simply write the following:
auto aThirdPair = pair(5, 10.10); Structured bindings is another C++17 feature introduced in Chapter 1. It can be used to decompose the elements of a pair into separate variables. Here’s an example:
pair<string, int> myPair("hello", 5);auto[theString, theInt] = myPair; // Decompose using structured bindingscout << "theString: " << theString << endl;cout << "theInt: " << theInt << endl;
A map, defined in the <map> header file, stores key/value pairs instead of just single values. Insertion, lookup, and deletion are all based on the key; the value is just “along for the ride.” The term map comes from the conceptual understanding that the container “maps” keys to values.
A map keeps elements in sorted order, based on the keys, so that insertion, deletion, and lookup all take logarithmic time. Because of the order, when you enumerate the elements, they come out in the ordering imposed by the type’s operator< or a user-defined comparator. It is usually implemented as some form of balanced tree, such as a red-black tree. However, the tree structure is not exposed to the client.
You should use a map whenever you need to store and retrieve elements based on a “key” and you would like to have them in a certain order.
The map class template takes four types: the key type, the value type, the comparison type, and the allocator type. As always, the allocator is ignored in this chapter. The comparison type is similar to the comparison type for a priority_queue described earlier. It allows you to specify a different comparison class than the default. In this chapter, only the default less comparison is used. When using the default, make sure that your keys all respond to operator< appropriately. If you’re interested in further detail, Chapter 18 explains how to write your own comparison classes.
If you ignore the comparison and allocator parameters, constructing a map is just like constructing a vector or a list, except that you specify the key and value types separately in the template instantiation. For example, the following code constructs a map that uses ints as the key and stores objects of the Data class:
class Data final{public:explicit Data(int value = 0) : mValue(value) { }int getValue() const { return mValue; }void setValue(int value) { mValue = value; }private:int mValue;};…map<int, Data> dataMap;
A map also supports uniform initialization:
map<string, int> m = {{ "Marc G.", 123 },{ "Warren B.", 456 },{ "Peter V.W.", 789 }};
Inserting an element into sequential containers such as vector and list always requires you to specify the position at which the element is to be added. A map, along with the other ordered associative containers, is different. The map’s internal implementation determines the position in which to store the new element; you need only to supply the key and the value.
When inserting elements, it is important to keep in mind that maps require unique keys: every element in the map must have a different key. If you want to support multiple elements with the same key, you have two options: you can either use a map and store another container such as a vector or an array as the value for a key, or you can use multimaps, described later.
The insert() method can be used to add elements to a map, and has the advantage of allowing you to detect if a key already exists. You must specify the key/value pair as a pair object or as an initializer_list. The return type of the basic form of insert() is a pair of an iterator and a bool. The reason for the complicated return type is that insert() does not overwrite an element value if one already exists with the specified key. The bool element of the returned pair specifies whether or not the insert() actually inserted the new key/value pair. The iterator refers to the element in the map with the specified key (with a new or old value, depending on whether the insert succeeded or failed). map iterators are discussed in more detail in the next section. Continuing the map example from the previous section, you can use insert() as follows:
map<int, Data> dataMap;auto ret = dataMap.insert({ 1, Data(4) }); // Using an initializer_listif (ret.second) {cout << "Insert succeeded!" << endl;} else {cout << "Insert failed!" << endl;}ret = dataMap.insert(make_pair(1, Data(6))); // Using a pair objectif (ret.second) {cout << "Insert succeeded!" << endl;} else {cout << "Insert failed!" << endl;}
The type of the ret variable is a pair as follows:
pair<map<int, Data>::iterator, bool> ret;The first element of the pair is a map iterator for a map with keys of type int and values of type Data. The second element of the pair is a Boolean value.
The output of the program is as follows:
Insert succeeded!Insert failed!
With initializers for if statements (C++17), inserting the data into the map and checking the result can be done with a single statement as follows:
if (auto result = dataMap.insert({ 1, Data(4) }); result.second) {cout << "Insert succeeded!" << endl;} else {cout << "Insert failed!" << endl;}
This can even be combined with C++17 structured bindings:
if (auto [iter, success] = dataMap.insert({ 1, Data(4) }); success) {cout << "Insert succeeded!" << endl;} else {cout << "Insert failed!" << endl;}
The insert_or_assign() Methodinsert_or_assign() has a similar return type as insert(). However, if an element with the given key already exists, insert_or_assign() overwrites the old value with the new value, while insert() does not overwrite the old value in that case. Another difference with insert() is that insert_or_assign() has two separate parameters: the key and the value. Here is an example:
ret = dataMap.insert_or_assign(1, Data(7));if (ret.second) {cout << "Inserted." << endl;} else {cout << "Overwritten." << endl;}
Another method to insert elements into a map is through the overloaded operator[]. The difference is mainly in the syntax: you specify the key and value separately. Additionally, operator[] always succeeds. If no element value with the given key exists, it creates a new element with that key and value. If an element with the key already exists, operator[] replaces the element value with the newly specified value. Here is part of the previous example using operator[] instead of insert():
map<int, Data> dataMap;dataMap[1] = Data(4);dataMap[1] = Data(6); // Replaces the element with key 1
There is, however, one major caveat to operator[]: it always constructs a new value object, even if it doesn’t need to use it. Thus, it requires a default constructor for your element values, and can be less efficient than insert().
The fact that operator[] creates a new element in a map if the requested element does not already exist means that this operator is not marked as const. This sounds obvious, but might sometimes look counterintuitive. For example, suppose you have the following function:
void func(const map<int, int>& m){cout << m[1] << endl; // Error}
This fails to compile, even though you appear to be just reading the value m[1]. It fails because the variable m is a const reference to a map, and operator[] is not marked as const. Instead, you should use the find() method described in the section “Looking Up Elements.”
A map supports emplace() and emplace_hint() to construct elements in-place, similar to the emplace methods of a vector. C++17 adds a try_emplace() method that inserts an element in-place if the given key does not exist yet, or does nothing if the key already exists in the map.
map iterators work similarly to the iterators on the sequential containers. The major difference is that the iterators refer to key/value pairs instead of just the values. In order to access the value, you must retrieve the second field of the pair object. map iterators are bidirectional, meaning you can traverse them in both directions. Here is how you can iterate through the map from the previous example:
for (auto iter = cbegin(dataMap); iter != cend(dataMap); ++iter) {cout << iter->second.getValue() << endl;}
Take another look at the expression used to access the value:
iter->second.getValue()iter refers to a key/value pair, so you can use the -> operator to access the second field of that pair, which is a Data object. You can then call the getValue() method on that Data object.
Note that the following code is functionally equivalent:
(*iter).second.getValue()Using a range-based for loop, the loop can be written more readable as follows:
for (const auto& p : dataMap) {cout << p.second.getValue() << endl;}
It can be implemented even more elegantly using a combination of a range-based for loop and C++17 structured bindings:
for (const auto& [key, data] : dataMap) {cout << data.getValue() << endl;}
A map provides logarithmic lookup of elements based on a supplied key. If you already know that an element with a given key is in a map, the simplest way to look it up is through operator[] as long as you call it on a non-const
map or a non-const reference to a map. The nice thing about operator[] is that it returns a reference to the element that you can use and modify directly, without worrying about pulling the value out of a pair object. Here is an extension to the preceding example to call the setValue() method on the Data object value at key 1:
map<int, Data> dataMap;dataMap[1] = Data(4);dataMap[1] = Data(6);dataMap[1].setValue(100);
However, if you don’t know whether the element exists, you may not want to use operator[], because it will insert a new element with that key if it doesn’t find one already. As an alternative, map provides a find() method that returns an iterator referring to the element with the specified key, if it exists, or the end() iterator if it’s not in the map. Here is an example using find() to perform the same modification to the Data object with key 1:
auto it = dataMap.find(1);if (it != end(dataMap)) {it->second.setValue(100);}
As you can see, using find() is a bit clumsier, but it’s sometimes necessary.
If you only want to know whether or not an element with a certain key is in a map, you can use the count() method. It returns the number of elements in a map with a given key. For maps, the result will always be 0 or 1 because there can be no elements with duplicate keys.
A map allows you to remove an element at a specific iterator position or to remove all elements in a given iterator range, in amortized constant and logarithmic time, respectively. From the client perspective, these two erase() methods are equivalent to those in the sequential containers. A great feature of a map, however, is that it also provides a version of erase() to remove an element matching a key. Here is an example:
map<int, Data> dataMap;dataMap[1] = Data(4);cout << "There are " << dataMap.count(1) << " elements with key 1" << endl;dataMap.erase(1);cout << "There are " << dataMap.count(1) << " elements with key 1" << endl;
The output is as follows:
There are 1 elements with key 1There are 0 elements with key 1
NodesAll the ordered and unordered associative containers are so-called node-based data structures. Starting with C++17, the Standard Library provides direct access to nodes in the form of node handles. The exact type is unspecified, but each container has a type alias called node_type that specifies the type of a node handle for that container. A node handle can only be moved, and is the owner of the element stored in a node. It provides read/write access to both the key and the value.
Nodes can be extracted from an associative container as a node handle using the extract() method, based either on a given iterator position or on a given key. Extracting a node from a container removes it from the container, because the returned node handle is the sole owner of the extracted element.
New insert() overloads are provided that allow you to insert a node handle into a container.
Using extract() to extract node handles, and insert() to insert node handles, you can effectively transfer data from one associative container to another one without any copying or moving involved. You can even move nodes from a map to a multimap, and from a set to a multiset. Continuing with the example from the previous section, the following code snippet transfers the node with key 1 to a second map:
map<int, Data> dataMap2;auto extractedNode = dataMap.extract(1);dataMap2.insert(std::move(extractedNode));
The last two lines can be combined into one:
dataMap2.insert(dataMap.extract(1));One additional operation is available to move all nodes from one associative container to another one: merge(). Nodes that cannot be moved because they would cause, for example, duplicates in a target container that does not allow duplicates, are left in the source container. Here is an example:
map<int, int> src = { {1, 11}, {2, 22} };map<int, int> dst = { {2, 22}, {3, 33}, {4, 44}, {5, 55} };dst.merge(src);
After the merge operation, src still contains one element, {2, 22}, because the destination already contains such an element, so it cannot be moved. dst contains {1, 11}, {2, 22}, {3, 33}, {4, 44}, and {5, 55} after the operation.
You can implement a simple bank account database using a map. A common pattern is for the key to be one field of a class or struct that is stored in a map. In this case, the key is the account number. Here are simple BankAccount and BankDB classes:
class BankAccount final{public:BankAccount(int acctNum, std::string_view name): mAcctNum(acctNum), mClientName(name) {}void setAcctNum(int acctNum) { mAcctNum = acctNum; }int getAcctNum() const { return mAcctNum; }void setClientName(std::string_view name) { mClientName = name; }std::string_view getClientName() const { return mClientName; }private:int mAcctNum;std::string mClientName;};class BankDB final{public:// Adds account to the bank database. If an account exists already// with that number, the new account is not added. Returns true// if the account is added, false if it's not.bool addAccount(const BankAccount& account);// Removes the account acctNum from the database.void deleteAccount(int acctNum);// Returns a reference to the account represented// by its number or the client name.// Throws out_of_range if the account is not found.BankAccount& findAccount(int acctNum);BankAccount& findAccount(std::string_view name);// Adds all the accounts from db to this database.// Deletes all the accounts from db.void mergeDatabase(BankDB& db);private:std::map<int, BankAccount> mAccounts;};
Here are the implementations of the BankDB methods, with comments explaining the code:
bool BankDB::addAccount(const BankAccount& acct){// Do the actual insert, using the account number as the keyauto res = mAccounts.emplace(acct.getAcctNum(), acct);// or: auto res = mAccounts.insert(make_pair(acct.getAcctNum(), acct));// Return the bool field of the pair specifying success or failurereturn res.second;}void BankDB::deleteAccount(int acctNum){mAccounts.erase(acctNum);}BankAccount& BankDB::findAccount(int acctNum){// Finding an element via its key can be done with find()auto it = mAccounts.find(acctNum);if (it == end(mAccounts)) {throw out_of_range("No account with that number.");}// Remember that iterators into maps refer to pairs of key/valuereturn it->second;}BankAccount& BankDB::findAccount(string_view name){// Finding an element by a non-key attribute requires a linear// search through the elements. Uses C++17 structured bindings.for (auto& [acctNum, account] : mAccounts) {if (account.getClientName() == name) {return account; // found it!}}// If your compiler doesn't support the above C++17 structured// bindings yet, you can use the following implementation//for (auto& p : mAccounts) {// if (p.second.getClientName() == name) { return p.second; }//}throw out_of_range("No account with that name.");}void BankDB::mergeDatabase(BankDB& db){// Use C++17 merge().mAccounts.merge(db.mAccounts);// Or: mAccounts.insert(begin(db.mAccounts), end(db.mAccounts));// Now clear the source database.db.mAccounts.clear();}
You can test the BankDB class with the following code:
BankDB db;db.addAccount(BankAccount(100, "Nicholas Solter"));db.addAccount(BankAccount(200, "Scott Kleper"));try {auto& acct = db.findAccount(100);cout << "Found account 100" << endl;acct.setClientName("Nicholas A Solter");auto& acct2 = db.findAccount("Scott Kleper");cout << "Found account of Scott Kleper" << endl;auto& acct3 = db.findAccount(1000);} catch (const out_of_range& caughtException) {cout << "Unable to find account: " << caughtException.what() << endl;}
The output is as follows:
Found account 100Found account of Scott KleperUnable to find account: No account with that number.
A multimap is a map that allows multiple elements with the same key. Like maps, multimaps support uniform initialization. The interface is almost identical to the map interface, with the following differences:
multimaps do not provide operator[] and at(). The semantics of these do not make sense if there can be multiple elements with a single key.multimaps always succeed. Thus, the multimap::insert() method that adds a single element returns just an iterator instead of a pair.insert_or_assign() and try_emplace() methods supported by map are not supported by a multimap.The trickiest aspect of multimaps is looking up elements. You can’t use operator[], because it is not provided. find() isn’t very useful because it returns an iterator referring to any one of the elements with a given key (not necessarily the first element with that key).
However, multimaps store all elements with the same key together and provide methods to obtain iterators for this subrange of elements with the same key in the container. The lower_bound() and upper_bound() methods each return a single iterator referring to the first and one-past-the-last elements matching a given key. If there are no elements matching that key, the iterators returned by lower_bound() and upper_bound() will be equal to each other.
If you need to obtain both iterators bounding the elements with a given key, it’s more efficient to use equal_range() instead of calling lower_bound() followed by calling upper_bound(). The equal_range() method returns a pair of the two iterators that would be returned by lower_bound() and upper_bound().
Most of the numerous online chat programs allow users to have a “buddy list” or list of friends. The chat program confers special privileges on users in the buddy list, such as allowing them to send unsolicited messages to the user.
One way to implement the buddy lists for an online chat program is to store the information in a multimap. One multimap could store the buddy lists for every user. Each entry in the container stores one buddy for a user. The key is the user and the value is the buddy. For example, if Harry Potter and Ron Weasley had each other on their individual buddy lists, there would be two entries of the form “Harry Potter” maps to “Ron Weasley” and “Ron Weasley” maps to “Harry Potter.” A multimap allows multiple values for the same key, so the same user is allowed multiple buddies. Here is the BuddyList class definition:
class BuddyList final{public:// Adds buddy as a friend of name.void addBuddy(const std::string& name, const std::string& buddy);// Removes buddy as a friend of namevoid removeBuddy(const std::string& name, const std::string& buddy);// Returns true if buddy is a friend of name, false otherwise.bool isBuddy(const std::string& name, const std::string& buddy) const;// Retrieves a list of all the friends of name.std::vector<std::string> getBuddies(const std::string& name) const;private:std::multimap<std::string, std::string> mBuddies;};
Here is the implementation, with comments explaining the code. It demonstrates the use of lower_bound(), upper_bound(), and equal_range():
void BuddyList::addBuddy(const string& name, const string& buddy){// Make sure this buddy isn't already there. We don't want// to insert an identical copy of the key/value pair.if (!isBuddy(name, buddy)) {mBuddies.insert({ name, buddy }); // Using initializer_list}}void BuddyList::removeBuddy(const string& name, const string& buddy){// Obtain the beginning and end of the range of elements with// key 'name'. Use both lower_bound() and upper_bound() to demonstrate// their use. Otherwise, it's more efficient to call equal_range().auto begin = mBuddies.lower_bound(name); // Start of the rangeauto end = mBuddies.upper_bound(name); // End of the range// Iterate through the elements with key 'name' looking// for a value 'buddy'. If there are no elements with key 'name',// begin equals end, so the loop body doesn't execute.for (auto iter = begin; iter != end; ++iter) {if (iter->second == buddy) {// We found a match! Remove it from the map.mBuddies.erase(iter);break;}}}bool BuddyList::isBuddy(const string& name, const string& buddy) const{// Obtain the beginning and end of the range of elements with// key 'name' using equal_range(), and C++17 structured bindings.auto [begin, end] = mBuddies.equal_range(name);// Iterate through the elements with key 'name' looking// for a value 'buddy'.for (auto iter = begin; iter != end; ++iter) {if (iter->second == buddy) {// We found a match!return true;}}// No matchesreturn false;}vector<string> BuddyList::getBuddies(const string& name) const{// Obtain the beginning and end of the range of elements with// key 'name' using equal_range(), and C++17 structured bindings.auto [begin, end] = mBuddies.equal_range(name);// Create a vector with all names in the range (all buddies of name).vector<string> buddies;for (auto iter = begin; iter != end; ++iter) {buddies.push_back(iter->second);}return buddies;}
This implementation uses C++17 structured bindings, as in this example:
auto [begin, end] = mBuddies.equal_range(name);If your compiler doesn’t support structured bindings yet, then you can write the following:
auto range = mBuddies.equal_range(name);auto begin = range.first; // Start of the rangeauto end = range.second; // End of the range
Note that removeBuddy() can’t simply use the version of erase() that erases all elements with a given key, because it should erase only one element with the key, not all of them. Note also that getBuddies() can’t use insert() on the vector to insert the elements in the range returned by equal_range(), because the elements referred to by the multimap iterators are key/value pairs, not strings. The getBuddies() method must iterate explicitly through the range extracting the string from each key/value pair and pushing it onto the new vector to be returned.
Here is a test of the BuddyList:
BuddyList buddies;buddies.addBuddy("Harry Potter", "Ron Weasley");buddies.addBuddy("Harry Potter", "Hermione Granger");buddies.addBuddy("Harry Potter", "Hagrid");buddies.addBuddy("Harry Potter", "Draco Malfoy");// That's not right! Remove Draco.buddies.removeBuddy("Harry Potter", "Draco Malfoy");buddies.addBuddy("Hagrid", "Harry Potter");buddies.addBuddy("Hagrid", "Ron Weasley");buddies.addBuddy("Hagrid", "Hermione Granger");auto harrysFriends = buddies.getBuddies("Harry Potter");cout << "Harry's friends: " << endl;for (const auto& name : harrysFriends) {cout << "\t" << name << endl;}
The output is as follows:
Harry's friends:Ron WeasleyHermione GrangerHagrid
A set, defined in <set>, is very similar to a map. The difference is that instead of storing key/value pairs, in sets the key is the value. sets are useful for storing information in which there is no explicit key, but which you want to have in sorted order without any duplicates, with quick insertion, lookup, and deletion.
The interface supplied by set is almost identical to that of map. The main difference is that set doesn’t provide operator[], insert_or_assign(), and try_emplace().
You cannot change the key/value of elements in a set because modifying elements of a set while they are in the container would destroy the order.
One way to implement basic security on a computer system is through access control lists. Each entity on the system, such as a file or a device, has a list of users with permissions to access that entity. Users can generally be added to and removed from the permissions list for an entity only by users with special privileges. Internally, a set provides a nice way to represent the access control list. You could use one set for each entity, containing all the usernames who are allowed to access the entity. Here is a class definition for a simple access control list:
class AccessList final{public:// Default constructorAccessList() = default;// Constructor to support uniform initialization.AccessList(std::initializer_list<std::string_view> initlist);// Adds the user to the permissions list.void addUser(std::string_view user);// Removes the user from the permissions list.void removeUser(std::string_view user);// Returns true if the user is in the permissions list.bool isAllowed(std::string_view user) const;// Returns a vector of all the users who have permissions.std::vector<std::string> getAllUsers() const;private:std::set<std::string> mAllowed;};
Here are the method definitions:
AccessList::AccessList(initializer_list<string_view> initlist){mAllowed.insert(begin(initlist), end(initlist));}void AccessList::addUser(string_view user){mAllowed.emplace(user);}void AccessList::removeUser(string_view user){mAllowed.erase(string(user));}bool AccessList::isAllowed(string_view user) const{return (mAllowed.count(string(user)) != 0);}vector<string> AccessList::getAllUsers() const{return { begin(mAllowed), end(mAllowed) };}
Take a look at the interesting one-line implementation of getAllUsers(). That one line constructs a vector<string> to return, by passing a begin and end iterator of mAllowed to the vector constructor. If you want, you can split this over two lines:
vector<string> users(begin(mAllowed), end(mAllowed));return users;
Finally, here is a simple test program:
AccessList fileX = { "pvw", "mgregoire", "baduser" };fileX.removeUser("baduser");if (fileX.isAllowed("mgregoire")) {cout << "mgregoire has permissions" << endl;}if (fileX.isAllowed("baduser")) {cout << "baduser has permissions" << endl;}auto users = fileX.getAllUsers();for (const auto& user : users) {cout << user << " ";}
One of the constructors for AccessList uses an initializer_list as a parameter, so that you can use the uniform initialization syntax, as demonstrated in the test program for initializing fileX.
The output of this program is as follows:
mgregoire has permissionsmgregoire pvw
A multiset is to a set what a multimap is to a map. A multiset supports all the operations of a set, but it allows multiple elements that are equal to each other to be stored in the container simultaneously. An example of a multiset is not shown because it’s so similar to set and multimap.
The Standard Library has support for unordered associative containers or hash tables. There are four of them: unordered_map, unordered_multimap, unordered_set, and unordered_multiset. The map, multimap, set, and multiset containers discussed earlier sort their elements, while these unordered variants do not sort their elements.
The unordered associative containers are also called hash tables. That is because the implementation makes use of so-called hash functions. The implementation usually consists of some kind of array where each element in the array is called a bucket. Each bucket has a specific numerical index like 0, 1, 2, up until the last bucket. A hash function transforms a key into a hash value, which is then transformed into a bucket index. The value associated with that key is then stored in that bucket.
The result of a hash function is not always unique. The situation in which two or more keys hash to the same bucket index is called a collision. A collision can occur when different keys result in the same hash value, or when different hash values transform to the same bucket index. There are many approaches to handling collisions, including quadratic re-hashing and linear chaining, among others. If you are interested, you can consult one of the references in the Algorithms and Data Structures section in Appendix B. The Standard Library does not specify which collision-handling algorithm is required, but most current implementations have chosen to resolve collisions by linear chaining. With linear chaining, buckets do not directly contain the data values associated with the keys, but contain a pointer to a linked list. This linked list contains all the data values for that specific bucket. Figure 17-1 shows how this works.
In Figure 17-1, there are two collisions. The first collision is because applying the hash function to the keys “Marc G.” and “John D.” results in the same hash value which maps to bucket index 128. This bucket then points to a linked list containing the keys “Marc G.” and “John D.” together with their associated data values. The second collision is caused by the hash values for “Scott K.” and “Johan G.” mapping to the same bucket index 129.
From Figure 17-1, it is also clear how lookups based on keys work and what the complexity is. A lookup involves a single hash function call to calculate the hash value. This hash value is then transformed to a bucket index. Once the bucket index is known, one or more equality operations are required to find the right key in the linked list. This shows that lookups can be much faster compared to lookups with normal maps, but it all depends on how many collisions there are.
The choice of the hash function is very important. A hash function that creates no collisions is known as a “perfect hash.” A perfect hash has a lookup time that is constant; a regular hash has a lookup time that is, on average, close to 1, independent of the number of elements. As the number of collisions increases, the lookup time increases, reducing performance. Collisions can be reduced by increasing the basic hash table size, but you need to take cache sizes into account.
The C++ standard provides hash functions for pointers and all primitive data types such as bool, char, int, float, double, and so on. Hash functions are also provided for error_code, error_condition, optional, variant, bitset, unique_ptr, shared_ptr, type_index, string, string_view, vector<bool>, and thread::id. If there is no standard hash function available for the type of keys you want to use, then you have to implement your own hash function. Creating a perfect hash is a nontrivial exercise, even when the set of keys is fixed and known. It requires deep mathematical analysis. However, even creating a non-perfect one, but one which is good enough and has decent performance, is still challenging. It’s outside the scope of this book to explain the mathematics behind hash functions in detail. Instead, only an example of a very simple hash function is given.
The following code demonstrates how to write a custom hash function. This implementation simply forwards the request to one of the available standard hash functions. The code defines a class IntWrapper that just wraps a single integer. An operator== is provided because that’s a requirement for keys used in unordered associative containers.
class IntWrapper{public:IntWrapper(int i) : mWrappedInt(i) {}int getValue() const { return mWrappedInt; }private:int mWrappedInt;};bool operator==(const IntWrapper& lhs, const IntWrapper& rhs){return lhs.getValue() == rhs.getValue();}
To write a hash function for IntWrapper, you write a specialization of the std::hash template for IntWrapper. The std::hash template is defined in <functional>. This specialization needs an implementation of the function call operator that calculates and returns the hash of a given IntWrapper instance. For this example, the request is simply forwarded to the standard hash function for integers:
namespace std{template<> struct hash<IntWrapper>{using argument_type = IntWrapper;using result_type = size_t;result_type operator()(const argument_type& f) const {return std::hash<int>()(f.getValue());}};}
Note that you normally are not allowed to put anything in the std namespace; however, std class template specializations are an exception to this rule. The two type definitions are required by the hash class template. The implementation of the function call operator is just one line. It creates an instance of the standard hash function for integers—std::hash<int>()—and then calls the function call operator on it with, as argument, f.getValue(). Note that this forwarding works in this example because IntWrapper contains just one data member, an integer. If the class contained multiple data members, then a hash value would need to be calculated taking all these data members into account; however, those details fall outside the scope of this book.
The unordered_map container is defined in <unordered_map> as a class template:
template <class Key,class T,class Hash = hash<Key>,class Pred = std::equal_to<Key>,class Alloc = std::allocator<std::pair<const Key, T>>>class unordered_map;
There are five template parameters: the key type, the value type, the hash type, the equal comparison type, and the allocator type. With the last three parameters you can specify your own hash function, equal comparison function, and allocator function, respectively. These parameters can usually be ignored because they have default values. I recommend you keep those default values when possible. The most important parameters are the first two. As with maps, uniform initialization can be used to initialize an unordered_map, as shown in the following example:
unordered_map<int, string> m = {{1, "Item 1"},{2, "Item 2"},{3, "Item 3"},{4, "Item 4"}};// Using C++17 structured bindings.for (const auto&[key, value] : m) {cout << key << " = " << value << endl;}// Without structured bindings.for (const auto& p : m) {cout << p.first << " = " << p.second << endl;}
The following table summarizes the differences between a map and an unordered_map. A filled box () means the container supports that operation, while an empty box () means the operation is not supported.
| OPERATION | <char:InlineCodeUserInput>map</char:InlineCodeUserInput> | <char:InlineCodeUserInput>unordered_map</char:InlineCodeUserInput> |
at() |
|
|
begin() |
|
|
begin(n) |
|
|
bucket() |
|
|
bucket_count() |
|
|
bucket_size() |
|
|
cbegin() |
|
|
cbegin(n) |
|
|
cend() |
|
|
cend(n) |
|
|
clear() |
|
|
count() |
|
|
crbegin() |
|
|
crend() |
|
|
emplace() |
|
|
emplace_hint() |
|
|
empty() |
|
|
end() |
|
|
end(n) |
|
|
equal_range() |
|
|
erase() |
|
|
extract() |
|
|
find() |
|
|
insert() |
|
|
insert_or_assign() |
|
|
iterator / const_iterator |
|
|
load_factor() |
|
|
local_iterator / const_local_iterator |
|
|
lower_bound() |
|
|
max_bucket_count() |
|
|
max_load_factor() |
|
|
max_size() |
|
|
merge() |
|
|
operator[] |
|
|
rbegin() |
|
|
rehash() |
|
|
rend() |
|
|
reserve() |
|
|
reverse_iterator / const_reverse_iterator |
|
|
size() |
|
|
swap() |
|
|
try_emplace() |
|
|
upper_bound() |
|
|
As with a normal map, all keys in an unordered_map should be unique. The preceding table includes a number of hash-specific methods. For example, load_factor() returns the average number of elements per bucket to give you an indication of the number of collisions. The bucket_count() method returns the number of buckets in the container. It also provides a local_iterator and const_local_iterator, allowing you to iterate over the elements in a single bucket; however, these may not be used to iterate across buckets. The bucket(key) method returns the index of the bucket that contains the given key; begin(n) returns a local_iterator referring to the first element in the bucket with index n, and end(n) returns a local_iterator referring to one-past-the-last element in the bucket with index n. The example in the next section demonstrates how to use these methods.
The following example uses an unordered_map to represent a phone book. The name of a person is the key, while the phone number is the value associated with that key.
template<class T>void printMap(const T& m){for (auto& [key, value] : m) {cout << key << " (Phone: " << value << ")" << endl;}cout << "-------" << endl;}int main(){// Create a hash table.unordered_map<string, string> phoneBook = {{ "Marc G.", "123-456789" },{ "Scott K.", "654-987321" } };printMap(phoneBook);// Add/remove some phone numbers.phoneBook.insert(make_pair("John D.", "321-987654"));phoneBook["Johan G."] = "963-258147";phoneBook["Freddy K."] = "999-256256";phoneBook.erase("Freddy K.");printMap(phoneBook);// Find the bucket index for a specific key.const size_t bucket = phoneBook.bucket("Marc G.");cout << "Marc G. is in bucket " << bucket<< " which contains the following "<< phoneBook.bucket_size(bucket) << " elements:" << endl;// Get begin and end iterators for the elements in this bucket.// 'auto' is used here. The compiler deduces the type of// both as unordered_map<string, string>::const_local_iteratorauto localBegin = phoneBook.cbegin(bucket);auto localEnd = phoneBook.cend(bucket);for (auto iter = localBegin; iter != localEnd; ++iter) {cout << "\t" << iter->first << " (Phone: "<< iter->second << ")" << endl;}cout << "-------" << endl;// Print some statistics about the hash tablecout << "There are " << phoneBook.bucket_count() << " buckets." << endl;cout << "Average number of elements in a bucket is "<< phoneBook.load_factor() << endl;return 0;}
A possible output is as follows. Note that the output can be different on a different system, because it depends on the implementation of both the hash function and the unordered_map itself being used.
Scott K. (Phone: 654-987321)Marc G. (Phone: 123-456789)-------Scott K. (Phone: 654-987321)Marc G. (Phone: 123-456789)Johan G. (Phone: 963-258147)John D. (Phone: 321-987654)-------Marc G. is in bucket 1 which contains the following 2 elements:Scott K. (Phone: 654-987321)Marc G. (Phone: 123-456789)-------There are 8 buckets.Average number of elements in a bucket is 0.5
An unordered_multimap is an unordered_map that allows multiple elements with the same key. Their interfaces are almost identical, with the following differences:
unordered_multimaps do not provide operator[] and at(). The semantics of these do not make sense if there can be multiple elements with a single key.unordered_multimaps always succeed. Thus, the unordered_multimap::insert() method that adds a single element returns just an iterator instead of a pair.insert_or_assign() and try_emplace() methods supported by unordered_map are not supported by an unordered_multimap.As discussed earlier with multimaps, looking up elements in unordered_multimaps cannot be done using operator[] because it is not provided. You can use find() but it returns an iterator referring to any one of the elements with a given key (not necessarily the first element with that key). Instead, it’s best to use the equal_range() method, which returns a pair of iterators: one referring to the first element matching a given key, and one referring to one-past-the-last element matching that key. The use of equal_range() is exactly the same as discussed for multimaps, so you can look at the example given for multimaps to see how it works.
The <unordered_set> header file defines unordered_set and unordered_multiset, which are very similar to set and multiset, respectively, except that they do not sort their keys but they use a hash function. The differences between unordered_set and unordered_map are similar to the differences between set and map as discussed earlier in this chapter, so they are not discussed in detail here. Consult a Standard Library Reference for a thorough summary of unordered_set and unordered_multiset operations.
There are several other parts of the C++ language that work with the Standard Library to varying degrees, including standard C-style arrays, strings, streams, and bitset.
Recall that “dumb”/raw pointers are bona fide iterators because they support the required operations. This point is more than just a piece of trivia. It means that you can treat standard C-style arrays as Standard Library containers by using pointers to their elements as iterators. Standard C-style arrays, of course, don’t provide methods like size(), empty(), insert(), and erase(), so they aren’t true Standard Library containers. Nevertheless, because they do support iterators through pointers, you can use them in the algorithms described in Chapter 18 and in some of the methods described in this chapter.
For example, you could copy all the elements of a standard C-style array into a vector using the insert() method of a vector that takes an iterator range from any container. This insert() method’s prototype looks like this:
template <class InputIterator> iterator insert(const_iterator position,InputIterator first, InputIterator last);
If you want to use a standard C-style int array as the source, then the templatized type of InputIterator becomes int*. Here is a full example:
const size_t count = 10;int arr[count]; // standard C-style array// Initialize each element of the array to the value of its index.for (int i = 0; i < count; i++) {arr[i] = i;}// Insert the contents of the array at the end of a vector.vector<int> vec;vec.insert(end(vec), arr, arr + count);// Print the contents of the vector.for (const auto& i : vec) {cout << i << " ";}
Note that the iterator referring to the first element of the array is the address of the first element, which is arr in this case. The name of an array alone is interpreted as the address of the first element. The iterator referring to the end must be one-past-the-last element, so it’s the address of the first element plus count, or arr+count.
It’s easier to use std::begin() or std::cbegin() to get an iterator to the first element of a statically allocated C-style array not accessed through pointers, and std::end() or std::cend() to get an iterator to one-past-the-last element of such an array. For example, the call to insert() in the previous example can be written as follows:
vec.insert(end(vec), cbegin(arr), cend(arr));You can think of a string as a sequential container of characters. Thus, it shouldn’t be surprising to learn that a C++ string is a full-fledged sequential container. It contains begin() and end() methods that return iterators into the string, insert(), push_back(), and erase() methods, size(), empty(), and all the rest of the sequential container basics. It resembles a vector quite closely, even providing the methods reserve() and capacity().
You can use string as a Standard Library container just as you would use vector. Here is an example:
string myString;myString.insert(cend(myString), 'h');myString.insert(cend(myString), 'e');myString.push_back('l');myString.push_back('l');myString.push_back('o');for (const auto& letter : myString) {cout << letter;}cout << endl;for (auto it = cbegin(myString); it != cend(myString); ++it) {cout << *it;}cout << endl;
In addition to the Standard Library sequential container methods, strings provide a host of useful methods and friend functions. The string interface is actually quite a good example of a cluttered interface, one of the design pitfalls discussed in Chapter 6. The string class is discussed in detail in Chapter 2.
Input and output streams are not containers in the traditional sense because they do not store elements. However, they can be considered sequences of elements, and as such share some characteristics with Standard Library containers. C++ streams do not provide any Standard Library–related methods directly, but the Standard Library supplies special iterators called istream_iterator and ostream_iterator that allow you to “iterate” through input and output streams. Chapter 21 explains how to use them.
A bitset is a fixed-length abstraction of a sequence of bits. A bit can represent only two values, 1 and 0, which can be referred to as on/off, true/false, and so on. A bitset also uses the terminology set and unset. You can toggle or flip a bit from one value to the other.
A bitset is not a true Standard Library container: it’s of fixed size, it’s not templatized on an element type, and it doesn’t support iteration. However, it’s a useful utility class, which is often lumped with the containers, so a brief introduction is provided here. Consult a Standard Library Reference for a thorough summary of the bitset operations.
A bitset, defined in <bitset>, is templatized on the number of bits it stores. The default constructor initializes all fields of a bitset to 0. An alternative constructor creates a bitset from a string of 0 and 1 characters.
You can adjust the values of individual bits with the set(), reset(), and flip() methods, and you can access and set individual fields with an overloaded operator[]. Note that operator[] on a non-const object returns a proxy object to which you can assign a Boolean value, call flip(), or complement with operator~. You can also access individual fields with the test() method. Additionally, you can stream bitsets with the normal insertion and extraction operators. A bitset is streamed as a string of 0 and 1 characters.
Here is a small example:
bitset<10> myBitset;myBitset.set(3);myBitset.set(6);myBitset[8] = true;myBitset[9] = myBitset[3];if (myBitset.test(3)) {cout << "Bit 3 is set!"<< endl;}cout << myBitset << endl;
The output is as follows:
Bit 3 is set!1101001000
Note that the leftmost character in the output string is the highest numbered bit. This corresponds to our intuitions about binary number representations, where the low-order bit representing 20 = 1 is the rightmost bit in the printed representation.
In addition to the basic bit manipulation routines, a bitset provides implementations of all the bitwise operators: &, |, ^, ~, <<, >>, &=, |=, ^=, <<=, and >>=. They behave just as they would on a “real” sequence of bits. Here is an example:
auto str1 = "0011001100";auto str2 = "0000111100";bitset<10> bitsOne(str1);bitset<10> bitsTwo(str2);auto bitsThree = bitsOne & bitsTwo;cout << bitsThree << endl;bitsThree <<= 4;cout << bitsThree << endl;
The output of the program is as follows:
00000011000011000000
One possible use of bitsets is tracking channels of cable subscribers. Each subscriber could have a bitset of channels associated with their subscription, with set bits representing the channels to which they actually subscribe. This system could also support “packages” of channels, also represented as bitsets, which represent commonly subscribed combinations of channels.
The following CableCompany class is a simple example of this model. It uses two maps, each of string/bitset. One stores the cable packages, while the other stores subscriber information.
const size_t kNumChannels = 10;class CableCompany final{public:// Adds the package with the specified channels to the database.void addPackage(std::string_view packageName,const std::bitset<kNumChannels>& channels);// Removes the specified package from the database.void removePackage(std::string_view packageName);// Retrieves the channels of a given package.// Throws out_of_range if the package name is invalid.const std::bitset<kNumChannels>& getPackage(std::string_view packageName) const;// Adds customer to database with initial channels found in package.// Throws out_of_range if the package name is invalid.// Throws invalid_argument if the customer is already known.void newCustomer(std::string_view name, std::string_view package);// Adds customer to database with given initial channels.// Throws invalid_argument if the customer is already known.void newCustomer(std::string_view name,const std::bitset<kNumChannels>& channels);// Adds the channel to the customers profile.// Throws invalid_argument if the customer is unknown.void addChannel(std::string_view name, int channel);// Removes the channel from the customers profile.// Throws invalid_argument if the customer is unknown.void removeChannel(std::string_view name, int channel);// Adds the specified package to the customers profile.// Throws out_of_range if the package name is invalid.// Throws invalid_argument if the customer is unknown.void addPackageToCustomer(std::string_view name,std::string_view package);// Removes the specified customer from the database.void deleteCustomer(std::string_view name);// Retrieves the channels to which a customer subscribes.// Throws invalid_argument if the customer is unknown.const std::bitset<kNumChannels>& getCustomerChannels(std::string_view name) const;private:// Retrieves the channels for a customer. (non-const)// Throws invalid_argument if the customer is unknown.std::bitset<kNumChannels>& getCustomerChannelsHelper(std::string_view name);using MapType = std::map<std::string, std::bitset<kNumChannels>>;MapType mPackages, mCustomers;};
Here are the implementations of all methods, with comments explaining the code:
void CableCompany::addPackage(string_view packageName,const bitset<kNumChannels>& channels){mPackages.emplace(packageName, channels);}void CableCompany::removePackage(string_view packageName){mPackages.erase(packageName.data());}const bitset<kNumChannels>& CableCompany::getPackage(string_view packageName) const{// Get a reference to the specified package.auto it = mPackages.find(packageName.data());if (it == end(mPackages)) {// That package doesn't exist. Throw an exception.throw out_of_range("Invalid package");}return it->second;}void CableCompany::newCustomer(string_view name, string_view package){// Get the channels for the given package.auto& packageChannels = getPackage(package);// Create the account with the bitset representing that package.newCustomer(name, packageChannels);}void CableCompany::newCustomer(string_view name,const bitset<kNumChannels>& channels){// Add customer to the customers map.auto result = mCustomers.emplace(name, channels);if (!result.second) {// Customer was already in the database. Nothing changed.throw invalid_argument("Duplicate customer");}}void CableCompany::addChannel(string_view name, int channel){// Get the current channels for the customer.auto& customerChannels = getCustomerChannelsHelper(name);// We found the customer; set the channel.customerChannels.set(channel);}void CableCompany::removeChannel(string_view name, int channel){// Get the current channels for the customer.auto& customerChannels = getCustomerChannelsHelper(name);// We found this customer; remove the channel.customerChannels.reset(channel);}void CableCompany::addPackageToCustomer(string_view name, string_view package){// Get the channels for the given package.auto& packageChannels = getPackage(package);// Get the current channels for the customer.auto& customerChannels = getCustomerChannelsHelper(name);// Or-in the package to the customer's existing channels.customerChannels |= packageChannels;}void CableCompany::deleteCustomer(string_view name){mCustomers.erase(name.data());}const bitset<kNumChannels>& CableCompany::getCustomerChannels(string_view name) const{// Use const_cast() to forward to getCustomerChannelsHelper()// to avoid code duplication.return const_cast<CableCompany*>(this)->getCustomerChannelsHelper(name);}bitset<kNumChannels>& CableCompany::getCustomerChannelsHelper(string_view name){// Find a reference to the customer.auto it = mCustomers.find(name.data());if (it == end(mCustomers)) {throw invalid_argument("Unknown customer");}// Found it.// Note that 'it' is a reference to a name/bitset pair.// The bitset is the second field.return it->second;}
Finally, here is a simple program demonstrating how to use the CableCompany class:
CableCompany myCC;auto basic_pkg = "1111000000";auto premium_pkg = "1111111111";auto sports_pkg = "0000100111";myCC.addPackage("basic", bitset<kNumChannels>(basic_pkg));myCC.addPackage("premium", bitset<kNumChannels>(premium_pkg));myCC.addPackage("sports", bitset<kNumChannels>(sports_pkg));myCC.newCustomer("Marc G.", "basic");myCC.addPackageToCustomer("Marc G.", "sports");cout << myCC.getCustomerChannels("Marc G.") << endl;
The output is as follows:
1111100111This chapter introduced the Standard Library containers. It also presented sample code illustrating a variety of uses for these containers. Hopefully, you appreciate the power of vector, deque, list, forward_list, array, stack, queue, priority_queue, map, multimap, set, multiset, unordered_map, unordered_multimap, unordered_set, unordered_multiset, string, and bitset. Even if you don’t incorporate them into your programs immediately, you should keep them in the back of your mind for future projects.
Now that you are familiar with the containers, the next chapter illustrates the true power of the Standard Library with a discussion of generic algorithms.
The “magic” behind the algorithms is that they work on iterator intermediaries instead of on the containers themselves. In that way, they are not tied to specific container implementations. All the Standard Library algorithms are implemented as function templates, where the template type parameters are usually iterator types. The iterators themselves are specified as arguments to the function. Templatized functions can usually deduce the template types from the function arguments, so you can generally call the algorithms as if they were normal functions, not templates.
The iterator arguments are usually iterator ranges. As Chapter 17 explains, iterator ranges are half-open for most containers such that they include the first element in the range, but exclude the last. The end iterator is really a “past-the-end” marker.
Algorithms pose certain requirements on iterators passed to them. For instance, copy_backward() is an example of an algorithm that requires a bidirectional iterator, and stable_sort() is an example of an algorithm requiring random access iterators. This means that such algorithms cannot work on containers that do not provide the necessary iterators. forward_list is an example of a container supporting only forward iterators, no bidirectional or random access iterators; thus, copy_backward() and stable_sort() cannot work on forward_list.
Most algorithms are defined in the <algorithm> header file, while some numerical algorithms are defined in <numeric>. All of them are in the std namespace.
The best way to understand the algorithms is to look at some examples first. After you’ve seen how a few of them work, it’s easy to pick up the others. This section describes the find(), find_if(), and accumulate() algorithms in detail. The following sections present the lambda expressions and function objects, and discuss each of the classes of algorithms with representative samples.
find() looks for a specific element in an iterator range. You can use it on elements in any container type. It returns an iterator referring to the element found, or the end iterator of the range in case the element is not found. Note that the range specified in the call to find() need not be the entire range of elements in a container; it could be a subset.
Here is an example using std::find(). Note that this example assumes that the user plays nice and enters valid numbers; it does not perform any error checking on the user input. Performing error checking on stream input is discussed in Chapter 13.
#include <algorithm>#include <vector>#include <iostream>using namespace std;int main(){int num;vector<int> myVector;while (true) {cout << "Enter a number to add (0 to stop): ";cin >> num;if (num == 0) {break;}myVector.push_back(num);}while (true) {cout << "Enter a number to lookup (0 to stop): ";cin >> num;if (num == 0) {break;}auto endIt = cend(myVector);auto it = find(cbegin(myVector), endIt, num);if (it == endIt) {cout << "Could not find " << num << endl;} else {cout << "Found " << *it << endl;}}return 0;}
The call to find() is made with cbegin(myVector) and endIt as arguments, where endIt is defined as cend(myVector) in order to search all the elements of the vector. If you want to search in a subrange, you can change these two iterators.
Here is a sample run of the program:
Enter a number to add (0 to stop): 3Enter a number to add (0 to stop): 4Enter a number to add (0 to stop): 5Enter a number to add (0 to stop): 6Enter a number to add (0 to stop): 0Enter a number to lookup (0 to stop): 5Found 5Enter a number to lookup (0 to stop): 8Could not find 8Enter a number to lookup (0 to stop): 0
With initializers for if statements (C++17), the call to find() and checking the result can be done with one statement as follows:
if (auto it = find(cbegin(myVector), endIt, num); it == endIt) {cout << "Could not find " << num << endl;} else {cout << "Found " << *it << endl;}
Some containers, such as map and set, provide their own versions of find() as class methods.
find_if() is similar to find(), except that it accepts a predicate function callback instead of a simple element to match. A predicate returns true or false. The find_if() algorithm calls the predicate on each element in the range until the predicate returns true, in which case find_if()returns an iterator referring to that element. The following program reads test scores from the user, then checks if any of the scores are “perfect.” A perfect score is a score of 100 or higher. The program is similar to the previous example. Only the major differences are in bold.
bool perfectScore(int num){return (num >= 100);}int main(){int num;vector<int> myVector;while (true) {cout << "Enter a test score to add (0 to stop): ";cin >> num;if (num == 0) {break;}myVector.push_back(num);}auto endIt = cend(myVector);auto it = find_if(cbegin(myVector), endIt, perfectScore);if (it == endIt) {cout << "No perfect scores" << endl;} else {cout << "Found a \"perfect\" score of " << *it << endl;}return 0;}
This program passes a pointer to the perfectScore() function to find_if(), which the algorithm then calls on each element until it returns true.
The following is the same call to find_if(), but using a lambda expression. It gives you an initial idea about the power of lambda expressions. Don’t worry about their syntax yet; they are explained in detail later in this chapter. Note the absence of the perfectScore() function.
auto it = find_if(cbegin(myVector), endIt, [](int i){ return i >= 100; });It’s often useful to calculate the sum, or some other arithmetic quantity, of elements in a container. The accumulate() function—defined in <numeric>, not in <algorithm>—does just that. In its most basic form, it calculates the sum of the elements in a specified range. For example, the following function calculates the arithmetic mean of a sequence of integers in a vector. The arithmetic mean is simply the sum of all the elements divided by the number of elements.
double arithmeticMean(const vector<int>& nums){double sum = accumulate(cbegin(nums), cend(nums), 0);return sum / nums.size();}
The accumulate() algorithm takes as its third parameter an initial value for the sum, which in this case should be 0 (the identity for addition) to start a fresh sum.
The second form of accumulate() allows the caller to specify an operation to perform instead of the default addition. This operation takes the form of a binary callback. Suppose that you want to calculate the geometric mean, which is the product of all the numbers in the sequence to the power of the inverse of the size. In that case, you would want to use accumulate() to calculate the product instead of the sum. You could write it like this:
int product(int num1, int num2){return num1 * num2;}double geometricMean(const vector<int>& nums){double mult = accumulate(cbegin(nums), cend(nums), 1, product);return pow(mult, 1.0 / nums.size()); // pow() needs <cmath>}
Note that the product() function is passed as a callback to accumulate() and that the initial value for the accumulation is 1 (the identity for multiplication) instead of 0.
To give you a second teaser about the power of lambda expressions, the geometricMean() function could be written as follows, without using the product() function:
double geometricMeanLambda(const vector<int>& nums){double mult = accumulate(cbegin(nums), cend(nums), 1,[](int num1, int num2){ return num1 * num2; });return pow(mult, 1.0 / nums.size());}
However, later in this chapter you will learn how to use accumulate() in the geometricMean() function without writing a function callback or lambda expression.
Just like Standard Library containers, Standard Library algorithms are also optimized to use move semantics at appropriate times. This can greatly speed up certain algorithms, for example, remove(), discussed in detail later in this chapter. For this reason, it is highly recommended that you implement move semantics in your custom element classes that you want to store in containers. Move semantics can be added to any class by implementing a move constructor and a move assignment operator. Both should be marked as noexcept, because they should not throw exceptions. Consult the “Move Semantics” section in Chapter 9 for details on how to add move semantics to your classes.
std::function, defined in the <functional> header file, can be used to create a type that can point to a function, a function object, or a lambda expression—basically anything that is callable. std::function is called a polymorphic function wrapper. It can be used as a function pointer, or as a parameter for a function to implement callbacks. The template parameters for the std::function template look a bit different than most template parameters. Its syntax is as follows:
std::function<R(ArgTypes…)>R is the return type of the function, and ArgTypes is a comma-separated list of parameter types for the function.
The following example demonstrates how to use std::function to implement a function pointer. It creates a function pointer f1 to point to the function func(). Once f1 is defined, you can call func() by using the name func or f1:
void func(int num, const string& str){cout << "func(" << num << ", " << str << ")" << endl;}int main(){function<void(int, const string&)> f1 = func;f1(1, "test");return 0;}
Of course, in the preceding example, it is possible to use the auto keyword, which removes the need to specify the exact type of f1. The following definition for f1 works exactly the same and is much shorter, but the compiler-deduced type of f1 is a function pointer, that is, void (*f1)(int, const string&) instead of an std::function.
auto f1 = func;Because std::function types behave as function pointers, they can be passed to Standard Library algorithms as shown in the following example using the find_if() algorithm:
bool isEven(int num){return num % 2 == 0;}int main(){vector<int> vec{ 1,2,3,4,5,6,7,8,9 };function<bool(int)> fcn = isEven;auto result = find_if(cbegin(vec), cend(vec), fcn);if (result != cend(vec)) {cout << "First even number: " << *result << endl;} else {cout << "No even number found." << endl;}return 0;}
After the preceding examples, you might think that std::function is not really useful; however, std::function really shines when you need to store a callback as a member variable of a class. You can also use std::function when you need to accept a function pointer as parameter to your own function. The following example defines a function called process(), which accepts a reference to a vector and an std::function. The process() function iterates over all the elements in the given vector, and calls the given function f for each element. You can think of the parameter f as a callback.
The print() function prints a given value to the console. The main() function first creates a vector of integers. It then calls the process() function with a function pointer to print(). The result is that each element in the vector is printed.
The last part of the main() function demonstrates that you can also pass a lambda expression (discussed in detail in the next section) for the std::function parameter of the process() function; that’s the power of std::function. You cannot get this same functionality by using a raw function pointer.
void process(const vector<int>& vec, function<void(int)> f){for (auto& i : vec) {f(i);}}void print(int num){cout << num << " ";}int main(){vector<int> vec{ 0,1,2,3,4,5,6,7,8,9 };process(vec, print);cout << endl;int sum = 0;process(vec, [&sum](int num){sum += num;});cout << "sum = " << sum << endl;return 0;}
The output of this example is as follows:
0 1 2 3 4 5 6 7 8 9sum = 45
Instead of using std::function to accept callback parameters, you can also write a function template as follows:
template <typename F>void processTemplate(const vector<int>& vec, F f){for (auto& i : vec) {f(i);}}
This function template can be used in the same way as the non-template process() function, that is, processTemplate() can accept both raw function pointers and lambda expressions.
Lambda expressions allow you to write anonymous functions inline, removing the need to write a separate function or a function object. Lambda expressions can make code easier to read and understand.
Let’s start with a very simple lambda expression. The following example defines a lambda expression that just writes a string to the console. A lambda expression starts with square brackets [], called the lambda introducer, followed by curly braces {}, which contain the body of the lambda expression. The lambda expression is assigned to the basicLambda auto-typed variable. The second line executes the lambda expression using normal function-call syntax.
auto basicLambda = []{ cout << "Hello from Lambda" << endl; };basicLambda();
The output is as follows:
Hello from LambdaA lambda expression can accept parameters. Parameters are specified between parentheses and separated by commas, just as with normal functions. Here is an example using one parameter:
auto parametersLambda =[](int value){ cout << "The value is " << value << endl; };parametersLambda(42);
If a lambda expression does not accept any parameters, you can either specify empty parentheses or simply omit them.
A lambda expression can return a value. The return type is specified following an arrow, called a trailing return type. The following example defines a lambda expression accepting two parameters and returning their sum:
auto returningLambda = [](int a, int b) -> int { return a + b; };int sum = returningLambda(11, 22);
The return type can be omitted, in which case the compiler deduces the return type of the lambda expression according to the same rules as for function return type deduction (see Chapter 1). In the previous example, the return type can be omitted as follows:
auto returningLambda = [](int a, int b){ return a + b; };int sum = returningLambda(11, 22);
A lambda expression can capture variables from its enclosing scope. For example, the following lambda expression captures the variable data so that it can be used in its body:
double data = 1.23;auto capturingLambda = [data]{ cout << "Data = " << data << endl; };
The square brackets part is called the lambda capture block. Capturing a variable means that the variable becomes available inside the body of the lambda expression. Specifying an empty capture block, [], means that no variables from the enclosing scope are captured. When you just write the name of a variable in the capture block as in the preceding example, then you are capturing that variable by value.
The compiler transforms any lambda expression into some kind of unnamed functor (= function object). The captured variables become data members of this functor. Variables captured by value are copied into data members of the functor. These data members have the same constness as the captured variables. In the preceding capturingLambda example, the functor gets a non-const data member called data, because the captured variable, data, is non-const. However, in the following example, the functor gets a const data member called data, because the captured variable is const:
const double data = 1.23;auto capturingLambda = [data]{ cout << "Data = " << data << endl; };
A functor always has an implementation of the function call operator, operator(). For a lambda expression, this function call operator is marked as const by default. That means that even if you capture a non-const variable by value in a lambda expression, the lambda expression is not able to modify this copy. You can mark the function call operator as non-const by specifying the lambda expression as mutable, as follows:
double data = 1.23;auto capturingLambda =[data] () mutable { data *= 2; cout << "Data = " << data << endl; };
In this example, the non-const variable data is captured by value; thus, the functor gets a non-const data member that is a copy of data. Because of the mutable keyword, the function call operator is marked as non-const, and so the body of the lambda expression can modify its copy of data. Note that if you specify mutable, then you have to specify the parentheses for the parameters even if they are empty.
You can prefix the name of a variable with & to capture it by reference. The following example captures the variable data by reference so that the lambda expression can directly change data in the enclosing scope:
double data = 1.23;auto capturingLambda = [&data]{ data *= 2; };
When you capture a variable by reference, you have to make sure that the reference is still valid at the time the lambda expression is executed.
There are two ways to capture all variables from the enclosing scope:
[=] captures all variables by value[&] captures all variables by referenceIt is also possible to selectively decide which variables to capture and how, by specifying a capture list with an optional capture default. Variables prefixed with & are captured by reference. Variables without a prefix are captured by value. If present, the capture default should be the first element in the capture list, and be either & or =. Here are some capture block examples:
[&x] captures only x by reference and nothing else.[x] captures only x by value and nothing else.[=, &x, &y] captures by value by default, except variables x and y, which are captured by reference.[&, x] captures by reference by default, except variable x, which is captured by value.[&x, &x] is illegal because identifiers cannot be repeated.[this] captures the current object. In the body of the lambda expression you can access this object, even without using this->. [*this] captures a copy of the current object. This can be useful in cases where the object will no longer be alive when the lambda expression is executed.The complete syntax of a lambda expression is as follows:
[capture_block](parameters) mutable constexprnoexcept_specifier attributes-> return_type {body}
A lambda expression contains the following parts:
mutable, constexpr, a noexcept specifier, attributes, or a return type. The parameter list is similar to the parameter list for normal functions.mutable (optional). This marks the lambda expression as mutable; see earlier examples. constexpr (optional). This marks the lambda expression as constexpr, so it can be evaluated at compile time. Even if omitted, a lambda expression can be constexpr implicitly if it satisfies certain restrictions, not further discussed in this text.noexcept specifier (optional). This can be used to specify noexcept clauses, similar to noexcept clauses for normal functions.It is possible to use auto type deduction for parameters of lambda expressions instead of explicitly specifying concrete types for them. To specify auto type deduction for a parameter, the type is simply specified as auto. The type deduction rules are the same as for template argument deduction.
The following example defines a generic lambda expression called isGreaterThan100. This single lambda expression is used with the find_if() algorithm, once for a vector of integers and once for a vector of doubles.
// Define a generic lambda to find values > 100.auto isGreaterThan100 = [](auto i){ return i > 100; };// Use the generic lambda with a vector of integers.vector<int> ints{ 11, 55, 101, 200 };auto it1 = find_if(cbegin(ints), cend(ints),isGreaterThan100);if (it1 != cend(ints)) {cout << "Found a value > 100: " << *it1 << endl;}// Use exactly the same generic lambda with a vector of doubles.vector<double> doubles{ 11.1, 55.5, 200.2 };auto it2 = find_if(cbegin(doubles), cend(doubles),isGreaterThan100);if (it2 != cend(doubles)) {cout << "Found a value > 100: " << *it2 << endl;}
Lambda capture expressions allow you to initialize capture variables with any kind of expression. It can be used to introduce variables in the lambda expression that are not captured from the enclosing scope. For example, the following code creates a lambda expression. Inside this lambda expression there are two variables available: one called myCapture, initialized to the string “Pi:” using a lambda capture expression; and one called pi, which is captured by value from the enclosing scope. Note that non-reference capture variables such as myCapture that are initialized with a capture initializer are copy constructed, which means that const qualifiers are stripped.
double pi = 3.1415;auto myLambda = [myCapture = "Pi: ", pi]{ cout << myCapture << pi; };
A lambda capture variable can be initialized with any kind of expression, thus also with std::move(). This is important for objects that cannot be copied, only moved, such as unique_ptr. By default, capturing by value uses copy semantics, so it’s impossible to capture a unique_ptr by value in a lambda expression. Using a lambda capture expression, it is possible to capture it by moving, as in this example:
auto myPtr = std::make_unique<double>(3.1415);auto myLambda = [p = std::move(myPtr)]{ cout << *p; };
It is allowed, though not recommended, to have the same name for the capture variable as the name in the enclosing scope. The previous example can be written as follows:
auto myPtr = std::make_unique<double>(3.1415);auto myLambda = [myPtr = std::move(myPtr)]{ cout << *myPtr; };
By using std::function, discussed earlier in this chapter, lambda expressions can be returned from functions. Take a look at the following definition:
function<int(void)> multiplyBy2Lambda(int x){return [x]{ return 2 * x; };}
The body of this function creates a lambda expression that captures the variable x from the enclosing scope by value, and returns an integer that is two times the value passed to multiplyBy2Lambda(). The return type of the multiplyBy2Lambda() function is function<int(void)>, which is a function accepting no arguments and returning an integer. The lambda expression defined in the body of the function exactly matches this prototype. The variable x is captured by value, and thus a copy of the value of x is bound to the x in the lambda expression before the lambda is returned from the function. The function can be called as follows:
function<int(void)> fn = multiplyBy2Lambda(5);cout << fn() << endl;
You can use the auto keyword to make this easier:
auto fn = multiplyBy2Lambda(5);cout << fn() << endl;
The output will be 10.
Function return type deduction (see Chapter 1) allows you to write the multiplyBy2Lambda() function more elegantly, as follows:
auto multiplyBy2Lambda(int x){return [x]{ return 2 * x; };}
The multiplyBy2Lambda() function captures the variable x by value, [x]. Suppose the function is rewritten to capture the variable by reference, [&x], as follows. This will not work because the lambda expression will be executed later in the program, no longer in the scope of the multiplyBy2Lambda() function, at which point the reference to x is not valid anymore.
auto multiplyBy2Lambda(int x){return [&x]{ return 2 * x; };// BUG!}
The “std::function” section earlier in this chapter discusses that a function parameter of type std::function can accept a lambda expression argument. An example in that section shows a process() function accepting a lambda expression as callback. The section also explains an alternative to std::function, that is, function templates. The processTemplate() function template example is also capable of accepting a lambda expression argument.
This section demonstrates lambda expressions with two Standard Library algorithms: count_if() and generate(). More examples follow later in this chapter.
The following example uses the count_if() algorithm to count the number of elements in a given vector that satisfy a certain condition. The condition is given in the form of a lambda expression, which captures the value variable from its enclosing scope by value.
vector<int> vec{ 1, 2, 3, 4, 5, 6, 7, 8, 9 };int value = 3;int cnt = count_if(cbegin(vec), cend(vec),[value](int i){ return i > value; });cout << "Found " << cnt << " values > " << value << endl;
The output is as follows:
Found 6 values > 3The example can be extended to demonstrate capturing variables by reference. The following lambda expression counts the number of times it is called by incrementing a variable in the enclosing scope that is captured by reference:
vector<int> vec = { 1, 2, 3, 4, 5, 6, 7, 8, 9 };int value = 3;int cntLambdaCalled = 0;int cnt = count_if(cbegin(vec), cend(vec),[value, &cntLambdaCalled](int i){ ++cntLambdaCalled; return i > value; });cout << "The lambda expression was called " << cntLambdaCalled<< " times." << endl;cout << "Found " << cnt << " values > " << value << endl;
The output is as follows:
The lambda expression was called 9 times.Found 6 values > 3
The generate() algorithm requires an iterator range and replaces the values in that range with the values returned from the function given as a third argument. The following example uses the generate() algorithm together with a lambda expression to put the numbers 2, 4, 8, 16, and so on in a vector:
vector<int> vec(10);int value = 1;generate(begin(vec), end(vec), [&value]{ value *= 2; return value; });for (const auto& i : vec) {cout << i << " ";}
The output is as follows:
2 4 8 16 32 64 128 256 512 1024You can overload the function call operator in a class such that objects of the class can be used in place of function pointers. These objects are called function objects, or just functors.
Many of the Standard Library algorithms, such as find_if() and a version of accumulate(), can accept callables, for example function pointers, lambda expressions, and functors, as parameters to modify the algorithm’s behavior. C++ provides several predefined functor classes, defined in the <functional> header file, that perform the most commonly used callback operations.
The clumsiness of having to create a function or functor class, give it a name that does not conflict with other names, and then use this name is considerable overhead for what is fundamentally a simple concept. In these cases, using anonymous (unnamed) functions represented by lambda expressions is a big convenience. Their syntax is easier and can make your code easier to understand. They are discussed in the previous sections. However, this section explains functors and how to use the predefined functor classes because you will likely encounter them at some point.
Your <functional> header might also contain functions like bind1st(), bind2nd(), mem_fun(), mem_fun_ref(), and ptr_fun(). These functions have officially been removed from the C++17 standard, and thus are not further discussed in this book. You should avoid using them.
C++ provides functor class templates for the five binary arithmetic operators: plus, minus, multiplies, divides, and modulus. Additionally, unary negate is supplied. These classes are templatized on the type of the operands and are wrappers for the actual operators. They take one or two parameters of the template type, perform the operation, and return the result. Here is an example using the plus class template:
plus<int> myPlus;int res = myPlus(4, 5);cout << res << endl;
This example is silly, because there’s no reason to use the plus class template when you could just use operator+ directly. The benefit of the arithmetic function objects is that you can pass them as callbacks to algorithms, which you cannot do directly with the arithmetic operators. For example, the implementation of the geometricMean() function earlier in this chapter used the accumulate() function with a function pointer to the product() callback to multiply two integers. You could rewrite it to use the predefined multiplies function object:
double geometricMean(const vector<int>& nums){double mult = accumulate(cbegin(nums), cend(nums), 1, multiplies<int>());return pow(mult, 1.0 / nums.size());}
The expression multiplies<int>() creates a new object of the multiplies functor class template, instantiating it with the int type.
The other arithmetic function objects behave similarly.
C++ has support for transparent operator functors, which allow you to omit the template type argument. For example, you can just specify multiplies<>() instead of multiplies<int>():
double geometricMeanTransparent(const vector<int>& nums){double mult = accumulate(cbegin(nums), cend(nums), 1,multiplies<>());return pow(mult, 1.0 / nums.size());}
A very important feature of these transparent operators is that they are heterogeneous. That is, they are not only more concise than the non-transparent functors, but they also have real functional advantages. For instance, the following code uses a transparent operator functor and uses 1.1, a double, as the initial value, while the vector contains integers. accumulate() calculates the result as a double, and result will be 6.6:
vector<int> nums{ 1, 2, 3 };double result = accumulate(cbegin(nums), cend(nums), 1.1,multiplies<>());
If this code uses a non-transparent operator functor as follows, then accumulate() calculates the result as an integer, and result will be 6. When you compile this code, the compiler will give you warnings about possible loss of data.
vector<int> nums{ 1, 2, 3 };double result = accumulate(cbegin(nums), cend(nums), 1.1,multiplies<int>());
In addition to the arithmetic function object classes, the C++ language provides all the standard comparisons: equal_to, not_equal_to, less, greater, less_equal, and greater_equal. You’ve already seen less in Chapter 17 as the default comparison for elements in the priority_queue and the associative containers. Now you can learn how to change that criterion. Here’s an example of a priority_queue using the default comparison operator: std::less.
priority_queue<int> myQueue;myQueue.push(3);myQueue.push(4);myQueue.push(2);myQueue.push(1);while (!myQueue.empty()) {cout << myQueue.top() << " ";myQueue.pop();}
Here is the output from the program:
4 3 2 1As you can see, the elements of the queue are removed in descending order, according to the less comparison. You can change the comparison to greater by specifying it as the comparison template argument. The priority_queue template definition looks like this:
template <class T, class Container = vector<T>, class Compare = less<T>>;Unfortunately, the Compare type parameter is last, which means that in order to specify it, you must also specify the container type. If you want to use a priority_queue that sorts the elements in ascending order using greater, then you need to change the definition of the priority_queue in the previous example to the following:
priority_queue<int, vector<int>, greater<>> myQueue;The output now is as follows:
1 2 3 4Note that myQueue is defined with a transparent operator, greater<>. In fact, it’s recommended to always use a transparent operator for Standard Library containers that accept a comparator type. Using a transparent comparator can be a bit more performant compared to using a non-transparent operator. For example, if a map<string> uses a non-transparent comparator, performing a query for a key given as a string literal might cause an unwanted copy to be created, because a string instance has to be constructed from the string literal. When using a transparent comparator, this copying is avoided.
Several algorithms that you will learn about later in this chapter require comparison callbacks, for which the predefined comparators come in handy.
C++ provides function object classes for the three logical operations: logical_not (operator!), logical_and (operator&&), and logical_or (operator||). These logical operations deal only with the values true and false. Bitwise function objects are covered in the next section.
Logical functors can, for example, be used to implement an allTrue() function that checks if all the Boolean flags in a container are true:
bool allTrue(const vector<bool>& flags){return accumulate(begin(flags), end(flags), true, logical_and<>());}
Similarly, the logical_or functor can be used to implement an anyTrue() function that returns true if there is at least one Boolean flag in a container true:
bool anyTrue(const vector<bool>& flags){return accumulate(begin(flags), end(flags), false, logical_or<>());}
C++ has function objects for all the bitwise operations: bit_and (operator&), bit_or (operator|), bit_xor (operator^), and bit_not (operator~). These bitwise functors can, for example, be used together with the transform() algorithm (discussed later in this chapter) to perform bitwise operations on all elements in a container.
When you try to use the basic function objects provided by the standard, it often feels as if you’re trying to put a square peg into a round hole. For example, you can’t use the less function object with find_if() to find an element smaller than some value because find_if() passes only one argument to its callback each time, instead of two. The adaptor function objects attempt to rectify this problem and others. They allow you to adapt function objects, lambda expressions, function pointers, basically any callable. The adaptors provide a modicum of support for functional composition, that is, to combine functions together to create the exact behavior you need.
Binders can be used to bind parameters of callables to certain values. For this you use std::bind(), defined in <functional>, which allows you to bind parameters of a callable in a flexible way. You can bind parameters to fixed values, and you can even rearrange parameters in a different order. It is best explained with an example.
Suppose you have a function called func() accepting two arguments:
void func(int num, string_view str){cout << "func(" << num << ", " << str << ")" << endl;}
The following code demonstrates how you can use bind() to bind the second argument of func() to a fixed value, myString. The result is stored in f1(). The auto keyword is used because the return type of bind() is unspecified by the C++ standard, and thus is implementation specific. Arguments that are not bound to specific values should be specified as _1, _2, _3, and so on. These are defined in the std::placeholders namespace. In the definition of f1(), the _1 specifies where the first argument to f1() needs to go when func() is called. After this, f1() can be called with just a single integer argument.
string myString = "abc";auto f1 = bind(func, placeholders::_1, myString);f1(16);
Here is the output:
func(16, abc)bind() can also be used to rearrange the arguments, as shown in the following code. The _2 specifies where the second argument to f2() needs to go when func() is called. In other words, the f2() binding means that the first argument to f2() will become the second argument to func(), and the second argument to f2() will become the first argument to func().
auto f2 = bind(func, placeholders::_2, placeholders::_1);f2("Test", 32);
The output is as follows:
func(32, Test)As discussed in Chapter 17, the <functional> header file defines the std::ref() and cref() helper template functions. These can be used to bind references or const references, respectively. For example, suppose you have the following function:
void increment(int& value) { ++value; }If you call this function as follows, then the value of index becomes 1:
int index = 0;increment(index);
If you use bind() to call it as follows, then the value of index is not incremented because a copy of index is made, and a reference to this copy is bound to the first parameter of the increment() function:
int index = 0;auto incr = bind(increment, index);incr();
Using std::ref() to pass a proper reference correctly increments index:
int index = 0;auto incr = bind(increment, ref(index));incr();
There is a small issue with binding parameters in combination with overloaded functions. Suppose you have the following two overloaded() functions. One accepts an integer and the other accepts a floating-point number:
void overloaded(int num) {}void overloaded(float f) {}
If you want to use bind() with these overloaded functions, you need to explicitly specify which of the two overloads you want to bind. The following will not compile:
auto f3 = bind(overloaded, placeholders::_1); // ERRORIf you want to bind the parameters of the overloaded function accepting a floating-point argument, you need the following syntax:
auto f4 = bind((void(*)(float))overloaded, placeholders::_1); // OKAnother example of bind() is to use the find_if() algorithm to find the first element in a sequence that is greater than or equal to 100. To solve this problem earlier in this chapter, a pointer to a perfectScore() function was passed to find_if(). This can be rewritten using the comparison functor greater_equal and bind(). The following code uses bind() to bind the second parameter of greater_equal to a fixed value of 100:
// Code for inputting scores into the vector omitted, similar as earlier.auto endIter = end(myVector);auto it = find_if(begin(myVector), endIter,bind(greater_equal<>(), placeholders::_1, 100));if (it == endIter) {cout << "No perfect scores" << endl;} else {cout << "Found a \"perfect\" score of " << *it << endl;}
Of course, in this case, I would recommend the solution using a lambda expression:
auto it = find_if(begin(myVector), endIter, [](int i){ return i >= 100; });Negators are similar to binders but they complement the result of a callable. For example, if you want to find the first element in a sequence of test scores less than 100, you can apply the not_fn() negator adaptor to the result of perfectScore() like this:
// Code for inputting scores into the vector omitted, similar as earlier.auto endIter = end(myVector);auto it = find_if(begin(myVector), endIter, not_fn(perfectScore));if (it == endIter) {cout << "All perfect scores" << endl;} else {cout << "Found a \"less-than-perfect\" score of " << *it << endl;}
The not_fn() functor complements the result of every call to the callable it takes as a parameter. Note that in this example you could have used the find_if_not() algorithm.
As you can see, using functors and adaptors can become complicated. My advice is to use lambda expressions instead of functors if possible. For example, the previous find_if() call using the not_fn() negator can be written more elegantly and more readable using a lambda expression:
auto it = find_if(begin(myVector), endIter, [](int i){ return i < 100; });The std::not_fn() adaptor is introduced with C++17. Before C++17 you could use the std::not1() and not2() adaptors. The “1” in not1() refers to the fact that its operand must be a unary function (one that takes a single argument). If its operand is a binary function (which takes two arguments), you must use not2() instead. Here is an example:
// Code for inputting scores into the vector omitted, similar as earlier.auto endIter = end(myVector);function<bool(int)> f = perfectScore;auto it = find_if(begin(myVector), endIter, not1(f));
If you wanted to use not1() with your own functor class, then you had to make sure your functor class definition included two typedefs: argument_type and result_type. If you wanted to use not2(), then your functor class definition had to provide three typedefs: first_argument_type, second_argument_type, and result_type. The easiest way to do that was to derive your function object class from either unary_function or binary_function, depending on whether they take one or two arguments. These two classes, defined in <functional>, are templatized on the parameter and return types of the function they provide. For example:
class PerfectScore : public std::unary_function<int, bool>{public:result_type operator()(const argument_type& score) const{return score >= 100;}};
This functor can be used as follows:
auto it = find_if(begin(myVector), endIter, not1(PerfectScore()));If you have a container of objects, you sometimes want to pass a pointer to a class method as the callback to an algorithm. For example, you might want to find the first empty string in a vector of strings by calling empty() on each string in the sequence. However, if you just pass a pointer to string::empty() to find_if(), the algorithm has no way to know that it received a pointer to a method instead of a normal function pointer or functor. The code to call a method pointer is different from that to call a normal function pointer, because the former must be called in the context of an object.
C++ provides a conversion function called mem_fn() that you can call with a method pointer before passing it to an algorithm. The following example demonstrates this. Note that you have to specify the method pointer as &string::empty. The &string:: part is not optional.
void findEmptyString(const vector<string>& strings){auto endIter = end(strings);auto it = find_if(begin(strings), endIter, mem_fn(&string::empty));if (it == endIter) {cout << "No empty strings!" << endl;} else {cout << "Empty string at position: "<< static_cast<int>(it - begin(strings)) << endl;}}
mem_fn() generates a function object that serves as the callback for find_if(). Each time it is called back, it calls the empty() method on its argument.
mem_fn() works exactly the same when you have a container of pointers to objects instead of objects themselves. Here is an example:
void findEmptyString(const vector<string*>& strings){auto endIter = end(strings);auto it = find_if(begin(strings), endIter, mem_fn(&string::empty));// Remainder of function omitted because it is the same as earlier}
mem_fn() is not the most intuitive way to implement the findEmptyString() function. Using lambda expressions, it can be implemented in a much more readable and elegant way. Here is the implementation using a lambda expression working on a container of objects:
void findEmptyString(const vector<string>& strings){auto endIter = end(strings);auto it = find_if(begin(strings), endIter,[](const string& str){ return str.empty(); });// Remainder of function omitted because it is the same as earlier}
Similarly, the following uses a lambda expression working on a container of pointers to objects:
void findEmptyString(const vector<string*>& strings){auto endIter = end(strings);auto it = find_if(begin(strings), endIter,[](const string* str){ return str->empty(); });// Remainder of function omitted because it is the same as earlier}
InvokersC++17 introduces std::invoke(), defined in <functional>, which you can use to call any callable object with a set of parameters. The following example uses invoke() three times: once to invoke a normal function, once to invoke a lambda expression, and once to invoke a member function on a string instance.
void printMessage(string_view message) { cout << message << endl; }int main(){invoke(printMessage, "Hello invoke.");invoke([](const auto& msg) { cout << msg << endl; }, "Hello invoke.");string msg = "Hello invoke.";cout << invoke(&string::size, msg) << endl;}
By itself, invoke() is not that useful, because you might as well just call the function or the lambda expression directly. However, it is very useful in templated code where you need to invoke some arbitrary callable object.
You can write your own function objects to perform more specific tasks than those provided by the predefined functors, and if you need to do something more complex than is suitable for a lambda expression. Here is a very simple function object example:
class myIsDigit{public:bool operator()(char c) const { return ::isdigit(c) != 0; }};bool isNumber(string_view str){auto endIter = end(str);auto it = find_if(begin(str), endIter, not_fn(myIsDigit()));return (it == endIter);}
Note that the overloaded function call operator of the myIsDigit class must be const in order to pass objects of it to find_if().
Before C++11, a class defined locally in the scope of a function could not be used as a template argument. This limitation has been removed, as shown in the following example:
bool isNumber(string_view str){class myIsDigit{public:bool operator()(char c) const { return ::isdigit(c) != 0; }};auto endIter = end(str);auto it = find_if(begin(str), endIter, not_fn(myIsDigit()));return (it == endIter);}
Chapter 16 lists all available Standard Library algorithms, divided into different categories. Most of the algorithms are defined in the <algorithm> header file, but a few are located in <numeric> and in <utility>. They are all in the std namespace. I cannot discuss all available algorithms in this chapter, and so I have picked a number of categories and provided examples for them. Once you know how to use these algorithms, you should have no problems with the other algorithms. Consult a Standard Library Reference, see Appendix B, for a full reference of all the algorithms.
First, a few more words on iterators. There are five types of iterators: input, output, forward, bidirectional, and random access. These are described in Chapter 17. There is no formal class hierarchy of these iterators, because the implementations for each container are not part of the standard hierarchy. However, one can deduce a hierarchy based on the functionality they are required to provide. Specifically, every random-access iterator is also bidirectional, every bidirectional iterator is also forward, and every forward iterator is also input. Iterators that satisfy the requirements for output iterators are called mutable iterators; otherwise they are called constant iterators. Figure 18-1 shows such hierarchy. Dotted lines are used because the figure is not a real class hierarchy.
The standard way for the algorithms to specify what kind of iterators they need is to use the following names for the iterator template type arguments: InputIterator, OutputIterator, ForwardIterator, BidirectionalIterator, and RandomAccessIterator. These names are just names: they don’t provide binding type checking. Therefore, you could, for example, try to call an algorithm expecting a RandomAccessIterator by passing a bidirectional iterator. The template cannot do type checking, so it would allow this instantiation. However, the code in the function that uses the random-access iterator capabilities would fail to compile on the bidirectional iterator. Thus, the requirement is enforced, just not where you would expect. The error message can therefore be somewhat confusing. For example, attempting to use the generic sort() algorithm, which requires a random access iterator, on a list, which provides only a bidirectional iterator, gives a cryptic error of more than 30 lines in Visual C++ 2017, of which the first two lines are as follows:
…\vc\tools\msvc\14.11.25301\include\algorithm(3032): error C2784: 'unknown-type std::operator -(const std::move_iterator<_RanIt> &,const std::move_iterator<_RanIt2> &)': could not deduce template argument for 'const std::move_iterator<_RanIt> &' from 'std::_List_unchecked_iterator<std::_List_val<std::_List_simple_types<int>>>'…\vc\tools\msvc\14.11.25301\include\xutility(2191): note: see declaration of 'std::operator -'
The non-modifying sequence algorithms include functions for searching elements in a range and for comparing two ranges to each other; they also include a number of counting algorithms.
You’ve already seen examples of two search algorithms: find() and find_if(). The Standard Library provides several other variations of the basic find() algorithm that work on sequences of elements. The section, “Search Algorithms,” in Chapter 16 describes the different search algorithms that are available, including their complexity.
All the algorithms use default comparisons of operator== or operator<, but also provide overloaded versions that allow you to specify a comparison callback.
Here are examples of some of the search algorithms:
// The list of elements to be searchedvector<int> myVector = { 5, 6, 9, 8, 8, 3 };auto beginIter = cbegin(myVector);auto endIter = cend(myVector);// Find the first element that does not satisfy the given lambda expressionauto it = find_if_not(beginIter, endIter, [](int i){ return i < 8; });if (it != endIter) {cout << "First element not < 8 is " << *it << endl;}// Find the first pair of matching consecutive elementsit = adjacent_find(beginIter, endIter);if (it != endIter) {cout << "Found two consecutive equal elements with value " << *it << endl;}// Find the first of two valuesvector<int> targets = { 8, 9 };it = find_first_of(beginIter, endIter, cbegin(targets), cend(targets));if (it != endIter) {cout << "Found one of 8 or 9: " << *it << endl;}// Find the first subsequencevector<int> sub = { 8, 3 };it = search(beginIter, endIter, cbegin(sub), cend(sub));if (it != endIter) {cout << "Found subsequence {8,3}" << endl;} else {cout << "Unable to find subsequence {8,3}" << endl;}// Find the last subsequence (which is the same as the first in this example)auto it2 = find_end(beginIter, endIter, cbegin(sub), cend(sub));if (it != it2) {cout << "Error: search and find_end found different subsequences "<< "even though there is only one match." << endl;}// Find the first subsequence of two consecutive 8sit = search_n(beginIter, endIter, 2, 8);if (it != endIter) {cout << "Found two consecutive 8s" << endl;} else {cout << "Unable to find two consecutive 8s" << endl;}
Here is the output:
First element not < 8 is 9Found two consecutive equal elements with value 8Found one of 8 or 9: 9Found subsequence {8,3}Found two consecutive 8s
Specialized SearchersC++17 adds an optional extra parameter to the search() algorithm that allows you to specify which search algorithm to use. You have three options: default_searcher, boyer_moore_searcher, or boyer_moore_horspool_searcher, all defined in <functional>. The last two options implement the well-known Boyer-Moore and Boyer-Moore-Horspool search algorithms. These are very efficient, and can be used to find a substring in a larger piece of text. The complexity of the Boyer-Moore searchers is as follows (N is the size of the sequence to search in, the haystack, and M is the size of the pattern to find, the needle):
These are the theoretical worst-case complexities. In practice, these specialized searchers are sublinear, better than O(N), which means they are much faster than the default one! They are sublinear because they are able to skip characters instead of looking at each single character in the haystack. They also have an interesting property that the longer the needle is, the faster they work, as they will be able to skip more characters in the haystack. The difference between the Boyer-Moore and the Boyer-Moore-Horspool algorithm is that the latter has less constant overhead for its initialization and in each loop iteration of its algorithm; however, its worst-case complexity can be significantly higher than for the Boyer-Moore algorithm. So, which one to choose depends on your specific use case.
Here is an example of using a Boyer-Moore searcher:
string text = "This is the haystack to search a needle in.";string toSearchFor = "needle";auto searcher = std::boyer_moore_searcher(cbegin(toSearchFor), cend(toSearchFor));auto result = search(cbegin(text), cend(text), searcher);if (result != cend(text)) {cout << "Found the needle." << endl;} else {cout << "Needle not found." << endl;}
You can compare entire ranges of elements in three different ways: equal(), mismatch(), and lexicographical_compare(). These algorithms have the advantage that you can compare ranges in different containers. For example, you can compare the contents of a vector with the contents of a list. In general, these algorithms work best with sequential containers. They work by comparing the values in corresponding positions of the two collections to each other. The following list describes how each algorithm works.
equal() returns true if all corresponding elements are equal. Originally, equal() accepted three iterators: begin and end iterators for the first range, and a begin iterator for the second range. This version required both ranges to have the same number of elements. Since C++14, there is an overload accepting four iterators: begin and end iterators for the first range, and begin and end iterators for the second range. This version can cope with ranges of different sizes. It’s recommended to always use the four-iterator version because it’s safer!mismatch() returns iterators, one iterator for each range, to indicate where in the range the corresponding elements mismatch. There are three-iterator and four-iterator versions available, just as with equal(). It’s again recommended to use the four-iterator version, because of safety!lexicographical_compare()returns true if the first unequal element in the first range is less than its corresponding element in the second range, or, if the first range has fewer elements than the second and all elements in the first range are equal to their corresponding initial subsequence in the second set. lexicographical_compare() gets its name because it resembles the rules for comparing strings, but extends this set of rules to deal with objects of any type.Here are some examples of these algorithms:
// Function template to populate a container of ints.// The container must support push_back().template<typename Container>void populateContainer(Container& cont){int num;while (true) {cout << "Enter a number (0 to quit): ";cin >> num;if (num == 0) {break;}cont.push_back(num);}}int main(){vector<int> myVector;list<int> myList;cout << "Populate the vector:" << endl;populateContainer(myVector);cout << "Populate the list:" << endl;populateContainer(myList);// Compare the two containersif (equal(cbegin(myVector), cend(myVector),cbegin(myList), cend(myList))) {cout << "The two containers have equal elements" << endl;} else {// If the containers were not equal, find out why notauto miss = mismatch(cbegin(myVector), cend(myVector),cbegin(myList), cend(myList));cout << "The following initial elements are the same in "<< "the vector and the list:" << endl;for (auto i = cbegin(myVector); i != miss.first; ++i) {cout << *i << '\t';}cout << endl;}// Now order them.if (lexicographical_compare(cbegin(myVector), cend(myVector),cbegin(myList), cend(myList))) {cout << "The vector is lexicographically first." << endl;} else {cout << "The list is lexicographically first." << endl;}return 0;}
Here is a sample run of the program:
Populate the vector:Enter a number (0 to quit): 5Enter a number (0 to quit): 6Enter a number (0 to quit): 7Enter a number (0 to quit): 0Populate the list:Enter a number (0 to quit): 5Enter a number (0 to quit): 6Enter a number (0 to quit): 9Enter a number (0 to quit): 8Enter a number (0 to quit): 0The following initial elements are the same in the vector and the list:5 6The vector is lexicographically first.
The non-modifying counting algorithms are all_of(), any_of(), none_of(), count(), and count_if(). Here are some examples of the first three algorithms. (An example of count_if() is given earlier in this chapter.)
// all_of()vector<int> vec2 = { 1, 1, 1, 1 };if (all_of(cbegin(vec2), cend(vec2), [](int i){ return i == 1; })) {cout << "All elements are == 1" << endl;} else {cout << "Not all elements are == 1" << endl;}// any_of()vector<int> vec3 = { 0, 0, 1, 0 };if (any_of(cbegin(vec3), cend(vec3), [](int i){ return i == 1; })) {cout << "At least one element == 1" << endl;} else {cout << "No elements are == 1" << endl;}// none_of()vector<int> vec4 = { 0, 0, 0, 0 };if (none_of(cbegin(vec4), cend(vec4), [](int i){ return i == 1; })) {cout << "All elements are != 1" << endl;} else {cout << "Some elements are == 1" << endl;}
The output is as follows:
All elements are == 1At least one element == 1All elements are != 1
The Standard Library provides a variety of modifying sequence algorithms that perform tasks such as copying elements from one range to another, removing elements, or reversing the order of elements in a range.
Some modifying algorithms use the concept of a source and a destination range. The elements are read from the source range and modified in the destination range. Other algorithms perform their work in-place, that is, they only require one range.
The section “Modifying Sequence Algorithms” in Chapter 16 lists all available modifying algorithms with a description of each one. This section provides code examples for a number of those algorithms. If you understand how to use the algorithms explained in this section, you should not have any problems using the other algorithms for which no examples are given.
A first version of the transform() algorithm applies a callback to each element in a range and expects the callback to generate a new element, which it stores in the specified destination range. The source and destination ranges can be the same if you want transform() to replace each element in a range with the result from the call to the callback. The parameters are a begin and end iterator of the source sequence, a begin iterator of the destination sequence, and the callback. For example, you could add 100 to each element in a vector like this:
vector<int> myVector;populateContainer(myVector);cout << "The vector contains:" << endl;for (const auto& i : myVector) { cout << i << " "; }cout << endl;transform(begin(myVector), end(myVector), begin(myVector),[](int i){ return i + 100;});cout << "The vector contains:" << endl;for (const auto& i : myVector) { cout << i << " "; }
Another version of transform() calls a binary function on pairs of elements in a range. It requires a begin and end iterator of the first range, a begin iterator of the second range, and a begin iterator of the destination range. The following example creates two vectors and uses transform() to calculate the sum of pairs of elements and store the result back in the first vector:
vector<int> vec1, vec2;cout << "Vector1:" << endl; populateContainer(vec1);cout << "Vector2:" << endl; populateContainer(vec2);if (vec2.size() < vec1.size()){cout << "Vector2 should be at least the same size as vector1." << endl;return 1;}// Create a lambda to print the contents of a containerauto printContainer = [](const auto& container) {for (auto& i : container) { cout << i << " "; }cout << endl;};cout << "Vector1: "; printContainer(vec1);cout << "Vector2: "; printContainer(vec2);transform(begin(vec1), end(vec1), begin(vec2), begin(vec1),[](int a, int b){return a + b;});cout << "Vector1: "; printContainer(vec1);cout << "Vector2: "; printContainer(vec2);
The output could look like this:
Vector1:Enter a number (0 to quit): 1Enter a number (0 to quit): 2Enter a number (0 to quit): 0Vector2:Enter a number (0 to quit): 11Enter a number (0 to quit): 22Enter a number (0 to quit): 33Enter a number (0 to quit): 0Vector1: 1 2Vector2: 11 22 33Vector1: 12 24Vector2: 11 22 33
The copy() algorithm allows you to copy elements from one range to another, starting with the first element and proceeding to the last element in the range. The source and destination ranges must be different, but, with restrictions, they can overlap. The restrictions are as follows: for copy(b,e,d), overlapping is fine if d is before b, however, if d is within [b,e), then the behavior is undefined. As with all modifying algorithms, copy() cannot insert elements into the destination. It just overwrites whatever elements are there already. Chapter 21 describes how to use iterator adaptors to insert elements into a container or stream with copy().
Here is a simple example of copy() that uses the resize() method on a vector to ensure that there is enough space in the destination container. It copies all elements from vec1 to vec2:
vector<int> vec1, vec2;populateContainer(vec1);vec2.resize(size(vec1));copy(cbegin(vec1), cend(vec1), begin(vec2));for (const auto& i : vec2) { cout << i << " "; }
There is also a copy_backward() algorithm, which copies the elements from the source backward to the destination. In other words, it starts with the last element of the source, puts it in the last position in the destination range, and then moves backward after each copy. Also for copy_backward(), the source and destination ranges must be different, but, with restrictions, they can again overlap. The restrictions this time are as follows: for copy_backward(b,e,d), overlapping is fine if d is after e, however, if d is within (b,e], then the behavior is undefined. The preceding example can be modified to use copy_backward() instead of copy(), as follows. Note that you need to specify end(vec2) as a third argument instead of begin(vec2).
copy_backward(cbegin(vec1), cend(vec1), end(vec2));This results in exactly the same output.
copy_if() works by having an input range specified by two iterators, an output destination specified by one iterator, and a predicate (for example, a function or lambda expression). The algorithm copies all elements that satisfy the given predicate to the destination. Remember, copy does not create or extend containers; it merely replaces existing elements, so the destination should be big enough to hold all elements to be copied. Of course, after copying the elements, it might be desirable to remove the space “beyond” where the last element was copied to. To facilitate this, copy_if() returns an iterator to the one-past-the-last-copied element in the destination range. This method can be used to determine how many elements should be removed from the destination container. The following example demonstrates this by copying only the even numbers to vec2:
vector<int> vec1, vec2;populateContainer(vec1);vec2.resize(size(vec1));auto endIterator = copy_if(cbegin(vec1), cend(vec1),begin(vec2), [](int i){ return i % 2 == 0; });vec2.erase(endIterator, end(vec2));for (const auto& i : vec2) { cout << i << " "; }
copy_n() copies n elements from the source to the destination. The first parameter of copy_n() is the start iterator. The second parameter is an integer specifying the number of elements to copy, and the third parameter is the destination iterator. The copy_n() algorithm does not perform any bounds checking, so you must make sure that the start iterator, incremented by the number of elements to copy, does not exceed the end() of the collection or your program will have undefined behavior. Here is an example:
vector<int> vec1, vec2;populateContainer(vec1);size_t cnt = 0;cout << "Enter number of elements you want to copy: ";cin >> cnt;cnt = min(cnt, size(vec1));vec2.resize(cnt);copy_n(cbegin(vec1), cnt, begin(vec2));for (const auto& i : vec2) { cout << i << " "; }
There are two move-related algorithms: move() and move_backward(). They both use move semantics, which are discussed in Chapter 9. You have to provide a move assignment operator in your element classes if you want to use these algorithms on containers with elements of your own types, as demonstrated in the following example. The main() function creates a vector with three MyClass objects, and then moves those elements from vecSrc to vecDst. Note that the code includes two different uses of move(). The move() function accepting a single argument converts an lvalue into an rvalue and is defined in <utility>, while move() accepting three arguments is the Standard Library move() algorithm to move elements between containers. Consult Chapter 9 for details on implementing move assignment operators and the use of the single parameter version of std::move().
class MyClass{public:MyClass() = default;MyClass(const MyClass& src) = default;MyClass(string_view str) : mStr(str) {}virtual ~MyClass() = default;// Move assignment operatorMyClass& operator=(MyClass&& rhs) noexcept {if (this == &rhs)return *this;mStr = std::move(rhs.mStr);cout << "Move operator= (mStr=" << mStr << ")" << endl;return *this;}void setString(string_view str) { mStr = str; }string_view getString() const {return mStr;}private:string mStr;};int main(){vector<MyClass> vecSrc {MyClass("a"), MyClass("b"), MyClass("c")};vector<MyClass> vecDst(vecSrc.size());move(begin(vecSrc), end(vecSrc), begin(vecDst));for (const auto& c : vecDst) { cout << c.getString() << " "; }return 0;}
The output is as follows:
Move operator= (mStr=a)Move operator= (mStr=b)Move operator= (mStr=c)a b c
move_backward() uses the same move mechanism as move(), but it moves the elements starting from the last to the first element. For both move() and move_backward(), the source and destination ranges are allowed to overlap with certain restrictions. These restrictions are the same as discussed for copy() and copy_backward().
The replace() and replace_if() algorithms replace elements in a range matching a value or predicate, respectively, with a new value. Take replace_if() as an example. Its first and second parameters specify the range of elements in your container. The third parameter is a function or lambda expression that returns true or false. If it returns true, the value in the container is replaced with the value given as fourth parameter; if it returns false, it leaves the original value.
For example, you might want to replace all odd values in a container with the value zero:
vector<int> vec;populateContainer(vec);replace_if(begin(vec), end(vec), [](int i){ return i % 2 != 0; }, 0);for (const auto& i : vec) { cout << i << " "; }
There are also variants of replace() and replace_if() called replace_copy() and replace_copy_if() that copy the results to a different destination range. They are similar to copy(), in that the destination range must already be large enough to hold the new elements.
Suppose you have a range of elements and you want to remove elements matching a certain condition. The first solution that you might think of is to check the documentation to see if your container has an erase() method, and then iterate over all the elements and call erase() for each element that matches the condition. The vector is an example of a container that has such an erase() method. However, if applied to the vector container, this solution is very inefficient as it will cause a lot of memory operations to keep the vector contiguous in memory, resulting in a quadratic complexity.1 This solution is also error-prone, because you need to be careful that you keep your iterators valid after a call to erase(). For example, here is a function that removes empty strings from a vector of strings without using algorithms. Note how iter is carefully manipulated inside the for loop:
void removeEmptyStringsWithoutAlgorithms(vector<string>& strings){for (auto iter = begin(strings); iter != end(strings); ) {if (iter->empty())iter = strings.erase(iter);else++iter;}}
This solution is inefficient and not recommended. The correct solution for this problem is the so-called remove-erase-idiom, which runs in linear time and is explained next.
Algorithms have access only to the iterator abstraction, not to the container. Thus, the remove algorithms cannot really remove them from the underlying container. Instead, the algorithms work by replacing the elements that match the given value or predicate with the next element that does not match the given value or predicate. It does so using move assignments. The result is that the range becomes partitioned into two sets: the elements to be kept and the elements to be erased. An iterator is returned that points to the first element in the range of elements to be erased. If you want to actually erase these elements from the container, you must first use the remove() algorithm, then call erase() on the container to erase all the elements from the returned iterator up to the end of the range. This is the remove-erase-idiom. Here is an example of a function that removes empty strings from a vector of strings:
void removeEmptyStrings(vector<string>& strings){auto it = remove_if(begin(strings), end(strings),[](const string& str){ return str.empty(); });// Erase the removed elements.strings.erase(it, end(strings));}int main(){vector<string> myVector = {"", "one", "", "two", "three", "four"};for (auto& str : myVector) { cout << "\"" << str << "\" "; }cout << endl;removeEmptyStrings(myVector);for (auto& str : myVector) { cout << "\"" << str << "\" "; }cout << endl;return 0;}
The output is as follows:
"" "one" "" "two" "three" "four""one" "two" "three" "four"
The remove_copy() and remove_copy_if() variations of remove() and remove_if() do not change the source range. Instead, they copy all kept elements to a different destination range. They are similar to copy(), in that the destination range must already be large enough to hold the new elements.
The unique() algorithm is a special case of remove() that removes all duplicate contiguous elements. The list container provides its own unique() method that implements the same semantics. You should generally use unique() on sorted sequences, but nothing prevents you from running it on unsorted sequences.
The basic form of unique() runs in place, but there is also a version of the algorithm called unique_copy() that copies its results to a new destination range.
Chapter 17 shows an example of the list::unique() algorithm in the section “list Example: Determining Enrollment,” so an example of the general form is omitted here.
sampleThe sample() algorithm returns a selection of n randomly chosen elements from a given source range and stores them in a destination range. It requires five parameters:
Here is an example (details on how to use random number generation engines, and how to “seed” them are explained in Chapter 20):
vector<int> vec{ 1,2,3,4,5,6,7,8,9,10 };const size_t numberOfSamples = 5;vector<int> samples(numberOfSamples);random_device seeder;const auto seed = seeder.entropy() ? seeder() : time(nullptr);default_random_engine engine(static_cast<default_random_engine::result_type>(seed));for (int i = 0; i < 6; ++i) {sample(cbegin(vec), cend(vec), begin(samples), numberOfSamples, engine);for (const auto& sample : samples) { cout << sample << " "; }cout << endl;}
Here is some possible output:
1 2 5 8 101 2 4 5 75 6 8 9 102 3 4 6 72 5 7 8 101 2 5 6 7
The reverse() algorithm reverses the order of the elements in a range. The first element in the range is swapped with the last, the second with the second-to-last, and so on.
The basic form of reverse() runs in place and requires two arguments: a start and end iterator for the range. There is also a version of the algorithm called reverse_copy() that copies its results to a new destination range and requires three arguments: a start and end iterator for the source range, and a start iterator for the destination range. The destination range must already be large enough to hold the new elements.
shuffle() rearranges the elements of a range in a random order with a linear complexity. It’s useful for implementing tasks like shuffling a deck of cards. shuffle() requires a start and end iterator for the range that you want to shuffle and a uniform random number generator object that specifies how the random numbers should be generated. Random number generators are discussed in detail in Chapter 20.
There are only two algorithms in this category: for_each() and for_each_n(). The latter is introduced with C++17. They execute a callback on each element of the range, or on the first n elements of a range, respectively. You can use them with simple function callbacks or lambda expressions for things like printing elements from a container. The algorithms are mentioned here so you know they exist; however, it’s often easier and more readable to use a simple range-based for loop instead.
Following is an example using a generic lambda expression, printing the elements from a map:
map<int, int> myMap = { { 4, 40 }, { 5, 50 }, { 6, 60 } };for_each(cbegin(myMap), cend(myMap), [](const auto& p){ cout << p.first << "->" << p.second << endl; });
The type of p is const pair<int, int>&. The output is as follows:
4->405->506->60
The following example shows how to use the for_each() algorithm and a lambda expression to calculate the sum and the product of a range of elements at the same time. Note that the lambda expression explicitly captures only those variables it needs. It captures them by reference; otherwise, changes made to sum and product in the lambda expression would not be visible outside the lambda.
vector<int> myVector;populateContainer(myVector);int sum = 0;int product = 1;for_each(cbegin(myVector), cend(myVector),[&sum, &product](int i){sum += i;product *= i;});cout << "The sum is " << sum << endl;cout << "The product is " << product << endl;
This example can also be written with a functor in which you accumulate information that you can retrieve after for_each() has finished processing each element. For example, you could calculate both the sum and product of the elements in one pass by writing a functor SumAndProduct that tracks both at the same time:
class SumAndProduct{public:void operator()(int value);int getSum() const { return mSum; }int getProduct() const { return mProduct; }private:int mSum = 0;int mProduct = 1;};void SumAndProduct::operator()(int value){mSum += value;mProduct *= value;}int main(){vector<int> myVector;populateContainer(myVector);SumAndProduct func;func = for_each(cbegin(myVector), cend(myVector), func);cout << "The sum is " << func.getSum() << endl;cout << "The product is " << func.getProduct() << endl;return 0;}
You might be tempted to ignore the return value of for_each(), yet still try to read information from func after the call. However, that doesn’t work because the functor is copied into the for_each(), and at the end, this copy is returned from the call. You must capture the return value in order to ensure correct behavior.
A final point about both for_each() and for_each_n(), discussed next, is that your lambda or callback is allowed to take its parameter by reference and modify it. That has the effect of changing values in the actual iterator range. The voter registration example later in this chapter shows a use of this capability.
for_each_nThe for_each_n() algorithm requires a begin iterator of the range, the number of elements to iterate over, and a function callback. It returns an iterator equal to begin + n. As usual, it does not perform any bounds checking. Here is an example that only iterates over the first two elements of a map:
map<int, int> myMap = { { 4, 40 }, { 5, 50 }, { 6, 60 } };for_each_n(cbegin(myMap), 2, [](const auto& p){ cout << p.first << "->" << p.second << endl; });
The C++ Standard Library provides the following swap and exchange algorithms.
std::swap() is used to efficiently swap two values, using move semantics if available. Its use is straightforward:
int a = 11;int b = 22;cout << "Before swap(): a = " << a << ", b = " << b << endl;swap(a, b);cout << "After swap(): a = " << a << ", b = " << b << endl;
The output is as follows:
Before swap(): a = 11, b = 22After swap(): a = 22, b = 11
exchangestd::exchange(), defined in <utility>, replaces a value with a new value and returns the old value, as in this example:
int a = 11;int b = 22;cout << "Before exchange(): a = " << a << ", b = " << b << endl;int returnedValue = exchange(a, b);cout << "After exchange(): a = " << a << ", b = " << b << endl;cout << "exchange() returned: " << returnedValue << endl;
The output is as follows:
Before exchange(): a = 11, b = 22After exchange(): a = 22, b = 22exchange() returned: 11
exchange() is useful in implementing move assignment operators. A move assignment operator needs to move the data from a source object to a destination object. Often, the data in the source object is nullified. Typically, this is done as follows. Suppose Foo has as data member a pointer to some raw memory, called mPtr:
Foo& operator=(Foo&& rhs) noexcept{// Check for self-assignmentif (this == &rhs) { return *this; }// Free the old memorydelete mPtr; mPtr = nullptr;// Move datamPtr = rhs.mPtr; // Move data from source to destinationrhs.mPtr = nullptr; // Nullify data in sourcereturn *this;}
The assignments to mPtr and to rhs.mPtr near the end of the method can be implemented using exchange() as follows:
Foo& operator=(Foo&& rhs) noexcept{// Check for self-assignmentif (this == &rhs) { return *this; }// Free the old memorydelete mPtr; mPtr = nullptr;// Move datamPtr = exchange(rhs.mPtr, nullptr);// Move + nullifyreturn *this;}
partition_copy() copies elements from a source to two different destinations. The specific destination for each element is selected based on the result of a predicate, either true or false. The returned value of partition_copy() is a pair of iterators: one iterator referring to one-past-the-last-copied element in the first destination range, and one iterator referring to one-past-the-last-copied element in the second destination range. These returned iterators can be used in combination with erase() to remove excess elements from the two destination ranges, just as in the earlier copy_if() example. The following example asks the user to enter a number of integers, which are then partitioned into two destination vectors: one for the even numbers and one for the odd numbers.
vector<int> vec1, vecOdd, vecEven;populateContainer(vec1);vecOdd.resize(size(vec1));vecEven.resize(size(vec1));auto pairIters = partition_copy(cbegin(vec1), cend(vec1),begin(vecEven), begin(vecOdd),[](int i){ return i % 2 == 0; });vecEven.erase(pairIters.first, end(vecEven));vecOdd.erase(pairIters.second, end(vecOdd));cout << "Even numbers: ";for (const auto& i : vecEven) { cout << i << " "; }cout << endl << "Odd numbers: ";for (const auto& i : vecOdd) { cout << i << " "; }
The output can be as follows:
Enter a number (0 to quit): 11Enter a number (0 to quit): 22Enter a number (0 to quit): 33Enter a number (0 to quit): 44Enter a number (0 to quit): 0Even numbers: 22 44Odd numbers: 11 33
The partition() algorithm sorts a sequence such that all elements for which a predicate returns true are before all elements for which it returns false, without preserving the original order of the elements within each partition. The following example demonstrates how to partition a vector into all even numbers followed by all odd numbers:
vector<int> vec;populateContainer(vec);partition(begin(vec), end(vec), [](int i){ return i % 2 == 0; });cout << "Partitioned result: ";for (const auto& i : vec) { cout << i << " "; }
The output can be as follows:
Enter a number (0 to quit): 55Enter a number (0 to quit): 44Enter a number (0 to quit): 33Enter a number (0 to quit): 22Enter a number (0 to quit): 11Enter a number (0 to quit): 0Partitioned result: 22 44 33 55 11
A couple of other partition algorithms are available. See Chapter 16 for a list.
The Standard Library provides several variations of sorting algorithms. A “sorting algorithm” reorders the contents of a container such that an ordering is maintained between sequential elements of the collection. Thus, it applies only to sequential collections. Sorting is not relevant for ordered associative containers because they already maintain elements in a sorted order. Sorting is not relevant to the unordered associative containers either, because they have no concept of ordering. Some containers, such as list and forward_list, provide their own sorting methods, because these methods can be implemented more efficiently than a generic sorting mechanism. Consequently, the generic sorting algorithms are most useful for vectors, deques, arrays, and C-style arrays.
The sort() algorithm sorts a range of elements in O(N log N) time in general. Following the application of sort() to a range, the elements in the range are in nondecreasing order (lowest to highest), according to operator<. If you don’t like that order, you can specify a different comparator, such as greater.
A variant of sort(), called stable_sort(), maintains the relative order of equal elements in a range, which means that it is less efficient than the sort() algorithm.
Here is an example of sort():
vector<int> vec;populateContainer(vec);sort(begin(vec), end(vec), greater<>());
There is also is_sorted() and is_sorted_until(). is_sorted() returns true if a given range is sorted, while is_sorted_until() returns an iterator such that everything before this iterator is sorted.
There are several search algorithms that work only on sequences that are sorted, or that are at least partitioned on the element that is searched for. These algorithms are binary_search(), lower_bound(), upper_bound(), and equal_range(). The lower_bound(), upper_bound(), and equal_range() algorithms are similar to their method equivalents on the map and set containers. See Chapter 17 for an example on how to use them on such containers.
The lower_bound() algorithm finds the first element in a sorted range not less than (that is greater or equal to) a given value. It is often used to find at which position in a sorted vector a new value should be inserted, so that the vector remains sorted. Here is an example:
vector<int> vec;populateContainer(vec);// Sort the containersort(begin(vec), end(vec));cout << "Sorted vector: ";for (const auto& i : vec) { cout << i << " "; }cout << endl;while (true) {int num;cout << "Enter a number to insert (0 to quit): ";cin >> num;if (num == 0) {break;}auto iter = lower_bound(begin(vec), end(vec), num);vec.insert(iter, num);cout << "New vector: ";for (const auto& i : vec) { cout << i << " "; }cout << endl;}
The binary_search() algorithm finds a matching element in logarithmic time instead of linear time. It requires a start and end iterator specifying the range to search in, a value to search, and optionally a comparison callback. It returns true if the value is found in the specified range, false otherwise. The following example demonstrates this algorithm:
vector<int> vec;populateContainer(vec);// Sort the containersort(begin(vec), end(vec));while (true) {int num;cout << "Enter a number to find (0 to quit): ";cin >> num;if (num == 0) {break;}if (binary_search(cbegin(vec), cend(vec), num)) {cout << "That number is in the vector." << endl;} else {cout << "That number is not in the vector." << endl;}}
The set algorithms work on any sorted range. The includes() algorithm implements standard subset determination, checking if all the elements of one sorted range are included in another sorted range, in any order.
The set_union(), set_intersection(), set_difference(), and set_symmetric_difference() algorithms implement the standard semantics of those operations. In set theory, the result of union is all the elements in either set. The result of intersection is all the elements which are in both sets. The result of difference is all the elements in the first set but not the second. The result of symmetric difference is the “exclusive or” of sets: all the elements in one, but not both, sets.
Here are examples of how to use these algorithms:
vector<int> vec1, vec2, result;cout << "Enter elements for set 1:" << endl;populateContainer(vec1);cout << "Enter elements for set 2:" << endl;populateContainer(vec2);// set algorithms work on sorted rangessort(begin(vec1), end(vec1));sort(begin(vec2), end(vec2));DumpRange("Set 1: ", cbegin(vec1), cend(vec1));DumpRange("Set 2: ", cbegin(vec2), cend(vec2));if (includes(cbegin(vec1), cend(vec1), cbegin(vec2), cend(vec2))) {cout << "The second set is a subset of the first." << endl;}if (includes(cbegin(vec2), cend(vec2), cbegin(vec1), cend(vec1))) {cout << "The first set is a subset of the second" << endl;}result.resize(size(vec1) + size(vec2));auto newEnd = set_union(cbegin(vec1), cend(vec1), cbegin(vec2),cend(vec2), begin(result));DumpRange("The union is: ", begin(result), newEnd);newEnd = set_intersection(cbegin(vec1), cend(vec1), cbegin(vec2),cend(vec2), begin(result));DumpRange("The intersection is: ", begin(result), newEnd);newEnd = set_difference(cbegin(vec1), cend(vec1), cbegin(vec2),cend(vec2), begin(result));DumpRange("The difference between set 1 and 2 is: ", begin(result), newEnd);newEnd = set_symmetric_difference(cbegin(vec1), cend(vec1),cbegin(vec2), cend(vec2), begin(result));DumpRange("The symmetric difference is: ", begin(result), newEnd);
DumpRange() is a small helper function template to write elements of a given range to the standard output stream; it is implemented as follows:
template<typename Iterator>void DumpRange(string_view message, Iterator begin, Iterator end){cout << message;for_each(begin, end, [](const auto& element) { cout << element << " "; });cout << endl;}
Here is a sample run of the program:
Enter elements for set 1:Enter a number (0 to quit): 5Enter a number (0 to quit): 6Enter a number (0 to quit): 7Enter a number (0 to quit): 8Enter a number (0 to quit): 0Enter elements for set 2:Enter a number (0 to quit): 8Enter a number (0 to quit): 9Enter a number (0 to quit): 10Enter a number (0 to quit): 0Set 1: 5 6 7 8Set 2: 8 9 10The union is: 5 6 7 8 9 10The intersection is: 8The difference between set 1 and set 2 is: 5 6 7The symmetric difference is: 5 6 7 9 10
The merge() algorithm allows you to merge two sorted ranges together, while maintaining the sorted order. The result is a sorted range containing all the elements of the two source ranges. It works in linear time. The following parameters are required:
Without merge(), you could still achieve the same effect by concatenating the two ranges and applying sort() to the result, but that would be less efficient, O(N log N) instead of the linear complexity of merge().
The following example demonstrates merge():
vector<int> vectorOne, vectorTwo, vectorMerged;cout << "Enter values for first vector:" << endl;populateContainer(vectorOne);cout << "Enter values for second vector:" << endl;populateContainer(vectorTwo);// Sort both containerssort(begin(vectorOne), end(vectorOne));sort(begin(vectorTwo), end(vectorTwo));// Make sure the destination vector is large enough to hold the values// from both source vectors.vectorMerged.resize(size(vectorOne) + size(vectorTwo));merge(cbegin(vectorOne), cend(vectorOne),cbegin(vectorTwo), cend(vectorTwo), begin(vectorMerged));DumpRange("Merged vector: ", cbegin(vectorMerged), cend(vectorMerged));
The min() and max() algorithms compare two or more elements of any type using operator< or a user-supplied binary predicate, returning a const reference to the smallest or largest element, respectively. The minmax() algorithm returns a pair containing the minimum and maximum value of two or more elements. These algorithms do not take iterator parameters. There is also min_element(), max_element(), and minmax_element() that work on iterator ranges.
The following program gives some examples:
int x = 4, y = 5;cout << "x is " << x << " and y is " << y << endl;cout << "Max is " << max(x, y) << endl;cout << "Min is " << min(x, y) << endl;// Using max() and min() on more than two valuesint x1 = 2, x2 = 9, x3 = 3, x4 = 12;cout << "Max of 4 elements is " << max({ x1, x2, x3, x4 }) << endl;cout << "Min of 4 elements is " << min({ x1, x2, x3, x4 }) << endl;// Using minmax()auto p2 = minmax({ x1, x2, x3, x4 });cout << "Minmax of 4 elements is <"<< p2.first << "," << p2.second << ">" << endl;// Using minmax() + C++17 structured bindingsauto[min1, max1] = minmax({ x1, x2, x3, x4 });cout << "Minmax of 4 elements is <"<< min1 << "," << max1 << ">" << endl;// Using minmax_element() + C++17 structured bindingsvector<int> vec{ 11, 33, 22 };auto[min2, max2] = minmax_element(cbegin(vec), cend(vec));cout << "minmax_element() result: <"<< *min2 << "," << *max2 << ">" << endl;
Here is the program output:
x is 4 and y is 5Max is 5Min is 4Max of 4 elements is 12Min of 4 elements is 2Minmax of 4 elements is <2,12>Minmax of 4 elements is <2,12>minmax_element() result: <11,33>
std::clamp() is a little helper function, defined in <algorithm>, that you can use to make sure that a value (v) is between a given minimum (lo) and maximum (hi). It returns a reference to lo if v < lo; returns a reference to hi if v > hi; otherwise returns a reference to v. Here is an example:
cout << clamp(-3, 1, 10) << endl;cout << clamp(3, 1, 10) << endl;cout << clamp(22, 1, 10) << endl;
The output is as follows:
1310
Parallel AlgorithmsC++17 adds support to more than 60 Standard Library algorithms for executing them in parallel to improve their performance. Examples include for_each(), all_of(), copy(), count_if(), find(), replace(), search(), sort(), transform(), and many more. Algorithms that support parallel execution have the option to accept a so-called execution policy as their first parameter.
The execution policy allows you to specify whether or not an algorithm is allowed to be executed in parallel or vectorized. There are three standard execution policy types, and three global instances of those types, all defined in the <execution> header file in the std::execution namespace.
| EXECUTION POLICY TYPE | GLOBAL INSTANCE | DESCRIPTION |
sequenced_policy |
seq |
The algorithm is not allowed to parallelize its execution. |
parallel_policy |
par |
The algorithm is allowed to parallelize its execution. |
parallel_unsequenced_policy |
par_unseq |
The algorithm is allowed to parallelize and vectorize its execution. It’s also allowed to migrate its execution across threads. |
A Standard Library implementation is free to add additional execution policies.
Note that for an algorithm executing with parallel_unsequenced_policy, function calls to callbacks are allowed to get interleaved, that is, they are unsequenced. This means that there are a lot of restrictions on what a function callback can do. For example, it cannot allocate/deallocate memory, acquire mutexes, use non-lock free std::atomics (see Chapter 23), and more. For the other standard policies, the function calls are sequenced, but in an indeterminate sequence. Such policies do not impose restrictions on what the function callbacks can do.
Parallel algorithms do not take any measures to prevent data races and deadlocks, so it is your responsibility to avoid them when executing an algorithm in parallel. Data race and deadlock prevention is discussed in detail in Chapter 23.
Here is an example of sorting the contents of a vector using a parallel policy:
sort(std::execution::par, begin(myVector), end(myVector));You’ve already seen an example of one numerical processing algorithm: accumulate(). The following sections give examples of some more numerical algorithms.
inner_product(), defined in <numeric>, calculates the inner product of two sequences. For example, the inner product in the following example is calculated as (1*9)+(2*8)+(3*7)+(4*6):
vector<int> v1{ 1, 2, 3, 4 };vector<int> v2{ 9, 8, 7, 6 };cout << inner_product(cbegin(v1), cend(v1), cbegin(v2), 0) << endl;
The output is 70.
The iota() algorithm, defined in the <numeric> header file, generates a sequence of values in a specified range starting with a specified value and applying operator++ to generate each successive value. The following example shows how to use this algorithm on a vector of integers, but note that it works on any element type that implements operator++:
vector<int> vec(10);iota(begin(vec), end(vec), 5);for (auto& i : vec) { cout << i << " "; }
The output is as follows:
5 6 7 8 9 10 11 12 13 14The gcd() algorithm returns the greatest common divisor, while lcm() returns the least common multiple of two integer types. Both are defined in <numeric>. Here is an example:
auto g = gcd(3, 18); // g = 3auto l = lcm(3, 18); // l = 18
reducestd::accumulate() is one of the few algorithms that does not support parallel execution. Instead, you need to use the newly introduced std::reduce() algorithm to calculate a generalized sum with the option to execute it in parallel. For example, the following two lines calculate the same sum, except that reduce() runs a parallel and vectorized version and thus is much faster, especially on big input ranges:
double result1 = std::accumulate(cbegin(vec), cend(vec), 0.0);double result2 = std::reduce(std::execution::par_unseq, cbegin(vec), cend(vec));
In general, both accumulate() and reduce() calculate the following sum for a range of elements [x0, xn), with a given initial value Init, and a given binary operator Ѳ:
Init Ѳ x0 Ѳ x1 Ѳ … Ѳ xn−1
transform_reducestd::inner_product() is another algorithm that does not support parallel execution. Instead, you need to use the generalized transform_reduce(), which has the option to execute in parallel, and which you can use to calculate the inner product, among others. Its use is similar to reduce(), so no example is given.
transform_reduce() calculates the following sum for a range of elements [x0, xn), with a given initial value Init, a given unary function f, and a given binary operator Ѳ:
Init Ѳ f(x0) Ѳ f(x1) Ѳ … Ѳ f(xn−1)
Scan AlgorithmsC++17 introduces four scan algorithms: exclusive_scan(), inclusive_scan(), transform_exclusive_scan(), and transform_inclusive_scan().
The following table shows which sums [y0, yn) are calculated by exclusive_scan() and by inclusive_scan()/partial_sum() for a range of elements [x0, xn), with a given initial value Init (0 for partial_sum()), and a given operator Ѳ.
exclusive_scan() |
inclusive_scan()/partial_sum() |
| y0 = Init y1 = Init Ѳ x0 y2 = Init Ѳ x0 Ѳ x1 … yn-1 = Init Ѳ x0 Ѳ x1 Ѳ … Ѳ xn−2 |
y0 = Init Ѳ x0 y1 = Init Ѳ x0 Ѳ x1 … yn-1 = Init Ѳ x0 Ѳ x1 Ѳ … Ѳ xn−1 |
transform_exclusive_scan() and transform_inclusive_scan() both first apply a unary function to the elements before calculating the generalized sum, similar to how transform_reduce() applies a unary function to the elements before reducing.
Note that all these scan algorithms can accept an optional execution policy to execute them in parallel. The order of evaluation for these scan algorithms is non-deterministic, while it is from left to right for partial_sum() and accumulate(). That’s also the reason why partial_sum() and accumulate() cannot be parallelized!
Voter fraud can be a problem everywhere. People sometimes attempt to register and vote in two or more different voting districts. Additionally, some people, for example, convicted felons, are ineligible to vote, but occasionally attempt to register and vote anyway. Using your newfound algorithm skills, you could write a simple voter registration auditing function that checks the voter rolls for certain anomalies.
The voter registration audit function should audit the voters’ information. Assume that voter registrations are stored by district in a map that maps district names to a vector of voters. Your audit function should take this map and a vector of convicted felons as parameters, and should remove all convicted felons from the vectors of voters. Additionally, the function should find all voters who are registered in more than one district and should remove those names from all districts. Voters with duplicate registrations must have all their registrations removed, and therefore become ineligible to vote. For simplicity, assume that the vector of voters is simply a vector of string names. A real application would obviously require more data, such as address and party affiliation.
The auditVoterRolls() function works in three steps:
vectors by making a call to getDuplicates().set of duplicates and the vector of convicted felons.vector all the names found in the combined set of duplicates and convicted felons. The approach taken here is to use for_each() to process each vector in the map, applying a lambda expression to remove the offending names from each vector.The following type aliases are used in the code:
using VotersMap = map<string, vector<string>>;using DistrictPair = pair<const string, vector<string>>;
Here’s the implementation of auditVoterRolls():
// Expects a map of string/vector<string> pairs keyed on district names// and containing vectors of all the registered voters in those districts.// Removes from each vector any name on the convictedFelons vector and// any name that is found on any other vector.void auditVoterRolls(VotersMap& votersByDistrict,const vector<string>& convictedFelons){// Get all the duplicate names.set<string> toRemove = getDuplicates(votersByDistrict);// Combine the duplicates and convicted felons -- we want// to remove names on both vectors from all voter rolls.toRemove.insert(cbegin(convictedFelons), cend(convictedFelons));// Now remove all the names we need to remove using// nested lambda expressions and the remove-erase-idiom.for_each(begin(votersByDistrict), end(votersByDistrict),[&toRemove](DistrictPair& district) {auto it = remove_if(begin(district.second),end(district.second), [&toRemove](const string& name) {return (toRemove.count(name) > 0);});district.second.erase(it, end(district.second));});}
This implementation uses the for_each() algorithm to demonstrate its use. Of course, instead of for_each(), you could use a range-based for loop as follows (also uses C++17 structured bindings):
for (auto&[district, voters] : votersByDistrict) {auto it = remove_if(begin(voters), end(voters),[&toRemove](const string& name) {return (toRemove.count(name) > 0);});voters.erase(it, end(voters));}
The getDuplicates() function must find any name that is on more than one voter registration list. There are several different approaches one could use to solve this problem. To demonstrate the adjacent_find() algorithm, this implementation combines the vectors from each district into one big vector and sorts it. At that point, any duplicate names between the different vectors will be next to each other in the big vector. Then the adjacent_find() algorithm can be used on the big, sorted vector to find all consecutive duplicates and store them in a set called duplicates. Here is the implementation:
// Returns a set of all names that appear in more than one vector in// the map.set<string> getDuplicates(const VotersMap& votersByDistrict){// Collect all the names from all the vectors into one big vector.vector<string> allNames;for (auto& district : votersByDistrict) {allNames.insert(end(allNames), begin(district.second),end(district.second));}// Sort the vector.sort(begin(allNames), end(allNames));// Now it's sorted, all duplicate names will be next to each other.// Use adjacent_find() to find instances of two or more identical names// next to each other.// Loop until adjacent_find() returns the end iterator.set<string> duplicates;for (auto lit = cbegin(allNames); lit != cend(allNames); ++lit) {lit = adjacent_find(lit, cend(allNames));if (lit == cend(allNames)) {break;}duplicates.insert(*lit);}return duplicates;}
In this implementation, allNames is of type vector<string>. That way, this example can show you how to use the sort() and adjacent_find() algorithms.
Another solution is to change the type of allNames to set<string>, which results in a more compact implementation, because a set doesn’t allow duplicates. This new solution loops over all vectors and tries to insert each name into allNames. When this insert fails, it means that there is already an element with that name in allNames, so the name is added to duplicates. Note that this code uses C++17 structured bindings.
set<string> getDuplicates(const VotersMap& votersByDistrict){set<string> allNames;set<string> duplicates;for (auto&[district, voters] : votersByDistrict) {for (auto& name : voters) {if (!allNames.insert(name).second) {duplicates.insert(name);}}}return duplicates;}
That’s the complete implementation of the voter roll audit functionality. Here is a small test program:
// Initialize map using uniform initializationVotersMap voters = {{"Orange", {"Amy Aardvark", "Bob Buffalo","Charles Cat", "Dwayne Dog"}},{"Los Angeles", {"Elizabeth Elephant", "Fred Flamingo","Amy Aardvark"}},{"San Diego", {"George Goose", "Heidi Hen", "Fred Flamingo"}}};vector<string> felons = {"Bob Buffalo", "Charles Cat"};// Local lambda expression to print a districtauto printDistrict = [](const DistrictPair& district) {cout << district.first << ":";for (auto& str : district.second) {cout << " {" << str << "}";}cout << endl;};cout << "Before Audit:" << endl;for (const auto& district : voters) { printDistrict(district); }cout << endl;auditVoterRolls(voters, felons);cout << "After Audit:" << endl;for (const auto& district : voters) { printDistrict(district); }cout << endl;
The output of the program is as follows:
Before Audit:Los Angeles: {Elizabeth Elephant} {Fred Flamingo} {Amy Aardvark}Orange: {Amy Aardvark} {Bob Buffalo} {Charles Cat} {Dwayne Dog}San Diego: {George Goose} {Heidi Hen} {Fred Flamingo}After Audit:Los Angeles: {Elizabeth Elephant}Orange: {Dwayne Dog}San Diego: {George Goose} {Heidi Hen}
This chapter concludes the basic Standard Library functionality. It provided an overview of the various algorithms and function objects that are available for your use. It also showed you how to use lambda expressions, which often make it easier to understand what your code is doing. I hope that you have gained an appreciation for the usefulness of the Standard Library containers, algorithms, and function objects. If not, think for a moment about rewriting the voter registration audit example without the Standard Library. You would need to write your own vector- and map-like classes, and your own searching, removing, iterating, and other algorithms. The program would be much longer, more error-prone, harder to debug, and more difficult to maintain.
The following chapters discuss a couple of other aspects of the C++ Standard Library. Chapter 19 discusses regular expressions. Chapter 20 covers a number of additional library utilities that are available for you to use, and Chapter 21 gives a taste of some more advanced features, such as allocators, iterator adaptors, and writing your own algorithms.
When you’re learning how to program in C or C++, it’s useful to think of a character as equivalent to a byte and to treat all characters as members of the ASCII (American Standard Code for Information Interchange) character set. ASCII is a 7-bit set usually stored in an 8-bit char type. In reality, experienced C++ programmers recognize that successful programs are used throughout the world. Even if you don’t initially write your program with international audiences in mind, you shouldn’t prevent yourself from localizing, or making the software locale aware, at a later date.
A critical aspect of localization is that you should never put any native-language string literals in your source code, except maybe for debug strings targeted at the developer. In Microsoft Windows applications, this is accomplished by putting the strings in STRINGTABLE resources. Most other platforms offer similar capabilities. If you need to translate your application to another language, translating those resources should be all you need to do, without requiring any source changes. There are tools available that will help you with this translation process.
To make your source code localizable, you should not compose sentences out of string literals, even if the individual literals can be localized. Here is an example:
cout << "Read " << n << " bytes" << endl;This statement cannot be localized to Dutch because it requires a reordering of the words. The Dutch translation is as follows:
cout << n << " bytes gelezen" << endl;To make sure you can properly localize this string, you could implement something like this:
cout << Format(IDS_TRANSFERRED, n) << endl;IDS_TRANSFERRED is the name of an entry in a string resource table. For the English version, IDS_TRANSFERRED could be defined as “Read $1 bytes”, while the Dutch version of the resource could be defined as “$1 bytes gelezen”. The Format() function loads the string resource, and substitutes $1 with the value of n.
The problem with viewing a character as a byte is that not all languages, or character sets, can be fully represented in 8 bits, or 1 byte. C++ has a built-in type called wchar_t that holds a wide character. Languages with non-ASCII (U.S.) characters, such as Japanese and Arabic, can be represented in C++ with wchar_t. However, the C++ standard does not define a size for wchar_t. Some compilers use 16 bits while others use 32 bits. To write cross-platform code, it is not safe to assume that wchar_t is of a particular size.
If there is any chance that your program will be used in a non-Western character set context (hint: there is!), you should use wide characters from the beginning. When working with wchar_t, string and character literals are prefixed with the letter L to indicate that a wide-character encoding should be used. For example, to initialize a wchar_t character to the letter m, you write it like this:
wchar_t myWideCharacter = L'm';There are wide-character versions of most of your favorite types and classes. The wide string class is wstring. The “prefix letter w” pattern applies to streams as well. Wide-character file output streams are handled with wofstream, and input is handled with wifstream. The joy of pronouncing these class names (woof-stream? whiff-stream?) is reason enough to make your programs locale aware! Streams are discussed in detail in Chapter 13.
There are also wide-versions of cout, cin, cerr, and clog available, called wcout, wcin, wcerr, and wclog. Using them is no different than using the non-wide versions:
wcout << L"I am a wide-character string literal." << endl;Wide characters are a great step forward because they increase the amount of space available to define a single character. The next step is to figure out how that space is used. In wide character sets, just like in ASCII, characters are represented by numbers, now called code points. The only difference is that each number does not fit in 8 bits. The map of characters to code points is quite a bit larger because it handles many different character sets in addition to the characters that English-speaking programmers are familiar with.
The Universal Character Set (UCS)—defined by the International Standard ISO 10646—and Unicode are both standardized sets of characters. They contain around one hundred thousand abstract characters, each identified by an unambiguous name and a code point. The same characters with the same numbers exist in both standards. Both have specific encodings that you can use. For example, UTF-8 is an example of a Unicode encoding where Unicode characters are encoded using one to four 8-bit bytes. UTF-16 encodes Unicode characters as one or two 16-bit values, and UTF-32 encodes Unicode characters as exactly 32 bits.
Different applications can use different encodings. Unfortunately, the C++ standard does not specify a size for wide characters (wchar_t). On Windows it is 16 bits, while on other platforms it could be 32 bits. You need to be aware of this when using wide characters for character encoding in cross-platform code. To help solve this issue, there are two other character types: char16_t and char32_t. The following list gives an overview of all available character types.
char: Stores 8 bits. This type can be used to store ASCII characters, or as a basic building block for storing UTF-8 encoded Unicode characters, where one Unicode character is encoded as one to four chars.char16_t: Stores at least 16 bits. This type can be used as the basic building block for UTF-16 encoded Unicode characters, where one Unicode character is encoded as one or two char16_ts.char32_t: Stores at least 32 bits. This type can be used for storing UTF-32 encoded Unicode characters as one char32_t.wchar_t: Stores a wide character of a compiler-specific size and encoding.The benefit of using char16_t and char32_t instead of wchar_t is that the size of char16_t is guaranteed to be at least 16 bits, and the size of char32_t is guaranteed to be at least 32 bits, independent of the compiler. There is no minimum size guaranteed for wchar_t.
The standard also defines the following macros.
__STDC_UTF_32__: If defined by the compiler, then the type char32_t uses UTF-32 encoding. If it is not defined, char32_t has a compiler-dependent encoding.__STDC_UTF_16__: If defined by the compiler, then the type char16_t uses UTF-16 encoding. If it is not defined, char16_t has a compiler-dependent encoding.String literals can have a string prefix to turn them into a specific type. The complete set of supported string prefixes is as follows.
u8: A char string literal with UTF-8 encoding.u: A char16_t string literal, which can be UTF-16 if __STDC_UTF_16__ is defined by the compiler.U: A char32_t string literal, which can be UTF-32 if __STDC_UTF_32__ is defined by the compiler.L: A wchar_t string literal with a compiler-dependent encoding.All of these string literals can be combined with the raw string literal prefix, R, discussed in Chapter 2. Here are some examples:
const char* s1 = u8R"(Raw UTF-8 encoded string literal)";const wchar_t* s2 = LR"(Raw wide string literal)";const char16_t* s3 = uR"(Raw char16_t string literal)";const char32_t* s4 = UR"(Raw char32_t string literal)";
If you are using Unicode encoding, for example, by using u8 UTF-8 string literals, or if your compiler defines __STDC_UTF_16__ or __STDC_UTF_32__, you can insert a specific Unicode code point in your non-raw string literal by using the \uABCD notation. For example, \u03C0 represents the pi character, and \u00B2 represents the ‘squared’ character. The following formula string represents “π r2”:
const char* formula = u8"\u03C0 r\u00B2";Similarly, character literals can also have a prefix to turn them into specific types. The prefixes u, U, and L are supported, and C++17 adds the u8 prefix for character literals. Here are some examples: u'a', U'a', L'a', and u8'a'.
Besides the std::string class, there is also support for wstring, u16string, and u32string. They are all defined as follows:
using string = basic_string<char>;using wstring = basic_string<wchar_t>;using u16string = basic_string<char16_t>;using u32string = basic_string<char32_t>;Multibyte characters are characters composed of one or more bytes with a compiler-dependent encoding, similar to how Unicode can be represented with one to four bytes using UTF-8, or with one or two 16-bit values using UTF-16. There are conversion functions to convert between char16_t/char32_t and multibyte characters, and vice versa: mbrtoc16, c16rtomb, mbrtoc32, and c32rtomb.
Unfortunately, the support for char16_t and char32_t doesn’t go much further. There are some conversion classes available (see the next section), but, for example, there is nothing like a version of cout or cin that supports char16_t and char32_t; this makes it difficult to print such strings to a console or to read them from user input. If you want to do more with char16_t and char32_t strings, you need to resort to third-party libraries. ICU—International Components for Unicode—is one well-known library that provides Unicode and globalization support for your applications.
The C++ standard provides the codecvt class template to help with converting between different encodings. The <locale> header defines the following four encoding conversion classes.
| CLASS | DESCRIPTION |
codecvt<char,char,mbstate_t> |
Identity conversion, that is, no conversion |
codecvt<char16_t,char,mbstate_t> |
Conversion between UTF-16 and UTF-8 |
codecvt<char32_t,char,mbstate_t> |
Conversion between UTF-32 and UTF-8 |
codecvt<wchar_t,char,mbstate_t> |
Conversion between wide (implementation-specific) and narrow character encodings |
Before C++17, the following three code conversion facets were defined in <codecvt>: codecvt_utf8, codecvt_utf16, and codecvt_utf8_utf16. These could be used with two convenience conversion interfaces: wstring_convert and wbuffer_convert. However, C++17 has deprecated those three conversion facets (the entire <codecvt> header) and the two convenience interfaces, so they are not further discussed in this book. The C++ Standards Committee decided to deprecate this functionality because it does not handle errors well. Ill-formed Unicode strings are a security risk, and in fact can be, and have been, used as an attack vector to compromise the security of systems. Also, the API is too obscure, and too hard to understand. I recommend using third-party libraries, such as ICU, to work correctly with Unicode strings until the Standards Committee comes up with a suitable, safe, and easier-to-use replacement for the deprecated functionality.
Character sets are only one of the differences in data representation between countries. Even countries that use similar character sets, such as Great Britain and the United States, still differ in how they represent certain data, such as dates and money.
The standard C++ mechanism that groups specific data about a particular set of cultural parameters is called a locale. An individual component of a locale, such as date format, time format, number format, and so on, is called a facet. An example of a locale is U.S. English. An example of a facet is the format used to display a date. There are several built-in facets that are common to all locales. C++ also provides a way to customize or add facets.
There are third-party libraries available that make it easier to work with locales. One example is boost.locale, which is able to use ICU as its backend, supporting collations and conversions, converting strings to uppercase (instead of converting character by character to uppercase), and so on.
When using I/O streams, data is formatted according to a particular locale. Locales are objects that can be attached to a stream, and they are defined in the <locale> header file. Locale names are implementation specific. The POSIX standard is to separate a language and an area into two-letter sections with an optional encoding. For example, the locale for the English language as spoken in the U.S. is en_US, while the locale for the English language as spoken in Great Britain is en_GB. The locale for Japanese spoken in Japan with Japanese Industrial Standard encoding is ja_JP.jis.
Locale names on Windows can have two formats. The preferred format is very similar to the POSIX format, but uses a dash instead of an underscore. The second, old format, looks like this:
lang[_country_region[.code_page]]Everything between the square brackets is optional. The following table lists some examples.
| POSIX | WINDOWS | WINDOWS OLD | |
| U.S. English | en_US |
en-US |
English_United States |
| Great Britain English | en_GB |
en-GB |
English_Great Britain |
Most operating systems have a mechanism to determine the locale as defined by the user. In C++, you can pass an empty string to the std::locale object constructor to create a locale from the user’s environment. Once this object is created, you can use it to query the locale, possibly making programmatic decisions based on it. The following code demonstrates how to use the user’s locale for a stream by calling the imbue() method on the stream. The result is that everything that is sent to wcout is formatted according to the formatting rules for your environment:
wcout.imbue(locale(""));wcout << 32767 << endl;
This means that if your system locale is English United States and you output the number 32767, the number is displayed as 32,767; however, if your system locale is Dutch Belgium, the same number is displayed as 32.767.
The default locale is the classic/neutral locale, and not the user’s locale. The classic locale uses ANSI C conventions, and has the name C. The classic C locale is similar to U.S. English, but there are slight differences. For example, numbers are handled without any punctuation:
wcout.imbue(locale("C"));wcout << 32767 << endl;
The output of this code is as follows:
32767The following code manually sets the U.S. English locale, so the number 32767 is formatted with U.S. English punctuation, independent of your system locale:
wcout.imbue(locale("en-US")); // "en_US" for POSIXwcout << 32767 << endl;
The output of this code is as follows:
32,767A locale object allows you to query information about the locale. For example, the following program creates a locale matching the user’s environment. The name() method is used to get a C++ string that describes the locale. Then, the find() method is used on the string object to find a given substring, which returns string::npos when the given substring is not found. The code checks for the Windows name and the POSIX name. One of two messages is output, depending on whether or not the locale appears to be U.S. English:
locale loc("");if (loc.name().find("en_US") == string::npos &&loc.name().find("en-US") == string::npos) {wcout << L"Welcome non-U.S. English speaker!" << endl;} else {wcout << L"Welcome U.S. English speaker!" << endl;}
The <locale> header contains the following character classification functions: std::isspace(), isblank(), iscntrl(), isupper(), islower(), isalpha(), isdigit(), ispunct(), isxdigit(), isalnum(), isprint(), isgraph(). They all accept two parameters: the character to classify, and the locale to use for the classification. Here is an example of isupper() using the user’s environment locale:
bool result = isupper('A', locale(""));The <locale> header also defines two character conversion functions: std::toupper() and tolower(). They accept two parameters: the character to convert, and the locale to use for the conversion.
You can use the std::use_facet() function to obtain a particular facet in a particular locale. The argument to use_facet() is a locale. For example, the following expression retrieves the standard monetary punctuation facet of the British English locale using the POSIX locale name:
use_facet<moneypunct<wchar_t>>(locale("en_GB"));Note that the innermost template type determines the character type to use. This is usually wchar_t or char. The use of nested template classes is unfortunate, but once you get past the syntax, the result is an object that contains all the information you want to know about British money punctuation. The data available in the standard facets is defined in the <locale> header and its associated files. The following table lists the facet categories defined by the standard. Consult a Standard Library reference for details about the individual facets.
| FACET | DESCRIPTION |
ctype |
Character classification facets. |
codecvt |
Conversion facets, see earlier in this chapter. |
collate |
Comparing strings lexicographically. |
time_get |
Parsing dates and times. |
time_put |
Formatting dates and times. |
num_get |
Parsing numeric values. |
num_put |
Formatting numeric values. |
numpunct |
Defines the formatting parameters for numeric values. |
money_get |
Parsing monetary values. |
money_put |
Formatting monetary values. |
moneypunct |
Defines formatting parameters for monetary values. |
The following program brings together locales and facets by printing out the currency symbol in both U.S. English and British English. Note that, depending on your environment, the British currency symbol may appear as a question mark, a box, or not at all. If your environment is set up to handle it, you may actually get the British pound symbol:
locale locUSEng("en-US"); // For Windows//locale locUSEng("en_US"); // For Linuxlocale locBritEng("en-GB"); // For Windows//locale locBritEng("en_GB"); // For Linuxwstring dollars = use_facet<moneypunct<wchar_t>>(locUSEng).curr_symbol();wstring pounds = use_facet<moneypunct<wchar_t>>(locBritEng).curr_symbol();wcout << L"In the US, the currency symbol is " << dollars << endl;wcout << L"In Great Britain, the currency symbol is " << pounds << endl;
Regular expressions, defined in the <regex> header, are a powerful feature of the Standard Library. They are a special mini-language for string processing. They might seem complicated at first, but once you get to know them, they make working with strings easier. Regular expressions can be used for several string-related operations.
Of course, you could write your own code to perform any of the preceding operations on your strings, but using the regular expressions functionality is highly recommended, because writing correct and safe code to process strings can be tricky.
Before I can go into more detail on regular expressions, there is some important terminology you need to know. The following terms are used throughout the discussion.
If you look around on the Internet, you will find several different grammars for regular expressions. For this reason, C++ includes support for several of these grammars:
If you already know any of these regular expression grammars, you can use it straight away in C++ by telling the regular expression library to use that specific syntax (syntax_option_type). The default grammar in C++ is ECMAScript, whose syntax is explained in detail in the following section. It is also the most powerful grammar, so it’s recommended to use ECMAScript instead of one of the other more limited grammars. Explaining the other regular expression grammars falls outside the scope of this book.
A regular expression pattern is a sequence of characters representing what you want to match. Any character in the regular expression matches itself except for the following special characters:
^ $ \ . * + ? ( ) [ ] { } |These special characters are explained throughout the following discussion. If you need to match one of these special characters, you need to escape it using the \ character, as in this example:
\[ or \. or \* or \\The special characters ^ and $ are called anchors. The ^ character matches the position immediately following a line termination character, and $ matches the position of a line termination character. By default, ^ and $ also match the beginning and ending of a string, respectively, but this behavior can be disabled.
For example, ^test$ matches only the string test, and not strings that contain test somewhere in the line, such as 1test, test2, test
abc, and so on.
The wildcard character . can be used to match any character except a newline character. For example, the regular expression a.c will match abc, and a5c, but will not match ab5c, ac, and so on.
The | character can be used to specify the “or” relationship. For example, a|b matches a or b.
Parentheses () are used to mark subexpressions, also called capture groups. Capture groups can be used for several purposes:
(.)(ab|cd)(.). It has three marked subexpressions. Running a regex_search() with this regular expression on 1cd4 results in a match with four entries. The first entry is the entire match, 1cd4, followed by three entries for the three marked subexpressions. These three entries are 1, cd, and 4. The details on how to use the regex_search() algorithm are shown in a later section.Parts of a regular expression can be repeated by using one of four repeats:
* matches the preceding part zero or more times. For example, a*b matches b, ab, aab, aaaab, and so on.+ matches the preceding part one or more times. For example, a+b matches ab, aab, aaaab, and so on, but not b.? matches the preceding part zero or one time. For example, a?b matches b and ab, but nothing else.{…} represents a bounded repeat. a{n} matches a repeated exactly n times; a{n,} matches a repeated n times or more; and a{n,m} matches a repeated between n and m times inclusive. For example, a{3,4} matches aaa and aaaa but not a, aa, aaaaa, and so on.The repeats described in the previous list are called greedy because they find the longest match while still matching the remainder of the regular expression. To make them non-greedy, a ? can be added behind the repeat, as in *?, +?, ??, and {…}?. A non-greedy repetition repeats its pattern as few times as possible while still matching the remainder of the regular expression.
For example, the following table shows a greedy and a non-greedy regular expression, and the resulting submatches when running them on the input sequence aaabbb.
| REGULAR EXPRESSION | SUBMATCHES |
Greedy: (a+)(ab)*(b+) |
"aaa" "" "bbb" |
Non-greedy: (a+?)(ab)*(b+) |
"aa" "ab" "bb" |
Just as with mathematical formulas, it’s important to know the precedence of regular expression elements. Precedence is as follows:
a are the basic building blocks of a regular expression.+, *, ?, and {…} bind tightly to the element on the left; for example, b+.ab+c binds after quantifiers.| binds last.For example, take the regular expression ab+c|d. This matches abc, abbc, abbbc, and so on, and also d. Parentheses can be used to change these precedence rules. For example, ab+(c|d) matches abc, abbc, abbbc, …, abd, abbd, abbbd, and so on. However, by using parentheses you also mark it as a subexpression or capture group. It is possible to change the precedence rules without creating new capture groups by using (?:…). For example, ab+(?:c|d) matches the same as the preceding ab+(c|d) but does not create an additional capture group.
Instead of having to write (a|b|c|…|z), which is clumsy and introduces a capture group, a special syntax for specifying sets of characters or ranges of characters is available. In addition, a “not” form of the match is also available. A character set is specified between square brackets, and allows you to write [c1c2…cn], which matches any of the characters c1, c2 , …, or cn. For example, [abc] matches any character a, b, or c. If the first character is ^, it means “any but”:
ab[cde] matches abc, abd, and abe.ab[^cde] matches abf, abp, and so on but not abc, abd, and abe.If you need to match the ^, [, or ] characters themselves, you need to escape them; for example, [\[\^\]] matches the characters [, ^, or ].
If you want to specify all letters, you could use a character set like [abcdefghijklmnopqrstuvwxyzABCDEFGHIJKLMNOPQRSTUVWXYZ]; however, this is clumsy and doing this several times is awkward, especially if you make a typo and omit one of the letters accidentally. There are two solutions to this.
One solution is to use the range specification in square brackets; this allows you to write [a-zA-Z], which recognizes all the letters in the range a to z and A to Z. If you need to match a hyphen, you need to escape it; for example, [a-zA-Z\-]+ matches any word including a hyphenated word.
Another solution is to use one of the character classes. These are used to denote specific types of characters and are represented as [:name:]. Which character classes are available depends on the locale, but the names listed in the following table are always recognized. The exact meaning of these character classes is also dependent on the locale. This table assumes the standard C locale.
| CHARACTER CLASS NAME | DESCRIPTION |
digit |
Digits |
d |
Same as digit |
xdigit |
Digits (digit) and the following letters used in hexadecimal numbers: ‘a’, ‘b’, ‘c’, ‘d’, ‘e’, ‘f’, ‘A’, ‘B’, ‘C’, ‘D’, ‘E’, ‘F’. |
alpha |
Alphabetic characters. For the C locale, these are all lowercase and uppercase letters. |
alnum |
A combination of the alpha class and the digit class |
w |
Same as alnum |
lower |
Lowercase letters, if applicable to the locale |
upper |
Uppercase letters, if applicable to the locale |
blank |
A blank character is a whitespace character used to separate words within a line of text. For the C locale, these are ‘ ’ and ‘\t’ (tab). |
space |
Whitespace characters. For the C locale, these are ‘ ’, ‘\t’, ‘\n’, ‘\r’, ‘\v’, and ‘\f’. |
s |
Same as space |
print |
Printable characters. These occupy a printing position—for example, on a display—and are the opposite of control characters (cntrl). Examples are lowercase letters, uppercase letters, digits, punctuation characters, and space characters. |
cntrl |
Control characters. These are the opposite of printable characters (print), and don’t occupy a printing position, for example, on a display. Some examples for the C locale are ‘\f’ (form feed), ‘\n’ (new line), and ‘\r’ (carriage return). |
graph |
Characters with a graphical representation. These are all characters that are printable (print), except the space character ‘ ’. |
punct |
Punctuation characters. For the C locale, these are all graphical characters (graph) that are not alphanumeric (alnum). Some examples are ‘!’, ‘#’, ‘@’, ‘}’, and so on. |
Character classes are used within character sets; for example, [[:alpha:]]* in English means the same as [a-zA-Z]*.
Because certain concepts like matching digits are so common, there are shorthand patterns for them. For example, [:digit:] and [:d:] mean the same thing as [0-9]. Some classes have an even shorter pattern using the escape notation \. For example, \d means [:digit:]. Therefore, to recognize a sequence of one or more numbers, you can write any of the following patterns:
[0-9]+[[:digit:]]+[[:d:]]+\d+The following table lists the available escape notations for character classes.
| ESCAPE NOTATION | EQUIVALENT TO |
\d |
[[:d:]] |
\D |
[^[:d:]] |
\s |
[[:s:]] |
\S |
[^[:s:]] |
\w |
[_[:w:]] |
\W |
[^_[:w:]] |
Here are some examples:
Test[5-8] matches Test5, Test6, Test7, and Test8.[[:lower:]] matches a, b, and so on, but not A, B, and so on.[^[:lower:]] matches any character except lowercase letters like a, b, and so on.[[:lower:]5-7] matches any lowercase letter like a, b, and so on, and the numbers 5, 6, and 7.A word boundary can mean the following:
[A-Za-z0-9_]. Matching the beginning of the source string is enabled by default, but you can disable it (regex_constants::match_not_bow).regex_constants::match_not_eow).You can use \b to match a word boundary, and \B to match anything except a word boundary.
Back references allow you to reference a captured group inside the regular expression itself: \n refers to the n-th captured group, with n
>
0. For example, the regular expression (\d+)-.*-\1 matches a string that has the following format:
(\d+)-.*-\1This regular expression matches 123-abc-123, 1234-a-1234, and so on but does not match 123-abc-1234, 123-abc-321, and so on.
Regular expressions support positive lookahead (which uses ?=pattern) and negative lookahead (which uses ?!pattern). The characters following the lookahead must match (positive), or not match (negative) the lookahead pattern, but those characters are not yet consumed.
For example: the pattern a(?!b) contains a negative lookahead to match a letter a not followed by a b. The pattern a(?=b) contains a positive lookahead to match a letter a followed by a b, but b is not consumed so it does not become part of the match.
The following is a more complicated example. The regular expression matches an input sequence that consists of at least one lowercase letter, at least one uppercase letter, at least one punctuation character, and is at least eight characters long. Such a regular expression can, for example, be used to enforce that passwords satisfy certain criteria.
(?=.*[[:lower:]])(?=.*[[:upper:]])(?=.*[[:punct:]]).{8,}As you saw in the preceding sections, regular expressions often use special characters that should be escaped in normal C++ string literals. For example, if you write \d in a regular expression, it matches any digit. However, because \ is a special character in C++, you need to escape it in your regular expression string literal as \\d; otherwise, your C++ compiler tries to interpret the \d. It can get more complicated if you want your regular expression to match a single back-slash character \. Because \ is a special character in the regular expression syntax itself, you need to escape it as \\. The \ character is also a special character in C++ string literals, so you need to escape it in your C++ string literal, resulting in \\\\.
You can use raw string literals to make a complicated regular expression easier to read in your C++ source code. (Raw string literals are discussed in Chapter 2.) For example, take the following regular expression:
"( |\\n|\\r|\\\\)"This regular expression matches spaces, newlines, carriage returns, and back slashes. As you can see, you need a lot of escape characters. Using raw string literals, this can be replaced with the following more readable regular expression:
R"(( |\n|\r|\\))"The raw string literal starts with R"( and ends with )". Everything in between is the regular expression. Of course, you still need a double back slash at the end because the back slash needs to be escaped in the regular expression itself.
This concludes a brief description of the ECMAScript grammar. The following sections explain how to actually use regular expressions in your C++ code.
Everything for the regular expression library is in the <regex> header file and in the std namespace. The basic template types defined by the regular expression library are
basic_regex: An object representing a specific regular expression.match_results: A substring that matched a regular expression, including all the captured groups. It is a collection of sub_matches.sub_match: An object containing a pair of iterators into the input sequence. These iterators represent the matched capture group. The pair is an iterator pointing to the first character of a matched capture group and an iterator pointing to one-past-the-last character of the matched capture group. It has an str() method that returns the matched capture group as a string.The library provides three key algorithms: regex_match(), regex_search(), and regex_replace(). All of these algorithms have different versions that allow you to specify the source string as a string, a character array, or as a begin/end iterator pair. The iterators can be any of the following:
const char*const wchar_t*string::const_iteratorwstring::const_iteratorIn fact, any iterator that behaves as a bidirectional iterator can be used. See Chapters 17 and 18 for details on iterators.
The library also defines the following two types for regular expression iterators, which are very important if you want to find all occurrences of a pattern in a source string.
regex_iterator: iterates over all the occurrences of a pattern in a source string.regex_token_iterator: iterates over all the capture groups of all occurrences of a pattern in a source string.To make the library easier to use, the standard defines a number of type aliases for the preceding templates:
using regex = basic_regex<char>;using wregex = basic_regex<wchar_t>;using csub_match = sub_match<const char*>;using wcsub_match = sub_match<const wchar_t*>;using ssub_match = sub_match<string::const_iterator>;using wssub_match = sub_match<wstring::const_iterator>;using cmatch = match_results<const char*>;using wcmatch = match_results<const wchar_t*>;using smatch = match_results<string::const_iterator>;using wsmatch = match_results<wstring::const_iterator>;using cregex_iterator = regex_iterator<const char*>;using wcregex_iterator = regex_iterator<const wchar_t*>;using sregex_iterator = regex_iterator<string::const_iterator>;using wsregex_iterator = regex_iterator<wstring::const_iterator>;using cregex_token_iterator = regex_token_iterator<const char*>;using wcregex_token_iterator = regex_token_iterator<const wchar_t*>;using sregex_token_iterator = regex_token_iterator<string::const_iterator>;using wsregex_token_iterator = regex_token_iterator<wstring::const_iterator>;
The following sections explain the regex_match(), regex_search(), and regex_replace() algorithms, and the regex_iterator and regex_token_iterator classes.
The regex_match() algorithm can be used to compare a given source string with a regular expression pattern. It returns true if the pattern matches the entire source string, and false otherwise. It is very easy to use. There are six versions of the regex_match() algorithm accepting different kinds of arguments. They all have the following form:
template<…>bool regex_match(InputSequence[, MatchResults], RegEx[, Flags]);
The InputSequence can be represented as follows:
std::stringThe optional MatchResults parameter is a reference to a match_results and receives the match. If regex_match() returns false, you are only allowed to call match_results::empty() or match_results::size(); anything else is undefined. If regex_match() returns true, a match is found and you can inspect the match_results object for what exactly got matched. This is explained with examples in the following subsections.
The RegEx parameter is the regular expression that needs to be matched. The optional Flags parameter specifies options for the matching algorithm. In most cases you can keep the default. For more details, consult a Standard Library Reference, see Appendix B.
Suppose you want to write a program that asks the user to enter a date in the format year/month/day, where year is four digits, month is a number between 1 and 12, and day is a number between 1 and 31. You can use a regular expression together with the regex_match() algorithm to validate the user input as follows. The details of the regular expression are explained after the code.
regex r("\\d{4}/(?:0?[1-9]|1[0-2])/(?:0?[1-9]|[1-2][0-9]|3[0-1])");while (true) {cout << "Enter a date (year/month/day) (q=quit): ";string str;if (!getline(cin, str) || str == "q")break;if (regex_match(str, r))cout << " Valid date." << endl;elsecout << " Invalid date!" << endl;}
The first line creates the regular expression. The expression consists of three parts separated by a forward slash (/) character: one part for year, one for month, and one for day. The following list explains these parts.
\d{4}: This matches any combination of four digits; for example, 1234, 2010, and so on.(?:0?[1-9]|1[0-2]): This subpart of the regular expression is wrapped inside parentheses to make sure the precedence is correct. You don’t need a capture group, so (?:…) is used. The inner expression consists of an alternation of two parts separated by the | character.0?[1-9]: This matches any number from 1 to 9 with an optional 0 in front of it. For example, it matches 1, 2, 9, 03, 04, and so on. It does not match 0, 10, 11, and so on.1[0-2]: This matches 10, 11, or 12, and nothing else.(?:0?[1-9]|[1-2][0-9]|3[0-1]): This subpart is also wrapped inside a non-capture group and consists of an alternation of three parts.0?[1-9]: This matches any number from 1 to 9 with an optional 0 in front of it. For example, it matches 1, 2, 9, 03, 04, and so on. It does not match 0, 10, 11, and so on.[1-2][0-9]: This matches any number between 10 and 29 inclusive and nothing else.3[0-1]: This matches 30 or 31 and nothing else.The example then enters an infinite loop to ask the user to enter a date. Each date entered is given to the regex_match() algorithm. When regex_match() returns true, the user has entered a date that matches the date regular expression pattern.
This example can be extended a bit by asking the regex_match() algorithm to return captured subexpressions in a results object. You first have to understand what a capture group does. By specifying a match_results object like smatch in a call to regex_match(), the elements of the match_results object are filled in when the regular expression matches the input string. To be able to extract these substrings, you must create capture groups using parentheses.
The first element, [0], in a match_results object contains the string that matched the entire pattern. When using regex_match() and a match is found, this is the entire source sequence. When using regex_search(), discussed in the next section, this is a substring in the source sequence that matches the regular expression. Element [1] is the substring matched by the first capture group, [2] by the second capture group, and so on. To get a string representation of a capture group, you can write m[i] as in the following code, or write m[i].str(), where i is the index of the capture group and m is a match_results object.
The following code extracts the year, month, and day digits into three separate integer variables. The regular expression in the revised example has a few small changes. The first part matching the year is wrapped in a capture group, while the month and day parts are now also capture groups instead of non-capture groups. The call to regex_match() includes a smatch parameter, which receives the matched capture groups. Here is the adapted example:
regex r("(\\d{4})/(0?[1-9]|1[0-2])/(0?[1-9]|[1-2][0-9]|3[0-1])");while (true) {cout << "Enter a date (year/month/day) (q=quit): ";string str;if (!getline(cin, str) || str == "q")break;smatch m;if (regex_match(str, m, r)) {int year = stoi(m[1]);int month = stoi(m[2]);int day = stoi(m[3]);cout << " Valid date: Year=" << year<< ", month=" << month<< ", day=" << day << endl;} else {cout << " Invalid date!" << endl;}}
In this example, there are four elements in the smatch results objects:
[0]: the string matching the full regular expression, which is the full date in this example[1]: the year[2]: the month[3]: the dayWhen you execute this example, you can get the following output:
Enter a date (year/month/day) (q=quit): 2011/12/01Valid date: Year=2011, month=12, day=1Enter a date (year/month/day) (q=quit): 11/12/01Invalid date!
The regex_match() algorithm discussed in the previous section returns true if the entire source string matches the regular expression, and false otherwise. It cannot be used to find a matching substring. Instead, you need to use the regex_search() algorithm, which allows you to search for a substring that matches a certain pattern. There are six versions of the regex_search() algorithm, and they all have the following form:
template<…>bool regex_search(InputSequence[, MatchResults], RegEx[, Flags]);
All variations return true when a match is found somewhere in the input sequence, and false otherwise. The parameters are similar to the parameters for regex_match().
Two versions of the regex_search() algorithm accept a begin and end iterator as the input sequence that you want to process. You might be tempted to use this version of regex_search() in a loop to find all occurrences of a pattern in a source string by manipulating these begin and end iterators for each regex_search() call. Never do this! It can cause problems when your regular expression uses anchors (^ or $), word boundaries, and so on. It can also cause an infinite loop due to empty matches. Use the regex_iterator or regex_token_iterator as explained later in this chapter to extract all occurrences of a pattern from a source string.
The regex_search() algorithm can be used to extract matching substrings from an input sequence. The following example extracts code comments from input lines. The regular expression searches for a substring that starts with // followed by some optional whitespace \s* followed by one or more characters captured in a capture group (.+). This capture group captures only the comment substring. The smatch object m receives the search results. If successful, m[1] contains the comment that was found. You can check the m[1].first and m[1].second iterators to see where exactly the comment was found in the source string.
regex r("//\\s*(.+)$");while (true) {cout << "Enter a string with optional code comments (q=quit): ";string str;if (!getline(cin, str) || str == "q")break;smatch m;if (regex_search(str, m, r))cout << " Found comment '" << m[1] << "'" << endl;elsecout << " No comment found!" << endl;}
The output of this program can look as follows:
Enter a string (q=quit): std::string str; // Our source stringFound comment 'Our source string'Enter a string (q=quit): int a; // A comment with // in the middleFound comment 'A comment with // in the middle'Enter a string (q=quit): float f; // A comment with a (tab) characterFound comment 'A comment with a (tab) character'
The match_results object also has a prefix() and suffix() method, which return the string preceding or following the match, respectively.
As explained in the previous section, you should never use regex_search() in a loop to extract all occurrences of a pattern from a source sequence. Instead, you should use a regex_iterator or regex_token_iterator. They work similarly to iterators for Standard Library containers.
The following example asks the user to enter a source string, extracts every word from the string, and prints all words between quotes. The regular expression in this case is [\w]+, which searches for one or more word-letters. This example uses std::string as source, so it uses sregex_iterator for the iterators. A standard iterator loop is used, but in this case, the end iterator is done slightly differently from the end iterators of ordinary Standard Library containers. Normally, you specify an end iterator for a particular container, but for regex_iterator, there is only one “end” iterator. You can get this end iterator by declaring a regex_iterator type using the default constructor.
The for loop creates a start iterator called iter, which accepts a begin and end iterator into the source string together with the regular expression. The loop body is called for every match found, which is every word in this example. The sregex_iterator iterates over all the matches. By dereferencing an sregex_iterator, you get a smatch object. Accessing the first element of this smatch object, [0], gives you the matched substring:
regex reg("[\\w]+");while (true) {cout << "Enter a string to split (q=quit): ";string str;if (!getline(cin, str) || str == "q")break;const sregex_iterator end;for (sregex_iterator iter(cbegin(str), cend(str), reg);iter != end; ++iter) {cout << "\"" << (*iter)[0] << "\"" << endl;}}
The output of this program can look as follows:
Enter a string to split (q=quit): This, is a test."This""is""a""test"
As this example demonstrates, even simple regular expressions can do some powerful string manipulation!
Note that both a regex_iterator and a regex_token_iterator internally contain a pointer to the given regular expression. They both explicitly delete constructors accepting an rvalue regular expression, so you cannot construct them with a temporary regex object. For example, the following does not compile:
for (sregex_iterator iter(cbegin(str), cend(str),regex("[\\w]+"));iter != end; ++iter) { … }
The previous section describes regex_iterator, which iterates through every matched pattern. In each iteration of the loop you get a match_results object, which you can use to extract subexpressions for that match that are captured by capture groups.
A regex_token_iterator can be used to automatically iterate over all or selected capture groups across all matched patterns. There are four constructors with the following format:
regex_token_iterator(BidirectionalIterator a,BidirectionalIterator b,const regex_type& re[, SubMatches[, Flags]]);
All of them require a begin and end iterator as input sequence, and a regular expression. The optional SubMatches parameter is used to specify which capture groups should be iterated over. SubMatches can be specified in four ways:
vector with integers representing the indices of the capture groups that you want to iterate over.initializer_list with capture group indices.When you omit SubMatches or when you specify a 0 for SubMatches, you get an iterator that iterates over all capture groups with index 0, which are the substrings matching the full regular expression. The optional Flags parameter specifies options for the matching algorithm. In most cases you can keep the default. Consult a Standard Library Reference for more details.
The previous regex_iterator example can be rewritten using a regex_token_iterator as follows. Note that *iter is used in the loop body instead of (*iter)[0] as in the regex_iterator example, because the token iterator with 0 as the default submatch index automatically iterates over all capture groups with index 0. The output of this code is exactly the same as the output generated by the regex_iterator example:
regex reg("[\\w]+");while (true) {cout << "Enter a string to split (q=quit): ";string str;if (!getline(cin, str) || str == "q")break;const sregex_token_iterator end;for (sregex_token_iterator iter(cbegin(str), cend(str), reg);iter != end; ++iter) {cout << "\"" << *iter << "\"" << endl;}}
The following example asks the user to enter a date and then uses a regex_token_iterator to iterate over the second and third capture groups (month and day), which are specified as a vector of integers. The regular expression used for dates is explained earlier in this chapter. The only difference is that ^ and $ anchors are added since we want to match the entire source sequence. Earlier, that was not necessary, because regex_match() automatically matches the entire input string.
regex reg("^(\\d{4})/(0?[1-9]|1[0-2])/(0?[1-9]|[1-2][0-9]|3[0-1])$");while (true) {cout << "Enter a date (year/month/day) (q=quit): ";string str;if (!getline(cin, str) || str == "q")break;vector<int> indices{ 2, 3 };const sregex_token_iterator end;for (sregex_token_iterator iter(cbegin(str), cend(str), reg, indices);iter != end; ++iter) {cout << "\"" << *iter << "\"" << endl;}}
This code prints only the month and day of valid dates. Output generated by this example can look like this:
Enter a date (year/month/day) (q=quit): 2011/1/13"1""13"Enter a date (year/month/day) (q=quit): 2011/1/32Enter a date (year/month/day) (q=quit): 2011/12/5"12""5"
The regex_token_iterator can also be used to perform a so-called field splitting or tokenization. It is a much safer and more flexible alternative to using the old strtok() function from C. Tokenization is triggered in the regex_token_iterator constructor by specifying -1 as the capture group index to iterate over. When in tokenization mode, the iterator iterates over all substrings of the input sequence that do not match the regular expression. The following code demonstrates this by tokenizing a string on the delimiters , and ; with zero or more whitespace characters before or after the delimiters:
regex reg(R"(\s*[,;]\s*)");while (true) {cout << "Enter a string to split on ',' and ';' (q=quit): ";string str;if (!getline(cin, str) || str == "q")break;const sregex_token_iterator end;for (sregex_token_iterator iter(cbegin(str), cend(str), reg, -1);iter != end; ++iter) {cout << "\"" << *iter << "\"" << endl;}}
The regular expression in this example is specified as a raw string literal and searches for patterns that match the following:
, or ; characterThe output can be as follows:
Enter a string to split on ',' and ';' (q=quit): This is, a; test string."This is""a""test string."
As you can see from this output, the string is split on , and ;. All whitespace characters around the , and ; are removed, because the tokenization iterator iterates over all substrings that do not match the regular expression, and because the regular expression matches , and ; with whitespace around them.
The regex_replace() algorithm requires a regular expression, and a formatting string that is used to replace matching substrings. This formatting string can reference part of the matched substrings by using the escape sequences in the following table.
| ESCAPE SEQUENCE | REPLACED WITH |
$ n |
The string matching the n-th capture group; for example, $1 for the first capture group, $2 for the second, and so on. n must be greater than 0. |
$& |
The string matching the entire regular expression. |
$` |
The part of the input sequence that appears to the left of the substring matching the regular expression. |
$´ |
The part of the input sequence that appears to the right of the substring matching the regular expression. |
$$ |
A single dollar sign. |
There are six versions of the regex_replace() algorithm. The difference between them is in the type of arguments. Four of them have the following format:
string regex_replace(InputSequence, RegEx, FormatString[, Flags]);These four versions return the resulting string after performing the replacement. Both the InputSequence and the FormatString can be an std::string or a C-style string. The RegEx parameter is the regular expression that needs to be matched. The optional Flags parameter specifies options for the replace algorithm.
Two versions of the regex_replace() algorithm have the following format:
OutputIterator regex_replace(OutputIterator,BidirectionalIterator first,BidirectionalIterator last,RegEx, FormatString[, Flags]);
These two versions write the resulting string to the given output iterator and return this output iterator. The input sequence is given as a begin and end iterator. The other parameters are identical to the other four versions of regex_replace().
As a first example, take the following HTML source string,
<body><h1>Header</h1><p>Some text</p></body>and the regular expression,
<h1>(.*)</h1><p>(.*)</p>The following table shows the different escape sequences and what they will be replaced with.
| ESCAPE SEQUENCE | REPLACED WITH |
$1 |
Header |
$2 |
Some text |
$& |
<h1>Header</h1><p>Some text</p> |
$` |
<body> |
$´ |
</body> |
The following code demonstrates the use of regex_replace():
const string str("<body><h1>Header</h1><p>Some text</p></body>");regex r("<h1>(.*)</h1><p>(.*)</p>");const string format("H1=$1 and P=$2");// See above tablestring result = regex_replace(str, r, format);cout << "Original string: '" << str << "'" << endl;cout << "New string : '" << result << "'" << endl;
The output of this program is as follows:
Original string: '<body><h1>Header</h1><p>Some text</p></body>'New string : '<body>H1=Header and P=Some text</body>'
The regex_replace() algorithm accepts a number of flags that can be used to manipulate how it is working. The most important flags are given in the following table.
| FLAG | DESCRIPTION |
format_default |
The default is to replace all occurrences of the pattern, and to also copy everything to the output that does not match the pattern. |
format_no_copy |
Replaces all occurrences of the pattern, but does not copy anything to the output that does not match the pattern. |
format_first_only |
Replaces only the first occurrence of the pattern. |
The following example modifies the previous code to use the format_no_copy flag:
const string str("<body><h1>Header</h1><p>Some text</p></body>");regex r("<h1>(.*)</h1><p>(.*)</p>");const string format("H1=$1 and P=$2");string result = regex_replace(str, r, format,regex_constants::format_no_copy);cout << "Original string: '" << str << "'" << endl;cout << "New string : '" << result << "'" << endl;
The output is as follows. Compare this with the output of the previous version.
Original string: '<body><h1>Header</h1><p>Some text</p></body>'New string : 'H1=Header and P=Some text'
Another example is to get an input string and replace each word boundary with a newline so that the output contains only one word per line. The following example demonstrates this without using any loops to process a given input string. The code first creates a regular expression that matches individual words. When a match is found, it is replaced with $1\n where $1 is replaced with the matched word. Note also the use of the format_no_copy flag to prevent copying whitespace and other non-word characters from the source string to the output.
regex reg("([\\w]+)");const string format("$1\n");while (true) {cout << "Enter a string to split over multiple lines (q=quit): ";string str;if (!getline(cin, str) || str == "q")break;cout << regex_replace(str, reg, format,regex_constants::format_no_copy) << endl;}
The output of this program can be as follows:
Enter a string to split over multiple lines (q=quit): This is a test.Thisisatest
This chapter gave you an appreciation for coding with localization in mind. As anyone who has been through a localization effort will tell you, adding support for a new language or locale is infinitely easier if you have planned ahead; for example, by using Unicode characters and being mindful of locales.
The second part of this chapter explained the regular expressions library. Once you know the syntax of regular expressions, it becomes much easier to work with strings. Regular expressions allow you to validate strings, search for substrings inside an input sequence, perform find-and-replace operations, and so on. It is highly recommended that you get to know regular expressions and start using them instead of writing your own string manipulation routines. They will make your life easier.
The Ratio library allows you to exactly represent any finite rational number that you can use at compile time. Ratios are used in the std::chrono::duration class discussed in the next section. Everything is defined in the <ratio> header file and is in the std namespace. The numerator and denominator of a rational number are represented as compile-time constants of type std::intmax_t, which is a signed integer type with the maximum width supported by a compiler. Because of the compile-time nature of these rational numbers, using them might look a bit complicated and different than what you are used to. You cannot define a ratio object the same way as you define normal objects, and you cannot call methods on it. Instead, you need to use type aliases. For example, the following line defines a rational compile-time constant representing the fraction 1/60:
using r1 = ratio<1, 60>;The numerator and denominator of the r1 rational number are compile-time constants and can be accessed as follows:
intmax_t num = r1::num;intmax_t den = r1::den;
Remember that a ratio is a compile-time constant, which means that the numerator and denominator need to be known at compile time. The following generates a compilation error:
intmax_t n = 1;intmax_t d = 60;using r1 = ratio<n, d>; // Error
Making n and d constants removes the error:
const intmax_t n = 1;const intmax_t d = 60;using r1 = ratio<n, d>; // Ok
Rational numbers are always normalized. For a rational number ratio<n, d>, the greatest common divisor, gcd, is calculated and the numerator, num, and denominator, den, are then defined as follows:
num = sign(n)*sign(d)*abs(n)/gcdden = abs(d)/gcdThe library supports adding, subtracting, multiplying, and dividing rational numbers. Because all these operations are also happening at compile time, you cannot use the standard arithmetic operators. Instead, you need to use specific templates in combination with type aliases. The following arithmetic ratio templates are available: ratio_add, ratio_subtract, ratio_multiply, and ratio_divide. These templates calculate the result as a new ratio type. This type can be accessed with the embedded type alias called type. For example, the following code first defines two ratios, one representing 1/60 and the other representing 1/30. The ratio_add template adds those two rational numbers together to produce the result rational number, which, after normalization, is 1/20.
using r1 = ratio<1, 60>;using r2 = ratio<1, 30>;using result = ratio_add<r1, r2>::type;
The standard also defines a number of ratio comparison templates: ratio_equal, ratio_not_equal, ratio_less, ratio_less_equal, ratio_greater, and ratio_greater_equal. Just like the arithmetic ratio templates, the ratio comparison templates are all evaluated at compile time. These comparison templates define a new type that is an std::bool_constant, representing the result. bool_constant is an std::integral_constant, a struct template that stores a type and a compile-time constant value. For example, integral_constant<int, 15> stores an integer with value 15. bool_constant is an integral_constant with type bool. For instance, bool_constant<true> is integral_constant<bool, true>, which stores a Boolean with value true. The result of the ratio comparison templates is either bool_constant<true> or bool_constant<false>. The value associated with a bool_constant or an integral_constant can be accessed using the value data member. The following example demonstrates the use of ratio_less. Chapter 13 discusses the use of boolalpha to output true or false for Boolean values.
using r1 = ratio<1, 60>;using r2 = ratio<1, 30>;using res = ratio_less<r2, r1>;cout << boolalpha << res::value << endl;
The following example combines everything I have just covered. Note that because ratios are compile-time constants, you cannot do something like cout << r1; you need to get the numerator and denominator and print them separately.
// Define a compile-time rational numberusing r1 = ratio<1, 60>;cout << "1) " << r1::num << "/" << r1::den << endl;// Get numerator and denominatorintmax_t num = r1::num;intmax_t den = r1::den;cout << "2) " << num << "/" << den << endl;// Add two rational numbersusing r2 = ratio<1, 30>;cout << "3) " << r2::num << "/" << r2::den << endl;using result = ratio_add<r1, r2>::type;cout << "4) " << result::num << "/" << result::den << endl;// Compare two rational numbersusing res = ratio_less<r2, r1>;cout << "5) " << boolalpha << res::value << endl;
The output is as follows:
1) 1/602) 1/603) 1/304) 1/205) false
The library provides a number of SI (Système International) type aliases for your convenience. They are as follows:
using yocto = ratio<1, 1'000'000'000'000'000'000'000'000>; // *using zepto = ratio<1, 1'000'000'000'000'000'000'000>; // *using atto = ratio<1, 1'000'000'000'000'000'000>;using femto = ratio<1, 1'000'000'000'000'000>;using pico = ratio<1, 1'000'000'000'000>;using nano = ratio<1, 1'000'000'000>;using micro = ratio<1, 1'000'000>;using milli = ratio<1, 1'000>;using centi = ratio<1, 100>;using deci = ratio<1, 10>;using deca = ratio<10, 1>;using hecto = ratio<100, 1>;using kilo = ratio<1'000, 1>;using mega = ratio<1'000'000, 1>;using giga = ratio<1'000'000'000, 1>;using tera = ratio<1'000'000'000'000, 1>;using peta = ratio<1'000'000'000'000'000, 1>;using exa = ratio<1'000'000'000'000'000'000, 1>;using zetta = ratio<1'000'000'000'000'000'000'000, 1>; // *using yotta = ratio<1'000'000'000'000'000'000'000'000, 1>; // *
The SI units with an asterisk at the end are defined only if your compiler can represent the constant numerator and denominator values for those type aliases as an intmax_t. An example of how to use these predefined SI units is given in the discussion of durations in the next section.
The chrono library is a collection of classes that work with times. The library consists of the following components:
Everything is defined in the std::chrono namespace and requires you to include the <chrono> header file. The following sections explain each component.
A duration is an interval between two points in time. It is represented by the duration class template, which stores a number of ticks and a tick period. The tick period is the time in seconds between two ticks and is represented as a compile-time ratio constant, which means it could be a fraction of a second. Ratios are discussed in the previous section. The duration template accepts two template parameters and is defined as follows:
template <class Rep, class Period = ratio<1>> class duration {...}The first template parameter, Rep, is the type of variable storing the number of ticks and should be an arithmetic type, for example long, double, and so on. The second template parameter, Period, is the rational constant representing the period of a tick. If you don’t specify the tick period, the default value ratio<1> is used, which represents a tick period of one second.
Three constructors are provided: the default constructor; one that accepts a single value, the number of ticks; and one that accepts another duration. The latter constructor can be used to convert from one duration to another duration, for example, from minutes to seconds. An example is given later in this section.
Durations support arithmetic operations such as +, -, *, /, %, ++, --, +=, -=, *=, /=, and %=, and support the comparison operators. The class also contains the methods shown in the following table.
| METHOD | DESCRIPTION |
Rep count() const |
Returns the duration value as the number of ticks. The return type is the type specified as a parameter to the duration template. |
static duration zero() |
Returns a duration with a duration value equivalent to zero. |
static duration min()static duration max() |
Returns a duration with the minimum/maximum possible duration value representable by the type specified as a parameter to the duration template. |
C++17 adds floor(), ceil(), round(), and abs() operations for durations that behave just as they behave with numerical data.
Let’s see how durations can be used in actual code. A duration where each tick is one second can be defined as follows:
duration<long> d1;Because ratio<1> is the default tick period, this is the same as writing the following:
duration<long, ratio<1>> d1;The following defines a duration in minutes (tick period = 60 seconds):
duration<long, ratio<60>> d2;To define a duration where each tick period is a sixtieth of a second, use the following:
duration<double, ratio<1, 60>> d3;As you saw earlier in this chapter, the <ratio> header file defines a number of SI rational constants. These predefined constants come in handy for defining tick periods. For example, the following line of code defines a duration where each tick period is one millisecond:
duration<long long, milli> d4;The following example demonstrates several aspects of durations. It shows you how to define durations, how to perform arithmetic operations on them, and how to convert one duration into another duration with a different tick period.
// Specify a duration where each tick is 60 secondsduration<long, ratio<60>> d1(123);cout << d1.count() << endl;// Specify a duration represented by a double with each tick// equal to 1 second and assign the largest possible duration to it.duration<double> d2;d2 = d2.max();cout << d2.count() << endl;// Define 2 durations:// For the first duration, each tick is 1 minute// For the second duration, each tick is 1 secondduration<long, ratio<60>> d3(10); // = 10 minutesduration<long, ratio<1>> d4(14); // = 14 seconds// Compare both durationsif (d3 > d4)cout << "d3 > d4" << endl;elsecout << "d3 <= d4" << endl;// Increment d4 with 1 resulting in 15 seconds++d4;// Multiply d4 by 2 resulting in 30 secondsd4 *= 2;// Add both durations and store as minutesduration<double, ratio<60>> d5 = d3 + d4;// Add both durations and store as secondsduration<long, ratio<1>> d6 = d3 + d4;cout << d3.count() << " minutes + " << d4.count() << " seconds = "<< d5.count() << " minutes or "<< d6.count() << " seconds" << endl;// Create a duration of 30 secondsduration<long> d7(30);// Convert the seconds of d7 to minutesduration<double, ratio<60>> d8(d7);cout << d7.count() << " seconds = " << d8.count() << " minutes" << endl;
The output is as follows:
1231.79769e+308d3 > d410 minutes + 30 seconds = 10.5 minutes or 630 seconds30 seconds = 0.5 minutes
Pay special attention to the following two lines:
duration<double, ratio<60>> d5 = d3 + d4;duration<long, ratio<1>> d6 = d3 + d4;
They both calculate d3+d4 but the first line stores it as a floating point value representing minutes, while the second line stores the result as an integral value representing seconds. Conversion from minutes to seconds or vice versa happens automatically.
The following two lines from the preceding example demonstrate how to explicitly convert between different units of time:
duration<long> d7(30); // secondsduration<double, ratio<60>> d8(d7); // minutes
The first line defines a duration representing 30 seconds. The second line converts these 30 seconds into minutes, resulting in 0.5 minutes. Converting in this direction can result in a non-integral value, and thus requires you to use a duration represented by a floating point type; otherwise, you will get some cryptic compilation errors. The following lines, for example, do not compile because d8 is using long instead of a floating point type:
duration<long> d7(30); // secondsduration<long, ratio<60>> d8(d7);// minutes // Error!
You can, however, force this conversion by using duration_cast():
duration<long> d7(30); // secondsauto d8 = duration_cast<duration<long, ratio<60>>>(d7);// minutes
In this case, d8 will be 0 minutes, because integer division is used to convert 30 seconds to minutes.
Converting in the other direction does not require floating point types if the source is an integral type, because the result is always an integral value if you started with an integral value. For example, the following lines convert ten minutes into seconds, both represented by the integral type long:
duration<long, ratio<60>> d9(10); // minutesduration<long> d10(d9); // seconds
The library provides the following standard duration types in the std::chrono namespace:
using nanoseconds = duration<X 64 bits, nano>;using microseconds = duration<X 55 bits, micro>;using milliseconds = duration<X 45 bits, milli>;using seconds = duration<X 35 bits>;using minutes = duration<X 29 bits, ratio<60>>;using hours = duration<X 23 bits, ratio<3600>>;
The exact type of X depends on your compiler, but the C++ standard requires it to be a signed integer type of at least the specified size. The preceding type aliases make use of the predefined SI ratio type aliases that are described earlier in this chapter. With these predefined types, instead of writing this,
duration<long, ratio<60>> d9(10); // minutesyou can simply write this:
minutes d9(10); // minutesThe following code is another example of how to use these predefined durations. The code first defines a variable t, which is the result of 1 hour + 23 minutes + 45 seconds. The auto keyword is used to let the compiler automatically figure out the exact type of t. The second line uses the constructor of the predefined seconds duration to convert the value of t to seconds, and writes the result to the console.
auto t = hours(1) + minutes(23) + seconds(45);cout << seconds(t).count() << " seconds" << endl;
Because the standard requires that the predefined durations use integer types, there can be compilation errors if a conversion could end up with a non-integral value. While integer division normally truncates, in the case of durations, which are implemented with ratio types, the compiler declares any computation that could result in a non-zero remainder as a compile-time error. For example, the following code does not compile because converting 90 seconds to minutes results in 1.5 minutes:
seconds s(90);minutes m(s);
However, the following code does not compile either, even though 60 seconds is exactly 1 minute. It is flagged as a compile-time error because converting from seconds to minutes could result in non-integral values.
seconds s(60);minutes m(s);
Converting in the other direction works perfectly fine because the minutes duration uses an integral type and converting it to seconds always results in an integral value:
minutes m(2);seconds s(m);
You can use the standard user-defined literals “h”, “min”, “s”, “ms”, “us”, and “ns” for creating durations. Technically, these are defined in the std::literals::chrono_literals namespace, but also made accessible with using namespace std::chrono. Here is an example:
using namespace std::chrono;// ...auto myDuration = 42min; // 42 minutes
A clock is a class consisting of a time_point and a duration. The time_point type is discussed in detail in the next section, but those details are not required to understand how clocks work. However, time_points themselves depend on clocks, so it’s important to know the details of clocks first.
Three clocks are defined by the standard. The first one is called system_clock and represents the wall clock time from the system-wide real-time clock. The second one is called steady_clock, and it guarantees its time_point will never decrease, which is not guaranteed for system_clock because the system clock can be adjusted at any time. The third one is the high_resolution_clock, which has the shortest possible tick period. Depending on your compiler, it is possible for the high_resolution_clock to be a synonym for steady_clock or system_clock.
Every clock has a static now() method to get the current time as a time_point. The system_clock also defines two static helper functions for converting time_points to and from the time_t C-style time representation. The first function is called to_time_t(), and it converts a given time_point to a time_t; the second function is called from_time_t(), and it returns a time_point initialized with a given time_t value. The time_t type is defined in the <ctime> header file.
The following example shows a complete program which gets the current time from the system and outputs the time in a human-readable format to the console. The localtime() function converts a time_t to a local time represented by tm and is defined in the <ctime> header file. The put_time() stream manipulator, defined in the <iomanip> header, is introduced in Chapter 13.
// Get current time as a time_pointsystem_clock::time_point tpoint = system_clock::now();// Convert to a time_ttime_t tt = system_clock::to_time_t(tpoint);// Convert to local timetm* t = localtime(&tt);// Write the time to the consolecout << put_time(t, "%H:%M:%S") << endl;
If you want to convert a time to a string, you can use an std::stringstream or the C-style strftime() function, defined in <ctime>, as follows. Using the strftime() function requires you to supply a buffer that is big enough to hold the human-readable representation of the given time:
// Get current time as a time_pointsystem_clock::time_point tpoint = system_clock::now();// Convert to a time_ttime_t tt = system_clock::to_time_t(tpoint);// Convert to local timetm* t = localtime(&tt);// Convert to readable formatchar buffer[80] = {0};strftime(buffer, sizeof(buffer), "%H:%M:%S", t);// Write the time to the consolecout << buffer << endl;
The chrono library can also be used to time how long it takes for a piece of code to execute. The following example shows how you can do this. The actual type of the variables start and end is high_resolution_clock::time_point, and the actual type of diff is a duration.
// Get the start timeauto start = high_resolution_clock::now();// Execute code that you want to timedouble d = 0;for (int i = 0; i < 1000000; ++i) {d += sqrt(sin(i) * cos(i));}// Get the end time and calculate the differenceauto end = high_resolution_clock::now();auto diff = end - start;// Convert the difference into milliseconds and output to the consolecout << duration<double, milli>(diff).count() << "ms" << endl;
The loop in this example is performing some arithmetic operations with sqrt(), sin(), and cos() to make sure the loop doesn’t end too fast. If you get really small values for the difference in milliseconds on your system, those values will not be accurate and you should increase the number of iterations of the loop to make it last longer. Small timings will not be accurate because, while timers often have a resolution in milliseconds, on most operating systems, this timer is updated infrequently, for example, every 10 ms or 15 ms. This induces a phenomenon called gating error, where any event that occurs in less than one timer tick appears to take place in zero units of time; any event between one and two timer ticks appears to take place in one timer unit. For example, on a system with a 15 ms timer update, a loop that takes 44 ms will appear to take only 30 ms. When using such timers to time computations, it is important to make sure that the entire computation takes place across a fairly large number of basic timer tick units so that these errors are minimized.
A point in time is represented by the time_point class and stored as a duration relative to the epoch. A time_point is always associated with a certain clock and the epoch is the origin of this associated clock. For example, the epoch for the classic Unix/Linux time is 1st of January 1970, and durations are measured in seconds. The epoch for Windows is 1st of January 1601 and durations are measured in 100-nanosecond units. Other operating systems have different epoch dates and duration units.
The time_point class contains a function called time_since_epoch(), which returns a duration representing the time between the epoch of the associated clock and the stored point in time.
Arithmetic operations of time_points and durations that make sense are supported. The following table lists those operations. tp is a time_point and d is a duration.
tp + d = tp |
tp – d = tp |
d + tp = tp |
tp – tp = d |
tp += d |
tp -= d |
An example of an operation that is not supported is tp+tp.
Comparison operators are also supported to compare two time points. Two static methods are provided: min(), which returns the smallest possible point in time, and max(), which returns the largest possible point in time.
The time_point class has three constructors.
time_point(): This constructs a time_point initialized with duration::zero(). The resulting time_point represents the epoch of the associated clock.time_point(const duration& d): This constructs a time_point initialized with the given duration. The resulting time_point represents epoch + d.template <class Duration2> time_point(const time_point<clock, Duration2>& t): This constructs a time_point initialized with t.time_since_epoch().Each time_point is associated with a clock. To create a time_point, you specify the clock as the template parameter:
time_point<steady_clock> tp1;Each clock also knows its time_point type, so you can also write it as follows:
steady_clock::time_point tp1;The following example demonstrates the time_point class:
// Create a time_point representing the epoch// of the associated steady clocktime_point<steady_clock> tp1;// Add 10 minutes to the time_pointtp1 += minutes(10);// Store the duration between epoch and time_pointauto d1 = tp1.time_since_epoch();// Convert the duration to seconds and output to the consoleduration<double> d2(d1);cout << d2.count() << " seconds" << endl;
The output should be as follows:
600 secondsConverting time_points can be done implicitly or explicitly, similar to duration conversions. Here is an example of an implicit conversion. The output is 42000 ms.
time_point<steady_clock, seconds> tpSeconds(42s);// Convert seconds to milliseconds implicitly.time_point<steady_clock, milliseconds> tpMilliseconds(tpSeconds);cout << tpMilliseconds.time_since_epoch().count() << " ms" << endl;
If the implicit conversion can result in a loss of data, then you need an explicit conversion using time_point_cast(), just as duration_cast() is needed for explicit duration casts. The following example outputs 42000 ms, even though you start from 42,424ms.
time_point<steady_clock, milliseconds> tpMilliseconds(42'424ms);// Convert milliseconds to seconds explicitly.time_point<steady_clock, seconds> tpSeconds(time_point_cast<seconds>(tpMilliseconds));// Convert seconds back to milliseconds and output the result.milliseconds ms(tpSeconds.time_since_epoch());cout << ms.count() << " ms" << endl;
C++17 adds floor(), ceil(), and round() operations for time_points that behave just as they behave with numerical data.
Generating good random numbers in software is a complex topic. Before C++11, the only way to generate random numbers was to use the C-style srand() and rand() functions. The srand() function needed to be called once in your application and was used to initialize the random number generator, also called seeding. Usually the current system time would be used as a seed.
Once the generator is initialized, random numbers could be generated with rand(). The following example shows how to use srand() and rand(). The time(nullptr) call returns the system time, and is defined in the <ctime> header file.
srand(static_cast<unsigned int>(time(nullptr)));cout << rand() << endl;
A random number within a certain range can be generated with the following function:
int getRandom(int min, int max){return (rand() % static_cast<int>(max + 1 - min)) + min;}
The old C-style rand() function generates random numbers in the range 0 to RAND_MAX, which is defined by the standard to be at least 32,767. Unfortunately, the low-order bits of rand() are often not very random, which means that using the previous getRandom() function to generate a random number in a small range, such as 1 to 6, will not result in very good randomness.
The old srand() and rand() functions don’t offer much in terms of flexibility. You cannot, for example, change the distribution of the generated random numbers. C++11 has added a powerful library to generate random numbers by using different algorithms and distributions. The library is defined in the <random> header file and has three big components: engines, engine adaptors, and distributions. A random number engine is responsible for generating the actual random numbers and storing the state for generating subsequent random numbers. The distribution determines the range of the generated random numbers and how they are mathematically distributed within that range. A random number engine adaptor modifies the results of a random number engine you associate it with.
It’s highly recommended to stop using srand() and rand(), and to start using the classes from <random>.
The following random number engines are available:
random_devicelinear_congruential_enginemersenne_twister_enginesubtract_with_carry_engineThe random_device engine is not a software-based generator; it is a special engine that requires a piece of hardware attached to your computer that generates truly non-deterministic random numbers, for example, by using the laws of physics. A classic mechanism measures the decay of a radioactive isotope by counting alpha-particles-per-time-interval, but there are many other kinds of physics-based random-number generators, including measuring the “noise” of reverse-biased diodes (thus eliminating the concerns about radioactive sources in your computer). The details of these mechanisms fall outside the scope of this book.
According to the specification for random_device, if no such device is attached to the computer, the library is free to use one of the software algorithms. The choice of algorithm is up to the library designer.
The quality of a random number generator is referred to as its entropy measure. The entropy() method of the random_device class returns 0.0 if it is using a software-based pseudo-random number generator, and returns a nonzero value if there is a hardware device attached. The nonzero value is an estimate of the entropy of the attached device.
Using a random_device engine is rather straightforward:
random_device rnd;cout << "Entropy: " << rnd.entropy() << endl;cout << "Min value: " << rnd.min()<< ", Max value: " << rnd.max() << endl;cout << "Random number: " << rnd() << endl;
A possible output of this program could be as follows:
Entropy: 32Min value: 0, Max value: 4294967295Random number: 3590924439
A random_device is usually slower than a pseudo-random number engine. Therefore, if you need to generate a lot of random numbers, I recommend to use a pseudo-random number engine, and to use a random_device to generate a seed for the pseudo-random number engine. This is demonstrated in the section “Generating Random Numbers.”
Next to the random_device engine, there are three pseudo-random number engines:
mt19937 has a period of 219937−1, while the state contains 625 integers or 2.5 kilobytes. It is also one of the fastest engines.The mathematical details of the engines and of the quality of random numbers fall outside the scope of this book. If you want to know more about these topics, you can consult a reference from the “Random Numbers” section in Appendix B.
The random_device engine is easy to use and doesn’t require any parameters. However, creating an instance of one of the three pseudo-random number generators requires you to specify a number of mathematical parameters, which can be complicated. The selection of parameters greatly influences the quality of the generated random numbers. For example, the definition of the mersenne_twister_engine class looks like this:
template<class UIntType, size_t w, size_t n, size_t m, size_t r,UIntType a, size_t u, UIntType d, size_t s,UIntType b, size_t t, UIntType c, size_t l, UIntType f>class mersenne_twister_engine {...}
It requires 14 parameters. The linear_congruential_engine and the subtract_with_carry_engine classes also require a number of such mathematical parameters. For this reason, the standard defines a couple of predefined engines. One example is the mt19937 Mersenne twister, which is defined as follows:
usingmt19937= mersenne_twister_engine<uint_fast32_t, 32, 624, 397, 31,0x9908b0df, 11, 0xffffffff, 7, 0x9d2c5680, 15, 0xefc60000, 18,1812433253>;
These parameters are all magic, unless you understand the details of the Mersenne twister algorithm. In general, you do not want to modify any of these parameters unless you are a specialist in the mathematics of pseudo-random number generators. Instead, it is highly recommended to use one of the predefined type aliases such as mt19937. A complete list of predefined engines is given in a later section.
A random number engine adaptor modifies the result of a random number engine you associate it with, which is called the base engine. This is an example of the adaptor pattern (see Chapter 29). The following three adaptor templates are defined:
template<class Engine, size_t p, size_t r> classdiscard_block_engine{...}template<class Engine, size_t w, class UIntType> classindependent_bits_engine{...}template<class Engine, size_t k> classshuffle_order_engine{...}
The discard_block_engine adaptor generates random numbers by discarding some of the values generated by its base engine. It requires three parameters: the engine to adapt, the block size p, and the used block size r. The base engine is used to generate p random numbers. The adaptor then discards p-r of those numbers and returns the remaining r numbers.
The independent_bits_engine adaptor generates random numbers with a given number of bits w by combining several random numbers generated by the base engine.
The shuffle_order_engine adaptor generates the same random numbers that are generated by the base engine, but delivers them in a different order.
How these adaptors internally work depends on mathematics and falls outside the scope of this book.
A number of predefined engine adaptors are available. The next section gives an overview of the predefined engines and engine adaptors.
As mentioned earlier, it is not recommended to specify your own parameters for pseudo-random number engines and engine adaptors, but instead to use one of the standard ones. C++ defines the following predefined engines and engine adaptors, all in the <random> header file. They all have complicated template arguments, but it is not necessary to understand those arguments to be able to use them.
| NAME | TEMPLATE |
minstd_rand0 |
linear_congruential_engine |
minstd_rand |
linear_congruential_engine |
mt19937 |
mersenne_twister_engine |
mt19937_64 |
mersenne_twister_engine |
ranlux24_base |
subtract_with_carry_engine |
ranlux48_base |
subtract_with_carry_engine |
ranlux24 |
discard_block_engine |
ranlux48 |
discard_block_engine |
knuth_b |
shuffle_order_engine |
default_random_engine |
implementation-defined |
The default_random_engine is compiler dependent.
The following section gives an example of how to use these predefined engines.
Before you can generate any random number, you first need to create an instance of an engine. If you use a software-based engine, you also need to define a distribution. A distribution is a mathematical formula describing how numbers are distributed within a certain range. The recommended way to create an engine is to use one of the predefined engines discussed in the previous section.
The following example uses the predefined engine called mt19937, using a Mersenne twister engine. This is a software-based generator. Just as with the old rand() generator, a software-based engine should be initialized with a seed. The seed used with srand() was often the current time. In modern C++, it’s recommended to use a random_device to generate a seed, and to use a time-based seed as a fallback in case the random_device does not have any entropy.
random_device seeder;const auto seed = seeder.entropy() ? seeder() : time(nullptr);mt19937 eng(static_cast<mt19937::result_type>(seed));
Next, a distribution is defined. This example uses a uniform integer distribution, for the range 1 to 99. Distributions are explained in detail in the next section, but the uniform distribution is easy enough to use for this example:
uniform_int_distribution<int> dist(1, 99);Once the engine and distribution are defined, random numbers can be generated by calling the function call operator of the distribution, and passing the engine as argument. For this example, this is written as dist(eng):
cout << dist(eng) << endl;As you can see, to generate a random number using a software-based engine, you always need to specify the engine and distribution. The std::bind() utility, introduced in Chapter 18 and defined in the <functional> header file, can be used to remove the need to specify both the distribution and the engine when generating a random number. The following example uses the same mt19937 engine and uniform distribution as the previous example. It then defines gen() by using std::bind() to bind eng to the first parameter for dist(). This way, you can call gen() without any argument to generate a new random number. The example then demonstrates the use of gen() in combination with the generate() algorithm to fill a vector of ten elements with random numbers. The generate() algorithm is discussed in Chapter 18 and is defined in <algorithm>.
random_device seeder;const auto seed = seeder.entropy() ? seeder() : time(nullptr);mt19937 eng(static_cast<mt19937::result_type>(seed));uniform_int_distribution<int> dist(1, 99);auto gen = std::bind(dist, eng);vector<int> vec(10);generate(begin(vec), end(vec), gen);for (auto i : vec) { cout << i << " "; }
Even though you don’t know the exact type of gen(), it’s still possible to pass gen() to another function that wants to use that generator. You have two options: use a parameter of type std::function<int()>, or use a function template. The previous example can be adapted to generate random numbers in a function called fillVector(). Here is an implementation using std::function:
void fillVector(vector<int>& vec, const std::function<int()>& generator){generate(begin(vec), end(vec), generator);}
and here is a function template version:
template<typename T>void fillVector(vector<int>& vec, const T& generator){generate(begin(vec), end(vec), generator);}
This function is used as follows:
random_device seeder;const auto seed = seeder.entropy() ? seeder() : time(nullptr);mt19937 eng(static_cast<mt19937::result_type>(seed));uniform_int_distribution<int> dist(1, 99);auto gen = std::bind(dist, eng);vector<int> vec(10);fillVector(vec, gen);for (auto i : vec) { cout << i << " "; }
A distribution is a mathematical formula describing how numbers are distributed within a certain range. The random number generator library comes with the following distributions that can be used with pseudo-random number engines to define the distribution of the generated random numbers. It’s a compacted representation. The first line of each distribution is the class name and class template parameters, if any. The next lines are a constructor for the distribution. Only one constructor for each distribution is shown to give you an idea of the class. Consult a Standard Library Reference, see Appendix B, for a detailed list of all constructors and methods of each distribution.
Available uniform distributions:
template<class IntType = int> class uniform_int_distributionuniform_int_distribution(IntType a = 0,IntType b = numeric_limits<IntType>::max());template<class RealType = double> class uniform_real_distributionuniform_real_distribution(RealType a = 0.0, RealType b = 1.0);
Available Bernoulli distributions:
class bernoulli_distributionbernoulli_distribution(double p = 0.5);template<class IntType = int> class binomial_distributionbinomial_distribution(IntType t = 1, double p = 0.5);template<class IntType = int> class geometric_distributiongeometric_distribution(double p = 0.5);template<class IntType = int> class negative_binomial_distributionnegative_binomial_distribution(IntType k = 1, double p = 0.5);
Available Poisson distributions:
template<class IntType = int> class poisson_distributionpoisson_distribution(double mean = 1.0);template<class RealType = double> class exponential_distributionexponential_distribution(RealType lambda = 1.0);template<class RealType = double> class gamma_distributiongamma_distribution(RealType alpha = 1.0, RealType beta = 1.0);template<class RealType = double> class weibull_distributionweibull_distribution(RealType a = 1.0, RealType b = 1.0);template<class RealType = double> class extreme_value_distributionextreme_value_distribution(RealType a = 0.0, RealType b = 1.0);
Available normal distributions:
template<class RealType = double> class normal_distributionnormal_distribution(RealType mean = 0.0, RealType stddev = 1.0);template<class RealType = double> class lognormal_distributionlognormal_distribution(RealType m = 0.0, RealType s = 1.0);template<class RealType = double> class chi_squared_distributionchi_squared_distribution(RealType n = 1);template<class RealType = double> class cauchy_distributioncauchy_distribution(RealType a = 0.0, RealType b = 1.0);template<class RealType = double> class fisher_f_distributionfisher_f_distribution(RealType m = 1, RealType n = 1);template<class RealType = double> class student_t_distributionstudent_t_distribution(RealType n = 1);
Available sampling distributions:
template<class IntType = int> class discrete_distributiondiscrete_distribution(initializer_list<double> wl);template<class RealType = double> class piecewise_constant_distributiontemplate<class UnaryOperation>piecewise_constant_distribution(initializer_list<RealType> bl,UnaryOperation fw);template<class RealType = double> class piecewise_linear_distributiontemplate<class UnaryOperation>piecewise_linear_distribution(initializer_list<RealType> bl,UnaryOperation fw);
Each distribution requires a set of parameters. Explaining all these mathematical parameters is outside the scope of this book, but the rest of this section includes a couple of examples to explain the impact of a distribution on the generated random numbers.
Distributions are easiest to understand when you look at a graphical representation of them. For example, the following code generates one million random numbers between 1 and 99, and counts how many times a certain number is randomly chosen. The counters are stored in a map where the key is a number between 1 and 99, and the value associated with a key is the number of times that that key has been selected randomly. After the loop, the results are written to a CSV (comma-separated values) file, which can be opened in a spreadsheet application.
const unsigned int kStart = 1;const unsigned int kEnd = 99;const unsigned int kIterations = 1'000'000;// Uniform Mersenne Twisterrandom_device seeder;const auto seed = seeder.entropy() ? seeder() : time(nullptr);mt19937 eng(static_cast<mt19937::result_type>(seed));uniform_int_distribution<int> dist(kStart, kEnd);auto gen = bind(dist, eng);map<int, int> m;for (unsigned int i = 0; i < kIterations; ++i) {int rnd = gen();// Search map for a key = rnd. If found, add 1 to the value associated// with that key. If not found, add the key to the map with value 1.++(m[rnd]);}// Write to a CSV fileofstream of("res.csv");for (unsigned int i = kStart; i <= kEnd; ++i) {of << i << "," << m[i] << endl;}
The resulting data can then be used to generate a graphical representation. The graph of the preceding uniform Mersenne twister is shown in Figure 20-1.
The horizontal axis represents the range in which random numbers are generated. The graph clearly shows that all numbers in the range 1 to 99 are randomly chosen around 10,000 times, and that the distribution of the generated random numbers is uniform across the entire range.
The example can be modified to generate random numbers according to a normal distribution instead of a uniform distribution. Only two small changes are required. First, you need to modify the creation of the distribution as follows:
normal_distribution<double> dist(50, 10);Because normal distributions use doubles instead of integers, you also need to modify the call to gen():
int rnd = static_cast<int>(gen());Figure 20-2 shows a graphical representation of the random numbers generated according to this normal distribution.
The graph clearly shows that most of the generated random numbers are around the center of the range. In this example, the value 50 is randomly chosen around 40,000 times, while values like 20 and 80 are chosen only around 500 times.
OPTIONALstd::optional, defined in <optional>, holds a value of a specific type, or nothing. It can be used for parameters of a function if you want to allow for values to be optional. It is also often used as a return type from a function if the function can either return something or not. This removes the need to return “special” values from functions such as nullptr, end(), -1, EOF, and so on. It also removes the need to write the function returning a Boolean while storing the actual value in a reference output parameter, such as bool getData(T& dataOut).
Here is an example of a function returning an optional:
optional<int> getData(bool giveIt){if (giveIt) {return 42;}return nullopt; // or simply return {};}
You can call this function as follows:
auto data1 = getData(true);auto data2 = getData(false);
To determine whether or not an optional has a value, use the has_value() method, or simply use the optional in an if statement:
cout << "data1.has_value = " << data1.has_value() << endl;if (data2) {cout << "data2 has a value." << endl;}
If an optional has a value, you can retrieve it with value(), or with the dereferencing operator:
cout << "data1.value = " << data1.value() << endl;cout << "data1.value = " << *data1 << endl;
If you call value() on an empty optional, a bad_optional_access exception is thrown.
value_or() can be used to return either the value of an optional, or another value when the optional is empty:
cout << "data2.value = " << data2.value_or(0) << endl;Note that you cannot store a reference in an optional, so optional<T&> does not work. Instead, you can use optional<T*>, optional<reference_wrapper<T>>, or optional<reference_wrapper<const T>>. Remember from Chapter 17 that you can use std::ref() or cref() to create an std::reference_wrapper<T> or a reference_wrapper<const T> respectively.
VARIANTstd::variant, defined in <variant>, can hold a single value of one of a given set of types. When you define a variant, you have to specify the types it can potentially contain. For example, the following code defines a variant that can contain an integer, a string, or a floating point value, one at a time:
variant<int, string, float> v;This default-constructed variant contains a default-constructed value of its first type, int in this case. If you want to be able to default construct a variant, you have to make sure that the first type of the variant is default constructible. For example, the following does not compile because Foo is not default constructible.
class Foo { public: Foo() = delete; Foo(int) {} };class Bar { public: Bar() = delete; Bar(int) {} };int main(){variant<Foo, Bar> v;}
In fact, neither Foo nor Bar are default constructible. If you still want to be able to default construct such a variant, then you can use std::monostate, an empty alternative, as first type of the variant:
variant<monostate, Foo, Bar> v;You can use the assignment operator to store something in a variant:
variant<int, string, float> v;v = 12;v = 12.5f;v = "An std::string"s;
A variant can only contain one value at any given time. So, with these three lines of code, first the integer 12 is stored in the variant, then the variant is modified to contain a single floating-point value, and lastly, the variant is modified again to contain a single string value.
You can use the index() method to query the index of the value’s type that is currently stored in the variant. The std::holds_alternative() function template can be used to figure out whether or not a variant currently contains a value of a certain type:
cout << "Type index: " << v.index() << endl;cout << "Contains an int: " << holds_alternative<int>(v) << endl;
The output is as follows:
Type index: 1Contains an int: 0
Use std::get<index>() or std::get<T>() to retrieve the value from a variant. These functions throw a bad_variant_access exception if you are using the index of a type, or a type, that does not match the current value in the variant:
cout << std::get<string>(v) << endl;try {cout << std::get<0>(v) << endl;} catch (const bad_variant_access& ex) {cout << "Exception: " << ex.what() << endl;}
This is the output:
An std::stringException: bad variant access
To avoid exceptions, use the std::get_if<index>() or std::get_if<T>() helper functions. These functions accept a pointer to a variant, and return a pointer to the requested value, or nullptr on error:
string* theString = std::get_if<string>(&v);int* theInt = std::get_if<int>(&v);cout << "retrieved string: " << (theString ? *theString : "null") << endl;cout << "retrieved int: " << (theInt ? *theInt : 0) << endl;
Here is the output:
retrieved string: An std::stringretrieved int: 0
There is an std::visit() helper function that you can use to apply the visitor pattern to a variant. Suppose you have the following class that defines a number of overloaded function call operators, one for each possible type in the variant:
class MyVisitor{public:void operator()(int i) { cout << "int " << i << endl; }void operator()(const string& s) { cout << "string " << s << endl; }void operator()(float f) { cout << "float " << f << endl; }};
You can use this with std::visit() as follows.
visit(MyVisitor(), v);The result is that the appropriate overloaded function call operator is called based on the current value stored in the variant. The output for this example is:
string An std::stringAs with optional, you cannot store references in a variant. You can either store pointers, or store instances of reference_wrapper<T> or reference_wrapper<const T>.
ANYstd::any, defined in <any>, is a class that can contain a single value of any type. Once it is constructed, you can ask an any instance whether or not it contains a value, and what the type of the contained value is. To get access to the contained value, you need to use any_cast(), which throws an exception of type bad_any_cast in case of failure. Here is an example:
any empty;any anInt(3);any aString("An std::string."s);cout << "empty.has_value = " << empty.has_value() << endl;cout << "anInt.has_value = " << anInt.has_value() << endl << endl;cout << "anInt wrapped type = " << anInt.type().name() << endl;cout << "aString wrapped type = " << aString.type().name() << endl << endl;int theInt = any_cast<int>(anInt);cout << theInt << endl;try {int test = any_cast<int>(aString);cout << test << endl;} catch (const bad_any_cast& ex) {cout << "Exception: " << ex.what() << endl;}
The output is as follows. Note that the wrapped type of aString is compiler dependent.
empty.has_value = 0anInt.has_value = 1anInt wrapped type = intaString wrapped type = class std::basic_string<char,struct std::char_traits<char>,class std::allocator<char> >3Exception: Bad any_cast
You can assign a new value to an any instance, and even assign a new value of a different type:
any something(3); // Now it contains an integer.something = "An std::string"s; // Now the same instance contains a string.
Instances of any can be stored in Standard Library containers. This allows you to have heterogeneous data in a single container. The only downside is that you have to perform explicit any_casts to retrieve specific values, as in this example:
vector<any> v;v.push_back(any(42));v.push_back(any("An std::string"s));cout << any_cast<string>(v[1]) << endl;
As with optional and variant, you cannot store references in an any instance. You can either store pointers, or store instances of reference_wrapper<T> or reference_wrapper<const T>.
The std::pair class, defined in <utility> and introduced in Chapter 17, can store exactly two values, each with a specific type. The type of each value should be known at compile time. Here is a short example:
pair<int, string> p1(16, "Hello World");pair<bool, float> p2(true, 0.123f);cout << "p1 = (" << p1.first << ", " << p1.second << ")" << endl;cout << "p2 = (" << p2.first << ", " << p2.second << ")" << endl;
The output is as follows:
p1 = (16, Hello World)p2 = (1, 0.123)
An std::tuple, defined in <tuple>, is a generalization of a pair. It allows you to store any number of values, each with its own specific type. Just like a pair, a tuple has a fixed size and fixed value types, which are determined at compile time.
A tuple can be created with a tuple constructor, specifying both the template types and the actual values. For example, the following code creates a tuple where the first element is an integer, the second element a string, and the last element a Boolean:
using MyTuple = tuple<int, string, bool>;MyTuple t1(16, "Test", true);
std::get<i>() is used to get the ith element from a tuple, where i is a 0-based index; that is, <0> is the first element of the tuple, <1> is the second element of the tuple, and so on. The value returned has the correct type for that index in the tuple:
cout << "t1 = (" << get<0>(t1) << ", " << get<1>(t1)<< ", " << get<2>(t1) << ")" << endl;// Outputs: t1 = (16, Test, 1)
You can check that get<
i
>() returns the correct type by using typeid(), from the <typeinfo> header. The output of the following code says that the value returned by get<1>(t1) is indeed an std::string:
cout << "Type of get<1>(t1) = " << typeid(get<1>(t1)).name() << endl;// Outputs: Type of get<1>(t1) = class std::basic_string<char,// struct std::char_traits<char>,class std::allocator<char> >
You can also retrieve an element from a tuple based on its type with std::get<T>(), where T is the type of the element you want to retrieve instead of the index. The compiler generates an error if the tuple has several elements with the requested type. For example, you can retrieve the string element from t1 as follows:
cout << "String = " << get<string>(t1) << endl;// Outputs: String = Test
Iterating over the values of a tuple is unfortunately not straightforward. You cannot write a simple loop and call something like get<i>(mytuple) because the value of i must be known at compile time. A possible solution is to use template metaprogramming, which is discussed in detail in Chapter 22, together with an example on how to print tuple values.
The size of a tuple can be queried with the std::tuple_size template. Note that tuple_size requires you to specify the type of the tuple (MyTuple in this case) and not an actual tuple instance like t1:
cout << "Tuple Size = " << tuple_size<MyTuple>::value << endl;// Outputs: Tuple Size = 3
If you don’t know the exact tuple type, you can always use decltype() as follows:
cout << "Tuple Size = " << tuple_size<decltype(t1)>::value << endl;// Outputs: Tuple Size = 3
With C++17’s template argument deduction for constructors, you can omit the template type parameters when constructing a tuple, and let the compiler deduce them automatically based on the type of arguments passed to the constructor. For example, the following defines the same t1
tuple consisting of an integer, a string, and a Boolean. Note that you now have to specify "Test"s to make sure it’s an std::string.
std::tuple t1(16, "Test"s, true);Because of the automatic deduction of types, you cannot use & to specify a reference. If you want to use template argument deduction for constructors to generate a tuple containing a reference or a constant reference, then you need to use ref() or cref(), respectively, as is demonstrated in the following example. The ref() and cref() utility functions are defined in the <functional> header file. For example, the following construction results in a tuple of type tuple<int, double&, const double&, string&>:
double d = 3.14;string str1 = "Test";std::tuple t2(16, ref(d), cref(d), ref(str1));
To test the double reference in the t2 tuple, the following code first writes the value of the double variable to the console. The call to get<1>(t2) returns a reference to d because ref(d) was used for the second (index 1) tuple element. The second line changes the value of the variable referenced, and the last line shows that the value of d is indeed changed through the reference stored in the tuple. Note that the third line fails to compile because cref(d) was used for the third tuple element, that is, it is a constant reference to d.
cout << "d = " << d << endl;get<1>(t2) *= 2;//get<2>(t2) *= 2; // ERROR because of cref()cout << "d = " << d << endl;// Outputs: d = 3.14// d = 6.28
Without C++17’s template argument deduction for constructors, you can use the std::make_tuple() utility function to create a tuple. This helper function template also allows you to create a tuple by only specifying the actual values. The types are deduced automatically at compile time. For example:
auto t2 = std::make_tuple(16, ref(d), cref(d), ref(str1));There are two ways in which you can decompose a tuple into its individual elements: structured bindings (C++17) and std::tie().
Structured BindingsStructured bindings, introduced in C++17, make it very easy to decompose a tuple into separate variables. For example, the following code defines a tuple consisting of an integer, a string, and a Boolean value, and then uses a structured binding to decompose it into three distinct variables:
tuple t1(16, "Test"s, true);auto[i, str, b] = t1;cout << "Decomposed: i = "<< i << ", str = \"" << str << "\", b = " << b << endl;
With structured bindings, you cannot ignore specific elements while decomposing. If your tuple has three elements, then your structured binding needs three variables. If you want to ignore elements, then you have to use tie(), explained next.
If you want to decompose a tuple without structured bindings, you can use the std::tie() utility function, which generates a tuple of references. The following example first creates a tuple consisting of an integer, a string, and a Boolean value. It then creates three variables—an integer, a string, and a Boolean—and writes the values of those variables to the console. The tie(i, str, b) call creates a tuple containing a reference to i, a reference to str, and a reference to b. The assignment operator is used to assign tuple t1 to the result of tie(). Because the result of tie() is a tuple of references, the assignment actually changes the values in the three separate variables, as is shown by the output of the values after the assignment.
tuple<int, string, bool> t1(16, "Test", true);int i = 0;string str;bool b = false;cout << "Before: i = " << i << ", str = \"" << str << "\", b = " << b << endl;tie(i, str, b) = t1;cout << "After: i = " << i << ", str = \"" << str << "\", b = " << b << endl;
The result is as follows:
Before: i = 0, str = "", b = 0After: i = 16, str = "Test", b = 1
With tie() you can ignore certain elements that you do not want to be decomposed. Instead of a variable name for the decomposed value, you use the special std::ignore value. Here is the previous example, but now the string element of the tuple is ignored in the call to tie():
tuple<int, string, bool> t1(16, "Test", true);int i = 0;bool b = false;cout << "Before: i = " << i << ", b = " << b << endl;tie(i, std::ignore, b) = t1;cout << "After: i = " << i << ", b = " << b << endl;
Here is the new output:
Before: i = 0, b = 0After: i = 16, b = 1
You can use std::tuple_cat() to concatenate two tuples into one tuple. In the following example, the type of t3 is tuple<int, string, bool, double, string>:
tuple<int, string, bool> t1(16, "Test", true);tuple<double, string> t2(3.14, "string 2");auto t3 = tuple_cat(t1, t2);
Tuples also support the following comparison operators: ==, !=, <, >, <=, and >=. For the comparison operators to work, the element types stored in the tuple should support them as well. Here is an example:
tuple<int, string> t1(123, "def");tuple<int, string> t2(123, "abc");if (t1 < t2) {cout << "t1 < t2" << endl;} else {cout << "t1 >= t2" << endl;}
The output is as follows:
t1 >= t2Tuple comparisons can be used to easily implement lexicographical comparison operators for custom types that have several data members. For example, suppose you have a simple structure with three data members:1
struct Foo{int mInt;string mStr;bool mBool;};
Implementing a correct operator< for Foo is not trivial! However, using std::tie() and tuple comparisons, this becomes a simple one-liner:
bool operator<(const Foo& f1, const Foo& f2){return tie(f1.mInt, f1.mStr, f1.mBool) <tie(f2.mInt, f2.mStr, f2.mBool);}
Here is an example of its use:
Foo f1{ 42, "Hello", 0 };Foo f2{ 32, "World", 0 };cout << (f1 < f2) << endl;cout << (f2 < f1) << endl;
make_from_tuplestd::make_from_tuple() constructs an object of a given type T, passing the elements of a given tuple as arguments to the constructor of T. For example, suppose you have the following class:
class Foo{public:Foo(string str, int i) : mStr(str), mInt(i) {}private:string mStr;int mInt;};
You can use make_from_tuple() as follows:
auto myTuple = make_tuple("Hello world.", 42);auto foo = make_from_tuple<Foo>(myTuple);
The argument given to make_from_tuple() does not have to be a tuple, but it has to be something that supports std::get<>() and std::tuple_size. Both std::array and std::pair satisfy these requirements as well.
This function is not that practical for everyday use, but it comes in handy when writing very generic code using templates and template metaprogramming.
applystd::apply() calls a given callable (function, lambda expression, function object, and so on), passing the elements of a given tuple as arguments. Here is an example:
int add(int a, int b) { return a + b; }...cout << apply(add, std::make_tuple(39, 3)) << endl;
As with make_from_tuple(), this function is also meant more for use with generic code using templates and template metaprogramming, than for everyday use.
FILESYSTEM SUPPORT LIBRARYC++17 introduces a filesystem support library. Everything is defined in the <filesystem> header, and lives in the std::filesystem namespace. It allows you to write portable code to work with the filesystem. You can use it for querying whether something is a directory or a file, iterating over the contents of a directory, manipulating paths, and retrieving information about files such as their size, extension, creation time, and so on. The two most important parts of the library—paths and directory entries—are introduced in the next sections.
The basic component of the library is a path. A path can be an absolute or a relative path, and can include a filename or not. For example, the following code defines a couple of paths. Note the use of a raw string literal to avoid having to escape the backslashes.
path p1(LR"(D:\Foo\Bar)");path p2(L"D:/Foo/Bar");path p3(L"D:/Foo/Bar/MyFile.txt");path p4(LR"(..\SomeFolder)");path p5(L"/usr/lib/X11");
When a path is converted to a string (for example by using the c_str() method), or inserted into a stream, it is converted to the native format of the system on which the code is running. For example:
path p1(LR"(D:\Foo\Bar)");path p2(L"D:/Foo/Bar");cout << p1 << endl;cout << p2 << endl;
The output is as follows:
D:\Foo\BarD:\Foo\Bar
You can append a component to a path with the append() method, or with operator/=. A path separator is automatically included. For example:
path p(L"D:\\Foo");p.append("Bar");p /= "Bar";cout << p << endl;
The output is D:\Foo\Bar\Bar.
You can use concat(), or operator+=, to concatenate a string to an existing path. This does not add any path separator! For example:
path p(L"D:\\Foo");p.concat("Bar");p += "Bar";cout << p << endl;
The output now is D:\FooBarBar.
A path supports iterators to iterate over its different components. Here is an example:
path p(LR"(C:\Foo\Bar)");for (const auto& component : p) {cout << component << endl;}
The output is as follows:
C:\FooBar
The path interface supports operations such as remove_filename(), replace_filename(), replace_extension(), root_name(), parent_path(), extension(), has_extension(), is_absolute(), is_relative(), and more. Consult a Standard Library reference, see Appendix B, for a full list of all available functionality.
A path just represents a directory or a file on a filesystem. A path may refer to a non-existing directory or file. If you want to query an actual directory or file on the filesystem, you need to construct a directory_entry from a path. This construction can fail if the given directory or file does not exist. The directory_entry interface supports operations like is_directory(), is_regular_file(), is_socket(), is_symlink(), file_size(), last_write_time(), and others.
The following example constructs a directory_entry from a path to query the size of a file:
path myPath(L"c:/windows/win.ini");directory_entry dirEntry(myPath);if (dirEntry.exists() && dirEntry.is_regular_file()) {cout << "File size: " << dirEntry.file_size() << endl;}
An entire collection of helper functions is available. For example, you can use copy() to copy files or directories, create_directory() to create a new directory on the filesystem, exists() to query whether or not a given directory or file exists, file_size() to get the size of a file, last_write_time() to get the time the file was last modified, remove() to delete a file, temp_directory_path() to get a directory suitable for storing temporary files, space() to query the available space on a filesystem, and more. Consult a Standard Library reference, see Appendix B, for a full list.
The following example prints out the capacity of a filesystem and how much space is still free:
space_info s = space("c:\\");cout << "Capacity: " << s.capacity << endl;cout << "Free: " << s.free << endl;
You can find more examples of these helper functions in the following section on directory iteration.
If you want to recursively iterate over all files and subdirectories in a given directory, you can use the recursive_directory_iterator as follows:
void processPath(const path& p){if (!exists(p)) {return;}auto begin = recursive_directory_iterator(p);auto end = recursive_directory_iterator();for (auto iter = begin; iter != end; ++iter) {const string spacer(iter.depth() * 2, ' ');auto& entry = *iter;if (is_regular_file(entry)) {cout << spacer << "File: " << entry;cout << " (" << file_size(entry) << " bytes)" << endl;} else if (is_directory(entry)) {std::cout << spacer << "Dir: " << entry << endl;}}}
This function can be called as follows:
path p(LR"(D:\Foo\Bar)");processPath(p);
You can also use a directory_iterator to iterate over the contents of a directory and implement the recursion yourself. Here is an example that does the same thing as the previous example but using a directory_iterator instead of a recursive_directory_iterator:
void processPath(const path& p, size_t level = 0){if (!exists(p)) {return;}const string spacer(level * 2, ' ');if (is_regular_file(p)) {cout << spacer << "File: " << p;cout << " (" << file_size(p) << " bytes)" << endl;} else if (is_directory(p)) {std::cout << spacer << "Dir: " << p << endl;for (auto& entry : directory_iterator(p)) {processPath(entry, level + 1);}}}
This chapter gave an overview of additional functionality provided by the C++ standard that did not fit naturally in other chapters. You learned how to use the ratio template to define compile-time rational numbers; the chrono library; the random number generation library; and the optional, variant, and any data types. You also learned about tuples, which are a generalization of pairs. The chapter finished with an introduction to the filesystem support library.
This chapter concludes Part 3 of the book. The next part discusses some more advanced topics and starts with a chapter showing you how to customize and extend the functionality provided by the C++ Standard Library.
Every Standard Library container takes an Allocator type as a template parameter, for which the default usually suffices. For example, the vector template definition looks like this:
template <class T, class Allocator = allocator<T>> class vector;The container constructors then allow you to specify an object of type Allocator. This permits you to customize the way the containers allocate memory. Every memory allocation performed by a container is made with a call to the allocate() method of the Allocator object. Conversely, every deallocation is performed with a call to the deallocate() method of the Allocator object. The Standard Library provides a default Allocator class called allocator, which implements these methods as wrappers for operator new and operator delete.
If you want containers in your program to use a custom memory allocation and deallocation scheme, you can write your own Allocator class. There are several reasons for using custom allocators. For example, if the underlying allocator has unacceptable performance, there are alternatives that can be constructed. Or, if memory fragmentation is a problem (a lot of different allocations and deallocations leaving unusable, small holes in memory), a single “pool” of objects of one type can be created, called a memory pool. When OS-specific capabilities, such as shared memory segments, must be allocated, using custom allocators allows the use of Standard Library containers in those shared memory segments. The use of custom allocators is complex, and there are many potential problems if you are not careful, so this should not be approached lightly.
Any class that provides allocate(), deallocate(), and several other required methods and type aliases can be used in place of the default allocator class.
C++17 introduces the concept of polymorphic memory allocators. Basically, the problem with the allocator for a container being specified as a template type parameter is that two containers that are similar but have different allocator types are completely different. For example, two vector<int> containers with different Allocator template type parameters are different, and so cannot be assigned to one another.
The polymorphic memory allocators, defined in <memory_resource> in the std::pmr namespace, help to solve this problem. The class std::pmr::polymorphic_allocator is a proper Allocator class because it satisfies all the requirements, such as having an allocate() and deallocate() method. The allocation behavior of a polymorphic_allocator depends on the memory_resource it’s given during construction, and not on any template type parameters. As such, different polymorphic_allocators can behave in completely different ways when allocating and deallocating memory, even though they all have the same type, that is, polymorphic_allocator. The standard provides some built-in memory resources that you can use to initialize a polymorphic memory allocator: synchronized_pool_resource, unsynchronized_pool_resource, and monotonic_buffer_resource.
However, in my experience, both custom allocators and polymorphic memory allocators are rather advanced and rarely used features. I’ve never used them myself, so a detailed discussion falls outside the scope of this book. For more information, consult one of the books listed in Appendix B that specifically covers the C++ Standard Library.
The Standard Library provides four stream iterators. These are iterator-like class templates that allow you to treat input and output streams as input and output iterators. Using these stream iterators, you can adapt input and output streams so that they can serve as sources and destinations, respectively, for various Standard Library algorithms. The following stream iterators are available:
ostream_iterator—an output stream iteratoristream_iterator—an input stream iteratorThere is also an ostreambuf_iterator and an istreambuf_iterator, but these are rarely used and are not further discussed here.
The ostream_iterator class is an output stream iterator. It is a class template that takes the element type as a type parameter. Its constructor takes an output stream and a delimiter string to write to the stream following each element. The ostream_iterator class writes elements using operator<<.
For example, you can use the ostream_iterator with the copy() algorithm to print the elements of a container with only one line of code. The first parameter of copy() is the start iterator of the range to copy, the second parameter is the end iterator of the range, and the third parameter is the destination iterator:
vector<int> myVector(10);iota(begin(myVector), end(myVector), 1); // Fill vector with 1,2,3...10// Print the contents of the vector.copy(cbegin(myVector), cend(myVector), ostream_iterator<int>(cout, " "));
The output is as follows:
1 2 3 4 5 6 7 8 9 10You can use the input stream iterator, istream_iterator, to read values from an input stream using the iterator abstraction. It is a class template that takes the element type as a type parameter. Elements are read using operator>>. You can use an istream_iterator as a source for algorithms and container methods.
For example, the following piece of code reads integers from the console until the end of the stream is reached. On Windows, this happens when you press Ctrl+Z followed by Enter, while on Linux you press Enter followed by Ctrl+D. The accumulate() algorithm is used to sum all the integers together. Note that the default constructor of istream_iterator creates an end iterator.
cout << "Enter numbers separated by white space." << endl;cout << "Press Ctrl+Z followed by Enter to stop." << endl;istream_iterator<int> numbersIter(cin);istream_iterator<int> endIter;int sum = accumulate(numbersIter, endIter, 0);cout << "Sum: " << sum << endl;
Take a moment to reflect on this code. If you remove all the output statements and the variable declarations, the only line left is the call to accumulate(). Thanks to algorithms and input stream iterators, this single line of code reads any number of integers from the console and sums them together, without using any explicit loops.
The Standard Library provides three iterator adaptors, which are special iterators built on top of other iterators. All three are defined in the <iterator> header. It’s also possible to write your own iterator adaptors, but this is not covered in this book. Consult one of the books on the Standard Library listed in Appendix B for details.
The Standard Library provides an std::reverse_iterator class template that iterates through a bidirectional or random access iterator in a reverse direction. Every reversible container in the Standard Library, which happens to be every container that’s part of the standard except forward_list and the unordered associative containers, supplies a reverse_iterator type alias and methods called rbegin() and rend(). These reverse_iterator type aliases are of type std::reverse_iterator<T> with T equal to the iterator type alias of the container. The method rbegin() returns a reverse_iterator pointing to the last element of the container, and rend() returns a reverse_iterator pointing to the element before the first element of the container. Applying operator++ to a reverse_iterator calls operator-- on the underlying container iterator, and vice versa. For example, iterating over a collection from the beginning to the end can be done as follows:
for (auto iter = begin(collection); iter != end(collection); ++iter) {}Iterating over the elements in the collection from the end to the beginning can be done using a reverse_iterator by calling rbegin() and rend(). Note that you still call ++iter:
for (auto iter = rbegin(collection); iter != rend(collection); ++iter) {}An std::reverse_iterator is useful mostly with algorithms in the Standard Library that have no equivalents that work in reverse order. For example, the basic find() algorithm searches for the first element in a sequence. If you want to find the last element in the sequence, you can use a reverse_iterator instead. Note that when you call an algorithm such as find() with a reverse_iterator, it returns a reverse_iterator as well. You can always obtain the underlying iterator from a reverse_iterator by calling the base() method on the reverse_iterator. However, due to the implementation details of reverse_iterator, the iterator returned from base() always refers to one element past the element referred to by the reverse_iterator on which it’s called. In order to get to the same element, you must subtract one.
Here is an example of find() with a reverse_iterator:
// The implementation of populateContainer() is identical to that shown in// Chapter 18, so it is omitted here.vector<int> myVector;populateContainer(myVector);int num;cout << "Enter a number to find: ";cin >> num;auto it1 = find(begin(myVector), end(myVector), num);auto it2 = find(rbegin(myVector), rend(myVector), num);if (it1 != end(myVector)) {cout << "Found " << num << " at position " << it1 - begin(myVector)<< " going forward." << endl;cout << "Found " << num << " at position "<< it2.base() - 1 - begin(myVector) << " going backward." << endl;} else {cout << "Failed to find " << num << endl;}
A possible output of this program is as follows:
Enter a number (0 to quit): 11Enter a number (0 to quit): 22Enter a number (0 to quit): 33Enter a number (0 to quit): 22Enter a number (0 to quit): 11Enter a number (0 to quit): 0Enter a number to find: 22Found 22 at position 1 going forward.Found 22 at position 3 going backward.
As Chapter 18 mentions, algorithms like copy() don’t insert elements into a container; they simply replace old elements in a range with new ones. In order to make algorithms like copy() more useful, the Standard Library provides three insert iterator adaptors that actually insert elements into a container: insert_iterator, back_insert_iterator, and front_insert_iterator. They are all templatized on a container type, and take the actual container reference in their constructor. Because they supply the necessary iterator interfaces, these adaptors can be used as the destination iterators of algorithms like copy(). However, instead of replacing elements in the container, they make calls on their container to actually insert new elements.
The basic insert_iterator calls insert(position, element) on the container, the back_insert_iterator calls push_back(element), and the front_insert_iterator calls push_front(element).
The following example uses a back_insert_iterator with the copy_if() algorithm to populate vectorTwo with all elements from vectorOne that are not equal to 100:
vector<int> vectorOne, vectorTwo;populateContainer(vectorOne);back_insert_iterator<vector<int>> inserter(vectorTwo);copy_if(cbegin(vectorOne), cend(vectorOne), inserter,[](int i){ return i != 100; });copy(cbegin(vectorTwo), cend(vectorTwo), ostream_iterator<int>(cout, " "));
As you can see, when you use insert iterators, you don’t need to size the destination containers ahead of time.
You can also use the std::back_inserter() utility function to create a back_insert_iterator. In the previous example, you can remove the line that defines the inserter variable, and rewrite the copy_if() call as follows. The result is exactly the same as the previous implementation:
copy_if(cbegin(vectorOne), cend(vectorOne),back_inserter(vectorTwo), [](int i){ return i != 100; });
With C++17’s template argument deduction for constructors, this can also be written as follows:
copy_if(cbegin(vectorOne), cend(vectorOne),back_insert_iterator(vectorTwo), [](int i) { return i != 100; });
The front_insert_iterator and insert_iterator work similarly, except that the insert_iterator also takes an initial iterator position in its constructor, which it passes to the first call to insert(position, element). Subsequent iterator position hints are generated based on the return value from each insert() call.
One benefit of using an insert_iterator is that it allows you to use associative containers as destinations of the modifying algorithms. Chapter 18 explains that the problem with associative containers is that you are not allowed to modify the elements over which you iterate. By using an insert_iterator, you can instead insert elements. Associative containers actually support a form of insert() that takes an iterator position, and are supposed to use the position as a “hint,” which they can ignore. When you use an insert_iterator on an associative container, you can pass the begin() or end() iterator of the container to use as the hint. The insert_iterator modifies the iterator hint that it passes to insert() after each call to insert(), such that the position is one past the just-inserted element.
Here is the previous example modified so that the destination container is a set instead of a vector:
vector<int> vectorOne;set<int> setOne;populateContainer(vectorOne);insert_iterator<set<int>> inserter(setOne, begin(setOne));copy_if(cbegin(vectorOne), cend(vectorOne), inserter,[](int i){ return i != 100; });copy(cbegin(setOne), cend(setOne), ostream_iterator<int>(cout, " "));
Similar to the back_insert_iterator example, you can use the std::inserter() utility function to create an insert_iterator:
copy_if(cbegin(vectorOne), cend(vectorOne),inserter(setOne, begin(setOne)),[](int i){ return i != 100; });
Or, you can use C++17’s template argument deduction for constructors:
copy_if(cbegin(vectorOne), cend(vectorOne),insert_iterator(setOne, begin(setOne)),[](int i) { return i != 100; });
Chapter 9 discusses move semantics, which can be used to prevent unnecessary copying in cases where you know that the source object will be destroyed after an assignment operation or copy construction. There is an iterator adaptor called std::move_iterator. The dereferencing operator for a move_iterator automatically converts the value to an rvalue reference, which means that the value can be moved to a new destination without the overhead of copying. Before you can use move semantics, you need to make sure your objects are supporting it. The following MoveableClass supports move semantics. For more details, see Chapter 9.
class MoveableClass{public:MoveableClass() {cout << "Default constructor" << endl;}MoveableClass(const MoveableClass& src) {cout << "Copy constructor" << endl;}MoveableClass(MoveableClass&& src) noexcept {cout << "Move constructor" << endl;}MoveableClass& operator=(const MoveableClass& rhs) {cout << "Copy assignment operator" << endl;return *this;}MoveableClass& operator=(MoveableClass&& rhs) noexcept {cout << "Move assignment operator" << endl;return *this;}};
The constructors and assignment operators are not doing anything useful here, except printing a message to make it easy to see which one is being called. Now that you have this class, you can define a vector and store a few MoveableClass instances in it as follows:
vector<MoveableClass> vecSource;MoveableClass mc;vecSource.push_back(mc);vecSource.push_back(mc);
The output could be as follows:
Default constructor // [1]Copy constructor // [2]Copy constructor // [3]Move constructor // [4]
The second line of the code creates a MoveableClass instance by using the default constructor, [1]. The first push_back() call triggers the copy constructor to copy mc into the vector, [2]. After this operation, the vector has space for one element, the first copy of mc. Note that this discussion is based on the growth strategy and the initial size of a vector as implemented by Microsoft Visual C++ 2017. The C++ standard does not specify the initial capacity of a vector or its growth strategy, so the output can be different with different compilers.
The second push_back() call triggers the vector to resize itself, to allocate space for the second element. This resizing causes the move constructor to be called to move every element from the old vector to the new resized vector, [4]. The copy constructor is triggered to copy mc a second time into the vector, [3]. The order of moving and copying is undefined, so [3] and [4] could be reversed.
You can create a new vector called vecOne that contains a copy of the elements from vecSource as follows:
vector<MoveableClass> vecOne(cbegin(vecSource), cend(vecSource));Without using move_iterators, this code triggers the copy constructor two times, once for every element in vecSource:
Copy constructorCopy constructor
By using std::make_move_iterator() to create move_iterators, the move constructor of MoveableClass is called instead of the copy constructor:
vector<MoveableClass> vecTwo(make_move_iterator(begin(vecSource)),make_move_iterator(end(vecSource)));
This generates the following output:
Move constructorMove constructor
You can also use C++17’s template argument deduction for constructors:
vector<MoveableClass> vecTwo(move_iterator(begin(vecSource)),move_iterator(end(vecSource)));
The Standard Library includes many useful containers, algorithms, and iterators that you can use in your applications. It is impossible, however, for any library to include all possible utilities that all potential clients might need. Thus, the best libraries are extensible: they allow clients to adapt and add to the basic capabilities to obtain exactly the functionality they require. The Standard Library is inherently extensible because of its fundamental structure of separating data from the algorithms that operate on them. You can write your own containers that can work with the Standard Library algorithms by providing iterators that conforms to the Standard Library guidelines. Similarly, you can write your own algorithms that work with iterators from the standard containers. Note that you are not allowed to put your own containers and algorithms in the std namespace.
If you sit down to write an algorithm or container in C++, you can either make it adhere to the Standard Library conventions or not. For simple containers and algorithms, it might not be worth the extra effort to follow the Standard Library requirements. However, for substantial code that you plan to reuse, the effort pays off. First, the code will be easier for other C++ programmers to understand, because you follow well-established interface guidelines. Second, you will be able to use your container or algorithm with the other parts of the Standard Library (algorithms or containers) without needing to provide special hacks or adaptors. Finally, it will force you to employ the necessary rigor required to develop solid code.
Chapter 18 describes a useful set of algorithms that are part of the Standard Library, but you will inevitably encounter situations in your programs for which you need new algorithms. When that happens, it is usually not difficult to write your own algorithm that works with Standard Library iterators just like the standard algorithms.
Suppose that you want to find all the elements matching a predicate in a given range. The find() and find_if() algorithms are the most likely candidates, but each returns an iterator referring to only one element. You can use copy_if() to find all elements matching a given predicate, but it fills the output with copies of the found elements. If you want to avoid copies, you can use copy_if() with a back_insert_iterator into a vector<reference_wrapper<T>>, but this does not give you the position of the found elements. In fact, there is no standard algorithm to get iterators to all the elements matching a predicate. However, you can write your own version of this functionality called find_all().
The first task is to define the function prototype. You can follow the model established by copy_if(), that is, a function template with three template type parameters: the input iterator type, the output iterator type, and the predicate type. The arguments of the function are start and end iterators of the input sequence, a start iterator of the output sequence, and a predicate object. As with copy_if(), the algorithm returns an iterator into the output sequence that is one-past-the-last element stored in the output sequence. Here is the prototype:
template <typename InputIterator, typename OutputIterator, typename Predicate>OutputIterator find_all(InputIterator first, InputIterator last,OutputIterator dest, Predicate pred);
Another option would be to omit the output iterator, and to return an iterator into the input sequence that iterates over all the matching elements in the input sequence. This would require you to write your own iterator class, which is discussed later in this chapter.
The next task is to write the implementation. The find_all() algorithm iterates over all elements in the input sequence, calls the predicate on each element, and stores iterators of matching elements in the output sequence. Here is the implementation:
template <typename InputIterator, typename OutputIterator, typename Predicate>OutputIterator find_all(InputIterator first, InputIterator last,OutputIterator dest, Predicate pred){while (first != last) {if (pred(*first)) {*dest = first;++dest;}++first;}return dest;}
Similar to copy_if(), the algorithm only overwrites existing elements in the output sequence, so make sure the output sequence is large enough to hold the result, or use an iterator adaptor such as back_insert_iterator, as demonstrated in the following code. After finding all matching elements, the code counts the number of elements found, which is the number of iterators in matches. Then, it iterates through the result, printing each element.
vector<int> vec{ 3, 4, 5, 4, 5, 6, 5, 8 };vector<vector<int>::iterator> matches;find_all(begin(vec), end(vec), back_inserter(matches),[](int i){ return i == 5; });cout << "Found " << matches.size() << " matching elements: " << endl;for (const auto& it : matches) {cout << *it << " at position " << (it - cbegin(vec)) << endl;;}
The output is as follows:
Found 3 matching elements:5 at position 25 at position 45 at position 6
Some algorithm implementations need additional information about their iterators. For example, they might need to know the type of the elements referred to by the iterator in order to store temporary values, or perhaps they want to know whether the iterator is bidirectional or random access.
C++ provides a class template called iterator_traits that allows you to find this information. You instantiate the iterator_traits class template with the iterator type of interest, and access one of five type aliases: value_type, difference_type, iterator_category, pointer, or reference. For example, the following function template declares a temporary variable of the type that an iterator of type IteratorType refers to. Note the use of the typename keyword in front of the iterator _traits line. You must specify typename explicitly whenever you access a type based on one or more template parameters. In this case, the template parameter IteratorType is used to access the value_type type.
#include <iterator>template <typename IteratorType>void iteratorTraitsTest(IteratorType it){typename std::iterator_traits<IteratorType>::value_type temp;temp = *it;cout << temp << endl;}
This function can be tested with the following code:
vector<int> v{ 5 };iteratorTraitsTest(cbegin(v));
With this code, the variable temp in iteratorTraitsTest() is of type int. The output is 5.
In this example, the auto keyword could be used to simplify the code, but that wouldn’t show you how to use iterator_traits.
The C++ standard contains a list of requirements that any container must fulfill in order to qualify as a Standard Library container.
Additionally, if you want your container to be sequential (like a vector), ordered associative (like a map), or unordered associative (like an unordered_map), it must conform to supplementary requirements.
My suggestion when writing a new container is to write the basic container first, following the general Standard Library rules such as making it a class template, but without worrying too much yet about the specific details of Standard Library conformity. After you’ve developed the basic implementation, you can add the iterator and methods so that it can work with the Standard Library framework. This chapter takes that approach to develop a hash map.
C++11 added support for hash tables, which are discussed in Chapter 17. However, pre-C++11 did not include hash tables. Unlike the Standard Library map and set, which provide logarithmic insertion, lookup, and deletion times, a hash table provides constant time insertion, deletion, and lookup in the average case, linear in the worst case. Instead of storing elements in sorted order, a hash table hashes, or maps, each element to a particular bucket. As long as the number of elements stored isn’t significantly greater than the number of buckets, and the hash function distributes the elements uniformly between the buckets, the insertion, deletion, and lookup operations all run in constant time.
This section implements a simple, but fully functional, hash_map. Like a map, a hash_map stores key/value pairs. In fact, the operations it provides are almost identical to those provided by the map, but with different performance characteristics.
This hash_map implementation uses chained hashing (also called open hashing), and does not attempt to provide advanced features such as rehashing. Chapter 17 explains the concept of chained hashing in the section on unordered associative containers.
The first choice when writing a hash_map is how to handle hash functions. Recalling the adage that a good abstraction makes the easy case easy and the hard case possible, a good hash_map interface allows clients to specify their own hash function and number of buckets in order to customize the hashing behavior for their particular workload. On the other hand, clients that do not have the desire, or ability, to write a good hash function and choose a number of buckets should still be able to use the container without doing so. One solution is to allow clients to provide a hash function and number of buckets in the hash_map constructor, but also to provide default values. In this implementation, the hash function is a simple function object containing just a single function call operator. The function object is templatized on the key type that it hashes in order to support a templatized hash_map container. Template specialization can be used to write custom hash functions for certain types. Here is the basic hash function object:
template <typename T>class hash{public:size_t operator()(const T& key) const;};
Note that everything for the hash_map implementation is inside a ProCpp namespace so that names don’t clash with already existing names. The implementation of the hash function call operator is tricky because it must apply to keys of any type. The following implementation computes an integer-sized hash value by simply treating the key as a sequence of bytes:
// Calculate a hash by treating the key as a sequence// of bytes and summing the ASCII values of the bytes.template <typename T>size_t hash<T>::operator()(const T& key) const{const size_t bytes = sizeof(key);size_t sum = 0;for (size_t i = 0; i < bytes; ++i) {unsigned char b = *(reinterpret_cast<const unsigned char*>(&key) + i);sum += b;}return sum;}
Unfortunately, when using this hashing method on strings, the function calculates the hash of the entire string object, and not just of the actual text. The actual text is probably on the heap, and the string object only contains a length and a pointer to the text on the heap. The pointer will be different, even if the text it refers to is the same. The result is that two string objects with the same text will generate different hash values. Therefore, it’s a good idea to provide a specialization of the hash template for strings, and in general for any class that contains dynamically allocated memory. Template specialization is discussed in detail in Chapter 12.
// A hash specialization for stringstemplate <>class hash<std::string>{public:size_t operator()(const std::string& key) const;};// Calculate a hash by summing the ASCII values of all characters.size_t hash<std::string>::operator()(const std::string& key) const{size_t sum = 0;for (auto c : key) {sum += static_cast<unsigned char>(c);}return sum;}
If you want to use other pointer types or objects as the key, you should write your own hash specialization for those types.
A hash_map supports three basic operations: insertion, deletion, and lookup. It is also swappable. Of course, it provides a constructor and destructor as well. The copy and move constructors are explicitly defaulted, and the copy and move assignment operators are provided. Here is the public portion of the hash_map class template:
template <typename Key, typename T, typename KeyEqual = std::equal_to<>,typename Hash = hash<Key>>class hash_map{public:using key_type = Key;using mapped_type = T;using value_type = std::pair<const Key, T>;virtual ~hash_map() = default; // Virtual destructor// Throws invalid_argument if the number of buckets is illegal.explicit hash_map(const KeyEqual& equal = KeyEqual(),size_t numBuckets = 101, const Hash& hash = Hash());// Copy constructorhash_map(const hash_map<Key, T, KeyEqual, Hash>& src) = default;// Move constructorhash_map(hash_map<Key, T, KeyEqual, Hash>&& src) noexcept = default;// Copy assignment operatorhash_map<Key, T, KeyEqual, Hash>& operator=(const hash_map<Key, T, KeyEqual, Hash>& rhs);// Move assignment operatorhash_map<Key, T, KeyEqual, Hash>& operator=(hash_map<Key, T, KeyEqual, Hash>&& rhs) noexcept;// Inserts the key/value pair x.void insert(const value_type& x);// Removes the element with key k, if it exists.void erase(const key_type& k);// Removes all elements.void clear() noexcept;// Find returns a pointer to the element with key k.// Returns nullptr if no element with that key exists.value_type* find(const key_type& k);const value_type* find(const key_type& k) const;// operator[] finds the element with key k, or inserts an// element with that key if none exists yet. Returns a reference to// the value corresponding to that key.T& operator[] (const key_type& k);// Swaps two hash_maps.void swap(hash_map<Key, T, KeyEqual, Hash>& other) noexcept;private:// Implementation details not shown yet};
As you can see, the key and value types are both template parameters, similar as for the Standard Library map. A hash_map stores pair<const Key, T> as the actual elements in the container. The insert(), erase(), find(), clear(), and operator[] methods are straightforward. However, a few aspects of this interface require further explanation.
Like a map, set, and other standard containers, a hash_map allows the client to specify the comparison type as a template parameter and to pass a specific comparison object of that type in the constructor. Unlike a map and set, a hash_map does not sort elements by key, but must still compare keys for equality. Thus, instead of using less as the default comparator, it uses the transparent equal_to<> comparator. The comparison object is used only to detect attempts to insert duplicate keys into the container.
You should be able to change the hashing function to make it better suit the type of elements you want to store in the hash map. Thus, the hash_map template takes four template parameters: the key type, the value type, the comparator type, and the hash type.
The hash_map class template defines three type aliases:
using key_type = Key;using mapped_type = T;using value_type = std::pair<const Key, T>;
The value_type, in particular, is useful for referring to the more cumbersome pair<const Key, T> type. As you will see, these type aliases are required to satisfy the Standard Library container requirements.
After you finalize the hash_map interface, you need to choose the implementation model. The basic hash table structure generally consists of a fixed number of buckets, each of which can store one or more elements. The buckets should be accessible in constant time based on a bucket-id (the result of hashing a key). Thus, a vector is the most appropriate container for the buckets. Each bucket must store a list of elements, so the Standard Library list can be used as the bucket type. Thus, the final structure is a vector of lists of pair<const Key, T> elements.1 Here are the private members of the hash_map class:
private:using ListType = std::list<value_type>;std::vector<ListType> mBuckets;size_t mSize = 0;KeyEqual mEqual;Hash mHash;
Without the type aliases for value_type and ListType, the line declaring mBuckets would look like this:
std::vector<std::list<std::pair<const Key, T>>> mBuckets;The mEqual and mHash members store the comparison and hashing objects, respectively, and mSize stores the number of elements currently in the container.
The constructor initializes all the fields. It constructs mBuckets with the correct number of buckets. Unfortunately, the template syntax is somewhat dense. If the syntax confuses you, consult Chapter 12 for details on writing class templates.
// Construct mBuckets with the correct number of buckets.template <typename Key, typename T, typename KeyEqual, typename Hash>hash_map<Key, T, KeyEqual, Hash>::hash_map(const KeyEqual& equal, size_t numBuckets, const Hash& hash): mBuckets(numBuckets), mEqual(equal), mHash(hash){if (numBuckets == 0) {throw std::invalid_argument("Number of buckets must be positive");}}
The implementation requires at least one bucket, so the constructor enforces that restriction.
Each of the three major operations (lookup, insertion, and deletion) requires code to find an element with a given key. Thus, it is helpful to have a private helper method that performs that task. findElement() first uses the hash object to calculate the hash of the key and limits the calculated hash value to the number of hash buckets by taking the modulo of the calculated value. Then, it searches all the elements in that bucket for an element with a key matching the given key. The elements stored are key/value pairs, so the actual comparison must be done on the first field of the element. The comparison function object specified in the constructor is used to perform the comparison.
template <typename Key, typename T, typename KeyEqual, typename Hash>std::pair<typename hash_map<Key, T, KeyEqual, Hash>::ListType::iterator, size_t>hash_map<Key, T, KeyEqual, Hash>::findElement(const key_type& k){// Hash the key to get the bucket.size_t bucket = mHash(k) % mBuckets.size();// Search for the key in the bucket.auto iter = find_if(begin(mBuckets[bucket]), end(mBuckets[bucket]),[this, &k](const auto& element) { return mEqual(element.first, k); });// Return a pair of the iterator and the bucket index.return std::make_pair(iter, bucket);}
findElement() returns a pair containing an iterator and a bucket index. The bucket index is the index of the bucket to which the given key maps, independent of whether or not the given key is actually in the container. The returned iterator refers to an element in the bucket list, the list representing the bucket to which the key mapped. If the element is found, the iterator refers to that element; otherwise, it is the end iterator for that list.
The syntax in the function header of this method is somewhat confusing, particularly the use of the typename keyword. You must use the typename keyword whenever you are using a type that is dependent on a template parameter. Specifically, the type ListType::iterator , which is list<pair<const Key, T>>::iterator , is dependent on both the Key and T template parameters.
You can implement the find() method as a simple wrapper for findElement():
template <typename Key, typename T, typename KeyEqual, typename Hash>typename hash_map<Key, T, KeyEqual, Hash>::value_type*hash_map<Key, T, KeyEqual, Hash>::find(const key_type& k){// Use the findElement() helper, and C++17 structured bindings.auto[it, bucket] = findElement(k);if (it == end(mBuckets[bucket])) {// Element not found -- return nullptr.return nullptr;}// Element found -- return a pointer to it.return &(*it);}
The const version of find() uses a const_cast to forward the request to the non-const version to avoid code duplication:
template <typename Key, typename T, typename KeyEqual, typename Hash>const typename hash_map<Key, T, KeyEqual, Hash>::value_type*hash_map<Key, T, KeyEqual, Hash>::find(const key_type& k) const{return const_cast<hash_map<Key, T, KeyEqual, Hash>*>(this)->find(k);}
The operator[] implementation uses findElement() and if it does not find the element, it inserts it as follows:
template <typename Key, typename T, typename KeyEqual, typename Hash>T& hash_map<Key, T, KeyEqual, Hash>::operator[] (const key_type& k){// Try to find the element. If it doesn't exist, add a new element.auto[it, bucket] = findElement(k);if (it == end(mBuckets[bucket])) {mSize++;mBuckets[bucket].push_back(std::make_pair(k, T()));return mBuckets[bucket].back().second;} else {return it->second;}}
insert() must first check if an element with that key is already in the hash_map. If not, it can add the element to the list in the appropriate bucket. Note that findElement() returns the bucket index to which a key hashes, even if an element with that key is not found:
template <typename Key, typename T, typename KeyEqual, typename Hash>void hash_map<Key, T, KeyEqual, Hash>::insert(const value_type& x){// Try to find the element.auto[it, bucket] = findElement(x.first);if (it != end(mBuckets[bucket])) {// The element already exists.return;} else {// We didn't find the element, so insert a new one.mSize++;mBuckets[bucket].push_back(x);}}
Note that this implementation of insert() returns void, so the caller does not know whether the element was inserted or if it was already in the hash_map. This shortcoming is resolved later in this chapter, once iterators have been implemented for hash_map.
erase() follows the same pattern as insert(): It first attempts to find the element by calling findElement(). If the element exists, it erases it from the list in the appropriate bucket. Otherwise, it does nothing.
template <typename Key, typename T, typename KeyEqual, typename Hash>void hash_map<Key, T, KeyEqual, Hash>::erase(const key_type& k){// First, try to find the element.auto[it, bucket] = findElement(k);if (it != end(mBuckets[bucket])) {// The element exists -- erase it.mBuckets[bucket].erase(it);mSize--;}}
clear() simply clears each bucket, and sets the size of the hash_map to zero:
template <typename Key, typename T, typename KeyEqual, typename Hash>void hash_map<Key, T, KeyEqual, Hash>::clear() noexcept{// Call clear on each bucket.for (auto& bucket : mBuckets) {bucket.clear();}mSize = 0;}
The swap() method just swaps all data members using std::swap():
template <typename Key, typename T, typename KeyEqual, typename Hash>void hash_map<Key, T, KeyEqual, Hash>::swap(hash_map<Key, T, KeyEqual, Hash>& other) noexcept{using std::swap;swap(mBuckets, other.mBuckets);swap(mSize, other.mSize);swap(mEqual, other.mEqual);swap(mHash, other.mHash);}
The following standalone swap() function is also provided, which simply forwards to the swap() method:
template <typename Key, typename T, typename KeyEqual, typename Hash>void swap(hash_map<Key, T, KeyEqual, Hash>& first,hash_map<Key, T, KeyEqual, Hash>& second) noexcept{first.swap(second);}
Here are the implementations of the copy and move assignment operators. See Chapter 9 for a discussion of the copy-and-swap idiom.
template <typename Key, typename T, typename KeyEqual, typename Hash>hash_map<Key, T, KeyEqual, Hash>&hash_map<Key, T, KeyEqual, Hash>::operator=(const hash_map<Key, T, KeyEqual, Hash>& rhs){// check for self-assignmentif (this == &rhs) {return *this;}// Copy-and-swap idiomauto copy = rhs; // Do all the work in a temporary instanceswap(copy); // Commit the work with only non-throwing operationsreturn *this;}template <typename Key, typename T, typename KeyEqual, typename Hash>hash_map<Key, T, KeyEqual, Hash>&hash_map<Key, T, KeyEqual, Hash>::operator=(hash_map<Key, T, KeyEqual, Hash>&& rhs) noexcept{swap(rhs);return *this;}
Here is a small test program demonstrating the basic hash_map class template:
hash_map<int, int> myHash;myHash.insert(make_pair(4, 40));myHash.insert(make_pair(6, 60));// x will have type hash_map<int, int>::value_type*auto x = myHash.find(4);if (x != nullptr) {cout << "4 maps to " << x->second << endl;} else {cout << "cannot find 4 in map" << endl;}myHash.erase(4);auto x2 = myHash.find(4);if (x2 != nullptr) {cout << "4 maps to " << x2->second << endl;} else {cout << "cannot find 4 in map" << endl;}myHash[4] = 35;myHash[4] = 60;auto x3 = myHash.find(4);if (x3 != nullptr) {cout << "4 maps to " << x3->second << endl;} else {cout << "cannot find 4 in map" << endl;}// Test std::swap().hash_map<int, int> other(std::equal_to<>(), 11);swap(other, myHash);// Test copy construction and copy assignment.hash_map<int, int> myHash2(other);hash_map<int, int> myHash3;myHash3 = myHash2;// Test move construction and move assignment.hash_map<int, int> myHash4(std::move(myHash3));hash_map<int, int> myHash5;myHash5 = std::move(myHash4);
The output is as follows:
4 maps to 40cannot find 4 in map4 maps to 60
The basic hash_map shown in the previous section follows the spirit, but not the letter, of the Standard Library. For most purposes, the preceding implementation is good enough. However, if you want to use the Standard Library algorithms on your hash_map, you must do a bit more work. The C++ standard specifies methods and type aliases that a data structure must provide in order to qualify as a Standard Library container.
The C++ standard specifies that every Standard Library container must provide the following public type aliases.
| TYPE NAME | DESCRIPTION |
value_type |
The element type stored in the container |
reference |
A reference to the element type stored in the container |
const_reference |
A const reference to the element type stored in the container |
iterator |
The type for iterating over elements of the container |
const_iterator |
A version of iterator for iterating over const elements of the container |
size_type |
A type that can represent the number of elements in the container; this is usually just size_t (from <cstddef>). |
difference_type |
A type that can represent the difference of two iterators for the container; this is usually just ptrdiff_t (from <cstddef>). |
Here are the definitions for the hash_map class template of all these type aliases except iterator and const_iterator. Writing an iterator is covered in detail in a subsequent section. Note that value_type (plus key_type and mapped_type, which are discussed later) was already defined in the previous version of the hash_map. This implementation also adds a type alias hash_map_type to give a shorter name to a specific template instantiation of hash_map:
template <typename Key, typename T, typename KeyEqual = std::equal_to<>,typename Hash = hash<Key>>class hash_map{public:using key_type = Key;using mapped_type = T;using value_type = std::pair<const Key, T>;using reference = value_type&;using const_reference = const value_type&;using size_type = size_t;using difference_type = ptrdiff_t;using hash_map_type = hash_map<Key, T, KeyEqual, Hash>;// Remainder of class definition omitted for brevity};
In addition to the obligatory type aliases, every container must provide the following methods.
| METHOD | DESCRIPTION | WORST-CASE COMPLEXITY |
| Default constructor | Constructs an empty container | Constant |
| Copy constructor | Performs a deep copy of the container | Linear |
| Move constructor | Performs a move constructing operation | Constant |
| Copy assignment operator | Performs a deep copy of the container | Linear |
| Move assignment operator | Performs a move assignment operation | Constant |
| Destructor | Destroys dynamically allocated memory; this method calls destructor on all elements left in the container. | Linear |
iterator begin();const_iterator begin() const; |
Returns an iterator referring to the first element in the container | Constant |
iterator end();const_iterator end() const; |
Returns an iterator referring to one-past-the-last element in the container | Constant |
const_iterator cbegin() const; |
Returns a const iterator referring to the first element in the container |
Constant |
const_iterator cend() const; |
Returns a const iterator referring to one-past-the-last element in the container |
Constant |
operator==operator!= |
Comparison operators that compare two containers, element by element | Linear |
void swap(Container&) noexcept; |
Swaps the contents of the container passed to the method with the object on which the method is called | Constant |
size_type size() const; |
Returns the number of elements in the container | Constant |
size_type max_size() const; |
Returns the maximum number of elements the container can hold | Constant |
bool empty() const; |
Returns whether the container has any elements | Constant |
The following code snippet shows the declarations of the remaining methods except for begin(), end(), cbegin(), and cend(). Those are covered in the next section.
template <typename Key, typename T, typename KeyEqual = std::equal_to<>,typename Hash = hash<Key>>class hash_map{public:// Type aliases omitted for brevity// Size methodsbool empty() const;size_type size() const;size_type max_size() const;// Other methods omitted for brevity};
The implementations of size() and empty() are easy because the hash_map implementation tracks its size in the mSize data member. Note that size_type is one of the type aliases defined in the class. Because it is a member of the class, such a return type in the implementation must be fully qualified with typename hash_map<Key, T, KeyEqual, Hash>:
template <typename Key, typename T, typename KeyEqual, typename Hash>bool hash_map<Key, T, KeyEqual, Hash>::empty() const{return mSize == 0;}template <typename Key, typename T, typename KeyEqual, typename Hash>typename hash_map<Key, T, KeyEqual, Hash>::size_typehash_map<Key, T, KeyEqual, Hash>::size() const{return mSize;}
max_size() is a little trickier. At first, you might think the maximum size of a hash_map container is the sum of the maximum size of all the lists. However, the worst-case scenario is that all the elements hash to the same bucket. Thus, the maximum size it can claim to support is the maximum size of a single list:
template <typename Key, typename T, typename KeyEqual, typename Hash>typename hash_map<Key, T, KeyEqual, Hash>::size_typehash_map<Key, T, KeyEqual, Hash>::max_size() const{return mBuckets[0].max_size();}
The most important container requirement is the iterator. In order to work with the generic algorithms, every container must provide an iterator for accessing the elements in the container. Your iterator should generally provide overloaded operator* and operator->, plus some other operations depending on its specific behavior. As long as your iterator provides the basic iteration operations, everything should be fine.
The first decision to make about your iterator is what kind it will be: forward, bidirectional, or random access. Random-access iterators don’t make much sense for associative containers, so bidirectional seems like the logical choice for a hash_map iterator. That means you must also provide operator++, operator--, operator==, and operator!=. Consult Chapter 17 for more details on the requirements for the different iterators.
The second decision is how to order the elements of your container. The hash_map is unsorted, so iterating in a sorted order is probably too difficult. Instead, your iterator can just step through the buckets, starting with the elements in the first bucket and progressing to those in the last bucket. This order will appear random to the client, but will be consistent and repeatable.
The third decision is how to represent your iterator internally. The implementation is usually quite dependent on the internal implementation of the container. The first purpose of an iterator is to refer to a single element in the container. In the case of a hash_map, each element is in a Standard Library list, so perhaps a hash_map iterator can be a wrapper around a list iterator referring to the element in question. However, the second purpose of a bidirectional iterator is to allow the client to progress to the next or previous element from the current one. In order to progress from one bucket to the next, you need to track the current bucket and the hash_map object to which the iterator refers.
Once you’ve chosen your implementation, you must decide on a consistent representation for the end iterator. Recall that the end iterator should really be the “past-the-end” marker: the iterator that’s reached by applying ++ to an iterator referring to the final element in the container. A hash_map iterator can use as its end iterator the end iterator of the list of the final bucket in the hash_map.
A container needs to provide both a const iterator and a non-const iterator. The non-const iterator must be convertible to a const iterator. This implementation defines a const_hash_map_iterator class with hash_map_iterator deriving from it.
Given the decisions made in the previous section, it’s time to define the const_hash_map_iterator class. The first thing to note is that each const_hash_map_iterator object is an iterator for a specific instantiation of the hash_map class. In order to provide this one-to-one mapping, the const_hash_map_iterator must also be a class template with the hash map type as a template parameter called HashMap.
The main question in the class definition is how to conform to the bidirectional iterator requirements. Recall that anything that behaves like an iterator is an iterator. Your class is not required to derive from another class in order to qualify as a bidirectional iterator. However, if you want your iterator to be usable in the generic algorithms functions, you must specify its traits. The discussion earlier in this chapter explains that iterator_traits is a class template that defines, for each iterator type, five type aliases: value_type, difference_type, iterator_category, pointer, and reference. The iterator_traits class template coud be partially specialized for your new iterator type if you want. Alternatively, the default implementation of the iterator_traits class template just grabs the five type aliases out of the iterator class itself. Thus, you can simply define those type aliases directly in your iterator class. The const_hash_map_iterator is a bidirectional iterator, so you specify bidirectional_iterator_tag as the iterator category. Other legal iterator categories are input_iterator_tag, output_iterator_tag, forward_iterator_tag, and random_access_iterator_tag. For the const_hash_map_iterator, the element type is typename HashMap::value_type.
Here is the basic const_hash_map_iterator class definition:
template <typename HashMap>class const_hash_map_iterator{public:using value_type = typename HashMap::value_type;using difference_type = ptrdiff_t;using iterator_category = std::bidirectional_iterator_tag;using pointer = value_type*;using reference = value_type&;using list_iterator_type = typename HashMap::ListType::const_iterator;// Bidirectional iterators must supply a default constructor.// Using an iterator constructed with the default constructor// is undefined, so it doesn't matter how it's initialized.const_hash_map_iterator() = default;const_hash_map_iterator(size_t bucket, list_iterator_type listIt,const HashMap* hashmap);// Don't need to define a copy constructor or operator= because the// default behavior is what we want.// Don't need destructor because the default behavior// (not deleting mHashmap) is what we want!const value_type& operator*() const;// Return type must be something to which -> can be applied.// Return a pointer to a pair<const Key, T>, to which the compiler// will apply -> again.const value_type* operator->() const;const_hash_map_iterator<HashMap>& operator++();const_hash_map_iterator<HashMap> operator++(int);const_hash_map_iterator<HashMap>& operator--();const_hash_map_iterator<HashMap> operator--(int);// The following are ok as member functions because we don't// support comparisons of different types to this one.bool operator==(const const_hash_map_iterator<HashMap>& rhs) const;bool operator!=(const const_hash_map_iterator<HashMap>& rhs) const;protected:size_t mBucketIndex = 0;list_iterator_type mListIterator;const HashMap* mHashmap = nullptr;// Helper methods for operator++ and operator--void increment();void decrement();};
Consult Chapter 15 for details on operator overloading if the definitions and implementations (shown in the next section) of the overloaded operators confuse you.
The const_hash_map_iterator constructor initializes the three member variables:
template<typename HashMap>const_hash_map_iterator<HashMap>::const_hash_map_iterator(size_t bucket,list_iterator_type listIt, const HashMap* hashmap): mBucketIndex(bucket), mListIterator(listIt), mHashmap(hashmap){}
The default constructor is defaulted so that clients can declare const_hash_map_iterator variables without initializing them. An iterator constructed with the default constructor does not need to refer to any value, and attempting any operations on it is allowed to have undefined results.
The implementations of the dereferencing operators are concise, but can be tricky. Chapter 15 explains that operator* and operator-> are asymmetric; operator* returns a reference to the actual underlying value, which in this case is the element to which the iterator refers, while operator-> must return something to which the arrow operator can be applied again. Thus, it returns a pointer to the element. The compiler then applies -> to the pointer, which results in accessing a field of the element.
// Return a reference to the actual element.template<typename HashMap>const typename const_hash_map_iterator<HashMap>::value_type&const_hash_map_iterator<HashMap>::operator*() const{return *mListIterator;}// Return a pointer to the actual element, so the compiler can// apply -> to it to access the actual desired field.template<typename HashMap>const typename const_hash_map_iterator<HashMap>::value_type*const_hash_map_iterator<HashMap>::operator->() const{return &(*mListIterator);}
The increment and decrement operators are implemented as follows. They defer the actual incrementing and decrementing to the private increment() and decrement() helper methods.
// Defer the details to the increment() helper.template<typename HashMap>const_hash_map_iterator<HashMap>&const_hash_map_iterator<HashMap>::operator++(){increment();return *this;}// Defer the details to the increment() helper.template<typename HashMap>const_hash_map_iterator<HashMap>const_hash_map_iterator<HashMap>::operator++(int){auto oldIt = *this;increment();return oldIt;}// Defer the details to the decrement() helper.template<typename HashMap>const_hash_map_iterator<HashMap>&const_hash_map_iterator<HashMap>::operator--(){decrement();return *this;}// Defer the details to the decrement() helper.template<typename HashMap>const_hash_map_iterator<HashMap>const_hash_map_iterator<HashMap>::operator--(int){auto oldIt = *this;decrement();return oldIt;}
Incrementing a const_hash_map_iterator tells it to refer to the “next” element in the container. This method first increments the list iterator, then checks if it has reached the end of its bucket. If so, it finds the next non-empty bucket in the hash_map and sets the list iterator equal to the start element in that bucket. Note that it can’t simply move to the next bucket, because there might not be any elements in it. If there are no more non-empty buckets, mListIterator is set, by the convention chosen for this example, to the end iterator of the last bucket in the hash_map, which is the special “end” position of the const_hash_map_iterator. Iterators are not required to be any safer than dumb pointers, so error-checking for things like incrementing an iterator already at the end is not required.
// Behavior is undefined if mListIterator already refers to the past-the-end// element, or is otherwise invalid.template<typename HashMap>void const_hash_map_iterator<HashMap>::increment(){// mListIterator is an iterator into a single bucket. Increment it.++mListIterator;// If we're at the end of the current bucket,// find the next bucket with elements.auto& buckets = mHashmap->mBuckets;if (mListIterator == end(buckets[mBucketIndex])) {for (size_t i = mBucketIndex + 1; i < buckets.size(); i++) {if (!buckets[i].empty()) {// We found a non-empty bucket.// Make mListIterator refer to the first element in it.mListIterator = begin(buckets[i]);mBucketIndex = i;return;}}// No more non-empty buckets. Set mListIterator to refer to the// end iterator of the last list.mBucketIndex = buckets.size() - 1;mListIterator = end(buckets[mBucketIndex]);}}
Decrement is the inverse of increment: it makes the iterator refer to the “previous” element in the container. However, there is an asymmetry because of the asymmetry between the way the start and end positions are represented: start is the first element, but end is “one past” the last element. The algorithm for decrement first checks if the underlying list iterator is at the start of its current bucket. If not, it can just be decremented. Otherwise, the code needs to check for the first non-empty bucket before the current one. If one is found, the list iterator must be set to refer to the last element in that bucket, which is the end iterator decremented by one. If no non-empty buckets are found, the decrement is invalid, so the code can do anything it wants (behavior is undefined). Note that the for loop needs to use a signed integer type for its loop variable and not an unsigned type such as size_t because the loop uses --i:
// Behavior is undefined if mListIterator already refers to the first// element, or is otherwise invalid.template<typename HashMap>void const_hash_map_iterator<HashMap>::decrement(){// mListIterator is an iterator into a single bucket.// If it's at the beginning of the current bucket, don't decrement it.// Instead, try to find a non-empty bucket before the current one.auto& buckets = mHashmap->mBuckets;if (mListIterator == begin(buckets[mBucketIndex])) {for (int i = mBucketIndex - 1; i >= 0; --i) {if (!buckets[i].empty()) {mListIterator = --end(buckets[i]);mBucketIndex = i;return;}}// No more non-empty buckets. This is an invalid decrement.// Set mListIterator to refer to the end iterator of the last list.mBucketIndex = buckets.size() - 1;mListIterator = end(buckets[mBucketIndex]);} else {// We're not at the beginning of the bucket, so just move down.--mListIterator;}}
Note that both increment() and decrement() access private members of the hash_map class. Thus, the hash_map class must declare const_hash_map_iterator to be a friend class.
After increment() and decrement(), operator== and operator!= are positively simple. They just compare each of the three data members of the objects:
template<typename HashMap>bool const_hash_map_iterator<HashMap>::operator==(const const_hash_map_iterator<HashMap>& rhs) const{// All fields, including the hash_map to which the iterators refer,// must be equal.return (mHashmap == rhs.mHashmap &&mBucketIndex == rhs.mBucketIndex &&mListIterator == rhs.mListIterator);}template<typename HashMap>bool const_hash_map_iterator<HashMap>::operator!=(const const_hash_map_iterator<HashMap>& rhs) const{return !(*this == rhs);}
The hash_map_iterator class derives from const_hash_map_iterator. It does not need to override operator==, operator!=, increment(), and decrement() because the base class versions are just fine:
template <typename HashMap>class hash_map_iterator : public const_hash_map_iterator<HashMap>{public:using value_type =typename const_hash_map_iterator<HashMap>::value_type;using difference_type = ptrdiff_t;using iterator_category = std::bidirectional_iterator_tag;using pointer = value_type*;using reference = value_type&;using list_iterator_type = typename HashMap::ListType::iterator;hash_map_iterator() = default;hash_map_iterator(size_t bucket, list_iterator_type listIt,HashMap* hashmap);value_type& operator*();value_type* operator->();hash_map_iterator<HashMap>& operator++();hash_map_iterator<HashMap> operator++(int);hash_map_iterator<HashMap>& operator--();hash_map_iterator<HashMap> operator--(int);};
The implementations of the hash_map_iterator methods are rather straightforward. The constructor just calls the base class constructor. The operator* and operator-> use const_cast to return a non-const type. operator++ and operator-- just use the increment() and decrement() from the base class, but return a hash_map_iterator instead of a const_hash_map_iterator. Note that the C++ name lookup rules require you to explicitly use the this pointer to refer to data members and methods in a base class template:
template<typename HashMap>hash_map_iterator<HashMap>::hash_map_iterator(size_t bucket,list_iterator_type listIt, HashMap* hashmap): const_hash_map_iterator<HashMap>(bucket, listIt, hashmap){}// Return a reference to the actual element.template<typename HashMap>typename hash_map_iterator<HashMap>::value_type&hash_map_iterator<HashMap>::operator*(){return const_cast<value_type&>(*this->mListIterator);}// Return a pointer to the actual element, so the compiler can// apply -> to it to access the actual desired field.template<typename HashMap>typename hash_map_iterator<HashMap>::value_type*hash_map_iterator<HashMap>::operator->(){return const_cast<value_type*>(&(*this->mListIterator));}// Defer the details to the increment() helper in the base class.template<typename HashMap>hash_map_iterator<HashMap>& hash_map_iterator<HashMap>::operator++(){this->increment();return *this;}// Defer the details to the increment() helper in the base class.template<typename HashMap>hash_map_iterator<HashMap> hash_map_iterator<HashMap>::operator++(int){auto oldIt = *this;this->increment();return oldIt;}// Defer the details to the decrement() helper in the base class.template<typename HashMap>hash_map_iterator<HashMap>& hash_map_iterator<HashMap>::operator--(){this->decrement();return *this;}// Defer the details to the decrement() helper in the base class.template<typename HashMap>hash_map_iterator<HashMap> hash_map_iterator<HashMap>::operator--(int){auto oldIt = *this;this->decrement();return oldIt;}
The final piece involved in providing iterator support for hash_map is to supply the necessary type aliases in the hash_map class template, and to write the begin(), end(), cbegin(), and cend() methods. The type aliases and method prototypes look like this:
template <typename Key, typename T, typename KeyEqual = std::equal_to<>,typename Hash = hash<Key>>class hash_map{public:// Other type aliases omitted for brevityusing iterator = hash_map_iterator<hash_map_type>;using const_iterator = const_hash_map_iterator<hash_map_type>;// Iterator methodsiterator begin();iterator end();const_iterator begin() const;const_iterator end() const;const_iterator cbegin() const;const_iterator cend() const;// Remainder of class definition omitted for brevity};
The implementation of begin() includes an optimization for the case when there are no elements in the hash_map, in which case the end iterator is returned. Here is the code:
template <typename Key, typename T, typename KeyEqual, typename Hash>typename hash_map<Key, T, KeyEqual, Hash>::iteratorhash_map<Key, T, KeyEqual, Hash>::begin(){if (mSize == 0) {// Special case: there are no elements, so return the end iterator.return end();}// We know there is at least one element. Find the first element.for (size_t i = 0; i < mBuckets.size(); ++i) {if (!mBuckets[i].empty()) {return hash_map_iterator<hash_map_type>(i,std::begin(mBuckets[i]), this);}}// Should never reach here, but if we do, return the end iterator.return end();}
end() creates a hash_map_iterator referring to the end iterator of the last bucket:
template <typename Key, typename T, typename KeyEqual, typename Hash>typename hash_map<Key, T, KeyEqual, Hash>::iteratorhash_map<Key, T, KeyEqual, Hash>::end(){// The end iterator is the end iterator of the list of the last bucket.size_t bucket = mBuckets.size() - 1;return hash_map_iterator<hash_map_type>(bucket,std::end(mBuckets[bucket]), this);}
The implementations of the const versions of begin() and end() use const_cast to call the non-const versions. These non-const versions return a hash_map_iterator, which is convertible to a const_hash_map_iterator:
template <typename Key, typename T, typename KeyEqual, typename Hash>typename hash_map<Key, T, KeyEqual, Hash>::const_iteratorhash_map<Key, T, KeyEqual, Hash>::begin() const{return const_cast<hash_map_type*>(this)->begin();}template <typename Key, typename T, typename KeyEqual, typename Hash>typename hash_map<Key, T, KeyEqual, Hash>::const_iteratorhash_map<Key, T, KeyEqual, Hash>::end() const{return const_cast<hash_map_type*>(this)->end();}
The cbegin() and cend() methods forward the request to the const versions of begin() and end():
template <typename Key, typename T, typename KeyEqual, typename Hash>typename hash_map<Key, T, KeyEqual, Hash>::const_iteratorhash_map<Key, T, KeyEqual, Hash>::cbegin() const{return begin();}template <typename Key, typename T, typename KeyEqual, typename Hash>typename hash_map<Key, T, KeyEqual, Hash>::const_iteratorhash_map<Key, T, KeyEqual, Hash>::cend() const{return end();}
Now that hash_map supports iteration, you can iterate over its elements just as you would on any Standard Library container, and you can pass the iterators to methods and functions. Here are some examples:
hash_map<string, int> myHash;myHash.insert(make_pair("KeyOne", 100));myHash.insert(make_pair("KeyTwo", 200));myHash.insert(make_pair("KeyThree", 300));for (auto it = myHash.cbegin(); it != myHash.cend(); ++it) {// Use both -> and * to test the operations.cout << it->first << " maps to " << (*it).second << endl;}// Print elements using a range-based for loopfor (auto& p : myHash) {cout << p.first << " maps to " << p.second << endl;}// Print elements using a range-based for loop and C++17 structured bindingsfor (auto&[key, value] : myHash) {cout << key << " maps to " << value << endl;}// Create an std::map with all the elements in the hash_map.map<string, int> myMap(cbegin(myHash), cend(myHash));for (auto& p : myMap) {cout << p.first << " maps to " << p.second << endl;}
The last piece of code also shows that the non-member functions such as std::cbegin() and std::cend() are working as expected.
As described earlier in this chapter, all the Standard Library containers allow you to specify a custom memory allocator. A “good citizen” hash_map implementation should do the same. However, those details are omitted because they obscure the main points of this implementation, and because custom allocators are rarely used.
If your container supplies a bidirectional or random access iterator, it is considered reversible. Reversible containers are supposed to supply two additional type aliases.
| TYPE NAME | DESCRIPTION |
reverse_iterator |
The type for iterating over elements of the container in reverse order |
const_reverse_iterator |
A version of reverse_iterator for iterating over const elements of the container in reverse order |
Additionally, the container should provide rbegin() and rend(), which are symmetric with begin() and end(); it should also provide crbegin() and crend(), which are symmetric with cbegin() and cend(). The usual implementations just use the std::reverse_iterator adaptor described earlier in this chapter. These are left as an exercise for you to try.
In addition to the basic container requirements that were shown already, you can also make your container adhere to additional requirements for ordered associative, unordered associative, or sequential containers. This section modifies the hash_map class template to satisfy a few additional unordered associative container requirements.
Unordered associative containers require the following type aliases.
| TYPE NAME | DESCRIPTION |
key_type |
The key type with which the container is instantiated |
mapped_type |
The element type with which the container is instantiated |
value_type |
pair<const Key, T> |
hasher |
The hash type with which the container is instantiated |
key_equal |
The equality predicate with which the container is instantiated |
local_iterator |
An iterator type to iterate through a single bucket. Cannot be used to iterate across buckets. |
const_local_iterator |
A const iterator type to iterate through a single bucket. Cannot be used to iterate across buckets. |
node_type |
A type to represent a node. See Chapter 17 for a discussion on nodes. Not further discussed in this section. |
Here is the hash_map definition with an updated set of type aliases. Note that the definition of ListType has been moved, because the definitions of the local iterators require ListType.
template <typename Key, typename T, typename KeyEqual = std::equal_to<>,typename Hash = hash<Key>>class hash_map{public:using key_type = Key;using mapped_type = T;using value_type = std::pair<const Key, T>;using hasher = Hash;using key_equal = KeyEqual;using reference = value_type&;using const_reference = const value_type&;using size_type = size_t;using difference_type = ptrdiff_t;using hash_map_type = hash_map<Key, T, KeyEqual, Hash>;using iterator = hash_map_iterator<hash_map_type>;using const_iterator = const_hash_map_iterator<hash_map_type>;private:using ListType = std::list<value_type>;public:using local_iterator = typename ListType::iterator;using const_local_iterator = typename ListType::const_iterator;// Remainder of hash_map class definition omitted for brevity};
The standard prescribes quite a few additional method requirements for unordered associative containers, as listed in the following table. In the last column, n is the number of elements in the container.
| METHOD | DESCRIPTION | COMPLEXITY |
| Constructor taking an iterator range |
Constructs the container and inserts the elements from the iterator range. The iterator range need not refer to another container of the same type. Note that all constructors of unordered associative containers must take an equality predicate. The constructors should provide a default constructed object as the default value. |
On average O(n), worst case O(n2) |
Constructor taking an initializer_list<value_type> as parameter |
Constructs the container and inserts the elements from the initializer list into the container. | On average O(n), worst case O(n2) |
Assignment operator with an initializer_list<value_type> as right-hand side |
Replaces all elements from the container with the elements from the initializer list. | On average O(n), worst case O(n2) |
hasher hash_function() const; |
Returns the hash function. | Constant |
key_equal key_eq() const; |
Returns the equality predicate for comparing keys. | Constant |
pair<iterator, bool> insert(value_type&);iterator insert( const_iterator hint, value_type&); |
Two different forms of insert.The hint can be ignored by the implementation.Containers that allow duplicate keys return just iterator for the first form, because insert() always succeeds in that case.
|
On average O(1), worst case O(n) |
void insert( InputIterator start, InputIterator end); |
Inserts a range of elements. The range need not be from a container of the same type. | On average O(m) with m the number of elements to insert. Worst case O(m*n+m) |
void insert( initializer_list< value_type>); |
Inserts the elements from the initializer list into the container. | On average O(m) with m the number of elements to insert. Worst case O(m*n+m) |
pair<iterator, bool> emplace(Args&&…);iterator emplace_hint( const_iterator hint, Args&&...); |
Implements the emplace operations to construct objects in-place. In-place construction is discussed in Chapter 17. | On average O(1), worst case O(n) |
size_type erase(key_type&);iterator erase( iterator position);iterator erase( iterator start, iterator end); |
Three different forms of erase. The first form returns the number of values erased (0 or 1 in containers that do not allow duplicate keys). The second and third forms erase the elements at position, or in the range start to end, and return an iterator to the element following the last erased element.
|
Worst case O(n) |
void clear(); |
Erases all elements. | O(n) |
Iterator find(key_type&);const_iterator find(key_type&) const; |
Finds the element with the specified key. | On average O(1), worst case O(n) |
size_type count(key_type&) const; |
Returns the number of elements with the specified key (0 or 1 in containers that do not allow duplicate keys). | On average O(1), worst case O(n) |
pair<iterator,iterator> equal_range( key_type&);pair<const_iterator, const_iterator> equal_range( key_type&) const; |
Returns iterators referring to the first element with the specified key and one past the last element with the specified key. | Worst case O(n) |
Note that hash_map does not allow duplicate keys, so equal_range() always returns a pair of identical iterators.
C++17 adds extract() and merge() methods to the list of requirements. These have to do with handling nodes as discussed in Chapter 17, but are omitted for this hash_map implementation.
Here is the complete hash_map class definition. The prototypes for insert(), erase(), and find() need to change slightly from the previous versions shown because those initial versions don’t have the right return types required for unordered associative containers.
template <typename Key, typename T, typename KeyEqual = std::equal_to<>,typename Hash = hash<Key>>class hash_map{public:using key_type = Key;using mapped_type = T;using value_type = std::pair<const Key, T>;using hasher = Hash;using key_equal = KeyEqual;using reference = value_type&;using const_reference = const value_type&;using size_type = size_t;using difference_type = ptrdiff_t;using hash_map_type = hash_map<Key, T, KeyEqual, Hash>;using iterator = hash_map_iterator<hash_map_type>;using const_iterator = const_hash_map_iterator<hash_map_type>;private:using ListType = std::list<value_type>;public:using local_iterator = typename ListType::iterator;using const_local_iterator = typename ListType::const_iterator;// The iterator classes need access to all members of the hash_mapfriend class hash_map_iterator<hash_map_type>;friend class const_hash_map_iterator<hash_map_type>;virtual ~hash_map() = default; // Virtual destructor// Throws invalid_argument if the number of buckets is illegal.explicit hash_map(const KeyEqual& equal = KeyEqual(),size_type numBuckets = 101, const Hash& hash = Hash());// Throws invalid_argument if the number of buckets is illegal.template <typename InputIterator>hash_map(InputIterator first, InputIterator last,const KeyEqual& equal = KeyEqual(),size_type numBuckets = 101, const Hash& hash = Hash());// Initializer list constructor// Throws invalid_argument if the number of buckets is illegal.explicit hash_map(std::initializer_list<value_type> il,const KeyEqual& equal = KeyEqual(), size_type numBuckets = 101,const Hash& hash = Hash());// Copy constructorhash_map(const hash_map_type& src) = default;// Move constructorhash_map(hash_map_type&& src) noexcept = default;// Copy assignment operatorhash_map_type& operator=(const hash_map_type& rhs);// Move assignment operatorhash_map_type& operator=(hash_map_type&& rhs) noexcept;// Initializer list assignment operatorhash_map_type& operator=(std::initializer_list<value_type> il);// Iterator methodsiterator begin();iterator end();const_iterator begin() const;const_iterator end() const;const_iterator cbegin() const;const_iterator cend() const;// Size methodsbool empty() const;size_type size() const;size_type max_size() const;// Element insert methodsT& operator[](const key_type& k);std::pair<iterator, bool> insert(const value_type& x);iterator insert(const_iterator hint, const value_type& x);template <typename InputIterator>void insert(InputIterator first, InputIterator last);void insert(std::initializer_list<value_type> il);// Element delete methodssize_type erase(const key_type& k);iterator erase(iterator position);iterator erase(iterator first, iterator last);// Other modifying utilitiesvoid swap(hash_map_type& other) noexcept;void clear() noexcept;// Access methods for Standard Library conformitykey_equal key_eq() const;hasher hash_function() const;// Lookup methodsiterator find(const key_type& k);const_iterator find(const key_type& k) const;std::pair<iterator, iterator> equal_range(const key_type& k);std::pair<const_iterator, const_iterator>equal_range(const key_type& k) const;size_type count(const key_type& k) const;private:// Returns a pair containing an iterator to the found element with// a given key, and the index of that element's bucket.std::pair<typename ListType::iterator, size_t> findElement(const key_type& k);std::vector<ListType> mBuckets;size_type mSize = 0;KeyEqual mEqual;Hash mHash;};
The constructor accepting an iterator range is a method template so that it can take an iterator range from any container, not just other hash_maps. If it were not a method template, it would need to specify the InputIterator type explicitly as hash_map_iterator, limiting it to iterators from hash_maps. Despite the syntax, the implementation is uncomplicated: it delegates the construction to the explicit constructor to initialize all the data members, then calls insert() to actually insert all the elements in the specified range.
// Make a call to insert() to actually insert the elements.template <typename Key, typename T, typename KeyEqual, typename Hash>template <typename InputIterator>hash_map<Key, T, KeyEqual, Hash>::hash_map(InputIterator first, InputIterator last, const KeyEqual& equal,size_type numBuckets, const Hash& hash): hash_map(equal, numBuckets, hash){insert(first, last);}
Initializer lists are discussed in Chapter 1. Following is the implementation of the hash_map constructor that takes an initializer list, which is very similar to the implementation of the constructor accepting an iterator range:
template <typename Key, typename T, typename KeyEqual, typename Hash>hash_map<Key, T, KeyEqual, Hash>::hash_map(std::initializer_list<value_type> il,const KeyEqual& equal, size_type numBuckets, const Hash& hash): hash_map(equal, numBuckets, hash){insert(std::begin(il), std::end(il));}
With this initializer list constructor, a hash_map can be constructed as follows:
hash_map<string, int> myHash {{ "KeyOne", 100 },{ "KeyTwo", 200 },{ "KeyThree", 300 } };
Assignment operators can also accept an initializer list on the right-hand side. Following is an implementation of an initializer list assignment operator for hash_map. It uses a copy-and-swap-like algorithm to guarantee strong exception safety.
template <typename Key, typename T, typename KeyEqual, typename Hash>hash_map<Key, T, KeyEqual, Hash>& hash_map<Key, T, KeyEqual, Hash>::operator=(std::initializer_list<value_type> il){// Do all the work in a temporary instancehash_map_type newHashMap(il, mEqual, mBuckets.size(), mHash);swap(newHashMap); // Commit the work with only non-throwing operationsreturn *this;}
With this assignment operator, you can write code as follows:
myHash = {{ "KeyOne", 100 },{ "KeyTwo", 200 },{ "KeyThree", 300 } };
In the earlier section, “Using the Basic Hash Map,” a simple insert() method is given. In this version, four insert() methods are provided with additional features:
insert() operation returns a pair<iterator, bool>, which indicates both where the item is inserted and whether or not it was newly created.insert() that takes a hint is useless for a hash_map, but it is provided for symmetry with other kinds of collections. The hint is ignored, and it merely calls the first version.insert() is a method template, so ranges of elements from arbitrary containers can be inserted into the hash_map.insert() accepts an initializer_list<value_type>.Note that technically, the following versions of insert() can also be provided. These accept rvalue references.
std::pair<iterator, bool> insert(value_type&& x);iterator insert(const_iterator hint, value_type&& x);
The hash_map does not provide these. Additionally, there are two versions of insert() related to handling nodes. Nodes are discussed in Chapter 17. The hash_map omits these as well.
The first two insert() methods are implemented as follows:
template <typename Key, typename T, typename KeyEqual, typename Hash>std::pair<typename hash_map<Key, T, KeyEqual, Hash>::iterator, bool>hash_map<Key, T, KeyEqual, Hash>::insert(const value_type& x){// Try to find the element.auto[it, bucket] = findElement(x.first);bool inserted = false;if (it == std::end(mBuckets[bucket])) {// We didn't find the element, so insert a new one.it = mBuckets[bucket].insert(it, x);inserted = true;mSize++;}return std::make_pair(hash_map_iterator<hash_map_type>(bucket, it, this), inserted);}template <typename Key, typename T, typename KeyEqual, typename Hash>typename hash_map<Key, T, KeyEqual, Hash>::iteratorhash_map<Key, T, KeyEqual, Hash>::insert(const_iterator /*hint*/, const value_type& x){// Completely ignore position.return insert(x).first;}
The third form of insert() is a method template for the same reason as the constructor shown earlier: it should be able to insert elements by using iterators from containers of any type. The actual implementation uses an insert_iterator, described earlier in this chapter.
template <typename Key, typename T, typename KeyEqual, typename Hash>template <typename InputIterator>void hash_map<Key, T, KeyEqual, Hash>::insert(InputIterator first, InputIterator last){// Copy each element in the range by using an insert_iterator adaptor.// Give begin() as a dummy position -- insert ignores it anyway.std::insert_iterator<hash_map_type> inserter(*this, begin());std::copy(first, last, inserter);}
The last insert operation accepts an initializer list. The implementation for hash_map simply forwards the work to the insert() method accepting an iterator range:
template <typename Key, typename T, typename KeyEqual, typename Hash>void hash_map<Key, T, KeyEqual, Hash>::insert(std::initializer_list<value_type> il){insert(std::begin(il), std::end(il));}
With this insert() method, you can write code as follows:
myHash.insert({{ "KeyFour", 400 },{ "KeyFive", 500 } });
Emplace operations construct objects in-place. They are discussed in Chapter 17. The emplace methods for hash_map look as follows :
template <typename... Args>std::pair<iterator, bool> emplace(Args&&... args);template <typename... Args>iterator emplace_hint(const_iterator hint, Args&&... args);
The ... in these lines are not typos. These are so-called variadic templates, that is, templates with a variable number of template type parameters and a variable number of function parameters. Variadic templates are discussed in Chapter 22. This hash_map implementation omits emplace operations.
The version of erase() in the earlier section, “A Basic Hash Map,” is not compliant with Standard Library requirements. You need to implement the following versions:
key_type and returns a size_type for the number of elements removed from the collection (for hash_map there are only two possible return values, 0 and 1).The first version is implemented as follows:
template <typename Key, typename T, typename KeyEqual, typename Hash>typename hash_map<Key, T, KeyEqual, Hash>::size_typehash_map<Key, T, KeyEqual, Hash>::erase(const key_type& k){// First, try to find the element.auto[it, bucket] = findElement(k);if (it != std::end(mBuckets[bucket])) {// The element exists -- erase it.mBuckets[bucket].erase(it);mSize--;return 1;} else {return 0;}}
The second version of erase() must remove the element at a specific iterator position. The iterator given is, of course, a hash_map_iterator. Thus, hash_map must have some ability to obtain the underlying bucket and list iterator from the hash_map_iterator. The approach taken here is to make the hash_map class a friend of the hash_map_iterator (not shown in the earlier class definition). Here is the implementation of this version of erase():
template <typename Key, typename T, typename KeyEqual, typename Hash>typename hash_map<Key, T, KeyEqual, Hash>::iteratorhash_map<Key, T, KeyEqual, Hash>::erase(iterator position){iterator next = position;++next;// Erase the element from its bucket.mBuckets[position.mBucketIndex].erase(position.mListIterator);mSize--;return next;}
The final version of erase() removes a range of elements. It iterates from first to last, calling erase() on each element, thus letting the previous version of erase() do all the work:
template <typename Key, typename T, typename KeyEqual, typename Hash>typename hash_map<Key, T, KeyEqual, Hash>::iteratorhash_map<Key, T, KeyEqual, Hash>::erase(iterator first, iterator last){// Erase all the elements in the range.for (iterator next = first; next != last;) {next = erase(next);}return last;}
The standard requires methods called key_eq() and hash_function() to retrieve the equality predicate and the hash function respectively:
template <typename Key, typename T, typename KeyEqual, typename Hash>typename hash_map<Key, T, KeyEqual, Hash>::key_equalhash_map<Key, T, KeyEqual, Hash>::key_eq() const{return mEqual;}template <typename Key, typename T, typename KeyEqual, typename Hash>typename hash_map<Key, T, KeyEqual, Hash>::hasherhash_map<Key, T, KeyEqual, Hash>::hash_function() const{return mHash;}
The find() method is identical to the version shown earlier for the basic hash_map, except for the return code. Instead of returning a pointer to the element, it constructs a hash_map_iterator referring to it:
template <typename Key, typename T, typename KeyEqual, typename Hash>typename hash_map<Key, T, KeyEqual, Hash>::iteratorhash_map<Key, T, KeyEqual, Hash>::find(const key_type& k){// Use the findElement() helper, and C++17 structured bindings.auto[it, bucket] = findElement(k);if (it == std::end(mBuckets[bucket])) {// Element not found -- return the end iterator.return end();}// Element found -- convert the bucket/iterator to a hash_map_iterator.return hash_map_iterator<hash_map_type>(bucket, it, this);}
The const version of find() returns a const_hash_map_iterator. It uses const_cast to call the non-const version of find() to avoid code duplication. Note that the non-const
find() returns a hash_map_iterator, which is convertible to a const_hash_map_iterator.
template <typename Key, typename T, typename KeyEqual, typename Hash>typename hash_map<Key, T, KeyEqual, Hash>::const_iteratorhash_map<Key, T, KeyEqual, Hash>::find(const key_type& k) const{return const_cast<hash_map_type*>(this)->find(k);}
The implementations of both versions of equal_range() are identical, except that one returns a pair of hash_map_iterators while the other returns a pair of const_hash_map_iterators. They both simply forward the request to find(). A hash_map cannot have elements with duplicate keys, so the result of equal_range() for hash_map is always a pair of identical iterators.
template <typename Key, typename T, typename KeyEqual, typename Hash>std::pair<typename hash_map<Key, T, KeyEqual, Hash>::iterator,typename hash_map<Key, T, KeyEqual, Hash>::iterator>hash_map<Key, T, KeyEqual, Hash>::equal_range(const key_type& k){auto it = find(k);return std::make_pair(it, it);}
Because hash_map does not allow duplicate keys, count() can only return 1 or 0: 1 if it finds the element, and 0 if it doesn’t. The implementation just wraps a call to find(). The find() method returns the end iterator if it can’t find the element. count() retrieves an end iterator by calling end() in order to compare it.
template <typename Key, typename T, typename KeyEqual, typename Hash>typename hash_map<Key, T, KeyEqual, Hash>::size_typehash_map<Key, T, KeyEqual, Hash>::count(const key_type& k) const{// There are either 1 or 0 elements matching key k.// If we can find a match, return 1, otherwise return 0.if (find(k) == end()) {return 0;} else {return 1;}}
The final method, operator[], is not required by the standard, but is provided for convenience of the programmer, and to be symmetric with std::map. The prototype is identical to the one for std::map. The comments explain the potentially confusing one-line implementation.
template <typename Key, typename T, typename KeyEqual, typename Hash>T& hash_map<Key, T, KeyEqual, Hash>::operator[] (const key_type& k){// It's a bit cryptic, but it basically attempts to insert// a new key/value pair of k and a zero-initialized value. Regardless// of whether the insert succeeds or fails, insert() returns a pair of// an iterator/bool. The iterator refers to a key/value pair, the// second element of which is the value we want to return.return ((insert(std::make_pair(k, T()))).first)->second;}
Unordered associative containers should also provide a number of bucket-related methods:
bucket_count() returns the number of buckets in the container.max_bucket_count() returns the maximum number of buckets that are supported.bucket(key) returns the index of the bucket to which the given key maps.bucket_size(n) returns the number of elements in the bucket with given index.begin(n), end(n), cbegin(n), cend(n) return local begin and end iterators to the bucket with given index.Here are the implementations for the hash_map:
template <typename Key, typename T, typename KeyEqual, typename Hash>typename hash_map<Key, T, KeyEqual, Hash>::size_typehash_map<Key, T, KeyEqual, Hash>::bucket_count() const{return mBuckets.size();}template <typename Key, typename T, typename KeyEqual, typename Hash>typename hash_map<Key, T, KeyEqual, Hash>::size_typehash_map<Key, T, KeyEqual, Hash>::max_bucket_count() const{return mBuckets.max_size();}template <typename Key, typename T, typename KeyEqual, typename Hash>typename hash_map<Key, T, KeyEqual, Hash>::size_typehash_map<Key, T, KeyEqual, Hash>::bucket(const Key& k) const{return const_cast<hash_map_type*>(this)->findElement(k).second;}template <typename Key, typename T, typename KeyEqual, typename Hash>typename hash_map<Key, T, KeyEqual, Hash>::size_typehash_map<Key, T, KeyEqual, Hash>::bucket_size(size_type n) const{return mBuckets[n].size();}template <typename Key, typename T, typename KeyEqual, typename Hash>typename hash_map<Key, T, KeyEqual, Hash>::local_iteratorhash_map<Key, T, KeyEqual, Hash>::begin(size_type n){return mBuckets[n].begin();}
The implementations for the other begin(n), end(n), cbegin(n), and cend(n) methods are similar; they simply forward the call to the correct bucket list based on the given index.
Finally, an unordered associative container should also provide load_factor(), max_load_ factor(), rehash(), and reserve() methods. These are omitted for hash_map.
The hash_map developed in the preceding sections is an unordered associative container. However, you could also write a sequential container, or an ordered associative container, in which case you would need to follow a different set of requirements. Instead of listing them here, it’s easier to point out that the deque container follows the prescribed sequential container requirements almost exactly. The only difference is that it provides an extra resize() method (not required by the standard). An example of an ordered associative container is the map, on which you can model your own ordered associative containers.
The final example in this chapter showed almost the complete development of a hash_map unordered associative container and its iterators. This hash_map implementation is given here only to teach you how to write your own Standard Library-compliant containers and iterators. C++ does include its own set of unordered associative containers. You should use those instead of your own implementation.
In the process of reading this chapter, you hopefully gained an appreciation for the steps involved in developing containers. Even if you never write another Standard Library algorithm or container, you understand better the Standard Library’s mentality and capabilities, and you can put it to better use.
This chapter concludes the tour of the Standard Library. Even with all the details given in this book, some features are still omitted. If this material excited you, and you would like more information, consult some of the resources in Appendix B. Don’t feel compelled to use all the features discussed here. Forcing them into your programs without a true need will just complicate your code. However, I encourage you to consider incorporating aspects of the Standard Library into your programs where they make sense. Start with the containers, maybe throw in an algorithm or two, and before you know it, you’ll be a convert!
There are actually three kinds of template parameters: type, non-type, and template template (no, you’re not seeing double: that really is the name). So far, you’ve seen examples of type and non-type parameters (in Chapter 12), but not template template parameters. There are also some tricky aspects to both type and non-type parameters that are not covered in Chapter 12. This section goes deeper into all three types of template parameters.
Template type parameters are the main purpose of templates. You can declare as many type parameters as you want. For example, you could add to the grid template from Chapter 12 a second type parameter specifying another templatized class container on which to build the grid. The Standard Library defines several templatized container classes, including vector and deque. The original grid class uses a vector of vectors to store the elements of a grid. A user of the Grid class might want to use a vector of deques instead. With another template type parameter, you can allow the user to specify whether they want the underlying container to be a vector or a deque. Here is the class definition with the additional template parameter:
template <typename T, typename Container>class Grid{public:explicit Grid(size_t width = kDefaultWidth,size_t height = kDefaultHeight);virtual ~Grid() = default;// Explicitly default a copy constructor and assignment operator.Grid(const Grid& src) = default;Grid<T, Container>& operator=(const Grid& rhs) = default;// Explicitly default a move constructor and assignment operator.Grid(Grid&& src) = default;Grid<T, Container>& operator=(Grid&& rhs) = default;typename Container::value_type& at(size_t x, size_t y);const typename Container::value_type& at(size_t x, size_t y) const;size_t getHeight() const { return mHeight; }size_t getWidth() const { return mWidth; }static const size_t kDefaultWidth = 10;static const size_t kDefaultHeight = 10;private:void verifyCoordinate(size_t x, size_t y) const;std::vector<Container> mCells;size_t mWidth = 0, mHeight = 0;};
This template now has two parameters: T and Container. Thus, wherever you previously referred to Grid<T>, you must now refer to Grid<T, Container> to specify both template parameters. Another change is that mCells is now a vector of Containers instead of a vector of vectors.
Here is the constructor definition:
template <typename T, typename Container>Grid<T, Container>::Grid(size_t width, size_t height): mWidth(width), mHeight(height){mCells.resize(mWidth);for (auto& column : mCells) {column.resize(mHeight);}}
This constructor assumes that the Container type has a resize() method. If you try to instantiate this template by specifying a type that has no resize() method, the compiler will generate an error.
The return type of the at() methods is the type of the elements that is stored inside the given container type. You can access this type with typename Container::value_type.
Here are the implementations of the remaining methods:
template <typename T, typename Container>void Grid<T, Container>::verifyCoordinate(size_t x, size_t y) const{if (x >= mWidth || y >= mHeight) {throw std::out_of_range("");}}template <typename T, typename Container>const typename Container::value_type&Grid<T, Container>::at(size_t x, size_t y) const{verifyCoordinate(x, y);return mCells[x][y];}template <typename T, typename Container>typename Container::value_type&Grid<T, Container>::at(size_t x, size_t y){return const_cast<typename Container::value_type&>(std::as_const(*this).at(x, y));}
Now you can instantiate and use Grid objects like this:
Grid<int, vector<optional<int>>> myIntVectorGrid;Grid<int, deque<optional<int>>> myIntDequeGrid;myIntVectorGrid.at(3, 4) = 5;cout << myIntVectorGrid.at(3, 4).value_or(0) << endl;myIntDequeGrid.at(1, 2) = 3;cout << myIntDequeGrid.at(1, 2).value_or(0) << endl;Grid<int, vector<optional<int>>> grid2(myIntVectorGrid);grid2 = myIntVectorGrid;
The use of the word Container for the parameter name doesn’t mean that the type really must be a container. You could try to instantiate the Grid class with an int instead:
Grid<int, int> test; // WILL NOT COMPILEThis line does not compile, but it also might not give you the error you expect. It does not complain that the second type argument is an int instead of a container. It tells you something more cryptic. For example, Microsoft Visual C++ tells you that “‘Container’: must be a class or namespace when followed by ‘::’.” That’s because the compiler attempts to generate a Grid class with int as the Container. Everything works fine until it tries to process this line in the class template definition:
typename Container::value_type& at(size_t x, size_t y);At that point, the compiler realizes that Container is an int, which does not have an embedded value_type type alias.
Just as with function parameters, you can give template parameters default values. For example, you might want to say that the default container for your Grid is a vector. The class template definition would look like this:
template <typename T, typename Container = std::vector<std::optional<T>>>class Grid{// Everything else is the same as before.};
You can use the type T from the first template parameter as the argument to the optional template in the default value for the second template parameter. The C++ syntax requires that you do not repeat the default value in the template header line for method definitions. With this default argument, clients can now instantiate a grid with the option of specifying an underlying container:
Grid<int, deque<optional<int>>> myDequeGrid;Grid<int, vector<optional<int>>> myVectorGrid;Grid<int> myVectorGrid2(myVectorGrid);
This approach is used by the Standard Library. The stack, queue, and priority_queue class templates all take a template type parameter, with a default value, specifying the underlying container.
There is one problem with the Container parameter in the previous section. When you instantiate the class template, you write something like this:
Grid<int, vector<optional<int>>> myIntGrid;Note the repetition of the int type. You must specify that it’s the element type both of the Grid and of the optional inside the vector. What if you wrote this instead:
Grid<int, vector<optional<SpreadsheetCell>>> myIntGrid;That wouldn’t work very well. It would be nice to be able to write the following, so that you couldn’t make that mistake:
Grid<int, vector> myIntGrid;The Grid class should be able to figure out that it wants a vector of optionals of ints. The compiler won’t allow you to pass that argument to a normal type parameter, though, because vector by itself is not a type but a template.
If you want to take a template as a template parameter, you must use a special kind of parameter called a template template parameter. Specifying a template template parameter is sort of like specifying a function pointer parameter in a normal function. Function pointer types include the return type and parameter types of a function. Similarly, when you specify a template template parameter, the full specification of the template template parameter includes the parameters to that template.
For example, containers such as vector and deque have a template parameter list that looks something like the following. The E parameter is the element type. The Allocator parameter is covered in Chapter 17.
template <typename E, typename Allocator = std::allocator<E>>class vector{// Vector definition};
To pass such a container as a template template parameter, all you have to do is copy and paste the declaration of the class template (in this example, template <typename E, typename Allocator = std::allocator<E>> class vector), replace the class name (vector) with a parameter name (Container), and use that as the template template parameter of another template declaration—Grid in this example—instead of a simple type name. Given the preceding template specification, here is the class template definition for the Grid class that takes a container template as its second template parameter:
template <typename T,template <typename E, typename Allocator = std::allocator<E>> class Container= std::vector>class Grid{public:// Omitted code that is the same as beforestd::optional<T>& at(size_t x, size_t y);const std::optional<T>& at(size_t x, size_t y) const;// Omitted code that is the same as beforeprivate:void verifyCoordinate(size_t x, size_t y) const;std::vector<Container<std::optional<T>>> mCells;size_t mWidth = 0, mHeight = 0;};
What is going on here? The first template parameter is the same as before: the element type T. The second template parameter is now a template itself for a container such as vector or deque. As you saw earlier, this “template type” must take two parameters: an element type E and an allocator type. Note the repetition of the word class after the nested template parameter list. The name of this parameter in the Grid template is Container (as before). The default value is now vector, instead of vector<T>, because the Container parameter is now a template instead of an actual type.
The syntax rule for a template template parameter, more generically, is this:
template <..., template <TemplateTypeParams> class ParameterName, ...>
Instead of using Container by itself in the code, you must specify Container<std::optional<T>> as the container type. For example, the declaration of mCells is now as follows:
std::vector<Container<std::optional<T>>> mCells;The method definitions don’t need to change, except that you must change the template lines, for example:
template <typename T,template <typename E, typename Allocator = std::allocator<E>> class Container>void Grid<T, Container>::verifyCoordinate(size_t x, size_t y) const{if (x >= mWidth || y >= mHeight) {throw std::out_of_range("");}}
This Grid template can be used as follows:
Grid<int, vector> myGrid;myGrid.at(1, 2) = 3;cout << myGrid.at(1, 2).value_or(0) << endl;Grid<int, vector> myGrid2(myGrid);
This C++ syntax is a bit convoluted because it is trying to allow for maximum flexibility. Try not to get bogged down in the syntax here, and keep the main concept in mind: you can pass templates as parameters to other templates.
You might want to allow the user to specify a default element used to initialize each cell in the grid. Here is a perfectly reasonable approach to implement this goal. It uses T() as the default value for the second template parameter.
template <typename T, const T DEFAULT = T()>class Grid{// Identical as before.};
This definition is legal. You can use the type T from the first parameter as the type for the second parameter, and non-type parameters can be const just like function parameters. You can use this initial value for T to initialize each cell in the grid:
template <typename T, const T DEFAULT>Grid<T, DEFAULT>::Grid(size_t width, size_t height): mWidth(width), mHeight(height){mCells.resize(mWidth);for (auto& column : mCells) {column.resize(mHeight);for (auto& element : column) {element = DEFAULT;}}}
The other method definitions stay the same, except that you must add the second template parameter to the template lines, and all the instances of Grid<T> become Grid<T, DEFAULT>. After making those changes, you can instantiate grids with an initial value for all the elements:
Grid<int> myIntGrid; // Initial value is 0Grid<int, 10> myIntGrid2; // Initial value is 10
The initial value can be any integer you want. However, suppose that you try to create a SpreadsheetCell Grid:
SpreadsheetCell defaultCell;Grid<SpreadsheetCell, defaultCell> mySpreadsheet; // WILL NOT COMPILE
That line leads to a compiler error because you cannot pass objects as arguments to non-type parameters.
This example illustrates one of the vagaries of class templates: they can work correctly on one type but fail to compile for another type.
A more comprehensive way of allowing the user to specify an initial element value for a grid uses a reference to a T as the non-type template parameter. Here is the new class definition:
template <typename T, const T& DEFAULT>class Grid{// Everything else is the same as the previous example.};
Now you can instantiate this class template for any type. The C++17 standard says that the reference you pass as the second template argument must be a converted constant expression of the type of the template parameter. It is not allowed to refer to a subobject, a temporary object, a string literal, the result of a typeid expression, or the predefined __func__ variable. The following example declares int and SpreadsheetCell grids using initial values:
int main(){int defaultInt = 11;Grid<int, defaultInt> myIntGrid;SpreadsheetCell defaultCell(1.2);Grid<SpreadsheetCell, defaultCell> mySpreadsheet;return 0;}
However, those are the rules of C++17, and unfortunately, most compilers do not implement those rules yet. Before C++17, an argument passed to a reference non-type template parameter could not be a temporary, and could not be a named lvalue without linkage (external or internal). So, here is the same example but using the pre-C++17 rules. The initial values are defined with internal linkage:
namespace {int defaultInt = 11;SpreadsheetCell defaultCell(1.2);}int main(){Grid<int, defaultInt> myIntGrid;Grid<SpreadsheetCell, defaultCell> mySpreadsheet;return 0;}
The const char* class specialization of the Grid class template shown in Chapter 12 is called a full class template specialization because it specializes the Grid template for every template parameter. There are no template parameters left in the specialization. That’s not the only way you can specialize a class; you can also write a partial class specialization, in which you specialize some template parameters but not others. For example, recall the basic version of the Grid template with width and height non-type parameters:
template <typename T, size_t WIDTH, size_t HEIGHT>class Grid{public:Grid() = default;virtual ~Grid() = default;// Explicitly default a copy constructor and assignment operator.Grid(const Grid& src) = default;Grid& operator=(const Grid& rhs) = default;std::optional<T>& at(size_t x, size_t y);const std::optional<T>& at(size_t x, size_t y) const;size_t getHeight() const { return HEIGHT; }size_t getWidth() const { return WIDTH; }private:void verifyCoordinate(size_t x, size_t y) const;std::optional<T> mCells[WIDTH][HEIGHT];};
You could specialize this class template for const char* C-style strings like this:
#include "Grid.h"// The file containing the Grid template definitiontemplate <size_t WIDTH, size_t HEIGHT>class Grid<const char*, WIDTH, HEIGHT>{public:Grid() = default;virtual ~Grid() = default;// Explicitly default a copy constructor and assignment operator.Grid(const Grid& src) = default;Grid& operator=(const Grid& rhs) = default;std::optional<std::string>& at(size_t x, size_t y);const std::optional<std::string>& at(size_t x, size_t y) const;size_t getHeight() const { return HEIGHT; }size_t getWidth() const { return WIDTH; }private:void verifyCoordinate(size_t x, size_t y) const;std::optional<std::string> mCells[WIDTH][HEIGHT];};
In this case, you are not specializing all the template parameters. Therefore, your template line looks like this:
template <size_t WIDTH, size_t HEIGHT>class Grid<const char*, WIDTH, HEIGHT>
Note that the template has only two parameters: WIDTH and HEIGHT. However, you’re writing a Grid class for three arguments: T, WIDTH, and HEIGHT. Thus, your template parameter list contains two parameters, and the explicit Grid<const char*, WIDTH, HEIGHT> contains three arguments. When you instantiate the template, you must still specify three parameters. You can’t instantiate the template with only height and width.
Grid<int, 2, 2> myIntGrid; // Uses the original GridGrid<const char*, 2, 2> myStringGrid; // Uses the partial specializationGrid<2, 3> test; // DOES NOT COMPILE! No type specified.
Yes, the syntax is confusing. And it gets worse. In partial specializations, unlike in full specializations, you include the template line in front of every method definition, as in the following example:
template <size_t WIDTH, size_t HEIGHT>const std::optional<std::string>&Grid<const char*, WIDTH, HEIGHT>::at(size_t x, size_t y) const{verifyCoordinate(x, y);return mCells[x][y];}
You need this template line with two parameters to show that this method is parameterized on those two parameters. Note that wherever you refer to the full class name, you must use Grid<const char*, WIDTH, HEIGHT>.
The previous example does not show the true power of partial specialization. You can write specialized implementations for a subset of possible types without specializing individual types. For example, you can write a specialization of the Grid class template for all pointer types. The copy constructor and assignment operator of this specialization could perform deep copies of objects to which pointers point, instead of shallow copies.
Here is the class definition, assuming that you’re specializing the initial version of Grid with only one parameter. In this implementation, Grid becomes the owner of supplied data, so it automatically frees the memory when necessary.
#include "Grid.h"#include <memory>template <typename T>class Grid<T*>{public:explicit Grid(size_t width = kDefaultWidth,size_t height = kDefaultHeight);virtual ~Grid() = default;// Copy constructor and copy assignment operator.Grid(const Grid& src);Grid<T*>& operator=(const Grid& rhs);// Explicitly default a move constructor and assignment operator.Grid(Grid&& src) = default;Grid<T*>& operator=(Grid&& rhs) = default;void swap(Grid& other) noexcept;std::unique_ptr<T>& at(size_t x, size_t y);const std::unique_ptr<T>& at(size_t x, size_t y) const;size_t getHeight() const { return mHeight; }size_t getWidth() const { return mWidth; }static const size_t kDefaultWidth = 10;static const size_t kDefaultHeight = 10;private:void verifyCoordinate(size_t x, size_t y) const;std::vector<std::vector<std::unique_ptr<T>>> mCells;size_t mWidth = 0, mHeight = 0;};
As usual, these two lines are the crux of the matter:
template <typename T>class Grid<T*>
The syntax says that this class is a specialization of the Grid template for all pointer types. You are providing the implementation only in cases where T is a pointer type. Note that if you instantiate a grid like Grid<int*> myIntGrid, then T will actually be int, not int*. That’s a bit unintuitive, but unfortunately, that’s the way it works. Here is an example of using this partial specialization:
Grid<int> myIntGrid; // Uses the non-specialized gridGrid<int*> psGrid(2, 2); // Uses the partial specialization for pointer typespsGrid.at(0, 0) = make_unique<int>(1);psGrid.at(0, 1) = make_unique<int>(2);psGrid.at(1, 0) = make_unique<int>(3);Grid<int*> psGrid2(psGrid);Grid<int*> psGrid3;psGrid3 = psGrid2;auto& element = psGrid2.at(1, 0);if (element) {cout << *element << endl;*element = 6;}cout << *psGrid.at(1, 0) << endl; // psGrid is not modifiedcout << *psGrid2.at(1, 0) << endl; // psGrid2 is modified
Here is the output:
336
The implementations of the methods are rather straightforward, except for the copy constructor, which uses the copy constructor of individual elements to make a deep copy of them:
template <typename T>Grid<T*>::Grid(const Grid& src): Grid(src.mWidth, src.mHeight){// The ctor-initializer of this constructor delegates first to the// non-copy constructor to allocate the proper amount of memory.// The next step is to copy the data.for (size_t i = 0; i < mWidth; i++) {for (size_t j = 0; j < mHeight; j++) {// Make a deep copy of the element by using its copy constructor.if (src.mCells[i][j]) {mCells[i][j].reset(new T(*(src.mCells[i][j])));}}}}
The C++ standard does not permit partial template specialization of functions. Instead, you can overload the function with another template. The difference is subtle. Suppose that you want to write a specialization of the Find() function template, presented in Chapter 12, that dereferences the pointers to use operator== directly on the objects pointed to. Following the syntax for class template partial specialization, you might be tempted to write this:
template <typename T>size_t Find<T*>(T* const& value, T* const* arr, size_t size){for (size_t i = 0; i < size; i++) {if (*arr[i] == *value) {return i; // Found it; return the index}}return NOT_FOUND; // failed to find it; return NOT_FOUND}
However, that syntax declares a partial specialization of the function template, which the C++ standard does not allow. The correct way to implement the behavior you want is to write a new template for Find(). The difference might seem trivial and academic, but it won’t compile otherwise.
template <typename T>size_t Find(T* const& value, T* const* arr, size_t size){for (size_t i = 0; i < size; i++) {if (*arr[i] == *value) {return i; // Found it; return the index}}return NOT_FOUND; // failed to find it; return NOT_FOUND}
Note that the first parameter to this version of Find() is T* const&. This is done to make it symmetric with the original Find() function template, which accepts a const T& as a first parameter. However, in this case, using T* instead of T*
const& for the first parameter of the partial specialization of Find() works as well.
You can define in one program the original Find() template, the overloaded Find() for partial specialization on pointer types, the complete specialization for const char*s, and the overloaded Find() just for const char*s. The compiler selects the appropriate version to call based on its deduction rules.
The following code calls Find() several times. The comments say which version of Find() is called.
size_t res = NOT_FOUND;int myInt = 3, intArray[] = { 1, 2, 3, 4 };size_t sizeArray = std::size(intArray);res = Find(myInt, intArray, sizeArray); // calls Find<int> by deductionres = Find<int>(myInt, intArray, sizeArray); // calls Find<int> explicitlydouble myDouble = 5.6, doubleArray[] = { 1.2, 3.4, 5.7, 7.5 };sizeArray = std::size(doubleArray);// calls Find<double> by deductionres = Find(myDouble, doubleArray, sizeArray);// calls Find<double> explicitlyres = Find<double>(myDouble, doubleArray, sizeArray);const char* word = "two";const char* words[] = { "one", "two", "three", "four" };sizeArray = std::size(words);// calls template specialization for const char*sres = Find<const char*>(word, words, sizeArray);// calls overloaded Find for const char*sres = Find(word, words, sizeArray);int *intPointer = &myInt, *pointerArray[] = { &myInt, &myInt };sizeArray = std::size(pointerArray);// calls the overloaded Find for pointersres = Find(intPointer, pointerArray, sizeArray);SpreadsheetCell cell1(10), cellArray[] = { SpreadsheetCell(4), SpreadsheetCell(10) };sizeArray = std::size(cellArray);// calls Find<SpreadsheetCell> by deductionres = Find(cell1, cellArray, sizeArray);// calls Find<SpreadsheetCell> explicitlyres = Find<SpreadsheetCell>(cell1, cellArray, sizeArray);SpreadsheetCell *cellPointer = &cell1;SpreadsheetCell *cellPointerArray[] = { &cell1, &cell1 };sizeArray = std::size(cellPointerArray);// Calls the overloaded Find for pointersres = Find(cellPointer, cellPointerArray, sizeArray);
Templates in C++ provide capabilities that go far beyond the simple classes and functions you have seen so far in this chapter and Chapter 12. One of these capabilities is template recursion. This section first provides a motivation for template recursion, and then shows how to implement it.
This section uses operator overloading, discussed in Chapter 15. If you skipped that chapter or are unfamiliar with the syntax for overloading operator[], consult Chapter 15 before continuing.
Up to now, the Grid template example supported only two dimensions, which limited its usefulness. What if you wanted to write a 3-D Tic-Tac-Toe game or write a math program with four-dimensional matrices? You could, of course, write a templated or non-templated class for each of those dimensions. However, that would repeat a lot of code. Another approach would be to write only a single-dimensional grid. Then, you could create a Grid of any dimension by instantiating the Grid with another Grid as its element type. This Grid element type could itself be instantiated with a Grid as its element type, and so on. Here is the implementation of the OneDGrid class template. It’s simply a one-dimensional version of the Grid template from earlier examples, with the addition of a resize() method, and the substitution of operator[] for at(). Just as with Standard Library containers such as vector, the operator[] implementation does not perform any bounds checking. Also, for this example, mElements stores instances of T instead of instances of std::optional<T>.
template <typename T>class OneDGrid{public:explicit OneDGrid(size_t size = kDefaultSize);virtual ~OneDGrid() = default;T& operator[](size_t x);const T& operator[](size_t x) const;void resize(size_t newSize);size_t getSize() const { return mElements.size(); }static const size_t kDefaultSize = 10;private:std::vector<T> mElements;};template <typename T>OneDGrid<T>::OneDGrid(size_t size){resize(size);}template <typename T>void OneDGrid<T>::resize(size_t newSize){mElements.resize(newSize);}template <typename T>T& OneDGrid<T>::operator[](size_t x){return mElements[x];}template <typename T>const T& OneDGrid<T>::operator[](size_t x) const{return mElements[x];}
With this implementation of OneDGrid, you can create multidimensional grids like this:
OneDGrid<int> singleDGrid;OneDGrid<OneDGrid<int>> twoDGrid;OneDGrid<OneDGrid<OneDGrid<int>>> threeDGrid;singleDGrid[3] = 5;twoDGrid[3][3] = 5;threeDGrid[3][3][3] = 5;
This code works fine, but the declarations are messy. As you will see in the next section, you can do better.
You can use template recursion to write a “real” N-dimensional grid because dimensionality of grids is essentially recursive. You can see that in this declaration:
OneDGrid<OneDGrid<OneDGrid<int>>> threeDGrid;You can think of each nested OneDGrid as a recursive step, with the OneDGrid of int as the base case. In other words, a three-dimensional grid is a single-dimensional grid of single-dimensional grids of single-dimensional grids of ints. Instead of requiring the user to do this recursion, you can write a class template that does it for you. You can then create N-dimensional grids like this:
NDGrid<int, 1> singleDGrid;NDGrid<int, 2> twoDGrid;NDGrid<int, 3> threeDGrid;
The NDGrid class template takes a type for its element and an integer specifying its “dimensionality.” The key insight here is that the element type of the NDGrid is not the element type specified in the template parameter list, but is in fact another NDGrid of dimensionality one less than the current one. In other words, a three-dimensional grid is a vector of two-dimensional grids; the two-dimensional grids are each vectors of one-dimensional grids.
With recursion, you need a base case. You can write a partial specialization of the NDGrid for dimensionality of 1, in which the element type is not another NDGrid, but is in fact the element type specified by the template parameter.
Here is the general NDGrid template definition, with highlights showing where it differs from the OneDGrid shown in the previous section:
template <typename T, size_t N>class NDGrid{public:explicit NDGrid(size_t size = kDefaultSize);virtual ~NDGrid() = default;NDGrid<T, N-1>& operator[](size_t x);const NDGrid<T, N-1>& operator[](size_t x) const;void resize(size_t newSize);size_t getSize() const { return mElements.size(); }static const size_t kDefaultSize = 10;private:std::vector<NDGrid<T, N-1>> mElements;};
Note that mElements is a vector of NDGrid<T, N-1>; this is the recursive step. Also, operator[] returns a reference to the element type, which is again NDGrid<T, N-1>, not T.
The template definition for the base case is a partial specialization for dimension 1:
template <typename T>class NDGrid<T, 1>{public:explicit NDGrid(size_t size = kDefaultSize);virtual ~NDGrid() = default;T& operator[](size_t x);const T& operator[](size_t x) const;void resize(size_t newSize);size_t getSize() const { return mElements.size(); }static const size_t kDefaultSize = 10;private:std::vector<T> mElements;};
Here the recursion ends: the element type is T, not another template instantiation.
The trickiest aspect of the implementations, other than the template recursion itself, is appropriately sizing each dimension of the grid. This implementation creates the N-dimensional grid with every dimension of equal size. It’s significantly more difficult to specify a separate size for each dimension. However, even with this simplification, there is still a problem: the user should have the ability to create the array with a specified size, such as 20 or 50. Thus, the constructor takes an integer size parameter. However, when you dynamically resize a vector of sub-grids, you cannot pass this size value on to the sub-grid elements because vectors create objects using their default constructor. Thus, you must explicitly call resize() on each grid element of the vector. That code follows. The base case doesn’t need to resize its elements because the elements are Ts, not grids.
Here are the implementations of the general NDGrid template, with highlights showing the differences from the OneDGrid:
template <typename T, size_t N>NDGrid<T, N>::NDGrid(size_t size){resize(size);}template <typename T, size_t N>void NDGrid<T, N>::resize(size_t newSize){mElements.resize(newSize);// Resizing the vector calls the 0-argument constructor for// the NDGrid<T, N-1> elements, which constructs// them with the default size. Thus, we must explicitly call// resize() on each of the elements to recursively resize all// nested Grid elements.for (auto& element : mElements) {element.resize(newSize);}}template <typename T, size_t N>NDGrid<T, N-1>& NDGrid<T, N>::operator[](size_t x){return mElements[x];}template <typename T, size_t N>const NDGrid<T, N-1>& NDGrid<T, N>::operator[](size_t x) const{return mElements[x];}
Now, here are the implementations of the partial specialization (base case). Note that you must rewrite a lot of the code because you don’t inherit any implementations with specializations. Highlights show the differences from the non-specialized NDGrid.
template <typename T>NDGrid<T, 1>::NDGrid(size_t size){resize(size);}template <typename T>void NDGrid<T, 1>::resize(size_t newSize){mElements.resize(newSize);}template <typename T>T& NDGrid<T, 1>::operator[](size_t x){return mElements[x];}template <typename T>const T& NDGrid<T, 1>::operator[](size_t x) const{return mElements[x];}
Now, you can write code like this:
NDGrid<int, 3> my3DGrid;my3DGrid[2][1][2] = 5;my3DGrid[1][1][1] = 5;cout << my3DGrid[2][1][2] << endl;
Normal templates can take only a fixed number of template parameters. Variadic templates can take a variable number of template parameters. For example, the following code defines a template that can accept any number of template parameters, using a parameter pack called Types:
template<typename... Types>class MyVariadicTemplate { };
You can instantiate MyVariadicTemplate with any number of types, as in this example:
MyVariadicTemplate<int> instance1;MyVariadicTemplate<string, double, list<int>> instance2;
It can even be instantiated with zero template arguments:
MyVariadicTemplate<> instance3;To avoid instantiating a variadic template with zero template arguments, you can write your template as follows:
template<typename T1, typename... Types>class MyVariadicTemplate { };
With this definition, trying to instantiate MyVariadicTemplate with zero template arguments results in a compiler error. For example, with Microsoft Visual C++ you get the following error:
error C2976: 'MyVariadicTemplate' : too few template argumentsIt is not possible to directly iterate over the different arguments given to a variadic template. The only way you can do this is with the aid of template recursion. The following sections show two examples of how to use variadic templates.
Variadic templates allow you to create type-safe variable-length argument lists. The following example defines a variadic template called processValues(), allowing it to accept a variable number of arguments with different types in a type-safe manner. The processValues() function processes each value in the variable-length argument list and executes a function called handleValue() for each single argument. This means that you have to write a handleValue() function for each type that you want to handle—int, double, and string in this example:
void handleValue(int value) { cout << "Integer: " << value << endl; }void handleValue(double value) { cout << "Double: " << value << endl; }void handleValue(string_view value) { cout << "String: " << value << endl; }void processValues() { /* Nothing to do in this base case.*/ }template<typename T1, typename... Tn>void processValues(T1 arg1, Tn... args){handleValue(arg1);processValues(args...);}
What this example also demonstrates is the double use of the triple dots ... operator. This operator appears in three places and has two different meanings. First, it is used after typename in the template parameter list and after type Tn in the function parameter list. In both cases it denotes a parameter pack. A parameter pack can accept a variable number of arguments.
The second use of the ... operator is following the parameter name args in the function body. In this case, it means a parameter pack expansion; the operator unpacks/expands the parameter pack into separate arguments. It basically takes what is on the left side of the operator, and repeats it for every template parameter in the pack, separated by commas. Take the following line:
processValues(args...);This line unpacks/expands the args parameter pack into its separate arguments, separated by commas, and then calls the processValues() function with the list of expanded arguments. The template always requires at least one template parameter, T1. The act of recursively calling processValues() with args... is that on each call there is one template parameter less.
Because the implementation of the processValues() function is recursive, you need to have a way to stop the recursion. This is done by implementing a processValues() function that accepts no arguments.
You can test the processValues() variadic template as follows:
processValues(1, 2, 3.56, "test", 1.1f);The recursive calls generated by this example are as follows:
processValues(1, 2, 3.56, "test", 1.1f);handleValue(1);processValues(2, 3.56, "test", 1.1f);handleValue(2);processValues(3.56, "test", 1.1f);handleValue(3.56);processValues("test", 1.1f);handleValue("test");processValues(1.1f);handleValue(1.1f);processValues();
It is important to remember that this method of variable-length argument lists is fully type-safe. The processValues() function automatically calls the correct handleValue() overload based on the actual type. Automatic casting can happen as usual in C++. For example, the 1.1f in the preceding example is of type float. The processValues() function calls handleValue(double value) because conversion from float to double is without any loss. However, the compiler will issue an error when you call processValues() with an argument of a certain type for which there is no handleValue() defined.
There is a problem, though, with the preceding implementation. Because it’s a recursive implementation, the parameters are copied for each recursive call to processValues(). This can become costly depending on the type of the arguments. You might think that you can avoid this copying by passing references to processValues() instead of using pass-by-value. Unfortunately, that also means that you cannot call processValues() with literals anymore, because a reference to a literal value is not allowed, unless you use const references.
To use non-const references and still allow literal values, you can use forwarding references. The following implementation uses forwarding references, T&&, and uses std::forward() for perfect forwarding of all parameters. Perfect forwarding means that if an rvalue is passed to processValues(), it is forwarded as an rvalue reference. If an lvalue or lvalue reference is passed, it is forwarded as an lvalue reference.
void processValues() { /* Nothing to do in this base case.*/ }template<typename T1, typename... Tn>void processValues(T1&& arg1, Tn&&... args){handleValue(std::forward<T1>(arg1));processValues(std::forward<Tn>(args)...);}
There is one line that needs further explanation:
processValues(std::forward<Tn>(args)...);The ... operator is used to unpack the parameter pack. It uses std::forward() on each individual argument in the pack and separates them with commas. For example, suppose args is a parameter pack with three arguments, a1, a2, and a3, of three types, A1, A2, and A3. The expanded call then looks as follows:
processValues(std::forward<A1>(a1),std::forward<A2>(a2),std::forward<A3>(a3));
Inside the body of a function using a parameter pack, you can retrieve the number of arguments in the pack as follows:
int numOfArgs = sizeof...(args);A practical example of using variadic templates is to write a secure and type-safe printf()-like function template. This would be a good practice exercise for you to try.
Parameter packs can be used almost everywhere. For example, the following code uses a parameter pack to define a variable number of mixin classes for MyClass. Chapter 5 discusses the concept of mixin classes.
class Mixin1{public:Mixin1(int i) : mValue(i) {}virtual void Mixin1Func() { cout << "Mixin1: " << mValue << endl; }private:int mValue;};class Mixin2{public:Mixin2(int i) : mValue(i) {}virtual void Mixin2Func() { cout << "Mixin2: " << mValue << endl; }private:int mValue;};template<typename... Mixins>class MyClass : public Mixins...{public:MyClass(const Mixins&... mixins) : Mixins(mixins)... {}virtual ~MyClass() = default;};
This code first defines two mixin classes: Mixin1 and Mixin2. They are kept pretty simple for this example. Their constructor accepts an integer, which is stored, and they have a function to print information about that specific instance of the class. The MyClass variadic template uses a parameter pack typename... Mixins to accept a variable number of mixin classes. The class then inherits from all those mixin classes and the constructor accepts the same number of arguments to initialize each inherited mixin class. Remember that the ... expansion operator basically takes what is on the left of the operator and repeats it for every template parameter in the pack, separated by commas. The class can be used as follows:
MyClass<Mixin1, Mixin2> a(Mixin1(11), Mixin2(22));a.Mixin1Func();a.Mixin2Func();MyClass<Mixin1> b(Mixin1(33));b.Mixin1Func();//b.Mixin2Func(); // Error: does not compile.MyClass<> c;//c.Mixin1Func(); // Error: does not compile.//c.Mixin2Func(); // Error: does not compile.
When you try to call Mixin2Func() on b, you will get a compilation error because b is not inheriting from the Mixin2 class. The output of this program is as follows:
Mixin1: 11Mixin2: 22Mixin1: 33
Folding ExpressionsC++17 adds supports for so-called folding expressions. This makes working with parameter packs in variadic templates much easier. The following table lists the four types of folds that are supported. In this table, Ѳ can be any of the following operators: + - * / % ^ & | << >> += -= *= /= %= ^= &= |= <<= >>= = == != < > <= >= && || , .* ->*.
| NAME | EXPRESSION | IS EXPANDED TO |
| Unary right fold | (pack Ѳ ...) | pack0 Ѳ (... Ѳ (packn-1 Ѳ packn)) |
| Unary left fold | (... Ѳ pack) | ((pack0 Ѳ pack1) Ѳ ... ) Ѳ packn |
| Binary right fold | (pack Ѳ ... Ѳ Init) | pack0 Ѳ (... Ѳ (packn-1 Ѳ (packn Ѳ Init))) |
| Binary left fold | (Init Ѳ … Ѳ pack) | (((Init Ѳ pack0) Ѳ pack1) Ѳ … ) Ѳ packn |
Let’s look at some examples. Earlier, the processValue() function template was defined recursively as follows:
void processValues() { /* Nothing to do in this base case.*/ }template<typename T1, typename... Tn>void processValues(T1 arg1, Tn... args){handleValue(arg1);processValues(args...);}
Because it was defined recursively, it needs a base case to stop the recursion. With folding expressions, this can be implemented with a single function template using a unary right fold, where no base case is needed:
template<typename... Tn>void processValues(const Tn&... args){(handleValue(args), ...);}
Basically, the three dots in the function body trigger folding. That line is expanded to call handleValue() for each argument in the parameter pack, and each call to handleValue() is separated by a comma. For example, suppose args is a parameter pack with three arguments, a1, a2, and a3. The expansion of the unary right fold then becomes as follows:
(handleValue(a1), (handleValue(a2), handleValue(a3)));Here is another example. The printValues() function template writes all its arguments to the console, separated by newlines.
template<typename... Values>void printValues(const Values&... values){((cout << values << endl), ...);}
Suppose that values is a parameter pack with three arguments, v1, v2, and v3. The expansion of the unary right fold then becomes as follows:
((cout << v1 << endl), ((cout << v2 << endl), (cout << v3 << endl)));You can call printValues() with as many arguments as you want, as shown here:
printValues(1, "test", 2.34);In these examples, the folding is used with the comma operator, but it can be used with almost any kind of operator. For example, the following code defines a variadic function template using a binary left fold to calculate the sum of all the values given to it. A binary left fold always requires an Init value (see the overview table earlier). So, sumValues() has two template type parameters: a normal one to specify the type of Init, and a parameter pack which can accept 0 or more arguments.
template<typename T, typename... Values>double sumValues(const T& init, const Values&... values){return (init + ... + values);}
Suppose that values is a parameter pack with three arguments, v1, v2, and v3. Here is the expansion of the binary left fold in that case:
return (((init + v1) + v2) + v3);The sumValues() function template can be used as follows:
cout << sumValues(1, 2, 3.3) << endl;cout << sumValues(1) << endl;
The template requires at least one argument, so the following does not compile:
cout << sumValues() << endl;This section touches on template metaprogramming. It is a very complicated subject and there are books written about it explaining all the little details. This book doesn’t have the space to go into all of these details. Instead, this section explains the most important concepts, with the aid of a couple of examples.
The goal of template metaprogramming is to perform some computation at compile time instead of at run time. It is basically a programming language on top of C++. The following section starts the discussion with a simple example that calculates the factorial of a number at compile time and makes the result available as a simple constant at run time.
Template metaprogramming allows you to perform calculations at compile time instead of at run time. The following code is a small example that calculates the factorial of a number at compile time. The code uses template recursion, explained earlier in this chapter, which requires a recursive template and a base template to stop the recursion. By mathematical definition, the factorial of 0 is 1, so that is used as the base case.
template<unsigned char f>class Factorial{public:static const unsigned long long val = (f * Factorial<f - 1>::val);};template<>class Factorial<0>{public:static const unsigned long long val = 1;};int main(){cout << Factorial<6>::val << endl;return 0;}
This calculates the factorial of 6, mathematically written as 6!, which is 1×2×3×4×5×6 or 720.
For this specific example of calculating the factorial of a number at compile time, you don’t necessarily need to use template metaprogramming. Since the introduction of constexpr, it can be written as follows without any templates, though the template implementation still serves as a good example on how to implement recursive templates.
constexpr unsigned long long factorial(unsigned char f){if (f == 0) {return 1;} else {return f * factorial(f - 1);}}
If you call this version as follows, the value is calculated at compile time:
constexpr auto f1 = factorial(6);However, you have to be careful not to forget the constexpr in this statement. If, instead, you write the following, then the calculation happens at run time!
auto f1 = factorial(6);You cannot make such a mistake with the template metaprogramming version; that one always happens at compile time.
A second example of template metaprogramming is to unroll loops at compile time instead of executing the loop at run time. Note that loop unrolling should only be done when you really need it, because the compiler is usually smart enough to unroll loops that can be unrolled for you.
This example again uses template recursion because it needs to do something in a loop at compile time. On each recursion, the Loop template instantiates itself with i-1. When it hits 0, the recursion stops.
template<int i>class Loop{public:template <typename FuncType>static inline void Do(FuncType func) {Loop<i - 1>::Do(func);func(i);}};template<>class Loop<0>{public:template <typename FuncType>static inline void Do(FuncType /* func */) { }};
The Loop template can be used as follows:
void DoWork(int i) { cout << "DoWork(" << i << ")" << endl; }int main(){Loop<3>::Do(DoWork);}
This code causes the compiler to unroll the loop and to call the function DoWork() three times in a row. The output of the program is as follows:
DoWork(1)DoWork(2)DoWork(3)
With a lambda expression you can use a version of DoWork() that accepts more than one parameter:
void DoWork2(string str, int i){cout << "DoWork2(" << str << ", " << i << ")" << endl;}int main(){Loop<2>::Do([](int i) { DoWork2("TestStr", i); });}
The code first implements a function that accepts a string and an int. The main() function uses a lambda expression to call DoWork2() on each iteration with a fixed string, "TestStr", as first argument. If you compile and run this code, the output is as follows:
DoWork2(TestStr, 1)DoWork2(TestStr, 2)
This example uses template metaprogramming to print the individual elements of an std::tuple. Tuples are explained in Chapter 20. They allow you to store any number of values, each with its own specific type. A tuple has a fixed size and fixed value types, determined at compile time. However, tuples don’t have any built-in mechanism to iterate over their elements. The following example shows how you could use template metaprogramming to iterate over the elements of a tuple at compile time.
As is often the case with template metaprogramming, this example is again using template recursion. The tuple_print class template has two template parameters: the tuple type, and an integer, initialized with the size of the tuple. It then recursively instantiates itself in the constructor and decrements the integer on every call. A partial specialization of tuple_print stops the recursion when this integer hits 0. The main() function shows how this tuple_print class template can be used.
template<typename TupleType, int n>class tuple_print{public:tuple_print(const TupleType& t) {tuple_print<TupleType, n - 1> tp(t);cout << get<n - 1>(t) << endl;}};template<typename TupleType>class tuple_print<TupleType, 0>{public:tuple_print(const TupleType&) { }};int main(){using MyTuple = tuple<int, string, bool>;MyTuple t1(16, "Test", true);tuple_print<MyTuple, tuple_size<MyTuple>::value> tp(t1);}
If you look at the main() function, you can see that the line to use the tuple_print template looks a bit complicated because it requires the exact type of the tuple and the size of the tuple as template arguments. This can be simplified a lot by introducing a helper function template that automatically deduces the template parameters. The simplified implementation is as follows:
template<typename TupleType, int n>class tuple_print_helper{public:tuple_print_helper(const TupleType& t) {tuple_print_helper<TupleType, n - 1> tp(t);cout << get<n - 1>(t) << endl;}};template<typename TupleType>class tuple_print_helper<TupleType, 0>{public:tuple_print_helper(const TupleType&) { }};template<typename T>void tuple_print(const T& t){tuple_print_helper<T, tuple_size<T>::value> tph(t);}int main(){auto t1 = make_tuple(167, "Testing", false, 2.3);tuple_print(t1);}
The first change made here is renaming the original tuple_print class template to tuple_print_helper. The code then implements a small function template called tuple_print(). It accepts the tuple’s type as a template type parameter, and accepts a reference to the tuple itself as a function parameter. The body of that function instantiates the tuple_print_helper class template. The main() function shows how to use this simplified version. Because you no longer need to know the exact type of the tuple, you can use make_tuple() together with auto. The call to the tuple_print() function template is very simple:
tuple_print(t1);You don’t need to specify the function template parameter because the compiler can deduce this automatically from the supplied argument.
constexpr ifC++17 introduced constexpr
if. These are if statements executed at compile time, not at run time. If a branch of a constexpr
if statement is never taken, it is never compiled. This can be used to simplify a lot of template metaprogramming techniques, and also comes in handy for SFINAE (discussed later in this chapter).
For example, you can simplify the previous code for printing elements of a tuple using constexpr
if, as follows. Note that the template recursion base case is not needed anymore, because the recursion is stopped with the constexpr
if statement.
template<typename TupleType, int n>class tuple_print_helper{public:tuple_print_helper(const TupleType& t) {if constexpr(n > 1) {tuple_print_helper<TupleType, n - 1> tp(t);}cout << get<n - 1>(t) << endl;}};template<typename T>void tuple_print(const T& t){tuple_print_helper<T, tuple_size<T>::value> tph(t);}
Now you can even get rid of the class template itself, and replace it with a simple function template called tuple_print_helper:
template<typename TupleType, int n>void tuple_print_helper(const TupleType& t) {if constexpr(n > 1) {tuple_print_helper<TupleType, n - 1>(t);}cout << get<n - 1>(t) << endl;}template<typename T>void tuple_print(const T& t){tuple_print_helper<T, tuple_size<T>::value>(t);}
This can be simplified even more. Both methods can be combined into one, as follows:
template<typename TupleType, int n = tuple_size<TupleType>::value>void tuple_print(const TupleType& t) {if constexpr(n > 1) {tuple_print<TupleType, n - 1>(t);}cout << get<n - 1>(t) << endl;}
It can still be called the same as before:
auto t1 = make_tuple(167, "Testing", false, 2.3);tuple_print(t1);
C++ supports compile-time integer sequences using std::integer_sequence, which is defined in <utility>. A common use case with template metaprogramming is to generate a compile-time sequence of indices, that is, an integer sequence of type size_t. For this, a helper std::index_sequence is available. You can use std::index_sequence_for to generate an index sequence of the same length as the length of a given parameter pack.
The tuple printer could be implemented using variadic templates, compile-time index sequences, and C++17 folding expressions as follows:
template<typename Tuple, size_t... Indices>void tuple_print_helper(const Tuple& t, index_sequence<Indices...>){((cout << get<Indices>(t) << endl), ...);}template<typename... Args>void tuple_print(const tuple<Args...>& t){tuple_print_helper(t, index_sequence_for<Args...>());}
It can be called in the same way as before:
auto t1 = make_tuple(167, "Testing", false, 2.3);tuple_print(t1);
With this call, the unary right fold expression in the tuple_print_helper() function template expands to the following:
(((cout << get<0>(t) << endl),((cout << get<1>(t) << endl),((cout << get<2>(t) << endl),(cout << get<3>(t) << endl)))));
Type traits allow you to make decisions based on types at compile time. For example, you can write a template that requires a type that is derived from a certain type, or a type that is convertible to a certain type, or a type that is integral, and so on. The C++ standard defines several helper classes for this. All type traits-related functionality is defined in the <type_traits> header file. Type traits are divided into separate categories. The following list gives a few examples of the available type traits in each category. Consult a Standard Library Reference, see Appendix B, for a complete list.
|
|
The type traits marked with an asterisk (*) are only available since C++17.
Type traits is a pretty advanced C++ feature. By just looking at the preceding list, which is already a shortened version of the list from the C++ standard, it is clear that this book cannot explain all details about all type traits. This section explains just a couple of use cases to show you how type traits can be used.
Before an example can be given for a template using type traits, you first need to know a bit more on how classes like is_integral work. The C++ standard defines an integral_constant class that looks like this:
template <class T, T v>struct integral_constant {static constexpr T value = v;using value_type = T;using type = integral_constant<T, v>;constexpr operator value_type() const noexcept { return value; }constexpr value_type operator()() const noexcept { return value; }};
It also defines bool_constant, true_type, and false_type type aliases:
template <bool B>using bool_constant = integral_constant<bool, B>;using true_type = bool_constant<true>;using false_type = bool_constant<false>;
What this code defines is two types: true_type and false_type. When you access true_type::value, you get the value true, and when you access false_type::value, you get the value false. You can also access true_type::type, which results in the type of true_type. The same holds for false_type. Classes like is_integral and is_class inherit from either true_type or false_type. For example, is_integral can be specialized for type bool as follows:
template<> struct is_integral<bool> : public true_type { };This allows you to write is_integral<bool>::value, which results in the value true. Note that you don’t need to write these specializations yourself; they are part of the Standard Library.
The following code shows the simplest example of how type categories can be used:
if (is_integral<int>::value) {cout << "int is integral" << endl;} else {cout << "int is not integral" << endl;}if (is_class<string>::value) {cout << "string is a class" << endl;} else {cout << "string is not a class" << endl;}
This example uses is_integral to check whether or not int is an integral type, and it uses is_class to check whether or not string is a class. The output is as follows:
int is integralstring is a class
For each trait that has a value member, C++17 adds a variable template that has the same name as the trait followed by _v. Instead of writing some_trait<T>::value, you can write some_trait_v<T>—for example, is_integral_v<T>, is_const_v<T>, and so on. Here is the previous example written using these helpers:
if (is_integral_v<int>) {cout << "int is integral" << endl;} else {cout << "int is not integral" << endl;}if (is_class_v<string>) {cout << "string is a class" << endl;} else {cout << "string is not a class" << endl;}
Of course, you will likely never use type traits in this way. They become more useful in combination with templates to generate code based on some properties of a type. The following template functions demonstrate this. The code defines two overloaded process_helper() function templates that accept a type as template parameter. The first parameter to these functions is a value, and the second is an instance of either true_type or false_type. The process() function template accepts a single parameter and calls process_helper().
template<typename T>void process_helper(const T& t, true_type){cout << t << " is an integral type." << endl;}template<typename T>void process_helper(const T& t, false_type){cout << t << " is a non-integral type." << endl;}template<typename T>void process(const T& t){process_helper(t, typename is_integral<T>::type());}
The second argument in the call to process_helper() is as follows:
typename is_integral<T>::type()This argument uses is_integral to figure out if T is an integral type. You use ::type to access the resulting integral_constant type, which can be true_type or false_type. The process_helper() function needs an instance of true_type or false_type as a second parameter, so that is the reason for the two empty parentheses behind ::type. Note that the two overloaded process_helper() functions use nameless parameters of type true_type and false_type. They are nameless because they don’t use those parameters inside their function body. These parameters are only used for function overload resolution.
The code can be tested as follows:
process(123);process(2.2);process("Test"s);
Here is the output:
123 is an integral type.2.2 is a non-integral type.Test is a non-integral type.
The previous example could be written as a single function template as follows. However, that doesn’t demonstrate how to use type traits to select different overloads based on a type.
template<typename T>void process(const T& t){if constexpr (is_integral_v<T>) {cout << t << " is an integral type." << endl;} else {cout << t << " is a non-integral type." << endl;}}
Some examples of type relations are is_same, is_base_of, and is_convertible. This section gives an example of how to use is_same; the other type relations work similarly.
The following same() function template uses the is_same type trait to figure out whether or not the two given arguments are of the same type, and outputs an appropriate message:
template<typename T1, typename T2>void same(const T1& t1, const T2& t2){bool areTypesTheSame = is_same_v<T1, T2>;cout << "'" << t1 << "' and '" << t2 << "' are ";cout << (areTypesTheSame ? "the same types." : "different types.") << endl;}int main(){same(1, 32);same(1, 3.01);same(3.01, "Test"s);}
The output is as follows:
'1' and '32' are the same types.'1' and '3.01' are different types'3.01' and 'Test' are different types
The use of enable_if is based on a feature called Substitution Failure Is Not An Error (SFINAE), a complicated feature of C++. This section only explains the basics of SFINAE.
If you have a set of overloaded functions, you can use enable_if to selectively disable certain overloads based on some type traits. The enable_if trait is usually used on the return types for your set of overloads. enable_if accepts two template type parameters. The first is a Boolean, and the second is a type that is void by default. If the Boolean is true, then the enable_if class has a nested type that you can access using ::type. The type of this nested type is the type given as a second template type parameter. If the Boolean is false, then there is no nested type.
The C++ standard defines alias templates for traits that have a type member, such as enable_if. These have the same name as the trait, but are appended with _t. For example, instead of writing the following,
typename enable_if<..., bool>::typeyou can write a much shorter version,
enable_if_t<..., bool>The same() function template from the previous section can be rewritten into an overloaded check_type() function template by using enable_if as follows. In this version, the check_type() functions return true or false depending on whether or not the types of the given values are the same. If you don’t want to return anything from check_type(), you can remove the return statements, and remove the second template type parameter for enable_if or replace it with void.
template<typename T1, typename T2>enable_if_t<is_same_v<T1, T2>, bool>check_type(const T1& t1, const T2& t2){cout << "'" << t1 << "' and '" << t2 << "' ";cout << "are the same types." << endl;return true;}template<typename T1, typename T2>enable_if_t<!is_same_v<T1, T2>, bool>check_type(const T1& t1, const T2& t2){cout << "'" << t1 << "' and '" << t2 << "' ";cout << "are different types." << endl;return false;}int main(){check_type(1, 32);check_type(1, 3.01);check_type(3.01, "Test"s);}
The output is the same as before:
'1' and '32' are the same types.'1' and '3.01' are different types.'3.01' and 'Test' are different types.
The code defines two versions of check_type(). The return type of both versions is the nested type of enable_if, which is bool. First, is_same_v is used to check whether or not the two types are the same. The result is given to enable_if_t. When the first argument to enable_if_t is true, enable_if_t has type bool; otherwise, there is no type. This is where SFINAE comes into play.
When the compiler starts to compile the first line of main(), it tries to find a function check_type() that accepts two integer values. It finds the first check_type() function template overload in the source code and deduces that it can use an instance of this function template by making T1 and T2 both integers. It then tries to figure out the return type. Because both arguments are integers and thus the same types, is_same_v<T1, T2> is true, which causes enable_if_t<true, bool> to be type bool. With this instantiation, everything is fine and the compiler can use that version of check_type().
However, when the compiler tries to compile the second line in main(), it again tries to find a suitable check_type() function. It starts with the first check_type() and decides it can use that overload by setting T1 to type int and T2 to type double. It then tries to figure out the return type. This time, T1 and T2 are different types, which means that is_same_v<T1, T2> is false. Because of this, enable_if_t<false, bool> does not represent a type, leaving the function check_type() without a return type. The compiler notices this error but does not yet generate a real compilation error because of SFINAE (Substitution Failure Is Not An Error). Instead, the compiler gracefully backtracks and tries to find another check_type() function. In this case, the second check_type() works out perfectly fine because !is_same_v<T1, T2> is true, and thus enable_if_t<true, bool> is type bool.
If you want to use enable_if on a set of constructors, you can’t use it with the return type because constructors don’t have a return type. In that case, you can use enable_if on an extra constructor parameter with a default value.
It is recommended to use enable_if judiciously. Use it only when you need to resolve overload ambiguities that you cannot possibly resolve using any other technique, such as specialization, partial specialization, and so on. For example, if you just want compilation to fail when you use a template with the wrong types, use static_assert(), explained in Chapter 27, and not SFINAE. Of course, there are legitimate use cases for enable_if. One such example is specializing a copy function for a custom vector-like class to perform bit-wise copying of trivially copyable types using enable_if and the is_trivially_copyable type trait. Such a specialized copy function could for example use memcpy().
Using constexpr if to Simplify enable_if ConstructsAs you can see from the earlier examples, using enable_if can become quite complicated. The constexpr
if feature, introduced in C++17, helps to dramatically simplify certain use cases of enable_if.
For example, suppose you have the following two classes:
class IsDoable{public:void doit() const { cout << "IsDoable::doit()" << endl; }};class Derived : public IsDoable { };
You can create a function template, call_doit(), that calls the doit() method if the method is available; otherwise, it prints an error message to the console. You can do this with enable_if by checking whether the given type is derived from IsDoable:
template<typename T>enable_if_t<is_base_of_v<IsDoable, T>, void>call_doit(const T& t){t.doit();}template<typename T>enable_if_t<!is_base_of_v<IsDoable, T>, void>call_doit(const T&){cout << "Cannot call doit()!" << endl;}
The following code tests this implementation:
Derived d;call_doit(d);call_doit(123);
Here is the output:
IsDoable::doit()Cannot call doit()!
You can simplify this enable_if implementation a lot by using C++17 constexpr
if:
template<typename T>void call_doit(const T& [[maybe_unused]] t){if constexpr(is_base_of_v<IsDoable, T>) {t.doit();} else {cout << "Cannot call doit()!" << endl;}}
You cannot accomplish this using a normal if statement! With a normal if statement, both branches need to be compiled, and this will fail if you supply a type T that is not derived from IsDoable. In that case, the line t.doit() will fail to compile. However, with the constexpr
if statement, if a type is supplied that is not derived from IsDoable, then the line t.doit() won’t even be compiled!
Note also the use of the [[maybe_unused]] attribute, introduced in C++17. Because the line t.doit() is not compiled if the given type T is not derived from IsDoable, the parameter t won’t be used in that instantiation of call_doit(). Most compilers give a warning or even an error if you have unused parameters. The attribute prevents such warnings or errors for the parameter t.
Instead of using the is_base_of type trait, you can also use the new C++17 is_invocable trait, which determines whether or not a given function can be called with a given set of arguments. Here is an implementation of call_doit() using the is_invocable trait:
template<typename T>void call_doit(const T& [[maybe_unused]] t){if constexpr(is_invocable_v<decltype(&IsDoable::doit), T>) {t.doit();} else {cout << "Cannot call doit()!" << endl;}}
Logical Operator TraitsThere are three logical operator traits: conjunction, disjunction, and negation. Variable templates, ending with _v, are available as well. These traits accept a variable number of template type parameters, and can be used to perform logical operations on type traits, as in this example:
cout << conjunction_v<is_integral<int>, is_integral<short>> << " ";cout << conjunction_v<is_integral<int>, is_integral<double>> << " ";cout << disjunction_v<is_integral<int>, is_integral<double>,is_integral<short>> << " ";cout << negation_v<is_integral<int>> << " ";
The output is as follows:
1 0 1 0As you have seen in this section, template metaprogramming can be a very powerful tool, but it can also get quite complicated. One problem with template metaprogramming, not mentioned before, is that everything happens at compile time so you cannot use a debugger to pinpoint a problem. If you decide to use template metaprogramming in your code, make sure you write good comments to explain exactly what is going on and why you are doing something a certain way. If you don’t properly document your template metaprogramming code, it might be very difficult for someone else to understand your code, and it might even make it difficult for you to understand your own code in the future.
This chapter is a continuation of the template discussion from Chapter 12. These chapters show you how to use templates for generic programming, and template metaprogramming for compile-time computations. Hopefully you gained an appreciation for the power and capabilities of these features, and an idea of how you could apply these concepts to your own code. Don’t worry if you didn’t understand all the syntax, or didn’t follow all the examples, on your first reading. The concepts can be difficult to grasp when you are first exposed to them, and the syntax is tricky whenever you want to write more complicated templates. When you actually sit down to write a class or function template, you can consult this chapter and Chapter 12 for a reference on the proper syntax.
Multithreaded programming allows you to perform multiple calculations in parallel. As a result, you can take advantage of the multiple processor units inside virtually all systems today. Two decades ago, the processor market was racing for the highest frequency, which is perfect for single-threaded applications. Around 2005, this race stopped due to a combination of power and heat management problems. Since then, the processor market is racing toward the most cores on a single processor chip. Dual- and quad-core processors are common, and even 12-, 16-, 18-, and more core processors are available.
Similarly, if you look at the processors on graphics cards, called GPUs, you’ll see that they are massively-parallel processors. Today, high-end graphics cards have more than 4,000 cores, a number that will increase rapidly! These graphics cards are used not only for gaming, but also to perform computationally intensive tasks. Examples are image and video manipulation, protein folding (useful for discovering new drugs), processing signals as part of the SETI (Search for Extraterrestrial Intelligence) project, and so on.
C++98/03 did not have support for multithreaded programming, and you had to resort to third-party libraries or to the multithreading APIs of your target operating system. Because C++11 included a standard multithreading library, it became easier to write cross-platform multithreaded applications. The current C++ standard targets only CPUs and not GPUs. This might change in the future.
There are two reasons to start writing multithreaded code. First, if you have a computational problem and you manage to separate it into small pieces that can be run in parallel independently from each other, you can expect a huge performance boost when running it on multiple processor units. Second, you can modularize computations along orthogonal axes. For example, you can do long computations in a thread instead of blocking the UI thread, so the user interface remains responsive while a long computation occurs in the background.
Figure 23-1 shows a situation that is perfectly suited for running in parallel. An example could be the processing of pixels of an image by an algorithm that does not require information about neighboring pixels. The algorithm could split the image into four parts. On a single-core processor, each part would be processed sequentially; on a dual-core processor, two parts would be processed in parallel; and on a quad-core processor, four parts would be processed in parallel, resulting in an almost linear scaling of the performance with the number of cores.
Of course, it’s not always possible to split the problem into parts that can be executed independently of each other in parallel. However, it can often be made parallel, at least partially, resulting in a performance increase. A difficult part of multithreaded programming is making your algorithm parallel, which is highly dependent on the type of the algorithm. Other difficulties are preventing race conditions, deadlocks, tearing, and false-sharing. These are discussed in the following sections. They are usually solved using atomics or explicit synchronization mechanisms, as discussed later in this chapter.
Race conditions can occur when multiple threads want to access any kind of shared resources. Race conditions in the context of shared memory are called data races. A data race can occur when multiple threads access shared memory, and at least one thread writes to the shared memory. For example, suppose you have a shared variable and one thread increments this value while another thread decrements it. Incrementing and decrementing the value means that the current value needs to be retrieved from memory, incremented or decremented, and stored back in memory. On old architectures, such as PDP-11 and VAX, this used to be implemented with an INC processor instruction, which was atomic. On modern x86 processors, the INC instruction is not atomic anymore, meaning that other instructions can be executed in the middle of this operation, which might cause the code to retrieve a wrong value.
The following table shows the result when the increment is finished before the decrement starts, and assumes that the initial value is 1.
| THREAD 1 (INCREMENT) | THREAD 2 (DECREMENT) |
| load value (value = 1) | |
| increment value (value = 2) | |
| store value (value = 2) | |
| load value (value = 2) | |
| decrement value (value = 1) | |
| store value (value = 1) |
The final value stored in memory is 1. When the decrement thread is finished before the increment thread starts, the final value is also 1, as shown in the following table.
| THREAD 1 (INCREMENT) | THREAD 2 (DECREMENT) |
| load value (value = 1) | |
| decrement value (value = 0) | |
| store value (value = 0) | |
| load value (value = 0) | |
| increment value (value = 1) | |
| store value (value = 1) |
However, when the instructions are interleaved, the result is different, as shown in the following table.
| THREAD 1 (INCREMENT) | THREAD 2 (DECREMENT) |
| load value (value = 1) | |
| increment value (value = 2) | |
| load value (value = 1) | |
| decrement value (value = 0) | |
| store value (value = 2) | |
| store value (value = 0) |
The final result in this case is 0. In other words, the effect of the increment operation is lost. This is a data race.
Tearing is a specific case or consequence of a data race. There are two kinds of tearing: torn read and torn write. If a thread has written part of your data to memory, while another part hasn’t been written yet by the same thread, any other thread reading that data at that exact moment sees inconsistent data, a torn read. If two threads are writing to the data at the same time, one thread might have written part of the data, while another thread might have written another part of the data. The final result will be inconsistent, a torn write.
If you opt to solve a race condition by using a synchronization method, such as mutual exclusion, you might run into another common problem with multithreaded programming: deadlocks. Two threads are deadlocked if they are both waiting for the other thread to do something. This can be extended to more than two threads. For example, if two threads want to acquire access to a shared resource, they need to ask for permission to access this resource. If one of the threads currently holds the permission to access the resource, but is blocked indefinitely for some other reason, then the other thread will block indefinitely as well when trying to acquire permission for the same resource. One mechanism to acquire permission for a shared resource is called a mutual exclusion object, discussed in detail later in this chapter. For example, suppose you have two threads and two resources protected with two mutual exclusion objects, A and B. Both threads acquire permission for both resources, but they acquire the permission in different order. The following table shows this situation in pseudo-code.
| THREAD 1 | THREAD 2 |
|
Acquire A Acquire B // … computeRelease B Release A |
Acquire B Acquire A // … computeRelease A Release B |
Now, imagine that the code in the two threads is executed in the following order.
Both threads are now waiting indefinitely in a deadlock situation. Figure 23-2 shows a graphical representation of the deadlock. Thread 1 has acquired permission for resource A and is waiting to acquire permission for resource B. Thread 2 has acquired permission for resource B and is waiting to acquire permission for resource A. In this graphical representation, you see a cycle that depicts the deadlock. Both threads will wait indefinitely.
It’s best to always acquire permissions in the same order to avoid these kinds of deadlocks. You can also include mechanisms in your program to break these deadlocks. One possible solution is to try for a certain time to acquire permission for a resource. If the permission could not be obtained within a certain time interval, the thread could stop waiting and possibly releases other permissions it is currently holding. The thread might then sleep for a little bit and try again later to acquire all the resources it needs. This method might give other threads the opportunity to acquire necessary permissions and continue their execution. Whether this method works or not depends heavily on your specific deadlock case.
Instead of using a workaround as described in the previous paragraph, you should try to avoid any possible deadlock situation altogether. If you need to acquire permission to multiple resources protected with several mutual exclusion objects, instead of acquiring permission for each resource individually, the recommended way is to use the standard std::lock() or std::try_lock() functions described later in the section “Mutual Exclusion.” These functions obtain or try to obtain permission for several resources with one call.
Most caches work with so-called cache lines. For modern CPUs, cache lines are usually 64 bytes. If something needs to be written to a cache line, the entire line needs to be locked. This can bring a serious performance penalty for multithreaded code if your data structure is not properly designed. For example, if two threads are using two different pieces of data, but that data shares a cache line, then when one thread writes something, the other thread is blocked because the entire cache line is locked. You can optimize your data structures by using explicit memory alignments to make sure data that is worked on by multiple threads does not share any cache lines. To do this in a portable manner, C++17 introduces a constant called hardware_destructive_interference_size, defined in <new>, which returns you the minimum recommended offset between two concurrently accessed objects to avoid cache line sharing. You can use that value in combination with the alignas keyword to properly align your data.
The C++ threading library, defined in the <thread> header file, makes it very easy to launch new threads. You can specify what needs to be executed in the new thread in several ways. You can let the new thread execute a global function, the operator() of a function object, a lambda expression, or even a member function of an instance of some class. The following sections give small examples of all these methods.
Functions such as CreateThread(), _beginthread(), and so on, on Windows, and pthread_create() with the pthreads library, require that the thread function has only one parameter. On the other hand, a function that you want to use with the standard C++ std::thread class can have as many parameters as you want.
Suppose you have a counter() function accepting two integers: the first representing an ID and the second representing the number of iterations that the function should loop. The body of the function is a single loop that loops the given number of iterations. On each iteration, a message is printed to standard output:
void counter(int id, int numIterations){for (int i = 0; i < numIterations; ++i) {cout << "Counter " << id << " has value " << i << endl;}}
You can launch multiple threads executing this function using std::thread. You can create a thread t1, executing counter() with arguments 1 and 6 as follows:
thread t1(counter, 1, 6);The constructor of the thread class is a variadic template, which means that it accepts any number of arguments. Variadic templates are discussed in detail in Chapter 22. The first argument is the name of the function to execute in the new thread. The subsequent variable number of arguments are passed to this function when execution of the thread starts.
A thread object is said to be joinable if it represents or represented an active thread in the system. Even when the thread has finished executing, a thread object remains in the joinable state. A default constructed thread object is unjoinable. Before a joinable thread object is destroyed, you need to make sure to call either join() or detach() on it. A call to join() is a blocking call, it waits until the thread has finished its work. A call to detach() detaches a thread object from its underlying OS thread, in which case the OS thread keeps running independently. Both methods cause the thread to become unjoinable. If a thread object that is still joinable is destroyed, the destructor will call std::terminate(), which abruptly terminates all threads and the application itself.
The following code launches two threads executing the counter() function. After launching the threads, main() calls join() on both threads.
thread t1(counter, 1, 6);thread t2(counter, 2, 4);t1.join();t2.join();
A possible output of this example looks as follows:
Counter 2 has value 0Counter 1 has value 0Counter 1 has value 1Counter 1 has value 2Counter 1 has value 3Counter 1 has value 4Counter 1 has value 5Counter 2 has value 1Counter 2 has value 2Counter 2 has value 3
The output on your system will be different and it will most likely be different every time you run it. This is because two threads are executing the counter() function at the same time, so the output depends on the number of processing cores in your machine and on the thread scheduling of the operating system.
By default, accessing cout from different threads is thread-safe and doesn’t cause any data races, unless you have called cout.sync_with_stdio(false) before the first output or input operation. However, even though there are no data races, output from different threads can still be interleaved! This means that the output of the previous example can be mixed together as follows:
Counter Counter 2 has value 01 has value 0Counter 1 has value 1Counter 1 has value 2…
This can be fixed using synchronization methods, which are discussed later in this chapter.
Instead of using function pointers, you can also use a function object to execute in a thread. With the function pointer technique of the previous section, the only way to pass information to the thread is by passing arguments to the function. With function objects, you can add member variables to your function object class, which you can initialize and use however you want. The following example first defines a class called Counter, which has two member variables: an ID and the number of iterations for the loop. Both variables are initialized with the constructor. To make the Counter class a function object, you need to implement operator(), as discussed in Chapter 18. The implementation of operator() is the same as the counter() function from the previous section. Here is the code:
class Counter{public:Counter(int id, int numIterations): mId(id), mNumIterations(numIterations){}void operator()() const{for (int i = 0; i < mNumIterations; ++i) {cout << "Counter " << mId << " has value " << i << endl;}}private:int mId;int mNumIterations;};
Three methods for initializing threads with a function object are demonstrated in the following code snippet. The first method uses the uniform initialization syntax. You create an instance of Counter with its constructor arguments and give it to the thread constructor between curly braces.
The second method defines a named instance of Counter and gives this named instance to the constructor of the thread class.
The third method looks similar to the first one; it creates an instance of Counter and gives it to the constructor of the thread class, but uses parentheses instead of curly braces. The ramifications of this are discussed after the code.
// Using uniform initialization syntaxthread t1{ Counter{ 1, 20 }};// Using named variableCounter c(2, 12);thread t2(c);// Using temporarythread t3(Counter(3, 10));// Wait for threads to finisht1.join();t2.join();t3.join();
If you compare the creation of t1 with the creation of t3, the only difference seems to be that the first method uses curly braces while the third method uses parentheses. However, when your function object constructor doesn’t require any parameters, the third method as written earlier does not work. Here is an example:
class Counter{public:Counter() {}void operator()() const { /* Omitted for brevity */ }};int main(){thread t1(Counter());// Error!t1.join();}
This results in a compilation error because C++ interprets the first line in main() as a declaration of a function called t1, which returns a thread object and accepts a pointer to a function without parameters returning a Counter object. For this reason, it’s recommended to use the uniform initialization syntax:
thread t1{ Counter{} }; // OKLambda expressions fit nicely with the standard C++ threading library. Here is an example that launches a thread to execute a given lambda expression:
int main(){int id = 1;int numIterations = 5;thread t1([id, numIterations] {for (int i = 0; i < numIterations; ++i) {cout << "Counter " << id << " has value " << i << endl;}});t1.join();}
You can specify a member function of a class to be executed in a thread. The following example defines a basic Request class with a process() method. The main() function creates an instance of the Request class, and launches a new thread, which executes the process() method of the Request instance req.
class Request{public:Request(int id) : mId(id) { }void process(){cout << "Processing request " << mId << endl;}private:int mId;};int main(){Request req(100);thread t{ &Request::process, &req };t.join();}
With this technique, you are executing a method on a specific object in a separate thread. If other threads are accessing the same object, you need to make sure this happens in a thread-safe way to avoid data races. Mutual exclusion, discussed later in this chapter, can be used as a synchronization mechanism to make it thread-safe.
The C++ standard supports the concept of thread local storage. With a keyword called thread_local, you can mark any variable as thread local, which means that each thread will have its own unique copy of the variable and it will last for the entire duration of the thread. For each thread, the variable is initialized exactly once. For example, the following code defines two global variables. Every thread shares one—and only one—copy of k, while each thread has its own unique copy of n:
int k;thread_local int n;
Note that if the thread_local variable is declared in the scope of a function, its behavior is as if it were declared static, except that every thread has its own unique copy and is initialized exactly once per thread, no matter how many times that function is called in that thread.
The C++ standard does not include any mechanism for cancelling a running thread from another thread. The best way to achieve this is to provide some communication mechanism that the two threads agree upon. The simplest mechanism is to have a shared variable, which the target thread checks periodically to determine if it should terminate. Other threads can set this shared variable to indirectly instruct the thread to shut down. You have to be careful here, because this shared variable is being accessed by multiple threads, of which at least one is writing to the shared variable. It’s recommended to use atomic variables or condition variables, both discussed later in this chapter.
As you saw in the previous examples, launching a new thread is pretty easy. However, in most cases you are probably interested in results produced by the thread. For example, if your thread performs some mathematical calculations, you really would like to get the results out of the thread once the thread is finished. One way is to pass a pointer or reference to a result variable to the thread in which the thread stores the results. Another method is to store the results inside class member variables of a function object, which you can retrieve later once the thread has finished executing. This only works if you use std::ref() to pass your function object by reference to the thread constructor.
However, there is another easier method to obtain a result from threads: futures. Futures also make it easier to handle errors that occur inside your threads. They are discussed later in this chapter.
The whole exception mechanism in C++ works perfectly fine, as long as it stays within one single thread. Every thread can throw its own exceptions, but they need to be caught within their own thread. If a thread throws an exception and it is not caught inside the thread, the C++ runtime calls std::terminate(), which terminates the whole application. Exceptions thrown in one thread cannot be caught in another thread. This introduces quite a few problems when you would like to use exception handling in combination with multithreaded programming.
Without the standard threading library, it’s very difficult if not impossible to gracefully handle exceptions across threads. The standard threading library solves this issue with the following exception-related functions. These functions work not only with std::exceptions, but also with other kinds of exceptions, ints, strings, custom exceptions, and so on:
exception_ptr current_exception() noexcept;
This is intended to be called from inside a catch block. It returns an exception_ptr object that refers to the exception currently being handled, or a copy of the currently handled exception. A null exception_ptr object is returned if no exception is being handled. This referenced exception object remains valid for as long as there is an object of type exception_ptr that is referencing it. exception_ptr is of type NullablePointer, which means it can easily be tested with a simple if statement, as the example later in this section will demonstrate.
[[noreturn]] void rethrow_exception(exception_ptr p);
This function rethrows the exception referenced by the exception_ptr parameter. Rethrowing the referenced exception does not have to be done in the same thread that generated the referenced exception in the first place, which makes this feature perfectly suited for handling exceptions across different threads. The [[noreturn]] attribute makes it clear that this function never returns normally. Attributes are introduced in Chapter 11.
template<class E> exception_ptr make_exception_ptr(E e) noexcept;
This function creates an exception_ptr object that refers to a copy of the given exception object. This is basically a shorthand notation for the following code:
try {throw e;} catch(…) {return current_exception();}
Let’s see how handling exceptions across different threads can be implemented using these functions. The following code defines a function that does some work and throws an exception. This function will ultimately be running in a separate thread:
void doSomeWork(){for (int i = 0; i < 5; ++i) {cout << i << endl;}cout << "Thread throwing a runtime_error exception…" << endl;throw runtime_error("Exception from thread");}
The following threadFunc() function wraps the call to the preceding function in a try/catch block, catching all exceptions that doSomeWork() might throw. A single argument is supplied to threadFunc(), which is of type exception_ptr&. Once an exception is caught, the function current_exception() is used to get a reference to the exception being handled, which is then assigned to the exception_ptr parameter. After that, the thread exits normally:
void threadFunc(exception_ptr& err){try {doSomeWork();} catch (…) {cout << "Thread caught exception, returning exception…" << endl;err = current_exception();}}
The following doWorkInThread() function is called from within the main thread. Its responsibility is to create a new thread and start executing threadFunc() in it. A reference to an object of type exception_ptr is given as argument to threadFunc(). Once the thread is created, the doWorkInThread() function waits for the thread to finish by using the join() method, after which the error object is examined. Because exception_ptr is of type NullablePointer, you can easily check it using an if statement. If it’s a non-null value, the exception is rethrown in the current thread, which is the main thread in this example. Because you are rethrowing the exception in the main thread, the exception has been transferred from one thread to another thread.
void doWorkInThread(){exception_ptr error;// Launch threadthread t{ threadFunc, ref(error) };// Wait for thread to finisht.join();// See if thread has thrown any exceptionif (error) {cout << "Main thread received exception, rethrowing it…" << endl;rethrow_exception(error);} else {cout << "Main thread did not receive any exception." << endl;}}
The main() function is pretty straightforward. It calls doWorkInThread() and wraps the call in a try/catch block to catch exceptions thrown by the thread spawned by doWorkInThread():
int main(){try {doWorkInThread();} catch (const exception& e) {cout << "Main function caught: '" << e.what() << "'" << endl;}}
The output is as follows:
01234Thread throwing a runtime_error exception…Thread caught exception, returning exception…Main thread received exception, rethrowing it…Main function caught: 'Exception from thread'
To keep the examples in this chapter compact and to the point, their main() functions usually use join() to block the main thread, and to wait until threads have finished. Of course, in real-world applications you do not want to block your main thread. For example, in a GUI application, blocking your main thread means that the UI becomes unresponsive. In that case, you can use a messaging paradigm to communicate between threads. For example, the earlier threadFunc() function could send a message to the UI thread with as argument a copy of the result of current_exception(). But even then, you need to make sure to call either join() or detach() on any spawned threads, as discussed earlier in this chapter.
Atomic types allow atomic access, which means that concurrent reading and writing without additional synchronization is allowed. Without atomic operations, incrementing a variable is not thread-safe because the compiler first loads the value from memory into a register, increments it, and then stores the result back in memory. Another thread might touch the same memory during this increment operation, which is a data race. For example, the following code is not thread-safe and contains a data race. This type of data races is discussed in the beginning of this chapter.
int counter = 0; // Global variable++counter; // Executed in multiple threads
You can use an std::atomic type to make this thread-safe without explicitly using any synchronization mechanism, such as mutual exclusion objects, which are discussed later in this chapter. Here is the same code using an atomic integer:
atomic<int> counter(0) ; // Global variable++counter; // Executed in multiple threads
You need to include the <atomic> header to use these atomic types. The C++ standard defines named integral atomic types for all primitive types. The following table lists a few.
| NAMED ATOMIC TYPE | EQUIVALENT STD::ATOMIC TYPE |
atomic_bool |
atomic<bool> |
atomic_char |
atomic<char> |
atomic_uchar |
atomic<unsigned char> |
atomic_int |
atomic<int> |
atomic_uint |
atomic<unsigned int> |
atomic_long |
atomic<long> |
atomic_ulong |
atomic<unsigned long> |
atomic_llong |
atomic<long long> |
atomic_ullong |
atomic<unsigned long long> |
atomic_wchar_t |
atomic<wchar_t> |
You can use atomic types without explicitly using any synchronization mechanism. However, underneath, operations on atomics of a certain type might use a synchronization mechanism such as mutual exclusion objects. This might happen, for example, when the hardware you are targeting lacks the instructions to perform an operation atomically. You can use the is_lock_free() method on an atomic type to query whether it supports lock-free operations, that is, its operations run without any explicit synchronization mechanism underneath.
The std::atomic class template can be used with all kinds of types, not only integral types. For example, you can create an atomic<double>, or an atomic<MyType>, but only if MyType is trivially copyable. Depending on the size of the specified type, underneath these might require explicit synchronization mechanisms. In the following example, both Foo and Bar are trivially copyable, that is, std::is_trivially_copyable_v is true for both. However, atomic<Foo> is not lock free, while atomic<Bar> is.
class Foo { private: int mArray[123]; };class Bar { private: int mInt; };int main(){atomic<Foo> f;// Outputs: 1 0cout << is_trivially_copyable_v<Foo> << " " << f.is_lock_free() << endl;atomic<Bar> b;// Outputs: 1 1cout << is_trivially_copyable_v<Bar> << " " << b.is_lock_free() << endl;}
When accessing a piece of data from multiple threads, atomics also solve problems such as memory ordering, compiler optimizations, and so on. Basically, it’s virtually never safe to read and write to the same piece of data from multiple threads without using atomics or explicit synchronization mechanisms!
This section explains in more detail why you should use atomic types. Suppose you have a function called increment() that increments an integer reference parameter in a loop. This code uses std::this_thread::sleep_for() to introduce a small delay in each loop. The argument to sleep_for() is an std::chrono::duration, which is explained in Chapter 20.
void increment(int& counter){for (int i = 0; i < 100; ++i) {++counter;this_thread::sleep_for(1ms);}}
Now, you would like to run several threads in parallel, all executing this increment() function on a shared counter variable. By implementing this naively without atomic types or without any kind of thread synchronization, you introduce data races. The following code launches ten threads, after which it waits for all threads to finish by calling join() on each thread:
int main(){int counter = 0;vector<thread> threads;for (int i = 0; i < 10; ++i) {threads.push_back(thread{ increment, ref(counter) });}for (auto& t : threads) {t.join();}cout << "Result = " << counter <<endl;}
Because increment() increments its given integer 100 times, and ten threads are launched, each of which executes increment() on the same shared counter, the expected result is 1,000. If you execute this program several times, you might get the following output but with different values:
Result = 982Result = 977Result = 984
This code is clearly showing a data race. In this example, you can use an atomic type to fix the code. The following code highlights the required changes:
#include <atomic>void increment(atomic<int>& counter){for (int i = 0; i < 100; ++i) {++counter;this_thread::sleep_for(1ms);}}int main(){atomic<int> counter(0);vector<thread> threads;for (int i = 0; i < 10; ++i) {threads.push_back(thread{ increment, ref(counter) });}for (auto& t : threads) {t.join();}cout << "Result = " << counter << endl;}
The changes add the <atomic> header file, and change the type of the shared counter to std::atomic<int> instead of int. When you run this modified version, you always get 1,000 as the result:
Result = 1000Result = 1000Result = 1000
Without explicitly adding any synchronization mechanism to the code, it is now thread-safe and data-race-free because the ++counter operation on an atomic type loads, increments, and stores the value in one atomic transaction, which cannot be interrupted.
However, there is a new problem with this modified code: a performance problem. You should try to minimize the amount of synchronization, either atomic or explicit synchronization, because it lowers performance. For this simple example, the best and recommended solution is to let increment() calculate its result in a local variable, and only after the loop, add it to the counter reference. Note that it is still required to use an atomic type, because you are still writing to counter from multiple threads.
void increment(atomic<int>& counter){int result = 0;for (int i = 0; i < 100; ++i) {++result;this_thread::sleep_for(1ms);}counter += result;}
The C++ standard defines a number of atomic operations. This section describes a few of those operations. For a full list, consult a Standard Library Reference, see Appendix B.
A first example of an atomic operation is the following:
bool atomic<T>::compare_exchange_strong(T& expected, T desired);The logic implemented atomically by this operation is as follows, in pseudo-code:
if (*this == expected) {*this = desired;return true;} else {expected = *this;return false;}
Although this logic might seem fairly strange on first sight, this operation is a key building block for writing lock-free concurrent data structures. Lock-free concurrent data structures allow operations on their data without requiring any synchronization mechanisms. However, implementing such data structures is an advanced topic, outside the scope of this book.
A second example is atomic<T>::fetch_add(), which works for integral atomic types. It fetches the current value of the atomic type, adds the given increment to the atomic value, and returns the original non-incremented value. Here is an example:
atomic<int> value(10);cout << "Value = " << value << endl;int fetched = value.fetch_add(4);cout << "Fetched = " << fetched << endl;cout << "Value = " << value << endl;
If no other threads are touching the contents of the fetched and value variables, the output is as follows:
Value = 10Fetched = 10Value = 14
Atomic integral types support the following atomic operations: fetch_add(), fetch_sub(), fetch_and(), fetch_or(), fetch_xor(), ++, --, +=, -=, &=, ^=, and |=. Atomic pointer types support fetch_add(), fetch_sub(), ++, --, +=, and -=.
Most of the atomic operations can accept an extra parameter specifying the memory ordering that you would like. Here is an example:
T atomic<T>::fetch_add(T value, memory_order = memory_order_seq_cst);You can change the default memory_order. The C++ standard provides memory_order_relaxed, memory_order_consume, memory_order_acquire, memory_order_release, memory_order_acq_rel, and memory_order_seq_cst, all of which are defined in the std namespace. However, you will rarely want to use them instead of the default. While another memory order may perform better than the default, according to some metrics, if you use them in a slightly incorrect way, you will again introduce data races or other difficult-to-track threading-related problems. If you do want to know more about memory ordering, consult one of the multithreading references in Appendix B.
If you are writing multithreaded applications, you have to be sensitive to sequencing of operations. If your threads read and write shared data, this can be a problem. There are many ways to avoid this problem, such as never actually sharing data between threads. However, if you can’t avoid sharing data, you must provide for synchronization so that only one thread at a time can change the data.
Scalars such as Booleans and integers can often be synchronized properly with atomic operations, as described earlier; however, when your data is more complex, and you need to use that data from multiple threads, you must provide explicit synchronization.
The Standard Library has support for mutual exclusion in the form of mutex and lock classes. These can be used to implement synchronization between threads and are discussed in the following sections.
Mutex stands for mutual exclusion. The basic mechanism of using a mutex is as follows:
The C++ standard provides non-timed mutex and timed mutex classes.
The Standard Library has three non-timed mutex classes: std::mutex, recursive_mutex, and shared_mutex (since C++17). The first two classes are defined in <mutex>, and the last one in <shared_mutex>. Each mutex supports the following methods.
lock(): The calling thread tries to obtain the lock and blocks until the lock has been acquired. It blocks indefinitely. If there is a desire to limit the amount of time the thread blocks, you should use a timed mutex, discussed in the next section.try_lock(): The calling thread tries to obtain the lock. If the lock is currently held by another thread, the call returns immediately. If the lock has been obtained, try_lock() returns true; otherwise, it returns false.unlock(): The calling thread releases the lock it currently holds, making it available for another thread.std::mutex is a standard mutual exclusion class with exclusive ownership semantics. There can be only one thread owning the mutex. If another thread wants to obtain ownership of this mutex, it either blocks when using lock(), or fails when using try_lock(). A thread already having ownership of a mutex is not allowed to call lock() or try_lock() again on that mutex. This might lead to a deadlock!
std::recursive_mutex behaves almost identically to mutex, except that a thread already having ownership of a recursive mutex is allowed to call lock() or try_lock() again on the same recursive mutex. The calling thread should call the unlock() method as many times as it obtained a lock on the recursive mutex.
The shared_mutex class supports the concept of shared lock ownership, also known as readers-writers lock. A thread can get either exclusive ownership or shared ownership of the lock. Exclusive ownership, also known as a write lock, can be acquired only when there are no other threads having exclusive or shared ownership. Shared ownership, also known as a read lock, can be acquired if there is no other thread having exclusive ownership, but other threads are allowed to have acquired shared ownership. The shared_mutex class supports lock(), try_lock(), and unlock(). These methods acquire and release exclusive locks. Additionally, they have the following shared ownership-related methods: lock_shared(), try_lock_shared(), and unlock_shared(). These work similarly to the other set of methods, but try to acquire or release shared ownership.
A thread already having a lock on a shared_mutex is not allowed to try to acquire a second lock on that mutex. This might lead to a deadlock!
The Standard Library provides three timed mutex classes: std::timed_mutex, recursive_timed_mutex, and shared_timed_mutex. The first two classes are defined in <mutex>, and the last one in <shared_mutex>. They all support the lock(), try_lock(), and unlock() methods; and shared_timed_mutex also supports lock_shared(), try_lock_shared(), and unlock_shared(). All these methods behave the same as described in the previous section. Additionally, they support the following methods.
try_lock_for(rel_time): The calling thread tries to obtain the lock for a certain relative time. If the lock could not be obtained after the given timeout, the call fails and returns false. If the lock could be obtained within the timeout, the call succeeds and returns true. The timeout is specified as an std::chrono::duration, see Chapter 20.try_lock_until(abs_time): The calling thread tries to obtain the lock until the system time equals or exceeds the specified absolute time. If the lock could be obtained before this time, the call returns true. If the system time passes the given absolute time, the function stops trying to obtain the lock and returns false. The absolute time is specified as an std::chrono::time_point, see Chapter 20.A shared_timed_mutex also supports try_lock_shared_for() and try_lock_shared_until().
A thread already having ownership of a timed_mutex or a shared_timed_mutex is not allowed to acquire the lock a second time on that mutex. This might lead to a deadlock!
A recursive_timed_mutex allows a thread to acquire a lock multiple times, just as with recursive_mutex.
A lock class is an RAII class that makes it easier to correctly obtain and release a lock on a mutex; the destructor of the lock class automatically releases the associated mutex. The C++ standard defines four types of locks: std::lock_guard, unique_lock, shared_lock, and scoped_lock. The latter has been introduced with C++17.
lock_guard, defined in <mutex>, is a simple lock with two constructors:
explicit lock_guard(mutex_type& m);
This is a constructor accepting a reference to a mutex. This constructor tries to obtain a lock on the mutex and blocks until the lock is obtained. The explicit keyword for constructors is discussed in Chapter 9.
lock_guard(mutex_type& m, adopt_lock_t);
This is a constructor accepting a reference to a mutex and an instance of std::adopt_lock_t. There is a predefined adopt_lock_t instance provided, called std::adopt_lock. The lock assumes that the calling thread has already obtained a lock on the referenced mutex. The lock “adopts” the mutex, and automatically releases the mutex when the lock is destroyed.
std::unique_lock, defined in <mutex>, is a more sophisticated lock that allows you to defer lock acquisition until later in the execution, long after the declaration. You can use the owns_lock() method, or the unique_lock’s bool conversion operator, to see if the lock has been acquired. An example of using this conversion operator is given later in this chapter in the section “Using Timed Locks.” unique_lock has several constructors:
explicit unique_lock(mutex_type& m);
This constructor accepts a reference to a mutex. It tries to obtain a lock on the mutex and blocks until the lock is obtained.
unique_lock(mutex_type& m, defer_lock_t) noexcept;
This constructor accepts a reference to a mutex and an instance of std::defer_lock_t. There is a predefined defer_lock_t instance provided, called std::defer_lock. The unique_lock stores the reference to the mutex, but does not immediately try to obtain a lock. A lock can be obtained later.
unique_lock(mutex_type& m, try_to_lock_t);
This constructor accepts a reference to a mutex and an instance of std::try_to_lock_t. There is a predefined try_to_lock_t instance provided, called std::try_to_lock. The lock tries to obtain a lock to the referenced mutex, but if it fails, it does not block, in which case, a lock can be obtained later.
unique_lock(mutex_type& m, adopt_lock_t);
This constructor accepts a reference to a mutex and an instance of std::adopt_lock_t, for example std::adopt_lock. The lock assumes that the calling thread has already obtained a lock on the referenced mutex. The lock “adopts” the mutex, and automatically releases the mutex when the lock is destroyed.
unique_lock(mutex_type& m, const chrono::time_point<Clock, Duration>& abs_time);
This constructor accepts a reference to a mutex and an absolute time. The constructor tries to obtain a lock until the system time passes the given absolute time. The chrono library is discussed in Chapter 20.
unique_lock(mutex_type& m, const chrono::duration<Rep, Period>& rel_time);
This constructor accepts a reference to a mutex and a relative time. The constructor tries to get a lock on the mutex with the given relative timeout.
The unique_lock class also has the methods lock(), try_lock(), try_lock_for(), try_lock_until(), and unlock(), which behave as explained in the section “Timed Mutex Classes,” earlier in this chapter.
The shared_lock class, defined in <shared_mutex>, has the same type of constructors and the same methods as unique_lock. The difference is that the shared_lock class calls the shared ownership-related methods on the underlying shared mutex. Thus, the methods of shared_lock are called lock(), try_lock(), and so on, but on the underlying shared mutex they call lock_shared(), try_lock_shared(), and so on. This is done to give shared_lock the same interface as unique_lock, so it can be used as a stand-in replacement for unique_lock, but acquires a shared lock instead of an exclusive lock.
C++ has two generic lock functions that you can use to obtain locks on multiple mutex objects at once without the risk of creating deadlocks. Both functions are defined in the std namespace, and both are variadic template functions, as discussed in Chapter 22.
The first function, lock(), locks all the given mutex objects in an unspecified order without the risk of deadlocks. If one of the mutex lock calls throws an exception, unlock() is called on all locks that have already been obtained. Its prototype is as follows:
template <class L1, class L2, class… L3> void lock(L1&, L2&, L3&…);try_lock() has a similar prototype, but it tries to obtain a lock on all the given mutex objects by calling try_lock() on each of them in sequence. It returns -1 if all calls to try_lock() succeed. If any try_lock() fails, unlock() is called on all locks that have already been obtained, and the return value is the zero-based index of the parameter position of the mutex on which try_lock() failed.
The following example demonstrates how to use the generic lock() function. The process() function first creates two locks, one for each mutex, and gives an instance of std::defer_lock_t as a second argument to tell unique_lock not to acquire the lock during construction. The call to std::lock() then acquires both locks without the risk of deadlocks.
mutex mut1;mutex mut2;void process(){unique_lock lock1(mut1, defer_lock); // C++17unique_lock lock2(mut2, defer_lock); // C++17//unique_lock<mutex> lock1(mut1, defer_lock);//unique_lock<mutex> lock2(mut2, defer_lock);lock(lock1, lock2);// Locks acquired} // Locks automatically released
std::scoped_lock, defined in <mutex>, is similar to lock_guard, except that it accepts a variable number of mutexes. This greatly simplifies acquiring multiple locks. For instance, the example with the process() function in the previous section can be written using a scoped_lock as follows:
mutex mut1;mutex mut2;void process(){scoped_lock locks(mut1, mut2);// Locks acquired} // Locks automatically released
This uses C++17’s template argument deduction for constructors. If your compiler does not support this feature yet, you have to write the following:
scoped_lock<mutex, mutex> locks(mut1, mut2);You can use std::call_once() in combination with std::once_flag to make sure a certain function or method is called exactly one time, no matter how many threads try to call call_once() with the same once_flag. Only one call_once() invocation actually calls the given function or method. If the given function does not throw any exceptions, then this invocation is called the effective call_once() invocation. If the given function does throw an exception, the exception is propagated back to the caller, and another caller is selected to execute the function. The effective invocation on a specific once_flag instance finishes before all other call_once() invocations on the same once_flag. Other threads calling call_once() on the same once_flag block until the effective call is finished. Figure 23-3 illustrates this with three threads. Thread 1 performs the effective call_once() invocation, thread 2 blocks until the effective invocation is finished, and thread 3 doesn’t block because the effective invocation from thread 1 has already finished.
The following example demonstrates the use of call_once(). The example launches three threads running processingFunction() that use some shared resources. These shared resources should be initialized only once by calling initializeSharedResources() once. To accomplish this, each thread calls call_once() with a global once_flag. The result is that only one thread effectively executes initializeSharedResources(), and exactly one time. While this call_once() call is in progress, other threads block until initializeSharedResources() returns.
once_flag gOnceFlag;void initializeSharedResources(){// … Initialize shared resources to be used by multiple threads.cout << "Shared resources initialized." << endl;}void processingFunction(){// Make sure the shared resources are initialized.call_once(gOnceFlag, initializeSharedResources);// … Do some work, including using the shared resourcescout << "Processing" << endl;}int main(){// Launch 3 threads.vector<thread> threads(3);for (auto& t : threads) {t = thread{ processingFunction };}// Join on all threadsfor (auto& t : threads) {t.join();}}
The output of this code is as follows:
Shared resources initialized.ProcessingProcessingProcessing
Of course, in this example, you could call initializeSharedResources() once in the beginning of the main() function before the threads are launched; however, that wouldn’t demonstrate the use of call_once().
The following sections give a couple of examples on how to use mutual exclusion objects to synchronize multiple threads.
Earlier in this chapter, in the “Threads” section, there is an example with a class called Counter. That example mentions that C++ streams are data-race free by default, but that the output from multiple threads can be interleaved. To solve this interleaving issue, you can use a mutual exclusion object to make sure that only one thread at a time is reading/writing to the stream object.
The following example synchronizes all accesses to cout in the Counter class. For this, a static
mutex object is added. It should be static, because all instances of the class should use the same mutex instance. lock_guard is used to obtain a lock on the mutex before writing to cout. Changes compared to the earlier version are shown in bold.
class Counter{public:Counter(int id, int numIterations): mId(id), mNumIterations(numIterations){}void operator()() const{for (int i = 0; i < mNumIterations; ++i) {lock_guard lock(sMutex);cout << "Counter " << mId << " has value " << i << endl;}}private:int mId;int mNumIterations;static mutex sMutex;};mutex Counter::sMutex;
This code creates a lock_guard instance on each iteration of the for loop. It is recommended to limit the time a lock is held as much as possible; otherwise, you are blocking other threads for too long. For example, if the lock_guard instance was created once right before the for loop, then you would basically lose all multithreading in this code because one thread would hold a lock for the entire duration of its for loop, and all other threads would wait for this lock to be released.
The following example demonstrates how to use a timed mutex. It is the same Counter class as before, but this time it uses a timed_mutex in combination with a unique_lock. A relative time of 200 milliseconds is given to the unique_lock constructor, causing it to try to obtain a lock for 200 milliseconds. If the lock cannot be obtained within this timeout interval, the constructor returns. Afterward, you can check whether or not the lock has been acquired. You can do this with an if statement on the lock variable, because unique_lock defines a bool conversion operator. The timeout is specified using the chrono library, discussed in Chapter 20.
class Counter{public:Counter(int id, int numIterations): mId(id), mNumIterations(numIterations){}void operator()() const{for (int i = 0; i < mNumIterations; ++i) {unique_lock lock(sTimedMutex, 200ms);if (lock) {cout << "Counter " << mId << " has value " << i << endl;} else {// Lock not acquired in 200ms, skip output.}}}private:int mId;int mNumIterations;static timed_mutex sTimedMutex;};timed_mutex Counter::sTimedMutex;
The double-checked locking pattern is actually an anti-pattern, which you should avoid! It is shown here because you might come across it in existing code bases. The idea of the double-checked locking pattern is to try to avoid the use of mutual exclusion objects. It’s a half-baked attempt at trying to write more efficient code than using a mutual exclusion object. It can really go wrong when you try to make it faster than demonstrated in the upcoming example, for instance, by using relaxed atomics (not further discussed), using a regular Boolean instead of an atomic<bool>, and so on. The pattern becomes sensitive to data races, and it is hard to get right. The irony is that using call_once() will actually be faster, and using a magic static1 (if applicable) will be even faster than that.
Double-checked locking could, for example, be used to make sure that resources are initialized exactly once. The following example shows how you can implement this. It is called the double-checked locking pattern because it is checking the value of the gInitialized variable twice, once before acquiring the lock and once right after acquiring the lock. The first gInitialized check is used to prevent acquiring a lock when it is not needed. The second check is required to make sure that no other thread performed the initialization between the first gInitialized check and acquiring the lock.
void initializeSharedResources(){// … Initialize shared resources to be used by multiple threads.cout << "Shared resources initialized." << endl;}atomic<bool> gInitialized(false);mutex gMutex;void processingFunction(){if (!gInitialized) {unique_lock lock(gMutex);if (!gInitialized) {initializeSharedResources();gInitialized = true;}}cout << "OK" << endl;}int main(){vector<thread> threads;for (int i = 0; i < 5; ++i) {threads.push_back(thread{ processingFunction });}for (auto& t : threads) {t.join();}}
The output clearly shows that only one thread initializes the shared resources:
Shared resources initialized.OKOKOKOKOK
Condition variables allow a thread to block until a certain condition is set by another thread, or until the system time reaches a specified time. These variables allow for explicit inter-thread communication. If you are familiar with multithreaded programming using the Win32 API, you can compare condition variables with event objects in Windows.
Two kinds of condition variables are available, both of which are defined in the <condition_variable> header file.
std::condition_variable: A condition variable that can wait only on a unique_lock<mutex>, which, according to the C++ standard, allows for maximum efficiency on certain platforms.std::condition_variable_any: A condition variable that can wait on any kind of object, including custom lock types.A condition_variable supports the following methods:
notify_one();
This method wakes up one of the threads waiting on this condition variable. This is similar to an auto-reset event in Windows.
notify_all();
This method wakes up all threads waiting on this condition variable.
wait(unique_lock<mutex>& lk);
The thread calling wait() should already have acquired a lock on lk. The effect of calling wait() is that it atomically calls lk.unlock() and then blocks the thread, waiting for a notification. When the thread is unblocked by a notify_one() or notify_all() call in another thread, the function calls lk.lock() again, possibly blocking until the lock has been acquired, and then returns.
wait_for(unique_lock<mutex>& lk, const chrono::duration<Rep, Period>& rel_time);
This method is similar to wait(), except that the thread is unblocked by a notify_one() call, a notify_all() call, or when the given timeout has expired.
wait_until(unique_lock<mutex>& lk, const chrono::time_point<Clock, Duration>& abs_time);
This method is similar to wait(), except that the thread is unblocked by a notify_one() call, a notify_all() call, or when the system time passes the given absolute time.
There are also versions of wait(), wait_for(), and wait_until() that accept an extra predicate parameter. For instance, the version of wait() accepting an extra predicate is equivalent to the following:
while (!predicate())wait(lk);
The condition_variable_any class supports the same methods as condition_variable, except that it accepts any kind of lock class instead of only a unique_lock<mutex>. The lock class used should have a lock() and unlock() method.
Threads waiting on a condition variable can wake up when another thread calls notify_one() or notify_all(), with a relative timeout, or when the system time reaches a certain time. However, they can also wake up spuriously. This means that a thread can wake up, even if no other thread has called any notify method, and no timeouts have been reached yet. Thus, when a thread waits on a condition variable and wakes up, it needs to check why it woke up. One way to check for this is by using one of the versions of wait() accepting a predicate, as shown in the following example.
As an example, condition variables can be used for background threads processing items from a queue. You can define a queue in which you insert items to be processed. A background thread waits until there are items in the queue. When an item is inserted into the queue, the thread wakes up, processes the item, and goes back to sleep, waiting for the next item. Suppose you have the following queue:
queue<string> mQueue;You need to make sure that only one thread is modifying this queue at any given time. You can do this with a mutex:
mutex mMutex;To be able to notify a background thread when an item is added, you need a condition variable:
condition_variable mCondVar;A thread that wants to add an item to the queue first acquires a lock on the mutex, then adds the item to the queue, and notifies the background thread. You can call notify_one() or notify_all() whether or not you currently have the lock; both work.
// Lock mutex and add entry to the queue.unique_lock lock(mMutex);mQueue.push(entry);// Notify condition variable to wake up thread.mCondVar.notify_all();
The background thread waits for notifications in an infinite loop, as follows. Note the use of wait() accepting a predicate to correctly handle spurious wake-ups. The predicate checks if there really is something in the queue. When the call to wait() returns, you are sure there is something in the queue.
unique_lock lock(mMutex);while (true) {// Wait for a notification.mCondVar.wait(lock, [this]{ return !mQueue.empty(); });// Condition variable is notified, so something is in the queue.// Process queue item…}
The section “Example: Multithreaded Logger Class,” toward the end of this chapter, provides a complete example on how to use condition variables to send notifications to other threads.
The C++ standard also defines a helper function called std::notify_all_at_thread_exit(cond, lk) where cond is a condition variable and lk is a unique_lock<mutex> instance. A thread calling this function should already have acquired the lock lk. When the thread exits, it automatically executes the following:
lk.unlock();cond.notify_all();
As discussed earlier in this chapter, using std::thread to launch a thread that calculates a single result does not make it easy to get the computed result back once the thread has finished executing. Another problem with std::thread is in how it handles errors like exceptions. If a thread throws an exception and this exception is not caught by the thread itself, the C++ runtime calls std::terminate(), which usually terminates the entire application.
A future can be used to more easily get the result out of a thread, and to transport exceptions from one thread to another thread, which can then handle the exception however it wants. Of course, it’s still good practice to always try to handle exceptions in the actual threads as much as possible, in order to prevent them from leaving the thread.
A promise is something where a thread stores its result. A future is used to get access to the result stored in a promise. That is, a promise is the input side for a result, a future is the output side. Once a function, running in the same thread or in another thread, has calculated the value that it wants to return, it can put this value in a promise. This value can then be retrieved through a future. You can think of this mechanism as an inter-thread communication channel for a result.
C++ provides a standard future, called std::future. You can retrieve the result from an std::future as follows. T is the type of the calculated result.
future<T> myFuture = …; // Is discussed laterT result = myFuture.get();
The call to get() retrieves the result and stores it in the variable result. If calculating the result is not finished yet, the call to get() blocks until the value becomes available. You can only call get() once on a future. The behavior of calling it a second time is undefined by the standard.
If you want to avoid blocking, you can first ask the future if there is a result available:
if (myFuture.wait_for(0)) { // Value is availableT result = myFuture.get();} else { // Value is not yet available…}
C++ provides the std::promise class as one way to implement the concept of a promise. You can call set_value() on a promise to store a result, or you can call set_exception() on it to store an exception in the promise. Note that you can only call set_value() or set_exception() once on a specific promise. If you call it multiple times, an std::future_error exception will be thrown.
A thread A that launches another thread B to calculate something can create an std::promise and pass this to the launched thread. Note that a promise cannot be copied, but it can be moved into a thread! Thread B uses that promise to store the result. Before moving the promise into thread B, thread A calls get_future() on the created promise to be able to get access to the result once B has finished. Here is a simple example:
void DoWork(promise<int> thePromise){// … Do some work …// And ultimately store the result in the promise.thePromise.set_value(42);}int main(){// Create a promise to pass to the thread.promise<int> myPromise;// Get the future of the promise.auto theFuture = myPromise.get_future();// Create a thread and move the promise into it.thread theThread{ DoWork, std::move(myPromise) };// Do some more work…// Get the result.int result = theFuture.get();cout << "Result: " << result << endl;// Make sure to join the thread.theThread.join();}
An std::packaged_task makes it easier to work with promises than explicitly using std::promise, as in the previous section. The following code demonstrates this. It creates a packaged_task to execute CalculateSum(). The future is retrieved from the packaged_task by calling get_future(). A thread is launched, and the packaged_task is moved into it. A packaged_task cannot be copied! After the thread is launched, get() is called on the retrieved future to get the result. This blocks until the result is available.
Note that CalculateSum() does not need to store anything explicitly in any kind of promise. A packaged_task automatically creates a promise, automatically stores the result of the called function, CalculateSum() in this case, in the promise, and automatically stores any exceptions thrown from the function in the promise.
int CalculateSum(int a, int b) { return a + b; }int main(){// Create a packaged task to run CalculateSum.packaged_task<int(int, int)> task(CalculateSum);// Get the future for the result of the packaged task.auto theFuture = task.get_future();// Create a thread, move the packaged task into it, and// execute the packaged task with the given arguments.thread theThread{ std::move(task), 39, 3 };// Do some more work…// Get the result.int result = theFuture.get();cout << result << endl;// Make sure to join the thread.theThread.join();}
If you want to give the C++ runtime more control over whether or not a thread is created to calculate something, you can use std::async(). It accepts a function to be executed, and returns a future that you can use to retrieve the result. There are two ways in which async() can run your function:
get() on the returned futureIf you call async() without additional arguments, the runtime automatically chooses one of the two methods depending on factors such as the number of CPU cores in your system and the amount of concurrency already taking place. You can influence the runtime’s behavior by specifying a policy argument.
launch::async: forces the runtime to execute the function asynchronously on a different thread.launch::deferred: forces the runtime to execute the function synchronously on the calling thread when get() is called.launch::async | launch::deferred: lets the runtime choose (= default behavior).The following example demonstrates the use of async():
int calculate(){return 123;}int main(){auto myFuture = async(calculate);//auto myFuture = async(launch::async, calculate);//auto myFuture = async(launch::deferred, calculate);// Do some more work…// Get the result.int result = myFuture.get();cout << result << endl;}
As you can see in this example, std::async() is one of the easiest methods to perform some calculations either asynchronously (on a different thread), or synchronously (on the same thread), and retrieve the result afterward.
A big advantage of using futures is that they can transport exceptions between threads. Calling get() on a future either returns the calculated result, or rethrows any exception that has been stored in the promise linked to the future. When you use packaged_task or async(), any exception thrown from the launched function is automatically stored in the promise. If you use std::promise as your promise, you can call set_exception() to store an exception in it. Here is an example using async():
int calculate(){throw runtime_error("Exception thrown from calculate().");}int main(){// Use the launch::async policy to force asynchronous execution.auto myFuture = async(launch::async, calculate);// Do some more work…// Get the result.try {int result = myFuture.get();cout << result << endl;} catch (const exception& ex) {cout << "Caught exception: " << ex.what() << endl;}}
std::future<T> only requires T to be move-constructible. When you call get() on a future<T>, the result is moved out of the future and returned to you. This means you can call get() only once on a future<T>.
If you want to be able to call get() multiple times, even from multiple threads, then you need to use an std::shared_future<T>, in which case T needs to be copy-constructible. A shared_future can be created by using std::future::share(), or by passing a future to the shared_future constructor. Note that a future is not copyable, so you have to move it into the shared_future constructor.
shared_future can be used to wake up multiple threads at once. For example, the following piece of code defines two lambda expressions to be executed asynchronously on different threads. The first thing each lambda expression does is set a value to their respective promise to signal that they have started. Then they both call get() on signalFuture which blocks until a parameter is made available through the future, after which they continue their execution. Each lambda expression captures their respective promise by reference, and captures signalFuture by value, so both lambda expressions have a copy of signalFuture. The main thread uses async() to execute both lambda expressions asynchronously on different threads, waits until both threads have started, and then sets the parameter in the signalPromise which wakes up both threads.
promise<void> thread1Started, thread2Started;promise<int> signalPromise;auto signalFuture = signalPromise.get_future().share();//shared_future<int> signalFuture(signalPromise.get_future());auto function1 = [&thread1Started, signalFuture] {thread1Started.set_value();// Wait until parameter is set.int parameter = signalFuture.get();// …};auto function2 = [&thread2Started, signalFuture] {thread2Started.set_value();// Wait until parameter is set.int parameter = signalFuture.get();// …};// Run both lambda expressions asynchronously.// Remember to capture the future returned by async()!auto result1 = async(launch::async, function1);auto result2 = async(launch::async, function2);// Wait until both threads have started.thread1Started.get_future().wait();thread2Started.get_future().wait();// Both threads are now waiting for the parameter.// Set the parameter to wake up both of them.signalPromise.set_value(42);
This section demonstrates how to use threads, mutual exclusion objects, locks, and condition variables to write a multithreaded Logger class. The class allows log messages to be added to a queue from different threads. The Logger class itself processes this queue in a background thread that serially writes the log messages to a file. The class will be designed in two iterations to show you some examples of problems you will encounter when writing multithreaded code.
The C++ standard does not have a thread-safe queue, so it is obvious that you have to protect access to the queue with some synchronization mechanism to prevent multiple threads from reading/writing to the queue at the same time. This example uses a mutual exclusion object and a condition variable to provide the synchronization. Based on that, you might define the Logger class as follows:
class Logger{public:// Starts a background thread writing log entries to a file.Logger();// Prevent copy construction and assignment.Logger(const Logger& src) = delete;Logger& operator=(const Logger& rhs) = delete;// Add log entry to the queue.void log(std::string_view entry);private:// The function running in the background thread.void processEntries();// Mutex and condition variable to protect access to the queue.std::mutex mMutex;std::condition_variable mCondVar;std::queue<std::string> mQueue;// The background thread.std::thread mThread;};
The implementation is as follows. Note that this initial design has a couple of problems and when you try to run it, it might behave strangely or even crash. This is discussed and solved in the next iteration of the Logger class. The inner while loop in the processEntries() method is worth looking at. It processes all messages in the queue one at a time, and acquires and releases the lock on each iteration. This is done to make sure the loop doesn’t keep the lock for too long, blocking other threads.
Logger::Logger(){// Start background thread.mThread = thread{ &Logger::processEntries, this };}void Logger::log(string_view entry){// Lock mutex and add entry to the queue.unique_lock lock(mMutex);mQueue.push(string(entry));// Notify condition variable to wake up thread.mCondVar.notify_all();}void Logger::processEntries(){// Open log file.ofstream logFile("log.txt");if (logFile.fail()) {cerr << "Failed to open logfile." << endl;return;}// Start processing loop.unique_lock lock(mMutex);while (true) {// Wait for a notification.mCondVar.wait(lock);// Condition variable notified, something might be in the queue.lock.unlock();while (true) {lock.lock();if (mQueue.empty()) {break;} else {logFile << mQueue.front() << endl;mQueue.pop();}lock.unlock();}}}
This Logger class can be tested with the following test code. It launches a number of threads, all logging a few messages to the same Logger instance.
void logSomeMessages(int id, Logger& logger){for (int i = 0; i < 10; ++i) {stringstream ss;ss << "Log entry " << i << " from thread " << id;logger.log(ss.str());}}int main(){Logger logger;vector<thread> threads;// Create a few threads all working with the same Logger instance.for (int i = 0; i < 10; ++i) {threads.emplace_back(logSomeMessages, i, ref(logger));}// Wait for all threads to finish.for (auto& t : threads) {t.join();}}
If you build and run this naive initial version, you will notice that the application is terminated abruptly. That is caused because the application never calls join() or detach() on the background thread. Remember from earlier in this chapter that the destructor of a thread object which is still joinable, that is, neither join() nor detach() has been called yet, will call std::terminate() to terminate all running threads and the application itself. This means that messages still in the queue are not written to the file on disk. Some runtime libraries even issue an error or generate a crash
dump when the application is terminated like this. You need to add a mechanism to gracefully shut down the background thread and wait until the background thread is completely shut down before terminating the application. You can do this by adding a destructor and a Boolean member variable to the class. The new definition of the class is as follows:
class Logger{public:// Gracefully shut down background thread.virtual ~Logger();// Other public members omitted for brevityprivate:// Boolean telling the background thread to terminate.bool mExit = false;// Other members omitted for brevity};
The destructor sets mExit to true, wakes up the background thread, and then waits until the thread is shut down. The destructor acquires a lock on mMutex before setting mExit to true and before calling notify_all(). This is to prevent a race condition and deadlock with processEntries(). processEntries() could be at the beginning of its while loop right after having checked mExit and right before the call to wait(). If the main thread calls the Logger destructor at that very moment, and the destructor wouldn’t acquire a lock on mMutex, then the destructor sets mExit to true and calls notify_all() after processEntries() has checked mExit and before processEntries() is waiting on the condition variable; thus, processEntries() will not see the new value of mExit and it will miss the notification. In that case, the application is in a deadlock situation, because the destructor is waiting on the join() call and the background thread is waiting on the condition variable. Note that the destructor must release the lock on mMutex before calling join(), which explains the extra code block using curly brackets.
Logger::~Logger(){{unique_lock lock(mMutex);// Gracefully shut down the thread by setting mExit// to true and notifying the thread.mExit = true;// Notify condition variable to wake up thread.mCondVar.notify_all();}// Wait until thread is shut down. This should be outside the above code// block because the lock must be released before calling join()!mThread.join();}
The processEntries() method needs to check this Boolean variable and terminate the processing loop when it’s true:
void Logger::processEntries(){// Open log file.ofstream logFile("log.txt");if (logFile.fail()) {cerr << "Failed to open logfile." << endl;return;}// Start processing loop.unique_lock lock(mMutex);while (true) {if (!mExit) {// Only wait for notifications if we don't have to exit.// Wait for a notification.mCondVar.wait(lock);}// Condition variable is notified, so something might be in the queue// and/or we need to shut down this thread.lock.unlock();while (true) {lock.lock();if (mQueue.empty()) {break;} else {logFile << mQueue.front() << endl;mQueue.pop();}lock.unlock();}if (mExit) {break;}}}
Note that you cannot just check for mExit in the condition for the outer while loop because even when mExit is true, there might still be log entries in the queue that need to be written.
You can add artificial delays in specific places in your multithreaded code to trigger certain behavior. Note that such delays should only be added for testing, and should be removed from your final code! For example, to test that the race condition with the destructor is solved, you can remove any calls to log() from the main program, causing it to almost immediately call the destructor of the Logger class, and add the following delay:
void Logger::processEntries(){// Omitted for brevity// Start processing loop.unique_lock lock(mMutex);while (true) {this_thread::sleep_for(1000ms);// Needs #include <chrono>if (!mExit) { // Only wait for notifications if we don't have to exit.// Wait for a notification.mCondVar.wait(lock);}// Omitted for brevity}}
Instead of creating and deleting threads dynamically throughout your program’s lifetime, you can create a pool of threads that can be used as needed. This technique is often used in programs that want to handle some kind of event in a thread. In most environments, the ideal number of threads is equal to the number of processing cores. If there are more threads than cores, threads will have to be suspended to allow other threads to run, and this will ultimately add overhead. Note that while the ideal number of threads is equal to the number of cores, this applies only in the case where the threads are compute bound and cannot block for any other reason, including I/O. When threads can block, it is often appropriate to run more threads than there are cores. Determining the optimal number of threads in such cases is hard, and may involve throughput measurements.
Because not all processing is identical, it is not uncommon to have threads from a thread pool receive, as part of their input, a function object or lambda expression that represents the computation to be done.
Because threads from a thread pool are pre-existing, it is much more efficient for the operating system to schedule a thread from the pool to run than it is to create one in response to an input. Furthermore, the use of a thread pool allows you to manage the number of threads that are created, so, depending on the platform, you may have just one thread or thousands of threads.
Several libraries are available that implement thread pools, including Intel Threading Building Blocks (TBB), Microsoft Parallel Patterns Library (PPL), and so on. It’s recommended to use such a library for your thread pools instead of writing your own implementation. If you do want to implement a thread pool yourself, it can be done in a similar way to an object pool. Chapter 25 gives an example implementation of an object pool.
This section briefly lists a few best practices related to multithreaded programming.
thread objects are unjoinable: Make sure that either join() or detach() has been called on all thread objects. Destructors of threads that are still joinable will call std::terminate() which abruptly terminates all threads and the application.std::lock() or std::try_lock():If multiple threads need to acquire multiple locks, they must be acquired in the same order in all threads to prevent deadlocks. You should use the generic std::lock() or std::try_lock() functions to acquire multiple locks.lock_guard, unique_lock, shared_lock, or scoped_lock RAII classes to automatically release locks at the right time.This chapter gave a brief overview of multithreaded programming using the standard C++ threading support library. It explained how you can use atomic types and atomic operations to operate on shared data without having to use an explicit synchronization mechanism. In case you cannot use these atomic types and operations, you learned how to use mutual exclusion mechanisms to ensure proper synchronization between different threads that need read/write access to shared data. You also saw how promises and futures represent a simple inter-thread communication channel; you can use futures to more easily get a result back from a thread. The chapter finished with a number of best practices for multithreaded application design.
As mentioned in the introduction, this chapter tried to touch on all the basic multithreading building blocks provided by the Standard Library, but due to space constraints, it cannot go into all the details of multithreaded programming. There are books available that discuss nothing but multithreading. See Appendix B for a few references.
Chapter 24 starts the last part of this book, which is about software engineering. This part describes software engineering methods, code efficiency, testing, debugging, design techniques, design patterns, and how to target multiple platforms.
When you first learned how to program, you were probably on your own schedule. You were free to do everything at the last minute if you wanted to, and you could radically change your design during implementation. When coding in the professional world, however, programmers rarely have such flexibility. Even the most liberal engineering managers admit that some amount of process is necessary. These days, knowing the software engineering process is as important as knowing how to code.
In this chapter, I will survey various approaches to software engineering. I will not go into great depth on any one approach—there are plenty of excellent books on software engineering processes. My intention is to cover some different types of processes in broad strokes so you can compare and contrast them. I will try not to advocate or discourage any particular methodology. Rather, I hope that by learning about the tradeoffs of several different approaches, you’ll be able to construct a process that works for you and the rest of your team. Whether you’re a contractor working alone on projects, or your team consists of hundreds of engineers on several continents, understanding different approaches to software development will help you with your job on a daily basis.
The last part of this chapter discusses Source Code Control solutions that make it easier to manage source code and keep track of its history. A Source Code Control solution is mandatory in every company in order to avoid a source code maintenance nightmare, and it is even highly recommended for one-person projects.
The history of software development is filled with tales of failed projects. From over-budget and poorly marketed consumer applications to grandiose mega-hyped operating systems, it seems that no area of software development is free from this trend.
Even when software successfully reaches users, bugs have become so commonplace that end users are often forced to endure constant updates and patches. Sometimes the software does not accomplish the tasks it is supposed to do or doesn’t work the way the user would expect. These issues all point to a common truism of software: writing software is hard.
You may wonder why software engineering seems to differ from other forms of engineering in its frequency of failures. For example, while cars have their share of bugs, you rarely see them stop suddenly and demand a reboot due to a buffer overflow (though as more and more car components become software-driven, you just may). Your TV may not be perfect, but you don’t have to upgrade to version 2.3 to get Channel 6 to work.
Is it the case that other engineering disciplines are just more advanced than software development? Is a civil engineer able to construct a working bridge by drawing upon the long history of bridge building? Are chemical engineers able to build a compound successfully because most of the bugs were worked out in earlier generations? Is software engineering too new, or is it really a different type of discipline with inherent qualities contributing to the occurrence of bugs, unusable results, and doomed projects?
It certainly seems as if there’s something different about software engineering. For one thing, computer technology changes rapidly, creating uncertainty in the software development process. Even if an earth-shattering breakthrough does not occur during your project, the pace at which the IT industry moves can lead to problems. Software also often needs to be developed quickly because competition is fierce.
Software development schedules can also be unpredictable. Accurate scheduling is nearly impossible when a single gnarly bug can take days or even weeks to fix. Even when things seem to be going according to schedule, the widespread tendency of product definition changes (feature creep) can throw a wrench in the process.
Software is often complex. There is no easy and accurate way to prove that a program is bug-free. Buggy or messy code can have an impact on software for years if it is maintained through several versions. Software systems are often so complex that when staff turnover occurs, nobody wants to get anywhere near some legacy messy code. This leads to a cycle of endless patching, hacks, and workarounds.
Of course, standard business risks apply to software as well. Marketing pressures and miscommunication get in the way. Many programmers try to steer clear of corporate politics, but it’s not uncommon to have adversity between the development and product marketing groups.
All of these factors working against software engineering products indicate the need for some sort of process. Software projects are big, complicated, and fast-paced. To avoid failure, engineering groups need to adopt a system to control this unwieldy process.
Elegantly designed software with clean and maintainable code can be developed. I’m convinced it is possible, but it takes continuous efforts of each individual team member, and requires following proper software development processes and practices.
Complexity in software isn’t new. The need for a formalized process was recognized decades ago. Several approaches to modeling the software life cycle have attempted to bring some order to the chaos of software development by defining the software process in terms of steps from the initial idea to the final product. These models, refined over the years, guide much of software development today.
A classic life cycle model for software is the Waterfall Model. This model is based on the idea that software can be built almost like following a recipe. There is a set of steps that, if followed correctly, will yield a mighty fine chocolate cake, or program as the case may be. Each stage must be completed before the next stage can begin, as shown in Figure 24-1. You can compare this process to a waterfall, as you can only go downward to the next phase.
The process starts with formal planning, which includes gathering an exhaustive list of requirements. This list defines feature completeness for the product. The more specific the requirements are, the more likely that the project will succeed. Next, the software is designed and fully specified. The design step, like the requirements step, needs to be as specific as possible to maximize the chance of success. All design decisions are made at this time, often including pseudo-code and the definition of specific subsystems that will need to be written. Subsystem owners work out how their code will interact, and the team agrees on the specifics of the architecture. Implementation of the design occurs next. Because the design has been fully specified, the code needs to adhere strongly to the design or else the pieces won’t fit together. The final four stages are reserved for unit testing, subsystem testing, integration testing, and evaluation.
The main problem with the Waterfall Model is that, in practice, it is nearly impossible to complete one stage without at least exploring the next stage. A design cannot be set in stone without at least writing some code. Furthermore, what is the point of testing if the model doesn’t provide a way to go back to the coding phase?
Various incarnations have refined the process in different ways. For example, some plans include a “feasibility” step where experiments are performed before formal requirements are even gathered.
The value of the Waterfall Model lies in its simplicity. You, or your manager, may have followed this approach in past projects without formalizing it or recognizing it by name. The underlying assumption behind the Waterfall Model is that as long as each step is accomplished as completely and accurately as possible, subsequent steps will go smoothly. As long as all of the requirements are carefully specified in the first step, and all the design decisions and problems are hashed out in the second step, implementation in the third step should be a simple matter of translating the designs into code.
The simplicity of the Waterfall Model makes project plans based on this system organized and easy to manage. Every project is started the same way: by exhaustively listing all the features that are necessary. For example, managers using this approach can require that by the end of the design phase, all engineers in charge of a subsystem must submit their design as a formal design document or a functional subsystem specification. The benefit for the manager is that by having engineers specify requirements and designs upfront, risks are, hopefully, minimized.
From the engineer’s point of view, the Waterfall Model forces resolution of major issues upfront. All engineers will need to understand their project and design their subsystem before writing a significant amount of code. Ideally, this means that code can be written once instead of being hacked together or rewritten when the pieces don’t fit.
For small projects with very specific requirements, the Waterfall Model can work quite well. Particularly for consulting arrangements, it has the advantage of specifying clearly defined metrics for success at the start of the project. Formalizing requirements helps the consultant to produce exactly what the client wants, and forces the client to be specific about the goals for the project.
In many organizations, and almost all modern software engineering texts, the Waterfall Model has fallen out of favor. Critics disparage its fundamental premise that software development tasks happen in discrete, linear steps. The Waterfall Model generally does not allow backward movement. Unfortunately, in many projects today, new requirements are introduced throughout the development of the product. Often, a potential customer will request a feature that is necessary for the sale, or a competitor’s product will have a new feature that requires parity.
Another drawback is that in an effort to minimize risk by making decisions as formally and early as possible, the Waterfall Model may actually be hiding risk. For example, a major design issue might be undiscovered, glossed over, forgotten, or purposely avoided during the design phase. By the time integration testing reveals the mismatch, it may be too late to save the project. A major design flaw has arisen but, according to the Waterfall Model, the product is one step away from shipping! A mistake anywhere in the waterfall process will likely lead to failure at the end of the process. Early detection is difficult and occurs rarely.
If you do use the Waterfall Model, it is often necessary to make it more flexible by taking cues from other approaches.
A number of refinements to the Waterfall Model have been formalized. One such refinement is called the Sashimi Model. The main advancement that the Sashimi Model brought was the concept of overlap between stages. The name, Sashimi Model, comes from a Japanese fish dish, called sashimi, in which different pieces of fish are overlapping each other. While the model still stresses a rigorous process of planning, designing, coding, and testing, successive stages can partially overlap. Figure 24-2 shows an example of the Sashimi Model, illustrating the overlapping of stages. Overlap permits activities in two phases to occur simultaneously. This recognizes the fact that one stage can often not be finished completely without at least partially looking at the next stage.
The Spiral Model was proposed by Barry W. Boehm in 1986 as a risk-driven software development process. Several derivatives have been formulated, which are called spiral-like models. The model discussed in this section is part of a family of techniques known as iterative processes. The fundamental idea is that it’s okay if something goes wrong because you’ll fix it the next time around. A single spin through this spiral-like model is shown in Figure 24-3.
The phases of this model are similar to the steps of the Waterfall Model. The discovery phase involves discovering requirements, determining objectives, determining alternatives (design alternatives, reuse, buying third-party libraries, and so on), and determining any constraints. During the evaluation phase, implementation alternatives are evaluated, risks are analyzed, and prototype options are considered. In a spiral-like model, particular attention is paid to evaluating and resolving risks in the evaluation phase. The tasks deemed most risky are the ones that are implemented in the current cycle of the spiral. The tasks in the development phase are determined by the risks identified in the evaluation phase. For example, if evaluation reveals a risky algorithm that may be impossible to implement, the main task for development in the current cycle will be modeling, building, and testing that algorithm. The fourth phase is reserved for analysis and planning. Based on the results of the current cycle, a plan for the subsequent cycle is formed.
Figure 24-4 shows an example of three cycles through the spiral in the development of an operating system. The first cycle yields a plan containing the major requirements for the product. The second cycle results in a prototype showing the user experience. The third cycle builds a component that is determined to be a high risk.
A spiral-like model can be viewed as the application of an iterative approach to the best that the Waterfall Model has to offer. Figure 24-5 shows a spiral-like model as a waterfall process that has been modified to allow iteration. Hidden risks and a linear development path, the main drawbacks of the Waterfall Model, are resolved through iterative cycles.
Performing the riskiest tasks first is another benefit. By bringing risk to the forefront and acknowledging that new conditions can arise at any time, a spiral-like model avoids the hidden time bombs that can occur with the Waterfall Model. When unexpected problems arise, they can be dealt with by using the same four-stage approach that works for the rest of the process.
This iterative approach also allows for incorporating feedback from testers. For example, an early version of the product can be released for internal or even external evaluation. Testers could, for instance, say that a certain feature is missing, or an existing feature is not working as expected. A spiral-like model has a built-in mechanism to react to such input.
Finally, by repeatedly analyzing after each cycle and building new designs, the practical difficulties with the design-then-implement approach are virtually eliminated. With each cycle, there is more knowledge of the system that can influence the design.
The main drawback of a spiral-like model is that it can be difficult to scope each iteration small enough to gain real benefit. In a worst-case scenario, a spiral-like model can degenerate into a Waterfall Model because the iterations are too long. Unfortunately, a spiral-like model only models the software life cycle; it cannot prescribe a specific way to break down a project into single-cycle iterations because that division varies from project to project.
Other possible drawbacks are the overhead of repeating all four phases for each cycle and the difficulty of coordinating cycles. Logistically, it may be difficult to assemble all the group members for design discussions at the right time. If different teams are working on different parts of the product simultaneously, they are probably operating in parallel cycles, which can get out of synch. For example, during the development of an operating system, the user interface group could be ready to start the discovery phase of the Window Manager cycle, but the core OS group could still be in the development phase of the memory subsystem.
To address the shortcomings of the Waterfall Model, the Agile Model was introduced in 2001 in the form of an Agile Manifesto.
As can be understood from this manifesto, the term Agile is only a high-level description. Basically, it tells you to make the process flexible so that customers’ changes can easily be incorporated into the project during development. Scrum is one of the most used Agile software development methodologies, and is discussed in the next section.
Software life cycle models provide a formal way of answering the question, “What do we do next?” but are rarely able to contribute an answer to the logical follow-up question, “How do we do it?” To provide some answers to the “how” question, a number of methodologies have been developed that provide practical rules of thumb for professional software development. Books and articles on software methodologies abound, but a few of these methodologies deserve particular attention: UP, RUP, Scrum, Extreme Programming, and Software Triage.
The Unified Process (UP) is an iterative and incremental software development process. The UP is not set in stone; it’s a framework that you should customize to the specific needs of your project. According to the Unified Process, a project can be split into four phases.
The elaboration, construction, and transition phases are split into time-boxed iterations, each having a tangible result. In each iteration, the teams are working on several disciplines of the project at the same time: business modeling, requirements, analysis and design, implementation, testing, and deployment. The amount of work done in each discipline changes with each iteration. This iterative and overlapping development is shown in Figure 24-6. In this example, the inception phase is done in one iteration, the elaboration phase in two, the construction phase in four, and the transition phase in two iterations.
The Rational Unified Process (RUP) is one of the best-known refinements of the Unified Process. It is a disciplined and formal approach to managing the software development process. The most important characteristic of the RUP is that, unlike the Spiral Model or the Waterfall Model, RUP is more than just a theoretical process model. RUP is actually a software product that is sold by Rational Software, a division of IBM. Treating the process itself as software brings about some interesting advantages:
As a product, the RUP takes the form of a suite of software applications that guides developers through the software development process. The product also offers specific guidance for other Rational products, such as the Rational Rose visual modeling tool and the Rational ClearCase configuration management tool. Extensive groupware communication tools are included as part of the “marketplace of ideas” that allows developers to share knowledge.
One of the basic principles behind RUP is that each iteration on a development cycle should have a tangible result. During the Rational Unified Process, users will create numerous designs, requirement documents, reports, and plans. The RUP software provides visualization and development tools for the creation of these artifacts.
Defining an accurate model is the central principle of RUP. Models, according to RUP, help explain the complicated structures and relationships in the software development process. In RUP, models are often expressed in Unified Modeling Language (UML) format, see Appendix D.
RUP defines each part of the process as an individual workflow (called discipline in the earlier discussion of the Unified Process). Workflows represent each step of a process in terms of who is responsible for the step, what tasks are being performed, the artifacts or results of these tasks, and the sequence of events that drives the tasks. Almost everything about RUP is customizable, but several core process workflows are defined “out of the box” by RUP.
The core process workflows bear some resemblance to the stages of the Waterfall Model, but each one is iterative and more specific in definition. The business modeling workflow models business processes, usually with the goal of driving software requirements forward. The requirements workflow creates the requirements definition by analyzing the problems in the system and iterating on its assumptions. The analysis and design workflow deals with system architecture and subsystem design. The implementation workflow covers the modeling, coding, and integration of software subsystems. The testing workflow models the planning, implementation, and evaluation of software quality tests. The deployment workflow is a high-level view of overall planning, releasing, supporting, and testing workflows. The configuration management workflow goes from new project conception to iteration and end-of-product scenarios. Finally, the environment workflow supports the engineering organization through the creation and maintenance of development tools.
RUP is aimed mainly at larger organizations and offers several advantages over the adoption of traditional life cycle models. Once the team has gotten over the learning curve of using the software, all members will be using a common platform for designing, communicating, and implementing their ideas. The process can be customized to the needs of the team, and each stage reveals a wealth of valuable artifacts that document each phase of the development.
A product like RUP can be too heavyweight for some organizations. Teams with diverse development environments or tight engineering budgets might not want to, or be able to, standardize on a software-based development system. The learning curve can also be a factor; new engineers who aren’t familiar with the process software will have to learn how to use it, while at the same time getting up to speed on the product and the existing code base.
The Agile model is just a high-level foundation; it does not specify exactly how the model should be implemented in real life. That’s where Scrum comes into play; it’s an Agile methodology with precise descriptions of how to use it on a daily basis.
Scrum is an iterative process. It is very popular as a means to manage software development projects. In Scrum, each iteration is called a sprint cycle. The sprint cycle is the central part of the Scrum process. The length of sprints, which should be decided at the beginning of the project, is typically between two and four weeks. At the end of each sprint, the goal is to have a version of the software available that is fully working and tested, and which represents a subset of the customers’ requirements. Scrum recognizes that customers will often change their minds during development, so it allows the result of each sprint to be shipped to the customer. This gives customers the opportunity to see iterative versions of the software, and allows them to give feedback to the development team about potential issues.
There are three roles in Scrum. The first role, Product Owner (PO), is the connection to the customer and to other people. The PO writes high-level user stories based on input from the customer, gives each user story a priority, and puts the stories in the Scrum product backlog. Actually, everyone on the team is allowed to write high-level user stories for the product backlog, but the Product Owner decides which user stories are kept and which are removed.
The second role, Scrum Master (SM), is responsible for keeping the process running and can be part of the team, although not the team leader, because with Scrum the team leads itself. The SM is the contact person for the team so that the rest of the team members can concentrate on their tasks. The SM ensures that the Scrum process is followed correctly by the team, for example, by organizing the Daily Scrum meetings, which are discussed later. The Scrum Master and Product Owner should be two different people.
The third and final role in the Scrum process is the team itself. Teams develop the software, and should be kept small, with preferably fewer than ten members.
The Scrum process enforces a daily meeting called the Daily Scrum or Standup. In this meeting, all team members stand together with the Scrum Master. According to the Scrum process, this meeting should start every day at exactly the same time and location, and should be no longer than 15 minutes. During this meeting, all team members get to answer three questions:
Problems faced by team members should be noted by the Scrum Master, who will try to solve them after the Daily Scrum meeting.
Before the start of each sprint cycle, there is a Sprint Planning meeting in which team members must decide which product features they will implement in the new sprint. This is formalized in a sprint backlog. The features are selected from a product backlog containing prioritized user stories, which are high-level requirements of new features. User stories from the product backlog are broken down into smaller tasks with an effort estimation and are put on the sprint backlog. Once a sprint is in progress, the sprint backlog is frozen and cannot be changed during that sprint. The duration of the Sprint Planning meeting depends on the length of the sprints, typically, four hours Sprint Planning meeting for each two weeks of a sprint. The Sprint Planning meeting is usually split into two parts: meeting with the Product Owner and the team to discuss the priority of product backlog items, and meeting with only the team to complete the sprint backlog.
In a Scrum team you will sometimes find a physical board with three columns: To Do, In Progress, and Done. Every task for the sprint is written on a small piece of paper and stuck on the board in the correct column. Tasks are not assigned to people during a meeting; instead, every team member can go to the board, pick one of the To Do tasks, and move that paper to the In Progress column. When the team member is finished with that task, the paper is moved to the Done column. This method makes it easy for team members to quickly get an overview of the work that still needs to be done and what tasks are in progress or finished. Instead of a physical Scrum board, you can also use a software solution to work with a virtual Scrum board.
Sometimes, a burn-down chart is also created every day that displays the days of the sprint on the horizontal axis and the remaining development hours on the vertical axis. This gives a quick overview of the progress made and can be used to determine whether all planned tasks can be completed during the sprint.
Once a sprint cycle is finished, there are two meetings: the Sprint Review and the Sprint Retrospective. The duration of the Sprint Review meeting again depends on the length of the sprints, typically, two hours per two weeks of a sprint. During the Sprint Review meeting, the results of the sprint cycle are discussed, including what tasks were completed and what tasks were not completed, and why. The Sprint Retrospective typically takes around one-and-a-half hours for each two weeks of a sprint, and allows the team to think about how the last sprint cycle was executed. For example, the team can identify shortcomings in the process and adapt the process for the next sprint. Questions like “What went well?”, “What could be improved?”, “What do we want to start, continue, or stop doing?”, and so on, are answered. This is called continuous improvement, that is, after every sprint, the process is examined and improved.
A final step in the Scrum process is a demo. At the end of each sprint cycle, a demo should be given to show the sprint results to all interested stakeholders.
Scrum is resilient to unforeseen problems that come up during the development stage. When a problem pops up, it can be handled in one of the following sprints. The team is involved in every step of the project. They discuss user stories from the product backlog with the Product Owner and convert these user stories into smaller tasks for inclusion in a sprint backlog. The team autonomously assigns work to their members with the aid of the Scrum task board. This board makes it easy to quickly see which team member is working on which task. And finally, the Daily Scrum meeting ensures that everyone knows what is happening.
A huge benefit to the paying customer is the demo that follows each sprint, which demonstrates the new iterative version of the project. The customer quickly gets a sense of how the project is progressing, and can make changes to the requirements, which usually can be incorporated into a future sprint.
Some companies might find it difficult to accept that the team itself decides who is doing what. Tasks are not assigned to team members by a manager or a team leader. All members pick their own tasks from the Scrum task board.
The Scrum Master is a key person to make sure the team stays on track. It is very important that the SM trusts the team. Having too tight a control over the team members will cause the Scrum process to fail.
A possible problem with Scrum is called feature creep. Scrum allows new user stories to be added to the product backlog during development. There is a danger that project managers will keep adding new features to the product backlog. This problem is best solved by deciding on a final release date, or the end date of the last sprint.
When a friend of mine arrived home from work years ago and told his wife that his company had adopted some of the principles of Extreme Programming, she joked, “I hope you wear a safety harness for that.” Despite the somewhat hokey name, Extreme Programming (or XP) effectively bundles up the best of other software development guidelines, and adds some new material.
XP, popularized by Kent Beck in eXtreme Programming eXplained (Addison-Wesley, 1999), claims to take the best practices of good software development and turn them up a notch. For example, most programmers would agree that testing is a good thing. In XP, testing is deemed so good that you’re supposed to write the tests before you write the code.
The Extreme Programming methodology is made up of 12 main guiding principles, grouped into four categories. These principles are manifested throughout all phases of the software development process, and have a direct impact on the daily tasks of engineers.
XP provides four fine-grained guidelines related to coding, planning, and testing.
XP suggests that all production code should be written by two people working side-by-side, a technique called pair programming. Obviously, only one person can actually be in control of the keyboard. The other person reviews the code his peer is writing, and takes a high-level approach, thinking about issues such as testing, necessary refactoring, and the overall model of the project.
As an example, if you are in charge of writing the user interface for a particular feature of your application, you might want to ask the original author of the feature to sit down with you. He can advise you about the correct use of the feature, warn you about any “gotchas” you should watch out for, and help oversee your efforts at a high level. Even if you can’t acquire the help of the original author, just grabbing another member of the team can help. The theory is that working in pairs builds shared knowledge, ensures proper design, and puts an informal system of checks and balances in place.
In the Waterfall Model, planning happens once, at the beginning of the process. Under the Spiral Model, planning is the first phase of each iteration. Under XP, planning is more than just a step—it’s a never-ending task. XP teams start with a rough plan that captures the major points of the product being developed. During each iteration of the process, there is a so-called planning game meeting. Throughout the development process, the plan is refined and modified as necessary. The theory is that conditions are constantly changing and new information is obtained all the time. There are two major parts in the planning process:
Under XP, estimates for a given feature are always made by the person who will be implementing that particular feature. This helps to avoid situations where the implementer is forced to adhere to an unrealistic and artificial schedule. Initially, estimates are very rough, perhaps on the order of weeks for a feature. As the time horizon shortens, the estimates become more granular. Features are broken down into tasks taking no more than five days.
According to eXtreme Programming eXplained, “Any program feature without an automated test simply doesn’t exist.” Extreme Programming is zealous about testing. Part of your responsibility as an XP engineer is to write the unit tests that accompany your code. A unit test is generally a small piece of code that makes sure that an individual piece of functionality works. For example, individual unit tests for a file-based object store may include testSaveObject, testLoadObject, and testDeleteObject.
XP takes unit testing one step further by suggesting that unit tests should be written before the actual code is written. Of course, the tests won’t pass because the code hasn’t been written yet. In theory, if your tests are thorough, you should know when your code is done because all the tests will complete successfully. This is called test-driven development, TDD. I told you it was “extreme.”
Because an XP-savvy engineering group constantly refines its product plan and builds only what is currently necessary, having a customer contribute to the process is very valuable. Although it is not always possible to convince a customer to be physically present during development, the idea that there should be communication between engineering and the end user is clearly a valuable notion. In addition to assisting with the design of individual features, customers can help prioritize tasks by conveying their individual needs.
XP advocates that you should continuously integrate subsystems so that mismatches between subsystems can be detected early. You should also refactor code whenever necessary, and aim to build and deploy small incremental releases.
All programmers are familiar with the dreaded chore of integrating code. This task becomes necessary when you discover that your view of the object store is a complete mismatch with the way it was actually written. When subsystems come together, problems are exposed. XP recognizes this phenomenon and advocates integrating code into the project frequently as it is being developed.
XP suggests a specific method for integration. Two programmers (the pair that developed the code) sit down at a designated “integration station” and merge the code in together. The code is not checked in until it passes 100 percent of the tests. By having a single station, conflicts are avoided and integration is clearly defined as a step that must occur before a check-in.
A similar approach can still work on an individual level. Engineers run tests individually or in pairs before checking code into the repository. A designated machine continually runs automated tests. When the automated tests fail, the team receives an e-mail indicating the problem and listing the most recent check-ins.
Most programmers refactor their code from time to time. Refactoring is the process of redesigning existing working code to take into account new knowledge or alternate uses that have been discovered since the code was written. Refactoring is difficult to build into a traditional software engineering schedule because its results are not as tangible as implementing a new feature. Good managers, however, recognize its importance for long-term code maintainability.
The extreme way of refactoring is to recognize situations during development when refactoring is useful and to do the refactoring at that time. Instead of deciding at the start of a release which existing parts of the product need design work, XP programmers learn to recognize the signs of code that is ready to be refactored. While this practice will almost certainly result in unexpected and unscheduled tasks, restructuring the code when appropriate should make future development easier.
One of the theories of XP is that software projects grow risky and unwieldy when they try to accomplish too much at one time. Instead of massive software releases that involve core changes and several pages of release notes, XP advocates smaller releases with a timeframe closer to two months than 18 months. With such a short release cycle, only the most important features can make it into the product. This forces engineering and marketing to agree on what features are truly important.
Software is developed by a team. Any code written is not owned by individuals, but by the team as a whole. XP gives a couple of guidelines to make sure sharing the code and ideas is possible.
Due to the collective ownership guideline and the practice of pair programming, coding in an extreme environment can be difficult if each engineer has their own naming and indenting conventions. XP doesn’t advocate any particular style, but recommends that if you can look at a piece of code and immediately identify the author, your group probably needs a better definition of its coding standards.
For additional information on various approaches to coding style, see Chapter 3.
In many traditional development environments, code ownership is strongly defined and often enforced. A friend of mine once worked in an environment where the manager explicitly forbade checking in changes to code written by any other member of the team. XP takes the extreme opposite approach by declaring that the code is collectively owned by everybody.
Collective ownership is practical for a number of reasons. From a management point of view, it is less detrimental when a single engineer leaves suddenly because there are others who understand that part of the code. From an engineer’s point of view, collective ownership builds a common view of how the system works. This helps with design tasks and frees the individual programmer to make any changes that will add value to the overall project.
One important note about collective ownership is that it is not necessary for every programmer to be familiar with every single line of code. It is more of a mindset that the project is a team effort, and there is no reason for any one person to hoard knowledge.
A mantra frequently sung by XP-savvy engineers is “avoid speculative generality.” This goes against the natural inclinations of many programmers. If you are given the task of designing a file-based object store, you may start down the path of creating the be-all, end-all solution to all file-based storage problems. Your design might quickly evolve to cover multiple languages and any type of object. XP says you should lean toward the other end of the generality continuum. Instead of making the ideal object store that will win awards and be celebrated by your peers, design the simplest possible object store that gets the job done. You should understand the current requirements and write your code to those specifications to avoid overly complex code.
It may be hard to get used to simplicity in design. Depending on the type of work you do, your code may need to exist for years and be used by other parts of the code that you haven’t even dreamed of. As discussed in Chapter 6, the problem with building in functionality that may be useful in the future is that you don’t know what those hypothetical use cases are, and there is no way to craft a good design that is purely speculative. Instead, XP says you should build something that is useful today and leave open the opportunity to modify it later.
XP uses the term metaphor for the idea that all members of the team (including customers and managers) should share a common high-level view of the system. This does not refer to the specifics of how objects will communicate, or the exact APIs that will be written. Rather, the metaphor is the mental model and naming model for the components of the system. Each component should be given a descriptive name, so that each member of the team can guess its functionality simply based on its name. Team members should use the metaphor to drive shared terminology when discussing the project.
Obviously, the welfare of the developers is important. So, the final guideline of XP is a guidance on working sane hours.
XP has a thing or two to say about the hours you’ve been putting in. The claim is that a well-rested programmer is a happy and productive programmer. XP advocates a workweek of approximately 40 hours and warns against putting in overtime for more than two consecutive weeks.
Of course, different people need different amounts of rest. The main idea, though, is that if you sit down to write code without a clear head, you’re going to write poor code and abandon many of the XP principles.
XP purists claim that the 12 tenets of Extreme Programming are so intertwined that adopting some of them without others would largely ruin the methodology. For example, pair programming is vital to testing because if you can’t determine how to test a particular piece of code, your partner can help. Also, if you’re tired one day and decide to skip the testing, your partner will be there to evoke feelings of guilt.
Some of the XP guidelines, however, can prove difficult to implement. To some engineers, the idea of writing tests before code is too abstract. For those engineers, it may be sufficient to design the tests without actually writing them until there is code to test. Many of the XP principles are rigidly defined, but if you understand the theory behind them, you may be able to find ways to adapt the guidelines to the needs of your project.
The collaborative aspects of XP can be challenging as well. Pair programming has measurable benefits, but it may be difficult for a manager to rationalize having half as many people actually writing code each day. Some members of the team may even feel uncomfortable with such close collaboration, perhaps finding it difficult to type while others are watching. Pair programming also has obvious challenges if the team is geographically spread out, or if members tend to telecommute regularly.
For some organizations, Extreme Programming may be too radical. Large, established companies with formal policies in place for engineering may be slow to adopt approaches like XP. However, even if your company is resistant to the implementation of XP, you can still improve your own productivity by understanding the theory behind it.
In the fatalistically named book Death March (Prentice Hall, 1997), Edward Yourdon describes the frequent and scary condition of software that is behind schedule, short on staff, over budget, or poorly designed. Yourdon’s theory is that when software projects get into this state, even the best modern software development methodologies will no longer apply. As you have learned in this chapter, many approaches to software development are built around formalized documents or taking a user-centered approach to design. In a project that’s already in “death march” mode, there simply isn’t time for these approaches.
The idea behind software triage is that when a project is already in a bad state, resources are scarce. Time is scarce, engineers are scarce, and money may be scarce. The main mental obstacle that managers and developers need to overcome when a project is way behind schedule is that it will be impossible to satisfy the original requirements in the allotted time. The task then becomes organizing remaining functionality into “must-have,” “should-have,” and “nice-to-have” lists.
Software triage is a daunting and delicate process. It often requires the leadership of an outside seasoned veteran of “death march” projects to make the tough decisions. For the engineer, the most important point is that in certain conditions, it may be necessary to throw familiar processes out the window (along with some existing code, unfortunately) to finish a project on time.
It’s unlikely that any book or engineering theory will perfectly match the needs of your project or organization. I recommend that you learn from as many approaches as you can and design your own process. Combining concepts from different approaches may be easier than you think. For example, RUP optionally supports an XP-like approach. Here are some tips for building the software engineering process of your dreams.
Some engineering techniques seem crazy at first or unlikely to work. Look at new innovations in software engineering methodologies as a way to refine your existing process. Try things out when you can. If XP sounds intriguing, but you’re not sure if it will work in your organization, see if you can work it in slowly, taking a few of the principles at a time or trying it out with a smaller pilot project.
Most likely, your engineering team is made up of people from varying backgrounds. You may have people who are veterans of startups, long-time consultants, recent graduates, and PhDs on your team. You all have a different set of experiences and your own ideas of how a software project should be run. Sometimes the best processes turn out to be a combination of the way things are typically done in these very different environments.
At the end of a project (or better yet, during the project, as with the Sprint Retrospective of the Scrum methodology), get the team together to evaluate the process. Sometimes there’s a major problem that nobody notices until the entire team stops to think about it. Perhaps there’s a problem that everybody knows about but nobody has discussed.
Consider what isn’t working and see how those parts can be fixed. Some organizations require formal code reviews prior to any source code check-in. If code reviews are so long and boring that nobody does a good job, discuss code-reviewing techniques as a group.
Also consider what is going well and see how those parts can be extended. For example, if maintaining the feature tasks as a group-editable website is working, then maybe devote some time to making the website even better.
Whether a process is mandated by your manager or custom-built by the team, it’s there for a reason. If your process involves writing formal design documents, make sure you write them. If you think that the process is broken or too complex, talk to your manager about it. Don’t just avoid the process—it will come back to haunt you.
Managing all source code is very important for any company, big or small, even for one-person projects. In a company, for example, it would be very impractical to store all the source code on the machines of individual developers that are not managed by any Source Code Control software. This would result in a maintenance nightmare because not everyone would always have the latest code. All source code must be managed by Source Code Control software. There are three kinds of Source Code Control software solutions.
The client/server solution consists of two parts. The first part is the server software, which is software running on the central server and which is responsible for keeping track of all source code files and their history. The second part is the client software. This client software should be installed on every developer’s machine; this software is responsible for communicating with the server software to get the latest version of a source file, get a previous version of a source file, commit local changes back to the server, roll back changes to a previous version, and so on.
A distributed solution doesn’t use a central server. The client software uses peer-to-peer protocols to synchronize with other peers by exchanging patches. Common operations such as committing changes, rolling back changes, and so on, are fast because no network access to a central server is involved. The disadvantage is that it requires more space on the client machine because it needs to store all the files, including the entire history.
Most Source Code Control systems have a special terminology, but unfortunately, not all systems use exactly the same terms. The following list explains a number of terms that are commonly used.
Several Source Code Control software solutions are available. Some of them are free, and some are commercial. The following table lists a few available solutions.
| FREE/OPEN-SOURCE | COMMERCIAL | |
| Local Only | SCCS, RCS | PVCS |
| Client/Server | CVS, Subversion | IBM Rational ClearCase, Microsoft Team Foundation Server, Perforce |
| Distributed | Git, Mercurial, Bazaar | TeamWare, BitKeeper, Plastic SCM |
This book does not recommend a particular software solution. Most software companies these days have a Source Code Control solution already in place, which every developer needs to adopt. If this is not the case, the company should definitely invest some time into researching the available solutions, and pick one that suits them. The bottom line is that it will be a maintenance nightmare without any Source Code Control solution in place. Even for your personal projects, you might want to investigate the available solutions. If you find one that you like, it will make your life easier. It will automatically keep track of different versions and a history of your changes. This makes it easy for you to roll back to an older version if a change didn’t work out the way it was supposed to.
This chapter introduced you to several models and methodologies for the software development process. There are certainly many other ways of building software, both formalized and informal. There probably isn’t a single correct method for developing software except the method that works for your team. The best way to find this method is to do your own research, learn what you can from various methods, talk to your peers about their experiences, and iterate on your process. Remember, the only metric that matters when examining a process methodology is how much it helps your team to write code.
The last part of this chapter briefly touched on the concept of Source Code Control. This should be an integral part of any software company, big or small, and is even beneficial for personal projects at home. There are several Source Code Control software solutions available, so it is recommended that you try out a few, and see which one of them works for you.
Before delving further into the details, it’s helpful to define the terms performance and efficiency, as used in this book. The performance of a program can refer to several areas, such as speed, memory usage, disk access, and network use. This chapter focuses on speed performance. The term efficiency, when applied to programs, means running without wasted effort. An efficient program completes its tasks as quickly as possible within the given circumstances. A program can be efficient without being fast, if the application domain is inherently prohibitive to quick execution.
Note that the title of this chapter, “Writing Efficient C++,” means writing programs that run efficiently, not efficiently writing programs. That is, the time you learn to save by reading this chapter will be your users’, not your own!
Language-level efficiency involves using the language as efficiently as possible, for example, passing objects by reference instead of by value. However, this will only get you so far. Much more important is design-level efficiency, which includes choosing efficient algorithms, avoiding unnecessary steps and computations, and selecting appropriate design optimizations. More often than not, optimizing existing code involves replacing a bad algorithm or data structure with a better, more efficient one.
As I’ve noted, efficiency is important for all application domains. Additionally, there is a small subset of programs, such as system-level software, embedded systems, intensive computational applications, and real-time games, that require extremely high levels of efficiency. Most programs don’t. Unless you write those types of high-performance applications, you probably don’t need to worry about squeezing every ounce of speed out of your C++ code. Think of it as the difference between building normal family cars and building sports cars. Every car must be reasonably efficient, but sports cars require extremely high performance. You wouldn’t want to waste your time optimizing family cars for speed when they’ll never go faster than 70 miles per hour.
C programmers often resist using C++ for high-performance applications. They claim that the language is inherently less efficient than C or a similar procedural language because C++ includes high-level concepts, such as exceptions and virtual methods. However, there are problems with this argument.
When discussing the efficiency of a language, you must separate the performance capabilities of the language itself from the effectiveness of its compilers at optimizing it, that is, you cannot ignore the effect of compilers. Recall that the C or C++ code you write is not the code that the computer executes. A compiler first translates that code into machine language, applying optimizations in the process. This means that you can’t simply run benchmarks of C and C++ programs and compare the results. You’re really comparing the compiler optimizations of the languages, not the languages themselves. C++ compilers can optimize away many of the high-level constructs in the language to generate machine code similar to, or even better than, the machine code generated from a comparable C program. These days, much more research and development is poured into C++ compilers than into C compilers, so C++ code might actually get better optimized and might run faster than C code.
Critics, however, still maintain that some features of C++ cannot be optimized away. For example, as Chapter 10 explains, virtual methods require the existence of a vtable and an additional level of indirection at run time, possibly making them slower than regular non-virtual function calls. However, when you really think about it, this argument is unconvincing. Virtual method calls provide more than just a function call: they also give you a run-time choice of which function to call. A comparable non-virtual function call would need a conditional statement to decide which function to call. If you don’t need those extra semantics, you can use a non-virtual function. A general design rule in the C++ language is that “if you don’t use a feature, you don’t need to pay for it.” If you don’t use virtual methods, you pay no performance penalty for the fact that you could use them. Thus, non-virtual function calls in C++ are identical to function calls in C in terms of performance. However, because virtual function calls have such a tiny overhead, I recommend making all your class methods, including destructors but not constructors, virtual for all your non-final classes.
Far more important, the high-level constructs of C++ enable you to write cleaner programs that are more efficient at the design level, are more readable, more easily maintained, and avoid accumulating unnecessary and dead code.
I believe that you will be better served in your development, performance, and maintenance by choosing C++ instead of a procedural language such as C.
There are also other higher-level object-oriented languages such as C# and Java, both of which run on top of a virtual machine. C++ code is executed directly by a CPU; there is no such thing as a virtual machine to run your code. C++ is closer to the hardware, which means that in most cases it runs faster than languages such as C# and Java.
Many books, articles, and programmers spend a lot of time trying to convince you to apply language-level optimizations to your code. These tips and tricks are important, and can speed up your programs in some cases. However, they are far less important than the overall design and algorithm choices in your program. You can pass-by-reference all you want, but it won’t make your program fast if you perform twice as many disk writes as you need to. It’s easy to get bogged down in references and pointers and forget about the big picture.
Furthermore, some of these language-level tricks can be performed automatically by good optimizing compilers. You should never spend time optimizing a particular area, unless a profiler, discussed later in this chapter, tells you that that particular area is a bottleneck.
That being said, using certain language-level optimizations, such as pass-by-reference, is just considered good coding style.
In this book, I’ve tried to present a balance of strategies. So, I’ve included here what I feel are the most useful language-level optimizations. This list is not comprehensive, but is a good start to write optimized code. However, make sure to read, and practice, the design-level efficiency advice that I offer later in this chapter as well.
C++ does a lot of work for you behind the scenes, particularly with regard to objects. You should always be aware of the performance impact of the code you write. If you follow a few simple guidelines, your code will become more efficient. Note that these guidelines are only relevant for objects, and not for primitive types such as bool, int, float, and so on.
The pass-by-reference rule is discussed elsewhere in this book, but it’s worth repeating here.
When you pass an object of a derived class by value as argument for a function parameter with as type one of the base classes, then the derived object is sliced to fit into the base class type. This causes information to be lost, see Chapter 10 for details.
Pass-by-value also incurs copying costs that are avoided with pass-by-reference. One reason why this rule can be difficult to remember is that on the surface there doesn’t appear to be any problem when you pass-by-value. Consider a class to represent a person that looks like this:
class Person{public:Person() = default;Person(std::string_view firstName, std::string_view lastName, int age);virtual ~Person() = default;std::string_view getFirstName() const { return mFirstName; }std::string_view getLastName() const { return mLastName; }int getAge() const { return mAge; }private:std::string mFirstName, mLastName;int mAge = 0;};
You could write a function that takes a Person object as follows:
void processPerson(Person p){// Process the person.}
You can call this function like this:
Person me("Marc", "Gregoire", 38);processPerson(me);
This doesn’t look like there’s any more code than if you write the function like this instead:
void processPerson(const Person& p){// Process the person.}
The call to the function remains the same. However, consider what happens when you pass-by-value in the first version of the function. In order to initialize the p parameter of processPerson(), me must be copied with a call to its copy constructor. Even though you didn’t write a copy constructor for the Person class, the compiler generates one that copies each of the data members. That still doesn’t look so bad: there are only three data members. However, two of them are strings, which are themselves objects with copy constructors. So, each of their copy constructors will be called as well. The version of processPerson() that takes p by reference incurs no such copying costs. Thus, pass-by-reference in this example avoids three copy constructor calls when the code enters the function.
And you’re still not done. Remember that p in the first version of processPerson() is a local variable to the processPerson() function, and so must be destroyed when the function exits. This destruction requires a call to the Person destructor, which will call the destructor of all of the data members. strings have destructors, so exiting this function (if you passed by value) incurs calls to three destructors. None of those calls are needed if the Person object is passed by reference.
Just as you should pass objects by reference to functions, you should also return them by reference from functions in order to avoid copying the objects unnecessarily. Unfortunately, it is sometimes impossible to return objects by reference, such as when you write overloaded operator+ and other similar operators. And, you should never return a reference or a pointer to a local object that will be destroyed when the function exits!
Since C++11, the language has support for move semantics, which allows you to efficiently return objects by value, instead of using reference semantics.
As noted in Chapter 14, you should catch exceptions by reference in order to avoid slicing and unnecessary copying. Throwing exceptions is heavy in terms of performance, so any little thing you can do to improve their efficiency will help.
You should make sure your classes have a move constructor and move assignment operator to allow the C++ compiler to use move semantics with objects of those classes. According to the rule of zero (see Chapter 9), you should try to design your classes such that the compiler generated copy and move constructors and copy and move assignment operators are sufficient. If the compiler cannot implicitly define these for a class, try to explicitly default them if that works for your class. If that is also not an option, you should implement them yourself. With move semantics for your objects, returning them by value from a function will be efficient without incurring large copying costs. Consult Chapter 9 for details on move semantics.
The compiler creates temporary, unnamed objects in several circumstances. Chapter 9 explains that after writing a global operator+ for a class, you can add objects of that class to other types, as long as those types can be converted to objects of that class. For example, the SpreadsheetCell class definition looks in part like this:
class SpreadsheetCell{public:// Other constructors omitted for brevitySpreadsheetCell(double initialValue);// Remainder omitted for brevity};SpreadsheetCell operator+(const SpreadsheetCell& lhs,const SpreadsheetCell& rhs);
The constructor that takes a double allows you to write code like this:
SpreadsheetCell myCell(4), aThirdCell;aThirdCell = myCell + 5.6;aThirdCell = myCell + 4;
The second line constructs a temporary SpreadsheetCell object from the 5.6 argument; it then calls the operator+ with myCell and this temporary object as arguments. The result is stored in aThirdCell. The third line does the same thing, except that 4 must be coerced to a double in order to call the double constructor of the SpreadsheetCell.
The important point in this example is that the compiler generates code to create an extra, unnamed SpreadsheetCell object for both addition operations in this example. That object must be constructed and destructed with calls to its constructor and destructor. If you’re still skeptical, try inserting cout statements in your constructor and destructor, and watch the printout.
In general, the compiler constructs a temporary object whenever your code converts a variable of one type to another type for use in a larger expression. This rule applies mostly to function calls. For example, suppose that you write a function with the following prototype:
void doSomething(const SpreadsheetCell& s);You can call this function like this:
doSomething(5.56);The compiler constructs a temporary SpreadsheetCell object from 5.56 using the double constructor. This temporary object is then passed to doSomething(). Note that if you remove the const from the s parameter, you can no longer call doSomething() with a constant; you must pass a variable.
You should generally attempt to avoid cases in which the compiler is forced to construct temporary objects. Although it is impossible to avoid in some situations, you should at least be aware of the existence of this “feature” so you aren’t surprised by performance and profiling results.
Move semantics is used by the compiler to make working with temporary objects more efficient. That’s another reason to make sure your classes support move semantics. See Chapter 9 for details.
A function that returns an object by value can cause the creation of a temporary object. Continuing with the Person example from earlier, consider this function:
Person createPerson(){Person newP("Marc", "Gregoire", 38);return newP;}
Suppose that you call it like this (assuming that operator<< is implemented for the Person class):
cout << createPerson();Even though this call does not store the result of createPerson() anywhere, the result must be stored somewhere in order to pass it to operator<<. In order to generate code for this behavior, the compiler is allowed to create a temporary variable in which to store the Person object returned from createPerson().
Even if the result of the function is not used anywhere, the compiler might still generate code to create the temporary object. For example, suppose that you have this code:
createPerson();The compiler might generate code to create a temporary object for the return value, even though it is not used.
However, you usually don’t need to worry about this issue because in most cases, the compiler optimizes away the temporary variable to avoid all copying and moving. For the createPerson() example, this optimization is called named return value optimization (NRVO) because the return statement returns a named variable. In the case the return statement has as argument a nameless temporary value, then this optimization is called return value optimization (RVO). These kinds of optimizations are usually only enabled for release builds. For NRVO to work, the argument to the return statement must be a single local variable. For example, in the following case, the compiler cannot do NRVO:
Person createPerson(){Person person1;Person person2;return getRandomBool() ? person1 : person2;}
If NRVO and RVO are not applicable, then copying or moving will happen. If the object you want to return from a function supports move semantics, then it is moved out of the function instead of copied.
One of the main advantages of using containers such as those from the C++ Standard Library is that they handle all memory management for you. The containers grow automatically when you add more elements to them. However, sometimes this causes a performance penalty. For example, an std::vector container stores its elements contiguously in memory. If it needs to grow in size, it needs to allocate a new block of memory, and then move (or copy) all elements to this new memory. This has serious performance implications, for example, if you use push_back() in a loop to add millions of elements to a vector.
If you know in advance how many elements you are going to add to a vector, or if you have a rough estimate, you should pre-allocate enough memory before starting to add your elements. A vector has a capacity, that is, the number of elements that can be added without reallocation, and a size, that is, the actual number of elements in the container. You can pre-allocate memory by changing the capacity using the reserve() method, or by resizing the vector using resize(). See Chapter 17 for details.
As described in Chapter 9, the code for an inline method or function is inserted directly into the code where it is called, avoiding the overhead of a function call. You should mark as inline all functions and methods that you think can qualify for this optimization. However, do not overuse this feature, because it basically throws away a fundamental design principle, which states that the interface and the implementation should be separated, such that the implementation can evolve without any changes to the interface. Consider using this feature only for often-used, fundamental classes. Also, remember that inlining requests by the programmer are only a recommendation to the compiler, which is allowed to refuse them.
On the other hand, some compilers inline appropriate functions and methods during their optimization steps, even if those functions aren’t marked with the inline keyword, and even if those functions are implemented in a source file instead of a header file. Thus, you should read your compiler documentation before wasting a lot of effort deciding which functions to inline.
The design choices in your program affect its performance far more than do language details such as pass-by-reference. For example, if you choose an algorithm for a fundamental task in your application that runs in O(n2) time instead of a simpler one that runs in O(n) time, you could potentially perform the square of the number of operations that you really need. To put numbers on that, a task that uses an O(n2) algorithm and performs one million operations would perform only one thousand with an O(n) algorithm. Even if that operation is optimized beyond recognition at the language level, the simple fact that you perform one million operations when a better algorithm would use only one thousand will make your program very inefficient. Always choose your algorithms carefully. Refer to Part II, specifically Chapter 4, of this book for a detailed discussion of algorithm design choices and big-O notation.
In addition to your choice of algorithms, design-level efficiency includes specific tips and tricks. Instead of writing your own data structures and algorithms, you should use existing ones, such as those from the C++ Standard Library, the Boost libraries, or other libraries, as much as possible because they are written by experts. These libraries have been, and are being, used a lot, so you can expect most bugs to have been discovered and fixed. You should also think about incorporating multithreading in your design to take full advantage of all processing power available on the machine. See Chapter 23 for more details. The remainder of this section presents two more design techniques for optimizing your program: caching and using object pools.
Caching means storing items for future use in order to avoid retrieving or recalculating them. You might be familiar with the principle from its use in computer hardware. Modern computer processors are built with memory caches that store recently and frequently accessed memory values in a location that is quicker to access than main memory. Most memory locations that are accessed at all are accessed more than once in a short time period, so caching at the hardware level can significantly speed up computations.
Caching in software follows the same approach. If a task or computation is particularly slow, you should make sure that you are not performing it more than necessary. Store the results in memory the first time you perform the task so that they are available for future needs. Here is a list of tasks that are usually slow.
One common problem with caching is that the data you store often comprises only copies of the underlying information. The original data might change during the lifetime of the cache. For example, you might want to cache the values in a configuration file so that you don’t need to read it repeatedly. However, the user might be allowed to change the configuration file while your program is running, which would make your cached version of the information obsolete. In cases like this, you need a mechanism for cache invalidation: when the underlying data changes, you must either stop using your cached information or repopulate your cache.
One technique for cache invalidation is to request that the entity managing the underlying data notifies your program of the data change. It could do this through a callback that your program registers with the manager. Alternatively, your program could poll for certain events that would trigger it to repopulate the cache automatically. Regardless of your specific cache invalidation technique, make sure that you think about these issues before relying on a cache in your program.
There are different kinds of object pools. One kind of object pool is where it allocates a large chunk of memory at once, in which the object pool creates smaller objects in-place. These objects can be handed out to clients, and reused when the clients are done with them, without incurring any additional calls to the memory manager to allocate or deallocate memory for individual objects.
This section describes another kind of object pool. If your program needs a large number of short-lived objects of the same type that have an expensive constructor (for example, a constructor creating a large, pre-sized vector for storing data), and a profiler confirms that allocating and deallocating these objects is a bottleneck, then you can create a pool, or cache, of those objects. Whenever you need an object in your code, you ask the pool for one. When you are done with the object, you return it to the pool. The object pool creates the objects only once, so their constructor is called only once, not each time they are used. Thus, object pools are appropriate when the constructor performs some setup actions that apply to many uses of the object, and when you can set instance-specific parameters on the object through non-constructor method calls.
This section provides an implementation of an object pool class template that you can use in your programs. The pool hands out objects via the acquireObject() method. If acquireObject() is called but there are no free objects, then the pool allocates another instance of the object. acquireObject() returns an Object that is an std::shared_ptr with a custom deleter. The custom deleter doesn’t actually delete the memory; it simply puts the object back on the list of free objects.
The most difficult aspect of an object pool implementation is keeping track of which objects are free and which are in use. This implementation takes the approach of storing free objects in a queue. Each time a client requests an object, the pool gives that client the top object from the queue. The code uses the std::queue class from the Standard Library, as discussed in Chapter 17. Because this standard data structure is used, this implementation is not thread safe. One way to make it thread safe is to use a lock-free concurrent queue. However, the Standard Library does not provide any concurrent data structures, so you’ll have to use third-party libraries.
Here is the class definition, with comments that explain the details. The class template is parameterized on the class type from which the objects in the pool are to be constructed.
#include <queue>#include <memory>// Provides an object pool that can be used with any class that provides a// default constructor.//// acquireObject() returns an object from the list of free objects. If// there are no more free objects, acquireObject() creates a new instance.// The pool only grows: objects are never removed from the pool (freed),// until the pool is destroyed.// acquireObject() returns an Object which is an std::shared_ptr with a// custom deleter that automatically puts the object back into the object// pool when the shared_ptr is destroyed and its reference reaches 0.//// The constructor and destructor on each object in the pool will be called// only once each for the lifetime of the object pool, not once per// acquisition and release.//// The primary use of an object pool is to avoid creating and deleting// objects repeatedly. This object pool is most suited to applications that// use large numbers of objects with expensive constructors for short// periods of time, and if a profiler tells you that allocating and// deallocating these objects is a bottleneck.template <typename T>class ObjectPool{public:ObjectPool() = default;virtual ~ObjectPool() = default;// Prevent assignment and pass-by-valueObjectPool(const ObjectPool<T>& src) = delete;ObjectPool<T>& operator=(const ObjectPool<T>& rhs) = delete;// The type of smart pointer returned by acquireObject().using Object = std::shared_ptr<T>;// Reserves and returns an object for use.Object acquireObject();private:// Stores the objects that are not currently in use by clients.std::queue<std::unique_ptr<T>> mFreeList;};
When using this object pool, you have to make sure that the object pool itself outlives all the objects handed out by the pool. A user of the object pool specifies through the template parameter the name of the class from which objects can be created.
acquireObject() returns the top object from the free list, first allocating a new object if there are no free objects:
template <typename T>typename ObjectPool<T>::Object ObjectPool<T>::acquireObject(){if (mFreeList.empty()) {mFreeList.emplace(std::make_unique<T>());}// Move next free object from the queue to a local unique_ptr.std::unique_ptr<T> obj(std::move(mFreeList.front()));mFreeList.pop();// Convert the object pointer to an Object (a shared_ptr with// a custom deleter).Object smartObject(obj.release(), [this](T* t){// The custom deleter doesn't actually deallocate the// memory, but simply puts the object back on the free list.mFreeList.emplace(t);});// Return the Object.return smartObject;}
Consider an application that uses a lot of short-lived objects with an expensive constructor. Let’s assume the ExpensiveObject class definition looks as follows:
class ExpensiveObject{public:ExpensiveObject() { /* Expensive construction … */ }virtual ~ExpensiveObject() = default;// Methods to populate the object with specific information.// Methods to retrieve the object data.// (not shown)private:// Data members (not shown)};
Instead of creating and deleting large numbers of such objects throughout the lifetime of your program, you can use the object pool developed in the previous section. Your program structure could be something like this:
ObjectPool<ExpensiveObject>::ObjectgetExpensiveObject(ObjectPool<ExpensiveObject>& pool){// Obtain an ExpensiveObject object from the pool.auto object = pool.acquireObject();// Populate the object. (not shown)return object;}void processExpensiveObject(ObjectPool<ExpensiveObject>::Object& object){// Process the object. (not shown)}int main(){ObjectPool<ExpensiveObject> requestPool;{vector<ObjectPool<ExpensiveObject>::Object> objects;for (size_t i = 0; i < 10; ++i) {objects.push_back(getExpensiveObject(requestPool));}}for (size_t i = 0; i < 100; ++i) {auto req = getExpensiveObject(requestPool);processExpensiveObject(req);}return 0;}
The first part of this main() function contains an inner code block which creates ten expensive objects and stores them in the objects container. Because all created Objects are stored in a vector and thus kept alive, the object pool is forced to create ten ExpensiveObject instances. At the closing brace of the inner code block, the vector goes out of scope, and all Objects contained in it are automatically released back to the object pool.
In the second for loop, the Objects (= shared_ptrs) returned by getExpensiveObject() go out of scope at the end of each iteration of the for loop, and so are automatically released back to the pool. If you add an output statement to the constructor of the ExpensiveObject class, you’ll see that the constructor is only called ten times during the entire program, even though the second for loop in main() loops a hundred times.
It is good to think about efficiency as you design and code. There is no point in writing obviously inefficient programs if this can be avoided with some common sense, or experience-based intuition. However, I urge you not to get too obsessed with performance during the design and coding phases. It’s best to first make a clean, well-structured design and implementation, then use a profiler, and only optimize parts that are flagged by the profiler as being performance bottlenecks. Remember the “90/10” rule, introduced in Chapter 4, which states that 90 percent of the running time of most programs is spent in only 10 percent of the code (Hennessy and Patterson, Computer Architecture, A Quantitative Approach, Fourth Edition, [Morgan Kaufmann, 2006]). This means that you could optimize 90 percent of your code, but still only improve the running time of the program by 10 percent. Obviously, you want to optimize the parts of the code that are exercised the most for the specific workload that you expect the program to run.
Consequently, it is often helpful to profile your program to determine which parts of the code require optimization. There are many profiling tools available that analyze programs as they run in order to generate data about their performance. Most profiling tools provide analysis at the function level by specifying the amount of time (or percent of total execution time) spent in each function in the program. After running a profiler on your program, you can usually tell immediately which parts of the program need optimization. Profiling before and after optimizing is essential to prove that your optimizations had an effect.
If you are using Microsoft Visual C++ 2017, you already have a great built-in profiler, which is discussed later in this chapter. If you are not using Visual C++, Microsoft has a Community edition available which is free of charge for students, open-source developers, and individual developers to create both free and paid applications. It’s also free of charge for up to five users in small organizations. Another great profiling tool is Rational PurifyPlus from IBM. There are also a number of smaller free profiling tools available: Very Sleepy and Luke Stackwalker are popular profilers for Windows, Valgrind and gprof (GNU profiler) are well-known profilers for Unix/Linux systems, and there are plenty of other choices.
The power of profiling can best be seen with a real coding example. As a disclaimer, the performance bugs in the first implementation shown are not subtle! Real efficiency issues would probably be more complex, but a program long enough to demonstrate them would be too lengthy for this book.
Suppose that you work for the United States Social Security Administration. Every year the administration puts up a website that allows users to look up the popularity of new baby names from the previous year. Your job is to write the back-end program that looks up names for users. Your input is a file containing the name of every new baby. This file will obviously contain redundant names. For example, in the file for boys for 2003, the name Jacob was the most popular, showing up 29,195 times. Your program must read the file to construct an in-memory database. A user may then request the absolute number of babies with a given name, or the rank of that name among all the babies.
A logical design for this program consists of a NameDB class with the following public methods:
#include <string_view>class NameDB{public:// Reads list of baby names in nameFile to populate the database.// Throws invalid_argument if nameFile cannot be opened or read.NameDB(std::string_view nameFile);// Returns the rank of the name (1st, 2nd, etc).// Returns –1 if the name is not found.int getNameRank(std::string_view name) const;// Returns the number of babies with this name.// Returns –1 if the name is not found.int getAbsoluteNumber(std::string_view name) const;// Protected and private members and methods not shown};
The hard part is choosing a good data structure for the in-memory database. My first attempt is a vector of name/count pairs. Each entry in the vector stores one of the names, along with a count of the number of times that name shows up in the raw data file. Here is the complete class definition with this design:
#include <string_view>#include <string>#include <vector>#include <utility>class NameDB{public:NameDB(std::string_view nameFile);int getNameRank(std::string_view name) const;int getAbsoluteNumber(std::string_view name) const;private:std::vector<std::pair<std::string, int>> mNames;// Helper methodsbool nameExists(std::string_view name) const;void incrementNameCount(std::string_view name);void addNewName(std::string_view name);};
Note the use of the Standard Library vector and pair classes, both of which are discussed in Chapter 17. A pair is a utility class that combines two values of possibly different types.
Here are the implementations of the constructor and the helper methods nameExists(), incrementNameCount(), and addNewName(). The loops in nameExists() and incrementNameCount() iterate over all the elements of the vector.
// Reads the names from the file and populates the database.// The database is a vector of name/count pairs, storing the// number of times each name shows up in the raw data.NameDB::NameDB(string_view nameFile){// Open the file and check for errors.ifstream inputFile(nameFile.data());if (!inputFile) {throw invalid_argument("Unable to open file");}// Read the names one at a time.string name;while (inputFile >> name) {// Look up the name in the database so far.if (nameExists(name)) {// If the name exists in the database, just increment the count.incrementNameCount(name);} else {// If the name doesn't yet exist, add it with a count of 1.addNewName(name);}}}// Returns true if the name exists in the database, false otherwise.bool NameDB::nameExists(string_view name) const{// Iterate through the vector of names looking for the name.for (auto& entry : mNames) {if (entry.first == name) {return true;}}return false;}// Precondition: name exists in the vector of names.// Postcondition: the count associated with name is incremented.void NameDB::incrementNameCount(string_view name){for (auto& entry : mNames) {if (entry.first == name) {entry.second++;return;}}}// Adds a new name to the database.void NameDB::addNewName(string_view name){mNames.push_back(make_pair(name.data(), 1));}
Note that in the preceding example, you could use an algorithm like find_if() to accomplish the same thing as the loops in nameExists() and incrementNameCount(). The loops are shown explicitly in order to emphasize the performance problems.
You might have noticed some performance problems already. What if there are hundreds of thousands of names? The many linear searches involved in populating the database will become slow.
In order to complete the example, here are the implementations of the two public methods:
// Returns the rank of the name.// First looks up the name to obtain the number of babies with that name.// Then iterates through all the names, counting all the names with a higher// count than the specified name. Returns that count as the rank.int NameDB::getNameRank(string_view name) const{// Make use of the getAbsoluteNumber() method.int num = getAbsoluteNumber(name);// Check if we found the name.if (num == -1) {return -1;}// Now count all the names in the vector that have a// count higher than this one. If no name has a higher count,// this name is rank number 1. Every name with a higher count// decreases the rank of this name by 1.int rank = 1;for (auto& entry : mNames) {if (entry.second > num) {rank++;}}return rank;}// Returns the count associated with this name.int NameDB::getAbsoluteNumber(string_view name) const{for (auto& entry : mNames) {if (entry.first == name) {return entry.second;}}return -1;}
In order to test the program, you need a main() function:
#include "NameDB.h"#include <iostream>using namespace std;int main(){NameDB boys("boys_long.txt");cout << boys.getNameRank("Daniel") << endl;cout << boys.getNameRank("Jacob") << endl;cout << boys.getNameRank("William") << endl;return 0;}
This main() function creates one NameDB database called boys, telling it to populate itself with the file boys_long.txt, which contains 500,500 names.
There are three steps to using gprof:
–pg, as in this example:
> gcc -lstdc++ -std=c++17 -pg -o namedb NameDB.cpp NameDBTest.cppgmon.out in the working directory. Be patient when you run the program because this first version is slow.gmon.out profiling information and produce a (somewhat) readable report. gprof outputs to standard out, so you should redirect the output to a file:> gprof namedb gmon.out > gprof_analysis.outNow you can analyze the data. Unfortunately, the output file is somewhat cryptic and intimidating, so it takes a little while to learn how to interpret it. gprof provides two separate sets of information. The first set summarizes the amount of time spent executing each function in the program. The second and more useful set summarizes the amount of time spent executing each function and its descendants; this set is also called a call graph. Here is some of the output from the gprof_analysis.out file, edited to make it more readable. Note that the numbers will be different on your machine.
index %time self children called name[1] 100.0 0.00 14.06 main [1]0.00 14.00 1/1 NameDB::NameDB [2]0.00 0.04 3/3 NameDB::getNameRank [25]0.00 0.01 1/1 NameDB::~NameDB [28]
The following list explains the different columns.
index: an index to be able to refer to this entry in the call graph.%time: the percentage of the total execution time of the program required by this function and its descendants.self: how many seconds the function itself was executing.children: how many seconds the descendants of this function were executing.called: how often this function was called.name: the name of the function. If the name of the function is followed by a number between square brackets, that number refers to another index in the call graph.The preceding extract tells you that main() and its descendants took 100 percent of the total execution time of the program, for a total of 14.06 seconds. The second line shows that the NameDB constructor took 14.00 seconds of the total 14.06 seconds. So, it’s immediately clear where the performance issue is situated. To track down which part of the constructor is taking so long, you need to jump to the call graph entry with index 2, because that’s the index in square brackets behind the name in the last column. The call graph entry with index 2 is as follows on my test system:
[2] 99.6 0.00 14.00 1 NameDB::NameDB [2]1.20 6.14 500500/500500 NameDB::nameExists [3]1.24 5.24 499500/499500 NameDB::incrementNameCount [4]0.00 0.18 1000/1000 NameDB::addNewName [19]0.00 0.00 1/1 vector::vector [69]
The nested entries below NameDB::NameDB show which of its descendants took the most time. Here you can see that nameExists() took 6.14 seconds, and incrementNameCount()took 5.24 seconds. These times are the sums of all the calls to the functions. The fourth column in those lines shows the number of calls to the function (500,500 to nameExists() and 499,500 to incrementNameCount()). No other function took a significant amount of time.
Without going any further in this analysis, two things should jump out at you:
nameExists() and incrementNameCount() take an almost identical amount of time, and are called almost the same number of times. If you think about the application domain, that makes sense: most names in the input text file are duplicates, so the vast majority of the calls to nameExists() are followed by a call to incrementNameCount(). If you look back at the code, you can see that these functions are almost identical; they could probably be combined. In addition, most of what they are doing is searching the vector. It would probably be better to use a sorted data structure to reduce the searching time.With these two observations from the gprof output, it’s time to redesign the program. The new design uses a map instead of a vector. Chapter 17 explains that the Standard Library map keeps the entries sorted, and provides O(log n) lookup instead of the O(n) searches in a vector. A good exercise for you to try would be to use an std::unordered_map, which has an expected O(1) for lookups, and to use a profiler to see if that is faster than std::map for this application.
The new version of the program also combines nameExists() and incrementNameCount() into one nameExistsAndIncrement() method.
Here is the new class definition:
#include <string_view>#include <string>#include <map>class NameDB{public:NameDB(std::string_view nameFile);int getNameRank(std::string_view name) const;int getAbsoluteNumber(std::string_view name) const;private:std::map<std::string, int> mNames;bool nameExistsAndIncrement(std::string_view name);void addNewName(std::string_view name);};
Here are the new method implementations:
// Reads the names from the file and populates the database.// The database is a map associating names with their frequency.NameDB::NameDB(string_view nameFile){// Open the file and check for errors.ifstream inputFile(nameFile.data());if (!inputFile) {throw invalid_argument("Unable to open file");}// Read the names one at a time.string name;while (inputFile >> name) {// Look up the name in the database so far.if (!nameExistsAndIncrement(name)) {// If the name exists in the database, the// method incremented it, so we just continue.// We get here if it didn't exist, in which case// we add it with a count of 1.addNewName(name);}}}// Returns true if the name exists in the database, false// otherwise. If it finds it, it increments it.bool NameDB::nameExistsAndIncrement(string_view name){// Find the name in the map.auto res = mNames.find(name.data());if (res != end(mNames)) {res->second++;return true;}return false;}// Adds a new name to the database.void NameDB::addNewName(string_view name){mNames[name.data()] = 1;}int NameDB::getNameRank(string_view name) const{// Implementation omitted, same as before.}// Returns the count associated with this name.int NameDB::getAbsoluteNumber(string_view name) const{auto res = mNames.find(name.data());if (res != end(mNames)) {return res->second;}return -1;}
By following the same steps shown earlier, you can obtain the gprof performance data on the new version of the program. The data is quite encouraging:
index %time self children called name[1] 100.0 0.00 0.21 main [1]0.02 0.18 1/1 NameDB::NameDB [2]0.00 0.01 1/1 NameDB::~NameDB [13]0.00 0.00 3/3 NameDB::getNameRank [28][2] 95.2 0.02 0.18 1 NameDB::NameDB [2]0.02 0.16 500500/500500 NameDB::nameExistsAndIncrement[3] 0.00 0.00 1000/1000 NameDB::addNewName [24]0.00 0.00 1/1 map::map [87]
If you run this on your machine, the output will be different. It’s even possible that you will not see the data for NameDB methods in your output. Because of the efficiency of this second attempt, the timings are getting so small that you might see more map methods in the output than NameDB methods.
On my test system, main() now takes only 0.21 seconds—a 67-fold improvement! There are certainly further improvements that you could make on this program. For example, the current constructor performs a lookup to see if the name is already in the map, and if not, adds it to the map. You could combine these two operations simply with the following single line:
++mNames[name];If the name is already in the map, this statement just increments its counter. If the name is not yet in the map, this statement first adds an entry to the map with the given name as key and a zero-initialized value, and then increments the value, resulting in a counter of 1.
With this improvement, you can remove the nameExistsAndIncrement() and addNewName() methods, and change the constructor as follows:
NameDB::NameDB(string_view nameFile){// Open the file and check for errorsifstream inputFile(nameFile.data());if (!inputFile) {throw invalid_argument("Unable to open file");}// Read the names one at a time.string name;while (inputFile >> name) {++mNames[name];}}
getNameRank() still uses a loop that iterates over all elements in the map. A good exercise for you to try is to come up with another data structure so that the linear iteration in getNameRank() can be avoided.
Most editions of Microsoft Visual C++ 2017 come with a great built-in profiler, which is briefly discussed in this section. The VC++ profiler has a complete graphical user interface. This book does not recommend one profiler over another, but it is always good to have an idea of what a command line–based profiler like gprof can provide in comparison with a GUI-based profiler like the one included with VC++.
To start profiling an application in Visual C++ 2017, you first need to open the project in Visual Studio. This example uses the same NameDB code as in the first inefficient design attempt from earlier in the chapter. That code is not repeated here. Once your project is opened in Visual Studio, click on the Analyze menu, and then choose Performance Profiler. A new window appears, as shown in Figure 25-1.
In this new window, enable the “Performance Wizard” option and click the Start button. This starts a wizard, as shown in Figure 25-2.
Depending on your version of VC++ 2017, there are a number of different profiling methods available. The following non-exhaustive list explains three of them.
For this profiling example, leave the default CPU sampling method selected and click the Next button. The next page of the wizard asks you to select the application that you want to profile. Here you should select your NameDB project and click the Next button. On the last page of the wizard, you can enable the “Launch profiling after the wizard finishes” option and then click the Finish button. You may get a message saying that you don’t have the right credentials for profiling, and asking whether you would like to upgrade your credentials. If you get this message, you should allow VC++ to upgrade your credentials; otherwise, the profiler will not work.
When the program execution is finished, Visual Studio automatically opens the profiling report. Figure 25-3 shows how this report might look like when profiling the first attempt of the NameDB application.
From this report, you can immediately see the hot path. Just like with gprof, it shows that the NameDB constructor takes up most of the running time of the program, and that incrementNameCount() and nameExists() both take almost the same time. The Visual Studio profiling report is interactive. For example, you can drill down the NameDB constructor by clicking on it. This results in a drill-down report for that function, as show in Figure 25-4.
This drill-down view shows a graphical breakdown at the top, and the actual code of the method at the bottom. The code view shows the percentage of the running time that a line needed. The lines using up most of the time are shown in red. When you are interactively browsing the profiling report, you can always go back by using the back arrow in the top-left corner of the report.
At the top of the report there is also a drop-down menu, which you can use to quickly jump to certain summary or details pages.
If you go back to the “Summary” page of the profiling report, you can see that there is a “Show Trimmed Call Tree” link on the right. Clicking that link displays a trimmed call tree showing you an alternative view of the hot path in your code, as shown in Figure 25-5.
Also in this view, you immediately see that main() is calling the NameDB constructor, which is using up most of the running time.
This chapter discussed the key aspects of efficiency and performance in C++ programs, and provided several specific tips and techniques for designing and writing more efficient applications. Hopefully you gained an appreciation for the importance of performance and for the power of profiling tools.
There are two important things to remember from this chapter. The first thing is that you should not get too obsessed with performance while designing and coding. It’s recommended to first make a correct, well-structured design and implementation, then use a profiler, and only optimize those parts that are flagged by a profiler as being a performance bottleneck.
The second thing to remember is that design-level efficiency is far more important than language-level efficiency. For example, you shouldn’t use algorithms or data structures with bad complexity if there are better ones available.
Large programming projects are rarely finished when a feature-complete goal is reached. There are always bugs to find and fix, both during and after the main development phase. It is essential to understand the shared responsibility of quality control and the life cycle of a bug in order to perform well in a group.
Software development organizations have different approaches to testing. In a small startup, there may not be a group of people whose full-time job is testing the product. Testing may be the responsibility of the individual developers, or all the employees of the company may be asked to lend a hand and try to break the product before its release. In larger organizations, a full-time quality assurance staff probably qualifies a release by testing it according to a set of criteria. Nonetheless, some aspects of testing may still be the responsibility of the developers. Even in organizations where the developers have no role in formal testing, you still need to be aware of what your responsibilities are in the larger process of quality assurance.
All good engineering groups recognize that bugs will occur in software both before and after its release. There are many different ways to deal with these problems. Figure 26-1 shows a formal bug process, expressed as a flow chart. In this particular process, a bug is always filed by a member of the QA team. The bug reporting software sends a notification to the development manager, who sets the priority of the bug and assigns the bug to the appropriate module owner. The module owner can accept the bug, or explain why the bug actually belongs to a different module or is invalid, giving the development manager the opportunity to assign it to someone else.
Once the bug has found its rightful owner, a fix is made and the developer marks the bug as “fixed.” At this point, the QA engineer verifies that the bug no longer exists and marks the bug as “closed” or reopens the bug if it is still present.
A less formal approach is shown in Figure 26-2. In this workflow, anybody can file a bug, and assign an initial priority and a module. The module owner receives the bug report and can either accept it or reassign it to another engineer or module. When a correction is made, the bug is marked as “fixed.” Toward the end of the testing phase, all the developers and QA engineers divide up the fixed bugs and verify that each bug is no longer present in the current build. The release is ready when all bugs are marked as “closed.”
There are many ways to keep track of software bugs, from informal spreadsheet- or e-mail-based schemes to expensive third-party bug-tracking software. The appropriate solution for your organization depends on the group’s size, the nature of the software, and the level of formality you want to build around bug fixing.
There are also a number of free open-source bug-tracking solutions available. One of the more popular free tools for bug tracking is Bugzilla, written by the authors of the Mozilla web browser. As an open-source project, Bugzilla has gradually accumulated a number of useful features to the point where it now rivals expensive bug-tracking software packages. Here are just a few of its many features:
Figure 26-3 shows a bug being entered into a Bugzilla project that was set up for the second edition of this book. For my purposes, each chapter was input as a Bugzilla component. The filer of the bug can specify the severity of the bug (how big of a deal it is). A summary and description are included to make it possible to search for the bug or list it in a report format.
Bug-tracking tools like Bugzilla are essential components of a professional software development environment. In addition to supplying a central list of currently open bugs, bug-tracking tools provide an important archive of previous bugs and their fixes. A support engineer, for instance, might use the tool to search for a problem similar to one reported by a customer. If a fix was made, the support person will be able to tell the customer which version they need to update to, or how to work around the problem.
The only way to find bugs is through testing. One of the most important types of tests from a developer’s point of view is the unit test. Unit tests are pieces of code that exercise specific functionality of a class or subsystem. These are the finest-grained tests that you could possibly write. Ideally, one or more unit tests should exist for every low-level task that your code can perform. For example, imagine that you are writing a math library that can perform addition and multiplication. Your suite of unit tests might contain the following tests:
Well-written unit tests protect you in many ways:
It’s hard to go wrong with unit tests, unless you don’t write them or you write them poorly. In general, the more tests you have, the more coverage you have. The more coverage you have, the less likely it is for bugs to fall through the cracks and for you to have to tell your boss, or worse, your customer, “Oh, we never tested that.”
There are several methodologies for writing unit tests most effectively. The Extreme Programming methodology, explained in Chapter 24, instructs its followers to write unit tests before writing code.
Writing tests first helps you to solidify the requirements for the component and to provide a metric that can be used to determine when it is done. However, writing tests first can be tricky and requires diligence on the part of the programmer. For some programmers, it simply doesn’t mesh well with their coding style. A less rigid approach is to design the tests before coding, but implement them later in the process. This way, the programmer is still forced to understand the requirements of the module but doesn’t have to write code that makes use of nonexistent classes.
In some groups, the author of a particular subsystem doesn’t write the unit tests for that subsystem. The idea is that if you write the tests for your own code, you might subconsciously work around problems that you know about, or only cover certain cases that you know your code handles well. In addition, it’s sometimes difficult to get excited about finding bugs in code you just wrote, so you might only put in a half-hearted effort. Having one developer write unit tests for another developer’s code requires a lot of extra overhead and coordination. When such coordination is accomplished, however, this approach helps guarantee more-effective tests.
Another way to ensure that unit tests are actually testing the right parts of the code is to write them so that they maximize code coverage. You can use a code coverage tool, such as gcov, that tells you what percentage of the code is called by unit tests. The idea is that a properly tested piece of code has unit tests to test all possible code paths that can be taken through that piece of code.
The process of providing unit tests for your code starts from the very beginning, long before any code is written. Keeping unit-testability in mind during the design phase can influence the design decisions you make for your software. Even if you do not subscribe to the methodology of writing unit tests before you write code, you should at least take the time to consider what sorts of tests you will provide, even while still in the design phase. This way, you can break the task up into well-defined chunks, each of which has its own test-validated criteria. For example, if your task is to write a database access class, you might first write the functionality that inserts data into the database. Once that is fully tested with a suite of unit tests, you can continue to write the code to support updates, deletes, and selects, testing each piece as you go.
The following list of steps is a suggested approach for designing and implementing unit tests. As with any programming methodology, the best process is the one that yields the best results. I suggest that you experiment with different ways of using unit tests to discover what works best for you.
Writing unit tests takes time, there is no way around this. Software developers are often crunched for time. To reach deadlines, developers tend to skip writing unit tests, because they think they will finish faster that way. Unfortunately, this thinking does not take the whole picture into account. Omitting unit tests will back-fire in the long run. The earlier a bug is detected in the software development process, the less it costs. If a developer finds a bug during unit testing, it can be fixed immediately, before anyone else encounters it. However, if the bug is discovered by QA, then it becomes a much costlier bug. The bug can cause an extra development cycle, requires bug management, has to go back to the development team for a fix, and then back to QA to verify the fix. If a bug slips through the QA process and finds its way to the customer, then it becomes even more expensive.
The granularity of tests refers to their scope. As the following table illustrates, you can initially unit test a database class with just a few test functions, and then gradually add more tests to ensure that everything works as it should.
| LARGE-GRAINED TESTS | MEDIUM-GRAINED TESTS | FINE-GRAINED TESTS |
testConnection()testInsert()testUpdate()testDelete()testSelect() |
testConnectionDropped()testInsertBadData()testInsertStrings()testInsertIntegers()testUpdateStrings()testUpdateIntegers()testDeleteNonexistentRow()testSelectComplicated()testSelectMalformed() |
testConnectionThroughHTTP()testConnectionLocal()testConnectionErrorBadHost()testConnectionErrorServerBusy()testInsertWideCharacters()testInsertLargeData()testInsertMalformed()testUpdateWideCharacters()testUpdateLargeData()testUpdateMalformed()testDeleteWithoutPermissions()testDeleteThenUpdate()testSelectNested()testSelectWideCharacters()testSelectLargeData() |
As you can see, each successive column brings in more-specific tests. As you move from large-grained tests to more finely grained tests, you start to consider error conditions, different input data sets, and different modes of operation.
Of course, the decisions you make initially when choosing the granularity of your tests are not set in stone. Perhaps the database class is just being written as a proof-of-concept and might not even be used. A few simple tests may be adequate now, and you can always add more later. Or perhaps the use cases will change at a later date. For example, the database class might not initially have been written with international characters in mind. Once such features are added, they should be tested with specific targeted unit tests.
Consider the unit tests to be part of the actual implementation of a feature. When you make a modification, don’t just modify the tests so that they continue to work. Write new tests and re-evaluate the existing ones. When bugs are uncovered and fixed, add new unit tests that specifically test those fixes.
Over time, you will gain an intuition for which aspects of a piece of code should turn into a unit test. Certain methods or inputs will just feel like they should be tested. This intuition is gained through trial and error, and by looking at unit tests that other people in your group have written. It should be pretty easy to pick out which programmers are the best unit testers. Their tests tend to be organized and frequently modified.
Until unit test creation becomes second nature, approach the task of figuring out which tests to write by brainstorming. To get some ideas flowing, consider the following questions:
You don’t need to write formal answers to those questions (unless your manager is a particularly fervent devotee of this book or of certain testing methodologies), but they should help you generate some ideas for unit tests. The table of tests for the database class contained test functions, each of which arose from one of these questions.
Once you have generated ideas for some of the tests you would like to use, consider how you might organize them into categories; the breakdown of tests will fall into place. In the database class example, the tests could be split into the following categories:
Splitting your tests into categories makes them easier to identify and augment. It might also make it easier to realize which aspects of the code are well tested and which could use a few more unit tests.
The most common trap to fall into when writing unit tests is to match the test to the behavior of the code, instead of using the test to validate the code. If you write a unit test that performs a database select for a piece of data that is definitely in the database, and the test fails, is it a problem with the code or a problem with the test? It’s often easier to assume that the code is right and to modify the test to match. This approach is usually wrong.
To avoid this pitfall, you should understand the inputs to the test and the expected output before you try it out. This is sometimes easier said than done. For example, say you wrote some code to encrypt an arbitrary block of text using a particular key. A reasonable unit test would take a fixed string of text and pass it in to the encryption module. Then, it would examine the result to see if it was correctly encrypted.
When you go to write such a test, it is tempting to try out the behavior with the encryption module first and see the result. If it looks reasonable, you might write a test to look for that value. Doing so really doesn’t prove anything, however! You haven’t actually tested the code; you’ve just written a test that guarantees it will continue to return that same value. Often times, writing the test requires some real work; you would need to encrypt the text independently of your encryption module to get an accurate result.
The exact code behind a test varies, depending on what type of test framework you have in place. One framework, the Microsoft Visual C++ Testing Framework, is discussed later in this chapter. Independent of the actual implementation, however, the following guidelines will help ensure effective tests:
As you will see later in this chapter, unit tests are usually very small and simple pieces of code. In most cases, writing a single unit test will take only a few minutes, making them one of the most productive uses of your time.
When you’re done writing a test, you should run it right away before the anticipation of the results becomes too much to bear. The joy of a screen full of passing unit tests shouldn’t be minimized. For most programmers, this is the easiest way to see quantitative data that declares your code useful and correct.
Even if you adopt the methodology of writing tests before writing code, you should still run the tests immediately after they are written. This way, you can prove to yourself that the tests fail initially. Once the code is in place, you have tangible data that shows that it accomplished what it was supposed to accomplish.
It’s unlikely that every test you write will have the expected result the first time. In theory, if you are writing tests before writing code, all of your tests should fail. If one passes, either the code magically appeared or there is a problem with the test. If the code is done and tests still fail (some would say that if tests fail, the code is actually not done), there are two possibilities: the code could be wrong, or the tests could be wrong.
Running unit tests must be automated. This can be done in several ways. One option is to have a dedicated system that automatically runs all unit tests after every continuous integration build, or at least once a night. Such a system must send out e-mails to notify developers when unit tests are failing. Another option is to set up your local development environment so that unit tests are executed every time you compile your code. For this, unit tests should be kept small and very efficient. If you do have longer-running unit tests, put these separate, and let these be tested by a dedicated test system.
Now that you’ve read about unit testing in theory, it’s time to actually write some tests. The following example draws on the object pool implementation from Chapter 25. As a brief recap, the object pool is a class that can be used to avoid excessive object creation. By keeping track of already-created objects, the pool acts as a broker between code that needs a certain type of object and such objects that already exist.
The interface for the ObjectPool class is as follows; consult Chapter 25 for all the details.
template <typename T>class ObjectPool{public:ObjectPool() = default;virtual ~ObjectPool() = default;// Prevent assignment and pass-by-valueObjectPool(const ObjectPool<T>& src) = delete;ObjectPool<T>& operator=(const ObjectPool<T>& rhs) = delete;// The type of smart pointer returned by acquireObject().using Object = std::shared_ptr<T>;// Reserves and returns an object for use.Object acquireObject();private:// Stores the objects that are not currently in use by clients.std::queue<std::unique_ptr<T>> mFreeList;};
Microsoft Visual C++ comes with a built-in testing framework. The advantage of using a unit testing framework is that it allows the developer to focus on writing tests instead of dealing with setting up tests, building logic around tests, and gathering results. The following discussion is written for Visual C++ 2017.
To get started with the Visual C++ Testing Framework, you have to create a test project. The following steps explain how to test the ObjectPool class:
unittest1.cpp. Select this file in the Solution Explorer and delete it, because you will add your own files.ObjectPoolTest.h and ObjectPoolTest.cpp to the newly created test project.#include "stdafx.h" as the first line in ObjectPoolTest.cpp. (This line is required for the precompiled header feature of Visual C++.)Now you are ready to start adding unit tests to the code.
The most common way is to divide your unit tests into logical groups of tests, called test classes. You will now create a test class called ObjectPoolTest. The basic code in ObjectPoolTest.h for getting started is as follows:
#pragma once#include <CppUnitTest.h>TEST_CLASS(ObjectPoolTest){public:};
This code defines a test class called ObjectPoolTest, but the syntax is a bit different compared to standard C++. This is so that the framework can automatically discover all the tests.
If you need to perform any tasks that need to happen prior to running the tests defined in a test class, or to perform any cleanup after the tests have been executed, then you can implement an initialize method and a cleanup method. Here is an example:
TEST_CLASS(ObjectPoolTest){public:TEST_CLASS_INITIALIZE(setUp);TEST_CLASS_CLEANUP(tearDown);};
Because the tests for ObjectPool are relatively simple and isolated, empty definitions will suffice for setUp() and tearDown(), or you can simply remove them altogether. If you do need them, the beginning stage of the ObjectPoolTest.cpp source file is as follows:
#include "stdafx.h"#include "ObjectPoolTest.h"void ObjectPoolTest::setUp() { }void ObjectPoolTest::tearDown() { }
That’s all the initial code you need to start developing unit tests.
Because this may be your first exposure to the Visual C++ Testing Framework, or to unit tests at large, the first test will be a very simple one. It tests whether 0 < 1.
An individual unit test is just a method of a test class. To create a simple test, add its declaration to the ObjectPoolTest.h file:
TEST_CLASS(ObjectPoolTest){public:TEST_CLASS_INITIALIZE(setUp);TEST_CLASS_CLEANUP(tearDown);TEST_METHOD(testSimple); // Your first test!};
The implementation of this test uses Assert::IsTrue(), defined in the Microsoft::VisualStudio::CppUnitTestFramework namespace, to perform the actual test. In this case, the test claims that 0 is less than 1. Here is the updated ObjectPoolTest.cpp file:
#include "stdafx.h"#include "ObjectPoolTest.h"using namespace Microsoft::VisualStudio::CppUnitTestFramework;void ObjectPoolTest::setUp() { }void ObjectPoolTest::tearDown() { }void ObjectPoolTest::testSimple(){Assert::IsTrue(0 < 1);}
That’s it. Of course, most of your unit tests will do something a bit more interesting than a simple assert. As you will see, the common pattern is to perform some sort of calculation, and then assert that the result is the value you expect. With the Visual C++ Testing Framework, you don’t even need to worry about exceptions; the framework catches and reports them as necessary.
Build your solution by clicking Build ➪ Build Solution, and open the Test Explorer (Test ➪ Windows ➪ Test Explorer), shown in Figure 26-4.
After having built the solution, the Test Explorer automatically displays all discovered unit tests. In this case, it displays the testSimple unit test. You can run the tests by clicking the “Run All” link in the upper-left corner of the window. When you do that, the Test Explorer shows whether the unit tests succeed or fail. In this case, the single unit test succeeds, as shown in Figure 26-5.
If you modify the code to assert that 1 < 0, the test fails, and the Test Explorer reports the failure, as shown in Figure 26-6.
The lower part of the Test Explorer window displays useful information related to the selected unit test. In case of a failed unit test, it tells you exactly what failed. In this case, it says that an assertion failed. There is also a stack trace that was captured at the time the failure occurred. You can click the hyperlinks in that stack trace to jump directly to the offending line—very useful for debugging.
You can write negative tests, tests that do something that should fail. For example, you can write a negative test to test that a certain method throws an expected exception. The Visual C++ Testing Framework provides the Assert::ExpectException() function to handle expected exceptions. For example, the following unit test uses ExpectException() to execute a lambda expression that throws an std::invalid_argument exception. The template type parameter for ExpectException() specifies the type of exception to expect.
void ObjectPoolTest::testException(){Assert::ExpectException<std::invalid_argument>([]{throw std::invalid_argument("Error"); },L"Unknown exception caught.");}
Now that the framework is all set up and a simple test is working, it’s time to turn your attention to the ObjectPool class and write some code that actually tests it. All of the following tests will be added to ObjectPoolTest.h and ObjectPoolTest.cpp, just like the earlier initial test.
First, copy the ObjectPool.h header file next to the ObjectPoolTest.h file you created, and then add it to the project.
Before you can write the tests, you’ll need a helper class to use with the ObjectPool class. The ObjectPool creates objects of a certain type and hands them out to the caller as requested. Some of the tests will need to check if a retrieved object is the same as a previously retrieved object. One way to do this is to create a pool of serial objects—objects that have a monotonically increasing serial number. The following code shows the Serial.h header file defining such a class:
#include <cstddef> // For size_tclass Serial{public:Serial();size_t getSerialNumber() const;private:static size_t sNextSerial;size_t mSerialNumber;};
And here are the implementations in Serial.cpp:
#include "stdafx.h"#include "Serial.h"size_t Serial::sNextSerial = 0; // The first serial number is 0.Serial::Serial(): mSerialNumber(sNextSerial++) // A new object gets the next serial number.{}size_t Serial::getSerialNumber() const{return mSerialNumber;}
Now, on to the tests! As an initial sanity check, you might want a test that creates an object pool. If any exceptions are thrown during creation, the Visual C++ Testing Framework will report an error:
void ObjectPoolTest::testCreation(){ObjectPool<Serial> myPool;}
Don’t forget to add a TEST_METHOD(testCreation); statement to the header file. This holds for all subsequent tests as well. You also need to add an include for "ObjectPool.h" and for "Serial.h" to the ObjectPoolTest.cpp source file.
A second test, testAcquire(), tests a specific piece of public functionality: the ability of the ObjectPool to give out an object. In this case, there is not much to assert. To prove validity of the resulting Serial reference, the test asserts that its serial number is greater than or equal to zero:
void ObjectPoolTest::testAcquire(){ObjectPool<Serial> myPool;auto serial = myPool.acquireObject();Assert::IsTrue(serial->getSerialNumber() >= 0);}
The next test is a bit more interesting. The ObjectPool should not give out the same Serial object twice (unless it is released back to the pool). This test checks the exclusivity property of the ObjectPool by retrieving a number of objects from the pool. The retrieved objects are stored in a vector to make sure they aren’t automatically released back to the pool at the end of each for loop iteration. If the pool is properly dishing out unique objects, none of their serial numbers should match. This implementation uses the vector and set containers from the Standard Library. Consult Chapter 17 for details if you are unfamiliar with these containers. The code is written according to the AAA principle: Arrange, Act, Assert; the test first sets up everything for the test to run, then does some work (retrieving a number of objects from the pool), and finally asserts the expected result (all serial numbers are different).
void ObjectPoolTest::testExclusivity(){ObjectPool<Serial> myPool;const size_t numberOfObjectsToRetrieve = 10;std::vector<ObjectPool<Serial>::Object> retrievedSerials;std::set<size_t> seenSerialNumbers;for (size_t i = 0; i < numberOfObjectsToRetrieve; i++) {auto nextSerial = myPool.acquireObject();// Add the retrieved Serial to the vector to keep it 'alive',// and add the serial number to the set.retrievedSerials.push_back(nextSerial);seenSerialNumbers.insert(nextSerial->getSerialNumber());}// Assert that all retrieved serial numbers are different.Assert::AreEqual(numberOfObjectsToRetrieve, seenSerialNumbers.size());}
The final test (for now) checks the release functionality. Once an object is released, the ObjectPool can give it out again. The pool shouldn’t create additional objects until it has recycled all released objects.
The test first retrieves ten Serial objects from the pool, stores them in a vector to keep them alive, records the serial number of the last retrieved Serial, and finally clears the vector to return all retrieved objects back to the pool.
The second phase of the test again retrieves ten objects from the pool and stores them in a vector to keep them alive. All these retrieved objects must have a serial number less than or equal to the last serial number retrieved during the first phase of the test. After retrieving ten objects, one additional object is retrieved. This object should have a new serial number.
Finally, two assertions assert that all ten objects were recycled, and that the eleventh object had a new serial number.
void ObjectPoolTest::testRelease(){ObjectPool<Serial> myPool;const size_t numberOfObjectsToRetrieve = 10;std::vector<ObjectPool<Serial>::Object> retrievedSerials;for (size_t i = 0; i < numberOfObjectsToRetrieve; i++) {// Add the retrieved Serial to the vector to keep it 'alive'.retrievedSerials.push_back(myPool.acquireObject());}size_t lastSerialNumber = retrievedSerials.back()->getSerialNumber();// Release all objects back to the pool.retrievedSerials.clear();// The above loop has created ten Serial objects, with serial// numbers 0-9, and released all ten Serial objects back to the pool.// The next loop first again retrieves ten Serial objects. The serial// numbers of these should all be <= lastSerialNumber.// The Serial object acquired after that should have a new serial number.bool wronglyNewObjectCreated = false;for (size_t i = 0; i < numberOfObjectsToRetrieve; i++) {auto nextSerial = myPool.acquireObject();if (nextSerial->getSerialNumber() > lastSerialNumber) {wronglyNewObjectCreated = true;break;}retrievedSerials.push_back(nextSerial);}// Acquire one more Serial object, which should have a serial// number > lastSerialNumber.auto anotherSerial = myPool.acquireObject();bool newObjectCreated =(anotherSerial->getSerialNumber() > lastSerialNumber);Assert::IsFalse(wronglyNewObjectCreated);Assert::IsTrue(newObjectCreated);}
If you add all these tests and run them, the Test Explorer should look like Figure 26-7. Of course, if one or more tests fail, you are presented with the quintessential issue in unit testing: is it the test or the code that is broken?
The Visual C++ Testing Framework makes it easy to debug unit tests that are failing. The Test Explorer shows a stack trace captured at the time a unit test failed, containing hyperlinks pointing directly to offending lines.
However, sometimes it is useful to run a unit test directly in the debugger so that you can inspect variables at run time, step through the code line by line, and so on. To do this, you put a breakpoint on some line of code in your unit test. Then, you right-click the unit test in the Test Explorer and click Debug Selected Tests. The testing framework starts running the selected tests in the debugger and breaks at your breakpoint. From then on, you can step through the code however you want.
The tests in the previous section should have given you a good idea of how to start writing professional-quality tests for real code. It’s just the tip of the iceberg, though. The previous examples should help you think of additional tests that you could write for the ObjectPool class. For example, you should include a test that acquires and releases objects multiple times, and tests whether such objects are properly recycled.
There is no end to the number of unit tests you could write for a given piece of code, and that’s the best thing about unit tests. If you find yourself wondering how your code might react to a certain situation, that’s a unit test. If a particular aspect of your subsystem seems to be presenting problems, increase unit test coverage of that particular area. Even if you simply want to put yourself in the client’s shoes to see what it’s like to work with your class, writing unit tests is a great way to get a different perspective.
While unit tests are the best first line of defense against bugs, they are only part of the larger testing process. Higher-level tests focus on how pieces of the product work together, as opposed to the relatively narrow focus of unit tests. In a way, higher-level tests are more challenging to write because it’s less clear what tests need to be written. Still, you cannot really claim that the program works until you have tested how its pieces work together.
An integration test covers areas where components meet. Unlike a unit test, which generally acts on the level of a single class, an integration test usually involves two or more classes. Integration tests excel at testing interactions between two components, often written by two different programmers. In fact, the process of writing an integration test often reveals important incompatibilities in designs.
Because there are no hard-and-fast rules to determine what integration tests you should write, some examples might help you get a sense of when integration tests are useful. The following scenarios depict cases where an integration test is appropriate, but they do not cover every possible case. Just as with unit tests, over time you will refine your intuition for useful integration tests.
Suppose that your project includes a persistence layer that is used to save certain types of objects to disk and to read them back in. The hip way to serialize data is to use the JSON format, so a logical breakdown of components might include a JSON conversion layer sitting on top of a custom file API. Both of these components can be thoroughly unit tested. The JSON layer can have unit tests that ensure that different types of objects are correctly converted to JSON and populated from JSON. The file API can have tests that read, write, update, and delete files on disk.
When these modules start to work together, integration tests are appropriate. At the very least, you should have an integration test that saves an object to disk through the JSON layer, then reads it back in and does a comparison to the original. Because the test covers both modules, it is a basic integration test.
Imagine a program that contains a data structure shared by different components. For example, a stock-trading program can have a queue of buy-and-sell requests. Components related to receiving stock transaction requests can add orders to the queue, and components related to performing stock trades can take data off the queue. You can unit test the heck out of the queue class, but until it is tested with the actual components that will be using it, you really don’t know if any of your assumptions are wrong.
A good integration test uses the stock request components and the stock trade components as clients of the queue class. You can write some sample orders and make sure that they successfully enter and exit the queue through the client components.
Integration tests do not always need to occur at integration points in your own code. Many times, integration tests are written to test the interaction between your code and a third-party library.
For example, you may be using a database connection library to talk to a relational database system. Perhaps you built an object-oriented wrapper around the library that adds support for connection caching or provides a friendlier interface. This is a very important integration point to test because, even though the wrapper probably provides a more useful interface to the database, it introduces possible misuse of the original library.
In other words, writing a wrapper is a good thing, but writing a wrapper that introduces bugs is going to be a disaster.
When it comes to actually writing integration tests, there is often a fine line between integration and unit tests. If a unit test is modified so that it touches another component, is it suddenly an integration test? In a way, the answer is moot because a good test is a good test, regardless of the type of test. I recommend that you use the concepts of integration and unit testing as two approaches to testing, but avoid getting caught up in labeling the category of every single test.
In terms of implementation, integration tests are often written by using a unit testing framework, further blurring their distinction. As it turns out, unit testing frameworks provide an easy way to write a yes/no test and produce useful results. Whether the test is looking at a single unit of functionality or the intersection of two components hardly makes a difference from the framework’s point of view.
However, for performance and organizational reasons, you may want to attempt to separate unit tests from integration tests. For example, your group may decide that everybody must run integration tests before checking in new code, but be a bit laxer on running unrelated unit tests. Separating the two types of tests also increases the value of results. If a test failure occurs within the JSON class tests, it will be clear that it’s a bug in that class, not in the interaction between that class and the file API.
System tests operate at an even higher level than integration tests. These tests examine the program as a whole. System tests often make use of a virtual user that simulates a human being working with the program. Of course, the virtual user must be programmed with a script of actions to perform. Other system tests rely on scripts or a fixed set of inputs and expected outputs.
Much like unit and integration tests, an individual system test performs a specific test and expects a specific result. It is not uncommon to use system tests to make sure that different features work in combination with one another.
In theory, a fully system-tested program would contain a test for every permutation of every feature. This approach quickly grows unwieldy, but you should still make an effort to test many features in combination. For example, a graphics program could have a system test that imports an image, rotates it, performs a blur filter, converts it to black and white, and then saves it. The test would compare the saved image to a file that contains the expected result.
Unfortunately, few specific rules can be stated about system tests because they are highly dependent on the actual application. For applications that process files with no user interaction, system tests can be written much like unit and integration tests. For graphical programs, a virtual user approach may be best. For server applications, you might need to build stub clients that simulate network traffic. The important part is that you are actually testing real use of the program, not just a piece of it.
Regression testing is more of a testing concept than a specific type of test. The idea is that once a feature works, developers tend to put it aside and assume that it will continue to work. Unfortunately, new features and other code changes often conspire to break previously working functionality.
Regression tests are often put in place as a sanity check for features that are, more or less, complete and working. If the regression test is well written, it will cease to pass when a change is introduced that breaks the feature.
If your company has an army of quality-assurance testers, regression testing may take the form of manual testing. The tester acts as a user would and goes through a series of steps, gradually testing every feature that worked in the previous release. This approach is thorough and accurate if carefully performed, but is not particularly scalable.
At the other extreme, you could build a completely automated system that performs each function as a virtual user. This would be a scripting challenge, though several commercial and noncommercial packages exist to ease the scripting of various types of applications.
A middle ground is known as smoke testing. Some tests will only test a subset of the most important features that should work. The idea is that if something is broken, it should show up right away. If smoke tests pass, they could be followed by more rigorous manual or automated testing. The term smoke testing was introduced a long time ago, in electronics. After a circuit was built, with different components like vacuum tubes, resistors, and so on, the question was, “Is it assembled correctly?” A solution was to “plug it in, turn it on, and see if smoke comes out.” If smoke came out, the design might be wrong, or the assembly might be wrong. By seeing what part went up in smoke, the error could be determined.
Some bugs are like nightmares: they are both terrifying and recurring. Recurring bugs are frustrating and a poor use of engineering resources. Even if, for some reason, you decide not to write a suite of regression tests, you should still write regression tests for bugs that you fix.
By writing a test for a bug fix, you both prove that the bug is fixed and set up an alert that is triggered if the bug ever comes back (for example, if your change is rolled back or otherwise undone, or if two branches are not merged correctly into the main development branch). When a regression test of a previously fixed bug fails, it should be easy to fix because the regression test can refer to the original bug number and describe how it was fixed the first time.
As a software engineer, your role in testing may range anywhere from basic unit testing responsibility to complete management of an automated test system. Because testing roles and styles vary so much, here are several tips from my experience that may help you in different testing situations:
The most important tip I can give you is to remember that testing is a part of software development. If you agree with that and accept it before you start coding, it won’t be quite as unexpected when the feature is finished, but there is still more work to do to prove that it works.
This chapter covered the basic information that all professional programmers should know about testing. Unit testing in particular is the easiest and most effective way to increase the quality of your own code. Higher-level tests provide coverage of use cases, synchronicity between modules, and protection against regressions. No matter what your role is with regard to testing, you should now be able to confidently design, create, and review tests at various levels.
Now that you know how to find bugs, it’s time to learn how to fix them. To that end, Chapter 27 covers techniques and strategies for effective debugging.
The first rule of debugging is to be honest with yourself and admit that your code will contain bugs! This realistic assessment enables you to put your best effort into preventing bugs from crawling into your code in the first place, while you simultaneously include the necessary features to make debugging as easy as possible.
A bug in a computer program is incorrect run-time behavior. This undesirable behavior includes both catastrophic and noncatastrophic bugs. Examples of catastrophic bugs are program death, data corruption, operating system failures, or some other horrific outcome. A catastrophic bug can also manifest itself external to the software or computer system running the software; for example, medical software might contain a catastrophic bug causing a massive radiation overdose to a patient. Noncatastrophic bugs are bugs that cause the program to behave incorrectly in more subtle ways; for example, a web browser might return the wrong web page, or a spreadsheet application might calculate the standard deviation of a column incorrectly.
There are also so-called cosmetic bugs, where something is visually not correct, but otherwise works correctly. For example, a button in a user interface is kept enabled when it shouldn’t be, but clicking it does nothing. All computations are perfectly correct, the program does not crash, but it doesn’t look as “nice” as it should.
The underlying cause, or root cause, of the bug is the mistake in the program that causes this incorrect behavior. The process of debugging a program includes both determining the root cause of the bug, and fixing the code so that the bug will not occur again.
It’s impossible to write completely bug-free code, so debugging skills are important. However, a few tips can help you to minimize the number of bugs.
override keyword, and so on. This makes it easier for other people to understand your code.Your programs should contain features that enable easier debugging when the inevitable bugs arise. This section describes these features and presents sample implementations, where appropriate, that you can incorporate into your own programs.
Imagine this scenario: You have just released a new version of your flagship product, and one of the first users reports that the program “stopped working.” You attempt to pry more information from the user, and eventually discover that the program died in the middle of an operation. The user can’t quite remember what he was doing, or if there were any error messages. How will you debug this problem?
Now imagine the same scenario, but in addition to the limited information from the user, you are also able to examine the error log on the user’s computer. In the log you see a message from your program that says, “Error: unable to open config.xml file.” Looking at the code near the spot where that error message was generated, you find a line in which you read from the file without checking whether the file was opened successfully. You’ve found the root cause of your bug!
Error logging is the process of writing error messages to persistent storage so that they will be available following an application, or even machine, death. Despite the example scenario, you might still have doubts about this strategy. Won’t it be obvious by your program’s behavior if it encounters errors? Won’t the user notice if something goes wrong? As the preceding example shows, user reports are not always accurate or complete. In addition, many programs, such as the operating system kernel and long-running daemons like inetd or syslogd on Unix, are not interactive and run unattended on a machine. The only way these programs can communicate with users is through error logging. In many cases, a program might also want to automatically recover from certain errors, and hide those errors from the user. Still, having logs of those errors available can be invaluable to improve the overall stability of the program.
Thus, your program should log errors as it encounters them. That way, if a user reports a bug, you will be able to examine the log files on the machine to see if your program reported any errors prior to encountering the bug. Unfortunately, error logging is platform dependent: C++ does not contain a standard logging mechanism. Examples of platform-specific logging mechanisms include the syslog facility in Unix, and the event reporting API in Windows. You should consult the documentation for your development platform. There are also some open-source implementations of cross-platform logging frameworks. Here are two examples:
http://log4cpp.sourceforge.net/http://www.boost.org/Now that you’re convinced that logging is a great feature to add to your programs, you might be tempted to log messages every few lines in your code so that, in the event of any bug, you’ll be able to trace the code path that was executing. These types of log messages are appropriately called traces.
However, you should not write these traces to log files for two reasons. First, writing to persistent storage is slow. Even on systems that write the logs asynchronously, logging that much information will slow down your program. Second, and most important, most of the information that you would put in your traces is not appropriate for the end user to see. It will just confuse the user, leading to unwarranted service calls. That said, tracing is an important debugging technique under the correct circumstances, as described in the next section.
Here are some specific guidelines for the types of errors your programs should log:
It is also useful to log warnings, or recoverable errors, which allows you to investigate if you can possibly avoid them.
Most logging APIs allow you to specify a log level or error level, typically error, warning, and info. You can log non-error conditions under a log level that is less severe than “error.” For example, you might want to log significant state changes in your application, or startup and shutdown of the program. You also might consider giving your users a way to adjust the log level of your program at run time so that they can customize the amount of logging that occurs.
When debugging complicated problems, public error messages generally do not contain enough information. You often need a complete trace of the code path taken, or values of variables before the bug showed up. In addition to basic messages, it’s sometimes helpful to include the following information in debug traces:
You can add this tracing to your program through a special debug mode, or via a ring buffer. Both of these methods are explained in detail in the following sections. Note that in multithreaded programs you have to make your trace logging thread-safe. See Chapter 23 for details on multithreaded programming.
The first technique to add debug traces is to provide a debug mode for your program. In debug mode, the program writes trace output to standard error or to a file, and perhaps does extra checking during execution. There are several ways to add a debug mode to your program. Note that all these examples are writing traces in text format.
Start-time debug mode allows your application to run with or without debug mode depending on a command-line argument. This strategy includes the debug code in the “release” binary, and allows debug mode to be enabled at a customer site. However, it does require users to restart the program in order to run it in debug mode, which may prevent you from obtaining useful information about certain bugs.
The following example is a simple program implementing a start-time debug mode. This program doesn’t do anything useful; it is only for demonstrating the technique.
All logging functionality is wrapped in a Logger class. This class has two static data members: the name of the log file, and a Boolean saying whether logging is enabled or disabled. The class has a static public log() variadic template method. Variadic templates are discussed in Chapter 22. Note that the log file is opened, flushed, and closed on each call to log(). This might lower performance a bit; however, it does guarantee correct logging, which is more important.
class Logger{public:static void enableLogging(bool enable) { msLoggingEnabled = enable; }static bool isLoggingEnabled() { return msLoggingEnabled; }template<typename… Args>static void log(const Args&… args){if (!msLoggingEnabled)return;ofstream logfile(msDebugFileName, ios_base::app);if (logfile.fail()) {cerr << "Unable to open debug file!" << endl;return;}// Use a C++17 unary right fold, see Chapter 22.((logfile << args),…);logfile << endl;}private:static const string msDebugFileName;static bool msLoggingEnabled;};const string Logger::msDebugFileName = "debugfile.out";bool Logger::msLoggingEnabled = false;
The following helper macro is defined to make it easy to log something. It uses __func__, a predefined variable defined by the C++ standard that contains the name of the current function.
#define log(…) Logger::log(__func__, "(): ", __VA_ARGS__)This macro replaces every call to log() in your code with a call to Logger::log(). The macro automatically includes the function name as first argument to Logger::log(). For example, suppose you call the macro as follows:
log("The value is: ", value);The log() macro replaces this with the following:
Logger::log(__func__, "(): ", "The value is: ", value);Start-time debug mode needs to parse the command-line arguments to find out whether or not it should enable debug mode. Unfortunately, there is no standard functionality in C++ for parsing command-line arguments. This program uses a simple isDebugSet() function to check for the debug flag among all the command-line arguments, but a function to parse all command-line arguments would need to be more sophisticated.
bool isDebugSet(int argc, char* argv[]){for (int i = 1; i < argc; i++) {if (strcmp(argv[i], "-d") == 0) {return true;}}return false;}
Some arbitrary test code is used to exercise the debug mode in this example. Two classes are defined, ComplicatedClass and UserCommand. Both classes define an operator<< to write instances of them to a stream. The Logger class uses this operator to dump objects to the log file.
class ComplicatedClass { /* … */ };ostream& operator<<(ostream& ostr, const ComplicatedClass& src){ostr << "ComplicatedClass";return ostr;}class UserCommand { /* … */ };ostream& operator<<(ostream& ostr, const UserCommand& src){ostr << "UserCommand";return ostr;}
Here is some test code with a number of log calls:
UserCommand getNextCommand(ComplicatedClass* obj){UserCommand cmd;return cmd;}void processUserCommand(UserCommand& cmd){// details omitted for brevity}void trickyFunction(ComplicatedClass* obj){log("given argument: ", *obj);for (size_t i = 0; i < 100; ++i) {UserCommand cmd = getNextCommand(obj);log("retrieved cmd ", i, ": ", cmd);try {processUserCommand(cmd);} catch (const exception& e) {log("exception from processUserCommand(): ", e.what());}}}int main(int argc, char* argv[]){Logger::enableLogging(isDebugSet(argc, argv));if (Logger::isLoggingEnabled()) {// Print the command-line arguments to the tracefor (int i = 0; i < argc; i++) {log(argv[i]);}}ComplicatedClass obj;trickyFunction(&obj);// Rest of the function not shownreturn 0;}
There are two ways to run this application:
> STDebug> STDebug -d
Debug mode is activated only when the -d argument is specified on the command line.
Instead of enabling or disabling debug mode through a command-line argument, you could also use a preprocessor symbol such as DEBUG_MODE and #ifdefs to selectively compile the debug code into your program. In order to generate a debug version of this program, you would have to compile it with the symbol DEBUG_MODE defined. Your compiler should allow you to define symbols during compilation; consult your compiler’s documentation for details. For example, GCC allows you to specify –Dsymbol through the command-line. Microsoft VC++ allows you to specify the symbols through the Visual Studio IDE, or by specifying /D symbol if you use the VC++ command-line tools. Visual C++ automatically defines the _DEBUG symbol for debug builds. However, that symbol is Visual C++ specific, so the example in this section uses a custom symbol called DEBUG_MODE.
The advantage of this method is that your debug code is not compiled into the “release” binary, and so does not increase its size. The disadvantage is that there is no way to enable debugging at a customer site for testing or following the discovery of a bug.
An example implementation is given in CTDebug.cpp in the downloadable source code archive. One important remark on this implementation is that it contains the following definition for the log() macro:
#ifdef DEBUG_MODE#define log(…) Logger::log(__func__, "(): ", __VA_ARGS__)#else#define log(…)#endif
That is, if DEBUG_MODE is not defined, then all calls to log() are replaced with nothing, called no-ops.
The most flexible way to provide a debug mode is to allow it to be enabled or disabled at run time. One way to provide this feature is to supply an asynchronous interface that controls debug mode on the fly. This interface could be an asynchronous command that makes an interprocess call into the application (for example, using sockets, signals, or remote procedure calls). This interface could also take the form of a menu command in the user interface. C++ provides no standard way to perform interprocess communication, so an example of this technique is not shown.
Debug mode is useful for debugging reproducible problems and for running tests. However, bugs often appear when the program is running in non-debug mode, and by the time you or the customer enables debug mode, it is too late to gain any information about the bug. One solution to this problem is to enable tracing in your program at all times. You usually need only the most recent traces to debug a program, so you should store only the most recent traces at any point in a program’s execution. One way to provide for this is through careful use of log file rotations.
However, for performance reasons, it is better that your program doesn’t log these traces continuously to disk. Instead, it should store them in memory and provide a mechanism to dump all the trace messages to standard error or to a log file if the need arises.
A common technique is to use a ring buffer, also known as a circular buffer, to store a fixed number of messages, or messages in a fixed amount of memory. When the buffer fills up, it starts writing messages at the beginning of the buffer again, overwriting the older messages. This cycle can repeat indefinitely. The following sections provide an implementation of a ring buffer and show you how you can use it in your programs.
The following RingBuffer class provides a simple debug ring buffer. The client specifies the number of entries in the constructor, and adds messages with the addEntry() method. Once the number of entries exceeds the number allowed, new entries overwrite the oldest entries in the buffer. The buffer also provides the option to output entries to a stream as they are added to the buffer. The client can specify an output stream in the constructor, and can reset it with the setOutput() method. Finally, the operator<< streams the entire buffer to an output stream. This implementation uses a variadic template method. Variadic templates are discussed in Chapter 22.
class RingBuffer{public:// Constructs a ring buffer with space for numEntries.// Entries are written to *ostr as they are queued (optional).explicit RingBuffer(size_t numEntries = kDefaultNumEntries,std::ostream* ostr = nullptr);virtual ~RingBuffer() = default;// Adds an entry to the ring buffer, possibly overwriting the// oldest entry in the buffer (if the buffer is full).template<typename… Args>void addEntry(const Args&… args){std::ostringstream os;// Use a C++17 unary right fold, see Chapter 22.((os << args), …);addStringEntry(os.str());}// Streams the buffer entries, separated by newlines, to ostr.friend std::ostream& operator<<(std::ostream& ostr, RingBuffer& rb);// Streams entries as they are added to the given stream.// Specify nullptr to disable this feature.// Returns the old output stream.std::ostream* setOutput(std::ostream* newOstr);private:std::vector<std::string> mEntries;std::vector<std::string>::iterator mNext;std::ostream* mOstr;bool mWrapped;static const size_t kDefaultNumEntries = 500;void addStringEntry(std::string&& entry);};
This implementation of the ring buffer stores a fixed number of string objects. This approach certainly is not the most efficient solution. Other possibilities would be to provide a fixed number of bytes of memory for the buffer. However, this implementation should be sufficient unless you’re writing a high-performance application.
For multithreaded programs, it’s useful to add the ID of the thread and a timestamp to each trace entry. Of course, the ring buffer has to be made thread-safe before using it in a multithreaded application. See Chapter 23 for multithreaded programming.
Here are the implementations:
// Initialize the vector to hold exactly numEntries. The vector size// does not need to change during the lifetime of the object.// Initialize the other members.RingBuffer::RingBuffer(size_t numEntries, ostream* ostr): mEntries(numEntries), mOstr(ostr), mWrapped(false){if (numEntries == 0)throw invalid_argument("Number of entries must be > 0.");mNext = begin(mEntries);}// The addStringEntry algorithm is pretty simple: add the entry to the next// free spot, then reset mNext to indicate the free spot after// that. If mNext reaches the end of the vector, it starts over at 0.//// The buffer needs to know if the buffer has wrapped or not so// that it knows whether to print the entries past mNext in operator<<.void RingBuffer::addStringEntry(string&& entry){// If there is a valid ostream, write this entry to it.if (mOstr) {*mOstr << entry << endl;}// Move the entry to the next free spot and increment// mNext to point to the free spot after that.*mNext = std::move(entry);++mNext;// Check if we've reached the end of the buffer. If so, we need to wrap.if (mNext == end(mEntries)) {mNext = begin(mEntries);mWrapped = true;}}// Set the output stream.ostream* RingBuffer::setOutput(ostream* newOstr){return std::exchange(mOstr, newOstr);}// operator<< uses an ostream_iterator to "copy" entries directly// from the vector to the output stream.//// operator<< must print the entries in order. If the buffer has wrapped,// the earliest entry is one past the most recent entry, which is the entry// indicated by mNext. So, first print from entry mNext to the end.//// Then (even if the buffer hasn't wrapped) print from beginning to mNext-1.ostream& operator<<(ostream& ostr, RingBuffer& rb){if (rb.mWrapped) {// If the buffer has wrapped, print the elements from// the earliest entry to the end.copy(rb.mNext, end(rb.mEntries), ostream_iterator<string>(ostr, "\n"));}// Now, print up to the most recent entry.// Go up to mNext because the range is not inclusive on the right side.copy(begin(rb.mEntries), rb.mNext, ostream_iterator<string>(ostr, "\n"));return ostr;}
In order to use the ring buffer, you can create an instance of it and start adding messages to it. When you want to print the buffer, just use operator<< to print it to the appropriate ostream. Here is the earlier start-time debug mode program modified to use a ring buffer instead. Changes are highlighted. The definitions of the ComplicatedClass and UserCommand classes, and the functions getNextCommand(), processUserCommand(), and trickyFunction() are not shown. They are exactly the same as before.
RingBuffer debugBuf;#define log(…) debugBuf.addEntry(__func__, "(): ", __VA_ARGS__)int main(int argc, char* argv[]){// Log the command-line argumentsfor (int i = 0; i < argc; i++) {log(argv[i]);}ComplicatedClass obj;trickyFunction(&obj);// Print the current contents of the debug buffer to coutcout << debugBuf;return 0;}
Storing trace debug messages in memory is a great start, but in order for them to be useful, you need a way to access these traces for debugging.
Your program should provide a “hook” to tell it to export the messages. This hook could be similar to the interface you would use to enable debugging at run time. Additionally, if your program encounters a fatal error that causes it to exit, it could export the ring buffer automatically to a log file before exiting.
Another way to retrieve these messages is to obtain a memory dump of the program. Each platform handles memory dumps differently, so you should consult a reference or expert for your platform.
The <cassert> header defines an assert macro. It takes a Boolean expression and, if the expression evaluates to false, prints an error message and terminates the program. If the expression evaluates to true, it does nothing.
Assertions allow you to “force” your program to exhibit a bug at the exact point where that bug originates. If you didn’t assert at that point, your program might proceed with those incorrect values, and the bug might not show up until much later. Thus, assertions allow you to detect bugs earlier than you otherwise would.
You could use assertions in your code whenever you are “assuming” something about the state of your variables. For example, if you call a library function that is supposed to return a pointer and claims never to return nullptr, throw in an assert after the function call to make sure that the pointer isn’t nullptr.
Note that you should assume as little as possible. For example, if you are writing a library function, don’t assert that the parameters are valid. Instead, check the parameters, and return an error code or throw an exception if they are invalid.
As a rule, assertions should only be used for cases that are truly problematic, and should therefore never be ignored when they occur during development. If you hit an assertion during development, fix it, don’t just disable the assertion.
Make sure your programs create crash dumps, also called memory dumps, core dumps, and so on. A crash dump is a dump file that is created when your application crashes. It contains information about which threads were running at the time of the crash, a call stack of all the threads, and so on. How you create such dumps is platform dependent, so you should consult the documentation of your platform, or use a third-party library that takes care of it for you. Breakpad1 is an example of such an open-source cross-platform library that can write and process crash dumps.
Also make sure you set up a symbol server and a source code server. The symbol server is used to store debugging symbols of released binaries of your software. These symbols are used later on to interpret crash dumps received from customers. The source code server, discussed in Chapter 24, stores all revisions of your source code. When debugging crash dumps, this source code server is used to download the correct source code for the revision of your software that created the crash dump.
The exact procedure of analyzing crash dumps depends on your platform and compiler, so consult their documentation.
From my personal experience, I have found that a crash dump is often worth more than a thousand bug reports.
The assertions discussed earlier in this chapter are evaluated at run time. static_assert() allows assertions evaluated at compile time. A call to static_assert() accepts two parameters: an expression to evaluate at compile time and a string. When the expression evaluates to false, the compiler issues an error that contains the given string. A simple example could be to check that you are compiling with a 64-bit compiler:
static_assert(sizeof(void*) == 8, "Requires 64-bit compilation.");If you compile this with a 32-bit compiler where a pointer is four bytes, the compiler issues an error that can look like this:
test.cpp(3): error C2338: Requires 64-bit compilation. Since C++17, the string parameter is optional, as in this example:
static_assert(sizeof(void*) == 8);In this case, if the expression evaluates to false, you get a compiler-dependent error message. For example, Microsoft Visual C++ 2017 gives the following error:
test.cpp(3): error C2607: static assertion failedAnother example where static_asserts are pretty powerful is in combination with type traits, which are discussed in Chapter 22. For example, if you write a function template or class template, you could use static_asserts together with type traits to issue compiler errors when template types don’t satisfy certain conditions. The following example requires that the template type for the process() function template has Base1 as a base class:
class Base1 {};class Base1Child : public Base1 {};class Base2 {};class Base2Child : public Base2 {};template<typename T>void process(const T& t){static_assert(is_base_of_v<Base1, T>, "Base1 should be a base for T.");}int main(){process(Base1());process(Base1Child());//process(Base2()); // Error//process(Base2Child()); // Error}
If you try to call process() with an instance of Base2 or Base2Child, the compiler issues an error that could look like this:
test.cpp(13): error C2338: Base1 should be a base for T.test.cpp(21) : see reference to function templateinstantiation 'void process<Base2>(const T &)' being compiledwith[T=Base2]
Debugging a program can be incredibly frustrating. However, with a systematic approach it becomes significantly easier. Your first step in trying to debug a program should always be to reproduce the bug. Depending on whether or not you can reproduce the bug, your subsequent approach will differ. The next four sections explain how to reproduce bugs, how to debug reproducible bugs, how to debug nonreproducible bugs, and how to debug regressions. Additional sections explain details about debugging memory errors and debugging multithreaded programs.
If you can reproduce the bug consistently, it will be much easier to determine the root cause. Finding the root cause of bugs that are not reproducible is difficult, if not impossible.
As a first step to reproduce the bug, run the program with exactly the same inputs as the run when the bug first appeared. Be sure to include all inputs, from the program’s startup to the time of the bug’s appearance. A common mistake is to attempt to reproduce the bug by performing only the triggering action. This technique may not reproduce the bug because the bug might be caused by an entire sequence of actions.
For example, if your web browser program dies when you request a certain web page, it may be due to memory corruption triggered by that particular request’s network address. On the other hand, it may be because your program records all requests in a queue, with space for one million entries, and this entry was number one million and one. Starting the program over and sending one request certainly wouldn’t trigger the bug in that case.
Sometimes it is impossible to emulate the entire sequence of events that leads to the bug. Perhaps the bug was reported by someone who can’t remember everything that she did. Alternatively, maybe the program was running for too long to emulate every input. In that case, do your best to reproduce the bug. It takes some guesswork, and can be time-consuming, but effort at this point will save time later in the debugging process. Here are some techniques you can try:
After you are able to reproduce the bug consistently, you should attempt to find the smallest sequence that triggers the bug. You can start with the minimum sequence, containing only the triggering action, and slowly expand the sequence to cover the entire sequence from startup until the bug is triggered. This will result in the simplest and most efficient test case to reproduce it, which makes it simpler to find the root cause of the problem, and easier to verify the fix.
When you can reproduce a bug consistently and efficiently, it’s time to figure out the problem in the code that causes the bug. Your goal at this point is to find the exact lines of code that trigger the problem. You can use two different strategies.
The debugging example at the end of this chapter demonstrates both these approaches.
Fixing bugs that are not reproducible is significantly more difficult than fixing reproducible bugs. You often have very little information and must employ a lot of guesswork. Nevertheless, a few strategies can aid you.
Once you have found the root cause of a nonreproducible bug, you should create a reproducible test case and move it to the “reproducible bugs” category. It is important to be able to reproduce a bug before you actually fix it. Otherwise, how will you test the fix? A common mistake when debugging nonreproducible bugs is to fix the wrong problem in the code. Because you can’t reproduce the bug, you don’t know if you’ve really fixed it, so you shouldn’t be surprised when it shows up again a month later.
If a feature contains a regression bug, it means that the feature used to work correctly, but stopped working due to the introduction of a bug.
A useful debugging technique for investigating regressions is to look at the change log of relevant files. If you know at what time the feature was still working, look at all the change logs since that time. You might notice something suspicious that could lead you to the root cause.
Another approach that can save you a lot of time when debugging regressions is to use a binary search approach with older versions of the software to try and figure out when it started to go wrong. You can use binaries of older versions if you keep them, or revert the source code to an older revision. Once you know when it started to go wrong, inspect the change logs to see what changed at that time. This mechanism is only possible when you can reproduce the bug.
Most catastrophic bugs, such as application death, are caused by memory errors. Many noncatastrophic bugs are triggered by memory errors as well. Some memory bugs are obvious. If your program attempts to dereference a nullptr pointer, the default action is to terminate the program. However, nearly every platform enables you to respond to catastrophic errors and take remedial action. The amount of effort you devote to the response depends on the importance of this kind of recovery to your end users. For example, a text editor really needs to make a best attempt to save the modified buffers (possibly under a “recovered” name), while for other programs, users may find the default behavior acceptable, even if it is unpleasant.
Some memory bugs are more insidious. If you write past the end of an array in C++, your program will probably not crash at that point. However, if that array was on the stack, you may have written into a different variable or array, changing values that won’t show up until later in the program. Alternatively, if the array was on the heap, you could cause memory corruption in the heap, which will cause errors later when you attempt to allocate or free more memory dynamically.
Chapter 7 introduces some of the common memory errors from the perspective of what to avoid when you’re coding. This section discusses memory errors from the perspective of identifying problems in code that exhibits bugs. You should be familiar with the discussion in Chapter 7 before continuing with this section.
In order to debug memory problems, you should be familiar with the types of errors that can occur. This section describes the major categories of memory errors. Each category lists different types of memory errors, including a small code example demonstrating each error, and a list of possible symptoms that you might observe. Note that a symptom is not the same thing as a bug: a symptom is an observable behavior caused by a bug.
The following table summarizes five major errors that involve freeing memory.
| ERROR TYPE | SYMPTOMS | EXAMPLE |
| Memory leak |
Process memory usage grows over time. Process runs more slowly over time. Eventually, depending on the OS, operations and system calls fail because of lack of memory. |
void memoryLeak(){ int* p = new int[1000]; return; // Bug! Not freeing p.} |
| Using mismatched allocation and free operations |
Does not usually cause a crash immediately. This type of error can cause memory corruption on some platforms, which might show up as a crash later in the program. Certain mismatches can also cause memory leaks. |
void mismatchedFree(){ int* p1 = (int*)malloc(sizeof(int)); int* p2 = new int; int* p3 = new int[1000]; delete p1; // BUG! Should use free() delete[] p2; // BUG! Should use delete free(p3); // BUG! Should use delete[]} |
| Freeing memory more than once | Can cause a crash if the memory at that location has been handed out in another allocation between the two calls to delete. | void doubleFree(){ int* p1 = new int[1000]; delete[] p1; int* p2 = new int[1000]; delete[] p1; // BUG! freeing p1 twice} // BUG! Leaking memory of p2 |
| Freeing unallocated memory | Will usually cause a crash. | void freeUnallocated(){ int* p = reinterpret_cast<int*>(10000); delete p; // BUG! p not a valid pointer.} |
| Freeing stack memory | Technically a special case of freeing unallocated memory. This will usually cause a crash. | void freeStack(){ int x; int* p = &x; delete p; // BUG! Freeing stack memory} |
The crashes mentioned in this table can have different manifestations depending on your platform, such as segmentation faults, bus errors, access violations, and so on.
As you can see, some of the errors do not cause immediate program termination. These bugs are more subtle, leading to problems later in the program’s execution.
Another category of memory errors involves the actual reading and writing of memory.
| ERROR TYPE | SYMPTOMS | EXAMPLE |
| Accessing invalid memory | Almost always causes the program to crash immediately. | void accessInvalid(){ int* p = reinterpret_cast<int*>(10000); *p = 5; // BUG! p is not a valid pointer.} |
| Accessing freed memory |
Does not usually cause a program crash. If the memory has been handed out in another allocation, this error type can cause “strange” values to appear unexpectedly. |
void accessFreed(){ int* p1 = new int; delete p1; int* p2 = new int; *p1 = 5; // BUG! The memory pointed to // by p1 has been freed.} |
| Accessing memory in a different allocation |
Does not cause a crash. This error type can cause “strange” and potentially dangerous values to appear unexpectedly. |
void accessElsewhere(){ int x, y[10], z; x = 0; z = 0; for (int i = 0; i <= 10; i++) { y[i] = 5; // BUG for i==10! element 10 // is past end of array. }} |
| Reading uninitialized memory | Does not cause a crash, unless you use the uninitialized value as a pointer and dereference it (as in the example). Even then, it will not always cause a crash. | void readUninitialized(){ int* p; cout << *p; // BUG! p is uninitialized} |
Memory-access errors don’t always cause a crash. They can instead lead to subtle errors, in which the program does not terminate but instead produces erroneous results. Erroneous results can lead to serious consequences, for example, when external devices (such as robotic arms, X-ray machines, radiation treatments, life support systems, and so on) are being controlled by the computer.
Note that the symptoms discussed here for both memory-freeing errors and memory-access errors are the default symptoms for release builds of your program. Debug builds will most likely behave differently, and when you run the program inside a debugger, the debugger might break into the code when an error occurs.
Memory-related bugs often show up in slightly different places in the code each time you run the program. This is usually the case with heap memory corruption. Heap memory corruption is like a time bomb, ready to explode at some attempt to allocate, free, or use memory on the heap. So, when you see a bug that is reproducible, but that shows up in slightly different places, you should suspect memory corruption.
If you suspect a memory bug, your best option is to use a memory-checking tool for C++. Debuggers often provide options to run the program while checking for memory errors. For example, if you run a debug build of your application in the Microsoft Visual C++ debugger, it will catch almost all types of errors discussed in the previous sections. Additionally, there are some excellent third-party tools such as Purify from Rational Software (now owned by IBM) and Valgrind for Linux (discussed in Chapter 7). Microsoft also provides a free download called Application Verifier, which can be used with release builds of your applications in a Windows environment. It is a run-time verification tool to help you find subtle programming errors like the previously discussed memory errors. These debuggers and tools work by interposing their own memory-allocation and -freeing routines in order to check for any misuse of dynamic memory, such as freeing unallocated memory, dereferencing unallocated memory, or writing off the end of an array.
If you don’t have a memory-checking tool at your disposal, and the normal strategies for debugging are not helping, you may need to resort to code inspection. First, narrow down the part of the code containing the bug. Then, as a general rule, look at all raw pointers. Provided that you work on moderate- to good-quality code, most pointers should already be wrapped in smart pointers. If you do encounter raw pointers, take a closer look at how they are used, because they might be the cause of the error. Here are some more items to look for in your code.
nullptr so that their destructors don’t try to free that memory.dynamic_casts.new is matched with exactly one call to delete. Similarly, every call to malloc, alloc, or calloc should be matched with one call to free, and every call to new[] should be matched with one call to delete[]. To avoid freeing memory multiple times or using freed memory, it’s recommended to set your pointer to nullptr after freeing its memory. Of course, the best solution is to avoid using raw pointers to handle ownership of resources, and instead use smart pointers.T* p = nullptr; or T* p = new T; but never T* p;. Better yet, use smart pointers!nullptr. Also here, the best solution is to use smart pointers.C++ includes a threading support library that provides mechanisms for threading and synchronization between threads. This threading support library is discussed in Chapter 23. Multithreaded C++ programs are common, so it is important to think about the special issues involved in debugging a multithreaded program. Bugs in multithreaded programs are often caused by variations in timings in the operating system scheduling, and can be difficult to reproduce. Thus, debugging multithreaded programs requires a special set of techniques.
<thread> header defines sleep_until() and sleep_for() in the std::this_thread namespace, which you can use to sleep. The time to sleep is specified as an std::time_point or an std::duration respectively, both part of the chrono library discussed in Chapter 20. Sleeping for several seconds right before releasing a lock, immediately before signaling a condition variable, or directly before accessing shared data can reveal race conditions that would otherwise go undetected. If this debugging technique reveals the root cause, it must be fixed, so that it works correctly after removing these forced sleeps and context switches. Never leave these forced sleeps and context switches in your code! That would be the wrong “fix” for the problem.This section presents a buggy program and shows you the steps to take in order to debug it and fix the problem.
Suppose that you’re part of a team writing a web page that allows users to search for the research articles that cite a particular paper. This type of service is useful for authors who are trying to find work similar to their own. Once they find one paper representing a related work, they can look for every paper that cites that one to find other related work.
In this project, you are responsible for the code that reads the raw citation data from text files. For simplicity, assume that the citation information for each paper is found in its own file. Furthermore, assume that the first line of each file contains the author, title, and publication information for the paper; that the second line is always empty; and that all subsequent lines contain the citations from the article (one on each line). Here is an example file for one of the most important papers in computer science:
Alan Turing, "On Computable Numbers, with an Application to the Entscheidungsproblem", Proceedings of the London Mathematical Society, Series 2, Vol.42 (1936-37), 230-265.Gödel, "Über formal unentscheidbare Sätze der Principia Mathematica und verwandter Systeme, I", Monatshefte Math. Phys., 38 (1931), 173-198.Alonzo Church. "An unsolvable problem of elementary number theory", American J. of Math., 58 (1936), 345-363.Alonzo Church. "A note on the Entscheidungsproblem", J. of Symbolic Logic, 1 (1936), 40-41.E.W. Hobson, "Theory of functions of a real variable (2nd ed., 1921)", 87-88.
You may decide to structure your program by writing an ArticleCitations class that reads the file and stores the information. This class stores the article information from the first line in one string, and the citations in a C-style array of strings.
The ArticleCitations class definition looks like this:
class ArticleCitations{public:ArticleCitations(std::string_view fileName);virtual ~ArticleCitations();ArticleCitations(const ArticleCitations& src);ArticleCitations& operator=(const ArticleCitations& rhs);std::string_view getArticle() const { return mArticle; }int getNumCitations() const { return mNumCitations; }std::string_view getCitation(int i) const { return mCitations[i]; }private:void readFile(std::string_view fileName);void copy(const ArticleCitations& src);std::string mArticle;std::string* mCitations;int mNumCitations;};
The implementation is as follows. Keep in mind that this program is buggy! Don’t use it verbatim or as a model.
ArticleCitations::ArticleCitations(string_view fileName): mCitations(nullptr), mNumCitations(0){// All we have to do is read the file.readFile(fileName);}ArticleCitations::ArticleCitations(const ArticleCitations& src){copy(src);}ArticleCitations& ArticleCitations::operator=(const ArticleCitations& rhs){// Check for self-assignment.if (this == &rhs) {return *this;}// Free the old memory.delete [] mCitations;// Copy the datacopy(rhs);return *this;}void ArticleCitations::copy(const ArticleCitations& src){// Copy the article name, author, etc.mArticle = src.mArticle;// Copy the number of citationsmNumCitations = src.mNumCitations;// Allocate an array of the correct sizemCitations = new string[mNumCitations];// Copy each element of the arrayfor (int i = 0; i < mNumCitations; i++) {mCitations[i] = src.mCitations[i];}}ArticleCitations::~ArticleCitations(){delete [] mCitations;}void ArticleCitations::readFile(string_view fileName){// Open the file and check for failure.ifstream inputFile(fileName.data());if (inputFile.fail()) {throw invalid_argument("Unable to open file");}// Read the article author, title, etc. line.getline(inputFile, mArticle);// Skip the white space before the citations start.inputFile >> ws;int count = 0;// Save the current position so we can return to it.streampos citationsStart = inputFile.tellg();// First count the number of citations.while (!inputFile.eof()) {// Skip white space before the next entry.inputFile >> ws;string temp;getline(inputFile, temp);if (!temp.empty()) {count++;}}if (count != 0) {// Allocate an array of strings to store the citations.mCitations = new string[count];mNumCitations = count;// Seek back to the start of the citations.inputFile.seekg(citationsStart);// Read each citation and store it in the new array.for (count = 0; count < mNumCitations; count++) {string temp;getline(inputFile, temp);if (!temp.empty()) {mCitations[count] = temp;}}} else {mNumCitations = -1;}}
The following program asks the user for a filename, constructs an ArticleCitations instance for that file, and passes this instance by value to the processCitations() function, which prints out all the information:
void processCitations(ArticleCitations cit){cout << cit.getArticle() << endl;int num = cit.getNumCitations();for (int i = 0; i < num; i++) {cout << cit.getCitation(i) << endl;}}int main(){while (true) {cout << "Enter a file name (\"STOP\" to stop): ";string fileName;cin >> fileName;if (fileName == "STOP") {break;}ArticleCitations cit(fileName);processCitations(cit);}return 0;}
You decide to test the program on the Alan Turing example (stored in a file called paper1.txt). Here is the output:
Enter a file name ("STOP" to stop): paper1.txtAlan Turing, "On Computable Numbers, with an Application to the Entscheidungsproblem", Proceedings of the London Mathematical Society, Series 2, Vol.42 (1936-37), 230-265.[ 4 empty lines omitted for brevity ]Enter a file name ("STOP" to stop): STOP
That doesn’t look right. There are supposed to be four citations printed instead of four blank lines.
For this bug, you decide to try log-based debugging, and because this is a console application, you decide to just print messages to cout. In this case, it makes sense to start by looking at the function that reads the citations from the file. If that doesn’t work right, then obviously the object won’t have the citations. You can modify readFile() as follows:
void ArticleCitations::readFile(string_view fileName){// Code omitted for brevity// First count the number of citations.cout << "readFile(): counting number of citations" << endl;while (!inputFile.eof()) {// Skip white space before the next entry.inputFile >> ws;string temp;getline(inputFile, temp);if (!temp.empty()) {cout << "Citation " << count << ": " << temp << endl;count++;}}cout << "Found " << count << " citations" << endl;cout << "readFile(): reading citations" << endl;if (count != 0) {// Allocate an array of strings to store the citations.mCitations = new string[count];mNumCitations = count;// Seek back to the start of the citations.inputFile.seekg(citationsStart);// Read each citation and store it in the new array.for (count = 0; count < mNumCitations; count++) {string temp;getline(inputFile, temp);if (!temp.empty()) {cout << temp << endl;mCitations[count] = temp;}}} else {mNumCitations = -1;}cout << "readFile(): finished" << endl;}
Running the same test with this program gives the following output:
Enter a file name ("STOP" to stop): paper1.txtreadFile(): counting number of citationsCitation 0: Gödel, "Über formal unentscheidbare Sätze der Principia Mathematica und verwandter Systeme, I", Monatshefte Math. Phys., 38 (1931), 173-198.Citation 1: Alonzo Church. "An unsolvable problem of elementary number theory", American J. of Math., 58 (1936), 345-363.Citation 2: Alonzo Church. "A note on the Entscheidungsproblem", J. of Symbolic Logic, 1 (1936), 40-41.Citation 3: E.W. Hobson, "Theory of functions of a real variable (2nd ed., 1921)", 87-88.Found 4 citationsreadFile(): reading citationsreadFile(): finishedAlan Turing, "On Computable Numbers, with an Application to the Entscheidungsproblem", Proceedings of the London Mathematical Society, Series 2, Vol.42 (1936-37), 230-265.[ 4 empty lines omitted for brevity ]Enter a file name ("STOP" to stop): STOP
As you can see from the output, the first time the program reads the citations from the file, in order to count them, it reads them correctly. However, the second time, they are not read correctly; nothing is printed between “readFile(): reading citations” and “readFile(): finished”. Why not? One way to delve deeper into this issue is to add some debugging code to check the state of the file stream after each attempt to read a citation:
void printStreamState(const istream& inputStream){if (inputStream.good()) {cout << "stream state is good" << endl;}if (inputStream.bad()) {cout << "stream state is bad" << endl;}if (inputStream.fail()) {cout << "stream state is fail" << endl;}if (inputStream.eof()) {cout << "stream state is eof" << endl;}}void ArticleCitations::readFile(string_view fileName){// Code omitted for brevity// First count the number of citations.cout << "readFile(): counting number of citations" << endl;while (!inputFile.eof()) {// Skip white space before the next entry.inputFile >> ws;printStreamState(inputFile);string temp;getline(inputFile, temp);printStreamState(inputFile);if (!temp.empty()) {cout << "Citation " << count << ": " << temp << endl;count++;}}cout << "Found " << count << " citations" << endl;cout << "readFile(): reading citations" << endl;if (count != 0) {// Allocate an array of strings to store the citations.mCitations = new string[count];mNumCitations = count;// Seek back to the start of the citations.inputFile.seekg(citationsStart);// Read each citation and store it in the new array.for (count = 0; count < mNumCitations; count++) {string temp;getline(inputFile, temp);printStreamState(inputFile);if (!temp.empty()) {cout << temp << endl;mCitations[count] = temp;}}} else {mNumCitations = -1;}cout << "readFile(): finished" << endl;}
When you run your program this time, you find some interesting information:
Enter a file name ("STOP" to stop): paper1.txtreadFile(): counting number of citationsstream state is goodstream state is goodCitation 0: Gödel, "Über formal unentscheidbare Sätze der Principia Mathematica und verwandter Systeme, I", Monatshefte Math. Phys., 38 (1931), 173-198.stream state is goodstream state is goodCitation 1: Alonzo Church. "An unsolvable problem of elementary number theory", American J. of Math., 58 (1936), 345-363.stream state is goodstream state is goodCitation 2: Alonzo Church. "A note on the Entscheidungsproblem", J. of Symbolic Logic, 1 (1936), 40-41.stream state is goodstream state is goodCitation 3: E.W. Hobson, "Theory of functions of a real variable (2nd ed., 1921)", 87-88.stream state is eofstream state is failstream state is eofFound 4 citationsreadFile(): reading citationsstream state is failstream state is failstream state is failstream state is failreadFile(): finishedAlan Turing, "On Computable Numbers, with an Application to the Entscheidungsproblem", Proceedings of the London Mathematical Society, Series 2, Vol.42 (1936-37), 230-265.[ 4 empty lines omitted for brevity ]Enter a file name ("STOP" to stop): STOP
It looks like the stream state is good until after the final citation is read for the first time. Because the paper1.txt file contains an empty last line, the while loop is executed one more time after having read the last citation. In this last loop, inputFile >> ws reads the white-space of the last line, which causes the stream state to become eof. Then, the code still tries to read a line using getline() which causes the stream state to become fail and eof. That is expected. What is not expected is that the stream state remains as fail after all attempts to read the citations a second time. That doesn’t appear to make sense at first: the code uses seekg() to seek back to the beginning of the citations before reading them a second time.
However, Chapter 13 explains that streams maintain their error states until you clear them explicitly; seekg() doesn’t clear the fail state automatically. When in an error state, streams fail to read data correctly, which explains why the stream state is also fail after trying to read the citations a second time. A closer look at the code reveals that it fails to call clear() on the istream after reaching the end of the file. If you modify the code by adding a call to clear(), it will read the citations properly.
Here is the corrected readFile() method without the debugging cout statements:
void ArticleCitations::readFile(string_view fileName){// Code omitted for brevityif (count != 0) {// Allocate an array of strings to store the citations.mCitations = new string[count];mNumCitations = count;// Clear the stream state.inputFile.clear();// Seek back to the start of the citations.inputFile.seekg(citationsStart);// Read each citation and store it in the new array.for (count = 0; count < mNumCitations; count++) {string temp;getline(inputFile, temp);if (!temp.empty()) {mCitations[count] = temp;}}} else {mNumCitations = -1;}}
Running the same test again on paper1.txt now shows you the correct four citations.
Now that your ArticleCitations class seems to work well on one citations file, you decide to blaze ahead and test some special cases, starting with a file with no citations. The file looks like this, and is stored in a file named paper2.txt:
Author with no citationsWhen you try to run your program on this file, depending on your version of Linux and your compiler, you might get a crash that looks something like the following:
Enter a file name ("STOP" to stop): paper2.txtterminate called after throwing an instance of 'std::bad_alloc'what(): std::bad_allocAborted (core dumped)
The message “core dumped” means that the program crashed. This time you decide to give the debugger a shot. The Gnu Debugger (GDB) is widely available on Unix and Linux platforms. First, you must compile your program with debugging information (-g with g++). Then you can launch the program under GDB. Here’s an example session using the debugger to find the root cause of this problem. This example assumes your compiled executable is called buggyprogram. Text that you have to type is shown in bold.
>gdb buggyprogram[ Start-up messages omitted for brevity ]Reading symbols from /home/marc/c++/gdb/buggyprogram…done.(gdb)runStarting program: buggyprogramEnter a file name ("STOP" to stop):paper2.txtterminate called after throwing an instance of 'std::bad_alloc'what(): std::bad_allocProgram received signal SIGABRT, Aborted.0x00007ffff7535c39 in raise () from /lib64/libc.so.6(gdb)
When the program crashes, the debugger breaks the execution, and allows you to poke around in the state of the program at that time. The backtrace or bt command shows the current stack trace. The last operation is at the top, with frame number zero (#0):
(gdb)bt#0 0x00007ffff7535c39 in raise () from /lib64/libc.so.6#1 0x00007ffff7537348 in abort () from /lib64/libc.so.6#2 0x00007ffff7b35f85 in __gnu_cxx::__verbose_terminate_handler() () from /lib64/libstdc++.so.6#3 0x00007ffff7b33ee6 in ?? () from /lib64/libstdc++.so.6#4 0x00007ffff7b33f13 in std::terminate() () from /lib64/libstdc++.so.6#5 0x00007ffff7b3413f in __cxa_throw () from /lib64/libstdc++.so.6#6 0x00007ffff7b346cd in operator new(unsigned long) () from /lib64/libstdc++.so.6#7 0x00007ffff7b34769 in operator new[](unsigned long) () from /lib64/libstdc++.so.6#8 0x00000000004016ea in ArticleCitations::copy (this=0x7fffffffe090, src=…) at ArticleCitations.cpp:40#9 0x00000000004015b5 in ArticleCitations::ArticleCitations (this=0x7fffffffe090, src=…)at ArticleCitations.cpp:16#10 0x0000000000401d0c in main () at ArticleCitationsTest.cpp:20
When you get a stack trace like this, you should try to find the first stack frame from the top that is in your own code. In this example, this is stack frame #8. From this frame, you can see that there seems to be a problem in the copy() method of ArticleCitations. This method is invoked because main() calls processCitations() and passes the argument by value, which triggers a call to the copy constructor, which calls copy(). Of course, in production code you should pass a const reference, but pass-by-value is used in this example of a buggy program. You can tell the debugger to switch to stack frame #8 with the frame command, which requires the index of the frame to jump to:
(gdb)frame 8#8 0x00000000004016ea in ArticleCitations::copy (this=0x7fffffffe090, src=…) at ArticleCitations.cpp:4040 mCitations = new string[mNumCitations];
This output shows that the following line caused a problem:
mCitations = new string[mNumCitations];Now, you can use the list command to show the code in the current stack frame around the offending line:
(gdb)list35 // Copy the article name, author, etc.36 mArticle = src.mArticle;37 // Copy the number of citations38 mNumCitations = src.mNumCitations;39 // Allocate an array of the correct size40 mCitations = new string[mNumCitations];41 // Copy each element of the array42 for (int i = 0; i < mNumCitations; i++) {43 mCitations[i] = src.mCitations[i];44 }
In GDB, you can print values available in the current scope with the print command. In order to find the root cause of the problem, you can try printing some of the variables. The error happens inside the copy() method, so checking the value of the src parameter is a good start:
(gdb)print src$1 = (const ArticleCitations &) @0x7fffffffe060: {_vptr.ArticleCitations = 0x401fb0 <vtable for ArticleCitations+16>,mArticle = "Author with no citations", mCitations = 0x7fffffffe080, mNumCitations = -1}
Ah-ha! Here’s the problem. This article isn’t supposed to have any citations. Why is mNumCitations set to the strange value -1? Take another look at the code in readFile() for the case where there are no citations. In that case, it looks like mNumCitations is erroneously set to -1. The fix is easy: you always need to initialize mNumCitations to 0, instead of setting it to -1 when there are no citations. Another problem is that readFile() can be called multiple times on the same ArticleCitations object, so you also need to free a previously allocated mCitations array. Here is the fixed code:
void ArticleCitations::readFile(string_view fileName){// Code omitted for brevitydelete [] mCitations;// Free previously allocated citations.mCitations = nullptr;mNumCitations = 0;if (count != 0) {// Allocate an array of strings to store the citations.mCitations = new string[count];mNumCitations = count;// Clear the stream state.inputFile.clear();// Seek back to the start of the citations.inputFile.seekg(citationsStart);// Code omitted for brevity}}
As this example shows, bugs don’t always show up right away. It often takes a debugger and some persistence to find them.
This section explains the same debugging procedure as described in the previous section, but uses the Microsoft Visual C++ 2017 debugger instead of GDB.
First, you need to create a project. Start VC++ and click File ➪ New ➪ Project. In the project template tree on the left, select Visual C++ ➪ Win32 (or Windows Desktop). Then select the Win32 Console Application (or Windows Console Application) template in the list in the middle of the window. At the bottom, you can specify a name for the project and a location where to save it. Specify ArticleCitations as the name, choose a folder in which to save the project, and click OK. A wizard opens.2 In this wizard, click Next, select Console application, select Empty Project, and click Finish.
Once your new project is created, you can see a list of project files in the Solution Explorer. If this docking window is not visible, go to View ➪ Solution Explorer. There should be no files in the solution right now. Right-click the ArticleCitations project in the Solution Explorer and click Add ➪ Existing Item. Add all the files from the 06_ArticleCitations\06_VisualStudio folder in the downloadable source code archive to the project. After this, your Solution Explorer should look similar to Figure 27-1.
VC++ 2017 does not yet automatically enable C++17 features yet. Because this example uses std::string_view from C++17, you have to tell VC++ to enable C++17 features. In the Solution Explorer window, right-click the ArticleCitations project and click Properties. In the properties window, go to Configuration Properties ➪ C/C++ ➪ Language, and set the C++ Language Standard option to “ISO C++17 Standard” or “ISO C++ Latest Draft Standard”, whichever is available in your version of Visual C++.
Visual C++ supports so-called precompiled headers, a topic outside the scope of this book. In general, I recommend to use precompiled headers if your compiler supports them. However, the ArticleCitations implementation does not use precompiled headers, so you have to disable that feature for this particular project. In the Solution Explorer window, right-click the ArticleCitations project and click Properties. In the properties window, go to Configuration Properties ➪ C/C++ ➪ Precompiled Headers, and set the Precompiled Header option to “Not Using Precompiled Headers.”
Now you can compile the program. Click Build ➪ Build Solution. Then copy the paper1.txt and paper2.txt test files to your ArticleCitations project folder, which is the folder containing the ArticleCitations.vcxproj file.
Run the application with Debug ➪ Start Debugging, and test the program by first specifying the paper1.txt file. It should properly read the file and output the result to the console. Then, test paper2.txt. The debugger breaks the execution with a message similar to Figure 27-2.
This immediately shows you the line where the crash happened. If you only see disassembly code, right-click anywhere on the disassembly and select Go To Source Code. You can now inspect variables by simply hovering your mouse over the name of a variable. If you hover over src, you’ll notice that mNumCitations is -1. The reason and the fix are exactly the same as in the earlier example.
You can come to the same conclusion by inspecting the call stack (Debug ➪ Windows ➪ Call Stack). In this call stack, you need to find the first line that contains code that you wrote. This is shown in Figure 27-3.
Just as with GDB, you see that the problem is in copy(). You can double-click that line in the call stack window to jump to the right place in the code.
Instead of hovering over variables to inspect their values, you can also use the Debug ➪ Windows ➪ Autos window, which shows a list of variables. Figure 27-4 shows this list with the src variable expanded to show its data members. From this window, you can also see that mNumCitations is -1.
You might be inclined to disregard this example as too small to be representative of real debugging. Although the buggy code is not lengthy, many classes that you write will not be much bigger, even in large projects. Imagine if you had failed to test this example thoroughly before integrating it with the rest of the project. If these bugs showed up later, you and other engineers would have to spend more time narrowing down the problem before you could debug it as shown here. Additionally, the techniques shown in this example apply to all debugging, whether on a large or small scale.
The most important concept in this chapter is the fundamental law of debugging: avoid bugs when you’re coding, but plan for bugs in your code. The reality of programming is that bugs will appear. If you’ve prepared your program properly, with error logging, debug traces, and assertions, then the actual debugging will be significantly easier.
In addition to these techniques, this chapter also presented specific approaches for debugging bugs. The most important rule when actually debugging is to reproduce the problem. Then, you can use a symbolic debugger, or log-based debugging, to track down the root cause. Memory errors present particular difficulties, and account for the majority of bugs in legacy C++ code. This chapter described the various categories of memory bugs and their symptoms, and showed examples of debugging errors in a program.
Debugging is a hard skill to learn. To take your C++ skills to a professional level, you will have to practice debugging a lot.
Chapter 1 compares the size of the C standard to the size of the C++ standard. It is possible, and somewhat common, for a C programmer to memorize the entire C language. The keywords are few, the language features are minimal, and the behaviors are well defined. This is not the case with C++. Even C++ experts need to look things up sometimes. With that in mind, this section presents examples of coding techniques that are used in almost all C++ programs. When you remember the concept but forgot the syntax, turn to the following sections for a refresher.
Don’t remember how to get started? No problem—here is the definition of a simple class:
#pragma once// A simple class that illustrates class definition syntax.class Simple{public:Simple(); // Constructorvirtual ~Simple() = default; // Defaulted virtual destructor// Disallow assignment and pass-by-value.Simple(const Simple& src) = delete;Simple& operator=(const Simple& rhs) = delete;// Explicitly default move constructor and move assignment operator.Simple(Simple&& src) = default;Simple& operator=(Simple&& rhs) = default;virtual void publicMethod(); // Public methodint mPublicInteger; // Public data memberprotected:virtual void protectedMethod(); // Protected methodint mProtectedInteger = 41; // Protected data memberprivate:virtual void privateMethod(); // Private methodint mPrivateInteger = 42; // Private data memberstatic const int kConstant = 2; // Private constantstatic int sStaticInt; // Private static data member};
As Chapter 10 explains, it’s a good idea to always make at least your destructor virtual in case someone wants to derive from your class. It’s allowed to leave the destructor non-virtual, but only if you mark your class as final so that no other classes can derive from it. If you only want to make your destructor virtual but you don’t need any code inside the destructor, then you can explicitly default it, as in the Simple class example.
This example also demonstrates that you can explicitly delete or default special member functions. The copy constructor and copy assignment operator are deleted to prevent assignment and pass-by-value, while the move constructor and move assignment operator are explicitly defaulted.
Next, here is the implementation, including the initialization of the static data member:
#include "Simple.h"int Simple::sStaticInt = 0; // Initialize static data member.Simple::Simple() : mPublicInteger(40){// Implementation of constructor}void Simple::publicMethod() { /* Implementation of public method */ }void Simple::protectedMethod() { /* Implementation of protected method */ }void Simple::privateMethod() { /* Implementation of private method */ }
With C++17, you can remove the initialization of sStaticInt from the source file if you make it an inline variable instead, initialized in the class definition as follows:
static inline int sStaticInt = 0; // Private static data memberChapters 8 and 9 provide all the details for writing your own classes.
To derive from an existing class, you declare a new class that is an extension of another class. Here is the definition for a class called DerivedSimple, which derives from Simple:
#pragma once#include "Simple.h"// A derived class of the Simple class.class DerivedSimple : public Simple{public:DerivedSimple(); // Constructorvirtual void publicMethod() override; // Overridden methodvirtual void anotherMethod(); // Added method};
The implementation is as follows:
#include "DerivedSimple.h"DerivedSimple::DerivedSimple() : Simple(){// Implementation of constructor}void DerivedSimple::publicMethod(){// Implementation of overridden methodSimple::publicMethod(); // You can access base class implementations.}void DerivedSimple::anotherMethod(){// Implementation of added method}
Consult Chapter 10 for details on inheritance techniques.
The copy-and-swap idiom is discussed in detail in Chapter 9. It’s an idiom to implement a possibly throwing operation on an object with a strong exception-safety guarantee, that is, all-or-nothing. You simply create a copy of the object, modify that copy (can be a complex algorithm, possibly throwing exceptions), and finally, when no exceptions have been thrown, swap the copy with the original object. An assignment operator is an example of an operation for which you can use the copy-and-swap idiom. Your assignment operator first makes a local copy of the source object, then swaps this copy with the current object using only a non-throwing swap() implementation.
Here is a concise example of the copy-and-swap idiom used for a copy assignment operator. The class defines a copy constructor, a copy assignment operator, and a friend swap() function, which is marked as noexcept.
class CopyAndSwap{public:CopyAndSwap() = default;virtual ~CopyAndSwap(); // Virtual destructorCopyAndSwap(const CopyAndSwap& src); // Copy constructorCopyAndSwap& operator=(const CopyAndSwap& rhs); // Assignment operatorfriend void swap(CopyAndSwap& first, CopyAndSwap& second) noexcept;private:// Private data members…};
The implementation is as follows:
CopyAndSwap::~CopyAndSwap(){// Implementation of destructor}CopyAndSwap::CopyAndSwap(const CopyAndSwap& src){// This copy constructor can first delegate to a non-copy constructor// if any resource allocations have to be done. See the Spreadsheet// implementation in Chapter 9 for an example.// Make a copy of all data members}void swap(CopyAndSwap& first, CopyAndSwap& second) noexcept{using std::swap; // Requires <utility>// Swap each data member, for example:// swap(first.mData, second.mData);}CopyAndSwap& CopyAndSwap::operator=(const CopyAndSwap& rhs){// Check for self-assignmentif (this == &rhs) {return *this;}auto copy(rhs); // Do all the work in a temporary instanceswap(*this, copy); // Commit the work with only non-throwing operationsreturn *this;}
Consult Chapter 9 for a more detailed discussion.
If you’ve been working on a team that doesn’t use exceptions (for shame!) or if you’ve gotten used to Java-style exceptions, the C++ syntax may escape you. Here’s a refresher that uses the built-in exception class std::runtime_error. In most large programs, you will write your own exception classes.
#include <stdexcept>#include <iostream>void throwIf(bool throwIt){if (throwIt) {throw std::runtime_error("Here's my exception");}}int main(){try {throwIf(false); // doesn't throwthrowIf(true); // throws} catch (const std::runtime_error& e) {std::cerr << "Caught exception: " << e.what() << std::endl;return 1;}return 0;}
Chapter 14 discusses exceptions in more detail.
Complete details for file input are included in Chapter 13. Here is a quick sample program for file reading basics. This program reads its own source code and outputs it one token at a time:
#include <iostream>#include <fstream>#include <string>using namespace std;int main(){ifstream inputFile("FileRead.cpp");if (inputFile.fail()) {cerr << "Unable to open file for reading." << endl;return 1;}string nextToken;while (inputFile >> nextToken) {cout << "Token: " << nextToken << endl;}return 0;}
The following program outputs a message to a file, then reopens the file and appends another message. Additional details can be found in Chapter 13.
#include <iostream>#include <fstream>using namespace std;int main(){ofstream outputFile("FileWrite.out");if (outputFile.fail()) {cerr << "Unable to open file for writing." << endl;return 1;}outputFile << "Hello!" << endl;outputFile.close();ofstream appendFile("FileWrite.out", ios_base::app);if (appendFile.fail()) {cerr << "Unable to open file for appending." << endl;return 2;}appendFile << "Append!" << endl;return 0;}
Template syntax is one of the messiest parts of the C++ language. The most-forgotten piece of the template puzzle is that code that uses a class template needs to be able to see the method implementations as well as the class template definition. The same holds for function templates. For class templates, the usual technique to accomplish this is to simply put the implementations directly in the header file following the class template definition, as in the following example. Another technique is to put the implementations in a separate file, often with an .inl extension, and then #include that file as the last line in the class template header file. The following program shows a class template that wraps a reference to an object and adds get and set semantics to it. Here is the SimpleTemplate.h header file:
template <typename T>class SimpleTemplate{public:SimpleTemplate(T& object);const T& get() const;void set(const T& object);private:T& mObject;};template<typename T>SimpleTemplate<T>::SimpleTemplate(T& object) : mObject(object){}template<typename T>const T& SimpleTemplate<T>::get() const{return mObject;}template<typename T>void SimpleTemplate<T>::set(const T& object){mObject = object;}
The code can be tested as follows:
#include <iostream>#include <string>#include "SimpleTemplate.h"using namespace std;int main(){// Try wrapping an integer.int i = 7;SimpleTemplate<int> intWrapper(i);i = 2;cout << "wrapped value is " << intWrapper.get() << endl;// Try wrapping a string.string str = "test";SimpleTemplate<string> stringWrapper(str);str += "!";cout << "wrapped value is " << stringWrapper.get() << endl;return 0;}
Details about templates can be found in Chapters 12 and 22.
As you read this paragraph, thousands of C++ programmers throughout the world are solving problems that have already been solved. Someone in a cubicle in San Jose is writing a smart pointer implementation from scratch that uses reference counting. A young programmer on a Mediterranean island is designing a class hierarchy that could benefit immensely from the use of mixin classes.
As a Professional C++ programmer, you need to spend less of your time reinventing the wheel, and more of your time adapting reusable concepts in new ways. This section gives some examples of general-purpose approaches that you can apply directly to your own programs or customize for your needs.
RAII, or Resource Acquisition Is Initialization, is a simple yet very powerful concept. It is used to automatically free acquired resources when an RAII instance goes out of scope. This happens at a deterministic point in time. Basically, the constructor of a new RAII instance acquires ownership of a certain resource and initializes the instance with that resource, hence the name Resource Acquisition Is Initialization. The destructor automatically frees the acquired resource when the RAII instance is destroyed.
Here is an example of a File RAII class that safely wraps a C-style file handle (std::FILE) and automatically closes the file when the RAII instance goes out of scope. The RAII class also provides get(), release(), and reset() methods that behave similar to the same methods on certain Standard Library classes, such as std::unique_ptr.
#include <cstdio>class File final{public:File(std::FILE* file);~File();// Prevent copy construction and copy assignment.File(const File& src) = delete;File& operator=(const File& rhs) = delete;// Allow move construction and move assignment.File(File&& src) noexcept = default;File& operator=(File&& rhs) noexcept = default;// get(), release(), and reset()std::FILE* get() const noexcept;std::FILE* release() noexcept;void reset(std::FILE* file = nullptr) noexcept;private:std::FILE* mFile;};File::File(std::FILE* file) : mFile(file){}File::~File(){reset();}std::FILE* File::get() const noexcept{return mFile;}std::FILE* File::release() noexcept{std::FILE* file = mFile;mFile = nullptr;return file;}void File::reset(std::FILE* file /*= nullptr*/) noexcept{if (mFile) {fclose(mFile);}mFile = file;}
It can be used as follows:
File myFile(fopen("input.txt", "r"));As soon as the myFile instance goes out of scope, its destructor is called, and the file is automatically closed.
I recommend to never include a default constructor or to explicitly delete the default constructor for RAII classes. The reason can best be explained using a Standard Library RAII class that has a default constructor, std::unique_lock (see Chapter 23). Proper use of unique_lock is as follows:
class Foo{public:void setData();private:mutex mMutex;};void Foo::setData(){unique_lock<mutex> lock(mMutex);// …}
The setData() method uses the unique_lock RAII object to construct a local lock object that locks the mMutex data member and automatically unlocks that mutex at the end of the method.
However, because you do not directly use the lock variable after it has been defined, it is easy to make the following mistake:
void Foo::setData(){unique_lock<mutex>(mMutex);// …}
In this code, you accidentally forgot to give the unique_lock a name. This will compile, but it does not what you intended it to do! It will actually declare a local variable called mMutex (hiding the mMutex data member), and initialize it with a call to the unique_lock’s default constructor. The result is that the mMutex data member is not locked!
Double dispatch is a technique that adds an extra dimension to the concept of polymorphism. As described in Chapter 5, polymorphism lets the program determine behavior based on types at run time. For example, you could have an Animal class with a move() method. All Animals move, but they differ in terms of how they move. The move() method is defined for every derived class of Animal so that the appropriate method can be called, or dispatched, for the appropriate animal at run time without knowing the type of the animal at compile time. Chapter 10 explains how to use virtual methods to implement this run-time polymorphism.
Sometimes, however, you need a method to behave according to the run-time type of two objects, instead of just one. For example, suppose that you want to add a method to the Animal class that returns true if the animal eats another animal, and false otherwise. The decision is based on two factors: the type of animal doing the eating, and the type of animal being eaten. Unfortunately, C++ provides no language mechanism to choose a behavior based on the run-time type of more than one object. Virtual methods alone are insufficient for modeling this scenario because they determine a method, or behavior, depending on the run-time type of only the receiving object.
Some object-oriented languages provide the ability to choose a method at run time based on the run-time types of two or more objects. They call this feature multi-methods. In C++, however, there is no core language feature to support multi-methods, but you can use the double dispatch technique, which provides a way to make functions virtual for more than one object.
The most straightforward way to implement a method whose behavior depends on the run-time types of two different objects is to take the perspective of one of the objects and use a series of if/else constructs to check the type of the other. For example, you could implement a method called eats() in each class derived from Animal that takes the other animal as a parameter. The method is declared pure virtual in the base class as follows:
class Animal{public:virtual bool eats(const Animal& prey) const = 0;};
Each derived class implements the eats() method, and returns the appropriate value based on the type of the parameter. The implementation of eats() for several derived classes follows. Note that the Dinosaur avoids the series of if/else constructs because—according to the author—dinosaurs eat anything:
bool Bear::eats(const Animal& prey) const{if (typeid(prey) == typeid(Bear)) {return false;} else if (typeid(prey) == typeid(Fish)) {return true;} else if (typeid(prey) == typeid(Dinosaur)) {return false;}return false;}bool Fish::eats(const Animal& prey) const{if (typeid(prey) == typeid(Bear)) {return false;} else if (typeid(prey) == typeid(Fish)) {return true;} else if (typeid(prey) == typeid(Dinosaur)) {return false;}return false;}bool Dinosaur::eats(const Animal& prey) const{return true;}
This brute force approach works, and it’s probably the most straightforward technique for a small number of classes. However, there are several reasons why you might want to avoid this approach:
Donkey, the Bear class would continue to compile, but would return false when told to eat a Donkey, even though everybody knows that bears eat donkeys.You could attempt to use polymorphism with overloading to circumvent all of the cascading if/else constructs. Instead of giving each class a single eats() method that takes an Animal reference, why not overload the method for each derived class of Animal? The base class definition would look like this:
class Animal{public:virtual bool eats(const Bear&) const = 0;virtual bool eats(const Fish&) const = 0;virtual bool eats(const Dinosaur&) const = 0;};
Because the methods are pure virtual in the base class, each derived class is forced to implement the behavior for every other type of Animal. For example, the Bear class contains the following methods:
class Bear : public Animal{public:virtual bool eats(const Bear&) const override { return false; }virtual bool eats(const Fish&) const override { return true; }virtual bool eats(const Dinosaur&) const override { return false; }};
This approach initially appears to work, but it really solves only half of the problem. In order to call the proper eats() method on an Animal, the compiler needs to know the compile-time type of the animal being eaten. A call such as the following will be successful because the compile-time types of both the animal that eats and the animal that is eaten are known:
Bear myBear;Fish myFish;cout << myBear.eats(myFish) << endl;
The missing piece is that the solution is only polymorphic in one direction. You can access myBear through an Animal reference and the correct method will be called:
Bear myBear;Fish myFish;Animal& animalRef = myBear;cout << animalRef.eats(myFish) << endl;
However, the reverse is not true. If you pass an Animal reference to the eats() method, you will get a compilation error because there is no eats() method that takes an Animal. The compiler cannot determine, at compile time, which version to call. The following example does not compile:
Bear myBear;Fish myFish;Animal& animalRef = myFish;cout << myBear.eats(animalRef) << endl; // BUG! No method Bear::eats(Animal&)
Because the compiler needs to know which overloaded version of the eats() method is going to be called at compile time, this solution is not truly polymorphic. It would not work, for example, if you were iterating over an array of Animal references and passing each one to a call to eats().
The double dispatch technique is a truly polymorphic solution to the multiple-type problem. In C++, polymorphism is achieved by overriding methods in derived classes. At run time, methods are called based on the actual type of the object. The preceding single polymorphic attempt didn’t work because it attempted to use polymorphism to determine which overloaded version of a method to call instead of using it to determine on which class to call the method.
To begin, focus on a single derived class, perhaps the Bear class. The class needs a method with the following declaration:
virtual bool eats(const Animal& prey) const override;The key to double dispatch is to determine the result based on a method call on the argument. Suppose that the Animal class has a method called eatenBy(), which takes an Animal reference as a parameter. This method returns true if the current Animal gets eaten by the one passed in. With such a method, the definition of eats() becomes very simple:
bool Bear::eats(const Animal& prey) const{return prey.eatenBy(*this);}
At first, it looks like this solution adds another layer of method calls to the single polymorphic method. After all, each derived class still has to implement a version of eatenBy() for every derived class of Animal. However, there is a key difference. Polymorphism is occurring twice! When you call the eats() method on an Animal, polymorphism determines whether you are calling Bear::eats(), Fish::eats(), or one of the others. When you call eatenBy(), polymorphism again determines which class’s version of the method to call. It calls eatenBy() on the run-time type of the prey object. Note that the run-time type of *this is always the same as the compile-time type so that the compiler can call the correct overloaded version of eatenBy() for the argument (in this case Bear).
Following are the class definitions for the Animal hierarchy using double dispatch. Note that forward class declarations are necessary because the base class uses references to the derived classes:
// forward declarationsclass Fish;class Bear;class Dinosaur;class Animal{public:virtual bool eats(const Animal& prey) const = 0;virtual bool eatenBy(const Bear&) const = 0;virtual bool eatenBy(const Fish&) const = 0;virtual bool eatenBy(const Dinosaur&) const = 0;};class Bear : public Animal{public:virtual bool eats(const Animal& prey) const override;virtual bool eatenBy(const Bear&) const override;virtual bool eatenBy(const Fish&) const override;virtual bool eatenBy(const Dinosaur&) const override;};// The definitions for the Fish and Dinosaur classes are identical to the// Bear class, so they are not shown here.
The implementations follow. Note that each Animal-derived class implements the eats() method in the same way, but it cannot be factored up into the base class. The reason is that if you attempt to do so, the compiler won’t know which overloaded version of the eatenBy() method to call because *this would be an Animal, not a particular derived class. Method overload resolution is determined according to the compile-time type of the object, not its run-time type.
bool Bear::eats(const Animal& prey) const { return prey.eatenBy(*this); }bool Bear::eatenBy(const Bear&) const { return false; }bool Bear::eatenBy(const Fish&) const { return false; }bool Bear::eatenBy(const Dinosaur&) const { return true; }bool Fish::eats(const Animal& prey) const { return prey.eatenBy(*this); }bool Fish::eatenBy(const Bear&) const { return true; }bool Fish::eatenBy(const Fish&) const { return true; }bool Fish::eatenBy(const Dinosaur&) const { return true; }bool Dinosaur::eats(const Animal& prey) const { return prey.eatenBy(*this); }bool Dinosaur::eatenBy(const Bear&) const { return false; }bool Dinosaur::eatenBy(const Fish&) const { return false; }bool Dinosaur::eatenBy(const Dinosaur&) const { return true; }
Double dispatch is a concept that takes a bit of getting used to. I suggest playing with this code to adapt to the concept and its implementation.
Chapters 5 and 10 introduce the technique of using multiple inheritance to build mixin classes. Mixin classes add a small piece of extra behavior to a class in an existing hierarchy. You can usually spot a mixin class by its name, which ends in “-able”, for example, Clickable, Drawable, Printable, or Lovable.
Mixin classes contain actual code that can be reused by other classes. A single mixin class implements a well-defined piece of functionality. For example, you might have a mixin class called Playable that is mixed into certain types of media objects. The mixin class could, for example, contain most of the code to communicate with the computer’s sound drivers. By mixing in the class, the media object would get that functionality for free.
When designing a mixin class, you need to consider what behavior you are adding and whether it belongs in the object hierarchy or in a separate class. Using the previous example, if all media classes are playable, the base class should derive from Playable instead of mixing the Playable class into all of the derived classes. If only certain media classes are playable and they are scattered throughout the hierarchy, a mixin class makes sense.
One of the cases where mixin classes are particularly useful is when you have classes organized into a hierarchy on one axis, but they also contain similarities on another axis. For example, consider a war simulation game played on a grid. Each grid location can contain an Item with attack and defense capabilities and other characteristics. Some items, such as a Castle, are stationary. Others, such as a Knight or FloatingCastle, can move throughout the grid. When initially designing the object hierarchy, you might end up with something like Figure 28-1, which organizes the classes according to their attack and defense capabilities.
The hierarchy in Figure 28-1 ignores the movement functionality that certain classes contain. Building your hierarchy around movement would result in a structure similar to Figure 28-2.
Of course, the design of Figure 28-2 throws away all the organization of Figure 28-1. What’s a good object-oriented programmer to do?
There are two common solutions for this problem. Assuming that you go with the first hierarchy, organized around attackers and defenders, you need some way to work movement into the equation. One possibility is that, even though only a portion of the derived classes support movement, you could add a move() method to the Item base class. The default implementation would do nothing. Certain derived classes would override move() to actually change their location on the grid.
The other approach is to write a Movable mixin class. The elegant hierarchy from Figure 28-1 could be preserved, but certain classes in the hierarchy would derive from Movable in addition to their parent. Figure 28-3 shows this design.
Writing a mixin class is no different from writing a normal class. In fact, it’s usually much simpler. Using the earlier war simulation, the Movable mixin class might look as follows:
class Movable{public:virtual void move() { /* Implementation to move an item… */ }};
This Movable mixin class implements the actual code to move an item on the grid. It also provides a type for Items that can be moved. This allows you to create, for example, an array of all movable items without knowing or caring what actual derived class of Item they belong to.
The code for using a mixin class is syntactically equivalent to multiple inheritance. In addition to deriving from your parent class in the main hierarchy, you also derive from the mixin class:
class FloatingCastle : public Castle, public Movable{// …};
This mixes in the functionality provided by the Movable mixin class into the FloatingCastle class. Now you have a class that exists in the most logical place in the hierarchy, but still shares commonality with objects elsewhere in the hierarchy.
When graphical operating systems first came on the scene in the 1980s, procedural programming was the norm. At the time, writing a GUI application usually involved manipulating complex data structures and passing them to OS-provided functions. For example, to draw a rectangle in a window, you might have had to populate a Window struct with the appropriate information and pass it to a drawRect() function.
As object-oriented programming (OOP) grew in popularity, programmers looked for a way to apply the OOP paradigm to GUI development. The result is known as an object-oriented framework. In general, a framework is a set of classes that are used collectively to provide an object-oriented interface to some underlying functionality. When talking about frameworks, programmers are usually referring to large class libraries that are used for general application development. However, a framework can really represent functionality of any size. If you write a suite of classes that provides database functionality for your application, those classes could be considered a framework.
The defining characteristic of a framework is that it provides its own set of techniques and patterns. Frameworks usually require a bit of learning to get started with because they have their own mental model. Before you can work with a large application framework, such as the Microsoft Foundation Classes (MFC), you need to understand its view of the world.
Frameworks vary greatly in their abstract ideas and in their actual implementation. Many frameworks are built on top of legacy procedural APIs, which may affect various aspects of their design. Other frameworks are written from the ground up with object-oriented design in mind. Some frameworks might ideologically oppose certain aspects of the C++ language. For example, a framework could consciously shun the notion of multiple inheritance.
When you start working with a new framework, your first task is to find out what makes it tick. To what design principles does it subscribe? What mental model are its developers trying to convey? What aspects of the language does it use extensively? These are all vital questions, even though they may sound like things that you’ll pick up along the way. If you fail to understand the design, model, or language features of the framework, you will quickly get into situations where you overstep the bounds of the framework.
An understanding of the framework’s design will also make it possible for you to extend it. For example, if the framework omits a feature, such as support for printing, you could write your own printing classes using the same model as the framework. By doing so, you retain a consistent model for your application, and you have code that can be reused by other applications.
A framework might use certain specific data types. For example, the MFC framework uses the CString data type to represent strings, instead of using the Standard Library std::string class. This does not mean that you have to switch to the data types provided by the framework for your entire code base. Instead, you should convert the data types on the boundaries between the framework code and the rest of your code.
As I mentioned earlier, frameworks vary in their approaches to object-oriented design. One common paradigm is known as model-view-controller, or MVC. This paradigm models the notion that many applications commonly deal with a set of data, one or more views on that data, and manipulation of the data.
In MVC, a set of data is called the model. In a race car simulator, the model would keep track of various statistics, such as the current speed of the car and the amount of damage it has sustained. In practice, the model often takes the form of a class with many getters and setters. The class definition for the model of the race car might look as follows:
class RaceCar{public:RaceCar();virtual ~RaceCar() = default;virtual double getSpeed() const;virtual void setSpeed(double speed);virtual double getDamageLevel() const;virtual void setDamageLevel(double damage);private:double mSpeed;double mDamageLevel;};
A view is a particular visualization of the model. For example, there could be two views on a RaceCar. The first view could be a graphical view of the car, and the second could be a graph that shows the level of damage over time. The important point is that both views are operating on the same data—they are different ways of looking at the same information. This is one of the main advantages of the MVC paradigm: by keeping data separated from its display, you can keep your code more organized, and easily create additional views.
The final piece to the MVC paradigm is the controller. The controller is the piece of code that changes the model in response to some event. For example, when the driver of the race car simulator runs into a concrete barrier, the controller instructs the model to bump up the car’s damage level and reduce its speed. The controller can also manipulate the view. For example, when the user scrolls a scrollbar in the user interface, the controller instructs the view to scroll its content.
The three components of MVC interact in a feedback loop. Actions are handled by the controller, which adjusts the model and/or views. If the model changes, it notifies the views to update them. This interaction is shown in Figure 28-4.
The model-view-controller paradigm has gained widespread support within many popular frameworks. Even nontraditional applications, such as web applications, are moving in the direction of MVC because it enforces a clear separation between data, the manipulation of data, and the displaying of data.
The MVC pattern has evolved into several different variants, such as model-view-presenter (MVP), model-view-adapter (MVA), model-view-viewmodel (MVVM), and so on.
In this chapter, you read about some of the common techniques that Professional C++ programmers use consistently in their projects. As you advance as a software developer, you will undoubtedly form your own collection of reusable classes and libraries. Discovering design techniques opens the door to developing and using patterns, which are higher-level reusable constructs. You will experience the many applications of patterns next in Chapter 29.
A design pattern is a standard approach to program organization that solves a general problem. C++ is an object-oriented language, so the design patterns of interest to C++ programmers are generally object-oriented patterns, which describe strategies for organizing objects and object relationships in your programs. These patterns are usually applicable to any object-oriented language, such as C++, C#, Java, or Smalltalk. In fact, if you are familiar with C# or Java programming, you will recognize many of these patterns.
Design patterns are less language-specific than are techniques. The difference between a pattern and a technique is admittedly fuzzy, and different books employ different definitions. This book defines a technique as a strategy particular to the C++ language, while a pattern is a more general strategy for object-oriented design applicable to any object-oriented language.
Note that many patterns have several different names. The distinctions between the patterns themselves can be somewhat vague, with different sources describing and categorizing them slightly differently. In fact, depending on the books or other sources you use, you may find the same name applied to different patterns. There is even disagreement as to which design approaches qualify as patterns. With a few exceptions, this book follows the terminology used in the seminal book Design Patterns: Elements of Reusable Object-Oriented Software, by Erich Gamma et al. (Addison-wesley Professional, 1994). However, other pattern names and variations are noted when appropriate.
The design pattern concept is a simple but powerful idea. Once you are able to recognize the recurring object-oriented interactions that occur in a program, finding an elegant solution becomes a matter of merely selecting the appropriate pattern to apply. This chapter describes several design patterns in detail and presents sample implementations.
Certain patterns go by different names or are subject to different interpretations. Any aspect of design is likely to provoke debate among programmers, and I believe that is a good thing. Don’t simply accept these patterns as the only way to accomplish a task—draw on their approaches and ideas to refine them and form new patterns.
The iterator pattern provides a mechanism for separating algorithms or operations from the data on which they operate. At first glance, this pattern seems to contradict the fundamental principle in object-oriented programming of grouping together in objects data and the behaviors that operate on that data. While that argument is true on a certain level, the iterator pattern does not advocate removing fundamental behaviors from objects. Instead, it solves two problems that commonly arise with tight coupling of data and behaviors.
The first problem with tightly coupling data and behaviors is that it precludes generic algorithms that work on a variety of objects, not all of which are in the same class hierarchy. In order to write generic algorithms, you need some standard mechanism to access the contents of the objects.
The second problem with tightly coupled data and behaviors is that it’s sometimes difficult to add new behaviors. At the very least, you need access to the source code for the data objects. However, what if the object hierarchy of interest is part of a third-party framework or library that you cannot change? It would be nice to be able to add an algorithm or operation that works on the data without modifying the original object hierarchy of classes that hold the data.
You’ve already seen an example of the iterator pattern in the Standard Library. Conceptually, iterators provide a mechanism for an operation or algorithm to access a container of elements in a sequence. The name comes from the English word iterate, which means “repeat.” It applies to iterators because they repeat the action of moving forward in the sequence to reach each new element. In the Standard Library, the generic algorithms use iterators to access the elements of the containers on which they operate. By defining a standard iterator interface, the Standard Library allows you to write algorithms that can work on any container that supplies an iterator with the appropriate interface. Thus, iterators allow you to write generic algorithms without modifying the classes that hold the data. Figure 29-1 shows an iterator as the central coordinator; operations depend on iterators, and data objects provide iterators.
Chapter 21 illustrates a detailed example of how to implement an iterator for a class that conforms to the Standard Library requirements, which means that its iterator can be used by the generic Standard Library algorithms.
The singleton is one of the simplest design patterns. In English, the word singleton means “one of a kind” or “individual.” It has a similar meaning in programming. The singleton pattern is a strategy for enforcing the existence of exactly one instance of a class in a program. Applying the singleton pattern to a class guarantees that only one object of that class will ever be created. The singleton pattern also specifies that that one object is globally accessible from anywhere in the program. Programmers usually refer to a class following the singleton pattern as a singleton class.
If your program relies on the assumption that there will be exactly one instance of a class, you could enforce that assumption with the singleton pattern.
However, the singleton pattern has a number of disadvantages that you need to be aware of. If you have multiple singletons, it’s not always easy to guarantee that they are initialized in the right order at program startup. It’s also not easy to ensure a singleton is still there when callers need it during program shutdown. On top of that, singleton classes introduce hidden dependencies, cause tight coupling, and complicate unit testing. In a unit test, for example, you might want to write a stub version (see Chapter 26) of a singleton, but given the nature of a typical singleton implementation, that’s hard to do. A more appropriate design pattern could be dependency injection. With dependency injection, you create an interface for each service you provide, and inject the interfaces a component needs into the component. Dependency injection allows mocking (stub versions), makes it easier to introduce multiple instances later on, allows for more complicated ways of constructing the single object than a typical singleton, for example using factories, and so on. Still, the singleton pattern is discussed here because you will encounter it.
Singletons can be useful for utility classes. Many applications have a notion of a logger—a class that is responsible for writing status information, debugging data, and errors to a central location. The ideal logging class has the following characteristics:
The singleton pattern is a good match for a logger because, even though the logger could be used in many different contexts and for many different purposes, it is conceptually a single instance. Implementing the logger class as a singleton also makes it easier to use because you never have to worry about which logger is the current one or how to get a hold of the current logger; there’s only one, so it’s a moot point!
There are two basic ways to implement singleton behavior in C++. The first approach uses a class with only static methods. Such a class needs no instantiation and is accessible from anywhere. The problem with this method is that it lacks a built-in mechanism for construction and destruction. However, technically, a class that uses all static methods isn’t really a singleton: it’s a nothington or a static class, to coin new terms. The term singleton implies that there is exactly one instance of the class. If all of the methods are static and the class is never instantiated at all, you cannot really call it a singleton anymore. So, this is not further discussed in this section.
The second approach uses access control levels to regulate the creation and access of one single instance of a class. This is a true singleton and discussed further with an example of a simple Logger class, which provides the following features:
To build a true singleton in C++, you can use the access control mechanisms as well as the static keyword. An actual Logger object exists at run time, and the class enforces that only one object is ever instantiated. Clients can always get a hold of that object through a static method called instance(). The class definition looks like this:
// Definition of a singleton logger class.class Logger final{public:enum class LogLevel {Error,Info,Debug};// Returns a reference to the singleton Logger object.static Logger& instance();// Prevent copy/move construction.Logger(const Logger&) = delete;Logger(Logger&&) = delete;// Prevent copy/move assignment operations.Logger& operator=(const Logger&) = delete;Logger& operator=(Logger&&) = delete;// Sets the log level.void setLogLevel(LogLevel level);// Logs a single message at the given log level.void log(std::string_view message, LogLevel logLevel);// Logs a vector of messages at the given log level.void log(const std::vector<std::string>& messages,LogLevel logLevel);private:// Private constructor and destructor.Logger();~Logger();// Converts a log level to a human readable string.std::string_view getLogLevelString(LogLevel level) const;static const char* const kLogFileName;std::ofstream mOutputStream;LogLevel mLogLevel = LogLevel::Error;};
This implementation is based on Scott Meyer’s singleton pattern. This means that the instance() method contains a local static instance of the Logger class. C++ guarantees that this local static instance is initialized in a thread-safe fashion, so you don’t need any manual thread synchronization in this version of the singleton pattern. These are so-called magic statics. Note that only the initialization is thread safe! If multiple threads are going to call methods on the Logger class, then you should make the Logger methods themselves thread safe as well. See Chapter 23 for a detailed discussion on synchronization mechanisms to make a class thread safe.
The implementation of the Logger class is fairly straightforward. Once the log file has been opened, each log message is written to it with the log level prepended. The constructor and destructor are called automatically when the static instance of the Logger class in the instance() method is created and destroyed. Because the constructor and destructor are private, no external code can create or delete a Logger. Here is the implementation:
#include "Logger.h"#include <stdexcept>using namespace std;const char* const Logger::kLogFileName = "log.out"; //*Logger& Logger::instance(){static Logger instance;return instance;}Logger::Logger(){mOutputStream.open(kLogFileName, ios_base::app);if (!mOutputStream.good()) {throw runtime_error("Unable to initialize the Logger!");}}Logger::~Logger(){mOutputStream << "Logger shutting down." << endl;mOutputStream.close();}void Logger::setLogLevel(LogLevel level){mLogLevel = level;}string_view Logger::getLogLevelString(LogLevel level) const{switch (level) {case LogLevel::Error:return "ERROR";case LogLevel::Info:return "INFO";case LogLevel::Debug:return "DEBUG";}throw runtime_error("Invalid log level.");}void Logger::log(string_view message, LogLevel logLevel){if (mLogLevel < logLevel) {return;}mOutputStream << getLogLevelString(logLevel).data()<< ": " << message << endl;}void Logger::log(const vector<string>& messages, LogLevel logLevel){if (mLogLevel < logLevel) {return;}for (const auto& message : messages) {log(message, logLevel);}}
If your compiler supports C++17 inline variables, introduced in Chapter 9, then you can remove the line marked with //* from the source file, and instead define it as an inline variable directly in the class definition, as follows:
class Logger final{// Omitted for brevitystatic inline const char* const kLogFileName = "log.out";};
The singleton Logger class can be tested as follows:
// Set log level to Debug.Logger::instance().setLogLevel(Logger::LogLevel::Debug);// Log some messages.Logger::instance().log("test message", Logger::LogLevel::Debug);vector<string> items = {"item1", "item2"};Logger::instance().log(items, Logger::LogLevel::Error);// Set log level to Error.Logger::instance().setLogLevel(Logger::LogLevel::Error);// Now that the log level is set to Error, logging a Debug// message will be ignored.Logger::instance().log("A debug message", Logger::LogLevel::Debug);
After executing, the file log.out contains the following lines:
DEBUG: test messageERROR: item1ERROR: item2Logger shutting down.
A factory in real life constructs tangible objects, such as tables or cars. Similarly, a factory in object-oriented programming constructs objects. When you use factories in your program, portions of code that want to create a particular object ask the factory for an instance of the object instead of calling the object constructor themselves. For example, an interior decorating program might have a FurnitureFactory object. When part of the code needs a piece of furniture such as a table, it would call the createTable() method of the FurnitureFactory object, which would return a new table.
At first glance, factories seem to lead to complicated designs without clear benefits. It appears that you’re only adding another layer of complexity to the program. Instead of calling createTable() on a FurnitureFactory, you could simply create a new Table object directly. However, factories can actually be quite useful. Instead of creating various objects all over the program, you centralize the object creation for a particular domain.
Another benefit of factories is that you can use them alongside class hierarchies to construct objects without knowing their exact class. As you’ll see in the following example, factories can run parallel to class hierarchies. This is not to say they must run parallel to class hierarchies. Factories may as well just create any number of concrete types.
Another reason to use a factory is that maybe the creation of your objects requires certain information, state, resources, and so on, owned by the factory. A factory can also be used if creating your objects requires a complex series of steps to be executed in the right order, or if all created objects need to be linked to other objects in a correct manner, and so on.
One of the main benefits is that factories abstract the object creation process; using dependency injection, you can easily substitute a different factory in your program. Just as you can use polymorphism with the created objects, you can use polymorphism with factories. The following example demonstrates this.
In the real world, when you talk about driving a car, you can do so without referring to the specific type of car. You could be discussing a Toyota or a Ford. It doesn’t matter, because both Toyotas and Fords are drivable. Now, suppose that you want a new car. You would then need to specify whether you wanted a Toyota or a Ford, right? Not always. You could just say, “I want a car,” and depending on where you were, you would get a specific car. If you said, “I want a car,” in a Toyota factory, chances are you’d get a Toyota. (Or you’d get arrested, depending on how you asked.) If you said, “I want a car,” in a Ford factory, you’d get a Ford.
The same concepts apply to C++ programming. The first concept, a generic car that’s drivable, is nothing new; it’s standard polymorphism, described in Chapter 5. You could write an abstract Car class that defines a virtual drive() method. Both Toyota and Ford could be derived classes of the Car class, as shown in Figure 29-2.
Your program could drive Cars without knowing whether they were really Toyotas or Fords. However, with standard object-oriented programming, the one place that you’d need to specify Toyota or Ford would be when you created the car. Here, you would need to call the constructor for one or the other. You couldn’t just say, “I want a car.” However, suppose that you also had a parallel class hierarchy of car factories. The CarFactory base class could define a virtual requestCar() method. The ToyotaFactory and FordFactory derived classes would override the requestCar() method to build a Toyota or a Ford. Figure 29-3 shows the CarFactory hierarchy.
Now, suppose that there is one CarFactory object in a program. When code in the program, such as a car dealer, wants a new car, it calls requestCar() on the CarFactory object. Depending on whether that car factory is really a ToyotaFactory or a FordFactory, the code gets either a Toyota or a Ford. Figure 29-4 shows the objects in a car dealer program using a ToyotaFactory.
Figure 29-5 shows the same program, but with a FordFactory instead of a ToyotaFactory. Note that the CarDealer object and its relationship with the factory stay the same.
This example demonstrates using polymorphism with factories. When you ask the car factory for a car, you might not know whether it’s a Toyota factory or a Ford factory, but either way it will give you a Car that you can drive. This approach leads to easily extensible programs; simply changing the factory instance can allow the program to work on a completely different set of objects and classes.
One reason for using factories is that the type of the object you want to create may depend on some condition. For example, if you want a car, you might want to put your order into the factory that has received the fewest requests so far, regardless of whether the car you eventually get is a Toyota or a Ford. The following implementation shows how to write such factories in C++.
The first thing you’ll need is the hierarchy of cars. To keep this example concise, the Car class simply has an abstract method that returns a description of the car:
class Car{public:virtual ~Car() = default; // Always a virtual destructor!virtual std::string_view info() const = 0;};class Ford : public Car{public:virtual std::string_view info() const override { return "Ford"; }};class Toyota : public Car{public:virtual std::string_view info() const override { return "Toyota"; }};
The CarFactory base class is a bit more interesting. Each factory keeps track of the number of cars produced. When the public requestCar() method is called, the number of cars produced at the factory is increased by one, and the pure virtual createCar() method is called, which creates and returns a new car. The idea is that individual factories override createCar() to return the appropriate type of car. The CarFactory itself implements requestCar(), which takes care of updating the number of cars produced. The CarFactory also provides a public method to query the number of cars produced at each factory.
The class definitions for the CarFactory class and derived classes are as follows:
#include "Car.h"#include <cstddef>#include <memory>class CarFactory{public:virtual ~CarFactory() = default; // Always a virtual destructor!std::unique_ptr<Car> requestCar();size_t getNumberOfCarsProduced() const;protected:virtual std::unique_ptr<Car> createCar() = 0;private:size_t mNumberOfCarsProduced = 0;};class FordFactory : public CarFactory{protected:virtual std::unique_ptr<Car> createCar() override;};class ToyotaFactory : public CarFactory{protected:virtual std::unique_ptr<Car> createCar() override;};
As you can see, the derived classes simply override createCar() to return the specific type of car that they produce. The implementation of the CarFactory hierarchy is as follows:
// Increment the number of cars produced and return the new car.std::unique_ptr<Car> CarFactory::requestCar(){++mNumberOfCarsProduced;return createCar();}size_t CarFactory::getNumberOfCarsProduced() const{return mNumberOfCarsProduced;}std::unique_ptr<Car> FordFactory::createCar(){return std::make_unique<Ford>();}std::unique_ptr<Car> ToyotaFactory::createCar(){return std::make_unique<Toyota>();}
The implementation approach used in this example is called an abstract factory because the type of object created depends on which concrete derived class of the factory class is being used. A similar pattern can be implemented in a single class instead of a class hierarchy. In that case, a single create() method takes a type or string parameter from which it decides which object to create. For example, a CarFactory class could provide a requestCar() method that takes a string representing the type of car to build, and constructs the appropriate car.
The simplest way to use a factory is to instantiate it and to call the appropriate method, as in the following piece of code:
ToyotaFactory myFactory;auto myCar = myFactory.requestCar();cout << myCar->info() << endl; // Outputs Toyota
A more interesting example makes use of the virtual constructor idea to build a car in the factory that has the fewest cars produced. To do this, you can create a new factory, called LeastBusyFactory, that derives from CarFactory and that accepts a number of other CarFactory objects in its constructor. As all CarFactory classes have to do, LeastBusyFactory overrides the createCar() method. Its implementation finds the least busy factory in the list of factories passed to the constructor, and asks that factory to create a car. Here is the implementation of such a factory:
class LeastBusyFactory : public CarFactory{public:// Constructs a LeastBusyFactory instance, taking ownership of// the given factories.explicit LeastBusyFactory(vector<unique_ptr<CarFactory>>&& factories);protected:virtual unique_ptr<Car> createCar() override;private:vector<unique_ptr<CarFactory>> mFactories;};LeastBusyFactory::LeastBusyFactory(vector<unique_ptr<CarFactory>>&& factories): mFactories(std::move(factories)){if (mFactories.empty())throw runtime_error("No factories provided.");}unique_ptr<Car> LeastBusyFactory::createCar(){CarFactory* bestSoFar = mFactories[0].get();for (auto& factory : mFactories) {if (factory->getNumberOfCarsProduced() <bestSoFar->getNumberOfCarsProduced()) {bestSoFar = factory.get();}}return bestSoFar->requestCar();}
The following code makes use of this factory to build ten cars, whatever brand they might be, from the factory that has produced the least number of cars.
vector<unique_ptr<CarFactory>> factories;// Create 3 Ford factories and 1 Toyota factory.factories.push_back(make_unique<FordFactory>());factories.push_back(make_unique<FordFactory>());factories.push_back(make_unique<FordFactory>());factories.push_back(make_unique<ToyotaFactory>());// To get more interesting results, preorder some cars.factories[0]->requestCar();factories[0]->requestCar();factories[1]->requestCar();factories[3]->requestCar();// Create a factory that automatically selects the least busy// factory from a list of given factories.LeastBusyFactory leastBusyFactory(std::move(factories));// Build 10 cars from the least busy factory.for (size_t i = 0; i < 10; i++) {auto theCar = leastBusyFactory.requestCar();cout << theCar->info() << endl;}
When executed, the program prints out the make of each car produced:
FordFordFordToyotaFordFordFordToyotaFordFord
The results are rather predictable because the loop effectively iterates through the factories in a round-robin fashion. However, one could imagine a scenario where multiple dealers are requesting cars, and the current status of each factory isn’t quite so predictable.
You can also use the factory pattern for more than just modeling real-world factories. For example, consider a word processor in which you want to support documents in different languages, where each document uses a single language. There are many aspects of the word processor in which the choice of document language requires different support: the character set used in the document (whether or not accented characters are needed), the spell checker, the thesaurus, and the way the document is displayed, to name just a few. You could use factories to design a clean word processor by writing an abstract LanguageFactory base class and concrete factories for each language of interest, such as EnglishLanguageFactory and FrenchLanguageFactory. When the user specifies a language for a document, the program instantiates the appropriate language factory and attaches it to the document. From then on, the program doesn’t need to know which language is supported in the document. When it needs a language-specific piece of functionality, it can just ask the LanguageFactory. For example, when it needs a spell checker, it can call the createSpellchecker() method on the factory, which will return a spell checker in the appropriate language.
The proxy pattern is one of several patterns that divorce the abstraction of a class from its underlying representation. A proxy object serves as a stand-in for a real object. Such objects are generally used when using the real object would be time-consuming or impossible. For example, take a document editor. A document could contain several big objects, such as images. Instead of loading all those images when opening the document, the document editor could substitute all images with image proxies. These proxies don’t immediately load the images. Only when the user scrolls down in the document and reaches an image, does the document editor ask the image proxy to draw itself. At that time, the proxy delegates the work to the real image class, which loads the image.
Consider a networked game with a Player class that represents a person on the Internet who has joined the game. The Player class includes functionality that requires network connectivity, such as an instant messaging feature. If a player’s connection becomes slow or unresponsive, the Player object representing that person can no longer receive instant messages.
Because you don’t want to expose network problems to the user, it may be desirable to have a separate class that hides the networked parts of a Player. This PlayerProxy object would substitute for the actual Player object. Either clients of the class would use the PlayerProxy class at all times as a gatekeeper to the real Player class, or the system would substitute a PlayerProxy when a Player became unavailable. During a network failure, the PlayerProxy object could still display the player’s name and last-known state, and could continue to function when the original Player object could not. Thus, the proxy class hides some undesirable semantics of the underlying Player class.
The first step is defining an IPlayer interface containing the public interface for a Player.
class IPlayer{public:virtual std::string getName() const = 0;// Sends an instant message to the player over the network and// returns the reply as a string.virtual std::string sendInstantMessage(std::string_view message) const = 0;};
The Player class definition then becomes as follows. The sendInstantMessage() method of a Player requires network connectivity to properly function.
class Player : public IPlayer{public:virtual std::string getName() const override;// Network connectivity is required.virtual std::string sendInstantMessage(std::string_view message) const override;};
The PlayerProxy class also derives from IPlayer, and contains another IPlayer instance (the ‘real’ Player):
class PlayerProxy : public IPlayer{public:// Create a PlayerProxy, taking ownership of the given player.PlayerProxy(std::unique_ptr<IPlayer> player);virtual std::string getName() const override;// Network connectivity is optional.virtual std::string sendInstantMessage(std::string_view message) const override;private:std::unique_ptr<IPlayer> mPlayer;};
The constructor takes ownership of the given IPlayer:
PlayerProxy::PlayerProxy(std::unique_ptr<IPlayer> player): mPlayer(std::move(player)){}
The implementation of the PlayerProxy’s sendInstantMessage() method checks the network connectivity, and either returns a default string or forwards the request.
std::string PlayerProxy::sendInstantMessage(std::string_view message) const{if (hasNetworkConnectivity())return mPlayer->sendInstantMessage(message);elsereturn "The player has gone offline.";}
If a proxy is well written, using it should be no different from using any other object. For the PlayerProxy example, the code that uses the proxy could be completely unaware of its existence. The following function, designed to be called when the Player has won, could be dealing with an actual Player or a PlayerProxy. The code is able to handle both cases in the same way because the proxy ensures a valid result.
bool informWinner(const IPlayer& player){auto result = player.sendInstantMessage("You have won! Play again?");if (result == "yes") {cout << player.getName() << " wants to play again." << endl;return true;} else {// The player said no, or is offline.cout << player.getName() << " does not want to play again." << endl;return false;}}
The motivation for changing the abstraction given by a class is not always driven by a desire to hide functionality. Sometimes, the underlying abstraction cannot be changed but it doesn’t suit the current design. In this case, you can build an adaptor or wrapper class. The adaptor provides the abstraction that the rest of the code uses and serves as the bridge between the desired abstraction and the actual underlying code. Chapter 17 discusses how the Standard Library uses the adaptor pattern to implement containers like stack and queue in terms of other containers, such as deque and list.
For this adaptor pattern example, let’s assume a very basic Logger class. Here is the class definition:
class Logger{public:enum class LogLevel {Error,Info,Debug};Logger();virtual ~Logger() = default; // Always a virtual destructor!void log(LogLevel level, std::string message);private:// Converts a log level to a human readable string.std::string_view getLogLevelString(LogLevel level) const;};
And here are the implementations:
Logger::Logger(){cout << "Logger constructor" << endl;}void Logger::log(LogLevel level, std::string message){cout << getLogLevelString(level).data() << ": " << message << endl;}string_view Logger::getLogLevelString(LogLevel level) const{// Same implementation as the Singleton logger earlier in this chapter.}
The Logger class has a constructor, which outputs a line of text to the standard console, and a method called log() that writes the given message to the console prefixed with a log level.
One reason why you might want to write a wrapper class around this basic Logger class is to change its interface. Maybe you are not interested in the log level and you would like to call the log() method with only one parameter, the actual message. You might also want to change the interface to accept an std::string_view instead of an std::string as parameter for the log() method.
The first step in implementing the adaptor pattern is to define the new interface for the underlying functionality. This new interface is called NewLoggerInterface and looks like this:
class NewLoggerInterface{public:virtual ~NewLoggerInterface() = default; // Always virtual destructor!virtual void log(std::string_view message) = 0;};
This class is an abstract class, which declares the desired interface that you want for your new logger. The interface only defines one abstract method, that is, a log() method accepting only a single argument of type string_view, which needs to be implemented by any class implementing this interface.
The next step is to write the actual new logger class, NewLoggerAdaptor, which implements NewLoggerInterface so that it has the interface that you designed. The implementation wraps a Logger instance; it uses composition.
class NewLoggerAdaptor : public NewLoggerInterface{public:NewLoggerAdaptor();virtual void log(std::string_view message) override;private:Logger mLogger;};
The constructor of the new class writes a line to standard output to keep track of which constructors are being called. The code then implements the log() method from NewLoggerInterface by forwarding the call to the log() method of the Logger instance that is wrapped. In that call, the given string_view is converted to a string, and the log level is hard-coded as Info:
NewLoggerAdaptor::NewLoggerAdaptor(){cout << "NewLoggerAdaptor constructor" << endl;}void NewLoggerAdaptor::log(string_view message){mLogger.log(Logger::LogLevel::Info, message.data());}
Because adaptors exist to provide a more appropriate interface for the underlying functionality, their use should be straightforward and specific to the particular case. Given the previous implementation, the following code snippet uses the new simplified interface for the Logger class:
NewLoggerAdaptor logger;logger.log("Testing the logger.");
It produces the following output:
Logger constructorNewLoggerAdaptor constructorINFO: Testing the logger.
The decorator pattern is exactly what it sounds like: a “decoration” on an object. It is also often called a wrapper. The pattern is used to add or change the behavior of an object at run time. Decorators are a lot like derived classes, but their effects can be temporary. For example, if you have a stream of data that you are parsing and you reach data that represents an image, you could temporarily decorate the stream object with an ImageStream object. The ImageStream constructor would take the stream object as a parameter and would have built-in knowledge of image parsing. Once the image is parsed, you could continue using the original object to parse the remainder of the stream. The ImageStream acts as a decorator because it adds new functionality (image parsing) to an existing object (a stream).
As you may already know, web pages are written in a simple text-based structure called HyperText Markup Language (HTML). In HTML, you can apply styles to a text by using style tags, such as <B> and </B> for bold and <I> and </I> for italic. The following line of HTML displays the message in bold:
<B>A party? For me? Thanks!</B>The following line displays the message in bold and italic:
<I><B>A party? For me? Thanks!</B></I>Suppose you are writing an HTML editing application. Your users will be able to type in paragraphs of text and apply one or more styles to them. You could make each type of paragraph a new derived class, as shown in Figure 29-6, but that design could be cumbersome and would grow exponentially as new styles were added.
The alternative is to consider styled paragraphs not as types of paragraphs, but as decorated paragraphs. This leads to situations like the one shown in Figure 29-7, where an ItalicParagraph operates on a BoldParagraph, which in turn operates on a Paragraph. The recursive decoration of objects nests the styles in code just as they are nested in HTML.
To start, you need an IParagraph interface:
class IParagraph{public:virtual ~IParagraph() = default; // Always a virtual destructor!virtual std::string getHTML() const = 0;};
The Paragraph class implements this IParagraph interface:
class Paragraph : public IParagraph{public:Paragraph(std::string_view text) : mText(text) {}virtual std::string getHTML() const override { return mText; }private:std::string mText;};
To decorate a Paragraph with zero or more styles, you need styled IParagraph classes, each one constructible from an existing IParagraph. This way, they can all decorate a Paragraph or a styled IParagraph. The BoldParagraph class derives from IParagraph and implements getHTML(). However, because you only intend to use it as a decorator, its single public non-copy constructor takes a const reference to an IParagraph.
class BoldParagraph : public IParagraph{public:BoldParagraph(const IParagraph& paragraph) : mWrapped(paragraph) {}virtual std::string getHTML() const override {return "<B>" + mWrapped.getHTML() + "</B>";}private:const IParagraph& mWrapped;};
The ItalicParagraph class is almost identical:
class ItalicParagraph : public IParagraph{public:ItalicParagraph(const IParagraph& paragraph) : mWrapped(paragraph) {}virtual std::string getHTML() const override {return "<I>" + mWrapped.getHTML() + "</I>";}private:const IParagraph& mWrapped;};
From the user’s point of view, the decorator pattern is appealing because it is very easy to apply, and is transparent once applied. The user doesn’t need to know that a decorator has been employed at all. A BoldParagraph behaves just like a Paragraph.
Here is a quick example that creates and outputs a paragraph, first in bold, then in bold and italic:
Paragraph p("A party? For me? Thanks!");// Boldstd::cout << BoldParagraph(p).getHTML() << std::endl;// Bold and Italicstd::cout << ItalicParagraph(BoldParagraph(p)).getHTML() << std::endl;
The output is as follows:
<B>A party? For me? Thanks!</B><I><B>A party? For me? Thanks!</B></I>
A chain of responsibility is used when you want a number of objects to get a crack at performing a particular action. The technique can employ polymorphism so that the most specific class gets called first and can either handle the call or pass it up to its parent. The parent then makes the same decision—it can handle the call or pass it up to its parent. A chain of responsibility does not necessarily have to follow a class hierarchy, but it typically does.
Chains of responsibility are perhaps most commonly used for event handling. Many modern applications, particularly those with graphical user interfaces, are designed as a series of events and responses. For example, when a user clicks on the File menu and selects Open, an open event has occurred. When the user moves the mouse over the drawable area of a paint program, mouse move events are generated continuously. If the user presses down a button on the mouse, a mouse down event for that button-press is generated. The program can then start paying attention to the mouse move events, allowing the user to “draw” some object, and continue doing this until the mouse up event occurs. Each operating system has its own way of naming and using these events, but the overall idea is the same: when an event occurs, it is somehow communicated to the program, which takes appropriate action.
As you know, C++ does not have any built-in facilities for graphical programming. It also has no notion of events, event transmission, or event handling. A chain of responsibility is a reasonable approach to event handling to give different objects a chance to handle certain events.
Consider a drawing program, which has a hierarchy of Shape classes, as in Figure 29-8.
The leaf nodes can handle certain events. For example, Circle can receive mouse move events to change the radius of the circle. The parent class handles events that have the same effect, regardless of the particular shape. For example, a delete event is handled the same way, regardless of the type of shape being deleted. With a chain of responsibility, the leaf nodes get the first crack at handling a particular event. If that leaf node cannot handle the event, it explicitly forwards the event to the next handler in the chain, and so on. For example, if a mouse down event occurs on a Square object, first the Square gets a chance to handle the event. If it doesn’t handle the event, it forwards the event to the next handler in the chain, which is the Shape class for this example. Now the Shape class gets a crack at handling the event. If Shape can’t handle the event either, it could forward it to its parent if it had one, and so on. This continues all the way up the chain. It’s a chain of responsibility because each handler may either handle the event, or pass the event up to the next handler in the chain.
The code for a chained messaging approach varies based on how your operating system handles events, but it tends to resemble the following code, which uses integers to represent types of events:
void Square::handleMessage(int message){switch (message) {case kMessageMouseDown:handleMouseDown();break;case kMessageInvert:handleInvert();break;default:// Message not recognized--chain to base class.Shape::handleMessage(message);}}void Shape::handleMessage(int message){switch (message) {case kMessageDelete:handleDelete();break;default:{stringstream ss;ss << __func__ << ": Unrecognized message received: " << message;throw invalid_argument(ss.str());}}}
When the event-handling portion of the program or framework receives a message, it finds the corresponding shape and calls handleMessage(). Through polymorphism, the derived class’s version of handleMessage() is called. This gives the leaf node the first chance at handling the message. If it doesn’t know how to handle the message, it passes it up to its base class, which gets the next chance. In this example, the final recipient of the message throws an exception if it is unable to handle the event. You could also have your handleMessage() method return a Boolean indicating success or failure.
This chain of responsibility example can be tested as follows. For the chain to respond to events, there must be another class that dispatches the events to the correct object. Because this task varies greatly by framework or platform, the following example shows pseudo-code for handling a mouse down event, in lieu of platform-specific C++ code:
MouseLocation loc = getClickLocation();Shape* clickedShape = findShapeAtLocation(loc);if (clickedShape)clickedShape->handleMessage(kMessageMouseDown);
The chained approach is flexible and has a very appealing structure for object-oriented hierarchies. The downside is that it requires diligence on the part of the programmer. If you forget to chain up to the base class from a derived class, events will effectively get lost. Worse, if you chain to the wrong class, you could end up in an infinite loop! Note that while event chains usually correlate with a class hierarchy, they do not have to. In the preceding example, the Square class could have just as easily passed the message to an entirely different object. An example of such a chain of responsibility is given in the next section.
If the different handlers in a chain of responsibility are not related by a class hierarchy, you need to keep track of the chain yourself. Here is an example. First, a Handler mixin class is defined:
class Handler{public:virtual ~Handler() = default;Handler(Handler* nextHandler) : mNextHandler(nextHandler) { }virtual void handleMessage(int message){if (mNextHandler)mNextHandler->handleMessage(message);}private:Handler* mNextHandler;};
Next, two concrete handlers are defined, both deriving from the Handler mixin. The first handles only messages with ID 1, and the second handles only messages with ID 2. If any of the handlers receives a message it doesn’t know about, it calls the next handler in the chain.
class ConcreteHandler1 : public Handler{public:ConcreteHandler1(Handler* nextHandler) : Handler(nextHandler) {}void handleMessage(int message) override{cout << "ConcreteHandler1::handleMessage()" << endl;if (message == 1)cout << "Handling message " << message << endl;else {cout << "Not handling message " << message << endl;Handler::handleMessage(message);}}};class ConcreteHandler2 : public Handler{public:ConcreteHandler2(Handler* nextHandler) : Handler(nextHandler) {}void handleMessage(int message) override{cout << "ConcreteHandler2::handleMessage()" << endl;if (message == 2)cout << "Handling message " << message << endl;else {cout << "Not handling message " << message << endl;Handler::handleMessage(message);}}};
This implementation can be tested as follows:
ConcreteHandler2 handler2(nullptr);ConcreteHandler1 handler1(&handler2);handler1.handleMessage(1);cout << endl;handler1.handleMessage(2);cout << endl;handler1.handleMessage(3);
The output is as follows:
ConcreteHandler1::handleMessage()Handling message 1ConcreteHandler1::handleMessage()Not handling message 2ConcreteHandler2::handleMessage()Handling message 2ConcreteHandler1::handleMessage()Not handling message 3ConcreteHandler2::handleMessage()Not handling message 3
The observer pattern is used to have objects/observers get notified by observable objects. With the observer pattern, individual objects register themselves with the observable object they are interested in. When the observable object’s state changes, it notifies all registered observers of this change.
The main benefit of using the observer pattern is that it decreases coupling. The observable class does not need to know the concrete observer types that are observing it. The observable class only needs to know about a basic interface, for example IObserver.
First, an IObserver interface is defined. Any object that wants to observe an observable should implement this interface:
class IObserver{public:virtual ~IObserver() = default; // Always a virtual destructor!virtual void notify() = 0;};
Here are two concrete observers that simply print out a message in response to a notification:
class ConcreteObserver1 : public IObserver{public:void notify() override{std::cout << "ConcreteObserver1::notify()" << std::endl;}};class ConcreteObserver2 : public IObserver{public:void notify() override{std::cout << "ConcreteObserver2::notify()" << std::endl;}};
An observable just keeps a list of IObservers that have registered themselves to get notified. It needs to support adding and removing observers, and should be able to notify all registered observers. All this functionality can be provided by an Observable mixin class. Here is the implementation:
class Observable{public:virtual ~Observable() = default; // Always a virtual destructor!// Add an observer. Ownership is not transferred.void addObserver(IObserver* observer){mObservers.push_back(observer);}// Remove the given observer.void removeObserver(IObserver* observer){mObservers.erase(std::remove(begin(mObservers), end(mObservers), observer),end(mObservers));}protected:void notifyAllObservers(){for (auto* observer : mObservers)observer->notify();}private:std::vector<IObserver*> mObservers;};
A concrete class, ObservableSubject, that wants to be observable simply derives from the Observable mixin class to get all its functionality. Whenever the state of an ObservableSubject changes, it simply calls notifyAllObservers() to notify all registered observers.
class ObservableSubject : public Observable{public:void modifyData(){// …notifyAllObservers();}};
Following is a very simple test that demonstrates how to use the observer pattern.
ObservableSubject subject;ConcreteObserver1 observer1;subject.addObserver(&observer1);subject.modifyData();std::cout << std::endl;ConcreteObserver2 observer2;subject.addObserver(&observer2);subject.modifyData();
The output is as follows:
ConcreteObserver1::notify()ConcreteObserver1::notify()ConcreteObserver2::notify()
This chapter has given you just a taste of how patterns can help you organize object-oriented concepts into high-level designs. A lot of design patterns are cataloged and discussed on Wikipedia1. It’s easy to get carried away and spend all your time trying to find the specific pattern that applies to your task. Instead, I recommend that you concentrate on a few patterns that interest you and focus your learning on how patterns are developed, not just the small differences between similar ones. After all, to paraphrase the old saying, “Teach me a design pattern, and I’ll code for a day. Teach me how to create design patterns, and I’ll code for a lifetime.”
C++ programs can be compiled to run on a variety of computing platforms, and the language has been rigorously defined to ensure that programming in C++ for one platform is very similar to programming in C++ for another. Yet, despite the standardization of the language, platform differences eventually come into play when writing professional-quality programs in C++. Even when development is limited to a particular platform, small differences in compilers can elicit major programming headaches. This chapter examines the necessary complication of programming in a world with multiple platforms and multiple programming languages.
The first part of this chapter surveys the platform-related issues that C++ programmers encounter. A platform is the collection of all of the details that make up your development and/or run-time system. For example, your platform may be the Microsoft Visual C++ 2017 compiler running on Windows 10 on an Intel Core i7 processor. Alternatively, your platform might be the GCC 7.2 compiler running on Linux on a PowerPC processor. Both of these platforms are able to compile and run C++ programs, but there are significant differences between them.
The second part of this chapter looks at how C++ can interact with other programming languages. While C++ is a general-purpose language, it may not always be the right tool for the job. Through a variety of mechanisms, you can integrate C++ with other languages that may better serve your needs.
There are several reasons why the C++ language encounters platform issues. C++ is a high-level language, and the standard does not specify certain low-level details. For example, the layout of an object in memory is undefined by the standard and left to the compiler. Different compilers can use different memory layouts for objects. C++ also faces the challenge of providing a standard language and a Standard Library without a standard implementation. Varying interpretations of the specification among C++ compiler and library vendors can lead to trouble when moving from one system to another. Finally, C++ is selective in what the language provides as standard. Despite the presence of a Standard Library, programs often need functionality that is not provided by the language or the Standard Library. This functionality generally comes from third-party libraries or the platform, and can vary greatly.
The term architecture generally refers to the processor, or family of processors, on which a program runs. A standard PC running Windows or Linux generally runs on the x86 or x64 architecture, and older versions of Mac OS were usually found on the PowerPC architecture. As a high-level language, C++ shields you from the differences between these architectures. For example, a Core i7 processor may have a single instruction that performs the same functionality as six PowerPC instructions. As a C++ programmer, you don’t need to know what this difference is or even that it exists. One advantage to using a high-level language is that the compiler takes care of converting your code into the processor’s native assembly code format.
However, processor differences do sometimes rise up to the level of C++ code. The first one discussed, the size of integers, is very important if you are writing cross-platform code. The others you won’t face often, unless you are doing particularly low-level work, but still, you should be aware that they exist.
The C++ standard does not define the exact size of integer types. The standard just says the following:
There are five standard signed integer types:
signed char,short int,int,long int, andlong long int. In this list, each type provides at least as much storage as those preceding it in the list.
The standard does give a few additional hints for the size of these types, but never an exact size. The actual size is compiler-dependent. Thus, if you want to write cross-platform code, you cannot really rely on these types.
Besides these standard integer types, the C++ standard does define a number of types that have clearly specified sizes, all defined in the <cstdint> header file, although some of the types are optional. Here is an overview:
| TYPE | DESCRIPTION |
int8_tint16_tint32_tint64_t |
Signed integers of which the size is exactly 8, 16, 32, or 64 bits. This type is defined by the standard as being optional, although most compilers support it. |
int_fast8_tint_fast16_tint_fast32_tint_fast64_t |
Signed integers with sizes of at least 8, 16, 32, or 64 bits. For these, the compiler should use the fastest integer type it has that satisfies the requirements. |
int_least8_tint_least16_tint_least32_tint_least64_t |
Signed integers with sizes of at least 8, 16, 32, or 64 bits. For these, the compiler should use the smallest integer type it has that satisfies the requirements. |
intmax_t |
An integer type with the maximum size supported by the compiler. |
intptr_t |
An integer type big enough to store a pointer. This type is also optional, but most compilers support it. |
There are also unsigned versions available, such as uint8_t, uint_fast8_t, and so on.
If you want to write cross-platform code, I recommend you to use these <cstdint> types instead of the basic integer types.
As you probably already know, you cannot take a program written and compiled for a Core i7 computer and run it on a PowerPC-based Mac. These two platforms are not binary compatible because their processors do not support the same set of instructions. When you compile a C++ program, your source code is turned into binary instructions that the computer executes. That binary format is defined by the platform, not by the C++ language.
One solution to support platforms that are not binary compatible is to build each version separately with a compiler on each target platform.
Another solution is cross-compiling. When you are using platform X for your development, but you want your program to run on platforms Y and Z, you can use a cross-compiler on your platform X that generates binary code for platforms Y and Z.
You can also make your program open source. When you make your source available to the end user, she can compile it natively on her system and build a version of the program that is in the correct binary format for her machine. As discussed in Chapter 4, open-source software has become increasingly popular. One of the major reasons is that it allows programmers to collaboratively develop software and increase the number of platforms on which it can run.
When someone describes an architecture as 32-bit, they most likely mean that the address size is 32 bits, or 4 bytes. In general, a system with a larger address size can handle more memory and might operate more quickly on complex programs.
Because pointers are memory addresses, they are inherently tied to address sizes. Many programmers are taught that pointers are always 4 bytes, but this is wrong. For example, consider the following code snippet, which outputs the size of a pointer:
int *ptr = nullptr;cout << "ptr size is " << sizeof(ptr) << " bytes" << endl;
If this program is compiled and run on a 32-bit x86 system, the output will be as follows:
ptr size is 4 bytesIf you compile it with a 64-bit compiler and run it on an x64 system, the output will be as follows:
ptr size is 8 bytesFrom a programmer’s point of view, the upshot of varying pointer sizes is that you cannot equate a pointer with 4 bytes. More generally, you need to be aware that most sizes are not prescribed by the C++ standard. The standard only says that a short integer has as much, or less, space than an integer, which has as much, or less, space than a long integer.
The size of a pointer is also not necessarily the same as the size of an integer. For example, on a 64-bit platform, pointers are 64 bit, but integers could be 32 bit. Casting a 64-bit pointer to a 32-bit integer will result in losing 32 critical bits! The standard does define an std::intptr_t integer type in <cstdint> which is an integer type at least big enough to hold a pointer. The definition of this type is optional according to the standard, but virtually all compilers support it.
All modern computers store numbers in a binary representation, but the representation of the same number on two platforms may not be identical. This sounds contradictory, but as you’ll see, there are two approaches to reading numbers that both make sense.
A single slot in your computer’s memory is usually a byte because most computers are byte addressable. Number types in C++ are usually multiple bytes. For example, a short may be 2 bytes. Imagine that your program contains the following line:
short myShort = 513;In binary, the number 513 is 0000 0010 0000 0001. This number contains 16 ones and zeros, or 16 bits. Because there are 8 bits in a byte, the computer needs 2 bytes to store the number. Because each individual memory address contains 1 byte, the computer needs to split the number up into multiple bytes. Assuming that a short is 2 bytes, the number is split into two even parts. The higher part of the number is put into the high-order byte and the lower part of the number is put into the low-order byte. In this case, the high-order byte is 0000 0010 and the low-order byte is 0000 0001.
Now that the number has been split up into memory-sized parts, the only question that remains is how to store them in memory. Two bytes are needed, but the order of the bytes is unclear and, in fact, depends on the architecture of the system in question.
One way to represent the number is to put the high-order byte first in memory and the low-order byte next. This strategy is called big-endian ordering because the bigger part of the number comes first. PowerPC and SPARC processors use a big-endian approach. Some other processors, such as x86, arrange the bytes in the opposite order, putting the low-order byte first in memory. This approach is called little-endian ordering because the smaller part of the number comes first. An architecture may choose one approach or the other, usually based on backward compatibility. For the curious, the terms “big-endian” and “little-endian” predate modern computers by several hundred years. Jonathan Swift coined the terms in his eighteenth-century novel Gulliver’s Travels to describe the opposing camps of a debate about the proper end on which to break an egg.
Regardless of the ordering a particular architecture uses, your programs can continue to use numerical values without paying any attention to whether the machine uses big-endian ordering or little-endian ordering. The ordering only comes into play when data moves between architectures. For example, if you are sending binary data across a network, you may need to consider the ordering of the other system. One solution is to use the standard network byte ordering, which is always big-endian. So, before sending data across a network, you convert it to big-endian, and whenever you receive data from a network, you convert it from big-endian to the byte ordering of your system.
Similarly, if you are writing binary data to a file, you may need to consider what will happen when that file is opened on a system with opposite byte ordering.
When a C++ compiler is written, it is designed by a human being who attempts to adhere to the C++ standard. Unfortunately, the C++ standard is more than a thousand pages long and written in a combination of prose, language grammars, and examples. Two human beings implementing a compiler according to such a standard are unlikely to interpret every piece of prescribed information in the exact same way or to catch every single edge case. As a result, compilers will have bugs.
There is no simple rule for finding or avoiding compiler bugs. The best you can do is to stay up to speed on compiler updates and perhaps subscribe to a mailing list or newsgroup for your compiler. If you suspect that you have encountered a compiler bug, a simple web search for the error message or condition you have witnessed could uncover a workaround or patch.
One area that compilers are notorious for having trouble with is language additions that are added by recent updates to the standard. Although in recent years, vendors of major compilers are pretty quick in adding support for the latest features.
Another issue to be aware of is that compilers often include their own language extensions without making it obvious to the programmer. For example, variable-length stack-based arrays (VLAs) are not part of the C++ language; however, they are part of the C language. Some compilers support both the C and the C++ standard, and can allow the use of VLAs in C++ code. One such compiler is g++. The following compiles and runs as expected with the g++ compiler:
int i = 4;char myStackArray[i]; // Not a standard language feature!
Some compiler extensions may be useful, but if there is a chance that you will switch compilers at some point, you should see if your compiler has a strict mode where it avoids using such extensions. For example, compiling the previous code with the -pedantic flag passed to g++ yields the following warning:
warning: ISO C++ forbids variable length array 'myStackArray' [-Wvla]The C++ specification allows for a certain type of compiler-defined language extension through the #pragma mechanism. #pragma is a precompiler directive whose behavior is defined by the implementation. If the implementation does not understand the directive, it ignores it. For example, some compilers allow the programmer to turn compiler warnings off temporarily with #pragma.
Most likely, your compiler includes an implementation of the C++ Standard Library. Because the Standard Library is written in C++, however, you aren’t required to use the implementation that came bundled with your compiler. You could use a third-party Standard Library that, for example, has been optimized for speed, or you could even write your own.
Of course, Standard Library implementers face the same problems that compiler writers face: the standard is subject to interpretation. In addition, certain implementations may make tradeoffs that are incompatible with your needs. For example, one implementation may optimize for speed, while another implementation may focus on using as little memory as possible for containers.
When working with a Standard Library implementation, or indeed any third-party library, it is important to consider the tradeoffs that the designers made during the development. Chapter 4 contains a more detailed discussion of the issues involved in using libraries.
C++ is a great general-purpose language. With the addition of the Standard Library, the language is packed full of so many features that a casual programmer could happily code in C++ for years without going beyond what is built in. However, professional programs require facilities that C++ does not provide. This section lists several important features that are provided by the platform or third-party libraries, not by the C++ language or the C++ Standard Library.
For certain types of programs, C++ may not be the best tool for the job. For example, if your Unix program needs to interact closely with the shell environment, you may be better off writing a shell script than a C++ program. If your program performs heavy text processing, you may decide that the Perl language is the way to go. If you need a lot of database interaction, then C# or Java might be a better choice. C# and the WPF framework might be better suited to write modern GUI applications, and so on. Still, if you do decide to use another language, you sometimes might want to be able to call into C++ code, for example, to perform some computational-expensive operations. Fortunately, there are some techniques you can use to get the best of both worlds—the unique specialty of another language combined with the power and flexibility of C++.
As you already know, the C++ language is almost a superset of the C language. That means that almost all C programs will compile and run in C++. There are a few exceptions. Some exceptions have to do with the fact that a handful of C features are not supported by C++, for example, C supports variable-length arrays (VLAs), while C++ does not. Other exceptions usually have to do with reserved words. In C, for example, the term class has no particular meaning. Thus, it could be used as a variable name, as in the following C code:
int class = 1; // Compiles in C, not C++printf("class is %d\n", class);
This program compiles and runs in C, but yields an error when compiled as C++ code. When you translate, or port, a program from C to C++, these are the types of errors you will face. Fortunately, the fixes are usually quite simple. In this case, rename the class variable to classID and the code will compile. The other types of errors you’ll face are the handful of C features that are not supported by C++, but these are usually rare.
The ease of incorporating C code in a C++ program comes in handy when you encounter a useful library or legacy code that was written in C. Functions and classes, as you’ve seen many times in this book, work just fine together. A class method can call a function, and a function can make use of objects.
One of the dangers of mixing C and C++ is that your program may start to lose its object-oriented properties. For example, if your object-oriented web browser is implemented with a procedural networking library, the program will be mixing these two paradigms. Given the importance and quantity of networking tasks in such an application, you might consider writing an object-oriented wrapper around the procedural library. A typical design pattern that can be used for this is called the façade.
For example, imagine that you are writing a web browser in C++, but you are using a C networking library that contains the functions declared in the following code. Note that the HostHandle and ConnectionHandle data structures have been omitted for brevity.
// netwrklib.h#include "HostHandle.h"#include "ConnectionHandle.h"// Gets the host record for a particular Internet host given// its hostname (i.e. www.host.com)HostHandle* lookupHostByName(char* hostName);// Frees the given HostHandlevoid freeHostHandle(HostHandle* host);// Connects to the given hostConnectionHandle* connectToHost(HostHandle* host);// Closes the given connectionvoid closeConnection(ConnectionHandle* connection);// Retrieves a web page from an already-opened connectionchar* retrieveWebPage(ConnectionHandle* connection, char* page);// Frees the memory pointed to by pagevoid freeWebPage(char* page);
The netwrklib.h interface is fairly simple and straightforward. However, it is not object-oriented, and a C++ programmer who uses such a library is bound to feel icky, to use a technical term. This library isn’t organized into a cohesive class and it isn’t even const-correct. Of course, a talented C programmer could have written a better interface, but as the user of a library, you have to accept what you are given. Writing a wrapper is your opportunity to customize the interface.
Before you build an object-oriented wrapper for this library, take a look at how it might be used as-is to gain an understanding of its actual usage. In the following program, the netwrklib library is used to retrieve the web page at www.wrox.com/index.html:
HostHandle* myHost = lookupHostByName("www.wrox.com");ConnectionHandle* myConnection = connectToHost(myHost);char* result = retrieveWebPage(myConnection, "/index.html");cout << "The result is " << result << endl;freeWebPage(result);closeConnection(myConnection);freeHostHandle(myHost);
A possible way to make the library more object-oriented is to provide a single abstraction that recognizes the links between looking up a host, connecting to the host, and retrieving a web page. A good object-oriented wrapper hides the needless complexity of the HostHandle and ConnectionHandle types.
This example follows the design principles described in Chapters 5 and 6: the new class should capture the common use case for the library. The previous example shows the most frequently used pattern: first a host is looked up, then a connection is established, and finally a page is retrieved. It is also likely that subsequent pages will be retrieved from the same host, so a good design will accommodate that mode of use as well.
To start, the HostRecord class wraps the functionality of looking up a host. It’s an RAII class. Its constructor uses lookupHostByName() to perform the lookup, and its destructor automatically frees the retrieved HostHandle. Here is the code:
class HostRecord{public:// Looks up the host record for the given hostexplicit HostRecord(std::string_view host);// Frees the host recordvirtual ~HostRecord();// Returns the underlying handle.HostHandle* get() const noexcept;private:HostHandle* mHostHandle = nullptr;};HostRecord::HostRecord(std::string_view host){mHostHandle = lookupHostByName(const_cast<char*>(host.data()));}HostRecord::~HostRecord(){if (mHostHandle)freeHostHandle(mHostHandle);}HostHandle* HostRecord::get() const noexcept{return mHostHandle;}
Because the HostRecord class deals with C++ string_views instead of C-style strings, it uses the data() method on host to obtain a const char*, then performs a const_cast() to make up for netwrklib’s const-incorrectness.
Next, a WebHost class can be implemented that uses the HostRecord class. The WebHost class creates a connection to a given host and supports retrieving webpages. It’s also an RAII class. When the WebHost object is destroyed, it automatically closes the connection to the host. Here is the code:
class WebHost{public:// Connects to the given hostexplicit WebHost(std::string_view host);// Closes the connection to the hostvirtual ~WebHost();// Obtains the given page from this hoststd::string getPage(std::string_view page);private:ConnectionHandle* mConnection = nullptr;};WebHost::WebHost(std::string_view host){HostRecord hostRecord(host);if (hostRecord.get()) {mConnection = connectToHost(hostRecord.get());}}WebHost::~WebHost(){if (mConnection)closeConnection(mConnection);}std::string WebHost::getPage(std::string_view page){std::string resultAsString;if (mConnection) {char* result = retrieveWebPage(mConnection,const_cast<char*>(page.data()));resultAsString = result;freeWebPage(result);}return resultAsString;}
The WebHost class effectively encapsulates the behavior of a host and provides useful functionality without unnecessary calls and data structures. The implementation of the WebHost class makes extensive use of the netwrklib library without exposing any of its workings to the user. The constructor of WebHost uses a HostRecord RAII object for the specified host. The resulting HostRecord is used to set up a connection to the host, which is stored in the mConnection data member for later use. The HostRecord RAII object is automatically destroyed at the end of the constructor. The WebHost destructor closes the connection. The getPage() method uses retrieveWebPage() to retrieve a web page, converts it to an std::string, uses freeWebPage() to free memory, and returns the std::string.
The WebHost class makes the common case easy for the client programmer:
WebHost myHost("www.wrox.com");string result = myHost.getPage("/index.html");cout << "The result is " << result << endl;
As you can see, the WebHost class provides an object-oriented wrapper around the C library. By providing an abstraction, you can change the underlying implementation without affecting client code, and you can provide additional features. These features can include connection reference counting, automatically closing connections after a specific time to adhere to the HTTP specification and automatically reopening the connection on the next getPage() call, and so on.
The previous example assumed that you had the raw C code to work with. The example took advantage of the fact that most C code will successfully compile with a C++ compiler. If you only have compiled C code, perhaps in the form of a library, you can still use it in your C++ program, but you need to take a few extra steps.
Before you can start using compiled C code in your C++ programs, you first need to know about a concept called name mangling. In order to implement function overloading, the complex C++ namespace is “flattened.” For example, if you have a C++ program, it is legitimate to write the following:
void MyFunc(double);void MyFunc(int);void MyFunc(int, int);
However, this would mean that the linker would see several different names, all called MyFunc, and would not know which one you want to call. Therefore, all C++ compilers perform an operation that is referred to as name mangling and is the logical equivalent of generating names, as follows:
MyFunc_doubleMyFunc_intMyFunc_int_int
To avoid conflicts with other names you might have defined, the generated names usually have some characters that are legal to the linker but not legal in C++ source code. For example, Microsoft VC++ generates names as follows:
?MyFunc@@YAXN@Z?MyFunc@@YAXH@Z?MyFunc@@YAXHH@Z
This encoding is complex and often vendor-specific. The C++ standard does not specify how function overloading should be implemented on a given platform, so there is no standard for name mangling algorithms.
In C, function overloading is not supported (the compiler will complain about duplicate definitions). So, names generated by the C compiler are quite simple, for example, _MyFunc.
Now, if you compile a simple program with the C++ compiler, even if it has only one instance of the MyFunc name, it still generates a request to link to a mangled name. However, when you link with the C library, it cannot find the desired mangled name, and the linker complains. Therefore, it is necessary to tell the C++ compiler to not mangle that name. This is done by using the extern "language" qualification both in the header file (to instruct the client code to create a name compatible with the specified language) and, if your library source is in C++, at the definition site (to instruct the library code to generate a name compatible with the specified language).
Here is the syntax of extern
"language":
extern "language" declaration1();extern "language" declaration2();
or it can also be like this:
extern "language" {declaration1();declaration2();}
The C++ standard says that any language specification can be used, so in principle, the following could be supported by a compiler:
extern "C" MyFunc(int i);extern "Fortran" MatrixInvert(Matrix* M);extern "Pascal" SomeLegacySubroutine(int n);extern "Ada" AimMissileDefense(double angle);
In practice, many compilers only support "C". Each compiler vendor will inform you which language designators they support.
For example, in the following code, the function prototype for doCFunction() is specified as an external C function:
extern "C" {void doCFunction(int i);}int main(){doCFunction(8); // Calls the C function.return 0;}
The actual definition for doCFunction() is provided in a compiled binary file attached in the link phase. The extern keyword informs the compiler that the linked-in code was compiled in C.
A more common pattern for using extern is at the header level. For example, if you are using a graphics library written in C, it probably came with an .h file for you to use. You can write another header file that wraps the original one in an extern block to specify that the entire header defines functions written in C. The wrapper .h file is often named with .hpp to distinguish it from the C version of the header:
// graphicslib.hppextern "C" {#include "graphicslib.h"}
Another common model is to write a single header file, which is conditioned on whether it is being compiled for C or C++. A C++ compiler predefines the symbol __cplusplus if you are compiling for C++. The symbol is not defined for C compilations. So, you will often see header files in the following form:
#ifdef __cplusplusextern "C" {#endifdeclaration1();declaration2();#ifdef __cplusplus} // matches extern "C"#endif
This means that declaration1() and declaration2() are functions that are in a library compiled by the C compiler. Using this technique, the same header file can be used in both C and C++ clients.
Whether you are including C code in your C++ program or linking against a compiled C library, remember that even though C++ is almost a superset of C, they are different languages with different design goals. Adapting C code to work in C++ is quite common, but providing an object-oriented C++ wrapper around procedural C code is often much better.
Even though this is a C++ book, I won’t pretend that there aren’t snazzier languages out there. One example is C#. By using the Interop services from C#, it’s pretty easy to call C++ code from within your C# applications. An example scenario could be that you develop parts of your application, like the graphical user interface, in C#, but use C++ to implement certain performance-critical or computational-expensive components. To make Interop work, you need to write a library in C++, which can be called from C#. On Windows, the library will be in a .DLL file. The following C++ example defines a FunctionInDLL() function that will be compiled into a library. The function accepts a Unicode string and returns an integer. The implementation writes the received string to the console and returns the value 42 to the caller:
#include <iostream>using namespace std;extern "C"{__declspec(dllexport) int FunctionInDLL(const wchar_t* p){wcout << L"The following string was received by C++:\n '";wcout << p << L"'" << endl;return 42; // Return some value…}}
Keep in mind that you are implementing a function in a library, not writing a program, so you do not need a main() function. How you compile this code depends on your environment. If you are using Microsoft Visual C++, you need to go to the properties of your project and select “Dynamic Library (.dll)” as the configuration type. Note that the example uses __declspec(dllexport) to tell the linker that this function should be made available to clients of the library. This is the way you do it with Microsoft Visual C++. Other linkers might use a different mechanism to export functions.
Once you have the library, you can call it from C# by using the Interop services. First, you need to include the Interop namespace:
using System.Runtime.InteropServices;Next, you define the function prototype, and tell C# where it can find the implementation of the function. This is done with the following line, assuming you have compiled the library as HelloCpp.dll:
[DllImport("HelloCpp.dll", CharSet = CharSet.Unicode)]public static extern int FunctionInDLL(String s);
The first part of this line is saying that C# should import this function from a library called HelloCpp.dll, and that it should use Unicode strings. The second part specifies the actual prototype of the function, which is a function accepting a string as parameter and returning an integer. The following code shows a complete example of how to use the C++ library from C#:
using System;using System.Runtime.InteropServices;namespace HelloCSharp{class Program{[DllImport("HelloCpp.dll", CharSet = CharSet.Unicode)]public static extern int FunctionInDLL(String s);static void Main(string[] args){Console.WriteLine("Written by C#.");int result = FunctionInDLL("Some string from C#.");Console.WriteLine("C++ returned the value " + result);}}}
The output is as follows:
Written by C#.The following string was received by C++:'Some string from C#.'C++ returned the value 42
The details of the C# code are outside the scope of this C++ book, but the general idea should be clear with this example.
The Java Native Interface, or JNI, is a part of the Java language that allows programmers to access functionality that was not written in Java. Because Java is a cross-platform language, the original intent was to make it possible for Java programs to interact with the operating system. JNI also allows programmers to make use of libraries written in other languages, such as C++. Access to C++ libraries may be useful to a Java programmer who has a performance-critical or computational-expensive piece of code, or who needs to use legacy code.
JNI can also be used to execute Java code within a C++ program, but such a use is far less common. Because this is a C++ book, I do not include an introduction to the Java language. This section is recommended if you already know Java and want to incorporate C++ code into your Java code.
To begin your Java cross-language adventure, start with the Java program. For this example, the simplest of Java programs will suffice:
public class HelloCpp {public static void main(String[] args){System.out.println("Hello from Java!");}}
Next, you need to declare a Java method that will be written in another language. To do this, you use the native keyword and leave out the implementation:
public class HelloCpp {// This will be implemented in C++.public static native void callCpp();// Remainder omitted for brevity}
The C++ code will eventually be compiled into a shared library that gets dynamically loaded into the Java program. You can load this library inside a Java static block so that it is loaded when the Java program begins executing. The name of the library can be whatever you want, for example, hellocpp.so on Linux systems, or hellocpp.dll on Windows systems.
public class HelloCpp {static {System.loadLibrary("hellocpp");}// Remainder omitted for brevity}
Finally, you need to actually call the C++ code from within the Java program. The callCpp() Java method serves as a placeholder for the not-yet-written C++ code. Here is the complete Java program:
public class HelloCpp {static {System.loadLibrary("hellocpp");}// This will be implemented in C++.public static native void callCpp();public static void main(String[] args){System.out.println("Hello from Java!");callCpp();}}
That’s all for the Java side. Now, just compile the Java program as you normally would:
javac HelloCpp.javaThen use the javah program (I like to pronounce it as jav-AHH!) to create a header file for the native method:
javah HelloCppAfter running javah, you will find a file named HelloCpp.h, which is a fully working (if somewhat ugly) C/C++ header file. Inside of that header file is a C function definition for a function called Java_HelloCpp_callCpp(). Your C++ program will need to implement this function. The full prototype is as follows:
JNIEXPORT void JNICALL Java_HelloCpp_callCpp(JNIEnv*, jclass);Your C++ implementation of this function can make full use of the C++ language. This example outputs some text from C++. First, you need to include the jni.h header file and the HelloCpp.h file that was created by javah. You also need to include any C++ headers that you intend to use:
#include <jni.h>#include "HelloCpp.h"#include <iostream>
The C++ function is written as normal. The parameters to the function allow interaction with the Java environment and the object that called the native code. They are beyond the scope of this example.
JNIEXPORT void JNICALL Java_HelloCpp_callCpp(JNIEnv*, jclass){std::cout << "Hello from C++!" << std::endl;}
How to compile this code into a library depends on your environment, but you will most likely need to tweak your compiler’s settings to include the JNI headers. Using the GCC compiler on Linux, your compile command might look like this:
g++ -shared -I/usr/java/jdk/include/ -I/usr/java/jdk/include/linux \HelloCpp.cpp -o hellocpp.so
The output from the compiler is the library used by the Java program. As long as the shared library is somewhere in the Java class path, you can execute the Java program normally:
java HelloCppYou should see the following result:
Hello from Java!Hello from C++!
Of course, this example just scratches the surface of what is possible through JNI. You could use JNI to interface with OS-specific features or hardware drivers. For complete coverage of JNI, you should consult a Java text.
The original Unix OS included a rather limited C library, which did not support certain common operations. Unix programmers therefore developed the habit of launching shell scripts from applications to accomplish tasks that should have had API or library support.
Today, many of these Unix programmers still insist on using scripts as a form of subroutine call. Usually, they execute the system() C library call with a string that is the script to execute. There are significant risks to this approach. For example, if there is an error in the script, the caller may or may not get a detailed error indication. The system() call is also exceptionally heavy-duty, because it has to create an entire new process to execute the script. This may ultimately be a serious performance bottleneck in your application.
Using system() to launch scripts is not further discussed in this text. In general, you should explore the features of C++ libraries to see if there are better ways to do something. There are some platform-independent wrappers around a lot of platform-specific libraries, for example, the Boost Asio library, which provides portable networking and other low-level I/O, including sockets, timers, serial ports, and so on. If you need to work with the filesystem, C++17 now includes a platform-independent <filesystem> API, as discussed in Chapter 20. Concepts like launching a Perl script with system() to process some textual data may not be the best choice. Using techniques like the regular expressions library of C++, see Chapter 19, might be a better choice for your string processing needs.
C++ contains a built-in general-purpose mechanism to interface with other languages and environments. You’ve already used it many times, probably without paying much attention to it—it’s the arguments to and return value from the main() function.
C and C++ were designed with command-line interfaces in mind. The main() function receives the arguments from the command line, and returns a status code that can be interpreted by the caller. In a scripting environment, arguments to and status codes from your program can be a powerful mechanism that allows you to interface with the environment.
Assume that you have a system that writes everything a user sees and types to a file for auditing purposes. The file can be read only by the system administrator so that she can figure out who to blame if something goes wrong. An excerpt of such a file might look like this:
Login: bucky-boPassword: feldsparbucky-bo> mailbucky-bo has no mailbucky-bo> exit
While the system administrator may want to keep a log of all user activity, she may also want to obscure everybody’s passwords in case the file is somehow obtained by a hacker. She decides to write a script to parse the log files, and to use C++ to perform the actual encryption. The script then calls out to a C++ program to perform the encryption.
The following script uses the Perl language, though almost any scripting language could accomplish this task. Note also that these days, there are libraries available for Perl that perform encryption, but, for the sake of this example, let’s assume the encryption is done in C++. If you don’t know Perl, you will still be able to follow along. The most important element of the Perl syntax for this example is the ` character. The ` character instructs the Perl script to shell out to an external command. In this case, the script will shell out to a C++ program called encryptString.
The strategy for the script is to loop over every line of a file, userlog.txt, looking for lines that contain a password prompt. The script writes a new file, userlog.out, which contains the same text as the source file, except that all passwords are encrypted. The first step is to open the input file for reading and the output file for writing. Then, the script needs to loop over all the lines in the file. Each line in turn is placed in a variable called $line.
open (INPUT, "userlog.txt") or die "Couldn't open input file!";open (OUTPUT, ">userlog.out") or die "Couldn't open output file!";while ($line = <INPUT>) {
Next, the current line is checked against a regular expression to see if this particular line contains the Password: prompt. If it does, Perl stores the password in the variable $1.
if ($line =~ m/^Password: (.*)/) {If a match is found, the script calls the encryptString program with the detected password to obtain an encrypted version of it. The output of the program is stored in the $result variable, and the result status code from the program is stored in the variable $?. The script checks $? and quits immediately if there is a problem. If everything is okay, the password line is written to the output file with the encrypted password instead of the original one.
$result = `./encryptString $1`;if ($? != 0) { exit(-1); }print OUTPUT "Password: $result\n";} else {
If the current line is not a password prompt, the script writes the line as-is to the output file. At the end of the loop, it closes both files and exits.
print OUTPUT "$line";}}close (INPUT);close (OUTPUT);
That’s it. The only other required piece is the actual C++ program. Implementation of a cryptographic algorithm is beyond the scope of this book. The important piece is the main() function because it accepts the string that should be encrypted as an argument.
Arguments are contained in the argv array of C-style strings. You should always check the argc parameter before accessing an element of argv. If argc is 1, there is one element in the argument list and it is accessible as argv[0]. The 0th element of the argv array is generally the name of the program, so actual parameters begin at argv[1].
Following is the main() function for a C++ program that encrypts the input string. Notice that the program returns 0 for success and non-0 for failure, as is standard in Linux.
int main(int argc, char* argv[]){if (argc < 2) {cerr << "Usage: " << argv[0] << " string-to-be-encrypted" << endl;return -1;}cout << encrypt(argv[1]);return 0;}
Now that you’ve seen how easily C++ programs can be incorporated into scripting languages, you can combine the strengths of the two languages for your own projects. You can use a scripting language to interact with the operating system and control the flow of the script, and a traditional programming language like C++ for the heavy lifting.
C++ is considered a fast language, especially relative to other languages. Yet, in some rare cases, you might want to use raw assembly code when speed is absolutely critical. The compiler generates assembly code from your source files, and this generated assembly code is fast enough for virtually all purposes. Both the compiler and the linker (when it supports link time code generation) use optimization algorithms to make the generated assembly code as fast as possible. These optimizers are getting more and more powerful by using special processor instruction sets such as MMX, SSE, and AVX. These days, it’s very hard to write your own assembly code that outperforms the code generated by the compiler, unless you know all the little details of these enhanced instruction sets.
However, in case you do need it, the keyword asm can be used by a C++ compiler to allow the programmer to insert raw assembly code. The keyword is part of the C++ standard, but its implementation is compiler-defined. In some compilers, you can use asm to drop from C++ down to the level of assembly right in the middle of your program. Sometimes, the support for the asm keyword depends on your target architecture. For example, Microsoft VC++ 2017 supports the asm keyword when compiling in 32-bit mode, but asm is not supported when compiling in 64-bit mode.
Assembly code can be useful in some applications, but I don’t recommend it for most programs. There are several reasons to avoid assembly code:
Practically, if you have a computationally expensive block of code, you should move it to its own C++ function. If you determine, using performance profiling (see Chapter 25), that this function is a performance bottleneck, and there is no way to write the code smaller and faster, you might use raw assembly code to try to increase its performance.
In such a case, one of the first things you want to do is declare the function extern
"C" so the C++ name mangling is suppressed. Then, you can write a separate module in assembly code that performs the function more efficiently. The advantage of a separate module is that there is both a “reference implementation” in C++ that is platform-independent, and also a platform-specific high-performance implementation in raw assembly code. The use of extern
"C" means that the assembly code can use a simple naming convention (otherwise, you have to reverse-engineer your compiler’s name mangling algorithm). Then, you can link with either the C++ version or the assembly code version.
You would write this module in assembly code and run it through an assembler, rather than using inline asm directives in C++. This is particularly true in many of the popular x86-compatible 64-bit compilers, where the inline asm keyword is not supported.
However, you should only use raw assembly code if there are significant performance improvements. Increasing the performance by a factor of 2 might possibly justify the effort. A factor of 10 is compelling. An improvement of 10 percent is not worth the effort.
If you take away one point from this chapter, it should be that C++ is a flexible language. It exists in the sweet spot between languages that are too tied to a particular platform, and languages that are too high-level and generic. Rest assured that when you develop code in C++, you aren’t locking yourself into the language forever. C++ can be mixed with other technologies, and has a solid history and code base that will help guarantee its relevance in the future.
In Part V of this book, I discussed software engineering methods, writing efficient C++, testing and debugging techniques, design techniques and patterns, and cross-platform and cross-language application development. This is a terrific way to end your journey through Professional C++ programming because these topics help good C++ programmers become great C++ programmers. By thinking through your designs, experimenting with different approaches in object-oriented programming, selectively adding new techniques to your coding repertoire, and practicing testing and debugging techniques, you’ll be able to take your C++ skills to the professional level.
Reading this book will surely give your C++ career a kick-start, but employers will want you to prove yourself before they offer the big bucks. Interview methodologies vary from company to company, but many aspects of technical interviews are predictable. A thorough interviewer will want to test your basic coding skills, your debugging skills, your design and style skills, and your problem-solving skills. The set of questions you might be asked is quite large. In this appendix, you’ll read about some of the different types of questions you may encounter and the best tactics for landing that high-paying C++ programming job you’re after.
This appendix iterates through the chapters of the book, discussing the aspects of each chapter that are likely to come up in an interview situation. Each section also includes a discussion of the types of questions that could be designed to test those skills, and the best ways to deal with those questions.
A technical interview will often include some basic C++ questions to weed out the candidates who put C++ on their resume simply because they’ve heard of the language. These questions might be asked during a phone screen, when a developer or recruiter calls you before bringing you in for an in-person interview. They could also be asked via e-mail or in person. When answering these questions, remember that the interviewer is just trying to establish that you’ve actually learned and used C++. You generally don’t need to get every detail right to earn high marks.
for loop, conditional statements, the conditional operator, and variablesconstauto keywordstd::vectorBasic C++ questions will often come in the form of a vocabulary test. The interviewer may ask you to define C++ terms, such as const or static. She may be looking for the textbook answer, but you can often score extra points by giving sample usage or extra detail. For example, in addition to saying that one of the uses of const is to specify that a reference parameter cannot be changed, you can also say that a const reference is more efficient than a copy when passing an object into a function or method.
The other form that basic C++ competence questions can take is a short program that you write in front of the interviewer. An interviewer may give you a warm-up question, such as, “Write Hello, World in C++.” When you get a seemingly simple question like this, make sure that you score all the extra points you can by showing that you are namespace-savvy, you use streams instead of printf(), and you know which standard headers to include.
Strings are very important, and are used in almost every kind of application. An interviewer will most likely ask at least one question related to string handling in C++.
std::string and std::string_view classesstd::string class and C-style strings, including why C-style strings should be avoidedAn interviewer could ask you to explain how you can append two strings together. With this question, he wants to find out whether you are thinking as a professional C++ programmer or as a C programmer. If you get such a question, you should explain the std::string class, and show how to use it to append two strings. It’s also worth mentioning that the string class will handle all memory management for you automatically, and contrasting this to C-style strings.
Your interviewer may not ask specifically about localization, but you can show your worldwide interest by using wchar_t instead of char during the interview. If you do receive a question about your experience with localization, be sure to mention the importance of considering worldwide use from the beginning of the project.
You may also be asked about the general idea behind locales and facets. You probably will not have to explain the exact syntax, but you should explain that they allow you to format text and numbers according to the rules of a certain language or country.
You might get a question about Unicode, but most likely it will be a question to explain the ideas and the basic concepts behind Unicode instead of implementation details. So, make sure you understand the high-level concepts of Unicode and that you can explain their use in the context of localization. You should also know about the different options for encoding Unicode characters, such as UTF-8 and UTF-16, without specific details.
As discussed in Chapter 19, regular expressions can have a daunting syntax. It is unlikely that an interviewer will ask you about little details of regular expressions. However, you should be able to explain the concept of regular expressions and what kind of string manipulations you can do with them.
Anybody who’s coded in the professional world has had a co-worker who codes as if they learned C++ from the back of a cereal box. Nobody wants to work with someone who writes messy code, so interviewers sometimes attempt to determine a candidate’s style skills.
Style questions can come in a few different forms. A friend of mine was once asked to write the code for a relatively complex algorithm on a whiteboard. As soon as he wrote the first variable name, the interviewer stopped him and told him he passed. The question wasn’t about the algorithm; it was just a red herring to see how well he named his variables. More commonly, you may be asked to submit code that you’ve written, or to give your opinions on style.
You need to be careful when a potential employer asks you to submit code. You probably cannot legally submit code that you wrote for a previous employer. You also have to find a piece of code that shows off your skills without requiring too much background knowledge. For example, you wouldn’t want to submit your master’s thesis on high-speed image rendering to a company that is interviewing you for a database administration position.
If the company gives you a specific program to write, that’s a perfect opportunity to show off what you’ve learned in this book. Even if the potential employer doesn’t specify the program, you should consider writing a small program specifically to submit to the company. Instead of selecting some code you’ve already written, start from scratch to produce code that is relevant to the job and highlights good style.
If you have documentation that you have written and that can be released, meaning it is not confidential, use it to show your skills to communicate; it will give you extra points. Websites you have built or maintained, and articles you have submitted to places like CodeGuru, CodeProject, and so on, are very useful. This tells the interviewer that you can not only write code, but also communicate to others how to use that code effectively. Of course, having a book title attached to your name is also a big plus.
If you are contributing to active open-source projects, for example on GitHub, you’ll score extra points. Even better would be if you have your own open-source project that you actively maintain. That’s the perfect opportunity to show off your coding style and your communication skills. Profile pages on websites such as GitHub are taken as part of your resume by certain employers.
Your interviewer will want to make sure that in addition to knowing the C++ language, you are skilled at applying it. You may not be asked a design question explicitly, but good interviewers have a variety of techniques to sneak design into other questions, as you’ll see.
A potential employer will also want to know that you’re able to work with code that you didn’t write yourself. If you’ve listed specific libraries on your resume, then you should be prepared to answer questions about them. If you didn’t list specific libraries, a general understanding of the importance of libraries will probably suffice.
Design questions are hard for an interviewer to come up with; any program that you could design in an interview setting is probably too simple to demonstrate real-world design skills. Design questions may come in a fuzzier form, such as, “Tell me the steps in designing a good program,” or “Explain the principle of abstraction.” They can also be less explicit. When discussing your previous job, the interviewer may ask, “Can you explain the design of that project to me?” Be careful not to expose intellectual property from your previous jobs though.
If the interviewer is asking you about a specific library, he will probably focus on the high-level aspects of the library as opposed to technical specifics. For example, you may be asked to explain what the strengths and weaknesses of the Standard Library are from a library design point of view. The best candidates talk about the Standard Library’s breadth and standardization as strengths, and its sometimes complex usage as a drawback.
You may also be asked a design question that initially doesn’t sound as if it’s related to libraries. For example, the interviewer could ask how you would go about creating an application that downloads MP3 music from the web and plays it on a local computer. This question isn’t explicitly related to libraries, but that’s what it’s getting at; the question is really asking about process.
You should begin by talking about how you would gather requirements and do initial prototypes. Because the question mentions two specific technologies, the interviewer would like to know how you would deal with them. This is where libraries come into play. If you tell the interviewer that you would write your own web classes and MP3 playing code, you won’t fail the test, but you will be challenged to justify the time and expense of reinventing these tools.
A better answer is to say that you would survey existing libraries that perform web and MP3 functionality to see if one exists that suits the project. You might want to name some technologies that you would start with, such as libcurl for web retrieval in Linux, or the Windows Media library for music playback in Windows.
Mentioning some websites with free libraries, and some ideas of what those websites provide, might also get you extra points. Some examples are www.codeguru.com and www.codeproject.com for Windows libraries; www.boost.org and www.github.com for platform-independent C++ libraries, and so on. Giving examples of some of the licenses that are available for open-source software, such as the GNU General Public License, Boost Software License, Creative Commons license, CodeGuru license, OpenBSD license, and so on, might score you extra credit.
Object-oriented design questions are used to weed out C programmers who merely know what a reference is, from C++ programmers who actually use the object-oriented features of the language. Interviewers don’t take anything for granted; even if you’ve been using object-oriented languages for years, they may still want to see evidence that you understand the methodology.
There are typically two ways to ask object-oriented design questions: you can be asked to define an object-oriented concept, or you can be asked to sketch out an object-oriented hierarchy. The former is pretty straightforward. Remember that examples might earn you extra credit.
If you’re asked to sketch out an object-oriented hierarchy, the interviewer will usually provide a simple application, such as a card game, for which you should design a class hierarchy. Interviewers often ask design questions about games because those are applications with which most people are already familiar. They also help lighten the mood a bit when compared to questions about things like database implementations. The hierarchy you generate will, of course, vary based on the game or application they are asking you to design. Here are some points to consider:
Interviewers rarely ask questions about designing reusable code. This omission is unfortunate because having programmers on staff who can write only single-purpose code can be detrimental to a programming organization. Occasionally, you’ll find a company that is savvy on code reuse and asks about it in their interviews. Such a question is an indication that it might be a good company to work for.
public methods and no implementation detailsQuestions about reuse will almost certainly be about previous projects on which you have worked. For example, if you worked at a company that produced both consumer and professional video-editing applications, the interviewer may ask how code was shared between the two applications. Even if you aren’t explicitly asked about code reuse, you might be able to sneak it in. When you’re describing some of your past work, tell the interviewer if the modules you wrote were used in other projects. Even when answering apparently straight coding questions, make sure to consider and mention the interfaces involved. As always, be careful not to expose intellectual property from your previous jobs though.
You can be sure that an interviewer will ask you some questions related to memory management, including your knowledge of smart pointers. Besides smart pointers, you will also get more low-level questions. The goal is to determine whether the object-oriented aspects of C++ have distanced you too much from the underlying implementation details. Memory management questions will give you a chance to prove that you know what’s really going on.
new, delete, new[], delete[], malloc(), free(), and so on. Instead, use smart pointers.std::unique_ptr by default, shared_ptr for shared ownership.std::make_unique() to create an std::unique_ptr.std::make_shared() to create an std::shared_ptr.std::auto_ptr; it has even been removed from C++17.new, delete, new[], and delete[] instead of malloc() and free().Find-the-bug questions often contain memory issues, such as double deletion, new/delete/new[]/delete[] mix-up, and memory leaks. When you are tracing through code that makes heavy use of pointers and arrays, you should draw and update the state of the memory as you process each line of code.
Another good way to find out if a candidate understands memory is to ask how pointers and arrays differ. At this point, the differences may be so tacit in your mind that the question catches you off-guard for a moment. If that’s the case, skim Chapter 7 again for the discussion on pointers and arrays.
When answering questions about memory allocation, it’s always a good idea to mention the concept of smart pointers and their benefits for automatically cleaning up memory and other resources. You definitely should also mention that it’s much better to use Standard Library containers, such as std::vector, instead of C-style arrays, because the Standard Library containers handle memory management for you automatically.
There are no bounds to the types of questions you can be asked about classes and objects. Some interviewers are syntax-fixated and might throw some complicated code at you. Others are less concerned with the implementation and more interested in your design skills.
this pointermutable keywordconst membersstatic methods and data membersinline keyword is just a hint for the compiler, which can ignore the hintpublic methods, should be as stable as possible, and should not contain any data members or private/protected methods. Thus, interfaces can remain stable while implementations are free to change under them.Questions such as, “What does the keyword mutable mean?” are great for phone screening. A recruiter may have a list of C++ terms and will move candidates to the next stage of the process based on the number of terms that they get right. You may not know all of the terms thrown at you, but keep in mind that other candidates are facing the same questions and it’s one of the few metrics available to a recruiter.
The find-the-bug style of questions is popular among interviewers and course instructors alike. You will be presented with some nonsense code and asked to point out its flaws. Interviewers struggle to find quantitative ways to analyze candidates, and this is one of the few ways to do it. In general, your approach should be to read each line of code and voice your concerns, brainstorming aloud. The types of bugs can fall into these categories.
std::string instead.Here’s a find-the-bug problem that demonstrates each of these areas:
class Buggy{Buggy(int param);~Buggy();double fjord(double val);int fjord(double val);protected:void turtle(int i = 7, int j);int param;double* mGraphicDimension;};Buggy::Buggy(int param){param = param;mGraphicDimension = new double;}Buggy::~Buggy(){}double Buggy::fjord(double val){return val * param;}int Buggy::fjord(double val){return (int)fjord(val);}void Buggy::turtle(int i, int j){cout << "i is " << i << ", j is " << j << endl;}
Take a careful look at the code, and then consult the following corrected version for the answers:
#include <iostream> // Streams are used in the implementation.#include <memory> // For std::unique_ptr.class Buggy{public: // These should most likely be public.Buggy(int param);// Recommended to make destructors virtual. Also, explicitly// default it, because this class doesn't need to do anything// in it.virtual ~Buggy() = default;// Disallow copy construction and copy assignment operator.Buggy(const Buggy& src) = delete;Buggy& operator=(const Buggy& rhs) = delete;// Explicitly default move constructor and move assignment op.Buggy(Buggy&& src) noexcept = default;Buggy& operator=(Buggy&& rhs) noexcept = default;// int version won't compile. Overloaded// methods cannot differ only in return type.double fjord(double val);private: // Use private by default.void turtle(int i, int j); // Only last parameters can have defaults.int mParam; // Data member naming.std::unique_ptr<double> mGraphicDimension; // Use smart pointers!};Buggy::Buggy(int param) // Prefer using ctor initializer: mParam(param), mGraphicDimension(new double){}double Buggy::fjord(double val){return val * mParam; // Changed data member name.}void Buggy::turtle(int i, int j){std::cout << "i is " << i << ", j is " << j << std::endl; // Namespaces.}
You should explain why you should never use raw pointers that represent ownership, but smart pointers instead. You should also explain why you are explicitly defaulting the move constructor and move assignment operator, and why you opt to delete the copy constructor and copy assignment operator. Explain what impact it would have on the class if you do need to implement a copy constructor and a copy assignment operator.
Questions about inheritance usually come in the same forms as questions about classes. The interviewer might also ask you to implement a class hierarchy to show that you have worked with C++ enough to write derived classes without looking it up in a book.
private and protected from a derived class point of viewvirtualvirtualvirtual methods and abstract base classesfinal keyword on classesoverride and final keywords on methodsMany of the pitfalls in inheritance questions are related to getting the details right. When you are writing a base class, don’t forget to make the methods virtual. If you mark all methods virtual, be prepared to justify that decision. You should be able to explain what virtual means and how it works. Also, don’t forget the public keyword before the name of the parent class in the derived class definition (for example, class Derived : public Base). It’s unlikely that you’ll be asked to perform nonpublic inheritance during an interview.
More challenging inheritance questions have to do with the relationship between a base class and a derived class. Be sure you know how the different access levels work, and the difference between private and protected. Remind yourself of the phenomenon known as slicing, when certain types of casts cause a class to lose its derived class information.
Many interviewers tend to focus on the more obscure cases because that way, experienced C++ programmers can demonstrate that they have conquered the unusual parts of C++. Sometimes interviewers have difficulty coming up with interesting questions and end up asking the most obscure question they can think of.
conststatictypedefs workAsking a candidate to define const and static is a classic C++ interview question. Both keywords provide a sliding scale with which an interviewer can assess an answer. For example, a fair candidate will talk about static methods and static data members. A good candidate will give good examples of static methods and static data members. A great candidate will also know about static linkage and static variables in functions.
The edge cases described in this chapter also come in find-the-bug type problems. Be on the lookout for misuse of references. For example, imagine a class that contains a reference as a data member:
class Gwenyth{private:int& mCaversham;};
Because mCaversham is a reference, it needs to be bound to a variable when the class is constructed. To do that, you’d need to use a constructor initializer. The class could take the variable to be referenced as a parameter to the constructor:
class Gwenyth{public:Gwenyth(int& i);private:int& mCaversham;};Gwenyth::Gwenyth(int& i) : mCaversham(i){}
As one of the most arcane parts of C++, templates are a good way for interviewers to separate the C++ novices from the pros. While most interviewers will forgive you for not remembering some of the advanced template syntax, you should go into the interview knowing the basics.
typedefsMany interview questions start out with a simple problem and gradually add complexity. Often, interviewers have an endless amount of complexity that they are prepared to add, and they simply want to see how far you get. For example, an interviewer might begin a problem by asking you to create a class that provides sequential access to a fixed number of ints. Next, the class will need to grow to accommodate an arbitrary-sized array. Then, it will need arbitrary data types, which is where templates come in. From there, the interviewer could take the problem in a number of directions, asking you to use operator overloading to provide array-like syntax, or continuing down the template path by asking you to provide a default type.
Templates are more likely to be employed in the solution of another coding problem than to be asked about explicitly. You should brush up on the basics in case the subject comes up. However, most interviewers understand that the template syntax is difficult, and asking someone to write complex template code in an interview is rather cruel.
The interviewer might ask you high-level questions related to metaprogramming to find out whether or not you have heard about it. While explaining, you could give a small example such as calculating the factorial of a number at compile time. Don’t worry if the syntax is not entirely correct. As long as you explain what it is supposed to do, you should be fine.
If you’re interviewing for a job writing GUI applications, you probably won’t get too many questions about I/O streams because GUI applications tend to use other mechanisms for I/O. However, streams can come up in other problems and, as a standard part of C++, they are fair game as far as the interviewer is concerned.
I/O may come up in the context of any question. For example, the interviewer could ask you to read in a file containing test scores and put them in a vector. This question tests basic C++ skills, basic Standard Library, and basic I/O. Even if I/O is only a small part of the problem you’re working on, be sure to check for errors. If you don’t, you’re giving the interviewer an opportunity to say something negative about your otherwise perfect program.
Managers sometimes shy away from hiring recent graduates or novice programmers for vital (and high-paying) jobs because it is assumed that they don’t write production-quality code. You can prove to an interviewer that your code won’t keel over randomly by demonstrating your error-handling skills during an interview.
const referencessetjmp() and longjmp() in C++Interviewers will be on the lookout to see how you report and handle errors. When you are asked to write a piece of code, make sure you implement proper error handling.
You might be asked to give a high-level overview of how stack unwinding works when an exception is thrown, without implementation details.
Of course, not all programmers understand or appreciate exceptions. Some may even have a completely unfounded bias against them for performance reasons. If the interviewer asks you to do something without exceptions, you’ll have to revert to traditional nullptr checks and error codes. That would be a good time to demonstrate your knowledge of nothrow new.
An interviewer can also ask questions in the form of “Would you use this?” One example question could be, “Would you use setjmp()/longjmp() in C++, as they are more efficient than exceptions?” Your answer should be a big no, because setjmp()/longjmp() do not work in C++ as they might bypass scoped destructors. The belief that exceptions have a big performance penalty is a misconception. On modern compilers, just having code that can handle potential exceptions has close to zero performance penalty.
It’s possible, though somewhat unlikely, that you will have to perform something more difficult than a simple operator overload during an interview. Some interviewers like to have an advanced question on hand that they don’t really expect anybody to answer correctly. The intricacies of operator overloading make great, nearly impossible questions because few programmers get the syntax right without looking it up. That means it’s a great area to review before an interview.
operator<= can be written by complementing the result of operator>)Let’s face it: operator overloading questions (other than the simple ones) can be cruel. Anybody who is asking such questions knows this and is going to be impressed when you get it right. It’s impossible to predict the exact question that you’ll get, but the number of operators is finite. As long as you’ve seen an example of overloading each operator that makes sense to overload, you’ll do fine!
Besides asking you to implement an overloaded operator, you could be asked high-level questions about operator overloading. A find-the-bug question could contain an operator that is overloaded to do something that is conceptually wrong for that particular operator. In addition to syntax, keep the use cases and theory of operator overloading in mind.
As you’ve seen, certain aspects of the Standard Library can be difficult to work with. Few interviewers would expect you to recite the details of Standard Library classes unless you claim to be a Standard Library expert. If you know that the job you’re interviewing for makes heavy use of the Standard Library, you might want to write some Standard Library code the day before to refresh your memory. Otherwise, recalling the high-level design of the Standard Library and its basic usage should suffice.
vector, which is the most frequently used Standard Library classmapunordered_mapIf interviewers are dead set on asking detailed Standard Library questions, there really are no bounds to the types of questions they could ask. If you’re feeling uncertain about syntax though, you should state the obvious during the interview: “In real life, of course, I’d look that up in Professional C++, but I’m pretty sure it works like this…” At least that way, the interviewer is reminded that he should forgive the details as long as you get the basic idea right.
High-level questions about the Standard Library are often used to gauge how much you’ve used the Standard Library without making you recall all the details. For example, casual users of the Standard Library may be familiar with associative and non-associative containers. A slightly more advanced user would be able to define an iterator, describe how iterators work with containers, and describe the remove-erase idiom. Other high-level questions could ask you about your experience with Standard Library algorithms, or whether you’ve customized the Standard Library. An interviewer might also gauge your knowledge about lambda expressions, and their use with Standard Library algorithms.
This chapter describes a number of features and additional libraries from the C++ standard that don’t fit in other chapters, including some new C++17 features. An interviewer might touch on a few of those topics to see whether you are keeping up to date with the latest developments in the C++ world.
<random> library as the preferred method of generating random numbersstd::optional valuesstd::variant and std::any data typesstd::tuple as a generalization of std::pairYou shouldn’t expect detailed questions about these topics. However, knowledge of the C++17 std::optional, variant, and any classes will definitely score you extra points. You might also be asked to explain the basic ideas and concepts of the chrono and random number generation libraries, but without going into syntax details. If the interviewer starts focusing on random numbers, it is important to explain the differences between true random numbers and pseudo-random numbers. You should also explain how the random number generation library uses the concepts of generators and distributions.
Multithreaded programming is becoming more and more important with the release of multicore processors for everything from servers to consumer computers. Even smartphones have multicore processors. An interviewer might ask you a couple of multithreading questions. C++ includes a standard threading support library, so it’s a good idea to know how it works.
std::thread to spawn threadsMultithreaded programming is a complicated subject, so you don’t need to expect detailed questions, unless you are interviewing for a specific multithreading programming position.
Instead, an interviewer might ask you to explain the different kinds of problems you can encounter with multithreaded code: problems such as race conditions, deadlocks, and tearing. You may also be asked to explain the general concepts behind multithreaded programming. This is a very broad question, but it allows the interviewer to get an idea of your multithreading knowledge. You can also mention that with C++17, a lot of the Standard Library algorithms have an option to run in parallel.
You should be suspicious if you go through the complete interview process with a company, and the interviewers do not ask any process questions—it may mean that they don’t have any process or that they don’t care about it. Alternatively, they might not want to scare you away with their process behemoth. Another important aspect of any development process is Source Code Control.
Most of the time, you’ll get a chance to ask questions regarding the company. I suggest you consider asking about engineering processes and Source Code Control solutions as one of your standard questions.
The most common question you’ll be asked is to describe the process that your previous employer used. Be careful, though, not to disclose any confidential information. When answering, you should mention what worked well and what failed, but try not to denounce any particular methodology. The methodology you criticize could be the one that your interviewer uses.
Almost every candidate is listing Scum/Agile as a skill these days. If the interviewer asks you about Scrum, he probably doesn’t want you to simply recite the textbook definition—the interviewer knows that you can read the table of contents of a Scrum book. Instead, pick a few ideas from Scrum that you find appealing. Explain each one to the interviewer along with your thoughts on it. Try to engage the interviewer in a conversation, proceeding in a direction in which he is interested based on the cues that he gives.
If you get a question regarding Source Code Control, it will most likely be a high-level question. You should explain the general principles behind Source Code Control solutions, mention the fact that there are commercial and free open-source solutions available, and possibly explain how Source Code Control was implemented by your previous employer.
Efficiency questions are quite common in interviews because many organizations are facing scalability issues with their code and need programmers who are savvy about performance.
Often, the interviewer will use her own product as an example to drive efficiency questions. Sometimes the interviewer will describe an older design and some performance-related symptoms she experienced. The candidate is supposed to come up with a new design that alleviates the problem. Unfortunately, there is a major problem with a question like this: what are the odds that you’re going to come up with the same solution that the company did when the problem was actually solved? Because the odds are slim, you need to be extra careful to justify your designs. You may not come up with the actual solution, but you could still have an answer that is correct or even better than the company’s newer design.
Other types of efficiency questions may ask you to tweak some C++ code for performance or iterate on an algorithm. For example, the interviewer could show you code that contains extraneous copies or inefficient loops.
The interviewer might also ask you for a high-level description of profiling tools and what their benefits are.
Potential employers value strong testing abilities. Because your resume probably doesn’t indicate your testing skills, unless you have explicit quality assurance (QA) experience, you might face interview questions about testing.
An interviewer could ask you to write some tests during the interview, but it’s unlikely that a program presented during an interview would contain the depth necessary for interesting tests. It’s more likely that you will be asked high-level testing questions. Be prepared to describe how testing was done at your last job, and what you liked and didn’t like about it. Again, be careful not to disclose any confidential information. After you’ve answered the interviewer’s questions about testing, a good question for you to ask the interviewer is to ask how testing is done at their company. It might start a conversation about testing and give you a better idea of the environment at your potential job.
Engineering organizations look for candidates who are able to debug their own code as well as code that they’ve never seen before. Technical interviews often attempt to size up your debugging muscles.
During an interview, you might be challenged with an obscure debugging problem. Remember that the process is the most important thing, and the interviewer probably knows that. Even if you don’t find the bug during the interview, make sure that the interviewer knows what steps you would go through to track it down. If the interviewer hands you a function and tells you that it crashes during execution, he should award you just as many points if you properly discuss the sequence of steps to find the bug, as if you find the bug right away.
Each of the techniques presented in Chapter 28 makes a fine interview question. Rather than repeat what you already read in the chapter, I suggest that you skim over Chapter 28 prior to an interview to make sure that you are able to understand each of the techniques.
If you are being interviewed for a GUI-based job, you should know about the existence of frameworks such as MFC, Qt, and possibly others.
Because design patterns are very popular in the professional world (many candidates even list them as skills), it’s likely that you’ll encounter an interviewer who wants you to explain a pattern, give a use case for a pattern, or implement a pattern.
Answering questions about design patterns is usually a walk in the park, unless the interviewer expects you to know the details of every single pattern known to humankind. Luckily, most interviewers who appreciate design patterns will just want to chat with you about them and get your opinions. After all, looking up concepts in a book or online instead of memorizing them is a good pattern in itself.
Few programmers submit resumes that list only a single language or technology, and few large applications rely on only a single language or technology. Even if you’re only interviewing for a C++ position, the interviewer may still ask questions about other languages, especially as they relate to C++.
The most popular cross-language question is to compare and contrast two different languages. You should avoid saying only positive or negative things about a particular language, even if you really love or hate that language. The interviewer wants to know that you are able to see tradeoffs and make decisions based on them.
Cross-platform questions are more likely to be asked while discussing previous work. If your resume indicates that you once wrote C++ applications that ran on a custom hardware platform, you should be prepared to talk about the compiler you used and the challenges of that platform.
This appendix contains a list of books and online resources on various C++-related topics that were either consulted while writing this book, or are recommended for further or background reading.
A quick (about 190 pages) tutorial-based overview of the entire C++ language and Standard Library at a moderately high level for people who already know C++ or are at least experienced programmers. This book includes C++11 features.
A very thorough introduction to C++ that covers just about everything in the language in a very accessible format and in great detail.
Covers the same material as C++ Primer, but in much less space, because it assumes that the reader has programmed in another language before.
An excellent introduction to C++ programming that expects the reader to know C already. This text is available at no cost online at www.bruceeckel.com.
The home of Standard C++ on the web, containing news, status, and discussions about the C++ standard on all compilers and platforms.
A huge collection of frequently asked questions about C++.
Three books that provide excellent tips and tricks on commonly misused and misunderstood features of C++.
The “bible” of C++ books, written by the designer of C++. Every C++ programmer should own a copy of this book, although it can be a bit obscure in places for the C++ novice.
Presented as a set of puzzles, with one of the best, most thorough discussions of proper resource management and exception safety in C++ through Resource Acquisition is Initialization (RAII). This book also includes in-depth coverage of a variety of topics, such as the pimpl idiom, name lookup, good class design, and the C++ memory model.
Covers additional exception safety topics not covered in Exceptional C++: 47 Engineering Puzzles, Programming Problems, and Solutions. This book also discusses effective object-oriented programming and correct use of certain aspects of the Standard Library.
Discusses generic programming, optimization, and resource management. This book also has an excellent exposition of how to write modular code in C++ by using nonmember functions and the single responsibility principle.
Provides 99 specific tips for C++ programming.
The second volume of Eckel’s book, which covers more advanced C++ topics. The text is also available at no cost online at www.bruceeckel.com.
A C++ reference covering everything from the basics to more-advanced material.
One of the most comprehensive C++ books available.
An excellent reference of C++98, C++03, C++11, C++14, and C++17.
A website containing a lot of information related to C++, with a complete reference of the language, including C++17.
A well-written article that takes the mystery out of defining custom stream manipulators in C++.
A unique blend of software development advice and C++ specifics, as well as a very good explanation of locale and Unicode support in C++.
A treatise by Joel Spolsky on the importance of localization. After reading this, you’ll want to check out the other entries on his Joel on Software website.
The definitive book on Unicode, which all developers using Unicode must have.
The best resource for finding Unicode characters, charts, and tables.
An explanation of what the Universal Character Set (UCS) is, including the Unicode standard.
This quick reference is a condensed guide to all essential data structures, algorithms, and functions provided by the C++ Standard Library
Covers the entire Standard Library, including I/O streams and strings as well as the containers and algorithms. This book is an excellent reference.
Written in the same spirit as the author’s Effective C++ books. This book provides targeted tips for using the Standard Library, but is not a reference or tutorial.
An interesting video lecture series on the C++ Standard Library.
Similar to the Josuttis text, but covering only parts of the Standard Library, such as containers and algorithms.
An excellent explanation of making function templates friends of classes.
Everything you ever wanted to know (or didn’t want to know) about C++ templates. This book assumes significant background in general C++.
Delivers practical metaprogramming tools and techniques into the hands of the everyday programmer.
A wealth of papers written by the C++ standards committee.
A document containing the presentation materials from a Scott Meyers’ training course. This is an excellent reference to get a list of all C++11 and select C++14 features.
Three Wikipedia articles with a description of new features added to C++11, C++14, and C++17.
One of the syntaxes of the regular expressions in C++ is the same as the regular expressions in the ECMAScript language, as described in this specification document.
A very readable book on UML 2.0. The authors use Java in examples, but they are convertible to C++ without too much trouble.
One of the most popular introductory algorithms books, covering all the common data structures and algorithms.
Knuth’s four-volume tome on algorithms and data structures. If you enjoy mathematical rigor, there is no better text on this topic. However, it is probably inaccessible without undergraduate knowledge of mathematics or theoretical computer science.
An approachable reference to data structures and algorithms.
A mathematical explanation of the Mersenne Twister, used to generate pseudo-random numbers.
Websites where the two main open-source movements explain their philosophies and provide information about obtaining open-source software and contributing to its development.
A huge number of free, peer-reviewed portable C++ source libraries. This website is definitely worth checking out.
Two websites that host many open-source projects. These are great resources for finding useful open-source software.
Excellent resources to find free libraries and code for reuse in your own projects.
Written for software engineers “in the trenches,” this text focuses on the technology—the principles, patterns, and process—that help software engineers effectively manage increasingly complex operating systems and applications.
An excellent guide to start with the Scrum methodology.
A classic book, and a must read for every software engineer. Almost twenty years later, its advice is still spot on. It examines the core process—what do you do, as an individual and as a team, if you want to create software that’s easy to work with and good for your users.
A landmark paper that described the state of software development at the time and proposed the Spiral Model.
One of several books in a series that promote Extreme Programming as a new approach to software development.
A guidebook for anybody who is responsible for the management of software development processes.
Discusses various aspects of the software development process and exposes hidden truisms along the way.
Provides an overview of RUP, including its mission and processes.
A wonderfully enlightening book about the politics and realities of software development.
A detailed discussion of the Scrum methodology.
Explains the concepts behind revision control systems, and what kinds of solutions are available.
This document is a set of guidelines for using C++ well. The aim of this document is to help people to use modern C++ effectively.
A classic book that espouses the practice of recognizing and improving bad code.
A must-have book on C++ design and coding style. “Coding standards” here doesn’t mean “how many spaces I should indent my code.” This book contains 101 best practices, idioms, and common pitfalls that can help you to write correct, understandable, and efficient C++ code.
A unique book that turns the issue of programming style upside down by challenging the reader to learn to read code properly in order to become a better programmer.
A highly configurable program that generates documentation from source code and comments.
A nice little book with advice about how to perform the most common operations on code: reading, modifying, testing, debugging, and writing.
A discussion of what code refactoring means, including a number of techniques for refactoring.
A discussion of the C++ style guidelines used at Google.
Two books that provide all the information most software engineers will ever need to know about computer architecture.
One of the few books to focus exclusively on efficient C++ programming. This book covers both language-level and design-level efficiency.
Information about the gprof profiling tool.
A book aimed at quality assurance professionals, although any software engineer will benefit from this book’s discussion of the software-testing process.
http://microsoft.com/vs.
The Community Edition of Microsoft Visual Studio is a version of Visual Studio free of charge for students, open-source developers, and individual developers to create both free and paid applications. It’s also free of charge for up to five users in small organizations. It comes with an excellent graphical symbolic debugger.
www.gnu.org/software/gdb/gdb.html.
An excellent command-line symbolic debugger.
http://valgrind.org/.
An open-source memory-debugging tool for Linux.
https://docs.microsoft.com/en-us/windows-hardware/drivers/debugger/application-verifier.
A run-time verification tool for C++ code that assists in finding subtle programming errors and security issues that can be difficult to identify with normal application testing techniques.
Called the “Gang of Four” (GoF) book (because of its four authors), the seminal work on design patterns.
Offers an approach to C++ programming that employs highly reusable code and patterns.
A companion to the GoF book, explaining how patterns can actually be applied.
A book that goes further than just listing design patterns. The authors show good and bad examples of using patterns, and give solid reasoning behind each pattern.
Contains descriptions of a large number of design patterns used in computer programming.
A great discussion on operating systems, including multithreading issues such as deadlocks and race conditions.
An excellent book on practical multithreaded programming, including the C++ threading library.
A book for developers of various skill levels who are making the move into multicore programming.
A great book on writing code for multiprocessor and multicore systems.
The interface to the C++ Standard Library consists of 87 header files, 26 of which present the C Standard Library. It’s often difficult to remember which header files you need to include in your source code, so this appendix provides a brief description of the contents of each header, organized into eight categories:
The C++ Standard Library includes almost the entire C Standard Library. The header files are generally the same, except for two points:
<cname> instead of <name.h>.<cname> header files are in the std namespace.The following table provides a summary of the most useful functionality. Note that it’s recommended to avoid using C functionality, and instead use equivalent C++ features whenever possible.
| HEADER FILENAME | CONTENTS |
<cassert> |
assert() macro |
<ccomplex> |
Only includes <complex>. This header is deprecated since C++17. |
<cctype> |
Character predicates and manipulation functions, such as isspace() and tolower() |
<cerrno> |
Defines errno expression, a macro to get the last error number for certain C functions. |
<cfenv> |
Supports the floating-point environment, such as floating-point exceptions, rounding, and so on. |
<cfloat> |
C-style defines related to floating-point arithmetic, such as FLT_MAX |
<cinttypes> |
Defines a number of macros to use with the printf(), scanf(), and similar functions. This header also includes a few functions to work with intmax_t. |
<ciso646> |
In C, the <iso646.h> file defines macros and, or, and so on. In C++, those are keywords, so this header is empty. |
<climits> |
C-style limit defines, such as INT_MAX. It is recommended to use the C++ equivalents from <limits> instead. |
<clocale> |
A few localization macros and functions like LC_ALL and setlocale(). See also the C++ equivalents in <locale>. |
<cmath> |
Math utilities, including trigonometric functions sqrt(), fabs(), and others |
<csetjmp> |
setjmp() and longjmp(). Never use these in C++! |
<csignal> |
signal() and raise(). Avoid these in C++. |
<cstdalign> |
Alignment-related macro __alignas_is_defined. This is deprecated since C++17. |
<cstdarg> |
Macros and types for processing variable-length argument lists |
<cstdbool> |
Boolean type-related macro __bool_true_false_are_defined. This is deprecated since C++17. |
<cstddef> |
Important constants such as NULL, and important types such as size_t |
<cstdint> |
Defines a number of standard integer types such as int8_t, int64_t and so on. It also includes macros specifying minimum and maximum values of those types. |
<cstdio> |
File operations, including fopen() and fclose(). Formatted I/O: printf(), scanf(), and family. Character I/O: getc(), putc(), and family. File positioning: fseek() and ftell(). It is recommended to use C++ streams instead. (See the section “I/O Streams,” later in this appendix.) |
<cstdlib> |
Random numbers with rand() and srand() (deprecated since C++14; use the C++ <random> instead). This header includes the abort() and exit() functions, which you should avoid; C-style memory allocation functions calloc(), malloc(), realloc(), and free(); C-style searching and sorting with qsort() and bsearch(); string to number conversions: atof(), atoi(); a set of functions related to multibyte/wide string manipulation. |
<cstring> |
Low-level memory management functions, including memcpy() and memset(). This header includes C-style string functions, such as strcpy() and strcmp(). |
<ctgmath> |
Only includes <complex> and <cmath>. This header is deprecated since C++17. |
<ctime> |
Time-related functions, including time() and localtime() |
<cuchar> |
Defines a number of Unicode-related macros, and functions like mbrtoc16(). |
<cwchar> |
Versions of string, memory, and I/O functions for wide characters |
<cwctype> |
Versions of functions in <cctype> for wide characters: iswspace(), towlower(), and so on. |
The definitions for the Standard Library containers can be found in 12 header files.
| HEADER FILENAME | CONTENTS |
<array> |
The array class template |
<bitset> |
The bitset class template |
<deque> |
The deque class template |
<forward_list> |
The forward_list class template |
<list> |
The list class template |
<map> |
The map and multimap class templates |
<queue> |
The queue and priority_queue class templates |
<set> |
The set and multiset class templates |
<stack> |
The stack class template |
<unordered_map> |
The unordered_map and unordered_multimap class templates |
<unordered_set> |
The unordered_set and unordered_multiset class templates |
<vector> |
The vector class template and the vector<bool> specialization |
Each of these header files contains all the definitions you need to use the specified container, including iterators. Chapter 17 describes these containers in detail.
The following header files define the available Standard Library algorithms, iterators, and allocators.
| HEADER FILENAME | CONTENTS |
<algorithm> |
Prototypes for most of the algorithms in the Standard Library. See Chapter 18. |
<execution> |
Defines the execution policy types for use with the Standard Library algorithms. See Chapter 18. |
<functional> |
Defines the built-in function objects, negators, binders, and adaptors. See Chapter 18. |
<iterator> |
Definitions of iterator_traits, iterator tags, iterator, reverse_iterator, insert iterators (such as back_insert_iterator), and stream iterators. See Chapter 21. |
<memory> |
Defines the default allocator, functions for dealing with uninitialized memory inside containers, unique_ptr, shared_ptr, make_unique(), and make_shared(), introduced in Chapter 1. |
<memory_resource> |
Defines polymorphic allocators and memory resources. See Chapter 21. |
<numeric> |
Prototypes for some numerical algorithms: accumulate(), inner_product(), partial_sum(), adjacent_difference(), and a few others. See Chapter 18. |
<scoped_allocator> |
An allocator that can be used with nested containers such as a vector of strings, or a vector of maps. |
The Standard Library contains some general-purpose utilities in several different header files.
| HEADER FILENAME | CONTENTS |
<any> |
Defines the any class. See Chapter 20. |
<charconv> |
Defines the chars_format enumeration class, the from_chars() and to_chars() functions, and related structs. |
<chrono> |
Defines the chrono library. See Chapter 20. |
<codecvt> |
Provides code conversion facets for various character encodings. This header is deprecated since C++17. |
<filesystem> |
Defines all available classes and functions to work with the filesystem. See Chapter 20. |
<initializer_list> |
Defines the initializer_list class. See Chapter 1. |
<limits> |
Defines the numeric_limits class template, and specializations for most built-in types. See Chapter 16. |
<locale> |
Defines the locale class, the use_facet() and has_facet() function templates, and the various facet families. See Chapter 19. |
<new> |
Defines the bad_alloc exception and set_new_handler() function. This header also defines the prototypes for all six forms of operator new and operator delete. See Chapter 15. |
<optional> |
Defines the optional class. See Chapter 20. |
<random> |
Defines the random number generation library. See Chapter 20. |
<ratio> |
Defines the Ratio library to work with compile-time rational numbers. See Chapter 20. |
<regex> |
Defines the regular expressions library. See Chapter 19. |
<string> |
Defines the basic_string class template and the type aliases string and wstring. See Chapter 2. |
<string_view> |
Defines the basic_string_view class template and the type aliases string_view and wstring_view. See Chapter 2. |
<system_error> |
Defines error categories and error codes. |
<tuple> |
Defines the tuple class template as a generalization of the pair class template. See Chapter 20. |
<type_traits> |
Defines type traits for use with template metaprogramming. See Chapter 22. |
<typeindex> |
Defines a simple wrapper for type_info, which can be used as an index type in associative containers and in unordered associative containers. |
<typeinfo> |
Defines the bad_cast and bad_typeid exceptions. Defines the type_info class, objects of which are returned by the typeid operator. See Chapter 10 for details on typeid. |
<utility> |
Defines the pair class template and make_pair() (see Chapter 17). This header also defines utility functions such as swap(), exchange(), move(), and more. |
<variant> |
Defines the variant class. See Chapter 20. |
C++ provides some facilities for numeric processing. These capabilities are not described in detail in this book; for details, consult one of the Standard Library references listed in the Annotated Bibliography in Appendix B.
| HEADER FILENAME | CONTENTS |
<complex> |
Defines the complex class template for working with complex numbers. |
<valarray> |
Defines valarray and related classes and class templates for working with mathematical vectors and matrices. |
Exceptions and exception support are covered in Chapter 14. Two header files provide most of the requisite definitions, but some exceptions for other domains are defined in the header file for that domain.
| HEADER FILENAME | CONTENTS |
<exception> |
Defines the exception and bad_exception classes, and the set_unexpected(), set_terminate(), and uncaught_exception() functions. |
<stdexcept> |
Non-domain-specific exceptions not defined in <exception>. |
The following table lists all the header files related to I/O streams in C++. However, normally your applications only need to include <fstream>, <iomanip>, <iostream>, <istream>, <ostream>, and <sstream>. Consult Chapter 13 for details.
| HEADER FILENAME | CONTENTS |
<fstream> |
Defines the basic_filebuf, basic_ifstream, basic_ofstream, and basic_fstream classes. This header declares the filebuf, wfilebuf, ifstream, wifstream, ofstream, wofstream, fstream, and wfstream type aliases. |
<iomanip> |
Declares the I/O manipulators not declared elsewhere (mostly in <ios>). |
<ios> |
Defines the ios_base and basic_ios classes. This header declares most of the stream manipulators. You rarely have to include this header directly. |
<iosfwd> |
Forward declarations of the templates and type aliases found in the other I/O stream header files. You rarely need to include this header directly. |
<iostream> |
Declares cin, cout, cerr, clog, and the wide-character counterparts. Note that it’s not just a combination of <istream> and <ostream>. |
<istream> |
Defines the basic_istream and basic_iostream classes. This header declares the istream, wistream, iostream, and wiostream type aliases. |
<ostream> |
Defines the basic_ostream class. This header declares the ostream and wostream type aliases. |
<sstream> |
Defines the basic_stringbuf, basic_istringstream, basic_ostringstream, and basic_stringstream classes. This header declares the stringbuf, wstringbuf, istringstream, wistringstream, ostringstream, wostringstream, stringstream, and wstringstream type aliases. |
<streambuf> |
Defines the basic_streambuf class. This header declares the type aliases streambuf and wstreambuf. You rarely have to include this header directly. |
<strstream> |
Deprecated. |
C++ includes a threading support library, which allows you to write platform-independent multithreaded applications. See Chapter 23 for details. The threading support library consists of the following header files.
| HEADER FILENAME | CONTENTS |
<atomic> |
Defines the atomic types, atomic<T>, and atomic operations. |
<condition_variable> |
Defines the condition_variable and condition_variable_any classes. |
<future> |
Defines future, promise, packaged_task, and async(). |
<mutex> |
Defines call_once() and the different non-shared mutex and lock classes. |
<shared_mutex> |
Defines the shared_mutex, shared_timed_mutex, and shared_lock classes. |
<thread> |
Defines the thread class. |
Unified Modeling Language, or UML, is the industry standard for diagrams visualizing class hierarchies, subsystem interactions, sequence diagrams, and so on. This book uses UML for its class diagrams. Explaining the entire UML standard warrants a book in itself, so this appendix is just a brief introduction to only those aspects of UML that are used throughout this book, which are class diagrams. There are different versions of the UML standard. This book uses UML 2.
UML defines the following collection of types of diagrams:
Because this book only uses class diagrams, that is the only type of diagram that is discussed further in this appendix.
Class diagrams are used to visualize individual classes and the relationships between different classes, both are discussed in the next sections.
A class is represented in UML as a box with a maximum of three compartments, containing the following:
Figure D-1 shows an example.
MyClass has two data members—one of type string, the other of type float—and it has two methods. The plus and minus signs in front of each member specify its visibility. The following table lists the most commonly used visibilities.
| VISIBILITY | MEANING |
+ |
public member |
- |
private member |
# |
protected member |
Depending on the goal of your class diagram, sometimes details of members are left out, in which case a class is represented with a box, as shown in Figure D-2. This can, for example, be used if you are only interested in visualizing the relationships between different classes without details of members of individual classes.
UML 2 supports six different kinds of relationships between classes. I discuss these relationships in the following sections.
Inheritance is visualized using a line starting from the derived class and going to the base class. The line ends in a hollow triangle on the side of the base class, depicting the is-a relationship. Figure D-3 shows an example.
A class implementing a certain interface is basically inheriting from that interface (is-a relationship). However, to make a distinction between generic inheritance and interface realization, the latter is visualized similar to inheritance but using a dashed line instead of a solid line, as shown in Figure D-4. The ListBox class is derived from UIElement, and implements/realizes the Clickable and Scrollable interfaces.
Aggregation represents a has-a relationship. It is shown with a line with a hollow diamond shape on the side of the class that contains the instance or instances of the other class. In an aggregation relationship, you can also optionally specify the multiplicity of each participant in the relationship. The location of the multiplicity, that is, on which side of the line you need to write it, can be confusing at first (see Figure D-5). In this example, a Class can contain/aggregate one or more Students, and each Student can follow zero or more Classes. An aggregation relationship means that the aggregated object or objects can continue to live when the aggregator is destroyed. For example, if a Class is destroyed, its Students are not destroyed. Figure D-5
The following table lists a few examples of possible multiplicities.
| MULTIPLICITY | MEANING |
N |
Exactly N instances |
0..1 |
Zero or one instance |
0..* |
Zero or more instances |
N..* |
N or more instances |
Composition is very similar to aggregation, and is visually represented almost the same, except that a full diamond is used instead of a hollow diamond. With composition, in contrast to aggregation, if the class that contains instances of the other class is destroyed, those contained instances are destroyed as well. Figure D-6 shows an example. A Window can contain zero or more Buttons, and each Button has to be contained by exactly one Window. If the Window is destroyed, all Buttons it contains are destroyed as well.
A dependency visualizes that a class depends on another class. It is depicted as a dashed line with an arrow pointing toward the dependent class. Usually, some text on the dashed line describes the dependency. To come back to the car factory example of Chapter 29, a CarFactory is dependent on a Car because the factory creates the cars. This is visualized in Figure D-7.
An association is a generalization of an aggregation. It represents a binary link between classes, while an aggregation is a unidirectional link. A binary link can be traversed in both directions. Figure D-8 shows an example. Every Book knows who its authors are, and every Author knows which books she wrote.
Professional C++, Fourth Edition
Published by
John Wiley & Sons, Inc.
10475 Crosspoint Boulevard
Indianapolis, IN 46256www.wiley.com
Copyright © 2018 by John Wiley & Sons, Inc., Indianapolis, Indiana
Published simultaneously in Canada
ISBN: 978-1-119-42130-6
ISBN: 978-1-119-42126-9 (ebk)
ISBN: 978-1-119-42122-1 (ebk)
No part of this publication may be reproduced, stored in a retrieval system or transmitted in any form or by any means, electronic, mechanical, photocopying, recording, scanning or otherwise, except as permitted under Sections 107 or 108 of the 1976 United States Copyright Act, without either the prior written permission of the Publisher, or authorization through payment of the appropriate per-copy fee to the Copyright Clearance Center, 222 Rosewood Drive, Danvers, MA 01923, (978) 750-8400, fax (978) 646-8600. Requests to the Publisher for permission should be addressed to the Permissions Department, John Wiley & Sons, Inc., 111 River Street, Hoboken, NJ 07030, (201) 748-6011, fax (201) 748-6008, or online at http://www.wiley.com/go/permissions.
Limit of Liability/Disclaimer of Warranty: The publisher and the author make no representations or warranties with respect to the accuracy or completeness of the contents of this work and specifically disclaim all warranties, including without limitation warranties of fitness for a particular purpose. No warranty may be created or extended by sales or promotional materials. The advice and strategies contained herein may not be suitable for every situation. This work is sold with the understanding that the publisher is not engaged in rendering legal, accounting, or other professional services. If professional assistance is required, the services of a competent professional person should be sought. Neither the publisher nor the author shall be liable for damages arising herefrom. The fact that an organization or Web site is referred to in this work as a citation and/or a potential source of further information does not mean that the author or the publisher endorses the information the organization or Web site may provide or recommendations it may make. Further, readers should be aware that Internet Web sites listed in this work may have changed or disappeared between when this work was written and when it is read.
For general information on our other products and services please contact our Customer Care Department within the United States at (877) 762-2974, outside the United States at (317) 572-3993 or fax (317) 572-4002.
Wiley publishes in a variety of print and electronic formats and by print-on-demand. Some material included with standard print versions of this book may not be included in e-books or in print-on-demand. If this book refers to media such as a CD or DVD that is not included in the version you purchased, you may download this material at http://booksupport.wiley.com. For more information about Wiley products, visit www.wiley.com.
Library of Congress Control Number: 2017963243
Trademarks: Wiley, the Wiley logo, Wrox, the Wrox logo, Programmer to Programmer, and related trade dress are trademarks or registered trademarks of John Wiley & Sons, Inc. and/or its affiliates, in the United States and other countries, and may not be used without written permission. All other trademarks are the property of their respective owners. John Wiley & Sons, Inc., is not associated with any product or vendor mentioned in this book.
Dedicated to my parents and my brother, who are always there for me. Their support and patience helped me in finishing this book.
MARC GREGOIRE is a software architect from Belgium. He graduated from the University of Leuven, Belgium, with a degree in “Burgerlijk ingenieur in de computer wetenschappen” (equivalent to master of science in engineering: computer science). The year after, he received an advanced master’s degree in artificial intelligence, cum laude, at the same university. After his studies, Marc started working for a software consultancy company called Ordina Belgium. As a consultant, he worked for Siemens and Nokia Siemens Networks on critical 2G and 3G software running on Solaris for telecom operators. This required working with international teams stretching from South America and the United States to Europe, the Middle East, Africa, and Asia. Now, Marc is a software architect at Nikon Metrology (www.nikonmetrology.com), a division of Nikon and a leading provider of precision optical instruments and metrology solutions for 3D geometric inspection.
His main expertise is in C/C++, and specifically Microsoft VC++ and the MFC framework. He has experience in developing C++ programs running 24/7 on Windows and Linux platforms: for example, KNX/EIB home automation software. In addition to C/C++, Marc also likes C# and uses PHP for creating web pages.
Since April 2007, he has received the annual Microsoft MVP (Most Valuable Professional) award for his Visual C++ expertise.
Marc is the founder of the Belgian C++ Users Group (www.becpp.org), co-author of C++ Standard Library Quick Reference (Apress), technical editor for numerous books for several publishers, and a member on the CodeGuru forum (as Marc G). He maintains a blog at www.nuonsoft.com/blog/, and is passionate about traveling and gastronomic restaurants.
PETER VAN WEERT is a Belgian software engineer, whose main interests and expertise are in C++, programming languages, algorithms, and data structures.
He received his master of science in computer science from the University of Leuven, Belgium, summa cum laude, with congratulations of the Board of Examiners. In 2010, the same university awarded him a PhD for his research on the efficient compilation of rule-based programming languages (mainly Java). During his doctoral studies, he was a teaching assistant for courses on object-oriented analysis and design, Java programming, and declarative programming languages.
After his studies, Peter worked for Nikon Metrology on large-scale, industrial-application software in the area of 3D laser scanning and point cloud inspection. In 2017, he joined the software R&D unit of Nobel Biocare, which specializes in digital dentistry software. Throughout his professional career, Peter has mastered C++ software development, as well as the management, refactoring, and debugging of very large code bases. He also gained further proficiency in all aspects of the software development process, including the analysis of functional and technical requirements, and Agile- and Scrum-based project and team management.
Peter is a regular speaker at, and board member of, the Belgian C++ Users Group. He also co-authored two books: C++ Standard Library Quick Reference and Beginning C++ (5th edition), both published by Apress.
I THANK THE JOHN WILEY & SONS AND WROX Press editorial and production teams for their support. Especially, thank you to Jim Minatel, executive editor at Wiley, for giving me a chance to write this new edition, Adaobi Obi Tulton, project editor, for managing this project, and Marylouise Wiack, copy editor, for improving readability and consistency and making sure the text is grammatically correct.
A very special thank you to my technical editor, Peter Van Weert, for his outstanding technical review. His many constructive comments and ideas have certainly made this book better.
Of course, the support and patience of my parents and my brother were very important in finishing this book. I would also like to express my sincere gratitude toward my employer, Nikon Metrology, for supporting me during this project.
Finally, I thank you, the reader, for trying this approach to professional C++ software development.
Go to www.wiley.com/go/eula to access Wiley’s ebook EULA.