Table of Contents for
Enterprise Android: Programming Android Database Applications for the Enterprise
 Enterprise Android: Programming Android Database Applications for the Enterprise
Published by
Wrox, 2013
Enterprise Android: Programming Android Database Applications for the Enterprise
Published by
Wrox, 2013
- Cover
- Contents
- Chapter 1: Developing for Android Tablets and Smartphones
- Chapter 2: The Relational Model and SQLite
- Chapter 3: Android Database Support
- Chapter 4: Content Providers
- Chapter 5: Rest, Content Providers, Concurrency, Networking, and Sync Adapters
- Chapter 6: Service Development
- Chapter 7: Mobile and the Cloud
- Chapter 8: Complex Device-Based Data: Android Contacts
- Chapter 9: Generic Data Synchronization: Project Migrate and the WebData API
- Chapter 10: WebData Applications
- Chapter 11: Building Human Interfaces for Data
- Chapter 12: Security
- Enterprise Android™
- Enterprise Android™
- Enterprise Android™
- Enterprise Android™
- Enterprise Android™
- Enterprise Android™
- Enterprise Android™
- Enterprise Android™
- Introduction
- Advertisement
- Enterprise Android™
Chapter 6
Service Development
WHAT’S IN THIS CHAPTER?
- Understanding the many choices in service development
- Learning the three-tier service architecture
- Understanding Spring and Hibernate: A conservative service stack
- Building a RESTful web service for contacts
- Building a synchronization service for contacts
- Learning best practices for service design
WROX.COM CODE DOWNLOADS FOR THIS CHAPTER
Please note that all the code examples in this chapter are available at https://github.com/wileyenterpriseandroid/Examples.git and as a part of the book’s code download at www.wrox.com on the Download Code tab.
This chapter provides a getting started tutorial that enables developers to write their first backend data service — making sure that the service integrates well with Android. The focus is on web service development that supports mobile applications with code running on a backend service host, not in an Android handset.
The discussion addresses mobile computing issues raised in earlier chapters. The following problems hold particular relevance when thinking about backend services for mobile clients:
- The network is not always available.
- Scalability requires efficiency in network use and power consumption.
- Mobile network connectivity is intermittent, slow, or altogether gone (when users drive into tunnels or otherwise off the grid).
The chapter example implements the RESTful contacts interface introduced in the previous chapter, and also explores the patterns from the previous chapter that will provide the focus for several subsequent chapters. This chapter will discuss implementations of the /Contacts REST methods and the /Contacts/sync POST method showing how a backend service should support these operations.
To elaborate, caching data on mobile devices has many advantages, such as reducing load on backend services, lowering the cost of user data bills, and allowing applications to keep working when the network becomes unavailable. Such benefits incur the cost of increased complexity in the form of synchronization logic that can handle data changes from concurrent hosts. If an app makes changes off the network, it needs to be able to sync with changes made in its absence on return. You can commonly find sophisticated synchronization behavior in enterprise applications like Gmail from Google. The next several chapters will explain how to integrate this type of support into services and applications that you develop. Along the way, you’ll pick up lucrative development skills for popular cloud providers.
A CHOICE FOR SERVICE DEVELOPMENT
Developers writing web applications and web services face an overwhelming array of architectural choices. Even selection of a software language or operating system doesn’t limit the options much. This chapter builds a simple three-tier RESTful service based on the Java-based software tools Spring, Hibernate, and Java Database Connectivity (JDBC). This is a commonly used technology stack, but there are many other valid alternatives.
This chapter makes getting started easier, and also provides background on more traditional software development tools. This software service stack provides a number of benefits, including wide deployment and a well understood feature set. The chapter notes the benefits of using this particular approach; the next chapter will cover more recent styles of persistence associated with modern cloud platforms.
The Lifecycle of a Request
Previous chapters discussed the widely popular web services protocol called REST from the perspective of client usage. This chapter focuses on implementing a RESTful interface by providing service for each RESTful URI. But what does that mean exactly? Software service implementations revolve around serving requests, like a GET for a contact. When a service receives a request, it’s possible that the service itself was not even running prior to receiving the invocation. Each request should run in isolation from other requests and should not make assumptions about the condition of memory (for example, it should not rely on memory in static fields) or about the machine on which they run. Distributed services usually run on a large number of different hosts inside a cloud provider. Well-written request implementations should seek to minimize the use of system resources such as memory, storage, and processing time. Figure 6-1 shows that a service request can run on many hosts in several different geographies. The code itself should not need to “know” about any other requests.
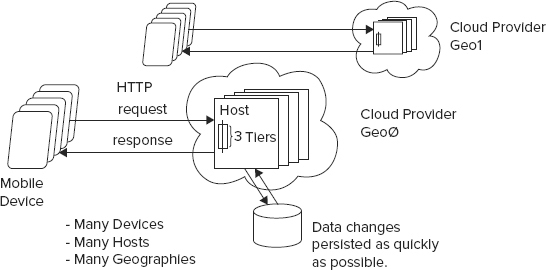
A well designed request should read arguments sent from the client, perform its function in isolation from other requests, store all its state in a persistence layer, return its result to the client, and finish by deleting any intermediate state from memory.
Application Containers
Now that you know what requests are, you’ll need to know where they live: Traditional service deployments have relied on a software service known as an application container. Application containers are web servers that support an application archive format that contains application logic and supporting libraries. When installed from an archive into a container, a web application will configure for a particular URL namespace. The container then forwards all HTTP requests to the URI space of the registered application, which entirely defines the behavior of the request.
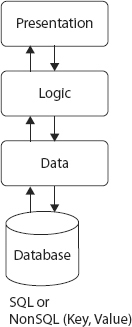
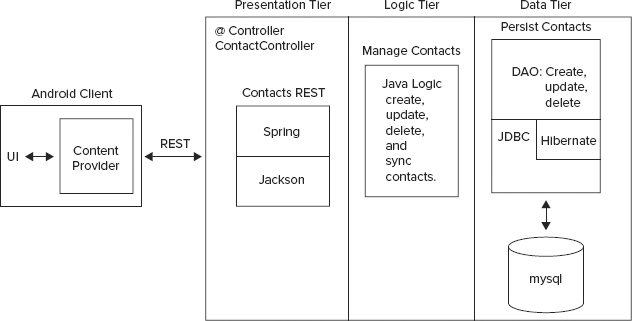
Three-Tier Service Architecture
The most common style of web application and service is the three-tier service architecture. This approach, illustrated in Figure 6-2, separates processing of request data parameters, called the presentation tier (or remote interface), from the logic of the application or service, the logic tier, and then again relies on a clearly defined data persistence layer known as the data tier. In large commercial systems, different layers can reside on different physical hardware. You can find extensive details on this type of service architecture here:
http://en.wikipedia.org/wiki/Three-tier_architecture#Three-tier_architecture
Figure 6-2 illustrates a basic three-tier service architecture.
Service Development Background
The array of choices for architecting a web service solution can be mind-boggling, especially for a software developer who has not settled on a useful set of tools. But to start thinking about how to narrow the choices, it’s important to be aware of the issues involved. These issues are covered in the following sections.
Language Choice (Type Safety vs. Convenient Syntax)
Choosing a server development environment begins with choosing a software language. Since backend applications do not mandate a language (the way Android requires Java and iOS requires Objective-C), language designers have taken every opportunity to explore this space with popular languages ranging from those on the type safe side, like Java, Dart, and Go, to those with more flexible language design like server JavaScript, Ruby, and Perl. Each popular language supports a plethora of software libraries, and it’s possible to build sophisticated applications in all of them. One of the main differentiating features between languages is type safety, and the lack of it. Proponents of type safety advocate the ability to find syntax errors at build time, rather than at run time.
It’s hard to overstate the potential benefits of finding errors at compile time instead of run time. Compiler found bugs shorten code ![]() test
test ![]() debug cycles. Also, you find your bugs instead of your customers running into them and disliking your product.
debug cycles. Also, you find your bugs instead of your customers running into them and disliking your product.
Application Container
Java alone supports several commercial and open source application containers, including JBoss, Apache Tomcat, WebLogic, and Glassfish, among others. The language Python supports Zope 1, 2, 3, BlueBream, and Grok. You can start to see that even when you pick a language, it’s still difficult to know what software to use to build a given application.
In Java, web applications and services almost exclusively require the support of an “application server,” which, as mentioned, is just a web server that can load and serve applications in the form of “web archives,” or .war files. Application servers support a programming interface called a “servlet container.” A servlet is a low-level Java service and application interface that uses an API tailored specifically to handling raw HTTP requests. Many open source libraries exist to add higher level implementation support on top of servlets, such as for JSON and REST support, or for older applications, SOAP. The file web.xml, part of a war file, provides the main point of configuration for these value-add libraries and enables developers to list the following components of their application — classpath, URL mapping, servlet dispatcher, and the files that are part of the application.
Prolific Software Libraries
Fortunately for application developers it’s possible to integrate a plethora of software libraries for all popular languages. The following list of functional areas provides a small taste of the richness and diversity of commercial and open source libraries available for popular languages: multiple web MVC frameworks per language, object relational mapping, JSON mapping, natural language processing, artificial intelligence, API libraries for communicating with Amazon web services, Google App Engine APIs, and so on. You can find library repositories by language in the following locations:
- Ruby — http://rubygems.org/gems
- Java — http://mvnrepository.com
- Python — http://pypi.python.org/pypi
Choice of MVC
The de facto standard tool for building web-based user interfaces is a web MVC framework. Examples of popular frameworks include Ruby on Rails, Play, Groovy and Grails, Spring MVC3, and JSF. These frameworks provide:
- View languages composed of different types of markup, including Java Server Pages (jsp), Groovy Server Pages (gsp), and Ruby Server Pages (rsp), which compile to HTML output for browser consumption
- Controller bindings that map web events, such as a user clicking on a button or link, to registered language level controller components, and that allow application logic to handle browser events
- A data model, a persistence layer such as the standard JPA, or Java Persistence API, that stores data in a SQL or key value datastore
Figure 6-3 illustrates the web MVC architecture.
Unless developers plan to run services on their own hardware, they will need to pick from a growing selection of cloud service providers that provide computing power for a usage fee. Here is a list of some significant cloud providers:
- Google App Engine
- Amazon Web Services
- Joyent
Databases
Like all other areas of service development just discussed, choices of software for application persistence seems to be growing exponentially. Today developers need to think beyond just SQL databases from different vendors, but also about newly popular schema-free databases built on JSON and plain key, value storage. Persistence tools in these categories include:
- SQL — MySQL, PostgreSQL, and Oracle
- Key, Value — Cassandra, DynamoDB, Voldemort, and Riak
- JSON — MongoDB
- Google App Engine — GQL
- Hadoop — HBase
You can find more detailed explanations of these tools in later chapters of this book. Chapter 7 introduces web services from Amazon — specifically examples based on DynamoDB.
BUILDING A RESTFUL SERVICE FOR CONTACTS
Now that you have completed a brief tour of the myriad different kinds of service development technologies, it should be clearer why this chapter uses a simple tried-and-true software stack to introduce you to the backend service development in the context of Android technology. Also, as an Android developer, you have some familiarity with Java.
A Conservative Software Stack
Let’s dig into the chapter examples: persistence and synchronization backend support for the contacts remote interface from Chapter 5. The example code is simple, but provides functional client-to-server solutions for Android. The contacts service uses a conservative but still relevant and productive environment based primarily on the Spring service framework and the Hibernate and JDBC persistence APIs. Although newer languages like Ruby and Scala have been gaining traction recently, a significant server-side contingent depends heavily on Java tools for existing and new projects — mainly for the reasons described earlier in this chapter: Java is a stable environment geared toward precluding the possibility of bugs, rather than finding them during runtime tests, or worse, in a production environment.
Let’s examine the technologies underlying the examples.
Spring
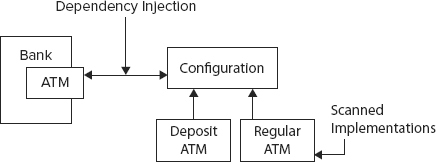
The power of Spring comes from dependency injection. Say you’re writing a Bank class for a finance program, and the class has a reference to an ATM cash machine object. Without dependency injection, you might write code that constructs a new ATM object and invokes it as needed. This is fine, but in the long run it is harder to maintain and test. In essence, you have hardcoded the dependency between the Bank class and the ATM class. With Spring, instead of constructing a new ATM object, you inject an implementation of the ATM interface into the Bank class through the constructor or through a public setter method. For testing, you could pass in a dummy ATM class that doesn’t make any real calls through the bank network. However, in your production servers, you have Spring inject an ATM interface, which does actual financial transactions. Through dependency injection, you can inject whichever dependency you want and the Bank code remains exactly the same. Not having to change the Bank class when you make changes in the ATM class makes the overall program easier to maintain and test in the long term.
Figure 6-4 shows an ATM implementation loaded into a Bank class using dependency injection.
Spring injection uses a configuration system to track implementation classes for a particular component that should be assigned to a field of an object. The service or application only knows about a Java interface that the component implements, and at run time, the configuration system “injects” the implementation component into the proper field values. The system finds out what implementation object to inject only by reading the Spring configuration.
You may be familiar with using a properties file to avoid hard-coding String values into your programs. This is useful for Strings, but becomes very cumbersome if you want to define complex objects. Spring allows you to specify an object’s data in an XML file (or through Spring Java annotations). Once you have defined your Objects, they can be referred to by a key/name, just like a property in a property file.
Applications do not use the new operator to instantiate its dependencies. Additionally, long chains of implementation inheritance constitute one of the more significant anti-patterns in object-oriented programming. Dependency injection encourages object composition over object inheritance to avoid this problem. See http://en.wikipedia.org/wiki/Composition_over_inheritance.
JDBC
This is the standard library for accessing a SQL database in Java. The major functions of JDBC include:
- SQL language support including select, insert, update, and delete
- Statement and prepared statement support
- Query statements return JDBC result sets
Hibernate
Hibernate, the most common Java Object Relational Mapping (ORM) layer, and JDBC, which provides a direct SQL language binding, represent the two most widely deployed Java persistence technologies. You’ll need to decide for yourself whether an ORM makes sense for your application. The chapter example supports both technologies using a simple abstraction layer. Both example persistence mappings make use of high-level utilities of the Spring project, thereby increasing the ease of programming with both approaches.
The Hibernate package provides an ORM on top of Java JDBC. Features of Hibernate include:
- Ability to transparently map Java POJO objects to and from database rows
- An object-oriented query language called HQL
Writing the Examples: Spring Contacts Service and its Synchronization Variant
The following code examples demonstrate basic service development with a specific example of a contacts service with a “three-tier” architecture — a standard way of writing web services. This contacts service supports the remote interface listed in Chapter 5. The example uses Spring for the presentation layer, Java for the logic tier, and a simple custom abstraction layer for the data layer. The data layer also uses Spring to inject the use of either direct JDBC or Hibernate.
The files for a CRUD oriented REST contact service reside in the examples project called $CODE/springServiceContacts. The chapter also describes a second variant of this service that adds synchronization support. You can find the variant of this service with synchronization support added in the project, $CODE/springSyncServiceContacts.
Prepare: Prerequisites and Getting Ready
Chapter 1 covered the use of Eclipse for Android; this chapter discusses how to use the IDE for service development. You’ll need to configure some tools first on the host that will run the service (localhost assumed). You can use any of the three major operating systems for PCs to develop the web backend: Linux, Mac OS, or Windows. The OS is not particularly relevant for backend services. The code is likely to work on a variety of software versions, but was specifically tested on Java (1.7.0_25), MySQL (5.7), Ant (1.9.1), EclipseEE (Kepler), and Tomcat (7.0.12).
Net/OpenSSH
Net/OpenSSL
Net/curl
Perl/Larry Wall's Wait Practical Extraction and Report LanguagePrepare
$CATALINA_HOME/bin/shutdown.sh
$CATALINA_HOME/bin/startup.shcd $CODE/springServiceContacts
ant distant builddbNow that you have set up the required tools, you can move to deploying the projects.
Deploying Using Ant
ant dist $CODE/springServiceContacts/dist/springServiceContacts.war $CATALINA_HOME/webappsLoading the Project in Eclipse
Perform all steps in the “Prepare” section.
cd $CODE\springservicecontacts
ant eclipse Apache Ivy Library
Apache IvyDE Eclipse pluginsExample Dependencies with Ivy
With Ivy, developers just need to specify top-level dependencies and their version, and then Ivy will download and install any dependency libraries. Listing 6-1 shows a list of Ivy dependencies for the contacts service, contained in the file:
$CODE/springServiceContacts/ivy.xmlLISTING 6-1: ivy.xml
<dependencies>
    <dependency org="org.hibernate" name="hibernate-entitymanager"
        rev="3.6.10.Final"/>
    <dependency org="org.hibernate" name="hibernate-tools" rev="3.2.4.GA"/>
    <dependency org="org.codehaus.jackson" name="jackson-core-asl" rev="1.9.5" />
    <dependency org="org.codehaus.jackson" name="jackson-mapper-lgpl" rev="1.9.5"/>
    <dependency org="org.springframework" name="spring-core" rev="3.1.1.RELEASE" />
    <dependency org="org.springframework" name="spring-webmvc"
        rev="3.1.1.RELEASE" />
    <dependency org="org.springframework" name="spring-oxm" rev="3.1.1.RELEASE"/>
    <dependency org="org.springframework" name="spring-orm" rev="3.1.1.RELEASE"/>
    <dependency org="org.springframework" name="spring-aop" rev="3.1.1.RELEASE"/>
    <dependency org="org.aspectj" name="aspectjweaver" rev="1.6.12"/>
    <dependency org="cglib" name="cglib-full" rev="2.0.2"/>
    <dependency org="log4j" name="log4j" rev="1.2.16"/>
    <dependency org="commons-dbcp" name="commons-dbcp" rev="1.4"/>
    <dependency org="junit" name="junit" rev="4.10"/>
    <dependency org="org.springframework" name="spring-test" rev="3.1.1.RELEASE"/>
    <dependency org="mysql" name="mysql-connector-java" rev="5.1.18"/>
    <dependency org="commons-httpclient" name="commons-httpclient" rev="3.1"/>
</dependencies>
Tools and Software Stack
It’s worth spending a minute to discuss Listing 6-1 to talk about other software that has not yet been highlighted, but is involved in the chapter example and in future chapters. As mentioned, these examples rely heavily on Spring and Hibernate, versions 3.1.1 and 3.6.10.Final, respectively. The following libraries are also included:
- Jackson — Supports JSON Java object serialization and JSON Schema, which is needed for serializing and deserializing service parameters and return values:
- Spring WebMVC — The Spring answer to MVC web architecture; enables the use of Spring controllers:
- MySQL — The open source and most popular SQL database on the Internet. Provides underlying persistence support for Hibernate:
- Commons httpclient — Apache Java libraries for HTTP communication; superior to core Java networking libraries for backend development.
Configuring Spring
When you create your own new application, you will need to take the following steps to configure Spring. Of course, the springServiceContacts code example has already completed these tasks.
As noted, with Java web applications, the common practice is to use servlets as hooks for layering value add frameworks. The code in web.xml for inserting Spring is shown as the main servlet dispatcher:
<servlet>
    <servlet-name>DispatcherServlet</servlet-name>
    <servlet-class>org.springframework.web.servlet.DispatcherServlet
         </servlet-class>
    <init-param>
        <param-name>contextConfigLocation</param-name>
        <param-value>classpath:spring/application*.xml</param-value>
    </init-param>
</servlet>
<servlet-mapping>
   <servlet-name>DispatcherServlet</servlet-name>
<url-pattern>/</url-pattern>
</servlet-mapping>
This code indicates to the Spring framework the location of the example Spring configuration files. The example has three configurations for rest, storage, and test. Let’s take a look inside the rest configuration file:
$CODE/springServiceContacts/src/spring/applicationContext-rest.xmlThe most significant part of the file is a command for scanning class files, the effect of which is to search all classes in the named base package annotated with Spring annotations, like @Controller. This search is an automatic component-registering process. You only need to annotate your controllers and Spring will integrate them for you:
<!-- Enable annotation scanning. -->
<context:component-scan base-package="com.enterpriseandroid.springServiceContacts" />
When the application container runs the Spring servlet, org.springframework.web.servlet.DispatcherServlet, Spring will load the components of the contact service. This servlet will forward all requests to scanned controllers.
The previous discussion defines the Spring dispatcher servlet in the web application. The contextConfigLocation defines the location for the Spring configuration files. In this case, you set it to the spring directory of the classpath. You also want the Spring dispatcher servlet to handle all the client requests that are sent to the / path of your service servlet, so you need to add the servlet mapping to the following:
<!-- mapping all request to "/" to the Dispatcher Servlet -->
 <servlet-mapping>
   <servlet-name>DispatcherServlet</servlet-name>
   <url-pattern>/</url-pattern>
 </servlet-mapping>
Example Code
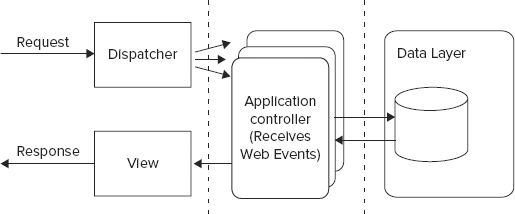
At this point it’s time to jump into the example code itself. We start with the overall architecture diagram of the contact service, showing the significant dependent libraries and layers of this simple three-tier architecture. (Figure 6-5 shows the three-tier architecture and its component dependencies.) The rest of the chapter explains the service and its code in detail.
Contacts Data Model
We start by looking at what the service does — often called the service domain. The example service provides persistent access to contact information. The code uses the following data model class, Contact, shown in Listing 6-2, to manipulate contacts in memory, transmit them to the network, and store them in MySQL. This class is central to the role of the contact service and is known as a model object.
LISTING 6-2: The contacts data model
public class Contact implements Serializable {
    private static final long serialVersionUID = 5322847412825669350L;
    private Long id;
    private String firstName;
    private String lastName;
    private String phone;
    private String email;
    private Long version;
    private long updateTime;
}
At this point, you should pause a moment to consider the similarity of this class to the schema defined model from Chapter 5. The listing here is the backend service equivalent of it.
Example Spring Controller
Next, we look at the events that drive the operation of contacts service requests — the heart of our three tier web service. Spring controllers receive the action of web UI remote requests as controller actions. When a Spring-based service receives a remote request, it delegates the request service to a scanned Spring controller, specifically to the class ContactsController, which will implement the backend service version of the RESTful contacts API from Chapter 5, listed for review as follows:
GET /Contacts/{id}GET /ContactsPOST /Contacts
PUT /Contacts/{id}DELETE /Contacts/{id}Contact Service Controller
Now you’ll see how to use the Spring framework to implement these requests. You start by defining the class, ContactController, in Listing 6-3.
LISTING 6-3: Annotations for a controller
@Controller
@RequestMapping("/Contacts")
public class ContactController {
ContactController gets marked as a Spring controller, which means that it can receive the action of the contact service REST methods (as mentioned, this means Spring will find it during the configuration scan).
The code requests a mapping for the namespace, "/Contacts". This will cause the application container and the Spring framework to direct contact requests that start with "/Contacts" to the implementation methods in the ContactController class. The following section explains these implementation methods as well as the RequestMapping annotation.
Presentation Tier: Spring Annotations
Now that you have a controller to contain it, it’s time to define the presentation layer for the contacts service. Recall that the presentation layer for a RESTful service encapsulates the processing of service parameters. The annotations provided next do this for the contact operations. We’ll start with the first RESTful operation listed previously. Listing 6-4 shows the Spring-based presentation layer implementation for a contact GET operation.
LISTING 6-4: Annotations for getting a contact
@RequestMapping(value = "/{id}", method = RequestMethod.GET)
@ResponseBody public Contact getContact(@PathVariable Long id,
    HttpServletResponse resp)
This segment of the presentation layer consists of the associated annotations, RequestMapping and ResponseBody. The RequestMapping annotation causes the contact service to use the getContact method to respond to any HTTP GET request for a specific given id, as indicated by the value and method annotation parameters. The ResponseBody annotation indicates that the method return value will be returned directly as an HTTP response. Spring passes the contact id to the method as a PathVariable, which is an elegant way of referring to variables embedded in RESTful URLS, such as:
where the 1 is the URL embedded id of the desired contact, or path parameter. You can use PathParam to refer to any variable embedded in a URL path.
The logic in the method itself and the persistence abstraction used in the method form the other two layers in the three-tier architecture — which you’ll read about shortly.
Next, you can find the Spring mappings for the remaining service operations. They work in roughly the same way as the one you just saw. Listing 6-5 shows the Spring-based presentation layer implementation for getting all contacts.
LISTING 6-5: Annotations for getting all contacts
@RequestMapping(value = "", method = RequestMethod.GET)
@ResponseBody public List<Contact> getAllContacts(@RequestParam(value="start",
    required=false)
The getAllContacts method uses a blank value to indicate that all contacts should be returned for a GET request on the "/Contacts" URL.
Listing 6-6 shows the implementation for creating a contact.
LISTING 6-6: Annotations for creating a contact
@RequestMapping(value = "", method = RequestMethod.POST)
@ResponseBody public Map<String, String> createObject(
@RequestBody Contact contact, HttpServletRequest req)
The value is blank here since the namespace is "/Contacts". The createObject creates the object and the contact ID does not yet exist. The @RequestBody annotation indicates that the POST payload should be deserialized to a Contact Java object. The Spring annotation framework delegates the deserialization process to a registered Jackson deserialization handler — more about that in a minute.
Listing 6-7 shows the implementation for updating a contact.
LISTING 6-7: Annotations for updating a contact
@RequestMapping(value = "", method = RequestMethod.PUT)
@ResponseBody public Map<String, String> updateObject(@PathVariable Long id,
@RequestBody Contact contact, HttpServletRequest req)
Again, the namespace is "/Contacts", although an id is passed to this method in the form of a PathVariable, where the code passes the id to the utility method createOrUpdate, which will update the indicated and already existing contact. The contact must exist, because it has an id. The request body contact is again deserialized from the request input, and becomes the information to update.
Finally, Listing 6-8 shows the implementation for deleting a contact.
LISTING 6-8: Annotations for deleting a contact
@RequestMapping(value = "/{id}", method = RequestMethod.DELETE)
@ResponseBody public String delete(@PathVariable Long id) throws IOException {
The ID value here refers to a pre-existing contact ID just like the getContact method. The URL for deletion is "/Contacts/{id}".
Data Marshaling
To wrap up the presentation layer, take a look at how input parameters and response values get marshaled back and forth between the client and server over the network: Jackson, a JSON serialization library, provides the answer. The following lines in the Spring configuration file (Listing 6-9) set up the use of a Jackson class as the system that maps Java objects into a wire transfer format.
LISTING 6-9: Spring configuration for setting the marshalling converter
<bean id="marshallingHttpMessageConverter"
   class="org.springframework.http.converter.json.MappingJacksonHttpMessageConverter">
</bean>
Next, Listing 6-10 shows an example of using Jackson to convert objects to JSON.
LISTING 6-10: A method that depends on Jackson for data marshalling
@RequestMapping(value = "/{id}", method = RequestMethod.GET)
@ResponseBody public Contact getContact(@PathVariable Long id,
    HttpServletResponse resp)
        throws IOException
{
    Contact c = service.getContact(id);
    if (c == null) {
       resp.setStatus(HttpStatus.NOT_FOUND.value());
    }
    return c;
}
You can see that all the code has to do to get objects on and off the wire is use them as parameters and as standard return values — no manual coding required.
Logic Tier: Java Code
As mentioned, the logic tier of a three-tier service is where service domain operations take place. They usually consist of manually written code in the service language of choice. Example operations for the logic tier of a contact service could involve finding the geographic distance between the handsets of two contacts, comparing the “Facebook likes” of one set of contacts against another set, or obtaining a list of bookmarks for a contact.
The logic tier of the chapter example contacts service is not particularly demonstrative of what you might expect to see in a “real-world” service because it’s part of the design of the example service to be simple.
This section focuses on a Java method, getAllContacts, from the logic tier of the chapter example contacts service interacting with the values from the Spring “presentation layer.”
Getting All Contacts
The getAllContacts method shown in Listing 6-11 does not have much of a logic layer, but it should serve to show that more complex domain operations could take place in a Spring controller method.
LISTING 6-11: Method for getting all contacts
 @RequestMapping(value = "", method = RequestMethod.GET)
 @ResponseBody public List<Contact> getAllContacts(
     @RequestParam(value="start", required=false) String startStr,
     @RequestParam(value="num", required=false) String numStr)
         throws IOException
 {
     int start = 0;
     int num = 100;

    if (startStr != null) {
        start = Integer.parseInt(startStr);
    }

    if (numStr != null) {
        num = Integer.parseInt(numStr);
    }

    return service.getAll(start, num);
}
Take note of the following in the preceding code:
- An empty mapping value to "/Contacts" means get all contacts.
- The code includes the parameter bounds of the resulting contacts window.
- The code queries the contacts persistence service to return the requested window of contacts.
Data Tier: Persistence Layer
As illustrated in Figure 6-6, the contacts service persistence service layer has two layers of its own for service abstraction and data access.
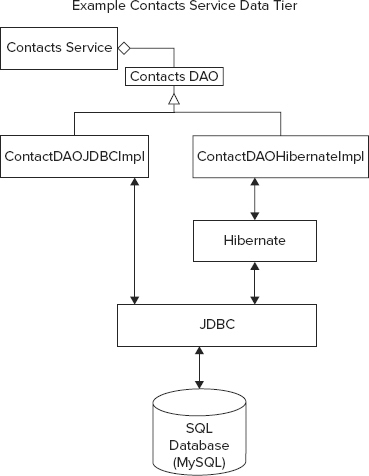
The Service Interface
The service interface provides a layer of abstraction that can hide information about the initialization of the data access layer from the logic layer and other parts of the persistence layer. The service interface shown in Listing 6-12 provides operations for storing and finding contacts. The operations support the contact controller, as discussed previously.
LISTING 6-12: The contacts data service interface
import java.io.IOException;
import java.util.List;

import com.wiley.demo.android.dataModel.Contact;

public interface ContactService {
     Long storeOrUpdateContact(Contact c) throws IOException;

     List<Contact> findContactByFirstName(String firstName,
     int start, int numOfmatches) throws IOException;
     List<Contact> getAll( int start, int numOfmatches) throws IOException;
     Contact getContact(long id) throws IOException ;
     void deleteContact(long id) throws IOException;
 }
The DAO Interface
The contacts example service provides support to its data service interface using a well-established metaphor — that of the data access object, or DAO. A DAO maps object persistence operations to a persistence layer. The example contacts DAO provides methods for finding, deleting, and saving contacts. Later you’ll see the implementations for mapping this DAO interface to JDBC and Hibernate. The DAO interface is shown in Listing 6-13.
LISTING 6-13: The contacts DAO interface
import java.io.IOException;
import java.util.List;
import com.wiley.demo.android.dataModel.Contact;

public interface ContactDao {
     Contact getContact(Long id) throws IOException;
     Long storeOrUpdateContact(Contact contact) throws IOException;
     List<Contact> findContactFirstName(String firstName, int start,
         int numOfmatches);
     List<Contact> findChanged(long timestamp, int start, int numOfmatches);
     void delete(Long id) throws IOException ;
     List<Contact> getAll(int start, int numOfmatches) throws IOException;
}
This interface supports methods to create a new contact or update an existing one; the other methods do what their self-documenting names describe.
Also, take note of the following in Listing 6-13:
- The methods getContact and delete both take an identifier that refers to a unique contact object. When supported with a SQL implementation, this identifier will most likely be a SQL primary key.
- Several of the DAO operations support the ability to select a window from possible database results, allowing a client to access sections of queries with a large number of results into small chunks or pages that do not overwhelm client resources.
Implementing the DAO Interface
In keeping with the example, the ContactDao interface is quite simple, and provides only the operations needed to support the contacts REST interface. This chapter provides two implementations of it for these reasons:
- To give you an idea of what it’s like to work with two commonly used Java technologies
- To help demonstrate why some groups of developers advocate using an ORM and why others feel that this class of technology can introduce hard-to-debug problems that do not arise with direct use of JDBC
- To demonstrate the flexibility of the three-tier service architecture and how it can support different storage solutions, like those found in different cloud vendors
Using Hibernate
After browsing the Hibernate code shown in Listing 6-14, one of the first takeaways you may notice is that it is short. Each method consists only of accessing a Spring Hibernate template — an API object that contains a slew of methods for accessing and modifying data — and then calling the right template operation to achieve the appropriate effect of a given DAO method. Proponents of Hibernate argue that this brevity is one of the main advantages of using the ORM. You just need to work with objects, and the Hibernate mapping will take care of all the details of getting your data into the underlying database. See the following link for more information on Hibernate mapping:
http://docs.jboss.org/hibernate/orm/3.3/reference/en-US/html/mapping.html
LISTING 6-14: The Hibernate contacts DAO implementation
package com.wiley.demo.android.dao.impl;

import java.io.IOException;
import java.util.List;

import org.hibernate.Query;
import org.springframework.orm.hibernate3.HibernateTemplate;
import org.springframework.orm.hibernate3.support.HibernateDaoSupport;

import com.wiley.demo.android.dao.ContactDao;
import com.wiley.demo.android.dataModel.Contact;

  public class ContactDaoHibernateImpl extends HibernateDaoSupport implements
      ContactDao {
    @Override
    public Contact getContact(Long id) throws IOException {
         return getHibernateTemplate().get(Contact.class, id);
    }

     @Override
     public Long storeOrUpdateContact(Contact contact) throws IOException {
         contact.setUpdateTime(System.currentTimeMillis());
         getHibernateTemplate().saveOrUpdate(contact);
         return contact.getId();
     }

    @SuppressWarnings("unchecked")
    @Override
    public List<Contact> findContactFirstName(String firstName, int start, int
        numOfmatches) {
    String hql="from Contact where firstName = ?";
    return (List<Contact>) getHibernateTemplate().find(hql,
        new Object[] {firstName});
    }

    @Override
    public List<Contact> findChanged(long timestamp, int start, int numOfmatches) {
        String hql="from Contact where updateTime > " + timestamp ;
        Query q = getSession().createQuery(hql);
        q.setFirstResult(start);
        q.setMaxResults(numOfmatches);

        @SuppressWarnings("unchecked")
        List<Contact> list =  q.list();
        return list;
    }

    @Override
    public void delete(Long id) throws IOException {
        getHibernateTemplate().delete(getContact(id));
    }

    @Override
    public List<Contact> getAll(int start, int numOfmatches)
        throws IOException
    {
        String hql = "from Contact";
        Query q = getSession().createQuery(hql);
        q.setFirstResult(start);
        q.setMaxResults(numOfmatches);
        @SuppressWarnings("unchecked")
        List<Contact> list =  q.list();
        return list;
    }
 }
Take note of the following:
- The single line getContact method gets a Hibernate template and then calls the get operation to access an object of type Contact.class. The method returns a Contact object.
- This code sets the update time for use in sync operations.
- The Hibernate template storeOrUpdate method stores the updated object. Note that the code also updates the contact with the service timestamp, enabling the application to know the last time a contact object changed.
- This code shows the use of a data language called HQL (Hibernate Query Language), which is a fully object-oriented version of SQL. In this case, the code just shows a simple query to select a contact by name. With the query in hand, the findContactFirstName method uses the Hibernate template to find contacts with the given parameter name firstName.
NOTE The Hibernate website has excellent resources on HQL:
http://docs.jboss.org/hibernate/orm/3.3/reference/en/html/queryhql.html - The findChanged method enables finding users changed after a given timestamp, thus taking advantage of the information left behind by storeOrUpdateContact.
- The query for the method to get all contacts, no arguments acts like a wild card.
Using JDBC
In Listing 6-15, you’ll find an implementation of the contact DAO interface based on JDBC. Your first reaction on reading this code might be that this version is quite a bit longer, coming in at well over twice the number of lines of code as the Hibernate equivalent. Of course, the main differences are that the JDBC code does not have the benefit of either the object-oriented nature of the Hibernate template class, nor the Hibernate object mapping. All contact insertions must consist of invocations on the contact POJO class, concatenated into strings to make SQL commands, much as is the case when using the raw SQL interface to SQLite on Android.
Although the code is not as terse as the Hibernate side, it allows you to quickly see exactly how it uses JDBC. The number of lines of code taken to write the Hibernate implementation, including the Hibernate libraries, would be significantly greater than the code shown here. Hibernate is a reliable ORM implementation, but it does have significant complexity in its session and object mapping support. Developers do need to understand Hibernate well enough to use it correctly.
Listing 6-15 does not use a Hibernate template, but instead relies on a Spring JDBC template. This template provides a large number of convenience methods for using JDBC directly without an ORM. The code uses SQL statements to pass DAO parameters to the underlying database connection. Two of the more interesting pieces of code include the use of a prepared statement to insert a contact object into a database row and a Spring row mapper that enables a binding from a row of a JDBC result set to a contact POJO.
LISTING 6-15: The JDBC contacts DAO implementation
1  package com.wiley.demo.android.dao.impl;
2
3  import java.io.IOException;
4  import java.sql.Connection;
5  import java.sql.PreparedStatement;
6  import java.sql.ResultSet;
7  import java.sql.SQLException;
8  import java.util.List;
9  import java.util.Map;
10
11  import javax.sql.DataSource;

12  import org.springframework.dao.EmptyResultDataAccessException;
13  import org.springframework.jdbc.core.JdbcTemplate;
14  import org.springframework.jdbc.core.PreparedStatementCreator;
15  import org.springframework.jdbc.core.RowMapper;
16  import org.springframework.jdbc.support.GeneratedKeyHolder;
17  import org.springframework.jdbc.support.KeyHolder;
18
19  import com.wiley.demo.android.dao.ContactDao;
20  import com.wiley.demo.android.dataModel.Contact;
21
22  public class ContactDaoJdbcImpl implements ContactDao {
23      private static final String FIND_FIRSTNAME_SQL =
24          "select * from contact where firstName = ?";
25      private static final String FIND_UPDATETIME_SQL =
26          "select * from contact where updateTime > ?";
27      private static final String GET_SQL =
28          "select * from contact where id = ?";
29      private static final String GET_ALL_SQL = "select * from contact ";
30      private static final String INSERT_SQL =
31          "Insert into contact( firstName, lastName, phone, email, updateTime,
              version)" +
32           VALUES(?,?,?,?,?,?);";
33      private static final String UPDATE_SQL = "update contact set firstname = ?, " +
34          lastname=?, phone=?, email=?, updateTime=?, version=? where id = ? and " +
35          "version=?";
36      private static final String DELETE_SQL = "delete from contact where id =?";
37
38      private DataSource dataSource;
39      private JdbcTemplate jdbcTemplate;
40
41      public void setDataSource(DataSource ds) {
42          dataSource = ds;
43          jdbcTemplate = new JdbcTemplate(dataSource);
44      }
45
46      @Override
47      public Long storeOrUpdateContact(Contact contact) throws IOException {
48          contact.setUpdateTime(System.currentTimeMillis());
49          if ( contact.getId() != null) {
50              update(contact);
51          } else {
52              create(contact);
53          }
54          return contact.getId();
55      }
56
57      @Override
58      public List<Contact> findContactFirstName(String firstName, int start,
59          int numOfmatches)
60      {
61          String query = FIND_FIRSTNAME_SQL + " limit " + new Long(start).toString()
              + " , " +
62              new Long(numOfmatches).toString();
63          return jdbcTemplate.query(query, getRowMapper(), new Object[] {firstName});
64      }
65
66      @Override
67      public List<Contact> getAll(int start, int numOfmatches) throws IOException {
68          String query = GET_ALL_SQL + " limit " + new Long(start).toString()
              + " , " +
69              new Long(numOfmatches).toString();
70          return jdbcTemplate.query(query, getRowMapper());
71      }
72
73     private void create(final Contact contact) {
74         if (contact.getVersion() != null) {
75             throw new IllegalArgumentException("version has to be 0 for create");
76         }
77
78         KeyHolder keyHolder = new GeneratedKeyHolder();
79         jdbcTemplate.update(new PreparedStatementCreator() {
80         public PreparedStatement createPreparedStatement(
81             Connection connection) throws SQLException
82         {
83             PreparedStatement ps = connection.prepareStatement(INSERT_SQL,
84                     new String[] { "id" });
85                 ps.setString(1, contact.getFirstName());
86                 ps.setString(2, contact.getLastName());
87                 ps.setString(3, contact.getPhone());
88                 ps.setString(4, contact.getEmail());
89                 ps.setLong(5, contact.getUpdateTime());
90                 ps.setLong(6, new Long(1));
91                 return ps;
92             }
93         }, keyHolder);
94         contact.setId(keyHolder.getKey().longValue());
95         contact.setVersion(new Long(1));
96     }
97
98     private void update(Contact contact)  throws IOException {
99          Long version = contact.getVersion();
100         contact.setVersion(version +1);
101         int rowupdated = jdbcTemplate.update(UPDATE_SQL, getUpdateSqlArgs(contact,
                version));
102
103         if (rowupdated != 1)  {
104             throw new IllegalArgumentException("Verson mismatch. row updated : " +
105                 rowupdated);
106         }
107     }
108
109     private Object[] getInsertSqlArgs(Contact contact) {
110         return new Object[] {
111         contact.getFirstName(), contact.getLastName(),
112         contact.getPhone(), contact.getEmail(), contact.getUpdateTime(),
                new Long(1L)};
113     }
114
115     private Object[] getUpdateSqlArgs(Contact contact, Long version) {
116         return new Object[] { contact.getFirstName(), contact.getLastName(),
117             contact.getPhone(), contact.getEmail(), contact.getUpdateTime(),
118             contact.getVersion(), contact.getId(), version };
119     }
120
121     @Override
122     public Contact getContact(Long id) {
123      try {
124          return jdbcTemplate.queryForObject(GET_SQL, getRowMapper(), id);
125      } catch( EmptyResultDataAccessException e) {
126          return null;
127      }
128  }
129
130  @Override
131  public void delete(Long id)  throws IOException {
132      jdbcTemplate.update(DELETE_SQL, new Object[] {id});
133  }
134
135  private RowMapper<Contact> getRowMapper() {
136      RowMapper<Contact> mapper = new RowMapper<Contact>() {
137          public Contact mapRow(ResultSet rs, int rowNum) throws SQLException {
138              Contact obj = new Contact();
139              obj.setId(rs.getLong("id"));
140              obj.setFirstName(rs.getString("firstName"));
141              obj.setLastName(rs.getString("lastName"));
142              obj.setPhone(rs.getString("phone"));
143              obj.setEmail((rs.getString("email")));
144              obj.setUpdateTime(rs.getLong("updateTime"));
145              obj.setVersion(rs.getLong("version"));
146              return obj;
147          }
148      };
149
150      return mapper;
151  }
152
153  @Override
154  public List<Contact> findChanged(long timestamp, int start, int numOfmatches) {
155      String query = FIND_UPDATETIME_SQL + " limit " + new Long(start).toString()
             + " , " +
156          new Long(numOfmatches).toString();
157      return jdbcTemplate.query(query, getRowMapper(), new Object[] {new
             Long(timestamp)});
158  }
159 }
Take note of the following lines in Listing 6-15:
- Lines 23-36 — Contain SQL convenience strings used later in the implementation of the DAO methods.
- Lines 38 and 39 — Represent the connection to the JDBC database and a Spring JDBC template, respectively. The DAO code uses the template to persist the contact state, and the template uses the database connection to write the information to the database.
- Line 47 — This time, the storeOrUpdateContact method uses two private implementation methods, update and create, on lines 50 and 52, respectively, depending on whether the contact object has an existing ID (also the primary key in the contacts database). On line 101, you can see the invocation of a template query method, passing in the SQL convenience string, UPDATE_SQL template.
- Lines 58-62 — Shows the implementation of findContactFirstName using FIND_FIRSTNAME_SQL and the JDBC Spring template. Allows one to query for contacts that have the first name as supplied by the firstName method parameter.
- Lines 78-93 — Use a prepared statement as mentioned earlier to insert a new contact row into the database. The prepared statement uses the INSERT_SQL string and the fields of a contact object as the parameters to the prepared statement.
- Lines 137-147 — Demonstrate the use of a Spring framework JDBC row mapper to map a JDBC result set row to a contact POJO object. The Spring row mapper nicely adds some object-oriented behavior to direct JDBC. With Spring, you can attain some significant benefits of Hibernate, but still work much closer to JDBC.
- Lines 154-156 — The findChanged implementation and the query it uses, FIND_UPDATETIME_SQL, enable finding contacts changed since a given timestamp.
- Lines 63, 70, 124, and 157 — All make use of the row mapper to convert result set rows into a Contact object that then is returned as a Java type from the relevant method.
To conclude the discussion of the springContactsService, you can switch DAO implementations by moving the x character between the following lines:
<!-- use jdbc dao -->
<bean id="contactServicex" class= ← - The x disables this DAO
  "com.enterpriseandroid.springServiceContacts.service.impl.ContactServiceImpl"
  p:contactDao-ref="contactDaoJdbc" />

<bean id="contactService" ← - Move x to here to switch impls
class="com.enterpriseandroid.springServiceContacts.service.impl.ContactServiceImpl"
p:contactDao-ref="contactDaoHibernate" />
in the file:
$CODE/springServiceContacts/src/spring/applicationContext-storage.xmland load it into Eclipse
Code Example: Spring Sync Contacts Service
The chapter began with a discussion of the benefits of synchronization in enterprise Android applications. Now that you have seen a CRUD-only version of the contacts RESTful service, the next example adds a simple but powerful synchronization system that works well with the sync adapter ![]() content provider pattern developed in the last chapter. This service resides in the project:
content provider pattern developed in the last chapter. This service resides in the project:
$CODE/springSyncServiceContactsAnd you can build it and load it into Eclipse with the same instructions you used in the previous example.
The following sections look at the relevant components of the contacts synchronization example.
Presentation Tier: Spring Controllers
The synchronization contact controller is identical to the CRUD version, except for two significant differences:
POST /Contacts/sync @RequestMapping(value = "/sync", method = RequestMethod.POST)
@ResponseBody
public SyncResult sync(@REQUESTBODY SyncRequest syncR) throws IOExceptionhttp://docs.oracle.com/javase/6/docs/api/java/util/UUID.html
The Spring controller definition that follows takes a UUID string, instead of a long ID as in the previous example:
    @RequestMapping(value = "/{id}", method = RequestMethod.GET)
    @ResponseBody
    public Contact getContact(@PathVariable String id,
        HttpServletResponse resp)
Clients for all services, except for springServiceContacts, will use RESTful URLs that look like the following:
http://localhost:8080/Contacts/ab619fb-4331-4826-b2e9-9516efd4d953
which seems more complex, but is actually used the same way as a URL like the following:
http://localhost:8080/Contacts/1
Logic Tier: Java Synchronization Logic
You can find the simplified contact synchronization example in Listing 6-16. In production, it would be necessary to improve its robustness, but the code should give you an idea of how backend service side synchronization with a mobile client can work, with a brief introduction as follows:
The synchronization example contact service contains an internal Spring contacts persistence service. Mobile clients have their own contact storage, likely in a SQLite table. When a sync operation kicks off after being initiated by the client or the service, the client will send its outstanding changes to the service, along with a timestamp, recorded on the service but stored in the client, of the last time the client synced with the service.
The service will first query for changes to its own persistent contacts made since the timestamp from the client. The service then merges with changes from the client. Finally, the service sends its own changes, from before any client merges, back to the client, where the client can ask users to resolve any conflicts between their own data and the data from the service. When the user finishes resolving the changes, the client should then perform another sync. This will ensure that conflict resolutions also make it back into service persistence. Figure 6-7 shows the example synchronization operation.
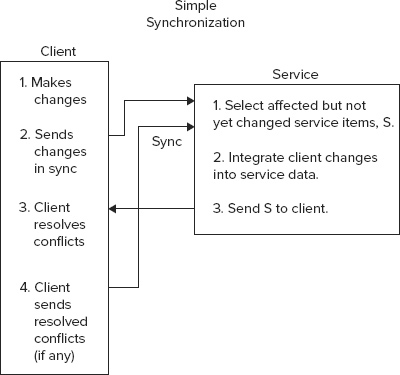
Listing 6-16 shows a simplified implementation of a synchronization routine for the synchronization controller.
LISTING 6-16: A method for synchronizing contacts
@RequestMapping(value = "sync", method = RequestMethod.POST)
@ResponseBody
public SynchResult sync(@RequestBody SynchRequest clientData),
    throws IOException, ParseException
{
    List<Contact> dataList = clientData.getContactList();
    Long now = clientData.getSyncTime();
    List<Contact> changedData = service.findChanged(syncTime, 0, 1000);
    SynchResult ret = new SynchResult(changedData, now);
    for (Contact c : dataList) {
        if (c.isDeleted()) {
            service.deleteContact( c.getId());
        } else {
            service.storeOrUpdateContact(c);
        }
    }
    return ret;
}
Take note of the following in the preceding code:
- The client passes in a SyncResult object, which contains a list modified contacts and a sync time.
- The code gets the current time. This time gets passed back to the client, and the client will pass it back during the next sync operation – the time allows the service to know its modifications since the last sync with a given client.
- If the client has deleted the object, it must be deleted on the server.
- The code updates the contact on the server.
- The server responds with the list of items it has changed since last sync.
Sync Client Implementation
You can find the corresponding client implementation of this synchronization protocol in the project syncAdapterContacts. This project implements the Sync Adapter+Content provider pattern discussed at length in Chapter 5. You’ve seen some details of how the synchronization algorithm works on the service side. It’s now time to take a look at the operation of the client at a high level:
String ts = mgr.getUserData(account, KEY_SYNC_MARKER); String xactId = UUID.randomUUID().toString();List<Map<String, Object>> localUpdates = syncUtil.getLocalUpdates(cr, xactId);String payload = gson.toJson(syncUtil.createSyncRequest(
localUpdates, account.name, auth, clientId, lastUpdate));String resp = sendRequest(HttpMethod.POST, uri, payload).getBody();Map<String, Object> syncResultMap = gson.fromJson(resp, SyncUtil.MAP_TYPE);t = syncUtil.processUpdates(cr, syncResultMap);processServerUpdates(cr, (List<Map<String, Object>>)
resolveConflicts(cr, (List<Map<String, Object>>) mgr.setUserData(account, KEY_SYNC_MARKER, String.valueOf(lastUpdate));Due to the detailed nature of the protocol implementation, it’s recommended that you look at the code in the following classes to gain a greater understanding of the sync protocol.
$CODE/syncAdaperContacts/src/com/enterpriseandroid/syncadaptercontacts
.svcsyncAdapterContacts/SyncUtil.java
$CODE/syncAdapterContacts/src/com/enterpriseandroid/syncadaptercontacts/svc
/RESTService.java
Running the Services
At this point, all the coding is done, and you are ready to run springServiceContacts, and its springSyncServiceContacts variant, with the following steps, which you’ll run independently for each service.
Using Eclipse
Watch the log file for errors, and keep in mind that it will take a few minutes for ivy to download dependencies the first time the service runs. To see that each service is running correctly, load the URL http://localhost:8080/springServiceContacts/Contacts in a browser. If you see an empty array symbol ( that is, “[ ]”) then it’s working.
Using Ant
$CODE/springServiceContacts
ant dist $CODE/springServiceContacts/dist/springServiceContacts.war $CATALINA_HOME/webappsInvoking Requests
Since you’ve just written a simple web service, it’s possible to drive its operation using only a web browser using the endpoint URL:
http://localhost:8080/springServiceContacts/Contacts
If the servers are running correctly, when you load this URL, the browser will simply show "[]" for an empty array - indicating an empty contacts database.
Another convenient way to drive the operation of the browser is to use a command like curl:
http://en.wikipedia.org/wiki/cURL
You can also install the Advanced Rest Client Chrome extension — a third convenient way to run REST requests.
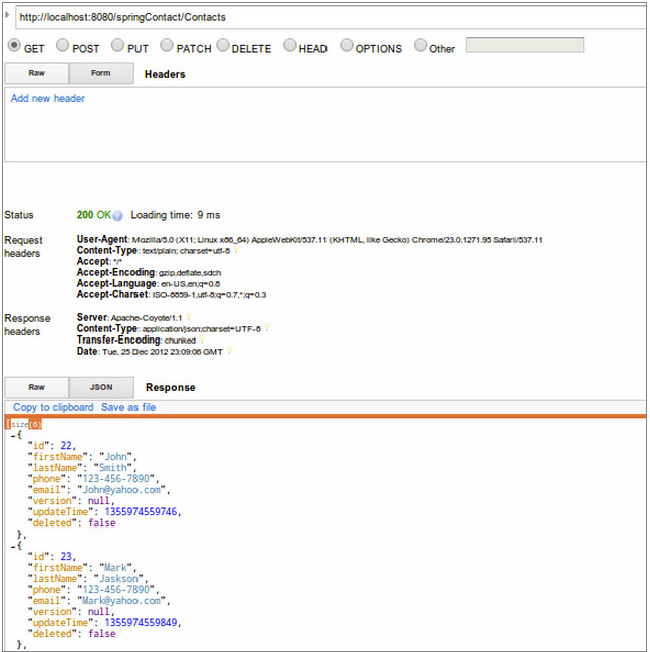
Figure 6-8 shows the output of a request to list contacts in a web-based REST invocation tool. This service contains two contacts, “John Smith”, and “Mark Jackson”.
You can install this particular tool in the Chrome browser from Google using:
Once you have installed the extension, you can run it using the following URL:
chrome-extension://hgmloofddffdnphfgcellkdfbfbjeloo/RestClient.html
Sample Requests
Here you can find a list of CURL operations you can type into your shell of choice to try out contact service operations.
Create an initial contact:
curl -H "Content-Type: application/json" -X POST -d '{"firstName":"John",
"lastName":"Smith", "phone":2345678901, "email":"jsmith@nosuchhost.com" }'
http://localhost:8080/springServiceContacts/Contacts
Get back the contact that you just sent:
curl –X GET http://localhost/Contacts/1The following command should return a 404 error code response:
curl –X GET http://localhost:8080/Contacts/2Since no contact exists for the ID 2.
It’s now possible to run the Chapter 5 Android clients as standard APKs in Eclipse using the configuration from Chapter 1 — you can edit contacts and see them modified in the backend services that you just learned to run.
To see the client and service operate, start restfulCachingProviderContacts, and then start springServiceContacts. Add a contact in the Android client. Enter the URL listed in the previous section; now instead of any empty array, you should see the contact you added. You can also run syncAdapterContacts with springSyncServiceContacts and use the browser to verify changes to contacts.
The project restfulCachingProviderContacts works with all services discussed in this book; the example syncAdapterContacts works with all services except springServiceContacts (because that service does not support synchronization). Set endpoint URLs as described in project README files after starting up the services.
You can try out a mix of interactions between the Chapter 5 clients and the previously listed curl commands. As before, refer to the README files contained in the repos for the most up-to-date versions of chapter instructions.
SUMMARY
This chapter provided an introduction to service development using Spring, Hibernate, and JDBC. Along the way, the discussion noted some common pain points in service development, as follows:
- The contacts service required an explicit definition of a RESTful protocol for transferring objects over the wire. Although the protocol for the contacts service was simple, real-world services often require more involved RESTful operations.
- The code showed a simple way to track changes to objects over time. Adding synchronization support to enable contact versioning from changes to multiple sources would add significant complexity as well.
- Both DAO implementations made use of a static SQL schema, thereby making the addition and deletions of fields difficult after initial schema creation.
The chapter produced two working backend service implementations to support the clients written in the previous chapter. You now have a complete mobile application and supporting web services that can use a RESTful CRUD protocol or can use Android sync adapters to perform a simple but powerful synchronization algorithm. The service code used a flexible three-tier architecture to enable its portability to other styles of persistence, as the next chapter on cloud-based backend services will demonstrate. When you work through the examples in Chapter 7, you’ll have ported the contacts service to the Amazon and Google clouds, thus allowing your Android applications to take advantage of the formidable resources offered by those platforms.