Table of Contents for
Gray Hat Hacking The Ethical Hacker’s Handbook
 Gray Hat Hacking The Ethical Hacker’s Handbook
Published by
McGraw-Hill, 2011
Gray Hat Hacking The Ethical Hacker’s Handbook
Published by
McGraw-Hill, 2011
- Cover Page
- Gray Hat Hacking the Ethical Hacker’s Handbook
- Gray Hat Hacking the Ethical Hacker’s Handbook
- Copyright Page
- Gray Hat Hacking the Ethical Hacker’s Handbook
- Gray Hat Hacking the Ethical Hacker’s Handbook
- Gray Hat Hacking the Ethical Hacker’s Handbook
- Gray Hat Hacking the Ethical Hacker’s Handbook
- Contents
- Preface
- Acknowledgments
- Introduction
- Part I Introduction to Ethical Disclosure
- Chapter 1 Ethics of Ethical Hacking
- Chapter 2 Ethical Hacking and the Legal System
- Chapter 3 Proper and Ethical Disclosure
- Part II Penetration Testing and Tools
- Chapter 4 Social Engineering Attacks
- Chapter 5 Physical Penetration Attacks
- Chapter 6 Insider Attacks
- Chapter 7 Using the BackTrack Linux Distribution
- Chapter 8 Using Metasploit
- Chapter 9 Managing a Penetration Test
- Part III Exploiting
- Chapter 10 Programming Survival Skills
- Chapter 11 Basic Linux Exploits
- Chapter 12 Advanced Linux Exploits
- Chapter 13 Shellcode Strategies
- Chapter 14 Writing Linux Shellcode
- Chapter 15 Windows Exploits
- Chapter 16 Understanding and Detecting Content-Type Attacks
- Chapter 17 Web Application Security Vulnerabilities
- Chapter 18 VoIP Attacks
- Chapter 19 SCADA Attacks
- Part IV Vulnerability Analysis
- Chapter 20 Passive Analysis
- Chapter 21 Advanced Static Analysis with IDA Pro
- Chapter 22 Advanced Reverse Engineering
- Chapter 23 Client-Side Browser Exploits
- Chapter 24 Exploiting the Windows Access Control Model
- Chapter 25 Intelligent Fuzzing with Sulley
- Chapter 26 From Vulnerability to Exploit
- Chapter 27 Closing the Holes: Mitigation
- Part V Malware Analysis
- Chapter 28 Collecting Malware and Initial Analysis
- Chapter 29 Hacking Malware
- Index
CHAPTER 5
Physical Penetration Attacks
Placing yourself or a member of your team inside the target organization during a penetration test can be an expeditious way to access the data network infrastructure from behind the border controls. It is often far easier to achieve your objective from inside the building than from outside. Physically penetrating your target organization for the purposes of obtaining sensitive information might not seem immediately obvious. In fact, physical access is increasingly a common factor in cybercrime, especially in the theft of personal private information for the purposes of identity theft.
Breaching the perimeter controls of any organization will vary in difficulty depending on the sophistication of the systems and procedures the organization has employed to prevent such breaches. Even if sophisticated systems such as biometric locks are employed, they often are easily bypassed because of relaxed or improperly followed procedures. Conversely, a seemingly open environment can be quite difficult to breach if personnel of the target organization are well trained and observe appropriate procedures. The gray hat hacker must make an accurate assessment of the environment before attempting a physical penetration. If the attempt is noticed, the whole penetration test may be compromised because the employees of the target organization will talk about an attempted break-in!
This activity frequently requires good social engineering skills and builds upon topics discussed in the previous chapter. Once the gray hat hacker is established behind the border controls of the target organization, the attack opportunities are abundant.
In this chapter, you’ll learn how to prepare and conduct a physical penetration. We’ll discuss the following topics:
• Why a physical penetration is important
• Conducting a physical penetration
• Common ways into a building
• Defending against physical penetrations
Why a Physical Penetration Is Important
Anyone who has taken an information security class in the past ten years has probably heard the “crunchy on the outside, soft on the inside” candy bar analogy of a data network security model. This means that all the “hard” security controls are around the outside of the network, and the inside of the network is “soft” and easy to exploit. This architecture is largely prevalent on corporate networks and has even shaped contemporary malware. Despite this being common knowledge, you will, more often than not, encounter this network security architecture in your role as a gray hat hacker. It is important to establish what damage could be done by a determined or bold attacker, one who may not even be all that technology savvy but knows someone he could sell a computer to. The value of personal private information, especially financial or transaction data, is now well known to smaller and less specialized criminals, and even to gangs. The attack doesn’t always come from across the world; sometimes it’s local, remarkably effective, and equally devastating.
When you’re initially discussing penetration testing services with your prospective client, your client likely won’t bring up the physical penetration scenario. This scenario often is not considered, or is overlooked, by CIOs, IT directors, and managers who do not have a physical security background, unless, of course, they’ve already been victimized in this way. Thus, it’ll be up to you to explain this type of testing and its benefits. In the majority of cases, once a client understands the reasons for conducting the physical penetration test, they will eagerly embrace it.
Conducting a Physical Penetration
All of the attacks described in this chapter are designed to be conducted during normal business hours and among the target organization’s employees. In this way, you can test virtually all of the controls, procedures, and personnel at once. Conducting an attack after hours is not recommended. Doing so is extremely dangerous because you might be met by a third party with an armed response or attack dogs. It also is relatively ineffective because it essentially only tests physical access controls. Finally, the consequences of getting caught after hours are more serious. Whereas it may be slightly uncomfortable to explain yourself to an office manager or security officer if you’re caught during the day, explaining yourself to a skeptical police officer while in handcuffs if you’re caught during the night might lead to detention or arrest.
You should always have a contact within the target organization who is aware of your activities and available to vouch for you should you be caught. This will typically be the person who ordered the penetration test. While you shouldn’t divulge your plans in advance, you and your client should agree on a window of time for the physical penetration activities. Also, since you will be targeting data assets, you may find yourself covertly working in close proximity to the person who hired you. It’s a good idea to ask your client in advance to act as if they don’t know you if they encounter you on the premises. Since they know what you have planned, they are not part of the test. Once this groundwork is in place, it is time to begin the planning and preparations to conduct the physical penetration.
Reconnaissance
You have to study any potential target prior to attempting a physical penetration. While most of the footprinting and reconnaissance activities in this book relate to the data network, the tools to look at the physical entities are much the same—Google Maps and Google Earth, for instance. You also have to physically assess the site in person beforehand. If it’s possible to photograph potential entrances without drawing attention to yourself, those photos will be useful in planning your attack. Getting close enough to determine what kind of physical access controls are in place will be helpful in planning your attempt to subvert them.
The front entrance to any building is usually the most heavily guarded. It’s also the most heavily used, which can be an opportunity, as we’ll discuss later in this chapter. Secondary entrances such as doors leading to the smokers’ area (smokers’ doors) and loading docks usually offer good ingress opportunity, as do freight elevators and service entrances.
Sometimes smoking doors and loading docks can be discernible from publicly available satellite imagery, as this Google Earth image of a loading dock illustrates:

When you survey the target site, note how people are entering and exiting the building. Are they required to use a swipe card or enter a code to open the outer door? Also note details such as whether the loading dock doors are left open even when there isn’t a truck unloading. You should closely examine the front door and lobby; choose someone from your team to walk in and drop off a handful of takeout menus from a nearby restaurant. This will give you some idea of how sophisticated their security controls are and where they’re located. For instance, you may walk into an unsecured lobby with a reception desk and see that employees use a swipe card to enter any further beyond the lobby into the building. Or you could encounter a locked outer door and a guard who “buzzes” you in and greets you at a security desk. Observe as much as you can, such as whether the security guard is watching a computer screen with photo IDs of people as they use their swipe or proximity cards to open the outer door. Keep in mind that this exposes you or one of your team members to an employee of the target organization who may recognize you if you encounter them again. If you’ve encountered a professional security guard, he will remember your face, because he’s been trained to do so as part of his job. You’ll most likely be on the target organization’s security cameras as well.
Sometimes the smokers’ door or a viable secondary entrance will be behind a fenced area or located on a side of the building away from the street or parking area. In order to assess the entrance up close, you’ll have to look like you belong in the area. Achieving this really depends on the site and may require you to be creative. Some techniques that have been used successfully in the past include the following:
• Using a tape measure, clipboard, and assistant, measure the distance between utility poles behind a fenced-in truck yard in order to assess the loading docks of a target. If confronted, you’re just a contractor working for the phone or electric company.
• Carrying an inexpensive pump sprayer, walk around the perimeter of a building spraying the shrubs with water while looking for a smokers’ door or side entrance.
• Carrying your lunch bag with you, sit down outside and eat lunch with the grounds maintenance crew. They’ll think you work at the organization; you’ll get to watch the target up close for a half hour or so. You may even learn something through small talk.
In addition to potential ingress points, you’ll want to learn as much as possible about the people who work at the organization, particularly how they dress and what type of security ID badge they use. Getting a good, close look at the company’s ID badges and how the employees wear them can go a long way toward helping you stay out of trouble once you’re in the building. Unless the target organization is large enough that it has its own cafeteria, employees will frequent local businesses for lunch or morning coffee. This is a great opportunity to see what their badges look like and how they wear them. Note the orientation of the badge (horizontal vs. vertical), the position of any logos or photos, and the color and size of the text. Also note if the card has a chip or a magnetic stripe.
You need to create a convincing facsimile of a badge to wear while you’re in the target’s facility. This is easy to do with a color printer and a few simple supplies from an office supply store such as Staples or OfficeMax. If the badge includes a corporate logo, you’ll most likely be able to find a digital version of the logo on the target organization’s public website. In addition to creating your badge, you’ll want to use a holder that is similar to those observed during your reconnaissance.
Now that you know about some potential ingress points, some of their access controls, what the security badges look like, and how the employees dress, it’s time to come up with a way to get inside.
Mental Preparation
Much like the preparation for the social engineering activities discussed in the previous chapter, a significant part of the preparation for a physical penetration is to practice managing yourself in a stressful and potentially confrontational situation. You’re going to meet face to face with employees of your target. If you’re nervous, they’re going to notice and may become suspicious. (If you are reading this chapter before Chapter 4, you should refer to the section “Preparing Yourself for Face-to-Face Attacks” prior to actually attempting a physical penetration.) Most importantly, you should be ready to answer questions calmly and confidently. If the inquisitive employee is simply curious, your level of confidence may determine whether they go on their way, satisfied with your answers, or become suspicious and ask more questions, call security, or confront you directly. You must always remain calm. The calmer you remain, the more time you’ll have to think. Remember, you’re working for them, you’re both on the same team, you’re not doing anything wrong, and you’re allowed to be there. If you can convince yourself of that, you will carry yourself in a way people can simply sense, you’ll blend in.
It’s a good idea to practice ahead of time with a partner your answers to questions you’ll commonly encounter. For instance:
• I don’t think we’ve met; are you new?
• Who are you working for?
• We have this conference room scheduled; didn’t you check with reception first?
• Are you lost/looking for someone/looking for something?
• May I help you?
These are just a few common questions you may encounter. Having a smooth and practiced answer for each will go a long way toward keeping your cover. You will also have to think on your feet, however, as you’ll certainly be asked questions you haven’t thought of. These questions will require quick thinking and convincing answers, which is another reason why it is so important to be mentally prepared and remain calm during a physical penetration.
Common Ways into a Building
In this section, we’re going to discuss a few common and likely successful physical penetration scenarios. As with the social engineering attacks described in Chapter 4, it is important to keep in mind that these attacks may not work every time, or may not work on your specific target, as each environment is different. We’re not going to discuss what attacks to perform once you’re inside the facility; rather, insider attacks will be covered in more detail in Chapter 6. The goal of this chapter is simply to give you enough information to enable you to get into your target’s facility. Once inside, you can then put the valuable things you’ve learned in this book to their intended use.
The Smokers’ Door
Whether it’s a bank, a factory, or a high-rise office building, employees typically are not allowed to smoke in the office environment. This has led to the practice of taking a smoking break outside of the building. As a cluster of employees huddled around an ashtray smoking isn’t the image most companies want to project to the public, the smoking area is usually located at or near a secondary entrance to the building. This entrance may or may not be protected by a card reader. In some cases, the smokers’ door is propped open or otherwise prevented from closing and fully locking. Because the smokers’ door is a relatively active area and mostly used for one specific purpose, it represents an excellent opportunity to enter a building unnoticed, or at least unchallenged.
In order to use the smokers’ door as your physical access to your target, you need only three items: a pack of cigarettes, a lighter, and a convincing ID badge. If possible, you should park your car close to or within sight of the smokers’ door so that you can watch and get the rhythm of the people going in and out of the door. You should be dressed as if you just got up from your desk and walked out of the building. Do not attempt to enter a smokers’ door dressed as if you’re just arriving to work. Everything you need for your activities inside must be concealed on your person. You must also be prepared for some small talk if you happen to encounter someone at the door.
A good way to approach the door is to wait until no one is near the door and then walk up holding a pack of cigarettes visibly in your hand. That way, if someone opens the door and sees you approaching, they’ll assume you’re returning from your car with more cigarettes. It’s also easy to explain if confronted. If the door is locked, pick up a cigarette butt from the ashtray or light one you’ve brought and wait for the door to open. When it does, simply grab the door, toss your cigarette butt into the ashtray, and nod to the person emerging as you enter. It’s best to carry your pack visibly as you walk into the building. In most cases, entry is as simple as that. We’ll discuss what to do once you’re inside later in this chapter.
If traffic through the door is really busy, you may have to smoke a cigarette in order to achieve your goal. It’s not hard to fake smoking, with a little practice. Approaching the door with the pack of cigarettes visible, remove one and light it. You must be prepared to explain yourself. That means everything from why you just walked up to the door from the outside to who you’re working for and why you haven’t been seen smoking here in the past. If you have convincing answers, you won’t have a problem.
Having a conversation with an employee while trying to gain access can help keep you within reach of the entrance you want, but it can also go wrong very quickly. One way to mitigate the threat of a conversation going awry is to have an accomplice watching nearby. Negotiate a signal in advance that indicates you need help, such as locking your fingers and stretching your arms palms out in front of you. Seeing the signal, your accomplice can call you to interrupt the conversation with the employee. You may even be able to time the one-sided conversation with an opportunity to enter the building: “Yes, I’m on my way back to my desk now.” Since most mobile phones have a silent mode, it is also possible to simply answer your phone as if someone has called you. If you do that, be sure the ringer is turned off to avoid an actual call coming in during your ruse!
In some cases, the smokers’ door may simply be propped open, unattended, with no one about. In that case, just walk in. You should still act as if you’re returning from your car, pack of cigarettes in hand, as you may be tracked on a security camera. Remember, just because you don’t see anyone doesn’t mean you’re not being watched. Take your time and pretend to smoke a cigarette outside the door. It’ll help answer the questions anyone who might be watching is asking themselves. Charging straight for the door and hastily entering the building is a good way to alert a security guard to the presence of an intruder.
Manned Checkpoints
In some penetration tests, you will encounter a manned checkpoint such as a guard desk or reception area in the lobby of a building. Sometimes visitors are required to check in and are issued a visitor badge before they are allowed access to the building. In the case of a multifloor or high-rise office building, this desk is usually between the lobby doors and the elevators. In the case of a building in a high-security area, visitors and employees alike may be required to enter through a turnstile or even a mantrap (described later in the chapter). This all sounds rather formidable, but subverting controls like these can often be rather simple with a little bit of creative thinking and some planning.
Multitenant Building Lobby Security
Multifloor, multitenant office buildings usually have contract security staff positioned in the lobby. The security procedure is usually straightforward: you sign in at the desk, present a photo ID, and explain who you are there to see. The guard will call the person or company, confirm you have an appointment, and then direct you to the appropriate elevator. There may also be a badge scanner. In most cases, you will be issued an adhesive-backed paper visitor badge, which may have your name and a printed photo of you on it.
If you wish to fully understand the lobby security process for a specific building prior to attempting to subvert it, make an appointment with another tenant in the building. Make arrangements, for example, to talk to another tenant’s HR department about a job application, to drop off donation forms for a charity at another tenant’s PR department, or even to present a phony sales pitch to another tenant. This will give you the experience of going through the building security process as a visitor, end to end. You will also get a close look at the visitor badge that is issued. Most lobby security companies use a paper self-adhering badge that changes color in a set amount of time to show it has expired. This works by exposure to either air or light. By peeling your badge off and placing it inside a book or plastic bag, you will slow down this process, possibly enabling you to reuse the badge on a different day (assuming they don’t ask for it back before you leave the building). If the badge fades or you wish to include other team members in the physical penetration attack, visitor badges are widely available at most office supply stores. It is also possible to make a printed facsimile of the badge, printed on self-adhesive label stock; it only has to look convincing from a short distance.
Once you have a visitor badge, it’s time to get to your target’s floor. You can usually determine which floor of the building is occupied by your target by using public resources, such as those you can locate with Google. It’s not uncommon for a company to list departmental floors on its public website. It’s also increasingly common to uncover property leases online if your target company is publicly traded. The leases specify which properties and floors are leased, and you may discover offices that are not listed on the public website or building directory.
The whole point of the visitor badge is to get you into the building without having to check yourself in with a legitimate ID badge. If the building you’re trying to enter does not have turnstiles or some sort of ID system, you can certainly just try to get onto the elevators using a facsimile of the target company’s badge. If turnstiles are used, then the visitor badge is more likely to be successful. With a visitor badge, you can use bag checks and scanners to your advantage is some cases. By entering the lobby and proceeding directly to the bag checker or scanner operator, they will see your visitor badge and assume you’ve been cleared by the front desk guard, while the front desk guard will assume the bag checker or scanner operator will send you back if you don’t have a badge. This works especially well in a busy lobby. A quick scan or peek at your computer bag and you’re on your way!
If there are no turnstiles, entry to the building may be as simple as following a crowd of people into the building. Lobby security in some areas is remarkably lax, using only one or two guards who simply eyeball people walking in and try to direct visitors to their destinations. In this case, gaining access to the building is as simple as entering during a high-volume traffic time such as the start of the work day or the end of the lunch hour. In this case, you’ll want to have a convincing facsimile of an employee or visitor badge from the target company.
Some lobby security will have a guard at a choke point where one person passes through at a time. The guard will check credentials or, in some cases, watch a video screen as each person swipes their ID card to ensure the photo of them that appears onscreen matches. This level of security is very difficult to defeat directly. A better approach would be to gain access to the building by arranging some sort of an appointment with another tenant, as previously discussed. While most security procedures require that a visitor be vetted by the hosting tenant, very few processes require the tenant to notify lobby security when the visitor leaves. This gives you an ample window of opportunity to try to access the floor of your target by removing your visitor badge and using your fake company ID badge once you’ve concluded your appointment with the other tenant. If for some reason you’re still not sure which floor(s) your target occupies, you can always follow someone in with a badge from your target company and observe which floor they exit on. As you get onto the elevator, just press the top-floor button and watch. You can then get off on the target’s floor on your way back down.
If the target company is located in a multitenant high-rise building, it mostly likely has offices on multiple floors if it’s not a small company. It will be much easier to make an entrance onto a floor that is not used for general public reception. The main reception desk usually has special doors, often glass, a receptionist, and a waiting area. It’ll be like the lobby, but a lot harder to get past. Employee-only floors typically have a regular door, usually locked but unmanned. We’ll talk about getting by locked doors a little later in this chapter.
Campus-Style or Single-Tenant Buildings
If the target company owns its own buildings or rents them in their entirety, it may provide its own security personnel and procedures to manage lobby or checkpoint security. This will require an entirely different approach to gaining entry to the building beyond the checkpoint or lobby. While it is possible to figure out what kind of visitor badge system is used, you’ll only get to try that once as you can’t test it on another tenant in the building. You could try to get an appointment with someone inside the building as well, but they’ll most likely escort you to the lobby or checkpoint and take your visitor badge when your meeting is over.
This sort of checkpoint is best defeated as a team, with one or more team members providing a distraction while another skirts the checkpoint. Unless the target company is very large or operating in a high-security environment, it will not have turnstiles. It will either have a locked lobby to which a guard inside grants access to visitors while employees use a key card access system, or have an open lobby with a desk. Both can be defeated in essentially the same way.
Again, this entry is best attempted during the lunch hour. You need as many decoys as there are guards at the desk, the idea being to engage each one of them while another member of the party walks by posing as an employee. The decoys should be dressed as if they are just arriving, whereas the entrant should dress as though he’s left and come back with his lunch. Anything the entrant needs inside should be concealed on his person. The entrant should answer the guard’s questions visually before they’re even asked—he should be wearing a convincing facsimile of the target company’s badge and carrying a bag of takeout food from a local vendor. It’s best to wait for a group of employees returning from lunch or with their lunch; the more traffic in the lobby, the lower the chance of being confronted. If the exterior door is locked, the first decoy rings the bell and says she has an appointment with an employee. She can give the name of a real employee, researched from public sources or social engineering, or just a made-up name; the guard will probably let her in while he tries unsuccessfully to verify her appointment.
When the door opens, the decoy holds the door open for the team member posing as the employee, who may even feign a card swipe as he enters. The decoy should walk directly toward the guard or lobby desk while the entrant team member peels off toward the elevator or stairs carrying his lunch. Again, joining a group returning from lunch will help as well. If multiple guards are on duty, the decoy holds the door for the second decoy, and so on until the guards are occupied. In most cases, there will be no more than two guards or receptionists at the lobby checkpoint.
If the exterior door is unlocked but there is a locked interior door, the decoy(s) should still enter first and occupy the guard’s attention while the entrant attempts to tailgate someone through the locked door. Timing is more critical in this case, and carrying a bigger load may also help, something cumbersome enough to encourage another employee to hold the door open. Keeping with the lunch scenario, it could be made to look like multiple lunch orders in a cardboard box.
Unlike the multitenant building scenario, in this environment, once you are past the lobby checkpoint, you most likely have access to the entire building. We’ll talk a bit about what to do once you’re inside a little later in this chapter.
Mantraps
A mantrap is a two-door entry system. The entrant is allowed through the first door, which then closes and locks. Before the second or inner door unlocks and opens, the entrant must identify and authenticate himself. If he does not, he’s trapped between the two doors and must be released by the security guard. Properly implemented and operated, a mantrap cannot be directly subverted except by impersonation. This is difficult because you would have to obtain functional credentials and know a pin or, worse, use a biometric. It’s just not a viable entry point at the testing level discussed in this book. When confronted with a mantrap, find a different way in or talk your way past it using the pretense that you are a visitor.
Locked Doors
If you plan to go places in a building without authorization, you should be prepared to run into locked doors. During penetration tests, you may opt to subvert physical locks by picking, bumping, or shimming them, all of which are demonstrated in this section. Directly subverting biometric locks is difficult, time consuming, and beyond the scope of this book. We’ll meet the challenge of the biometric access control in a low-tech fashion by waiting for someone to open it or by simply giving someone a convincing reason to open it for us.
The Unmanned Foyer
So you’re past the main lobby, you’ve found an employee-only floor, and now you’re stuck in the foyer between the elevators and the locked office doors. How do you get past them and into the offices beyond? You’ll have to wait until either someone leaves the office to take the elevator or someone gets off the elevator and uses their key card to open the door. Like so many steps in a physical intrusion, you have to be prepared to present a convincing reason why you’re waiting or loitering in that area. You may even be on camera while you’re waiting. One simple way to do this is to feign a phone call. By talking on your mobile phone, you can appear to be finishing a conversation before entering the office. This is believable and can buy you quite a bit of time while you wait.
You should position yourself near the door you want to enter. Should an employee exit to take the elevator or exit the building, keep talking on your phone, grab the door before it closes, and keep walking. If an employee arrives on the elevator and unlocks the door, grab the door handle or use your foot to prevent the door from closing entirely and latching. This will provide some space between you and the person who just entered.
Conversing on a mobile phone can deter an employee from inquiring about your presence. In most cases, an employee won’t interrupt you as long as you don’t look out of place and your ID badge looks convincing. The gray hat hacker performing a physical intrusion must always seek to pre-answer questions that are likely to come up in an employee’s mind, without speaking a word.
The Biometric Door Lock
The biometric door lock is not infallible, but subverting it by emulating an employee’s biometric attributes is more an academic exercise than a realistic way past the door. The easiest way to get past a biometric door is to follow someone through it or convince someone inside that they should open it for you. You could pose as a safety inspection official and ask to speak to the office manager. Every door opens for the fire inspector! Since these positions are often municipal and un-uniformed, they are easily impersonated. Before impersonating an official, know your state and local laws! Sometimes it’s safer, but less effective, to impersonate a utility worker such as an employee of the telephone company or electric company. It’s also more difficult because they have specialized tools and in many cases are uniformed. If your target is a tenant in the building, claiming to work for the building management is relatively low risk, mostly effective, and does not require a uniform.
The Art of Tailgating
This chapter has suggested several times that the entrant attempt to follow an employee through an access-controlled door before the door has a chance to close. This is known as tailgating. It is a common practice at many companies despite being clearly prohibited by policy. It’s no secret why, either: think of a long line of people opening and closing a door one at a time in order to “swipe in” individually. While this does happen at security-conscience companies, it doesn’t happen at many other companies. Several people go through the door at once as a matter of simple logistics. This practice can be exploited to gain unauthorized entry to a facility. It’s a matter of timing your opportunity and looking like you belong. Whether it’s an exterior or interior door, pick a time of high-volume traffic and find a place to wait where you can see people approaching. Join them as they are funneling toward the entry and try to follow them in. Someone will likely hold the door for you, especially if you’re holding something cumbersome.
You will be most effective at this technique if you master fitting in with the crowd and timing your entry so that you do not arouse suspicion. You should also practice using your foot or grabbing the handle to prevent the door from completely closing and latching while you swipe your fake ID card. When practiced, it looks convincing from a short distance. The loud “pop” of the solenoid-activated lock can even be simulated with a sharp hard twist of the door handle.
Physically Defeating Locks
In some cases it may be advantageous to defeat a physical lock, such as a padlock on a fence gate, a door lock, or a filing cabinet lock. Most common locks can be easily defeated by one of several methods with a little practice and some simple homemade tools. In this section, we’ll demonstrate how to make three common lock-picking tools and then demonstrate how they can be used to open the same lock. To simplify this exercise, we’ll use a common lock, the Master Lock No. 5 padlock, which is shown throughout the figures in this section. A Master Lock No. 5 padlock is inexpensive and can be purchased at almost any hardware store. It’s an excellent example of the cylinder and pin, or “tumbler,” technology used in most locks.
Before you attempt to defeat a mechanical lock, it’s important to understand how a basic cylinder lock and key work. A lock is simply a piece of metal that has been drilled to accept a cylinder of metal, which is attached to a release or catch mechanism such as a door bolt. The cylinder rotates to activate the release and open the door. Holes are drilled through the metal frame of the lock and into the cylinder. Small two-piece, spring-loaded pins are then positioned in the hole. The pins prevent the cylinder from rotating unless the line at which they are split lines up with the gap between the cylinder and the lock frame. A slot into which a key fits is cut in the cylinder. When the key is inserted, the teeth of the key position each pin correctly so that their splits all line up and the cylinder can be rotated, as shown in Figure 5-1.
While there are many variations on basic lock design, it is usually possible to open a lock without the key by manually manipulating the pins to line up with the cylinder. Two common ways to do this are picking and bumping.
Making and Using Your Own Picks
The first method we’ll use to open our example lock is a classic pick. Pick tools come in a wide variety of shapes and sizes to accommodate both the variety of locks manufactured and the personal preference of the person using the tools. Although lock-picking tools are widely available online, it’s easy to make a simple “snake rake” tool and a tension wrench out of a hacksaw blade and open our lock. The tension wrench is used to place a gentle rotational shear load on the cylinder, while the rake tool is used to bounce the pins or tumblers.
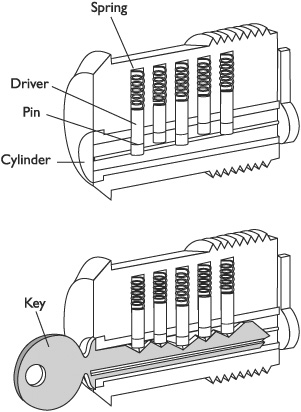
Figure 5-1 Tumbler lock

CAUTION
Before you order or make lock-picking tools, it’s wise to take a moment to understand your local and state laws, as simply possessing such tools is illegal in some areas if you are not a locksmith.
Start with common hacksaw blades from the hardware store and cut them into usable sizes, as shown in Figure 5-2. The left frame of Figure 5-2, starting from the top, shows a six-inch mini-hacksaw blade, a tension wrench made from the same, a commercial rake tool, a rake tool created from a hacksaw blade, and a piece of hacksaw blade prior to machining. To make the rake from a hacksaw blade, use a grinding wheel, Dremel tool, or hand file, as well as appropriate safety gear, to shape the blade to look like a commercial rake tool. Make sure as you work the metal that you repeatedly cool it in water so it does not become brittle. To create the tension wrench, you’ll need to twist the metal in addition to shaping it with a grinder or Dremel tool to fit in the lock cylinder with enough room to use your rake. Twist it by holding it with a pair of pliers, heating it with a propane torch until the section you want to bend is glowing red, and then twisting it with another pair of pliers while it’s still glowing. Immediately cool it in water. There are good video tutorials available online that show how to make your own lock-picking tools and also cover the finer points of working with metal.
To use your newly made tools, insert the tension wrench into the lock cylinder and maintain a gentle rotational pressure as you bounce the pins up and down by moving the rake in and out, as shown in the right panel of Figure 5-2. The correct pressure will be one that allows the pins to move but causes them to stick in place when they align with the cylinder wall. It will take a few tries and some patience, but when you get it right, the lock cylinder will turn, opening the lock. Your first attempt at the Master Lock No. 5 padlock may take a half hour or more to succeed, but with a few hours of practice, you’ll develop a feel for the proper tension and should be able to open it in two or three quick tries. The picking principal is the same for any cylinder lock, but the technique and tools required may vary depending on the complexity, number, and arrangement of the security pins or tumblers.
Making and Using a Bump Key
Lock “bumping” builds on the principal of picking but can be much faster, easier, and a lot less obvious. A bump key is a key that fits the cylinder keyway and is cut with one uniform-sized tooth for each security pin in a given lock, four in our example. Every lock has a specific number of security pins. In our example, the number can be determined by looking at the number of valleys between the teeth of the original key, each of which corresponds to an individual pin. A more experienced user will have an assortment of bump keys arranged by lock manufacturer, model, and security pin count. The key is partially inserted into the lock and then tapped with a small hammer while maintaining a gentle rotational pressure on the key. This causes the pins to jump upward simultaneously. As they spring back into their static position, the slight rotational pressure on the lock cylinder causes them to stick, similar to the picking method.

Figure 5-2 Lock picking
In order to demonstrate this on our example lock, we’ll use the spare key provided with the lock and file a uniform tooth for each security pin in our lock. You need one tooth for each pin so that you can bounce them all at once when you strike the key with the hammer. In the left pane of Figure 5-3, the top key is the actual key to the lock and the lower key is the bump key worked from the spare with a Dremel tool. In our example, we’ll use a screwdriver handle as our hammer. Insert the key into the lock with one key valley remaining outside the keyway, which is three pins in our example. Apply some slight clockwise pressure and tap it with the hammer, as shown in the right pane of Figure 5-3. As with basic lock picking, this technique requires patience and practice to develop a feel for how much rotational pressure to keep on the key and how hard to tap it with the hammer. While bumping can be faster and easier than picking, you’ll need to have a key that fits the cylinder keyway and number of pins for each lock you want to open with this method.
Making and Using a Shim
Some padlocks, both key and combination, retain the security hoop by inserting a small metal keeper into a groove, as shown in the center pane of Figure 5-4. When the key is inserted or the combination turned, the keeper moves out of the groove to free the metal security hoop. This is true for our example lock, which uses two such keeper mechanisms. The keeper is often spring loaded, so it is possible to forcibly push it aside and free the hoop by using a simple shim. While commercial shims are widely available, we’ll construct ours using the thin metal from a beverage can.
Using the pattern shown in the left frame of Figure 5-4, carefully cut two shims from beverage can metal using scissors. Because the metal is very thin, fold it in half before cutting to make a stronger shim. After cutting the shim tongue, fold the top part down two or three times to form a usable handle. Be very careful cutting and handling beverage can metal as it can be razor sharp! Next, pre-bend your shims around a small cylindrical object such as a pencil or pen until they look like the one at the bottom of the left frame of Figure 5-4. Now carefully insert the shim into the gap between the lock frame and security loop to one side of the keeper mechanism. Then, insert the second shim. When both shims are fully inserted, rotate them to position the shim tongue between the keeper and the security loop, as shown in the right frame of Figure 5-4. With both shims in place, the security hoop may now be pulled open. Beverage can shims are very fragile and will most likely only work once or twice before tearing apart inside the lock. This can permanently damage the lock and prevent it from opening again even with the key.
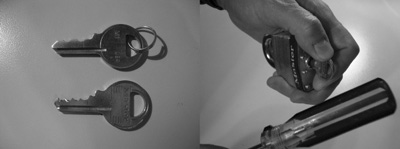
Figure 5-3 Lock bumping

Figure 5-4 Lock shimming
Once You Are Inside
The goal of entering the building is to gain access to sensitive information as part of the penetration test. Once you are past the perimeter access controls of the building, you have to find your way to a location where you can work undisturbed or locate assets you want to physically remove from the building. Either way, you’ll likely go into the building without knowing the floor plan or where specific assets are located. Walking blindly around searching for a place to work is the most difficult part of the physical intrusion process. It’s also when you’re most likely to be exposed or confronted.
Unless your goal is to take backup tapes or paper, you’ll probably want access to the data network. A good place to get that access is in a conference room, as most of them have data network ports available. A company that is following industry best practices will have the data ports in their conference rooms on a guest network that is not directly connected to the corporate local area network. If this is the case, you can still use the conference room as a base of operations while you attempt to gain access to the data network. You may consider using the Trojan USB key technique described in Chapter 4 to quickly establish remote access.
Another possible location to operate from is an empty cubicle or office. Many companies have surplus work space from downsizing or for future growth. It’s easy to “move in” to one of these over lunch or first thing in the morning. You will have to have a cover story handy, and your window of opportunity may be limited, but you will most likely have full access to the network or perhaps even a company computer left in the cubicle or office. Techniques for utilizing company computing assets for penetration testing are discussed in Chapter 6.
Defending Against Physical Penetrations
You might assume that protecting a company’s informational assets from a physical intrusion is covered under its existing security measures, but often that’s simply not the case. Understandably, these same assets must be available to the employees so that they can perform their work. All an attacker has to do to obtain physical access to the data network infrastructure is to look convincingly like an employee or like they belong in the building for another reason. With physical access, it is much easier to gain unauthorized access to sensitive information.
In order to successfully defend against a physical penetration, the target company must educate its employees about the threat and train them how best to deal with it. Data thefts often are not reported because the victim companies seek to avoid bad press, in which cases the full extent of the threat is not experienced by the people handling the data. In addition, employees often don’t understand the street value of the data they handle. The combination of hidden threat and unperceived value makes training in this area critically important for a successful policy and procedure program.
Perhaps the single most effective policy to ensure that an intruder is noticed is one that requires employees to report or inquire about someone they don’t recognize. Even employees at very large corporations encounter a regular group of people on a daily basis. If a policy of inquiring about unfamiliar faces can be implemented, even if they have a badge, it will make a successful intrusion much more difficult. This is not to say that an employee should directly confront a person who is unfamiliar to them, as they may actually be a dangerous intruder. That’s the job of the company’s security department. Rather, employees should ask their direct supervisor about the person.
Other measures that can help mitigate physical intrusions include the following:
• Key card turnstiles
• Manned photo ID checkpoints
• Enclosed or fenced smoking areas
• Locked loading area doors, equipped with doorbells for deliveries
• Mandatory key swipe on entry/re-entry
• Rotation of visitor badge markings daily
• Manned security camera systems